

Page 1

Installation and Configuration Guide
Novell®
PlateSpin Orchestrate
novdocx (en) 13 May 2009
AUTHORIZED DOCUMENTATION
2.0.2
October 9, 2009
www.novell.com
PlateSpin Orchestrate 2.0 Installation and Configuration Guide
Page 2

Legal Notices
Novell, Inc., makes no representations or warranties with respect to the contents or use of this documentation, and
specifically disclaims any express or implied warranties of merchantability or fitness for any particular purpose.
Further, Novell, Inc., reserves the right to revise this publication and to make changes to its content, at any time,
without obligation to notify any person or entity of such revisions or changes.
Further, Novell, Inc., makes no representations or warranties with respect to any software, and specifically disclaims
any express or implied warranties of merchantability or fitness for any particular purpose. Further, Novell, Inc.,
reserves the right to make changes to any and all parts of Novell software, at any time, without any obligation to
notify any person or entity of such changes.
Any products or technical information provided under this Agreement may be subject to U.S. export controls and the
trade laws of other countries. You agree to comply with all export control regulations and to obtain any required
licenses or classification to export, re-export or import deliverables. You agree not to export or re-export to entities on
the current U.S. export exclusion lists or to any embargoed or terrorist countries as specified in the U.S. export laws.
You agree to not use deliverables for prohibited nuclear, missile, or chemical biological weaponry end uses. See the
Novell International Trade Services Web page (http://www.novell.com/info/exports/) for more information on
exporting Novell software. Novell assumes no responsibility for your failure to obtain any necessary export
approvals.
novdocx (en) 13 May 2009
Copyright © 2008-2009 Novell, Inc. All rights reserved. No part of this publication may be reproduced, photocopied,
stored on a retrieval system, or transmitted without the express written consent of the publisher.
Novell, Inc., has intellectual property rights relating to technology embodied in the product that is described in this
document. In particular, and without limitation, these intellectual property rights may include one or more of the U.S.
patents listed on the Novell Legal Patents Web page (http://www.novell.com/company/legal/patents/) and one or
more additional patents or pending patent applications in the U.S. and in other countries.
Novell, Inc.
404 Wyman Street, Suite 500
Waltham, MA 02451
U.S.A.
www.novell.com
Online Documentation: To access the latest online documentation for this and other Novell products, see
the Novell Documentation Web page (http://www.novell.com/documentation).
Page 3

Novell Trademarks
For Novell trademarks, see the Novell Trademark and Service Mark list (http://www.novell.com/company/legal/
trademarks/tmlist.html).
Third-Party Materials
All third-party trademarks are the property of their respective owners.
novdocx (en) 13 May 2009
Page 4

novdocx (en) 13 May 2009
4 PlateSpin Orchestrate 2.0 Installation and Configuration Guide
Page 5

Contents
About This Guide 7
1 Planning the Orchestrate Server Installation 9
1.1 PlateSpin Orchestrate Requirements. . . . . . . . . . . . . . . . . . . . . . . . . . . . . . . . . . . . . . . . . . . . . 9
1.1.1 Orchestrate Server . . . . . . . . . . . . . . . . . . . . . . . . . . . . . . . . . . . . . . . . . . . . . . . . . . 10
1.1.2 Required Network Resources . . . . . . . . . . . . . . . . . . . . . . . . . . . . . . . . . . . . . . . . . . 11
1.1.3 Orchestrate Agent . . . . . . . . . . . . . . . . . . . . . . . . . . . . . . . . . . . . . . . . . . . . . . . . . . . 13
1.1.4 VM Hosts . . . . . . . . . . . . . . . . . . . . . . . . . . . . . . . . . . . . . . . . . . . . . . . . . . . . . . . . . . 13
1.1.5 Orchestrate VM Client . . . . . . . . . . . . . . . . . . . . . . . . . . . . . . . . . . . . . . . . . . . . . . . . 14
1.1.6 Other Orchestrate Clients . . . . . . . . . . . . . . . . . . . . . . . . . . . . . . . . . . . . . . . . . . . . . 15
1.2 Component Installation Methods . . . . . . . . . . . . . . . . . . . . . . . . . . . . . . . . . . . . . . . . . . . . . . . 16
2 Installation and Configuration 21
2.1 Installation Prerequisites . . . . . . . . . . . . . . . . . . . . . . . . . . . . . . . . . . . . . . . . . . . . . . . . . . . . . 21
2.2 Installing and Configuring All PlateSpin Orchestrate Components Together. . . . . . . . . . . . . . 21
2.2.1 Installation and Configuration Steps . . . . . . . . . . . . . . . . . . . . . . . . . . . . . . . . . . . . . 22
2.2.2 PlateSpin Orchestrate Configuration Information . . . . . . . . . . . . . . . . . . . . . . . . . . . 30
2.2.3 Correcting Configuration Errors and Repeating the Configuration Process . . . . . . . 35
2.2.4 Installing and Configuring the Orchestrate Server for Use with a PostgreSQL Audit
Database on a Different Host . . . . . . . . . . . . . . . . . . . . . . . . . . . . . . . . . . . . . . . . . . 35
2.2.5 Installing and Configuring the Orchestrate Server for Use with a Local PostgreSQL
Audit Database . . . . . . . . . . . . . . . . . . . . . . . . . . . . . . . . . . . . . . . . . . . . . . . . . . . . . 40
2.2.6 Configuring the Audit Database After PlateSpin Orchestrate Is Configured . . . . . . . 43
2.2.7 Configuring the Remote Audit Database after PlateSpin Orchestrate Is Configured. 44
2.2.8 Modifying Audit Database Tables to Accommodate Long Names. . . . . . . . . . . . . . . 44
2.3 Installing the Orchestrate Agent Only . . . . . . . . . . . . . . . . . . . . . . . . . . . . . . . . . . . . . . . . . . . 45
2.3.1 Installing the Orchestrate Agent Using the Product ISO . . . . . . . . . . . . . . . . . . . . . . 46
2.3.2 Installing the Orchestrate Agent from the Administrator Information Page . . . . . . . . 60
2.3.3 Performing a Silent Install of the PlateSpin Orchestrate Agent on Multiple Network
Resources . . . . . . . . . . . . . . . . . . . . . . . . . . . . . . . . . . . . . . . . . . . . . . . . . . . . . . . . . 67
2.3.4 Installing the PlateSpin Orchestrate Agent on Other Supported Operating Systems 68
2.3.5 Automatically Installing the Orchestrate Agent on a VM Host Using a Job . . . . . . . . 72
2.4 Installing the Orchestrate Development Client Only. . . . . . . . . . . . . . . . . . . . . . . . . . . . . . . . . 72
2.4.1 Installing the Orchestrate Development Client for Windows from the Administrator
Information Page . . . . . . . . . . . . . . . . . . . . . . . . . . . . . . . . . . . . . . . . . . . . . . . . . . . . 73
2.4.2 Using the ISO to Install the Orchestrate Development Client on Windows Machines 77
2.4.3 Installing the Orchestrate Development Client for SLES 10 From the Administrator
Information Page . . . . . . . . . . . . . . . . . . . . . . . . . . . . . . . . . . . . . . . . . . . . . . . . . . . . 77
2.4.4 Using the ISO to Install the Orchestrate Client on SLES 10 Machines . . . . . . . . . . . 78
2.4.5 Using the ISO to Install the Orchestrate Client on SLES 11 Machines . . . . . . . . . . . 79
2.5 Installing the Orchestrate VM Client. . . . . . . . . . . . . . . . . . . . . . . . . . . . . . . . . . . . . . . . . . . . . 81
2.5.1 Minimum Installation Requirements. . . . . . . . . . . . . . . . . . . . . . . . . . . . . . . . . . . . . . 81
2.5.2 Installing the Orchestrate VM Client on the Windows Operating System . . . . . . . . . 83
2.5.3 Installing Orchestrate VM Client in a Linux Environment. . . . . . . . . . . . . . . . . . . . . . 87
2.6 Uninstalling the VM Client . . . . . . . . . . . . . . . . . . . . . . . . . . . . . . . . . . . . . . . . . . . . . . . . . . . . 92
2.6.1 Uninstalling the Orchestrate VM Client from the Windows Operating System . . . . . 93
2.6.2 Uninstalling Orchestrate VM Client in a Linux Environment . . . . . . . . . . . . . . . . . . . 94
2.7 Determining the Product Version . . . . . . . . . . . . . . . . . . . . . . . . . . . . . . . . . . . . . . . . . . . . . . . 96
novdocx (en) 13 May 2009
Contents 5
Page 6

3 First Use of Basic PlateSpin Orchestrate Components 99
3.1 Walkthrough: Launching the PlateSpin Orchestrate Development Client . . . . . . . . . . . . . . . . 99
3.2 Walkthrough: Logging In to the PlateSpin Orchestrate Server . . . . . . . . . . . . . . . . . . . . . . . 101
3.2.1 Logging In by Using the Explorer. . . . . . . . . . . . . . . . . . . . . . . . . . . . . . . . . . . . . . . 101
3.2.2 Logging In Explicitly to a Named Server . . . . . . . . . . . . . . . . . . . . . . . . . . . . . . . . . 101
3.2.3 Logging In As Default . . . . . . . . . . . . . . . . . . . . . . . . . . . . . . . . . . . . . . . . . . . . . . . 102
3.3 Walkthrough: Creating a Resource Account . . . . . . . . . . . . . . . . . . . . . . . . . . . . . . . . . . . . . 103
3.3.1 Opening the Resources Monitor . . . . . . . . . . . . . . . . . . . . . . . . . . . . . . . . . . . . . . . 104
3.3.2 Automatically Registering a Resource. . . . . . . . . . . . . . . . . . . . . . . . . . . . . . . . . . . 105
3.3.3 Manually Registering a Resource . . . . . . . . . . . . . . . . . . . . . . . . . . . . . . . . . . . . . . 105
3.3.4 Selecting a Resource for Manual Registration . . . . . . . . . . . . . . . . . . . . . . . . . . . . 109
3.4 Walkthrough: Observing Discovery Jobs . . . . . . . . . . . . . . . . . . . . . . . . . . . . . . . . . . . . . . . . 110
3.5 Walkthrough: Deploying a Sample Job . . . . . . . . . . . . . . . . . . . . . . . . . . . . . . . . . . . . . . . . . 111
3.6 Walkthrough: Creating a User Account . . . . . . . . . . . . . . . . . . . . . . . . . . . . . . . . . . . . . . . . . 113
3.6.1 Opening the Users Monitor . . . . . . . . . . . . . . . . . . . . . . . . . . . . . . . . . . . . . . . . . . . 113
3.6.2 Automatically Registering a User. . . . . . . . . . . . . . . . . . . . . . . . . . . . . . . . . . . . . . . 114
3.6.3 Manually Registering a User . . . . . . . . . . . . . . . . . . . . . . . . . . . . . . . . . . . . . . . . . . 115
3.6.4 Logging In a User for Manual Registration . . . . . . . . . . . . . . . . . . . . . . . . . . . . . . . 116
3.7 Walkthrough: Running the Sample Job . . . . . . . . . . . . . . . . . . . . . . . . . . . . . . . . . . . . . . . . . 117
3.8 Walkthrough: Looking at the Job After It Has Run . . . . . . . . . . . . . . . . . . . . . . . . . . . . . . . . . 118
3.8.1 Verification at the Command Line . . . . . . . . . . . . . . . . . . . . . . . . . . . . . . . . . . . . . . 118
3.8.2 Verification at the Jobs Monitor . . . . . . . . . . . . . . . . . . . . . . . . . . . . . . . . . . . . . . . . 119
3.8.3 Verification at the Server Portal . . . . . . . . . . . . . . . . . . . . . . . . . . . . . . . . . . . . . . . . 120
3.9 Walkthrough: Using the zosadmin Command to Gather Information . . . . . . . . . . . . . . . . . . . 122
3.10 Stopping and Starting PlateSpin Orchestrate Components . . . . . . . . . . . . . . . . . . . . . . . . . . 122
3.10.1 Stopping and Starting the PlateSpin Orchestrate Server . . . . . . . . . . . . . . . . . . . . 123
3.10.2 Stopping and Starting the PlateSpin Orchestrate Agent . . . . . . . . . . . . . . . . . . . . . 123
3.10.3 Starting and Stopping the PlateSpin Orchestrate Development Client . . . . . . . . . . 124
novdocx (en) 13 May 2009
A PlateSpin Orchestrate Components: Install Patterns 125
A.1 Installation Patterns in YaST . . . . . . . . . . . . . . . . . . . . . . . . . . . . . . . . . . . . . . . . . . . . . . . . . 125
B Installing the Orchestrate Monitoring Agent On Windows Machines 127
B.1 Installing the Monitoring Agent . . . . . . . . . . . . . . . . . . . . . . . . . . . . . . . . . . . . . . . . . . . . . . . . 127
B.1.1 Hardware and Software Requirements . . . . . . . . . . . . . . . . . . . . . . . . . . . . . . . . . . 127
B.1.2 Installing the Monitoring Agent . . . . . . . . . . . . . . . . . . . . . . . . . . . . . . . . . . . . . . . . 127
B.1.3 Starting and Stopping the Monitoring Agent . . . . . . . . . . . . . . . . . . . . . . . . . . . . . . 128
B.1.4 Uninstalling the Monitoring Agent . . . . . . . . . . . . . . . . . . . . . . . . . . . . . . . . . . . . . . 128
B.2 Configuring the Monitoring Agent. . . . . . . . . . . . . . . . . . . . . . . . . . . . . . . . . . . . . . . . . . . . . . 128
C Documentation Updates 131
C.1 October 9, 2009 . . . . . . . . . . . . . . . . . . . . . . . . . . . . . . . . . . . . . . . . . . . . . . . . . . . . . . . . . . . 131
C.2 July 15, 2009 . . . . . . . . . . . . . . . . . . . . . . . . . . . . . . . . . . . . . . . . . . . . . . . . . . . . . . . . . . . . . 131
C.3 June 17, 2009 (2.0.2 Release). . . . . . . . . . . . . . . . . . . . . . . . . . . . . . . . . . . . . . . . . . . . . . . . 131
6 PlateSpin Orchestrate 2.0 Installation and Configuration Guide
Page 7

About This Guide
novdocx (en) 13 May 2009
This Installation and Configuration Guide explains how to install, monitor, and manage applications
running on PlateSpin
PlateSpin Orchestrate components, to install them, and helps you understand how to use them in
basic usage scenarios.
Chapter 1, “Planning the Orchestrate Server Installation,” on page 9
Chapter 2, “Installation and Configuration,” on page 21
Chapter 3, “First Use of Basic PlateSpin Orchestrate Components,” on page 99
Appendix A, “PlateSpin Orchestrate Components: Install Patterns,” on page 125
Appendix B, “Installing the Orchestrate Monitoring Agent On Windows Machines,” on
page 127
Appendix C, “Documentation Updates,” on page 131
Information in this guide includes content about the latest release, which currently stands at 2.0.1.
For information about installing and using the Virtual Machine management capabilities of
PlateSpin Orchestrate, see the PlateSpin Orchestrate 2.0 VM Client Guide and Reference or the
PlateSpin Orchestrate 2.0 Virtual Machine Management Guide.
Audience
The contents of this guide are of interest to the following individuals:
®
Orchestrate 2.0 from Novell®. It helps you plan the installation of the basic
VM Administrator: A PlateSpin Orchestrate virtual machine (VM) administrator manages the life
cycle of the VMs in the enterprise, including creating, starting, stopping, migrating, and deleting
VMs. For more information about the tasks and tools used by the VM administrator, see the
PlateSpin Orchestrate 2.0 VM Client Guide and Reference.
Orchestrate Administrator: A PlateSpin Orchestrate Administrator deploys jobs, manages users,
and monitors distributed computing resources. Administrators can also create and set policies for
automating the usage of these computing resources. For more information about the tasks and tools
used by the Orchestrate Administrator, see the PlateSpin Orchestrate 2.0 Administrator Reference.
User: The end user of PlateSpin Orchestrate, also called a “Job Manager,” runs and manages jobs
that have been created by a Job Developer and deployed by the administrator. It is also possible that
the end user could be a developer who has created applications to run on distributed computing
resources. For more information about the tasks and tools used by the Job Manager, see the
PlateSpin Orchestrate 2.0 Server Portal Reference.
Job Developer: The developer has control of a self-contained development system where he or she
creates jobs and policies and tests them in a laboratory environment. When the jobs are tested and
proven to function as intended, the developer delivers them to the PlateSpin Orchestrate
administrator. For more information about the tasks and tools used by the job developer, see the
PlateSpin Orchestrate 2.0 Developer Guide and Reference.
About This Guide 7
Page 8

Prerequisite Skills
As data center managers or IT or operations administrators, it is assumed that users of the product
have the following background:
General understanding of network operating environments and systems architecture.
Knowledge of basic Linux* shell commands and text editors.
Feedback
We want to hear your comments and suggestions about this manual and the other documentation
included with this product. Please use the User Comments feature at the bottom of each page of the
online documentation, or go to www.novell.com/documentation/feedback.html (http://
www.novell.com/documentation/feedback.html) and enter your comments there.
Additional Product Documentation
In addition to this Installation and Configuration Guide, PlateSpin Orchestrate 2.0 includes the
following additional guides that contain valuable information about the product:
novdocx (en) 13 May 2009
PlateSpin Orchestrate 2.0 Getting Started Reference
PlateSpin Orchestrate 2.0 Upgrade Guide
PlateSpin Orchestrate 2.0 High Availability Configuration Guide
PlateSpin Orchestrate 2.0 Administrator Reference
PlateSpin Orchestrate 2.0 VM Client Guide and Reference
PlateSpin Orchestrate 2.0 Virtual Machine Management Guide
PlateSpin Orchestrate 2.0 Development Client Reference
PlateSpin Orchestrate 2.0 Command Line Reference
PlateSpin Orchestrate 2.0 Server Portal Reference
PlateSpin Orchestrate 2.0 Developer Guide and Reference
Documentation Updates
This Installation and Configuration Guide is updated periodically. To view the most recent version,
visit the PlateSpin Orchestrate 2.0 documentation Web site (http://www.novell.com/documentation/
pso_orchestrate20/) and look for the documentation updates section included at the end of the book.
Documentation Conventions
In Novell documentation, a greater-than symbol (>) is used to separate actions within a step and
items in a cross-reference path.
®
A trademark symbol (
, TM, etc.) denotes a Novell trademark. An asterisk (*) denotes a third-party
trademark.
When a single pathname can be written with a backslash for some platforms or a forward slash for
other platforms, the pathname is presented with a backslash. Users of platforms that require a
forward slash, such as Linux or UNIX, should use forward slashes as required by your software.
8 PlateSpin Orchestrate 2.0 Installation and Configuration Guide
Page 9

1
Planning the Orchestrate Server
novdocx (en) 13 May 2009
Installation
Before you begin installing PlateSpin® Orchestrate 2.0 from Novell®, you need to compare your
system resources with the requirements of the PlateSpin Orchestrate product. This section includes
information to help you with that evaluation so that you can adequately plan for the installation. The
following subsections are included:
Section 1.1, “PlateSpin Orchestrate Requirements,” on page 9
Section 1.2, “Component Installation Methods,” on page 16
1.1 PlateSpin Orchestrate Requirements
This section includes the hardware and software requirements for the following PlateSpin
Orchestrate components:
Section 1.1.1, “Orchestrate Server,” on page 10
Section 1.1.2, “Required Network Resources,” on page 11
Section 1.1.3, “Orchestrate Agent,” on page 13
Section 1.1.4, “VM Hosts,” on page 13
Section 1.1.5, “Orchestrate VM Client,” on page 14
1
Section 1.1.6, “Other Orchestrate Clients,” on page 15
Planning the Orchestrate Server Installation
9
Page 10

1.1.1 Orchestrate Server
The network machine where you install the Orchestrate Server software must meet the following
requirements:
Table 1-1 Orchestrate Server Requirements
Item Requirement
Server Usage PlateSpin Orchestrate Server: Your server might be capable of
handling tasks in addition to the tasks an Orchestrate Server
performs for PlateSpin Orchestrate. However, we strongly
recommend that you install the Orchestrate Server software on a
dedicated server to ensure optimal performance. For example, you
might not want the server to host Novell eDirectory
NOTE: Although you can install the PlateSpin Orchestrate Server on
a Virtual Machine, do not try to manage that server using PlateSpin
Orchestrate. In addition, installing the server on a VM slows down
the performance of the product.
TM
.
novdocx (en) 13 May 2009
PlateSpin Orchestrate Monitoring Server: This pattern is an
Apache* Web server that is installed alongside the Orchestrate
Server.
Refer to the information in Appendix A, “PlateSpin Orchestrate
Components: Install Patterns,” on page 125 for more detail about these
patterns.
Operating System
Hardware
SUSE
Processor: Xeon* 2.8 GHz 32-bit, or equivalent AMD or Intel
®
Linux Enterprise Server 10 (SLES 10) Service Pack 2 (SP2),
on the 32-bit (x86) and 64-bit (x86-64) architectures (Intel* and
AMD* Opteron* processors)
processor (minimum); Dual-Core Xeon 4 GHz 32-bit or 64-bit
(recommended)
RAM: 2 GB minimum; 4 GB recommended
Disk Space: 350 MB minimum for installing; 1 GB recommended for
managing fewer than 100 resources.
Hostname Resolution The server must resolve device hostnames by using a method such as
DNS (recommended).
IP Address The server must have a static IP address or a permanently leased DHCP
address.
NOTE: For more information about the requirements for virtual machine management, see
Section 1.1.5, “Orchestrate VM Client,” on page 14.
10 PlateSpin Orchestrate 2.0 Installation and Configuration Guide
Page 11

1.1.2 Required Network Resources
The Orchestrate Server must allow traffic on TCP ports 80, 8001, 8100, 8101 (these four ports are
configurable), and UDP and TCP port 1099 (mandatory). The following list summarizes the
network resources required in a PlateSpin Orchestrate setup:
Port 80 is used for the Server Portal when monitoring is not installed. When monitoring is
installed, the monitoring related Apache server takes port 80 and the Server Portal is moved to
port 8080. The Monitoring Server transparently routes communication for the PlateSpin
Orchestrate Server Portal to port 8080.
Port 8001 is used for communication with the Administrator Information page.
Port 8100 is used with a custom protocol for communication with the Orchestrate Agent and
for invoking the zos command line interface or opening the Java* Developer’s toolkit.
Port 8101 is also used for invoking the zos command line interface or opening the Java
Developer’s toolkit by using TLS.
Port 1099 is used with RMI for invoking the zosadmin command line interface and/or for
running the Orchestrate Development Client.
novdocx (en) 13 May 2009
Monitored systems (physical and virtual) send metrics to the Monitoring Server on UDP port 8649.
The Monitoring Server is installed on the same system as the PlateSpin Orchestrate Server.
Connections to VM consoles are accommodated through a VNC client. Typically, this means TCP
port 5900 for the first VM on a VM host, 5901 for the second, and so on. Note that these connections
go to the VM host, exposing the console on behalf of the VM.
Datagrid multicast file transfers use UDP ports 4011-4014 are used. UDP port 4000 is used as a
datagrid multicast request port and a control channel port. Multicast groups for datagrid multicastbased file transfers are 239.192.10.10-14.
The following illustration shows these relationships.
Planning the Orchestrate Server Installation 11
Page 12
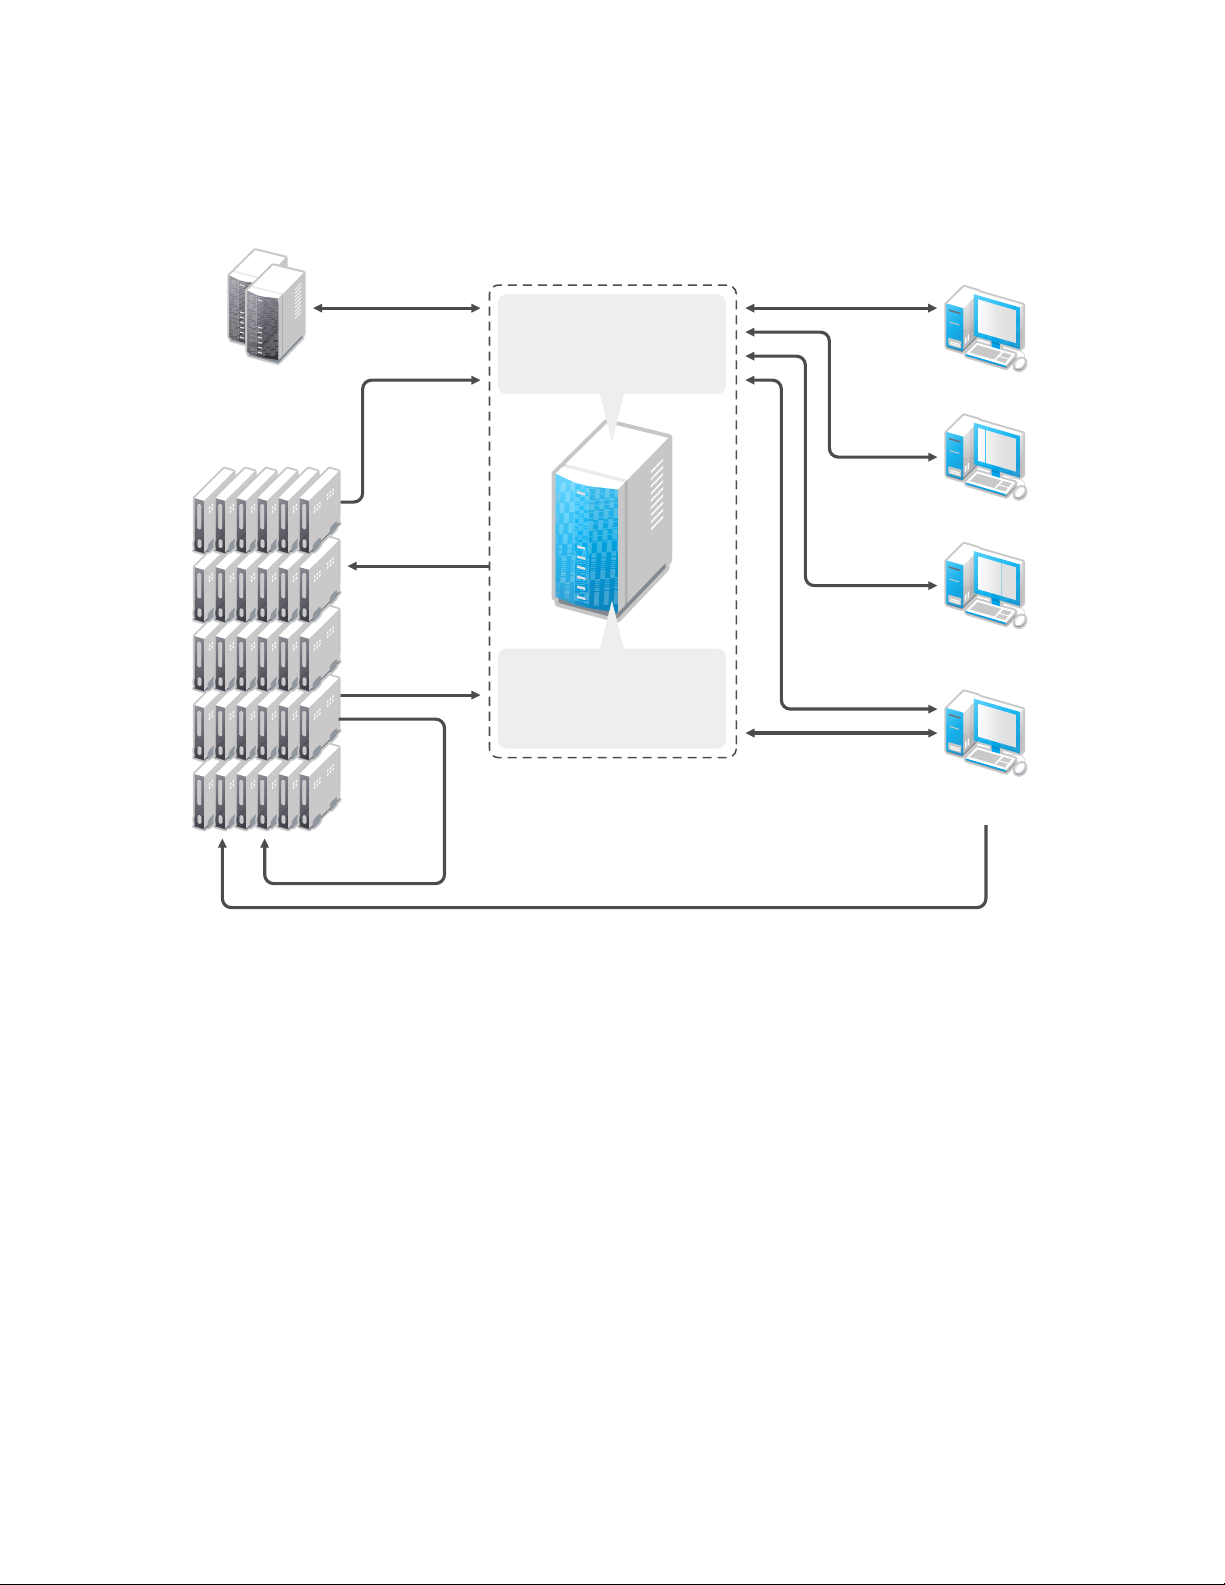
Figure 1-1 PlateSpin Orchestrate Network Resources
VM Builders
OS Install Sources
Auto-install files
novdocx (en) 13 May 2009
Managed
Resources
VM Guests & Hosts
TCP 8649 (localhost)
TCP 8100
TCP 8101
TCP 8100
TCP 8101
UDP 4011-4014
(multicast)
UDP/TCP 8649
Orchestrate Service
Admin Portal-TCP 8001
User Portal-TCP 8080
(optionally TCP 80)
Monitoring Service
Monitor Web Server-TCP 80
Monitor Collector-TCP 8649
(optionally TCP 80)
TCP 5900, 5901, etc. for VM console access
TCP 8100
TCP 8101
“zos” CLI
JMX 1099
“zosadmin” CLI
JMX 1099
Orchestrate
Development Client
JMX 1099
TCP 8100
Orchestrate VM
Client
12 PlateSpin Orchestrate 2.0 Installation and Configuration Guide
Page 13

1.1.3 Orchestrate Agent
PlateSpin Orchestrate manages jobs on and gathers data about data center computing resources
running the PlateSpin Orchestrate Agent and meet the following minimum requirements:
Table 1-2 Orchestrate Agent Requirements
Item Requirement
Operating System Linux machines:
SUSE Linux Enterprise Server 9 SP3 (32-bit or 64-bit)
SUSE Linux Enterprise Server 10 SP1 (32-bit or 64-bit)
SUSE Linux Enterprise Server 10 SP2 (32-bit or 64-bit)
SUSE Linux Enterprise Server 11 (32-bit or 64-bit)
Red Hat* Enterprise Linux* 4 (32-bit or 64-bit)
Red Hat Enterprise Linux 5 (32-bit or 64-bit)
novdocx (en) 13 May 2009
Windows* machines:
Windows Server* 2003 (32-bit or 64-bit)
Windows Server 2008 (32-bit or 64-bit)
VMware* console operating systems:
ESX machine:
ESX 3.0.x /3.5.x
Hardware The Orchestrate Agent does not require a minimum hardware
configuration other than a minimum recommended disk space of 100 MB.
TCP Ports The computing node communicates with the Orchestrate Server over a
custom protocol. The server listens for the agent on port 8100 and 8101
(port 8101 is for secure agent connections). Network firewalls need to
allow outgoing agent connections to these ports on the server.
1.1.4 VM Hosts
We recommend that computers designated as VM hosts in your data center be able to host the VM
and run it according to designated parameters of the specific VM. The processor architecture must
match the designated VM’s processor in architecture, although not in version number. In order for a
machine to serve as a host machine, it must also have a hypervisor installed along with the operating
system. For a detailed list of the supported hypervisors, see Table 2-2 on page 69.
Table 1-3 Minimum and Recommended Hardware Requirements for VM Host Machines
Host Operating System Minimum Requirements Recommended Hardware
SLES 11 x86 or x86_64
2 GB RAM
30 GB Hard Drive Space
x86 or x86_64
4+ GB RAM
100+ GB Hard Drive Space
Planning the Orchestrate Server Installation 13
Page 14

Host Operating System Minimum Requirements Recommended Hardware
novdocx (en) 13 May 2009
SLES 10 SP2 x86 or x86_64
2 GB RAM
30 GB Hard Drive Space
Windows Server 2008 enabled
with Hyper-V
1GHz (x86 processor) or
1.4GHz (x64 processor)
512MB RAM
x86 or x86_64
4+ GB RAM
100+ GB Hard Drive Space
2+ GHz
2+ GB RAM
40+ GB Hard Drive Space
10 GB Hard Drive Space
ESX 3.0.x/3.5.x *Subject to the VMWare support
matrix
VMware Virtual Center *Subject to the VMWare support
matrix
VMware Server *Subject to the VMWare support
matrix
*Subject to the VMWare support
matrix
*Subject to the VMWare support
matrix
*Subject to the VMWare support
matrix
1.1.5 Orchestrate VM Client
The VM Client allows you to manage VMs in your enterprise. You can install the VM Client
interface on the following platforms:
Table 1-4 VM Client Supported Operating Systems and Installation Files
Operating System Installation File
SLES 10 SP2 (32-bit)
SLES 10 SP2 (64-bit)
SLES 11 or SLED 11 (32-bit)
SLES 11 or SLED 11 (64-bit)
Windows XP or Vista (32-bit or 64-bit)
/i386/SLE10/nvmminst
/x86_64/SLE10/nvmminst
sles11/i386/SLE11/nvmminst
sles11/x86_64/SLE11/nvmminst
\Windows\nvmminst.exe
14 PlateSpin Orchestrate 2.0 Installation and Configuration Guide
Page 15

1.1.6 Other Orchestrate Clients
You can monitor and run jobs, run the command line interfaces, and create and modify jobs by using
the tools and monitors included with the PlateSpin Orchestrate Clients. PlateSpin Orchestrate
manages jobs on and gathers data about data center computing resources that meet the following
minimum requirements:
Table 1-5 Orchestrate Client Requirements
Item Requirement
Operating System Linux machines:
SUSE Linux Enterprise Server 10 SP2 (32-bit or 64-bit)
SUSE Linux Enterprise Server 11 (32-bit or 64-bit)
SUSE Linux Enterprise Desktop 11 (32-bit or 64 bit)
Windows machines:
Windows XP (32-bit or 64-bit)
Windows Vista* (32-bit or 64-bit)
novdocx (en) 13 May 2009
Hardware The Orchestrate Development Client installation does not require a
minimum hardware configuration other than a minimum recommended
disk space of 100 MB and an SVGA-grade monitor.
TCP Ports The Orchestrate Clients consist of various components that communicate
with the Orchestrate Server:
Port 8100 is used with a custom protocol for invoking the zos
command line interface or for opening the SDK (Java Developer’s
toolkit).
Port 8101 is also used for invoking the zos command line interface
or opening the Java Developer’s toolkit by using TLS.
Port 1099 is used with RMI for invoking the zosadmin command line
interface or for running the Orchestrate Development Client.
IMPORTANT: The platforms listed here have been tested for the 2.0 release, and are the only
platforms supported at this time.
Some of the install programs for other operating systems that are embedded with the Administrator
Information page have not been tested for this release.
Planning the Orchestrate Server Installation 15
Page 16

1.2 Component Installation Methods
The following table shows the installation methods you can use for the Orchestrate Server, the
Orchestrate Agents, the Orchestrate VM Client, and the other Orchestrate clients:
Table 1-6 PlateSpin Orchestrate Installation Methods and Sources
novdocx (en) 13 May 2009
PlateSpin
Orchestrate
Component
Orchestrate
Server
Supported Operating
System
SLES 10 SP2 (32-bit
or 64-bit)
Installation Method and Source
Available as an RPM package distribution (ISO images, 32-bit or
64-bit) from the Novell Downloads Web site (http://
download.novell.com) after purchase and receipt of a license key.
Uses the Add-On CD installation (PlateSpin Orchestrate Server
pattern) available in YaST.
Requires server configuration after installation by using a text
interface at the Linux console (.
program (.
For installation details, see Section 2.2, “Installing and
Configuring All PlateSpin Orchestrate Components Together,” on
page 21.
/guiconfig
).
/config
) or by using a GUI
16 PlateSpin Orchestrate 2.0 Installation and Configuration Guide
Page 17

novdocx (en) 13 May 2009
PlateSpin
Orchestrate
Component
Orchestrate
Agent
Supported Operating
System
SLES 9 SP3 (32-
bit or 64-bit)
SLES 10 SP1
(32-bit or 64-bit)
SLES 10 SP2
(32-bit or 64-bit)
SLES 11 (32-bit
or 64-bit)
RHEL 4 (32-bit or
64-bit)
RHEL 5 (32-bit or
64-bit)
Installation Method and Source
Available as an RPM package distribution (ISO images, 32-
bit or 64-bit) from the Novell Downloads Web site (http://
download.novell.com) after purchase and receipt of a
license key. Uses the Add-On CD installation (PlateSpin
Orchestrate Agent pattern) available in YaST.
For installation details, see Section 2.2, “Installing and
Configuring All PlateSpin Orchestrate Components
Together,” on page 21.
NOTE: YaST installation is supported only on SLES 10 and
SLES 11, not on RHEL platforms or SLES 9. For these last
two platforms, use either the RPMs located on the ISO
(found in the RHEL or SLES9 directories) or use the
that you can download from the Administrator Information
page. See Section 2.3, “Installing the Orchestrate Agent
Only,” on page 45.)
.sh
After Orchestrate Server installation, available from the
server through a downloadable installation script (
from the Administrator Information page (port 8001) or run
as a post-install from the ISO image.
For installation details, see Section 2.3, “Installing the
Orchestrate Agent Only,” on page 45.
.sh
file
file)
Windows Server
2003 (32-bit or
64-bit)
Windows Server
2008 (32-bit or
64-bit)
VMware ESX
3.0.x
VMware ESX
3.5.x
After Orchestrate Server installation, available from the
server through a downloadable installation script (
from the Administrator Information page (port 8001) or run
as a post-install from the ISO image.
For installation details, see Section 2.3, “Installing the
Orchestrate Agent Only,” on page 45.
.sh
file)
After Orchestrate Server installation, available as a
downloadable GUI installation program (
Administrator Information page (port 8001).
For installation details, see “Using the ISO to Install the
Orchestrate Agent on Windows Machines” on page 60 in
Section 2.3, “Installing the Orchestrate Agent Only,” on
page 45.
.exe
file) from the
Available as an RPM package distribution (ISO images, 32-
bit or 64-bit) from the Novell Downloads Web site (http://
download.novell.com) after purchase and receipt of a
license key. Uses the Add-On CD installation (PlateSpin
Orchestrate Agent pattern) available in YaST.
For installation details, see Section 2.2, “Installing and
Configuring All PlateSpin Orchestrate Components
Together,” on page 21.
After Orchestrate Server installation, available from the
server through a downloadable RPM from the Administrator
Information page (port 8001) or run as a post-install from the
ISO image.
For installation details, see Section 2.3, “Installing the
Orchestrate Agent Only,” on page 45.
Planning the Orchestrate Server Installation 17
Page 18

novdocx (en) 13 May 2009
PlateSpin
Orchestrate
Component
Orchestrate
Clients
Supported Operating
System
SLES 10 SP2
(32-bit or 64-bit)
SLES 11 (32-bit
or 64-bit)
SLED 11 (32-bit
or 64-bit)
Windows XP (32-
bit or 64-bit)
Windows Vista
(32-bit or 64-bit)
Installation Method and Source
Available as an RPM package distribution (ISO images, 32-
bit or 64-bit) available from the Novell Downloads Web site
(http://download.novell.com) after purchase and receipt of a
license key. Uses the Add-On CD installation (PlateSpin
Orchestrate Agent pattern) available in YaST.
For installation details, see Section 2.2, “Installing and
Configuring All PlateSpin Orchestrate Components
Together,” on page 21.
After Orchestrate Server installation, available from the
server through a downloadable installation script (
from the Administrator Information page (port 8001) or run
as a post-install from the ISO image.
For installation details, see Section 2.3, “Installing the
Orchestrate Agent Only,” on page 45.
.sh
After Orchestrate Server installation, available as a
downloadable GUI installation program (
ISO images (32-bit or 64-bit).
For installation details, see in “Using the ISO to Install the
Orchestrate Agent on Windows Machines” on page 60 in
Installing the Orchestrate Agent Only.
.exe
file) in the
After Orchestrate Server installation, available as a
downloadable GUI installation program (
Administrator Information page (port 8001).
For installation details, see in “Using the ISO to Install the
Orchestrate Agent on Windows Machines” on page 60 in
Installing the Orchestrate Agent Only.
.exe
file) from the
file)
VM Builder SLES 10 SP2
(32-bit and 64bit)
SLES 11 (32-bit
and 64-bit)
Monitoring
Server
SLES 10 SP2
(32-bit and 64bit)
YaST Installation (required in order to use VM Client)
YaST Installation (required in order to use VM Client)
18 PlateSpin Orchestrate 2.0 Installation and Configuration Guide
Page 19

novdocx (en) 13 May 2009
PlateSpin
Orchestrate
Component
Monitoring
Agent
Supported Operating
System
SLES 9 SP3 (32-
bit and 64-bit)
Installation Method and Source
YaST Installation or RPMs on ISO (required in order to use VM
Client)
SLES 10 SP1
(32-bit and 64bit)
SLES 10 SP2
(32-bit and 64bit)
SLES 11 (32-bit
and 64-bit)
RHEL 4 (32-bit
and 64-bit)
RHEL 5 (32-bit
and 64-bit)
NOTE: If you install or configure PlateSpin Orchestrate components using a trial key, the product
behaves normally for 90 days, although the trial key controls the number of users and managed
nodes you can configure. For fully supported functionality, product components require a purchased
license key. contact your Novell Sales Representative or a Certified Novell Partner for purchase
information.
Planning the Orchestrate Server Installation 19
Page 20

novdocx (en) 13 May 2009
20 PlateSpin Orchestrate 2.0 Installation and Configuration Guide
Page 21

2
Installation and Configuration
novdocx (en) 13 May 2009
2
This section explains the installation and setup of various components of PlateSpin® Orchestrate
from Novell
Section 2.1, “Installation Prerequisites,” on page 21
Section 2.2, “Installing and Configuring All PlateSpin Orchestrate Components Together,” on
page 21
Section 2.3, “Installing the Orchestrate Agent Only,” on page 45
Section 2.4, “Installing the Orchestrate Development Client Only,” on page 72
Section 2.5, “Installing the Orchestrate VM Client,” on page 81
Section 2.6, “Uninstalling the VM Client,” on page 92
Section 2.7, “Determining the Product Version,” on page 96
®
.
2.1 Installation Prerequisites
During installation of an PlateSpin Orchestrate component, you need to have the following
information available:
(Optional) certificate authority information (internal, or signed certificate, private key, and
public certificate)
License key (a 90-day trial option is available)
For more information on these items, see Table 2-1, “PlateSpin Orchestrate Configuration
Information,” on page 31.
2.2 Installing and Configuring All PlateSpin Orchestrate Components Together
This section discusses the installation and configuration of all PlateSpin Orchestrate components
(except the Orchestrate VM Client) on one SUSE
The steps are shown as an installation example; you would not normally install all of these
components together on a single machine in a data center.
The PlateSpin Orchestrate Server (Orchestrate Server) is supported on SUSE Linux Enterprise
Server 10 Service Pack 2 (SLES 10 SP2) only. You should install the PlateSpin Orchestrate Server
on a dedicated server for optimal performance.
After you install and configure the components you want from PlateSpin Orchestrate, there are other
basic tasks you need to perform to make the PlateSpin Orchestrate system perform at a basic level.
Those tasks are documented in Chapter 3, “First Use of Basic PlateSpin Orchestrate Components,”
on page 99.
IMPORTANT: The Orchestrate Monitoring Server can be installed on any server because it runs
independently of the other components. For more information, see Section 1.1, “PlateSpin
Orchestrate Requirements,” on page 9.
®
Linux* Enterprise Server (SLES) 10 machine.
Installation and Configuration
21
Page 22

The VM Builder cannot be installed on a VM and must only be installed on the host operating
system of the VM Builder node. Multiple servers with VM host capability can be used as VM
Builder machines to make the VM Builder group.
This section includes the following information:
Section 2.2.1, “Installation and Configuration Steps,” on page 22
Section 2.2.2, “PlateSpin Orchestrate Configuration Information,” on page 30
Section 2.2.3, “Correcting Configuration Errors and Repeating the Configuration Process,” on
page 35
Section 2.2.4, “Installing and Configuring the Orchestrate Server for Use with a PostgreSQL
Audit Database on a Different Host,” on page 35
Section 2.2.5, “Installing and Configuring the Orchestrate Server for Use with a Local
PostgreSQL Audit Database,” on page 40
Section 2.2.6, “Configuring the Audit Database After PlateSpin Orchestrate Is Configured,” on
page 43
Section 2.2.7, “Configuring the Remote Audit Database after PlateSpin Orchestrate Is
Configured,” on page 44
novdocx (en) 13 May 2009
Section 2.2.8, “Modifying Audit Database Tables to Accommodate Long Names,” on page 44
2.2.1 Installation and Configuration Steps
To install and configure a complete PlateSpin Orchestrate system (except the VM Client) on a SLES
machine:
1 Review Chapter 1, “Planning the Orchestrate Server Installation,” on page 9 to verify that the
device where you want to install the Orchestrate Server software fulfills the necessary
requirements.
2 Download the appropriate PlateSpin Orchestrate Server ISO (32-bit or 64-bit) to an accessible
network location.
3 (Optional) Create a DVD ISO (32-bit or 64-bit) that you can take with you to the machine
where you want to install it.
4 Install PlateSpin Orchestrate software:
root
4a Log in to the target SLES 10 SP2 server as
4b In the YaST Control Center, click Software, then click Add-on Product to display the Add-
on Product Media dialog box.
4c In the Add-on Product Media dialog box, select the ISO media (Local Directory or DVD)
to install.
4c1 (Conditional) Select DVD, click Next, insert the DVD, then click Continue.
, then open YaST2.
4c2 (Conditional) Select Local Directory, click Next, select the ISO Image check box,
browse to ISO on the file system, then click OK.
4d Read and accept the license agreement, then click Next to display YaST2.
4e In YaST2, click the Filter drop-down menu, then select Patterns to display the install
patterns available on the PlateSpin Orchestrate ISO.
22 PlateSpin Orchestrate 2.0 Installation and Configuration Guide
Page 23
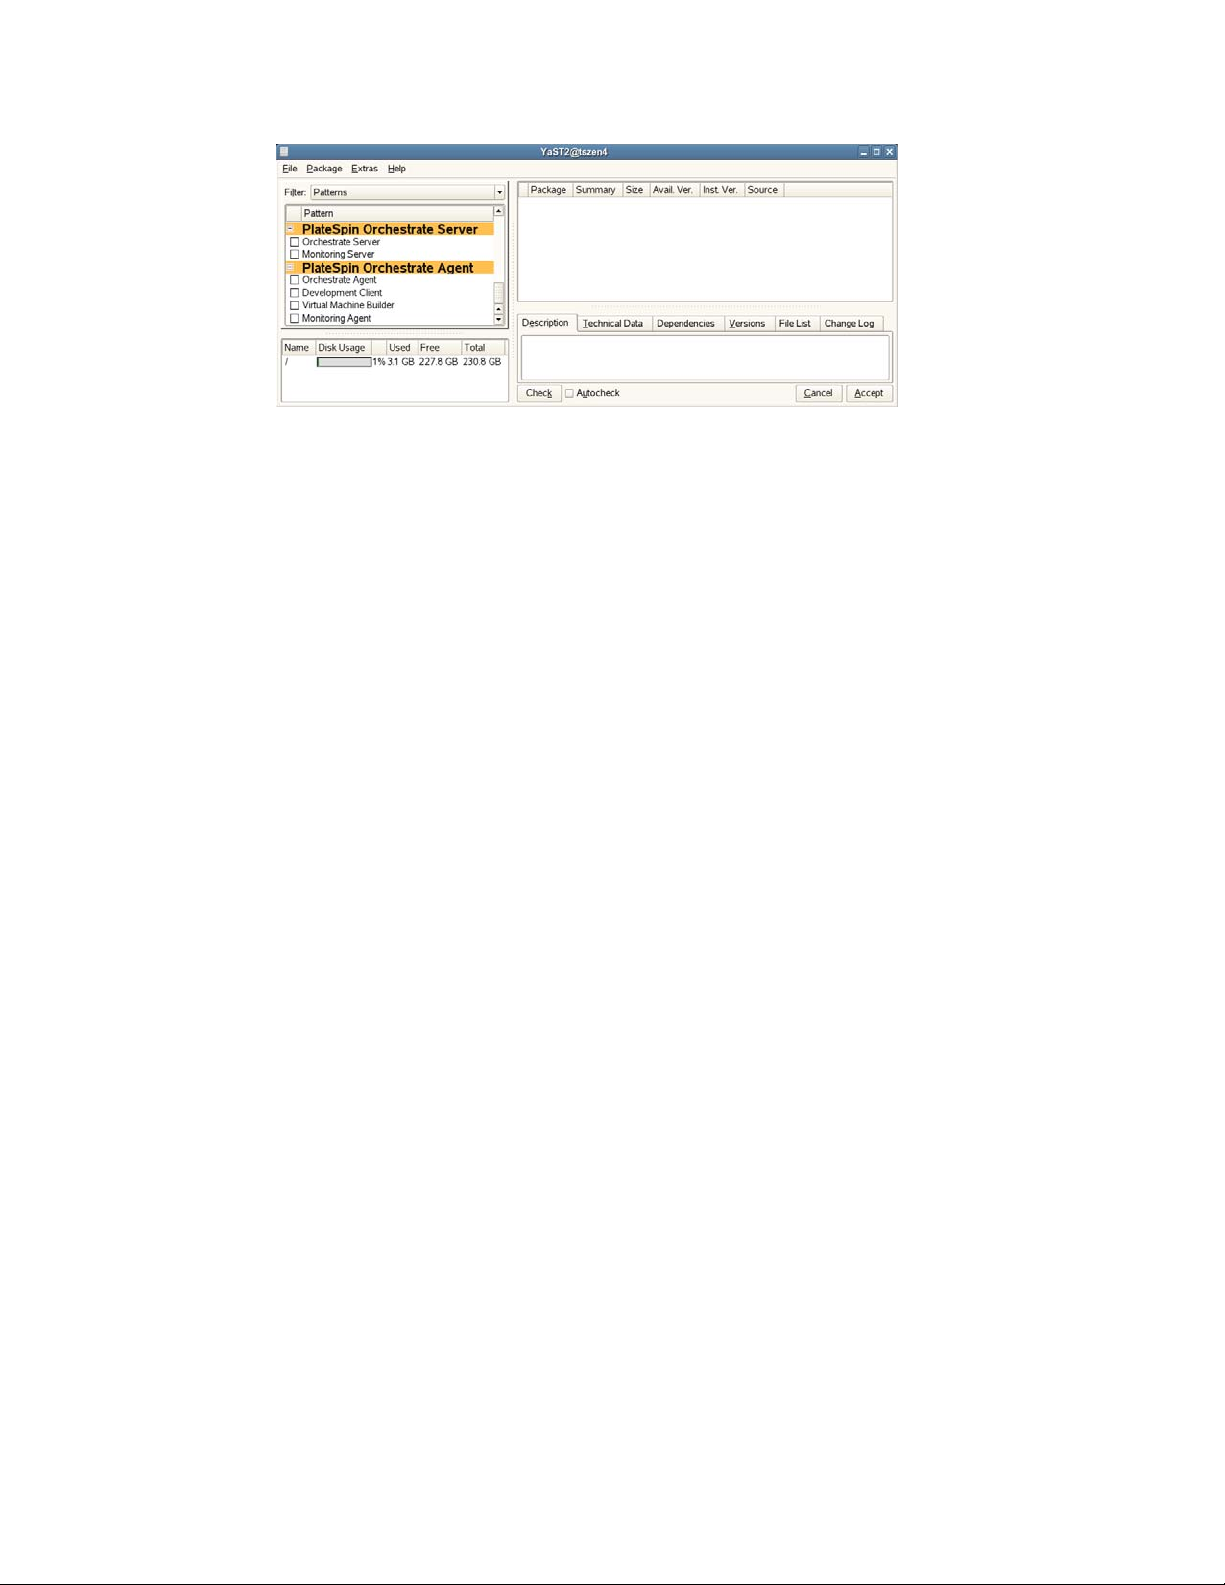
4f Select the PlateSpin Orchestrate installation patterns that you want to install:
Orchestrate Server: This pattern is the gateway between enterprise applications and
resource servers. The Orchestrate Server manages computing nodes (resources) and
the jobs that are submitted from applications to run on these resources.
Monitoring Server: Uses open source Ganglia monitoring of the performance of
certain data on network resources in a user-defined time period.
novdocx (en) 13 May 2009
This pattern can be installed on a server where any other PlateSpin Orchestrate
pattern is installed, or on a server by itself.
Orchestrate Agent: This pattern is installed on all computing resources that are to
be managed. It runs applications under the management of the Orchestrate Server and
reports its status to the Orchestrate Server.
Development Client: Installing this pattern lets the administrator of a computing
resource troubleshoot, initiate, change, or shut down server functions for PlateSpin
Orchestrate and its computing resources. For information about the tools included in
this pattern, see PlateSpin Orchestrate Clients in Appendix A, “PlateSpin Orchestrate
Components: Install Patterns,” on page 125.
Virtual Machine Builder: This pattern is an agent that builds the VM images as the
jobs are sent to it by the Orchestrate Server. The Xen hypervisor must exist on the
server where this pattern is installed.
For better scale and performance, we recommend that this pattern be installed to a
different server than the one where the Orchestrate Server is installed.
Monitoring Agent: This pattern is installed with any installation of the Orchestrate
Server. It installs the Ganglia Agent on each monitored node, which collects
performance metrics and sends the data to the Orchestrate Monitoring Server.
Refer to the information in Appendix A, “PlateSpin Orchestrate Components: Install
Patterns,” on page 125 for more detail about these patterns.
If you choose not to install the PlateSpin Orchestrate Agent or the PlateSpin Orchestrate
Clients on some machines now, you can install them later by using installers that are
accessible from a hosted Web page from the PlateSpin Orchestrate Server, or you can
repeat this process by downloading the ISO to the machine where you want to install the
agent or clients. For more information, see Section 2.3, “Installing the Orchestrate Agent
Only,” on page 45.
4g Click Accept to install the packages.
Installation and Configuration 23
Page 24

5 Configure the PlateSpin Orchestrate components that you have installed. You can use one of
two methods to perform the configuration:
The PlateSpin Orchestrate product configuration script. If you use this method, continue
with Step 6.
The GUI Configuration Wizard. If you use this method, skip to Step 7.
TIP: The text-based configuration process detects which RPM patterns are installed, but the
GUI Configuration Wizard requires that you specify the components to be configured.
IMPORTANT: The configuration tools produce a configuration file that can be used to
automatically reconfigure your system after an upgrade. If you use the tools to reconfigure your
server after the original configuration has been done, make sure you reconfigure all of the
components that are installed on the system (this is the default).
6 (Conditional) If you are using the PlateSpin Orchestrate product configuration script, run the
script:
6a Make sure you are logged in as
root
to run the configuration script.
6b Run the script, as follows:
/opt/novell/zenworks/orch/bin/config
When the script runs, the following information is initially displayed:
Welcome to PlateSpin Orchestrate.
novdocx (en) 13 May 2009
This program will configure PlateSpin Orchestrate 2.0
Select whether this is a new install or an upgrade
i) install
u) upgrade
- - - - - -
Selection [install]:
6c Determine whether this is a new installation or an upgrade.
This example procedure discusses standard installation, so specify
i
(for install) or press
Enter to accept the default. For more information about upgrade, see the PlateSpin
Orchestrate 2.0 Upgrade Guide.
When you make the selection, the following information is displayed:
Select products to configure
# selected Item
1) yes PlateSpin Orchestrate Monitoring Service
2) yes PlateSpin Orchestrate Server
3) yes PlateSpin Orchestrate Agent
4) yes PlateSpin Orchestrate VM Builder
Select from the following:
1 - 4) toggle selection status
a) all
n) none
f) finished making selections
q) quit -- exit the program
Selection [finish]:
24 PlateSpin Orchestrate 2.0 Installation and Configuration Guide
Page 25
The list shows the products listed whose patterns you previously installed.
6d Determine which installed products you want to configure. The options are listed with
option numbers.
6d1 Select or deselect an option by typing its number to toggle its selection status, or type
a
and press Enter to select all of them.
6d2 When you have selected the products you want to configure, type
f
and press Enter
to finish the selection and begin the configuration.
For information to help you complete the configuration process, see Section 2.2.2,
“PlateSpin Orchestrate Configuration Information,” on page 30
6d3 When the you have finished answering questions about the configuration, continue
with Step 8.
7 (Conditional) If you are using the GUI Configuration Wizard:
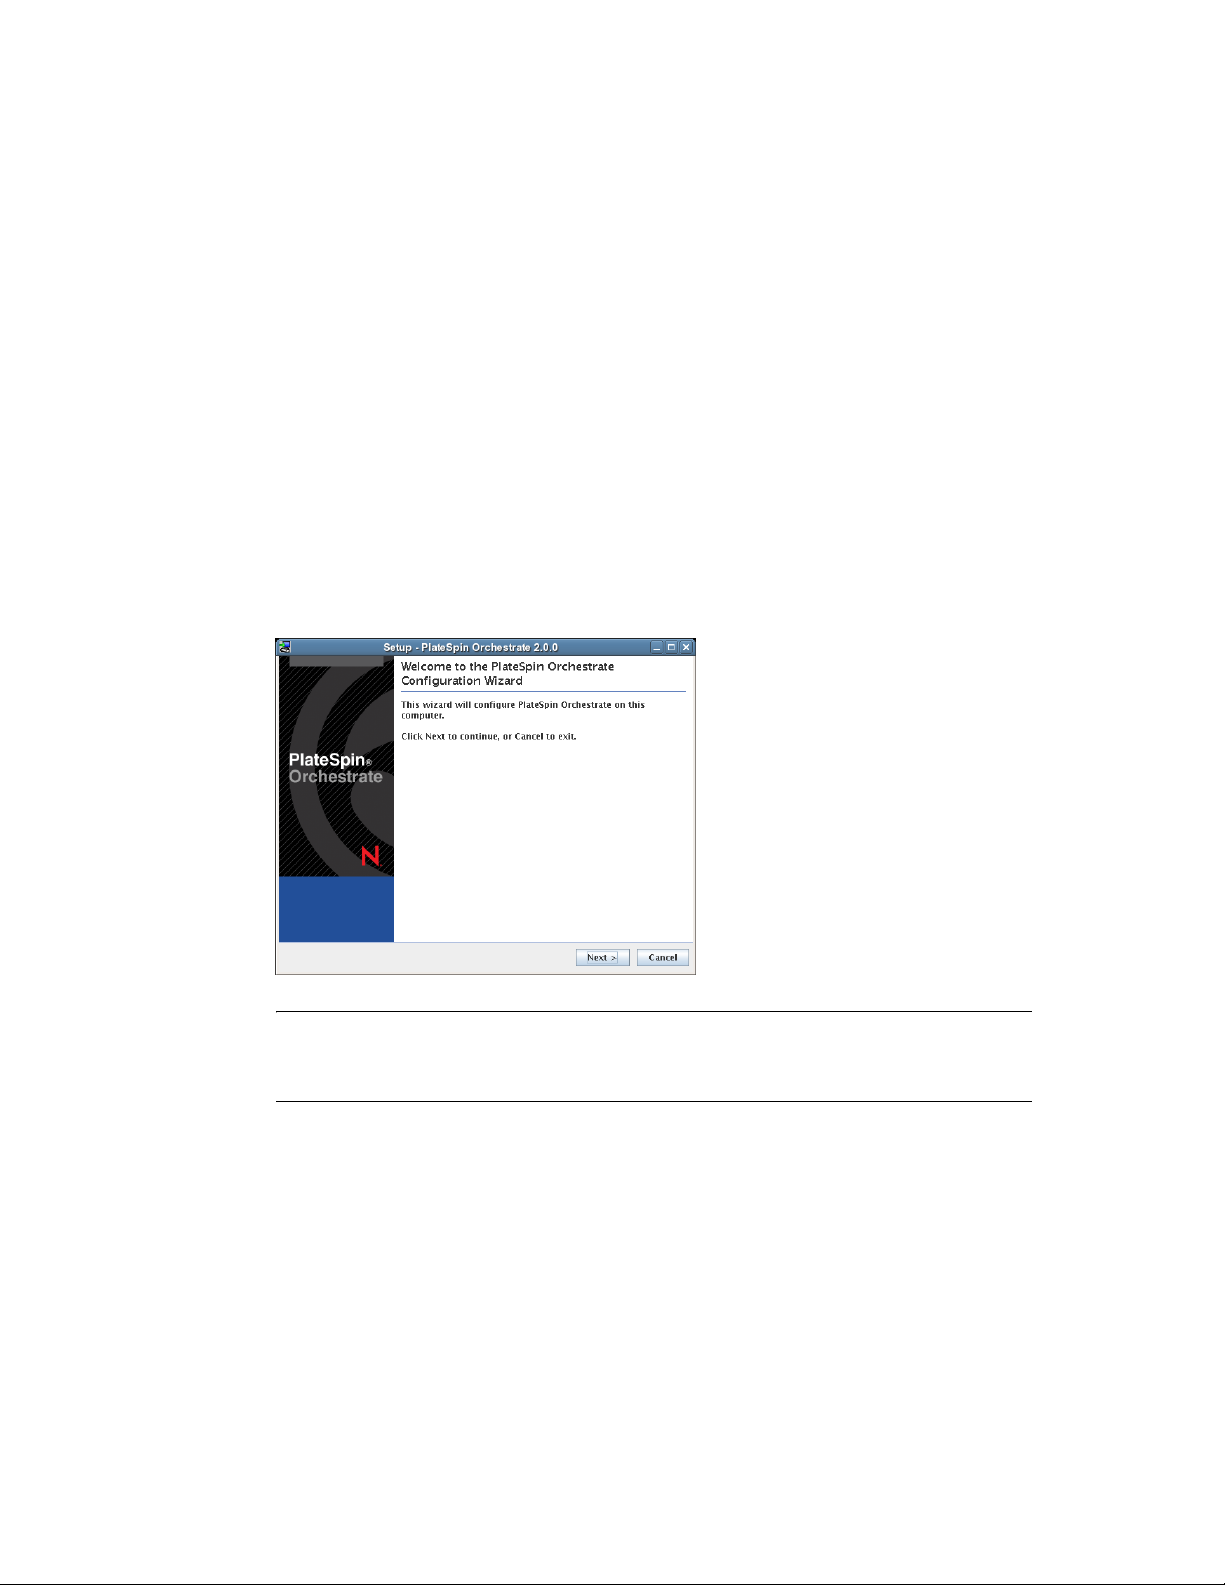
7a Enter the following command at the bash prompt of the machine where you installed the
PlateSpin Orchestrate patterns:
/opt/novell/zenworks/orch/bin/guiconfig
The GUI Configuration Wizard launches.
novdocx (en) 13 May 2009
IMPORTANT: If you have only a keyboard to navigate through the pages of the GUI
Configuration Wizard, use the Tab key to shift the focus to a control you want to use (for
example, a Next button), then press the spacebar to activate that control.
7b Click Next to display the license agreement.
Installation and Configuration 25
Page 26

7c Accept the agreement, then click Next to display the PlateSpin Orchestrate components
page.
novdocx (en) 13 May 2009
This section discusses new installation. For information about upgrading, see the
PlateSpin Orchestrate 2.0 Upgrade Guide.
7d Select New Installation, then click Next to display the PlateSpin Orchestrate components
page.
26 PlateSpin Orchestrate 2.0 Installation and Configuration Guide
Page 27
The components page lists the PlateSpin Orchestrate components that are available for
configuration. By default, all installed components are selected for configuration.
7e Click Next to confirm the components you want to install.
or
Deselect any PlateSpin Orchestrate components that you do not want to configure, then
click Next.
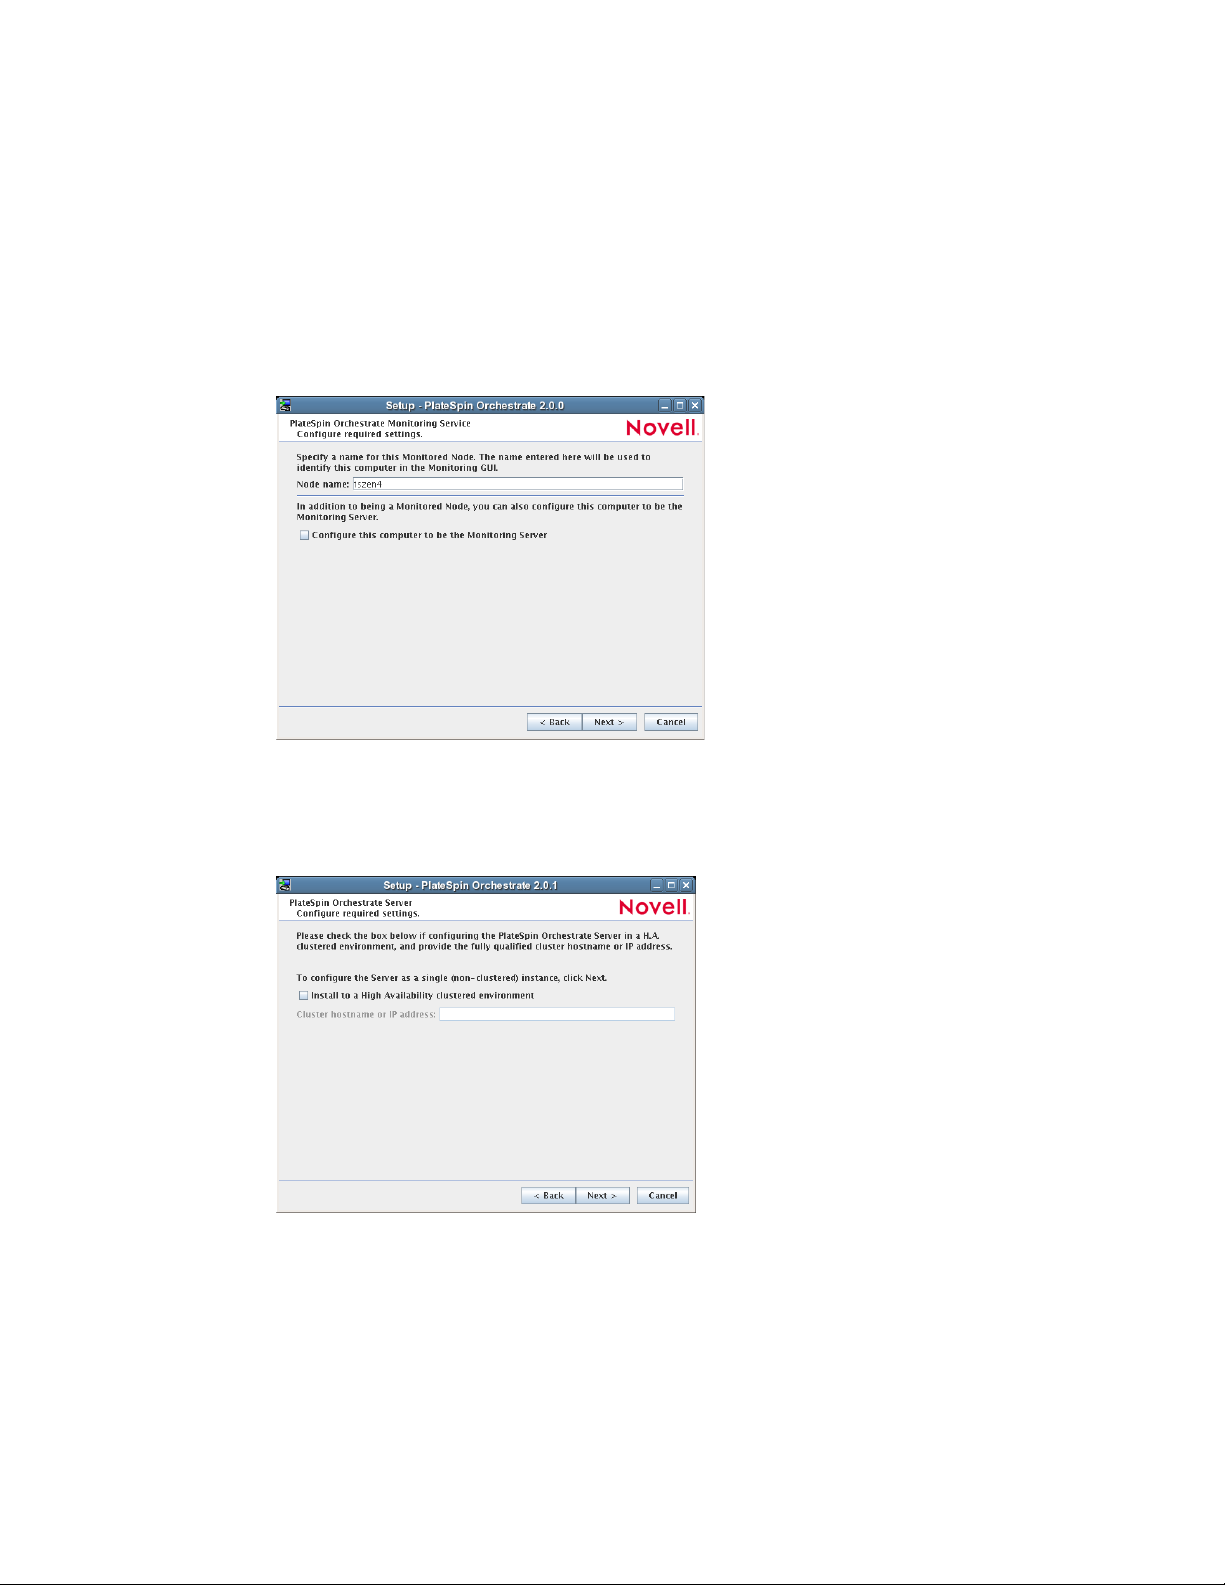
(Conditional) If you selected the PlateSpin Orchestrate Monitoring Service as a
component to install, the Monitoring Service Configuration page is displayed.
novdocx (en) 13 May 2009
See Step 7e1 to continue.
(Conditional) If you did not select the PlateSpin Orchestrate Monitoring Service as a
component to install, the High Availability configuration page is displayed.
See Step 7f to continue.
7e1 (Conditional) Specify a name for this monitored node. The default name is the
computer name.
Select the Configure this computer check box if you want this computer to be a
Monitoring Server, then click Next and continue with Step 7f.
Installation and Configuration 27
Page 28
If you do not select this check box and click Next, a second page of the Monitoring
Configuration Wizard is displayed.
Continue with Step 7e2.
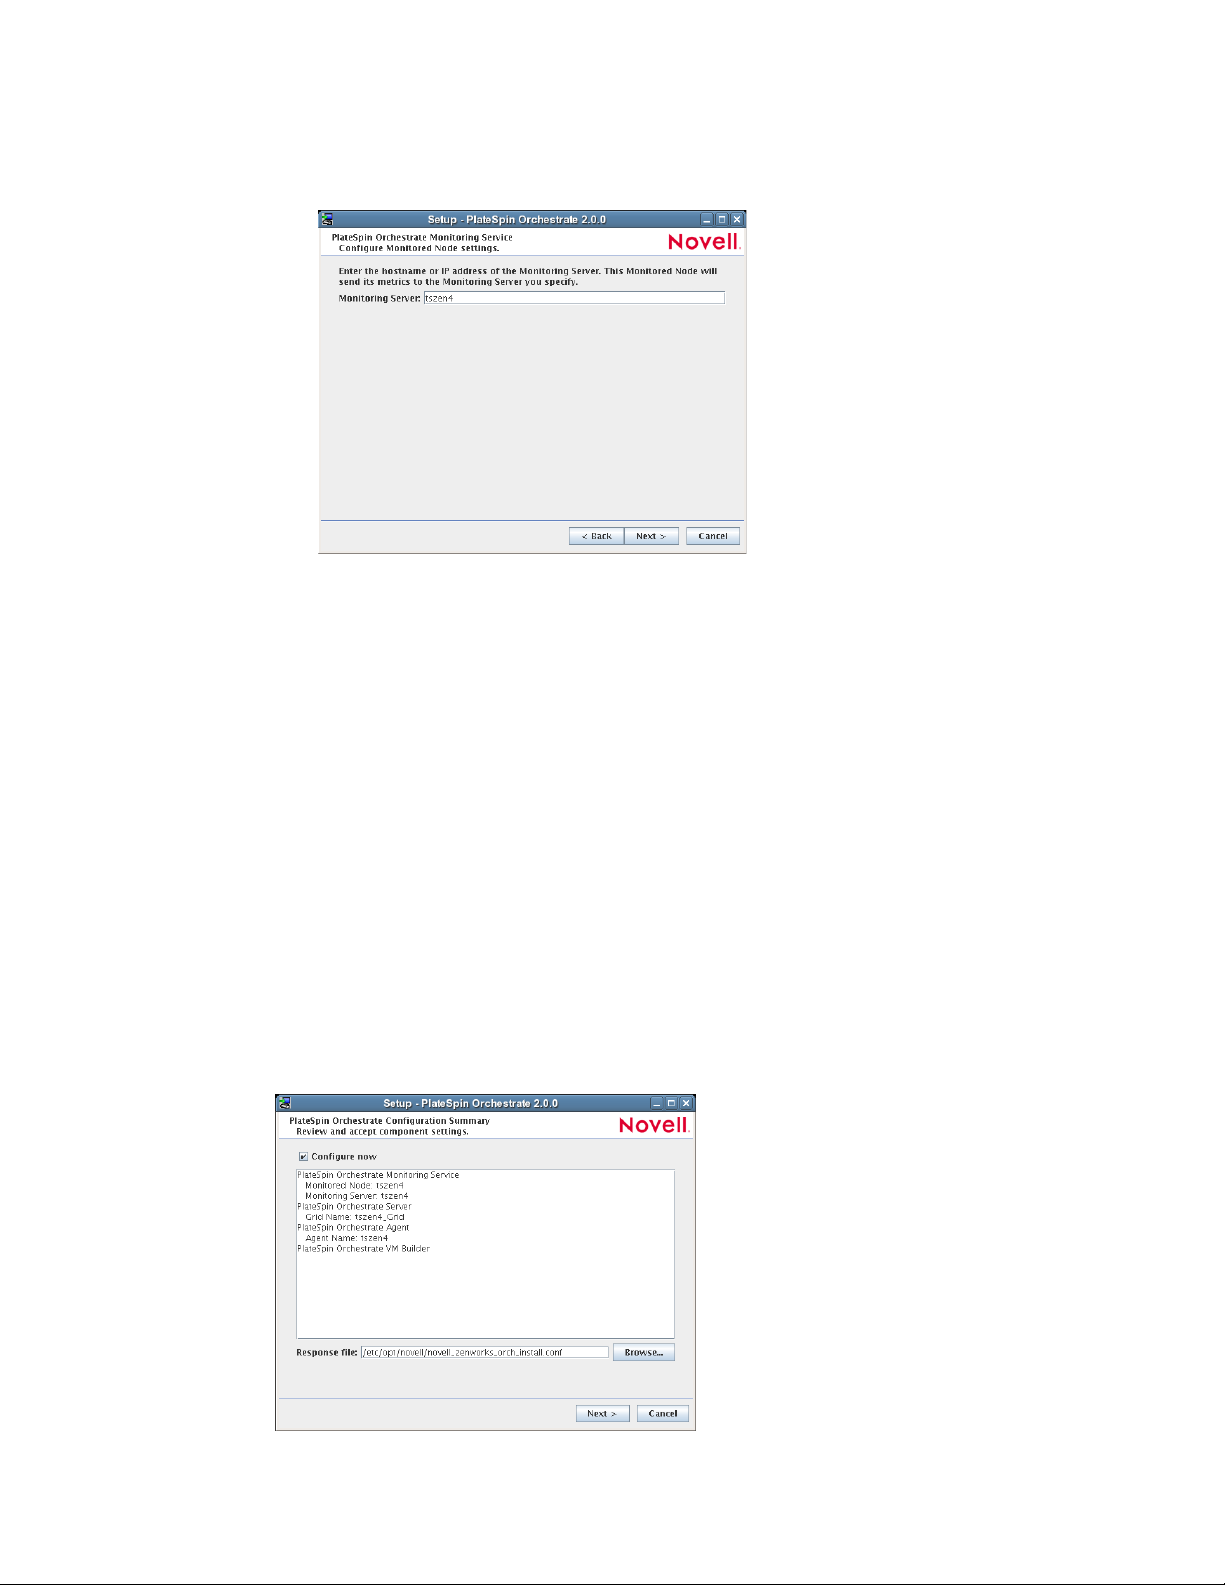
7e2 (Conditional) Specify the host name or IP address you want to associate to this
monitored node. This node sends its metrics to the Monitoring Server you specify.
7e3 Click Next and continue with Step 7f.
7f (Conditional) If you are configuring this Orchestrate Server in a High Availability
environment, select the Install to a High Availability check box, then specify the fully
qualified cluster hostname or IP Address.
or
novdocx (en) 13 May 2009
If you are configuring this Orchestrate Server for a non-clustered instance, click Next.
7g On the settings pages and the succeeding pages of the wizard, provide information to be
used in the configuration process. As the configuration questions in the wizard continue,
refer to the information in Table 2-1, “PlateSpin Orchestrate Configuration Information,”
on page 31 for details about the configuration data that you need to provide. The GUI
Configuration Wizard uses this information to build a response file that is consumed by
the setup program inside the Configuration Wizard.
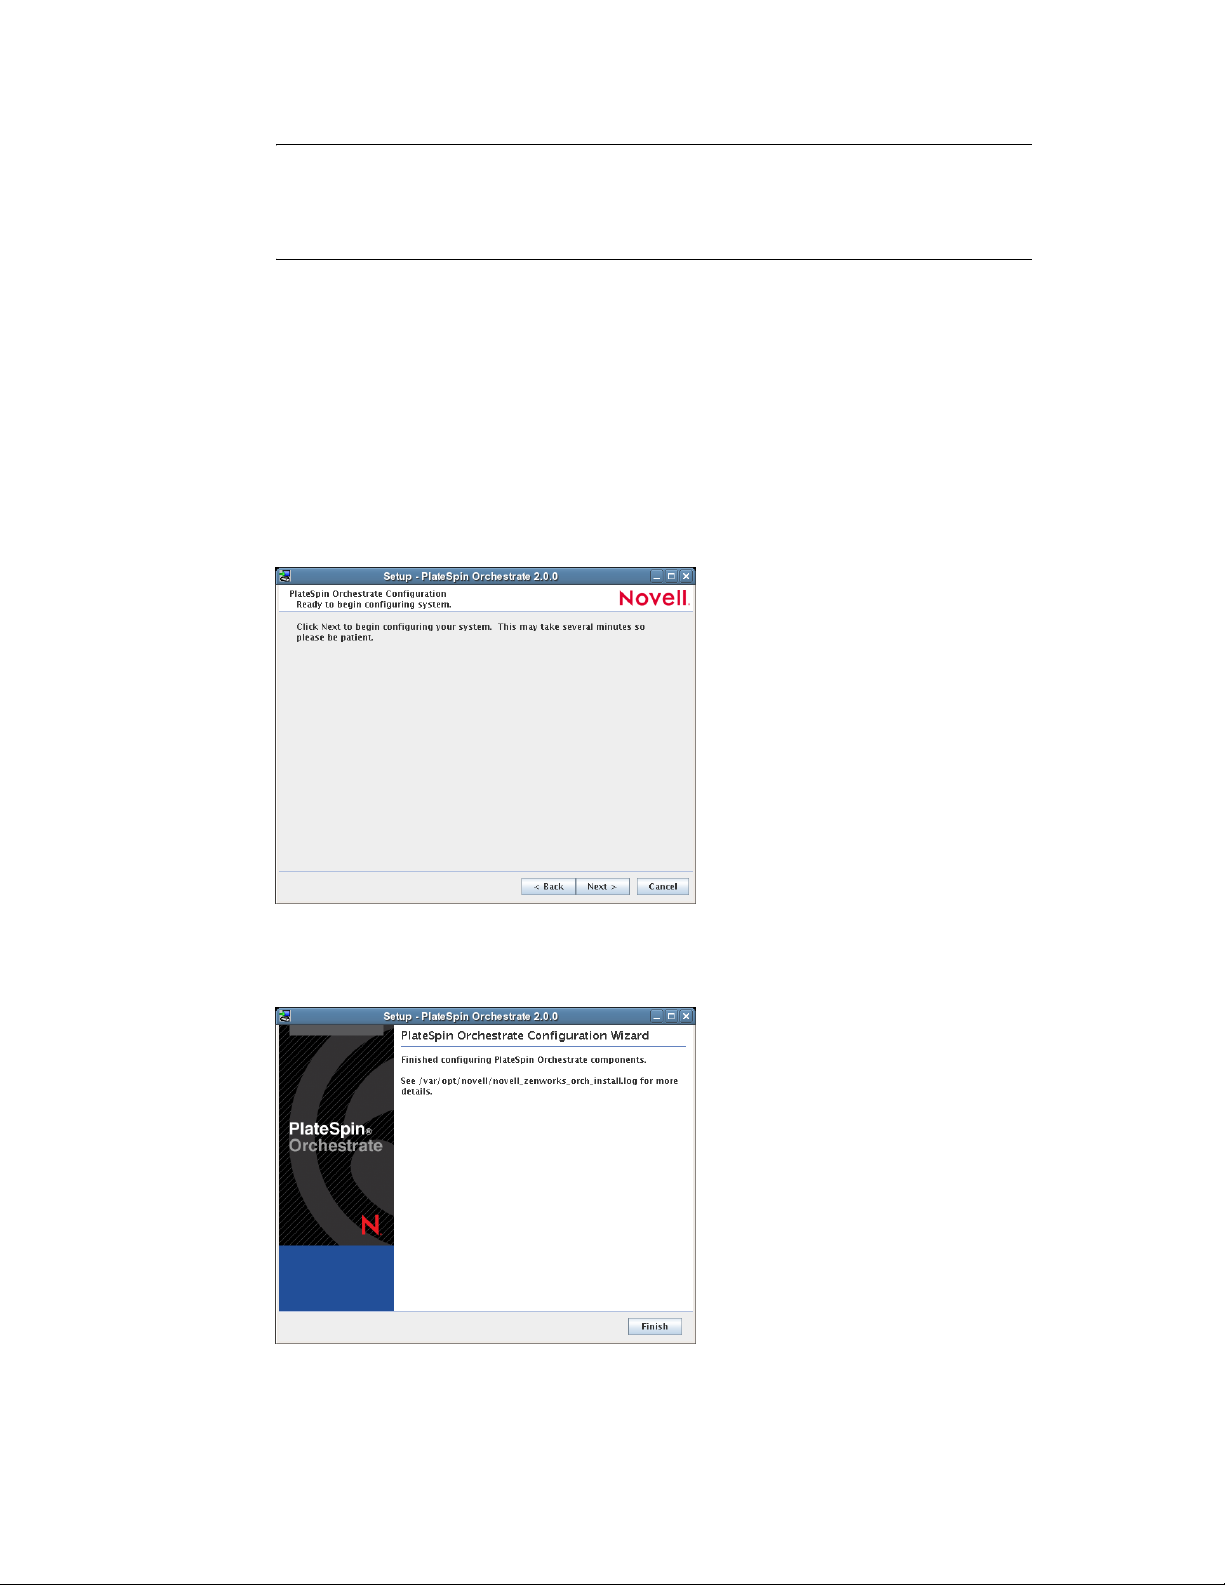
When you have finished answering the configuration questions in the wizard, the
PlateSpin Orchestrate Configuration Summary page is displayed.
28 PlateSpin Orchestrate 2.0 Installation and Configuration Guide
Page 29
IMPORTANT: Although this page of the wizard lets you navigate by using the Tab key
and the spacebar, you need to use the Ctrl+Tab combination to navigate past the summary
list. Click Back if you accidentally enter the summary list, and re-enter the page to
navigate to the control buttons.
By default, the Configure now check box on this page is selected. If you accept the default
of having it selected, the wizard starts PlateSpin Orchestrate and applies the configuration
settings. If you deselect the check box, the wizard writes out the configuration file to
etc/opt/novell/novell_zenworks_orch_install.conf
without starting PlateSpin
/
Orchestrate or applying the configuration settings.
novdocx (en) 13 May 2009
You can use this
.conf
file to start the Orchestrate Server or Agent and apply the settings
either manually or with an installation script. Use the following command to run the
configuration:
/opt/novell/zenworks/orch/bin/config -rs
7h Click Next to display the following wizard page.
7i Click Next to launch the configuration script. When the configuration is finished, the
following page is displayed:
7j Click Finish to close the configuration wizard.
Installation and Configuration 29
Page 30

IMPORTANT: When the installation and configuration are complete, you need to
register the resources to be managed by the PlateSpin Orchestrate system. Please refer to
Chapter 3, “First Use of Basic PlateSpin Orchestrate Components,” on page 99 for
detailed information about getting resources to manage in the PlateSpin Orchestrate
system.
novdocx (en) 13 May 2009
8 Open the configuration log file (
/var/opt/novell/novell_zenworks_orch_install.log
to make sure that the components were correctly configured.
You might want to change the configuration if you change your mind about some of the
parameters you provided in the configuration process. For information about what to do in
these circumstances, see Section 2.2.3, “Correcting Configuration Errors and Repeating the
Configuration Process,” on page 35.
9 Access the PlateSpin Orchestrate Administrator Information Page to verify that the Orchestrate
Server is installed and running. Use the following URL to open the page in a Web browser:
http://DNS_name_or_IP_address_of_Orchestrate_Server:8001
The Administrator Information page includes links to separate installation programs (installers)
for the PlateSpin Orchestrate Agent and the PlateSpin Orchestrate Clients. The installers are
used for various operating systems. You can download the installers and install the agent or the
clients on any supported machine you choose. For more information, see Section 2.3,
“Installing the Orchestrate Agent Only,” on page 45.
10 (Conditional and Optional) If you installed the PlateSpin Orchestrate Clients, you can increase
the heap size that the JVM* handles. This enables the console to manage a larger number of
objects.
10a Open the
bash shell script at
/opt/novell/zenworks/zos/server/bin
.
zoc
On Microsoft* Windows*, the path to the console is
files\novell\zos\clients\bin\zoc.bat
. For more information, see Section 2.3,
“Installing the Orchestrate Agent Only,” on page 45.
10b Inside the script, find the following line where the JVM parameters are defined:
JVMARGS="-Xmx256m -Xms256m -Xmn64m -XX:NewSize=64m -XX:MaxNewSize=64m"
The
-Xmx
argument specifies the maximum heap size for the JVM. Increasing the heap
size prevents a JVM out of memory condition.
)
-Xmx
10c Change the value in the
argument from 256MB to 512MB.
2.2.2 PlateSpin Orchestrate Configuration Information
The following table describes the information required by the PlateSpin Orchestrate configuration
config
(
readily available if you want to evaluate the entire product. The information is listed in the order that
it is presented in the configuration file.
30 PlateSpin Orchestrate 2.0 Installation and Configuration Guide
) and the configuration wizard (
guiconfig
). The information is organized to make it
Page 31

Table 2-1 PlateSpin Orchestrate Configuration Information
novdocx (en) 13 May 2009
Configuration
Information
Orchestrate
Monitoring
Explanation
If you installed the Orchestrate Monitoring Server and the Orchestrate Monitoring
Agent, the following questions are asked during the configuration process.
Monitored or Monitoring:
You can configure this host to be the
Monitoring Server or a monitored node. Configure this host
as the Monitoring Server? (y/n)
Default value = yes (if the Monitoring Server is installed on this machine)
This question always appears if you installed the Monitoring Server
component.
Because the configuration already knows that Orchestrate Monitoring is
installed, you are choosing whether the machine being installed to is to be
the controlling node for monitoring.
Monitoring Server:
Specify the hostname or IP address of the
Monitoring Server.
Default value = none
This question appears if you did not install the Monitoring Server on this
machine. It is the name or IP address of the server (also known as the
controlling node) where the Monitoring Agent will send its metrics.
Location:
Enter a name describing this monitored computer’s
location.
Default value = name_of_this_computer
This question always appears if you specify this computer as a monitored
no
node (that is, you answer
Monitoring Server).
when asked if this machine is to be the
The descriptive name you create here appears in the Monitoring user
interface as the location of the device.
Type of
Configuration
Select whether this is a standard or high-availability server
configuration.
Default value =
standard
Your answer here determines whether this is a standard installation or a High
Availability installation.
s
(for
This section discusses standard installation, so specify
press Enter to accept the default. For more information about High Availability
configuration, see the PlateSpin Orchestrate 2.0 High Availability Configuration
Guide.
standard
) or
Installation and Configuration 31
Page 32

novdocx (en) 13 May 2009
Configuration
Information
Orchestrate
Server
Explanation
Because the PlateSpin Orchestrate Server must always be installed for a full
PlateSpin Orchestrate system, the following questions are always asked when you
have installed server patterns prior to the configuration process:
PlateSpin Orchestrate grid name:
Select a name for the Orchestrator
grid.
Default =
hostname_grid
A grid is an administrative domain container holding all of the objects in
your network or data center. The PlateSpin Orchestrate Server monitors
and manages these objects, including users, resources, and jobs.
The grid name you create here is displayed as the name for the container
placed at the root of the tree in the Explorer panel of the Orchestrate
Development Client.
PlateSpin Orchestrate Administrator user:
Create an Administrator user
for PlateSpin Orchestrate.
Default = none
The name you create here is required when you access the PlateSpin
Orchestrate Console or the
zosadmin
command line interface.
You should remember this username for future use.
PlateSpin Orchestrate Administrator password:
Specify the password for
<Administrator user>
Default = none
This password you create here is required when you access the PlateSpin
Orchestrate Console or the
zosadmin
command line interface.
You should remember this password for future use.
Audit Database:
Default =
If you answer
database management system.
Novell has tested and supports only the PostgreSQL* relational database
as the audit database for this release of PlateSpin Orchestrate. If you use a
different RDBMS, no support or documentation is available from Novell.
Enable auditing?
no
yes
to this question, you need access to a relational
For more information, see Section 2.2.4, “Installing and Configuring the
Orchestrate Server for Use with a PostgreSQL Audit Database on a
Different Host,” on page 35 or Section 2.2.5, “Installing and Configuring the
Orchestrate Server for Use with a Local PostgreSQL Audit Database,” on
page 40.
License file:
Specify the full path to the license file.
Default = none
A license key (90-day evaluation license or a full license) is required to use
this product. You should have received this key from Novell, then you
should have subsequently copied it to the network location that you specify
here. Be sure to include the name of the license file in the path.
32 PlateSpin Orchestrate 2.0 Installation and Configuration Guide
Page 33

novdocx (en) 13 May 2009
Configuration
Information
Orchestrate
Server
(continued)
Explanation
Server Portal
Default =
1
installed).
:
Specify the Server Portal port.
8080
(if Monitoring is installed) or 80 (if Monitoring is not
Because Apache uses port 80 for Orchestrate Monitoring, it forwards non-
monitoring requests to the Orchestrate Server on the port you specify here.
Administrator Information port
1
:
Specify the Administrator
Information page port.
Default =
8001
Port 8001 on the Orchestrate Server provides access to an Administrator
Information page that includes links to product documentation, agent and
client installers, and product tools to help you understand and use the
product. Specify another port number if 8001 is reserved for another use on
this server.
Agent Port
Default =
1
: Specify the Agent port.
8100
Port 8100 is used for communication between the Orchestrate Server and
the Orchestrate Agent. Specify another port number if 8100 is reserved for
another use.
TLS Certificate and Key
1
:
Generate a TLS certificate and key?
Specify the full path to the TLS server certificate.
Specify the full path to the TLS server private key.
Default =
for authentication)
yes
(the Orchestrate Server must generate a certificate and key
A PEM-encoded TLS certificate and key is needed for secure
communication between the Orchestrate Server and Orchestrate Agent.
If you respond with
certificate and key.
TLS Server Certificate
no
, you need to provide the location of an existing
2
:
Specify the full path to the TLS server
certificate.
Default =
/etc/ssl/servercerts/servercert.pem
Specify the path to the existing TLS certificate.
TLS Server Key
2
:
Specify the full path to the TLS server
private key.
Default =
/etc/ssl/servercerts/serverkey.pem
Specify the path to the existing TLS private key.
Xen VNC password:
Set the password that will be used for VNC on
Xen virtualization hosts.
You will need this password when you log into virtual machines through
VNC.
Installation and Configuration 33
Page 34

novdocx (en) 13 May 2009
Configuration
Information
Orchestrate
Agent
Explanation
You can install and configure the Orchestrate Agent on any computing node. It is not
necessary to install it on the same machine with the Orchestrate Server. If you
installed the Orchestrate Agent, the following questions are asked in the configuration
process.
Agent Name:
Specify the name of the Orchestrate Agent on this
node.
Default = none
The name you specify here is used by the Orchestrate Agent to
authenticate to the Orchestrate Server.
Orchestrate Server:
Specify the hostname or IP address of the
Orchestrate Server.
Default = none
Specify the DNS name or IP address of the Orchestrate Server that this
agent binds to.
Orchestrate Server Certificate
3
:
Do you want to specify an existing
Orchestrate Server certificate?
Default = no
In configuring the Orchestrate Server, you either entered a PEM-encoded
TLS certificate and key, or the system generated them.
If you answer
certificate is downloaded from the Orchestrate Server to the Orchestrate
Agent the first time the Agent connects.
If you answer
communicating with the correct server.
Virtual Machine
no
, the agent always trusts the server certificate. The
yes
, the Agent uses the certificate to verify that it is
3
:
Is the host a Virtual Machine?
Default = no
This setting helps the PlateSpin Orchestrate system to know how to treat
this host.
Agent Port
Default =
3
:
Specify the Agent port on the Orchestrate Server.
8100
Port 8100 is used for communication between the Orchestrate Server and
the Orchestrate Agent. Specify another port number if 8100 is reserved for
another use.
For an Agent installed on ESX, configure port 8101.
Agent IP Address:
Specify an optional local bind address for the
agent.
Default = none
If specified, the Agent tries to use this address locally when it connects to
the Server. Otherwise, the operating system automatically sets the local
address for each connection. This value is not normally needed.
Orchestrate Server Certificate File
4
:
Specify the path to the
Orchestrate Server certificate file.
Default =
/root/zos_server_cert.pem
34 PlateSpin Orchestrate 2.0 Installation and Configuration Guide
Page 35

novdocx (en) 13 May 2009
Configuration
Information
Configuration
Summary
1
This configuration parameter is considered an advanced setting for the Orchestrate Server in the
Explanation
When you have completed the configuration process, you have the option of viewing
a summary of the configuration information.
View summary:
Default =
Answering
Orchestrate components you have configured and the information with
which they will be configured.
Answering
Configuration information change:
Default =
Answering
you can make changes to the configuration information.
Answering
Do you want to view summary information?
yes
yes
to this question displays a list of all the PlateSpin
no
to this question starts the configuration program.
Do you want to make any changes?
no
yes
to this question restarts the configuration process so that
no
to this question starts the configuration program.
PlateSpin Orchestrate Configuration Wizard. If you select the Configure Advanced Settings check
box in the wizard, you have the option of changing the default values. If you leave the check box
deselected the setting is configured with normal defaults.
2
This configuration parameter is considered an advanced setting for the Orchestrate Server in the
PlateSpin Orchestrate Configuration Wizard. If you select the Configure Advanced Settings check
box in the wizard, this parameter is listed, but default values are provided only if the previous value
is manually set to no.
3
This configuration parameter is considered an advanced setting for the Orchestrate Agent in the
PlateSpin Orchestrate Configuration Wizard. If you select the Configure Advanced Settings check
box in the wizard, the setting is configured with normal defaults. Leaving the check box deselected
lets you have the option of changing the default value.
4
This configuration parameter is considered an advanced setting for the Orchestrate Agent in the
PlateSpin Orchestrate Configuration Wizard, but only if you set Provide Existing Orchestrate Server
Certificate to yes.
2.2.3 Correcting Configuration Errors and Repeating the Configuration Process
If you want to reconfigure the components of a PlateSpin Orchestrate system that you previously
installed and configured, you can rerun the configuration script or the GUI Configuration Wizard
and change your responses during the configuration process.
2.2.4 Installing and Configuring the Orchestrate Server for Use with a PostgreSQL Audit Database on a Different Host
When you install PlateSpin Orchestrate, you can optionally point it to a relational database that you
can use to audit the work done by the product. There is no relational database management system
bundled with the product, but because PlateSpin Orchestrate is supported by default on SLES 10
Installation and Configuration 35
Page 36

SP2, you can use a PostgreSQL database and configure it for use with PlateSpin Orchestrate
auditing. If you want to use another database, you have to configure it separately for use with
PlateSpin Orchestrate.
“Installing the PostgreSQL Package and Dependencies on an Independent Host” on page 36
“Configuring PostgreSQL to Accept Remote Database Connections” on page 37
“Logging in Locally to the PostgreSQL Database” on page 38
“Creating a PlateSpin Orchestrate User for the PostgreSQL Database” on page 39
“Configuring the PlateSpin Orchestrate Audit Database on a Separate Host” on page 39
Installing the PostgreSQL Package and Dependencies on an Independent Host
When you enable and configure PlateSpin Orchestrate auditing, you create a small custom database
and a simple schema that persists all of the PlateSpin Orchestrate jobs that have been run, along with
their parameters.The database also maintains the login or logout activity of the PlateSpin
Orchestrate users and resources and includes an “actions” table that records provisioning actions and
their status (started, failed, completed successfully, etc.).
novdocx (en) 13 May 2009
NOTE: We recommend that you install the PostgreSQL packages on a SLES 10 SP2 server that is
different from the server where you install the PlateSpin Orchestrate Server. This ensures an
adequate amount of space for running the server as the database is used.
For high availability Orchestrate Server configurations, you need to install the database outside of
the high availability cluster.
If you want to run the database on the same host with PlateSpin Orchestrate, see Section 2.2.5,
“Installing and Configuring the Orchestrate Server for Use with a Local PostgreSQL Audit
Database,” on page 40.
If the SLES 10 SP2 machine does not have PostgreSQL packages installed and running, use YaST to
search for
postgresql-server
, then install the package and its dependencies.
You can also run the following command from the bash prompt:
yast2 -i postgresql-server
When PostgreSQL is installed, you need to create the default database and start it. Use the following
commands:
su - postgres
initdb
pg_ctl start
These commands create or update the PostgreSQL privilege database and installs the prepared
tables. For more detail about what you will see when you run these commands, see “Detail” on
page 37.
NOTE: You cannot run the
PostgreSQL (
36 PlateSpin Orchestrate 2.0 Installation and Configuration Guide
su - postgres
pg_ctl
command as root. You must first change to the superuser for
). Failure to issue this command first results as follows:
Page 37

# pg_ctl start
pg_ctl: cannot be run as root
Please log in (using, e.g., "su") as the (unprivileged) user that will
own the server process.
Detail
postgres> initdb
The files belonging to this database system will be owned by user "postgres".
This user must also own the server process.
The database cluster will be initialized with locale en_US.UTF-8.
The default database encoding has accordingly been set to UTF8.
creating directory /var/lib/pgsql/data ... ok
creating directory /var/lib/pgsql/data/global ... ok
creating directory /var/lib/pgsql/data/pg_xlog ... ok
creating directory /var/lib/pgsql/data/pg_xlog/archive_status ... ok
creating directory /var/lib/pgsql/data/pg_clog ... ok
creating directory /var/lib/pgsql/data/pg_subtrans ... ok
creating directory /var/lib/pgsql/data/pg_twophase ... ok
creating directory /var/lib/pgsql/data/pg_multixact/members ... ok
creating directory /var/lib/pgsql/data/pg_multixact/offsets ... ok
creating directory /var/lib/pgsql/data/base ... ok
creating directory /var/lib/pgsql/data/base/1 ... ok
creating directory /var/lib/pgsql/data/pg_tblspc ... ok
selecting default max_connections ... 100
selecting default shared_buffers ... 1000
creating configuration files ... ok
creating template1 database in /var/lib/pgsql/data/base/1 ... ok
initializing pg_authid ... ok
enabling unlimited row size for system tables ... ok
initializing dependencies ... ok
creating system views ... ok
loading pg_description ... ok
creating conversions ... ok
setting privileges on built-in objects ... ok
creating information schema ... ok
vacuuming database template1 ... ok
copying template1 to template0 ... ok
copying template1 to postgres ... ok
novdocx (en) 13 May 2009
WARNING: enabling "trust" authentication for local connections
You can change this by editing pg_hba.conf or using the -A option the
next time you run initdb.
Success. You can now start the database server using:
postmaster -D /var/lib/pgsql/data
or
pg_ctl -D /var/lib/pgsql/data -l logfile start
postgres> postmaster -i
Configuring PostgreSQL to Accept Remote Database Connections
To configure the PostgreSQL database to accept remote database connections, you need to add the
following line to the
/var/lib/pgsql/data/pg_hba.conf
file:
Installation and Configuration 37
Page 38

host all all 0.0.0.0/0 trust
novdocx (en) 13 May 2009
NOTE: After initial configuration, you can replace the
0.0.0.0/0
with a more restrictive mask. In
a high availability server configuration, make sure that each host in the high availability cluster is
enabled as a remote host.
After you make the change to the
pg_hba.conf
file, you need to specify the following command so
that you do not receive an error when remote hosts try to connect:
pg_ctl reload
If
pg_hba.conf
is not configured when attempting to connect, an error similar to the following is
displayed:
psql: FATAL: no pg_hba.conf entry for host "164.99.15.64", user "postgres",
database "postgres", SSL off
Depending on the environment, you might have to perform some additional configuration for remote
database setup. Editing the
listen_addresses
section of the
postgresql.conf
file enables the
database server to listen for incoming connections on the specified IP addresses. The following is
excerpt from that section of the file:
listen_addresses = 'localhost'
# what IP address(es) to listen on;
# comma-separated list of addresses;
# defaults to 'localhost', '*' = all
After you modify the
listen_addresses
entry in
postgresql.conf
, use the following command
to restart the PostgreSQL server (recommended in the PostgreSQL documentation):
pg_ctl restart
Logging in Locally to the PostgreSQL Database
When you have installed the database, the next step is to check that you can connect to the database
on the database host. The default admin username is
postgres
. Use the following commands to set
up a password for the postgres user on the database host machine:
psql
NOTE: Remember the password. You need it to log in later to log in to the database.
Running this command results in a screen like this:
Welcome to psql 8.1.11, the PostgreSQL interactive terminal.
Type: \copyright for distribution terms
\h for help with SQL commands
\? for help with psql commands
\g or terminate with semicolon to execute query
\q to quit
postgres=# alter user postgres password 'pass';
ALTER ROLE
postgres=#
38 PlateSpin Orchestrate 2.0 Installation and Configuration Guide
Page 39

Creating a PlateSpin Orchestrate User for the PostgreSQL Database
Next, set up a PostgreSQL user to own the audit database schema before you run the server
configuration script or the GUI Configuration Wizard.
root
1 On the database host machine, use the following commands to log in as
at the database
host machine:
su - postgres
psql
2 At the
psql
prompt on the database host, use the following command to create an audit
database schema user, for example:
postgres=# create user zos password 'zos';
CREATE ROLE
NOTE: Single quotes surrounding the password are required.
novdocx (en) 13 May 2009
3 Enter the
\q
command at the
psql
prompt to exit the database.
Configuring the PlateSpin Orchestrate Audit Database on a Separate Host
The easiest way to configure the audit database is to do so when you configure the PlateSpin
Orchestrate Server. Use the following procedure to configure the database.
NOTE: The questions presented in the text-based config script are shown here, but the questions
presented in the graphical Configuration Wizard are similar.
1 After you have installed the PlateSpin Orchestrate packages you want, run the configuration
(either the config script or the graphical Configuration Wizard) until you see the following
question:
Enable Auditing (y/n) [no]:
2 Enter
3 Enter
yes
to answer this question. The following question displays:
Configure Audit DB (y/n) [no]:
yes
to answer this question. The following question displays:
Jdbc URL [jdbc:postgresql://localhost/]:
4 Enter the URL of the server where PostgreSQL is running, then press Enter.
jdbc:postgresql://IP_address_of_database_server/
This is a standard JDBC* URL because this is a Java server that JDBC for the interface
database. The URL must be properly formed, with a slash and without a database name at the
end. We do not recommend using “localhost” as the URL.
The following prompt is displayed:
DB Admin Username:
5 Specify the PostgreSQL database administrator username, then press Enter.
This is the same username that was created when PostgreSQL was installed. In most instances,
the username is
postgres
.
The following prompt is displayed:
DB Admin Password:
Installation and Configuration 39
Page 40

6 Specify the PostgreSQL database administrator password, then press Enter.
The following prompt is displayed:
Retype password:
7 Retype the database administrator password to verify it, then press Enter. The following prompt
is displayed:
ZOS Audit Database Name [zos_db]:
8 Specify the name of the database you want to create for PlateSpin Orchestrate auditing, then
press Enter. The following prompt is displayed:
Audit DB Username:
9 Specify the name you want to use for the PostgreSQL database user that will be used by
PlateSpin Orchestrate for auditing (that is, a user with Read and Write privileges, not the
administrator), then press Enter. The following prompt is displayed:
Audit DB Password:
10 Specify the password you want to use for authentication by the designated PostgreSQL
database user, then press Enter. The following prompt is displayed:
Retype password:
11 Retype the password, then press Enter.
novdocx (en) 13 May 2009
After you retype the new audit database password, the configuration interview for the Orchestrate
Server continues normally.
2.2.5 Installing and Configuring the Orchestrate Server for Use with a Local PostgreSQL Audit Database
When you install PlateSpin Orchestrate, you can optionally point it to a relational database that you
can use to audit the work done by the product. There is no relational database management system
bundled with the product, but because PlateSpin Orchestrate is supported by default on SLES 10
SP1 and SP2, you can use a PostgreSQL database and configure it for use with PlateSpin
Orchestrate auditing. If you want to use some other database, you must configure it separately for
use with PlateSpin Orchestrate.
“Installing the PostgreSQL Package and Dependencies” on page 40
“Logging in Locally to the PostgreSQL Database” on page 41
“Installing and Configuring the Local PlateSpin Orchestrate Audit Database” on page 41
Installing the PostgreSQL Package and Dependencies
NOTE: We recommend that you install the PostgreSQL package on a SLES 10 SP2 server that is
different from the server where you install the PlateSpin Orchestrate Server. This ensures an
adequate amount of space for running the server as the database is used.
For more information, see Section 2.2.4, “Installing and Configuring the Orchestrate Server for Use
with a PostgreSQL Audit Database on a Different Host,” on page 35.
If your SLES 10 SP2 machine does not have the PostgreSQL package installed and running, use
YaST to search for
postgresql-server
, then install the package and its dependencies.
You can also run the following command from the bash prompt:
40 PlateSpin Orchestrate 2.0 Installation and Configuration Guide
Page 41

yast2 -i postgresql-server
When PostgreSQL is installed, you need to create the default database and start it. Use the following
commands:
su - postgres
initdb
pg_ctl start
These commands create or update the PostgreSQL privilege database and installs the prepared
tables. For more detail about what you will see when you run these commands, see “Detail” on
page 37.
novdocx (en) 13 May 2009
NOTE: You cannot run the
PostgreSQL (
su - postgres
pg_ctl
command as
root
. You must first change to the superuser for
). Failure to issue this command first results in the following
messages:
# pg_ctl start
pg_ctl: cannot be run as root
Please log in (using, e.g., "su") as the (unprivileged) user that will
own the server process.
Logging in Locally to the PostgreSQL Database
When you have installed the database, the next step is to check that you can connect to the database
on the database host. The default admin username is
postgres
. Use the following commands to set
up a password for the postgres user on the database host machine:
psql
NOTE: Remember the password. You need it to log in to the database later.
Running this command results in a screen like this:
Welcome to psql 8.1.11, the PostgreSQL interactive terminal.
Type: \copyright for distribution terms
\h for help with SQL commands
\? for help with psql commands
\g or terminate with semicolon to execute query
\q to quit
postgres=# alter user postgres password 'pass';
ALTER ROLE
postgres=#
Installing and Configuring the Local PlateSpin Orchestrate Audit Database
When you enable and configure PlateSpin Orchestrate auditing, you create a small custom database
and a simple schema that persists all of the PlateSpin Orchestrate jobs that have been run, along with
their parameters.The database also maintains the login or logout activity of the PlateSpin
Orchestrate users and resources.
Installation and Configuration 41
Page 42

The easiest way to configure the audit database is to do so when you configure the PlateSpin
Orchestrate Server. Use the following procedure to configure the database.
NOTE: The questions presented in the text-based config script are shown here, but the questions
presented in the graphical Configuration Wizard are similar.
1 After you have installed the PlateSpin Orchestrate packages you want, run the configuration
(either the config script or the graphical Configuration Wizard) until you see the following
question:
Enable Auditing (y/n) [no]:
2 Enter
3 Enter
4 Press Enter to accept the default (
yes
to answer this question. The following question displays:
Configure Audit DB (y/n) [no]:
yes
to answer this question. the following question displays:
Jdbc URL [jdbc:postgresql://localhost/]:
jdbc:postgresql://localhost/
) by pressing Enter.
This is a standard JDBC URL because this is a Java server that uses JDBC for the interface
database. The URL must be properly formed, with a slash and without a database name at the
end.
The following prompt is displayed:
DB Admin Username:
5 Specify the PostgreSQL database administrator username, then press Enter.
This is the same name that was specified when PostgreSQL was installed. In most instances,
the username is
postgres
.
The following prompt is displayed:
DB Admin Password:
6 Specify the PostgreSQL database administrator password, then press Enter.
The following prompt is displayed:
Retype password:
7 Retype the database administrator password to verify it, then press Enter. The following prompt
is displayed:
ZOS Audit Database Name [zos_db]:
8 Specify the name of the database you want to create for PlateSpin Orchestrate auditing, then
press Enter. The following prompt is displayed:
Audit DB Username:
9 Specify the name you want to use for the PostgreSQL database user that will be used by
PlateSpin Orchestrate for auditing (that is, a user with Read and Write privileges, not the
administrator), then press Enter. The following prompt is displayed:
Audit DB Password:
10 Specify the password you want to use for authentication by the designated PostgreSQL
database user, then press Enter. The following prompt is displayed:
Retype password:
11 Retype the password, then press Enter.
novdocx (en) 13 May 2009
42 PlateSpin Orchestrate 2.0 Installation and Configuration Guide
Page 43
After you retype the new audit database password, the configuration interview for the Orchestrate
Server continues normally.
2.2.6 Configuring the Audit Database After PlateSpin Orchestrate Is Configured
If you have already installed and configured PlateSpin Orchestrate, it is still possible to configure an
audit database.
novdocx (en) 13 May 2009
1 On the PlateSpin Orchestrate host machine, use your favorite editor to edit the script
novell/zenworks/zos/server/conf/audit_db_prep.sql
1a Replace the
zos_db
1b Replace the
zos
).
${DB_NAME}
).
${DB_USER}
variable with the PostgreSQL database name (for example,
variable with the PostgreSQL schema owner name (for example,
.
/opt/
2 Use the following commands to run the modified script as the PostgreSQL database
administrator:
su - postgres
psql -f audit_db_prep.sql
3 Use the following command to log into PostgreSQL, using the database name and schema
owner substituted in Step 1 above:
su - postgres
psql -d zos_db -U zos -f audit_db_def.sql
4 Confirm that the database username and password match the values used when creating the
schema owner database user in “Creating a PlateSpin Orchestrate User for the PostgreSQL
zos
Database” on page 39. In this example, the username is
and the password is
zos
.
5 Confirm that the database username and password match the values you replaced in the
variables of the
script. In this example, the username is
zos
and the password is
zos
.sql
6 Click Connect.
The Is Connected check box is selected: the Orchestrate Server is connected to the database so
that any queued data and subsequent job, user, and resource events are written there.
Installation and Configuration 43
.
Page 44

2.2.7 Configuring the Remote Audit Database after PlateSpin Orchestrate Is Configured
If you have already installed and configured PlateSpin Orchestrate, it is still possible to configure an
audit database.
novdocx (en) 13 May 2009
1 On the PlateSpin Orchestrate host machine, use your favorite editor to edit the script
novell/zenworks/zos/server/conf/audit_db_def.sql
1a Replace the
zos_db
1b Replace the
zos
).
${DB_NAME}
).
${DB_USER}
variable with the PostgreSQL database name (for example,
variable with the PostgreSQL schema owner name (for example,
.
/opt/
2 Use the following commands to run the modified script as the PostgreSQL database
administrator for the remote database:
su - postgres
psql -h <psql-server-addr> -d postgres -U postgres -f audit_db_prep.sql
3 Use the following command to log into PostgreSQL, using the database name and schema
owner substituted in Step 1 above:
su - postgres
psql -h <psql-server-addr> -d zos_db -U zos -f audit_db_def.sql
4 Confirm that the database username and password match the values used when creating the
schema owner database user in “Creating a PlateSpin Orchestrate User for the PostgreSQL
zos
Database” on page 39. In this example, the username is
and the password is
zos
.
5 Confirm that the database username and password match the values you replaced in the
variables of the
.sql
script. In this example, the username is
6 Click Connect.
The Is Connected check box is selected: the Orchestrate Server is connected to the database so
that any queued data and subsequent job, user, and resource events are written there.
2.2.8 Modifying Audit Database Tables to Accommodate Long Names
If your installation of PlateSpin Orchestrate uses Grid Object names that have an unusual number of
characters, the server might lose its connection with the audit database.
44 PlateSpin Orchestrate 2.0 Installation and Configuration Guide
zos
and the password is
zos
.
Page 45

If your Grid Objects are named with long names, you might have to configure some of the table
columns in the audit database with different sizes. Here are some things you need to know about the
database and how to make such changes:
The default length of some names is pre-defined in the audit database. For example, the
username
and the
resource name
size in the audit database both default to 30 characters in
allowable length.
The workflow id (
originWorkflowId, parentWorkflowId
) in the workflow table is
constructed by concatenating the name of the user who invoked the job + the name of the
deployed job + an instance number. The default size value is 100.
The job instance id (
jobinstanceid
) in the workflow table includes either the deployed name
of the job or a server component name that invoked the job. For example, when the Scheduler
invokes the job, then
Scheduler(cpuinfo)
Scheduler
.
is concatenated with the deployed job name. For example:
novdocx (en) 13 May 2009
The
The sql table definition is found at
name
column in the sessions table records both user and resource names.
<server>/conf/audit_db_def.sql
.
Use sql commands to change an existing table column. The following excerpts from the database
show some table columns that you might need to change:
CREATE TABLE actions (
targetobjectname VARCHAR(50) NOT NULL,
username VARCHAR(30) NOT NULL,
jobinstanceid VARCHAR(100)
CREATE TABLE workflow (
jobId VARCHAR(100) NOT NULL,
jobInstanceName VARCHAR(100) NOT NULL,
deployedJobName VARCHAR(30) NOT NULL,
originWorkflowId VARCHAR(100) NOT NULL,
parentWorkflowId VARCHAR(100),
username VARCHAR(30) NOT NULL,
CREATE TABLE sessions (
name VARCHAR(30) NOT NULL,
2.3 Installing the Orchestrate Agent Only
You might need to install the PlateSpin Orchestrate Agent on many different kinds of machines in
your data center.
Section 2.3.1, “Installing the Orchestrate Agent Using the Product ISO,” on page 46
Section 2.3.2, “Installing the Orchestrate Agent from the Administrator Information Page,” on
page 60
Section 2.3.3, “Performing a Silent Install of the PlateSpin Orchestrate Agent on Multiple
Network Resources,” on page 67
Installation and Configuration 45
Page 46

Section 2.3.4, “Installing the PlateSpin Orchestrate Agent on Other Supported Operating
Systems,” on page 68
Section 2.3.5, “Automatically Installing the Orchestrate Agent on a VM Host Using a Job,” on
page 72
NOTE: To automatically install the Orchestrate Agent on a VM that you created in the VM Client,
in the client, right-click a VM that has been shut down, then select Install Agent. This launches a job
that installs the Orchestrate Agent on the VM, regardless of its platform. The agent’s service is
started the next time you provision the VM. For more information, see “Installing the PlateSpin
Orchestrate Agent on a VM” in the PlateSpin Orchestrate 2.0 VM Client Guide and Reference.
2.3.1 Installing the Orchestrate Agent Using the Product ISO
If you want to independently install the Orchestrate Agent to a node in your grid, you can do so, but
the procedures for doing so vary depending on the platform where you are installing it.
“Using the ISO to Install the Orchestrate Agent on SLES 9.x and 10.x Machines” on page 46
“Using the ISO to Install the PlateSpin Orchestrate 2.0.2 Agent on SLED and SLES 11
Machines” on page 53
“Using the ISO to Install the Orchestrate Agent on Windows Machines” on page 60
novdocx (en) 13 May 2009
Using the ISO to Install the Orchestrate Agent on SLES 9.x and 10.x Machines
Use the following procedure if you want to use the Add-on CD method to install just the Orchestrate
Agent to a SLES machine.
NOTE: The Orchestrate Agent is supported on SLES 9 SP3, SLES 10 SP1, SLES 10 SP2, and
SUSE Linux Enterprise Desktop (SLED) 11 and SLES 11.
For more information about installing on SLED 11 or SLES 11, see “Using the ISO to Install the
PlateSpin Orchestrate 2.0.2 Agent on SLED and SLES 11 Machines” on page 53.
1 To verify that the device where you want to install the agent and client software fulfills the
necessary requirements, review Chapter 1, “Planning the Orchestrate Server Installation,” on
page 9.
2 Download the appropriate PlateSpin Orchestrate Server ISO (32-bit or 64-bit) to an accessible
network location.
3 (Optional) Create a DVD ISO (32-bit or 64-bit) that you can take with you to the machine
where you want to install it.
4 Install PlateSpin Orchestrate Agent software:
root
4a Log in to the target SLES server as
, then open YaST2.
4b In the YaST Control Center, click Software, then click Add-on Product to display the Add-
on Product Media dialog box.
46 PlateSpin Orchestrate 2.0 Installation and Configuration Guide
Page 47

4c In the Add-on Product Media dialog box, select the ISO media (Local Directory or DVD)
to install:
(Conditional) Select DVD, click Next, insert the DVD, then click Continue.
(Conditional) Select Local Directory, click Next, select the ISO Image check box,
browse to and select the ISO in the file system, then click OK.
4d Read and accept the license agreement, then click Next to display YaST2.
4e In YaST2, click the Filter drop-down menu, then select Patterns to display the install
patterns available on the PlateSpin Orchestrate ISO.
novdocx (en) 13 May 2009
4f Select the PlateSpin Orchestrate installation patterns that you want to install:
Orchestrate Agent: Runs applications on all managed nodes under the management
of the Orchestrate Server. An agent reports its status to the Orchestrate Server.
Includes packages to help you configure the Orchestrate Agent.
Virtual Machine Builder: Installs software on the individual nodes where
customers want the VMs to be created from the VM Client.
Monitoring Agent: This pattern installs the Ganglia Agent (gmond) on each
monitored node, which collects performance metrics and sends the data to the
Orchestrate Monitoring Server. This pattern includes packages that help you
configure the Monitoring Agent.
If you select the Orchestrate Agent pattern, the Monitoring Agent pattern is selected
by default. This is only a recommended dependence (most users install both
components together) and is not binding. The autoselection is made for your
convenience.
For more information about gmond, see “Understanding Resource Metrics Facts” in
the PlateSpin Orchestrate 2.0 Developer Guide and Reference.
Refer to the information in Appendix A, “PlateSpin Orchestrate Components: Install
Patterns,” on page 125 for details on the installation data that you need to know.
4g Click Accept to install the packages.
You must install PlateSpin Orchestrate components before you can configure them.
5 Configure the PlateSpin Orchestrate components that you have installed. You can use one of
two methods to gather information for the configuration:
The PlateSpin Orchestrate product configuration script. If you use this method, continue
with Step 6 on page 48.
The GUI Configuration Wizard. If you use this method, skip to Step 7 on page 49.
Installation and Configuration 47
Page 48

NOTE: The remaining steps in this procedure show the installation of the Orchestrate Agent as
an example of component installation. Steps for installing any of the other components are
similar. Refer to Section 2.2.2, “PlateSpin Orchestrate Configuration Information,” on page 30
for further information you might need to configure a component.
6 (Conditional) If you use the PlateSpin Orchestrate product configuration script, run it from the
command line.
6a Make sure the product ISO is accessible. The script copies some files from the ISO.
6b Make sure you are logged in as
root
to run the configuration script.
6c Run the script, as follows:
/opt/novell/zenworks/orch/bin/config
When the script runs, the following information is initially displayed:
Welcome to PlateSpin Orchestrate.
This program will configure PlateSpin Orchestrate 2.0
Select whether this is a new install or an upgrade
novdocx (en) 13 May 2009
i) install
u) upgrade
- - - - - -
Selection [install]:
6d Press Enter to select the default (install) and display the following text, depending on
which components you installed previously:
Select products to configure
# selected Item
1) no PlateSpin Orchestrate Monitoring Service (not installed)
2) no PlateSpin Orchestrate Server (not installed)
3) yes PlateSpin Orchestrate Agent
4) no PlateSpin Orchestrate VM Builder (not installed)
Select from the following:
1 - 4) toggle selection status
a) all
n) none
f) finished making selections
q) quit -- exit the program
Selection [finish]:
6e Type f and press Enter to finish the selection of the Orchestrate Agent (for this example,
only the Orchestrate Agent is installed).
6f Specify the name of the Orchestrate Agent on this node, then press Enter.
6g Specify the hostname or IP address of the Orchestrate Server, then press Enter.
6h Specify (yes or no) whether you want to use a certificate for verifying communication,
then press Enter.
6i Specify (yes or no) whether this is a virtual machine, then press Enter.
6j Specify the port on the Orchestrate Server that you want to use for communication
between this Agent and the Server, then press Enter.
48 PlateSpin Orchestrate 2.0 Installation and Configuration Guide
Page 49

6k (Optional) Specify a local bind address for the Agent, then press Enter.
6l Verify the configuration summary information, specify whether changes are needed, then
(when all changes are made) press Enter to begin the configuration.
7 (Conditional) If you use the GUI Configuration Wizard, run it as follows:
7a Make sure the product ISO is accessible. The script copies some files from the ISO.
root
7b Make sure you are logged in as
to run the configuration wizard.
7c Run the wizard:
/opt/novell/zenworks/orch/bin/guiconfig
When the script runs, the following information is initially displayed:
novdocx (en) 13 May 2009
IMPORTANT: If you have only a keyboard to navigate through the pages of the GUI
Configuration Wizard, use the Tab key to shift the focus to a control you want to use (for
example, a Next button), then press the spacebar to activate that control.
Default values are built into the script; most of these defaults are set to configure all of the
product patterns that were installed using the Add-on Product Media utility in SLES 9 and
in SLES 10.
7d Click Next to display the license agreement:
Installation and Configuration 49
Page 50
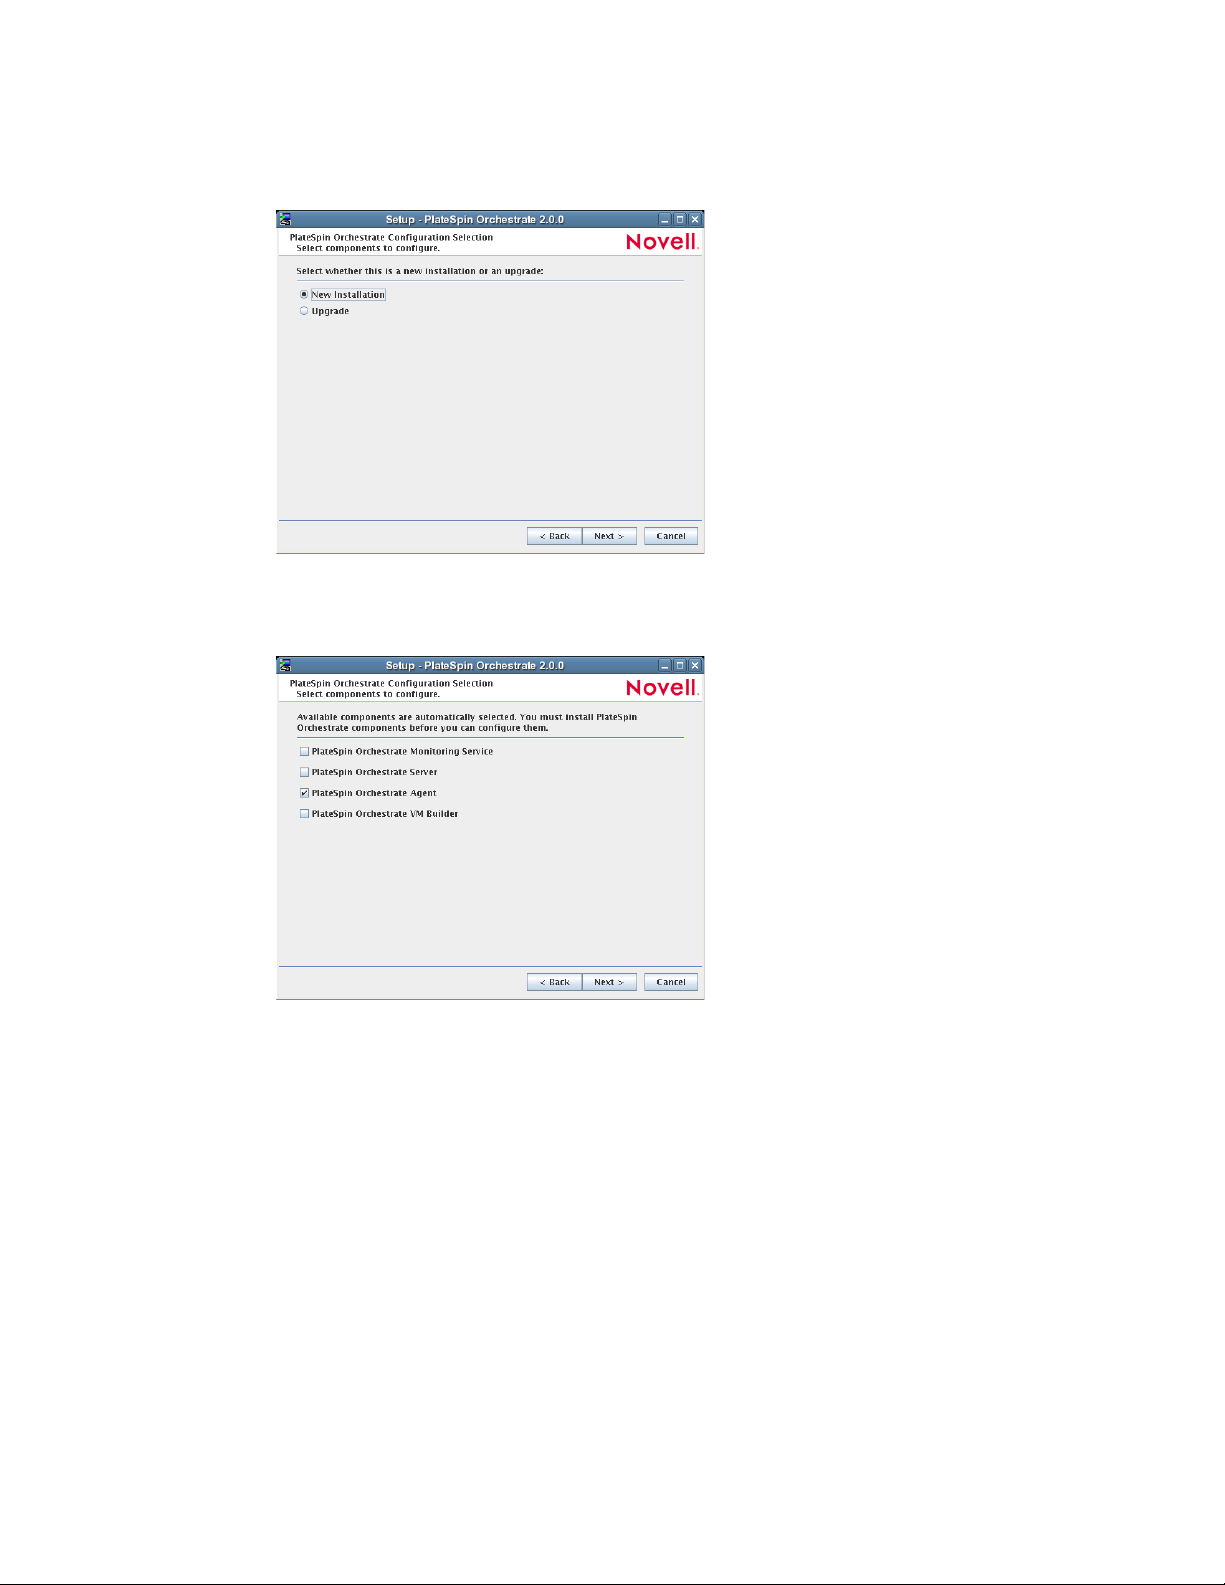
7e Select the option to accept the agreement, then click Next to open the installation type
page of the wizard:
7f Select New Installation, then click Next to display the Orchestrate Components page of the
wizard:
novdocx (en) 13 May 2009
50 PlateSpin Orchestrate 2.0 Installation and Configuration Guide
Page 51

7g Confirm that the Orchestrate Agent is selected for configuration, then click Next to display
the Orchestrate Agent Configuration page:
7h Check and if necessary change the name of the Orchestrate Agent and the Orchestrate
Server.
novdocx (en) 13 May 2009
If you select the Configure Advanced Settings check box in the wizard, you have the
option of changing the default values. If you leave the check box deselected, the setting is
configured with normal defaults. For information about the advanced settings see
Section 2.2.2, “PlateSpin Orchestrate Configuration Information,” on page 30.
7i Click Next to display the configuration wizard summary page:
IMPORTANT: Although this page of the wizard lets you navigate by using the Tab key
and the spacebar, you need to use the Ctrl+Tab combination to navigate past the summary
list. Click Back if you accidentally enter the summary list, and re-enter the page to
navigate to the control buttons.
By default, the Configure now check box on this page is selected. If you accept the default
of having it selected, the wizard starts the PlateSpin Orchestrate Agent and applies the
configuration settings. If you deselect the check box, the wizard writes out the
configuration file to
/etc/opt/novell/novell_zenworks_orch_install.conf
without starting PlateSpin Orchestrate or applying the configuration settings.
Installation and Configuration 51
Page 52
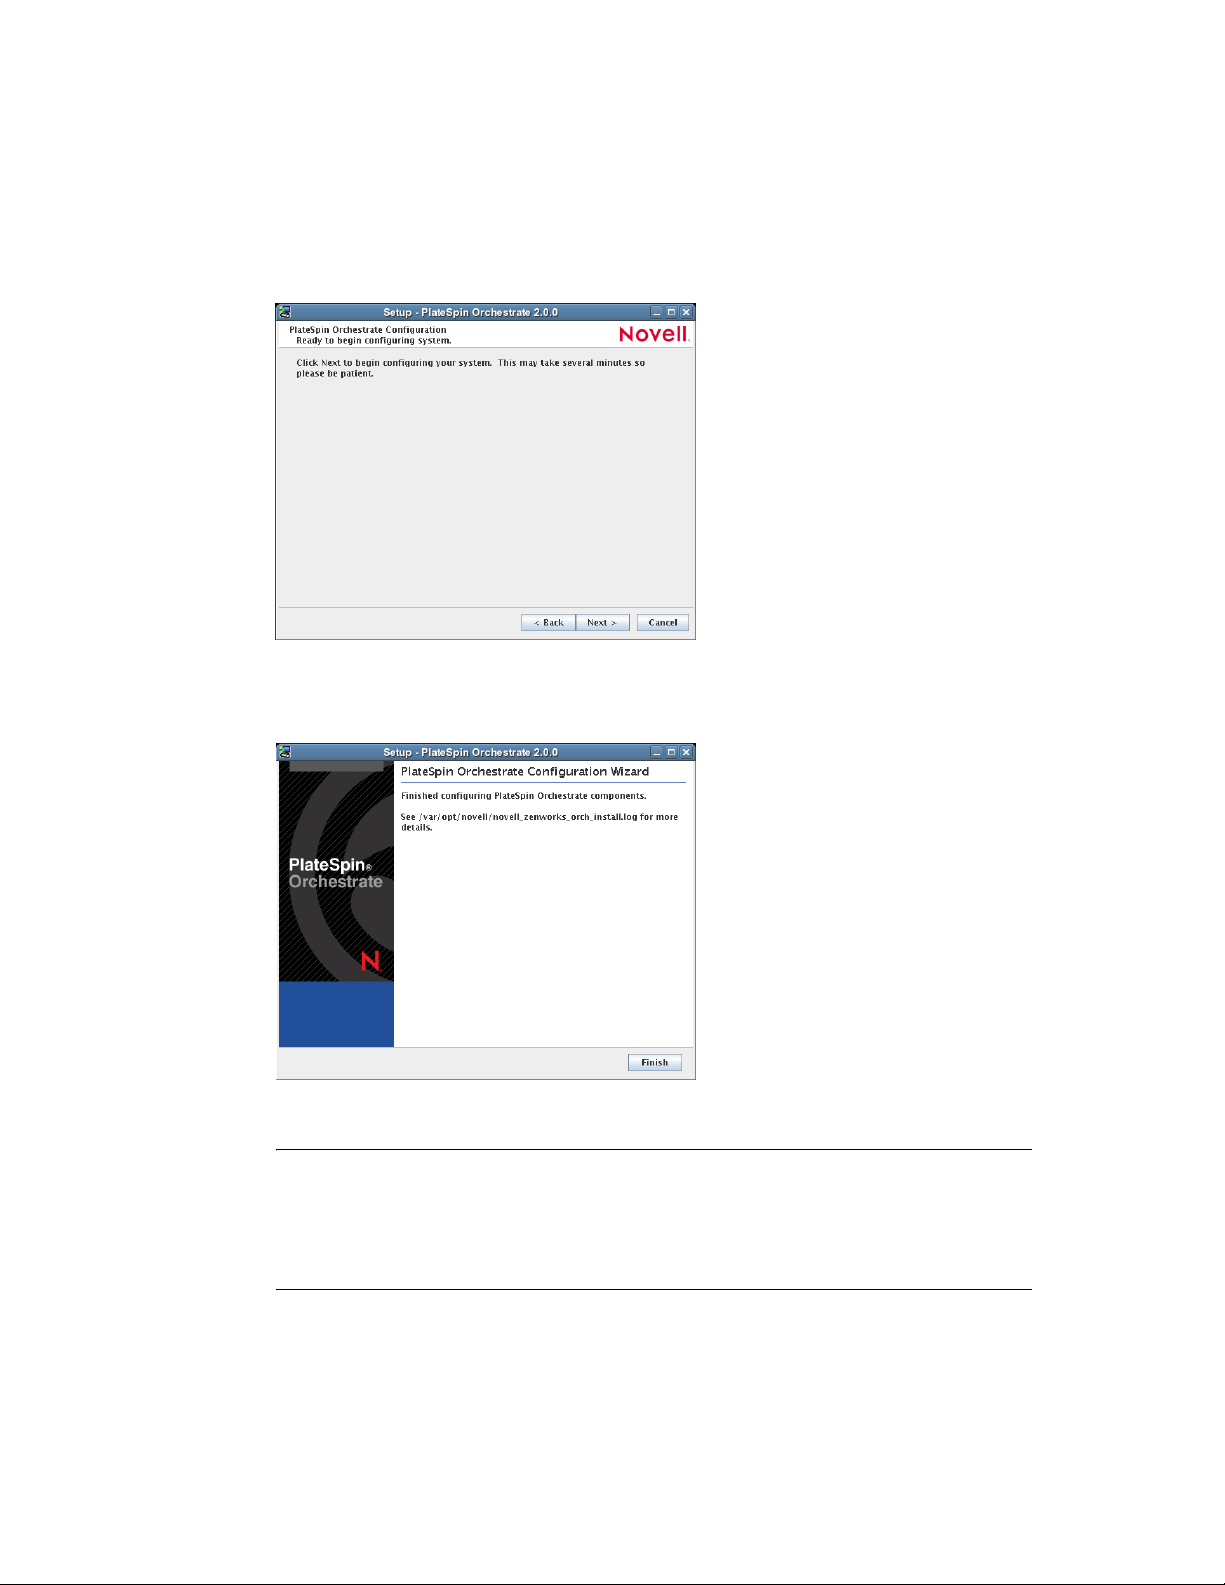
novdocx (en) 13 May 2009
You can use this
.conf
file to start the Orchestrate Agent and apply the settings either
manually or with an installation script. Use the following command to run the
configuration:
/opt/novell/zenworks/orch/bin/config -rs
7j Click Next to display the following wizard page.
7k Click Next to launch the configuration script. When the configuration is finished, the
following page is displayed:
7l Click Finish to close the configuration wizard.
IMPORTANT: When the installation and configuration are complete, you need to
register the resources to be managed by the PlateSpin Orchestrate system. Please refer to
Chapter 3, “First Use of Basic PlateSpin Orchestrate Components,” on page 99 for
detailed information about getting resources to manage in the PlateSpin Orchestrate
system.
8 (Optional) Increase the heap size that the JVM handles to enable the console to manage a large
number of objects.
8a Open the bash shell script at
/opt/novell/zenworks/zos/server/bin
8b Inside the script, find the following line where the JVM parameters are defined:
52 PlateSpin Orchestrate 2.0 Installation and Configuration Guide
.
Page 53

JVMARGS="-Xmx256m -Xms256m -Xmn64m -XX:NewSize=64m -XX:MaxNewSize=64m"
The
-Xmx
argument specifies the maximum heap size for the JVM. Increasing the heap
size prevents a JVM out of memory condition.
8c Change the value in the
-Xmx
argument from 256 MB to 512 MB.
Using the ISO to Install the PlateSpin Orchestrate 2.0.2 Agent on SLED and SLES 11
Machines
PlateSpin Orchestrate 2.0.2 provides a separate ISO designated for SUSE Linux Enterprise Desktop
SLED 11 and SLES 11 installations of the PlateSpin Orchestrate Agent and Client.
Installation on SLED/SLES 11 is supported for the PlateSpin Orchestrate Agent and PlateSpin
Orchestrate Clients only. Neither the PlateSpin Orchestrate Server nor the PlateSpin Orchestrate
Monitoring Server are supported on SLED/SLES 11
NOTE: The Orchestrate Agent is also supported on SLES 9 SP3, SLES 10 SP1, SLES 10 SP2. For
more information, see “Using the ISO to Install the Orchestrate Agent on SLES 9.x and 10.x
Machines” on page 46.
novdocx (en) 13 May 2009
Use the following procedure if you want to use the Add-on CD method to install just the PlateSpin
Orchestrate 2.0.2 Agent to a SLED 11 or SLES 11 machine.
1 To verify that the device where you want to install the agent and client software fulfills the
necessary requirements, review Chapter 1, “Planning the Orchestrate Server Installation,” on
page 9.
2 Download the appropriate PlateSpin Orchestrate Server SLES 11 ISO (32-bit or 64-bit) to an
accessible network location.
3 (Optional) Create a DVD ISO (32-bit or 64-bit) that you can take with you to the machine
where you want to install it.
4 Install PlateSpin Orchestrate Agent software:
root
4a Log in to the target SLES 11 server or SLED 11 desktop machine as
, then open
Ya ST 2 .
4b In the YaST Control Center, click Software, then click Add-on Product to display the Add-
on Product Media dialog box.
4c In the Add-on Product Media dialog box, select the ISO media (Local Directory or DVD)
to install:
(Conditional) Select DVD, click Next, insert the DVD, then click Continue.
(Conditional) Select Local Directory, click Next, select the ISO Image check box,
browse to and select the ISO in the file system, then click OK.
(Conditional) Select Local ISO image, click Next, enter the repository name of the
ISO image, browse to the location of the ISO image, then click Next.
4d Read and accept the license agreement, then click Next to display YaST2.
4e In YaST2, click the Filter drop-down menu, then select Patterns to display the install
patterns available on the PlateSpin Orchestrate ISO.
Installation and Configuration 53
Page 54

4f Select the PlateSpin Orchestrate installation patterns that you want to install:
Orchestrate Agent: Runs applications on all managed nodes under the management
of the Orchestrate Server. An agent reports its status to the Orchestrate Server.
Includes packages to help you configure the Orchestrate Agent.
Virtual Machine Builder: Installs software on the individual nodes where
customers want the VMs to be created from the VM Client.
Monitoring Agent: This pattern installs the Ganglia Agent (gmond) on each
monitored node, which collects performance metrics and sends the data to the
Orchestrate Monitoring Server. This pattern includes packages that help you
configure the Monitoring Agent.
If you select the Orchestrate Agent pattern, the Monitoring Agent pattern is selected
by default. This is only a recommended dependence (most users install both
components together) and is not binding. The autoselection is made for your
convenience.
For more information about gmond, see “Understanding Resource Metrics Facts” in
the PlateSpin Orchestrate 2.0 Developer Guide and Reference.
Refer to the information in Appendix A, “PlateSpin Orchestrate Components: Install
Patterns,” on page 125 for details on the installation data that you need to know.
novdocx (en) 13 May 2009
4g Click OK to install the patterns.
You must install PlateSpin Orchestrate components before you can configure them.
5 Configure the PlateSpin Orchestrate components that you have installed. You can use one of
two methods to gather information for the configuration:
The PlateSpin Orchestrate product configuration script. If you use this method, continue
with Step 6 on page 48.
The GUI Configuration Wizard. If you use this method, skip to Step 7 on page 49.
NOTE: The remaining steps in this procedure show the installation of the Orchestrate Agent as
an example of component installation. Steps for installing any of the other components are
similar. Refer to Section 2.2.2, “PlateSpin Orchestrate Configuration Information,” on page 30
for further information you might need to configure a component.
6 (Conditional) If you use the PlateSpin Orchestrate product configuration script, run it from the
command line.
6a Make sure the product ISO is accessible. The script copies some files from the ISO.
6b Make sure you are logged in as
root
to run the configuration script.
6c Run the script, as follows:
/opt/novell/zenworks/orch/bin/config
When the script runs, the following information is initially displayed:
Welcome to PlateSpin Orchestrate.
This program will configure PlateSpin Orchestrate 2.0
Select whether this is a new install or an upgrade
54 PlateSpin Orchestrate 2.0 Installation and Configuration Guide
Page 55

i) install
u) upgrade
- - - - - -
Selection [install]:
6d Press Enter to select the default (install) and display the following text, depending on
which components you installed previously:
Select products to configure
# selected Item
1) no PlateSpin Orchestrate Monitoring Service (not installed)
2) no PlateSpin Orchestrate Server (not installed)
3) yes PlateSpin Orchestrate Agent
4) no PlateSpin Orchestrate VM Builder (not installed)
Select from the following:
1 - 4) toggle selection status
a) all
n) none
f) finished making selections
q) quit -- exit the program
Selection [finish]:
6e Type f and press Enter to finish the selection of the Orchestrate Agent (for this example,
only the Orchestrate Agent is installed).
novdocx (en) 13 May 2009
6f Specify the name of the Orchestrate Agent on this node, then press Enter.
6g Specify the hostname or IP address of the Orchestrate Server, then press Enter.
6h Specify (yes or no) whether you want to use a certificate for verifying communication,
then press Enter.
6i Specify (yes or no) whether this is a virtual machine, then press Enter.
6j Specify the port on the Orchestrate Server that you want to use for communication
between this Agent and the Server, then press Enter.
6k (Optional) Specify a local bind address for the Agent, then press Enter.
6l Verify the configuration summary information, specify whether changes are needed, then
(when all changes are made) press Enter to begin the configuration.
7 (Conditional) If you use the GUI Configuration Wizard, run it as follows:
7a Make sure the product ISO is accessible. The script copies some files from the ISO.
7b Make sure you are logged in as
root
to run the configuration wizard.
7c Run the wizard:
/opt/novell/zenworks/orch/bin/guiconfig
Installation and Configuration 55
Page 56
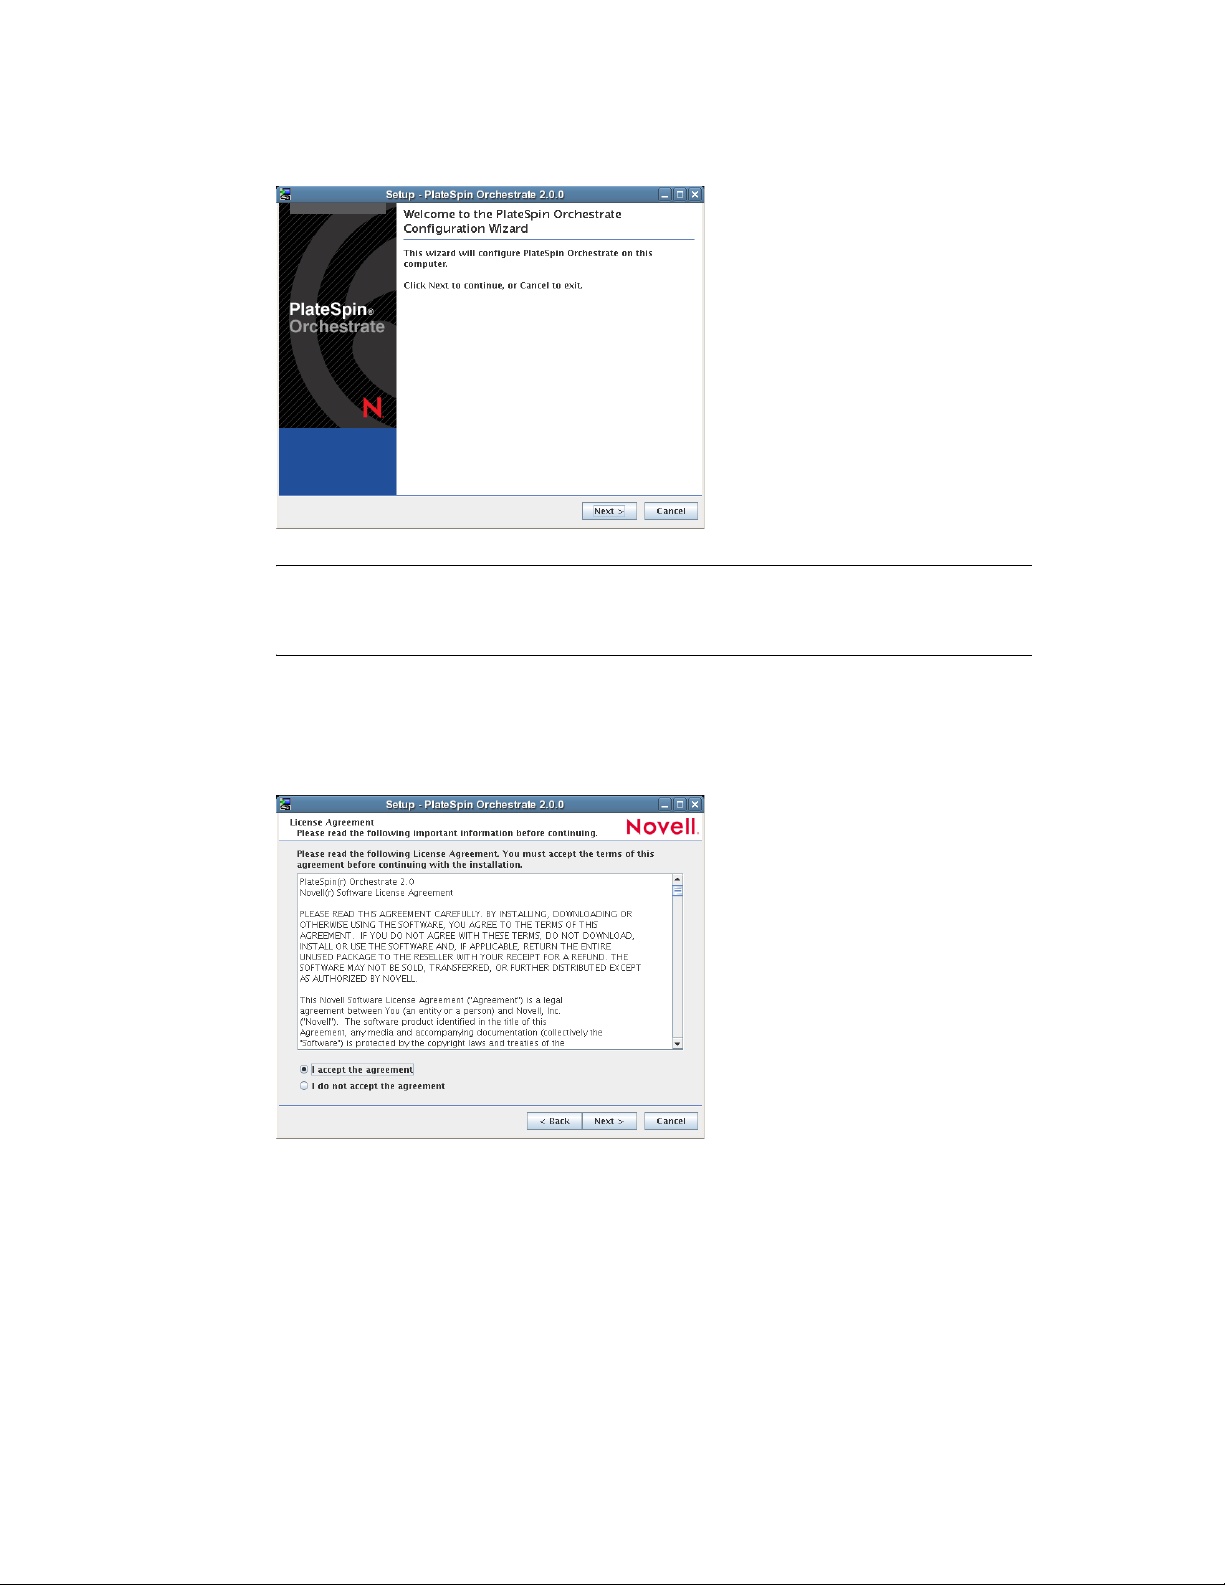
When the script runs, the following information is initially displayed:
IMPORTANT: If you have only a keyboard to navigate through the pages of the GUI
Configuration Wizard, use the Tab key to shift the focus to a control you want to use (for
example, a Next button), then press the spacebar to activate that control.
novdocx (en) 13 May 2009
Default values are built into the script; most of these defaults are set to configure all of the
product patterns that were installed using the Add-on Product Media utility in SLES 9 and
in SLES 10.
7d Click Next to display the license agreement:
56 PlateSpin Orchestrate 2.0 Installation and Configuration Guide
Page 57

7e Select the option to accept the agreement, then click Next to open the installation type
page of the wizard:
7f Select New Installation, then click Next to display the Orchestrate Components page of the
wizard:
novdocx (en) 13 May 2009
Installation and Configuration 57
Page 58
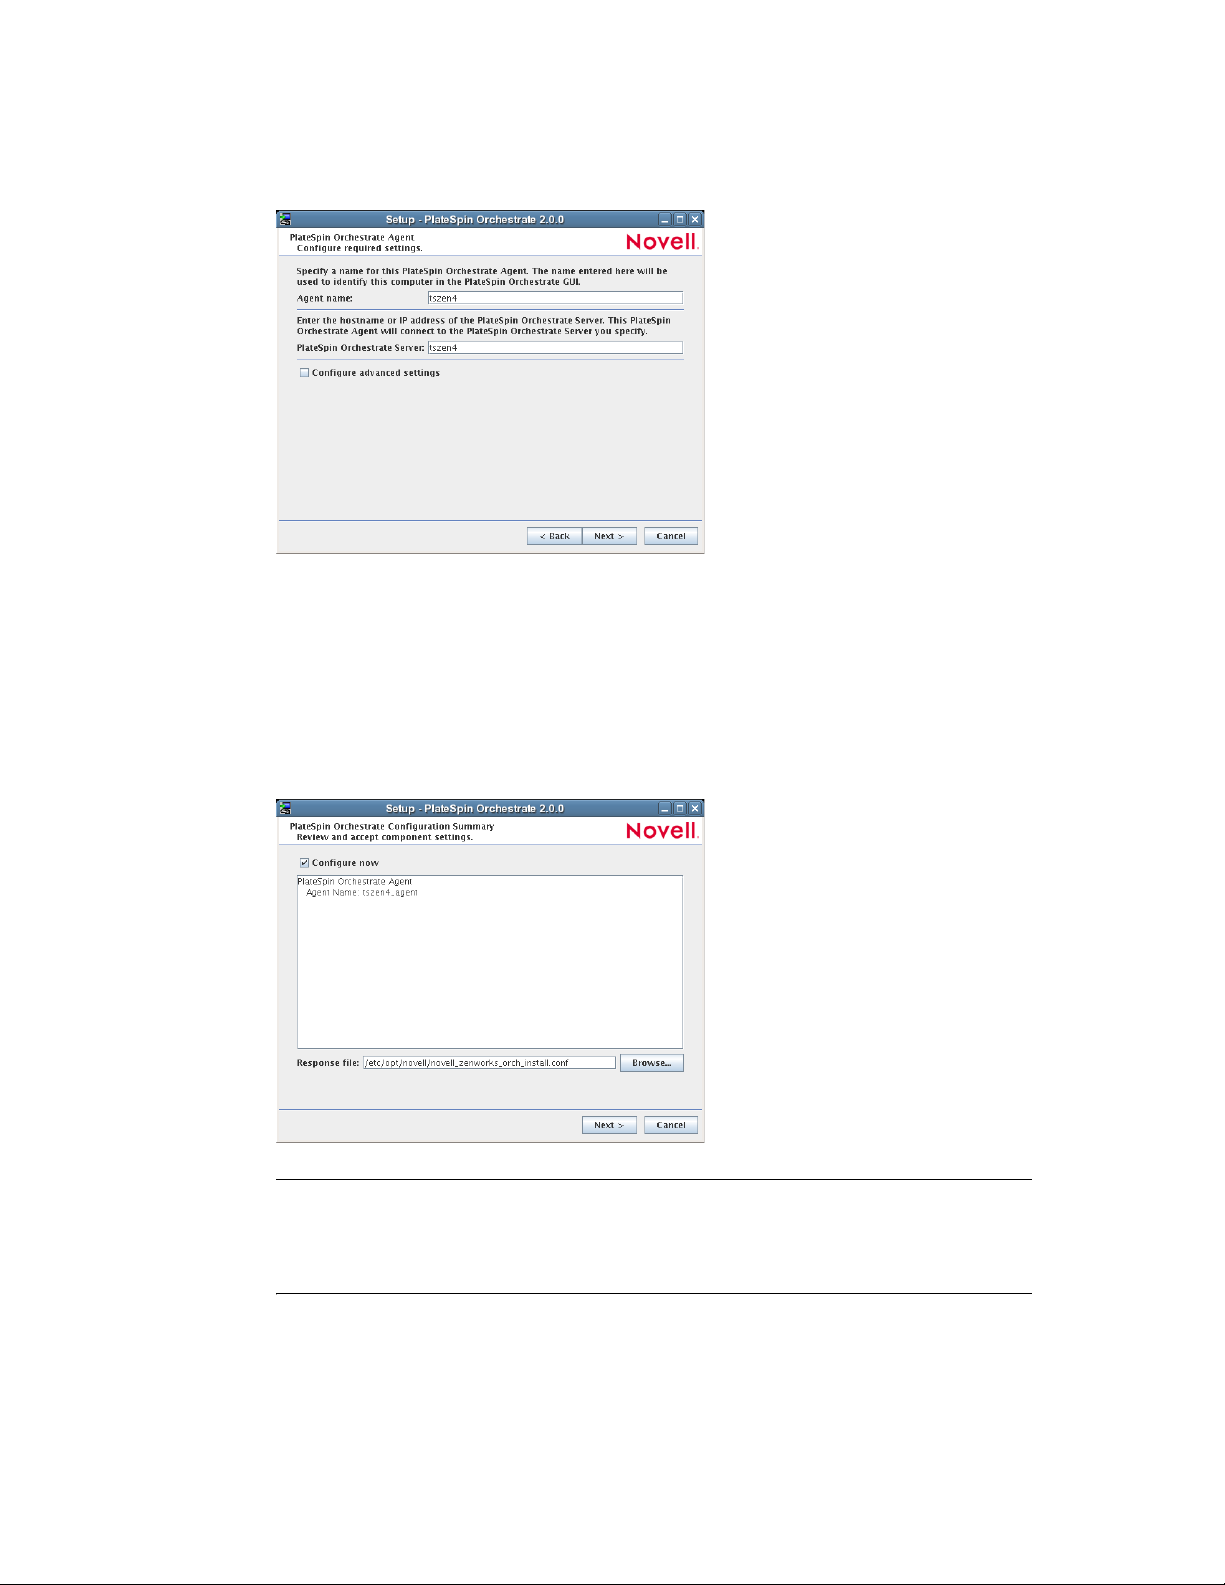
7g Confirm that the Orchestrate Agent is selected for configuration, then click Next to display
the Orchestrate Agent Configuration page:
7h Check and if necessary change the name of the Orchestrate Agent and the Orchestrate
Server.
novdocx (en) 13 May 2009
If you select the Configure Advanced Settings check box in the wizard, you have the
option of changing the default values. If you leave the check box deselected, the setting is
configured with normal defaults. For information about the advanced settings see
Section 2.2.2, “PlateSpin Orchestrate Configuration Information,” on page 30.
7i Click Next to display the configuration wizard summary page:
IMPORTANT: Although this page of the wizard lets you navigate by using the Tab key
and the spacebar, you need to use the Ctrl+Tab combination to navigate past the summary
list. Click Back if you accidentally enter the summary list, and re-enter the page to
navigate to the control buttons.
By default, the Configure now check box on this page is selected. If you accept the default
of having it selected, the wizard starts the PlateSpin Orchestrate Agent and applies the
configuration settings. If you deselect the check box, the wizard writes out the
configuration file to
/etc/opt/novell/novell_zenworks_orch_install.conf
without starting PlateSpin Orchestrate or applying the configuration settings.
58 PlateSpin Orchestrate 2.0 Installation and Configuration Guide
Page 59

novdocx (en) 13 May 2009
You can use this
.conf
file to start the Orchestrate Agent and apply the settings either
manually or with an installation script. Use the following command to run the
configuration:
/opt/novell/zenworks/orch/bin/config -rs
7j Click Next to display the following wizard page.
7k Click Next to launch the configuration script. When the configuration is finished, the
following page is displayed:
7l Click Finish to close the configuration wizard.
IMPORTANT: When the installation and configuration are complete, you need to
register the resources to be managed by the PlateSpin Orchestrate system. Please refer to
Chapter 3, “First Use of Basic PlateSpin Orchestrate Components,” on page 99 for
detailed information about getting resources to manage in the PlateSpin Orchestrate
system.
8 (Optional) Increase the heap size that the JVM handles to enable the console to manage a large
number of objects.
8a Open the bash shell script at
/opt/novell/zenworks/zos/server/bin
.
8b Inside the script, find the following line where the JVM parameters are defined:
Installation and Configuration 59
Page 60

JVMARGS="-Xmx256m -Xms256m -Xmn64m -XX:NewSize=64m -XX:MaxNewSize=64m"
The
-Xmx
argument specifies the maximum heap size for the JVM. Increasing the heap
size prevents a JVM out of memory condition.
8c Change the value in the
-Xmx
argument from 256 MB to 512 MB.
Using the ISO to Install the Orchestrate Agent on Windows Machines
The PlateSpin Orchestrate Agent is supported on Windows Server 2003 and Windows Server 2008,
but not on Windows Vista, Windows XP, Windows 2000, or earlier releases (Windows ME,
Windows 95, etc.). Use the following steps to download the PlateSpin Orchestrate component you
want to install:
1 To verify that the device where you want to install the agent and client software fulfills the
necessary requirements, review Chapter 1, “Planning the Orchestrate Server Installation,” on
page 9.
2 Download the appropriate PlateSpin Orchestrate Server ISO (32-bit or 64-bit) to an accessible
network location.
3 Create a DVD from the ISO or use a tool that will mount the ISO.
novdocx (en) 13 May 2009
4 Navigate to the directory path where the Windows packages reside.
.exe
5 Double-click the appropriate file (
) to launch an installation and configuration wizard. See
“Installing and Registering the SLES PlateSpin Orchestrate Agent from the Administrator
Information page.” on page 61 in Installing the Orchestrate Agent from the Administrator
Information Page for information about this wizard.
2.3.2 Installing the Orchestrate Agent from the Administrator Information Page
After you install the server for PlateSpin Orchestrate on the network, you can launch the PlateSpin
Orchestrate Administrator Information page. The page has links to various installer programs that
you can use to install required PlateSpin Orchestrate software on the computing resources that you
will be utilizing in the grid system.
The following browsers support the PlateSpin Orchestrate Server Portal and PlateSpin Orchestrate
Administrator’s Web page applications:
Internet Explorer*, version 6.0 or higher
Netscape* Navigator*, version 6.0 or higher
Mozilla*, version 1.5 or higher
Mozilla Firefox*
Using a supported browser, enter the following URL to access the Administrator Information page
for PlateSpin Orchestrate from the server:
http://server_name_for_PlateSpin_Orchestrate:8001/
60 PlateSpin Orchestrate 2.0 Installation and Configuration Guide
Page 61

This URL is the DNS name (or IP address) of the server for PlateSpin Orchestrate. Be sure to use
Port 8001 in the address to access and display the page, as shown in the following illustration:
novdocx (en) 13 May 2009
The page includes links to information for PlateSpin Orchestrate administrators, including product
documentation and the installers for the PlateSpin Orchestrate Development Client and the
PlateSpin Orchestrate Agent.
This section includes the following information about installing the Orchestrate Agent from the
Administrator Information page:
“Installing and Registering the SLES PlateSpin Orchestrate Agent from the Administrator
Information page.” on page 61
“Installing and Registering the Windows PlateSpin Orchestrate Agent from the Administrator
Information Page” on page 63
“Installing and Registering the PlateSpin Orchestrate Agent on an ESX Machine from the
Administrator Information Page” on page 66
Installing and Registering the SLES PlateSpin Orchestrate Agent from the
Administrator Information page.
PlateSpin Orchestrate requires computing resources in order to run applications. The PlateSpin
Orchestrate Agent must be installed on each managed device to add that computing resource to the
grid where the Orchestrate Server can manage it.
Use the following steps to install the agent on a SLES 9 SP3, SLES 10 SP1, SLES 10 SP2, RHEL 4
or RHEL 5 computing resource:
1 From the managed resource desktop, launch a browser to access the Web page for PlateSpin
Orchestrate, as described above.
2 Scroll to the Installation section of the page:
Installation and Configuration 61
Page 62
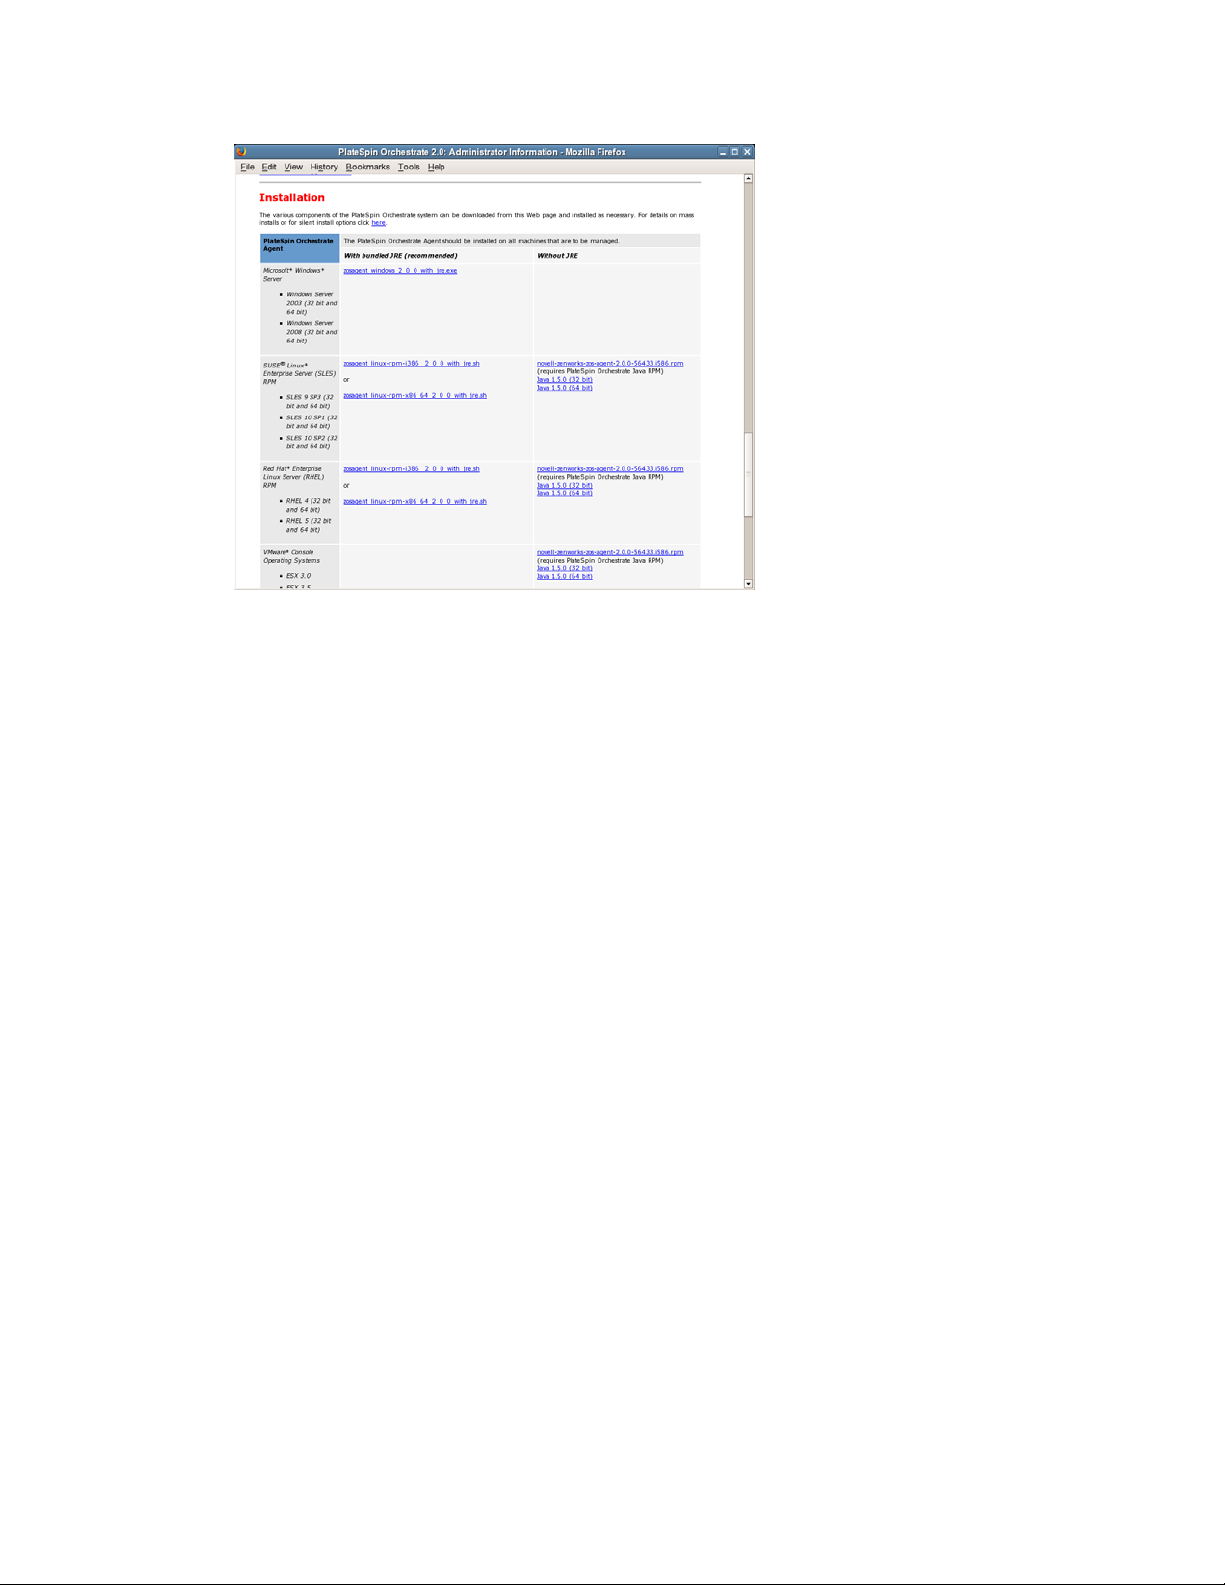
novdocx (en) 13 May 2009
3 In the agent section of the PlateSpin Orchestrate Web page, identify the installer link for the
operating system of the SLES Machine where you want to install the Orchestrate Agent.
4 Click the installer link to download the agent installer and the appropriate JRE (32-bit or 64-
bit) to the SLES machine.
Although your SLES machine might have the JRE installed, we recommend that you install it
again to make sure it is present.
5 In the PlateSpin Orchestrate Agent section, download:
novell-zenworks-zos-agent-2.0.2-57039.i586.rpm
The Java 1.5.0 (32-bit) or Java 1.5.0 (64-bit) RPM
6 Install the Java 1.5.0 RPM by entering the one of the following commands (as applicable):
rpm -ivh novell-zenworks-zos-java-1.5.0_sun_update17-0.x86_64.rpm
or
rpm -ivh novell-zenworks-zos-java-1.5.0_sun_update17-0.i586.rpm
7 Install the Orchestrate Agent by entering the following command:
rpm -ivh novell-zenworks-zos-agent-2.0.2-57039.i586.rpm
8 Edit
/opt/novell/zenworks/zos/agent/agent.properties
zos.agent.server
to the IP address of the PlateSpin Orchestrate Server where you want to
to set the value of
register the agent.
9 Start the agent by entering the following command:
/etc/init.d/novell-zosagent start
10 Register the agent to the PlateSpin Orchestrate Development Client. For more information on
how to register the agent, see Section 3.3, “Walkthrough: Creating a Resource Account,” on
page 103.
Agents can be automatically installed on multiple computing resources or groups of computing
resources by using your favorite configuration management software.
62 PlateSpin Orchestrate 2.0 Installation and Configuration Guide
Page 63
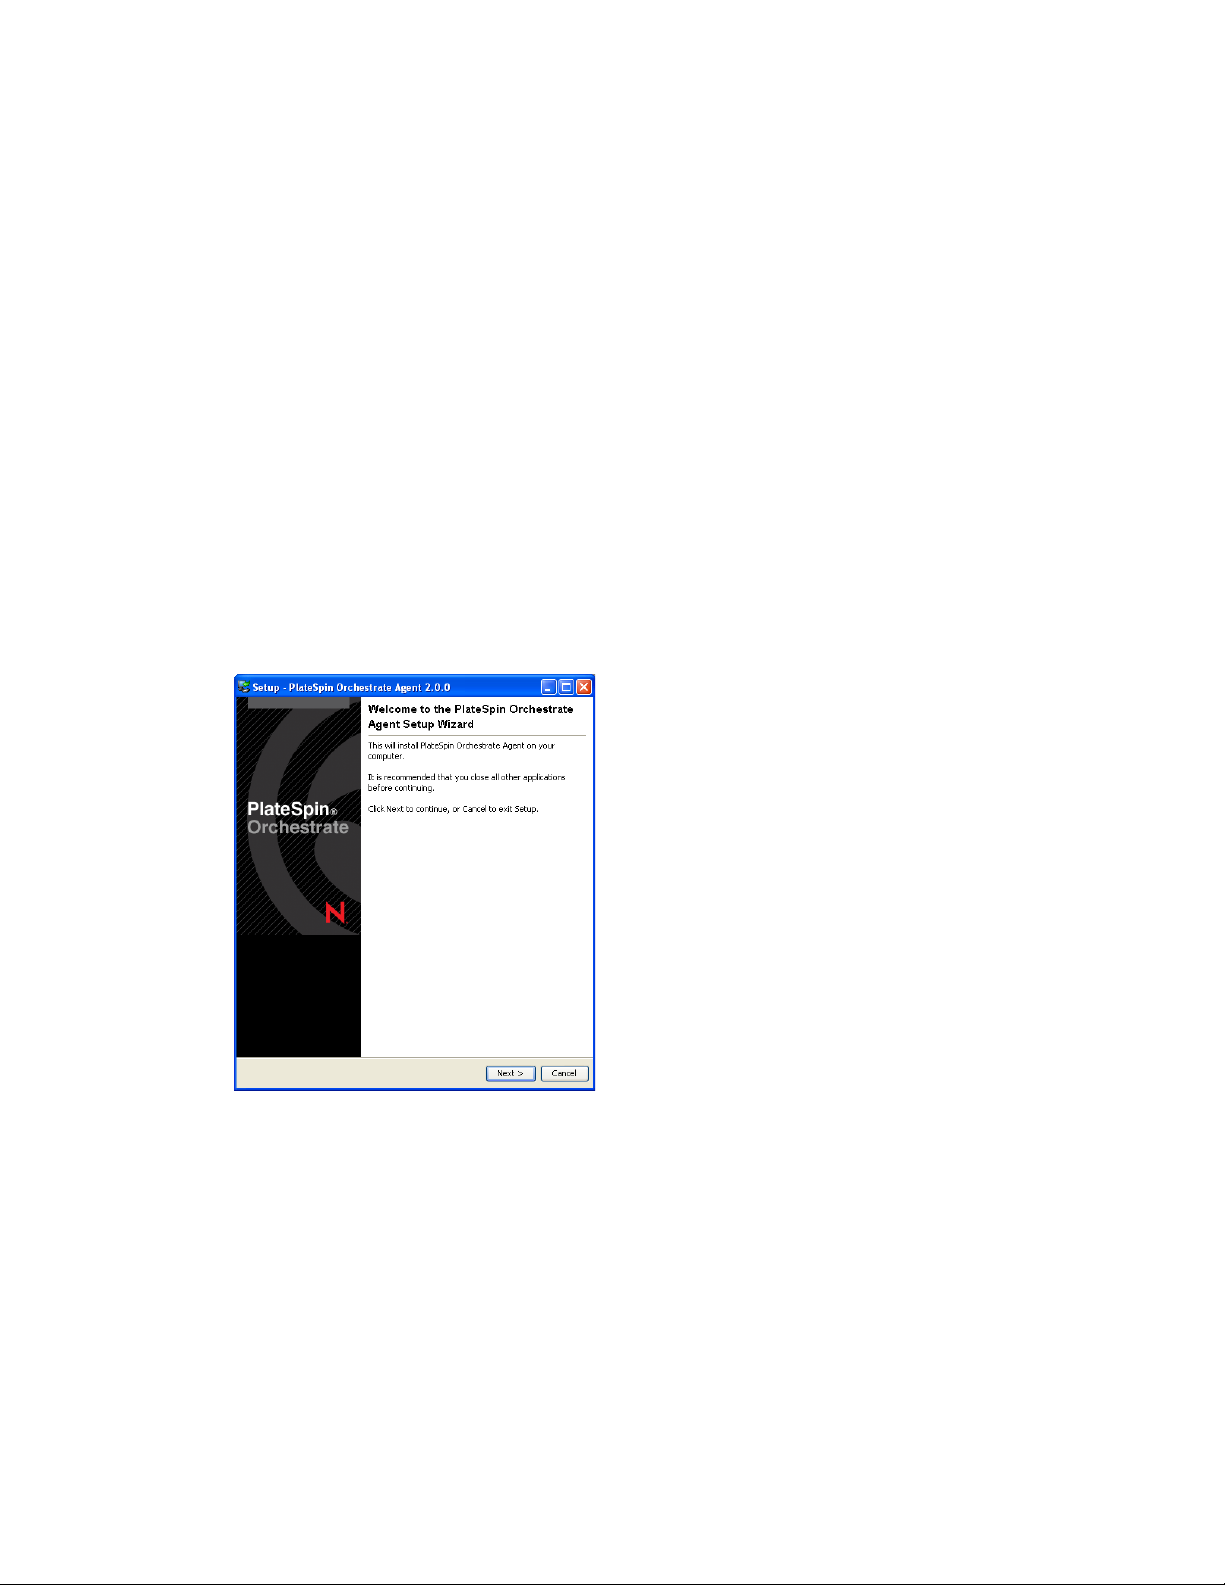
Installing and Registering the Windows PlateSpin Orchestrate Agent from the
Administrator Information Page
This section includes the following information about installing the Orchestrate Agent for Windows
from the Administrator Information page:
1 On the computer where the PlateSpin Orchestrate Agent for Windows is to be installed, launch
the PlateSpin Orchestrate Administrator Information page, as shown above.
2 Scroll to the Installation section of the page:
3 In the agents section of the Web page, identify the
zosagent_windows_2_0_2_with_jre.exe
installer link.
4 Click the installer link to initiate the download of the Orchestrate Agent on the Windows
computer.
5 At a Windows XP or Windows Vista location where you downloaded the client installer, double
click the
zosagent_windows_2_0_2_with_jre.exe
icon to run the installer.
When you launch the installer on Windows XP or Windows Vista, a Security Warning for an
Unknown Publisher is displayed. You can ignore this warning and run the installer without a
problem.
The first page of the Orchestrate Agent Setup Wizard is displayed.
novdocx (en) 13 May 2009
Installation and Configuration 63
Page 64
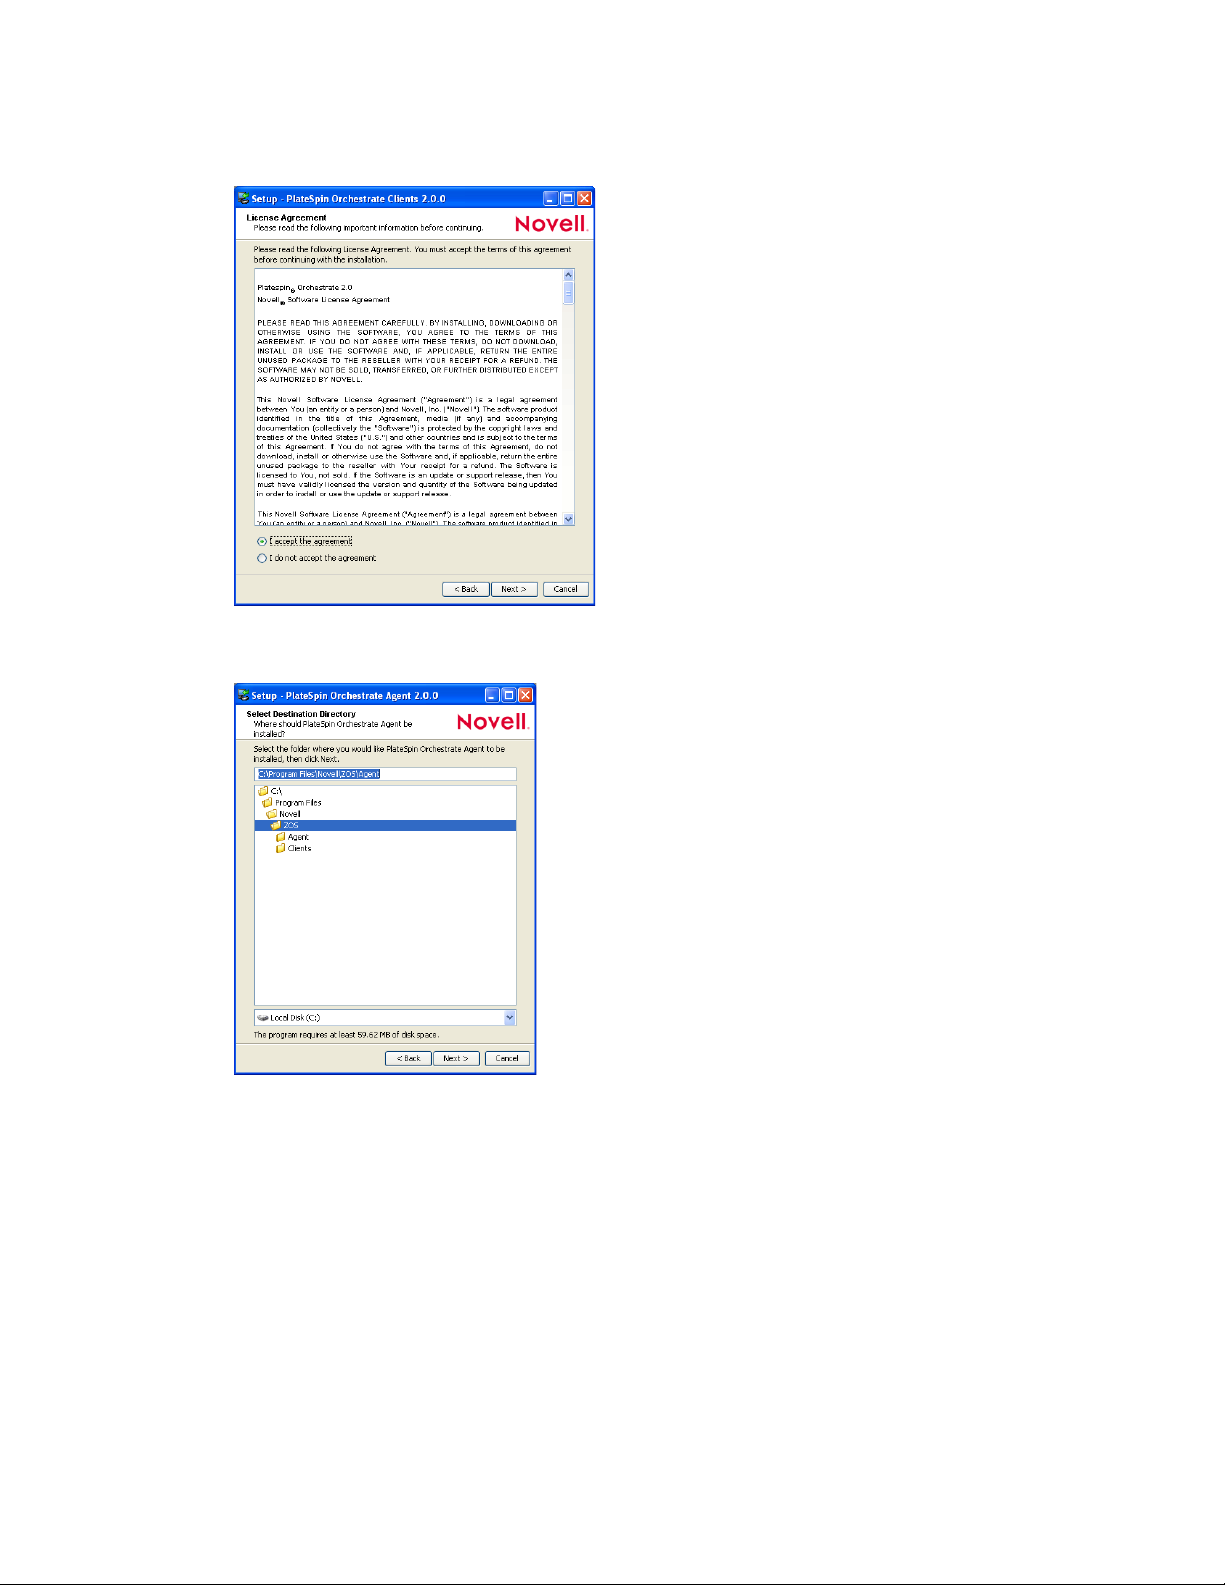
6 Click Next to display the License Agreement page.
novdocx (en) 13 May 2009
7 Accept the license agreement, then click Next to display the Select Destination Directory page.
8 Accept the default location, then click Next to display the Select Start Menu Folder page of the
Setup Wizard.
64 PlateSpin Orchestrate 2.0 Installation and Configuration Guide
Page 65

9 Enter the path to the folder where you want the Wizard to set up shortcuts to the Agent or select
Next to accept the default and to display the Windows Services page.
10 Select the services you want to install (at a minimum, you must select Install Service PlateSpin
Orchestrate Agent), then click Next to display the Identify PlateSpin Orchestrate Server page.
novdocx (en) 13 May 2009
11 Enter the PlateSpin_Orchestrate_Server_name in the PlateSpin Orchestrate Server field.
You might find it easier to click Discover so that the installer searches for and finds the
Orchestrate Server on the network.
Installation and Configuration 65
Page 66
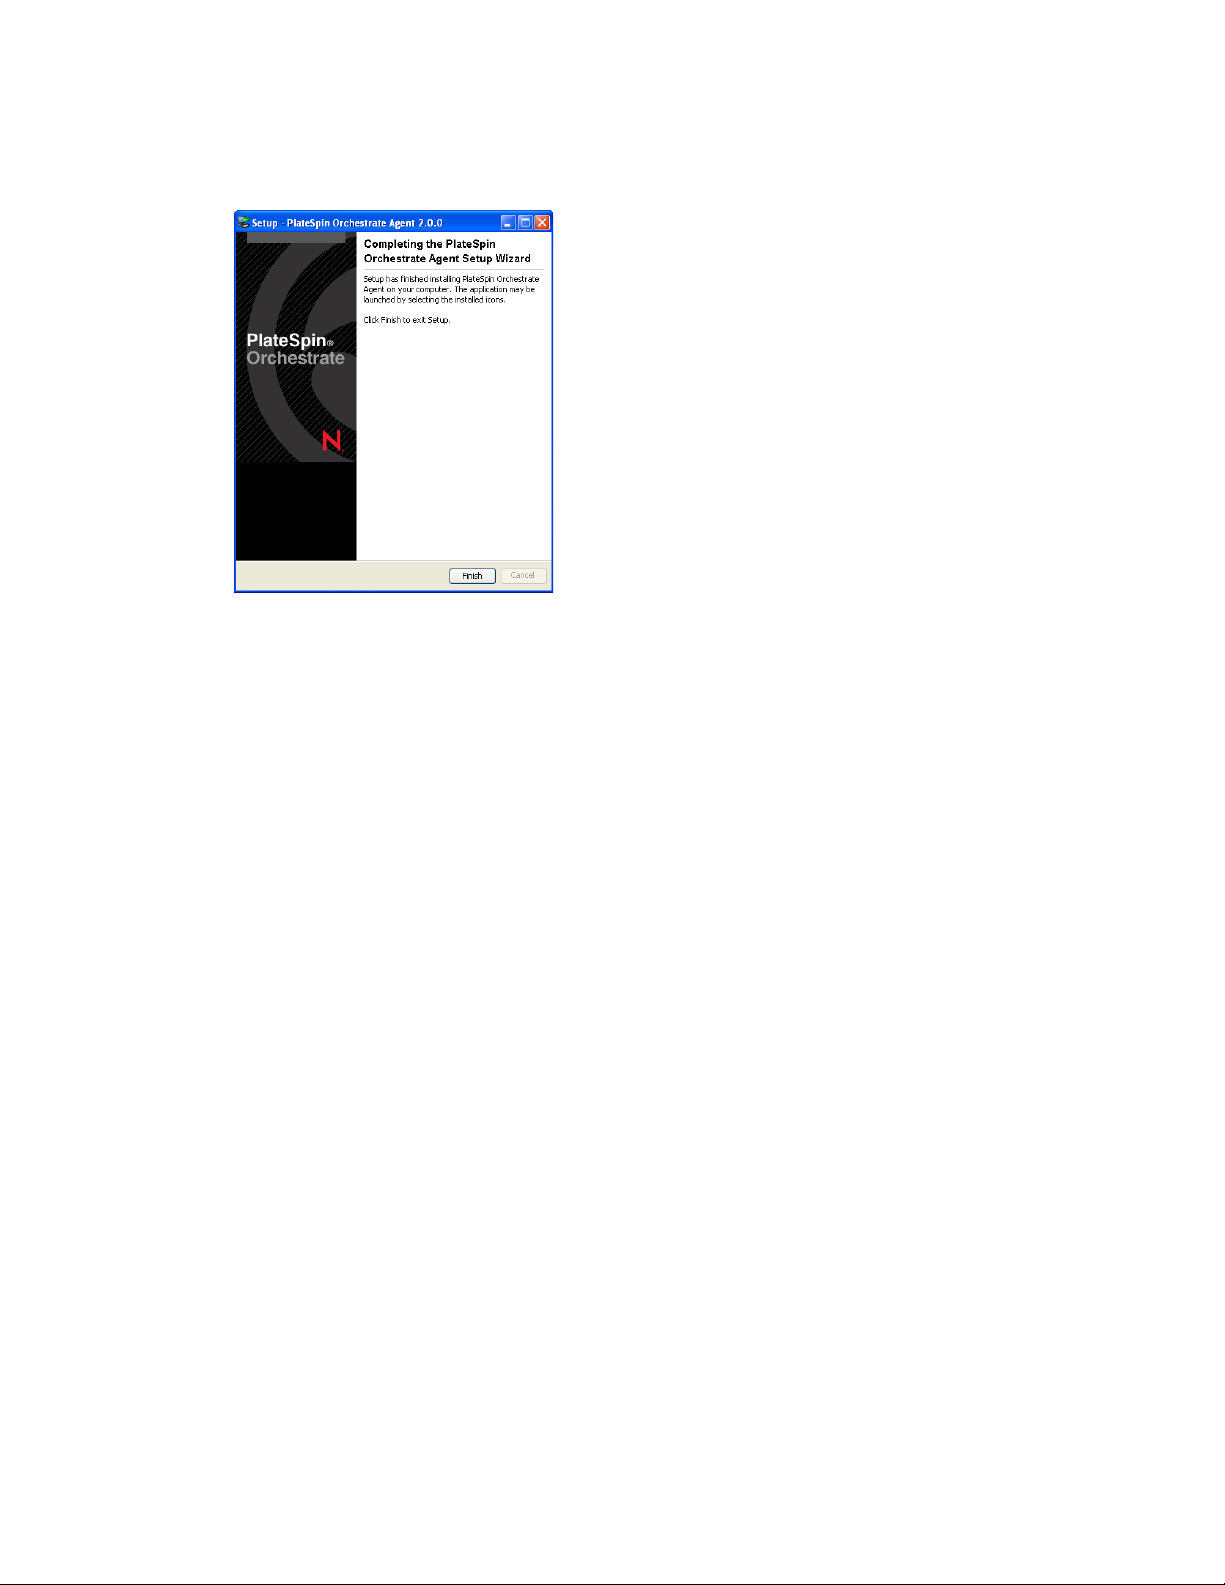
12 Accept the remaining defaults in the setup wizard pages to run the Orchestrate Agent
installation until the following page is displayed:
novdocx (en) 13 May 2009
13 Click Finish to exit the setup.
14 Register the agent to the PlateSpin Orchestrate Development Client. For more information on
how to register the agent, see Section 3.3, “Walkthrough: Creating a Resource Account,” on
page 103.
Installing and Registering the PlateSpin Orchestrate Agent on an ESX Machine from
the Administrator Information Page
1 From the Administrator Information Web page for PlateSpin Orchestrate, download the
following:
novell-zenworks-zos-agent-2.0.2.rpm
The Java 1.5.0 (32-bit) or Java 1.5.0 (64-bit) RPM, depending upon the ESX processor on
which you want to install the Orchestrate Agent.
For more information on how to access the Administrator Information Web page, see
Section 2.3.2, “Installing the Orchestrate Agent from the Administrator Information Page,” on
page 60.
2 Copy the downloaded
novell-zenworks-zos-agent-2.0.2.rpm
and the appropriate Java
1.5.0 RPM to the ESX machine on which you want to install the Orchestrate Agent.
3 Install the Java 1.5.0 RPM by entering the following command:
rpm -ivh novell-zenworks-zos-java-1.5.0.rpm
4 Install the Orchestrate Agent by entering the following command:
rpm -ivh novell-zenworks-zos-agent-2.0.2rpm
5 Edit
/opt/novell/zenworks/zos/agent/agent.properties
zos.agent.server
to the IP address of the PlateSpin Orchestrate Server to which you want to
to set the value of
register the agent.
6 At the Linux bash prompt, enter the following command to open TCP port 8100:
esxcfg-firewall -o 8100,tcp,out,port_name
7 Enter the following command to open TCP port 8101:
66 PlateSpin Orchestrate 2.0 Installation and Configuration Guide
Page 67

esxcfg-firewall -o 8101,tcp,out,port_name
8 Start the agent by entering the following command:
/etc/init.d/novell-zosagent start
9 Register the agent to the PlateSpin Orchestrate Development Client. For more information on
how to register the agent, see Section 3.3, “Walkthrough: Creating a Resource Account,” on
page 103.
2.3.3 Performing a Silent Install of the PlateSpin Orchestrate Agent on Multiple Network Resources
In a large data center, it might not be practical to perform an interactive configuration of the
Orchestrate Agent on the multiple servers that you intend to use for PlateSpin Orchestrate resources.
The information in this section provides information about performing a silent install and
configuration.
“Silent Install and Configuration of the Orchestrate Agent RPM” on page 67
“Silent Install and Configuration of the Orchestrate Agent for Windows” on page 68
novdocx (en) 13 May 2009
Silent Install and Configuration of the Orchestrate Agent RPM
Use the following process to configure the Orchestrate Agent RPM (downloaded from the product
ISO) on multiple servers:
1 Perform the product installation and manual configuration of the agent on a “seed” machine.
The processes to do this are described in Section 2.2.1, “Installation and Configuration Steps,”
on page 22.
2 On the “seed” machine, copy the file found at
novell_zenworks_orch_install.conf
3 Edit the local copy of
novell_zenworks_orch_install.conf
/etc/opt/novell/
to a location where you can modify it locally.
, updating the fields that
require a password (for security purposes, when a configuration program runs, the passwords in
conf
the .
file are deleted).
4 Edit any other fields as necessary for the configuration of the Orchestrate Agent.
5 Distribute the modified file to the machines where you want to perform a silent configuration.
6 At the machine where you distributed the
.conf
file, open YaST and perform the Add-on
Installation of the RPMs as described in Step 1 through Step 4 in Section 2.2, “Installing and
Configuring All PlateSpin Orchestrate Components Together,” on page 21. Make sure that you
do not configure the agent manually.
7 From the bash prompt on the machine where you are configuring the agent, run the following
command:
/opt/novell/zenworks/orch/bin/config -s -C $CONF_FILE
where CONF_FILE is the modified configuration file from Step 5.
The silent configuration runs, then the agent is displayed in the PlateSpin Orchestrate Console as
registered with the server node.
Installation and Configuration 67
Page 68
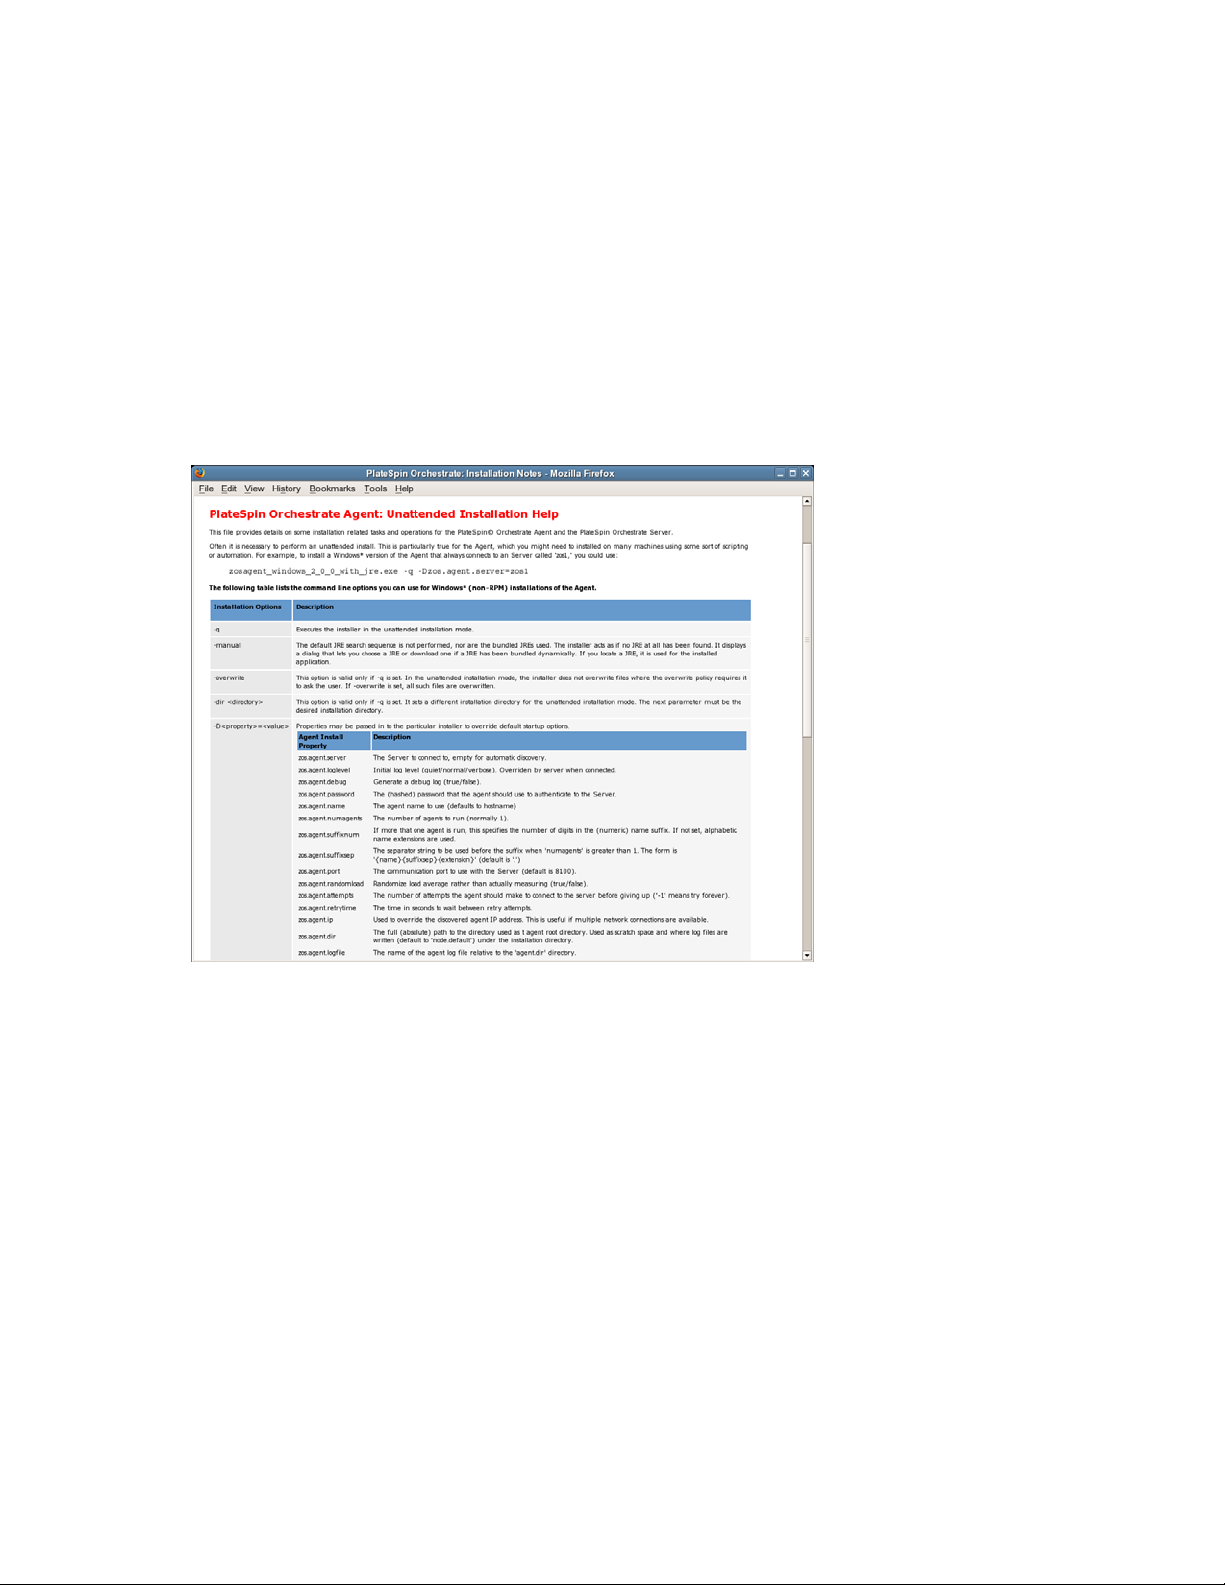
Silent Install and Configuration of the Orchestrate Agent for Windows
The Windows Agent installer can be downloaded from the Administrator Information page, as
documented in Section 2.3.2, “Installing the Orchestrate Agent from the Administrator Information
Page,” on page 60.
PlateSpin Orchestrate includes an installation help page that provides tips for installing the Windows
Orchestrate Agent on many machines by using some sort of scripting or automation.
The page is accessed from the Orchestrate Server IP address:
http://IP_address:8001/install.html
Figure 2-1 PlateSpin Orchestrate Agent Silent Installation Help
novdocx (en) 13 May 2009
2.3.4 Installing the PlateSpin Orchestrate Agent on Other Supported Operating Systems
When you have the Orchestrate Server installed and have also installed the VM Client, you can
install the PlateSpin Orchestrate Agent on a machine (virtual or physical) that is running a supported
operating system in order to manage that machine in the VM Client.
“Supported Operating Systems and Hypervisors” on page 68
“Installing the Orchestrate Agent” on page 69
Supported Operating Systems and Hypervisors
For PlateSpin Orchestrate 2.0, other supported operating systems are:
Microsoft Windows Server 2003
68 PlateSpin Orchestrate 2.0 Installation and Configuration Guide
Page 69

RHEL 4 or 5
SLES 9
For example, these operating systems might be running in VMware or on a physical machine.
The operating system must have a hypervisor supported by PlateSpin Orchestrate. The following
table lists the supported hypervisors and host operating systems. For a listing of currently supported
guest operating systems, refer to the host operating system vendor’s Web site.
Table 2-2 Hypervisors and Supported Host Operating Systems
Hypervisor Host Operating System
Xen 3.0 SLES 10
SLES 10 SP 1
SLES 10 SP2
SLES 11
novdocx (en) 13 May 2009
NPIV is supported for Xen 3.0 hypervisor running
only on SLES 10 SP2 and SLES 11.
RHEL 5
VMware Server SLES 10
SLES 10 SP 1
RHEL 4
RHEL 5
Windows Server 2003 and 2008
VMware Virtual Center *Subject to the VMware support matrix
VMware ESX 3.0.x/3.5.x *Subject to the VMware support matrix
Microsoft Hyper-V
NOTE: Microsoft Hyper-V Server 2008 is not
supported.
Windows Server 2008 enabled with Hyper-V
With the hypervisor installed on one of the supported operating systems, the Orchestrate Server
deploys the VMs to the host machine using the hypervisor-associated provisioning adapter to start
and use the VMs for jobs. The provisioning adapters allow you to control and migrate the VM. For a
detailed explanation of the actions you can perform with a VM through its provisioning adapter, see
“Managing Virtual Machines” in the PlateSpin Orchestrate 2.0 VM Client Guide and Reference.
Installing the Orchestrate Agent
The manual installation procedure for the Orchestrate Agent depends on the operating system. The
installed Orchestrate Agent components are:
novell-zenworks-monitor-gmond-3.0.4-50.x86_64.rpm
Installation and Configuration 69
Page 70

novell-zenworks-orch-config-2.0.2-119.noarch.rpm
novell-zenworks-orch-config-gui-2.0.2-56295.noarch.rpm
novell-zenworks-zos-agent-2.0.2-56295.i586.rpm
novell-zenworks-zos-java-1.5.0_sun_update17-0.x86_64.rpm
The Orchestrate Agent can be installed on the following operating systems:
“Microsoft Windows Server 2003 and Windows Server 2008” on page 70
“RHEL 4” on page 70
“RHEL 5” on page 71
“SLES 9” on page 71
NOTE: The Orchestrate Agent can be installed on VMware ESX 3.0.x /3.5.x VM hosts. Use the
installation instructions for RHEL 4 or RHEL 5.
Microsoft Windows Server 2003 and Windows Server 2008
To install the Orchestrate Agent on Microsoft Windows Server 2003 and Microsoft Windows Server
2008:
novdocx (en) 13 May 2009
1 Download the pertinent 32-bit or 64-bit Add-On ISO from the DVD.
2 Create a CD from the ISO or use ISOBuster (or a similar tool) to mount the CD.
3 Browse to the Windows 2003 or Windows 2008 folder for the Orchestrate Agent.
4 Double-click the Orchestrate Agent icon and follow the wizard through the setup.
See Table 2-1 on page 31 for an explanation of the configuration for the Orchestrate Agent.
NOTE: Installation of the Orchestrate Agent on a Windows machine does not install the Orchestrate
Monitoring Agent (gmond). For information about installing and setting up gmond on Windows,
see. The capability of installing gmond was added with the 2.0.2 release of the product.
For Monitoring Agent installation information, see Appendix B, “Installing the Orchestrate
Monitoring Agent On Windows Machines,” on page 127. For information about some of the
functions of gmond, see “Understanding Resource Metrics Facts” in the PlateSpin Orchestrate 2.0
Developer Guide and Reference.
RHEL 4
To install the five packages of the Orchestrate Agent on RHEL 4:
1 Download the pertinent 32-bit or 64-bit Add-On ISO from the DVD.
2 Mount the ISO as a loopback device.
If you are mounting a 64-bit ISO, the command is:
$ mount -o loop PlateSpin_Orchestrate-2.0.2.x86_64.iso /mnt
3 Change your working directory to the location of the RHEL package:
$ cd /mnt/RHEL4
4 Use the
$ rpm -Uvh *.rpm
70 PlateSpin Orchestrate 2.0 Installation and Configuration Guide
rpm
command to install the packages:
Page 71

novdocx (en) 13 May 2009
5 Use the
For example, if you are missing
$ up2date --solvedeps=libcap.so, libcap.so.1
up2date
command to download and install any missing dependencies.
libcap.so
and
libcap.so.1
, you would enter:
6 Run the configuration script:
$ /opt/novell/zenworks/orch/bin/config
See Table 2-1 on page 31 for an explanation of the configuration for the Orchestrate Agent.
RHEL 5
To install the five packages of the Orchestrate Agent on RHEL 5:
1 Download the pertinent 32-bit or 64-bit Add-On ISO from the DVD.
2 Mount the ISO as a loopback device.
If you are mounting a 64 bit ISO, the command is:
$ mount -o loop PlateSpin_Orchestrate-2.0.2.x86_64.iso /mnt
3 Change your working directory to the location of the RHEL package:
$ cd /mnt/RHEL5
4 Use the package manager included in RHEL to install the Orchestrate Agent packages.
(Missing dependencies are met by using RHN):
$ yum localinstall *.rpm
5 Run the configuration script:
$ /opt/novell/zenworks/orch/bin/config
See Table 2-1 on page 31 for an explanation of the configuration for the Orchestrate Agent.
SLES 9
To install the five packages of the Orchestrate Agent on SLES 9:
1 Download the pertinent 32-bit or 64-bit Add-On ISO from the DVD.
2 Mount the ISO as a loopback device.
If you are mounting a 64-bit ISO, the command is:
$ mount -o loop PlateSpin_Orchestrate-2.0.2.x86_64.iso /mnt
3 Change your working directory to the location of the SLES 9 package:
$ cd /mnt/SLES9
4 Use the
$ rpm -Uvh *.rpm
5 Use the
For example, if you are missing
$ up2date --solvedeps=libcap.so, libcap.so.1
rpm
command to install the packages:
up2date
command to download and install any missing dependencies.
libcap.so
and
libcap.so.1
, you would enter:
6 Run the configuration script:
$ /opt/novell/zenworks/orch/bin/config
See Table 2-1 on page 31 for an explanation of the configuration for the Orchestrate Agent.
Installation and Configuration 71
Page 72

2.3.5 Automatically Installing the Orchestrate Agent on a VM Host Using a Job
You can write a job to automatically install and configure the Orchestrate Agent on a host server.
Such a job can be a script similar to the following, which is for an Apache VM:
"""
Search for a VM Grid objects using Constraints and run a VM operation on them.
"""
class test(Job):
def job_started_event(self):
# collect all VM Instances whose resource ID
# starts with the string "apache"
a = AndConstraint()
e1 = EqConstraint()
e1.setFact("resource.type")
e1.setValue("VM")
a.add(e1)
novdocx (en) 13 May 2009
e2 = EqConstraint()
e2.setValue("apache*")
e2.setMatchMode(EqConstraint.MATCH_MODE_REGEXP)
e2.setFact("resource.id")
a.add(e2)
vms = getMatrix().getGridObjects(TYPE_RESOURCE,a,None)
for vm in vms:
vm.installAgent()
For information on developing jobs, see the PlateSpin Orchestrate 2.0 Developer Guide and
Reference.
2.4 Installing the Orchestrate Development Client Only
You can use the PlateSpin Orchestrate Development Client to administer the Orchestrate Server
from any SLES 10 or a Windows (XP or Vista) machine. No other PlateSpin Orchestrate
components need to be installed on that machine. This section includes information that details how
to install the Orchestrate Development Client by itself.
Section 2.4.1, “Installing the Orchestrate Development Client for Windows from the
Administrator Information Page,” on page 73
Section 2.4.2, “Using the ISO to Install the Orchestrate Development Client on Windows
Machines,” on page 77
Section 2.4.3, “Installing the Orchestrate Development Client for SLES 10 From the
Administrator Information Page,” on page 77
72 PlateSpin Orchestrate 2.0 Installation and Configuration Guide
Page 73

Section 2.4.4, “Using the ISO to Install the Orchestrate Client on SLES 10 Machines,” on
page 78
Section 2.4.5, “Using the ISO to Install the Orchestrate Client on SLES 11 Machines,” on
page 79
2.4.1 Installing the Orchestrate Development Client for Windows from the Administrator Information Page
After you install the server for PlateSpin Orchestrate on the network, you can launch the PlateSpin
Orchestrate Administrator Information page. The page has links to various installer programs that
you can use to install required PlateSpin Orchestrate software on the computing resources that you
will be utilizing in the grid system.
The following browsers support the PlateSpin Orchestrate Server Portal and PlateSpin Orchestrate
Administrator’s Web page applications:
Internet Explorer, version 6.0 or higher
Netscape Navigator, version 6.0 or higher
Mozilla, version 1.5 or higher
Mozilla Firefox
novdocx (en) 13 May 2009
Using a supported browser, enter the following URL to access the Administrator Information page
for PlateSpin Orchestrate from the server:
http://server_name_for_PlateSpin_Orchestrate:8001/
This URL is the DNS name (or IP address) of the server for PlateSpin Orchestrate. Be sure to use
Port 8001 in the address to access and display the page, as shown in the following illustration:
The page includes links to information for PlateSpin Orchestrate administrators, including product
documentation and the installers for the PlateSpin Orchestrate Development Client and the
PlateSpin Orchestrate Agent.
Installation and Configuration 73
Page 74
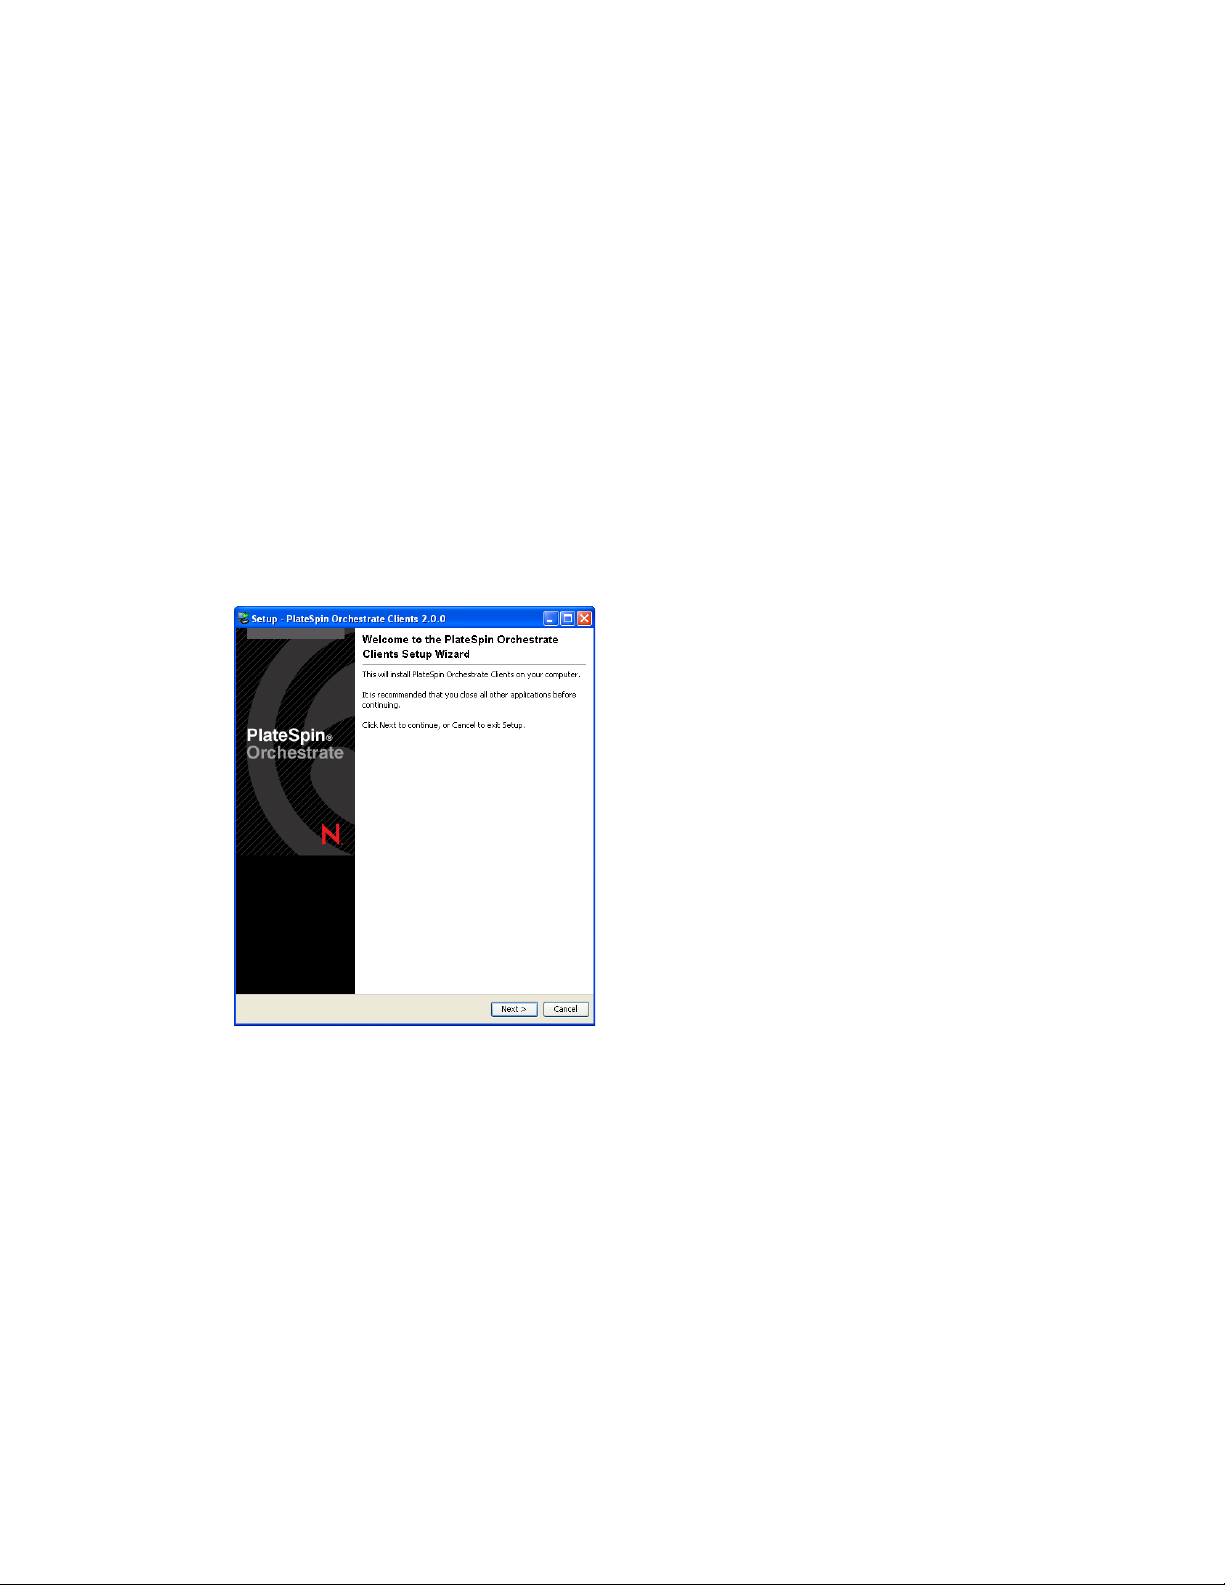
To install the Orchestrate Development Client for Windows from the Administrator Information
page:
1 On the computer where the Orchestrate Development Client for Windows is to be installed,
launch the PlateSpin Orchestrate Administrator Information page, as shown above.
2 Scroll to the Installation section of the page:
3 In the clients section of the Web page, identify the
zosclients_windows_2_0_2_with_jre.exe
installer link.
4 Click the installer link to initiate the download of the Orchestrate Development Client on the
Windows computer.
5 At a Windows XP or Windows Vista location where you downloaded the client installer, double
click the
zosclients_windows_2_0_2_with_jre.exe
icon to run the installer.
When you launch the installer on Windows XP or Windows Vista, a Security Warning for an
Unknown Publisher is displayed. You can ignore this warning and run the installer without a
problem.
The first page of the Orchestrate Clients Setup Wizard is displayed.
novdocx (en) 13 May 2009
6 Click Next to display the License Agreement page.
74 PlateSpin Orchestrate 2.0 Installation and Configuration Guide
Page 75
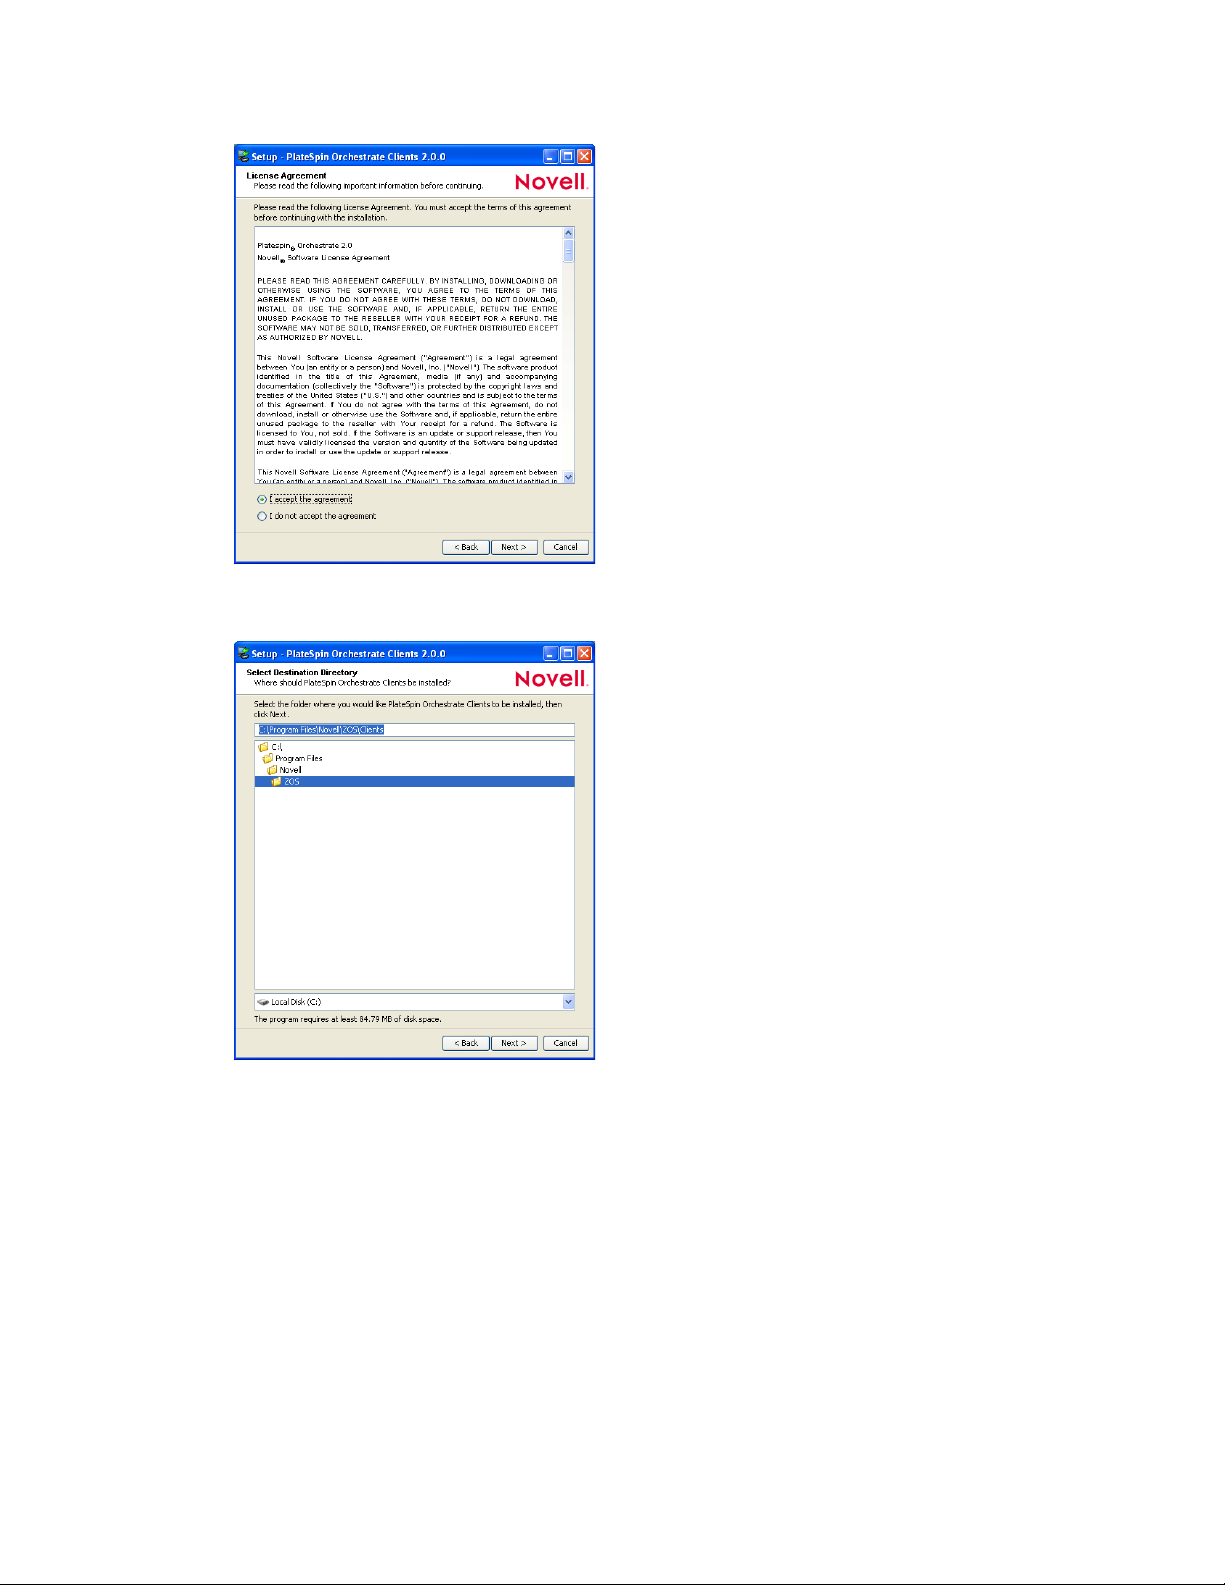
7 Accept the license agreement, then click Next to display the Select Destination Directory page.
novdocx (en) 13 May 2009
8 Accept the default location, then click Next to display the Select Components page of the Setup
Wizard.
Installation and Configuration 75
Page 76

9 Select the client components that you want to install:
PlateSpin Orchestrate User Client & Toolkit: Selecting this option installs the zos
.jar
command line tool and a
file used to develop custom clients.The zos command line
tool provides a non-Web method for a user to access the server.
For more information, see the PlateSpin Orchestrate 2.0 Command Line Reference.
novdocx (en) 13 May 2009
PlateSpin Orchestrate Development Client and Tools: Selecting this option installs the
PlateSpin Development Client, which is a thick client console for administrators. It also
installs the zosadmin command line tool for administrators. Both of these tools require
administrator login.
For more information, see the PlateSpin Orchestrate 2.0 Development Client Reference
and the PlateSpin Orchestrate 2.0 Command Line Reference.
Installing these components on a Windows workstation adds several items to the program
group available from Start > All Programs > Novell > ZOS > Clients. One of these programs is
the PlateSpin Orchestrate Command Prompt. The PATH is preset in this prompt to run the zos
and zosadmin commands.
10 Accept the remaining defaults in the setup wizard pages to run the Orchestrate Development
Client installation until the following page is displayed:
76 PlateSpin Orchestrate 2.0 Installation and Configuration Guide
Page 77
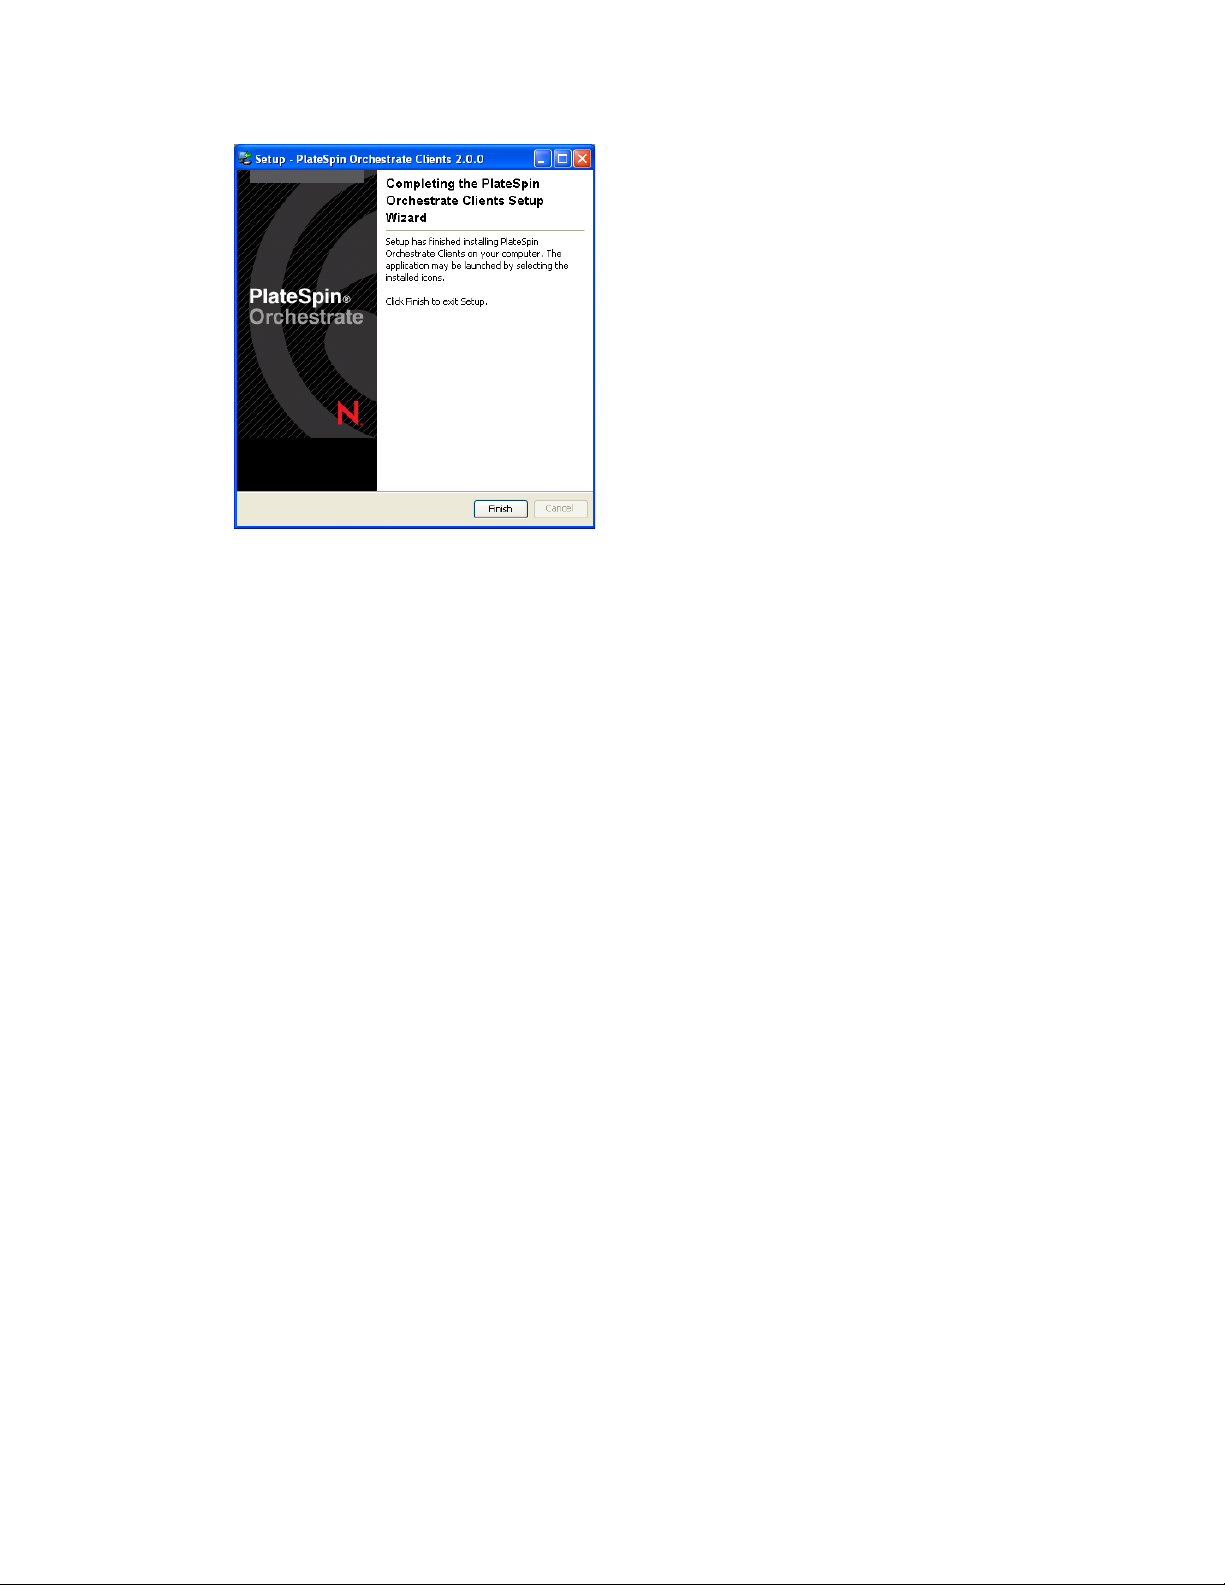
11 Click Finish to exit the setup.
novdocx (en) 13 May 2009
2.4.2 Using the ISO to Install the Orchestrate Development Client on Windows Machines
The PlateSpin Orchestrate Client is supported on Windows Vista and Windows XP only. Use the
following steps to download the PlateSpin Orchestrate Client for installation:
1 To verify that the device where you want to install the client software fulfills the necessary
requirements, review Chapter 1, “Planning the Orchestrate Server Installation,” on page 9.
2 Download the appropriate PlateSpin Orchestrate Server ISO (32-bit or 64-bit) to an accessible
network location.
3 Create a DVD from the ISO or use a tool that will mount the ISO.
4 Navigate to the directory path (
5 Double-click the appropriate file (
installation and configuration wizard.
See Section 2.4.1, “Installing the Orchestrate Development Client for Windows from the
Administrator Information Page,” on page 73 for information about this wizard.
DVD drive:\Windows
zosclients_windows_2_0_2_with_jre.exe
) where the Windows files reside.
) to launch an
2.4.3 Installing the Orchestrate Development Client for SLES 10 From the Administrator Information Page
Before you can perform any PlateSpin Orchestrate management functions, such as creating user
accounts and managing activities of the server, you need to install the PlateSpin Orchestrate
Development Client. The console is a thick desktop client designed for administrative tasks
including infrastructure management (for example, managing computing resources) and monitoring.
You can install the console on the server itself or on another network computer.
When you install the Orchestrate Development Client, you also install the zosadmin command line
tool that also facilitate the administration of PlateSpin Orchestrate and its computing resources.
Installation and Configuration 77
Page 78

The following steps explain how to install the Development Client and other Orchestrate Clients
from the web hosted Administrator information page.
1 On the computer where the Orchestrate Development Client is to be installed, launch the
PlateSpin Orchestrate Administrator Information page. For information about how to do this,
see Section 2.3.2, “Installing the Orchestrate Agent from the Administrator Information Page,”
on page 60.
2 Scroll to the Installation section of the page:
3 In the PlateSpin Orchestrate Clients section, download:
novell-zenworks-zos-clients-2.0.2-57039.i586.rpm
The Java 1.5.0 (32-bit) or Java 1.5.0 (64-bit) RPM
4 Install the Java 1.5.0 RPM by entering the one of the following commands (as applicable):
rpm -ivh novell-zenworks-zos-java-1.5.0_sun_update17-0.x86_64.rpm
or
rpm -ivh novell-zenworks-zos-java-1.5.0_sun_update17-0.i586.rpm
5 Install the Orchestrate Development Client by entering the following command:
rpm -ivh novell-zenworks-zos-clients-2.0.2-57039.i586.rpm
novdocx (en) 13 May 2009
6 Start the Development Client by entering the following command in
zenworks/zos/clients/bin
.
/zoc
:
/opt/novell/
7 Select the Orchestrate Server grid object you want to log onto, then enter the username and
password for that server to connect to it.
2.4.4 Using the ISO to Install the Orchestrate Client on SLES 10 Machines
Use the following procedure if you want to use the Add-on CD method to install just the Orchestrate
Agent or the Orchestrate Clients to a SLES machine.
IMPORTANT: The Orchestrate Clients are not supported on SLES 9 SP3.
1 To verify that the device where you want to install the agent and client software fulfills the
necessary requirements, review Chapter 1, “Planning the Orchestrate Server Installation,” on
page 9.
2 Download the appropriate PlateSpin Orchestrate Server ISO (32-bit or 64-bit) to an accessible
network location.
3 (Optional) Create a DVD ISO (32-bit or 64-bit) that you can take with you to the machine
where you want to install it.
4 Install PlateSpin Orchestrate Client software:
root
4a Log in to the target SLES server as
, then open YaST2.
4b In the YaST Control Center, click Software, then click Add-on Product to display the Add-
on Product Media dialog box.
78 PlateSpin Orchestrate 2.0 Installation and Configuration Guide
Page 79
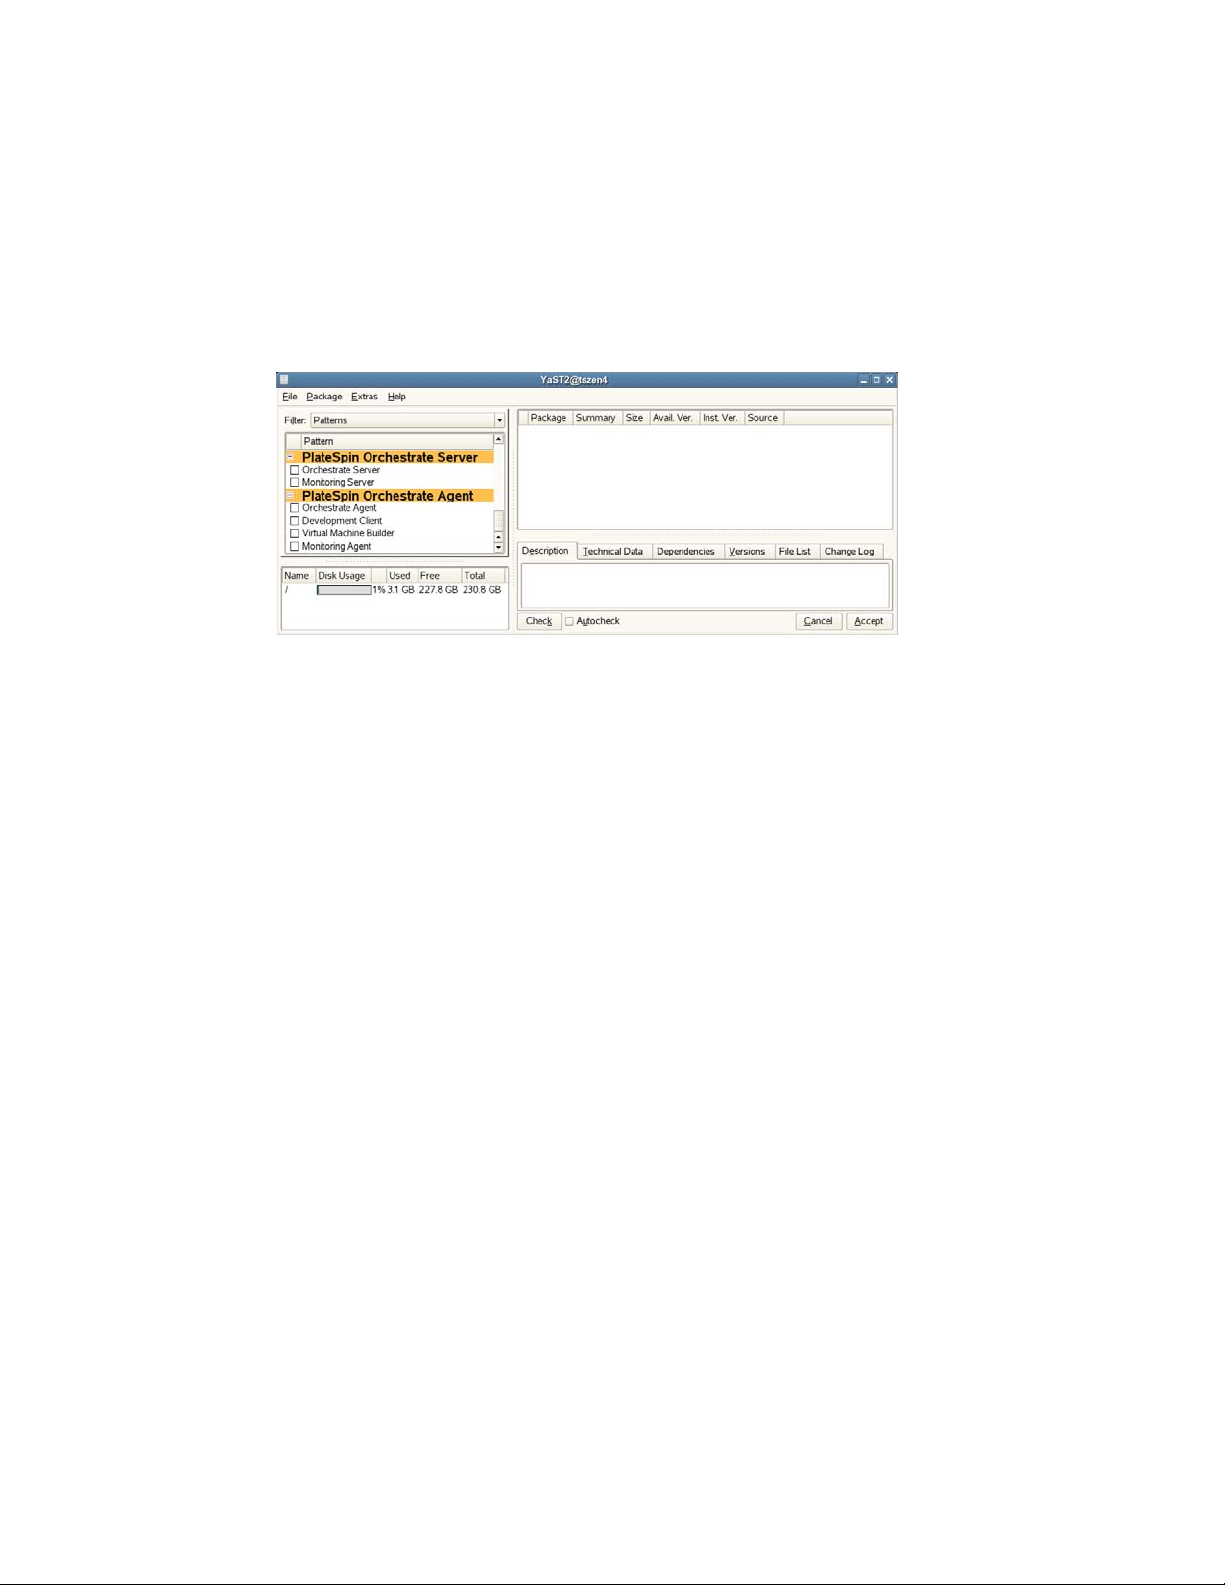
4c In the Add-on Product Media dialog box, select one of the following:
(Conditional) Select DVD, click Next, insert the DVD, then click Continue.
(Conditional) Select Local Directory, click Next, select the ISO Image check box,
browse to the ISO in the file system, then click OK.
4d Read and accept the license agreement, then click Next to display YaST2.
4e In YaST2, click the Filter drop-down menu, then select Patterns to display the install
patterns available on the PlateSpin Orchestrate ISO.
novdocx (en) 13 May 2009
4f Select the PlateSpin Orchestrate Development Client installation pattern.
This pattern includes both a GUI console (the Development Client) and command line
interface tools. These clients let you troubleshoot, initiate, change, or shut down server
functions for PlateSpin Orchestrate and its computing resources. For information about
the client tools, see PlateSpin Orchestrate Clients. This pattern includes packages that help
you configure the Orchestrate Clients.
Refer to the information in Appendix A, “PlateSpin Orchestrate Components: Install
Patterns,” on page 125 for details on the installation data that you need to know.
4g Click Accept to install the packages.
You must install PlateSpin Orchestrate components before you can configure them.
5 Launch the Orchestrate Development Client from
with the following command:
bin
./zoc
6 Select the Orchestrate Server grid object you want to log in to, then enter the username and
password for that server to connect to it.
/opt/novell/zenworks/zos/clients/
2.4.5 Using the ISO to Install the Orchestrate Client on SLES 11 Machines
Use the following procedure if you want to use the Add-on CD method to install just the Orchestrate
Orchestrate Clients to a SLES machine.
1 To verify that the device where you want to install the client software fulfills the necessary
requirements, review Chapter 1, “Planning the Orchestrate Server Installation,” on page 9.
2 Download the appropriate PlateSpin Orchestrate Server ISO (32-bit or 64-bit) to an accessible
network location.
Installation and Configuration 79
Page 80

3 (Optional) Create a DVD ISO (32-bit or 64-bit) that you can take with you to the machine
where you want to install it.
4 Install PlateSpin Orchestrate Client software:
4a Log in to the target SLES 11 server or SLED 11 machine as
root
, then open YaST2.
4b In the YaST Control Center, click Software, then click Add-on Product to display the Add-
on Product Media dialog box.
4c In the Add-on Product Media dialog box, select one of the following:
(Conditional) Select DVD, click Next, insert the DVD, then click Continue.
(Conditional) Select Local Directory, click Next, select the ISO Image check box,
browse to the ISO in the file system, then click OK.
(Conditional) Select Local ISO image, click Next, enter the repository name of the
ISO image, browse to the location of the ISO image, then click Next.
4d Read and accept the license agreement, then click Next to display YaST2.
4e In YaST2, click the Filter drop-down menu, then select Patterns to display the install
patterns available on the PlateSpin Orchestrate SLES 11 ISO.
novdocx (en) 13 May 2009
4f Select the PlateSpin Orchestrate Development Client installation pattern.
This pattern includes both a GUI console (the Development Client) and command line
interface tools. These clients let you troubleshoot, initiate, change, or shut down server
functions for PlateSpin Orchestrate and its computing resources. For information about
the client tools, see PlateSpin Orchestrate Clients. This pattern includes packages that help
you configure the Orchestrate Clients.
Refer to the information in Appendix A, “PlateSpin Orchestrate Components: Install
Patterns,” on page 125 for details on the installation data that you need to know.
4g Click Accept to install the packages.
You must install PlateSpin Orchestrate components before you can configure them.
80 PlateSpin Orchestrate 2.0 Installation and Configuration Guide
Page 81

novdocx (en) 13 May 2009
5 Launch the Orchestrate Development Client from
with the following command:
bin
./zoc
6 Select the Orchestrate Server grid object you want to log in to, then enter the username and
password for that server to connect to it.
/opt/novell/zenworks/zos/clients/
2.5 Installing the Orchestrate VM Client
The PlateSpin Orchestrate VM Client program is installed on your Windows or Linux
administration machines. The interface is an Eclipse-based rich client environment designed to
allow you to create and manage virtual machines (VMs).
To install the VM Client, first fulfill the minimum requirements, then select the installation
platform:
Section 2.5.1, “Minimum Installation Requirements,” on page 81
Section 2.5.2, “Installing the Orchestrate VM Client on the Windows Operating System,” on
page 83
Section 2.5.3, “Installing Orchestrate VM Client in a Linux Environment,” on page 87
2.5.1 Minimum Installation Requirements
To install the PlateSpin Orchestrate VM Client software, you must meet the following requirements:
“Host Servers for VM Repositories” on page 81
“Workstations for Running the VM Client Software” on page 82
“Uninstallation of Previous Versions of the Client” on page 82
Host Servers for VM Repositories
PlateSpin Orchestrate VM Client operates in conjunction with the PlateSpin Orchestrate Server
software, which provides the grid environment for creating, storing, and using VMs. For
information on installing PlateSpin Orchestrate Development Client for management of Orchestrate
Servers, see Section 2.4, “Installing the Orchestrate Development Client Only,” on page 72.
Installation and Configuration 81
Page 82

Workstations for Running the VM Client Software
The following table contains a list of operating system, hardware requirements, and installation file
paths for PlateSpin Orchestrate VM Client. The installed program execution file is found in the ISO
in the indicated folder.
Table 2-3 Workstation Installation Constraints
Operating System Recommended Hardware Installation File
novdocx (en) 13 May 2009
Windows XP, Vista i386 (32-bit) and 64-
bit
240 MB of free
space
SLES 10 SP2 i386 (32-bit) and 64-
bit
257 MB of free
space
SLES 11, SLED 11 i386 (32-bit) and 64-
bit
257 MB of free
space
cdrom_drive\i386\Windows\vmclient_insta
ll.exe
or
cdrom_drive\x86_64\Windows\vmclient_ins
tall.exe
cdrom_drive/i386/SLE10/vmclient_install
or
cdrom_drive/x86_64/SLE10/
vmclient_install
cdrom_drive/sles11/i386/SLE11/
vmclient_install
or
cdrom_drive/sles11/x86_64/SLE11/
vmclient_install
NOTE: When you install the Xen kernel, make sure you install the
Xen VMs can be used on any 32-bit or 64-bit operating system.
Uninstallation of Previous Versions of the Client
kernel-xenpae
to ensure that
You must uninstall the previous version of VM Client before installing version 2.0:
Windows: On the Windows machine where the client is installed, click Start > Control Panel >
Add or Remove Programs, select the Novell ZENworks VM Manager item, then click Remove.
Linux: Run the following command:
/opt/novell/zenworks/vmmanagement/Uninstall_ZENworks_VMM/
Uninstall_Novell_ZENworks_VM_Manager_1.3.0
This opens the InstallAnyWhere utility to uninstall VM Client.
82 PlateSpin Orchestrate 2.0 Installation and Configuration Guide
Page 83
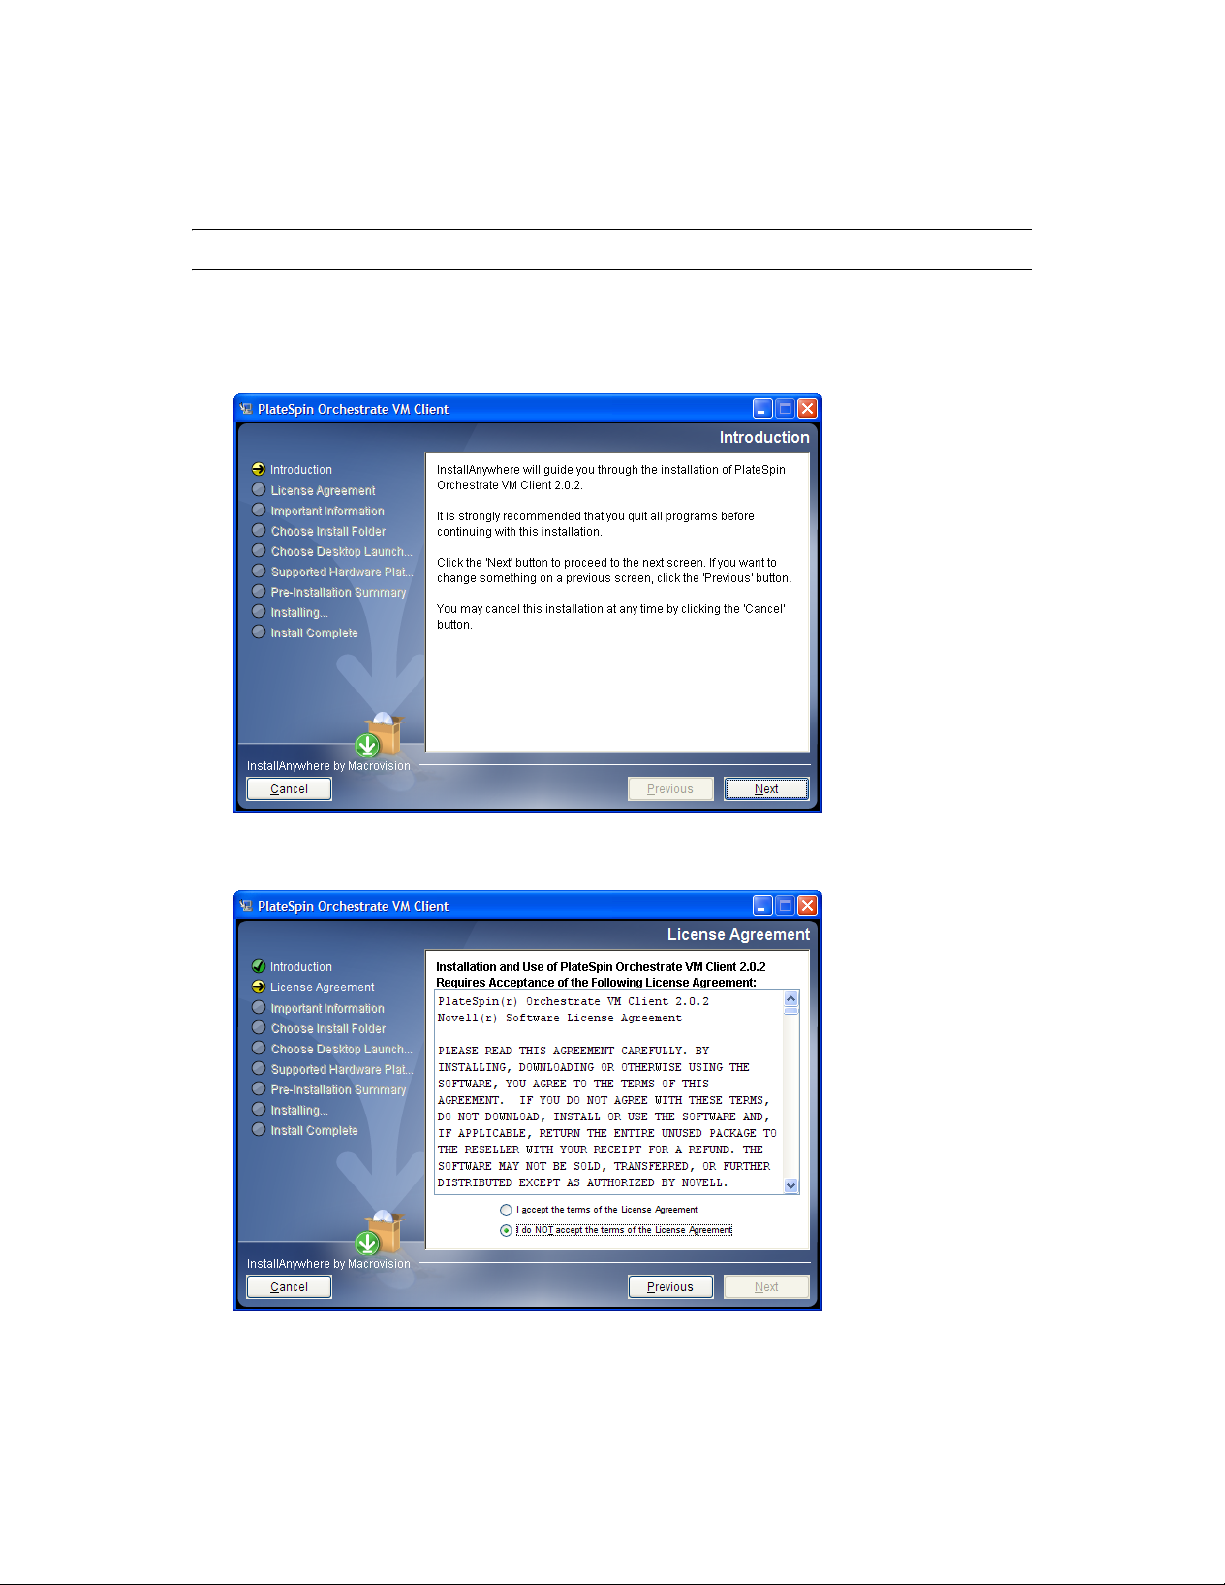
2.5.2 Installing the Orchestrate VM Client on the Windows Operating System
NOTE: These installation steps apply only to Windows Vista and Windows XP.
novdocx (en) 13 May 2009
1 Copy the
a location on your management Windows workstation.
2 Double-click the
3 Click Next on the Introduction page to display the License Agreement page:
vmclient_install.exe
vmclient_install.exe
file from the \Windows folder (see Table 2-3 on page 82) to
file to start the installation program:
Installation and Configuration 83
Page 84

4 Read the terms of the license agreement; if you agree to abide by the terms, then click Next to
display the Important Information page; otherwise, click Cancel to exit the installation:
novdocx (en) 13 May 2009
5 After reviewing the third-party licenses, if you agree with them, click Next to display the
Choose Install Folder page; otherwise, click Cancel to exit the installation:
84 PlateSpin Orchestrate 2.0 Installation and Configuration Guide
Page 85

6 Select your installation folder, then click Next to display the Choose Shortcut Folder page:
novdocx (en) 13 May 2009
7 Select a shortcut folder and any other options and groupings you want for the control of this
interface, then click Next to display the Supported Hardware Platforms page:
Installation and Configuration 85
Page 86
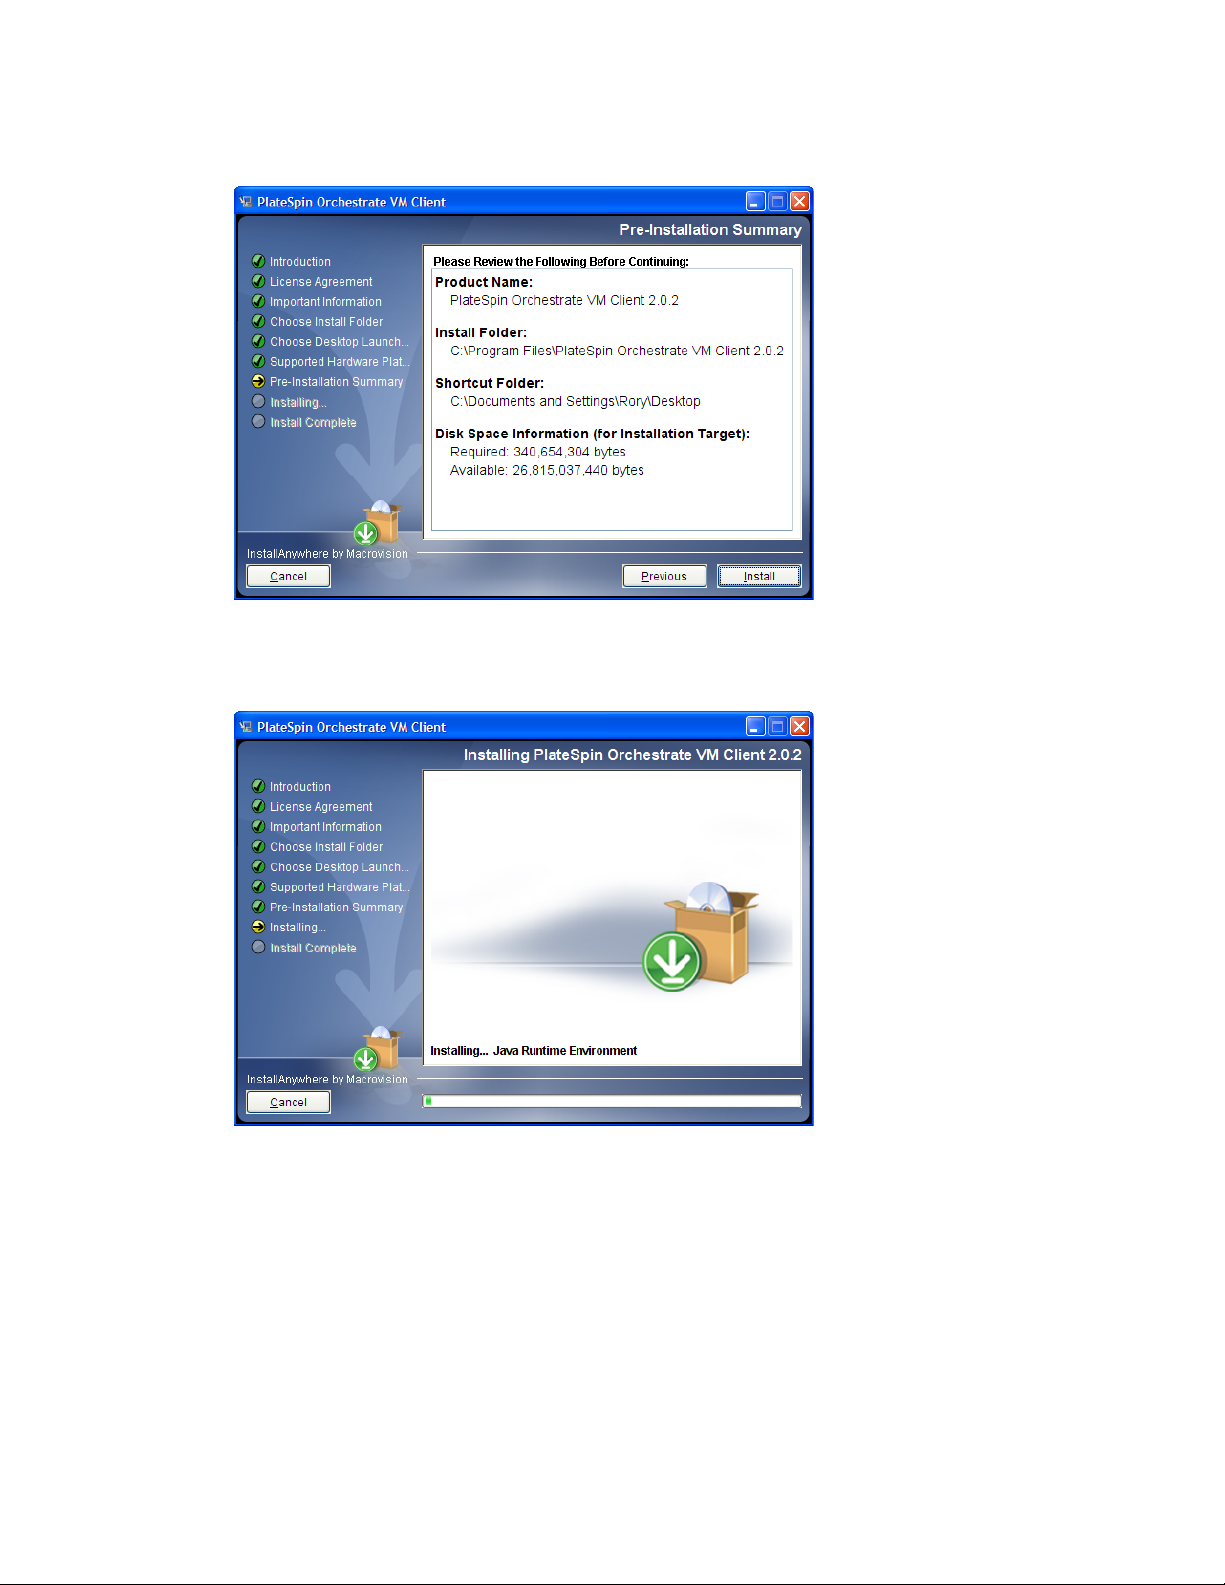
8 Click Next to display the Pre-Installation Summary page:
novdocx (en) 13 May 2009
9 Verify the information and click Previous as necessary to make changes.
10 When ready, click Install to begin the installation:
86 PlateSpin Orchestrate 2.0 Installation and Configuration Guide
Page 87

When the installation has completed, the Install Complete page is displayed:
novdocx (en) 13 May 2009
11 Click Done to finish the installation.
If you selected to place the shortcut icon on your desktop, this is what it looks like:
12 For some necessary setup tasks, continue with “Managing Virtual Machines” in the PlateSpin
Orchestrate 2.0 VM Client Guide and Reference.
2.5.3 Installing Orchestrate VM Client in a Linux Environment
1 Copy the PlateSpin Orchestrate 2.0 product ISO file to your management Linux workstation.
2 Open a terminal on the workstation and log in as
3 Mount the PlateSpin Orchestrate 2.0 product ISO file to a temporary directory.
For example, if you copied the 32-bit version of the ISO file to
commands:
mkdir /mnt/iso
cd /Desktop
mount -o loop PlateSpin_Orchestrate-2.0.2.i386.iso /mnt/iso
cd /mnt/iso/SLE10
root
.
Desktop
, enter the following
Installation and Configuration 87
Page 88

novdocx (en) 13 May 2009
4 From the
/mnt/iso/SLE10
directory, enter
./vmclient_install
to launch the installer:
5 Click Next on the Introduction page to display the License Agreement page:
88 PlateSpin Orchestrate 2.0 Installation and Configuration Guide
Page 89
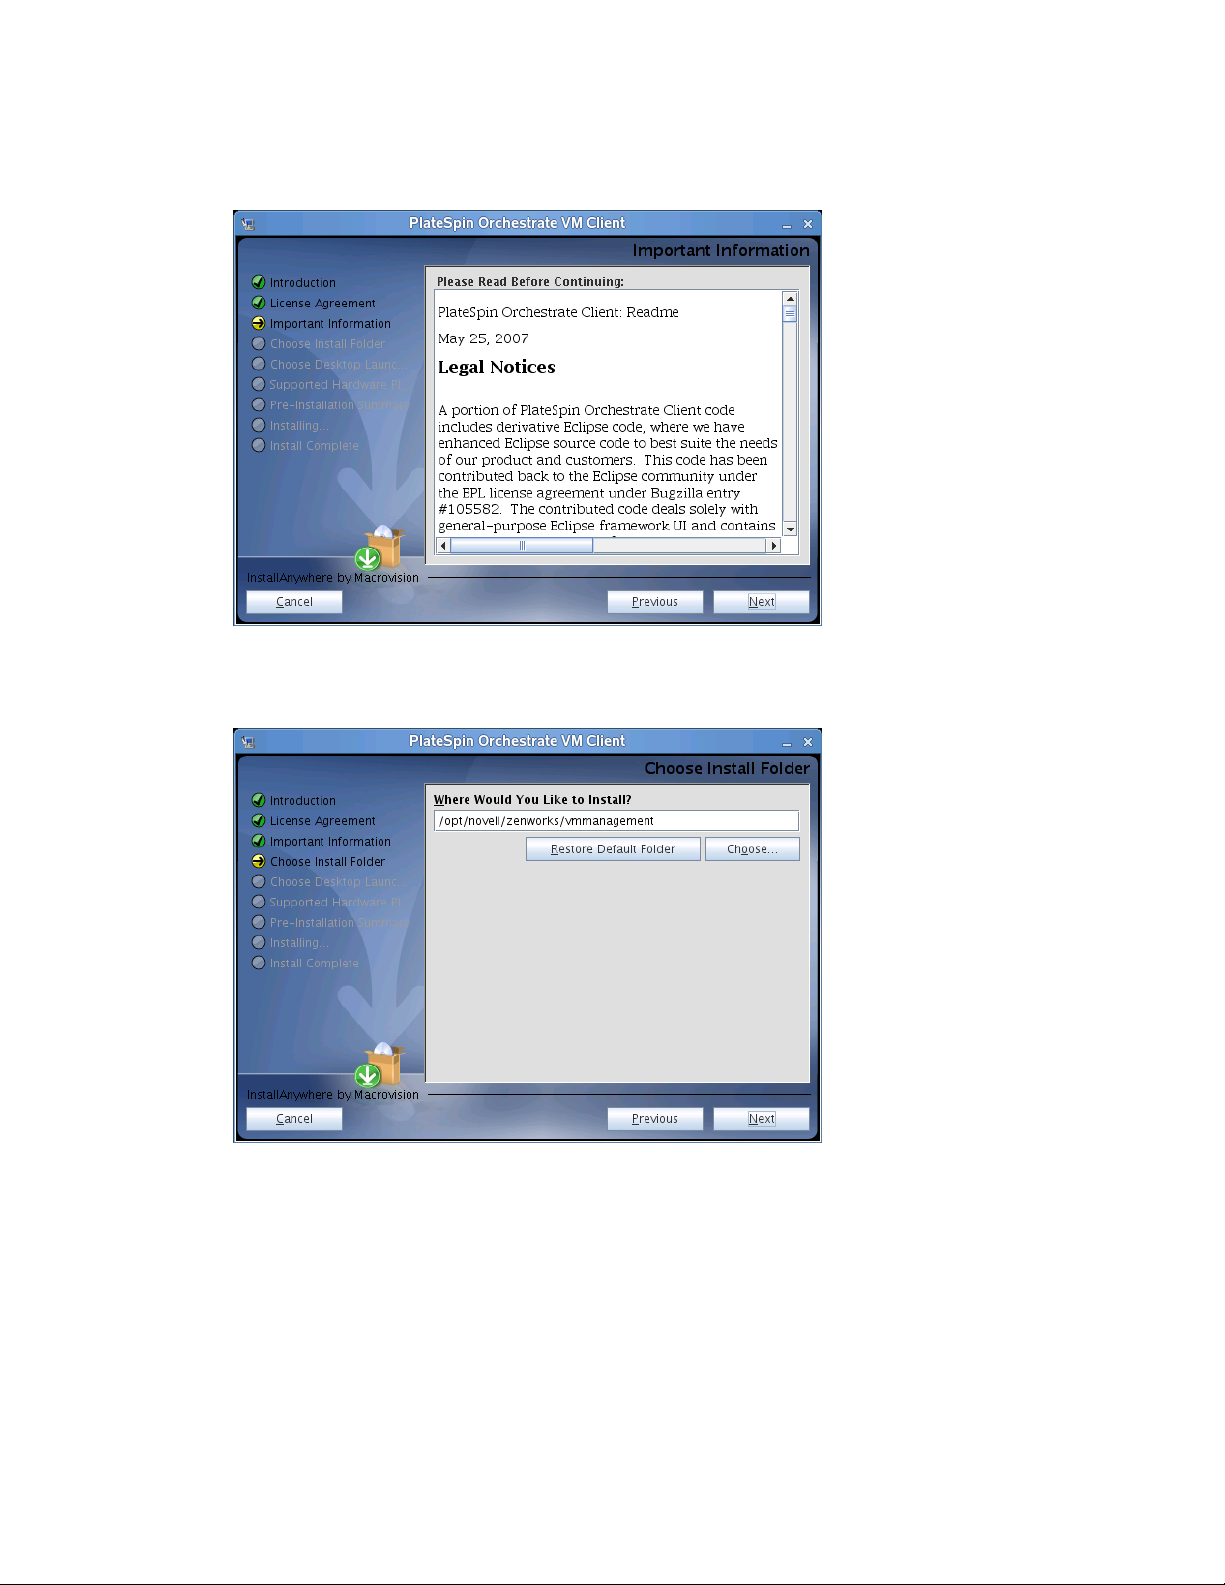
6 Read the terms of the license agreement; if you agree to abide by the terms, then click Next to
display the Important Information page; otherwise, click Cancel to exit the installation:
novdocx (en) 13 May 2009
7 After reviewing the third-party licenses, if you agree with them, click Next to display the
Choose Install Folder page; otherwise, click Cancel to exit the installation:
Installation and Configuration 89
Page 90
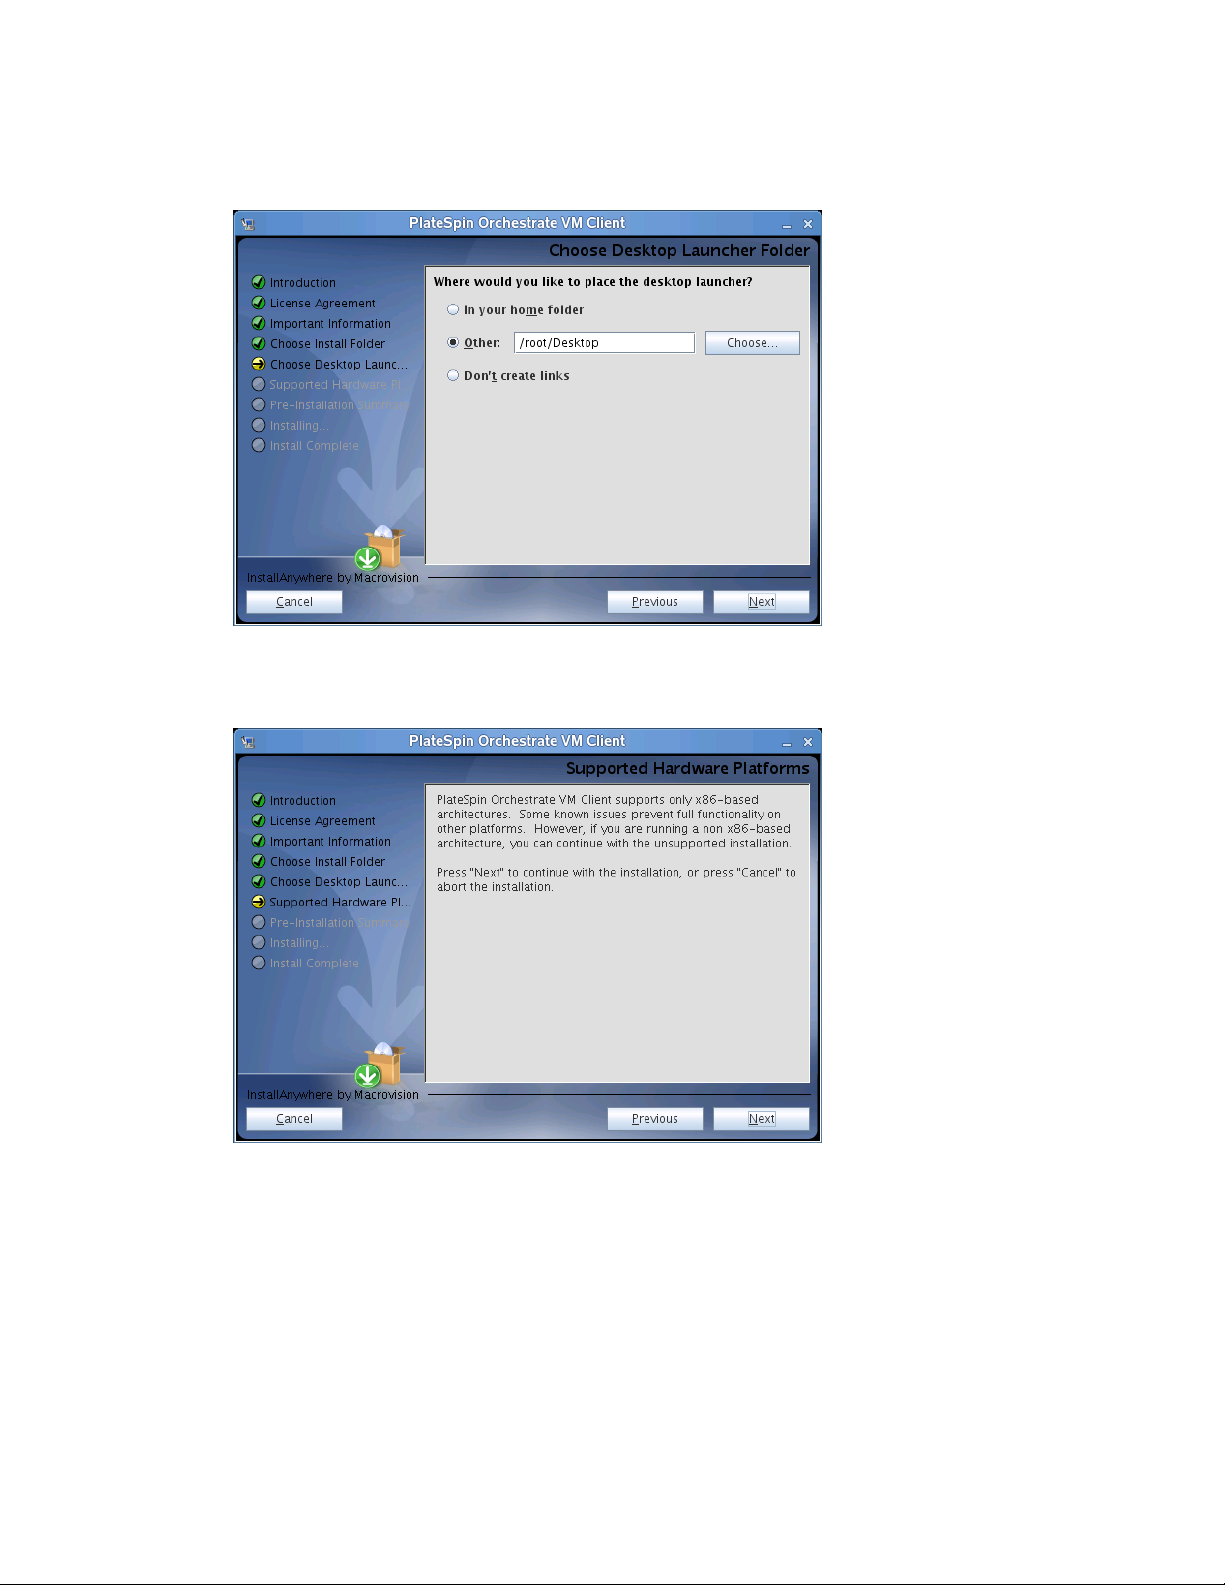
8 Select your installation folder, then click Next to display the Choose Desktop Launcher Folder
page:
novdocx (en) 13 May 2009
9 Select a shortcut folder and any other options and groupings you want for the control of this
interface, then click Next to display the Supported Hardware Platforms page:
90 PlateSpin Orchestrate 2.0 Installation and Configuration Guide
Page 91
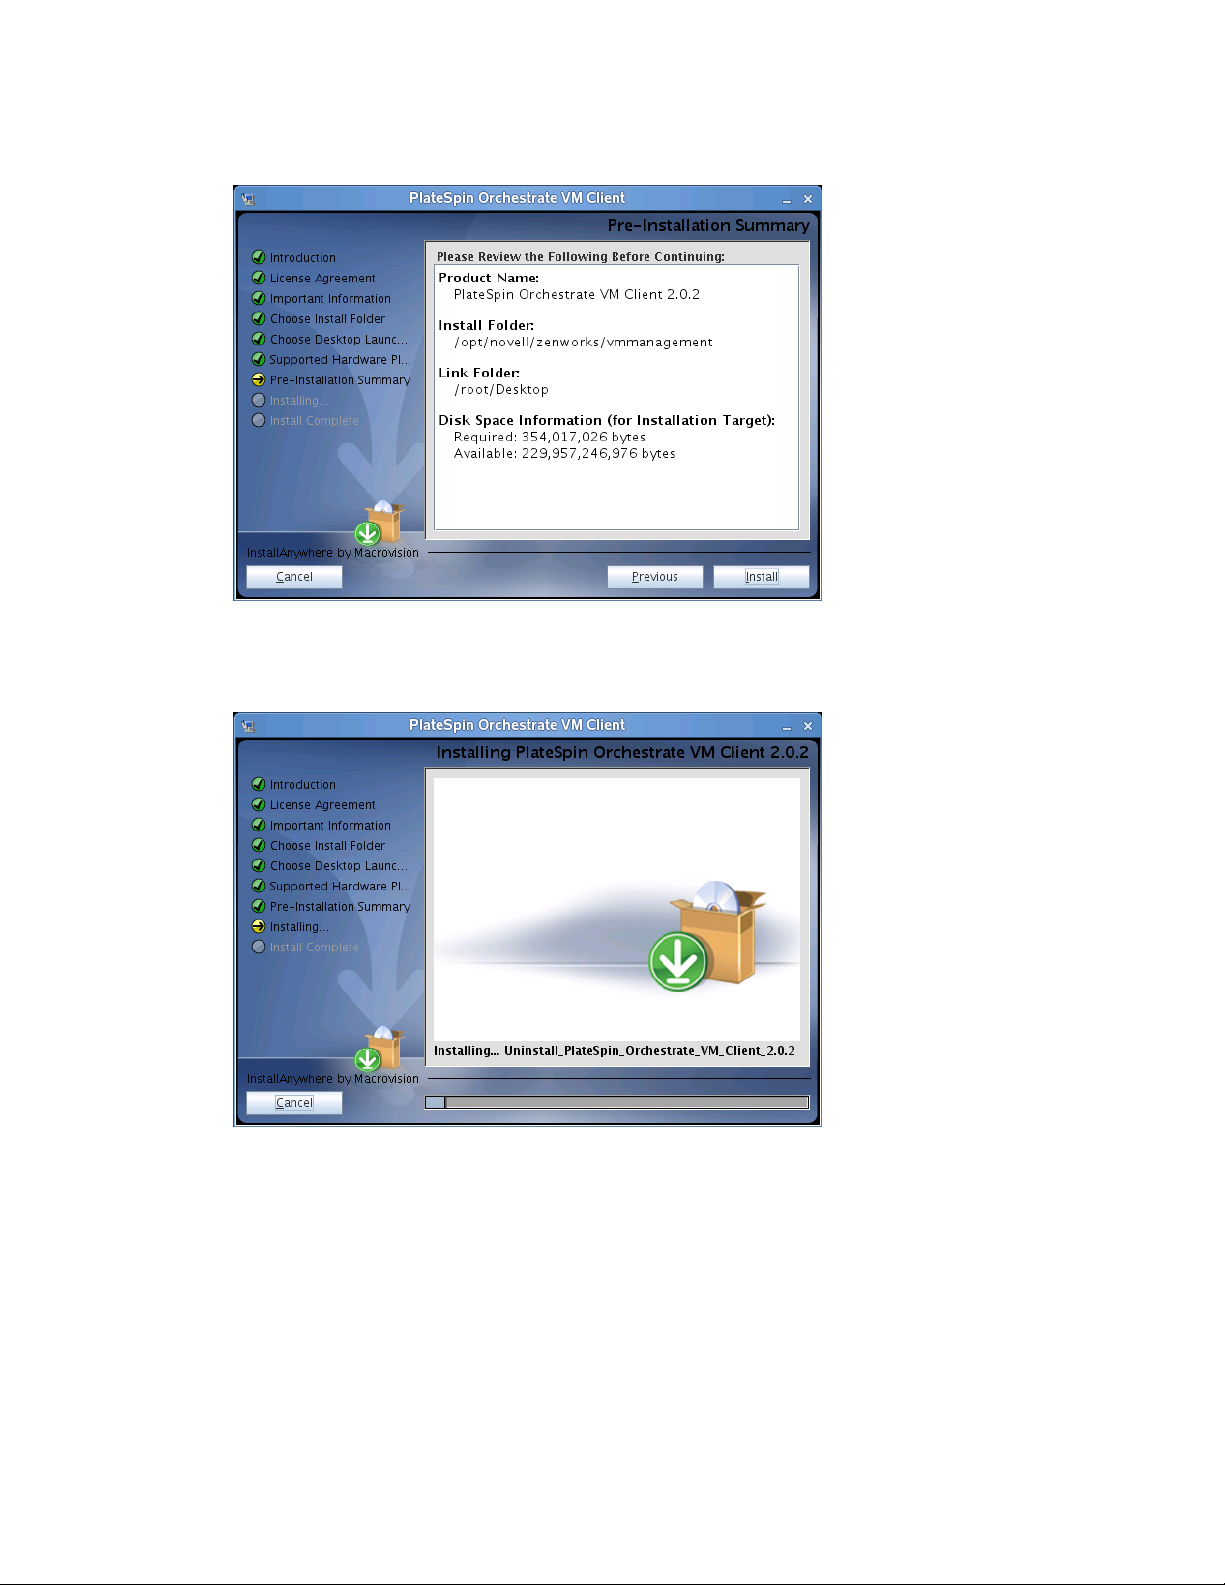
10 Click Next to display the Pre-Installation Summary page:
novdocx (en) 13 May 2009
11 Verify the information and click Previous as necessary to make changes.
12 When ready, click Install to begin the installation:
Installation and Configuration 91
Page 92

When the installation has completed, the Install Complete page is displayed:
novdocx (en) 13 May 2009
13 Click Done to finish the installation.
If you selected to place the launcher icon on your desktop, this is what it looks like:
14 For some necessary setup tasks, continue with “Managing Virtual Machines” in the PlateSpin
Orchestrate 2.0 VM Client Guide and Reference.
2.6 Uninstalling the VM Client
The PlateSpin Orchestrate VM Client program is installed on your Windows or Linux
administration machines. You can uninstall the client from these machines.
Select the appropriate platform:
Section 2.6.1, “Uninstalling the Orchestrate VM Client from the Windows Operating System,”
on page 93
Section 2.6.2, “Uninstalling Orchestrate VM Client in a Linux Environment,” on page 94
92 PlateSpin Orchestrate 2.0 Installation and Configuration Guide
Page 93
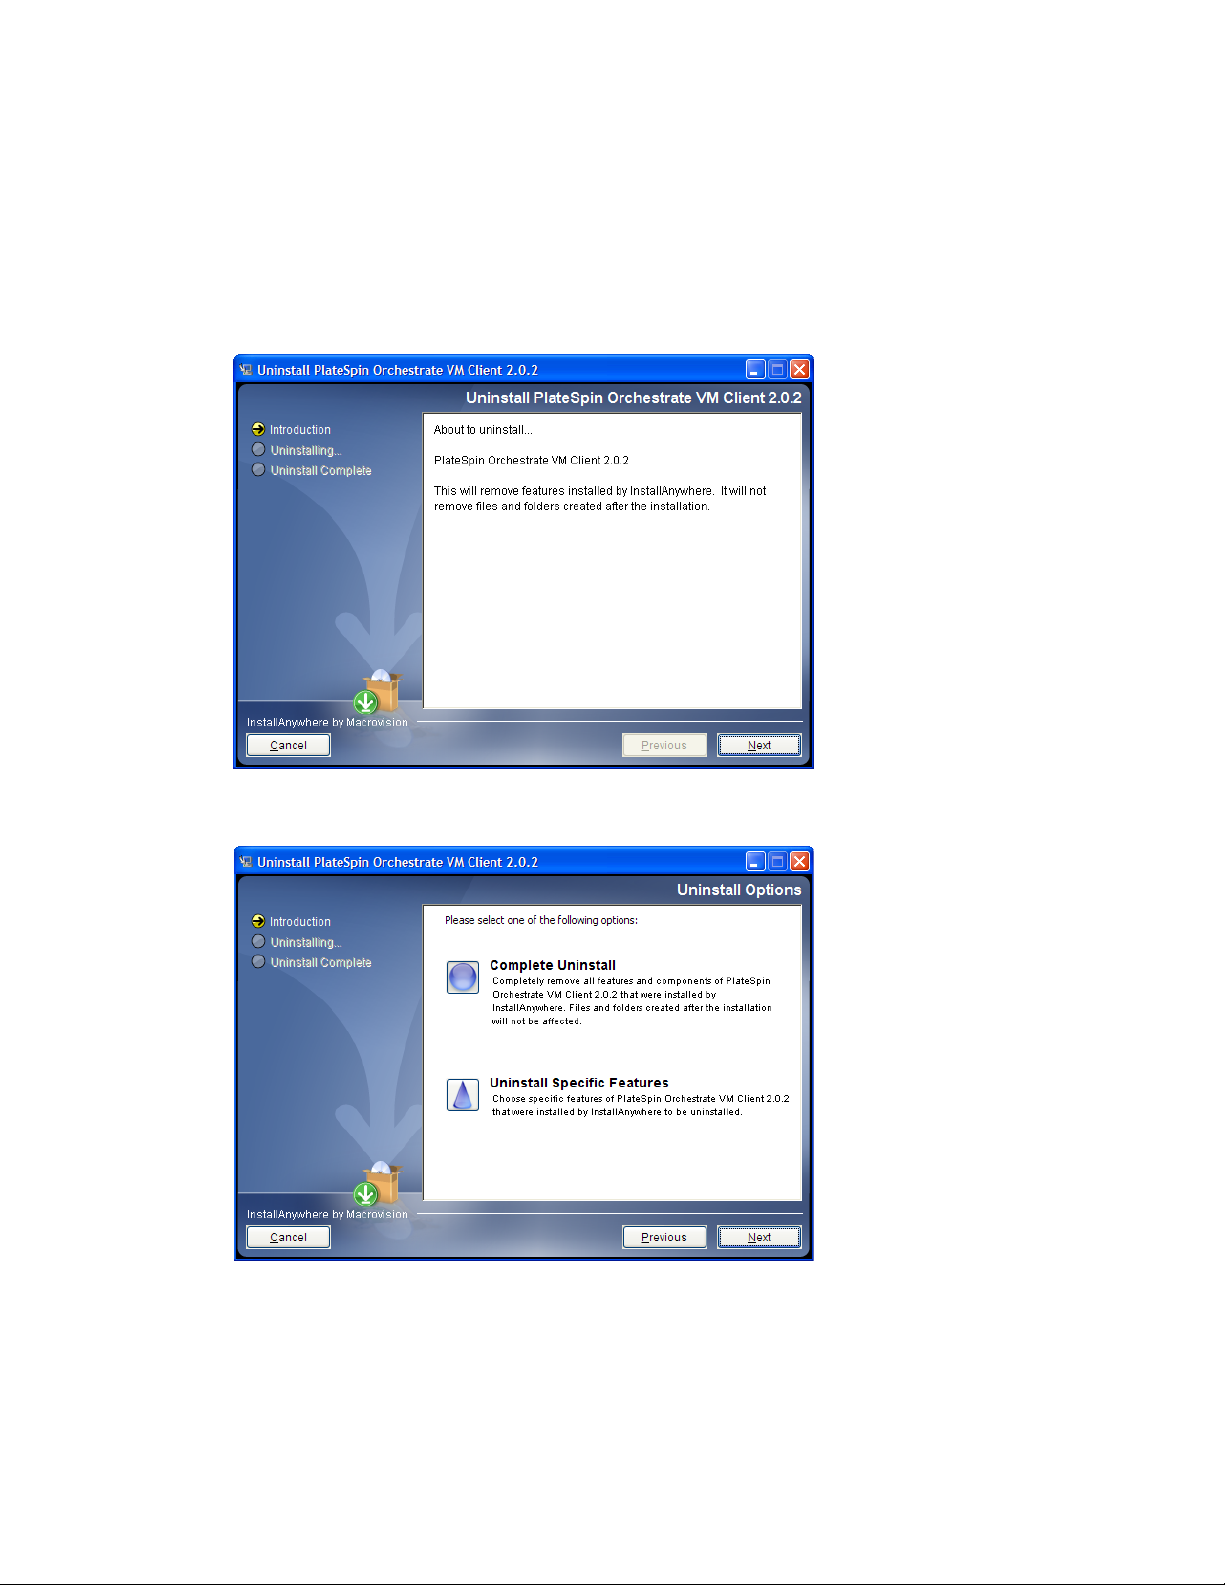
2.6.1 Uninstalling the Orchestrate VM Client from the Windows Operating System
1 On the Windows machine where the client is installed, click Start > Control Panel > Add or
Remove Programs.
2 Select the PlateSpin Orchestrate VM Client item, then click Remove to open the
InstallAnyWhere utility, which displays the first wizard page:
novdocx (en) 13 May 2009
3 Click Next to display the Uninstall Options page:
Installation and Configuration 93
Page 94
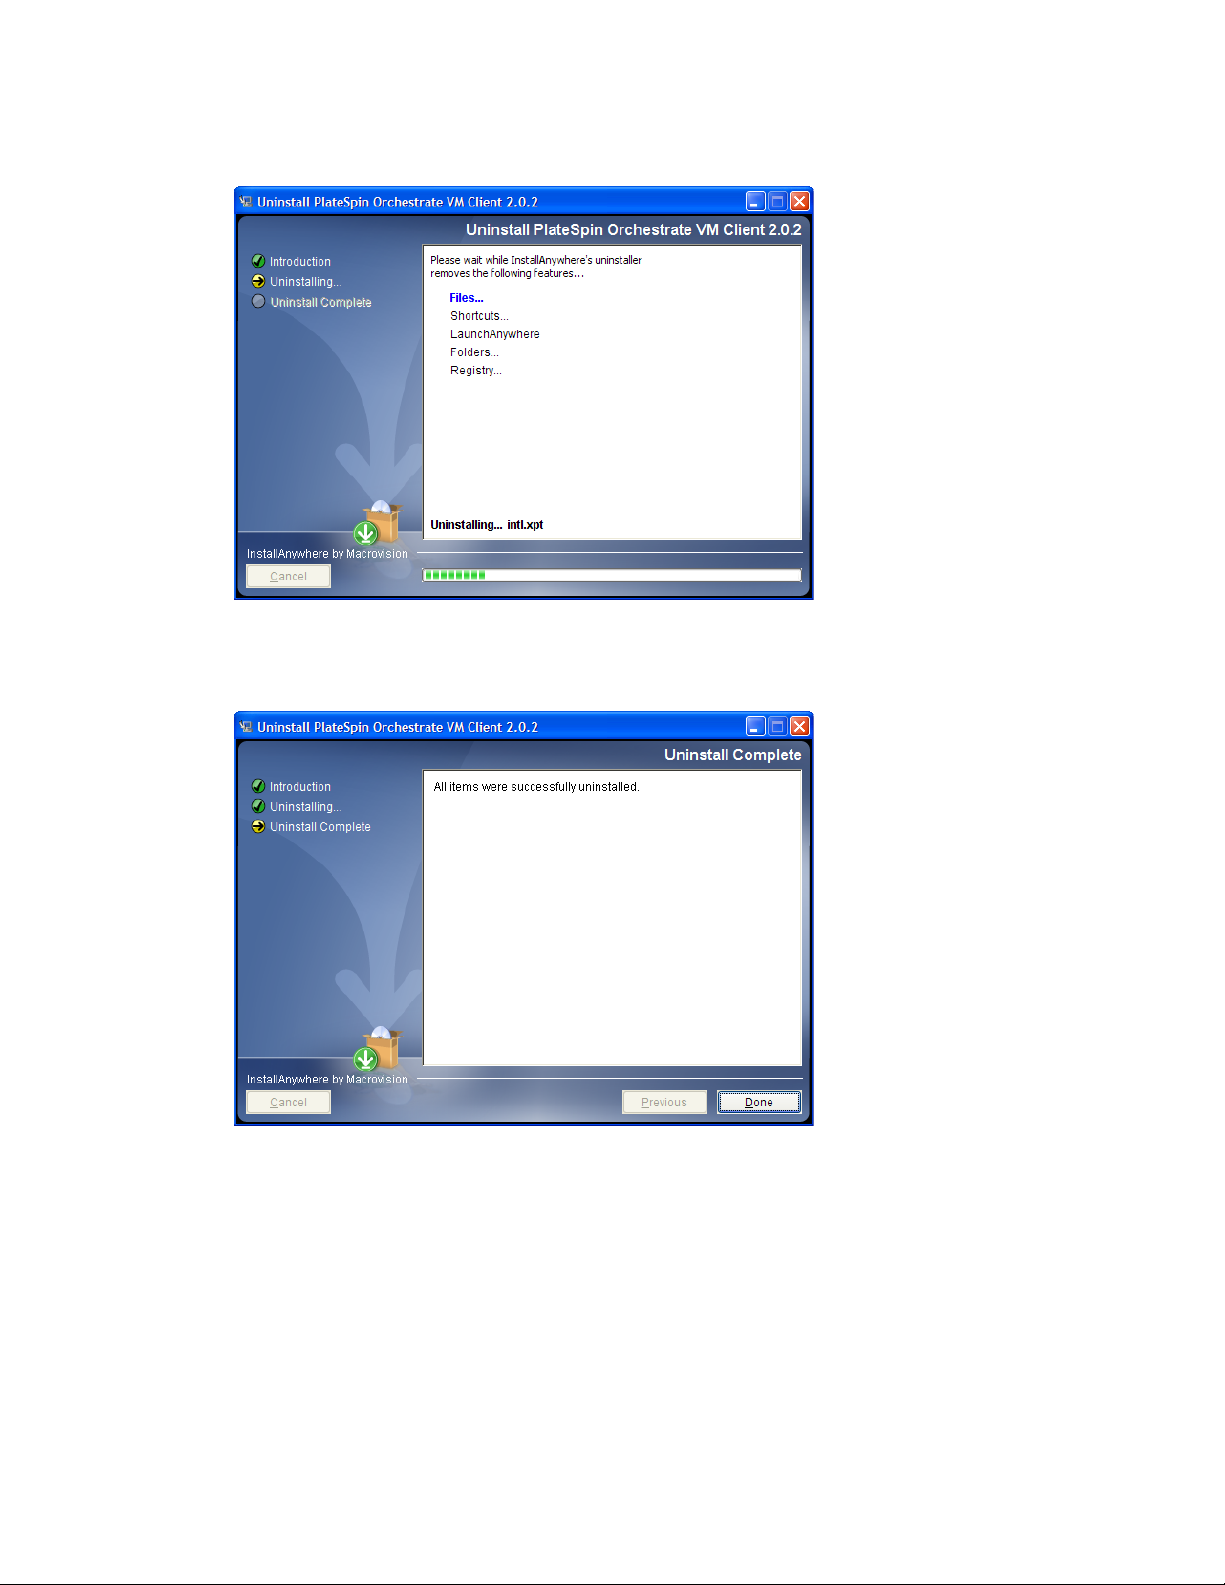
4 Click Next to display the Uninstalling page:
novdocx (en) 13 May 2009
This removes all installation files and registry settings.
After the installation has completed, the Uninstall Complete page is displayed:
5 Click Done to complete the uninstallation.
If you receive a message after it is uninstalled indicating that some folders could not be
removed, you must delete them manually.
2.6.2 Uninstalling Orchestrate VM Client in a Linux Environment
1 Run the following command:
/opt/novell/zenworks/vmmanagement/Uninstall_PlateSpin_VMM/
Uninstall_PlateSpin_Orchestrate_VM_Client_2.0.2
94 PlateSpin Orchestrate 2.0 Installation and Configuration Guide
Page 95
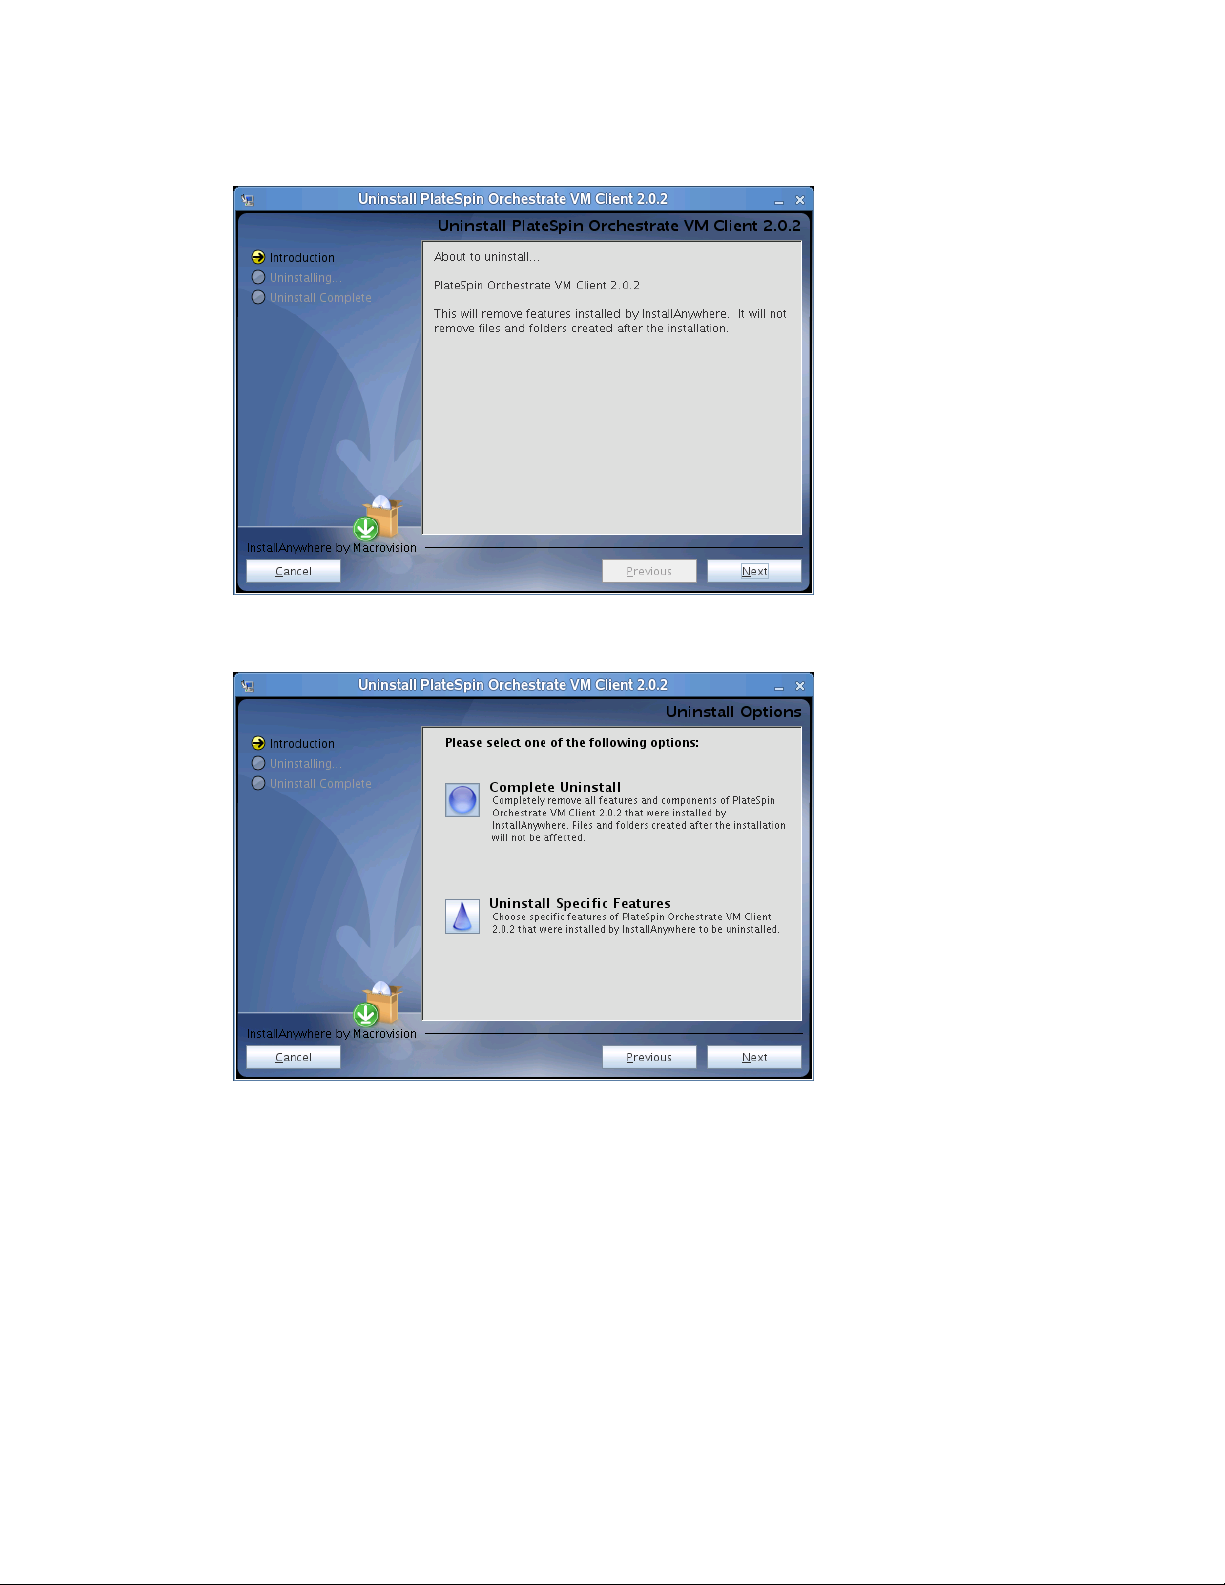
This opens the InstallAnyWhere utility, which displays the first wizard page:
novdocx (en) 13 May 2009
2 Click Next to display the Uninstall Options page:
Installation and Configuration 95
Page 96

3 Click Next to display the Uninstalling page:
novdocx (en) 13 May 2009
This removes all installation files.
After the installation has completed, the Uninstall Complete page is displayed:
4 Click Done to complete the uninstallation.
If you receive a message after it is uninstalled indicating that some folders could not be
removed, you must delete them manually.
2.7 Determining the Product Version
PlateSpin Orchestrate is a product made up of many components, which you choose whether to
install when you first install the product. If you are new to PlateSpin Orchestrate, if you need to
determine component compatibility, or if you need to confer with Novell Support, it is useful to
know how to obtain the version number of the different components.
96 PlateSpin Orchestrate 2.0 Installation and Configuration Guide
Page 97

One way to determine which version of the PlateSpin Orchestrate RPM packages you have installed
is to use the following command on the machine where an PlateSpin Orchestrate component is
installed:
rpm -qa | grep novell
The table below provides additional methods you can use to determine the version number for
PlateSpin Orchestrate components.
Table 2-4 Determining the Component Version Number in PlateSpin Orchestrate
Component How to Determine Version Number
Orchestrate Server At the Orchestrate Development Client Explorer view, select the
grid object, then open the Info/Configuration page of the
workspace panel. The version number is listed in the Server
Version field.
Advanced PlateSpin Orchestrate users can also find the version
value in the
matrix.version
fact.
novdocx (en) 13 May 2009
Orchestrate Agent After the agent is registered at the Orchestrate Development
Client Explorer view, select its resource object listed under
Resources, then open the Info/Groups page of the workspace
panel. On the Info/Groups page, select Agent Information. The
version number is listed in the Agent Version field.
Advanced PlateSpin Orchestrate users can also find the version
value in the
Orchestrate Development Client At the console, click Help > About PlateSpin Orchestrate Console.
Console version number and license expiration date is listed on
the About PlateSpin Orchestrate dialog box.
Command Line Tools (zos,
zosadmin)
VM Builder Version information is displayed in the Orchestrate VM Client.
Orchestrate VM Client Version information is displayed in the Orchestrate VM Client.
Orchestrate Monitoring Server On the command line of the machine where the Monitoring Server
No method is currently available.
is running, enter (at
the following command:
resources.agent.version
/opt/novell/zenworks/monitor/sbin
fact.
gmetad -V
gmetad -- version
Orchestrate Monitoring Agent On the command line of the machine where the agent is running,
enter (at
following command:
/opt/novell/zenworks/monitor/sbin
) the
)
gmond -V
gmond -- version
Installation and Configuration 97
Page 98

novdocx (en) 13 May 2009
98 PlateSpin Orchestrate 2.0 Installation and Configuration Guide
Page 99

3
First Use of Basic PlateSpin
novdocx (en) 13 May 2009
Orchestrate Components
After you install and configure the basic components of PlateSpin® Orchestrate from Novell®, (that
is, the PlateSpin Orchestrate Server, the PlateSpin Orchestrate Agent, and the PlateSpin Orchestrate
Clients), you will want to see them at work. The information in this section is organized sequentially
(that is, in a “walkthrough” scenario) so that you can follow the process an administrator might use
to begin applying PlateSpin Orchestrate capabilities in a production environment.
Section 3.1, “Walkthrough: Launching the PlateSpin Orchestrate Development Client,” on
page 99
Section 3.2, “Walkthrough: Logging In to the PlateSpin Orchestrate Server,” on page 101
Section 3.3, “Walkthrough: Creating a Resource Account,” on page 103
Section 3.4, “Walkthrough: Observing Discovery Jobs,” on page 110
Section 3.5, “Walkthrough: Deploying a Sample Job,” on page 111
Section 3.6, “Walkthrough: Creating a User Account,” on page 113
Section 3.7, “Walkthrough: Running the Sample Job,” on page 117
Section 3.8, “Walkthrough: Looking at the Job After It Has Run,” on page 118
Section 3.9, “Walkthrough: Using the zosadmin Command to Gather Information,” on
page 122
Section 3.10, “Stopping and Starting PlateSpin Orchestrate Components,” on page 122
3
The first three subsections listed above are basic tasks you need to perform to make the PlateSpin
Orchestrate system perform at a basic level. The other sections include information to help you
understand how the PlateSpin Orchestrate system can work in your production environment.
For information about the first use of PlateSpin Orchestrate VM Client components, see “Overview”
in the PlateSpin Orchestrate 2.0 VM Client Guide and Reference.
3.1 Walkthrough: Launching the PlateSpin Orchestrate Development Client
This section assumes that you have installed all of the basic PlateSpin Orchestrate components,
including the PlateSpin Orchestrate Server, the PlateSpin Orchestrate Agent, and the PlateSpin
Orchestrate Clients. For more information about installation, see Chapter 2, “Installation and
Configuration,” on page 21.
The installation of the Orchestrate Clients actually installs four separate subcomponents: the
PlateSpin Orchestrate Development Client, the zos command line interface, the zosadmin command
line interface, and the Java SDK (toolkit) for PlateSpin Orchestrate. The Development Client and
the command line interfaces (CLIs) constitute the clients for the product. You can use them to
troubleshoot, initiate, change, or shut down server functions for PlateSpin Orchestrate and its
computing resources. For more information about installing these clients, see Section 2.3,
“Installing the Orchestrate Agent Only,” on page 45.
First Use of Basic PlateSpin Orchestrate Components
99
Page 100
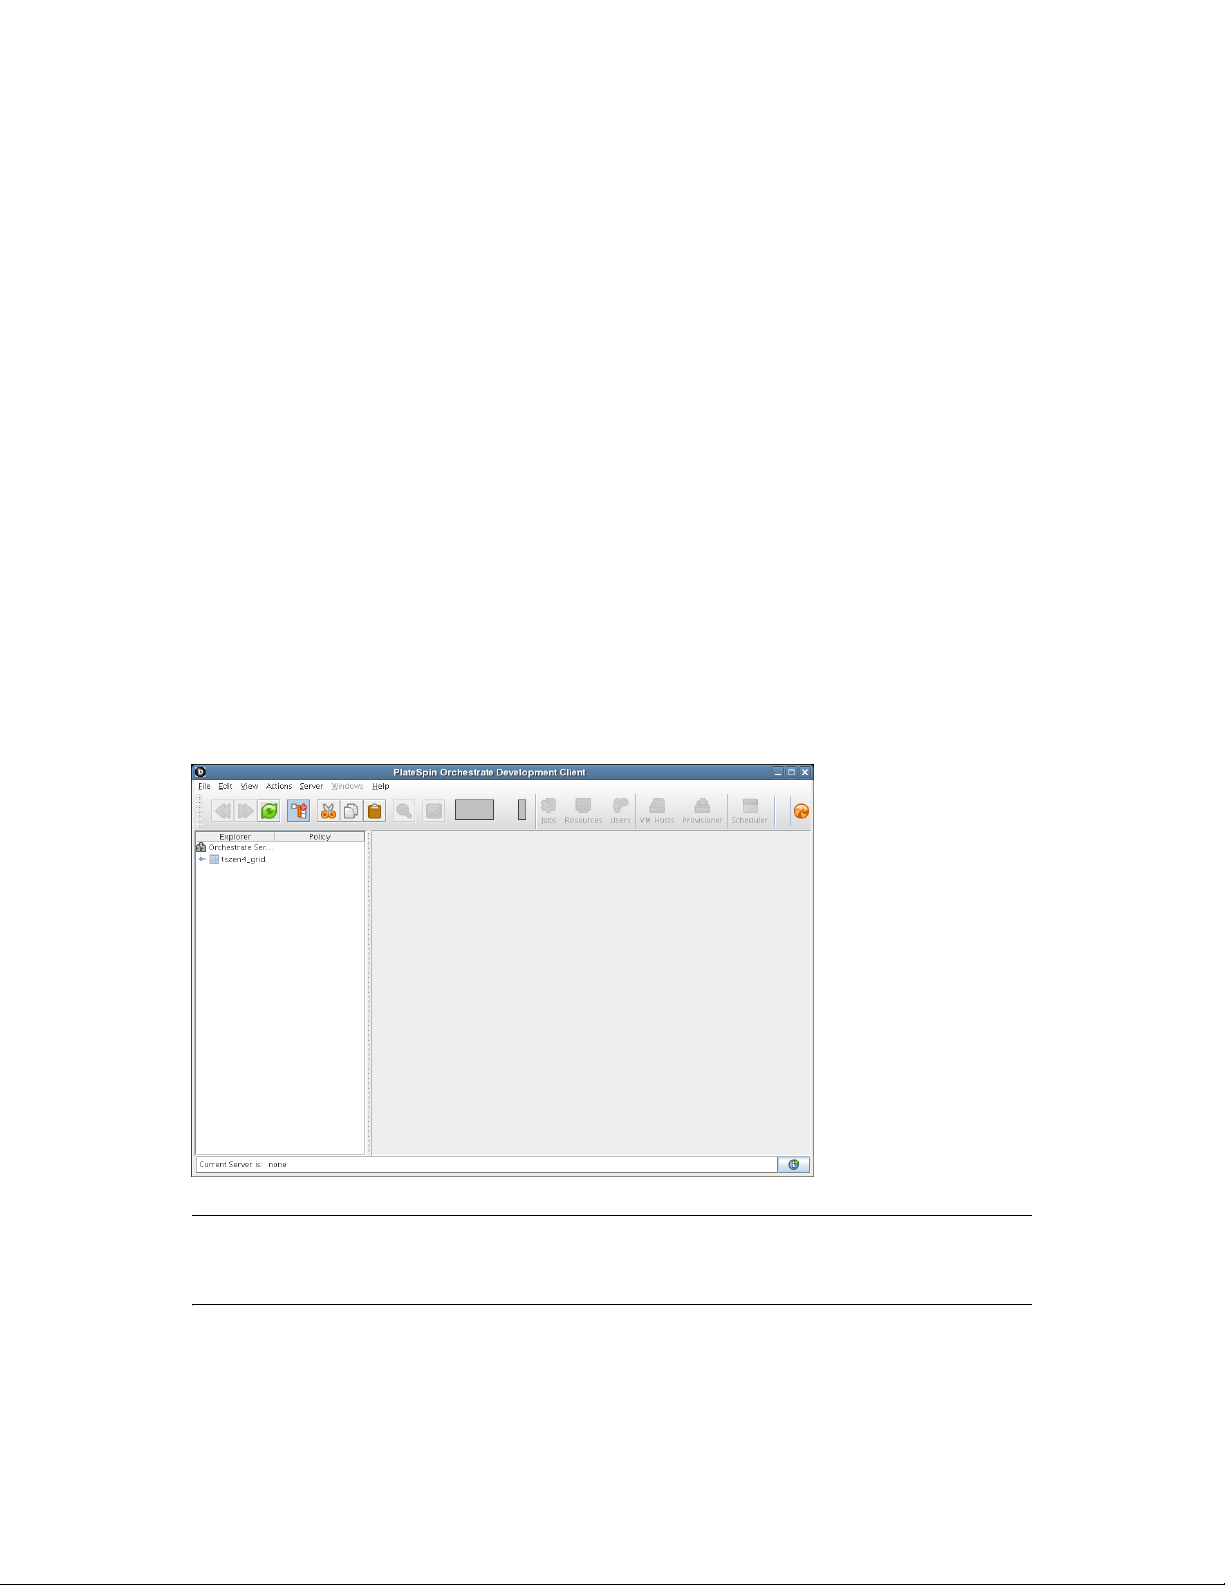
Those who use the Orchestrate Development Client are the job developer, who uses the tools in the
Development Client to create and debug jobs, and the PlateSpin Orchestrate administrator
(sometimes called the grid administrator), who oversees job deployment and overall PlateSpin
Orchestrate usage.
To launch the Development Client:
1 Navigate to the location where the Development Client was installed.
SLES 10 SP2: Change to the following directory:
/opt/novell/zenworks/zos/server/bin
Windows: In the Start menu, click Programs > Novell > ZOS > Clients.
2 Launch the Development Client.
SLES 10 SP2: Use the following command to launch the Orchestrate Development
Client:
./zoc
Windows: In the Start menu, click Programs > Novell > ZOS > Clients submenu, click
ZOS Management Console.
novdocx (en) 13 May 2009
When the Orchestrate Development Client is launched, it broadcasts throughout the network to
discover all of the PlateSpin Orchestrate Servers that have been previously installed. The server or
servers are displayed at the root of the Explorer panel in the Development Client.
Figure 3-1 PlateSpin Orchestrate Development Client After First Launch
NOTE: PlateSpin Orchestrate Server discovery by the Development Client might not find and
display Orchestrate Servers that are installed on virtual machines; the Development Client can only
discover servers on a broadcast-capable network.
To begin using the Development Client, you first need to log in to an Orchestrate Server. To
understand and continue with the server login process, see Section 3.2, “Walkthrough: Logging In to
the PlateSpin Orchestrate Server,” on page 101.
100 PlateSpin Orchestrate 2.0 Installation and Configuration Guide
 Loading...