

Page 1

Novell Open Workgroup Suite Small Business Edition 9.3 Administration and Installation Guide
Novell
Open Workgroup Suite Small
Business Edition
novdocx (en) 11 December 2007
9.3
October 2007
www.novell.com
INSTALLATION AND
ADMINISTRATION GUIDE
Page 2

Legal Notices
Novell, Inc., makes no representations or warranties with respect to the contents or use of this documentation, and
specifically disclaims any express or implied warranties of merchantability or fitness for any particular purpose.
Further, Novell, Inc., reserves the right to revise this publication and to make changes to its content, at any time,
without obligation to notify any person or entity of such revisions or changes.
Further, Novell, Inc., makes no representations or warranties with respect to any software, and specifically disclaims
any express or implied warranties of merchantability or fitness for any particular purpose. Further, Novell, Inc.,
reserves the right to make changes to any and all parts of Novell software, at any time, without any obligation to
notify any person or entity of such changes.
Any products or technical information provided under this Agreement may be subject to U.S. export controls and the
trade laws of other countries. You agree to comply with all export control regulations and to obtain any required
licenses or classification to export, re-export or import deliverables. You agree not to export or re-export to entities on
the current U.S. export exclusion lists or to any embargoed or terrorist countries as specified in the U.S. export laws.
You agree to not use deliverables for prohibited nuclear, missile, or chemical biological weaponry end uses. See the
Novell International Trade Services Web page (http://www.novell.com/info/exports/) for more information on
exporting Novell software. Novell assumes no responsibility for your failure to obtain any necessary export
approvals.
novdocx (en) 11 December 2007
Copyright © 2007 Novell, Inc. All rights reserved. No part of this publication may be reproduced, photocopied,
stored on a retrieval system, or transmitted without the express written consent of the publisher.
Novell, Inc., has intellectual property rights relating to technology embodied in the product that is described in this
document. In particular, and without limitation, these intellectual property rights may include one or more of the U.S.
patents listed on the Novell Legal Patents Web page (http://www.novell.com/company/legal/patents/) and one or
more additional patents or pending patent applications in the U.S. and in other countries.
Novell, Inc.
404 Wyman Street, Suite 500
Waltham, MA 02451
U.S.A.
www.novell.com
Online Documentation: To access the latest online documentation for this and other Novell products, see
the Novell Documentation Web page (http://www.novell.com/documentation).
Page 3

Novell Trademarks
For Novell trademarks, see the Novell Trademark and Service Mark list (http://www.novell.com/company/legal/
trademarks/tmlist.html).
Third-Party Materials
All third-party trademarks are the property of their respective owners.
novdocx (en) 11 December 2007
Page 4

novdocx (en) 11 December 2007
Page 5

Contents
About This Guide 9
1 Understanding NOWS SBE 11
1.1 Overview . . . . . . . . . . . . . . . . . . . . . . . . . . . . . . . . . . . . . . . . . . . . . . . . . . . . . . . . . . . . . . . . . 11
1.2 Product Components . . . . . . . . . . . . . . . . . . . . . . . . . . . . . . . . . . . . . . . . . . . . . . . . . . . . . . . . 11
1.2.1 Backup, Restore, and Recovery . . . . . . . . . . . . . . . . . . . . . . . . . . . . . . . . . . . . . . . . 11
1.2.2 Business Applications . . . . . . . . . . . . . . . . . . . . . . . . . . . . . . . . . . . . . . . . . . . . . . . . 12
1.2.3 Collaboration Groupware and Messaging . . . . . . . . . . . . . . . . . . . . . . . . . . . . . . . . . 12
1.2.4 File, Print, and Fax . . . . . . . . . . . . . . . . . . . . . . . . . . . . . . . . . . . . . . . . . . . . . . . . . . 12
1.2.5 Security Management . . . . . . . . . . . . . . . . . . . . . . . . . . . . . . . . . . . . . . . . . . . . . . . . 12
1.2.6 Systems Management. . . . . . . . . . . . . . . . . . . . . . . . . . . . . . . . . . . . . . . . . . . . . . . . 13
1.3 Requirements . . . . . . . . . . . . . . . . . . . . . . . . . . . . . . . . . . . . . . . . . . . . . . . . . . . . . . . . . . . . . 13
1.3.1 Approved and Tested Hardware List . . . . . . . . . . . . . . . . . . . . . . . . . . . . . . . . . . . . . 13
1.3.2 Server Requirements . . . . . . . . . . . . . . . . . . . . . . . . . . . . . . . . . . . . . . . . . . . . . . . . 13
1.3.3 Desktop Operating System and Browser Requirements. . . . . . . . . . . . . . . . . . . . . . 14
1.4 Planning for the NOWS SBE Install. . . . . . . . . . . . . . . . . . . . . . . . . . . . . . . . . . . . . . . . . . . . . 14
1.4.1 Server . . . . . . . . . . . . . . . . . . . . . . . . . . . . . . . . . . . . . . . . . . . . . . . . . . . . . . . . . . . . 15
1.4.2 Installing Two NICs with NOWS SBE . . . . . . . . . . . . . . . . . . . . . . . . . . . . . . . . . . . . 15
1.4.3 Firewall (IPTables ) . . . . . . . . . . . . . . . . . . . . . . . . . . . . . . . . . . . . . . . . . . . . . . . . . . 15
1.4.4 Component Install Order . . . . . . . . . . . . . . . . . . . . . . . . . . . . . . . . . . . . . . . . . . . . . . 16
1.4.5 Creating a New Directory . . . . . . . . . . . . . . . . . . . . . . . . . . . . . . . . . . . . . . . . . . . . . 16
1.4.6 NetWork Backup (Amanda). . . . . . . . . . . . . . . . . . . . . . . . . . . . . . . . . . . . . . . . . . . . 16
1.4.7 E-Mail and Collaboration (GroupWise) . . . . . . . . . . . . . . . . . . . . . . . . . . . . . . . . . . . 16
1.4.8 Helpdesk . . . . . . . . . . . . . . . . . . . . . . . . . . . . . . . . . . . . . . . . . . . . . . . . . . . . . . . . . . 16
novdocx (en) 11 December 2007
2 Getting Started 17
2.1 Installing Novell Workgroup Suite Small Business Edition . . . . . . . . . . . . . . . . . . . . . . . . . . . 17
2.1.1 Using YaST to Install the Novell Open Workgroup Suite Small Business Edition. . . 17
2.1.2 Using the NOWS SBE DVD to Install the Novell Open Workgroup Suite Small Business
Edition . . . . . . . . . . . . . . . . . . . . . . . . . . . . . . . . . . . . . . . . . . . . . . . . . . . . . . . . . . . . 18
2.2 Administering the Novell Open Workgroup Suite Small Business Edition . . . . . . . . . . . . . . . . 20
2.2.1 Components Panel . . . . . . . . . . . . . . . . . . . . . . . . . . . . . . . . . . . . . . . . . . . . . . . . . . 20
2.2.2 Tasks Panel. . . . . . . . . . . . . . . . . . . . . . . . . . . . . . . . . . . . . . . . . . . . . . . . . . . . . . . . 22
2.2.3 Basic View Panel. . . . . . . . . . . . . . . . . . . . . . . . . . . . . . . . . . . . . . . . . . . . . . . . . . . . 23
2.2.4 Server Updates Panel . . . . . . . . . . . . . . . . . . . . . . . . . . . . . . . . . . . . . . . . . . . . . . . . 23
2.2.5 Component Updates . . . . . . . . . . . . . . . . . . . . . . . . . . . . . . . . . . . . . . . . . . . . . . . . . 23
2.3 Configuring Components . . . . . . . . . . . . . . . . . . . . . . . . . . . . . . . . . . . . . . . . . . . . . . . . . . . . . 23
3 Directory Services (eDirectory) 25
3.1 Installing eDirectory Basic . . . . . . . . . . . . . . . . . . . . . . . . . . . . . . . . . . . . . . . . . . . . . . . . . . . . 25
3.2 Installing eDirectory Advanced - New Tree . . . . . . . . . . . . . . . . . . . . . . . . . . . . . . . . . . . . . . . 26
3.3 Installing eDirectory Advanced - Existing Tree . . . . . . . . . . . . . . . . . . . . . . . . . . . . . . . . . . . . 28
3.4 Installing eDirectory Advanced - Remote Tree . . . . . . . . . . . . . . . . . . . . . . . . . . . . . . . . . . . . 30
3.5 Post-Installation . . . . . . . . . . . . . . . . . . . . . . . . . . . . . . . . . . . . . . . . . . . . . . . . . . . . . . . . . . . . 31
3.5.1 Desktop Download . . . . . . . . . . . . . . . . . . . . . . . . . . . . . . . . . . . . . . . . . . . . . . . . . . 31
3.5.2 ConsoleOne . . . . . . . . . . . . . . . . . . . . . . . . . . . . . . . . . . . . . . . . . . . . . . . . . . . . . . . 32
3.5.3 Helpful Links . . . . . . . . . . . . . . . . . . . . . . . . . . . . . . . . . . . . . . . . . . . . . . . . . . . . . . . 32
Contents 5
Page 6

4 Management Tools (iManager) 33
4.1 Installing iManager Basic . . . . . . . . . . . . . . . . . . . . . . . . . . . . . . . . . . . . . . . . . . . . . . . . . . . . . 33
4.2 Installing iManager Advanced . . . . . . . . . . . . . . . . . . . . . . . . . . . . . . . . . . . . . . . . . . . . . . . . . 34
4.3 Post-Installation . . . . . . . . . . . . . . . . . . . . . . . . . . . . . . . . . . . . . . . . . . . . . . . . . . . . . . . . . . . . 34
4.3.1 iManager Features . . . . . . . . . . . . . . . . . . . . . . . . . . . . . . . . . . . . . . . . . . . . . . . . . . . 34
4.3.2 How to Create Users, Groups, and Designate the NOWS SBE Administrator . . . . . 34
4.3.3 Helpful Links. . . . . . . . . . . . . . . . . . . . . . . . . . . . . . . . . . . . . . . . . . . . . . . . . . . . . . . . 35
5 Personal File Backup (iFolder) 37
5.1 Installing iFolder Basic . . . . . . . . . . . . . . . . . . . . . . . . . . . . . . . . . . . . . . . . . . . . . . . . . . . . . . . 37
5.2 Installing iFolder Advanced . . . . . . . . . . . . . . . . . . . . . . . . . . . . . . . . . . . . . . . . . . . . . . . . . . . 38
5.3 Post-Installation . . . . . . . . . . . . . . . . . . . . . . . . . . . . . . . . . . . . . . . . . . . . . . . . . . . . . . . . . . . . 39
5.3.1 iFolder Web Client Desktop Download . . . . . . . . . . . . . . . . . . . . . . . . . . . . . . . . . . . 39
5.3.2 iFolder Administration Desktop Download . . . . . . . . . . . . . . . . . . . . . . . . . . . . . . . . 39
6 Network Backup (Amanda) 41
6.1 Installing Amanda Basic . . . . . . . . . . . . . . . . . . . . . . . . . . . . . . . . . . . . . . . . . . . . . . . . . . . . . . 41
6.2 Installing Amanda Advanced . . . . . . . . . . . . . . . . . . . . . . . . . . . . . . . . . . . . . . . . . . . . . . . . . . 42
6.3 Post-Installation . . . . . . . . . . . . . . . . . . . . . . . . . . . . . . . . . . . . . . . . . . . . . . . . . . . . . . . . . . . . 43
6.3.1 Labeling Tapes. . . . . . . . . . . . . . . . . . . . . . . . . . . . . . . . . . . . . . . . . . . . . . . . . . . . . . 43
6.3.2 Backup Scheduling and Configuration . . . . . . . . . . . . . . . . . . . . . . . . . . . . . . . . . . . . 44
novdocx (en) 11 December 2007
7 OpenOffice 45
7.1 Installing OpenOffice Basic . . . . . . . . . . . . . . . . . . . . . . . . . . . . . . . . . . . . . . . . . . . . . . . . . . . 45
7.2 Post-Installation . . . . . . . . . . . . . . . . . . . . . . . . . . . . . . . . . . . . . . . . . . . . . . . . . . . . . . . . . . . . 45
8 E-Mail Collaboration and Groupware (GroupWise) 47
8.1 Installing GroupWise Basic. . . . . . . . . . . . . . . . . . . . . . . . . . . . . . . . . . . . . . . . . . . . . . . . . . . . 47
8.2 Installing Groupwise Advanced . . . . . . . . . . . . . . . . . . . . . . . . . . . . . . . . . . . . . . . . . . . . . . . . 48
8.3 Post-Installation . . . . . . . . . . . . . . . . . . . . . . . . . . . . . . . . . . . . . . . . . . . . . . . . . . . . . . . . . . . . 49
8.3.1 GroupWise Client Desktop Download . . . . . . . . . . . . . . . . . . . . . . . . . . . . . . . . . . . . 49
8.3.2 GroupWise Instant Messenger Desktop Download . . . . . . . . . . . . . . . . . . . . . . . . . . 50
8.3.3 Installing ConsoleOne for Advanced Administrative Tasks . . . . . . . . . . . . . . . . . . . . 50
8.3.4 Configuring WebAccess. . . . . . . . . . . . . . . . . . . . . . . . . . . . . . . . . . . . . . . . . . . . . . . 50
8.3.5 Using GroupWise Monitor . . . . . . . . . . . . . . . . . . . . . . . . . . . . . . . . . . . . . . . . . . . . . 51
8.3.6 Considerations for using MailScanner . . . . . . . . . . . . . . . . . . . . . . . . . . . . . . . . . . . . 51
9 Print Services (iPrint) 53
9.1 Installing iPrint Basic . . . . . . . . . . . . . . . . . . . . . . . . . . . . . . . . . . . . . . . . . . . . . . . . . . . . . . . . 53
9.2 Post-Installation . . . . . . . . . . . . . . . . . . . . . . . . . . . . . . . . . . . . . . . . . . . . . . . . . . . . . . . . . . . . 54
9.2.1 Creating a Driver Store . . . . . . . . . . . . . . . . . . . . . . . . . . . . . . . . . . . . . . . . . . . . . . . 54
9.2.2 Creating a Print Manager . . . . . . . . . . . . . . . . . . . . . . . . . . . . . . . . . . . . . . . . . . . . . . 55
9.2.3 Creating a Printer . . . . . . . . . . . . . . . . . . . . . . . . . . . . . . . . . . . . . . . . . . . . . . . . . . . . 55
9.2.4 Installing Printer from /ipp and Print . . . . . . . . . . . . . . . . . . . . . . . . . . . . . . . . . . . . . . 55
10 Windows File and Print Sharing (Samba) 57
10.1 Installing Samba Basic . . . . . . . . . . . . . . . . . . . . . . . . . . . . . . . . . . . . . . . . . . . . . . . . . . . . . . . 57
10.2 Installing Samba Advanced . . . . . . . . . . . . . . . . . . . . . . . . . . . . . . . . . . . . . . . . . . . . . . . . . . . 58
6 Novell Open Workgroup Suite Small Business Edition 9.3 Administration and Installation Guide
Page 7

10.3 Post-Installation . . . . . . . . . . . . . . . . . . . . . . . . . . . . . . . . . . . . . . . . . . . . . . . . . . . . . . . . . . . . 59
10.3.1 Creating a Samba User. . . . . . . . . . . . . . . . . . . . . . . . . . . . . . . . . . . . . . . . . . . . . . . 59
10.3.2 Creating a Group. . . . . . . . . . . . . . . . . . . . . . . . . . . . . . . . . . . . . . . . . . . . . . . . . . . . 60
10.3.3 Assigning a Password . . . . . . . . . . . . . . . . . . . . . . . . . . . . . . . . . . . . . . . . . . . . . . . . 60
10.3.4 Enabling Groups for LUM (Linux User Management) . . . . . . . . . . . . . . . . . . . . . . . . 60
10.3.5 Enabling a User for LUM . . . . . . . . . . . . . . . . . . . . . . . . . . . . . . . . . . . . . . . . . . . . . . 60
10.3.6 Enabling a User for Samba . . . . . . . . . . . . . . . . . . . . . . . . . . . . . . . . . . . . . . . . . . . . 61
10.3.7 Enabling a Domain . . . . . . . . . . . . . . . . . . . . . . . . . . . . . . . . . . . . . . . . . . . . . . . . . . 61
10.3.8 Launching Samba from the Administration Link . . . . . . . . . . . . . . . . . . . . . . . . . . . . 61
11 Fax Server (HylaFAX) 63
11.1 Installing HylaFAX Basic . . . . . . . . . . . . . . . . . . . . . . . . . . . . . . . . . . . . . . . . . . . . . . . . . . . . . 63
11.2 Installing HylaFAX Advanced . . . . . . . . . . . . . . . . . . . . . . . . . . . . . . . . . . . . . . . . . . . . . . . . . 64
11.3 Post-Installation . . . . . . . . . . . . . . . . . . . . . . . . . . . . . . . . . . . . . . . . . . . . . . . . . . . . . . . . . . . . 65
11.3.1 Desktop Download for Linux . . . . . . . . . . . . . . . . . . . . . . . . . . . . . . . . . . . . . . . . . . . 65
11.3.2 Desktop Download for OS X and Windows . . . . . . . . . . . . . . . . . . . . . . . . . . . . . . . . 66
12 Anti-Spam (MailScanner) 67
12.1 Installing MailScanner Basic . . . . . . . . . . . . . . . . . . . . . . . . . . . . . . . . . . . . . . . . . . . . . . . . . . 67
12.2 Installing MailScanner Advanced . . . . . . . . . . . . . . . . . . . . . . . . . . . . . . . . . . . . . . . . . . . . . . . 67
12.3 Post-Installation . . . . . . . . . . . . . . . . . . . . . . . . . . . . . . . . . . . . . . . . . . . . . . . . . . . . . . . . . . . . 67
12.3.1 Configuring MailScanner to Scan Mail . . . . . . . . . . . . . . . . . . . . . . . . . . . . . . . . . . . 67
12.3.2 Helpful Links . . . . . . . . . . . . . . . . . . . . . . . . . . . . . . . . . . . . . . . . . . . . . . . . . . . . . . . 67
novdocx (en) 11 December 2007
13 Anti-Virus (ClamAV) 69
13.1 Installing ClamAV Basic. . . . . . . . . . . . . . . . . . . . . . . . . . . . . . . . . . . . . . . . . . . . . . . . . . . . . . 69
13.2 Installing ClamAV Advanced . . . . . . . . . . . . . . . . . . . . . . . . . . . . . . . . . . . . . . . . . . . . . . . . . . 69
13.3 Post-Installation . . . . . . . . . . . . . . . . . . . . . . . . . . . . . . . . . . . . . . . . . . . . . . . . . . . . . . . . . . . . 72
13.3.1 ClamAV Client Desktop Download . . . . . . . . . . . . . . . . . . . . . . . . . . . . . . . . . . . . . . 72
13.3.2 ClamAV Signatures Desktop Download . . . . . . . . . . . . . . . . . . . . . . . . . . . . . . . . . . 73
13.3.3 Scan Scheduling . . . . . . . . . . . . . . . . . . . . . . . . . . . . . . . . . . . . . . . . . . . . . . . . . . . . 73
13.3.4 Helpful Links . . . . . . . . . . . . . . . . . . . . . . . . . . . . . . . . . . . . . . . . . . . . . . . . . . . . . . . 73
14 VPN Server (OpenVPN) 75
14.1 Installing OpenVPN Basic . . . . . . . . . . . . . . . . . . . . . . . . . . . . . . . . . . . . . . . . . . . . . . . . . . . . 75
14.2 Installing OpenVPN Advanced . . . . . . . . . . . . . . . . . . . . . . . . . . . . . . . . . . . . . . . . . . . . . . . . 76
14.3 Post-Installation . . . . . . . . . . . . . . . . . . . . . . . . . . . . . . . . . . . . . . . . . . . . . . . . . . . . . . . . . . . . 77
14.3.1 Monitoring Clients Connected to OpenVPN . . . . . . . . . . . . . . . . . . . . . . . . . . . . . . . 78
14.3.2 Creating the OpenVPN Certificates for Clients in the Key Management Interface . . 78
14.3.3 Installing the Windows OpenVPN . . . . . . . . . . . . . . . . . . . . . . . . . . . . . . . . . . . . . . . 79
14.4 VPN Site-to-Site. . . . . . . . . . . . . . . . . . . . . . . . . . . . . . . . . . . . . . . . . . . . . . . . . . . . . . . . . . . . 80
14.4.1 Installing Two NICs . . . . . . . . . . . . . . . . . . . . . . . . . . . . . . . . . . . . . . . . . . . . . . . . . . 80
14.4.2 VPN Site-to-Site Setup . . . . . . . . . . . . . . . . . . . . . . . . . . . . . . . . . . . . . . . . . . . . . . . 81
14.4.3 Troubleshooting Tips . . . . . . . . . . . . . . . . . . . . . . . . . . . . . . . . . . . . . . . . . . . . . . . . . 82
15 Firewall (IPTables) 83
15.1 Installing IPTables Basic . . . . . . . . . . . . . . . . . . . . . . . . . . . . . . . . . . . . . . . . . . . . . . . . . . . . . 83
15.2 Installing IPTables Advanced . . . . . . . . . . . . . . . . . . . . . . . . . . . . . . . . . . . . . . . . . . . . . . . . . 83
15.3 Post-Installation . . . . . . . . . . . . . . . . . . . . . . . . . . . . . . . . . . . . . . . . . . . . . . . . . . . . . . . . . . . . 84
15.3.1 Firewall Configuration . . . . . . . . . . . . . . . . . . . . . . . . . . . . . . . . . . . . . . . . . . . . . . . . 84
Contents 7
Page 8

16 Dynamic Local User 85
16.1 Installing DLU Basic . . . . . . . . . . . . . . . . . . . . . . . . . . . . . . . . . . . . . . . . . . . . . . . . . . . . . . . . . 85
16.2 Installing DLU Advanced . . . . . . . . . . . . . . . . . . . . . . . . . . . . . . . . . . . . . . . . . . . . . . . . . . . . . 85
16.3 Post-Installation . . . . . . . . . . . . . . . . . . . . . . . . . . . . . . . . . . . . . . . . . . . . . . . . . . . . . . . . . . . . 86
17 Helpdesk 89
17.1 Installing Helpdesk Basic . . . . . . . . . . . . . . . . . . . . . . . . . . . . . . . . . . . . . . . . . . . . . . . . . . . . . 89
17.2 Installing Helpdesk Advanced . . . . . . . . . . . . . . . . . . . . . . . . . . . . . . . . . . . . . . . . . . . . . . . . . 90
17.3 Post-Installation . . . . . . . . . . . . . . . . . . . . . . . . . . . . . . . . . . . . . . . . . . . . . . . . . . . . . . . . . . . . 94
18 DHCP 95
18.1 Installing DHCP Basic . . . . . . . . . . . . . . . . . . . . . . . . . . . . . . . . . . . . . . . . . . . . . . . . . . . . . . . 95
18.2 Installing DHCP Advanced . . . . . . . . . . . . . . . . . . . . . . . . . . . . . . . . . . . . . . . . . . . . . . . . . . . . 96
18.3 Post-Installation . . . . . . . . . . . . . . . . . . . . . . . . . . . . . . . . . . . . . . . . . . . . . . . . . . . . . . . . . . . . 97
19 DNS 99
novdocx (en) 11 December 2007
19.1 Installing Basic DNS . . . . . . . . . . . . . . . . . . . . . . . . . . . . . . . . . . . . . . . . . . . . . . . . . . . . . . . . . 99
19.2 Post-Installation . . . . . . . . . . . . . . . . . . . . . . . . . . . . . . . . . . . . . . . . . . . . . . . . . . . . . . . . . . . 100
20 Remote Desktop (TightVNC) 101
20.1 Installing TightVNC Basic . . . . . . . . . . . . . . . . . . . . . . . . . . . . . . . . . . . . . . . . . . . . . . . . . . . . 101
20.2 Post-Installation . . . . . . . . . . . . . . . . . . . . . . . . . . . . . . . . . . . . . . . . . . . . . . . . . . . . . . . . . . . 102
20.2.1 TightVNC Desktop Download for Linux . . . . . . . . . . . . . . . . . . . . . . . . . . . . . . . . . . 102
20.2.2 TightVNC Desktop Download for Windows . . . . . . . . . . . . . . . . . . . . . . . . . . . . . . . 102
20.2.3 TightVNC Desktop Download for the Windows Terminal Services Client for Linux . 102
20.2.4 TightVNC Desktop Download for MAC OS X. . . . . . . . . . . . . . . . . . . . . . . . . . . . . . 103
20.2.5 TightVNC Desktop Download for the Putty SSH Client for Windows. . . . . . . . . . . . 103
20.2.6 Helpful Links. . . . . . . . . . . . . . . . . . . . . . . . . . . . . . . . . . . . . . . . . . . . . . . . . . . . . . . 103
21 Uninstalling Components 105
8 Novell Open Workgroup Suite Small Business Edition 9.3 Administration and Installation Guide
Page 9

About This Guide
Novell® Open Workgroup Suite Small Business Edition (NOWS SBE) is the first workgroup suite
for small businesses that provides organizations with a flexible solution based on proven, open
standards based software. The Novell suite features a simple, yet customizable installation process
along with remote management capabilities. This means that solution providers can remotely
manage their small business customers’ IT infrastructures, thus reducing costs and improving
service.
Chapter 1, “Understanding NOWS SBE,” on page 11
Chapter 2, “Getting Started,” on page 17
Chapter 3, “Directory Services (eDirectory),” on page 25
Chapter 4, “Management Tools (iManager),” on page 33
Chapter 5, “Personal File Backup (iFolder),” on page 37
Chapter 6, “Network Backup (Amanda),” on page 41
novdocx (en) 11 December 2007
Chapter 7, “OpenOffice,” on page 45
Chapter 8, “E-Mail Collaboration and Groupware (GroupWise),” on page 47
Chapter 9, “Print Services (iPrint),” on page 53
Chapter 10, “Windows File and Print Sharing (Samba),” on page 57
Chapter 11, “Fax Server (HylaFAX),” on page 63
Chapter 12, “Anti-Spam (MailScanner),” on page 67
Chapter 13, “Anti-Virus (ClamAV),” on page 69
Chapter 14, “VPN Server (OpenVPN),” on page 75
Chapter 15, “Firewall (IPTables),” on page 83
Chapter 16, “Dynamic Local User,” on page 85
Chapter 17, “Helpdesk,” on page 89
Chapter 18, “DHCP,” on page 95
Chapter 19, “DNS,” on page 99
Chapter 20, “Remote Desktop (TightVNC),” on page 101
Chapter 21, “Uninstalling Components,” on page 105
Audience
This guide is intended for Novell Open Workgroup Suite Small Business Edition administrators.
Feedback
We want to hear your comments and suggestions about this manual and the other documentation
included with this product. Please use the User Comments feature at the bottom of each page of the
online documentation, or go to www.novell.com/documentation/feedback.html and enter your
comments there.
About This Guide
9
Page 10

Documentation Updates
For the most recent version of the Novell Open Workgroup Suite Small Business Edition
Administration and Installation Guide, visit the Novell Documentation Web site (http://
www.novell.com/documentation/nows/).
Documentation Conventions
In Novell documentation, a greater-than symbol (>) is used to separate actions within a step and
items in a cross-reference path.
®
A trademark symbol (
, TM, etc.) denotes a Novell trademark. An asterisk (*) denotes a third-party
trademark.
When a single pathname can be written with a backslash for some platforms or a forward slash for
other platforms, the pathname is presented with a backslash. Users of platforms that require a
forward slash, such as Linux* or UNIX*, should use forward slashes as required by your software.
novdocx (en) 11 December 2007
10 Novell Open Workgroup Suite Small Business Edition 9.3 Administration and Installation Guide
Page 11

1
Understanding NOWS SBE
Section 1.1, “Overview,” on page 11
Section 1.2, “Product Components,” on page 11
Section 1.3, “Requirements,” on page 13
Section 1.4, “Planning for the NOWS SBE Install,” on page 14
1.1 Overview
Novell® Open Workgroup Suite Small Business Edition (NOWS SBE) is the first workgroup suite
for small businesses that provides organizations with a flexible solution based on proven, open
standards based software. The Novell suite features a simple, yet customizable installation process
along with remote management capabilities. This means that solution providers can remotely
manage their small business customers’ IT infrastructures, thus reducing costs and improving
service.
novdocx (en) 11 December 2007
1
The Novell Open Workgroup Suite Small Business Edition also has a newly developed integration
layer that makes it easier for resellers and service providers to integrate their specialized products
into a solution. The suite is supported by popular business software applications certified to work
with SUSE
Novell Groupwise
advanced storage management, user and rights administration, and clustering and failover
capabilities; SUSE Linux Enterprise Desktop from Novell for complete desktop productivity; and
the Novell edition of the popular office productivity suite, OpenOffice.org, for Windows and Linux.
®
Linux Enterprise. Novell Open Workgroup Suite Small Business Edition includes
®
for e-mailing and calendaring; Novell Open Enterprise Server (OES) for
1.2 Product Components
Novell Open Workgroup Suite Small Business Edition includes a comprehensive collection of
services and applications that provide small offices with all the networking capabilities that are in a
corporate setting. The following solutions and features are part of the suite.
Section 1.2.1, “Backup, Restore, and Recovery,” on page 11
Section 1.2.2, “Business Applications,” on page 12
Section 1.2.3, “Collaboration Groupware and Messaging,” on page 12
Section 1.2.4, “File, Print, and Fax,” on page 12
Section 1.2.5, “Security Management,” on page 12
Section 1.2.6, “Systems Management,” on page 13
1.2.1 Backup, Restore, and Recovery
Personal File Backup (iFolder): iFolder
you to back up, access, and manage your personal files from anywhere, at anytime. After you
have installed iFolder, you simply save your files locally—as you have always done—and
Novell iFolder automatically updates the files on your network server and delivers them to the
other machines you use.
TM
is a simple and secure storage solution that enables
Understanding NOWS SBE
11
Page 12

Network Backup (Amanda): Amanda allows you to set up a single backup server to back up
multiple hosts to a tape or disk-based storage system. Amanda uses native dump and GNU tar
facilities and can back up a large number of workstations and servers running various versions
of Linux, UNIX or Microsoft* Windows* operating systems.
1.2.2 Business Applications
OpenOffice: OpenOffice is a full-featured office suite. It includes a word processing,
presentations, spreadsheets, and databases.
1.2.3 Collaboration Groupware and Messaging
E-Mail and Collaboration (GroupWise): GroupWise has a set of tools that will keep your
employees connected to clients and each other. The system comes with e-mail, calendaring, and
instant messaging to be set up according to your company needs.
1.2.4 File, Print, and Fax
novdocx (en) 11 December 2007
Print Services (iPrint): iPrint is a network printing service so everyone can print at a
centralized location. iPrint extends print services securely across multiple networks and
operating systems.
Windows File and Print Sharing (Samba): The Samba file and print sharing service for
Windows enables you to configure your network with the security of Linux and still be able to
access files on your Windows servers.
Fax Server (HylaFAX): HylaFAX is the leading fax server for UNIX-like computer systems.
It uses a client-server design and supports the sending and receiving of faxes as well as text
pages, on any scale from low to very high volumes, making use of large numbers of modems if
necessary.
1.2.5 Security Management
Anti-Virus (ClamAV): Clam AntiVirus is an anti-virus toolkit for UNIX, designed especially
for e-mail scanning on mail gateways. It provides a number of utilities, including a flexible and
scalable multi-threaded daemon, a command line scanner, and an advanced tool for automatic
database updates. The core of the package is an anti-virus engine available in the form of a
shared library.
VPN Server (OpenVPN): OpenVPN is a component that enables your users to work remotely.
A Virtual Private Network (VPN) allows users to connect securely to your internal business
network and conduct business transactions with the same functionality as they do within the
office.
Firewall (IPTables): A firewall is a hardware or software device that is configured to permit,
deny, or proxy data through a computer network that has different levels of trust. Novell Open
Workgroup Suite Small Business Edition includes a fully configurable firewall service to keep
out unwanted traffic and intruders.
12 Novell Open Workgroup Suite Small Business Edition 9.3 Administration and Installation Guide
Page 13

1.2.6 Systems Management
novdocx (en) 11 December 2007
Dynamic Local User: If you have Windows on desktops, you can use the Dynamic Local
User component to synchronize the Novell Client
seamless to your users.
Directory Services (eDirectory): eDirectory
rights and privileges in your NOWS SBE network.
Helpdesk: Help your administrators track trouble calls and give your end users the ability to
submit trouble tickets without picking up the phone.
Management Tools (iManager): This is a role-based tool for network and systems
management of your environment through a consolidated Web interface.
DHCP: Dynamic Host Configuration Protocol (DHCP) enables your server to dynamically
assign IP address as clients need them instead of statically assigning an IP address to each of
the clients.
DNS: Dynamic Name Server (DNS) is a service to link a common name to an IP address for
easy location and searching of resources over TCP/IP.
VPN Server (OpenVPN): Remote Access software to securely connect to your company files
when away from the office.
Remote Desktop (TightVNC): This software gives your administrators the ability to remotely
manage and assist end users with questions and tasks.
TM
with the Windows client so that login is
TM
manages user identities and is the core of all
1.3 Requirements
The hardware being used for installation must be in the tested and approved hardware list. Support is
only available to those who install on the tested and approved hardware.
Section 1.3.1, “Approved and Tested Hardware List,” on page 13
Section 1.3.2, “Server Requirements,” on page 13
Section 1.3.3, “Desktop Operating System and Browser Requirements,” on page 14
1.3.1 Approved and Tested Hardware List
For a list of tested and approved hardware, see YES CERTIFIED (http://developer.novell.com/
yessearch/).
1.3.2 Server Requirements
The following server requirements are based on OES server requirements.
Understanding NOWS SBE 13
Page 14

Table 1-1 Server Requirements
Server Components Minimum Requirements Recommended Requirements
novdocx (en) 11 December 2007
Server Server-class computer with Pentium* II
or AMD* K7 450 Mhz processor
(Bootable DVD-ROM drive)
Memory 512 RAM 1 GB of RAM
Disk Space 10 GB of unpartitioned disk space Additional disk space might be required,
Server-class computer with Pentium III,
Pentium III Xeon*, Pentium 4, Intel*
Xeon 700 Mhz, AMD K8 CPUs
(Athlon64 and Opteron*), Intel EM64T
or higher processor (Bootable DVDROM drive)
depending on which OES components
are selected and how they are used.
1.3.3 Desktop Operating System and Browser Requirements
Table 1-2 Desktop and Browser Requirements
Desktop Operating System Browser
Windows 2000 NA
Windows XP Internet Explorer 7 or higher
Windows Vista* Internet Explorer 7 or higher
SUSE Linux Desktop (SLED) 10 Mozilla* Firefox* 2.0x
Mac OS* X Mozilla* Firefox* for Macintosh* 2.0x
NOTE: IE 6 is not supported.
1.4 Planning for the NOWS SBE Install
When planning your installation of Novell Open Workgroup Suite Small Business Edition, keep
these items in mind prior to installation.
Section 1.4.1, “Server,” on page 15
Section 1.4.2, “Installing Two NICs with NOWS SBE,” on page 15
Section 1.4.3, “Firewall (IPTables ),” on page 15
Section 1.4.4, “Component Install Order,” on page 16
Section 1.4.5, “Creating a New Directory,” on page 16
Section 1.4.6, “NetWork Backup (Amanda),” on page 16
Section 1.4.7, “E-Mail and Collaboration (GroupWise),” on page 16
Section 1.4.8, “Helpdesk,” on page 16
14 Novell Open Workgroup Suite Small Business Edition 9.3 Administration and Installation Guide
Page 15

1.4.1 Server
By accepting the default partitioning information, the installation overwrites all existing files on the
server. Change this configuration if you plan to install NOWS SBE on an existing partition. Verify
that the server does not see any partitions or devices that you do not want to be formatted and wiped.
If components are installed while connected to a Storage Area Network (SAN), it has the potential to
wipe out any partitions and data that it sees.
You also need to make sure that your server is plugged into a network where DHCP is installed.
1.4.2 Installing Two NICs with NOWS SBE
When you install and configure a NOWS SBE server, do not configure the second network interface
card (NIC) until you have completed the installation and configured the primary NIC through the
Web configuration tool. After the initial Web configuration is complete, you can then use YaST to
configure the second NIC.
NOTE: Because you will be routing traffic through the server, be sure to enable IP Forwarding
when configuring the second NIC.
novdocx (en) 11 December 2007
1.4.3 Firewall (IPTables )
Below is a table with the typical ports that need to be opened on your firewall for each component.
Table 1-3 Port Numbers
Component Port Type Port Number
Amanda UPD 10080
iManager TCP 80, 443
Samba UDP 631, 135, 137, 138, 139, 445
Samba TCP 137, 138, 139
iFolder TCP 80, 443
GroupWise TCP 25, 80, 443, 110, 143, 993, 1677,
7100, 7101, 7102, 7180, 71, 81,
8200, 8312, 8300, 9850
DNS UDP, TCP 53, 953
ClamAV TCP 3310
OpenVPN NA NA
HylaFAX TCP 4557, 4559
Helpdesk TCP 80, 443
iPrint TCP 80, 443, 631
IPTables TCP 8181, 22, 8182
Understanding NOWS SBE 15
Page 16

Component Port Type Port Number
eDirectory NCP 389, 636, 427, 524, 8008, 8009,
8028, 8030, 8180, 9009
eDirectory TCP 524
DHCP UDP 67
1.4.4 Component Install Order
Begin component installation with eDirectory, then install iManager. You need iManager to manage
iPrint, iFolder, and Helpdesk, as well as GroupWise.
If you are choosing to install MailScanner and GroupWise, be sure to install in this order:
1. GroupWise
2. MailScanner
1.4.5 Creating a New Directory
novdocx (en) 11 December 2007
Before you create a new eDirectory tree, you should define a naming standard. A consistent naming
scheme provides a guideline for network administrators who will add, modify, or move objects
within the eDirectory tree. For additional information, see the eDirectory Documentation Web site
(http://www.novell.com/documentation/edir88/index.html?page=/documentation/edir88/edir88/
data/acavuil.html).
1.4.6 NetWork Backup (Amanda)
This component requires a tape drive to send your backups. For information about supported tape
drives, see the Amanda Documentation Web site (http://amanda.sourceforge.net/fomserve/cache/
1.html).
1.4.7 E-Mail and Collaboration (GroupWise)
If you are installing GroupWise and MailScanner, when you install the GroupWise Internet
Assistant (GWIA) you are given the opportunity to assign GWIA a different port (the default is 26)
so that the two programs do not conflict. Incoming mail from the Internet to the GroupWise system
is then accepted by MailScanner on port 25 (SMRP’s default), scanned, and delivered to GWIA,
which accepts non-standard mail on port 26.
1.4.8 Helpdesk
You need an e-mail account designated for notifications and workflows for the Helpdesk
component. You can use an existing account or create one named support@yourdomain.com or
helpdesk@yourdomain.com.
16 Novell Open Workgroup Suite Small Business Edition 9.3 Administration and Installation Guide
Page 17

2
Getting Started
Section 2.1, “Installing Novell Workgroup Suite Small Business Edition,” on page 17
Section 2.2, “Administering the Novell Open Workgroup Suite Small Business Edition,” on
page 20
Section 2.3, “Configuring Components,” on page 23
2.1 Installing Novell Workgroup Suite Small Business Edition
novdocx (en) 11 December 2007
2
If you have a NOWS SBE DVD, go to Section 2.1.1, “Using YaST to Install the Novell Open
Workgroup Suite Small Business Edition,” on page 17. If you want to install the Novell
Workgroup Suite Small Business Edition without the DVD or if you do not have DVD drive, follow
the directions in Section 2.1.2, “Using the NOWS SBE DVD to Install the Novell Open Workgroup
Suite Small Business Edition,” on page 18
Section 2.1.1, “Using YaST to Install the Novell Open Workgroup Suite Small Business
Edition,” on page 17
Section 2.1.2, “Using the NOWS SBE DVD to Install the Novell Open Workgroup Suite Small
Business Edition,” on page 18
®
Open
2.1.1 Using YaST to Install the Novell Open Workgroup Suite Small Business Edition
1 Use a standard SUSE® Linux Enterprise Server (SLES) 9 or SLES 9 SP3 disc to boot up your
computer.
2 You are directed to the initial (GRUB) setup menu; use the arrow keys to select Installation.
3 Press F3, specify the desired network server type used to connect to the installation server, then
specify your connection settings.
4 Type the following so it appears in Boot Options:
x11i=fbdev autoyast=PATH_TO_AUTOYAST.XML.
The format for PATH_TO_AUTOYAST.XML will look similar to the following for HTTP
servers: http://www.example.com/nowssbe/autoyast.xml. For other server types, see Novell
documentation.
5 Press the Enter key to continue with install. During installation the NOWS-copyMedia package
might fail, but can be safely ignored.
6 If the /opt/media/nows directory exists, erase the contents. If the directory does not exist,
create it.
7 Over the network, using a portable storage device, copy the i386, i586, i686, noarch, and
nosrc directories from the media onto the NOWS SBE server in /opt/media/nows.
After copying, the directory should look like this:
sbsDP:/opt/media/nows # Is -Ia
total 89
Getting Started
17
Page 18

drwxr-xr-x 8 root root 192 Aug 30 07:08
drwxr-xr-x 4 root root 96 Aug 30 06:53
drwxr-xr-x 2 root root 3384 Aug 30 2007 i386
drwxr-xr-x 2 root root 75048 Aug 30 07:04 i586
drwxr-xr-x 2 root root 752 Aug 30 2007 i686
drwxr-xr-x 2 root root 13072 Aug 30 2007 noarch
drwxr-xr-x 2 root root 344 Aug 30 2007 nosrc
drwxr-xr-x 3 root root 120 Aug 30 2007 setup
8 Run the following command: /opt/simba/modules/sbs/bin/copyMedia.sh.
9 Reboot the server and continue with Step 3 on page 18.
2.1.2 Using the NOWS SBE DVD to Install the Novell Open Workgroup Suite Small Business Edition
1 Insert the NOWS SBE DVD into the DVD drive.
2 After installation, your computer will reboot. When it boots up, perform the following steps
before doing any further configuration or component installation.
novdocx (en) 11 December 2007
3 Boot the server. You will be presented with the a splash screen, and then the installation screen.
Click Installation.
NOTE: Do not change the software packages or configurations in YaST. Doing so causes your
installation to fail.
4 The server starts the installation process, then stops at the installation summary screen. To
accept system defaults, click Accept; otherwise, click Change to modify settings.
5 Click Accept to continue with the installation.
The installation copies the files required to install the SUSE Linux Enterprise server and related
service packs. You are also presented with a status screen so you can monitor the time
remaining on the installation.You have approximately 20 minutes before the next intervention
is necessary.
6 When the base installation of the server completes, enter the IP address that is presented on the
screen. The rest of the server configuration is Web-browser-based.
7 (Conditional) If you receive an IP address of https://127.0.0.1:8181, or https://:8181 instead of
a valid IP address, complete the following steps to fix the problem:
7a Verify that you are connected to the network with your DHCP server.
7b At the command line, log in as root without a password.
The rest of the installation process is completed from a Web browser. Refer to Section 1.3,
“Requirements,” on page 13 for information on supported browsers.
7c Enter the following command: /etc/init.d/network restart.
8 The first page you are presented with is the End User License Agreement (EULA). Read
through the agreement and click I Agree to advance to the next page.
The next page is where you set up the network settings for your NOWS SBE server.
9 Enter the host name for your server and verify the remaining network information. The IP
address, netmask, gateway, and DNS address should be those provided by your DHCP server.
Verify that this is accurate. The netmask and gateway can be changed to match that of your
18 Novell Open Workgroup Suite Small Business Edition 9.3 Administration and Installation Guide
Page 19

network. The DNS entry should be the IP address of your DNS server. Specify the host name
you want to name your server. Keep in mind that you should not include special characters in
the name of your server. The Domain should match the name of your Internet domain name.
IP Address: The address should be the one from the initial setup of your server operating
system. Verify that this is accurate.
Netmask: Verify the netmask from your network.
Gateway: Verify the gateway from your network.
DNS Entry: Verify the IP address of your DNS server.
Host: Specify a name for your server. Keep in mind that you should not include special
characters in the name of your server.
Domain: Verify your Internet domain name.
10 After you have specified the pertinent information, click the Next button to continue. This takes
a moment to set up.
11 After your network settings have been specified, you are advanced to the License Key page.
Specify your Contact E-mail address and the license key that was provided to you, then click
Next.
12 Click Check for Updates, to check for updates to the system and components. This process
goes out to the Internet to check for updates. Make sure you have an active Internet connection
for this process. If updates are found, select Install Updates to install the latest updates.
Be sure not to browse away from this page while the updates are installing.
13 Click Next to continue with installation.
novdocx (en) 11 December 2007
14 On the User Information page, specify the password information for the administrator login.
You have two options:
Basic setup. Specify a password for the NOWS SBE Administrator. The server root
password is set to be the same.
Advanced Mode. Click the link labeled Advanced Mode, which allows you to specify a
separate password for the NOWS SBE Administrator (sbsadmin) and for the server admin
(root).
The difference between these two passwords is that the NOWS SBE Administrator password
enables you to add, remove, and configure components on your NOWS SBE server from the
NOWS SBE administration console. The server (root) password is what you use to configure or
update your server from the console. If you do not choose to make each password different,
then the passwords are the same as the NOWS SBE Administrator password you have chosen.
Passwords must be at least five characters long and cannot include any special characters.
15 Click Next to continue with installation.
You are now directed to the Available Software page. This section is optional. You are not
required to install any of the components at this time. If you do not install the components, you
will have the opportunity to add components from the NOWS SBE administration console
later. The components have been grouped together with similar software types for easy location
of what you need to install.
16 Click Next, then click Install to proceed to the NOWS SBE administration login.
17 Click the Continue to Administration button.
18 To log in to the administration page, specify the username of the administrator and the
password you chose during the installation, then click Login.
Getting Started 19
Page 20

You are taken to the NOWS SBE administration console. The NOWS SBE administration
console is where you install components.
From this page, you can manage your server, environment, and users. If you grant users access
to the NOWS SBE administration console with user privileges, they can get needed resources
for their desktop computers.
19 To log out, click the red button next to You are logged in as. This logs you out of the session
and brings you back to the login screen.
NOTE: For the remainder of the installation process, you will be installing components from the
NOWS SBE administration console.
2.2 Administering the Novell Open Workgroup Suite Small Business Edition
The NOWS SBE administration page gives you the tools to install, uninstall, configure, and update
components. In addition, it provides you with Help links to assist you with any questions you might
have about your new NOWS SBE server.
novdocx (en) 11 December 2007
Section 2.2.1, “Components Panel,” on page 20
Section 2.2.2, “Tasks Panel,” on page 22
Section 2.2.3, “Basic View Panel,” on page 23
Section 2.2.4, “Server Updates Panel,” on page 23
Section 2.2.5, “Component Updates,” on page 23
2.2.1 Components Panel
In the Components panel, you have the following menu items listed:
Products and Services enables you to view what you have installed.
The Add/Remove link enables you to install and uninstall components.
Desktop Downloads enables you and your business community to install products and services
they will use on their computers, such as collaboration tools and file and print services.
Help Links provides access to documentation.
Management Links provides access to other management consoles that you will use to manage
your Novell Open Workgroup Suite Small Business Edition environment.
20 Novell Open Workgroup Suite Small Business Edition 9.3 Administration and Installation Guide
Page 21
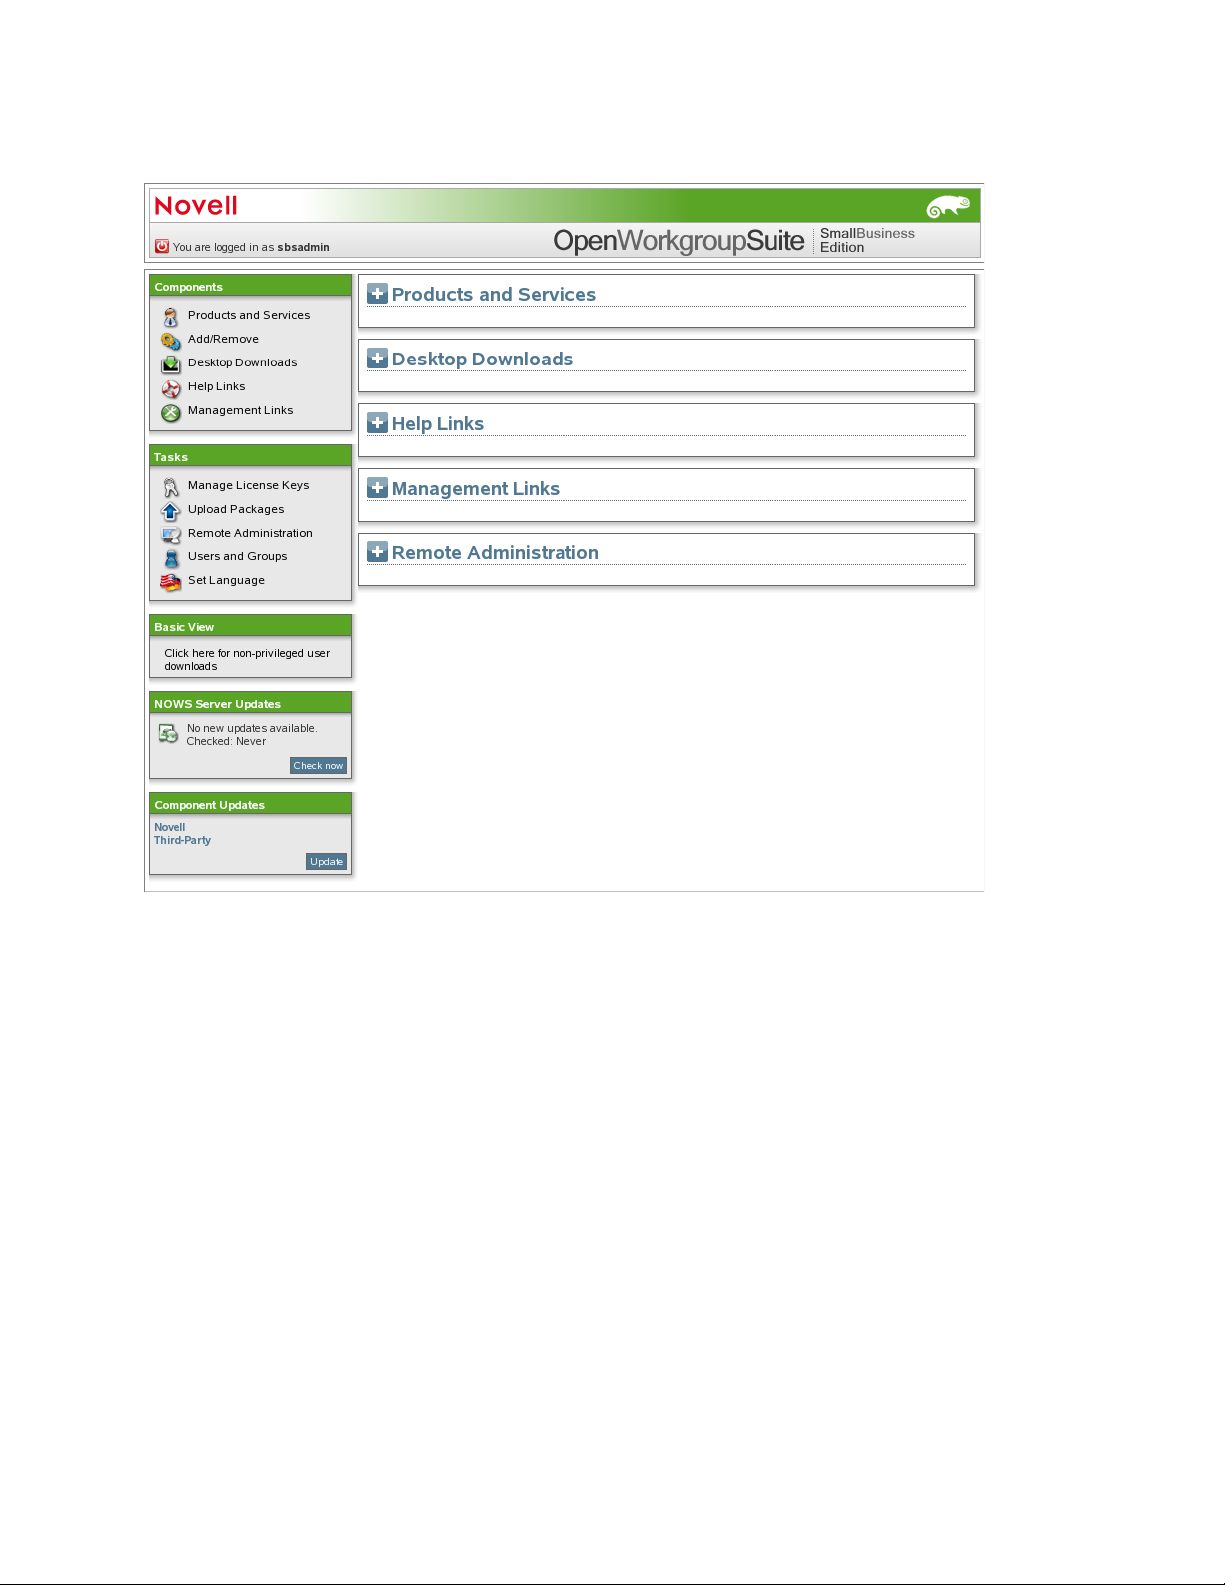
Figure 2-1 Components Panel
novdocx (en) 11 December 2007
Products and Services
When you click Products and Services, you can view additional information on the installed
components. Under Select Component, click the component’s name to populate the Administrative
Console, Helplinks, and Desktop Downloads.
Add/Remove
This link allows you to add and remove components. To view all components, click All under
Available Software. You can also view components in the following categories: Backup Restore and
Recovery, Business Applications, Collaboration Groupware and Messaging, File Print and Fax,
Security Management, and Systems Management. To uninstall a component, click Uninstall under
Installed Software.
When each component is uninstalled, specific actions are taken to disable the component from your
server.
Desktop Downloads
This link allows you to search for desktop applications that can be installed on the user desktops.
Under Choose Operating System, specify the appropriate operating systems you are using. Under
Getting Started 21
Page 22

Choose Component, select the component you are searching for. You can also specify a keyword for
your search.
Help Links
Click Help Links to view additional links to documentation sites. Under Choose Component, specify
a component. You can also specify a keyword for your search.
Management Links
Click Management Links to view helpful management links. Under Filter Component, specify the
desired component. You can also specify a keyword for your search.
2.2.2 Tasks Panel
“Manage License Keys” on page 22
“Upload Packages” on page 22
“Remote Administration” on page 22
novdocx (en) 11 December 2007
“Users and Groups” on page 22
“Set Language” on page 22
Manage License Keys
The license key for your copy of Novell Open Workgroup Suite Small Business Edition is saved
here.
To update your key or add a key for the first time, specify your e-mail address and current license
key, then click Validate Key.
Upload Packages
To receive component downloads and updates, click Novell, Third-Party, and Upload.
To add a new update package, click, then click Start Upload.
NOTE: Updates should be done only through the Administrative interface.
Remote Administration
Manage your remote access and desktop downloads.
Users and Groups
Manage and view users and groups.
Set Language
Specify the language for the NOWS SBE administration console.
22 Novell Open Workgroup Suite Small Business Edition 9.3 Administration and Installation Guide
Page 23

2.2.3 Basic View Panel
Click here for non-privileged user downloads. These are the desktop downloads that your end users
will see. This view can help in assisting your end users with desktop download questions.
2.2.4 Server Updates Panel
Novell Open Workgroup Suite Small Business Administration server updates are available through
the Server Updates panel. Click the Check now button to check for updates for all components.
2.2.5 Component Updates
On the Component Updates menu panel, you can check for recent updates for Novell and third-party
components. Click Novell to check for component updates from Novell. Click Third-Party to check
for component updates from third-party clients.
2.3 Configuring Components
novdocx (en) 11 December 2007
Use this interface to add and remove components from your server. On the left side of the NOWS
SBE administration page, under the Components section, select Add or Remove. Under Available
Software, click All. A list of possible component installations appear. To install a component, click
the Install button for that component.
TM
You should begin your component download with eDirectory
components help you to manage many of the remaining components.
and iManager. These two software
Getting Started 23
Page 24
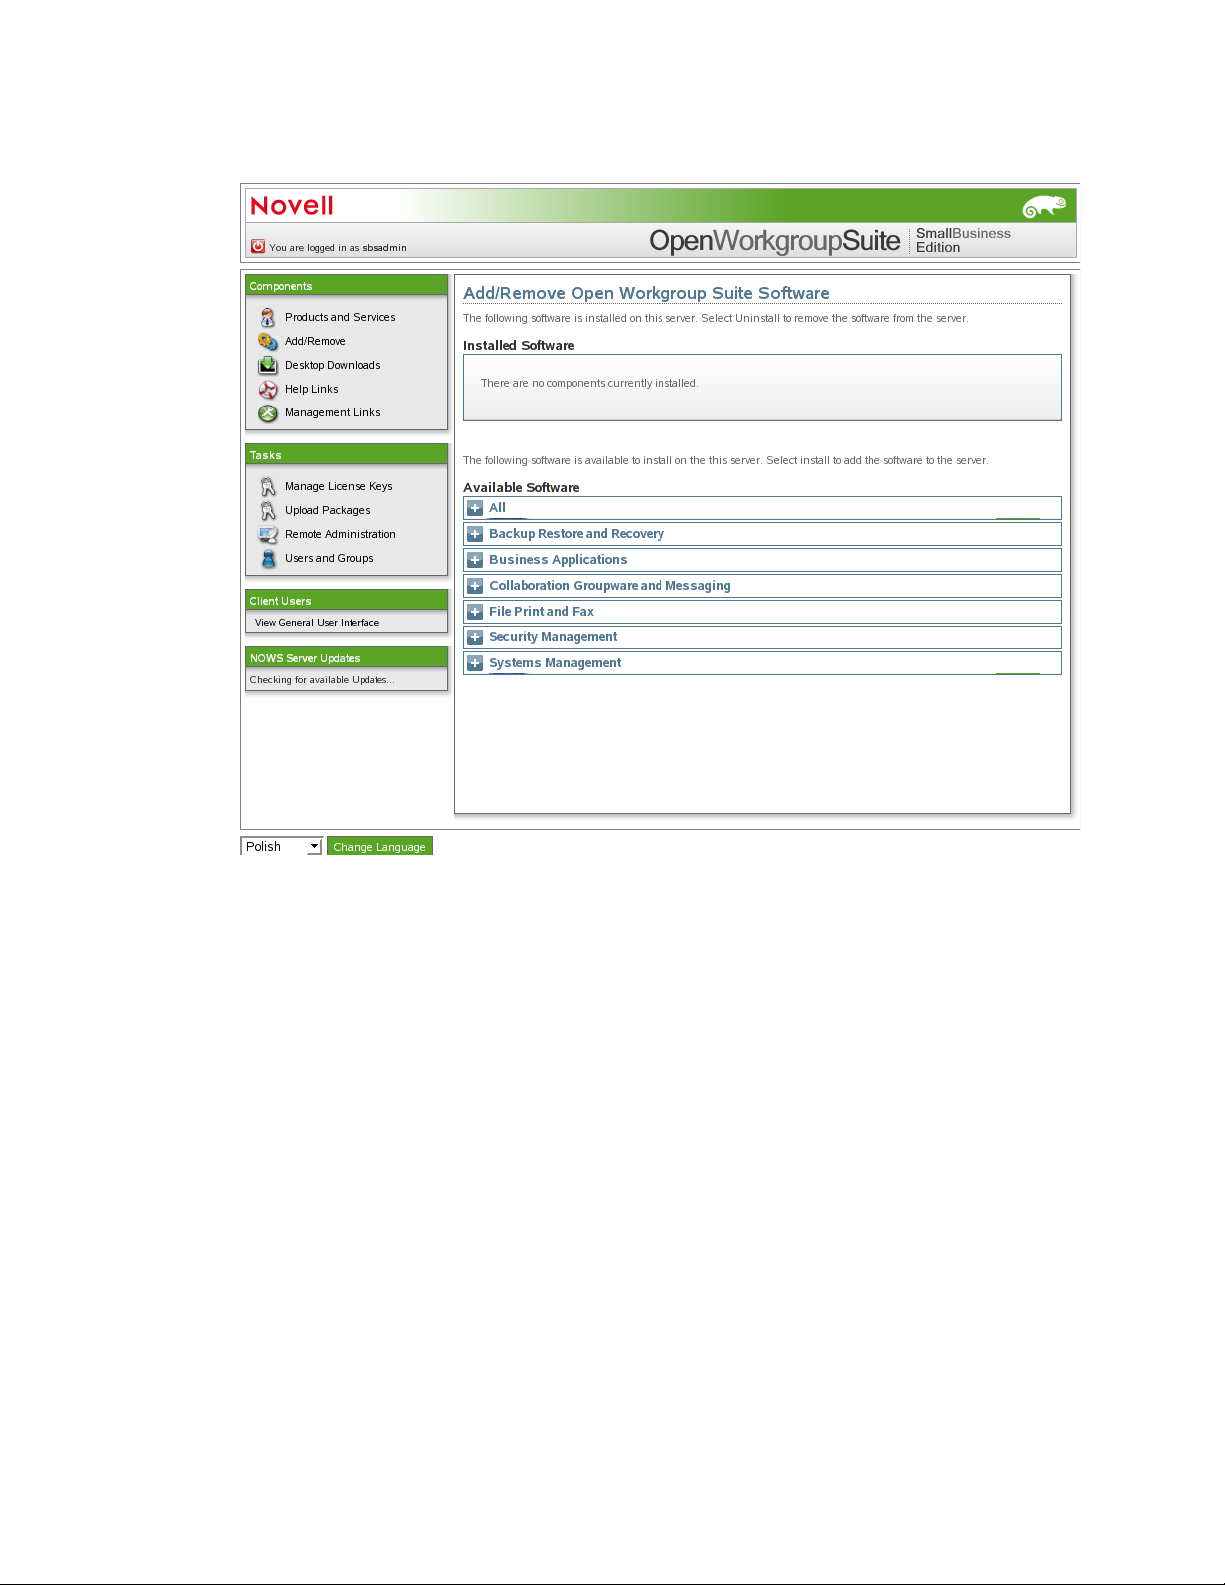
Figure 2-2 Add/Remove Software
novdocx (en) 11 December 2007
24 Novell Open Workgroup Suite Small Business Edition 9.3 Administration and Installation Guide
Page 25

3
Directory Services (eDirectory)
To start the eDirectoryTM component install, click Install from under Available Components, then
decide which installation type you want to use.
Basic: Installs a new eDirectory tree.
Advanced - New Tree: Installs a new eDirectory tree with more options.
Advanced - Existing Tree: Installs this server into an existing eDirectory tree.
Advanced - Use Remote Tree: Use this option when there is already an eDirectory installed
on a dedicated server and you want components that depend on eDirectory to point to the
existing tree.
Section 3.1, “Installing eDirectory Basic,” on page 25
Section 3.2, “Installing eDirectory Advanced - New Tree,” on page 26
Section 3.3, “Installing eDirectory Advanced - Existing Tree,” on page 28
Section 3.4, “Installing eDirectory Advanced - Remote Tree,” on page 30
Section 3.5, “Post-Installation,” on page 31
novdocx (en) 11 December 2007
3
3.1 Installing eDirectory Basic
This option installs a new eDirectory tree on your server with default options.
1 In the components section of the NOWS SBE administration page, click Install for eDirectory.
2 Select the Basic installation, then click Next.
3 Specify a name for the new eDirectory tree. Do not use special characters when naming your
tree.
4 Specify an organization name for your eDirectory.
This will be the name of the eDirectory container that the server is installed into. Do not use
special characters when specifying your organization name.
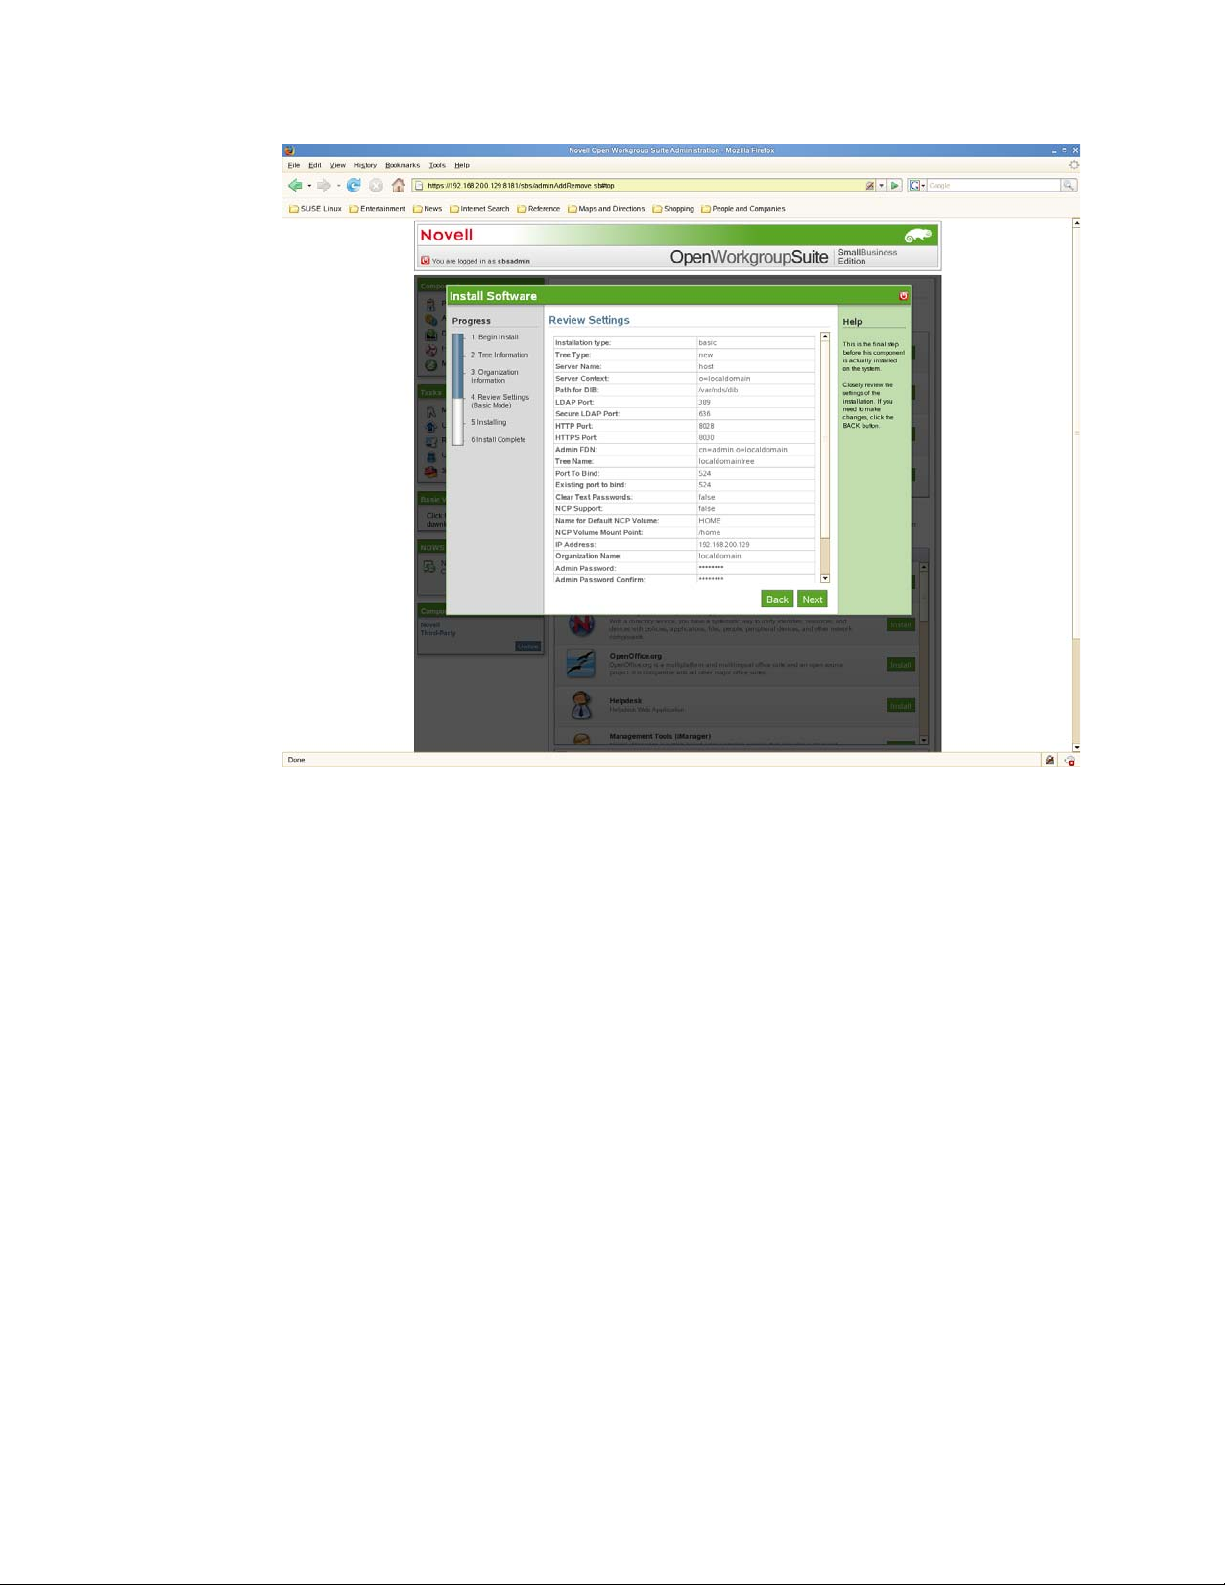
5 Review the settings. To make changes, click the Back button. To proceed with the installation,
click Next.
Directory Services (eDirectory)
25
Page 26
novdocx (en) 11 December 2007
6 Basic eDirectory installation is now complete. Click Finish to return to the available
components page. eDirectory is now listed on the installed software list and can be launched
from the eDirectory administration link.
3.2 Installing eDirectory Advanced - New Tree
This option installs a new eDirectory tree on your server, and allows you to specify many of the
parameters, such as server context and LDAP ports.
1 In the components section of the NOWS SBE administration page, click Install for eDirectory.
2 Click Advanced-New Tree, then click Next.
3 Specify the eDirectory tree name. Do not use special characters when specifying your tree
name.
4 Specify your organization name. This will be the name of the eDirectory container that the
server is installed into. Do not use special characters when specifying your organization name.
5 Specify your administrative information. Do not use special characters when specifying your
password.
Administrator Password: Password of the eDirectory administrator user.
Administrator Password Confirm: Retype the password for the eDirectory
administrator user.
SBS Administrator Password: The password for the SBS administrator user.
26 Novell Open Workgroup Suite Small Business Edition 9.3 Administration and Installation Guide
Page 27

SBS Administrator Password Confirm: Retype the password for the eDirectory
administrator user.
6 Specify the advanced settings for your server. Do not use special characters, except for
hyphens, when specifying the server name.
Server Name: Specify the name of the server you are adding to the tree.
Server Context: Specify the server context. The server will be added to the tree in the
specified context.
Path for DIB: Specify the directory path where the database files are to be stored.
LDAP Port: Specify the TCP port number on the LDAP server, such as 389. Fill in the
field only if you know the correct information; otherwise, leave it blank.
Secure LDAP Port: Specify the secure port number on the LDAP server, such as 636.
Fill in the field only if you know the correct information; otherwise, leave it blank.
HTTP Port: Specify the HTTP clear port number, such as 8028. Fill in this field only if
you know the correct information; otherwise, leave it blank.
HTTPS Port: Specify the HTTP secure port number, such as 8030. Fill in this field only
if you know the correct information; otherwise, leave it blank.
7 Specify NCP settings if you want to enable access to NCP
TM
volumes via the Novell ClientTM or
other NCP aware utilities.
novdocx (en) 11 December 2007
NCP Support: Enables NCP support on native Linux file systems (not NSS).
Name for Default NCP Volume: If NCP Support is enabled, a volume with this name is
created.
NCP Volume Mount Point: Specify the location on the file system where the NCP
volume will reside if NCP support is enabled.
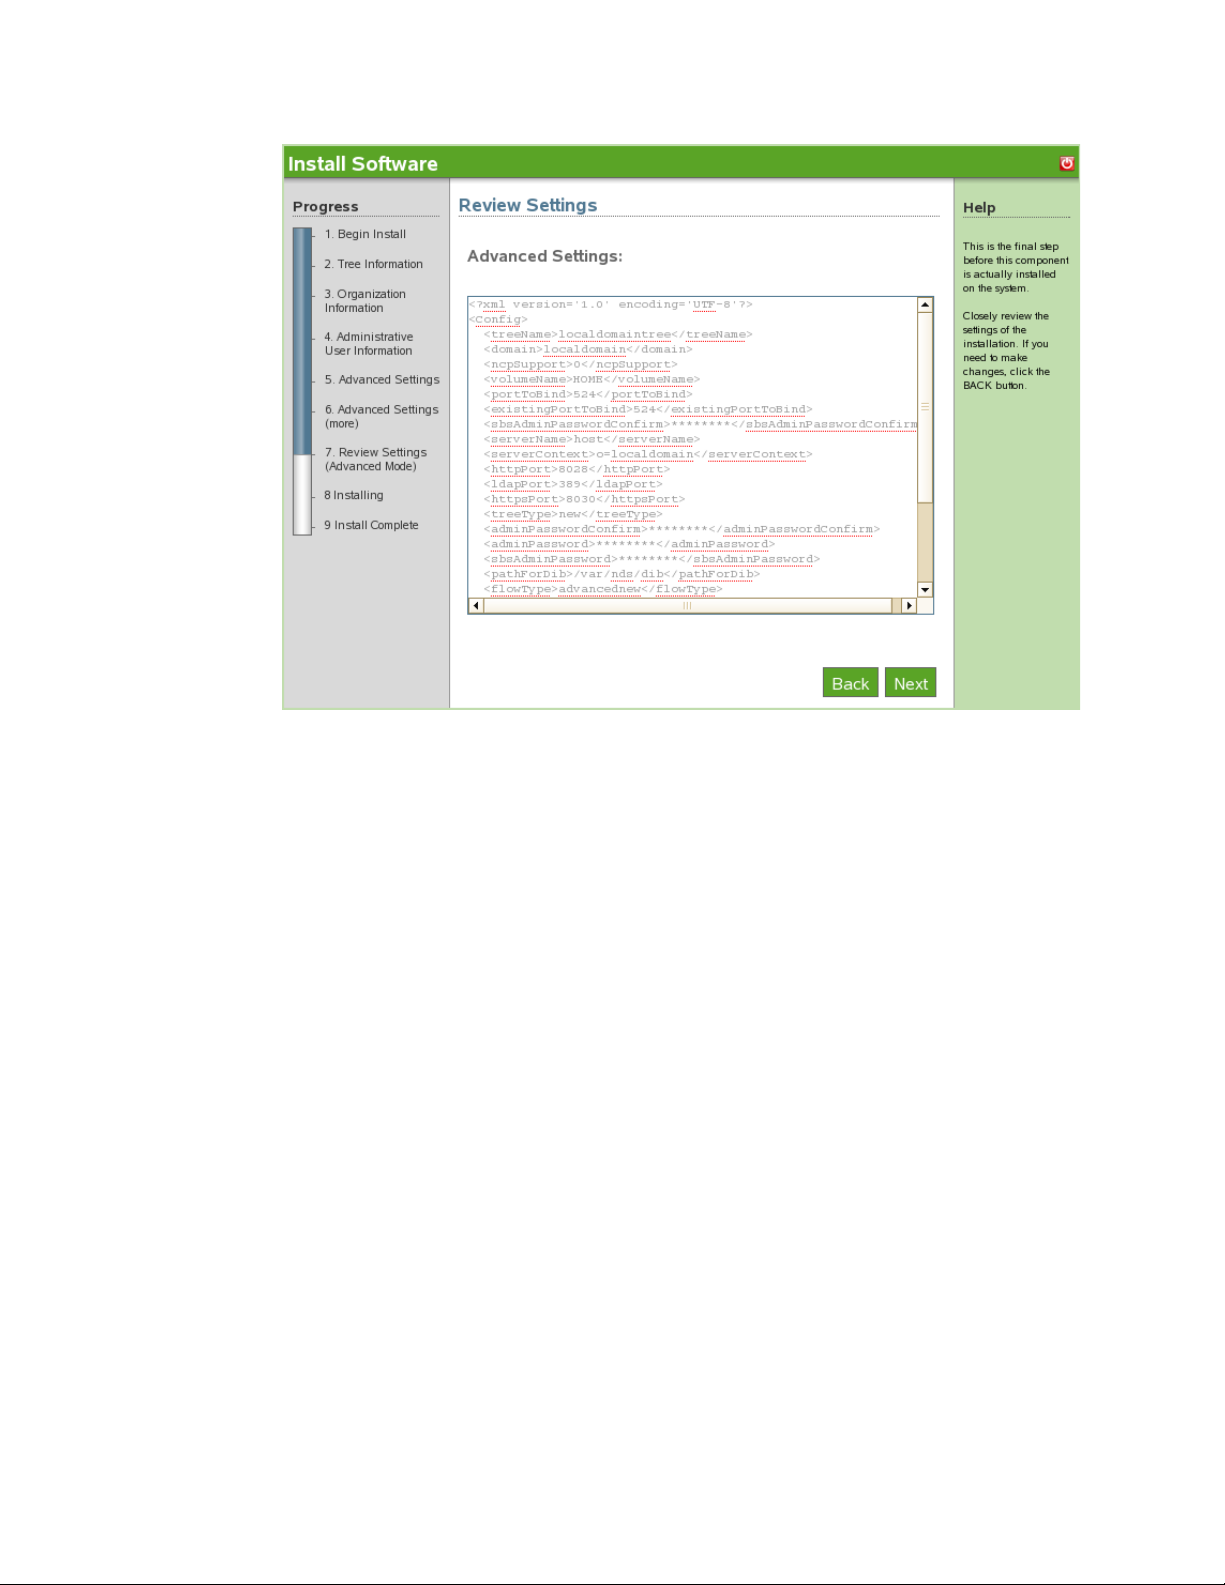
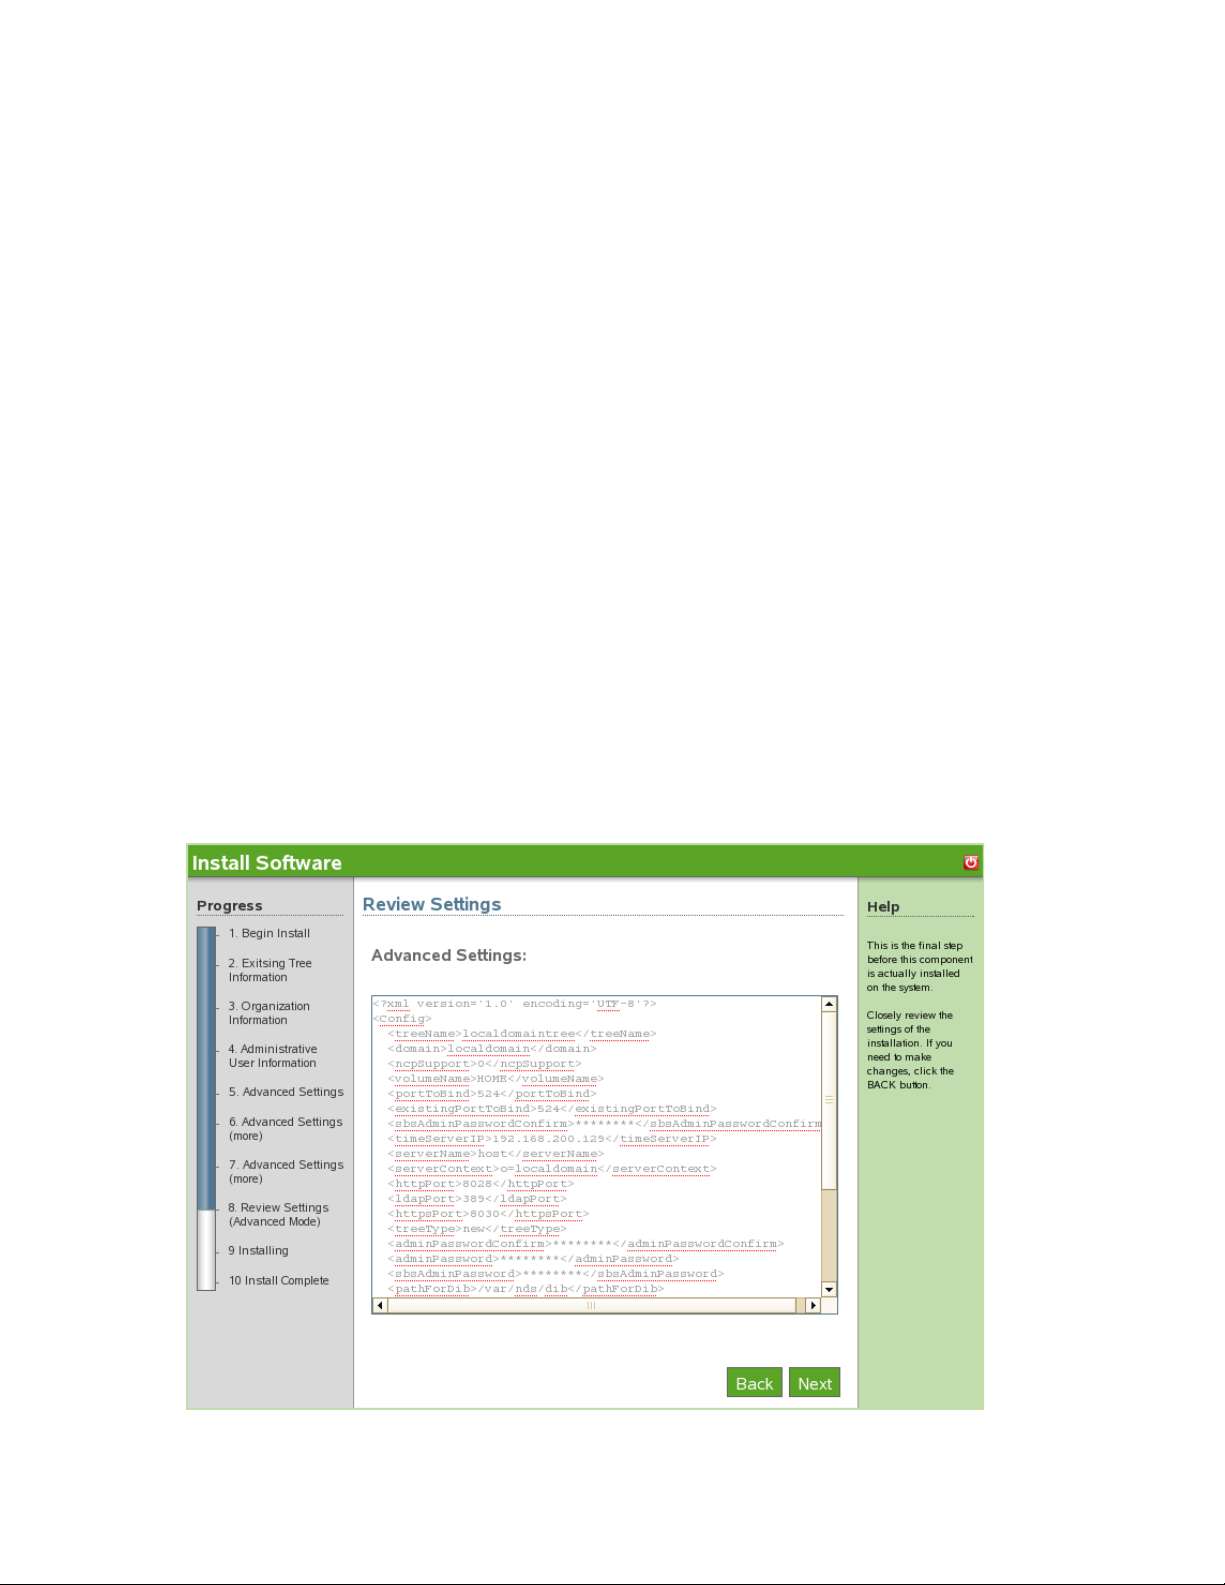
8 Review the settings. To make changes, you can edit the XMPL text directly to specify
additional advanced settings as needed. To proceed with the installation, click Next.
Directory Services (eDirectory) 27
Page 28
novdocx (en) 11 December 2007
9 The Advanced eDirectory - New Tree install is now complete. Click Finish to return to the
available components page. eDirectory is now listed on the installed software list.
3.3 Installing eDirectory Advanced - Existing Tree
1 In the components section of the NOWS SBE administration page, click Install for eDirectory.
2 To proceed with the Advanced installation, click Advanced-Existing Tree, then click Next.
3 Specify existing tree information.
Tree Name: Specify the name of your existing eDirectory tree.
IP Address of Existing Server: Specify the IP address of the server that is already
hosting the tree.
4 Specify the organization name.
5 Specify your administrative information. Do not use special characters when specifying your
password.
Administrator Password: Password of the eDirectory administrator user.
Administrator Password Confirm: Retype the password for the eDirectory
administrator user.
SBS Administrator Password: The password for the SBS administrator user.
SBS Administrator Password Confirm: Retype the password for the eDirectory
administrator user.
28 Novell Open Workgroup Suite Small Business Edition 9.3 Administration and Installation Guide
Page 29
6 Specify the advanced settings for your server. Do not use special characters, except for
hyphens, when specifying server name.
Server Name: Specify the name of the server you are adding to the tree.
Server Context: Specify the server context. The server will be added to the tree in the
specified context.
Path for DIB: Specify the directory path where the database files are to be stored.
LDAP Port: Specify the TCP port number on the LDAP server, such as 389. Fill in the
field only if you know the correct information; otherwise, leave it blank.
Secure LDAP Port: Specify the secure port number on the LDAP server, such as 636.
Fill in the field only if you know the correct information; otherwise, leave it blank.
HTTP Port: Specify the HTTP clear port number, such as 8028. Fill in this field only if
you know the correct information; otherwise, leave it blank.
HTTPS Port: Specify the HTTP secure port number, such as 8030. Fill in this field only
if you know the correct information; otherwise, leave it blank.
7 Specify NCP settings if you want to enable access to NCP volumes via the Novell Client or
other NCP aware utilities.
NCP Support: Enables NCP support on top native Linux file systems (not NSS)
Name for Default NCP Volume: If NCP Support is enabled, a volume with this name is
created.
NCP Volume Mount Point: Specify the location on the file system where the NCP
volume will reside if NCP support is enabled.
novdocx (en) 11 December 2007
8 Review the settings. To make changes, you can edit the XMPL text directly to specify
additional advanced settings as needed. To proceed with the installation, click Next.
Directory Services (eDirectory) 29
Page 30

9 The Advanced eDirectory - Existing Tree install is complete. Click Finish to go back to the
available components page. eDirectory is now listed on the installed software list.
3.4 Installing eDirectory Advanced - Remote Tree
1 In the components section of the NOWS SBE administration page, click Install for eDirectory.
2 To proceed with the Advanced installation, click Advanced-Remote Tree, then click Next.
3 Specify existing tree information.
Tree Name: Specify the name of your existing eDirectory tree.
IP Address of Existing Server: Specify the IP address of the server that is already
hosting the tree.
4 Specify the organization name.
5 Specify your administrative information. Do not use special characters when specifying your
password.
Administrator Password: Password of the eDirectory administrator user.
Administrator Password Confirm Retype the password for the eDirectory administrator
user.
SBS Administrator Password: The password for the SBS administrator user.
SBS Administrator Password Confirm: Retype the password for the eDirectory
administrator user.
6 Specify LDAP settings. Do not use special characters, except for hyphens, when specifying the
server name.
novdocx (en) 11 December 2007
LDAP Port: Specify the TCP port number on the LDAP server, such as 389. Fill in the
field only if you know the correct information; otherwise, leave it blank.
Secure LDAP Port: Specify the secure port number on the LFAP server, such as 636. Fill
in the field only if you know the correct information; otherwise, leave it blank.
7 Review the settings. To make changes, you can edit the XMPL text directly to specify
additional advanced settings as needed. To proceed with the installation, click Next.
30 Novell Open Workgroup Suite Small Business Edition 9.3 Administration and Installation Guide
Page 31

novdocx (en) 11 December 2007
8 The Advanced eDirectory - Remote Tree install is now complete. Click Finish to return to the
available components page. eDirectory is now listed on the installed software list.
3.5 Post-Installation
eDirectory is managed by using iManager, which can be accessed through the eDirectory
Administration link in the Components panel or through various administration links, such as Users
and Groups.
Section 3.5.1, “Desktop Download,” on page 31
Section 3.5.2, “ConsoleOne,” on page 32
Section 3.5.3, “Helpful Links,” on page 32
3.5.1 Desktop Download
1 Log in to the NOWS SBE console.
2 Click Products and Services.
3 On the Select Component panel, click Directory Services (eDirectory).
4 Under Desktop Downloads, click the link.
5 To save the install to your computer, click Save to Disk, then click OK.
6 After the download has completed, click the novell-client-1.2-SLES10.tar.gz file
on your desktop, then click Extract Here. The eDirectory component is now downloaded to
your desktop.
Directory Services (eDirectory) 31
Page 32

3.5.2 ConsoleOne
ConsoleOne® is an alternate tool for managing eDirectory. It is also provided if a needed task is not
available in iManager.
ConsoleOne resides in the /usr/ConsoleOne/bin directory.
1 Click the tree icon to log in to ConsoleOne.
3.5.3 Helpful Links
For additional information on administering eDirectory, see the eDirectory Administration Guide
(http://www.novell.com/documentation/edir873/edir873/data/a2iii88.html).
For additional information on administering eDirectory with ConsoleOne, see the ConsoleOne
online documentation (http://www.novell.com/documentation/consol13/).
For additional information on the Novell Windows Client, see the Novell Windows Client online
documentation (http://www.novell.com/products/clients/windows/xp2000/overview.html).
novdocx (en) 11 December 2007
32 Novell Open Workgroup Suite Small Business Edition 9.3 Administration and Installation Guide
Page 33

4
Management Tools (iManager)
iManager is the administration interface for eDirectoryTM. iManager uses a simple list of roles, which
you can click to reveal tasks. This is a role-based tool for network and systems management in your
environment.
Section 4.1, “Installing iManager Basic,” on page 33
Section 4.2, “Installing iManager Advanced,” on page 34
Section 4.3, “Post-Installation,” on page 34
4.1 Installing iManager Basic
1 Click Install from under Available Components.
2 Click Basic, then click Next.
3 Closely review the settings. To make a change, click Back. To proceed with the installation,
click Next.
novdocx (en) 11 December 2007
4
4 The Basic iManager installation is now complete. Click Finish to return to the available
components page. iManager is now listed on the installed software list and can be launched
from the iManager administration link.
Management Tools (iManager)
33
Page 34

4.2 Installing iManager Advanced
1 Click Install from Available Components.
2 Click Advanced, then click Next.
3 Specify the tree iManager should connect to.
Admin DN: The admin DN formatted with dots, for example: cn=admin.o=mycompany.
Tree Name: The name of the tree to connect to.
4 review the settings. To make a change, click Back. To proceed with the installation, click Next.
5 The Advanced iManager install is now complete. To proceed to the available components page,
click Finish. iManager is now listed on the installed software list and can be launched from the
iManager administration link.
4.3 Post-Installation
Section 4.3.1, “iManager Features,” on page 34
Section 4.3.2, “How to Create Users, Groups, and Designate the NOWS SBE Administrator,”
on page 34
Section 4.3.3, “Helpful Links,” on page 35
novdocx (en) 11 December 2007
4.3.1 iManager Features
iManager is now available and can be launched with rights to perform specific tasks from the
following links (if the component is installed):
Users and Groups
iFolder
eDirectory Administration
iPrint Administration
Samba Administration
iManager can be launched with all available roles and tasks from the iManager Administration link;
however, you must authenticate as an administrator to access all available tasks.
iManager can also be launched directly from the iManager Web site (https://server-ip/nps/
iManager.html).
TM
Administration
4.3.2 How to Create Users, Groups, and Designate the NOWS SBE Administrator
1 Log in to the NOWS SBE console.
2 Click Products and Services.
3 Under Select Component, click iManager Administration. This launches the iManager login
page.
4 Log in to iManager with your network admin login, for example cn= admin., o= localdomain.
34 Novell Open Workgroup Suite Small Business Edition 9.3 Administration and Installation Guide
Page 35

5 After login, you are taken to the iManager console. Follow the links to create users, groups, and
designate the NOWS SBE Administrator. A NOWS SBE Administrator has administrator
access for all NOWS SBE components.
For more information on how to designate users, see the iManager Web Site (http://
www.novell.com/documentation/imanager25/index.html?page=/documentation/imanager25/
imanager_admin_25/data/bob1yft.html).
4.3.3 Helpful Links
For additional administrator information, see the iManager Administration Guide Web site (http://
www.novell.com/documentation/imanager25/index.html?page=/documentation/imanager25/
imanager_admin_25/data/hk42s9ot.html).
novdocx (en) 11 December 2007
Management Tools (iManager) 35
Page 36

novdocx (en) 11 December 2007
36 Novell Open Workgroup Suite Small Business Edition 9.3 Administration and Installation Guide
Page 37

5
Personal File Backup (iFolder)
iFolderTM is a simple and secure storage solution that enables you to back up, access, and manage
your personal files from anywhere, at anytime. After you have installed iFolder, you simply save
your files locally as you have always done, and Novell iFolder automatically updates the files on
your network server and delivers them to the other machines you use.
Section 5.1, “Installing iFolder Basic,” on page 37
Section 5.2, “Installing iFolder Advanced,” on page 38
Section 5.3, “Post-Installation,” on page 39
5.1 Installing iFolder Basic
1 Click Install from Available Components.
2 Click Basic, then click Next.
3 Specify your iFolder server name.
novdocx (en) 11 December 2007
5
System Name: The name assigned to the iFolder sever.
System Description: An optional description of this iFolder server.
4 Closely review the settings. If you need to make a change, click Back. To proceed with the
installation, click Next.
Personal File Backup (iFolder)
37
Page 38

5 The iFolder install is complete. Click Finish to proceed to available software page. iFolder is
now listed on the installed software list and can be launched from the iFolder administration
link.
5.2 Installing iFolder Advanced
1 Click Install from Available Components.
2 Select Advanced, then click Next.
3 Specify your iFolder server name.
System Name: The name assigned to the iFolder sever.
System Description: An optional description of this iFolder server.
4 Specify the settings for your LDAP services. LDAP is used for user authentication and
authorization.
LDAP URL: The LDAP URL is the server address that iFolder authenticates against.
LDAP Admin DN: The admin user DN for the LDAP server. For example: cn= admin,
o=treename.
novdocx (en) 11 December 2007
LDAP Proxy: Where iFolder should create its proxy user in the directory.
System Admin DN: The distiguished name for an iFolder-specific administrator user.
This user will be created if it does not exist.
5 Click Next to continue your iFolder install.
6 Review the settings. To make a change, click Back. To proceed with the installation, click Next.
38 Novell Open Workgroup Suite Small Business Edition 9.3 Administration and Installation Guide
Page 39

7 The iFolder installation is now complete. Click Finish to proceed to installed software page.
iFolder is now listed on the installed software list and can be launched from the iFolder
Administration link.
5.3 Post-Installation
Section 5.3.1, “iFolder Web Client Desktop Download,” on page 39
Section 5.3.2, “iFolder Administration Desktop Download,” on page 39
5.3.1 iFolder Web Client Desktop Download
1 Log in to the NOWS SBE console.
2 Select Products and Services.
3 Under Select Component, click Personal File Backup (iFolder).
4 Under Administrative Console, click iFolder Client. You are directed to the iFolder Web Client
login page.
5 Specify the username and password, then click Log In.
novdocx (en) 11 December 2007
For additional iFolder information, see the iFolder online documentation (http://
www.novell.com/documentation/ifolder3/index.html?page=/documentation/ifolder3/user/data/
prerequisites.html).
5.3.2 iFolder Administration Desktop Download
1 Log in to the NOWS SBE console.
2 Select Products and Services.
3 Under Select Component, click Personal File Backup (iFolder).
4 Under Administrative Console, click iFolder Administration. You are directed to the iManager
login page.
5 Specify the username and password, then click Log In.
For additional iManager information, see the iManager online documentation (http://
www.novell.com/documentation/imanager25/index.html?page=/documentation/imanager25/
imanager_admin_25/data/bob1yft.html).
Personal File Backup (iFolder) 39
Page 40

novdocx (en) 11 December 2007
40 Novell Open Workgroup Suite Small Business Edition 9.3 Administration and Installation Guide
Page 41

6
Network Backup (Amanda)
Amanda, or Advanced Maryland Automatic Network Disk Archiver, is an archiving tool that is able
to back up data residing on a single server, or multiple computers on a network, to a tape or diskbased storage system. Amanda uses native dump and GNU tar facilities and can back up a large
number of workstations and servers running various versions of Linux, UNIX, or Microsoft
Windows operating systems.
For more information, see the Amanda documentation site (http://www.amanda.org/docs/amanda-
docs.html).
Section 6.1, “Installing Amanda Basic,” on page 41
Section 6.2, “Installing Amanda Advanced,” on page 42
Section 6.3, “Post-Installation,” on page 43
6.1 Installing Amanda Basic
novdocx (en) 11 December 2007
6
1 Click Install under Available Components.
2 Click Hard-Disk Backup (Basic), then click Next.
3 Specify your network backup configurations for Amanda.
Organization: Title of backup reports.
Mail To: A comma-separated list of recipients for e-mail reports.
Days to Backup: Select the days the backups will run.
Hours to Run: Select the hours that backups will run.
4 Specify your disk backup.
Maximum Backup Size (GB): The size of the virtual backup tapes in gigabytes. This is
the maximum amount of data that can be backed up during each cycle.
Number of Backups to Keep: This is the total number of backups to store at one time.
Path to Store Backups: The Linux path to your storage device.
5 Review the settings of the installation. To make a change, click Back. To proceed with the
installation, click Next.
Network Backup (Amanda)
41
Page 42

novdocx (en) 11 December 2007
6 The Amanda Basic installation is now complete. Click Finish to proceed to the installed
software page. Amanda is now listed on the installed software list and can be launched from the
Amanda administration link.
6.2 Installing Amanda Advanced
1 Click Install under Available Components.
2 Select Tape Backup (Advanced), then click Next.
3 Specify your network back up configurations for Amanda.
Organization: Title of backup reports.
Mail To: A comma-separated list of recipients for e-mail reports.
Days to Backup: Select the days the backups will run.
Hours to Run: Select the hours that backups will run.
4 Specify the properties for your particular tape type. You can use the Amanda Web site (http://
amanda.sourceforge.net/cgi-bin/fom?file=46) as a resource.
Tap e De v i c e : The path to the local tape device.
Tape Length (kbytes): The Filemark in kilobytes of your tape media.
Tape Filemark (kbytes): The Filemark in kilobytes of your tape media.
Tape Speed (kbytes): The Filemark in kilobytes of your tape media.
Tap e Co u nt: The number of tapes in your Filemark in kilobytes of your tape media.
5 Review the settings of the installation. To make a change, click Back. To proceed with the
installation, click Next.
42 Novell Open Workgroup Suite Small Business Edition 9.3 Administration and Installation Guide
Page 43

novdocx (en) 11 December 2007
6 The Amanda Basic installation is now complete. Click Finish to proceed to the available
software page. Amanda is now listed on the installed software list and can be launched from the
Amanda administration link.
6.3 Post-Installation
Section 6.3.1, “Labeling Tapes,” on page 43
Section 6.3.2, “Backup Scheduling and Configuration,” on page 44
6.3.1 Labeling Tapes
This needs to be done after installation of Amanda in tape mode.
1 Su to user amandabackup.
2 Write DailySet1-XX on the tape, where XX is the number of the tape.
3 Load the tape into the drive.
4 Run the command amlabel DailySet DailySet1-XX.
You need to change tapes manually before backup time. Amanda does not overwrite the wrong tape,
so the appropriate tape must be inserted prior to the selected backup time.
If you are using a tape changer, you need to set the tape changer manually. Setting up the tape
changer is very specific to the device. For more information, see the Amanda manual (http://
www.amanda.org/docs/tapechangers.html).
Network Backup (Amanda) 43
Page 44

6.3.2 Backup Scheduling and Configuration
For more information about administering software, see the Amanda documentation site (http://
www.amanda.org/docs/install.html#id325444).
novdocx (en) 11 December 2007
44 Novell Open Workgroup Suite Small Business Edition 9.3 Administration and Installation Guide
Page 45

7
OpenOffice
OpenOffice is a full-featured office suite. It includes word processing, presentations, spreadsheets,
and databases.
7.1 Installing OpenOffice Basic
1 Click Install from Available Components.
2 Click Basic, then click Next.
3 To proceed with the installation, click Next.
novdocx (en) 11 December 2007
7
4 The OpenOffice installation is now complete. Click Finish to return to the available software
page. OpenOffice is now listed on the installed software list and shows up as an available
application in the Desktop Downloads panel for your users.
7.2 Post-Installation
OpenOffice is now available from Desktop Downloads for installation to a Windows client.
NOTE: There is no desktop download for the Linux client, because SUSE® Linux Enterprise
Desktop (SLED) includes OpenOffice.
OpenOffice
45
Page 46

For additional information regarding OpenOffice installation, see the OpenOffice online
documentation (http://documentation.openoffice.org/).
novdocx (en) 11 December 2007
46 Novell Open Workgroup Suite Small Business Edition 9.3 Administration and Installation Guide
Page 47

8
E-Mail Collaboration and
novdocx (en) 11 December 2007
Groupware (GroupWise)
GroupWise® has a set of tools that keep your employees connected to clients and each other. The
system comes with e-mail, calendaring, and instant messaging to set up according to your company
needs.
For additional GroupWise information, see the GroupWise documentation Web site (http://
www.novell.com/documentation/gw7/index.html).
Section 8.1, “Installing GroupWise Basic,” on page 47
Section 8.2, “Installing Groupwise Advanced,” on page 48
Section 8.3, “Post-Installation,” on page 49
8.1 Installing GroupWise Basic
1 Click Install from Available Components.
2 Select Basic, then click Next.
3 Select your GroupWise configuration items.
Base GroupWise System: The base GroupWise system includes the mail server with
thick client support.
8
Internet Agent: Required for sending e-mail.
Web Access: Web-based mail client.
Monitor: Administrative monitoring server activity.
Messenger: Instant messenger server.
4 Specify your GroupWise LDAP settings.
Tree Name: Specify a name for your eDirectory
IP Address: Specify the IP address for your eDirectory tree.
Tree Context: Specify a name for your eDirectory domain.
Admin User: Specify the name of your admin user.
Admin Password: Specify a password for your admin user.
gwSysName: Specify the name of your GroupWise system.
5 Specify your Internet Domain. For example: novell.com.
6 Review the settings. To make a change, click Back. To proceed with the installation, click Next.
TM
tree.
E-Mail Collaboration and Groupware (GroupWise)
47
Page 48

novdocx (en) 11 December 2007
7 The GroupWise basic install is now complete. Click Finish to proceed to the Add/Remove
Software page. GroupWise is now listed on the installed software list.
8.2 Installing Groupwise Advanced
1 Click Install from Available Components.
2 Select Advanced, then click Next.
3 Select your GroupWise configuration items.
Base GroupWise System: The base GroupWise system includes the mail server with
thick client support.
Internet Agent: Required for Internet e-mail addresses.
Web Access: Web-based mail client.
Monitor: Administrative monitoring server activity.
Messenger: Instant messenger server.
4 Specify your GroupWise LDAP settings.
Tree Name: Specify a name for your eDirectory tree.
IP Address: Specify the IP address for your eDirectory tree.
Tree Context: Specify a name for your eDirectory domain.
Admin User: Specify the name of your admin user.
Admin Password: Specify a password for your admin user.
gwSysName: Specify the name of your GroupWise system.
5 Specify your business Internet Domain, for example, novell.com.
48 Novell Open Workgroup Suite Small Business Edition 9.3 Administration and Installation Guide
Page 49

6 Review the settings of the installation. To make a change, click Back. To proceed with the
installation, click Next.
novdocx (en) 11 December 2007
7 The GroupWise advanced install is now complete. Click Finish to proceed to the Add/Remove
Software page. GroupWise is now listed on the installed software list. The GroupWise client
now appears in the Desktop Downloads panel for end users.
8.3 Post-Installation
Section 8.3.1, “GroupWise Client Desktop Download,” on page 49
Section 8.3.2, “GroupWise Instant Messenger Desktop Download,” on page 50
Section 8.3.3, “Installing ConsoleOne for Advanced Administrative Tasks,” on page 50
Section 8.3.4, “Configuring WebAccess,” on page 50
Section 8.3.5, “Using GroupWise Monitor,” on page 51
Section 8.3.6, “Considerations for using MailScanner,” on page 51
8.3.1 GroupWise Client Desktop Download
1 Log in to the NOWS SBE console.
2 Click Products and Services.
3 Under Select Component panel, click E-Mail Collaboration and Groupware (GroupWise).
4 Under the Desktop Downloads, click GroupWise Client Software.
5 To save the install to your computer, click Save to Disk, then click OK.
E-Mail Collaboration and Groupware (GroupWise) 49
Page 50

6 After download has completed, click file ending in .gz on your desktop, then click Extract
Here. The GroupWise Client Software component is now downloaded to your desktop.
8.3.2 GroupWise Instant Messenger Desktop Download
1 Log in to the NOWS SBE console.
2 Click Products and Services.
3 Under Select Component panel, click E-Mail Collaboration and Groupware (GroupWise).
4 Under the Desktop Downloads, click Instant Messenger Software.
5 To save the install to your computer, click Save to Disk, then click OK.
6 After download has completed, click file ending in .gz on your desktop, then click Extract
Here. The Instant Messenger Software component is now downloaded to your desktop.
8.3.3 Installing ConsoleOne for Advanced Administrative Tasks
novdocx (en) 11 December 2007
GroupWise is administered by using ConsoleOne®, a Java*-based tool for managing your network
and its resources. When you create your GroupWise system, GroupWise snap-ins are added to your
ConsoleOne installation and GroupWise objects are created in Novell
your GroupWise system, you use ConsoleOne to create additional GroupWise objects, modify
GroupWise object properties, and so on.
NOTE: Because the GroupWise snap-ins to ConsoleOne are required in order to work with
GroupWise objects, you cannot use other network management tools, such as Novell iManager, to
administer your GroupWise system. Also, you should not use older network management tools, such
as NetWare® Administrator, to administer your GroupWise system, unless your GroupWise system
includes legacy gateways that require such tools to administer the corresponding Gateway objects
and their properties.
Because GroupWise is a cross-platform product, you might have components of your GroupWise
system located on NetWare servers, Linux servers, and Windows servers. You can run ConsoleOne
on Windows or Linux to manage GroupWise domains and post offices located on any of these
platforms.
ConsoleOne on Windows (http://www.novell.com/documentation/gw7/gw7_admin/
index.html?page=/documentation/gw7/gw7_admin/data/bwmb48w.html)
ConsoleOne on Linux (//www.novell.com/documentation/gw7/gw7_admin/index.html?page=/
documentation/gw7/gw7_admin/data/bwmb48w.html)
ConsoleOne in a Multi-Platform Environment (http://www.novell.com/documentation/gw7/
gw7_admin/index.html?page=/documentation/gw7/gw7_admin/data/bwmb48w.html)
®
eDirectory. As you manage
8.3.4 Configuring WebAccess
During setup you are given the opportunity to assign GWIA a different port, 26, so that the two
programs do not conflict. Incoming mail from the Internet to the GroupWise system is then
accepted by MailScanner on port 25 (SMRP’s default), scanned, then delivered to GWIA, which
accepts non-standard mail on port 26.
50 Novell Open Workgroup Suite Small Business Edition 9.3 Administration and Installation Guide
Page 51

For directions on component configuration, see the GroupWise Administration Guide Web site
WebAccess
Agent
Web
Browser
Web
Server
WebPublisher
Application
WebAccess
Application
Viewer
Agent
Post Office
Library
(http://www.novell.com/documentation/gw7/gw7_userweb/data/front_page.html).
Figure 8-1 WebAccess Components: Simplified
8.3.5 Using GroupWise Monitor
For administrative information on using the GroupWise Monitor, see the GroupWise Documentation
Web site (http://www.novell.com/documentation/gw7/gw7_admin/index.html?page=/
documentation/gw7/gw7_admin/data/a7q51ga.html)
8.3.6 Considerations for using MailScanner
novdocx (en) 11 December 2007
Installing GroupWise first is preferred.
E-Mail Collaboration and Groupware (GroupWise) 51
Page 52

novdocx (en) 11 December 2007
52 Novell Open Workgroup Suite Small Business Edition 9.3 Administration and Installation Guide
Page 53

9
Print Services (iPrint)
iPrint extends print services securely across multiple networks and operating systems.
For more information, see the iPrint online documentation (http://www.novell.com/documentation/
oes/print-services.html#print-services).
Section 9.1, “Installing iPrint Basic,” on page 53
Section 9.2, “Post-Installation,” on page 54
NOTE: There is no Advanced Install option for iPrint.
9.1 Installing iPrint Basic
1 Click Install from Available Components
2 Click Basic, then click Next.
3 Review the settings. To make a change, click Back. To proceed with the installation, click Next.
novdocx (en) 11 December 2007
9
4 The iPrint installation is now complete. Click Finish to proceed to available software page.
iPrint is now listed on the installed software list and can be launched from the iPrint
administration link.
Print Services (iPrint)
53
Page 54

novdocx (en) 11 December 2007
9.2 Post-Installation
Section 9.2.1, “Creating a Driver Store,” on page 54
Section 9.2.2, “Creating a Print Manager,” on page 55
Section 9.2.3, “Creating a Printer,” on page 55
Section 9.2.4, “Installing Printer from /ipp and Print,” on page 55
9.2.1 Creating a Driver Store
You need only one Driver Store for your iPrint system; however, depending on your network setup,
you can add additional Driver Stores. A Driver Store must be created in order to create a Print
Manager.
1 In iManager, click iPrint > Create Driver Store.
2 Fill in the fields.
Click Help for explanations about the fields.
54 Novell Open Workgroup Suite Small Business Edition 9.3 Administration and Installation Guide
Page 55

3 Click OK.
After the Driver Store is created, the daemon is loaded on the server, and you can start
uploading drivers.
9.2.2 Creating a Print Manager
You need to create at least one Print Manager for your print system; however, depending on your
network setup, you can create additional Print Managers, for example, across a WAN link. The Print
Manager must be running in order to create printers.
NOTE: The Print Manager creates a URL for each printer based on the print manager configuration.
When you create the print manager, you can specify an IP address or DNS name for the iPrint
Service. You should always use a DNS name because using an IP address causes users to delete and
reinstall printers if the IP address changes.
1 In iManager, click iPrint > Create Print Manager.
2 Fill in the fields. Click the help for explanations about the fields.
3 Leave the Start Print Manager after Creation check box checked.
If you do not do this, you must start the Print Manager by using Manage Print Manager >
Manager Control in iManager or entering /etc/init.d./novell-ipsmd start at a
command prompt.
4 Click OK.
After the Driver Store is created, the daemon is loaded on the server and you can start adding
printer drivers.
novdocx (en) 11 December 2007
9.2.3 Creating a Printer
Before you can create a printer, you must first create a Print Manager on your server.
1 In iManager, click iPrint > Create Printer.
2 Follow the prompts and fill in the fields. Click the help for explanations about the fields.
3 Click Next, then select the drivers for this printer.
If the printer drivers for this printer are not listed, you can still create the printer. After the
printer is created, add the printer drivers to the Driver Store and then associate the drivers to the
printer by clicking Manage Printer > Drivers.
4 Click Next to create the printer.
9.2.4 Installing Printer from /ipp and Print
See the following iPrint documentation to install and distribute iPrint printers:
iPrint Printer List Web site (http://www.novell.com/documentation/oes/iprint_lx/
index.html?page=/documentation/oes/iprint_lx/data/boeyibx.html#boeyibx)
Location-Based Printing Web site (http://www.novell.com/documentation/oes/iprint_lx/
index.html?page=/documentation/oes/iprint_lx/data/boeyibx.html#boeyibx)
Print Services (iPrint) 55
Page 56

novdocx (en) 11 December 2007
56 Novell Open Workgroup Suite Small Business Edition 9.3 Administration and Installation Guide
Page 57

10
Windows File and Print Sharing
novdocx (en) 11 December 2007
(Samba)
The Samba file and print sharing service for Windows enables you to configure your network with
the security of Linux and still be able to access files on your Windows servers.
For more information, see the Samba online documentation (http://www.novell.com/documentation/
oes/samba_admin/data/bookinfo.html).
Section 10.1, “Installing Samba Basic,” on page 57
Section 10.2, “Installing Samba Advanced,” on page 58
Section 10.3, “Post-Installation,” on page 59
10.1 Installing Samba Basic
1 Click Install from Available Components.
2 Click Basic, then click Next.
3 Specify the LDAP configurations for your system.
Workgroup: Specify the name of the workgroup that your server belongs to.
LDAP Suffix: Specify the base LDAP suffix. This is where the samba Domain object is
stored.
10
Domain Controller: Specify if Samba should act as the Primary Domain Controller
(PDC).
4 Review the settings. To make a change, click Back. To proceed with the installation, click Next.
Windows File and Print Sharing (Samba)
57
Page 58

novdocx (en) 11 December 2007
5 The Samba installation is now complete. Click Finish to proceed to the available software
page. Samba is now listed on the installed software list and can be launched from the
administration link.
10.2 Installing Samba Advanced
1 Click Install from Available Components.
2 Click Advanced, then click Next.
3 Specify the LDAP configurations for your system.
NetBIOS Name: Specify the NetBIOS name of the server. The first part of the host’s
DNS name can be used as the NetBIOS name.
Workgroup or Domain Name: Specify the name of the workgroup or domain that your
server belongs to or will host.
LDAP Admin Name: Specify the name of the LDAP admin that has supervisory rights.
LDAP Context: Specify the context of the admin user in your eDirectory
LDAP Admin Password: Specify the password for the LDAP admin whose
distinguished name is specified above.
User Container: Specify the base LDAP container for users. This is where the
sambaDomain object is stored
Emulate NT4 Domain Controller: Select this option to enable Samba to emulate an NT4
Primary Domain Controller.
4 Review the settings. To make a change, click Back. To proceed with the installation, click Next.
TM
tree.
58 Novell Open Workgroup Suite Small Business Edition 9.3 Administration and Installation Guide
Page 59

novdocx (en) 11 December 2007
5 The Samba advanced installation is now complete. Click Finish to proceed to the available
software page. Samba is now listed on the installed software list and can be launched from the
Samba administration link.
10.3 Post-Installation
Section 10.3.1, “Creating a Samba User,” on page 59
Section 10.3.2, “Creating a Group,” on page 60
Section 10.3.3, “Assigning a Password,” on page 60
Section 10.3.4, “Enabling Groups for LUM (Linux User Management),” on page 60
Section 10.3.5, “Enabling a User for LUM,” on page 60
Section 10.3.6, “Enabling a User for Samba,” on page 61
Section 10.3.7, “Enabling a Domain,” on page 61
Section 10.3.8, “Launching Samba from the Administration Link,” on page 61
10.3.1 Creating a Samba User
1 In iManager, click Roles and Tasks on the top menu panel.
2 In the menu tab on the left, click Users, then click Create User.
3 Specify user information, then click OK.
Windows File and Print Sharing (Samba) 59
Page 60

10.3.2 Creating a Group
1 In iManager, click Groups, then click Create Group.
2 Specify the group name and context.
Context is the location in eDirectory tree. It is recommended that the user has the same context
as the group.
3 Click OK.
10.3.3 Assigning a Password
1 In iManager, click Password, then click Password Policies.
2 Click Samba Default Password Policy, then click Edit.
3 From the drop-down menu, click Policy Assignment.
4 Click the Object Selector icon.
5 Assign the password policy to either the Organizational Unit that the user is in or assign it to
the specific user object.
6 Click OK.
7 Click Apply.
novdocx (en) 11 December 2007
10.3.4 Enabling Groups for LUM (Linux User Management)
1 In iManager, click Linux User Management, then click Enable Groups for Linux.
2 Click Object Selector and choose the group that you want to enable for LUM.
3 Select check box labeled Linux-enable all users in these groups, then click Next.
4 Click Object Selector, then locate your Linux Workstation object.
5 Click OK.
6 Click Next.
7 Click Finish, then click OK.
10.3.5 Enabling a User for LUM
1 In iManager, click Linux User Management, then click Enable Users for Linux.
2 Click Object Selector and choose the user that you want to enable for LUM.
3 Click OK.
4 Click Next.
5 Specify the user’s primary group.
6 Click Next.
7 Select Linux Workstation, then click Next.
8 Click Finish, then click OK.
60 Novell Open Workgroup Suite Small Business Edition 9.3 Administration and Installation Guide
Page 61

10.3.6 Enabling a User for Samba
1 In iManager, click Samba Management, then click Enable Linux User for Samba.
2 To select a LUM user, click Object Selector.
3 Select the user, then click OK.
4 To have the user authenticate to Samba through eDirectory, click OK. Otherwise, click Cancel.
5 Specify that Universal Password to be used for Samba login. Confirm the password, then click
OK.
6 Click OK.
10.3.7 Enabling a Domain
Complete this procedure if you chose to set up this server as a Primary Domain Controller.
1 Log in to the NOWS SBE console.
2 Click Product and Services, then click Windows File and Print Sharing (Samba).
3 Click the Novell Samba Wiki link under Help Links. Follow the directions from the Novell
documentation site.
novdocx (en) 11 December 2007
10.3.8 Launching Samba from the Administration Link
1 Log in to the NOWS SBE console.
2 Click Management Links.
3 From the drop-down menu, click Windows File and Print Sharing (Samba), then click Search.
4 Click Samba - Samba Administration.
Windows File and Print Sharing (Samba) 61
Page 62

novdocx (en) 11 December 2007
62 Novell Open Workgroup Suite Small Business Edition 9.3 Administration and Installation Guide
Page 63

11
Fax Server (HylaFAX)
HylaFAX is the leading fax server for UNIX-like computer systems. It uses a client-server design
and supports the sending and receiving of faxes as well as text pages, on any scale from low to very
high volumes, making use of large numbers of modems if necessary.
For more information, see the HylaFAX documentation site (http://www.hylafax.org/content/How-
To).
Section 11.1, “Installing HylaFAX Basic,” on page 63
Section 11.2, “Installing HylaFAX Advanced,” on page 64
Section 11.3, “Post-Installation,” on page 65
11.1 Installing HylaFAX Basic
To start the component download section, Next decide if you would like the Basic or Advanced
installation. The set of questions you will be asked will differ depending on your choice. Installation
instructions will start with Basic, followed by Advanced.
novdocx (en) 11 December 2007
11
1 Click Install under Available Components.
2 Click Basic, then click Next.
3 Specify the HylaFAX configuration settings.
Machine Type: This is the identification that is sent out with each Fax. For example, a
good choice would be your company name.
Fax Identification String: Select Send and Receive if you are using this machine to both
send and receive faxes. Select Set Only if you do not have a dedicated phone line or only
want to send faxes from your machine.
Country Code: Country code of your fax server.
Area Code: Area code of your fax server.
Long Distance Prefix: Long-distance prefix for your fax server.
International Prefix: The prefix you need for an international call.
Dial Out Prefix: Specify a number here if the fax modem needs to specify a number to go
outside of your internal phone network.
4 Specify the modem configurations.
Modem Device: the TTY port of your fax modem is a serial port modem. It is probably
something like /dev/ttyS1. If this is an internal or built-in modem, Linux modem drivers
need to be configured.
Phone Number of the Fax-modem: Phone number of the fax modem.
5 Review the settings. To make a change, click Back. To proceed with the installation, click Next.
Fax Server (HylaFAX)
63
Page 64

novdocx (en) 11 December 2007
6 The HylaFAX installation is now complete. Click Finish to proceed to the available software
page. HylaFAX is now listed on the installed software list and can be launched from the
HylaFAX administration link.
11.2 Installing HylaFAX Advanced
1 Click Install under Available Components.
2 Click Advanced, then click Next.
3 Specify the HylaFAX configuration settings.
Machine Type: This is the identification that will be sent out with each Fax. For example,
a good choice would be your company name.
Fax Identification String: Select Send and Receive if you are using this machine to both
send and receive faxes. Select Set Only if you do not have a dedicated phone line or only
want to send faxes from your machine.
Country Code: Country code of your fax server.
Area Code: Area code of your fax server.
Long Distance Prefix: Long distance prefix for your fax server.
International Prefix: The prefix you need for an international call.
Dial Out Prefix: Specify a number here if the fax modem needs to specify a number to go
outside of your internal phone network.
64 Novell Open Workgroup Suite Small Business Edition 9.3 Administration and Installation Guide
Page 65

4 Specify the modem configurations.
Modem Device: The TTY port of your fax modem is a serial port modem. It is probably
something like /dev/ttyS1. If this is an internal or built-in modem, drivers need to be
configured.
Phone Number of the Fax-modem: Phone number of the fax modem.
5 Review the settings. To make a change, click Back. To proceed with the installation, click Next.
novdocx (en) 11 December 2007
6 The HylaFAX installation is now complete. Click Finish to proceed to the available software
page. HylaFAX is now listed on the installed software list and can be launched from the
administration link.
11.3 Post-Installation
HylaFAX requires that Java is already installed. For additional information, see the Java Web site
(http://java.sun.com).
Section 11.3.1, “Desktop Download for Linux,” on page 65
Section 11.3.2, “Desktop Download for OS X and Windows,” on page 66
11.3.1 Desktop Download for Linux
1 Log in to the NOWS SBE console.
2 Click Products and Services.
3 Under Select Component, click Fax Server (HylaFAX).
4 Under Desktop Downloads and Linux, click JHylaFAX.
Fax Server (HylaFAX) 65
Page 66

5 Open a command prompt and type java -jar jhylafax-1.3.10-app.jar to launch
JHylaFAX.
11.3.2 Desktop Download for OS X and Windows
1 Log in to the NOWS SBE console.
2 Click Products and Services.
3 Under Select Components, click Fax Server (HylaFAX).
4 Under Desktop Downloads, click JHylaFAX for OS X or Windows.
5 Follow download procedures to download JHylaFax to your desktop.
6 To launch JHylaFAX, click the JHylaFAX icon.
novdocx (en) 11 December 2007
66 Novell Open Workgroup Suite Small Business Edition 9.3 Administration and Installation Guide
Page 67

12
Anti-Spam (MailScanner)
MailScanner scans all e-mail for viruses, spam and attacks against security vulnerabilities, and plays
a major role in the security of a network.
For additional information, see the MailScanner documentation site (http://www.nk.ca/mailscanner/
docs.html).
Section 12.1, “Installing MailScanner Basic,” on page 67
Section 12.2, “Installing MailScanner Advanced,” on page 67
Section 12.3, “Post-Installation,” on page 67
12.1 Installing MailScanner Basic
1 Click Install under Available Components.
2 Click Basic, then click Next.
3 Review the settings. To make a change, click Back. To proceed with the installation, click Next.
4 The MailScanner basic installation is complete. Click Finish to proceed to the available
software page. MailScanner is now listed on the installed software list and can be launched
from the MailScanner administration link
novdocx (en) 11 December 2007
12
12.2 Installing MailScanner Advanced
1 Click Install under Available Components.
2 Select Advanced, then click Next.
3 Specify the settings that are best for your business needs, then click Next.
4 Review the settings. To make a change, click Back. To proceed with the installation, click Next.
5 The MailScanner advanced installation is now complete. Click Finish to proceed to the Add/
Remove Software page. MailScanner is now listed on the installed software list.
12.3 Post-Installation
Section 12.3.1, “Configuring MailScanner to Scan Mail,” on page 67
Section 12.3.2, “Helpful Links,” on page 67
12.3.1 Configuring MailScanner to Scan Mail
After MailScanner is installed it automatically scans your mail for harmful viruses.
12.3.2 Helpful Links
For considerations for using MailScanner with GroupWise see the MailScanner documentation site
(http://www.nk.ca/mailscanner/docs.html).
Anti-Spam (MailScanner)
67
Page 68

novdocx (en) 11 December 2007
68 Novell Open Workgroup Suite Small Business Edition 9.3 Administration and Installation Guide
Page 69

13
Anti-Virus (ClamAV)
Clam AntiVirus is an anti-virus toolkit for UNIX, designed especially for e-mail scanning on mail
gateways. It provides a number of utilities, including a flexible and scalable multi-threaded daemon,
a command line scanner, and an advanced tool for automatic database updates. The core of the
package is an anti-virus engine available in the form of a shared library.
For additional information, see the ClamAV documentation site (http://www.clamav.net/doc/latest/
clamdoc.pdf).
13.1 Installing ClamAV Basic
1 Click Install from under Available Components.
2 Click Basic, then click Next.
3 Review the setting. To make a change, click Back. To proceed with the installation, click Next.
novdocx (en) 11 December 2007
13
4 The Basic ClamAV install is now complete. Click Finish to return to the available components
page.
13.2 Installing ClamAV Advanced
1 Click Install from Available Components.
2 Click Advanced, then click Next.
Anti-Virus (ClamAV)
69
Page 70

3 Set your scanner options for archival file support.
Clam Archive Max Files to Scan: Specify the maximum number of files to scan within
an archive. A value of 0 disables this option.
Clam Archive Recursion: Specify the Clam archive maximum compression ratio. Any
file that has a compression ratio above this value is marked as a virus. A value of 0
disables this option.
Clam Archive Limit Memory Usage: Select the check box to enable slower but more
memory-efficient decompression algorithm. This only affects the bzip2 decompressor.
Clam Block Encrypted Archives: Select the check box to mark encrypted archives as
viruses.
Clam Archive Block Max: Select the check box to mark archives as viruses when the
archive max files, archive max file size, or archive max recusion limit is reached.
4 Select the security options most suitable for your business needs.
Portable Executable Support: By default, AntiVirus uses the most common
recommended options. This option disables recommended options and allows you to
enable the selected ones below. The first option is PE. PE stands for Portable Executable,
which is an executable file format used in all 32-bit versions of Windows operating
systems. This option allows ClamAV to perform a deeper analysis of executable files and
it is also required for decompression of popular executable packers such as Petite.
Detect Broken Executables: Select the check box to allow detection of broken
executables.
novdocx (en) 11 December 2007
Microsoft Office Document Scanner: Select the check box to enable scanning of
Microsoft Office document macros.
Check Mail Scanner: Select the check box to enable the internal e-mail scanner.
Clam Mail URL Scanner: Select the check box to enable the downloading and scanning
of e-mail that contains URLs.
Clam MS HTML Script Scanner: Select the check box to enable HTML normalization
and decryption of MS and Script Encoder code.
5 Select the appropriate runtime parameters.
Clam Stream Max Length: Specify that the Clam Stream maximum length connection is
closed when the data size limit is exceeded. The value should match your mail transport
agent’s (MTA) limit for a maximum attachment size.
Clam Max Connection Queue Length: Specify the maximum length for the queue of
pending connections.
Clam Max Threads: Specify the maximum number of threads running at the same time.
Clam Data Read Timeout: Specify the time in seconds to wait for data from a client
socket before going to timeout.
Clam Idle Job Timeout: Specify the time in seconds to wait for a new job before going
into timeout.
Clam Max Directory Scan Recursion: Specify the maximum depth to which directories
are scanned.
Clam Self Check of Software: Specify the time in seconds to perform internal sanity
checks, such as database integrity and freshness.
70 Novell Open Workgroup Suite Small Business Edition 9.3 Administration and Installation Guide
Page 71

Clam Follow Directory Symlinks: Select the check box to enable following of directory
symlinks.
Clam Follow File Symlinks: Select the check box to enable following of regular file
symlinks.
Clam Virus Event Command Execution: Enable the execution of a command when a
virus is found.
Clam Run as User: Run as a selected user (Clam must be started by root).
Clam Allow Supplementary Groups: Select the check box to allow the initialization of
supplementary group access (Clam must be started by root).
Clam Exit if Out of Memory Condition Exists: Select the check box to enable stopping
the daemon when libclamav reports an out-of-memory condition.
6 Select the appropriate network configuration.
Clam Path to Local Socket File: Specify the path to a local socket file the daemon will
listen on.
Clam Fix Stale Socket: Select the check box to enable the removal of a stale socket after
an unclean shutdown.
Clam TCP Port Number: Specify the TCP port address.
Clam IP Bind Address: Specify the TCP address to bind to.
novdocx (en) 11 December 2007
7 Select appropriate network configurations.
Clam Path to Local Socket File: Specify the path to a local socket file the daemon will
listen on.
Clam TCP Port Number: Select the check box to enable the removal of a stale socket
after an unclean shutdown.
Clam IP Bind Address: Specify the TCP port address.
Clam Fix Stale Socket: Specify the TCP address to bind to.
8 Select the appropriate logging options.
Clam Log File Path: Specify the full path of the log file. The log file must be writable for
the user running the daemon.
Clam Log File Maximum Size: Specify the maximum size of a log file. A value of 0
disables the limit. You can use modifiers to specify log size in megabytes (M or m) or
kilobytes (K or k). To specify the size in bytes, do not use modifiers.
Clam Log Syslog Facility: Specify the type of syslog message. Refer to man syslog
for facility names.
Clam Log File Unlock: Select the check box to disable log file locking. By default, the
log file is locked for writing to protect against running ClamAV multiple times. If you
want to run another ClamAV, copy the configuration file, change the Log File variable,
and run the daemon with the -config-file option.
Clam Log Event Time: Select the check box to enable an event’s time to be logged.
Clam Log Event Messaging to Syslog: Select the check box to use the system logger.
This can work together with LogFile.
Clam Verbose Logging: Select the check box to enable verbose logging.
9 Review the settings. To make a change, click Back. To proceed with the installation, click Next.
Anti-Virus (ClamAV) 71
Page 72

novdocx (en) 11 December 2007
10 The ClamAV advanced install is now complete. Click Finish to return to the available
components page.
13.3 Post-Installation
Section 13.3.1, “ClamAV Client Desktop Download,” on page 72
Section 13.3.2, “ClamAV Signatures Desktop Download,” on page 73
Section 13.3.3, “Scan Scheduling,” on page 73
Section 13.3.4, “Helpful Links,” on page 73
13.3.1 ClamAV Client Desktop Download
The ClamAV client is now available for installing to Windows client components from Desktop
Downloads.
1 Log in to the NOWS SBE console.
2 Click Products and Services.
3 Under Select Component panel, click Anti-Virus (ClamAV).
4 Under Desktop Downloads, click ClamAV Client Software.
5 To save the install to your computer, click Save to Disk, then click OK.
6 After the download has completed, click the file ending in clamAV.msi on your desktop. The
ClamAV Client Software component is now downloaded to your desktop.
72 Novell Open Workgroup Suite Small Business Edition 9.3 Administration and Installation Guide
Page 73

13.3.2 ClamAV Signatures Desktop Download
ClamAV Signatures is available in Desktop Downloads. There is not a desktop download for the
Linux client, because SLED includes ClamAV.
1 Log in to the NOWS SBE console.
2 Click Products and Services.
3 Under Select Component, click Anti-Virus (ClamAV).
4 Under Desktop Downloads, click Signatures.
5 To save the install to your computer, click Save to Disk, then click OK.
6 After the download has completed, right-click the file ending in clamav-signatures.zip on your
desktop, then click Extract Here. The ClamAV signature is now downloaded to your desktop
and downloads new updates automatically.
13.3.3 Scan Scheduling
1 Log in to the NOWS SBE console.
novdocx (en) 11 December 2007
2 Click Products and Services.
3 Under Select Component, click Anti-Virus (ClamAV).
4 Under Administrative Console, click Scan Scheduling.
5 Select the days and time you want automatic virus scans to occur.
6 Click Save Changes.
13.3.4 Helpful Links
See also scan scheduling information (http://www/clamav.net/).
Anti-Virus (ClamAV) 73
Page 74

novdocx (en) 11 December 2007
74 Novell Open Workgroup Suite Small Business Edition 9.3 Administration and Installation Guide
Page 75

14
VPN Server (OpenVPN)
OpenVPN is a Virtual Private Network (VPN) package for creating point-to-point encrypted tunnels
between host computers. A VPN allows users to authenticate and connect securely to the internal
business network.
For additional information, see the OpenVPN documentation site (http://openvpn.net/howto.html).
Section 14.1, “Installing OpenVPN Basic,” on page 75
Section 14.2, “Installing OpenVPN Advanced,” on page 76
Section 14.3, “Post-Installation,” on page 77
Section 14.4, “VPN Site-to-Site,” on page 80
14.1 Installing OpenVPN Basic
1 Click Install on the OpenVPN row.
2 Click Basic, then click Next.
3 The following network specifications are automatically configured:
novdocx (en) 11 December 2007
14
Virtual IP Address Network: Virtual IP network range (such as 192.168.1.0) to use for
VPN network or automatic network detection.
VPN Network Mask: Network mask (such as 225.225.255.0) of the VPN network or
auto for automatic detection.
Allow VPN Clients Access to Internal Network: Whether to allow VPN clients to route
through the VPN server to the internal network.
4 Review the settings of the installation. To make a change, click Back. To proceed with the
installation, click Next.
VPN Server (OpenVPN)
75
Page 76

novdocx (en) 11 December 2007
5 The OpenVPN installation is now complete. Click Finish to proceed to the available software
page. OpenVPN is now listed on the installed software list.
14.2 Installing OpenVPN Advanced
1 Click Install on the OpenVPN row.
2 Click Advanced, then click Next.
3 Specify the OpenVPN advanced network configuration.
Server IP Address for VPN Interface: The IP address to be set to the assigned address
of the interface that will be accepting VPN connections. If a system has multiple network
interfaces, only one of them can be used for the VPN server.
Virtual IP Address Network: Virtual IP network range (such as 192.168.1.0) to use for
VPN network or auto for automatic network detection
VPN Network Mask: Network mask (such as 255.255.255.0) of the VPN network or
auto for automatic detection.
Port to Use for VPN Traffic: Port to use for VPN traffic. The default is 1194, but it can
be anything above 1024 (1194 is highly recommended for best results).
Protocol to Use for VPN Traffic: The protocol to use for VPN traffic, either UDP or
TCP (the default is UDP for better performance).
IP Address or FQDN of VPN Server: IP address or fully qualified domain name that
VPN clients will connect to (such as vpn.mycompany.com or 207.191.20.141).
Unique Name for VPN Client: Name to use for the VPN client (no special characters).
Allow VPN Clients Access to Internal Network: Select this option to enable access.
76 Novell Open Workgroup Suite Small Business Edition 9.3 Administration and Installation Guide
Page 77

4 Specify your OpenVPN certificate configuration.
Country of VPN Server: Your co u nt r y.
City of VPN Server: The city of your VPN server.
The State or Province of Your VPN Server: The state of your VPN server.
Organization Name: The name of your organization.
Hostname for Key: Unique hostname for this server, which will be embedded in the key.
E-mail Address for Certificate: An e-mail address to be displayed with the certificate.
Key Size in bits for Diffie Helman Key: The Diffie Helman Key Size determines the
size of the key used for the initial handshake between the VPN client and server. The
larger the key, the more secure it is, but it also takes much longer to generate during install
and takes slightly more time for each VPN client to connect. 2048 provides the best
balance between security and speed. 1024 is less secure but faster.
5 Review the settings. To make a change, click Back. To proceed with the installation, click Next.
novdocx (en) 11 December 2007
6 The OpenVPN advanced installation is now complete. Click Finish to proceed to the available
software page. OpenVPN is now listed on the installed software list and can be launched from
the OpenVPN administration page.
14.3 Post-Installation
Section 14.3.1, “Monitoring Clients Connected to OpenVPN,” on page 78
Section 14.3.2, “Creating the OpenVPN Certificates for Clients in the Key Management
Interface,” on page 78
Section 14.3.3, “Installing the Windows OpenVPN,” on page 79
VPN Server (OpenVPN) 77
Page 78

14.3.1 Monitoring Clients Connected to OpenVPN
The Connection Status Windows shows what clients are connected and their addresses.
1 Log in to the NOWS SBE console.
2 Under Select Component, click VPN Server (OpenVPN).
3 Under Administrative Console, click OpenVPN Connection Status.
novdocx (en) 11 December 2007
14.3.2 Creating the OpenVPN Certificates for Clients in the Key Management Interface
Key Management allows you to create a new key/certificate pair, revoke an existing key/certificate
pair, and download client configurations for Windows and Linux clients.
1 Log in to the NOWS SBE console.
2 Click Products and Services.
3 Under Select Component, click VPN Server (OpenVPN).
4 Under Administrative Console, click OpenVPN Key Management.
78 Novell Open Workgroup Suite Small Business Edition 9.3 Administration and Installation Guide
Page 79

novdocx (en) 11 December 2007
5 To revoke a client certificate, click Revoke on the client’s certificate.
14.3.3 Installing the Windows OpenVPN
1 Log in to the NOWS SBE console.
2 Click Products and Services.
3 Under Select Component, click OpenVPN Services (OpenVPN).
4 Click Key Management.
5 Click Windows Client and Configuration.
6 Specify the username in Unique Name field, then click Generate. This downloads a .zip file
to your desktop.
7 Open the .zip file and extract the contents to a folder on your system.
8 To install the OpenVPN client and set up the client configuration, double-click the
install.bat file. This loads the OpenVPN GUI Client Installation.
9 Accept the default values or specify new values. Under some versions of Windows, a warning
prompts the user to allow installation of a non-secure driver. Click Continue.
VPN Server (OpenVPN) 79
Page 80

10 After the installation completes, a new program is visible in the taskbar. Click the new icon to
launch OpenVPN with the new configuration, and a status window displays, showing the
connection progress:
novdocx (en) 11 December 2007
When the connection is fully established, the status window disappears and the taskbar briefly
shows the new VPN address. At this point, the VPN tunnel has been established and OpenVPN
has been successfully downloaded.
The VPN tunnel can be broken by right-clicking in the taskbar icon and selecting disconnect.
14.4 VPN Site-to-Site
Section 14.4.1, “Installing Two NICs,” on page 80
Section 14.4.2, “VPN Site-to-Site Setup,” on page 81
Section 14.4.3, “Troubleshooting Tips,” on page 82
14.4.1 Installing Two NICs
It is best to complete the installation and configuration of the first network interface card (NIC)
through the Web configuration tool before configuring a second NIC. After the initial Web
configuration is complete, you can then use YaST to configure the second NIC.
80 Novell Open Workgroup Suite Small Business Edition 9.3 Administration and Installation Guide
Page 81

NOTE: Because traffic is routed through the server, be sure to enable IP Forwarding when
configuring the second NIC.
14.4.2 VPN Site-to-Site Setup
The process of setting up a site-to-site VPN between two NOWS SBE servers is to create two clientto-server VPNs between the servers in opposite directions.
1 Synchronize the time between the two servers by using ntpdate.
2 In the NOWS SBE Web administration tool, install Firewall (IPTables) and VPN Server
(OpenVPN) on both Server A and Server B.
2a For Server A, replace auto in the Virtual IP Address Network field with a distinct
segment address, such as 172.16.150.0.
2b For Server B, replace auto in the Virtual IP Address Network field with a distinct
segment address, such as 172.16.151.0.
2c Replace auto in the VPN Network Mask field with the appropriate mask, such as
255.255.255.0.
2d Verify that Allow VPN Clients Access to Internal Network is selected.
novdocx (en) 11 December 2007
3 From Server A’s Web administration tool, create a client key for Server B to use.
3a Go to Products and Service > VPN Server (OpenVPN) > Administrative Console > Open
VPN Key Management.
3b Specify a unique name and select Generate.
Using the name of Server B helps maintain organization.
3c Select Windows Client and Configuration to download and save the Windows client .zip
file. The filename is based on the unique name selected.
4 Copy the client .zip file to /etc/openvpn on Server B.
5 Extract the client .zip file into the /etc/openvpn folder using the command unzip
unique_name_client.zip. If desired, delete the Windows install files.
6 Rename (mv) or copy (cp) the unique_name.ovpn file to client.conf.
7 Using a text editor, such as vi, open the server.conf file and comment out the second to
the last line with a # symbol. This prevents the VPN from pushing the public route to the other
server and allows each server to access the public network directly.
8 Create a client key for Server A to use by repeating Step 3 from Server B’s Web administration
tool.
9 Finalize Server A’s configuration by repeating Step 4 through Step 7 on Server A. When
complete, each server should have a server.conf and a client.conf file in the /etc/
openvpn/ directory.
10 Restart OpenVPN on each server by using /etc/init.d/openvpn restart.
You should now have a functioning two-way VPN tunnel. Each server should push its private
routes to the other.
11 Test the connection by pinging a host on Network A from Server B, and a host on Network B
from Server A.
VPN Server (OpenVPN) 81
Page 82

For most networks with more than a single subnet, or where Server A and Server B are not the
default gateway for clients on their networks, you also need to set up routing on internal switches
and routers so that clients on Network A know to point to Server A as the next hop to Network B.
This also needs to be done so that clients on Network B know to point to Server B as the next hop to
Network A.
WARNING: This involves modifying systems beyond the NOWS SBE servers and can break the
network if performed incorrectly. You are on your own at this point.
14.4.3 Troubleshooting Tips
To verify the validity of the certificates on the VPN, issue the following command:
openssl verify-<keyname>ca.crt-purpose sslclient <keyname>.crt
Step 7 on page 81 suggests commenting out the public push statements for the VPN. If this is
not done and the VPN servers are on the same network segment, the servers will hang. Pushing
the public route can also cause trouble communicating over the VPN tunnel.
Uninstalling the Firewall (IPTables) component does not undo any firewall configuration
changes that have been made. Changes to the firewall configuration can cause the Site-to-Site
VPN to stop functioning, so make firewall changes with care.
To verify the firewall configuration, follow these directions:
1. In a text editor, open /etc/sysconfig/SuSEfirewall2
novdocx (en) 11 December 2007
2. Find the line beginning with FW_DEV_INT
3. Verify that it looks like this:
FW_DEV_INT="eth1 tun0 tun1 tun2 tun3 tun4 tun5 tun6 tun7 tun8
tun9
82 Novell Open Workgroup Suite Small Business Edition 9.3 Administration and Installation Guide
Page 83

15
Firewall (IPTables)
A firewall is a hardware or software device that is configured to permit, deny, or proxy data through
a computer network that has different levels of trust.
Section 15.1, “Installing IPTables Basic,” on page 83
Section 15.2, “Installing IPTables Advanced,” on page 83
Section 15.3, “Post-Installation,” on page 84
15.1 Installing IPTables Basic
1 Click Install under Available Components.
2 Click Basic, then click Next.
3 Specify your IPTable configurations.
External Interface: The network interface connected to the Internet.
Internal Interface: The internal network interface. If you are using NAT, it routes from
the external interface to the internal interface.
NAT: Network Address Translation shares the firewalled Internet connection with the
network on the internal network interface. This is a must if you are using this server as
your network firewall.
4 Closely review the settings. If you need to make a change, click Back. To proceed with the
installation, click Next.
novdocx (en) 11 December 2007
15
5 The firewall install is complete. Click Finish to proceed to the available software page.
IPTables is now listed on the installed software list.
15.2 Installing IPTables Advanced
1 Click Install under Available Components.
2 Click Advanced, then click Next.
3 Specify your firewall configurations.
External Interface: The network interface connected to the Internet.
Internal Interface: The internal network interface. If you are using NAT, it will route
from the external interface to the internal interface.
NAT: Network Address Translation shares the firewalled internet connection with the
network on the internal network interface. This is a must if you are using this server as
your network firewall.
4 Specify your firewall port setup. See Section 1.4, “Planning for the NOWS SBE Install,” on
page 14 for typical ports that should be open for TCP and UDP.
Additional Ports (TCP): Specify a comma-separated list of additional TCP ports to open
on the firewall. Port ranges can be specified with a hyphen.
Additional Ports (UDP): Specify a comma-separated list of additional UDP ports to open
on the firewall. Port ranges can be specified with a hyphen.
Firewall (IPTables)
83
Page 84

5 Review the settings. To make a change, click Back. To proceed with the installation, click Next.
6 The firewall install is complete. Click Finish to proceed to the available software page.
Firewall is now listed on the installed software list.
15.3 Post-Installation
Further firewall configuration is necessary to secure your system. The administration interface is
currently exposed to all interfaces.
15.3.1 Firewall Configuration
1 Log in to the NOWS SBE console.
2 Click Products and Services.
3 Under Product Components, click Firewall (IPTables).
4 Under Administrator Console, click Firewall Administration.
5 Specify the port configuration, then click Save Changes.
It is recommended that you disable access to this administration interface. For additional
recommendations for setting firewall rules, see the Firewall Documentation Web sit (http://
www.fwbuilder.org/pages/cd/contrdoc3.html).
novdocx (en) 11 December 2007
84 Novell Open Workgroup Suite Small Business Edition 9.3 Administration and Installation Guide
Page 85

16
Dynamic Local User
Dynamic Local User enables you to authenticate to Windows by using your Novell® eDirectoryTM
User ID through LDAP, which gives you a single place to manage and synchronize user IDs and
passwords.
Section 16.1, “Installing DLU Basic,” on page 85
Section 16.2, “Installing DLU Advanced,” on page 85
Section 16.3, “Post-Installation,” on page 86
16.1 Installing DLU Basic
1 Click Install under Available Components.
2 Configure your DLU LDAP settings.
LDAP User Container: Specify the LDAP user container. For example, if your user context is
cn=jdoe, ou=users, o=mycompany, then your LDAP user container is ou=users,o=mycompany.
novdocx (en) 11 December 2007
16
16.2 Installing DLU Advanced
1 Click Install under Available Components.
2 Select Advanced, then click Next.
3 Configure your DLU LDAP settings.
LDAP Naming Attribute: Specify the LDAP Naming Attribute. For example, if your
user context is cn=jdoe, ou=users, o=mycompany, then your LDAP Naming Attribute is
cn.
LDAP User Container: Specify the LDAP User Container. For example, if your user
context is cn= jdoe, ou= users, o=mycompany, then your LDAP User Container is
ou=users,o=mycompany.
LDAP Server IP: Specify the IP address of your LDAP server.
Secure Connection: Specify port 636 to ensure that the authentication method is secure
LDAP.
4 Review the settings. To make a change, click Back. To proceed with the installation, click Next.
Dynamic Local User
85
Page 86

novdocx (en) 11 December 2007
5 The DLU install is now complete. Click Finish to return to the available software page.
16.3 Post-Installation
After the installation, complete the following for DLU desktop downloads.
1 Log in to the NOWS SBE console.
2 Click Desktop Downloads.
3 Under the Choose Component drop-down menu, select Dynamic Local User, then click Search.
4 Under Search Results, click dlu- Dynamic Local User Client and dlu- pGina LDAP Registry
files.
5 For both downloads, click Save File.
6 Install dlu-Dynamic Local User Client from Windows workstation.
7 Click the pGina LDAP Plugin icon.
8 Specify pGina user information, then click Next to proceed with installation.
9 Follow the screen prompts to define your computer’s architecture type.
Enter 1 for x86 architecture type.
Enter 2 for x86-64 architecture type.
Enter 0 to abort install.
10 Continue as directed by screen prompts.
11 Verify that the plug-in path in the pgina-ldap-regedit.reg file is correct. It should
point to ldapath_plus.dll.
86 Novell Open Workgroup Suite Small Business Edition 9.3 Administration and Installation Guide
Page 87

12 Import the pgina-ldap-regedit.reg registry file by using the Windows Registry
Editor.
12a From your Windows workstation, click Start > Run.
12b Type regedit, then click OK.
12c Next, click File > Import and browse for pgina-ldap-regedit.
13 After installation is complete, test your pGina installation. To test the plug-in from your
Windows workstation, click Start > All Programs > pGina > Plugin Tester.
14 Specify your directory administrator username and password, then click Login.
15 After the LDAP plug-in is successfully configured, restart your Windows workstation for
changes to take effect.
After the reboot, the login window is DLU instead of the standard Windows login screen. DLU
is automatically configured by the pgina-ldap-regit.reg file that has been copied to
each Windows workstation’s registry settings.
novdocx (en) 11 December 2007
Dynamic Local User 87
Page 88

novdocx (en) 11 December 2007
88 Novell Open Workgroup Suite Small Business Edition 9.3 Administration and Installation Guide
Page 89

17
Helpdesk
Helpdesk provides an online resource for administrators to monitor issues, check status incident
tickets, allocate work, and personalize settings to best fit their company’s needs. This allows users
the reassurance that their incidents have been received by support teams.
Section 17.1, “Installing Helpdesk Basic,” on page 89
Section 17.2, “Installing Helpdesk Advanced,” on page 90
Section 17.3, “Post-Installation,” on page 94
17.1 Installing Helpdesk Basic
1 Click Install on the Helpdesk row.
2 Click Basic, then click Next.
3 Specify settings for your LDAP services. LDAP is used for user authentication and
authorization.
novdocx (en) 11 December 2007
17
Helpdesk Administrator User Name: The login ID for the default administrator of your
Helpdesk application.
Password for Helpdesk Admin: The password to which the default administrator login
is linked.
Admin FDN: The fully distinguished name of the eDirectory
cn= admin, o= tree.
Admin User Password: The password you use for your eDirectory tree's admin user.
Helpdesk Proxy Username: For security purposes, a separate proxy user is created for
the back-end helpdesk.
Helpdesk Proxy User Password: The password to use for the Helpdesk proxy user.
MySQL User Password: The password to use for the Helpdesk proxy username. For
security purposes, the root password in MySQL* is also set to this.
Helpdesk Mail User Name: The login name of the Helpdesk support e-mail account.
Helpdesk Mail Password: The password used to log in to the Helpdesk support e-mail
account.
4 Click Next to continue.
5 Review the settings. To make a change, click Back. To proceed with the installation, click Next.
TM
tree's admin user, such as
Helpdesk
89
Page 90

novdocx (en) 11 December 2007
6 The Helpdesk Basic installation is now complete. Click Finish to proceed to the available
software page. Helpdesk is now listed on the installed software list and can be launched from
the Helpdesk administration link.
17.2 Installing Helpdesk Advanced
1 Click Install on the Helpdesk row.
2 Click Advanced, then click Next.
3 Specify the settings for your LDAP services. LDAP is used for user authentication and
authorization.
LDAP Host: Specify the IP address for your eDirectory server. In most cases this is the
same as the server on which you are installing Helpdesk
LDAP Port: The default port for LDAP services is 389. However, this is a non-secure
port and all authentication should use a secure connection. Change this to port 636, which
is for LDAP over SSL.
LDAP Base Organization: The base context your Helpdesk application will look to
authenticate users. Typically it is the o of the eDirectory tree.
Helpdesk Object: The eDirectory Helpdesk object's fully distinguished name, such as
cn=___, ou=___.
Admin FDN: The fully distinguished name of the eDirectory tree's admin user, such as
cn= admin, o= tree.
Admin User Password: The password you use for your eDirectory tree's admin user.
4 Click Next to continue.
90 Novell Open Workgroup Suite Small Business Edition 9.3 Administration and Installation Guide
Page 91

5 Specify the settings for your Helpdesk environment.
Helpdesk Administrator User Name: The login ID for the default administrator of your
Helpdesk application.
Password for Helpdesk Admin: The password to which the default administrator login
is linked.
Helpdesk Tree: The name of your eDirectory tree.
novdocx (en) 11 December 2007
Helpdesk Upload Path: The path from which all Helpdesk uploads occur. Use the default
to ensure that you receive updates from Novell
Helpdesk Download Path: The path from which all Helpdesk downloads occur. Use the
®
.
default to ensure that you receive updates from Novell.
Helpdesk Title: The name you want employees to see when they log in to the Helpdesk
application.
Helpdesk Proxy Username: For security purposes, a separate proxy user is created for
the back-end helpdesk.
Helpdesk Proxy User Password: The password to use for the helpdesk proxy user.
Helpdesk Admin E-Mail: The e-mail address to be used when users submit tickets, such
as support@yourdomainname.com
Helpdesk Database User Name: The name of the user on your database server that will
have full access to this database instance.
6 Click Next to continue.
7 Specify the settings for MySQL, then click Next.
MySQL User: The user that will manage the database.
MySQL User Password: The password used by your eDirectory tree’s administrator.
8 Click Next to continue.
9 Specify the Advanced Helpdesk configurations.
Helpdesk 91
Page 92

novdocx (en) 11 December 2007
Helpdesk Send User Queue Change: Keep 0 to not notify users of a change in their
queue association. Change to 1 to turn on notification.
Helpdesk Send User Priority Change: Keep 0 to not notify users of a change in the
priority of their incident. Change to 1 to turn on notification.
Helpdesk Send User Tech Change: Keep 1 to activate notification. Change to 0 to not
notify users of a change to the technician assigned to their incident.
Helpdesk Send User Status Change: Keep 1 to activate notification. Change to 0 to not
notify users of a change in their incident's status.
Helpdesk Send User Close: Keep 1 to activate notification. Change to 0 to not notify
users of a change in their incident's status to Close.
Helpdesk Web Helpdesk Page: The address for your Helpdesk services.
E-mail Address of Queue Changes: Specify the e-mail address to be used to send
notifications of reassignments of queues.
Helpdesk Technician Change E-Mail: Specify the e-mail address to be used to send
notifications of reassignments of technicians.
Helpdesk Solution Change E-Mail: Specify the e-mail address to be used to send
notifications of incident solutions.
Helpdesk Status Change E-Mail: Specify the e-mail address to be used to send
notifications of a change to incident status.
Helpdesk Priority Change E-Mail: Specify the e-mail address to be used to send
notifications of a change to incident priority.
Helpdesk Default Technician: Specify the default technician name for unassigned
Helpdesk incidents.
92 Novell Open Workgroup Suite Small Business Edition 9.3 Administration and Installation Guide
Page 93

Helpdesk Technician Change E-Mail: Specify the e-mail address to be used to send
notifications of reassignments of technicians.
Helpdesk Auto Assign: Keep 0 to not automatically assign incidents. Change to 1 to
enable this feature.
Helpdesk Allow Technician Assign: Keep 0 to not allow technicians to assign incidents.
Change to 1 to enable this feature.
Helpdesk Check Sleep Time: The interval in seconds that the system polls for incidents
submitted by e-mail.
Helpdesk Ticket Sleep Time: The interval in seconds that the system polls for new
incidents submitted through the Helpdesk interface.
10 Click Next to continue.
11 Specify any additional Advanced Helpdesk configurations.
novdocx (en) 11 December 2007
Helpdesk Log Location: The directory location on the server for log files.
Helpdesk Log Level: FINE, NORMAL, VERBOSE. FINE is the default.
Helpdesk Report Closure: Keep at 0 to not report on closed reports. Change to 1 to
activate notification.
Helpdesk Mail Digest: Keep at 0 to not send out a report of all incidents daily. Change to
1 to activate this notification.
Helpdesk Send Notifications: Keep 1 to send out notifications. Change to 0 to deactivate
this notification.
Helpdesk 93
Page 94

Helpdesk Mail Password: The password used to log in to the designated Helpdesk mail
account.
Helpdesk Mail User Name: The user name of the designated Helpdesk mail account.
Helpdesk Return Address: The e-mail address used by the Helpdesk for responding to
user inquiries.
Helpdesk Mail Provider: The mail service used by your company.
Helpdesk Incoming Mail Port: The port on which the server is listening for incoming
mail.
Helpdesk Outgoing Mail Server: The address of your mail server.
Helpdesk Database Port: The port that the database uses.
Helpdesk Database Host: The host that is running the MySQL server.
12 Click Next to continue.
13 Review your settings. To make a change, click Back. To proceed with the installation, click
Next.
novdocx (en) 11 December 2007
14 The Helpdesk Advanced installation is now complete. Click Finish to proceed to the available
software page. Helpdesk is now listed on the installed software list and can be launched from
the Helpdesk administration link.
17.3 Post-Installation
Additional information on administering Helpdesk can be found in the Helpdesk online
documentation (http://www.novell.com/documentation/nows/).
94 Novell Open Workgroup Suite Small Business Edition 9.3 Administration and Installation Guide
Page 95

18
DHCP
The Dynamic Host Configuration Protocol (DHCP) enables your server to provide IP addresses as
clients need them instead of manually assigning addresses to client computers.
®
For additional information, see the Novell
documentation/oes/networking-protocols.html#dhcp).
Section 18.1, “Installing DHCP Basic,” on page 95
Section 18.2, “Installing DHCP Advanced,” on page 96
Section 18.3, “Post-Installation,” on page 97
DHCP online documentation (http://www.novell.com/
18.1 Installing DHCP Basic
To start DHCP component install, click on Install under Available Components. Next decide if you
would like the Basic or Advanced installation. The Basic installation installs a DHCP server with
default parameters for your network. Installation instructions will start with Basic, followed by
Advanced.
novdocx (en) 11 December 2007
18
1 Click Install under Available Components.
2 Click Basic, then click Next.
3 Confirm that the default settings for DHCP configuration are appropriate, then click Next.
DHCP
95
Page 96

4 Review the settings. To make a change, click Back. To proceed with the installation, click
Next.
5 The DCHP basic installation is now complete. Click Finish to return to the available software
page.
novdocx (en) 11 December 2007
18.2 Installing DHCP Advanced
1 Click Install under Available Components.
2 Click Advanced, then click Next.
3 Specify your DHCP configuration.
DHCP Settings: Verify that the DHCP settings are correct for your network.
Subnet: Specify the network’s subnet IP address.
Netmask: Specify the network’s subnet mask.
IP Range Start: Specify beginning number of the range of your network’s IP addresses (0
is usually the network address).
IP Range End: Specify the ending number of the range of your network’s IP addresses
(255 is usually the broadcast address).
DNS 1: Specify the IP addresses of your DNS server.
DNS 2: Specify the IP address of an alternative DNS server.
Default Route: Specify the default route for DHCP clients. This is the IP address of the
next hop router that the clients would go for any traffic off their network. If your server is
the NAT/internal gateway, use the server’s internal IP address for this setting.
Domain: This is your company’s domain name.
96 Novell Open Workgroup Suite Small Business Edition 9.3 Administration and Installation Guide
Page 97

4 Review the settings. To make a change, click Back. To proceed with the installation, click Next.
novdocx (en) 11 December 2007
5 The DHCP advanced installation is now complete. Click Finish to return to the available
software page. DHCP is now listed on the installed software page.
18.3 Post-Installation
After installation, the DHCP server is up and running on your network. There are no modifications
or maintenance that need to be done. Custom tasks can be done from the command line by logging
in to the server through SSH.
DHCP 97
Page 98

novdocx (en) 11 December 2007
98 Novell Open Workgroup Suite Small Business Edition 9.3 Administration and Installation Guide
Page 99

19
DNS
DNS, or Domain Name System, is an Internet service that translates domain names into IP
addresses. Because domain names are alphabetic, they're easier to remember. However, the Internet
however, is really based on IP addresses. Every time you use a domain name, a DNS service must
translate that name into the corresponding IP address. For example, the domain name
www.example.com might translate to 198.105.232.4.
®
For additional information, see the Novell
documentation/oes/networking-protocols.html#dhcp).
Section 19.1, “Installing Basic DNS,” on page 99
Section 19.2, “Post-Installation,” on page 100
DNS online documentation (http://www.novell.com/
19.1 Installing Basic DNS
novdocx (en) 11 December 2007
19
1 Click Install on the DNS row.
2 Select Basic, then click Next.
3 Specify your DNS configurations.
DNS Domain Name: Specify your DNS domain name.
DNS Forwarder 1: Specify your DNS forwarder. This should be obtained from your ISP.
DNS Forwarder 2: Specify another DNS forwarder.
Internal A Record x Hostname: Add the hostname of the servers you want your DNS
server to be able to resolve for your network.
Internal A Record x IP: Add the IP address of the servers specified for your network.
4 Review the settings. To make a change, click Back. To proceed with the installation, click Next.
DNS
99
Page 100

novdocx (en) 11 December 2007
5 The DNS Basic installation is now complete. Click Finish to proceed to the Add/Remove
Software page. DNS is now listed on the installed software list.
19.2 Post-Installation
After installation, DNS is up and running on your network. There are no modifications or
maintenance that need to be done.
For help setting server parameters in DNS or starting and stopping DNS, see the Novell
online documentation (http://www.novell.com/documentation/oes/networkingprotocols.html#dhcp).
®
DNS
100 Novell Open Workgroup Suite Small Business Edition 9.3 Administration and Installation Guide
 Loading...