

Page 1

Novell®
www.novell.com
Installation Guide
Identity Manager
novdocx (en) 17 September 2009
AUTHORIZED DOCUMENTATION
3.6.1
January 05, 2010
Identity Manager 3.6.1 Installation Guide
Page 2

Legal Notices
Novell, Inc. makes no representations or warranties with respect to the contents or use of this documentation, and
specifically disclaims any express or implied warranties of merchantability or fitness for any particular purpose.
Further, Novell, Inc. reserves the right to revise this publication and to make changes to its content, at any time,
without obligation to notify any person or entity of such revisions or changes.
Further, Novell, Inc. makes no representations or warranties with respect to any software, and specifically disclaims
any express or implied warranties of merchantability or fitness for any particular purpose. Further, Novell, Inc.
reserves the right to make changes to any and all parts of Novell software, at any time, without any obligation to
notify any person or entity of such changes.
Any products or technical information provided under this Agreement may be subject to U.S. export controls and the
trade laws of other countries. You agree to comply with all export control regulations and to obtain any required
licenses or classification to export, re-export, or import deliverables. You agree not to export or re-export to entities
on the current U.S. export exclusion lists or to any embargoed or terrorist countries as specified in the U.S. export
laws. You agree to not use deliverables for prohibited nuclear, missile, or chemical biological weaponry end uses.
Please refer to the International Trade Services (http://www.novell.com/company/policies/trade_services) for more
information on exporting Novell software. Novell assumes no responsibility for your failure to obtain any necessary
export approvals.
novdocx (en) 17 September 2009
Copyright © 2007-2010 Novell, Inc. All rights reserved. No part of this publication may be reproduced, photocopied,
stored on a retrieval system, or transmitted without the express written consent of the publisher.
Novell, Inc. has intellectual property rights relating to technology embodied in the product that is described in this
document. In particular, and without limitation, these intellectual property rights may include one or more of the U.S.
patents listed on the Novell Legal Patents Web page (http://www.novell.com/company/legal/patents/) and one or
more additional patents or pending patent applications in the U.S. and in other countries.
Novell, Inc.
404 Wyman Street, Suite 500
Waltham, MA 02451
U.S.A.
www.novell.com
Online Documentation: To access the latest online documentation for this and other Novell products, see
the Novell Documentation Web page (http://www.novell.com/documentation).
Page 3

Novell Trademarks
For Novell trademarks, see the Novell Trademark and Service Mark list (http://www.novell.com/company/legal/
trademarks/tmlist.html).
Third-Party Materials
All third-party trademarks are the property of their respective owners.
novdocx (en) 17 September 2009
Page 4

novdocx (en) 17 September 2009
4 Identity Manager 3.6.1 Installation Guide
Page 5

Contents
About This Guide 9
Part I Planning 11
1 Setting Up a Development Environment 13
2 Creating a Project Plan 15
2.1 Discovery Phase . . . . . . . . . . . . . . . . . . . . . . . . . . . . . . . . . . . . . . . . . . . . . . . . . . . . . . . . . . . 15
2.1.1 Defining Current Business Processes . . . . . . . . . . . . . . . . . . . . . . . . . . . . . . . . . . . . 16
2.1.2 Defining How the Identity Manager Solution Affects the Current Business
Processes . . . . . . . . . . . . . . . . . . . . . . . . . . . . . . . . . . . . . . . . . . . . . . . . . . . . . . . . . 17
2.1.3 Identifying the Key Business and Technical Stakeholders . . . . . . . . . . . . . . . . . . . . 18
2.1.4 Interviewing All Stakeholders. . . . . . . . . . . . . . . . . . . . . . . . . . . . . . . . . . . . . . . . . . . 18
2.1.5 Creating a High-level Strategy and an Agreed Execution Path . . . . . . . . . . . . . . . . . 18
2.2 Requirements and Design Analysis Phase . . . . . . . . . . . . . . . . . . . . . . . . . . . . . . . . . . . . . . . 19
2.2.1 Define the Business Requirements . . . . . . . . . . . . . . . . . . . . . . . . . . . . . . . . . . . . . . 20
2.2.2 Analyze Your Business Processes . . . . . . . . . . . . . . . . . . . . . . . . . . . . . . . . . . . . . . 21
2.2.3 Design an Enterprise Data Model . . . . . . . . . . . . . . . . . . . . . . . . . . . . . . . . . . . . . . . 22
2.3 Proof of Concept . . . . . . . . . . . . . . . . . . . . . . . . . . . . . . . . . . . . . . . . . . . . . . . . . . . . . . . . . . . 23
2.4 Data Validation and Preparation . . . . . . . . . . . . . . . . . . . . . . . . . . . . . . . . . . . . . . . . . . . . . . . 23
2.5 Production Pilot . . . . . . . . . . . . . . . . . . . . . . . . . . . . . . . . . . . . . . . . . . . . . . . . . . . . . . . . . . . . 24
2.6 Production Rollout Planning. . . . . . . . . . . . . . . . . . . . . . . . . . . . . . . . . . . . . . . . . . . . . . . . . . . 24
2.7 Production Deployment . . . . . . . . . . . . . . . . . . . . . . . . . . . . . . . . . . . . . . . . . . . . . . . . . . . . . . 25
novdocx (en) 17 September 2009
3 Technical Guidelines 27
3.1 Management Tools Guidelines . . . . . . . . . . . . . . . . . . . . . . . . . . . . . . . . . . . . . . . . . . . . . . . . 28
3.1.1 Designer Guidelines . . . . . . . . . . . . . . . . . . . . . . . . . . . . . . . . . . . . . . . . . . . . . . . . . 28
3.1.2 iManager Guidelines . . . . . . . . . . . . . . . . . . . . . . . . . . . . . . . . . . . . . . . . . . . . . . . . . 29
3.2 Metadirectory Server Guidelines . . . . . . . . . . . . . . . . . . . . . . . . . . . . . . . . . . . . . . . . . . . . . . . 29
3.3 eDirectory Guidelines. . . . . . . . . . . . . . . . . . . . . . . . . . . . . . . . . . . . . . . . . . . . . . . . . . . . . . . . 30
3.3.1 Identity Manager Objects in eDirectory . . . . . . . . . . . . . . . . . . . . . . . . . . . . . . . . . . . 30
3.3.2 Replicating the Objects that Identity Manager Needs on the Server . . . . . . . . . . . . . 31
3.3.3 Using Scope Filtering to Manage Users on Different Servers . . . . . . . . . . . . . . . . . 32
3.4 User Application . . . . . . . . . . . . . . . . . . . . . . . . . . . . . . . . . . . . . . . . . . . . . . . . . . . . . . . . . . . . 34
3.5 Auditing and Reporting Guidelines. . . . . . . . . . . . . . . . . . . . . . . . . . . . . . . . . . . . . . . . . . . . . . 35
Part II Installation 37
4 Basic Identity Manager System Checklist 39
4.1 Prerequisites . . . . . . . . . . . . . . . . . . . . . . . . . . . . . . . . . . . . . . . . . . . . . . . . . . . . . . . . . . . . . . 40
4.2 Planning . . . . . . . . . . . . . . . . . . . . . . . . . . . . . . . . . . . . . . . . . . . . . . . . . . . . . . . . . . . . . . . . . . 40
4.3 Installation . . . . . . . . . . . . . . . . . . . . . . . . . . . . . . . . . . . . . . . . . . . . . . . . . . . . . . . . . . . . . . . . 40
4.4 Driver Configuration with the Remote Loader . . . . . . . . . . . . . . . . . . . . . . . . . . . . . . . . . . . . . 41
4.5 Driver Configuration without the Remote Loader . . . . . . . . . . . . . . . . . . . . . . . . . . . . . . . . . . . 41
4.6 Additional Configuration . . . . . . . . . . . . . . . . . . . . . . . . . . . . . . . . . . . . . . . . . . . . . . . . . . . . . . 41
Contents 5
Page 6

5 Where to Get Identity Manager 43
6 System Requirements 45
6.1 eDirectory and iManager . . . . . . . . . . . . . . . . . . . . . . . . . . . . . . . . . . . . . . . . . . . . . . . . . . . . . 46
6.2 Metadirectory Server . . . . . . . . . . . . . . . . . . . . . . . . . . . . . . . . . . . . . . . . . . . . . . . . . . . . . . . . 46
6.2.1 Supported Processors . . . . . . . . . . . . . . . . . . . . . . . . . . . . . . . . . . . . . . . . . . . . . . . . 47
6.2.2 Server Operating Systems. . . . . . . . . . . . . . . . . . . . . . . . . . . . . . . . . . . . . . . . . . . . . 48
6.3 Remote Loader . . . . . . . . . . . . . . . . . . . . . . . . . . . . . . . . . . . . . . . . . . . . . . . . . . . . . . . . . . . . 49
6.4 User Application . . . . . . . . . . . . . . . . . . . . . . . . . . . . . . . . . . . . . . . . . . . . . . . . . . . . . . . . . . . . 50
6.5 Auditing and Reporting. . . . . . . . . . . . . . . . . . . . . . . . . . . . . . . . . . . . . . . . . . . . . . . . . . . . . . . 50
6.6 Workstations . . . . . . . . . . . . . . . . . . . . . . . . . . . . . . . . . . . . . . . . . . . . . . . . . . . . . . . . . . . . . . 51
6.6.1 Workstation Platforms . . . . . . . . . . . . . . . . . . . . . . . . . . . . . . . . . . . . . . . . . . . . . . . . 52
6.6.2 iManager and Web Browsers . . . . . . . . . . . . . . . . . . . . . . . . . . . . . . . . . . . . . . . . . . 53
7 Installing Identity Manager 55
7.1 Installing Designer . . . . . . . . . . . . . . . . . . . . . . . . . . . . . . . . . . . . . . . . . . . . . . . . . . . . . . . . . . 55
7.2 Installing the Metadirectory Server. . . . . . . . . . . . . . . . . . . . . . . . . . . . . . . . . . . . . . . . . . . . . . 55
7.2.1 Nonroot Installation of the Metadirectory Server . . . . . . . . . . . . . . . . . . . . . . . . . . . . 57
7.2.2 Silent Installation of the Metadirectory Server . . . . . . . . . . . . . . . . . . . . . . . . . . . . . . 58
7.3 Installing the Remote Loader . . . . . . . . . . . . . . . . . . . . . . . . . . . . . . . . . . . . . . . . . . . . . . . . . . 59
7.3.1 Requirements . . . . . . . . . . . . . . . . . . . . . . . . . . . . . . . . . . . . . . . . . . . . . . . . . . . . . . 59
7.3.2 Supported Drivers . . . . . . . . . . . . . . . . . . . . . . . . . . . . . . . . . . . . . . . . . . . . . . . . . . . 59
7.3.3 Installation Procedure . . . . . . . . . . . . . . . . . . . . . . . . . . . . . . . . . . . . . . . . . . . . . . . . 60
7.3.4 Silent Installation of the Remote Loader . . . . . . . . . . . . . . . . . . . . . . . . . . . . . . . . . . 62
7.3.5 Installing the Java Remote Loader on UNIX, Linux, or AIX . . . . . . . . . . . . . . . . . . . . 63
7.4 Installing the Roles Based Provisioning Module . . . . . . . . . . . . . . . . . . . . . . . . . . . . . . . . . . . 63
7.5 Installing a Custom Driver . . . . . . . . . . . . . . . . . . . . . . . . . . . . . . . . . . . . . . . . . . . . . . . . . . . . 64
7.6 Installing Identity Audit or Sentinel . . . . . . . . . . . . . . . . . . . . . . . . . . . . . . . . . . . . . . . . . . . . . . 64
7.7 Installing Identity Manager in Clustering Environment . . . . . . . . . . . . . . . . . . . . . . . . . . . . . . . 64
novdocx (en) 17 September 2009
8 Activating Novell Identity Manager Products 65
8.1 Purchasing an Identity Manager Product License . . . . . . . . . . . . . . . . . . . . . . . . . . . . . . . . . . 65
8.2 Installing a Product Activation Credential . . . . . . . . . . . . . . . . . . . . . . . . . . . . . . . . . . . . . . . . 65
8.3 Viewing Product Activations for Identity Manager and for Drivers . . . . . . . . . . . . . . . . . . . . . . 66
9 Troubleshooting Identity Manager 67
Part III Upgrading 69
10 What’s New 71
10.1 Support for 64-Bit Operating Systems . . . . . . . . . . . . . . . . . . . . . . . . . . . . . . . . . . . . . . . . . . . 71
10.2 Support for 32-Bit Remote Loader Installation on 64-Bit Operating Systems . . . . . . . . . . . . . 71
10.3 Identity Manager Driver for SAP Portal . . . . . . . . . . . . . . . . . . . . . . . . . . . . . . . . . . . . . . . . . . 71
10.4 Updated Identity Manager Driver for SAP HR and Identity Manager Driver for SAP User
Management . . . . . . . . . . . . . . . . . . . . . . . . . . . . . . . . . . . . . . . . . . . . . . . . . . . . . . . . . . . . . . 71
11 Supported Versions for Upgrades and System Requirements 73
11.1 Supported Versions for Upgrades . . . . . . . . . . . . . . . . . . . . . . . . . . . . . . . . . . . . . . . . . . . . . . 73
6 Identity Manager 3.6.1 Installation Guide
Page 7

11.2 System Requirements . . . . . . . . . . . . . . . . . . . . . . . . . . . . . . . . . . . . . . . . . . . . . . . . . . . . . . . 73
12 In-place Upgrade Versus Migration 75
12.1 In-place Upgrade . . . . . . . . . . . . . . . . . . . . . . . . . . . . . . . . . . . . . . . . . . . . . . . . . . . . . . . . . . . 75
12.2 Migration . . . . . . . . . . . . . . . . . . . . . . . . . . . . . . . . . . . . . . . . . . . . . . . . . . . . . . . . . . . . . . . . . 76
12.3 Multiple Servers Associated with a Single Driver Set. . . . . . . . . . . . . . . . . . . . . . . . . . . . . . . . 76
13 Performing an In-place Upgrade 77
13.1 Creating a Backup of the Current Configuration . . . . . . . . . . . . . . . . . . . . . . . . . . . . . . . . . . . 79
13.1.1 Ensuring that Your Designer Project is Current. . . . . . . . . . . . . . . . . . . . . . . . . . . . . 79
13.1.2 Creating an Export of the Drivers . . . . . . . . . . . . . . . . . . . . . . . . . . . . . . . . . . . . . . . 80
13.2 Stopping the Drivers. . . . . . . . . . . . . . . . . . . . . . . . . . . . . . . . . . . . . . . . . . . . . . . . . . . . . . . . . 81
13.2.1 Using Designer to Stop the Drivers . . . . . . . . . . . . . . . . . . . . . . . . . . . . . . . . . . . . . . 81
13.2.2 Using iManager to Stop the Drivers. . . . . . . . . . . . . . . . . . . . . . . . . . . . . . . . . . . . . . 81
13.3 Adding Files to the Correct Location on Linux/UNIX Platforms . . . . . . . . . . . . . . . . . . . . . . . . 82
13.4 Upgrading Designer . . . . . . . . . . . . . . . . . . . . . . . . . . . . . . . . . . . . . . . . . . . . . . . . . . . . . . . . . 83
13.5 Upgrading the Metadirectory Engine and Driver Configuration Files . . . . . . . . . . . . . . . . . . . . 83
13.6 Upgrading the Remote Loader. . . . . . . . . . . . . . . . . . . . . . . . . . . . . . . . . . . . . . . . . . . . . . . . . 83
13.7 Overlaying the New Driver Configuration File over the Existing Driver . . . . . . . . . . . . . . . . . . 84
13.7.1 Using Designer to Overlay the New Driver Configuration File over the Existing
Driver . . . . . . . . . . . . . . . . . . . . . . . . . . . . . . . . . . . . . . . . . . . . . . . . . . . . . . . . . . . . . 84
13.7.2 Using iManager to Overlay the New Driver Configuration File over the Existing
Driver . . . . . . . . . . . . . . . . . . . . . . . . . . . . . . . . . . . . . . . . . . . . . . . . . . . . . . . . . . . . . 85
13.8 Restoring Custom Policies and Rules to the Driver . . . . . . . . . . . . . . . . . . . . . . . . . . . . . . . . . 85
13.8.1 Using Designer to Restore Custom Policies and Rules to the Driver . . . . . . . . . . . . 85
13.8.2 Using iManager to Restore Custom Policies and Rules to the Driver . . . . . . . . . . . . 86
13.9 Deploying the Converted Project . . . . . . . . . . . . . . . . . . . . . . . . . . . . . . . . . . . . . . . . . . . . . . . 87
13.10 Starting the Drivers . . . . . . . . . . . . . . . . . . . . . . . . . . . . . . . . . . . . . . . . . . . . . . . . . . . . . . . . . 87
13.10.1 Using Designer to Start the Drivers . . . . . . . . . . . . . . . . . . . . . . . . . . . . . . . . . . . . . . 87
13.10.2 Using iManager to Start the Drivers. . . . . . . . . . . . . . . . . . . . . . . . . . . . . . . . . . . . . . 87
novdocx (en) 17 September 2009
14 Performing a Migration 89
14.1 Adding the New Server to the Driver Set . . . . . . . . . . . . . . . . . . . . . . . . . . . . . . . . . . . . . . . . . 90
14.2 Changing Server-Specific Information . . . . . . . . . . . . . . . . . . . . . . . . . . . . . . . . . . . . . . . . . . . 90
14.2.1 Changing the Server-Specific Information in Designer . . . . . . . . . . . . . . . . . . . . . . . 91
14.2.2 Changing the Server-Specific Information in iManager . . . . . . . . . . . . . . . . . . . . . . . 91
14.3 Removing the Old Server from the Driver Set . . . . . . . . . . . . . . . . . . . . . . . . . . . . . . . . . . . . . 92
14.3.1 Using Designer to Remove the Old Server from the Driver Set. . . . . . . . . . . . . . . . . 92
14.3.2 Using iManager to Remove the Old Server from the Driver Set . . . . . . . . . . . . . . . . 92
14.3.3 Decommissioning the Old Server . . . . . . . . . . . . . . . . . . . . . . . . . . . . . . . . . . . . . . . 93
Part IV Uninstalling Identity Manager 95
15 Removing Objects from eDirectory 97
16 Uninstalling the Metadirectory Server and Drivers 99
16.1 Uninstalling on Windows . . . . . . . . . . . . . . . . . . . . . . . . . . . . . . . . . . . . . . . . . . . . . . . . . . . . . 99
16.2 Uninstalling on Linux/UNIX . . . . . . . . . . . . . . . . . . . . . . . . . . . . . . . . . . . . . . . . . . . . . . . . . . . 99
Contents 7
Page 8

17 Uninstalling Designer 101
A Documentation Updates 103
A.1 July 31, 2009 . . . . . . . . . . . . . . . . . . . . . . . . . . . . . . . . . . . . . . . . . . . . . . . . . . . . . . . . . . . . . 103
A.1.1 What’s New . . . . . . . . . . . . . . . . . . . . . . . . . . . . . . . . . . . . . . . . . . . . . . . . . . . . . . . 103
novdocx (en) 17 September 2009
8 Identity Manager 3.6.1 Installation Guide
Page 9

About This Guide
Novell® Identity Manager is a data sharing and synchronization service that enables applications,
directories, and databases to share information. It links scattered information and enables you to
establish policies that govern automatic updates to designated systems when identity changes occur.
Identity Manager provides the foundation for account provisioning, security, single sign-on, user
self-service, authentication, authorization, automated workflow, and Web services. It allows you to
integrate, manage, and control your distributed identity information so you can securely deliver the
right resources to the right people.
This guide contains information about how to plan, install, or upgrade an Identity Manager system
that is useful for your environment.
Part I, “Planning,” on page 11
Chapter 2, “Creating a Project Plan,” on page 15
Chapter 3, “Technical Guidelines,” on page 27
Part II, “Installation,” on page 37
novdocx (en) 17 September 2009
Chapter 4, “Basic Identity Manager System Checklist,” on page 39
Chapter 5, “Where to Get Identity Manager,” on page 43
Chapter 6, “System Requirements,” on page 45
Chapter 7, “Installing Identity Manager,” on page 55
Chapter 8, “Activating Novell Identity Manager Products,” on page 65
Part III, “Upgrading,” on page 69
Chapter 10, “What’s New,” on page 71
Chapter 11, “Supported Versions for Upgrades and System Requirements,” on page 73
Chapter 12, “In-place Upgrade Versus Migration,” on page 75
Chapter 13, “Performing an In-place Upgrade,” on page 77
Chapter 14, “Performing a Migration,” on page 89
Part IV, “Uninstalling Identity Manager,” on page 95
Chapter 15, “Removing Objects from eDirectory,” on page 97
Chapter 16, “Uninstalling the Metadirectory Server and Drivers,” on page 99
Audience
This guide is intended for administrators, consultants, and network engineers who plan and
implement Identity Manager in a network environment.
Documentation Updates
For the most recent version of this document, see the Identity Manager Documentation Web site
(http://www.novell.com/documentation/idm361/index.html).
About This Guide 9
Page 10

Additional Documentation
For additional Identity Manager documentation, see the Identity Manager Documentation Web site
(http://www.novell.com/documentation/idm361/index.html).
For User Application documentation, see the Identity Manager Roles Based Provisioning Module
Documentation Web site (http://www.novell.com/documentation/idmrbpm361/index.html).
Documentation Conventions
In Novell documentation, a greater-than symbol (>) is used to separate actions within a step and
items in a cross-reference path.
®
A trademark symbol (
, TM, etc.) denotes a Novell trademark. An asterisk (*) denotes a third-party
trademark.
When a single pathname can be written with a backslash for some platforms or a forward slash for
other platforms, the pathname is presented with a backslash. Users of platforms that require a
forward slash, such as Linux* or UNIX*, should use forward slashes as required by your software.
novdocx (en) 17 September 2009
10 Identity Manager 3.6.1 Installation Guide
Page 11

I
Planning
Identity Manager helps you manage the identities and resources in your business. It also automates
many business processes for you that are currently manual tasks.
If you have any questions about the different components that make up an Identity Manager
solution, see the Identity Manager 3.6.1 Overview guide for more information about each
component.
To create an effective Identity Manager solution for your environment, you first must take time to
plan and design your Identity Manager solution. There are two major aspects to planning: setting up
a test lab to become familiar with the products and creating a project plan to implement an Identity
Manager solution. When you create a project plan, you define your business process and create an
implementation plan. Most companies have many different business processes that are managed by
many different people. A complete Identity Manager solution affects most of these processes. It is
extremely important to take the time to plan an Identity Manager solution, so that it can be
effectively implemented in your environment.
novdocx (en) 17 September 2009
We strongly recommend that an Identity Manager expert be engaged to assist in each phase of your
Identity Manager implementation. For more information about partnership options, see the Novell
®
Solution Partner Web site (http://www.novell.com/partners/). Novell Education also offers courses
that address Identity Manager implementation.
Chapter 1, “Setting Up a Development Environment,” on page 13
Chapter 2, “Creating a Project Plan,” on page 15
Chapter 3, “Technical Guidelines,” on page 27
PlanningI11
Page 12

novdocx (en) 17 September 2009
12 Identity Manager 3.6.1 Installation Guide
Page 13

1
Setting Up a Development
novdocx (en) 17 September 2009
Environment
Before you begin the planning phase of the Identity Manager deployment, you must be familiar with
the Identity Manager products so you can create a useful plan. Setting up a development
environment where you can test, analyze, and develop your Identity Manager solution allows you to
learn about each component of Identity Manager and find unforeseen issues and complications that
can arise.
For example, when you synchronize information between different systems, the information is
presented differently for each system. Changing the data to synchronize between these two systems,
allows you to see if this change affects other systems that use this same information.
The other major reason to set up a development environment is to make sure your solutions work,
without affecting live data. Identity Manager manipulates data, which includes deleting data. Having
the test environment allows you to make changes without any loss to the data in your production
environment.
You should set up a development environment for each deployment of Identity Manager. Each
deployment is different. There are different systems, business policies, and procedures that need to
be included in the Identity Manager solution. The development environment allows you to create the
solution that is best for each situation.
The most important tool to use when you are developing your Identity Manager solution is Designer.
It allows you to capture all of the information about your environment and then use that information
to create an Identity Manager solution that fits your needs. Use Designer during all aspects of the
planning to capture all of the information. Designer makes it much easier to create a project plan that
includes the business information as well as the technical information. For more information about
Designer, see Designer 3.5 for Identity Manager 3.6 Administration Guide.
1
To set up your development environment, use the information in Chapter 4, “Basic Identity Manager
System Checklist,” on page 39. It is an installation checklist of all of the Identity Manager
components. Use this to make sure you have installed and configured all components for Identity
Manager that you can use to develop a project plan. Use the information in Chapter 3, “Technical
Guidelines,” on page 27 as you set up your development environment, so you can learn about the
technical considerations as you install and configure each component of Identity Manager.
After your development environment is created, the next step is to create the project plan to
implement the Identity Manager solution. Use the information in Chapter 2, “Creating a Project
Plan,” on page 15 to create the project plan.
Setting Up a Development Environment
13
Page 14

novdocx (en) 17 September 2009
14 Identity Manager 3.6.1 Installation Guide
Page 15

2
Creating a Project Plan
This planning material provides an overview of the type of activities that are usually part of an
Identity Manager project, from its inception to its full production deployment. Implementing an
identity management strategy requires you to discover what all of your current business processes
are, what are the needs for these processes, who the stakeholders are in your environment, and then
design a solution, get buy-in from stakeholders, and test and roll out the solution. This section is
intended to provide you with sufficient understanding of the process so that you can maximize the
benefit from working with Identity Manager.
This section is not exhaustive; it is not intended to address all possible configurations, nor is it
intended to be rigid in its execution. Each environment is different and requires flexibility in the type
of activities to be used.
Section 2.1, “Discovery Phase,” on page 15
Section 2.2, “Requirements and Design Analysis Phase,” on page 19
Section 2.3, “Proof of Concept,” on page 23
novdocx (en) 17 September 2009
2
Section 2.4, “Data Validation and Preparation,” on page 23
Section 2.5, “Production Pilot,” on page 24
Section 2.6, “Production Rollout Planning,” on page 24
Section 2.7, “Production Deployment,” on page 25
2.1 Discovery Phase
The Identity Manager solution affects many aspects of your business. In order to create an effective
solution, you must take time to define all of your current business processes, then identify how an
implementation of Identity Manager changes these processes, who these changes affect, and how the
changes are implemented.
The discovery phase provides a common understanding of the issues and solutions for all
stakeholders. It creates a plan or road map that contains the key business and systems information
that are affected by the Identity Manager solution. It also allows all stakeholders to participate in the
creation of the Identity Manager solution so they understand how it can affect their area of the
business.
The following list indicates the steps needed to have a successful discovery phase. There might be
additional items you find that you need to add to the list as you proceed through the discovery and
design phases.
Section 2.1.1, “Defining Current Business Processes,” on page 16
Section 2.1.2, “Defining How the Identity Manager Solution Affects the Current Business
Processes,” on page 17
Section 2.1.3, “Identifying the Key Business and Technical Stakeholders,” on page 18
Section 2.1.4, “Interviewing All Stakeholders,” on page 18
Section 2.1.5, “Creating a High-level Strategy and an Agreed Execution Path,” on page 18
Creating a Project Plan
15
Page 16

2.1.1 Defining Current Business Processes
Identity Manager automates business processes to easily manage identities in your environment. If
you do not know what the current business processes are, you cannot design an Identity Manager
solution that automates those processes. You can use the Architecture mode of Designer to capture
your current business processes and display them graphically. For more information, see the
“Architect Mode” in Designer 3.5 for Identity Manager 3.6 Administration Guide.
Here are a few business process examples:
When an employee is terminated, the user account in the e-mail system is deleted, but the
user’s account in all other systems is disabled, not deleted.
The format for a user’s e-mail address.
What systems or resources sales employees can access.
What systems or resources managers can access.
What systems generate new accounts? Is it the human resource system or is it through a
workflow request?
A password policy for the company that defines how often a password changes, how complex
the password is, and which systems are synchronizing the password.
novdocx (en) 17 September 2009
As you define your business processes, use the following list of items to help you understand all of
the processes:
Define or clarify the current business issues.
Determine what initiatives are required to address these issues.
Determine which services and systems are affected by these initiatives.
This step allows you to create a high-level overview of what your business is currently doing and
what processes need to be improved. For example, Figure 2-1 is from Designer it shows that new
user accounts are generated from the PeopleSoft* system. They are synchronized into the Identity
Vault and then synchronized into Lotus Notes* and Active Directory*. Passwords are being
synchronized between Active Directory and the Identity Vault. Accounts are synchronizing into the
Notes system, but no accounts are synchronizing back to the Identity Vault.
16 Identity Manager 3.6.1 Installation Guide
Page 17
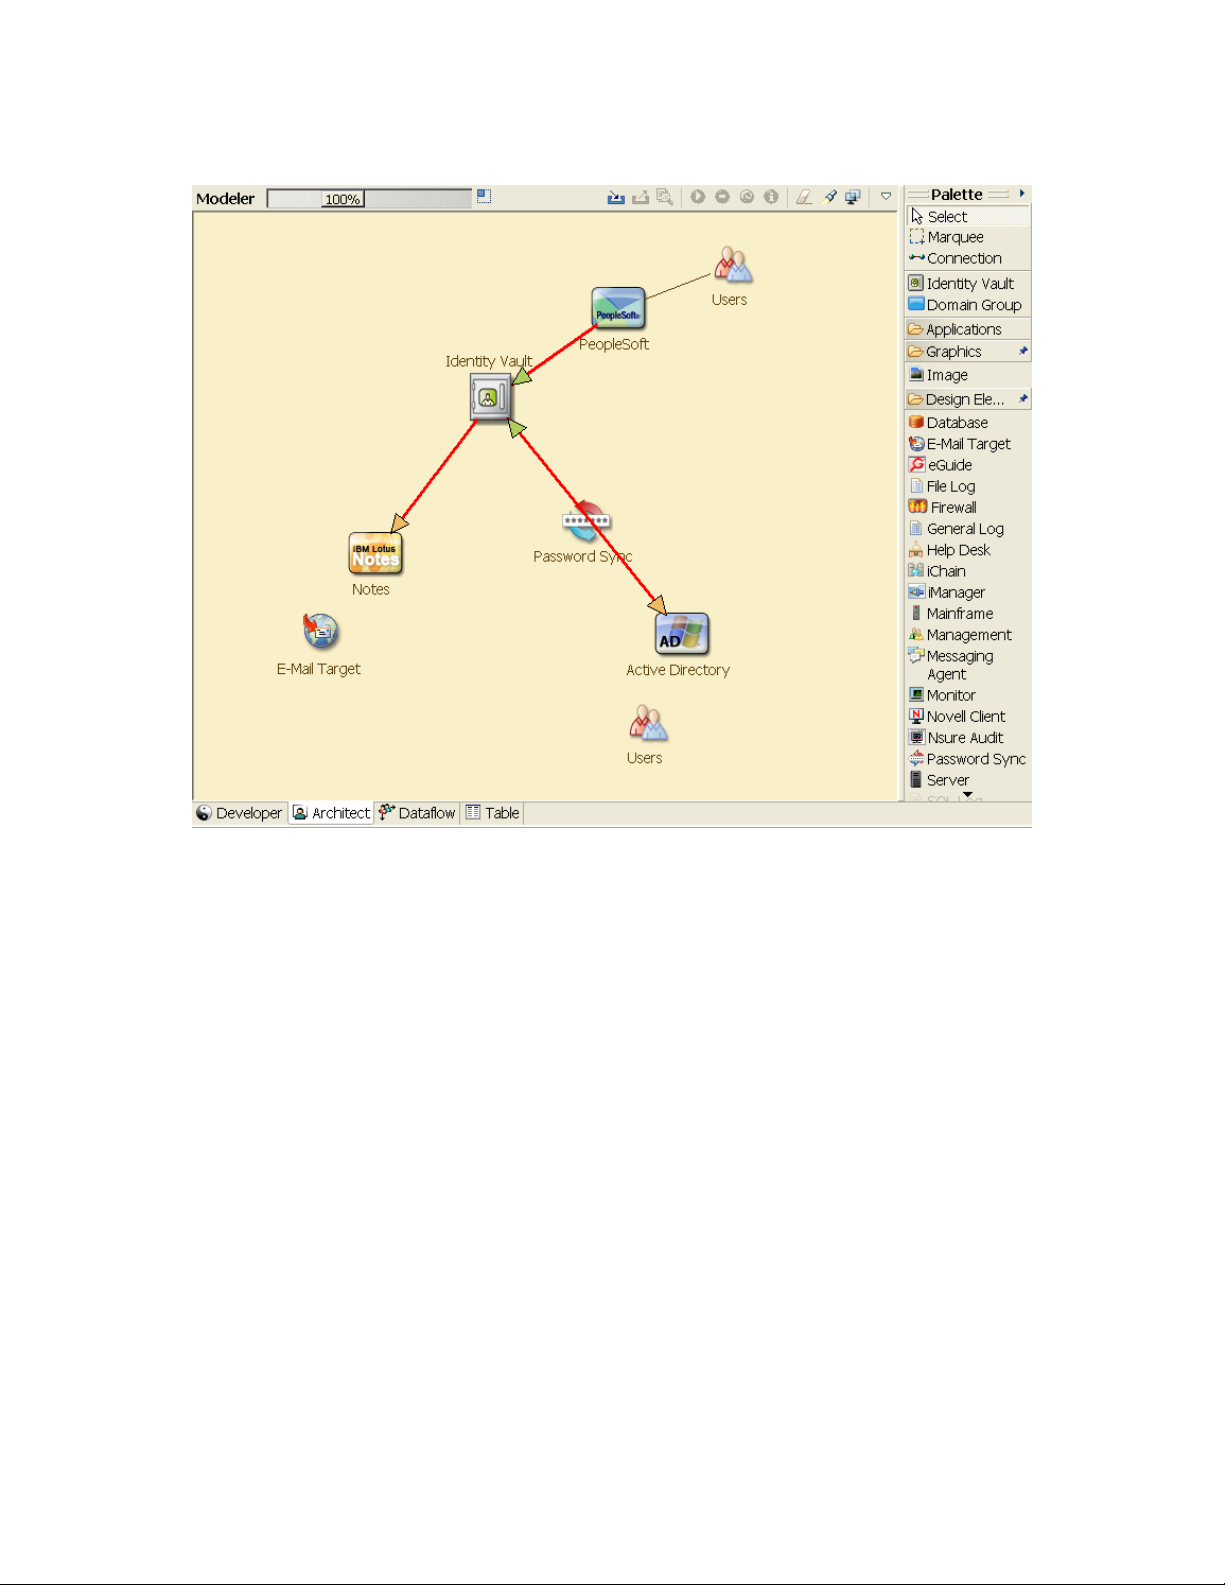
Figure 2-1 Example of Business Processes
novdocx (en) 17 September 2009
The next step is in Section 2.1.2, “Defining How the Identity Manager Solution Affects the Current
Business Processes,” on page 17.
2.1.2 Defining How the Identity Manager Solution Affects the Current Business Processes
After you have defined your current business processes, you need to decide which processes you
want to incorporate into an Identity Manager solution.
It is best to look at the entire solution and then prioritize which processes should be implemented.
Identity Manager encompasses so many aspects of your business, it is easier to plan the entire
solution rather than approach each business process as its own solution.
Create a list of which business processes are a priority to automate, then identify which systems
these changes will affect. The next step is in Section 2.1.3, “Identifying the Key Business and
Technical Stakeholders,” on page 18.
Creating a Project Plan 17
Page 18

2.1.3 Identifying the Key Business and Technical Stakeholders
Identifying all stakeholders involved in the Identity Manager solution is important for the success of
the solution. In most companies, there is not just one person you can contact who understands all
business and technical aspects of the business processes. You must identify which services and
systems are going to be affected by the Identity Manager solution, and you must also identify the
person who is responsible for that service or system.
For example, if you are integrating an e-mail system into your solution, you would need to list what
the e-mail system is, who the e-mail system administrator is, and what the contact information is.
You can add all of this information into the Designer project. Each application icon has a place
where you can store information about the system and the system administrator. For more
information, see “Configuring Application Properties” in Designer 3.5 for Identity Manager 3.6
Administration Guide.
After you have identified all of the people involved in each business process, the next step is in
Section 2.1.4, “Interviewing All Stakeholders,” on page 18.
2.1.4 Interviewing All Stakeholders
novdocx (en) 17 September 2009
Interviews with key business and technical stakeholders allow you to gather information needed for
a complete design of the Identity Manager solution. The interviews also allow you to educate each
stakeholder about the Identity Manager solution and how the solution affects them. Here is a list of
items to cover when you do the interviews:
Define or clarify the business processes being addressed by the Identity Manager solution. The
person you are interviewing might have information that can change the current plan.
Determine how the solution will impact the stakeholders and address any concerns they have.
Also ask the stakeholders how much time their part of the solution might take. They might or
might not have an estimate, but gathering this information helps to determine the scope of the
solution.
Capture key business and systems information from the stakeholders. Sometimes a proposed
plan might adversely affect a business process or a system. By capturing this information, you
can make educated decisions about the Identity Manager solution.
After you have interviewed the key stakeholders, the next step is in Section 2.1.5, “Creating a High-
level Strategy and an Agreed Execution Path,” on page 18.
2.1.5 Creating a High-level Strategy and an Agreed Execution Path
After all of the information is gathered, you need to create a high-level strategy or road map for the
Identity Manager solution. Add all of the features you want to be included in the Identity Manager
solution. For example, new user accounts are generated from a request through a workflow, but the
type of user depends upon the resources the user is given access to.
Present this high-level strategy to all of the stakeholders in the same meeting, if possible. This
allows you to:
Verify that the included initiatives are the most correct and identify which ones have the
highest priority.
18 Identity Manager 3.6.1 Installation Guide
Page 19

Identify planning activities in preparation for a requirements and design phase
Determine what it would take to carry out one or more of these initiatives.
Create an agreed execution path for the Identity Manager solution.
Define additional education for stakeholders.
Discovery provides a common understanding of the issues and solutions for all stakeholders. It
provides an excellent primer for the analysis phase-- a phase that requires stakeholders to have a
basic knowledge of directories, Novell
integration in general.
After you have completed the discovery phase, proceed to the Section 2.2, “Requirements and
Design Analysis Phase,” on page 19.
®
eDirectoryTM, Novell Identity Manager, and XML
2.2 Requirements and Design Analysis Phase
Take the high-level road map that was created in the discovery phase as a starting point for this
analysis phase. The document and the Designer project both need technical and business details
added. This produces the data model and high-level Identity Manager architecture design used to
implement the Identity Manager solution.
novdocx (en) 17 September 2009
The focus of the design should be specifically on identity management; however, many of the
elements traditionally associated with a resource management directory, such as file and print, can
also be addressed. Identity Manager synchronizes user accounts to directories that do not have direct
access to the operating system’s file system. For example, you can have a user account in Active
Directory, but that does not grant you access to the file system on the Active Directory server.
Using the information gathered in the discovery phase, answer the following sample questions to see
what other information needs to be gathered. This might require additional interviews with
stakeholders.
What versions of system software are being used?
Is the eDirectory design appropriate? For example, does the Identity Manager server contain a
Master or Read/Write replica of the user objects that are synchronizing? If it does not, the
eDirectory design is not appropriate.
Is the quality of the data in all systems appropriate? (If the data is not of usable quality, the
business policy might not be implemented as desired.) For example, there might be duplicate
accounts for the users in the systems that are synchronizing, or the format of the data might not
be consistent throughout each system. Each system’s data must be evaluated before
information is synchronized.
Is data manipulation required for your environment? For example, a user’s hire date format in
the human resource system can only be 2008/02/23 and the hire date in the Identity Vault is 0223-2008. This requires that the date be manipulated for synchronization to occur.
Review the information in Chapter 3, “Technical Guidelines,” on page 27 to help make the correct
decisions for your environment.
Creating a Project Plan 19
Page 20

After the requirements analysis, you can establish the scope and project plan for the implementation,
and determine if any prerequisite activities need to occur. To avoid costly mistakes, be as complete
as possible in gathering information and documenting requirements. Here is a list of possible
requirements:
Data model showing all systems, authoritative data sources, events, information flow, data
format standards, and mapping relationships between connected systems and attributes within
Identity Manager.
Appropriate Identity Manager architecture for the solution.
Details for additional system connection requirements.
Strategies for data validation and record matching.
Directory design to support the Identity Manager infrastructure.
The following tasks should be completed during the requirements and design assessment:
“Define the Business Requirements” on page 20
“Analyze Your Business Processes” on page 21
“Design an Enterprise Data Model” on page 22
novdocx (en) 17 September 2009
2.2.1 Define the Business Requirements
In the discovery phase, you gathered your organization’s business processes and the business
requirements that define these business processes. Create a list of these business requirements and
then start mapping these processes in Designer by completing the following tasks:
Create a list of the business requirements and determine which systems are affected by this
process. For example, a business requirement for terminating an employee might be that the
employee’s network and e-mail account access must be removed the same day the employee is
terminated. The e-mail system and the Identity Vault are affected by this termination process.
Establish the process flows, process triggers, and data mapping relationships.
For example, if something is going to happen in a certain process, what will happen because of
that process? What other processes are triggered?
Map data flows between applications. Designer allows you to see this information. For more
information, see “Managing the Flow of Data” in Designer 3.5 for Identity Manager 3.6
Administration Guide.
Identify data transformations that need to take place from one format to another, such as 2/25/
2007 to 25 Feb 2007.
Document the data dependencies that exist.
If a certain value is changed, it is important to know if there is a dependency on that value. If a
particular process is changed, it is important to know if there is a dependency on that process.
For example, selecting a “temporary” employee status value in a human resources system
might mean that the IT department needs to create a user object in eDirectory with restricted
rights and access to the network during certain hours.
List the priorities.
Not every requirement, wish, or desire of every party can be immediately fulfilled. Priorities
for designing and deploying the provisioning system will help plan a road map.
20 Identity Manager 3.6.1 Installation Guide
Page 21

It might be advantageous to divide the deployment into phases that enable implementation of a
portion of the deployment earlier and other portions of the deployment later. You can do a
phased deployment approach as well. It should be based on groups of people within the
organization.
Define the prerequisites.
The prerequisites required for implementing a particular phase of the deployment should be
documented. This includes access to the connected systems that you are wanting to interface
with Identity Manager.
Identify authoritative data sources.
Learning early on which items of information system administrators and managers feel belong
to them can help in obtaining and keeping buy-in from all parties.
For example, the account administrator might want ownership over granting rights to specific
files and directories for an employee. This can be accommodated by implementing local trustee
assignments in the account system.
After you have defined your business requirements, proceed to Section 2.2.2, “Analyze Your
Business Processes,” on page 21.
novdocx (en) 17 September 2009
2.2.2 Analyze Your Business Processes
After completing the analysis of your business requirements, there is more information you need to
gather to help focus the Identity Manager solution. You need to interview essential individuals such
as managers, administrators, and employees who actually use the application or system. Issues to be
addressed include:
Where does the data originate?
Where does the data go?
Who is responsible for the data?
Who has ownership for the business function to which the data belongs?
Who needs to be contacted to change the data?
What are all the implications of the data being changed?
What work practices exist for data handling (gathering and/or editing)?
What types of operations take place?
What methods are used to ensure data quality and integrity?
Where do the systems reside (on what servers, in which departments)?
What processes are not suitable for automated handling?
For example, questions that might be posed to an administrator for a PeopleSoft system in Human
Resources could include:
What data are stored in the PeopleSoft database?
What appears in the various panels for an employee account?
What actions are required to be reflected across the provisioning system (such as add, modify,
or delete)?
Which of these are required? Which are optional?
What actions need to be triggered based on actions taken in PeopleSoft?
Creating a Project Plan 21
Page 22
What operations/events/actions are to be ignored?
How is the data to be transformed and mapped to Identity Manager?
Interviewing key people can lead to other areas of the organization that can provide a more clear
picture of the entire process.
After you have gathered all of this information, you can design a correct enterprise data model for
your environment. Proceed to Section 2.2.3, “Design an Enterprise Data Model,” on page 22 to start
the design.
2.2.3 Design an Enterprise Data Model
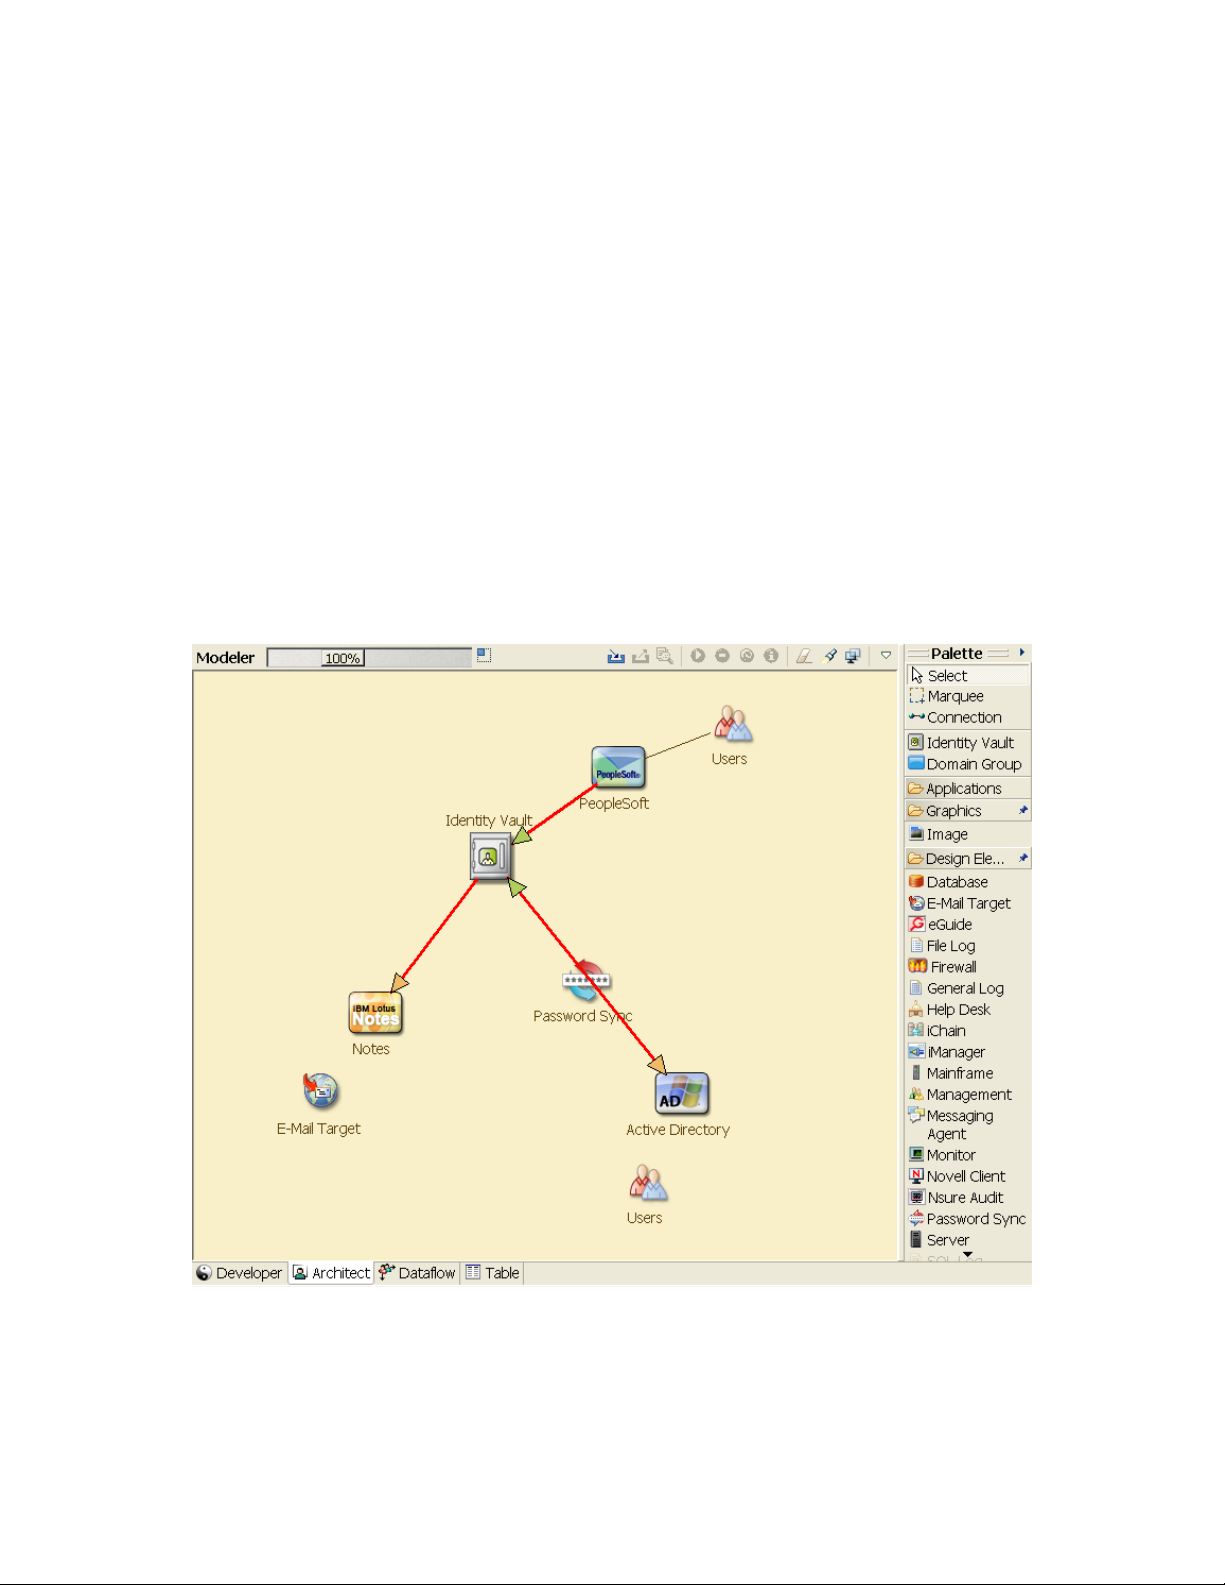
After your business processes have been defined, you can use Designer to begin to design a data
model that reflects your current business processes.
The model in Designer illustrates where data originates, where it moves to, and where it can’t move.
It can also account for how critical events affect the data flow. For example, Figure 2-2 shows that
the data flows from the PeopleSoft, but no data synchronizes back into PeopleSoft.
Figure 2-2 Data Flow through Designer
novdocx (en) 17 September 2009
You might also want to develop a diagram that illustrates the proposed business process and the
advantages of implementing automated provisioning in that process.
22 Identity Manager 3.6.1 Installation Guide
Page 23

The development of this model begins by answering questions such as the following:
What types of objects (users, groups, etc.) are being moved?
Which events are of interest?
Which attributes need to be synchronized?
What data is stored throughout your business for the various types of objects being managed?
Is the synchronization one-way or two-way?
Which system is the authoritative source for which attributes?
It is also important to consider the interrelationships of different values between systems.
For example, an employee status field in PeopleSoft might have three set values: employee,
contractor, and intern. However, the Active Directory system might have only two values:
permanent and temporary. In this situation, the relationship between the “contractor” status in
PeopleSoft and the “permanent” and “temporary” values in Active Directory needs to be
determined.
The focus of this work should be to understand each directory system, how they relate to each other,
and what objects and attributes need to be synchronized across the systems. After the design is
complete, the next step is to create a proof of concept. Proceed to Section 2.3, “Proof of Concept,”
on page 23.
novdocx (en) 17 September 2009
2.3 Proof of Concept
The outcome of this activity is to have a sample implementation in a lab environment that reflects
your company’s business policy and data flow. It is based on the design of the data model developed
during the requirement analysis and design and is a final step before the production pilot.
NOTE: This step is often beneficial in gaining management support and funding for a final
implementation effort.
Chapter 3, “Technical Guidelines,” on page 27 contains information that can help you validate your
proof of concept. It contains technical guidelines to help make your Identity Manager deployment
successful.
As you create the proof of concept, you need to also create a plan to validate the data that you have
in your systems. This step helps you make sure that conflicts don’t occur between systems. Proceed
to Section 2.4, “Data Validation and Preparation,” on page 23 to make sure these conflicts do not
occur.
2.4 Data Validation and Preparation
The data in production systems can be of varying quality and consistency and therefore might
introduce inconsistencies when synchronizing systems. This phase presents an obvious point of
separation between the resources implementation team and the business units or groups who “own”
or manage the data in the systems to be integrated. At times, the associated risk and cost factors
might not belong in a provisioning project.
Creating a Project Plan 23
Page 24

You need to have the data model that you completed in the analysis and design phases. You should
also have a proposed record matching and data format strategy defined in order to prepare the data
correctly. With the data model and format strategy defined, you can:
Create production data sets appropriate for loading into the Identity Vault (as identified in the
analysis and design activities). This includes the likely method of loading (either bulk load or
via connectors). The requirement for data that is validated or otherwise formatted is also
identified.
Identify performance factors and validate these factors against equipment being used and the
overall distributed architecture of the deployment of Identity Manager.
After the data is prepared, proceed to Section 2.5, “Production Pilot,” on page 24.
2.5 Production Pilot
The purpose of this activity is to begin the migration into a production environment. During this
phase, there might be additional customization that occurs. In this limited introduction, the desired
outcomes of the preceding activities can be confirmed and agreement obtained for the production
rollout. The pilot validates the plan that has been created to this point in the process.
novdocx (en) 17 September 2009
NOTE: This phase might provide the acceptance criteria for the solution and the necessary
milestone en route to full production.
The pilot solution provides live proof of concept and validation for the data model and desired
process outcomes. After the pilot is completed, proceed to Section 2.6, “Production Rollout
Planning,” on page 24.
2.6 Production Rollout Planning
This phase is where the production deployment is planned. The plan should:
Confirm server platforms, software revisions, and service packs
Confirm the general environment
Confirm the design of the Identity Vault in a mixed coexistence
Confirm that the business logic is correct
Confirm that the data synchronization is occurring as planned
Plan the legacy process cutover
Plan a rollback contingency strategy
The plan needs to contain implementation and completion dates for each step in the rollout. Each
stakeholder provides input for these dates and agrees that these dates work for them. This allows
each person involved in the rollout to know when the changes are coming and when they should be
completed.
With the production rollout plan completed, proceed to the Section 2.7, “Production Deployment,”
on page 25.
24 Identity Manager 3.6.1 Installation Guide
Page 25

2.7 Production Deployment
The production deployment phase puts all of the plans into action and the Identity Manager solution
is created in the live environment. Use the production rollout plan to put the different pieces of the
Identity Manager solution into place. This might take one night or it might be spread across a longer
period of time. It depends upon what your plan contains.
novdocx (en) 17 September 2009
Creating a Project Plan 25
Page 26

novdocx (en) 17 September 2009
26 Identity Manager 3.6.1 Installation Guide
Page 27
3
Designer iManager
Metadirectory
Server with
eDirectory
iManager
Server
Administration
Workstation
User
Application
Server
Novell
Sentinel Server
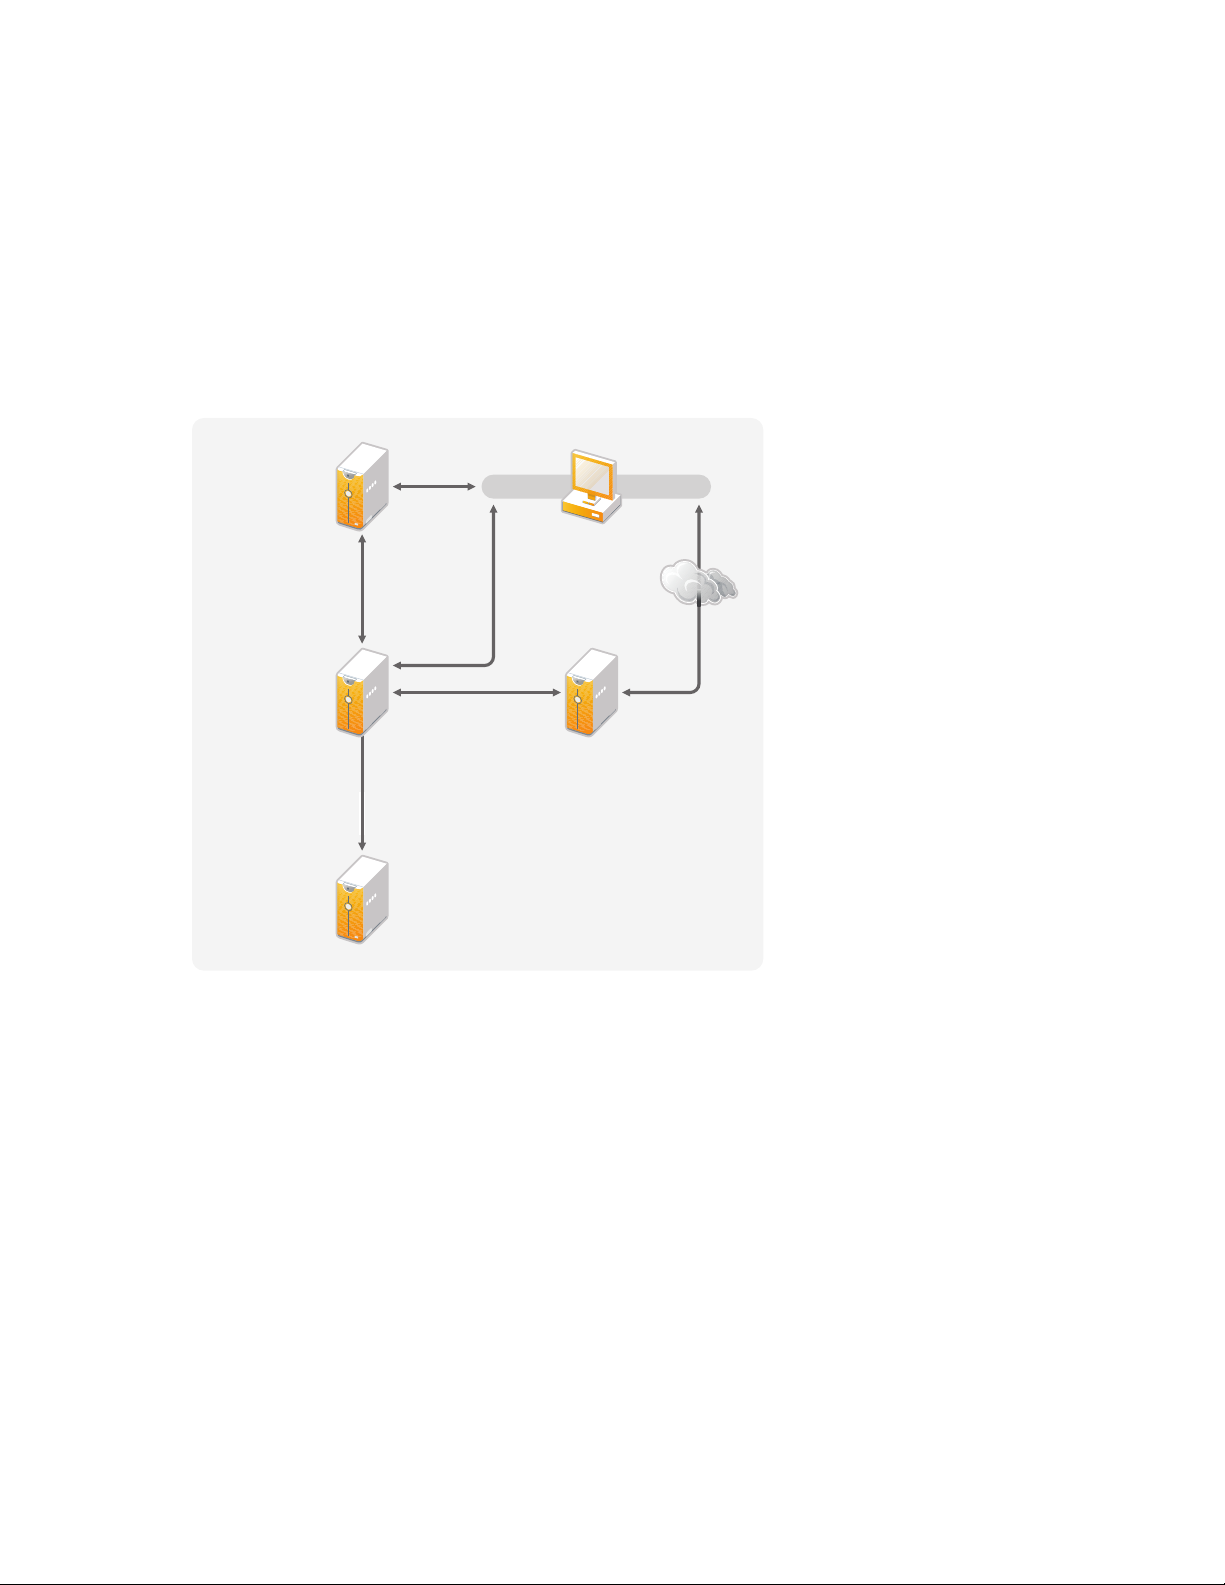
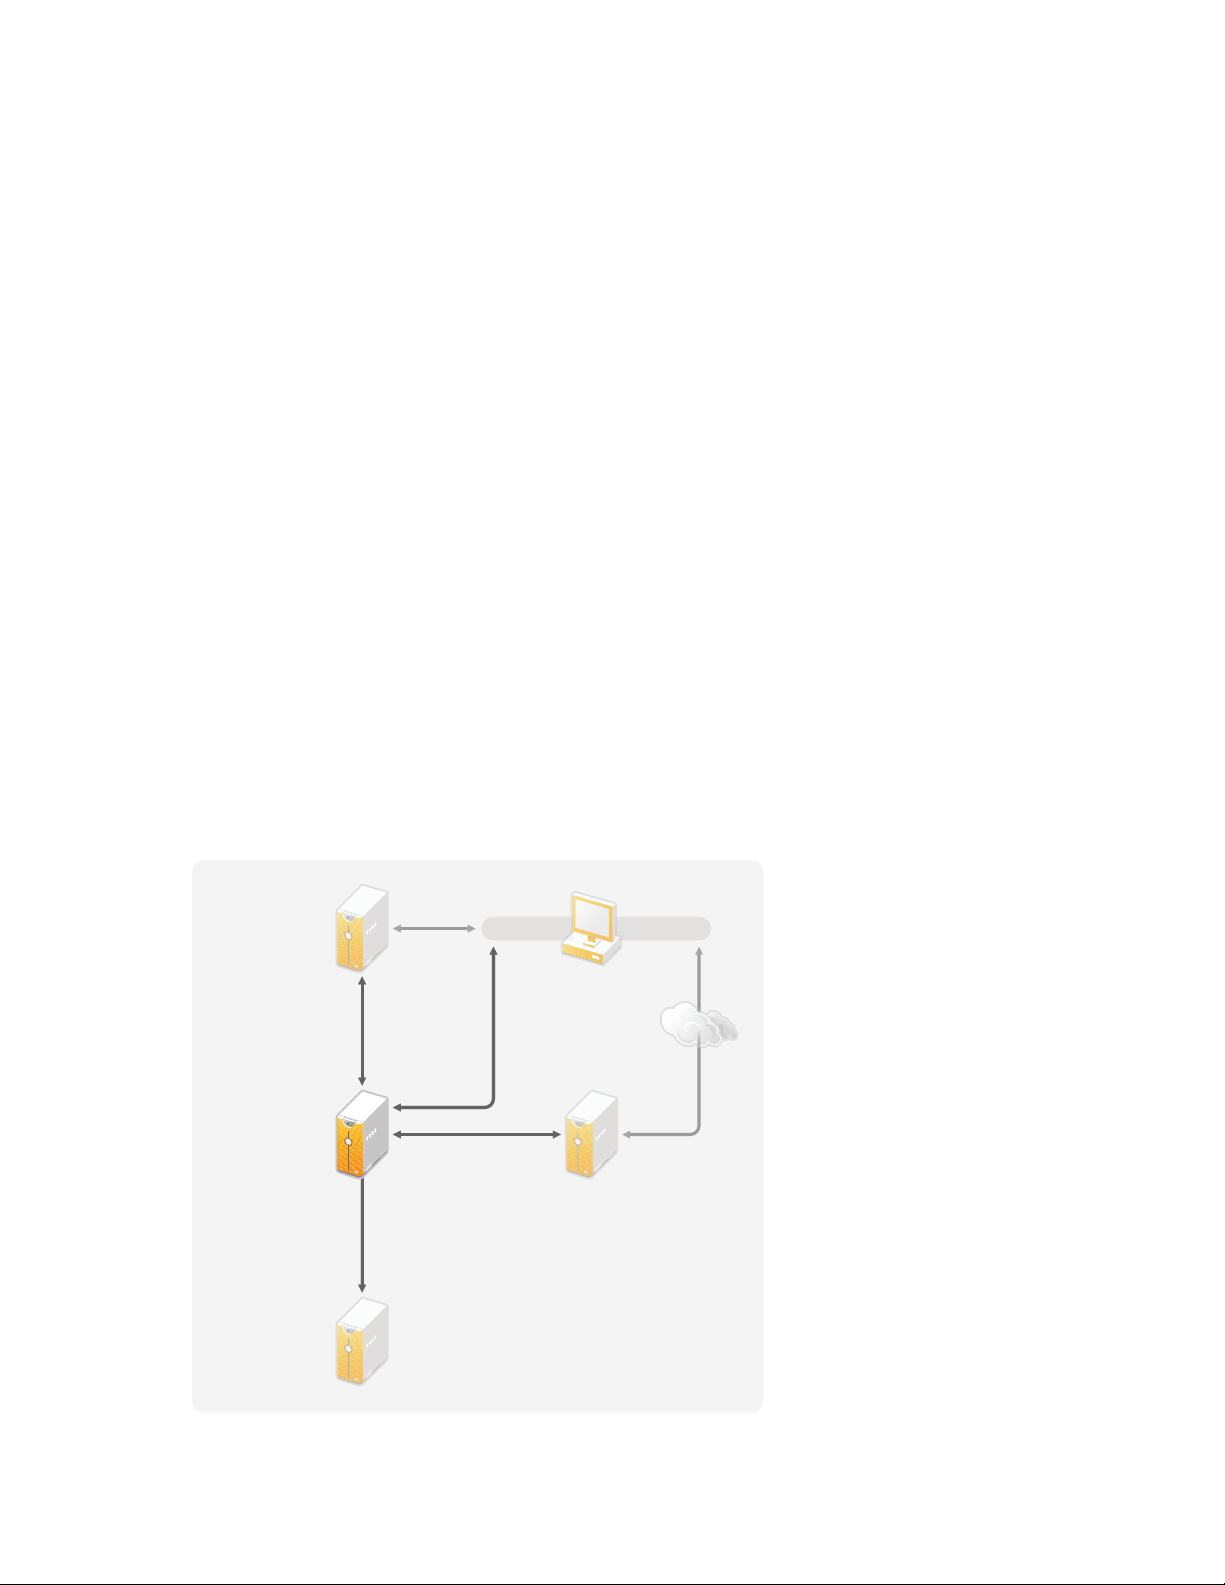
Technical Guidelines
The information that you gather in Designer allows you to make the technical decisions such as
installation location and configuration options, about each component of Identity Manager. For an
introduction to each component, see the Identity Manager 3.6.1 Overview guide. Figure 3-1 is one
possible configuration of an Identity Manager solution.
Figure 3-1 Identity Manager Components
novdocx (en) 17 September 2009
3
Identity Manager is very customizable. The following sections contain technical best practices
guidelines to help set up and configure the Identity Manager solution that works best for your
environment. Variables that affect how these guidelines apply to your environment include the type
of hardware you have for your servers, how your WAN is configured, and how many objects are
being synchronized.
Section 3.1, “Management Tools Guidelines,” on page 28
Section 3.2, “Metadirectory Server Guidelines,” on page 29
Section 3.3, “eDirectory Guidelines,” on page 30
Section 3.4, “User Application,” on page 34
Section 3.5, “Auditing and Reporting Guidelines,” on page 35
Technical Guidelines
27
Page 28
3.1 Management Tools Guidelines
Designer iManager
iManager
Server
Administration
Workstation
U
A
S
Novell
Sentinel Server
M
y
eDi
y
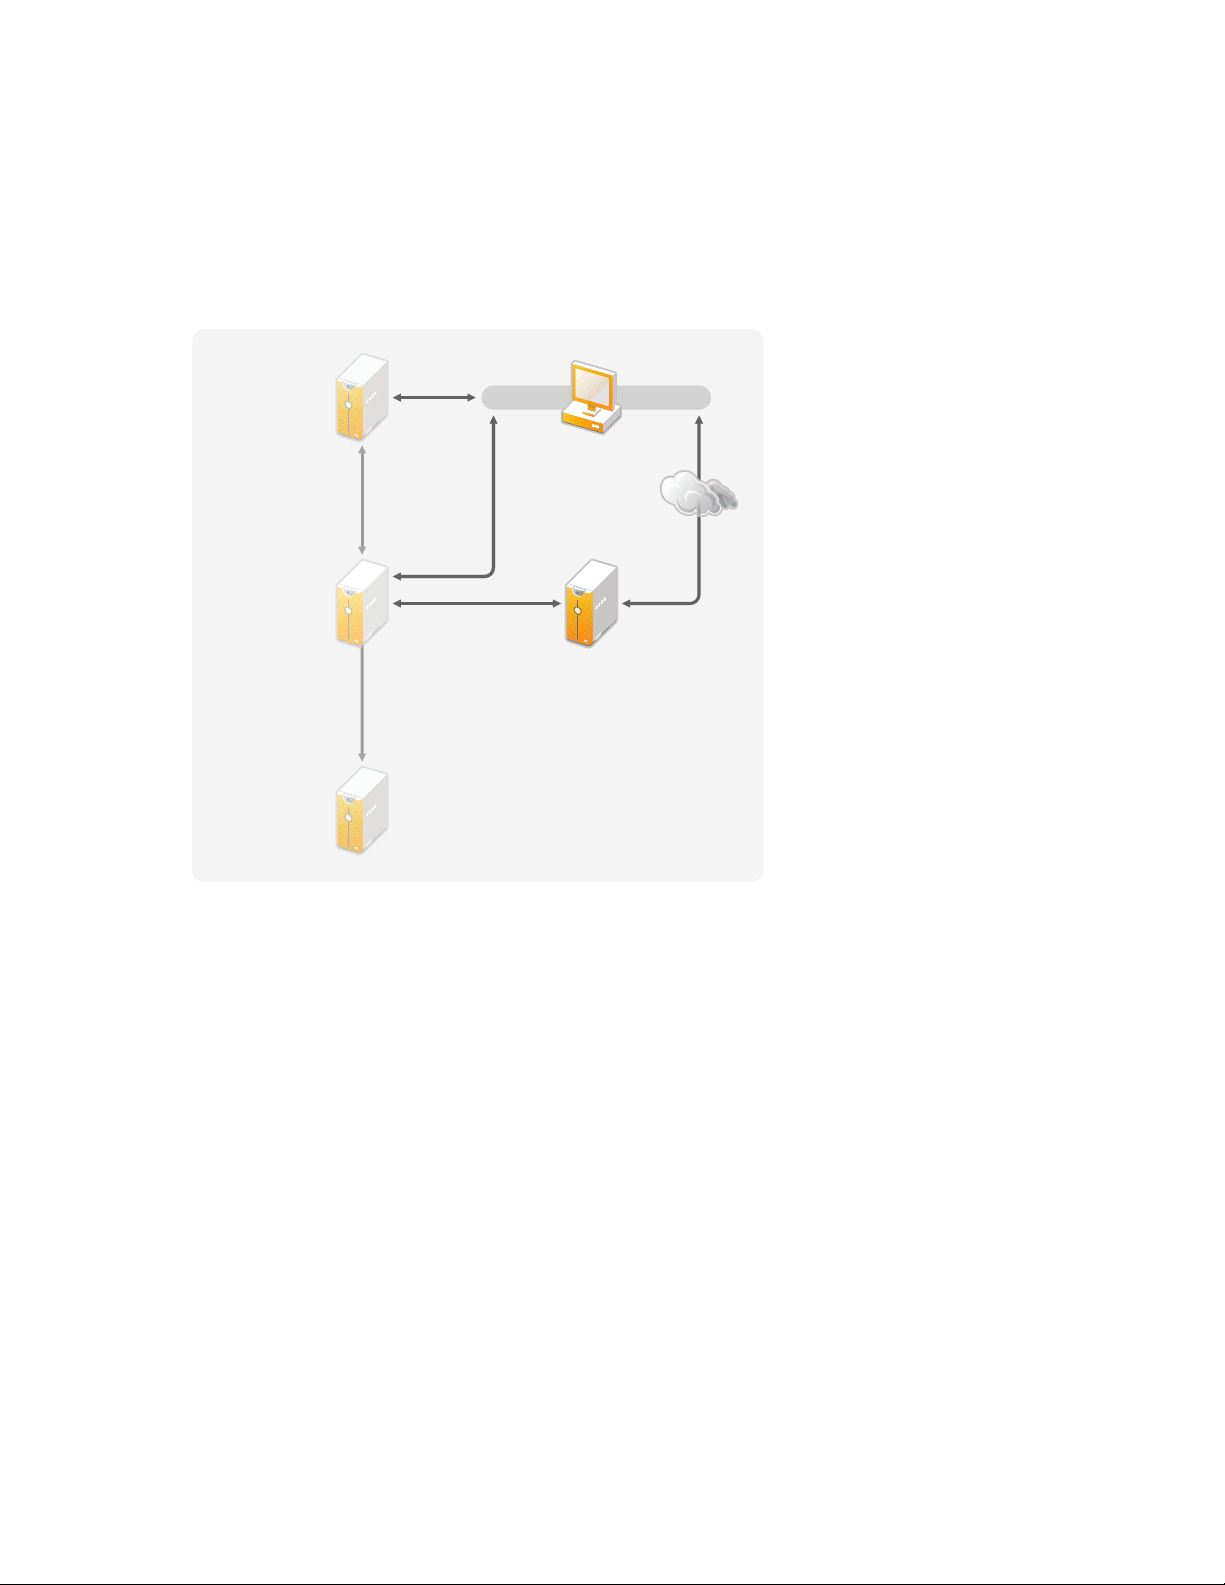
The two main management tools for the Identity Manager solution are Designer and iManager, as
illustrated in Figure 3-2. Designer is used during the planning and creation of the Identity Manager
solution, and iManager is used for daily management tasks of the Identity Manager solution.
Figure 3-2 Identity Manager Management Tools
ser
pplication
erver
etadirector
Server with
rector
novdocx (en) 17 September 2009
This document contains information only about Designer and iManager. The User Application uses
a Web-based administration page that is not discussed here. For more information about the User
Application, see “Administering the User Application” (http://www.novell.com/documentation/
idmrbpm361/agpro/data/agpropartadminapp.html) in the User Application Administration Guide.
Section 3.1.1, “Designer Guidelines,” on page 28
Section 3.1.2, “iManager Guidelines,” on page 29
3.1.1 Designer Guidelines
Designer is a thick client that is installed on a workstation. Designer is used to design, test,
document, and then deploy your Identity Manager solution. Using Designer throughout the planning
phase helps you capture information in one place. It also helps you see issues you might not be
aware of as you look at all of the components of the solution together.
There are no major considerations for using Designer, unless you have multiple people working on
the same project. Designer allows for version control of the project. For more information, see
“Version Control” in Designer 3.5 for Identity Manager 3.6 Administration Guide.
28 Identity Manager 3.6.1 Installation Guide
Page 29
3.1.2 iManager Guidelines
Designer iManager
iManager
Server
Administration
Workstation
U
A
S
Novell
Sentinel Server
Metadirectory
Server with
eDirectory
novdocx (en) 17 September 2009
iManager is the administration tool for Identity Manager. When you install Identity Manager, the
TM
installation expects that you already have an iManager server installed in your eDirectory
tree.
If you have more than 10 administrators constantly working in iManager at one time, you should
have a server that hosts only iManager. Figure 3-2 represents this configuration of your Identity
Manager solution. If you have only one administrator, you can run iManager on your Metadirectory
server without complications.
3.2 Metadirectory Server Guidelines
You can have one or more Metadirectory servers in your Identity Manager solution, depending on
the server workload. The Metadirectory server requires that eDirectory be installed as shown in
Figure 3-3. You can add a Remote Loader server, not represented in the figure, to help with the
workload or configuration of your environment.
Drivers must run on the same server as the connected application. For example, to configure the
Active Directory driver, the server in Figure 3-3 must be a Member server or a Domain controller. If
you do not want to install eDirectory and Identity Manager on a Member server or Domain
controller, then you would install the Remote Loader on a Member Server or a Domain controller.
The Remote Loader sends all of the events from Active Directory to the Metadirectory server. The
Remote Loader receives any information from the Metadirectory server and passes that to the
connected application.
The Remote Loader provides added flexibility for your Identity Manager solution. For more
information, see the Identity Manager 3.6.1 Remote Loader Guide.
Figure 3-3 Metadirectory Sever
ser
pplication
erver
Technical Guidelines 29
Page 30

There are many variables that affect the performance of the server. The standard recommendation is
that you have no more than ten drivers running on a Metadirectory server. However, if you are
synchronizing millions of objects with each driver, you might not be able to run ten drivers on a
server. On the other hand, if you are synchronizing 100 objects per driver, you can probably run
more than ten drivers on one server.
Setting up the Identity Manager solution in a lab environment gives you the opportunity to test how
the servers will perform. You can use the health monitoring tools in iManager to obtain a baseline
and then be able to make the best decisions for your environment. For more information about the
health monitoring tools, see “Monitoring Driver Health” in the Identity Manager 3.6.1 Common
Driver Administration Guide.
For considerations for each driver, see the Identity Manager Drivers documentation Web site (http://
www.novell.com/documentation/idm36drivers/index.html). Driver-specific information is provided
in each driver guide.
3.3 eDirectory Guidelines
eDirectory is the Identity Vault that stores the objects that are synchronized through the Identity
Manager solution. The follow sections contain guidelines that help you plan your deployment of
eDirectory.
novdocx (en) 17 September 2009
Section 3.3.1, “Identity Manager Objects in eDirectory,” on page 30
Section 3.3.2, “Replicating the Objects that Identity Manager Needs on the Server,” on page 31
Section 3.3.3, “Using Scope Filtering to Manage Users on Different Servers,” on page 32
3.3.1 Identity Manager Objects in eDirectory
The following list indicates the major Identity Manager objects that are stored in eDirectory and
how they relate to each other. No objects are created during the installation of Identity Manager. The
Identity Manager objects are created during the configuration of the Identity Manager solution.
Driver Set: A driver set is a container that holds Identity Manager drivers and library objects.
Only one driver set can be active on a server at a time. However, more than one server might be
associated to one driver set. Also, a driver can be associated with more than one server at a
time. However, the driver should only be running on one server at a time. The driver should be
in a disabled state on the other servers. Any server that is associated with a driver set must have
the Metadirectory engine installed on it.
Library: The Library object is a repository of commonly used policies that can be referenced
from multiple locations. The library is stored in the driver set. You can place a policy in the
library that every driver in the driver set can reference.
Driver: A driver provides the connection between an application and the Identity Vault. The
driver is the connector that enables data synchronization and sharing between systems. The
driver is stored in the driver set.
Job: The purpose of a job is to complete a task that occurs many times. For example, a job can
configure a system to disable an account on a specific day, or to initiate a workflow to request
an extension of a person’s access to a corporate resource. The job is stored in the driver set.
30 Identity Manager 3.6.1 Installation Guide
Page 31

3.3.2 Replicating the Objects that Identity Manager Needs on the Server
If your Identity Manager environment calls for multiple servers in order to run multiple Identity
Manager drivers, then your plan should make sure that certain eDirectory objects are replicated on
servers where you want to run these Identity Manager drivers.
You can use filtered replicas, as long as all of the objects and attributes that the driver needs to read
or synchronize are included in the filtered replica.
Keep in mind that you must give the Identity Manager Driver object sufficient eDirectory rights to
any objects it is to synchronize, either by explicitly granting it rights or by making the Driver object
security equivalent to an object that has the desired rights.
An eDirectory server that is running an Identity Manager driver (or that the driver refers to, if you
are using the Remote Loader) must hold a master or read/write replica of the following:
The Driver Set object for that server.
You should have one Driver Set object for each server that is running Identity Manager. Unless
you have specific needs, don’t associate more than one server with the same Driver Set object.
novdocx (en) 17 September 2009
NOTE: When creating a Driver Set object, the default setting is to create a separate partition.
®
Novell
Manager to function, the server is required to hold a full replica of the Driver Set object. If the
server has a full replica of the location where the Driver Set object is installed, the partition is
not required.
The Server object for that server.
The Server object is necessary because it allows the driver to generate key pairs for objects. It
is also important for Remote Loader authentication.
The objects that you want this instance of the driver to synchronize.
The driver can’t synchronize objects unless a replica of those objects is on the same server as
the driver. In fact, an Identity Manager driver synchronizes the objects in all the containers that
are replicated on the server unless you create rules for scope filtering to specify otherwise.
For example, if you want a driver to synchronize all user objects, the simplest way is to use one
instance of the driver on a server that holds a master or read/write replica of all your users.
However, many environments don’t have a single server that contains a replica of all the users.
Instead, the complete set of users is spread across multiple servers. In this case, you have three
choices:
recommends creating a separate partition on the Driver Set object. For Identity
Aggregate users onto a single server. You can create a single server that holds all users
by adding replicas to an existing server. Filtered replicas can be used to reduce the size of
the eDirectory database if desired, as long as the necessary user objects and attributes are
part of the filtered replica.
Use multiple instances of the driver on multiple servers, with scope filtering. If you
don’t want to aggregate users onto a single server, you need to determine which set of
servers holds all the users, and set up one instance of the Identity Manager driver on each
of those servers.
Technical Guidelines 31
Page 32

To prevent separate instances of a driver from trying to synchronize the same users, you
need to use scope filtering to define which users each instance of the driver should
synchronize. Scope filtering means that you add rules to each driver to limit the scope of
the driver’s management to specific containers. See “Using Scope Filtering to Manage
Users on Different Servers” on page 32.
Use multiple instances of the driver on multiple servers, without scope filtering. If
you want to have multiple instances of a driver running on different servers without using
filtered replicas, you need to define policies on the different driver instances that enable
the driver to process different sets of objects within the same Identity Vault.
The Template objects you want the driver to use when creating users, if you choose to use
templates.
Identity Manager drivers do not require you to specify eDirectory Template objects for creating
users. However, if you specify that a driver should use a template when creating users in
eDirectory, the Template object must be replicated on the server where the driver is running.
Any containers you want the Identity Manager driver to use for managing users.
For example, if you have created a container named Inactive Users to hold user accounts that
have been disabled, you must have a master or read/write replica (preferably a master replica)
of that container on the server where the driver is running.
novdocx (en) 17 September 2009
Any other objects that the driver needs to refer to (for example, work order objects for the
Avaya* PBX driver).
If the other objects are only to be read by the driver, not changed, the replica for those objects
on the server can be a read-only replica.
3.3.3 Using Scope Filtering to Manage Users on Different Servers
Scope filtering means adding rules to each driver to limit the scope of the driver’s actions to specific
containers. The following are two situations in which you would need to use scope filtering:
You want the driver to synchronize only users that are in a particular container.
By default, an Identity Manager driver synchronizes objects in all the containers that are
replicated on the server where it is running. To narrow that scope, you must create scope
filtering rules.
You want an Identity Manager driver to synchronize all users, but you don’t want all users to
be replicated on the same server.
To synchronize all users without having them replicated on one single server, you need to
determine which set of servers holds all the users, and then create an instance of the Identity
Manager driver on each of those servers. To prevent two instances of the driver from trying to
synchronize the same users, you need to use scope filtering to define which users each instance
of the driver should synchronize.
NOTE: You should use scope filtering even if your server’s replicas don’t currently overlap.
In the future, replicas could be added to your servers and an overlap could be created
unintentionally. If you have scope filtering in place, your Identity Manager drivers do not try to
synchronize the same users, even if replicas are added to your servers in the future.
Here’s an example of how scope filtering is used:
32 Identity Manager 3.6.1 Installation Guide
Page 33

The following illustration shows an Identity Vault with three containers that hold users: Marketing,
ACME
DevelopmentMarketing Finance
ACME Identity Vault
JBassad
Identity Management
Driver Set
Server A Server B
GroupWise
Driver A
GroupWise
Driver B
Finance, and Development. It also shows an Identity Management container that holds the driver
sets. Each of these containers is a separate partition.
Figure 3-4 Example Tree for Scope Filtering
novdocx (en) 17 September 2009
In this example, the Identity Manager administrator has two Identity Vault servers, Server A and
Server B, shown in Figure 3-5 on page 34. Neither server contains a copy of all the users. Each
server contains two of the three partitions, so the scope of what the servers hold is overlapping.
®
The administrator wants all the users in the tree to be synchronized by the GroupWise
driver, but
does not want to aggregate replicas of the users onto a single server. He chooses instead to use two
instances of the GroupWise driver, one on each server. He installs Identity Manager and sets up the
GroupWise driver on each Identity Manager server.
Server A holds replicas of the Marketing and Finance containers. Also on the server is a replica of
the Identity Management container, which holds the driver set for Server A and the GroupWise
Driver object for Server A.
Server B holds replicas of the Development and Finance containers, and the Identity Management
container holding the driver set for Server B and the GroupWise Driver object for Server B.
Because Server A and Server B both hold a replica of the Finance container, both servers hold the
user JBassad, who is in the Finance container. Without scope filtering, both GroupWise Driver A
and GroupWise Driver B would synchronize JBassad.
Technical Guidelines 33
Page 34

Figure 3-5 Two Servers with Overlapping Replicas, without Scope Filtering
Identity
Manager
Server A
Finance
Driver Set Server A
GroupWise Server A
Marketing
Identity Management
JBassad
Finance
Driver Set Server B
GroupWise Server B
Development
Identity Management
JBassad
Without scope filtering,
both GroupWise drivers try
to manage user JBassad
Identity
Manager
Server B
Identity
Manager
Server A
Finance
Driver Set
GroupWise Driver A
Marketing
Identity Management
JBassad
Finance
Driver Set
GroupWise Driver B
Development
Identity Management
JBassad
With scope filtering,
only the GroupWise driver on
Server A manages user JBassad
Identity
Manager
Server B
The next illustration shows that scope filtering prevents the two instances of the driver from
managing the same user, because it defines which drivers synchronize each container.
novdocx (en) 17 September 2009
Figure 3-6 Scope Filtering Defines Which Drivers Synchronize Each Container
Identity Manager 3.6.1 comes with predefined rules. There are two rules that help with scope
filtering. “Event Transformation - Scope Filtering - Include Subtrees” and “Event Transformation Scope Filtering - Exclude Subtrees” are documented in Understanding Policies for Identity
Manager 3.6.
For this example, you would use the Include Subtrees predefined rule for Server A and Server B.
You would define the scope for each driver differently so that they would only synchronize the users
in the specified containers. Server A would synchronize Marketing and Finance. Server B would
synchronize Development.
3.4 User Application
The User Application should run on its own server, as shown in Figure 3-7. You might need more
than one User Application server.
34 Identity Manager 3.6.1 Installation Guide
Page 35

Figure 3-7 User Application
Designer iManager
Metadirectory
Server with
eDirectory
iManager
Server
Administration
Workstation
User
Application
Server
Novell
Sentinel Server
novdocx (en) 17 September 2009
Use the information in the “Performance Tuning” (http://www.novell.com/documentation/
idmrbpm361/agpro/data/b2gx735.html) section of the User Application Administration Guide to
determine how best to configure the User Application server.
If the User Application server will be busy, you might need to consider using clustering for the User
Application server. Clustering helps with high availability, scalability, and load balancing. For more
information, see “Clustering” (http://www.novell.com/documentation/idmrbpm361/agpro/data/
b2gx73a.html) in the User Application Administration Guide.
3.5 Auditing and Reporting Guidelines
If you need auditing and reporting as part of the Identity Manager solution, you need to implement
Identity Audit or Novell Sentinel
own server, as shown in Figure 3-8. The number of servers that are required for your solution
depends on how many drivers you have in your environment and how many events you have defined
to audit.
TM
. It is recommended that you run Identity Audit or Sentinel on its
Technical Guidelines 35
Page 36

Figure 3-8 Sentinel
Designer iManager
iManager
Server
Administration
Workstation
U
A
S
Novell
Sentinel Server
M
y
eDi
y
ser
pplication
erver
etadirector
Server with
rector
novdocx (en) 17 September 2009
36 Identity Manager 3.6.1 Installation Guide
Page 37

II
Installation
The following sections contain the information required to install an Identity Manager system.
Chapter 4, “Basic Identity Manager System Checklist,” on page 39
Chapter 5, “Where to Get Identity Manager,” on page 43
Chapter 6, “System Requirements,” on page 45
Chapter 7, “Installing Identity Manager,” on page 55
Chapter 8, “Activating Novell Identity Manager Products,” on page 65
Chapter 9, “Troubleshooting Identity Manager,” on page 67
novdocx (en) 17 September 2009
II
Installation
37
Page 38

novdocx (en) 17 September 2009
38 Identity Manager 3.6.1 Installation Guide
Page 39

4
Driver
Driver
Entitlements
Metadirectory
Engine
Metadirectory
Server
Domain Controller
or Member Server
Identity
Vault
LDAP
Active
Director y
Remote
Loader
iPlanet Server
Active Directory
Server
Basic Identity Manager System
novdocx (en) 17 September 2009
Checklist
The are many different ways to configure Identity Manager to take advantage of all of its features.
Figure 4-1 represents a basic configuration of Identity Manager, which provisions users by
synchronizing data. No matter how Identity Manager is configured, you always start with a basic
system.
As you configure your Identity Manager system, use this checklist to make sure all steps are
completed.
Figure 4-1 Basic Identity Manager System
4
Section 4.1, “Prerequisites,” on page 40
Section 4.2, “Planning,” on page 40
Section 4.3, “Installation,” on page 40
Section 4.4, “Driver Configuration with the Remote Loader,” on page 41
Section 4.5, “Driver Configuration without the Remote Loader,” on page 41
Section 4.6, “Additional Configuration,” on page 41
Basic Identity Manager System Checklist
39
Page 40

4.1 Prerequisites
novdocx (en) 17 September 2009
Install Novell
Manager. Make sure NMAS
information, see the eDirectory 8.8 documentation Web site (http://www.novell.com/
documentation/edir88/index.html).
Install Novell iManager 2.7.3 on the same server. For more information, see the iManager
documentation Web site (http://www.novell.com/documentation/imanager27/index.html).
Download the Identity Manager product. For instructions on how to access the Identity
Manager software, see Chapter 5, “Where to Get Identity Manager,” on page 43.
Install Designer 3.5 on a workstation. For more information, see Section 7.1, “Installing
Designer,” on page 55.
®
eDirectoryTM 8.8.5 or later on the server where you want to run Identity
TM
is installed during the installation of eDirectory. For more
4.2 Planning
Planning is the key to having a successful implementation and deployment of Identity Manager.
Create a development environment. It is important to have access to an Identity Manager
system to validate your Identity Manager solution. You want to do all testing and development
in the development environment before changing the production environment. For more
information, see Chapter 1, “Setting Up a Development Environment,” on page 13.
Create a project plan for deploying Identity Manager. The project plan includes defining you
key business processes, creating an Identity Manager solution that automates those processes,
and an technical implementation plan. To have a successful deployment of Identity Manager,
you must have a project plan. For more information, see Chapter 2, “Creating a Project Plan,”
on page 15.
4.3 Installation
Install the Metadirectory server and drivers. For more information, see Chapter 7, “Installing
Identity Manager,” on page 55.
Activate Identity Manager. For more information, see Chapter 8, “Activating Novell Identity
Manager Products,” on page 65.
(Optional) Design and create entitlements for your Identity Manager system.
Entitlements are a set of defined criteria for a person or group that can be applied to multiple
drivers. After the criteria are met, the entitlements initiate an event to grant or revoke access to
business resources. Entitlements add an additional level of control and automation for granting
and revoking resources.
The key benefit of entitlements is to create and define business logic in the entitlements, and
then have that logic applied to multiple drivers. If you need to make a change, you change it in
the entitlement instead of in each driver.
Entitlements are implemented through three agents:
Role-Based Entitlements using the Entitlements service driver
Workflow
Roles Based Provisioning Module
For more information about entitlements, see the Identity Manager 3.6.1 Entitlements Guide.
40 Identity Manager 3.6.1 Installation Guide
Page 41

4.4 Driver Configuration with the Remote Loader
The Remote Loader allows you to synchronize information to a connected system without having
eDirectory installed on the connected system. The Remote Loader synchronizes the information to
the Metadirectory server, which stores the data in the Identity Vault. Identity Manager uses
eDirectory as the Identity Vault.
Install the Remote Loader on a machine that communicates with the connected system. The
Remote Loader communicates between the connected system and the Metadirectory engine,
and makes it possible for Identity Manager to communicate with a machine that does not have
eDirectory installed. For more information, see“Installing the Remote Loader” in the Identity
Manager 3.6.1 Remote Loader Guide.
Configure the Remote Loader for a driver. You define a specific instance of the Remote Loader
to communicate with a specific driver. For more information, see “Configuring the Remote
Loader” in the Identity Manager 3.6.1 Remote Loader Guide.
Configure the driver to communicate with the Remote Loader. There is a driver guide for each
driver. For specific information about your driver, see the Identity Manager 3.6.1 Drivers
Documentation Web site (http://www.novell.com/documentation/idm36drivers/).
(Optional) Enable entitlements on the driver. Verify that you have the correct policies in place
to execute the entitlement. For more information, see Identity Manager 3.6.1 Entitlements
Guide.
Repeat these steps for each driver you have in your environment.
novdocx (en) 17 September 2009
4.5 Driver Configuration without the Remote Loader
Create and configure your driver. There is a driver guide for each driver. For specific
information about your driver, see the Identity Manager 3.6.1 Drivers Documentation Web site
(http://www.novell.com/documentation/idm36drivers/).
(Optional) Enable entitlements on the driver. Verify that you have the correct policies in place
to execute the entitlement. For more information, see Identity Manager 3.6.1 Entitlements
Guide.
Repeat these steps for each driver you have in your environment.
4.6 Additional Configuration
With the basic Identity Manager system installed and configured, you can add the following
features:
Password Management: If you want to manage passwords with Identity Manager, there is
additional configuration that is required. Use the “Password Management Checklist” in the
Identity Manager 3.6.1 Password Management Guide to verify all configuration steps are
completed.
Roles Based Provisioning: If you want to add Roles Based Provisioning to your Identity
Manager solution, use the checklist in the User Application Installation Guide (http://
www.novell.com/documentation/idmrbpm361/install/data/bookinfo.html) to verify all
configuration steps are completed.
Basic Identity Manager System Checklist 41
Page 42

Auditing and Reporting: Adding auditing and reporting to your Identity Manager solution,
provides a means that you can show your business policies comply with the company’s
policies. You can add Identity Audit or Novell Sentinel to your Identity Manager solution for
auditing and reporting. For more information about Identity Audit, see the Identity Manager
3.6.1 Integration Guide for Identity Audit. For more information about Novell Sentinel, see the
Identity Manager 3.6.1 Reporting Guide for Novell Sentinel.
novdocx (en) 17 September 2009
42 Identity Manager 3.6.1 Installation Guide
Page 43

5
Where to Get Identity Manager
To download Identity Manager and its services:
1 Go to the Novell Downloads Web site (http://download.novell.com).
2 In the Product or Technology menu, select Novell Identity Manager, then click Search.
3 On the Novell Identity Manager Downloads page, click the Download button next to a file you
want.
4 Follow the on-screen prompts to download the file to a directory on your computer.
5 Repeat from Step 2 until you have downloaded all the files you need. Most installations require
multiple ISO images.
Table 5-1 How the ISO Images Work
Identity Manager Components Platforms ISO
novdocx (en) 17 September 2009
5
Identity Manager DVD Identity Manager:
Linux, Windows*,
and UNIX
Designer: Linux
and Windows
Identity Manager and Drivers CDWindows
Identity Manager and Drivers CDLinux
Identity Manager and Drivers CDSolaris
Identity Manager and Drivers AIX
Designer for Identity Manager CDWindows
Designer for Identity Manager CDLinux
User Application See the User Application Installation Guide (http://
Identity_Manager_3_6_1_DVD.iso
Identity_Manager_3_6_1_Win.iso
Identity_Manager_3_6_1_Linux.iso
Identity_Manager_3_6_1_Solaris.iso
Identity_Manager_3_6_1_AIX.iso
Identity_Manager_3_6_1_Designer_Win.is
o
Identity_Manager_3_6_1_Designer_Linux.
iso
www.novell.com/documentation/idmrbpm37/) for this
information.
Your Identity Manager purchase includes integration modules for several common systems that you
might already have licenses for: Novell
Directories, Novell GroupWise
Modules must be purchased separately.
The User Application ISO image is the standard version included with your Identity Manager 3.6.1
purchase. The User Application Roles Based Provisioning Module is an add-on product that adds a
powerful roles based approval workflow to managing your users’ identities. The Roles Based
®
®
eDirectoryTM, Microsoft* Active Directory, LDAP v3
, and Lotus* Notes*. All other Identity Manager Integration
Where to Get Identity Manager
43
Page 44

Provisioning Module comes on a separate ISO image and is purchased separately. See the User
Application Installation Guide (http://www.novell.com/documentation/idmrbpm37/) for more
information.
Your Identity Manager purchase also includes Designer for Identity Manager, a powerful and
flexible administration tool that dramatically simplifies configuration and deployment.
novdocx (en) 17 September 2009
44 Identity Manager 3.6.1 Installation Guide
Page 45
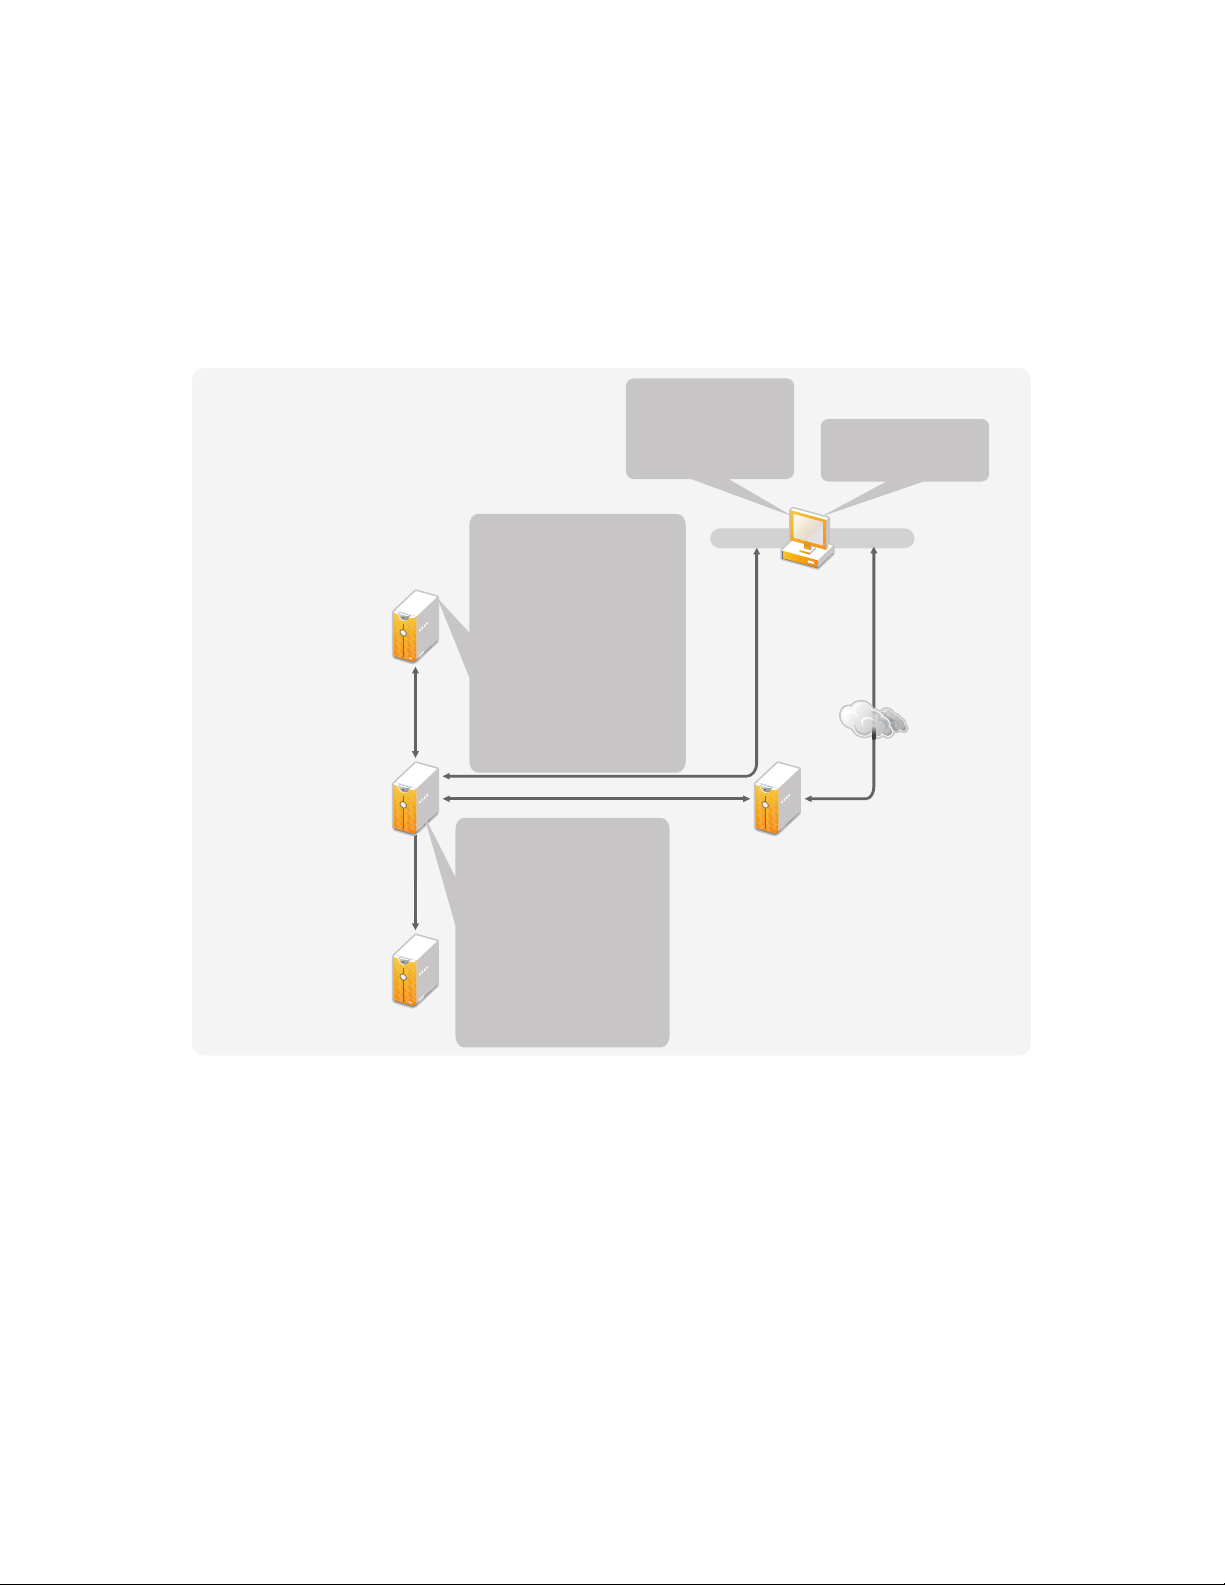
6
Designer iManager
Metadirectory 3.6.1
Server with
eDirectory 8.8.5
or later 32-bit
and 64-bit
iManager 2.7.3
Server
Administration
Workstation
Remote
Loader 3.6.1
Server
Novell Sentinel
Server 6.1
Windows Server 2003 SP2
(32-bit)
Windows Server 2008
(32-bit and 64-bit)
Red Hat 5.0 or later (32-bit
and 64-bit)
SLES 10 SP1 or later SPs
(32-bit and 64-bit)
SLES 11 (32-bit and 64-bit)
Solaris 10 (32-bit and 64-bit)
AIX 5.3 (64-bit)
OES 2 SP1 and SP2 (32-bit
and 64-bit)
Windows 2008 R2
Windows Vista
Windows XP Pro. SP2
openSUSE 10.3
SLED 10 SP1/SP2
SLES 10 SP1/SP2
Windows 2008 R2
Internet Explorer 6 SP2
Internet Explorer 7
Firefox 2
Windows Server 2003 SP2
(32-bit and 64-bit)
Windows Server 2008 (32-bit
and 64-bit)
Windows Server 2008
Server Core
Red Hat 5.0 or later (32-bit
and 64-bit)
SLES 10 SP1 or later SPs
(32-bit and 64-bit)
SLES 11 (32-bit and 64-bit)
Solaris 10 (32-bit and 64-bit)
AIX 5.3 (64-bit)
OES 2 SP1 and SP2 (32-bit
and 64-bit)
Windows 2008 R2
System Requirements
The components of Novell® Identity Manager can be installed on multiple systems and platforms.
Figure 6-1 shows which platforms and systems are supported.
Figure 6-1 System Requirements for the Identity Manager Components
novdocx (en) 17 September 2009
6
Depending on your system configuration, you might need to run the Identity Manager installation
program several times to install Identity Manager components on the appropriate systems.
Section 6.1, “eDirectory and iManager,” on page 46
Section 6.2, “Metadirectory Server,” on page 46
Section 6.3, “Remote Loader,” on page 49
Section 6.4, “User Application,” on page 50
Section 6.5, “Auditing and Reporting,” on page 50
Section 6.6, “Workstations,” on page 51
System Requirements
45
Page 46
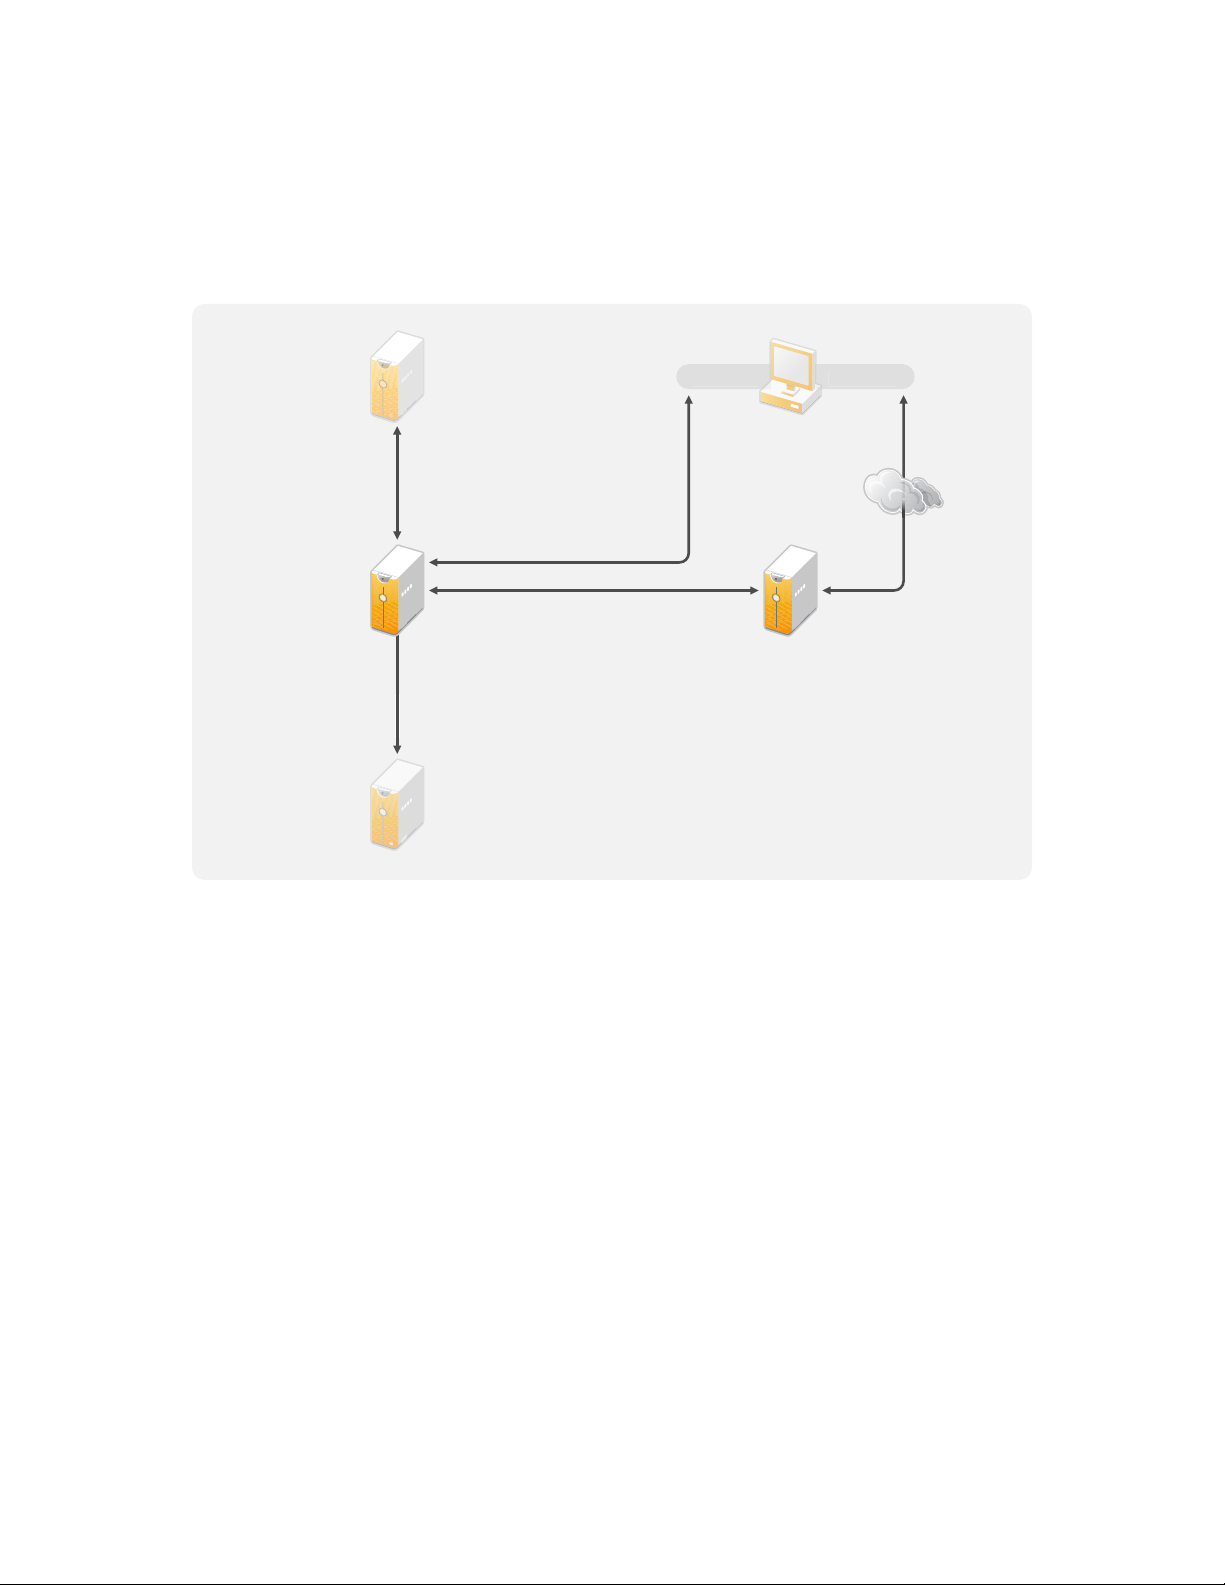
6.1 eDirectory and iManager
D
r
iManager 2.7.3
Server
Admini
Work
n
R
1
S
S
1
Metadirectory 3.6.1
Server with
eDirectory 8.8.5
or later 32-bit
and 64-bit
Identity Manager requires eDirectoryTM and iManager to be installed. These products provide a base
for Identity Manager. Figure 6-2 illustrates these components.
Figure 6-2 Base Products for Identity Manager
novdocx (en) 17 September 2009
emote
Loader 3.6.
erver
Novell Sentinel
erver 6.
esigne
The following list indicates the required versions of these products:
iManager
stration
statio
eDirectory 8.8.5 or later (32-bit or 64-bit)
iManager 2.7.3
For system requirements for eDirectory, see the Novell eDirectory 8.8 SP5 Installation Guide (http:/
/www.novell.com/documentation/edir88/index.html). For system requirements for iManager, see the
iManager 2.7 Installation Guide (http://www.novell.com/documentation/imanager27/index.html).
6.2 Metadirectory Server
The Metadirectory server processes the events from the drivers, whether they are configured using
the Remote Loader or not. For a list of the supported operating systems, see Figure 6-3.
46 Identity Manager 3.6.1 Installation Guide
Page 47
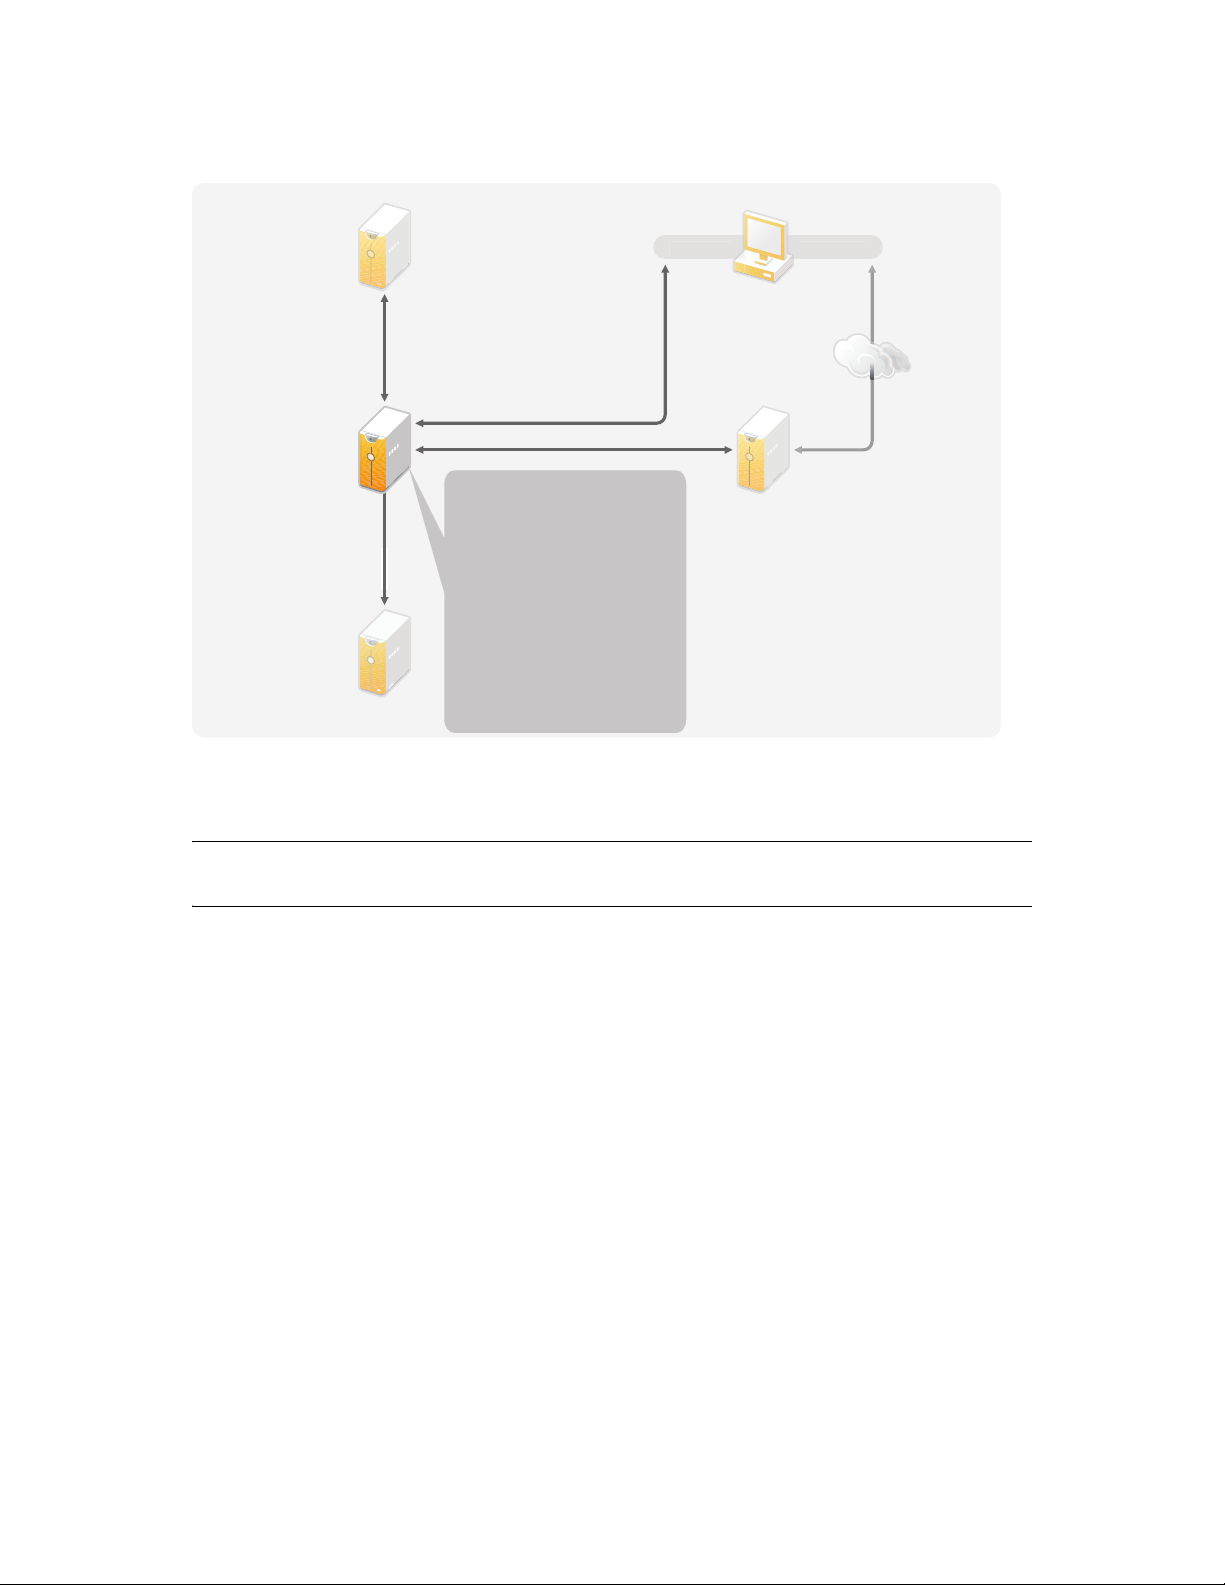
Figure 6-3 Supported Operating Systems for the Metadirectory Server
D
r
i
r
i
3
S
r
Admini
n
Work
Remote
L
N
Metadirectory 3.6.1
Server with
eDirectory 8.8.5
or later 32-bit
and 64-bit
Windows Server 2003 SP2
(32-bit)
Windows Server 2008
(32-bit and 64-bit)
Red Hat 5.0 or later (32-bit
and 64-bit)
SLES 10 SP1 or later SPs
(32-bit and 64-bit)
SLES 11 (32-bit and 64-bit)
Solaris 10 (32-bit and 64-bit)
AIX 5.3 (64-bit)
OES 2 SP1 and SP2 (32-bit
and 64-bit)
Windows 2008 R2
novdocx (en) 17 September 2009
oader 3.6.1
Server
ovell Sentinel
Server 6.1
esigne
Manager 2.7.
Manage
stratio
station
erve
During the installation of the Metadirectory server, the installation program detects what version of
eDirectory is installed.
NOTE: You must have eDirectory 8.8.5 or later (32-bit or 64-bit) installed, or the installation
program does not continue with the installation.
Section 6.2.1, “Supported Processors,” on page 47
Section 6.2.2, “Server Operating Systems,” on page 48
6.2.1 Supported Processors
The processors listed here are used during the testing of Identity Manager. The SPARC* processor is
used for Solaris* testing.
®
The supported 32-bit processors for Linux (Red Hat* and SUSE
Windows operating systems are:
Intel* x86-32
AMD* x86-32
The supported 64-bit processors for Linux (Red Hat and SUES Linux Enterprise Server) and
Windows operating systems are:
Intel EM64T
AMD Athlon64
AMD Opteron*
Linux Enterprise Server) and
System Requirements 47
Page 48

6.2.2 Server Operating Systems
You can install the Metadirectory engine as a 32-bit application on a 64-bit operating system. Table
6-1 contains a list of the supported server operating systems that the Metadirectory server can run
on.
Table 6-1 Supported Server Operating Systems
Server Operating System Version Notes
Windows Server* 2003 SP2 or later (32-bit) The Metadirectory server runs only in 32-bit
mode.
Windows Server* 2008 SP2 or later (32-bit and 64-bit) The Metadirectory server runs in either 32-bit
or 64-bit mode.
Windows Server 2008 R2 The Metadirectory server runs in either 32-bit
or 64-bit mode.
Red Hat 5.0 or later (32-bit and 64-bit) The Metadirectory server runs in either 32-bit
or 64-bit mode. Novell recommends that you
apply the latest OS patches via the
manufacturer’s automated update facility
before you install Identity Manager.
novdocx (en) 17 September 2009
SUSE Linux Enterprise Server 10 SP1 or later support
packs (32-bit and 64-bit)
SUSE Linux Enterprise Server 11 (32-bit and 64-bit) The Metadirectory server runs in either 32-bit
Solaris 10 (32-bit and 64-bit) The Metadirectory server runs in either 32-bit
Solaris Zones (32-bit and 64-bit) The Metadirectory server runs in either 32-bit
AIX* 5L v5.3 (64-bit) The Metadirectory server runs only in 32-bit
Xen* Xen is supported when the Xen Virtual
VMware* The Metadirectory server runs in either 32-bit
The Metadirectory server runs in either 32-bit
or 64-bit mode. Novell recommends that you
apply the latest OS patches via the
manufacturer's automated update facility
before you install Identity Manager.
or 64-bit mode. Novell recommends that you
apply the latest OS patches via the
manufacturer's automated update facility
before you install Identity Manager.
or 64-bit mode.
or 64-bit mode.
mode.
Machine is running SLES 10/OES 2/OES 2
SP1 as the guest operating system in
paravirtualized mode.
or 64-bit mode.
48 Identity Manager 3.6.1 Installation Guide
Page 49
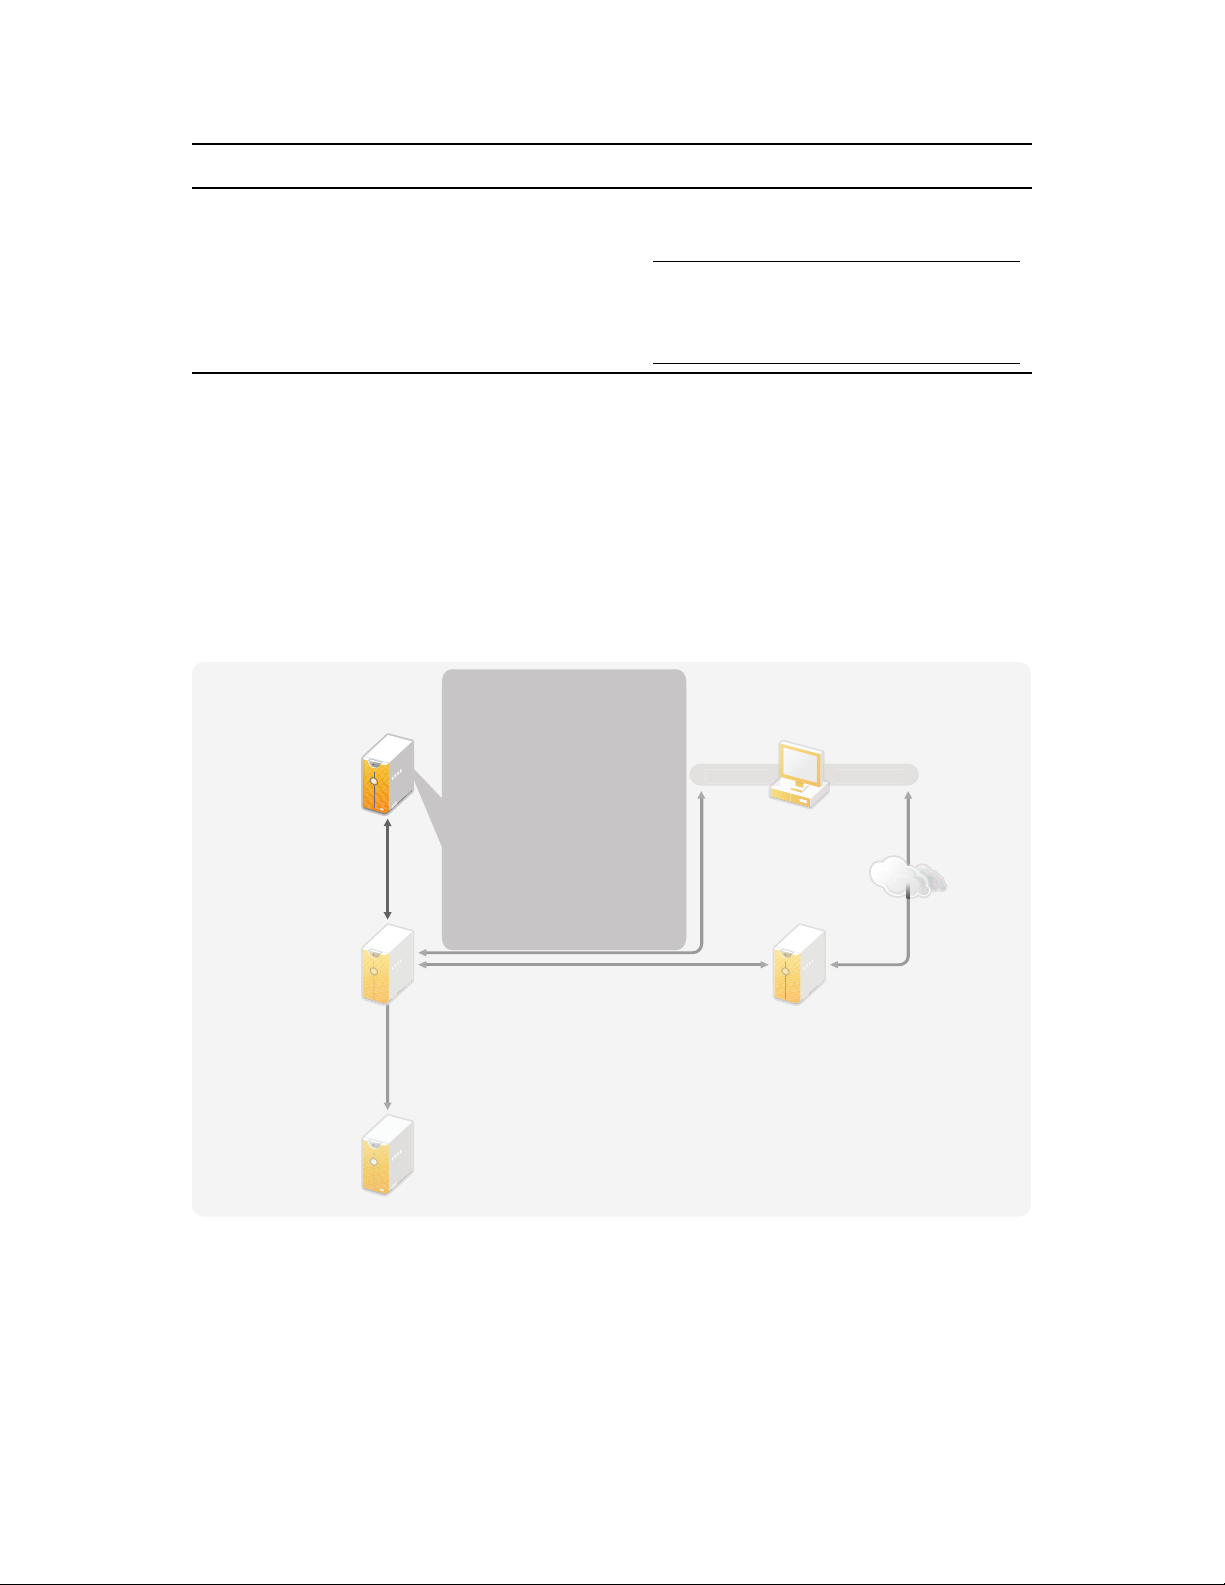
Server Operating System Version Notes
Designer
iM
r
1
S
e
5
t
a
t
i
3
S
r
A
n
S
1
Remote
Loader 3.6.1
Server
Windows Server 2003 SP2
(32-bit and 64-bit)
Windows Server 2008 (32-bit
and 64-bit)
Windows Server 2008
Server Core
Red Hat 5.0 or later (32-bit
and 64-bit)
SLES 10 SP1 or later SPs
(32-bit and 64-bit)
SLES 11 (32-bit and 64-bit)
Solaris 10 (32-bit and 64-bit)
AIX 5.3 (64-bit)
OES 2 SP1 and SP2 (32-bit
and 64-bit)
Windows 2008 R2
novdocx (en) 17 September 2009
Open Enterprise Server 2 SP1 and SP2 (32-bit and 64bit)
The Metadirectory server runs in either 32-bit
or 64-bit mode.
NOTE: You must have eDirectory 8.8.5 or
later (32-bit or 64-bit) installed, or the
installation program does not continue with
the installation.
6.3 Remote Loader
The Remote Loader gives you flexibility in your Identity Manager solution configuration. It
provides 32-bit or 64-bit support. By default, the installation program detects the version of the
operating system and then installs the corresponding version of the Remote Loader. For installing
32-bit Remote Loader on a 64-bit Operating System, see “Installing 32-Bit Remote Loader on 64-
Bit Operating System” on page 62. Figure 6-4 lists the supported operating systems for the Remote
Loader.
Figure 6-4 Supported Operating Systems for the Remote Loader
anage
dministratio
Workstation
Metadirectory 3.6.
If you have installed the Metadirectory engine as a 32-bit application on a 64-bit operating system,
you cannot install the 64-bit Remote Loader on the same machine. The libraries for the 32-bit
Metadirectory engine and the 64-bit Remote Loader have the same names. If they are both installed
erver with
Directory 8.8.
or later 32-bi
nd 64-bi
Novell Sentinel
erver 6.
Manager 2.7.
erve
on the same machine, it causes conflicts.
Table 6-2 lists the supported operating systems for the Remote Loader.
System Requirements 49
Page 50

Table 6-2 Supported Operating Systems for the Remote Loader
Server Operating System Version Notes
Windows Server* 2003 SP2 or later (32-bit and 64-bit) The Remote Loader runs in either 32-bit or 64-
bit mode.
Windows Server* 2008 SP2 or later (32-bit and 64-bit) The Remote Loader runs in either 32-bit or 64-
bit mode.
Windows Server 2008 Server Core (32-bit and 64-bit) The Remote Loader runs in either 32-bit or 64-
bit mode.
Windows Server 2008 R2 The Remote Loader runs in either 32-bit or 64-
bit mode.
Red Hat 5.0 or later (32-bit and 64-bit) The Remote Loader runs in either 32-bit or 64-
bit mode. Novell recommends that you apply
the latest OS patches via the manufacturer’s
automated update facility before you install
Identity Manager.
novdocx (en) 17 September 2009
SUSE Linux Enterprise Server 10 SP1 or later support
packs (32-bit and 64-bit)
SUSE Linux Enterprise Server 11 (32-bit and 64-bit) The Remote Loader runs in either 32-bit or 64-
Solaris 10 (32-bit and 64-bit) The Remote Loader runs in either 32-bit or 64-
Solaris Zones (32-bit and 64-bit) The Remote Loader runs in either 32-bit or 64-
AIX* 5L v5.3 (64-bit) The Remote Loader runs only in 32-bit mode.
Open Enterprise Server 2 SP1 and SP2 (32-bit and 64bit)
The Remote Loader runs in either 32-bit or 64bit mode. Novell recommends that you apply
the latest OS patches via the manufacturer's
automated update facility before you install
Identity Manager.
bit mode. Novell recommends that you apply
the latest OS patches via the manufacturer's
automated update facility before you install
Identity Manager.
bit mode.
bit mode.
The 64-bit Remote Loader is not supported.
The Remote Loader runs in either 32-bit or 64bit mode.
6.4 User Application
See the User Application Installation Guide (http://www.novell.com/documentation/idmrbpm37/)
for a list of the User Application system requirements.
6.5 Auditing and Reporting
Identity Audit and Novell SentinelTM are two different tools used to gather auditing and reporting
information about Identity Manager. Figure 6-5 lists the supported version of Sentinel with Identity
Manager 3.6.1.
50 Identity Manager 3.6.1 Installation Guide
Page 51
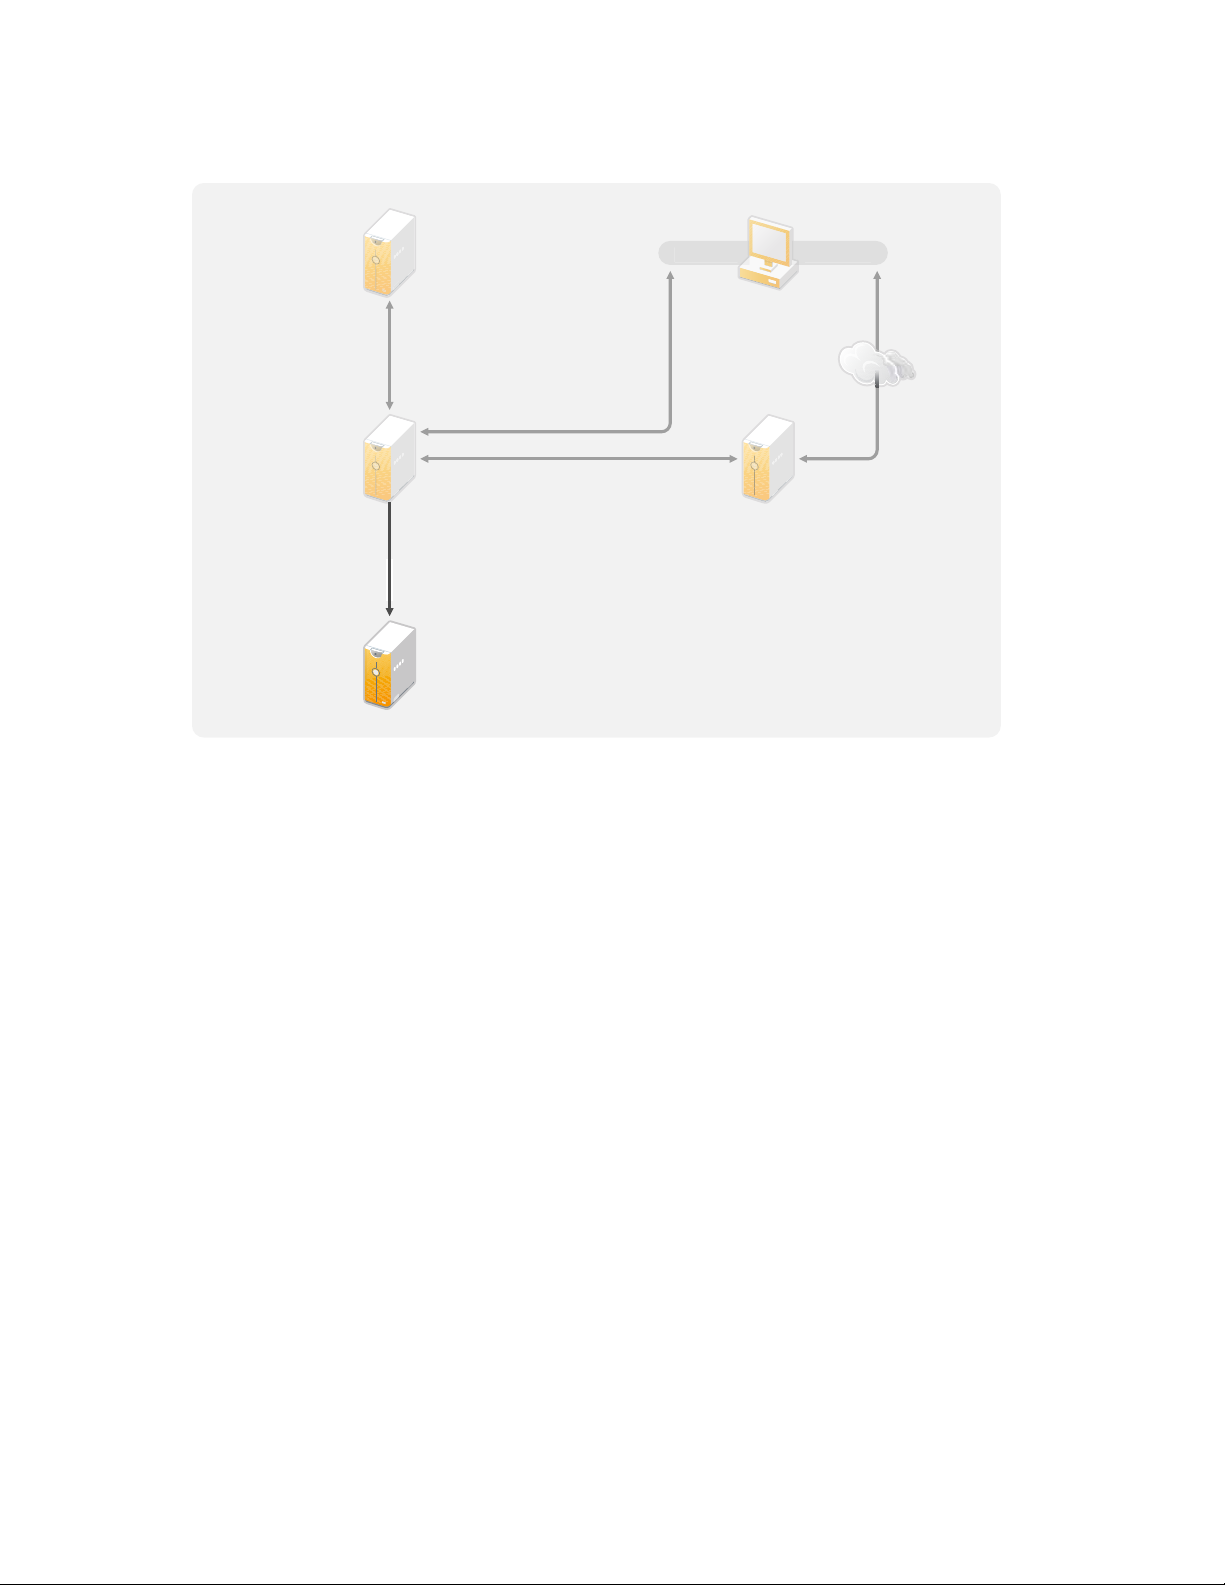
Figure 6-5 Sentinel
D
r
e
o
t
a
t
3
S
Admini
n
Work
n
R
S
Novell Sentinel
Server 6.1
novdocx (en) 17 September 2009
emote
Loader 3.6.1
erver
Metadirectory 3.6.1
Server with
Directory 8.8.5
r later 32-bi
nd 64-bi
esigne
iManager 2.7.
iManager
stratio
statio
erver
This is an optional addition to the Identity Manager solution. By adding auditing and reporting, you
can meet compliance standards that many companies must abide by. It creates audit trails for any
events you need to track, and it can generate reports to meet audit standards for your company.
For configuration information about Identity Audit with Identity Manager, see the Identity Manager
3.6.1 Integration Guide for Identity Audit. For configuration uniformitarian about Sentinel with
Identity Manager, see the Identity Manager 3.6.1 Reporting Guide for Novell Sentinel. For system
requirement information about Identity Audit, see the Identity Audit Guide (http://www.novell.com/
documentation/identityaudit/index.html). For system requirement information about Novell
Sentinel, see the Novell Sentinel Installation Guide (http://www.novell.com/documentation/
sentinel6/index.html).
6.6 Workstations
The workstations are used for Designer, iManager, or the User Application administration Web
page. Figure 6-6 lists the different components for workstations that are supported with Identity
Manager 3.6.1.
System Requirements 51
Page 52

Figure 6-6 Supported Components for Workstations
Designer iManager
M
S
h
i
3
S
r
Administration
Workstation
Remote
L
r
N
l
S
Internet Explorer 6 SP2
Internet Explorer 7
Firefox 2
Windows Vista
Windows XP Pro. SP 2
openSUSE 10.3
SLED 10 SP1/SP2
SLES 10 SP1/SP2
oader 3.6.1
Serve
etadirectory 3.6.1
erver wit
eDirectory 8.8.5
or later 32-bit
and 64-bit
novdocx (en) 17 September 2009
Manager 2.7.
erve
ovell Sentine
erver 6.1
There are three different items that affect workstations:
Section 6.6.1, “Workstation Platforms,” on page 52
Section 6.6.2, “iManager and Web Browsers,” on page 53
6.6.1 Workstation Platforms
Table 6-3 contains a list of the supported workstation platforms for Designer and iManager.
Table 6-3 Supported Workstation Platforms
Platforms Details
Windows Vista* The Ultimate and Business Editions are supported.
Windows XP Professional SP2
®
openSUSE
10.3 Apply the latest patches via the automated update
facility.
SUSE Linux Enterprise Desktop 10 SP1/SP2 Apply the latest patches via the automated update
52 Identity Manager 3.6.1 Installation Guide
facility.
Page 53

Platforms Details
SUSE Linux Enterprise Server 10 SP1/SP2 Apply the latest patches via the automated update
facility.
6.6.2 iManager and Web Browsers
The supported version of iManager for Identity Manager 3.6.1 is iManager 2.7.3. It runs all of the
plug-ins required to configure and administer Identity Manager.
The supported Web browsers for managing Identity Manager are:
Internet Explorer* 6 SP2
Internet Explorer 7
Firefox* 2
novdocx (en) 17 September 2009
System Requirements 53
Page 54

novdocx (en) 17 September 2009
54 Identity Manager 3.6.1 Installation Guide
Page 55

7
Installing Identity Manager
Identity Manager has separate installations for the different components. It is important to install and
use Designer during the planning phase of the Identity Manager implementation. For more
information, see Chapter 2, “Creating a Project Plan,” on page 15.
You can install the Metadirectory Server or the Remote Loader next, in whatever order you want.
The rest of the components need to be installed in the order listed. For an explanation of the different
components, see the Identity Manager 3.6.1 Overview guide.
Section 7.1, “Installing Designer,” on page 55
Section 7.2, “Installing the Metadirectory Server,” on page 55
Section 7.3, “Installing the Remote Loader,” on page 59
Section 7.4, “Installing the Roles Based Provisioning Module,” on page 63
Section 7.5, “Installing a Custom Driver,” on page 64
Section 7.6, “Installing Identity Audit or Sentinel,” on page 64
Section 7.7, “Installing Identity Manager in Clustering Environment,” on page 64
novdocx (en) 17 September 2009
7
7.1 Installing Designer
Designer 3.5 is a workstation-based tool that allows you to design your Identity Manager solution.
Install Designer first and use it throughout the planning part of your Identity Manager
implementation. For more information about planning, see Part I, “Planning,” on page 11.
1 Verify that your workstation’s operating system is supported. For more information, see
Section 6.6, “Workstations,” on page 51.
2 Start the installation by executing the correct program for your workstation’s platform.
Windows:
Linux:
To execute the binary file, enter
3 Use the following information to complete the installation:
Install Folder: Specify a location on the workstation where Designer should be installed.
Create Shortcuts: Select whether the shortcuts are placed on your desktop and in your
Desktop Menu.
4 Refer to Designer 3.5 for Identity Manager 3.6 Administration Guide (http://www.novell.com/
documentation/designer35/admin_guide/data/front.html) for further information.
IDM3.6.1_Designer_Win:/windows/designer/install.exe
IDM3.6.1_Designer_Linux:/linux/designer/install
./install
.
7.2 Installing the Metadirectory Server
For Linux\UNIX platforms you can install the Metadirectory Server as
install Identity Manager as a nonroot user to increase the security on the server. eDirectory must be
installed by a nonroot user for the nonroot installation to work. The installation procedure is
different if you are using the nonroot installation. See Section 7.2.1, “Nonroot Installation of the
Metadirectory Server,” on page 57 for the installation instructions.
root
or a nonroot user. You
Installing Identity Manager
55
Page 56

This procedure covers the installation of the Metadirectory server, web components, and utilities for
the different platforms that Identity Manager supports.
1 Verify that you have met the system requirement list in Chapter 6, “System Requirements,” on
page 45.
2 (Linux\UNIX only) To verify that the environment variables for eDirectory are exported before
starting the installation on Linux/UNIX, go to a command prompt and enter:
set | grep PATH
The environment variables set the path for the eDirectory installation. The eDirectory
installation path is listed if the environment variables are set. If the environment variables are
not set, the installation of Identity Manager fails.
To set the environment variables for your current shell:
. /opt/novell/eDirectory/bin/ndspath
You must have the space between the . and the / for the command to work. For more
information, see “Using the nds-install Utility to Install eDirectory Components” (http://
www.novell.com/documentation/edir88/edirin88/index.html?page=/documentation/edir88/
edirin88/data/a79kg0w.html#ai39feq).
novdocx (en) 17 September 2009
3 Start the installation, using the correct program for your platform.
Windows:
Linux - GUI Install:
Linux - Command Line Install:
Solaris - GUI Install:
Solaris - Command Line Install:
console
AIX - GUI Install:
AIX - Command Line Install:
To execute the binary files on Linux\Solaris\AIX, enter
console}]
IDM3.6.1_Win:windows\setup\idm_install.exe
IDM3_6_1_Lin/idm_linux.bin [-i gui]
IDM3_6_1_Lin/idm_linux.bin -i console
IDM3_6_1_Solaris/idm_solaris.bin [-i gui]
IDM3_6_1_Solaris/idm_solaris.bin -i
IDM3_6_1_AIX/idm_aix.bin [-i gui]
IDM3_6_1_AIX/idm_aix.bin -i console
./install.bin [-i {gui |
.
4 Use the following information to complete the installation:
Select Components: Select the Metadirectory server, iManager plug-ins, and utilities to
install the Metadirectory server.
Novell Identity Manager Metadirectory Server: This option requires the Identity
Vault to be installed on this server. It extends the schema for Identity Manager,
installs the Metadirectory engine, the Identity Manager drivers, and the Novell
Audit Agent.
Novell Identity Manager Connected System Server: This option does not require
the Identity Vault to be installed on this server. Select this option only if you are
installing the Remote Loader. For more information, see Section 7.3, “Installing the
Remote Loader,” on page 59.
None: Select this option if you want to install the iManager plug-ins or the utilities
without installing the Metadirectory server or the connected system server on this
server.
®
56 Identity Manager 3.6.1 Installation Guide
Page 57

Novell Identity Manager Web-based Administration Server: Select this option if
you have iManager installed on this server. It installs the iManager plug-ins for
Identity Manager.
Utilities: Installs utilities used to help configure the drivers for the connected
systems. Not all drivers have utilities. If you are not sure if you need this, select it. It
does not use much disk space.
Customize the selected components: This option enables you to customize the
components that you have selected to install. Therefore, before selecting this option,
you should select the relevant components to install.
Authentication: Specify a user and password that has sufficient rights in eDirectory to
extend the schema. Specify the username in the LDAP format. For example,
cn=idmadmin,o=company.
5 Activate Identity Manager. For more information, see Chapter 8, “Activating Novell Identity
Manager Products,” on page 65.
6 Create and configure your driver objects. This information is contained in each driver guide.
For more information, see Identity Manager Drivers documentation (http://www.novell.com/
documentation/idm36drivers/).
novdocx (en) 17 September 2009
7.2.1 Nonroot Installation of the Metadirectory Server
You can install Identity Manager as a nonroot user to enhance the security of your UNIX/Linux
server. You cannot install Identity Manager as a nonroot user if eDirectory is installed by
The nonroot installation does not install the following items:
Remote Loader: Use the Java Remote Loader if you need to install the Remote Loader as a
nonroot user. For more information, see Section 7.3.5, “Installing the Java Remote Loader on
UNIX, Linux, or AIX,” on page 63.
UNIX/Linux Account Driver: Requires root privileges to function.
Novell Sentinel Platform Agent: Install Novell Sentinel Platform Agent by
Dirxml.properties
where the event log file gets generated (
AuditEvents.log
in the
/etc/opt/novell/sentinelpa/conf
/var/opt/novell/sentinelpa/data/
is the default location) should have the
directory. The location
write
permission for a non root
root
user.
Use the following procedure to run the nonroot installation of the Metadirectory server:
1 Install eDirectory 8.8.5 or later as a nonroot user. For more information, see “Nonroot User
Installing eDirectory 8.8” (http://www.novell.com/documentation/edir88/edirin88/
index.html?page=/documentation/edir88/edirin88/data/a79kg0w.html#bs6a3gs).
2 Log in as the nonroot user used to install eDirectory.
You should install Identity Manager as the same user you used to install the nonroot version of
eDirectory. The user that installs Identity Manager must have write access to the directories and
files of the nonroot eDirectory installation.
root
. Create
.
3 Execute the installation program for your platform.
Linux:
AIX:
IDM3.6.1_Lin/linux/setup/idm-nonroot-install
IDM3.6.1_Unix/aix/setup/idm-nonroot-install
Installing Identity Manager 57
Page 58

IMPORTANT: The only supported AIX maintenance level is 5300-09. Newer or older
maintenance levels are not supported.
novdocx (en) 17 September 2009
Solaris:
To execute the script files, enter
IDM3.6.1_solaris/setup/idm-nonroot-install
./idm-nonroot-install
4 Use the following information to complete the installation:
Base Directory for the nonroot eDirectory Installation: Specify the directory where
the nonroot eDirectory installation is. For example,
Extend eDirectory Schema: If this is the first Identity Manager server installed into this
Y
instance of eDirectory, enter
to extend the schema. If the schema is not extended,
/home/user/install/eDirectory
Identity Manager cannot function.
You are prompted to extend the schema for each instance of eDirectory owned by the
nonroot user that is hosted by the nonroot eDirectory installation.
If you do select to extend the schema, specify the full distinguished name (DN) of the
eDirectory user that has rights to extend the schema. The user must have the Supervisor
right to the entire tree to extend the schema. For more information about extending the
schema as a nonroot user, see the
schema.log
file that is placed in the
data
directory for
each instance of eDirectory.
Run the
/opt/novell/eDirectory/idm-install-schema
program to extend the
schema on additional eDirectory instances after the installation is complete.
Utilities: (Optional) If you need an Identity Manager driver utility, you must copy the
utilities from the Identity Manager installation media to the Identity Manager server. All
utilities are found under the
IDM3.6.1_platform/setup/utilities
directory.
5 Activate Identity Manager. For more information, see Chapter 8, “Activating Novell Identity
Manager Products,” on page 65.
.
6 Create and configure the driver objects. This information is contained in each driver guide. For
more information, see the Identity Manager Drivers documentation (http://www.novell.com/
documentation/idm36drivers/).
7.2.2 Silent Installation of the Metadirectory Server
Start the silent installation by using the correct program for your platform:
Linux:
Solaris:
AIX:
Create a property file
where you run the Identity Manger installer:
EDIR_USER_NAME=cn=admin,o=test
EDIR_USER_PASSWORD=test
METADIRECTORY_SERVER_SELECTED=true
CONNECTED_SYSTEM_SELECTED=false
WEB_ADMIN_SELECTED=false
UTILITIES_SELECTED=false
IDM3_6_1_Lin/idm_linux.bin -i silent -f <filename>.properties
IDM3_6_1_Solaris/idm_solaris.bin -i silent -f <filename>.properties
IDM3_6_1_AIX/idm_aix.bin -i silent -f <filename>.properties
<filename>.properties
with the following attributes, in the location from
58 Identity Manager 3.6.1 Installation Guide
Page 59

novdocx (en) 17 September 2009
For default installed locations, see
/tmp/idmInstall.log
.
NOTE: If you have installed iManager, and later you want to install iManager plug-ins, then you
must set the
WEB_ADMIN_SELECTED
value to
true
.
NOTE: If you want to install (silent installation) Identity Manager on multiple instances, then you
must make sure that the <filename>.properties file has the following:
EDIR_NCP_PORT=1524
EDIR_NDS_CONF=/etc/opt/novell/eDirectory/conf
EDIR_IP_ADDRESS=<xxx.xx.xx.xx>
7.3 Installing the Remote Loader
The Remote Loader extends the functionality of Identity Manager by allowing the driver to access
the connected system without having the Identity Vault and Metadirectory engine installed on the
same server as the connected system. As part of the planning process, you need to decide if you are
going to use the Remote Loader or not. For more information about the planning process, see
Chapter 3, “Technical Guidelines,” on page 27.
Section 7.3.1, “Requirements,” on page 59
Section 7.3.2, “Supported Drivers,” on page 59
Section 7.3.3, “Installation Procedure,” on page 60
If you want to install the Remote Loader using a nonroot user, use the Java Remote Loader. It can
also be used when customizing your environment and installing it on a unsupported platform such as
HP-UX*. For more information, see Section 7.3.5, “Installing the Java Remote Loader on UNIX,
Linux, or AIX,” on page 63.
7.3.1 Requirements
The Remote Loader requires that each driver’s connected system is available and the relevant APIs
are provided. Refer to the Identity Manager Driver documentation (http://www.novell.com/
documentation/idm36drivers) for operating system and connected system requirements that are
specific to each driver.
7.3.2 Supported Drivers
Not all Identity Manager drivers are supported by the Remote Loader. Table 7-1 lists the drivers that
are Remote Loader capable.
Table 7-1 Remote Loader Capable Drivers
Active Directory Avaya* PBX
Delimited Text GroupWise
®
JDBC* JMS
LDAP Driver for Linux and UNIX
Installing Identity Manager 59
Page 60

Lotus Notes* PeopleSoft* 5.2
Remedy* ARS SAP* HR
SAP User Management Scripting
SOAP WorkOrder
Manual Task Services Null Services
LoopBack
The drivers listed in Table 7-2 are not capable of using the Remote Loader.
Table 7-2 No Remote Loader Capabilities
eDirectory Entitlements Service
Role Service User Application
novdocx (en) 17 September 2009
7.3.3 Installation Procedure
The Remote Loader has different programs for the different platforms that allow it to communicate
with the Metadirectory engine.
Windows: The Remote Loader Console uses
dirxml_remote.exe
, which is an executable that enables the Metadirectory engine to
communicate with the Identity Manager drivers running on Windows.
Linux/UNIX:
rdxml
is an executable that enables the Metadirectory engine to communicate
with the Identity Manager drivers running in Solaris, Linux, or AIX environments.
To install the Remote Loader:
1 Verify you have met the system requirements listed in Chapter 6, “System Requirements,” on
page 45.
2 Start the installation, using the correct program for your platform.
Windows:
Linux - GUI Install:
IDM3.6.1_Win:windows\setup\idm_install.exe
IDM3_6_1_Lin/idm_linux.bin [-i gui]
Linux - Command Line Install:
Solaris - GUI Install:
IDM3_6_1_Solaris/idm_solaris.bin [-i gui]
Solaris - Command Line Install:
console
AIX - GUI Install:
AIX - Command Line Install:
IDM3_6_1_AIX/idm_aix.bin [-i gui]
IDM3_6_1_AIX/idm_aix.bin -i console
rlconsole.exe
IDM3_6_1_Lin/idm_linux.bin -i console
IDM3_6_1_Solaris/idm_solaris.bin -i
to interface with
To execute the binary files on Linux\Solaris\AIX, enter
console}]
.
IMPORTANT: The only supported AIX maintenance level is 5300-09. Newer or older
maintenance levels are not supported.
60 Identity Manager 3.6.1 Installation Guide
./install.bin [-i {gui |
Page 61

3 Use the following information provided to complete the installation:
Select Components: Select the connected system server and utilities to install the
Remote Loader.
Novell Identity Manager Metadirectory Server: Select this option only if you are
installing the Metadirectory server. This option requires the Identity Vault to be
installed on this server. For more information, see Section 7.2, “Installing the
Metadirectory Server,” on page 55.
Novell Identity Manager Connected System Server: This option does not require
the Identity Vault to be installed on this server. It installs the Remote Loader Service
on your application server.
None: Select this option if you want to install the iManager plug-ins or the utilities
without installing the Metadirectory server or the connected system server on this
server.
Novell Identity Manager Web-based Administration Server: Select this option if
you have iManager installed on this server. It installs the iManager plug-ins for
Identity Manager.
Utilities: Installs utilities used to help configure the drivers for the connected
systems. Not all drivers have utilities. If you are not sure if you need this, select it. It
does not use much disk space.
novdocx (en) 17 September 2009
WARNING: For installing Identity Manager 3.6.1, do not select the Utilities
component. The installation does not proceed if you select the Utilities component.
Custom: Select this option if you want to customize the features that are installed. It
allows you to select the following options:
Remote Loader Service: The service that communicates with the
Metadirectory engine.
Drivers: Select which driver files to install. You should install all of the driver
files. If you need to add another Remote Loader instance, you do not need to run
the installation again.
Register the Identity Audit System Components for Identity Manager:
Select this option if you have Identity Audit or Novell Sentinel installed.
Other options must be select when you select the customize for the installation to
proceed.
(Windows Only) Install Location for Connected System Server: Specify the directory
where the Connected System Server is installed.
(Windows Only) Install Location for Utilities: Specify the directory where the utilities
are installed.
4 Create and configure your driver objects to use the Remote Loader. This information is
contained in each driver guide. For more information, see the Identity Manager Drivers
documentation (http://www.novell.com/documentation/idm36drivers/).
5 Create a Remote Loader configuration file to work with your connected system. For more
information, see “Configuring the Remote Loader for Linux\UNIX by Creating a
Configuration File” in the Identity Manager 3.6.1 Remote Loader Guide.
Installing Identity Manager 61
Page 62

Installing 32-Bit Remote Loader on 64-Bit Operating System
By default 64-bit Remote Loader is installed. To install a 32-bit Remote Loader, do the following:
On Windows:
novdocx (en) 17 September 2009
1 Browse the
32bit_RL_Install.properties
file in the
IDM3.6.1_Win:Windows\setup\
folder and set the RL_32BIT_INSTALL_ON_64BIT property values to true as follows:
RL_32BIT_INSTALL_ON_64BIT=true
2 In the command prompt, change the directory path to IDM 3.6.1 installation folder (say,
C:\IDM3.6.1\windows\setup) and enter one of the following commands:
idm_install.exe - i gui -f 32bit_RL_Install.properties
idm_install.exe - i console -f 32bit_RL_Install.properties
3 Follow from Step 3 of Section 7.3.3, “Installation Procedure,” on page 60 to complete the
installation.
On Linux:
1 Browse the
32bit_RL_Install.properties
file in the
IDM3_6_1_Lin/linux/setup
and set the RL_32BIT_INSTALL_ON_64BIT property values to true as follows:
RL_32BIT_INSTALL_ON_64BIT=true
2 In the terminal, change the directory path to IDM 3.6.1 installation folder (say,../linux/setup)
and enter one of the following commands:
idm_linux.bin - i gui -f 32bit_RL_Install.properties
idm_linux.bin - i console -f 32bit_RL_Install.properties
3 Follow from Step 3 of Section 7.3.3, “Installation Procedure,” on page 60 to complete the
installation.
folder
7.3.4 Silent Installation of the Remote Loader
Start the silent installation by using the correct program for your platform:
Linux:
Solaris:
AIX:
Create a property file
where you run the Identity Manger installer:
EDIR_USER_NAME=cn=admin,o=test
EDIR_USER_PASSWORD=test
METADIRECTORY_SERVER_SELECTED=false
CONNECTED_SYSTEM_SELECTED=true
WEB_ADMIN_SELECTED=false
UTILITIES_SELECTED=false
For default installed locations, see
IDM3_6_1_Lin/idm_linux.bin -i silent -f <filename>.properties
IDM3_6_1_Solaris/idm_solaris.bin -i silent -f <filename>.properties
IDM3_6_1_AIX/idm_aix.bin -i silent -f <filename>.properties
<filename>.properties
/tmp/idmInstall.log
with the following attributes, in the location from
.
62 Identity Manager 3.6.1 Installation Guide
Page 63

NOTE: If you have installed iManager, and later you want to install iManager plug-ins, then you
must set the
WEB_ADMIN_SELECTED
value to
true
.
7.3.5 Installing the Java Remote Loader on UNIX, Linux, or AIX
novdocx (en) 17 September 2009
dirxml_jremote
is a pure Java Remote Loader. It is used to exchange data between the
Metadirectory engine running on one server and the Identity Manager drivers running in another
rdxml
location, where
doesn’t run. It should be able to run on any system with a compatible JRE
(1.5.0 minimum) and Java Sockets. It is supported on the Linux/UNIX platforms the Identity
Manager supports.
1 Verify that the Java 1.5.x JDK*/JRE is available on the host system.
2 Copy the
3 Copy the
dirxml_jremote_dev.tar.gz
dirxml_jremote.tar.gz
file to the desired location on the remote server.
or the
dirxml_jremote_mvs.tar
file to the desired
location on the remote server.
For example:
/usr/idm
The file is located in the same location on the Linux or UNIX ISO images. The files are located
java_remoteloader
in the
dirxml_jremote_mvs.tar
the
4 Unzip and extract the
folder off the root of the ISO image. For information on mvs, untar
file, then refer to the
dirxml_jremote.tar.gz
usage.html
file and the
document.
dirxml_jremote_dev.tar.gz
file.
For example:
5 Copy the application shim
dirxml_jremote.tar
gunzip dirxml_jremote.tar.gz
.jar
files to the
file was extracted.
Because the tar file doesn’t contain drivers, you must manually copy the drivers into the
lib
directory. The
6 Customize the
directory is under the directory where the untarring occurred.
dirxml_jremote
script by doing either of the following:
or
tar -xvf dirxml_jremote_dev.tar
lib
subdirectory that was created when the
lib
Verify that the Java executable is reachable through the PATH environment variable by
setting the environment variable RDXML_PATH. Enter the following commands to set
the environment variable:
set RDXML_PATH=path
1.
2.
export RDXML_PATH
Edit the
dirxml_jremote
script and prepend the path to the Java executable on the script
line that executes Java.
7 Configure the sample
config8000.txt
file for use with your application shim. For more
information, see “Configuring the Remote Loader for Linux\UNIX by Creating a
Configuration File” in the Identity Manager 3.6.1 Remote Loader Guide.
7.4 Installing the Roles Based Provisioning Module
To install the Roles Based Provisioning Module, see the Installation Guide (http://www.novell.com/
documentation/idmrbpm361/index.html) for the Roles Based Provisioning Module.
Installing Identity Manager 63
Page 64

7.5 Installing a Custom Driver
You can create a custom driver to use in your environment For more information on creating a
custom driver or installing one, see the Novell Developer Kit (http://developer.novell.com/wiki/
index.php/Dirxml).
7.6 Installing Identity Audit or Sentinel
This is an optional addition to the Identity Manager solution. By adding auditing and reporting, you
can meet compliance standards that many companies must abide by. It creates audit trails for any
events you need to track, and it can generate reports to make sure you meet any audits standards for
your company.
For configuration information about Identity Audit with Identity Manager, see Identity Manager
3.6.1 Integration Guide for Identity Audit. For configuration information about Sentinel with
Identity Manager, see the Identity Manager 3.6.1 Reporting Guide for Novell Sentinel. For system
requirement information about Identity Audit, see the Identity Audit Guide (http://www.novell.com/
documentation/identityaudit/index.html). For system requirement information about Sentinel, see
the Novell Sentinel Installation Guide (http://www.novell.com/documentation/sentinel6/
index.html).
novdocx (en) 17 September 2009
7.7 Installing Identity Manager in Clustering Environment
If you deploy Identity Manager in a clustered environment, Novell supports Identity Manager
running in the cluster, although in most situations, the cluster itself is not supported. The following
two scenarios describe the extent of support given:
If you run the Identity Manager engine or remote loader on SUSE Linux Enterprise Server
(SLES), and use Heartbeat to manage High Availability, everything is supported.
If you run the Identity Manager engine or Remote Loader in a clustered environment on any
other supported platform, support is extended for everything except the cluster management
system.
NOTE: SLES is the only platform that is fully supported in a clustered environment.
For more information on how to configure a cluster with Identity Manager, refer to these resources:
“Configuring a Linux High Availability Cluster for IDM 3 and eDirectory 8.8” AppNote, at the
Novell Cool Solutions Web site (http://www.novell.com/coolsolutions/appnote/18591.html).
“Clustering eDirectory and IDM on Windows 2003” AppNote, at the Novell Cool Solutions
Web site (http://www.novell.com/coolsolutions/appnote/14856.html).
“High Availability on PolyServe Clusters” AppNote, at the Novell Cool Solutions Web site
(http://www.novell.com/coolsolutions/appnote/16131.html).
“Setting Up an Identity Manager Cluster on Windows”, at the Novell Support Web site (http://
www.novell.com/support/
search.do?cmd=displayKC&docType=kc&externalId=3575742&sliceId=SAL_Public&dialog
ID=310596&stateId=1%200%20308676). The document number is 3575742.
64 Identity Manager 3.6.1 Installation Guide
Page 65

8
Activating Novell Identity Manager
novdocx (en) 17 September 2009
Products
The following information explains how activation works for products based on Novell® Identity
Manager. Identity Manager, Integration Modules, and the Provisioning Module must be activated
within 90 days of installation, or they will shut down. At any time during the 90 days, or afterward,
you can choose to activate Identity Manager products.
You can activate Identity Manager and the drivers by completing the following tasks:
Section 8.1, “Purchasing an Identity Manager Product License,” on page 65
Section 8.2, “Installing a Product Activation Credential,” on page 65
Section 8.3, “Viewing Product Activations for Identity Manager and for Drivers,” on page 66
8.1 Purchasing an Identity Manager Product License
To purchase an Identity Manager product license, see the Novell Identity Manager How to Buy Web
page (http://www.novell.com/products/identitymanager/howtobuy.html)
After you purchase a product license, Novell sends you a Customer ID via e-mail. The e-mail also
contains a URL to the Novell site where you can obtain a credential. If you do not remember or do
not receive your Customer ID, call the Novell Activation Center at 1-800-418-8373 in the U.S. In all
other locations, call 1-801-861-8373 (You will be charged for calls made using the 801 area code.).
You can also chat with us online (http://support.novell.com/chat/activation).
8
8.2 Installing a Product Activation Credential
You should install the Product Activation Credential via iManager.
1 After you purchase a license, Novell sends you an e-mail with your Customer ID. The e-mail
also contains a link under the Order Detail section to the site where you can obtain your
credential. Click the link to go to the site.
2 Click the license download link and do one of the following:
Save the Product Activation Credential file.
or
Open the Product Activation Credential file, then copy the contents of the Product
Activation Credential to your clipboard.
Carefully copy the contents, and make sure that no extra lines or spaces are included. You
should begin copying from the first dash (-) of the credential (----BEGIN PRODUCT
ACTIVATION CREDENTIAL) through the last dash (-) of the credential (END
PRODUCT ACTIVATION CREDENTIAL-----).
3 Open iManager.
4 Select Identity Manager > Identity Manager Overview.
Activating Novell Identity Manager Products
65
Page 66

5 Click to browse for and select a driver set in the tree structure.
6 On the Identity Manager Overview page, click the driver set that contains the driver to activate.
7 On the Driver Set Overview page, click Activation > Installation.
8 Select the driver set where you want to activate an Identity Manager component, then click
Next.
9 Do one of the following:
Specify where you saved the Identity Manager Activation Credential, then click Next.
or
Paste the contents of the Identity Manager Activation Credential into the text area, then
click Next.
10 Click Finish.
NOTE: You need to activate each driver set that has a driver. You can activate any tree with the
credential.
novdocx (en) 17 September 2009
8.3 Viewing Product Activations for Identity Manager and for Drivers
For each of your driver sets, you can view the Product Activation Credentials you have installed for
the Metadirectory engine and Identity Manager drivers:
1 Open iManager.
2 Click Identity Manager > Identity Manager Overview.
3 Click to browse for and select a driver set in the tree structure, then click . to perform the
search.
4 On the Identity Manager Overview page, click the driver set you want to view the activation
information for.
5 On the Driver Set Overview page, click Activation > Information.
You can view the text of the activation credential or, if an error is reported, you can remove an
activation credential.
NOTE: After installing a valid Product Activation Credential for a driver set, you might still see
“Activation Required” next to the driver name. If this is the case, restart the driver and the message
should then disappear.
66 Identity Manager 3.6.1 Installation Guide
Page 67

9
Troubleshooting Identity Manager
Keep in mind the following information when you install Identity Manager:
On AIX 5.3, IDM 3.6.1 installation hangs if NFS mounts are down. This behavior is also
applicable for the instances where the IDM installer iso is on the same machine (AIX) and any
mounted partition is down.
Work around: Unmount/bring up the mounts that are down and proceed with the installation.
On Solaris 10, while installing IDM 3.6.1 as non root, you might encounter the following error
message for Lotus Notes driver:
ln: cannot create /usr/lib/locale/ja/wnn//ndsrep: File exists
ln: cannot create
cp: cannot create /usr/lib/locale/ja/wnn//libnotesdrvjni.so.1.0.0:
Permission
denied
ln: cannot create /usr/lib/locale/ja/wnn//libnotesdrvjni.so.1: File exists
ln: cannot create /usr/lib/locale/ja/wnn//libnotesdrvjni.so: File exists
Work around: You should manually create the symbolic links. For information on checking and
recreating symbolic links, see “Troubleshooting Installation Problems” in the Identity Manager
3.6.1 Driver for Lotus Notes Implementation Guide.
novdocx (en) 17 September 2009
9
Troubleshooting Identity Manager
67
Page 68

novdocx (en) 17 September 2009
68 Identity Manager 3.6.1 Installation Guide
Page 69

III
Upgrading
The following sections contain information about upgrading your existing Identity Manager
solution:
Chapter 10, “What’s New,” on page 71
Chapter 11, “Supported Versions for Upgrades and System Requirements,” on page 73
Chapter 12, “In-place Upgrade Versus Migration,” on page 75
Chapter 13, “Performing an In-place Upgrade,” on page 77
Chapter 14, “Performing a Migration,” on page 89
novdocx (en) 17 September 2009
III
Upgrading
69
Page 70

novdocx (en) 17 September 2009
70 Identity Manager 3.6.1 Installation Guide
Page 71

10
What’s New
Section 10.1, “Support for 64-Bit Operating Systems,” on page 71
Section 10.2, “Support for 32-Bit Remote Loader Installation on 64-Bit Operating Systems,”
on page 71
Section 10.3, “Identity Manager Driver for SAP Portal,” on page 71
Section 10.4, “Updated Identity Manager Driver for SAP HR and Identity Manager Driver for
SAP User Management,” on page 71
10.1 Support for 64-Bit Operating Systems
Identity Manager now supports 64-bit operating systems. For a list of supported operating systems,
see Section 6.2.2, “Server Operating Systems,” on page 48.
10.2 Support for 32-Bit Remote Loader
novdocx (en) 17 September 2009
10
Installation on 64-Bit Operating Systems
Identity Manager supports 32-bit Remote Loader installation on 64-bit Operating Systems. For a list
of supported Operating Systems, see Section 6.3, “Remote Loader,” on page 49.
10.3 Identity Manager Driver for SAP Portal
The Identity Manager Integration Module for Enterprise contains a new driver; the SAP Portal
driver. The SAP Portal driver provisions users to the SAP NetWeaver* Application Server. For more
inforamation, see the Identity Manager 3.6.1 Driver for SAP Portal Implementation Guide.
10.4 Updated Identity Manager Driver for SAP HR and Identity Manager Driver for SAP User Management
The SAP HR and SAP User Management drivers now support JCo 3. For more information see the
Identity Manager 3.6.1 Driver for SAP HR Implementation Guide and the Identity Manager 3.6.1
Driver for SAP User Management Implementation Guide.
What’s New
71
Page 72

novdocx (en) 17 September 2009
72 Identity Manager 3.6.1 Installation Guide
Page 73

11
Supported Versions for Upgrades
novdocx (en) 17 September 2009
and System Requirements
Section 11.1, “Supported Versions for Upgrades,” on page 73
Section 11.2, “System Requirements,” on page 73
11.1 Supported Versions for Upgrades
The table indicates the supported upgrades for the previous versions of Identity Manager.
Table 11-1 Supported Versions for Upgrades
Installed Versions Newest Version Upgrade Supported
DirXML® 1.1a Identity Manager 3.6.1 No
Identity Manager 2.x Identity Manager 3.6.1 No
Identity Manager 3.0.x Identity Manager 3.6.1 No
Identity Manager 3.5.x Identity Manager 3.6.1 Yes
11
NOTE: Identity Manager 3.5.x works with Remote Loader 3.6 and 3.6.1 supported platforms.
See Section 12.2, “Migration,” on page 76 if you are migrating Identity Manager on a new server or
see Section 12.1, “In-place Upgrade,” on page 75 for performing an in-place upgrade.
11.2 System Requirements
In order to upgrade to Identity Manager 3.6.1, the servers running the Identity Manager services
need to meet the minimum requirements. See Chapter 6, “System Requirements,” on page 45 for the
list of minimum requirements for each platform.
Supported Versions for Upgrades and System Requirements
73
Page 74

novdocx (en) 17 September 2009
74 Identity Manager 3.6.1 Installation Guide
Page 75

12
In-place Upgrade Versus Migration
There are two different ways to upgrade: in-place upgrade or migration. Each method has
advantages and disadvantages, and there are scenarios where only one method can be used.
Section 12.1, “In-place Upgrade,” on page 75
Section 12.2, “Migration,” on page 76
Section 12.3, “Multiple Servers Associated with a Single Driver Set,” on page 76
12.1 In-place Upgrade
novdocx (en) 17 September 2009
12
An in-place upgrade is installing the new version of Identity Manager on the existing server. To
install Identity Manager, you must upgrade the current versions of the OS and eDirectory
supported versions for Identity Manager 3.6.1. See Chapter 6, “System Requirements,” on page 45
for a list of the supported platforms.
The advantages are:
No new hardware
No migration of data
The disadvantages are:
Downtime when the OS is updated and the server is rebooted
Downtime when eDirectory is updated and is restarted
There are certain scenarios that occur when an in-place upgrade is not feasible, or multiple in-place
upgrades must be performed. Because Identity Manager 3.5.x and above are the only supported
migration paths, these are the only versions that are contained in the following scenarios:
The only supported situation for an in-place upgrade is to have Identity Manager 3.5.x on a
supported operating system. But there are some scenarios where an in-place upgrade is not feasible.
The following are some examples where an in-place upgrade is not feasible:
Unsupported OS: If the current version of the OS is not supported by Identity Manager 3.6.1,
the only supported upgrade path is to perform a migration to a new server.
TM
to the
Identity Manager 3.0.x: If the current version of Identity Manager is 3.0.x, you cannot
perform a direct in-place upgrade. The two options are:
Perform an in-place upgrade to Identity Manager 3.5.1, upgrade to eDirectory 8.8.5, then
perform an in-place upgrade to Identity Manager 3.6.1.
Perform a migration to a new server.
If you are performing an in-place upgrade, proceed to Chapter 13, “Performing an In-place
Upgrade,” on page 77.
In-place Upgrade Versus Migration
75
Page 76

12.2 Migration
A migration is installing Identity Manager 3.6.1 on a new server, then migrating the existing data to
this new server. Follow the Chapter 4, “Basic Identity Manager System Checklist,” on page 39 to
verify that the installation is complete.
The advantages are:
There is minimal downtime for the drivers
The disadvantages are:
Requires new hardware
If you are performing a migration, proceed to Chapter 14, “Performing a Migration,” on page 89.
12.3 Multiple Servers Associated with a Single Driver Set
If you have multiple servers associated with a driver set, you can perform an in-place upgrade or a
migration on one server at a time. If you don’t have time to upgrade the servers at the same time, the
drivers continue to work with the different versions of Identity Manager until the upgrades for each
server can be completed.
novdocx (en) 17 September 2009
The Identity Manager engine is backward compatible, so the Identity Manager 3.6.1 engine can run
Identity Manager 3.5.x drivers without problems.
WARNING: If you enable features for drivers that are supported only on Identity Manager 3.6.1,
the drivers stop working on the servers with mixed versions. The older engines cannot handle the
new functionality. This breaks the drivers until all servers are upgraded to Identity Manager 3.6.1.
76 Identity Manager 3.6.1 Installation Guide
Page 77

13
Performing an In-place Upgrade
Before beginning, make sure you have reviewed the differences between an in-place upgrade and a
migration. See Chapter 12, “In-place Upgrade Versus Migration,” on page 75.
Use the following checklist to verify that all of the steps are completed in the correct order for a
successful in-place upgrade of the Identity Manager system. Follow these steps for each Identity
Manager server in your environment.
Create a backup of the current configuration of your Identity Manager solution. This is done by
creating exports of your drivers or creating a Designer project of your Identity Manager
solution. For more information, see Section 13.1, “Creating a Backup of the Current
Configuration,” on page 79.
Verify that the operating system on the servers running Identity Manager is a supported
version. See Chapter 6, “System Requirements,” on page 45 for a list of supported operating
systems. If the operating system requires only a service pack to meet the system requirements,
then proceed with the in-place upgrade. If it requires more, you must perform a migration to
instead of an in-place upgrade. Continue with Chapter 14, “Performing a Migration,” on
page 89 if your operating system is:
NetWare
®
novdocx (en) 17 September 2009
13
Windows NT
Windows 2000
Red Hat Linux 3
SLES 8
Solaris 8 or 9
Upgrade your iManager server to iManager 2.7.3. For more information, see the iManager
Installation Guide (http://www.novell.com/documentation/imanager27/imanager_install_27/
data/hk42s9ot.html).
Stop the drivers associated with the server you are upgrading. For more information, see
Section 13.2, “Stopping the Drivers,” on page 81.
Upgrade eDirectory
information, see the eDirectory Installation Guide (http://www.novell.com/documentation/
edir88/index.html).
(Conditional) If your platform is Linux, UNIX, or Solaris, there are additional steps the must be
completed to add files to the correct location. For more information, see Section 13.3, “Adding
Files to the Correct Location on Linux/UNIX Platforms,” on page 82.
Start the drivers and verify that the drivers start. This also verifies that the upgrade to
eDirectory 8.8.5 is successful. For more information, see Section 13.10, “Starting the Drivers,”
on page 87.
Upgrade to Designer 3.5. For more information, see “Updating Designer” in Designer 3.5 for
Identity Manager 3.6 Administration Guide.
Convert the Designer project. For more information, see “Converting Earlier Projects” in
Designer 3.5 for Identity Manager 3.6 Administration Guide.
TM
to 8.8.5 or later on the server running Identity Manager. For more
Performing an In-place Upgrade
77
Page 78

Stop the drivers associated with the server you are upgrading. For more information, see
Section 13.2, “Stopping the Drivers,” on page 81.
Upgrade the Metadirectory server. For more information, see Section 13.5, “Upgrading the
Metadirectory Engine and Driver Configuration Files,” on page 83.
(Conditional) If any of the drivers in the driver set for this server are Remote Loader drivers,
upgrade the Remote Loader servers for each driver. For more information, see Section 13.6,
“Upgrading the Remote Loader,” on page 83
(Conditional) If this server is your User Application server, perform the following additional
steps:
The User Application driver must be migrated in Designer. For more information, see the
Roles Based Provisioning Module Migration Guide (http://www.novell.com/
documentation/idmrbpm361/index.html).
Create a new Roles Services driver. The Roles Service drivers are not migrated. If you
have an existing Role Service driver for version 3.6.1, you must create a new driver for
version 3.6.1. For more information, see the Roles Based Provisioning Module Migration
Guide (http://www.novell.com/documentation/idmrbpm361/index.html).
Deploy the migrated User Application driver into the Identity Vault. For more
information, see the Roles Based Provisioning Module Migration Guide (http://
www.novell.com/documentation/idmrbpm361/index.html).
Upgrade the User Application. For more information, see the Roles Based Provisioning
Module Migration Guide (http://www.novell.com/documentation/idmrbpm361/
index.html).
(Optional) Overlay the new driver configuration files over the existing drivers to get new
policies. This is required only if there is new functionality included in the policies for a driver
that you want to add to your existing driver. For more information, see Section 13.7,
“Overlaying the New Driver Configuration File over the Existing Driver,” on page 84.
(Optional) Restore custom policies and rules to the drivers. When you overlay the new driver
configuration files, the policies are overwritten, so restoring policies is required only if you did
an overlay of the new driver configuration file. For more information, see Section 13.8,
“Restoring Custom Policies and Rules to the Driver,” on page 85.
novdocx (en) 17 September 2009
Deploy the converted Designer project into the Identity Vault. For more information, see
“Deploying and Exporting” in Designer 3.5 for Identity Manager 3.6 Administration Guide.
Start the drivers associated with this server. For more information, see Section 13.10, “Starting
the Drivers,” on page 87
If you are using Novell Sentinel
information about upgrading Sentinel, see the Sentinel Installation Guide (http://
www.novell.com/documentation/sentinel6/pdfdoc/sentinel60_installationguide.pdf).
Activate the Metadirectory engine and any upgraded driver. For more information, see
Chapter 8, “Activating Novell Identity Manager Products,” on page 65.
78 Identity Manager 3.6.1 Installation Guide
TM
, you must update to Novell Sentinel 6.1. For more
Page 79

13.1 Creating a Backup of the Current Configuration
Before upgrading, it is important to create a backup of the current configuration of your Identity
Manager system. There are no additional steps required if you are using the User Application. All
User Application configuration is stored in the User Application driver. There are two ways to create
a backup:
Section 13.1.1, “Ensuring that Your Designer Project is Current,” on page 79
Section 13.1.2, “Creating an Export of the Drivers,” on page 80
13.1.1 Ensuring that Your Designer Project is Current
A Designer project contains the schema and all driver configuration information. Creating a project
of your Identity Manager solution allows you to create an export of all of the driver in one step
instead of creating a separate export file for each driver.
“Exporting the Current Project” on page 79
“Creating a New Project from the Identity Vault” on page 79
novdocx (en) 17 September 2009
Exporting the Current Project
If you already have a Designer project, verify that the information in the project is synchronized
with what is in the Identity Vault:
1 In Designer, open your project.
2 In the Modeler, right-click the Identity Vault, then select Live > Compare.
3 Evaluate the project and reconcile any differences, then click OK.
For more information, see “Using the Compare Feature When Deploying” in Designer 3.5 for
Identity Manager 3.6 Administration Guide.
4 On the toolbar, select Project > Export.
5 Click Select All to select all resources to export.
6 Select where to save the project and in what format, then click Finish.
Save the project in any location, except for the current workspace. When you upgrade to
Designer 3.5, you must create a new workspace location. For more information, see “Exporting
a Project” in Designer 3.5 for Identity Manager 3.6 Administration Guide.
Creating a New Project from the Identity Vault
If you don't have a Designer project of your Identity Manager solution, use the following procedure:
1 Download and install Designer 3.5.
You can create a Identity Manager 3.6.x project with Designer 3.5. For more information, see
Section 7.1, “Installing Designer,” on page 55.
2 Launch Designer, then specify a location for your workspace.
3 Select whether you want to check for online updates, then click OK.
4 On the Welcome page, click Run Designer.
Performing an In-place Upgrade 79
Page 80

5 On the toolbar, select Project > Import Project > Identity Vault.
6 Specify a name for the project, then either use the default location for your project or select a
different location.
7 Click Next.
8 Specify the Identity Vault connection information:
Host Name: Specify the IP address or DNS name of the Identity Vault server.
User name: Specify the DN of the user used to authenticate to the Identity Vault.
Password: Specify the password of the authentication user.
9 Click Next.
10 Leave the Identity Vault Schema and the Default Notification Collection selected.
11 Expand the Default Notification Collection, then deselect the languages you don’t need.
The Default Notification Collections are translated into many different languages. You can
import all languages or select only the languages that you use.
12 Click Browse, then browse to and select a driver set to import.
13 Repeat Step 12 for each driver set in this Identity Vault, then click Finish.
novdocx (en) 17 September 2009
14 Click OK after the project is imported.
15 If you only have one Identity Vault, you are finished. If you have multiple Identity Vaults
proceed with Step 16.
16 Click Live > Import on the toolbar.
17 Repeat Step 8 through Step 14 for each additional Identity Vault.
13.1.2 Creating an Export of the Drivers
Creating an export of the drivers makes a backup of your current configuration.
“Using Designer to Create an Export of the Driver” on page 80
“Using iManager to Create an Export of the Driver” on page 80
Using Designer to Create an Export of the Driver
1 Verify that your project in Designer has the most current version of your driver. For
instructions, see “Importing a Library, a Driver Set, or Driver from the Identity Vault” in
Designer 3.5 for Identity Manager 3.6 Administration Guide.
2 In the Modeler, right-click the driver line of the driver you are upgrading.
3 Select Export to a Configuration File.
4 Browse to a location to save the configuration file, then click Save.
5 Click OK on the results page.
6 Repeat Step 1 through Step 5 for each driver.
Using iManager to Create an Export of the Driver
1 In iManager, select Identity Manager > Identity Manager Overview.
2 Browse to and select the location in the tree to search for Driver Set objects, then click the
search icon .
80 Identity Manager 3.6.1 Installation Guide
Page 81

3 Click the Driver Set object that holds the driver you want to upgrade.
4 Click the driver you want to upgrade, then click Export.
5 Click Next, then select Export all contained policies, linked to the configuration or not.
6 Click Next, then click Save As.
7 Select Save to Disk, then click OK.
8 Click Finish.
9 Repeat Step 1 through Step 8 for each driver.
13.2 Stopping the Drivers
Before you upgrade any files, it is important to stop the drivers.
Section 13.2.1, “Using Designer to Stop the Drivers,” on page 81
Section 13.2.2, “Using iManager to Stop the Drivers,” on page 81
13.2.1 Using Designer to Stop the Drivers
novdocx (en) 17 September 2009
1 Select the Identity Vault object in the Outline tab.
2 In the Modeler toolbar, click the Stop All Drivers icon .
This stops all drivers that are part of the project.
3 Set the drivers to manual start to ensure that the drivers do not start until the upgrade process is
complete.
3a Double-click the driver icon in the Outline tab.
3b Select Driver Configuration > Startup Options.
3c Select Manual, then click OK.
3d Repeat Step 3a through Step 3c for each driver.
13.2.2 Using iManager to Stop the Drivers
1 In iManager, select Identity Manager > Identity Manager Overview.
2 Browse to and select the location in the tree to search for Driver Set objects, then click the
search icon .
3 Click the Driver Set object.
4 Click Drivers > Stop all drivers.
5 Repeat Step 2 through Step 4 for each Driver Set object.
6 Set the drivers to manual start to ensure that the drivers do not start until the upgrade process is
complete.
6a In iManager, select Identity Manager > Identity Manager Overview.
6b Browse to and select the location in the tree to search for Driver Set objects, then click the
search icon .
6c Click the Driver Set object.
6d In the upper right corner of the driver icon, click Edit properties.
Performing an In-place Upgrade 81
Page 82

6e On the Driver Configuration page under Startup Options, select Manual, then click OK.
6f Repeat Step 6a through Step 6e for each driver in your tree.
13.3 Adding Files to the Correct Location on Linux/UNIX Platforms
When you do an in-place upgrade from eDirectory 8.7.3 to eDirectory 8.8.5, the installation places
the eDirectory files in different locations. Because you have Identity Manager installed, eDirectory
will not start unless specific Identity Manager files are in-place. Complete the following steps to add
the files to the correct location:
1 After eDirectory is upgraded to 8.8.5, run the Identity Manager installation with the following
command:
Linux
./idm_linux.bin -i console -DCLUSTER_INSTALL=true
Solaris
./idm_solaris.bin -i console -DCLUSTER_INSTALL=true
AIX
./idm_aix.bin -i console -DCLUSTER_INSTALL=true
This adds the correct files without authenticating to eDirectory.
2 Enter
3 Verify whether the following entry exists in the
ndsconfig upgrade
to upgrade the eDirectory files.
nds.conf
file:
novdocx (en) 17 September 2009
n4u.server.interfaces=<ipaddress>@<port>
For example:
If
n4u.server.interfaces
n4u.server.interfaces=<ipaddress>@524
entry does not exist, you should manually set it. To set
n4u.server.interfaces, do the following:
1. Run the following command to find the ncp port:
ndsconfig get "n4u.server.interfaces"
The command returns the ncp port number, for example,
n4u.server.interfaces=@524
2. Run the following command to set
ndsconfig set n4u.server.interfaces=<ipaddress>@<port>
ndsconfig
for
n4u.server.interfaces
:
Where,
<ipaddress>
<port>
is the ip address of the machine where eDirectory exists.
is the ncp port number that you have obtained in Step 1.
For example:
ndsconfig set n4u.server.interfaces=<ipaddress>@524
4 Proceed to Section 13.5, “Upgrading the Metadirectory Engine and Driver Configuration
Files,” on page 83.
82 Identity Manager 3.6.1 Installation Guide
Page 83

13.4 Upgrading Designer
Before upgrading Designer, make sure you export your projects to create a backup of them. For
instructions on how to export your project, see “Exporting a Project”in the Designer 3.5 for Identity
Manager 3.6 Administration Guide. For upgrade information, see “Converting Earlier Projects” in
Designer 3.5 for Identity Manager 3.6 Administration Guide.
13.5 Upgrading the Metadirectory Engine and Driver Configuration Files
After the supporting components have been upgraded, the Metadirectory engine is upgraded. During
the upgrade process, the driver configuration files that are stored in the file system are updated.
1 Verify that the drivers are stopped. For instructions, see Section 13.2, “Stopping the Drivers,”
on page 81.
2 Install Identity Manager 3.6.1.
The steps to upgrade to Identity Manager 3.6.1 are the same as the ones for installing Identity
Manager 3.6.1. See Chapter 7, “Installing Identity Manager,” on page 55 for the instructions on
how to install Identity Manager.
Installing Identity Manager 3.6.1 overwrites the previous versions of Identity Manager,
updating the binaries, extending the schema, and updating the driver configuration files.
novdocx (en) 17 September 2009
NOTE: After upgrading Identity Manager from 32-bit to 64-bit, the
native custom drivers do not work.
Groupwise
driver and the
13.6 Upgrading the Remote Loader
If you are running the Remote Loader, you also need to upgrade the Remote Loader files.
1 Create a backup of the Remote Loader configuration files. The default location of the files is as
follows:
Windows:
Linux: Create your own configuration file in the path of rdxml.
2 Verify that the drivers are stopped. For instructions, see Section 13.2, “Stopping the Drivers,”
on page 81.
3 Stop the Remote Loader service or daemon for each driver.
Windows: In the Remote Loader Console, select the Remote Loader instance, then click
Stop.
Linux:
Java Remote Loader:
4 Run the installation programs for the Remote Loader.
The installation process updates the files and binaries to the current version. For more
information, see Section 7.3, “Installing the Remote Loader,” on page 59.
C:\Novell\RemoteLoader\remoteloadername-config.txt
rdxml -config path_to_configfile -u
dirxml_jremote -config path_to_configfile -u
5 After the installation completes, verify that your configuration files contain your environment’s
information.
Performing an In-place Upgrade 83
Page 84

6 (Conditional) If there is a problem with the configuration file, copy the backup file created in
Step 1. Otherwise, continue with Step 7.
7 Start the Remote Loader service or daemon for each driver.
Windows: In the Remote Loader Console, select the Remote Loader instance, then click
Start.
Linux:
rdxml -config path_to_config_file -sp password password
novdocx (en) 17 September 2009
Java Remote Loader:
password password
NOTE: After upgrading Remote Loader from 32-bit to 64-bit, the
custom drivers do not work.
dirxml_jremote -config path_to_config_file -sp
Groupwise
driver and the native
13.7 Overlaying the New Driver Configuration File over the Existing Driver
Before you begin, make sure that any customized policies have different policy names than the
default policies. When a driver configuration is overlaid with a new driver file, the existing policies
are overwritten. If your custom policies do not have a unique name, you lose those custom policies.
You overlay the new driver configuration file over your existing driver to update the driver with any
new policies or functionality that are in the driver configuration file.
Section 13.7.1, “Using Designer to Overlay the New Driver Configuration File over the
Existing Driver,” on page 84
Section 13.7.2, “Using iManager to Overlay the New Driver Configuration File over the
Existing Driver,” on page 85
13.7.1 Using Designer to Overlay the New Driver Configuration File over the Existing Driver
1 In the Modeler, right-click the driver line of the driver you are upgrading.
2 Select Run Configuration Wizard.
3 Click Yes on the warning page.
The warning informs you that all of the driver settings and policies are reset.
IMPORTANT: Make sure that your customized policies have different names than the default
policies, so you do not lose any data.
4 Browse to and select the driver configuration for the driver you are upgrading, then click Run.
5 Specify the information for the driver, then click Next.
There might be more than one page of information to specify.
6 Click OK on the results page.
7 Look at the driver parameters and policies to make sure everything is set how you want it.
8 If you have custom policies, proceed to Section 13.8, “Restoring Custom Policies and Rules to
the Driver,” on page 85. Otherwise, proceed to Section 13.10, “Starting the Drivers,” on
page 87.
84 Identity Manager 3.6.1 Installation Guide
Page 85

13.7.2 Using iManager to Overlay the New Driver Configuration File over the Existing Driver
1 In iManager, select Identity Manager > Identity Manager Overview.
2 Browse to and select the location in the tree to search for Driver Set objects, then click the
search icon .
3 Click the Driver Set object.
4 Click Drivers > Add driver, then click Next on the New Driver Wizard page.
5 Select the driver configuration you want to overlay, then click Next.
6 In the Existing drivers field, browse to and select the driver you want to upgrade.
7 Specify the information for the driver, the click Next.
8 On the summary page, select Update everything about that driver and policy libraries.
IMPORTANT: Make sure that any customized policies have a different name than the default,
so you do not lose any data.
9 Click Next, then click Finish on the Summary page.
10 Look at the driver parameters and policies to make sure everything is set how you want it.
11 If you have custom policies, proceed to Section 13.8, “Restoring Custom Policies and Rules to
the Driver,” on page 85. Otherwise, proceed to Section 13.10, “Starting the Drivers,” on
page 87.
novdocx (en) 17 September 2009
13.8 Restoring Custom Policies and Rules to the Driver
If you have custom policies or rules, they must be restored to the driver after you have overlaid the
new driver configuration file. If these policies have different names, they are still stored in the
driver, but the links are broken and need to be reestablished.
Section 13.8.1, “Using Designer to Restore Custom Policies and Rules to the Driver,” on
page 85
Section 13.8.2, “Using iManager to Restore Custom Policies and Rules to the Driver,” on
page 86
13.8.1 Using Designer to Restore Custom Policies and Rules to the Driver
You can add policies into the policy set in two different ways:
“Adding a Customized Policy through the Outline View” on page 85
“Adding a Customized Policy through the Show Policy Flow View” on page 86
Adding a Customized Policy through the Outline View
1 In the Outline view, select the upgraded driver to display the Policy Set view.
2 Right-click the policy set icon where you need to restore the customized policy to the driver,
then select New > From Copy.
Performing an In-place Upgrade 85
Page 86

3 Browse to and select the customized policy, then click OK.
4 Specify the name of the customized policy, then click OK.
5 Click Yes in the file conflict message to save your project.
6 After the Policy Builder opens the policy, verify that the information is correct in the copied
policy.
7 Repeat Step 2 through Step 6 for each customized policy you need to restore to the driver.
8 Start the driver and test the driver.
For more information on starting the driver, see Section 13.10, “Starting the Drivers,” on
page 87. For more information on testing the driver, see “Testing Policies with the Policy
Simulator” in Policies in Designer 3.5.
9 After you verify that the policies work, move the driver to the production environment.
Adding a Customized Policy through the Show Policy Flow View
1 In the Outline view, select the upgraded driver, then click the Show Policy Flow icon .
2 Right-click the policy set where you need to restore the customized policy to the driver, then
select Add Policy > Copy Existing.
3 Browse to and select the customized policy, then click OK.
4 Specify the name of the customized policy, then click OK.
novdocx (en) 17 September 2009
5 Click Yes in the file conflict message to save your project.
6 After the Policy Builder opens the policy, verify that the information is correct in the copied
policy.
7 Repeat Step 2 through Step 6 for each customized policy you need to restore to the driver.
8 Start the driver and test the driver.
For more information on starting the driver, see Section 13.10, “Starting the Drivers,” on
page 87. For more information on testing the driver, see “Testing Policies with the Policy
Simulator” in Policies in Designer 3.5.
9 After you verify that the policies work, move the driver to the production environment.
13.8.2 Using iManager to Restore Custom Policies and Rules to the Driver
1 In iManager, select Identity Manager > Identity Manager Overview.
2 Browse to and select the location in the tree to search for Driver Set objects, then click the
search icon .
3 Click the Driver Set object that contains the upgraded driver.
4 Click the driver icon, then select the policy set where you need to restore the customized policy.
5 Click Insert.
6 Select Use an existing policy, then browse to and select the custom policy.
7 Click OK, then click Close.
8 Repeat Step 3 through Step 7 for each custom policy you need to restore to the driver.
9 Start the driver and test the driver.
86 Identity Manager 3.6.1 Installation Guide
Page 87

For information on starting the driver, see Section 13.10, “Starting the Drivers,” on page 87.
There is no policy simulator in iManager. To test the policies, cause events to happen that make
the policies execute. For example, create a user, modify a user, or delete a user.
10 After you verify that the policies work, move the driver to the production environment.
13.9 Deploying the Converted Project
Deploy the converted Designer project into the Identity Vault. For more information, see
“Deploying and Exporting” in Designer 3.5 for Identity Manager 3.6 Administration Guide.
13.10 Starting the Drivers
After all of the Identity Manager components are upgraded, the drivers must be restarted. It is
important to test the drivers after they are running to verify that all of the policies still work.
Section 13.10.1, “Using Designer to Start the Drivers,” on page 87
Section 13.10.2, “Using iManager to Start the Drivers,” on page 87
novdocx (en) 17 September 2009
13.10.1 Using Designer to Start the Drivers
1 Select the Identity Vault object in the Outline tab.
2 Click the Start All Drivers icon in the Modeler toolbar. This starts all of the drivers in the
project.
3 Set the driver startup options.
3a Double-click the driver icon in the Outline tab.
3b Select Driver Configuration > Startup Option.
3c Select Auto start or select your preferred method of starting the driver, then click OK.
3d Repeat Step 3a through Step 3c for each driver.
4 Test the drivers to verify the policies are working as designed. For information on how to test
your policies, see “Testing Policies with the Policy Simulator” in Policies in Designer 3.5.
13.10.2 Using iManager to Start the Drivers
1 In iManager, select Identity Manager > Identity Manager Overview.
2 Browse to and select the location in the tree to search for Driver Set objects, then click the
search icon .
3 Click the Driver Set object.
4 Click Drivers > Start all drivers to start all of the drivers at the same time.
or
In the upper right corner of the driver icon, click Start driver to start each driver individually.
5 If you have multiple drivers, repeat Step 2 through Step 4.
6 Set the driver startup options:
6a In iManager, select Identity Manager > Identity Manager Overview.
Performing an In-place Upgrade 87
Page 88

6b Browse to and select the location in the tree to search for Driver Set objects, then click the
search icon .
6c Click the Driver Set object.
6d In the upper right corner of the driver icon, click Edit properties.
6e On the Driver Configuration page, under Startup Options, select Auto start or select your
preferred method of starting the driver, then click OK.
6f Repeat Step 6b through Step 6e for each driver.
7 Test the drivers to verify the policies are working as designed.
There is no policy simulator in iManager. To test the policies, cause events to happen that make
the policies execute. For example, create a user, modify a user, or delete a user.
novdocx (en) 17 September 2009
88 Identity Manager 3.6.1 Installation Guide
Page 89

14
Performing a Migration
Before beginning, make sure you have reviewed the differences between an in-place upgrade and a
migration. See Chapter 12, “In-place Upgrade Versus Migration,” on page 75.
Use the following checklist to verify that all of the steps are completed in the correct order for a
successful migration of the Identity Manager system. Follow these steps for each Identity Manager
server in your environment.
Create a backup of the current configuration of your Identity Manager solution. This is done by
creating exports of your drivers or creating a Designer project of your Identity Manager
solution. For more information, see Section 13.1, “Creating a Backup of the Current
Configuration,” on page 79.
Install the desired operating system. For a list of supported platforms, see Chapter 6, “System
Requirements,” on page 45.
Install eDirectory
Guide (http://www.novell.com/documentation/edir88/index.html).
TM
8.8.5 on the server. For more information, see the eDirectory Installation
novdocx (en) 17 September 2009
14
Add the same eDirectory replicas that are on the current Identity Manager server to this new
server. For more information, see “Administering Replicas” (http://www.novell.com/
documentation/edir88/edir88/data/fbgciaad.html) in the eDirectory Administration Guide
(http://www.novell.com/documentation/edir88/pdfdoc/edir88/edir88.pdf).
Install Identity Manager 3.6.1. Use the Chapter 4, “Basic Identity Manager System Checklist,”
on page 39 to verify that all steps are completed.
If any of the drivers in the driver set are Remote Loader drivers, upgrade the Remote Loader
server for each driver. For more information, see Section 13.6, “Upgrading the Remote
Loader,” on page 83.
(Conditional) If the old server is your User Application server, perform the following
additional steps:
The User Application driver must be migrated in Designer. For more information, see the
Roles Based Provisioning Module Migration Guide (http://www.novell.com/
documentation/idmrbpm361/index.html).
Create a new Roles Service driver. The Roles Service driver is not migrated. If you have
an existing Role Service driver for version 3.6.1, you must create a new driver for version
3.6.1. For more information, see the Roles Based Provisioning Module Migration Guide
(http://www.novell.com/documentation/idmrbpm361/index.html).
Deploy the migrated User Application driver into the Identity Vault. For more
information, see the Roles Based Provisioning Module Migration Guide (http://
www.novell.com/documentation/idmrbpm361/index.html).
Install the User Application on this new server. For more information, see the Roles Based
Provisioning Module Installation Guide (http://www.novell.com/documentation/
idmrbpm361/install/data/bookinfo.html).
Add the new server to the driver set. For more information, see Section 14.1, “Adding the New
Server to the Driver Set,” on page 90.
Change the server-specific information for each driver. For more information, see Section 14.2,
“Changing Server-Specific Information,” on page 90.
Performing a Migration
89
Page 90

novdocx (en) 17 September 2009
(Conditional) Run
information from the old server to the new server for the User Application configuration. For
more information, see “User Application Configuration Reference” (http://www.novell.com/
documentation/idmrbpm361/install/data/bb1zmw0.html) in the Roles Based Provisioning
Module Installation Guide (http://www.novell.com/documentation/idmrbpm361/install/data/
bookinfo.html).
(Optional) Overlay the new driver configuration files over the existing drivers to get new
policies. This is required only if there is new functionality included in the policies for a driver
that you want to add to your existing driver. For more information, see Section 13.7,
“Overlaying the New Driver Configuration File over the Existing Driver,” on page 84.
(Optional) Restore custom policies and rules to the drivers. When you overlay the new driver
configuration files, the policies are overwritten, so restoring policies is required only if you did
an overlay of the new driver configuration file. For more information, see Section 13.8,
“Restoring Custom Policies and Rules to the Driver,” on page 85.
Remove the old server from the driver set. For more information, see Section 14.3, “Removing
the Old Server from the Driver Set,” on page 92.
If you are using Novell Sentinel
information about upgrading Sentinel, see the Sentinel Installation Guide (http://
www.novell.com/documentation/sentinel6/pdfdoc/sentinel60_installationguide.pdf).
Activate the Metadirectory engine and any upgraded driver. For more information, see
Chapter 8, “Activating Novell Identity Manager Products,” on page 65.
configupdate.sh
TM
, you must update to Novell Sentinel 6.1. For more
or
configupdate.bat
to change server-specific
14.1 Adding the New Server to the Driver Set
If you are using iManager, you must add the new server to the driver set. Designer contains a
migration wizard for the server that does this step for you. If you are using Designer, skip to
Section 14.2, “Changing Server-Specific Information,” on page 90. If you are using iManager,
complete the following procedure:
1 In iManager, click to display the Identity Manager Administration page.
2 Click Identity Manager Overview.
3 Browse to and select the container that holds the driver set.
4 Click the driver set name to access the Driver Set Overview page.
5 Click Servers > Add Server.
6 Browse to and select the new Identity Manager 3.6.1 server, then click OK.
14.2 Changing Server-Specific Information
You must change all server-specific information that is stored in each driver to the new server’s
information. The server-specific information is contained in:
Global configuration values
Engine control values
Named passwords
Driver authentication information
Driver startup options
90 Identity Manager 3.6.1 Installation Guide
Page 91

Driver parameters
Driver set data
You can do this in Designer or iManager. If you use Designer, it is an automated process. If you use
iManager, it is a manual process. You should use iManager if you are migrating from an IDM server
earlier than 3.5 version to an IDM server greater than or equal to 3.5. For all other supported
migration paths, you can use Designer.
Section 14.2.1, “Changing the Server-Specific Information in Designer,” on page 91
Section 14.2.2, “Changing the Server-Specific Information in iManager,” on page 91
14.2.1 Changing the Server-Specific Information in Designer
The procedure affects all drivers stored in the driver set.
1 In Designer, open your project.
2 In the Outline tab, right-click the server, then select Migrate.
3 Read the overview to see what items are migrated to the new server, then click Next.
4 Select the target server from the list available servers, then click Next.
novdocx (en) 17 September 2009
The only servers listed are servers that are not currently associated with a driver set and are
equal to or newer than the source server’s Identity Manager version.
5 Select Make the target server active.
There are three options, but Make the target server active is recommended.
Make the target server active: Copies the settings from the source server to the target
server and disables the drivers on the source server.
Keep the source server active: Does not copy the settings and disables all drivers on the
target server.
Makes both target and source servers active: Copies settings from the source server to
the target server without disabling the drivers on the source or target servers. This option
is not recommended. If both drivers started, the same information is written to two
different queues and this can cause corruption.
6 Click Migrate.
After server-specific information is migrated, you must deploy the changed drivers to the Identity
Vault. For more information, see “Deploying a Driver to an Identity Vault” in Designer 3.5 for
Identity Manager 3.6 Administration Guide.
The last step is to start the drivers. For more information, see Section 13.10, “Starting the Drivers,”
on page 87.
14.2.2 Changing the Server-Specific Information in iManager
1 In iManager, click to display the Identity Manager Administration page.
2 Click Identity Manager Overview.
3 Browse to and select the contain that holds the driver set.
4 Click the driver set name to access the Driver Set Overview page.
5 Click the upper right corner of the driver, then click Stop driver.
Performing a Migration 91
Page 92

6 Click the upper right corner of the driver, then click Edit properties.
7 You must copy or migrate all server-specific driver parameters, global configuration values,
engine control values, named passwords, driver authentication data, and driver startup options
that contain the old server’s information to the new server’s information. Global configuration
values and other parameters of the driver set, such as max heap size, Java settings, and so on,
must have identical values as those of the old server.
8 Click OK to save all changes.
9 Click the upper right corner of the driver to start the driver.
10 Repeat Step 5 through Step 9 for each driver in the driver set.
14.3 Removing the Old Server from the Driver Set
After the new server is running all of the drivers, the old server must be removed from the driver set.
Section 14.3.1, “Using Designer to Remove the Old Server from the Driver Set,” on page 92
Section 14.3.2, “Using iManager to Remove the Old Server from the Driver Set,” on page 92
Section 14.3.3, “Decommissioning the Old Server,” on page 93
novdocx (en) 17 September 2009
14.3.1 Using Designer to Remove the Old Server from the Driver Set
1 In Designer, open your project.
2 In the Modeler, right-click the driver set, then select Properties.
3 Select Server List.
4 Select the old Identity Manager server in the Selected Servers list, then click the < to remove
the server from the Selected Servers list.
5 Click OK to save the changes.
This change must be deployed to the Identity Vault. For more information, see “Deploying a Driver
Set to an Identity Vault” in Designer 3.5 for Identity Manager 3.6 Administration Guide.
14.3.2 Using iManager to Remove the Old Server from the Driver Set
1 In iManager, click to display the Identity Manager Administration page.
2 Click Identity Manager Overview.
3 Browse to and select the container that holds the driver set.
4 Click the driver set name to access the Driver Set Overview page.
5 Click Servers > Remove Server.
6 Select the old Identity Manager server, then click OK.
92 Identity Manager 3.6.1 Installation Guide
Page 93

14.3.3 Decommissioning the Old Server
At this point, the old server is not hosting any drivers. If you no longer need this server, you must do
additional steps to decommission this server:
1 Remove the eDirectory replicas from this server. For more information, see “Deleting
Replicas” (http://www.novell.com/documentation/edir88/edir88/data/fbgciaad.html) in the
eDirectory Administration Guide (http://www.novell.com/documentation/edir88/pdfdoc/
edir88/edir88.pdf).
2 Remove eDirectory from this server. For more information, see TID 10056593, “Removing a
Server From an NDS Tree Permanently” (http://www.novell.com/support/php/
search.do?cmd=displayKC&docType=kc&externalId=10056593&sliceId=&docTypeID=DT_
TID_1_1&dialogID=35218849&stateId=0%200%2035214815).
novdocx (en) 17 September 2009
Performing a Migration 93
Page 94

novdocx (en) 17 September 2009
94 Identity Manager 3.6.1 Installation Guide
Page 95

IV
Uninstalling Identity Manager
If you need to uninstall Identity Manager, use the procedures in the following sections in order.
Chapter 15, “Removing Objects from eDirectory,” on page 97
Chapter 16, “Uninstalling the Metadirectory Server and Drivers,” on page 99
Chapter 17, “Uninstalling Designer,” on page 101
novdocx (en) 17 September 2009
IV
Uninstalling Identity Manager
95
Page 96

novdocx (en) 17 September 2009
96 Identity Manager 3.6.1 Installation Guide
Page 97

15
Removing Objects from eDirectory
novdocx (en) 17 September 2009
15
The first step in uninstalling Identity Manager is to delete all Identity Manager objects from the
Identity Vault. If any driver set objects are partition root objects in eDirectory
be merged into the parent partition before the driver set object can be deleted. When the driver set is
created, the wizard prompts you to make the driver set a partition.
Delete the Identity Manager objects:
1 Perform a health check on the eDirectory database. If any errors occur, fix the errors before
proceeding. For more information, see Keeping eDirectory Healthy (http://www.novell.com/
documentation/edir88/edir88/data/a5ziqam.html) in the Novell eDirectory 8.8 Administration
Guide.
2 Log in to iManager as an administrator user with full rights to the eDirectory tree.
3 Select Partitions and Replica > Merge Partition.
4 Browse to and select the driver set object that is the partition root object, then click OK.
5 Wait for the merge process to complete, then click OK.
6 Delete the driver set object.
When you delete the driver set object, it deletes all of the driver objects associated with that
driver set.
7 Repeat Step 3 through Step 6 for each driver set object that is in the eDirectory database, until
they are all deleted.
8 Repeat Step 1 to make sure all merges completed and all of the objects have been deleted.
TM
, the partition must
Proceed to Chapter 16, “Uninstalling the Metadirectory Server and Drivers,” on page 99.
Removing Objects from eDirectory
97
Page 98

novdocx (en) 17 September 2009
98 Identity Manager 3.6.1 Installation Guide
Page 99

16
Uninstalling the Metadirectory
novdocx (en) 17 September 2009
Server and Drivers
When Identity Manager is installed, there is an uninstall script that is placed on the Identity Manager
server. It allows you to remove all services, packages, and directories that were created when
Identity Manager was installed.
Section 16.1, “Uninstalling on Windows,” on page 99
Section 16.2, “Uninstalling on Linux/UNIX,” on page 99
16.1 Uninstalling on Windows
To uninstall Identity Manager on Windows:
For 32-bit Windows, use one of the following methods:
Access the Control Panel on the Windows server. If the server is Windows Server 2003,
click Add or Remove Programs. If the server is Windows Server 2008, click Programs
and Features.
NOTE: This method is not applicable for Windows Server 2008 Server Core.
Execute the uninstall script (
C:\Program Files\Novell\Identity Manager\Uninstall_Identity_Manager
Uninstall Identity Manager.exe
) located at
.
16
For 64-bit Windows, use one of the following methods:
Access the Control Panel on the Windows server. If the server is Windows Server 2003,
click Add or Remove Programs. If the server is Windows Server 2008, click Programs
and Features.
NOTE: This method is not applicable for Windows Server 2008 Server Core.
Execute the uninstall script (
C:\Program Files (x86)\Novell\Identity
Manager\Uninstall_Identity_Manager
Uninstall Identity Manager.exe
.
) located at
16.2 Uninstalling on Linux/UNIX
To uninstall Identity Manager on Linux/UNIX run the uninstall script located at
Uninstall_Identity_Manager/Uninstall_Identity_Manager
Uninstall_Identity_Manager
.
. To execute the script, enter
~/idm/
./
Uninstalling the Metadirectory Server and Drivers
99
Page 100

novdocx (en) 17 September 2009
100 Identity Manager 3.6.1 Installation Guide
 Loading...