


Novell®
www.novell.com
Entitlements Guide
Identity Manager
novdocx (en) 13 May 2009
AUTHORIZED DOCUMENTATION
3.6.1
June 05, 2009
Identity Manager 3.6.1 Entitlements Guide

Legal Notices
Novell, Inc., makes no representations or warranties with respect to the contents or use of this documentation, and
specifically disclaims any express or implied warranties of merchantability or fitness for any particular purpose.
Further, Novell, Inc., reserves the right to revise this publication and to make changes to its content, at any time,
without obligation to notify any person or entity of such revisions or changes.
Further, Novell, Inc., makes no representations or warranties with respect to any software, and specifically disclaims
any express or implied warranties of merchantability or fitness for any particular purpose. Further, Novell, Inc.,
reserves the right to make changes to any and all parts of Novell software, at any time, without any obligation to
notify any person or entity of such changes.
Any products or technical information provided under this Agreement may be subject to U.S. export controls and the
trade laws of other countries. You agree to comply with all export control regulations and to obtain any required
licenses or classification to export, re-export or import deliverables. You agree not to export or re-export to entities
on the current U.S. export exclusion lists or to any embargoed or terrorist countries as specified in the U.S. export
laws. You agree to not use deliverables for prohibited nuclear, missile, or chemical biological weaponry end uses.
See the Novell International Trade Services Web page (http://www.novell.com/info/exports/) for more information
on exporting Novell software. Novell assumes no responsibility for your failure to obtain any necessary export
approvals.
novdocx (en) 13 May 2009
Copyright © 2008-2009 Novell, Inc. All rights reserved. No part of this publication may be reproduced, photocopied,
stored on a retrieval system, or transmitted without the express written consent of the publisher.
Novell, Inc., has intellectual property rights relating to technology embodied in the product that is described in this
document. In particular, and without limitation, these intellectual property rights may include one or more of the U.S.
patents listed on the Novell Legal Patents Web page (http://www.novell.com/company/legal/patents/) and one or
more additional patents or pending patent applications in the U.S. and in other countries.
Novell, Inc.
404 Wyman Street, Suite 500
Waltham, MA 02451
U.S.A.
www.novell.com
Online Documentation: To access the latest online documentation for this and other Novell products, see
the Novell Documentation Web page (http://www.novell.com/documentation).

Novell Trademarks
For Novell trademarks, see the Novell Trademark and Service Mark list (http://www.novell.com/company/legal/
trademarks/tmlist.html).
Third-Party Materials
All third-party trademarks are the property of their respective owners.
novdocx (en) 13 May 2009

novdocx (en) 13 May 2009
4 Identity Manager 3.6.1 Entitlements Guide

Contents
About This Guide 7
1 Entitlements Overview 9
1.1 How Entitlements Work . . . . . . . . . . . . . . . . . . . . . . . . . . . . . . . . . . . . . . . . . . . . . . . . . . . . . . . 9
1.2 Why Use Entitlements? . . . . . . . . . . . . . . . . . . . . . . . . . . . . . . . . . . . . . . . . . . . . . . . . . . . . . . 10
1.3 Drivers with Preconfigured Entitlements . . . . . . . . . . . . . . . . . . . . . . . . . . . . . . . . . . . . . . . . . 11
2 Checklist for Implementing Entitlements 13
3 Enabling Entitlements on a Driver 15
3.1 Using Designer to Enable Entitlements . . . . . . . . . . . . . . . . . . . . . . . . . . . . . . . . . . . . . . . . . . 15
3.2 Using iManager to Enable Entitlements . . . . . . . . . . . . . . . . . . . . . . . . . . . . . . . . . . . . . . . . . . 15
novdocx (en) 13 May 2009
4 Creating Entitlements 17
4.1 Sample Entitlements for the Active Directory Driver . . . . . . . . . . . . . . . . . . . . . . . . . . . . . . . . 17
4.2 Creating Entitlements in Designer . . . . . . . . . . . . . . . . . . . . . . . . . . . . . . . . . . . . . . . . . . . . . . 17
4.2.1 Administrator-Defined Entitlements with Value Lists . . . . . . . . . . . . . . . . . . . . . . . . . 19
4.2.2 Administrator-Defined Entitlements without Value Lists . . . . . . . . . . . . . . . . . . . . . . 20
4.2.3 Valued Entitlement that Queries an External Application . . . . . . . . . . . . . . . . . . . . . 21
4.3 Creating Entitlements in iManager . . . . . . . . . . . . . . . . . . . . . . . . . . . . . . . . . . . . . . . . . . . . . . 24
5 Creating Policies to Support Entitlements 27
6 Editing Entitlements 29
6.1 Editing Entitlements in Designer . . . . . . . . . . . . . . . . . . . . . . . . . . . . . . . . . . . . . . . . . . . . . . . 29
6.1.1 Using the Entitlement Editor . . . . . . . . . . . . . . . . . . . . . . . . . . . . . . . . . . . . . . . . . . . 29
6.1.2 Using the XML Source and XML Tree Views . . . . . . . . . . . . . . . . . . . . . . . . . . . . . . 31
6.2 Editing Entitlements in iManager . . . . . . . . . . . . . . . . . . . . . . . . . . . . . . . . . . . . . . . . . . . . . . . 34
A Writing Entitlements in XML 35
A.1 Novell Entitlement Document Type Definition (DTD) . . . . . . . . . . . . . . . . . . . . . . . . . . . . . . . . 35
A.1.1 Explaining the Entitlement DTD. . . . . . . . . . . . . . . . . . . . . . . . . . . . . . . . . . . . . . . . . 36
A.1.2 Other Headings in the DTD . . . . . . . . . . . . . . . . . . . . . . . . . . . . . . . . . . . . . . . . . . . . 38
A.2 Examples to Help You Write Your Own Entitlements. . . . . . . . . . . . . . . . . . . . . . . . . . . . . . . . 39
A.2.1 Example 1: Account Entitlement: Valueless . . . . . . . . . . . . . . . . . . . . . . . . . . . . . . . 39
A.2.2 Example 2: Application Query Entitlement: External Query . . . . . . . . . . . . . . . . . . . 40
A.2.3 Example 3: Administrator-Defined Entitlement: With Lists. . . . . . . . . . . . . . . . . . . . . 43
A.2.4 Example 4: Administrator-Defined Entitlements: Without Lists . . . . . . . . . . . . . . . . . 43
Contents 5

novdocx (en) 13 May 2009
6 Identity Manager 3.6.1 Entitlements Guide

About This Guide
The guide explains how to create and use entitlements as part of your Identity Manager solution.
Chapter 1, “Entitlements Overview,” on page 9
Chapter 2, “Checklist for Implementing Entitlements,” on page 13
Chapter 3, “Enabling Entitlements on a Driver,” on page 15
Chapter 4, “Creating Entitlements,” on page 17
Chapter 5, “Creating Policies to Support Entitlements,” on page 27
Appendix A, “Writing Entitlements in XML,” on page 35
Audience
This guide is intended for Identity Manager administrators, partners, and consultants.
novdocx (en) 13 May 2009
Feedback
We want to hear your comments and suggestions about this manual and the other documentation
included with this product. Please use the User Comments feature at the bottom of each page of the
online documentation, or go to www.novell.com/documentation/feedback.html and enter your
comments there.
Documentation Updates
For the most recent version of the Entitlements Guide, visit the Identity Manager Documentation
Web site (http://www.novell.com/documentation/idm36/).
Additional Documentation
For additional Identity Manager 3.6 documentation, see the Identity Manager Documentation Web
site (http://www.novell.com/documentation/idm36/).
Documentation Conventions
In Novell documentation, a greater-than symbol (>) is used to separate actions within a step and
items in a cross-reference path.
®
A trademark symbol (
trademark.
, TM, etc.) denotes a Novell trademark. An asterisk (*) denotes a third-party
When a single pathname can be written with a backslash for some platforms or a forward slash for
other platforms, the pathname is presented with a backslash. Users of platforms that require a
forward slash, such as Linux* or UNIX*, should use forward slashes as required by your software.
About This Guide 7

novdocx (en) 13 May 2009
8 Identity Manager 3.6.1 Entitlements Guide
1
Entitlements Overview
Novell® Identity Manager uses entitlements as a way for you to provide users with access to
resources in connected systems.
You can think of an entitlement as a permission slip. For example, if you want a new employee to be
given an Active Directory* account when he or she is added to your Human Resource system, the
user must have a permission slip, or entitlement, for the Active Directory account. If the user doesn’t
have the permission slip, he or she doesn’t receive the account.
The following sections explain how entitlements work and how they make administration of your
Identity Manager system more efficient.
Section 1.1, “How Entitlements Work,” on page 9
Section 1.2, “Why Use Entitlements?,” on page 10
Section 1.3, “Drivers with Preconfigured Entitlements,” on page 11
novdocx (en) 13 May 2009
1
1.1 How Entitlements Work
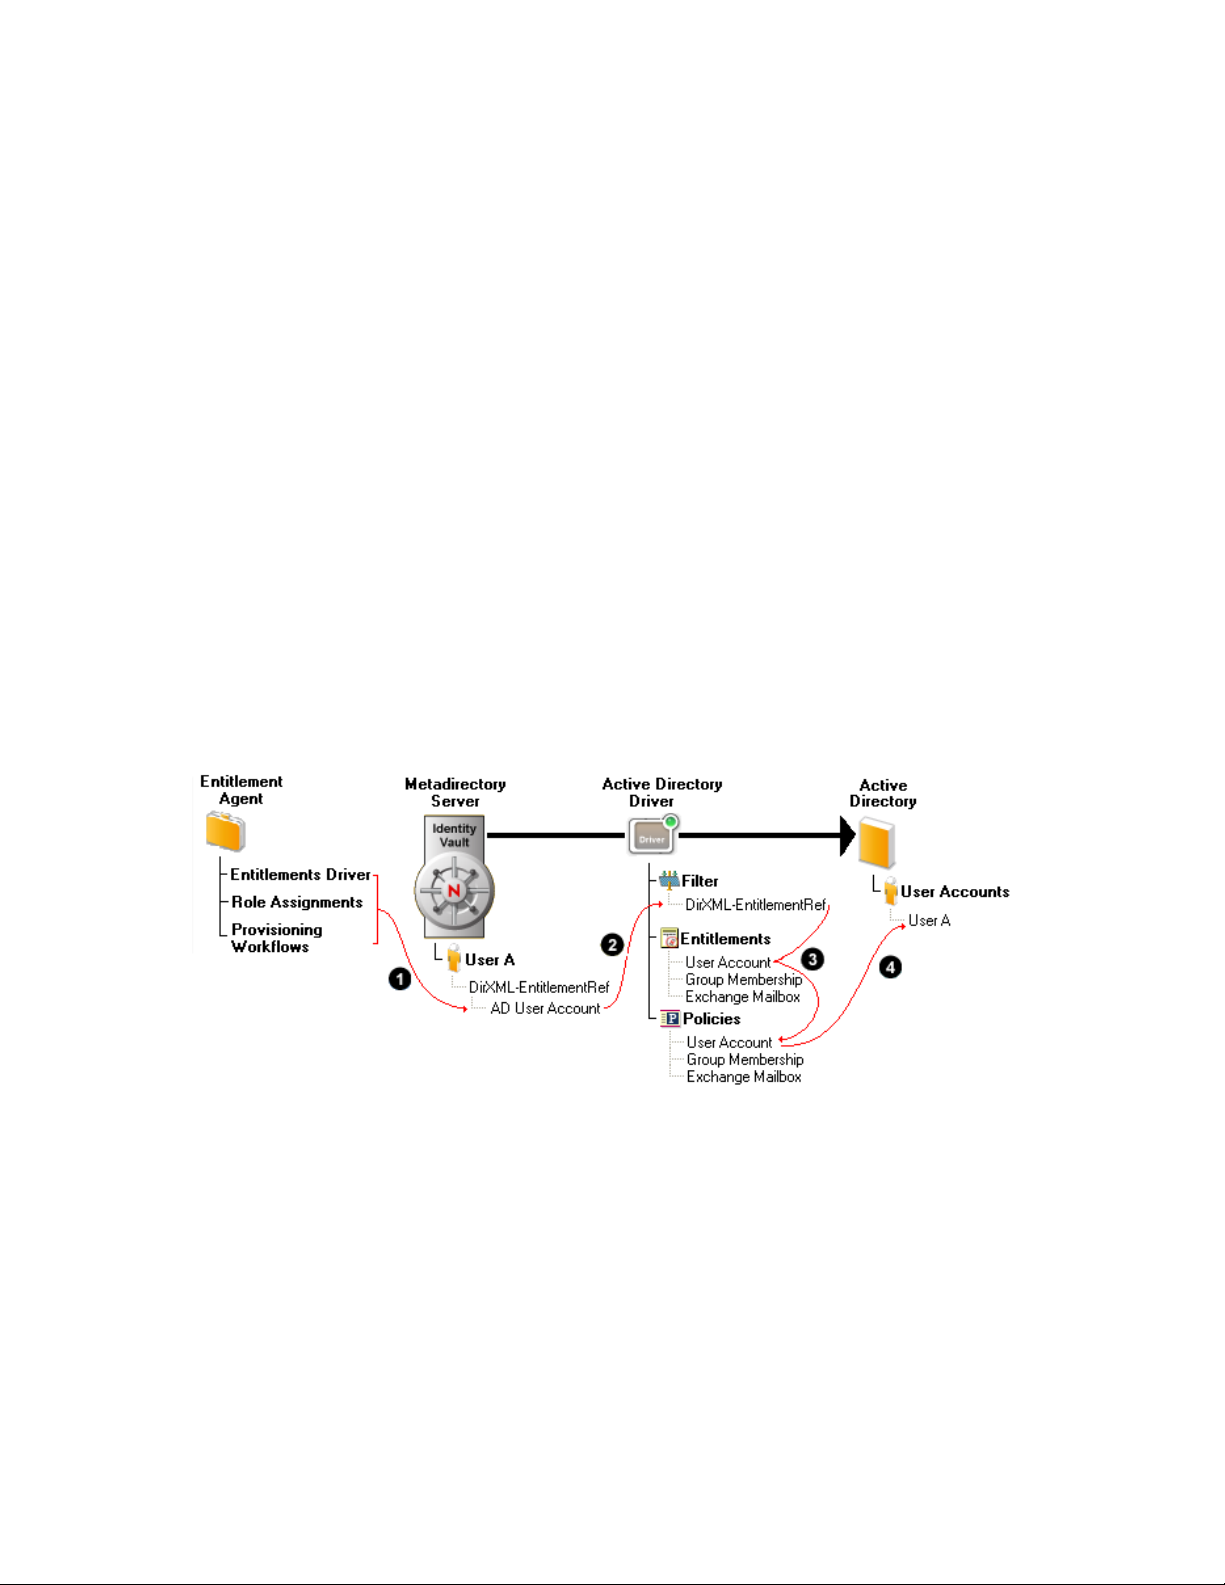
The following diagram shows the basic entitlement process.
Figure 1-1 Overview of Entitlements
1. An entitlement agent grants an entitlement to a user. There are three ways that entitlements are
granted to a user:
Role-Based Entitlements: The Entitlements Service driver grants the entitlement based
on criteria that place the user in a particular role (or group). The criteria can be based on
any event that occurs in the Identity Vault. For example, adding a new employee in an HR
system causes a User object to be created in the Identity Vault. Creation of the new User
object is the criterion that causes the Entitlements Service driver to grant the Active
Directory User Account entitlement to the user.
User Application Roles Based Provisioning: The user receives a role assignment
through the User Application. The User Application’s Role Service driver grants the user
any entitlements associated with the new role. For example, a user is assigned an
Entitlements Overview
9

Accountant role that requires access to the Accounting group in Active Directory. The
Role Service driver grants the Active Directory Group Membership entitlement to the
user.
User Application Workflow-Based Provisioning: A provisioning workflow grants the
entitlement to the user. For example, a new employee is added to the HR system, which
causes a User object to be created in the Identity Vault. Creation of the new User object
initiates a workflow that grants the Active Directory User Account entitlement to the user.
2. When an entitlement is added to or removed from a user’s DirXML-EntitlementRef attribute,
any entitlement-enabled drivers begin to process the event. Only drivers that have the DirXMLEntitlementRef attribute added to their Subscriber channel filter can monitor users for
entitlement changes.
3. The driver processes the entitlement event against the Subscriber channel policies. If the
entitlement event is for an entitlement that applies to the driver, the policies are processed.
Otherwise, no processing occurs. In the diagram above, the Grant User Account policy is
processed because 1) the Active Directory User Account entitlement was added to the user’s
DirXML-EntitlementRef attribute and 2) the User Account entitlement is defined on the Active
Directory driver. If the Active Directory User Account entitlement is later removed from the
user’s DirXML-EntitlementRef attribute, the Revoke User Account policy is processed.
novdocx (en) 13 May 2009
4. The policies trigger the granting or revoking of access to the entitled resource. In the diagram
above, the Grant User Account policy triggers the creation of a user account in Active
Directory.
1.2 Why Use Entitlements?
Both roles-based provisioning and workflow-based provisioning require the use of entitlements. If
you use either of these User Application provisioning methods, you must use entitlements.
If you are not using the User Application for roles-based or workflow-based provisioning, you might
still want to use Role-Based Entitlements (RBEs) through the Entitlements Service driver. Using
Role-Based Entitlements enables you to remove the business logic, or decision-making, from your
driver policies. In the example used in Section 1.1, “How Entitlements Work,” on page 9, the Active
Directory driver policies include only the information required to grant or revoke an Active
Directory user account. The decision about whether or not a user receives an Active Directory user
account is handled through the entitlement agent, not the driver policies. In this case, the entitlement
agent is the Entitlements Service driver.
Removing the business logic from drivers provides several benefits:
If you have multiple drivers that are the same (for example, multiple Active Directory drivers)
and your business logic changes, you don’t have to change the logic in each driver. The logic
only needs to change in the entitlement agent.
You can use any of the three entitlement agents to grant an entitlement to a user. You can even
use all three entitlement agents together. However, you should have only one entitlement agent
handle an entitlement for a given user. For example, you could have an Active Directory User
Account entitlement granted to a user by the Entitlement driver and a Linux User Account
entitlement granted to the same user through the User Application’s Role Service driver.
However, you should not have the same entitlement (for example, the Active Directory User
Account) managed by both the Entitlement driver and the User Application’s Role Service
driver. Doing so can cause unintended granting and revoking of the entitlement.
10 Identity Manager 3.6.1 Entitlements Guide

1.3 Drivers with Preconfigured Entitlements
The following drivers include configuration files that already contain entitlements and the policies
required to implement them. These entitlements support the most common scenarios, including
granting and revoking user accounts, groups, and e-mail distribution lists.
Active Directory: Grant and revoke accounts, group membership, Exchange Mailbox
GroupWise
LDAP: Grant and revoke user accounts and group memberships
Linux and UNIX: Grant and revoke accounts
Lotus* Notes*: Grant and revoke user accounts and group memberships
RACF*: Grant and revoke group accounts and group memberships
These are example entitlements and policies that you can use if they meet your needs. If not, you can
modify them to meet your needs, or you can use them as examples as you implement additional
entitlements.
®
: Grant and revoke accounts, grant and revoke members of distribution lists
novdocx (en) 13 May 2009
Entitlements Overview 11

novdocx (en) 13 May 2009
12 Identity Manager 3.6.1 Entitlements Guide

2
Checklist for Implementing
novdocx (en) 13 May 2009
Entitlements
Use the following checklist to ensure that you complete all of the tasks required to implement
entitlements for an Identity Manager driver. The tasks are listed in the recommended order of
completion, but you can change the completion order if necessary.
Table 2-1 Entitlements Checklist
Details
Enable the driver to
support entitlements
The driver must be configured to listen for entitlement events. You enable
the driver by modifying the driver filter to add the DirXML-EntitlementRef
attribute to the User class.
The following drivers are already enabled for entitlements. You do not
need to complete this task for these drivers:
Active Directory
GroupWise
LDAP
Linux and UNIX
Lotus Notes
RACF
®
2
For enablement instructions, see Chapter 3, “Enabling Entitlements on a
Driver,” on page 15.
Create entitlements Entitlements represent resources in connected systems. When creating an
entitlement, you create it on the driver that is associated with the
connected system where the entitlement’s resource is located.
For instructions, see Chapter 4, “Creating Entitlements,” on page 17.
Create policies to
support the
entitlements
Entitlements are implemented by adding new driver policies or modifying
existing policies.
For instructions, see Chapter 5, “Creating Policies to Support
Entitlements,” on page 27.
Checklist for Implementing Entitlements
13

Details
novdocx (en) 13 May 2009
Set up an entitlement
agent to manage the
entitlements
The entitlement agent is responsible for granting or revoking entitlements
for users. You can use any of the following entitlement agents:
Entitlements Service Driver: Manages entitlements based on
events that occur in the Identity Vault. For instructions, see the
Identity Manager 3.6 Driver for Role-Based Entitlements:
Implementation Guide (http://www.novell.com/documentation/
idm36drivers/entitlements/data/bktitle.html).
User Application Roles-Based Provisioning: Manages
entitlements based on roles that are assigned to users. For
instructions, see the Identity Manager Roles Based Provisioning
Module 3.6.1 documentation (http://www.novell.com/documentation/
idmrbpm361/).
User Application Workflow-Based Provisioning: Manages
entitlements through provisioning workflows. For instructions, see the
Identity Manager Roles Based Provisioning Module 3.6.1
documentation (http://www.novell.com/documentation/idmrbpm361).
14 Identity Manager 3.6.1 Entitlements Guide

3
Enabling Entitlements on a Driver
A driver must be enabled in order to use entitlements. You enable a driver by modifying the driver
filter to add the DirXML-EntitlementRef attribute to the User class. Refer to the following sections
for instructions:
Section 3.1, “Using Designer to Enable Entitlements,” on page 15
Section 3.2, “Using iManager to Enable Entitlements,” on page 15
The following drivers are already enabled for entitlements. You do not need to manually enable
these drivers:
Active Directory
GroupWise
LDAP
Linux and Unix
®
novdocx (en) 13 May 2009
3
Lotus Notes
RACF
3.1 Using Designer to Enable Entitlements
Designer is the recommended tool for creating entitlements (see Section 4.2, “Creating Entitlements
in Designer,” on page 17). During the entitlement creation process in Designer, you are given the
opportunity to have Designer automatically enable the driver to support entitlements. You should do
so at that time.
3.2 Using iManager to Enable Entitlements
1 In iManager, click to display the Identity Manager Administration page.
2 In the Administration list, > click Identity Manager Overview.
3 If the driver set is not listed on the Driver Sets tab, use the Search In field to search for and
display the driver set.
4 Click the driver set to open the Driver Set Overview page.
5 Click the driver to display the Driver Overview page.
Enabling Entitlements on a Driver
15

6 On the Driver Overview page, click the Driver Filter icon for the Subsciber channel. By
default, Organizational Unit is highlighted.
7 Click User and select Add Attribute, then scroll to the bottom and select Show all attributes.
8 Select the DirXML-EntitlementRef attribute, then click OK.
novdocx (en) 13 May 2009
9 Select DirXML-EntitlementRef in the Filter page, then under the Subscribe heading, select
Notify.
10 Click OK to save the changes.
This process is performed automatically when you create entitlements through Designer on a
driver.
16 Identity Manager 3.6.1 Entitlements Guide

4
Creating Entitlements
Because entitlements represent resources in a connected system, each entitlement must be created on
the driver associated with the connected system. For example, to create an entitlement for an Active
Directory User Account, you would create it on the Active Directory driver that connects to the
directory where you want the account created.
The following sections provide instructions for creating entitlements in Designer and iManager.
Although you can use either tool to create entitlements, we strongly recommend that you use
Designer. Designer includes an Entitlement Wizard that creates the entitlement XML from the
information you provide in the wizard. iManager does not include this wizard; instead, you must
write the XML required for the entitlement.
Section 4.1, “Sample Entitlements for the Active Directory Driver,” on page 17
Section 4.2, “Creating Entitlements in Designer,” on page 17
Section 4.3, “Creating Entitlements in iManager,” on page 24
novdocx (en) 13 May 2009
4
4.1 Sample Entitlements for the Active Directory Driver
By default, the Active Directory driver includes the entitlements listed below. You can use these
entitlements as examples of the types of entitlements you might want to create for other drivers.
User Account Entitlement: Grants or revokes an account in Active Directory for the user.
When the account is granted, the user is given an enabled logon account. When the account is
revoked, the logon account is either disabled or deleted, depending on how the driver is
configured.
Group Membership Entitlement: Grants or revokes membership in a group in Active
Directory. When membership is revoked, the user is removed from the group. The group
membership entitlement is not enforced on the Publisher channel; if a user is added to a
controlled group in Active Directory by some external tool, the user is not removed by the
driver. Further, if the entitlement is removed from the user object instead of being simply
revoked, the Active Directory driver takes no action.
Exchange Mailbox Entitlement: Grants or revokes an Exchange mailbox for the user in
Microsoft Exchange.
4.2 Creating Entitlements in Designer
Designer is the recommended tool for creating entitlements.
Designer provides an Entitlement Wizard that steps you through the creation of entitlements. The
wizard creates the entitlement XML from the information you provide. In iManager, you must
manually create the entitlement XML (see Section 4.3, “Creating Entitlements in iManager,” on
page 24)
1 In the Modeler view for your Designer project, right-click the driver icon , then click New >
Entitlement to launch the Entitlement Wizard.
2 Fill in the following fields:
Creating Entitlements
17

Name: Specify the name you want used for the entitlement. This is the name used for the
entitlement object in the Identity Vault, and the name that is seen in both Designer and
iManager.
Display Name: By default, the entitlement agents that consume the entitlements use the name
specified in the Name field. If you want to specify a different name for the entitlement agent to
use, deselect the Use this name for the display name box, then enter a name in the Display
Name field.
For example, the GroupWise driver’s default configuration file includes a predefined
GroupWise account entitlement. The entitlement’s name is gwAccount and its display name is
GroupWise User Account.
Description: Specify any information you want to use to describe the entitlement. This field is
optional.
3 Click Next to display the Set Entitlement Values dialog box.
There are two types of entitlements that you can create. Valued entitlements contain values that
are passed to the driver policy that enforces the entitlement. Valueless entitlements do not
contain any values to pass.
4 Select No if the entitlement does not need to include values, then click Finish. If the Add to
Filter dialog box is displayed, select Yes , then click OK to enable the entitlement for the driver.
Skip the remaining steps in this section.
or
Select Yes if the entitlement needs to include values, click Next, then continue with the next
step.
There are two types of values that you can use with valued entitlements.
Administrator-defined values are defined by you or another administrator. You can define a
specific list of values from which the entitlement consumer must select, or you can designate a
free-form value that the entitlement consumer defines.
Application Query values are supplied by the application to which the driver is connected. For
example, the GroupWise driver’s default configuration includes a predefined GroupWise
Distribution List entitlement that enables users to be added to GroupWise distribution lists. The
available distribution lists are discovered through a query of the GroupWise system.
novdocx (en) 13 May 2009
5 Select Administrator-defined values if the valued entitlement requires values that you will
define, click Next, then skip to Section 4.2.1, “Administrator-Defined Entitlements with Value
Lists,” on page 19 or Section 4.2.2, “Administrator-Defined Entitlements without Value Lists,”
on page 20.
or
Select Values from an application query if the valued entitlement requires values that must be
discovered by querying the connected application, click Next, the skip to Section 4.2.3,
“Valued Entitlement that Queries an External Application,” on page 21.
18 Identity Manager 3.6.1 Entitlements Guide
4.2.1 Administrator-Defined Entitlements with Value Lists
The example in the following procedure is an administrator-defined entitlement that allows you to
select a listed entry. This type of entitlement is best used through Workflow entitlements rather than
Role-Based Entitlements.
1 Make sure you’ve completed Step 1 through Step 5 on page 18. The following steps start where
those steps ended.
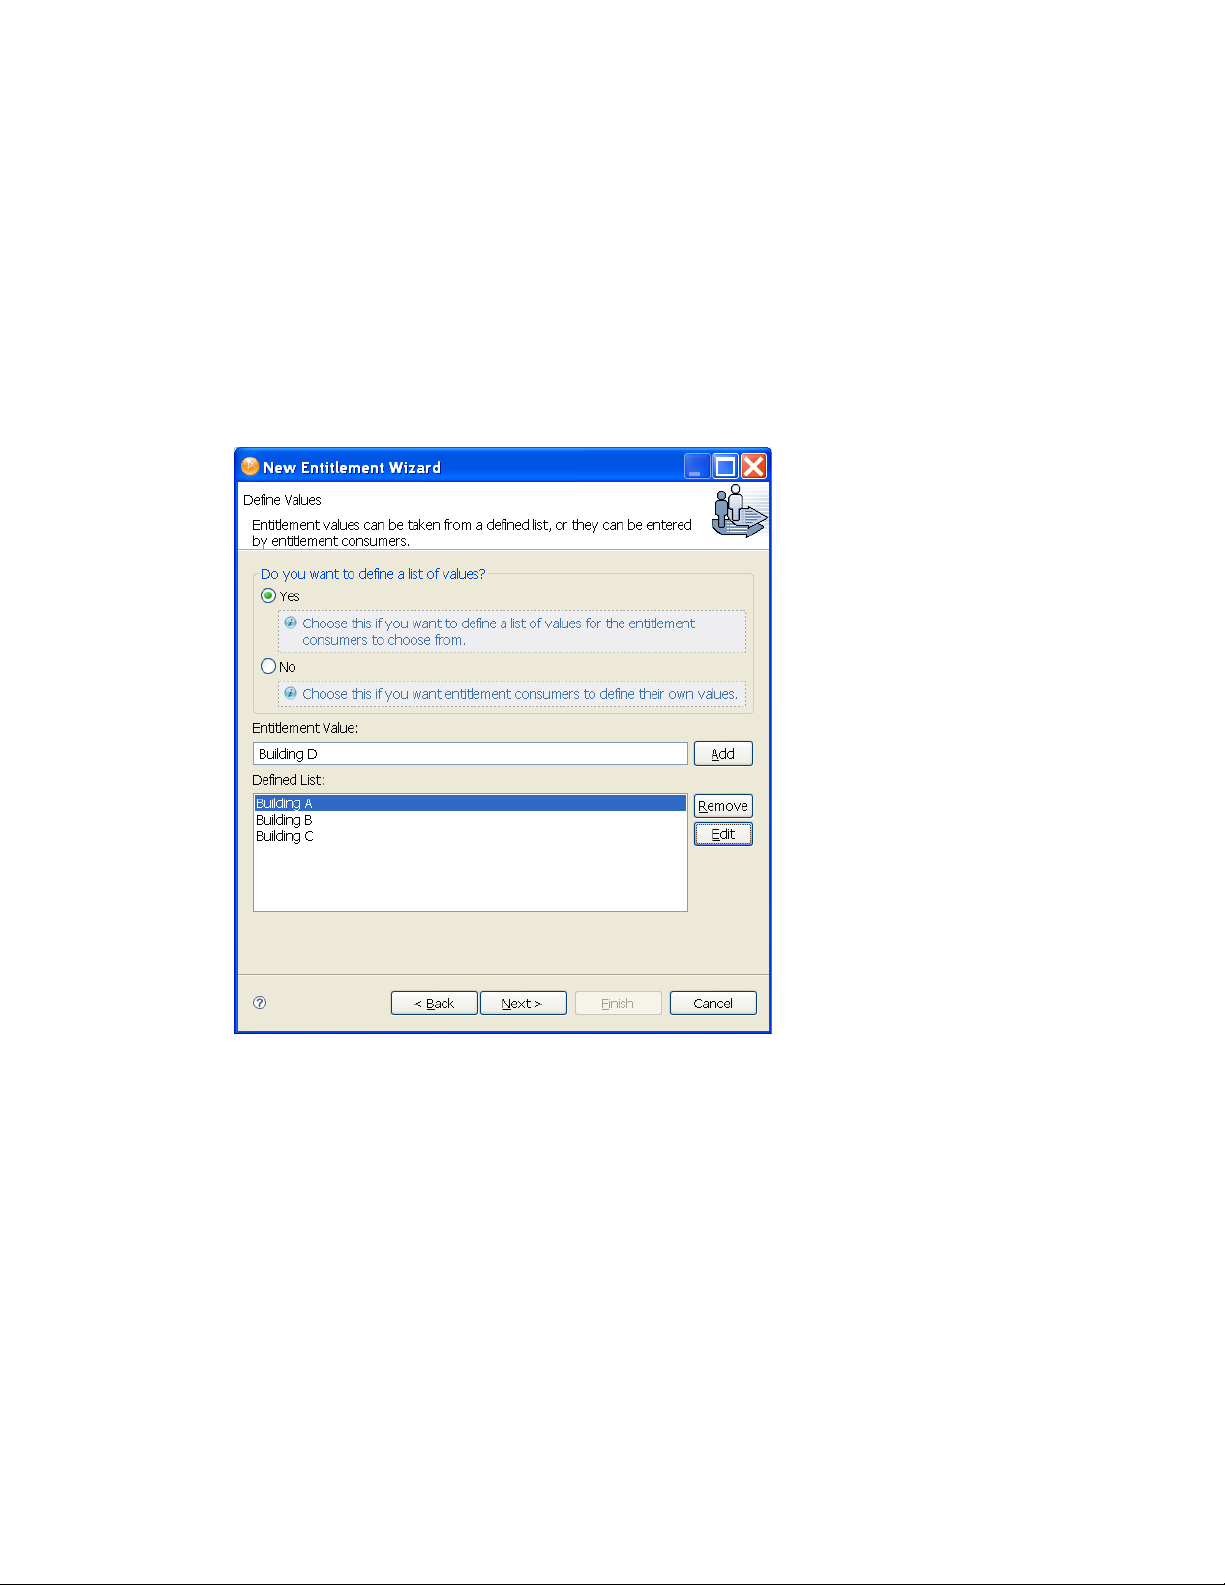
2 In the Define Values dialog box, make sure that Yes is selected.
3 In the Entitlement Value field, type the value you want to add to the list, then click Add. Repeat
this step for each value you want to add to the list, then click Next.
novdocx (en) 13 May 2009
In this example, the values are corporate buildings: Building A through Building D. Through
an entitlement client, such as an iManager Role-Based Entitlement task or through the user
application, users or defined-task managers can specify the building information, which is then
included in an external application, such as Novell eDirectory.
4 In the Assign Multiple Values dialog box, select Yes if you want the entitlements to be able to
be granted to a user more than once and with different values, then click Next.
or
Select No if the entitlement can only be granted once, then click Next.
For example, you might only want to use an entitlement one time to assign a building location
to a user. However, because a user could belong to multiple groups, you might want an
entitlement that assigns a user to a group to be able to be used multiple times to assign the user
to multiple groups.
Creating Entitlements 19

5 You are asked if this entitlement is intended to be used by Role-Based Entitlement policies
through iManager. If you want this entitlement to be granted or revoked automatically, select
Ye s to the Role-Based Entitlements question, click Next, then continue with Step 6.
or
If you want the granting or revoking of this entitlement to be a manual process (approved by
someone), select No to use the User Application, then skip to Step 7.
6 (Conditional) If you selected Yes to the Role-Based Entitlements question, you are asked if you
want to use the Role-Based Entitlements priority to resolve any conflicts that might happen
when this entitlement is assigned by different Role-Based Entitlement Policies with different
values. You can resolve the conflict by either using the Role-Based Entitlements priority, or by
merging the values.
Merging the values merges the entitlements of all involved Role-Based Entitlement policies, so
if one policy revokes an entitlement but another policy grants an entitlement, the entitlement is
eventually granted. Solving conflicts by priority works if you need to ensure that only one
policy is applied to this entitlement at any time.
7 Click Finish.
8 If you see the Add To Filter dialog box, answer Yes if you want the driver to listen for this
entitlement. This enables entitlements for the driver. The DirXML-EntitlementRef attribute
allows the driver filter to listen for entitlement activities, which is necessary in order to use the
entitlements you are creating.
or
novdocx (en) 13 May 2009
If you don’t want to see the Add To Filter window on entitlements you are creating for any
driver in Designer, select Remember Selection - Don’t Prompt Again, then click OK. However,
after the attribute is added to this driver filter, you won’t see the Add To Filter window again.
Before you can edit this entitlement, you are asked to save the editor’s changes before continuing.
Once the editor is saved, the entitlement displays in the Modeler view.
4.2.2 Administrator-Defined Entitlements without Value Lists
The example in the following procedure is an administrator-defined entitlement that forces the
administrator to type a value. You can use this kind of entitlement if you do not have all of the
information at the initial setup, so you cannot create a value list.
1 Make sure you’ve completed Step 1 through Step 5 on page 18. The following steps start where
those steps ended.
2 In the Define Values dialog box, select No to the question “Do you want to define a list of
values?” on the Define Values page, then click Next.
Selecting this option allows the administrator or users to type in a value. Using this option can
be risky however since wrong or misspelled information can cause the value to be incorrect and
the action in the entitlement to fail.
3 In the Assign Multiple Values dialog box, select Yes if you want the entitlements to be able to
be granted to a user more than once and with different values, then click Next.
or
Select No if the entitlement can only be granted once, then click Next.
20 Identity Manager 3.6.1 Entitlements Guide

For example, you might only want to use an entitlement one time to assign a building location
to a user. However, because a user could belong to multiple groups, you might want an
entitlement that assigns a user to a group to be able to be used multiple times to assign the user
to multiple groups.
4 You are asked if this entitlement is intended to be used by Role-Based Entitlement policies
through iManager. If you want this entitlement to be granted or revoked automatically, select
Ye s to the Role-Based Entitlements question, click Next, then continue with Step 5.
or
If you want the granting or revoking of this entitlement to be a manual process (approved by
someone), select No to use the User Application, then skip to Step 6.
5 (Conditional) If you select Ye s to the Role-Based Entitlements question, you are asked if you
want to use the Role-Based Entitlements priority to resolve any conflicts that might happen
when this entitlement is assigned by different Role-Based Entitlement Policies with different
values. You can resolve the conflict by either using the Role-Based Entitlements priority, or by
merging the values. This example uses priority.
Merging the values merges the entitlements of all involved Role-Based Entitlement policies, so
if one policy revokes an entitlement but another policy grants an entitlement, the entitlement is
eventually granted. Solving conflicts by priority works if you need to ensure that only one
policy is applied to this entitlement at any time.
6 Click Finish.
7 If you see the Add To Filter window, answer Yes if you want the driver to listen for this
entitlement. This enables entitlements for the driver. The DirXML-EntitlementRef attribute
allows the driver filter to listen for entitlement activities, which is necessary in order to use the
entitlements you are creating.
novdocx (en) 13 May 2009
or
If you don’t want to see the Add To Filter window on entitlements you are creating for any
driver in Designer, select Remember Selection - Don’t Prompt Again, then click OK. However,
after the attribute is added to this driver filter, you won’t see the Add To Filter window again.
Before you can edit this entitlement, you are asked to save the editor’s changes before continuing.
Once the editor is saved, the entitlement displays in the Modeler view.
4.2.3 Valued Entitlement that Queries an External Application
1 Make sure you’ve completed Step 1 through Step 5 on page 18. The following steps start where
those steps ended.
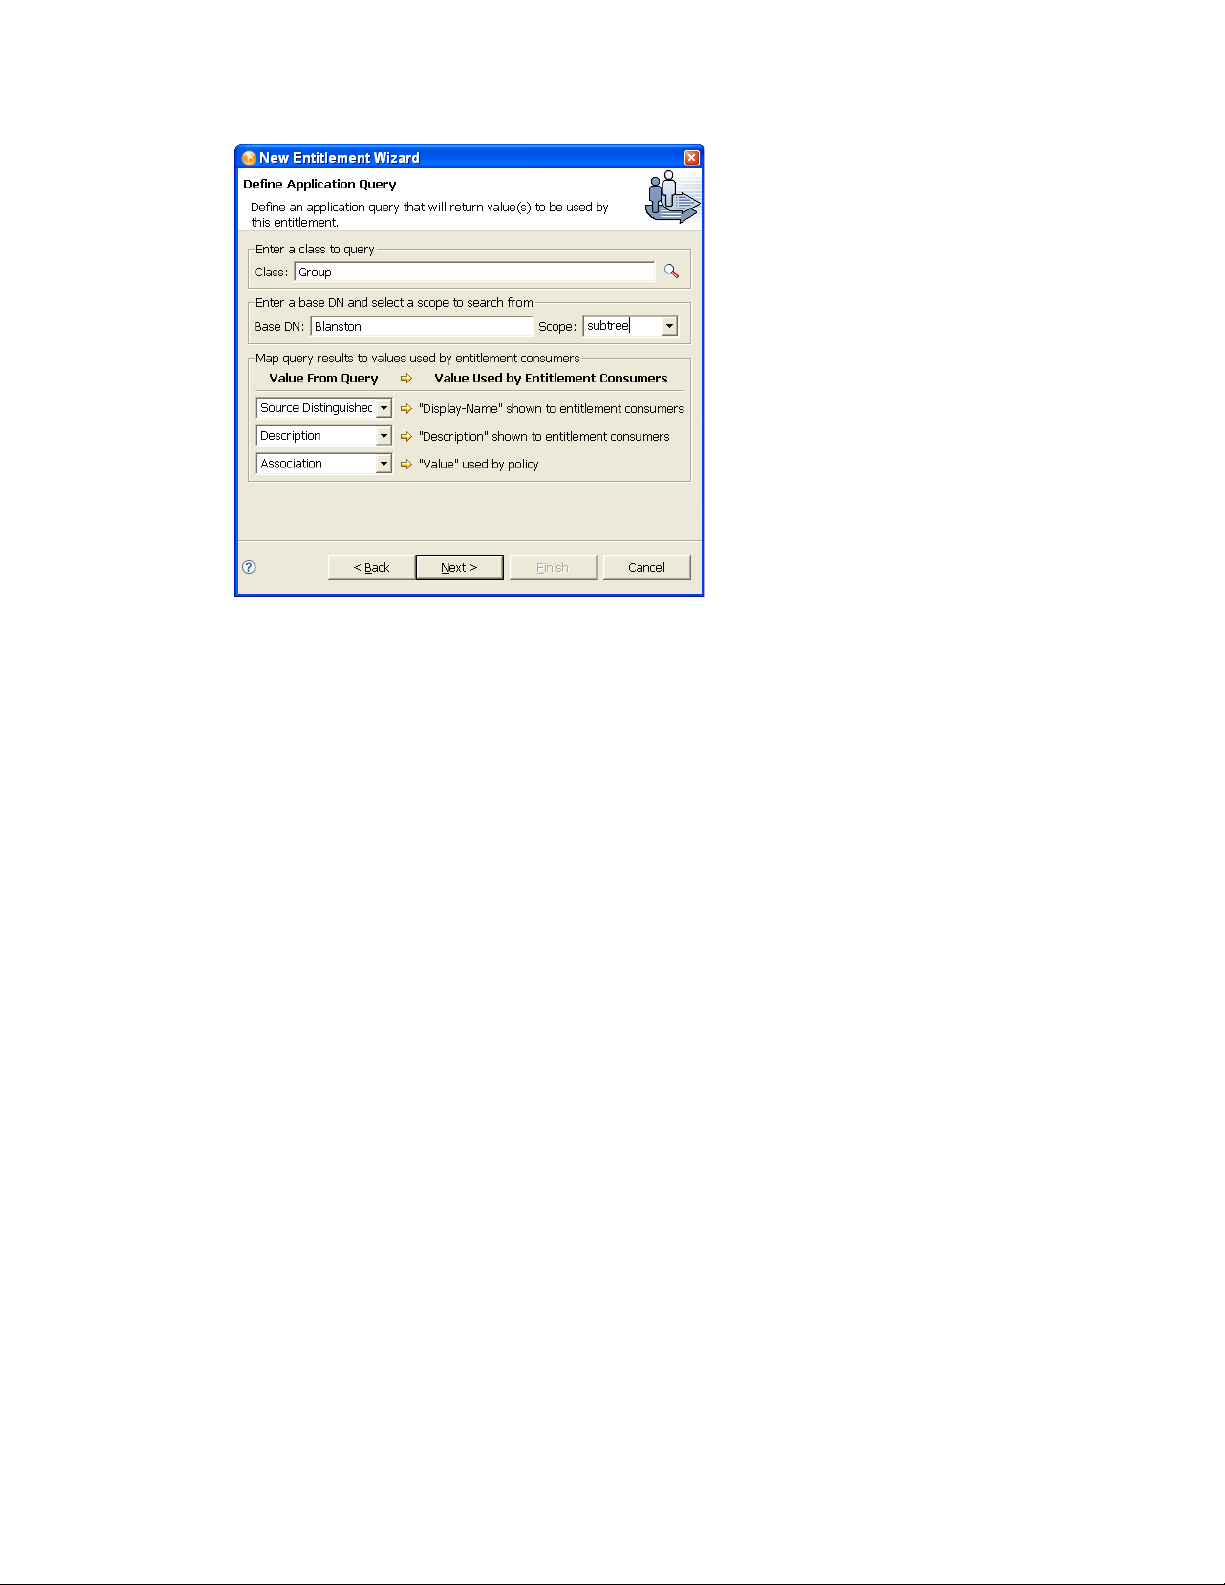
2 On the Define Application Query page, fill in the fields to define the query and map the query
results.
Creating Entitlements 21
novdocx (en) 13 May 2009
Enter a class to query: Click the Schema Browser button on the right side of the Class entry.
The Schema Browser shows you the Classes in the eDirectory namespace that are available. If
you know the name of the Class type you want to query, click to select a selection in the
Classes tab, then start typing the Class name. The browser jumps to the alphabetical order of
what you type. Select the Class name, then click OK.
Enter a base DN and select a scope to search from: Type the distinguished name (DN) of
the directory base where you want to start the search. Select the scope (subtree, entry, or
subordinates).
Map query results to the values used by entitlement consumers: Map the query results
from the connected system to values that entitlement consumers can use.
Display Name: Defines the attribute that displays in the list of values. Click the drop-
down button on the Display Name shown to entitlement consumers list to see a list of
Attributes associated with the class you selected through the Schema Browser. The list
includes both the Attributes and the Inherited Attributes for the selected class.
Description: Defines the attribute that displays as a description for that value. For the
description, select Description from the Value drop-down list to map the query results
from the connected system to the entitlement.
Va lu e: Defines the attribute or token that is the actual value. The Va l ue entry is not seen
in the entitlement consumer, but it is the value that is assigned when the entitlement is
granted or revoked. In this case, choose Association.
If you do not use the Schema Browser button when selecting the class, you see only two
selections in the Va lu e F r om Q u e r y lists: Association and Source Distinguished Name. If these
attributes suit your needs, use them. You can also type the attribute name into the text field.
However, if you want to select the attributes from the lists, use the Schema Browser button
when selecting a class for the query. You see the attributes and inherited attributes for the
selected class.
3 When you’ve finished defining the query, select Next.
4 In the Assign Multiple Values dialog box, select Yes if you want the entitlements to be able to
be granted to a user more than once and with different values, then click Next.
22 Identity Manager 3.6.1 Entitlements Guide

or
Select No if the entitlement can only be granted once, then click Next.
For example, you might only want to use an entitlement one time to assign a building location
to a user. However, because a user could belong to multiple groups, you might want an
entitlement that assigns a user to a group to be able to be used multiple times to assign the user
to multiple groups.
5 You are asked if this entitlement is intended to be used by Role-Based Entitlement policies
through iManager. If you want this entitlement to be granted or revoked automatically, select
Ye s to the Role-Based Entitlements question, click Next, then continue with Step 11.
or
If you want the granting or revoking of this entitlement to be a manual process (approved by
someone), select No to use the User Application, then skip to Step 7.
6 (Conditional) If you select Ye s to the Role-Based Entitlements question, you are asked if you
want to use the Role-Based Entitlements priority to resolve any conflicts that might happen
when this entitlement is assigned more than once with different values. You can resolve the
conflict by either using Role-Based Entitlements priority, or by merging the values.
Merging the values merges the entitlements of all involved Role-Based Entitlement policies, so
if one policy revokes an entitlement but another policy grants an entitlement, the entitlement is
eventually granted. Solving conflicts by priority works if you need to ensure that only one
policy is applied to this entitlement at any time. This example uses priority.
7 Click Finish.
novdocx (en) 13 May 2009
In the example shown in Step 2, the query values look for the Source Distinguished Name
attribute of the Class name of Group, starting from the Base DN (Blanston) and checking
through the subtree from that beginning point. The values that come back from the query are
similar to the following:
<instance class-name="Group" src-dn="o=Blanston,cn=group1">
<association>o=Blanston,cn=group1</association>
<attr attr-name="Description"> the description for group1</attr>
</instance>
<instance class-name="Group" src-dn="o=Blanston,cn=group2">
<association>o=Blanston,cn=group2</association>
<attr attr-name="Description"> the description for group2</attr>
</instance>
<instance class-name="Group" src-dn="o=Blanston,cn=group3">
<association>o=Blanston, cn=group3</association>
<attr attr-name="Description"> the description for group3</attr>
</instance>
<!-- ... ->
The information received from the query fills in the various fields. For instance, the
display-name
<
the description for Group1, and the <
> field receives o=Blanston,cn=group1. The <
ent-value
> field receives o=Blanston,cn=group1.
description
> field receives
Because more than one group exists and meets the query criteria, this information is also
collected and shown as other instances of the query.
The association format value is unique for every external system, so the format and syntax are
different for each external system queried.
Creating Entitlements 23
8 If you see the Add To Filter window, answer Yes if you want the driver to listen for this
entitlement. This enables entitlements for the driver. The DirXML-EntitlementRef attribute
allows the driver filter to listen for entitlement activities, which is necessary in order to use the
entitlements you are creating.
or
If you don’t want to see the Add To Filter window on entitlements you are creating for any
driver in Designer, select Remember Selection - Don’t Prompt Again, then click OK. However,
after the attribute is added to this driver filter, you won’t see the Add To Filter window again.
4.3 Creating Entitlements in iManager
We strongly recommend that you use the Entitlement Wizard in Designer to create entitlements. The
Entitlement Wizard creates the entitlement XML from the information you provide in the wizard.
iManager does not include this wizard; instead, you must write the XML required for the
entitlement.
To create an entitlement:
1 In iManager, click to display the Identity Manager Administration page.
2 In the Administration list, > click Identity Manager Overview.
novdocx (en) 13 May 2009
3 If the driver set is not listed on the Driver Sets tab, use the Search In field to search for and
display the driver set.
4 Click the driver set to open the Driver Set Overview page.
5 Click the driver to display the Driver Overview page.
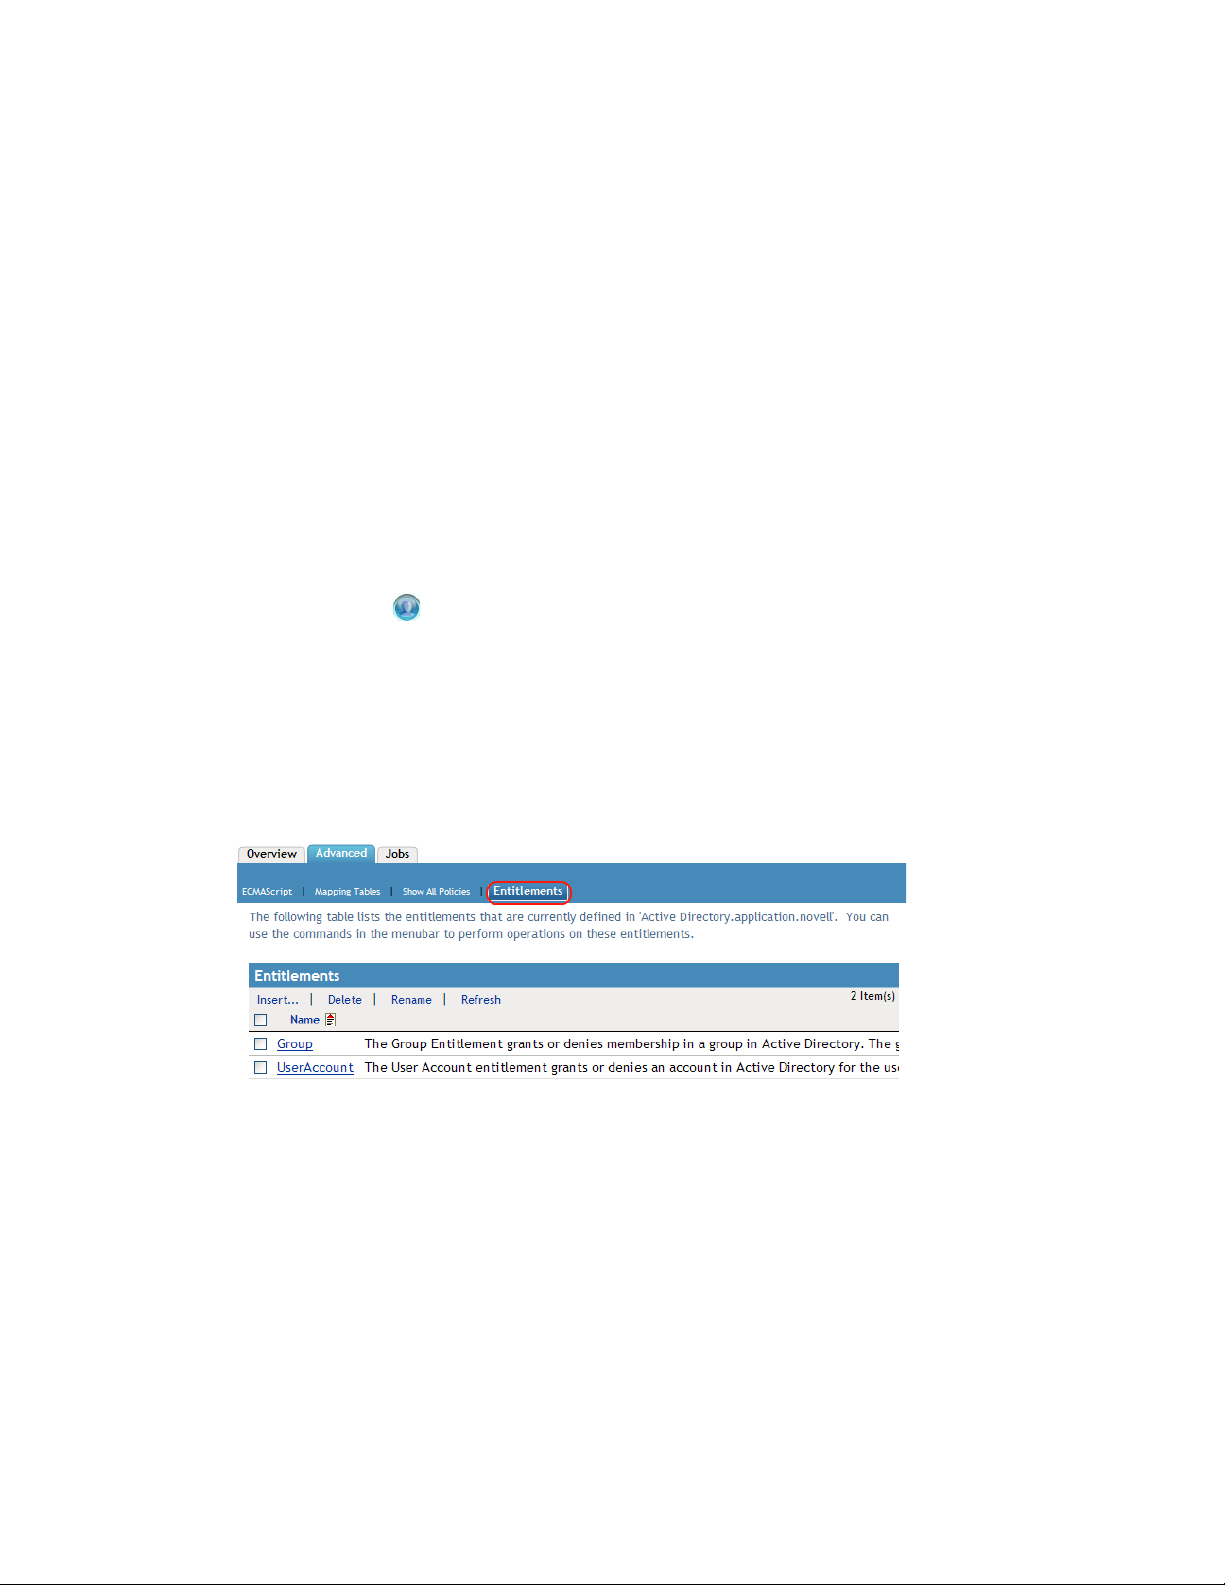
6 On the Driver Overview page, click the Advanced tab, then click Entitlements.
7 Click Insert to create an entitlement.
24 Identity Manager 3.6.1 Entitlements Guide
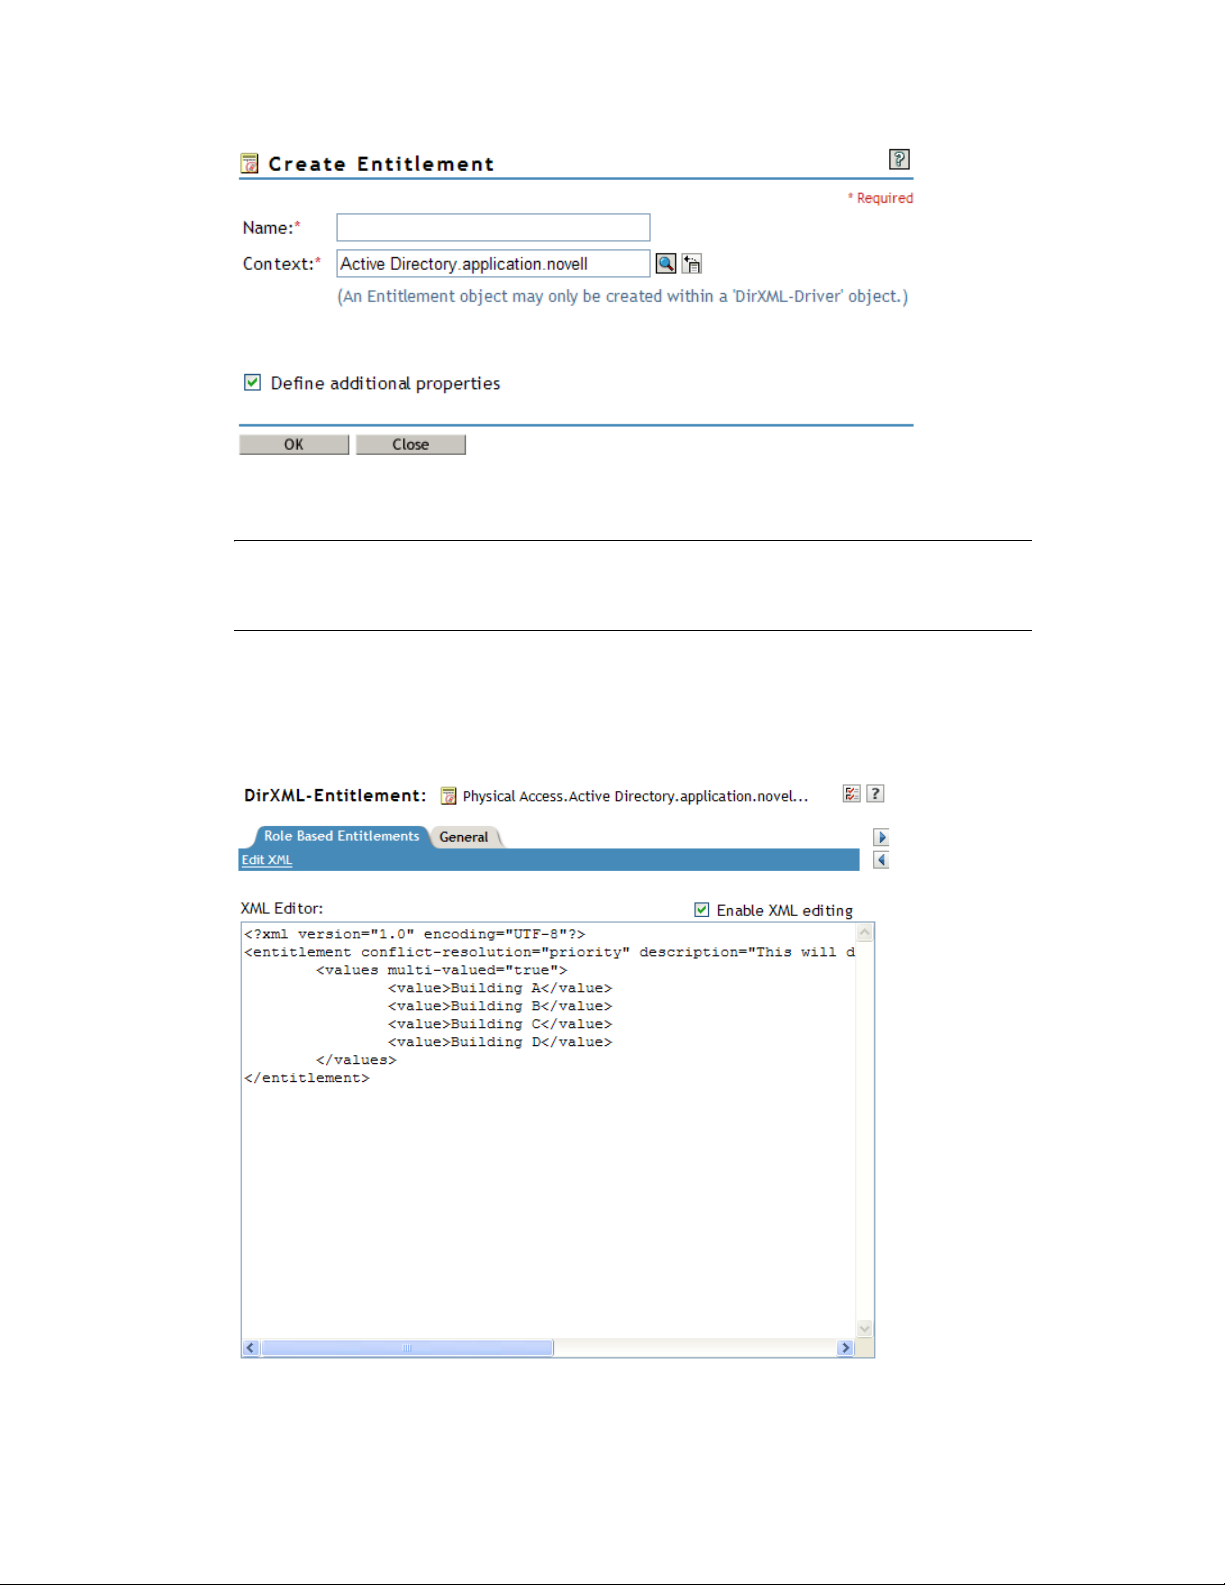
8 Specify a name for the entitlement.
NOTE: You should not change an entitlement’s name after it is created. If you rename an
entitlement, you need to change all of the references in the policies that are implementing the
entitlement. The entitlement name is stored on the Ref and Result attributes within the policy.
novdocx (en) 13 May 2009
The context for the entitlement is already populated, because the driver object is selected.
9 Verify that Define additional properties is selected, then click OK.
10 Check Enable XML editing, then create your entitlement. See Appendix A, “Writing
Entitlements in XML,” on page 35 for details.
Creating Entitlements 25

novdocx (en) 13 May 2009
26 Identity Manager 3.6.1 Entitlements Guide

5
Creating Policies to Support
novdocx (en) 13 May 2009
Entitlements
An entitlement gives a user permission to access the resource represented by the entitlement.
However, for the entitlement to actually be granted or revoked, you need to create the appropriate
policies.
Information about how to create policies is provided in the Policies in Designer 3.0 (http://
www.novell.com/documentation/idm36/policy_designer/data/bookinfo.html) and Policies in
iManager for Identity Manager 3.6.1 (http://www.novell.com/documentation/idm36/
policy_imanager/data/bookinfo.html) guides.
By default, the Active Directory driver includes several entitlements and the policies required to
support the entitlements. These policies are listed below. You can use these policies as examples of
the types of policies you might need to create to support entitlements on other drivers.
Input Transform (driver level): The Check Target Of Add Association For Group
Membership Entitlements rule in this policy checks the target of “add-association” for group
membership entitlements. Group membership entitlements assigned to users being created in
Active Directory cannot be processed until the user is successfully created. Add-association
signals that an object has been created by the driver in Active Directory. If the object is also
tagged for group entitlement processing, it performs the work now.
Event Transform (Publisher channel): The Disallow User Account Delete rule in this policy
disallows a user account delete in the Identity Vault. When you use the User Account
Entitlement, managed user accounts are controlled by the entitlement in the Identity Vault. A
delete in Active Directory does not delete the controlling object in the Identity Vault. A future
change to the object in the Identity Vault or a merge operation might re-create the account in
Active Directory.
5
Command (Subscriber channel): The Command policy contains the following rules
pertaining to entitlements:
The User Account Entitlement Change (Delete Option) rule. The User Account
Entitlement grants the user an enabled account in Active Directory. Revoking the
entitlement disables or deletes the Active Directory account, depending on the value you
select for the When account entitlement revoked global variable. This rule executes when
the entitlement is changing and you have selected the Delete option.
The User Account Entitlement Change (Disable Option) rule. The User Account
Entitlement grants the user an enabled account in Active Directory. Revoking the
entitlement disables or deletes the Active Directory account, depending on the value you
select for the When account entitlement revoked global variable. This rule executes when
the entitlement is changing and you have selected the Disable option.
The Check User Modify for Group Membership Being Granted or Revoked rule.
The Check User Modify for Exchange Mailbox Being Granted or Revoked rule.
Matching (Subscriber channel): This is the Account Entitlement: Do Not Match Existing
Accounts rule for this policy. When you use the User Account entitlement with the Identity
Manager user application or Role-Based Entitlements, accounts are created and deleted (or
disabled) by granting or revoking the entitlement. The default policy does not match an existing
Creating Policies to Support Entitlements
27

account in Active Directory if the user is not entitled to an account in Active Directory. Modify
or remove this rule if you want the entitlement policy to apply to matching accounts in Active
Directory. This might result in the Active Directory account being deleted or disabled.
Creation (Subscriber channel): The Creation policy contains the following rules pertaining
to entitlements:
Account Entitlement: Block Account Creation When Entitlement Not Granted. When you
use the User Account entitlement with the Identity Manager User Application or Role
Based Entitlements, accounts are created only for users that are specifically granted the
account entitlement. This rule vetoes user account creation when the entitlement is not
granted.
Identity Vault Accounts Are Enabled if Login Disabled Does Not Exist.
Prepare To Check Group Entitlements After Add. Group entitlements are processed after
the add completes, because the added object needs to exist in order to be added to a group.
The add is flagged with an operational property that is checked in the input transform
when the add processing completes.
Signal the Need To Check Exchange Entitlements After the Add.
Map User Name to Windows Logon Name. When userPrincipalName is configured to
follow the eDirectory
TM
user name, set userPrincipalName to the eDirectory object name
plus the name of the Active Directory domain.
novdocx (en) 13 May 2009
28 Identity Manager 3.6.1 Entitlements Guide

6
Editing Entitlements
The following sections provide instructions for editing entitlements in Designer and iManager.
Although you can use either tool to create entitlements, we strongly recommend that you use
Designer.
Section 6.1, “Editing Entitlements in Designer,” on page 29
Section 6.2, “Editing Entitlements in iManager,” on page 34
6.1 Editing Entitlements in Designer
After you have created entitlements, you might need to edit them. The Entitlement Editor provides a
graphical interface for editing entitlements. You can also edit the XML source directly.
Section 6.1.1, “Using the Entitlement Editor,” on page 29
Section 6.1.2, “Using the XML Source and XML Tree Views,” on page 31
novdocx (en) 13 May 2009
6
6.1.1 Using the Entitlement Editor
1 From the Outline view, right-click an entitlement that appears under the Subscriber channel of
the selected driver, then click Edit.
or
Double-click the entitlement icon to bring up the entitlement in the Entitlement Editor.
You can also right-click the driver icon in the Modeler view, then select Edit Entitlements.
2 If you have more than one entitlement for the selected driver, you see the Edit Entitlements
windows listing the available entitlements. Select an entitlement, then click OK. The
entitlement appears in the Entitlement Editor.
Editing Entitlements
29

novdocx (en) 13 May 2009
The Entitlement Editor view shows you all of the pages and choices that you see in the
Entitlement Wizard, but the information is on one page.
Entitlement Editor: Displays the full DN name for the entitlement. If there is a conflict
with the entitlement name or some other error, you see a red icon to the left of the
Entitlement Editor name, followed by an error message.
Name and Description: Allows you to edit the name, the display name, and the
description that you have given to this entitlement.
Multi-Value: Allows you to select if you want an entitlement to be assigned multiple
times.
Role-Based Entitlements: Allows you to select conflict resolution for Role-Based
Entitlements. If you do not select Role-Based Entitlements, the Role-based entitlements
with priority button is the default.
Va lu es : Allows you to define how values are defined: no values, administrator defined
values, or values from an application.
The information that appears in the Entitlement Editor depends on what you initially defined in
the entitlement. If you choose to edit a valueless entitlement, the Val u e s heading displays No
Va l ue s . If you are editing a valued entitlement and you want to add values to a list, type the
value in the Va lu e field and click Add. If you want to remove a value, select the value in the
Va l ue s list and click Remove.
If you don’t want to select from a list, select Administrator Defined Values under the Va l ue s
heading and leave the Va lu e s list blank. This gives you a blank text box in iManager or in the
user application, and you can fill in the value there.
3 When you have made your changes to the entitlement, click the Save icon in the upper left
corner of Designer, or click the X on the entitlement’s tab to display a Save Resource window,
allowing you to save changes (Yes/No/Cancel).
30 Identity Manager 3.6.1 Entitlements Guide

6.1.2 Using the XML Source and XML Tree Views
1 From the Outline view, right-click an entitlement that appears under the Subscriber channel of
the selected driver, then click Edit.
or
Double-click the entitlement icon to bring up the entitlement in the Entitlement Editor.
You can also right-click the driver icon in the Modeler view, then select Edit Entitlements.
2 To see the XML Source view, click XML Source at the bottom of the Entitlement Editor view.
The XML Source view shows the XML code in a formatted state.
novdocx (en) 13 May 2009
The upper right corner of the XML Source view has the following selections:
Name Description
Expand All Allows you to see all items under the item that you have selected.
Collapse All Allows you to collapse all items that you have selected.
Attach XML Catalog Entry,
XML Schema, or DTD
Copy XML to Clipboard Allows you to copy highlighted XML code to the clipboard. This action
Allows you to attach an XML Catalog entry, an XML schema file, or a
DTD (Document Type Definition) file. For default Windows installation,
the DTD for entitlements is found under
Files\Novell\Designer\eclipse\plugins\com.novell.de
signer.idm.entitlements_1.1.0\DTD\dirxmlentitlement
s.dtd
.
removes the DOCTYPE element.
C:\Program
Editing Entitlements 31

Name Description
Find/Replace (Ctrl+F) Ctrl+F brings up the Find/Replace window, which allows you to query
text, structure, and XPath searches in a forward or a backward
direction. Other options include case sensitive, wrap search, whole
word, incremental, and regular expressions search capabilities.
Help Opens the Help view to the right of the XML Source view.
Right-clicking in the XML Source view brings up the following options:
Undo Text Change (Ctrl+Z)
Revert File
Save
Cut (Ctrl+X)
Copy (Ctrl+C)
Paste (Ctrl+V)
Format the document or active elements
Clear Validation Errors
novdocx (en) 13 May 2009
Validate
Preferences
3 To see the XML Tree view, click XML Tree at the bottom of the Entitlement Editor view.
The XML Tree view is a tree control view of the XML source code. You can perform the same
edits in this view as you can in the Entitlement Editor view or the XML Source view. To view
the entitlement in XML Tree view, select XML Tree at the bottom of the Entitlement Editor
view.
32 Identity Manager 3.6.1 Entitlements Guide

The upper right corner of the XML Tree view menu contains the following selections:
Name Description
Expand All Allows you to see all items under the item that you have selected.
Collapse All Allows you to collapse all items that you have selected.
novdocx (en) 13 May 2009
Attach XML Catalog Entry,
XML Schema, or DTD
Find/Replace (Ctrl+F) Brings up the Find/Replace window, which allows you to query text,
Help Opens the Help view to the right of the XML Tree view.
Allows you to attach an XML Catalog entry, an XML schema file, or a
DTD (Document Type Definition) file. For default Windows installation,
the DTD for entitlements is found under
Files\Novell\Designer\eclipse\plugins\com.novell.de
signer.idm.entitlements_1.1.0\DTD\dirxmlentitlement
s.dtd
.
structure, and XPath searches in a forward or a backward direction.
Other options include case sensitive, wrap search, whole word,
incremental, and regular expressions search capabilities.
C:\Program
Right-clicking in the XML Tree view can bring up a number of different options. For example,
right-clicking the highlighted value on the right side presents the following options:
Undo
Cut
Copy
Paste
Delete
Select All
Right-clicking an attribute on the left side in the XML Tree view presents the following
options:
Remove
Edit the Selected Attribute
Replace with a value
Depending on what you select on the left side in the XML Tree view, you see different options.
For example, right-clicking an element presents the following options:
Remove Element
Add New Attribute
Add to a Child Element a Comment, a Processing Instruction, a PCDATA, a CDATA
Section, a new Element
Add Before a Comment, a Processing Instruction, a PCDATA, a CDATA Section, a new
Element
Add After a Comment, a Processing Instruction, a PCDATA, a CDATA Section, a new
Element
Editing Entitlements 33

6.2 Editing Entitlements in iManager
1 In iManager, click to display the Identity Manager Administration page.
2 In the Administration list, > click Identity Manager Overview.
3 If the driver set is not listed on the Driver Sets tab, use the Search In field to search for and
display the driver set.
4 Click the driver set to open the Driver Set Overview page.
5 Click the driver to display the Driver Overview page.
6 On the Driver Overview page, click the Advanced tab, then click Entitlements.
novdocx (en) 13 May 2009
7 Click the entitlement you want to edit.
8 Check Enable XML editing, then edit the entitlement. See Appendix A, “Writing Entitlements
in XML,” on page 35 for details.
9 Click OK when you’ve finished editing the XML.
34 Identity Manager 3.6.1 Entitlements Guide

A
Writing Entitlements in XML
Entitlements, like other Identity Manager features and functionality, are implemented through XML
code that is processed by the various Identity Manager components. Designer includes an
Entitlements Wizard that creates the required XML code for an entitlement. We strongly
recommend that you use Designer to create entitlements.
If you use iManager to create entitlements, you must create the XML code yourself. To help you
better understand what needs to go into an entitlement, you can look at the preconfigured
entitlements and policies in the Active Directory driver. You will need to examine the Novell
Entitlement DTD (Document Type Definition) and then look at XML examples of writing
entitlements based on the DTD.
The following sections provide information to help you create XML entitlement documents:
Section A.1, “Novell Entitlement Document Type Definition (DTD),” on page 35
Section A.2, “Examples to Help You Write Your Own Entitlements,” on page 39
®
novdocx (en) 13 May 2009
A
A.1 Novell Entitlement Document Type Definition (DTD)
The Novell Entitlement DTD is provided below. An explanation of the DTD is provided in the two
sections following the DTD:
Section A.1.1, “Explaining the Entitlement DTD,” on page 36
Section A.1.2, “Other Headings in the DTD,” on page 38
<!-*****************************************************************->
<!-- DirXML Entitlements DTD
<!-- Novell Inc.
<!-- 1800 South Novell Place
<!-- Provo, UT 84606-6194
<!-- Version=1.0.0
<!-- Copyright 2005 Novell, Inc. All rights reserved -->
<!--************************************************************* -->
<!- Entitlement definition stored in the XmlData attribute of a
DirXML-Entitlement object.
-->
<!ELEMENT entitlement (values?)>
<!ATTLIST entitlement
conflict-resolution (priority | union) "priority"
display-name CDATA #REQUIRED
description CDATA #REQUIRED
>
<!ELEMENT values (query-app | value+)?>
<!ATTLIST values
multi-valued (true | false) "true"
>
<!ELEMENT value (#PCDATA)>
<!ELEMENT query-app (query-xml, result-set)>
<!ELEMENT query-xml ANY>
Writing Entitlements in XML
35

<!ELEMENT result-set (display-name, description, ent-value)>
<!ELEMENT display-name(token-attr | token-src-dn | token-association)>
<!ELEMENT ent-value (token-association | token-src-dn | token-attr)>
<!ELEMENT description (token-association | token-src-dn | token-attr)>
<!ELEMENT token-association EMPTY>
<!ELEMENT token-attr EMPTY>
<!ATTLIST token-attr
attr-name CDATA #REQUIRED
>
<!ELEMENT token-src-dn EMPTY>
<!- Entitlement reference stored in the DirXML-EntitlementRef attribute of a
DirXML-EntitlementRecipient or a DirXML-SharedProfile object.
-->
<!ELEMENT ref (src?, id?, param?)>
<!ELEMENT param (#PCDATA)>
<!ELEMENT id (#PCDATA)>
<!ELEMENT src (#PCDATA)>
<!- Entitlement result stored in the DirXML-EntitlementResult attribute of a
DirXML-EntitlementRecipient object.
-->
<!ELEMENT result(dn, src, id?, param?, state, status, msg?,timestamp)>
<!ELEMENT dn (#PCDATA)>
<!ELEMENT state (#PCDATA)>
<!ELEMENT status (#PCDATA)>
<!ELEMENT msg ANY>
<!ELEMENT timestamp (#PCDATA)>
<!- Cached query results stored in the DirXML-SPCachedQuery attribute of a
DirXML-Entitlement object.
-->
<!ELEMENT items (item*)>
<!ELEMENT item (item-display-name?, item-description?, item-value)>
<!ELEMENT item-display-name (#PCDATA)>
<!ELEMENT item-description (#PCDATA)>
<!ELEMENT item-value (#PCDATA)>
<!- Representation of a DirXML-EntitlementRef within the DirXML Script and
within the operation-data of an operation in an XDS document.
-->
<!ELEMENT entitlement-impl (#PCDATA)>
<!ATTLIST entitlement-impl
name CDATA #REQUIRED
src CDATA #REQUIRED
id CDATA #IMPLIED
state (0 | 1) #REQUIRED
src-dn CDATA #REQUIRED
src-entry-id CDATA #IMPLIED
>
novdocx (en) 13 May 2009
A.1.1 Explaining the Entitlement DTD
The Entitlement DTD is broken into five parts: definition, reference, result, cached query, and
internal reference information. The heading is just a comment and is optional. In the DTD, the
heading for the Entitlement Definition is:
36 Identity Manager 3.6.1 Entitlements Guide

<!-Entitlement definition stored in the XmlData attribute of a
DirXML-Entitlement object.
-->
novdocx (en) 13 May 2009
Headings are followed by Elements (
ELEMENT
) and Attribute lists (
ATTLIST
). Below is a detailed
explanation of the elements and attributes under the Entitlement Definition heading, which is the
main heading you need to focus on when creating entitlements.
<!ELEMENT entitlement (values?)>
The root level element is
element. This is followed by the Attribute list, which includes
, and
name
conflict-resolution (priority | union) "priority"
description
<entitlement>
, which can contain a single, optional, child
conflict-resolution, display-
. Conflict resolution uses Priority or Union attribute values.
<values>
Role-Based Entitlements use conflict resolution to determine what should happen when a valued
entitlement is applied multiple times to the same object. For example, suppose that user U is a
member of Entitlement Policy A and Entitlement Policy B, each of which reference the same valued
entitlement E, but with a different set of values. Entitlement E of Entitlement Policy A has values (a,
b, c). Entitlement E of Entitlement Policy B has a set of values (c, d, e).
The conflict resolution attribute decides which set of values should apply to user U. If the attribute is
set to union, user U is assigned both sets of values (a, b, c, d, e). If it is set to priority, user U would
get only one set of values, depending upon which Entitlement Policy has a higher priority.
If an entitlement is single-valued, conflicts must be resolved by priority, because a union of values
results in more than one value being applied. Role-Based Entitlements presently uses this attribute;
in the future, Workflow Entitlements might also use it.
display-name CDATA #REQUIRED
description CDATA #REQUIRED
The literal entitlement name is not necessarily what an entitlement should display. The Displayname and Description attributes are intended for end-user display. (In Designer, you have an option
to choose a display name for the entitlement instead of using the actual entitlement name.)
<!ELEMENT values (query-app | value+)?>
<!ATTLIST values
multi-valued (true | false) "true"
The
<values>
element is optional and indicates that an entitlement is valued. If you do not use this
element, it means an entitlement is valueless. An example of a valued entitlement is an entitlement
that grants a distribution list. An example of a valueless entitlement is an entitlement that grants an
account in an application, such as the User Account entitlement that comes with the Active
Directory driver.
Valued entitlements receive their values from three sources. One source is the external application
(designated by the
(one or more
element with no
<value>
<value>
<query-app>
elements). The third source is from the entitlement client (a
element). Another is from a predefined list of enumerated values
<values>
children). The examples are helpful in explaining the way values work.
Valued entitlements may be single-valued or multi-valued, and the default is multi-valued. It is the
responsibility of the entitlement client to enforce this restriction.
Writing Entitlements in XML 37

<!ELEMENT value (#PCDATA)>
Entitlement values are untyped strings.
<!ELEMENT query-app (query-xml, result-set)>
If values come from an external application (such as an e-mail distribution list), you must specify an
application query through the
<result-set>
the
element. We show two examples of this in “Example 2: Application Query
<query-xml>
element. You extract the results from the query through
Entitlement: External Query” on page 40.
<!ELEMENT query-xml ANY>
novdocx (en) 13 May 2009
XML queries are XDS-formatted. The
from the connected application. The functionality for DirXML
<query-xml>
command is used to find and read objects
®
rules, object migration, etc.
depends on the driver’s implementation of the query command. For more information on XML
queries, see the Novell developer documentation on queries (http://developer.novell.com/ndk/doc/
dirxml/dirxmlbk/ref/ndsdtd/query.html).
<!ELEMENT result-set (display-name, description, ent-value)>
<!ELEMENT display-name(token-attr | token-src-dn | token-association)>
<!ELEMENT ent-value (token-association | token-src-dn | token-attr)>
<!ELEMENT description (token-association | token-src-dn | token-attr)>
<!ELEMENT token-association EMPTY>
<!ELEMENT token-attr EMPTY>
<!ATTLIST token-attr
attr-name CDATA #REQUIRED
Use the
are three pieces of data that are of interest: the display name of the value (the
element), the value’s description (the
(the
The token elements
result set
ent-value
element to help you interpret the result of an external application query. There
display-name
description
child element), and the literal entitlement value
child element), which is not displayed.
<token-src-dn>, <token-association>, <token-attr>
are actually
child
placeholders for XPATH expressions that extract the src-dn attribute value, association value, or any
attribute values respectively from an XDS-formatted XML document. The DTD assumes that the
query result is XDS.
A.1.2 Other Headings in the DTD
The remaining entitlement headings in the Entitlement DTD serve different functions, but they are
not items that you need to focus on when creating an entitlement.
<!-Entitlement reference stored in the DirXML-EntitlementRef attribute of a
DirXML-EntitlementRecipient or a DirXML-SharedProfile object.
-->
The information stored in the Entitlement Reference portion of the DTD points to an entitlement
object. This information is placed there by the managing agent (such as the Role-Based Entitlement
driver,
Entitlement.xml
triggering event for an action to take place in a connected system. You don’t need to do anything
with the DTD under this heading, but you can use this information to ensure that the entitlement
object is being referenced.
38 Identity Manager 3.6.1 Entitlements Guide
, or the Approval Flow driver,
UserApplication.xml
). This is the

<!- Entitlement result stored in the DirXML-EntitlementResult attribute of a
DirXML-EntitlementRecipient object.
-->
The Entitlement Result portion reports the results about whether an entitlement is granted or
revoked. The information includes the state or status of the event and when the event is granted or
revoked (through a time stamp). You don’t need to do anything with the elements and attributes
under this heading.
<!- Cached query results stored in the DirXML-SPCachedQuery attribute of a
DirXML-Entitlement object.
-->
The Entitlement Query portion contains the entitlement values that are gathered from an external
application. This information can then be used again if the entitlement client needs to display this
information. These values are stored in the
DirXML-SPCachedQuery
attribute of the Entitlement
object. You don’t need to do anything with the elements and attributes under this heading.
novdocx (en) 13 May 2009
<!- Representation of a DirXML-EntitlementRef within the DirXML Script and
within the operation-data of an operation in an XDS document.
-->
Because the DTD defines values for more than one document, this EntitlementRef portion is
actually not part of the Entitlement definition. You don’t need to do anything with the elements and
attributes under this heading.
A.2 Examples to Help You Write Your Own Entitlements
You can create valued and valueless entitlements. Valued entitlements can get their values from an
external query, from an administrator-defined list, or free form. The following sections contain
examples of four entitlements you can create.
Section A.2.1, “Example 1: Account Entitlement: Valueless,” on page 39
Section A.2.2, “Example 2: Application Query Entitlement: External Query,” on page 40
Section A.2.3, “Example 3: Administrator-Defined Entitlement: With Lists,” on page 43
Section A.2.4, “Example 4: Administrator-Defined Entitlements: Without Lists,” on page 43
A.2.1 Example 1: Account Entitlement: Valueless
<?xml version="1.0" encoding="UTF-8"?>
<entitlement conflict-resolution="priority"
description="This is an Account Entitlement"
display-name="Account Entitlement"/>
In this example, the valueless entitlement’s name is Account. This is followed by the conflictresolution line with the default setting of Priority, which in most cases means that if the entitlement
is used by Role-Based Entitlements, the RBE with priority sets the value. (However, because this is
an example of a valueless entitlement, valued settings don’t apply.) The Entitlement description is
Writing Entitlements in XML 39

This is an Account Entitlement, and the display name is Account Entitlement. This information is all
you need to create an Account Entitlement, which you can then use to grant an account in an
application.
The Active Directory driver with entitlements enabled has a UserAccount entitlement that Active
Directory uses to grant or revoke a user account.
<?xml version="1.0" encoding="UTF-8"?>
<entitlement conflict-resolution="union"
description="The User Account entitlement grants or denies an
account in Active Directory for the user. When granted, the user
is given an enabled logon account. When revoked, the logon
account is either disabled or deleted depending on how the drive
is configured."
display-name="User Account Entitlement" name="UserAccount">
</entitlement>
In this example, the conflict resolution is Union, which allows the entitlement to merge the values
that are assigned. (Again, valued settings don’t apply to valueless entitlements.) The Description
field explains what this entitlement is used for and why it was created. This is useful information for
those who perform future modifications to the entitlement. The actual name of the entitlement is
UserAccount, while the
<display-name>
displays in a managing agent as User Account
Entitlement.
novdocx (en) 13 May 2009
A.2.2 Example 2: Application Query Entitlement: External Query
The Group and Exchange Mailbox entitlements that come with an entitlement-enabled Active
Directory driver offer examples of application queries. Use this entitlement type when you need
external information from a connected system to perform an event.
<?xml version="1.0" encoding="UTF-8"?>
<entitlement conflict-resolution="union"
description="The Group Entitlement grants or denies membership in
a group in Active Directory. The group must be associated with a
group in the Identity Vault. When revoked, the user is removed from
the group. The group membership entitlement is not enforced on the
publisher channel: If a user is added to a controlled group in
Active Directory by some external tool, the user is not removed by
the driver. Further, if the entitlement is removed from the user
object instead of being simply revoked, the driver takes no action."
display-name="Group Membership Entitlement" name="Group">
<values>
<query-app>
<query-xml>
<nds dtd-version="2.0">
<input>
<query class-name="Group"
scope="subtree">
<search-class class-name="Group"/>
<read-attr attr-name="Description"/>
</query>
</input>
</nds>
</query-xml>
<result-set>
40 Identity Manager 3.6.1 Entitlements Guide

<display-name>
<token-src-dn/>
</display-name>
<description>
<token-attr attr-name="Description"/>
</description>
<ent-value>
<token-association/>
</ent-value>
</result-set>
</query-app>
</values>
</entitlement>
In this example, the Group entitlement uses Union to settle conflicts if the entitlement is applied
more than once to the same object. The Union attribute merges the entitlements of all involved RoleBased Entitlement policies, so if one policy revokes an entitlement but another policy grants an
entitlement, the entitlement is eventually granted.
The Group description is useful because of its detail, which explains what was set up through rules
in the driver’s policies. This description is a good example of the detail you need go into when
defining entitlements in the first place.
novdocx (en) 13 May 2009
<display-name>
The
is Group Membership Entitlement, which appears in the managing agents,
such as iManager for Role-Based Entitlements. The name is the Relative Distinguished Name
(RDN) of the entitlement. If you don’t define a display name, the entitlement’s name is its RDN.
The initial query values look for the class name of Group at the top of the tree and continues through
its subtrees. These values come from the connected Active Directory server and the application
query starts at the
tag. Under the
<query-xml>
tag, this query receives information similar to
<nds>
the following:
<instance class-name="Group" src-dn="o=Blanston,cn=group1">
<association>o=Blanston,cn=group1</association>
<attr attr-name="Description"> the description for group1</attr>
</instance>
<instance class-name="Group" src-dn="o=Blanston,cn=group2">
<association>o=Blanston,cn=group2</association>
<attr attr-name="Description"> the description for group2</attr>
</instance>
<instance class-name="Group" src-dn="o=Blanston,cn=group3">
<association>o=Blanston, cn=group3</association>
<attr attr-name="Description"> the description for group3</attr>
</instance>
<!-- ... ->
Then, under the
fields. For instance, the
<description>
receives
o=Blanston,cn=group1
<result-set>
<display-name>
field receives
tag, the information received from the query fills in the various
field receives
the description for group1
o=Blanston,cn=group1
, and the
<ent-value>
. The
field
. Because more than one group existed and met the query criteria,
this information was also collected and shown as other instances.
NOTE: The association format value is unique for every external system, so the format and syntax
are different for each external system queried.
Another example is the Exchange Mailbox entitlement:
Writing Entitlements in XML 41

<?xml version="1.0" encoding="UTF-8"?>
<entitlement conflict-resolution="union"
description="The Exchange Mailbox Entitlement grants or denies an
Exchange mailbox for the user in Microsoft Exchange."
display-name="Exchange Mailbox Entitlement" name="ExchangeMailbox">
<values>
<query-app>
<query-xml>
<nds dtd-version="2.0">
<input>
<query class-name="msExchPrivateMDB"
dest-dn="CN=Configuration," scope="subtree">
<search-class class-name="msExchPrivateMDB"/>
<read-attr attr-name="Description"/>
<read-attr attr-name="CN"/>
</query>
</input>
</nds>
</query-xml>
<result-set>
<display-name>
<token-attr attr-name="CN"/>
</display-name>
<description>
<token-attr attr-name="Description"/>
</description>
<ent-value>
<token-src-dn/>
</ent-value>
</result-set>
</query-app>
</values>
</entitlement>
novdocx (en) 13 May 2009
In this example, the Exchange Mailbox entitlement uses Union to settle conflicts if the entitlement is
applied more than once to the same object. The Union attribute merges the entitlements of all
involved Role-Based Entitlement policies, so if one policy revokes an entitlement but another policy
grants an entitlement, the entitlement is eventually granted.
The description states that the entitlement grants or revokes an Exchange mailbox for the user in
Microsoft* Exchange, which is enough detail for what the entitlement does. The display name is
Exchange Mailbox Entitlement, which appears in the managing agents, such as iManager for RoleBased Entitlements. The name is the Relative Distinguished Name (RDN) of the entitlement. If you
don’t define a display name, the entitlement’s name is its RDN.
The initial query values look for the class name of msExchPrivateMDB, which is a Microsoft
Exchange function call that begins looking in container Configuration and continues through its
subtrees. These values come from the connected Active Directory database and the application
<nds>
query starts at the
tag. The class msExchPrivateMDB has no equivalent in eDirectory, so you
need to be conversant in Microsoft Exchange function calls to make such a query. But the query is
completed because of the rules and policies that are found in the Active Directory driver.
Entitlement consumers use the information that is retrieved by the query. For example, the
entitlement value (
ent-value
) is passed to Identity Manager policies through the DirXMLEntitlementRef attribute. The display name and description information are displayed by iManager
or the User Application and are stored in the DirXML-SPCachedQuery attribute.
42 Identity Manager 3.6.1 Entitlements Guide

A.2.3 Example 3: Administrator-Defined Entitlement: With Lists
The third example is an admin-defined entitlement that creates a grant or revoke event after you
select a list entry.
<?xml version="1.0" encoding="UTF-8"?>
<entitlement conflict-resolution="union"
description="This will show Administrator-defined Values">
<display-name="Admin-defined Entitlement"/>
<values multi-valued="true">
<value>Building A</value>
<value>Building B</value>
<value>Building C</value>
<value>Building D</value>
<value>Building E</value>
<value>Building F</value>
</values>
</entitlement>
novdocx (en) 13 May 2009
In this example, the entitlement name is
defined Entitlement
. (You only need to put in a display name if you want the display name to be
Admin-defined
, with a defined display name of
Admin-
different from the entitlement’s RDN.) The conflict resolution line shows the setting of Union,
which allows the entitlement to merge the values that are assigned.
The Entitlement description is
This will show Administrator-defined Values
. The multivalued attribute is set to true, which allows the entitlement to assign a value more than once. In this
example, the values are corporate building letters: Building A through Building F. Then, through an
entitlement client such as an iManager Roles-Based Entitlement task or through the User
Application, users or defined-task managers can specify the building information, which is then
TM
included in an external application, such as Novell eDirectory
.
A.2.4 Example 4: Administrator-Defined Entitlements: Without Lists
The fourth example is an admin-defined entitlement that forces the administrator to type a value
before the entitlement can grant or revoke an event. You can use this kind of entitlement if you do
not have all of the information to create a task list at the initial setup.
<?xml version="1.0" encoding="UTF-8"?>
<entitlement conflict-resolution="priority"
description="There will be no pre-defined list">
<values multi-valued="false"/>
</entitlement>
In this example, the entitlement name is
Admin-defined
(no list), and it uses the entitlement name
as the displayed name because there is no display name entry. The conflict resolution is again set to
the default of Priority, which means that if the entitlement is used by Role-Based Entitlements, the
RBE with priority sets the value. Through an entitlement client, such as an iManager RBE task or
through the User Application, you specify the building information, which is then included in an
external application, such as eDirectory.
Writing Entitlements in XML 43

novdocx (en) 13 May 2009
44 Identity Manager 3.6.1 Entitlements Guide
 Loading...