

Page 1

Novell®
www.novell.com
Common Driver Administration Guide
Identity Manager
novdocx (en) 17 September 2009
AUTHORIZED DOCUMENTATION
3.6.1
December 24, 2009
Identity Manager 3.6.1 Common Driver Administration Guide
Page 2

Legal Notices
Novell, Inc. makes no representations or warranties with respect to the contents or use of this documentation, and
specifically disclaims any express or implied warranties of merchantability or fitness for any particular purpose.
Further, Novell, Inc. reserves the right to revise this publication and to make changes to its content, at any time,
without obligation to notify any person or entity of such revisions or changes.
Further, Novell, Inc. makes no representations or warranties with respect to any software, and specifically disclaims
any express or implied warranties of merchantability or fitness for any particular purpose. Further, Novell, Inc.
reserves the right to make changes to any and all parts of Novell software, at any time, without any obligation to
notify any person or entity of such changes.
Any products or technical information provided under this Agreement may be subject to U.S. export controls and the
trade laws of other countries. You agree to comply with all export control regulations and to obtain any required
licenses or classification to export, re-export, or import deliverables. You agree not to export or re-export to entities
on the current U.S. export exclusion lists or to any embargoed or terrorist countries as specified in the U.S. export
laws. You agree to not use deliverables for prohibited nuclear, missile, or chemical biological weaponry end uses.
Please refer to the International Trade Services (http://www.novell.com/company/policies/trade_services) for more
information on exporting Novell software. Novell assumes no responsibility for your failure to obtain any necessary
export approvals.
novdocx (en) 17 September 2009
Copyright © 2008-2009 Novell, Inc. All rights reserved. No part of this publication may be reproduced, photocopied,
stored on a retrieval system, or transmitted without the express written consent of the publisher.
Novell, Inc. has intellectual property rights relating to technology embodied in the product that is described in this
document. In particular, and without limitation, these intellectual property rights may include one or more of the U.S.
patents listed on the Novell Legal Patents Web page (http://www.novell.com/company/legal/patents/) and one or
more additional patents or pending patent applications in the U.S. and in other countries.
Novell, Inc.
404 Wyman Street, Suite 500
Waltham, MA 02451
U.S.A.
www.novell.com
Online Documentation: To access the latest online documentation for this and other Novell products, see
the Novell Documentation Web page (http://www.novell.com/documentation).
Page 3

Novell Trademarks
For Novell trademarks, see the Novell Trademark and Service Mark list (http://www.novell.com/company/legal/
trademarks/tmlist.html).
Third-Party Materials
All third-party trademarks are the property of their respective owners.
novdocx (en) 17 September 2009
Page 4

novdocx (en) 17 September 2009
4 Identity Manager 3.6.1 Common Driver Administration Guide
Page 5

Contents
About This Guide 9
1 Starting, Stopping, or Restarting the Driver 11
1.1 Starting the Driver in Designer . . . . . . . . . . . . . . . . . . . . . . . . . . . . . . . . . . . . . . . . . . . . . . . . . 11
1.2 Starting the Driver in iManager . . . . . . . . . . . . . . . . . . . . . . . . . . . . . . . . . . . . . . . . . . . . . . . . 11
1.3 Stopping the Driver in Designer . . . . . . . . . . . . . . . . . . . . . . . . . . . . . . . . . . . . . . . . . . . . . . . . 11
1.4 Stopping the Driver in iManager. . . . . . . . . . . . . . . . . . . . . . . . . . . . . . . . . . . . . . . . . . . . . . . . 11
1.5 Restarting the Driver in Designer . . . . . . . . . . . . . . . . . . . . . . . . . . . . . . . . . . . . . . . . . . . . . . . 12
1.6 Restarting the Driver in iManager . . . . . . . . . . . . . . . . . . . . . . . . . . . . . . . . . . . . . . . . . . . . . . 12
2 Activating the Driver 13
3 Viewing Version Information 15
novdocx (en) 17 September 2009
3.1 Viewing a Hierarchical Display of Version Information. . . . . . . . . . . . . . . . . . . . . . . . . . . . . . . 15
3.2 Viewing the Version Information as a Text File . . . . . . . . . . . . . . . . . . . . . . . . . . . . . . . . . . . . 17
3.3 Saving Version Information . . . . . . . . . . . . . . . . . . . . . . . . . . . . . . . . . . . . . . . . . . . . . . . . . . . 19
3.4 Driver Configuration Files Naming Convention . . . . . . . . . . . . . . . . . . . . . . . . . . . . . . . . . . . . 20
4 Backing Up a Driver 21
4.1 Exporting the Driver in Designer . . . . . . . . . . . . . . . . . . . . . . . . . . . . . . . . . . . . . . . . . . . . . . . 21
4.2 Exporting the Driver in iManager . . . . . . . . . . . . . . . . . . . . . . . . . . . . . . . . . . . . . . . . . . . . . . . 21
5 Monitoring Driver Health 23
5.1 Creating a Driver Health Configuration . . . . . . . . . . . . . . . . . . . . . . . . . . . . . . . . . . . . . . . . . . 23
5.2 Creating a Driver Health Job . . . . . . . . . . . . . . . . . . . . . . . . . . . . . . . . . . . . . . . . . . . . . . . . . . 25
5.3 Modifying the Driver Health Job’s Settings . . . . . . . . . . . . . . . . . . . . . . . . . . . . . . . . . . . . . . . 26
5.4 Modifying the Conditions for a Health State. . . . . . . . . . . . . . . . . . . . . . . . . . . . . . . . . . . . . . . 27
5.5 Modifying the Actions for a Health State . . . . . . . . . . . . . . . . . . . . . . . . . . . . . . . . . . . . . . . . . 30
5.6 Creating a Custom State . . . . . . . . . . . . . . . . . . . . . . . . . . . . . . . . . . . . . . . . . . . . . . . . . . . . . 31
5.7 Memory Requirements for Driver Health . . . . . . . . . . . . . . . . . . . . . . . . . . . . . . . . . . . . . . . . . 33
6 Viewing Driver Statistics 35
6.1 Viewing Statistics for an Individual Driver . . . . . . . . . . . . . . . . . . . . . . . . . . . . . . . . . . . . . . . . 35
6.2 Viewing Statistics for a Driver Set . . . . . . . . . . . . . . . . . . . . . . . . . . . . . . . . . . . . . . . . . . . . . . 36
7 Managing Associations between Drivers and Objects 39
7.1 Inspecting Objects . . . . . . . . . . . . . . . . . . . . . . . . . . . . . . . . . . . . . . . . . . . . . . . . . . . . . . . . . . 39
7.2 Inspecting Drivers . . . . . . . . . . . . . . . . . . . . . . . . . . . . . . . . . . . . . . . . . . . . . . . . . . . . . . . . . . 41
Contents 5
Page 6

8 Inspecting a Driver’s Cache File 45
9 Securely Storing Driver Passwords with Named Passwords 47
9.1 Using Designer to Configure Named Passwords . . . . . . . . . . . . . . . . . . . . . . . . . . . . . . . . . . . 47
9.2 Using iManager to Configure Named Passwords . . . . . . . . . . . . . . . . . . . . . . . . . . . . . . . . . . 48
9.3 Using Named Passwords in Driver Policies . . . . . . . . . . . . . . . . . . . . . . . . . . . . . . . . . . . . . . . 49
9.3.1 Using the Policy Builder. . . . . . . . . . . . . . . . . . . . . . . . . . . . . . . . . . . . . . . . . . . . . . . 49
9.3.2 Using XSLT . . . . . . . . . . . . . . . . . . . . . . . . . . . . . . . . . . . . . . . . . . . . . . . . . . . . . . . . 49
9.4 Using the DirXML Command Line Utility to Configure Named Passwords . . . . . . . . . . . . . . . 50
9.4.1 Creating a Named Password in the DirXML Command Line Utility . . . . . . . . . . . . . . 50
9.4.2 Removing a Named Password in the DirXML Command Line Utility . . . . . . . . . . . . 52
10 Configuring Java Environment Parameters 55
10.1 Using iManager to Configure the Java Environment Parameters . . . . . . . . . . . . . . . . . . . . . . 55
10.2 Using Designer to Configure the Java Environment Parameters. . . . . . . . . . . . . . . . . . . . . . . 56
11 Reassociating a Driver Set Object with a Server 59
novdocx (en) 17 September 2009
12 Using the DirXML Command Line Utility 61
12.1 Interactive Mode. . . . . . . . . . . . . . . . . . . . . . . . . . . . . . . . . . . . . . . . . . . . . . . . . . . . . . . . . . . . 61
12.2 Command Line Mode . . . . . . . . . . . . . . . . . . . . . . . . . . . . . . . . . . . . . . . . . . . . . . . . . . . . . . . . 72
13 Synchronizing Objects 77
13.1 What Is Synchronization? . . . . . . . . . . . . . . . . . . . . . . . . . . . . . . . . . . . . . . . . . . . . . . . . . . . . 77
13.2 When Is Synchronization Done? . . . . . . . . . . . . . . . . . . . . . . . . . . . . . . . . . . . . . . . . . . . . . . . 77
13.3 How Does the Metadirectory Engine Decide Which Object to Synchronize? . . . . . . . . . . . . . 78
13.4 How Does Synchronization Work?. . . . . . . . . . . . . . . . . . . . . . . . . . . . . . . . . . . . . . . . . . . . . . 79
13.4.1 Scenario One. . . . . . . . . . . . . . . . . . . . . . . . . . . . . . . . . . . . . . . . . . . . . . . . . . . . . . . 79
13.4.2 Scenario Two. . . . . . . . . . . . . . . . . . . . . . . . . . . . . . . . . . . . . . . . . . . . . . . . . . . . . . . 81
13.4.3 Scenario Three . . . . . . . . . . . . . . . . . . . . . . . . . . . . . . . . . . . . . . . . . . . . . . . . . . . . . 82
14 Migrating and Resynchronizing Data 85
15 Viewing Identity Manager Processes 87
15.1 Adding Trace Levels in Designer . . . . . . . . . . . . . . . . . . . . . . . . . . . . . . . . . . . . . . . . . . . . . . . 87
15.1.1 Driver Set . . . . . . . . . . . . . . . . . . . . . . . . . . . . . . . . . . . . . . . . . . . . . . . . . . . . . . . . . 87
15.1.2 Driver . . . . . . . . . . . . . . . . . . . . . . . . . . . . . . . . . . . . . . . . . . . . . . . . . . . . . . . . . . . . . 88
15.2 Adding Trace Levels in iManager. . . . . . . . . . . . . . . . . . . . . . . . . . . . . . . . . . . . . . . . . . . . . . . 89
15.2.1 Driver Set. . . . . . . . . . . . . . . . . . . . . . . . . . . . . . . . . . . . . . . . . . . . . . . . . . . . . . . . . . 89
15.2.2 Driver . . . . . . . . . . . . . . . . . . . . . . . . . . . . . . . . . . . . . . . . . . . . . . . . . . . . . . . . . . . . . 90
15.3 Capturing Identity Manager Processes to a File . . . . . . . . . . . . . . . . . . . . . . . . . . . . . . . . . . . 90
15.3.1 Windows . . . . . . . . . . . . . . . . . . . . . . . . . . . . . . . . . . . . . . . . . . . . . . . . . . . . . . . . . . 90
15.3.2 UNIX . . . . . . . . . . . . . . . . . . . . . . . . . . . . . . . . . . . . . . . . . . . . . . . . . . . . . . . . . . . . . 91
15.3.3 iMonitor . . . . . . . . . . . . . . . . . . . . . . . . . . . . . . . . . . . . . . . . . . . . . . . . . . . . . . . . . . . 91
15.3.4 Remote Loader . . . . . . . . . . . . . . . . . . . . . . . . . . . . . . . . . . . . . . . . . . . . . . . . . . . . . 92
16 Editing Driver Configuration Files 95
16.1 Variables in a Driver Configuration File . . . . . . . . . . . . . . . . . . . . . . . . . . . . . . . . . . . . . . . . . . 95
6 Identity Manager 3.6.1 Common Driver Administration Guide
Page 7

16.1.1 General Notes . . . . . . . . . . . . . . . . . . . . . . . . . . . . . . . . . . . . . . . . . . . . . . . . . . . . . . 96
16.1.2 Import Driver Notes . . . . . . . . . . . . . . . . . . . . . . . . . . . . . . . . . . . . . . . . . . . . . . . . . . 98
16.2 Flexible Prompting in a Driver Configuration File . . . . . . . . . . . . . . . . . . . . . . . . . . . . . . . . . . . 98
16.3 Viewing the Informal Identity Manager Driver Configuration DTD . . . . . . . . . . . . . . . . . . . . . 100
17 Troubleshooting the Driver 101
17.1 Using Novell Sentinel to Log Identity Manager Events . . . . . . . . . . . . . . . . . . . . . . . . . . . . . 101
17.2 Troubleshooting Driver Processes . . . . . . . . . . . . . . . . . . . . . . . . . . . . . . . . . . . . . . . . . . . . . 101
17.3 Removing a Driver . . . . . . . . . . . . . . . . . . . . . . . . . . . . . . . . . . . . . . . . . . . . . . . . . . . . . . . . . 101
17.4 Driver Shim Errors . . . . . . . . . . . . . . . . . . . . . . . . . . . . . . . . . . . . . . . . . . . . . . . . . . . . . . . . . 101
17.5 Identity Manager Driver Errors . . . . . . . . . . . . . . . . . . . . . . . . . . . . . . . . . . . . . . . . . . . . . . . . 104
17.6 Java Customization Errors . . . . . . . . . . . . . . . . . . . . . . . . . . . . . . . . . . . . . . . . . . . . . . . . . . . 107
18 When and How to Use Global Configuration Values 109
18.1 Using GCVs to Adapt the Driver Configuration File to Changing Environments . . . . . . . . . . 109
18.2 When Not to Use GCVs . . . . . . . . . . . . . . . . . . . . . . . . . . . . . . . . . . . . . . . . . . . . . . . . . . . . . 109
18.3 When to Use Driver Set GCVs Versus Driver GCVs . . . . . . . . . . . . . . . . . . . . . . . . . . . . . . . 110
18.4 Naming Convention for GCVs . . . . . . . . . . . . . . . . . . . . . . . . . . . . . . . . . . . . . . . . . . . . . . . . 110
novdocx (en) 17 September 2009
A Driver Properties 111
A.1 Accessing the Properties . . . . . . . . . . . . . . . . . . . . . . . . . . . . . . . . . . . . . . . . . . . . . . . . . . . . 111
A.2 Named Passwords . . . . . . . . . . . . . . . . . . . . . . . . . . . . . . . . . . . . . . . . . . . . . . . . . . . . . . . . . 112
A.3 Engine Control Values . . . . . . . . . . . . . . . . . . . . . . . . . . . . . . . . . . . . . . . . . . . . . . . . . . . . . . 112
A.4 Log Level . . . . . . . . . . . . . . . . . . . . . . . . . . . . . . . . . . . . . . . . . . . . . . . . . . . . . . . . . . . . . . . . 114
A.5 Driver Image/iManager Icon. . . . . . . . . . . . . . . . . . . . . . . . . . . . . . . . . . . . . . . . . . . . . . . . . . 115
A.6 Security Equals . . . . . . . . . . . . . . . . . . . . . . . . . . . . . . . . . . . . . . . . . . . . . . . . . . . . . . . . . . . 115
A.7 Filter . . . . . . . . . . . . . . . . . . . . . . . . . . . . . . . . . . . . . . . . . . . . . . . . . . . . . . . . . . . . . . . . . . . . 115
A.8 Edit Filter XML . . . . . . . . . . . . . . . . . . . . . . . . . . . . . . . . . . . . . . . . . . . . . . . . . . . . . . . . . . . . 115
A.9 Misc/Trace . . . . . . . . . . . . . . . . . . . . . . . . . . . . . . . . . . . . . . . . . . . . . . . . . . . . . . . . . . . . . . . 116
A.10 Excluded Objects . . . . . . . . . . . . . . . . . . . . . . . . . . . . . . . . . . . . . . . . . . . . . . . . . . . . . . . . . . 116
A.11 Driver Health Configuration . . . . . . . . . . . . . . . . . . . . . . . . . . . . . . . . . . . . . . . . . . . . . . . . . . 116
A.12 Driver Manifest . . . . . . . . . . . . . . . . . . . . . . . . . . . . . . . . . . . . . . . . . . . . . . . . . . . . . . . . . . . . 116
A.13 Driver Cache Inspector . . . . . . . . . . . . . . . . . . . . . . . . . . . . . . . . . . . . . . . . . . . . . . . . . . . . . 116
A.14 Driver Inspector . . . . . . . . . . . . . . . . . . . . . . . . . . . . . . . . . . . . . . . . . . . . . . . . . . . . . . . . . . . 117
A.15 Server Variables. . . . . . . . . . . . . . . . . . . . . . . . . . . . . . . . . . . . . . . . . . . . . . . . . . . . . . . . . . . 117
Contents 7
Page 8

novdocx (en) 17 September 2009
8 Identity Manager 3.6.1 Common Driver Administration Guide
Page 9

About This Guide
This guide contains administration tasks that are common to all Identity Manager drivers. The guide
is organized as follows:
Chapter 1, “Starting, Stopping, or Restarting the Driver,” on page 11
Chapter 2, “Activating the Driver,” on page 13
Chapter 3, “Viewing Version Information,” on page 15
Chapter 4, “Backing Up a Driver,” on page 21
Chapter 5, “Monitoring Driver Health,” on page 23
Chapter 6, “Viewing Driver Statistics,” on page 35
Chapter 7, “Managing Associations between Drivers and Objects,” on page 39
Chapter 8, “Inspecting a Driver’s Cache File,” on page 45
Chapter 9, “Securely Storing Driver Passwords with Named Passwords,” on page 47
Chapter 10, “Configuring Java Environment Parameters,” on page 55
novdocx (en) 17 September 2009
Chapter 11, “Reassociating a Driver Set Object with a Server,” on page 59
Chapter 12, “Using the DirXML Command Line Utility,” on page 61
Chapter 13, “Synchronizing Objects,” on page 77
Chapter 14, “Migrating and Resynchronizing Data,” on page 85
Chapter 15, “Viewing Identity Manager Processes,” on page 87
Chapter 16, “Editing Driver Configuration Files,” on page 95
Chapter 17, “Troubleshooting the Driver,” on page 101
Chapter 18, “When and How to Use Global Configuration Values,” on page 109
Appendix A, “Driver Properties,” on page 111
Audience
This guide is intended for administrators, consultants, and network engineers who require a highlevel introduction to Identity Manager business solutions, technologies, and tools.
Documentation Updates
For the most recent version of this document, see the Identity Manager Documentation Web site
(http://www.novell.com/documentation/idm36/index.html).
Additional Documentation
For additional Identity Manager documentation, see the Identity Manager Documentation Web site
(http://www.novell.com/documentation/idm36/index.html)
For information about specific Identity Manager drivers, see the Identity Manager Drivers Web site
(http://www.novell.com/documentation/idm36drivers/index.html).
About This Guide 9
Page 10

Documentation Conventions
In Novell® documentation, a greater-than symbol (>) is used to separate actions within a step and
items in a cross-reference path.
®
A trademark symbol (
, TM, etc.) denotes a Novell trademark. An asterisk (*) denotes a third-party
trademark.
When a single pathname can be written with a backslash for some platforms or a forward slash for
other platforms, the pathname is presented with a backslash. Users of platforms that require a
forward slash, such as Linux* or UNIX*, should use forward slashes as required by your software.
novdocx (en) 17 September 2009
10 Identity Manager 3.6.1 Common Driver Administration Guide
Page 11

1
Starting, Stopping, or Restarting
novdocx (en) 17 September 2009
the Driver
The following sections describe how to start, stop, and restart a driver in Designer and iManager.
Section 1.1, “Starting the Driver in Designer,” on page 11
Section 1.2, “Starting the Driver in iManager,” on page 11
Section 1.3, “Stopping the Driver in Designer,” on page 11
Section 1.4, “Stopping the Driver in iManager,” on page 11
Section 1.5, “Restarting the Driver in Designer,” on page 12
Section 1.6, “Restarting the Driver in iManager,” on page 12
1.1 Starting the Driver in Designer
1 Open a project in the Modeler, then right-click the driver line.
2 Click Live > Start Driver.
1.2 Starting the Driver in iManager
1 In the Roles and Tasks view, click Identity Manager > Identity Manager Overview.
1
2 In the Search in field, specify the fully distinguished name of the container where you want to
start searching and then click , or click to browse for and select the container in the tree
structure.
3 Click the upper right corner of the driver icon whose status you want to change, then click Start
driver.
1.3 Stopping the Driver in Designer
1 Open a project in the Modeler, then right-click the driver line.
2 Click Live > Stop Driver.
1.4 Stopping the Driver in iManager
1 In the Roles and Tasks view, click Identity Manager > Identity Manager Overview.
2 In the Search in field, specify the fully distinguished name of the container where you want to
start searching and then click , or click to browse for and select the container in the tree
structure.
3 Click the upper right corner of the driver icon whose status you want to change, then click Stop
driver.
Starting, Stopping, or Restarting the Driver
11
Page 12

1.5 Restarting the Driver in Designer
1 Open a project in the Modeler, then right-click the driver line.
2 Click Live > Restart Driver.
1.6 Restarting the Driver in iManager
1 In the Roles and Tasks view, click Identity Manager > Identity Manager Overview.
2 In the Search in field, specify the fully distinguished name of the container where you want to
start searching and then click , or click to browse for and select the container in the tree
structure.
3 Click the upper right corner of the driver icon, then click Restart driver.
novdocx (en) 17 September 2009
12 Identity Manager 3.6.1 Common Driver Administration Guide
Page 13

2
Activating the Driver
Novell® Identity Manager, Integration Modules (drivers), and the Roles Based Provisioning Module
must be activated within 90 days of installation, or they shut down. At any time during the 90 days,
or afterward, you can choose to activate Identity Manager products.
To activate the driver, see “Activating Novell Identity Manager Products” in the Identity Manager
3.6.1 Installation Guide.
novdocx (en) 17 September 2009
2
Activating the Driver
13
Page 14

novdocx (en) 17 September 2009
14 Identity Manager 3.6.1 Common Driver Administration Guide
Page 15
3
Viewing Version Information
The Metadirectory engine, the driver shims, and the driver configuration files each contain a
separate version number. The Version Discovery Tool in iManager helps you find the versions of the
Metadirectory engine and the driver shims versions. The driver configuration files contain there own
naming convention.
Section 3.1, “Viewing a Hierarchical Display of Version Information,” on page 15
Section 3.2, “Viewing the Version Information as a Text File,” on page 17
Section 3.3, “Saving Version Information,” on page 19
Section 3.4, “Driver Configuration Files Naming Convention,” on page 20
3.1 Viewing a Hierarchical Display of Version Information
novdocx (en) 17 September 2009
3
1 In iManager, click Identity Manager > Identity Manager Overview, then click Search to find
the driver sets in the Identity Vault.
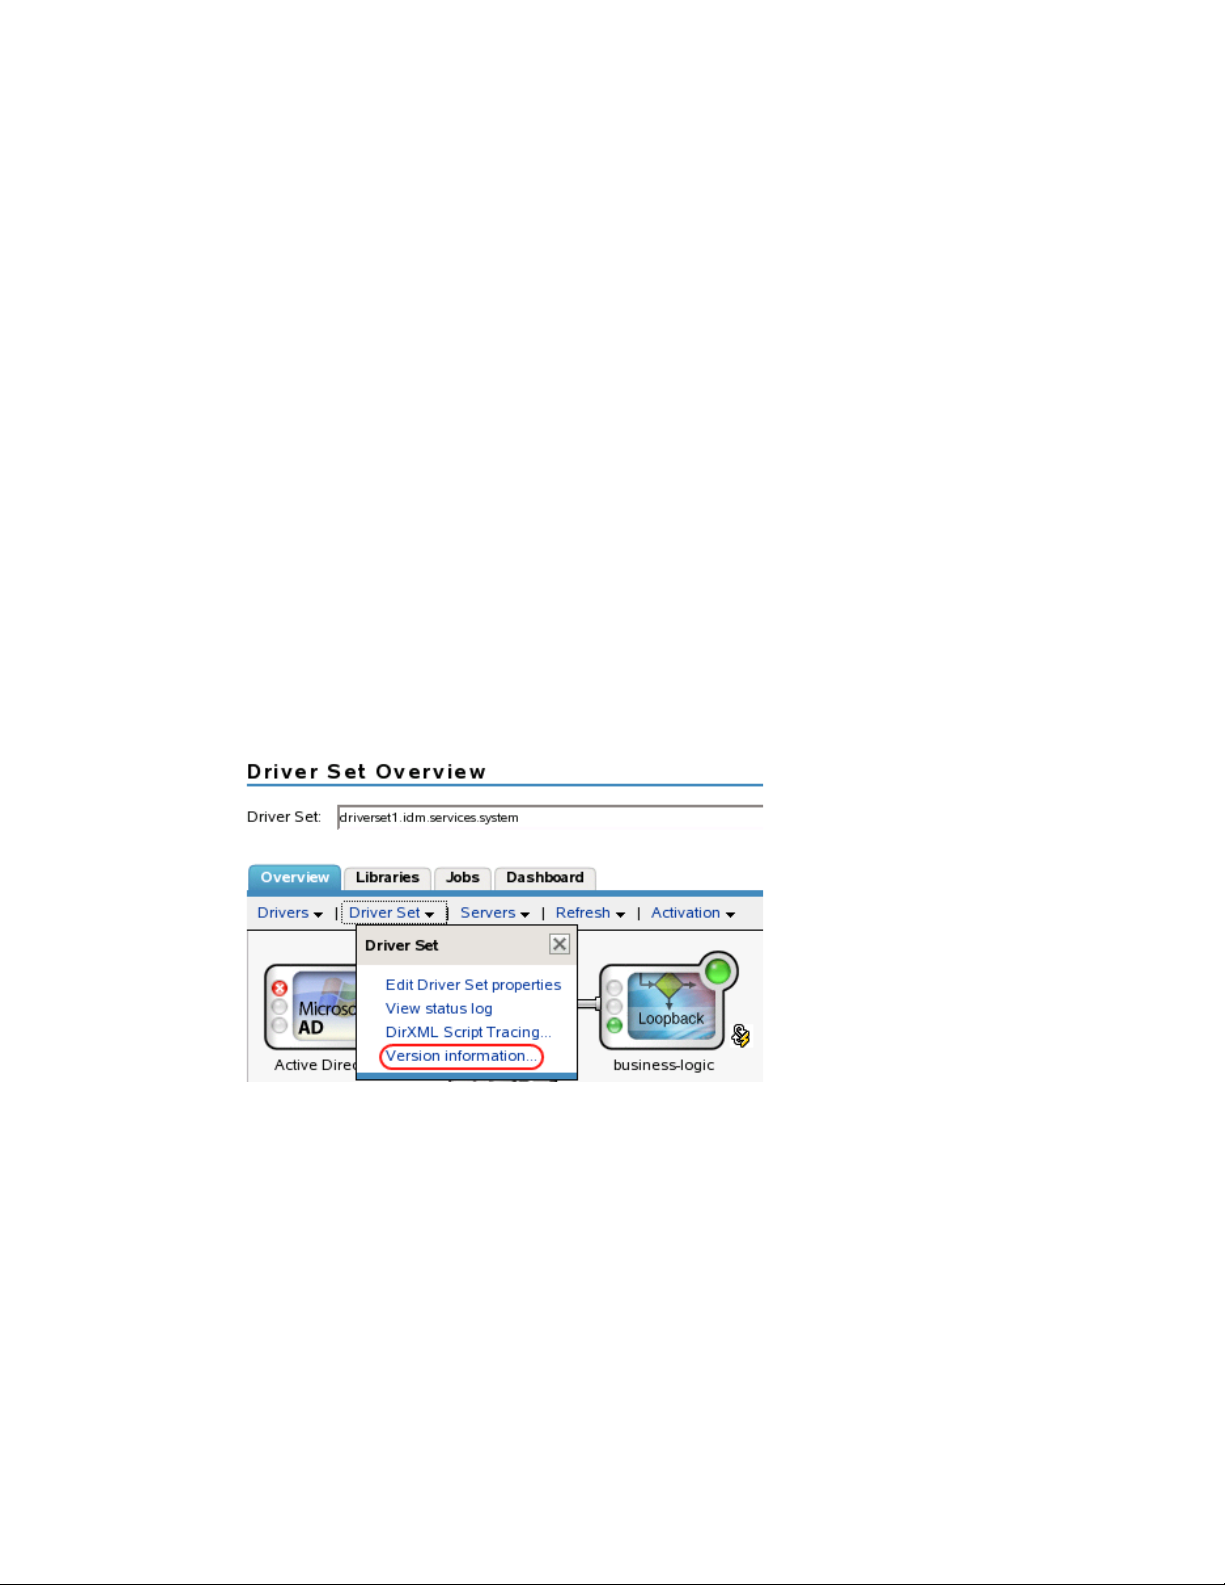
2 Click the specific driver set in the list.
3 Click Driver Set > Version information in the Driver Set Overview page.
You can also select Identity Manager Utilities > Versions Discovery, browse to and select the
driver set, then click OK.
4 View a top-level or unexpanded display of versioning information.
Viewing Version Information
15
Page 16
The unexpanded hierarchical view displays the following:
The eDirectory
TM
tree that you are authenticated to
The driver set that you selected
Servers that are associated with the driver set
novdocx (en) 17 September 2009
If the driver set is associated with two or more servers, you can view Identity Manager
information on each server.
Drivers
5 View version information related to servers by expanding the server icon.
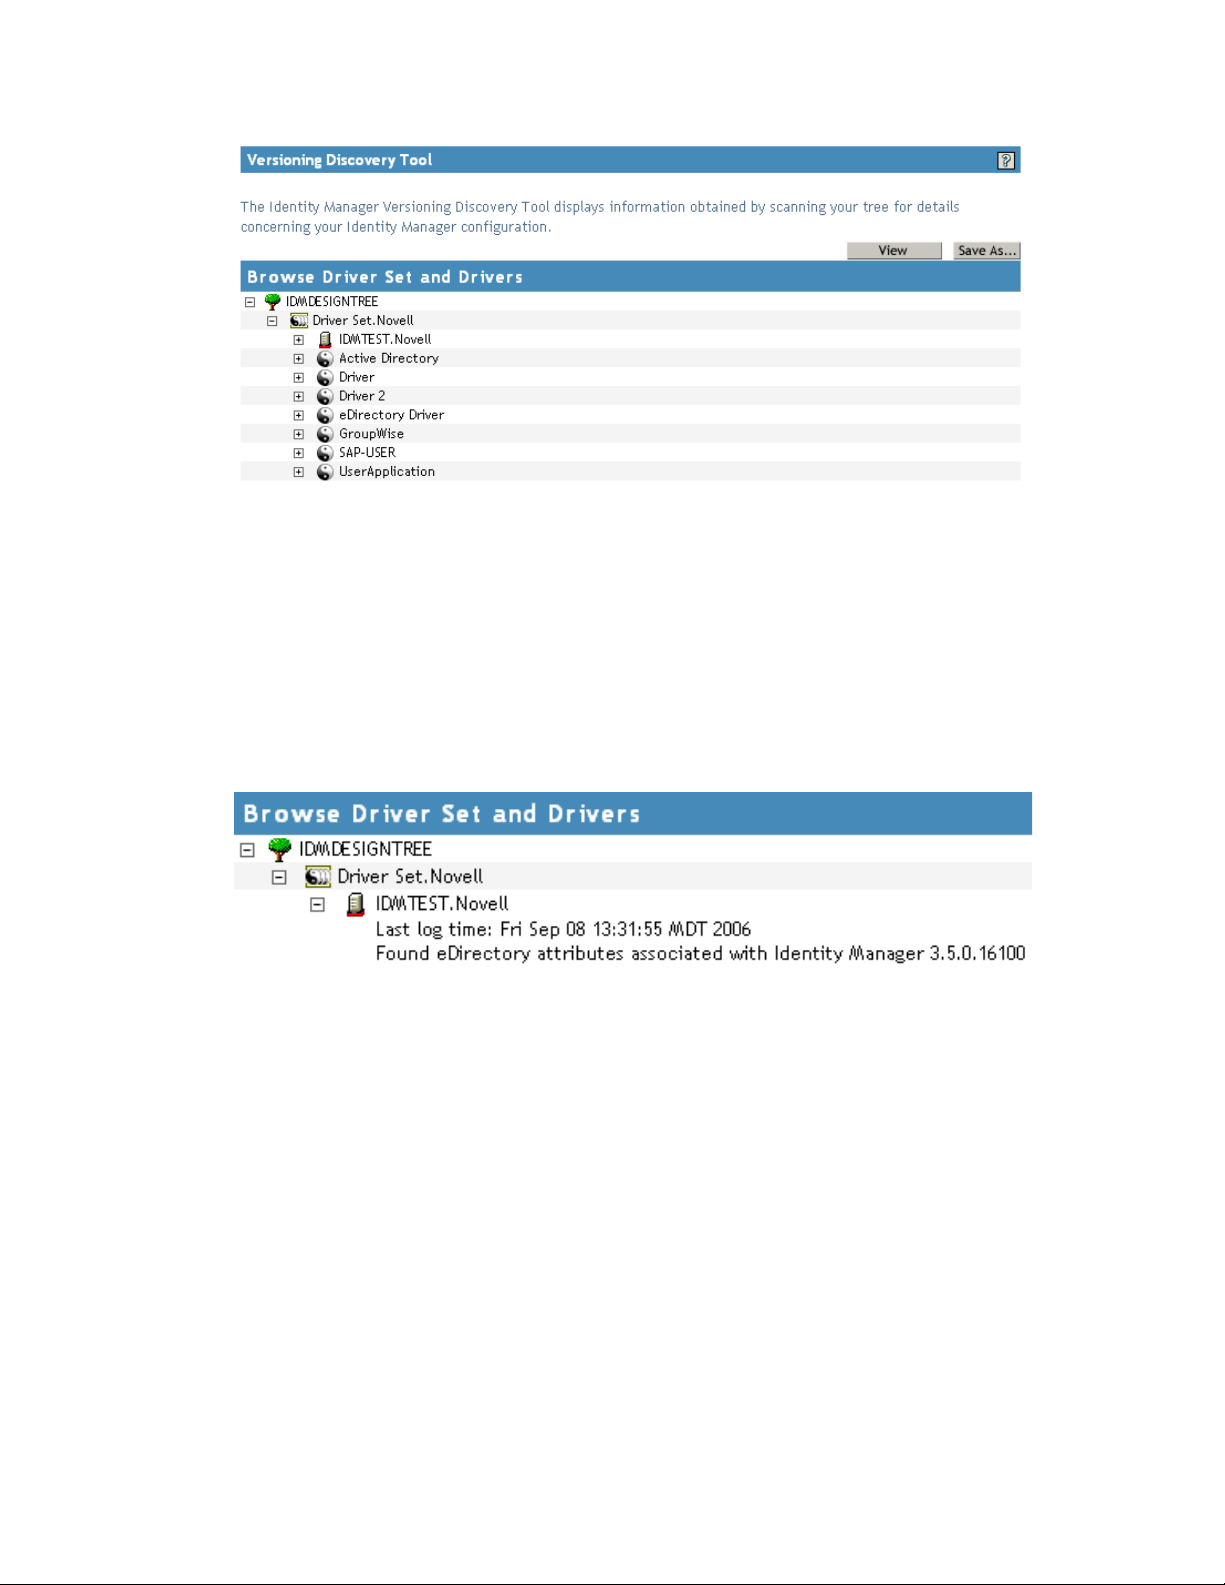
The expanded view of a top-level server icon displays the following:
Last log time
Version of Identity Manager that is running on the server
6 View version information related to drivers by expanding the driver icon.
16 Identity Manager 3.6.1 Common Driver Administration Guide
Page 17

The expanded view of a top-level driver icon displays the following:
The driver name
novdocx (en) 17 September 2009
The driver module (for example, com.novell.nds.dirxml.driver.nds.DriverShimImpl)
The expanded view of a server under a driver icon displays the following:
The driver ID
The version of the instance of the driver running on that server
3.2 Viewing the Version Information as a Text File
Identity Manager publishes versioning information to a file. You can view this information in text
format. The textual representation is the same information contained in the hierarchical view.
1 In iManager, click Identity Manager > Identity Manager Overview, then click Search to find
the driver sets in the Identity Vault.
2 Click the specific driver set in the list.
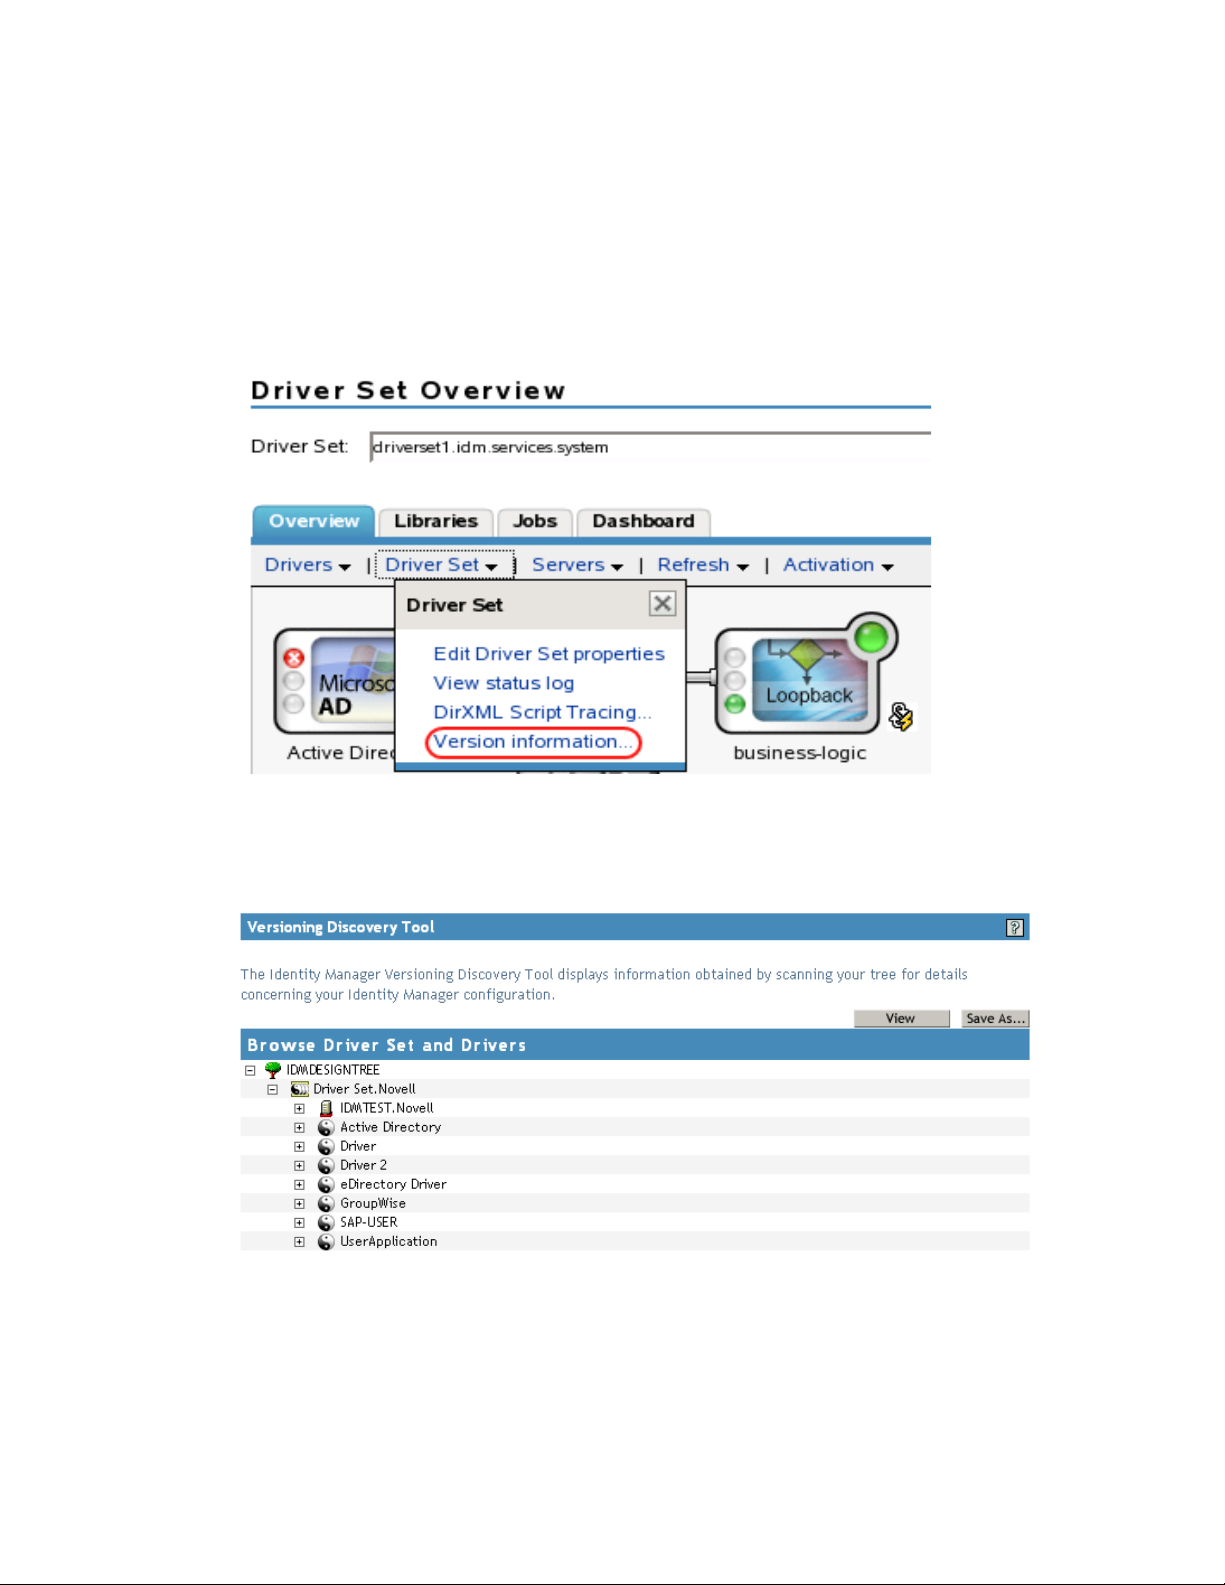
3 Click Driver Set > Version information in the Driver Set Overview page.
Viewing Version Information 17
Page 18
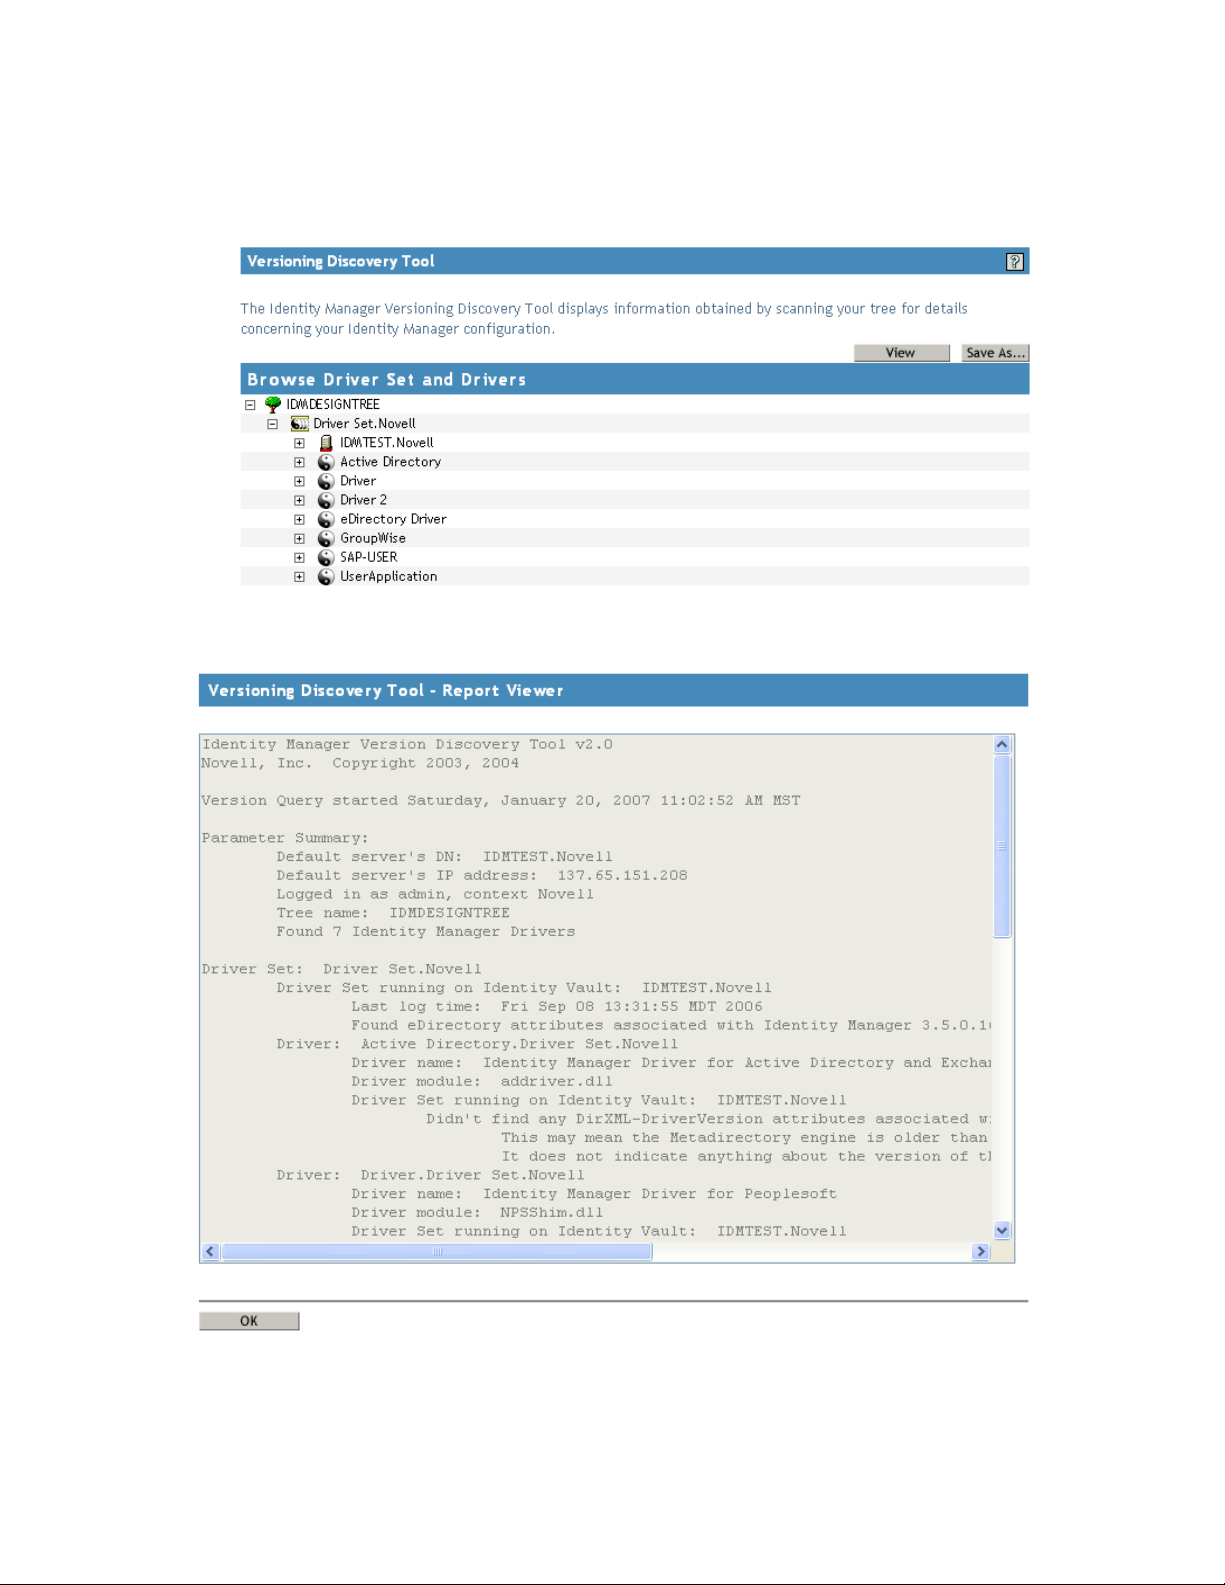
You can also select Identity Manager Utilities > Versioning Discovery, then browse to and
select the driver set, then click Information.
4 In the Versioning Discovery Tool dialog box, click View.
novdocx (en) 17 September 2009
The information is displayed as a text file in the Report Viewer window.
18 Identity Manager 3.6.1 Common Driver Administration Guide
Page 19
3.3 Saving Version Information
You can save version information to a text file on your local or network drive.
1 In iManager, click Identity Manager > Identity Manager Overview, then click Search to find
the driver sets in the Identity Vault.
2 Click the specific driver set in the list.
3 Click Driver Set > Version information in the Driver Set Overview page.
novdocx (en) 17 September 2009
You can also select Identity Manager Utilities > Versioning Discovery, browse to and select the
driver set, then click Information.
4 In the Versioning Discovery Tool dialog box, click Save As.
5 In the File Download dialog box, click Save.
6 Navigate to the desired directory, type a filename, then click Save.
Identity Manager saves the data to a text file.
Viewing Version Information 19
Page 20

3.4 Driver Configuration Files Naming Convention
The driver configuration file naming convention is:
<base name>[-<type>]-IDM<min. engine version>-V<config version>.xml
Base Name: The name of the connected system or service the driver provides. For example,
Active Directory or Delimited Text.
Type: An additional descriptor for the driver configuration file. If there are multiple
configuration files, the type distinguishes among the different files.
Minimum Engine Version: Lists the minimum engine version that the driver can run against.
The elements to date are:
IDM2_0_0
IDM2_0_1
IDM2_0_2
IDM3_0_0
IDM3_0_1
IDM3_5_0
novdocx (en) 17 September 2009
IDM3_5_1
IDM3_6_0
Configuration Version: Specifies the particular driver configuration file version. It is a
number that is incriminated with each release of a new driver configuration file.
V1
V2
V11
V23
For example:
ActiveDirectory-IDM3_6_0-V4.xml
DelimitedText-CSVSample-IDM3_6_0-V2.xml
20 Identity Manager 3.6.1 Common Driver Administration Guide
Page 21

4
Backing Up a Driver
After you have created a driver, it is important to create a backup of the driver. You can use Designer
or iManager to create an XML file of the driver. The file contains all of the information entered into
the driver during configuration. If the driver becomes corrupted, the exported file can be imported to
restore the configuration information.
IMPORTANT: If the driver has been deleted, all of the associations on the objects are purged.
When the XML file is imported again, new associations are created through the migration process.
Not all server-specific information stored on the driver is contained in the XML file. Make sure this
information is documented through the Doc Gen process in Designer. See Documenting Projects
(http://www.novell.com/documentation/designer35/admin_guide/data/docgenoverview.html) in the
Designer 3.5 for Identity Manager Administration Guide.
Section 4.1, “Exporting the Driver in Designer,” on page 21
novdocx (en) 17 September 2009
4
Section 4.2, “Exporting the Driver in iManager,” on page 21
4.1 Exporting the Driver in Designer
1 Open a project in Designer, then right-click the driver object.
2 Select Export to Configuration File.
3 Specify a unique name for the configuration file, browse to location where it should be saved,
then click Save.
4 Click OK in the Export Configuration Results window.
4.2 Exporting the Driver in iManager
1 In iManager, click Identity Manager > Identity Manager Overview.
2 Browse to and select the driver set object, then click Search.
3 Click the driver icon.
4 Select Export in the Identity Manager Driver Overview page.
5 Browse to and select the driver object you want to export, then click Next.
6 Select Export all policies, linked to the configuration or not or select Only export policies that
are linked to the configuration, depending upon the information you want to have stored in the
XML file.
7 Click Next.
8 Click Save As, then click Save.
9 Browse and select a location to save the XML file, then click Save.
10 Click Finish.
Backing Up a Driver
21
Page 22

novdocx (en) 17 September 2009
22 Identity Manager 3.6.1 Common Driver Administration Guide
Page 23
5
Monitoring Driver Health
Driver health monitoring allows you to view a driver’s current state of health as green, yellow, or
red, and to define the actions to perform in response to each of these health states.
You create the conditions (criteria) that determine each of the health states, and you also define the
actions you want performed whenever the driver’s health state changes. For example, if the driver’s
health changes from a green state to a yellow state (based on the conditions you’ve established), you
can perform such actions as restarting the driver, shutting down the driver, and sending an e-mail to
the person designated to resolve issues with the driver.
You can also define custom states. Whenever the conditions for the custom state are met, the
associated actions are performed regardless of the driver’s current state of green, yellow, or red.
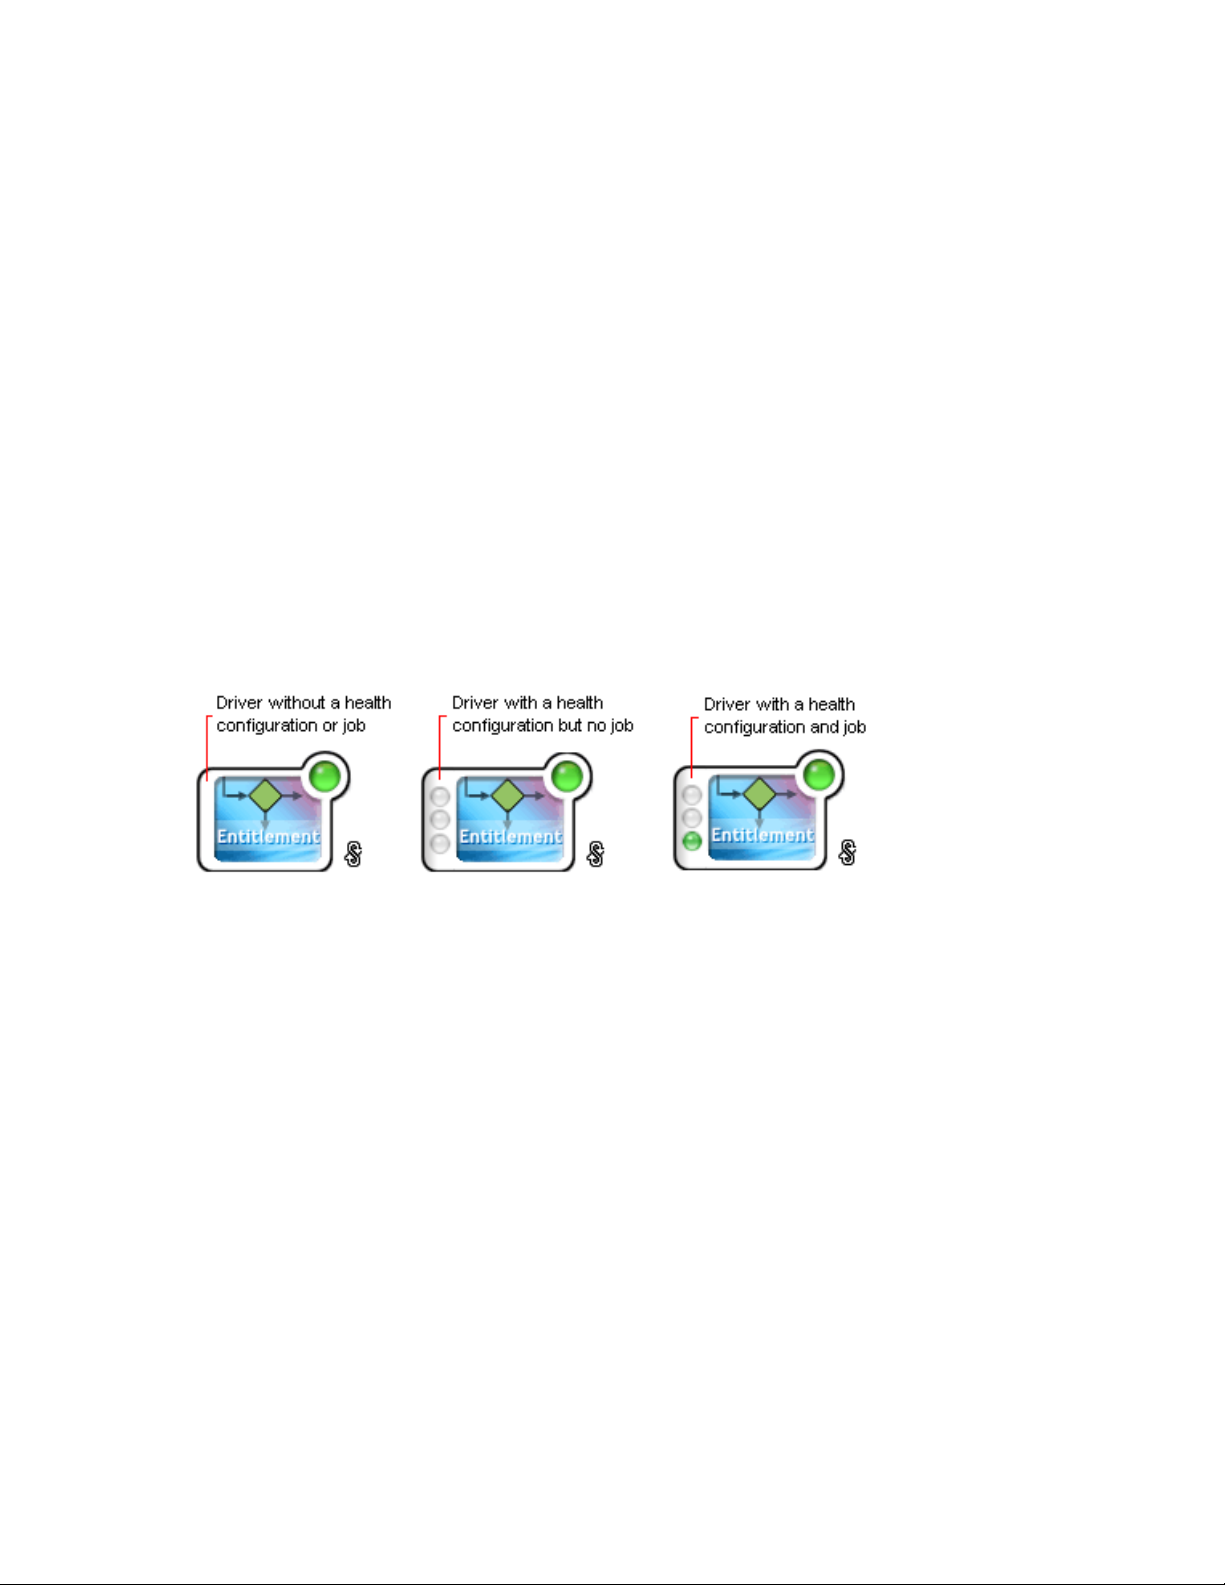
The driver’s health state is not monitored unless both a health configuration and a health job exist
and the health job is running. If the configuration and job exist and the job is running, the driver icon
displays a semaphore (green, yellow, or red indicator). Otherwise, the semaphore is not displayed or
is displayed without a colored indicator.
novdocx (en) 17 September 2009
5
Figure 5-1 Driver health indicator
To turn on health monitoring for the driver, complete the steps provided in the following three
sections:
Section 5.1, “Creating a Driver Health Configuration,” on page 23
Section 5.2, “Creating a Driver Health Job,” on page 25
Section 5.3, “Modifying the Driver Health Job’s Settings,” on page 26
After you’ve created the driver’s health configuration and health job, you can use the steps in the
following sections to modify the conditions and actions associated with each health state and to
create one or more custom states:
Section 5.4, “Modifying the Conditions for a Health State,” on page 27
Section 5.5, “Modifying the Actions for a Health State,” on page 30
Section 5.6, “Creating a Custom State,” on page 31
5.1 Creating a Driver Health Configuration
The health configuration for version 3.6 or newer drivers is automatically configured. Skip this
section if your drivers are version 3.6 or newer.
Monitoring Driver Health
23
Page 24
If you have drivers that are older than version 3.6, you need to create the health configuration for
each driver you want to monitor.
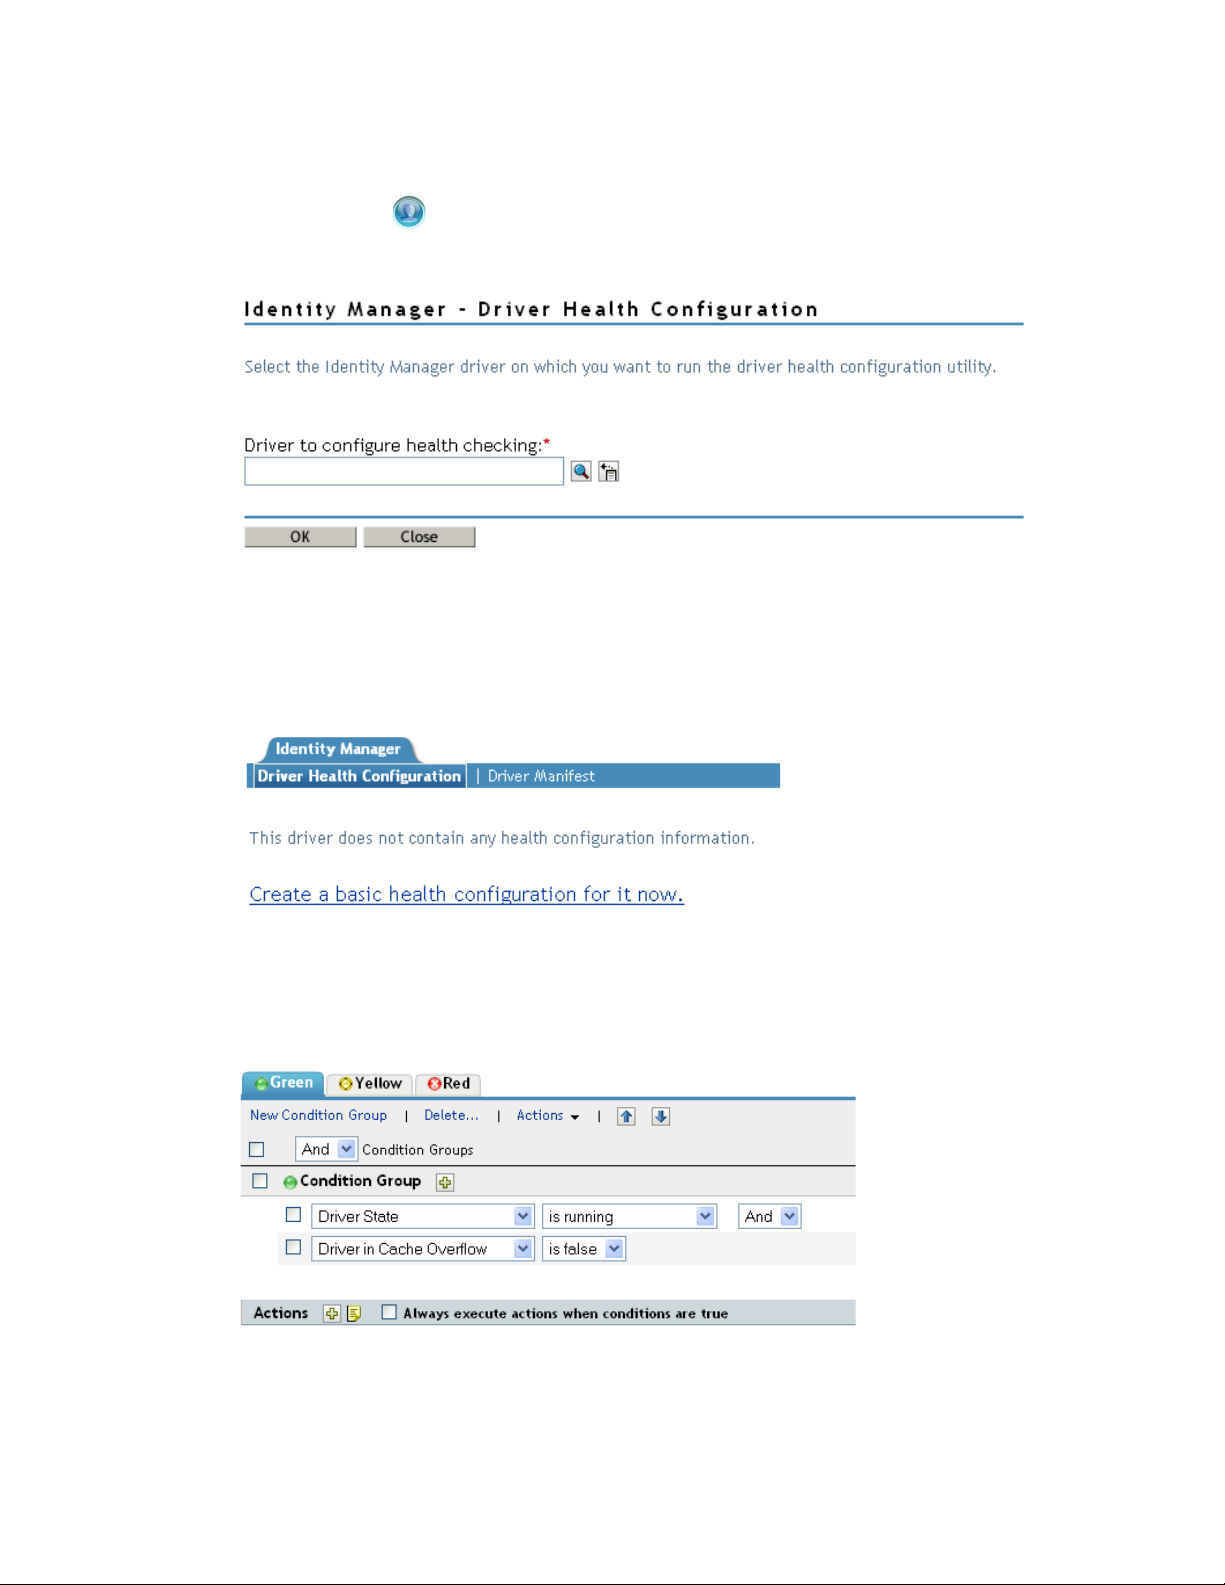
1 In iManager, click to display the Identity Manager Administration page.
2 In the Administration list, click Driver Health Configuration.
3 In the Driver to configure health checking field, select the driver for which you want to create
the health configuration, then click OK to display the Driver Health Configuration page.
If the driver’s health configuration does not yet exist, the Driver Health Configuration page
displays a Create a basic health configuration for it now prompt.
novdocx (en) 17 September 2009
4 Click Create a basic health configuration for it now.
A basic health configuration is created and displayed. Sample conditions are created for the
green and yellow states (not the red).
5 Continue with Section 5.2, “Creating a Driver Health Job,” on page 25.
24 Identity Manager 3.6.1 Common Driver Administration Guide
Page 25
5.2 Creating a Driver Health Job
The health of a driver is evaluated during the periodic execution of a Driver Health job. The job
evaluates the conditions for the health states and assigns the driver the appropriate state. The job
also executes any actions associated with the assigned state.
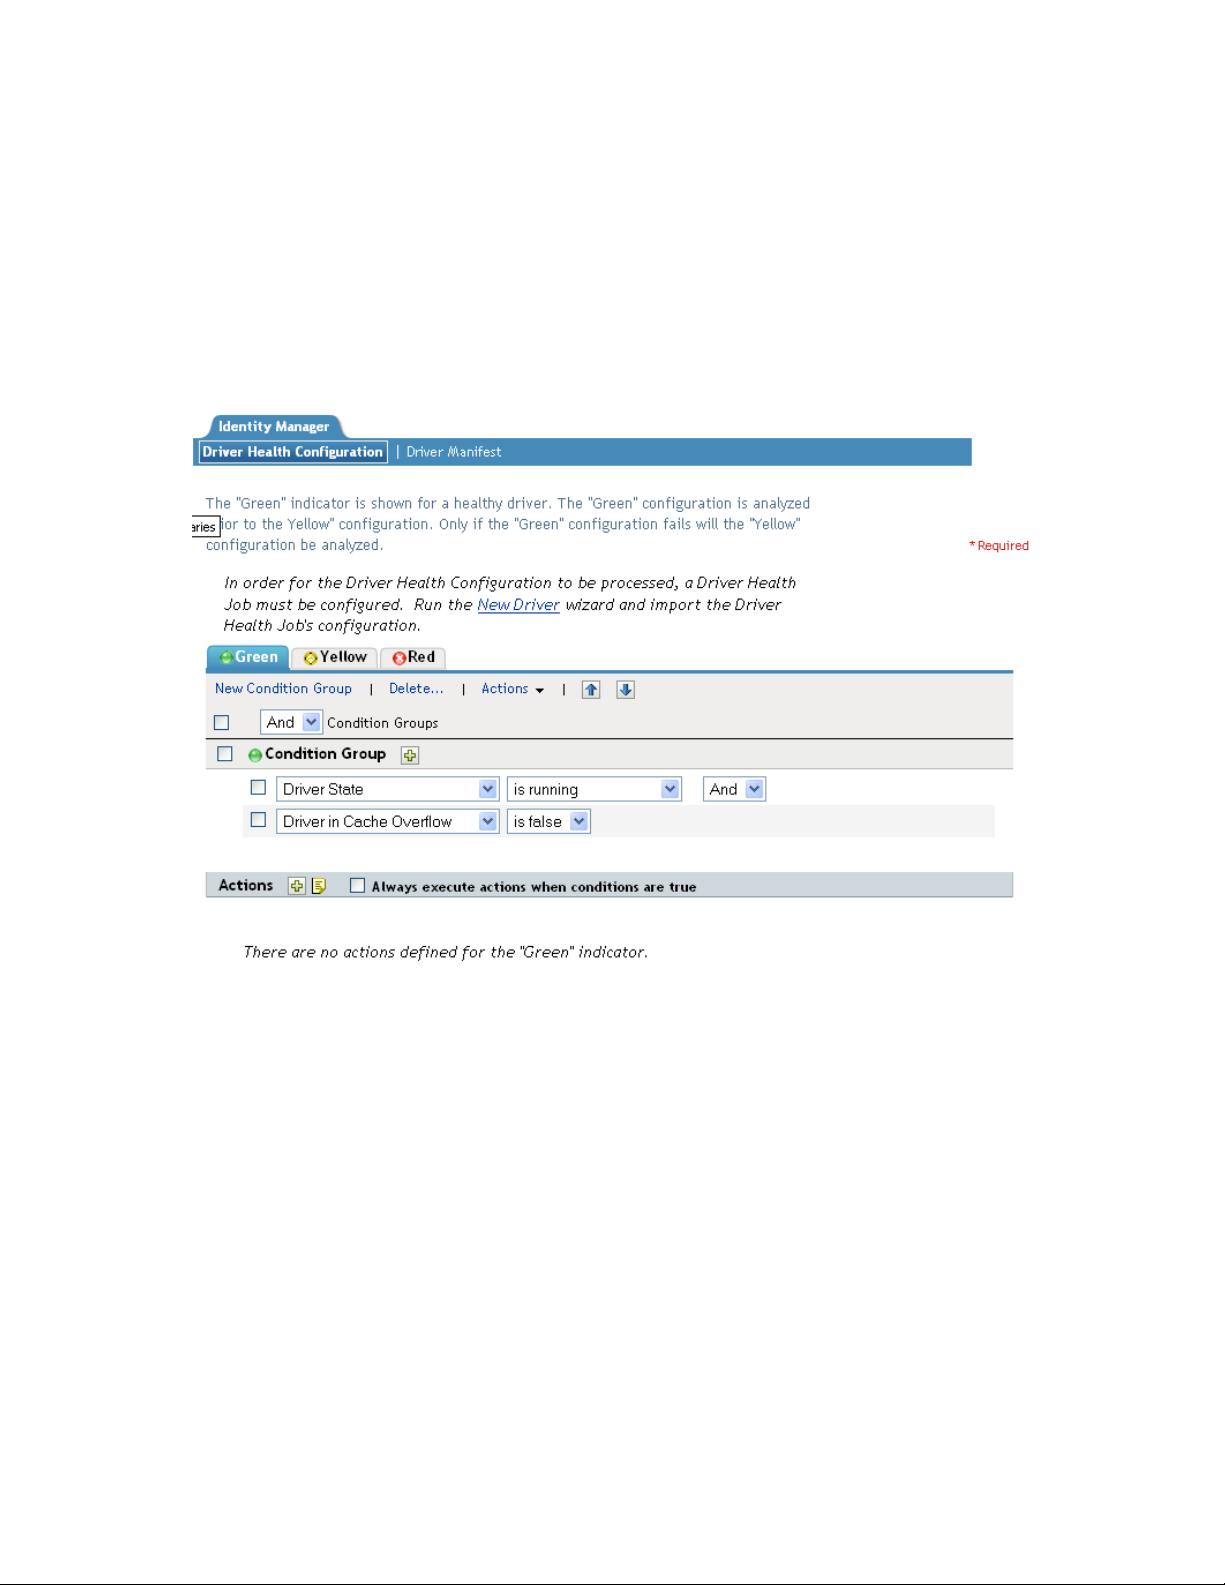
If a Driver Health job does not exist, the Driver Health Configuration page displays a Run the New
Driver wizard and import the Driver Health Job’s configuration prompt, as shown in the following
screenshot. If the page does not display this prompt, the Driver Health job already exists; you can
skip to Section 5.4, “Modifying the Conditions for a Health State,” on page 27.
novdocx (en) 17 September 2009
To create a Driver Health job:
1 Open the Driver Health Configuration page for a driver you want to monitor.
For help opening the Driver Health Configuration page, see Step 1 through Step 3 on page 24.
2 Click New Driver, then follow the prompts to import the configuration file for the Driver
Health job. Refer to the following information for details:
Where to place the driver: Place the job in the same driver set as the driver. The correct
driver set is selected by default.
Import a configuration: Import the configuration from the server. In the Show field,
select Identity Manager 3.6.1 configurations, then select the Driver Health job in the
Configurations field.
Email server: Select the e-mail server that you want used for any actions that initiate e-
mail. If you have not defined additional e-mail servers, select the Default Notification
Collection server.
Monitoring Driver Health 25
Page 26

Servers: If the driver set is associated with only one server, that server is selected and
cannot be changed. If the driver set is associated with multiple servers, select the server
where you want to run the job.
After the job is created, you can adjust the job settings as desired. For example, you can modify how
often the job runs, which drivers use the job, and how much data the job maintains to support
transaction history. For instructions, continue with Section 5.3, “Modifying the Driver Health Job’s
Settings,” on page 26.
5.3 Modifying the Driver Health Job’s Settings
The Driver Health job evaluates the conditions for the health states and assigns the driver the
appropriate state. The job also executes any actions associated with the assigned state.
As with all driver jobs, there are several Driver Health job settings that you can modify to optimize
health monitoring performance for your environment, including settings for how often the job runs,
which drivers use the job, and how much data the job maintains to support transaction history.
To modify the job settings:
novdocx (en) 17 September 2009
1 Open the Driver Health Configuration page for a driver that uses the Driver Health job you
want to modify.
For help opening the Driver Health Configuration page, see Step 1 through Step 3 on page 24.
2 Click the Driver Health job.
3 Change the desired settings on the following tabs:
Schedule: The Driver Health job is a continuously running job, meaning that it does not
stop unless a health state action shuts it down or it is shut down manually. The job must
run continuously to be able to support transaction data collection for use in Transactions
History conditions.
If the job does stop, it is restarted based on the schedule. The default schedule checks
every minute to see if the job is running. If the job is not running, it is started.
Scope: By default, the job applies to all drivers in the driver set. This means that you only
need one Driver Health job per driver set. However, you can create multiple Driver Health
jobs for different drivers within the same driver set. For example, you might have some
drivers whose health you want updated more frequently than other drivers, in which case
you would need at least two Driver Health jobs.
Parameters: You can change any of the following parameters:
Login ID: This defaults to the login ID that was used when creating the driver job.
You should only change this if you want the driver to authenticate with different
credentials.
Login password: This is the password required for the login ID that you supplied in
the Login ID field.
Subscriber Heartbeat: Controls whether the Driver Health job does a heartbeat
query on a driver’s Subscriber channel before performing a health check on the
driver.
Polling interval: Determines how often the job evaluates the conditions for the
health states, assigns the driver the appropriate state, executes any actions associated
with the assigned state, and stores the driver’s transaction data. The default polling
interval is one minute.
26 Identity Manager 3.6.1 Common Driver Administration Guide
Page 27

Polling interval units: Specifies the time unit (minutes, hours, days, weeks) for the
number specified in the Polling interval setting.
Duration sampling data is kept: Specifies how long a driver’s transaction data is
kept. The default, two weeks, causes a transaction to be retained for two weeks
before being deleted. A longer duration provides a greater time period that can be
used in Transactions History conditions, but requires more memory. For example, to
use a Transactions History condition that evaluates of the number of publisher
reported events for the last 10 days, you need to keep transaction data for at least 10
days.
Duration units: Specifies the time unit (minutes, hours, days, weeks) for the number
specified in the Duration transaction data is kept setting.
4 Click OK to save your changes.
5.4 Modifying the Conditions for a Health State
You control the conditions that determine each health state. The green state is intended to represent a
healthy driver, and a red state is intended to represent an unhealthy driver.
novdocx (en) 17 September 2009
The conditions for the green state are evaluated first. If the driver fails to meet the green conditions,
the yellow conditions are evaluated. If the driver fails to meet the yellow conditions, the driver is
automatically assigned a red health state.
To modify the conditions for a state:
1 Open the Driver Health Configuration page for a driver whose conditions you want to modify.
For help opening the Driver Health Configuration page, see Step 1 through Step 3 on page 24.
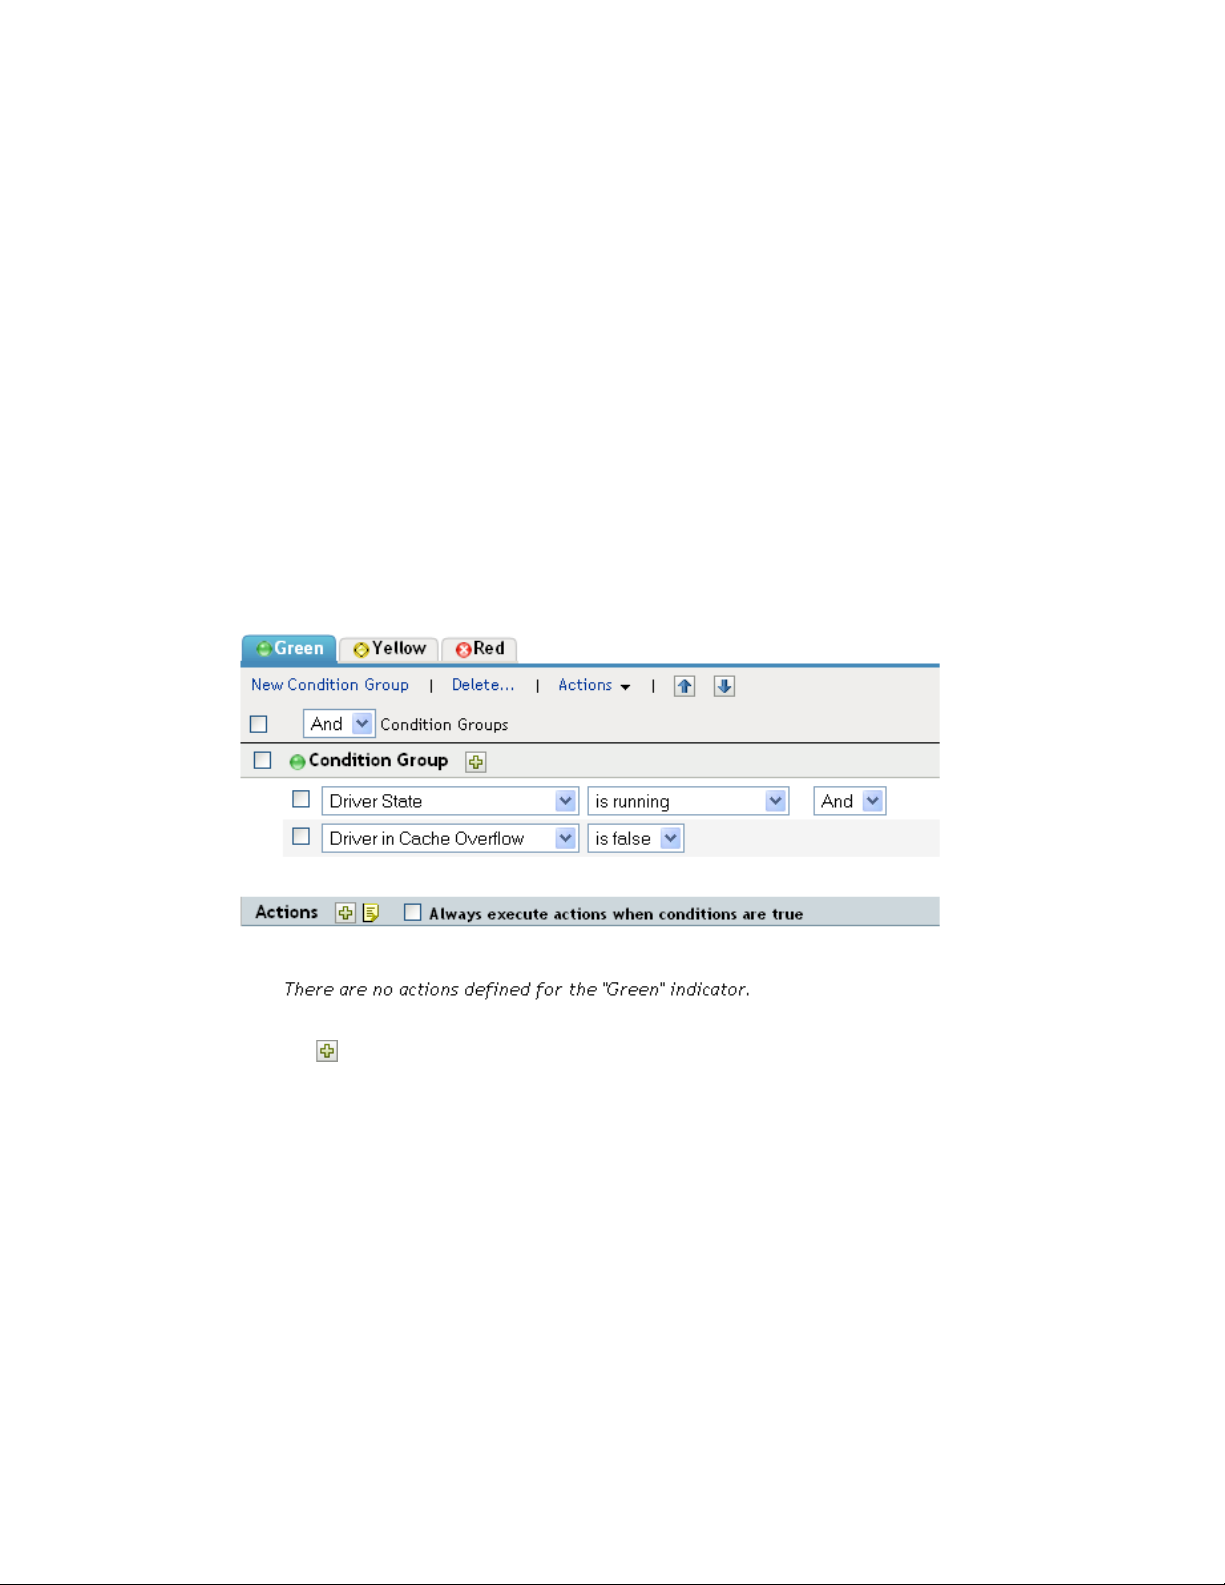
2 Click the tab for the state (Green or Yellow) you want to modify.
The tab displays the current conditions for the health state. Conditions are organized into
groups, and logical operators, either AND or OR, are used to combine each condition and each
group. Consider the following example for the green state:
Monitoring Driver Health 27
Page 28

GROUP1
Condition1 and
Condition2
Or
GROUP2
Condition1 and
Condition2 and
Condition3
In the example, the driver is assigned a green state if either the GROUP1 conditions or the
GROUP2 conditions evaluate as true. If neither group of conditions is true, then the conditions
for the yellow state are evaluated.
The conditions that can be evaluated are:
Driver State: Running, stopped, starting, not running, or shutting down. For example, one
of the default conditions for the green health state is that the driver is running.
Driver in Cache Overflow: The state of the cache used for holding driver transactions. If
the driver is in cache overflow, all available cache has been used. For example, the default
condition for the green health state is that the Driver in Cache Overflow condition is false
and the default for the yellow health state is that the Driver in Cache Overflow condition is
true.
Newest: The age of the newest transaction in the cache.
Oldest: The age of the oldest transaction in the cache.
novdocx (en) 17 September 2009
Tot a l S iz e: The size of the cache.
Unprocessed Size: The size of all unprocessed transactions in the cache.
Unprocessed Transactions: The number of unprocessed transactions in the cache. You
can specify all transactions types or specific transaction types (such as adds, removes, or
renames).
Transactions History: The number of transactions processed at various points in the
Subscriber or Publisher channel over a given period of time. This condition uses multiple
elements in the following format:
<transaction type> <transaction location and time period > <relational operator>
<transaction number>.
<transaction type>: Specifies the type of transaction being evaluated. This can be all
transactions, adds, removes, renames, and so forth.
<transaction location and time period>: Specifies the place in the Subscriber or
Publisher channel and the time period being evaluated. For example, you might
evaluate the total number of transactions processed as Publisher reported events over
the last 48 hours. By default, transaction history data is kept for two weeks, which
means that you cannot specify a time period greater than two weeks unless you
change the default Transaction Data Duration setting. This setting is specified on the
Driver Health job. See Section 5.3, “Modifying the Driver Health Job’s Settings,” on
page 26 for information about changing the setting.
<relational operator>: Specifies that the identified transactions must be equal to, not
equal to, less than, less than or equal to, greater than, or greater than or equal to the
<transaction number>.
<transaction number>: Specifies the number of transactions being used in the
evaluation.
The following provides an example of a Transactions History condition:
28 Identity Manager 3.6.1 Common Driver Administration Guide
Page 29

<number of adds> <as publisher commands> <over the last 10 minutes> <is
less than> <1000>
Available History: The amount of transaction history data that is available for evaluation.
The primary purpose for this condition is to ensure that a Transactions History condition
does not cause the current state to fail because it does not have enough transaction history
data collected for the time period being evaluated.
For example, assume that you want to use the Transactions History condition to evaluate
the number of adds as Publisher commands over the last 48 hours (the example shown in
the Transactions History section above). However, you don't want the condition to fail if
there is not yet 48 hours worth of data, which can be the case after the initial setup of the
driver's health configuration or if the driver's server restarts (because transaction history
data is kept in memory). Therefore, you create condition groups similar to the following:
Group1
Available History <is less than> <48 hours>
or
Group2
Available History <is greater than or equal to> <48 hours> and
Transactions History <number of adds> <as publisher commands> <over
the last 48 hours> <is less than> <1000>
novdocx (en) 17 September 2009
The state evaluates to true if either condition group is true, meaning that a) there is less
than 48 hours of data, or b) there is at least 48 hours of data and the number of adds as
Publisher commands over the last 48 hours is less than 1000.
The state evaluates to false if both conditions evaluate to false, meaning that a) there is at
least 48 hours of data and b) the number of adds as publisher commands over the last 48
hours is greater than 1000.
3 Modify the criteria as desired.
To add a new group, click New Group.
To add a condition, click the button next to the group heading.
To reorder condition groups or individual conditions, select the check box next to the
group or condition you want to move, then click the and buttons to move it up and
down. You can also use the and buttons to move a condition from one group to
another.
To copy condition groups or individual conditions, select the check box next to the group
or condition you want to copy, click Edit > Copy selections to clipboard, click the tab for
the health state where you want to copy the group or condition, then click Edit > Append
items on clipboard. For example, assume that you want to copy a condition from one
condition group to another. You would select the condition, copy it to the clipboard, then
append it. The condition is added as its own condition group; if desired, use the and
buttons to move it into another condition group.
To move condition groups or individual conditions, select the check box next to the group
or condition you want to move, click Edit > Cut selections to clipboard, click the tab for
the health state where you want to move the group or condition, then click Edit > Append
items on clipboard. For example, assume that you want to move a condition group from
the green health state to the yellow health state. You would select the condition group, cut
it to the Clipboard, open the yellow health state, then append it.
Monitoring Driver Health 29
Page 30
4 Click Apply to save your changes.
5 If you want to change the actions associated with the conditions you’ve set, continue with
Section 5.5, “Modifying the Actions for a Health State,” on page 30.
5.5 Modifying the Actions for a Health State
You can determine the actions that you want performed when the driver health state changes. For
example, if the state changes from green to yellow, you can shut down or restart the driver, generate
an event, or start a workflow. Or, if the state changes from yellow to green, any actions associated
with the green state are performed.
A health state’s actions are performed only once each time the conditions are met; as long as the
state remains true, the actions are not repeated. If the state changes because its conditions are no
longer met, the actions are performed again the next time the conditions are met.
1 Open the Driver Health Configuration page for a driver whose actions you want to modify.
For help opening the Driver Health Configuration page, see Step 1 through Step 3 on page 24.
2 Click the tab for the state whose actions you want to modify.
novdocx (en) 17 September 2009
3 Click the button next to the Actions heading to add an action, then select the type of action
you want:
Start Driver: Starts the driver.
Stop Driver: Stops the driver.
Restart Driver: Stops and then starts the driver.
Clear Driver Cache: Removes all transactions, including unprocessed transactions, from
the cache.
Send Email: Sends an e-mail to one or more recipients. The template you want to use in
the e-mail message body must already exist. To include the driver name, server name, and
current health state information in the e-mail, add the
$HealthState$
tokens to the e-mail template and then include the tokens in the message
text. For example:
The current health state of the $Driver$ driver running on $Server$ is
$HealthState$.
30 Identity Manager 3.6.1 Common Driver Administration Guide
$Driver$, $Server$
, and
Page 31

Write Trace Message: Outputs a message to the driver’s log file.
Generate Event: Generates an event that can be used by Novell
Sentinel
Execute ECMAScript: Executes an existing ECMAScript. Use the or buttons to select
TM
®
Audit and Novell
the DirXML-Resource object that contains the ECMAScript.
Start Workflow: Starts a provisioning workflow.
On Error: If an action fails, instructs what to do with the remaining actions, the current
health state, and the Driver Health job.
Affect actions by: You can continue to execute the remaining actions, stop execution
of the remaining actions, or default to the current setting. The current setting applies
only if you have multiple On Error actions and you set the Affect actions by option in
one of the preceding On Error actions.
Affect state by: You can save the current state, reject the current state, or default to
the current setting. Saving the state causes the state’s conditions to continue to
evaluate as true. Rejecting the state causes the state’s conditions to evaluate as false.
The current setting applies only if you have multiple On Error actions and you set the
Affect state by option in one of the preceding On Error actions.
Affect Driver Health Job by: You can continue to run the job, abort and disable the
job, or default to the current setting. Continuing to run the job causes the job to finish
evaluating the conditions to determine the driver’s health state and perform any
actions associated with the state. Aborting and disabling the job stops the job’s
current activity and shuts down the job; the job does not run again until you enable it.
The current setting applies only if you have multiple On Error actions and you set the
Affect Driver Health Job by setting in one of the preceding On Error actions.
novdocx (en) 17 September 2009
4 If you want the actions executed every time the conditions evaluate to true, click Always
execute actions when conditions are true.
By default, actions are performed only one time while a driver's health state remains the same;
regardless of the number of times the conditions are evaluated, as long as the health state
remains true, the actions are not repeated. For example, when the driver's health state changes
from red to green, the green state's actions are executed. The next time the conditions are
evaluated, if the health state is still green, the actions are not repeated.
Selecting the Always execute actions when conditions are true setting causes the actions to be
repeated each time the condition evaluates to true. For example, if the driver's health state
repeatedly evaluates to green without changing to another state, the green state's actions are
repeated after each evaluation.
5 Click Apply to save your changes.
5.6 Creating a Custom State
You can create one or more custom states to perform actions independent of the driver’s current
health state (green, yellow, red). If a custom state’s conditions are met, its actions are performed
regardless of the current health state.
Monitoring Driver Health 31
Page 32

As with the green, yellow, and red health states, a custom state’s actions are performed only once
each time the conditions are met; as long as the state remains true, the actions are not repeated. If the
state changes because its conditions are no longer met, the actions are performed again the next time
the conditions are met.
1 Open the Driver Health Configuration page for a driver for which you want to create a custom
state.
For help opening the Driver Health Configuration page, see Step 1 through Step 3 on page 24.
novdocx (en) 17 September 2009
2 On any of the tabs, click Actions, then click New Custom State.
3 Follow the instructions in Section 5.4, “Modifying the Conditions for a Health State,” on
page 27 and Section 5.5, “Modifying the Actions for a Health State,” on page 30 to define the
custom state’s conditions and actions.
32 Identity Manager 3.6.1 Common Driver Administration Guide
Page 33

5.7 Memory Requirements for Driver Health
The combination of interval, interval-units, duration, and duration-units define how much sampling
data is maintained by the Driver Health Job. The values for these parameters directly affect how
much memory the Driver Health Job requires to run.
The number of samples per driver per server is calculated as:
Number of samples = ((duration * duration units) / (polling interval * polling units)) + 1
For example, if
duration = 12 hours
polling interval = 1 minute
Number of samples = (12*60) / (1*1) + 1 = 721
If there are 4 drivers on 1 server, total number of samples = 4*1*721 = 2884.
Each sample stores data from 5 points in the publisher channel and 5 points in the subscriber
channel.
novdocx (en) 17 September 2009
Publisher Channel Points:
publisher-commands
publisher-command-results
publisher-post-event-transformation
publisher-post-input-transformation
publisher-reported-events
Subscriber Channel Points:
subscriber-commands
subscriber-command-results
subscriber-pre-output-transformation
subscriber-post-event-transformation
subscriber-reported-events
A sample contains a list of IDs and counts for each point. IDs correspond to operations such as
query, status, instance, add-association, and so on.
Consider the following driver cache statistics:
<subscriber>
<operations>
<command-results>
<status>12</status>
<instance>12</instance>
</command-results>
</operations>
</subscriber>
For subscriber-command-results, the list has IDs 7,21 (for instance and status) and counts 12,12.
Each sample consumes ~700 bytes.
Monitoring Driver Health 33
Page 34

721 samples consume ~ 500 KB. This is the memory requirement per driver.
For 4 drivers, 2 MB is required for storing sampling data.
novdocx (en) 17 September 2009
34 Identity Manager 3.6.1 Common Driver Administration Guide
Page 35

6
Viewing Driver Statistics
You can use Novell® iManager to view a variety of statistics for a single driver or for an entire driver
set. This includes statistics such as the cache file size, the size of the unprocessed transactions in the
cache file, the oldest and newest transactions, and the total number of unprocessed transactions by
category (add, remove, modify, and so forth). The following sections provide instructions:
Section 6.1, “Viewing Statistics for an Individual Driver,” on page 35
Section 6.2, “Viewing Statistics for a Driver Set,” on page 36
6.1 Viewing Statistics for an Individual Driver
1 In iManager, click to display the Identity Manager Administration page.
2 In the Administration list, click Identity Manager Overview to display the Identity Manager
Overview page.
You use the Identity Manager Overview page to locate the driver set in which the driver
resides.
3 In the Search in field, specify the fully distinguished name of the container where you want to
start searching for the driver set, then click . Or click to browse for and select the
container in the tree structure.
iManager keeps a record of the objects you have previously selected, so you can also use the
to select the container from a list of previously selected objects. Or, you can search from the
root of the tree by simply clicking .
4 After the search completes and displays the driver sets, click the driver set in which the driver
resides to display the Driver Set Overview page.
novdocx (en) 17 September 2009
6
5 Locate the driver whose statistics you want to check, click the driver’s Status icon (the green or
red circle on the driver icon), then click Statistics.
Viewing Driver Statistics
35
Page 36

novdocx (en) 17 September 2009
Server: The name of the server running the driver.
Cache Filename: The name of the cache file.
Cache File Size: The total size of the cache file.
Unprocessed: The amount of cache file space being used for unprocessed transactions.
Oldest Transaction: The date and time of the oldest transaction in the cache.
Newest Transaction: The date and time of the newest transaction in the cache.
Unprocessed Transactions Total: The total number of unprocessed transactions in the cache.
Individual transaction types (add, remove, modify, and so forth), with the number of
unprocessed transactions for each type, are listed below the total.
6.2 Viewing Statistics for a Driver Set
1 In iManager, click to display the Identity Manager Administration page.
2 In the Administration list, click Driver Set Dashboard to display the Driver Set Query page.
You use the Driver Set Query page to specify the driver set for which you want to display
statistics.
3 In the Driver Set field, specify the fully distinguished name of the driver set, then click OK. Or
click to browse for and select the driver set in the tree structure, then click OK.
iManager keeps a record of the objects you have previously selected, so you can also use the
icon to select the container from a list of previously selected objects.
A page is displayed that allows you to view the statistics for all of the drivers contained in the
driver set.
36 Identity Manager 3.6.1 Common Driver Administration Guide
Page 37

To refresh the statistics, click Refresh, then select Refresh now or select a refresh interval.
novdocx (en) 17 September 2009
To close the statistics for a driver, click the button in the upper right corner of the
driver’s statistics window.
To open the statistics for all drivers, click Actions > Show all drivers.
To collapse the list of unprocessed transactions for a driver, click the button located
above the list. To collapse the list of unprocessed transactions for all drivers, click Actions
> Collapse all transactions
To expand the list of transactions, click the button. To expand the list of unprocessed
transactions for all drivers, click Actions > Expand all transactions.
To change the layout of the driver dashboard, click Actions, then select a column layout.
Viewing Driver Statistics 37
Page 38

novdocx (en) 17 September 2009
38 Identity Manager 3.6.1 Common Driver Administration Guide
Page 39

7
Managing Associations between
novdocx (en) 17 September 2009
Drivers and Objects
Novell® iManager provides two tools to enable you to view and manage the associations between
drivers and objects (data).
The first tool is the Driver Inspector. The Driver Inspector displays all objects associated with a
driver and lets you perform various actions on those associations, such as deleting an object or
modifying its properties.
The second tool is the Object Inspector. The Object Inspector displays all connected systems
associated with an object. For each association, you can perform various actions, including viewing
the object’s data flow between the Identity Vault and the connected system, configuring the
connected system’s driver or driver set, viewing the entitlements, and removing the association
between the object and the connected system.
The following sections provide instructions for using the Driver Inspector and Object Inspector.
Section 7.1, “Inspecting Objects,” on page 39
Section 7.2, “Inspecting Drivers,” on page 41
7.1 Inspecting Objects
7
You can use the Object Inspector to view detailed information about how an object participates in
Identity Manager relationships. These relationships include the connected systems that are
associated with the object, how data flows between the Identity Vault and the connected systems, the
attribute values that are currently stored in the Identity Vault and on the connected systems, the
connected system driver configurations, and so forth.
1 In iManager, click to display the Identity Manager Administration page.
2 In the Administration list, click Object Inspector to display the Object Inspector page.
This page allows you to select an object to inspect.
3 Specify the fully distinguished name of the object that you want to inspect, or click to select
the desired object.
Managing Associations between Drivers and Objects
39
Page 40

iManager keeps a record of the objects you have previously selected, so you can also use the
icon to select from a list of previously selected objects.
4 After you’ve selected the object, click OK to display the Object Inspector page.
The Connected Systems section lists each of the connected systems with which the object is
associated. You can perform any of the following actions:
novdocx (en) 17 September 2009
Delete: To delete an association with a connected system, select the check box to the left
of the association and click Delete. To delete all associations, select the check box beneath
the Delete column, then click Delete.
Refresh: Select Refresh to re-read the connected system associations and refresh the table.
Actions: Select a connected system by clicking the check box to the left of the association
reference (you do not need to select any boxes for the Add New Association action item).
Click Actions, then choose one of the following options:
Run Overview on Driver: Launches the overview page for the connected system's
driver.
Run Overview on Driver Set: Launches the overview page for the connected
system's driver set.
Configure Driver: Launches the properties page for the connected system's driver
so that you can modify the driver’s properties.
Configure Driver Set: Launches the properties page for the connected system's
driver set so that you can modify the driver set’s properties.
Add New Association: Prompts you for the parameters necessary to add new
attribute values to the object's DirXML-Association attribute.
Edit Selected Association: Prompts you to edit the parameters of the connected
system's DirXML-Association attribute values.
View Entitlements: Displays a list of the entitlements associated with the connected
system. The list displays the current state of the entitlement (granted or revoked) as
well as the source of the entitlement (for example, workflow or role-based).
Connector: Lists the connected system's fully distinguished name that is associated with
the object. Click the icon next to the connected system to see how data flows through
the connected system.
40 Identity Manager 3.6.1 Common Driver Administration Guide
Page 41

The Servers entry shows the servers that are associated with the driver set. Clicking the
Edit icon to the right of the server brings up the server’s properties page in a pop-up
window. Clicking the Query icon queries the attribute values for all classes in the driver
filter. The larger the filter, the longer the query takes. If the Inspector cannot communicate
with the connected system, you see a message stating that the attribute cannot be queried
from the application.
The driver filter’s associated classes (such as Group) and their attributes (such as
Description and Member) are listed under the Server entry. Click the class to see all of the
values for the defined attributes in that class. You can also click an attribute to see its
values, or you can click the entries to the right of the attributes to see just the Identity
Vault value or the application value. If no value has been defined, the entry displays No
Values. If the Inspector cannot communicate with the connected system, you see a
message stating that the attribute cannot be queried from the application.
novdocx (en) 17 September 2009
States: The connected system’s driver states are Enabled, Disabled, Processed, Pending,
Manual, and Migrate.
Object ID: The identification value of the associated object to the connected system. If
the connected system driver has no identification, this column displays None.
7.2 Inspecting Drivers
You can use the Driver Inspector to view detailed information about the objects associated with a
driver.
1 In iManager, click to display the Identity Manager Administration page.
2 In the Administration list, click Driver Inspector to display the Driver Inspector page.
This page allows you to select a driver to inspect.
Managing Associations between Drivers and Objects 41
Page 42

3 Specify the fully distinguished name of the driver that you want to inspect, or click the icon
to select the desired driver.
iManager keeps a record of the objects you have previously selected, so you can also use the
icon to select from a list of previously selected objects.
4 After you’ve selected the driver to inspect, click OK to display the Driver Inspector page.
novdocx (en) 17 September 2009
The page displays information about the objects associated with the selected driver. You can
perform any of the following actions:
Driver: Displays the name of the inspected driver. Click the driver name to display the
Driver Overview page.
Driver Set: Displays the name of the driver set in which the inspected driver resides.
Click the driver set name to display the Driver Set Overview page.
Delete: Removes the association between the driver and an object. Select the check box in
front of the object you no longer want associated with the driver, click Delete, then click
OK to confirm the deletion.
Refresh: Select this option to re-read all of the objects associated with the driver and
refresh the displayed information.
Show: Select the number of associations to display per page. You can select a predefined
number (25, 50, or 100) or specify another number of your choice. The default is 50
associations per page. If there are more associations than the number displayed, you can
use the and buttons to display the next and previous pages of associations.
Actions: Perform actions on the objects associated with the driver. Click Actions, then
select one of the following options:
Show All Associations: Displays all objects associated with the driver.
Filter for Disabled Associations: Displays all objects associated with the driver that
have a Disabled state.
Filter for Manual Associations: Displays all objects associated with the driver that
have a Manual state.
Filter for Migrate Associations: Displays all objects associated with the driver that
have a Migrate state.
42 Identity Manager 3.6.1 Common Driver Administration Guide
Page 43

Filter for Pending Associations: Displays all objects associated with the driver that
have a Pending state.
Filter for Processed Associations: Displays all objects associated with the driver
that have a Processed state.
Filter for Undefined Associations: Displays all objects associated with the driver
that have an Undefined state.
Association Summary: Displays the state of all objects associated with the driver.
Object DN: Displays the DN of the associated objects.
State: Displays the association state of the object.
Object ID: Displays the value of the association.
novdocx (en) 17 September 2009
Managing Associations between Drivers and Objects 43
Page 44

novdocx (en) 17 September 2009
44 Identity Manager 3.6.1 Common Driver Administration Guide
Page 45

8
Inspecting a Driver’s Cache File
You can use iManager to view the transactions in a driver’s cache file. The Driver Cache Inspector
displays information about the cache file, including a list of the events to be processed by the driver.
1 In iManager, click to display the Identity Manager Administration page.
2 In the Administration list, click Driver Cache Inspector to display the following page.
novdocx (en) 17 September 2009
8
3 Specify the fully distinguished name of the driver whose cache you want to inspect, or click the
button to select the desired driver, then click OK to display the Driver Cache Inspector page.
A driver’s cache file can only be read when the driver not running. If the driver is stopped, the
Driver Cache Inspector page displays the cache as shown in the screen shot below. If the driver
is running, the page displays a
of the cache entries. To stop the driver, click the button; the cache is then read and displayed.
Driver not stopped, cache cannot be read
note in place
Driver: Lists the driver that is associated with the cache file. Click the link to display the
Driver Overview page.
Inspecting a Driver’s Cache File
45
Page 46

Driver Set: Lists the driver set in which the driver resides. Click the link to display the
Driver Set Overview page.
Driver’s cache on: Lists the server that contains this instance of the cache file. If the
driver is running on multiple servers, you can select another server in the list to view the
driver’s cache file for that server.
Start/Stop Driver icons: Displays the current state of the driver and allows you to start or
stop the driver. The cache can only be read while the driver is stopped.
Edit icon: Allows you to edit the properties of the currently selected server.
Delete: Select entries in the cache, then click Delete to remove them from the cache file.
Refresh: Select this option to re-read the cache file and refresh the displayed information.
Show: Select the number of entries to display per page. You can select a predefined
number (25, 50, or 100) or specify another number of your choice. The default is 50
entries per page. If there are more entries than the number displayed, you can use the
and buttons to display the next and previous pages.
Actions: Allows you to perform actions on the entries in the cache file. Click Actions to
expand the menu, then select one of the following options:
Expand All: Expands all of the entries displayed in the cache file.
Collapse All: Collapses all of the entries displayed in the cache file.
novdocx (en) 17 September 2009
Go To: Allows you to access a specified entry in the cache file. Specify the entry
number, then click OK.
Cache Summary: Summarizes all of the events stored in the cache file.
46 Identity Manager 3.6.1 Common Driver Administration Guide
Page 47

9
Securely Storing Driver
novdocx (en) 17 September 2009
Passwords with Named
Passwords
Identity Manager allows you to securely store multiple passwords for a driver. This functionality is
referred to as Named Passwords. Each different password is accessed by a key, or name.
You can add Named Passwords to a driver set or to individual drivers. Named Passwords for a driver
set are available to all drivers in the set. Named Passwords for an individual driver are available only
to that driver.
To use a Named Password in a driver policy, you refer to it by the name of the password, instead of
using the actual password, and the Metadirectory engine sends the password to the driver. The
method described in this section for storing and retrieving Named Passwords can be used with any
driver without making changes to the driver shim.
NOTE: The sample configurations provided for the Identity Manager Driver for Lotus* Notes*
include an example of using Named Passwords in this way. The Notes driver shim has also been
customized to support other ways of using Named Passwords, and examples of those methods are
also included. For more information, see the section on Named Passwords in the Identity Manager
Driver Guide for Lotus Notes.
9
In this section:
Section 9.1, “Using Designer to Configure Named Passwords,” on page 47
Section 9.2, “Using iManager to Configure Named Passwords,” on page 48
Section 9.3, “Using Named Passwords in Driver Policies,” on page 49
Section 9.4, “Using the DirXML Command Line Utility to Configure Named Passwords,” on
page 50
9.1 Using Designer to Configure Named Passwords
1 Select the driver, then right-click and select Properties.
2 Select Named Password, then click New.
Securely Storing Driver Passwords with Named Passwords
47
Page 48

3 Specify a name, display name, and a password, then click OK twice.
9.2 Using iManager to Configure Named Passwords
novdocx (en) 17 September 2009
1 Locate the driver set or driver where you want to add a Named Password:
1a Click to display the Identity Manager Administration page.
1b In the Administration list, click Identity Manager Overview.
1c If the driver set is not listed on the Driver Sets tab, use the Search In field to search for and
display the driver set.
1d Click the driver set to open the Driver Set Overview page.
2 To add a Named Password to a driver set, click the Driver Set menu, then click Edit Driver Set
properties.
or
To add a Named Password to a driver, click the upper right corner of the driver icon, then click
Edit properties.
3 On the Identity Manager tab, click Named Passwords.
4 Click Add to display the following page.
48 Identity Manager 3.6.1 Common Driver Administration Guide
Page 49

5 Specify a name, display name and a password, then click OK twice.
novdocx (en) 17 September 2009
6 A message is displayed,
in effect?
Click OK.
Do you want to restart the driver to put your changes
9.3 Using Named Passwords in Driver Policies
Section 9.3.1, “Using the Policy Builder,” on page 49
Section 9.3.2, “Using XSLT,” on page 49
9.3.1 Using the Policy Builder
The Policy Builder allows you to make a call to a Named Password. Create a new rule and select
Named Password as the condition, then set an action depending upon if the Named Password is
available or not available.
1 In Designer, launch the Policy Builder, right-click, then click New > Rule.
2 Specify the name of the rule, then click Next.
3 Select the condition structure, then click Next.
4 Select named password for the Condition.
5 Browse to and select the Named Password that is stored on the driver.
In this example, it is
6 Select whether the operator is available or not available, then click Next.
user info
.
7 Select an action for the Do field.
In this example, the action is veto.
8 Click Finish.
The example indicates that if the
vetoed.
Figure 9-1 A Policy Using Named Passwords
user info
Named Password is not available, then the event is
9.3.2 Using XSLT
The following example shows how a Named Password can be referenced in a driver policy on the
Subscriber channel in XSLT:
<xsl:value-of
select="query:getNamedPassword($srcQueryProcessor,'mynamedpassword')"
xmlns:query="http://www.novell.com/nxsl/java/
com.novell.nds.dirxml.driver.XdsQueryProcessor"/>
Securely Storing Driver Passwords with Named Passwords 49
Page 50

9.4 Using the DirXML Command Line Utility to Configure Named Passwords
“Creating a Named Password in the DirXML Command Line Utility” on page 50
“Removing a Named Password in the DirXML Command Line Utility” on page 52
9.4.1 Creating a Named Password in the DirXML Command Line Utility
1 Run the DirXML® Command Line utility.
For information, see Chapter 12, “Using the DirXML Command Line Utility,” on page 61.
2 Specify your user name and password.
The following list of options is displayed:
DirXML commands
1: Start driver
2: Stop driver
3: Driver operations...
4: Driver set operations...
5: Log events operations...
6: Get DirXML version
7: Job operations...
99: Quit
Enter choice:
3 Specify one of the following:
Option 3 for Driver Operations
novdocx (en) 17 September 2009
Option 4 for Driver Set Operations
Option 3 for Driver Operations: If you have specified 3, a numbered list of drivers is
displayed. Do the following:
1. Specify the number for the driver you want to add a Named Password to.
The following list of options is displayed:
Select a driver operation for:
driver_name
1: Start driver
2: Stop driver
3: Get driver state
4: Get driver start option
5: Set driver start option
6: Resync driver
7: Migrate from application into DirXML
8: Submit XDS command document to driver
9: Submit XDS event document to driver
10: Queue event for driver
11: Check object password
12: Initialize new driver object
13: Passwords operations
14: Cache operations
99: Exit
Enter choice:
50 Identity Manager 3.6.1 Common Driver Administration Guide
Page 51

2. Specify 13 for Password Operations.
The following list of options is displayed.
Select a password operation
1: Set shim password
2: Reset shim password
3: Set Remote Loader password
4: Clear Remote Loader password
5: Set named password
6: Clear named password(s)
7: List named passwords
8: Get passwords state
99: Exit
Enter choice:
3. Specify 5 to set a new Named Password.
Go to Step 4.
Option 4 for Driver Set Operations: If you have specified 4, the following numbered list of
driver set operations is displayed.
Select a driver set operation
novdocx (en) 17 September 2009
1: Associate driver set with server
2: Disassociate driver set from server
3: Export Identity Manager server public key certificate
4: Regenerate Identity Manager server keypair
5: Passwords operations
6: Get default reciprocal attribute mappings
7: Regenerate all Identity Manager server keys
99: Exit
Enter choice:
Do the following:
1. Specify 5 for Password Operations.
The following list of options is displayed.
Select a password operation
1: Set named password
2: Clear named password(s)
3: List named passwords
99: Exit
Enter choice:
2. Specify 1 to set a new Named Password.
Go to Step 4.
4 At the following prompt, specify the name by which you want to refer to the Named Password:
Enter password name:
5 At the following prompt, specify a description of the password:
Enter password description:
6 At the following prompt, specify the actual password that you want to secure:
Enter password:
The characters you type for the password are not displayed.
Securely Storing Driver Passwords with Named Passwords 51
Page 52

7 At the following prompt, confirm the password by specifying it again:
Confirm password:
The password operations menu is displayed.
8 Specify the 99 option twice to exit the menu and quit the DirXML Command Line utility.
9.4.2 Removing a Named Password in the DirXML Command Line Utility
This option is useful if you no longer need Named Passwords you previously created.
1 Run the DirXML Command Line utility.
For information, see Chapter 12, “Using the DirXML Command Line Utility,” on page 61.
2 Specify your user name and password.
The following list of options is displayed:
DirXML commands
1: Start driver
2: Stop driver
3: Driver operations...
4: Driver set operations...
5: Log events operations...
6: Get DirXML version
7: Job operations...
99: Quit
Enter choice:
3 Specify one of the following:
Option 3 for Driver Operations
Option 4 for Driver Set Operations
novdocx (en) 17 September 2009
Option 3 for Driver Operations: If you have specified 3, a numbered list of drivers is
displayed. Do the following:
1. Enter the number for the driver you want to remove Named Passwords from.
The following list of options is displayed:
Select a driver operation for:
driver_name
1: Start driver
2: Stop driver
3: Get driver state
4: Get driver start option
5: Set driver start option
6: Resync driver
7: Migrate from application into DirXML
8: Submit XDS command document to driver
9: Submit XDS event document to driver
10: Queue event for driver
11: Check object password
12: Initialize new driver object
13: Passwords operations
14: Cache operations
99: Exit
52 Identity Manager 3.6.1 Common Driver Administration Guide
Page 53

Enter choice:
2. Specify 13 for Password Operations.
The following list of options is displayed:
Select a password operation
1: Set shim password
2: Reset shim password
3: Set Remote Loader password
4: Clear Remote Loader password
5: Set named password
6: Clear named password(s)
7: List named passwords
8: Get passwords state
99: Exit
Enter choice:
3. (Optional) Specify 7 to see the list of existing Named Passwords.
This helps you to make sure that you are removing the correct password.
4. Specify 6 to remove one or more Named Passwords.
5. Go to Step 4.
Option 4 for Driver Set Operations: If you have specified 4, the following numbered list of
driver set operations is displayed.
Select a driver set operation
novdocx (en) 17 September 2009
1: Associate driver set with server
2: Disassociate driver set from server
3: Export Identity Manager server public key certificate
4: Regenerate Identity Manager server keypair
5: Passwords operations
6: Get default reciprocal attribute mappings
7: Regenerate all Identity Manager server keys
99: Exit
Enter choice:
Do the following:
1. Specify 5 for Password Operations.
The following list of options is displayed.
Select a password operation
1: Set named password
2: Clear named password(s)
3: List named passwords
99: Exit
Enter choice:
2. (Optional) Specify 3 to see the list of existing Named Passwords.
This helps you to make sure that you are removing the correct password.
3. Specify 2 to remove one or more Named Passwords.
4. Go to Step 4.
4 At the following prompt, enter
No
to remove a single Named Password:
Securely Storing Driver Passwords with Named Passwords 53
Page 54

Do you want to clear all named passwords? (yes/no):
5 At the following prompt, enter the name of the Named Password you want to remove:
Enter password name:
The password operations menu is displayed.
6 (Optional) Specify the appropriate number to see the list of existing Named Passwords.
This step helps you to verify that you have removed the correct password.
7 Specify the 99 option twice to exit the menu and quit the DirXML Command Line utility.
novdocx (en) 17 September 2009
54 Identity Manager 3.6.1 Common Driver Administration Guide
Page 55

10
Configuring Java Environment
novdocx (en) 17 September 2009
Parameters
Rather than use command line options and configuration files to set the environment parameters for
the Java* virtual machine (JVM*) associated with a driver set, you can use iManager or Designer.
Section 10.1, “Using iManager to Configure the Java Environment Parameters,” on page 55
Section 10.2, “Using Designer to Configure the Java Environment Parameters,” on page 56
10.1 Using iManager to Configure the Java Environment Parameters
1 Click to display the Identity Manager Administration page.
2 Open the properties for the driver set whose parameters you want to configure:
2a In the Administration list, click Identity Manager Overview.
2b If the driver set is not listed on the Driver Sets tab, use the Search In field to search for and
display the driver set.
2c Click the driver set to open the Driver Set Overview page.
2d Click the Driver Set menu, then click Edit Driver Set properties.
3 Click Misc to display the property page that contains the Java environment parameters.
10
4 Modify the following settings as desired:
Classpath Additions: Specify additional paths for the JVM to search for package (
.class
class (
command. When entering multiple class paths, separate them with a semicolon (;) for a
Windows* JVM and a colon (:) for a UNIX/Linux JVM.
JVM Options: Specify additional options to use with the JVM. Refer to your JVM
documentation for valid options.
DHOST_JVM_OPTIONS
JVM 1.2. For example:
-Xnoagent -Xdebug -Xrunjdwp: transport=dt_socket,server=y, address=8000
Each option string is separated by whitespace. If an option string contains whitespace, then it
must be enclosed in double quotes.
The driver set attribute option has precedence over the
variable. This environment variable is tacked on to the end of driver set attribute option.
Initial Heap Size: Specify the initial (minimum) heap size available to the JVM. Increasing
the initial heap size can improve startup time and throughput performance. Use a numeric value
followed by G, M, or K. If no letter size is specified, the size defaults to bytes. Using this
parameter is the same as using the
DHOST_JVM_INITIAL_HEAP
JVM heap size in decimal number of bytes. It has precedence over the driver set attribute
option.
) files. Using this parameter is the same as using the
is the corresponding environment variable. It specifies the arguments for
DHOST_JVM_OPTIONS
java -Xms
is the corresponding environment variable. It specifies the initial
command.
java -classpath
.jar
environment
) and
Configuring Java Environment Parameters
55
Page 56

Refer to your JVM documentation for information about the JVM's default initial heap size.
Maximum Heap Size: Specify the maximum heap size available to the JVM. Use a numeric
value followed by G, M, or K. If no letter size is specified, the size defaults to bytes. Using this
parameter is the same as using the
java -Xmx
command.
novdocx (en) 17 September 2009
DHOST_JVM_MAX_HEAP
JVM heap size in decimal number of bytes. It has precedence over the driver set attribute
option.
Refer to your JVM documentation for information about the JVM's default maximum heap
size.
5 Click OK to save your changes.
is the corresponding environment variable. It specifies the maximum
10.2 Using Designer to Configure the Java Environment Parameters
1 Open your project in the Modeler.
2 Right-click the driver set icon , then click Properties > Java.
3 Modify the following settings as desired:
Server: If the driver set is associated with multiple Metadirectory servers, select the server
whose JVM parameters you want to configure.
Classpath Additions: Specify additional paths for the JVM to search for package (
.class
class (
command. When entering multiple class paths, separate them with a semicolon (;) for a
Windows JVM and a colon (:) for a UNIX/Linux JVM.
JVM Options: Specify additional options to use with the JVM. Refer to your JVM
documentation for valid options.
DHOST_JVM_OPTIONS
JVM 1.2. For example:
-Xnoagent -Xdebug -Xrunjdwp: transport=dt_socket,server=y, address=8000
Each option string is separated by whitespace. If an option string contains whitespace, then it
must be enclosed in double quotes.
The driver set attribute option has precedence over the
variable. This environment variable is tacked on to the end of driver set attribute option.
) files. Using this parameter is the same as using the
is the corresponding environment variable. It specifies the arguments for
DHOST_JVM_OPTIONS
java -classpath
environment
.jar
) and
Initial Heap Size: Specify the initial (minimum) heap size available to the JVM. Increasing
the initial heap size can improve startup time and throughput performance. Use a numeric value
followed by G, M, or K. If no letter size is specified, the size defaults to bytes. Using this
parameter is the same as using the
DHOST_JVM_INITIAL_HEAP
JVM heap size in decimal number of bytes. It has precedence over the driver set attribute
option.
Refer to your JVM documentation for information about the JVM's default initial heap size.
Maximum Heap Size: Specify the maximum heap size available to the JVM. Use a numeric
value followed by G, M, or K. If no letter size is specified, the size defaults to bytes. Using this
parameter is the same as using the
56 Identity Manager 3.6.1 Common Driver Administration Guide
java -Xms
is the corresponding environment variable. It specifies the initial
java -Xmx
command.
command.
Page 57

novdocx (en) 17 September 2009
DHOST_JVM_MAX_HEAP
is the corresponding environment variable. It specifies the maximum
JVM heap size in decimal number of bytes. It has precedence over the driver set attribute
option.
Refer to your JVM documentation for information about the JVM's default maximum heap
size.
4 Click OK to save your changes.
5 To deploy the changes into your Identity Vault, right-click the driver set icon , click Live >
Deploy, and follow the deployment prompts.
Configuring Java Environment Parameters 57
Page 58

novdocx (en) 17 September 2009
58 Identity Manager 3.6.1 Common Driver Administration Guide
Page 59

11
Reassociating a Driver Set Object
novdocx (en) 17 September 2009
with a Server
A driver set object is associated with a server. If the association becomes invalid for some reason, it
is indicated by one of the following:
When upgrading eDirectory on your Identity Manager server, you get the error
UniqueSPIException error -783
No server is listed in the Servers tab on the driver or driver set.
A server is listed next to the driver in the Identity Manager Overview screen, but the name is
garbled text.
To resolve this issue, you must disassociate the driver set object and the server, and then reassociate
them:
1 In iManager, click to display the Identity Manager Administration page.
2 In the Administration list, click Identity Manager Overview.
3 In the Search in field, specify the fully distinguished name of the container where you want to
start searching and then click , or click to browse for and select the container in the tree
structure.
4 Click the driver set object that you want to reassociate with a server.
5 In the Overview tab, click Servers.
.
11
6 Click Remove server.
7 Click Add server.
Be aware that when you reassociate a driver set object with a server, all drivers are disabled, and all
passwords are cleared.
Reassociating a Driver Set Object with a Server
59
Page 60

novdocx (en) 17 September 2009
60 Identity Manager 3.6.1 Common Driver Administration Guide
Page 61

12
Using the DirXML Command Line
novdocx (en) 17 September 2009
Utility
The DirXML® Command Line utility allows you to use a command line interface to manage the
driver. The primary use of this utility is to allow you to create platform-specific scripts to manage
the driver.
The utility and scripts are installed on all platforms during the Identity Manager installation. The
utility is installed to the following locations:
Windows:
UNIX/Linux:
There are two different methods for using the DirXML Command Line utility:
Section 12.1, “Interactive Mode,” on page 61
Section 12.2, “Command Line Mode,” on page 72
12.1 Interactive Mode
The interactive mode provides a text interface to control and use the DirXML Command Line utility.
1 At the console, enter
2 Enter the name of a user with sufficient rights to the Identity Manager objects, such as
admin.novell.
3 Enter the user’s password.
\Novell\Nds\dxcmd.bat
/usr/bin/dxcmd
dxcmd
.
12
4 Enter the number of the command you want to perform.
Table 12-1 on page 62 contains the list of options and what functionality is available.
5 Enter 99 to quit the utility.
NOTE: If you are running eDirectoryTM 8.8 on UNIX or Linux, you must specify the -host and -port
parameters. For example,
a jclient error occurs.
dxcmd -host 10.0.0.1 -port 524
. If the parameters are not specified,
Using the DirXML Command Line Utility
61
Page 62

novell.jclient.JCException: connect (to address) 111 UNKNOWN ERROR
By default, eDirectory 8.8 is not listening to localhost. The DirXML Command Line utility needs to
resolve the server IP address or hostname and the port to be able to authenticate.
Table 12-1 Interactive Mode Options
Option Description
1: Start Driver Starts the driver. If there is more than one driver, each driver is listed
with a number. Enter the number of the driver to start the driver.
2: Stop Driver Stops the driver. If there is more than one driver, each driver is listed
with a number. Enter the number of the driver to stop the driver.
3: Driver operations Lists the operations available for the driver. If there is more than one
driver, each driver is listed with a number. Enter the number of the driver
to see the operations available. For a list of operations, see Table 12-2
on page 63.
novdocx (en) 17 September 2009
4: Driver set operations Lists the operations available for the driver set. For a list of operations,
see Table 12-3 on page 66.
5: Log events operations Lists the operations available for logging events through Novell
For a description of these options, see Table 12-6 on page 69.
6: Get DirXML version Lists the version of the Identity Manager installed.
7: Job operations Manages jobs created for Identity Manager.
99: Quit Exits the DirXML Command Line utility.
Figure 12-1 Driver Options
®
Audit.
62 Identity Manager 3.6.1 Common Driver Administration Guide
Page 63

Table 12-2 Driver Options
Options Description
1: Start driver Starts the driver.
2: Stop driver Stops the driver.
3: Get driver state Lists the state of the driver.
0 - Driver is stopped
1 - Driver is starting
2 - Driver is running
3 - Driver is stopping
4: Get driver start option Lists the current driver start option.
1 - Disabled
2 - Manual
3 - Auto
novdocx (en) 17 September 2009
5: Set driver start option Changes the start option of the driver.
1 - Disabled
2 - Manual
3 - Auto
99 - Exit
6: Resync driver Forces a resynchronization the driver. It prompts for
a time delay: Do you want to specify a minimum
time for resync? (yes/no).
If you enter Yes, specify the date and time you want
the resynchronization to occur: Enter a date/time
(format 9/27/05 3:27 PM).
If you enter No, the resynchronization occurs
immediately.
7: Migrate from application into DirXML Processes an XML document that contains a query
command: Enter filename of XDS query document:
Create the XML document that contains a query
command by using the Novell
developer.novell.com/ndk/doc/dirxml/dirxmlbk/ref/
ndsdtd/query.html).
Examples:
nds.dtd
(http://
NetWare:
Windows:
Linux:
sys:\files\query.xml
c:\files\query.xml
/files/query.xml
Using the DirXML Command Line Utility 63
Page 64

Options Description
8: Submit XDS command document to driver Submits an XDS command document to the
driver’s Subscriber channel, bypassing the driver
cache. The document is processed before anything
that might be in the cache at the time of the
submission. It also means that the submission fails
if the driver is not running.
Enter filename of XDS command document:
Examples:
novdocx (en) 17 September 2009
Windows:
Linux:
Enter name of file for response:
Examples:
Windows:
Linux:
9: Submit XDS event document to driver Submits an XDS event document to the driver’s
Subscriber channel, bypassing the driver cache.
The document is processed before anything that
might be in the cache at the time of the submission.
It also means that the submission fails if the driver
is not running.
Enter filename of XDS event document:
Examples:
Windows:
Linux:
10: Queue event for driver Submits a document to the driver’s Subscriber
channel by queuing the document in the driver
cache. The document is processed after anything
that might be in the cache at the time of the
submission. The submission does not fail if the
driver is not running.
c:\files\user.xml
/files/user.xml
c:\files\user.log
/files/user.log
c:\files\add.xml
/files/add.xml
Enter filename of XDS event document:
Examples:
Windows:
Linux:
11: Check object password Validates that an object’s password in the
connected system is associated with a driver. It
matches the object’s eDirectory password
(Distribution Password, used with Universal
Password).
Enter user name:
64 Identity Manager 3.6.1 Common Driver Administration Guide
c:\files\add.xml
/files/add.xml
Page 65

Options Description
12: Initialize new driver object Performs an internal initialization of data on a new
Driver object. This is only for testing purposes.
13: Password operations There are nine Password options. See Table 12-4
on page 67 for a description of these options.
14: Cache operations There are five Cache operations. See Table 12-5
on page 68 for a descriptions of these options.
99: Exit Exits the driver options.
Sample XDS Event Document
<nds dtdversion="1.1" ndsversion="8.6" xml:space="default">
<input>
<add class-name="User" src-dn="Doe John">
<association>JDoe@novell.com</association>
<add-attr attr-name="LastName">
<value type="string">John</value>
</add-attr>
<add-attr attr-name="FirstName">
<value type="string">Doe</value>
</add-attr>
<add-attr attr-name="Email">
<value type="string">JDoe@novell.com</value>
</add-attr>
</add>
</input>
</nds>
novdocx (en) 17 September 2009
Sample XDS Command Document
<nds dtdversion="3.5" ndsversion="8.x">
<source>
<product version="3.5.11.4223">DirXML</product>
<contact>Novell, Inc.</contact>
</source>
<input>
<add cached-time="20080519102858.809Z" class-name="User" eventid=
"blr-krajiv-sles#20080519102858#1#1" qualified-srcdn=
"O=n\OU=People\CN=JDoe" src-dn="\KRAJIV-LINUXTREE\n\People\JDoe"
src-entry-id="32956" timestamp="1211192938#9">
<add-attr attr-name="Internet EMail Address">
<value timestamp="1211192938#8"
type="string">JDoe@novell.com</value>
</add-attr>
<add-attr attr-name="Given Name">
<value timestamp="1211192938#5" type="string">John</value>
</add-attr>
<add-attr attr-name="Surname">
<value timestamp="1211192938#9" type="string">Doe</value>
</add-attr>
</add>
</input>
</nds>
Using the DirXML Command Line Utility 65
Page 66

Figure 12-2 Driver Set Operations
Table 12-3 Driver Set Operations
Operation Description
1: Associate driver set with server Adds a driver set to the server after which the driver
set becomes active.
novdocx (en) 17 September 2009
2: Disassociate driver set from server Removes a driver set from the server after which
the driver set becomes inactive.
3: Export Identity Manager server public key
certificate
Exports the DirXML server's public key certificate
which is used for encrypting data when setting
passwords.
4: Regenerate Identity Manager server keypair Makes the DirXML Engine regenerate the public
key/private key pair which is used for encrypting
data when setting passwords.
5: Passwords operations There are four password operations. For
description of these operations, see the operations
5, 6, 7, and 99 in the Table 12-4 on page 67.
6: Get default reciprocal attribute mappings Lists the default reciprocal attribute mappings.
7: Regenerate all Identity Manager server keys Makes the DirXML Engine regenerate all server-
specific encryption keys.
99: Exit Exits the current menu and takes you back to the
DirXML commands.
66 Identity Manager 3.6.1 Common Driver Administration Guide
Page 67

Figure 12-3 Password Operations
Table 12-4 Password Operations
Operation Description
novdocx (en) 17 September 2009
1: Set shim password Sets the application password. This is the
password of the user account you are using to
authenticate into the connected system with.
2: Clear shim password Clears the application password.
3: Set Remote Loader password The Remote Loader password is used to control
access to the Remote Loader instance.
Enter the Remote Loader password, then confirm
the password by typing it again.
4: Clear Remote Loader password Clears the Remote Loader password so no Remote
Loader password is set on the Driver object.
5: Set named password Allows you to store a password or other pieces of
security information on the driver. See Chapter 9,
“Securely Storing Driver Passwords with Named
Passwords,” on page 47 for more information.
There are four prompts to fill in:
Enter password name:
Enter password description:
Enter password:
Confirm password
6: Clear named passwords Clears a specified Named Password or all Named
Passwords that are stored on the driver object: Do
you want to clear all named passwords? (yes/no).
If you enter Yes, all Named Passwords are cleared.
If you enter No, you are prompted to specify the
password name that you want to clear.
Using the DirXML Command Line Utility 67
Page 68

Operation Description
7: List named passwords Lists all Named Passwords that are stored on the
driver object. It lists the password name and the
password description.
8: Get password state Lists if a password is set for:
Driver Object password:
Application password:
Remote loader password:
The dxcmd utility allows you to set the Application
password and the Remote Loader password. You
cannot set the Driver Object password with this
utility. It shows if the password has been set or not.
99: Exit Exits the current menu and takes you back to the
Driver options.
Figure 12-4 Cache Operations
novdocx (en) 17 September 2009
Table 12-5 Cache Operations
Operation Description
1: Get driver cache limit Displays the current cache limit that is set for the
driver.
2: Set driver cache limit Sets the driver cache limit in kilobytes. A value of 0
is unlimited.
3: View cached transactions A text file is created with the events that are stored
in cache. You can select the number of transactions
to view.
Enter option token (default=0):
Enter maximum transactions records to return
Enter name of file for response:
68 Identity Manager 3.6.1 Common Driver Administration Guide
(default=1):
Page 69

Operation Description
4: Delete cached transactions Deletes the transactions stored in cache.
Enter position token (default=0):
Enter event-id value of first transaction record
to delete (optional):
Enter number of transaction records to delete
(default=1):
99: Exit Exits the current menu and takes you back to the
Driver options.
Figure 12-5 Log Event Operations
novdocx (en) 17 September 2009
Table 12-6 Log Events Operations
Operation Description
1: Set driver set log events Allows you to log driver set events through Novell
Audit. There are 49 items you can select to log. See
Table 12-7 on page 70 for a list of these options.
Enter the number of the item you want to log. After
the items are selected, enter 99 to accept the
selections.
2: Reset driver set log events Resets all of the log event options.
3: Set driver log events Allows you to log driver events through Novell
Audit. There are 49 items to select to log. See Table
12-7 on page 70 for a list of these options.
Enter the number of the item you want to log. After
the items are selected, enter 99 to accept the
selections.
4: Reset driver log events Resets all of the log event options.
99: Exit Exits the log events operations menu.
Using the DirXML Command Line Utility 69
Page 70

Table 12-7 Driver Set and Driver Log Events
Options
1: Status success
2: Status retry
3: Status warning
4: Status error
5: Status fatal
6: Status other
7: Query elements
8: Add elements
9: Remove elements
10: Modify elements
novdocx (en) 17 September 2009
11: Rename elements
12: Move elements
13: Add-association elements
14: Remove-association elements
15: Query-schema elements
16: Check-password elements
17: Check-object-password elements
18: Modify-password elements
19: Sync elements
20: Pre-transformed XDS document from shim
21: Post input transformation XDS document
22: Post output transformation XDS document
23: Post event transformation XDS document
24: Post placement transformation XDS document
25: Post create transformation XDS document
26: Post mapping transformation <inbound> XDS document
27: Post mapping transformation <outbound> XDS document
28: Post matching transformation XDS document
29: Post command transformation XDS document
30: Post-filtered XDS document <Publisher>
31: User agent XDS command document
70 Identity Manager 3.6.1 Common Driver Administration Guide
Page 71

Options
32: Driver resync request
33: Driver migrate from application
34: Driver start
35: Driver stop
36: Password sync
37: Password request
38: Engine error
39: Engine warning
40: Add attribute
41: Clear attribute
42: Add value
novdocx (en) 17 September 2009
43: Remove value
44: Merge entire
45: Get named password
46: Reset Attributes
47: Add Value - Add Entry
48: Set SSO Credential
49: Clear SSO Credential
50: Set SSO Passphrase
51: User defined IDs
99: Accept checked items
Table 12-8 Job Operations
Options Description
1: Get available job definitions Allows you to select an existing job.
Enter the driverset number or the driver number:
Do you want to filter the job definitions by
containment? Enter Yes or No
Enter name of the file for response:
Examples:
Windows:
Linux:
c:\files\user.log
/files/user.log
Using the DirXML Command Line Utility 71
Page 72

Options Description
2: Operations on specific job object Allows you to perform operations for a specific job.
Enter the job number:
The following list of options is displayed:
1: Send job update notification
2: Start job
3: Abort running job
4: Get job state
5: Check job configuration
6: Passwords operations
99: Exit
12.2 Command Line Mode
The command line mode allows you to use script or batch files. Table 12-9 on page 72 contains the
different options that are available.
novdocx (en) 17 September 2009
To use the command line options, decide which items you want to use and string them together.
Example:
test.driverset.headquarters
dxcmd -user admin.headquarters -host 10.0.0.1 -password n0vell -start
This example command starts the driver.
Table 12-9 Command Line Options
Option Description
Configuration
-user <user name> Specify the name of a user with administrative
rights to the drivers you want to test.
-host <name or IP address> Specify the IP address of the server where the
driver is installed.
-password <user password> Specify the password of the user specified above.
-port <port number> Specify a port number, if the default port is not
used.
-q <quiet mode> Displays very little information when a command is
executed.
-v <verbose mode> Displays detailed information when a command is
executed.
-s <stdout> Writes the results of the dxcmd command to stdout.
-? <show this message> Displays the help menu.
-help <show this message> Displays the help menu.
-cert <X.509 DER certificate filename> Certificate file used for encrypting passwords.
72 Identity Manager 3.6.1 Common Driver Administration Guide
Page 73

Option Description
-version <n.n[.n[.n]]> Changes engine version by force.
-nossl Uses clear socket for LDAP.
-keystore <keystore path and filename> Specifies the filename of the Java keystore that
contains the trusted root certificate of the issuer of
the certificate used by the remote interface shim.
-storepass <keystore password> Specifies the password for the Java keystore
specified by the keystore parameter.
novdocx (en) 17 September 2009
-dnform <slash|qualified-slash|dot|qualified-
dot|ldap>
Actions
-start <driver dn> Starts the driver.
-stop <driver dn> Stops the driver.
-getstate <driver dn> Shows the state of the driver as running or stopped.
-getdriverstats <driver dn> <output filename> Shows the statistics of the driver.
-resetdriverstats <driver dn> Resets the statistics of the driver.
-getstartoption <driver dn> Shows the startup option of the driver.
-setstartoption <driver dn> <disabled|manual|auto>
<resync|noresync>
-getcachelimit <driver dn> Lists the cache limit set for the driver.
-setcachelimit <driver dn> <0 or positive integer> Sets the cache limit for the driver.
-migrateapp <driver dn> <filename> Processes an XML document that contains a query
Changes the dn form by force.
Sets how the driver starts if the server is rebooted.
Sets whether the objects are to be resynchronized
when the driver restarts.
command.
Create the XML document that contains a query
command by using the Novell
www.novell.com/documentation/idm35/
index.html?page=/documentation/idm35/
policy_dtd/data/
dtdndsoverview.html#dtdndsoverview).
nds.dtd
(http://
-setshimpassword <driver dn> <password> Sets the application password. This is the
password of the user account you are using to
authenticate into the connected system with.
-clearshimpassword <driver dn> <password> Clears the application password.
-setremoteloaderpassword <driver dn>
<password>
<clearremoteloaderpassword <driver dn> Clears the Remote Loader password.
Sets the Remote Loader password.
The Remote Loader password is used to control
access to the Remote Loader instance.
Using the DirXML Command Line Utility 73
Page 74

Option Description
novdocx (en) 17 September 2009
-sendcommand <driver dn> <input filename>
<output filename>
Submits a document to the driver’s Subscriber
channel, bypassing the driver cache. The
document gets processed ahead of anything that
might be in the cache at the time of the submission.
It also means that the submission fails if the driver
is not running.
Specify the XDS command document as the input
file.
Example:
dxcmd -a admin.n -w n -sendcommand /
sys:/files/user.xml /output.txt
-sendevent <driver dn> <input filename> Submits a document to the driver’s Subscriber
channel, bypassing the driver cache. The
document gets processed ahead of anything that
might be in the cache at the time of the submission.
It also means that the submission fails if the driver
is not running.
Example:
dxcmd -a admin.n -w n -sendevent /
event.xml /output.txt
-queueevent <driver dn> <input filename> Submits a document to the driver’s Subscriber
channel by queuing the document in the driver
cache. The document gets processed after
anything that might be in the cache at the time of
the submission. The submission won’t fail if the
driver isn’t running.
Example:
dxcmd -user admin.novell -password
novell -queueevent "Delimited
Text.test1.novell" /input.xml
-setlogevents <dn> <integer ...> Sets Novell Audit log events on the driver. The
integer is the option of the item to log. See Table
12-7 on page 70 for the list of the integers to enter.
-clearlogevents <dn> Clears all Novell Audit log events that are set on the
driver.
-setdriverset <driver set dn> Associates a driver set with the server.
-cleardriverset Clears the driver set association from the server.
-getversion Shows the version of Identity Manager that is
installed.
-initdriver object <dn> Performs an internal initialization of data on a new
Driver object. This is only for testing purposes.
-setnamedpassword <driver dn> <name>
<password> [description]
Sets Named Passwords on the driver object. You
specify the name, the password, and the
description of the Named Password.
74 Identity Manager 3.6.1 Common Driver Administration Guide
Page 75

Option Description
-clearnamedpassword <driver dn> <name> Clears a specified Named Password.
-startjob <job dn> Starts the specified job.
-abortjob <job dn> Aborts the specified job.
-getjobrunningstate <job dn> Returns the specified job’s running state.
-getjobenabledstate <job dn> Returns the specified job’s enabled state.
-getjobnextruntime <job dn> Returns the specified job’s next run time.
-updatejob <job dn> Updates the specified job.
-clearallnamedpaswords <driver dn> Clears all Named Passwords set on a specific
driver.
If a command line is executed successfully, it returns a zero. If the command line returns anything
other than zero, it is an error. For example 0 means success, and -641 means invalid operation. -641
is an eDirectory error code. Table 12-10 on page 75 contains other values for specific command line
options.
novdocx (en) 17 September 2009
Table 12-10 Command Line Option Values
Command Line Option Values
-getstate 0- stopped
1- starting
2- running
3- shutting down
11- get schema
Anything else that is returned is an error.
-getstartoption 0- disabled
1- manual
2- auto
Anything else that is returned is an error.
-getcachelimit 0- unlimited
Anything else that is returned is an error.
-getjobrunningstate 0- stopped
1- running
Anything else that is returned is an error.
Using the DirXML Command Line Utility 75
Page 76

Command Line Option Values
-getjobenabledstate 0- disabled
1- enabled
2- configuration error
Anything else that is returned is an error.
-getjobnextruntime The return is the next scheduled time for the job in
eDirectory time format (number of seconds since
00:00:00 Jan 1, 1970 UTC).
novdocx (en) 17 September 2009
76 Identity Manager 3.6.1 Common Driver Administration Guide
Page 77

13
Synchronizing Objects
The following sections explain how data is synchronized between the Identity Vault and connected
systems:
Section 13.1, “What Is Synchronization?,” on page 77
Section 13.2, “When Is Synchronization Done?,” on page 77
Section 13.3, “How Does the Metadirectory Engine Decide Which Object to Synchronize?,” on
page 78
Section 13.4, “How Does Synchronization Work?,” on page 79
13.1 What Is Synchronization?
The actions commonly referred to as “synchronization” in Identity Manager refer to several different
but related actions:
novdocx (en) 17 September 2009
13
Synchronization (or merging) of attribute values of an object in the Identity Vault with the
corresponding attribute values of an associated object in a connected system.
Migration of all Identity Vault objects and classes that are included in the filter on the
Subscriber channel.
Generation of the list of objects to submit to the driver’s Subscriber channel for
synchronization or migration in response to a user request (a manual synchronization).
Generation of the list of objects to submit to the driver’s Subscriber channel for
synchronization or migration in response to enabling a formerly disabled driver, or in response
to a cache error.
13.2 When Is Synchronization Done?
The Metadirectory engine performs object synchronization or merging in the following
circumstances:
A
<sync>
A
<sync>
circumstances:
The state of the object’s association value is set to “manual” or “migrate.” (This causes an
An object synchronization command is read from the driver’s cache.
A
<sync>
event element is submitted on the Subscriber or Publisher channel.
event element is submitted on the Subscriber channel in the following
TM
eDirectory
object synchronization command in the affected driver’s cache.)
event element is submitted on the Publisher channel in the following circumstances:
event, which in turn causes the Identity Manager caching system to queue an
A driver submits a
The Metadirectory engine submits a
result of a migrate-into-NDS query. These
Subscriber thread, but are processed using the Publisher channel filter and policies.
<sync>
event element. No known driver currently does this.
<sync>
event element for each object found as the
<sync>
events are submitted by using the
Synchronizing Objects
77
Page 78

An
<add>
event (real or synthetic) is submitted on a channel and the channel Matching policy
finds a matching object in the target system.
An
<add>
event with an association is submitted on the Subscriber channel. This normally
occurs only in exceptional cases, such as the bulk load of objects into eDirectory with
DirXML-Associations attribute values.
An
<add>
event is submitted on the Publisher channel and an object is found in eDirectory that
<add>
already has the association value reported with the
The Metadirectory engine generates synchronization requests for zero or more objects in the
following cases:
event.
novdocx (en) 17 September 2009
The user issues a manual driver synchronization request. This corresponds to the Resync button
in the Driver Set property page in ConsoleOne
Identity Manager Driver Overview page.
The Metadirectory engine encounters an error with the driver’s cache and cannot recover from
the cache error. The driver’s cache is deleted and the engine generates object synchronization
commands as detailed in Section 13.3, “How Does the Metadirectory Engine Decide Which
Object to Synchronize?,” on page 78.
®
, or to the Synchronize button on the iManager
13.3 How Does the Metadirectory Engine Decide Which Object to Synchronize?
The Metadirectory engine processes both manually initiated and automatically initiated
synchronization requests in the same manner. The only difference in the processing of manually
initiated versus automatically initiated driver synchronization requests is the starting filter time used
to filter objects being considered for synchronization.
The starting filter time is used to filter objects that have modification or creation times that are older
than the starting time specified in the synchronization request.
For automatically initiated driver synchronization, the starting filter time is obtained from the time
stamps of cached eDirectory events. In particular, the starting filter time is the earliest time for the
cached events that haven’t yet been successfully processed by the driver’s Subscriber channel.
For manually initiated driver synchronization, the default starting filter time is the earliest time in
the eDirectory database. In Identity Manager 2 and Identity Manager 3, an explicit starting filter
time can also be set. In DirXML 1.1a there is no facility to set the starting filter time value for
synchronization when manually initiating driver synchronization.
The Metadirectory engine creates a list of objects to be synchronized on the Subscriber channel in
the following manner:
1. It finds all objects that have an entry modification time stamp greater than or equal to the
starting filter time.
2. It finds all objects that have an entry creation time stamp greater than or equal to the starting
filter time.
3. It adds a
that has an entry modification time stamp greater than or equal to the starting filter time.
78 Identity Manager 3.6.1 Common Driver Administration Guide
synchronize object
command to the driver cache for each unique object found
Page 79

13.4 How Does Synchronization Work?
After the Metadirectory engine determines that an object is to be synchronized, the following
processes occur:
1. Each system (the Identity Vault and the connected system) is queried for all attribute values in
the appropriate filters.
eDirectory is queried for all values in the Subscriber filter, and for values that are marked
for synchronization in Identity Manager 2.x and Identity Manager 3.x.
The connected system is queried for all values in the Publisher filter, and for values that
are marked for synchronization in Identity Manager 2.x and Identity Manager 3.x.
2. The returned attribute values are compared and modification lists are prepared for the Identity
Vault and the connected system according to Table 13-1 on page 80, Table 13-2 on page 81, and
Table 13-3 on page 83.
In the tables the following pseudo-equations are used:
Left = Right
Left = Right[1]
there is more than one value, it is indeterminate.
Left += Right
existing values.
Left = Left + Right
left and right sides.
indicates that the left side receives all values from the right side.
indicates that the left side receives one value from the right side. If
indicates that the left side adds the right side values to the left side’s
indicates that the left sides receives the union of the values of the
novdocx (en) 17 September 2009
There are three different combinations of selected items in the filter, and each one creates a different
output.
Section 13.4.1, “Scenario One,” on page 79
Section 13.4.2, “Scenario Two,” on page 81
Section 13.4.3, “Scenario Three,” on page 82
13.4.1 Scenario One
The attribute is set to Synchronize on the Publisher and Subscriber channels, and the merge authority
is set to Default.
Synchronizing Objects 79
Page 80

Figure 13-1 Scenario One
novdocx (en) 17 September 2009
The following table contains the values that the Metadirectory engine synchronizes when the
attribute is sent through a filter that is set to the configuration for Scenario One. The table shows
different outputs depending upon whether the attribute comes from the Identity Vault or the
Application, if the attribute is single-valued or multi-valued, and if the attribute is empty or nonempty.
Table 13-1 Output of Scenario One
Application
single-valued
empty
Application
single-valued
non-empty
Application
multi-valued
empty
Application
multi-valued
non-empty
Identity Vault
single-valued
empty
No change App = Identity Vault No change App = Identity
Identity Vault = App App = Identity Vault Identity Vault = App Identity Vault + =
No change App = Identity Vault No change App = Identity Vault
Identity Vault =
App[1]
Identity Vault
single-valued
non-empty
App + = Identity
Vault
Identity Vault
multi-valued
empty
Identity Vault
multi-valued
non-empty
Vault[1]
App
Identity Vault = App App = App +
Identity Vault
Identity Vault = App
+ Identity Vault
80 Identity Manager 3.6.1 Common Driver Administration Guide
Page 81

13.4.2 Scenario Two
The attribute is set to Synchronize only on the Subscriber channel, or it is set to Synchronize on both
the Subscriber and Publisher channels. The merge authority is set to Identity Vault.
Figure 13-2 Scenario Two
novdocx (en) 17 September 2009
The following table contains the values that the Metadirectory engine synchronizes when the
attribute is sent through a filter that is set to the configuration for Scenario Two. The table shows
different outputs depending upon whether the attribute comes from the Identity Vault or the
Application, if the attribute is single-valued or multi-valued, and if the attribute is empty or nonempty.
Table 13-2 Output of Scenario Two
Application
single-valued
empty
Application
single-valued
empty
Application
multi-valued
empty
Identity Vault
single-valued
empty
No change App = Identity Vault No change App = Identity
App = empty App = Identity Vault Identity Vault = App App = Identity
No change App = Identity Vault No change App = Identity Vault
Identity Vault
single-valued
non-empty
Identity Vault
multi-valued
empty
Identity Vault
multi-valued
non-empty
Vault[1]
Vault[1]
Synchronizing Objects 81
Page 82

novdocx (en) 17 September 2009
Application
multi-valued
non-empty
Identity Vault
single-valued
empty
App = empty App = Identity Vault App = empty App = Identity Vault
Identity Vault
single-valued
non-empty
Identity Vault
multi-valued
empty
Identity Vault
multi-valued
non-empty
13.4.3 Scenario Three
The attribute is set to Synchronize on the Publisher channel or the merge authority is set to
Application.
Figure 13-3 Scenario Three
The following table contains the values that the Metadirectory engine synchronizes when the
attribute is sent through a filter that is set to the configuration for Scenario Three. The table shows
different outputs depending upon whether the attribute comes from the Identity Vault or the
Application, if the attribute is single-valued or multi-valued, and if the attribute is empty or nonempty.
82 Identity Manager 3.6.1 Common Driver Administration Guide
Page 83

Table 13-3 Output of Scenario Three
novdocx (en) 17 September 2009
Application
single-valued
empty
Application
single-valued
non-empty
Application
multi-valued
empty
Application
multi-valued nonempty
Identity Vault
single-valued
empty
No change Identity Vault =
Identity Vault
single-valued
non-empty
empty
Identity Vault
multi-valued
empty
Identity Vault
multi-valued
non-empty
No change Identity Vault =
empty
Identity Vault = App Identity Vault = App Identity Vault = App Identity Vault =
App
No change Identity Vault =
empty
Identity Vault =
App[1]
Identity Vault =
App[1]
No change Identity Vault =
empty
Identity Vault = App Identity Vault = App
Synchronizing Objects 83
Page 84

novdocx (en) 17 September 2009
84 Identity Manager 3.6.1 Common Driver Administration Guide
Page 85

14
Migrating and Resynchronizing
novdocx (en) 17 September 2009
Data
Identity Manager synchronizes data when the data changes. If you want to synchronize all data
immediately, you can choose from the following options:
Migrate Data from Identity Vault: Allows you to select containers or objects you want to
migrate from the Identity Vault to an application. When you migrate an object, the Identity
Manager engine applies all of the Matching, Placement, and Create policies, as well as the
Subscriber filter, to the object.
Migrate Data into Identity Vault: Assumes that the remote application can be queried for
entries that match the criteria in the Publisher filter.
Synchronize: The Identity Manager engine looks in the Subscriber class filter and processes
all objects for those classes. Associated objects are merged. Unassociated objects are processed
as Add events.
To use one of the options explained above:
1 In iManager, in the Roles and Tasks view, click Identity Manager > Identity Manager
Overview.
2 Browse to and select the driver set where the driver exists, then click Search.
3 Click the driver icon then click the Migrate tab.
14
4 Click the appropriate migration button.
For more information, see Chapter 13, “Synchronizing Objects,” on page 77.
Migrating and Resynchronizing Data
85
Page 86

novdocx (en) 17 September 2009
86 Identity Manager 3.6.1 Common Driver Administration Guide
Page 87

15
Viewing Identity Manager
novdocx (en) 17 September 2009
Processes
To view Identity Manage processing events, use DSTrace. You only use this during testing and
troubleshooting Identity Manager. Running DSTrace while the drivers are in production increases
the utilization on the Identity Manager server and can cause events to process very slowly.
To see Identity Manager processes in DSTrace, you add values to the driver set and the drivers. You
can do this in Designer and iManager.
Section 15.1, “Adding Trace Levels in Designer,” on page 87
Section 15.2, “Adding Trace Levels in iManager,” on page 89
Section 15.3, “Capturing Identity Manager Processes to a File,” on page 90
15.1 Adding Trace Levels in Designer
You can add trace levels to the driver set or to each driver.
Section 15.1.1, “Driver Set,” on page 87
Section 15.1.2, “Driver,” on page 88
15.1.1 Driver Set
15
1 In an open project in Designer, select the driver set in the Outline view.
2 Right-click and select Properties, then click 5. Trace.
3 Set the parameters for tracing, then click OK. See Table 15-1 on page 88 for more information
about the driver set trace parameters.
If you set the trace level on the driver set, all drivers appear in the DSTrace logs.
Viewing Identity Manager Processes
87
Page 88

Table 15-1 Driver Set Trace Parameters
Parameter Description
Driver trace level As the driver trace level increases, the amount of
information displayed in DSTrace increases.
Trace level one shows errors, but not the cause of
the errors. If you want to see password
synchronization information, set the trace level to
five.
XSL trace level DSTrace displays XSL events. Only set this trace
level when troubleshooting XSL style sheets. If you
do not want to see XSL information, set the level to
zero.
Java debug port Allows developers to attach a Java debugger.
Java trace file When a value is set in this field, all Java information
for the driver set is written to a file. The value for
this field is the patch for that file.
novdocx (en) 17 September 2009
As long as the file is specified, Java information is
written to this file. If you do not need to debug Java,
leave this field blank.
Trace file size limit Allows you to set a limit for the Java trace file. If you
set the file size to unlimited, the file grows in size
until there is no disk space left.
NOTE: The trace file is created in multiple files.
Identity Manager automatically divides the
maximum file size by ten and creates ten separate
files. The combined size of these files equals the
maximum trace file size.
15.1.2 Driver
1 In an open project in Designer, select the driver in the Outline view.
2 Right-click and select Properties, then click 8. Trace.
3 Set the parameters for tracing, then click OK. See Table 15-2 on page 89 for more information
about these parameters.
If you set the parameters on the driver only, only information for that driver appears in the
DSTrace log.
88 Identity Manager 3.6.1 Common Driver Administration Guide
Page 89

Table 15-2 Driver Trace Parameters
Parameter Description
Trace level As the driver trace level increases, the amount of
information displayed in DSTrace increases.
Trace level one shows errors, but not the cause of
the errors. If you want to see password
synchronization information, set the trace level to
five.
If you select Use setting from Driver Set, the value
is taken from the driver set.
Trace file Specify a file name an location of where the Identity
Manager information is written for the selected
driver.
If you select Use setting from Driver Set, the value
is taken from the driver set.
Trace file size limit Allows you to set a limit for the Java trace file. If you
set the file size to unlimited, the file grows in size
until there is no disk space left.
novdocx (en) 17 September 2009
NOTE: The trace file is created in multiple files.
Identity Manager automatically divides the
maximum file size by ten and creates ten separate
files. The combined size of these files equals the
maximum trace file size.
If you select Use setting from Driver Set, the value
is taken from the driver set.
Trace name The driver trace messages are prepended with the
value entered instead of the driver name. Use if the
driver name is very long.
15.2 Adding Trace Levels in iManager
You can add trace levels to the driver set or to each driver.
Section 15.2.1, “Driver Set,” on page 89
Section 15.2.2, “Driver,” on page 90
15.2.1 Driver Set
1 Click to display the Identity Manager Administration page.
2 Open the properties for the driver set whose parameters you want to configure:
2a In the Administration list, click Identity Manager Overview.
2b If the driver set is not listed on the Driver Sets tab, use the Search In field to search for and
display the driver set.
Viewing Identity Manager Processes 89
Page 90

2c Click the driver set to open the Driver Set Overview page.
2d Click the Driver Set menu, then click Edit Driver Set properties.
3 Select the Misc tab for the driver set.
4 Set the parameters for tracing, then click OK. See Table 15-1 on page 88 for information about
these parameters.
15.2.2 Driver
1 Click to display the Identity Manager Administration page.
2 Open the properties for the driver set that contains the driver you want to configure:
2a In the Administration list, click Identity Manager Overview.
2b If the driver set is not listed on the Driver Sets tab, use the Search In field to search for and
display the driver set.
2c Click the driver set to open the Driver Set Overview page.
3 Click the upper right corner of the driver, then click Edit properties.
4 Select the Misc tab for the driver.
novdocx (en) 17 September 2009
5 Set the parameters for tracing, then click OK. See Table 15-2 on page 89 for information.
15.3 Capturing Identity Manager Processes to a File
Identity Manager processes are saved to a file by using a parameter on the driver or through
DSTrace. The parameter on the driver is the Trace file parameter.
The driver processed that are captured through DSTrace are the processes that occur on the Identity
Manager engine. If you use the Remote Loader, you need to capture a trace on the Remote Loader at
the same time as you are capturing the trace on the Identity Manager engine.
The following methods helps you capture and save Identity Manager processes through DSTrace on
different OS platforms.
15.3.1 Windows
1 Open the Control Panel > NDS Services > dstrace.dlm, then click Start.
A window opens named NDS Server Trace Utility.
2 Select Edit > Options, then click Clear All.
This clears all of the default flags.
3 Select DirXML and DirXML Drivers.
4 Click OK.
5 Select File > New.
6 Specify the filename and location of where you want the DSTrace information saved, then click
Open.
7 Wait for the event to occur.
8 Select File > Close.
90 Identity Manager 3.6.1 Common Driver Administration Guide
Page 91

This stops the information from being written to the log file.
9 Open the file in a text editor and search for the event or the object you modified.
15.3.2 UNIX
novdocx (en) 17 September 2009
1 Enter
2 Enter
ndstrace
set ndstrace=nodebug
to start the ndstrace utility.
Turns off all trace flags currently set.
3 Enter
set ndstrace on
Displays trace messages to the console.
4 Enter
5 Enter
set ndstrace file on
Captures trace messages to the file
By default it is
set ndstrace=+dxml
/var/nds
.
ndstrace.log
the directory where eDirectory is installed.
Displays the Identity Manager events.
6 Enter
set ndstrace=+dvrs
Displays the Identity Manager driver events.
7 Wait for the event to occur.
8 Enter
set ndstrace file off
This stops the logging of information to the file.
9 Enter
exit
to quit the ndstrace utility.
10 Open the file in a text editor. Search for the event or the object that was modified.
15.3.3 iMonitor
iMonitor allows you to get DSTrace information from a web browser. It does not matter where
Identity Manager is running. These are the files that run iMonitor:
NDSIMON.DLM
ndsimonitor
1 Access iMonitor from http://server_ip:8008/nds.
Port 8008 is the default port.
2 Enter a username and password with administrative rights, then click Login.
3 Select Trace Configuration on the left side.
4 Click Clear All.
5 Select DirXML and DirXML Drivers.
6 Click Tra c e On.
7 Select Trace History on the left side.
8 Click the document with the Modification Time of Current to see a live trace.
9 Change the Refresh Interval if you want to see information more often.
Runs on Windows.
Runs on UNIX.
Viewing Identity Manager Processes 91
Page 92

10 Select Trace Configuration on the left side, then click Tra c e Off to turn the tracing off.
11 You can view the trace history by selecting Trace History. The files are distinguished by their
time stamps.
If you need a copy of the HTML file, the default location is:
novdocx (en) 17 September 2009
Windows:
UNIX/Linux:
Drive_letter:\Novell\NDS\ndsimon\dstrace\*.htm
/var/nds/dstrace/*.htm
15.3.4 Remote Loader
You can capture the events that occur on the machine running the Remote Loader service.
1 Launch the Remote Loader Console by clicking the icon.
2 Select the driver instance, then click Edit.
3 Set the Trace Level to 3 or above.
4 Specify a location and file for the trace file.
5 Specify the amount of disk space that the file is allowed.
6 Click OK twice to save the changes.
You can also enable tracing from the command line by using the following switches. For more
information, see “Configuring the Remote Loader” in the Identity Manager 3.6.1 Remote Loader
Guide.
Table 15-3 Command Line Tracing Switches
Switch
Secondary
Name
Parameter Description
-trace -t integer Specifies the trace level. This is only used when hosting an
application shim. Trace levels correspond to those used on the
Identity Manager server.
Example:
-tracefile -tf filename Specify a file to write trace messages to. Trace messages are
written to the file if the trace level is greater than zero. Trace
messages are written to the file even if the trace window is not
open.
Example:
-tracefile c:\temp\trace.txt
or
-tf c:\temp\trace.txt
-trace 3
or
-t3
92 Identity Manager 3.6.1 Common Driver Administration Guide
Page 93

novdocx (en) 17 September 2009
Switch
Secondary
Name
Parameter Description
-tracefilemax -tfm size Specifies the approximate maximum size that trace file data can
occupy on disk. If you specify this option, there is a trace file with
the name specified using the tracefile option and up to 9
additional “roll-over” files. The roll-over files are named using the
base of the main trace filename plus “_n”, where n is 1 through 9.
The size parameter is the number of bytes. Specify the size by
using the suffixes K, M, or G for kilobytes, megabytes, or
gigabytes.
If the trace file data is larger than the specified maximum when
the Remote Loader is started, the trace file data remains larger
than the specified maximum until roll-over is completed through all
10 files.
Example:
-tracefilemax 1000M or -tfm 1000M
Viewing Identity Manager Processes 93
Page 94

novdocx (en) 17 September 2009
94 Identity Manager 3.6.1 Common Driver Administration Guide
Page 95

16
Editing Driver Configuration Files
You must have a good knowledge of XML to use the information in this section. This information
allows you to add custom prompts to drivers you have created.
Section 16.1, “Variables in a Driver Configuration File,” on page 95
Section 16.2, “Flexible Prompting in a Driver Configuration File,” on page 98
Section 16.3, “Viewing the Informal Identity Manager Driver Configuration DTD,” on
page 100
16.1 Variables in a Driver Configuration File
For the iManager plug-ins, several node types are defined for the driver configuration files. The
following is a list of actions that the Identity Manager engine supports:
Prompting once for a value that is used repeatedly throughout a single driver configuration file.
Prompting once for a value that is used across multiple driver configuration files, as part of the
Import Drivers Wizard.
novdocx (en) 17 September 2009
16
Allowing the user to select a value from a drop-down list of values.
Global modification of the driver configuration files according to a contained XSL style sheet.
Built-in variables that can be referenced without declaring them to access information about the
driver and its environment. For example, tree name, driver set name, driver set DN, server
name, server DN, driver name, and driver DN.
The ability to layer prompts. It is possible to ask the user multiple sets of questions, with the
second and later sets being controlled by the user’s responses to prior sets of questions. For
more information, see Section 16.2, “Flexible Prompting in a Driver Configuration File,” on
page 98.
The primary new node types are:
variable-decl: Allows you to define driver configuration variables that are prompted for and
placed into a driver configuration file during its import. Multiple
be used to define a layered set of prompts. For more information, see Section 16.2, “Flexible
Prompting in a Driver Configuration File,” on page 98.
variable-ref: Used to reference a variable defined in a
configuration files.
xsl-modify: Used to globally modify the driver configuration file after all variables and
prompts have been resolved. The contents of this node are extracted and used as an XSL style
sheet that is applied to the patched driver configuration file.
To view the driver configuration file XML extensions, see DriverConfigXMLExtension.txt.
variable-decl
variable-decl
within your driver
blocks can
In addition, be aware of the following:
Section 16.1.1, “General Notes,” on page 96
Section 16.1.2, “Import Driver Notes,” on page 98
Editing Driver Configuration Files
95
Page 96

16.1.1 General Notes
A
variable-decl
long as the order they are resolved is taken into account.
If a
variable-decl
attribute and does not contain an optional
treated as follows:
A prompt-type of
value the user specifies for the first part is appended by a colon (:) and the value the user
specifies for the second part in the value is rendered by the variable.
Figure 16-1 Two Edit Fields
can contain
text-var
but not
contains an optional prompt attribute and an optional prompt-type
browse=“yes”
"ipa"
results in two edit fields. See Figure 16-1 for an example. The
node-var
attribute setting, the prompt-type is
. It can contain
variable-refs
novdocx (en) 17 September 2009
as
A prompt-type of
"password"
results in two password edit fields. See Figure 16-2 for an
example. The first prompt is for the actual password, and the second prompt is used to
verify that the password specified in the first field is correct. The value rendered by the
variable reference is the password.
Figure 16-2 Two Password Fields
A prompt-type of
"hidden"
results in a field that is not displayed, but is checked to make
sure a previous condition is met before proceeding to the next screen.
Any other prompt-type value is ignored.
If a
variable-decl
contains an optional description attribute in addition to a prompt attribute,
the description is displayed in the UI along with the prompt. The purpose of the description
attribute is to allow a complete description of what’s being asked for along with a simple
prompt.
For example:
<text-var
var-name="eProv.Company"
prompt="Company name:" description="Please enter the name of your
company. This must be the same name as you entered during the initial
installation."
browse="no">
Novell
</text-var>
Note the differences between the
If a
variable-decl
contains an optional description attribute and an optional highlight
prompt
and the
description
.
attribute, the highlight attribute is handled as follows:
If the highlight is not two characters in length, it is ignored.
96 Identity Manager 3.6.1 Common Driver Administration Guide
Page 97

If the highlight is two characters in length, all occurrences of the first character are
preceded with HTML tags to turn on highlighting and all occurrences of the second
character are followed by HTML tags to turn off highlighting.
For example:
<text-var
var-name="foo"
prompt="Foo:"
description="Please enter some foo. Format: [foo looks
like this]">
Bar
</text-var>
When the description is displayed, [foo looks like this] is displayed and highlighted.
If a
variable-decl
contains a
browse=“yes”
attribute, it is assumed to supply a DN and is
formatted in slash format by default when applied to the driver configuration file.
This is assumed to be more generally useful for driver writers and can be overridden on a per
reference basis by adding a
dn-format=“dot”
attribute to
variable-ref
nodes that reference
it.
If a
variable-ref
attribute can be included in the
part="ipa"
part="port"
is to
text-var
with a
variable-ref
prompt-type="ipa"
attribute, a
. Supported parts are
"ipa"
part="..."
and
"port"
is specified, only the IP address portion of the variable’s value is returned. If
is specified, only the port portion of the variable’s value is returned. Any other
setting is ignored and the variable's entire value is returned.
A
dn-format
variable-decl
rendered in the
The supported values for the
treated as
attribute on a
variable-ref
that does not have
browse="yes"
causes that variable to be treated as though it supplies a DN. The DN is
dn-format
"slash"
without an error being generated.
specified.
dn-format
attribute are
"dot"
and
"slash"
specified in its
. Any other value is
novdocx (en) 17 September 2009
. If
The built-in defined variables are:
System.TreeName
System.DSetDN
System.DSetName
System.DriverDN
System.DriverName
System.ServerDN
System.ServerName
Built-in variables can be overridden. If you include a
variable-decl
for a variable named
with one of the built-in variable names, your definition overrides the built-in variable of the
same name.
This is implemented after all variable declarations have been processed (prompting, ...). Just
before the code begins applying values, it walks the variables and defines all the built-ins that
haven't otherwise been defined.
The built-in variables that provide a DN can include a
dn-format
attribute in the variable-ref
to control the format the DN is rendered in. By default, these are rendered in slash format.
A
node-var
and a
text-var
cannot be named the same thing. They use the same namespace.
Editing Driver Configuration Files 97
Page 98

If a
variable-ref
string value of the
variable-ref
"#text",
which removes the requirement of having an
references a
node-var
. The
node-var
node-var
and contains an
attr-name
attribute, the XSL
is stored in as the named attribute on the parent node of the
used in this manner can have a
attr-name
node-name
attribute on the
attribute of
node-var
novdocx (en) 17 September 2009
.
node-var
A
with a node-name of
"#text"
can only be referenced in this manner. Any other
reference causes an error when the driver configuration file is imported.
At patch time after the user has responded to the prompts but before the XML is actually
imported. patching is done in the following order:
1.
The text-var variable-refs
The node-var variable-refs
2.
3.
The xsl-modify
4. The
ds-object
Patching is performed in the
commands are processed.
commands are processed.
commands are patched, all the
are processed.
are processed.
variable-decl
text-var
commands contained in them have been
so that by the time the
node-var
resolved.
The
node-var
commands cannot contain
node-var variable-ref
.
16.1.2 Import Driver Notes
The order in which the selected driver configuration files are processed is not defined and no
order can be assumed.
For
variable-decl
Commands from selected drivers are carried forward from driver to driver.
The first one wins.
The first driver encountered that defines a variable foo has its variable foo used
throughout all remaining driver configuration files. Care must be taken to coordinate
this between drivers.
A variable foo that is used in multiple driver configuration files is only prompted for
once, with the first driver configuration file encountered that declares it.
Built-in variables are not propagated between drivers. This includes any variables you define to
override a built-in variable. The built-in variables for each driver are handled separately.
commands:
Other prompting is handled unchanged at the beginning of each driver configuration file’s
import sequence.
Refer to Section 16.2, “Flexible Prompting in a Driver Configuration File,” on page 98 for
information about prompt layering supported by flexible prompting.
16.2 Flexible Prompting in a Driver Configuration File
variable-decl
input.
98 Identity Manager 3.6.1 Common Driver Administration Guide
blocks can be marked to allow them to be prompted for separately, based on user
Page 99

DTD changes:
----------* <!ENTITY % CompareMode "equals | not-equals">
<!--******************************************************** -->
<!--The variable-decl element contains definitions of variables -->
<!-- whose values can be prompted for and referred to throughout -->
<!-- the pre-configured driver file. -->
<!-- *********************************************************** -->
<!ELEMENT variable-decl(
node-var*,
text-var*)>
* <!ATTLIST variable-decl
* <!-- The following are used in the support of flexible -->
* <!-- prompting. -->
* use-when-var CDATA #IMPLIED
* use-when-value CDATA #IMPLIED
* use-when-mode (%CompareMode) "equals"
>
* Added for flexible prompting.
novdocx (en) 17 September 2009
Semantics
1. All
variable-decl
variable-decl
2. All
blocks with no
blocks with a
use-when-var
use-when-var
attribute are added to the prompt set.
attribute where the variable is defined and
the variable value meets the condition are added to the prompt set.
Variable analysis includes built-ins and variables carried forward from any previous import.
3. The user is prompted.
4. The prompt set is emptied and Steps 2 and 3 are repeated until there are no more prompts to
process or all
variable-decl
blocks have been processed.
5. The import proceeds as before.
NOTE: The comparisons for
use-when-var
variables are case insensitive.
Example 1
<variable-decl use-when-var="varCheck" use-when-value="Fu" use-whenmode="equals">
<text-var prompt="When Fu?" var-name="fuVar"/>
</variable-decl>
<variable-decl use-when-var="varCheck" use-when-value="Fu" use-whenmode="not-equals">
<text-var prompt="When not Fu?" var-name="fuVar"/>
</variable-decl>
<variable-decl>
<text-var prompt="Which other <variable-decl>?" var-name="varCheck">
<dropdown>
Editing Driver Configuration Files 99
Page 100

<value>Fu</value>
<value>Bar</value>
</dropdown>
</text-var>
</variable-decl>
In this example, the user would be prompted with a drop-down list. The description of the dropdown list is “Which other <variable-decl>?” The options in the list are Fu and Bar.
If the user select Fu from the drop-down and clicks Next, he or she is prompted again with a box.
The description of the box is “When Fu?”
If the user selects anything else from the drop-down list and clicks Next, he or she is prompted with
another box. The description of the box is “When not Fu?”
Example 2
<variable-decl use-when-var="varCheck" use-when-value="Fu">
<text-var prompt="When Fu?" var-name="fuBarVar"/>
</variable-decl>
novdocx (en) 17 September 2009
<variable-decl use-when-var="varCheck" use-when-value="Bar">
<text-var prompt="When when Bar?" var-name="fuBarVar"/>
</variable-decl>
<variable-decl>
<text-var prompt="Which other <variable-decl>?" var-name="varCheck"/>
</variable-decl>
In this example, the user is presented with a box. The description of the box is “Which other
<variable-decl>?” If the user specifies “Fu” in the box and clicks Next, he or she is presented with
another box. The description on the second box is “When Fu?”
If the user specifies “Bar” in the box and clicks Next, he or she is presented with a box. The
description is “When Bar?” If he or she specifies anything else, there are no further prompts and the
variable fuBarVar is not defined.
16.3 Viewing the Informal Identity Manager Driver Configuration DTD
To view the informal Identity Manager Driver Configuration DTD, go to PCDrivers.txt. The DTD
cannot be used for validation. It is not a valid XML DTD. It is a mechanism to document the valid
constructs in a driver configuration file.
100 Identity Manager 3.6.1 Common Driver Administration Guide
 Loading...