

Page 1

Identity Assurance Solution 3.0.2 Installation Guide
Novell
Identity Assurance Solution
novdocx (en) 24 April 2008
3.0.2
May 12, 2008
www.novell.com
INSTALLATION GUIDE
Page 2

Legal Notices
Novell, Inc. makes no representations or warranties with respect to the contents or use of this documentation, and
specifically disclaims any express or implied warranties of merchantability or fitness for any particular purpose.
Further, Novell, Inc. reserves the right to revise this publication and to make changes to its content, at any time,
without obligation to notify any person or entity of such revisions or changes.
Further, Novell, Inc. makes no representations or warranties with respect to any software, and specifically disclaims
any express or implied warranties of merchantability or fitness for any particular purpose. Further, Novell, Inc.
reserves the right to make changes to any and all parts of Novell software, at any time, without any obligation to
notify any person or entity of such changes.
Any products or technical information provided under this Agreement may be subject to U.S. export controls and the
trade laws of other countries. You agree to comply with all export control regulations and to obtain any required
licenses or classification to export, re-export or import deliverables. You agree not to export or re-export to entities
on the current U.S. export exclusion lists or to any embargoed or terrorist countries as specified in the U.S. export
laws. You agree to not use deliverables for prohibited nuclear, missile, or chemical biological weaponry end uses.
See the Novell International Trade Services Web page (http://www.novell.com/info/exports/) for more information
on exporting Novell software. Novell assumes no responsibility for your failure to obtain any necessary export
approvals.
novdocx (en) 24 April 2008
Copyright © 2007-2008 Novell, Inc. All rights reserved. No part of this publication may be reproduced, photocopied,
stored on a retrieval system, or transmitted without the express written consent of the publisher.
Novell, Inc. has intellectual property rights relating to technology embodied in the product that is described in this
document. In particular, and without limitation, these intellectual property rights may include one or more of the U.S.
patents listed on the Novell Legal Patents Web page (http://www.novell.com/company/legal/patents/) and one or
more additional patents or pending patent applications in the U.S. and in other countries.
Novell, Inc.
404 Wyman Street, Suite 500
Waltham, MA 02451
U.S.A.
www.novell.com
Online Documentation: To access the latest online documentation for this and other Novell products, see
the Novell Documentation Web page (http://www.novell.com/documentation).
Page 3

Novell Trademarks
For Novell trademarks, see the Novell Trademark and Service Mark list (http://www.novell.com/company/legal/
trademarks/tmlist.html).
Third-Party Materials
All third-party trademarks are the property of their respective owners.
novdocx (en) 24 April 2008
Page 4

novdocx (en) 24 April 2008
Page 5

Contents
About This Guide 7
1Overview 9
1.1 Identity Assurance Solution Components . . . . . . . . . . . . . . . . . . . . . . . . . . . . . . . . . . . . . . . . 10
1.2 Driver Overviews . . . . . . . . . . . . . . . . . . . . . . . . . . . . . . . . . . . . . . . . . . . . . . . . . . . . . . . . . . . 10
1.2.1 PIV Life Cycle Driver . . . . . . . . . . . . . . . . . . . . . . . . . . . . . . . . . . . . . . . . . . . . . . . . . 11
1.2.2 PIV Workflow Driver. . . . . . . . . . . . . . . . . . . . . . . . . . . . . . . . . . . . . . . . . . . . . . . . . . 11
1.2.3 Enrollment Driver . . . . . . . . . . . . . . . . . . . . . . . . . . . . . . . . . . . . . . . . . . . . . . . . . . . . 11
1.2.4 CMS Driver . . . . . . . . . . . . . . . . . . . . . . . . . . . . . . . . . . . . . . . . . . . . . . . . . . . . . . . . 12
1.2.5 PACS Integration Driver . . . . . . . . . . . . . . . . . . . . . . . . . . . . . . . . . . . . . . . . . . . . . . 14
1.3 Identity Assurance Solution Workflow . . . . . . . . . . . . . . . . . . . . . . . . . . . . . . . . . . . . . . . . . . . 15
1.4 What’s Next . . . . . . . . . . . . . . . . . . . . . . . . . . . . . . . . . . . . . . . . . . . . . . . . . . . . . . . . . . . . . . . 16
2 Planning the Identity Assurance Solution Installation 17
novdocx (en) 24 April 2008
2.1 Minimum Requirements . . . . . . . . . . . . . . . . . . . . . . . . . . . . . . . . . . . . . . . . . . . . . . . . . . . . . . 17
2.1.1 Novell Identity Manager Support . . . . . . . . . . . . . . . . . . . . . . . . . . . . . . . . . . . . . . . . 17
2.1.2 Identity Vault Server . . . . . . . . . . . . . . . . . . . . . . . . . . . . . . . . . . . . . . . . . . . . . . . . . 18
2.1.3 User Enrollment/Biometric Capture Station. . . . . . . . . . . . . . . . . . . . . . . . . . . . . . . . 18
2.1.4 Card Management System . . . . . . . . . . . . . . . . . . . . . . . . . . . . . . . . . . . . . . . . . . . . 18
2.1.5 Physical Access Control System . . . . . . . . . . . . . . . . . . . . . . . . . . . . . . . . . . . . . . . . 18
2.1.6 User Application Server . . . . . . . . . . . . . . . . . . . . . . . . . . . . . . . . . . . . . . . . . . . . . . . 18
2.1.7 Workstations . . . . . . . . . . . . . . . . . . . . . . . . . . . . . . . . . . . . . . . . . . . . . . . . . . . . . . . 18
2.1.8 Web Browser . . . . . . . . . . . . . . . . . . . . . . . . . . . . . . . . . . . . . . . . . . . . . . . . . . . . . . . 19
2.2 Preparing the Software . . . . . . . . . . . . . . . . . . . . . . . . . . . . . . . . . . . . . . . . . . . . . . . . . . . . . . 19
2.2.1 Novell Products that Need to be Downloaded and Installed . . . . . . . . . . . . . . . . . . . 19
2.2.2 Third-Party Products that Need to be Installed . . . . . . . . . . . . . . . . . . . . . . . . . . . . . 19
2.2.3 IAS CD Images . . . . . . . . . . . . . . . . . . . . . . . . . . . . . . . . . . . . . . . . . . . . . . . . . . . . . 19
2.3 Contents of Each Identity Assurance Solution CD. . . . . . . . . . . . . . . . . . . . . . . . . . . . . . . . . . 20
2.4 What's Next . . . . . . . . . . . . . . . . . . . . . . . . . . . . . . . . . . . . . . . . . . . . . . . . . . . . . . . . . . . . . . . 20
3 Installing Identity Assurance Solution 21
3.1 Installing the User Enrollment Biometric Capture Station . . . . . . . . . . . . . . . . . . . . . . . . . . . . 21
3.2 Installing the Card Management System . . . . . . . . . . . . . . . . . . . . . . . . . . . . . . . . . . . . . . . . . 21
3.3 Installing the Physical Access Control System. . . . . . . . . . . . . . . . . . . . . . . . . . . . . . . . . . . . . 22
3.4 Installing the Identity Vault Server . . . . . . . . . . . . . . . . . . . . . . . . . . . . . . . . . . . . . . . . . . . . . . 22
3.4.1 Novell eDirectory 8.8.1 . . . . . . . . . . . . . . . . . . . . . . . . . . . . . . . . . . . . . . . . . . . . . . . 22
3.4.2 iManager 2.6 . . . . . . . . . . . . . . . . . . . . . . . . . . . . . . . . . . . . . . . . . . . . . . . . . . . . . . . 22
3.4.3 Novell Identity Manager 3.5.1 . . . . . . . . . . . . . . . . . . . . . . . . . . . . . . . . . . . . . . . . . . 23
3.4.4 Novell Identity Manager 3.5.1 on Connected Systems . . . . . . . . . . . . . . . . . . . . . . . 23
3.4.5 Novell Enhanced Smart Card Method (NESCM) Server Component . . . . . . . . . . . . 23
3.5 Installing Drivers. . . . . . . . . . . . . . . . . . . . . . . . . . . . . . . . . . . . . . . . . . . . . . . . . . . . . . . . . . . . 24
3.5.1 PIV Life Cycle Driver . . . . . . . . . . . . . . . . . . . . . . . . . . . . . . . . . . . . . . . . . . . . . . . . . 24
3.5.2 PIV Workflow Driver. . . . . . . . . . . . . . . . . . . . . . . . . . . . . . . . . . . . . . . . . . . . . . . . . . 25
3.5.3 Enrollment Driver for the Honeywell SmartPlus System . . . . . . . . . . . . . . . . . . . . . . 25
3.5.4 CMS Driver for ActivIdentity ActivID . . . . . . . . . . . . . . . . . . . . . . . . . . . . . . . . . . . . . 27
3.5.5 PACS Integration Driver for the Honeywell SmartPlus System. . . . . . . . . . . . . . . . . 28
3.6 Post-Installation Tasks . . . . . . . . . . . . . . . . . . . . . . . . . . . . . . . . . . . . . . . . . . . . . . . . . . . . . . . 29
Contents 5
Page 6

3.7 Installing Workstations . . . . . . . . . . . . . . . . . . . . . . . . . . . . . . . . . . . . . . . . . . . . . . . . . . . . . . . 30
3.7.1 Installing the Novell Client Patch . . . . . . . . . . . . . . . . . . . . . . . . . . . . . . . . . . . . . . . . 31
3.7.2 Workstation Configuration . . . . . . . . . . . . . . . . . . . . . . . . . . . . . . . . . . . . . . . . . . . . . 32
3.8 What's Next . . . . . . . . . . . . . . . . . . . . . . . . . . . . . . . . . . . . . . . . . . . . . . . . . . . . . . . . . . . . . . . 32
4 Configuring Identity Assurance Solution 33
4.1 Configuring the Drivers . . . . . . . . . . . . . . . . . . . . . . . . . . . . . . . . . . . . . . . . . . . . . . . . . . . . . . 33
4.1.1 Configuring the PIV Life Cycle Driver . . . . . . . . . . . . . . . . . . . . . . . . . . . . . . . . . . . . 33
4.1.2 Configuring the PIV Workflow Driver . . . . . . . . . . . . . . . . . . . . . . . . . . . . . . . . . . . . . 36
4.1.3 Configuring the Enrollment Driver . . . . . . . . . . . . . . . . . . . . . . . . . . . . . . . . . . . . . . . 37
4.1.4 Configuring the Honeywell SmartPlus Enrollment System . . . . . . . . . . . . . . . . . . . . 39
4.1.5 Configuring the CMS Driver. . . . . . . . . . . . . . . . . . . . . . . . . . . . . . . . . . . . . . . . . . . . 39
4.1.6 Configuring the PACS Integration Driver . . . . . . . . . . . . . . . . . . . . . . . . . . . . . . . . . . 41
4.1.7 (Optional) Using Designer to Customize Your Implementation . . . . . . . . . . . . . . . . . 43
4.2 Installing the User Application Server . . . . . . . . . . . . . . . . . . . . . . . . . . . . . . . . . . . . . . . . . . . 43
4.2.1 Installing User Application for Provisioning . . . . . . . . . . . . . . . . . . . . . . . . . . . . . . . . 43
4.2.2 Installing the IAS Digital Signature Applet . . . . . . . . . . . . . . . . . . . . . . . . . . . . . . . . . 44
4.2.3 Restarting the PIV Life Cycle Driver . . . . . . . . . . . . . . . . . . . . . . . . . . . . . . . . . . . . . 44
4.3 Configuring E-Mail Notifications . . . . . . . . . . . . . . . . . . . . . . . . . . . . . . . . . . . . . . . . . . . . . . . . 44
4.4 What’s Next . . . . . . . . . . . . . . . . . . . . . . . . . . . . . . . . . . . . . . . . . . . . . . . . . . . . . . . . . . . . . . . 45
novdocx (en) 24 April 2008
5 Troubleshooting the Identity Assurance Solution 47
5.1 Known Issues. . . . . . . . . . . . . . . . . . . . . . . . . . . . . . . . . . . . . . . . . . . . . . . . . . . . . . . . . . . . . . 47
A IAS Installation Security 49
A.1 Identity Assurance Solution . . . . . . . . . . . . . . . . . . . . . . . . . . . . . . . . . . . . . . . . . . . . . . . . . . . 49
A.1.1 Using SSL Connections with Remote Loaders . . . . . . . . . . . . . . . . . . . . . . . . . . . . . 49
A.1.2 Using SSL Connections with JBoss. . . . . . . . . . . . . . . . . . . . . . . . . . . . . . . . . . . . . . 49
A.2 Novell Products . . . . . . . . . . . . . . . . . . . . . . . . . . . . . . . . . . . . . . . . . . . . . . . . . . . . . . . . . . . . 49
A.3 Third-Party Products . . . . . . . . . . . . . . . . . . . . . . . . . . . . . . . . . . . . . . . . . . . . . . . . . . . . . . . . 50
B Manually Configuring the ActivIdentity Card Management System 51
C Upgrading the Identity Assurance Solution from 3.0.1 to 3.0.2 53
D Documentation Updates 61
D.1 May 12th, 2008 . . . . . . . . . . . . . . . . . . . . . . . . . . . . . . . . . . . . . . . . . . . . . . . . . . . . . . . . . . . . 61
D.2 March 7th, 2008 . . . . . . . . . . . . . . . . . . . . . . . . . . . . . . . . . . . . . . . . . . . . . . . . . . . . . . . . . . . . 61
D.2.1 Overview . . . . . . . . . . . . . . . . . . . . . . . . . . . . . . . . . . . . . . . . . . . . . . . . . . . . . . . . . . 61
D.3 February 20, 2008 . . . . . . . . . . . . . . . . . . . . . . . . . . . . . . . . . . . . . . . . . . . . . . . . . . . . . . . . . . 61
D.3.1 Overview . . . . . . . . . . . . . . . . . . . . . . . . . . . . . . . . . . . . . . . . . . . . . . . . . . . . . . . . . . 61
6 Identity Assurance Solution 3.0.2 Installation Guide
Page 7

About This Guide
This guide provides an overview of the Identity Assurance Solution. It includes instructions on how
to install, configure, and manage the solution.
Chapter 1, “Overview,” on page 9
Chapter 2, “Planning the Identity Assurance Solution Installation,” on page 17
Chapter 3, “Installing Identity Assurance Solution,” on page 21
Chapter 4, “Configuring Identity Assurance Solution,” on page 33
Chapter 5, “Troubleshooting the Identity Assurance Solution,” on page 47
Audience
This guide is written primarily for network administrators and system integrators.
novdocx (en) 24 April 2008
Feedback
We want to hear your comments and suggestions about this manual and the other documentation
included with this product. Please use the User Comments feature at the bottom of each page of the
online documentation, or go to www.novell.com/documentation/feedback.html and enter your
comments there.
Documentation Updates
For the most recent version of the Identity Assurance Solution 3.0.2 Installation Guide, visit the
Identity Assurance Solution Documentation Web site (http://www.novell.com/documentation/
ias301/index.html).
Documentation Conventions
®
In Novell
items in a cross-reference path.
A trademark symbol (
trademark.
When a single pathname can be written with a backslash for some platforms or a forward slash for
other platforms, the pathname is presented with a backslash. Users of platforms that require a
forward slash, such as Linux* or UNIX*, should use forward slashes as required by your software.
documentation, a greater-than symbol (>) is used to separate actions within a step and
®
, TM, etc.) denotes a Novell trademark. An asterisk (*) denotes a third-party
About This Guide 7
Page 8

novdocx (en) 24 April 2008
8 Identity Assurance Solution 3.0.2 Installation Guide
Page 9
1
Overview
Novell® has partnered with third-party companies to build a solution that offers an integrated logical
and physical control system that complies with Homeland Security Presidential Directive 12
(HSPD-12). HSPD-12 directs the implementation of a new standardized badging process, which is
designed to enhance security, reduce identity fraud, and protect the personal privacy of those issued
government identification.
Identity Assurance Solution (IAS) provides a complete system for managing the enrollment,
issuance, access control, and retirement of Personal Identification Verification (PIV) cards. This
solution is in compliance with the Federal Information Processing Standards Publication 201 (FIPS
201) and provides components such as an Identity Management System (IDMS), a User Enrollment/
Biometric Capture system, a Card Management System (CMS), and Logical and Physical Access
Control Systems (LACS/PACS).
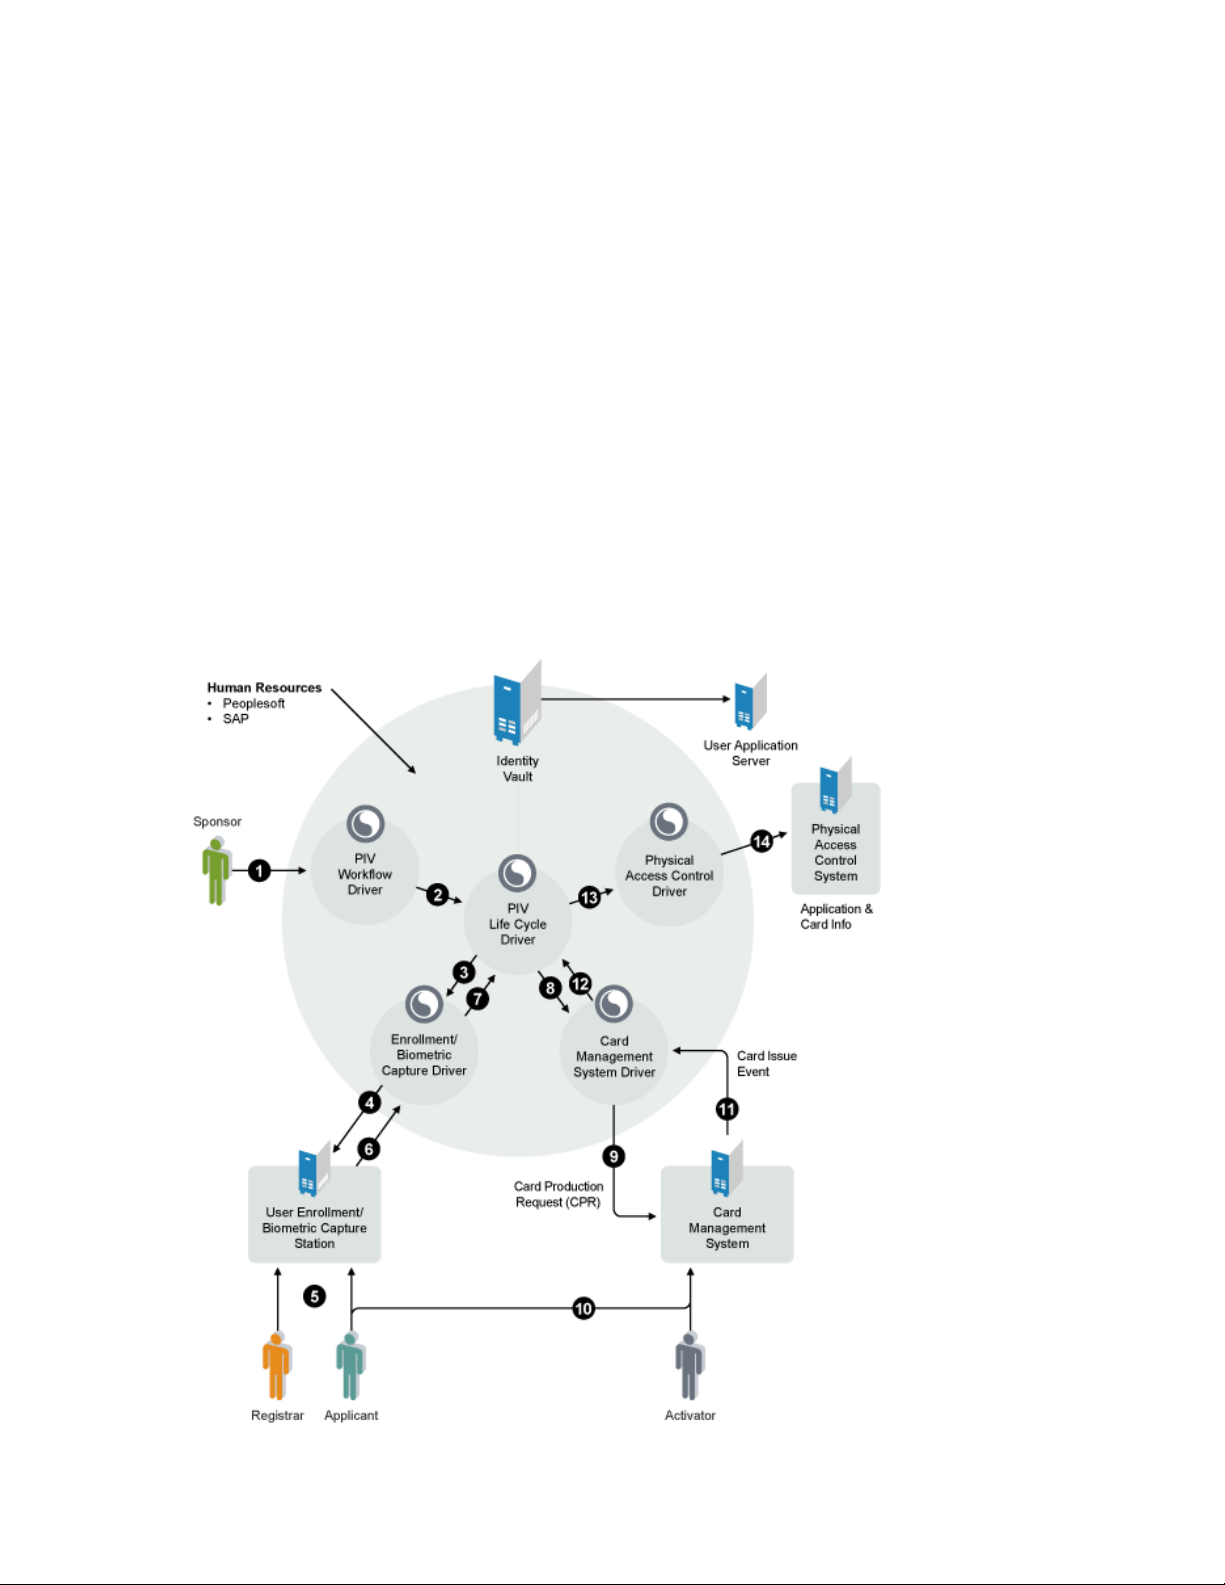
Figure 1-1 shows the different components of the solution and shows how the workflow is designed.
Figure 1-1 Identity Assurance Solution Workflow Overview
novdocx (en) 24 April 2008
1
Overview
9
Page 10

The components and workflow are discussed in the following sections:
Section 1.1, “Identity Assurance Solution Components,” on page 10
Section 1.2, “Driver Overviews,” on page 10
Section 1.3, “Identity Assurance Solution Workflow,” on page 15
Section 1.4, “What’s Next,” on page 16
1.1 Identity Assurance Solution Components
Table 1-1 describes the basic components and the specific products in this solution.
Table 1-1 Identity Assurance Solution Components and Products
Component Product
novdocx (en) 24 April 2008
Identity Management System / Identity Vault Novell eDirectory
Novell Identity Manager
Novell iManager
Workflow System User Application for Provisioning
User Enrollment/Biometric Capture system Enrollment Driver for the Honeywell* SmartPlus*
System
Card Management System (CMS) CMS Driver for ActivIdentity* ActivID*
Logical Access Control System (LACS) Novell Enhanced Smart Card Method (NESCM)
Physical Access Control System (PACS) PACS Integration Driver for the Honeywell
SmartPlus System
TM
A more detailed list of components and products is provided in Chapter 2, “Planning the Identity
Assurance Solution Installation,” on page 17.
1.2 Driver Overviews
The IAS drivers provide a means for the different solution components to communicate and work
together. The drivers are a vital part of the IAS solution.
The following sections provide information about each driver:
Section 1.2.1, “PIV Life Cycle Driver,” on page 11
Section 1.2.2, “PIV Workflow Driver,” on page 11
Section 1.2.3, “Enrollment Driver,” on page 11
Section 1.2.4, “CMS Driver,” on page 12
Section 1.2.5, “PACS Integration Driver,” on page 14
10 Identity Assurance Solution 3.0.2 Installation Guide
Page 11

1.2.1 PIV Life Cycle Driver
The PIV Life Cycle driver acts as a traffic director for the solution. It verifies that all expected
attributes are included in each step of the process and either allows the process to continue if all
requirements are met, or halts the process if requirements are not met.
1.2.2 PIV Workflow Driver
The PIV Workflow driver provides a means for the various roles to perform tasks related to
requesting and provisioning PIV cards for users.
1.2.3 Enrollment Driver
The Enrollment driver for the Honeywell SmartPlus system does the following tasks in the PIV
provisioning scenario:
Creates application user accounts in the Honeywell SmartPlus Enrollment system.
Provisions sponsor-approved appellation information from the Identity Manager system to the
Honeywell SmartPlus Enrollment system.
Publishes biometric data and vetting confirmation from the Honeywell SmartPlus Enrollment
system to the Identity Manager system.
novdocx (en) 24 April 2008
Deletes cardholder biometric data from the Honeywell SmartPlus Enrollment system upon
termination of the user.
The driver contains policies to detect events that indicate when data should be provisioned to or
deprovisioned from the Honeywell SmartPlus Enrollment system. It also contains an event
“listener” capability that allows it to receive data transmissions from the Honeywell SmartPlus
Enrollment system.
In order to maintain a simple interface with Identity Manager, the driver is configured to only
respond to state changes in the fipsBioStatus attribute.
The value of this attribute is modified only by the Enrollment driver or PIV Life Cycle driver. After
the initial provisioning information is added by the sponsor to the user through the PIV Workflow,
the PIV Life Cycle driver sets the fipsBioStatus attribute to a value of Biometric Enrollment Ready.
This modification event triggers the driver to send the account creation and sponsor enrollment data
to the Biometric Enrollment server. If the information is sent and provisioned successfully, the
fipsBioStatus attribute is set to Biometric Enrollment in Progress. If the information fails to be sent
to the server, fipsBioStatus is set to Biometric Enrollment Failure and the fipsBioStatusReason and
fipsBioStatusExplanation attributes contain the reason for the failure.
The PIV Life Cycle driver receives the modify event for the fipsBioStatus attribute and updates the
PIV provisioning state attributes. If the information is submitted successfully to the Honeywell
SmartPlus Enrollment server, the registrar notifies the applicant to report to the biometric enrollment
station, as indicated in Figure 1-2.
Overview 11
Page 12
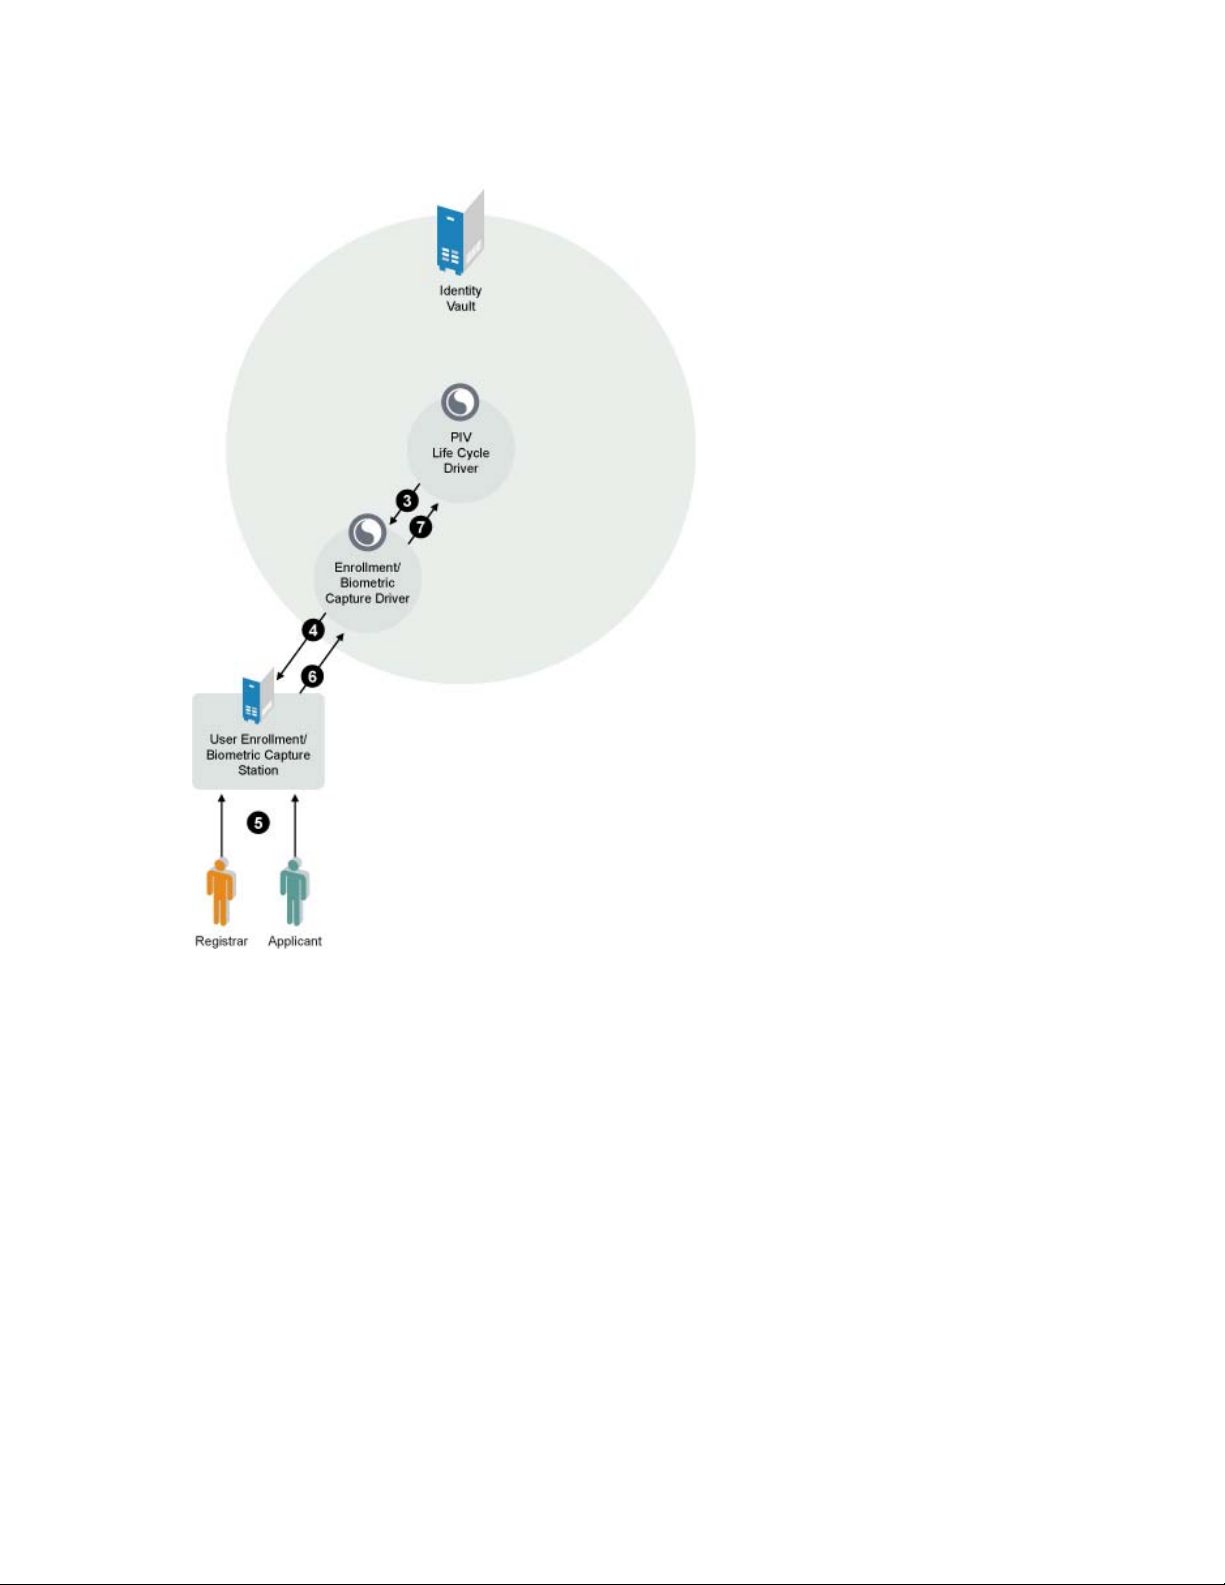
Figure 1-2 Enrollment Driver
novdocx (en) 24 April 2008
After the information is entered into the Honeywell SmartPlus Enrollment server, the registrar sends
the completed biometric data package to the driver for storage in the Identity Vault. The driver
stores the biometric data and updates the fipsBioStatus attribute with a value of either Biometric
Enrollment Complete or Biometric Enrollment Failure. The fipsBioStatusReason and
fipsBioStatusExplanation attributes can be updated with relevant success or failure information.
The role of the Enrollment driver is finished at this point in the Identity Assurance Solution.
1.2.4 CMS Driver
The CMS driver for ActivIdentity Active ID is used for the following tasks in the PIV provisioning
scenario:
Creates applicant user accounts in the Card Management System.
Sends a Card Production Request (CPR) containing all required data to the Card Management
System.
12 Identity Assurance Solution 3.0.2 Installation Guide
Page 13
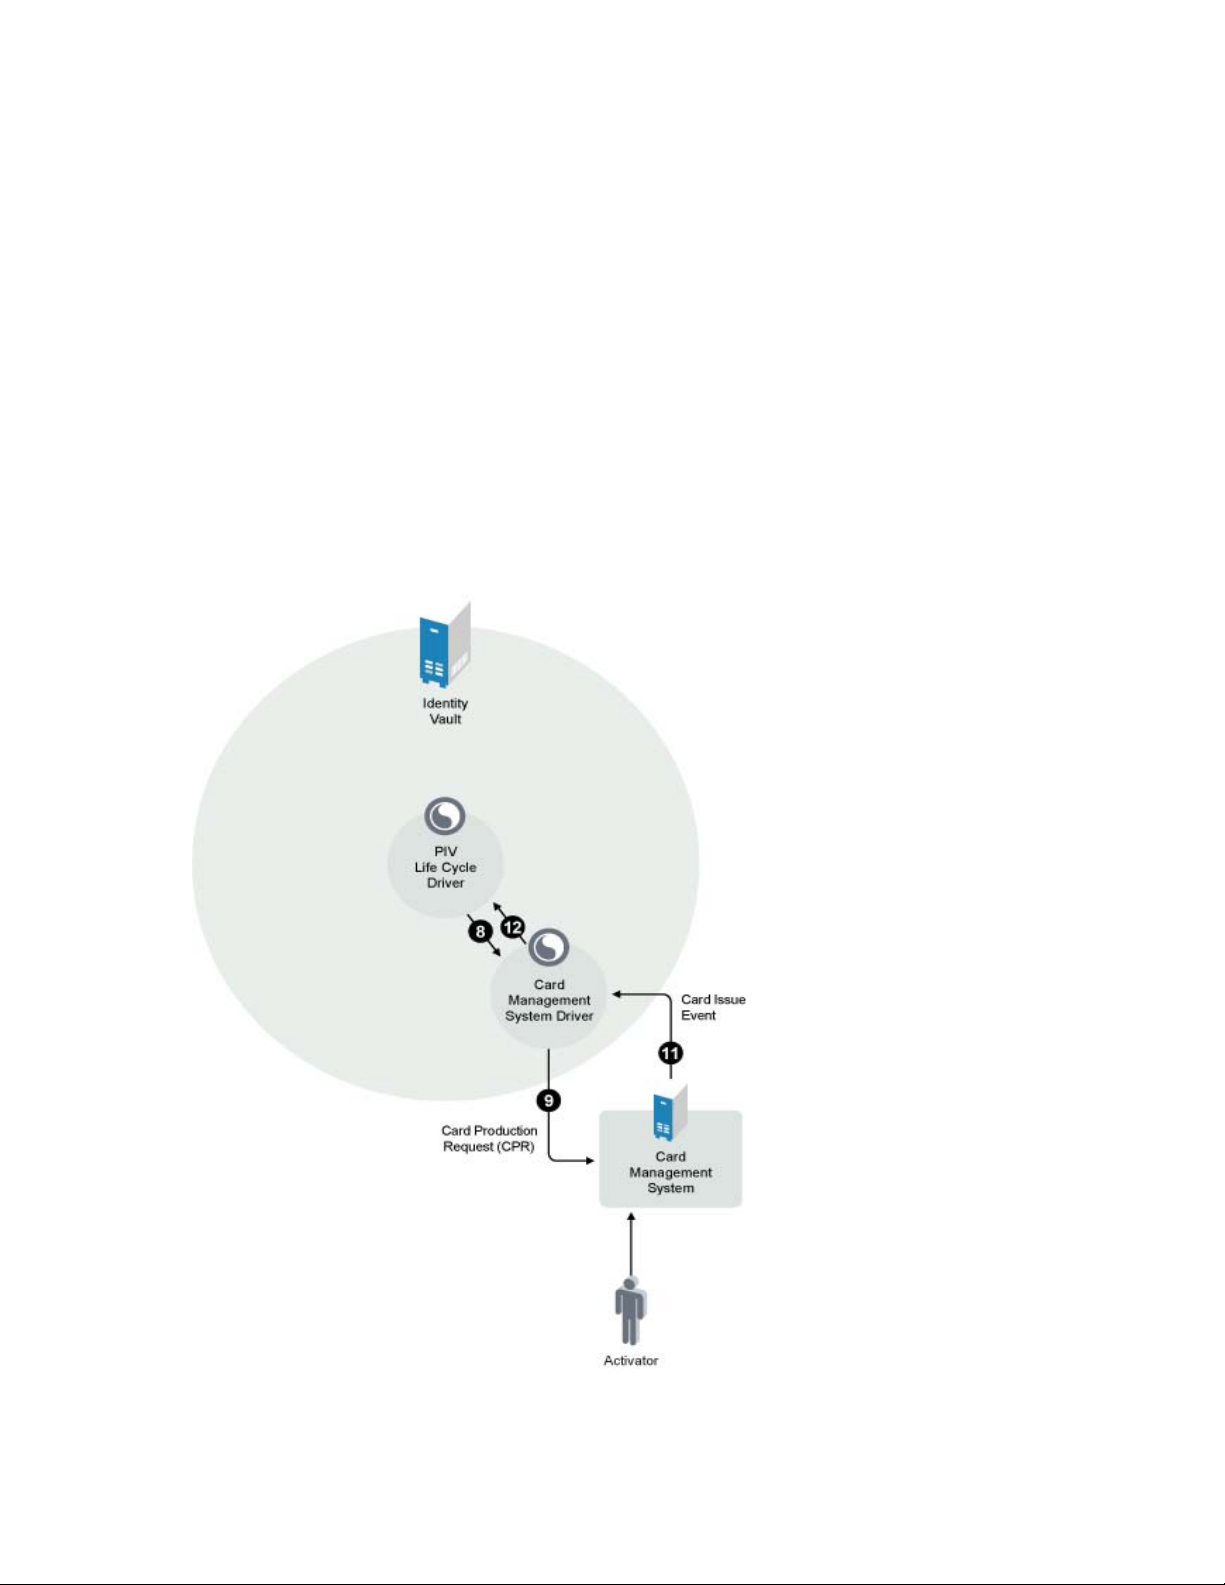
Notifies Identity Manager of a Card Issued or a Credential Issued event from the Card
Management System.
Sends card information (card serial number, FIPS 201 required certificate, CHUID) back to
Identity Manager.
Sends a Card Termination Request to the Card Management System.
The driver contains policies to detect events that indicate when data should be provisioned to or
deprovisioned from the Card Management System.
In order to maintain a simple interface with Identity Manager, the driver is configured to only
respond to state changes in the fipsCMSStatus attribute.
The value of this attribute is modified only by the CMS driver or by the PIV Life Cycle driver. After
the enrollment process is completed successfully, the PIV Life Cycle driver sets the fipsCMSStatus
attribute to a value of PIV Card Production Request Ready and then to CMS User Provisioning
Ready. See Figure 1-3.
Figure 1-3 Card Management System Driver
novdocx (en) 24 April 2008
Overview 13
Page 14

If the sponsor approves the PIV issuance, the CMS driver sends a User Add request to the Card
Management System. If the User Add request is successful, the fipsCMSStatus attribute is set to
CMS User Provisioning Complete. If the Add request fails, the fipsCMSStatus attribute is set to
CMS User Provisioning Failed and the fipsCMSStatusReason attribute and
fipsCMSStatusExplanation attribute explain why the process failed.
When the CMS User Provisioning is complete, the PIV Life Cycle driver sets the fipsPIVStatus
attribute to CMS User Provisioning Complete and ensures that all attributes for a Card Provisioning
Request (CPR) are present for the user. If so, the PIV Life Cycle driver sets the fipsCMSStatus
attribute and the fipsPIVStatus attribute to PIV Card Production Request Ready.
The CMS driver gathers all available attributes, builds the Card Production Request, and submits it
to the Card Management System. If the sponsor approves the Card Production Request, the PIV Life
Cycle driver sets the fipsCMSStatus attribute and the fipsPIVStatus attribute to PIV Card
Production Approved. The Card Management System driver then sends a production request to the
Card Management System and sets the fipsCMSStatus attribute to PIV Card Issuance Ready.
The CMS driver forwards the results of the card issuance procedure. It sets the fipsCMSStatus
attribute to PIV Card Issued and the fipsCMSPhysicalCardSN attribute to the card’s serial number
value. It also retrieves and stores the card’s certificates from the Card Management System in
Identity Manager.
novdocx (en) 24 April 2008
1.2.5 PACS Integration Driver
The PACS Integration driver for the Honeywell SmartPlus system is used for the following tasks in
the PIV provisioning scenario:
Creates applicant user accounts in the Physical Access Control system (PACS).
Sends information to the Honeywell SmartPlus PACS system, stating what locations the user
has access to.
Deletes the user from the Honeywell SmartPlus PACS system upon termination.
The driver contains policies to detect events that indicate when data should be provisioned to or
deprovisioned from the Honeywell SmartPlus PAC system.
In order to maintain a simple interface with Identity Manager, the driver is configured to only
respond to state changes in the fipsPACSStatus attribute.
The value of this attribute is modified only by the PACS Integration driver or by the PIV Life Cycle
driver. After the PIV card is issued to the applicant, the PIV Life Cycle driver sets the
fipsPACSStatus attribute to a value of PACS Activation Ready. See Figure 1-4.
14 Identity Assurance Solution 3.0.2 Installation Guide
Page 15
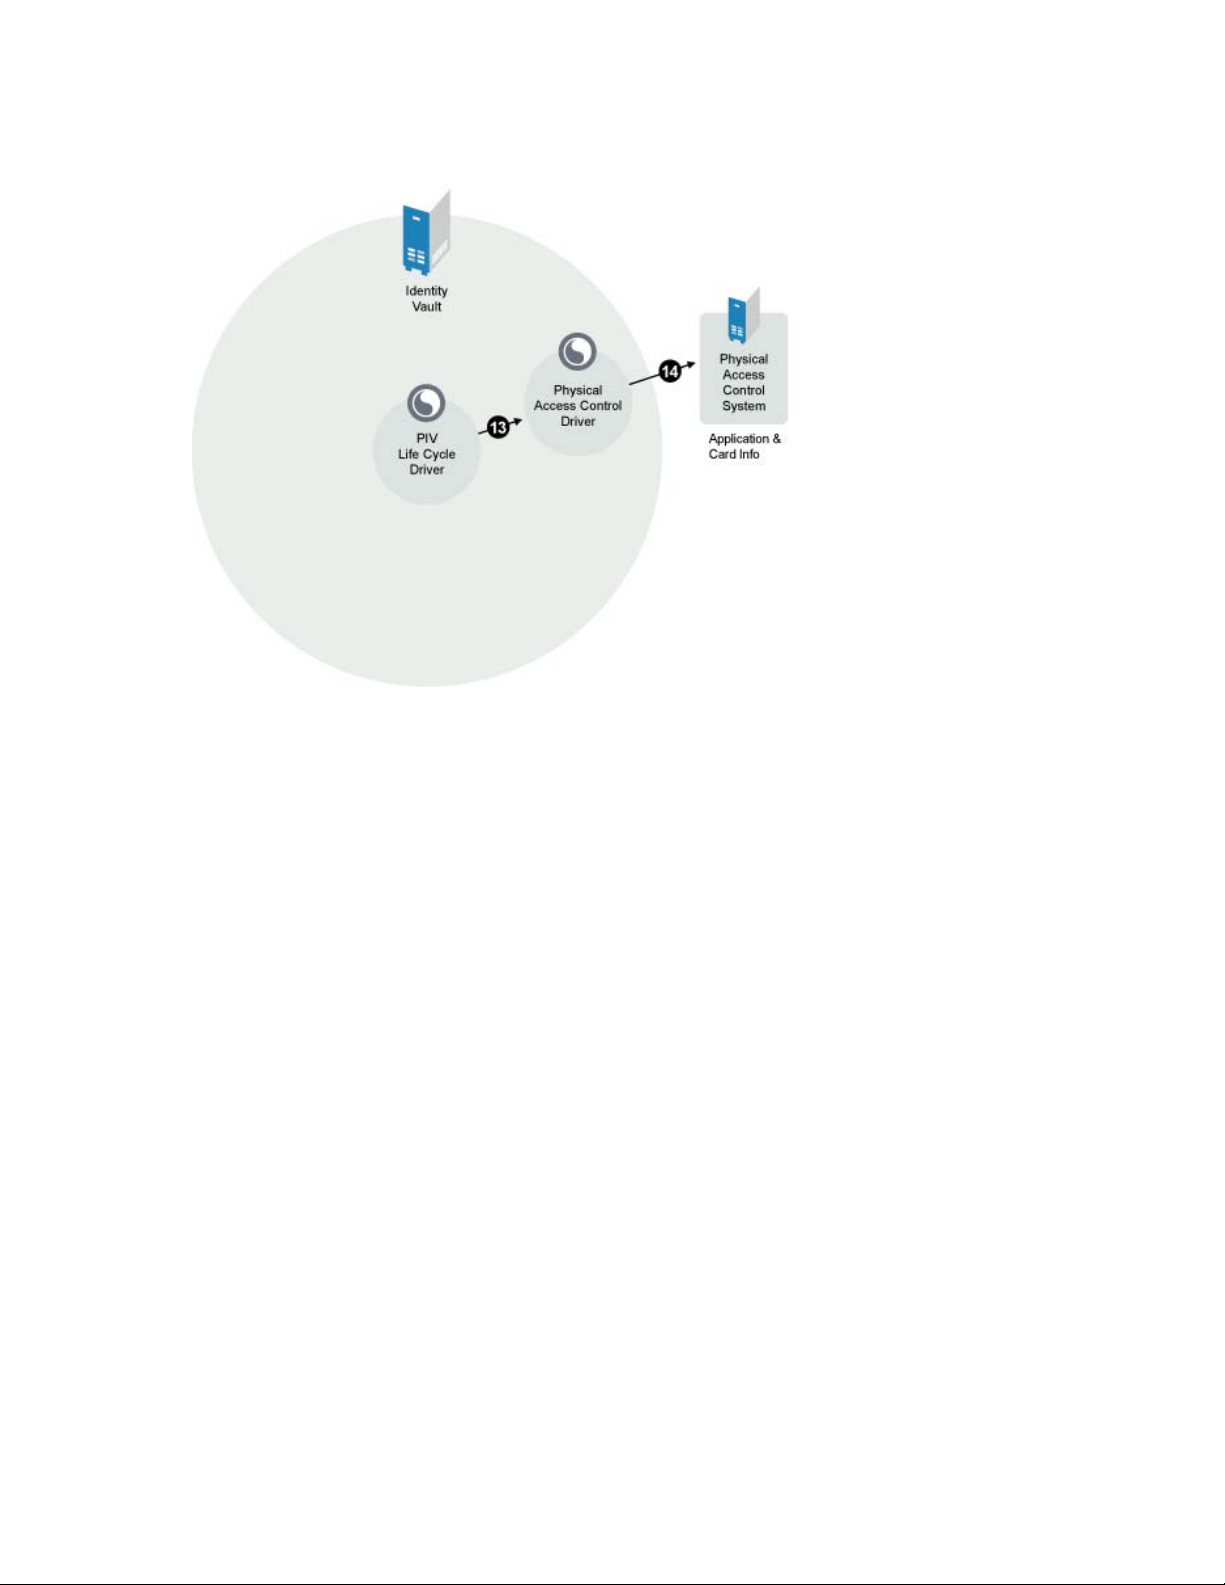
Figure 1-4 Physical Access Control System Driver
novdocx (en) 24 April 2008
This modification event triggers the driver to send the applicant’s PIV card information to the
Honeywell SmartPlus PACS system. If the information is sent and provisioned successfully, the
fipsPACSStatus attributes is set to PACS Activation Ready. If the information fails to be sent to the
system, the fipsPACSStatus is set to PACS Activation Failed and the fipsPACSStatusReason and
fipsPACSStatusExplanation attributes contain the reason for the failure.
The Honeywell SmartPlus PAC system receives the applicant’s information and allows the applicant
physical access to the place of employment.
1.3 Identity Assurance Solution Workflow
Figure 1-1 on page 9 describes the basic workflow of this solution.
1. From a workstation, the sponsor accesses the user application associated with the PIV
Workflow Driver and submits a request for a PIV card for the applicant.
2. The PIV Workflow Driver sends the request to the PIV Life Cycle driver.
3. The PIV Life Cycle driver checks to make sure the request is valid and complete. If it is a valid
request, it routes the request to the Enrollment/Biometric Capture driver.
4. The Enrollment/Biometric Capture driver routes the request to the biometric engine, accessible
by the registrar’s workstation.
5. The applicant meets with the registrar and provides whatever information is required by the
company. The following are examples of information that could be included on the PIV card:
Signature
Photo
Fingerprint
I9 Form
Overview 15
Page 16

A background check is also conducted on the applicant.
6. After the enrollment data is captured, the registrar submits it again to the Enrollment/Biometric
Capture driver.
7. The Enrollment/Biometric Capture driver sends the enrollment data to the PIV Life Cycle
driver.
8. The PIV Life Cycle driver checks to make sure the data is valid and complete. If the data is
valid and complete, it routes the request to the Card Management System driver.
9. The Card Management System driver sends a Card Production Request (CPR) to the Card
Management System.
10. The activator creates the PIV card for the applicant.
The applicant meets with the activator to receive the PIV card. The applicant provides a
fingerprint scan to confirm his or her identity and to finalize the PIV card creation and
issuance. When this is successfully completed, the activator hands over the card.
11. After the card is physically issued, the activator sends a Card Issue Event back to the Card
Management System driver. The Card Issue Event contains all the card data.
12. The Card Management System driver notifies the PIV Life Cycle driver of the Card Issue
Event.
13. The PIV Life Cycle driver stores the card data and verifies that everything is in order. If so, the
applicant can now use his or her card for logical access to the network. The PIV Life Cycle
driver notifies the Physical Access Control driver of the card issuance.
14. The Physical Access Control driver sends the information to the Physical Access Control
System. The card is activated for physical access based on the sponsor’s chosen settings.
novdocx (en) 24 April 2008
1.4 What’s Next
To prepare for the installation, see Chapter 2, “Planning the Identity Assurance Solution
Installation,” on page 17.
To begin the installation, see Chapter 3, “Installing Identity Assurance Solution,” on page 21.
16 Identity Assurance Solution 3.0.2 Installation Guide
Page 17

2
Planning the Identity Assurance
novdocx (en) 24 April 2008
Solution Installation
This section describes the minimum requirements that must be met for each machine before starting
the Identity Assurance Solution (IAS) installation. It also describes the contents of each CD
distributed with this solution.
Section 2.1, “Minimum Requirements,” on page 17
Section 2.2, “Preparing the Software,” on page 19
Section 2.3, “Contents of Each Identity Assurance Solution CD,” on page 20
Section 2.4, “What's Next,” on page 20
2.1 Minimum Requirements
The following minimum requirements apply to this release:
Section 2.1.1, “Novell Identity Manager Support,” on page 17
Section 2.1.2, “Identity Vault Server,” on page 18
Section 2.1.3, “User Enrollment/Biometric Capture Station,” on page 18
Section 2.1.4, “Card Management System,” on page 18
Section 2.1.5, “Physical Access Control System,” on page 18
2
Section 2.1.6, “User Application Server,” on page 18
Section 2.1.7, “Workstations,” on page 18
Section 2.1.8, “Web Browser,” on page 19
2.1.1 Novell Identity Manager Support
IAS 3.0.2 supports the following versions of Novell® Identity Manager User Application (a
browser-based Web application that gives the user the ability to perform a variety of identity selfservice tasks):
Identity Manager 3.5.0 with User Application 3.5.0 (http://www.novell.com/documentation/
idm35/pdfdoc/idm350.zip)
Identity Manager 3.5.1 with User Application 3.6.0 (http://www.novell.com/documentation/
idm35/index.html)
WARNING: IAS 3.0.2 does not support Identity Manager User Application 3.5.1. You must
either upgrade or install Identity Manager User Application 3.6.0. Follow the procedures
outlined in the IDM Migration Guide (http://www.novell.com/documentation/idmrbpm36/
migration/data/seafang_antelope.html).
Planning the Identity Assurance Solution Installation
17
Page 18

2.1.2 Identity Vault Server
The Identity Vault server must be running Windows* 2003 Server SP1 or later.
2.1.3 User Enrollment/Biometric Capture Station
The software being utilized for the User Enrollment Biometric Capture station for this release is
Honeywell SmartPlus Enrollment software. Make sure this software is installed on the machine you
are designating for this function.
For information on the minimum requirements for the Honeywell SmartPlus Enrollment software,
see the installation documentation provided by Honeywell.
2.1.4 Card Management System
The software being utilized for the Card Management System for this release is the ActivIdentity
CMS 4.0.3 software. Make sure this software is installed on the machine you are designating for this
function.
novdocx (en) 24 April 2008
IMPORTANT: Patch # FISX0709018 is required and must be applied to ActivIdentity CMS 4.0.3.
For information on the minimum requirements for the ActivIdentity CMS software, see the
installation documentation provided by ActivIdentity.
NOTE: For this release, ActivIdentity CMS is only supported on the Windows platform with
Microsoft* Active Directory.*
2.1.5 Physical Access Control System
The software being utilized for the Physical Access Control System for this release is the Honeywell
SmartPlus Integration software. Make sure this software is installed on the machine you are
designating for this function.
For information on the minimum requirements for the Honeywell SmartPlus Integration software,
see the installation documentation provided by Honeywell.
2.1.6 User Application Server
The Identity Vault server must be running Windows 2003 Server SP1 or later.
2.1.7 Workstations
Each workstation must meet the following minimum requirements:
Windows XP SP2 or later installed.
PIV card reader is connected and PIV card middleware is installed.
Use supported PIV cards.
18 Identity Assurance Solution 3.0.2 Installation Guide
Page 19

Use supported middleware.
2.1.8 Web Browser
The administration of the Identity Management Solution is supported by using the following
browsers on Windows only:
Firefox* 1.5.x or later
Internet Explorer* 6.0 SP2 or later
2.2 Preparing the Software
Identity Assurance Solution is made up of several software components:
Section 2.2.1, “Novell Products that Need to be Downloaded and Installed,” on page 19
Section 2.2.2, “Third-Party Products that Need to be Installed,” on page 19
Section 2.2.3, “IAS CD Images,” on page 19
novdocx (en) 24 April 2008
2.2.1 Novell Products that Need to be Downloaded and Installed
Novell eDirectoryTM
Novell Identity Manager
Novell Audit
2.2.2 Third-Party Products that Need to be Installed
Honeywell SmartPlus Enrollment
ActivIdentity CMS
Honeywell SmartPlus Integration
For more information on installing these products, see Section 3.1, “Installing the User Enrollment
Biometric Capture Station,” on page 21,Section 3.2, “Installing the Card Management System,” on
page 21, and Section 3.3, “Installing the Physical Access Control System,” on page 22.
2.2.3 IAS CD Images
Configuration files
Drivers
Workstation setup software
Download the IAS .iso files and verify the MD 5 values, then create a CD for each .iso file you
downloaded. Label each CD as outlined in the following table:
Filename CD Label
iasmodules_302.iso CD 1-IAS Modules
Planning the Identity Assurance Solution Installation 19
Page 20

Filename CD Label
iasclient_302.iso CD 2-IAS Client
The CDs are referenced according to these labels throughout the installation instructions.
2.3 Contents of Each Identity Assurance Solution CD
The Identity Assurance Solution software is contained on two CDs. The following table can serve as
a reference as you install each component.
Table 2-1 IAS CD Contents
CD Name CD Contents
CD 1–IAS Modules iManager 2.6 (standard iManager structure,
plug-ins, custom utilities, and Web
applications)
Installs for Identity Manager drivers specific to
IAS:
CMS Driver for ActivIdentity ActivID
Enrollment Driver for the Honeywell
SmartPlus System
PACS Integration Driver for Honeywell
SmartPlus System
PIV Life Cycle Driver
IAS Digital Signature Applet
Pre-config files for all IAS Identity Manager
drivers
novdocx (en) 24 April 2008
CD 2–IAS Client
2.4 What's Next
To perform the installation, follow the instructions in Chapter 3, “Installing Identity Assurance
Solution,” on page 21.
20 Identity Assurance Solution 3.0.2 Installation Guide
IAS Client Umbrella Install
Novell Client
NICI 2.7.0.1 and NMASTM Client 3.1.1.0
Novell Enhanced Smart Card Method
(NESCM) 3.0.1
Novell Audit Platform Agent 2.0.2
TM
4.9.1 SP3
Page 21

3
Installing Identity Assurance
novdocx (en) 24 April 2008
Solution
This section describes or points to information on how to install all software components for the
Identity Assurance Solution.
IMPORTANT: The steps outlined in this section and in Chapter 4, “Configuring Identity
Assurance Solution,” on page 33 must be performed in the order they are listed.
Section 3.1, “Installing the User Enrollment Biometric Capture Station,” on page 21
Section 3.2, “Installing the Card Management System,” on page 21
Section 3.3, “Installing the Physical Access Control System,” on page 22
Section 3.4, “Installing the Identity Vault Server,” on page 22
Section 3.5, “Installing Drivers,” on page 24
Section 3.6, “Post-Installation Tasks,” on page 29
Section 3.7, “Installing Workstations,” on page 30
Section 3.8, “What's Next,” on page 32
3.1 Installing the User Enrollment Biometric
3
Capture Station
The software being utilized for the User Enrollment Biometric Capture station for this release is
Honeywell SmartPlus Enrollment software. Make sure this software is installed on the machine you
are designating for this function.
For information on installing the Honeywell SmartPlus Enrollment software, see the installation
documentation provided by Honeywell.
3.2 Installing the Card Management System
The software being utilized for the Card Management System for this release is the ActivIdentity
CMS 4.0.3 software. Make sure this software is installed on the machine you are designating for this
function.
IMPORTANT: Patch # FISX0709018 is required and must be applied to ActivIdentity CMS 4.0.3.
For information on installing the ActivIdentity CMS software, see the installation documentation
provided by ActivIdentity.
Installing Identity Assurance Solution
21
Page 22

3.3 Installing the Physical Access Control System
The software being utilized for the Physical Access Control System for this release is the Honeywell
SmartPlus Integration software. Make sure this software is installed on the machine you are
designating for this function.
For information on installing the Honeywell SmartPlus Integration software, see the installation
documentation provided by Honeywell.
3.4 Installing the Identity Vault Server
Install the Identity Vault server components in the order they are presented in this section. Each
section lists the product to install and the CD the product is on.
Section 3.4.1, “Novell eDirectory 8.8.1,” on page 22
Section 3.4.2, “iManager 2.6,” on page 22
Section 3.4.3, “Novell Identity Manager 3.5.1,” on page 23
Section 3.4.4, “Novell Identity Manager 3.5.1 on Connected Systems,” on page 23
Section 3.4.5, “Novell Enhanced Smart Card Method (NESCM) Server Component,” on
page 23
novdocx (en) 24 April 2008
3.4.1 Novell eDirectory 8.8.1
Purchase, download, and install Novell® eDirectoryTM 8.8.1 from the Novell Download Web site
(http://download.novell.com/index.jsp).
For information on installing Novell eDirectory, see the Installing or Upgrading Novell eDirectory
on Windows section of the Novell eDirectory 8.8 Installation Guide (http://www.novell.com/
documentation/edir88/edirin88/data/ahna7o7.html).
By installing Novell eDirectory 8.8.1, you will also install the following components:
NICI 2.7.0-1
Novell Certificate Server
NMAS
Consider the following as you install eDirectory:
Do not re-install the Novell Client
If the eDirectory server is being installed on a Windows 2000 AD Domain Controller, you must
change the ports to avoid a conflict with the AD LDAP server. We recommend changing the
ports to 390 for clear text and 637 for SSL/TLS.
Don’t install any NMAS login methods. The NESCM method is installed as a separate
component.
TM
3.1.0.1
TM
3.1.1.0
TM
if prompted.
3.4.2 iManager 2.6
CD: CD 1 - IAS Modules
22 Identity Assurance Solution 3.0.2 Installation Guide
Page 23

Install Location: \imanager\installs\win
Install Documentation: Novell iManager 2.6 Installation Guide (http://www.novell.com/
documentation/imanager26/imanager_install_26/data/alw39eb.html)
1 Run imanagerinstall.exe.
2 Accept the license agreement.
3 Configure iManager to use the following:
Web Server: Apache
Servlet Container: Tomcat
JVM*: Sun* JRE*
4 Accept the default installation folder.
5 Specify the Tree name and Admin username.
6 Complete the installation.
novdocx (en) 24 April 2008
NOTE: When logging in to iManager, use the fully distinguished Admin user DN (for example,
admin.ias). If the tree can’t be located, use the IP address or DNS name of the Identity Vault server.
3.4.3 Novell Identity Manager 3.5.1
Purchase, download, and install Novell Identity Manager 3.5.1 from the Novell Download Web site
(http://download.novell.com/index.jsp).
For information on installing Novell Identity Manager, see the Installation section of the Novell
Identity Manager 3.5 Documentation Web site (http://www.novell.com/documentation/idm35/
install/data/front.html).
3.4.4 Novell Identity Manager 3.5.1 on Connected Systems
Each of the three connected systems (User Enrollment/Biometric Capture Station, Card
Management System, and Physical Access Control System) needs to have Novell Identity Manager
3.5.1 Connected System installed on it.
For information on installing Novell Identity Manager on connected systems, see the “Installing the
Connected Systems Option” section of the Identity Manager 3.5.1 Installation Guide (http://
www.novell.com/documentation/idm35/admin/data/bs35odr.html).
3.4.5 Novell Enhanced Smart Card Method (NESCM) Server Component
CD: CD 2 - IAS_Client
Location: \nmasmethods\novell\enhancedsmartcard.zip
The NESCM method’s server component is installed by using iManager.
Installing Identity Assurance Solution 23
Page 24

You must complete the procedures for installing and configuring the NESCM method on a server as
provided in the Novell Enhanced Smart Card Method Installation Guide (http://www.novell.com/
documentation/ias/index.html?page=/documentation/ias/nescm_install/data/bookinfo.html).
3.5 Installing Drivers
Identity Assurance Solution contains five separate drivers. The following table describes which
driver is installed on which system:
Table 3-1 Driver/System Installation
Driver Type Driver Brand Name System to Install Driver On
PIV card control center driver PIV Life Cycle driver Identity Vault server
PIV card user application driver PIV Workflow driver User Application server
novdocx (en) 24 April 2008
Enrollment driver Enrollment Driver for the
Honeywell SmartPlus System
Card Management System driver CMS Driver for ActivIdentity
ActivID
Physical Access Control driver PACS Integration Driver for the
Honeywell SmartPlus System
User Enrollment/Biometric
Capture station
Card Management System
Physical Access Control System
NOTE: The driver installation programs shut down eDirectory if eDirectory is installed on the
system.
If the eDirectory shutdown attempt fails, the installer stops and must be run again. In order to avoid
the inconvenience of re-running the installer, you can stop the eDirectory service before launching
each installer.
Use the following procedures to install each drivers:
Section 3.5.1, “PIV Life Cycle Driver,” on page 24
Section 3.5.2, “PIV Workflow Driver,” on page 25
Section 3.5.3, “Enrollment Driver for the Honeywell SmartPlus System,” on page 25
Section 3.5.4, “CMS Driver for ActivIdentity ActivID,” on page 27
Section 3.5.5, “PACS Integration Driver for the Honeywell SmartPlus System,” on page 28
3.5.1 PIV Life Cycle Driver
CD: CD 1 - IAS_Modules
Location: \idmdriver
The PIV Life Cycle driver must be installed on the Identity Vault server.
After the PIV Life Cycle driver is installed, you need to restart the application server (typically
JBoss) where the User Application is running. Failure to do so might result in denied access to the
User Application and an error occurs.
24 Identity Assurance Solution 3.0.2 Installation Guide
Page 25

To install the PIV Life Cycle driver on the Identity Vault server:
1 Double-click IASModules_302:IDMDriver\PIV Life Cycle Driver.exe to
install the driver.
2 Read the welcome page, then click Next.
3 Read the license agreement and select I accept the terms of the license agreement, then click
Next.
4 Specify the eDirectory server’s IP address.
This is the IP address of the Identity Vault server.
5 Specify the name of an eDirectory user who has sufficient administrative rights to the root of
the tree to extend the schema, then click Next.
The username must be entered in LDAP (comma-delimited) notation.
6 Click Install to begin the installation.
7 Click Finish to exit the installation wizard.
To configure the driver, see Section 4.1.1, “Configuring the PIV Life Cycle Driver,” on
page 33.
novdocx (en) 24 April 2008
3.5.2 PIV Workflow Driver
CD: CD 1 - IAS_Modules
Location: \idmdriver
For this solution, the PIV Workflow driver is installed by using iManager, and it works with the
User Application for Provisioning.
For more information on importing and configuring the PIV Workflow driver, see Section 4.1.2,
“Configuring the PIV Workflow Driver,” on page 36.
3.5.3 Enrollment Driver for the Honeywell SmartPlus System
CD: CD 1 - IAS_Modules
Location: \idmdriver
To install the Enrollment driver, you need to complete the following three tasks:
“Installing Identity Manager 3.5.1 for Connected Systems on the Enrollment Biometric
Capture System” on page 25
“Installing the Driver” on page 26
“Configuring the Connected System (Remote Loader)” on page 26
Installing Identity Manager 3.5.1 for Connected Systems on the Enrollment Biometric
Capture System
For information on installing Novell Identity Manager on connected systems, see the “Installing the
Connected Systems Option” section of the Identity Manager 3.5.1 Installation Guide (http://
www.novell.com/documentation/idm35/admin/data/bs35odr.html).
Installing Identity Assurance Solution 25
Page 26

Installing the Driver
The driver is installed on the same machine where the Honeywell SmartPlus Enrollment system is
installed. Make sure that the Identity Manager Connected System is installed before proceeding with
the installation of the driver.
1 Double-click IASModules_302:IDMDriver\Honeywell SmartPlus
Enrollment Driver.exe to install the driver.
2 Read the welcome page, then click Next.
3 Read the license agreement and select I accept the terms of the license agreement, then click
Next.
4 Browse to and select the location where you have the Remote Loader installed on the
Honeywell SmartPlus Enrollment system, then click Next.
5 Click Install to begin the installation.
6 Click Finish to exit the installation wizard.
To configure the driver, see Section 4.1.3, “Configuring the Enrollment Driver,” on page 37.
novdocx (en) 24 April 2008
Configuring the Connected System (Remote Loader)
1 Launch the Remote Loader Console by clicking the Remote Loader Console icon on your
desktop.
2 Click Add to add a remote driver.
3 Specify a description for the remote driver.
4 Select com.novell.nds.dirxml.hwbio.HWBioEnrollmentDriver in the driver drop-down list.
This is the Biometric Enrollment driver. If the driver is not listed, it means the driver has not
been installed. You must first install the driver. See “Installing the Driver” on page 26.
5 Specify a filename and location for the Remote Loader configuration file.
6 Select All for the Remote Loader service to listen for communication on all IP addresses for the
ActivIdentity server.
6a Leave the connection port at the default of 8090.
6b Leave the command port at the default of 8000.
7 Specify the Remote Loader password.
8 Specify the driver object password.
9 Select Use an SSL Connection.
9a Browse to and select a trusted root file.
See Providing for Secure Data Transfer (http://www.novell.com/documentation/idm35/
admin/data/bs35pi6.html#bs35pi6) for information on how to create a trusted root file.
10 Set the trace level to zero.
Increase this only during troubleshooting of the driver.
11 Select Establish a Remote Loader service for this driver instance.
12 Click OK to save the information.
To configure the driver, see
Section 4.1.4, “Configuring the Honeywell SmartPlus Enrollment
System,” on page 39.
26 Identity Assurance Solution 3.0.2 Installation Guide
Page 27

3.5.4 CMS Driver for ActivIdentity ActivID
CD: CD 1 - IAS_Modules
Location: \idmdriver
To install the CMS driver, you need to complete the following three tasks:
“Installing Identity Manager 3.5.1 for Connected Systems on the Card Management System”
on page 27
“Installing the Driver” on page 27
“Configuring the Connected System (Remote Loader)” on page 27
Installing Identity Manager 3.5.1 for Connected Systems on the Card Management
System
For information on installing Novell Identity Manager on connected systems, see the “Installing the
Connected Systems Option” section of the Identity Manager 3.5.1 Installation Guide (http://
www.novell.com/documentation/idm35/admin/data/bs35odr.html).
novdocx (en) 24 April 2008
Installing the Driver
The driver is installed on the same machine where the Card Management System for ActivIdentity is
installed.
1 Double-click IASModules_302:IDMDriver\CMS Driver for ActivIdentity
ActivID.exe to install the driver.
2 Read the welcome page, then click Next.
3 Read the license agreement and select I accept the terms of the license agreement, then click
Next.
4 Browse to and select the location where you have the Remote Loader installed on the
ActivIdentity Card Management system, then click Next.
5 Specify the path to your CMS portal deployment, then click Next.
6 Click Install to begin the installation.
7 Click Finish to exit the installation wizard.
Configuring the Connected System (Remote Loader)
1 Launch the Remote Loader Console.
2 Click Add to add a remote driver.
3 Specify a description for the remote driver.
4 Select com.novell.nds.dirxml.driver.aicmsshim.AICMSDriverShim in the driver drop-down list.
If the driver is not listed, it means the driver has not been installed. You must first install the
driver. See “Installing the Driver” on page 27.
5 Specify a filename and location for the Remote Loader configuration file.
6 Select All for the Remote Loader service to listen for communication on all IP addresses for the
ActivIdentity server.
6a Leave the connection port at the default of 8090.
Installing Identity Assurance Solution 27
Page 28

6b Leave the command port at the default of 8000.
7 Specify the Remote Loader password.
8 Specify the driver object password.
9 Select Use an SSL Connection.
9a See Providing for Secure Data Transfer (http://www.novell.com/documentation/idm35/
admin/data/bs35pi6.html#bs35pi6) for information on how to create a trusted root file.
10 Set the trace level to zero.
Increase this only during troubleshooting of the driver.
11 Select Establish a Remote Loader service for this driver instance.
12 Click OK to save the information.
To configure the driver, see Section 4.1.5, “Configuring the CMS Driver,” on page 39.
3.5.5 PACS Integration Driver for the Honeywell SmartPlus System
novdocx (en) 24 April 2008
CD: CD 1 - IAS_Modules
Location: \idmdriver
To install the PACS driver, you need to do the following three tasks:
“Installing Identity Manager 3.5.1 for Connected Systems on the Physical Access Control
System” on page 28
“Installing the Driver” on page 28
“Configuring the Connected System (Remote Loader)” on page 29
Installing Identity Manager 3.5.1 for Connected Systems on the Physical Access
Control System
For information on installing Novell Identity Manager on connected systems, see the Installing the
Connected Systems Option section of the Identity Manager 3.5.1 Installation Guide (http://
www.novell.com/documentation/idm35/admin/data/bs35odr.html).
Installing the Driver
The driver is installed on the same machine where the Honeywell SmartPlus Integration system is
installed.
1 Double-click IASModules_302:IDMDriver\Honeywell SmartPlus
Integration Driver.exe to install the driver.
2 Read the welcome page, then click Next.
3 Read the license agreement and select I accept the terms of the license agreement, then click
Next.
4 Browse to and select the location where you have the Remote Loader installed on the
Honeywell SmartPlus Integration system, then click Next.
5 Click Install to begin the installation.
6 Click Finish to exit the installation wizard.
28 Identity Assurance Solution 3.0.2 Installation Guide
Page 29

To configure the driver, see Section 4.1.6, “Configuring the PACS Integration Driver,” on page 41.
Configuring the Connected System (Remote Loader)
1 Launch the Remote Loader Console.
2 Click Add to add a remote driver.
3 Specify a description for the remote driver.
4 Select com.novell.nds.dirxml.driver.hwpacs.HWPACSDriver in the driver drop-down list.
This is the Physical Access Control System (PACS) driver. If the driver is not listed, it means
the driver has not been installed. You must first install the driver. See “Installing the Driver” on
page 28.
5 Specify a filename and location for the Remote Loader configuration file.
6 Select All for the Remote Loader service to listen for communication on all IP address for the
ActivIdentity server.
6a Leave the connection port at the default of 8090.
6b Leave the command port at the default of 8000.
novdocx (en) 24 April 2008
7 Specify the Remote Loader password.
8 Specify the driver object password.
9 Select Use an SSL Connection.
9a Browse to and select a trusted root certificate.
See Providing for Secure Data Transfer (http://www.novell.com/documentation/idm35/
admin/data/bs35pi6.html#bs35pi6) for information on how to create a trusted root file.
This trusted root certificate enables the remote loader to establish an SSL connection with
the Identity Vault server.
10 Set the trace level to zero.
Increase this only during troubleshooting of the driver.
11 Select Establish a Remote Loader service for this driver instance.
12 Click OK to save the information.
To configure the driver, see Section 4.1.6, “Configuring the PACS Integration Driver,” on page 41.
3.6 Post-Installation Tasks
After installation, you need to enable the iManager plug-ins:
1 Launch iManager.
2 Click the Configure icon .
3 Install the NESCM plug-ins:
3a Click Module to select all available modules.
3b Click Install.
4 Close iManager.
5 Restart Tomcat by either rebooting the server or doing the following:
5a Click Start > Settings > Control Panel.
Installing Identity Assurance Solution 29
Page 30

5b Double-click Administrative tool > Services.
5c Right-click Tomcat, then click Restart.
3.7 Installing Workstations
CD: CD 2 - IAS_Client
Location: Auto launch
Each applicant’s workstation should meet the minimum requirements. See Section 2.1.7,
“Workstations,” on page 18.
Each applicant’s workstation that will be authenticating by using a PIV card must be installed by
using the following procedure:
1 Insert the CD 2 - IAS Client into the workstation’s CD drive.
The client installation should auto launch.
If not, browse to the root of CD 2 - IAS Client and double-click setup.exe.
2 Read the welcome page, then click Next.
3 Read the license agreement and select I accept the terms of the license agreement, then click
Next.
novdocx (en) 24 April 2008
4 Select Novell Client and Enhanced Smart Card Method.
(Optional) If you also want to audit Workstation Only logins, select Novell Audit Platform
Agent.
5 Click Next.
6 Click Install.
7 Read the Novell Enhanced Smart Card Method welcome page, then click Next.
8 Read the license agreement and select I accept the terms of the license agreement, then click
Next.
9 On the Disconnected Support page, select Yes, I Want Disconnected Support, then click Next.
This feature allows you to authenticate to the workstation only by using the Smart Card login
method.
10 On the ID Plugin Support page, select whether or not you want to use the ID plug-in support
feature.
This feature allows the ID plug-in to query the database for the smart card’s associated
username.
If you select Yes, you must also supply the IP addresses and port numbers for all LDAP servers
you want to query.
11 Click Next.
12 Choose whether or not to customize the password field description on the login screen, then
click Next.
If you choose to customize the login screen's password field, you must type in the new text for
the field.
30 Identity Assurance Solution 3.0.2 Installation Guide
Page 31

If you use Alt+P to access the password field when logging in, you lose this functionality when
you customize the password field description. To keep this functionality, you must include an
ampersand (&) in front of a letter P in the new text you enter in the password field.
For example, if your new text reads Password, you should enter it as &Password so that Alt+P
continues to function as usual.
13 Select either PC/SC or PKCS#11, then click Next.
PC/SC and PKCS#11 are technical standards used to communicate between a server and PKIenabled applications. PC/SC is a standard used for integrating smart cards and smart card
readers. PKCS#11 is a standard for public key message exchanges.
Select the standard that best supports your hardware. For more information, see the
manufacturer's specifications.
If you select PKCS#11, you must also select a provider that best suits your needs.
14 Review the page, then click Install.
15 (Conditional) If you decided to install the Novell Audit Platform Agent in Step 4, click Next on
the Novell Audit Platform Agent page. If not, skip to Step 21.
16 Accept the License Agreement, then click Next.
17 Fill in the customer information, then click Next.
18 Type the IP address or DNS name of the Secure Logging Server, then click Next.
novdocx (en) 24 April 2008
This is the IP address or DNS name of the Novell Audit server (the Identity Vault server that
was set up previously).
19 Select Complete, click Next > Install.
20 Click Finish.
21 Click Finish.
22 Restart the workstation.
23 Complete the instructions for installing and configuring the NESCM method on a workstation
as provided in the Novell Enhanced Smart Card Installation Guide (http://www.novell.com/
documentation/ias301/index.html?page=/documentation/ias301/nescm_install/data/
bookinfo.html).
3.7.1 Installing the Novell Client Patch
CD: CD 2 - IAS_Client
Location: \novellclient\winnt\i386\491_SP3_update
After installing the Novell Client, you need to install the Novell Client Patch.
1 On CD 2 - IAS Client, browse to the
\novellclient\winnt\i386\491_sp3_update directory.
2 Right-click the _491psp3_nwsso.inf file, then click Install.
3 If files are in use, reboot the workstation when prompted.
Installing Identity Assurance Solution 31
Page 32

3.7.2 Workstation Configuration
For information about configuring NESCM on a workstation, see the Novell Enhanced Smart Card
Installation Guide (http://www.novell.com/documentation/ias/index.html?page=/documentation/
ias/nescm_install/data/bookinfo.html).
3.8 What's Next
Configure the Identity Assurance Solution drivers by following the instructions in Chapter 4,
“Configuring Identity Assurance Solution,” on page 33.
novdocx (en) 24 April 2008
32 Identity Assurance Solution 3.0.2 Installation Guide
Page 33

4
Configuring Identity Assurance
novdocx (en) 24 April 2008
Solution
This section describes how to use iManager to configure the drivers and how to install the User
Application server.
For overview information about each driver, see Section 1.2, “Driver Overviews,” on page 10.
Section 4.1, “Configuring the Drivers,” on page 33
Section 4.2, “Installing the User Application Server,” on page 43
Section 4.3, “Configuring E-Mail Notifications,” on page 44
Section 4.4, “What’s Next,” on page 45
4.1 Configuring the Drivers
Use iManager to configure the drivers by completing the following tasks:
Section 4.1.1, “Configuring the PIV Life Cycle Driver,” on page 33
Section 4.1.2, “Configuring the PIV Workflow Driver,” on page 36
Section 4.1.3, “Configuring the Enrollment Driver,” on page 37
Section 4.1.4, “Configuring the Honeywell SmartPlus Enrollment System,” on page 39
Section 4.1.5, “Configuring the CMS Driver,” on page 39
Section 4.1.6, “Configuring the PACS Integration Driver,” on page 41
4
Section 4.1.7, “(Optional) Using Designer to Customize Your Implementation,” on page 43
4.1.1 Configuring the PIV Life Cycle Driver
After the driver is installed, it is configured through iManager (See Section 3.5.1, “PIV Life Cycle
Driver,” on page 24 for instructions on how to install the driver). The PIV Life Cycle driver
configuration file creates the policies that govern how the information is synchronized.
1 In iManager, select Identity Manager Utilities > New Driver.
2 Select In a new driver set.
For the PIV Life Cycle driver, you place the driver in a new driver set. For the remaining four
drivers, you place the drivers in the driver set you create for the PIV Life Cycle driver.
Configuring Identity Assurance Solution
33
Page 34

3 Click Next.
4 Define the properties of the new driver set.
4a Specify the name of the driver set.
4b Browse to and select the context where the driver set will be created.
4c Browse to and select the server you want the driver set associated with.
4d Leave the Create a new partition on this driver set option selected.
We recommend that you create a partition for the driver object. For Identity Manager to
function, the server that is associated with the driver set must hold a real replica of the
Identity Manager objects. If the server holds a Master or Read/Write replica of the context
where the objects are to be created, then the partition is not required.
4e Click Next.
5 Select Import a configuration from the server, browse to and select the
IAS_PIVLifeCycle-IDM3_5_0-V1.xml driver configuration file, then click Next.
6 If the driver configuration file is not listed, select Import a configuration from the client, then
click Browse.
6a Browse to and select the driver configuration file from
IASMODULES_302:\IDMDriver\configs\IAS_PIVLifeCycle-IDM3_5_0V2.xml from the IAS modules ISO, then click Open.
novdocx (en) 24 April 2008
6b Click Next.
7 Configure the driver by filling in the configuration parameters:
Parameter Description
Driver name Specify the name of the driver.
IAS Root Container Name The name of the root container for IAS. All IAS objects will be
created in this container. The installation program will create this
container.
IMPORTANT: Don't enter the name of an existing container.
Agency Short Name Specify the unique name of the agency (16 characters or less).
Unique Agency Code Specify the unique agency code (4 digits).
Role Password Specify a password that applies to all roles.
8 Click Next.
9 Select Define Security Equivalences.
9a Click Add, then browse to and select a user object that has the rights the driver needs to
have on the server.
Many administrators use the Administrator User object in the Identity Vault for this task.
However, you might want to create another object, such as a DriversUser, and assign
sufficient rights to that user for the driver to function. Whatever rights the driver needs to
have on the server, the DriversUser object must have the same rights.
9b Click OK twice.
10 Select Exclude Administrative Roles.
34 Identity Assurance Solution 3.0.2 Installation Guide
Page 35

10a Click Add, browse to and select all objects that represent administrative roles, then
exclude them from replication with the driver.
Exclude the User object in the Identity Vault (for example, DriversUser) that you
specified in Step 9. If you delete the User object, you have removed the rights from the
driver. Therefore, the driver can’t make changes to Identity Manager.
If there are objects that are currently excluded, they do not appear in the Excluded users
list unless you select Retrieve Current Exclusions.
10b Click OK twice.
11 Click Next.
12 View the summary, then click Finish with Overview.
13 Select the PIV Life Cycle Driver and edit its properties:
13a Select Named Passwords.
novdocx (en) 24 April 2008
13b Add piv-workflow-user and passwords > Save.
Configuring Identity Assurance Solution 35
Page 36

The password value for the Named Password is the password for the PIV Workflow User. This is the
admin user who is specified in the User Application Admin DN field during the configuration of the
User Application driver object. For information on the User Application Admin DN field, see “User
Application Admin DN” on page 36. It is also the same user who is indicated in the Global Settings
of the Driver Set under the name PIV Workflow: User ID.
IMPORTANT: At this point, make sure you start the PIV Life Cycle driver in Identity Manager
before proceeding. The remaining driver configurations rely on policies in the PIV Life Cycle
driver.
4.1.2 Configuring the PIV Workflow Driver
After the driver is installed, it is configured through iManager. (See Section 3.5.2, “PIV Workflow
Driver,” on page 25 for instructions on how to install the driver.) The PIV Life Cycle driver
configuration file creates the policies that govern how the information is synchronized.
1 In iManager, select Identity Manager Utilities > New Driver.
novdocx (en) 24 April 2008
2 Select In an existing driver set.
3 Browse to and select the driver set you set up in Step 4 on page 34, then click Next.
4 Browse to and select the server the driver is associated with, then click Next.
5 Select Import a configuration from the server, browse to and select the IAS_PIVWorkflow-
IDM3_5_0-V2.xml driver configuration file, then click Next.
6 If the driver configuration file is not listed, select Import a configuration from the client, then
click Browse.
6a Browse to and select the driver configuration file from
IASMODULES_302:\IDMDriver\configs\IAS_PIVWorkflow-IDM3_5_0V2.xml from the IAS modules ISO, then click Open.
6b Click Next.
7 Configure the driver by filling in the configuration parameters:
Parameter Description
Driver name Specify the name of the driver.
User Application Admin DN Specify the User Application Administrator's DN. The User
Application Administrator is specified when you install the User
Application. See Section 4.2.1, “Installing User Application for
Provisioning,” on page 43.
User App Server Protocol Specify your User Application Server protocol. (Example: https).
36 Identity Assurance Solution 3.0.2 Installation Guide
Page 37

Parameter Description
User App Server Address Specify your User Application Server address and port number.
(Example: 137.65.159.42:8080).
User App Server Context Specify your User Application Server context. (Example: IDM).
8 Click Next.
9 Select Define Security Equivalences.
9a Click Add, then browse to and select a user object that has the rights the driver needs to
have on the server.
Many administrators use the Administrator User object in the Identity Vault for this task.
However, you might want to create another object, such as a DriversUser, and assign
sufficient rights to that user for the driver to function. Whatever rights the driver needs to
have on the server, the DriversUser object must have the same rights.
9b Click OK twice.
10 Select Exclude Administrative Roles.
10a Click Add, browse to and select all objects that represent administrative roles, then
exclude them from replication with the driver.
Exclude the User object in the Identity Vault (for example, DriversUser) that you
specified in Step 9. If you delete the User object, you have removed the rights from the
driver. Therefore, the driver can’t make changes to Identity Manager.
If there are objects that are currently excluded, they do not appear in the Excluded users
list unless you select Retrieve Current Exclusions.
novdocx (en) 24 April 2008
10b Click OK twice.
11 Click Next.
12 View the summary, then click Finish with Overview.
4.1.3 Configuring the Enrollment Driver
After the driver is installed, it is configured through iManager. (See Section 3.5.3, “Enrollment
Driver for the Honeywell SmartPlus System,” on page 25 for instructions on how to install the
driver.) The Enrollment driver configuration file creates the policies that govern how the
information is synchronized.
1 In iManager, select Identity Manager > New Driver.
2 Select In an existing driver set.
3 Browse to and select the driver set you set up in Step 4 on page 34, then click Next.
Configuring Identity Assurance Solution 37
Page 38

4 Browse to and select the server the driver is associated with, then click Next.
5 Select Import a configuration from the server, browse to and select the
IAS_IWBioEnrollment-IDM3_5_0-V1.xml driver configuration file, then click Next.
6 If the driver configuration file is not listed, select Import a configuration from the client, then
click Browse.
6a Browse to and select the driver configuration file from
IASMODULES_302:\IDMDriver\configs\IAS_IWBioEnrollmentIDM3_5_0-V1.xml from the IAS modules ISO, then click Open.
6b Click Next.
7 Configure the driver by filling in the configuration parameters:
Parameter Description
Driver name Specify the name of the driver.
Remote host name and port Specify the hostname or IP address and port number where the
Remote Loader Service has been installed for this driver. The
default port is 8090.
novdocx (en) 24 April 2008
Driver password Specify the driver object password. It is the same password as
specified in Step 8 on page 26.
Authentication password Specify the Remote Loader password. It is the same password as
specified in Step 7 on page 26.
KMO Name Specify the name of the KMO object. See “Providing for Secure
Data Transfer” (http://www.novell.com/documentation/idm/
index.html?page=/documentation/idm/admin/data/
bs35pi6.html#bs35pi6) for steps on how to create a KMO.
URL of the Biometric
Enrollment Server
Listening Hostname and Port Specify the local host address and port that will listen to receive
Specify the URL of the Honeywell SmartPlus Enrollment server.
events from the Honeywell SmartPlus Enrollment server. See
“Installing Identity Manager 3.5.1 for Connected Systems on the
Enrollment Biometric Capture System” on page 25 for more
information.
8 Click Next.
9 Select Define Security Equivalences.
9a Click Add, then browse to and select a user object that has the rights the driver needs to
have on the server.
Many administrators use the Administrator User object in the Identity Vault for this task.
However, you might want to create another object, such as a DriversUser, and assign
sufficient rights to that user for the driver to function. Whatever rights the driver needs to
have on the server, the DriversUser object must have the same rights.
9b Click OK twice.
10 Select Exclude Administrative Roles.
10a Click Add, browse to and select all objects that represent administrative roles, then
exclude them from replication with the driver.
38 Identity Assurance Solution 3.0.2 Installation Guide
Page 39

Exclude the User object in the Identity Vault (for example, DriversUser) that you
specified in Step 9. If you delete the User object, you have removed the rights from the
driver. Therefore, the driver can’t make changes to Identity Manager.
If there are objects that are currently excluded, they do not appear in the Excluded users
list unless you select Retrieve Current Exclusions.
10b Click OK twice.
11 Click Next.
12 View the summary, then click Finish with Overview.
4.1.4 Configuring the Honeywell SmartPlus Enrollment System
The Enrollment/Biometric Capture driver runs on the Honeywell SmartPlus Enrollment system.
(For installation instructions, see Section 3.1, “Installing the User Enrollment Biometric Capture
Station,” on page 21.) Use the following instructions in this section to modify the iws.cfg file to
communicate with the Identity Manager server.
1 Locate the Tomcat directory where the Honeywell SmartPlus Enrollment Web service is
running.
novdocx (en) 24 April 2008
2 Open the tomcat_directory/webapps/PIV/WEB-INF/iws.cfg file in a text editor.
3 Add the following two lines at the bottom of this file:
IDMS=NOVELL
IDMS_NovellEnrollURL = http://127.0.0.1:Publisher_Port_Number
The Publisher port number is located in the properties of the Enrollment driver. It can be any
port that is not in use on the connected system.
3a In iManager, click Identity Manager > Identity Manager Overview, then click Search to
find the driver set objects in the Identity Vault.
3b Click the upper right corner of the driver, then select Edit properties.
The Publisher port number is listed under Driver Configuration > Driver Parameters
Publisher Options > Listening IP address and port.
4 Restart Tomcat.
4.1.5 Configuring the CMS Driver
After the driver is installed, it is configured through iManager. (See Section 3.5.4, “CMS Driver for
ActivIdentity ActivID,” on page 27 for instructions on how to install the driver.) The CMS driver
configuration file creates the policies that govern how the information is synchronized.
1 In iManager, select Identity Manager > New Driver.
Configuring Identity Assurance Solution 39
Page 40

2 Select In an existing driver set.
3 Browse to and select the driver set you set up in Step 4 on page 34, then click Next.
4 Browse to and select the server the driver is associated with, then click Next.
5 Select Import a configuration from the server, browse to and select the IAS_AICMSDriver-
IDM3_5_0-V1.xml driver configuration file, then click Next.
6 If the driver configuration file is not listed, select Import a configuration from the client, then
click Browse.
6a Browse to and select the driver configuration file from
IASMODULES_302:\IDMDriver\configs\IAS_AICMSDriver-IDM3_5_0V1.xml from the IAS modules ISO, then click Open.
6b Click Next.
7 Configure the driver by filling in the configuration parameters:
Parameter Description
Driver name Specify the name of the driver.
novdocx (en) 24 April 2008
Remote host name and port Specify the hostname or IP address and port
number where the Remote Loader Service has
been installed for this driver. The default port is
8090.
Driver Password Specify the driver password. It is the same
password as specified in Step 8 on page 28.
Remote Password Specify the remote password. It is the same
password as specified in Step 7 on page 28.
KMO name Specify the KMO name. See “Providing for
Secure Data Transfer” (http://www.novell.com/
documentation/idm/index.html?page=/
documentation/idm/admin/data/
bs35pi6.html#bs35pi6) for steps on how to
create a KMO.
Client certificate Specify the path to a client certificate that can be
used to initiate an SSL connection with CMS.
This is a client certificate signed by the CMS
Certificate Authority (CA)
Client certificate password Specify the password to unwrap the client
certificate.
Trusted root certificate Specify the path to a trusted root certificate. This
is a trusted root certificate from the CMS
Certificate Authority (CA).
Card Policy Specify the name of the CMS policy that will be
“No Fingerprints” Card Policy Specify the name of the CMS policy that will be
CMS users parent AD context Specify the name of the container in Active
40 Identity Assurance Solution 3.0.2 Installation Guide
used to issue PIV cards.
used for issuing PIV cards without fingerprints.
Directory where the driver will create CMS users.
Page 41

8 Click Next.
9 Select Define Security Equivalences.
9a Click Add, then browse to and select a user object that has the rights the driver needs to
have on the server.
Many administrators use the Administrator User object in the Identity Vault for this task.
However, you might want to create another object, such as a DriversUser, and assign
sufficient rights to that user for the driver to function. Whatever rights the driver needs to
have on the server, the DriversUser object must have the same rights.
9b Click OK twice.
10 Select Exclude Administrative Roles.
10a Click Add, browse to and select all objects that represent administrative roles, then
exclude them from replication with the driver.
Exclude the User object in the Identity Vault (for example, DriversUser) that you
specified in Step 9. If you delete the User object, you have removed the rights from the
driver. Therefore, the driver can’t make changes to Identity Manager.
If there are objects that are currently excluded, they do not appear in the Excluded users
list unless you select Retrieve Current Exclusions.
10b Click OK twice.
novdocx (en) 24 April 2008
11 Click Next.
12 View the summary, then click Finish with Overview.
4.1.6 Configuring the PACS Integration Driver
After the driver is installed, it is configured through iManager. (See Section 3.5.5, “PACS
Integration Driver for the Honeywell SmartPlus System,” on page 28 for instructions on how to
install the driver.) The PACS Integration driver configuration file creates the policies that govern
how the information is synchronized.
1 In iManager, select Identity Manager > New Driver.
2 Select In an existing driver set.
3 Browse to and select the driver set you set up in Step 4 on page 34, then click Next.
4 Browse to and select the server the driver is associated with, then click Next.
5 Select Import a configuration from the server, browse to and select the
IAS_HoneywellPACS-IDM3_5_0-V1.xml driver configuration file, then click Next.
6 If the driver configuration file is not listed, select Import a configuration from the client, then
click Browse.
Configuring Identity Assurance Solution 41
Page 42

6a Browse to and select the driver configuration file from
IASMODULES_302:\IDMDriver\configs\IAS_HoneywellPACSIDM3_5_0-V1.xml from the IAS modules ISO, then click Open.
6b Click Next.
7 Configure the driver by filling in the configuration parameters:.
Parameter Description
Driver name Specify the name of the driver.
Remote host name and port Specify the hostname or IP address and port number where the
Remote Loader Service has been installed for this driver. The
default port is 8090.
Driver password Specify the driver object password. It is the same password as
specified in Step 8 on page 29.
Remote password Specify the Remote Loader password. It is the same password as
specified in Step 7 on page 29.
KMO Name Specify the name of the KMO object. See “Providing for Secure
Data Transfer” (http://www.novell.com/documentation/idm/
index.html?page=/documentation/idm/admin/data/
bs35pi6.html#bs35pi6) for steps on how to create a KMO.
novdocx (en) 24 April 2008
URL of the Honeywell
SmartPlus PAC Server
Listening Hostname and Port Specify the local host address and port that will listen to receive
Specify the URL of the Honeywell SmartPlus PACS Integration
server.
events from the Honeywell SmartPlus Enrollment server. See
“Installing Identity Manager 3.5.1 for Connected Systems on the
Physical Access Control System” on page 28 for more information.
8 Click Next.
9 Select Define Security Equivalences.
9a Click Add, then browse to and select a user object that has the rights the driver needs to
have on the server.
Many administrators use the Administrator User object in the Identity Vault for this task.
However, you might want to create another object, such as a DriversUser, and assign
sufficient rights to that user for the driver to function. Whatever rights the driver needs to
have on the server, the DriversUser object must have the same rights.
9b Click OK twice.
10 Select Exclude Administrative Roles.
10a Click Add, browse to and select all objects that represent administrative roles, then
exclude them from replication with the driver.
Exclude the User object in the Identity Vault (for example, DriversUser) that you
specified in Step 9. If you delete the User object, you have removed the rights from the
driver. Therefore, the driver can’t make changes to Identity Manager.
If there are objects that are currently excluded, they do not appear in the Excluded users
list unless you select Retrieve Current Exclusions.
10b Click OK twice.
42 Identity Assurance Solution 3.0.2 Installation Guide
Page 43

11 Click Next.
12 View the summary, then click Finish with Overview.
4.1.7 (Optional) Using Designer to Customize Your Implementation
Designer is a powerful graphical toolset that you can use to customize, test, and document the
drivers after you have configured them in iManager. You can import the driver set or drivers from
the Identity Vault to create a project in Designer. After you customize, test, and document the
drivers in Designer, you can deploy the changes using Designer.
NOTE: Using Designer to directly import the IAS drivers has not been tested and is not officially
supported for this release.
Designer can be downloaded from the Novell Download Web site (http://download.novell.com/
index.jsp).
For more information on using Designer, see the Designer 1.2 for Identity Manager Documentation
Web site (http://www.novell.com/documentation/designer12/index.html).
novdocx (en) 24 April 2008
4.2 Installing the User Application Server
With the IAS drivers configured, you can complete the installation by completing the following
steps:
Section 4.2.1, “Installing User Application for Provisioning,” on page 43
Section 4.2.2, “Installing the IAS Digital Signature Applet,” on page 44
Section 4.2.3, “Restarting the PIV Life Cycle Driver,” on page 44
4.2.1 Installing User Application for Provisioning
If you are using Identity Manager 3.5.0, you can use the User Application for Provisioning version
3.5.0 that is included in the Novell Identity Manager 3.5.0 build. If you are using Identity Manager
3.5.1, use User Application for Provisioning version 3.6.0 (http://www.novell.com/documentation/
idmrbpm36/index.html), which can be found on the Novell download site.
For installation instructions, see the “Installing User Application” section of the Identity Manager
3.5 Installation Guide (http://www.novell.com/documentation/idm/install/data/i1064071.html) and
the Identity Manager 3.5.1 Installation Guide (http://www.novell.com/documentation/idm35/install/
data/front.html) product.
For this release, we recommend installing the User Application for Provisioning on a separate
Windows 2003 server on the network because of the large number of workflow requests this system
will be handling. Alternatively, you can install the User Application for Provisioning on the Identity
Vault server.
During the User Application configuration, you need to enter the PIV Workflow driver’s
distinguished name in the field next to Provisioning Driver DN.
Also, when prompted for the search root, user root, and group root containers, select the IAS Root
container you specified during the PIV Life Cycle driver configuration (See Section 4.1.1,
Configuring Identity Assurance Solution 43
Page 44

“Configuring the PIV Life Cycle Driver,” on page 33). For the user root, select the IAS Root/Users
container. For the group root, select IAS Root/Groups container.
IMPORTANT: After you install the IDM User Application for Provisioning product, you should
configure JBoss* to only allow mutual authenticated SSL connections. For more information, see
this JBoss Wiki page (http://wiki.jboss.org/wiki/Wiki.jsp?page=SSLSetup).
4.2.2 Installing the IAS Digital Signature Applet
CD: CD 1 - IAS_Modules
Location: \idmdriver
The IAS Digital Signature Applet must be installed on the same server as the User Application for
Provisioning.
Before you begin the installation, make sure that JBoss is not running on the server.
1 Double-click IASModules_302:IDMDriver\IASSignerApplet.exe to install the
driver.
2 Read the welcome page, then click Next.
novdocx (en) 24 April 2008
3 Read the license agreement and select I accept the terms of the license agreement, then click
Next.
4 Select the folder that is the root of your User Application deployment, then click Next.
5 Click Install to begin the installation.
6 Read the post-install instructions on the last installation page.
These instructions need to be completed after you click Finish.
7 Click Finish to exit the installation wizard.
Complete the post-install instructions:
1 Start JBoss and wait until User Application is fully deployed.
2 Open an Internet browser and go to the following URL, substituting your system-specific
values where appropriate:
http://userapp-domain-or-ip:port/userapp-context/jsps/IASSignerConfig.jsp
This redirects you to the Digital Signature Service configuration page.
3 Log in as Administrator.
4 Make sure the Enable Digital Signature Support check box is checked.
4.2.3 Restarting the PIV Life Cycle Driver
To complete your installation and configuration of Identity Assurance Solution, restart the PIV Life
Cycle driver.
4.3 Configuring E-Mail Notifications
You can configure an SMTP e-mail server on your network to send e-mail notifications when tasks
have been completed or when a task is requested. The PIV Life Cycle driver installs IAS-specific e-
44 Identity Assurance Solution 3.0.2 Installation Guide
Page 45

mail templates into the Identity Vault’s Default Notification Collection. These templates are
associated with the IAS workflow tasks, and notifications are sent automatically to specific
workflow roles based on IAS policy.
To enable e-mail notifications, you must configure the e-mail server.
1 Start iManager.
2 From the Roles and Tasks menu, select Passwords > E-mail Server Options.
3 In the Host Server field, type the name or IP address of the SMTP e-mail server.
4 In the From field, type the e-mail address for the sender.
When the recipient opens the e-mail, this text is displayed in the From field of the e-mail
header.
5 If your server requires authentication before sending e-mail, select the Authenticate to server
using credentials check box and specify the username and password.
6 Click OK.
For more information on setting up e-mail notifications, see Configuring E-mail Notification (http://
www.novell.com/documentation/idm35/admin/data/bnpdcy4.html) in the Novell Identity Manager
3.5.1 Administration Guide.
novdocx (en) 24 April 2008
4.4 What’s Next
The Identity Assurance Solution is ready to use.
For information on managing the Identity Assurance Solution, see the Identity Assurance
Solution 3.0.2 Administration Guide (http://www.novell.com/documentation/ias302/
index.html).
For known issues and troubleshooting information, see Chapter 5, “Troubleshooting the
Identity Assurance Solution,” on page 47.
Configuring Identity Assurance Solution 45
Page 46

novdocx (en) 24 April 2008
46 Identity Assurance Solution 3.0.2 Installation Guide
Page 47

5
Troubleshooting the Identity
novdocx (en) 24 April 2008
Assurance Solution
This section provides troubleshooting information for the Identity Assurance Solution installation.
5.1 Known Issues
COULD_NOT_FIND_USER: Error while retrieving userAIMS_NO_SUCH_WALLET
If you receive the above message in the Remote Loader trace when attempting to suspend a
card in the CMS system and the card is not being suspended in the other systems, you must
properly configure the card binding. This is an ActivIdentity CMS setting. For more
information, see the “Customizing” chapter of the CMS Operator Guide under the section on
configuring the Directory setting User Attribute for Card Binding.
The following LDAP special characters are not permitted in User Distinguished Names or
contexts:
, + ” \ < > ;
Using these characters causes forms to not be auto-populated with default values, and fail to be
submitted.
An error similar to the following will be displayed if any of the above characters are used:
Sponsor: Script error in idvault.globalQuery(): Service returned
error. Return code=500, Message=Error encountered while executing
the service globalquery: {1}., Throwable=Ldap error querying for
results. Error: javax.naming.InvalidNameException: O=IasTest:
[LDAP: error code 34 - NDS error: illegal ds name (-610)];
remaining name 'O=IasTest'
5
Troubleshooting the Identity Assurance Solution
47
Page 48

novdocx (en) 24 April 2008
48 Identity Assurance Solution 3.0.2 Installation Guide
Page 49

A
IAS Installation Security
This section provides information on securely installing and configuring the products included in the
Identity Assurance Solution (IAS).
Some products have specific security considerations called out in the documentation. Other products
have security information dispersed throughout the documentation.
Section A.1, “Identity Assurance Solution,” on page 49
Section A.2, “Novell Products,” on page 49
Section A.3, “Third-Party Products,” on page 50
A.1 Identity Assurance Solution
The following issues relate to the Identity Assurance Solution:
novdocx (en) 24 April 2008
A
Section A.1.1, “Using SSL Connections with Remote Loaders,” on page 49
Section A.1.2, “Using SSL Connections with JBoss,” on page 49
A.1.1 Using SSL Connections with Remote Loaders
The IAS installation instructions describe how to set up the Remote Loaders on the connected
systems so they use a secure SSL connection. See the following references:
Step 9 of “Configuring the Connected System (Remote Loader)” on page 26.
Step 9 of “Configuring the Connected System (Remote Loader)” on page 27.
Step 9 of “Configuring the Connected System (Remote Loader)” on page 29.
A.1.2 Using SSL Connections with JBoss
The IAS installation instructions provide information on setting up JBoss to allow only mutually
authenticated SSL connections. See Section 4.2.1, “Installing User Application for Provisioning,”
on page 43.
A.2 Novell Products
For additional information on securely installing the Novell® products in this solution, see the
following resources:
Novell eDirectory 8.8 Installation Guide (http://www.novell.com/documentation/edir88/
edirin88/data/ahna7o7.html)
Novell iManager 2.6 Installation Guide (http://www.novell.com/documentation/imanager26/
imanager_install_26/data/alw39eb.html)
Novell Identity Manager 3.5 Installation Guide (http://www.novell.com/documentation/idm/
install/data/front.html)
IAS Installation Security
49
Page 50

Novell Enhanced Smart Card Method Installation Guide (http://www.novell.com/
documentation/ias/index.html?page=/documentation/ias/nescm_install/data/bookinfo.html)
Novell Client 4.91 for Windows XP/2003 Installation and Administration Guide (http://
www.novell.com/documentation/noclienu/index.html).
Novell Audit 2.0.2 Installation Guide (http://www.novell.com/documentation/novellaudit20/
install/data/bktitle.html).
A.3 Third-Party Products
For information on securely installing the third-party products in this solution, see the
documentation provided with the third-party software.
novdocx (en) 24 April 2008
50 Identity Assurance Solution 3.0.2 Installation Guide
Page 51

B
Manually Configuring the
novdocx (en) 24 April 2008
ActivIdentity Card Management
System
This section describes how to manually configure the ActivIdentity Card Management System.
The Identity Assurance Solution automatically does this configuration when the CMS driver is
installed on the Card Management System. However, if you make changes to the Card Management
System that overwrite the Novell Event Handler settings, you might need to manually perform this
procedure.
For this deployment scenario, ActivIdentity Card Management System is being used for the card
management system. The CMS driver runs on the ActivIdentity Card Management System. The
installation of the Card Management System was done previously. See Section 3.2, “Installing the
Card Management System,” on page 21.
You must complete the following steps:
1 Stop IIS.
2 Locate the /cmsevent directory inside the Remote Loader directory created by the CMS
Driver install.
3 Copy the following files from the /cmsevent directory to the CMS Directory/
cms_portal/WEB-INF/lib directory:
novellplugin.jar
B
aims-spi.jar
4 Copy the following file from the /cmsevent directory to the CMS Directory/
cms_portal/WEB-INF/conf directory:
novellplugin.properties
This file contains a path to c:\novell\remoteloader\cmsevent\event. This path
must match the event files directory that is configured for the CMS driver. If you accepted all
of the default settings during the CMS driver installation, the paths will match.
5 Edit the CMS Directory/cms_portal/WEB-INF/conf/
eventnotificationplugins.properties file:
5a Locate the plugins = line near the top of the file. Add, novell_plugin at the end
of this line.
For example, plugins = piv_notify,novell_plugin
5b Add the following two lines at the end of the file:
# Novell Event Notification Plugin
novell_plugin.class=com.novell.nds.dirxml.novellplugin.Novel
lCMSEventPlugin
6 Edit the CMS Directory/cms_portal/WEB-INF/conf/log4j.properties file:
Manually Configuring the ActivIdentity Card Management System
51
Page 52

6a Add the following lines at the end of the List categories for logging section
of this file:
log4j.category.com.novell.nds.dirxml.novellplugin =INFO,
novellplugin
log4j.additivity.com.novell.nds.dirxml.novellplugin = false
6b Add the following lines at the end of this file (replace occurrences of CMS Dir below with
the directory where CMS is installed):
# NOVELL
#---------------------------
log4j.appender.novellplugin =
org.apache.log4j.RollingFileAppender
log4j.appender.novellplugin.File = CMS Dir/logs/
novell_plugin.log
log4j.appender.novellplugin.MaxFileSize = 10MB
log4j.appender.novellplugin.MaxBackupIndex = 20
log4j.appender.novellplugin.layout =
org.apache.log4j.PatternLayout
log4j.appender.novellplugin.layout.ConversionPattern =
%d{ISO8601} %-5p [%t] %c{1} %M - %m%n
log4j.appender.credProviders.File=CMS Dir/logs/
credProviders.log
log4j.appender.InitializationManager.File=CMS Dir/logs/
InitializationManager.log
7 Start IIS.
novdocx (en) 24 April 2008
In order for CMS notification events, such as Suspend/Resume, to be properly propagated to the
Identity Manager system, the CMS system needs to have card binding properly configured. For
example, where the CMS directory is Microsoft* Active Directory* in the CMS Portal, the setting
for Card Binding under the Configuration/Customization/Directories section should be set to
distinguishedName.
52 Identity Assurance Solution 3.0.2 Installation Guide
Page 53

C
Upgrading the Identity Assurance
novdocx (en) 24 April 2008
Solution from 3.0.1 to 3.0.2
Identity Assurance Solution 3.0.1 was updated to 3.0.2 in February, 2008. Use the following
procedure to update from version 3.0.1 to 3.0.2:
1 Start with a working 3.0.1 system.
2 Make sure that iManager and User Application ports do not conflict.
3 Make sure that jdk1.5.0_14 is the JDK* installed in the
C:\Program files\java\jdk1.5.0_14 directory.
For more information, see the J2SE Development Kit 5.0 Update 14 (http://onesearch.sun.com/
search/
clickthru?qt=%2Bjdk1.5&url=http%3A%2F%2Fjava.sun.com%2Fj2se%2F1.5.0%2Finstall_jd
k1.5_14nb5.5.1_ml.html&pathInfo=%2Fsearch%2Fonesearch%2Findex.jsp&hitNum=7&col=downlo
ads-all).
4 Upgrade from Identity Manager 3.5.0 to 3.5.1 by following the procedures described in the
Identity Manager 3.5.1 User Application: Migration Guide (http://www.novell.com/
documentation/idm35/migration/data/bookinfo.html).
4a Select the specific components that you need, or use the defaults.
5 Upgrade the Identity Manager User Application 3.5 to Novell IDM Roles Based Provisioning
Module 3.6:
5a Set up the Prerequisites to Installation (http://www.novell.com/documentation/
idmrbpm36/install/data/bcz53mm.html) required for your application.
C
5b Follow the migration steps outlined in the Novell IDM User Application: Migration Guide
(http://www.novell.com/documentation/idmrbpm36/migration/data/
seafang_antelope.html).
After you upgrade the User Application, you can upgrade IAS 3.0.1 to 3.0.2.
6 From the IDMDriver folder located on the IASModules_302 ISO, run
iasSignerApplet.exe.
Upgrading the Identity Assurance Solution from 3.0.1 to 3.0.2
53
Page 54

novdocx (en) 24 April 2008
7 When prompted, select Remove.
IMPORTANT: Do not select Modify.
8 Rerun the iasSignerApplet.exe.
9 From the IDMDriver folder located on the IASModules_302 ISO, run the PIV Life
Cycle Driver.exe .
54 Identity Assurance Solution 3.0.2 Installation Guide
Page 55

novdocx (en) 24 April 2008
10 Save the configuration information on the driver.
11 In iManager, select Identity Manager > Identity Manager Overview > Edit Properties on the
User Application driver.
12 Write down and save the values associated with this driver. You need these values when
installing the new User Application driver.
Upgrading the Identity Assurance Solution from 3.0.1 to 3.0.2 55
Page 56

novdocx (en) 24 April 2008
56 Identity Assurance Solution 3.0.2 Installation Guide
Page 57

novdocx (en) 24 April 2008
13 Delete the User Application driver.
Make sure PIV Life Cycle Driver is up and running before adding the new User Application
driver.
Upgrading the Identity Assurance Solution from 3.0.1 to 3.0.2 57
Page 58

14 Add the driver by selecting Add Driver, then select IAS PIVWorkflow-IDM3_5_0-
V2.xml.
Enter the values saved in Step 12 in the required fields.
15 Verify that the PIV Life Cycle driver is running by ensuring that the circle in the upper-right
corner of the driver icon is green.
16 Select the PIV Life Cycle driver and edit its properties:
16a Select Named Passwords.
novdocx (en) 24 April 2008
16b Add piv-workflow-user and passwords > Save.
The password value for the Named Password is the password for the PIV Workflow user.
This is the admin user who is specified in the User Application Admin DN field during the
configuration of the User Application Driver object. For information on the User
Application Admin DN field, see “User Application Admin DN” on page 36. It is also the
same user who is indicated in the Global Settings of the Driver Set under the name PIV
Workflow: User ID.
58 Identity Assurance Solution 3.0.2 Installation Guide
Page 59

17 Run Designer 2.1.1.
novdocx (en) 24 April 2008
For more help about updating to Designer 2.1.1, refer to the Identity Manager Roles Based
Provisioning Module 3.6 Migration Guide (http://www.novell.com/documentation/
idmrbpm36/migration/data/seafang_antelope.html).
18 Follow the migration steps outlined in the Migration Guide (http://www.novell.com/
documentation/idmrbpm36/migration/data/seafang_antelope.html).
19 Import the User Application driver from the driver set:
19a Import the fips.sch schema file.
19b Import the fips.sch schema file a second time.
The fips.sch file is in the c:\novell\nds directory.
Disregard any schema errors and warnings during import.
Upgrading the Identity Assurance Solution from 3.0.1 to 3.0.2 59
Page 60

19c Select the option to migrate the User Application driver.
19d Deploy the User Application driver.
Ignore the errors and warnings during deployment.
20 Configure and run configupdat.bat (located in c:\novell).
21 Verify that your values are correct, then click Save.
For more information, see the Post-Installation Tasks (http://www.novell.com/documentation/
idmrbpm36/install/data/bcz611v.html) in the IDM Roles Based Provisioning Module 3.6 User
Application: Installation Guide.
22 Start the User Application (follow the steps in “Testing the Installation on the JBoss
Application Server” (http://www.novell.com/documentation/idmrbpm36/install/data/
b70jg1p.html)).
23 In your browser, enter the following URL to run the IAS Single Sign-on configuration:
http://<User App Server IP Address>:<User App Server Port>/IDM/
jsps/IASSignerConfig.jsp
24 Log in as cn=admin,o=novell
25 Select the Select Enable Digital Signature Support option.
novdocx (en) 24 April 2008
26 Save the configuration, then click Exit.
IAS should now be operational.
60 Identity Assurance Solution 3.0.2 Installation Guide
Page 61

D
Documentation Updates
The documentation was updated on the following dates:
Section D.1, “May 12th, 2008,” on page 61
Section D.2, “March 7th, 2008,” on page 61
Section D.3, “February 20, 2008,” on page 61
D.1 May 12th, 2008
Updates were made to the following sections. The changes are explained below.
Location Change
Step 5 on page 25 Changed information to read that the username
must be entered in LDAP (comma-delimited)
notation, instead of with the leading dot-delimited
notation.
novdocx (en) 24 April 2008
D
D.2 March 7th, 2008
Updates were made to the following sections. The changes are explained below.
D.2.1 Overview
Location Change
Entire Book Made editorial changes and updated the guide to current Novell
documentation standards.
D.3 February 20, 2008
Updates were made to the following sections. The changes are explained below.
D.3.1 Overview
Location Change
Section 2.1.1, “Novell Identity Manager Support,”
on page 17
Added section describing what versions of Novell
Identity Manager are supported by IAS 3.0.2.
Appendix C, “Upgrading the Identity Assurance
Solution from 3.0.1 to 3.0.2,” on page 53
Added appendix, which is a tutorial to assist users
upgrading IAS from 3.0.1 to 3.0.2.
Documentation Updates
61
 Loading...