


Client User Guide
Novell®
GroupWise® Messenger
novdocx (en) 11 July 2008
AUTHORIZED DOCUMENTATION
2.0
November 17, 2008
www.novell.com
GroupWise Messenger 2.0 Client User Guide

Legal Notices
Novell, Inc. makes no representations or warranties with respect to the contents or use of this documentation, and
specifically disclaims any express or implied warranties of merchantability or fitness for any particular purpose.
Further, Novell, Inc. reserves the right to revise this publication and to make changes to its content, at any time,
without obligation to notify any person or entity of such revisions or changes.
Further, Novell, Inc. makes no representations or warranties with respect to any software, and specifically disclaims
any express or implied warranties of merchantability or fitness for any particular purpose. Further, Novell, Inc.
reserves the right to make changes to any and all parts of Novell software, at any time, without any obligation to
notify any person or entity of such changes.
Any products or technical information provided under this Agreement may be subject to U.S. export controls and the
trade laws of other countries. You agree to comply with all export control regulations and to obtain any required
licenses or classification to export, re-export, or import deliverables. You agree not to export or re-export to entities
on the current U.S. export exclusion lists or to any embargoed or terrorist countries as specified in the U.S. export
laws. You agree to not use deliverables for prohibited nuclear, missile, or chemical biological weaponry end uses.
Please refer to www.novell.com/info/exports/ for more information on exporting Novell software. Novell assumes no
responsibility for your failure to obtain any necessary export approvals.
Copyright © 2005 Novell, Inc. All rights reserved. No part of this publication may be reproduced, photocopied,
stored on a retrieval system, or transmitted without the express written consent of the publisher.
novdocx (en) 11 July 2008
Novell, Inc. has intellectual property rights relating to technology embodied in the product that is described in this
document. In particular, and without limitation, these intellectual property rights may include one or more of the U.S.
patents listed at http://www.novell.com/company/legal/patents/ and one or more additional patents or pending patent
applications in the U.S. and in other countries.
Novell, Inc.
404 Wyman Street, Suite 500
Waltham, MA 02451
U.S.A.
www.novell.com
Online Documentation: To access the online documentation for this and other Novell products, and to get
updates, see www.novell.com/documentation.

Novell Trademarks
eDirectory is a trademark of Novell, Inc.
iFolder is a registered trademark of Novell, Inc. in the United States and other countries.
GroupWise is a registered trademark of Novell, Inc. in the United States and other countries.
Novell is a registered trademark of Novell, Inc. in the United States and other countries.
Third-Party Materials
All third-party trademarks are the property of their respective owners.
novdocx (en) 11 July 2008

novdocx (en) 11 July 2008

Contents
About This Guide 7
1 Getting Started 9
1.1 Logging In to GroupWise Messenger. . . . . . . . . . . . . . . . . . . . . . . . . . . . . . . . . . . . . . . . . . . . . 9
1.2 Logging Out of GroupWise Messenger . . . . . . . . . . . . . . . . . . . . . . . . . . . . . . . . . . . . . . . . . . 10
1.3 Connecting Messenger to Other Instant Messaging Systems . . . . . . . . . . . . . . . . . . . . . . . . . 10
1.3.1 Downloading and Installing Pidgin . . . . . . . . . . . . . . . . . . . . . . . . . . . . . . . . . . . . . . . 10
1.3.2 Setting Up Pidgin . . . . . . . . . . . . . . . . . . . . . . . . . . . . . . . . . . . . . . . . . . . . . . . . . . . . 11
2 Working with Conversations 13
2.1 Sending an Instant Message . . . . . . . . . . . . . . . . . . . . . . . . . . . . . . . . . . . . . . . . . . . . . . . . . . 13
2.2 Using Emoticons in Your Message . . . . . . . . . . . . . . . . . . . . . . . . . . . . . . . . . . . . . . . . . . . . . 14
2.3 Changing the Font of Text in a Conversation. . . . . . . . . . . . . . . . . . . . . . . . . . . . . . . . . . . . . . 14
2.4 Holding a Group Conversation. . . . . . . . . . . . . . . . . . . . . . . . . . . . . . . . . . . . . . . . . . . . . . . . . 15
2.5 Adding a Time Stamp to Each Entry in a Conversation . . . . . . . . . . . . . . . . . . . . . . . . . . . . . . 15
2.6 Saving a Conversation . . . . . . . . . . . . . . . . . . . . . . . . . . . . . . . . . . . . . . . . . . . . . . . . . . . . . . . 16
2.7 Opening a Saved Conversation . . . . . . . . . . . . . . . . . . . . . . . . . . . . . . . . . . . . . . . . . . . . . . . . 16
2.8 Printing a Conversation . . . . . . . . . . . . . . . . . . . . . . . . . . . . . . . . . . . . . . . . . . . . . . . . . . . . . . 16
2.9 Searching the Archives for Logged Conversations . . . . . . . . . . . . . . . . . . . . . . . . . . . . . . . . . 16
2.10 Sending an E-Mail Message (Windows Only) . . . . . . . . . . . . . . . . . . . . . . . . . . . . . . . . . . . . . 17
novdocx (en) 11 July 2008
3 Working with Chat Rooms 19
3.1 Searching for a Chat Room . . . . . . . . . . . . . . . . . . . . . . . . . . . . . . . . . . . . . . . . . . . . . . . . . . . 19
3.2 Joining a Chat Room Without Searching . . . . . . . . . . . . . . . . . . . . . . . . . . . . . . . . . . . . . . . . . 20
3.3 Creating a Chat Room . . . . . . . . . . . . . . . . . . . . . . . . . . . . . . . . . . . . . . . . . . . . . . . . . . . . . . . 20
3.4 Modifying Access Rights for a Chat Room. . . . . . . . . . . . . . . . . . . . . . . . . . . . . . . . . . . . . . . . 21
3.5 Ignoring a User in a Chat Room. . . . . . . . . . . . . . . . . . . . . . . . . . . . . . . . . . . . . . . . . . . . . . . . 22
3.6 Performing Moderator Tasks . . . . . . . . . . . . . . . . . . . . . . . . . . . . . . . . . . . . . . . . . . . . . . . . . . 23
3.6.1 Removing a User from the Chat Room . . . . . . . . . . . . . . . . . . . . . . . . . . . . . . . . . . . 23
3.6.2 Changing the Topic of a Chat Room . . . . . . . . . . . . . . . . . . . . . . . . . . . . . . . . . . . . . 23
4 Working with Broadcasts 25
4.1 Receiving a Broadcast Message . . . . . . . . . . . . . . . . . . . . . . . . . . . . . . . . . . . . . . . . . . . . . . . 25
4.2 Clearing Broadcasts. . . . . . . . . . . . . . . . . . . . . . . . . . . . . . . . . . . . . . . . . . . . . . . . . . . . . . . . . 25
4.3 Sending a Broadcast Message to Selected Users . . . . . . . . . . . . . . . . . . . . . . . . . . . . . . . . . . 26
4.4 Sending a System Broadcast. . . . . . . . . . . . . . . . . . . . . . . . . . . . . . . . . . . . . . . . . . . . . . . . . . 26
5 Working with Contacts 27
5.1 Adding a Contact . . . . . . . . . . . . . . . . . . . . . . . . . . . . . . . . . . . . . . . . . . . . . . . . . . . . . . . . . . . 27
5.2 Deleting a Contact . . . . . . . . . . . . . . . . . . . . . . . . . . . . . . . . . . . . . . . . . . . . . . . . . . . . . . . . . . 27
5.3 Organizing the Contact List . . . . . . . . . . . . . . . . . . . . . . . . . . . . . . . . . . . . . . . . . . . . . . . . . . . 28
5.4 Importing a Contact List . . . . . . . . . . . . . . . . . . . . . . . . . . . . . . . . . . . . . . . . . . . . . . . . . . . . . . 28
5.5 Exporting a Contact List . . . . . . . . . . . . . . . . . . . . . . . . . . . . . . . . . . . . . . . . . . . . . . . . . . . . . . 28
Contents 5

6 Working with Your Personal History 29
6.1 Viewing Your Personal History in a Conversation, Chat Room, or Broadcast Window . . . . . . 29
6.2 Disabling the Personal History in a Conversation, Chat Room, or Broadcast Window . . . . . . 30
6.3 Displaying the History File from a Conversation, Chat Room, or Broadcast Window . . . . . . . 30
6.4 Clearing Your History . . . . . . . . . . . . . . . . . . . . . . . . . . . . . . . . . . . . . . . . . . . . . . . . . . . . . . . . 30
7 Working With Statuses 33
7.1 Changing Your Status . . . . . . . . . . . . . . . . . . . . . . . . . . . . . . . . . . . . . . . . . . . . . . . . . . . . . . . 33
7.2 Creating a Custom Status . . . . . . . . . . . . . . . . . . . . . . . . . . . . . . . . . . . . . . . . . . . . . . . . . . . . 33
8 Customizing GroupWise Messenger 35
8.1 Changing Your Password . . . . . . . . . . . . . . . . . . . . . . . . . . . . . . . . . . . . . . . . . . . . . . . . . . . . 35
8.2 Specifying When GroupWise Messenger Opens. . . . . . . . . . . . . . . . . . . . . . . . . . . . . . . . . . . 36
8.3 Specifying Whether to Show Contacts at Startup . . . . . . . . . . . . . . . . . . . . . . . . . . . . . . . . . . 37
8.4 Specifying How Long to Wait Before You Are Shown as Idle . . . . . . . . . . . . . . . . . . . . . . . . . 37
8.5 Specifying If You're Prompted to Save Conversations. . . . . . . . . . . . . . . . . . . . . . . . . . . . . . . 38
8.6 Specifying to be Prompted to Connect to the Internet . . . . . . . . . . . . . . . . . . . . . . . . . . . . . . . 38
8.7 Specifying to Use Graphical Emoticons . . . . . . . . . . . . . . . . . . . . . . . . . . . . . . . . . . . . . . . . . . 38
8.8 Specifying to Always Accept Invitations to Conferences Without Prompting . . . . . . . . . . . . . . 39
8.9 Specifying the Interface Language. . . . . . . . . . . . . . . . . . . . . . . . . . . . . . . . . . . . . . . . . . . . . . 39
8.10 Specifying to Remember Your Password . . . . . . . . . . . . . . . . . . . . . . . . . . . . . . . . . . . . . . . . 40
8.11 Specifying the Font of Composed Messages . . . . . . . . . . . . . . . . . . . . . . . . . . . . . . . . . . . . . . 40
8.12 Specifying How the Enter Key Works . . . . . . . . . . . . . . . . . . . . . . . . . . . . . . . . . . . . . . . . . . . 41
8.13 Specifying the Font of Received Messages . . . . . . . . . . . . . . . . . . . . . . . . . . . . . . . . . . . . . . . 41
8.14 Specifying Offline Options for Contacts . . . . . . . . . . . . . . . . . . . . . . . . . . . . . . . . . . . . . . . . . . 41
8.15 Specifying When You Receive Sounds and Alerts . . . . . . . . . . . . . . . . . . . . . . . . . . . . . . . . . 42
8.16 Specifying Who Can See Your Status and Send You Messages . . . . . . . . . . . . . . . . . . . . . . 42
8.17 Changing the Contact List Appearance . . . . . . . . . . . . . . . . . . . . . . . . . . . . . . . . . . . . . . . . . . 43
8.18 Changing the History Files Location . . . . . . . . . . . . . . . . . . . . . . . . . . . . . . . . . . . . . . . . . . . . 43
8.19 Specifying To Show the History In the Conversation Window . . . . . . . . . . . . . . . . . . . . . . . . . 44
8.20 Specifying the Number of Days to Keep the History . . . . . . . . . . . . . . . . . . . . . . . . . . . . . . . . 45
8.21 Showing Only Online Contacts . . . . . . . . . . . . . . . . . . . . . . . . . . . . . . . . . . . . . . . . . . . . . . . . 45
8.22 Turning Off the Sound (Windows and Linux Only) . . . . . . . . . . . . . . . . . . . . . . . . . . . . . . . . . . 45
8.23 Using Startup Options . . . . . . . . . . . . . . . . . . . . . . . . . . . . . . . . . . . . . . . . . . . . . . . . . . . . . . . 46
novdocx (en) 11 July 2008
9 Using GroupWise Messenger from Within GroupWise (Windows Only) 49
9.1 Displaying Messenger Presence in GroupWise (Windows Only). . . . . . . . . . . . . . . . . . . . . . . 49
9.2 Sending an Instant Message . . . . . . . . . . . . . . . . . . . . . . . . . . . . . . . . . . . . . . . . . . . . . . . . . . 49
9.3 Displaying the GroupWise Messenger Contact List. . . . . . . . . . . . . . . . . . . . . . . . . . . . . . . . . 50
9.4 Specifying Whether or Not to Start GroupWise Messenger When GroupWise Starts . . . . . . . 50
9.5 Displaying GroupWise Messenger Options . . . . . . . . . . . . . . . . . . . . . . . . . . . . . . . . . . . . . . . 50
A Documentation Updates 51
A.1 November 17, 2008 . . . . . . . . . . . . . . . . . . . . . . . . . . . . . . . . . . . . . . . . . . . . . . . . . . . . . . . . . 51
A.2 April 16, 2007 . . . . . . . . . . . . . . . . . . . . . . . . . . . . . . . . . . . . . . . . . . . . . . . . . . . . . . . . . . . . . . 51
6 GroupWise Messenger 2.0 Client User Guide

About This Guide
This Novell® GroupWise® Messenger 1.0 Client User Guide explains how to use GroupWise
Messenger on Windows*, Linux* or MacIntosh*. The guide is divided into the following sections:
Chapter 1, “Getting Started,” on page 9
Chapter 2, “Working with Conversations,” on page 13
Chapter 3, “Working with Chat Rooms,” on page 19
Chapter 4, “Working with Broadcasts,” on page 25
Chapter 5, “Working with Contacts,” on page 27
Chapter 6, “Working with Your Personal History,” on page 29
Chapter 7, “Working With Statuses,” on page 33
Chapter 8, “Customizing GroupWise Messenger,” on page 35
Chapter 9, “Using GroupWise Messenger from Within GroupWise (Windows Only),” on
page 49
novdocx (en) 11 July 2008
Appendix A, “Documentation Updates,” on page 51
Audience
This guide is intended for GroupWise Messenger users.
Feedback
We want to hear your comments and suggestions about this manual and the other documentation
included with this product. Please use the User Comments feature at the bottom of each page of the
online documentation, or go to www.novell.com/documentation/feedback.html and enter your
comments there.
Documentation Updates
For the most recent version of the GroupWise Messenger Client User Guide, visit the Novell
GroupWise Messenger 2 documentation Web site (http://www.novell.com/documentation/nm2).
Additional Documentation
For additional GroupWise Messenger documentation, see the following guides at the Novell
GroupWise Messenger 2 documentation Web site (http://www.novell.com/documentation/nm2):
Installation Guide
Administration Guide
Documentation Conventions
In Novell documentation, a greater-than symbol (>) is used to separate actions within a step and
items in a cross-reference path.
About This Guide 7

A trademark symbol (®, TM, etc.) denotes a Novell trademark. An asterisk (*) denotes a third-party
trademark.
When a single pathname can be written with a backslash for some platforms or a forward slash for
other platforms, the pathname is presented with a backslash. Users of platforms that require a
forward slash, such as Linux or UNIX, should use forward slashes as required by your software.
novdocx (en) 11 July 2008
8 GroupWise Messenger 2.0 Client User Guide
1
Getting Started
novdocx (en) 11 July 2008
1
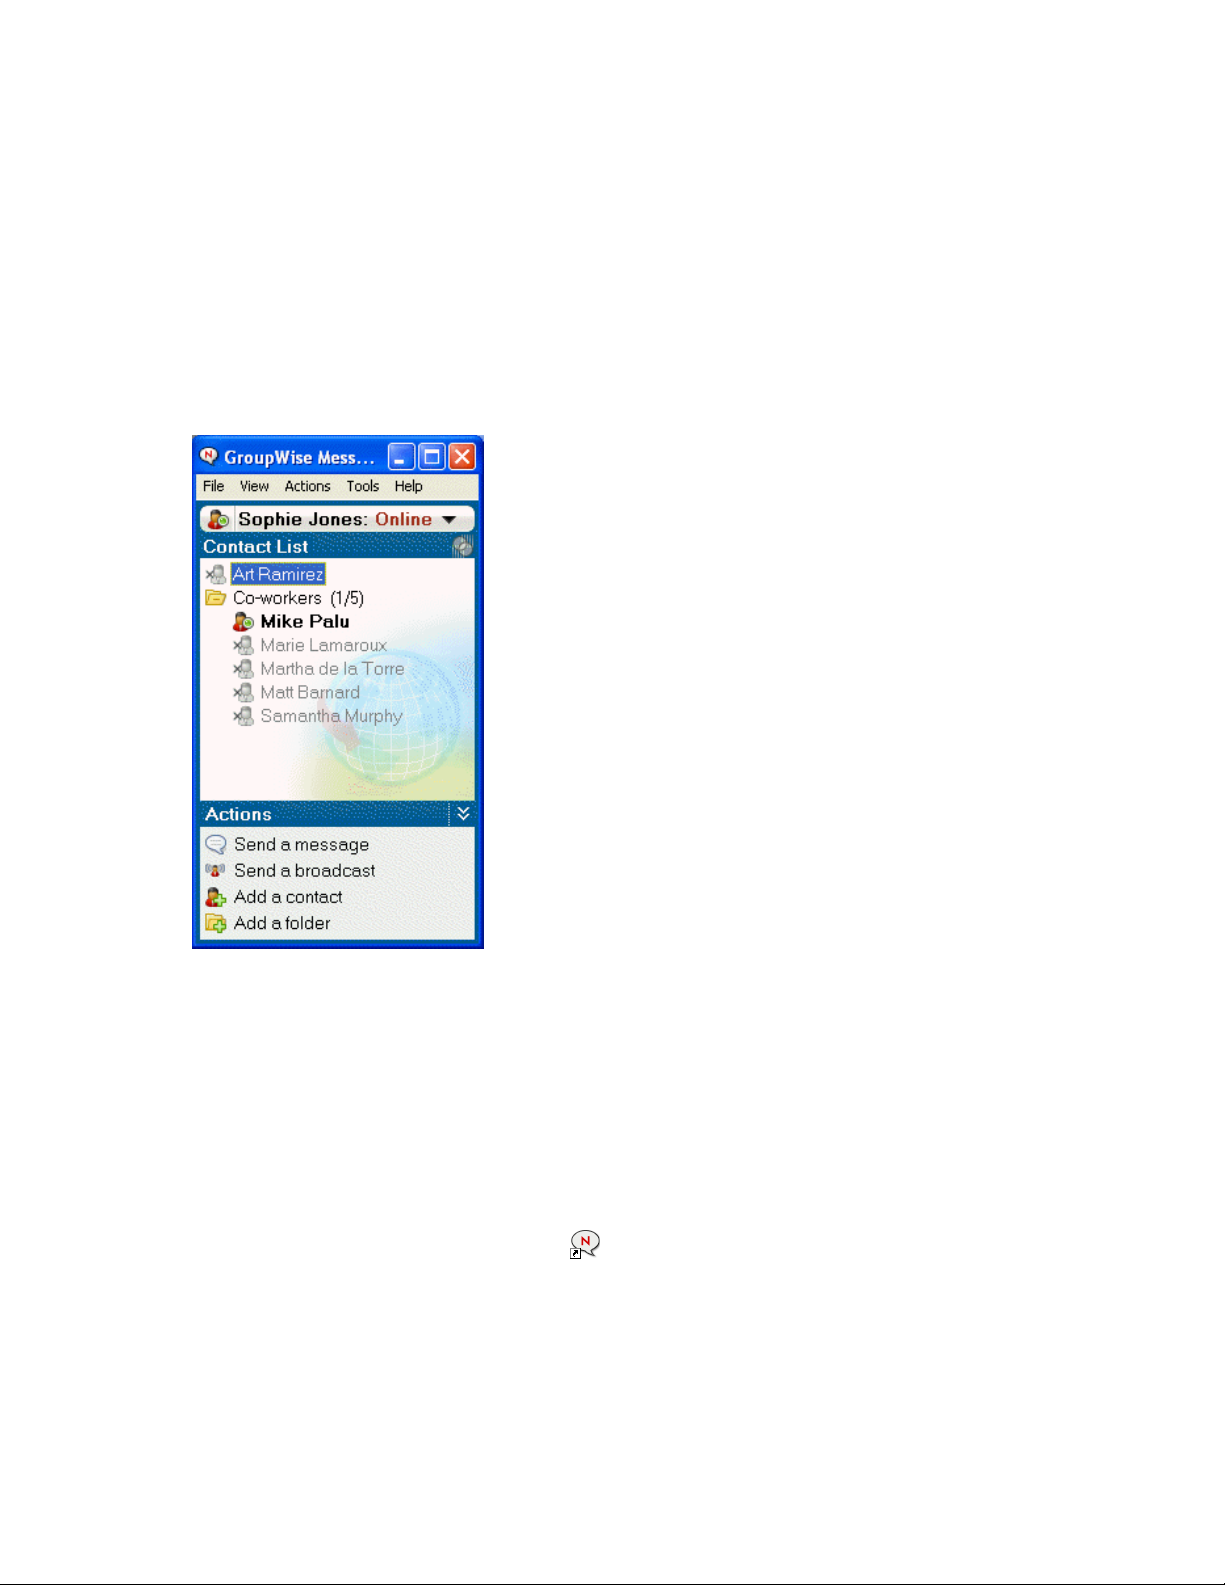
Novell® GroupWise® Messenger is a corporate instant messaging product that uses Novell
eDirectory
You can create a Contact List, send instant messages, create an archive of messages, allow and block
others from seeing your availability, and more.
Figure 1-1 GroupWise Messenger Main Window
TM
as its user database.
GroupWise Messenger options are available only if GroupWise Messenger is installed and running.
This section contains the following topics:
Section 1.1, “Logging In to GroupWise Messenger,” on page 9
Section 1.2, “Logging Out of GroupWise Messenger,” on page 10
Section 1.3, “Connecting Messenger to Other Instant Messaging Systems,” on page 10
1.1 Logging In to GroupWise Messenger
1 Open GroupWise Messenger, using the icon on your desktop.
2 Type your user ID in the User ID field.
3 Type your password in the Password field.
4 Select Remember Password if you want the system to not ask you for your password again.
Getting Started
9

The user ID and password you use to log in to GroupWise Messenger is your directory (Novell
eDirectory) user ID and password, which might not be the same as your GroupWise user ID
and password. Check with your system administrator if you don't know your password.
5 Click Advanced.
6 Type your server name in the Server field.
7 Type your port number in the Port field.
If you are not sure what to type in the Server and Port fields, contact your system administrator.
8 Click OK.
When you log in to GroupWise Messenger, the GroupWise Messenger icon is added to the
system tray for Windows and Linux. For Macintosh, the GroupWise Messenger icon is added to
the dock.
1.2 Logging Out of GroupWise Messenger
1 Click File > Log Out.
Log Out logs you out of GroupWise Messenger but does not close the main window or exit
GroupWise Messenger.
novdocx (en) 11 July 2008
There are two other options on the main File menu: Close this Window closes the GroupWise
Messenger window but leaves the icon in the system tray for Windows and Linux, and leaves the
icon on the dock for Macintosh. Exit logs you out of GroupWise Messenger, closes the
GroupWise Messenger window, and removes the icon from the system tray for Windows and Linux,
and from the dock on Macintosh.
If at any time your network or GroupWise Messenger connection is interrupted, you are logged out
of GroupWise Messenger, but as soon as your connection is restored, you are logged back in. If you
are in the middle of a conversation when this happens, the conversation can continue as soon as the
connection is restored.
1.3 Connecting Messenger to Other Instant Messaging Systems
Pidgin* is an open source project that enables you to connect various instant messaging networks,
including GroupWise Messenger. When you use Pidgin with GroupWise Messenger, you are not
limited to instant messaging colleagues and friends who are on your same GroupWise Messenger
network. For example, if you have a friend that uses MSN Messenger*, you can chat with that friend
through your GroupWise Messenger system by using Pidgin.
For more information about Pidgin that isn’t covered in this section, see the Pidgin Web Site (http://
www.pidgin.im/).
Section 1.3.1, “Downloading and Installing Pidgin,” on page 10
Section 1.3.2, “Setting Up Pidgin,” on page 11
1.3.1 Downloading and Installing Pidgin
1 In your internet browser, enter the address to the Pidgin Web Site (http://www.pidgin.im/).
2 Click the Download tab.
10 GroupWise Messenger 2.0 Client User Guide

3 Click the operating system that is installed on your computer.
4 Click the Download icon.
5 Click Save File.
6 Browse to the location in your filesystem where you want to save the file, then click Save.
7 Navigate to the location where you saved the pidgin.exe file, double-click the file, then
click Run.
8 Choose your preferred language, then click OK.
This launches the Pidgin Setup Wizard.
9 At the wizard welcome screen, click Next.
10 Click Next to accept the license agreement.
11 Select the components you want to install, then click Next.
If you are unsure, then do not select anything. This installs only the default options.
Pidgin requires that your computer have a GTK installed. If your computer does not already
have a GTK installed, then the Pidgin Setup Wizard installs one for you.
12 If you need to install the GTK, browse to the location where you want to install it, then click
Next.
13 Browse to the location where you want to install Pidgin, then click Next.
14 When installation is complete, click Next.
novdocx (en) 11 July 2008
15 Select Run Pidgin, then click Finish.
1.3.2 Setting Up Pidgin
After Pidgin is installed, you need to set it up.
“Setting Up Your GroupWise Account” on page 11
“Setting Up Other Instant Message Systems” on page 12
“Adding Contacts” on page 12
Setting Up Your GroupWise Account
1 In the Welcome to Pidgin page, click Add.
The Add Account page is displayed.
2 In the Protocol field, click the drop-down arrow, then click GroupWise.
3 In the Username field, enter your GroupWise username.
4 In the Password field, enter your GroupWise password.
This must be the same username and password that you use to sign in to GroupWise.
5 Click the Advanced tab.
6 In the Server address and Server port fields, enter the server address and server port that your
GroupWise Messenger system uses.
Getting Started 11

If you know the server address and port number, then enter the information into the appropriate
fields and skip to Step 7. If you don’t know the server address and port number, then complete
the following steps:
6a Launch GroupWise Messenger.
6b On the GroupWise Messenger toolbar, click Help > About GroupWise Messenger.
The server address and server port of the GroupWise Messenger network are listed.
7 Click Save.
8 In the Accounts window, select the GroupWise account.
9 Click Accept to accept the certificate from the GroupWise server.
After you accept the certificate, you are logged in to the GroupWise server through the Pidgin
application, and should now be able to instant message your GroupWise contacts.
In order to instant message users who are using instant messaging clients other than
GroupWise, you need to set up those individual clients in Pidgin. To accomplish this, see
“Setting Up Other Instant Message Systems” on page 12.
Setting Up Other Instant Message Systems
novdocx (en) 11 July 2008
1 In the Accounts page, click Add.
2 In the Protocol field, click the drop-down arrow, then click the instant messaging service that
you want to communicate with. For example, if you want to instant message a user who has a
Yahoo* account, click Yahoo.
You must have an active account with the messenger service that you want to communicate
with. For example, if you want to add Yahoo to your list of accounts, then you must have an
account with Yahoo.
3 In the Username field, enter the username that you have already established with the messenger
service.
4 In the Password field, enter the password that is associated with your username.
5 Click Save.
Adding Contacts
1 From the Buddy List toolbar, click Buddies > Add Buddy.
2 From the drop-down list, select the messenger service where the contact you want to add is
registered.
3 In the Buddy’s username field, enter the contact’s username that is associated with the network
where they are registered.
For example, if you want to add a contact who has an account with Yahoo, and the contact’s
email address is Jim75@yahoo.com, then in the Buddy’s username field, enter Jim75.
4 (Optional) In the Alias field, enter a name for the contact.
5 In the Add buddy to group field, click the drop-down list and click the category where you want
to add your contact.
This feature helps you keep your contacts organized.
6 Click Add.
12 GroupWise Messenger 2.0 Client User Guide
2
Working with Conversations
This section contains the following topics:
Section 2.1, “Sending an Instant Message,” on page 13
Section 2.2, “Using Emoticons in Your Message,” on page 14
Section 2.3, “Changing the Font of Text in a Conversation,” on page 14
Section 2.4, “Holding a Group Conversation,” on page 15
Section 2.5, “Adding a Time Stamp to Each Entry in a Conversation,” on page 15
Section 2.6, “Saving a Conversation,” on page 16
Section 2.7, “Opening a Saved Conversation,” on page 16
Section 2.8, “Printing a Conversation,” on page 16
Section 2.9, “Searching the Archives for Logged Conversations,” on page 16
Section 2.10, “Sending an E-Mail Message (Windows Only),” on page 17
novdocx (en) 11 July 2008
2
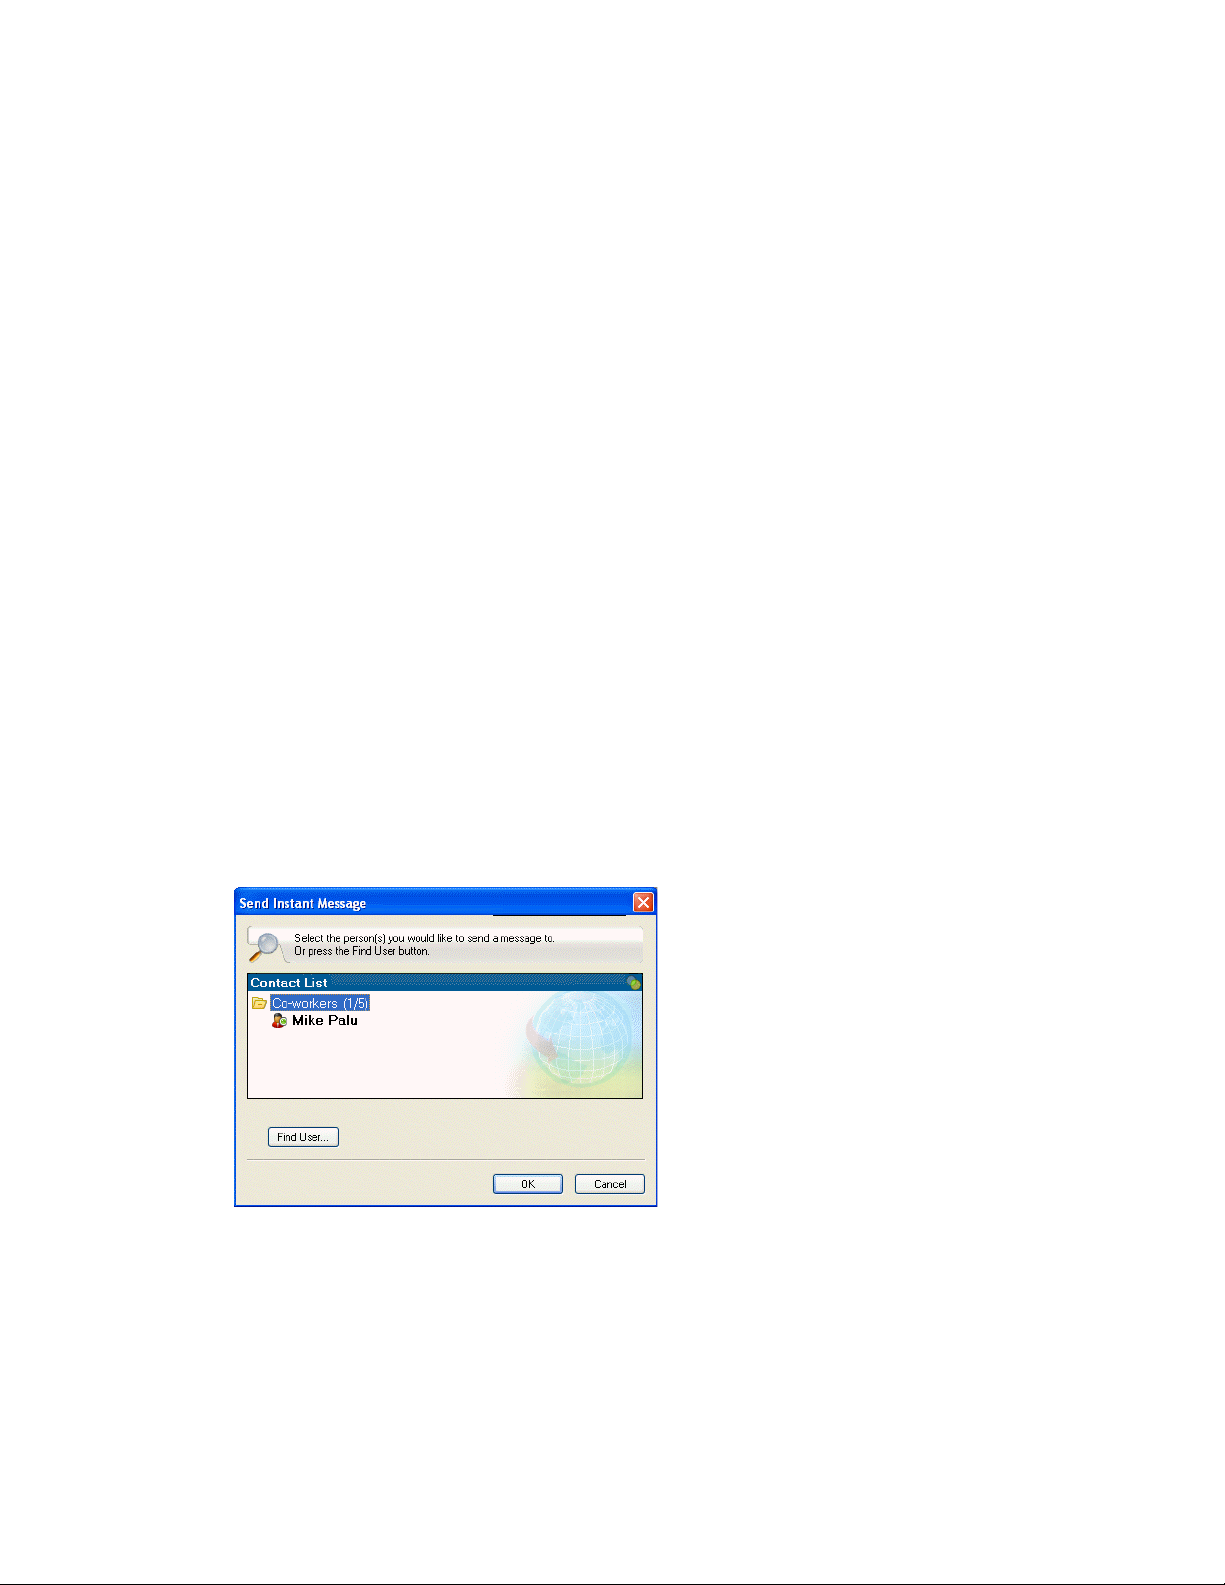
2.1 Sending an Instant Message
1 Double-click a contact, then follow Step 3.
or
If you want to send a message to someone who is not in your Contact List, click Send a
message, then follow Step 2.
2 Click Find User, select Use this User ID, type the user ID of the person, then click Finish.
or
Click Find User, select Search for a user, type all or part of the name you are looking for, then
click Next. Select the user you want from the Search Results list, click Add if you want to add
the user to your contact list, then click Finish.
or
Working with Conversations
13
Click Find User, click Advanced, click begins with, contains, or equals from the drop-down list
next to a field, type the information you are looking for in the field, then click Next. Select the
user you want from the Search Results list, click Add if you want to add the user to your contact
list, then click Finish.
3 Type your message.
4 Click or press Enter.
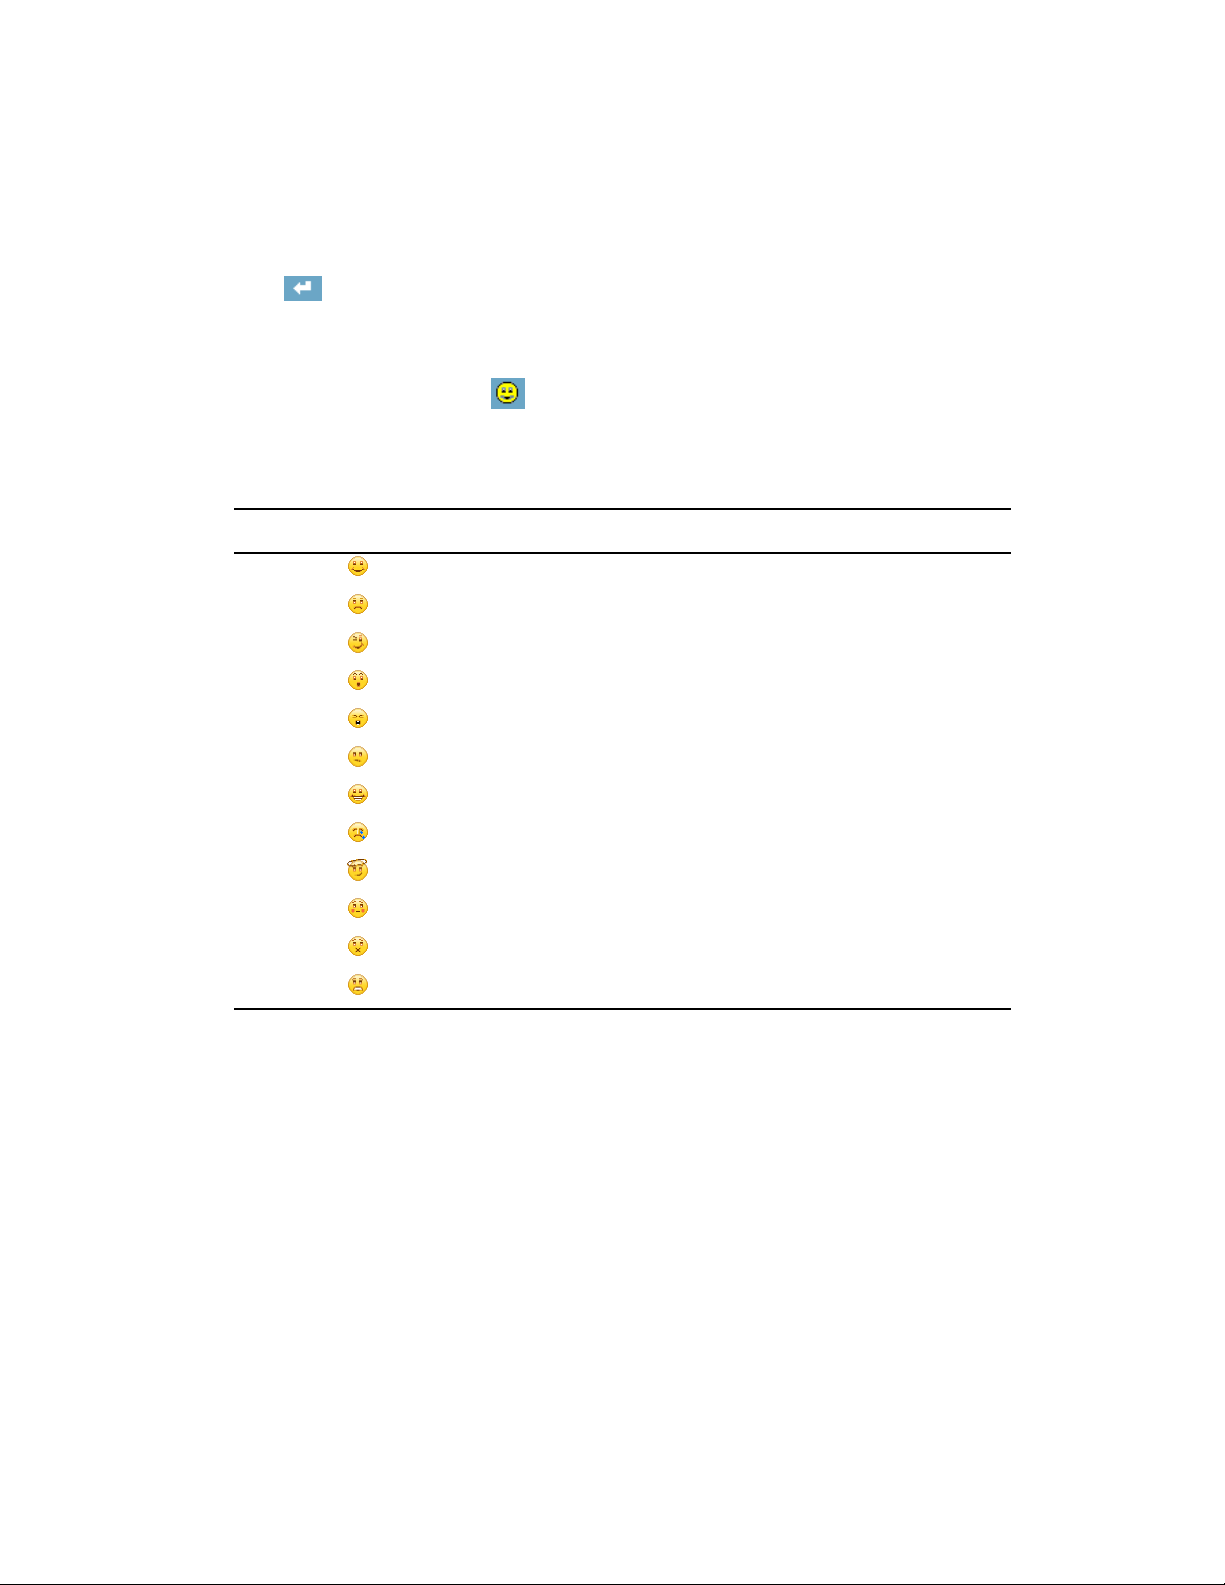
2.2 Using Emoticons in Your Message
1 In an open conversation, click , then click the image that conveys your feelings.
or
Type any of the following keystrokes to represent an emoticon:
Keystrokes Emoticon Meaning
:) or :-) Smile
:( or :-( Frown
novdocx (en) 11 July 2008
;) or ;-) Wink
:O or :-O Surprised
:@ or :-@ Angry
:/ or :-/ Undecided
:D or :-D Big Smile
:’( or :’-( Crying
O:) or O:-) Innocent
:[ or :-[ Embarrassed
:X or :-X Lips Are Sealed
:! or :-! Foot in Mouth
When you use the keystrokes rather than selecting the image, the emoticon image appears when
you press Enter to send your message. To remind yourself of the keystrokes when typing a
message, click Edit > Emoticons.
If you do not want the keystrokes to be converted into images, click Too ls > Options, then
deselect Use graphical emoticons. This setting prevents the typed character sequences from
being converted into images.
2.3 Changing the Font of Text in a Conversation
1 In an open conversation, select the text you want to change.
2 Click Edit > Font.
3 Make selections, then click OK.
You can also select text and make selections from the header over the text you are typing.
14 GroupWise Messenger 2.0 Client User Guide
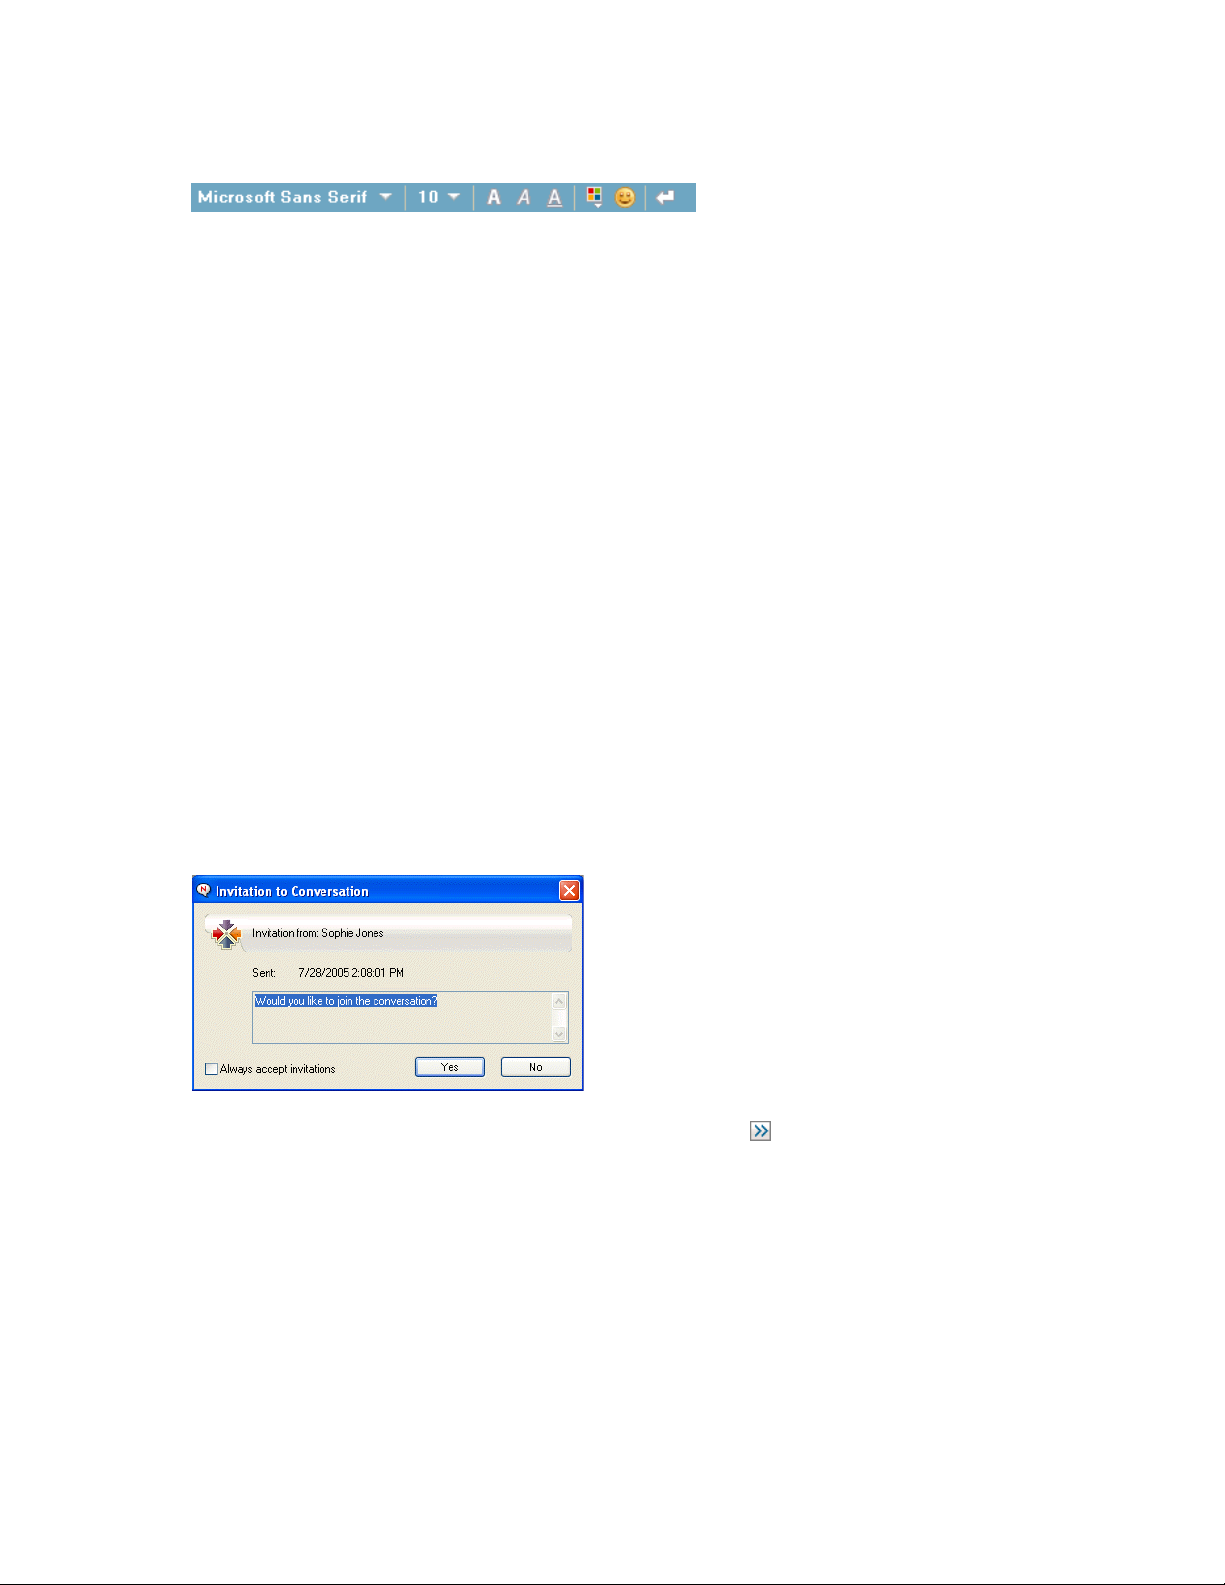
Figure 2-1 Font Header
To specify default fonts, see Section 8.11, “Specifying the Font of Composed Messages,” on
page 40 and Section 8.13, “Specifying the Font of Received Messages,” on page 41.
2.4 Holding a Group Conversation
You can hold instant messaging conversations with more than one user. Start a conversation with
one user, then invite additional users to join.
1 Double-click a user in your Contact List.
or
Click Send a message, then find a user by following Step 2 on page 13.
2 Click the Expand arrow next to the user’s name with whom you are having a conversation.
3 Click Invite others to join the conversation.
4 Click a user (or Ctrl+click multiple users) in your Contact List, then click OK.
or
novdocx (en) 11 July 2008
Click Find User to search for users who are not in your Contact List. Follow Step 2 on page 13.
You can also Ctrl+click multiple users in your Contact List and press Enter to begin a group
conversation.
Each user who is invited to the conversation receives this message box:
Figure 2-2 Invitation To Conversation Message Box
If you cannot see the list of participants in this conversation, click to open the Control Panel.
After a user accepts the invitation to join the conversation, he or she can send messages to the other
participants. A user cannot see any messages that were sent before he or she joined the conversation,
or after he or she leaves the conversation.
2.5 Adding a Time Stamp to Each Entry in a Conversation
1 In an open conversation, click Vie w, then click Show Timestamp.
Working with Conversations 15

2.6 Saving a Conversation
1 In an open conversation, click File.
2 Click Save Conversation As, browse to a location, then specify a filename.
or
Click Save Conversation if you have already saved the conversation at least once.
or
Click Save Conversation to iFolder if you have Novell iFolder
3 Specify the location to save the conversation.
4 Click Save.
The conversation is saved with a .txt file extension.
You are also prompted to save a conversation whenever you close the conversation. To change this
setting, see Section 8.5, “Specifying If You're Prompted to Save Conversations,” on page 38.
®
installed (Windows only).
2.7 Opening a Saved Conversation
novdocx (en) 11 July 2008
1 In a Conversation window, click File > Open Saved Conversation.
2 Browse to the location of the conversation, then click OK.
If you want to search for a conversation that has been archived, your system administrator needs to
grant you access rights. For more information, see Section 2.9, “Searching the Archives for Logged
Conversations,” on page 16.
2.8 Printing a Conversation
1 In an open conversation, click File > Print Conversation.
or
In Macintosh and Linux, click File > Print.
2 Click Print again.
2.9 Searching the Archives for Logged Conversations
The system administrator can specify that all conversations be logged in a system archive. If you are
given access rights, you can search the archive for logged conversations. The Search Archive menu
item only appears if you have been granted access to search the archive.
1 Click File > Search Archive.
16 GroupWise Messenger 2.0 Client User Guide

2 Use the Search Archived Messages dialog box to search by participants, dates, and
conversation text:
Click Find to search for and add participants.
novdocx (en) 11 July 2008
Click to select dates in the Date Range field.
Type the text you want to search for in the Containing Text field.
3 Click Search to search for conversations that meet the search criteria you specified.
4 To print or save the list of logged conversations that displays, click Print List or Save List on
the File menu.
5 To print or save the currently selected logged conversation, click Print or Save on the File
menu.
6 To make changes to your search, click File, click Modify Search, make changes, then click
Search again.
2.10 Sending an E-Mail Message (Windows Only)
1 Click Actions > Send E-Mail.
2 Select the name of the person you want to send an e-mail message to, then click OK.
or
Double-click the name of the person you want to send an e-mail message to.
or
Click Find User, select Use this User ID, type the user ID of the person, then click Finish.
or
Click Find User, select Search for a user, type all or part of the name you are looking for, then
click Next. Select the user you want from the Search Results list, click Add to my Contact List if
desired, then click Finish.
or
Working with Conversations 17

Click Find User to search for a person. Click Advanced, click begins with, contains, or equals
from the drop-down list next to a field, type the information you are looking for in the field,
then click Next. Select the user you want from the Search Results list, click Add to my Contact
List if desired, then click Finish.
3 When the e-mail item opens, complete the message and click Send on the Toolbar.
If you want to be prompted to send an e-mail each time you try to send an instant message to
someone who is offline, click Too ls > Options, select Message, make sure Send e-mail when i start a
message to an offline contact is selected, then click OK.
novdocx (en) 11 July 2008
18 GroupWise Messenger 2.0 Client User Guide

3
Working with Chat Rooms
Chat rooms allow several users to join a chat room and discuss a topic. You can create and join chat
rooms in the client, if you have rights to do so.
Figure 3-1 Main Chat Room Window
novdocx (en) 11 July 2008
3
The following topics are included in this section:
Section 3.1, “Searching for a Chat Room,” on page 19
Section 3.2, “Joining a Chat Room Without Searching,” on page 20
Section 3.3, “Creating a Chat Room,” on page 20
Section 3.4, “Modifying Access Rights for a Chat Room,” on page 21
Section 3.5, “Ignoring a User in a Chat Room,” on page 22
Section 3.6, “Performing Moderator Tasks,” on page 23
3.1 Searching for a Chat Room
Only chat rooms that are selected to be searchable when created appear in a chat room search.
1 Click Tools > Chat Rooms.
2 Select the chat room to join, then click Join.
Working with Chat Rooms
19

novdocx (en) 11 July 2008
3.2 Joining a Chat Room Without Searching
You can join a chat room that was not selected to be searchable during creation by joining the chat
room by name.
1 Click Actions > Join Chat Room.
The last four chat rooms that you joined are stored in the Join Chat Room drop-down list.
3.3 Creating a Chat Room
You can create a chat room only if the administrator has granted you access to create chat rooms.
The default access does not allow you to create a chat room.
1 Click Tools > Chat Rooms, then click Create.
20 GroupWise Messenger 2.0 Client User Guide

novdocx (en) 11 July 2008
2 (Optional) Select the owner of the chat room.
By default, the owner is the user who is creating the chat room.
3 Type the chat room name.
4 (Optional) Type a description and welcome message for the chat room.
5 (Optional) Select the maximum number of participants.
The default number of participants is 50 and 500 is the maximum number for any chatroom.
6 (Optional) Select if you want to archive the chat room.
7 (Optional) Select if you want the chat room to be searchable.
8 (Optional) Click the Access tab, then select the access rights for all users and a particular user.
9 Click OK to create the chat room.
3.4 Modifying Access Rights for a Chat Room
You can modify the access right for a chat room that you have the ability to change the rights for.
1 If you are creating a chat room with access rights, click Tools > Chat Room, click Create, then
click the Access tab. For additional information about creating chat rooms, see Section 3.3,
“Creating a Chat Room,” on page 20.
or
If you are modifying the rights for a chat room already created, click Too ls > Chat Rooms,
select the chat room to modify, then click Properties.
Working with Chat Rooms 21

novdocx (en) 11 July 2008
2 By default general user access is displayed in the access list. To add another user to the access
list click Find User.
3 Type the contacts name in the Name field, then click Next.
4 Select the user then click Finish.
5 Select the access rights for the user. The following is a list of access rights:
View: Allows the user to view the chat room.
Send: Allows the user to send a message to the chat room.
Modify Rights: Allows the user to modify the rights to the chat room.
Moderator: The moderator can delete a user and change the topic of the chat room.
6 Click Set Password to set a password for the chat room.
This requires user to enter a password to join the chat room. There is only one password for the
chat room.
3.5 Ignoring a User in a Chat Room
If you do not want to see the messages sent to a chat room from a particular user, you can choose to
ignore that user.
1 Right-click the user to ignore, then click Ignore.
To see messages from that user again, right-click the user you ignored, then deselect Ignore.
22 GroupWise Messenger 2.0 Client User Guide

3.6 Performing Moderator Tasks
The owner of a chat room can make a person a moderator in the Access page of the chat room
properties. For more information about access rights, see Section 3.4, “Modifying Access Rights for
a Chat Room,” on page 21.
As a moderator of a chat room, you can remove users from the chat room and you can change the
topic of the chat room.
Section 3.6.1, “Removing a User from the Chat Room,” on page 23
Section 3.6.2, “Changing the Topic of a Chat Room,” on page 23
3.6.1 Removing a User from the Chat Room
When you remove someone from a chat room, their chat room window closes and they are no longer
part of the chat room. However, they can join back into the chat room.
1 Right-click the user to remove from the chat room, then click Remove.
novdocx (en) 11 July 2008
3.6.2 Changing the Topic of a Chat Room
1 Click Actions > Edit Chat Room Topic.
2 Type the new topic in the Chat Room Topic field, then click OK.
Working with Chat Rooms 23

novdocx (en) 11 July 2008
24 GroupWise Messenger 2.0 Client User Guide

4
Working with Broadcasts
A broadcast message is a message that can either be sent to the entire system or to individual users.
There are two types of broadcast message types: a system broadcast that is sent to all users and a
broadcast message that is sent to selected users.
A broadcast message is a one-way message; you cannot respond to it. By default, broadcast
messaging to other users in enabled, and system broadcasts are disabled. A system administrator can
change the defaults.
Section 4.1, “Receiving a Broadcast Message,” on page 25
Section 4.2, “Clearing Broadcasts,” on page 25
Section 4.3, “Sending a Broadcast Message to Selected Users,” on page 26
Section 4.4, “Sending a System Broadcast,” on page 26
novdocx (en) 11 July 2008
4
4.1 Receiving a Broadcast Message
When a broadcast is sent to you, the Received Broadcast window appears.
Figure 4-1 Received Broadcast Window
From the Received Broadcast window, you can clear the broadcast or clear all broadcasts.
4.2 Clearing Broadcasts
1 From the Received Broadcast window, select the broadcast to clear, then click Clear.
To clear all received broadcasts, click Clear All in the Received Broadcast window.
Working with Broadcasts
25

NOTE: If you do not clear your broadcast messages, you are prompted to clear your broadcast
messages when Messenger shuts down.
4.3 Sending a Broadcast Message to Selected Users
1 Right-click a contact and click Send Broadcast, then follow Step 3.
or
If you want to send a broadcast to someone who is not in your Contact List, click Send a
broadcast, then follow Step 2.
2 Click Find User, select Use this User ID, type the user ID of the person, then click Add.
novdocx (en) 11 July 2008
or
Click Find User, select Search for a user, type all or part of the name you are looking for, then
click Next. Select the user you want from the Search Results list, click Add to my Contact List if
desired, then click Finish.
or
Click Find User, click Advanced, click begins with, contains, or equals from the drop-down list
next to a field, type the information you are looking for in the field, then click Next. Select the
user you want from the Search Results list, click Add to my Contact List if desired, then click
Finish.
3 Type your broadcast message.
4 Click or press Enter.
4.4 Sending a System Broadcast
A system broadcast is sent to everyone in the entire system who is currently online. You must be
granted access to send system broadcasts by your system administrator.
1 Click Actions > Send System Broadcast.
2 Type your broadcast message.
3 Click or press Enter.
26 GroupWise Messenger 2.0 Client User Guide

5
Working with Contacts
This section contains the following topics:
Section 5.1, “Adding a Contact,” on page 27
Section 5.2, “Deleting a Contact,” on page 27
Section 5.3, “Organizing the Contact List,” on page 28
Section 5.4, “Importing a Contact List,” on page 28
Section 5.5, “Exporting a Contact List,” on page 28
5.1 Adding a Contact
1 Click Add a contact.
novdocx (en) 11 July 2008
5
2 Type part or all of the name of the person you want to add, click Next, click the name in the
Search Results list, then click Add.
or
Select Use this User ID and type the user ID of the person, then click Add.
or
Click Advanced, click begins with, contains, or equals from the drop-down list next to a field,
type the information you are looking for in the field, then click Next. Select the user you want
from the Search Results list, then click Add.
5.2 Deleting a Contact
1 Right-click the contact, then click Remove.
Working with Contacts
27

5.3 Organizing the Contact List
You can organize your Contact List by dragging contacts and folders to the location you want them.
Or, you can use the following steps:
1 Click Tools > Organize Contacts. For Macintosh, click Preferences > Organize.
2 Click contact names, then click Move Up or Move Down to change the position in the list.
3 To add a folder, click Add Folder, then type the folder name.
4 To move a contact to a folder, drag the contact to the folder, or click the contact, click Move,
select the folder from the drop-down list, then click OK.
5 Click Close.
5.4 Importing a Contact List
novdocx (en) 11 July 2008
You can import a contact list if you have a .nmx file (contact list file) to import. A .nmx file is a file
that has been exported from a GroupWise
merged with your existing Contact List.
1 Click File > Import Contact List.
2 Browse to the location of the .nmx file.
3 Click the filename, then click Open.
®
Messenger contact list. The imported contacts are
5.5 Exporting a Contact List
You can save your contact list as a .nmx file (contact list file) to distribute to other users. When
someone imports the .nmx file, the imported contacts are merged with his or her existing Contact
List.
1 Click File > Export Contact List.
2 Browse to the location of the .nmx file.
3 Select the filename, then click Save.
28 GroupWise Messenger 2.0 Client User Guide

6
Working with Your Personal
novdocx (en) 11 July 2008
History
Personal History shows past messages that you have either received or sent in GroupWise®
Messenger. This feature is helpful when you need to find information from an earlier message.
Conversations, chat rooms, and broadcasts are all part of your personal history. Personal history can
be disabled by an administrator. By default, personal history is enabled for all users.
Section 6.1, “Viewing Your Personal History in a Conversation, Chat Room, or Broadcast
Window,” on page 29
Section 6.2, “Disabling the Personal History in a Conversation, Chat Room, or Broadcast
Window,” on page 30
Section 6.3, “Displaying the History File from a Conversation, Chat Room, or Broadcast
Window,” on page 30
Section 6.4, “Clearing Your History,” on page 30
6.1 Viewing Your Personal History in a Conversation, Chat Room, or Broadcast Window
By default your personal history displays the last 100 messages in a conversation, chat room, or
broadcast window.
6
Figure 6-1 Personal History In a Conversation Window
Working with Your Personal History
29

6.2 Disabling the Personal History in a Conversation, Chat Room, or Broadcast Window
1 Click > Tools > Options, then click History. For Macintosh, click Preferences > Options, then
click History.
novdocx (en) 11 July 2008
2 Deselect Display history in conversation windows.
6.3 Displaying the History File from a Conversation, Chat Room, or Broadcast Window
You can display the history file for a conversation window from the conversation window. Every
time you have a conversation, enter a chat room, or send/receive a broadcast, the history of that
conversation, chat room, or broadcast is written to a history file.
Most history files are associated with the type of window you are in and who you are messaging. For
example, all your conversations with Mike Palu would be saved in a file named
Conv_mpalu_number.hst. If it is a chat room history file, the name changes to
Chat_nameofchatroom_number.hst. However, all sent broadcasts are saved in the
Broadcasts_sent.hst file. You can change the history file location. For more information
about moving the history file, see Section 8.18, “Changing the History Files Location,” on page 43.
When the history file displays, you cannot edit the file from History window.
1 From a conversation, chat room, or broadcast window, click Show history. The content of the
history file is displayed.
6.4 Clearing Your History
1 Click Tools > Options, then click History. For Macintosh, click Preferences > Options, then
click History.
2 Select the number of days to keep recent messages.
3 Click Delete History.
30 GroupWise Messenger 2.0 Client User Guide

This clears all messages up to the number of days selected. You can only clear history up to one day
old.
To totally clear your history, you need to delete the history files. To determine where you history
files are stored, click Tools > Options, then click History. For Macintosh, click Preferences >
Options, then click History. The history files location is stored in the Store conversations locally
field.
You can change the history file location. For more information about moving the history file, see
Section 8.18, “Changing the History Files Location,” on page 43.
novdocx (en) 11 July 2008
Working with Your Personal History 31

novdocx (en) 11 July 2008
32 GroupWise Messenger 2.0 Client User Guide

7
Working With Statuses
This section contains the following topics:
Section 7.1, “Changing Your Status,” on page 33
Section 7.2, “Creating a Custom Status,” on page 33
7.1 Changing Your Status
1 Click the status bar (where your name appears under the menu bar).
2 Click the status you want other users to see next to your name in their Contact Lists.
Online
Busy
Aw a y
Appear Offline
novdocx (en) 11 July 2008
7
You can also right-click the GroupWise Messenger icon on the system tray (Windows and Linux
only), click Status, then click a status.
7.2 Creating a Custom Status
1 Click File > Status > Custom Status.
2 Click Add.
3 Type the custom status title, for example, In a Meeting.
4 Select Online, Busy or Away from the Show As drop-down list. This determines the icon that
displays next to your status.
5 (Optional) Type the text you want to automatically be returned to a user who tries to send you
an instant message when you have this status selected, for example, “I'm in a meeting right now
and can't respond.”
6 Click OK, then click Close.
Working With Statuses
33

novdocx (en) 11 July 2008
34 GroupWise Messenger 2.0 Client User Guide

8
Customizing GroupWise
novdocx (en) 11 July 2008
Messenger
This section contains the following topics:
Section 8.1, “Changing Your Password,” on page 35
Section 8.2, “Specifying When GroupWise Messenger Opens,” on page 36
Section 8.3, “Specifying Whether to Show Contacts at Startup,” on page 37
Section 8.4, “Specifying How Long to Wait Before You Are Shown as Idle,” on page 37
Section 8.5, “Specifying If You're Prompted to Save Conversations,” on page 38
Section 8.6, “Specifying to be Prompted to Connect to the Internet,” on page 38
Section 8.7, “Specifying to Use Graphical Emoticons,” on page 38
Section 8.8, “Specifying to Always Accept Invitations to Conferences Without Prompting,” on
page 39
Section 8.9, “Specifying the Interface Language,” on page 39
Section 8.10, “Specifying to Remember Your Password,” on page 40
Section 8.11, “Specifying the Font of Composed Messages,” on page 40
Section 8.12, “Specifying How the Enter Key Works,” on page 41
Section 8.13, “Specifying the Font of Received Messages,” on page 41
Section 8.14, “Specifying Offline Options for Contacts,” on page 41
Section 8.15, “Specifying When You Receive Sounds and Alerts,” on page 42
8
Section 8.16, “Specifying Who Can See Your Status and Send You Messages,” on page 42
Section 8.17, “Changing the Contact List Appearance,” on page 43
Section 8.18, “Changing the History Files Location,” on page 43
Section 8.19, “Specifying To Show the History In the Conversation Window,” on page 44
Section 8.20, “Specifying the Number of Days to Keep the History,” on page 45
Section 8.21, “Showing Only Online Contacts,” on page 45
Section 8.22, “Turning Off the Sound (Windows and Linux Only),” on page 45
Section 8.23, “Using Startup Options,” on page 46
8.1 Changing Your Password
If the system administrator gives you rights, you can change your GroupWise® Messenger
password. Because you log in to GroupWise Messenger using your directory (Novell
password, this changes your directory password.
1 Click Tools > Change Password. For Macintosh, click Preferences > Change Password.
®
eDirectoryTM)
Customizing GroupWise Messenger
35

2 Type your old password in the Old Password field, then type your new password in the New
Password and Confirm Password fields.
3 Click OK.
8.2 Specifying When GroupWise Messenger Opens
novdocx (en) 11 July 2008
1 Click Tools > Options. For Macintosh, click Preferences > Options.
2 Click General.
3 Select or deselect Run GroupWise Messenger when Windows starts.
4 Click OK.
In the GroupWise client, you can also specify whether or not to open GroupWise Messenger when
the GroupWise client starts. In the GroupWise client, click Too l s > Options, double-click
Environment, then select or deselect Launch Messenger at startup.
36 GroupWise Messenger 2.0 Client User Guide

8.3 Specifying Whether to Show Contacts at Startup
1 Click Tools > Options. For Macintosh, click Preferences > Options.
2 Click General.
novdocx (en) 11 July 2008
3 Select or deselect Show contacts list when GroupWise Messenger starts.
If you deselect Show contacts when GroupWise Messenger starts, GroupWise Messenger starts
minimized in the system tray.
8.4 Specifying How Long to Wait Before You Are Shown as Idle
When you do not use GroupWise Messenger for a certain amount of time, “Idle” displays next to the
status for your name in other users' Contact Lists. You can change this amount of time.
1 Click Tools > Options. For Macintosh, click Preferences > Options.
2 Click General.
Customizing GroupWise Messenger 37

3 Make sure Show me as “Idle” when I'm inactive for __ minutes is selected.
4 Change the amount of time.
5 Click OK.
novdocx (en) 11 July 2008
8.5 Specifying If You're Prompted to Save Conversations
1 Click Tools > Options. For Macintosh, click Preferences > Options.
2 Click General.
3 Select or deselect Prompt to save conversations when I close them.
4 Click OK.
8.6 Specifying to be Prompted to Connect to the Internet
1 Click Tools > Options. For Macintosh, click Preferences > Options.
2 Click General.
3 Select or deselect Prompt to connect to internet.
4 Click OK.
8.7 Specifying to Use Graphical Emoticons
1 Click Tools > Options. For Macintosh, click Preferences > Options.
2 Click General.
38 GroupWise Messenger 2.0 Client User Guide

3 Select or deselect Use graphical emoticons.
4 Click OK.
novdocx (en) 11 July 2008
8.8 Specifying to Always Accept Invitations to Conferences Without Prompting
1 Click Tools > Options. For Macintosh, click Preferences > Options.
2 Click General.
3 Select or deselect Always accept invitations to conferences without prompting.
4 Click OK.
8.9 Specifying the Interface Language
1 Click Tools > Options. For Macintosh, click Preferences > Options.
Customizing GroupWise Messenger 39

2 Click General.
novdocx (en) 11 July 2008
3 Select the user interface language in the User interface language drop-down list.
4 Click OK.
8.10 Specifying to Remember Your Password
1 Click Tools > Options. For Macintosh, click Preferences > Options.
2 Click General.
3 Select or deselect Remember my password.
4 Click OK.
8.11 Specifying the Font of Composed Messages
1 Click Tools > Options. For Macintosh, click Preferences > Options.
40 GroupWise Messenger 2.0 Client User Guide

2 Click Message.
3 Click Change (next to Default font when i compose messages).
4 Make font selections, then click OK.
5 Click OK.
8.12 Specifying How the Enter Key Works
By default, pressing the Enter key sends the message you are composing. You can change this so
that the Enter key inserts a new line into your message.
1 Click Tools > Options. For Macintosh, click Preferences > Options.
2 Click Message.
novdocx (en) 11 July 2008
3 Select Enter key inserts new line when composing messages.
4 Click OK.
Ctrl+Enter and Shift+Enter always insert a new line and Alt+Enter always sends a message.
8.13 Specifying the Font of Received Messages
1 Click Tools > Options. For Macintosh, click Preferences > Options.
2 Click Message.
3 Select one of the options in the Receiving Messages group box.
4 Click OK.
8.14 Specifying Offline Options for Contacts
1 Click Tools > Options. For Macintosh, click Preferences > Options.
2 Click Message.
3 Select one of the options in the Offline Contacts group box.
Customizing GroupWise Messenger 41

Send e-mail when I start a message to an offline contact is only available in the Windows
client.
4 Click OK.
8.15 Specifying When You Receive Sounds and Alerts
1 Click Tools > Options. For Macintosh, click Preferences > Options.
2 Click Alerts.
novdocx (en) 11 July 2008
3 In the Notification of Events list, click the event for which you want to specify sounds and
alerts.
4 Select or deselect Display Alert and Play Sound. To change the default sound, browse to a
different sound file.
5 (Optional) Select Don't play any sounds unless my status is Available.
6 Click OK.
To mute all sounds temporarily, right-click the GroupWise Messenger status icon in the system tray,
then select Mute. Follow the same step to turn sounds back on. If you use mute to turn sounds off,
they are turned back on when you exit GroupWise Messenger and log back in.
8.16 Specifying Who Can See Your Status and Send You Messages
1 Click Tools > Options. For Macintosh, click Preferences > Options.
2 Click Privacy.
42 GroupWise Messenger 2.0 Client User Guide

3 Use the Add and Remove buttons to add and remove users from the Allowed and Blocked lists.
4 (Optional) Select users and use the Block >> and Allow >> buttons to move users from one list
to the other.
novdocx (en) 11 July 2008
5 Click OK.
8.17 Changing the Contact List Appearance
1 Click Tools > Options. For Macintosh, click Preferences > Options.
2 Click Appearance.
3 Click Change, then select the font, the font style, and the font size.
4 Click OK twice.
8.18 Changing the History Files Location
You can only specify one location for all the history files. When you move the history file location,
new history files are created, and the old content of the history file is not displayed when you view
the history.
1 Click Tools > Options. For Macintosh, click Preferences > Options.
2 Click History.
Customizing GroupWise Messenger 43

3 Select Store conversations locally.
4 Click Browse, then browse to the location you want to save the history files at.
5 Click OK twice.
novdocx (en) 11 July 2008
8.19 Specifying To Show the History In the Conversation Window
1 Click Tools > Options. For Macintosh, click Preferences > Options.
2 Click History.
3 Select or deselect Display history in conversation window.
4 Specify the number of recent messages to display.
5 Click OK.
44 GroupWise Messenger 2.0 Client User Guide

8.20 Specifying the Number of Days to Keep the History
1 Click Tools > Options. For Macintosh, click Preferences > Options.
2 Click History.
novdocx (en) 11 July 2008
3 Specify the number of days to keep messages in the history.
4 Click Delete History to delete the history older than the number of days selected.
5 Click OK.
8.21 Showing Only Online Contacts
By default, all the contacts in your Contact List display.
1 Click in the header over the Contact List, then click Show Online Contacts.
You can also click View > Show Online Contacts.
8.22 Turning Off the Sound (Windows and Linux Only)
You can turn all sounds off temporarily.
1 Right-click the GroupWise Messenger status icon on the system tray, then select Mute.
2 To turn sounds back on, repeat step 1.
If you use mute to turn sounds off, they are turned back on when you exit GroupWise Messenger
and log back in.
For information about specifying when you are notified by sounds and alerts, see Section 8.15,
“Specifying When You Receive Sounds and Alerts,” on page 42.
Customizing GroupWise Messenger 45

8.23 Using Startup Options
You can use the following startup options on the command line when starting GroupWise
Messenger:
Startup Option What It Does
/l-xx Sets the user interface language. XX is the two-letter ANSI
language abbreviation.
/background Starts GroupWise Messenger without showing the main
window.
/u-xxx or /@u-xxx Specifies what user ID to log in with. XXX is the user ID.
/ipa-xxx Specifies the IP address to log in with. XXX is the IP
address.
/ipp-xxx Specifies the IP port to log in with. XXX is the IP port.
/import-filename Imports a specific contacts list. filename is the .nmx file.
novdocx (en) 11 July 2008
/multi Starts multiple instances of the GroupWise Messenger client.
The following options can be used both on the command line and in a browser window, such as
Internet Explorer.
Option What It Does
nim:launchNM Opens GroupWise Messenger.
nim:startIm Opens the Invite dialog box.
nim:startIm?username=username Starts a conversation with username.
nim:startIm?username=username&me
ssage=message
nim:addContact Brings up the Add Contact dialog box.
nim:addContact?username=username Opens the GroupWise Messenger main window with
nim:addContact?username=username
&foldername=folder_name
nim:import?filename=filename Imports the contacts in the .nmx file filename.
Sends a specific message to username. For example:
nim:startIm?username=AAdams&message=Good+morning.
username added to the Contact List. The name is added to
the root level of the contact list and not to a specific folder.
For example: nim:addcontact?username=AAdams.
Opens the GroupWise Messenger main window with
username added to the Contact List. The name is added to
the folder named folder_name.
nim:invite Opens the Invite dialog box. (same as nim:startim)
nim:close Closes the GroupWise Messenger main window but does
nim:exit Exits GroupWise Messenger.
nim:open Opens the GroupWise Messenger main window.
nim:preferences Opens the Options dialog box.
46 GroupWise Messenger 2.0 Client User Guide
not exit GroupWise Messenger.

Option What It Does
nim:joinChat?roomname=roomname Joins the specified chat room when Messenger starts.
novdocx (en) 11 July 2008
Customizing GroupWise Messenger 47

novdocx (en) 11 July 2008
48 GroupWise Messenger 2.0 Client User Guide

9
Using GroupWise Messenger from
novdocx (en) 11 July 2008
Within GroupWise (Windows Only)
The following GroupWise® Messenger options are available within GroupWise:
Section 9.1, “Displaying Messenger Presence in GroupWise (Windows Only),” on page 49
Section 9.2, “Sending an Instant Message,” on page 49
Section 9.3, “Displaying the GroupWise Messenger Contact List,” on page 50
Section 9.4, “Specifying Whether or Not to Start GroupWise Messenger When GroupWise
Starts,” on page 50
Section 9.5, “Displaying GroupWise Messenger Options,” on page 50
For GroupWise Messenger to work with GroupWise, you must be using the Windows client for
both.
9.1 Displaying Messenger Presence in GroupWise (Windows Only)
With the GroupWise Client for Windows, you can see the presence information for a user. The
presence information is displayed in the Quick Info for the To field when sending a message, in the
Quick Info for the From field of messages that you have received, and in the Quick Info for contacts
in your Address Book.
9
To display the Quick Info, hold your mouse cursor over the contact and the Quick Info displays after
a short period.
You can send a message to contacts who are online by clicking the presence status.
9.2 Sending an Instant Message
1 In GroupWise, click File > New, then click Instant Message.
or
Click the presence status for a contact. Continue with Step 4.
2 Click the person you want to send a message to.
or
Click the Find User button to search for a person who is not in your Contact List.
3 Click OK.
4 Type the message.
5 Press Enter, or press Alt+Enter.
Using GroupWise Messenger from Within GroupWise (Windows Only)
49

9.3 Displaying the GroupWise Messenger Contact List
1 In GroupWise, click Tools > Messenger, then click Contact List.
9.4 Specifying Whether or Not to Start GroupWise Messenger When GroupWise Starts
1 In GroupWise, click Tools > Options.
2 Double-click Environment.
3 On the General tab, select or deselect Launch Messenger at startup.
If you are running both GroupWise and GroupWise Messenger and you exit GroupWise, GroupWise
Messenger continues to run until you exit it also.
9.5 Displaying GroupWise Messenger Options
novdocx (en) 11 July 2008
1 In GroupWise, click Tools > Messenger, then click Preferences.
50 GroupWise Messenger 2.0 Client User Guide

A
Documentation Updates
novdocx (en) 11 July 2008
A
This section lists updates to the GroupWise Messenger 2 Client User Guide that have been made
since the initial release of GroupWise
on documentation updates and, in some cases, software updates (such as a Support Pack release).
The information is grouped according to the date when the GroupWise Messenger 2 Client User
Guide was republished.
The GroupWise Messenger 2 Client User Guide has been updated on the following dates:
Section A.1, “November 17, 2008,” on page 51
Section A.2, “April 16, 2007,” on page 51
®
Messenger 2. The information will help you to keep current
A.1 November 17, 2008
Location Update
Entire Document Updated document to current Novell® template and
current Novell style.
Section 1.3, “Connecting Messenger to Other
Instant Messaging Systems,” on page 10
Added information explaining how you can use
Pidgin to connect Messenger to other instant
messaging systems.
A.2 April 16, 2007
Location Update
Section 8.23, “Using Startup Options,” on page 46 Added the /multi startup option to the list.
Documentation Updates
51
 Loading...