

Page 1
B 8 0 8 0
LI-PO CHARGER Manual
1.Input voltage range 9~15V DC
2.Output 8.4V (4.2V x 2) x 2, or 12.6V (4.2V x 3) x 1, or 16.8V (4.2V x 4) x 1.
3.CC (2.0A charging current) and CV (4.2V charging voltage) charging technique.
4.Auto adjustment of the charging current at voltage peak region. Auto cutoff when battery cell
is fully charged.
5.This is an innovative charger for 1- 4 cells of (Minimum 360 mAh) Li-ion or Li-poly battery
packs. It can be used to charge 4 ea 1 cell packs (optional by using 2 ea series charge
adaptor cables for port of 7.4V), or 2 ea 2 cell packs, or 1 ea 3 cell packs or 1 ea 4 cell packs.
6.LED indication, red color for charging, green color for charger ready or battery cell fully
charged.
7.Instead of charging all cells of the battery pack in series, this charger will independently
control the charging process of each cell of the battery pack. It will completely eliminate the
interference between cells of the battery pack during charging process. It will also avoid the
possibility of fire or explosion caused by a problem battery pack with defective cell(s) inside.
8.Load polarity & short protection. In-put polarity protection.
9.Sturdy aluminum case & exhaust fan for maximum heat dissipation.
10.Auto cutoff charger operation when voltage of the power source is lower than 8V.
11.Size : 132 x 82 x 35 mm. Weight :313 gm (~11oz)
Specification
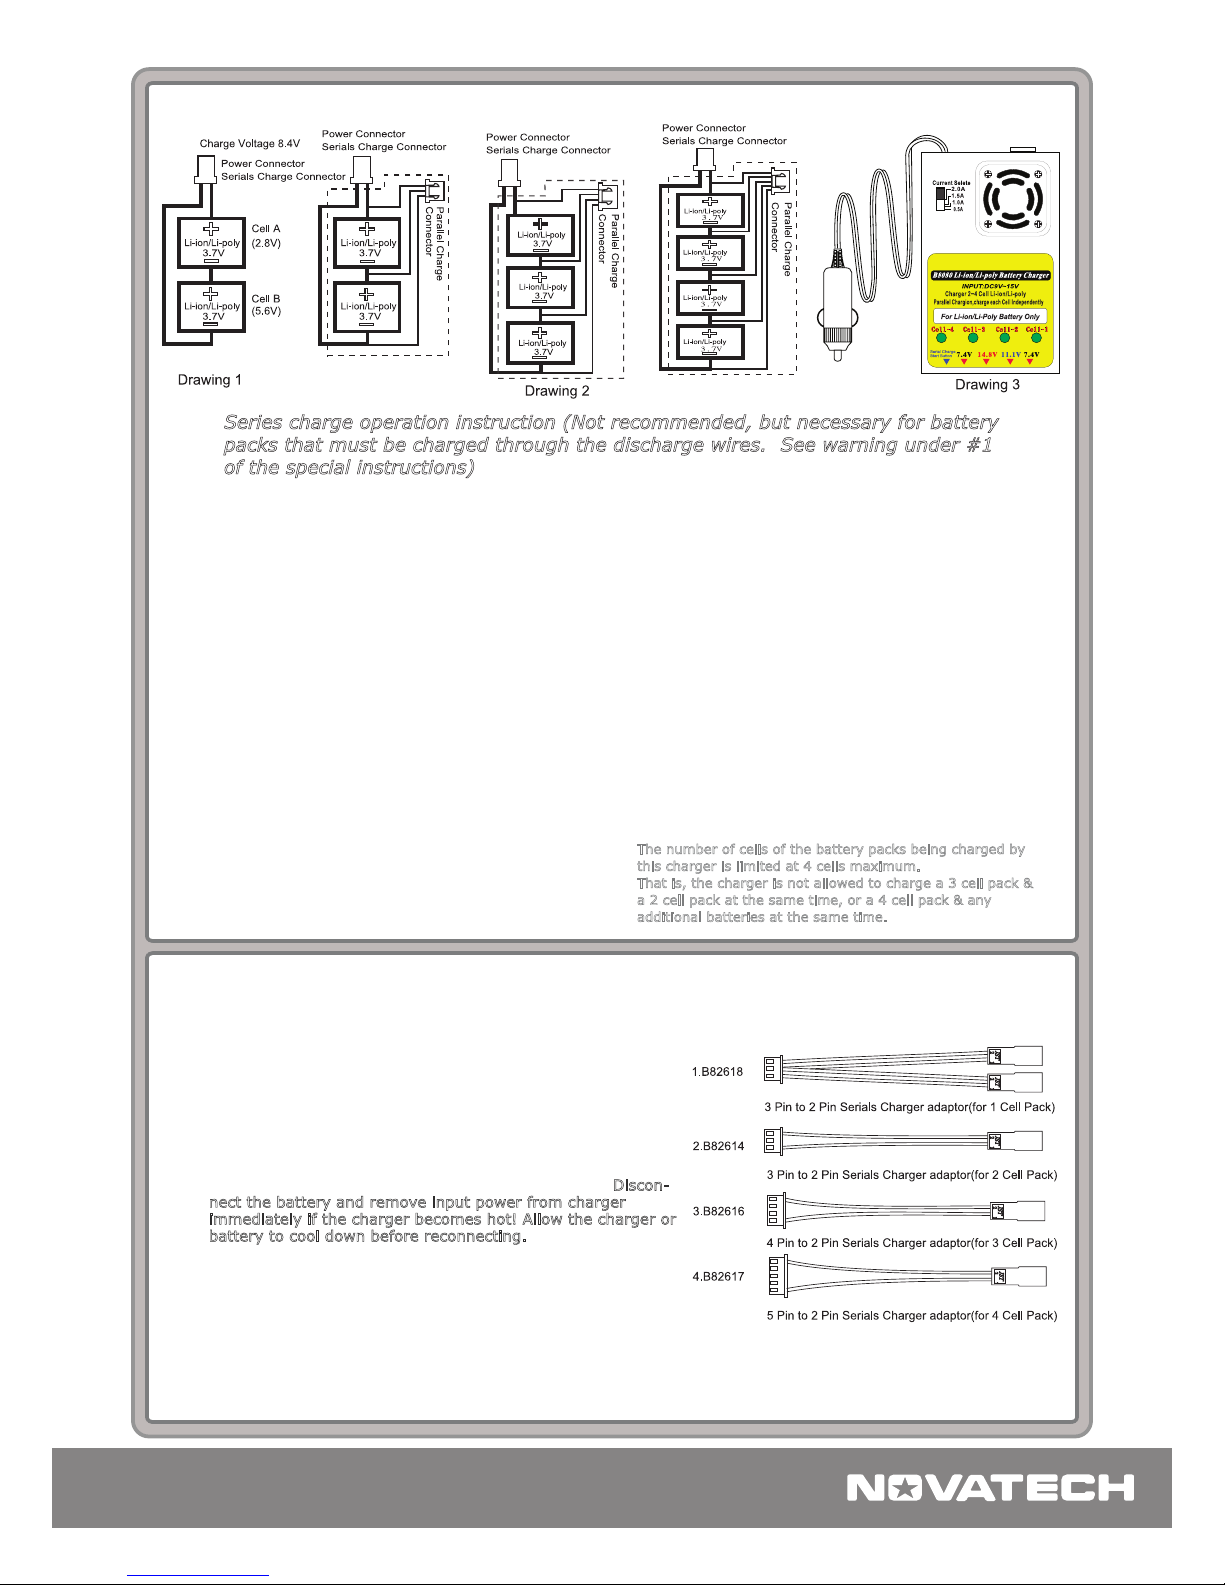
1.Potential Fire or Explosion Hazard of batteries or packs
charged by series charging technique
Most of the Li-ion/polymer chargers on the market are
using series charging technique to charge the Li-xx
batteries. The series charging technique is circuit
connected as Drawing 1 indicated. In case, if one of the
cells of the battery pack is defective & can’t be full
charged up to its defined full voltage level, the other good
cell or (cells) will then be over charged. Take cells in
drawing 1 for example, if cell A is defective & can only be
charged up to 2.8V or lower, the good cell B will then be
overcharged up to 4.2 + (4.2-2.8) = 5.6V or higher. A
Li-xx battery can only stand its maximum voltage up to
4.6~4.9. If it is over 4.9V, it can burn or explode. Series
charging is necessary for battery packs that must be
charged through the discharge wires.
2.Parallel charging technique of our charger-circuit
connected as drawing 2 Dotted Lines
Instead of charging all cells of the battery pack in series,
our charger is designed to control the charging process of
each cell of the battery pack independently or in parallel.
It will completely eliminate the interference between cells
of the battery pack during charging process. It will also
reduce and avoid the possibility of fire or explosion caused
by a problem battery pack with defective or unbalanced
capacity cells inside.
3.Special battery pack package style is required
The battery packs to be charged on this charger should be
assembled as in drawing 2. Every battery pack should
have one additional charge connector. By connecting this
connector to the respective charger out-put port, you are
now safely charging to your Li-xx battery packs.
4.Life of the Li-xx battery packs
When in storage and not in use, the Li-xx battery will have
a self-discharge process. It will be severely damaged or
rendered unusable if it is allowed to discharge to less than
2.4V. It is strongly recommended to check / recharge all
Li-xx batteries once every 3 months.
5.The number of cells of the battery packs being charged by
this charger is limited at 4 cells maximum.
That is, the charger is not allowed to charge a 3 cell pack
& a 2 cell pack at the same time, or a 4 cell pack & any
additional batteries at the same time.
6.DISCLAIMER
The manufacturer or distributor shall not be held
responsible for any miss-use of the charger.
1.Connecting charger to power source, LED display will be
green, indicating that the charger is in good status &
ready to use. Set Current Select to suitable position: 0.5A
--- For cells with 360 mAh or higher, 1.0A --- For cells with
750 mAh or higher, 1.5A --- For cells with 1200 mAh or
higher. 2A --- For cells with 1800 mAh or higher. When
charging multiple cells or packs of different capacities at
the same time, charger must be set to the setting of the
lowest cell.
2.Select correct charger output ports (connectors) for the
battery packs to be charged. There are 4 out-put ports of
the charger, the two ports labeled 7.4V are for 2 cells
(3.7V x 2), the port labeled 11.1V is for the 3 cell battery
packs & the port labeled 14.8v is for the 4 cell battery
packs. After connecting battery packs to the charger, a
short auto-check of each cell of the battery pack will be
done by the charger. After the auto-check, the charger will
start charging each cell of the battery pack independently.
During charging process, if the cell is good the
corresponding LED display will change to red; otherwise, if
the cell is defective, the corresponding LED display light
will be green.
3.When charging starts, for a good battery pack, the number
of the LED displays which change color into red shall be
the same as the number of the cells of the battery pack.
For example, a 2 cell battery pack will have 2 LEDs in red
color during charging, a 3 cell battery pack will have 3
LEDs in red color during charging, a 4 cell battery pack
will have 4 LEDs in red color during charging.
4.When the battery pack is fully charged, all corresponding
cell - LED colors will change from red to green. This
indicates the battery pack is fully charged and ready to
use any time. If the battery pack remains on the charger
after fully charged, the charger will re-charge the batteries
when the voltage of the battery cell (cells) is less than
4.15V.
5.Within 20-30 seconds after the battery or pack is fully
charged, the charger will detect and indicate any problems
by changing the LED colors from green to red for a
defective or failing battery. If the charger detects a
defective or failing battery, the defective or failing battery
should not be used.
Operation instruction – PARALLEL CHARGING
Special instructions
Page 2
TEL+886-04-25606216 FAX:+886-04-25606217
E-mail | novatech@novatech-tw.com , awanacorp@yahoo.com.tw
COPYRIGHT NOVATECH ENTERPRISE CO.,LTD ALL RIGHTS RESRVED.
No.17, Ln. 423, Sec. 1, Shenlin Rd., Daya Township,Taichung County 42856, Taiwan (R.O.C.)
1.Connecting charger to power source, all LED displays will
be green, indicating that the charger is in good status &
ready to use. Set Current Select to suitable position; 0.5A
--- For cells with 360 mAh or higher, 1.0A --- For cells with
750 mAh or higher, 1.5A --- For cells with 1200 mAh or
higher, 2A --- For cells with 1800 mAh or higher. When
charging multiple cells or packs of different capacities at
the same time, charger must be set to the setting of the
lowest cell.
2.Select correct charger out - put ports (connectors) for the
battery packs to be charged. There are 4 out-put ports of
the charger, the 2 ports labeled 7.4V are for 1 or 2 cells
(3.7V x 2), the port labeled 11.1v is for the 3 cells battery
pack, the port labeled 14.8V is for the 4 cells battery pack.
3.Connect the serial charge adaptor to the relative charger
out-put ports. P/N B82618 series charge adaptor matches
to 7.4V out-put port for 2 ea single cell battery pack . P/N
B82614 series charge adaptor matches to 7.4V out-put
port for 1 ea 2-cell battery pack. P/N B82616 series charge
adaptor matches to 11.1V out-put port for 3-cell battery
pack. P/N B82617 series charge adaptor matches to 14.8V
out-put port for 4-cell battery pack.
4.Connect the battery packs to the series charger adaptors
& push down the start button. The charger will start
charging. During charging process, the corresponding LED
displays on the charger will turn red. While charging, the
number of the LEDs which change color to red will be the
same as the number of the cells of the battery pack. For
example, a 2 cell battery pack will have 2 LEDs in red
during charging, a 3 cell battery pack will have 3 LEDs in
red during charging, a 4 cell battery pack will have 4 LEDs
in red during charging. If the number of the lighted LED
displays are not the same as the number of the cells of the
battery packs, reset the charger by pushing down the start
button again to make both numbers the same. If it’s not
possible to get the both numbers at the same figure after
pushing down the button again, the battery pack has a
defective or failing cell and should no longer be used.
5.When the battery pack is fully charged, all relative LED
colors will change from red to green. It indicates the
battery pack is fully charged and ready to use any time.
6.The number of cells of the battery packs being charged by
this charger is limited at 4 cells maximum.
That is, the charger is not allowed to charge a 3 cell pack &
a 2 cell pack at the same time, or a 4 cell pack & any
additional batteries at the same time.
IMPORTANT PRECAUTIONS
※Do not attempt to charge incompatible type rechargeable
batteries as permanent damage to the battery and charger
could result.
※Do not allow water, moisture or foreign objects into the
charger.
※Do not block the air intake holes or the fan vent, which could
cause the charger to overheat.
※Do not attempt to use batteries with more cells or total
voltage more than listed in the specifications.
※Do not leave the charger unattended while charging. Discon-
nect the battery and remove input power from charger
immediately if the charger becomes hot! Allow the charger or
battery to cool down before reconnecting.
※DO not place the charger or battery on a flammable surface or
near a flammable object while in use. Keep away from
carpets, cluttered work b enches, etc.
※Always disconnect from power source when not in use.
※Do not overcharge batteries as permanent damage could
result. Do not use a charge or discharger current rate which
exceeds the safe level of the battery. Do not attempt to
charge or discharge a battery if it is hot.
※Keep out of reach of children.
Series charge operation instruction (Not recommended, but necessary for battery
packs that must be charged through the discharge wires. See warning under #1
of the special instructions)
 Loading...