

Page 1

Model 511
User’s Manual
Pulse Oximeter
May 01, 1996
Catalog No. 6116-23-01/6416-23-01
Copyright 1993, 1996. Novametrix Medical Systems Inc. Wallingford, Connecticut, U.S.A. 06492.
All rights reserved. No part of this manual may be reproduced without
the written permission of Novametrix Medical Systems Inc.
Page 2

[This page intentional ly bl ank.]
ii Model 511
User’s Manual Rev. 01
Page 3

Manual Revision History
Section i Manual Revision History
21-July-93 Release at revision 00.
01-Mayr-96 Revision 01 (R-N389). Includes Addendums A
through D from r evis ion 00. Single patient u se sensor
information included.
Rev. 01
MOdel 511
User’s Manual iii
Page 4

Section ii Guarantee
Equipment manufactured or distributed by Novametrix Medical Systems Inc., is fully
guaranteed, covering materials and workmanship, for a period of o ne year fro m the date of
shipment, except for certain disposable pr odu cts and pr odu cts with stated g uarantee s other
than one year.
Novametrix reserves the right to perform guarantee service(s) at its factory , at an authorized
repair station, or at the customer’s installation. Contact the Novametrix Technical Service
Department, at the numbers listed below, to arrange for warranty repair and to receive a
Repair Order Number prior to returning any equipment to Novametrix.
Novametrix’ obligations under this guarantee are limited to repairs, or at Novametrix’
option, replacement of any defective parts of our equipment, except fuses, batteries, and
calibration gasses, without charge, if said defects occur during normal service.
Claims for dama ges during shipmen t must be filed promptly wi th the transportation
company . All corresponden ce concerning the equipment must specify both the model name
and number, and the serial number as it appears on the equipment.
Improper use, mishandling, tampering with, or operation of the equipment without
following specific operating instructions will void this gu arantee and release Novametrix
from any further guarantee obligations.
Service Department
For factory repair service, call toll free
1-800-243-3444
In Connecticut, call Collect (203) 265-7701
Facsimile (203) 284-0753
Caution:
order of a licensed medical practitioner.
Copyright 1993, 1996, Novametrix Medical System s Inc. This document contains
information which is proprietary and the property of Novametrix Medical Systems Inc., and
may not be reproduced, stored in a retrieval system, translated, transcribed, or transmitted,
in any form, or by any means, without prior explicit written permission from Novametrix
Medical Systems Inc.
Model 511 User’s Manual 01-May-96 iv
Federal (U.S.A.) law restricts this device to sale, distribution, or use by or on the
Page 5

Section ii Guarantee
[This page intentional ly bl ank . ]
v 01-May-96
Model 511
User’s Manual
Page 6

Section ii Contents
Manual Revision History
Guarantee
Contents
Introduction
Patient Safety
Illustrations
...................................................................................................................................... iv
.......................................................................................................................................... vi
................................................................................................................................... 1
Principles of Operation.............................................................................................................. 1
Indications and Usage................................................................................................................ 2
................................................................................................................................. 3
Warnings.................................................................................................................................... 3
Cautions..................................................................................................................................... 4
.................................................................................................................................... 5
Front Panel Illustration .............................................................................................................. 5
Display Illustrations................................................................................................................... 6
Monitor Operation
Battery Installation.................................................................................................................... 7
External DC Supply................................................................................................................... 7
Power On/Off....................................................................................... ...... ................................ 8
Display Illumination and Pulse Beep Options........................................................................... 8
Audible Alarms.......................................................................................................................... 9
Saturation Auto Alert Limits .......................................................... ..... ...... ................................ 9
Battery Life.............................................................................................................................. 10
Select and Apply a Sensor to the Patient................................................................................. 10
Monitoring Saturation and Pulse Rate..................................................................................... 10
Alerts........................................................................................................................................ 11
Status Messages and Numbers...................................................................................... 11
........................................................................................................ iii
...................................................................................................................... 7
SpO2 Sensors
Finger Sensor........................................................................................................................... 13
Y-Sensor................................................................................................................................... 15
Single Patient Use SpO
Model 511 User’s Manual 01-May-96 vi
............................................................................................................................... 13
Finger Sensor Quick Check.......................................................................................... 14
Y-Sensor Application using Y-Strip Tapes.................................................................... 15
Y-Sensor Application using Ear Clip............................................................................ 17
Y-Sensor Quick Check.................................................................................................. 18
Sensors............................................................................................. 19
2
Instructions for Use:...................................................................................................... 19
Page 7

Section ii Contents
Connecting the sensor:.................................................................................................. 19
Sensor Application........................................ ...... .................................. ..... ................... 21
Single Patient Use SpO
Sensor Quick Check.............................................................. 22
2
Serial Communication Option
Connecting a sensor to the Model 511..................................................................................... 23
Connecting the Model 511 for serial communication ............................................................. 24
NOVACOMM1 Interface......................................................................................................... 25
Trend Dump.................................................................................................................. 25
Date and Time............................................................................................................... 26
Setting Date and Time................................................................................................... 27
Clear Trends.................................................................................................................. 27
Exit Command ................................................................................ ...... ........................ 27
Cleaning & Sterilization
Model 511
Finger Sensor ................................................................................................................ 29
Y-Sensor........................................................................................................................ 29
Y-Strip Tapes................................................................................................................. 30
Ear Clip......................................................................................................................... 30
Specifications
General.............................. ....................................... ........................................ ........................ 31
Oxygen Saturation (SpO2)....................................... ...... ...... ................................. ...... ...... ....... 31
Pulse Rate ................................................................................................................................ 31
General Specifications............................................................................................................. 31
............................................................................................................................... 31
......................................................................................................... 29
Monitor ....................................................................................................... 29
............................................................................................. 23
vii 01-May-96
Model 511
User’s Manual
Page 8

Section 1 Introduction
This manual describes the use and operation of the
Novametrix Medical Systems Inc.
The
Model 511
measurement and displays for functional pulsatile oxygen saturation (SpO
The monitor is powered from four standard AA size alkaline batter ies, or may be connected
to an optional external power source for continuous mains operation.
Numerical SpO
A pulsatile signal activity bar, battery strength indicator, and general alarm indicators are
also displayed on the LCD. The
controls display illumination, and an alarm key that enables/disables audible alarms, and
sets alert limits.
Model 511 monitors (Cat. No. 6416-00) are av ail abl e with a serial comm unicat ions op t ion
which allows patient trend information to be downloaded into the Novametrix
Data Archive System or other communicating devices. Interfacing between the
communicating device and the monitor is via a simple cable connection. See “Serial
Communication Option” on page 23 for more information.
is a lightweight, easy to use, pulse oximeter that provides reliable
and Pulse Rate information is pres ented on a liquid crys tal display (LCD).
2
Principles of Operation
The
Model 511
infrared light sources, called LEDs. Since oxygen saturated blood absorbs different
amounts of light at each wavelength (red and infrared) as compared to unsaturated blood,
the amount of light absorbed by the blood in each pulse can be used to calculate oxygen
saturation.
The light energy from red (660 nm) and infrared (940 nm) LEDs is beamed through a
sample cell—a pulsating vascular bed, the patient’s finger or toe for example. The
remaining light energy not absorbed by the sample cell reaches a light receptor, ca lled a
photodiode, on the opposing side of the sensor. The data received at the photodiode is sent
back to the monitor where it is split into its red and infrared components, digit ized,
processed by a microprocessor chip, and finally displayed as a numerical value for oxygen
saturation and a plethysmogram.
The
Model 511
“fractional” saturation value displayed by most co-oximeters. Functional saturation
represents the amount of oxyhemoglobin as a percentage of the hemoglobin that can be
measures oxygen saturation an d pulse rate with sens ors that contain red and
is calibrated to display “functional” saturation. This differs from the
Model 511
Model 511
controls include a power on/of f switch that also
Pulse Oximeter, from
) and pulse rate.
2
NovaCARD
Model 511 User’s Manual 01-May-96 1
Page 9

Section 1 Introduction
oxygenated. Dysfunctional hemoglobins (COHb and METHb) are not included in the
measurement of functional saturation .
Calculating Functional Oxygen
Saturation
Indications and Usage
HbO
Functional Saturation =
Pulse Rate is calculated by measuring the time interval between the peaks of the infrared
light waveform. The inverse of this measurement is displayed as pulse rate.
The
Model 511
sensors.
The
Model 511
and pulse rate. T he
pediatric and neonatal.
must be used in conjunction with OxySnap SuperBright™ saturation
Pulse Oximeter is intended to be used for monitoring of oxygen saturation
100 - (COHb + METHb)
Model 511
is designed to monitor all patient areas including adult,
2
HbO2 = Fractional Hemoglobin
COHb = Carboxyhemoglobin
METHb = Methemoglobin
2 01-May-96
Model 511
User’s Manual
Page 10

Section 2 Patient Safety
For maximum patient and operator safety, the following are recommended;
•
Failure of Operation:
situation has been co rrected by qualified personnel.
• Keep the
• Do not operate the
• Do not operate the
• Care should be exercised to assure continued peripheral perfusion distal to the SpO
sensor site after application.
Model 511
If the monitor fails to respond as described, do not use it until the
and its accessories clean.
Model 511
Model 511
when it is wet due to spills or condensation.
if it appears to have been dropped or damaged.
2
Warnings
!
Do
processed when the cuff is inflated. Attach the sensor to the limb opposite to the site used
for the blood pressure cuff.
•
Explosion Hazard:
anesthetics. Use of this instrument in such an environment may present an explosion
hazard.
•
Electrical Shock Hazard:
use a damaged sensor or one with exp osed electrical contacts. Do not use with a damaged
external power source or one with a damaged cord. Refer servicing to qualified service
personnel.
•
Failure of Operation:
situation has been co rrected by qualified personnel.
•
Patient Safety:
to the SpO
•
Data Validity:
be caused by;
attach an SpO
NOT
Indicates a potentially harmful condition that can lead to personal injury.
Care should be exercise d to assur e continued p eripheral perfusion d istal
sensor site after application.
2
As with all pulse oximeters, inaccurate SpO
• Incorrect application or use of a sensor
• Significant levels of dysfunctional hemoglobin; carboxyhemoglobin or
methemoglobin
• Significant levels of in docy ani ne g reen, met hy lene bl u e, or ot her i ntravas cul ar dyes
sensor distal to a blood pressure cuff. Valid data
2
Warning
Do NOT use the
Always turn the
If the monitor fails to respond as described, do not use it until the
Model 511
(continued next page)
in the presence of flammable
Model 511
off before cleaning it. Do NOT
and Pulse Rate values may
2
CANNOT
be
Model 511 User’s Manual 01-May-96 3
Page 11

Section 2 Patient Safety
Cautions
• Exposure to excessive illumination such as surgical lamps—especially ones with a
xenon light sour ce, or direct su nlight
• Excessive patient movement
• Venous pulsations
• Electrosurgical interference
Caution
Indicates a condition that may lead to equipment damage or malfunction.
• Do not operate the
• Do not operate the
• Never sterilize or immerse the monitor in liquids.
• Do not sterilize or immerse sensors except as directed in this manual.
• No tension should be applied to any sensor cable.
• Do not store the monitor or sensors at temperatures less than
than 1
• Do not operate the monitor or sensors at temperatures less than
than 130° F (
• Caution: Federal (U.S.A.) law restricts this device to sale, distribution, or use by or on
the order of a licensed medical practitioner.
F (55° C).
31°
54.4°
Model 511
Model 511
C).
when it is wet due to spills or condensation.
if it appears to have been dropped or damaged.
F (-10° C) or greater
14°
F (0° C) or greater
32°
4 01-May-96
Model 511
User’s Manual
Page 12
Section 3 Illustrations
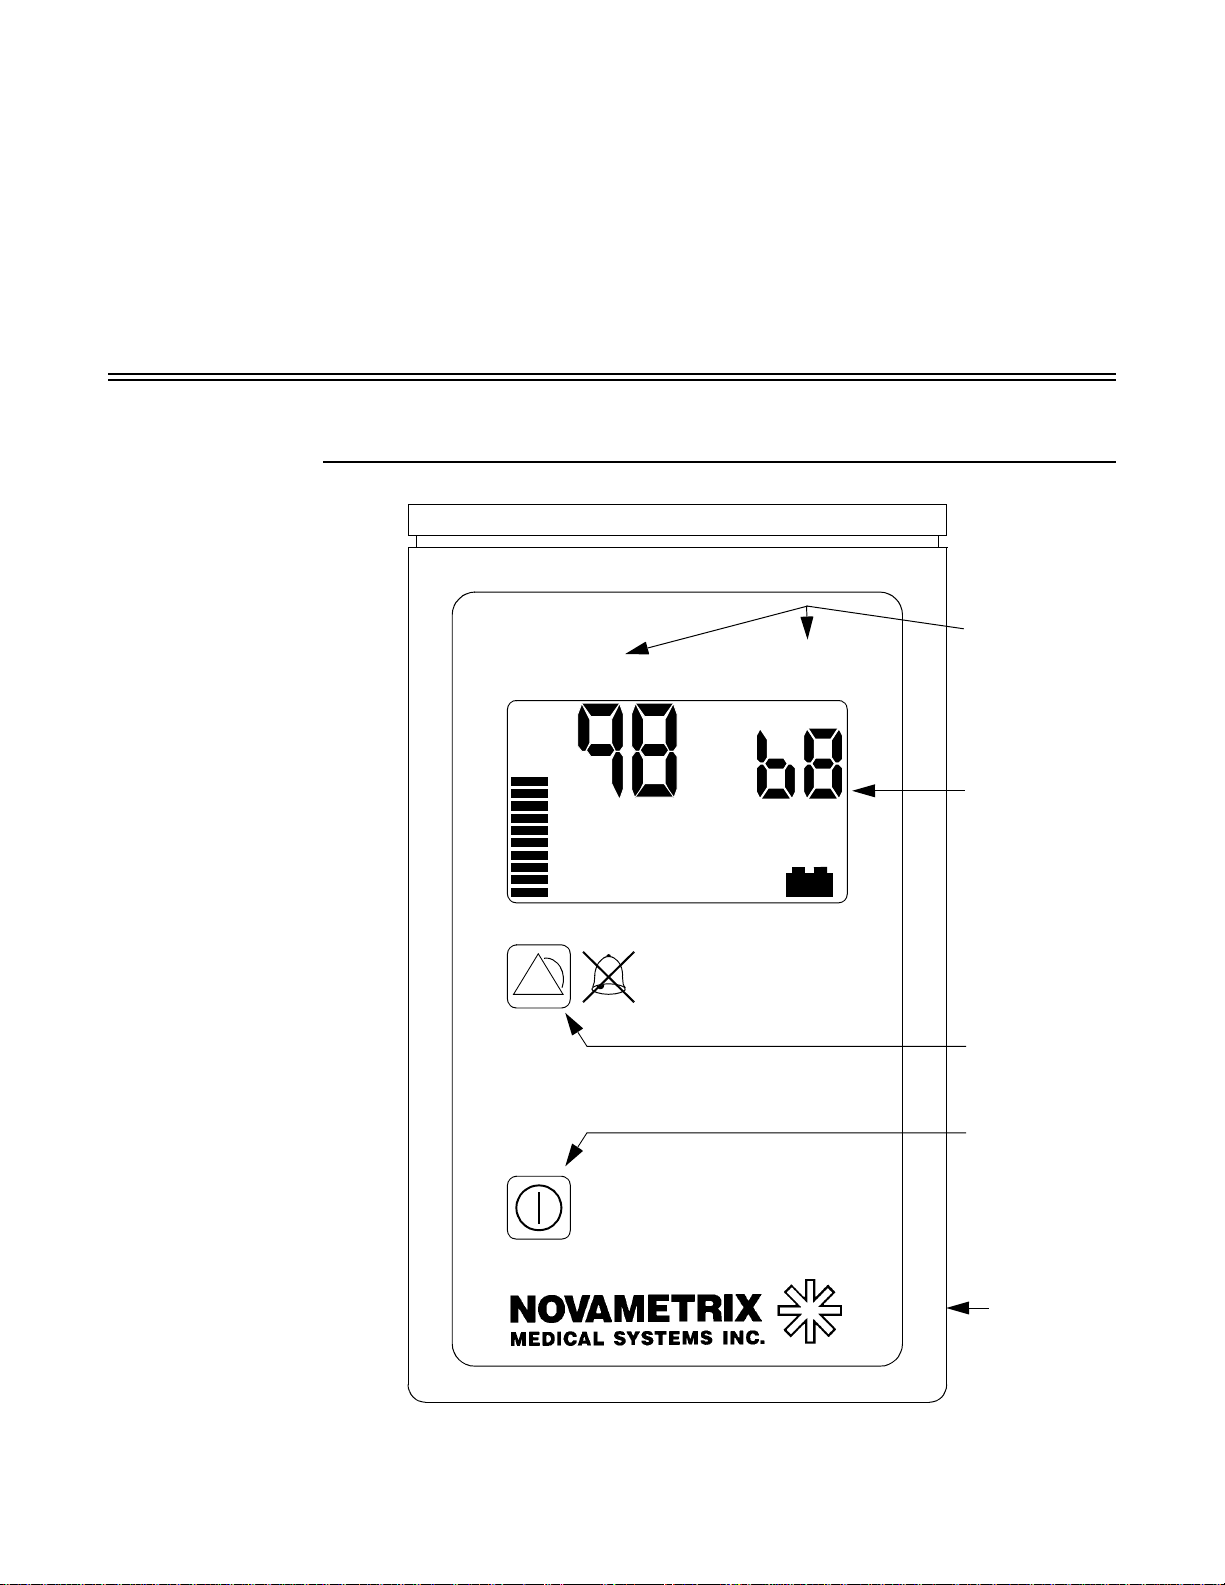
%
SpO
2
beats/min
SATURATION PULSE RATE
Saturation and
Pulse Rate
display
identifiers
Display, see
next section
Po wer On/Off
control
511
Pulse Oximeter
Audible Alert
Enable/disable
Key
DC Input
Jack
Front Panel Illustration
Front Panel Illustration
Model 511 User’s Manual 01-May-96 5
Page 13

Section 3 Illustrations
%
SENSOR OFF PATIENT
Displays “blanked” (dashes)
Message displayed as needed
Status number
displayed as needed
Display Illustrations
Typical display
Typical alert condition display
All displays illuminated
%
%
Saturation display (0-100)
Pulse Rate display (30-250)
Pulse Activity Bar (16 bars)
Audible Alert Disabled Icon
Battery Indicator (3 levels)
Full Half Low
UNIT/SENSOR ERROR
REPOSITION SENSOR
SENSOR OFF PATIENT
SENSOR DISCONNECT
6 01-May-96
Model 511
User’s Manual
Page 14

Section 4 Monitor Operation
Battery Installation
Top of monitor
Bottom of monitor
The
Model 511
should not be used with the
WARNING: Use of improper batteries may present a risk of fire or explosion.
To install batteries into the monitor:
1. Locate the battery compartment cover on the back side of the monitor.
2. Press the “OPEN” area o f the com par tment cover, slide the cover in the directio n
indicated by the arrow, and remove the cover.
3. Install new batteries according to the “+” and “-” symbols on the bottom of the
battery compartment and on each battery.
WARNING: Alkaline batteries may explode or leak if recharged, inserted improperly or
disposed of in a fire. Do not open batteries.
4. Slide the battery cover back into place. The cover latches into place when properly
seated.
operates on four (4) 1.5 volt “AA” alkaline batteries. Other battery types
Model 511
.
External DC Supply
The
Model 511
DC power jack located on the lower right side of the m onitor . Th e external supply dra ws its
power from the mains. Both 105-130 VAC and 230 VAC (50/60Hz) versions are available.
When the external power supply is used, the batteries are disconnected from the monitor
internally, howe ver the battery icon displays a fully charged condition. While powered from
the external supply the battery icon does not reflect the condition of the batteries. When
changing operation from the external supply to battery (external supply disconnected)
allow the monitor to run for one minute, after which the icon will reflect the true batt ery
charge.
can be powered by an external DC supply. The supply plugs into the small
WARNING: U se only Novametrix supplied external power supplie s. The use of other
external power sources may jeopardize patient safety, or may damage the
Model 511 User’s Manual 01-May-96 7
Model 511
.
Page 15

Section 4 Monitor Operation
Power On/Off
1. To turn the monitor on, press and hold the power control.
2. To turn the monitor off, press the power control.
Display Illumination and Pulse Beep Options
A tone sounds to verify audio is functional, the monitor performs a system self-test, all
display segments are briefly illuminated, the software version is displayed, the number “1”
will be displayed in the alert triangle, it will then sequence through to “4”. Release the
power control key when the desired number is displayed (illumination/pulse beep options).
Reference the next section “Display Illumination and Pulse B eep” for an explanation on the
options available.
If the power control key is pressed, but not held the monitor will power up as described
above and will default to selection of “1” for the illumination/pulse beep options (both
OFF).
SpO
and pulse rate information wi ll be displayed withi n 20 seconds of po wer up, pro vided
2
the sensor is properly applied to the patient prior to power up or prior to the completion of
any monitor self test.
The Model 511 is supplied with a display illumin ation option, this is designed for
better viewability under low ambient lighting conditions. A pulse beep option is also
available, this will emit a tone w ith each pulse dete cted by the monitor. These
options are sele cted or deselec ted at power up by holding the power control key
until the desired option combination number is displayed, then releasing the power
control key to select that number.
There are four possible options in regards to display illumination and pulse beep
when powering on the Model 511. The four options wil l a ppea r i n se que nc e in th e
status field as numbers one through four, these are identified below:
Option
Number Illumination Pulse Beep
1 Illumination OFF Pulse Beep OFF
2 Illumination OFF Pulse Beep ON
3 Illumination ON Pulse Beep OFF
4 Illumination ON Pulse Beep ON
1. To select one of the four display illumination/pulse beep options press and hold the
power control key when the monitor is off.
The monitor will power up as described in “Power On/Off” on page 8. The status number
field will display “1” inside the alert triangle, it will then chang e to “2” and sequence
through to “4”. If the power control key is still held after the “4” is displayed the m onitor
will shut off.
2. To select th e desired option rel ease the power control key when the a ppropriate
number is displayed inside the alert triangle.
3. To select another option, press the power control to turn the monitor off. Press and
hold the power control to turn the monitor back on and select another option
number.
8 01-May-96
Model 511
User’s Manual
Page 16

Audib le Alarms
%
Alert limits shown for 3 seconds
(default values shown here)
%
Audible alert icon
shown when audible alert is disabled
Display showing alert limits
when audible alert is enabled
Audible Alarms
1. To toggle between enabled and dis abled audible alarms, press and relea se the
alarm key.
If pressing and releasing the alarm key causes the alarms to be enabled, the monitor shall
display the saturation auto alert limit settings (in the SpO
seconds, beep once, and turn off the alarm icon. The alarm display icon will not be
displayed while audible alarms are enabled. All visible alerts continuously acti ve for long er
than 10 seconds will cause an unlatched audible alarm to sound.
and pulse rate displays) for three
2
Typical display with audible
alert icon displayed
NOTE: Disabling and re-enabling the audible alarms will reset the ten second delay clock
when an alert condition exists.
If pressing and releasing the alarm key causes the alarms to be disabled, the monitor shall
beep once, and turn on the alarm icon. The alarm display icon will illuminate as a warning
that the audible alarms are disabled.
NOTE: W ith the audible alarms disabled, the audible alarm will
condition.
Saturation Auto Alert Limits
sound under any alert
not
Model 511
1. To set aler t limits, press and hold the aler t key for more than 2.5 seconds. The
monitor will beep twice if new limits are set (based on valid SpO
SpO
is displayed, the monitor will use default limits and will beep three times.
2
The
Model 511
User’s Manual 01-May-96
rate display for three seconds. The monitor will then return to normal operation .
NOTE: Setting alert limits automatically enables the audible alarms.
will display the high limit in the SpO
values). If no
2
display and the low limit in the pulse
2
9
Page 17

Section 4 Monitor Operation
2. T o displa y limits without setting new limits if audio is enabled, press and release the
3. To display limits without setting new limits if the audio is disabled (audible alert icon
Battery Life
alarm key twice. The first press turns off the alarms and the second turns them
back on and causes the high and low limits to be displayed for three seconds. The
monitor will then return to normal operation.
visible), press and release the alarm key. The high and low limits will be displayed
for three seconds before the mo nitor returns to no rmal operation. Pre ss and
release the alarm key to disable the audible alarms.
The
Model 511
• fully charged batteries, over 4 hours of battery life
• less than 4 hours of battery life
• indicates less than 2 hours of battery life
• (flashing) less than 15 minutes of battery life
When the battery voltage reaches the 2 hour level , the battery is very low. As the battery
reaches near depletion, the battery icon will flash at a rate of once per second, and the alert
audio will sound, this alert tone cannot be muted (even if alerts are disabled). Continued
use of the monitor at this point will result in the monitor shutting itself off.
NOTE: The above information is based upon normal monitoring conditions (e.g. sensor
on patient, new alkaline batteries). Use of non-alkaline, previously used alkaline, or
rechargeable alkaline batteries will affect the battery life times. Prolonged use of the
backlight can significantly reduce overall battery life.
The battery icon may appear fully charged for the first minute after power up, after which
it will reflect the true battery charge.
NOTE: When oper ating from th e external po wer supp ly the battery ico n does not reflect the
condition of the batteries. See “External DC Supply ”.
displays a battery icon to indicate:
Select and Apply a Sensor to the Patient
Refer to Section 5.
Monitoring Saturation and Pulse Rate
Once the
applied to the patient, numerical SpO
display. A “pulse activity bar”, derived from the pulsatile signal, is also displayed. The
monitor automatically adjusts the activity bar’s length to produce an easily visible display.
Verify the pulse activity bar reflects the patient’s pulse. The bar should show regular
rhythmic movement. Erratic or non-rhythmic pulse bar activity may indicate a poorly
positioned or applied sensor, or may be indicative of excess patient movement at the sensor
site. Check the sensor site and if necessary, attempt to reduce patient movement.
Violation of the upper or lower saturation auto alert limits shall immediately cause a “H”
or “L” to flash within the borders of the display alarm icon, even if the icon itself is
disabled.
Model 511
10 01-May-96
is powered on and a sensor is connected to the monitor and properly
and Pulse Rate values appear on the monitor’s
2
Model 511
User’s Manual
Page 18

Alerts
%
SENSOR OFF PATIENT
Message displayed as needed
Status number
Typical status message and
number display
Alerts
If the
Model 511
previous contents of the display shall be “held”. Should the display be held for more than
ten seconds, a “-” character will start to flash within the borders of the display alarm icon,
even if the alarm icon itself is disabled. If the
from the sensor within sixty seconds, the saturation and pulse rate displays will blank out
(display “--” and “---” respectively). If the display is held longer than ninety seconds the
Model 511
along with the number 9 will appear in the display. If at any time the monitor processes
valid data with which to update the display, the “-” will stop flashing, the display w ill be
updated, the timer reset to zero (seconds), and the audible alarm, if active, will be reset.
cannot detect “valid” saturation data with which to update the display, the
Model 511
will emit an audible unlatched alarm (if enabled) and REPOSITION SENSOR
cannot detect valid pulsatile data
Status Messages and Numbers
The
Model 511
conditions:
will display status messages and related status numbers under certain
Summary of status messages
and numbers.
The following table lists the conditions that cause status m e ssages to be displayed.
Message Number Condition
Sensor Disconnect 1 Sensor not connected to monitor.
Sensor Off Patient 2 Sensor not applied to the patient.
Reposition Sensor 3 Low signal strength. Pulse strength as detected by the
sensor is too small for proper monitor operation.
Reposition Sensor 4 Insufficient light. Sensor placed on a site too thick (or
opaque) for adequate light transmission.
Reposition Sensor 5 Pulse out of range. Pulse must be 30-250 bpm inclusive.
Reposition Sensor 6 Light Interference. Ambient light sources (sunlight,
warming lights, etc.) are interfering with sensor
operation. Shield sensor from these light sources.
Unit/Sensor Error 7 Sensor fault. Remove sensor from use and contact
qualified service personnel.
Unit/Sensor Error 8 Monitor fault. Record the error num ber that appears in
the pulse rate display. Remove the monitor from use and
contact qualified service personnel.
Reposition Sensor 9 Bad signal, monitor not receiving valid signals from
sensor. May be caused by excessive motion, cardiac
arrhythmia or other situations leading to poor signal.
Check patient status, reposition sensor.
Model 511
User’s Manual 01-May-96
11
Page 19

Section 4 Monitor Operation
All status condition s except for Unit/Sensor Error wil l reset automatically once the
condition is corrected. Unit/Sensor Error conditions are latching conditions—that is you
must replace the sensor for a sensor fault, or turn the
before the monitor fault is reset.
Model 511
off and fix the problem
12 01-May-96
Model 511
User’s Manual
Page 20

Section 5 SpO2 Sensors
OxySnap Connector
OxySnap Finger
Sensor
The
Model 511
WARNING: Connect only Novametrix OxySnap SuperBright saturation sensors to the
Model 511
Before connecting to the patient or to the
with no broken, frayed or damaged co mpo nents. Ensure the connector s are clean and dry,
with no signs of contamination or corrosion. Do not use a broken or damaged sensor or
one with wet, contaminated or corroded connectors.
To attach an OxySnap SuperBright sensor to the
1. Align the arrows on the Oxy
Model 511
2. To disconnect, grasp the connectors at the finger grips and pull them apart.
Pulse Oximeter requires OxySnap SuperBright SpO2 Sensors.
. DO NOT use other sensors or accessories with the
Model 511
Snap
connectors and press the connectors together.
, ensure sensors are physically intact,
Model 511
Model 511
:
Finger Sensor
The Finger Sensor is intended for adult fingers and not designed for neonatal or pediatric
applications.
.
Sensor
Before applying the sensor to the patient, verify the sensor is physically intact, with no
broken/frayed wires or damaged parts. Ensure the connectors are clean and dry, with no
signs of contamination or corrosion. Do not use a broken or damaged sensor or one with
wet, contaminated or corroded connectors.
Model 511 User’s Manual 01-May-96 13
Page 21

Section 5 SpO2 Sensors
Applying the F inger
Sensor to the Patient
To apply the finger sensor to the patient;
1. Gently squeeze the grips at the rear of the sensor (indicated by arrows below).
Cable exits above fingerPlacement Guide
2. Position fingertip against placement guide with fingernail towards the red light.
Do not position the finger so as to protrude past the placement guide.
3. Release the finger grips.
4. Inspect the site often for adequate circulation—at least once every four hours.
5. To remove sensor, gently squeeze grips and slide the sensor from the finger.
CAUTION: Overstretching the pulse oximeter finger sensor can damage the sensor and
potentially affest pulse oximeter readings. Do not stretch the finger sensor open beyond
the limit for which it was designed. Overstretchin g can be preventerd: avoid opening the
sensor by any means other than squeezing the grips;
objects such as bedrails.
DO NOT
force the sensor onto large
Finger Sensor Quick Check
1. Is Probe Off Patient illuminated when the se nsor is connected to the monitor but
not applied to the patient?
2. Apply the sensor to your index finger. Are reasonable SpO
displayed?
3. A YES to BOTH #1 and #2 indi cates the sensor is OK . Apply the sensor to th e
patient as instructed above.
The quick check also tests the functionality of the extension cable.
and pulse rate values
2
14 01-May-96
Model 511
User’s Manual
Page 22

OxySnap Y-Sensor
Y-Sensor showing
Center Strip
removed
Y-Sensor
Y-Sensor
The reusable Y-Sensor is a flexible versatile sensor designed for use on any patient.
Before applying the sensor to the patient, verify the sensor is physically intact, with no
broken/frayed wires or damaged parts. Ensure the connectors are clean and dry, with no
signs of contamination or corrosion. Do not use a broken or damaged sensor or one with
wet, contaminated, or corroded connectors.
The Y -Sensor’ s Center Strip is not a functional part of the sensor. Its purpose is to aid in the
placement of the sensor into the tape or other securing system. The center strip may be
removed (carefully cut a way) if th e distance between the sensor heads needs to b e changed
from 25 mm.
Sensor Heads
Y-Strip Application Sites and
Catalog Numbers
Model 511
User’s Manual 01-May-96
Center Strip
Strip may be removed
Y-Sensor Application using Y-Strip Tapes
1. Select a Y-Strip based on the patient type and intended sensor location.
Y-Strips come in two color coded sizes: 25 mm tapes are coded green, and 20 mm tapes are
coded blue. The size refers to the distance between the holes in the tape.
Wrap Style Tape
Cat. No. 8829
25 mm (Green)
Neonatal Foot,
Hand
Cat. No. 8828
20 mm (Blue)
Neonatal Foot, Hand
Pediatric Toe, Finger
Cat. No. 8836
Non-adhesive Foam
Wrap
15
Page 23

Section 5 SpO2 Sensors
Liner this
side (top)
Y-Strip Tape
Head
Button
Cross Section
Remove release
liner with holes.
Y-Sensor placed on
Y-Strip tape.
Finger Style Tape
Cat. No. 8832
25 mm (Green)
Adult Finger
2. Remove the portion of the release liner containing the holes.
Cat. No. 8828/8829
Skip this step if using the 25 mm Y-Strip tape.
3.
If using the 20 mm Y- Str i p ta pe, carefully remove the sensor’s center strip usi ng a
pair of scissors or a sharp blade.
The center strip does not effect sensor operation, its purpose is to aid putting the sensor into
the 25 mm tape.
4. Press the “button”, on the back of each sensor head, through a hole in the tape.
Press in from the sticky side of the tape. The tape will stretch to fit the sensor button.
Cat. No. 8831
20 mm (Blue)
Pediatric Finger
Adult Finger
Cat. No. 8831/8832
5. Remove the remaining release liner and apply the sensor/tape to the patient.
Do not wrap the tape around the limb so tightly that circulation is restricted. Inspect the
site often for adequate circulation—at least once every four hours.
Ensure that the sensor heads are directly opposite each other through the tissue.
prevents the sensor from being placed on a site too thick (high arch) for proper operation.
Position the sensor so that the tape does not extend over the space between the fingers or
toes to insure there will be no light transmission through this space.
16 01-May-96
6. To maximize sensor life, secure the sensor to the patient with additional tape.
Model 511
This
User’s Manual
Page 24

Y-Sensor applied to
SENSOR HEADS
CENTER STRIP (REMOVE)
EAR CLIP RECEPTACLE
SENSOR HEAD
SQUEEZE HERE TO APPLY
patient
Leave slack in the wires between the tape and the sensor.
Adult/Pediatric Finger
Y-Sensor
Neonatal Hand
Y-Sensor before
attachment to Ear Clip
Y-Sensor placed on
Ear Clip
Neonatal/Pediatric Foot
7. Inspect the site often for adequate circulation—at least once every four hours.
Pediatric Toe
Y-Sensor Application using Ear Clip
1. Remove center strip from the Y-Sensor.
2. Slide each Y-Senso r head into the ear clip‘s receptacl es, the heads should face
each other.
Model 511
User’s Manual 01-May-96
3. Gently squeeze the end of the ear clip (shown in diagram), and apply the sensor to
the patient.
17
Page 25

Section 5 SpO2 Sensors
ADULT EAR
OPTIONAL PLACEMENTS
Y-Sensor with Ear Clip
placed on patient ear
If a satisfactory readi ng canno t be obtained, rub the site and/or use adhesive dots for better
response. The adhesive dots (PN: 8700-00) included with the ear clips will also he lp in
preventing the ear clip from falling off (e.g. during exercising).
W AR NING: Inspect the site often for adequate circulation—at least once e very four ho urs.
When applying sensors take note of patient’s physiological condition. For example, burn
patients may exhibit more sensitivity to heat and pressure and therefore additional
consideration such as more frequent site checks may be appropriate.
Y-Sensor Quick Check
1. With the Y-Sensor con nected to monitor but not applied to patient, position th e
sensor heads so that they face each other (the r ed light shines at the detector). Is
Probe Off Patient illuminated?
2. Tape the Y-Sensor to your index finger. Does the monitor shows reasonable SpO
and pulse rate values?
3. A YES to BOTH #1 and #2 indi cates the sensor is OK . Apply the sensor to the
patient as instructed above.
The quick check also tests the functionality of the extension cable.
2
18 01-May-96
Model 511
User’s Manual
Page 26

Single Patient Use SpO2 Sensors
Model 511
DB-9
Connector
Cable
Intended Use:
The Single Patient Use SpO
monitoring adult, pediatric or neon atal patients with Novametrix Pulse Oximeters
(SuperBright™ series). These sensors are used with the DB-9 connector cable.
WARNING:
Novametrix SuperBright compatible pulse oximeters. Use with any other device may result
in equipment damage or patient injury.
CAUTION:
reapplied to various sites on the same patient but should not be used on multip le patients.
Do not attempt to clean or disinf ect the sensor, as system performance will be
compromised.
NOTE:
question.
Use the Single Patient Use sensor and DB-9 connector ca ble only with
These SpO2 sensors are intended for single pa tient use. The sensors can be
The Single Patient Use sensor should be discarded if sensor integrity becomes a
Instructions for Use:
sensors (Catalog Nos. 6480 a nd 6455) can be used wh en
2
Single Patient Use SpO2 Sensors
Model 511
Connecting the sensor:
1. Attach the DB-9 to OxySnap conne cto r ca ble to th e Model 511. Align the a rrows on
the OxySnap connectors and press the connectors together.
Model 511
User’s Manual 01-May-96
19
Page 27

Section 5 SpO2 Sensors
Model 511 with RS232 option
6292-01 cable
DB-9 to
OxySnap
Connector
Model 511 with RS232
DB-9 connection
20 01-May-96
2. Press the black connector on the en d of the DB-9 to OxySnap extension cable into
the black connector on the end of the Single Patient Use SpO
sensor
connector
DB-9 to
OxySnap
connector
sensor.
2
Model 511
User’s Manual
Page 28

Single Patient Use SpO2 Sensors
3. T o disconnect the DB-9 to
OxySnap
connector cable, grasp the connectors and pull
them apart (the DB-9 to OxySnap connector can remain attached to the Model 511
as long as single patient use sensors will be used).
Sensor Application
1. Select the appropriate size sensor based on the patient type.
PEDIATRIC/ADULT SENSOR
ADULT TOE
ADULT FINGER
NEONATAL/PEDIATRIC SENSOR
NEONATAL HAND
PEDIATRIC TOE
NEONATAL FOOT
2. Apply the sensor by placing the blue side of the sensor wrap against the skin, wrap
it around the site (cut excess foam if necessary) and secure with Velcro® tab. The
V elcro tab on the neonatal/pediatric version is removable to allow the foam wrap to
be cut before applying to the patient.
CUT EXCESS OFF
NEONATAL/PEDIATRIC
SENSOR
VELCRO TAB
Ensure that sensor heads are positioned directly opposite each other through the tissue.
The adhesive dots (Cat No 8700) which are included with each sensor can be applied the
sensor before patient application for additional adhesion to the site.
Model 511
User’s Manual 01-May-96
21
Page 29

Section 5 SpO2 Sensors
3. For additional support, secure the cable along the limb with tape.
WARNING: Do not wrap the sensor around the limb so tightly that circulation is
restricted. Inspect the site often, at least every four hours, for adequate circulation. When
applying sensors, t ake note of patients phy siological condition. F or examp le, burn p atients
may exhibit more sensitivity to heat and pressure and therefore additional consideration
such as more frequent site checks may be appropriate
Single Patient Use SpO2 Sensor Quick Check
1. With the sensor connected to the monitor but not applied to the patient, position the
sensor heads so that they face each other (the r ed light shines at the detector). Is
PROBE OFF PATIEN T displ ayed?
2. Apply the sensor to your index finger. Are reasonable SpO
displayed?
3. A YES to BOTH #1 and #2 indi cates the sensor is OK . Apply the sensor to th e
patient as instructed above.
This quick check also tests the functionality of the DB-9 to
and pulse rate values
2
OxySnap
connector cable.
22 01-May-96
Model 511
User’s Manual
Page 30

Section 4 Serial Communication Option
Model 511
6292-01 cable
OxySnap
connection for
SuperBright™
sensor
Connecting a sensor to
the Model 511
Model 511
which allows patient trend information to be downloaded into the Novametrix
Data Archive System or other communicating devices. A 15-pin mini-D connector
(
PATIENT/SERIAL INTERFACE
cable (Novametrix Cat. No. 6493-01) is required for connection between the monitor and
the communicating device.
The
communication. When attaching a sensor for patient monitoring, the 6292-01 cable must
be connected to the
the cable. When utilizing the monitor for serial communication the 6293-01 interf ace cable
must be used, this cable terminates in a 9 pin D female for connection to the communication
device.
monitors (Cat. No. 6416-00) are av aila ble with a serial communications option
) on the top panel indicates the optio n is installed. An in terface
PATIENT/SERIAL INTERFACE
PATIENT/SERIAL INTERFACE
connector is shared between patient monitoring and serial
, the sensor will plug into the other end of
Connecting a sensor to the Model 511
1. Plug the 6292-01 cable into the PATIENT/SERIAL INTERFACE connector.
NovaCARD
2. Connect an
3. Apply the sensor as described in “Y-Sensor” on page 15.
Model 511 User’s Manual 01-May-96 23
OxySnap
Finger or “Y” sensor into the end of the cable.
Page 31

Section 4 Serial Communication Option
Model 511
6293-01 cable
Connection to computer
or communication device
Connecting the Model 511 for serial communication
Connecting the Model
511 for serial
communication
1. Unplug any sensor that may be connected from the
connector.
2. Connect the 6293-01 interface cable to the
the monitor, plug the other end into the communication device.
PATIENT /SERIAL INTERFACE
PATIENT/SERIAL INTERFACE
connector on
3. If using the NovaCARD Data Archive System, please refer to the NovaCARD User’s
Manual (Cat. No. 6066-23) for set-up and o peration of the Nova COMM interface.
(See “
NovaCOMM
section).
4. If you are using a communications package other than
appropriate commands from the device to the monitor as i nstructed in the next
section titled “
NOVACOMM1
24 01-May-96
Setup (Direct Cable)”, page 13 under the “Hardware Setup”
NovaCARD
Interface”.
Model 511
send the
User’s Manual
Page 32

NOVACOMM1 Interface
T********************************<cr><lf>
byte 0
byte 15
NOVACOMM1
The
NOVACOMM1
or data logging device. The computer interface provides the user the ability to “dump” trend
information to a computer file for later analysis. The communication format is 9600 baud,
8 bits, no parity, 1 stop bit and XON/XOFF handshaking.
Trend Dump
Trend data is transmitted as a succession of records. The record size for
bytes of ASCII Hexadecimal data. A record can be one of two types, an INFO record or a
DATA record. The INFO record contains monitor information such as time of day, date,
limit settings, and units. The DAT A record contains ev ent marker, audio disable, SpO
pulse rate values.
The first record sent is always
buffer , then recor ds would continue being sent in chronolo gical order from the ol dest record
to the newest record. In normal monitoring use, an INFO record would be followed by 15
data records, followed by another INFO record and then another 15 data records, etc.
Turning the monitor off, or changing the limits will disrupt this sequence. When this occurs
a new INFO record will be sent and indicate the time and date, along with the current limits.
At this point, unless another exception occu rs, the next I NFO record will be fo llo wed by 15
DATA records.
An INFO record can be distinguished from a DATA record by the first byte. The first byte
of an INFO record is FF, the first byte of a DATA record is 00-C8 (0-200 decimal), or FB
(pen lift or no data available). Any other values are not applicable. The DATA record uses
8 data points per parameter, at 8 second resolution, for a total of 64 seconds of trend data
per data record.
To reques t trend dump, the computer must send an ASCII “6” character. The monitor
echoes back the “6” character and transmits the first INFO record.
The Mode 6 data format is;
INFO record;
Interface
interface is designed to output data in fo rmats easily read by a computer
Model 511
an INFO record. This record reflects the oldest data in the
is 16
, and
2
where;
T- Trend mode identifier
**-INFO byte, starting at byte 0 and ending at byte 15 (see below)
byte -0 flag byte = FF for INFO record
INFO record byte assignment
Model 511
User’s Manual 01-May-96
byte-1 information type (FE-power on, FD-limit change,
FC-time stamp)
byte-2 model code = 2
byte-3 compression ratio = 8 (i.e. 1 point/8 seconds)
byte-4 seconds (0-59)
byte-5 minute (0-59)
byte-6 hour (0-23)
byte-7 day (1-31)
25
Page 33

Section 4 Serial Communication Option
T****************
****************<cr><lf>
byte 0
byte 15
d•MMM/DD/YY•hh:mm:ss<cr><lf>
byte-8 month (1-12)
byte-9 year (0-99)
byte-10 unused
byte-11 unused
byte-12 unused
byte-13 unused
byte-14 unused
byte-15 unused
DATA record;
<cr> - carriage return
<lf> - line feed
T - Trend mode identifier
**-DATA byte, starting at byte 0 and ending at byte 39 (see below)
DATA record byte
assignments
byte 0-7 8 byte SpO2 data, rang e: 01-28 Hex (1-40 de cimal)
(corresponds to 60-100%, i.e. a value of 1E Hex that
corresponds to 30 decimal will indicate an SpO2 value
of 90%), 00-no data available. The MSB and second
MSB (bits 7 & 6) of the SpO2 bytes are not used in
this monitor and should be masked out.
byte 8-15 8 byte pulse rate data, range: 00-FA Hex (0-250
decimal), FB Hex (251 decimal) - no data available
over period.
<cr> - carriage return
<lf> - line feed
Date and Time
Date and Time mode causes the
calculated by the monitor’s internal calendar clock.
T o request the date and time, the computer must send an ASCII “d” character. The monitor
echoes back the “d” character and sends the date and time on the same line. The Mode d
data format is;
where;
- the echoed command character
d
- is an ASCII space character
•
- a 3-character month (Jan, Dec),
MMM
- a 2-digit ASCII day (01, 31),
DD
- the last 2-digits of the year (1990 is 90),
YY
- a 2-digit hour based on a 24 hour clock (00, 23),
hh
Model 511
to transmit, on request, the date an d time as
26 01-May-96
Model 511
User’s Manual
Page 34

NOVACOMM1 Interface
sMM/DD/YY•hh:mm:ss
- a 2-digit minute,
mm
- a 2-digit second,
ss
<cr><lf>
is a carriage return, line-feed sequence.
Setting Date and Time
To set the date and time the computer must send the ASCII “s” character. The “s” is the
command to set the time. The mode of the data format is;
where;
- is an ASCII space character
•
- the echoed command character
s
- a 2-digit month number (01, 12),
MM
- a 2-digit ASCII day (01, 31),
DD
- the last 2-digits of the year (1990 is 90),
YY
- a 2-digit hour based on a 24 hour clock (00, 23),
hh
- a 2-digit minute,
mm
- a 2-digit second.
ss
There must be a delay of at least 20 msec between bytes so the data receive buffer will not
overflow. When the monitor has received the complete command it will echo the date in the
format described in the section above.
Clear Trends
Clear Trends mode allows the user to remotely cl ear the
action has the same result as the monitor’s Clear Trend function in that trend memory and
the Trend Page displays are cleared.
Use this remote Clear Trends function with care as there is no way to undo the clear
command once issued.
T o clear the
Model 511
cleared.
Model 511
will echo the “c” followed by a
trend memory, the computer must send an ASCII “c” character. The
<cr><lf>
Model 511
and then the trend memory will be
trend memory This
Exit Command
To exit the NOVACOMM1 mode, the computer must send an “x” or “X” character. The
Model 511
character will start communication again.
will echo the “x” and then stop communication. Sending a ne w valid command
Model 511
User’s Manual 01-May-96
27
Page 35

Section 4 Serial Communication Option
[This page intentional ly bl ank.]
28 01-May-96
Model 511
User’s Manual
Page 36

Section 6 Cleaning & Sterilization
Follow the cleaning and sterilization instructio ns listed below to clean an d/or steri lize the
Model 511
Model 511 Monitor
• Turn the monitor off before cleaning.
• Clean the monitor surface with a cloth dampened with an isopropyl alcohol 70% solution
or bleach 10% solution or with the cold liquid sterilants Cidex™, or Sporicidin™, then
wipe down with a clean water dampened cloth and dry before use.
• Do not immerse the monitor.
• Do not attempt to sterilize the monitor.
Finger Sensor
• Clean the Finger Sensor surface with a cloth dampened with an isopropyl alcohol 70%
solution or bleach 10% solution or with the cold liquid sterilants Cidex™, or
Sporicidin™. After cleaning wipe the sensor down thoroughly with a clean water
dampened cloth to rinse.
• Ensure the Finger Sensor windows are clean and dry before reuse.
• Do not immerse the Finger Sensor.
• Do not attempt to sterilize the Finger Sensor.
• After cleaning the Finger Sensor, verify the sensor is physically intact, with no broken/
frayed wires or damaged parts. Ensure the connectors are clean and dry, with no signs of
contaminatio n or corrosion. Do not use a broken or damage d sensor or one with wet,
contaminated or corroded connectors.
• Perform a Finger Sensor Quick Check test before returning the sensor to patient use.
Refer to “Finger Sensor Quick Check” on page 14.
and its accessories.
Y-Sensor
• The Y-Sensor may be immersed—up to, but not including, the connector, in a
glutheralhyde solution, 10% bleach solution or Sporicidin™. Refer to manufacturer’s
instructions and standard hos pi ta l prot ocol s to determi ne recomm ended times for
disinfection/sterilization.
• Rinse thoroughly with water and dry before use.
• Do not attempt to sterilize Y-Sensor except as stated above.
• Do not immerse the connector on the Y-Sensor.
Model 511 User’s Manual 01-May-96 29
Page 37

Section 6 Cleaning & Sterilization
• After cleaning/sterilizing the Y-Sensor, verify the sensor is physically intact, with no
broken/frayed wires or damaged parts. E nsure the con nector s are clean and dry, with no
signs of contamination or corr osion. Do not use a broken or damag ed sensor or one with
wet, contaminated, or corroded connectors.
• Perform a Y-Sensor Quick Check test before returning the sensor to patient use. Refer to
“Y-Sensor Quick Check” on page 18.
Y-Strip Tapes
• Treat Y-Strip Tapes in accordance with hospital protocol for single-patient use.
Ear Clip
• Clean the ear clip with a cloth dampened with 70% isoprophyl alcohol. After cleaning
wipe the ear clip down thoroughly with a clean water dampened cloth to rinse.
• Do not immerse the ear clip.
30 01-May-96
Model 511
User’s Manual
Page 38

Section 7 Specifications
General
Specifications for the Novametrix
purposes only, and are subject to change without notice.
Oxygen Saturation (SpO2)
• Range, 0-100%
• Accuracy, 80-100% ± 2%, 0-79% unspecified
(Approximately 68% of the observations are within the accuracy claim.)
• Display Resolution, 1%
• Averaging Time, fixed at 8 seconds
• Settling Time
Display settles to within 1% of the final reading less than 15 seconds after the sensor is
properly applied.
Pulse Rate
• Range, 30-250 beats per minute (bpm)
• Accuracy
(Approximately 68% of the observations are within the accuracy claim.)
• Display Resolution, 1 bpm
• Averaging Time, fixed at 8 seconds
• Settling Time
Display settles to within 1% of the final reading less than 15 seconds after the sensor is
properly applied.
1% of full scale
, ±
Model 511
Pulse Oximeter, are listed for informational
General Specifications
• Operating Environment
50-104° F (10-40 °C), 0-90% relative humidity (non-condensing)
• Weight, 13 ounces including batteries
•Dimensions
Height 6.25 inches, Width 3.75 inches , Depth 1.3 inches
Model 511 User’s Manual 01-May-96 31
Page 39

Section 7 Specifications
•Battery
Type, four “AA” alkaline cells. Life, 12 hours.
• External power supply
Input: 105-130 VAC, 50/60Hz* or 230 VAC, 50/60Hz**
Output: 6VDC @ 150ma
Cord length: 6 ft.
*105-130 volt unit designed to meet electrical tests of
U. L. 544 Patient Care Equipment-Patient Connected/Isolated
**230 volt unit designed to IEC601 Electrical Specification
32 01-May-96
Model 511
User’s Manual
 Loading...