

Page 1

Model 509
Service Manual
Jan 26, 2000
Part Number 6900-90-00
Novametrix Medical Systems Inc.
P.O. Box 690
5 Technology Drive
Wallingford, Connecticut, U.S.A. 06492.
Page 2

Page 3

Revision History
Guarantee
26-Jan-00 Preliminary
Equipment manufactured or distributed by Novametrix Medical Systems Inc., is fully guaranteed,
covering materials and workmanship, for a period of one year from the date of shipment, except for
certain disposable products and products with stated guarantees other than one year. Novametrix
reserves the right to perform guarantee service(s) at its factory, at an authorized repair station, or at
the customer’s installation.
Novametrix’ obligations under this guarantee are limited to repairs, or at Novametrix’ option,
replacement of any defective parts of our equipment, except fuses, batteries, and calibration gasses,
without charge, if said defects occur during normal service.
Claims for damages during shipment must be filed promptly with the transportation company. All
correspondence concerning the equipment must specify both the model name and number, and the
serial number as it appears on the equipment.
Improper use, mishandling, tampering with, or operation of the equipment without following specific
operating instructions will void this guarantee and release Novametrix from any further guarantee
obligations.
Service Department
For factory repair service, call toll free
1-800-243-3444
In Connecticut, call Collect (203) 265-7701
Facsimile (203) 284-0753
World Wide Web: http://www.novametrix.com
Internet: techline@novametrix.com
Caution:
licensed medical practitioner.
Copyright 2000, Novametrix Medical Systems Inc. This document contains information which is
proprietary and the property of Novametrix Medical Systems Inc., and may not be reproduced, stored
in a retrieval system, translated, transcribed, or transmitted, in any form, or by any means, without
prior explicit written permission from Novametrix Medical Systems Inc.
Federal (U.S.A.) law restricts this device to sale, distribution, or use by or on the order of a
Rev. 00
Model 509 Service
Manua
iii
Page 4

Service Policy
Novametrix Medical Systems Inc. provides 24-hour a day access to technical support through its Technical
Support Department in Wallingford, Connecticut, and company Service Representatives located throughout
the United States. (Outside the U.S., primary technical support is handled through our qualified international
sales and service distributors.
Novametrix will provide Warranty Service support within 48 hours of receiving a request for assistance
Contact the Technical Support Department by telephone toll free at 800-243-3444, or 203-265-7701; by
facsimile at 203-284-0753; or, by e-mail at techline@novametrix.com. After hours telephone support
requests (before 8:00 AM and after 5:00 PM Eastern Time) will be responded to promptly by the Technical
Support on-call staff. After hours facsimile and e-mail requests will be answered the next business day. It is
suggested that any person calling in for technical support have the equipment available for product
identification and preliminary troubleshooting.
Novametrix reserves the right to repair or replace any product found to be defective during the warranty
period. Repair may be provided in the form of replacement exchange parts or accessories, on-site technical
repair assistance or complete system exchanges. Repairs provided due to product abuse or misuse will be
considered “non-warranty” and invoiced at the prevailing service rate. Replaced or exchanged materials are
expected to be returned to Novametrix within 10 days in order to avoid (additional) charges. Return materials
should be cleaned as necessary and sent directly to Novametrix using the return paperwork and shipping
label(s) provided (Transferring return materials to a local sales or dealer representatives does not absolve
you of your return responsibility.).
Novametrix manufactures equipment that is generally field serviceable. When repair parts are provided, the
recipient can call Technical Support for parts replacement assistance and repair assurance. In the event a
replacement part requires increased technical capability, Technical Support may request Biomedical
assistance, provide on-site technical support or complete replacement equipment. If the customer requires
the return of their original product, the exchange material will be considered “loaner material” and exchanged
again after the customer equipment is repaired.
Novametrix promotes customer participation in warranty repairs, should they become necessary. A longer
useful product life, and quicker, more cost-effective maintenance and repair cycles—both during and after
the warranty period, are benefits of a smooth transition into self-maintenance. The Technical Support
Department can provide technical product support at a level appropriate to your protocol and budget
requirements.
Please contact Technical Support for information on these additional programs and services:
• Focus Series Technical Training Seminars
• Test Equipment and Test Kits
• Service Contract / Parts Insurance Plans
• On-Site Technical Support
• “Demand Services” including:
Flat rate parts exchange
Flat rate return for repair
Time and material,
Full warranty, discounted replacement sensors.
Declaration of Conformity with European Union Directive
Model 509 Service
iv
The authorized representative for Novametrix Equipment is:
D.R.M. Green
European Compliance Services Limited,
Oakdene House,
Oak Road,
Watchfield
Swindon, Wilts SN 6 8TD
United Kingdo
Manual Rev. 00
Page 5

1
Patient Safety ....................................................................................................................1
Front and Rear Panel Illustrations .....................................................................................5
Electronic Theory of Operation ..........................................................................................7
Functional Tests ..............................................................................................................15
Accuracy Tests ................................................................................................................17
Table of Contens
Indications and Usage ....................................................................................................2
Front Panel Illustration ...................................................................................................5
Rear Panel Illustration ....................................................................................................6
2543 Main Board ............................................................................................................7
2581 Power Board ........................................................................................................13
2542 Display Board ......................................................................................................14
Equipment Required .....................................................................................................15
Procedure .....................................................................................................................15
Equipment Required .....................................................................................................17
Procedure .....................................................................................................................17
Electronic Tests ...............................................................................................................19
Equipment Required .....................................................................................................19
Procedure .....................................................................................................................20
Safety Testing ..............................................................................................................22
Maintenance ....................................................................................................................23
Maintenance Schedules ...............................................................................................23
Cleaning and Sterilization .............................................................................................23
Assembly Exchanges ...................................................................................................25
Battery Replacement ....................................................................................................26
Software Update Instructions .......................................................................................27
Troubleshooting ...............................................................................................................29
Status Messages ..........................................................................................................29
Specifications ...................................................................................................................31
SpO2 (Oxygen Saturation) ...........................................................................................31
Pulse Rate ....................................................................................................................31
General Specifications .................................................................................................31
Parts Lists ........................................................................................................................33
6900-00 Pulse Oximetry Interface ................................................................................33
6900-01 Main Assy Model 509 ....................................................................................33
Rev. 00
Model 509 Service
Manua
v
Page 6

2542-01 Display Board Assy, Front ............................................................................. 33
2543-01 Main Board Assy, ........................................................................................... 34
2581-01 Power Board Assy, ........................................................................................ 36
Schematics and Assembly Drawings .............................................................................. 37
Model 509 Service
vi
Manual Rev. 00
Page 7

2
Patient Safety
Pulse oximetry is a non-invasive method of monitoring the oxygen saturation of arterial
blood. Pulse oximeters display oxygen saturation of functional hemoglobin and
therefore the accuracy may be interfered with by carboxyhemoglobin or other
dysfunctional hemoglobins present in significant concentrations. Oxygen saturation
monitoring is intended to be used in a variety of clinical situations, including, but not
limited to respiratory therapy, anesthesia, intensive care, and emergency.
Model 509
The
Patient leakage current flowing from the instrument to ground is limited to less than 50
µ
A at 120 VAC, 60 Hz. Patient isolation is tested at 2500 VAC rms at 60 Hz.
For maximum patient and operator safety, the following are recommended:
•
Failure of Operation:
until the situation has been corrected by qualified personnel.
• Keep the
• Do not operate
• Do not operate the
• Connect the
• Connect the external supply only to a grounded hospital grade outlet. It should
be connected to the same electrical circuit as the equipment it is used with.
Outlets on the same electrical circuit can be identified by the hospital’s
engineering department.
• Care should be exercised to assure continued peripheral perfusion distal to the
SpO
•Do
CANNOT
opposite to the site used for the blood pressure cuff.
• Do NOT wrap the sensor tape around the limb so tightly that circulation is
restricted. Inspect the site often for adequate circulation - at least once every four
hours. When applying sensors take not of the patient’s physiological condition.
For example, burn patients may exhibit more sensitivity to heat and pressure and
therefore additional consideration such as more frequent site checks may be
appropriate.
• Connect the
modules only.
Pulse Oximetry Interface Module SpO
If the module fails to respond as described, do not use it
Model 509
sensor site after application.
2
attach an SpO
NOT
be processed when the cuff is inflated. Attach the sensor to the limb
and its accessories clean.
the
Model 509
Model 509
Model 509
Model 509
when it is wet due to spills or condensation.
if it appears to have been dropped or damaged.
only to Novametrix approved power supply.
sensor distal to a blood pressure cuff. Valid data
2
external interface cable (Cat. No. 6905-00) to VueLink
input is electrically isolated.
2
Rev. 00 Model 509 Service Manual
1
Page 8

2
Patient Safety
Indications and Usage
2.1 Indications and Usage
The
Model 509
with Hewlett Packard VueLink Gas Analyzer modules (Cat. # M1032A with option A03)
and supported patient monitoring systems. The
monitoring oxygen saturation and pulse rate in all critical monitoring environments in all
patient areas including adult, pediatric and neonatal.
NOTE:
!
WAR N I N G :
•
Explosion Hazard:
anesthetics. Use of this instrument in such an environment may present an
explosion hazard.
•
Electrical Shock Hazard:
any equipment before cleaning it. Do NOT use a damaged sensor or one with
exposed electrical contacts. Refer servicing to qualified service personnel.
• Do not operate the
• Do not operate the
•
Failure of Operation:
until the situation has been corrected by qualified personnel.
•
Patient Safety:
perfusion distal to the SpO
•
Data Validity:
values may be caused by
• Incorrect application or use of a sensor
• Significant levels of dysfunctional hemoglobin; carboxyhemoglobin or
• Significant levels of indocyanine green, methylene blue, or other intravascular dyes
• Exposure to excessive illumination such as surgical lamps—especially ones with a
• Excessive patient movement
• Venous pulsations
• Electrosurgical interference
•
Data Validity:
CANNOT be processed when the cuff is inflated. Attach the sensor to the limb
opposite to the site used for the blood pressure cuff.
•
Do Not
Inspect site often for adequate circulation - at least once every four hours. When
applying sensors take note of patient’s physiological condition. For example,
burn patients may exhibit more sensitivity to heat and pressure and therefore
additional consideration such as more frequent site checks may be appropriate.
• Electric shock hazard. Do NOT remove covers or panels. Refer servicing to
qualified service personnel.
Pulse Oximetry Interface Module is intended to be used in conjunction
Model 509
Components of this product and its associated accessories which may have
patient contact are free of latex.
Indicates a potentially harmful condition that can lead to personal injury.
Do NOT use the
Always turn the
Model 509
Model 509
If the monitor fails to respond as described, do not use it
Care should be exercised to assure continued peripheral
As with all pulse oximeters, inaccurate SpO
methemoglobin
xenon light source, or direct sunlight
Do NOT attach a sensor distal to a blood pressure cuff. Valid data
apply Y-Sensor tapes or wraps so tightly that circulation is restricted.
when it is wet due to spills or condensation.
if it appears to have been dropped or damaged.
sensor site after application.
2
Model 509
Model 509
is intended to be used for
in the presence of flammable
off and disconnect it from
and Pulse Rate
2
2
Model 509 Service Manual Rev. 00
Page 9

Indications and Usage
Patient Safety
2
CAUTION:
• Do not operate
• Do not operate
• Never sterilize or immerse the monitor in liquids.
• Do not sterilize or immerse sensors except as directed in this manual.
• No tension should be applied to any sensor cable.
• Do not store the monitor or sensors at temperatures less than
greater than 1
• Do not operate the monitor or sensors at temperatures less than
greater than 1
• Caution: Federal (U.S.A.) law restricts this device to sale, distribution, or use by
or on the order of a licensed medical practitioner.
• Overstretching the pulse oximeter finger sensor can damage the sensor and
potentially affect pulse oximeter readings. Do not stretch the finger sensor open
beyond the limit for which it was designed. Overstretching can be prevented:
avoid opening the sensor by any means other than squeezing the grips;
force the sensor onto large objects such as a bed rail.
• Electric shock hazard. Do NOT remove covers or panels. Refer servicing to
qualified service personnel.
• For continued protection against fire hazard, replace fuse only with those of the
same type and rating.
Indicates a condition that may lead to equipment damage or malfunction.
Model 509
Model 509
31 °
F (55 °C).
04 °
F (
when it is wet due to spills or condensation.
if it appears to have been dropped or damaged.
14 °
40 °
C).
F (-10 °C) or
50 °
F (10 °C) or
DO NOT
Rev. 00 Model 509 Service Manual
3
Page 10

2
Patient Safety
Indications and Usage
[This page intentionally blank.]
4
Model 509 Service Manual Rev. 00
Page 11

3
Front and Rear Panel Illustrations
3.1 Front Panel Illustration
AUDIO key
SET key
Adjustment keys
SpO
sensor input connector
2
AUDIO key-Press for two
minute silence. Press and
hold to permanently mute
audible alert. Press again to
cancel two minute silence or
audible alert mute.
SET key-Use to select
between alert limits, pulse
beep volume and alert
volume.
Alert Icon (visible only during alert)
SpO2 High Alert Limit displa
SpO2 Low Alert Limit display
Power indicator LED
SpO2 High Limit display-Upper limit value
displayed during normal monitoring.
Displays “ ” , “VOL”, “BEEP” or “AUTO”
depending upon the function selected by
the key.
Low Limit display-Lower limit value
SpO
2
during normal monitoring. Displa ys “”,
volume setting value, pulse beep value, or
“LMTS” depending upon the function
selected by the key.
ADJUSTMENT keys-Use to
adjust selected option’s
value.
SpO2 sensor input connectorFor connection of Novametrix
SuperBright series sensors.
Rev. 00 Model 509 Service Manual
Power indicator LED-Lights green when
the
Model 509
Alert Icon- Flashes red when an alert
condition is detected. This icon is visible
only when indicating an alert.
is powered.
5
Page 12
3
Front and Rear Panel Illustrations
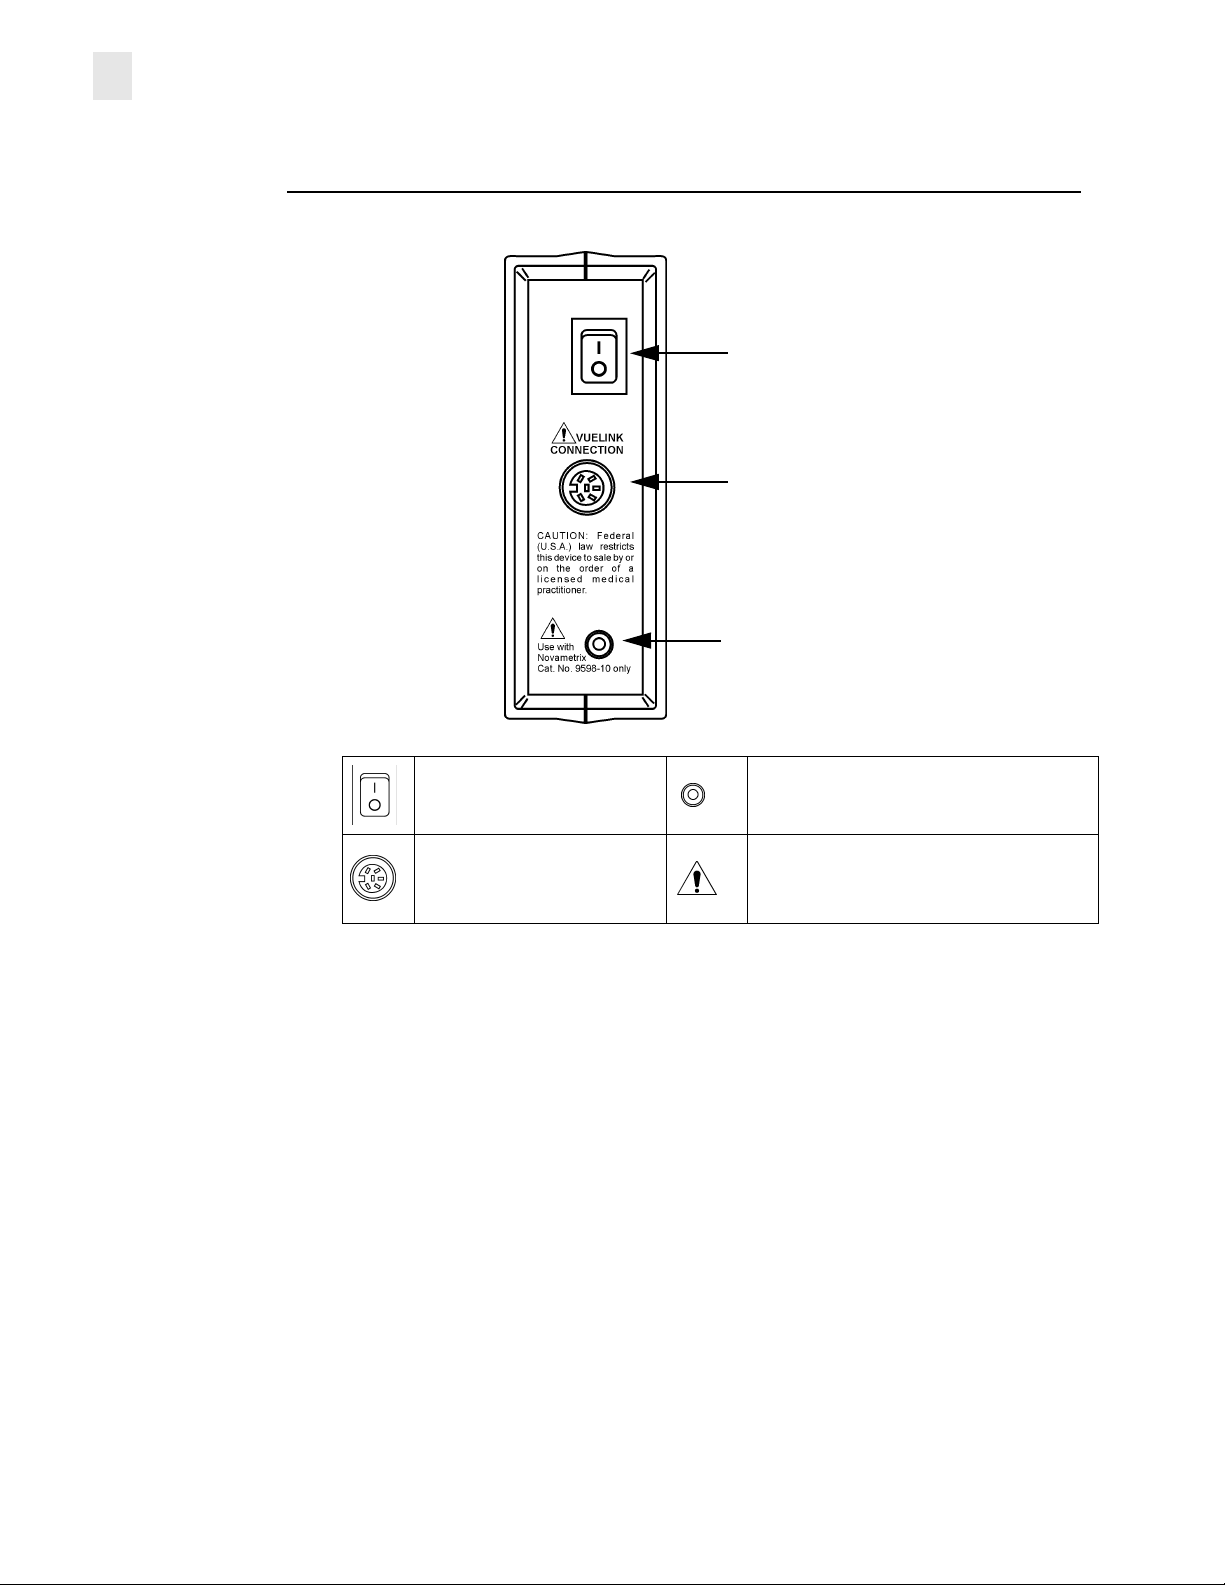
3.2 Rear Panel Illustration
Rear Panel Illustration
Power swi tch
Connection to VueLink module
Power jack
Power switch- “|” - ON turns
module on, “O” - OFF turns
module off.
VUELINK connectionConnects to the “black” end
of the VueLink interface
cable.
Power jack-Connect only to Novametrix
power supply catalog number 9598-10.
Attention symbol-Consult manual for
detailed information.
6
Model 509 Service Manual Rev. 00
Page 13

4
Electronic Theory of Operation
The electronic theory of operation of the Model 509 Pulse Oximeter monitor is detailed
in the subsections below. See
accompanying information.
Schematics and Assembly Drawings
4.1 2543 Main Board
4.1.1 Power Supplies and Voltage Reference
Refer to schematic sheet 3. Power for the monitor enters at J101 when SW1 is closed
(switched ON), the power is routed to the 2581 Power board through J102. Power then
returns to the board as an analog (V8.1) and a digital (VDD) supply. Diode D1 protects
against reverse bias, fuse F1 protects against over current conditions.
The LEDSRC supply which supplies the sensor’s LEDs is current regulated by IC2 and
further filtered by L3, C8 and C9. It is supplied by the analog supply V8.1 from the 2581
board. The VDD digital supply from the 2581 board is filtered by L2 which creates the
+VA supply. The -VA supply is created by IC3 which is a charge pump inverter. The +VA
and -VA supplies are needed by the bipolar analog circuits in the monitor.
Refer to schematic sheet 2. A positive reference voltage VREF2.5 is developed by IC8,
which is a +2.5 volts DC reference derived from the +VA supply. A negative reference
voltage is developed by IC23A (pin1) by inverting the +2.5 volt supply (schematic sheet
3). This negative reference is -VREF at TP6. The analog to digital converters IC9, IC10
and IC11use the VREF2.5, the -VREF (-2.5V DC) is used by the digital to analog
converter IC22.
on page 37. for
4.1.2 Sensor LED Drive Circuits
See schematic sheet 2. When the RDLED signal goes low (logic 0), Q3 turns off and
the VLED signal is divided down by R23 and R25, at IC7A (pin 3). FET Q2 is in turn
driven on by IC7A (pin 1). Current will flow from LEDSRC (J200 pin 7) through the red
LED in the sensor, through Q2, then through R20 to ground.
When RDLED
potential, this results in 0 volts at the output of IC7A (pin 1). FET Q2 is biased off, and
as a result, the Red LED in the sensor is off.
The Infrared LED drive circuit operates in the same manner as the Red LED drive
discussed above. The IRLED
controls Q8. The source of Q8 will control the Infrared LED of the sensor.
Refer to schematic sheet 3. The VLED line voltage is derived from IC23B pin 7 which
is controlled by the Digital to Analog Converter IC22. When the DACCS
Low IC22 is enabled. The data on lines D0-D7 now control the output of IC22 which in
turn control IC23Bs output on pin 7(VLED).
Rev. 00 Model 509 Service Manual
returns high (logic 1), Q3 is biased on, forcing IC7A pin3 to ground
signal activates Q4 which controls IC7B, this in turn
line is brought
7
Page 14

4
Electronic Theory of Operation
4.1.3 Photodiode Return Path
Refer to schematic sheet 2. Light, from the sensor’s red or infrared LED, shines through
the pulsating vascular bed (the patient’s finger, toe, etc.) placed between the LEDs and
the photodiode. Some of this light emerges from the tissue and impinges on the
photodiode, causing the photodiode to conduct current. IC4B pins 5-7 are set up as a
differential amplifier that converts this input current to a voltage at the amplifier output.
The sensors are wired such that photodiode current produces a positive voltage at
IC4B pin 7
The voltage at IC4B pin 7 is presented to an analog switch IC5B pin 6. This switch is
controlled at pin8 by INSIG
connected) except if the monitor is in a probe off patient condition or is undergoing its
self-test at system power up. The switch IC5C pins 9-11, controlled from SIGND
Ground) will be open (no connection between IC5C pins10 and 11) except as noted
above for the switch at IC5B pins 6-8. As a result, the IC4B pin 7 voltage passe
undisturbed to the high pass filter consisting of R14 and C15.
The ASAMP
to turn off and the charge at C15 passes through to IC4A pin 3. The ASAMP
to a logic high when neither LED is being driven, causing Q5 to turn on. With Q5
conducting, any charge at C15 is discharged to ground and the next pulse will charge
C15 from a known level. If it were not for Q5, any charge remaining on C15 from the
previous pulse or from ambient light reaching the photodiode would be added to the
charge from a new pulse—creating measurement errors.
If the signal at IC4A pin 1 is the product of the Red LED being turned on, then RDSAMP
will go low and close the switch at IC5A pins 2-3, thereby presenting the signal to a
sample and hold circuit consisting of R29 and C26 (that maintains the signal until next
sample pulse arrives), a gain stage, (IC6A), a filter network (C34 and R34), and finally,
to the red channel Analog-to-Digital Convertor (ADC) IC10.
If the signal at IC4A pin 1 is the product of the Infrared LED being turned on, then
IRSAMP
signal to a sample and hold circuit consisting of R28 and C25 (that maintains the signal
until next sample pulse arrives), a gain stage, (IC6B), a filter network (C29 and R38),
and finally, to the infrared channel Analog-to-Digital Convertor IC9.
2543 Main Board
1
.
(Input Signal), and will be closed (IC5B pins 6 and 7
(Signal
signal is active whenever either sensor LED is turned on. This causes Q5
line returns
will go low and close the switch at IC5D pins 14-15, thereby presenting the
4.1.4 Calibrating the 20-Bit Analog to Digital Converters (ADCs)
The 20-bit ADCs are calibrated as part of the system self-test which occurs each time
the monitor is turned on. At power up, the microprocessor sets the CAL line high. The
system calibrations input SC1 is set high. The CS5503 ADC will not operate while the
CAL line is high. On the falling edge of the CAL signal, the ADC will initiate a calibration
cycle. The type of calibration is determined by the state of the SC1.
The high at SC1 causes INSIG
INSIG
opens the switch at IC5B pin8 so that IC5B pins 6 and 7 are no longer
connected—disconnecting the returning photodiode signal from the rest of the circuitry.
The low SIGND
C15-R14 high pass filter (and thus the entire ADC input circuitry) is brought to ground
potential.
The CAL line (which went high at power up) is reset low and ADCs IC9 and IC10 begin
their calibration cycles. Because the analog input circuitry is grounded via SIGND
circuit offset voltages can be present at the (pin 9 AIN) inputs. The calibration cycle sets
1. The Model 509 uses SuperBright™ sensors. If a non-SuperBright™ sensor is connected, IC4b pin 7 will go negative.
8
Model 509 Service Manual Rev. 00
signal closes the switch at IC5C pin9 and as a result, the input to the
to go high and reset SIGND to a logic low. The high
, only
Page 15

2543 Main Board
4.1.5 20-Bit Analog to Digital Conversion
Electronic Theory of Operation
the ADC “zero” point to equal this voltage, thus compensating for any circuitry offsets.
The ADC then sets its “full scale” point to equal the voltage at its VREF (pin 10) input.
This completes the calibration cycle.
The ADC can now start sampling its input and converting it to a 20-bit digital word. The
processor resets SC1 to a logic low, causing IC5C pin9 to open and IC5B pin8 to close.
The photodiode signal can now reach the ADCs.
Refer to sheet 2 on schematic. Data from the red and infrared channels is sampled by
the 20-bit measurement ADCs, IC10 and IC9 respectively. The analog input at pin 9 is
converted to a digital representation with 20-bit resolution based on the input
magnitude.
The CS5503 converter continuously samples its input, converts the value to a digital
word, puts the word in its output buffer (overwriting previous buffer contents), then
repeats the process by again sampling its input. The frequency of the sample/convert/
overwrite-buffer sequence is based on the 3.072 MHz clock signal at the ADC pin 3
(F_ADCCLK) input.
The microprocessor starts a read cycle of the Infrared channel by bringing ADCIRCS
low. A Red channel read starts when ADCREDCS is brought low. On the falling edge
of these signals (CS
20 SDATA (Serial Data) output. The SDATA line connects directly to the
microprocessor’s serial input (RXS) pin. The remaining bits (in descending order) are
output from SDATA with subsequent falling edges of the Serial Clock (CLKS) input at
pin 19. The SDATA output automatically goes to a 3-state (high impedance) condition
after completing a word transmission, thus freeing the data line for other uses (i.e., the
other ADC channel).
The CLKS rate is significantly slower than the ADC sampling rate. As a result, the ADC
rewrites its output buffer with new information at a faster rate than the data can be read
from the buffer. No conflict occurs, however, because while CS
cycle), the ADC does not update its output buffer—the current word is not overwritten.
After the processor receives the entire word, it allows the convertor’s CS
and the ADC resumes its sample/convert/overwrite-buffer cycle.
lines), the output word’s MSB (most significant bit) appears at pin-
is low (during the read
to return high,
4
4.1.6 Sensor Status
The microprocessor monitors several sensor parameters in addition to the red and
infrared data channels. These parameters allow the software to determine when
certain error conditions are present in order to display the proper error code.
Refer to schematic sheet 2. The 8-to-1 multiplexor, IC12, decodes the A0MUX-A2MUX
input address lines and connects one of eight status parameter inputs to the multiplexer
output at IC12 pin 3. Resistor R47 and diode D13 prevent negative voltages from
reaching the input of IC11.
IC11 is an 8-bit serial analog-to-digital convertor. While the IC11 Chip Select ( ADC3CS
input is high, the CLK input and DOUT output are in 3-state mode. When ADC3
brought low (under processor control), the most significant bit (D7) of the previous data
conversion becomes available at the DOUT pin. The remaining bits (D6-D0) are shifted
out on subsequent falling edges of the CLK input. On the clock pulse following the one
that shifts out the least significant bit (D0), the CLK and DOUT lines are returned to 3state and IC11 performs a new conversion based on the input it receives from the IC12
channel selected by the A0MUX-A2MUX input address lines.
Rev. 00 Model 509 Service Manual
CS is
)
9
Page 16

4
Electronic Theory of Operation
The IC11 sample/convert/store-result cycle is based on internal chip timing and not the
CLKS input which (along with ADC3
line is free to return high once the IC11 cycle begins.
4.1.7 Sensor Status Parameters
The sensor status parameters input to the multiplexor IC12 are described below.
ADCVRD: This signal is not used as of this writing.
ADCVIR: This signal is not used as of this writing.
ADCFEDC: Photodiode DC Level.
Resistors R11, R12 and capacitor C14 form a voltage divider and low pass filter that
provide a measure of the mean DC level at the output of the photodiode amplifier IC4B
pin 7. This signal (IC12 pin 15) is used in determining ambient light interference. If this
line is examined while the sensor’s red and infrared LEDs are turned off, then any DC
level at IC4B pin 7 must be the result of ambient light impinging on the photodiode. If
the DC shift is in excess of limits set in the software, a Light Interference message
appears on the monitor’s display.
ADCLPWR: Sensor LED Supply Voltage.
This channel, at IC12 pin 12, monitors the sensor LED supply voltage through a voltage
divider consisting of R2 and R3 (sheet 3 on schematic). If a fault occurs that causes the
LED supply fuse F2 to blow, or if the sensor wires are shorted, this channel reports the
condition and the monitor will indicate the appropriate error condition.
ADCIRLED: Infrared LED Cathode Voltage.
A low pass filter/divider consisting of R17, R18 and C24 provides a means to measure
the cathode voltage of the sensor’s Infrared LED. When the channel at IC12 pin 5 is
sampled the monitor can determine if the LED is open circuit (zero volts at IC12 pin 5)
or operational (approximately 2.5 volts at IC12 pin 5).
ADCRDLED: Red LED Cathode Voltage.
A low pass filter/divider consisting of R15, R16, and C23 provides a means to measure
the cathode voltage of the sensor’s Red LED. When the channel at IC12 pin 4 is
sampled the monitor can determine if the LED is open circuit (zero volts at IC12 pin 4)
or operational (approximately 2.5 volts at IC12 pin 4).
2543 Main Board
CS) only controls serial data output. Thus the CS
4.1.8 Processor and Memory
Refer to page 1 on schematic. The Model 509 is controlled by IC14, an 8 bit
microprocessor running at 6.144 MHz. Crystal Y1 (12.288 MHz) controls the operating
frequency, system address lines are labelled as A0-A17, and system data lines are
labelled D0-D7.
The system program is contained in IC18, a 27C101 (1 MB) EPROM. When ROMCS
is brought low a read operation is performed on IC18. The ROMCS line is controlled by
the ME
address line A17 are low the ROMCS
data to be read from IC18.
System RAM is contained in IC17, a 256k SRAM. When both the RD
are brought low a read operation is performed on IC17. With both WR
a write operation will be performed. The RAMCS
Enable) line and address line A17. When address line A17 is brought high, and the ME
line brought low, IC20B pin 3 will go low activating the RAMCS line.
Refer to sheet 3 on schematic. The processor communicates to the Vuelink through
serial channel 0 on the microprocessor. The TX0 and RX0 lines from the processor are
converted to RS232 levels by IC13 as TXD0 and RXDI.
10
Model 509 Service Manual Rev. 00
line (Memory Enable) and address line A17. When both the ME line and
line will go low (IC20A pin 6), this enables the
and RAMCS lines
and RAMCS low
line is controlled by the ME (Memory
Page 17

2543 Main Board
4.1.9 Decoding
Electronic Theory of Operation
Refer to page 1 on schematic. A three to eight line decoder IC19, is used for decoding
various address, write, and I/O lines for the system. Address lines A4, A5, A6, and A7
along with the IOE
and LIR lines will enable one of the Q outputs of IC19.
Name Function
4
DACCS
Digital to Analog Converter
Chip Select
DISPC
Display Chip Select
KEYLATCH
DAC2CS
PORT1WR
Port #1 Write
PORT2WR
Port #2 Write
4.1.10 Processor Superviso
Refer to page 1 on schematic. A microprocessor supervisory integrated circuit, IC29
monitors the power supply, generates the Reset signals, and switches the power
supply to the SRAM over to battery on power down. The WDOG line under control of
the processor must be toggled before a specific time-out occurs (1.6 seconds)
otherwise the RESET
Therefore, the processor toggles the WDOG line periodically to avoid the reset which
ensures that the processor is working and not lost in a loop or task. If the VDD supply
drops below a certain level (4.65V) the RESET
system.
This line will enable writing to IC22.
This line enables the displays to be written to.
This line enables the input latch that reads the
keypanel.
This line enables the D/A converter which controls
the audio output level.
This line enables writing to IC16, which controls
the multiplexor lines, SC1 and CAL lines for the 20
bit A/D Converters, and all data converter chip
selects.
This line enables writing to IC15 which controls the
20 bit A/D converter sleep line ADCSLP
ALERT
line is brought low resulting in the system resetting itself.
line
line will also be brought low to reset the
and the
4.1.11 Front End Timing Signals
Refer to page 3 on schematic. A 14 stage divider IC27, acts as a timing sequencer. The
ADCCLK input is the clock input, the RESET line is the clear input, used for clearing
the chip at power up. The Q4-Q11 outputs of IC27 are divided down from the clock input
and feed IC28, the data sampling controller. The Q14 output of IC27 is used as an
interrupt that is generated roughly every 5 milliseconds (INT5MS).
The data sampling controller IC28 is a Programmable Electrically Erasable Logic
device (PEEL). The PEEL uses the outputs from IC27 and generates the front end
timing signals. These signals control the sensor LED drive and the photodiode’s return
path circuitry during normal operation and calibration.
The RESET and SC1 lines control when the outputs of IC28 are active, both these lines
must be low in order for IC28 to operate normally. The RESET line controls IC28 during
Rev. 00 Model 509 Service Manual
11
Page 18

4
Electronic Theory of Operation
power up, while the SC1 line is under processor control and will toggle when a probe
off patient alert exists and during the power up self test.
2543 Main Board
Signal Description
INSIG
Input Signal
RDLED
Red LED
IRLED
Infrared LED
SIGND
Signal Ground
ASAMP
Analog Sample
SYNC
Synchronization
IRSAMP
Infrared Sampling
RDSAMP
Red Sampling
4.1.12 System Output Ports
Refer to page 1 on schematic. There are two output latch chips IC15 and IC16, these
control various lines for system control. The first port IC16, enabled when PORT1WR
is high, controls the CSIO PEEL IC26, the analog multiplexor IC12, and selection of the
A/D converters. The second port IC15, enabled by the PORT2WR line, handles control
line ADCSLP
The output ports are selected by the decoding performed by IC19, IC20 & IC21 and the
line. The signals controlled by the ports are listed below with a brief description of
WR
their function.
and the ALERT line.
This line will enable signals from the
photodiode, or prevent signals from the
photodiode from reaching the detection circuitry.
Controls the signals for the Red LED in the
sensor.
Controls the signals for the Infrared LED in the
sensor.
This is used to short out the inputs of the
detection circuitry so that the system can
compensate for offsets.
This line is used to short out the capacitor used
in the sample and hold circuitry to avoid having
residual charge interfere with data sampling.
Synchronization signal, not used in this system.
Used for sampling the Infrared signal response
from the photodiode.
Used for sampling the Red signal response from
the photodiode.
Signal Description
AA0-AA1
SC1
CAL
A0MUX-A1MUX
Decode line for selecting ADCs.
Used for 20 bit ADC calibration.
De-activates the 20 bit ADCs prior to calibration.
Selects one of six sensor status channels that will
be switched to the serial A/D converter for conversion.
NEXT
ADCSLP
ALERT
12
Model 509 Service Manual Rev. 00
Used in decoding selection of ADCs.
ADC sleep line.
Alert line.
Page 19

2581 Power Board
4.1.13 Serial I/O Controller
Electronic Theory of Operation
Refer to page 1 on schematic. Digital data from the three Analog-To-Digital Convertors
SDATA is read by the CPU through its clocked serial data input (RXS) at IC14 pin 56.
The PEEL IC26 acts as the Clocked Serial Input/Output (CSI/O) Controller.
Except during power up or watchdog timer reset, IC27 pin 3 (sheet 3 on schematic)
provides an interrupt to the CSI/O controller in the form of a 5 millisecond period
square-wave input to IC26 pin 7 (INT5MS).
On the rising edge of INT5MS, a CPU interrupt request is generated when IC26 pin 18
(CPUINIT
(CKS) at IC26 pin 6 low. (This CKS line is inactive (high) unless a serial receive
operation is in progress.) The CPU also sets up the ADC decode lines AA1 and AA0 at
IC26 pins 5 and 4, and as a result, one of the ADC chip select lines (ADCIRCS
ADCREDCS
On the rising CKS signal a CLKS output pulse at IC26 pin 14 is sent as a serial clock
input to the ADC selected by the decode lines. Decode results are shown below.
) goes low. The CPU responds by sending the clock input to CSI/O controller
, ADC3CS) is brought low, and the CPUINIT line is disabled.
AA1 AA0 Decode
4
,
00
01
11
10
Successive CKS/CLKS pulses cause the ADC data to be shifted out of the ADC (most
significant bit first) along the serial data line (SDATA) to the CPU serial input (RXS) at
IC14 pin 56.
After receiving the correct number of bits for the ADC being read, the CPU changes the
AA1 and AA0 decode lines and exerts the Next line (NEXT
restarts the serial data shifting out of the newly selected ADC.
After all three ADCs have been read, the CPU sets the AA1 and AA0 decode lines to
exert the internal TEND signal and set the 8-bit ADC to the next channel (so that it has
time to settle before the next read of the ADC). This re-enables the CPUINIT line. At
this point the CSI/O controller is reset awaiting an INT5MS pulse to begin the cycle
again.
4.1.14 Audio Drive Circuitry
Refer to page 3 on schematic. Audible tones are generated by the Digital to Analog
Converter IC24 when both the WR
non-inverting amplifier IC25B which in turn drives Q7. Transistor Q7 boosts the current
of IC25B in order to drive transducer LS1.
Red LED 20-bit ADC
Infrared LED 20-bit ADC
Sensor Status 8-bit ADC
Internal CSI/O signal (TEND)
) at IC16 pin 12 low. This
and DAC2CS are low. The output of IC24 drives
4.2 2581 Power Board
Power from the external supply enters the board as VRAW through J1 and is converted
to a digital supply (VCC) by voltage regulator IC2 and an analog supply (V8.1) b
voltage regulator IC1. The analog supply is used as the supply for the LEDs in the
sensor (LEDSRC) and is also used by the audio circuitry. The digital supply, in addition
to supplying the digital circuitry is converted to bipolar supplies for some of the analog
circuitry in the monitor
Rev. 00 Model 509 Service Manual
13
Page 20

4
Electronic Theory of Operation
4.3 2542 Display Board
The display board contains two three digit LED displays and the keypanel latch. The
front keypanel connects to J203 and the main board connects through J202. Two
LEDS, one for power indication and the other for the alert icon are also located on the
display board.
Address line A2 controls which of the two displays is currently selected while address
lines A0 and A1 determine which digit of the selected display is being written to by the
processor’s data lines D0-D7. The WR
the displays (IC2 and IC3). The combination of RP1 pins 1and 6, R3 and Q1 inverts the
A2 signal for IC3, this enables A2 to either select IC2 or IC3 by changing states (this is
in accordance with the WR
The ALERT
alert icon (red). When power is applied to the monitor LED D2 illuminates green.
The membrane keypanel is decoded by IC1. The KEYLATCH
polling it to check if any of the four front panel keys has been depressed. The
appropriate output from IC1 is read by data lines D0-D3 (remaining lines are not
necessary and are tied to ground).
2542 Display Board
and DISPCS lines also control the selection of
, DISPCS and RESET lines).
line draws current through LED D1 when low, this illuminates the display’s
line enables IC1 b
14
Model 509 Service Manual Rev. 00
Page 21

5
Functional Tests
The Functional Test described below verifies overall functional integrity of the monitor
and sensors. If the monitor or sensors do not pass these tests, remove from use and
contact the Novametrix Service Department for repair/replacement assistance.
5.1 Equipment Required
1. HP Merlin System
2. 6904-00 HP Vuelink Module - Programmed for Novametrix Model 509
3. 6905-00 HP Adapter Cable
4. 8776-00 Novametrix Finger Sensor
5. 9598-10 Power Supply
5.2 Procedure
1. Connect the HP Merlin System to AC power and press the power on button.
2. Plug the HP Vuelink Module into one of the HP Merlin System bays.
3. Plug the HP Adapter Cable into the HP Vuelink Module.
4. Apply power to the Model 509 by switching the power switch from “O” to “|”
5. Verify a proper power up sequence. The alert limit displays “NMTX” and “509” followed
by the software revision. The alert led flashes and the high and low alert limits are
shown.
6. Press the Set key. Verify the high alert limit has an arrow beside it.
7. Using the Up Arrow and Down Arrow key’s change the high alert limit. Set the high
alert limit to 100.
8. Press the Set key again. Verify the low alert limit has an arrow beside it.
9. Using the Up Arrow and Down Arrow key’s change the low alert limit. Set the low alert
limit to 85.
10. Press the Set key again. Verify ALRM appears in the upper display. Set the Volume to
VOL4 (can be set from VOL1 to VOL7).
11. Press the Set key again. Verify BEEP appears in the upper display.
12. Press the Up Arrow key to set the Beep to VOL3 (can be set OFF or from VOL1 to
VOL7).
13. Connect the HP Adapter Cable to the Model 509.
Rev. 00 Model 509 Service Manual
15
Page 22

5
Functional Tests
Procedure
14. Press the HP Vuelink Module button.
15. Verify the Open Interface Saturation Information Page is displayed. Press the MAIN
SCREEN button on the HP Merlin System to display the full Merlin screen.
16. Connect the Finger Sensor to the Model 509. Place the Finger Sensor on your finger
and verify a Saturation and Pulse values are displayed on the HP Merlin screen along
with a Plethysmogram waveform.
17. Verify the HP Merlin displays a Plethysmogram waveform that is clean and free of any
drop out.
18. Remove your finger from the Finger Sensor. Verify “SPO2 Probe Off PT” message on
HP Merlin display, alert tone and flashing alert icon on Model 509.
19. Press the AUDIO key (Model 509) to silence the alert for two minutes (a beep will
sound). Verify the alert tone returns after two minutes. Press and hold the AUDIO key
for three seconds to permanently mute the alert one (two beeps will sound).
20. Disconnect the Model 509 from the HP Merlin system. Verify the Model 509 displays
a “Chk Com” and the Alert LED is flashing.
21. The test is complete. Power down the Model 509 by disconnecting the power supply
from the AC outlet. Disconnect the Model 509 from the HP Merlin system.
16
Model 509 Service Manual Rev. 00
Page 23

6
Accuracy Tests
The Accuracy Test verifies the performance accuracy of the Model 8100. This test is
typically performed in conjunction with (after) the “Functional Tests” on page 15. If the
monitor does not pass the accuracy test, contact the Novametrix Service Department
for repair/replacement assistance.
This procedure assumes the technician performs each step as indicated—leaving the
monitor in a known state prior to performing the next step. If steps are omitted o
performed out of order, be sure that the monitor is set to the correct state before
continuing.
6.1 Equipment Required
1. HP Merlin System
2. 6904-00 HP Vuelink Module - Programmed for Novametrix Model 509
3. 6905-00 HP Adapter Cable
4. TB500B Saturation Sensor Simulator (calibrated)
This is the same device used by the factory technicians to calibrate the monitor prior to
shipping. The TB500B is an updated version of the TB500A Test Box. The TB500A,
used in conjunction with adapter cable (Catalog No. 5453-00), may be substituted for
the TB500B in most parts of this test.
5. 9598-10 Power Supply
6.2 Procedure
1. Connect the HP Merlin System to AC power and press the power on button.
2. Plug the HP Vuelink Module into one of the HP Merlin System bays.
3. Plug the HP Adapter Cable into the HP Vuelink Module
4. Apply power to the Model 509 by switching the power switch from “O” to “|”
5. Verify a proper power up sequence. The alert limit displays “NMTX” and “509” followed
by the software revision. The alert led flashes and the high and low alert limits are
shown.
6. Press the Set key. Verify the high alert limit has an arrow beside it.
7. Using the Up Arrow and Down Arrow key’s change the high alert limit. Set the high
alert limit back to 100.
8. Press the Set key again. Verify the low alert limit has an arrow beside it.
Rev. 00 Model 509 Service Manual
17
Page 24

6
Accuracy Tests
Procedure
9. Using the Up Arrow and Down Arrow key’s change the low alert limit. Set the low alert
limit back to 85.
10. Press the Set key again. Set the Volume to VOL4.
11. Press the Set key again.
12. Press the Up Arrow key to set the Beep to VOL3.
13. Connect the HP Adapter Cable to the Model 509.
14. Connect the TB500B to the Model 509. Set the Signal Attenuation to “3” and the
Saturation to “100”.
15. Apply power to the Model 509 by switching the power switch from “O” to “|”
16. Press the HP Vuelink Module button.
17. Verify the Open Interface Saturation Information Page is displayed. Press the MAIN
SCREEN button on the HP Merlin System to display the full Merlin screen.
18. Press and hold the Audio Off key until a double beep is heard.
19. Set the TB500B Attenuation to “3”.
20. Verify the following Saturation values. For each setting verify a Pulse Rate of 60 ± 1.
Verify an audio beep consistent with the Pulse beat.
Saturation Setting Attenuation Tolerance Range
100 3 98 - 100
92 3 90 - 94
82 3 80 - 84
72 3 70 - 74
62 3 60 - 64
72 7 68 - 76
82 7 78 - 86
92 7 88 - 96
100 7 98 - 100
21. Disconnect the TB500B from the Model 509.
22. Disconnect the Model 509 from the HP Merlin system. Verify the Model 509 displays
a “CHK COM” and the Alert LED is flashing.
23. The test is complete. Power down the Model 509 by disconnecting the power supply
from the AC outlet. Disconnect the Model 509 from the HP Merlin system.
18
Model 509 Service Manual Rev. 00
Page 25

7
Electronic Tests
The Electronic Tests verify the calibration and operation of the electronic circuits within
the Model 509. These tests DO NOT need to be performed on a regular (preventative)
basis. Perform these tests only if the monitor fails to operate as expected or fails the
“Functional Tests” on page 15 and/or “Accuracy Tests” on page 17. The Electroni
Tests should be performed only by qualified service personnel.
The Electronic Tests require access to the internal components of the monitor. Refer to
“Assembly Exchanges” on page 25 for disassembly instructions.
CAUTION:
proper grounding procedures when handling the internal components to avoid
damage from static discharge.
If the monitor does not pass an Electronic Test, remove it from use and contact the
Novametrix Service Department for repair/replacement assistance.
This procedure assumes the technician performs each step as indicated—leaving the
monitor in a known state prior to performing the next step. If steps are omitted o
performed out of order, be sure the monitor is set to the correct state before continuing.
The Model 8100 contains static sensitive devices. Be sure to follow
7.1 Equipment Required
1. HP Merlin System
2. 6904-00 HP Vuelink Module - Programmed for Novametrix Model 509
3. 6905-00 HP Adapter Cable
4. 9598-10 Power Supply
5. 5530-00 TB500B Saturation Sensor Simulator*
This is the same device used by the factory technicians to calibrate the monitor prior to
shipping. The TB500B is an updated version of the TB500A Test Box. The TB500A,
used in conjunction with adapter cable (Catalog No. 5453-00), may be substituted for
the TB500B in most parts of this test.
6. 5942-00 Saturation Test Jack
7. 6573-48 Shorted Saturation Test Jack (safety checks)
8. 8776-00 Novametrix Finger Sensor
9. Hipot Tester*
10. DMM*
*Calibrated
Rev. 00 Model 509 Service Manual
19
Page 26

7
Electronic Tests
7.2 Procedure
Procedure
1. Connect the HP Merlin System to AC power and press the power on button.
2. Plug the HP Vuelink Module into one of the HP Merlin System bays.
3. Plug the HP Adapter Cable into the HP Vuelink Module.
4. Apply power to the Model 509 by switching the power switch from “O” to “|”
5. Verify a proper power up sequence. The alert limit displays “NMTX” and “509” followed
by the software revision. The alert led flashes and the high and low alert limits are
shown.
6. Measuring the following voltages:
Location Signal Name Voltage
TP1 VDD 5.00 V ± 0.2 V
TP2 +VA 5.00 V ± 0.2 V
TP3 -VA - 4.75 V ± 0.25 V
TP4 LEDSRC 7.00V ± 0.5 V
TP9 VREF 2.5 2.50 V ± 0.05 V
TP6 VREF -2.5 -2.50V ± 0.05 V
IC29-1 VBACK 5.00 V ± 0.2 V
** Use Test Point 5 (TP5) for ground reference
7. Jumper Test Point 12 to Test Point 13.
8. Connect the Saturation Test Jack to the Model 509 input connector.
9. Monitor IC4 pin 7. Verify 1.00VDC ± 50mV.
10. Monitor Test Point 10. Verify 2.00VDC ± 0.1V.
11. Monitor Test Point 11. Verify 2.00VDC ± 0.1V.
12. Remove the jumper and disconnect the Saturation Test Jack.
13. Press the Set key. Verify the high alert limit has an arrow beside it.
14. Using the Up Arrow and Down Arrow key’s change the high alert limit. Set the high alert
limit back to 100.
15. Press the Set key again. Verify the low alert limit has an arrow beside it.
16. Using the Up Arrow and Down Arrow key’s change the low alert limit. Set the low alert
limit back to 85.
17. Press the Set key again. Verify the Alert Volume setting is displayed.
18. Using the up and down arrow keys, set the alert volume to “VOL7”.
19. Press the Set key again. Verify the Beep Volume setting is displayed.
20. Using the up and down arrow keys, set the Beep Volume to “VOL5”.
21. Power down the main board by switching the power from "|” to “O”.
22. Measure IC17-28. Verify 2.50V to 3.50VDC.
20
Model 509 Service Manual Rev. 00
Page 27

Procedure
Electronic Tests
23. Connect the HP Adapter Cable to the Model 509.
24. Connect the TB500B to the Model 509. Set the Signal Attenuation to “3”, the Saturation
to “100” and turn it ON.
25. Apply power to the Model 509 by switching the power switch from “O” to “|”
26. Press the HP Vuelink Module button.
27. Verify the HP Merlin displays a “Preparing Operation Screen” followed by the “Gas
Analyzer Information Page”. Press the MAIN SCREEN button on the HP Merlin System
to display the full Merlin screen.
28. Set the TB500B Saturation to “62”. Verify the Model 509 Alert LED is flashing and an
audible alert is present.
29. Press the Audio Off key and verify the audible alert is gone. Verify a “2 min” message
si displayed on the left side of the HP Merlin waveform.
30. Wait approximately two minutes. Verify the audible alert returns and the “2 min”
message clears.
31. Press and hold the Audio Off key until a double beep is heard. Verify the audible alert
is gone. Verify a “Mute” message is displayed on the left side of the HP Merlin
waveform.
7
32. Return the TB500B Saturation to “100”.
33. Verify the following alert conditions. Verify the error message displayed in the upper left
hand corner of the HP Merlin display. Verify the Model 509 Alert LED is flashing and no
audible alert is heard. Verify any Saturation and Pulse values displayed on the HP
Merlin screen clear. Return the TB500B to the original setting after each error check
and verify the error condition clears and the Saturation and Pulse values return.
Atten Sat Switches Error Message After 10 seconds
3 100 None
3 0 SPO2 Low Signal SpO2 REPOS PROBE
3 100 Red Open SPO2 Probe Failed no change
3 100 IR Open SPO2 Probe Failed no change
3 100 Pwr Off SPO2 Insuf. Light SpO2 REPOS PROBE
3 100 TB Not Connected SPO2 Probe Discon no change
34. Verify the following Saturation values. For each setting verify a Pulse Rate of 60 ± 1.
Verify an audio beep consistent with the Pulse beat.
Saturation Setting Attenuation To le ra nc e R an g e
100 3 98 - 100
92 3 90 - 94
82 3 80 - 84
72 3 70 - 74
62 3 60 - 64
72 7 68 - 76
82 7 78 - 86
92 7 88 - 96
100 7 98 - 100
35. Disconnect the TB500B from the Model 509.
Rev. 00 Model 509 Service Manual
21
Page 28

7
Electronic Tests
7.3 Safety Testing
Safety Testing
36. Disconnect the Model 509 from the HP Merlin system. Verify the Model 509 displays a
“Chk Com” and the Alert LED is flashing.
37. The test is complete. Power down the Model 509 by disconnecting the power supply
from the AC outlet. Disconnect the Model 509 from the HP Merlin system.
1. Connect the 6573-48 Shorted Saturation Test Jack to the Model 509 input.
2. Using the Hipot apply 2.5KV from the shorted hot / neutral to earth ground on the power
supply. Wait approximately one minute. Verify there is no arcing or leakage during the
test period.
3. Using the Hipot apply 2.5KV from the shorted hot / neutral on the power supply to the
6573-48 Shorted Saturation Test Jack. Wait approximately one minute. Verify there is
no arcing or leakage during the test period.
4. Using the Hipot apply 500V from earth ground on the power supply to the 6573-48
Shorted Saturation Test Jack. Wait approximately one minute. Verify there is no arcing
or leakage during the test period.
5. Measure the AC leakage from the 6573-48 Shorted Saturation Test Jack to the hot side
of the AC line. Verify the leakage current is < 50 uA.
22
Model 509 Service Manual Rev. 00
Page 29

8
Maintenance
8.1 Maintenance Schedules
The electronic circuits within the Model 509 do not require scheduled calibration o
service
1
.
8.2 Cleaning and Sterilization
Follow the cleaning and sterilization instructions listed below to clean and/or sterilize
the
Model 509
8.2.1 Model 509 Module
• Turn the module off and unplug the DC supply from the AC Mains before
cleaning.
• The module can be cleaned and disinfected by wiping with solutions such as a
70% isopropyl alcohol, 2% glutaraldehyde, or 10% bleach solution. Then wipe
down with a water dampened clean cloth to rinse. Dry before use.
• Do not immerse the module.
• Do not attempt to sterilize the module.
8.2.2 Finger Sensor
• The sensor can be cleaned and disinfected by wiping with solutions such as a
70% isopropyl alcohol, 2% glutaraldehyde, or 10% bleach solution. Then wipe
down with a water dampened clean cloth to rinse. Dry before use.
• Ensure the Finger Sensor is clean and dry before reuse.
• Do not immerse the Finger Sensor.
• Do not attempt to sterilize the Finger Sensor.
• After cleaning the finger sensor, verify that the sensor is physically intact, with no
broken or frayed wires or damaged parts. Make certain that the connectors are
clean and dry, with no signs of contamination or corrosion. Do not use a broken
or damaged sensor or one with wet, contaminated or corroded connectors.
• Perform a Quick Check to verify the integrity of the sensor.
and its accessories.
8.2.3 Y-Sensor
• The Y-Sensor may be immersed - up to, but not including, the connector, in a 2%
glutaraldehyde solution, or 10% bleach solution. Refer to the manufacturer’s
instructions and standard hospital protocols to determine recommended times
for disinfection and sterilization.
1. At the customer’s request, Novametrix will provide repair and calibration services under terms of a Service Contract. Contact the Novametrix Service Department for contract details.
Rev. 00 Model 509 Service Manual
23
Page 30

8
Maintenance
Cleaning and Sterilization
• Rinse thoroughly with water and dry before use (do not rinse connector).
• Do not attempt to sterilize the Y-Sensor except as stated above.
• Do not immerse connector on the Y-Sensor.
• After cleaning or sterilizing the Y-Sensor, verify that the sensor is physically
intact, with no broken or frayed wires or damaged parts. Make certain that the
connectors are clean and dry, with no signs of contamination or corrosion. Do not
use a broken or damaged sensor or one with wet, contaminated or corroded
connectors.
• Perform a Quick Check to verify the integrity of the sensor
8.2.4 Y-Strip Tapes
• Treat Y-Strip Tapes in accordance with hospital protocol for single-patient use.
8.2.5 Single Patient Use Sensors
• Treat Single Patient Use sensors in accordance with hospital protocol for single
patient use.
8.2.6 Ear Clip
• Clean the ear clip with a cloth dampened with 70% isopropyl alcohol. After
cleaning wipe the ear clip down thoroughly with a clean water dampened cloth to
rinse.
• Do not immerse the ear clip.
24
Model 509 Service Manual Rev. 00
Page 31

Assembly Exchanges
cover screws
Audio tube
8.3 Assembly Exchanges
Maintenance
The disassembly instructions below are intended as a guide to enable assembly
exchanges if necessary. There are no user serviceable parts inside. Disassembly
should be performed by qualified service personnel only.
CAUTION: The Model 509 contains static sensitive devices. Be sure to follow proper
grounding procedures when handling the internal components to avoid damage from
static discharge.
1. Disconnect any sensor and external supply from the Model 509. Remove the two (2)
cover screws and set aside.
8
2. Turn unit over to rest on the Velcro side. Carefully pull the cover side that contains the
instructions (and speaker holes) out. Be careful not to lose the audio tube.
Rev. 00 Model 509 Service Manual
25
Page 32

8
Maintenance
Battery Replacement
3. The 2581 Power Board, which is attached to the cover, is connected to the Main Board
by a cable. The internal circuit boards can now be accessed. The display board and
keypanel assembly can be removed and the main board is secured to the cover by four
(4) screws.
Audio transducer
Main board
Display board
Keypanel
4. When reassembling the Model 509 be sure that the audio tube is set in place over the
transducer and that the top cover is aligned to the tube before securing. Ensure there
are no loose objects inside and that all cables are secure when reassembling.
8.4 Battery Replacement
The main board in the Model 509 contains a 3 volt 190mAH Lithium battery (PN:
400047) that is used to store the user settings when the monitor is turned off. If the
monitor fails to retain any user settings (when turned off) then this internal battery may
need replacement. Replace the main board Lithium battery only with same type and
rating.
1. The Model 509 must be disassembled, the main board removed, then the battery
desoldered from the main board.
2. Solder the new battery in place, be sure to observe proper plarity when replacing the
new battery.
Lithium battery
26
Model 509 Service Manual Rev. 00
Page 33

Software Update Instructions
Observe pin 1 alignment
Ribbon cable
3. Refer to Assembly Exchanges on page 25 for instructions on reassembling the montior.
8.5 Software Update Instructions
1. Disconnect any sensor, cable and external supply from the Model 509.
2. Disassemble the monitor to expose the main board.
3. Carefully remove EPROM IC18 from its’ socket. Disconnecting the ribbon cable from
Maintenance
The following instructions are for updating the Model 509’s software. Refer to any
additional instructions that may accompany the software update package for changes
in the procedure or other pertinent information.
J201 will allow easier access to the chip.
8
4. Install the new EPROM into the socket, be sure to observe peroper pin 1 alignment with
28 pin DIP packages. The Model 509 will not operate unless the chip is properly
installed.
5. Reconnect the ribbon cable to J201, then reassemble the monitor.
Rev. 00 Model 509 Service Manual
27
Page 34

8
Maintenance
Software Update Instructions
[This page intentionally blank.]
28
Model 509 Service Manual Rev. 00
Page 35

9
Troubleshooting
Conditions may occur that require certain status messages to be displayed. These
status messages that will appear on the Hewlett Packard Patient monitor’s display are
listed below. All these messages relate to operation of the
Interface Module and its sensors.
9.1 Status Messages
9.1.1
Status Message Condition/correction
SpO2 PROBE OFF PT Sensor disconnected from patient, improperly applied, or
SpO
REPOS. PROBE
2
SpO
NOISY SIGNAL
2
PROBE DISCON 1. Sensor is disconnected from the monitor.
SpO
2
Model 509
placed on an area too translucent for proper sensor operation.
Reposition sensor.
1. Reposition probe. Monitor not receiving valid signals from
sensor. May be caused by excessive motion, cardiac
arrhythmia or other situations leading to poor signal. Check
patient status, reposition sensor.
2. Sensor is placed on too thick of a site. Reposition the
sensor on a thinner (less opaque) section of tissue.
2. Sensor is faulty. Remove sensor from use and contact
qualified service personnel.
Pulse Oximetry
SpO2 PROBE FAILED Sensor faulty. Remove sensor from use and contact qualified
service personnel.
SpO
INSUF. LIGHT 1. Insufficient Light. Sensor placed on a site too thick (or
2
SpO
LIGHT INT Light Interference. Ambient light sources (sunlight, warming
2
SpO
LOW SIGNAL Low Signal Strength. Pulse strength as detected by sensor is
2
MUTE Displayed in the left corner of the pleth window when user
2 MIN Displayed in the left corner of the pleth window if user enables
Rev. 00 Model 509 Service Manual
opaque) for adequate light transmission. Reposition sensor.
2. Incompatible sensor. Connect only Novametrix
SuperBright™ sensors to the
lights, etc.) are interfering with sensor light sources. Shield the
sensor from ambient light sources.
too weak for proper monitor operation. Reposition sensor.
enables Audio Off mode by pressing and holding the key.
2 minute silence mode by pressing the key.
Model 509
.
29
Page 36

9
Troubleshooting
Status Messages
Chk Co
(displayed on
If the
Model 509
Model 509
detects an internal error, then a numerical code will be displayed in the
Connection between the VueLink module and the
)
has been disturbed. Reconnect cables, if condition is not
corrected remove the module from use and contact qualified
service personnel.
NOTE: If the
VueLink module and then disconnected, or a communications
error has occurred, this message will be displayed on the
Model 509
to reset and proceed with monitoring.
Model 509
. Push the button on the front of the VueLink module
had previously been connected to a
Model 509
PULSE RATE display. The numerical codes with the error detected are listed below.
Code Problem Code Problem
1
RAM Self Test Failed
3
ROM Self Test Failed
Stack pointer error-not at top of
10
stack
11
MMU error-not at base page
12
250 ms interrupt-illegal task
13
Stack error-stack overflow
14
Display buffer overflow
15
Front end offset error
20
10 ms overrun
21
250 ms overrun
22
illegal int1 interrupt
23
illegal int2 interrupt
24
illegal prt1 interrupt
25
illegal dma0 interrupt
26
illegal asc0 interrupt
27
illegal nmi interrupt
Trap error-illegal command
28
executed
40
Unknown error
30
Model 509 Service Manual Rev. 00
Page 37

10
Specifications
Specifications for the
informational purposes only, and are subject to change without notice.
Model 509 Pulse Oximetry Interface Module
10.1 SpO2 (Oxygen Saturation)
• Range: 0-100%.
• Accuracy: (1 standard deviation) 80-100% ± 2%, 0-79% unspecified.
• Averaging Time: fixed at 8 seconds.
• Audio: Pitch of pulse tone varies with SpO
• Continuous numerical display of SpO
Monitor Display.
10.2 Pulse Rate
• Range: 30-250 beats/min.
• Accuracy: (1 standard deviation) ±1% of full scale.
• Averaging Time: 8 seconds, fixed.
• Continuous numerical display of pulse rate value on Hewlett Packard Patient
Monitor Display.
10.3 General Specifications
are listed for
value and high alert limit setting.
2
value on the Hewlett Packard Patient
2
10.3.1 Alerts
•SpO2 Alert Limits: Displayed on
selectable for high and low SpO
• 2 Minute Silence: When key is pressed, alarms are deactivated for two
minutes.
• Audio Off: Press and hold the key for three seconds to deactivate audible
alerts.
• Status Messages: Displayed on the Hewlett Packard Patient Monitor.
• Alert and Pulse Beep Volume: Operator selectable.
10.3.2 Display
• Numerics: Green Alpha Numeric LED’s on
• Plethysmogram: Continuously displayed on the Hewlett Packard Patient
Monitor.
Rev. 00 Model 509 Service Manual
Model 509
.
2
module. Automatic or manually
Model 509
front panel.
31
Page 38

10
Specifications
General Specifications
10.3.3 EMC Emissions
• EN55011:1991, Class A. Classification for Radiated and Conducted Emissions
10.3.4 EMC Immunity
• EN60601-1-2:1993. Collateral standard: Electromagnetic compatibility requirements and test. Includes; IEC801-2 Electrostatic Discharge
Requirements, IEC801-3 Radiated Electromagnetic Fields, IEC801-4 Electrical
Fast Transient Burst.
• Electomagnetic fields up to 3 V/m will not adversely affect system performance.
10.3.5 Physical
• Operating Environment: 50 °F - 104 °F (10 °C - 40 °C), 0-90% relative humidity
(non-condensing).
• Size: Height 5 in. (12.7 cm), width 1.5 in, (3.81 cm), depth 5.25 in. (13.34 cm).
• Weight: 12 ounces (0.34 kg).
10.3.6 Electrical
• Power: 100-120 VAC, 60 Hz, 8 VA.
32
Model 509 Service Manual Rev. 00
Page 39

11
6900-00 Pulse Oximetry Interface
LINE PART NO REV QPA DESCRIPTION
6900-01 Main Assy Model 509
LINE PART NO REV QPA DESCRIPTION
Parts Lists
001 1217-32 03 1 REPAIR LABEL
002 6070-32 03 1 LABEL, SERIAL NUMBER
003 6900-01 03 1 MAIN ASSY, MODEL 509
005 6900-09 03 0 OVERALL WIRING DIAGRAM
011 9598-10 06 1 120V AC ADAPTOR
013 6926-32 03 1 LABEL, QUICK START GUIDE
015 140055 03 1 VELCRO, HOOK, 1" W, WHITE
016 140056 03 1 VELCRO, LOOP, 1" W, WHITE
017 9026-32 03 1 LABEL, "MANUFACTURED IN US”
001 2542-01 01 1 DISPLAY BOARD ASSY, FRONT
002 2543-01 01 1 MAIN BOARD ASSY, MODEL 509
003 6711-27 01 1 MEMBRANE KEYPANEL
004 6884-32 01 1 FACEPLATE, REAR PANEL
005 6921-01 01 1 CABLE ASSY, SPO2 INPUT
006 6933-32 01 1 LABEL, BATTERY REPLACEMEN
007 6955-01 01 1 BOTTOM COVER WITH 4 SCREWS
008 6959-10 01 1 TUBE, AUDIO, MODEL 509
009 2581-01 02 1 POWER BOARD ASSY
010 9513-01 02 1 CABLE ASSY, POWER, 509
012 6955-11 01 1 TOP COVER MODIFICATION
013 284003 01 0 SCREW, NO. 4 x 1/4L
014 285039 01 0 WASHER, STAR, .594 ID
015 600071 01 1 RIBBON CABLE ASSY, 20 COND
2542-01 Display Board Assy, Front
PART NO REV QPA DESCRIPTION
212542 00 1 CONNECTOR, 20 PIN, HEADER
485510 00 1 VN10LM VMOS F.E.T.
Rev. 00 Model 509 Service Manual
33
Page 40

11
Parts Lists
2543-01 Main Board Assy,
PART NO REV QPA DESCRIPTION
486680 00 1 IC, MM74HC573AN-
2542-02 00 1 FAB, DISPLAY BOARD, FRONT
472205 00 1 RESISTOR, 1.21K OHM, 1/4W
482596 00 1 LED, HLMP-C100, RED
2542-03 00 0 SCHEMATIC, DISPLAY BOARD
482518 00 1 LED, HLMP-3502, GREEN, PC
474107 00 1 RESISTOR PACK, 1K, 2%
211 92 1 0 0 4 CO N N E CT O R , 9 P IN , R E C EPTACL E
474113 00 1 RESISTOR PACK, 10K, 5%
280233 00 0 SPACER, LED, FOR 2 LEADS
154016 00 3 CAPACITOR, .1UF, 50V, 10%
211 63 5 0 0 1 CO N N E CT O R , 6 P IN , R E C EPTACL E
470030 00 1 RESISTOR, 330 OHM, 1/4W
482606 00 2 DISPLAY, DOT MATRIX
470034 02 1 RESISTOR, 680 OHM, 1/4W
2543-01 Main Board Assy,
LINE PART NO REV QPA DESCRIPTION
000 472200 03 1 RESISTOR, 5.6 OHM, 1/4W
000 154111 03 3 CAPACITOR, .1UF, l6VDC
000 154074 03 1 CAPACITOR, 1.5UF, 25VDC
000 212542 03 1 CONNECTOR, 20 PIN, HEADER
000 484546 03 1 VOLTAGE CONVERTER, LTC104
000 180034 03 1 FERRITE FILTER, 4 LIN
000 484060 03 1 TRANSISTOR, MMBT3904T
000 211721 03 1 CONNECTOR, 7 PIN, HEADER
000 180029 03 3 INDUCTOR, 50MHZ CUT-OFF F
000 486333 03 1 IC, HD64180RCP-6X, 8-BIT
000 486334 03 1 IC, MC14051BD, 8-CH
000 2543-02 03 1 FAB, MAIN BOARD, 509
000 474165 03 8 RESISTOR, 10K OHM, 1/8W
000 474220 03 1 RESISTOR, ZERO OHM, 1/4W
000 230023 03 1 CRYSTAL, 12.288 MHZ
000 485546 03 4 TRANSISTOR, VN0605T
000 486 33 7 03 1 IC, LT118 1AC S , R S 2 32 D U A L
000 484541 03 1 VOLTAGE REGULATOR, LM317L
000 486329 03 1 IC, SN74HC32D, QUAD 2-IN.
000 211640 03 1 CONNECT OR , 6 PI N , R E C EPTACL E
000 486776 03 1 IC, AD7528JP, 8-BIT D-A C
000 474175 03 5 RESISTOR, 3.92K OHM, 1/8W
000 512006 03 1 SWITCH, ROCKER, 3 POSITlON
000 515082 03 1 FUSE W FUSEHOLDER, 1/2A
000 154085 03 4 CAPACITOR, 47PF, 100VDC
000 472274 03 1 RESISTOR, 26.7 OHM, 1/4W
000 474160 03 1 RESISTOR, 5.11K OHM, 1/8W
34
Model 509 Service Manual Rev. 00
Page 41

2543-01 Main Board Assy,
LINE PART NO REV QPA DESCRIPTION
000 481035 03 1 DIODE, ZENER, BZX84C7V5L
000 486320 03 1 IC, SN74HC14D, HEX SCHMITT
000 515077 03 1 FUSE, 1/16A, 125V, VERY FAST
000 486324 03 1 IC, DG444DY, QUAD SPST CM
000 486319 03 1 IC, MC14020BD, 14-BIT BIN
000 154078 03 1 CAPACITOR, 1000PF, 50VDC
000 486794 03 1 IC, PM7524FS
000 481546 03 7 DIODE, SWITCHING, SURF MT
000 481547 03 5 DIODE, BAT54, HOT CARRIER
000 474166 03 19 RESISTOR, 100K OHM, 1/8W
000 180022 03 1 INDUCTOR, 10UH, 10%, SURF
000 472198 03 1 RESISTOR, 3.3 OHM, 1/4W
000 484522 03 1 VOLTAGE REGULATOR, LM2940
000 486332 03 2 IC, AD7703BR
000 215059 03 1 SOCKET, 32 PIN, LOW PROFILE
000 474169 03 1 RESISTOR, 7.5K OHM, 1/8W
000 210141 03 1 CONNECTOR, DC PWR JACK
000 154082 03 3 CAPACITOR, 22PF, 100V
000 481552 03 1 DIODE, MBRS340T3, SCHOTTKEY
000 154072 03 49 CAPACITOR, .1UF, 50V, 10%
000 486788 03 1 IC, LT1019CS8-2.5, PREC V
000 180019 03 1 INDUCTOR, 100UH, 10%, SURF
000 474186 03 1 RESISTOR, 15K OHM, 1/8W
000 474153 03 16 RESISTOR, 42.2K OHM, 1/8W
000 487084 03 4 IC, OP-282GS, DUAL JFET
000 474138 03 12 RESISTOR, 100 OHM, 1/8W
000 130016 03 1 TRANSDUCER, AUDIO
000 486795 03 1 IC, TLC549ID
000 486321 03 1 IC, SN74HC138D
000 154080 03 7 CAPACITOR, 47UF, 10VDC
000 216029 03 0 TEST POINT, SPRING LOADED
000 5965-07 03 1 PROGRAM, PEEL ASSY, CSIO
000 400047 03 1 BATTERY, 3V, 190M AH, LITH
000 5966-07 03 1 PROGRAM, PEEL ASSY, TIMING
000 487086 03 1 IC, LTC694C58, UPROCESSOR
000 485532 03 2 TRANSISTOR, 2N7002T1
000 180011 03 1 FERRITE BEAD, 22 AWG TCW
000 486323 03 2 IC, SN74HC573DW
000 281211 01 0 SCREW, 2-56 X 1/4L, SELF
000 2543-03 01 0 SCHEMATIC, MAIN BOARD
000 6923-07 01 1 PROGRAM, EPROM ASSY, SYST
000 2543-04 01 0 TEST PROCEDURE, MAIN BOARD
000 2543-17 01 1 MAIN BOARD SUBASSY
000 211414 03 1 CONNECTOR, 4 PIN, PLUG
000 474184 03 1 RESISTOR, 39.2 OHM, 1/8W
001 486790 03 1 IC, TLE2022CD, DUAL OP AMP
002 180030 03 1 INDUCTOR-CAP, 4700PF, 50V
Parts Lists
11
Rev. 00 Model 509 Service Manual
35
Page 42

11
Parts Lists
2581-01 Power Board Assy,
LINE PART NO REV QPA DESCRIPTION
003 474172 03 10 RESISTOR, 10 OHM, 1/8W, 1
004 154081 03 3 CAPACITOR, 100PF, 100V, 1
005 154079 03 1 CAPACITOR, 10UF, 25V, 10%
006 474136 03 4 RESISTOR, 1K OHM, 1/8W, 1
2581-01 Power Board Assy,
LINE PART NO REV QPA DESCRIPTION
001 2581-02 1 FAB, POWER BOARD
007 152065 01 2 CAPACITOR, 10UF, 20%, 25V
007 154079 2 CAPACITOR, 10UF, 25V, 10%
008 154016 01 2 CAPACITOR, .1UF, 50V, 10%
008 154072 2 CAPACITOR, .1UF, 50V, 10%
009 154142 01 2 CAPACITOR, 47UF, 20%, 16V
009 154080 1 CAPACITOR, 47UF, 10VDC
010 211414 1 CONNECTOR, 4 PIN, PLUG
012 281500 01 0 NUT, HEX, NO. 4-40, STEEL
013 284200 01 0 #4-40 X 1/4 SLOTTED BINDING
014 285000 01 0 LOCK WASHER, NO. 4, INTER
015 472058 01 2 RESISTOR, 100K OHM, 1/4W
015 474166 2 RESISTOR, 100K OHM, 1/8W
016 472137 01 1 RESISTOR, 562K OHM, 1/4W
016 472294 1 RESISTOR, 562k OHM, 1/4W
017 474005 01 2 RESISTOR, 5 OHM, 1W, 5%
017 474340 2 RESISTOR, 4.7 OHM, 1W, 1%
018 484522 01 1 VOLTAGE REGULATOR
018 484578 1 V RGLTR, 5V OUT
019 484580 01 1 V RGLTR, ADJ MICROPWR
019 484579 1 V RGLTR, 1.23V-29V OUT
020 606401 01 0 #24 BUSS WIRE
021 152096 1 CAPACITOR, 220UF, 35V
36
Model 509 Service Manual Rev. 00
Page 43

12
Drawing Description
6900-00 Pulse Oximetry Interface Module, Model 509
6900-01 Main Assy, Model 509
6900-09 Overall Wiring Diagram, Model 509
Schematics and Assembly Drawings
6921-01 Cable Assy, SpO
2543-01 Main Board Assy, Model 509 (2 sheets)
2543-03 Schematic, Main Board, Model 509 (3 sheets)
2542-01 Display Board Assy, Front Panel, Model 509
2542-03 Schematic, Display Board, Front Panel, Model 509
2581-01 Power Board Assy, 509
2581-03 Schematic, Power Board, 509
6711-27 Membrane Keypanel, Model 509 (2 sheets)
Input, Model 509
2
Rev. 00 Model 509 Service Manual
37
Page 44

12
Schematics and Assembly Drawings
[This page intentionally blank.]
38
Model 509 Service Manual Rev. 00
Page 45

Page 46

Page 47

Page 48

Page 49

Page 50

Page 51

Page 52

Page 53

Page 54

Page 55

Page 56

Page 57

 Loading...