

Page 1

NovaJet® PRO 600e Quick Start Guide
P/N 210058-03 Rev. AA
(text P/N 210637-1, Rev. C)
Copyright ENCAD, Inc. 1998.
ENCAD
Outdoor Matched System are trademarks of ENCAD, Inc.
Other trademarks and registered trademarks are the property of their respective
owners.
No part of this manual may be copied or distributed, transmitted, transcribed,
stored in a retrieval system, or translated in any human or computing language, in
any form or by any means, electronic, mechanical, magnetic or otherwise, or
disclosed to a third party without the express written permission of:
ENCAD, Inc., 6059 Cornerstone Court West, San Diego, CA 92121, U.S.A.
REVISION HISTORY
Rev. AA October 1998
®
, NovaJet®, Quality Imaging Supplies, Extreme Color Printing, and Graphic
Page 2

NovaJet PRO 600e
Contents
Unpacking your printer .............................................................................3
Loading Windows Drivers and Macintosh ENCAD Print Utility (EPU)........8
Using the control panel........................................................................... 10
Choosing menu functions .......................................................................10
Setting the language ..............................................................................10
Load ing me dia........................................................................................ 1 1
Moving the carriage ................................................................................12
Installing the cutter.................................................................................1 2
Priming the ink delivery lines .................................................................. 15
Printing the color test ............................................................................ 18
Printing the prime pattern .......................................................................18
Aligning the ink cartridges ...................................................................... 2 0
Cartridge recognition ..............................................................................21
Quality Imaging Supplies™ ....................................................................22
2 Quick Start
Page 3
NovaJet PRO 600e
NovaJet PRO 600e Quick Start
Congratulations on your purchase of a NovaJet PRO 600e wide format color printer. This
guide gives you details on the following:
• unpacking and assembling the printer
• loading media
• filling ink reservoirs
• installing ink cartridges
• installing the media cutter
• installing the driver software
• testing ink cartridges.
Unpacking your printer
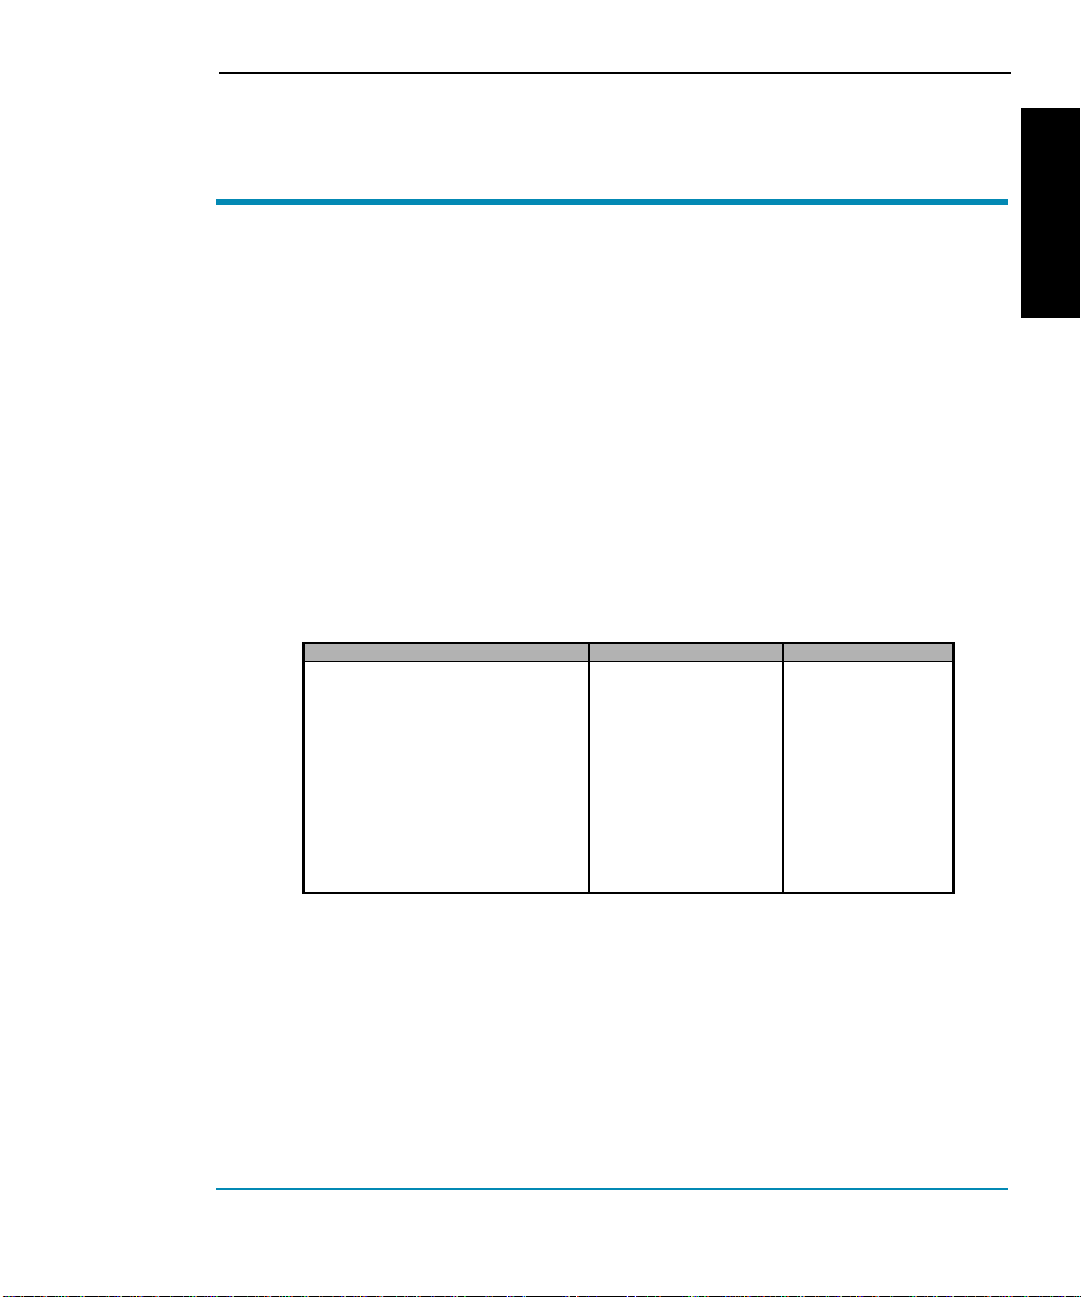
NovaJet PRO 600e printers are shipped in three boxes. The contents are listed in the table
below .
Box 1 Box 2 Box 3
Printer with four ink reservoirs.
Accessories bo x which includes
the fo llow ing:
• quick start guide;
• users guide, installation
instructions and software
drivers on CD-RO M ;
• ink reservoirs;
• five cartridge tube needles;
• screw driver;
• stand sc rews;
• loopback cable; and
• warranty card.
•
P rinte r stand w ith
integ rated m ed ia
feeding/takeup
mech anism ;
• dryer;
• 2” diameter m edia
cores; and
• NovaPrime.
•
Four ink
cartridges;
•
po wer cords;
•
printed users
guide;
•
sa m ple m edia;
and
•
one 500 m l
bottle of each
ink color (four
colors).
ENGLISH
Before starting assembly, you should verify that all the items on the lists are present. If
not, contact your sales representative or ENCAD. You will need to provide an IEEE 1284
parallel cable for connecting to a PC or an ImageWriter II serial cable for connecting to a
Macintosh.
The printer is quite large and heavy. Two people (or a forklift) are recommended to move
the box. Before assembly, you may want to measure halls and elevators to determine
whether the unit should be assembled in the area where it will be used.
Quick Start 3
Page 4
NovaJet PRO 600e
Assembling the stand and printer
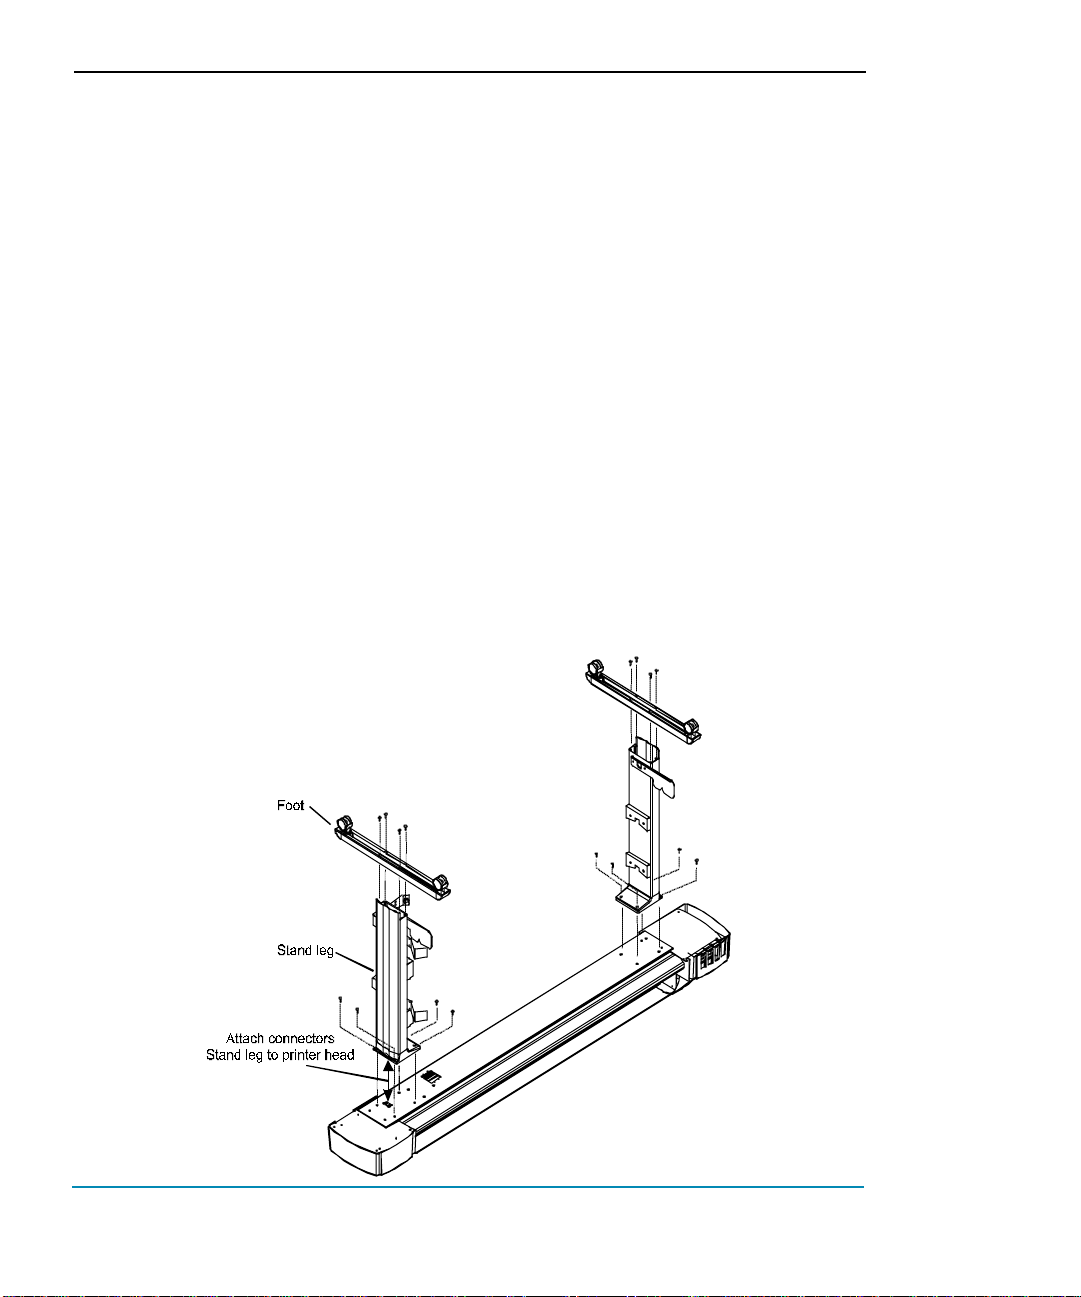
1 Locate the box containing the printer head and turn it upside down. Open the
box and remove the Setup box which contains the screws and screwdriver to
use for the next steps.
2 Open the box containing the stand and remove the stand and feet from the
box.
3 Note that each foot has two casters, only one of which locks. Attach the feet
to the stand legs using the screwdriver and screws provided in the setup
box. Locate the casters so that they are diagonally opposite each other.
Lock the casters to prevent the stand from rolling during subsequent assembly.
4 One of the stand legs has a connector on it. Pull the connector from the
access hole in the leg and remove the tiewrap holding the connector in
place. Attach the connector to the receptacle on the bottom of the print
head. Orient the stand legs so that the roll holder brackets are facing the
center of the printer head and align with the holes in the bottom of the printer
head. Attach both stand legs to the printer head using the screwdriver and
eight screws contained in the Setup box.
CAUTION: Be careful not to pinch the cable when attaching the leg.
5 Two persons are required to lift the printer. Remove the assembled printer
and stand from the box. Save the boxes and packing materials in case you
ever need to ship the printer.
4 Quick Start
Page 5
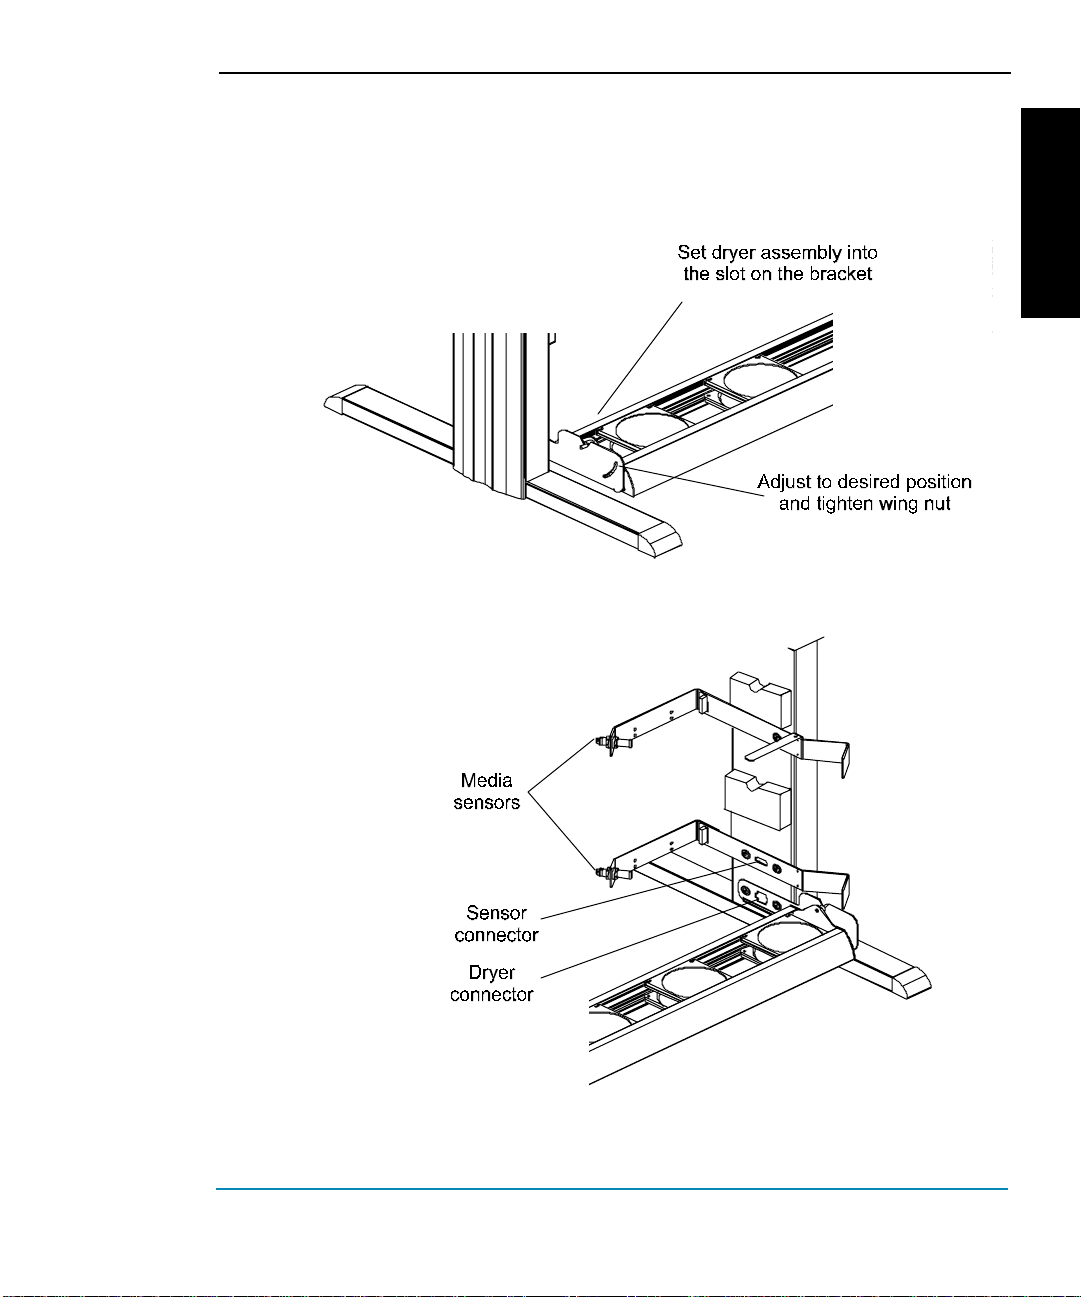
6 Remove the wing nut and mount the dryer assembly in the slots provided
7 Plug the dryer connector into the receptacle on the right stand leg.
NovaJet PRO 600e
at the base of the stand. Be sure fans will blow upward and toward the
printer. Position the dryer assembly to the desired angle. Replace and
tighten the wing nut on the left side.
ENGLISH
Quick Start 5
Page 6
NovaJet PRO 600e
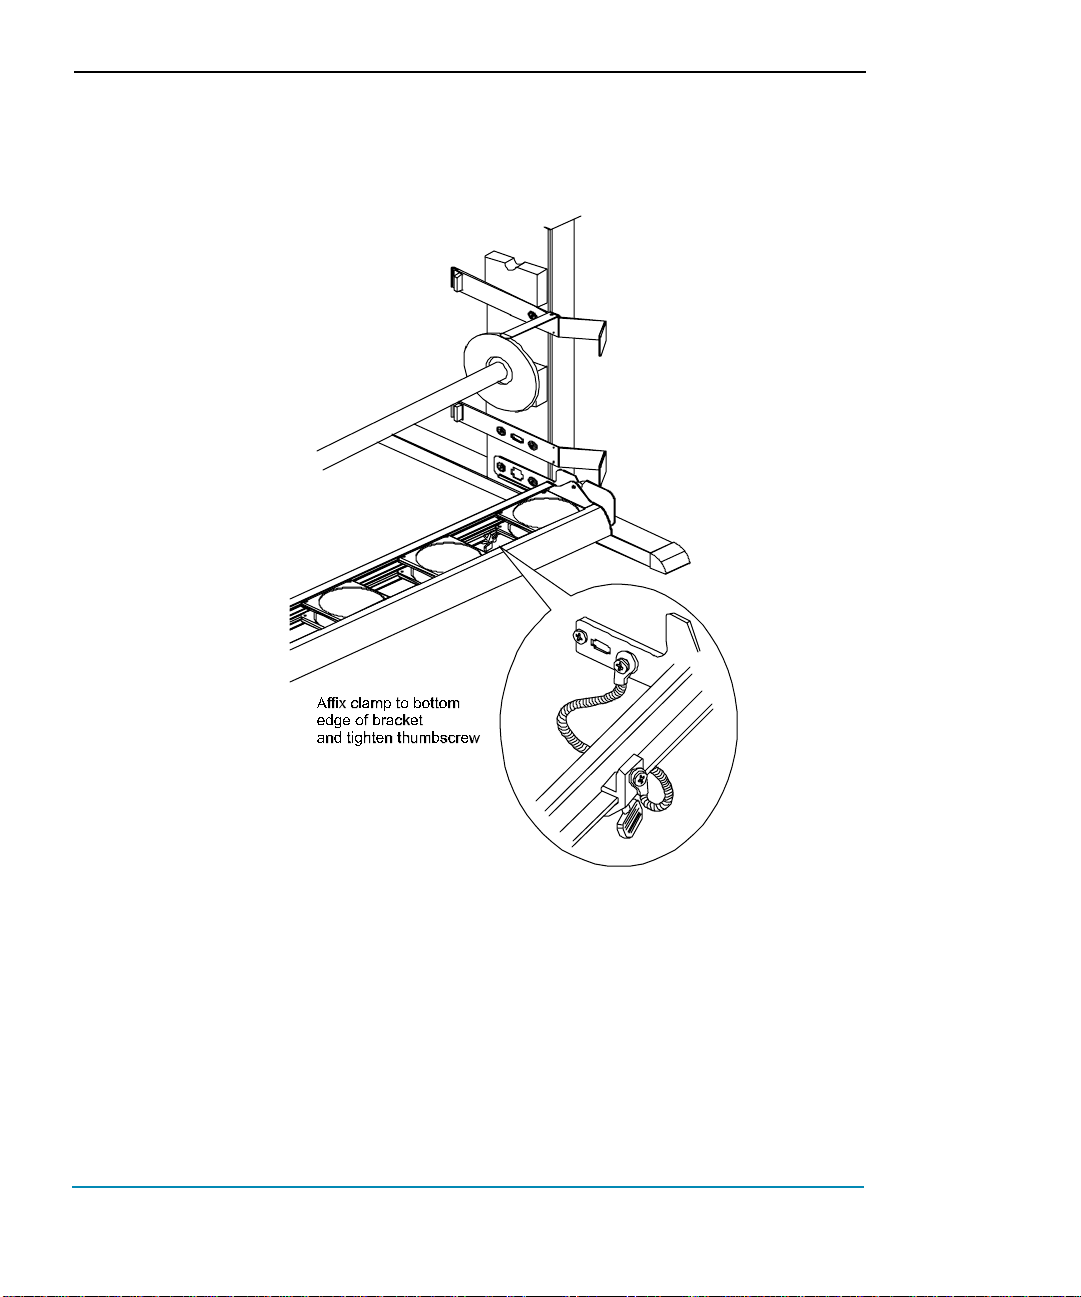
8 Attach the clamp for the grounding strap to the right lower rear edge of the
dryer assembly bracket and tighten the thumbscrew securely so that the
paint is penetrated.
9 Check to be sure that the media sensor is plugged in to the connector on
10 To load media, slide the media roll over the feed roller. If you will be using the
6 Quick Start
the right stand leg. You can swing the sensor mounting bracket away from
the printer if necessary when loading media.
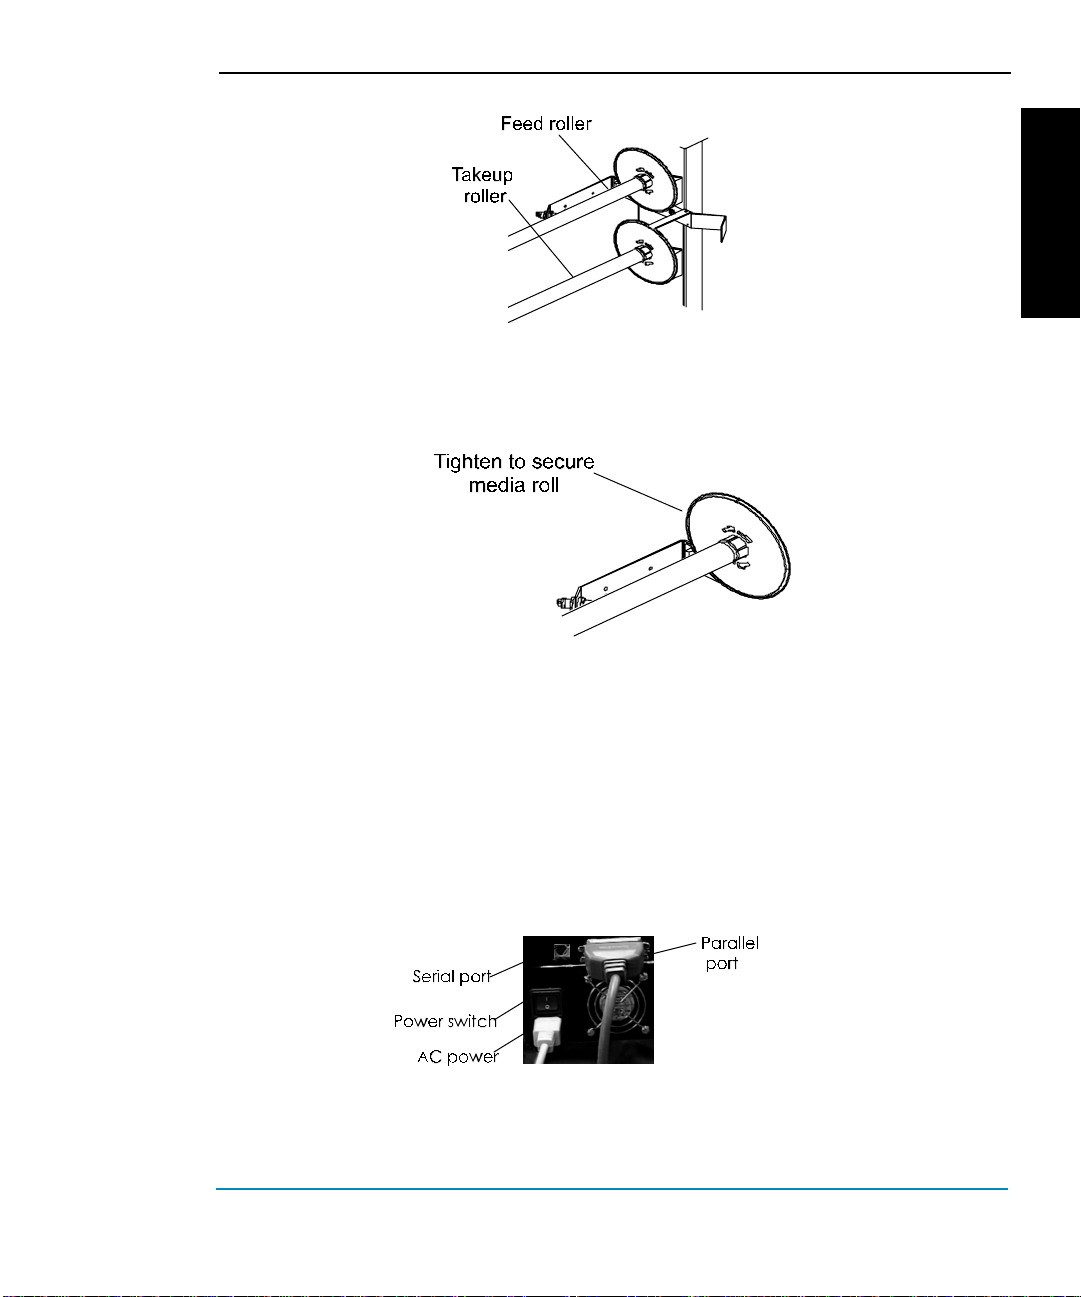
takeup roller, mount an empty media core on the takeup roller before inserting the roller into the stand. Mount the two rollers as shown below. Insert the
end of a roller into the space provided in the left roller support, then fit the
other end of the roller into the right support. Make sure the gear on the roller
is engaged with the gear on the support.
Page 7
NovaJet PRO 600e
11 Slide the media guide into the media core, and secure it by tightening the
locking mechanism. If you moved the sensor mounting bracket before
loading the roll media, be sure to return it to its normal position.
ENGLISH
Removing protective shipping material
CAUTION: Before turning on the printer, make sure to remove the protective material that
secures the carriage. Remove the protective film from the control panel and remove the
tape from the ink reservoir cover. Do not remove the foam insert located between the rear
support bracket and slide shaft on the left side of the unit. Do not remove black tape
affixed to left and right sides of the carriage assembly.
Connecting power and your computer
1 Plug the power cord into the power inlet at the rear of printer.
2 Plug the printer cable into the connector at the rear of the printer. For
connecting to a PC, use an IEEE 1284 parallel cable. For connecting to a
Macintosh, use an ImageWriter II serial cable.
Quick Start 7
Page 8

NovaJet PRO 600e
3 To turn on the printer, turn the power switch on at the rear of the printer. The
control panel will display the printer's model name, the firmware version,
status and progress of the power on self-test, and status and progress of the
RAM test.
Loading Windows drivers and Macintosh ENCAD Print Utility (EPU)
Before continuing, install the printer driver on your computer. The drivers are on the CDROM shipped with your printer in box 1. Be sure to view the Install.txt file for installation
instructions. Details on using the driver are included in the Docs folder on the CD-ROM.
System Requirements:
• Microsoft Windows 95, or W indows NT v4.0 or higher .
• Intel 80386 compatible computer or better
• 32 MB memory or better
• Minimum 10 MB free hard disk space for the application and 15 MB for each of the
color tables. Y ou will need additional space for RIPing and printing files.
For Windows 95 installation:
1 Insert the CD-ROM in your disk drive.
2 Select Start/Settings/Printers, then double-click the Add Printer icon.
3 When prompted, select 'Have Disk' then type:
<cd drive>:\drivers\Windows\(language)\95 and select OK
OR
select 'Browse' then navigate to <cd drive>:\drivers\Windows\(language)\95
select 'OK'.
For Windows NT 4.0 installation
1 Insert the CD-ROM in your disk drive.
2 Select Start/Settings/Printers, then double-click the Add Printer icon.
2 When prompted select 'Have Disk' then type:
For Macintosh
System Requirements:
• PowerPC class Macintosh computer
• 32MB RAM min.
• 20MB hard disk space. Y ou will need additional space for RIPing and printing files.
8 Quick Start
<cd drive>:\drivers\Windows\(language)\NT40 and select OK
OR
select 'Browse' then navigate to <cd drive>:\drivers\Windows\(language)\
NT40 select 'OK'.
Page 9

NovaJet PRO 600e
1 Insert the CD-ROM in your disk drive and navigate to
drivers\MAC\(language)\epu and double-click the Install Print Utility icon.
2 Click Continue. Driver installation information displays. You may want to
print it at this time.
3 Click Continue and the program will prompt you with further instructions.
4 Select the port to which your printer is connected. If you are using a print
server, select AppleTalk for the port, then select the print server in the
Chooser using one of the LaserWriter drivers.
If you are not using AppleTalk, you will need a standard ImageWriter II serial
cable attached to either the printer or modem port. Attach the other end of
the cable to the RS-422 port on the printer. Refer to the instructions on the
CD-ROM for further details.
! Caution: Wider prints (60" vs 42" vs 24") and 600DPI prints require substantial
file sizes. You may experience printer slowing or stalling when using the
Windows driver to print from an application, or when printing a file using the
ENCAD Macintosh EPU. The number of print passes specified will significantly
impact the data transfer requirements. Less passes require more data; consequently, ther e is a higher probability of stalling when using less passes (faster
printing modes). T o do independent RIPing and printing, or faster simultaneous
RIPing and printing, you may want to consider a stand-alone software or hardware
RIP product. A list of RIP products that supports the NovaJet PRO 600e can be
found at www.encad.com.
ENGLISH
Installing the ICC Color Profiles
Note: ICC color profiles are installed automatically for the Macintosh EPU.
ENCAD Windows drivers use ICC color management profiles to provide the best
possible color match between your original source file and your final printed output.
These files, while not required, are essential to providing the maximum efficiency and
quality from your ENCAD Windows drivers. These color profiles are located in the Color
folder on the CD-ROM shipped with your printer. It is highly recommended that you
install these files prior to printing with your new printer.
1 Insert the CD-ROM into your disk drive.
2 Open the \Color folder.
3 Double click 600eicc.exe.
4 The color management files are installed in C:\Windows\system\color and
have a file extension of .icm.
Quick Start 9
Page 10
NovaJet PRO 600e
Using the control panel
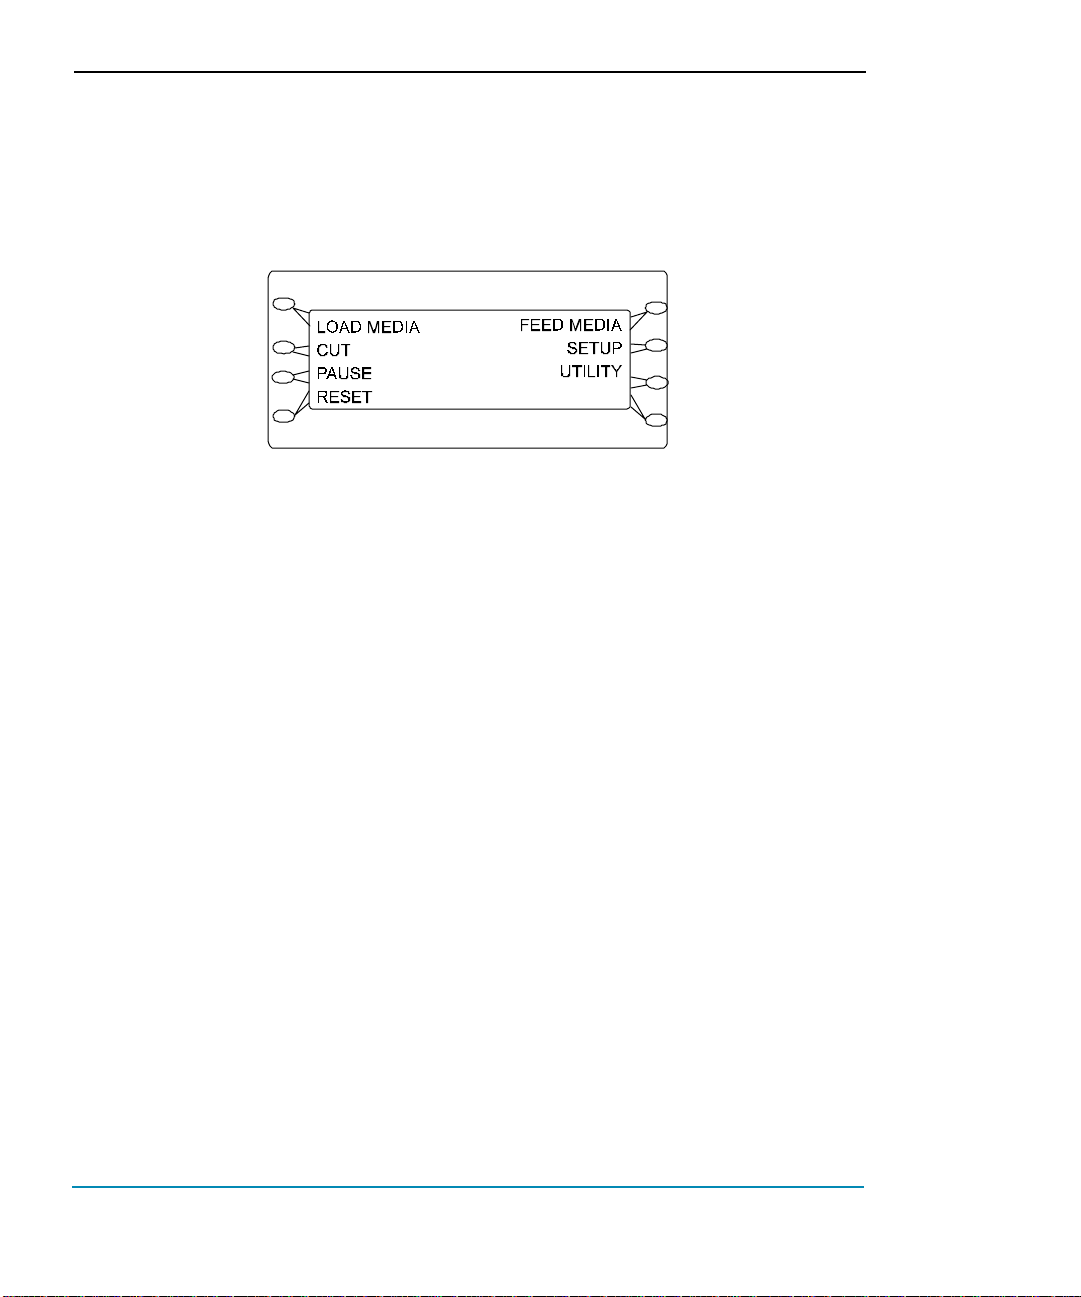
The control panel at the right side of the printer includes eight buttons and a display
which indicates modes and settings. An overview is provided here so that you can load
media and ink cartridges. Details on menu options are included in Chapters 2, 3, and 4 in
the User's Guide. The menu tree in Appendix C of the User's Guide gives you a summary
of all the printer modes and their functions.
Two types of menus are displayed: action menus provide a list of additional menus or
immediate tasks to perform, such as Cut, Load Media, etc. Selection menus let you view
and modify values.
Choosing menu functions
To select a function, press the button adjacent the function displayed.
The display will list options available for the selected function. Press the button for the
option you want and press OK to accept the selection.
Depending on the type of menu, you can return to the previous menu level by pressing
the OK or Exit button. There is no way to immediately return to the top level menu.
Press the Cancel button to restore the previous setting and exit the menu.
Setting the language
With the appropriate firmware version, your printer can display menu items and messages in English, German, French, Italian, Portuguese, Spanish, Japanese, Chinese, or
Korean.
➪➪
➪ T o change the language
➪➪
1 Press Setup/User Setup/Language, and select the language you want.
2 Press OK.
10 Quick Start
Page 11
NovaJet PRO 600e
Loading media
You can use either roll or single sheet media; the default is take up. To ensure straight
paper loading and avoid skewing, be sure to hold the media parallel to the platen. Use
the load lines on the platen as a guide to correctly align the media. Be sure to load from
the back only. Set the media guides to the width of the media.
! IMPORTANT! It is very important to use only ENCAD QIS media with your printer .
Some third party media has been found to generate electrostatic discharge in excess of
20 KV . Emissions of this level can cause arcing between the lower roller and printer leg,
cause the LCD to blank out, and cause the paper axis motor to stop. These conditions
can be temporary or permanent.
! Depending on the model, the printer can use media up to 60" wide. The rolls can be
heavy, so you may want to have someone help you to load them.
! If your roll media has wrinkled or damaged edges, cut off the damaged part of the roll
prior to loading to prevent the media from jamming in the printer.
➪➪
➪ To load roll media
➪➪
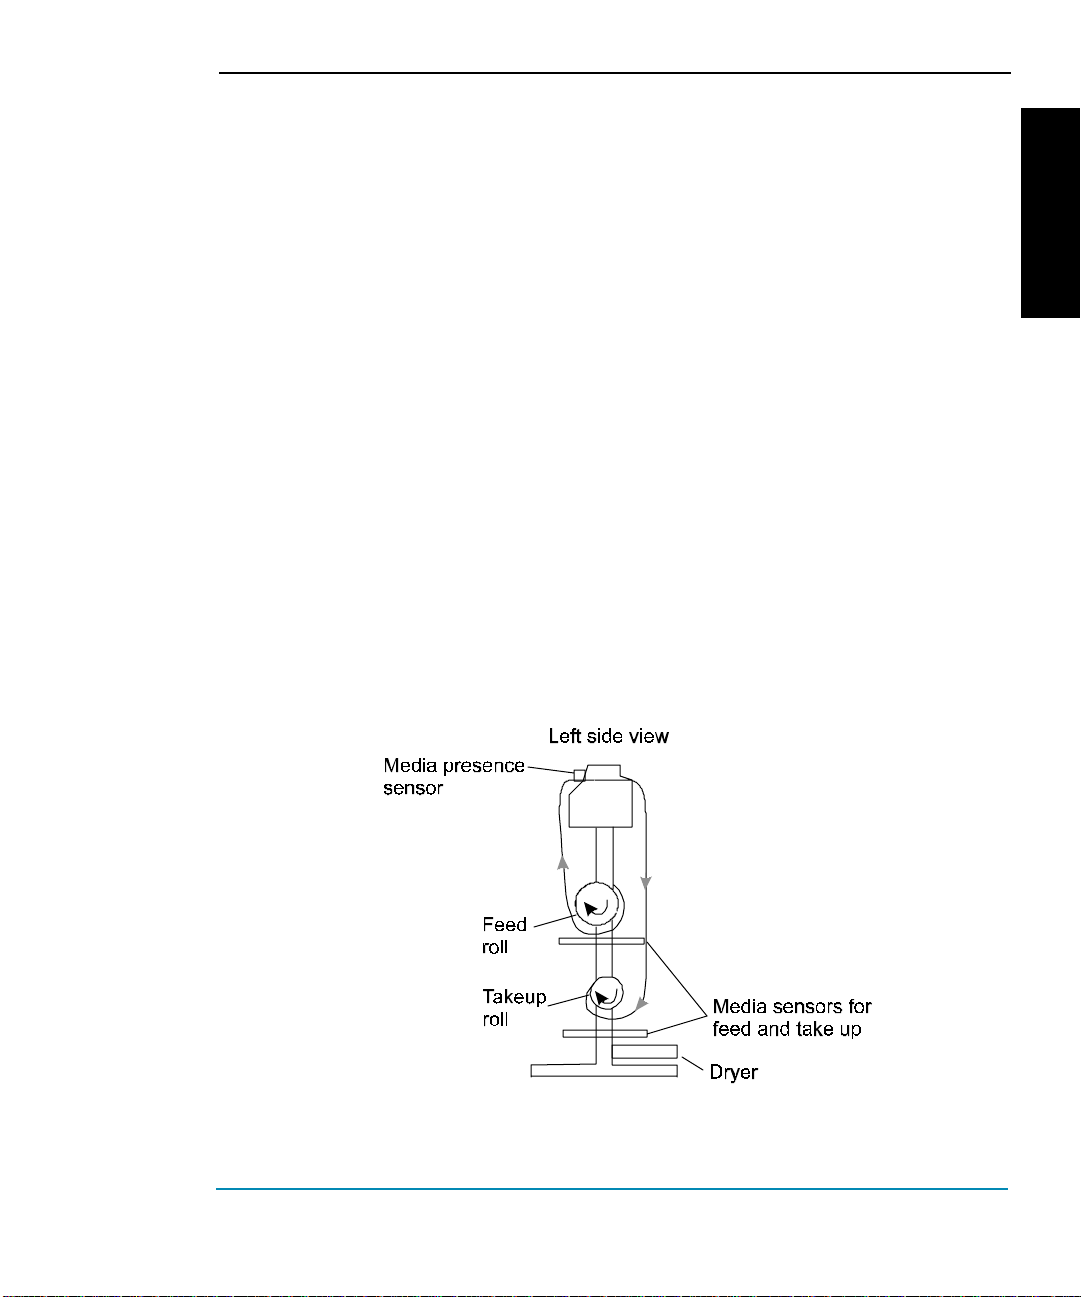
1 Slide the roll media onto the top roller, orienting it as shown below. Slide
the media guide into the roll core, and tighten the guide to secure the roll.
Insert the media's leading edge into the back of the printer, aligning the
paper edge with the alignment mark on the platen. The printer will sense
the presence of the media and automatically feed it.
ENGLISH
Loading roll media
Quick Start 11
Page 12
NovaJet PRO 600e
2 Press the Load Media button to move the media into printing position.
3 If you are going to use the takeup roll, be sure that a media core is installed
on it. Attach the leading edge of the media to the takeup roll with three
pieces of tape: one at the left, right, and center of the core. Orient the media
as shown in the preceding illustration.
As printing progresses, media loops down in front of the takeup core and will
be detected by the sensor on the printer stand leg. The takeup roll will then
be activated to roll the media.
Be sure not to block the sensor!
4 Adjust the media edge guides on the back of the printer. 1/16" gap spacing
is optimum.
Moving the carriage
When not in use, the ink cartridges rest in the service station at the right side of the
printer. This device seals the inkjets to prevent them from drying out. With the power
turned on, select Utility/Access Cartridges on the control panel to move the carriage
away from the service station so that you can install, change, adjust or clean the ink
cartridges, change the cutter , or clean the service station. Do not move the carriage
manually as you could damage the printer .
Installing the cutter
A cutter located in the ink cartridge carriage cuts roll media. The printer is shipped with
the cutter installed.
! Be careful when handling the cutter to avoid injury.
! Cutting media with a worn cutter can cause the media to jam and create
a ragged cut line. Replace the cutter to avoid this condition.
media on the printer with an external knife, as you could seriously damage the platen and void the warranty.
Do not cut
➪➪
➪ T o install the cutter
➪➪
1 Press Utility/Access Cartridge button to move the carriage to the center of
the platen.
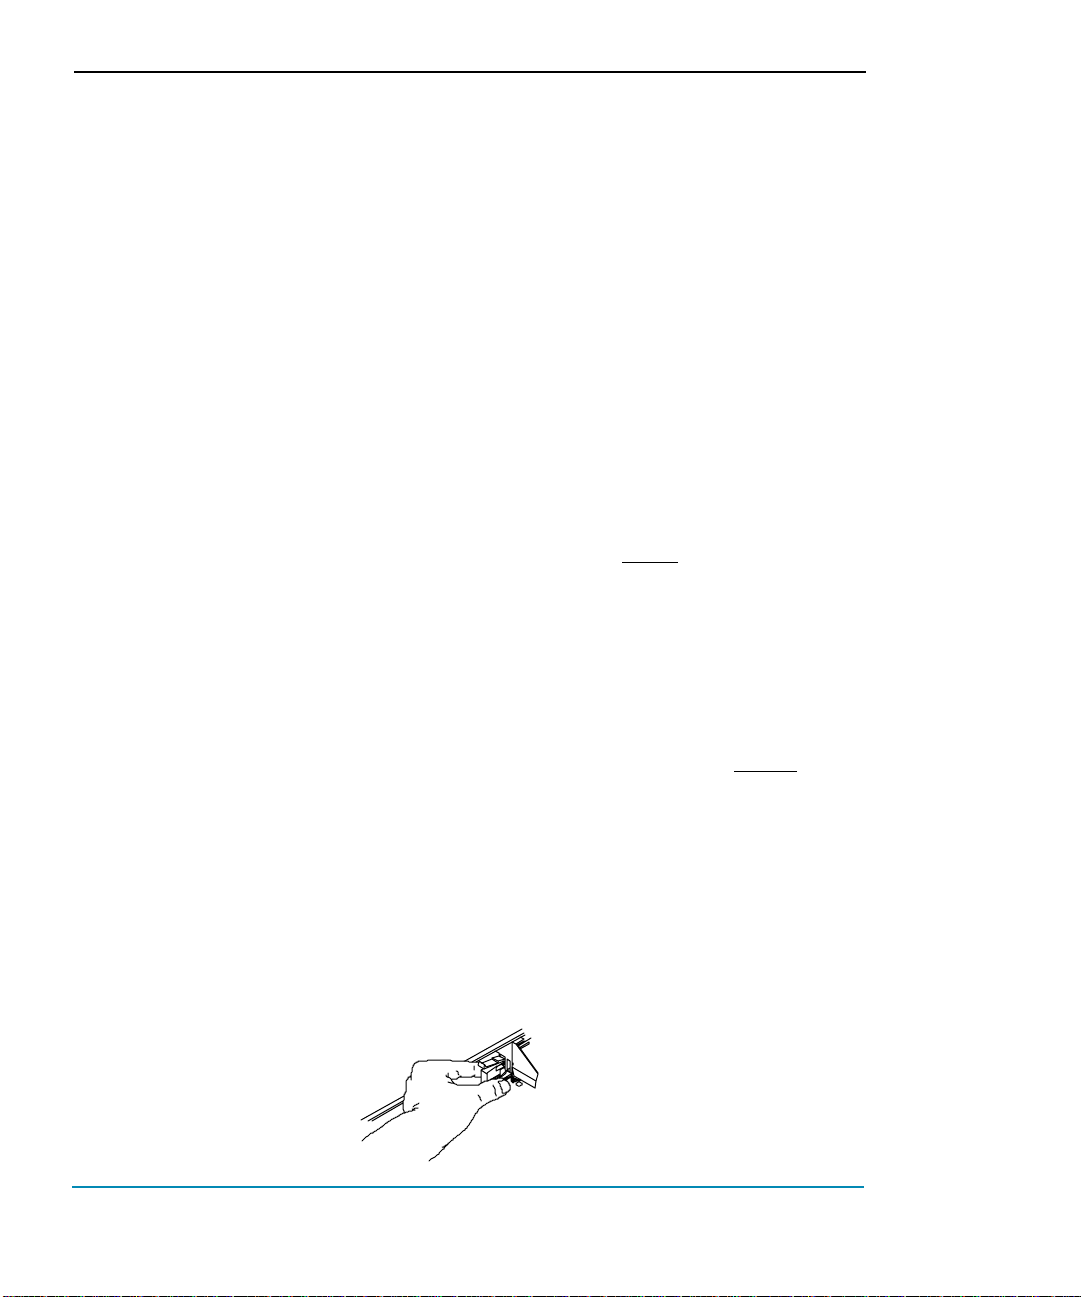
2 The cutter fits in the printer on the left side of the carriage. To remove an
older cutter, push the cutter lever down and pull it out. Install the new cutter
by pushing it into the slot until it clicks into place.
12 Quick Start
Page 13
3 Press Utility/Access Cartridge to move the carriage back into the service
station. This ensures that the cutter blade is in the home position.
Filling the ink reservoirs
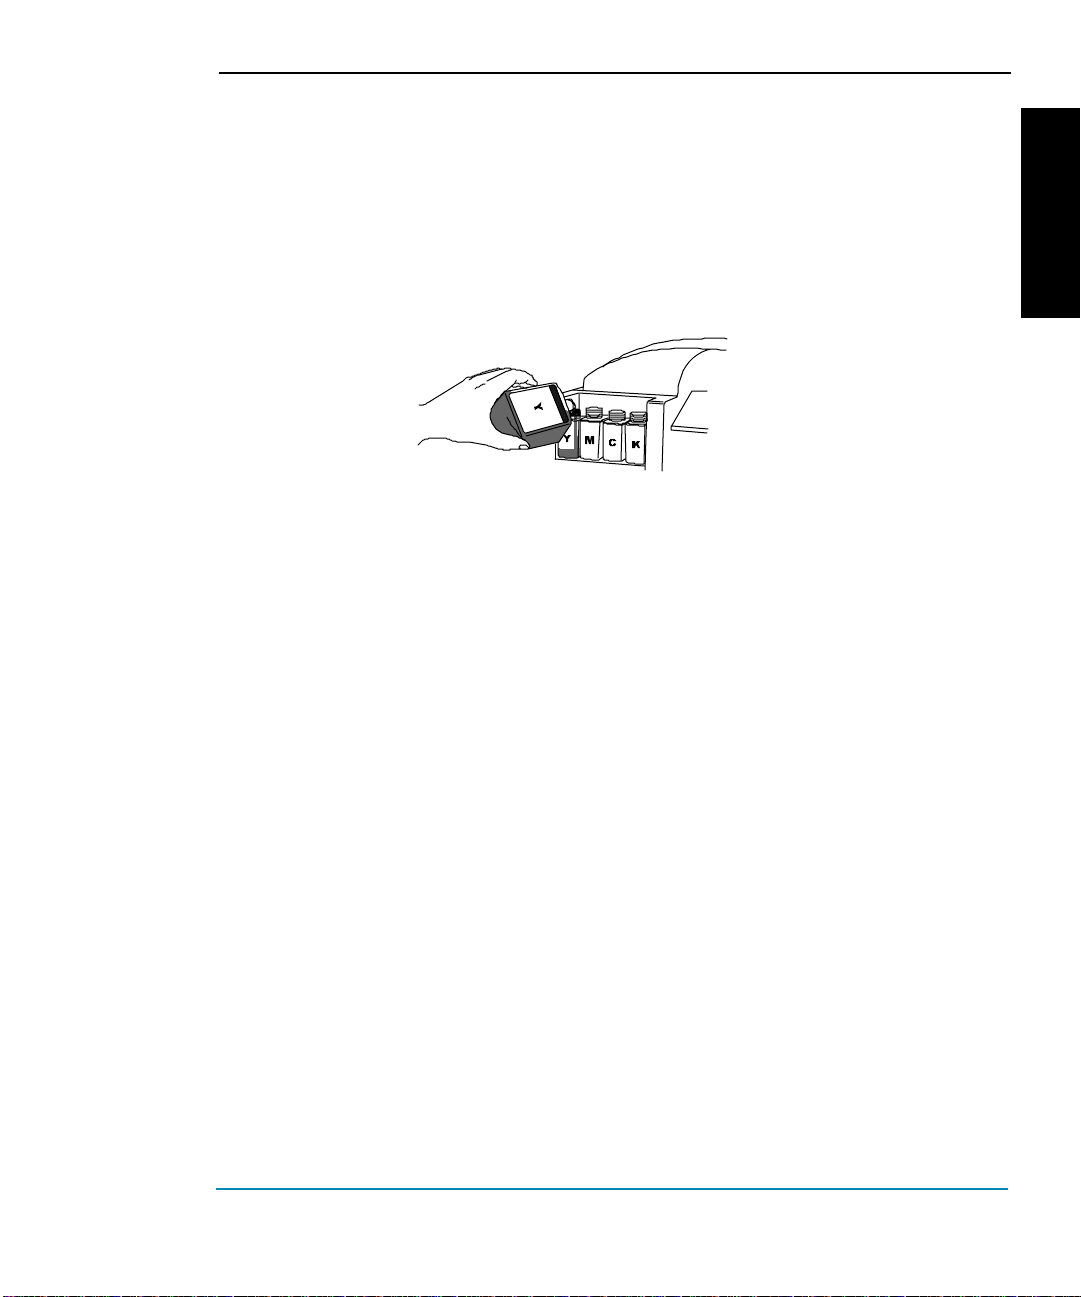
The printer can support long, uninterrupted printing runs because of the large
capacity of each of the four ink reservoirs. The ink reservoirs are located in the
printer's left side cover.
Note: When running at carriage speeds faster than the default, it is recommended that ink levels in the reservoirs be no more than 300ml maximum.
➪➪
➪ T o fill the ink reservoirs
➪➪
1 Open the cover on the left side of the printer to access the ink reservoirs.
Unscrew and remove the cap of one reservoir. Open only one reservoir at a
time to prevent contamination with other ink colors.
2 Make sure the ink color and type matches the reservoir and pour in the
ink. Do not add more than 400 ml of ink or fill higher than 1/2 inch from top
of the reservoir. Be sure to use the same type of ink (i.e., GA, GS, or GO)
in all the reservoirs and ink cartridges. Be sure there is no excess ink on
the inside of the reservoir cap. Replace the cap loosely on the reservoir -
do not overtighten.
3 Your printer comes standard with two complete sets of plumbing for easy
changeover between two ink sets. Each of these lines has color coded
quick connect fittings.
same color fitting.
fittings.
4 Repeat for the remaining reservoirs, then close the cover.
Be sure that each reservoir is connected to the
To change reservoirs, simply snap into the appropriate
NovaJet PRO 600e
ENGLISH
Installing the ink cartridges
The printer is designed to use only ENCAD PRO 600e series cartridges. It is not
compatible with NovaJet, NovaJet Pro, or NovaJet PROe cartridges. Use of other
cartridges may damage the printer and/or prevent it from printing and void the
warranty.
Be sure all cartridges and reservoirs use the same ink type; i.e., PRO
600e series GA, GS, or GO.
Quick Start 13
Page 14
NovaJet PRO 600e
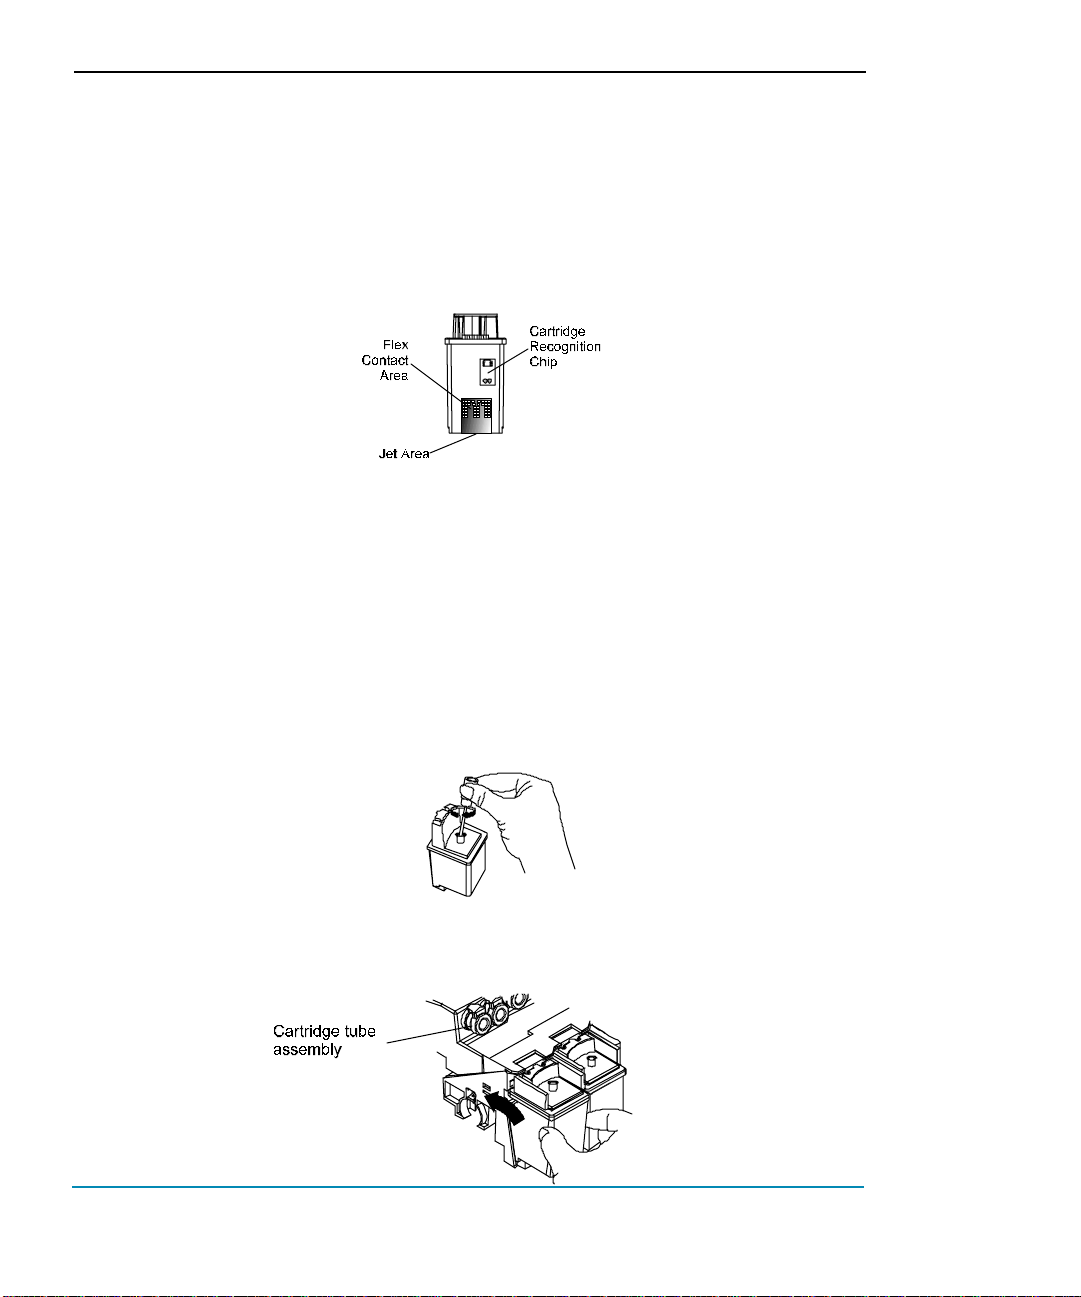
Note: V isually inspect each cartridge before installing. Make sure the blue tape
is intact on the jet area of the cartridge. (Do not remove the tape at this time as
the cartridge could leak! The tape will be removed later after negative pressure has been established by priming the ink delivery lines.) Inspect the IC
chip on the cartridge. Make sure it is secure and in approximately the location
shown on the following figure. If any cartridge is damaged, contact your
authorized ENCAD distributor/dealer for return/replacement of the defective
cartridge.
➪➪
➪ To install the ink cartridges
➪➪
! Do not touch the jet area or the flex contact area of the ink cartridge.
! Work with only one ink color at a time to prevent contamination.
1 With printer power on, press Utility/Access Cartridges to move the carriage
to the position which allows replacement of the ink cartridges.
2 Cartridges are prefilled and preprimed. Remove the cartridge from the sealed
bag and remove the shipping cap.
3 Install the cartridge bottom first into the correct slot on the carrier. DO NOT
REMOVE THE BLUE TAPE FROM THE JET PLATE. Tilt the cartridge up
until it clicks into place. Make sure the cartridge is firmly seated.
14 Quick Start
Page 15
NovaJet PRO 600e
Priming the ink delivery lines
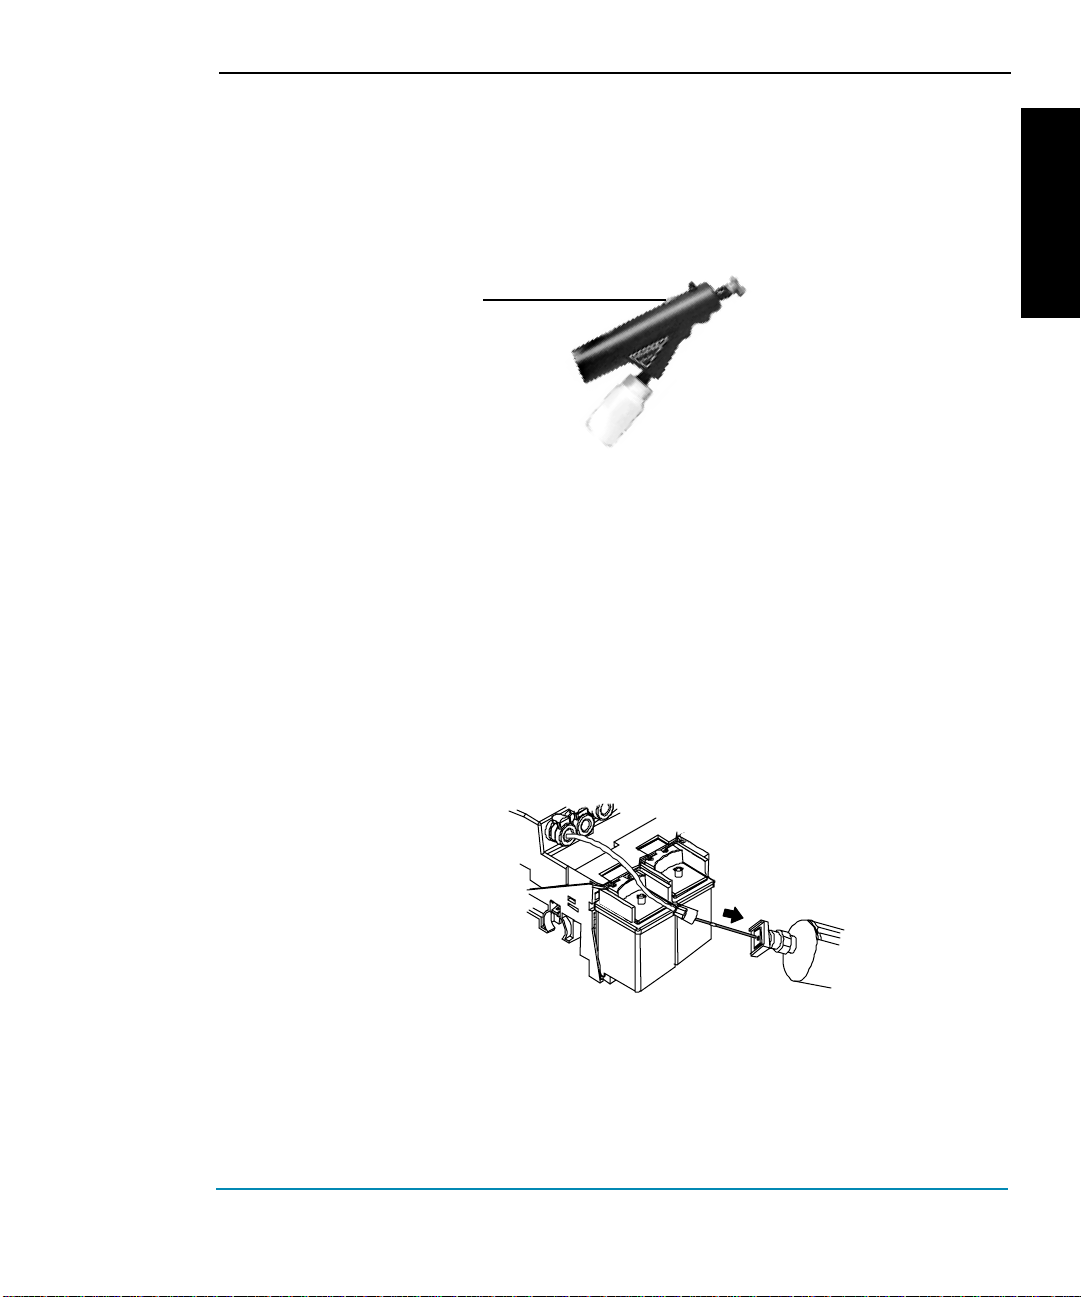
After filling the ink reservoirs, you will need to prime each of the four ink delivery lines to
establish ink flow through the lines and ink cartridges. The NovaPrime is provided for
this purpose. Be sure it has batteries in it before continuing.
Sight Tube
This procedure needs to be done the first time you set up the printer and whenever ink
cartridges are replaced. It is not necessary when refilling the reservoirs.
When filling more than one color of ink, be sure to thoroughly wipe any excess ink from
the NovaPrime before working with the next color to avoid the possibility of contamination.
➪➪
➪ To install tube needle assemblies and prime the delivery lines
➪➪
ENGLISH
1 Snap the tube needle assembly connector into the fitting on the carrier.
Insert the needle into the small hole on the NovaPrime. There are two
connectors for each cartridge - one is blue and the other is gray. Be sure
that the tube needle assembly is plugged into the same color connector as
the ink reservoir.
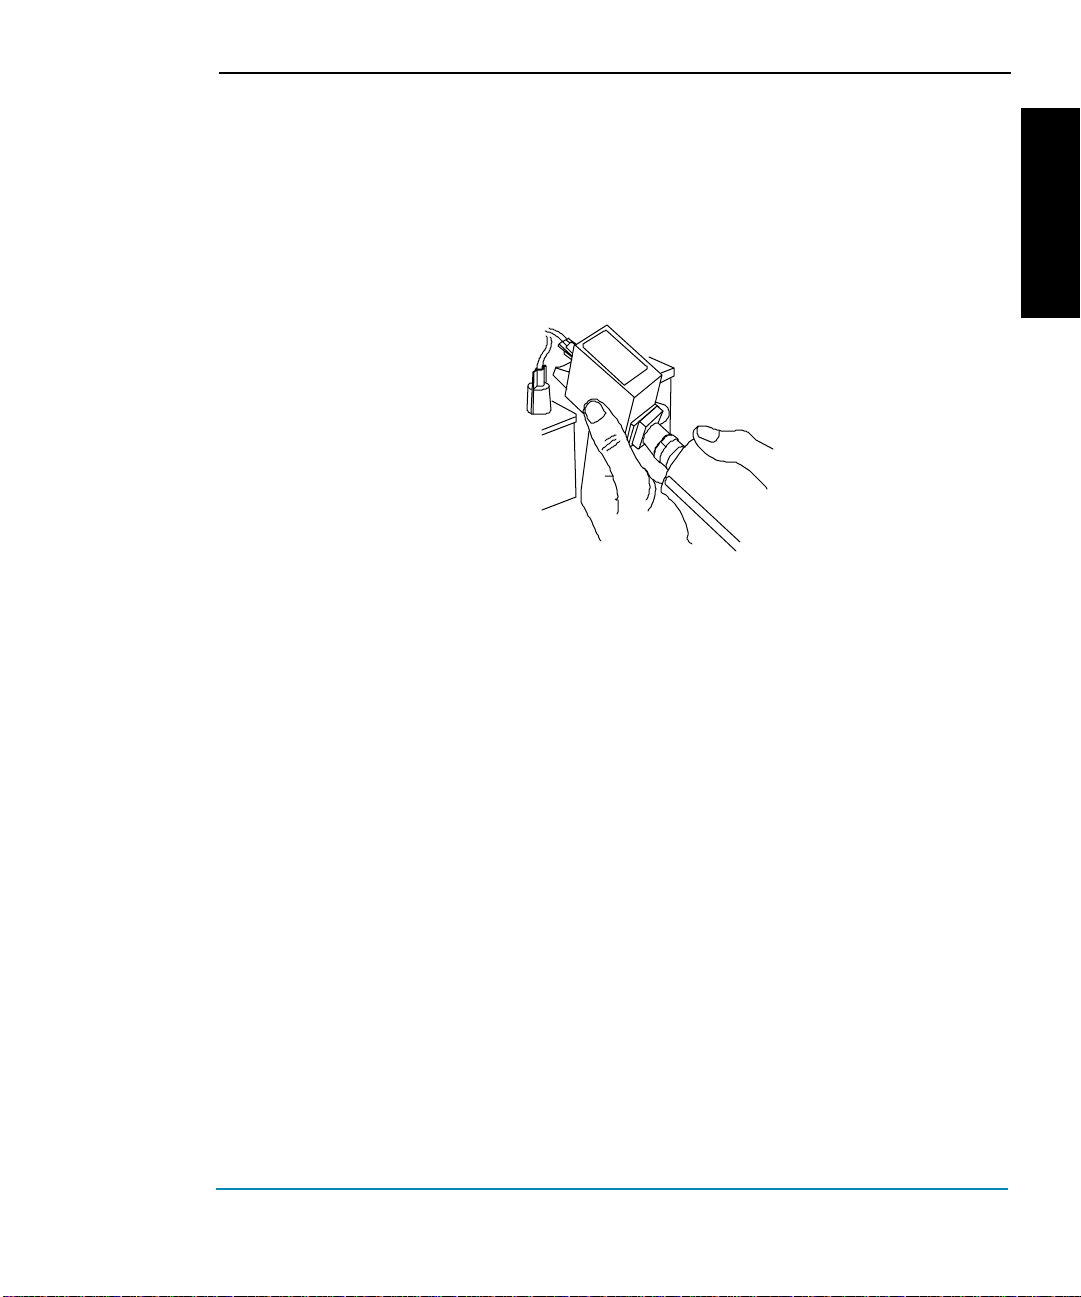
2 Press the button on the NovaPrime to activate the vacuum and draw ink from
the reservoir into the needle.
Quick Start 15
Page 16
NovaJet PRO 600e
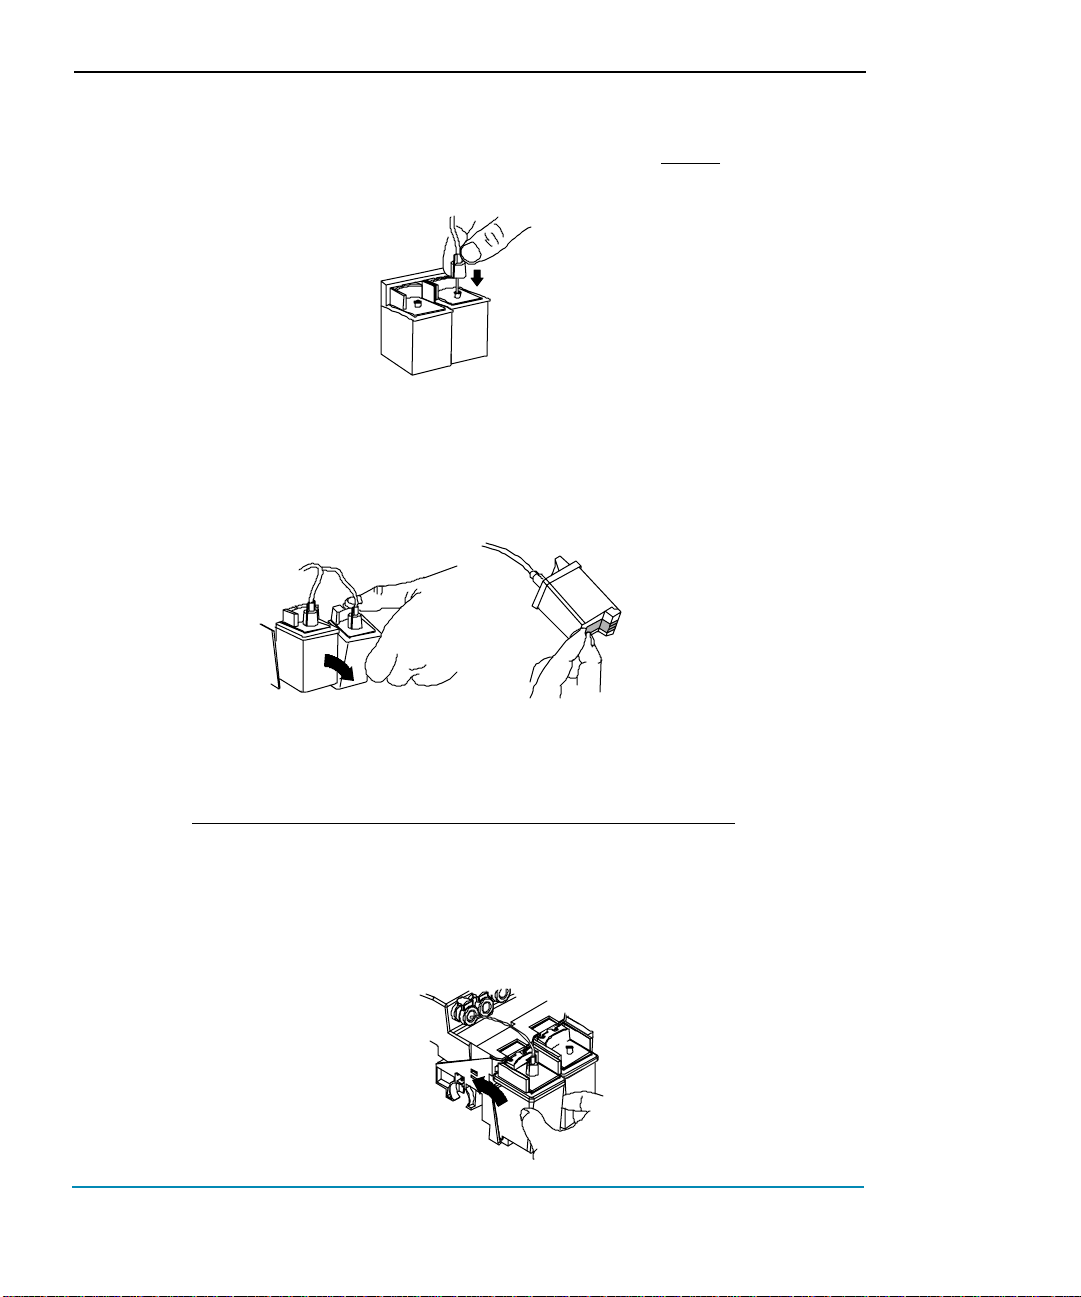
3 When ink is visible in the NovaPrime sight tube (should take 5-10 seconds),
remove the cartridge needle from the NovaPrime and
hole in the top of the ink cartridge. Be sure the needle is tightly connected
by turning the fitting clockwise until finger-tight.
4 Gently tighten the fitting (about 1/4 turn) to prevent air leaks. Do not over-
tighten. Wait 20 seconds for the ink pressure to stabilize.
5 Remove the cartridge from the carriage and remove the blue tape from the jet
area of the cartridge. CAUTION! Do not tilt the cartridge up higher than
a 30 degree angle. This could cause the cartridge to lose pressure.
quickly insert it into the
6 Rotate the cartridge one complete revolution counterclockwise to ensure that
there are no twists in the ink delivery line.
Check for ink on the jet plate. Continuous bleeding of the jet plate indicates
a loss of vacuum in the cartridge or an air leak in the lines. A small amount
of ink can be cleaned off the jet plate by dabbing with a moist, lint-free cloth.
7 Insert the cartridge into the carriage.
16 Quick Start
Page 17
NovaJet PRO 600e
8 Repeat with each cartridge.
9 Press Utility/Access Cartridges to return the carriage to the service station.
10 Print the color test, prime test pattern and paper axis test as described in
the following sections.
11 If all colors look fine, go on to step 15. If any color drops out, prime car-
tridges as necessary, using the NovaPrime. Place the suction end of the
NovaPrime over the jet area of the cartridge.
12 Make sure the NovaPrime is making good contact with the jet area. Pulse
the pump 3 - 5 times, until the ink is visible in the NovaPrime sight tube.
Maintain good contact between the inkjet plate and the pump for an addi-
tional 5 seconds.
When removing the NovaPrime, use the silicone tip to wipe and clean the jet
plate. Remember to clean the silicone tip of ink before moving to the next
cartridge.
13 Re-print the color test and prime test pattern. (The paper axis test is only
required when changing media). Inspect to ensure proper pressure is
maintained for each color.
14 Re-prime cartridges as necessary to remove clogs. Manually bypass
(compensate) clogged jets as necessary.
15 Once all cartridges are working correctly, print the color deadband and color
calibration test patterns as described in the section on
cartridges
which follows.
Aligning the ink
ENGLISH
Quick Start 17
Page 18

NovaJet PRO 600e
Printing the color test
Printing the color test verifies a proper manual prime and that pressure is set properly.
➪➪
➪ To print the color test
➪➪
1 Be sure media is loaded in the printer.
2 Select Utility Menu/Service Menu/Diagnostics/Color Test.
3 Change the color test percentage to 100% and press OK.
The test prints.
4 Verify that all bands print a solid pattern. This indicates that the cartridges
were properly primed. If it doesn't print a solid pattern, run the color test
again.
Printing the prime pattern
Before printing and at regular intervals during printing, the printer wipes the ink cartridge
jets at the service station. This function is user selectable during printing or between
prints. Still, ink cartridge jets can become clogged, especially with prolonged exposure to
the air or with non-use. Printing the Prime pattern helps to clear the jets and to check that
the ink cartridges fire properly. ENCAD recommends that you print the prim pattern daily
to ensure the best possible print quality.
The printer includes a feature called Open Jet Detection and Compensation. This feature
helps maintain optimal print quality and gives you the confidence to print long, unattended jobs. During multi-pass printing, the printer will automatically compensate for jets
found to be electrically damaged. The only intervention needed is to verify that there are
no clogged jets and then choose which print mode is most appropriate for your needs.
This is done by printing the Prime test pattern and then setting the print mode accordingly.
➪➪
➪ To print the prime pattern
➪➪
1 With media loaded, press Utility/Prime.
A test pattern prints. It should be smooth with no obvious banding.
2 If the printed results are unsatisfactory, run the test several more times to
unclog the inkjet nozzles.
18 Quick Start
Page 19
➪➪
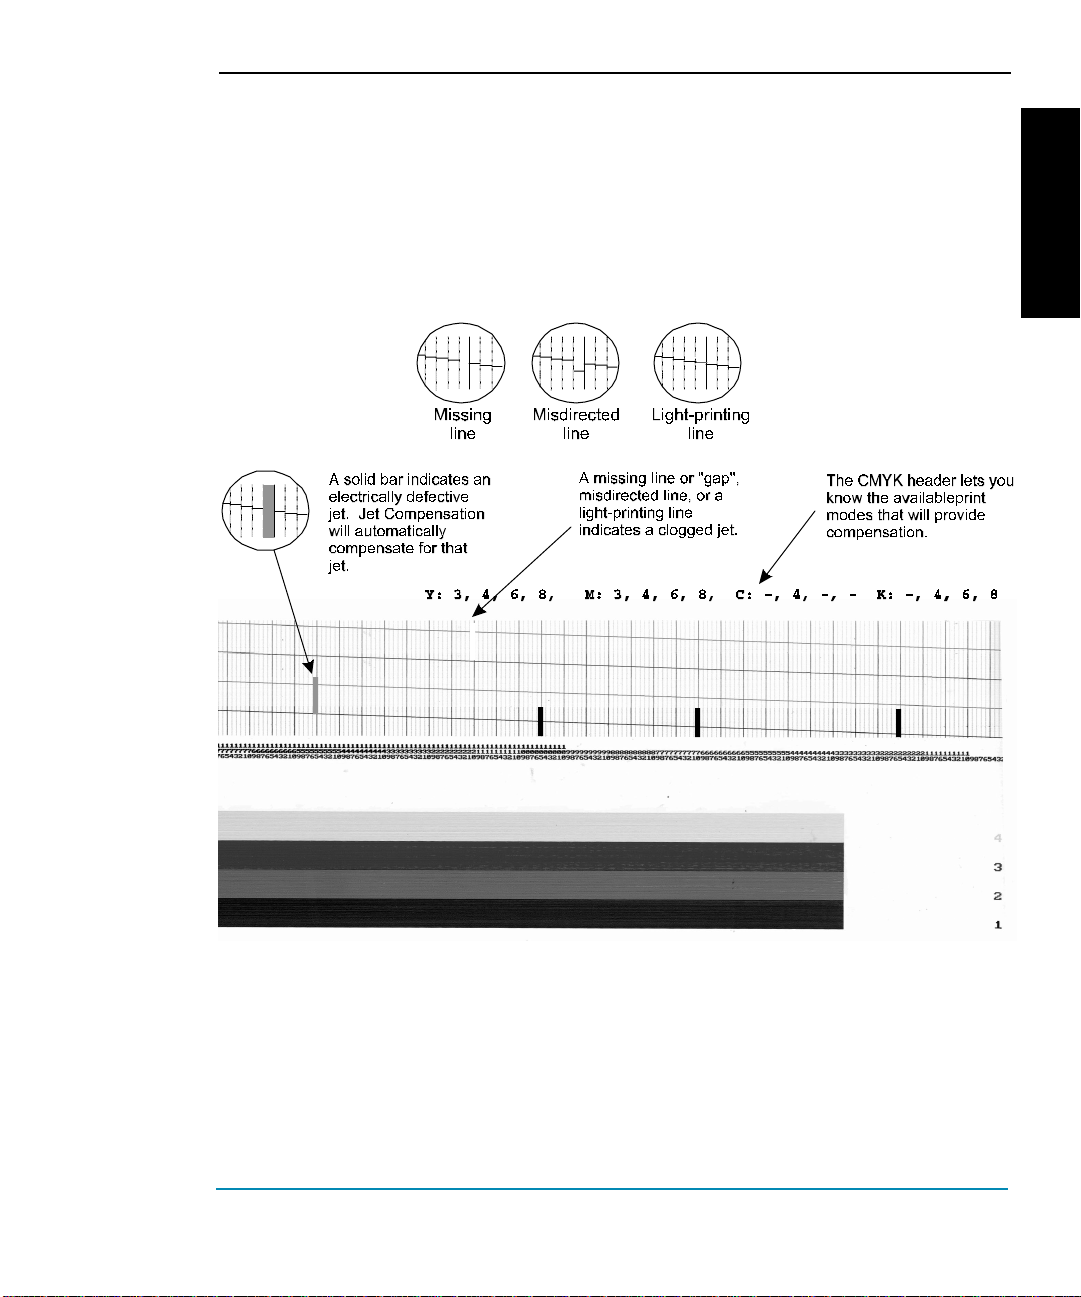
➪ To interpret the Prime test pattern
➪➪
The test pattern consists of bands of color for each cartridge and a sloping
line. Within the Prime test pattern, each jet is represented with a short
horizontal line. Together, these short horizontal lines form a “stair step”
pattern. Electrically defective jets appear as solid bars. Clogged jets appear
as missing or misdirected lines in the “stair step” pattern. The print modes
for which compensation is available are shown clearly above the Prime.
NovaJet PRO 600e
ENGLISH
Clogged jets
Clogged jets cannot be automatically detected and therefore must be cleared manually. If
a jet is clogged, it will appear in the prime pattern as a gap in the sloping line for each
cartridge.
To clear a clogged jet, clean and prime the af fected cartridge according to the instructions in Chapter 4 of the User Guide. Your goal is to eliminate all gaps in the “stair step”
pattern before starting your job.
Quick Start 19
Page 20
NovaJet PRO 600e
Aligning the ink cartridges
Two tests are provided to help you align the cartridges: Color Deadband Compensation
and Color Calibration.
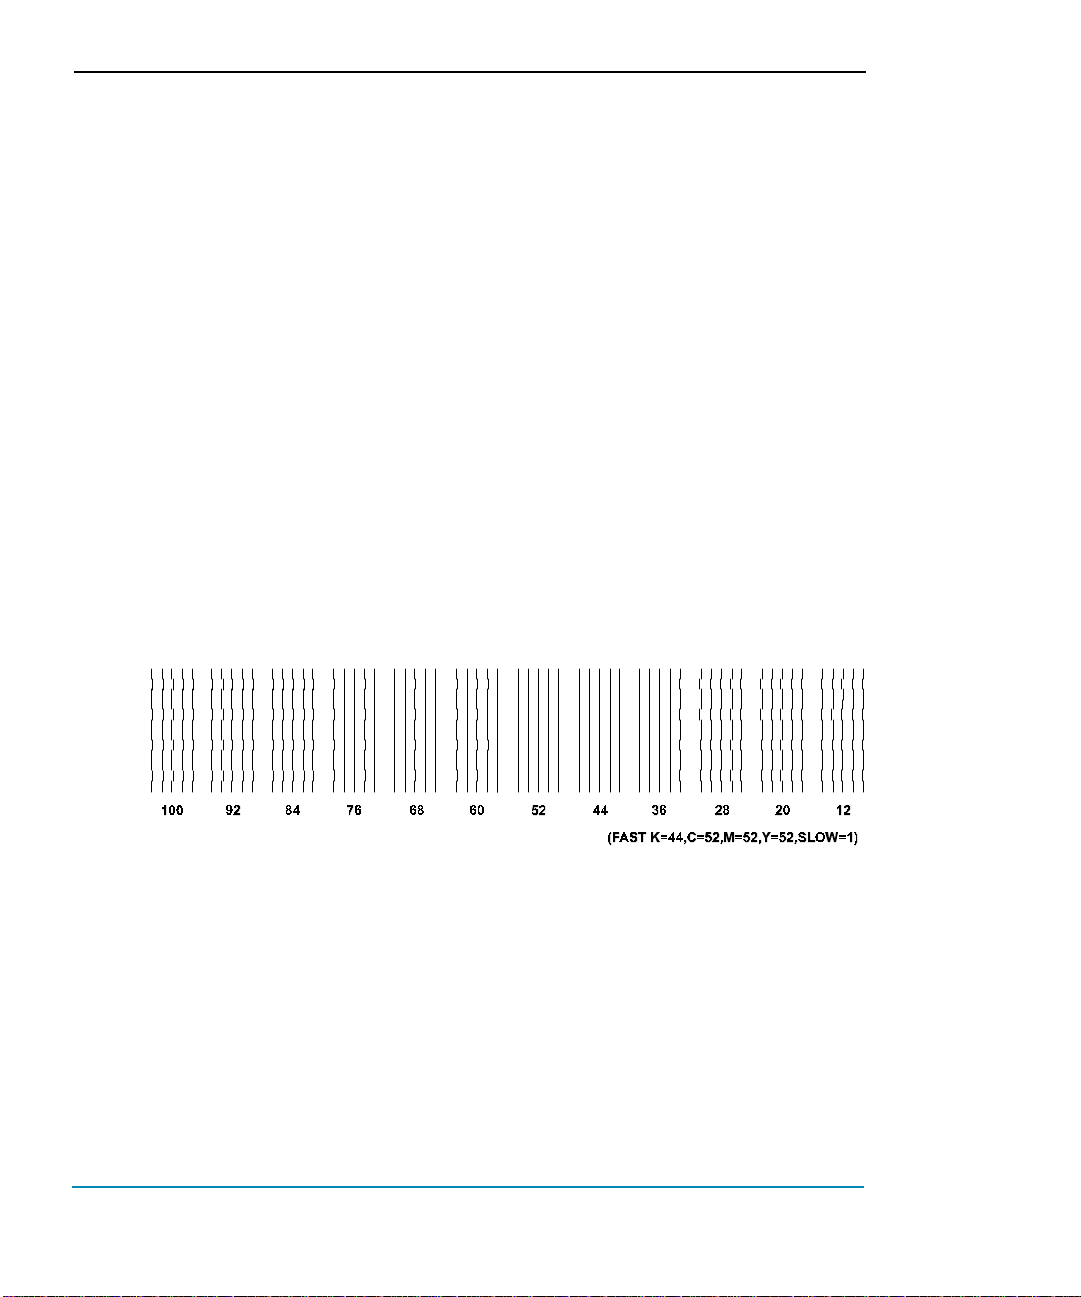
Color Deadband Compensation provides a method for adjusting dot placement. In bidirectional printing mode, the velocity of the carriage causes dots to miss the target area
on the media. The color deadband test pattern lets you check the velocity deadband
values and adjust them for the best printing results. A loupe is provided in the accessory box to help you check the prints.
Color calibration aligns the inkjets of the cartridges to each other. Misalignment can
result from small tolerance variations in cartridges during manufacturing and from
cartridge alignment in the printer. Color test patterns let you check the horizontal and
vertical alignment values and adjust them for the best printing results. A loupe is
provided in the accessory box to help you check the prints.
Y ou should perform Color Deadband Compensation before perfoming Color Calibration.
Perform Color Deadband Calibration and Color Calibration each time a cartridge is
replaced with a different cartridge. If you remove and reinstall the same cartridge, only
Color Calibration needs to be performed.
➪➪
➪ T o perform color deadband compensation
➪➪
1 With paper loaded, press Utility/Calibration Menu/Color DB Test.
The test patterns print as shown below.
2 For each color, examine the vertical lines and select the straightest lines.
Note the compensation number at the bottom of the lines you selected.
3 Existing compensation values are printed in the lower right corner of the test
pattern. If any of these differ from the values you selected, enter new
compensation values by pressing the button for the color deadband you want
to change. Then use the Next and Previous option buttons to scroll to the
desired compensation.
20 Quick Start
Page 21
➪➪
➪ To perform color calibration
➪➪
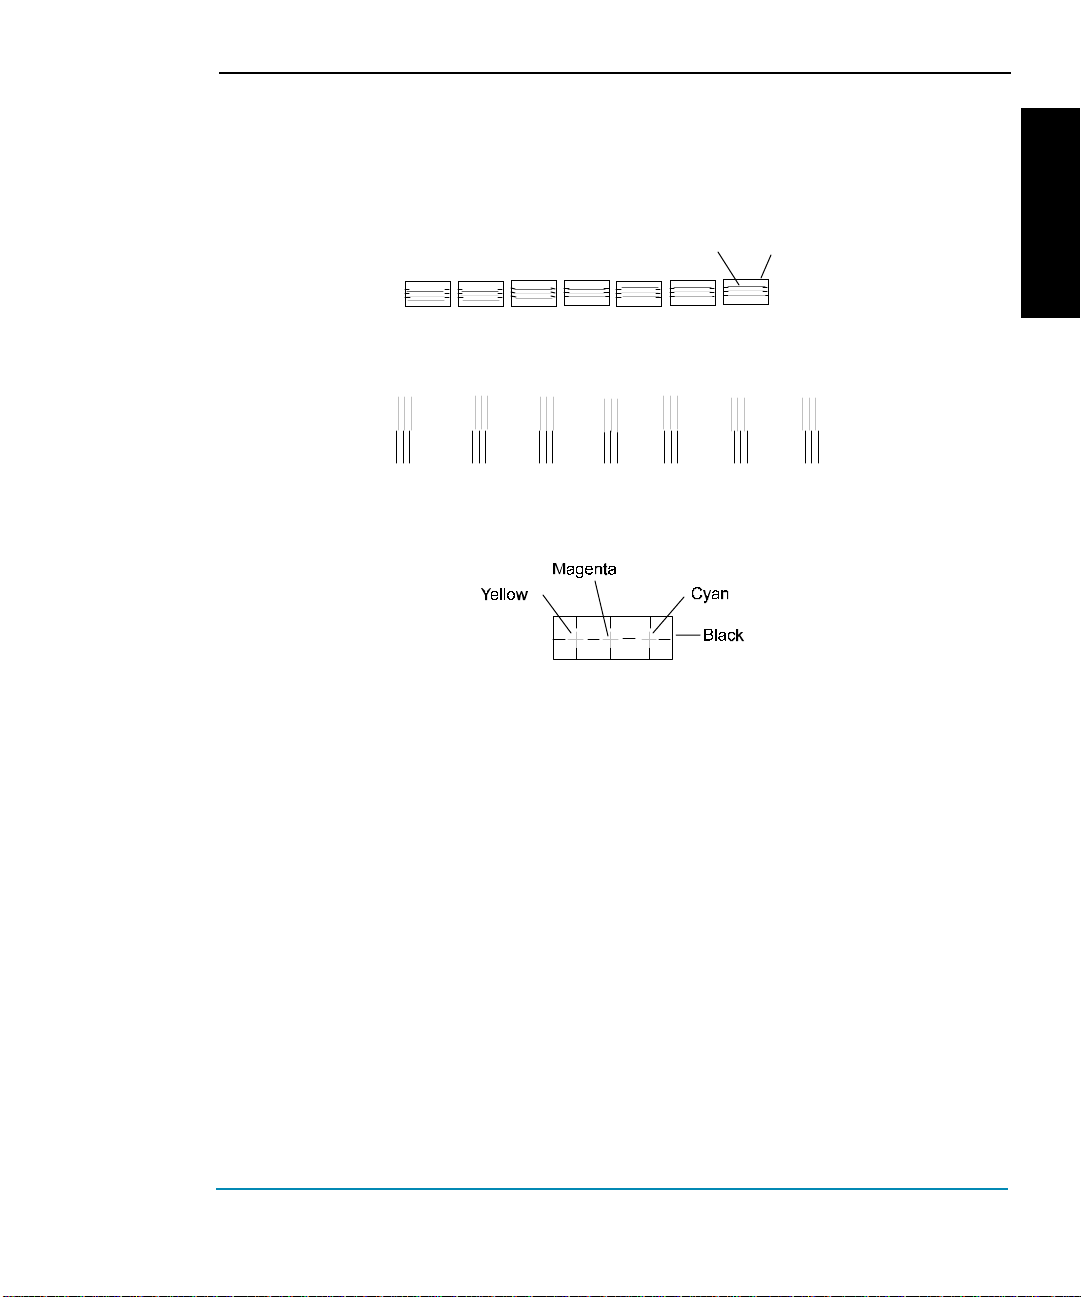
1 With paper loaded, press Utility/Color Calibration Menu/Calib Print Test.
The test patterns print as shown below.
Horizontal head-to-head test pattern
... -3 -2 -1 0 1 2 3 ...
V ertical head-to-head test pattern
Co lor
NovaJet PRO 600e
ENGLISH
Black
Current heads test pattern
Examine the registration + in the Current Heads T est Pattern. If they are in
register, your calibration is correct. If not, perform the following steps to align
the printer heads.
2 Press Cyan Adjust - Vertical.
3 Examine the Vertical Head-to-Head Test Pattern and enter the number that
represents the best color alignment for cyan-vertical.
4 Repeat for each color and for horizontal alignment as well, using the Hori-
zontal Head-to-Head Test Pattern.
Quick Start 21
Page 22

NovaJet PRO 600e
Paper axis calibration
Choosing Utility/Calibration/Paper Axis T est lets the printer draw a set of vertical marks
to calibrate the paper axis. To measure the marks laid down by the printer, you will need a
ruler or scale at least 33 inches (838.2 mm) long. The vertical marks should be exactly
33.00 inches (838.2 mm) apart. If the distance between the marks is different from that
shown on the display, you may adjust the printer by setting its values to match the
length or width you measured. Note: The Paper Axis T est should be performed ever y
time new media is loaded.
➪➪
➪ To print the Paper Axis calibration test pattern
➪➪
1 Load the printer with media that is at least 36 (91 cm) inches long (or the
media that you are going to run; you cannot load a 36" sheet and then run
the calibration from a roll feed because the line lengths will not match).
2 Press Utility/Calibration/Paper Axis Test.
The printer prints two marks.
3 Remove the media from the printer and measure the distance between the
marks. The distance between the marks should be exactly 33.00 inches
(838.2 mm).
4 If the measurement is not exactly 33.00 inches, select "Paper Axis" and
adjust the value to the measurement read on the scale.
22 Quick Start
Page 23

Cartridge recognition
The printer is designed to use only ENCAD PRO 600e cartridges. T o eliminate potential
damage to the printer, a Cartridge Recognition feature checks to ensure that ENCAD PRO
600e cartridges are installed, and that they are installed properly. Cartridge recognition is
performed when a print request is received (i.e., image data, prime, etc.).
In addition to cartridge recognition, the printer automatically performs tests on the
cartridges and uses the information to improve image quality, monitor cartridge life, and
update the user with system status. Some tests are performed between prints and require
no user input, while others require user input.
Cartridge-related error messages are listed in Appendix F of the User Guide.
T o clear a cartridge-related error, press Access Cartridges to move the carriage to the
position which allows replacement of the ink cartridges. Check to make sure you have
ENCAD NovaJet PRO 600e cartridges installed in each position, that they all contain the
same type of ink (i.e. GA, GS, or GO) and all cartridges are installed properly. Install new
cartridges if necessary.
➪➪
➪ T o clear cartridge recognition error:
➪➪
1 Press Access Cartridges to move the carriage to the position which allows
replacement of the ink cartridges.
2 Verify that four ENCAD PRO 600e cartridges are installed. Replace any
invalid cartridges.
3 Press OK. If the problem has been corrected, the printer will proceed with
the print request. If the problem has not been corrected, the printer will
beep.
NovaJet PRO 600e
ENGLISH
Quick Start 23
Page 24

NovaJet PRO 600e
Quality Imaging Supplies™
ENCAD QIS offers a full line of inks and media for the NovaJet PRO 600e. The following
indicates the most popular choices. Call your ENCAD supplies dealer for the latest
product offerings or to order.
QIS MEDIA FOR NOV AJET PRO 600e
POPULAR MEDIA AND INK REORDER INFORMA TION
REORDER # MEDIA
208041 PHOTO GLOSS 7 MIL 60” X 100’
208040 PHOTO GLOSS 7 MIL 42” X 100’
208141 PHOTO GLOSS 4 MIL 60" X 100'
208142 PHOTO GLOSS 4 MIL 42" X 100'
208045 PHOTO SEMI-GLOSS 7 MIL 60" X 100'
208044 PHOTO SEMI-GLOSS 7 MIL 42" X 100'
208143 PHOTO SEMI-GLOSS 4 MIL 60" X 100'
208144 PHOTO SEMI-GLOSS 4 MIL 42" X 100'
208146 PREMIUM MA TTE 60" X 100'
208147 PREMIUM MA TTE 42" X 100'
208148 CLEAR FILM 60" X 100'
208149 CLEAR FILM 42" X100'
208038 WHITE FILM 42” X 100’
208039 WHITE FILM 60" X 100'
208152 BACKLIT FILM 60" X 100'
208153 BACKLIT FILM 42" X 100'
209353 CANVAS 42" X 35'
209356 CANVAS 60" X 35'
GRAPHIC OUTDOOR (GO) MEDIA
209681 POLYETHYLENE BANNER 42" X 50'
209687 POLYETHYLENE BANNER 60" X 50'
209680 TYVEK® 42" X 50'
209686 TYVEK® 60" X 50'
209688 WET STRENGTH P APER 42" X 70'
209689 WET STRENGTH P APER 60" X 70'
208512 WA TER-RESISTANT VINYL 42" X 40'
208513 WA TER-RESISTANT VINYL 60" X 40'
GRAPHIC STANDARD INK ACCESSOR Y KITS
208163-1 GR APHIC ST ANDARD (GS) CYAN
208163-2 GR APHIC ST ANDARD (GS) MAGENT A
208163-3 GR APHIC ST ANDARD (GS) YELLOW
208163-4 GR APHIC ST ANDARD (GS) BLACK
GRAPHIC OUTDOOR (GO) INK ACCESSORY KITS
208164-1 GRAPHIC OUTDOOR (GO) CY AN
208164-2 GRAPHIC OUTDOOR (GO) MAGENT A
208164-3 GRAPHIC OUTDOOR (GO) YELLOW
208164-4 GRAPHIC OUTDOOR (GO) BLACK
Note: Each kit contains 500 ml of ink and ink
cartridge.
24 Quick Start
 Loading...