

North Star M459211B Maintenance Manual
M459211B
®
459211; Honda GX160, 8 Gal. Twin Tank
459221; Honda GX270, 8 Gal. Twin Tank
Gasoline Portable Air Compressor
Installation, Operation and Maintenance Manual
To the Owner:
Thank you for purchasing a NorthStar Air Compressor. Your machine is designed for long life, dependability,
and the top performance you demand! Please take time now to read through this manual so you better
understand the machine’s operation, maintenance and safety precautions. Everyone who operates this machine
must read and understand this manual. The time you take now w ill prolong your machine’s life and prepare you
for its safe operation. Enjoy the exceptional performance of your NorthStar Air Compressor, the industry leader!
The manufacturer reserves the right to make improvements in design and/or changes in specifications at any
time without incurring any obligation to install them on units previously sold.
Quick Facts
Engine Oil Engine is shipped without oil. Fill before starting.
Use SAE 10W-30 motor oil.
Pump Oil
Air Filter Replacement air filter part number is AB2281000 for Item #459211,
Maximum
Pressure
Maintenance
Schedule
Tank: Drain water daily
Compressor
Check pump oil level before starting.
Use non-detergent pump oil (part # 4043).
and filter #35409 for Item #459221
Item #459211 maximum pressure = 130 psi.
Item #459221 maximum pressure = 175 psi
Engine: Oil: change after first 20 hours, then annually or every 100 hours.
Spark Plug: clean every 100 hrs, replace annually or every 300 hrs.
Air Filter: clean weekly, replace annually or every 1000 hrs.
Refer to your Honda engine owner’s manual for further instructions.
Oil: change after first 50 hours, then every 3 months or 500 hours.
Pump:
Read and understand all manuals before operating.
Any Questions, Comments, Problems, or Parts Orders
Call NorthStar Product Support 1-800-270-0810

Table of Contents
Important Safety Instructions 2 Maintenance 6
Receipt and Inspection 2 Kits & Service Parts 6
Machine Component
Identification
Assembly 4 Pneumatic Schematic Diagrams 10
Operation 5 Troubleshooting 11
Limited Warranty 13
3 Exploded View / Component List 7-9
Safety
DEFINITIONS
DANGER!
WILL cause DEATH, SEVERE INJURY or substantial
property damage.
WARNING!
CAN cause DEATH, SEVERE INJURY or substantial
property damage.
CAUTION!
WILL or CAN cause MINOR INJURY or property
damage.
GENERAL SAFETY PRECAUTIONS
ALWAYS wear eye protection when operating or
servicing compressor.
NEVER operate where flammable or explosive liquids or
vapors such as gasoline, natural gas and solvents are
present.
NEVER remove, paint over, or deface decals. Replace
any missing decals.
NEVER operate with guards or shields removed,
damaged or broken.
NEVER operate indoors, this compressor intended for
outdoor use only. Avoid inhaling exhaust fumes, risk of
asphyxiation. Exhaust fumes are deadly.
NEVER add fuel when the product is operating or hot.
NEVER directly inhale compressed air.
NEVER over-pressurize the receiver tank or similar
vessels beyond design limits.
NEVER use a receiver tank or similar vessels that fail to
meet the design requirements of the compressor.
NEVER drill into, weld or otherwise alter the receiver
tank or similar vessels.
NEVER remove, adjust, bypass, change, modify or
make substitutions for safety/relief valves, pressure
switches or other pressure control related devices.
NEVER use air tools or attachments without first
determining the maximum pressure recommended for
that equipment.
NEVER point air nozzles or sprayers toward people or
animals.
NEVER touch the compressor pump, engine or
discharge tubing during or shortly after operation. These
parts become hot.
BREATHING AIR PRECAUTION
NorthStar air compressors are not designed, intended
or approved for breathing air. Compressed air should not
be used for breathing air applications unless treated in
accordance with all applicable codes and regulations.
Receipt and Inspection
Before signing the delivery receipt, inspect for
damage and missing parts. If damage or missing parts
are apparent, make the appropriate notation on the
delivery receipt, then sign the receipt. Immediately
contact the carrier for an inspection. All material must be
held in the receiving location for the carrier’s inspection.
Delivery receipts that have been signed without a
notation of damage or missing parts are considered to
be delivered “clear” Subsequent claims are then
considered to be concealed damage claims. Settle
damage claims directly with the transportation company.
If you discover damage after receiving the air
compressor (concealed damage), the carrier must be
notified within 15 day of receipt and an inspection must
requested by telephone with confirmation in writing. On
concealed damage claims, the burden of establishing
that the compressor was damaged in transit reverts back
to the claimant.
Read the compressor nameplate to verify it is the
model ordered, and read the motor nameplate to verify it
is compatible with your electrical conditions. Make sure
electrical enclosures and components are appropriate.
2

Machine Component Identification
Machine Component Identification
1. Engine - Engine is NOT shipped with oil. Refer to engine owners’ manual for proper viscosity and
capacity of oil for your engine.
2. On/Off Switch - Make sure switch is at “ON” position when starting engine.
3. Compressor Air Filter - Make sure your air filter is clean and particle free. See pump exploded view for
replacement filter part number.
4. Belt Guard - Covers the belt, motor pulley and flywheel. NEVER operate compressor without belt
guard.
5. Regulated Pressure Gauge - Easy to read liquid filled gauge indicates regulated pressure.
6. Port at Tank Pressure – To access full tank pressure, attach hose to this port. Thread size is ¼” NPT.
7. Tank Drain – Location of tank drains. Drain tank daily or after each use.
8. Regulator – Adjust outlet pressure, not to exceed pressure rating of the tool.
9. Quick Connect - This is a ¼” quick connect.
10. Unloader - Lift knob to relieve pressure when starting the engine.
11. ASME Safety Valve - This valve automatically releases air if the tank pressure exceeds the preset maximum.
12. Pneumatic Tire - Keep tire pressure at 20 psi for easy movement.
13. Tank Pressure Gauge - Easy to read liquid filled gauge indicates pressure in the tank.
14. Discharge Tube - This tube carries compressed air from the pump to the check valve. This tube
becomes very hot during use. To avoid the risk of severe burns, never touch the discharge tube.
15. Engine Control - Location of choke, engine speed and fuel valve.
3
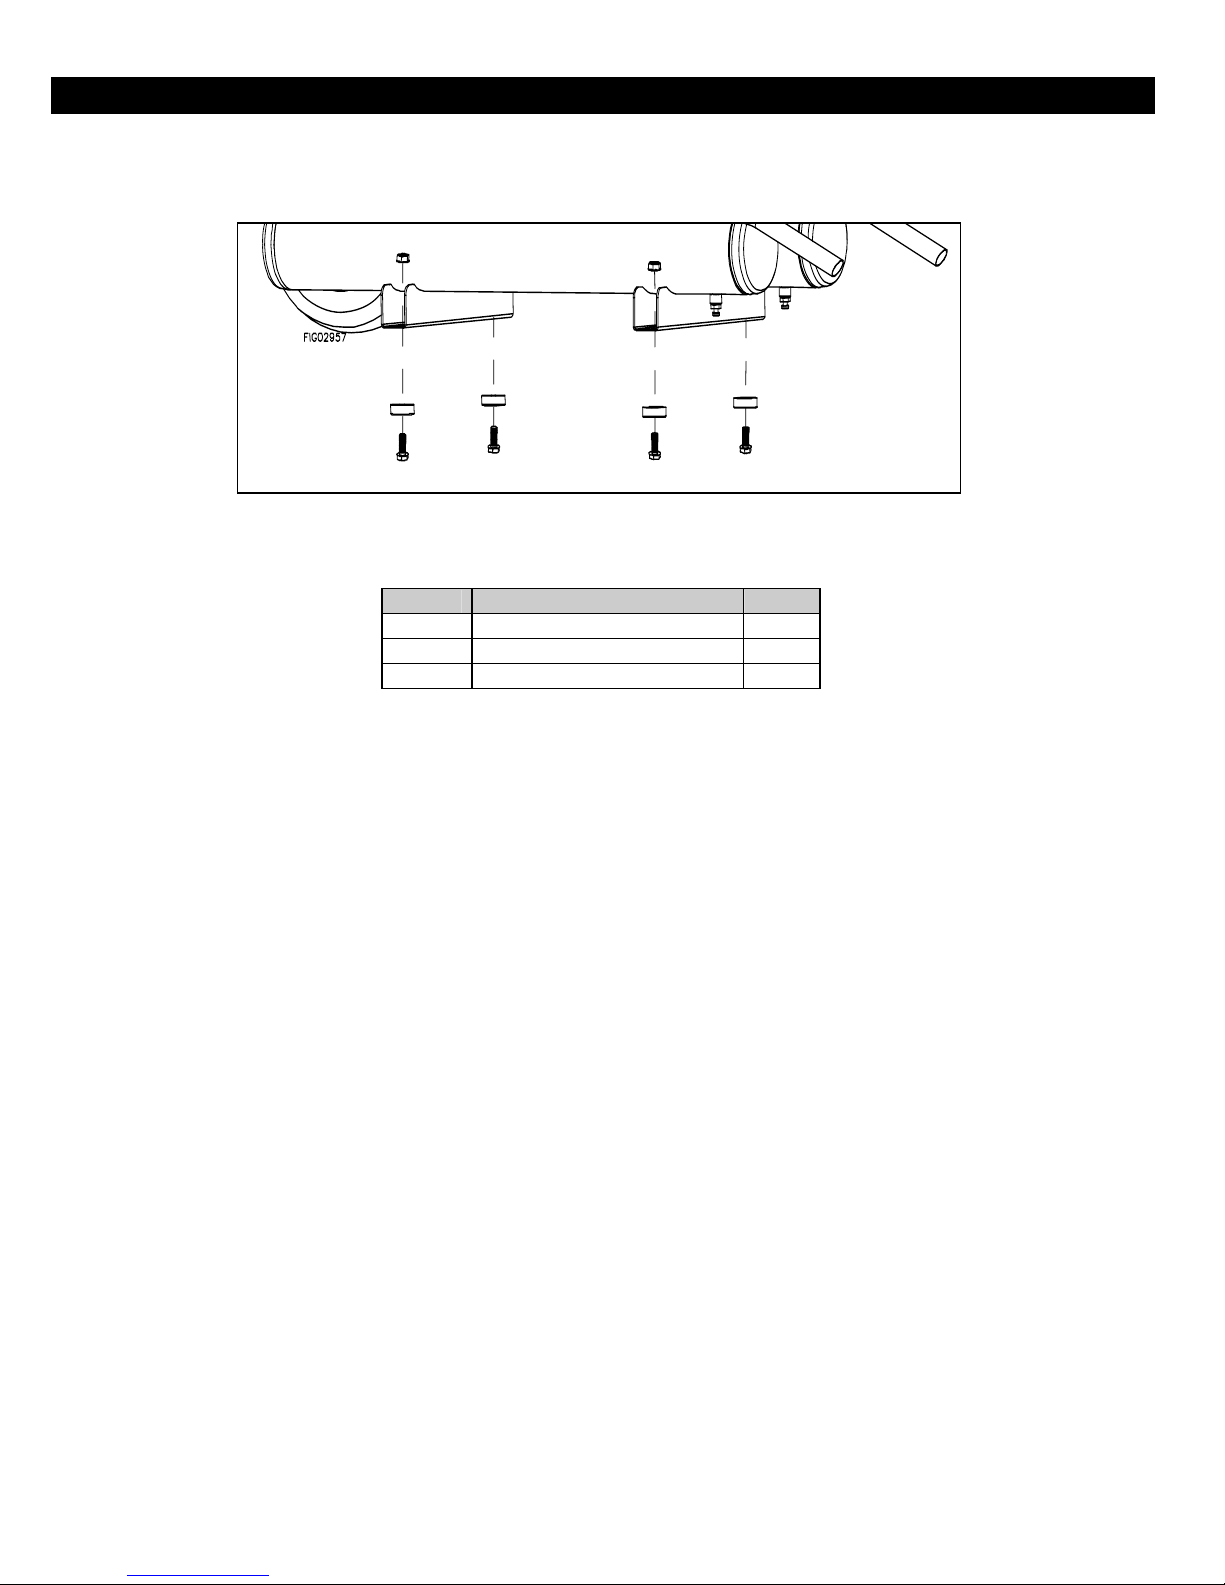
Assembly
Attach rubber feet as shown
Item# Description Qty
2215 Rubber Foot 4
82017 5/16 X 3/4” Flange Bolt 4
82019 5/16 Flange Nut 4
4

p
Operation
INITIAL START-UP
1. Pump is shipped with oil. Remove the oil cap
and check pump oil level. Add SAE 30 nondetergent pump oil (NorthStar part #4043), if
necessary. Hand tighten breather cap.
2. Turn pressure relief knob to engine start
position.
Engine
Start
3. The engine is shipped without oil. Refer to the
engine manual for oil capacity and viscosity
recommendations.
4. Refer to engine manual to start your engine.
5. Once the engine has started, move the pressure
relief knob to the engine run position.
CAUTION! Unusual noise or vibration indicates a
problem. Do not continue to operate until you
identify and correct the source of the problem.
CAUTION! Do not attach air tools to open end of
the hose until start-up is completed and the unit
checks out OK.
6. Run the unit for 30 minutes, with ball valve open,
to break in pump parts.
7. Close the ball valve to shut off airflow. The
compressor is now ready for use.
8. After 50 hours of operation change the
compressor oil.
Breather
ca
Engine
Run
WARNING!
Never disconnect threaded joints with pressure in
the tank.
NOTE: Reduce tank pressure below 10 psi, and
then drain moisture from tank daily to avoid tank
corrosion. Drain moisture from tank(s) by opening
the drain petcock located at the bottom of the tank.
COMPRESSOR LUBRICATION
CAUTION! Do not operate without lubricant or with
inadequate lubricant. Use of compressor without
lubricant or inadequate lubricant voids all warranties.
Synthetic Lubricants
Synthetic lubricants are recommended after 50-hour
break-in. Compressor life is greatly increased with
the use of synthetic lubricants. CAUTION! If you will
be using synthetic lubricant, all downstream piping
material and system components must be
compatible.
Suitable
Alkyd, Fluorosilicone, Flourocarbon, Polysulfide, 2-Component
Urethane, Nylon, Delrin®, Celcon®, High Nitrile Rubber (Buna N.
NBR more than 36
Epichlorohydrin, Polyacrylate, Melamine, Polypropylene, Baked
Phenolics, Epoxy, Modified Alkyds
Viton®, Teflon®, Epoxy (Glass Filled), Oil Resistant
Acrylonite), Polyurethane, Polyethylene,
( ® indicates trademark of DuPont Corporation)
Not Recommended
Neoprene, Natural Rubber, SBR Rubber, Acrylic Paint, Lacquer,
Varnish, Polystyrene, PVC, ABS, Polycarbonite, Cellulose
Acetate, Latex, EPR, Acrylics, Phenoxy, Polysulfones, Styrene
Acrylonitile (San), Butyl
Alternate Lubricants. You may use petroleum-based lubricant
that is premium quality, does not contain detergents, contains
only anti-rust, anti-oxidation, and anti-foam agents as additives,
has a flashpoint of 440°F (227°C) or higher, and has a autoignition point of 650°F (343°C) or higher.
See the petroleum lubricant viscosity table below. The table is
intended as a general guide only. Heavy-duty operating conditions
require heavier viscosities. Refer specific operating conditions to
NorthStar Product Support at 1-800-270-0810.
Temperature
around
Compressor
Below 40°F (4°C)
40°F to 80°F
(4°C to 27°C)
80°F to 100°F
(27°C to 37°C)
Viscosity Grade
ISO SAE
60 20
100
150
30
40
Pump Capacities.
Refer to the following table for crankcase capacity
Item # Crankcase capacity
459211 36 oz
459221 48 oz
5
 Loading...