

Page 1
M268180M
ITEM NUMBER: 268180
SERIAL NUMBER: _____________
TM
Owner’s Manual
I nst ruc tion s fo r Ass embly, Te stin g, Oper at ion, Ser vicing, and Sto rage
Tree Sprayer: For outdoor use with agricultural
pesticides and other liquids**
WARNING
READ and UNDERS TAN D the O wner’ s Ma n ual com pletely befor e usin g this spraye r.
Assemble, test, and use only in accordance with the Owner’s Manual instructi ons.
READ and FOLLOW chemical label instructions. Pesti cides are hazardous chemicals.
KNOW emergency procedur es BEFORE handli ng che m i ca l s. Sprayer leaks, bodily
chemical contact, poisoning, and spills require immediate response.
AVOID inha ling, ingesting, or coming into conta ct wi th a ny c hemicals .
WEAR persona l protective gear when filling, using, cleani ng, and se rvicing the
sprayer.
KEEP sprayer and spray materials away from children and pets. Pesticides are
especially toxic to them.
EXE RCIS E CAUTION in ATV ve hicle handl ing and do no t ex ce ed 5 MP H. ATV will be
less stable and handle very differently with filled sprayer attached.
DO NO T TURN ON P OWER to spraye r u ntil r eady to s pray in order to avoid
unintentional spray release.
Impr oper use of the sprayer or handli ng of chemicals c ould result i n ser ious injur y
or illness to the operator or nea rby persons/animals, or could cause damage to the
environment.
** T his sprayer is recommended for use in spraying non-flammable liquids s uch as pesticides, water for plants/trees
or dust control, ice control chemi cals, or water-based non-fl ammable sealants or stains for outdoor wood sur faces.
Howeve r, WE REC OM MEND T HAT THE SP R AYER NOT B E USED F OR OTHER P UR POS ES ONC E IT HAS
BEEN USED FOR SPRAYING PEST ICIDES. Any chemical will leave some residual in the tank liner or sprayer
components, even aft er the sprayer has been properly cle aned. T hese residual chemi cals can have unexpected
effects on futur e uses. For example, spraying water or other liquids that are contami nated with residual pesticide
may result in unforeseen hazards to plant or animal life.
Any Questions, Comments, Problems, or Parts Orders
Call NorthStar Customer Service 1-800-270-0810
©2005 Northern Tool and Equipment Company
Page 2

Hazard Signal Wo rd Definitions
2
Page 3

Table o f Contents
Intended Use ................................................................................................................................. 4
Summary of Important Safety Information................................................................................5
During Assembly
During Operation
• Gen e ral Chemical Safety
• Chemical Application Safety
• AT V Vehicl e Handling Safety
• Che mic al Acci d e n t Proc ed ures
Warning Label Locations..............................................................................................................7
Component Inventory
Unpacking.....................................................................................................................................8
Assembly
Step One: Att ach gauge..................................................................................................................9
St ep Two: Attac h gun hose to s pray gun and pump ..........................................................................9
Step Three: Attach gun clips to tank................................................................................................9
Step Four: Attach drain cap to tank.................................................................................................9
St ep F ive: Attach hose guide t o tank .............................................................................................10
Step Six: Attach sprayer to vehicle................................................................................................10
Step Seven: Connect power cords to vehicle battery.......................................................................11
Step Eight: Check and test completed assembly.............................................................................14
Machine Components..................................................................................................................15
Operation
Imp or ta nt Safety In forma tion - Operation ................................................................................16
• General Chemical Safety
• AT V Vehi cl e Handl i ng Safety
• C h em i cal Ap p l icat o r Saf et y
• C h em i cal Accid en t Pro ced ures
Preparing the Sprayer for Each Use........................................................................................20
Using the Sprayer
S t ep O ne: Ass es s w i n d cond it i o n s an d cl ear wo rk area......................................................................21
Step Two: Fill the spra yer...........................................................................................................22
S t ep T h ree: O per at e t h e s p ray er....................................................................................................24
Step Four: Clean sprayer and decontami nate aft er use......................................................................27
Storage ..........................................................................................................................................28
Preparing for storage
Removing from st orage
Troubleshooting...........................................................................................................................29
Specifications................................................................................................................................30
Parts Breakdown – Exploded View............................................................................................31
3
Page 4

Intended Use
The sprayer is intended for use in spraying agricult ural pesticides and other nonf lammable liquids.
SPRAYING PESTICIDES:
Pesticides ar e hazar dou s chemicals that must be handl ed with caution as directed
throughout this manual and on the pesticide label. Pesticides are regulated by the United
S ta t es Environmental Pr ot e c t ion Agency (EPA) and de fined a s:
Any substance or mixture of substances intended for preventing, destroying, repelling,
or mitigating any pest. Though often misunderstood to refer only to insecticides, the
term pesticide is a comprehensive term that applies to insecticides, herbicides,
fungicides, and various other substances used to control pests.
The spr a yer is intende d for use in sprayi ng pestic ides in liquid form onl y. The spraye r is
N OT i ntended for use in spr ayi ng pesticides in dry or ae rosolize d form, or f or use with
fumigants.
S ome formula tions of liquid pestici des do not remain in solution and should be agit a ted
to maintain a uniform mix. This sprayer is equipped with an agitator that should be used
when sprayin g pestici des classified as “flow able” (“F” or “L”), “wettable powder” (“WP”
or “W”), “emulsion” (“EC” or “E”), “microencapsulated ” (“M”), or w ater dispersibl e
granules (“WDG” or “DF”) . (See pesticide label to de termine i ts clas sificati on.)
This sprayer comes equipped with a spray gun for applying pesticides on selected plants.
I f you wish to s pray large ground a reas, a broadcast boom (Item #273011) and a boom
adapter kit (Item #268181) f or mounti ng the broadcast boom to the ve hicl e ar e avail able
as o ptio nal accessori es.
SPRAYING OTHER LI QUIDS:
I n a dditi on to spr ayi ng pestici de s, thi s sprayer may be used to spr ay ot he r non-flammabl e
liquids. E xample uses include : wat e ring plants/trees or spr a ying water for dust control,
applying ic e c ontrol c he micals, or applyi ng wat e r-based, non- fla mmable seala nt or stain
to outdoor wood surfac es.
However, W E RECOMMEND THAT THE S PRAYER NOT B E USED FO R
OTHER PURPOS E S ONCE IT HAS ALREADY BEEN USED F OR SPRAYING
PESTICIDES . Any chemical will leave some resi dual in the tank l iner or sprayer
components, e ve n a fte r the spr ayer has bee n properly cl e a ned. T hese residual che mica ls
can have unexpect ed ef fec ts on f uture uses. For example , spra ying wa ter or othe r liquids
that are contaminated with residual pesticide may result in unf oreseen hazar ds to pl ant or
animal lif e.
Contact North s t ar Cust omer Service at 1-800- 270-0810 for any questions
about the appropriate use of the s praye r and/or optional access ories.
4
Page 5

Summary o f Important Safety Informatio n
WARNING
Re ad a nd unde rs ta nd this ow ner’s manual com pletely befo re using t he sprayer. Read
each ch emica l lab el’s instru ct io ns bef ore handling th e chemical.
Im proper u se o f the spra yer or handli n g of che mica l s co u ld result i n serious i nj u ry or
illness for the op erato r or nearby persons/animals, or cause damage to the environment.
L I STED BE LOW is a su mmary of sa fety i nfo rm atio n o f part ic u lar i mp or t an ce. S ee ind ividua l
sections of this o wne r’s manual for more de t ails.
-------------------------------------- DURING ASS EMBLY -------------------------------
• EXE RCI S E CAUTIO N when attach i n g remote swi tch to b attery t erminal s . Follow the steps listed in the
Assembly section of this manual in exact sequence when connecting the sprayer’s remote switch battery clamps
to the battery terminals. Ca u t i o n mus t b e exer ci s ed to a void co n t a ct wi t h ba t ter y a ci d a n d to p r even t s p a r ki n g .
• CHECK and TEST completed assembly as directed in this manual. S erious injury could result from chemical
leaks if sprayer is improperly assembled.
• DO NO T MO DIFY spray er des ig n .
------------------------------------- DURING OPERA TI O N ------------------------------
General Chemical Safety
• RE A D a nd FOL LO W ea ch chemica l l a bel’s i n s t ru ct i o ns an d wa rn ing s.
• AVOID inh aling, ingesting, or coming into contact with any chemicals.
• KN O W a pp li ca ble li cen s ing and regula to ry requi rement s for the chemical you pl an to use.
• KN O W emerg ency pro cedures before ha ndl ing ch emi ca l s . Careful l y rev iew “Ch em ical A cci d en t
Procedures” listed below and later in this manual. Also see First Aid instructions on the chemical label.
• WEAR p ro t ecti v e cl o thing , ey e pro tectio n , and ch em i ca l res is ta nt g lo v es when filling, using and cleaning
th e s p r ayer . Wear ad d i ti o n al p ro tect iv e g ear, s u ch as facemas k o r ap ro n , as reco mm en d ed o n th e ch em i cal l ab el.
• EXE RCI S E EXT RA CAUT IO N a round ch i ldren and p ets. P es ti ci d es ar e es p eci al ly t o x i c t o th em. Keep
sprayer and spray materials away from them at all times.
• DO NOT MIX OR POU R chemica l s in an enclo s ed, un v entil a ted a rea
• DO NOT US E fla mma ble o r co rrosi v e chemica l s in the sprayer.
• FL U SH the sp ra y er befo re s w i tching chemica l s i n order t o prevent dangerous chemi cal intera ctions.
• S T ORE pes tici des in a correct l y l a bel ed co nt ainer a nd in a secure l o ca ti o n.
• MON I TO R the hea l th of opera to rs freq uently exp o s ed to pes tici des , as reco mm en d ed b y t h e ch em i cal l ab el
or local/federal regulations.
Chemical Application Safety
Before Spraying
• IN S P ECT an d PR E P AR E s pra y er before ea ch us e as directed in this manual.
• DO NO T TURN ON PO W E R to s p rayer u n til read y to spray in order to avoid unintentional spray release.
• WE AR ADDIT I O NAL PE RSO NAL PRO T E CTIVE EQUI PME NT if you will be sp ray ing o verh ead o r
fogging. You will be exposed to much more chemical fallout in these applications . W ear chemical resist ant
head and neck protection, full face mask or hal f face mask with sealed goggles, and consider using a respirator.
• DO NO T SPRAY wh en wind sp eed exceeds 4 MP H in order to minimize spray drift.
• CLEAR work area of people/ pets and POST warning notices t o res t r i ct acces s for t h e p erio d reco m m en d ed
on ch em i cal l ab el.
• KEE P sprayer and spray materials away f rom children/p ets. Pest ici d es can b e es p eci all y t o x i c to ch i l d r en
and animals.
• DO NOT ALLOW anyon e youn ger than 16 to operate sprayer si n ce p es t i cid es are es p ecial ly t o x i c t o
children.
During Spraying
• DO NO T OVERAPP L Y p esti cide. Apply at rate recommended by chemical manu facturer. Excess pesticide
can be dange rous to humans/animals, damage desirable plants, and contaminate soil and water sources.
• DO NO T EAT, DRI NK, SMOK E, RUB YOUR E YES , or TO UCH YO UR BARE SKI N whil e h and lin g
chemicals an d sp raying.
• NE VER PO I NT T H E SPRAY G UN a t p eop l e or animal s .
5
Page 6

Summary o f Important Safety Information (continued)
•
ALW AYS H O L D THE SP RAY GUN F IRML Y when spray i n g a t h i gher pressures to prevent gun from
whipping. Keep good footing and balance at all times.
• E XERCISE EXTRA CAUT I O N wh en sp ray ing near areas acces si ble to chi ldren a nd pets .
• CLEAN up spills immediately per instructions on the chemical label.
• T URN O F F veh i cle and s et brake or b l ock wheels , TURN OF F p o wer to sp rayer, and REL IEVE s ys tem
pressure be for e leaving sprayer unattended.
• S E E Troublesh ooting section of this manu al before attemptin g an y repairs. Wea r per sona l protective
equipment and follow sa fety instructions.
After Spraying
• CL EAN s pra y er i mmedia tel y a fter u s e acco rd i n g to t h e d i recti o n s p ro v i d ed i n this manu al .
• DECO NT AMINATE yo u rsel f after you a re done spraying and have cleaned the sprayer. Wash all exposed
are as of the body with s oap and water, and remove and launder clot hing.
• DI S P O SE O F o r ST O R E rema i ni ng ch emi ca ls i n s ecure s to ra g e with co rrectl y ma rk ed co nt ainer.
ATV Veh icl e Ha n dl i n g S a fe ty
• DO NOT ALLOW drivers you n ger than 16 to operate AT V with sprayer attached.
• EXE RCI S E SPE CI AL CAUTI O N in AT V vehicl e ha ndl in g and DO NOT ex ceed 5 MPH . ATV will be
less stable and perform very differently with filled sprayer attached. Exercise particular caution on sloped or
rough surfaces to avoid rollover. Use a vehicle equipped with rollover protecti on for use on non-level terrain.
• DO NO T RI DE or TRANS PO RT cargo on th e sprayer.
Chemica l Accident Procedu res
Im mediate response is necessary in the event of sp ray e r leaks, bodily chem ica l c onta ct, poisoning, or sp ills.
See instruct ions below:
Sp rayer leak If the sprayer develops a leak, immediately stop spraying. Turn off power to the sprayer
and foll ow directions below, as applicable.
Bodily chemical
contact
Poisoning by
ingestion or
inhalation
Chemical spills Chemical spills must be quickly contained and properly cleaned up.
Pers o na l co nta mina ti o n ca n o ccu r w hen chemi ca ls s pl a s h, sp i ll, o r sp ra y directl y o nto a
person.
1. Immediately follow First Aid instructions on chemical label.
General p ro ced ures can in cl u d e:
a) Eyes – immediately flush with water.
b) Skin – wash all contaminated skin surfa ces with soap and water.
c) Cl othi ng – remove contaminated clothing. Dispose of heavil y contaminated
clothing per chemical label instructions.
2. Seek medical advice if instructed on the label or the victim experiences symptoms of
harm ful effects . Brin g t h e ch em i cal l ab el for reference.
In case of poisoning f rom ingestion or inh al ation:
If the victim has collapsed or is not breathing, call 911. Oth erw i se:
1. If you are the victim, immediately seek assistance from nearby personn el because y o u
may become incapacitated.
2. Immediately follow first aid instructions on chemical label.
3. C all a poison control center for further advi ce. In the U. S., call 1-800-222-1222. Have
th e ch emi cal lab el av ai lab l e for re fer ence.
R efer t o th e ch em i cal l ab el for an y s p eci fic cl ean -u p i n s t ru cti o n s .
General procedu res include:
1. Controlling the spill by stopping the source of the spill.
2. Containing the spill so that it does not spread and get into water sources.
3. C l e a ni ng up the spill immediately.
4. Seeking additional advice from:
- Chemical manufacturer. See ch em ical lab el fo r co n t act i n form at i o n .
- State pesticide regulatory agency. In the U.S., call the National Pesticide Info. Ctr. at
800-858-7378 fo r assistance in contacting your state’ s agency.
6
Page 7
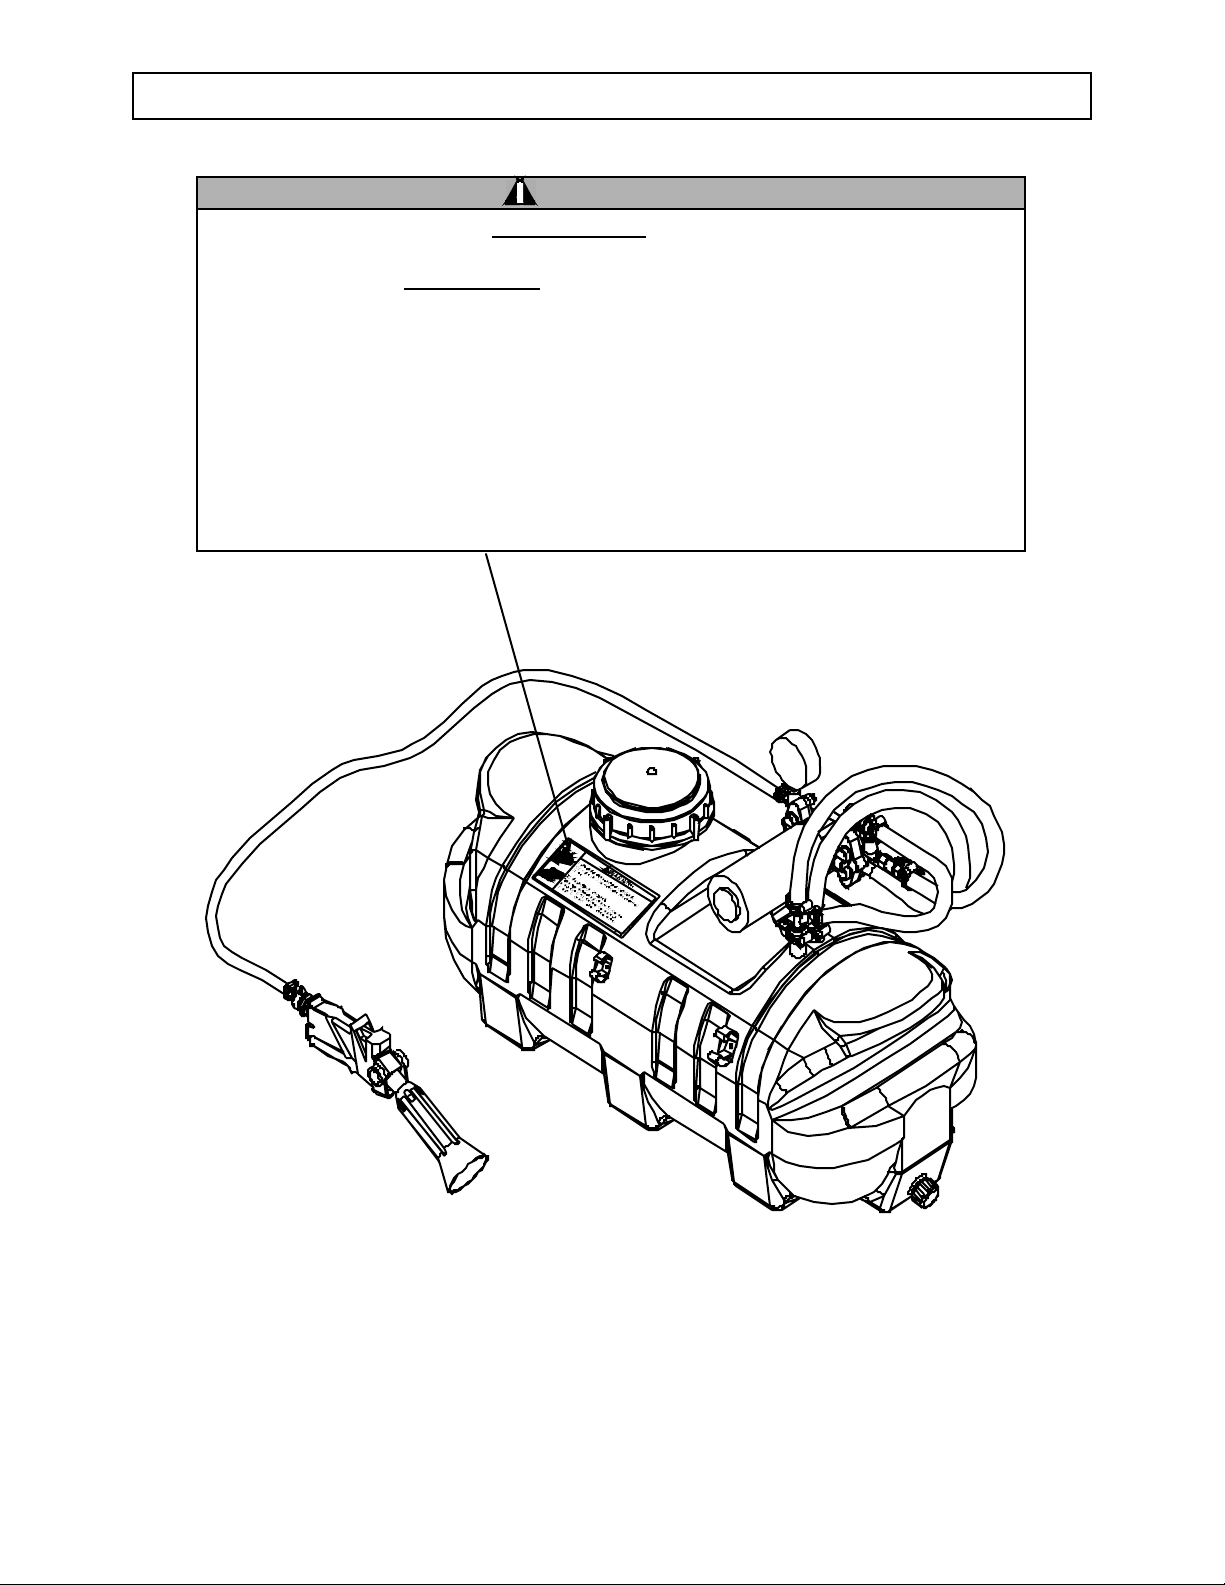
Wa rning Label Location
WARNING
READ and UNDERS TAN D the O wner’ s Ma n ual com pletely befor e usin g this spraye r.
Assemble, test, and use only in accordance with the Owner’s Manual instructi ons.
READ and FOLLOW chemical label instructions. Pesti cides are hazardous chemicals.
KNOW emergency procedur es BEFORE handli ng che m i ca l s. Sprayer leaks, bodily
chemical contact, poisoning, and spills require immediate response.
AVOID inha ling, ingesting, or coming into conta ct wi th a ny c hemicals .
EXE RCIS E CAUTION in vehicle h andling. Vehicle will be less stable and handle very
differently with filled sprayer attached.
DO NO T TURN ON P OWER to spraye r u ntil r eady to s pray in order to avoid
unintentional spray release.
Impr oper use of the sprayer or handli ng of chemicals c ould result i n ser ious injur y
or illness to the operator or nea rby persons/animals, or could cause damage to the
environment.
),*
7
Page 8
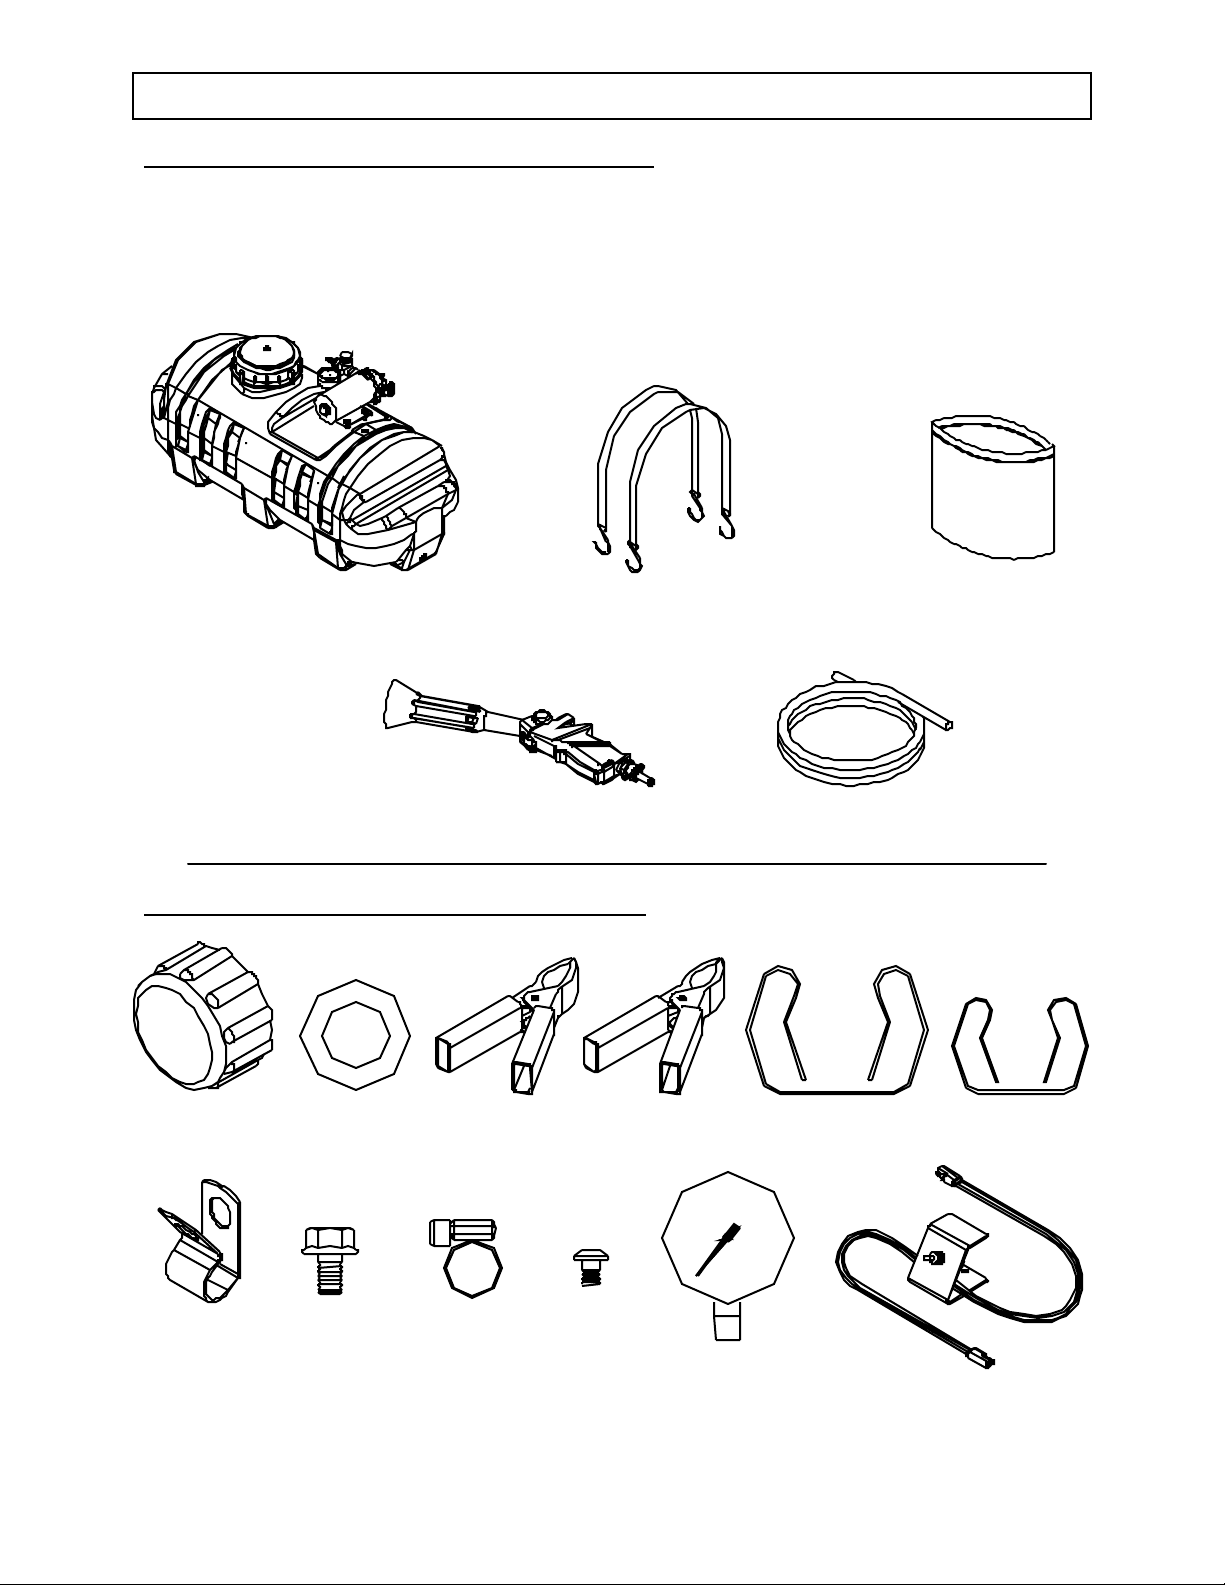
Unpacking
N
r
Closely inspect all contents in the shipping carton.
Note that some parts are shipped inside the tank.
• If you have damaged components: Contact the freight company that delivered the unit and
file a claim.
• If you have missing components: Contact NorthStar Customer Service at 1-800-270-0810.
Tank Strap sSpraye
Spray Gun
The following items are found in the manual bag.
Drain Cap
Rubber
Washer
Positive Battery
Cla mp - Red
egative Battery
Clamp - Black
Manual Bag
42 0” Gun Ho s e
Lar ge Gun Clip Gun Clip
Hose
Guide
5/16 x 1/2”
Bolt
Hose
Cla mp (4 )
#10 x 1/4”
Screw (2)
Pressure
Gauge
Remote Switch
02205
8
Page 9
Assembly
Gu
ose
ose clamps
p
p
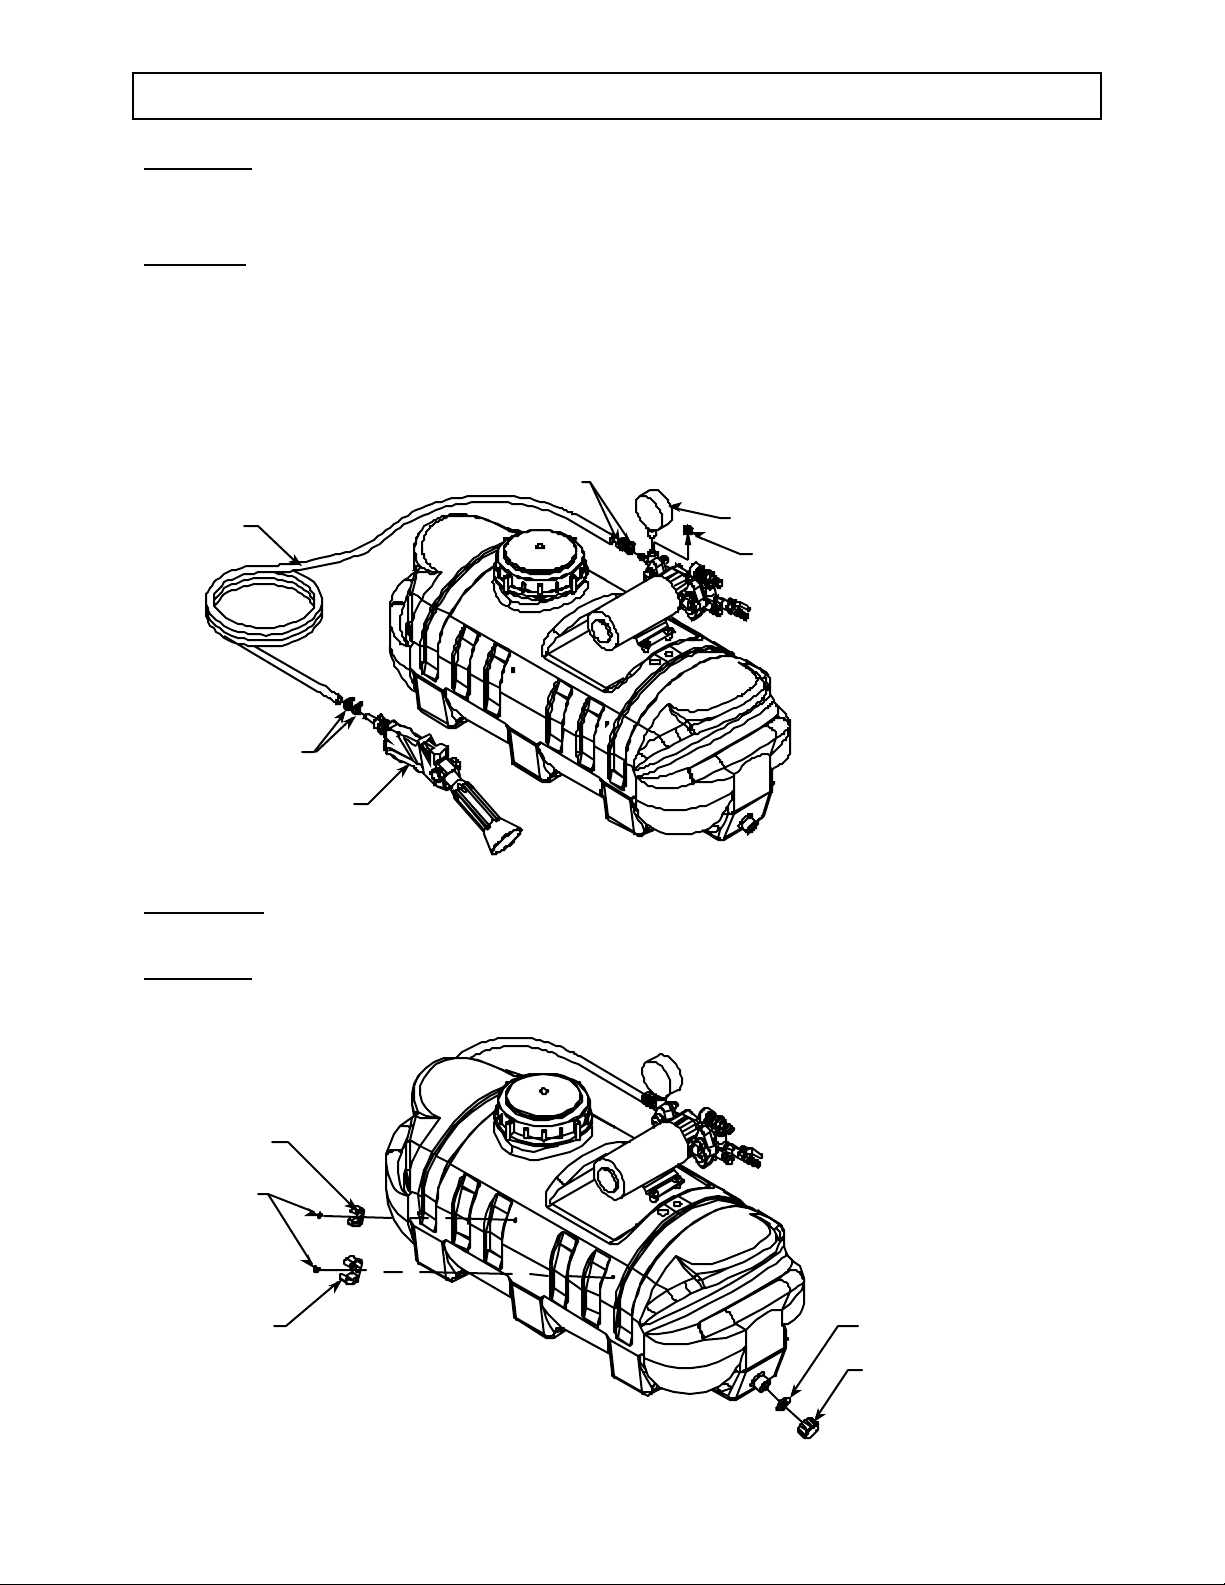
Step O ne: Attach ga uge
1. Remove and discard the plug in the gauge port.
2. Thread in pressure gauge. Hand tighten, then turn 2 full turns with a wrench.
Step Two: Attach gun ho se to spray g un and pump
1. Install hose clamps on hose.
i) Slide hose clamp over the end of the hose.
ii) Push the hose onto the hose barb.
iii) Slide the hose clamp over the hose barb.
iv) Tighten the hose clamp
2. Using 2 hose clamps, attach one end of the gun hose to the pump hose barb.
3. Using 2 hose clamps, attach the other end of the gun hose to the spray gun.
H
n h
Pressure gauge
Plug
Hose cl am p s
Spray gun
01976
Step Th ree: Att ach gun clips to tank
Fasten one gun clip and one large gun clip to the sprayer tank with #10 x 1/4” screws.
S te p Four : Attach drain ca p to tank
Press the rubber washer into the drain cap with your finger and thread the drain cap onto the tank.
Gun cli
#10 x ¼”
Screws
Large
gun clip
01978
Rubber washer
Drai n ca
9
Page 10
Assembly (co ntinued)
k
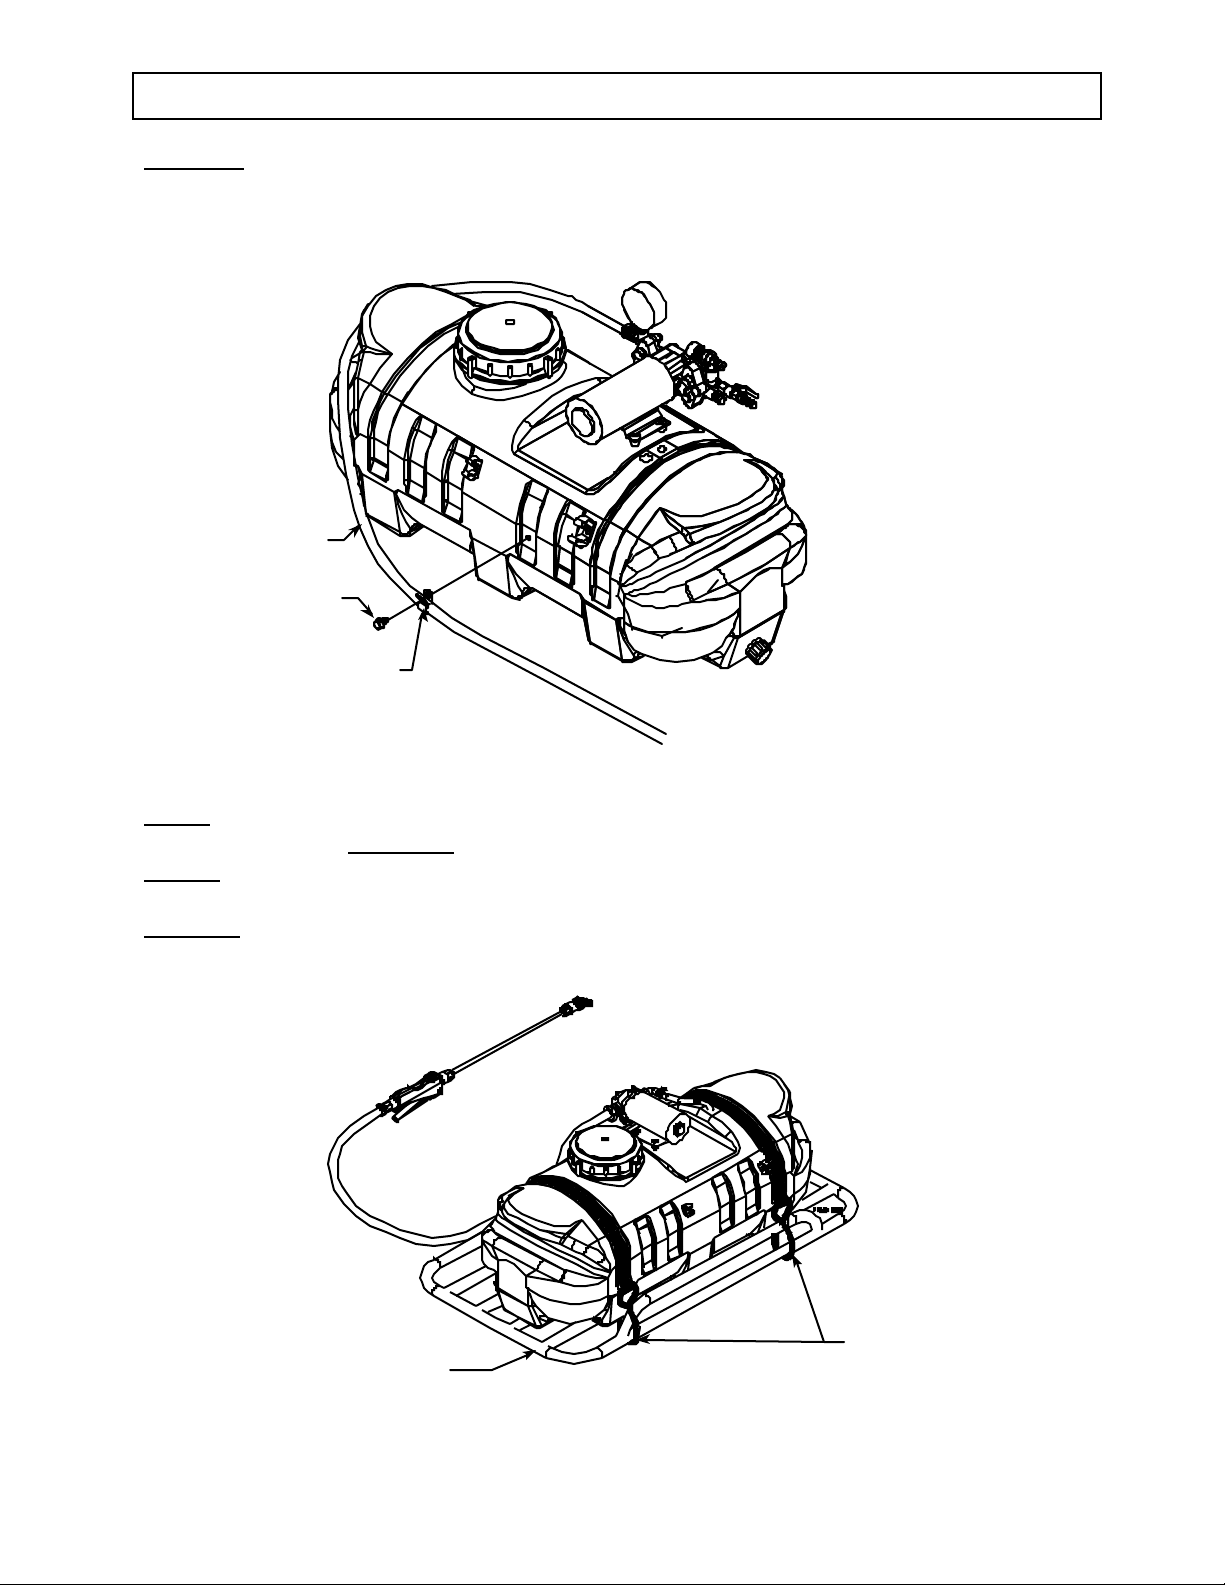
Step Five: At ta ch hose guide to tank
1. Route gun hose around sprayer and through hose guide.
2. Attach hose guide to tank with 5/16 x 1/2” bolt.
Gun hose
5/16 x ½ ” Bolt
Hose guide
02206
NOTE: If your vehicle battery will be inaccessible after the sprayer is attached, you will
need to proceed to “Step Seven: Connect remote switch to ATV battery” prior to performing
Step Six below.
Step Six: A ttach spray er to veh icle
Secure the sprayer tank to your ATV rack with the two tank straps.
AT V rac
(Not included)
T ank straps
10
Page 11

Assembly (co ntinued)
y
p
d
p
d
Step Seven: Co nnect power cords to vehicle batt ery
WARNING
Batteries are hazardous because they contain caustic acid, can emit explosive
gases, and can cause electr ic shock.
Caution must be exercised when making connection s to a battery to avoid shock
and contact with the acid, and to prevent any sparking that could lead to an
explosion.
ALWAYS follow th e safety instr uction s and steps list ed below in exact sequence
when connecting the sprayer’s remote swit ch to the battery ter m inals.
1. Preparator y sa fet y Preparator y sa fet y st ep s:
• ALWAYS use eye protection
• NEVER smoke or work near sparks or other sources of ignit ion.
• NEVE R touch bot h bat te ry te rmina ls at the s ame time or with an y non-
insulated tools.
• I f bat te ry ac id c ontacts s kin or c lothing, flus h immedi ately with wate r and
neutralize with baking soda.
2. Identi fy sprayer’s
power cords
Identify the powe r cords shipped wi th the sprayer.
Th e re ar e three power c ords fo r th e sprayer t hat you will ev entually connect end to
end to po wer th e spr ayer. Locate and ident ify t h ese thr ee cords:
a) T h e battery power cord and the pump power cord
are shipped con nect ed
together to the sprayer.
b) Th e remote switch power cord is pack ed separat ely in the Man ual Bag.
Batter
ower co r
P u m p p o wer co rd
Remote switch
ower co r
11
Page 12

Assembly (co ntinued)
e
y
3. Separate power
Disconnect the battery powe r cord from the pump power cord.
cords
Batter
po wer cor d
P u m p p o wer co rd
4. P repare wire ends Prepare the wire ends of the s prayer’s battery power cord for conne ction to
the vehicle battery:
a) Determine the t ype of end connectors you need to connect to your vehicle’s
battery t erminals.
b) Ins t al l b a ttery cla m ps (su ppl i ed) or e nd co nnectors of you r c h oos i ng o n t he
bare ends of the sprayer’s batt ery power cord wires.
To install battery clamps:
1. Remove red plastic handle
shield fr om red batte ry
clamp and slide onto red wire
2. Strip red battery cord wire ½”
3. Insert bare wire under raised hoop
on red battery clamp handle
Hoop
Prongs
Strip ½”
Red wir
Handle
shield
4. Us e a pl i ers to pre s s hoop down and cr imp wire
5. Fold prongs over wire insulation to hold wire in place
6. P ush plastic handle shield back over battery clamp handle
7. Repeat for black wire and black battery clamp.
5. Connect po wer cord
to battery
6. Verify co nne ction
7. Attach sprayer to
vehicle if haven’t yet
Connect the sprayer’s battery power cord to the vehicle bat tery using the
foll owing procedure:
a) Disconnect the vehicle battery ground wire.
b) C onne c t the re m ote switch ’s red ba t ter y cla mp or red w ire connec tor to the
positive(+) termi nal of the battery.
c) C onnect the re m o te switch ’s black batt ery clamp or black wire connect o r to
the negative(-) term i nal o f the b a t tery.
d) Reconnect the vehicle battery ground wire.
WARNING: Always c onn ect in this s eque nce to avoi d possi ble s hoc k.
Verify a complete conne ction has be en m ade by che cking with a DC voltm eter,
or by briefly connect ing to the pump power cord and listening for pump
activation .
If you have n ot yet mounted the sp rayer to your vehicle, d o so at this ti m e
following the instructio ns in “Step Six: A tt ac h Spray er to V ehic le”.
12
Page 13

Assembly (co ntinued)
d
p
d
power cord
8. Connect a ll three
power cords
together
9. Attach rem ote switch
to vehicle
10. Disc onnect after use
11. To disconnect
permanently
Connect the three s prayer power cords together.
a) Check to be su re the pow er sw itch is in the “OFF” posi ti on on the remo te
switch power co r d.
b) C onne c t the on e end of t he remote switch power c or d to the battery p ower
cord and the other end to t he pump power co r d.
To Ba tte ry
Remote switch
ower co r
Pump
Battery power co r
01981
Usin g supplied velcro pads, affix remote swit ch to vehicle in a position that is
ea sily reache d from the driver’s seat.
AFTER EACH US E, dis con nect power to the sprayer by di s connecting the
sprayer’s rem ote switch power cord fro m the battery power cord – t he battery
po wer cord may remain connected to the battery.
NOTE: It is important to discon nect power to the spra y er wh en not in use,
bo th for safety reasons and to prevent the pump from draining the battery.
ALWAYS verify that the power has been disconnected before servicing the
sprayer.
When it is necessary to disconnect the sprayer’s bat tery power co rd from the
batter y, use the following proced ure:
1. Disconnect sprayer’s remote swit ch power cord from the battery power cord
2. Disconnect the batt ery power cord from t he vehicle battery as follows:
a) Disconnect vehicle battery ground wire.
b) D isconnect the batt ery cord’s black battery clamp or bl ac k wir e
connector from the negative(-) terminal of t he ve hic l e b at te r y.
c) Disconn ect the battery cor d’s red battery clamp or red wire
connector from the positive(+) ter minal of the vehi cle battery .
d) Reconnect the vehicle battery ground wire.
.
WARNING: Always connect in this sequence to avoid possible shock.
(Remember that on some vehicle models, you may need to remove the spra yer to
access the battery)
13
Page 14

Assembly (co ntinued)
Ste p Eig h t: Chec k an d te s t comple ted as se mbly.
WARNING
C heck and test comple te d as s e mbl y
Serious injury c ould r esult from chemica l leaks if sp ray e r is improperly
as s embl ed or t he design of the s prayer is modifi ed.
Follow th e steps below to en sure the spray e r is properly a ssem bled. Never
modify the spraye r design.
1. Check assembly Check assembly to assure the sprayer is properly assembled and in safe
work i ng con d iti on :
a) Check th at the gun clip screws are tight , hose clamps are secure, and tank
s tra ps are prope rl y fastened.
b) While it is unl ikely that factory a s s embl ed components be come loose , th ey
should also be checked to make sure they are tight.
2. Test with water Test th e syste m for le a ks with water:
a) First read the instruction s in this Owner’s Man ual for Operat ion of the
sprayer
b) Fill t he tank with wate r per th e inst ruct ion s in this manual.
Important: The spraye r shou ld be OFF when you fill the ta nk.
c) Check for leaks throughout the system by operating the spray er per the
instr uctions in t his manual:
i) Turn the sprayer ON. (See Operation Instruct ions)
ii) Oper ate the spray gun. (See Operat ion Instructions)
iii) Adjust the pre ssure th rough its full range – to m axim um and back.
(See Operation Instructions)
d) If a leak is det ected, fix th e leak and re-test the syst em with water.
14
Page 15

Machine Co mponents
1.) Batte ry Clamps. Use the batt ery clamp s t o connect the battery po wer cord to the batt ery.
2.) Ba tte ry Power Cord. The battery power cord connects the vehicle batt ery to the remote switch . This
cord remain s connected to th e battery when the sprayer is not in use.
3.) Remote Switch. Th e remote switch allo ws the operato r to safely turn ON/OFF the spray e r.
4.) P ump Power Cord. The pump power cord conn ects the remote switch to the pump.
5.) Gun Hos e. The 420” gu n hose transfers chemic al fr om the pump to the sp ray gu n.
6.) Sp rayer Ta nk. The s p ra yer tank hold s the che mi c al .
7.) Fi ll Cap. The fill cap has a ball check to allo w air to enter the tank as t he chem ica l is dispensed, but
does not allow chem ical to escape the tank.
8.) Spraye r Pump. The sprayer pump mak es the chemical flow to the sp r ay gun and t h e nozzle.
9.) Pressure Gauge. The pressure gauge is an indicator of the pressure in the system.
10.) Pressure A djustme nt Knob. Turn the pressure adjust ment knob until the sprayer is running at the
desired pr essure.
11.) P r iming Hose. The priming hose tra nsfers c hemi cals from the pump bac k to the tank w hile priming .
12.) Suc tion Tube . The suctio n tube is the in let line for t he p um p. The suction tube has a suct ion strainer
to prevent debri s from entering the pump .
13.) P r iming Val ve. The primin g v alve performs three functions. First , it allows the pump to prime itself
when o pen. Seco n d, it helps keep the chemical well circulat ed when the valve is left open. Third, it will
relie ve the system pressure by op e nin g the valv e.
14.) Bypass Hose. The bypass hose tr ans fer s liquid from th e pump to th e ta nk whe n the system is up t o
pressure.
15.) Agitat ion Hose. T he agita tio n hos e combines the bypa s s and prim ing hose t o s end t he liquid ba ck to
the tank to keep the chemical mi xed .
16.) Spray Gun. The spray gun has three spraying modes; st ream, cone, fog (see operation instructions).
17.) Gun Clips. Use the gun cl ips t o s tore the spray gun.
18.) Ho s e Wr ap . The ho se wrap is built into th e t a nk, and provides a stora ge lo cat ion for th e gun hose.
15
Page 16

Operatio n – Important Safety Informatio n
Now that you have complet ed and tested your assembly, there is some important safety an d health
information you need to know with regard t o handling and spraying chemicals, as well as vehicle
ha ndling with the sprayer atta ched.
WARNING
Carefully read and make sure yo u understand the following safety information before
using the s praye r.
Gen eral Chemica l Safety:
WARNING
P esticides are hazardous chemicals.
Heed the warnin gs below and follow all instructio ns car efully.
Im prop er h andling of ch e micals can re sult in serious injury or illness,
or caus e d amage to the environme n t.
• C h e mical la bel. ALWAYS READ a nd FOLLOW all chem ic al la bel in str uctions.
• Li censing/re gulation. Refer to any applicable licensing rest rictions or stat e/federal regulations
with regard to the application of the particular ch emical you plan to use.
• Emergency procedures. Before handling chemicals, carefully review the “Chemical Accident
P rocedures” list ed later in this section, as well as the “St atement of Practical Treatment ” on the
chem ical label.
• Inhalation/contact. ALWAYS take precaut ions to avo id inhaling or coming int o contact wit h
t he chemical.
• P er s onal protective eq u ipme nt. ALW AYS wear protective clothing, eye protection, and
ch emical-resistant gloves when filling, using and clea nin g th e sprayer. Wear addition a l
prot ective gear (such as facemask or apron) as recommended o n the chemical label.
• Childr en/pets. Pesticides can be especially toxic to children and animals. ALWAYS exer cise
extra caution aro und children . Keep sprayer and all spray mater ials away from children and
animals.
• Ventilation. ALWAYS ensure there is adequate ventilation when mixing, pouring, or spraying.
• Flammables. NEVER use any f lammable chemicals in the sp rayer.
• Corrosives. DO NOT use corrosive chemicals in the spr ayer. Th ey can weak en the sprayer and
its part s, resulting in leaks. Check wit h the chemical manufact urer to ensure chemical is
co mpat ible with all components of the sp rayer.
• C h e mical int erac tio n. ALWAYS flush the sp rayer before switching chemicals. Different
chem icals may interact dangerously with each other.
• Chemical storage. ALWAYS store pesticides in a properly labeled container and in a secure
location per t he manufacturer’s recommendations.
• Healt h monitoring. Monit or t he health of operators who are frequently exposed to pest icides, as
recommended by the chemical label or local/federal regulations.
16
Page 17

Operatio n – Important Safety Informatio n (continued)
C hemical Ap plication Saf e ty:
WARNING
Ca uti on mus t be used when s prayi ng chemi cals to av oid unsafe expos ure to
humans and the environment
Heed the warnin gs below and follow all instructio ns car efully.
• Sp rayer prep. ALWAYS inspect and prepare the sprayer before use according to th e
directions provided in th is manual.
• Kee p spraye r off. Do not turn on power to the sprayer until ready to spray in order to avoid
unin tentional spray rele a se.
•
Overhead spraying or f oggin g. Wear additional personal protective equipment if you will be spraying
overhe ad or fogging. You will be exposed to much more pesticide fallout i n these appli cati ons. Wear
chemical resist ant head and neck protection, full face mask or half face mask wit h sealed goggles, and
consider using a dust/mist respirator.
• Wind speed. NEVER spr ay when wind speed exceeds 4 MP H in order t o minimize spray
drift.
• Clear area /post. A LWAYS kee p the w ork area clear of pe ople and pe ts. POS T w arni ng
notices to rest r ict access by the public for the period recommended on chemical label.
• Op erator age. You mus t b e 16 years of age or older to opera te this spraye r. Pes ticides are
espe cia lly to xic to childre n.
.
B efore Spr ay i ng
D uring Sp r ayi n g
• Overapplication. DO NOT overapply pesticide. Apply at a rate recommended by chemical
manufacturer. Excess pesticide can be dangerous to humans, damage desirable plants, and
contaminate soil and water sources.
• Neve r po int gun. NEVER point the spray gun at people or animals.
• Use firm gri p. A LWAY S hold the spray gun with a firm grip wh en using i t to spra y at higher
pre s s ures i n or der t o prevent gun f rom whipping. Ke ep good footin g and balance at a ll times.
• Childr en/pets. ALWAYS exer cise extra caution when sprayin g near areas accessible to
children and pet s.
• Eating/smoking. DO NOT eat, drink, smoke, rub your eyes, or touch any part of your bare
skin while handling chemicals an d spraying.
• Heat/flames. DO NOT spray near open flames or sources of heat.
• Spills. ALWAYS clean up spills immediat ely p er instr uctions on the ch e mical label.
• Unattended. ALWAYS turn off veh icle and set brake or block wheels, t urn off power to
sprayer, and relieve system pressure before leaving sprayer unattended.
• Troubleshooting. ALWAYS refer to the safet y instruct ions in the Troubleshooting Section
before att empting any repairs.
A fter Spr a yi ng
• Clean s prayer. ALWAYS clean t he sprayer immediately aft er use according to the direct ions
provided in this manual.
• Decontaminate. ALWAYS deco ntaminate yourself imm ediately aft er you are finished
spraying and han dling chemicals. W ash all exposed areas of th e body wit h soap and water
and r emove a nd launde r clothing.
• Che m ical dispos al/ storage. ALWAYS dispose of or sto r e remaining chemicals properly as
recommended on the chemical label.
17
Page 18

Operatio n – Important Safety Informatio n (continued)
ATV Vehicle Hand ling Safety:
WARNING
Serious injury can occur if th e ATV on which the sprayer is m ount ed is
dr iven unsafe ly.
• D r i ver age. You must be 16 years of ag e or older to opera te the A TV wi th the spra yer at tached.
• Less stable. Be aware that all veh ic le han dling will be affected with the filled sprayer att ached.
See your ATV’s warnin g label for the hazards associated with driving:
o Too fast
o On p aved surfaces
o On incl in es or rough terra in .
The se haza rd s will b e increa sed d ra stically as a result of th e additiona l weight and lo cation of
the filled sp ra y er. Th e center o f gravity will be higher and weight distribution different, causing
t he ATV to be less stable wh en braking, turnin g, and drivin g. Exer cise extra caution in vehicle
han dling. Use particular caut ion on sloped or rough surfaces in order to prevent rollover. A
ve hicle equipp e d with Roll Over Pr otect ion System (ROP S) is recommended if yo u will be
operating on non-level terrain.
• Sp eed limit. DO NOT exceed 5 mph with spr ayer mounted on ATV.
• Ri de /tran sport. N EVE R ride or t ransport cargo on the sprayer.
Chemica l acciden t procedu res:
WARNING
Befo re y ou fill th e sp rayer, rev ie w the following in f ormation with regar d
t o handling accident s.
Chemical sp ills, sprayer le aks, personal cont amin at ion, and p oisoning ar e
accident situat ions which y o u may encounter. All r eq uir e an immed iate
response – See instruct ions b elow.
Sp rayer leak In the eve nt that the sprayer develop s a le ak while sp rayi ng chemic als,
yo u mu st immediately stop spraying.
Turn off power to the sprayer and follow the directions below, as
app licable.
Bodily chemical
conta ct
Perso nal c o nt aminat ion can occur when c hem ica ls sp lash, sp il l, or spray
d i rectl y on to a pers on.
1. Follow the emer gen cy first aid inst ruct ion s o n th e chemical label listed in
the “Fir st Aid” o r “State m e nts of Pr ac tic a l Tr e atmen t” s e cti o n .
General p rocedures include:
a) Eyes – immediat ely flush with water or follow other directions as
specified on t he chemical label.
b) Sk in – immediately wash all contamin ated skin surfaces with soap
and water , or fo llow direct ions as specified on the chemical label.
18
Page 19

Operatio n – Important Safety Informatio n (continued)
c) Clothing – remove contaminated clothing immediately. Dispose of
heavily con tami na ted clo thing per the inst ructi ons on the chemical
label for safe chemical/container disposal.
2. Seek medical advice if instr uct ed on th e label, or if the victim experiences
sym pto ms of harmful ef f ect s such a s bur nin g, swelling, nausea, c hest
pa in, diffi cul ty bre athing, di zzines s or confusion. When seeking m edi ca l
advice , be sure to br ing t he che mic al product l abe l.
Poi soning by
ingestion or
inhalation
Chemical s pills Chemical s pills must be quickly containe d and pro perly cleaned up.
In case o f poisoning from inges tion o r i nhalation :
IF THE VICTIM HAS COLLAPSED OR IS NOT BREATHING, CALL
911. Otherwise:
1. If you are the victim , immediately seek assist ance from nearby personn el
because you may become incapacitated.
2. Follo w the emergen cy f irst aid in structions on the chemical label in the
“First Aid” or “Statement of Practical Treatment” sect ion.
3. Call a poison control cent er for further advice. In the U.S ., call 1-800-
222-1222 to be automatically linked to the nearest certified poison
control center. Have the chem ical label av ailable for reference.
Refer to the chemical label for any specific clean-up instruct ions wit h regard
to t he chem ic a l sp ille d.
General p rocedures include:
1. Control th e spill by stopp ing the so urce of the spill. If th e so urc e of the
spill is a conta iner leak, place the leaking container in a larger, watert ight
co ntainer. Keep unprotecte d pe op le a way from the spill site.
2. Contain t he sp ill so that it doe s n ot spr e a d an d get into wat er sources.
Use a shovel or other tool to make a dike around the spill wit h soil, sod, or
abs orbent materi al.
3. C l e an up the spill im mediately -- Absor ben t materials like ground
co r nco bs or pet litter sho uld be sp read on th e sp ill a r e a to soak up the
pest icide. T he contam inat ed material should t h en shoveled into a
leak proo f cont a iner . Do not f lush the spill area with wate r until you
receive advice as direct ed below.
4. Seek add itional advice from the chemical manufacturer and your state’s
pest icide regulatory agency regarding decontamin ation of the spill site:
- C hemical ma nufac t ur er . The che mical lab el provid es con tac t
info rmati on for the che mic al manu fac tu rer .
- State pesticide regulatory agency. In the U. S., call the National
Pest icide Information Center at 1-800-858-7378 for assistance in
det ermin i ng how to contact your s tate’s pestici de re gula tory
agency.
19
Page 20

Operatio n – Preparing the Sprayer for Each Use
p
If the spr ayer has been used pr eviously, it must be prep ared BEFORE EACH SUBSEQUENT USE.
WARNING
Read instr uct ions below carefully for inspect ing and preparing t he sprayer.
Damage d or clo gged equipm ent c ould resul t in le aks or uncontrol le d s pray.
Leaks could result in injury to the oper ator or bystanders from chemical exposure,
or caus e d amage to the environme n t.
Important safety rules:
• Pow er off . Make sure all power is OFF before cleaning, inspecting, or servicing the sprayer.
• Guards / shields . Make sure all guards and shields are replaced after servicing the sprayer.
• Replacement parts. If a part needs replacement, only use parts that m eet the manufacturer’s
specificat ions. Replacem ent parts that do not meet specification s may result in a safety hazard or
poo r opera tion o f the sprayer .
1. Ensure sprayer
attached
2. Ens ure tank
em pty
3. Clean suct ion
strainer
Ensu re the s praye r is securely attache d to the vehi cle.
En sure the sprayer has been thoroughl y fl ushed an d drained of all resi dual
chemica l from prior uses.
Clean the suction s t rai ner of any chemi cal resi due.
It is important to clean t he suct ion str ainer before each use to ensure it is not
clogged a nd t o prevent resi dual chemi ca l f rom conta minati ng spra yer c ont ents.
IMPORTANT: The strainer must be accessed by r eaching into the t ank, so th e
tank must be empty to avoid immersing your hand in chemicals.
a) Open fill cap on top of ta nk.
b) USI NG RUBBER GLOVE S, reach into th e tank and pull the suction
strainer off t h e end of t he suct ion t ube. (See f igure below.)
c) Run the suction strainer under fresh water t o remove debris.
d) Replace the suction strainer onto the end of th e suction tube.
Fill ca
),*
Suction strainer
(Inside tank)
4. Inspe ct &
repair
Inspect and test the sprayer thoroughly:
a) Inspect hoses for exposed mesh and holes. Replace all worn or damaged hoses.
b) In spect fitt ings for cra cks an d leaks. Rep lac e all damaged fittings with origina l
NorthStar part s.
c) Inspect tank for cracks.
d) C heck t o be sure all nuts, bolts, and scre ws a re t ight.
e) P artially fill tan k with plain wa te r and spray to test for leaks. Repair as needed.
IMPORTANT: Afte r any repair work has b een done, AL WAY S t est fo r l eaks
with water one final time b e fore using.
20
Page 21

Operatio n – Using the Sprayer
Step O ne: Asse s s wind cond itions a nd clear work area.
Before you decide t o spray, you must determine whether wind conditions are suitable. You must
also restrict access to the work area to ensure the safet y of byst anders.
WARNING
Do not spray if wind speeds are greater th an 4 MPH or if th ere are
bystanders in t he intended spray area.
1. Assess wind speed Assess weather con ditions to ensu re that i t i s not too win dy to spray.
DO NO T SPRAY if wind s pee ds are greater than 4 MPH.
Visible indication of wind speed:
I f le ave s are in constant motion or the re i s any bra nch movement, DO NOT
spray because t h e wind is too strong.
2. Clear work a rea Clear the work area of all bystan ders an d pets .
Restrict access by the public for the period recommended on chemical label.
21
Page 22

Operatio n - Using the Sprayer (continued)
Step Two: Fill th e sprayer.
WARNING
ALWAYS wear p er sonal protectiv e equipm ent as directed on the
ch emical label when handling pe sticides.
Long pants and sleeves, chem ical resistant gloves, and eye protection are
str ongly rec ommended. A dditional protectiv e ge ar ma y be required
d epe nd i ng on the pa r ti cu l a r pestic ide.
Fill the sprayer using the following steps:
1. Review safety
informat ion
2. Ch oos e safe
mixing/
loading area
3. W ear per so n a l
protective
equipment
4. Turn off
spraye r and
vehicle
5. Remove fill
cap
R e vie w the “ O peratio n – Impo rtant Safe ty Information” re l ated to Gen era l
Chemical Safety and Chemical Accident Pro cedures provided in this manual.
Choose a safe pesticide mixing and loading area.
- Choose an outdoor, well-ventilated area away from unprotect ed people, animals,
food, and o th er items t hat might become con t aminat ed.
Wear personal p rotec tive equipme nt as direc ted on th e chemic al la bel.
- Note that addit ional equipment may be specified for mixing and loading activities.
Tur n OFF powe r to the s prayer before filling.
- Th e vehicle should also be off, with brake set or wheels block ed t o prev ent
unin tended movem ent.
Remove the fill cap locate d on top of the spraye r.
Fill cap
),*
6. Ensure tank
flushed
E nsure tank is flushed of all chemica ls from prior uses.
- Chemicals can interact dangerously when mixed, and residue chemicals are also a
heal th haza rd .
22
Page 23

Operatio n - Using the Sprayer (continued)
p
7. C hec k d r ain
Be fore filling tan k, ensure drain ca p is securely tightened.
cap
8. Fill tank Add pes ticide to tank thr ough fill ca p:
a) Confirm t he chemical/wat er dilution ratio s specified on the chemical label.
b) Determine chemical and water volumes needed for th e p lanned applicat ion,
taking into consideration that maximum tank capacity is 16 gallons.
Note: Only purchase and mix as much chemical as you need for the
planned application in order to minim ize chem ical overapplication and
the need for storing unused chemicals.
c) Add chemical to the ta nk thr ough the fill ca p.
If the chemical is not pre-mixed, add water and pesticide conc entrate in the
order prescribed on the label.
Drai n ca
9. Ensure
chemica l
mixed
10. Repl ace f i ll
cap
CHEMI CAL
),*
E nsure chemical is thoroughly mixed in tank.
- Stirring device should be made of metal or plastic, non- chemical absorbing
material, and t hen properly cleaned and stored after use.
Re place fill cap and tighten securely.
23
Page 24

Operatio n - Using the Sprayer (continued)
g
valve lever
e
Step Th ree: Operate t he sp rayer.
ALWAYS wear p er sonal protectiv e equipm ent as directed on the
chem ical label when spraying.
Long pants and sleeves, chem ical-r esistant gloves, and eye protection are
str ongly rec ommended. A dditional protectiv e ge ar ma y be required
d epe nd i ng on the pa r ti cu l a r pestic ide.
WARNING
1. Review safety
informat ion
2. Wear personal
protective
equipment
R e vie w the “ O peratio n – Impo rtant Safe ty Information” rela ted to C hemical
Application Safet y and ATV Vehicle Handling Safety provided in this manual.
Wear personal p rotec tive equipme nt as direc ted on th e chemic al la bel.
Warn ing : Wear additiona l per so nal prot e ct ive equipm ent if you will be
spr aying overh ead or f oggin g. You will be exposed to much mor e pesticide
fallout in these applicat ions. Wear chemical resistant head and neck protection,
full face m ask or half face mask with sealed goggles, and consider using a
dust/mist re sp i rator .
3. Open primi n g
T urn pr iming valv e lev er so that it is in- line with the priming hose.
valv e
Primin
Priming
hos
4. Tu rn on power Turn on the power to the s prayer.
1. Verify the battery power cord is conn ected to t he remot e swit ch power cord
and that the remote switch power cor d is connected to t h e pump power cord.
2. Tu rn th e remote s wi tch to the “ O N ” p osition.
01542
5. Ensure flow
through priming
hose
Note: The pump will start a utom atically when power is turned o n. Running
the pum p dry will void all warranties.
Once chemical is fl owing through the priming hose, close the priming valve.
Primi ng valve
01542
24
Page 25

Operatio n - Using the Sprayer (continued)
6. Oper ate sp r ay
gun (as needed
for application)
Proper Operation of the Spray Gun
Cone and St ream spray pattern inst ructions
1. Pull th e choke back. Squeeze t he t r igger to begin spraying.
2. The spray patt ern is determin e d by h ow fa r the trigger is pulled back . The
spray begins at a wide cone and progressively becomes a straight stream
whe n th e trigger is p ulled all the way back .
3. Once the desired spray p att ern is achieved, press the trigger lock to ho ld th e
position of the trigger. To release the trigger lock, pull the trigger back until
t he lock disengages.
4. When the gun is not in use, activate the safety lock by relea sin g the trigger
an d pressing the safety lock pin. This will lock the tr igger in the off po sition
t o prevent accident al spraying.
Additional orifice and
sp are O -rin g s t o rag e Safety lock
Choke pulled back
Trigger
Fig 02364
T rigger lock
S wiv el co n n ect i o n
Fog and St r eam spray patter n instr uctions
1. Push the choke all the way forward.
2. Squeeze th e trigger to begin spraying. Set the trigger to a wide cone spray
patt ern. This will ach ie ve the best atomiz ed mist.
3. Pull the trigger all the way back t o chan ge to a straight stre am.
Choke pushed forw ard
Fig. 02365
Note: Op eratin g pressure of the pump will var y depe nding on the orif ic e size
used. 110 psi is achieved with the small orifice. The medium and large orifices
achie ve 50 and 2 psi, r espectively . (A dditional orif ic es are locate d under the
yel l ow plu g on the t op of t he gun.)
IMPORTANT: ALWAYS hold t he s pray gun with a f irm grip when sprayi ng
at hi gher press ures i n orde r t o prevent gun f rom whipping. Keep good f ooti ng
and balance at all tim es.
Note: It is not unu sual fo r the o pera tor to be expo sed to chemical d rip s wh ile
adjusting the spray pattern – gloves should be chemical resistant.
25
Page 26

Operatio n - Using the Sprayer (continued)
7 . Ad just pressure
and agitation as
needed
8. Le aving
unattended
9. Discontinue use if
clogged or
inope rative
-Rotate the pressure adju st me nt knob until the sprayer is runnin g at the
desire d pressure.
-Ope n primi ng valve to circulate flow back to the tank a nd create agitati o n.
Open until desired amount of agi tation is achieve d.
Pressure adjustment knob
Primi ng valve
0154 2
If the sprayer must be left unattend ed at any time:
a) Disconnect power to the sprayer.
b) Relieve system pressure by depre s sing t he gun tri gger.
c) Turn off the vehicle. Set brake or blo ck the wheels.
If the spr aye r becomes clogged or inoperative during use , disco ntinue use
immediately.
- DO N OT attempt to serv ic e while c hemicals are in th e sprayer and po wer is
connected.
- Ret urn to service area to review instruct ions for t roubleshoot ing befo re
attempting to ser vice.
Note: A reserve, clean container capable of holding at least 16 gallons should be kept for use when
the sp ra y e r ta nk n eeds to be em ptied temp orarily for repairs. It is advisable to purchase a
reserve tank suitable for pesticide storage from Northern Tool and Equipment for use in these
circumstances. The container should be properly labeled as to its contents if it is used.
26
Page 27

Operatio n - Using the Sprayer (continued)
Step Fou r: C lean spray er and decontaminate af ter use.
Wh en done using the sprayer, it is important to clean the spray er and decontam inate yourself. Do
not store the sprayer with chemicals in the tank, as it is un safe and could also result in damage t o the
equipment.
WARNING
Clean-up and decontaminat ion procedures must be followed after each use.
Improper equipment clean-up and disposal of chem icals can result in dangerous
chem ical exposure to humans and the environment, as well as equipment damage.
Personal decontami nation is required after sprayin g to min imize unsafe exposure
to chemicals and potential illness.
1. Drain tan k If there i s excess pesticide left i n the tank, drain th e ta nk :
a) Disconnect power to the sprayer and relieve system pressure by depressing the
gun tr igge r.
b) Find a suitable container in which to drain the unused pesticide. Place it under
the t ank drain hole.
c) W hile weari ng rubber gl oves , eye prote ction, and a ll other requi red per s onal
protective equipment, remove the drain cap and allow pest icide to drain into
container.
d) When t ank stops draining, replace drain cap. Tighten securely .
2. Unused chemical Properly store or dispose of unused chemical:
a) If th e unused pesticide is t o be stored for future use:
Store all unused pest icide in its or iginal, or a suitably mark ed, contain er in a
secure location out of the reach of children & animals.
b) If r emainin g pe sticide is to be dispo sed:
P roperly dispose of th e remaining chem ical and its container per the chemical
man ufact urer’s recommen dat ion and according to local hazardous waste
disposal regul ations .
3. Fl ush sp rayer
4. Decontaminate
& la under
Flush the s prayer per the chemical manufa cturer’s recommendations. A
general procedure is a s follows:
a) Add fresh water to the t ank.
b) Recon nect power to th e sprayer.
c) Operate the spray gun and discharge all rinse water onto an area that can
accept dilute pesticide applicat ion.
d) Add 5 gallons of th e chemical man ufact urer’s recommen ded cleaning
solu t ion. Operat e the s pray g u n , co llect in g the discharged sol u t i on i f
recommended by the manufacturer.
e) After flushing, disconnect power to the sprayer and be sure all syst em pressure
is reliev ed by squeezing th e gun trigger.
f) Dispose of cleaning solution discharge as recommended by the manufacturer
of the solu tion.
Decontaminate yourself after you are finishe d han dling chemicals:
a) Remove all clothing worn during spraying and chemical handling.
b) Wash all expo sed parts of th e body wit h soap and water.
c) Launder clothing separately from other wash.
27
Page 28

Storage
P r epare t he sprayer for end-of-season storage by running RV antifr eeze through the system.
Th is will keep int erna l parts lubricated, prot e ct against cor rosion, and keep the unit from freezing.
CAUTION
Th e sprayer will be dama ged if it freezes.
P rotect the sprayer from freezing during storage by following th e instr uct io n s
below.
Preparing for storage:
1. Add antifreeze
2. Spr a y br i e fl y
Pour 1 gallon of RV antif reeze into the tank .
Note: RV antifreeze is non-toxic and b iode gradable a nd gen e ra lly safer for
the enviro nment than au tomo tiv e an tifreeze.
Turn on the pump motor and squeeze th e gun trigger briefly until fluid
sprays.
Removing from storage:
1. Drain
2. Flush wi t h water
3. Disposal
Drain the ant ifr eeze left in the tank through the tank drain ho le into a
suitable container .
Fill the t a nk with fresh wat er an d run through the system. Oper at e the
spray gun until the s ystem is compl etely flus hed. Be sure to set up
containers to capture the an tif reeze flus h w ater.
Dispose of the ant ifreeze and flush wat er properly.
28
Page 29

Troubleshooting
WARNING
Befo re tr oublesh oot ing or att empt ing t o serv ic e, rea d the followin g safet y rules to
avo id accidental exposure to chemical and also risk of electric shock.
Note: A reserve, clean container capable of holding at least 16 gallons should be kept for use when the
sprayer tank needs to be emptied temporarily for repairs. It is advisable to purchase a reserve tank
suitable for pesticide storage from Northern Tool and Equipment for use in these circumstances. The
co nta iner should be properly labe led a s to its contents if it is used. In add ition , it may be a dvisa ble to
empty the tank contents using a transfer pump if the tank drain hole is inaccessible while the sprayer
is mounted on the ATV.
Before attempting to service the sprayer:
1. Per s onal
protective
equipment
2. Review
troubleshooting
table
3. Em pty and flush If the cause listed for you r problem i s Clogged intake tu be, Clog ged suction
4. Disconnect
power/relieve
pressure
5. Perform repairs Follow the directions provided in the troubleshooting table to repair the
6. Te st afte r
servicing
Wear personal p rotec tive equipme nt as direc ted on th e chemic al la bel whi le
servicing your spr ayer.
Review the Troubleshooting Table below for the type of problem you are
experien cing. However, DO NOT attempt to repair unt il the steps liste d below
are followed.
str a iner, or Worn spra y gun no zzle: em pty the ta nk and fl u s h t he spra yer w ith
wat er as directed in the section, “Op eration – Step Four”.
- In order to avo id accidental exposure to chemicals, never attempt to unclog
the inta ke tub e or suction strainer, or service the sp ray g un no zzle, un til the
tank has been em ptied and the sprayer flushed with water.
Di s conne ct p ower t o the s praye r an d be su re all sys t em pressure is relie ved
by s queezing the gun trigger.
spraye r.
NOTE: Never try to unclog the sprayer nozzle by blowing through it.
A fte r ser vici n g, A L W AYS test th e sp ray e r for leaks with plain wate r before
using.
PROBLEM CAUSE SOLUTION
Bad electr ical connection Check battery con nections
Short in wires Check condition of wires
Pump will not turn o n
Low pre ssur e
Low flow
M otor hooked to batte ry
incorrectly
Wo rn spray gun no zzle Replace spray gun
I mpr oper pressure a djustment Tight en pre s s ure a djustment kno b.
Clogged inta ke t ube Re move o bs t ruction
Clogged suct ion strainer Clean suction str ainer
Obstruction in inlet/outlet valves Clean inlet/outlet valves
Leak in the system Tight en leaking hose clamps/fittin gs
Ensure red wire is connected to
pos itive b atter y te rm inal. If no t,
correct wiring, then remove pump
head and tight en offset bearing.
29
Page 30

Specifications
Electrical System Requirements
Electrica l connect ion………………. 12 VDC
Amp draw from pu m p……………... 15.0 Amps
Sprayer Specifications
Maximum GPM……………………. 2.0 GPM
Maximum Press ure………………… 200 PSI
Pressure Adjustment 0-200 PSI
Tank Max imum Capacity………….. 16 Gallons
O ver all Dimensio ns 34. 0”L x 14. 5”W x 20.5”H
D ry Wei ght / Weight full of water 35 lbs. / 163 lbs.
Compo nent Materials*
Tank............................… Polyethylene, EPDM
Suction Tube...............… Polypropylene, PVC, Stainless Steel
Hose............................… PVC
Pump...........................… Polypropylene, Viton, Sanoprene
Valves.........................… PVC, Buna-N
Gun and Nozzle..........… Brass, Nylon, Polyacetal
*Before using any chemical, check to ensure the chemical is compatible with all materials in
the sy stem.
The manufacturer reserves the rig ht to make improvements in design and/ or
c hanges i n specifications at any time wit hout incurring any obligation t o
install the m on un its prev iously sold.
Any Questio ns, Co mments, Pro blems or Parts Orders
Call NorthStar Customer Service 1-800-270-0810
30
Page 31

Explo ded View – 268180 – Rev. M
Item Part# Description Qty Item Part# Description Qty
1 35119 3/8” Galaxy Spray Gun 1 19 82057 10-24 x 1/4” Phillips Head Screw 2
2 30746 Small Hose Clamp 9 20 52035 Gun Clip 1
3 30290 3/8” Braided PVC Gun Hose 420” 21 82014 5/16-18 x 1/2” Bolt 1
4 35118 Liquid F illed Gauge 1 22 777110 Hose Guide 1
5 37652 200 PS I Pressure Regulator 1 23 777358 Large Gun Clip 1
6 30290 3/8” Braided PVC Hose 12” 24 35203 50 Mesh Suction S trainer 1
7 30290 3/8” Braided PVC Hose 12” 25 5232 R ubber Washer 1
8 5329 Hose Barb T ee 1 26 37680 Drain C ap 1
9 30290 3/8” Braided PVC Hose 12” 27 5262 Autolocking Tie-down Straps 2
10 36565 Intake T ube 1 28 37693 2-Way Connector 14Ga. 1
11 82061 10-24 x 1” P hillips Head Screw 4 29 37694 Remote Swit ch 2-Way Connector 1
12 37678 Ball Valve 1 30 5250 S witch 1
13 37679 3/8” Hose Barb 1 31 5253 Insulated female spade 2
14 777119 Large Hose Clamp 2 32 34026 S witch Bracket 1
15 30160 1/2” Braided PVC Hose 15” 33 35363 5/8” x 2” Velcro 2
16 37659 Pum ptec Pump Series 114 1 34 777461 P ositive Battery Clamp, Red 1
17 778143 T ank Lid 1 35 777462 Negati ve Battery Clamp, Bl ack 1
18 777468 16 Gall on T ank 1
Any Questions, Comme nts, Problems or Parts Orde rs
Call NorthStar Customer Service 1-800-270-0810
31
 Loading...