


MEI 10-9-12
1
M157305?
Owner’s Manual
Electric Hot Water/Steam Pressure Washer
Instructions for Set-up, Operation, Maintenance & Storage
This pressure washer produces cold or hot water high-pressure spray as well as steam spray. Cleaning chemicals
may be incorporated into the spray if desired. The pressure pump is powered by an electric motor and water is
heated by an open flame burner fueled by diesel/kerosene or fuel-oil. Read and understand this Owner’s Manual
completely before using and keep this manual for review. Failure to properly set up, operate, and maintain could
result in serious injury or death to operator or bystanders.
WARNING: SPECIAL HAZARDS
• Skin/Eye Injury: High-pressure spray can cause serious skin or eye injury, including injection injury if fluid pierces the skin.
Injection injury can result in blood poisoning and/or severe tissue damage.
• Burns: Hot spray can scald and burn skin. Hot surfaces of wand and burner, as well as hot exhaust from the burner can
cause burns.
• Slips/Falls: Spray discharge can cause puddles and slippery surfaces. Spray-gun kickback can cause operator loss of
balance and falls.
• Flying Debris: High-pressure spray can cause surface damage and flying debris.
• Fire/Explosion: Burner sparking can ignite fuel or other flammable liquids or vapors in the vicinity. Hot exhaust from burner
can ignite combustible materials.
• Chemical Exposure: Cleaning chemical vapors or contact with skin may be hazardous.
• Electric shock: Spray contact with electrical sources can cause electric shock.
• Electrocution: Improper connection of the equipment or grounding conductor can result in a risk of electrocution.
• CO Poisoning: Exhaust from burner contains carbon monoxide, a poisonous gas that can cause carbon monoxide poisoning
and possible death if inhaled.
Equipment Protection Quick Facts
Inspect Upon Delivery: STOP! Closely inspect to make sure no components are missing or damaged. See the
“Assembly and Initial Set-Up” section for instructions on whom to contact to report missing or damaged parts.
Check Pump Oil: Pump is shipped with oil. Check pump oil level before starting.
Water Flow Requirements: Make sure your supply water flow rate is 20% higher than the pressure washer’s flow
rate (3 gal/min preferred), and that your water is clean and particle free.
Chemical Spraying: Use only NorthStar brand or equivalent washer chemicals designed for pressure washer use.
Maintenance Schedule: Pump, burner fuel filter, burner coil and electrodes require periodic checking and servicing
to keep pressure washer functioning efficiently. See “Maintenance Schedule Summary” for frequency of servicing.
ITEM NUMBER: 157305, 157306,
157307, 157308
SERIAL NUMBER: _____________
®

MEI 10-9-12
2
Table of Contents
Equipment Protection Quick Facts ......................................................................................................................................... 1!
TABLE OF CONTENTS ................................................................................................................................................. 2!
ABOUT YOUR PRESSURE WASHER .......................................................................................................................... 4!
SPECIFICATIONS ......................................................................................................................................................... 5!
COMPONENT IDENTIFICATION .................................................................................................................................. 6!
SPECIAL EQUIPMENT SAFETY FEATURES .............................................................................................................. 7!
High Pressure Relief Valve .................................................................................................................................................... 7!
Temperature Control Switch .................................................................................................................................................. 7!
Pump Thermal Relief Valve ................................................................................................................................................... 7!
Spray Gun Safety Latch ........................................................................................................................................................ 7!
SAFETY ......................................................................................................................................................................... 8!
Hazard Signal Word Definitions ............................................................................................................................................. 8!
SAFETY LABELING ...................................................................................................................................................... 9!
ASSEMBLY AND INITIAL SET-UP ............................................................................................................................. 10!
Step 1. Inspect & Unpack ...................................................................................................................................................... 10!
Step 2. Assembly .................................................................................................................................................................... 10!
Step 3. Verify Electrical Connection ..................................................................................................................................... 10!
Grounding ............................................................................................................................................................................ 10!
Ground Fault Circuit Interrupter Protection .......................................................................................................................... 10!
Extension Cord and Usage .................................................................................................................................................. 11!
Electric Shock Accident ....................................................................................................................................................... 11!
MOVING AND HANDLING .......................................................................................................................................... 11!
Moving your pressure washer around ................................................................................................................................. 11!
BEFORE EACH USE ................................................................................................................................................... 12!
Step 1: Inspect Equipment ................................................................................................................................................... 12!
Electrical .............................................................................................................................................................................. 12!
Pump Oil .............................................................................................................................................................................. 12!
Spray System ...................................................................................................................................................................... 12!
Burner Fuel System (if heated water to be used) ................................................................................................................ 12!
Periodic Maintenance .......................................................................................................................................................... 12!
Step 2. Check and Fill Burner Fuel Tank ............................................................................................................................. 13!
Filling Burner Fuel Tank (if heated water to be used) .......................................................................................................... 13!
Step 3. Select Suitable Worksite Guidelines ...................................................................................................................... 13!
For All Indoor and Outdoor Uses ......................................................................................................................................... 13!
For Indoor Hot Water/Burner Use ........................................................................................................................................ 14!
OPERATION ................................................................................................................................................................ 14!
Step 1. Connect Hoses, Water Supply, and Spray Nozzle .................................................................................................. 14!
Hose and Water Supply ....................................................................................................................................................... 14!
Connect Water Supply to Pump .......................................................................................................................................... 14!
Connect Pressure Hose to Pump ........................................................................................................................................ 14!
Quick Connect Procedure ................................................................................................................................................... 14!
Selecting and Connecting Spray Nozzle ............................................................................................................................. 15!
Step 2. Pre-Spraying Procedure .......................................................................................................................................... 15!
Safety Rules ........................................................................................................................................................................ 15!
Personal Protective Gear .................................................................................................................................................... 16!
Purging ................................................................................................................................................................................ 16!

MEI 10-9-12
3
Step 3. Spraying .................................................................................................................................................................... 16!
Starting ................................................................................................................................................................................ 16!
Spraying Procedure ............................................................................................................................................................. 16!
Using Chemicals for Cleaning (if desired) ........................................................................................................................... 16!
Hot Spray Procedure ........................................................................................................................................................... 18!
Step 4. Stopping ..................................................................................................................................................................... 18!
STORAGE .................................................................................................................................................................... 18!
Between-Use Storage ......................................................................................................................................................... 18!
Long-Term Storage Preparation (between infrequent uses and at end of season) ............................................................. 18!
Winter Storage Preparation ................................................................................................................................................. 19!
MAINTENANCE & REPAIR ......................................................................................................................................... 20!
MAINTENANCE SCHEDULE ...................................................................................................................................... 20!
DETAILED INSTRUCTIONS – MAINTENANCE & REPAIR ....................................................................................... 20!
Dust/Debris Removal ........................................................................................................................................................... 20!
Inspect Fuel System(s) ........................................................................................................................................................ 20!
Inspect Spray System .......................................................................................................................................................... 20!
Clean Inlet Filter for Garden Hose ....................................................................................................................................... 21!
Check Tire Pressure ............................................................................................................................................................ 21!
Change Pump Oil ................................................................................................................................................................ 21!
Drain Burner’s Fuel Filter/Water Separator ......................................................................................................................... 21!
Descale Heating Coil ........................................................................................................................................................... 21!
Inspect and Clean Flow Switch ........................................................................................................................................... 22!
Inspect Heating Coil and Desoot as Needed ....................................................................................................................... 23!
Inspect/Clean/Adjust Electrodes .......................................................................................................................................... 23!
Perform Engine Maintenance .............................................................................................................................................. 24!
OIL BURNER ADJUSTMENT (ONLY NEEDED IF WHITE EXHAUST SMOKE APPEARS) ..................................... 25!
TROUBLESHOOTING ................................................................................................................................................. 26!
PARTS EXPLOSION – REV NEW ............................................................................................................................... 27!
PUMP EXPLOSIONS ................................................................................................................................................... 29!
WIRING DIAGRAMS .................................................................................................................................................... 34!
LIMITED WARRANTY ................................................................................................................................................. 37!

MEI 10-9-12
4
About Your Pressure Washer
Thank you for purchasing a NorthStar hot water
pressure washer! It is designed for long life,
dependability, and top performance.
Intended Use. Washing siding, windows, walkways,
driveways, patios, decks, fences, vehicles, boats,
lawnmowers, ATVs and other equipment by:
• Producing a high-pressure water spray (heated or
unheated), and
• Incorporating cleaning chemicals into a low-
pressure water spray.
Note: Do not use for other purposes, as unforeseen
hazards or equipment damage may result.
Water Supply. The pump requires a clean, standard tap
water supply provided through a garden hose at a flow
rate of at least 3 gallons per minute. Use of a backflow
preventer on the water supply hose is recommended
and may be required by local code.
Chemical Usage. Any cleaning chemicals that are used
must be specifically approved for use in pressure
washers.
Power Source. The pump is powered by an electric
motor. The spray water is heated (when desired) by a
spark-ignited, open flame burner fueled by
diesel/kerosene/fuel-oil.
Supplies Required. Normal operation will require you
to supply:
• Pump oil
• Burner fuel if heating water (kerosene, diesel, or
fuel oil)
• Input water supply
• Input water supply hose
See “Specifications” section of this manual for more
detail.
Site Selection. Pressure washers used while the open
flame burner heats the water are for OUTDOOR USE
ONLY unless specific exhausting guidelines are met.
Read additional details in “Before Each Use” section of
this manual.
Personal Protection. Wear safety apparel during
operation, including waterproof insulated gloves, safety
glasses with side and top protection, and non-slip
protective footwear. Some cleaning chemicals may
require the use of a respirator mask (as instructed on
chemical label).
Adult Control Only. Only trained adults should set up
and operate the pressure washer. Do not let children
operate. Pressure washers can generate forces greater
than children can control and require judgment beyond
what can be expected of them.
Under The Influence. Never operate, or let anyone else
operate, the pressure washer while fatigued or under
the influence of alcohol, drugs, or medication.
Keep this manual for reference and review.
ATTENTION: Rental Companies and Private
Owners who loan this equipment to others!
All persons to whom you rent/loan this pressure washer
must have access to and read this manual. Keep this
owner’s manual with the pressure washer at all times
and advise all persons who will operate the machine to
read it. You must also provide personal instruction on
how to safely set-up and operate the pressure washer
and remain available to answer any questions a
renter/borrower might have. Owner’s Manuals are
available from NorthStar at 1-800-270-0810.

MEI 10-9-12
5
Specifications
MODEL
Model #
157305
157306
157307
157308
FLOW OUTPUT
Pressure Rating
1700 psi
2700 psi
2000 psi
2750 psi
Flow Rate
1.5 gpm
2.5 gpm
1.5 gpm
2.5 gpm
Maximum Temperature
250° F
POWER REQUIREMENTS
Dedicated NEMA
Receptacles
5-20R
6-30R
5-20R
6-30R
Volts
115V
230V
115V
230V
Amps
20A
30A
20A
30A
Hertz
60Hz
Phase
Single
DIMENSIONS/COMPONENTS
Length
38”
Width
26”
Height
43”
Weight (fueled)
385 lbs.
415 lb.
385 lb.
415 lb.
Pump Type
Ceramic Triplex Plunger
Motor Horsepower
1.5 hp
5 hp
2 hp
5 hp
High Pressure
Discharge Hose
3/8” x 50’
Chemical Injection Point
Injection dilution ratio 15-to-1
SUPPLIES REQUIRED (not included)
Burner Fuel
#1 or #2 Diesel, B5 or lower Biodiesel, Kerosene, or Fuel Oil
(Capacity: 8.25 gal.)
Pump Oil
(shipped with oil, but
refills required)
Comet: Universal Tractor Transmission Oil
or Mobil 1 Synthetic 15W-50
Cat: SAE Non-Detergent Oil
Input Water Supply
Standard tap water @ 20-100 psi, delivered @ 3.0 gpm or higher
Input Water Supply
Hose
Standard garden hose with inside diameter at least 5/8”
(at least 3/4” diameter if hose longer than 100 ft.)
MEI 10-9-12
6
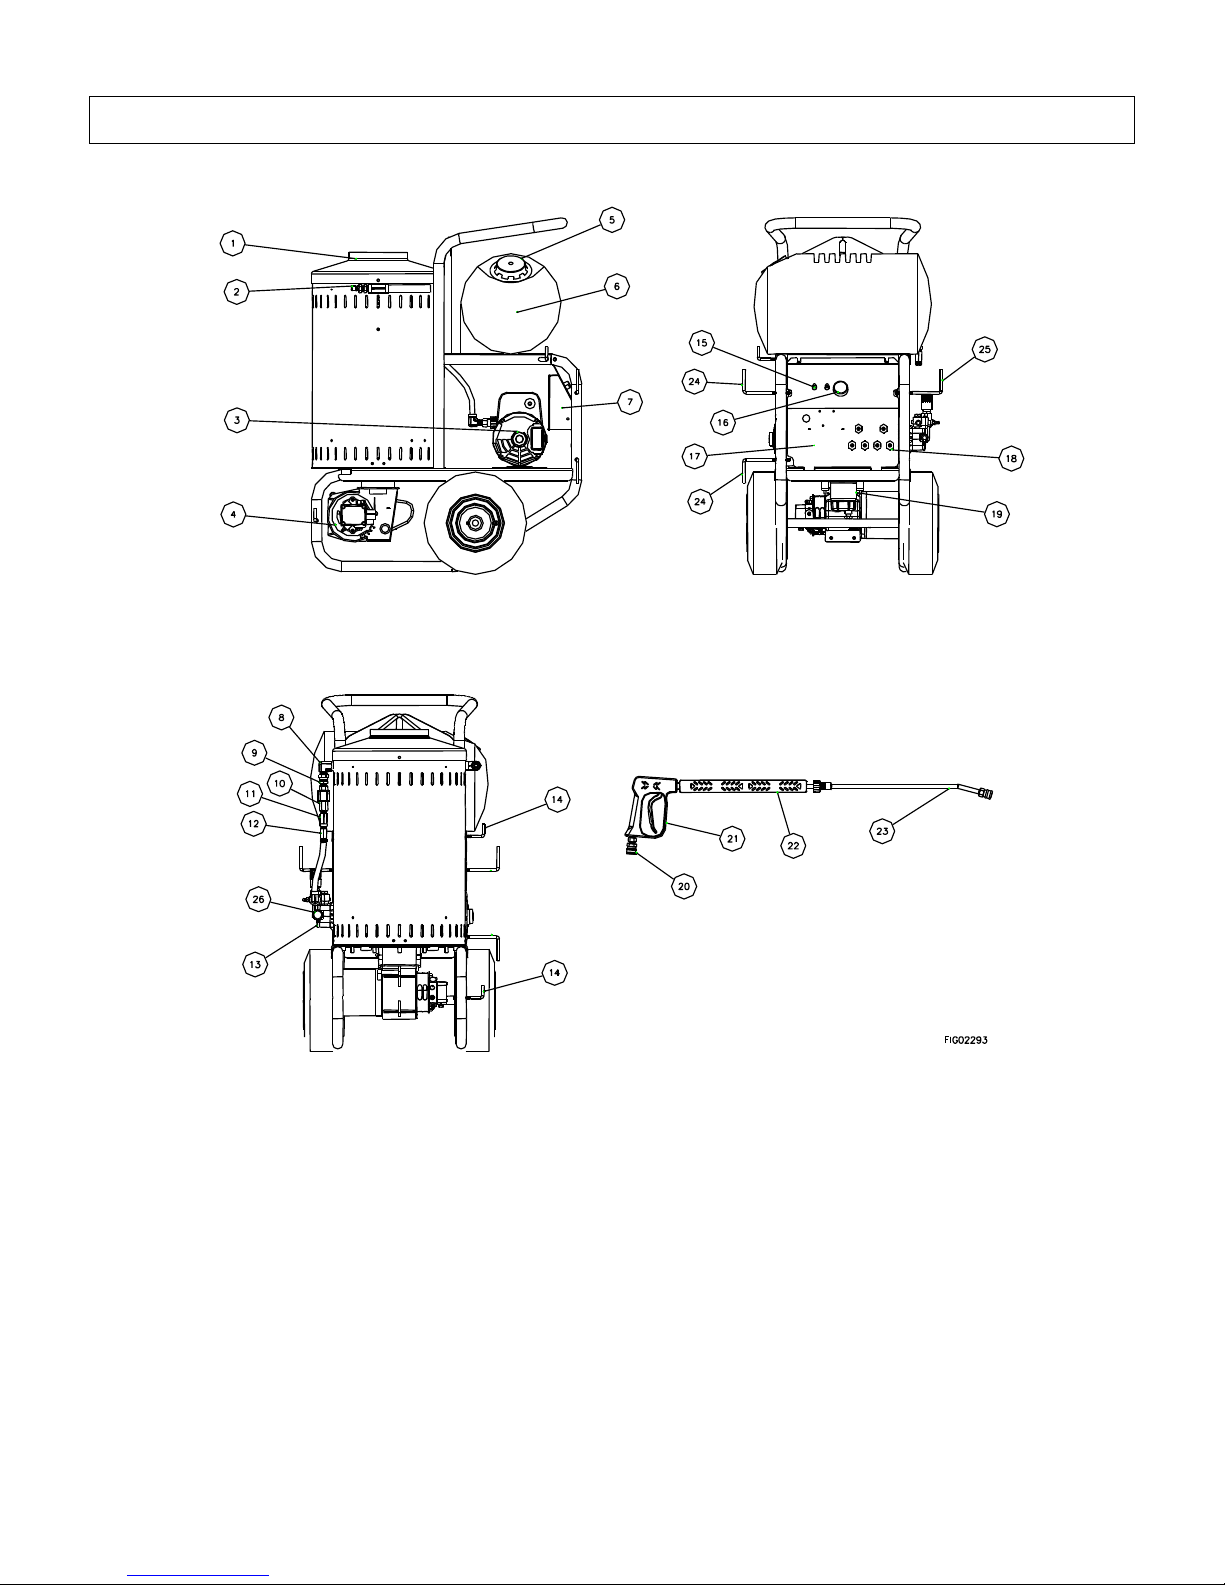
Component Identification
1. Exhaust Vent: Provides an exit for burner exhaust
gases.
2. High Pressure Water Outlet: A passage for water
to exit pump and enter the hose.
3. Motor: Electric motor powers the pump.
4. Burner: The oil burner is preset and performance
tested at the factory. The Burner may need initial
adjustment for peak performance. See “Oil Burner
Adjustment” section for instructions on initial
adjustment of the oil burner. You will need to use
the handle to tip the pressure washer up in order to
access the Burner from underneath.
5. Fuel Fill Cap: Vented cover for fuel tank.
6. Fuel Tank: The Burner has a 8.25 gal. fuel tank-
kerosene, #1 or #2 diesel, or fuel oil may be used.
Do not mix fuel types.
7. Control Box: Flat surface for mounting switches.
8. Elbow: Junction between Swivel Fitting (Reference
9) and coil inlet.
9. Swivel Fitting: Connection point of Flow Switch
(Reference 10) to Elbow (Reference 8).
10. Flow Switch: Water activated switch to control on
and off of burner.
11. Tee: Junction between Safety Relief Valve
(Reference 12) and Flow Switch (Reference 10).
12. Safety Relief Valve: Controls over pressure (Pop
Off Valve).
Machine Component Identification
157305, 157306, 157307, 157308

MEI 10-9-12
7
13. Pump: A mechanical device that moves and
pressurizes fluid. [Pump oil must be changed after
first 40 hours of use, and then changed every three
months or 500 hours of use. See “Maintenance and
Repair” section for pump oil change instructions
and recommendations.]
14. Gun Hooks: Spray gun storage location.
15. Power Switch: Flip up for on.
16. Thermostat: Controls power to fuel solenoid for
firing.
17. Control Panel: Power Switch (Reference 15),
Thermostat (Reference 16) and Nozzle Storage
(Reference 18) are located on control panel.
18. Nozzle Storage: Control Panel (Reference 17) has
space for storing nozzles.
19. Fuel Filter/Water Separator: Filter in fuel line that
removes water and screens out dirt and debris from
fuel.
20. Quick Connector: Connection point on spray gun
for high pressure hose.
21. Spray Gun: Pressurized water is discharged.
22. Grip: Protected area on spray gun for additional
hold.
23. Lance Wand: Unprotected area on spray gun.
24. Power Cord Hangers: Storage location.
25. High Pressure Hose Hanger: Storage location.
26. Garden Hose Water Inlet: Connection point for
standard garden hose. Garden hoses less than
100’ in length must have a minimum inner diameter
of 5/8.” Garden hoses over 100’ in length must
have a minimum inner diameter of 3/4.”
Note: See “Parts Explosion” for additional detail.
Special Equipment Safety Features
This unit is equipped with the following safety features:
High Pressure Relief Valve
Acts as a backup safety feature. If the Pressure Control
Valve (Unloader) malfunctions, this separate highpressure relief valve will open and relieve excess
system pressure. Repair is required.
WARNING: Relief valve failure
If the high-pressure relief valve ever discharges water,
turn the unit off and do not use the machine. Call
Product Support at 1-800-270-0810.
Temperature Control Switch
Measures water temperature and automatically turns
burner off when temperature setting is reached. When
water temperature drops, burner automatically reignites.
Figure 1
Pump Thermal Relief Valve
This valve, on the Unloader bypass port, protects the
pump from overheating. The pump continues to work in
bypass mode when you are not spraying. If high
temperatures are developed during bypass mode, the
Thermal Relief Valve will open and discharge hot water
onto the ground, protecting the pump from overheating.
Note: One of two pumps will be on your machine.
Figure 2
Spray Gun Safety Latch
Has a built-in trigger safety latch to guard against
accidental trigger actuation.
Figure 3
High Pressure
Relief Valve
Note: Shield not
shown for clarity
Pump
Thermal
relief valve
Cat pump
Comet
pump
00417
Safety Latch

MEI 10-9-12
8
Safety
Hazard Signal Word Definitions
DANGER
WARNING
CAUTION
CAUTION
NOTICE
This is the safety alert symbol. It is used to alert you to
potential personal injury hazards. Obey all safety
messages that follow this symbol to avoid possible injury
or death.
DANGER (red) indicates a hazardous situation, which if
not avoided, will result in death or serious injury.
WARNING (orange) indicates a hazardous situation,
which if not avoided, could result in death or serious
injury.
CAUTION (yellow), used with the safety alert symbol,
indicates a hazardous situation, which if not avoided,
could result in minor or moderate injury.
CAUTION (yellow), without the safety alert symbol, is
used to address practices not related to personal injury.
NOTICE is used to address practices not related to
personal injury.

MEI 10-9-12
9
Safety Labeling
On-Product Warning Labels
Part numbers
Description
34131
Warning & Operating Instructions
305410
Caution Hot
778070
Risk of Electrocution
305427
Danger Label
Always make sure safety labels are in place and in good condition. If a safety label is missing or not legible, order
new labels or unsafe operation could result. To order replacement safety labels, call NorthStar Product Support at
1-800-270-0810.
Part No. 778070
RISK OF ELECTROCUTION
1. Connect only to properly grounded
outlet. Do not remove ground pin.
2. Inspect cord before using - Do not
use if cord is damaged.
3. Keep all connections dry and off
the ground.
4. Do not touch plug with wet hands
5. This product is provided with a
Ground Fault Circuit Interrupter built
into the power cord plug. If
replacement of the plug or cord is
needed use only identical
replacement parts.
6. Read owner's manual before using.
DO NOT REMOVE THIS TAG
WARNING
NT+E Co. 800-270-0810
MEI 10-9-12
10
Assembly and Initial Set-Up
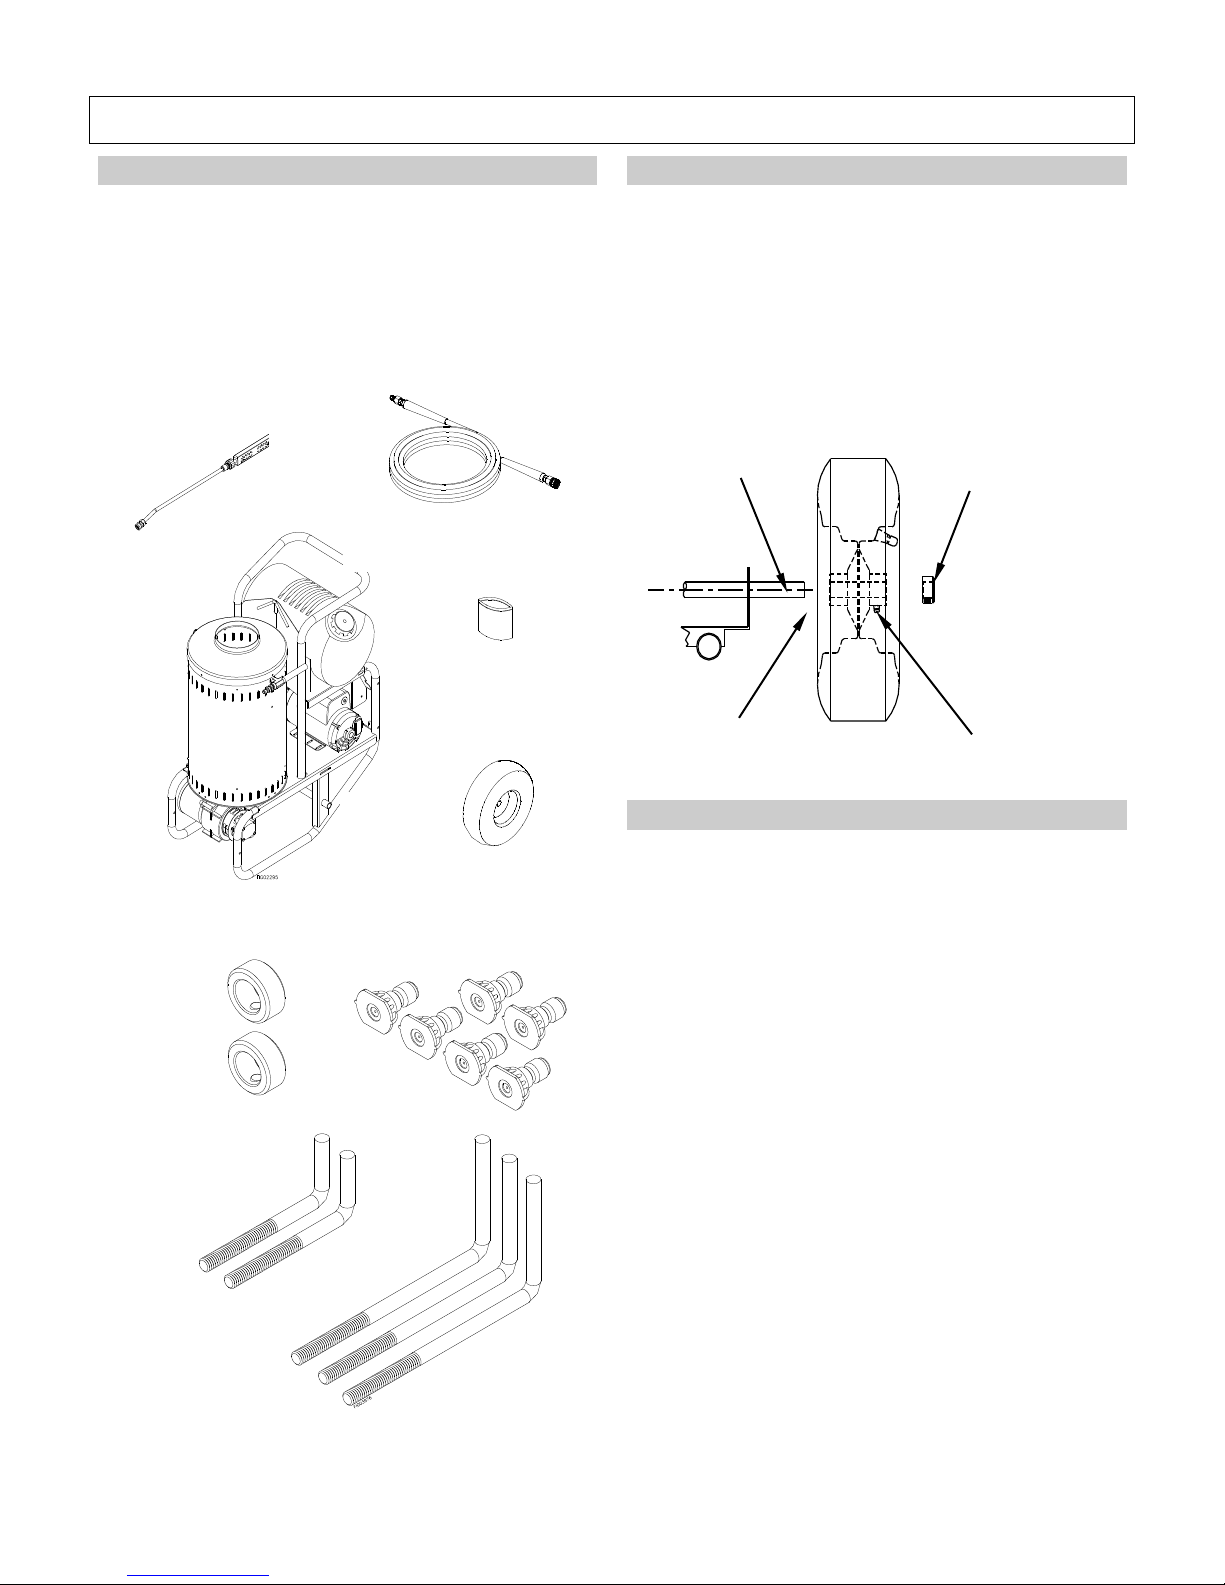
Step 1. Inspect & Unpack
Inspect pressure washer immediately after delivery for
missing parts or damage. Find and separate
components identified in Figure 4 and Figure 5.
• For missing components, contact Product
Support at 1-800-270-0810.
• For damaged components, contact the freight
company that delivered the unit and file a claim.
Figure 4 – Pressure Washer Components
Figure 5 – Parts to be Installed
Step 2. Assembly
Insert nozzles in spaces provided on the control panel.
To install wheels, refer to Figure 6:
• Raise pressure washer off floor using blocks or
ramps and secure.
• Install two wheels with grease zerk away from
frame.
• Slide wheel retainers onto end of each axle.
Tighten retainer setscrew with a hex wrench.
Figure 6
Step 3. Verify Electrical Connection
Grounding
Product must be grounded. The supply cord is equipped
with an equipment-grounding conductor and a
grounding plug. This plug must be plugged into an outlet
that is properly installed and grounded in accordance
with all local codes and ordinances.
Ground Fault Circuit Interrupter Protection
Connecting the pressure washer through some type of
ground fault circuit interrupter (GFCI) protector is
required to comply with the National Electric Code
(NFPA 70) and to provide additional protection from the
risk of electric shock.
Note: Before use, your GFCI should be tested
at either built-in or receptacle base.
The GFCI is built into the power cord plug.
• This GFCI device provides additional protection
from the risk of electric shock. If replacement of
the plug or cord is needed, use only identical
replacement parts.
Wheel
Qty-2
Manual Bag
Qty-1
High Pressure Hose
Qty-1
Spray
Gun
Qty-1
Pressure
Washer
Qty-1
Gun
Hooks
Qty-2
Wheel
Retainers
Qty-2
Hose
Hooks
Qty-3
Nozzles
Qty-6
Wheel
Retainer
Wheel
Axle
Grease Zerk
MEI 10-9-12
11
DANGER: Electrocution hazard
Improper connection of the equipment or grounding
conductor can result in a risk of electrocution. Check
with a qualified electrician or service personnel if you
are in doubt as to whether an outlet is properly
grounded. Do not modify the plug provided with the
product. If it will not fit the outlet, have a proper outlet
installed by a qualified electrician. Do not use any type
adapter with this product.
Extension Cord and Usage
Use only 3-wire extension cords that:
• Have 3 prong grounding-type plugs and 3-pole
cord connectors that accept the plug from the
product.
• Are intended for outdoor use, identified by the
marking, “Acceptable for use with outdoor
appliances; store indoors while not in use.”
• Have an electrical amperage rating not less than
the rating of the product.
Usage Precautions:
• Do not yank on any cord to disconnect.
• Keep cord away from heat and sharp edges.
• Always disconnect the extension cord from the
receptacle before disconnecting the product from
the extension cord.
Electric Shock Accident
If an electric shock occurs to a victim, immediately shut
down the source of electrical power. If this is not
possible, avoid direct contact with victim. Use a nonconducting implement, such as a dry rope or board, to
free the victim from the live conductor. Apply first aid
and get immediate medical help.
Moving and Handling
WARNING: Lifting hazard
The pressure washer is heavy. It can crush and cause
serious injury if it rolls out of control or tips over. Follow
the instructions below for safely moving the pressure
washer.
Figure 7
Moving your pressure washer around
• Use handle to manually move pressure washer.
• To turn, push down slightly on handle and pivot
pressure washer on its wheels. Do not move or
operate cross-wise on a slope. High center of gravity
can cause tipping.
• Block wheels to prevent inadvertent movement.
• Never pull by hose. Do not move this machine by
pulling on the hose. Hose or connections could fail
and result in catastrophic high-pressure release of
fluid as well as hose whipping.
To reduce risk of injury, do not attempt to manually lift
the pressure washer. Use a shallow ramp to raise or
lower pressure washer to a different elevation.
Handle

MEI 10-9-12
12
Before Each Use
Follow the steps below prior to each use.
Step 1: Inspect Equipment
Electrical
• Inspect cord before using. Do not use if cord is
damaged.
• Connect only to properly grounded outlet.
• Keep all connections dry and off the ground.
• Do not touch plug with wet hands.
• If product is provided with a GFCI built into the power
cord plug, use only identical parts if replacement is
necessary.
Pump Oil
Check oil level with sight glass (or dip stick). If low, add
type of oil indicated below.
See “Specifications” section of this manual to determine
type of pump you have.
a. Comet pumps: Use Universal Tractor
Transmission Oil or Mobil 1 Synthetic 15W-50 oil.
b. Cat pumps: Use SAE30 non-detergent oil or Cat
Pump Oil Item #22158.
Replace oil fill cap after any additions.
Figure 8
Spray System
Because of the high-pressure fluid hazards, a special
check must be made before each use to look for signs
of wear, cracks, looseness or leaks in the hoses, fittings,
wand, trigger gun and connections. See special
instructions for checking and repairing high-pressure
hoses within “Maintenance & Repair” section.
• Check and clean nozzle orifice.
• Clean garden hose water inlet filter. (See
Maintenance instructions.)
WARNING: High pressure fluid injection
hazard
High-pressure fluid discharge from leaks (even pinsized) or ruptured components can pierce skin and
inject fluid into the body. Injection injury can result in
blood poisoning and/or severe tissue damage leading to
infection, gangrene, and possibly amputation.
WARNING: Respond to fluid injection
immediately
If injured by high-pressure fluid, no matter how small
the wound is, see a doctor at once. A typical injection
injury may be a small puncture wound that does not
look serious. However, severe infection or reaction can
result if proper medical treatment is not administered
immediately by a doctor who is familiar with injection
injuries.
Burner Fuel System (if heated water to be
used)
Inspect burner fuel system for leaks BEFORE starting
pressure washer. Look for:
• Signs of leaks, wetted areas, or deterioration
• Chafed or spongy fuel hose
• Loose connections
• Loose or missing fuel hose clamps
• Damaged fuel tank
WARNING: Fuel leak hazard
Burner fuels are highly flammable and fuel leaks can
result in fire or explosions. You can be burned and
seriously injured if there is a fuel leak when you start
the pressure washer.
Periodic Maintenance
Other periodic maintenance is listed within
“Maintenance & Repair” section.
Note: Do not start pressure washer until all
needed repairs have been completed.
Oil Sight
Glass
Oil Fill
Cap
Drain Plug
 Loading...