

Page 1
Installation and Operation Manual
NPX136D Series VHF P25
Panel Mount Transceiver
SM68
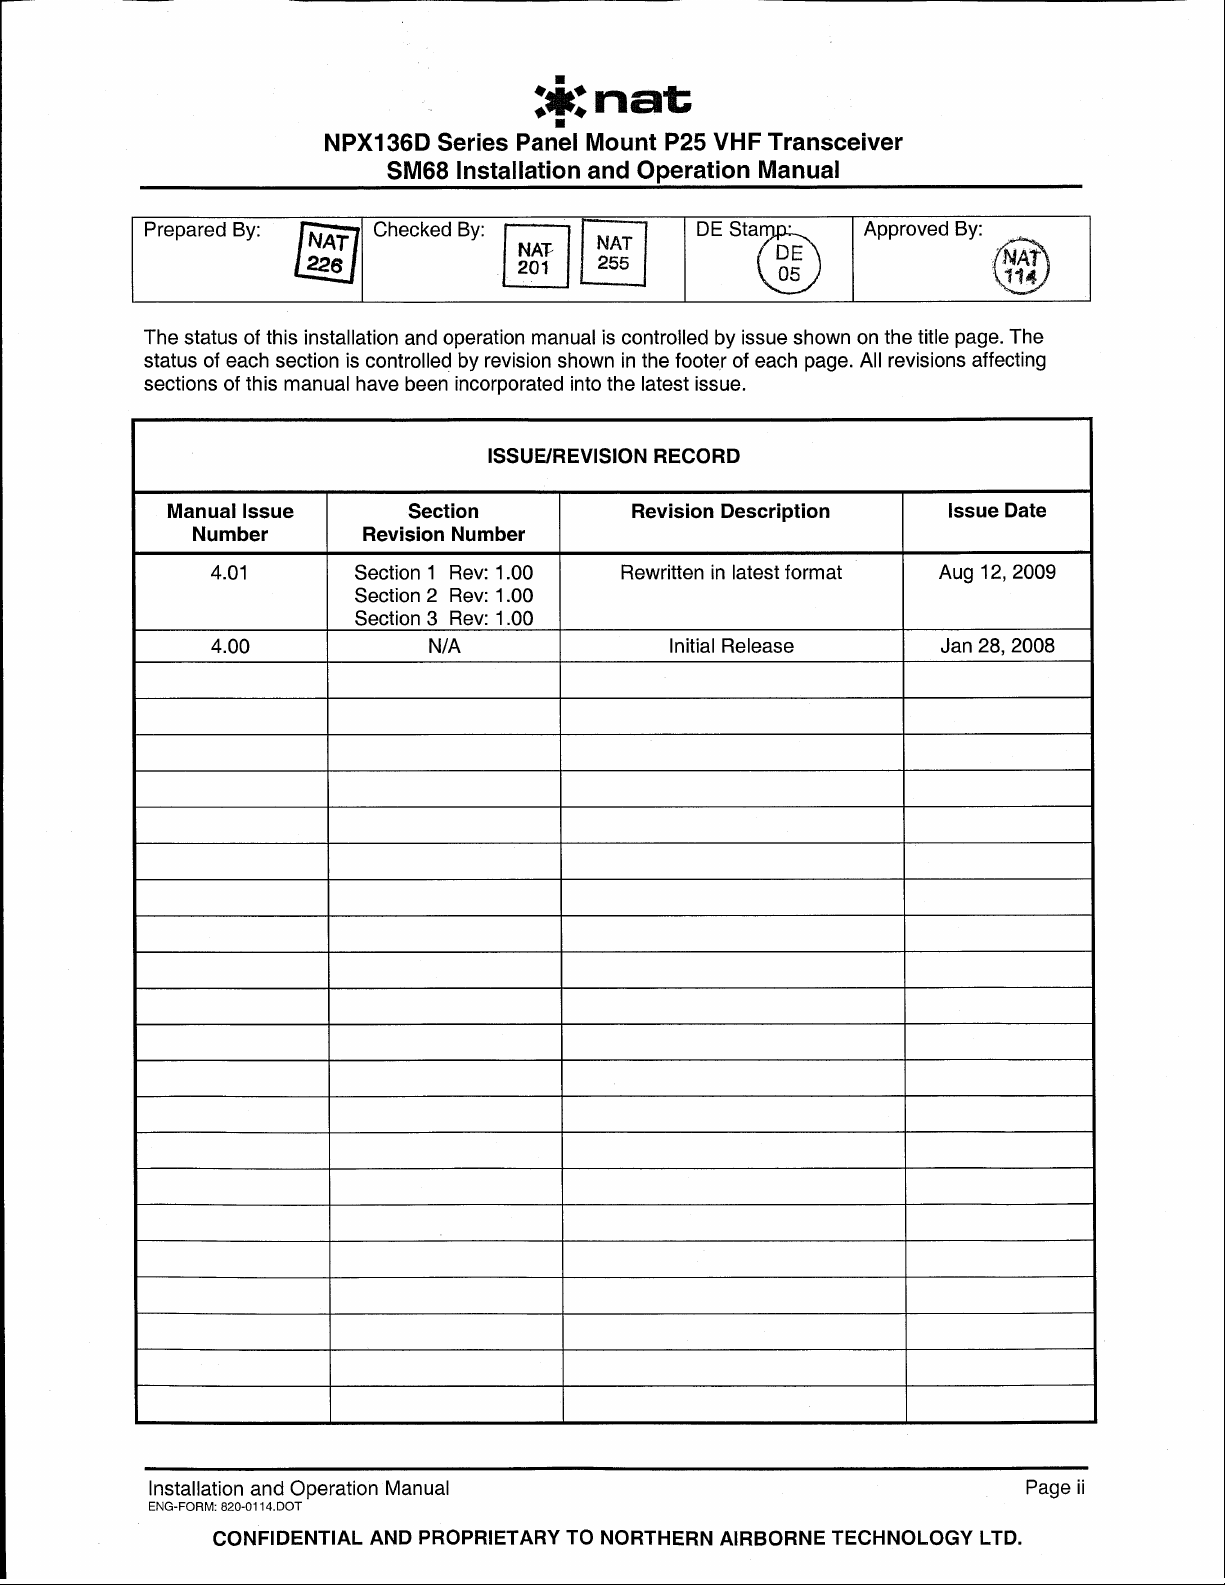
ISSUE 4.01
Northern Airborne Technology Ltd.
1925 Kirschner Road
Kelowna, BC, Canada.
V1Y 4N7
Telephone (250) 763-2232
Facsimile (250) 762-3374
Issued on the authority of Northern Airborne Technology Ltd.
Copyright 2008
Page 2
Page 3

NPX136D Series Panel Mount P25 VHF Transceiver
SM68 Installation and Operation Manual
Table of Contents
Section Title Page
1. Description
1.1 Introduction 1-1
1.2 Product Description 1-1
1.3 Design Features 1-1
1.4 Specifications 1-1
1.4.1 Radio Specifications 1-1
1.4.2 Main Receiver 1-2
1.4.3 Guard Receiver (NPX136D-x70 only) 1-2
1.4.4 Transmitter 1-3
1.4.5 Physical Specifications 1-3
1.4.6 Environmental Specifications 1-4
1.5 Unit Nomenclature 1-4
1.5.1 Lighting Power 1-4
1.5.2 Special Options 1-4
1.5.3 Other Options 1-4
1.6 Accessories 1-5
2. Installation
2.1 Introduction 2-1
2.2 Unpacking and Inspection 2-1
2.2.1 Warranty 2-1
2.3 Continued Airworthiness 2-1
2.4 Installation Procedures 2-1
2.4.1 Note on Cable Routing 2-2
2.4.2 Notes on Cable Wiring and Shielding 2-2
2.4.3 Notes on Grounding 2-2
2.4.4 Cabling and Wiring 2-2
2.4.5 Antennas 2-3
2.4.6 Mechanical Mounting 2-4
2.4.7 Post-Installation Checks 2-4
2.4.8 Post Installation EMI Test 2-5
2.5 Accessories Required But Not Supplied 2-5
2.6 Installation Drawings 2-5
Installation and Operation Manual Page iii
ENG-FORM: 820-0114.DOT
CONFIDENTIAL AND PROPRIETARY TO NORTHERN AIR BORNE TECHNOLOGY LTD.
Page 4

NPX136D Series Panel Mount P25 VHF Transceiver
SM68 Installation and Operation Manual
Section Title Page
3. Operation
3.1 Introduction 3-1
3.2 General Information 3-1
3.3 Controls and Indicators 3-1
3.3.1 General Features 3-1
3.3.2 Power On 3-1
3.3.3 Controls and Indicators 3-3
3.4 Displays - Normal Operating Mode 3-6
3.4.1 Display Details 3-6
3.4.2 Changing channels on the main receiver 3-8
3.4.3 Changing zones on the main receiver 3-8
3.5 Menus and Settings 3-9
3.6 Settings Menu 3-10
3.6.1 Brightness 3-10
3.6.2 Transmit Power 3-10
3.6.3 Transmit Mode 3-10
3.6.4 Squelch Mode, Analog Tones 3-10
3.6.5 Squelch Mode, Receive Digital Squelch 3-11
3.6.6 Power Up Channel 3-11
3.6.7 Squelch Setting 3-11
3.6.8 Display Menu 3-11
3.7 Channel Menu 3-12
3.7.1 Edit Main Channel Menu (Edit Main) 3-12
3.7.2 Edit Guards (Edit Guard Channel) Menu (-070 only) 3-15
3.7.3 Edit Zone Menu 3-15
3.7.4 Edit Scan Menu 3-16
3.8 Maintenance Menu 3-17
3.8.1 Master Edit Mode 3-17
3.8.2 Configuration Menu 3-17
3.8.3 Data Transfer Menu 3-19
3.8.4 Software Version 3-20
3.9 Function Mode (Fn) 3-20
3.9.1 Call Menu for Analog Channels 3-20
3.9.2 Call Menu for Digital Channels 3-22
3.10 Scanning 3-22
3.11 CTCSS and CDCSS Tone Lists 3-23
3.11.1 CTCSS Tones 3-23
3.11.2 CDCSS Tone Codes 3-24
3.12 Error Messages 3-24
Installation and Operation Manual Page iv
ENG-FORM: 820-0114.DOT
CONFIDENTIAL AND PROPRIETARY TO NORTHERN AIR BORNE TECHNOLOGY LTD.
Page 5

NPX136D Series Panel Mount P25 VHF Transceiver
SM68 Installation and Operation Manual
Section 1 Description
1.1 Introduction
Information in this section consists of product description, design features and specifications for the NPX136D
Series Panel Mount P25 VHF Transceiver. All derivative product information shall be contained in the
applicable manual supplement, which may be obtained from Northern Airborne Technology Ltd. as required.
Review all notes, warnings and cautions.
1.2 Product Description
The NPX136D panel mount P25 VHF transceiver is a stand-alone radio designed for the single mission
user. It provides all the features needed to satisfy communications within the VHF high band. The
NPX136D incorporates NAT’s proven user-friendly operating system with on-line help, making it easy to
program and use. The small size makes this radio ideal for airframes where size and weight are a factor.
1.3 Design Features
The radio covers a frequency range of 136.0000 to 173.9975 MHz in 2.5/6.25 kHz increments. Each of
the 255 available channels can operate in one of three modes: wide band analog, narrow band analog or
digital P25 Phase I.
A SCAN function allows scanning of selected channels. Transmit power of either 1 watt or 10 watts is
selectable from the front panel. Simplex and semi-duplex operations are available. A guard receiver is
standard with the -070 model.
Conveniently located beside the display are separate main volume, guard volume and transmit select
switches. Easily identified along the bottom of the front panel are squelch test, channel up/down and
display controls. The aircraft dimmer bus provides control for the panel lighting.
1.4 Specifications
1.4.1 Radio Specifications
+28Vdc Power Nominal: +27.5 Vdc
Maximum: +30.3 Vdc
Minimum: +22.0 Vdc
Emergency: +18.0 Vdc
Current (Under standard conditions) NPX136D-000
Idle: 330 mA (max.) 380 mA (max.)
Receive: 380 mA (max.) 430 mA (max.)
Transmit: 2.6 A (max.) 2.6 A (max.)
+28V Lights +28 Vdc, 300 mA (max.)
Frequency Range 136.000 – 173.9975 MHz
Operating Modes Project 25 and conventional Analog Simplex or Semi-Duplex
Section 1 Rev: 1.00 Issue 4 Page 1-1
ENG-FORM: 800-0115.DOT
CONFIDENTIAL AND PROPRIETARY TO NORTHERN AIR BORNE TECHNOLOGY LTD.
NPX136D-070
Page 6

NPX136D Series Panel Mount P25 VHF Transceiver
SM68 Installation and Operation Manual
Channels 255 max. Plus GD1 and GD2
Zones 16 max.
Sub-audible signalling CTCSS - 42 tones from 67.0 to 254.8 Hz
CDCSS - 83 data patterns
Remote Interface RS232C Data, to PC for Channel Loading and Firmware
RF Input/Output Impedance 50 ohms
Voice Digital Mode IMBE 4.4 kb
Frame Re-sync Interval 180 ms
Error Correction Algorithms RS / Golay / Hamming
Channel Increments 2.5 / 6.25 kHz
Channel Separation 12.5 / 25 kHz
Scan Capability 16 channels max. 1 home, 1 priority, 14 list.
Scan Rate 8 channels per second.
1.4.2 Main Receiver
Reference Sensitivity (12 dB SINAD) ≤-113 dBm
Loading
Reference Sensitivity (5% BER) ≤-113 dBm
Adjacent Channel Rejection ≥70 dB (25 kHz BW)
Spurious Response Rejection ≥70 dB
Intermodulation Rejection ≥70 dB
Audio Output Power 100 mW (600 ohms) rated
Audio Dynamic Range ≥37 dB
Audio Frequency Response 300 – 3000 Hz, Standard: EIA Std. -6 dB
(+1/-3 dB) / oct de-emphasis.
300 – 500 Hz, Standard with an additional
+6 dB/oct permitted.
2500 – 3000 Hz, Standard with an additional
-12 dB / oct permitted.
Audio Distortion 4% typical (10% max.)
Conducted Spurious Emissions ≤-57 dBm
FM Hum and Noise ≥34 dB (12.5 kHz BW)
≥40 dB (25 kHz BW)
≤-57 dBW squelched
1.4.3 Guard Receiver (NPX136D-x70 only)
All specifications are identical to the main receiver with the following exception.
Audio Output Power, minimum: 10 mW (adjustable)
Note: Main and Guard cannot be 455 kHz from each other due to 2nd IF interference
Section 1 Rev: 1.00 Issue 4 Page 1-2
ENG-FORM: 800-0115.DOT
CONFIDENTIAL AND PROPRIETARY TO NORTHERN AIR BORNE TECHNOLOGY LTD.
Page 7

NPX136D Series Panel Mount P25 VHF Transceiver
SM68 Installation and Operation Manual
1.4.4 Transmitter
Carrier Output Power 1 or 10 W ±1 dB
Time-out Timer 30-300 s (Factory Set to 60 s)
Duty Cycle 20% (1 min Tx, 4 min Rx.)
VSWR 20:1 (30 sec duration - undamaged)
Transmitter Stability into VSWR (3:1):
Spurious Output ≤ -13 dBm
Rated Deviation ±5.0 kHz (25 kHz BW)
Carrier Frequency Stability ±2.5 ppm
Conducted Spurious Emissions ≤-20 dBm
Adjacent Channel Power ≤-70 dBc (25 kHz BW)
FM Hum and Noise ≥40 dB (25 kHz BW)
±2.5 kHz (12.5 kHz BW)
≥34 dB (12.5 kHz BW)
Microphone Input Impedance 150 Ω ±20 %
Audio Frequency Response 300 – 3000 Hz, Standard: EIA Std. +6 dB
Audio Distortion 4% typical (10% max.)
Audio Input Sensitivity 100 mV rms (60% of rated deviation)
Sidetone Audio Level 25 mW (Adjustable)
Transmitter CTCSS Tone Deviation 475 ± 125 Hz (12.5 kHz BW)
Carrier Attack Time/Duration ≤100 ms
1.4.5 Physical Specifications
Height 2.65" (67.2 mm) max
Depth behind panel 7.02" (178.2 mm) not including connectors
Width 5.77" (146.6 mm), 4.97" behind panel
Weight 3.2 lbs. (max.)
(+1/-3 dB) / oct pre-emphasis.
300 – 500 Hz, Standard with an additional +6 dB/oct
permitted.
2500 – 3000 Hz, Standard with an additional -6 dB / oct
permitted.
750 ± 250 Hz (25 kHz BW)
Mounting Four standard Dzus-rail fasteners
Connectors One 25-pin male D-sub, with JVL locking hardware.
One 15-pin male D-sub, with JVL locking hardware
(reserved). One BNC female RF connector
Section 1 Rev: 1.00 Issue 4 Page 1-3
ENG-FORM: 800-0115.DOT
CONFIDENTIAL AND PROPRIETARY TO NORTHERN AIR BORNE TECHNOLOGY LTD.
Page 8

NPX136D Series Panel Mount P25 VHF Transceiver
SM68 Installation and Operation Manual
1.4.6 Environmental Specifications
Temperature -30 C to +60 C
Altitude 50,000 feet
Humidity 95 %
Shock 6g (any axis)
RTCA/DO-160D Env. Cat. [(A4)(D1)]BAB(SBM)
1.5 Unit Nomenclature
NPX136D radios are identified as follows:
1
XXXXXXZBABA[UUX]MXXXX
NPX136D - 000
Lighting Power Special Options
1.5.1 Lighting Power
The digit in the first position of the unit suffix indicates the lighting power used.
NPX136D - 000
0 = 28 Vdc Lights
1.5.2 Special Options
The digit in the second position of the unit suffix indicates any special options installed.
NPX136D - 000
0 = No Guard installed
7 = Two channel synthesized Guard
1.5.3 Other Options
The digit in the third position of the unit suffix is currently not assigned.
NPX136D - 000
1
Vibration also qualified to DO-160C, Sec. 8, Cat. N.
Section 1 Rev: 1.00 Issue 4 Page 1-4
ENG-FORM: 800-0115.DOT
CONFIDENTIAL AND PROPRIETARY TO NORTHERN AIR BORNE TECHNOLOGY LTD.
Page 9

NPX136D Series Panel Mount P25 VHF Transceiver
SM68 Installation and Operation Manual
1.6 Accessories
Installation Kit NPX-IKC
Serial Load Kit FC51-000
Consists of:
PC Serial Load (CD) NUDP-006
Data Transfer Cable FC51-001
PC Cable FC47-001
TFM138 Harness to NPX FC45-002
Section 1 ends
Section 1 Rev: 1.00 Issue 4 Page 1-5
ENG-FORM: 800-0115.DOT
CONFIDENTIAL AND PROPRIETARY TO NORTHERN AIR BORNE TECHNOLOGY LTD.
Page 10

NPX136D Series Panel Mount P25 VHF Transceiver
SM68 Installation and Operation Manual
Section 2 Installation
2.1 Introduction
Information in this section consists of unpacking and inspection procedures, installation procedure s, po stinstallation checks and installation drawings for the NPX136D Series Panel Mount P25 VHF Transceiver.
Review all notes, warnings and cautions.
2.2 Unpacking and Inspection
Unpack the equipment carefully and locate the warranty card. Inspect the unit visually for damage due to
shipping and report all such claims immediately to the carrier involved. Check that all items listed below
are present before proceeding and report any shortage immediately to your supplier:
- Warranty Card
- Operators Manual
- Certificate of Conformity or Release Certification
2.2.1 Warranty
All Northern Airborne Technology Ltd. products are warranted for 2 years from date of installation by an
authorized Northern Airborne Technology Ltd. dealer, to be free of defects in workmanship or
performance. This warranty covers all materials and labour, but is exclusive of any transport to deliver the
defective unit to and from Northern Airborne Technology Ltd. or its designated warranty repair center, or
any labour to remove or re-install the defective unit in the aircraft. Contact Northern Airborne Technology
Ltd. for any questions regarding this warranty, its applicability to your units and/or for return authorization.
Northern Airborne Technology Ltd. is the final arbitrator concerning warranty administration. Units which
have been physically damaged, burned, immersed in water or otherwise abused beyond the scope of
normal use will not be considered for warranty. WARRANTY IS VOID UNLESS THE PRODUCT IS
INSTALLED BY AN AUTHORIZED NORTHERN AIRBORNE TECHNOLOGY LTD. DEALER. Product
for which a warranty card is not returned shall be warranted from date of manufacture.
2.3 Continued Airworthiness
Maintenance of the NPX136D is ‘on condition’ only. Periodic maintenance of this product is not required.
2.4 Installation Procedures
Installation Notice
This product must be installed in accordance with the installation instructions provided in the latest issue
of this Installation and Operation Manual. Check the NAT Publication Index at www.northernairborne.com
for the issue status of the manual. The latest issue of the manual may be downloaded from the same
website. All risk associated with installation of this product contrary to these instructions shall be the
responsibility of the installing agency.
Section 2 Rev: 1.00 Issue 4 Page 2-1
ENG-FORM: 805-0118.DOT
CONFIDENTIAL AND PROPRIETARY TO NORTHERN AIR BORNE TECHNOLOGY LTD.
Page 11

NPX136D Series Panel Mount P25 VHF Transceiver
SM68 Installation and Operation Manual
2.4.1 Note on Cable Routing
Do not bundle any lines from this unit with transmitter coax lines. Do not bundle any logic, audio, or DC
power lines from this unit with 400 Hz synchro wiring or AC power lines. Do not position this unit next to
any device with a strong alternating magnetic field such as an inverter or significant interference
to operation will result. In all installations, use shielded cable exactly as shown
indicated. Significant problems may result if these guidelines are not followed.
2.4.2 Notes on Cable Wiring and Shielding
All audio installations can be severely degraded by incorrect wiring and shielding, and may result in much
higher cross-talk, hum, and ground-loop interference. This should be considered when audio wiring to
and from the radio installation is performed.
2.4.3 Notes on Grounding
The case of the radio must be electrically grounded for maximum resistance to low frequency
interference. A pin on the connector (Chassis ground) is provided and must be connected by a short wire
to a clean ground, NOT jumpered to the power ground wire connection.
Refer to the aircraft structural repair manual and maintenance manual for instructions and information
pertinent to this installation.
and ground as
2.4.4 Cabling and Wiring
All wire shall be selected in accordance with the original aircraft manufacturer's Maintenance Instructions
or AC43.13-1B Change 1, Paragraphs 11-76 through 11-78. Unshielded wire types shall qualify to
MIL-W-22759 as specified in AC43.13-1B Change 1, Paragraphs 11-85, 11-86, and listed in Table 11-11.
For shielded wire applications, use Tefzel MIL-C-27500 shielded wire with solde r sleeve s (fo r shield
terminations) to make the most compact and easily terminated interconnect. Follow the connector map in
Section 2.6 as required.
Coaxial cable shall be selected in accordance with MIL-C-17 unless otherwise specified. Do not use coax
cable with PVC insulation. Teflon dielectric cable is encouraged at or above VHF frequencies or where
cable runs exceed 8 feet. Note that at VHF frequencies, cables losses due to long cable runs and tight
bends may reduce the ERP (Effective Radiated Power) by greater than 50%.
Allow 3" from the end of the shielded wiring to the shield termination to allow the connector hood to be
easily installed. Reference the interconnect drawing in Section 2.6 for shield termination details. Note that
the hood is a "clamshell" hood, and is installed after the wiring is complete. Installation cabling must allow
the radio to be easily withdrawn for disconnection and field service adjustments. Ensure an adequate
service loop in the routing of the cables. It can be a serious issue if the unit is installed with the cables so
short that the unit cannot be removed without disassembly of the surrounding structures. At least 30 cm
(1 foot) of free cable is recommended.
Maintain wire segregation and route wiring in accordance with the original aircraft manufacturers
Maintenance Instructions. Fabrication & installation of wiring harness should be in accordance with the
original aircraft manufacturer’s Maintenance Instructions or AC 43.13-1B Change 1, chapter 11, sections 5
to 13, 16 and 17. Coaxial cables shall be routed separately from existing wire bundles in the aircraft to
minimize electromagnetic coupling effects. To prevent RF interference between similar systems, it is
Section 2 Rev: 1.00 Issue 4 Page 2-2
ENG-FORM: 805-0118.DOT
CONFIDENTIAL AND PROPRIETARY TO NORTHERN AIR BORNE TECHNOLOGY LTD.
Page 12

NPX136D Series Panel Mount P25 VHF Transceiver
SM68 Installation and Operation Manual
recommended that VHF FM coax runs be widely separated, or be made using triaxial cable, with the outer
shield bonded to the airframe at one end only (transceiver end). In communication-intensive applications,
poor cable routing and shielding may drastically compromise over-all system performance. Symptoms may
be spurious squelch opening, RFI (Radio-Frequency Interference), and garbled reception.
RF cables must be neatly terminated (solder or crimp), and tested for shorts prior to system check-out
(not while connected to the radio or antenna). Keep cable bends to a minimum at the antenna. Avoid
sharp bends in the coax cables (minimum 3" radius) to prevent severe reflections. If sharp bends are
required, use 90° elbow adapters.
Unless otherwise noted, all wiring shall be a minimum of 22 AWG, except power and ground lines, which
shall be a minimum of 20 AWG. Reference the Interconnect drawing for additional specifications. Check
that the ground connection is clean and well secured, and that it shares no path with any electrically noisy
aircraft accessories such as blowers, turn and bank instruments or similar loads. Power to this unit must
be supplied from a separate circuit breaker or fuse (fast blow), and not attached to any other circuit
breaker without additional protection. Verify that the selected circuit breaker size and wire gauge are
adequate for the installation using the techniques specified in AC43.13-1B Change 1, Paragraphs 11-47
through 11-51 and 11-66 through 11-69.
Grounding and bonding should be in accordance with the original aircraft manufacturers Maintenance
Instructions or AC 43.13-1B Change 1, chapter 11, section 15.
2.4.5 Antennas
WARNING:
To limit exposure to radio frequency fields that exceed exposure limits for
people occupying the aircraft, install the antenna such that it is mounted either
on a ground plane that is between the antenna and the occupants of the aircraft,
or further than 32 inches (80cm) from the occupants of the aircraft.
Correct antenna placement and mounting is critical in order to achieve the best possible performance. In
general, keep all antennas as widely separated as possible and clear of any large airframe obstructions.
Installation of the antenna should be in accordance with the aircraft manufacturer’s instructions for
continued airworthiness or AC 43.13-1B Change 1, chapter 11, section 15 and AC 43.13-2A chapter 3. If
possible, the antenna should be located a minimum of 12 ft from aircraft navigation receiver antennas an d
a minimum of 4 feet from aircraft communications and ELT antennas. Be careful not to choose
separations that closely approximate ¼, ½ or whole-number multiples of the navigation or
communications system wavelength.
Note: Avoid any placement that puts antennas of like frequencies close together.
Bottom mounted antennas will perform best in flight, but poorest on the ground during testing. Antennas
may be severely degraded by 'masking' effects of the fuselage or stabilizers, and generally give best
performance when bottom mounted.
To reduce interference from rotor modulation and other undesirable stimuli, any blade or whip antenna must
be surrounded by a ground plane surface (metallic, grounded material) with a radius equal to or greater than
the height of the antenna. Under the same conditions, the antenna is also much less likely to cause
interference to other aircraft systems (e.g. coupling into audio system, fluctuations in instrumentation, etc).
Poor grounding will result in severe reflected power and high levels of RFI throughout the airframe.
Section 2 Rev: 1.00 Issue 4 Page 2-3
ENG-FORM: 805-0118.DOT
CONFIDENTIAL AND PROPRIETARY TO NORTHERN AIR BORNE TECHNOLOGY LTD.
Page 13
NPX136D Series Panel Mount P25 VHF Transceiver
SM68 Installation and Operation Manual
Avoid antenna locations that will become fouled with oil, water, fuel or dirt, as this will degrade
performance. Roof mounts (in close proximity to rotor blades) are permissible.
2.4.6 Mechanical Mounting
Installation of the transceiver should be in accordance with the aircraft manufacturer’s instructions for
continued airworthiness or AC 43.13-1B Change 1, chapter 7, sections 2 to 7 and AC 43.13-2 A, chapter 2.
Pr 35 Dzus rail or equivalent may be used.
Mounting the radio requires a Dzus rail assembly with an opening width of 5 inches (127 mm) and a front
clearance width of 5.75 inches (146.1 mm). Height requirement is 2.65" max (67.2 mm max). Refer to the
mounting drawings and unit mechanical specifications to determine proper clearance dimensions. Be
sure that adequate clearance is allowed for the cable connections to each unit.
2.4.7 Post-Installation Checks
2.4.7.1 Voltage/resistance checks
Do not attach the radio until the following conditions are met.
Check the following:
a) P1 pins <12> and <13> for +28 Vdc relative to ground.
b) P1 pins <22>, <23>, <24> and <25> for continuity to ground (below 0.5 Ω).
c) Light voltage as per table below.
Light Voltage P1 Pin # Voltage
28 Volt Models 11 28 Vdc
14 Volt Models 10 14 Vdc
5 Volt Models 10 5 Vdc
Ensure that the antenna is disconnected for the following test or erroneous readings may be obtained.
d) Radio coax connector for continuity to the antenna coax connector (shield and centre conductor),
and for open circuit from the centre conductor to ground and open circuit from the centre
conductor to the shield.
2.4.7.2 Power On Checks
a) Install the radio and power up the ship’s systems. Turn on the radio. Check the operation of all front
panel controls. Adjust brightness and volume levels as required.
b) Check all transmit and receive functions. Ensure the RX/TX status indicator lights green when the
c) Check the SCAN function.
radio is keyed to transmit and amber when receiving.
Note: You may be unable to hear the received audio if the tones do not match those set in the
radio. To avoid any confusion, tones should be set to OFF (via the settings menu) before
scanning so that all channels will be heard.
Section 2 Rev: 1.00 Issue 4 Page 2-4
ENG-FORM: 805-0118.DOT
CONFIDENTIAL AND PROPRIETARY TO NORTHERN AIR BORNE TECHNOLOGY LTD.
Page 14

NPX136D Series Panel Mount P25 VHF Transceiver
SM68 Installation and Operation Manual
d) Check the antenna feedline at the R/T with a through-line wattmeter and suitable frequency
elements to ensure correct antenna matching. Reflected power in excess of 25% represents a
serious problem, and should be investigated carefully, or serious RFI and system interference as
well as possible radio damage may result. A VSWR measurement over 3.0:1 represe nts a
significant loss in signal power to the antenna. Check that forward power is to specifications over
Upon satisfactory completion of all performance checks, make all required log book entries, electrical
load, weight and balance amendments and other documentation as required by your local regulatory
agency before releasing the aircraft for service.
2.4.8 Post Installation EMI Test
The purpose of this test is to identify any interference that the radio may cause with existing aircraft
systems. The radio should be tested in accordance with the Installation Approval Test Procedure (see
section 2.6), and the test results documented on the record sheets.
2.5 Accessories Required But Not Supplied
Installation kit p/n NPX-IKC (crimp) is required to complete the installation. The kit consists of the following:
The NAT Part D25SV-IKC Crimp Installation Kit consists of:
the frequency band of the radio.
Quantity Description NAT Part #
1 D-min 25 Pin Female Crimp Installation Kit D25SV-IKC
1 Field Serviceable BNC Coax Connector 20-51-001
Quantity Description NAT Part #
1 D-min 25 Socket housing 20-21-025
25 MS Crimp Socket 20-26-901
1 25 pin JVL Hood/Locklever 20-29-250
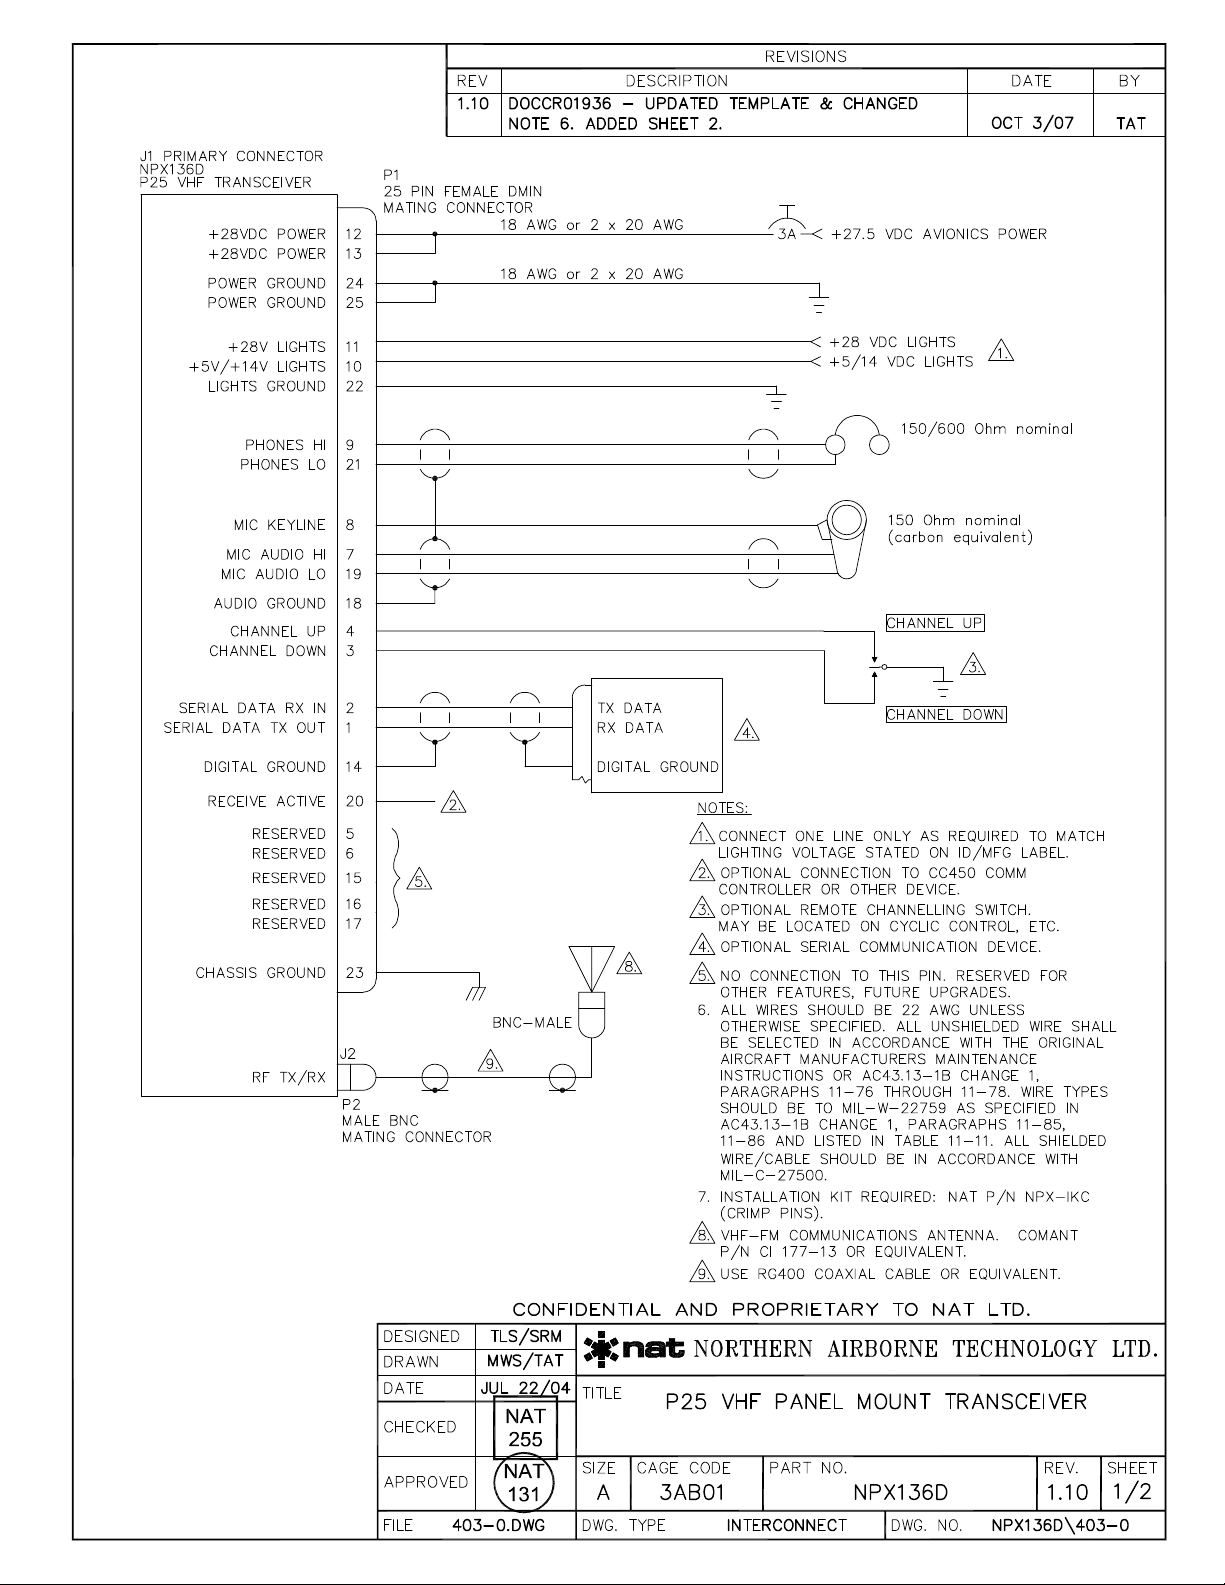
2.6 Installation Drawings
DOCUMENT
REV. DESCRIPTION TYPE
NPX136D\403-0 1.10 Panel Mount Transceiver Interconnect (2 sheets)
NPX136D\405-0 1.00 Panel Mount Transceiver Connector Map
NPX136D\634-0 1.00 Panel Mount Radio Installation Approval Test Procedure
NPX136D\905-0 1.01 Panel Mount Transceiver Faceplate
NPX136D\922-0 1.00 Panel Mount Transceiver Mechanical Installation
SERIAL NO.
All
All
All
All
All
Section 2 ends following the above documents
Section 2 Rev: 1.00 Issue 4 Page 2-5
ENG-FORM: 805-0118.DOT
CONFIDENTIAL AND PROPRIETARY TO NORTHERN AIR BORNE TECHNOLOGY LTD.
Page 15
Page 16

Page 17

Page 18

INSTALLATION APPROVAL
NAT Part #: NPX136D Description: Panel Mount Radio
Document #: NPX136D\634-0 Rev: 1.00
1. Post Installation EMI Test
The purpose of this test is to identify any interference that the NPX136D may cause with
existing aircraft systems.
2. Test Conditions
The NPX136D should be installed and function tested. The antenna VSWR should be
checked. A forward/reverse power check with an in-line wattmeter should show no
more than 10% reflected power. For the following tests, insure that the transmit power
is set to HI.
3. Methodology
TEST PROCEDURE
Most of the EMI tests can be accomplished on the ground. In some cases, flight testing is
required or is easier. If the aircraft is approved for IFR operations, then it is mandatory
that interference between the NPX136D and the approach aids be checked in flight.
The GPS should be operational and navigating with at least the minimum compliment of
satellites. The VHF comm should be set to the frequencies indicated with the squelch open.
VOR/ILS/GS receivers should be set to the frequencies indicated and selected for display. If
possible, set up a VOR/ILS ramp test set on the frequencies indicated and adjust the output
until the flags are out of view. The transponder and encoder should be monitored with ramp
test equipment. If possible set the ADF to a nearby navigation station.
Modulate the NPX136D transmitter on the indicated frequencies for at least 20 seconds.
Observe the GPS for any degradation in satellite status or availability or flags. Listen for
any noise or detected audio signals on the VHF comm(s). Listen for any noise or
detected audio signals on the VOR/LOC receiver audio; look for any movement of flags
or needles on the VOR/LOC/GS navigation display(s).
List the power plant, fuel and other electric instruments in the chart provided and note
any anomalies that occur while transmitting. Assess the results.
If the aircraft is equipped with an autopilot or a stability augmentation system, then test
fly the aircraft and verify that the operation of the NPX136D transceiver does not have
adverse effects on these systems. After checking for gross effects at a safe altitude, fly
an approach with each of the different navigation systems coupled to the autopilot (ILS,
GPS etc.) and look for any anomalies.
Rev. 1.00 Apr 22, 2004 Page 1 of 7
ENG-FORM: 634-0100.DOT
CONFIDENTIAL AND PROPRIETARY TO NORTHERN AIRBORNE TECHNOLOGY LTD.
Page 19

NPX136D Installation Approval Test Procedure
4. Results
If the installed system passes all of the applicable EMI tests, then no further action is
required. If interference is observed, then the interference must be assessed against
the appropriate standards of airworthiness for the system in question. For example: it is
permissible for a VFR certified GPS to lose navigation capability while the NPX136D is
transmitting, providing that it recovers properly and promptly, but it is not permissible for
an IFR Approach certified GPS to be affected in the same way. A complete discussion
of all the standards of airworthiness to be applied in assessing EMI effects is beyond
the scope of this document.
5. Procedure
A. Operate the NPX136D transmitter on the following frequencies for at least 20
seconds. Observe the GPS for any degradation in satellite status, or availability, or
flags.
FREQUENCIES GPS #1 GPS #2
NPX136D PASS FAIL PASS FAIL
NOTES:
143.2187 MHz
143.2200 MHz
153.4500 MHz
157.5400 MHz
157.5437 MHz
Rev. 1.00 Apr 22, 2004 Page 2 of 7
E NG-FORM: 634-0100.DOT
CONFIDENTIAL AND PROPRIETARY TO NORTHERN AIRBORNE TECHNOLOGY LTD.
Page 20

NPX136D Installation Approval Test Procedure
B. Determine if the image frequency for the VHF Comm falls within the range of the
NPX136D unit. If so, select a set of frequencies that will cause the NPX136D to
be set as close as possible to the image frequency. Any one of the many
possible sets will suffice. Record these values in the spaces provided in the
following chart. Modulate the NPX136D transmitter on the following frequencies
for at least 20 seconds. Listen for any noise or detected audio signals on the
VHF comm.
Example - Bendix/King KY 196A:
The first IF frequency is 11.4 MHz. The L.O. is above the received frequency
(high side injection), therefore the image frequency is 22.8 MHz above the
selected frequency. Set the KY 196A to 120.000 MHz and the NPX136D to
142.8000 MHz.
FREQUENCIES RESULTS
VHF #1 NPX136D PASS FAIL
135.975 138.0000
121.150 157.5000
NOTES:
131.250 157.5000
Image:
FREQUENCIES RESULTS
VHF #2 NPX136D PASS FAIL
135.975 138.0000
121.150 157.5000
131.250 157.5000
Image:
Rev. 1.00 Apr 22, 2004 Page 3 of 7
E NG-FORM: 634-0100.DOT
CONFIDENTIAL AND PROPRIETARY TO NORTHERN AIRBORNE TECHNOLOGY LTD.
Page 21

NPX136D Installation Approval Test Procedure
C. Determine if the image frequency for the VOR/ILS Nav falls within the range of
the NPX136D unit. If so, select two sets of frequencies that will cause the
NPX136D to be set as close as possible to the image frequency. Choose one
set in the localizer frequency range, and one in the VOR frequency range.
Record these values in the spaces provided in the following chart. Modulate the
NPX136D transmitter on the following frequencies for at least 20 seconds. Listen for
any noise or detected audio signals on the receiver audio; look for any movement of flags
or needles on the navigation display.
FREQUENCIES RESULTS
VOR/ILS #1 NPX136D PASS FAIL
108.000 162.0000
108.100 162.1500
Image:
Image:
NOTES:
FREQUENCIES RESULTS
VOR/ILS #2 NPX136D PASS FAIL
108.000 162.0000
108.100 162.1500
Image:
Image:
Rev. 1.00 Apr 22, 2004 Page 4 of 7
E NG-FORM: 634-0100.DOT
CONFIDENTIAL AND PROPRIETARY TO NORTHERN AIRBORNE TECHNOLOGY LTD.
Page 22

NPX136D Installation Approval Test Procedure
D. Modulate the NPX136D transmitter on the following frequencies for at least 20
seconds. Look for any movement of flags or needles on the navigation display.
FREQUENCIES RESULTS
G/S #1 NPX136D PASS FAIL
334.7 (108.1) 167.3500
FREQUENCIES RESULTS
G/S #2 NPX136D PASS FAIL
334.7 (108.1) 167.3500
NOTES:
Note: For the following tests, select frequencies at the top, middle and bottom of the
range of the NPX136D.
Frequency #1 ______________ Frequency #2 ______________
Frequency #3 ______________
E. At a safe altitude, engage the autopilot or stability augmentation system.
Modulate the NPX136D transmitter on the above frequencies for at least 20
seconds. Observe any effect on the autopilot or stability augmentation system.
Observations:
Rev. 1.00 Apr 22, 2004 Page 5 of 7
E NG-FORM: 634-0100.DOT
CONFIDENTIAL AND PROPRIETARY TO NORTHERN AIRBORNE TECHNOLOGY LTD.
Page 23

NPX136D Installation Approval Test Procedure
F. Perform a coupled ILS approach to the aircraft's certified limits. Modulate the
NPX136D transmitter on the above frequencies for at least 20 seconds. Observe
any effect on the autopilot. Repeat for each different system such as ILS #2,
GPS, FMS etc.
Observations:
G. List the power plant, fuel and other electric instruments in the chart provided and
note any anomalies that occur while transmitting. Assess the results.
STEP SYSTEM PASS FAIL NOTES
1 Xponder & Encoder
2 ADF 1 & 2
3 VG
4 Compass
5 Directional Gyro
6 Oil Pressure
7 Fuel Pressure
8 Oil Temp
9 Amps
10 Bus Voltage
11 Fuel %
12 Ng
13 TOT
14 Torque %
15 Annunciators
16 Digital Clock
Rev. 1.00 Apr 22, 2004 Page 6 of 7
E NG-FORM: 634-0100.DOT
CONFIDENTIAL AND PROPRIETARY TO NORTHERN AIRBORNE TECHNOLOGY LTD.
Page 24

NPX136D Installation Approval Test Procedure
STEP SYSTEM PASS FAIL NOTES
NOTES:
End of Installation Approval Test Procedure
Rev. 1.00 Apr 22, 2004 Page 7 of 7
E NG-FORM: 634-0100.DOT
CONFIDENTIAL AND PROPRIETARY TO NORTHERN AIRBORNE TECHNOLOGY LTD.
Page 25

Page 26

NORM
GD 2
SCAN
GD 1
GD TX
OFF
NPX136D TRANSCEIVER
MIN
SQ
CHAN
_
4
8
#
DEL
TUV
7
3
DEF GHI
2
ABC
1
- / _
6
5
PQRS
MNO
JKL
0
9
*
ADD
WXYZ
HELP
+
+
DISP
_
Esc
Page 27

NPX136D Series Panel Mount P25 VHF Transceiver
SM68 Installation and Operation Manual
Section 3 Operation
3.1 Introduction
Information in this section consists of the functional and operational procedures for the NPX136D-000
and NPX136D-070 Panel Mount P25 VHF Transceivers.
3.2 General Information
The NPX136D Panel Mount P25 VHF transceiver is a stand-alone radio designed for the single mission
user. It provides all the features needed to satisfy communications within the VHF high band.
The NPX136D incorporates NAT’s proven user-friendly operating system with on-line help, making it
easy to program and use. The small size makes this radio ideal for airframes where size and weight are
a factor.
The NPX136D covers a frequency range of 136.0000 to 173.9975 MHz in 2.5/6.25 kHz increments.
Each of the 255 available channels can operate in one of three modes: wide band analog, narrow band
analog or digital P25 Phase I.
A SCAN function allows scanning of selected channels. Transmit power of either 1 watt or 10 watts is
selectable from the front panel. Simplex and semi-duplex operations are available. A separate twochannel guard receiver is standard with the -070 model. The guard receiver is not installed in –000
models, and the guard controls in these transceivers provide no function.
Conveniently located beside the display are separate main volume, guard volume and transmit select
switches. Easily identified along the bottom of the front panel are squelch test, channel up/down and
display controls. The aircraft dimmer bus provides control for the panel lighting.
3.3 Controls and Indicators
3.3.1 General Features
In addition to the general features that are available, the NPX136D has several features that extend its
capability and make it easier to use. These features include alphanumeric channel labelling, and built-in
operator help.
For ease of use and operability, the NPX136D series of radios uses a control layout and operating system
similar to the popular Northern Airborne Technology Tac/Com™ family of radio control heads.
In addition to this manual, most operational questions can be addressed by the comprehensive Help
function built into the radio.
3.3.2 Power On
3.3.2.1 Power-up Screen
Turn the NPX136D on by rotating the main (MN) volume control clockwise, away from the off (detent)
position. The software revision number is shown briefly on the top display line and the status of the
installed transceiver modules is shown on the lower display line. If enabled, the operator is able to choose
between starting normal operation or being shown a tutorial on the operation of the radio.
Section 3 Rev: 1.00 Issue 4 Page 3-1
ENG-FORM: 806-0114.DOT
CONFIDENTIAL AND PROPRIETARY TO NORTHERN AIR BORNE TECHNOLOGY LTD.
Page 28

NPX136D Series Panel Mount P25 VHF Transceiver
SM68 Installation and Operation Manual
S/W Ver: X.XX
Checking Modules
To display a tutorial on the operation of the NPX136D press the SQ/HELP button. To exit the tutorial,
press the ESC button.
To decline Help, press the Enter or Esc button. The NPX136D will then display a summary of the installed
functions and current settings. (This feature can be disabled for faster start-up – see section 3.6.8.3
Power up Help) The NPX136D is then ready for normal operation, referred to as Normal Operating
Mode throughout this manual.
Radio Status:
Tx Mode=Duplex
Note: Any activity that causes the radio to reprogram the transceiver modules (changing the guard
channel, enabling or disabling squelch, changing channel parameters, etc) may cause the receive
audio to mute momentarily.
Section 3 Rev: 1.00 Issue 4 Page 3-2
ENG-FORM: 806-0114.DOT
CONFIDENTIAL AND PROPRIETARY TO NORTHERN AIR BORNE TECHNOLOGY LTD.
Page 29

NPX136D Series Panel Mount P25 VHF Transceiver
SM68 Installation and Operation Manual
3.3.3 Controls and Indicators
Main On/Off/Volume
Main RX/TX Annunciator
Scan-Normal-Guard Transmit
001=ABCDEFGHI W
S
C
Guard Volume Control
R:173.9975 067
Guard Channel Switch
Guard RX/TX Annunciator
Display Switch Channel Switch Squelch/Help Control Number Pushbuttons
3.3.3.1 Main Receive Volume and Power On / Off Control (MN)
The MN knob controls the main receiver volume; rotating it clockwise (cw) increases the volume, and
counterclockwise (ccw) decreases it. When rotated fully ccw past the detent, the NPX136D will be turned
off.
3.3.3.2 Guard Receive Volume (GD) (-070 only)
To increase the volume of the guard receiver, turn this knob cw; to decrease the volume turn it ccw. When
rotated fully ccw, the guard receive audio will be at the preset minimum level.
3.3.3.3 Main RX/TX Status Annunciator
The main RX/TX annunciator displays the RX (Receive) and the TX (Transmit) status of the main
transceiver. When transmitting, the LED will light green. When an RF signal is received that matches the
main channel's receive frequency, the LED will light amber. When idle (not receiving or transmitting), the
LED will be dark. The colour coding used for these functions corresponds to standard aircraft FM radio
conventions. Note that this is the reverse of standard vehicular conventions used with land mobile
equipment.
Note: An NPX136D that is receiving may not produce any audio if the analog tones or digital squelch
mode present on the receive signal do not match those set for the current channel.
3.3.3.4 Guard RX/TX Status Annunciator (-070 only)
The guard RX/TX annunciator displays the RX (Receive) and the TX (Transmit) status of the guard
channel. When an RF signal is received that matches the guard channel's receive frequency, the LED will
light amber. When the main transceiver is transmitting on the guard channel, the LED will light green.
When idle (not receiving or transmitting), the LED will be dark.
Section 3 Rev: 1.00 Issue 4 Page 3-3
ENG-FORM: 806-0114.DOT
CONFIDENTIAL AND PROPRIETARY TO NORTHERN AIR BORNE TECHNOLOGY LTD.
Page 30

NPX136D Series Panel Mount P25 VHF Transceiver
SM68 Installation and Operation Manual
3.3.3.5 SCAN / N O R M / GD TX S witc h
The SCAN / NORM / GD TX switch is a three-position centre-off toggle switch used to select the mode of the
transceiver. The scan mode is turned on by putting the SCAN / NORM / GD
TX switch in the SCAN position. For details on scanning operation see section 3.10.
Turn on the GD TX mode (-070 only) by putting the SCAN / NORM / GD TX switch in the GD TX position.
For details on Guard Transmit operation see section 3.3.3.6.
To turn off the scan mode (or GD TX mode in the -070 only) and put the NPX136D into normal operating
mode, put the SCAN / NORM / GD TX switch in the NORM position.
3.3.3.6 Guard Transmit Mode (-070 only)
To select the guard channel for transmit or to review the guard channels' parameters put the SCAN / NORM /
GD TX switch in the GD TX position. All radio transmissions will be on the selected guard channel’s transmit
frequency. To use the main transceiver's channel for the transmit frequency put the SCAN / NORM / GD TX
switch in the NORM position.
This function only applies to NPX136Ds with the guard receiver option installed. If not installed, GD NOT
INSTALLED will be displayed on the upper line when the switch is set to the GD TX position.
When the SCAN / NORM / GD TX switch is placed in the GD TX position all other modes of operation are
cancelled and the NPX136D is put in to the guard transmit mode.
3.3.3.7 Guard Channel Switch (GD 1/GD 2) (-070 only)
The guard channel switch is a two-position toggle switch that selects either guard channel GD 1 or GD 2.
3.3.3.8 Display Switch (DISP)
The display switch is a two-position momentary toggle switch used to change the channel parameters
shown on the lower display. By toggling the switch left or right, the operator can select between the
channel's receive frequency, the channel's transmit frequency, the current zone (if enabled), or the
channel's talk group IDs (if enabled),
3.3.3.9 Channel +/- Switch
The Channel +/- switch is a two-position momentary toggle switch used to select channels. For full
information, see section 3.4.2
3.3.3.10 Squelch/Help Button (SQ / HELP)
The SQ/HELP button is a momentary pushbutton used to disable squelch (in normal operating mode) or
to display help screens (in any menu mode).
3.3.3.10.1 Squelch (normal operating mode)
The first press of the SQ button disables the main receiver squelch, and the lower display will show MAIN
SQ DISABLED (on an analog channel), or MAIN MONITOR (on a digital channel).
The second press of the SQ button disables the guard receiver squelch, and the lower display will show GD SQ
DISABLED when on an analog channel, or GD MONITOR when on a digital channel.
Section 3 Rev: 1.00 Issue 4 Page 3-4
ENG-FORM: 806-0114.DOT
CONFIDENTIAL AND PROPRIETARY TO NORTHERN AIR BORNE TECHNOLOGY LTD.
Page 31

NPX136D Series Panel Mount P25 VHF Transceiver
SM68 Installation and Operation Manual
Press the SQ button a third time or press the Esc button to return to normal squelch operation. The lower
display will return to its previous condition. On a digital channel with squelch set to monitor, no audio will
be heard unless receiving a digital transmission.
3.3.3.10.2 HELP (menu mode)
To read the help for any menu item press the help (SQ / HELP) button. The HELP text scrolls across the
lower display. Press the Enter button to pause and resume scrolling. Use the CHAN +/- switch to
increase/decrease the scroll rate. Press the ◄ arrow to scroll backwards, and the ► arrow to scroll
forward quickly. To return to the menu or field in use when HELP was selected, press the Esc button.
3.3.3.11 Menu Button
Pressing the Menu button advances through the available menu choices. For details see section 3.5.
3.3.3.12 Enter Button
Pressing the Enter button selects a menu item or value. For details see the relevant sections.
3.3.3.13 Function Button (Fn)
The Fn button is used to provide access to special functions. See section 3.10.
3.3.3.14 Escape Button (Esc)
The Escape button is pressed to exit a menu or to discard changes. For details see the relevant sections.
3.3.3.15 Arrow and Number Pushbuttons
The number buttons (0-9,½ and #) and arrow buttons - right ►, left ◄, up ▲ and down ▼, are
momentary pushbuttons used to enter information, or to select specific channel numbers.
In Normal Operating mode, the ► and ◄ buttons change the channel, and (if enabled) the ▲ and ▼
buttons change the zone (see section 3.4.3). The number buttons enter the Goto channel mode (see
section 3.4.2).
In Menu mode, the ► and ◄ buttons change the cursor position or select channels, the ▲ and ▼ buttons
change the value of certain fields, and the number buttons allow entry of alphanumeric information into
frequency and name fields (see section 3.6).
Full details on use are given in the relevant sections.
Note: The ½ and # keys are used as ADD and DELETE keys in some sections of the menus.
Section 3 Rev: 1.00 Issue 4 Page 3-5
ENG-FORM: 806-0114.DOT
CONFIDENTIAL AND PROPRIETARY TO NORTHERN AIR BORNE TECHNOLOGY LTD.
Page 32

NPX136D Series Panel Mount P25 VHF Transceiver
SM68 Installation and Operation Manual
3.4 Displays - Normal Operating Mode
Channel Number
Display Type Frequency Tone/Squelch Number
Tone/Squelch Flag Channel Name Modulation Type
S
001=Abcd23Efg W
C
R:173.9975 067
Scan
Flag
The upper row of the display contains the channel number, channel name and various flags. The
channel's tone/squelch flag shows the state of analog tones or digital squelch mode. The channel's
modulation type flag shows the modulation mode. The scan flag shows if the current channel is in the
scan list or is a priority scan channel.
The lower row of the display contains current channel information for one of the following: the receive
information, the transmit information, the current zone (if zones are turned on), and the receive or transmit
talk group id (if talk group display is turned on).
3.4.1 Display Details
3.4.1.1 Channel Number:
Channel numbers for the main receiver are 001 – 255. This may be changed to include letters and other
characters if the display settings channel number mode is set to alphanumeric. Channel numbers allowed
for the guard receiver are GD1 and GD2.
3.4.1.2 Tone/Squelch Flag
The tone squelch flag shows the status of analog tones and digital squelch as set from the settings menu.
This flag is shown as follows:
" " Blank, for analog tones off. (Not applicable for digital channels.)
"–" Dash, for analog tones set to transmit only or digital squelch set to monitor.
"=" Equal Sign, for analog tones on or digital squelch set to per chan.
3.4.1.3 Channel Name
The channel name is a nine-character alphanumeric name for the channel.
3.4.1.4 Modulation Type
The modulation type for the current channel may be: W for wideband analog; N for narrowband analog;
D for P25 Phase I digital.
Section 3 Rev: 1.00 Issue 4 Page 3-6
ENG-FORM: 806-0114.DOT
CONFIDENTIAL AND PROPRIETARY TO NORTHERN AIR BORNE TECHNOLOGY LTD.
Page 33

NPX136D Series Panel Mount P25 VHF Transceiver
SM68 Installation and Operation Manual
3.4.1.5 Scan Flags
Scan flags denote the channels that will be checked during scanning.
checked when list scanning.
is set as a priority scan channel and a list scan channel just the priority scan flag is shown.
S
indicates the current channel is
C
P
1
indicates the current channel is checked during priority scan. If a channel
3.4.1.6 Display Type
The display type is selected with the Display switch. The display types are R: for receive display, T: for
transmit display. S: for simplex display, Z: for zone display, Rx TGID : for receive talk group,
Tx TGID : for transmit talk group and Splx TGID : for simplex talk group. The display types shown are
dependent on the current radio configuration.
3.4.1.6.1 Receive Display (Duplex Mode)
R:173.9975 ---
Shows the receive frequency in MHz to four decimal places and the receive squelch mode. For analog
channels the receive squelch mode is the analog tone frequency or code, or dashed lines if no tone is
selected. For digital channels the receive squelch mode is the receive network access code or MON if the
T
is shown if the
digital squelch mode is set to monitor. Also, for digital channels, the talk group flag
G
channel's digital squelch mode is set to select. See section 3.6.3.
3.4.1.6.2 Transmit Display (Duplex Mode)
T:173.9975 --- LO
Shows the transmit frequency in MHz to four decimal places and the transmit squelch mode. For analog
channels the transmit squelch mode is the analog tone frequency or code, or dashed lines if no tone is
selected. For digital channels this is the transmit network access code. Also shown is the transmit power
L
H
or
O
flag
3.4.1.6.3 Simplex Display (Simplex Mode)
I for the NPX136D's transmit power setting. See section 3.6.3.
S:173.9975 --- LO
If the Transmit mode is set to Simplex, the simplex display shows the receive and transmit frequency in
L
MHz to four decimal places, and the receive and transmit squelch mode. The transmit power flag
H
or
O
is
I
also shown. See section 3.6.3.
3.4.1.6.4 Zone display
Z:All ALL CHANS
Shows the zone number and zone name for the current zone. The zone display is shown when zones are
turned on from the edit zone menu.
3.4.1.6.5 Receive Talk Group ID (Duplex Mode)
Rx TGID: 12345
Shows the receive talk group ID for the channel. Shown for digital channels with the digital squelch set to
select when turned on from the display settings talk group field.
Section 3 Rev: 1.00 Issue 4 Page 3-7
ENG-FORM: 806-0114.DOT
CONFIDENTIAL AND PROPRIETARY TO NORTHERN AIR BORNE TECHNOLOGY LTD.
Page 34

NPX136D Series Panel Mount P25 VHF Transceiver
SM68 Installation and Operation Manual
3.4.1.6.6 Transmit Talk Group ID (Duplex Mode)
Tx TGID: 12345
Shows the transmit talk group ID for the channel. Shown for digital channels when turned on from the
display settings talk group field.
3.4.1.6.7 Simplex Talk Group ID (Simplex Mode)
Splx TGID: 12345
Shows the receive and transmit talk group ID for the channel. Shown for digital channels with the digital
squelch set to select when turned on from the display settings menu's talk group field.
3.4.2 Changing channels on the main receiver
There are two different ways to select a channel on the main transceiver:
Step or scroll through the channels using the CHAN switch or the ► and ◄ arrow buttons. To
sequentially change channels; press the CHAN switch right (+), or the right arrow button ► to increment
by one channel, press the CHAN switch left (-) or the left arrow button ◄ to decrement by one channel.
Holding the switch or button causes the transceiver to scroll through the channels. A remote channel
switch may also be connected to the rear connector of the transceiver to provide the same function.
Jump directly to a specific channel by pressing the keypad buttons of the required channel number and
then pr
Wh
more information on setting the channel number mode.
ess the Enter button. When the channel number setting is numeric Goto Channel: is displayed.
en the channel number setting is alphanumeric Goto Label: is displayed. See section 3.6.8.5 for
If the channel number entered is too big, a message indicating the maximum channel number
CH #> MAX (---)! is displayed briefly. If the channel number entered is not in the current zone then
the messa
the messa
the display setting's channel number mode field (Chan #). When the channel number mode is set to
num
ge CH# Not In Zone! is displayed briefly. If the channel number entered is not valid then
ge Invalid CH#! is displayed briefly. The channel numbers that must be entered depend on
eric, leading zeros are not required; in alphanumeric, all three channel characters must be entered.
3.4.3 Changing zones on the main receiver
When zones are turned on (from the edit zones menu) the lower display can show the current zone. To
show the current zone, press the DISP +/- switch until Z:xx Zone Name is shown. To change the
current zone press the up and down arrow buttons. Only the channels in the current zone and channels
with zone set to All may be selected. If the current zone is the All zone then every channel may be
selected.
Section 3 Rev: 1.00 Issue 4 Page 3-8
ENG-FORM: 806-0114.DOT
CONFIDENTIAL AND PROPRIETARY TO NORTHERN AIR BORNE TECHNOLOGY LTD.
Page 35

NPX136D Series Panel Mount P25 VHF Transceiver
SM68 Installation and Operation Manual
3.5 Menus and Settings
Settings Menu
DsplBrt Lt On:20
All of the parameters of the NPX136D that are not controlled from a front panel switch may be changed or
reviewed from fields within a menu. These fields are made available by entering Menu mode.
To access the menu mode, press the Menu button. The first menu shown is the Settings Menu. Press the
Menu button again to show the Channel Menu, and again to show the Maintenance Menu. Each press of
the Menu button advances to the next menu screen. When the required menu is shown, press the Enter
button to select it. The first of the available sub-menus or editable fields will be displayed.
When a menu has been selected, press the Menu button again to advance to the next menu or editable
field. Pressing the Esc button will exit a menu and move to the previous menu level, and from the top
level menu, pressing the Esc button will return to normal operating mode. When any field is changed the
operator is prompted Save Changes?. Press the Enter button to save the changes or press the Esc
button to discard changes.
The Settings Menu contains the fields that control general operation of the entire NPX136D. For details
on the settings menu see section 3.6.
The Edit Menu contains the sub-menus for editing channels, guards, zones and scanning. For details on
the edit menu see section 3.7.1.
The Maintenance Menu contains the sub-menus and fields that are not normally used, or that should only be
changed by a knowledgeable user. For details see section 3.8.
Section 3 Rev: 1.00 Issue 4 Page 3-9
ENG-FORM: 806-0114.DOT
CONFIDENTIAL AND PROPRIETARY TO NORTHERN AIR BORNE TECHNOLOGY LTD.
Page 36

NPX136D Series Panel Mount P25 VHF Transceiver
SM68 Installation and Operation Manual
3.6 Settings Menu
The settings menu allows changing of general NPX136D settings.
3.6.1 Brightness
DsplBrt LtOff:01-20
DsplBrt Lt On:01-20
The display is dimmable in 20 steps. Two settings for the display brightness are stored in non-volatile
memory: one level for when panel lights are off and one for when panel lights are on. Both of these
settings are changed from the brightness settings menu. To switch between levels turn the panel lights on
or off.
Note: In a well-lit area, such as daylight in an aircraft cockpit, brightness settings below 10 may be
difficult to read. If the display cannot be read properly, follow these instructions for a 'short-cut' to
changing the brightness:
1. Turn the NPX136D radio off and then back on.
2. Wait for 12 seconds, or until the HELP screen is displayed.
3. Press the Esc button three times.
4. Press the Menu button and then the Enter button.
5. The NPX136D should be in the brightness field of the Settings Menu.
6. Press the up or down arrow until the display can be read.
7. If this does not work, repeat starting at step 1.
3.6.2 Transmit Power
Tx Pwr:Lo, Hi, Per Chan
The transmit power level for all channels can be changed from Lo (1 Watt) or Hi (10 Watts) or may be set
to Per Chan where the power setting from the channel is used to control the transmit power level.
3.6.3 Transmit Mode
Tx Mode:Simplex, Duplex
There are two modes possible: DUPLEX (repeater) operation, and SIMPLEX (direct) operation. Duplex
means that the NPX136D uses both the RX and TX frequencies programmed into the selected channel.
When in duplex mode the display shows both the receive (preceded by the text R:) and transmit (preceded
by the text T:) frequencies and squelch mode. Simplex means that the NPX136D uses the RX frequency
and tone or digital squelch programmed into the selected channel for both RX and TX purposes. When in
simplex mode the display shows the text S: and the channel frequency and squelch mode.
3.6.4 Squelch Mode, Analog Tones
Anlg Tone: On, Off, TxOnly
For analog channels, CTCSS and DCS tones are selectable to on, off or transmit only.
Section 3 Rev: 1.00 Issue 4 Page 3-10
ENG-FORM: 806-0114.DOT
CONFIDENTIAL AND PROPRIETARY TO NORTHERN AIR BORNE TECHNOLOGY LTD.
Page 37

NPX136D Series Panel Mount P25 VHF Transceiver
SM68 Installation and Operation Manual
3.6.5 Squelch Mode, Receive Digital Squelch
Dgtl Sq: Mon, Per Chan
For digital channels, the receive digital squelch mode may be changed globally from monitor (MON) to
per channel (Per Chan). When the receive digital squelch is set to monitor, audio is heard on digital
channels. When the receive digital squelch is set to Per Chan, audio is heard when the received digital
squelch meets the digital squelch setting for the channel.
3.6.6 Power Up Channel
Pwr Up Chan: PrDn, 001-255
The power up channel is the channel the NPX136D tunes to after power up and may be set as the power
down channel (PrDn) or to a specific channel number.
3.6.7 Squelch Setting
Noise Sq: 01-16
The noise squelch setting, for analog channels with no CTCSS or DCS squelch mode, may be set from 1 to
16. Displayed when enabled from the configuration menu. The lower the selected setting value, the lower
the received RF signal may be to disable squelch, and the higher the value, the higher the received RF
signal must be to disable the squelch.
Note: If the noise squelch is set incorrectly, the NPX136D may not receive properly.
3.6.8 Display Menu
Set Disp Menu?
The Display menu is a sub-menu of the Settings menu, and is used to change the way information is
shown on the display.
3.6.8.1 CTCSS Display
CTCSS Disp: Freq, Mtrla
CTCSS tones may be displayed as one of two methods: Motorola Code, or Frequency. See section
3.11.1 for a list of CTCSS tones.
3.6.8.2 Talk Group ID Display
Talk Groups: On, Off
For digital channels, the display of talk group IDs may be turned on or off.
3.6.8.3 Power Up Help
PwrUp Help: On, Off
Display of help screens at power up can be turned on and off.
3.6.8.4 Power Up Status
PwrUp Status: On, Off
Display of status screens at power up can be turned on and off.
Section 3 Rev: 1.00 Issue 4 Page 3-11
ENG-FORM: 806-0114.DOT
CONFIDENTIAL AND PROPRIETARY TO NORTHERN AIR BORNE TECHNOLOGY LTD.
Page 38

NPX136D Series Panel Mount P25 VHF Transceiver
SM68 Installation and Operation Manual
3.6.8.5 Channel Number Mode
Chan#: Numeric, Alphanum
The channel number may be set as Numeric or Alphanumeric.
When set to Numeric, the channel numbers are 001-255. When in Numeric mode the Goto channel uses
numbers for selecting a channel and leading zeros are not required.
When set to Alphanumeric, the channel label is used in place of the channel number, and may include
letters and symbols. When in Alphanumeric mode the Goto channel function uses numbers and letters for
selecting channels and the entire three-character channel label must be entered.
3.7 Channel Menu
The channel menu allows access to the menus for editing main channels, guard channels, zones and
scan lists. See sections 3.7.1 thru 3.7.4 for details.
3.7.1 Edit Main Channel Menu (Edit Main)
Channel Menu...
Edit Main?
The Edit Main menu allows the operator to change the parameters of the channels on the main transceiver.
To edit guard channels see the Edit Guard menu, section 3.7.2.
The Main receiver continues to operate with the original settings until the Edit Main menu is exited and
normal operating mode is entered. The transmitter is locked out from operation when in the Edit Main
menu.
Select a different channel using the CHAN +/– switch to scroll to the required channel.
Only unlocked channels may be edited from the Edit Main menu. Channels may be locked from the serial
load program. When channels are locked the message LOCKED! is shown on the lower display and no
channel parameters are displayed.
To edit a locked channel (all channel parameters can be changed), turn the Master Edit mode 'on' from
the maintenance menu (Section 3.10). If master edit mode is on when the Edit Main menu is entered, the
message MASTER EDIT MODE is flashed three times.
To ensure that no channel parameters may be changed, a shorting block may be installed on the agile
edit jumper. In this case, when the Edit Main menu is entered, the message EDIT DISABLED! is flashed
three times and the Edit Main menu is shown.
When allowed, the channel's parameters that may be changed from the Edit Main menu are listed as
follows.
Section 3 Rev: 1.00 Issue 4 Page 3-12
ENG-FORM: 806-0114.DOT
CONFIDENTIAL AND PROPRIETARY TO NORTHERN AIR BORNE TECHNOLOGY LTD.
Page 39

NPX136D Series Panel Mount P25 VHF Transceiver
SM68 Installation and Operation Manual
3.7.1.1 Channel's receive and transmit frequency
RxFreq, TxFreq: 136.0000 - 173.9975
The channel's receive and transmit frequency may be changed from 136.0000 to 173.9975 MHz in 2.5 or 6.25
kHz increments. After entering a new receive frequency the transmit frequency is set to the same frequency.
Only the numbers shown in bold may be edited. The leading number "1" is always shown. Numbers
shown in italics are not displayed.
Table of allowed frequencies:
1xx.x0000 1xx.x2500 1xx.x5000 1xx.x7500
1xx.x0250 1xx.x2750 1xx.x5250 1xx.x7750
1xx.x0500 1xx.x3000 1xx.x5500 1xx.x8000
1xx.x0625 1xx.x3125 1xx.x5625 1xx.x8125
1xx.x0750 1xx.x3250 1xx.x5750 1xx.x8250
1xx.x1000 1xx.x3500 1xx.x6000 1xx.x8500
1xx.x1250 1xx.x3750 1xx.x6250 1xx.x8750
1xx.x1500 1xx.x4000 1xx.x6500 1xx.x9000
1xx.x1750 1xx.x4250 1xx.x6750 1xx.x9250
1xx.x1875 1xx.x4375 1xx.x6875 1xx.x9375
1xx.x2000 1xx.x4500 1xx.x7000 1xx.x9500
1xx.x2250 1xx.x4750 1xx.x7250 1xx.x9750
Note: ½½½.½½½½ is displayed if the frequency is not valid. To enter an invalid number press the
zero button when on the tens-of-megahertz number. Invalid frequencies are used to disable a
channel and prevent its use.
3.7.1.2 Channel Name
Name:xxxxxxxxx Allowed characters: 0-9 A-Z a-z / _ ½ #
The channel name can be up to 9 characters in length. The character to be edited flashes. Press the 0–9,
½ or # button until the required character (0-9 A-Z a-z / _ ½ #) is displayed at the flashing
position. Press a different button to advance to the next character. If the same key is needed for adjacent
digits, it may be necessary use the arrow buttons to advance to the required position. Move the flashing
position left or right by pressing the left ◄ or right ►arrow buttons. To insert a space press ▲, and to
delete a character press ▼.
3.7.1.3 Modulation Type
Type: Wide, Narrow, Digital
The channel modulation type may be set to analog wide band, analog narrow band or digital.
3.7.1.4 Transmit Power
Tx Power: Hi, Lo
The channel's transmit power level may be set to Hi or Lo. This field is shown when the NPX136D's transmit
power setting is set to Per Chan from the settings menu.
Section 3 Rev: 1.00 Issue 4 Page 3-13
ENG-FORM: 806-0114.DOT
CONFIDENTIAL AND PROPRIETARY TO NORTHERN AIR BORNE TECHNOLOGY LTD.
Page 40

NPX136D Series Panel Mount P25 VHF Transceiver
SM68 Installation and Operation Manual
3.7.1.5 Zone
Zone: All, 01-16, None
A channel may be set to a single zone (01–16), to all zones (All), or to no zones (None). The zone field is
shown when zones are turned on from zone menu.
3.7.1.6 Channel Label
New Label: XXX
Allowed characters: 0-9 A-Z a-z - / _ ½ #
The channel label field is shown when master edit mode is on.
Note: Use this feature with care. Duplicate channel labels can be entered. Channels are not sorted by the label.
The channel label must be in alphanumeric mode (see section 3.6.8.5.)
3.7.1.7 Analog Receive Subaudible Tone Type
Rx Tn Type: None, Ctcss, Dcs
The receive subaudible tone type field is shown when the channel's modulation type is set to wide or to
narrow.
3.7.1.8 Analog Receive Subaudible Tone
Rx Tone: 067 - 254, 023 - 754 CTCSS frequency, Motorola or DCS Code
The receive subaudible tone field is shown when the receive subaudible tone type is set to CTCSS or DCS.
3.7.1.9 Analog Transmit Subaudible Tone Type
Tx Tn Type: None, Ctcss, Dcs
The transmit subaudible tone type field is shown when the channel's modulation type is set to wide or to
narrow.
3.7.1.10 Analog Transmit Subaudible Tone
Tx Tone: 067 - 254, 023 - 754 CTCSS frequency, Motorola or DCS Code
The transmit subaudible tone field is shown when the transmit subaudible tone type is set to CTCSS or DCS.
3.7.1.11 Receive Digital Squelch
Rx Dgtl Sq: Mon, Norm, Sel
The receive digital squelch field is shown when the channel's modulation type is digital. The receive
digital squelch may be monitor (Mon), where all audio is heard; or normal (Norm), where audio is heard
when the received network access code (NAC) matches the channel's NAC; or select (Sel), where audio
is heard when the received NAC and talk group ID match the channel's NAC and talk group ID.
3.7.1.12 Receive Network Access Code
Rx NAC: 000h - FFFh
The receive Network Access Code (NAC) field is shown when the receive digital squelch is set to normal
or to select. The NAC is a hexadecimal number; the allowed characters are 0–9, A–F.
Section 3 Rev: 1.00 Issue 4 Page 3-14
ENG-FORM: 806-0114.DOT
CONFIDENTIAL AND PROPRIETARY TO NORTHERN AIR BORNE TECHNOLOGY LTD.
Page 41

NPX136D Series Panel Mount P25 VHF Transceiver
SM68 Installation and Operation Manual
3.7.1.13 Receive Talk Group ID
Rx TGID: 00000 - 65535
The receive talk group ID is shown when the receive digital squelch is set to select. The Rx TGID field is a
decimal number with allowed characters 0–9.
3.7.1.14 Transmit Network Access Code
Tx NAC: 000h - FFFh
The transmit NAC field is shown when the channel's modulation type is set to digital. The NAC is a
hexadecimal number with allowed characters 0–9, A–F.
3.7.1.15 Transmit Talk Group ID
Tx TGID:00000 - 65535
The transmit talk group ID field is shown when the channel's modulation type is set to digital. The Tx
TGID is a decimal number, the allowed characters are 0–9.
3.7.2 Edit Guards (Edit Guard Channel) Menu (-070 only)
Edit Menu...
Edit Guards?
The Edit Guards menu is a sub-menu of the Channel Menu.
Allows editing of the guard channels' parameters. The channel being edited can be changed at any time
using the GD1 / GD2 switch. Guard Channels are always locked, and can only be edited if the master edit
mode is on.
The guard receiver continues to operate with the original settings until the field is saved and normal
operating mode is entered.
All fields are the same as for the main channels except that no zones may be selected and channel labels
are not editable.
3.7.3 Edit Zone Menu
Edit Menu...
Edit Zone?
The Edit Zone menu is a sub-menu of the Channel Menu.
The Edit Zone menu allows the zone feature to be turned on or off, allows editing of the zone's name, and
allows review and selection of the channels that belong to a zone. There are 16 zones. A channel may
belong to all zones, one of the 16 zones or to no zone. When a zone is selected only the channels
assigned to that zone and to all zones are displayed.
3.7.3.1 Turn Zones on and off.
Use Zones: Off, On
Zones may be turned on or off from this field. In normal operating mode, when zones are off, all channels
may be selected and the zone display is not shown.
Section 3 Rev: 1.00 Issue 4 Page 3-15
ENG-FORM: 806-0114.DOT
CONFIDENTIAL AND PROPRIETARY TO NORTHERN AIR BORNE TECHNOLOGY LTD.
Page 42

NPX136D Series Panel Mount P25 VHF Transceiver
SM68 Installation and Operation Manual
3.7.3.2 Edit Zone
Edit Zone: 01-16
Name:XXXXXXXXXX
The edit zone menu is shown when zones are turned on. The edit zone menu allows changing the name
of the current zone. Use the up and down arrow buttons to select a different zone. The All Channels zone
name may not be changed.
3.7.3.3 Zone List
Zone All, 01-16 [List]:
123 Chan Name
The zone list field shows the channels assigned to each zone.
Use the CHAN switch or ► and ◄ arrows to show channels currently in the zone. Use the up and down
arrow buttons to select different zones. Use the DEL button to remove a channel from a zone. To add a
channel to the zone press the ADD button, scroll to the desired channel and press Enter.
3.7.4 Edit Scan Menu
The Edit Scan menu is a sub-menu of the Channel Menu. From the Edit Scan menu the operator may
select the scan mode, select the channel numbers used for priority scanning and add or delete channels
from scan list. For details on scanning see section 3.10.
3.7.4.1 Scan Mode
Scan Menu...
Scan Mode: List, Pri, L+P
The scan mode may be set to scan the list channels (List), the priority channel (Pri), or both (L+P).
3.7.4.1.1 Priority Channel
Scan Menu...
Pri 1 Chan: 001 – 255, ---
The priority channel is set from this menu field. Set to --- to disable (no priority channel).
3.7.4.1.2 Scan List Review/Edit
Review Scan List
001 Forestry
The scan list channels are selected from this menu. There may be up to 14 channels in the scan list.
Use the CHAN +/- switch or the ► and ◄ keys to scroll through the channels in the scan list. Press the
DEL button to remove the displayed channel from the scan list. Press the ADD button to enter Scan List
Add mode. Use the CHAN +/- switch to scroll to the channel required in the scan list, and press the Enter
button.
Note: Before returning to normal operating mode, the messages Loading P1... and Loading
List... are displayed if changes have been made to the priority or list channels.
Section 3 Rev: 1.00 Issue 4 Page 3-16
ENG-FORM: 806-0114.DOT
CONFIDENTIAL AND PROPRIETARY TO NORTHERN AIR BORNE TECHNOLOGY LTD.
Page 43

NPX136D Series Panel Mount P25 VHF Transceiver
SM68 Installation and Operation Manual
3.8 Maintenance Menu
3.8.1 Master Edit Mode
Enter the master edit password to be allowed to edit locked channels or channel numbers. Master Edit
menu is not shown when the agile edit jumper is installed or when master edit mode is turned on.
Maint. Menu...
Mstr Edit Mode?
Mstr Edit Mode
Password: ___
At the prompt, enter the master edit password "NAT" to turn master edit mode on. Master Edit Mode
flashes three times, and then the main edit menu is shown.
When master edit mode is on, each time main edit or guard edit is entered the Master Edit Mode
message is flashed three times.
If master edit mode is on, the master edit menu is not shown in the maintenance menu.
To exit master edit mode, turn the NPX136D off and then on.
3.8.2 Configuration Menu
Note: Incorrect use of this mode may render the NPX136D INOPERABLE! Use this function with
extreme care.
Maint. Menu
Config Menu?
The configuration menu allows setting of NPX136D parameters that should only be carried out by
qualified technicians or experienced operators.
Config Menu...
Password:___
At the prompt, enter the configuration password to edit the configuration information. Refer to the
Maintenance section of the Service Manual for the configuration password.
To enter this mode requires a special code, and should be USED ONLY AT THE FACTORY OR BY
QUALIFIED SERVICE PERSONNEL. It is possible to completely DISABLE the NPX136D by incorrect
settings in this mode, so considerable care is required.
Config Menu...
User ID: 0000001 - 9999999
Enter the User ID of the NPX136D. This field sets the NPX136D's ID number when transmitting with
digital modulation. The NPX136D's default setting for the user ID is 0000001. Consult authorized
personnel for the correct code number if needed.
Section 3 Rev: 1.00 Issue 4 Page 3-17
ENG-FORM: 806-0114.DOT
CONFIDENTIAL AND PROPRIETARY TO NORTHERN AIR BORNE TECHNOLOGY LTD.
Page 44

NPX136D Series Panel Mount P25 VHF Transceiver
3.8.2.2 Test Menu
SM68 Installation and Operation Manual
Config Menu...
Test Menu?
Refer to the NPX136D Alignment Procedure for instructions on using the tests accessed from the test
menu.
3.8.2.2.1 Switch Test
Test Menu...
Switch Test?
The lower display shows the number of the switch being operated and the action or value of the switch.
Press and hold the Esc button for 5 seconds to exit the test.
F/P Switch Test
Press a key...
3.8.2.2.2 Display Test.
Test Menu...
Display Test?
The display's characters are cycled between three states: All odd pixels on, all even pixels on, and all
characters displayed as the pound sign #.
3.8.2.2.3 RF PA Power Input Test.
Test Menu...
Pwr Input Test?
The main module's transmit power may be set to 1 W to test the RF PA subassembly's power input
protection circuit.
3.8.2.3 Noise Squelch Settings Display Menu
Config Menu...
Display Sq: On, Off
This configuration field controls display of the noise squelch field in the settings menu.
3.8.2.4 Guard Module Enable
Config Menu...
Gd Enable: Off, On
The guard receiver may be enabled or disabled from this field. After this field is changed, the NPX136D
must be turned off and then on again before the new setting will take effect.
Note: For the –000 model, this field must be set to 'Off'. When the guard module is not installed and
'Guard Enable' is set to 'Off', this field will not be shown.
3.8.2.5 Guard Receiver Volume
Config Menu...
Gd Vol Min: 00 - 64
The minimum volume allowed for the guard receiver can be adjusted from 00 (off) to 64 (max). Only shown when
the guard receiver is enabled.
Section 3 Rev: 1.00 Issue 4 Page 3-18
ENG-FORM: 806-0114.DOT
CONFIDENTIAL AND PROPRIETARY TO NORTHERN AIR BORNE TECHNOLOGY LTD.
Page 45

NPX136D Series Panel Mount P25 VHF Transceiver
SM68 Installation and Operation Manual
3.8.2.6 Sidetone Volume
Config Menu...
Sidetone Vol: 00 - 64
The level of the sidetone volume can be adjusted from 00 (off) to 64 (max).
3.8.2.7 Transmit Time-out Timer
Config Menu...
Tx Time-out: 30,60...300
The transmit time-out timer sets the duration, in seconds, for which the transmitter is allowed to transmit.
3.8.2.8 Priority Scan Period
Config Menu...
Pri Scan: 1, 2, 3
When priority scanning, and stopped on a list channel, the period (in seconds) at which the priority
channel is checked for a valid RF signal.
3.8.2.9 Number of Channels
Config Menu...
Num of Chans: 032 - 255
The number of channels available on the main transceiver may be set from 32 to 255. Only the available
channels, as set from this field, are written during data transfer.
3.8.3 Data Transfer Menu
Allows copying of channel and configuration data from the source transceiver to the destination
transceiver over a data transfer cable connected to another NPX136D.
To use this feature connect the data transfer cable to a +28 Vdc power supply. Connect one of the cable's
25-pin dmin connectors to the source transceiver's J1 connector and the cable's other 25-pin dmin
connector to the destination transceiver's J1 connector.
Turn on both transceivers. Leave the destination transceiver in the help screen. On the source
transceiver, enter the Data Transfer mode from the maintenance menu.
When Data Xfer? is shown, data transfer starts immediately after the Enter button is pressed. The
destination transceiver screen will change to display the messages shown below in response to the
messages displayed on the source transceiver.
Source Transceiver Destination Transceiver
Maint. Menu: Help=Instruction
Data Xfer? Enter=Operation
Source Xcvr -–-> --->Destination
Connecting... Connecting...
Connected Connected
Writing XXX Reading...
Finished Writing
Please Press Esc
On the destination transceiver, turn the transceiver off and then on to exit data transfer mode.
Finished Reading
Please restart
Section 3 Rev: 1.00 Issue 4 Page 3-19
ENG-FORM: 806-0114.DOT
CONFIDENTIAL AND PROPRIETARY TO NORTHERN AIR BORNE TECHNOLOGY LTD.
Page 46

NPX136D Series Panel Mount P25 VHF Transceiver
SM68 Installation and Operation Manual
3.8.4 Software Version
Maint. Menu...
Show Version?
Press Enter to view the revision and date of the NPX136D's MCU application, and the Build Date of the
software in the Main and Guard Modules.
3.9 Function Mode (Fn)
The Fn button is used to provide quick access to often used functions. Pressing Fn from normal operating
mode displays the first available function. Subsequent presses will advance to the next function.
Currently, there is only one direct function option available: The CALL Menu. Press the Fn button to enter
the call menu. The call menu is only available for analog channels on the main transceiver.
When entering a number or name, the ► and ◄ buttons move the editing cursor left and right, the up
arrow ▲ inserts a space in the number and the down arrow ▼deletes a single number or character.
3.9.1 Call Menu for Analog Channels.
The analog call menu allows DTMF sequences to be transmitted. The DTMF sequences may be added as
new (New Number?), redialled from previously transmitted sequences (Redial Number?) or recalled from
the memory (Find Number?). Twelve DTMF numbers are supported: 0-9,*,#. Spaces may also be included
in the sequence. Each space will add a delay of approximately 350 ms to the sequence.
3.9.1.1 New Number
Analog Call...
New Number?
Press Enter to select the new number menu.
New Number...
123456789
Press the numbers 0-9, ½, # required for the new number.
Press Enter to advance to the next screen
Fn = Send
ADD = Save
Press Fn to transmit the DTMF sequence and be returned to the Analog Call menu.
Calling...
123456789
Press ADD to store the number in the next available memory location and then be prompted to enter a
name.
Edit Number
M01:
If required edit the number.
Press Menu to enter the name.
Section 3 Rev: 1.00 Issue 4 Page 3-20
ENG-FORM: 806-0114.DOT
CONFIDENTIAL AND PROPRIETARY TO NORTHERN AIR BORNE TECHNOLOGY LTD.
Page 47

NPX136D Series Panel Mount P25 VHF Transceiver
SM68 Installation and Operation Manual
Edit Number
Name:
Press the number buttons to enter a name.
Press Menu to edit the number
Press Esc when done.
Ten DTMF sequences may be stored in memory locations M01 – M10. When every memory location
conta
ins a DTMF sequence, the List is Full! message is displayed when attempting to add a
number.
3.9.1.2 DTMF Redial
Analog Call
Redial Number?
The NPX136D stores the last ten transmitted DTMF sequences in a redial memory. To select the redial
number menu, press Enter.
Redial Number
R01: 123456789
Use the up and down arrows to find the required previously sent number. If no sequence has been
transmitted, the message <Empty List> is shown.
Press Enter to advance to the next screen
Fn = Send
ADD = Save
Press Fn to transmit the DTMF sequence and be returned to the Analog Call menu.
Calling...
Press ADD to store the number in the next available memory location and then be prompted to enter a name.
Edit Number
M01:
3.9.1.3 DTMF Recall Preset Numbers
Analog Call
Find Number?
Press Enter to select the find number menu.
Find Number
M01: 123456789
Press the up and down arrows to scroll through the numbers.
Name: ABCDE
Press the DISP + / - switch to toggle between the name and the number.
Press Enter to advance to the next screen.
Enter = Edit, Fn = Send, DEL = Delete
Section 3 Rev: 1.00 Issue 4 Page 3-21
ENG-FORM: 806-0114.DOT
CONFIDENTIAL AND PROPRIETARY TO NORTHERN AIR BORNE TECHNOLOGY LTD.
Page 48

NPX136D Series Panel Mount P25 VHF Transceiver
SM68 Installation and Operation Manual
Press Fn to transmit the DTMF sequence and be returned to the Analog Call menu.
Calling...
Press Enter to edit the number and name.
Press Menu to toggle between the name and the number.
Edit Number
123456789
Edit Number
Name:
3.9.2 Call Menu for Digital Channels
There is no call menu implemented for digital channels.
3.10 Scanning
Turn scan mode on by putting the SCAN / NORM / GD TX switch in the SCAN position. The lower display
will briefly show Enabling List... and then XXX SCANNING, where XXX is the current scan mode:
LIST, PRI or L+P. The scan mode, and list and priority channels are set from the edit scan menu (section
3.7.4).
To turn scan mode off put the SCAN / NORM / GD TX switch in the NORM position.
When the SCAN / NORM / GD TX switch is placed in the SCAN position all other modes of operation are
cancelled and the NPX136D starts scanning.
The NPX136D can scan up to 16 channels. This includes 14 list channels, 1 priority channel and the
home channel.
The home channel is the current channel, shown when scanning is turned on.
When list scanning, the NPX136D checks for an RF signal on the list channels and the home channel.
When an RF signal is detected which meets the channel's squelch requirements, the NPX136D stops on
that channel until there is no receive or transmit for 5 seconds, and then scanning is started.
When priority scanning the NPX136D checks for an RF signal on the priority channel and the home
channel. If an RF signal is detected on the home channel the NPX136D checks the priority channel for an
RF signal once every three seconds. To check for a priority channel the NPX136D must retune the main
receiver to the priority channel. The main receive audio is muted during this check. There is no priority
scanning for 5 seconds after transmitting.
When list and priority scanning, the priority channel is added to the list channels and when the NPX136D
stops on a home or list channel the priority channel is checked for an RF signal the same as when priority
scanning.
Note that the selected zone has no effect on scanning. Channels that are not in the current zone but are
still in the scan list are still checked for carrier when scanning.
When the NPX136D is stopped on a list channel, the list channel may be temporarily removed from the
scan list by pressing the DEL button or CHAN – switch. To re-enable these channels, scanning is turned
off and then on.
Section 3 Rev: 1.00 Issue 4 Page 3-22
ENG-FORM: 806-0114.DOT
CONFIDENTIAL AND PROPRIETARY TO NORTHERN AIR BORNE TECHNOLOGY LTD.
Page 49

NPX136D Series Panel Mount P25 VHF Transceiver
SM68 Installation and Operation Manual
3.11 CTCSS and CDCSS Tone Lists
3.11.1 CTCSS Tones
Displayed
Tone
Frequency
Displayed
Frequency
Motorola
Code
67.0 Hz 067 XZ
69.3 Hz 069 WZ
71.9 Hz 071 XA
74.4 Hz 074 WA
77.0 Hz 077 XB
79.7 Hz 079 WB
82.5 Hz 082 YZ
85.4 Hz 085 YA
88.5 Hz 088 YB
91.5 Hz 091 ZZ
94.8 Hz 094 ZA
97.4 Hz 097 ZB
100.0 Hz 100 1Z
103.5 Hz 103 1A
107.2 Hz 107 1B
110.9 Hz 110 2Z
114.8 Hz 114 2A
118.8 Hz 118 2B
123.0 Hz 123 3Z
127.3 Hz 127 3A
131.8 Hz 131 3B
Tone
Frequency
136.5 Hz 136 4Z
141.3 Hz 141 4A
146.2 Hz 146 4B
151.4 Hz 151 5Z
156.7 Hz 156 5A
162.2 Hz 162 5B
167.9 Hz 167 6Z
173.8 Hz 173 6A
179.9 Hz 179 6B
186.2 Hz 186 7Z
192.8 Hz 192 7A
203.5 Hz 203 M1
206.5 Hz 206 8Z
210.7 Hz 210 M2
218.1 Hz 218 M3
225.7 Hz 225 M4
229.1 Hz 229 9Z
233.6 Hz 233 M5
241.8 Hz 241 M6
250.3 Hz 250 M7
254.8 Hz 254 0Z
Displayed
Frequency
Displayed
Motorola
Code
3.11.2 CDCSS Tone Codes
023 114 205 306 411 503 606 703
025 115 223 311 412 506 612 712
026 116 226 315 413 516 624 723
031 125 243 331 423 532 627 731
032 131 244 343 431 546 631 732
043 132 245 346 432 565 632 734
047 134 251 351 445 654 743
051 143 261 364 464 662 754
054 152 263 365 465 664
065 155 265 371 466
071 156 271
072 162
073 165
074 172
174
Section 3 Rev: 1.00 Issue 4 Page 3-23
ENG-FORM: 806-0114.DOT
CONFIDENTIAL AND PROPRIETARY TO NORTHERN AIR BORNE TECHNOLOGY LTD.
Page 50

NPX136D Series Panel Mount P25 VHF Transceiver
SM68 Installation and Operation Manual
3.12 Error Messages
Error Message Problem Description
STOP MODULE COM ERROR XX
(MN, GD, MN+GD
Failed Communication with the main and/or guard transceiver
module at power up.
STOP: EEPROM ERR REQUIRES
SERVICE
MODULE COM ERROR
RESETTING
Pri List Empty!
Release Scan Key
Scan List Empty!
Release Scan Key
Failed memory test at power up
Failed Communication with the main or guard transceiver after
power up.
No priority channel set when priority scanning turned on.
No list channel set when list scanning turned on.
Section 3 ends
Section 3 Rev: 1.00 Issue 4 Page 3-24
ENG-FORM: 806-0114.DOT
CONFIDENTIAL AND PROPRIETARY TO NORTHERN AIR BORNE TECHNOLOGY LTD.
 Loading...