

Page 1

Nortel Secure Network Access Switch Software Release 1.6.1
Installing and Using Security and Routing Element Manager (SREM)
NN47230-301 (320199-D)
.
Page 2

Document status: Standard
Document version: 02.01
Document date: 16 July 2007
Copyright © 2007, Nortel Networks
All Rights Reserved.
The information in this document is subject to change without notice. The statements, configurations, technical
data, and recommendations in this document are believed to be accurate and reliable, but are presented without
express or implied warranty. Users must take full responsibility for their applications of any products specified in this
document. The information in this document is proprietary to Nortel Networks Inc.
The software described in this document is furnished under a license agreement and may be used only in accordance
with the terms of that license. The software license agreement is included in this document.
Trademarks
*Nortel, Nortel Networks, the Nortel logo, the Globemark, Passport, BayStack, and Contivity are trademarks of
Nortel Networks.
All other products or services may be trademarks or registered trademarks of their respective owners.
The asterisk after a name denotes a trademarked item.
Restricted rights legend
Use, duplication, or disclosure by the United States Government is subject to restrictions as set forth in subparagraph
(c)(1)(ii) of the Rights in Technical Data and Computer Software clause at DFARS 252.227-7013.
Notwithstanding any other license agreement that may pertain to, or accompany the delivery of, this computer
software, the rights of the United States Government regarding its use, reproduction, and disclosure are as set forth
in the Commercial Computer Software-Restricted Rights clause at FAR 52.227-19.
Export
This product, software and related technology is subject to U.S. export control and may be subject to export or import
regulations in other countries. Purchaser must strictly comply with all such laws and regulations. A license to export
or reexport may be required by the U.S. Department of Commerce.
Statement of conditions
In the interest of improving internal design, operational function, and/or reliability, Nortel Networks Inc. reserves the
right to make changes to the products described in this document without notice.
Nortel Networks Inc. does not assume any liability that may occur due to the use or application of the product(s) or
circuit layout(s) described herein.
Portions of the code in this software product may be Copyright © 1988, Regents of the University of California. All
rights reserved. Redistribution and use in source and binary forms of such portions are permitted, provided that the
above copyright notice and this paragraph are duplicated in all such forms and that any documentation, advertising
materials, and other materials related to such distribution and use acknowledge that such portions of the software
were developed by the University of California, Berkeley. The name of the University may not be used to endorse or
promote products derived from such portions of the software without specific prior written permission.
SUCH PORTIONS OF THE SOFTWARE ARE PROVIDED "AS IS" AND WITHOUT ANY EXPRESS OR IMPLIED
WARRANTIES, INCLUDING, WITHOUT LIMITATION,THE IMPLIED WARRANTIES OF MERCHANTABILITY AND
FITNESS FOR A PARTICULAR PURPOSE.
In addition, the program and information contained herein are licensed only pursuant to a license agreement that
contains restrictions on use and disclosure (that may incorporate by reference certain limitations and notices
imposed by third parties).
Page 3

Licensing
This product includes software developed by the OpenSSL Project for use in the OpenSSL Toolkit
ttp://www.openssl.org/).
(h
This product includes cryptographic software written by Eric Young (eay@cryptsoft.com).
This product includes software written by Tim Hudson (tjh@cryptsoft.com).
This product includes software developed by the Apache Software Foundation (h
This product includes a TAP-Win32 driver derived from the CIPE-Win32 kernel driver, Copyright © Damion K. Wilson,
and is licensed under the GPL.
Portions of the TunnelGuard code include software licensed from The Legion of the Bouncy Castle.
ttp://www.apache.org/).
Nortel Networks Inc. software license agreement
This Software License Agreement ("License Agreement") is between you, the end-user ("Customer") and Nortel
Networks Corporation and its subsidiaries and affiliates ("Nortel Networks"). PLEASE READ THE FOLLOWING
CAREFULLY. YOU MUST ACCEPT THESE LICENSE TERMS IN ORDER TO DOWNLOAD AND/OR USE THE
SOFTWARE. USE OF THE SOFTWARE CONSTITUTES YOUR ACCEPTANCE OF THIS LICENSE AGREEMENT.
If you do not accept these terms and conditions, return the Software, unused and in the original shipping container,
within 30 days of purchase to obtain a credit for the full purchase price.
"Software" is owned or licensed by Nortel Networks, its parent or one of its subsidiaries or affiliates, and is
copyrighted and licensed, not sold. Software consists of machine-readable instructions, its components, data,
audio-visual content (such as images, text, recordings or pictures) and related licensed materials including all whole
or partial copies. Nortel Networks grants you a license to use the Software only in the country where you acquired the
Software. You obtain no rights other than those granted to you under this License Agreement. You are responsible for
the selection of the Software and for the installation of, use of, and results obtained from the Software.
Licensed Use of Software. Nortel Networks grants Customer a nonexclusive license to use a copy of the
1.
Software on only one machine at any one time or to the extent of the activation or authorized usage level,
whichever is applicable. To the extent Software is furnished for use with designated hardware or Customer
furnished equipment ("CFE"), Customer is granted a nonexclusive license to use Software only on such
hardware or CFE, as applicable. Software contains trade secrets and Customer agrees to treat Software as
confidential information using the same care and discretion Customer uses with its own similar information that it
does not wish to disclose, publish or disseminate. Customer will ensure that anyone who uses the Software
does so only in compliance with the terms of this Agreement. Customer shall not a) use, copy, modify,transferor
distribute the Software except as expressly authorized; b) reverse assemble, reverse compile, reverse engineer
or otherwise translate the Software; c) create derivative works or modifications unless expressly authorized; or d)
sublicense, rent or lease the Software. Licensors of intellectual property to Nortel Networks are beneficiaries of
this provision. Upon termination or breach of the license by Customer or in the event designated hardware or
CFE is no longer in use, Customer will promptly return the Software to Nortel Networks or certify its destruction.
Nortel Networks may audit by remote polling or other reasonable means to determine Customer’s Software
activation or usage levels. If suppliers of third party software included in Software require Nortel Networks to
include additional or different terms, Customer agrees to abide by such terms provided by Nortel Networks
with respect to such third party software.
2. Warranty. Except as may be otherwise expressly agreed to in writing between Nortel Networks and Customer,
Software is provided "AS IS" without any warranties (conditions) of any kind. NORTEL NETWORKS DISCLAIMS
ALL WARRANTIES (CONDITIONS) FOR THE SOFTWARE, EITHER EXPRESS OR IMPLIED, INCLUDING,
BUT NOT LIMITED TO THE IMPLIED WARRANTIES OF MERCHANTABILITY AND FITNESS FOR A
PARTICULAR PURPOSE AND ANY WARRANTY OF NON-INFRINGEMENT. Nortel Networks is not obligated
to provide support of any kind for the Software. Some jurisdictions do not allow exclusion of implied warranties,
and, in such event, the above exclusions may not apply.
3. Limitation of Remedies. IN NO EVENT SHALL NORTEL NETWORKS OR ITS AGENTS OR SUPPLIERS BE
LIABLE FOR ANY OF THE FOLLOWING: a) DAMAGES BASED ON ANY THIRD PARTY CLAIM; b) LOSS
OF, OR DAMAGE TO, CUSTOMER’S RECORDS, FILES OR DATA; OR c) DIRECT, INDIRECT, SPECIAL,
INCIDENTAL, PUNITIVE, OR CONSEQUENTIAL DAMAGES (INCLUDING LOST PROFITS OR SAVINGS),
WHETHER IN CONTRACT, TORT OR OTHERWISE (INCLUDING NEGLIGENCE) ARISING OUT OF YOUR
USE OF THE SOFTWARE, EVEN IF NORTEL NETWORKS, ITS AGENTS OR SUPPLIERS HAVE BEEN
Page 4

ADVISED OF THEIR POSSIBILITY. The foregoing limitations of remedies also apply to any developer and/or
supplier of the Software. Such developer and/or supplier is an intended beneficiary of this Section. Some
jurisdictions do not allow these limitations or exclusions and, in such event, they may not apply.
General
4.
a. If Customer is the United States Government, the following paragraph shall apply: All Nortel Networks
Software available under this License Agreement is commercial computer software and commercial
computer software documentation and, in the event Software is licensed for or on behalf of the United States
Government, the respective rights to the software and software documentation are governed by Nortel
Networks standard commercial license in accordance with U.S. Federal Regulations at 48 C.F.R. Sections
12.212 (for non-DoD entities) and 48 C.F.R. 227.7202 (for DoD entities).
b. Customer may terminate the license at any time. Nortel Networks may terminate the license if Customer
fails to comply with the terms and conditions of this license. In either event, upon termination, Customer
must either return the Software to Nortel Networks or certify its destruction.
c. Customer is responsible for payment of any taxes, including personal property taxes, resulting from
Customer’s use of the Software. Customer agrees to comply with all applicable laws including all applicable
export and import laws and regulations.
d. Neither party may bring an action, regardless of form, more than two years after the cause of the action
arose.
e. The terms and conditions of this License Agreement form the complete and exclusive agreement between
Customer and Nortel Networks.
f. This License Agreement is governed by the laws of the country in which Customer acquires the Software.
If the Software is acquired in the United States, then this License Agreement is governed by the laws of
the state of New York.
Page 5

Contents
Preface 9
Before you begin 9
Text conventions 10
Related information 11
How to get help 12
Chapter 1 Installing SREM 15
SREM installation precautions 15
System requirements 16
Removing previous versions of SREM 16
Installing SREM on your system 21
Chapter 2 SREM Screen Descriptions 27
SREM window areas 27
Indicator icons 33
Screen icons 34
Right-click menu 35
5
Publications 11
Online 12
Accessing the uninstall application 17
Uninstalling SREM 17
Menus 29
Toolbar items 32
Chapter 3 Using SREM 37
Accessing the SREM software 37
Opening SREM 38
Quitting SREM 38
Viewing SREM online help 38
Configuring SREM settings 40
Managing network access devices from the SREM 41
Adding a new network access device 42
Deleting a network access device 44
Grouping network access devices in SREM 44
Modifying network information 46
Nortel Secure Network Access Switch Software Release 1.6.1
Installing and Using Security and Routing Element Manager (SREM)
Copyright © 2007, Nortel Networks
.
NN47230-301 02.01 Standard
1.6.1 16 July 2007
Page 6

6 Contents
Logging into a network access device 46
Saving a network configuration 47
Opening a network configuration 47
Changing information within the SREM 48
Cutting, copying, and pasting data between devices 49
Changing field values in the SREM 50
Managing changes within the SREM 50
Applying and saving individual changes 50
Applying and saving groups of changes 51
Managing logs and statistics within the SREM 52
Using the Log Browser tool 54
Index 57
Figures
Figure 1 Introduction 18
Figure 2 Uninstall Options 19
Figure 3 Choose Product Features 20
Figure 4 Uninstall Complete 21
Figure 5 InstallAnywhere 21
Figure 6 Introduction 22
Figure 7 Close all running instances of Security and Routing Element
Manager 22
Figure 8 Choose Install Folder 23
Figure 9 Choose Shortcut Folder 24
Figure 10 Launching uninstaller 24
Figure 11 Pre-Installation Summary 25
Figure 12 Install Complete 26
Figure 13 Main SREM screen 28
Figure 14 SREM toolbar 32
Figure 15 Change Manager tab 34
Figure 16 Statistics Manager tab 35
Figure 17 Right-click menu example 35
Figure 18 SREM online help 39
Figure 19 Options dialog box 40
Figure 20 New Device screen 43
Figure 21 Right-click menu 45
Figure 22 New Sub Network dialog box 45
Figure 23 Save dialog box 47
Figure 24 Open dialog box 48
Figure 25 Right-click menu 49
Figure 26 Paste As dialog box 49
Figure 27 Change Manager tab 52
Figure 28 Statistics Manager tab 53
Figure 29 Log Browser 54
Figure 30 Retrieval Criteria — Definition View 55
Figure 31 Retrieval Criteria — Summary View 56
Tables
Table 1 SREM Descriptions 27
Nortel Secure Network Access Switch Software Release 1.6.1
Installing and Using Security and Routing Element Manager (SREM)
Copyright © 2007, Nortel Networks
.
NN47230-301 02.01 Standard
1.6.1 16 July 2007
Page 7

Table 2 Main SREM window 27
Table 3 File menu 29
Table 4 Edit menu 30
Table 5 View menu 30
Table 6 Tools menu 31
Table 7 Window menu 31
Table 8 Help menu 32
Table 9 Toolbar items 32
Table 10 Indicator icons 33
Table 11 Screen icons 34
Table 12 Right-click menu options 36
Table 13 Online help icons 39
Table 14 SREM Options 41
Table 15 New Device fields 43
Table 16 SREM Options 52
Contents 7
Nortel Secure Network Access Switch Software Release 1.6.1
Installing and Using Security and Routing Element Manager (SREM)
Copyright © 2007, Nortel Networks
.
NN47230-301 02.01 Standard
1.6.1 16 July 2007
Page 8

8 Contents
Nortel Secure Network Access Switch Software Release 1.6.1
Installing and Using Security and Routing Element Manager (SREM)
Copyright © 2007, Nortel Networks
.
NN47230-301 02.01 Standard
1.6.1 16 July 2007
Page 9

Preface
This document provides generic instructions for installing and using the
Security & Routing Element Manager (SREM) software.
Security & Routing Element Manager (SREM) is a graphical user
interface (GUI) that runs in an online, interactive mode. SREM allows the
management of multiple devices (for example, the Nortel SNAS 4050) from
one application. To use SREM, you must have network connectivity to a
management station running SREM in one of the supported environments.
Before you begin
This guide is intended for network administrators who have the following
background:
•
basic knowledge of networks, Ethernet bridging, and IP routing
•
familiarity with networking concepts and terminology
•
experience with windowing systems or GUIs
9
• basic knowledge of network topologies
Before using this guide, you must complete the following procedures. For a
new switch:
Step Action
1
2
3
Nortel Secure Network Access Switch Software Release 1.6.1
Installing and Using Security and Routing Element Manager (SREM)
Copyright © 2007, Nortel Networks
.
Install the switch.
For installation instructions, see Nortel Secure Network Access
Switch 4050 Installation Guide (320846-A).
Connect the switch to the network.
For more information, see Nortel Secure Network Access Solution
Guide (320817-A).
Complete the basic switch configuration using CLI commands.
For more information, see Nortel Secure Network Access Switch
4050 User Guide (320818-A).
NN47230-301 02.01 Standard
1.6.1 16 July 2007
Page 10

10 Preface
Text conventions
This guide uses the following text conventions:
angle brackets (< >) Enter text based on the description inside the brackets.
—End—
Do not type the brackets when entering the command.
Example: If the command syntax is
ping <ip_address>, you enter
ping 192.32.10.12
bold body text
Objects such as window names, dialog box names,
and icons, as well as user interface objects such as
buttons, tabs, and menu items.
bold Courier
text
Command names, options, and text that you must
enter.
Example: Use the dinfo command.
Example: Enter show ip {alerts|routes}.
braces ({}) Required elements in syntax descriptions where there
is more than one option. You must choose only one
of the options. Do not type the braces when entering
the command.
Example: If the command syntax is
show ip {alerts|routes}, you must enter either
show ip alerts or show ip routes, but not
both.
brackets ([ ]) Optional elements in syntax descriptions. Do not type
the brackets when entering the command.
ellipsis points (. . . ) Repeat the last element of the command as needed.
Nortel Secure Network Access Switch Software Release 1.6.1
Installing and Using Security and Routing Element Manager (SREM)
Copyright © 2007, Nortel Networks
.
Example: If the command syntax is
show ip interfaces [-alerts], you can enter
either show ip interfaces or
show ip interfaces -alerts.
Example: If the command syntax is
ethernet/2/1 [<parameter> <value>]... ,
you enter ethernet/2/1 and as many
parameter-value pairs as needed.
NN47230-301 02.01 Standard
1.6.1 16 July 2007
Page 11

Related information 11
italic text Variables in command syntax descriptions. Also
indicates new terms and book titles. Where a variable
is two or more words, the words are connected by an
underscore.
Example: If the command syntax is
show at <valid_route>,
valid_route is one variable and you substitute one
value for it.
plain Courier
text
separator ( > ) Menu paths.
vertical line ( | ) Options for command keywords and arguments. Enter
Command syntax and system output, for example,
prompts and system messages.
Example: Set Trap Monitor Filters
Example: Protocols > IP identifies the IP command
on the Protocols menu.
only one of the options. Do not type the vertical line
when entering the command.
Related information
This section lists information sources that relate to this document.
Publications
Refer to the following publications for information on the Nortel SNA solution:
•
Nortel Secure Network Access Solution Guide (320817-A)
•
Nortel Secure Network Access Switch 4050 Installation Guide
(320846-A)
• Nortel Secure Network Access Switch 4050 User Guide (320818-A)
•
Installing and Using the Security & Routing Element Manager (SREM)
(320199-B)
•
Release Notes for Nortel Ethernet Routing Switch 5500 Series, Software
Release 4.3 (217468-B)
•
Release Notes for the Ethernet Routing Switch 8300, Software Release
2.2.8 (316811-E)
Example: If the command syntax is
show ip {alerts|routes}, you enter either
show ip alerts or show ip routes, but not
both.
Nortel Secure Network Access Switch Software Release 1.6.1
Installing and Using Security and Routing Element Manager (SREM)
Copyright © 2007, Nortel Networks
.
NN47230-301 02.01 Standard
1.6.1 16 July 2007
Page 12

12 Preface
Online
•
Release Notes for the Nortel Secure Network Access Solution, Software
Release 1.0 (320850-A)
•
Release Notes for Enterprise Switch Manager (ESM), Software Release
5.1 (209960-H)
• Using Enterprise Switch Manager Release 5.1 (208963-F)
To access Nortel technical documentation online, go to the Nortel web site:
www
nortel.com/support
.
You can download current versions of technical documentation. To locate
documents, browse by category or search using the product name or
number.
You can print the technical manuals and release notes free, directly from
the Internet. Use Adobe* Reader* to open the manuals and release notes,
search for the sections you need, and print them on most standard printers.
Go to the Adobe Systems site at w
ww.adobe.com to download a free copy
of Adobe Reader.
How to get help
If you purchased a service contract for your Nortel product from a distributor
or authorized reseller, contact the technical support staff for that distributor
or reseller for assistance.
If you purchased a Nortel service program, use the w
web page to locate information to contact Nortel for assistance:
•
•
An Express Routing Code (ERC) is available for many Nortel products and
services. When you use an ERC, your call is routed to a technical support
person who specializes in supporting that product or service. To locate the
ERC for your product or service, go to the w
and follow these links:
Step Action
1
ww.nortel.com/help
To obtain Nortel Technical Support contact information, click the
CONTACT US link on the left side of the page.
To call a Nortel Technical Solutions Center for assistance, click the
CALL US link on the left side of the page to find the telephone number
for your region.
ww.nortel.com/help web page
Click CONTACT US on the left side of the HELP web page.
2
Nortel Secure Network Access Switch Software Release 1.6.1
Installing and Using Security and Routing Element Manager (SREM)
Copyright © 2007, Nortel Networks
.
Click Technical Support on the CONTACT US web page.
NN47230-301 02.01 Standard
1.6.1 16 July 2007
Page 13

How to get help 13
3
Click Express Routing Codes on the TECHNICAL SUPPORT
web page.
—End—
Nortel Secure Network Access Switch Software Release 1.6.1
Installing and Using Security and Routing Element Manager (SREM)
Copyright © 2007, Nortel Networks
.
NN47230-301 02.01 Standard
1.6.1 16 July 2007
Page 14

14 Preface
Nortel Secure Network Access Switch Software Release 1.6.1
Installing and Using Security and Routing Element Manager (SREM)
Copyright © 2007, Nortel Networks
.
NN47230-301 02.01 Standard
1.6.1 16 July 2007
Page 15

Chapter 1
Installing SREM
The Security & Router Element Manager (SREM) is a graphical user
interface that allows users to configure and monitor a variety of devices,
including the Nortel Secure Network Access Switch 4050 (Nortel SNAS
4050) and the Nortel Secure Router 6200 Series.
SREM runs in an online, interactive mode, and allows the management of
multiple devices from a single application.
This chapter includes the following topics:
Topic
"SREM installation precautions" (page 15)
"System requirements" (page 16)
"Removing previous versions of SREM" (page 16)
"Installing SREM on your system" (page 21)
15
•
"SREM installation precautions" (page 15)
•
"System requirements" (page 16)
•
"Removing previous versions of SREM" (page 16)
•
"Installing SREM on your system" (page 21)
SREM installation precautions
The following warnings apply to SREM on all operating environments:
•
If you have other Nortel devices in your network, and are running earlier
versions of SREM software, you must install the newest version of
SREM in order to access the switches running the latest software.
•
To maintain multiple versions of SREM on your system, choose a
different installation folder for each new version of SREM.
Nortel Secure Network Access Switch Software Release 1.6.1
Installing and Using Security and Routing Element Manager (SREM)
Copyright © 2007, Nortel Networks
.
NN47230-301 02.01 Standard
1.6.1 16 July 2007
Page 16

16 Chapter 1 Installing SREM
To replace an existing version of SREM, you must complete the uninstall
process first. The uninstall process is launched when:
— the SREM uninstall process is started manually (see "Accessing the
uninstall application" (page 17) "Accessing the uninstall application"
(page 17))
— the install folder selected during an SREM installation already
contains a version of the software
•
SREM saves the IP addresses that are visited to an encrypted network
configuration (.xvn) file. Uninstalling SREM does not remove this
settings file.
For details about creating a network configuration file, refer to "Saving
a network configuration" (page 47) "Saving a network configuration"
(page 47).
• The network configuration file containing IP addresses visited from a
previous SREM version is automatically used by a newly installed SREM
version. If you do not wish to use the existing network configuration
file, rename or delete the network configuration file before starting the
SREM.
System requirements
Before you install SREM, ensure that you have the current installation file
and that your system meets the following minimum requirements:
•
Java Runtime Environment 1.4.2_02 or later (w
• Win 2k, Win NT 4.0 or later, Windows XP
•
Hardware: P3 1.2 GHz or higher
•
Memory: 512 MB
•
Hard drive space: 72.5 MB
Removing previous versions of SREM
Removing previous versions of SREM is an optional process. Multiple
versions of SREM can exist on one system, as long as each version is
installed in a separate location. If you decide to allow previous versions of
SREM to remain, then you must choose a different folder to use during the
installation process.
For details about the Uninstall process, refer to "Uninstalling SREM" (page
17) "Uninstalling SREM" (page 17).
ww.java.com/)
Nortel Secure Network Access Switch Software Release 1.6.1
Installing and Using Security and Routing Element Manager (SREM)
Copyright © 2007, Nortel Networks
.
NN47230-301 02.01 Standard
1.6.1 16 July 2007
Page 17

Accessing the uninstall application
If you attempt to install SREM in a folder that already contains a version
of the software, then you are prompted to uninstall the existing version
automatically before completing the install process.
There are also two ways to access the SREM uninstall application manually:
•
"Using the Start Menu shortcut" (page 17)
•
"Using Windows Explorer" (page 17)
•
"Using the Start Menu shortcut" (page 17)
•
"Using Windows Explorer" (page 17)
Using the Start Menu shortcut
Remove existing versions of SREM software with the Uninstall Security
& Routing Element Manager option, created in the Windows Start menu
during installation.
For example, to remove SREM from a Windows XP system using the default
program group, choose the following option from the Windows Start menu:
All Programs > Nortel Networks Device Manager > Uninstall Security &
Routing Element Manager.
Removing previous versions of SREM 17
Using Windows Explorer
If no program group was added to the Windows Start menu during
installation, then complete the following steps to access the SREM uninstall
software:
Step Action
1
Navigate to the folder where the SREM software is installed using
Windows Explorer.
2
3
Open the Uninstall_Security & Routing Element Manager sub-folder.
Run the Uninstall Security & Routing Element Manager.exe file.
Note: If more than one version of SREM software is installed, be sure
that you select the correct software version to uninstall.
Uninstalling SREM
Use the following procedure to remove SREM from your system.
—End—
Nortel Secure Network Access Switch Software Release 1.6.1
Installing and Using Security and Routing Element Manager (SREM)
Copyright © 2007, Nortel Networks
.
NN47230-301 02.01 Standard
1.6.1 16 July 2007
Page 18
18 Chapter 1 Installing SREM
Step Action
1
Start the SREM uninstall application.
Note: The uninstall process can be started using steps
described in "Accessing the uninstall application" (page 17)
"Accessing the uninstall application" (page 17), or by attempting
to install SREM into a directory that contains an existing SREM
installation.
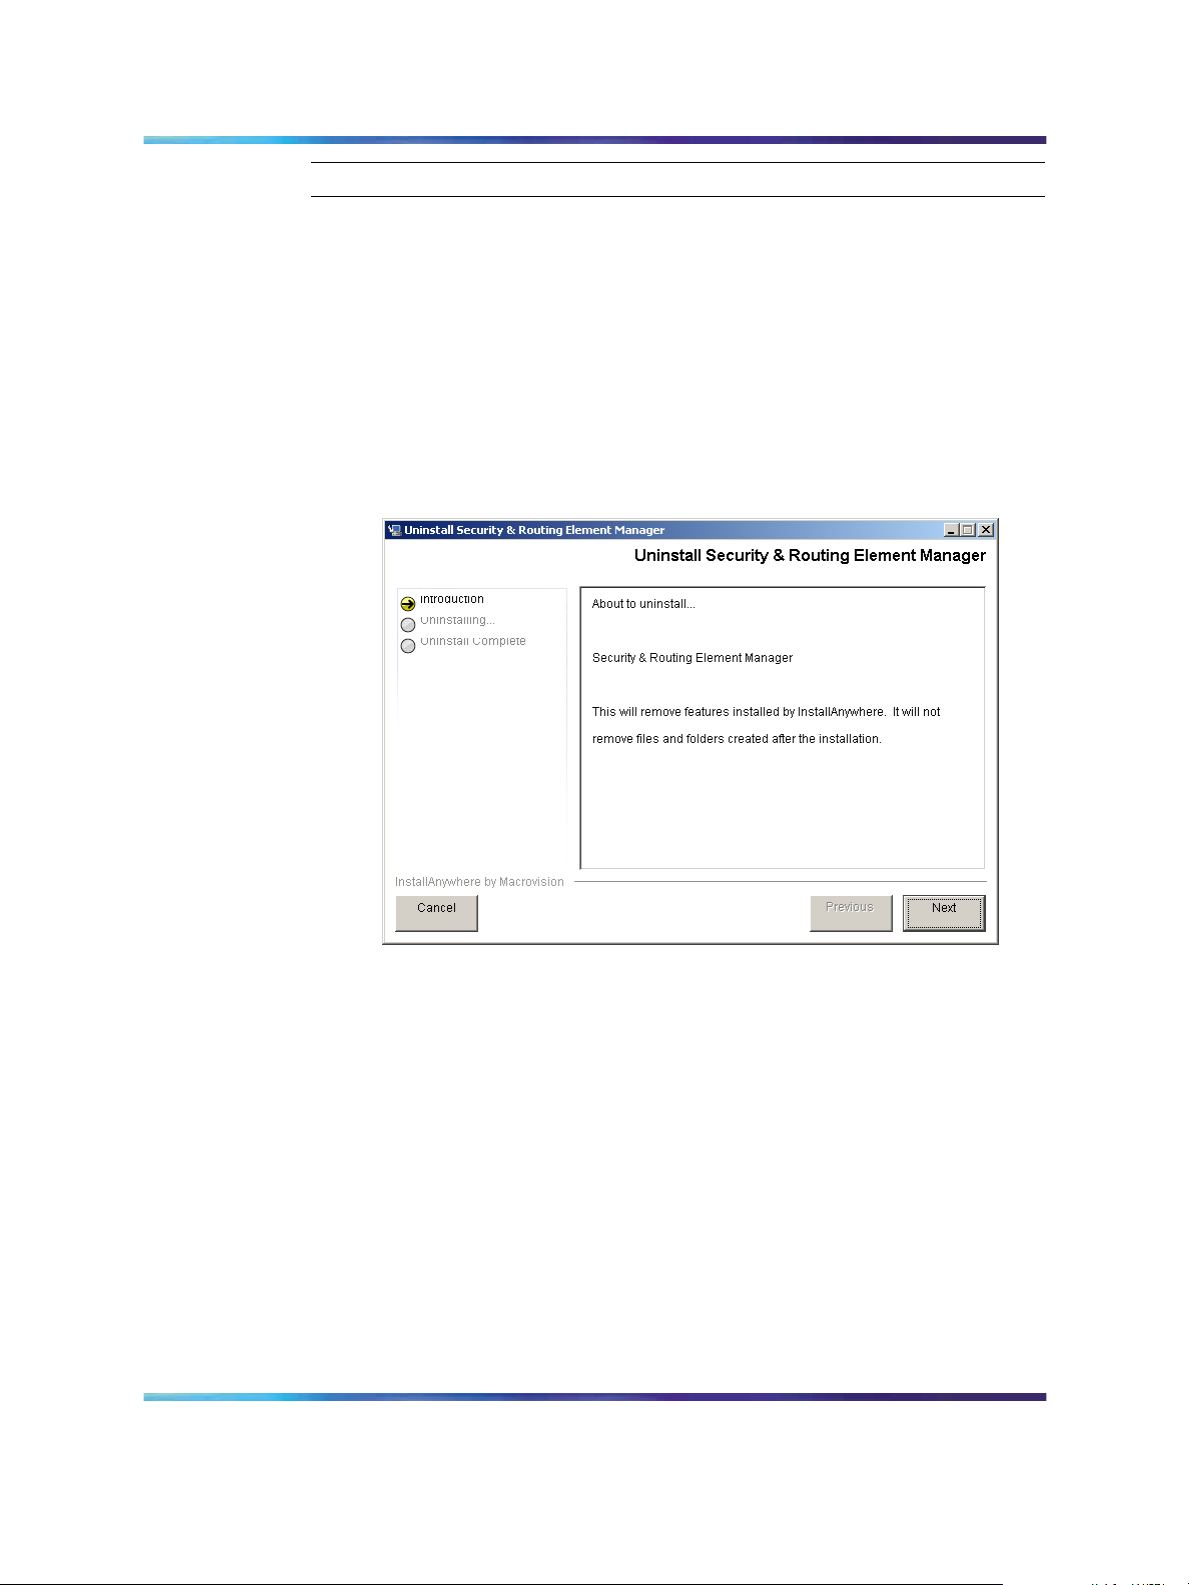
The Uninstall Security & Routing Element Manager Introduction
screen appears(Figure 1 "Introduction" (page 18)).
Figure 1 Introduction
2
Nortel Secure Network Access Switch Software Release 1.6.1
Installing and Using Security and Routing Element Manager (SREM)
Copyright © 2007, Nortel Networks
.
Click Next.
The Uninstall Options screen appears (Figure 2 "Uninstall Options"
(page 19)).
NN47230-301 02.01 Standard
1.6.1 16 July 2007
Page 19

Figure 2 Uninstall Options
Removing previous versions of SREM 19
3
Select the uninstall type from the following options:
•
Complete Uninstall — Remove the existing instance of SREM
completely. Continue with step 6.
•
Uninstall Specific Features — Remove only specific features
from the existing SREM installation. Continue with step 4.
4
Click Next.
The Choose Product Features screen appears, listing specific
features that can be removed (Figure 3 "Choose Product Features"
(page 20)).
Nortel Secure Network Access Switch Software Release 1.6.1
Installing and Using Security and Routing Element Manager (SREM)
Copyright © 2007, Nortel Networks
.
NN47230-301 02.01 Standard
1.6.1 16 July 2007
Page 20

20 Chapter 1 Installing SREM
Figure 3 Choose Product Features
5
Select only the feature you wish to uninstall from the list.
A description of a feature appears when it is selected. To remove all
features, click Previous and select the Complete Uninstall option.
6 Click Next if beginning a complete uninstall, or Uninstall if only
removing selected features.
The uninstall progress is displayed as the application is uninstalled.
The Uninstall Complete window appears (Figure 4 "Uninstall
Complete" (page 21)) when the application had been completely
uninstalled from your system.
Nortel Secure Network Access Switch Software Release 1.6.1
Installing and Using Security and Routing Element Manager (SREM)
Copyright © 2007, Nortel Networks
.
NN47230-301 02.01 Standard
1.6.1 16 July 2007
Page 21

Figure 4 Uninstall Complete
Installing SREM on your system 21
7
Click Done to exit the uninstall application.
Installing SREM on your system
Step Action
1
2
Insert the Software Install CD, or download the Installation file on
your system, and browse to the srem_1.2.0.0_<build>.exe file.
Double-click srem_1.2.0.0_<build>.exe to launch the
InstallAnywhere application (Figure 5 "InstallAnywhere" (page 21)).
Figure 5 InstallAnywhere
—End—
Nortel Secure Network Access Switch Software Release 1.6.1
Installing and Using Security and Routing Element Manager (SREM)
Copyright © 2007, Nortel Networks
.
NN47230-301 02.01 Standard
1.6.1 16 July 2007
Page 22

22 Chapter 1 Installing SREM
After the InstallAnywhere application is installed, the Security &
Routing Element Manager Introduction screen appears(Figure 6
"Introduction" (page 22)).
Figure 6 Introduction
3
Click Next.
The Close all running instances of Security & Routing Element
Manager screen appears (Figure 7 "Close all running instances of
Security and Routing Element Manager" (page 22)).
Figure 7 Close all running instances of Security and Routing Element Manager
Nortel Secure Network Access Switch Software Release 1.6.1
Installing and Using Security and Routing Element Manager (SREM)
Copyright © 2007, Nortel Networks
.
NN47230-301 02.01 Standard
1.6.1 16 July 2007
Page 23

Installing SREM on your system 23
4
Click Next.
The Choose Install Folder screen appears (Figure 8 "Choose Install
Folder" (page 23)).
Figure 8 Choose Install Folder
5
Click Restore Default Folder to use the default location for SREM,
or click Choose to select a different installation folder.
Note: To replace an SREM installation on your computer, select
the same storage path as the existing version. The existing
SREM version will be uninstalled before the current installation
is completed.
To install multiple instances of SREM on your computer, choose
a storage path that does not conflict with existing versions.
6
Click Next.
The Choose Shortcut Folder screen appears (Figure 9 "Choose
Shortcut Folder" (page 24)).
Nortel Secure Network Access Switch Software Release 1.6.1
Installing and Using Security and Routing Element Manager (SREM)
Copyright © 2007, Nortel Networks
.
NN47230-301 02.01 Standard
1.6.1 16 July 2007
Page 24

24 Chapter 1 Installing SREM
Figure 9 Choose Shortcut Folder
7
Confirm the default shortcut location, or select the shortcut path from
the listed options.
8
Click Next.
If the selected install folder already contains a version of SREM, then
the Launching uninstaller screen appears (Figure 10 "Launching
uninstaller" (page 24)) and you are prompted to remove the existing
version of SREM before continuing.
Figure 10 Launching uninstaller
For details about removing an existing SREM installation, see
"Uninstalling SREM" (page 17) "Uninstalling SREM" (page 17).
If the selected install folder is empty, or if you complete the required
uninstall process, then the Pre-Installation Summary screen
appears(Figure 11 "Pre-Installation Summary" (page 25)). This
screen displays a summary of the installation choices you have
made for confirmation.
Nortel Secure Network Access Switch Software Release 1.6.1
Installing and Using Security and Routing Element Manager (SREM)
Copyright © 2007, Nortel Networks
.
NN47230-301 02.01 Standard
1.6.1 16 July 2007
Page 25

Figure 11 Pre-Installation Summary
Installing SREM on your system 25
9
10
Review your choices in the Pre-Installation Summary screen.
If the install or shortcut folders are incorrect, click Previous to return
to the appropriate screen and update that information.
Click Install to accept displayed information and install SREM.
The installation process begins. After a successful installation, the
Install Complete screen(Figure 12 "Install Complete" (page 26))
appears.
Nortel Secure Network Access Switch Software Release 1.6.1
Installing and Using Security and Routing Element Manager (SREM)
Copyright © 2007, Nortel Networks
.
NN47230-301 02.01 Standard
1.6.1 16 July 2007
Page 26

26 Chapter 1 Installing SREM
Figure 12 Install Complete
11
Click Done to exit the installation.
SREM is now installed on your machine. For instructions on starting
the SREM software, see "Opening SREM" (page 38) "Opening
SREM" (page 38).
—End—
Nortel Secure Network Access Switch Software Release 1.6.1
Installing and Using Security and Routing Element Manager (SREM)
Copyright © 2007, Nortel Networks
.
NN47230-301 02.01 Standard
1.6.1 16 July 2007
Page 27

Chapter 2
SREM Screen Descriptions
This section is a quick tour of the SREM screens and menus. General
procedures for opening and operating SREM can be found in Chapter 3
"Using SREM" (page 37) Chapter 3 "Using SREM" (page 37).
This chapter includes the following topics:
Table 1 SREM Descriptions
Topic
"SREM window areas" (page 27)
"Indicator icons" (page 33)
"Screen icons" (page 34)
"Right-click menu" (page 35)
27
•
"SREM window areas" (page 27)
•
"Indicator icons" (page 33)
•
"Screen icons" (page 34)
•
"Right-click menu" (page 35)
SREM window areas
This section is an overview of the areas of the SREM screen. The following
table Table 2 "Main SREM window" (page 27) describes the six key areas of
the SREM interface, as shown in the figure below Figure 13 "Main SREM
screen" (page 28).
Table 2 Main SREM window
Screen element
Menus See "Menus" (page 29) "Menus" (page 29).
Nortel Secure Network Access Switch Software Release 1.6.1
Installing and Using Security and Routing Element Manager (SREM)
Copyright © 2007, Nortel Networks
.
Description
NN47230-301 02.01 Standard
1.6.1 16 July 2007
Page 28

28 Chapter 2 SREM Screen Descriptions
Figure 13 Main SREM screen
Screen element
Description
Toolbar items See "Toolbar items" (page 32) "Toolbar items"
(page 32).
Tabs Screen areas that the user can select to monitor
and configure additional device options.
Configuration and
Monitoring pane
Area where the user views, updates and configures
device options. Required fields are marked with
asterisk (*).
Device list Allows you to select, view, expand, and collapse
configured devices. When you expand a device,
you see any devices or components configured
under it in the device hierarchy. Devices with
subdevices or components are referred to as
"parents."
Screen icons Allows quick access to some common screens.
Nortel Secure Network Access Switch Software Release 1.6.1
Installing and Using Security and Routing Element Manager (SREM)
Copyright © 2007, Nortel Networks
.
NN47230-301 02.01 Standard
1.6.1 16 July 2007
Page 29

Menus
SREM window areas 29
This section describes the SREM menu available options.
•
File — Used to manage network devices and configuration files. Refer
to "File menu items" (page 29) "File menu items" (page 29) for details
about the File menu items.
•
Edit — Used to remove network devices from the current configuration.
Refer to "Edit menu items" (page 30) "Edit menu items" (page 30) for
details about the Edit menu items.
•
View — Used to control and manage the SREM screens being viewed.
Refer to "View menu items" (page 30) "View menu items" (page 30) for
details about the View menu items.
•
Tools — Used to access additional SREM options and built-in tools.
Refer to "Tools menu items" (page 31) "Tools menu items" (page 31) for
details about the Tools menu items.
•
Window — Used to open additional instances of the SREM window.
Refer to "Window menu items" (page 31) "Window menu items" (page
31) for details about the Window menu items.
•
Help — Used to access information and details about the SREM. Refer
to "Help menu items" (page 32) "Help menu items" (page 32) for details
about the Help menu items.
File menu items
The menu items available from the File menu are described in the following
table Table 3 "File menu" (page 29).
Table 3 File menu
Menu option Description
New Sub Network Create a Sub Network under the selected network.
New Open the New Device screen.
Open Open the Open window, which allows you to select
network configuration files.
Save Save a previously saved configuration, or opens the
Save window to allow you to save a configuration
in a user-defined location if no previously saved
configuration exists.
Save As Open the Save window to allow you to select a save
location for the network configuration file.
Exit Quit SREM.
Nortel Secure Network Access Switch Software Release 1.6.1
Installing and Using Security and Routing Element Manager (SREM)
Copyright © 2007, Nortel Networks
.
NN47230-301 02.01 Standard
1.6.1 16 July 2007
Page 30

30 Chapter 2 SREM Screen Descriptions
Edit menu items
The menu items available from the Edit menu are described in the following
table Table 4 "Edit menu" (page 30).
Table 4 Edit menu
Menu option Description
Delete Delete the highlighted device or attribute.
View menu items
The menu items availablefrom the View menu are described in the following
table Table 5 "View menu" (page 30).
Table 5 View menu
Menu option Description
Back Revert to the previous view.
Forward Jump to the next view, if you reverted to a previous
view.
Rediscover Rediscover the selected device, or any discoverable
component in the Device List if no device is selected.
Revert to Default Revert all attributes on the selected screen to their
default value.
Refresh Refresh attributes displayed in the Configuration and
Monitoring pane.
Apply Apply changes made in SREM to the network access
device.
Screens Open any currently visible tab from the Configuration
and Monitoring pane for the selected device.
This option is only available after a device is configured.
Commit Commit any configuration changes to the device.
Revert Refresh attributes displayed in the Configuration and
Monitoring pane
Diff Open the Configuration Modifications screen, which
lists all configuration changes made during this
session.
Disconnect Terminates connectivity to the selected device.
A Guide to Create a
Group
Open a wizard that helps you quickly create a Group
within an existing domain.
Nortel Secure Network Access Switch Software Release 1.6.1
Installing and Using Security and Routing Element Manager (SREM)
Copyright © 2007, Nortel Networks
.
NN47230-301 02.01 Standard
1.6.1 16 July 2007
Page 31

SREM window areas 31
Menu option Description
Tunnel Guard Open the Nortel Networks TunnelGuard Software and
Rule Definition Tool.
Domain Quick Wizard Open a wizard that helps you quickly create a domain.
Tools menu items
The menu items available from the Tools menu are described in The
following table Table 6 "Tools menu" (page 31).
Table 6 Tools menu
Menu option Description
Options Open the Options dialog box for setting generic SREM
options.
See "Configuring SREM settings" (page 40)
"Configuring SREM settings" (page 40) for additional
details.
SSH Known Hosts View and delete SSH Known Hosts.
Launch Log Browser Query trace options, statistics, alarms, account, and
security audit logs.
See "Using the Log Browser tool" (page 54) "Using the
Log Browser tool" (page 54) for additional details.
Window menu items
The menu items available from the Window menu are described in The
following table Table 7 "Window menu" (page 31).
Table 7 Window menu
Menu option Description
New Window Open a second, synchronized occurrence of SREM.
Use this option to view configuration info for two
devices at the same time.
Nortel Secure Network Access Switch Software Release 1.6.1
Installing and Using Security and Routing Element Manager (SREM)
Copyright © 2007, Nortel Networks
.
NN47230-301 02.01 Standard
1.6.1 16 July 2007
Page 32

32 Chapter 2 SREM Screen Descriptions
Help menu items
The menu items available from the Help menu are described in The
following table Table 8 "Help menu" (page 32).
Table 8 Help menu
Menu option Description
Contents Open the SREM help system.
About Display details about the SREM software version.
Toolbar items
This section is an overview of the toolbar items available on the SREM
screen, as shown in the figure below Figure 14 "SREM toolbar" (page 32).
SREM help is divided into generic and device-specific
sections. When this menu item is selected, context
sensitive help appears for the current screen or device,
as applicable.
Figure 14 SREM toolbar
The following table Table 9 "Toolbar items" (page 32) provides descriptions
of each toolbar item.
Table 9 Toolbar items
Item Description
First row
New Clear the Device List.
Open Open the Device List.
Save Save the Device List.
Delete Delete currently selected devices/components.
Revert to Default Revert all attributes on the selected screen to the
default value.
Rediscover Refresh the Device List hierarchy by clearing cached
data.
Refresh Refresh attributes on the Configuration and Monitoring
Nortel Secure Network Access Switch Software Release 1.6.1
Installing and Using Security and Routing Element Manager (SREM)
Copyright © 2007, Nortel Networks
.
Pane.
NN47230-301 02.01 Standard
1.6.1 16 July 2007
Page 33

Indicator icons 33
Item Description
Apply Update the selected device with new entries made on
the Configuration and Monitoring Pane.
New Window Open another SREM window with the same devices in
the Device List.
Second row
<
Open the previously displayed Configuration and
Monitoring Pane.
>
Open the next Configuration and Monitoring Pane, if
you opened a previous screen.
Commit Commit configuration changes to the device.
Revert Refresh attributes displayed in the Configuration and
Monitoring pane
Diff Open a screen that lists the existing configuration
changes.
Disconnect Terminates connectivity to the selected device.
Indicator icons
Icons that identify the status of an entered or displayed component or device
are described in The following table Table 10 "Indicator icons" (page 33).
Table 10 Indicator icons
A Guide to Create a
Group
Open a wizard to help you quickly create a Group
within a domain.
Tunnel Guard Open the Nortel Networks TunnelGuard Software and
Rule Definition Tool.
Domain Quick Wizard Open a wizard to help you quickly create a domain.
Icon Name Description
Valid Parameter values were successfully
retrieved from the device and are in sync
with the device.
Modified The parameter changed in SREM but has
not yet been applied to the device.
Error The parameter changed in SREM and a
failure occurred while applying it to the
device.
Nortel Secure Network Access Switch Software Release 1.6.1
Installing and Using Security and Routing Element Manager (SREM)
Copyright © 2007, Nortel Networks
.
Unknown The parameter value cannot be retrieved
from the device.
NN47230-301 02.01 Standard
1.6.1 16 July 2007
Page 34

34 Chapter 2 SREM Screen Descriptions
Screen icons
Icons in the bottom, right corner of the SREM screen are described in The
following table Table 11 "Screen icons" (page 34).
Table 11 Screen icons
Icon Name Description
Change Manager Opens the Change Manager tab (Figure
Statistics Manager Opens the Statistics Manager tab (Figure
15 "Change Manager tab" (page 34))
where you view, delete or apply unapplied
configurations to the network access
device.
For details about using the Change
Manager, see "Applying and saving
groups of changes" (page 51) "Applying
and saving groups of changes" (page 51).
16 "Statistics Manager tab" (page 35))
where you view statistics gathered from
the selected network access device.
Figure 15 Change Manager tab
For details about using the Statistics
Manager, see "Managing logs and
statistics within the SREM" (page 52)
"Managing logs and statistics within the
SREM" (page 52).
Nortel Secure Network Access Switch Software Release 1.6.1
Installing and Using Security and Routing Element Manager (SREM)
Copyright © 2007, Nortel Networks
.
NN47230-301 02.01 Standard
1.6.1 16 July 2007
Page 35

Figure 16 Statistics Manager tab
Right-click menu 35
Right-click menu
Open the Right-click menu by highlighting a device or I/O and clicking the
alternate, or secondary button on your mouse. The right-click menu varies
according to the device or parameter selected. In addition to cut/paste and
renaming functionality, the Right-click menu provides quick access to tabs
in the Configuring and Monitoring pane and to buttons available on the
toolbar for the selected equipment.
When you right-click a network access device in the Device List, the
right-click menu also contains all toolbar options.
the figure below Figure 17 "Right-click menu example" (page 35) illustrates
a generic right-click menu that is displayed when you click on devices and
options in the Device List.
Figure 17 Right-click menu example
Nortel Secure Network Access Switch Software Release 1.6.1
Installing and Using Security and Routing Element Manager (SREM)
Copyright © 2007, Nortel Networks
.
NN47230-301 02.01 Standard
1.6.1 16 July 2007
Page 36

36 Chapter 2 SREM Screen Descriptions
For descriptions of each right-click menu item, refer to The following table
Table 12 "Right-click menu options" (page 36).
Table 12 Right-click menu options
Menuoption Description
Go To Select to select an available tab from the Configuration and
Monitoring pane.
Rediscover Select to rediscover component changes on the device from
this parent, down through the hierarchy.
Cut Transfer configuration data from one parameter to be pasted
to another parameter. See "Cutting, copying, and pasting data
between devices" (page 49).
Copy Copy configuration data from one parameter to be pasted to
another parameter. See "Cutting, copying, and pasting data
between devices" (page 49).
Paste Copy configuration data that you have "cut" or "pasted" from
another parameter. See "Cutting, copying, and pasting data
between devices" (page 49).
Paste As Operates like Paste, but allows you to change the name of the
index attribute, so that the paste can be performed on the same
device by changing only the name but keeping all other values.
Rename Rename the selected equipment. For an I/O card, Rename
allows you to change the slot number.
Delete Delete the selected configuration.
Nortel Secure Network Access Switch Software Release 1.6.1
Installing and Using Security and Routing Element Manager (SREM)
Copyright © 2007, Nortel Networks
.
NN47230-301 02.01 Standard
1.6.1 16 July 2007
Page 37

Chapter 3
Using SREM
This section provides procedures for general or common SREM tasks. For
more detailed SREM procedures and interface descriptions, refer to the
online help.
This chapter includes the following topics:
Topic
"Accessing the SREM software" (page 37)
"Configuring SREM settings" (page 40)
"Managing network access devices from the SREM" (page 41)
"Changing information within the SREM" (page 48)
"Managing changes within the SREM" (page 50)
"Managing logs and statistics within the SREM" (page 52)
37
"Using the Log Browser tool" (page 54)
•
"Accessing the SREM software" (page 37)
•
"Configuring SREM settings" (page 40)
•
"Managing network access devices from the SREM" (page 41)
•
"Changing information within the SREM" (page 48)
•
"Managing changes within the SREM" (page 50)
•
"Managing logs and statistics within the SREM" (page 52)
•
"Using the Log Browser tool" (page 54)
Accessing the SREM software
This section covers the following tasks:
•
"Opening SREM" (page 38) "Opening SREM" (page 38)
•
"Quitting SREM" (page 38) "Quitting SREM" (page 38)
Nortel Secure Network Access Switch Software Release 1.6.1
Installing and Using Security and Routing Element Manager (SREM)
Copyright © 2007, Nortel Networks
.
NN47230-301 02.01 Standard
1.6.1 16 July 2007
Page 38

38 Chapter 3 Using SREM
•
"Viewing SREM online help" (page 38) "Viewing SREM online help"
(page 38)
Opening SREM
Several different methods exist to access the SREM software, depending on
the options selected during installation. To open the SREM application on
your local system, use one of the following directions:
•
From the Windows Start menu, select All Programs > Nortel >
Security & Routing Element Manager.
•
From the desktop, click the SREM icon (if you installed icons on your
workstation during the installation process).
•
Using Windows Explorer, locate the SREM installation folder and run
the Security & Routing Element Manager.exe file. The default folder
location for this file is: C:\Program Files\Nortel\SREM\Nortel Secure
Network Access.
Quitting SREM
Use the following procedure to quit the SREM application on your local
system.
Step Action
1
Apply and commit any unsaved changes. (See "Applying and
saving individual changes" (page 50) "Applying and saving individual
changes" (page 50) for details.)
2
Select File > Exit.
A confirmation dialog box appears.
3 Click Yes to quit the SREM application.
Viewing SREM online help
The help system contains procedures for configuring and monitoring a
network access device through SREM and context sensitive descriptions
for each screen and window.
To open the SREM online help system, do one of the following:
•
Click Help > Contents from the main menu.
•
Press F1 on your keyboard.
—End—
Nortel Secure Network Access Switch Software Release 1.6.1
Installing and Using Security and Routing Element Manager (SREM)
Copyright © 2007, Nortel Networks
.
NN47230-301 02.01 Standard
1.6.1 16 July 2007
Page 39

Figure 18 SREM online help
Accessing the SREM software 39
The online help content appears in a new web browser instance (Figure 18
"SREM online help" (page 39)). If the SREM screen that is active when
online help is opened has context sensitive help available, then the content
displayed will related to that screen.
To view available online help content use either the navigation tree on the
left side of the web browser or the toolbar icons described in the following
table Table 13 "Online help icons" (page 39).
Table 13 Online help icons
Icon Name Description
Nortel Secure Network Access Switch Software Release 1.6.1
Installing and Using Security and Routing Element Manager (SREM)
Copyright © 2007, Nortel Networks
.
Show Navigation Display the navigation tree.
This icon is only available when viewing context
sensitive help where the navigation tree is not
already visible.
NN47230-301 02.01 Standard
1.6.1 16 July 2007
Page 40

40 Chapter 3 Using SREM
Icon Name Description
Show in Contents Show the displayed page in the navigation tree.
Previous Display the previous page of online help content.
Next Display the next page of online help content.
Print Print the currently displayed help content page.
Configuring SREM settings
Use the following procedure to change general configuration settings for
SREM.
This icon is only available when the navigation
tree is already visible.
Using this icon will print only the content displayed
in the actual help screen. Toolbar icons and the
navigation tree are not printed.
Step Action
1
2
Open SREM.
Select Tools > Options to open the Options dialog box (Figure 19
"Options dialog box" (page 40)).
Figure 19 Options dialog box
Nortel Secure Network Access Switch Software Release 1.6.1
Installing and Using Security and Routing Element Manager (SREM)
Copyright © 2007, Nortel Networks
.
NN47230-301 02.01 Standard
1.6.1 16 July 2007
Page 41

Managing network access devices from the SREM 41
3
Change the desired settings, as described in the following table
Table 14 "SREM Options" (page 41).
Table 14 SREM Options
Option
Application Look
and Feel
Beep on Error Select Yes from the list to have SREM beep
Eager Refresh
Mode
Tool Tip from Help Select Yes to view tooltip help over certain fields
Show Uncomm
itted Changes
Warning
Description
Allows you to configure how the application looks.
Configuration changes to the Application Look
and Feel setting take effect only after you restart
SREM.
when an error is made.
Automatically refreshes the Configuration and
Monitoring pane with changes applied to the
device.
and buttons.
Select Yes to have SREM prompt you that
uncommitted changes exist before leaving the
active screen.
Click Yes on the prompt dialog to return to the
screen with changes, or click No to continue
to a new screen without saving the changes.
Selecting the check box before closing the
warning prompt changes this setting to No.
Do Not Save
Passwords
4
Click OK.
Select Yes to force SREM to check passwords
every time.
Important Note: If you select No for this option,
unauthorized users might gain access to the
SREM. Use caution when you change this option.
—End—
Managing network access devices from the SREM
This section covers the following tasks:
•
"Adding a new network access device" (page 42)
•
"Deleting a network access device" (page 44)
Nortel Secure Network Access Switch Software Release 1.6.1
Installing and Using Security and Routing Element Manager (SREM)
Copyright © 2007, Nortel Networks
.
NN47230-301 02.01 Standard
1.6.1 16 July 2007
Page 42

42 Chapter 3 Using SREM
•
"Grouping network access devices in SREM" (page 44)
•
"Modifying network information" (page 46)
•
"Logging into a network access device" (page 46)
•
"Saving a network configuration" (page 47)
•
"Opening a network configuration" (page 47)
•
"Adding a new network access device" (page 42)
•
"Deleting a network access device" (page 44)
•
"Grouping network access devices in SREM" (page 44)
•
"Modifying network information" (page 46)
•
"Logging into a network access device" (page 46)
•
"Saving a network configuration" (page 47)
•
"Opening a network configuration" (page 47)
Adding a new network access device
Use the following procedure to add a new network access device through
SREM.
Step Action
1
2
Open SREM.
Click New on the toolbar to open the New Device screen (Figure 20
"New Device screen" (page 43)).
Nortel Secure Network Access Switch Software Release 1.6.1
Installing and Using Security and Routing Element Manager (SREM)
Copyright © 2007, Nortel Networks
.
NN47230-301 02.01 Standard
1.6.1 16 July 2007
Page 43

Figure 20 New Device screen
Managing network access devices from the SREM 43
3
Enter the connection details for this new device in the applicable
fields. the following table Table 15 "New Device fields" (page 43)
describes the New Device fields.
Table 15
New Device fields
Field Description
Device Specifies the IP address for the network access
device you are adding.
User Name Specifies the user name to connect with the
specified device.
Password Specifies the password to connect with the
specified device.
Device Type Specifies the type of network access device to
connect to.
The default value is Secure Network Access
Switch.
Note: This field is not editable for this release.
Nortel Secure Network Access Switch Software Release 1.6.1
Installing and Using Security and Routing Element Manager (SREM)
Copyright © 2007, Nortel Networks
.
SNMP Community
Name
NN47230-301 02.01 Standard
1.6.1 16 July 2007
Specifies the SNMP community name setting.
This field is not used for Secure Network Access
Switch device types.
Page 44

44 Chapter 3 Using SREM
Field Description
The default value is public.
Note: This field is not editable in this release.
4
Click Create.
SREM will attempt to connect to the network access device. One of
two results follows:
•
If SREM connects to the network access device successfully,the
network access device appears in the Device List.
•
If SREM cannot connect to the specified device, check the IP
and login information, and click Try Again.
Deleting a network access device
Use the following procedure to add a new network access device through
SREM.
Step Action
1
2
Open SREM.
Select the network access device you want to delete in the Device
List.
—End—
3
Grouping network access devices in SREM
Use the following procedure to organize the SREM device list by creating
Sub Networks of network access devices.
Nortel Secure Network Access Switch Software Release 1.6.1
Installing and Using Security and Routing Element Manager (SREM)
Copyright © 2007, Nortel Networks
.
Select Edit > Delete.
The network access device disappears from the Device List.
—End—
NN47230-301 02.01 Standard
1.6.1 16 July 2007
Page 45

Step Action
Managing network access devices from the SREM 45
Figure 21 Right-click menu
1
Right-click the New icon in the Device List, and select New Sub
Network in the right-click menu (Figure 21 "Right-click menu" (page
45)).
2
3
4
5
6
Nortel Secure Network Access Switch Software Release 1.6.1
Installing and Using Security and Routing Element Manager (SREM)
Copyright © 2007, Nortel Networks
.
The New Sub Network dialog box (Figure 22 "New Sub Network
dialog box" (page 45)) is displayed.
Figure 22 New Sub Network dialog box
Type the name of your Sub Network in the Name field.
Click OK.
Right-click the new Sub Network in the Device List, and select New
Device. The New Device tab (Figure 20 "New Device screen" (page
43)) is displayed.
Type the IP address, User Name, and password for the new device.
Click Create.
NN47230-301 02.01 Standard
1.6.1 16 July 2007
Page 46

46 Chapter 3 Using SREM
SREM finds the new device and adds it to the Sub Network.
7
Continue configuring the new device and adding new devices to
the Sub Network, as required.
Modifying network information
Use the following procedure to rename an existing network or Sub Network
using the SREM.
Step Action
1
2
3
4
5
Open SREM.
In the Device List, select the network or Sub Network to rename.
Select the Network Information tab.
The Network File Name setting is displayed for that network element.
Edit the Network File Name for the device as desired.
Click Apply.
The Device List is changed immediately to reflect the new name.
—End—
Logging into a network access device
Use the following procedure to log into a network access device through
SREM, if SREM does not discover the device automatically at start up.
Step Action
1
2
3 Click Rediscover.
4
5
Nortel Secure Network Access Switch Software Release 1.6.1
Installing and Using Security and Routing Element Manager (SREM)
Copyright © 2007, Nortel Networks
.
—End—
Open SREM.
In the Device List, highlight the IP for the device you want to log in to.
If SREM cannot rediscover the device, a Discovery Failed screen is
displayed with an error message and the required login fields.
Type the User Name and Password for the device.
Click Try Again.
NN47230-301 02.01 Standard
1.6.1 16 July 2007
Page 47

Managing network access devices from the SREM 47
Saving a network configuration
Use the following procedure to save information you configured for a
network access device.
Step Action
—End—
1
2
Configure the network access device as required.
Select File > Save As to open the Save dialog box (Figure 23 "Save
dialog box" (page 47)).
Figure 23 Save dialog box
3
Navigate to the folder where you want to save the configuration file.
4
5
6
Opening a network configuration
Use the following procedure to open a saved configuration for a network
access device or network element.
Nortel Secure Network Access Switch Software Release 1.6.1
Installing and Using Security and Routing Element Manager (SREM)
Copyright © 2007, Nortel Networks
.
Type a name for the configuration in the File Name field.
Ensure that Network Definition File (.xvn) is displayed in the Files
of Type field.
Click Save.
—End—
NN47230-301 02.01 Standard
1.6.1 16 July 2007
Page 48

48 Chapter 3 Using SREM
Step Action
1
2
Open SREM.
Select File > Open.
The Open dialog box appears (Figure 24 "Open dialog box" (page
48)).
Figure 24 Open dialog box
3
Navigate to the Network Configuration File (.xvn) you want to open.
4 Highlight the file you want to open.
5
Click Open.
—End—
Changing information within the SREM
This section covers the following tasks:
•
"Cutting, copying, and pasting data between devices" (page 49)
•
"Changing field values in the SREM" (page 50)
•
"Cutting, copying, and pasting data between devices" (page 49)
•
"Changing field values in the SREM" (page 50)
Nortel Secure Network Access Switch Software Release 1.6.1
Installing and Using Security and Routing Element Manager (SREM)
Copyright © 2007, Nortel Networks
.
NN47230-301 02.01 Standard
1.6.1 16 July 2007
Page 49

Changing information within the SREM 49
Cutting, copying, and pasting data between devices
Cut, copy and paste information between devices, such as interface cards,
to save time when you enter data. If you are entering similar data for several
devices, SREM allows you to cut, copy and paste information between
devices.
If moving information between multiple network access devices, SREM
allows you to cut and paste information from one device to another. Copying
is not enabled between devices because you cannot have multiple network
access devices in the Device List with the same configuration data.
Step Action
1
In the Device List, right-click the device with information that you
want to cut or copy.
2
Select Cut or Copy in the right-click menu (Figure 21 "Right-click
menu" (page 45)).
Figure 25 Right-click menu
3
In the Device List, right-click the device heading for the network
access device where you want to paste the copied information.
4
Select Paste As in the right-click menu.
The Paste As dialog box appears (Figure 26 "Paste As dialog box"
(page 49)).
Figure 26 Paste As dialog box
5
Nortel Secure Network Access Switch Software Release 1.6.1
Installing and Using Security and Routing Element Manager (SREM)
Copyright © 2007, Nortel Networks
.
Select the slot for the card to which you want to paste the copied
data.
NN47230-301 02.01 Standard
1.6.1 16 July 2007
Page 50

50 Chapter 3 Using SREM
6
Click OK.
Changing field values in the SREM
SREM uses standard Windows components to display and edit information.
The most common components includes editable text boxes, lists to select
from, and checkboxes to select.
Some special actions to be aware of when using SREM include:
• "Selecting and deselecting table items" (page 50) "Selecting and
deselecting table items" (page 50)
•
"Copying, cutting, and pasting values" (page 50) "Copying, cutting, and
pasting values" (page 50)
Selecting and deselecting table items
To select an item from a table in SREM, click on the table row to highlight
that item. To select multiple items in a table, or to deselect a row that is
highlighted, hold the Ctrl key and select the desired table row.
Copying, cutting, and pasting values
Fields that are editable can use the standard copy, cut, and paste short-cut
keys, although these options are not present in the Edit menu.
—End—
•
To copy selected values, press Ctrl-C.
•
To cut selected values (where applicable), press Ctrl-X.
•
To paste existing values into editable fields, press Ctrl-V.
Managing changes within the SREM
There are two ways to save and apply changes made in the SREM:
individually for each screen, or as a group of all unapplied changes made
during the session.
This section covers the following tasks:
•
"Applying and saving individual changes" (page 50)
•
"Applying and saving groups of changes" (page 51)
•
"Applying and saving individual changes" (page 50)
• "Applying and saving groups of changes" (page 51)
Applying and saving individual changes
To apply apply and save individual changes in SREM immediately after they
are made, complete the following process:
Nortel Secure Network Access Switch Software Release 1.6.1
Installing and Using Security and Routing Element Manager (SREM)
Copyright © 2007, Nortel Networks
.
NN47230-301 02.01 Standard
1.6.1 16 July 2007
Page 51

Step Action
Managing changes within the SREM 51
1
Click Apply on the toolbar to send changes to the device.
Changes to the active SREM screen are sent to and stored on the
device, but are not yet made permanent.
2
Click Commit on the toolbar to make all applied changes permanent
on the device.
Changes are now permanent and take full effect. In some cases, you
may need press Rediscover to view updated information in SREM.
—End—
Applying and saving groups of changes
To apply and save many changes in the SREM at one time, update the
values for fields on multiple screens or devices before accessing the
Change Manager to view and apply the changes.
Note: If the Show Uncommited Changes option is enabled, a dialog
box will appear each time you attempt to leave a screen with unapplied
changes. For more information, see "Configuring SREM settings" (page
40) "Configuring SREM settings" (page 40).
Use the following procedure to open and access the Change Manager:
Step Action
1
2
3
Nortel Secure Network Access Switch Software Release 1.6.1
Installing and Using Security and Routing Element Manager (SREM)
Copyright © 2007, Nortel Networks
.
Open SREM.
Change network access device settings as necessary.
When unapplied changes exist in the SREM, the Change Manager
icon appears in color. See "Screen icons" (page 34) "Screen icons"
(page 34) for more information about the Change Manager icon.
Click the Change Manager icon in the bottom-right corner of the
SREM window to open the Change Manager tab (Figure 27 "Change
Manager tab" (page 52)).
NN47230-301 02.01 Standard
1.6.1 16 July 2007
Page 52

52 Chapter 3 Using SREM
Figure 27 Change Manager tab
4
Review the pending changes, as described in the following table
Table 14 "SREM Options" (page 41).
Table 16 SREM Options
Option
Device Name Displays the device where the change was made.
Component Name Displays the device list component where the
Form Name Displays the particular form (or tab) within a
Status Displays the current status of a change, where
Description
change was made.
component where the change was made.
applicable.
Note: To view further details for any listed change, double-click
the Change Manager list item. SREM displays the screen where
that change occured.
5
Remove any unwanted changes from the list using the following
steps:
a. Select the unwanted item from the Change Manager list.
b. Click Remove.
6
Click Apply All to apply and commit all of the displayed changes.
—End—
Managing logs and statistics within the SREM
Use the following procedure to view and manage log files and statistic
tracking using the Statistics Manager tab.
Nortel Secure Network Access Switch Software Release 1.6.1
Installing and Using Security and Routing Element Manager (SREM)
Copyright © 2007, Nortel Networks
.
NN47230-301 02.01 Standard
1.6.1 16 July 2007
Page 53

Step Action
Managing logs and statistics within the SREM 53
1
2
Open SREM.
Click the Statistics Manager icon in the bottom-right corner of
the SREM window to open the Statistics Manager tab (Figure 28
"Statistics Manager tab" (page 53)).
Figure 28 Statistics Manager tab
3
Nortel Secure Network Access Switch Software Release 1.6.1
Installing and Using Security and Routing Element Manager (SREM)
Copyright © 2007, Nortel Networks
.
The Statistics Manager icon appears in color if there are any log files
or general statistics being tracked. See "Screen icons" (page 34)
"Screen icons" (page 34) for more information about the Statistics
Manager icon.
Each list entry in the Statistics Manager allows you to complete any
of the following tasks:
•
Click Start to enable Auto Refresh and Logging for the selected
list item.
•
Click Stop to disable Auto Refresh and Logging for the selected
list item.
• Click Remove to disable Auto Refresh and Logging for the
selected list item, and remove that item from the Statistics
Manager.
NN47230-301 02.01 Standard
1.6.1 16 July 2007
Page 54

54 Chapter 3 Using SREM
•
Select Auto Refresh or Logging for any list item to toggle that
setting.
Note: To view additional details about any of the statistics being
tracked, double-click the Statistics Manager list item. SREM
displays the screen where the selected statistic is tracked and
configured.
Using the Log Browser tool
To easily browse log files generated by SREM, a Log Browser tool is
available. To access and use the Log Browser, perform the following steps:
Step Action
—End—
1
Select Tools > Launch Log Browser from the SREM menu.
The Log Browser tool appears (Figure 29 "Log Browser" (page 54)).
Figure 29 Log Browser
Nortel Secure Network Access Switch Software Release 1.6.1
Installing and Using Security and Routing Element Manager (SREM)
Copyright © 2007, Nortel Networks
.
NN47230-301 02.01 Standard
1.6.1 16 July 2007
Page 55

Using the Log Browser tool 55
Note: When using Log Browser, the Retrieval Criteria and
Details sections can be viewed or hidden by clicking the small
arrows beside the section name. Hide these sections as
necessary to see the entire Log Browser tool on systems with
low screen resolution.
2
Select File > Open > Open NSNAS Log File from the Log Browser
menu.
A dialog box appears, allowing you to specify a log file on the current
system.
3
Select the Nortel SNAS 4050 log file to view.
The Retrieval Criteria list displays Attributes that can be used to
limit log results that are displayed.
4
Check to ensure the Retrieval Criteria section is in Definition View.
The Definition View (shown in the figure below Figure 30 "Retrieval
Criteria — Definition View" (page 55)) allows you to specify attributes
and attribute values to sort and view the log entries.
Figure 30
Retrieval Criteria — Definition View
5
6
7
Nortel Secure Network Access Switch Software Release 1.6.1
Installing and Using Security and Routing Element Manager (SREM)
Copyright © 2007, Nortel Networks
.
Select a criteria from the list, and set the desired values in the space
available.
After a criteria has been added to the Retrieval list, a checkmark
appears beside the name of that criteria.
Repeat step 5 for each criteria you want to use to sort log file entries.
Confirm the current list of criteria by changing the Retrieval Criteria
section to Summary View (shown in the figure below Figure 31
"Retrieval Criteria — Summary View" (page 56)).
NN47230-301 02.01 Standard
1.6.1 16 July 2007
Page 56

56 Chapter 3 Using SREM
Figure 31
Retrieval Criteria — Summary View
8 Click Retrieve to display all log entries that match the specified
criteria.
The Retrieval Results section displays the number of matches
discovered, and lists all log entries in the retrieval table.
9
Select a log entry from the Retrieval Results section to view the
details of that particular entry.
The log entry appears in the Details section.
—End—
Nortel Secure Network Access Switch Software Release 1.6.1
Installing and Using Security and Routing Element Manager (SREM)
Copyright © 2007, Nortel Networks
.
NN47230-301 02.01 Standard
1.6.1 16 July 2007
Page 57

Index
57
A
add
network access device 42
C
conventions, text 10
customer support 12
D
delete
network access device 44
E
edit menu 30
F
fields
SREM 50
file menu 29
G
group
network access device 44
H
help
SREM 38
help menu 32
I
icons
indicator 33
screen 34
install 21
precautions 15
removing SREM 16
requirements 16
L
log browser 54
log in
network access device 46
M
menu
right-click 35
menus 29
edit 30
file 29
help 32
tools 31
view 30
window 31
N
network access device 41
add 42
delete 44
group 44
log in 46
network configuration
open 47
save 47
Nortel Secure Network Access Switch Software Release 1.6.1
Installing and Using Security and Routing Element Manager (SREM)
Copyright © 2007, Nortel Networks
.
NN47230-301 02.01 Standard
1.6.1 16 July 2007
Page 58

58 Index
O
open
network configuration 47
SREM 38
P
precautions
install 15
product support 12
publications 12
Q
quit
SREM 38
R
requirements
install 16
right-click menu 35
S
save
changes 50
network configuration 47
settings
SREM 40
SREM
fields 50
help 38
log browser 54
open 38
quit 38
save changes 50
settings 40
support, Nortel 12
switch. <ItalicText>See<Default Para Font>
network access device
T
technical publications 12
technical support 12
text conventions 10
toolbar 32
tools menu 31
U
uninstall 17
accessing 17
V
view menu 30
W
window areas 27
menus 29
window menu 31
Nortel Secure Network Access Switch Software Release 1.6.1
Installing and Using Security and Routing Element Manager (SREM)
Copyright © 2007, Nortel Networks
.
NN47230-301 02.01 Standard
1.6.1 16 July 2007
Page 59

Page 60

Nortel Secure Network Access Switch Software Release 1.6.1
Installing and Using Security and Routing Element Manager
(SREM)
Copyright © 2007, Nortel Networks
All Rights Reserved.
Publication: NN47230-301
Document status: Standard
Document version: 02.01
Document date: 16 July 2007
To provide feedback or report a problem in this document, go to
Sourced in Canada and the United States of America.
The information in this document is subject to change without notice. Nortel Networks reserves the right to make changes in design
or components as progress in engineering and manufacturing may warrant.
*Nortel, Nortel Networks, the Nortel logo and the Globemark are trademarks of Nortel Networks.
 Loading...