

Page 1

NN10265-111
Multimedia Communication Portfolio
Multimedia Communication
Server
RTP Media Portal Basics
MCS 5100 3.5 Standard 4.0 January 2006
Page 2

Page 3

Copyright © Nortel Networks Limited 2006
Finding the latest updates on the Nortel web site
The content of this documentation was current at the time the product was released. To
check for updates to the latest documentation and software for MCS 5100, click one of
the following links:
Link to Takes you directly to the
Latest Software Nortel page for MCS 5100 software located at
Latest Documentation Nortel page for MCS 5100 documentation located at
www130.nortelnetworks.com/cgi-bin/eserv/cs/
main.jsp?cscat=SOFTWARE&resetFilter=1&tranProduct=124
82.
www130.nortelnetworks.com/cgi-bin/eserv/cs/
main.jsp?cscat=DOCUMENTATION&resetFilter=1&tranProdu
ct=12482
MCS 5100 RTP Media Portal Basics
Page 4

Copyright © Nortel Networks Limited 2006
NN10265-111 MCS 5100 3.5 Standard 4.0 January 2006
Page 5

Copyright © Nortel Networks Limited 2006
How to get help
This section explains how to get help for Nortel products and services.
Getting help from the Nortel web site
The best way to get technical support for Nortel products is from the Nortel Technical Support
web site:
www.nortel.com/support
This site provides quick access to software, documentation, bulletins, and tools to address
issues with Nortel products. From this site, you can:
• download software, documentation, and product bulletins
• search the Technical Support Web site and the Nortel Knowledge Base for answers
to technical issues
• sign up for automatic notification of new software and documentation for Nortel
equipment
• open and manage technical support cases
Getting help over the phone from a Nortel Solutions Center
If you do not find the information you require on the Nortel Technical Support web site, and
you have a Nortel support contract, you can also get help over the phone from a Nortel
Solutions Center.
In North America, call 1-800-4NORTEL (1-800-466-7835).
Outside North America, go to the following Web site to obtain the phone number for your
region:
www.nortel.com/callus
MCS 5100 RTP Media Portal Basics
Page 6

Copyright © Nortel Networks Limited 2006
6
Getting help from a specialist by using an Express Routing Code
To access some Nortel Technical Solutions Centers, you can use an Express Routing Code
(ERC) to quickly route your call to a specialist in your Nortel product or service. To locate the
ERC for your product or service, go to:
www.nortel.com/erc
Getting help through a Nortel distributor or reseller
If you purchased a service contract for your Nortel product from a distributor or authorized
reseller, contact the technical support staff for that distributor or reseller.
NN10265-111 MCS 5100 3.5 Standard 4.0 January 2006
Page 7

Copyright © Nortel Networks Limited 2006
Overview
How this chapter is organized
This chapter is organized as follows:
• Functional description on page 7
• Hardware on page 8
• Software on page 12
• Operations, administration, and management on page 12
• Interfaces on page 13
— Protocols on page 13
— Network interfaces on page 14
Functional description
The Real-time Transport Protocol (RTP) Media Portal is an optional
component that addresses media plane specific issues with advanced
service delivery, Internet addressing efficiencies, and system security.
The primary function of the RTP Media Portal is to extend the reach of
multimedia services so that they are accessible to obscured endpoints,
devices residing behind a firewall, or a Network Address Translation
(NAT) and/or Network Address Port Translation (NAPT) device.
Functioning as a media NAPT point that shields Multimedia
Communications Platform (MCP) Service Network components from
external exposure, the RTP Media Portal also provides IP address/port
pair mapping between internal and external network components as
well as media anchoring and media pivot abilities for terminals.
The RTP Media Portal may be deployed in a single- or dual-network
configuration. For dual-networks, the RTP Media Portal enables
elements in the Protected MCS Network to safely communicate with
elements in the Managed IP access network.
MCS 5100 RTP Media Portal Basics
Page 8
Copyright © Nortel Networks Limited 2006
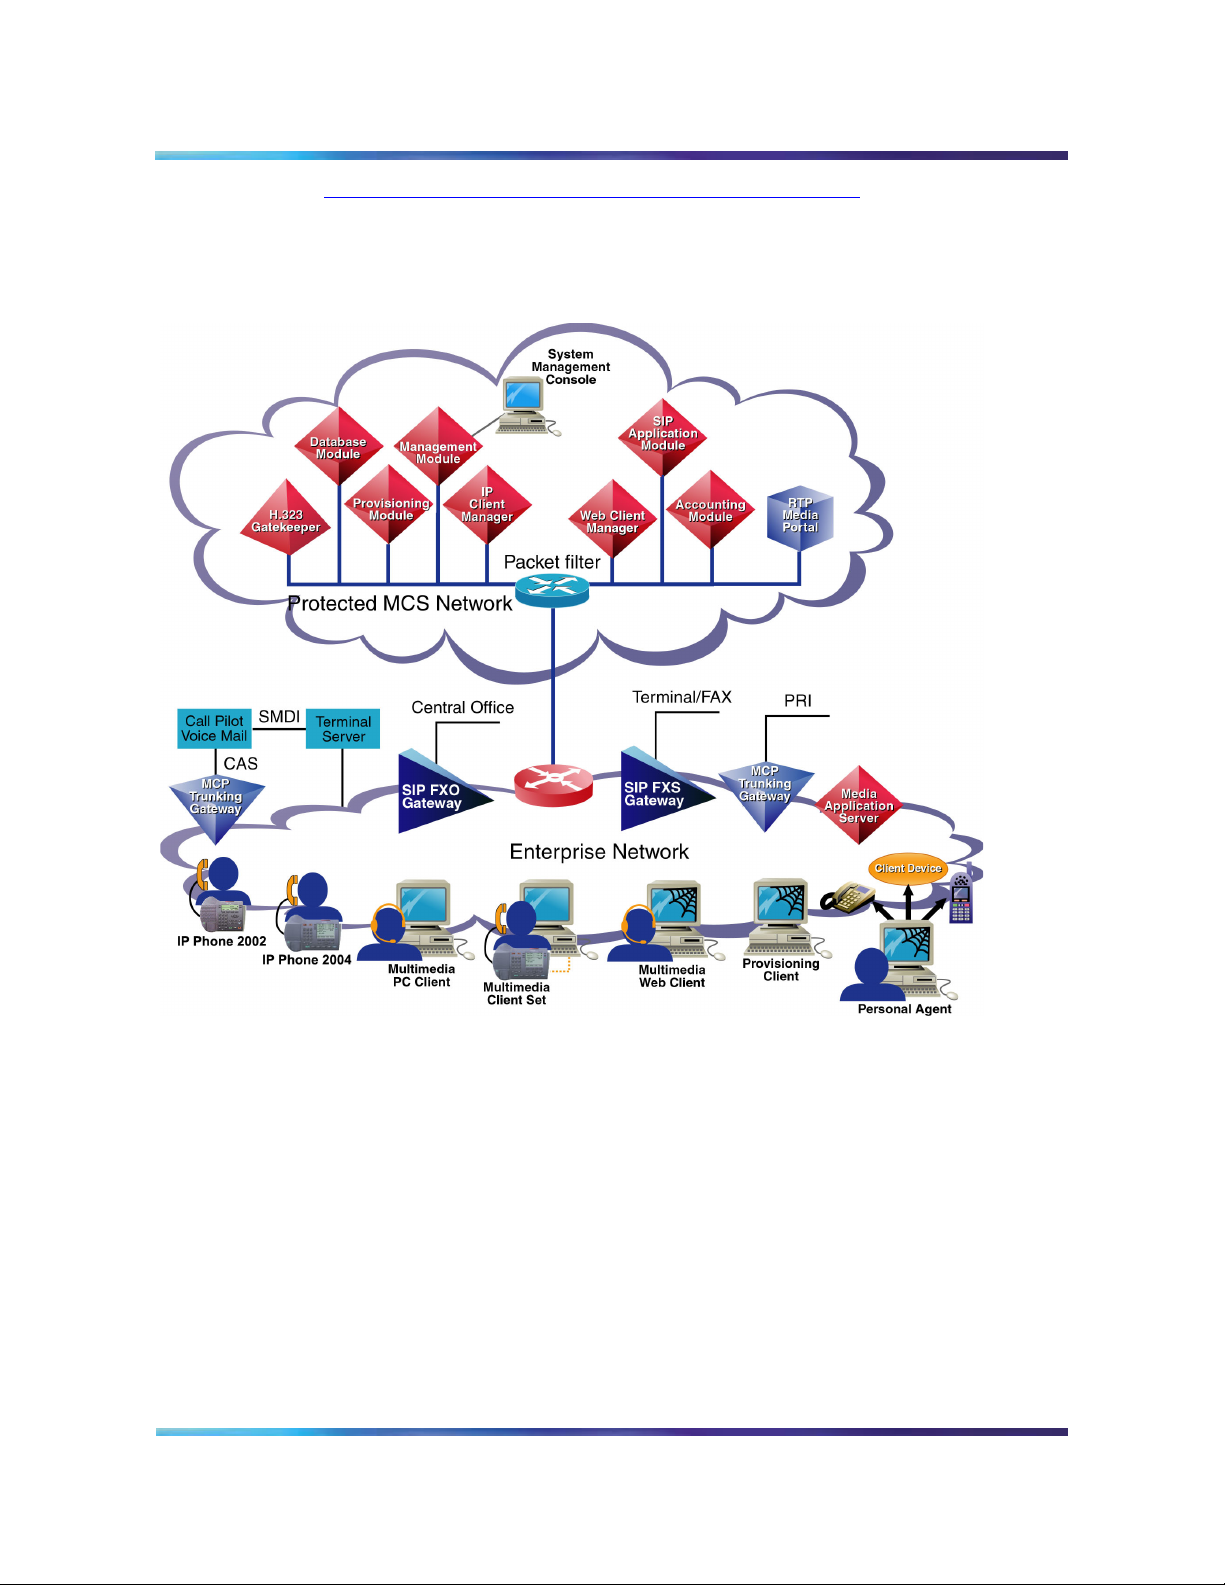
Figure 1, Network component topology, on page 8 is a graphical
depiction of the RTP Media Portal’s position in a single-network MCS
solution.
Figure 1 Network component topology
8
Hardware
The RTP Media Portal resides on a Motorola* CPX8216T platform, a
16-slot CompactPCI (cPCI) chassis design.
The chassis offers a High Availability platform that provides the basic
operating environment (such as power, backplane, cooling, and
mounting slots) required to sustain the resident subcomponent
single-board computers. The CPX8216T hardware architecture
partitions the chassis into separate logical operational Domains,
NN10265-111 MCS 5100 3.5 Standard 4.0 January 2006
Page 9
Copyright © Nortel Networks Limited 2006
dividing the chassis shelf into two half-shelves consisting of 8-slots
each.
Note: The chassis logical Domains are not internet Domains.
Rather, the term is used to identify Side A and Side B of the chassis.
Other terms used interchangeably include: Domain A and Domain B,
Left Domain and Right Domain, and half-shelf.
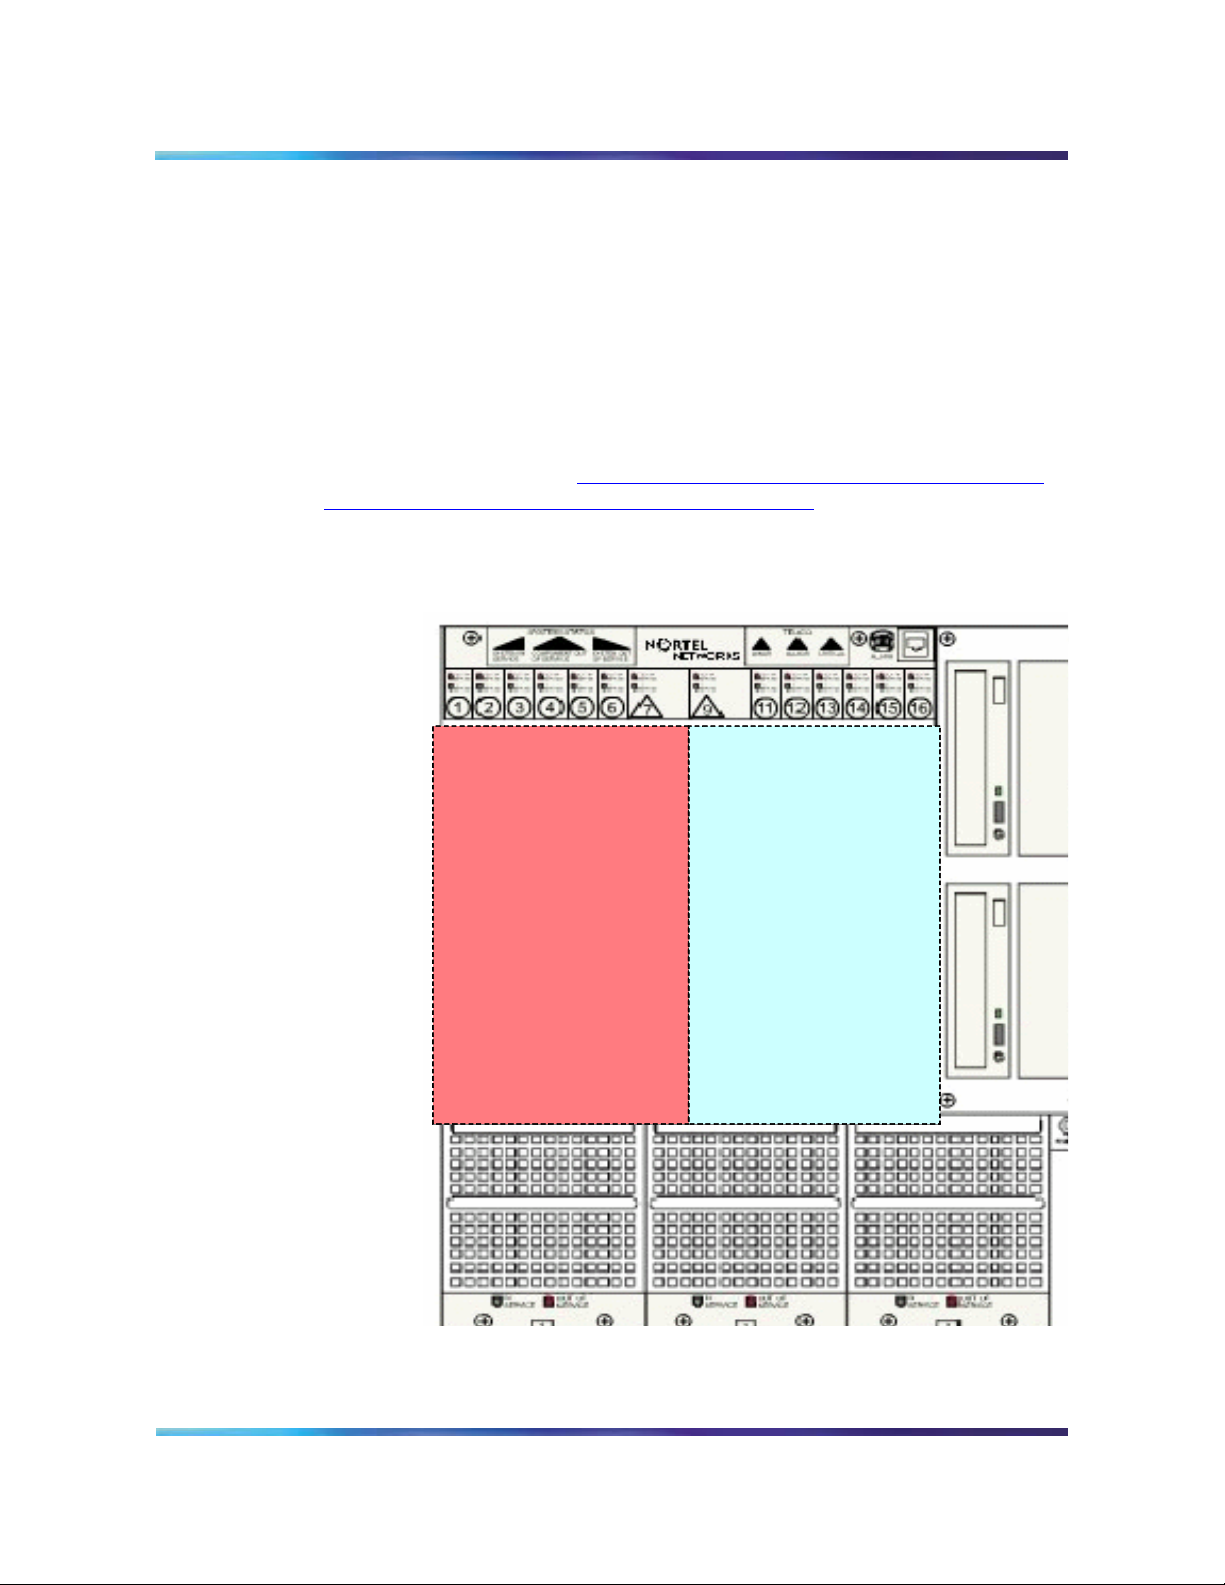
An RTP Media Portal occupies a single logical operational Domain in
the CPX8216T. A single CPX8216T chassis can host two RTP Media
Portal components (one in chassis Domain A, the other in chassis
Domain B) as shown in Figure 2, Card slot associations for the two
logical Domains in a single chassis, on page 9.
Figure 2 Card slot associations for the two logical Domains in a
single chassis
9
If the chassis is viewed from the front, the slots are numbered from left
to right (1-16). If viewed from the rear, the slots are numbered from right
MCS 5100 RTP Media Portal Basics
Domain A Domain B
Page 10
Copyright © Nortel Networks Limited 2006
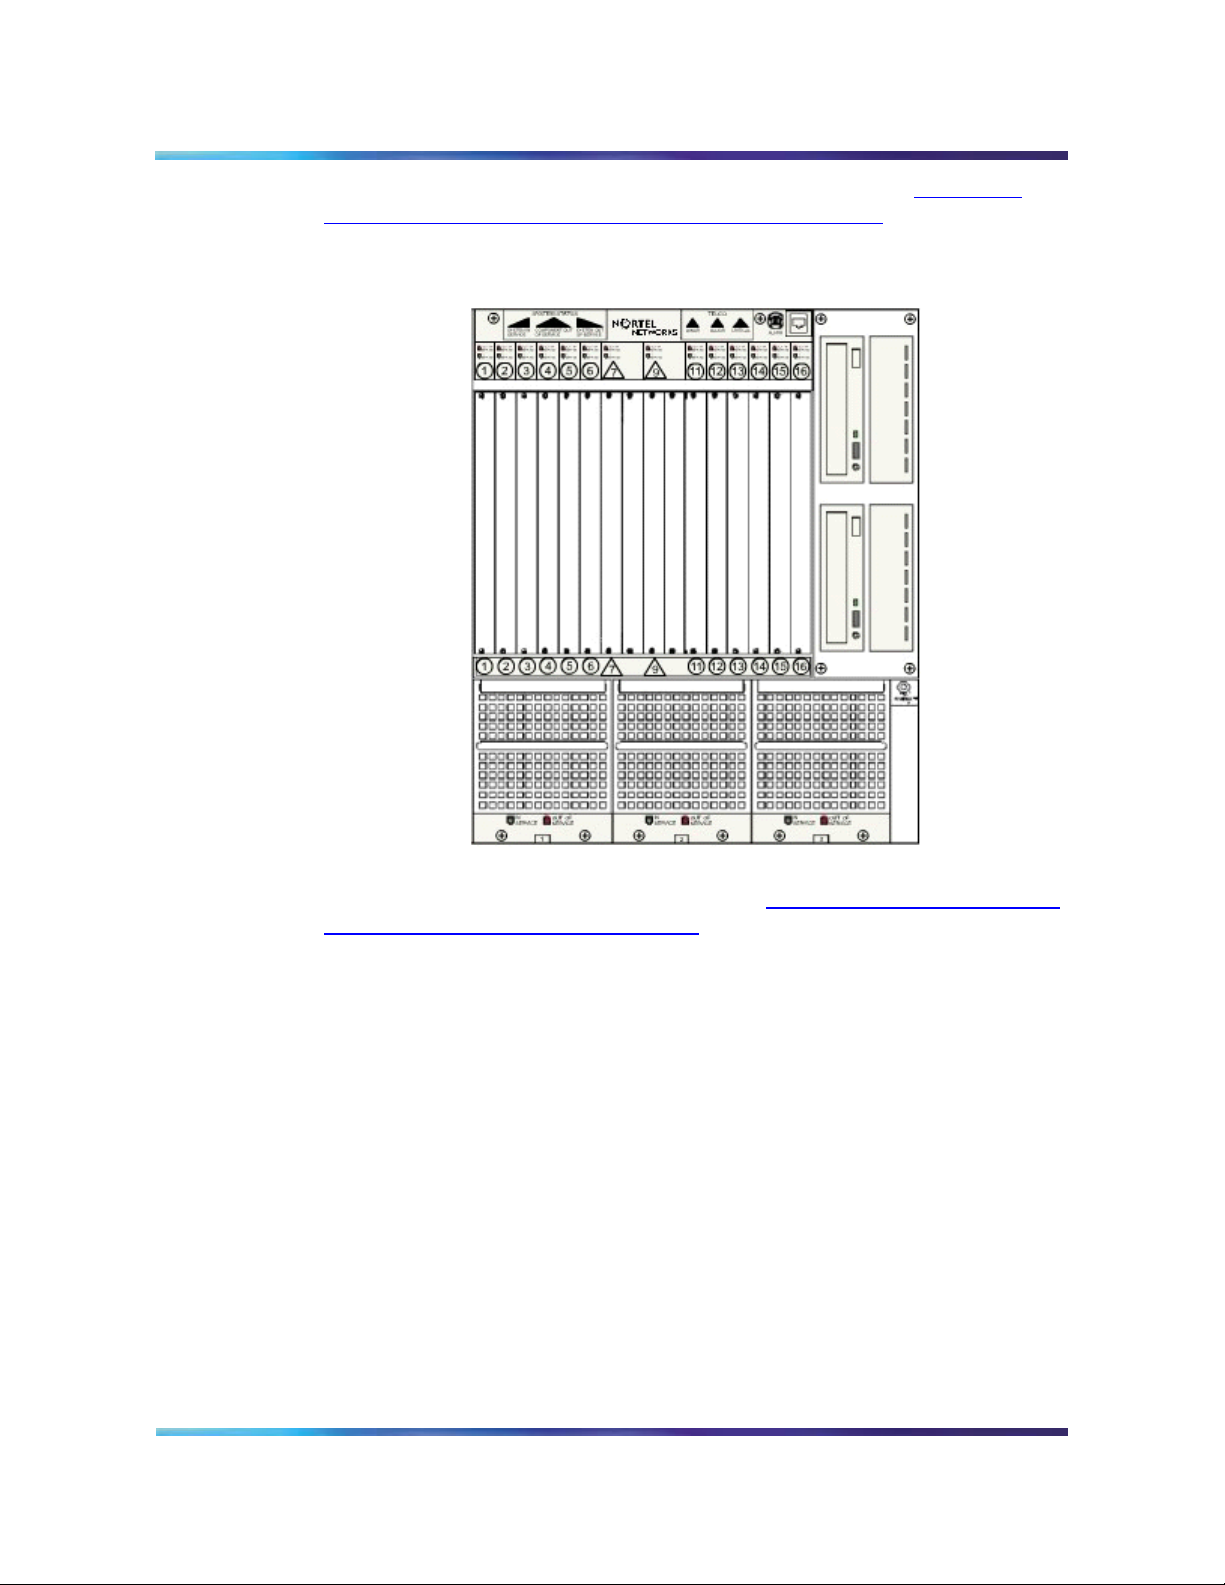
to left (1-16). A front view of the CPX8216T is shown in Figure 3,
Motorola chassis CPX8216T - front view, on page 10.
Figure 3 Motorola chassis CPX8216T - front view
10
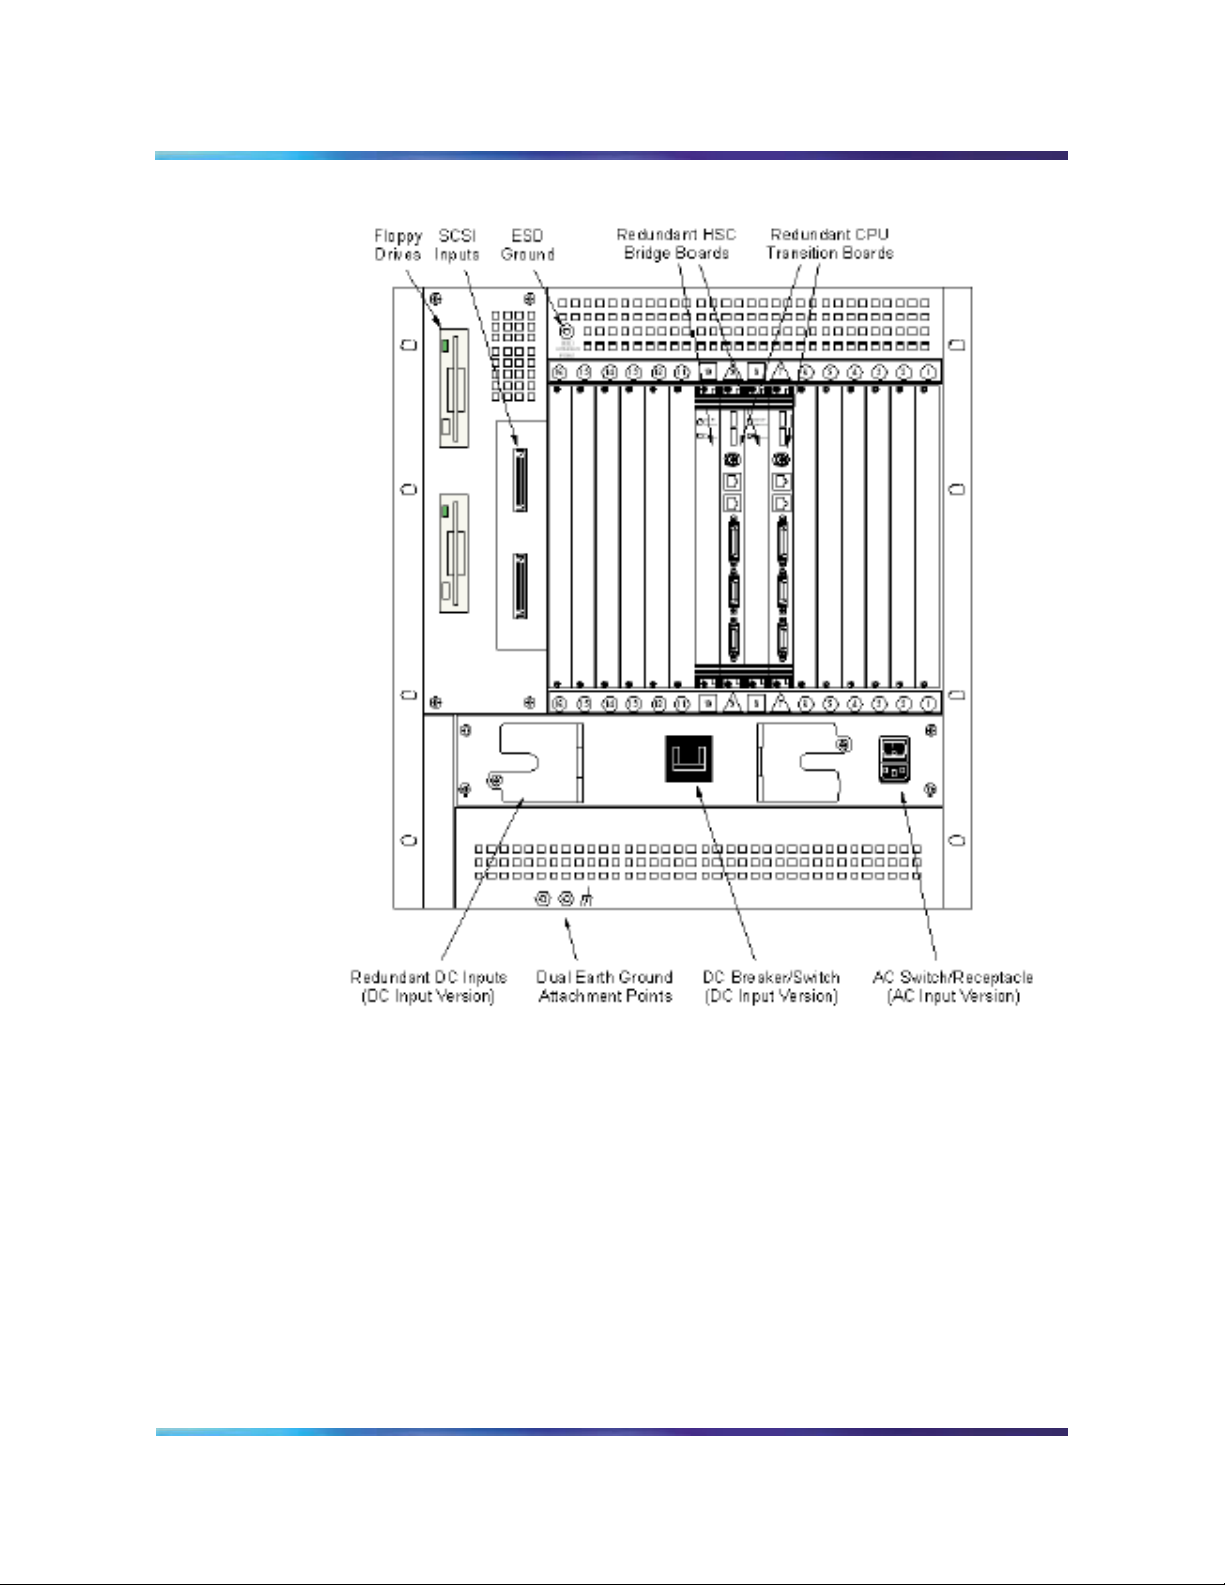
A rear view of the CPX8216T is shown in Figure 4, Motorola chassis
CPX8216T - back view, on page 11.
NN10265-111 MCS 5100 3.5 Standard 4.0 January 2006
Page 11
Copyright © Nortel Networks Limited 2006
Figure 4 Motorola chassis CPX8216T - back view
11
Within the CPX8216T dual 8-slot architecture, each logical Domain in
the chassis contains a dedicated host card (with an associated
transition module in the rear), a slot dedicated to the Motorola Hot Swap
Controller (HSC), and the remaining six slots which may be populated
with Media Blades (media input/output cards with an associated
transition module in the rear).
The Hot Swap Controller in the Left Domain controls the Right Domain.
The Hot Swap Controller in the Right Domain controls the Left Domain.
MCS 5100 RTP Media Portal Basics
Page 12

Copyright © Nortel Networks Limited 2006
Each logical Domain, and therefore each RTP Media Portal, consists of
the following hardware components:
• a single CPV5370 Intel processor board (the host card) with 1 GB
memory, a SCSI input/output (I/O) daughter board, and rear
Transition Module.
• Hot Swap Controller and Bridge (HSC) module
• SCSI CD-ROM drive
• SCSI hard drive
• Floppy drive
• One (or more) Motorola MCPN765 Power PC processor board (the
Media Blade), with 64 MB RAM and associated Rear Transition
Module.
• Available AC or DC power options
Customer provided requirements include:
•Mouse
• Keyboard
12
•Monitor
Software
The RTP Media Portal is primarily a software entity that is comprised of
subcomponents distributed across the hardware platform.
The RTP Media Portal, servers and components must be configured
and provisioned under the same site as the management server, even
if deployed from a remote location. Failure to deploy the RTP Media
Portal under the same site as the management server will prevent OMs,
logs, and alarms form being managed from the System Management
Console. For more information regarding network configuration, refer to
MCS 5100 Network Engineering and Deployment Guide
(NN10313-191).
For information regarding maintenance updates, refer to Maintenance
updates on page 19. For information regarding the upgrading of RTP
Media Portal software releases, refer to Full release upgrades
page 27.
Operations, administration, and management
Operations, administration, and management (OAM) of the RTP Media
Portal is available through the System Management Console. This
console provides an overall view into the status of the various
on
NN10265-111 MCS 5100 3.5 Standard 4.0 January 2006
Page 13
Copyright © Nortel Networks Limited 2006
components in the system and administrative access to OAM functions
(including fault and configuration management).
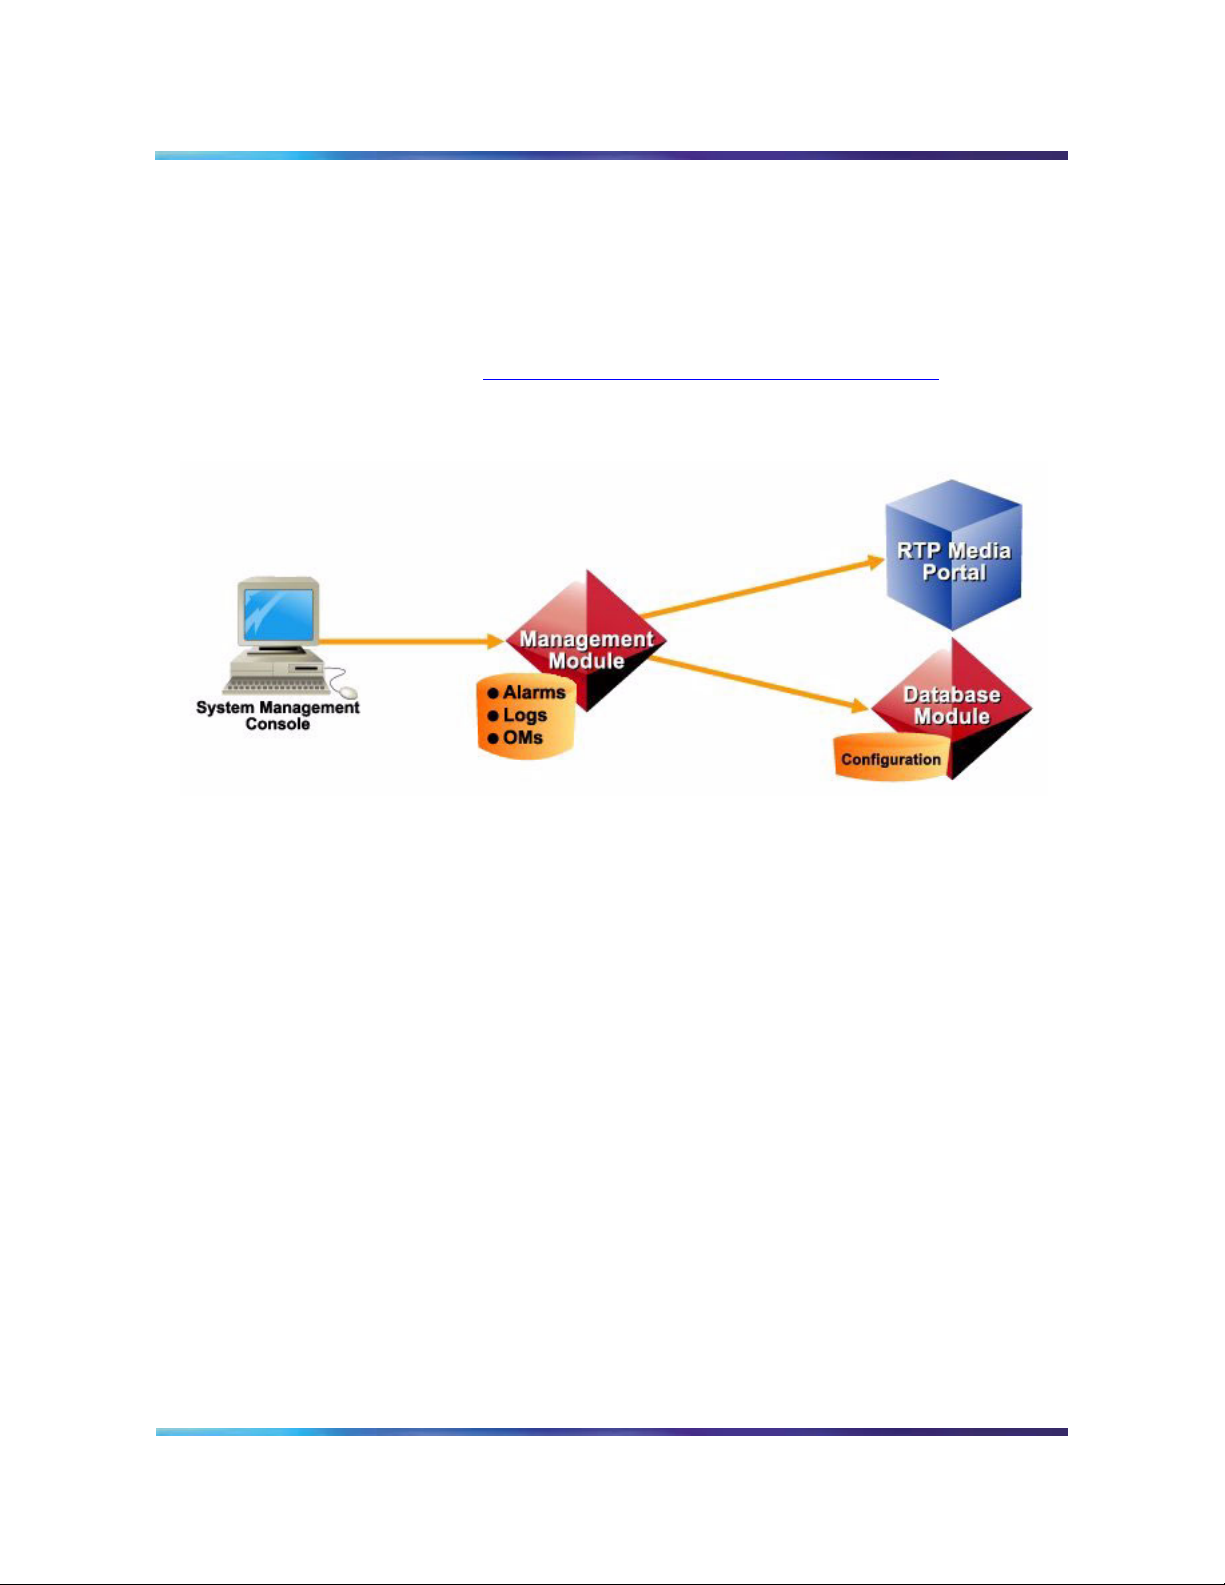
RTP Media Portal OAM data is stored on both the Management Module
and the database. The Management Module stores alarm and log data.
Configuration data is stored locally on the RTP Media Portal as well as
persistently in the database. For a graphical view of these relationships,
please refer to Figure 5, OAM interoperability, on page 13.
Figure 5 OAM interoperability
13
Interfaces
Protocols
For additional information, please refer to MCS 5100System
Management Console User Guide. (NN10273-111)
While in service, the RTP Media Portal interfaces with the network
through the following protocols:
• MPCP, Media Portal Control Protocol, used to control messages
between the SIP Application Module and the RTP Media Portal.
MPCP messages control the making, modification, and breaking of
media session connections.
• RTP, Real-time Transport Protocol, transports real-time media
streams (for example, audio and video) across a packet network.
• RTCP, Real-time Transport Control Protocol, provides a means of
sharing session data (for example, performance data) between
endpoints.
• UDP, User Datagram Protocol, provides data-based media streams
(for example, file transfer).
MCS 5100 RTP Media Portal Basics
Page 14
Copyright © Nortel Networks Limited 2006
c
a
ades
Media Portal
ost
U
otected
k
14
• TCP, Transmission Control Protocol, communicates configuration,
performance data, logs, and alarms (OAM data) between the RTP
Media Portal and the Management Module.
Network interfaces
The RTP Media Portal is comprised of two physical hardware
subcomponents: a single Host CPU, and up to six (6) Media Blades.
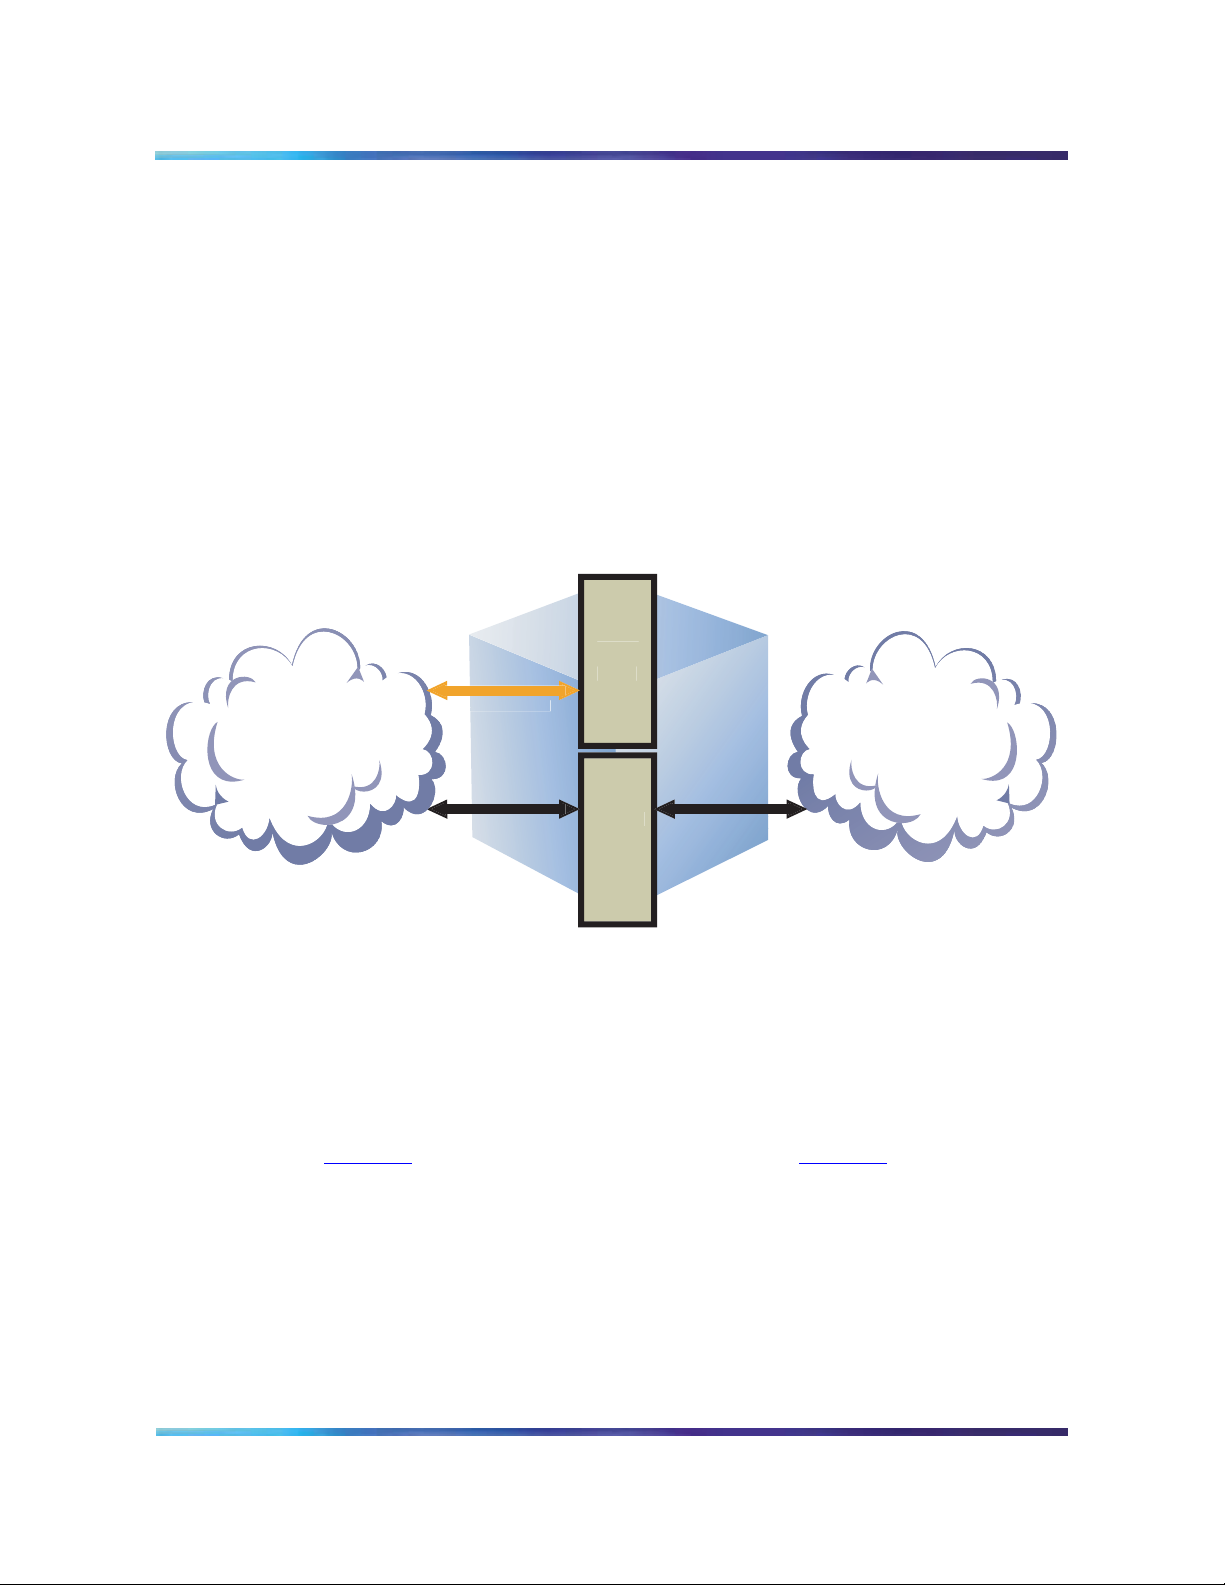
The following figure shows an example of RTP Media Portal
dual-network connectivity between a Protected MCS Network and a
Public Network.
Figure 6 RTP Media Portal operational interface - dual-network deployment
H
CP
r
Networ
MCS
Medi
Bl
li
Network
The Host CPU interacts with the management infrastructure to provide
OAM capabilities. The Host CPU also provides the control capabilities
(MPCP) through which a call controller can access, manipulate, and
apply advanced functions to media streams.
The Media Blades provide the Media Packet Engine for processing
media streams. A Media Blade can be configured for a dual- (see
Figure 6) or single-network deployment (see Figure 7). For
single-network deployment, the Media Blade and Host CPU must be on
the same local network. This enables the distributed Host and Media
Blades to communicate using a non-routable network addressing
scheme.
NN10265-111 MCS 5100 3.5 Standard 4.0 January 2006
Page 15

Copyright © Nortel Networks Limited 2006
Figure 7 RTP Media Portal operational interface - single-network
deployment
15
Host CPU
RTP Media
Portal
Network
Host CPU
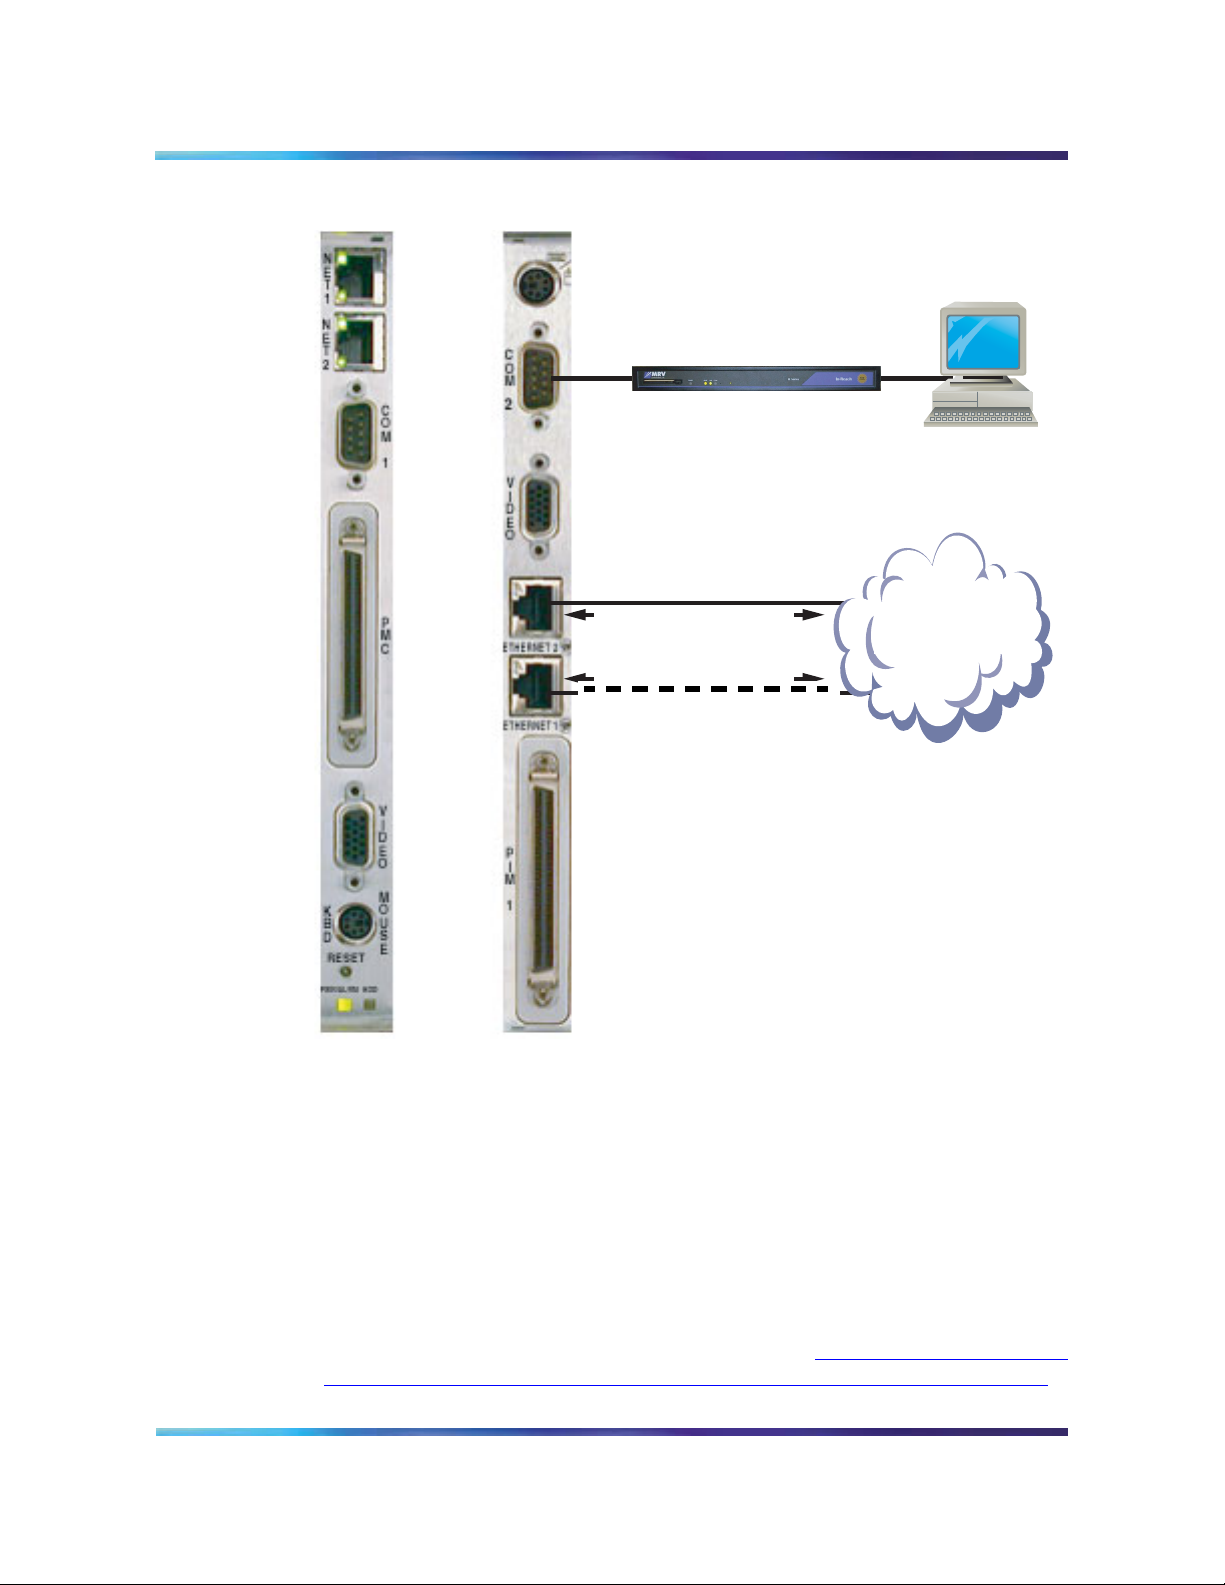
As shown in Figure 8, Control and OAM interface - CPV5370 Host card
and RTP Media Portal, on page 16, the Rear Transition Module for the
host card (CPV5370) provides the following:
• COM2 port for connection to a terminal server and local monitor.
• Two Ethernet ports which provide connectivity to the Protected MCS
Network. The connection carries control and OAM data.
— The Ethernet 1 port is used to provide an active connection.
Control/OAM
Media
Blades
Media
— The Ethernet 2 port provides a standby connection. The standby
ethernet function is enabled by default through the “Activate IP
Failover” property when configuring the RTP Media Portal. (For
additional information, refer to Tabl e 2,
configurable properties, on page 51.)
MCS 5100 RTP Media Portal Basics
RTP Media Portal tab
Page 16
Copyright © Nortel Networks Limited 2006
16
Figure 8 Control and OAM interface - CPV5370 Host card and RTP Media Portal
Front Main
Board
Rear Transition
Module
terminal
server
100BaseT Ethernet
(Standby)
Control and OAM
100BaseT Ethernet
(Active)
Protected MCS
MCP Service
Network
Network
These Ethernet connections carry the following:
• MPCP control messages to communicate with the SIP Application
Module.
• Operations, administration, and maintenance (OAM) data to the
Management Module over TCP.
• Internal communications between Host and Media Blades.
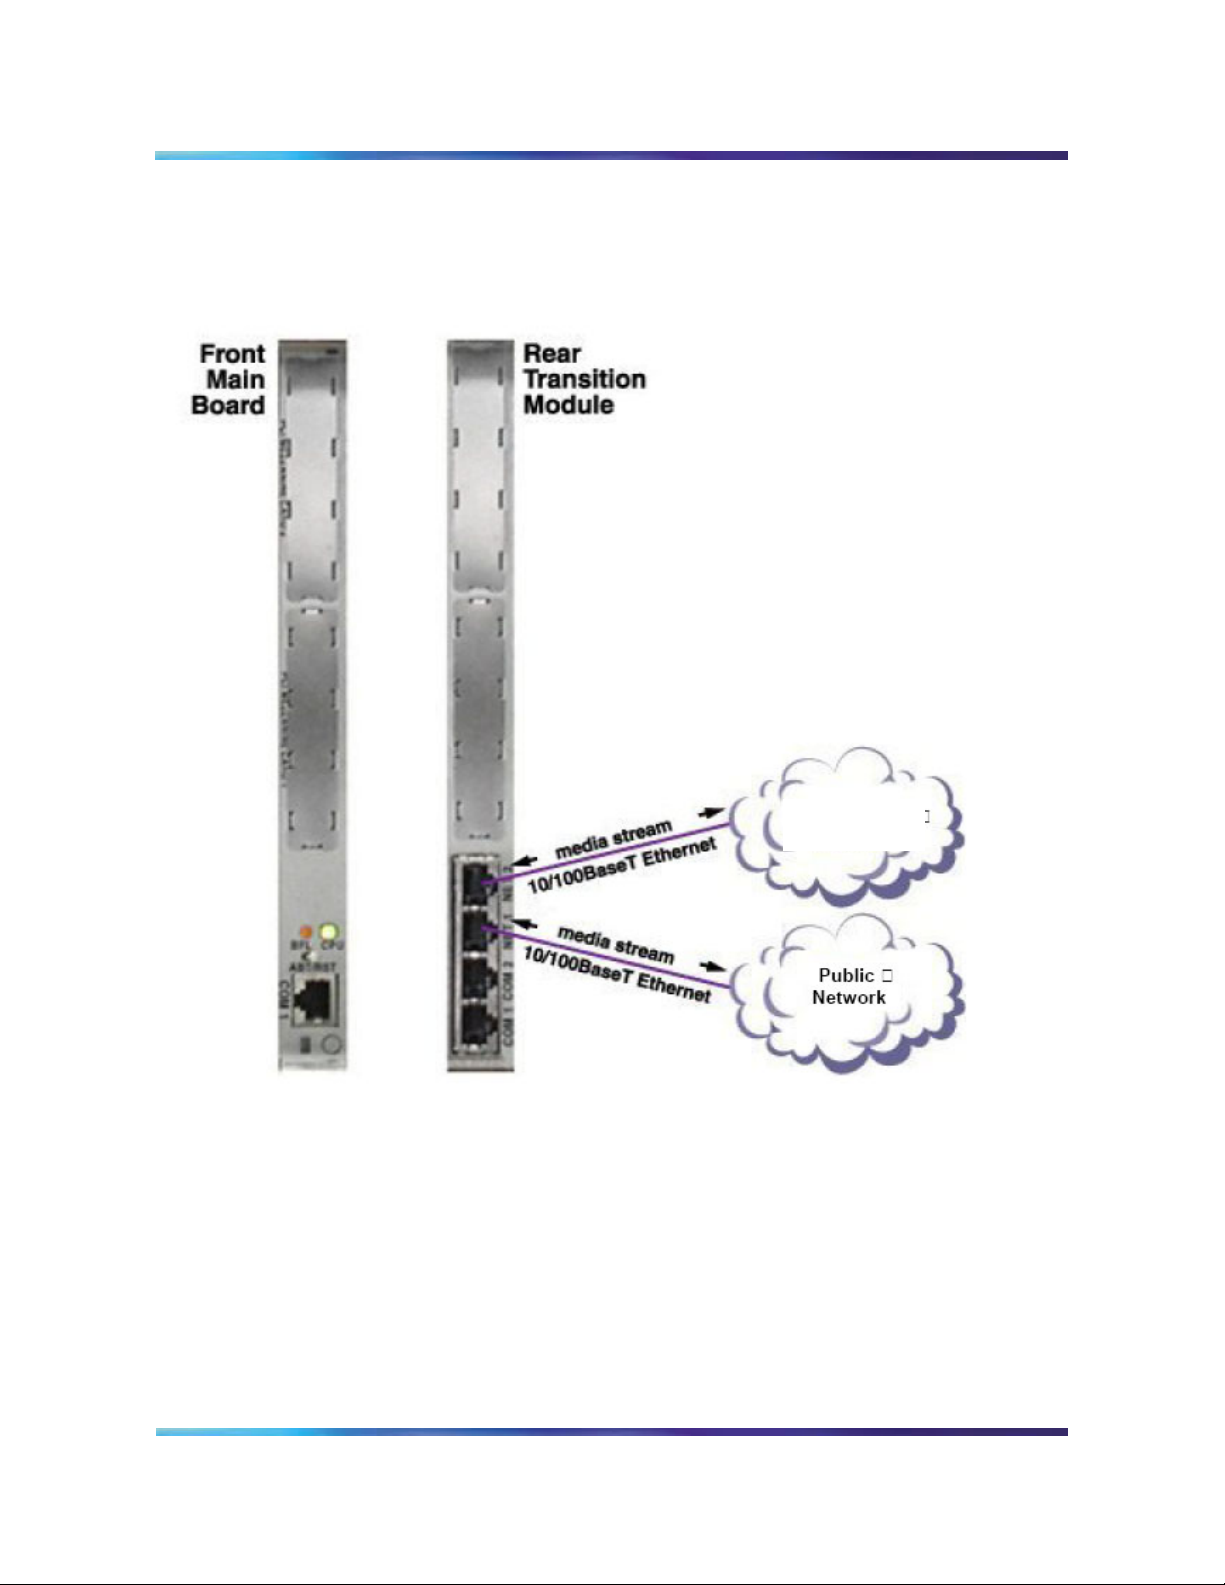
Media blades
Network interfaces on each of the Media Blades (MCPN765) in the RTP
Media Portal provide a path for media streams. Figure 9, Media stream
interface – MCPN765 Media Blade to RTP Media Portal, on page 17
NN10265-111 MCS 5100 3.5 Standard 4.0 January 2006
Page 17
Copyright © Nortel Networks Limited 2006
17
illustrates media stream interfaces in a dual-network deployment
between a Protected MCS Network and Public Network.
Figure 9 Media stream interface – MCPN765 Media Blade to RTP Media Portal
Protected
MCS Network
A Media Blade in the RTP Media Portal consists of the following
input/output cards:
• MCPN765 Front Main Board
• TM-PIMC-0101 Rear Transition Module
There is a 1:1 relationship between the Front Card and Rear Transition
Module.
MCS 5100 RTP Media Portal Basics
Page 18

Copyright © Nortel Networks Limited 2006
The Rear Transition Module contains two, 10/100 BaseT Ethernet
connections for RTP/RTCP/UDP media streams. Each Media Blade
(pair of MCPN765 and TM-PIMC-0101 cards) performs the following
functions:
• Connectivity for RTP/RTCP/UDP media streams.
• Address and Port Discovery (APD) for obscured media endpoints.
• Relay of media packets between end points.
• An array of NAT and/or NAPT functions.
The NET ports are used as following:
• In a single-network deployment, only the NET2 port is used.
• In dual-network deployment, NET2 is used for connectivity to the
Protected MCS Network and NET1 for the other network.
References
The following are referenced in this document and provide additional
information:
18
• MCS 5100 Network Engineering and Deployment, NN10313-191
• MCS 5100 System Management Console User Guide,
NN10273-111
• Provisioning Client User Guide, NN42020-105
• MCS 5100 Fault Management: Alarm and Log Reference,
NN10385-900
• MCS 5100 Accounting Module Basics, NN10279-111
NN10265-111 MCS 5100 3.5 Standard 4.0 January 2006
Page 19

Copyright © Nortel Networks Limited 2006
Maintenance updates
How this chapter is organized
This chapter is organized as follows:
• Functional description on page 19
• Operations, administration, and management on page 19
• Maintenance update tasks on page 20
— Shut down the RTP Media Portal component on page 21
— Update the RTP Media Portal component on page 23
Functional description
This chapter documents upgrade tasks to be performed when
upgrading a maintenance release.
Tools and utilities
Upgrades to the RTP Media Portal are performed through the System
Management Console. Please refer to MCS 5100 System Management
Console User Guide (NN10273-111) for more information.
Operations, administration, and management
The SIP Application Module may try to contact the RTP Media Portal
while the update is in progress, potentially generating error logs. To
minimize impact to service, the RTP Media Portal should first be
SHUTDOWN so that it does not accept new service requests. While
shutting down, the RTP Media Portal will continue to process
established media sessions. These pre-existing media sessions are
cleared as the associated calls end. The RTP Media Portal
automatically transitions into the LOCKED state when there are no
MCS 5100 RTP Media Portal Basics
Page 20

Copyright © Nortel Networks Limited 2006
active media sessions present. When this occurs, it is safe to proceed
with the upgrade without affecting service.
CAUTION
It is possible to update and reboot one RTP Media
Portal in a chassis, while the RTP Media Portal in the
other half of the chassis continues to run the previous
software. Once one RTP Media Portal is updated, the
other RTP Media Portal in the chassis can be
shutdown, locked, updated, and rebooted. This
rolling upgrade will only impact available capacity and
will not cause a service outage.
Updating all RTP Media Portals concurrently will
cause a service outage.
If an upgrade fails during the initial stages, a rollback to the previous
load is performed. A notification of the failure appears within the System
Management Console.
20
If a component upgrade fails after the initial stages of the upgrade, it
does not rollback automatically. A dialog box appears in the
Management Console stating that the upgrade failed and prompts the
administrator to determine whether a rollback should be performed.
Upgrade commands may require several minutes to complete
execution and will initiate a reboot of the RTP Media Portal. The length
of the reboot is approximately 2-3 minutes. Due to reduced capacity,
perform updates during low traffic periods.
Maintenance update tasks
For maintenance updates, administrators may decide to either upgrade
the RTP Media Portal component to the latest maintenance release, or
downgrade the RTP Media Portal component to a previous
maintenance release.
To upgrade or downgrade the RTP Media Portal, the update operation
is issued to the RTP Media Portal from the System Management
Console. This operation will reboot the host card, which in turn reboots
all Media Blades. When the RTP Media Portal recovers from this
operation, it is in service (UNLOCKED) with the updated software.
To avoid any conflicts with service requests from the SIP Application
Module(s), the following procedure describes the steps that must be
NN10265-111 MCS 5100 3.5 Standard 4.0 January 2006
Page 21

Copyright © Nortel Networks Limited 2006
followed when updating a software load for the RTP Media Portal
component.
From the System Management Console
1 Shut down the RTP Media Portal component. For details, please
refer to Shut down the RTP Media Portal component on page 21.
2 Update the software load for the RTP Media Portal component.
For details, please refer to Update the RTP Media Portal
component on page 23.
Shut down the RTP Media Portal component
The following procedure describes how to shutdown the RTP Media
Portal component. To perform these procedures, the administrator must
login to the System Management Console. For detailed procedures on
logging into the System Management Console, please refer to MCS
5100 System Management Console User Guide (NN10273-111).
From the System Management Console
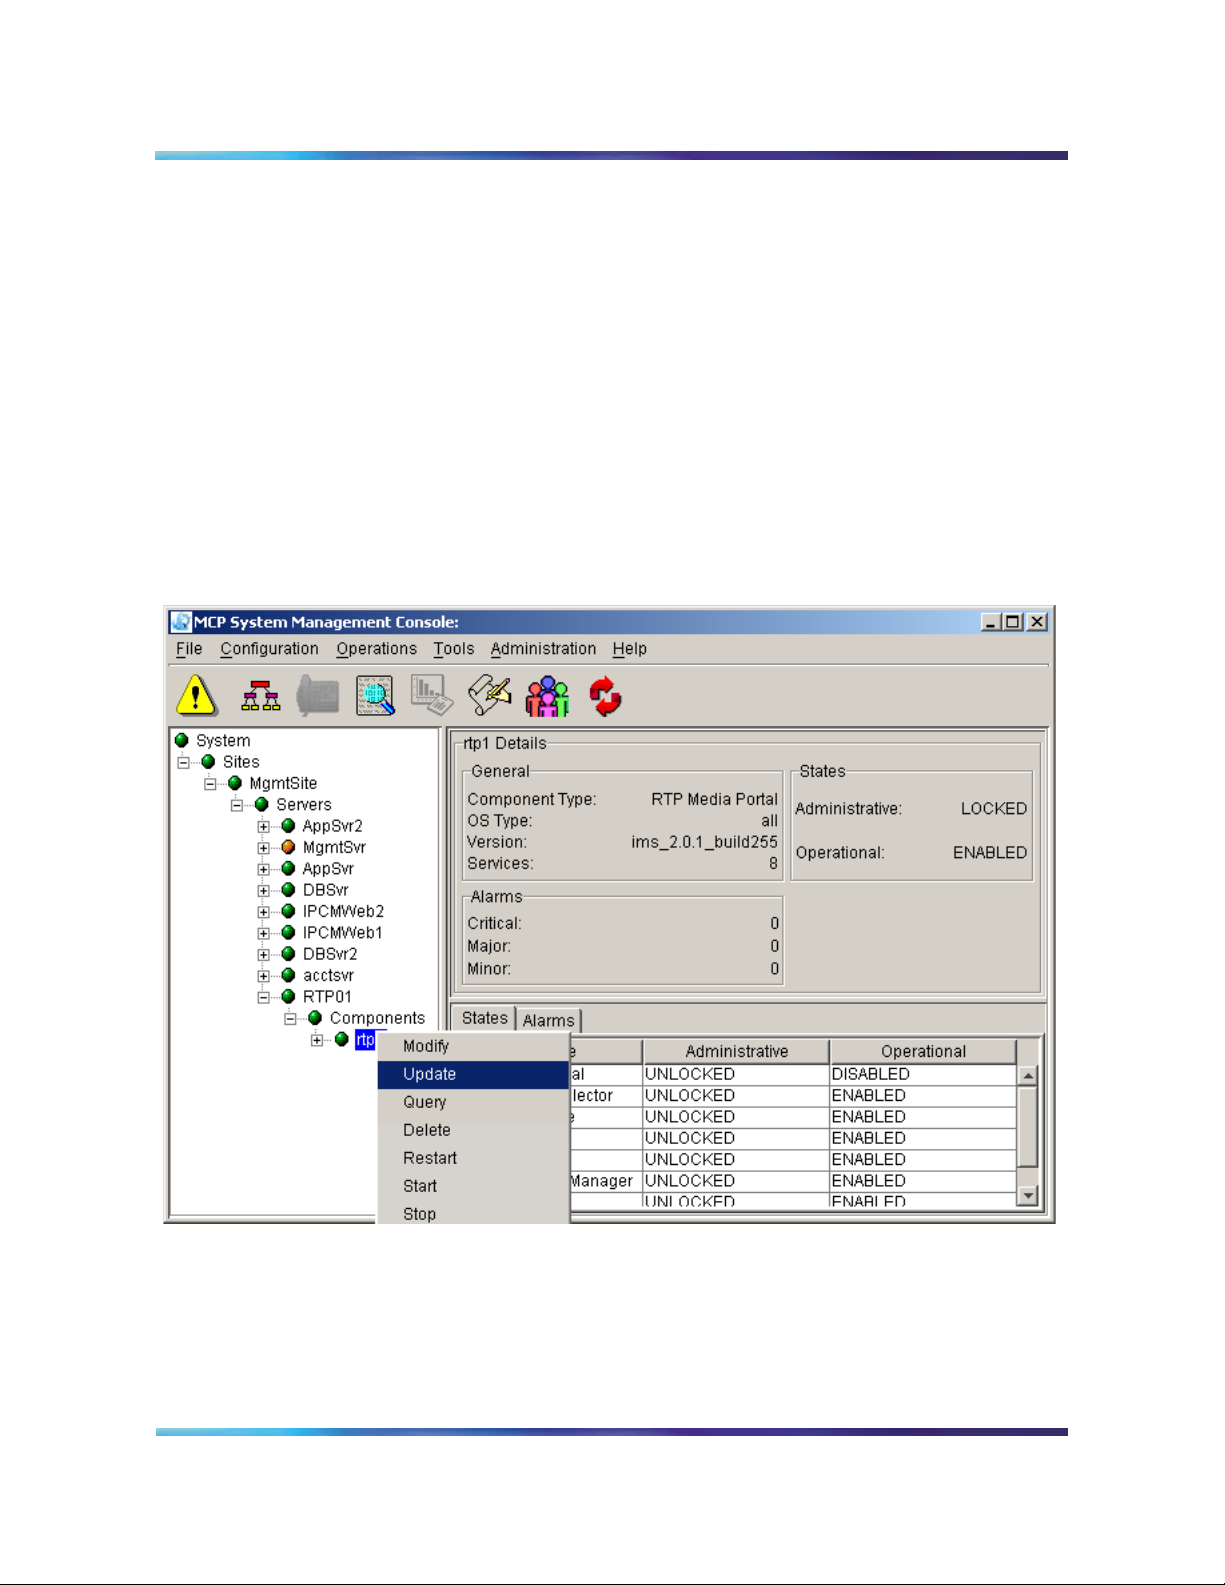
1 In the System tree, right-click on the RTP Media Portal
component.
21
2 From the pop-up menu, select the Shutdown command. You
can also launch the shutdown command by selecting Shutdown
from the pull-down Operations menu.
MCS 5100 RTP Media Portal Basics
Page 22

Copyright © Nortel Networks Limited 2006
Figure 10 RTP Portal Shutdown
22
3 A confirmation window appears. Click on the Yes button to
continue.
Figure 11 RTP Portal Shutdown confirmation
4 The RTP Media Portal component shuts down gracefully and
eventually goes into a LOCKED state when the last active media
session ends (as seen in the General Information Area of the
System Management Console).
NN10265-111 MCS 5100 3.5 Standard 4.0 January 2006
Page 23
Copyright © Nortel Networks Limited 2006
Update the RTP Media Portal component
The following procedure describes how to update a load for the RTP
Media Portal component.
Note: Updates (both upgrades and downgrades) to network
components must be performed in a specific order. Please refer to
MCS 5100Basics (NN10270-100) for further information.
From the System Management Console
1 In the System tree, right-click on the RTP Media Portal
component.
2 From the pop-up menu, select the Update command. This
command may require substantial time to complete execution.
Figure 12 Update from the pop-up menu
23
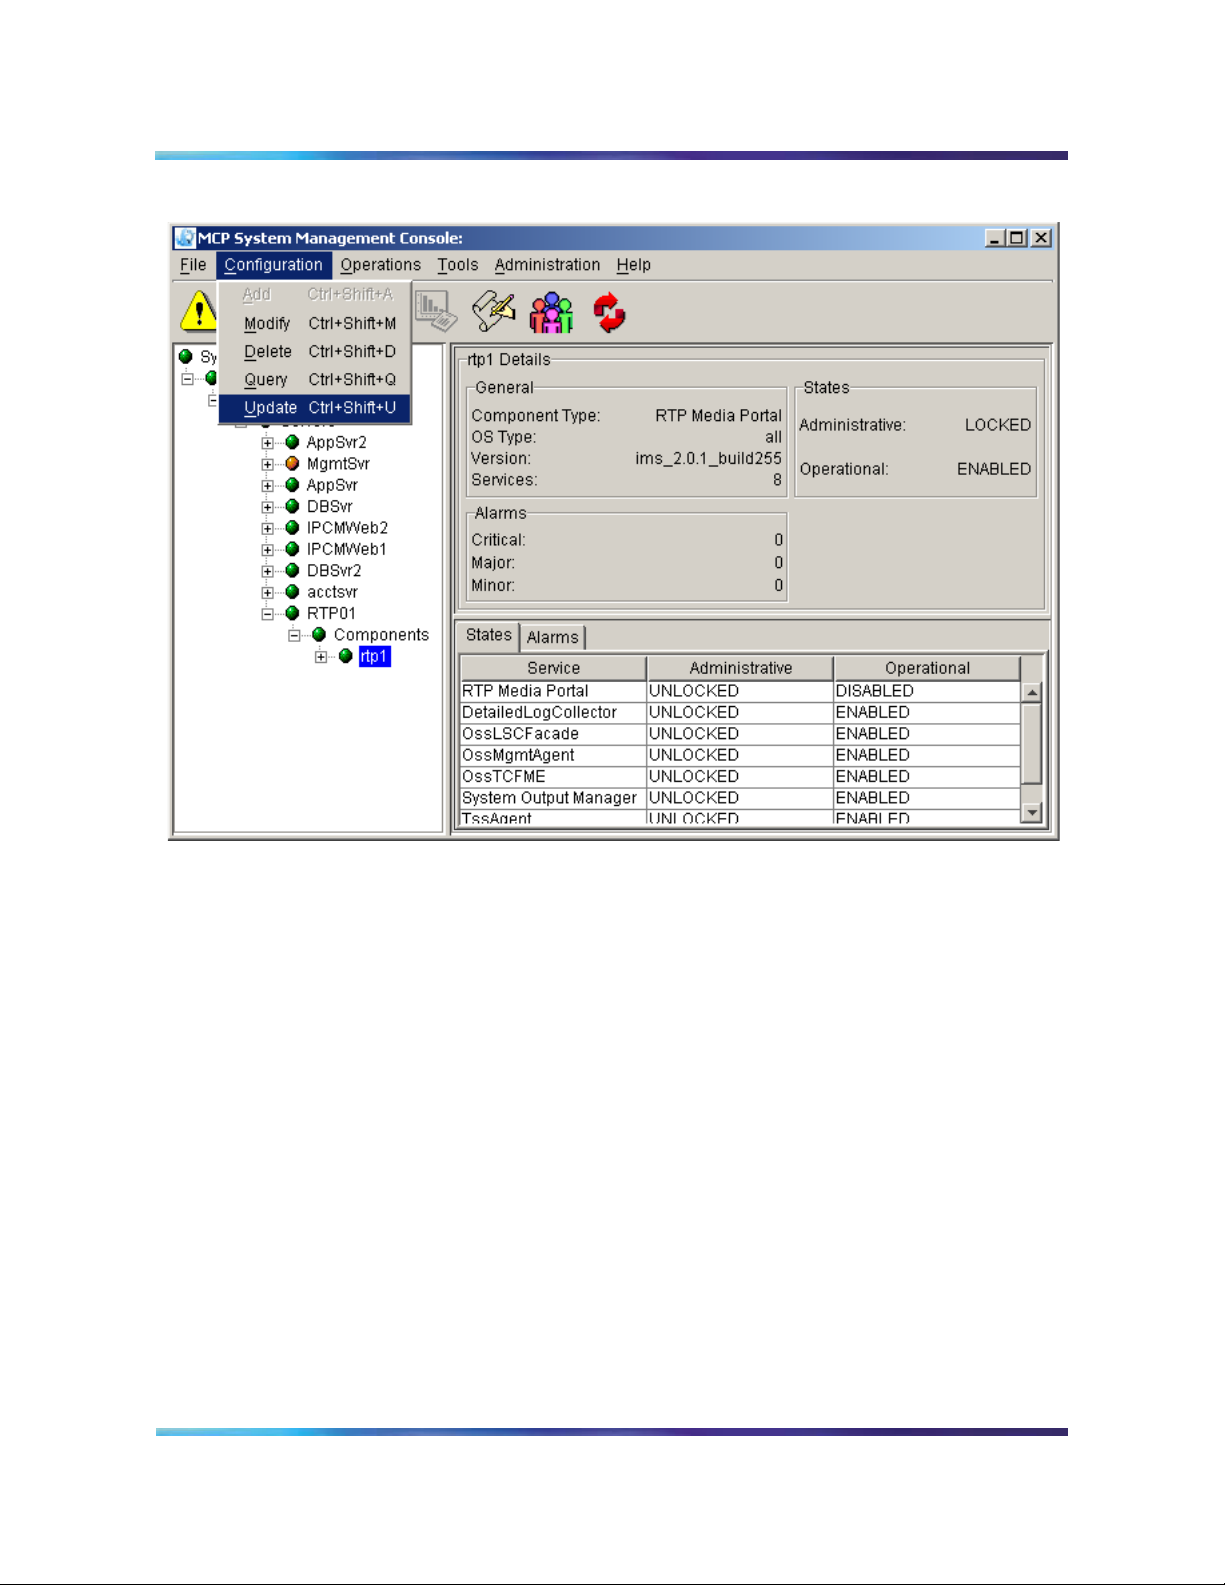
You can also launch the update command from the pull-down
Configuration menu.
MCS 5100 RTP Media Portal Basics
Page 24
Copyright © Nortel Networks Limited 2006
24
Figure 13 Update from the Configuration menu
NN10265-111 MCS 5100 3.5 Standard 4.0 January 2006
Page 25
Copyright © Nortel Networks Limited 2006
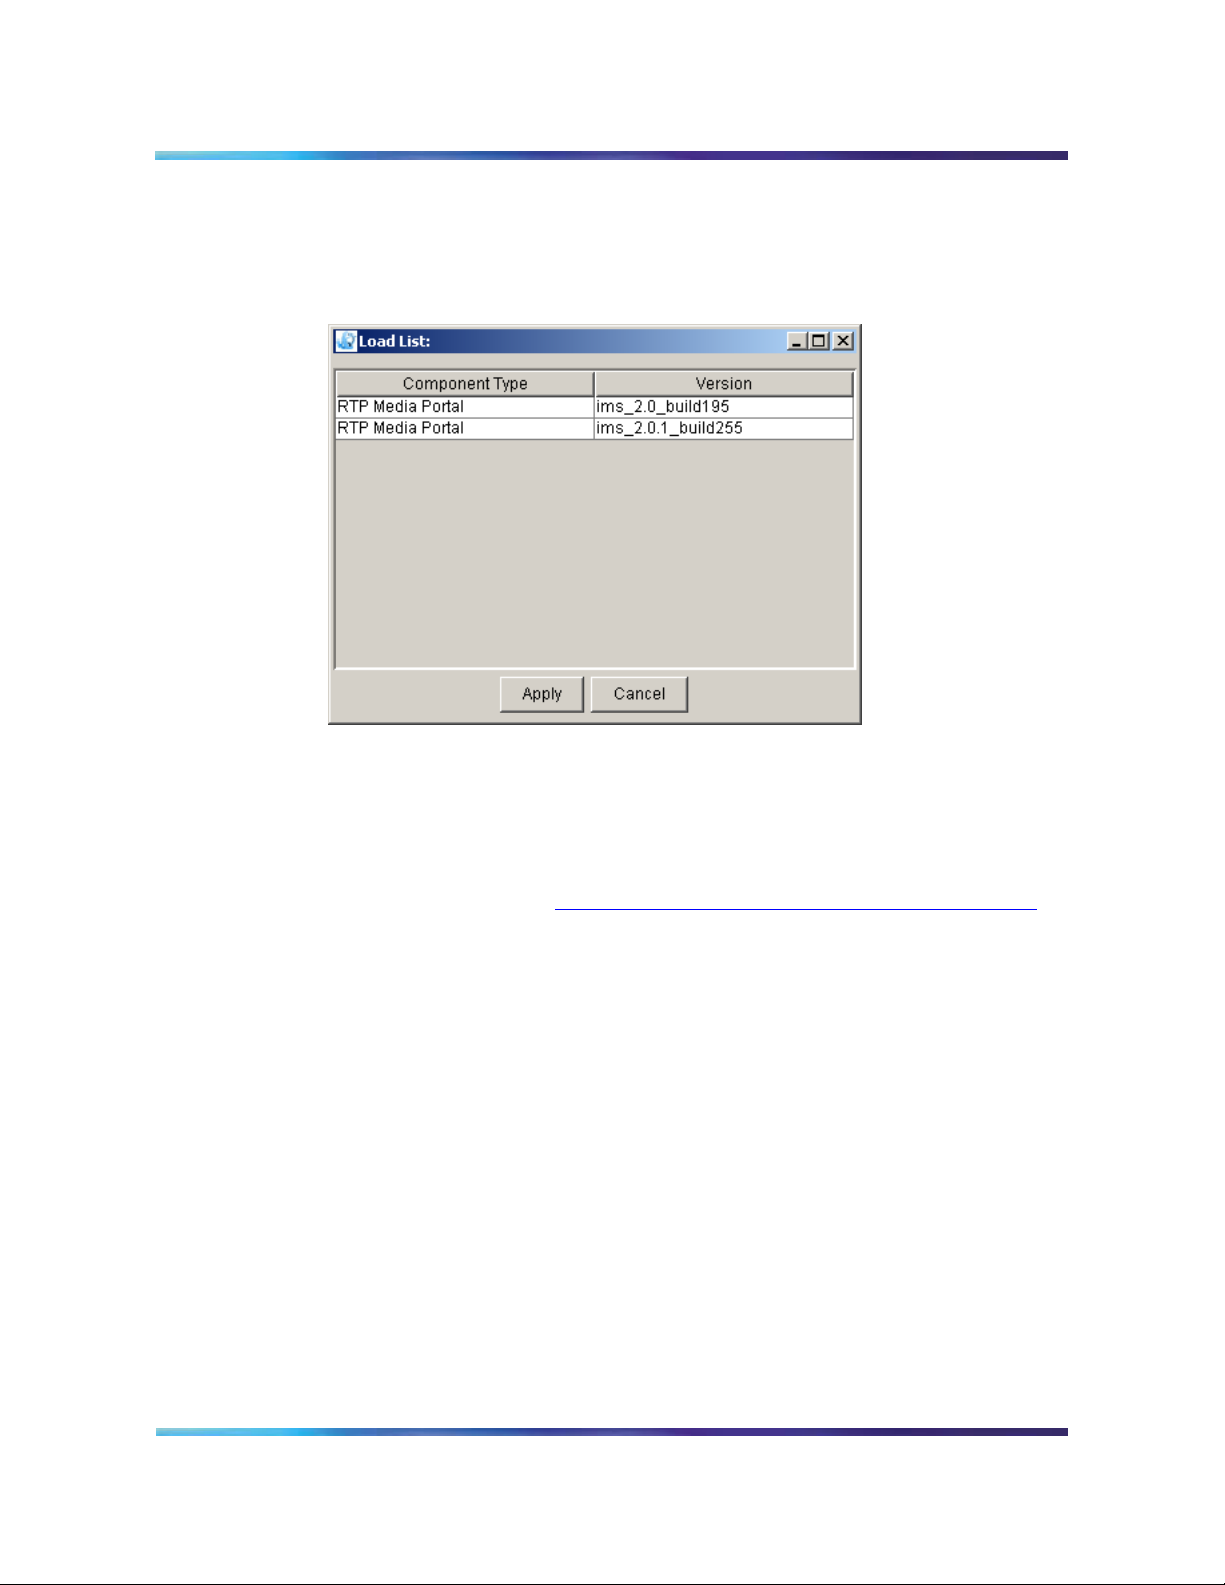
3 The Load List window appears. The window only shows
software loads suitable for the RTP Media Portal component
type, since this is the component type being updated.
Figure 14 Load list for updating
25
4 Select the load version that should be used to update the RTP
Media Portal. Click on the Apply button.
5 The System Management Console displays the RTP Media
Portal configuration window. If required, modify any
configuration properties. For a description of these properties,
please refer to Configuration tabs and properties on page 47.
Make changes as needed, then click on the Apply button to
continue.
6 A window showing the progress of the update appears. Once the
update has completed, the Update successful message appears
showing that the RTP Media Portal component was successfully
updated.
MCS 5100 RTP Media Portal Basics
Page 26

Copyright © Nortel Networks Limited 2006
26
NN10265-111 MCS 5100 3.5 Standard 4.0 January 2006
Page 27

Copyright © Nortel Networks Limited 2006
Full release upgrades
How this chapter is organized
This chapter is organized as follows:
• Functional description on page 27
• Tools and utilities on page 27
• Operations, administration, and management on page 27
• Upgrade tasks on page 28
— Shutdown the target RTP Media Portal component on page 29
— Delete the previous load of the RTP Media Portal component on
page 30
— Upgrade the RTP Media Portal component on page 30
— Deploy the RTP Media Portal component on page 31
Functional description
This chapter documents upgrade tasks to be performed when
upgrading to a full release.
Tools and utilities
Upgrades to the RTP Media Portal are partially performed through the
System Management Console. Please refer to MCS 5100System
Management Console User Guide (NN10273-111) for more
information.
Operations, administration, and management
The SIP Application Module may try to contact the RTP Media Portal
while the update is in progress, potentially generating error logs. To
minimize impact to service, the RTP Media Portal should first be
SHUTDOWN so that it does not accept new service requests. While
shutting down, the RTP Media Portal will continue to process
established media sessions. These pre-existing media sessions are
cleared as the associated calls end. The RTP Media Portal
automatically transitions into the LOCKED state when there are no
MCS 5100 RTP Media Portal Basics
Page 28

Copyright © Nortel Networks Limited 2006
active media sessions present. When this occurs, it is safe to proceed
with the upgrade without affecting service.
CAUTION
It is possible to update and reboot one RTP Media
Portal in a chassis, while the RTP Media Portal in the
other half of the chassis continues to run the previous
software. Once one RTP Media Portal is updated, the
other RTP Media Portal in the chassis can be
shutdown, locked, updated, and rebooted. This
rolling upgrade will only impact available capacity and
will not cause a service outage.
Upgrading all RTP Media Portals concurrently will
cause a service outage.
If an upgrade fails during the initial stages, a rollback to the previous
load is performed. A notification of the failure appears within the System
Management Console.
28
If a component upgrade fails after the initial stages of the upgrade, it
does not rollback automatically. A dialog box appears in the
Management Console stating that the upgrade failed and prompts the
administrator to determine whether a rollback should be performed.
The length of time required to complete an upgrade is approximately 30
minutes. While there is no impact to call-processing services, perform
updates during low traffic periods to minimize reduced capacity.
Upgrade tasks
This section provides instruction for a full release RTP Media Portal
upgrade.
From the System Management Console and terminal window
1 Shutdown the targeted RTP Media Portal component. For
2 Delete the previous load of the RTP Media Portal component
details, please refer to Shutdown the target RTP Media Portal
component on page 29.
from the server. For details, refer to Delete the previous load of
the RTP Media Portal component on page 30.
NN10265-111 MCS 5100 3.5 Standard 4.0 January 2006
Page 29
Copyright © Nortel Networks Limited 2006
3 Perform the upgrade. For details, refer to Upgrade the RTP
Media Portal component on page 30.
4 Deploy the upgraded RTP Media Portal. For details, refer to
Deploy the RTP Media Portal component on page 31.
Shutdown the target RTP Media Portal component
The following procedure describes how to shutdown the target RTP
Media Portal component.
From the System Management Console
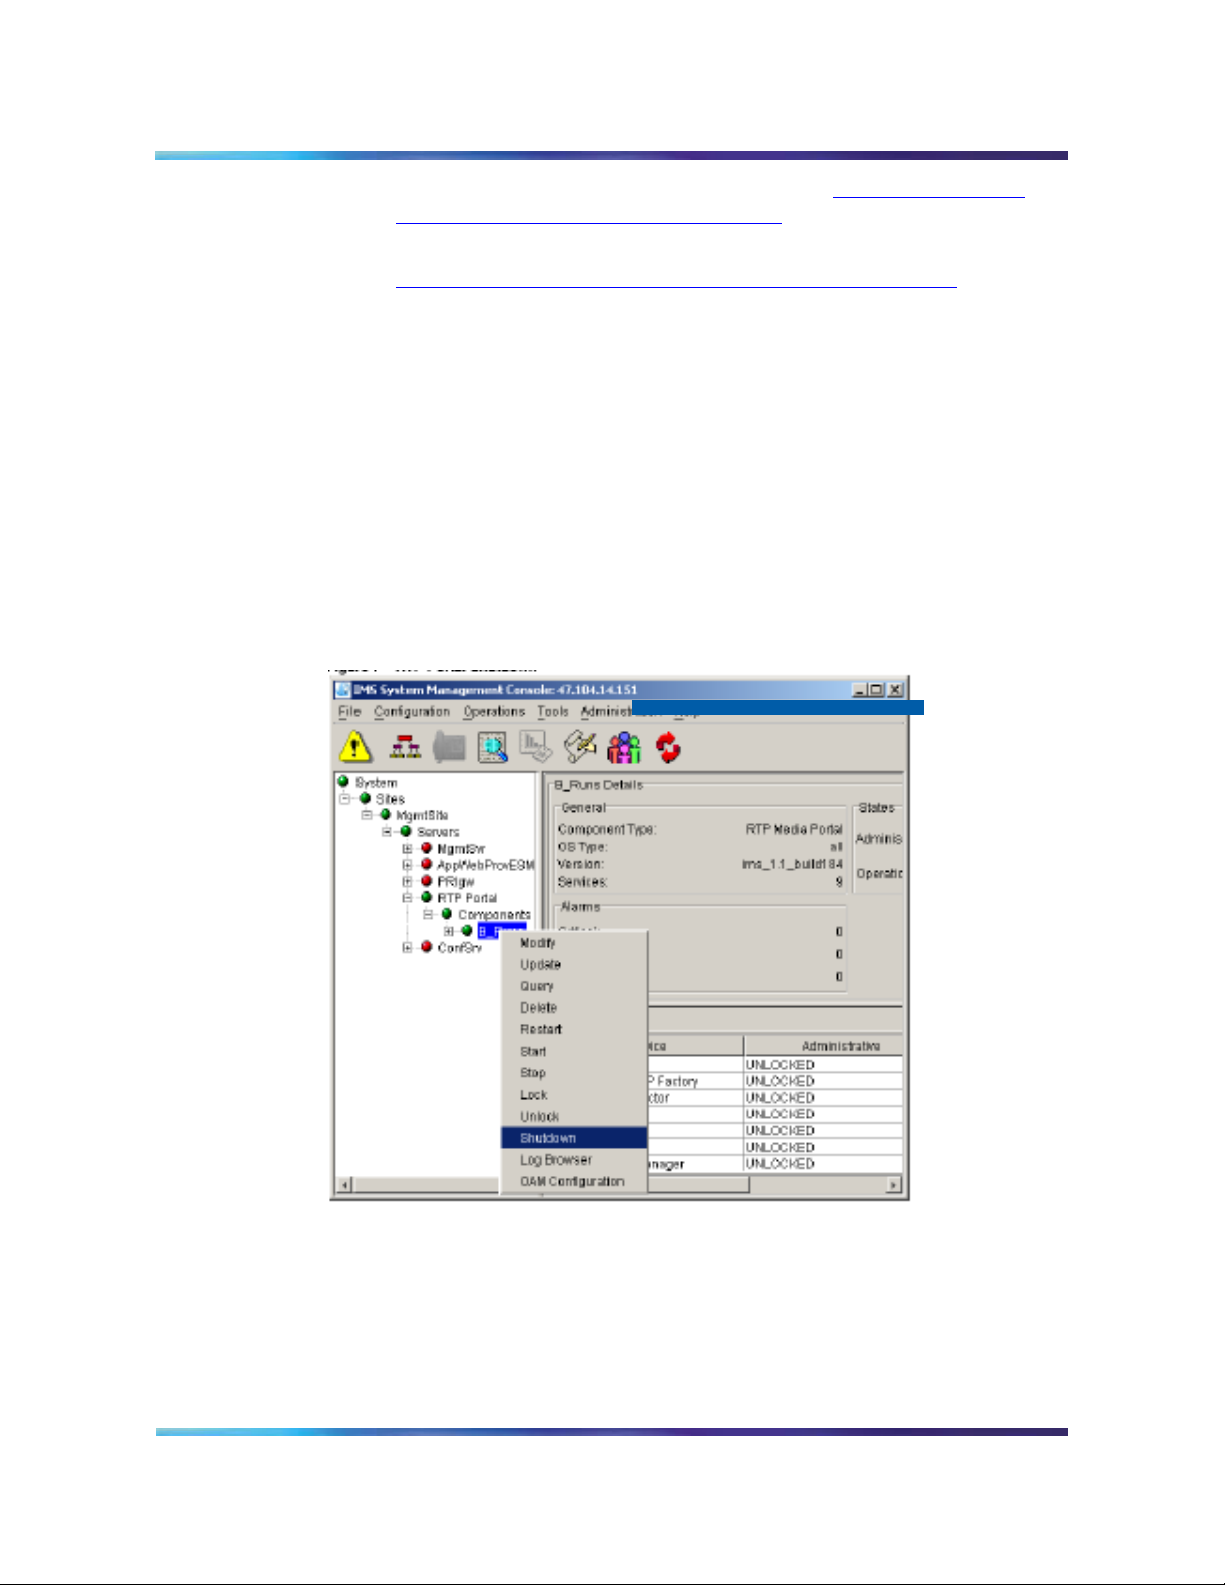
1 In the System tree, right-click on the target RTP Media Portal
component.
2 From the pop-up menu, select the Shutdown command. Users
may also choose the shutdown command from the pull-down
Operations menu.
Figure 15 RTP Portal Shutdown
29
3 A confirmation window appears. Click on the Yes button to
continue.
MCS 5100 RTP Media Portal Basics
Page 30

Copyright © Nortel Networks Limited 2006
Figure 16 RTP Portal Shutdown confirmation
4 The RTP Media Portal component shuts down gracefully and
eventually goes into a LOCKED state when the last active media
session ends (as seen in the General Information Area of the
System Management Console).
Delete the previous load of the RTP Media Portal component
The following procedure describes how to delete the previous load of
the RTP Media Portal component.
From the System Management Console
1 In the system tree, right-click on the target RTP Media Portal
component.
30
2 From the pop-up menu, select the Delete command.
This command removes the previous load, preventing problems
that might occur if an older build is brought into service on top of
a newer one.
Upgrade the RTP Media Portal component
The following procedure describes how to upgrade the RTP Media
Portal load. Use Terminal Server access, or the main console with
keyboard and monitor attached.
From a terminal window
1 Log in as root on the target RTP Media Portal.
2 Insert the upgrade CD into the associated CD-ROM.
3 Mount the CD.
mount /dev/cdrom <Enter>
mnt/cdrom <Enter>
4 Change directory to the top-level directory on the CD.
cd /mnt/cdrom <Enter>
5 Run the install script.
./install <Enter>
6 Change directory.
NN10265-111 MCS 5100 3.5 Standard 4.0 January 2006
Page 31

Copyright © Nortel Networks Limited 2006
cd <Enter>
7 Dismount the CD.
umount /mnt/cdrom <Enter>
8 Eject the upgrade CD from the CD-ROM.
eject <Enter>
9 Remove the upgrade CD from the CD-ROM.
10 Repeat step 2 through step 9 for each upgrade CD.
11 Reboot the RTP Media Portal.
reboot <Enter>
Deploy the RTP Media Portal component
This section provides instruction to deploy the upgraded RTP Media
Portal component.
From the System Management Console
1 In the System tree, right-click Components under the
appropriate RTP Media Portal server.
31
2 From the pop-up menu, select the Add > Component
command.
MCS 5100 RTP Media Portal Basics
Page 32

Copyright © Nortel Networks Limited 2006
Figure 17 Add from the pop-up menu
32
Note, you may also launch the add command from the pull-down
Configuration menu.
NN10265-111 MCS 5100 3.5 Standard 4.0 January 2006
Page 33

Copyright © Nortel Networks Limited 2006
33
Figure 18 Add from the Configuration menu
After Add > Component is selected, you must wait for the load
list to retrieve.
3 The Load List window appears with all available component
loads (except for those components already deployed to the
server).
Figure 19 Load list for adding
4 Select the desired software load version for the RTP Media
Portal. Click on the Apply button.
MCS 5100 RTP Media Portal Basics
Page 34

Copyright © Nortel Networks Limited 2006
5 You will be prompted to configure the RTP Media Portal. For a
description of these tabs and properties, please refer to
Configuring and managing the RTP Media Portal component on
page 43.
6 After entering the appropriate configuration information, enter a
label (six characters or less) in the Service Component Name
field. This label is the component name that appears in the
System tree after deployment. Click on the Apply button. A
progress screen appears while it deploys
7 When deployment completes, and information dialog message
appears to indicate that the action was successful.
34
NN10265-111 MCS 5100 3.5 Standard 4.0 January 2006
Page 35

Copyright © Nortel Networks Limited 2006
Fault management
How this chapter is organized
This chapter is organized as follows:
• Network fault management on page 35
— Fault tolerance on page 35
— Fault management procedures on page 37
— RTP Media Portal alarms on page 38
— Informational and communication logs on page 39
— System logs on page 41
Network fault management
The system handles network fault management through the reporting
of alarms and logs to the Management Module. RTP Media Portal
alarms and logs are viewed from the System Management Console.
For further details related to alarms, please refer to MCS 5100 Fault
Management: Alarm and Log Reference (NN10385-900).
Fault tolerance
The RTP Media Portal provides base capabilities that significantly
improve the performance and reliability of the system in the event of a
fault. These capabilities include:
• Dynamic Pool Registration
— provides the basic mechanism that ensures resource availability
and utilization in the event of a SIP Application Module loss of
communications with gateway controllers. This is accomplished
through the generation of periodic registration messages (over
the control channel) to each of the gateway controllers
configured for the RTP Media Portal. This function works in
tandem with SIP Application Module redundancy to ensure that
RTP Media Portal resources continue to be used in the event of
a SIP Application Module failure. The RTP Media Portal is
configured to advertise its availability with the Standby SIP
Application Module. This configuration enables the Standby SIP
MCS 5100 RTP Media Portal Basics
Page 36

Copyright © Nortel Networks Limited 2006
Application Module to immediately begin utilization of the RTP
Media Portal for session requests whenever a failure condition
occurs on the Active SIP Application Module.
• Idle Session Detection
— enables the RTP Media Portal to detect and recover media
resources associated with idle media sessions. This basic
capability enables the system to recover resources as well as
maintain capacity and performance.
• Media Survivability
— enables the RTP Media Portal to allow media sessions to survive
(through to session completion) in the absence of control
signaling from the SIP Application Module. This capability
enables the system to permit media sessions to continue
through to completion in the wake of loss of communications
with SIP Application Module gateway controllers.
• Host IP Failover
— provides redundant (active/standby) network connectivity for the
RTP Media Portal host card so that if there is a network issue
that affects one of the connections then the other connection will
assume activity. This functionality enables the RTP Media Portal
to maintain control and OAM connectivity in the event of a
network failure.
36
• Shared Resource
— enables the distribution of RTP Media Portal resources through
association with multiple SIP Application Modules. The strategy
of distributing media sessions over multiple RTP Media Portals
strengthens the network's ability to continue processing
sessions in the event of a failure condition. Failures would result
in diminished capacity, but not necessarily a service outage
since many other RTP Media Portals remain available for SIP
Application Modules to utilize.
• Host CPU Recovery
— provides for media stream survival through a Host CPU failure
and subsequent recovery. Upon Host CPU failure, media
streams on subtending Media Blades continue to flow
undisturbed. During the subsequent Host CPU recovery
process, communications are re-established with the Media
Blades and available capacity information is retrieved from each
of the Media Blades. When the RTP Media Portal resumes
NN10265-111 MCS 5100 3.5 Standard 4.0 January 2006
Page 37

Copyright © Nortel Networks Limited 2006
37
service, if offers the remaining available capacity on the Media
Blades for the processing of new sessions.
Fault management procedures
Alarm surveillance
The following procedure lists steps to obtain information regarding
alarms.
From the System Management Console
1 In the System tree, select the appropriate RTP Media Portal
component.
2 The General Information Area (GIA) pane displays general
information, state information, and alarm information for the RTP
Media Portal component.
3 Select the Alarm tab within the GIA pane to view the RTP Media
Portal services and the severity of any alarm which is raised
against it. For alarm severity classification, refer to MCS 5100
Fault Management: Alarm and Log Reference (NN10385-900).
Figure 20 Example of viewing alarm information
MCS 5100 RTP Media Portal Basics
Page 38

Copyright © Nortel Networks Limited 2006
Clearing an alarm
The following procedure lists steps to clear an alarm.
From the System Management Console
1 In the System tree, select the appropriate RTP Media Portal.
component.
2 From the pull-down Tools menu, select Alarm Browser.
3 The Alarm Browser window appears displaying the alarms.
4 Double click the alarm row. Information regarding the alarm and
necessary steps to clear the alarm appears in the information
screen at the bottom of the alarm window.
5 Follow the steps to clear the alarm.
Note: These steps are defined in RTP Media Portal alarms
on page 38.
RTP Media Portal alarms
The following section details how to clear certain alarms that affect the
RTP Media Portal. RTP Media Portal alarms are discussed in further
detail in MCS 5100 Fault Management: Alarm and Log Reference
(NN10385-900).
38
Clearing the RTP101 Alarm (Blade out of service)
1 Verify that you can log in to the media blade from the host card.
If successful, the MCP Service Network connection is OK.
2 Once you are logged in to the media blade, verify the media
blade can reach the default gateway: Ping the gateway IP
address from the media blade. If successful, the network
connection is OK.
3 Contact your next level of support with the results of these tests.
Clearing the RTP102 Alarm (RTP Media Portal Out of Service)
1 Verify that you can log in to the host card. If successful, the MCP
Service Network connection to the host card is OK.
2 Once you are logged in to the host card, verify that each of the
available Media Blades is reachable (ping each media blade).
3 Log in to a Media Blade. Verify the media blade can reach the
default gateway: Ping the gateway IP address from the media
blade. If successful, the network connection is OK.
4 Repeat for each media blade.
5 Contact your next level of support with the results of these tests.
NN10265-111 MCS 5100 3.5 Standard 4.0 January 2006
Page 39

Copyright © Nortel Networks Limited 2006
Clearing the RTP103 Alarm (Best Blade Selection)
1 Verify that you can log in to the media blade from the host card.
If successful, the MCP Service Network connection is OK.
2 Once you are logged in to the media blade, verify the media
blade can reach the default gateway: ping the gateway IP
address from the media blade. If successful, the network
connection is OK.
3 Repeat for each media blade.
4 Verify that the correct number of ports have been configured.
Use the query tool in the System Management Console.
5 Contact your next level of support with the result of these tests.
Clearing the RTP104 Alarm (Port Usage)
1 Wait for at least two audit cycles to see if the alarm is cleared
automatically. An audit cycle has a duration defined by the “Idle
Session Audit Period” property.
2 If the alarm persists, the number of available ports per media
blade and/or the number of Media Blades in the system must be
increased.
39
3 If it is not possible to increase the number of ports or the number
of Media Blades, contact your next level of support.
Clearing the RTP105 Alarm (Host Interface Failure)
1 Ensure network connectivity. Verify interfaces have a good
connection to the network (link LED is lit on the host card).
2 If the alarm persists, contact your next level of support.
Informational and communication logs
Logs assist with the maintenance and operation of the RTP Media
Portal. Information logs begin with the number nine (RTP906), where
communication logs begin with one (RTP108).
• Host Recovery-Mode Initiated, RTP906, produced upon recovery
of the RTP Media Portal Host application upon discovery of
pre-existing media sessions. No action is required.
• Host Recovery- Mode Completed, RTP907, produced during the
Host CPU recovery process to report the number of connections
recovered on a Media Blade. No action is required.
• Host Recovery-Mode Blade Communication Failure, RTP108,
produced during the Host CPU recovery process reporting the
number of Media Blades with which the Host CPU failed to establish
MCS 5100 RTP Media Portal Basics
Page 40

Copyright © Nortel Networks Limited 2006
communications. No action is required. An associated alarm is
raised for each Media Blade which does not respond.
• Blade Recovery-Mode Initiated, RTP909, indicates that the Host
CPU was able to re-establish communication with a subtending
Media Blade and that the Media Blade is supporting connections.
No action is required.
• Blade Recovery-Mode Completed, RTP910, indicates the Host
CPU was able to re-establish communication with a subtending
Media Blade and reports the number of connections the Host CPU
was able to restore control over. No action is required.
• Connection Map Increase Capacity, RTP911, generated
whenever it is necessary for an increase in the size of the Hash Map
used to store connection information. This may indicate a need for
additional RTP Media Portal resources.
• Connection Map Increase Capacity Denied, RTP912, generated
whenever a request for an increase in the size of the Hash Map is
denied. This indicates the Hash Map has already doubled in size,
and prevents unbounded increases in the size of the Connection
Map. Report this log to your next level of support.
40
• Connection Map Increase Capacity Failed, RTP913, generated
whenever a request for an increase in the size of the Hash Map fails
due to some unforeseen software issue. Report this log to your next
level of support.
• Connection Not Found, RTP914, generated whenever an audit is
performed over the Connection Map and a particular connection is
not found on the corresponding Media Blade to match the entry in
the Connection Map. No action is required.
• Connection Idle, RTP915, generated whenever an audit is
performed over the Connection Map and a particular connection is
not found idle on the corresponding Media Blade. No action is
required.
• Connection Exceeds Long Idle Duration, RTP916, generated
whenever an audit is performed over the Connection Map and a
particular connection is found on the corresponding Media Blade
which exceeds the Long Idle Duration threshold. No action is
required.
• Connection Exceeds Long Call Duration, RTP917, generated
whenever an audit is performed over the Connection Map and a
particular connection is found on the corresponding Media Blade
which exceeds the Long Call Duration threshold. No action is
required.
NN10265-111 MCS 5100 3.5 Standard 4.0 January 2006
Page 41

Copyright © Nortel Networks Limited 2006
• Failed to Send Signal, RTP118, generated whenever an attempt to
dispatch an outgoing signal fails. No action is required.
• Failed to Reboot IO Exception, RTP919, generated whenever a
request for reboot of the system fails due to a software request for
said reboot. Report this log to your next level of support.
• No Blades Configured, RTP920, generated whenever the Media
Portal initiates in a state in which no Media Blade information has
been configured from the System Management Console. No action
is required.
• Unknown Proxy, RTP921, generated whenever a request for
service is made from an unknown proxy, one which is not datafilled
for this Media Portal. No action is required.
• Unable to Register with Proxy, RTP922, generated whenever an
attempt to send a registration message to a proxy fails. No action is
required.
• Host Interface Status File Problem, RTP923, generated during a
failed attempt to establish a file handle for the interface status file,
read from it, or it does not exist. Verify the host IP failover setting is
properly set from the System Management Console. Report this log
to your next level of support.
41
System logs
System logs are discussed in detail in MCS 5100 Fault Management:
Alarm and Log Reference (NN10385-900).
MCS 5100 RTP Media Portal Basics
Page 42

Copyright © Nortel Networks Limited 2006
42
NN10265-111 MCS 5100 3.5 Standard 4.0 January 2006
Page 43

Copyright © Nortel Networks Limited 2006
Configuration management
How this chapter is organized
This chapter is organized as follows:
• Tools and utilities on page 43
• Configuring and managing the RTP Media Portal component on
page 43
— Deploying the RTP Media Portal server on page 44
— Adding the RTP Media Portal component on page 44
— Querying or modifying RTP Media Portal configuration
properties on page 46
— Configuration tabs and properties on page 47
Tools and utilities
Deployment and configuration of the RTP Media Portal is performed by
the System Management Console and the Provisioning Client. Please
refer to MCS 5100 System Management Console User Guide
(NN10273-111) and Provisioning Client User Guide (NN42020-132) for
more information.
The add operation on the System Management Console allows
administrators to initially deploy and configure the RTP Media Portal
component. The query operation is used for viewing configuration
property values. The modify operation is used for changing the values
of configuration properties any time after initial deployment.
Configuring and managing the RTP Media Portal component
This section provides procedures relevant to configuring the RTP
Media Portal component.
MCS 5100 RTP Media Portal Basics
Page 44

Copyright © Nortel Networks Limited 2006
Deploying the RTP Media Portal server
For information regarding how to deploy and configure an RTP Media
Portal server, please refer to MCS 5100 System Management Console
User Guide (NN10273-111).
Adding the RTP Media Portal component
This procedure assumes that the server on which the RTP Media Portal
will be deployed, has already been configured. For example, Figure 21,
Add from the pop-up menu, on page 44 shows the RTP Media Portal
component being deployed onto the previously configured RTP Media
Portal server.
From the System Management Console
1 In the System tree, right-click Components under the
appropriate RTP Media Portal server.
2 From the pop-up menu, select the Add > Component
command.
Figure 21 Add from the pop-up menu
44
Note: You may also launch the add command from the
pull-down Configuration menu.
NN10265-111 MCS 5100 3.5 Standard 4.0 January 2006
Page 45

Copyright © Nortel Networks Limited 2006
45
Figure 22 Add from the Configuration menu
After Add > Component is selected, you must wait for the load
list to retrieve.
3 The Load List window appears with all available component
loads (except for those components already deployed to the
server).
Figure 23 Load list for adding
4 Select the desired software load version for the RTP Media
Portal. Click on the Apply button.
5 You will be prompted to configure the RTP Media Portal. For a
description of these tabs and properties, please refer to
Configuration tabs and properties
6 After entering the appropriate configuration information, enter a
label (six characters or less) in the Service Component Name
field. This label is the component name that appears in the
System tree after deployment. Click on the Apply button. A
progress screen appears while it deploys.
MCS 5100 RTP Media Portal Basics
on page 47.
Page 46

Copyright © Nortel Networks Limited 2006
46
7 When deployment completes, and information dialog message
appears to indicate that the action was successful.
Querying or modifying RTP Media Portal configuration properties
Use the following procedure to query or modify the configuration
properties for the RTP Media Portal component.
From the System Management Console
1 In the System tree, find the appropriate RTP Media Portal
component to be queried or modified.
2 To query the configuration properties, right-click the root level
RTP Media Portal component and select Query.
Figure 24 Query RTP Media Portal configuration properties
The Query RTP Media Portal window displays the properties.
However, no configuration changes are permitted in the window.
3 To modify the configuration properties of an RTP Media Portal
component, do the following:
NN10265-111 MCS 5100 3.5 Standard 4.0 January 2006
Page 47

Copyright © Nortel Networks Limited 2006
47
a Right-click the root level RTP Media Portal component and
click Shutdown to shutdown and eventually lock the
component so configuration properties can be modified.
Note: After completing the shutdown, the RTP Media
Portal component’s media resources are no longer
available for new sessions and its state is automatically
transitioned to LOCKED once all existing in-progress
sessions are released.
b Once the RTP Media Portal component is LOCKED,
right-click the root level RTP Media Portal component and
click Modify.
Figure 25 Modify RTP Media Portal configuration properties
c Modify the properties as required and click OK. For
information on the configuration properties, please refer to
Configuration tabs and properties on page 47.
Configuration tabs and properties
The following figure shows the configurable properties of the System
Output Manager tab.
MCS 5100 RTP Media Portal Basics
Page 48

Copyright © Nortel Networks Limited 2006
Figure 26 System Output Manager tab
The following table details the configurable properties of the System
Output Manager tab.
Table 1 System Output Manager tab configurable properties
Configuration
Property Format Description
48
Send to File Type: String
Range: Null, 1-500
characters
Name of file that
additional detailed
logs should be sent
to.
Default:
SystemOutLog
Number of Backup
Logfiles
Type: Integer
Range: N/A
Number of logfiles
that should be kept.
Default: 10
Maximum Size of a
Log File
Type: Integer (bytes)
Range:
200000-2147483647
Default: 200000
Maximum size of the
log file in bytes.
When this size is
reached, the log file
is rotated.
The following figures show the configurable properties of the RTP Media Portal tab.
NN10265-111 MCS 5100 3.5 Standard 4.0 January 2006
Page 49

Copyright © Nortel Networks Limited 2006
Figure 27 RTP Media Portal tab (1 of 3)
49
MCS 5100 RTP Media Portal Basics
Page 50

Copyright © Nortel Networks Limited 2006
Figure 28 RTP Media Portal tab (2 of 3)
50
NN10265-111 MCS 5100 3.5 Standard 4.0 January 2006
Page 51

Copyright © Nortel Networks Limited 2006
Figure 29 RTP Media Portal tab (3 of 3)
51
The following table details the configurable properties of the RTP Media
Por tal tab.
Table 2 RTP Media Portal tab configurable properties (Sheet 1 of 8)
Configuration property Format Description
Call Legs Type: String
Range:
4096-MaxInt
Defines the bounds for internal
data structures. This value is not
normally changed. Default
recommended.
Default: 4096
Domain Type: String
Range: 1-20
characters
Domain in which the RTP Media
Portal will operate.
Not currently used.
Default:
<ForFutureUse>
(Sheet 1 of 8)
MCS 5100 RTP Media Portal Basics
Page 52

Copyright © Nortel Networks Limited 2006
52
Table 2 RTP Media Portal tab configurable properties (Sheet 2 of 8)
Configuration property Format Description
RTP Portal IP Type: String
Range: 7-15
characters
Default: 0.0.0.0
AppSvr IP Type: String
Range: 7-15
characters
Default: 0.0.0.0
Port Type: String
Range:
1025-65535
Default: 3903
Discovery Probe Time
Period
Type: String
Range:
0-3600000
Default: 60000
MCP Service Network IP Address
of the RTP Media Portal Host.
Identifies a specific Host.
Note: This value must be unique.
MCP Service Network IP Address
of SIP Application Module to
which this RTP Media Portal is
assigned.
Port on which the SIP Application
Module is listening for MPCP
messaging from the RTP Media
Portal. It must match the
associated setting on the SIP
Application Module.
Note: The use of the default value
for this property is highly
recommended.
Controls the frequency (in
milliseconds) of MPCP
registration messages (RSIPs)
sent from the RTP Media Portal to
the SIP Application Module in the
absence of MPCP messaging
from the SIP Application Module.
Host Receive Port Type: String
Range:
1025-65535
Default: 3904
(Sheet 2 of 8)
NN10265-111 MCS 5100 3.5 Standard 4.0 January 2006
Port on which the RTP Media
Portal listens for MPCP
messaging from the SIP
Application Module.
Note: The use of the default value
for this property is highly
recommended.
Page 53

Copyright © Nortel Networks Limited 2006
53
Table 2 RTP Media Portal tab configurable properties (Sheet 3 of 8)
Configuration property Format Description
Polltimer Delay Type: String
Range: 0-65535
Default: 20000
milliseconds
Polltimer Interval Type: String
Range: 0-65535
Default: 65000
milliseconds
Minor Port Usage Alarm
Level
Type: Percent
Range: 0-100
Default: 50
Time span (in milliseconds)
required for startup and
initialization of the Media Blades.
The Host waits this period of time
before attempting to contact the
Media Blades.
Note: The use of the default value
for this property is highly
recommended.
Interval (in milliseconds) at which
the Host periodically polls the
Media Blades to ensure they are
still available. (Periodic checks
that make sure the media blade is
still up.)
Note: The use of the default value
for this property is highly
recommended.
The percent usage at which the
number of ports used on an RTP
Media Portal (over all Media
Blades) causes a minor
RTP104/RTP105 alarm.
Major Port Usage Alarm
Level
Critical Port Usage Alarm
Level
MCS 5100 RTP Media Portal Basics
Type: Percent
Range: 0-100
Default: 80
Type: Percent
Range: 0-100
Default: 90
(Sheet 3 of 8)
The percent usage at which the
number of ports used on an RTP
Media Portal (over all Media
Blades) causes a major
RTP104/RTP105 alarm.
The percent usage at which the
number of ports used on the an
RTP Media Portal (over all Media
Blades) causes a critical
RTP104/RTP105 alarm.
Page 54

Copyright © Nortel Networks Limited 2006
54
Table 2 RTP Media Portal tab configurable properties (Sheet 4 of 8)
Configuration property Format Description
Net1 Netmask Type: IP address
Range: N/A
Default:
255.255.255.0
(Used for the
Media Blades,
not for the host
card.)
Net2 Netmask Type: IP address
Range: N/A
Default:
255.255.255.0
(Used for the
Media Blades,
not for the host
card.)
Default Gateway Type: IP Address
Range: N/A
Default: 0.0.0.0
(Used for the
Media Blades,
not for the host
card.)
The Net1 Netmask is the netmask
used for routing on the network
that is reachable by the NET1
interface on the media card. This
is only used in dual-network
configurations.
The Net2 Netmask is the netmask
used for routing on the network
that is reachable by the NET2
interface on the media card.
The Default Gateway is the
gateway router to the rest of the
world (the default route).
Note: If this value is not
configured, the RTP Media Portal
will be unable to provide service.
The RTP Media Portal will only
provide service if the Media
Blades can communicate with the
specified Default Gateway.
Chassis # Type: String
Range: 0-255
Default: 1
(Sheet 4 of 8)
NN10265-111 MCS 5100 3.5 Standard 4.0 January 2006
Chassis identifier used to identify
a specific CPX8216T chassis.
This information is used by
configuration scripts to
synchronize RTP Media Portal
configuration across multiple
CX8216T chassis. Must be unique
per chassis. Must match the
Chassis # assigned to the Media
Blades during the staging of the
RTP Media Portal hardware.
Page 55

Copyright © Nortel Networks Limited 2006
55
Table 2 RTP Media Portal tab configurable properties (Sheet 5 of 8)
Configuration property Format Description
Idle Session Audit Period Type: String
Range:
0-3600000
Default: 300000
(ms)
Long Idle Duration Type: String
Range: 0-65535
Default: 24
Long Call Duration Type: String
Range: 0-65535
Default: 576
Static RTP Ports Type: Boolean
Range: true/false
Default: false
The period of the audit that runs to
detect idle media sessions on the
media blade.
This represents the maximum
amount of time that a RTP Media
Portal resource may remain
validly idle. This has units of
number of Idle Session Audit
Periods.
This represents the maximum
amount of time that an RTP Media
Portal resource may remain active
in a media session. This has units
of number of Idle Session Audit
Periods.
Boolean indicating whether the
RTP Media Portal should perform
static fixed port
allocation/management, or
dynamic randomized port
allocation/management.
MCS 5100 RTP Media Portal Basics
Note: When this parameter is
selected, the media blade's
configuration parameter "Number
Ports" is disregarded and all ports
in the range from “Min Port Value”
to “Max Port Value” are allocated
for usage. All even-numbered
ports in the specified range are
used for RTP streams and the
odd-numbered ports are used for
RTCP streams.
(Sheet 5 of 8)
Page 56

Copyright © Nortel Networks Limited 2006
56
Table 2 RTP Media Portal tab configurable properties (Sheet 6 of 8)
Configuration property Format Description
Activate IP Failover Type: Boolean
Range: true/false
Default: true
Enables the RTP Media Portal
Host to monitor the status of the
MCP Service Network Interface
and react accordingly. This basic
capability enables the system to
maintain service availability in the
wake of MCP Service Network
failures. Whenever an RTP Media
Portal Host detects that it is having
problems with its MCP Service
Network interface, the Host
switches to the other available
MCP Service Network interface.
Note: There are two tests
associated with the activation of
Host IP Failover: a carrier sense
test and an optional network (ping)
test. Upon activation of Host IP
failover, the carrier sense test is
automatically provided. Enabling
of the optional network test is
controlled by the “Activate IP
Failover NW Test” configuration
parameter. Enabling the optional
network test will generate a
periodic ping to the default
gateway on the MCP Service
Network which was configured on
the Host during installation and
commissioning.
Activate IP Failover NW Test Type: Boolean
Range: true/false
Default: false
(Sheet 6 of 8)
NN10265-111 MCS 5100 3.5 Standard 4.0 January 2006
This configuration parameter is
associated with the “Activate IP
Failover” configuration parameter.
Please refer to Note in description
of the “Activate IP Failover”
configuration parameter for
details.
Page 57

Copyright © Nortel Networks Limited 2006
57
Table 2 RTP Media Portal tab configurable properties (Sheet 7 of 8)
Configuration property Format Description
Net1 Media IP Type: IP Address
Range: 7-15
characters
Default: 0.0.0.0
Net2 Media IP Type: IP Address
Range: 7-15
characters
Default: 0.0.0.0
Number Ports Type: Positive
Integer
Range: 0-65535
Default: 20
Blade Name Type: Text
Range:
blade1-blade16
The Net1 Media IP address of this
particular media blade. Repeated
for each media blade.
The Net2 Media IP address for
this particular media blade.
Repeated for each media blade.
Defines the size of the media
resource pool for each media
blade. The value is specified by
System Engineering and based on
call types and traffic patterns. The
default should change in
accordance with the factors
described above.
String describing this particular
media blade. Repeated for each
media blade.
Default: blade1,
blade 2, etc.
Min Port Value Type: Positive
Integer
Range: 0-65535
Default: 40000
Max Port Value Type: Positive
Integer
Range: 0-65535
Default: 60000
(Sheet 7 of 8)
MCS 5100 RTP Media Portal Basics
Note: This field is not
configurable.
Minimum port range value.
Maximum port value.
Page 58

Copyright © Nortel Networks Limited 2006
58
Table 2 RTP Media Portal tab configurable properties (Sheet 8 of 8)
Configuration property Format Description
InsertPortalWhenAnyBFW Type: Boolean
Range: true/false
Default: false
LocationBasedInsertRules Type: Boolean
Range: true/false
Default: false
(Sheet 8 of 8)
If set to false, a RTP Media Portal
is not used for calls when two
Firewall clients are in the same
Domain. If set to true, a RTP
Media Portal is used when one or
both clients in the same Domain
are behind a Firewall.
If set to true, RTP Media Portal
Location Based Insertion Rules
and user-defined Routability
Groups are activated.
NN10265-111 MCS 5100 3.5 Standard 4.0 January 2006
Page 59

Copyright © Nortel Networks Limited 2006
Accounting management
Functional description
The RTP Media Portal does not perform accounting management.
However, an indication that an RTP Media Portal component was used
during a session is provided in the accounting records.
For more information on accounting, please refer to MCS 5100
Accounting Module Basics (NN10279-111).
MCS 5100 RTP Media Portal Basics
Page 60

Copyright © Nortel Networks Limited 2006
60
NN10265-111 MCS 5100 3.5 Standard 4.0 January 2006
Page 61

Copyright © Nortel Networks Limited 2006
Performance management
Functional description
RTP Media Portal performance is monitored through the System
Management Console by viewing Operational Measurements (OMs).
For more information on RTP Media Portal OMs and the viewing of
these OMs, please refer to MCS 5100 System Management Console
User Guide (NN10273-111).
MCS 5100 RTP Media Portal Basics
Page 62

Copyright © Nortel Networks Limited 2006
62
NN10265-111 MCS 5100 3.5 Standard 4.0 January 2006
Page 63

Copyright © Nortel Networks Limited 2006
Security and administration
How this chapter is organized
This chapter is organized as follows:
• Security overview on page 63
— Network level security functions on page 63
— RTP Media Portal component level security functions on
page 64
• User administration on page 65
Security overview
One function of the RTP Media Portal is to secure the media interface
to the MCP Services Network. Securing the media layer is achieved
through a combination of methods at the network level and the
component (RTP Media Portal) level.
Network level security functions
At the network level, media layer security is achieved by the
randomization of the IP addresses/ports used for multimedia sessions
and utilization of NAPT (Network Address Port Translation) technology
to obscure the network topology of the MCP Services Network.
Media Blade (IP address) randomization
When a multimedia session requests resources, the RTP Media Portal
selects an appropriate Media Blade to host the session. Media blade
selection determines the specific IP address that will be made available
to the media streams for the session.
During the selection of a Media Blade, the port usage of each Media
Blade is queried to determine the number of available ports for each.
The Media Blade which has the most available ports is selected. This
method of selection provides randomization and helps distribute the
session load across the Media Blades.
MCS 5100 RTP Media Portal Basics
Page 64

Copyright © Nortel Networks Limited 2006
Port randomization
When the RTP Media Portal is deployed, each Media Blade is
configured with a pool of ports containing a specific number of ports in
a specific range based on configuration data (“Number Ports”, “Min Port
Value”, “Max Port Value”, respectively). For more information on these
configuration properties, refer to Tabl e 2 , RTP Media Portal tab
configurable properties, on page 51.
As multimedia sessions are initiated, a port is chosen from the port pool
associated with the selected Media Blade. For non-static port
configurations (i.e. “Static RTP Ports” is configured to be “false”), when
a multimedia session completes, their associated ports are deallocated
from the pool and new replacement ports are allocated to the pool. The
deallocation of used ports and allocation of replacement ports provides
randomization in the port pools for the Media Blades.
NAPT function
In order to obscure the MCP Services Network topology, the RTP Media
Portal uses the NAPT functionality to secure the multimedia sessions
so that there is no leakage of topology information.
64
This is achieved by maintaining a list of media ports (NAPT table) which
are being used within active multimedia sessions. Only packets which
arrive on these active ports are processed. Packets which arrive on
non-active ports are rejected and logged as potential problems.
RTP Media Portal component level security functions
The RTP Media Portal component also contributes to system security
by opening and closing media ports only in response to requests from
the SIP Application Module (which has pre-authenticated such
requests) and by rejecting any unauthorized packets arriving on an
active connection.
Authenticated requests
All requests to manipulate the media resources on the RTP Media
Portal originate from the SIP Application Module. The SIP Application
Module ensures that all requests are made by, or made to, a valid
service subscriber. In this way, the SIP Application Module effectively
authenticates all requests.
In addition, the portion of the RTP Media Portal which processes these
requests to manipulate the media resources resides safely within the
MCP Services Network.
NN10265-111 MCS 5100 3.5 Standard 4.0 January 2006
Page 65

Copyright © Nortel Networks Limited 2006
Packet filter/firewall
As packets are received, the RTP Media Portal analyzes each packet
to ensure the following:
• The data format is RTP/RTCP/UDP, as indicated by the session
description. All other packet types are discarded and logged as
problems.
• The source/destination addresses match the expected
source/destination addresses indicated in the session description.
Packets that do not have a matching source/destination address are
discarded and logged as potential problems.
• The source/destination ports match the expected
source/destination ports indicated in the session description.
Packets that do not have a matching source/destination port are
discarded and logged as potential problems.
User administration
Basic administrative tasks for the RTP Media Portal are covered in the
Upgrade, Configuration, and Fault sections of this document. Other
basic administrative tasks related to the System Management Console
are covered in MCS 5100 System Management Console User Guide
(NN10273-111).
65
MCS 5100 RTP Media Portal Basics
Page 66

Copyright © Nortel Networks Limited 2006
66
NN10265-111 MCS 5100 3.5 Standard 4.0 January 2006
Page 67

Copyright © Nortel Networks Limited 2006
Appendix A: Backup and recovery
How this chapter is organized
This chapter is organized as follows:
• Backup and restore on page 67
— Prerequisites on page 67
— Duration on page 68
— Remote tape drive set up on page 69
— Backup to remote tape drive on page 70
— Restore on page 70
— Error scenarios on page 80
• Recovery on page 83
— Replacement of CPU host card on page 83
— Replacement of task processor on page 83
Backup and restore
Prerequisites
The following prerequisites are required for a RTP Media Portal backup
or restore.
• Remote DDS4 tape drive. The tape drive does not need to be within
the MCP Service Network, but it must be attached to a Solaris*
machine that is visible to the server conducting the backup.
• DDS4 tape, in the remote tape drive. For Universal Serial Bus (USB)
drives, use a 20 GB tape. For SCSI drives, use a 12 GB tape.
• Live 100Mbps Ethernet connection.
• IP address of the tape server.
• Full duplex mode. Ensure all nodes involved have their network
interface set to full duplex mode. This includes the server being
backed up or restored, the tape server, and any intermediate node
in the network being traversed. All MCP Servers should be set to
MCS 5100 RTP Media Portal Basics
Page 68

Copyright © Nortel Networks Limited 2006
Auto Negotiate so that they too will respond in full duplex mode.
Failure to set the mode to full duplex will result in restore times that
are ten times normal.
• For restore operation, server address information is required.
• For restore operation, the Linux Recovery CD is required. The Linux
Recovery CD is the Linuxcare Bootable Toolbox CD-ROM, available
at: http://www.linuxcare.com/bootable_cd.
When connecting a USB tape drive to the server, perform the following:
• Log in as root to the server where the tape drive is being connected
or disconnected.
• Type the command /etc/init.d/volmgt stop and press Enter.
• Connect or remove the USB tape drive. When connecting the tape
drive, use port 0.
• If connecting the tape drive, type the command /etc/init.d/volmgt
start and press Enter.
• If connecting the tape drive, turn it on.
68
If there is an error installing a USB tape drive, refer to Error installing
USB tape drive on page 83 for instructions to correct the problem.
System access
Backup
To establish connection to the RTP Media Portal, access is obtained
through a Secured Shell (SSH). Note, if this connection is used and the
SSH session dies, the backup operation will die as well.
Restore
During a system restore, the server’s operating system is executing in
a limited capacity. Therefore, access must be through the server’s
console port (via the serial port).
Duration
Determine how much data will be involved in the backup or restore
operation in order to estimate the length of time required for the
NN10265-111 MCS 5100 3.5 Standard 4.0 January 2006
Page 69

Copyright © Nortel Networks Limited 2006
operation. Use Unix commands to determine the size of the following
partitions:
•/
• /boot
•/var
• /IMS
•/usr
Backup requires approximately 20 minutes per GB when using a USB
tape drive, and approximately eight minutes per GB for a SCSI tape
device.
Restore requires approximately 35 minutes per GB, regardless of which
type of tape drive is used.
Estimates for backup and restore are rough as there are multiple factors
that can affect the time required to complete the operation. As backups
can be performed while the machine is live, system activity may slow
the operation. If a backup or restore occurs across a network, network
traffic can affect the time required to complete the operation.
69
Remote tape drive set up
A remote tape drive is required. The following procedure outlines the
steps necessary to properly set up the remote tape drive if it is on an
MCP Server.
If the remote tape drive is NOT on a MCP Server, you may skip this
procedure. However, the user must ensure the remote shell operations
from the server to be backed up are enabled on the remote tape drive
server.
From the terminal server
1 As the MCP Server has to access the tape drive on the remote
host, make sure it has the proper access to that host.
2 Log in as sysadmin to the server with the tape drive.
3 Enable the execution of remote shell commands.
sudo /usr/local/bin/mcp_enable_remote_sh.pl
<MCP_Server_IP> <Enter>
where <MCP_Server_IP> is the Portal Host IP address.
4 From the Portal, log in as root.
5 Verify access to the remote host has been set correctly.
MCS 5100 RTP Media Portal Basics
Page 70

Copyright © Nortel Networks Limited 2006
rsh -l sysadmin <Tape_Server_IP> df -k <Enter>
where <Tape_Server_IP> is the IP address of the remote host
with the tape drive.
6 Output appears on screen, indicating the target system is
correctly set for the restore operation. In not, contact your next
line of support before continuing.
Backup to remote tape drive
The following procedure lists steps to backup the RTP Media Portal to
tape. As the restore operation is manual, no logs are generated.
Ensure the remote tape drive has been set up correctly before
proceeding with the backup. For more information, refer to Remote tape
drive set up on page 69.
From a terminal server
1 Label the DDS4 tape with the RTP Media Portal name and the
date of backup. Insert the tape into the tape drive of the server
acting as backup host.
70
2 Log in as sysadmin to the RTP Media Portal.
3 Initiate the backup.
sudo /usr/local/bin/mcp_backup.pl <Tape_Server_IP>
<Enter>
where <Tape_Server_IP> is the IP address of the selected tape
host where the tape drives resides.
The backup operation will take a while to complete. If the backup
requires more than one tape, the system will prompt the user to
insert additional tapes as needed.
4 When the backup is complete, remove the tape from the tape
drive. Store the tape in a safe, dry location.
5 Review the backup script mcp_backup.pl to ensure the backup
was successful. The log file is store in the directory
/home/sysadmin/bkup_restore, and the filename is
mcp_backup.pl.log.<dayTimeStamp>. Where
<dayTimeStamp> is YYYY_MM_DD_HH:MM:SS.
6 From the remote host, disable remote access.
sudo /usr/local/bin/mcp_disable_remote_sh.pl <Enter>
Restore
The following procedure lists steps to restore the RTP Media Portal
from tape. Ensure the remote tape drive has been set up correctly
NN10265-111 MCS 5100 3.5 Standard 4.0 January 2006
Page 71

Copyright © Nortel Networks Limited 2006
before proceeding with the restore. For more information, refer to
Remote tape drive set up on page 69.
From the terminal server
1 Prepare the system for restore. For instructions, refer to Prepare
system for restore on page 71.
2 Partition the hard drive. For instructions, refer to Partition the
hard drive on page 74.
3 Initiate the rollback. For instructions, refer to Initiate restore on
page 78.
Prepare system for restore
The following provides instruction to prepare the system for rollback.
From the terminal server
1 From the terminal server, prevent the console session from
timing out due to inactivity during the restore process.
TMOUT=0;export TMOUT; <Enter>
71
2 Select the proper DDS4 tape, the most recent backup tape for
the server. Insert the tape into the tape drive of the tape host
server.
3 Reboot the Portal by pressing the reset button on the front of the
Host card.
4 From the terminal server session, press F2 to enter the BIOS
Setup.
Use the escape sequence <Shift+Esc+OQ> instead of F2 when
logged in from a terminal server.
MCS 5100 RTP Media Portal Basics
Page 72

Copyright © Nortel Networks Limited 2006
Boot
Figure 30 Enter BIOS Setup screen
PhoenixPICOBIOS 4.0 Release 6.0
Copyright 1985-2000 Phoenix Technologies Ltd.
All Rights Reserved
CPV5370 BIOS 1.0RM01. Copyright 2001 Motorola, Inc.
Build Time: 03/11/2001 17:58:18
CPU = Intel (R) Mobile Pentium (RO III processor 700 MHz
640K System RAM Passed
Press <F2> to enter Setup
5 From the BIOS Setup Utility screen, use the arrow keys to move
to the Boot menu.
72
Figure 31 BIOS Setup: Boot menu
BIOS Setup Utility
Main M em ory Advanced Security Status Boot
Quick B o ot: [Enabled]
Summ ary Screen: [Disabled]
SE TUP prompt: [Enabled]
N u m Lock: [Auto]
Boot Retry: [Disabled]
Jump to Flash: [Disabled]
Boot D evice Priority
6 Use the arrow keys to select Boot Device Priority, then press
the Enter key to display the Boot Device Selection menu.
Exit
Item Specific Help
__________________
Allows the sytem to
skip certain tests
while booting. This
w ill decrease the
time needed to boot
the system.
NN10265-111 MCS 5100 3.5 Standard 4.0 January 2006
Page 73

Copyright © Nortel Networks Limited 2006
Boot
Boot D evice Priority
73
Figure 32 BIOS Setup: Boot Device Selection menu
BIOS Setup Utility
Main M em ory Advanced Security Status Boot
Boot D evice Priority
8XX S C SI CD-RO M LSI Logic
!+H ard Drive
!+Rem ovable D evices
! ATAPI CD-RO M Drive
! Leg acy N e twork Boot
Item Specific Help
Keys used to view or
co nfigure devices:
<Enter> expands or
col lapses de vi c es w ith
a '+' or '-'
<Ctrl+Enter> expands
all
<!> enables o r
disables a device.
<+> and <-> moves
the device up or down.
<n> m oves rem ovable
device between Hard
Disk and Rem ovable Disk.
Exit
7 Use Item Specific Help to disable all devices except the SCSI
CD-ROM drive. For each device to be disabled, use the arrow
keys to select the device, then type an exclamation mark (!) to
disable it.
MCS 5100 RTP Media Portal Basics
8 Press the Esc key four times. Then press Enter when prompted
to save the configuration. The system will reboot from the
CD-ROM drive.
9 Insert the Linux Recovery CD into the RTP Media Portal
CD-ROM drive.
10 Press the reset button on the Linux server. This will cause the
Linux server to reboot from the recovery CD-ROM.
11 Log in as root, password rescue.
12 Verify that access to the tape server has been set correctly.
rsh -l sysadmin <Tape_Server_IP> df -k <Enter>
where <Tape_Server_IP> is the name of the remote tape server
host.
Output appears on screen, indicating the target system is
correctly set for the restore operation. In not, contact your next
line of support before continuing.
Page 74

Copyright © Nortel Networks Limited 2006
Partition the hard drive
The following table lists fdisk commands used to partition the hard
drive.
Command Description
m Display a list of available commands.
n Create a new partition.
p Print the current partition table.
d Delete a partition.
t Change the type of a partition.
w Write the partition table and exit fdisk.
The following procedure assumes a 40 GB hard drive, and includes
partition recommendations.
74
From the terminal server
1 Select the fdisk option under Disk Setup to partition the hard
drive.
Figure 33 Red Hat: Disk Setup screen
Disk Setup
Disk Druid is a tool for partitioning and setting
up mount points. It is designed to be easier to use
than Linux's traditional disk partitioning software,
fdisk, as well as more powerful. However, there are
some cases where fdisk may be preferred.
Which tool would you like to use?
Disk Druid
fdisk
Back
2 Select the only highlighted hard disk present, and select edit.
NN10265-111 MCS 5100 3.5 Standard 4.0 January 2006
Page 75

Copyright © Nortel Networks Limited 2006
Figure 34 Red Hat: Edit hard disk
To install Red Hat Linux, you must have at least one
partition of 150 MB dedicated to Linux. We suggest placing
that partition on one of the first two hard drives in your
system so you can boot into Linux with LILO.
/dev/sda - Seagate ST336938LW
75
Disk Setup
Done
Edit
Back
3 Type p and press Enter to display existing partitions. If any exist,
type d to delete them. For example to delete partition 1, type d,
press Enter, type 1, press Enter.
After deleting existing partitions, type w and press Enter to save
changes to the partition table.
4 Create the first partition. Type n and press Enter to create a
partition. To note the primary partition, type p and press Enter,
then type 1 and press Enter. Press Enter to accept the default
beginning block, and type +1000M and press Enter for the size.
Command (m for help):n
Command action
e extended
p primary partition (1-4)
p
Partition number (1-4): 1
First cylinder (1-35242, default 1): <Enter>
Using default value 1
Last cylinder or +size or +sizeM or +sizeK (1-35242,
default 35242): +1000M
MCS 5100 RTP Media Portal Basics
Page 76

Copyright © Nortel Networks Limited 2006
Figure 35 Red Hat: Create partition screen
Command (m for help): p
Disk /tmp/sda: 64 heads, 32 sectors, 35242 sylinders
Units = sylinders of 2048 * 512 bytes
Device Boot Start End Blocks Id System
/tmp/sda1 1 1001 1025008 83 Linux
/tmp/sda2 1002 6002 5121024 83 Linux
/tmp/sda3 6003 7003 1025024 83 Linux swap
/tmp/sda4 7004 35242 28916736 5 Extended
/tmp/sda5 7004 17004 10241008 83 Linux
/tmp/sda6 17005 27005 10241008 83 Linux
/tmp/sda7 27006 35242 8434672 83 Linux
Command (m for help) : d
Partition number (1-7) : 1
Command (m for help) : d
Partition number (1-7) : 2
76
Command (m for help) : d
Partition number (1-7) : 3
Command (m for help) : d
Partition number (1-7) : 4
Command (m for help) :
5 Create the second partition. Type n and press Enter to create a
partition. To note the primary partition, type p and press Enter,
then type 2 and press Enter. Press Enter to accept the default
beginning block, and type +5000M and press Enter for the size.
Command (m for help):n
Command action
e extended
p primary partition (1-4)
p
Partition number (1-4): 2
First cylinder (1002-35242, default 1002): <Enter>
Using default value 1002
Last cylinder or +size or +sizeM or +sizeK
(1002-35242, default 35242): +5000M
6 Create the third partition.Type n and press Enter to create a
partition. To note the primary partition, type p and press Enter,
NN10265-111 MCS 5100 3.5 Standard 4.0 January 2006
Page 77

Copyright © Nortel Networks Limited 2006
then type 3 and press Enter. Press Enter to accept the default
beginning block, and type +1000M and press Enter for the size.
Command (m for help):n
Command action
e extended
p primary partition (1-1)
p
Partition number (1-4): 3
First cylinder (6003-35242, default 1): <Enter>
Using default value 6003
Last cylinder or +size or +sizeM or +sizeK
(6003-35242, default 35242): +1000M
7 Change the partition type for the third partition. Type t and press
Enter, type 3 and press Enter, then type 82 and press Enter.
Command (m for help):t
Partition number (1-7): 3
Hex code (type L to list codes): 82
Changed system type of partition 3 to 82 (Linux swap)
8 Create the fourth partition. Type n and press Enter, type e and
press Enter, then type 4 and press Enter. Press Enter to accept
the default beginning block, then press Enter again to accept the
default for the last block.
77
Command (m for help):n
Command action
e extended
p primary partition (1-1)
e
Partition number (1-4): 4
First cylinder (7004-35242, default 7004): <Enter>
Using default value 7004
Last cylinder or +size or +sizeM or +sizeK
(7004-35242, default 35242): <Enter>
9 As the drive may only have four main partitions, the fourth
partition will hold partitions five through seven. Type n and press
Enter to create the fifth partition. Press Enter to accept the
default beginning block, then type +10000M and press Enter for
the size.
Command (m for help):n
First cylinder (7004-35242, default 7004): <Enter>
Using default value 7004
Last cylinder or +size or +sizeM or +sizeK
(7004-35242, default 35242): +10000M
MCS 5100 RTP Media Portal Basics
Page 78

Copyright © Nortel Networks Limited 2006
10 To create the sixth partition type n and press Enter. Press Enter
to accept the default beginning block, then type +10000M and
press Enter for the size.
Command (m for help):n
First cylinder (17005-35242, default 17005): <Enter>
Using default value 17005
Last cylinder or +size or +sizeM or +sizeK
(17005-35242, default 35242): +10000M
11 To create the seventh partition type n and press Enter. Press
Enter to accept the default beginning block, then press Enter
again to accept the default value for the last block.
Command (m for help):n
First cylinder (27006-35242, default 27006): <Enter>
Using default value 27006
Last cylinder or +size or +sizeM or +sizeK
(27006-35242, default 35242): <Enter>
12 Type p and press Enter to view the final partition table. Example
output:
Disk /tmp/sda: 64 heads, 32 sectors, 35242 cylinders
Units= cylinders of 2048 * 512 bytes
78
Device Boot Start End Blocks Id System
/tmp/sda1 1 1001 1025008 83 Linux
/tmp/sda2 1002 6002 5121024 83 Linux
/tmp/sda3 6003 7003 1025024 82 Linux swap
/tmp/sda4 7004 35242 28916736 5 Extended
/tmp/sda5 7004 17004 10241008 83 Linux
/tmp/sda6 17005 27005 10241008 83 Linux
/tmp/sda7 27006 35242 8434672 83 Linux
13 Press w and press Enter to save changes.
14 Press q and press Enter to exit.
Initiate restore
The following provides instructions to initiate the restore.
From the terminal server
1 Format the partitions.
mke2fs /dev/sda1 <Enter>
mke2fs /dev/sda2 <Enter>
mkswap /dev/sda3 <Enter>
mke2fs /dev/sda5 <Enter>
mke2fs /dev/sda6 <Enter>
mke2fs /dev/sda7 <Enter>
NN10265-111 MCS 5100 3.5 Standard 4.0 January 2006
Page 79

Copyright © Nortel Networks Limited 2006
2 Locate the NIC driver.
modprobe eepro100 <Enter>
3 Activate the network interface.
ifconfig eth0 <IP_address> netmask <net_mask> up
<Enter>
where <IP_address> is the IP address of the Portal Host card,
and <net_mask> is the network address mask for this network
segment.
4 Route the IP address of the MCP Service Network’s gateway.
route add default gw <gateway> <Enter>
where <gateway> is the IP address of the network gateway for
the subnet.
5 Create a mountpoint for the root partition.
mkdir /a <Enter>
6 Restore the boot partition.
mount /dev/sda1 /a <Enter>
cd /a <Enter>
restore rfv sysadmin@<tape_server_IP>:/dev/rmt/0cn
<Enter>
rm -f restoresymtable <Enter>
cd .. <Enter>
umount /dev/sda1 <Enter>
79
7 Restore the root partition.
mount /dev/sda2 /a <Enter>
cd /a <Enter>
restore rfv sysadmin@<tape_server_IP>:/dev/rmt/0cn
<Enter>
rm -f restoresymtable <Enter>
cd .. <Enter>
umount /dev/sda2 <Enter>
8 Restore the var partition.
mount /dev/sda5 /a <Enter>
cd /a <Enter>
restore rfv sysadmin@<tape_server_IP>:/dev/rmt/0cn
<Enter>
rm -f restoresymtable <Enter>
cd .. <Enter>
umount /dev/sda5 <Enter>
9 Restore the usr partition.
MCS 5100 RTP Media Portal Basics
Page 80

Copyright © Nortel Networks Limited 2006
mount /dev/sda6 /a <Enter>
cd /a <Enter>
restore rfv sysadmin@<tape_server_IP>:/dev/rmt/0cn
<Enter>
rm -f restoresymtable <Enter>
cd .. <Enter>
umount /dev/sda6 <Enter>
10 Restore the IMS partition.
mount /dev/sda7 /a <Enter>
cd /a <Enter>
restore rfv sysadmin@<tape_server_IP>:/dev/rmt/0cn
<Enter>
rm -f restoresymtable <Enter>
cd .. <Enter>
umount /dev/sda7 <Enter>
11 Run the Linux boot loader
mount /dev/sda2 /a <Enter>
cd /a <Enter>
mount /dev/sda1 boot <Enter>
80
12 Set the current system root to the new partition.
chroot /a <Enter>
13 Set the boot kernel.
lilo <Enter>
14 Reboot the RTP Media Portal by pressing the reset button on the
front of the Host Card.
15 While rebooting, hold down the F2 key to enter BIOS to force the
system to boot from the hard drive. Follow steps step 5 through
step 8
page 71 to reverse settings.
16 Remove the Linux Recovery CD from the CD-ROM drive.
17 Remove the tape from the tape drive. Return it to a safe, dry
location.
18 From the remote host, disable remote access.
sudo /usr/local/bin/mcp_disable_remote_sh.pl <Enter>
Error scenarios
This section provides information regarding error scenarios that could
occur when a backup or restore operation is in progress. For RTP
Media Portal, log files are located in the directory
/home/sysadmin/bkup_restore/
from the procedure Prepare system for restore on
NN10265-111 MCS 5100 3.5 Standard 4.0 January 2006
Page 81

Copyright © Nortel Networks Limited 2006
Invalid IP address
If an invalid IP address is entered, an information message is displayed.
Example output:
/usr/local/bin/mcp_backup.pl 47.47.47.46
no answer from 47.47.47.46
10:22:27 ERROR: System, 47.47.47.46, could not be
pinged
10:22:27 Remote Backup verification failed, aborting
backup process
Logs are written to
/export/home/sysadmin/bkup_restore/mcp_backup...
For restore operations, if an invalid IP address is entered after the
ufsrestore command has been executed, an information message is
displayed. Example output:
ufsrestore rfsv sysadmin@47.47.47.47:/dev/rmt/Ocn 1
Fri Feb 6 17:06:14 CST 2004
48.48.48.48: Connection timed out
before Fri Feb 6 17:11:03 CST 2004
81
Connection to remote tape server is lost
If a RTP Portal looses connection to the tape drive during a backup, the
system will display error messages on screen.
Example output:
<47.47.47.48:20976,47.104.157.20:16001,108076965965
5,3,1080343335125,54>:
Established ---> Destroying
<47.47.47.48:20976,47.104.157.20:16001,108076965965
5,3,1080343335125,54>:
Destroying ---> Destroyed
<47.47.47.48:20976,47.104.157.20:16001,108076965965
5,4,null,null>:
Inactive ---> Reset
<47.47.47.48:20976,47.104.157.20:7001,1080769659655
,2,1080343397775,63>:
Established ---> Destroying
<47.47.47.48:20976,47.104.157.20:7001,1080769659655
,2,1080343397775,63>:
Destroying ---> Destroyed
<47.47.47.48:20976,47.104.157.20:7001,1080769659655
,5,null,null>:
Inactive ---> Reset
MCS 5100 RTP Media Portal Basics
Page 82

Copyright © Nortel Networks Limited 2006
DUMP: Lost connection to remote host.
As the mcp_backup script “hangs”, type Ctrl-C to abort. (To kill the
process from another session type => kill -9 <pid>.)
Tape drive failure
If something happens to the tape drive during a backup, an information
message is displayed. Example output:
DUMP: write: I/O error
DUMP: write error 8320 blocks into volume 1
DUMP: Do you want to restart?: (“yes” or “no”)
Answer no to this prompt. The script will terminate, and another backup
can be started. An information message is displayed on screen:
DUMP: The ENTIRE dump is aborted.
19:29:15
***************************************************
19:29:15 An error occurred during one (or more) dump
commands=>
82
19:29:15 DUMP: Do you want to restart? (“yes” or
“no”) DUMP: the ENTIRE dump is aborted.
19:29:15 DO NOT USE THIS BACKUP - a RESTORE USING THIS
BACKUP WILL FAIL
19:29:15 Fix the associated problem, and perform
another backup
19:29:15
***************************************************
19:29:15 Dump command(s) failed. Aborting backup.
Logs are written to
/home/sysadmin/bkup_restore/mcp_backup.pl.log
Restoring from multiple tapes
When restoring from multiple tapes, if a user presses Enter before
inserting the next tape into the tape drive, the restore process must be
restarted.
To recover, continue to press Enter until a “Read error” is displayed. For
example, the following shows output generated when a user incorrectly
presses Enter before tape 2 is inserted, then presses Enter again to
obtain the “Read error” message:
NN10265-111 MCS 5100 3.5 Standard 4.0 January 2006
Page 83

Copyright © Nortel Networks Limited 2006
Mount volume 2
then enter volume name (default: /dev/rmt/0cn)
Mount volume 3
then enter volume name (default: /dev/rmt/0cn)
Read error while restoring
./me/loads/pool9/Files/B/UAS06.zip.bLfCbwYvd5YvveYt
continue? [y n] n
Verify volume and initialize maps
Media read error: I/O error
rest*: No such file or directory
12:49:35 Failed to Restore /IMS/imssipdb directory,
aborting restore process
Logs are written to
/export/home/sysadmin/bkup_restore/mcp_recover.pl.
log.2004_03_24.12:49:35
Error installing USB tape drive
If there is an error installing a USB tape drive, reboot the server and log
in as root. Then type the command shutdown -y -g0 -i6 and press
Enter.
83
Recovery
Replacement of CPU host card
Replacement of task processor
The following procedures include instructions to replace the CPU host
card and task processor.
If a CPV5370 fails, calls in progress stay up but call control is lost. Calls
cannot be controlled again, nor can any new calls be set up on that
Portal until the CPV5370 has been replaced and the new CPV5370 is
in service.
If a CPU host card fails, replace the bad card with a new one. Follow
steps in BIOS configuration of the CPV5370 Host Card
on page 90 to
make the appropriate BIOS changes to the new card.
If the RTP Media Portal MCPN765 fails, all calls set up on that blade are
lost at the time of the failure and cannot be recovered. Replace the bad
card, and perform the following initialization procedures. This
procedure requires a special cable to configure the BIOS of the card.
From the terminal device
1 Set up the MCPN765 Card. For more information, refer to
Setting up the MCPN765 I/O Card
on page 104.
MCS 5100 RTP Media Portal Basics
Page 84

Copyright © Nortel Networks Limited 2006
2 Configure the MCPN765 Card. For more information, refer to
Configuring the MCPN765 I/O Card on page 108.
3 Complete the installation. For more information, refer to
Complete the installation on page 84.
Complete the installation
This section provides instruction for completing the installation of the
MCPN765 Card.
From the terminal device
1 Change directory.
cd /etc <Enter>
2 Edit the bladeEtherAddres file. Change the MAC address for the
765 that was replaced. The top of the file contains comments
detailing the file format.
Note on MCPN765 blades (when paired with the PIMC-0101
transition module), NET2 is used for the MCP Service Network
interface and corresponds to CLUN 13/DLUN 0, while NET1 is
used for another network interface (either a Public Network or
subnet of the MCP Service Network) and corresponds to CLUN
0/DLUN 0.
84
3 Move to the Edit menu to save the file and exit the editor.
NN10265-111 MCS 5100 3.5 Standard 4.0 January 2006
Page 85

Copyright © Nortel Networks Limited 2006
Appendix B: RTP Media Portal installation
How this chapter is organized
This chapter is organized as follows:
• Prerequisites on page 85
• Network deployment on page 87
• Installing RTP Media Portal on page 90
• Installing MCPN765 cards on page 104
Prerequisites
This chapter provides instruction for installing a new RTP Media Portal.
It is assumed that hardware is already assembled as follows:
• MCPN765 I/O blades are installed in front slots 1-6 for Domain A,
and slots 11-16 for Domain B.
• PIMC-0101 765 transition modules are installed in rear slots 1-6 for
Domain A, and slots 11-16 for Domain B.
• CPV5370 host blades are installed in front slot 7 for Domain A, and
slot 9 for Domain B.
• 5370 transition modules are installed in rear slot 7 for Domain A,
and slot 9 for Domain B.
• CPX8216T HSC/BR hot swap controllers are installed in front slot 8
for Domain B, and slot 10 for Domain A.
• Hard drives and CD-ROM drives are installed in the front peripheral
bay.
• Floppy drives are installed in rear peripheral bay.
Installing the RTP Media Portal software consists of placing the
required packages on the hard drive of the host blade. As the host blade
is the only blade in the system that has a hard drive, it is also configured
MCS 5100 RTP Media Portal Basics
Page 86

Copyright © Nortel Networks Limited 2006
to allow I/O blades to boot and mount their file systems over the
network.
The complete base system can be installed in approximately 30
minutes.
IMPORTANT: The installation procedures must be followed separately
for each side if two Portals are installed in the same chassis.
The following is required for an installation:
• Chassis and peripherals
— One Motorola CPX8216T high availability compact PCI which is
divided into two domains (A and B), each running independent
media portals.
— One SCSI hard drive per domain, minimum 40Gb.
— One SCSI CD-ROM per domain.
— One 3.5” floppy drive per domain.
— One Motorola CPX8216T HSC/BR hot swap controller per
domain.
86
• Host Blade
— One Motorola CPV5370 per domain.
— One Motorola 5370 transition module per domain.
• I/O Blades
— Up to six MCPN765 per domain.
— One PIMC-0101 transition module for each MCPN 765.
• Other hardware
— VT100-compatible terminal device for console access to the host
and I/O blades.
• Base software
— Red Hat 6.2 installation CD (disc 1)
— RTP Media Portal installation CD
• Required information
— IP address information: one address per host blade and one or
two media addresses per I/O blade.
— IP address(es) of timeservers.
— MAC (ethernet) addresses of all I/O blades (two addresses per
blade). Addresses can be found on labels affixed to the blade or
NN10265-111 MCS 5100 3.5 Standard 4.0 January 2006
Page 87

Copyright © Nortel Networks Limited 2006
from blade NVRAM (use the niot ;h command to get the blade
Ethernet addresses from the bug prompt).
— RTP Portal chassis number
— Gateway router address, may be different between host(s) and
media card(s).
— Netmasks for all assigned IP addresses
— Root password for host(s)
— Password for user “nortel”
— Time zone
Network deployment
The RTP Media Portal may be configured as a dual- or single-network.
For backwards compatibility, the media cards may be connected to
separate networks. For new deployments, the recommended
approach is to deploy the RTP Media Portal in a single-network configuration.
87
Single-network deployment
Single-network configuration requires both the host and Media Blades
of the Portal to be assigned the same subnet. Media Portals may be
deployed centrally with the core MCS components, or dispersed
remotely to provide geographic proximity.
The two network interfaces of the host blade (eth0 and eth1) are
grouped together as a redundant pair. These two interfaces are
connected to different switch units. For the Media Blades, only one of
the available network interface (NET2, eth1) is utilized. In order to
provide high availability in this simplex mode, one half of the Media
Blades are connected to switch unit 0, and the other half to switch unit
1.
A single-network deployment is shown Figure 36 on page 88.
MCS 5100 RTP Media Portal Basics
Page 88

Copyright © Nortel Networks Limited 2006
U
U
Figure 36 RTP Media Portal single-network deployment
88
Media Portal
Baystack 47 0
eth1
Host
Blade
Media
Blade
(Net2, eth1)
eth0
MCS VLAN
(Net2, eth1)
Linux interface
name Usage
Media
Blade
The below table details the usage of the physical port for single-network
deployment.
BIOS device
Label
number
MCPN 765 I/O Card Ethernet port usage
NET1 CLUN 0/DLUN 0 eth0 unused
NET2 CLUN 13/DLUN 0 eth1 MCS VLAN
CPV5370 Host Card Ethernet port usage
1 N/A eth0 MCS VLAN
2 N/A eth1 MCS VLAN
Failure to use the ports as described will result in a non-operational
RTP Media Portal.
Dual-network deployment
For the dual-network configurations, the host is connected to the MCP
Service Network. The Media Card has one interface connected to the
MCP Service Network (NET2) and one to the other network (NET1),
either a public network or a subnet of the MCP Service Network. The
NN10265-111 MCS 5100 3.5 Standard 4.0 January 2006
Page 89

Copyright © Nortel Networks Limited 2006
S
a
a
two interfaces on the host are used in an active, standby mode and
there is no interface redundancy on the media cards as each connects
to a separate network. This configuration is depicted in Figure 37 on
page 89.
Figure 37 Dual-network deployment
89
M ed ia Portal
Baystack 47 0
Unit
eth1
Host
Blade
Medi
Blade
NET1
NET1
eth0
Baystack 47 0
Unit
NET2
M C P S ervice
P ublic Su b net
Medi
Blade
NET2
The below table details the usage of the physical port for dual-network
deployment.
Label
BIOS device
number
Linux
interface name
Usage
MCPN 765 I/O Card Ethernet port usage
NET1 CLUN 0/DLUN 0 eth0 Public
NET2 CLUN 13/DLUN 0 eth1 MCS Service
CPV5370 Host Card Ethernet port usage
1 N/A eth0 MCS Service
2 N/A eth1 MCS Service
Failure to use the ports as described will result in a non-operational
RTP Media Portal.
MCS 5100 RTP Media Portal Basics
Page 90

Copyright © Nortel Networks Limited 2006
Installing RTP Media Portal
This section outlines steps to install the RTP Media Portal.
From the terminal console
1 Establish BIOS settings for the CPV5370 Host Card. For details,
refer to BIOS configuration of the CPV5370 Host Card on
page 90.
2 Install the base operating system, Red Hat 6.2. For details, refer
to Installing the base Red Hat system on page 93 and
Partitioning the hard drive on page 94
3 Complete the installation. For details, refer to Completing the
installation on page 96.
4 Install the RTP Media Portal packages. For details refer to
Installing the RTP Media Portal packages on page 101.
5 Configure the Network Time Protocol. For details, refer to
Configuring Network Time Protocol on page 103.
BIOS configuration of the CPV5370 Host Card
This procedure provides instruction for BIOS settings. While many of
the factory default settings are acceptable, a few require changes. If you
are not certain the factory settings are in effect, reset all values to
default from within the BIOS set up under the Exit menu.
90
From the terminal console
1 Create a console connection to COM1 (A) on the front panel of
the host CPU card.
A connection to COM1 is only used during the initial power up
procedures. Once the BIOS configuration is set, the user must
remove the serial cable from COM1 and connect the Terminal
Server to cable COM2 on the transition module.
2 As the system is powering on, hold down the F2 key to enter
BIOS set up. The CPV5370 Card ships from the factory with
serial port settings 19,200 baud, 8/n/1.
If you do not see output on screen, it may be necessary to reseat
the CPV5370 card and press the Reset button on the front panel.
NN10265-111 MCS 5100 3.5 Standard 4.0 January 2006
Page 91

Copyright © Nortel Networks Limited 2006
Figure 38 BIOS Setup Utility screen
BIOS Setup Utility
Main Memory Advanced Security Status Boot Exit
91
BIOS Version CPV5501 1.0RM01
Board Version 01-R5347P09A
Board Serial No. 9975639
CPU Type Pentium (R) III
CPU Speed 700 MHz
Cache RAM 256 KB
Total Memory 512 KB
System Time: [09:59:07]
System Date: [09/17/2003]
Item Specific Help
__________________
<Tab>, <Shift-Tab>, or
<Enter> selects field.
3 From the Advanced menu, move to IDE Configuration and
press Enter.
4 Verify, or change, the values on screen to match the values listed
below. Leave all other values as default.
Local Bus IDE adapter: [Disabled]
Large Disk Access Mode: [DOS]
SMART Device Monitoring: [Disabled]
Primary Master: [NONE]
Primary Slave: [NONE]
Secondary Master: [NONE]
Secondary Slave: [NONE]
5 Press Esc twice to return to the Advanced menu.
6 Move to PCI Configuration and press Enter.
7 Verify, or change, the values on screen to match the values listed
below.
Default Primary Video Adapter: [AGP]
On-Card Ethernet 1: [Enabled]
Ethernet 1 Connection: [Rear]
Ethernet 1 Option ROM: [Disabled]
On-Card Ethernet 2: [Enabled]
Ethernet 2 Connection: [Rear]
Ethernet 2 Option ROM: [Disabled]
8 Move to the HA configuration sub-menu and press Enter.
MCS 5100 RTP Media Portal Basics
Page 92

Copyright © Nortel Networks Limited 2006
9 Set the HA Config value to Enabled. Also, set the Domain that
is being configured to Enable, and Disable for the other domain.
CPU in slot 7 is Domain A, and CPU in slot 9 is Domain B.
Example for Domain A, the Host Card in slot 7:
HA Config [Enabled]
Domain A [Enabled]
Domain B [Disabled]
10 Press Esc twice to return to the Advanced menu.
11 Move to Remote Console and press Enter.
12 Verify, or change, the values on screen to match the values listed
below. Leave all other values as default.
COM Port: [COM B]
Serial port B: [Enabled]
Base I/O address: [2F8]
Interrupt: [IRQ 3]
Baud Rate: [9600]
Console Type: [VT100]
Flow Control: [None]
Screen Lines: [25]
Active After Post: [On]
92
13 Press Esc twice to return to the Advanced menu.
14 From the Boot menu, move the cursor to Boot Device Priority
and press Enter.
15 Ensure the system boots in the following order:
8XX SCSI CD-ROM LSI Logic
+Hard Drive
! +Removable Devices
! ATAPI CD-ROM Drive
! Legacy Network Boot
Place an exclamation mark (!) beside the appropriate devices to
disable them.
16 Press the Esc key to return to the main menu.
17 Move to the Security menu to set control access to the BIOS
settings. Unauthorized BIOS access enables any Linux security
to be circumvented.
18 Set up the BIOS supervisor password. Ensure the password on
Boot option is disabled.
19 Move to the Exit menu to save changes and exit the BIOS set
up. The system will reboot.
NN10265-111 MCS 5100 3.5 Standard 4.0 January 2006
Page 93

Copyright © Nortel Networks Limited 2006
20 While the system is rebooting, quickly change the console
connection from COM1 to COM2. Use the escape sequence
<Esc><Shift>OQ to enter the BIOS set up screen again.
If you do not see output on the terminal, make sure the terminal
is set to 9600/8/n/1 and reset the CPV5370 card to try again.
21 When prompted, enter the supervisor password to ensure the
password was correctly set and is using COM2 as the console
port.
22 Insert the Red Hat 6.2 installation CD in the CD-ROM drive for
the domain (the top CD-ROM drive is Domain A).
23 Press the Esc key to exit BIOS without making any changes.
The system will reboot.
24 Remove the serial cable from COM2, and connect the serial
cable from the Terminal Server to that port.
Installing the base Red Hat system
The RTP Media Portal uses the operating system Red Hat 6.2.
93
The installation script provides a graphic user interface (GUI). Use the
Next or Done keys to move to the next screen, the Tab key to move
between items/buttons, the Space key to select and deselect items, the
Enter key to expand items for editing, and arrow keys for moving
between items in a list.
If it is necessary to re-enter the BIOS from the Terminal Server, use the
Escape key sequence <Esc><Shift>OQ .
From the terminal server
1 Establish a terminal session to the Host CPU through the
terminal server.
2 After the system boots from the Red Hat CD, the Red Hat
installation menu appears. Type the following:
text console=ttyS1,9600n8 <Enter>
IMPORTANT: If the first character is not quickly typed, the Red
Hat installation script will use the default automatic option and
begin installation.
If entry is not typed correctly, reset the card using the reset
button in the front of the 5370 card.
3 Select English for the Language Selection, then select OK.
4 In the Red Hat welcome screen, Choose the Install Custom
System installation.
MCS 5100 RTP Media Portal Basics
Page 94

Copyright © Nortel Networks Limited 2006
Figure 39 Red Hat: Installation Type screen
What type of system would you like to install?
Install GNOME Workstation
Install KDE Workstation
Install Server System
Install Custom System
Upgrade Existing Installation
94
Installation Type
OK
5 For Bad Partition Table, select Initialize.
Partitioning the hard drive
The following includes instruction to partition the hard drive.
From the terminal server
1 Press w and press Enter to save changes and exit.
2 Select Done and press Enter to continue.
3 At the Disk Setup screen, select the individual partitions and
press Tab to move to the Edit button. Press Enter.
4 Type in the mountpoints. The highlighted line indicates the
current cursor position. Press Enter, input the mountpoint in the
text box, and press Enter again.
Partition 1: mountpoint = /boot <Enter>
Partition 2: mountpoint = / <Enter>
Partition 3: /swap <Enter>
Partition 5: mountpoint = /var <Enter>
Partition 6: mountpoint = /usr <Enter>
Partition 7: mountpoint = /IMS <Enter>
Back
It is not necessary to enter the mountpoint for the swap partition,
as this occurs automatically when this partition is designated as
a swap partition.
NN10265-111 MCS 5100 3.5 Standard 4.0 January 2006
Page 95

Copyright © Nortel Networks Limited 2006
Repeat for all partitions as necessary. Select OK when finished.
Figure 40 Red Hat: Mountpoints
Mount Point Device Requested Actual Type
sda1 1000M 1000M Linux native
sda2 5001M 5001M Linux native
Mount Point: /boot_____________________
95
Current Disk Partitions
Edit Partition: /dev/sda1
Size (Megs): 1000
Grow to fill disk?: [ ]
Allocation Status: Successful
OK
Edit
OK
Type: Linux native
Cancel
Back
5 In the Choose Partitions to be Formatted screen, ensure all
partitions are selected and the Check for bad blocks option is
NOT selected.
[*] /dev/sda2 /
[*] /dev/sda7 /IMS
[*] /dev/sda1 /boot
[*] /dev/sda6 /usr
[*] /dev/sda5 /var
Press the Tab key twice to position the cursor on the OK button,
and press the Enter key.
MCS 5100 RTP Media Portal Basics
Page 96

Copyright © Nortel Networks Limited 2006
Figure 41 Red Hat: Formatting partitions
What partitions would you like to format? We strongly suggest
formatting all of the system partitions, including /, /usr,
and /ar. There is no need to format /home or /usr/local if
they have already been configured during a previous install.
[ ] Check for bad blocks during format
96
Choose Partitions to Format
[*] /dev/sda2 /
[*] /dev/sda7 /IMS
[*] /dev/sda1 /boot
[*] /dev/sda6 /usr
[*] /dev/sda5 /var
Completing the installation
The following procedure includes instructions for completing the
installation.
From the terminal server
1 The LILO Configuration screen appears. Ensure the User linear
mode (needed for some SCSI drives) is selected.
2 Type the boot arguments for LILO as follows:
console=ttyS1,9600n8 <Enter>
OK
Back
NN10265-111 MCS 5100 3.5 Standard 4.0 January 2006
Page 97

Copyright © Nortel Networks Limited 2006
Figure 42 Red Hat: LILO Configuration
A few systems will need to pass special options to the kernel
at book time for the system to function properly. If you need
to pass boot options to the kernel, enter them now. If you
don't need any or aren't sure, leave this blank.
[*] User linear mode (needed for some SCSI drives)
sonsole=ttyS1,9600n8..................................................
97
LILO Configuration
OK
Skip
Back
Select OK when finished.
3 Ensure /dev/sda for the location to install LILO is selected, and
select OK to continue.
4 Select OK to accept the default selection for the partition to boot
the Linux OS.
5 The Host Configuration screen will appear. Type in the host
name of the RTP Media Portal. Select OK when finished.
6 In the Network Configuration screen, de-select the bootp/DHCP
check box.
Enter nameserver IP addresses if they are available. If you enter
nameserver addresses, ENSURE THEY ARE CORRECT. The
RTP Media Portal will not function correctly if unreachable or
otherwise incorrect nameserver IP addresses are used. If you do
not have nameserver IP addresses, leave this field empty.
[ ] Use bootp/dhcp
IP address: <eth0 IP of Host Card>
Netmask: <Host Card Netmask>
Default gateway (IP): <Default Gateway>
Primary nameserver:
Select OK to continue.
MCS 5100 RTP Media Portal Basics
Page 98

Copyright © Nortel Networks Limited 2006
Figure 43 Red Hat: Network Configuration screen
Network Configuration
[ ] Use bootp/dhcp
IP address: 47.47.47.48_________
Netmask: 250.250.250.0_______
Default gateway (IP): 48.48.48.49_________
Primary nameserver: __________________
98
OK
Back
7 In the Device settings screen, accept the default setting and
select OK to continue.
Figure 44 Red Hat: Device settings screen
Device
What device is your mouse located on? ttyS0 0
/dev/ttyS0 (COM1 under DOS)
/dev/ttyS1 (COM2 under DOS)
/dev/ttyS2 (COM3 under DOS)
/dev/ttyS3 (COM4 under DOS)
OK
Back
8 In the Time Zone Selection screen, select the appropriate local
time zone and select OK.
NN10265-111 MCS 5100 3.5 Standard 4.0 January 2006
Page 99

Copyright © Nortel Networks Limited 2006
Figure 45 Red Hat: Time Zone Selection screen
Time Zone Selection
What time zone are you located in?
Current time: 13:12:56 CDT
[ ] Hardware clock set to GMT?
US/Aleutian
US/Arizona
US/Central
US/East-Indiana
US/Eastern
99
OK
Back
9 The next screen sets the root password. When prompted, enter
the appropriate root password. Retype the password for
confirmation and select OK to continue.
Figure 46 Red Hat: Root Password screen
Root Password
Pick a root password. You must type it
twice to ensure you know what it is and
didn't make a mistake in typing. Remember
that the root password is a critical part
of system security.
Password : _____________________
Password (again) : _______________
OK
Back
10 The Add User screen appears. Create a “nortel” user account
with password. Retype the password for confirmation and select
OK to continue.
MCS 5100 RTP Media Portal Basics
Page 100

Copyright © Nortel Networks Limited 2006
Figure 47 Red Hat: Add User screen
Add User
You should use a normal user account
for most activities on your system. By
not using the root account casually,
you'll reduce the chance of disrupting
your system's configuration.
User ID Nortel_______
Full Name Nortel_______
Password : _____________________
Password (confirm) : _______________
100
OK
Back
11 In the Authentication Configuration screen, verify the Use
Shadow Password and Enable MD5 password check boxes
are selected. Select OK to continue.
[*] Use Shadow Password
[*] Enable MD5 Password
[ ] Enable NIM
NIS Domain:
NIS Server: [ ] Request server via broadcast
or use:
NN10265-111 MCS 5100 3.5 Standard 4.0 January 2006
 Loading...