

Page 1

[Standard—Nortel Networks Confidential]
Part No. NN10041-112
April 2003
MCP 1.1 FP1 (02.02)
SIP Multimedia PC Client
User Guide
Page 2

[Standard—Nortel Networks Confidential]
ii
Copyright © 2003 Nortel Networks
All rights reserved. April 2003.
The information in this document is subject to c hange without notice. The statements, co nfiguration s, technical data , and
recommendations in this document are believed to be accurate and reliable, but are presen ted without express or implied
warranty. Users must take full responsibility for their applications of any products specified in this document. The
information in this document is proprietary to Nortel Networks Inc.
The software described in this documen t is furnished under a license agreemen t and may be used only in accordance
with the terms of that license. The software license agreement is included in this document.
Trademarks
Nortel Networks, the Nortel Networks logo, the Globemark, Unified Networks, and i2004 are trademarks of Nortel
Networks.
Microsoft, Windows, Windows NT, and Microsoft Outlook are trademarks of Microsoft Corporation.
Adobe and Acrobat Reader are trademarks of Adobe Systems Incorporated.
Netscape is a trademar k of Netscape Communications Corporation .
The asterisk after a name denotes a trademarked item.
Restricted rights legend
Use, duplication, or disclosure by the United States Government is subject to restrictions as set forth in subparagraph
(c)(1)(ii) of the Rights in Technical Data and Computer Software clause at DFARS 252.227-7013.
Notwithstanding any other li cen s e agre eme nt that may pertain to, or accompany the de liv er y o f, th is co mp ut er softwa re,
the rights of the United States Government regarding its use, repro du ction , and disc lo sure are as set forth in the
Commercial Computer Software-Restric ted Rights clause at FAR 52.227-19.
Statement of conditions
In the interest of improving internal design, operational function, and/or reliability, Nortel Networks Inc. reserves the
right to make changes to the products described in this document without notice.
Nortel Networks Inc. does not assume any liability that may occur d ue t o t he use or application of the product (s) or
circuit layout(s) described herein.
Portions of the code in this software product may be Copyright © 1988, Regents of the University of California. All
rights reserved. Redistribution and use in source and binary forms of such portions are permitted, provided that the
above copyright notice and t hi s paragraph are duplicated in all such forms and that any documentati on, advertising
materials, and other materials related to such distribution and use acknowledge that such por ti ons of the software were
developed by th e U niv e r si ty of California, Berkele y. The nam e of the University may no t b e us e d t o e n dorse or promote
products derived from such portions of the software without specific prior written permission.
SUCH PORTIONS OF THE SOFTWARE ARE PROVIDED “AS IS” AND WITHOUT ANY EXPRESS OR IMPLIED
W ARRANTIES , INCLUDING, WITHOUT LIMIT ATION, THE IMPLIED WARRANTIES OF MERCHANTABILITY
AND FITNESS FOR A PARTICULAR PURPOSE.
In addition, the progra m and info rmation con tained here in are licen sed only pu rsuant to a lic ense agreemen t that cont ains
restrictions on us e and disclosure (that may incorporate by refer ence certain limitations and notices imposed by third
parties).
NN10041-112
Page 3

[Standard—Nortel Networks Confide ntial ]
iii
Nortel Networks Inc. software license agreement
This Software License Agreement (“License Agreement”) is between you, the end-user (“Customer”) and Nortel
Networks Corporation and its subsidiaries and affiliates (“Nortel Networks”). PLEASE READ THE FOLLOWING
CAREFULLY. YOU MUST ACCEPT THESE LICENSE TERMS IN ORDER TO DOWNLOAD AND/OR USE THE
SOFTWARE. USE OF THE SOFTWARE CONSTITUTES YOUR ACCEPTANCE OF THIS LICENSE
AGREEMENT. If you do no t acc ept these term s an d cond ition s, re turn th e So ftw are, unus ed an d in the origin al s hipp ing
container, within 30 days of purchase to obtain a cr edit for the full pu rchase price.
“Software” is owned or licensed by Nor tel Net work s, its p a rent o r o ne o f its su bsid iarie s o r affiliates, and is copyrighted
and licensed, not sold. Software consists of machine-readable instructions, its components, data, audio-visual content
(such as images, text, recordings or pi ct ures) and related licensed materials inclu ding all whole or partial copies. Nortel
Networks grants you a li cense to use the Software only in the country where you acquired the Software. You obtain no
rights other than th ose granted to you under this License Agreement. You are responsible for the selecti on of the
Software and for the installation of, use of, and results obtained from the Software.
1. Licensed Use of Software. Nortel Networks grants Customer a nonexclusive license to use a copy of the Software
on only one machine at any one time or to the exte nt of the activ ation or autho rized usag e level, whichever is app licable.
To the extent Software is furnished for use with designated hardware or Customer furnished equipment (“CFE”),
Customer is granted a nonexclusive l icense to use Software only on such hardware or CFE, as ap pl icable. Software
contains trade secrets and Customer agrees to treat Software as confidential information using the same care and
discretion Customer uses with its own similar information that it does not wish to disclose, publish or disseminate.
Customer will ensure that anyone who uses the Software does so only in compliance with the terms of this Agreement.
Customer shall not a) use, copy, modify, transfer or distribute the Software except as expressly authorized; b) reverse
assemble, reverse compile, reverse eng in eer or otherwise translate the Software; c) create derivat ive works or
modifications unless expressly authorize d; or d) sublicense, rent or lease the Software. Licensors of intellectual property
to Nortel Networks are beneficiaries of this provision. Upon termin ation or breach of the license by Cust omer or in the
event designated hardware or CFE is no longer in use, Customer will promptly return the Software to Nortel Networks
or certify its destruction. Nortel Networks may audit by remote polling or other reasonable means to determine
Customer’s Software activ ation o r usa g e le vels. If suppliers of third party software included in Software require Nortel
Networks to include additional o r d ifferent terms, Customer agrees to abide by suc h terms p rov id ed b y Norte l Networks
with respect to such third party software.
2. Warranty. Except as may be otherwise expressly agreed to in writing between Nortel Networks and Customer,
Software is provided “AS IS” without any warranties (conditions) of any kind. NORTEL NETWORKS DISCLAIMS
ALL WARRANTIES (CONDITIONS) FOR THE SOFTWARE, EITHER EXPRESS OR IMPLIED, INCLUDING,
BUT NOT LIMITED TO THE IMPLIED WARRANTIES OF MERCHANTABILITY AND FITNESS FOR A
PARTICULAR PURPOSE AND ANY WARRANTY OF NON-INFRINGEMENT. Nortel Networks is not obligated to
provide support of any kind for the Software. Some jurisdictions do not allow exclusion of implied warranties, and, in
such event , t he above exclusions ma y n ot apply.
3. Limitation of Remedies. IN NO EVENT SHALL NORTEL NETWORKS OR ITS AGENTS OR SUPPLIER S BE
LIABLE FOR ANY OF THE FOLLOWING: a) DAMAGES BASED ON ANY THIRD PARTY CLAIM; b) LOSS OF,
OR DAMAGE TO, CUSTOMER’S RECORDS, FILES OR DATA; OR c) DIRECT, INDIRECT, SPECIAL,
INCIDENTAL, PUNITIVE, OR CONSEQUENTIAL DAMAGES (INCLUDING LOST PROFITS OR SAVINGS),
WHETHER IN CONTRACT, TORT OR OTHERWISE (INCLUDING NEGLIGENCE) ARISING OUT OF YOUR
USE OF THE SOFTWARE, EVEN IF NORTEL NETWORKS, ITS AGENTS OR SUPPLIERS HAVE BEEN
ADVISED OF THEIR POSSIBILITY. The forgoing limitations of remedies also apply to any developer and/or supplier
of the Software. Such developer and/or supplier is an intended beneficiary of this Section. Some jurisdictions do not
allow these limitations or exclusions and, in such event, they may not apply.
4. General
a. If Customer is the United States Government, the following paragraph shall apply: All Nortel Networks
Software available under this Licen se Agreement is commercial computer so ftwa re and commercial computer
software documentation and, in the event Software is licensed for or on behalf of the United States
SIP Multimedia PC Client User Guide
Page 4

[Standard—Nortel Networks Confidential]
iv
Government, the respective rights to the software and software documentation are governed by Nortel
Networks standard commercial license in accordance with U.S. Federal Regulations at 48 C.F.R. Sections
12.212 (for non-DoD en tities) and 48 C.F.R. 227.7202 (for DoD entities).
b. Customer may terminate the license at any time. Nortel Networks may ter minate the license if Customer fails to
comply with the terms and conditions of this license. In either event, upon termination, Customer must either
return the Software to Nortel Networks or certify its destruction.
c. Customer is resp onsible f or paym ent of any ta xes, incl uding persona l proper ty taxes , resultin g from Cu stomer’ s
use of the Software. Customer agrees to comply with all applicable laws including all applicable export and
import laws and regulations.
d. Neither party may bring an action, regardless of form, more than two y ears after the cause of the action arose.
e. The terms and conditio ns of this License Agreement form the complete and exclusive agreement between
Customer and Nortel Networks.
f. This License Agreement is governed by the laws of the country in whi ch Customer acquires the Softwa re. If the
Software is acquired in the United States, then this License Agreement is governed by the laws of the state of
New York.
NN10041-112
Page 5

[Standard—Nortel Networks Confide ntial ]
Contents
Welcome . . . . . . . . . . . . . . . . . . . . . . . . . . . . . . . . . . . . . . . . . . . . . . . . . . . . . 15
Audience . . . . . . . . . . . . . . . . . . . . . . . . . . . . . . . . . . . . . . . . . . . . . . . . . . . . . . . . . . .15
Text conventions . . . . . . . . . . . . . . . . . . . . . . . . . . . . . . . . . . . . . . . . . . . . . . . . . . . . . 15
Acronyms . . . . . . . . . . . . . . . . . . . . . . . . . . . . . . . . . . . . . . . . . . . . . . . . . . . . . . . . . . .16
Related publications . . . . . . . . . . . . . . . . . . . . . . . . . . . . . . . . . . . . . . . . . . . . . . . . . . . 16
How to get help . . . . . . . . . . . . . . . . . . . . . . . . . . . . . . . . . . . . . . . . . . . . . . . . . . . . . .17
Chapter 1
Getting started . . . . . . . . . . . . . . . . . . . . . . . . . . . . . . . . . . . . . . . . . . . . . . . . 19
What is the SIP Multimedia PC Client? . . . . . . . . . . . . . . . . . . . . . . . . . . . . . . . . . . . . 19
Configurations . . . . . . . . . . . . . . . . . . . . . . . . . . . . . . . . . . . . . . . . . . . . . . . . . . . . . . . 20
SIP Multimedia PC Client . . . . . . . . . . . . . . . . . . . . . . . . . . . . . . . . . . . . . . . . . . . 20
SIP Multimedia PC Client Set . . . . . . . . . . . . . . . . . . . . . . . . . . . . . . . . . . . . . . . . 21
SIP Multimedia Blended PC Client . . . . . . . . . . . . . . . . . . . . . . . . . . . . . . . . . . . . 21
Useful terms to know . . . . . . . . . . . . . . . . . . . . . . . . . . . . . . . . . . . . . . . . . . . . . . . . . . 22
Proxy server . . . . . . . . . . . . . . . . . . . . . . . . . . . . . . . . . . . . . . . . . . . . . . . . . . . . . 22
Address . . . . . . . . . . . . . . . . . . . . . . . . . . . . . . . . . . . . . . . . . . . . . . . . . . . . . . . . . 22
Network-based address book . . . . . . . . . . . . . . . . . . . . . . . . . . . . . . . . . . . . . . . . 23
Buddies . . . . . . . . . . . . . . . . . . . . . . . . . . . . . . . . . . . . . . . . . . . . . . . . . . . . . . . . . 23
Presence . . . . . . . . . . . . . . . . . . . . . . . . . . . . . . . . . . . . . . . . . . . . . . . . . . . . . . . .23
Service package . . . . . . . . . . . . . . . . . . . . . . . . . . . . . . . . . . . . . . . . . . . . . . . . . . 23
Before you begin . . . . . . . . . . . . . . . . . . . . . . . . . . . . . . . . . . . . . . . . . . . . . . . . . . . . . 24
Minimum hardware and operating system requirements . . . . . . . . . . . . . . . . 24
Recommended hardware and operating system requirements . . . . . . . . . . . 25
Optional hardware and software requirements . . . . . . . . . . . . . . . . . . . . . . . . 25
Installing the SIP Multimedia PC Client software . . . . . . . . . . . . . . . . . . . . . . . . . .25
Launching the SIP Multimedia PC Client . . . . . . . . . . . . . . . . . . . . . . . . . . . . . . . .27
Signing in to the SIP Multimedia PC Client . . . . . . . . . . . . . . . . . . . . . . . . . . . . . . . . . 32
Configuring Windows to automatically start the SIP Multimedia PC Client . . . . . . 33
Understanding the SIP Multimedia PC Client interface . . . . . . . . . . . . . . . . . . . . . . . . 34
Understanding the Blended SIP Multimedia PC Client interface . . . . . . . . . . . . . . . . . 35
Main menu actions . . . . . . . . . . . . . . . . . . . . . . . . . . . . . . . . . . . . . . . . . . . . . . . . 36
Contents v
SIP Multimedia PC Client User Guide
Page 6

vi Contents
Using online help . . . . . . . . . . . . . . . . . . . . . . . . . . . . . . . . . . . . . . . . . . . . . . . . . . . . . 39
Chapter 2
Multimedia communication. . . . . . . . . . . . . . . . . . . . . . . . . . . . . . . . . . . . . . 41
Making a call . . . . . . . . . . . . . . . . . . . . . . . . . . . . . . . . . . . . . . . . . . . . . . . . . . . . . . . .41
Receiving a call . . . . . . . . . . . . . . . . . . . . . . . . . . . . . . . . . . . . . . . . . . . . . . . . . . . . . .43
Answering a call . . . . . . . . . . . . . . . . . . . . . . . . . . . . . . . . . . . . . . . . . . . . . . . . . . . . . .45
Ending a call . . . . . . . . . . . . . . . . . . . . . . . . . . . . . . . . . . . . . . . . . . . . . . . . . . . . . . . . . 47
Holding a call . . . . . . . . . . . . . . . . . . . . . . . . . . . . . . . . . . . . . . . . . . . . . . . . . . . . . . . . 47
Retrieving a held call . . . . . . . . . . . . . . . . . . . . . . . . . . . . . . . . . . . . . . . . . . . . . . . . . . 47
Transferring a call . . . . . . . . . . . . . . . . . . . . . . . . . . . . . . . . . . . . . . . . . . . . . . . . . . . . 48
Three-way calling . . . . . . . . . . . . . . . . . . . . . . . . . . . . . . . . . . . . . . . . . . . . . . . . . . . . .50
Conference calling . . . . . . . . . . . . . . . . . . . . . . . . . . . . . . . . . . . . . . . . . . . . . . . . . . . . 51
Sending instant messages . . . . . . . . . . . . . . . . . . . . . . . . . . . . . . . . . . . . . . . . . . . . . . 52
Sending web pages . . . . . . . . . . . . . . . . . . . . . . . . . . . . . . . . . . . . . . . . . . . . . . . . . . . 54
Using voice mail . . . . . . . . . . . . . . . . . . . . . . . . . . . . . . . . . . . . . . . . . . . . . . . . . . . . . 56
Sending and receiving video . . . . . . . . . . . . . . . . . . . . . . . . . . . . . . . . . . . . . . . . . . . . 58
Placing a voice call from Outlook 2000 (optional) . . . . . . . . . . . . . . . . . . . . . . . . . . . . 59
[Standard—Nortel Networks Confidential]
Main menu shortcuts . . . . . . . . . . . . . . . . . . . . . . . . . . . . . . . . . . . . . . . . . . . .37
Status area . . . . . . . . . . . . . . . . . . . . . . . . . . . . . . . . . . . . . . . . . . . . . . . . . . . . . . 37
Main buttons . . . . . . . . . . . . . . . . . . . . . . . . . . . . . . . . . . . . . . . . . . . . . . . . . . . . . 37
System tray icon . . . . . . . . . . . . . . . . . . . . . . . . . . . . . . . . . . . . . . . . . . . . . . . . . . 38
SIP Multimedia Blended PC Client . . . . . . . . . . . . . . . . . . . . . . . . . . . . . . . . . . . . 44
Blind transfer . . . . . . . . . . . . . . . . . . . . . . . . . . . . . . . . . . . . . . . . . . . . . . . . . . . . .48
Consult transfer . . . . . . . . . . . . . . . . . . . . . . . . . . . . . . . . . . . . . . . . . . . . . . . . . .49
Setting up a three-way call . . . . . . . . . . . . . . . . . . . . . . . . . . . . . . . . . . . . . . . . . . 50
Removing a person from a three-way call . . . . . . . . . . . . . . . . . . . . . . . . . . . . . . . 51
Creating a conference . . . . . . . . . . . . . . . . . . . . . . . . . . . . . . . . . . . . . . . . . . . . . .51
Leaving a conference . . . . . . . . . . . . . . . . . . . . . . . . . . . . . . . . . . . . . . . . . . . . . .52
Pushing a web page to another party on an active call . . . . . . . . . . . . . . . . . . . . . 54
Pushing a web page to another party not on an active call . . . . . . . . . . . . . . . . . . 55
Co-browsing web pages . . . . . . . . . . . . . . . . . . . . . . . . . . . . . . . . . . . . . . . . . . . . 56
Accessing your voice mailbox . . . . . . . . . . . . . . . . . . . . . . . . . . . . . . . . . . . . . . . .57
Using voice mail functions . . . . . . . . . . . . . . . . . . . . . . . . . . . . . . . . . . . . . . . . . . . 57
NN10041-112
Page 7

[Standard—Nortel Networks Confide ntial ]
Chapter 3
Managing your contacts and calls . . . . . . . . . . . . . . . . . . . . . . . . . . . . . . . . 61
Call logs . . . . . . . . . . . . . . . . . . . . . . . . . . . . . . . . . . . . . . . . . . . . . . . . . . . . . . . . . . . .61
Checking your inbox . . . . . . . . . . . . . . . . . . . . . . . . . . . . . . . . . . . . . . . . . . . . . . . 61
Returning a missed call . . . . . . . . . . . . . . . . . . . . . . . . . . . . . . . . . . . . . . . . . . 62
Acknowledging missed call log entries . . . . . . . . . . . . . . . . . . . . . . . . . . . . . . 62
Checking your outbox . . . . . . . . . . . . . . . . . . . . . . . . . . . . . . . . . . . . . . . . . . . . . . 63
Deleting call log entries . . . . . . . . . . . . . . . . . . . . . . . . . . . . . . . . . . . . . . . . . . . . .63
Managing your network-based address book . . . . . . . . . . . . . . . . . . . . . . . . . . . . . . . 64
Viewing an address book entry . . . . . . . . . . . . . . . . . . . . . . . . . . . . . . . . . . . . . . .65
Adding a new group to your network-based address book . . . . . . . . . . . . . . . . . . 66
Adding an entry to your network-based address book . . . . . . . . . . . . . . . . . . . . . 67
Deleting an address book entry . . . . . . . . . . . . . . . . . . . . . . . . . . . . . . . . . . . . . . . 71
Importing contacts from Outlook 2000 . . . . . . . . . . . . . . . . . . . . . . . . . . . . . . . . . . 71
Managing your Buddies . . . . . . . . . . . . . . . . . . . . . . . . . . . . . . . . . . . . . . . . . . . . . . . . 74
List of Buddies actions . . . . . . . . . . . . . . . . . . . . . . . . . . . . . . . . . . . . . . . . . . . . . . 75
Screening calls . . . . . . . . . . . . . . . . . . . . . . . . . . . . . . . . . . . . . . . . . . . . . . . . . . . . . . . 76
Special call handling options for incoming calls . . . . . . . . . . . . . . . . . . . . . . . . . . 77
Creating a set of call screening instructions . . . . . . . . . . . . . . . . . . . . . . . . . . . . . 77
Completing screening information in the call screening window . . . . . . . . . . . . . . 78
Recording a greeting to play to callers . . . . . . . . . . . . . . . . . . . . . . . . . . . . . . . . . 80
To view your call screening records . . . . . . . . . . . . . . . . . . . . . . . . . . . . . . . . . . . . 81
Deactivating a call screening record . . . . . . . . . . . . . . . . . . . . . . . . . . . . . . . . . . . 81
Contents vii
Chapter 4
Multimedia collaboration. . . . . . . . . . . . . . . . . . . . . . . . . . . . . . . . . . . . . . . . 83
Understanding collaboration tools . . . . . . . . . . . . . . . . . . . . . . . . . . . . . . . . . . . . . . . .83
Initiating a collaboration . . . . . . . . . . . . . . . . . . . . . . . . . . . . . . . . . . . . . . . . . . . . . . . .84
Starting an integrated collaboration session . . . . . . . . . . . . . . . . . . . . . . . . . . . . . 84
Starting a standalone collaboration session . . . . . . . . . . . . . . . . . . . . . . . . . . . . . 85
Ending a collaboration session . . . . . . . . . . . . . . . . . . . . . . . . . . . . . . . . . . . . . . . 86
Exchanging files . . . . . . . . . . . . . . . . . . . . . . . . . . . . . . . . . . . . . . . . . . . . . . . . . . . . . . 87
Sending a file . . . . . . . . . . . . . . . . . . . . . . . . . . . . . . . . . . . . . . . . . . . . . . . . . . . . .87
Setting the preferred directory to store incoming files . . . . . . . . . . . . . . . . . . . . . . 89
Sending one file in a file list . . . . . . . . . . . . . . . . . . . . . . . . . . . . . . . . . . . . . . . . . . 89
SIP Multimedia PC Client User Guide
Page 8

viii Contents
Sending all files in a file list . . . . . . . . . . . . . . . . . . . . . . . . . . . . . . . . . . . . . . . . . .89
Whiteboarding . . . . . . . . . . . . . . . . . . . . . . . . . . . . . . . . . . . . . . . . . . . . . . . . . . . . . . . 90
Opening a shared whiteboard workspace on your PCs . . . . . . . . . . . . . . . . . . . . . 91
Saving whiteboard drawings . . . . . . . . . . . . . . . . . . . . . . . . . . . . . . . . . . . . . . . . . 91
Restoring whiteboard drawings . . . . . . . . . . . . . . . . . . . . . . . . . . . . . . . . . . . . . . . 91
Collaborating with the clipboard . . . . . . . . . . . . . . . . . . . . . . . . . . . . . . . . . . . . . . . . . . 92
Collaborating by sharing clipboard contents . . . . . . . . . . . . . . . . . . . . . . . . . . . . . 92
Placing the content in the Windows clipboard . . . . . . . . . . . . . . . . . . . . . . . . . . . . 93
Sending the contents of your Windows clipboard to the other party . . . . . . . . . . .93
Accepting or declining the data transfer from the other user . . . . . . . . . . . . . . . . .94
Copying the incoming clipboard data to your Windows clipboard . . . . . . . . . . . . . 94
Using or saving the new Windows clipboard contents . . . . . . . . . . . . . . . . . . . . . .94
Chapter 5
Advanced set-up . . . . . . . . . . . . . . . . . . . . . . . . . . . . . . . . . . . . . . . . . . . . . . 97
Configuring your preferences . . . . . . . . . . . . . . . . . . . . . . . . . . . . . . . . . . . . . . . . . . . . 97
Setting up your user profile . . . . . . . . . . . . . . . . . . . . . . . . . . . . . . . . . . . . . . . . . . 98
Setting your connection speed and preferences . . . . . . . . . . . . . . . . . . . . . . . . . . 99
Defining network settings . . . . . . . . . . . . . . . . . . . . . . . . . . . . . . . . . . . . . . . . . . 100
Setting up audio devices and preferences . . . . . . . . . . . . . . . . . . . . . . . . . . . . .102
Setting up video (optional) . . . . . . . . . . . . . . . . . . . . . . . . . . . . . . . . . . . . . . . . . . 104
Disabling video transmission . . . . . . . . . . . . . . . . . . . . . . . . . . . . . . . . . . . . . . . . 106
Custom video configuration . . . . . . . . . . . . . . . . . . . . . . . . . . . . . . . . . . . . . . . . . 107
Setting up network-based voice mail access (optional) . . . . . . . . . . . . . . . . . . . . 111
Setting up calling from Outlook 2000 (optional) . . . . . . . . . . . . . . . . . . . . . . . . . . 113
Setting up an i2004 Internet Telephone (optional) . . . . . . . . . . . . . . . . . . . . . . . . 114
Setting up file exchange settings (optional) . . . . . . . . . . . . . . . . . . . . . . . . . . . . . 116
Setting automatic presence indicators . . . . . . . . . . . . . . . . . . . . . . . . . . . . . . . . . 117
Specifying miscellaneous settings . . . . . . . . . . . . . . . . . . . . . . . . . . . . . . . . . . . . 118
Using the audio wizard to configure audio volume . . . . . . . . . . . . . . . . . . . . . . . . . . . 121
Configuring multiple profiles . . . . . . . . . . . . . . . . . . . . . . . . . . . . . . . . . . . . . . . . . . . . 123
[Standard—Nortel Networks Confidential]
Specifying a tool tips delay . . . . . . . . . . . . . . . . . . . . . . . . . . . . . . . . . . . . . . 119
Setting the SIP Multimedia PC Client to startup as an icon . . . . . . . . . . . . . 119
Setting the standby option . . . . . . . . . . . . . . . . . . . . . . . . . . . . . . . . . . . . . . . 119
Specifying the look of the SIP Multimedia GUI at startup . . . . . . . . . . . . . . . 120
NN10041-112
Page 9

[Standard—Nortel Networks Confide ntial ]
Adding a new profile . . . . . . . . . . . . . . . . . . . . . . . . . . . . . . . . . . . . . . . . . . . . . . 123
Chapter 6
Troubleshooting. . . . . . . . . . . . . . . . . . . . . . . . . . . . . . . . . . . . . . . . . . . . . . 127
Startup problems . . . . . . . . . . . . . . . . . . . . . . . . . . . . . . . . . . . . . . . . . . . . . . . . . . . .127
Audio problems . . . . . . . . . . . . . . . . . . . . . . . . . . . . . . . . . . . . . . . . . . . . . . . . . . . . .127
Configuration and administration problems . . . . . . . . . . . . . . . . . . . . . . . . . . . . . . . . 129
Calling and messaging problems . . . . . . . . . . . . . . . . . . . . . . . . . . . . . . . . . . . . . . . .130
Collaboration problems . . . . . . . . . . . . . . . . . . . . . . . . . . . . . . . . . . . . . . . . . . . . . . .131
Video problems . . . . . . . . . . . . . . . . . . . . . . . . . . . . . . . . . . . . . . . . . . . . . . . . . . . . .132
Appendix A
Button references . . . . . . . . . . . . . . . . . . . . . . . . . . . . . . . . . . . . . . . . . . . . 135
Main GUI buttons . . . . . . . . . . . . . . . . . . . . . . . . . . . . . . . . . . . . . . . . . . . . . . . . . . . .135
Incoming call control buttons . . . . . . . . . . . . . . . . . . . . . . . . . . . . . . . . . . . . . . . . . . . 138
Active call control buttons . . . . . . . . . . . . . . . . . . . . . . . . . . . . . . . . . . . . . . . . . . . . .138
Contents ix
Appendix B
Hardware notes . . . . . . . . . . . . . . . . . . . . . . . . . . . . . . . . . . . . . . . . . . . . . . 141
Compatible video cameras . . . . . . . . . . . . . . . . . . . . . . . . . . . . . . . . . . . . . . . . . . . . . 141
Compatibility with the client application . . . . . . . . . . . . . . . . . . . . . . . . . . . . . . . . . . . 142
SIP Multimedia PC Client User Guide
Page 10

x Contents
[Standard—Nortel Networks Confidential]
NN10041-112
Page 11

[Standard—Nortel Networks Confide ntial ]
Figures
Figure 1 Installation Wizard . . . . . . . . . . . . . . . . . . . . . . . . . . . . . . . . . . . . . . . . . .26
Figure 2 Configuration wizard - step 1 . . . . . . . . . . . . . . . . . . . . . . . . . . . . . . . . . . 27
Figure 3 Configuration wizard - step 2 . . . . . . . . . . . . . . . . . . . . . . . . . . . . . . . . . . 28
Figure 4 Configuration wizard - step 3 . . . . . . . . . . . . . . . . . . . . . . . . . . . . . . . . . . 29
Figure 5 Configuration wizard - step 4 . . . . . . . . . . . . . . . . . . . . . . . . . . . . . . . . . . 30
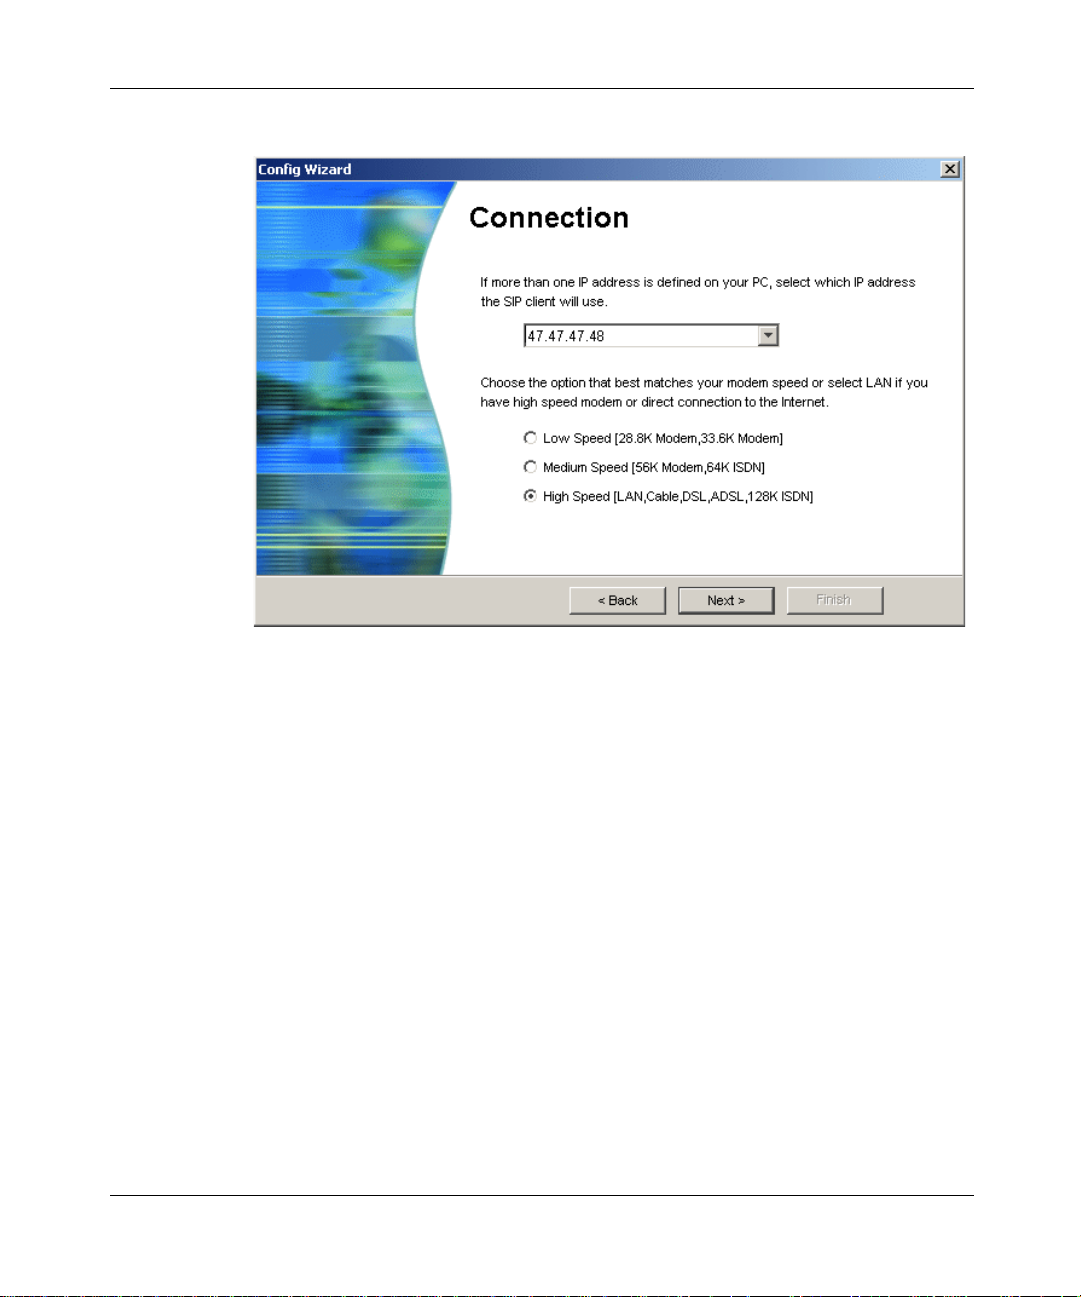
Figure 6 Configuration wizard - step 5 . . . . . . . . . . . . . . . . . . . . . . . . . . . . . . . . . . 31
Figure 7 Configuration wizard - step 5 . . . . . . . . . . . . . . . . . . . . . . . . . . . . . . . . . . 32
Figure 8 Sign in . . . . . . . . . . . . . . . . . . . . . . . . . . . . . . . . . . . . . . . . . . . . . . . . . . . . 33
Figure 9 SIP Multimedia PC Client main graphical user interface (GUI) . . . . . . . . 34
Figure 10 Blended PC Client main GUI . . . . . . . . . . . . . . . . . . . . . . . . . . . . . . . . . . 35
Figure 11 SIP Multimedia PC Client system tray icon . . . . . . . . . . . . . . . . . . . . . . . 38
Figure 12 SIP Multimedia PC Client System tray icon . . . . . . . . . . . . . . . . . . . . . . .39
Figure 13 Incoming Call Control window . . . . . . . . . . . . . . . . . . . . . . . . . . . . . . . . .43
Figure 14 Incoming Call Control window for Blended Client . . . . . . . . . . . . . . . . . . . 44
Figure 15 Active Call Control window . . . . . . . . . . . . . . . . . . . . . . . . . . . . . . . . . . . . 46
Figure 16 Transfer Call window . . . . . . . . . . . . . . . . . . . . . . . . . . . . . . . . . . . . . . . . 48
Figure 17 Complete transfer destination Call window . . . . . . . . . . . . . . . . . . . . . . . . 49
Figure 18 Sending an instant message . . . . . . . . . . . . . . . . . . . . . . . . . . . . . . . . . .53
Figure 19 Confirm Web push . . . . . . . . . . . . . . . . . . . . . . . . . . . . . . . . . . . . . . . . . . 55
Figure 20 Voice mail dialpad . . . . . . . . . . . . . . . . . . . . . . . . . . . . . . . . . . . . . . . . . . .57
Figure 21 Voice mail command buttons . . . . . . . . . . . . . . . . . . . . . . . . . . . . . . . . . . 58
Figure 22 Inbox . . . . . . . . . . . . . . . . . . . . . . . . . . . . . . . . . . . . . . . . . . . . . . . . . . . . . 62
Figure 23 Outbox . . . . . . . . . . . . . . . . . . . . . . . . . . . . . . . . . . . . . . . . . . . . . . . . . . . 63
Figure 24 Address book . . . . . . . . . . . . . . . . . . . . . . . . . . . . . . . . . . . . . . . . . . . . . . 65
Figure 25 View address book entry options . . . . . . . . . . . . . . . . . . . . . . . . . . . . . . . 66
Figure 26 Add New Group . . . . . . . . . . . . . . . . . . . . . . . . . . . . . . . . . . . . . . . . . . . . 67
Figure 27 Add new group dialog box . . . . . . . . . . . . . . . . . . . . . . . . . . . . . . . . . . . . 67
Figure 28 Add new address book entry . . . . . . . . . . . . . . . . . . . . . . . . . . . . . . . . . . 68
Figure 29 Add new entry - user information . . . . . . . . . . . . . . . . . . . . . . . . . . . . . . . 69
Figure 30 Add new entry - user phone information . . . . . . . . . . . . . . . . . . . . . . . . . . 70
Figure 31 Add new entry - other user information . . . . . . . . . . . . . . . . . . . . . . . . . . 70
Figure 32 Outlook security . . . . . . . . . . . . . . . . . . . . . . . . . . . . . . . . . . . . . . . . . . . . 72
Figures xi
SIP Multimedia PC Client User Guide
Page 12

xii Figures
Figure 33 Import contacts from Outlook . . . . . . . . . . . . . . . . . . . . . . . . . . . . . . . . . . 73
Figure 34 Buddies tree . . . . . . . . . . . . . . . . . . . . . . . . . . . . . . . . . . . . . . . . . . . . . . . 75
Figure 35 View buddy entry options . . . . . . . . . . . . . . . . . . . . . . . . . . . . . . . . . . . . . 76
Figure 36 Call Screening window . . . . . . . . . . . . . . . . . . . . . . . . . . . . . . . . . . . . . . . 78
Figure 37 Collaboration - tool . . . . . . . . . . . . . . . . . . . . . . . . . . . . . . . . . . . . . . . . . . 85
Figure 38 Open a collaboration session . . . . . . . . . . . . . . . . . . . . . . . . . . . . . . . . . .86
Figure 39 Stop a Collaboration Call . . . . . . . . . . . . . . . . . . . . . . . . . . . . . . . . . . . . . 87
Figure 40 Collaboration - file transfer . . . . . . . . . . . . . . . . . . . . . . . . . . . . . . . . . . . . 88
Figure 41 Collaboration - whiteboard . . . . . . . . . . . . . . . . . . . . . . . . . . . . . . . . . . . . 90
Figure 42 Collaboration - clipboard . . . . . . . . . . . . . . . . . . . . . . . . . . . . . . . . . . . . . . 92
Figure 43 Preferences - User Information . . . . . . . . . . . . . . . . . . . . . . . . . . . . . . . . 98
Figure 44 Preferences - Connection information . . . . . . . . . . . . . . . . . . . . . . . . . . . 99
Figure 45 Preferences - Network information . . . . . . . . . . . . . . . . . . . . . . . . . . . . . 101
Figure 46 Preferences - Network configuration . . . . . . . . . . . . . . . . . . . . . . . . . . . 102
Figure 47 Preferences - Audio settings . . . . . . . . . . . . . . . . . . . . . . . . . . . . . . . . . 103
Figure 48 Preferences Video . . . . . . . . . . . . . . . . . . . . . . . . . . . . . . . . . . . . . . . . . 104
Figure 49 Video camera configured for use by the client . . . . . . . . . . . . . . . . . . . . 106
Figure 50 Custom Video configuration . . . . . . . . . . . . . . . . . . . . . . . . . . . . . . . . . . 108
Figure 51 Sample video format window 1 . . . . . . . . . . . . . . . . . . . . . . . . . . . . . . . . 110
Figure 52 Sample video format window 2 . . . . . . . . . . . . . . . . . . . . . . . . . . . . . . . . 110
Figure 53 Preferences - Voice Mail . . . . . . . . . . . . . . . . . . . . . . . . . . . . . . . . . . . . . 112
Figure 54 Preferences - RAIDerLink . . . . . . . . . . . . . . . . . . . . . . . . . . . . . . . . . . . . 114
Figure 55 Preferences - i2004 . . . . . . . . . . . . . . . . . . . . . . . . . . . . . . . . . . . . . . . . 115
Figure 56 Preferences - File exchange . . . . . . . . . . . . . . . . . . . . . . . . . . . . . . . . . . 116
Figure 57 Presence settings . . . . . . . . . . . . . . . . . . . . . . . . . . . . . . . . . . . . . . . . . . 117
Figure 58 Preferences - tool tips delay . . . . . . . . . . . . . . . . . . . . . . . . . . . . . . . . . . 118
Figure 59 Windows look interface . . . . . . . . . . . . . . . . . . . . . . . . . . . . . . . . . . . . . . 120
Figure 60 Audio wizard - Audio Test Call . . . . . . . . . . . . . . . . . . . . . . . . . . . . . . . .121
Figure 61 Audio Test Call - Audio Properties . . . . . . . . . . . . . . . . . . . . . . . . . . . . . 122
Figure 62 Profile Manager . . . . . . . . . . . . . . . . . . . . . . . . . . . . . . . . . . . . . . . . . . .124
[Standard—Nortel Networks Confidential]
NN10041-112
Page 13

[Standard—Nortel Networks Confide ntial ]
Tables
Table 1 Main menu actions . . . . . . . . . . . . . . . . . . . . . . . . . . . . . . . . . . . . . . . . . . 36
Table 2 Video configuration settings . . . . . . . . . . . . . . . . . . . . . . . . . . . . . . . . . .105
Table 3 NeoMagic sound card drivers . . . . . . . . . . . . . . . . . . . . . . . . . . . . . . . . . 128
Table 4 Main GUI buttons . . . . . . . . . . . . . . . . . . . . . . . . . . . . . . . . . . . . . . . . . . 135
Table 5 Incoming call buttons . . . . . . . . . . . . . . . . . . . . . . . . . . . . . . . . . . . . . . . 138
Table 6 Active call buttons . . . . . . . . . . . . . . . . . . . . . . . . . . . . . . . . . . . . . . . . . . 138
Tables xiii
SIP Multimedia PC Client User Guide
Page 14

xiv Tables
[Standard—Nortel Networks Confidential]
NN10041-112
Page 15

[Standard—Nortel Networks Confide ntial ]
Welcome
The SIP Multimedia PC Client User Guide provides you with the instructions
necessary to get up and running with this product. This guide also describes the
capabilities of the SIP Multimedia PC Client, a feature-rich user interface.
Topics include:
• “Getting started” on page 19
• “Multimedia communication” on page 41
• “Managing your contacts and calls” on page 61
• “Multimedia collaboration” on page 83
• “Advanced set-up” on page 97
• “Troubleshooting” on page 127
15
Audience
This guide is intended for users of the SIP Multimedia PC Client services and
features.
Text conventions
This guide uses the following text conventions:
bold text Indicates the command key you need to press
italic text Indicates new terms, document titles
Example: Press Ok.
SIP Multimedia PC Client User Guide
Page 16

[Standard—Nortel Networks Confide ntial ]
16
Acronyms
This guide uses the following acronyms:
ADSL Asynchronous Digital Subscriber Line
codec coder/decoder
DSL Digital Subscriber Line
DTMF Dual Tone Multi-Frequency
ERC Express Routing Code
GUI Graphical User Interface
IM Instant Message
IP Internet Protocol
IPCM Internet Protocol Client Manager
ISDN Integrated Services Digital Network
LAN Local Area Network
NAT Network Address Translation
PNG Portable Network Gr aphic
PSTN Public Switched Telephone Network
SIP Session Initiation Protocol
URL Universal Resource Locator (internet address)
Related publications
Other public ations relate d to the SIP Multimedia PC C lient Guide:
• SIP Personal Agent Getting Started Guide
• i2004 Internet Telephone User Guide
SIP Multimedia PC Client User Guide
Page 17

[Standard—Nortel Networks Confide ntial ]
How to get help
If you purchased a service contract for your Nortel Networks product from a
distributor or authorized reseller, contact the technical support staff for that
distributor or reseller for assistance.
If you purchased a Nortel Networks service program, contact Nortel Networks
Technical Support. To obtain contact information online, go to the http://
www.nortelnetworks.com/cgi-bin/comments/comments.cgi URL, then click on
Technical Support.
From the Technical Support page, you can open a Customer Service Request
online or find the telephone number for the nearest Technical Solutions Center. If
you are not connected to the Internet, you can call 1-800-4NORTEL
(1-800-466-7835) to learn the telephone number for the nearest Technical
Solutions Center.
An Express Routing Code (ERC) is available for many Nortel Networks p rod uct s
and services. When you use an ERC, your call is routed to a technical support
person who specialize s in suppor ting tha t product or servi ce. To locate an ERC for
your product or service, go to the following the http://www.nortelnetworks.com/
help/contact/erc/index.html URL.
17
SIP Multimedia PC Client User Guide
Page 18

[Standard—Nortel Networks Confide ntial ]
18
SIP Multimedia PC Client User Guide
Page 19

[Standard—Nortel Networks Confide ntial ]
Chapter 1
Getting started
Topics in this section:
• “What is the S IP Multimedia PC Client?” on page 19
• “Configurations” on page 20
• “Useful terms to know” on page 22
• “Before you begin” on page 24
• “Understanding the SIP Multimedia PC Client interface” on page 34
• “Using online help” on page 39
What is the SIP Multimedia PC Client?
19
The SIP Multimedia PC Client is an application that provides advanced IP
telephony features, many of which are not available on a traditional telephone:
• Internet Protocol (IP) calls
• advanced call logging - keep track of incoming, outgoing and missed calls
• network-based address book
• presence - see who is online and let others know that you are online
• control of Nortel Networks i2004 Internet Telephone
• call hold/retrieve
• call trans fer (blind o r consultat i ve)
• web push - send a web page to another user
• collaboration - transfer files, use a “whiteboard”, clipboard
• advanced call forward ing and call screening
• call handling - decline, redirect, or ignore incoming calls
• instant messaging - send and receive text messages
SIP Multimedia PC Client User Guide
Page 20

[Standard—Nortel Networks Confide ntial ]
20
• video calls (one-way and two-way video)
• local three-way calling
• conference calls [requires network conference server]
• a COM AddIn button that allows you to make calls from Outlook 2000 and
import contacts from Outlook 2000
Configurations
The SIP Multimedia PC Client is available in three configurations.
• “SIP Multimedia PC Client” on page 20
• “SIP Multimedia PC Client Set” on page 21
• “SIP Multimedia Blended PC Client” on page 21
SIP Multimedia PC Client
The SIP Multimedia PC Client is a software application that transforms your PC
into a powerful telephony and multimedia communications tool. This software
application runs on your PC and provides access to SIP features and multimedia
services.
Most users will choos e to u se a heads et to speak and hea r dur ing ca ll s. Opti onall y,
you can use a separate microphone and your computer’s speakers for the voice
part of the call (not recommended in open office environments).
Tip: Keep the SIP Multimedia PC Client running in the background
whenever you are using your computer so you can easily accept or
screen incoming calls.
SIP Multimedia PC Client User Guide
Page 21

[Standard—Nortel Networks Confide ntial ]
SIP Multimedia PC Client Set
When the SIP Multimedia PC Client controls an i2004 Internet Telephone the
configuration is called a SIP Multimedia PC Client Set. The i2004 Internet
Telephone provides premium-quality voice, while your computer is dedicated to
the data and video components of the multimedia session.
The SIP Multimedia PC Client Set is ideal when superior voice quality is
required. It is also ide al whe n the sessi ons i nclude proc essing -inte nsive t asks s uch
as real-time video, which would consume bandwidth required for voice
processing.
To configure the SIP Multimedia PC Client to control your i2004 telephone, see
Chapter 5, “ Advanced se t-up”.
SIP Multimedia Blended PC Client
When you use your existing desktop telephone for voice calls and your SIP
Multimedia PC Client for multimedia communication, it is called a SIP
Multimedia Blended PC Client. A desktop telephone provides premium-quality
voice, while your computer is dedicated to the data component s of the multimed ia
session.
21
The SIP Multimedia Blended PC Cli ent is a cost- effectiv e solution tha t allows you
to maintain your current desktop telephone for voice calls, while enhancing your
communication possibilities with multimedia features such as the collaboration
tools.
Note: Calling actions, audio , vide o and adv anc ed screening settings are
disabled for the SIP Multimedia Blended PC Client.
SIP Multimedia PC Client User Guide
Page 22

[Standard—Nortel Networks Confide ntial ]
22
Useful terms to know
The SIP Multimedia PC Client uses some terms that may be new to you. Take a
moment to read through the explanations to familiarize yourself with the
following terms:
• “Proxy server” on page 22
• “Address” on page 22
• “Network-based address book” on page 23
• “Buddies” on page 23
• “Presence” on page 23
• “Service package” on page 23
Proxy server
A proxy server is an ap plica tion t hat r elays data betwee n yo ur SIP Multimed ia PC
Client and the network. The IP address of the proxy server is already defined in
your SIP Multimedia PC Client. When you connect to the proxy server you need
to provide a valid username and password.
Address
When a procedure instructs you to enter an address it means entering either a
telephone number or a SIP address. A SIP address is a unique identifier of users
on the IP network. It has the same format as an email address, for example,
jdoe@lab1.org, but it is not an email addr ess. The networ k can identi fy where you
are and route your calls by tracki ng your SIP addr ess when you sign-i n to any SIP
Multimedia PC Client, SIP Multimedia Web Client or i2004 Internet Telephone.
In order to make it easier to pl ace calls, you can store addresses (SIP addre sses or
telephone numbers) in an network-based address book.
Using SIP addresses allows you to take advantage of the more powerful features
of the PC Client, such as presence.
SIP Multimedia PC Client User Guide
Page 23

[Standard—Nortel Networks Confide ntial ]
Network-based address book
Your personal network-based address book is a key tool for managing addresses.
You can save your addresses for quick call access as well as organize addresses
into groups.
When you make changes in your network-based address book it applies to all the
devices you can use to access the network (SIP Multimedia PC Client, SIP
Multimedia Web Client, i2004 Internet Telephone).
Buddies
Within your network-based address book, you can designate entries as Buddies.
People that you contact f requently are good candidates for you r l is t of Buddies. If
you have entered the SIP ad dre ss of someone in your l ist of Budd ies, then y ou can
see their online presence status. Just click the Buddies button to see your list of
Buddies and whether or not they are available to contact.
23
Presence
Presence is a feature that allows you to see the online status of other users on the
network and also a way to let oth ers know your st atus. In the Statu s Area there is a
drop-down menu where you can choose your presence state to let other users
know if you are online or away from your desk. You can also set the system to
automatically alert others whether you are away from your PC or on the
telephone. Click on the Buddies button to see your Buddies and their online
presence status.
Service package
Your service provider or system administrator assigns a service package with
pre-defined features and options for you. Some features will only be available to
you if they are listed in your service package. For example, your company may
not support PC video cameras and therefore these settings would not be available
for you to change. In addition to video, your service package defines how many
Buddies you can have, how man y call ers you c an joi n in an a udio con feren ce, and
whether you have voice mail enabled.
SIP Multimedia PC Client User Guide
Page 24

[Standard—Nortel Networks Confide ntial ]
24
If you have access to the SIP Personal Agent, you can view the features and
options available in your service package through Settings > Preferences.
Note: Your service package features won’t be available on your SIP
Multimedia PC Client until you sign-in.
Before you begin
You need the following items to start us ing the SIP Multimedia PC C lient:
• a PC configured with the required minimum software and hardware, as
described in the following section
• Internet access and a connection that meets the minimum transmission speed
requirements, as described in the following section.
Note: The SIP Multimedia PC Client can operate with the minimum
hardware and software req uirem ents but the rec omme nded req uirem ents
will provide enhanced multimedia communications quality.
Minimum hardware and operating system requirements
• 550 MHz Pentium-class or equivalent processor
• Windows* 98(SE), Windows Me, Windows NT* 4.x with SP5, Windows
2000, or Windows XP
• 28.8 Kbps modem
• Microphone and full duplex sound card. [Note: Some laptops do not come
equipped with full duplex sound cards.]
• 48 MB free RAM (This requirement is in addition to the memory
requirements of the OS and other concurrent applications.)
• 60 MB free hard disk space
• 640x480 @8bpp (256 colors) VGA graphics card
SIP Multimedia PC Client User Guide
Page 25

[Standard—Nortel Networks Confide ntial ]
• Mouse
Recommended hardware and operating system requirements
• 1 GHz (or higher) Pentium-class or equivalent processor
• Windows XP, Windows 2000, Windows 98(SE), or Windows NT 4.x with
SP5
• 56 Kbps modem or faster network connection (a Cable modem, DSL,
10base-T Ethernet connection will provide a better user experience)
• Full duplex sound card with headset (microphone-headphone combination)
• 64 MB free RAM (This requirement is in addition to the memory
requirements of the OS and other concurrent applications).
• 60 MB free hard disk space
• 800x600 @16bpp (65,536 colors) VGA or better video graphics card
• Mouse
Optional hardware and software requirement s
25
• Nortel Networks i2004 Internet Telephone
• USB-based Internet Video Camera (Web Cam). A 16bpp (65,536) VGA or
better video graphics mode is required in or der to send video. See Appendix B
for more information about video camera support.
• Auto Web Push requires a Web browser: Internet Explorer 5.0 and above or
Netscape* 4.77 and above
• Microsoft Outlook* 2000 (if you want to use the Microsoft Outlook 2000
AddIn or Import Contacts features)
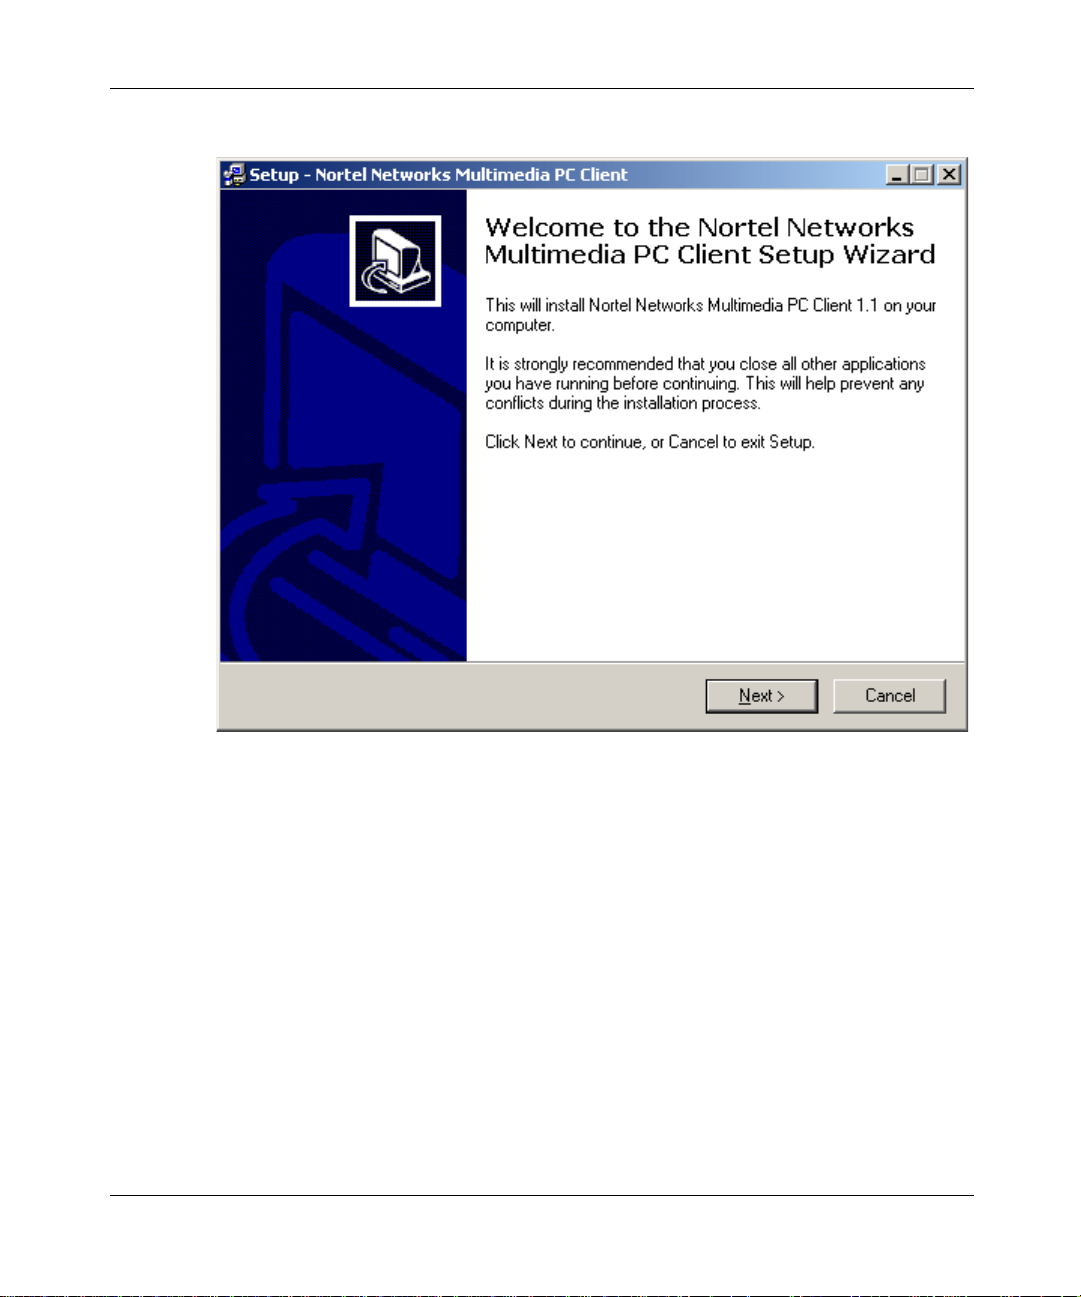
Installi ng the SIP Multimedia PC Client software
To install the SIP Multimedia PC Client, double-click the SIP Multimedia PC
Client insta ll file you downloaded or received on CD.
SIP Multimedia PC Client User Guide
Page 26
[Standard—Nortel Networks Confide ntial ]
26
Figure 1 Installation Wizard
The installer application will walk you through the installation process, allowing
you to select options, including:
• the location of where the SIP Multimedia PC Client should be installed
• whether or not the SIP Multimedia PC Client should install a desktop icon
• whether or not the SIP Multimedi a PC Client should ins tall the Outl ook COM
AddIn
• whether or not the SIP Multimedia PC Cl ient starts au tomatically
• whether or not you would like to view any important release notes
SIP Multimedia PC Client User Guide
Page 27
[Standard—Nortel Networks Confide ntial ]
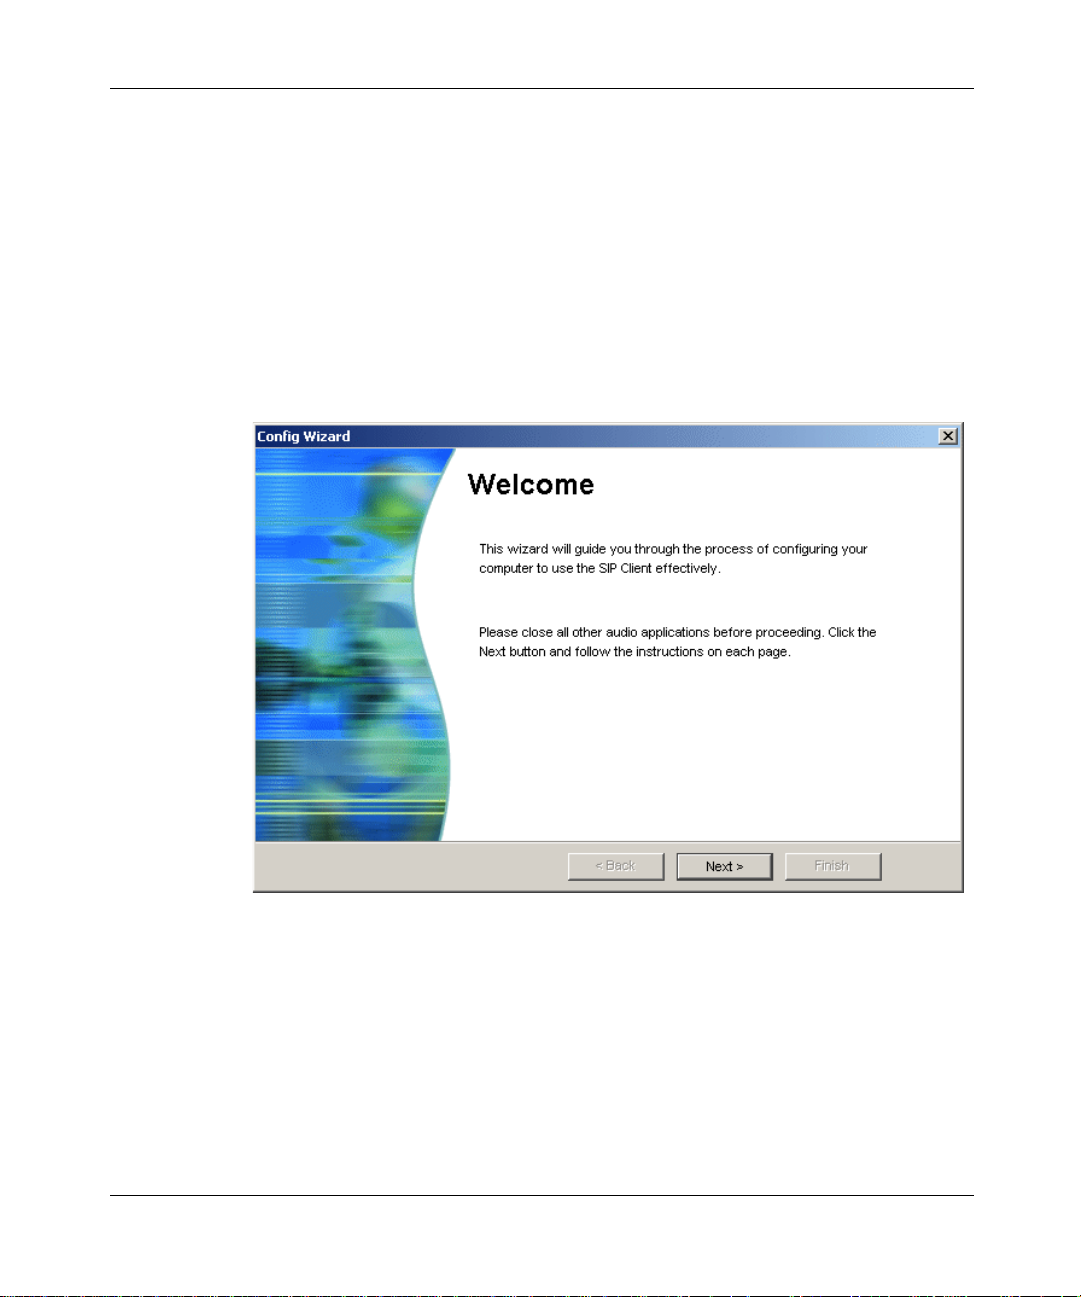
Launching the SIP Multimedia PC Client
Double-select the desktop icon (if present) or select the Nortel Networks SIP
Client from the Windows Start Menu to open the SIP Multimedia PC Client
application.
The first time yo u u se th e appl icat ion, you wi ll b e pre sented wi th a wizar d to walk
you through the SIP Multimedia PC Client configuration. Follow
that appear on your screen.
Figure 2 Configuration wizard - step 1
27
the prompts
SIP Multimedia PC Client User Guide
Page 28
[Standard—Nortel Networks Confide ntial ]
28
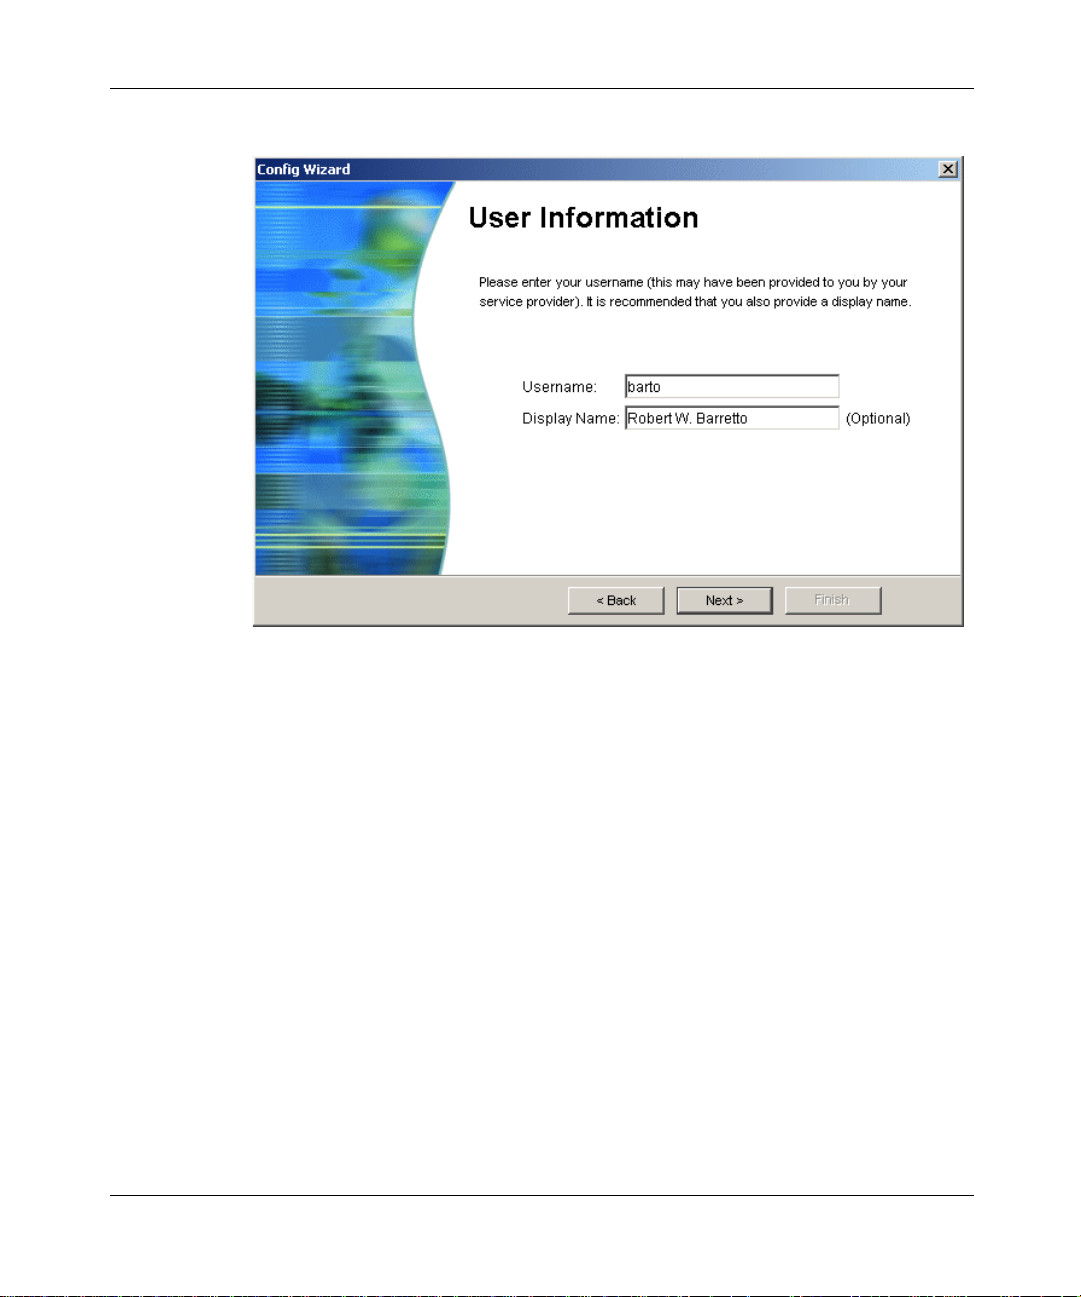
Figure 3 Configuration wizard - step 2
SIP Multimedia PC Client User Guide
Page 29
[Standard—Nortel Networks Confide ntial ]
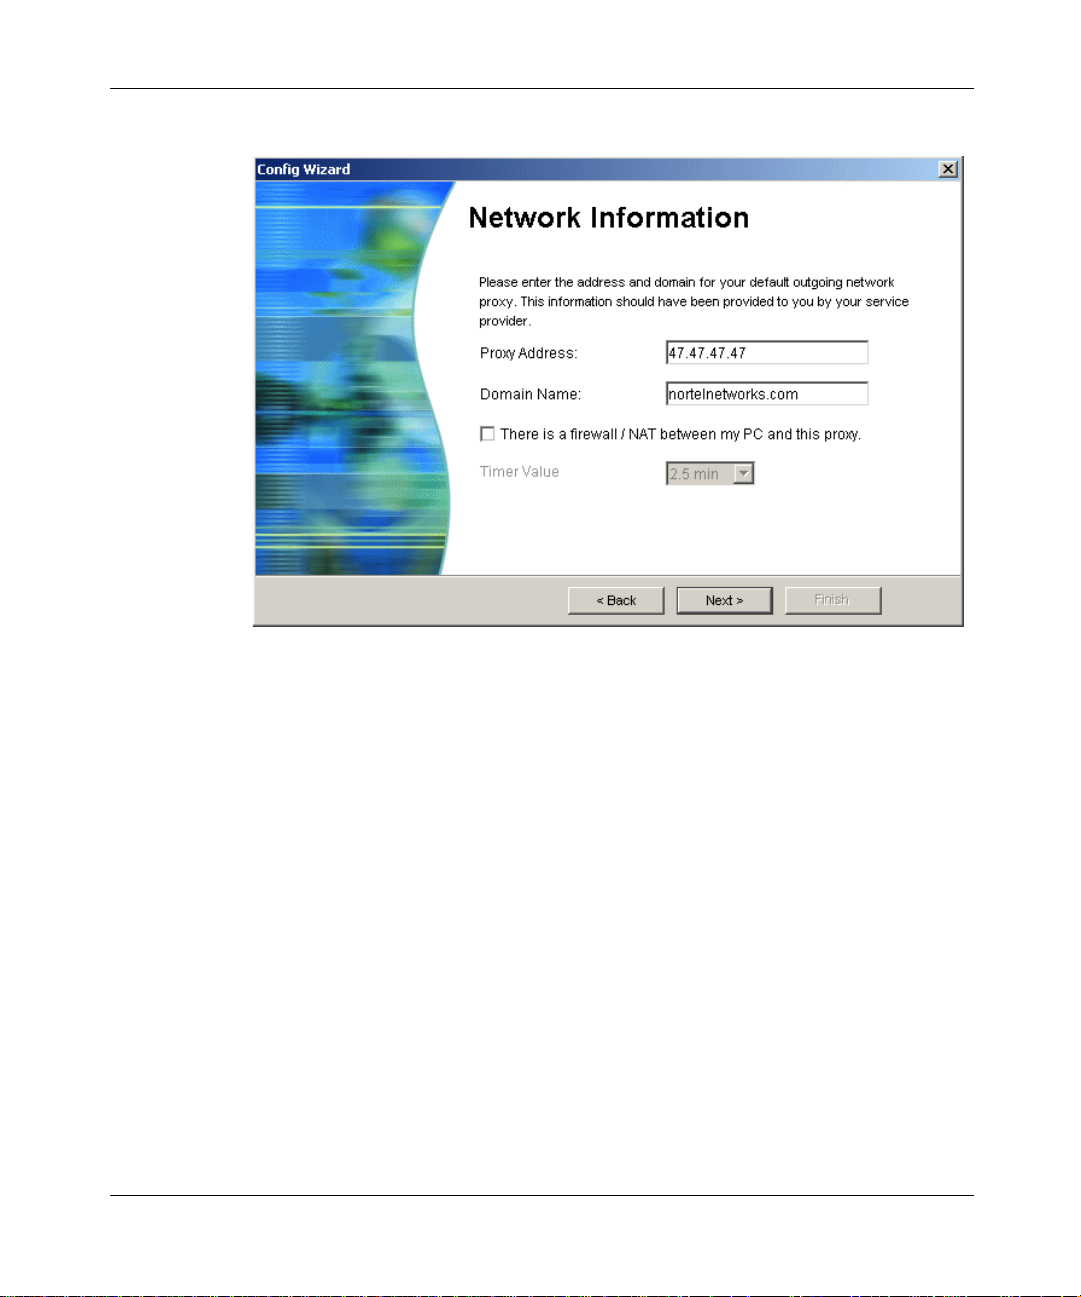
Figure 4 Configuration wizard - step 3
29
SIP Multimedia PC Client User Guide
Page 30
[Standard—Nortel Networks Confide ntial ]
30
Figure 5 Configuration wizard - step 4
SIP Multimedia PC Client User Guide
Page 31

[Standard—Nortel Networks Confide ntial ]
Figure 6 Configuration wizard - step 5
31
Note: SIP Multimedia Blended PC Client users can click Next to s kip the
Audio Test Call step.
SIP Multimedia PC Client User Guide
Page 32

[Standard—Nortel Networks Confide ntial ]
32
Figure 7 Configuration wizard - step 5
Signing in to the SIP Multimedia PC Client
You will be prompted to s ign in to t he SIP Multi media PC Client when you l aunch
it. At other times (for example, if you disconnect or lose connection with the
server) you may need to manually sign in.
Note: If you chose the option to have the SIP Multimedia PC Client
automatically start-up, and you set your Network preferences to
automatically connect to your proxy server, then it may be convenient to
set the Remember my password option.
1 Select Login and the button beside your default proxy server IP address. The
Sign In window displays with your proxy server’s IP address and your
username.
SIP Multimedia PC Client User Guide
Page 33

[Standard—Nortel Networks Confide ntial ]
Figure 8 Sign in
2 E nter your pa ssword.
3 Click on the Remember my password check box if you do not want to ent er
your password every time you sign in. This step is optional.
33
4 Click the Sign me in automatically check box if you want the SIP
Multimedia PC Client to au tomatically sign in.This step is optio nal.
Note: If you select both these options (Remember my password and
Sign me in automatically) then you will not be prompted with this Sign
In window again.
5 Click Ok.
Configuring Windows to automatically start the SIP Multimedia PC Client
The SIP Multimedia PC Client installation presents the option to have the client
start automatically. If th is option is not chosen and you would st i ll li ke t o start the
client automatically with Windows, perform the following steps (dependant on
your Windows configuration):
If you are running Active Desktop (Windows 98SE, Windows Me, Windows
2000, Windows XP)
SIP Multimedia PC Client User Guide
Page 34

[Standard—Nortel Networks Confide ntial ]
34
1 Drag-and-drop the desktop SIP Client icon onto the task bar Start button.
2 Place the file into the Programs Startup program group.
If you are running Windows 98 First Edition
1 Right-click on the Start menu and select Explore.
2 Drag-and-drop (or copy and paste) the desktop SIP Client icon into the Start
Menu/ Programs/Startup program group folder.
Understanding the SIP Multimedia PC Client interface
The following figure shows the main window interface that appears when you
start up the SIP Multimedia PC Client:
Figure 9 SIP Multimedia PC Client main graphical user interface (GUI)
Status
area
Address
field
Subject field
SIP Multimedia PC Client User Guide
Display area
Page 35

[Standard—Nortel Networks Confide ntial ]
Understanding the Blended SIP Multimedia PC Client interface
When the SIP Multimedia PC Client is running in Blended mode, some parts of
the main GUI are not available. The following figure shows the main window
interface that appears when the SIP Multimedia PC Client becom es Blended:
Figure 10 Blended PC Client main GUI
Call
screening
unavailable
35
Address and subject
fields unavailable
Call origination
functions unavailable
Display area
SIP Multimedia PC Client User Guide
Page 36

[Standard—Nortel Networks Confide ntial ]
36
Main menu actions
The following actions are available from the main window menu:
Table 1 Main menu actions
Menu Action
Login • Connect/disconnect to a defined proxy
View • Call Logs
Tools • Send Instant Message...
Help • Contents
server IP address
• Change My Status
•Exit
• Web Push...
• Collaboration
• Preferences...
• Audio Wizard...
• Import Contact from Outlook
• Show Tip of the Day
• About...
Note: If you are running the SIP Multimedia Blended PC Client some
menu options are not available.
SIP Multimedia PC Client User Guide
Page 37

[Standard—Nortel Networks Confide ntial ]
Main menu shortcuts
The SIP Multimedia PC Client incl udes many keyboar d shortcut s that make it fast
and easy to access frequently used functions:
37
Open the L
Open the V
Open the T
Open the H
Send Instant Me ssage Ctrl+M
Show Call Logs Ctrl+L
Edit Preferences Ctrl+P
Status area
The status area presents the following information regardin g how the client is
operating:
• User for displaying the username of your account
• Proxy for displaying the default server to process outgoing calls and
messages. This server provides your service package, network-based address
book, and Buddies
• Status for displaying your current presence state on the network (Online, Be
Right Back, Busy, Out to Lunch, Away, Show Offline)
• S as the indicator light that displays whether call screening is enabled or
disabled
• I as the indicator light that displays whether an i2004 Internet Telephone is
configured
• there are also two lines to display call information
ogin menu Alt+L
iew menu Alt+V
ools menu Alt+T
elp menu Alt+H
Main buttons
The main interface provides the buttons to access the following features of the SIP
Multimedia PC Client:
SIP Multimedia PC Client User Guide
Page 38

[Standard—Nortel Networks Confide ntial ]
38
• Send Instant Message for sending an instant message
• Voice Mail for calling a voice mail system
• Conference for conferencing active calls
• Call Screening for configuring local screening rules
• Inbox for showing a list of all calls to you
• Outbox for showing a list of calls you have made
• Call for placing a call
— Address entry field for the person you are calling
— Subject text entry field for sending optional subject for calls you place
• Address Book for displaying the network-based address book in the display
area
• Buddies for displaying your Buddies in the display area
System tray icon
When started, the SIP Multimedia PC Client places the following icon in the
system tray.
Figure 11 SIP Multimedia PC Client system tray icon
Tip: When you are not using the SIP Multimedia PC Client you can
click the X in the uppe r right hand corne r to minimize the windo w . It will
continue to run in the system tray and prompt you when you receive a
call or instant message.
Double-click on the system tray icon to restore SIP Multimedia PC Client and
bring it to the front of your desktop.
Right-click on the system tray icon to ac cess SIP Multimedia PC Client
functionality (for example, Make a Call, Send Instant Message, and Start
Collaboration).
SIP Multimedia PC Client User Guide
Page 39

[Standard—Nortel Networks Confide ntial ]
Figure 12 SIP Multimedia PC Client System tray icon
When the SIP Multimedia PC Client is offline the icon in the system tray will
change to red and orange with a bar crossed through it.
39
Using online help
There are several ways that you can access SIP Multimedia PC Client help:
• tool tip help - a small help description that is available when you roll your
mouse over a button on the SIP Multimedia PC Client main interface
• tool tip help from t he s yst em tr ay i con - roll your mouse over the icon several
times to see tool tip help for:
— your presence status and network proxy
— whether or not there are missed calls (if voice calls are available)
— whether or not there are new messages (local or PSTN, if available)
SIP Multimedia PC Client User Guide
Page 40

[Standard—Nortel Networks Confide ntial ]
40
SIP Multimedia PC Client User Guide
Page 41

[Standard—Nortel Networks Confide ntial ]
Chapter 2
Multimedia communication
Topics in this section:
• “Making a call” on page 41
• “Receiving a call” on page 43
• “Answering a call” on page 45
• “Ending a call” on page 47
• “Holding a call” on page 47
• “Retrieving a held call” on page 47
• “Transferring a call” on page 48
• “Three-way calling” on page 50
• “Conference calling” on page 51
• “Sending instant messages” on page 52
• “Sending web pages” on page 54
• “Using voice mail” on page 56
• “Sending and receiving video” on page 58
• “Placing a voice call from Outlook 2000 (optional)” on page 59
41
Making a call
There are multiple ways to initiate a call using the SIP Multimedia PC Client. The
most common ways are th e following :
• Double-click on any Address Book, Buddies, Inbox, or Outbox entry.
SIP Multimedia PC Client User Guide
Page 42

[Standard—Nortel Networks Confide ntial ]
42
• Enter an address (IP address, SIP address, or public telephone number) in the
Addr field, and press Enter or click the Call button. When dialing a public
telephone number, no punctuation is required.
For example, 5556245.
Tip: For outside calls from an office system, or for long distance calls,
be sure to include any necessary access codes.
For example, 619725556245
• Right-click on any Address Book, Buddies, Inbox, or Outbox entry, and
then click Call from the pop-up menu that appears.
Tip: Right-clicking is a quick way to access extended actions that you
can perform on the selected entry.
— Select an email, cont act list entr y, or meetin g request in your Microsoft
Outlook 2000 folder and click the Call button. (You must have the
Outlook 2000 COM AddIn installed and the SIP Multimedia PC Client
running.) You may be prompted to choose a number if there are multiple
telephone numbers for this entry.
Note: Calling actions are not available for the SIP Multimedia PC
Blended Client.
SIP Multimedia PC Client User Guide
Page 43

[Standard—Nortel Networks Confide ntial ]
Receiving a call
When the SIP Multime dia PC Cl ient is running on your comput er and receives an
incoming call, it displays a Call Control window on your PC screen.
Figure 13 Incoming Call Control window
43
The incoming Call Control window contains the following buttons and status
information:
•the username of the calling party in the window header. If there is a display
name associated with the caller, that name appears in the display area at the
bottom of the window.
• photograph of the caller. If the caller has provided a networ k calling picture
ID, a digital photograph of the caller displays.
• call-handling buttons
— Answer - When selected, the call is answered and voice (and if
negotiated, video) is started. The incoming Call Control window
disappears and is replaced by an active Call Control window.
— Decline - When selected, t he caller is informed that the call has been
declined and the incoming Call Control window disappears. You are
given the option of declining with or without a reason.
SIP Multimedia PC Client User Guide
Page 44

[Standard—Nortel Networks Confide ntial ]
44
— Redirect - When selected, a Redirect window appears where you can
select or enter an address where the calling party will be redirected to.
After selecting or manually providing a redirect address, the incoming
call control window disappears.
— Instant Message - When selected, an Instant Message window appears
where you can enter a message to the originator. The incoming call is not
affected and can still be handled through one of the other Call Control
window buttons.
— Ignore - When selected, the incoming Call Control window disappears.
Whether or not the caller is not informed that the call has been ignored is
configurable using Tools > Preferences > Connection. If any call
screening actions are defined against this incoming caller, those actions
are still executed according to the screening rules.
SIP Multimedia Blended PC Client
If you have the SIP Multimedia Blended PC Client installed, the incoming Call
Control window will display.
Figure 14 Incoming Call Control window for Blended Client
The incoming Call Control window contains the following buttons and status
information:
SIP Multimedia PC Client User Guide
Collaboration tools
button
Page 45

[Standard—Nortel Networks Confide ntial ]
•the username of the calling party in the window header. If there is a display
name associated with the caller, that name appears in the display area at the
bottom of the window.
• photograph of the caller. If the caller has provided a networ k calling picture
ID, a digital photograph of the caller displays.
• call-handling buttons
— Instant Message - When selected, an Instant Message window appears
where you can enter a message to the originator.
— Web Push - When select ed, a Web Push window displays so that you can
select a URL to send to the caller’s PC.
• the collaboration button allows you to initiate a collaboration session and use
the whiteboard, file transfer and clipboard tools
•the Stay button keeps the Call Control window open for convenient access to
the Instant Message, Web Push, and Collaboration buttons
•the Close button manually removes the Call Control window
45
Note: If you do nothing with Call Control window it will close
automatically after approximately 30 seconds.
Answering a call
To answer a call, click Answer in the Call Contr ol windo w. The window changes
to an active C all Control window.
SIP Multimedia PC Client User Guide
Page 46

[Standard—Nortel Networks Confide ntial ]
46
Figure 15 Active Call Control window
The following buttons/features are available in the active Ca ll Control w indow:
• Hold - places the caller on hold
• Mute - mutes the call (voice)
• Instant Message - sends an instant message to the caller
• Transfer - transfers the caller to another party
• Web Push - pushes web pages to the caller
• Hangup - hangs up the call
• Visual indication of transmission and reception voice energy levels
• Visual indication of network quality (packet lo ss)
• Call duration clock indicator (hours, minutes, and seconds)
• V isual indicat ion of t he codec s peed an d abilit y to swit ch betw een High-s peed
and Low-speed codec
• Photo display button
• Dialpad di splay button
• Collaboration options display button
• Status area at the bottom of the window that displays the status of the call
SIP Multimedia PC Client User Guide
Page 47

[Standard—Nortel Networks Confide ntial ]
Note: Please refer to Appendix A for a reference guide to SIP
Multimedia PC Client buttons.
Note: The SIP Multimedia PC Client graphically displays voice energy
only when the PC is used for voice, and not when the i2004 Internet
Telephone (SIP Mu ltimedia PC Client Set) or other telep hone is used f or
voice.
Ending a call
To end a call, click Hang Up in the Call C ontrol window.
47
Holding a call
To put a call on hold
1 Make a call or answer an incoming call.
2 Click Hold. The call is now held, and the Hold button on the Call Control
window flashes. No audio or video is heard or seen while the call is on hold
Tip: While the call is on hold, you can make and receive other calls.
Retrieving a held call
T o retr ieve a ca ll on hold, cl ick the fla shing Hold button . The call is retri eved, and
the Hold button on the Call Control window stops flashing.
SIP Multimedia PC Client User Guide
Page 48

[Standard—Nortel Networks Confide ntial ]
48
Note: It is possible that you might not be able to retrieve a call. For
example, the caller you put on hold can place you on hold as well.
Transferring a call
You can transfer an active call without talking to the person you are transferring
the call to (blind transfer), or you can consult with the person who will receive
your transferred call (consult transfer).
Figure 16 Transfer Call window
Blind transfer
To perform a blind transfer of an active call
SIP Multimedia PC Client User Guide
Page 49

[Standard—Nortel Networks Confide ntial ]
1 Select T ransfer in the Call Cont ro l window. A Transfer Call window appears.
2 E nter a transfer address, such as a telephone number or SIP addr ess (or by
selecting an Address Book, Inbox, or Outbox entry).
3 Click on OK.
4 The Call Control window clo ses, and the SIP Multimedia PC Client transfers
the call to the named destination and hangs up the call from your system.
Consult transfer
To transfer an active call and speak with the party you are transferring to
1 Click Transfer in the Call Control window. A Transfer Call window appears.
2 Enter a transfer address, for example a telephone number or SIP address (or
by selecting an Address Book, Inbox, or Outbox entry).
3 Select the T al k to this person befo r e comple ting the tra nsfer che ckbox and
click on OK. The SIP Multim edia PC Cli ent init iates a n ew call to t he trans fer
destination.
49
4 After talking to the transfer destination, click OK on the new transfer
destination Call Control window to initiate the transfer.
Figure 17 Complete transfer destinati on Cal l window
5 The transfer destination is placed on hold and the SIP Multimedia PC Client
initiates a new ca ll to the n etwo rk audi o conf erenc e serv er. Once connecte d to
SIP Multimedia PC Client User Guide
Page 50

[Standard—Nortel Networks Confide ntial ]
50
the audio conference server, the SIP Multimedia PC perfor ms a bli nd t ran sf er
of the transferee and the transfer destination to the audio conference.
6 Once the transferee and the transfer destination join the conference, both the
original Call Control window and the transfer destination Call Control
windows close. To complete the transfer, press Hangup on the conference
Call Control window to drop out of the call.
Three-way calling
The SIP Multimedia PC Client can combine two separate calls into one three-way
call, without the use of a network-based conference server
Note: During a three-way call, video is only available on the first active
call leg.
Note: Three-way calling is not available when the i2004 Internet
Telephone (SIP Mu ltimedia PC Client Set) or other telep hone is used f or
voice.
Setting up a three-way call
To set up a three-way call
1 Make a call or answer an incoming call.
2 Place that call on hold.
3 Make another call to a different party.
4 Once the second party has answered the call , re tr ieve the first call by clicking
Hold from the Call Control window of the first call. You now have a
three-way call.
SIP Multimedia PC Client User Guide
Page 51

[Standard—Nortel Networks Confide ntial ]
Removing a person from a three-way call
You can choose from one of the following options to remove a person from a
three-way call:
• Select Hang up in the Call Control window to drop the person from the call.
• Select Hold in the Call Control window to put the person on hold.
• Select Transfer in the Call Control window to transfer the person to another
destination.
Conference calling
You can use the SIP Multimedia PC Client to set up conference calls.
Creating a conference
51
Note: The maximum number of parties that can join together with the
network-based conference is dependent on your service package.
To set up a conference call using the SIP Multimedia PC Client
1 Complete a call to another p arty.
2 Place that party on hold.
3 Repeat this process up to the Conference Port limit defined in your service
package.
4 Click the Conference button on the main GUI. The SIP Multim edia PC Client
initiates a n ew call to the network conference server, requesting the
appropriate number of conference ports.
5 Once the PC Client has successfully contact ed the ne twork con feren ce se rver,
all the held calls are transferred to the network conference server. As each
party joins the conference, the Call Control window for that call closes.
SIP Multimedia PC Client User Guide
Page 52

[Standard—Nortel Networks Confide ntial ]
52
Note: Video is not available during a conference call.
Leaving a conference
Any user can depart from a conference call by pressing the Hangup button on
their Call Contro l wi ndo w for the conference call. The net work conference server
continues hosting the conference call until only one party remain s, at which point
it ends the call.
Sending instant messages
Instant messaging enables you to send and receive text notes among one or more
recipients, even while you are engaged in an active call.
You can send an instant message in any of the following ways:
• From the SIP Multimedia PC Client main window, select the Instant
Message button. The SIP Mult imedia PC Client displa ys a wind ow for you t o
select recipient(s) and enter the message.
• From the Call Control window of an active call, select the Instan t Message
button. The SIP Multimedia PC Client displays a window for you to send a
text message to the other user on the call.
• Right-click any Address Book, Buddies, Inbox or Outbox entry, and select
Send Instant Message to… The SIP Multimedia PC Client displays a
window for you to send a text message to the address of the selected entry.
• From the Incoming Call Control window, select the Instant Message button.
The SIP Multimedia PC Client displays a window for you to send a text
message to the originat or of the call.
SIP Multimedia PC Client User Guide
Page 53

[Standard—Nortel Networks Confide ntial ]
Tip: To bring up the Instant Message address window, press <Ctrl+M>
or select Tools > Send Instant Message from the SIP Multimedia PC
Client's main menu.
To send an instant message, complete the follow ing steps in the Instant Message
window.
Figure 18 Sending an instant message
53
1 From the list of Address Book Entries, highlight an entry and select the
right-arrow. Or , enter a user's address in the Additional Users field and sel ect
the up arrow.
SIP Multimedia PC Client User Guide
Page 54

[Standard—Nortel Networks Confide ntial ]
54
2 Enter your message in the text box at the bottom of the Instant Message
window. If desired, you may format the text by using the four formatting
control buttons (color, bold, italics, and underline).
3 When you are ready to send the Instant Message, press Enter on your
keyboard, or click Send on the window.
Note: When initiating an Instant Message from the address book,
Buddies, inbox, outbox, or the Call Control window for an active or
incoming call, you are presented with the Instant Message window
directly. You do not have to enter a recipient.
Sending web pages
The SIP Multimedia PC Client lets you push (send) web pages for display on
another user’s screen. It also enables you to view web pages pushed from another
user
Tip: If the SIP Multimedia PC Client re ceives a web page while Auto
Web Push is active, it deactivates auto web pushing. This prevents two
SIP Multimedia PC Client systems fro m gettin g into a web push ing loop
with each other.
Pushing a web page to another party on an active call
To push the active web page on your browser to another party on an active call
1 Click Web Push in the Call Control window. The SIP Multimedia PC Client
displays a window to enter or confirm a web page selection to be pushed to
the remote co mputer.
2 If the SIP Multimedia PC Client was able to communicat e with a compatible
running web browser application, a Confirm W eb Push window displays,
SIP Multimedia PC Client User Guide
Page 55

[Standard—Nortel Networks Confide ntial ]
with the current web page URL already entered for you. Select Yes to push the
web page to the other computer.
Figure 19 Confirm Web push
If the SIP Multimedia PC Client was una ble to commun icate with a
compatible running web browser application, an empty Web Push
window opens. Manually type in a URL and select Ok to push the web
page to the other computer.
55
Pushing a web page to another party not on an active call
T o push the ac tive web pa ge on your bro wser to ano the r part y not on an act ive cal l
1 Right-click on any Address Book, or Buddies entry and select Web Push
to… The SIP Multimedia PC Client displays a window to enter or confirm a
web page selection to be pushed to the remote computer.
2 If the SIP Multimedia PC Client was able to communicat e with a compatible
running web browser application, a Confirm W eb Push window displays,
with the current web page URL already entered for you. Select Yes to push the
web page to the other computer. If the SIP Multimedia PC Client was unable
to communicate with a compatible running web browser application, an
empty Web Push windows opens. Manually type in a URL and select Ok to
push the page to the other computer.
Tip: If you want to push a web page to a user that is not a Buddy or in
your Addr ess Book, select Tools > W eb Push... from the SIP Mu ltimedi a
PC Client's main menu to bring up a web push address window.
SIP Multimedia PC Client User Guide
Page 56

[Standard—Nortel Networks Confide ntial ]
56
Co-browsing web pages
You can set the SIP Multimedia PC Client to automatically push all viewed web
pages to the far-end computer.
Tip: While auto web push (co-browsin g) is acti ve on a call , the web push
button flashes.
To automatically push web pages, cl ic k Enable aut o web push from the Confirm
Web Push window. The SIP Multimedia PC Client automaticall y sends all
subsequent pages you view to the other computer.
Note: To enable Co-Browsing, you must have a browser application
running. Netscape ve rsion 4.75 or l ater , or Inte rnet Explore r version 5.x o r
later are recommended.
Note: Co-Browsing is not available when using the SIP Multimedia PC
Blended Client or when pushing a web page to a user not on an active
call.
Using voice mail
The SIP Multimedia PC Client gives you point-and-select access to the
time-saving productivity features of your voice mail service from your
organization or network provider. Contact your service provider for details on
obtaining network-based voice mail and ensuring that the unanswered calls go to
your network voice mailbox.
SIP Multimedia PC Client User Guide
Page 57

[Standard—Nortel Networks Confide ntial ]
See Chapter 5, “Advanced set-up,” on page 97 for more information on
configuring the SIP Multimedia PC Client for use with a voice mail system.
Tip: If you are accessing voice mail through the SIP Multimedia PC
Client for the first time, you must tell the SIP Multimedi a PC Client how
to contact your voice mail system.
Accessing your voice mailbox
To access your voice mailbox, click Voice Mail on the SIP Multime dia PC Client
main window. The SIP Multimedia PC Cl ient displ ays a Call Control wi ndow and
dialpad window that enables you to interact with the voice mail system.
Figure 20 Voice mail dialpad
57
Using voice mail functions
To use the voice mail functions, click the command buttons on the dialpad
window for the function you wish to perform on the voice mail system. You can
also use the dialpad buttons to enter commands for the voice mail system.
Please refer to Chapter 5, “Advanced set-up,” on page 97 for information about
configuring the SIP Multimedia PC Client voice mail command buttons.
SIP Multimedia PC Client User Guide
Page 58

[Standard—Nortel Networks Confide ntial ]
58
Figure 21 Voice mail command buttons
Tip: If you are using the SIP Multimedia PC Client Voice Mail for the
first time, y ou must tell the SIP Multimedia PC Client how to enter
various voice mail commands.
If you are configured as a SIP Multimedia PC Client Set, you can use the dialpad
buttons on the i2004 Internet Telephone to manually enter voice mail commands
as well.
Note: Access to voice mail is dependent on your service package.
Sending and receiving video
If you have a web camera for your PC, you can easily transmit video to your
called party. A high-bandwidth network connection and fast PC processor are
recommended. If the party you are calling has a camera, you can receive their
video transmission.
SIP Multimedia PC Client User Guide
Page 59

[Standard—Nortel Networks Confide ntial ]
There are pre-defined video settings for:
•Home
•Office
• Conference room
• Reception only
The default setting for video is disabled (off). Before you can send or receive
video you must configure the video settings.
“Setting up video (optional)” on page 104 for configuration procedures.
Tip: If you select Mute during an active audio-video call, the outgoing
audio stops, but video is not affected. You will still have outgoing and
incoming video.
59
Placing a voice call from Outlook 2000 (optional)
You can use the SIP Multimedia PC Client to initiate a call from within your
Microsoft Outlook 2000 email application. During the initial installation of the
SIP Multimedia PC Client, you had th e optio n to in stall t he Communicat ions Add
In feature or, COM AddIn. The COM AddIn, installs a Call button in t he Out lo ok
toolbar.
To place a call from Outlook
1 Select a message in any Outlook 2000 folder, contacts list or meeting request.
2 Click the Call button.
SIP Multimedia PC Client User Guide
Page 60

[Standard—Nortel Networks Confide ntial ]
60
3 If the AddIn finds multiple telephone n umbers for the cont act then you will be
prompted to select a number to call. Select a number from the pull-down list
and click Start Call.
The SIP Multimedia PC Client initiates a call.
Tip: The SIP Multimedia PC Client Outlook 2000 call preferences are
established through Tools > Preferences> and the RAIDerLink list
item.
SIP Multimedia PC Client User Guide
Page 61

[Standard—Nortel Networks Confide ntial ]
Chapter 3
Managing your contacts and calls
Topics in this section:
• “Call logs” on page 61
• “Managing your network-based address book” on page 64
• “Managing your Buddies” on page 74
• “Screening calls” on page 76
Call logs
The SIP Multimedia PC Client keeps a record of all calls. It stores these call log
entries in the inbox (for incoming calls) and the outbox (for outgoing calls).
61
Checking your inbox
To check your inbox for your incoming calls
1 Select the Inbox button from the SIP Mult imedia PC Client main GUI.
2 Sort the entries in your inbox by any of the displayed columns by clicking the
column name. To sort in reverse, click on the column name again.
Note: Your missed calls are highlighted in bold and blue color.
SIP Multimedia PC Client User Guide
Page 62

[Standard—Nortel Networks Confide ntial ]
62
Figure 22 Inbox
Returning a missed call
Your missed calls are hig hlight ed in b old. To return a missed call, double-click on
a call log entry. The SIP Multimedia PC Client initiates a call to the address of the
selected ca ll log entry.
Tip: An alternate met hod for re turning a missed ca ll is t o right- click on a
call log entry and select the Call function from the pop-up menu.
Acknowledging missed call log entries
To acknowledge a missed call log entry, click on a missed call log entry. The SIP
Multimedia PC Client remove s the b lue and bold hi ghligh ting of t he call log e ntry.
SIP Multimedia PC Client User Guide
Page 63

[Standard—Nortel Networks Confide ntial ]
Tip: To ack nowledge all missed calls at one time, right -cli ck on any call
log entry and select Clear Missed Calls from the pop-up menu.
Checking your outbox
To check your outbox for a list of your outgoing calls
1 Click the Outbox button from the SIP Multimedia PC Client main GUI.
2 To sort the call entries in your outbox by any of the displayed categories.
Click the column name. To reverse the sort, click on the column name again.
Figure 23 Outbox
63
Deleting call log entries
To perm anently delete a call log entry
SIP Multimedia PC Client User Guide
Page 64

[Standard—Nortel Networks Confide ntial ]
64
1 Select the call log entry you wish to delete.
2 Click the Delete button on the Call Logs window. The SIP Multimedia PC
Client will bring up a delete confirmation dialog box.
3 Select Yes to delete the call log entry.
Tip: To remove all call logs from the inbox (or outbox), right-click on a
inbox call log entry and select Remove All Entries.
Managing your network-based address book
Your SIP Multimedia PC Client network-based address book helps you manage,
track, and use information about all of yo ur key cont acts. When you sig n-in to the
SIP Multimedia PC Client, your network-based address book is downloaded and
synchronized from the network and shown in the display area. The SIP
Multimedia PC Client displays your network-based address book in a tree format.
SIP Multimedia PC Client User Guide
Page 65

[Standard—Nortel Networks Confide ntial ]
Figure 24 Address book
65
Viewing an address book entry
To view information about an entry in your network-based address book
1 Select the Address Book entry.
2 Right-click the Address Book entry for a pop-up menu of available actions.
—Call
— Call at...
— Send Instant Message
— Send emai l
— Go to website
— Edit this entry
— Add/Remove entry from Buddies
— Remove this entry
SIP Multimedia PC Client User Guide
Page 66

[Standard—Nortel Networks Confide ntial ]
66
Note: The list of available actions depend s o n how much information is
available for the addr ess book e nt ry. For example, if the sel ecte d addres s
book entry has a home phone number, then an option to call the user at
that home phone number will also appear on the action menu.
Figure 25 View address book entry options
Adding a new group to your network-based address book
The Add New Group option helps you keep track of users by grouping similar
entries into a common address book group. For example, you can group contacts
for a major project into one category, personal contacts in another, and
administrative contacts in another.
To add a new group
1 Right-click the Address Book folder and select Add New Group.
SIP Multimedia PC Client User Guide
Page 67

[Standard—Nortel Networks Confide ntial ]
Figure 26 Add New Group
67
2 In the Add New Group dialog box, enter a name for the group.
Figure 27 Add new group dialog box
3 Click Save.
Adding an entry to your network-based address book
To add a new entry into your network-based address book
SIP Multimedia PC Client User Guide
Page 68

[Standard—Nortel Networks Confide ntial ]
68
1 Right-click the Address Book folder and select Add new Address Book
Entry.
Figure 28 Add new address book entry
2 In the Address Book Entry window, type the NickName, First Name, Last
Name, e-mail, and Primary Contact information for the person.
SIP Multimedia PC Client User Guide
Page 69

[Standard—Nortel Networks Confide ntial ]
Figure 29 Add new entry - user information
3 If you want the entry to appear in your list of Buddies, select the checkbox
next to Buddy.
69
4 To add the entry to a group, select a group from the Group drop down list.
5 Click the Phone button to enter the Business, Home, Pager, Mobile, Fax, and
Web Address of the entry.
SIP Multimedia PC Client User Guide
Page 70

[Standard—Nortel Networks Confide ntial ]
70
Figure 30 Add new entry - user phone information
6 Click the Other button to add the entry’s home address and any freeform text
notes.
Figure 31 Add new entry - other user information
7 Click Save to add the entry to your network-based address book.
SIP Multimedia PC Client User Guide
Page 71

[Standard—Nortel Networks Confide ntial ]
Deleting an address book entry
To delete an address book entry
1 Right-click on an Address Book entry and select Remove this entry.
2 Click Yes to confirm deletion.
Note: Since your network-based address book is stored on the network
and shared by all clients that you have logged in on, when you delete an
address book entry, it will no longer be present on all of your clients.
This includes the SIP Personal Agent. If you remove an address book
entry using the SIP Per sonal Agent, that e ntry will a lso be removed from
the SIP Multimedia PC Client address book.
Importing contacts from Outlook 2000
71
You can import contacts from your Outlook email application to your SIP
Multimedia PC Client network-based address book. You can only import entries
from your main contacts list.
To impo rt contacts
1 Select Tools and the Import Contact from Outlook option. The Outlook
security window displays.
SIP Multimedia PC Client User Guide
Page 72

[Standard—Nortel Networks Confide ntial ]
72
Figure 32 Outlook security
2 Click in the Allow access for 1 minute check box.There is a delay while the
SIP Multimed ia PC Client retrieves the information and displays the Outlook
Contacts Import window.
Note: Depending on your security settings, the Outlook security
window may not display.
SIP Multimedia PC Client User Guide
Page 73

[Standard—Nortel Networks Confide ntial ]
Figure 33 Import contacts from Outlook
73
3 Select single entries in the Outlook Cont acts list an d click the arrow button to
move them over to the Selected Contacts list or click the double arrow to
move all of the contacts.
Tip: Press Shift on the keyboard to select a range of co ntact s. P ress Ctrl
to select multiple entries that are not adjacent.
4 Select a Group for these contacts from the Group ID list (optional).
5 Click Import.
SIP Multimedia PC Client User Guide
Page 74

[Standard—Nortel Networks Confide ntial ]
74
Note: If the entry you select is missing a required field for the SIP
Multimedia PC Client then you will be prompted with a message. You
must add the missing information to the contact entry in your Outlook
before you retry the import procedure.
Managing your Buddies
The SIP Multimedia PC Client al lows you to mark an address book entry as one of
your Buddies. The SIP Multimedia PC Client displays the presence information
(the online status) of Buddies entries. The SIP Multimedia PC Client displays
your list of Buddies in a tree format.
Note: Your service package determines the maximum number of
buddies that you can have.
Other users may have you designated as a buddy in order to see your online
presence status. You can right-click o n your stat us i n the stat us ar ea a nd selec t one
of the pre-defined values (see “Status area” on page 37). Through the Tools >
Preferences menu you can configure the SIP Multimedia PC Client to
automatically change your presence when your PC is idle or you are on the
telephone (see “Setting automatic presence indicators” on page 117).
Note: Your service package de termines wh ether or not automatic
presence support is enabled on the SIP Multimedia PC Client.
Note: Users have the ability to prevent you from seeing their presence
information. Please r efer to the SIP Personal Ag ent Getting Sta r ted
Guide for more information about the b an list.
SIP Multimedia PC Client User Guide
Page 75

[Standard—Nortel Networks Confide ntial ]
Figure 34 Buddies tree
75
List of Buddies actions
You can take the following actions for your list of Buddies:
• Right-click on a Buddi es entry to di splay a pop- up menu with act ions that you
can perform.
• Double-click on a Buddies entries to initiate a call.
SIP Multimedia PC Client User Guide
Page 76

[Standard—Nortel Networks Confide ntial ]
76
Figure 35 View buddy entry options
Screening calls
For any number of incoming call numbers, you can define special call-handling
procedures by the time of day and day of week, for designated periods or always.
For example, with the SIP Multimedia PC Client call screening you can
• have your calls foll ow you home afte r 5pm on week days, b ut rol l ove r to your
voicemail on weekends
• automatically forward calls to email during regularly scheduled staff meeting
times
• forward all calls to your mobile phone during business trips
• specify a remote response that has a special greeting until the day you return
from vacati on, then resume traditional call-handling
SIP Multimedia PC Client User Guide
Page 77

[Standard—Nortel Networks Confide ntial ]
Special call handling options for incoming calls
For a specified calling number, SIP address, username, or IP address, you can
define the action the SIP Mult imedia PC Clie nt should ta ke. For example, yo u can
set up call screening to
• play a selected greeting after a custom-defined number of rings
• forward the call to another number
• redirect the caller to a web site or email address
• launch an application on your computer
You can also defi ne the t ime frame f or the c all a ctions to take effect. For example,
you can set up the time frame for
• certain hours of the 24-hour day
• a certain day of the seven-day week
• until a certain month, day, and year
•always
77
Creating a set of call screening instructi o ns
To create a set of call screening instructions
1 Click Call Screening on the SIP Multimedia PC Client main GUI. The SIP
Multimedia PC Client displa ys a dial og box that enable s you to cus tomize t he
way the SIP Multimedia PC Client handles incoming calls.
SIP Multimedia PC Client User Guide
Page 78

[Standard—Nortel Networks Confide ntial ]
78
Figure 36 Call Screening window
2 Click the New Entry button on the right side of the Call Screening window.
The SIP Multimedia PC Client presents a blank template for you to enter
screening instructions.
3 Fill in the entries in the Call Screening window (see the following section).
4 Click Apply to save the Call Screening rule.
5 Click Ok to close the Call Screening window.
Completing screening information in the call screening window
To complete screening information in the Call Screening window
SIP Multimedia PC Client User Guide
Page 79

[Standard—Nortel Networks Confide ntial ]
1 Enter a Number to Screen – either the name or public number you wish to
screen.
Tip: You can use the wildcard character (*) to match several calling
parties with one screening record. For example, John* would match
Johnny, JohnDoe, and JohnQPublic.
Tip: Screen all incomi ng cal ls by us ing j ust t he wil dcard ch aract er ( *) as
the number to screen. For example, * would match any incoming call.
2 Click Enable screening for this number to activate or deactivate this
function.
3 In the Use tabs selection, check the categories you wish to consider when
screening calls, s uch as time of day, day of week, a set period of days , always ,
or any combination or all of them. The following list defines tabs:
79
•The Time of Day tab sets the hours/minutes of the day during which
screening instructions are in effect. For example, you can use this tab to
handle calls when you go to lunch.
•The Day of Week tab sets the day(s) of the week during which screening
instructions are in effect (regardless of any time of day settings). For
example, you can use this tab to handle weekend calls.
•The Until tab sets the screening instructions that are always used
(regardless of the time of day and day of week settings) until the date
specified by the month/day/year. For example, you can use this table to
handle calls when you are traveling or on vacation.
•The Always tab direc ts the SIP Multimedia PC Client to screen at all
times of the day, days of the week, indefinitely.
4 In each of these tabs, you can define the following remote and local
responses— that is, what the SIP Multimedia PC Client should do for the
caller and on your computer when it receives a call from that number or
address.
• Play greeting (if any) to the caller, after a designated number of rings.
Select a greeting from the list of greetings you have pre-recorded.
Select the number of rings after which the greeting will play.
SIP Multimedia PC Client User Guide
Page 80

[Standard—Nortel Networks Confide ntial ]
80
• Forward call to a public telephone number, such as a home number or
mobile phone.
• Redirect to Web/E-mail.
To display a web sit e, enter the URL (Uniform Resource Locator) of the
Web site you want to display on the caller’s computer. To redirect to
email, enter the email address that should be automatically datafilled in
the To field of the caller’s email. The SIP Multimedia PC Client opens a
window for the remote user to compose and send an e-mail.
• Application to Launch on your comput er. T ype the pat h and file name of
the application to be launched, or select the folder icon to browse
available folders and files on your computer.
5 Select the Ok button to save your new call screen ing reco rd and clos e the Call
Screening window.
Tip: Selecting the Apply button saves the current call screening record,
but does not close the Call Screening window. This allows you to make/
edit several call screening records without having to close and re-open
the Call Screening window each time.
Note: To send a caller to voice mail, do not select the play greeting
option. Select forward call and enter the number for your voice mail
system.
Recording a greeting to play to callers
To record a greeting
1 In the Call Screening window, select Add/Edit Greeting. The SIP
Multimedia PC Client displays a window to record and title the greeting.
2 To initiate and control the recording process, sele ct the Record button and
begin speaking into the microphone.
3 The other buttons let you stop recording, prev iew your greeti ng, save or dele te
it.
SIP Multimedia PC Client User Guide
Page 81

[Standard—Nortel Networks Confide ntial ]
4 In the Name of Recording field, enter an easy-to-remember name. This name
appears on the list of greetings you can select from the Call Screening
window.
To view your call screening records
To view your call screening records
1 In the Call Screening windows, use the previous and next buttons (the blue
arrows near the bottom right of the window) to see other defined screening
records.
2 Check the indicator at the bottom right corner to know which record you are
viewing, relative to the total numbe r of records defined.
Tip: If any call screening record is enabled, the call screening indicator
light (circle with “S” in the top status bar at the top of the SIP
Multimedia PC Client main window) will be lit (green).
81
Deactivating a call screening record
There are two ways to deactivate a call screening record
• to disable a call screening record - uncheck the Enable screening for this
number at the top of the Call Screening window
• to delete a call screening record - select the Remove Entry button and
confirm that you wish to delete the record
SIP Multimedia PC Client User Guide
Page 82

[Standard—Nortel Networks Confide ntial ]
82
SIP Multimedia PC Client User Guide
Page 83

[Standard—Nortel Networks Confide ntial ]
Chapter 4
Multimedia collaboration
The SIP Multimedia PC Client en ables tw o users to tea m together i n a multimedia
collaboration session and enables one PC to support multiple one-on-one
collaboration sessions simultaneously.
Topics in this section:
• “Understanding collabor ati on tools” on page 83
• “Initiating a collaboration” on page 84
• “Exchanging files” on page 87
• “Whiteboarding” on page 90
• “Collaborating with the clipboard” on page 92
83
Understanding collaboration tools
When a collaboration session is open with another party, the SIP Multimedia PC
Client offers the following tools:
• File exchange enables you to send and receive files to the remote
collaborator.
• Whiteboard enables you to collaborate by entering text and graphic objects
in a shared workspace, which both you and the other person can manipulate
and view equally.
• Clipboard enables you to send and receive the contents of a Windows
clipboard, which can contain a wide variety of content copied from Windows
applications, such as images, clips of text, logs, and so forth.
SIP Multimedia PC Client User Guide
Page 84

[Standard—Nortel Networks Confide ntial ]
84
Note: The collaboration tools can be used whether or not you already
have an active call with another person. You can use the collaboration
tools only when the other user is also using the SIP Multimedia PC
Client. You cannot start a collaboration session with an endpoint that
does not support the collaboration tools.
Initiating a collaboration
There are two types of collaboration sessions, standalone sessions and sessions
integrated with an active call.
Starting an integrated collaboration session
To create an integrated collaboration session
1 Make a call .
2 Press the Show Collaboration Tools button on the active Call Control
window, to show the available collaboration tools in the active Call Control
window.
3 Select the collaboration tool you wish to use.
SIP Multimedia PC Client User Guide
Page 85

[Standard—Nortel Networks Confide ntial ]
tools
85
s
Figure 37 Collaboration - tool
View
Picture ID
View
dialpad
controls
View
collaboration
St arting a standalone collaboration session
To open a standalone collaboration session
1 Select Tools > Collaboration > Start Collaboration... from the SIP
Multimedia PC Client menu. The SIP Multimedia PC Client displays a
window for you to select participants/invitees to the session.
SIP Multimedia PC Client User Guide
Page 86

[Standard—Nortel Networks Confide ntial ]
86
Figure 38 Open a collaboration session
2 From the list of Address Book Entries, highlight a user to invite and select
the right-arrow. Or, enter a user’s address in the Additional users field and
select the up-arrow.
3 Select Send to invite the user t o part icipa te in a colla bora tion sess io n.The SIP
Multimedia PC Client displays a pop-up invitation on the invitee’s PC screen.
If the far end SIP Multimedia PC Client user accepts the collaboration
invitation, the collaboration session starts.
Ending a collaboration session
To end a collaboration session
1 Select Tools > Collaboration > Stop Collaboration... from the SIP
Multimedia PC Client menu.
The SIP Multimedia PC Client displays a Stop a Collaboration Call dialog
box.
SIP Multimedia PC Client User Guide
Page 87

[Standard—Nortel Networks Confide ntial ]
Figure 39 Stop a Collaboration Call
2 Highlight the collaboration session to end, and select Stop.
3 The SIP Multimedia PC Client closes the selected collaboration session.
87
Tip: Integrated collaboration sessions will automatically end when the
call ends.
Exchanging files
Once a collaboration session has been successfully started, two users can
exchange files by starting up the File Exchange collaboration tool.
Sending a file
To send a file
1 Select Tools > Collaboration > File Exchange from the SIP Multimedia P C
Client menu.
SIP Multimedia PC Client User Guide
Page 88

[Standard—Nortel Networks Confide ntial ]
r
88
The SIP Multimedia PC Client displays a File Transfer window for each
active collaboration session.
Figure 40 Collaboration - file transfer
Add File
button
Remove
Selected
File
button
Send
Selected
File button
Send All Files
In File List
button
Cancel Send Cancel Receive
button button
Set Local
Receiv e F o lder
button
Display
Receive Folde
button
2 Select a file to send using any of the following methods:
— open a Windows Explorer window and drag-and-drop a file onto the File
Transfer control window
—select File > Add File... f rom the File Trans fer window menu and use the
file browse window to add a file to the File Transfer window
3 Send the file using either of the following methods:
—select File > Send File from the File Transfer window menu
— select the Send Selected File button on the File Transfer window
Tip: To send multiple file s at one time, select File > Send All Files or
select the Send All Files In File List button on the File Transfer
window.
SIP Multimedia PC Client User Guide
Page 89

[Standard—Nortel Networks Confide ntial ]
Setting the preferred directory to store incoming files
To set the preferred directory to store incoming files
1 Before the calling party se nds the file, select the Set Local Receive Folder
button (ico n with a file folder with a yellow arrow).
2 Enter the desired directory path. The SIP Multimedia PC Client sends the
incoming fi le to this directory.
Tip: You can also set the preferred dire ctory from the SIP Multimedia
PC Client's main GUI by selecting Tools > Preferences and the
FileExchange list item. Refer to “Setting up file exchange settings
(optional)” on page 116.
Sending one file in a file list
89
To send one file in a file list
1 Select (highlight) the file in the File Transfer send list.
2 Select the Send Selected File button (icon with page and green arrow), or
Select File > Send File from the menu in the File Transfer window. A
window shows the progress of the file transfer.
Sending all files in a file list
To send all files in a file list, choose one of the following actions:
• select the Send All Files in File List button (icon with three pages and green
arrow)
•select File >Send All Files from the menu in the File Transfer window
SIP Multimedia PC Client User Guide
Page 90

[Standard—Nortel Networks Confide ntial ]
90
Whiteboarding
Once a collaboration sess ion is started, you and another user can share a common
drawing window. Both of you can draw/write to the window, and both users can
see the results of the shared session—by using the Whiteboard collaboration tool.
Figure 41 Collaboration - whiteboard
SIP Multimedia PC Client User Guide
Page 91

[Standard—Nortel Networks Confide ntial ]
Opening a shared whiteboard workspace on your PCs
To open a shared workspace
1 Select Tools > Collaboration > Whiteboard from the SIP Multimedia PC
Client menu.
2 The shared Whiteboard window displays.
Keep the following in mind when collaborating using the whiteboard workspace:
• Use the object drawing tools—circle, square, polygon—to create shapes and
lines.
• The drawings are vector drawings, not bitmaps. This means you can move,
edit, or delete the objects you create with these tools, rather than manipulate
them pixel by pixel (as you do with paint type programs).
• Use the color selectors to choose colors for drawing objects and text.
• Use the line weight selectors to choose the thickness of drawing lines.
• Both you and the other user can edit the whiteboard drawing space. Both of
you can view the results immediately.
91
Saving whiteboard drawings
To save whiteboard drawings
1 Select File > Save from the menu on the Whiteboard window.
2 Select a location and enter a filename.
3 Click Save. The SIP Multimedia PC Client saves the file to the location and
filename you specify in the Save Whiteboard window.
Restoring whiteboard drawings
To restore whiteboard drawings
1 Select File > Restore from the menu on the Whiteboard window.
2 Browse to select the previously saved whiteboard drawing.
3 Click Open. The SIP Multimedia PC Client displays the file.
SIP Multimedia PC Client User Guide
Page 92

[Standard—Nortel Networks Confide ntial ]
92
Collaborating with the clipboard
Once a collaboration session has been successfully started, two users can
exchange data in their Windows clipboards, such as images, text, or anything
pasted to the clipboard, using the Clipboard collaboration tool.
You can share clips of text, photos, drawings, Web bookmarks, email address
books, and other clipboard contents with a remote user during an active
multimedia collaboration session.
Figure 42 Collaboration - clipboard
Send contents of
clipboard button
Copy received data
into clipboard button
Tip: Certain items copied to your clipboard file, such as file icons,
cannot be copied and sent to the other party. Use the File Exchange
option to send these f iles to the other party.
Empty clipboard
button
Collaborating by sharing clipboard contents
To share clipboard contents
1 Select Tools > Collaboration > Clipboard from the SIP Multimedia PC
Client menu.
SIP Multimedia PC Client User Guide
Page 93

[Standard—Nortel Networks Confide ntial ]
2 The SIP Multimedia PC Client displays a clipboard control window for each
active collaboration session and the username of the remote party appears in
the title bar of the control window.
Placing the content in the Windows clipboard
To place the clipboard contents in the windows clipboard
1 Open the application and file containing the desired content.
2 Select and highlight the portion of the file you wish to exchange through the
clipboard.
3 Use that application’s Copy function to copy the content to the clipboard.
For most Windows applications, the keyboard shortcut command is Ctrl+C
and the menu command is Edit > Copy. The selected contents are
automatically placed in your Windows clipboard.
Sending the contents of your Windows clipboard to the other party
93
To send the contents of your clipboard to the other party
1 Select the clipboard Send contents... button (icon with the full clipboard and
green arrow) on the clipboard control window.
2 The SIP Multimedia PC Client sends the contents of your clipboard to the
remote user.
Note: The SIP Multimedia PC Client attempts to pick the best format to
send the clipboard contents to the remote user. If this format fails to go to
the remote user, you can re-send the clipboard using a different format.
Right-click on the clipboard Send contents... button and select a
different available format to send the clipboard contents.
SIP Multimedia PC Client User Guide
Page 94

[Standard—Nortel Networks Confide ntial ]
94
Accepting or declining the data transfer from the other user
Once the clipboard contents have been successfully received by the SIP
Multimedia PC Client, you can copy that inf ormat ion to your Windows clipboard.
Tip: The SI P Multimedi a PC Client automatically detects incoming
clipboard data and brings up a Clipboard Exchange window that shows
who is sending the clipboard data, and the progress of the transfer.
Copying the incoming clipboard data to your Windows clipboard
To copy the incoming clipboard data to your Windows clipboard, choose one of
the following actions:
• Select the Copy received data... button (icon with empty clipboard and the
yellow arrow) on the Clipboard window.
• Select File > Copy Received Data to Clipboard from the menu in the
Clipboard window.
Using or saving the new Windows clipboard contents
To use or save the new Windows clipboard contents
1 Open the Windows applicatio n(s) i n which you want to u se the c lipboa rd dat a.
2 Use the Paste function of that application (usua lly Ctrl+P or Edi t > Past e) to
paste the data from the Windows clipboard into the application.
3 Edit and save in the Windows application.
SIP Multimedia PC Client User Guide
Page 95

[Standard—Nortel Networks Confide ntial ]
Tip: The data format selected for the clipboard transfer determines how
the clipboard data appears when it is finally pasted into an application.
For example , Rich Text Format (RTF) retains formatting, there fore,
clipboard data transferred in Rich Text Format and pasted into an
application that understands this format (Microsoft Word or Windows
WordPad) retains formatting even when shared through the clipboard
tool.
95
SIP Multimedia PC Client User Guide
Page 96

[Standard—Nortel Networks Confide ntial ]
96
SIP Multimedia PC Client User Guide
Page 97

[Standard—Nortel Networks Confide ntial ]
Chapter 5
Advanced set-up
Topics in this section:
• “Configuring your preferences” on page 97
• “Using the audio wizard to configure audio volume” on page 121
• “Configuring multiple profiles” on page 123
Configuring your preferences
The Preferences menu allows you to configure the following settings:
• user profile
• connection speed
• default network proxy server
• audio
•video
•voice mail
• RAIDerLink (Outlook 2000)
• i2004
• file exchange
•presence
• miscellaneous (tool tips, startup, standby, GUI)
97
SIP Multimedia PC Client User Guide
Page 98

[Standard—Nortel Networks Confide ntial ]
98
Note: You may not be able to change some settings because they are
dependent on your service package, pre-configured by your service
provider or not available for your configuration. For example, SIP
Multimedia Blended PC Client users will not be able to view audio
settings because they are not applicable.
Setting up your user profile
To set up your user profile
1 Select Tool s > Prefer ences and the User list item to display a wind ow for yo u
to identify yourself.
Figure 43 Preferences - User Information
2 Enter your Username. This is the same name you use when a ccessi ng the SIP
Personal Agent. Usernames are uni que ; your username cannot be the same as
any other username in your network domain.
SIP Multimedia PC Client User Guide
Page 99

[Standard—Nortel Networks Confide ntial ]
3 Select your IP Address, if different from the default IP address the SIP
Multimedia PC Client detected from the Windows networking subsystem. If
your computer has multiple IP addresses assigned to it, select the appropriate
IP address from the pull-down menu. If public network and private network
IP addresses are available, use the public IP address.
4 Enter your Display Name, to have your real name or nickname displayed to
callers.
5 Press Ok to save your changes or Cancel to exit without saving.
Setting your connection speed and preferences
To set your connection speed and preferences
1 Select Tools > Preferences and the Connection list item to display the
connection speed window.
Figure 44 Preferences - Connection info rmation
99
2 Select the Connection Speed of your computer’s connection to the network
SIP Multimedia PC Client User Guide
Page 100

[Standard—Nortel Networks Confide ntial ]
100
— low speed (28.8K Modem, 33.6K Modem
— medium speed (56K Modem, 64K ISDN)
— high speed (LAN, Cable, DSL, ADSL, 128K, ISDN)
The SIP Multimedia PC Client selects the voice coder/decoder (codec) based on
this connection speed. If you enter a connection speed higher than your actual
connection, the application may overload your PC with incoming voice packets.
Check with your syst em a dmini st rator if you are not sure what t ype of connection
you have.
3 Select how the client should behave when the Ignore button is pressed on an
incoming Call Control window.
— Ignore Action affects PC Client Only – silences ringing only on the PC
Client, your other network devices will continue to ring.
— Ignore Action affects all User Netw ork Contac ts – silences ringing on
the PC Client plus all your network devices. The incoming call route
advances to your next route list.
4 Press Ok to save your changes or Cancel to exit without saving.
Defining network settings
To define network settings
1 Select Tools > Preferences and the Network list item to display the Network
configuration window. Your default proxy server IP address displays.
SIP Multimedia PC Client User Guide
 Loading...