

Page 1

Modular ICS 4.0
System
Coordinator
Guide
Norstar, Meridian and Companion are trademarks of
Northern Telecom
© Northern Telecom 1998
1-800-4 NORTEL
www.nortel.com/norstar
P0881591 Issue 01
Printed in Canada
Page 2

Page 3

Table of Contents
Getting started with Norstar 1
Using this guide 1
Understanding programming 2
Before you start 3
What you’ll need to do programming 3
Using Buttons 4
Using the buttons under the display 5
The programming overlay 6
A map for working in programming 7
Starting and ending a session 11
Ending a session 11
Frequently used programming operations 13
Changing the time and date on the display 13
Programming Automatic Time and Date 16
Adding or changing a system speed dial 17
Changing the name of a telephone 20
Changing the name of a line 22
Making changes to Call Forward No Answer 23
Making changes to Call Forward on Busy 25
Making Changes to Do Not Disturb on Busy 26
What would you like to do next? 28
Answering calls 29
Answering incoming calls with Hunt Groups 29
Answering an incoming call 29
Line buttons 30
What line indicators mean 30
Rings you may hear 30
Answering calls at a prime telephone 31
Using a central answering position (CAP) module 31
Customizing your CAP module 32
Monitoring telephones with the CAP module 33
Release button 33
P0881591 Issue 01 Modular ICS 4.0 System Coordinator Guide
Page 4

ii
/ Table of Contents
Hearing aid compatibility 33
Viewing information about a call on the display 34
Using Call Information for a particular call 34
Displaying Call Information before or after answering 35
Displaying Call Information for a call on hold 35
Making Call Display information appear automatically at a
Changing which information is shown first about a call 36
Picking up a call ringing at another telephone 37
Answering any ringing telephone using Directed Pickup 37
Answering any ringing telephone using Group Pickup 38
Changing a telephone’s pickup group 38
Trunk Answer 39
Answering a call using Trunk Answer 40
Answer buttons 40
Creating a Conference Call 41
Disconnecting one party 42
Independently holding two calls 43
Putting a conference on hold 43
Splitting a conference 43
Removing yourself from a conference 44
Listening to a call as a group 45
Canceling Group Listening 45
Using Handsfree/Mute 45
Answering calls without lifting the receiver 45
Making calls without lifting the receiver 46
Muting Handsfree 46
Changing a regular call to handsfree 46
Changing a handsfree to a regular call 46
Using Handsfree 47
Changing Handsfree for a telephone 47
Handsfree Answerback 49
Turning Privacy on or off for a call 49
Creating a conference by releasing privacy 50
Making a call private 50
Checking call length using Call Duration Timer 50
Disconnecting by accident 51
Time 51
telephone 36
Modular ICS 4.0 System Coordinator Guide P0881591 Issue 01
Page 5

Table of Contents /
Making calls 53
Choosing a line using a line button 55
Line pools 55
Using a line pool to make a call 56
Programming a memory button with a line pool feature code
56
Making calls from an ISDN terminal 57
Changing how you dial your calls 57
Using Standard dial 57
Using Automatic dial 58
Using Pre-dial 58
When the internal number you have called is busy 58
Priority Call 58
Making a priority call 59
Giving a telephone the ability to make priority calls 59
Using Ring Again 60
Turning on Ring Again 61
Canceling Ring Again 61
Time savers for making calls 63
Storing a number on a memory button for Autodial 63
Adding an autodial button 63
Choosing a line for Autodial 63
Using intercom as the line for Autodial 64
Using Last Number Redial 65
Preventing a telephone from using Last Number Redial 66
Using Speed Dial 67
Making a speed dial call 67
Changing and adding System Speed Dials 67
Adding or changing User Speed Dial 68
Using Saved Number Redial 69
Saving a number 69
Dialing a saved number 70
Preventing a telephone from using Saved Number Redial 70
iii
Handling many calls at once 73
Using Hold 73
Retrieving a held call 73
Holding automatically 73
P0881591 Issue 01 Modular ICS 4.0 System Coordinator Guide
Page 6

iv
/ Table of Contents
Listening on hold 73
Holding a call exclusively 74
Using Call Queuing 74
Transferring calls 75
Using the transfer feature 75
Transferring a call 75
Transferring external calls 76
Canceling a transfer 76
Using Camp-on 78
Parking a call 79
Retrieving a parked call 80
Using Call Park 80
Using Callback 82
Forwarding your calls 83
Forwarding your calls to another Norstar telephone 83
Canceling Call Forward 83
Using Call Forward at your telephone 83
Overriding Call Forward 84
Changing the automatic Call Forward settings for a telephone
Changing Forward no answer 84
Changing the delay before a call is forwarded 85
Forward on busy 85
DND on Busy 86
Call Forward and Voice Mail 87
Line Redirection 87
Turning on Line Redirection 88
Canceling Line Redirection 89
Allowing a telephone to redirect calls 89
Turning the redirect ring for a telephone on or off 90
How Line Redirection is different from Call Forward 92
Using Line Redirection 92
84
Communicating in the office 95
Paging 95
Making a page announcement 95
Activating and deactivating the ability to page 96
Creating page zones 96
Using Page with external paging equipment 98
Modular ICS 4.0 System Coordinator Guide P0881591 Issue 01
Page 7

Table of Contents /
Sending messages 98
Sending a message 98
Canceling a message you have sent 100
Viewing your messages 100
Replying to a message 100
Replying to a message using an analog telephone connected to
an ASM 101
Removing items from your message list 102
Removing items from your message list using an analog
telephone connected to an ASM 102
Viewing messages you have sent 103
Using Voice Call 104
Making a Voice Call 104
Muting Voice Call tones 105
Answering a Voice Call without touching your telephone 105
Preventing V oice Calls to your telephone using V oice Call Deny
105
Canceling Voice Call Deny 105
Tracking your incoming calls 107
Using Call Log 107
Call Log options 108
Logging a call manually 108
Deleting old log items 109
Viewing your Call Log 109
Viewing a Call Log item 110
Erasing log items 110
Making a call using Call Log 110
Creating a password to your Call Log 111
Changing your Call Log password 111
Deleting an assigned password 112
Programming a telephone to log calls automatically 112
Using Voice mail 114
v
Customizing your telephone 115
Finding out what a button does using Button Inquiry 115
Making the display darker or lighter using Contrast adjustment
115
Changing the language on the display 116
English 116
French 116
P0881591 Issue 01 Modular ICS 4.0 System Coordinator Guide
Page 8

vi
/ Table of Contents
Spanish 116
Programming a feature code onto a memory button 116
Programming feature buttons 117
Erasing a feature button 117
Applying button cap labels 118
Types of button caps 119
Identifying the telephones 119
Norstar default button assignments 120
Rules of default button assignment 120
M7310 telephone button defaults 121
M7324 telephone button defaults 122
M7100 telephone button defaults 123
M7208 telephone button defaults 123
Moving line buttons 124
Changing the type of ring 125
Adjusting the Ring volume 125
Hiding the message or calls indication 125
Restoring the messages and calls indication 126
User Preferences 127
Using User Preferences 127
Changing button programming 128
Changing User Speed Dial 130
Changing Call Log options 131
Changing how calls are dialed 131
Changing the language used on the display 131
Making the display lighter or darker 132
Changing the telephone’s ring 132
Programming Hunt Groups 135
Adding or removing members from a group 136
Moving members of a group 138
Assigning or unassigning lines to a group 138
Setting the distribution mode 139
Setting the hunt delay 141
Programming busy line setting 142
Programming the queue time-out 143
Programming the overflow set 144
Setting the name 145
Modular ICS 4.0 System Coordinator Guide P0881591 Issue 01
Page 9

Table of Contents /
Telephone features 147
Installing Norstar telephones 147
Naming a telephone or a line 149
Moving telephones 149
Stopping calls from ringing at your telephone using Do Not
Disturb (DND) 150
Stopping calls 150
Refusing to answer a call 150
Canceling Do Not Disturb 150
Using Do Not Disturb 150
Using Background Music 151
Turning Background Music off 151
ISDN PRI and BRI 153
ISDN PRI 153
ISDN PRI features 154
Network Name Display for PRI 154
Name and number blocking for PRI 155
Emergency 911 Dialing 155
2-way DID 155
Call by Call service selection for PRI 156
Dialing Plan and PRI 157
ISDN BRI 158
Line access from an ISDN terminal 159
ISDN BRI features 159
Network Name Display for BRI 159
Name and number blocking for BRI 160
Service provider features 160
Call Forward 160
Canceling Call Forward 161
Calling the number your calls are forwarded to 161
Automatic Call Back 161
Automatic Recall 161
ISDN BRI terminals 162
ISDN applications for BRI and PRI 162
Videoconferencing and video telephony 162
Desktop conferencing 162
File transfer 162
Telecommuting 162
vii
P0881591 Issue 01 Modular ICS 4.0 System Coordinator Guide
Page 10

viii
/ Table of Contents
Using System features 165
Using alternate or scheduled services 165
Turning Services on and off 166
Turning Services on and off using feature codes 168
Using passwords 171
Using special telephones 174
Using Set lock 178
Changing Set Lock programming for a telephone 179
Using an auxiliary ringer 179
Using Host System dialing signals 180
Group 4 fax 163
Remote LAN access 163
Leased line backup 163
LAN to LAN bridging 163
Internet and database access 163
Preventing certain calls from being made 165
Making additional telephones ring 165
Changing the lines used by outgoing calls 165
An example of how to turn on a Service manually 167
Viewing the active Services from a two-line display telephone
169
Viewing the active Services from a one-line display telephone
169
Using a Basic password 172
Registration password 173
Changing passwords 173
Clearing a Call Log password 174
Direct-dial 174
Changing the direct-dial telephone assignments 175
Hotline 176
Bypassing a Hotline 176
Making a telephone a hotline telephone 177
Control telephone 178
Turning the auxiliary ringer for a telephone on or off 179
Link 180
Preventing a telephone from using Link 181
Pause 181
Long Tones 182
Programmed Release 183
Modular ICS 4.0 System Coordinator Guide P0881591 Issue 01
Page 11

Table of Contents /
Run/Stop 183
Wait for Dial Tone 184
Using pulse dialing for a call 184
Using your Norstar system from an external location 184
Controlling access to your Norstar system 185
Direct inward system access (DISA) 185
Class of Service (COS) 186
Maintaining security 186
Accessing Norstar remotely over the public network 186
Tones 187
Using Class of Service (COS) passwords 187
Changing your Class of Service 188
Programming Automatic Time and Date 189
General System features 191
Set profile 191
Line profile 191
Pulse or tone dialing 191
Disconnect supervision 192
Hunt Groups 192
Internal numbers 192
Line assignment 192
Target line 193
Line pools 194
Overflow call routing 194
M7100 telephone 194
Memory buttons 195
One-line display 195
Prime line 196
Private lines 196
Volume bar 196
Wall mounting 197
ix
Troubleshooting 199
Using the alarm telephone 199
Reporting and recording alarm codes 199
Testing the telephone 199
Testing the telephone display 200
Testing the telephone buttons 200
P0881591 Issue 01 Modular ICS 4.0 System Coordinator Guide
Page 12

x
/ Table of Contents
Testing the speaker in the telephone handset 201
Testing the telephone headset 201
Testing the telephone speaker 201
Testing the power supply to a telephone 202
Common feature displays 203
Index 209
Modular ICS 4.0 System Coordinator Guide P0881591 Issue 01
Page 13
Getting started with Norstar
Your Norstar digital key system has many powerful features that
can be customized to keep up with changes in your workplace.
Using this guide
The person who is responsible for adding or moving telephones
or making changes to the system is called the system coordinator.
This guide is designed to give the system coordinator all the
information he or she needs to carry out these kinds of jobs.
The first section contains step-by-step instructions on changing
the time and date, deciding how many rings it takes before a call
is forwarded and other day-to-day programming. Once you
understand these basic steps, you can move on to the many other
features described in the second section of the guide, and refer to
the first section only from time to time.
/
1
You can look at the contents page for an overview of the features
that are available, or check the index for specific features or
messages displayed on your telephone.
Emergency 911 Dialing
Emergency 911 Dialing is the capability to access a public
emergency response system by dialing the digits “9-1-1”.
Emergency 911 Dialing
State and local requirements for support of Emergency
911 Dialing service by Customer Premises Equipment
vary. Consult your local telecommunications service
provider regarding compliance with applicable laws and
regulations.
P0881591 Issue 01 Modular ICS 4.0 System Coordinator Guide
Page 14

2
/ Getting started with Norstar
Understanding programming
When your system is installed, your installer or customer service
representative programs it to work with your telephone lines,
with your private network, if you have one, and with optional
equipment. They customize the system for your office. All
programming is recorded in the
Norstar Programming Record
You may want to further customize your system. For example,
you can change how some features work, or adapt the system to
changes in your office. Programming allows you to change
settings that probably need to be updated regularly because of
staff turnover or new business contacts. You can also assign
features and program buttons on individual telephones.
There are four ways to customize and maintain your Norstar
system:
• Initial programming is done for you by your installer or
customer service representative. It deals mostly with how
the system interacts with lines, telephones, and other
equipment.
.
• Your programming as a system coordinator changes how
features work for the system, as needed. It requires a
system coordinator password.
• A basic programming password is available to allow
individuals other than the system coordinator to make
changes without giving access to sensitive programming
capabilities.
• Personal programming is available to anyone through the
Feature button on their Norstar telephone. It allows
individuals to change how their telephone works to suit
themselves.
Modular ICS 4.0 System Coordinator Guide P0881591 Issue 01
Page 15
Getting started with Norstar /
Before you start
Before you begin programming, plan what changes you want to
make. Record the changes in the
Norstar Programming Record
so
that you have the information at hand. For example, if you are
going to program system speed dial numbers, fill out the page in
Norstar Programming Record
the
so that you have all the numbers
and codes handy once you start programming.
What you’ll need to do programming
Programming is done using a telephone that can show two lines
of information on its display. Examples of telephones with twoline displays are shown on page 4.
You need a programming overlay to show which buttons to press
when you are doing programming. See “The programming
overlay” on page 6.
3
When you use a telephone for programming, it is taken out of
service. This means it is unable to receive or make calls, and the
call forward features do not work. Do not use the main reception
telephone for programming because you may lose incoming
calls.
P0881591 Issue 01 Modular ICS 4.0 System Coordinator Guide
Page 16
4
/ Getting started with Norstar
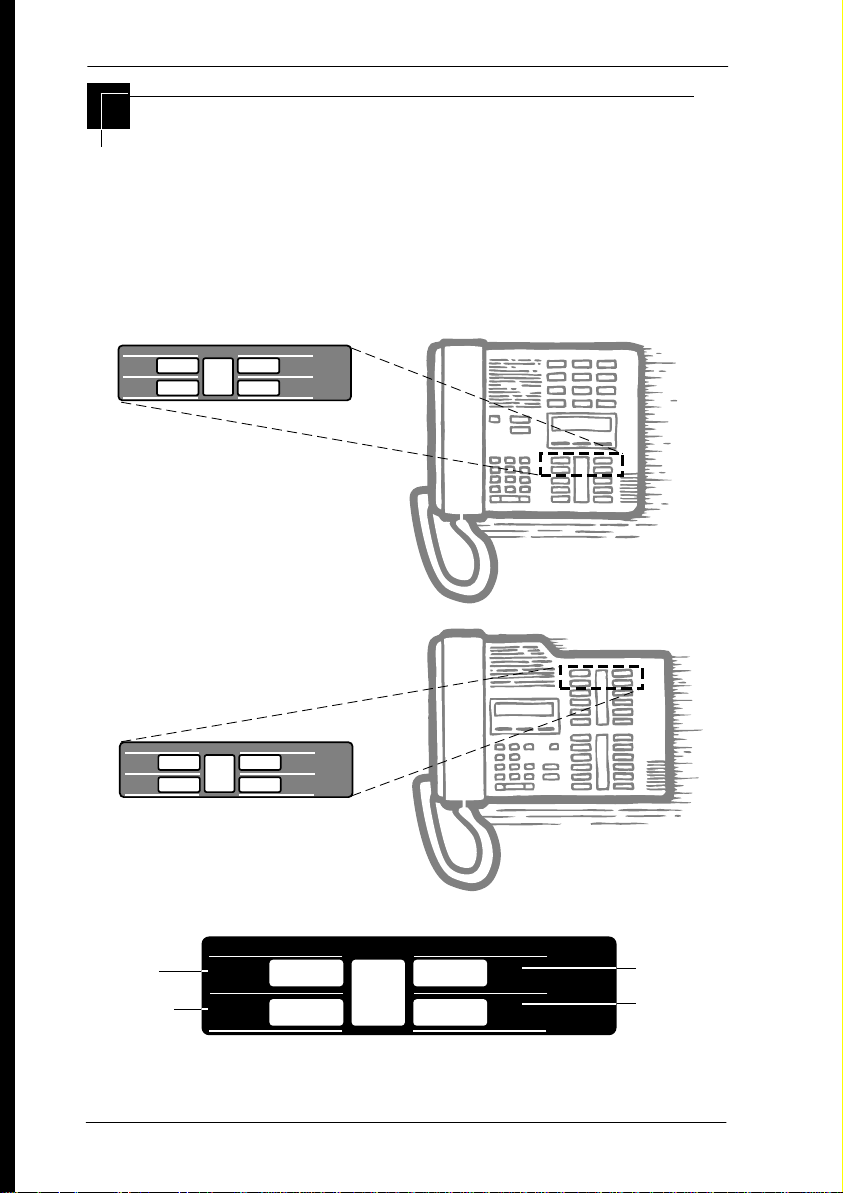
Using Buttons
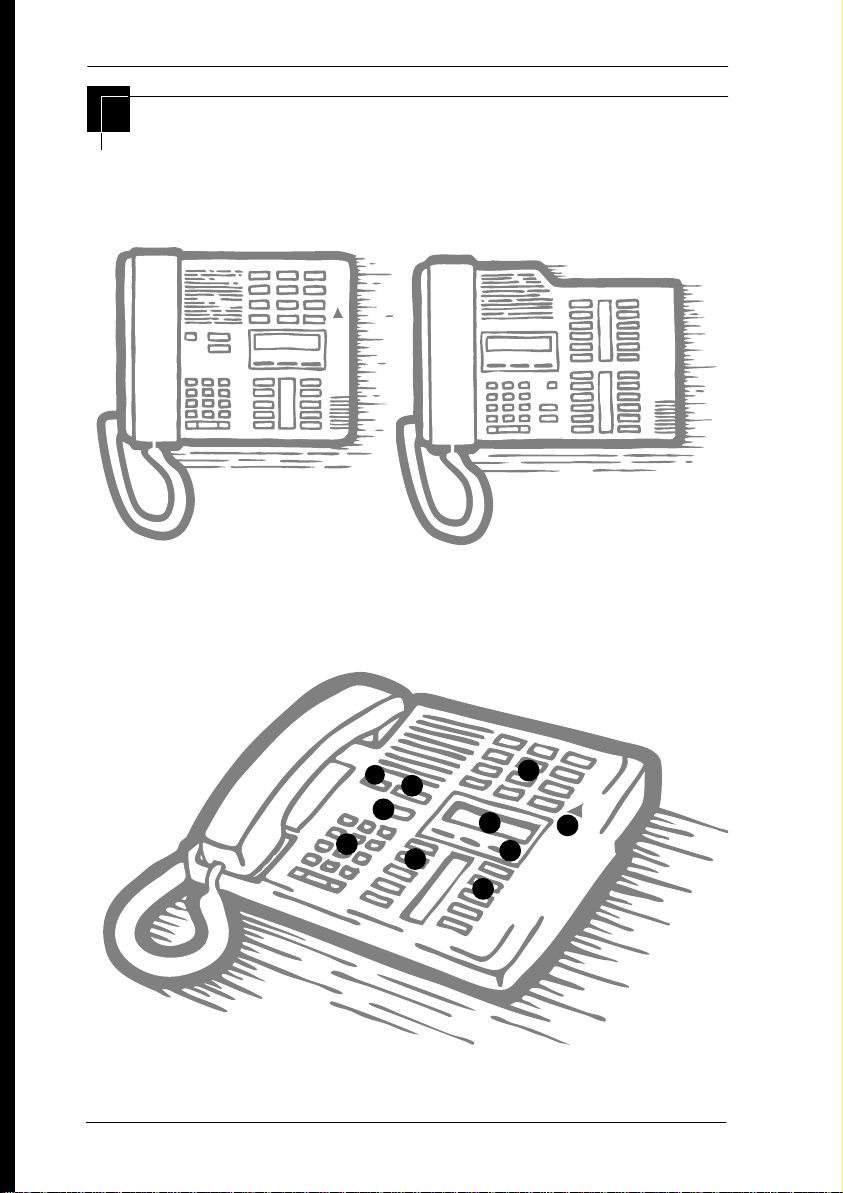
The two-line telephone you use for everyday calling is used for
changes and maintenance. Examples of telephones with two-line
displays are shown in the illustration.
M7324 M7310
The next illustration numbers the buttons that are used for both
day-to-day communication and programming on the M7310.
99
77
88
1 1
Modular ICS 4.0 System Coordinator Guide P0881591 Issue 01
44
55
22
44
66
33
Page 17
1
Dial pad
Getting started with Norstar /
Used for dialing numbers when you are making
calls. It’s also used for entering numbers and
letters when you’re programming.
5
2
Display
3
Display buttons
4
Memory buttons
5
Dual memory buttons
6
Shift button
7
Feature button
8
Hold button
9
Release button
Shows instructions for everyday calling as well as
for programming.
Have a variety of uses. The current use is shown
on the display above each button.
Dial a number or feature code stored on the
button.
Can store two numbers or feature codes (used
with the shift button).
Press the shift button before a dual memory
button to activate the second number or feature
code stored on a dual memory button.
Allows you to enter a feature code while using or
programming the telephone.
Puts an active call on hold.
Hangs up an active call or ends programming.
The M7324 is different from the M7310 in two ways: it does not
have dual memory buttons (item 5) or a shift button (item 6).
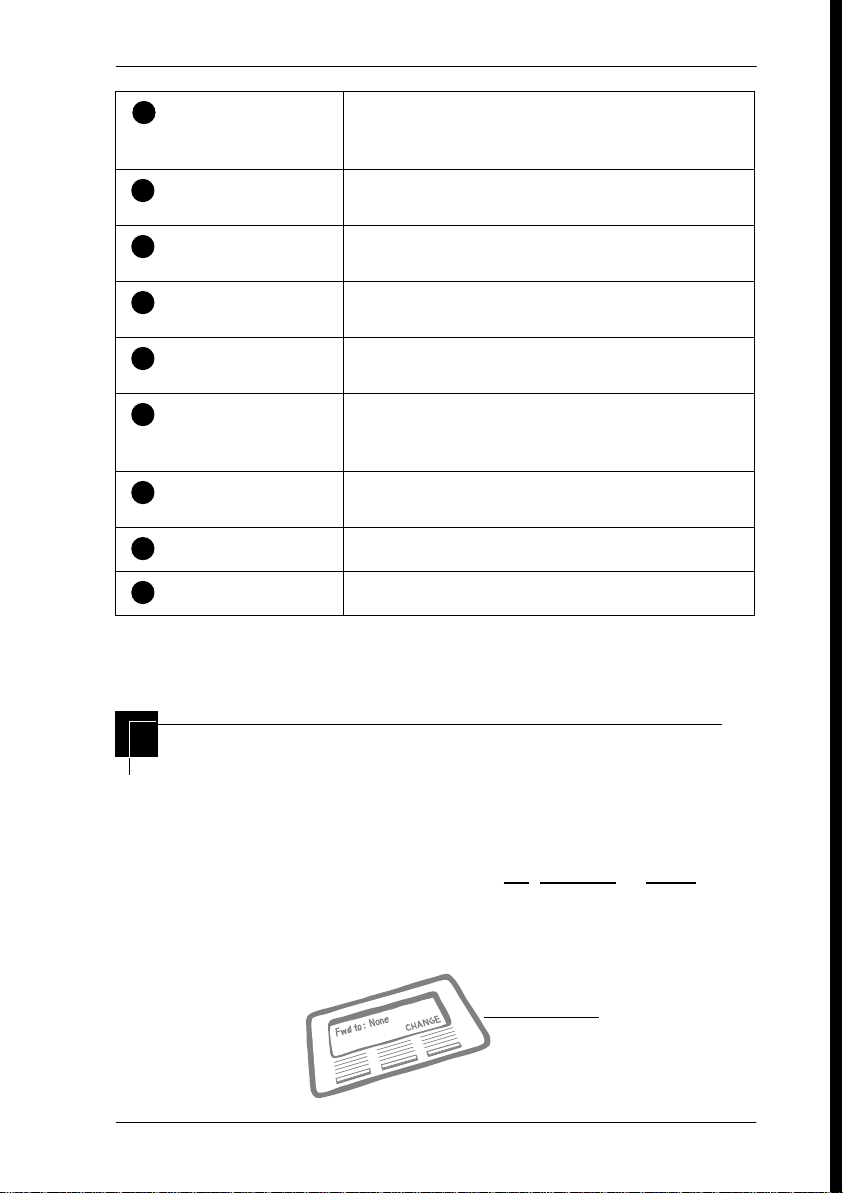
Using the buttons under the display
The three display buttons are used both for telephone features
and programming, but what each button does depends on what
the display shows. Some display instructions that you may see
when making changes on the system are
OK
CHANGE
or
COPY
. In
,
this guide, display button instructions are underlined.
Display buttons
display button
P0881591 Issue 01 Modular ICS 4.0 System Coordinator Guide
Page 18
6
/ Getting started with Norstar
The programming overlay
When you begin programming, a group of buttons on the
telephone become the buttons for moving through programming
headings and settings. The programming overlay is a paper
cutout (found at the back of this guide) that shows the directions
the four buttons take you when programming.
Placing the programming overlay
Norstar Programming Overlay
Heading
Back Next
Show
Norstar Programming Overlay
Heading
Back Next
Shows you the
heading for the
current level
Moves you one
item back at the
current level
Modular ICS 4.0 System Coordinator Guide P0881591 Issue 01
Heading
Back Next
Show
Norstar Programming Overlay
Show
Shows you the
first setting
within
the level
Moves you one
item forward at
the current level
Page 19
Getting started with Norstar /
Programming buttons are active or inactive at different stages of
programming. A button is active (meaning you can use that
ª
option), when the indicator next to it is lit (
or º).
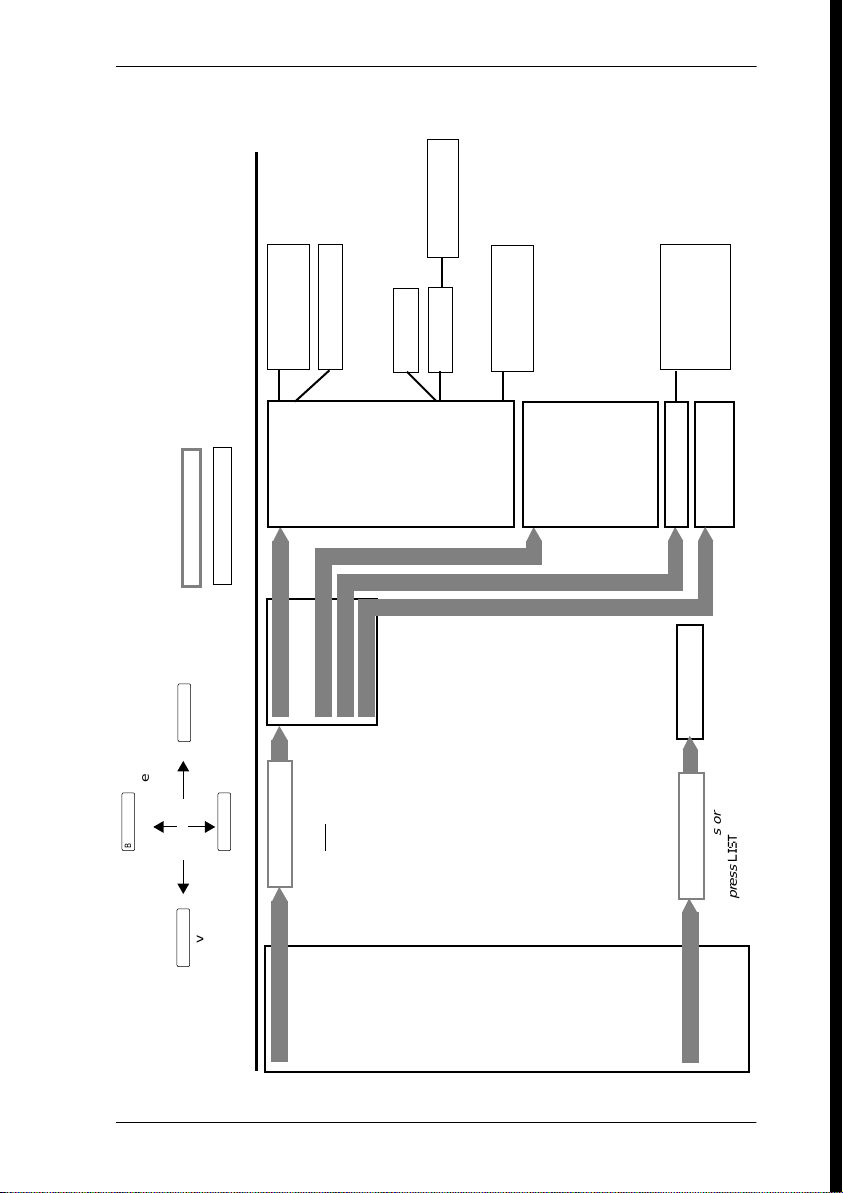
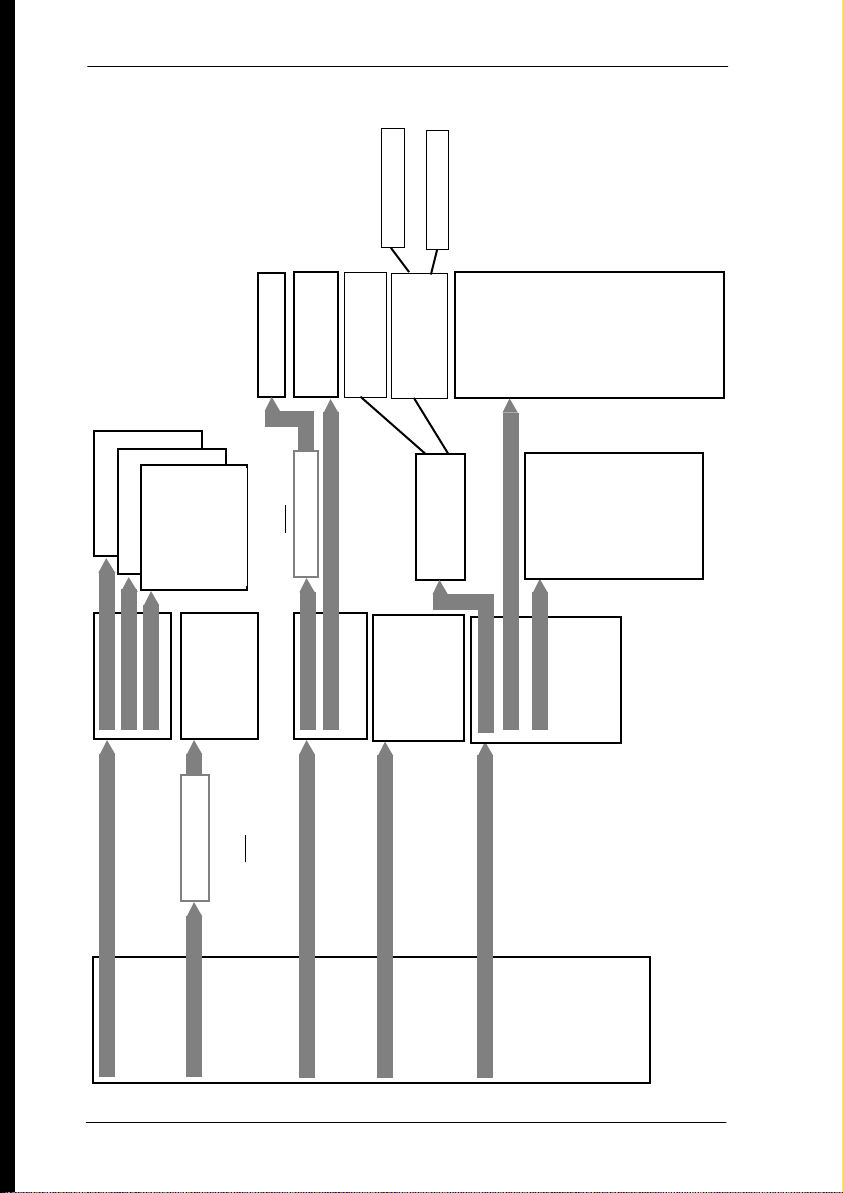
A map for working in programming
The programming maps on the following two pages show the
headings you’ll see when you move through the display menu
after pressing
the password (the default password is
¤‹fl›fl
ƒ••Ç؈ÏÈÌ
ÅΘȈ
). The maps show you the choices under each
menu heading.
Another level of access is provided for special programming
instances (the default password is
‡¤‡fi°‡
SCPLUS).
A Basic password can be used with a limited number of feature
codes, including
••ÊȘ‰
and the codes for turning
call services on and off. For more information, see “Using
passwords” on page 171.
and entering
or
or
7
Terminals&Sets
Lines
Services
P0881591 Issue 01 Modular ICS 4.0 System Coordinator Guide
Terminals and sets - Customize the many features
used by telephones. You can change where a call is
forwarded, give a telephone a name, or allow certain
features to be used at a telephone. You can change the
button programming on any telephone on the system.
Lines - Program names for each line.
Services - Turn services on or off. These are Ringing
service, (often called night service) that allows
additional telephones to ring, Restriction service that
blocks certain kinds of calls and Routing Service that
decides what lines a call uses.
Page 20
8
/ Getting started with Norstar
Sys speed dial
Passwords
Time&Date
System prgrming
System speed dial - Program up to 70 different
telephone numbers so that people in your office can
dial them with a two-digit code.
Passwords - Change the password you use for
programming, or erase a Call log password. On an XC
system, you can also change the password for
Companion portable telephone registration.
Time and date - Change the time, date, or both.
System programming - On an XC system, you can
enable or disable registration for Companion portable
telephones.
Modular ICS 4.0 System Coordinator Guide P0881591 Issue 01
Page 21
Getting started with Norstar /
Use prime line
9
(italic text) = instructions or descriptions
Legend:
Name (grey text) = appears only if needed to complete programming
Enter digits
“
(go to previous item)
number, or speed dial number
(black box) = items are in a list
(grey box) = enter an extension number, line
≠
(go to next level)
‘
(go to next item)
Fwd to
Fwd delay
Fwd no answer ˆ
Fwd on busy ˆ
DND on busy
Handsfree
Capabilities ˆ
Name
User prefernces ˆ
LIST
Show set:_ ˆ
press
Enter digits or
Fwd to
HF answerback
Restrictions ˆ
Intrnl#
Extrnl#
Paging
D-Dial
Hotline ˆ
Priority call
Page zone
Pickup grp
Telco features ˆ
Allow redirect
Aux. ringer
ATA ans timer
MsgIndicate
Redirect ring
ATA Settings ˆ
User speed dial
Call log opt’ns
Model
Button prgrming
Dialing opt’ns
Language
Display cntrst
Ring type
Set lock
Allow last no
Set restrns
Name
Show line:_ ˆLines
Allow saved no
1stDisplay
Allow link
Called ID
LIST
press
Enter digits or
–
(go to previous level)
Key to Navigation:
P0881591 Issue 01 Modular ICS 4.0 System Coordinator Guide
Terminals & Sets
Page 22
10 / Getting started with Norstar
Log pswd
Sys Coord 23646
Registration
Portable DNs
Basic 22742
Status
Re-evaluation
Radios
Cell Assignment
Backgrnd music
On hold
Receiver volume
Cells
Camp timeout
Park timeout
Park Mode
Trnsfr callbk
Netwk callbk
Held reminder
Remind delay
Confrence tone
Directd pickup
Page Tone
Page Timeout
Auto Time&Date
Call log space
AlarmExtn
Extn relocation
Sched:Night
Sched:Evening
Sched:Lunch
Sched:Sched 4
Sched:Night
Sched:Evening
Sched:Lunch
Sched:Night
Sched:Evening
Ringing service ˆ
Restrn service ˆ
Routing service ˆ
Services
Sched:Sched 5
Sched:Sched 6
Sched:Sched 4
Sched:Sched 5
Sched:Sched 6
Sched:Lunch
Sched:Sched 4
Sched:Sched 5
Sched:Sched 6
add/change tel#
Use prime line
Display digits
Name
LIST
Speed dial #:_ ˆ
press
Enter digits or
Sys speed dial
LIST
Show set:_ ˆ
press
Enter digits or
Call Log pswds ˆ
Progrmng pswds
Passwords
*
Reg. pswd
Registration ˆ
Hour
Minutes
Year
Month
Time&Date
Name
Member DNs
Line assignment
Mode
Hunt Delay
Radio data ˆ
Day
Show Group
Hunt Groups ˆ
Featr Settings ˆ
Companion* ˆ
If Busy
Sys Prgrming
Q Timeout
Overflow
Business Name
*MICS-XC only
Modular ICS 4.0 System Coordinator Guide P0881591 Issue 01
Page 23
Getting started with Norstar / 11
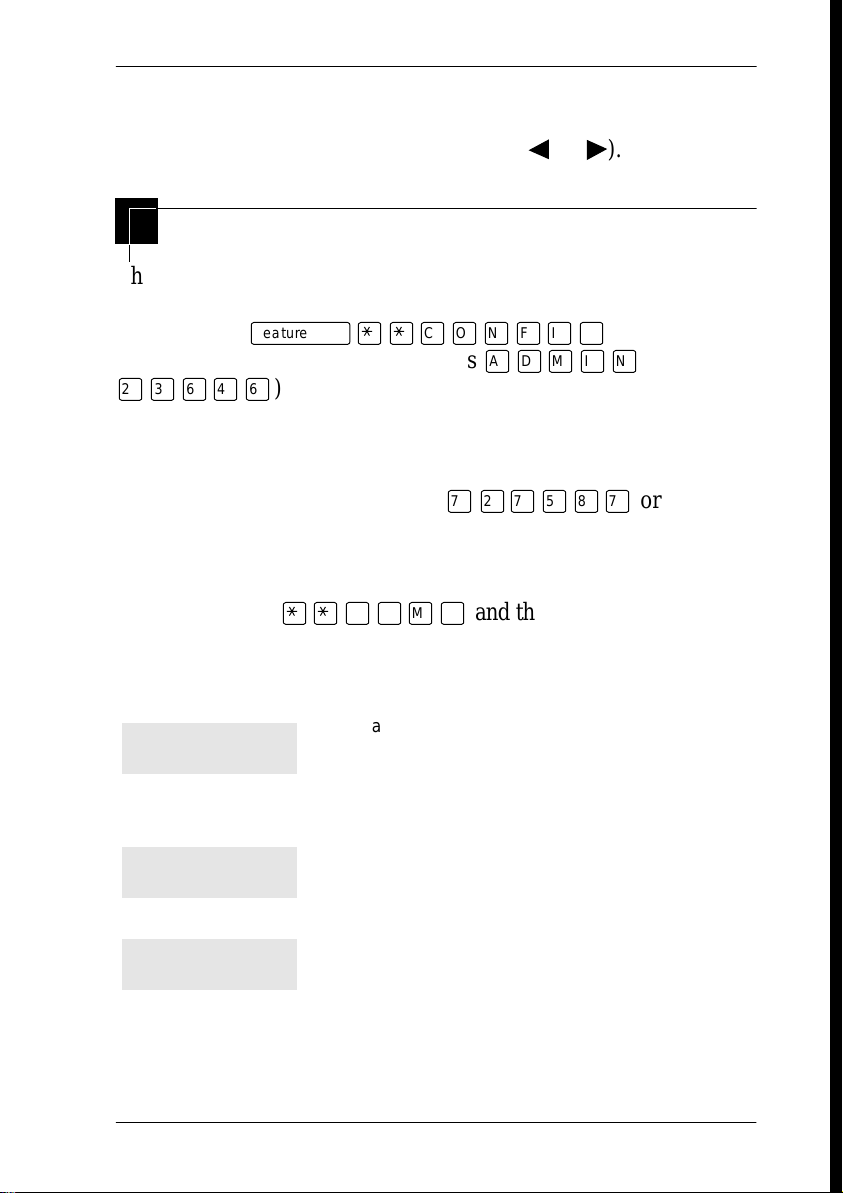
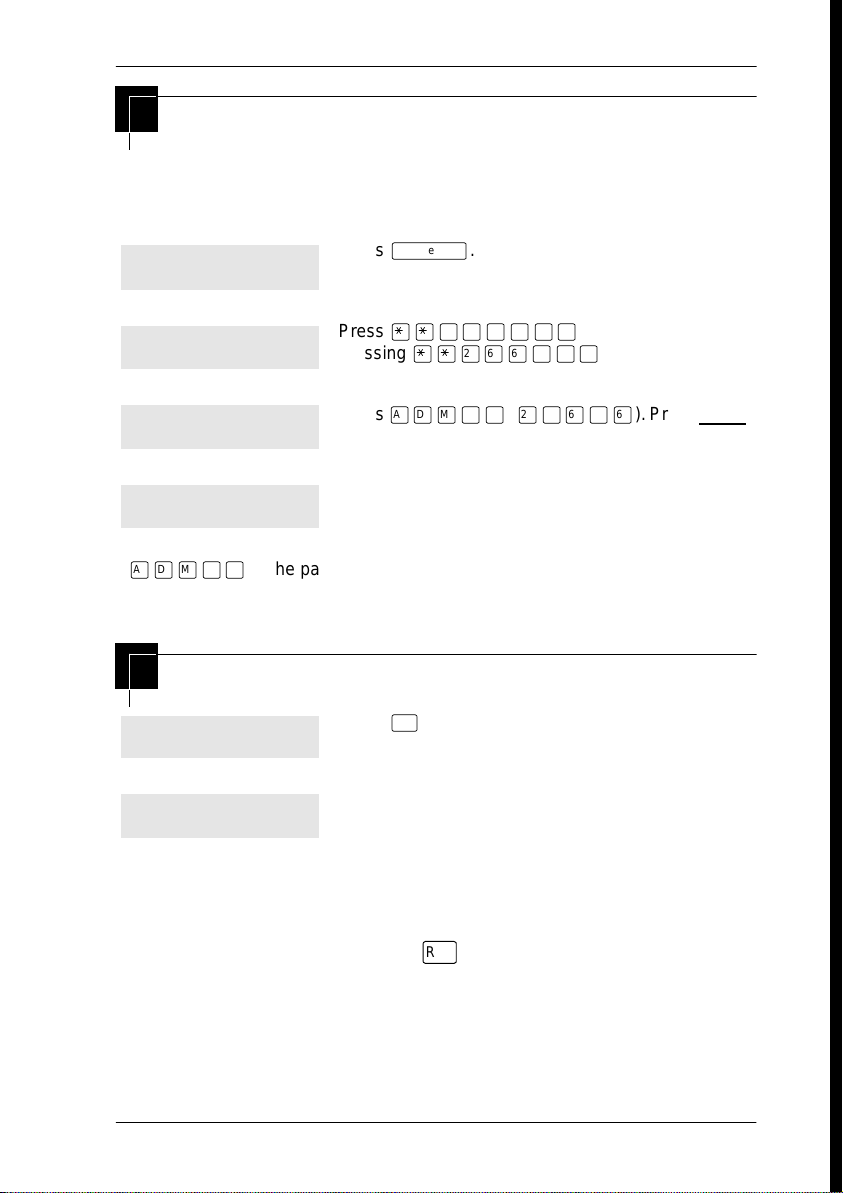
Starting and ending a session
As system coordinator the first steps in making any change to the
Norstar system are always the same.
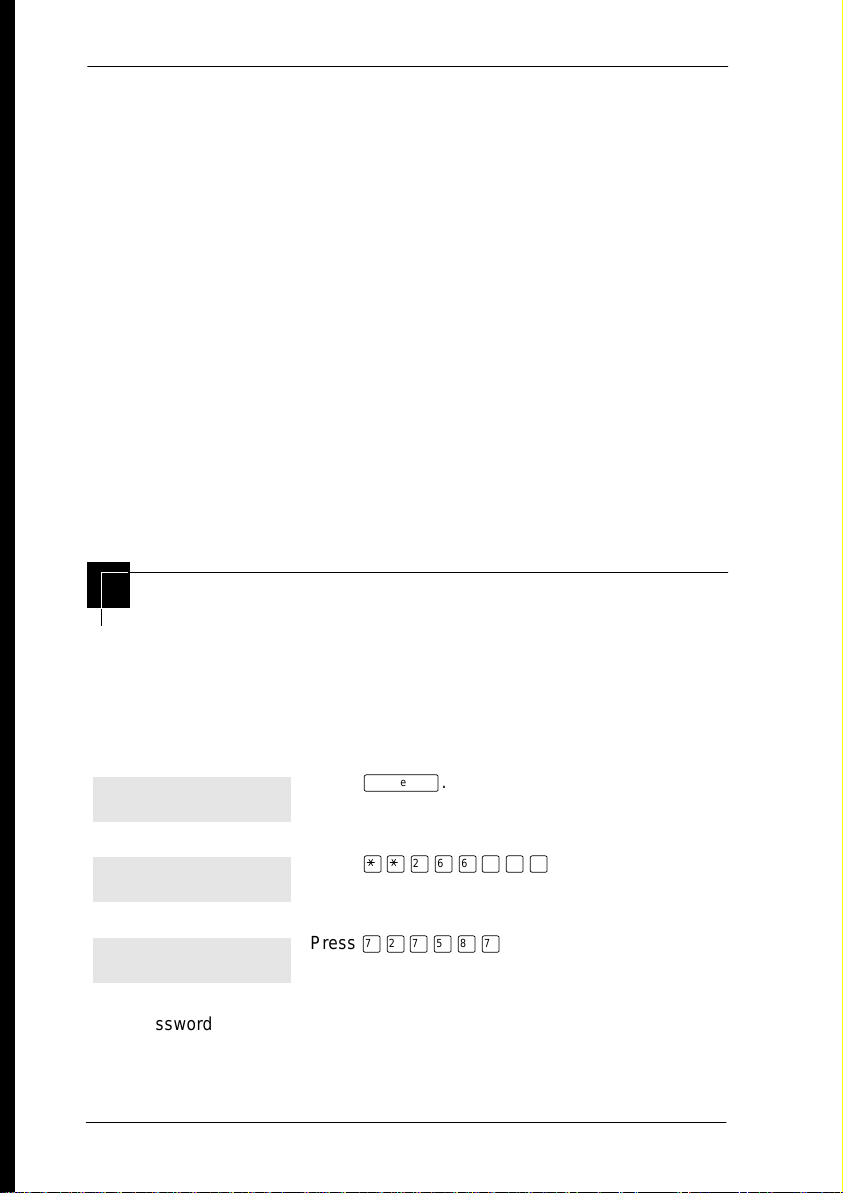
Press
Jan 1 12:00pm
Feature:
ƒ
Press
••Ç؈ÏÈÌ
pressing
.
. It’s the same as
••¤flfl‹››
.
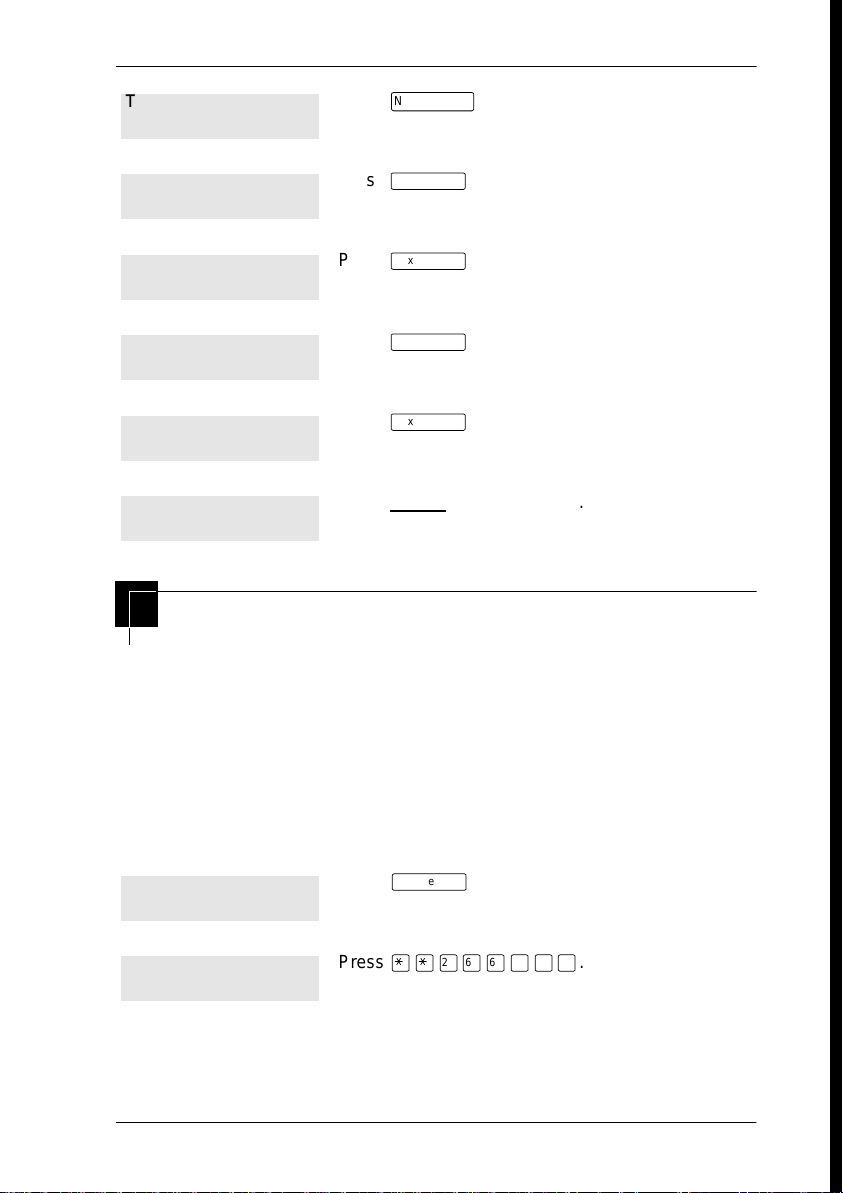
Password:
Terminals&Sets
ÅΘȈ
Check the
is the password, unless the password has been changed.
Norstar Programming Record
RETRY
Press
ÅΘȈ (¤‹fl›fl
to re-enter the password if it is entered wrong.
The display shows the first of the seven headings
available for administration programming.
for the most recent password.
). Press RETRY
Ending a session
Display digits:Y
CHANGE
End of session
The system goes ahead with any changes you make to
programming as soon as you move away from a setting, either by
using the navigation buttons or
Press ® to end the session.
After a few seconds, the time and date reappears on
the display.
®
.
P0881591 Issue 01 Modular ICS 4.0 System Coordinator Guide
Page 24

12 / Getting started with Norstar
You can see if the changes you have made to telephone
programming have taken effect by pressing the UPDATE
display
key. The display shows you how many telephones have not been
updated.
Press DNs
to see the specific extensions where programming
changes have not taken effect yet. Items disappear from the list
as they are updated.
Record any changes you make in the
Norstar Programming Record
If there is a problem with the system, the installer needs to see a
history of the changes you have made. Remember to inform
people in your office of any changes you have made that affect
them. For example, you may change system speed dial codes or
change the number of rings before an unanswered telephone is
forwarded.
.
Modular ICS 4.0 System Coordinator Guide P0881591 Issue 01
Page 25
Frequently used programming
operations
The following sections highlight the most frequently used
programming operations. To consult these or other programming
operations, see either the Table of Contents or the Index.
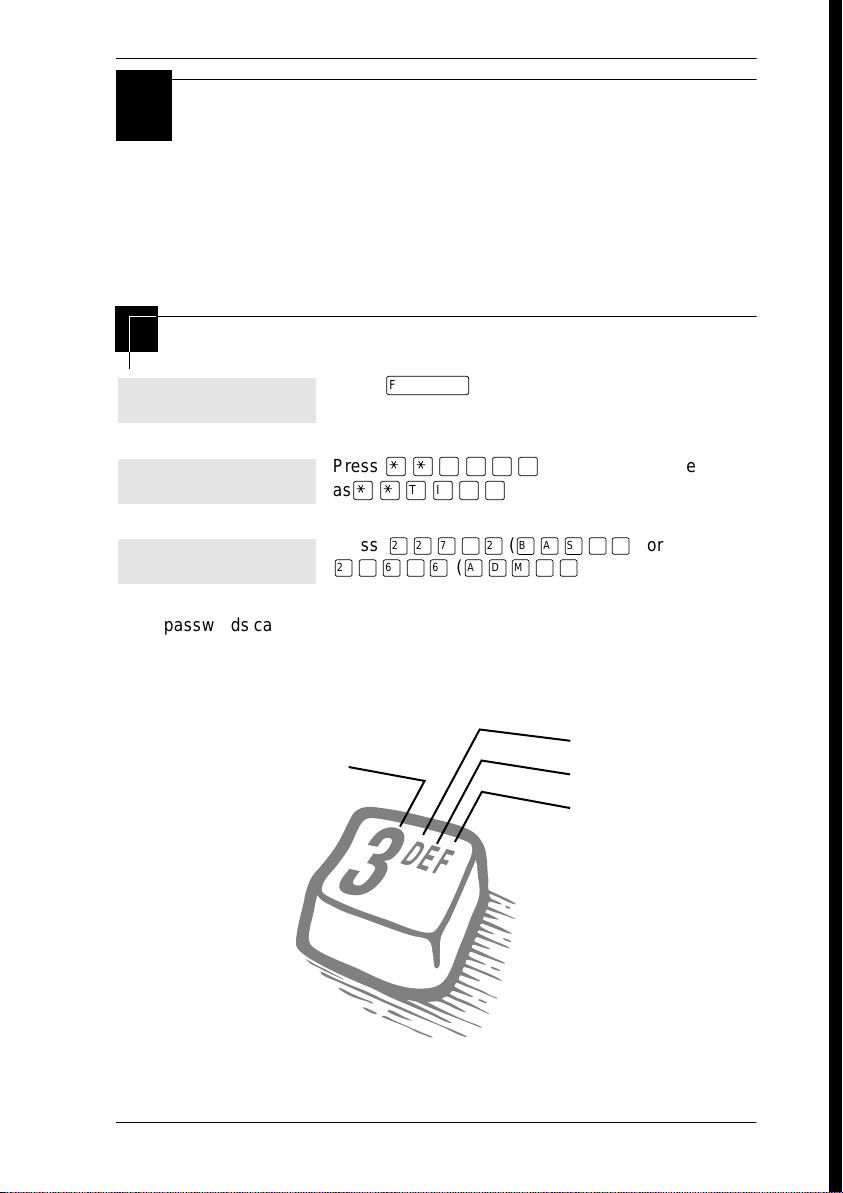
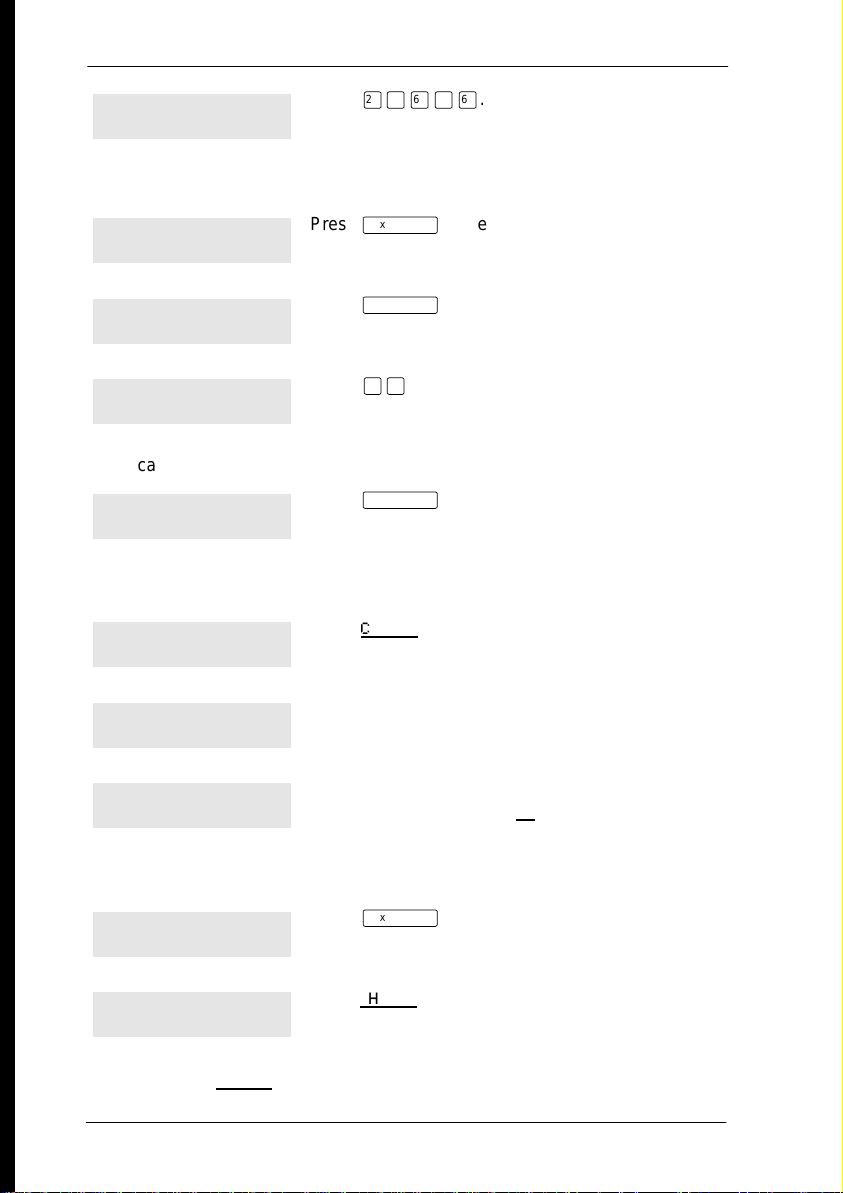
Changing the time and date on the display
Press
Jan 1 12:00pm
Feature:
Password:
RETRY
ƒ
Press
••°›fl‹
as
••ÊȘ‰
Press
¤¤‡›¤(ıÅÍÈÇ
¤‹fl›fl (ÅΘȈ
.
(which is the same
).
) or
)
/ 13
The passwords can be changed. See “Using passwords” on page 171 for more
information.
Entering letters and numbers using the dial pad
first press
fourth press
P0881591 Issue 01 Modular ICS 4.0 System Coordinator Guide
second press
third press
Page 26
14 / Frequently used programming operations
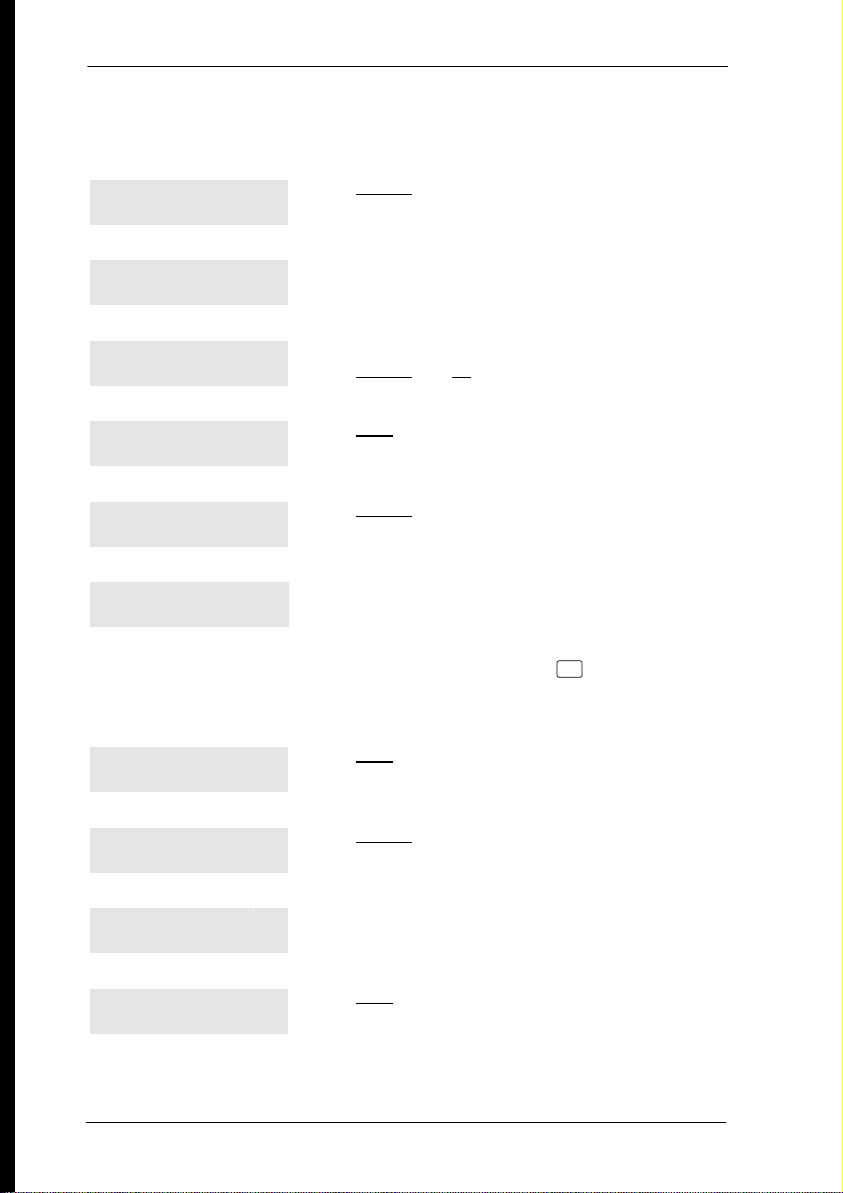
In this example, you are changing the time to 1:30 p.m.
Hour:01
Press CHANGE.
NEXT CHANGE
Hour:___
CANCL
AM
OK CHANGE
Hour:01
Press the dial pad buttons to enter the hour. Use two
digits for all hours. The clock on the display shows
either one or two digits.
The display prompts you to choose a.m. or p.m.
Press CHANGE
Press NEXT.
and OK to select p.m.
NEXT CHANGE
Minutes:00
Press CHANGE.
NEXT CHANGE
Minutes:___
Press the dial pad buttons to enter the minutes.
CANCL
If you are only changing the time and not the date, press ® to end your
session.
In this example, you are changing the date to July 15, 1998.
Minutes:30
Press NEXT.
NEXT CHANGE
Year:97
Press CHANGE.
NEXT CHANGE
Year:___
Press the dial pad buttons to enter the year.
CANCL
Year:98
Press NEXT.
NEXT CHANGE
Modular ICS 4.0 System Coordinator Guide P0881591 Issue 01
Page 27
Frequently used programming operations / 15
Month:01
NEXT CHANGE
Month:___
CANCL
Use numbers for the months: 01 is January; 12 is December.
Month:07
NEXT CHANGE
Day:01
NEXT CHANGE
Day:___
CANCL
Day:15
CANCL
End of session
Press CHANGE.
Press the dial pad buttons to enter the month.
Press NEXT.
Press CHANGE.
Press the dial pad buttons to enter the day.
Press ® to end your session.
The clock controls the schedules used for services such as ringing
and routing services.
After a power failure, the clock is behind by the length of time
power was lost. For example, if the power is out for two minutes,
the clock is two minutes behind.
You can program your Norstar system with the Automatic Time
and Date feature to automatically update the time and date.
Whenever the clock is out of sync by more than two minutes, as
a result of a power failure or a loss of power, the first incoming
call updates the clock automatically after two rings.
P0881591 Issue 01 Modular ICS 4.0 System Coordinator Guide
Page 28
16 / Frequently used programming operations
Note: CLASS Trunks are required for this feature to work.
Consult your customer service representative to
determine if you have CLASS Trunks.
This feature also allows the automatic changing between North
American daylight savings and standard time. Your system uses
the time and date information from the first incoming call after
two rings to update to daylight savings or standard time.
The Automatic Time and Date feature automatically overrides
any manually programmed changes to the time and date in your
system.
Note: The year is not included with the time and date
information and must be programmed manually if the
current year differs from the network time.
Programming Automatic Time and Date
You can program the Automatic Time and Date feature to enable
your system to automatically update the time and date after a
power failure, and to automatically change between daylight
savings and standard time.
Press
Jan 1 12:00pm
Feature:
Password:
RETRY
The passwords can be changed. See “Using passwords” on page 171 for more
information.
Modular ICS 4.0 System Coordinator Guide P0881591 Issue 01
ƒ
Press
••¤flfl‹››
Press
‡¤‡fi°‡
.
.
.
Page 29
Terminals&Setsˆ
Sys prgrmingˆ
Change DNsˆ
Featr settingsˆ
Backgrnd music:
CHANGE
Frequently used programming operations / 17
Press
‘
prgrming.
Press
≠
Press
‘
Press
≠
Press
‘
AutoTime&Date.
until the display shows System
.
.
.
until the display shows
AutoTime&Date:
Press CHANGE to choose Y or N.
CHANGE
Adding or changing a system speed dial
You program a speed dial on your Norstar so that anyone in your
office can dial a frequently used number using a two-digit code.
To change a speed dial that already exists, follow the same steps.
The new programming overwrites the previous number and
settings.
Begin the programming session
Press
Jan 1 12:00pm
Feature:
ƒ
Press
••¤flfl‹››
.
.
P0881591 Issue 01 Modular ICS 4.0 System Coordinator Guide
Page 30
18 / Frequently used programming operations
Press
Password:
¤‹fl›fl
.
RETRY
Choose a speed dial code
Terminals&Setsˆ
Sys Speed Dialˆ
Speed dial #:___
Press
Press
‘
≠
‚⁄
three times.
.
.
Press
LIST
You can pick any system speed dial code between 01 and 70.
Press
Speed dial #:01ˆ
≠
.
FIND
Add or change the telephone number
01:No number
Press CHANGE.
CHANGE
01:___
CANCL OK
01:nnnnnnnn__
CANCL BKSP OK
Use the dial pad to program the telephone number
that you want to add. The telephone number can be
up to 24 digits long.
Your display shows the telephone number, and not
n’s as shown here. Press OK
.
Select a line for the speed dial code
01:nnnnnnnn
‘
.
Press
CLR CHANGE
Use prime line
CHANGE
Stop pressing CHANGE when the display shows the prime line again.
Modular ICS 4.0 System Coordinator Guide P0881591 Issue 01
Press CHANGE to see your options: Use prime line, a
specific line (for example Use line: 01), a line pool
(for example Pool code:71), or Use routing tbl.
Page 31

Frequently used programming operations / 19
Use prime line
CHANGE
If you assign a specific line to a system speed dial number, only telephones with
an appearance of that line can use the speed dial number.
In this example, the system selects the prime line
automatically (the most common choice), to dial
speed dial code 01.
Choose what shows up on the display
Use prime line
‘
.
Press
CHANGE
Display digits:Y
CHANGE
Display digits:N
Your choices are Yes and No. Yes means the display
shows the telephone number. Press CHANGE
No means the display shows a name for the code.
.
CHANGE
Program a name for a speed dial
The system has a standard name to display, so it is not necessary for you to
program one. However, if you have chosen not to display the telephone number,
you may want a specific name.
Press
Display digits:N
‘
.
CHANGE
Name:Sys Spd Di...
≠
.
Press
CHANGE
...al 01 ...
CHANGE
Name:___
Press the telephone’s numeric dial pad button that has the first letter of the
name until the display shows the letter you want.
Name:S
This is the name the display shows if you don’t
change it. Press CHANGE
Decide the name you want to give to the speed dial
-->
code.
Press -->.
.
BKSP -->
P0881591 Issue 01 Modular ICS 4.0 System Coordinator Guide
Page 32

20 / Frequently used programming operations
Name:S__
<-- BKSP -->
The name can be up to 16 characters long, including spaces.
Press # on the numeric dial pad to add spaces.
Name:SAVINGS BANK
Use the dial pad and --> until you have the entire
name.
Press
‘
.
<-- BKSP -->
Name:SAVINGS BA...
Press ® to end your session.
CLR CHANGE
Or you can press
number.
–
, then
‘
to program another speed dial
End of session
Changing the name of a telephone
Begin the programming session
Press
Jan 1 12:00pm
ƒ
.
Feature:
Password:
••¤flfl‹››
Press
¤‹fl›fl
.
.
Press
RETRY
Change the name of a telephone
Press
Terminals&Setsˆ
Show set:___
LIST
Modular ICS 4.0 System Coordinator Guide P0881591 Issue 01
≠
Enter the internal number (DN) of the telephone or
voice mail extension. In this example, it’s 221.
.
Page 33

Frequently used programming operations / 21
If the set has already been given a name, it appears after DN: on the display.
Press
221:221ˆ
≠
then
‘
.
FIND
Name:221
CHANGE
Decide what name you want to give to the telephone number.
Name:___
Name:J
This is the name the display shows if you don’t
change it. Press CHANGE
Press the telephone’s numeric dial pad button that
-->
has the first letter of the name until the display shows
the letter you want.
Press -->.
.
BKSP -->
Name:J___
<-- BKSP -->
Name:JEAN B
Use the dial pad and --> until you have the entire
name.
Press
‘
to use the name you have entered.
<-- BKSP -->
The name can be up to 7 characters long, including spaces.
Name:JEAN B
Press ® to end your session.
CLR CHANGE
You can press
press
–
–
twice to return to the Terminals and Sets heading.
once to continue programming this telephone, or
End of session
P0881591 Issue 01 Modular ICS 4.0 System Coordinator Guide
Page 34

22 / Frequently used programming operations
Changing the name of a line
Begin the programming session
Press
Jan 1 12:00pm
Feature:
Password:
RETRY
Change the name of a line
Terminals&Setsˆ
ƒ
Press
••¤flfl‹››
Press
¤‹fl›fl
Press ‘
.
.
.
.
Linesˆ
Show line:______
This is the name the display shows if you don’t change it.
Line002:Line002ˆ
Press ≠
Enter the three-digit number of the line you want to
LIST
name. In this example, it’s line 002.
Press
≠
.
.
FIND
Name:Line002
Press CHANGE.
CHANGE
Decide what name you want to give to the line.
Name:___
Name:L
Press the telephone’s numeric dial pad button that
-->
has the first letter of the name, until the display
shows the letter you want.
Press -->.
BKSP -->
Modular ICS 4.0 System Coordinator Guide P0881591 Issue 01
Page 35

Frequently used programming operations / 23
Name:L___
<-- BKSP -->
The name can be up to 7 characters long, including spaces.
Name:LOCAL
Use the dial pad and --> until you have the entire
name.
Press
‘
to use the name you have entered.
<-- BKSP -->
Name:LOCAL
Press ® to end your session.
CLR CHANGE
You can press
–
–
twice to return to the Lines heading.
once to continue programming this line, or press
End of session
Making changes to Call Forward No Answer
Begin the programming session
Press
Jan 1 12:00pm
ƒ
.
Feature:
Password:
••¤flfl‹››
Press
¤‹fl›fl
.
.
Press
RETRY
Change where a call goes when there is no answer
Press
Terminals&Setsˆ
Show set:___
LIST
If the set has been given a name, it appears on the display.
P0881591 Issue 01 Modular ICS 4.0 System Coordinator Guide
≠
Enter the internal number (DN) of the telephone or
voice mail extension. In this example, it’s 225.
.
Page 36

24 / Frequently used programming operations
Press
225:225
≠
FIND
Press
Press
≠
≠
Capabilitiesˆ
Fwd no answerˆ
.
.
.
Fwd to:None
CHANGE
Press CHANGE and enter the internal number where
you want the calls to be sent. In this example, it’s
221.
Fwd to:221
CLR CHANGE
You can press CLR to change the destination back to None.
Change the number of times the telephone rings before it is forwarded
Fwd to:221
‘
.
Press
CLR CHANGE
Forward delay:4
CHANGE
Your choices are 2, 3, 4, 6 and 10 rings.
Forward delay:3
Use the CHANGE button to choose the number of times
the telephone rings before it is forwarded.
Press ® to end your session.
CHANGE
You can press
telephone, or press
heading.
–
–
to continue programming capabilities for this
four times to return to the Terminals and Sets
End of session
Modular ICS 4.0 System Coordinator Guide P0881591 Issue 01
Page 37

Frequently used programming operations / 25
Tip -
If the Norstar set is a member of a Hunt Group, the
Call Forward no answer feature is overridden and the
Hunt Group call continues to ring until the hunt time has
expired. For more information on Hunt Groups see
“Programming Hunt Groups” on page 135.
Making changes to Call Forward on Busy
Begin the programming session
Press
Jan 1 12:00pm
Feature:
Password:
ƒ
Press
••¤flfl‹››
Press
¤‹fl›fl
RETRY
Change where a call goes when a telephone is busy
Press
Terminals&Setsˆ
≠
.
.
.
.
Show set:___
If the set has been given a name, it appears on the display.
225:225
Enter the internal number (intercom number) of the
LIST
telephone extension. In this example, it’s 225.
Press
≠
.
FIND
Press
Press
≠
‘
Capabilitiesˆ
Fwd no answerˆ
P0881591 Issue 01 Modular ICS 4.0 System Coordinator Guide
.
.
Page 38

26 / Frequently used programming operations
Press
Fwd on busy. . .
≠
.
Fwd to:None
CHANGE
You can press CLR to change the destination back to None.
Fwd to:221
Press CHANGE and enter the internal number where
you want the calls to be sent. In this example, it’s 221.
Press ® to end your session.
CLR CHANGE
You can press
telephone, or press
heading.
‘
–
to continue programming capabilities for this
three times to return to the Terminals and Sets
End of session
Tip -
If the Norstar set is a member of a Hunt Group, the
Call Forward on busy feature is overridden and the Hunt
Group call continues to ring until the hunt time has
expired. For more information on Hunt Groups see
“Programming Hunt Groups” on page 135.
Making Changes to Do Not Disturb on Busy
When you are on a call and a second call comes in, your
telephone rings softly to alert you to the second call. You can turn
this feature on or off for each telephone.
Begin the programming session
Press
Jan 1 12:00pm
Feature:
Modular ICS 4.0 System Coordinator Guide P0881591 Issue 01
ƒ
Press
••¤flfl‹››
.
.
Page 39

Password:
Press
RETRY
Change Do Not Disturb on Busy
Terminals&Setsˆ
Frequently used programming operations / 27
¤‹fl›fl
Press
≠
.
.
Show set:___
If the set has been given a name, it appears on the display.
225:225
Enter the internal number (intercom number) of the
LIST
telephone extension. In this example, it’s 225.
Press
≠
.
FIND
Capabilitiesˆ
Fwd no answerˆ
DND on Busy:N
≠
Press
‘
Press CHANGE to turn the feature on.
.
twice.
Press
CHANGE
DND on Busy:Y
CHANGE
You can press
telephone, or press
heading.
‘
A second press turns it off again. Press ® to end
your session.
to continue programming capabilities for this
–
three times to return to the Terminals and Sets
End of session
P0881591 Issue 01 Modular ICS 4.0 System Coordinator Guide
Page 40

28 / Frequently used programming operations
Tip -
If the Norstar set is a member of a Hunt Group and
the set activates this feature, the set does not receive
notification of incoming Hunt Group calls while on a call.
The DND on busy feature overrides the Hunt Group. For
more information on Hunt Groups see “Programming
Hunt Groups” on page 135.
For more information on Call Forward and similar settings, see
“Forwarding your calls to another Norstar telephone” on page
83.
What would you like to do next?
Some of the most common programming tasks are listed below.
For a comprehensive list of settings and instructions, see either
the Table of Contents or the Index.
Redirect calls coming in on a line. See “Turning on Line Redirection”
on page 88.
Allow individuals to answer calls that are
ringing at another telephone.
Assign telephones to different zones for
paging.
Turn the night service on and off. See “Making additional
Use a basic password so others can take
care of programming such as changing
user speed dials, changing names, and
changing the time and date.
Modular ICS 4.0 System Coordinator Guide P0881591 Issue 01
See “Picking up a call ringing at
another telephone” on page 37.
See “Paging” on page 95.
telephones ring” on page 165.
See “Using passwords” on page
171.
Page 41

Answering calls
Answering incoming calls with Hunt Groups
Your Norstar system now allows you to establish Hunt Groups
in your system. Hunt Groups are a group of Norstar set DNs
that can be called by a single directory number. The Hunt
Groups feature ensures calls are easily routed to the
appropriate people. You can program
• the members for a Hunt Group
• member position within a Hunt Group
• how calls are distributed
• how long a call spends looking for available members
• what happens if all members are busy
For more information on Hunt Groups see “Programming
Hunt Groups” on page 135.
Answering an incoming call
There are three indications of an incoming call: ringing, a line
button flashing, and a message on the display. You do not
necessarily receive all three indications for any particular call.
For example, you may have a line that has been set up not to
ring at your telephone. If so, you see only a flashing line
button. There are many possible combinations, depending on
how your system is set up. See “Choosing a line using a line
button” on page 55 for more information on the use of lines.
If you receive a priority call and your telephone has no free
internal line buttons, you cannot transfer the priority call, you
must accept or release it.
P0881591 Issue 01 Modular ICS 4.0 System Coordinator Guide
Page 42

30 / Answering calls
Line buttons
One line button for each line is assigned to your telephone.
Press the line button to select the line you want to answer or
use to make a call. Having several line buttons gives you
immediate access to more than one line.
The M7100 telephone has two intercom paths which are used
instead of line buttons to answer and make calls. Each M7100
can be assigned two lines. You can press
˙
between two calls, one active and one on hold.
What line indicators mean
Flashing on and off for
º
equal lengths of time
There is an incoming call on the line.
to switch
Flashing on and off more
º
quickly
Flashing on for longer
º
than off
On, not flashing You are connected to the call on that
º
Off The line is free.
You have placed a call on hold.
Someone else has put a call on hold
on that line.
line or the line is in use elsewhere.
Rings you may hear
A double beep every ten
seconds
A long single ring There is an external call on the line for you.
A shorter double ring There is an internal call on the line for you or
A brief single ring A call is being redirected on one of your
Three beeps descending
in tone
A call has been camped to your telephone.
a call is being transferred to you.
redirected lines. You cannot answer this call.
You are receiving a priority call.
Modular ICS 4.0 System Coordinator Guide P0881591 Issue 01
Page 43

Answering calls / 31
Answering calls at a prime telephone
Each line in a Norstar system can be assigned a prime
telephone. Calls not answered at their normal destinations are
transferred to the prime telephone. The prime telephone is
usually the attendant’s telephone. The installer or customer
service representative programs a prime telephone for a line.
Displays
DND from 221
The person at telephone 221 has forwarded
a call to you using Do Not Disturb.
DND transfer
DRT Line001
Line001 callback
CALLBACK
Line001 to prime
Line002>Line052
For other displays, see “Common feature displays” on page 203.
The system has transferred a call to you from
a telephone with Do Not Disturb turned on.
Nobody answered this call so the system
transferred it to you.
Someone has camped, parked or transferred
a call on line 001, but no one has answered
it. Press CALLBACK
connect to the call.
There is no telephone that can receive a call
on line 001 so the system has transferred it
to you.
The call coming in on line 002 was intended
for target line 052. Line 052 is busy so the
call has come to you.
or the line button to
Using a central answering position (CAP) module
A central answering position (CAP) is a Norstar M7324
telephone and a CAP module that your installer or customer
service representative programmed as a CAP. You can have
five CAPs in a Norstar Modular system. It is best if the CAP is
the prime telephone and direct-dial telephone for the lines and
telephones it serves.
P0881591 Issue 01 Modular ICS 4.0 System Coordinator Guide
Page 44

32 / Answering calls
M7324 telephone
CAP module
A CAP module is an add-on device that provides 48 extra
memory or line buttons. You can connect one or two Norstar
CAP modules to the telephone to increase the number of lines
it can handle.
When a CAP module is first plugged into your telephone,
some of the module buttons are already programmed to dial an
internal number.
Customizing your CAP module
If your installer has programmed the CAP module to be the
central answering position for your system, you can move
external lines onto the CAP module by using
ƒ•°⁄
. See “Moving line buttons” on page 124.
Any of the buttons on your CAP module that do not select lines
can be programmed to dial internal or external numbers
automatically. You can program features onto CAP module
buttons. See “Time savers for making calls” on page 63 and
“Customizing your telephone” on page 115 for information on
programming memory buttons.
Buttons on a CAP module cannot be assigned as answer
buttons.
Modular ICS 4.0 System Coordinator Guide P0881591 Issue 01
Page 45

Answering calls / 33
Monitoring telephones with the CAP module
The indicators ˆ beside internal autodial buttons on your CAP
module show the status of Norstar telephones.
The indicator is on when the telephone has:
• an active call
• Do Not Disturb turned on
The indicator is off when a telephone has:
• no active call
• a call on hold and no other active call
Tip -
You can send up to 30 messages from a CAP.
Release button
Pressing
down.
While you are on a call, do not press
are using. If you do, you disconnect the call. Use
instead.
®
ends a call. You do not have to put the receiver
®
also ends feature programming.
®
to end a feature you
ƒ
Hearing aid compatibility
The receivers on all Norstar telephones are compatible with
hearing aids as defined in the FCC rules, Part 68, section
68.316. Not all hearing aids are optimized for use with a
telephone.
P0881591 Issue 01 Modular ICS 4.0 System Coordinator Guide
Page 46

34 / Answering calls
Viewing information about a call on the display
If you subscribe to Call Display services from your local
telephone company, one line of information about an external
caller is displayed after you answer. Depending on the setting
and the external information available, either the caller’s name
or telephone number is displayed.
When you transfer an external call to another Norstar user, this
information is displayed on the recipient’s telephone.
Call Display information becomes available between the first
and second ring of an incoming call. If you answer before the
Call Display information is available on your display, and you
press
ƒ°⁄⁄
line name.
To use logging features with Call Display, see “Using Call
Log” on page 107.
, you see only the line number or
Using Call Information for a particular call
ƒ°⁄⁄
Call Information allows you to see information about
incoming calls. This information is more detailed than the Call
Display information you can receive automatically. For
external calls, you can display the caller’s name, telephone
number, and the line name. For an internal call, you can
display the caller’s name and their internal number. You can
see information for ringing, answered, or held calls.
Call Information is available for calls even if they have been
transferred, forwarded or rerouted in some way.
Names and numbers for external calls are displayed only if you
have subscribed to Call Display services from your telephone
company.
Modular ICS 4.0 System Coordinator Guide P0881591 Issue 01
Page 47

Answering calls / 35
Tip -
Call Log displays the same information as Call
Information, along with the date and time of the call, and
the number of times the caller called.
Displaying Call Information before or after answering
To find out who is calling or to display information about your
current call:
1. Press
2. Press £ or VIEW
ƒ°⁄⁄
to display more information about an
.
external call.
Call Display information becomes available between the first
and second ring of an incoming call. If you answer before the
Call Display information is available on your display, and you
press
ƒ°⁄⁄
, you see only the line number or
line name.
Displaying Call Information for a call on hold
1. Press
ƒ°⁄⁄
. The display reads ˆSelect a
call.
2. Select the line on hold. Information about the call is
displayed.
3. Press £ or VIEW
to display more information about an
external call.
Tip -
If your telephone automatically displays Call Display
information for a call, you still need to press
ƒ°⁄⁄
display more information about the call.
before you can press
£
or
VIEW
to
P0881591 Issue 01 Modular ICS 4.0 System Coordinator Guide
Page 48

36 / Answering calls
Making Call Display information appear automatically at a telephone
Each telephone that rings for an external line can display Call
Display information for that line. After the call is answered,
Call Display information is always shown at the telephone that
answered the call. Your installer or customer service
representative can program telephones to have automatic Call
Display.
This feature is not available to ISDN terminals.
Changing which information is shown first about a call
Depending on the services you subscribe to, Call Display
information may contain up to three parts: the name of the
caller, the number of the caller, and the name of the line in your
Norstar system that the call is on. For each telephone, you can
determine which information is displayed first.
You need the programming template found at the front of this
guide. See “Getting started with Norstar” on page 1 for more
information.
1. Press
2. Press
ƒ••¤flfl‹››
¤‹fl›fl
(the default System Coordinator
.
password).
3. Press
≠
and enter the internal number of the
telephone you want to program.
4. Press
5. Press
6. Press
7. Choose a setting at 1stDisplay: using the CHANGE
≠
‘
≠
.
four times.
.
button.
The choices are Name, Numbr or Line.
Modular ICS 4.0 System Coordinator Guide P0881591 Issue 01
Page 49

Answering calls / 37
You may see Unknown name or Unknown number on the
display if the information is not available from your telephone
company. You may see Private name or Private number
on the display if the caller blocks that information.
Picking up a call ringing at another telephone
You can pick up a call ringing at another telephone by using
Directed Pickup or Group Pickup.
Answering any ringing telephone using Directed Pickup
ƒ‡fl
You can answer any telephone that is ringing in your Norstar
system.
1. Press
ƒ‡fl
.
2. Enter the internal number of the ringing telephone.
Call Pickup cannot be used to answer private lines.
To use Call Pickup (Directed Pickup), the telephone must be
ringing. If, for example, the auxiliary ringer is ringing, but the
call is not ringing at a telephone, the call cannot be answered
using Directed Pickup. It must be answered normally at a
telephone that has a flashing indicator for the call, or by using
Trunk Answer. You can answer a call that is ringing because
someone has transferred the call to a telephone and the call is
ringing on an intercom button.
Tip -
Directed pickup can retrieve calls that are ringing
on an Answer DN. While you may enter the internal
number of the telephone you hear ringing, it may be calls
from another telephone you are answering.
P0881591 Issue 01 Modular ICS 4.0 System Coordinator Guide
Page 50

38 / Answering calls
Answering any ringing telephone using Group Pickup
ƒ‡fi
Your Norstar system can be divided into nine pickup groups.
If you are a member of a pickup group, you can pick up a call
that is ringing at any telephone in your pickup group.
Press
ƒ‡fi
.
Group Pickup cannot be used to retrieve a camped call.
If there is more than one incoming call at a telephone in a
pickup group, a call ringing on an external line is answered
first followed by calls on the prime line and, finally, calls on
internal lines.
Tip -
A Hunt Group call ringing at a Norstar set DN that
is also a member of a call pickup group can be picked up
by any Norstar set in that call pickup group. For more
information on Hunt Groups see “Programming Hunt
Groups” on page 135.
Changing a telephone’s pickup group
Telephones can be put into and taken out of pickup groups.
You need the programming template found at the front of this
guide. See “Getting started with Norstar” on page 1 for more
information.
1. Press
2. Press
ƒ••¤flfl‹››
¤‹fl›fl
(the default System Coordinator
.
password).
3. Press
≠
and enter the internal number of the
telephone you want to program.
4. Press
Modular ICS 4.0 System Coordinator Guide P0881591 Issue 01
≠
twice.
Page 51

Answering calls / 39
5. Press
‘
five times.
6. Press CHANGE at Pickup grp: to assign the telephone to
pickup group 1, 2, 3, or 4, 5, 6, 7, 8, 9, or to None.
Displays
Already joined
Pickup denied
Pickup:
You are already connected to the telephone
that made the call you are trying to pick up.
This can happen if you are on a call to a
co-worker, your co-worker dials the number
of a telephone in your pickup group, and you
attempt to pick up that call.
There is no call that you can pick up or the
call that was ringing has already been
answered.
You have tried to pick up a call on someone
else’s private line.
Enter the internal number of the telephone
that is ringing. (You may use an internal
autodial button to do this.)
If you decide not to answer a ringing call after
you have activated Directed Pickup, press
ƒ
.
Trunk Answer
ƒ°‚‚
The Trunk Answer feature allows you to answer a ringing call
anywhere in the system from any telephone in the system. The
line you are answering does not have to appear or ring at the
telephone you are using.
Trunk Answer works only with calls that are ringing on lines
for which a Ringing Service schedule is active and if Trunk
Answer is enabled by your installer or customer service
representative.
P0881591 Issue 01 Modular ICS 4.0 System Coordinator Guide
Page 52

40 / Answering calls
Answering a call using Trunk Answer
Press
ƒ°‚‚
Tip -
Ringing Service, the Trunk Answer feature picks up the
external call that has been ringing the longest.
Displays
Line denied
If there is more than one incoming call on lines in a
.
You have tried to pick up a call on someone
else’s private line.
Pickup denied
The call that is ringing is on a line that is not
in a Ringing Service.
Answer buttons
You can use an Answer button to monitor calls on another
person’s telephone. All calls to the monitored Norstar
telephone appear on the Answer button.
Answer buttons are useful for attendants who monitor
incoming calls for one or several other people. For example, a
secretary may have appearances for three different bosses on
her answer buttons. Once a call for boss A is answered by the
secretary, the appearance stops at that boss’ set. This allows
for another (simultaneous) call to come in on the same line.
The same is true for boss B and boss C. When incoming call
traffic becomes high, the calls can then be routed to a Hunt
Group to optimize call handling. For more information on
Hunt Groups see “Programming Hunt Groups” on page 135.
The Answer button setting in Featr settings programming
allows you to determine what types of calls alert at the
telephone. Your choices are: Basic, Enhanced and Extended.
Modular ICS 4.0 System Coordinator Guide P0881591 Issue 01
Page 53

Answering calls / 41
See the Norstar Modular ICS 4.0 Installer Guide for more
information.
M7100N telephones and ISDN terminals cannot be assigned
Answer buttons to monitor other sets, but they can be
monitored.
You cannot make calls using Answer buttons.
If more than one call is ringing at someone’s telephone, the
first call appears on the attendant’s Answer button. Any
subsequent calls appear on intercom buttons, if they are
available.
Tip -
More than one attendant may have an Answer
button for a single telephone. This allows two or more
attendants to handle calls for a busy person.
Each telephone can handle calls for up to eight other
people using a separate Answer button for each person.
Creating a Conference Call
ƒ‹
You can talk to two people at once.
1. Make sure you have two calls, one active and one on hold.
2. Press
3. Press the appropriate button to retrieve the held call (this is
You can create a conference when you are on a call.
1. Make a second call.
2. Press
P0881591 Issue 01 Modular ICS 4.0 System Coordinator Guide
ƒ‹
.
automatic on the M7100 telephone).
ƒ‹
.
Page 54

42 / Answering calls
3. Press the button where the first call is on hold to create a
conference.
Only the person who established the conference can process
the conference by using the procedures described in this
section.
Tip -
You can create a conference by releasing privacy
on a call. See “Turning Privacy on or off for a call” on page
49.
Disconnecting one party
You can disconnect one party from a conference and continue
talking to the other.
On an M7208, M7310 or M7324 telephone:
1. Press the line button of the call that you want to disconnect.
The call that you want to keep is automatically put on hold.
2. Press
®
. The call is disconnected.
3. Press the line button of the held call to speak to the
remaining person.
On an M7100 telephone:
1. Press
ƒ£‹
˙
, to place one caller on hold. Press
again, to put the caller you want to keep on
hold.
2. Press
3. Press
Modular ICS 4.0 System Coordinator Guide P0881591 Issue 01
®
. The call is disconnected.
˙
to speak to the remaining party.
Page 55

Answering calls / 43
Independently holding two calls
For all Norstar telephones except the M7100 telephone, you
can put the two people in a conference call on hold
independently so that they cannot talk to each other.
1. Press the line button of one person. The other person is
automatically put on hold.
2. Press
˙
. The second person is put on hold.
You can re-establish the conference.
1. Take one call off hold.
2. Press
ƒ‹
.
3. Take the other call off hold.
Putting a conference on hold
You can put a conference on hold, allowing the other two
people to continue speaking to each other by pressing
˙
.
You can reconnect to the conference by pressing either of the
held line buttons. For the M7100 telephone, press
˙
Splitting a conference
You can talk with one person while the other person is on hold.
On an M7208, M7310 or M7324 telephone
Press the line button of the person you want to speak to.
The other person is automatically put on hold.
.
On an M7100 telephone:
1. Press
2. Press
ƒ£‹
˙
, if necessary, to switch parties.
. The first party is on hold.
You can re-establish the conference.
1. Press
P0881591 Issue 01 Modular ICS 4.0 System Coordinator Guide
ƒ‹
.
Page 56

44 / Answering calls
2. Take the held call off hold. This is not necessary for the
M7100 telephone.
Removing yourself from a conference
ƒ‡‚
You can remove yourself from a conference, and connect the
other two callers through your Norstar system.
Enter the Transfer feature code
ƒ‡‚
.
When you remove yourself from a conference using the
Transfer feature, and both callers are from outside your
system, one of the callers must have called you on a disconnect
supervised line, or the call is be disconnected.
Displays
3 parties only
Conf. on hold
Conference busy
Line001 221
TRANSFER
You are trying to add a fourth party to your
conference call, or to join two conferences
together. Release one call from the
conference before adding another, or keep
the two conferences separate.
You have put a conference call on hold.
You have tried to make a conference call, but
your system is already handling its maximum
number of conference calls.
You are on a conference with the two lines or
telephones shown. You can drop out of the
conference and leave the other two parties
connected (Unsupervised Conference) by
pressing TRANSFER
feature code.
or entering the Transfer
Press held line
For other displays, see “Common feature displays” on page 203.
Modular ICS 4.0 System Coordinator Guide P0881591 Issue 01
You have activated the Conference feature
with one call active and another on hold.
Press the line of the call on hold to bring that
person into the conference.
Page 57

Answering calls / 45
Listening to a call as a group
ƒ°‚¤
To allow people in your office to listen in on a call using
Group Listening, press
You hear the caller’s voice through your telephone’s speaker.
Continue to speak to the caller through the telephone receiver.
Your telephone’s microphone is off, so the caller does not hear
people in your office.
Canceling Group Listening
Group Listening is canceled automatically when you hang up
or when you press
Tip -
Keep the receiver away from the speaker, or you
may hear feedback. The higher the volume, the more the
feedback. Press
up.
ƒ°‚¤
ƒ£°‚¤
ƒ£°‚¤
®
to prevent feedback when hanging
.
.
Using Handsfree/Mute
The ability to use Handsfree must be turned on or off for each
telephone. The type of Handsfree can be changed. See
“Changing Handsfree for a telephone” on page 47.
You must turn on Handsfree for a telephone to be able to use
a headset.
Answering calls without lifting the receiver
1. Press the line button for the ringing call. (This step is not
necessary if you have a prime line assigned to your
telephone.)
P0881591 Issue 01 Modular ICS 4.0 System Coordinator Guide
Page 58

46 / Answering calls
2. Press
©
. The telephone’s internal microphone
and speaker are automatically turned on.
Handsfree is not available for an M7100 telephone.
Tip -
Direct your voice toward the telephone. The closer
you are to the telephone, the easier it is for the
microphone to transmit your voice clearly to your listener.
Making calls without lifting the receiver
1. Press
©
. (If you don’t have a prime line assigned
to your telephone, press a line button.)
The telephone’s internal microphone and speaker are
automatically turned on.
2. Dial your call.
3. Speak normally.
Muting Handsfree
1. Press
©
to switch off the telephone microphone
so that you can speak privately to someone in your office
while you are on a handsfree call.
2. Press
©
to turn the microphone back on again and
continue your handsfree call.
Changing a regular call to handsfree
1. Press
©
.
2. Hang up the receiver.
Changing a handsfree to a regular call
Lift the receiver.
Modular ICS 4.0 System Coordinator Guide P0881591 Issue 01
Page 59

Answering calls / 47
Using Handsfree
The indicator next to
©
is solid when you have
Handsfree turned on. It flashes when you mute the
microphone.
Wait for your caller to finish speaking before you speak. The
microphone and speaker cannot both be on at once. Your
caller’s voice may be cut off if you both speak at the same
time. Noises such as a tapping pencil could be loud enough to
turn on your microphone and cut off your caller’s speech.
To prevent a possible echo, keep the area around your
telephone free of paper and other objects that might screen
your microphone. Turning down the microphone’s volume
(press the left end of
√
while speaking) prevents
echoes. When you change the volume level, both the
microphone and speaker volume are adjusted to prevent
feedback problems.
Place the telephone so that any unavoidable local noise (such
as an air conditioner) is behind it. This limits the amount of
disruptive background noise.
Tip -
In open-concept environments, use the receiver
when handsfree communication is not necessary or when
you need privacy during a call. Another option is to use a
headset.
Changing Handsfree for a telephone
You can program the type of Handsfree used with each
telephone or activate Handsfree Answerback.
You need the programming template found at the front of this
guide. See “Getting started with Norstar” on page 1 for more
information.
P0881591 Issue 01 Modular ICS 4.0 System Coordinator Guide
Page 60

48 / Answering calls
1. Press
2. Press
ƒ••¤flfl‹››
¤‹fl›fl
(the default System Coordinator
.
password).
3. Press
≠
and enter the internal number of the
telephone you want to program.
4. Press
5. Press
6. Choose a setting at Handsfree: using the CHANGE
≠
‘
twice.
three times.
button.
There are three ways to set Handsfree for an individual
telephone:
Handsfree:None
CHANGE
Handsfree:Auto
CHANGE
Handsfree is not available to the telephone.
You can make or answer a call without
having to pick up the receiver or press
©
microphone and speaker turn on
automatically when you press a line or
intercom button to make or answer a call.
. The telephone’s internal
Handsfree:Std
CHANGE
For other displays, see “Common feature displays” on page 203.
A standard version of Handsfree described
“Using Handsfree/Mute” on page 45.
Both Auto and standard Handsfree allow you to use a headset
with a Norstar telephone.
A Handsfree/Mute button is automatically assigned to a
telephone that is programmed with Handsfree and is always
located in the lower right-hand corner of the telephone.
Modular ICS 4.0 System Coordinator Guide P0881591 Issue 01
Page 61

Answering calls / 49
Handsfree Answerback
Handsfree Answerback allows you to answer a voice call
without lifting the receiver. It is always turned off for an
M7100 telephone.
You can turn Handsfree Answerback on or off for a telephone
that is programmed to use Handsfree.
You need the programming template found at the front of this
guide. See “Getting started with Norstar” on page 1 for more
information.
1. Press
2. Press
ƒ••¤flfl‹››
¤‹fl›fl
(the default System Coordinator
.
password).
3. Press
≠
and enter the internal number of the
telephone you want to program.
4. Press
5. Press
≠
‘
twice.
four times.
6. Choose a setting (Yes or No) at HF answerback: using the
CHANGE
button.
Turning Privacy on or off for a call
ƒ°‹
Lines in your system can be configured to have automatic
privacy. If a line is not programmed with privacy, anyone with
the line assigned to their telephone can join your call by
pressing the line button. If a line is programmed with privacy,
only one person at a time can use the line.
Privacy control cannot be used on internal or conference calls.
P0881591 Issue 01 Modular ICS 4.0 System Coordinator Guide
Page 62

50 / Answering calls
When another telephone joins a call, the participants on the
call hear a tone, and a message appears on the Norstar display.
You cannot join a call without this tone being heard.
Creating a conference by releasing privacy
If a line is programmed with privacy, you can turn privacy off
to allow another person with the same line to join in your
conversation and form a conference. All the rules applicable to
a conference apply except there is only one line in use, instead
of the normal two. This means that you cannot split a
conference set up using Privacy.
1. Press
ƒ°‹
.
2. Tell the other person to press the line button and join your
conversation.
Only two Norstar telephones in addition to the external caller
can take part in this kind of conference.
Making a call private
If a line is programmed not to have privacy, you can turn
privacy on for a call, preventing other people with the same
line from joining your conversation.
Press
ƒ°‹
.
Checking call length using Call Duration Timer
ƒ‡‡
By pressing
spent on your last call, or how long you have been on your
present call.
Displays
221 02:47
ƒ‡‡
The display shows the last call you made, or
the current call, and the total elapsed time in
minutes and seconds.
, you can see how long you
Modular ICS 4.0 System Coordinator Guide P0881591 Issue 01
Page 63

Answering calls / 51
Line001 01:45
You parked your last call. The display shows
the length of time the call was parked. You
cannot see the length of time a call was
parked unless the call is active at your
telephone or has just been released by your
telephone.
Disconnecting by accident
If you accidentally drop the receiver back into the telephone
cradle while answering a call, you can quickly retrieve the call.
Pick up the receiver again or press
©
within one
second to be reconnected to your call.
Time
Press
ƒ°‚‹
while you are on a call.
to display the current date and time
P0881591 Issue 01 Modular ICS 4.0 System Coordinator Guide
Page 64

52 / Answering calls
Modular ICS 4.0 System Coordinator Guide P0881591 Issue 01
Page 65

Making calls
There are many ways to make a call, depending on the
programming and the type of call, as follows:
• Pick up the receiver and dial. The Norstar system supports
three methods of dialing. See “Changing how you dial
your calls” on page 57.
• Pick up the receiver, press a line button, and dial (if the call
is not on your prime line).
• Press
©
and dial (to talk without using the
receiver). See “Using Handsfree/Mute” on page 45.
• Press
©
, press a line button, and dial (to talk
without the receiver and if the call is not on your prime
line).
• Press a line button and dial (to talk without the receiver and
if Automatic Handsfree is assigned to your telephone).
• Use one of the features that make dialing easier. See “Time
savers for making calls” on page 63.
Displays
221 busy
PRIORITY LATER
9__
QUIT BKSP
95551234
TRANSFER
The telephone you have called has no
internal lines available. Press
the Ring Again or Message features or press
PRIORITY
You are dialing using Pre-dial. To erase an
incorrect digit, press the left end of
√
complete, select a line or lift the receiver.
This prompt remains on your display as long
as you are on a call you have dialed. To
transfer the call, press TRANSFER
to make a priority call.
or BKSP
. When the number is
LATER to use
.
P0881591 Issue 01 Modular ICS 4.0 System Coordinator Guide
Page 66

54 / Making calls
Already joined
Calling 221
PRIORITY LATER
Can't ring again
Do not disturb
PRIORITY LATER
Expensive route
Hidden number
Your telephone is already connected to the
telephone you are trying to call. Check your
active line buttons, and return to that call.
Wait for the telephone to be answered. If no
one answers, press LATER
Again (page 60) or Message (page 98)
feature, or press PRIORITY
call.
You cannot use Ring Again on your current
call. You can only use Ring Again while you
have a busy signal on an internal call or line
pool request or while an internal call is
ringing.
The telephone you are calling has Do Not
Disturb turned on. Press LATER
Ring Again or Messages features, or press
PRIORITY
You have dialed a number, but the least
expensive route that the system is
programmed to use is busy. Unless you
release the call, it goes through on a more
expensive route.
The last number you dialed or the number
you saved for Saved Number Redial was a
speed dial number that displayed a name
rather than the number. The number is dialed
correctly, but you cannot see it.
to make a priority call.
to use the Ring
to make a priority
to use the
Line denied
Line001
TRANSFER
No last number
No line selected
Modular ICS 4.0 System Coordinator Guide P0881591 Issue 01
You have attempted to use someone else’s
private line.
Enter the digits of the number you want to
dial.
You have not dialed an external telephone
number since the last power interruption or
system reset.
Either you have no prime line or your prime
line is busy. Select a line manually before
dialing.
Page 67

Making calls / 55
Not in service
On another call
LATER
Restricted call
Ring Again?
YES NO EXIT
Select a line
Send message?
YES NO
For other displays, see “Common feature displays” on page 203.
You have entered the number of a telephone
that is not in service.
The telephone you have called is on another
call. Press LATER
Message features.
The call you are trying to make has been
restricted in programming. A possible reason
is time-of-day restrictions on certain calls.
Press YES to use Ring Again. Press NO to
send a message. See “Sending messages”
on page 98 and “Turning on Ring Again” on
page 61.
Either you have no prime line, or the prime
line is in use, or the line programmed for an
autodial number, speed dial number, or
Hotline is in use. Select a line and dial again.
Press YES to send a message. See
Messages.
to use the Ring Again or
Choosing a line using a line button
You have one line button for each line assigned to your
telephone. Press the line button to select the line you want to
answer or use to make a call. Having several line buttons
allows you immediate access to more than one line.
The M7100 telephone has two intercom paths which are used
instead of line buttons to answer and make calls. Each M7100
can be assigned two lines. You can press
˙
to switch
between two calls, one active and one on hold.
Line pools
A line pool is a group of external lines that can be shared by
many telephones. You can use a line in a line pool to make an
external call.
P0881591 Issue 01 Modular ICS 4.0 System Coordinator Guide
Page 68

56 / Making calls
The Norstar Modular ICS system can have 15 line pools, and
a telephone can be programmed to access any number of them.
A line pool access code is a number you dial to get a line pool.
The access code can be up to four digits long. You can have
several different line pools for your system, each one giving
you access to a different set of external lines. It is one way of
sharing lines across telephones in a system.
Your installer or customer service representative programs the
line pool access codes and gives each telephone access to a
line pool.
Everyone in the office should have a list of the line pool access
codes for the line pools their telephones can use.
Using a line pool to make a call
ƒfl›
1. Press
ƒfl›
.
2. Enter a line pool access code.
If you have a free internal line, you can make a call using a line
pool without entering the feature code first.
1. Select an internal line (intercom).
2. Dial the line pool access code.
Tip -
If no lines are available in the line pool, you can use
Ring Again at the busy tone. You are notified when a line
in the line pool becomes available. See “Using Ring
Again” on page 60.
Programming a memory button with a line pool feature code
When you program a button with the line pool feature code,
you must enter a line pool access code after the feature code.
Modular ICS 4.0 System Coordinator Guide P0881591 Issue 01
Page 69

Making calls / 57
The programmed line pool button accesses a specific line pool,
not the line pool feature. See “Programming feature buttons”
on page 117 for more information.
If you program a button with an indicator to access a line pool,
when all the lines in a line pool are busy, the indicator for the
line pool button turns on. The indicator turns off when a line
becomes available.
Making calls from an ISDN terminal
ISDN terminals do not have line keys or intercom keys as do
Norstar telephones. To make an outgoing call from an ISDN
terminal, access an external line by entering a line pool code
or by using the ARS feature.
Changing how you dial your calls
ƒ•°¤
1. Press
2. Press £ or NEXT
3. Press
ƒ•°¤
until the dialing mode you want appears.
˙
or OK to select the displayed dialing
.
mode.
The dialing modes feature code cannot be programmed onto a
memory button.
Using Standard dial
Standard dial allows you to make a call by selecting a line and
dialing the number. If you have a prime line, it is selected
automatically when you lift the receiver or press
©
You cannot use Standard dial on an M7100 telephone unless
you pick up the receiver first. If you have an M7100 telephone,
use the Automatic dial or Pre-dial feature for on-hook dialing.
P0881591 Issue 01 Modular ICS 4.0 System Coordinator Guide
.
Page 70

58 / Making calls
Using Automatic dial
Automatic dial allows you to dial a number without selecting
a line. Your prime line is selected as soon as you start dialing
a number.
Automatic dial does not work if your telephone has no prime
line or if your prime line is in use.
Telephones connected to an analog terminal adapter (ATA)
cannot use Automatic dial.
Using Pre-dial
Pre-dial allows you to enter a telephone number, check it, then
change it before actually making the call. The call is not dialed
until you select a line or line pool, or pick up the receiver. You
can pre-dial both external and internal numbers. You must,
however, select the correct type of line (external or internal)
for the type of number you have entered.
Tip -
If your telephone starts ringing while you are
pre-dialing a number, you can stop the ringing by turning
on Do Not Disturb (
numbers you are entering.
You cannot pre-dial a telephone number if all the lines on
your telephone are busy.
ƒ°fi
). This does not affect
When the internal number you have called is busy
Priority Call
ƒfl·
If you get a busy signal or a Do Not Disturb message when you
call someone in your office, you can interrupt them. Use this
feature for urgent calls only.
Modular ICS 4.0 System Coordinator Guide P0881591 Issue 01
Page 71

Making calls / 59
Tip -
Priority calls cannot be made to Hunt Group DNs.
For more information on Hunt Groups see “Programming
Hunt Groups” on page 135.
Making a priority call
1. Press
ƒfl·
.
2. Wait for a connection, then speak.
A person who receives a priority call while on another call has
eight seconds to accept or block the call. For information on
blocking calls see “Stopping calls” on page 150. If the person
does nothing, the priority call feature puts their active call,
including conference parties, on Exclusive Hold and connects
your call.
Giving a telephone the ability to make priority calls
You need the programming template found at the front of this
guide. See “Getting started with Norstar” on page 1 for more
information.
1. Press
2. Press
ƒ••¤flfl‹››
¤‹fl›fl
(the default System Coordinator
.
password).
3. Press
≠
and enter the internal number of the
telephone you want to program.
4. Press
5. Press
≠
‘
twice.
nine times. The display shows Priority
call:.
6. Press CHANGE
P0881591 Issue 01 Modular ICS 4.0 System Coordinator Guide
to choose Y (Yes) or N (No)
Page 72

60 / Making calls
Displays
Call blocked
You tried to place a priority call to another
Norstar telephone. The person you called
has blocked your call. Try to call later.
Please wait
Priority denied
The party you are calling has eight seconds
to decide whether to accept or reject your
priority call.
The telephone you are calling has already
received a priority call or is unable to receive
priority calls.
You can make a priority call only while your telephone
displays:
221 busy
PRIORITY LATER
Calling 221
PRIORITY LATER
Do not disturb
PRIORITY LATER
On another call
PRIORITY LATER
Using Ring Again
ƒ¤
Use Ring Again when you call someone on your Norstar
system and their telephone is busy or there is no answer. Ring
Again can tell you when they hang up or next use their
telephone. You can use Ring Again to tell you when a busy
line pool becomes available.
Modular ICS 4.0 System Coordinator Guide P0881591 Issue 01
Page 73

Making calls / 61
Tip -
The Ring Again feature cannot be used when calling
a Hunt Group DN. For more information on Hunt Groups
see “Programming Hunt Groups” on page 135
Turning on Ring Again
ƒ¤
Press
ƒ¤
before you hang up.
Using Ring Again cancels any previous Ring Again requests
at your telephone.
Canceling Ring Again
ƒ£¤
Press
ƒ£¤
to cancel a Ring Again request.
Displays
Can't ring again
Ring Again?
YES NO EXIT
P0881591 Issue 01 Modular ICS 4.0 System Coordinator Guide
You cannot use Ring Again on your current
call. You can only use Ring Again while you
have a busy signal on an internal call or line
pool request, or while an internal call is
ringing.
Press YES to use Ring Again. Press NO if you
prefer to send a message.
Page 74

62 / Making calls
Modular ICS 4.0 System Coordinator Guide P0881591 Issue 01
Page 75

Time savers for making calls
Storing a number on a memory button for Autodial
You can program memory buttons for one-touch dialing of
internal or external telephone numbers.
Buttons used for lines, answer or Handsfree/Mute cannot be
used as autodial buttons.
If the power to your Norstar system is off for more than three
days, autodial numbers (as well as some other system
programming) may be lost from the memory.
Adding an autodial button
ƒ•⁄
or
ƒ•¤
1. Press
2. Choose a button and then enter the number as if you were
When programming Autodial you can use:
• Last Number Redial
• Saved Number Redial
• destination codes (choose
• host system signalling
Choosing a line for Autodial
To include a line selection for an external number, press the
line or intercom button before you enter the number. To select
a line pool, press a programmed line pool button, or press
∆
P0881591 Issue 01 Modular ICS 4.0 System Coordinator Guide
ƒ•⁄
ƒ•¤
dialing it.
and enter a line pool access code.
to program an external number or
for an internal number.
∆
as the line)
Page 76

64 / Time savers for making calls
If you select a line before pressing the autodial button, the call
goes out on the line you have selected instead of the line that
is part of the autodialer programming.
For the M7100 telephone, an external autodialer can be
programmed only by using a line and not a line pool.
Tip -
If you do not include a line selection in an autodial
number, the call uses your prime line (if you have one).
Using intercom as the line for Autodial
If you press
∆
as the line for an external autodial
number, you must include a valid line pool access code or a
destination code. If line pool access codes or destination codes
are changed, remember to reprogram autodial numbers.
Displays
987___
QUIT BKSP OK
Autodial full
Continue to enter digits until the number is
complete. Press
erase an incorrect digit. Press
OK
when you are finished.
The memory allotted to autodial numbers in
your Norstar system is full.
√
or BKSP
˙
to
or
Button erased
Enter digits
QUIT OK
Intercom #: ___
QUIT
Modular ICS 4.0 System Coordinator Guide P0881591 Issue 01
While programming external Autodial, you
erased the button by pressing
OK before entering any digits.
Enter the number you want to program
(choosing the line first if necessary) exactly
as if you were making a call.
Enter the internal telephone number you
want to program.
˙
or
Page 77

Time savers for making calls / 65
Invalid number
Press a button
QUIT
Program and HOLD
Program and OK
QUIT OK
Programmed
For other displays, see “Common feature displays” on page 203.
You are programming an internal autodial
button and have entered a number that is not
an internal number on your system. Enter a
valid internal number. If the number you are
entering is a destination code, use external
autodial.
Press the memory button you want to
program.
Enter the number you want to program onto
the button, then press
Enter the number you want to program onto
the button, then press
may include a line or line pool selection in an
autodial sequence by selecting the line
before entering any digits.
The number is stored on the button.
Using Last Number Redial
˙
˙
.
or OK
ƒfi
. You
Press
ƒfi
to redial the last external number you
dialed.
Last Number Redial records a maximum of 24 digits.
Tip -
If you have a programmed Last Number Redial
button, you can use Button Inquiry (
ƒ•‚
press the Last Number Redial button followed by £) to
check the last number before you dial it.
P0881591 Issue 01 Modular ICS 4.0 System Coordinator Guide
), then
Page 78

66 / Time savers for making calls
Preventing a telephone from using Last Number Redial
Last Number Redial can be restricted at individual telephones.
You need the programming template found at the front of this
guide. See “A map for working in programming” on page 7 for
more information.
1. Press
2. Press
ƒ••¤flfl‹››
¤‹fl›fl
(the default System Coordinator
password).
3. Press
≠
and enter the internal number of the
telephone you want to program.
4. Press
5. Press
≠
‘
.
three times. The display shows
Restrictions.
6. Press
7. Press
8. Press CHANGE
Displays
Hidden number
No last number
≠
‘
to choose Y (Yes) or N (No).
twice.
. The display shows Allow last no:.
The last number you dialed was a speed dial
number that displayed a name rather than
the number. The number is dialed correctly,
but you cannot see it.
You have not dialed an external telephone
number since the last power interruption or
system reset.
.
Tip -
You can copy a number onto an autodial button
using Last Number Redial.
Modular ICS 4.0 System Coordinator Guide P0881591 Issue 01
Page 79

Time savers for making calls / 67
Using Speed Dial
Norstar provides two types of speed dialing: system and
personal. System Speed Dial programming allows you to
assign two-digit speed dial codes to the external numbers your
co-workers call most frequently. Personal or User Speed Dial
programming allows individuals to program their own speed
dial numbers.
Speed dial numbers are subject to the same restriction filters as
regularly dialed numbers. Your installer or customer service
representative can program system speed dial numbers to
bypass dialing restrictions.
Speed dial numbers may include host system signaling codes.
Making a speed dial call
ƒ‚
1. Press
ƒ‚
to quickly dial external telephone
numbers that have been programmed onto speed dial
codes.
2. Enter the appropriate two-digit speed dial code.
Changing and adding System Speed Dials
System Speed Dial codes are numbered from 01 to 70. The
system coordinator assigns numbers to System Speed Dial
codes for the entire system. See “Adding or changing a system
speed dial” on page 17.
Tip -
There is no difference between using User Speed
Dial and using System Speed Dial. They differ only in how
you program them.
P0881591 Issue 01 Modular ICS 4.0 System Coordinator Guide
Page 80

68 / Time savers for making calls
Adding or changing User Speed Dial
To add or change a User Speed Dial number on your
telephone:
ƒ•›
1. Press
ƒ•›
.
2. Enter a two-digit code from 71 to 94 that you want to
associate with a telephone number.
3. To include a line selection for this number, press the line
or intercom button. To select a line pool, press a
programmed line pool button, or press
∆
and
enter a line pool access code. For the M7100 telephone,
you can select only a line pool.
4. Enter the number you want to program.
5. Press
Displays
01:9___
CANCL BKSP OK
Enter digits
QUIT OK
Invalid code
˙
.
or OK
Continue entering the number you want to
program. You can change the number by
pressing BKSP
finished, press
Enter the telephone number you want to
program exactly as if you were dialing it
normally. When you are finished, press
˙
You have entered a code outside the code
range (01-70 for system, 71-94 for personal).
or
or OK
√
˙
.
. When you are
or OK
.
No number stored
Modular ICS 4.0 System Coordinator Guide P0881591 Issue 01
There is no number stored on the speed dial
code you have dialed.
Page 81

Time savers for making calls / 69
Program and HOLD
Program and OK
QUIT OK
Select a line
Unknown number
For other displays, see “Common feature displays” on page 203.
If you want to program a line or line pool
selection for this speed dial number, select
the line or line pool. Otherwise, enter the
telephone number exactly as if you were
dialing it normally. When you are finished,
press
˙
If you want to program a line or line pool
selection for this speed dial number, select
the line or line pool. Otherwise, enter the
telephone number you want to program
exactly as if you were dialing it normally.
When you are finished, press OK
There is no line associated with the speed
dial number you are trying to use. Select a
free external line or line pool and enter the
speed dial feature code again.
The system cannot dial the number stored.
Reprogram the number.
Using Saved Number Redial
.
.
ƒfl‡
You can save the number of the external call you are on
(provided you dialed the call) so that you can call it again later.
Each telephone can save one number at a time with Saved
Number Redial, not one number for each line.
Tip -
You can copy a number onto an autodial button
using Saved Number Redial.
Saving a number
Press
ƒfl‡
while you are on the call.
Saved Number Redial records a maximum of 24 digits.
P0881591 Issue 01 Modular ICS 4.0 System Coordinator Guide
Page 82

70 / Time savers for making calls
Dialing a saved number
Press
ƒfl‡
when you are not on a call.
If you have a programmed Saved Number Redial button, you
can use Button Inquiry (
ƒ•‚
) to check the last
number before you dial it.
Preventing a telephone from using Saved Number Redial
Saved Number Redial can be restricted at individual
telephones.
You need the programming template found at the front of this
guide. See “A map for working in programming” on page 7 for
more information.
1. Press
2. Press
ƒ••¤flfl‹››
¤‹fl›fl
(the default System Coordinator
password).
3. Press
≠
and enter the internal number of the
telephone you want to program.
4. Press
5. Press
≠
‘
.
three times. The display shows
Restrictions.
6. Press
7. Press
≠
‘
twice.
twice. The display shows Allow saved
no:.
7. Press CHANGE
Displays
Hidden number
to choose Y (Yes) or N (No).
You have saved a speed dial number that
displays a name rather than the number. The
number is dialed correctly, but you cannot
see it.
.
Modular ICS 4.0 System Coordinator Guide P0881591 Issue 01
Page 83

Time savers for making calls / 71
No number saved
You have tried to save the number of an
incoming call. You can only save numbers
that you have dialed yourself.
P0881591 Issue 01 Modular ICS 4.0 System Coordinator Guide
Page 84

72 / Time savers for making calls
Modular ICS 4.0 System Coordinator Guide P0881591 Issue 01
Page 85

Handling many calls at once
Using Hold
You can temporarily suspend a call by pressing
When a call is on hold, its indicator flashes on all telephones
that have access to the line. The call can be retrieved from any
of these telephones.
˙
.
On the M7100 telephone,
˙
alternates between two
lines; one active, one on hold. The M7100 telephone cannot
retrieve a call placed on hold by another telephone.
Tip -
Answered Hunt Group calls can be placed on hold
at the answering Norstar set. For more information on
Hunt Groups see “Programming Hunt Groups” on page
135.
Retrieving a held call
You can connect to a call on hold by pressing the flashing line
button of the held call.
Holding automatically
If your line has been programmed with full autohold, you can
switch from one call to another and have your calls put on hold
automatically.
Press the line button of the caller you want to speak to. Your
current caller is put on hold automatically.
Listening on hold
If you have been put on hold, you can hang up the receiver
while you wait for the other person to return.
1. Press
P0881591 Issue 01 Modular ICS 4.0 System Coordinator Guide
˙
.
Page 86

74 / Handling many calls at once
2. Hang up the receiver.
3. Press the line button of the call. You may hear indications
from the far end that you are on hold (for example, tones
or music).
4. When the person you were talking to returns you hear them
through your telephone speaker. Lift the receiver and talk.
Tip -
If Automatic Handsfree has been assigned to your
telephone, you can use the Handsfree/Mute feature
instead of Listen on Hold.
Holding a call exclusively
ƒ‡·
You can put a call on Exclusive Hold so that it can be retrieved
only at your telephone.
Press
ƒ‡·
or
ƒ˙
. The line
appears busy on all other telephones, and the call cannot be
picked up by anyone else in the office.
Displays
On hold: LINENAM
You have placed one or more calls on hold.
The name of the line that has been held the
longest is displayed.
Using Call Queuing
ƒ°‚⁄
If you have more than one call ringing at your telephone, you
can choose the call that has the highest priority by pressing
ƒ°‚⁄
Call Queuing answers incoming external calls before callback,
camped, and transferred calls.
Modular ICS 4.0 System Coordinator Guide P0881591 Issue 01
.
Page 87

Transferring calls
Using the transfer feature
ƒ‡‚
Transfer allows you to direct a call to a telephone in your
Norstar system, within the Norstar network, or external to
Norstar.
Transferring a call
1. Press
2. Call the person to whom you want to transfer the call.
3. If you want to talk to the person to whom you are
ƒ‡‚
.
transferring the call, wait for them to answer, and speak to
them before proceeding.
4. When you are ready to complete the transfer, press
®
or JOIN.
You cannot use Last Number Redial, Saved Number Redial, a
speed dial code, Priority Call or Ring Again to dial the number
for a transfer.
Depending on how a private network call is routed, it may not
always be possible for the system to return a transferred call to
you if the transferred call is not answered. When transferring
a call to a private network destination, stay on the line until the
person to whom you are transferring the call answers.
You cannot use the Line Pool feature code to access a line pool
for a transfer. To use a line pool, use a programmed line pool
button, or press
P0881591 Issue 01 Modular ICS 4.0 System Coordinator Guide
∆
and enter a line pool access code.
Page 88

76 / Transferring calls
If you have an auxiliary ringer programmed to ring for calls on
an external line, and you transfer a call on that line without
announcing the transfer, the auxiliary ringer rings for the
transferred call.
Transferring external calls
If an external call is transferred to a busy telephone, or not
answered after a few rings, the call automatically rings again
at the telephone from which it was transferred, and the display
indicates that the telephone was busy or that no one answered.
When transferring an external call to an external number, the
external call you are trying to transfer must be an incoming
call on a disconnect supervised line.
While on a conference call, you can remove yourself from the
conference and connect the other two callers using the
Transfer feature. However, if both of the other people are from
outside the system, at least one of the outside callers must have
called you and both of the outside calls must be on disconnect
supervision lines.
Note: Transfer via Hold on DID lines is not supported. Once
a call is answered the line appearances on all other sets
are free immediately to take other calls. This allows a
greater number of calls to be received. Use the Call Park
feature to transfer a call.
In certain situations, you may experience lower volume levels
when transferring an external call to an external person, or
when transferring two external callers from a conference call.
Canceling a transfer
You can reconnect to the person you are trying to transfer at
any time before the transfer is complete.
1. Press
Modular ICS 4.0 System Coordinator Guide P0881591 Issue 01
ƒ£‡‚
or CANCL
.
Page 89

Transferring calls / 77
2. If you are not reconnected to your original call, press
and then press the line key of the original call, which is
now on hold.
Displays
221>222
CANCL RETRY JOIN
221 no reply
CALLBACK
Do not disturb
CANCL RETRY JOIN
Invalid number
CANCL RETRY
You are talking to the person you want to
transfer the call to. Press RETRY
to transfer the call to someone else. Press
®
or JOIN
The person to whom you tried to transfer a
call did not answer. Press CALLBACK
flashing line button to reconnect to the call.
On the M7100 telephone, lift the receiver.
The person to whom you tried to transfer a
call has Do Not Disturb active on their
telephone. Press JOIN
anyway. Press RETRY
someone else. Press CANCL
line button to reconnect to the call (on the
M7100 telephone, press
ƒ£‡‚
You entered an invalid internal number.
Press RETRY
to transfer the call.
to transfer the call
to transfer the call to
).
and enter the number again.
if you decide
or the
or the flashing
®
Line001 hung up
Line001>221
CANCL RETRY JOIN
Not in service
CANCL RETRY
Restricted call
CANCL RETRY
Still in trnsfer
CANCL RETRY
P0881591 Issue 01 Modular ICS 4.0 System Coordinator Guide
The external caller you were transferring
hung up before the transfer was complete.
Press JOIN to transfer the call on line 001 to
telephone 221. Press RETRY
the person at extension 221, you decide to
transfer the call to someone else.
The telephone to which you are trying to
transfer a call is out of service.
You cannot transfer the call because of
telephone or line restrictions.
Complete the transfer in progress before you
access a new feature, answer another
alerting call or select an outgoing line.
if, after talking to
Page 90

78 / Transferring calls
Transfer denied
CANCL RETRY
Transfer to:2___
CANCL RETRY
For other displays, see “Common feature displays” on page 203.
Your transfer cannot be completed for one of
these reasons:
• All the resources needed to perform a
transfer are in use. Try again later.
• You have tried to transfer an external
call to another external party. Some
restrictions apply.
• You cannot transfer your conference
call.
Press RETRY if you entered the wrong internal
number or if the person to whom you are
transferring the call is unavailable.
Using Camp-on
ƒ°¤
You can transfer an external call to another telephone, even if
all of its lines are busy.
1. Press
2. Dial the number of the telephone you want to camp the call
ƒ°¤
to.
.
Camped calls appear on a line button on the receiving
telephone, if one is available. If there is no line button
available, you receive a message on the display and hear Camp
tones.
Each Norstar telephone can handle only one camped call at a
time.
Displays
221 Camp max
CALLBACK
Modular ICS 4.0 System Coordinator Guide P0881591 Issue 01
You tried to camp a call to a telephone that
already has a camped call. The call has
come back to you. Press the CALLBACK
or the line button to reconnect to the call. On
the M7100 telephone, just pick up the
receiver.
button
Page 91

Transferring calls / 79
221 DND
CALLBACK
Camp denied
Camp to:
CANCL
Camped: 221
CALLBACK
Line001 hung up
Not in service
CALLBACK
The person to whom you redirected a call
has Do Not Disturb active on the telephone.
The call has come back to you. Press the
CALLBACK
reconnect to the call. On the M7100
telephone, just pick up the receiver.
You have tried to camp an internal call. You
can only camp external calls.
Dial the number of the internal telephone to
which the call is sent.
The telephone to which you camped a call
did not answer the call. The call has come
back to you. Press CALLBACK
button to reconnect to the call. On the M7100
telephone, just pick up the receiver.
A call you camped has come back to you, but
the caller hung up before you could
reconnect.
The telephone to which you have camped a
call is out of service or is being used for
programming. The call has come back to
you. Press CALLBACK
reconnect to the call. On the M7100
telephone, just pick up the receiver.
button or the line button to
or the line
or the line button to
Release a call
For other displays, see “Common feature displays” on page 203.
The line that the camped call is on is in use
or that line does not appear at your
telephone. Release the line or release an
internal line.
Parking a call
ƒ‡›
You can suspend a call so that it can be retrieved from any
telephone in your system.
1. Press
P0881591 Issue 01 Modular ICS 4.0 System Coordinator Guide
ƒ‡›
.
Page 92

80 / Transferring calls
2. Use the Page feature (
ƒfl‚
) or press PAGE to
announce the retrieval code displayed by your telephone.
Retrieving a parked call
1. Select an internal line. (On the M7100 telephone, pick up
the receiver.)
2. Dial the Call Park retrieval code.
Using Call Park
When you park a call, the system assigns one of 25 codes for
the retrieval of the call. These codes consist of the Call Park
prefix, which may be any digit from 1 to 9, and a two-digit call
number between 01 and 25. For example, if the Call Park
prefix is 1, the first parked call is assigned Call Park retrieval
code 101.
The Norstar system assigns Call Park codes in sequence, from
the lowest to the highest, until all the codes are used. This
round-robin approach means that a greater variety of codes are
used, which makes it easier for a call to reach the right person
when more than one incoming call is parked.
The highest call number (the Call Park prefix followed by 25)
is used only by analog telephones or devices connected to the
system using an analog terminal adapter (ATA) or an Analog
Station Module (ASM). Analog telephones or devices cannot
use the other Call Park codes.
Your installer or customer service representative programs
both the Call Park prefix and the delay before parked calls are
returned to the originating telephone. External calls parked for
longer than the programmed delay are returned to your
telephone.
Modular ICS 4.0 System Coordinator Guide P0881591 Issue 01
Page 93

Transferring calls / 81
Tip -
Answered Hunt Group calls are parked in the same
manner as other calls. For more information on Hunt
Groups see “Programming Hunt Groups” on page 135.
Call Park can be disabled by your installer or customer service
representative.
Displays
Already parked
The person you were talking to has already
parked your call. You cannot park the same
call.
No call to park
Invalid number
No call on: 101
Park denied
Parked on: 402
PAGE EXIT
Parking full
For other displays, see “Common feature displays” on page 203.
You have attempted to use Call Park with no
active call on your telephone. If the call you
want to park is on hold, reconnect to it before
you park it.
You have entered an invalid retrieval code.
There was no call on the retrieval code you
entered.
You have tried to park a conference call. Split
the conference and park the calls separately.
The person who retrieves the calls can
reconnect the conference.
Record the code shown. Use Page
(
ƒfl‚
the call and its retrieval code.
All available retrieval codes are in use.
Transfer the call or take a message instead.
) or press PAGE
to announce
P0881591 Issue 01 Modular ICS 4.0 System Coordinator Guide
Page 94

82 / Transferring calls
Using Callback
When you direct a call you have answered to another
telephone, the system monitors the call to make sure it is
answered. If no one answers the call within a set length of
time, the system directs it back to you.
Callback generates a variety of displays. Most occur after a set
delay and are listed in the index. Some occur immediately if
the telephone to which you are directing a call is out of service
or otherwise unavailable. These are listed with the descriptions
of the specific features such as Transfer or Camp-on.
Modular ICS 4.0 System Coordinator Guide P0881591 Issue 01
Page 95

Forwarding your calls
Forwarding your calls to another Norstar telephone
ƒ›
Press
ƒ›
telephone to which you want your calls forwarded.
Use Line Redirection to forward calls outside the system. Line
redirection takes precedence over Call Forward.
Canceling Call Forward
Press
ƒ£›
Using Call Forward at your telephone
When you use
you select, regardless of how Forward on busy and Forward no
answer are programmed.
Tip -
If your Norstar set is a member of a Hunt Group, the
Call Forward all calls setting is overridden by the Hunt
Group routing for Hunt Group calls. For more information
on Hunt Groups see “Programming Hunt Groups” on page
135.
and enter the number of the internal
.
ƒ›
, all calls go to the destination
If the telephone to which you forwarded your calls does not
have the same external lines as your telephone, the forwarded
calls appear on intercom buttons.
If a call is forwarded, it does not ring but the line indicator
flashes on your telephone. You can answer the call by pressing
the button next to the flashing indicator.
P0881591 Issue 01 Modular ICS 4.0 System Coordinator Guide
Page 96

84 / Forwarding your calls
Tip -
If you are one of a group of people who regularly
forward their calls to one another, be aware that it is
possible to set up forward loops where a call is forwarded
from one telephone to another in a circle, and is never
answered anywhere.
Overriding Call Forward
If you call someone who has their calls forwarded to you, your
call rings at that person’s telephone even though they are
forwarding their calls to you.
Changing the automatic Call Forward settings for a telephone
Call forwarding occurs automatically when a call is not
answered or the line is busy. These automatic options are
changed in programming.
For step-by-step instructions, see “Change where a call goes
when there is no answer” on page 23.
Changing Forward no answer
Forward no answer redirects unanswered calls to another
telephone on your Norstar system.
Tip -
If the Norstar set is a member of a Hunt Group, the
Call Forward no answer feature is overridden and the
Hunt Group call continues to ring until the hunt time has
expired. For more information on Hunt Groups see
“Programming Hunt Groups” on page 135.
Line Redirection takes precedence over Forward no answer.
Modular ICS 4.0 System Coordinator Guide P0881591 Issue 01
Page 97

Forwarding your calls / 85
For step-by-step instructions for changing Forward no answer
see “Change where a call goes when there is no answer” on
page 23.
Changing the delay before a call is forwarded
You can assign the number of times that the incoming call
rings at your telephone before the call is forwarded. To
estimate the delay time in seconds, multiply the number of
rings by six.
For step-by-step instructions, see “Change the number of
times the telephone rings before it is forwarded” on page 24.
Forward on busy
Forward on busy redirects your calls to another telephone on
your Norstar system when you are busy on a call, or when you
have Do Not Disturb activated at your telephone. For step-bystep instructions, see “Making changes to Call Forward on
Busy” on page 25.
Line Redirection takes precedence over Forward on busy.
Calls that are redirected by Line Redirection are not affected
by any Call Forward features or Call Forward programming.
Telephones that have Forward on busy active can receive
priority calls. If you are busy on a target line call, another call
to that target line is redirected to the prime telephone for that
target line.
Tip -
If the Norstar set is a member of a Hunt Group, the
Call Forward on busy feature is overridden and the Hunt
Group call continues to ring until the hunt time has
expired. For more information on Hunt Groups see
“Programming Hunt Groups” on page 135.
P0881591 Issue 01 Modular ICS 4.0 System Coordinator Guide
Page 98

86 / Forwarding your calls
DND on Busy
When you are busy on a call and a second call comes in, your
telephone rings softly to alert you to the second call. If you
find this second ring distracting, you can have the system
prevent a second call from disturbing you by assigning Do Not
Disturb (DND) on Busy to your extension.
When DND on Busy is turned on for the set, internal and
private network callers hear a busy tone instead of ringing
when you are on the telephone. External callers are transferred
to the prime set used in your system. For step-by-step
instructions, see “Making Changes to Do Not Disturb on
Busy” on page 26.
If you use DND on Busy, the line indicator for an external
incoming call flashes, but your telephone does not ring.
Forward on busy takes priority over DND on Busy.
If an external call uses a target line, the call is processed
according to the programming of the target line. If the target
line is busy, the caller may hear a busy tone or be routed to the
prime set for the target line regardless of the DND on Busy
programming for the telephone.
Tip -
If a Norstar set is a member of a Hunt Group and the
set activates this feature, the set does not receive
notification of incoming Hunt Group calls while on a call.
The DND on busy feature overrides the Hunt Group. For
more information on Hunt Groups see “Programming Hunt
Groups” on page 135.
Modular ICS 4.0 System Coordinator Guide P0881591 Issue 01
Page 99

Forwarding your calls / 87
Call Forward and Voice Mail
If you want a voice mail system to pick up unanswered calls
automatically
• use the internal number of your voice mail as the
destination when you program Forward no Answer and
Forward on busy
or
• make the ring delay greater than the delay used by your
voice mail system, if your voice messaging system or
service automatically retrieves calls
Displays
Forward denied
There are several reasons why you may get
this message. For instance, you cannot
forward your calls to a telephone that has
been forwarded to your telephone.
Forward>221
CANCL
Not in service
For other displays, see “Common feature displays” on page 203.
Your calls are being forwarded to telephone
221.
Two or more telephones are linked in a
forwarding chain, and one of them is out of
service or is being used for programming.
Line Redirection
Line Redirection allows you to send your external calls to a
telephone outside the office. You may choose to redirect all
your external lines or only some of them.
Line Redirection takes precedence over the Call Forward
feature. If both features are active on a set, incoming external
calls on redirected lines are routed to the specified Selective
Line Redirection (SLR) external destination. Incoming
internal calls are forwarded to the specified Call Forward
destination.
P0881591 Issue 01 Modular ICS 4.0 System Coordinator Guide
Page 100

88 / Forwarding your calls
You cannot use the Line Redirection feature on either an
M7100 telephone or a telephone connected to an ATA.
Turning on Line Redirection
ƒ°›
1. Press
ƒ°›
.
2. Select the outgoing line to be used for redirected calls.
3. Enter the number to which calls are redirected (the ways
you can do this are listed below).
4. Select the lines to be redirected.
Enter the telephone number to which you want to redirect
calls, using one of the following methods:
• Press an external autodial button.
• Enter an external telephone number (using no more than
24 digits) then press
• Press
˙
˙
or OK if the line you have chosen as the
or OK
.
outgoing line is a private network line that does not require
you to dial digits.
If you use ALL
to redirect all your lines, it is important that you
wait until all the lines on your telephone light up before
pressing
˙
. If you press
or OK
˙
or OK
before all the lines light up, those lines not lit are not
redirected.
Modular ICS 4.0 System Coordinator Guide P0881591 Issue 01
 Loading...