

Page 1
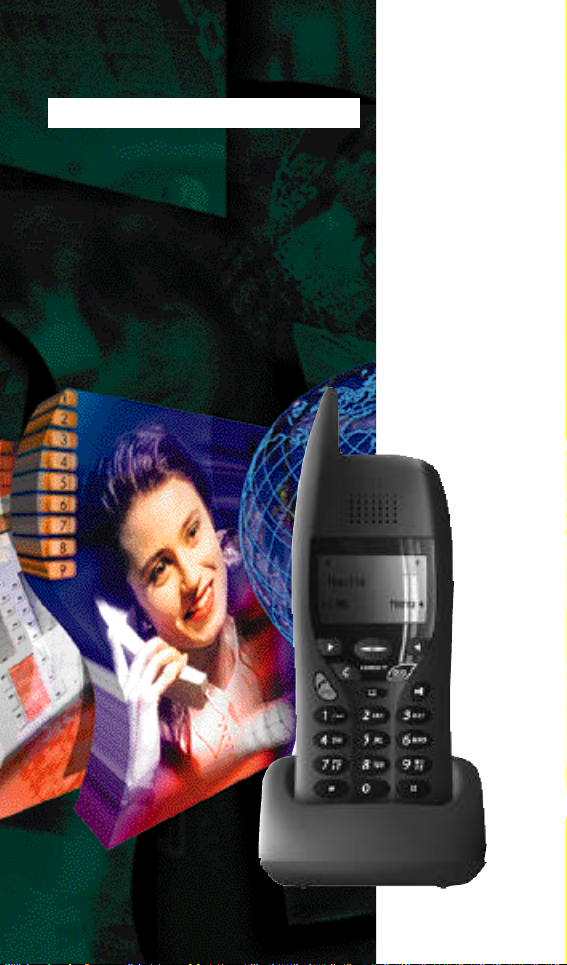
USER GUIDE
M
900
M 901
M 902
Page 2

C O N T E N T S
• About your phone 4
• Installing the battery 5
• Features of the mobile 6 / 7
• Belt clip 8
• The mobile’s display 9
• Icons on the display 1 0
• Menu functions 1 1
• Making a call 1 2 / 1 3
• During a call 1 4
• Answering a call 1 5
• Directory 1 6 / 1 7 / 1 8
Storing - Consulting Changing or deleting - Calling
• Personalizing your handset 1 9 / … / 2 3
Ring volume – melody Handset name - Key sound
Headset - Automatic answer
Vibrator - Backlight
Speed key - Range test
Ambiance - Declare base
• Selecting a base 2 3
• Selecting a language 2 4
• Locking the keypad 2 4
• Switching off the mobile 2 4
• B a t t e r y 2 5
• Wall mounting of the charger 2 5
• Advice and safety 26
PAGE 3
Page 3

ABOUT YOUR PHONE
This mobile has been provided for your
use by your telephone system administrator.
You have a M 900*, a M 901 or
a M 902* (See specific functions p. 21).
Your administrator will give you a personal phone number and will tell you which
system features you can access.
Your phone number:
Your mobile is based on DECT digital
transmission technology, which guarantees excellent audio quality without any
background noise, while ensuring total
confidentiality.
To get the most out of your handset, please read this user guide carefully.
This package contains:
• The present user guide
• A mobile with battery
• A battery
• A battery charger
• A power lead with transformer
• A belt clip kit
Upkeep
Clean your phone using a soft cloth
slightly moistened with a mild soap and
water solution and then wipe it with a dry
cloth. Do not use solvents or household
detergents, as they can damage the surface. You should regularly clean the metal
charge pins on the battery charger and the
mobile using a soft cloth moistened with
alcohol.
* Subject to country availability.
PAGE 4
Page 4
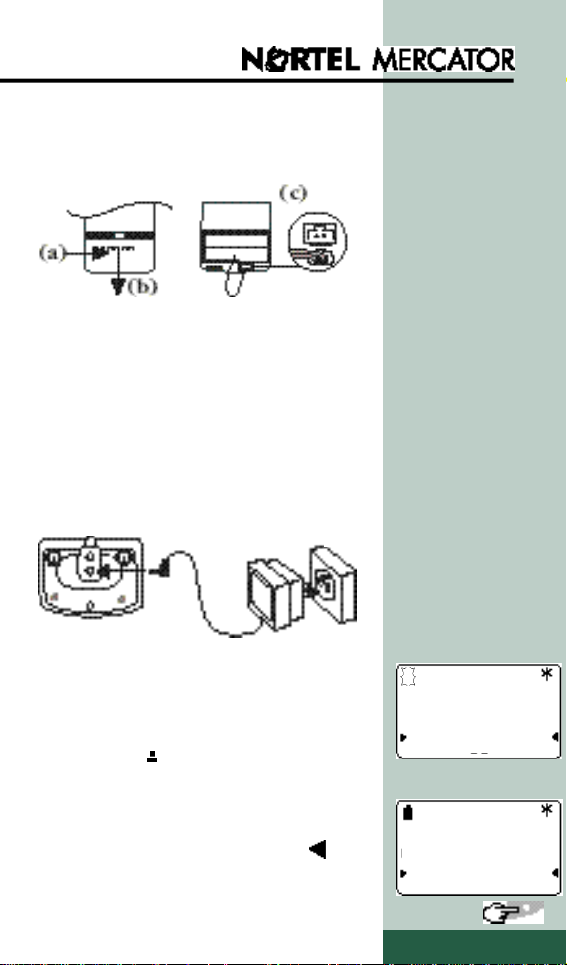
I N S TALLING THE BAT T E RY
1• Connect the battery:
- Open the cover: press (a) then pull (b).
- Insert the battery (connector wires exit
on top).
- Connect the battery to the connector (c).
- Replace the cover.
2• Connect the transformer to the
charger. Plug the transformer into a
mains socket.
*
3• Place the mobile in the charger and
leave it to charge. Before using the
mobile for the first time leave it to charge
for at least 12 hours (see p. 25). The
battery icon on the display flashes.
* See ADVICE
AND SAFETY
p .2 6
Mobile
LNR Menu
4• Once the battery is completely
charged, you can select a language
from the scrolling list: press Yes ,
when «English» is displayed, for
example.
Language
English?
No Yes
PAGE 5
Page 5
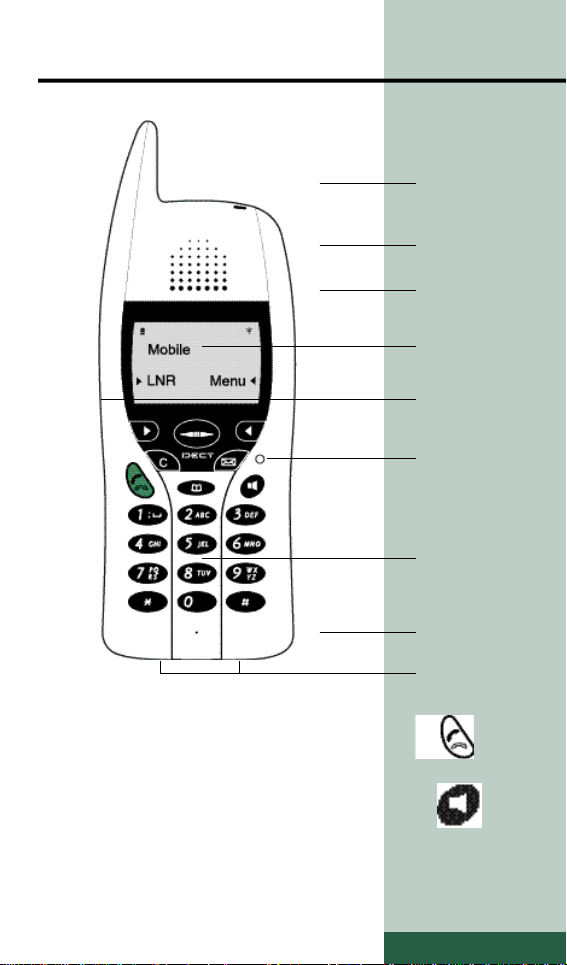
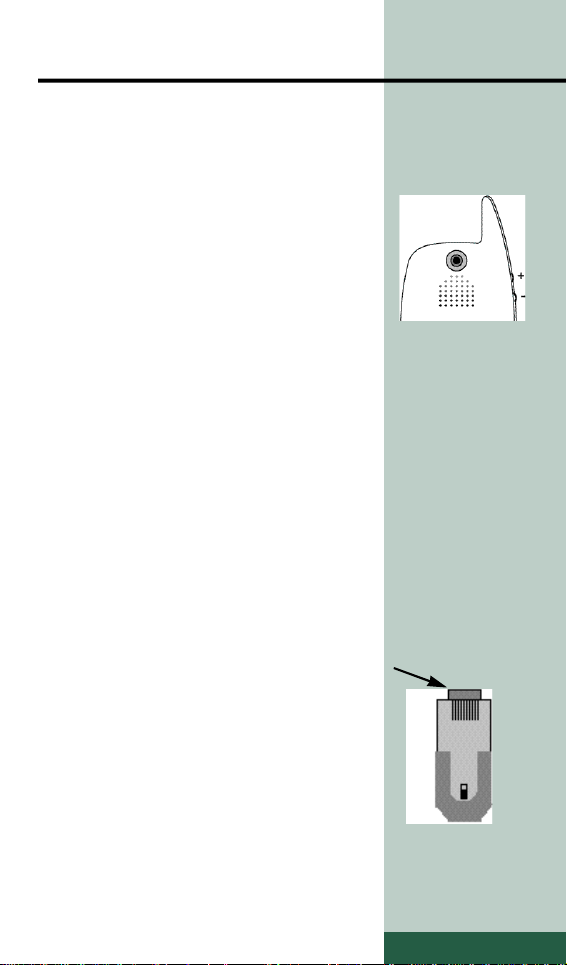
F E ATURES OF THE MOBILE
Receiver and
loudspeaker
volume
(side)
Receiver
Loudspeaker
(rear)
Display
Headset
connector
(side for M 901
and M 902*)
Reset button
Numeric
keypad
Microphone
Charge pins
• Press this key to place a call, hang up
or answer a call.
• Press this key during a call to activate
Hands Free mode: you can continue
talking within about 50 cm of your
mobile which must be positioned
upright or face down on a table. To cancel Hands Free mode and return to discrete mode, press the same key again.
PAGE 6
Page 6
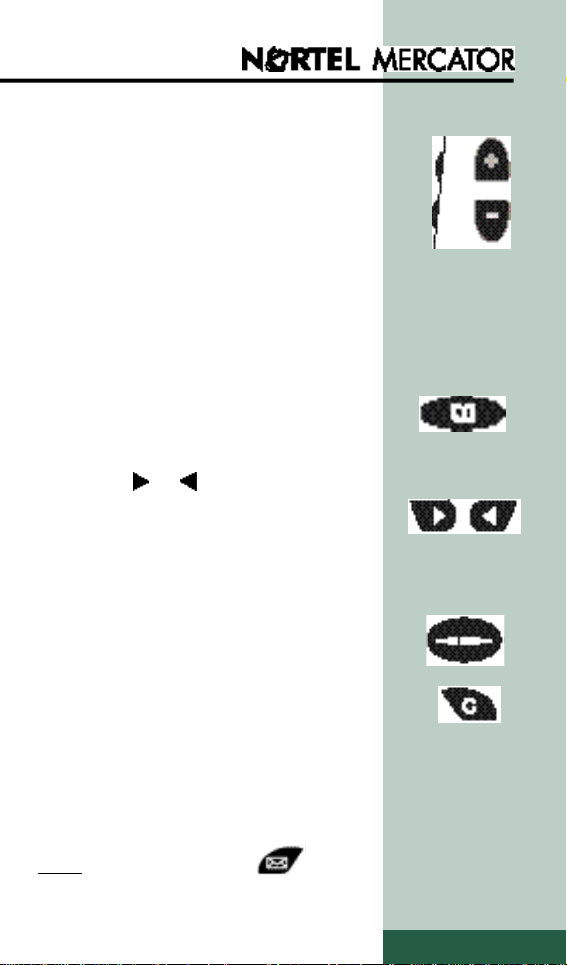
• When you receive a call, press this key
to stop the sound ringer and/or the
vibrator.
During a call, press this key to adjust:
- the receiver volume during a normal
call,
- the loudspeaker volume in Hands Free
mode.
• Press this key to enter, delete, consult
and call numbers stored in your directory.
• When the or arrows appears on
the display, press one of these scrollkeys to confirm the function or choi-
ce shown.
• Use these keys to browse the menu.
• Press this key to turn the mobile on or
off and to lock the keypad.
You can also use this key to exit a
menu.
Note: on these models, the key
is not used.
PAGE 7
Page 7
B E LT CLIP
Mounting instructions
Firstly, clean all surfaces using a cloth
moistened with alcohol.
1 • Remove the adhesive protection and
place it on the rear tab.
2• Position the tab on the mark on the
rear of the mobile above the loudspeaker
holes. Press firmly.
Leave the tab on the mobile for 72 hours
before use.
Instructions for use
The clip is used to attach the mobile to
your belt.
1 • Slide the tab into the clip to attach the
mobile.
Caution: the mobile must not be wedged against your chair when you are
seated.
2 • To remove the mobile, press the
upper part of the clip and slide the mobile
upwards.
PAGE 8
Page 8
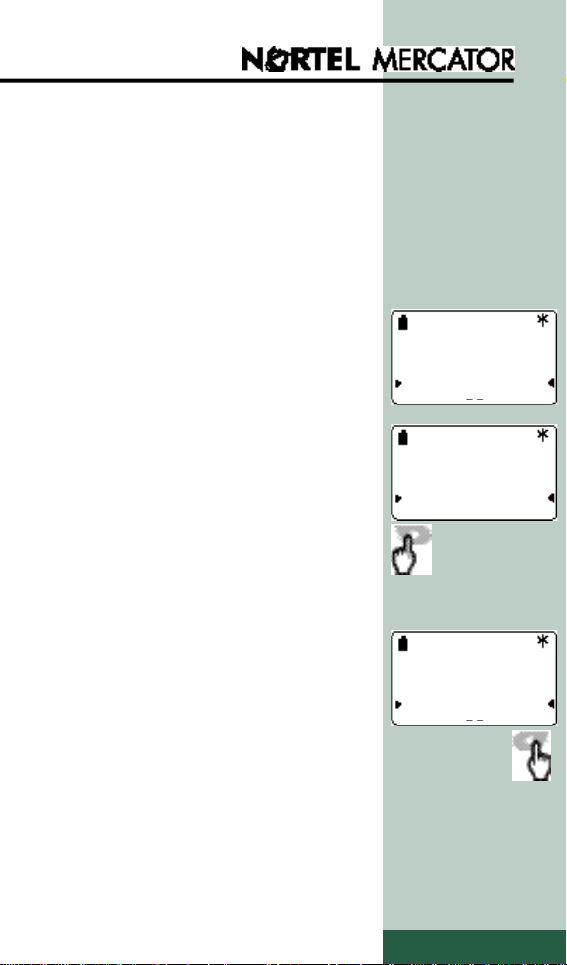
THE MOBILE’S DISPLAY
The mobile screen displays short
information and status messages.
The display has three12-characters lines,
a 2-digit counter and a set of icons at
various positions on the screen.
In the example opposite:
- the mobile is idle.
- the battery is fully charged.
- the signal strength is adequate.
• You can access LNR via the Speed
key.
This programmable key enables you to
provide direct acces to an emergency
number or an other menu function
(see on page 22).
By default, this key is assigned to the
Last Number Redial function.
Mobile
LNR Menu
Mobile
LNR Menu
• You can also access the Main Menu
(see on page 11).
Mobile
LNR Menu
PAGE 9
Page 9

ICONS ON THE DISPLAY
• This icon indicates the battery charge
level. It is divided into three segments,
corresponding to three charge levels.
Each segment represents approximately
one third of the total battery charge
level. The icon flashes when the mobile
is placed in the charger to indicate that it
is charging.
• This icon indicates that the ringer has
been deactivated.
• This icon indicates that the signal
strength is adequate. The message “Out
of range” means that you are outside the
coverage area.
• This icon on the 3rd line on the bottom
right of the display indicates that the
function shown on this line can be activated by pressing the key.
• This icon on the 2nd or 3rd line on the
left of the display indicates that the
function shown on these lines concerned
can be activated by pressing
the key.
• This icon indicates that you can press
the corresponding scroll key to
access another
menu or to program a function.
• This icon indicates that the keypad is
locked.
• This 2-digit counter indicates the entry
from the directory or the number of
menu for direct access to it.
PAGE 10
Page 10

MENU FUNCTIONS
PAGE 11
Page 11

MAKING A CALL
Direct dialing
• 1 – Press
• 2 – Dial the number you wish to call
Direct dialing in Hands Free mode
• 1 – Press .
• 2 – Dial the number you wish to call.
Once connected you can talk in Hands
Free mode (within 50 cm of the mobile).
Phone number
Phone number
XXXXXX
• To switch to discrete mode and cancel
Hands Free mode:
- press again.
• To return to Hands Free mode:
- presss .
P r e d i a l i n g
• 1 - Dial the number on the keypad.
• Press Pause within 2 seconds
to program a pause after the line
seizure prefix.
• After 3 seconds, the following option
appears: Erase to delete the last
digit if incorrect.
• 2 - Press Call to initiate the call.
Line seizure occurs and the number is
dialed automatically.
Mute R
Phone number
XXXXXX
Pause Call
XXXXXX
Erase Call
PAGE 12
Page 12

MAKING A CALL
Using the Last Number Redial
f u n c t i o n
The last 5 numbers called are stored and
you can automatically recall any of
them.
Note:
You can also access this function by
pressing the Speed key which is assigned
to the Last Number Redial function by
default (see p.9 and p.22).
• 1 – Press Menu
• 2 – Press Last numbers to dis-
play the last number dialed.
• To display the others last numbers:
- press .
• 3 – Select the last number you wish to
recall.
Line seizure occurs and the number is
dialed automatically.
Mobile
LNR Menu
Main Menu
Personalise
Last numbers
24
MENU
Last numbers
Delete
Last number 1
• To delete all the numbers stored by the
LNR function:
- press Delete and then Yes .
Note: In this case, when you press
Last numbers , «No Number» is
displayed.
No
Number
PAGE 13
Page 13

DURING A CALL
Adjusting the receiver or loudspeaker volume
• Press the keys on the side of the
mobile.
- If the loudspeaker is on, the loudspeaker volume is adjusted (2 levels)
- If the loudspeaker is off, the receiver
volume is adjusted (5 levels).
Note:
Beeps indicate the highest and lowest
levels.
Mute function
• 1 - Press Mute to mute the
microphone and to talk aside.
• 2 - Press Unmute to reactivate the
microphone.
02 Mn 25 s
XXXXXX
Mute R
Three-party conference calls
Firstly, set up a call with the first
conference member.
• 1 - Press R to place your first
conference member on hold.
• 2 - Dial the second number.
• 3 - Press R and then key 3 to set up
the three-party conference call.
• If the second number does not answer,
- press R and then key 1 to return to
the first conference member.
R
Mute R
PAGE 14
Page 14

ANSWERING A CALL
• To answer the call when the mobile
rings:
- press
or
- press .
Note:
When the mobile rings, you can stop the
sound ringer (and the vibrator if activated) by pressing key on the side of the
mobile. You can then decide whether to
answer the call.
At the end of a call
• Press .
Note:
When you hang up, the display briefly
shows the call duration.
- Press Ok to clear this display.
Call
Duration
02 Mn 25 s
Ok
PAGE 15
Page 15

D I R E C T O RY
You can store the numbers (and names)
you call most often.
Each mobile has a personal directory for
storing up to 20 numbers.
Storing a number
• 1 - Press .
• 2 - Press Add .
The display shows the first unused
memory location.
Note:
You can select a different memory
location:
- Memories 0 to 9: enter the digit
directly on the keypad
- Memories *0 to *9: press
before entering the digit.
• 3 - Press Ok .
• 4 - Enter the telephone number you
wish to store:
• To program an R (flashing) before
the number,
- select R.
• To program a pause after the external
line seizure prefix (e.g. 0),
- select Pause after entering the
prefix (within 2 seconds).
• If you enter an incorrect digit:
- press Erase or select the digit to
be replaced and enter the corect digit.
Private dir.
Search
Choose mem
0 to 9 : 1
Choose mem
*0 to *9 :* 1
MEM
1
Enter number
R Ok
MEM
1
Enter number
0
PAUSE Ok
MEM
1
Enter number
XXXXXXXXXX
Erase Ok
PAGE 16
Add
Ok
Ok
Page 16

D I R E C T O RY
• 5 - Select Ok once you have ente-
red the complete telephone number.
The display then prompts you to enter
a name (optional).
You can confirm the number entered
without entering a name by pressing
Ok or follow the instructions given
bellow.
• 6 - Enter the name using the correspon-
ding letters on the keys.
To do this:
- Select the letter required by pressing
on the appropriate key as many times
as is necessary until the letter appears.
- Wait (approx. 3 seconds) until the
cursor shifts to the next space before
entering another letter on the same key,
or press another key without waiting.
• If you enter an incorrect character,
- press Erase or use to
select the character to be replaced,
and enter the correct character.
• 7 - Press Ok to confirm.
You can then store another telephone
number.
MEM
1
Enter name
1 = -/space
2 = ABC
3 = DEF
4 = GHI
5 = JKL
6 = MNO
7 = PQRS
8 = TUV
9 = WXYZ
MEM
1
Enter name
JONES
Erase Ok
Private dir.
Search
Ok
Add
PAGE 17
Page 17

D I R E C T O RY
C o n s u l t i n g
• 1 - Press .
• 2 - Press Search.
The first two names in the directory
are displayed.
• 3 - Use to consult the names and
numbers stored in your directory.
• 4 - Select the name (or number) you
wish to change or call.
Note:
To acces a directory number quickly:
- Press and enter the memory
number directly on the keypad
(0 to 9 or 0 to 9).
Private dir.
JONES
MEM
1
JONES
Change
GSM
Call
Changing or deleting an entry
- Press Change and then change
the name or number as required.
• To change only the name:
- select Ok when the number is dis-
played.
• After changing the name:
- select Ok to confirm.
• To delete a memory:
- press and hold Erase and then
press Yes .
Calling a directory number
- Press Call to call the number or
name displayed.
Line seizure occurs and the number is
dialed automatically.
MEM
1
Change no
XXXXXXXXXX
Erase Ok
MEM
1
Change name
JONES
Erase Ok
PAGE 18
Page 18

PERSONALIZING
YOUR HANDSET
The following functions are used to personalize your mobile:
You can also access these functions by
selecting Menu and then entering
a specific code. The table below shows
the corresponding function codes:
PAGE 19
Page 19

PERSONALIZING
YOUR HANDSET
Ring volume
• 1 - Press Ring volume.
• 2 - Select a volume level from 1 to 4
using or the keypad.
• To deactivate the ringer:
- Select 0.
(the icon is displayed as
a reminder)
• 3 - Press Ok to confirm.
M e l o d y
• 1 - Press Melody .
• 2 - Select a melody from 1 to 6.
• 3 - Press Ok to confirm.
87
MENU
Ring volume
0 1 2 3 4
63
MENU
Melody
1 2 3 4 5 6
Ok
Ok
Handset name
This function enables you to change the
default name of your mobile («Mobile»)
and assign it another name.
• 1 - Press Handset name.
• 2 - Enter, for example, your surname
(10 characters maximum) in the same
way as when entering a name in the
directory (see page 17).
• 3 - Press Ok to confirm.
Key sound
By default, each time you press a key on
the keypad, a beep is emitted to indicate
that the action has been registred. You
may turn off the key sound, if required.
• 1 - Press Key sound .
86
MENU
Handset name :
JONES
Erase Ok
28
MENU
Key sound
No Yes
PAGE 20
Page 20

PERSONALIZING
YOUR HANDSET
Headset (on M 901 and M 902*)
This function enables you to adjust the
type of headset ( 1 ou 2 ) you wish
to use (please, consult your administrator).
• 1 - Press Headset.
• 2 - Select a headset type.
Automatic answer
This function enables you to program
automatic hook-off 10 seconds after the
start of an incoming call.
• 1 - Press Auto. answer .
• 2 - Press No or Yes as required.
Vibrator (on M 901 and M 902*)
This function allows to activate or
deactivate the vibrator with (or not) the
ring when there is an incoming call.
Note: If you want to activate only the
vibrator when you receive a call, you have
to turn off the ringer as described on p.20.
• 1 - Press Vibrator.
• 2 - Press No or Yes as required.
64
MENU
Headset
1 2
Auto.answer
No Yes
Vibrator
No Yes
Backlight (only on M 902*)
This function enables you to deactivate or
activate display and keyboard illumination.
• 1 - Press Backlight .
• 2 - Press No or Yes as required.
Note: The backlight is limited at 8 s.
Battery level will be reduced when using
with display and keyboard illumination.
32
MENU
Backlight
No Yes
PAGE 21
Page 21

PERSONALIZING
YOUR HANDSET
Speed key
By default, this key is assigned to the Last
Number Redial function. However, you
can assign it to an emergency number or
to provide direct access to a menu function that you use regularly.
Note:
The process to enter numbers and names is
the same as that described pages 16 to 17.
• SOS emergency number
1 - Press SOS key.
2 - Enter the emergency number.
3 - Press Ok .
4 - Enter the title (5 characters maximum).
5 - Press Ok to confirm.
Speed key
SOS key
Direct menu
83MENU
N° to dial
R Ok
• Direct access to a menu function
1 - Press Direct Menu .
2 - Enter the menu code
(see table on page 19).
3 - Press Ok .
4 - Enter the title (5 characters maximum).
5 - Press Ok to confirm.
Range Test
• 1 - Press Range test .
0: you are out of range.
1 to 4: indicates the reception quality
level (4 is the highest quality level).
• 2 - Press Ok to exit.
MENU
83
Direct Menu
Menu code :
76
MENU
Range test
0 1 2 3 4
PAGE 22
Ok
Ok
Page 22

PERSONALIZING
YOUR HANDSET
E n v i r o n m e n t
This function enables you to adapt your
listenning to the environment.
• 1 - Press Environment.
• 2 - Select Calm,
Noisy ,
Mixed,
accordingly your environment.
Note: During a call, you can adjust the
listening level by pressing the keys.
Declare base
This function enables you to declare
the mobile on a G.A.P.compatible base.
• 1 - Press Declare base .
• 2 - Select the base number.
• 3 - Refer to the base manufacturer’s
documentation.
• 4 - Press Ok to confirm.
Environment
Calm
Declare base
12345678 Ok
Noisy
33MENU
number?
SELECTING A BASE
Select this function in the main menu to
choose the base on which your mobile
will operate.
• 1 - Press Select base .
• 2 - Select the base number or
Auto to connect the nearest base.
• 3 - Press Ok to confirm and exit.
22
MENU
Select base
12345678 Auto
PAGE 23
Ok
Page 23

SELECTING A LANGUAGE
Select this function in the main menu to
choose the language you wish to use.
You can choose from six languages
• 1 - Press Language .
• 2 - Select the language you want.
• 3 - Press Ok to confirm and exit this
function
LOCKING THE KEYPA D
When your mobile is idle, this function
prevents accidental dialing.
You can however, receive calls.
• 1 - Press the key.
Language
Français
English
• 2 - Press Locked .
(The icon appears to indicate
the lock is active).
• To unlock the keypad:
- Press the key
and then Unlocked .
SWITCHING OFF
THE MOBILE
When the mobile is idle, you can switch
the mobile off to save battery power.
• 1 - Press the key.
• 2 - Press Off .
Note: You can also press and hold the
key to switch off the mobile.
You can no longer receive calls.
• To switch on the mobile:
- Press and hold the key.
MOBILE
Off
Locked
MOBILE
Off
Locked
PAGE 24
Page 24

B AT T E RY
Before you use your mobile for the first
time, you are advised to charge the battery
for at least 12 hours. You should subsequently replace the mobile regularly in its
charger to maintain the battery level.
When the battery is low:
• When the mobile is idle, the display
shows the following message:
“Recharge battery”.
• During a call, the mobile transmits 4
beeps and displays the message:
“Battery 1 min.” to warn you that the
call will be cut off in 1 minute.
You must then recharge the battery.
Note: “Bat.: » is displayed when installing or replacing battery (in the later
case, when the battery is completely flat).
You are advised to carry out a complete
recharge for at least 12 hours.
WALL MOUNTING OF
THE CHARGER
• 1 - Mark the position of the screws on
the wall using the template below.
• 2 - Put in the screws (5 mm diameter)
leaving appoximately 5mm to hang the
phone on.
• 3 - Insert the screws in the wall mounting holes of the charger, push the charger against the wall and pull downwards
until it latches.
CAUTION: You can’t
throw away batteries
with household rubbish
You have to bring back
them to your distributor or
to drop off them at a
recovery center.
.
PAGE 25
Page 25

ADVICE AND SAFETY
Note
You are about to use approved equipment of type
DECT, allowing intercommunication for private use between cordless telephones and a cordless Private Automatic
Branch Exchange (PABX) or domestic radio bases. This
equipment can be used as long as the conditions specified
in the decree dated 13 January 1995 published in the
Official Bulletin 26 January 1995, which defines the conditions of a general authorisation licence on the basis of
article L89 of the post and Telecommunication code.
Apart from the equipment approval, in fact, the following operating instructions must be respected, especially
considering the radio-electric frequencies used:
1. Use of DECT equipment is not guaranteed against
jamming caused by other authorised use of radio electric
frequencies;
2. DECT equipment can only be used to establish links
between fixed points if these links are not permanent and if
the equivalent radiated isotropic power at the antenna is less
than 50 mW;
3. The installation of DECT equipment (of type cordless PABX including more than two access lines to the network) must be carried out by an installer approved by the
minister responsible for telecommunications, since these
installations constitute complex installations within the
meaning of article R. 20-22 in the Post and
Telecommunication code.
4. The conditions of access to a DECT equipment telepoint network must be defined in an agreement signed with
the operator of the authorised telepoint network concerned.
Electrical connection: 230 V AC monophase power
supply with the exclusion of installations with an IT-design
defined in the EN 60-950 standard. Note that the network
voltage is classified as excessive according to the criteria of
this same standard.
As a precautionary measure, in case of danger the mains
power supply block serves as a disconnecting device for the
230V power supply.
CE: This equipment complies with the requirements of
EMC Directive 89/336/EEC for Electromagnetic.
Compatibility and LVD Directive 73/23/EEC for Electrical
Safety as amended by Directive 93/68/EEC.
PAGE 26
Page 26

Entreprise Solutions
International Sales
Rue J.-P. Thimbaud B. P. 26
78392 Bois d’Arcy Cedex - France
Tel: +33 1 34 60 70 00
Information subject to change without notice. Nortel Networks corporation reserves the right to make changes in design
Nortel Networks, the Nortel Networks Globemark, are trademarks of Nortel Networks Corporation.
or components as progress in engineering or manufacturing may warrant. Details may vary between countries.
© 1999 Nortel Networks Corporation.
 Loading...