

Page 1

Enterprise Edge
M7100N
User Card
© 2000 Nortel Networks
P0908517 Issue 02
Page 2

Page 3
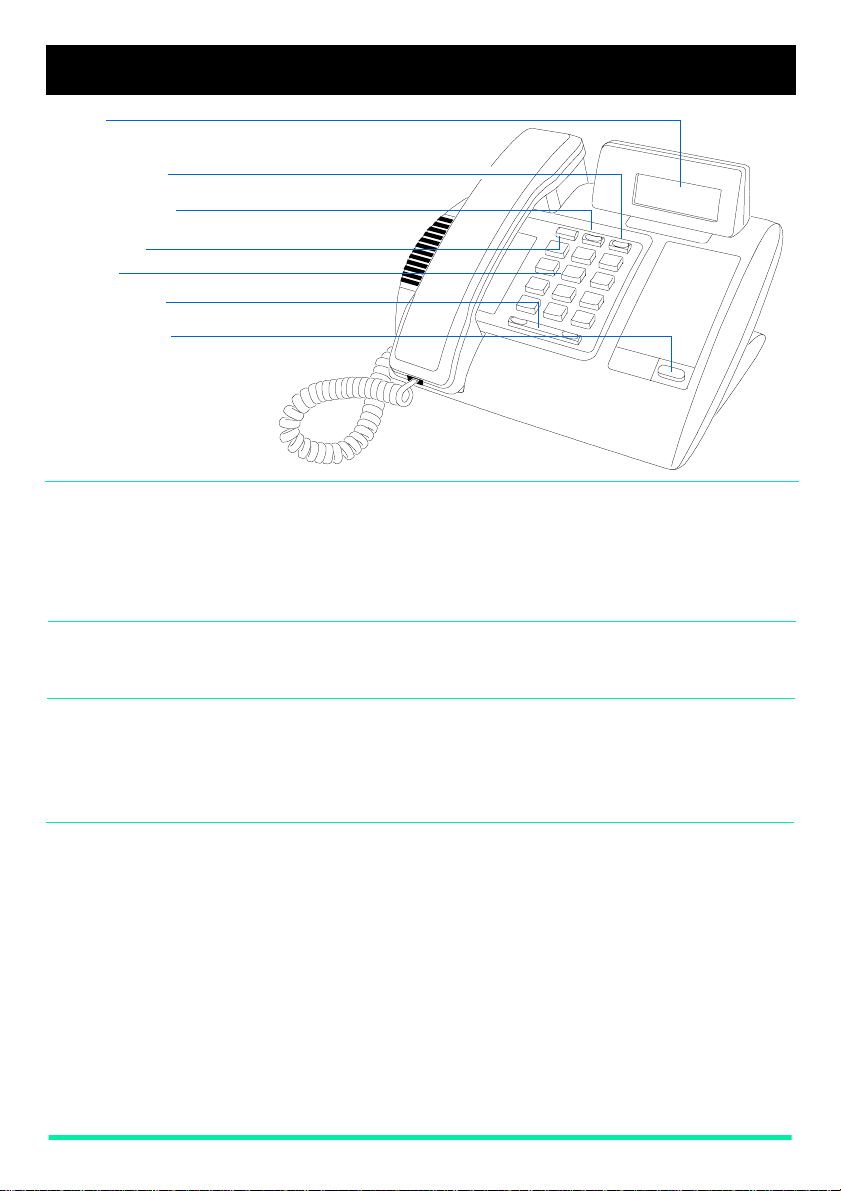
Your Enterprise Edge M7100N telephone
Display
shows the time, date, and call information; guides you while
using features; tilts for easy viewing
Release button
cancels active calls
Feature button
starts or ends a feature
Hold button
Dial pad
Volume control
Memory button
is programmable to store a
feature or to automatically
dial an internal or external
number.
Using Button
Inquiry
Adjusting the
display contrast
Selecting a ring
type and volume
level
Adjusting the
handset or
telephone
speaker volume
Check what is programmed on your memory button.
1. Release all calls or lin es with dial tone.
2. Press
ƒ•‚
.
3. Press the button that you want to check.
4. Read the display.
5. Press
1. Press
2. Press
when finished.
ƒ
ƒ•‡
to · for the le vel y ou want; the high er the number the high er
⁄
.
the level.
1. Press
2. Press
ĥfl
⁄, ¤, ‹
3. While the telephone is ringing, press
.
or
to hear the different ring types.
›
√
volume level.
4. Press
1. Press
to store the ring.
ƒ
√
when using the handset or the speaker.
to adjust the
Page 1 Enterprise Edge M7100N User Card
Page 4

Making and answering calls
Answering calls 1. When your telephone rings, lift your handset.
You are immediately connected to the call.
Making external
calls
Making internal
calls
Making or
answering a
second call
Depending upon the dialling mode programmed for your telephone, you
may be able to dial your call before lifting your handset.
1. Pick up the handset.
9
2. Dial
access code).
3. Dial the external telephone number.
1. Pick up the handset.
2. Dial the internal number.
Note: Extension numbers and the exchange line access code are
The M7100N telephone allows you to have two calls active at the same
time.
You can switch between calls using
To answer a second call while on another call
1. Press
The second call automatically comes onto the line.
To hold a call and make a second call
1. Press
2. Dial the telephone number for the second call.
To return to the first call
1. Press
The second call is automatically put on hold.
(your system’s exchange line access code or a line pool
‚
supplied by your System Administrator.
.
˙
to put the first call on hold.
˙
to put the first call on hold.
˙
again to return to the first call on hold.
˙
˙
Page 2 Enterprise Edge M7100N User Card
To hold a call
1. Press
2. Press
Note: If you have difficulty selecting a line on yo ur M7100N telephone,
˙
˙
Check the display for confirmation or additional information.
ask your System Administrator to check your telephone's
programming. Your telephone must be assigned to use an
exchange line or line pool.
.
again to return to the call on hold.
Page 5

Programming the memory button
About the
memory button
Programming the
memory button
The memory button can store a
telephone number or feature
code to give you one touch
dialling or feature activation. You
can change the memory button
by programming it with a new
number or feature code.
Memory button
Remember: Press
External Autodial
1. If you are on a call or a line with dial tone, press
2. Press
3. Dial the external number.
4. Press
5. Label your new button.
Internal Autodial
1. If you are on a call or a line with dial tone, press
2. Press
3. Dial the extension number.
4. Label your new button.
ƒ•⁄
˙
ƒ•¤
ƒ•‚
.
to store the number.
.
to check a memory or line button.
˙
˙
or
or
®
®
.
.
Features
1. If you are on a call or a line with dial tone, press
2. Press
3. Press
4. Label your new button.
Erasing the memory button
1. If you are on a call or a line with dial tone, press
2. Press
3. Press
Notice These telephones now conform to the latest standards in relation to the
positioning of Q and Z on the number buttons. The Q appears on button
number 7 and the Z appears on button number 9.
Page 3 Enterprise Edge M7100N User Card
Page 3 Enterprise Edge M7100N User Card
ƒ•‹
ƒ
ƒ•⁄
˙
.
and the feature code.
.
to erase the button.
˙
˙
or
or
®
®.
.
Page 6

Setting up the telephone
Connecting the cords
1
Press here firmly
until it clicks, to
attach the stand.
Press here to
remove the stand.
ATTENTION
2
out
that the line cord is unplugg ed from th e
wall socket.
To remove any of the cords, squeeze
the release latch on the p lug and ge ntly
pull the plug from the socket.
Connect the handset cord to the jack
labelled with the telephone i con and
route the cord as shown.
Route the line cord through the stand
and connect the cord to the telephone
jack that is marked with th e j ack icon.
Attach the stand using either pair of
slots; to raise the bac k of the telepho ne
to its highest position, use these slots.
Once the above work is complete, plug
the line cord back into its wall socket.
Before attempting to carry
work on the telephone, ensure
any
Page 4 Enterprise Edge M7100N User Card
Page 7

Setting up the telephone
Mounting the
telephone on
the wall
12 cm
Page 5 Enterprise Edge M7100N User Card
Page 5 Enterprise Edge M7100N User Card P0908517 Issue 02
 Loading...