

Page 1

Nortel Communications Servers
Nortel IP Phone 1535 Installation
and Commissioning
NN43160-300
.
Page 2

Document status: Standard
Document version: 02.03
Document date: 28 October 2009
Copyright © 2009, Nortel Networks
All Rights Reserved.
LEGAL NOTICE While the information in this document is believed to be accurate and reliable, except as otherwise
expressly agreed to in writing NORTEL PROVIDES THIS DOCUMENT "AS IS" WITHOUT WARRANTY OR
CONDITION OF ANY KIND, EITHER EXPRESS OR IMPLIED. The information and/or products described in this
document are subject to change without notice.
Nortel, the Nortel logo and the Globemark are trademarks of Nortel Networks.
All other trademarks are the property of their respective owners.
Sourced in Canada.
Page 3

Revision history
October 2009
Standard 02.03. This document is up-issued to support the Nortel IP Phone
1535 on Nortel Communication Server 1000 Release 6.0.
November, 2007
Standard 02.02. This document is issued to support the Nortel IP Phone
1535 Phase 2 on Nortel Communication Server 2000 Release SN10.
September, 2007
Standard 02.01. This document is issued to support the Nortel IP Phone
1535 Phase 2 on Nortel Multimedia Communication Server 5100 Release
4.0.
November, 2006
Standard 01.01. This document is issued to support the Nortel IP Phone
1535 in Multimedia Communications Server 5100 Release 3.5.
3
Copyright © 2009, Nortel Networks
.
Nortel IP Phone 1535 Installation and Commissioning
Nortel Communications Servers
NN43160-300 02.03 Standard
Release 4.0/SN10 28 October 2009
Page 4

4 Revision history
Copyright © 2009, Nortel Networks
.
Nortel IP Phone 1535 Installation and Commissioning
Nortel Communications Servers
NN43160-300 02.03 Standard
Release 4.0/SN10 28 October 2009
Page 5

Contents
New in this release 9
Features 9
How to get help 11
Contents 11
Getting help from the Nortel web site 11
Getting help over the telephone from a Nortel Solutions Center 11
Getting help from a specialist by using an Express Routing Code 12
Getting help through a Nortel distributor or reseller 12
About the Nortel IP Phone 1535 13
Care of the IP Phone 1535 14
Safety information 14
IP Phone 1535 shipping box content 14
Default factory settings 14
Technical specifications 15
Multiple language support 16
Description of the IP Phone 1535 menu options 16
Using the SD/MMC card 18
5
Other changes 9
VoIP Settings menu 16
System Settings menu 17
First time installation of the IP Phone 1535 21
Installing the IP Phone 1535 for the first time 21
Procedures for installing the IP Phone 1535 for the first time navigation 23
Provision the Communications Server 23
Physically install the IP Phone 1535 24
Installation guidelines 24
Connect the handset 24
Connect the IP Phone 1535 to a power source 24
Attach the IP Phone 1535 to the stand 25
Connect to PSTN 25
Logging in to the IP Phone 1535 Admin Mode 25
Connecting the IP Phone 1535 to the LAN 26
Enabling the LAN connection profile 26
Copyright © 2009, Nortel Networks
.
Nortel IP Phone 1535 Installation and Commissioning
Nortel Communications Servers
NN43160-300 02.03 Standard
Release 4.0/SN10 28 October 2009
Page 6

6 Contents
Accessing and modifying the LAN Network Settings 27
Enabling the WiFi connection profile 28
Access and modify Wireless Settings 29
Modifying User Information parameters 30
Modifying Proxy parameters 31
Configuration of NAT-traversal 32
Configuring VoIP domain name information 33
Modifying port assignments 33
Registering the IP Phone 1535 34
Configuration on a CS 1000 system 37
Limitations 37
IP Phone 1535 system software updates 39
Checking for available IP Phone 1535 software updates 39
Initiating manual software updates for the IP Phone 1535 40
FTP software update process 41
Provisioning the FTP update server 41
Configuring the FTP server login account 42
Provisioning the FTP server directory structure 42
FTP software update files 43
Handling the FirmwareUpdateRequest.acfg file 43
Additional configuration using the VoIP Settings menu 47
Registration option 47
De-Registering the IP Phone 1535 47
Setting the registration interval using the Expires configuration option 48
Misc. (Miscellaneous) configuration option 48
Accessing and modifying Call Total Bandwidth (CTBW) 49
Modifying Codec Priority lists 50
Configuring VoIP Voice Mail 51
Additional configuration using the System Settings menu 53
Modifying the Date and Time 53
Accessing and activating the Reset function 53
Accessing the Technical Features configuration option 54
Configuring Email 57
Configuring IP Phone 1535 Email account information 57
Emails containing phone number strings 58
The IP Phone 1535 Camera 59
Enabling and disabling the Camera 59
Troubleshooting 61
Required software for CS1000E call server in MCS5100 configuration 61
Known issues 61
Basic troubleshooting 61
Troubleshooting connectivity issues 61
Copyright © 2009, Nortel Networks
.
Nortel IP Phone 1535 Installation and Commissioning
Nortel Communications Servers
NN43160-300 02.03 Standard
Release 4.0/SN10 28 October 2009
Page 7

Contents 7
IP Phone 1535 regulatory information 63
IP Phone 1535 emissions statement 63
Regulatory information and disclaimers 63
Regulatory and safety information 64
Warnings 65
Connecting to PSTN 65
Wireless 65
Connecting power 65
Connecting to LAN 65
Operation 65
Location 65
USA-FCC (Federal Communications Commission) statement 65
FCC Interference statement 66
Compliance statement for Canada 66
Telecom requirements for both Canada and USA 66
Copyright © 2009, Nortel Networks
.
Nortel IP Phone 1535 Installation and Commissioning
Nortel Communications Servers
NN43160-300 02.03 Standard
Release 4.0/SN10 28 October 2009
Page 8

8 Contents
Copyright © 2009, Nortel Networks
.
Nortel IP Phone 1535 Installation and Commissioning
Nortel Communications Servers
NN43160-300 02.03 Standard
Release 4.0/SN10 28 October 2009
Page 9

New in this release
The following sections detail what is new in NortelIP Phone 1535 Installation
and Commissioning (NN43160-300) for Phase 2.
Features
See the following sections for information about feature changes:
•
"Configuration of NAT-traversal" (page 32)
•
"Modifying the Date and Time" (page 53)
•
"Access and modify Wireless Settings" (page 29)
Other changes
IP Phone 1535 is supported on Communication Server 1000 Release 6.0.
For more information, see "Configuration on a CS 1000 system" (page 37).
This document was updated for support of Nortel Communications Server
2000.
9
This document was renumbered from NN43160-101 to NN43160-300.
Copyright © 2009, Nortel Networks
.
Nortel IP Phone 1535 Installation and Commissioning
Nortel Communications Servers
NN43160-300 02.03 Standard
Release 4.0/SN10 28 October 2009
Page 10

10 New in this release
Copyright © 2009, Nortel Networks
.
Nortel IP Phone 1535 Installation and Commissioning
Nortel Communications Servers
NN43160-300 02.03 Standard
Release 4.0/SN10 28 October 2009
Page 11

How to get help
Contents
This section contains information on the following topics:
•
Getting help from the Nortel web site
•
Getting help over the telephone from a Nortel Solutions Center
•
Getting help from a specialist by using an Express Routing Code
•
Getting help through a Nortel distributor or reseller
Getting help from the Nortel web site
The best way to get technical support for Nortel products is from the Nortel
Technical Support web site:
ww.nortel.com/support
w
This site provides quick access to software, documentation, bulletins, and
tools to address issues with Nortel products. From this site, you can:
11
•
download software, documentation, and product bulletins
•
search the Technical Support Web site and the Nortel Knowledge Base
for answers to technical issues
• sign up for automatic notification of new software and documentation
for Nortel equipment
•
open and manage technical support cases
Getting help over the telephone from a Nortel Solutions Center
If you do not find the information you require on the Nortel Technical Support
web site, and you have a Nortel support contract, you can also get help over
the telephone from a Nortel Solutions Center.
In North America, call 1-800-4NORTEL (1-800-466-7835).
Outside North America, go to the following web site to obtain the telephone
number for your region:
w
ww.nortel.com/callus
Nortel IP Phone 1535 Installation and Commissioning
Copyright © 2009, Nortel Networks
.
Nortel Communications Servers
NN43160-300 02.03 Standard
Release 4.0/SN10 28 October 2009
Page 12

12 How to get help
Getting help from a specialist by using an Express Routing Code
Toaccess some NortelTechnicalSolutions Centers, you can use an Express
Routing Code (ERC) to quickly route your call to a specialist in your Nortel
product or service. To locate the ERC for your product or service, go to:
w
ww.nortel.com
Getting help through a Nortel distributor or reseller
If you purchased a service contract for your Nortel product from a distributor
or authorized reseller, contact the technical support staff for that distributor
or reseller.
Copyright © 2009, Nortel Networks
.
Nortel IP Phone 1535 Installation and Commissioning
Nortel Communications Servers
NN43160-300 02.03 Standard
Release 4.0/SN10 28 October 2009
Page 13
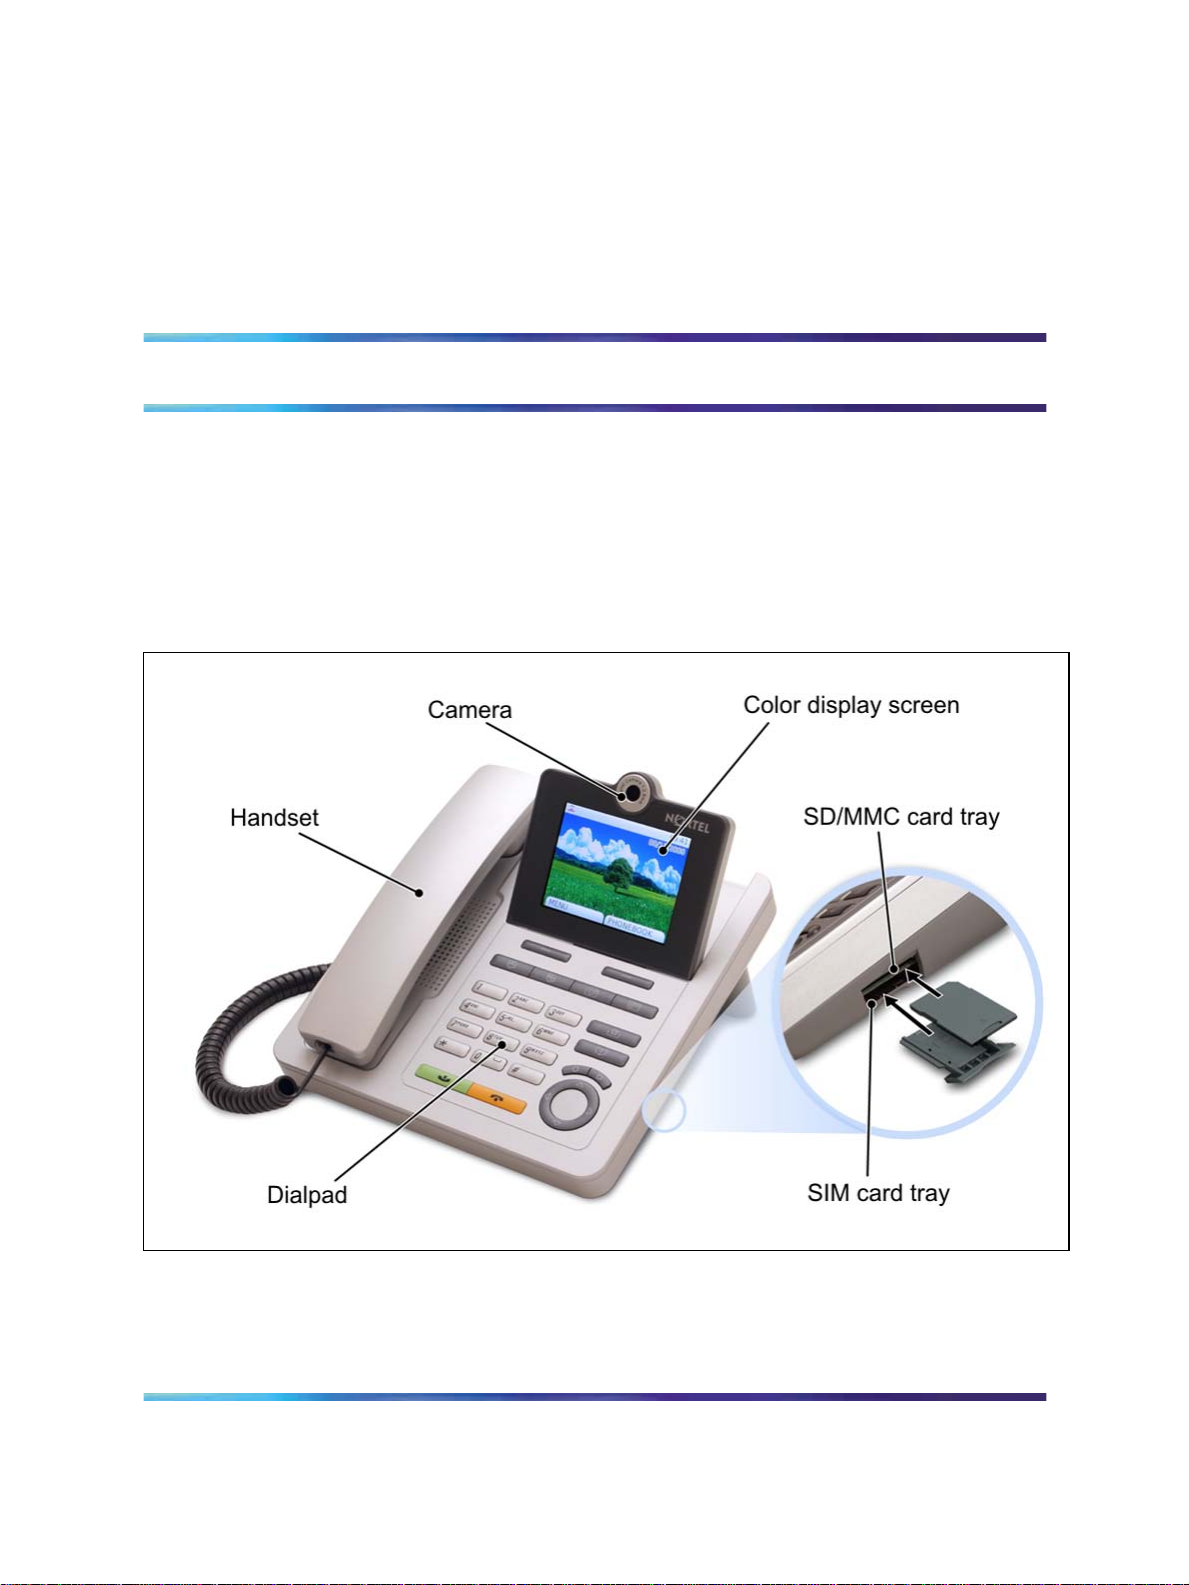
About the Nortel IP Phone 1535
This section provides an overview description of the IP Phone 1535,
including its technical specifications, factory settings, and basic menu
structure.
The physical layout of the IP Phone 1535 is shown in the following image:
Figure 1 The IP Phone 1535
13
Copyright © 2009, Nortel Networks
.
Nortel IP Phone 1535 Installation and Commissioning
Nortel Communications Servers
NN43160-300 02.03 Standard
Release 4.0/SN10 28 October 2009
Page 14

14 About the Nortel IP Phone 1535
Care of the IP Phone 1535
Clean the IP Phone 1535 only with a moist or antistatic cloth. Do not use
detergents or solvents. Avoid using dry cloths as they can generate static
electricity, which can be potentially dangerous for the electrically sensitive
parts of the IP Phone 1535.
To avoid audio problems caused by electromagnetic interference (EMI),
install the IP Phone 1535 in a location away from electromagnetic sources,
such as microwave ovens.
Safety information
The IP Phone 1535 complies with the binational UL 60950-1/CSA 60950-1
and EN 60950-1 Safety Standards.
IP Phone 1535 shipping box content
The shipping box contains the following components:
•
1 IP Phone 1535 Telephone Base
•
1 Handset
•
1 RJ-45 LAN Cable
•
1 External Universal Adapter: 100V~240V, 50Hz~60Hz
•
1 Nortel IP Phone 1535 Getting Started Guide (Part Number
NN43160-101)
•
1 Coiled Handset Cable
Default factory settings
The IP Phone 1535 has the following default settings:
•
Ring Tone volume: Level 3
• Handset/Hands Free volume: Level 3
•
Date: 01/01/2007 (MM/DD/YYYY)
•
Time: 00:00 (HH:MM)
• Ringing mode: Standard
•
VIP Filter: Disabled
•
Video Quality: Level 3
• Camera: Enabled
•
Screen Size: Remote/Local Small
•
Screen Color: Default
•
Screen Background: Blue
Copyright © 2009, Nortel Networks
.
Nortel IP Phone 1535 Installation and Commissioning
Nortel Communications Servers
NN43160-300 02.03 Standard
Release 4.0/SN10 28 October 2009
Page 15

•
Screen Saver: Disabled
•
PIN: 0000
•
Network Connection Profile: LAN
•
Email Account Protocol: POP
•
DHCP: Enabled
•
ESSID: None
•
Encryption: None
•
Authentication: None
Technical specifications
•
Unit Base Size: 206 x 190 x 50 mm.
•
Handset Size: 184 x 42 x 32 mm.
•
Approximate Weight: 2.06 lbs / 0.94 kg
•
Main Processor: Intel PXA270 @ 416 MHz
Technical specifications 15
•
RAM: 64 MB SDRAM
•
Flash Memory: 128 MB NAND
•
LAN Port: RJ-45
•
WLAN Interface: IEEE802.11b/g
•
SD/MMC slot
•
SIM slot (Compliant with standard ISO 7816-3(2002-06-01) and 3G TS
31.101. SIM card operates with voltages of 1.8V (Class B) and 3V(Class
C) - Class A (5V) is not supported.)
•
Audio Codec Types: G.711 a-law and u-law: 20, 30, 60 msec payload,
G.723.1: 30, 60 msec payload, G.729A: 20, 30, 60 msec payload,
AMR-NB: 20, 40, 60 msec payload
•
Video Codec Types: H.263 (RFC 2190) and H.264
•
Ring Melodies: 50 polyphonic
•
Images: 5 png
•
Operating Temperature: +0
•
Operating Humidity: 5% to 95%, Noncondensing
•
Noise Level: 15 dB @ 1 m
Cto50C
• Dialing Mode: DTMF (Dual Tone Multi Frequency)
•
Power: External Universal Adapter
•
AC Input: AC100~240V, 50-60Hz, 0.5A
Copyright © 2009, Nortel Networks
.
Nortel IP Phone 1535 Installation and Commissioning
Nortel Communications Servers
NN43160-300 02.03 Standard
Release 4.0/SN10 28 October 2009
Page 16

16 About the Nortel IP Phone 1535
•
DC Output: DC5V, 3.0A
Multiple language support
The IP Phone 1535 supports the following languages:
•
English
•
French
•
German
•
Korean
•
Latin American (LA) Spanish
•
Portuguese
Description of the IP Phone 1535 menu options
The following sections describe the various administrative menu options
used in the configuration and operation of the IP Phone 1535.
On the IP Phone 1535, there are two login modes, the standard User
mode and the restricted access Admin mode. In order to have access to
the system administrative functions, you must log in to the IP Phone 1535
using Admin Mode.
For more information, see "Logging in to the IP Phone 1535 Admin Mode"
(page 25).
VoIP Settings menu
After you enable either the LAN or WiFi connection profile and configure
the connection settings to allow successful connection of the IP Phone
1535 to the local network, you can use the VoIP Settings menu to configure
the IP Phone 1535 to find and use Voice Over IP (VoIP) services installed
on your network.
Accessing the VoIP Settings menu:
Step Action
1
2
Log in to the IP Phone 1535 using the Admin Mode. For more
information, "Logging in to the IP Phone 1535 Admin Mode" (page
25).
From the Main Menu, select Settings > VoIP Settings, and press
OK.
—End—
Copyright © 2009, Nortel Networks
.
Nortel IP Phone 1535 Installation and Commissioning
Nortel Communications Servers
NN43160-300 02.03 Standard
Release 4.0/SN10 28 October 2009
Page 17

On the VoIP Settings menu, the following configuration options are available:
•
User Information: Modify the parameters of this configuration option
to specify information used to identify the installed IP Phone 1535 as a
client on your VoIP network. For more information, see "Modifying User
Information parameters" (page 30).
•
Proxy: Modify the parameters of this configuration option to direct the IP
Phone 1535 to your network proxy server. For more information, see
"Modifying Proxy parameters" (page 31).
•
Registration: Initiate the registration of the IP Phone 1535 with the
communications server. For more information, see "Registering the
IP Phone 1535" (page 34).
•
Misc. (Miscellaneous): Use this configuration option to configure
additional operational functionality of the IP Phone 1535 on
your communications server. For more information, see "Misc.
(Miscellaneous) configuration option" (page 48).
System Settings menu
The System Settings menu of the IP Phone 1535 contains the administrative
configuration options for system-related parameters.
Description of the IP Phone 1535 menu options 17
Accessing the System Settings menu:
Step Action
1
Log in to the IP Phone 1535 using the Admin Mode. For more
information, see "Logging in to the IP Phone 1535 Admin Mode"
(page 25).
2
From the Main Menu, select Settings > System Settings, and
press OK.
—End—
On the System Settings menu, the available configuration options are as
follows:
•
Admin: The Admin menu provides login access to the Admin Mode,
which is a protected system login to control access to advanced
configuration options that affect the basic functionality of the IP Phone
1535. Access to all functions of the System Settings menu requires that
you be logged in to the Admin Mode first. For more information, see
"Logging in to the IP Phone 1535 Admin Mode" (page 25).
Copyright © 2009, Nortel Networks
.
Nortel IP Phone 1535 Installation and Commissioning
Nortel Communications Servers
NN43160-300 02.03 Standard
Release 4.0/SN10 28 October 2009
Page 18

18 About the Nortel IP Phone 1535
•
Date and Time: Manually modify the system date and time on the IP
Phone 1535. For more information, see "Modifying the Date and Time"
(page 53).
•
Network Time: You can configure the IP Phone 1535 to obtain date and
time updates from the network server. If you enable the Network Time
function, the date and time on the IP Phone 1535 updates automatically
on a daily basis from the specified network server.
•
LAN or WiFi : Depending on the network connection profile currently
active on the IP Phone 1535, this option on the System Settings menu
offers another path to the configuration options for the currently active
network connection profile. With the LAN connection profile active, you
can use this menu option to configure the Network Settings associated
with the LAN connection profile. If the WiFi connection profile is active,
you can use this menu option to configure the Wireless Settings
associated with the WiFi connection profile. For more information, see
"Access and modify Wireless Settings" (page 29).
•
PIN: Configure the User PIN, which is used to access secured IP Phone
1535 features such as Video Monitoring and Call Restriction. The
default value for the User PIN is 0000.
•
Technical Features: The Technical Features option provides system
information about the IP Phone 1535, including the current hardware
and software versions. You can also use this configuration option to
check whether new updates are available for the currently installed IP
Phone 1535 system software, and to perform the automatic download
and installation of any updates that are found. For more information, see
"Accessing the Technical Features configuration option" (page 54).
•
Reset: The IP Phone 1535 incorporates two databases in which data
parametersare stored. The databases serve two basic functions: one for
the built-in Phonebook (which stores information related to call-making
[forexample, Usernames/ Numbers and blocked call programming]) and
one for Settings (which saves any system configuration entries made on
the IP Phone 1535). These two databases are reset individually (or at
the same time) using the Reset configuration option, which erases the
stored data or returns the IP Phone 1535 to factory default. For more
information, "Accessing and activating the Reset function" (page 53)
Using the SD/MMC card
Secure Digitial/Multimedia Cards (SD/MMC) are used for external storage of
images or sounds. These may be uploaded to the IP Phone 1535 using the
SD/MMC card in the card slot provided. For more information, see "About
the Nortel IP Phone 1535" (page 13).
Copyright © 2009, Nortel Networks
.
Nortel IP Phone 1535 Installation and Commissioning
Nortel Communications Servers
NN43160-300 02.03 Standard
Release 4.0/SN10 28 October 2009
Page 19

Using the SD/MMC card 19
This section provides procedures for copying files to and from the IP Phone
1535 to an SD/MMC card, as well as a list of limitations and supported
file types.
To copy files from the SD/MMC card to the IP Phone 1535:
Step Action
1
Insert the card into the SD/MMC slot. For more information, see
"About the Nortel IP Phone 1535" (page 13).
2
3
Select MENU > Images and Sounds > Copy.
Select one of the file galleries (Images / Sounds / Videos) that you
want to copy the files to.
4
5
Select Copy from SD/MMC.
Select the files you want to copy and press SELECT.
—End—
To copy files from the phone to SD/MMC card:
Step Action
1
Insert the card into the SD/MMC slot. For more information, see
"About the Nortel IP Phone 1535" (page 13).
2
3
Select MENU > Images and Sounds > Copy.
Select one of the file galleries (Images / Sounds / Videos) that you
want to copy the files to.
4
5
Some general notes for limitation and supported files types of the SD/MMC
card are as follows:
•
Support provided for use of SD/MMC cards up to 1GB in size.
•
Limitation: The IP Phone 1535 cannot display larger than 640 x 480
pixels. An icon will appear instead to notify that “it is too big to display”.
Copyright © 2009, Nortel Networks
.
Select Copy to SD/MMC
Select the files you want to copy and press SELECT.
—End—
Nortel Communications Servers
Nortel IP Phone 1535 Installation and Commissioning
NN43160-300 02.03 Standard
Release 4.0/SN10 28 October 2009
Page 20

20 About the Nortel IP Phone 1535
•
Supported File Types: MIDI Standard MIDI Files 1.0, WAV, IMY
iMelodyversion (v1.0, v1.1 , v1.2), AMR 3GPP TS 26.071, JPG
JFIF:1.01, PNG (PNG version 1.2), GIF (GIF87a, GIF89 - Does not
support animated gif), 3GP movie file (3GPP TS.26.140 version 6)
Copyright © 2009, Nortel Networks
.
Nortel IP Phone 1535 Installation and Commissioning
Nortel Communications Servers
NN43160-300 02.03 Standard
Release 4.0/SN10 28 October 2009
Page 21

First time installation of the IP Phone 1535
Installing the IP Phone 1535 for the first time
This chapter provides a description of the tasks and procedures that must
be completed for you to successfully complete a first time installation of the
IP Phone 1535 within a Nortel Communications Server IP call environment.
In addition, a description is given of the specific Communications Server
provisioning that is required for the successful operation of the IP Phone
1535 on your network.
By using the information and procedures contained in this chapter, you will
be able to connect the IP Phone 1535 to your network, making it available
for use with IP telephony services installed on your network.
The following task flow diagram shows you the sequence of procedures
you must perform to install the IP Phone 1535 for the first time. Each of
the procedures listed in the diagram may be referenced by title in the
"Procedures for installing the IP Phone 1535 for the first time navigation"
(page 23) section of this chapter.
21
Copyright © 2009, Nortel Networks
.
Nortel IP Phone 1535 Installation and Commissioning
Nortel Communications Servers
NN43160-300 02.03 Standard
Release 4.0/SN10 28 October 2009
Page 22

22 First time installation of the IP Phone 1535
Figure 2
Installing the IP Phone 1535 for the first time
Copyright © 2009, Nortel Networks
.
Nortel IP Phone 1535 Installation and Commissioning
Nortel Communications Servers
NN43160-300 02.03 Standard
Release 4.0/SN10 28 October 2009
Page 23

Provision the Communications Server 23
Procedures for installing the IP Phone 1535 for the first time
navigation
•
"Provision the Communications Server" (page 23)
•
"Physically install the IP Phone 1535" (page 24)
•
"Connecting the IP Phone 1535 to the LAN" (page 26)
•
"Enabling the LAN connection profile" (page 26)
• "Accessing and modifying the LAN Network Settings" (page 27)
•
"Enabling the WiFi connection profile" (page 28)
•
"Access and modify Wireless Settings" (page 29)
• "Modifying User Information parameters" (page 30)
•
"Modifying Proxy parameters" (page 31)
•
"Configuring VoIP domain name information" (page 33)
• "Modifying port assignments" (page 33)
•
"Registering the IP Phone 1535" (page 34)
•
"Configuration on a CS 1000 system" (page 37)
Provision the Communications Server
To successfully install or operate the IP Phone 1535 on your network, you
must ensure that you have the following configured:
•
a Communications Server SIP port license is available for each IP
Phone 1535 that you want to install.
•
a preconfigured SIP account for each connected user.
•
an SIP address and Username / Number alias for each user you want
to register.
•
the Communications Server service package has H.263 video enabled.
•
on Communications Server systems without an RTP media portal, the
IgnoreMediaPortalInstertionRules option is checked.
•
if your IP telephony environment does not support for the G.723.1 codec
on all endpoint devices (on the same node), configure the G.723.1
codec to the lowest priority on the IP Phone 1535 to avoid problems with
codec negotiation. For more information, see "Modifying Codec Priority
lists" (page 50).
Copyright © 2009, Nortel Networks
.
Nortel IP Phone 1535 Installation and Commissioning
Nortel Communications Servers
NN43160-300 02.03 Standard
Release 4.0/SN10 28 October 2009
Page 24

24 First time installation of the IP Phone 1535
Physically install the IP Phone 1535
Basic installation of the IP Phone 1535 consists of connecting to the correct
ports using the appropriate cables. Make the physical connections for the
handset and power, as well as attach the IP Phone 1535 to the included
telephone stand, by following the procedures in the following sections.
Installation guidelines
Consider the following conditions when you choose a location in which to
install the IP Phone 1535:
•
Use the IP Phone 1535 in an environment with a temperature range of
+0
•
Place the IP Phone 1535 on a smooth, nonslip surface.
•
Do not install the IP Phone 1535 in a dusty environment; dust deposits
can adversely affect moving parts.
• Do not install the IP Phone 1535 in a location directly exposed to
sunlight or radiant heat sources; these can cause damage to electrical
components.
•
The IP Phone 1535 does not support Power Over Ethernet (PoE);
therefore, do not install the phone on a PoE configuration.
to 40
C and a relative humidity of 5 to 95 percent.
Connect the handset
Step Action
1
Insert one end of the coiled cord into the handset connector port.
This port is on the handset cradle side of the IP Phone 1535.
2
Insert the other end of the coil cord into the port on the handset.
—End—
Connect the IP Phone 1535 to a power source
WARNING
Use only the power adapter supplied with the IP Phone 1535,
as other adapters can cause operating anomalies, hazardous
conditions, and material damage.
Step Action
1
Insert the power adapter DC plug into the DC power jack, at the rear
of the IP Phone 1535 phone base.
Copyright © 2009, Nortel Networks
.
Nortel IP Phone 1535 Installation and Commissioning
Nortel Communications Servers
NN43160-300 02.03 Standard
Release 4.0/SN10 28 October 2009
Page 25

Logging in to the IP Phone 1535 Admin Mode 25
2
Connect the adapter AC plug into an appropriate AC voltage socket.
—End—
Attach the IP Phone 1535 to the stand
Insert the tabs of the stand into the two slots on the bottom of the IP Phone
1535. This sets the phone at an optimal angle for video camera use.
Connect to PSTN
Your IP Phone 1535 does not support connection to a Public Switched
Telephone Network (PSTN).
Logging in to the IP Phone 1535 Admin Mode
The IP Phone 1535 includes an Admin Mode, which is a protected system
login designed to control access to advanced configuration options that
affect basic functionality of the IP Phone 1535.
Step Action
1
From the Main Menu, select Settings > System Settings > Admin,
and press OK.
2
3
Select Log in, and press OK.
Enter the Admin password (default is 1234), and press OK.
—End—
You access the following only if you log in to the Admin Mode first:
• Camera
•
VoIP Settings menu
•
Network / Wireless Settings menu
•
System Settings menu
ATTENTION
When you log in to Admin Mode and make administrative changes on the IP
Phone 1535, you must actively log out of the Admin Mode when finished in order
to prevent unauthorized access to administrative functions by subsequent users.
Note that simply resetting or rebooting the IP Phone 1535 does not automatically
log you out of your active Admin Mode session.
Logging out of the IP Phone 1535 Admin mode:
Copyright © 2009, Nortel Networks
.
Nortel IP Phone 1535 Installation and Commissioning
Nortel Communications Servers
NN43160-300 02.03 Standard
Release 4.0/SN10 28 October 2009
Page 26

26 First time installation of the IP Phone 1535
Step Action
1
From the Main Menu, select Settings > System Settings > Admin,
and press OK.
2
Select Logout, and press OK.
—End—
Connecting the IP Phone 1535 to the LAN
To connect the IP Phone 1535 to a LAN you must make an RJ-45
connection.
Step Action
1
2
Insert the RJ-45 cable into the LAN port at the back of the IP Phone
1535.
Connect the other end of the LAN cable into an active LAN
connection port on the network.
—End—
Enabling the LAN connection profile
To establish an active network connection, you must configure the IP Phone
1535 to operate in either of two network connection profiles: LAN or WiFi.
The IP Phone 1535 is preconfigured to make a network connection using
LAN over an Ethernet switch or router. Thus, the LAN connection profile is
enabled on the IP Phone 1535 by default.
Step Action
1
2
3
Copyright © 2009, Nortel Networks
.
From the Main Menu, select Settings >Profile and press OK.
Select LAN >Enable (the LAN connection profile is enabled on the
IP Phone 1535 by default).
When asked to confirm the change, select Yes to accept.
Nortel Communications Servers
Nortel IP Phone 1535 Installation and Commissioning
NN43160-300 02.03 Standard
Release 4.0/SN10 28 October 2009
—End—
Page 27

Accessing and modifying the LAN Network Settings 27
Accessing and modifying the LAN Network Settings
To configure the IP Phone 1535 with network settings particular to your LAN
environment, you must access and configure the parameters of the Network
Settings option. With the LAN Network connection profile enabled, you can
access and configure the parameters of the Network Settings configuration
options:
Step Action
1
From Main Menu, select Settings > Profile > LAN > Settings >
Network Settings, and press OK to accept.
2
Select the appropriate configuration options and set network
parameters (specific to your network configuration) for the LAN
connection profile:
Parameter Description
Details Displays the network configuration parameters (MAC address, DHCP, IP address,
Subnet Mask, Gateway and DNS) as currently configured on the IP Phone 1535.
DHCP Used to configure DHCP server information (for DHCP-enabled network
environments) or static IP Address information (for DHCP-disabled network
environments).
DHCP must be disabled to access further configuration options:
• IP Address
• Subnet Mask
• Gateway
• DNS1/DNS2
If you enable DHCP, these options are automatically configured (through the
network DHCP server) after the IP Phone 1535 connects to the network
If manually configuring the DHCP options, the IP Phone 1535 attempts to connect
to the network using the parameters you set. Should a connection failure occurs
when using your manual DHCP values, the IP Phone 1535 retains its current
configuration values. Check your values for correctness and retry the connection.
IP Address View or change network IP address information
Subnet Mask View or change the Subnet mask information
Gateway View or change default Gateway Address information
DNS1/DNS2 View or change the primary (DNS1) and secondary (DNS2) Domain Name
Servers.
Nortel IP Phone 1535 Installation and Commissioning
Copyright © 2009, Nortel Networks
.
Nortel Communications Servers
NN43160-300 02.03 Standard
Release 4.0/SN10 28 October 2009
Page 28

28 First time installation of the IP Phone 1535
For changes made in any of these configuration options to take effect,
you must hit Back to return to the previous menu, and select Apply every
time you make a change.
After you successfully connect the IP Phone 1535 to the network using the
LAN connection interface, you make both video and voice calls using that
interface and the WiFi profile is disabled. So, in this example, when you
enable the LAN connection profile, all voice and video calls made using
the IP Phone 1535 are made through the LAN connection to the network,
and the WiFi connection profile is disabled (along with all menu selections
associated with configuring the WiFi connection profile).
Enabling the WiFi connection profile
To establish an active network connection, you must configure the IP Phone
1535 to operate in either of two network connection profiles: LAN or WiFi.
ATTENTION
—End—
The IP Phone 1535 can connect to your network using a wireless
connection. To do this, a wireless router or access point on your network
(to which the IP Phone 1535 can associate itself) must serve as a bridge
connection. With an available access point or wireless router in place,
enable the WiFi connection profile to install the IP Phone 1535 on your
network using WiFi:
Step Action
1
2
From the Main Menu, select Settings > Profile and press OK.
Select WiFi > Enable, and press OK to activate the WiFi connection
profile.
3
When you are asked to confirm the change, select Yes to accept.
—End—
With the WiFi connection profile enabled, the IP Phone 1535 locates the
available wireless router or access point automatically, and register itself
with the WiFi network.
Copyright © 2009, Nortel Networks
.
Nortel IP Phone 1535 Installation and Commissioning
Nortel Communications Servers
NN43160-300 02.03 Standard
Release 4.0/SN10 28 October 2009
Page 29

If further configuration is required for the IP Phone 1535 to establish a
network connection after you enable the WiFi network connection profile,
the disconnected network connection icon displays. For more information on
the network connection icons and network problems, see "Troubleshooting
connectivity issues" (page 61).
Access and modify Wireless Settings
If the IP Phone 1535 does not automatically register itself with a wireless
router or access point within your network, the IP Phone 1535 requires
manual configuration. With the WiFi network connection profile enabled,
you can access and configure the Wireless Settings configuration options:
Step Action
1 From the Main Menu, select Settings > System Settings > WiFi
> Wireless Settings, and OK.
Access and modify Wireless Settings 29
2
Select the desired configuration options to set the Wireless
networking parameters. The configuration options contained in the
Wireless Settings menu are as follows:
Parameter Description
Details Display network information for the wireless router or access point currently in
use by the IP Phone 1535.
Wi-Fi Scanning Search for available wireless routers in the area and report whether encryption
is enabled on the available routers.
ESSID Manually assign the SSID value to be used by the IP Phone 1535 to connect
to the wireless network. If the wireless router is configured to hide (or not
broadcast) SSID information, you must use the ESSID option must be used to
enter the SSID information manually. Manually setting the SSID information
using the ESSID configuration option also requires that you configure either
the Encryption or the Authentication option as well. From the Main Menu,
Settings > System Settings > WiFi > Wireless Settings, and then select
either Encryption or Authentication (as dictated by local network settings).
Enter an 8 to 63 character passphrase.
Channel ID Assign a manual value to specify the Wi-Fi channel ID to be used in connecting
the IP Phone 1535 to the wireless network.
Encryption Configure data for the encryption key entry (see previous notes for ESSID).
Authentication The following are the three options for configuring the IP Phone 1535
authentication method:
•
•
•
Copyright © 2009, Nortel Networks
.
No Authentication
WPA-PSK
WPA2-PSK
Nortel Communications Servers
Nortel IP Phone 1535 Installation and Commissioning
NN43160-300 02.03 Standard
Release 4.0/SN10 28 October 2009
Page 30

30 First time installation of the IP Phone 1535
—End—
After you successfully connect the IP Phone 1535 to the network using
the WiFi connection interface, you make both voice and video calls using
that interface and the LAN profile becomes disabled. So, in this example,
when you enable the WiFi connection profile, all voice and video calls made
using the IP Phone 1535 will now be made through the WiFi connection to
the network, and the LAN connection profile will be disabled (along with all
menu selections associated with configuring the LAN connection profile).
Modifying User Information parameters
After you have enabled either the LAN or WiFi connection profile and have
configured the settings to allow successful connection of the IP Phone 1535
to your local network, you can configure the IP Phone 1535 to find and
use the Voice Over IP (VoIP) services installed on your network. This is
done by accessing and modifying required parameters contained in several
configuration options on the VoIP Settings menu.
You can use the User Information configuration option (on the VoIP
Settings menu) to setup and configure specific user data required for
VoIP connectivity and use. The user data you enter will be used for client
identification while accessing connected VoIP services and for client
authentication (in registering the IP Phone 1535 with the VoIP network).
For successful registration of the IP Phone 1535 with the VoIP services
available on your network, you must access and configure the User
Information parameters as described below:
Step Action
1
From the Main Menu, select Settings > VoIP Settings > User
Information , and press OK.
2
Select the configuration options to modify and press OK. Adjust the
values in each of the following parameters as required.
Parameter Description
Telephone Number Modify the assigned Username / Number the configured IP Phone
1535 will use while it has access to Communications Server. The
Number is optional when the Username is entered. This value is
required information for successful registration of the IP Phone 1535
with the IP telephony services installed on your network.
Display Name (OPTIONAL) Edit the display name of the specific VoIP user account configured
on the IP Phone 1535.
Nortel IP Phone 1535 Installation and Commissioning
Copyright © 2009, Nortel Networks
.
Nortel Communications Servers
NN43160-300 02.03 Standard
Release 4.0/SN10 28 October 2009
Page 31

Modifying Proxy parameters 31
Parameter Description
Authentication Name Enter the User’s SIP account username, as configured on the
Communications Server. This value is required information for
successful registration of the IP Phone 1535 with the IP telephony
services installed on your network.
Authentication Password Enter the User’s SIP account password, as configured on the
Communications Server. This value is required information for
successful registration of the IP Phone 1535 with the IP telephony
services installed on your network.
3
Enter the values as required, and press OK to confirm changes.
Modifying Proxy parameters
After you have enabled either the LAN or WiFi connection profile and
have configured the settings to allow successful connection of the IP
Phone 1535 to your local network, you can configure the IP Phone 1535
to find and use your installed proxy server in its operations with your
installed Communications Server. If you are configuring the IP Phone for
a Communication Server 1000 (CS 1000), you configure the phone to find
the SIP Line Gateway (SLG).
For successful registration of the IP Phone 1535, you must access and
modify the parameters of the Proxy configuration option as described below:
Step Action
1
2
From the Main Menu, select Settings > VoIP Settings > Proxy,
and press OK.
Select the Proxy Address option.
—End—
3 Enter the IP address of the SPS or SLG and press OK to confirm
4
5
6
Copyright © 2009, Nortel Networks
.
changes. In the current setup, the proxy IP is 47.11.132.164.
Select a specific port and enter the port number to connect to the
network proxy server. By default, the proxy port value is 5060.
Note: If you are configuring the IP Phone 1535 for a CS 1000,
the default port value is 5070.
Press OK to confirm changes.
Select NAT timer option and then select Disable. The IP Phone 1535
requires this option to register it to the SPS, or if on a CS 1000, the
SLG. This option ensures that IP Phone 1535 does not send SIP
Nortel Communications Servers
Nortel IP Phone 1535 Installation and Commissioning
NN43160-300 02.03 Standard
Release 4.0/SN10 28 October 2009
Page 32

32 First time installation of the IP Phone 1535
Ping message to the SPS or SLG before sending the REGISTER
message.
Note: This option to disable the NATtimer on the IP Phone 1535
is not available in firmware versions below V.0.2.25. You must
install the latest firmware version (V2.0.76).
NAT-Traversal: The IP Phone 1535 supports two methods of NAT
Traversal - the SIP-PING method and the • STUN method. For more
information on configuring NAT-Traversal, see "Configuration of
NAT-traversal" (page 32).
Configuration of NAT-traversal
This section provides a description of NAT-traversal on the IP Phone 1535,
and its subsequent configuration.
The IP Phone 1535 supports two methods of NAT-Traversal:
•
SIP-PING: requires a Border Control Point (BCP) server for the MCS
5100 Release 4.0 and a RTP Media Portal server for MCS 5100 Release
3.5 if it is located behind a NAT/firewall.
—End—
•
STUN: The STUN protocol lets a client discover the presence and type
of NATs between the client and the public Internet - a STUN server can
be located using DNS to lookup the domain information of the service
provider.
Enabling STUN protocol
Step Action
1
From the Main Menu, select Settings > VoIP Settings > Proxy
> STUN > Enable.
2 Press OK.
Configuring the STUN server
Step Action
1
From the Main Menu, select Settings > VoIP Settings > Proxy >
STUN > STUN Server.
—End—
Copyright © 2009, Nortel Networks
.
Nortel IP Phone 1535 Installation and Commissioning
Nortel Communications Servers
NN43160-300 02.03 Standard
Release 4.0/SN10 28 October 2009
Page 33

Note: If the domain name is used, the STUN server domain
should be configured on the DNS server.
—End—
Configuring VoIP domain name information
To connect IP Phone 1535 to your installed IP telephony services, you must
access and configure the SIP domain name, which is the Service Domain
Name configured on the SPS, or SLG if on a CS 1000 system.
Step Action
Modifying port assignments 33
1
From the Main Menu,gotoSettings > VoIP Settings > Misc. >
Domain Name, and press OK to accept selection.
2
Enter the SIP Service domain name as configured on the SPS
or SLG, and on the Signaling Server. In the current setup,
the Service domain name configured on the SPS or SLG is
sps2.competitive.com.
3
Press OK to confirm changes.
Modifying port assignments
You can configure the parameters with UDP port values used to transport IP
Phone 1535 operational information (Audio, Video, and Local), according
to the particulars of your network environment.
Step Action
1
From the Main Menu, select Settings > VoIP Settings > Misc. >
Ports and press OK.
—End—
2
Copyright © 2009, Nortel Networks
.
Select the port type to configure (Audio, Video, or Local), and press
OK. The following are the acceptable value ranges by port type:
•
Audio: Specify the port to be used by the IP Phone 1535 for
audio-related VoIP activity. You can configure this with a value
between 1024 and 65535 (The default value is 23000).
•
Video: Specify the port to be used by the IP Phone 1535 for
video-related VoIP activity. You can configure this with a value
from 1024 to 65535 (The default value is 24000).
Nortel IP Phone 1535 Installation and Commissioning
Nortel Communications Servers
NN43160-300 02.03 Standard
Release 4.0/SN10 28 October 2009
Page 34

34 First time installation of the IP Phone 1535
•
Local: The Local port is the port used by the IP Phone 1535
in making connections to the proxy server - the port value you
assign must be within the range from 1024 to 65535 (The default
value is 5060).
Registering the IP Phone 1535
To access VoIPservices on the connected network, the IP Phone 1535 must
first register itself as an endpoint with the connected communications server.
The Register configuration option on the Misc. menu is used to initiate this
registration process, after all required configuration has been completed.
To successfully complete the IP Phone 1535 registration process, ensure
that you have configured the following minimum required information:
•
Under the User Information configuration option of the VoIP Settings
menu:
— User Name or Telephone Number
—End—
— Authentication Name
— Authentication Password
•
Under the Misc. (Miscellaneous) configuration option of the VoIP
Settings menu:
— Domain Name
— Ports
•
Under the Proxy configuration option of the VoIP Settings menu:
— Proxy Address
— Proxy Port
Having verified the configuration of the above required information, access
and initiate the registration process:
Step Action
1
From the Main Menu,gotoSettings > VoIP Settings >
Registration .
2
Choose Register to initiate the registration of the IP Phone 1535
on the SPS or SLG.
Copyright © 2009, Nortel Networks
.
Nortel IP Phone 1535 Installation and Commissioning
Nortel Communications Servers
NN43160-300 02.03 Standard
Release 4.0/SN10 28 October 2009
Page 35

Registering the IP Phone 1535 35
—End—
After completion of the IP Phone 1535 registration process, it is normal
to see an idle screen on the display. At the center of the idle screen, the
telephone number assigned to the IP Phone 1535 appears, showing that
registration is complete.
If registration fails, confirm that all configured system and VoIP parameters
are correct, and initiate the registration process again.
After the initial registration of the IP Phone 1535 with your connected
SPS or SLG, you must repeat the registration process any time you make
configuration changes to the following:
•
Network Settings
•
Wireless Settings
•
The currently active network connection profile
After the IP Phone 1535 has registered on the network, it is possible to view
information about your connection with the Registration Statistics option.
To access this option, from the Main Menu,gotoSettings > VoIP Settings
> Registration and select Registration Statistics.
Copyright © 2009, Nortel Networks
.
Nortel IP Phone 1535 Installation and Commissioning
Nortel Communications Servers
NN43160-300 02.03 Standard
Release 4.0/SN10 28 October 2009
Page 36

36 First time installation of the IP Phone 1535
Copyright © 2009, Nortel Networks
.
Nortel IP Phone 1535 Installation and Commissioning
Nortel Communications Servers
NN43160-300 02.03 Standard
Release 4.0/SN10 28 October 2009
Page 37

Configuration on a CS 1000 system
When configuring the IP Phone 1535 on a CS 1000 system, you must
perform the following:
•
Configure the IP Phone 1535 as SIPN UEXT type on the CS 1000
Call Server. For more information, see SIP Line Fundamentals
(NN43001-508).
•
Configure Proxy type to CS2K in the phone configuration:
— Select Main Menu, Settings, VoIP Settings, Proxy, Proxy Type.
— Select CS2K
•
Disable the Network Address Translation (NAT) Timer:
— Select Main Menu, Settings, VoIP Settings, Proxy, NAT Timer,
Disable.
•
Disable Stun:
37
— Select Main Menu, Settings,VoIP Settings, Proxy, STUN, Disable.
Limitations
The following limitations exist for an IP Phone 1535 on a CS 1000 system:
• Call Transfer with Consultation—The IP Phone 1535 does not support
Call Transfer with Consultation.
•
Ad Hoc Conference (3-way call and so on)—The IP Phone 1535 does
not support Ad Hoc Conference on CS 1000.
•
Video Conference—Video conferencing between Nortel SMC 3456
and IP Phone 1535 is not recommended because Call Hold/Retrieve
invocation between these two clients in a video call can cause the IP
Phone 1535 to lock up and requires a reboot of the IP Phone 1535.
Copyright © 2009, Nortel Networks
.
Nortel IP Phone 1535 Installation and Commissioning
Nortel Communications Servers
NN43160-300 02.03 Standard
Release 4.0/SN10 28 October 2009
Page 38

38 Configuration on a CS 1000 system
Copyright © 2009, Nortel Networks
.
Nortel IP Phone 1535 Installation and Commissioning
Nortel Communications Servers
NN43160-300 02.03 Standard
Release 4.0/SN10 28 October 2009
Page 39

39
IP Phone 1535 system software updates
Checking for available IP Phone 1535 software updates
You can use the Check Updates function to have the IP Phone 1535
check for available updates for its installed system software, which can
be downloaded from your locally managed FTP server and installed
automatically (for more information on provisioning your FTP server, see
"Provisioning the FTP update server" (page 41).
Using the Check Updates option to determine available updates:
Step Action
1 Log in to the IP Phone 1535 using the Admin Mode. For more
information, see "Logging in to the IP Phone 1535 Admin Mode"
(page 25).
2
From the Main Menu, select Settings > System Settings >
Technical Features, and press OK.
3
Select Check Updates , and press OK.
—End—
The Check Updates option performs a remote version check for the system
software installed on the IP Phone 1535. This process can take several
minutes.
Upon completion of the version check, the IP Phone 1535 reports if a newer
system software version is available. If the version check reports that
updates are available, you can initiate the download and installation of these
updates through the Update Software configuration option.
ATTENTION
You can also schedule software updates. For more information, see "Accessing
the Technical Features configuration option" (page 54)
Copyright © 2009, Nortel Networks
.
Nortel IP Phone 1535 Installation and Commissioning
Nortel Communications Servers
NN43160-300 02.03 Standard
Release 4.0/SN10 28 October 2009
Page 40

40 IP Phone 1535 system software updates
Initiating manual software updates for the IP Phone 1535
You can manually initiate the download and installation of available
updates to the IP Phone 1535 system software using the Update Software
configuration option.
The Update Software option uses a configured connection to a
locally-managed FTP server to download and install system software
updates.
New software releases for the IP Phone 1535 must be available on the
designated FTP server for a successful software upgrade.
Initiating the system software upgrade process:
Step Action
1 Log in to the IP Phone 1535 using the Admin Mode . For more
information, see "Logging in to the IP Phone 1535 Admin Mode"
(page 25).
2
From the Main Menu, select Settings > System Settings >
Technical Features, and press OK.
3
Select Update Software , and press OK.
—End—
The Update Software function initiates the download and installation of the
available system software upgrade. This process can take several minutes.
ATTENTION
When updating the IP Phone 1535, it is important to note that you must update
the device for every available software version between the current version and
the latest version, inclusively. In updating the IP Phone 1535, you cannot install
the latest version of the system software without having installed every earlier
software version first. The update packages are not cumulative, and must be
applied in order.
The IP Phone 1535 will regularly check for updates every 24 hours. Should
the update fail, it will retry every 15 minutes (to a total of three tries).
Subsequent failures to update will cause the IP Phone 1535 to perform
successive update attempts as follows:
•
every 1 hour (to a total of three tries)
•
every 24 hours thereafter
Copyright © 2009, Nortel Networks
.
Nortel IP Phone 1535 Installation and Commissioning
Nortel Communications Servers
NN43160-300 02.03 Standard
Release 4.0/SN10 28 October 2009
Page 41

If an outgoing or incoming call is made or received on the IP Phone 1535 during
the software update process, the update process is halted for the duration of
the call.
FTP software update process
The IP Phone 1535 can perform updates to its installed system software, by
connecting to a locally provisioned FTP update server and automatically
detecting, downloading, and installing any available updates it finds there.
The sequence for a successful FTP-based software update to the IP Phone
1535 is as follows:
1. The IP Phone 1535 opens a connection to your configured FTP server.
2. Upon successful connection, the Username and Password (ipphone /
15354all) are sent automatically by the IP Phone 1535 for authentication
on the FTP server.
3. The IP Phone 1535 retrieves the FirmwareUpdateRequest.acfg file for
its currently installed version from the [software version] directory of
your FTP server.
Provisioning the FTP update server 41
ATTENTION
4. The FirmwareUpdateRequest.acfg file points the IP Phone 1535 to
information about available upgrades. In order to successfully complete
the upgrade process, you must update this file within the existing
software directory for any new FTP image that is placed on the FTP
server.
5. If the firmware on the phone is found to be current, the FTP connection
is closed.
6. If the firmware is not current, the IP Phone 1535 retrieves and
applies the upgrade, according to the directory specified by the
FirmwareUpdateRequest.acfg file.
7. After the successful download and install of the available upgrade, the
IP Phone 1535 determines itself to be current and closes the active
connection to your FTP server.
Provisioning the FTP update server
For the IP Phone 1535 to successfully perform updates to its system
software, certain provisioning requirements must be met on the local FTP
server hosting the IP Phone 1535 software update files.
This section details the provisioning requirements of your FTP update
server by providing descriptions of:
•
the required configuration of the FTP server login account (used by the
IP Phone 1535 for connections to the FTP update server),
Copyright © 2009, Nortel Networks
.
Nortel IP Phone 1535 Installation and Commissioning
Nortel Communications Servers
NN43160-300 02.03 Standard
Release 4.0/SN10 28 October 2009
Page 42

42 IP Phone 1535 system software updates
•
the required provisioning of the directory structure on your FTP update
server,
•
the files involved in the IP Phone 1535 software update process, and
•
the special handling requirements for the FirmwareUpdateRequest.acfg
file.
Configuring the FTP server login account
For the IP Phone 1535 to successfully obtain software updates, you must
configure a login account on your FTP server, which the IP Phone 1535 will
use in making its connection during the software update process.
You must provision an FTP user account with a username and password as
follows:
•
Username: ipphone
•
Password: 15354all
When the IP Phone 1535 attempts to make a connection to your FTP
server, it will automatically do so using this username and password. These
required username and password values are coded into the firmware of the
IP Phone 1535, and so your FTP account information must be configured
to match.
Provisioning the FTP server directory structure
In order for the IP Phone 1535 to successfully find the software update files
available on your FTP update server, the directory structure on the FTP
server must be provisioned as follows:
/ [hardware version] / [software version]
For more information, see Figure 3 "Sample FTP server directory structure"
(page 46).
•
The ROOT (/) Directory: The ROOT Folder of your FTP server is
the folder to which the IP Phone 1535 will connect and authenticate
itself (using the username ipphone and the password 15354all,as
provisioned in your FTP account setup).
•
The [hardware version] Folder: This folder sits inside the Root folder the name of the [hardware version] folder corresponds to the hardware
version of your IP Phone 1535. You will need a corresponding [hardware
version] folder inside the Root folder for every different hardware version
for every IP Phone 1535 device installed on your network. That is, if you
have an IP Phone 1535 with hardware version 1.0, you will need to have
a corresponding [hardware version] folder named ’1.0’ within your Root
folder. If you then also have an IP Phone 1535 installed on your network
with hardware version 1.1, you will need to add a second [hardware
Copyright © 2009, Nortel Networks
.
Nortel IP Phone 1535 Installation and Commissioning
Nortel Communications Servers
NN43160-300 02.03 Standard
Release 4.0/SN10 28 October 2009
Page 43

Provisioning the FTP update server 43
version] folder (named 1.1) within the Root folder of your FTP server
for that hardware version as well.
•
The [software version] Folder: This folder sits inside the [hardware
version] folder - the folder name corresponds to the software version of
the IP Phone 1535 update files it contains. You will need a corresponding
[software version] folder inside the Root folder for every different software
version you wish to make available on your network. That is, if you have
an IP Phone 1535 software update with version 0.1.12, you will need to
have a corresponding 0.1.12 [software version] folder placed within the
[hardware version] folder corresponding to every hardware version of
IP Phone installed on your network. If you then also have an IP Phone
1535 software update with version number 0.1.13, you will need to add
a second [software version] folder (0.1.13) within the [hardware version]
folder corresponding to each IP Phone hardware version.
Example: You have an IP Phone 1535 with hardware version 1.1. In
setting up your FTP server for future updates to this IP Phone, you create a
[hardware version] folder inside the ROOT Directory, and name it 1.1. Your
IP Phone has a current software version of 0.1.12. You have two available
updates you wish to host, 0.1.13 and 0.1.14. For each of these software
update versions, create a [software version] folder within all [hardware
version] folder and place the update files in their respective folders.
FTP software update files
There are three different kinds of files that are required for the firmware
update process:
• tar, tar2, tar3: These are the actual software upgrade files that contain
the firmware content itself.
•
filecheck: the checksum file that confirms the integrity of the software
upgrade files.
•
FirmwareUpdateRequest.acfg: This is the file that contains hardware
and software version numbers for the available firmware updates. The
FirmwareUpdateRequest.acfg file is what the IP Phone 1535 uses to
compare its current firmware version number against to determine if
there are updates available. Should the version number comparison
show that an update is available, this file directs the IP Phone to the
appropriate folder to initiate the download of the updated software.
Handling the FirmwareUpdateRequest.acfg file
The FirmwareUpdateRequest.acfg file is the most important file in the entire
software update process. When the IP Phone 1535 goes to the FTP server
to check for available updates, the FirmwareUpdateRequest.acfg file is
what it uses to learn if updates are available, and also the location of those
update files should a newer version be detected.
Copyright © 2009, Nortel Networks
.
Nortel IP Phone 1535 Installation and Commissioning
Nortel Communications Servers
NN43160-300 02.03 Standard
Release 4.0/SN10 28 October 2009
Page 44

44 IP Phone 1535 system software updates
The FirmwareUpdateRequest.acfg file requires special handling in its
placement on your FTP server - for each firmware update package,
there is a new version of the FirmwareUpdateRequest.acfg file, and for
the IP Phone 1535 to be able to use it effectively, it needs to be placed
into the folder for the previous available software version. That is, if
you receive a new firmware update package, 0.1.13, for example, that
package contains a FirmwareUpdateRequest.acfg file. Instead of placing
the file in the 0.1.13 [software version] folder, though, you must place the
FirmwareUpdateRequest.acfg file in the folder for the previous update
software version, 0.1.12, so that the file points to the latest available install
package.
To better understand this, consider the way the IP Phone 1535 uses the
FirmwareUpdateRequest.acfg file in learning about and finding available
updates:
1. Upon initiation of the Software Update process, the IP Phone 1535
makes a connection to your FTP server, authenticates, and then looks
in your FTP server’s root directory for the folder corresponding to its
hardware version, and then looks for the folder that corresponds to its
installed software version.
2. Once the IP Phone 1535 reaches the software version folder
that corresponds to its installed software version, it searches for
the FirmwareUpdateRequest.acfg file to compare its installed
firmware version number with the firmware version number of the
FirmwareUpdateRequest.acfg file.
3. If the IP Phone 1535 has a software version number that matches
that of the FirmwareUpdateRequest.acfg file, then the IP Phone
1535 determines itself to be current and closes the active connection
to your FTP server. If the FirmwareUpdateRequest.acfg file is one
from a later version, though, the IP Phone moves up one folder
level (to the [hardware version] folder level) and then searches for
a folder that corresponds to the version number contained in the
FirmwareUpdateRequest.acfg file. Upon finding that folder, it initiates
the download and installation of the firmware update it finds in this
new folder. The IP Phone then repeats the process of checking the
FirmwareUpdateRequest.acfg file in the latest folder, to determine if
more updates are available, until it is fully updated.
The reason for placing the FirmwareUpdateRequest.acfg file from the latest
firmware update package into the [software version] folder for the previous
version is because the IP Phone initially moves only to the folder for its
current software version. Placing the FirmwareUpdateRequest.acfg file for
the later version in the folder for the earlier version allows the IP Phone to
discover that it should leave the folder for its current version and look for a
folder one version up so that it can find updates there.
Copyright © 2009, Nortel Networks
.
Nortel IP Phone 1535 Installation and Commissioning
Nortel Communications Servers
NN43160-300 02.03 Standard
Release 4.0/SN10 28 October 2009
Page 45

Provisioning the FTP update server 45
If the IP Phone 1535 reaches a [software version] folder and finds the
FirmwareUpdateRequest.acfg file is the same version number as the
folder in which it resides, the IP Phone will consider itself updated fully
and never go looking for folders that contain newer versions. Thus,
it is extremely important to the Update process for you to place the
FirmwareUpdateRequest.acfg file for any new firmware version you receive
into the folder for the previous update version - otherwise, the IP Phone
1535 will not update itself.
ATTENTION
In order to maintain an unbroken sequence between one version of an available
firmware updates and the next, it is very important that when you place the newest
available FirmwareUpdateRequest.acfg file into the folder for the previous update
version, you DO NOT forget to move, in turn, the FirmwareUpdateRequest.acfg
file for the previous version to the folder of the update previous to that folder.
For example: You receive an update package for firmware version
0.9.44. To point the IP Phone to the new update folder, you place the
0.9.44 FirmwareUpdateRequest.acfg file to the folder for 0.9.42. The
FirmwareUpdateRequest.acfg file for version 0.9.42 does not get destroyed,
however, but moved to the folder for version 0.9.41, and so on.
As an added note, be sure and keep a copy of the FirmwareUpdateRequest.acfg
file for the latest version in the latest version folder, so that the IP Phone 1535 will
determine itself to be current after reaching that folder.
For example: For the firmware version 0.9.44, you would copy the 0.9.44
FirmwareUpdateRequest.acfg file into the 0.9.42 folder (as above), and also
leave a copy in the 0.9.44 folder. Then, when the IP Phone 1535 reaches the
0.9.44 folder, it uses this file to determine that this is the final version available
and completes its update process.
Copyright © 2009, Nortel Networks
.
Nortel IP Phone 1535 Installation and Commissioning
Nortel Communications Servers
NN43160-300 02.03 Standard
Release 4.0/SN10 28 October 2009
Page 46

46 IP Phone 1535 system software updates
Figure 3 Sample FTP server directory structure
Copyright © 2009, Nortel Networks
.
Nortel IP Phone 1535 Installation and Commissioning
Nortel Communications Servers
NN43160-300 02.03 Standard
Release 4.0/SN10 28 October 2009
Page 47

Additional configuration using the VoIP
Settings menu
This chapter describes additional configuration options found on the VoIP
Settings menu, which have not been described elsewhere in this document.
Registration option
This section covers functions of the Registration option of the VoIP Settings
menu not covered elsewhere in this document. Specifically, De-Register
function and the Expires configuration option.
To access the Registration configuration options:
Step Action
47
1
2
Log in to the IP Phone 1535 using the Admin Mode. For more
information, see "Logging in to the IP Phone 1535 Admin Mode"
(page 25).
From the Main Menu, select Settings > VoIP Settings >
Registration, and press OK.
De-Registering the IP Phone 1535
Use the De-register function to de-register the IP Phone 1535 as an
endpoint on your communications server. For this function to be available,
the IP Phone 1535 must be registered as a valid endpoint with the
Communications Server. For more information, see "Registering the IP
Phone 1535" (page 34).
Accessing and activating the De-register function:
—End—
Copyright © 2009, Nortel Networks
.
Nortel IP Phone 1535 Installation and Commissioning
Nortel Communications Servers
NN43160-300 02.03 Standard
Release 4.0/SN10 28 October 2009
Page 48

48 Additional configuration using the VoIP Settings menu
Step Action
1
Log in to the IP Phone 1535 using the Admin Mode. For more
information, see "Logging in to the IP Phone 1535 Admin Mode"
(page 25).
2 From the Main Menu, select Settings > VoIP Settings >
Registration, and press OK.
3
Select De-register and press OK. The IP Phone 1535 will now
deregister itself as an endpoint of the Communications Server.
—End—
Setting the registration interval using the Expires configuration
option
To maintain access, the IP Phone 1535 must periodically reregister itself as
an endpoint with the Communications Server. The period of time between
these scheduled registrations is a value (in seconds) that you can set using
the Expires configuration option.
Configuring the registration interval:
Step Action
1
Log in to the IP Phone 1535 using the Admin Mode. For more
information, see "Logging in to the IP Phone 1535 Admin Mode"
(page 25).
2
From the Main Menu,gotoSettings > VoIP Settings >
Registration and select Expires, and press OK
3
Enter a value in seconds from 60 to 86400, and press OK(the
default value is 86400).
—End—
Misc. (Miscellaneous) configuration option
This section covers additional functions of the Misc. configuration option not
covered elsewhere in this document. Specifically, the Call Total Bandwidth
(CTBW), Codec Priority, and Voice Mail functions. Each of these will be
covered separately in subsequent sections.
To access the Misc. configuration options:
Nortel IP Phone 1535 Installation and Commissioning
Copyright © 2009, Nortel Networks
.
Nortel Communications Servers
NN43160-300 02.03 Standard
Release 4.0/SN10 28 October 2009
Page 49

Step Action
Accessing and modifying Call Total Bandwidth (CTBW) 49
1
Log in to the IP Phone 1535 using the Admin Mode. For more
information, see "Logging in to the IP Phone 1535 Admin Mode"
(page 25).
2 From the Main Menu,gotoSettings > VoIP Settings >
Registration and select Misc. then press OK to accept selection.
—End—
The available Misc. configuration options are as follows:
•
Domain Name: For more information, see "Configuring VoIP domain
name information" (page 33).
•
CTBW: Configure the Call Total Bandwidth value using this configuration
option, to define the limit for bandwidth usage by the IP Phone 1535, in
its operations on your network. For more information, see "Accessing
and modifying Call Total Bandwidth (CTBW)" (page 49).
•
Ports: For more information, see "Modifying port assignments" (page
33).
•
Codec Priority: The IP Phone 1535 supports various audio and video
codecs, and you can set the order of preference for their use (depending
on the particulars of your network setup) by using the Codec Priority
configuration option. For more information, see "Modifying Codec
Priority lists" (page 50).
•
Voice Mail: Set up Voice Mail on the VoIP network service. For more
information, see "Configuring VoIP Voice Mail" (page 51). You can
access the Voice Mail configuration option on the Misc.section of the
VoIP Settings menu without logging in using the Admin Mode.
• Decline Type
Accessing and modifying Call Total Bandwidth (CTBW)
To define the limit for bandwidth usage by the IP Phone 1535, in its
operations on the VoIP network, you would use the CTBW configuration
option.
Accessing and modifying CTBW parameters:
Nortel IP Phone 1535 Installation and Commissioning
Copyright © 2009, Nortel Networks
.
Nortel Communications Servers
NN43160-300 02.03 Standard
Release 4.0/SN10 28 October 2009
Page 50

50 Additional configuration using the VoIP Settings menu
Step Action
1
Log in to the IP Phone 1535 using the Admin Mode. For more
information, see "Logging in to the IP Phone 1535 Admin Mode"
(page 25).
2 From the Main Menu,gotoSettings > VoIP Settings >
Registration and select Misc. then press OK to accept selection.
3
Select CTBW and press OK. The parameters controlling bandwidth
usage are now available. Set the bandwidth parameter to a value
between the range of 60 and 250 Kb/s. By default, the IP Phone
1535 is set with a CTBW value of 250 Kb/s.
4
Press OK to confirm.
Modifying Codec Priority lists
To set Audio and Video codec priorities (to suit the specifics of your
Communications Server setup), use this configuration option.
Configuring the order of Codec Priority:
Step Action
—End—
1
2
3
4
Copyright © 2009, Nortel Networks
.
Log in to the IP Phone 1535 using the Admin Mode. For more
information, see "Logging in to the IP Phone 1535 Admin Mode"
(page 25).
From the Main Menu,gotoSettings > VoIP Settings > Misc. and
select Codec Priority. Press OK.
Select the Codec Type (Audio or Video) to configured, and press
OK.
Select the priority level, and assign a codec from the list of codecs
available:
a. Audio: The IP Phone 1535 supports the following Audio Codec
Types: G.711 u-law, G.711 a-law, G.723, G.729, AMR,orNone.
You can configure these Audio codec types in a priority list of up
to five options. Prioritize codecs depending on your network
configuration.
b. Video: The IP Phone 1535 supports the following Video Codec
Types: H.263 and H.264. You can configure these Video codec
Nortel Communications Servers
Nortel IP Phone 1535 Installation and Commissioning
NN43160-300 02.03 Standard
Release 4.0/SN10 28 October 2009
Page 51

Configuring VoIP Voice Mail 51
types in a priority list of up to five options. Prioritize codecs
depending on your network configuration.
5
Press OK to accept the new priority level of the chosen Codec.
6 After modifying the Codec Priority list, you must manually register
the IP Phone 1535 with the network, in order to utilize the new
codec priorities in subsequent operation. For more information, see
"Registering the IP Phone 1535" (page 34).
Configuring VoIP Voice Mail
Before you use the VoIP Voice Mail service on the IP Phone 1535, configure
the Voice Mail configuration options with the proper Voice Mail Number,
Mailbox ID, and Mailbox Password.
Accessing the Voice Mail configuration option:
Step Action
1
2
From the Main Menu,gotoSettings > VoIP Settings > Misc. >
Voice Mail , and press OK.
On the Voice Mail menu the following configuration options are
available:
—End—
Configuring the Voice Mail Number:
Step Action
1
2
Copyright © 2009, Nortel Networks
.
•
Voice Mail Number: Configure the phone number used by the
IP Phone 1535 to reach the VoIP Voice Mail server. By default,
this value is 55999.
•
Mailbox ID: Configure the Mailbox ID used to access the VoIP
Voice Mail.
•
Mailbox Password: Configure the password used to access
the VoIP voice mailbox.
—End—
From the Main Menu, select Settings > VoIP Settings > Misc. >
Voice Mail > Number, and press OK.
Enter the Number associated with your voice mail. Press OK.
Nortel IP Phone 1535 Installation and Commissioning
Nortel Communications Servers
NN43160-300 02.03 Standard
Release 4.0/SN10 28 October 2009
Page 52

52 Additional configuration using the VoIP Settings menu
—End—
Configuring the Mailbox ID:
Step Action
1
From the Main Menu,gotoSettings > VoIP Settings > Misc. >
Voice Mail > ID, and press OK.
2
Enter the ID used to access your voice mail, and press OK.
Configuring the Mailbox Password:
Step Action
1
From the Main Menu, select Settings > VoIP Settings > Misc. >
Voice Mail > Password, and press OK.
2
Enter the Password used to access your voice mail. Press OK to
accept changes.
—End—
—End—
Copyright © 2009, Nortel Networks
.
Nortel IP Phone 1535 Installation and Commissioning
Nortel Communications Servers
NN43160-300 02.03 Standard
Release 4.0/SN10 28 October 2009
Page 53

Additional configuration using the
System Settings menu
This chapter describes additional configuration options found on the System
Settings menu, which have not been described elsewhere in this document.
Specifically, the functions used to modify
functionality contained in the Technical Features configuration option, and
the Reset function.
Modifying the Date and Time
Use the Date and Time option on the System Settings configuration
menu to set the system Date and Time on the IP Phone 1535. It is NOT
required that you log in using the Admin Mode to access the Date and Time
configuration option.
Modifying the Date and Time:
Step Action
Date and Time, the system update
53
1
2
3 Enter the time (HH:MM), and select OK.
From Main Menu, select Settings > System Settings > Date and
Time, and press OK.
Enter the date (YYYY/MM/DD), and select OK.
—End—
Accessing and activating the Reset function
The IP Phone 1535 incorporates two databases in which local data
parameters are stored. The databases serve two basic functions:
•
Phonebook: Stores information related to call activity, such as phone
numbers and blocked call programming.
•
Settings: Saves any system configuration entries made on the IP
Phone 1535.
Nortel IP Phone 1535 Installation and Commissioning
Copyright © 2009, Nortel Networks
.
Nortel Communications Servers
NN43160-300 02.03 Standard
Release 4.0/SN10 28 October 2009
Page 54

54 Additional configuration using the System Settings menu
You can reset these two databases individually (or at the same time) by
means of the Reset configuration option, which erases the stored data.
On the Reset menu, the following configuration options are available:
•
Phonebook: Resets the Phonebook database.
•
Settings: Resets the System Settings database.
•
System: Resets BOTH the Phonebook and the Settings database at
the same time.
ATTENTION
Resetting the System database returns the IP Phone 1535 to factory default
settings.
Accessing and Activating the Reset function:
Step Action
1
Log in to the IP Phone 1535 using the Admin Mode. For more
information, see "Logging in to the IP Phone 1535 Admin Mode"
(page 25).
2
From the Main Menu, select Settings > System Settings > Reset,
and press OK.
3
Select the database to be reset (or System for both) and press OK
to confirm.
—End—
Accessing the Technical Features configuration option
The Technical Features configuration option of the System Settings menu
provides system information about the IP Phone 1535, including the current
hardware and software versions. This configuration option also contains
functions that allow you to check whether new updates are available for
the IP Phone 1535 software and also to download and install the available
updates found.
Accessing the Technical Features Configuration Option:
Step Action
1
Copyright © 2009, Nortel Networks
.
Log in to the IP Phone 1535 using the Admin Mode. For more
information, see "Logging in to the IP Phone 1535 Admin Mode"
(page 25).
Nortel Communications Servers
Nortel IP Phone 1535 Installation and Commissioning
NN43160-300 02.03 Standard
Release 4.0/SN10 28 October 2009
Page 55

Accessing the Technical Features configuration option 55
2
From the Main Menu, select Settings > System Settings >
Technical Features, and press OK.
—End—
On the Technical Features menu, the following configuration options are
available:
•
Show HW/SW Version: Displaycurrent versioninformation for hardware
and software installed on the IP Phone 1535. This configuration option
is not accessible while an active call is in operation - for the duration of
an active call, this menu option is inactive.
•
Check Updates: Check for available updates to the IP Phone 1535
currently installed system software.
•
Update Software: If the Check Updates option returns a confirmation
that a newer version of the IP Phone 1535’s installed system software is
available, you can use the Update Software option to download and
install the update from your configured FTP update server. For more
information, see "Initiating manual software updates for the IP Phone
1535 " (page 40)
•
Download Server Address: To obtain the system software updates,
you must update the IP Phone 1535 with the FTP server address
location from which to initiate the download. Use this configuration
option to specify the address information of your FTP update server - the
1535 will look for software updates at this FTP Download IP address.
•
Scheduled Update: Option used to Enable, Disable,orSet Schedule
for software updates to the IP Phone 1535.
Copyright © 2009, Nortel Networks
.
Nortel IP Phone 1535 Installation and Commissioning
Nortel Communications Servers
NN43160-300 02.03 Standard
Release 4.0/SN10 28 October 2009
Page 56

56 Additional configuration using the System Settings menu
Copyright © 2009, Nortel Networks
.
Nortel IP Phone 1535 Installation and Commissioning
Nortel Communications Servers
NN43160-300 02.03 Standard
Release 4.0/SN10 28 October 2009
Page 57

Configuring Email
Before E-mail services become available through the IP Phone 1535, you
must configure the E-mail account settings locally for access of the E-mail
services installed on your network. The IP Phone 1535 E-mail service
supports POP3-based and (partially) IMAP-based server types.
Microsoft Exchange Server is not a supported server type for this device.
Multiple E-mail accounts can be configured on a single IP Phone 1535, but it is
important to note that there is only one Inbox and Outbox, which means that the
Inbox and Outbox is shared between all accounts configured on the device.
You must configure the IP Phone 1535 with the following for the successful
configuration of the E-Mail services:
•
POP3 Server Address
57
ATTENTION
•
E-mail Username and Password
•
SMTP Authentication Information (if required)
The IP Phone 1535 E-Mail services are configured through the Messages
menu.
Configuring IP Phone 1535 Email account information
Configuring the IP Phone 1535 for E-mail functionality:
Step Action
1
2
3 Select either Add New (for new account setup) or Modify (to make
4
Copyright © 2009, Nortel Networks
.
With no other processes currently active on the IP Phone 1535, go
to the Main Menu, select Messages and press OK.
Select Account and press OK.
changes to a existing account) and select OK.
Enter E-mail configuration data into the appropriate fields:
Nortel Communications Servers
Nortel IP Phone 1535 Installation and Commissioning
NN43160-300 02.03 Standard
Release 4.0/SN10 28 October 2009
Page 58

58 Configuring Email
• SMTP Server
•
Receiving Protocol: Select either POP or IMAP as the
receiving protocol of the IP Phone 1535 E-mail service. Set to
the POP protocol by default.
•
POP Server/IMAP Server: Depending on the Receiving
Protocol accepted, define the POP or IMAP server address
information.
•
User/Account: Specifies whether the configured E-mail service
belongs to a specific User or is a general (shared) E-mail
account.
•
User Information: Configure user-specific information on the
IP Phone 1535 E-mail service by means of the User Information
configuration option, User Name and Email Address.
5
Select OK to confirm any entries made.
—End—
Emails containing phone number strings
If an email contains a phone number string, the IP Phone 1535 can either
use the number string as a phonebook entry or in returning a phone call to
the sender.
Example
An email is received that contains the phone number string 4024532022
in the message body. When the email is finished downloading to the IP
Phone 1535, the user can either select User number to automatically
return the call to the email sender at 4024532022 or add a new contact
using that number.
Copyright © 2009, Nortel Networks
.
Nortel IP Phone 1535 Installation and Commissioning
Nortel Communications Servers
NN43160-300 02.03 Standard
Release 4.0/SN10 28 October 2009
Page 59

The IP Phone 1535 Camera
Enabling and disabling the Camera
The Camera built into the IP Phone 1535 can be Disabled so that the video
and photo functions of the IP Phone 1535 can be turned off. You can access
the Enable / Disable Camera configuration option only if Admin Mode is
currently active.
Enabling / Disabling the IP Phone 1535 Camera Mode:
Step Action
59
1
Log in to the IP Phone 1535 using the Admin Mode. For more
information, see "Logging in to the IP Phone 1535 Admin Mode"
(page 25).
2
from the Main Menu, select Settings, Video Settings, and then
Camera. Press OK.
3
Depending on the current state of the Camera, select Enable or
Disable.
—End—
Copyright © 2009, Nortel Networks
.
Nortel IP Phone 1535 Installation and Commissioning
Nortel Communications Servers
NN43160-300 02.03 Standard
Release 4.0/SN10 28 October 2009
Page 60

60 The IP Phone 1535 Camera
Copyright © 2009, Nortel Networks
.
Nortel IP Phone 1535 Installation and Commissioning
Nortel Communications Servers
NN43160-300 02.03 Standard
Release 4.0/SN10 28 October 2009
Page 61

61
Troubleshooting
Required software for CS1000E call server in MCS5100 configuration
If your MCS 5100 resides on the same network as a CS1000E, make sure
your CS1000E has the following patches installed:
•
MPLR22491
•
MPLR22494
Known issues
•
Successful NAT/Firewall traversal requires an RTP Media Portal (same
as MMPC client).
•
If the IP Phone 1535 is installed within an IP Telephony environment in
which the G.723.1 codec is not supported by all endpoint devices (on
the same node), the IP Phone 1535 G.723.1 codec must be set as the
lowest priority (default setting) to avoid codec negotiation related issues.
•
Selecting the Korean language for your menu language option causes
the IP Phone 1535 to reboot automatically to enable the changes.
Basic troubleshooting
Check physical connections on the IP Phone 1535:
•
For power related failures ensure that the power supply is connected, as
IP Phone 1535 does not support PoE.
•
For issues of connectivity loss, check all installed cabling for the IP
Phone 1535: are all cables installed firmly and in the correct ports?
•
If the handset has no audio, check to see if the handset accidentally
connected to PSTN RJ-11 connector?
Troubleshooting connectivity issues
The following illustrates the icons used by the IP Phone 1535 in describing
the various network connection states encountered during operation and
installation:
Nortel IP Phone 1535 Installation and Commissioning
Copyright © 2009, Nortel Networks
.
Nortel Communications Servers
NN43160-300 02.03 Standard
Release 4.0/SN10 28 October 2009
Page 62

62 Troubleshooting
Copyright © 2009, Nortel Networks
.
Nortel IP Phone 1535 Installation and Commissioning
Nortel Communications Servers
NN43160-300 02.03 Standard
Release 4.0/SN10 28 October 2009
Page 63

IP Phone 1535 regulatory information
This chapter contains the regulatory information.
IP Phone 1535 emissions statement
Radio frequency electromagnetic energy is emitted from Wireless Lan
devices. The energy levels of these emissions are much less than the
electromagnetic energy emissions from wireless devices such as mobile
phones. Wireless LAN devices are safe for use by consumers because they
operate within the guidelines found in radio frequency safety standards
and recommendations. The use of Wireless LAN devices be restricted
in some situations or environments, such as on board an airplane, an
explosive environment or situations where interference risk to other devices
or services is perceived or identified as harmful. In cases in which policy
regarding use of Wireless devices in specific environments is not clear
(airports, hospitals, industrial plants, private buildings), obtain authorization
to use these devices prior to operating the equipment.
63
Regulatory information and disclaimers
Privacy of communications not be ensured when using this telephone.
To prevent radio interference to the licensed service, this device must be
operated indoors only and should be kept away from windows to provide
maximum shielding.
The user should not make any changes or modifications not expressly
approved by Nortel Networks. Any changes or modifications made to
this device that are not expressly approved by the manufacturer void
the user’s authority to operate the equipment. The manufacturer is not
responsible for any radio or television interference caused by unauthorized
modification of this device, or substitution or attachment of connecting
cables and equipment other that those specified by the manufacturer. It is
the responsibility of the user to correct any interference caused by such
unauthorized modification, substitution or attachment.
The manufacturer and its authorized resellers or distributors will assume no
liability for any damage or violation of government regulations arising from
failure to comply with these guidelines.
Nortel IP Phone 1535 Installation and Commissioning
Copyright © 2009, Nortel Networks
.
Nortel Communications Servers
NN43160-300 02.03 Standard
Release 4.0/SN10 28 October 2009
Page 64

64 IP Phone 1535 regulatory information
Regulatory and safety information
The manufacturer and its authorized resellers or distributors will assume no
liability for any damage or violation of government regulations arising from
failure to comply with these guidelines.
The following table lists EMC compliance for various jurisdictions.
Table 1
EMC compliance
Jurisdiction
Standard
Description
United States FCC CFR 47 Part 15 Class B Emissions: FCC Rules
for Radio Frequency Devices
Canada ICES-003 Class B Emissions:
Interference-Causing
Equipment Standard: Digital
Apparatus
Australia/New Zealand CISPR 22 Class B Emissions: Information
technology equipment - Radio
disturbance
European Community
EN 55022 Class B Emissions: Information
technology equipment - Radio
disturbance
EN 55024 Information technology
equipment - Immunity
characteristics Limits and
methods of measurement
EN 61000-3-2 Limits for harmonic current
emissions (equipment input
current <= 16 A per phase)
EN 61000-3-3 Limitation of voltage fluctuations
and flicker in low-voltage supply
systems for equipment with
rated current <= 16 A
Japan VCCI Regulations for voluntary
control measures.
The following table lists the Safety information for various jurisdictions.
Table 2
Safety
Jurisdiction
Standard
United States UL 60950-1 Safety of Information
Nortel IP Phone 1535 Installation and Commissioning
Copyright © 2009, Nortel Networks
.
Nortel Communications Servers
NN43160-300 02.03 Standard
Release 4.0/SN10 28 October 2009
Description
Technology Equipment
Page 65

USA-FCC (Federal Communications Commission) statement 65
Jurisdiction
Canada CSA 60950-1-03 Safety of Information
European Community EN 60950-1 ITE equipment - Safety - Part 1:
Australia/New Zealand AS/NZS 60950.1:2003 Safety of Information
Standard
Description
Technology Equipment
General requirements
Technology Equipment
Other Safety Approvals: IEC 60950-1: ITE equipment - Safety - Part 1:
General requirements.
Warnings
Connecting to PSTN
Your IP Phone 1535 does not support connection to the Public Switched
Telephone Network (PSTN).
Wireless
With the RF WiFi transmitter enabled, this device must be operated only
indoors.
Connecting power
Use only with Nortel-approved Limited Power Source 5 V DC, 3A (FSP
Group Inc. Model: FSP015- 1AD201A).
Connecting to LAN
Severe damage to your IP phone will occur if this telephone is plugged into
an ISDN connection. Consult your system administrator to ensure that you
are plugging your telephone into a 10/100BaseT Ethernet jack.
Operation
The earpiece and the mouthpiece region on the handset can attract and
retain small objects.
Location
It is recommended that you do not expose this unit to direct sunlight for
a prolonged period of time.
USA-FCC (Federal Communications Commission) statement
This device complies with Part 15 rules. Operation is subject to the following
two conditions:
1. This device not cause harmful interference, and
2. This device must accept any interferencereceived, including interference
that cause undesired operation.
Nortel IP Phone 1535 Installation and Commissioning
Copyright © 2009, Nortel Networks
.
Nortel Communications Servers
NN43160-300 02.03 Standard
Release 4.0/SN10 28 October 2009
Page 66

66 IP Phone 1535 regulatory information
FCC Interference statement
This equipment has been tested and found to comply with the limits of
a Class B digital device pursuant to Part 15 of the FCC Rules. These
limits are designed to provide reasonable protection against harmful
interference when the equipment is operated in a residential environment.
This equipment generates, uses, and radiates radio frequency energy, and
if not installed and use in accordance with the instructions, cause harmful
interference to radio communication. However, there is no guarantee that
interference will not occur in a particular installation. If this equipment does
cause interference to radio or television reception, which can be determined
by turning the equipment off and on, the user is encouraged to correct the
interference by one of the following measures:
1. Reorient or relocate the receiving antenna.
2. Increase the separation between the equipment and receiver.
3. Connect the equipment to an outlet on a circuit different from which
the receiver is connected.
4. Consult the dealer or an experienced radio/TV technician.
Compliance statement for Canada
This Class B digital apparatus complies with Canadian ICES-003.
Cet appareil numérique de la classe B est conforme à la norme NMB-003
du Canada.
This device complies with Class B Limits of Industry Canada. Operation is
subject to the following two conditions:
1. This device not cause harmful interference, and
2. This device must accept any interferencereceived, including interference
that cause undesired operation.
The device is certified to the requirements of RSS-210 for 2.4GHz spread
spectrum devices. The use of this device in a system operating either
partially or completely outdoors require the user to obtain a license for the
system according to the Canadian regulations. For further information
contact you Local Industry Canada office.
Telecom requirements for both Canada and USA
This equipment complies with Part 68 of the FCC rules and requirements
adopted by ACTA. On the bottom of the equipment is a label that
contains, among other information, a product identifier in the format US:
AAAEQ##TXXXX. If requested, this number must be provided to the
telephone company.
Copyright © 2009, Nortel Networks
.
Nortel IP Phone 1535 Installation and Commissioning
Nortel Communications Servers
NN43160-300 02.03 Standard
Release 4.0/SN10 28 October 2009
Page 67

Telecom requirements for both Canada and USA 67
This equipment uses an RJ11C modular plug to connect to the premises
wiring. A plug and jack used to connect this equipment to the premises
wiring and telephone network must comply with the applicable FCC Part
68 rules and requirements adopted by the ACTA. A compliant telephone
cord and modular plug is provided with this product. It is designed to be
connected to a compatible modular jack that is also compliant.
See installation instructions for details.
The Ringer Equivalence Number (REN) is used to determine the maximum
number of devices that be connected to a telephone line.
Excessive RENs on a telephone line result in the devices not ringing in
response to an incoming call. In most but not all areas, the sum of RENs
should not exceed five (5.0). The REN for the IP Phone 1535 for Canada is
0.1A and for USA is 1.6B. To be certain of the number of devices that be
connected to a line as determined but the total RENs, contact the local
telephone company.
If the IP Phone 1535 causes harm to the telephone network, the telephone
company will notify you in advance that temporary discontinuance of service
be required. But if advance notice isn’t practical, the telephone company will
notify the customer as soon as possible. Also, you will be advised of your
right to file a complaint with the FCC if you believe it is necessary.
The telephone company make changes in its facilities, equipment,
operations, or procedures that could affect the operation of the equipment.
If this happens the telephone company will provide advance notice in order
for you to make necessary modifications to maintain uninterrupted service.
If trouble is experienced with the IP Phone 1535, for repair or warranty
information, please contact Nortel Networks Inc. in the USA at 1-8004NORTEL. If the equipment is causing harm to the network, the telephone
company request that you disconnect the equipment until the problem
is resolved.
Connection to party line service is subject to state tariffs. Contact the
state public utility commission, public service commission or corporation
commission for information.
This equipment is hearing aid compatible.
This product meets applicable Industry Canada technical specifications.
Copyright © 2009, Nortel Networks
.
Nortel IP Phone 1535 Installation and Commissioning
Nortel Communications Servers
NN43160-300 02.03 Standard
Release 4.0/SN10 28 October 2009
Page 68

68 IP Phone 1535 regulatory information
WARNING
WARNING: To comply with FCC radio frequency (RF) exposure
limits, this device should be located at a minimum of 7.9 inches
(20 cm.) or more from the body of all persons.
Copyright © 2009, Nortel Networks
.
Nortel IP Phone 1535 Installation and Commissioning
Nortel Communications Servers
NN43160-300 02.03 Standard
Release 4.0/SN10 28 October 2009
Page 69

Page 70

Nortel Communications Servers
Nortel IP Phone 1535 Installation and Commissioning
Copyright © 2007, Nortel Networks
All Rights Reserved.
Publication: NN43160-300
Document status: Standard
Document version: 02.03
Document date: 28 October 2009
To provide feedback or to report a problem with this document, go to h
Sourced in Canada.
LEGAL NOTICE While the information in this document is believed to be accurate and reliable, except as otherwise expressly
agreed to in writing NORTEL PROVIDES THIS DOCUMENT "AS IS" WITHOUT WARRANTY OR CONDITION OF ANY KIND,
EITHER EXPRESS OR IMPLIED. The information and/or products described in this document are subject to change without notice.
Nortel, the Nortel logo and the Globemark are trademarks of Nortel Networks.
All other trademarks are the property of their respective owners.
ttp://www.nortel.com/documentfeedback.
 Loading...