

Page 1

Norstar
Norstar
Compact Plus Release 5
Modular Plus Release 5
System Administration Guide
System Administration Guide
Page 2

Published by Nortel Networks on behalf of British Telecommunications PLC. All
possible care has been taken in the preparation of this publication, but British
Telecommunications PLC assumes no liability for any inaccuracies that may occur.
British Telecommunication PLC reserves the right to make changes without notice both
to this publication and to the product that it describes.
No part of this publication may be reproduced, transmitted, transcribed, stored in a
retrieval system, or translated into any human or computer language in any form or by
any means without prior written permission of British Telecommunications PLC.
If you find any errors in this publication, or would like to make suggestions for its
improvement, please write to:
British Telecommunications
Norstar Product Manager
Weston House
246 High Holborn
London, WC1V 7DQ
British Telecom is a registered trademark of:
British Telecommunications PLC
Registered Office 81, Newgate Street
London, EC1A 7AJ
Registered in England, Number 1800000
Meridian, Companion, and Norstar are trademarks of Nortel Networks.
Meridian Norstar Business Communication System is manufactured by Nortel
Networks.
Touchtone is a trademark of British Telecom.
This document is for use with Compact Plus Release 4 Norstar UK.
P0986921 02
Printed in Canada
©2002 Nortel Networks
Page 3

SECTION I: System Administration 9
Introduction 11
Safety and Regulatory information 12
You must be the administrator 13
Here’s what you need to start programming 13
Understanding the telephone keys 15
Starting a programming session 18
Ending a programming session 19
Using passwords to access programming 19
Understanding your system 20
Map of Administrator Plus programming 20
iii
Contents
SECTION II: System programming 23
Conventions used in this guide 24
Programming overview 24
Using passwords 29
Programmable settings and features 31
Making suggestions 38
Advice Line 38
Programming Terminals and Extensions 39
Terminals and extensions 40
Assigning a line to an extension (line access) 40
Assigning line pool access 42
Assigning a Prime line to an extension 42
Assigning intercom keys to an extension 43
Assigning an Answer key to an extension 44
Setting the Originating Line Identification for an extension 45
Programming Hospitality Services 47
Hospitality extensions 48
Alarm time (AL) feature 49
Hospitality Services admin alarm feature 51
Room occupancy (RO) 52
Room condition (RC) 53
Service time 55
Software Keys 57
Viewing the System ID 58
Software Keys 58
Setting System speed dial 61
Setting System speed dial 62
Assigning a number to a System speed dial code 62
Selecting a line 63
Setting the system to display a name instead of a number 63
Setting the speed dial number to bypass restrictions 65
P0607114 Issue 01 Compact Plus System Administration Guide
Page 4

Naming extensions and lines 67
Naming extensions 68
Naming lines 69
Changing the time and date 71
Changing the time and date 72
Changing the time 72
Changing the date 73
Changing the time and date using the Basic password 73
Changing the time by an hour 74
Automatic Time & Date 74
Assigning a Direct-Dial extension 75
Programming Direct-Dial 76
Programming an internal Direct-Dial extension 76
Programming an external Direct-Dial extension 77
Barring calls and privileges (Restrictions) 79
Using restriction filters to bar calls 80
Assigning filters to a telephone (Extn restrns) 83
Assigning filters to a line (Line restrns) 84
Assigning filters to a line/extension (Line/extn restrns) 85
Class of Service passwords 86
Assigning a remote access filter 89
Locking an extension 93
Preventing Last Number Redial 94
Preventing Saved Number Redial 94
Preventing Recall 95
Preventing Redirect 96
iv
Programming capabilities 97
Programming an extension 98
Setting Call Forward no answer 98
Setting Call Forward on Busy 100
Programming Do Not Disturb on Busy 101
Programming Handsfree 102
Programming Handsfree answerback 103
Assigning a Pickup group 104
Assigning a page zone 104
Programming paging 105
Assigning telephones to the Direct-Dial extension 106
Allowing Priority call 107
Assigning a Hotline 108
Auxiliary ringer 109
Activating Redirect ring 109
Receive tones 110
Programming User preferences 111
Programming User preferences 112
Changing the key programming for an extension 112
Changing a personal (user) speed dial code 113
Changing the Call log options 114
Changing the dialling options 114
Changing the display language 115
Changing the display contrast 116
Changing the Ring type 116
P0607114 Issue 01 Compact Plus System Administration Guide
Page 5

Programming Hunt groups 119
Programming Hunt Groups 120
Adding or removing members from a group 121
Moving members of a group 122
Assigning or unassigning lines to a group 122
Assigning a distinctive ring pattern to a Hunt Group 123
Setting the distribution mode 124
Setting the hunt delay 125
Programming options if all hunt members are busy 125
Programming the queue timeout 126
Programming the overflow extension 127
Setting the name 127
Checking hunt group metrics 128
Programming feature settings 131
Background music 132
On hold 132
Receiver volume 133
Camp timeout 133
Park timeout 134
Park mode 135
Transfer callback 136
Network callback 137
Held line reminder and delay 137
Conference tone 138
Directed (call) pickup 139
Page tone 139
Page timeout 140
Call log space 140
Alarm extension 141
Answer extension 142
Setting SWCA controls 143
CLID Match 144
v
Moving and copying 145
Extension relocation 146
Copying programming for telephones 147
Settings for analogue equipment 151
Settings for analogue equipment 152
Setting the delay before the ATA/I-ATA answers 152
Changing the dial mode of an ATA or an I-ATA 153
Setting whether the ATA/I-ATA should receive system tones 154
Setting whether an ATA is used on-site or off-site 155
Services 157
Using alternate or scheduled services 158
Turning services on or off 158
Designating alternate routes for calls 161
Programming routes 163
Programming destination codes 164
Turning a manual service on or off with a feature code 167
Assigning control extensions 168
Changing the name of a schedule 169
Changing the time of a schedule 170
P0607114 Issue 01 Compact Plus System Administration Guide
Page 6

Passwords 171
Password security 172
Setting the SAPLUS password 172
Setting the Administrator password 173
Setting the Basic password 173
Hospitality passwords 174
I-RAD password 175
Call services 177
Erasing a forgotten Call log password 178
Programming Call services 179
1st Display 179
Auto called ID 180
Remote access 181
Programming lines and features for remote access 182
Auto Attendant 187
Auto Attendant 188
System Answer 188
Custom Call Routing (CCR) 189
CCR groups 189
Direct extension dialling 190
Customising System Answer and CCR 190
Turning System Answer on or off 191
Turning CCR on or off 191
Choosing the attendant telephone 191
Setting the number of rings before System Answer answers a call 192
Setting the number of rings before a caller hears the CCR greeting 192
Adding or removing extensions from a CCR group 193
Using the pre-recorded greetings 194
Using customised greetings for System Answer and CCR 194
Recording customised greetings for System Answer and CCR 196
Programming or changing CCR destinations 197
Testing your custom System Answer and CCR 197
vi
Maintenance 199
Beginning a Maintenance session 200
Checking the system version of the software 201
System Administration Log record 201
Troubleshooting 203
Recording and reporting alarm codes 204
Clearing lines 204
Power failure 205
Power-fail telephone 206
SECTION III: Using telephone features 207
About your system telephones 209
T7316E Business Series Terminals and KIMs 210
T7316 Business Series Terminal key defaults 213
M7324N telephone and CAPN 214
M7310N telephone 215
M7208N/T7208 telephones 216
M7100N/T7100 telephones 217
P0607114 Issue 01 Compact Plus System Administration Guide
Page 7

M7000/T7000 telephones 217
Release key 218
Visually Impaired Operator Console 218
Common feature display messages 219
Customising your telephone 223
Dialling mode 224
Display contrast 225
Key Inquiry 225
Moving line keys 226
Ring type 227
Ring volume 227
Programming M7000/T7000 memory keys 227
Using personal features 229
Background music 230
Do Not Disturb 230
Personal Speed Dial codes 231
Using Speed Dial 231
Answering calls 233
Answering a call 234
Sorting calls by distinctive ring patterns 234
Privacy feature (external calls only) 234
Answering the next queued call 235
Answering hunt group calls 235
Multiple appearances of DIA lines 236
Using SWCA line buttons 236
Using Handsfree 239
Answering a telephone using Directed Pickup 240
Answering a telephone using Pickup Group 241
Answer keys 242
Listening in a group 243
Disconnecting accidentally 243
Malicious call identification (MCID) 243
vii
Holding calls 245
Holding 246
Listening on hold 247
Routing calls 249
Call Parking 250
DIA calls 251
Making a Priority call 253
Transferring a call 253
Transferring to a busy extension (Call Camping) 254
Making external calls 257
Using an exchange code 258
Using line pools 258
Making a conference call 259
Using Class of Service passwords 263
Making internal calls 265
Making an internal call 266
Making a conference call 266
Accessing a Direct-Dial extension 266
P0607114 Issue 01 Compact Plus System Administration Guide
Page 8

viii
Leaving messages 267
Paging 270
Remote paging 270
Voice call 271
Forwarding calls 273
Forwarding all calls 274
External Call forward 275
Line redirection 276
Saving time with features 279
Using System Speed Dial 280
Using Autodial 280
Using Redial 282
Programming memory keys 283
Using Ring Again 284
Using Hotline 285
Using display features 287
Time and Date 288
Static Time 288
Call Duration Timer 288
Call Information 289
Call Log 290
Autobumping 295
Special dialling features 297
Special dialling features 298
Inserting a pause 298
Setting Long tones 298
Programmed Release 299
Recall 299
Run/Stop 299
Wait for Dial Tone 300
Integrated Services Digital Network (ISDN) 301
ISDN services 302
Digital Network Adapter 304
Feature quick reference 305
Compact Plus feature codes 306
ISDN terminal features 309
ATA extension features 311
Appendix A: Programming overviews 313
Charts 315
Index 335
Compact Plus System Administration Guide P0607114 Issue 01
Page 9

SECTION I: System Administration
P0607114 Issue 01 Compact Plus System Administration Guide
Page 10

10
Compact Plus System Administration Guide P0607114 Issue 01
Page 11

Introduction
• Safety and Regulatory information.........12
• You must be the administrator.........13
• Here’s what you need to start programming.........13
• Understanding the telephone keys.........15
• Starting a programming session.........18
• Ending a programming session.........19
• Using passwords to access programming.........19
• Understanding your system.........20
• Map of Administrator Plus programming.........20
P0607114 Issue 01 Compact Plus System Administration Guide
Page 12
12 Introduction
Safety and Regulatory information
Markings
The CE Marking on this equipment indicates compliance with
the following:
This device conforms to Directive 1999/5/EC on Radio
Equipment and Telecommunications Terminal Equipment as
adopted by the European Parliament And Of The Council.
This is a class A product. In a domestic environment this product
may cause radio interference in which case the user may be
required to take adequate measures.
Hereby, Nortel Networks declares that Compact ICS, is in
compliance with the essential requirements and other relevant
provisions of Directive 1999/5/EC.
Information is subject to change without notice. Nortel Networks
reserves the right to make changes in design or components as
progress in engineering and manufacturing may warrant. This
equipment has been tested and found to comply with the
European Safety requirements EN 60950 and EMC requirements
EN 55022 (Class A) and EN 55024. These EMC limits are
designed to provide reasonable protection against harmful
interference when the equipment is operated in a commercial and
light industrial environment.
WARNING!
This is a class A product. In a domestic
environment this product may cause radio
interference in which case the user may be
required to take adequate measures. The
above warning is inserted for regulatory
reasons. If any customer believes that they
have an interference problem, either because
their Nortel Networks product seems to cause
interference or suffers from interference, they
should contact their distributor immediately.
The distributor will assist with a remedy for any
problems and, if necessary, will have full
support from Nortel Networks.
Compact Plus System Administration Guide P0607114 Issue 01
Page 13
You must be the administrator
If the installer has given this guide to you, you’re most likely the
system administrator.
As an administrator, your role is to
• help your colleagues learn to use their Norstar and Business
Series Terminal (BST) telephones
• change Norstar programming to customise the system for your
office or to keep up with changes in your office environment
or personnel
• call for help or service when necessary
System Administration Guide contains all the information you
need to become proficient at using and programming the
Compact Plus system.
Here’s what you need to start programming
Introduction 13
By following instructions on the telephone display and by
pressing a few keys, you can change the Compact Plus system to
suit the specific needs of your office. Before you begin
programming, make sure you have one of the following:
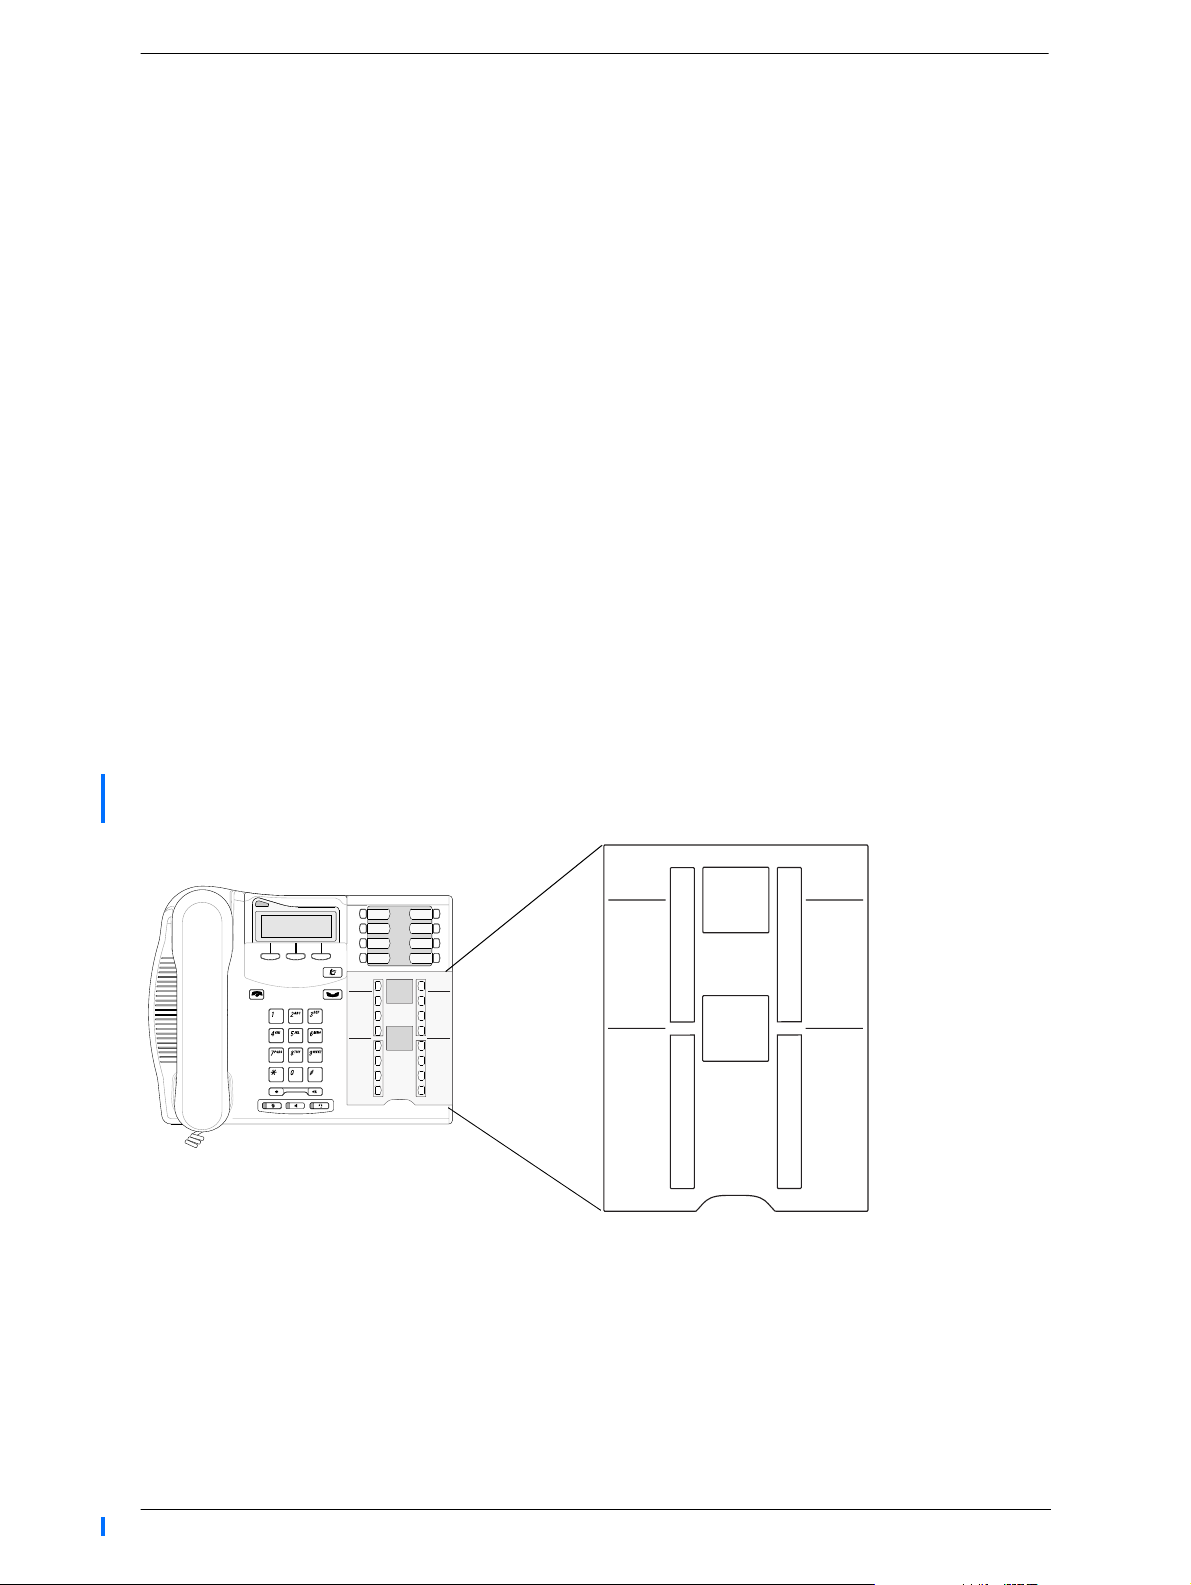
• T7316E telephone and the T7316/T7316E programming
overlay.
Heading
Back
Heading
Back
Business
Series
Terminal
Programming
overlay
Show
Next
Show
Next
T7316E
programming
buttons
T7316
programming
buttons
P0607114 Issue 01 Compact Plus System Administration Guide
Page 14
14 Introduction
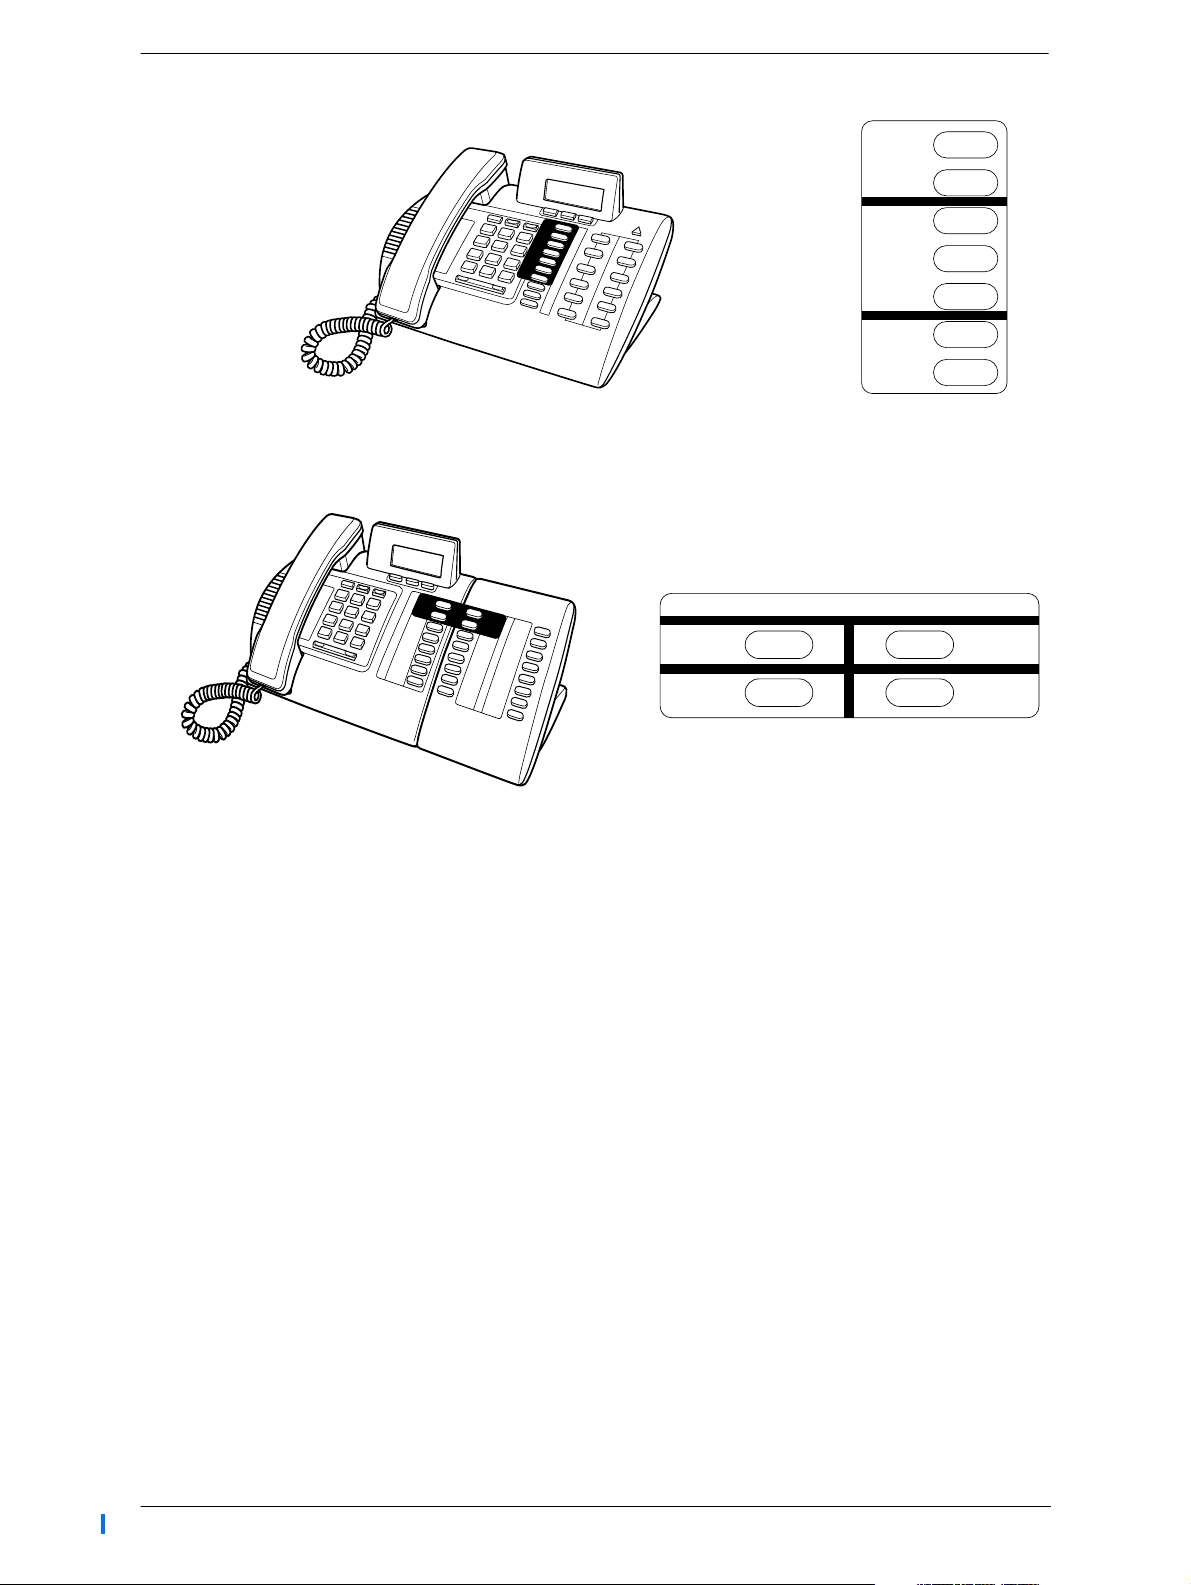
• an M7310N telephone and its programming overlay
Heading
Back
Norstar
Overlay
M7310N
Programming
Show
Next
OR
• an M7324N telephone and its programming overlay.
Norstar Programming Overlay M7324N
Heading
Back
Placing the programming overlay
Place the programming overlay on the appropriate memory keys
as shown in the preceding illustrations. Four memory keys have
special functions during a programming session. Once you exit
programming, the keys return to their normal functions. The
programming keys are active or inactive at different stages of
programming. When a key is active, the indicator next to it is lit
with a (ª or º).
This is what each programming key does:
Heading—shows you the heading for the current level
Back—moves you back one item at the current level
Show
Next
Show—shows you the first setting within the level
Next—moves you one item forward at the current level
Compact Plus System Administration Guide P0607114 Issue 01
Page 15
Introduction 15
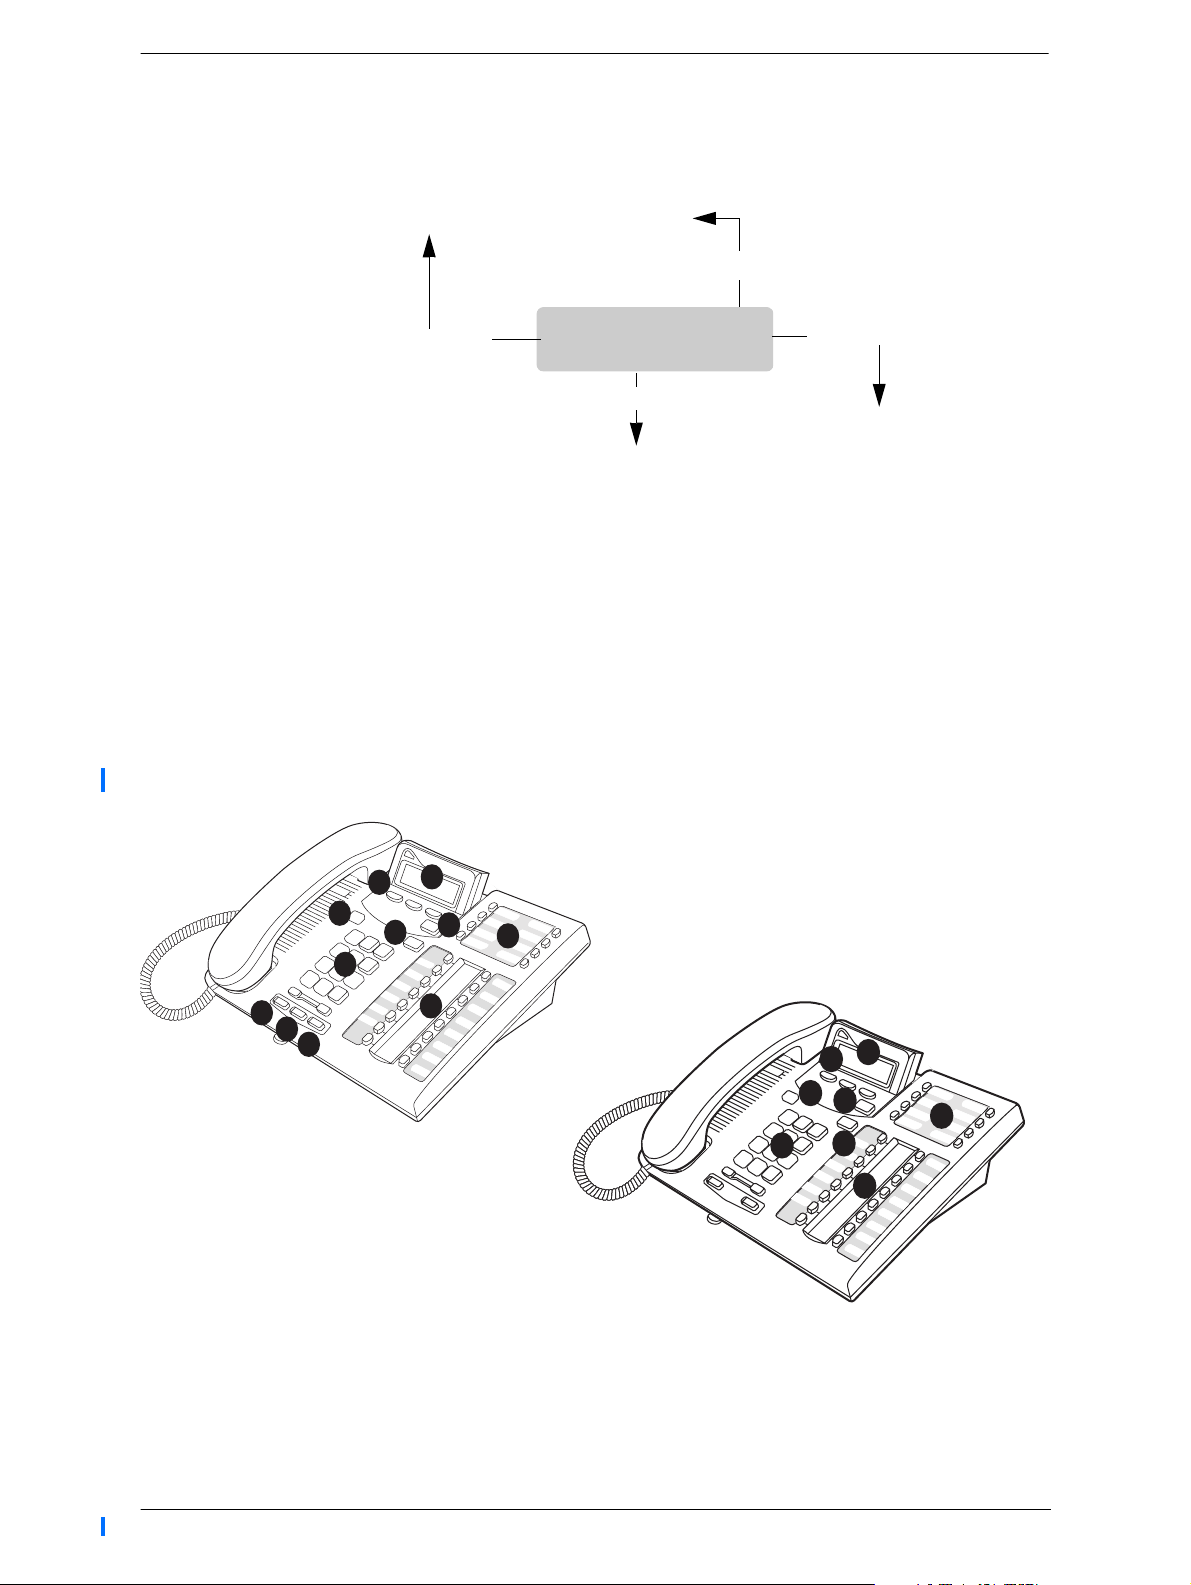
The diagram below visually shows you how the overlay buttons
move through the menus.
Terminals&Extns
Heading
EXT: 221
Current display
EXT: 222
Next
EXT: 223
Understanding the telephone keys
Take a few minutes to study the telephones. Notice that the T7316
and M7324 telephones do not have a Shift key or dual memory
keys.
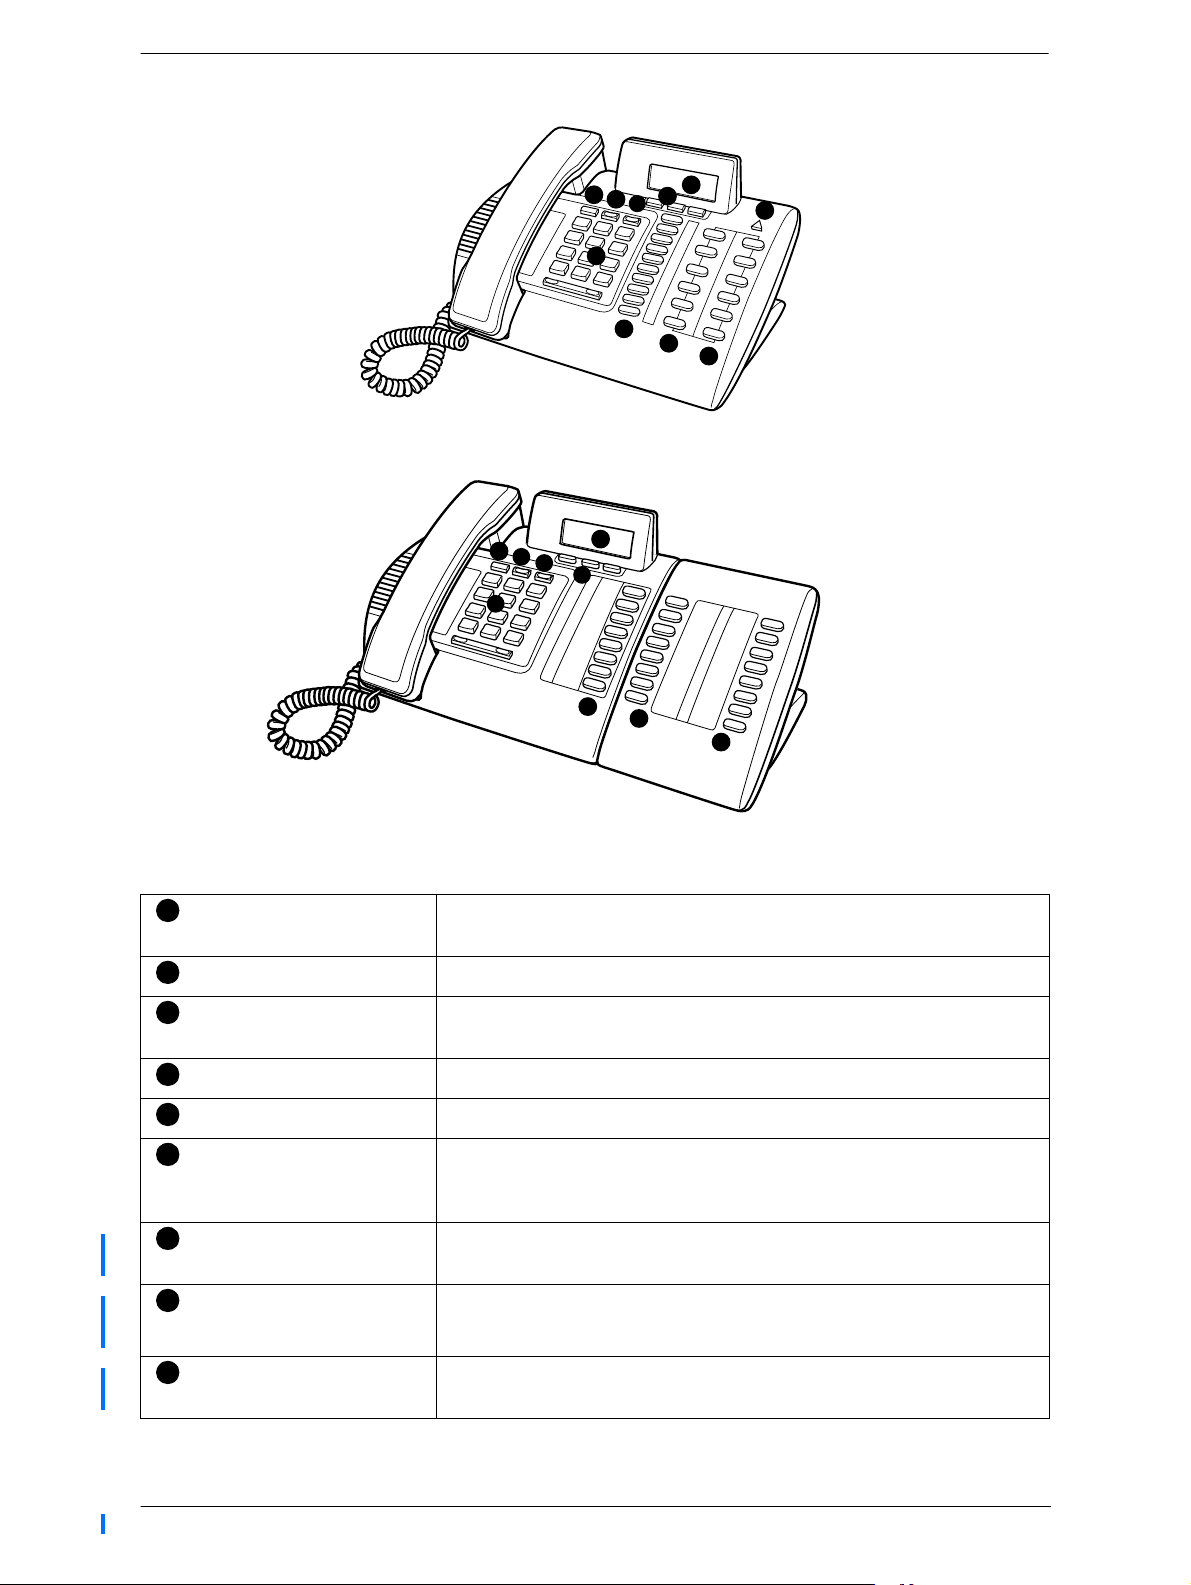
Locate the different items shown in the following illustrations.
Back
Show
Line Access
T7316E
11
10
12
2
3
9
1
7
8
4
4
T7316
2
3
9
7
1
8
4
4
P0607114 Issue 01 Compact Plus System Administration Guide
Page 16
16 Introduction
M7310N
8
7
1
4
2
3
9
5
6
5
M7324N
8
7
1
1
2
6
3
3
4
4
4
The following table describes the various items.
1
keypad Used for dialling numbers when you are making calls and for
entering numbers and letters when you are programming.
2
Display Shows instructions for using and programming the telephone.
3
Display key Activates the instruction that appears on the display above the
display key.
4
Memory key Activates a number or feature code stored in the key.
5
Dual memory key Can store two numbers or feature codes (M7310N only).
6
Shift key Press the Shift key before a dual memory key to activate the
number or feature code stored in the secondary memory of the
dual memory key (M7310N only).
7
Feature key
(
≤, ƒ or ƒ)
8
Hold key
(
˙, ˙
9
Release key (
)
®
)
®, ®
Allows you to enter a feature code while using or programming the
telephone.
Puts an active call on hold.
Hangs up an active call or ends programming.
,
Compact Plus System Administration Guide P0607114 Issue 01
Page 17
Introduction 17
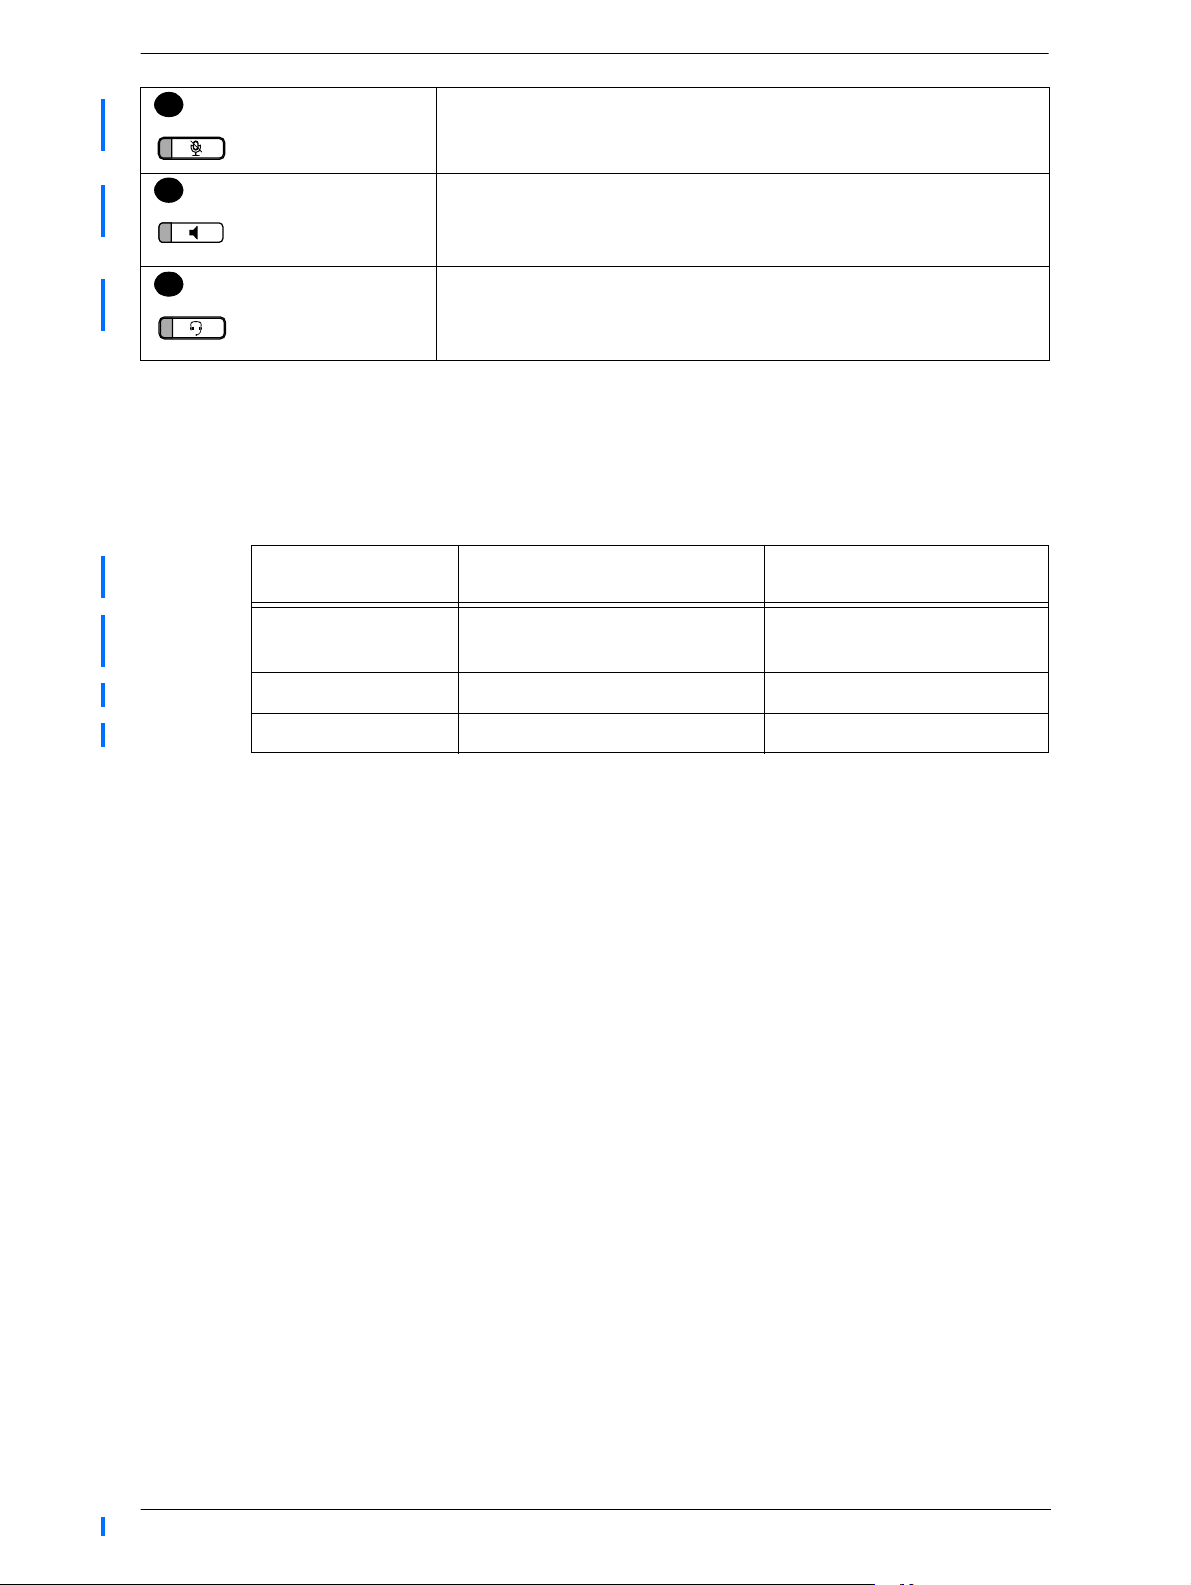
10
Mute key Mutes handset and microphone.
Only available on T7316 and T7316E keystations.
11
Handsfree key Turns on speaker so user does not have to pick up handset or use
headset.
Only available on T7316E keystations.
12
Headset key Allows user to use switch between headset and handset answer
mode without removing headset.
Only available on T7316 and T7316E keystations.
Telephone programming buttons
This guide shows the Business Series Terminal (BST) buttons.
The following table shows how the BST (T-series) buttons
compare with the Norstar telephones (M-series).
Button Name
Hold
Release
Feature
T7316E, T7316, T7208, T7100,
T7000
≥˙
≥(T7000)
® ®or ™
≤ ƒ or ƒ
M7324N, M7310N, M7208N,
M7100N, M7000
˙or ˙
≥(M7000)
To use a feature: Press ≤, ƒ or ƒ and enter the
feature code. For example: Press ≤·°⁄ to access your
mailbox.
Note: The BST terminal programming keys have label tabs
beside the buttons.
Entering numbers and letters using the keypad
Use the keys on the telephone keypad to enter numbers and letters
during programming. When you enter programming or use a
feature code, the keys you press often spell a word. For example,
when you press ≤••¤flfl‹››, the number keys
spell CONFIG. The C is on key number 2, the O is on key number
6, the N is also on key number 6, and so on. However, the display
shows numbers instead of letters. The word just provides an easy
way to remember the sequence of numbers.
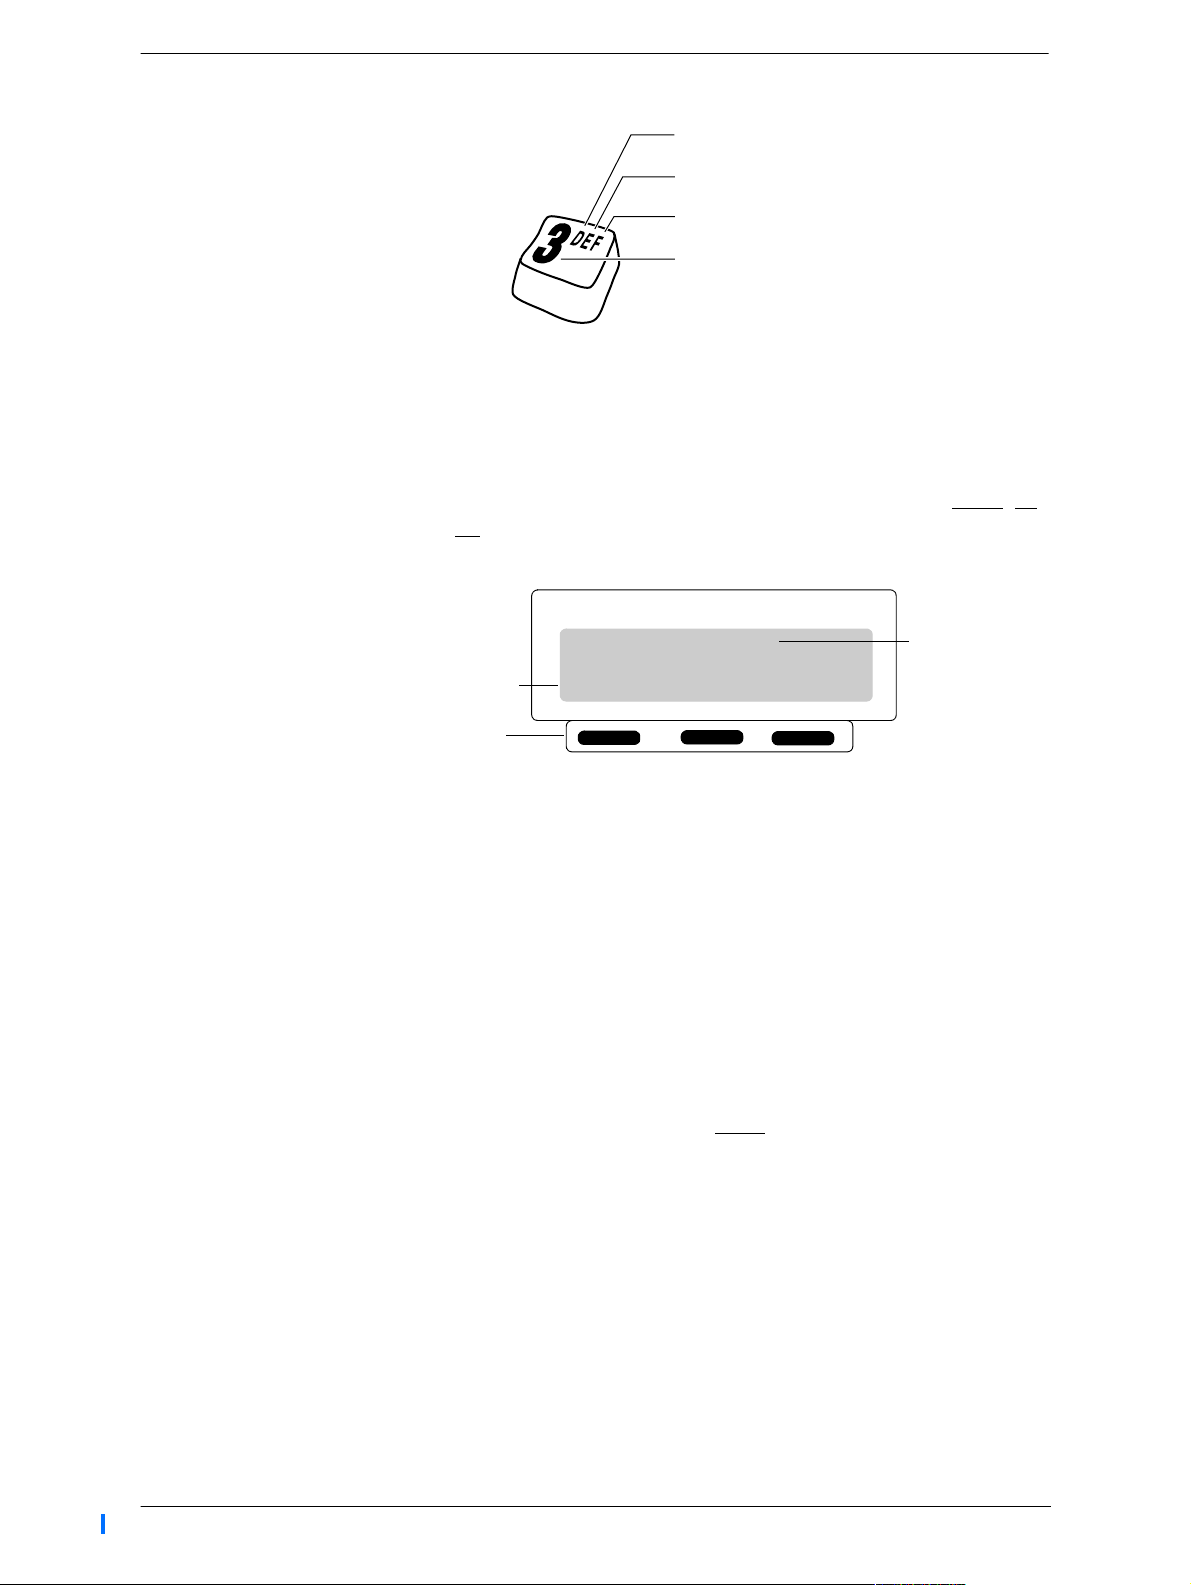
Entering names using the keypad
When you want to use a key to spell a name, such as naming a
hunt group during programming, the function of the key changes
according to the number of times you press the key. The
following illustration shows the functions for the keypad key ‹
when entering letters.
P0607114 Issue 01 Compact Plus System Administration Guide
Page 18
18 Introduction
Keypad key
press once for the letter D
press twice for the letter E
press three times for the letter F
press four times for the number 3
More about display keys
Use the three display keys below the display on your telephone to
set and select options. Their function depends on the instruction
that appears on the display directly above each key. Some display
instructions that you may see during programming are DOWN, UP,
or OK.
Display keys
Contrast level 2
Instructions for display keys
Display keys
DOWN UP OK
Starting a programming session
As administrator, the first steps in making any change to the
Compact Plus system are always the same. You must press the
≤ button and then press ••¤flfl‹›› to access
Configuration programming.
Jan1 1:00am
Fe a t ur e : ∫∫∫∫∫∫∫∫
∫∫∫∫∫∫∫∫∫∫∫∫∫∫∫∫
Password:∫∫∫∫∫∫∫
∫∫∫∫∫∫∫∫∫∫∫RETRY
Terminals&Extns∫
∫∫∫∫∫∫∫∫∫∫∫∫∫∫∫∫
Press
Press
(
CONFIG
Press
Press RETRY
entered incorrectly.
The display shows the first of the seven
headings available for programming.
Display text
.
≤
••¤flfl‹››
).
¤‹fl›fl
to re-enter the password if it is
(
ADMIN
).
¤‹fl›fl
been changed. Check Programming Record for the most recent
password.
Compact Plus System Administration Guide P0607114 Issue 01
(ADMIN) is the password, unless the password has
Page 19

Ending a programming session
Introduction 19
Possible display
∫∫∫∫∫∫∫∫∫∫CHANGE
Endofsession
∫∫∫∫∫∫∫∫∫∫∫∫∫∫∫∫
Press
After a few seconds, the time and date
reappear on the display.
to end the session.
®
The system proceeds with any changes you make to
programming as soon as you move away from a setting, either by
using the navigation keys or ®.
You can see if the changes you have made to telephone
programming have taken effect by pressing the UPDATE display
key. The display shows you how many telephones are still
waiting to update.
Using passwords to access programming
There are three passwords for Administration programming.
• ‡¤‡fi°‡ (SAPLUS) — The System Administrator
Plus password accesses all the settings for Administration
programming, plus several installer settings.
• ¤‹fl›fl (ADMIN) — The Administrator password
accesses most of the settings for Administration
programming.
• ¤¤‡›¤ (BASIC) — The Basic password accesses a
few settings that can be changed using feature codes.
The Basic password allows you to delegate some of the duties of
being an administrator without allowing access to sensitive
programming. It should be given out with care and changed when
necessary (for example, when someone leaves the company).
For information about changing passwords, see “Setting the
Basic password” on page 173. For more information about the
settings that can be changed with the Basic password, see "Using
passwords" on page 29.
P0607114 Issue 01 Compact Plus System Administration Guide
Page 20

20 Introduction
Understanding your system
Exchange lines have been set up by your installer to be either
public, private, or part of a line pool.
• A public line is assigned to more than one extension.
• A private line is assigned to only one extension and to the
Prime extension for that line.
• A line can be assigned to one of three line pools. Extensions
are assigned access to line pools and they share the lines in the
pool with other extensions having access to that pool.
The Compact Plus system automatically assigns extension 221 as
the Prime extension for each exchange line. The Prime extension
provides back-up answering for all unanswered calls coming in
on the exchange line.
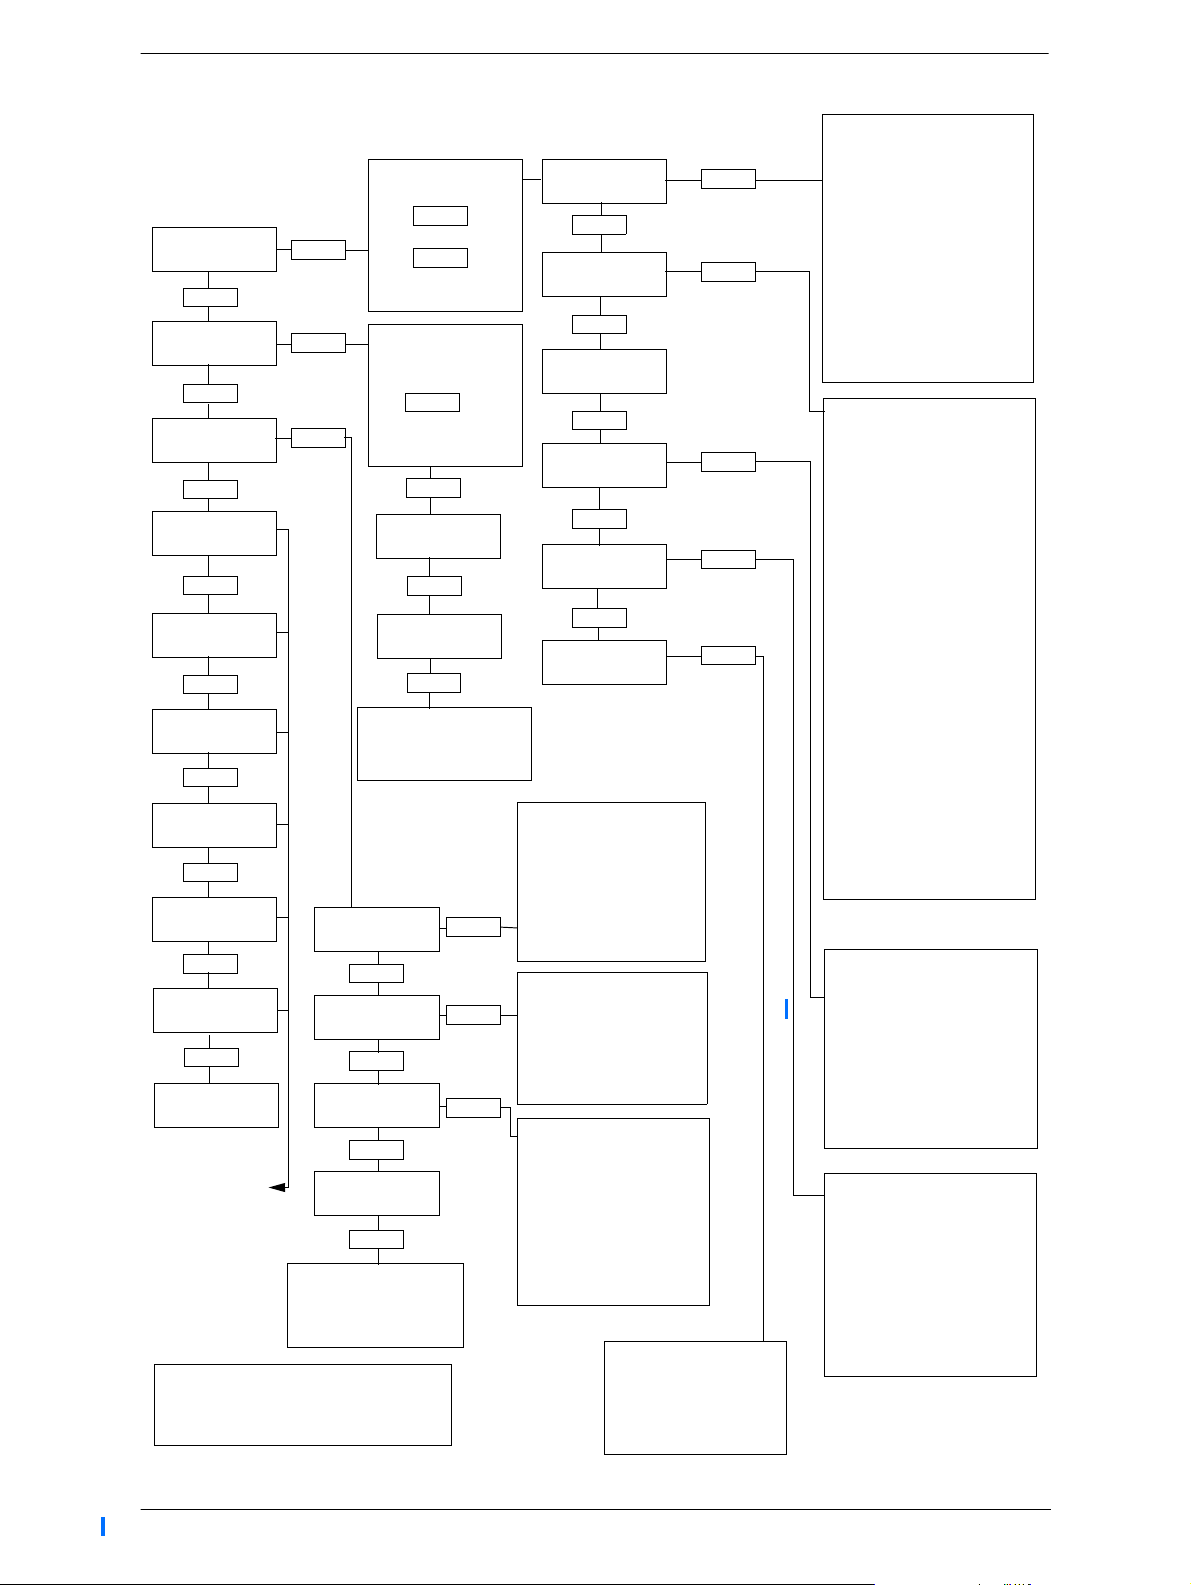
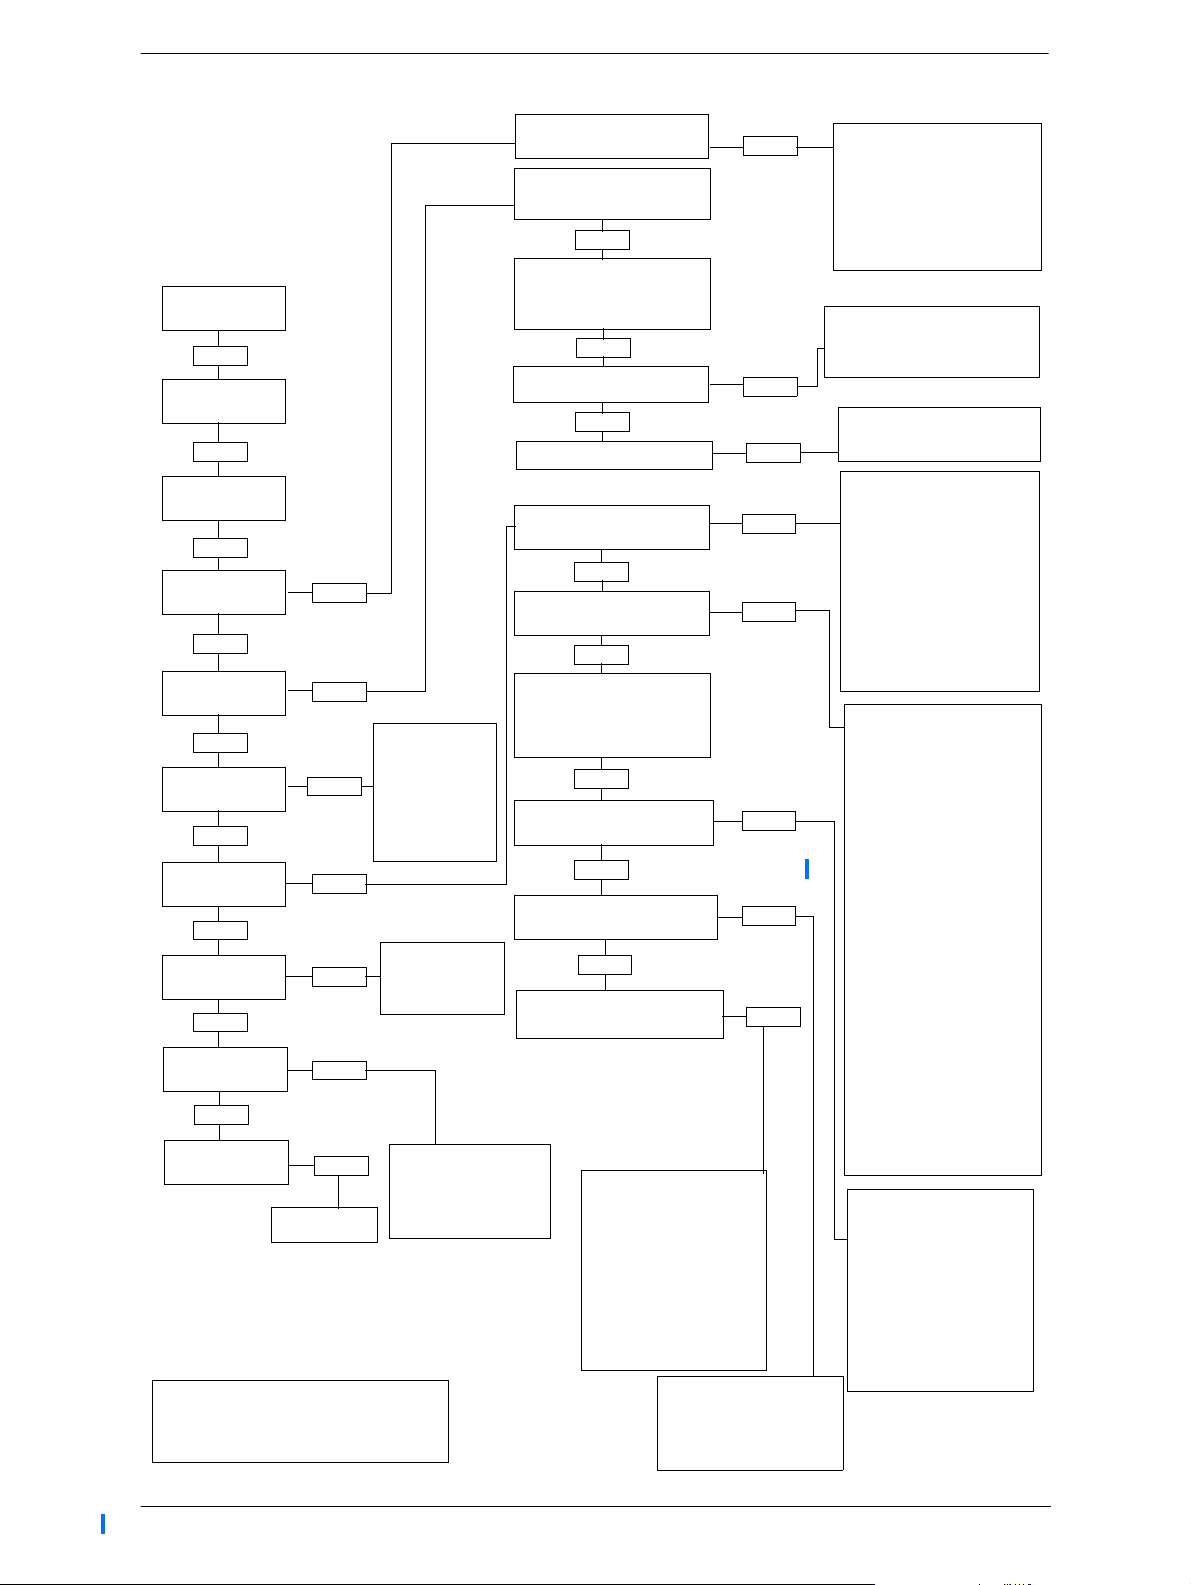
Map of Administrator Plus programming
The programming map on the following pages shows the
headings, sub-headings, and settings that you can view when you
access the programming menus after pressing
≤••¤flfl‹›› (CONFIG) and entering the
Administrator Plus password ‡¤‡fi°‡.
Compact Plus System Administration Guide P0607114 Issue 01
Page 21
Show extn#
Enter extension then
Terminals & Extns
ˆ Next
Lines
ˆ Next
Services
ˆ Next
Sys speed dial
ˆ Next
Passwords
ˆ Next
Time & Date
ˆ Next
System Prgrming
ˆ Next
Software keys
ˆ Next
Maintenance
ˆ Next
Usage Metrics
These
Headings
continue on
next page.
Note:
The
ˆ
symbol means Press. For example,
Press Show, Press Next, or Press Heading.
ˆ Show
ˆ Show
ˆ Show
ˆ
Next Control extns
ˆ
Next Schedule names
ˆ
Next Schedule times
or
to go through a list of
telephones.
Show line
Enter line number or
to go through a list of
the lines.
Name
Restrictions
Restrn filters
ˆ
Next Line restrns
ˆ
Next Remote restrns
Ringing service
ˆ Next
Restrn service
ˆ Next
Routing service
ˆ Next
Common settings
ˆ Show
Programming map (Administrator Plus)
ˆ Show
ˆ Next
ˆ Next
ˆ Show
ˆ Next
ˆ Show
ˆ Show
ˆ Show
ˆ Show
Line access
ˆ Next
Capabilities
ˆ Next
Name
ˆ Next
User Prefernces
ˆ Next
Restrictions
ˆ Next
Call Services
Ringing groups
ˆ
Show, Sched:Night
ˆ
Next Sched:Evening
ˆ
Next Sched:Lunch
ˆ
Next Sched:Sched 4
ˆ
Next Sched:Sched 5
ˆ
Next Sched:Sched 6
Sched:Night
ˆ
Next Sched:Evening
ˆ
Next Sched:Lunch
ˆ
Next Sched:Sched 4
ˆ
Next Sched:Sched 5
ˆ
Next Sched:Sched 6
Routes
ˆ
Next Dest codes
ˆ
Show, Sched:Night
ˆ
Next Sched:Evening
ˆ
Next Sched:Lunch
ˆ
Next Sched:Sched 4
ˆ
Next Sched:Sched 5
ˆ
Next Sched:Sched 6
Auto call info
ˆ
Show, Show line
ˆ
Next 1stDisplay
ˆ
Next Auto Called ID
ˆ
Next Log space
ˆ Show
ˆ Show
ˆ Show
ˆ Show
ˆ Show
Introduction 21
Line assignment
ˆ
Show, Show line
ˆ
Next Line Pool access
ˆ
Show, Line Pool A
ˆ
Show, Line Pool B
ˆ
Show, Line Pool C
ˆ
Next Prime line
ˆ
Next Intercom keys
ˆ
Next Answer extns
ˆ
Show, Show extn#
ˆ
Show, 221
ˆ
Next OLI #
Fwd no answer
ˆ
Show, Fwd to
ˆ
Next Fwd on busy
ˆ
Show, Fwd to
ˆ
Next DND on busy
ˆ
Next Handsfree
ˆ
Next HF on answerback
ˆ
Next Pickup grp
ˆ
Next Page zone
ˆ
Next Paging
ˆ
Next D-Dial
ˆ
Next Priority call
ˆ
Next Hotline
ˆ
Next Aux. ringer
ˆ
Next Redirect ring
ˆ
Next Receive tones
ˆ
Next ATA settings
ˆ
Show, ATA ans timer
ˆ
Next ATA mode
ˆ
Next ATA tones
ˆ
Next ATA use
ˆ
Next Intrusion
ˆ
Show Protect lvl
Model
ˆ
Next Key prgrming
ˆ
Next CAP/KIM key progm
ˆ
Next User speed dial
ˆ
Next Call log opt’ns
ˆ
Next Dialling opt’ns
ˆ
Next Language
ˆ
Next Display cntrst
ˆ
Next Ring type
Restrn filters
ˆ
Show, Show filter
ˆ
Next Extn restrns
Filters
Extn Lock
Allow last no
Allow saved no
Allow recall
Allow redirect
ˆ
Next Line/extn rstrn
ˆ
Show, Show line
P0607114 Issue 01 Compact Plus System Administration Guide
Page 22
22 Introduction
Terminals & Extns
ˆ Next
Lines
ˆ Next
Services
ˆ Next
Sys speed dial
ˆ Next
Passwords
ˆ Next
Time & Date
ˆ Next
System Prgrming
ˆ Next
Software keys
ˆ Next
Maintenance
ˆ Next
Usage Metrics
Note:
The
ˆ
symbol means Press. For example,
Press Show, Press Next, or Press Heading.
ˆ Show
ˆ Show
ˆ Show
ˆ Show
ˆ Show
ˆ Show
ˆ Show
Hunt Groups
Hour
ˆ
Next Minutes
ˆ
Next Year
ˆ
Next Month
ˆ
Next Day
Sys ID
ˆ
Next Password
keys
System version
ˆ
Next Clear lines
ˆ
Next Sys admin log
ˆ
Next Remote montr
Speed dial # (enter #)
COS pswds
ˆ
Show, Show pwd#
ˆ Next
Call Log pswds
ˆ
Show, Show extn#
ˆ
Show, Log pswd
ˆ Next
Progrming pswds
ˆ Next
Hospitality
Hunt groups
ˆ Next
Featr settings
ˆ Next
Direct-dial
ˆ
Show, D-dial1
ˆ
Next, Intrnl #
ˆ Next
Auto Attendant
ˆ Next
Remote access
ˆ Next
Hospitality
Room/desk info
ˆ
Show, Show extn#
ˆ
Next Call restrns
ˆ
Next Service time
ˆ
Next Alarm
ˆ
Show Attn attempts
ˆ
Next Retry intrvl
ˆ
Next Attn duration
ˆ
Next Time format
ˆ Show
ˆ Show
ˆ Show
ˆ Show
ˆ Show
ˆ Show
ˆ Show
ˆ Show
Rem access pkgs
ˆ
Show, Show pkg
ˆ
Next Rem line access
ˆ
Show, Show line
Speed dial number is displayed
ˆ
Show, Use prime line
ˆ
Next Display digits
(if display digits=N)
Name (Max. 16 characters)
ˆ
Show, <name>
ˆ
Next Bypass restr’n
SysAdmin+ (727587)
ˆ
Show Sys admin (23646)
ˆ
Next Basic (22742)
Desk pswd 4677 (HOSP)
ˆ
Next Cond None
Show group
ˆ
Show, Member extns
ˆ
Next Line assignment
ˆ
Next Mode
ˆ
Next Hunt delay
ˆ
Next If busy
ˆ
Next Q Timeout
ˆ
Next Overflow
ˆ
Next Name
ˆ
Next Dstnct ring
Backgrnd music
ˆ
Show On hold
ˆ
Next Receiver volume
ˆ
Next Camp timeout
ˆ
Next Park timeout
ˆ
Next Park Mode
ˆ
Next Trnsfr callbk
ˆ
Next Trnsfr callbk
ˆ
Next Netwk callbk
ˆ
Next Held reminder
ˆ
Next Remind delay
ˆ
Next Confrence tone
ˆ
Next Directd pickup
ˆ
Next Page tone
ˆ
Next Page Timeout
ˆ
Next AutoTime&Date
ˆ
Next Call log space
ˆ
Next Alarm Extn
ˆ
Next Extn relocation
ˆ
Next Answer Extn
ˆ
Next SWCA Cntrls
ˆ
Next CLID Match
Auto attend
ˆ
Show Attd Extn
ˆ
Next System Answer
ˆ
Next CCR
ˆ
Show, After
ˆ
Next CCR lines
ˆ
Next CCR Groups
ˆ
Show, Show group
ˆ
Next CCR grp 1
Compact Plus System Administration Guide P0607114 Issue 01
Page 23

SECTION II: System programming
P0607114 Issue 01 Compact Plus System Administration Guide
Page 24

24
Conventions used in this guide
This section describes the programming choices available to
assist you in designing a system that is efficient for your business.
When you see a numbered symbol, ⁄, it represents the numbers
on the telephone keypad. A lettered symbol, Å, represents the
letters on the telephone keypad. ™ represents a telephone
key. Keys shown like this, ≤, are found on the Business Series
Terminals telephones. Four keys, –, ≠,
“, and ‘, are labelled on the programming
overlay and represent the temporary use of keys during
programming.
A word shown like this, OK, indicates the action of the display key
located directly below on the display of two-line display
telephones.
All default settings appear in bold in the procedures. For
example, if the default setting is none, it appears as None.
Programming overview
Use programming to change default settings as required. Default
settings for the PBX template are shown in bold in the
programming map on page 26.
Headings and sub-headings in programming help you to know
where you are.
Programming has the following main headings
Te r m i n a l s & E x t n s
Lines
Services
Sys speed dial
Pas s w or d s
Ti m e & D a t e
System prgming
Call services
:
Assign settings to each telephon’e.
Assign settings to each internal, external, and DIA
line.
Create services such as night ringing, routing, and
restrictions for making external calls.
Create Speed Dial codes that can be used by any
extension in the system.
View and change passwords for programming and
features.
Set the time and date on the system clock.
Change system-wide settings, Auto Attendant, and
custom call routing programming.
Assign settings for external voice message
services.
Software Keys
Maintenance
Usage Metrics
Compact Plus System Administration Guide P0607114 Issue 01
Upgrade a restricted Feature Cartridge or activate
the Remote Administration feature using key
codes.
View diagnostic information about the system.
View statistical information about Hunt group calls.
Page 25
25
Each main heading has sub-headings within it. For example,
Terminals&Extns has six sub-headings: Line access,
Capabilities, Name, User preferences, Restrictions, and Call
services.
Using the System Administrator Plus password, you programme
settings for the entire system as well as settings for individual
extensions.
Programming affects system operation.
Only a qualified installer or sales support
officer should perform start-up, installation,
and maintenance programming. Some of
the settings affect the correct operation of
the system.
The first three steps of each procedure are provided to get to
Terminals&Extns on the telephone display and can be used to
programme any individual item at any time. However, when you
are programming the whole system, once you have completed the
first programming item, it is not necessary to start at step 1 of the
next procedure unless you leave programming. Just press
‘ to move to the next item in the programming
sequence.
While you are programming the system, the display occasionally
shows Update. You can press the display key below the word to
see what programming changes the system is undergoing.
Any procedure that specifies using the Administrator (
ADMIN
)
password can also be accessed using the System Administrator
Plus (
SAPLUS
) password.
P0607114 Issue 01 Compact Plus System Administration Guide
Page 26

26
Programming overview (SAPLUS)
Startup
Template: PBX, Square, Hybrid
Start Extension: 221
Terminals & Extns
Show extn#:_
Line access
Line assignment
Show line:_
(Non-DIA line)
L001: Ring only, Appr&Ring, Appr only, Unassigned
(DIA line)
L101: Ring only, Appr&Ring, Appr only, Unassigned
Appearances:1
LinePool access
Line pool A: Y, Line pool B: N, Line pool C: N
Prime line: None, PoolA, Pool C, Intcm
Intercom keys: 2 (0 to 8)
Answer extns
Show extn#:_
221: Unassigned, Appr&Ring, Appr only
OLI #: Extn #
Capabilities
Fwd no answer
Fwd to: None
Forward delay: 2, 3, 4, 6, 10
Fwd on busy
Fwd to: None
DND on busy: 221: N
Handsfree: None, Auto, Std
HF answerback: Y
Pickup grp: None, 1, 2, 3, 4
Page zone: None, 1, 2, 3
Paging: Y
D-Dial: None, Extn1
Priority call: N
Hotline: None, Intrnl, Extrnl
(if Extrnl) Use prime line, Use line, Pool code, Use routing tabl
Aux. ringer: N
Redirect ring: Y
Receive tones: N
ATA settings
ATA ans timer: 3, 5, 7, 10
(If DN is the I-ATA) Use ringback
ATA mode: Tone, Pulse
ATA tones: N
ATA use: On site, Off site
Name: 221
User prefernces
Mdl: M7208N, M7310N, M7324N, M7100N, M7000, T7316E+KIM
Key prgrming
(If M7000/T7000) 1 key
(If M7100N/T7100) 1 key
(If M7208N/T7208) 8 keys (also Norstar Doorphone)
(If M7310N) 10 +24 keys/ T7316 16 + 8 keys
(If T7316E+KIM) 16 + 8 plus 24 keys on each KIM
(If M7324N) 24 keys (also BST Doorphone)
CAP/KIM key prgrming
KIM1, KIM 2 ...
User speed dial
Call log opt’ns: No one answered, Unanswerd by me, Log all calls, No
auto logging
Dialling opt’ns: Automatic dial, Predial, Standard dial
Language: English, Opratng
Display cntrst: 1, 2, 3, 4, 5, 6, 7, 8, 9
Ring type: 1, 2, 3, 4
Restrictions (extns)
Restrn filters (00-99)
Show filter:_
Restrn flt: 00
No restrictions
Restrn flt 01:
Restrn 01:
Deny: 0
Override 001: 0800
Restrn 02:
Deny: 1
Override 001: No overrides
Restrn flt: 05
Restrn 01: 010
Deny: 010
No overrides
Restrn 02: 1
Deny: 1
No overrides
Restrn 03: 00
Deny: 00
No overrides
Restrn flt: 06
Restrn 01: <ANY>
Deny: <ANY>
No overrides
Extn restrns
Filters
Normal: 02
Night: 11
Evening: 12
Lunch: 13
Sched 4: 00
Sched 5: 00
Sched 6: 00
Extn lock: None, Partial, Full
Allow last no: Y
Allow saved no: Y
Allow link: Y
Allow redirect: N
Line/extn rstrns
Show line:_
Normal: None
Night: None
Evening: None
Lunch: None
Sched 4: None
Sched 5: None
Sched 6: None
Call Services
Auto call info
Show line:_
Caller ID set: N (Default for DIA: Y)
Call log set: N (Default for DIA: Y)
1stDispl ay: Name, Numb, Line
Auto called ID:N
Log space
Log 0 Pool 250
Lines
Name: Line001
Restrictions (lines)
Restrn filters (00-99)
Show filter:_
Restrn flt 00
No restrictions
Restrn flt 01
Restrn 01:
Deny: 0
Override 001:0800
Restrn 02:
Deny: 1
Override 001: No overrides
Restrn flt: 05
Restrn 01: 010
Deny: 010
No overrides
Restrn 02: 1
Deny: 1
No overrides
Restrn 03: 00
Deny: 00
No overrides
Restrn flt: 06
Restrn 01: <ANY>
Deny: <ANY>
No overrides
Compact Plus System Administration Guide P0607114 Issue 01
Page 27

27
Line restrns
Normal: 03
Night: 21
Evening: 22
Lunch: 23
Sched 4: 00
Sched 5: 00
Sched 6: 00
Remote restrns
Normal: 04
Night: 31
Evening: 32
Lunch: 33
Sched 4: 00
Sched 5: 00
Sched 6: 00
Services
Ringing service
Ringing groups (01-20)
Show group:_
Sched:Night
Service: Manual, Auto, Off
Trunk answer: Y
ExtraDial: 221
Line settings
Sched: Evening
Sched: Lunch
Sched: Sched 4
Sched: Sched 5
Sched: Sched 6
Restrn service
Sched: Night
Service: Manual, Auto, Off
Sched: Evening
Sched: Lunch
Sched: Sched 4
Sched: Sched 5
Sched: Sched 6
Routing service
Routes (000-200)
Show rout e:_
Dest codes
Show DstCode:_
Sched: Night
Service: Manual, Auto, Off
Overflow: N
Sched: Evening
Sched: Lunch
Sched: Sched 4
Sched: Sched 5
Sched: Sched 6
Common settings
Control extns
For lines
For extns
Ring grp: 01
Show extension:_
221: Assigned, all others: Unassign
Show line:_
Ring grp: 0 (0 to 20)
Aux. ringer: Y
DialOut: No numbr (Max.24 digits)
Use: Pool A, Pool B, Pool C
Normal: 000
AbsorbLength: All
Night: None
Evening: None
Lunch: None
Sched 4: None
Sched 5: None
Sched 6: None
Show line:_
L001: 221
Show extn#:_
221: 221
Schedule names
Sched 1: Night
Sched 2: Evening
Sched 3: Lunch
Sched 4: Sched 4
Sched 5: Sched 5
Sched 6: Sched 6
Schedule times
Monday
Sched: Night
Start time: 23:00
Stop time: 07:00
Sched:Evening
Sched: Lunch
Sched: Sched 4
Sched: Sched 5
Sched: Sched 6
Tuesday
Wednesday
Thursday
Friday
Saturday
Sunday
Sys speed dial
Speed dial #: (Max. 24 digits)
XXX: No Number, <extrn extn>
if extrn extn entered: Use prime line, Use line, Pool code, Use
routing tabl
Display digits: Y
if Display digits=N) Name: Sys Spd Dial XXX, <name>
Bypass restr'n: N
Passwords
COS pswds
Show pswd #:_ (00-99)
COS pswd # 00
Pswd 00: None
User flt: None (00 to 99)
Line flt: None (00 to 99)
Remote pkg: None (00 to 15)
Call log pswds
Show extn#:_
Log pswd: None
Progrming pswds
Installer: 266344 (CONFIG)
SysAdmin+: 727587 (SAPLUS)
Sys admin: 23646 (ADMIN)
Basic: 22742 (BASIC)
Hospitality
Desk pswd: 4677 (HOSP)
Cond: None
Time&Date
Hour: 01
Minutes: 00
Year: 01
Month: 01
Day: 01
System prgrming
Hunt groups
Show grp:_
HGn:<DN>
Members
01:<extn>...
Appr only, Appr&Ring, Ring only
Line assignment
Show line:_
Lnnn: Unassigned, Assigned
Mode: Sequential, Cyclic, Broadcast
Hunt delay: 1, 2, 3, 4, 5, 6, 7, 8, 9, 10
If busy: busyTone, overflow, queue
Q Timeout: 15, 30, 45, 60, 120, 180
Overflow:_ <extension>
Name: HGn, _<7 characters>
Aux ringer: N
Dstnct ring: None (2, 3, 4)
Change extns
Old extn:_ (Max. 7 digits)
New extn:_ (Max. 7 digits)
P0607114 Issue 01 Compact Plus System Administration Guide
Page 28

28
Featr settings
Backgrnd music: N
On hold: Tones, Music, Silence
Receiver volume: Use sys volume, Use extn volume
Camp timeout: 30, 45, 60, 90, 120, 150, 180
Park timeout: 30, 45, 60, 90, 120, 150, 180, 300, 600
Park Mode: Lowest, Cycle
Trnsfr callbk: Y
Trnsfr callbk: 3, 4, 5, 6, 12
Network callbk: 15, 30, 45, 60, 90
DRT to prime: Y
DRT delay: 1, 2, 3, 4, 6
EX-EX Trf/Conf: Y
Held reminder: Y
Remind delay: 30, 60, 90, 120, 150, 180
Confrence tone: Y
Directd pickup: Y
Page tone: Y
PageTimeout: 15, 30, 60, 120, 180, 300, 600, 2700
AutoTime&Date: Y
SWCA Cntrls
Auto Associate: N
Invoke by Hold: N
Call log space
Reset all logs?
Host delay: 1000 (1000 to 7000 in 500 ms increments)
AlarmExtn: 221
Extn relocation: N
Exch ring: Preset, Echo
Msg reply enh: N
Ans.Extn: Basic, Enhanced, Extended
CLID match: 3, 4, 5, 6, 7, 8, None
Direct-dial
D-Dial 1: Intrnl, Extrnl, None
Intrnl#: 221, Extrnl#: None
Auto Attendant
Auto attend: Off, On
Attd extn: 221
System Answer
After: 3 rings (2 to 12)
CCR
After: 3 rings (2 to 12)
CCR lines
L001: Answer: No, Yes
CCR groups
Show group:_
CCR grp 1
Show DN:_
221: Unassgnd, Assigned
Remote access
Rem access pkgs (00 to 15)
Show pkg:_
LinePool access
Pool A: (9) N
Remote page: N
Remote admin: N
Remote monitor: N
Rem line access
Show line:_
L001: Rem pkg: 00
IRAD
Answer line: None
After: 5 ring (1 to 12)
Rec’d # lengths
Private length: 3 (1-7)
Public length: 3 (1-7)
Extn # length: 3
Intrl modem: Fast, Slow
Alarm reportin g
Auto-report: Off, On
Phone #1: None
Phone #2: None
Use line: None
Retry time: 15
Num. retries: 5 (0 to 9)
Hospitality
Room / desk info
Show extn:__
Room #:_
Adm pwd req’d: Y
Call restrns
Vacant: 00
Use fit:
Base: 00
Mid: 00
Full: 00
Service time
Hour: 00
Minutes: 00
Alarm
Attn attempts: 3
Retry intrvl: 3
Attn duration: 15
Time format: 12hr, 24hr
Expired Alarms
Notify extn: None
Use tone: N
Network Services
ETSI
Network Diversion: N
MCID: N
Software Keys
SysID (8 digits)
Password keys
Key 1 (8 digits)
Key 2 (8 digits)
Key 3 (8 digits)
Maintenance
System version
Clear lines
Sys admin log
Usage Metrics
Hunt groups
Show group:_
HG <n> metrics
Clear
Time&Date of last clear
TotalCalls: nnnnn
Ans: nnnnn=nnn%
Avg ans: nn sec
Abndn: nnnnn=nnn%
Busy: nnnnn=nnn%
Ovrfl: nnnnn=nnn%
Avg: Q nnn sec
Compact Plus System Administration Guide P0607114 Issue 01
Page 29

Using passwords
29
Programming access is controlled by four passwords.
• Installer password—allows you to see and change any item in
programming.
• System Administrator Plus password—provides
knowledgeable users with access to all but a few sensitive
areas of programming.
• Administrator password—used to view and change the
settings that are part of day-to-day administration of the
Norstar system.
• Basic password—only used with a limited number of feature
codes to change programming and control system services.
The following tables show the items that can be programmed
when using the System Administrator Plus password or the
Administrator password. The IRAD password will appear only if
BT has authorised its use after making a remote access (RACE)
connection and changing the default IRAD password.
Programming using the SAPLUS password
Terminals&Extns Sys speed dial Software Keys
Line access SysID
Capabilities
Name COS pswds
User Prefernces Call Log pswds System version
Restrictions Progrming pswds Clear lines
Call Services Hospitality pswds Sys admin log
Lines Time&Date Remote montr
Name
Restrictions Hunt groups
Services
Ringing service Direct-dial
Restrn service Auto Attendant
Routing service Remote access
Common settings Hospitality
Programming using the Administrator password
Terminals&Extns Lines Passwords
Capabilities Name Call Log pswds
Name
User Prefernces Ringing service
Restrictions (Extn only) Restrn service
Call Services Routing service
Passwords
System prgrming Usage Metrics
Featr settings
Services
Sys speed dial
Password keys
Maintenance
Progrming pswds
Time&Date
System prgrming
Auto Attendant
P0607114 Issue 01 Compact Plus System Administration Guide
Page 30

30
Entering programming using the SAPLUS password
The staff person who is in charge of making changes to the
Compact Plus system is called the system administrator.
The System Administrator Plus password allows the
administrator to access all the settings for Administration
programming, plus a few installer settings that may have to be
changed infrequently. All procedures in this guide indicate
whether you need to use the System Administrator Plus or the
Administrator password.
The default System Administrator Plus password is
‡¤‡fi°‡, which spells SAPLUS on the keypad.
1. Press ≤••¤flfl‹›› (CONFIG).
The display shows Password :.
2. Enter ‡¤‡fi°‡ (SAPLUS). The display shows
Terminals&Extns. Three triangular indicators º appear on
the vertical display between the rows of keys.
3. Place the programming overlay over the keys pointed to by
the indicators º.
Entering programming using the Administrator password
The Administrator password is your key to Administration
programming. Most of the programming in this guide can be
entered with the Administrator password.
The default Administrator password is ¤‹fl›fl, which
spells ADMIN on the telephone keypad.
Entering programming using the Basic password
The Basic password allows you to do day-to-day maintenance of
individual telephones without allowing access to sensitive
programming.
The default Basic password is ¤¤‡›¤, which spells
BASIC on the telephone keypad.
You do not enter Basic programming using ¤flfl‹››
(CONFIG). Instead, you enter the Feature code that you want to
program, followed by ¤¤‡›¤ (BASIC). For example:
1. Press ≤••, followed by the code.
2. Enter ¤¤‡›¤ (BASIC).
3. Follow the instructions on the display and make your
selections using the display keys.
Compact Plus System Administration Guide P0607114 Issue 01
Page 31

The following feature codes can be accessed using the Basic
password:
• ≤••°‡‹‡ (USER) — User preferences settings
allow you to programme telephone model, key assignment,
User speed dial, Call log options, Dialling options, Language,
Display contrast, and Ring type.
• ≤••°›fl‹ (TIME) — Time and Date settings
let you change any of the settings for hour, minutes, seconds,
year, month, and day.
Programmable settings and features
Compact Plus has several features to assist you in assuring that
calls do not go unanswered or do not get lost. For example,
extensions can be programmed to provide back-up answering for
other extensions or lines. You can also create an attendant
position to provide answering for a group of extensions.
31
You can forward calls that are unanswered, pick up calls for other
extensions, redirect selected lines to telephones inside or outside
your business, and have calls answered from any extension
during non-business or off-peak hours.
Many call capture features are pre-configured with your Compact
Plus system. Others, however, must be programmed in order to
take full advantage of their flexibility.
The following programming settings are used to enhance
answering and handling calls:.
Do Not Disturb on busy Call Forward all calls
Forward on Busy Call Pickup Directed
Forward No Answer Call Pickup Group
Hunt groups Callback
Pickup Group Call Queuing
Prime extension Do Not Disturb (DND)
Prime line Line redirection
Redirect Ring Transfer
Trunk Answer System-wide call appearance
(SWCA)
Answer extension
P0607114 Issue 01 Compact Plus System Administration Guide
Page 32

32
Do Not Disturb (DND) on Busy
When this setting is turned on, you do not hear any ringing if a
second call arrives while you are talking on the telephone. If you
want to know when a second call arrives, turn this setting off.
For example, Mr. Forbes dislikes having his telephone ring when
he is on a call. Therefore, he uses the DND on Busy feature so that
additional calls are diverted to the Prime extension until he has
finished his current call. If your telephone is a Prime extension
for any line, do not use the DND on Busy feature.
If an extension is a member of a hunt group and the extension
activates this feature, the extension will not receive notification
of incoming hunt group calls while on a call.
See "Programming Do Not Disturb on Busy" on page 101.
Forward on Busy
When you already have a call, ensure that other calls to your
extension are answered. Forward the additional calls to an
extension that you know will be monitored.
For example, Miss Vale works with Mr. Cassidy as a team. They
answer each other’s calls. Forward on Busy is set for the
extension of the other person. When Mr. Cassidy is busy on a call,
other calls to his extension are forwarded immediately to Miss
Va l e.
If your extension is a member of a hunt group, the Call Forward
on Busy setting is overridden by the hunt group routing.
See "Setting Call Forward no answer" on page 98.
Forward No Answer
When you are away from your telephone, ensure that calls are
answered by forwarding to an extension that you know will be
monitored.
For example, Miss Vale works with Mr. Cassidy as a team. They
make sure that one of them is always in the office. Forward No
Answer is set for the team-mate’s extension. When Miss Vale is
away from her telephone, calls are forwarded immediately to Mr.
Cassidy.
If your extension is a member of a hunt group, the Call Forward
No Answer setting is overridden by the hunt group routing.
See "Setting Call Forward no answer" on page 98.
Compact Plus System Administration Guide P0607114 Issue 01
Page 33

Hunt groups
Establish hunt groups in your system to allow external and
internal callers to reach a group of extensions by calling a single
directory number. The hunt groups feature ensures calls are easily
routed to the appropriate people. You can programme the
members for a group, member position within a group, how calls
are distributed, how long is spent looking for available agents,
and what happens if all agents are busy.
For example, your company has five sales people available to
field calls from clients. Bob is your most experienced sales
person and you would like him to receive incoming calls first.
You would set up a Hunt Group with these five extensions as
members, programme Bob’s extension as the first member in the
group, set the distribution mode to sequential so Bob receives
incoming calls first, and name this group SALES.
See "Programming Hunt groups" on page 119.
33
Pickup group
Assign extensions to one of nine Pickup groups for maximum call
coverage. This ensures that extensions in a group can answer calls
for any other extension in that group.
For example, Mr. Forbes and Ms. Smith both belong to Pickup
group 3. When Mr. Forbes is away from his extension, Ms. Smith
presses ≤‡fi on her own extension to answer Mr. Forbes’
calls.
A hunt group call ringing at an extension that is a member of a
hunt group can be picked up by any extension in that Call Pickup
Group.
See "Assigning a Pickup group" on page 104.
Prime extension
The Compact Plus system automatically assigns extension 221 as
the Prime extension for each exchange line. Your system installer
can change the extension number in Lines programming. The
Prime extension can be programmed to receive unanswered calls
through Delayed Ring Transfer, Held Line Reminders and Do
Not Disturb transfers.
In a busy office, the receptionist or secretary extension may be
designated as the Prime extension.
P0607114 Issue 01 Compact Plus System Administration Guide
Page 34

34
Prime line for an extension
A line can be assigned to a telephone as its primary line to use
when making an outgoing call. This feature saves the user time
because the system automatically selects the line rather than the
user having to select the line.
See "Assigning a Prime line to an extension" on page 42.
Redirect ring
When this feature is turned on, the telephone gives an audible
signal whenever a call has been redirected. This reminds you that
a line has been redirected using the Line redirection feature and
serves as a cue to turn the feature off.
For example, you have re-directed line 1 to another extension in
the network. If Redirect ring is on, you hear a short ring every
time a call on line 1 is forwarded to the other telephone.
See "Activating Redirect ring" on page 109.
Trunk answer
This feature is active by default for all Service modes. This means
that during non-business or non-busy times, any extension can
answer calls ringing at any other extension. It does not matter
which lines appear on the extensions. It only matters that the line
itself has been placed in a Service mode using its Control
extension.
For example, during the lunch break between 11:30 a.m. and 1:00
p.m., lines 1, 2, and 3 are put in Lunch mode. Trunk answer is
active, so whenever any extension rings, Mr. Cassidy, who acts as
a temporary attendant, can answer from his extension.
See "Using alternate or scheduled services" on page 158.
Answer extension
If your telephone has an Answer key for another extension, you
can answer calls that come in for that extension on your
telephone.
For example, Mr. Cassidy’s telephone has an Answer key for
Miss Vale. When Miss Vale’s telephone rings, Mr. Cassidy can
answer it on his telephone by pressing the Answer key. Miss
Vale’s extension has been assigned as an Answer extension on
Mr. Cassidy’s telephone.
Simply press the Answer key when you hear the other person’s
telephone ringing.
See "Answer keys" on page 242.
Compact Plus System Administration Guide P0607114 Issue 01
Page 35

Call Forward all calls
If you know you are going to be away from your telephone for a
while, forward your calls to another extension. Otherwise the
callers must wait for the Forward No Answer feature to
automatically transfer the call after several rings.
For example, Mr. Forbes knows that most client calls arrive in the
morning, but he will be in meetings until noon. He forwards his
extension to Ms. Smith, who can deal with issues right away.
Press ≤›, then the extension number that you wish to send
the calls to.
If your extension is a member of a hunt group, the Call Forward
all calls setting is overridden by the hunt group routing.
See "Forwarding all calls" on page 274.
35
Call Pickup Directed
If any telephone is ringing in your office, you can answer it from
your extension.
For example, only a few people are in the office early in the
morning. When Miss Vale’s telephone rings, Mr. Forbes takes the
call using Call Pickup Directed.
Press ≤‡fl, then dial the extension of the telephone that is
ringing.
See "Answering a telephone using Pickup Group" on page 241.
Call Pickup Group
If your telephone is part of a Pickup Group, you can answer calls
ringing on any telephone in the same group.
For example, Mr. Forbes and Ms. Smith both belong to Pickup
Group 3. When Mr. Forbes is away from his telephone, Ms. Smith
uses the Call Pickup Group feature on her own extension to
answer Mr. Forbes’ calls.
Press ≤‡fi.
See "Answering a telephone using Pickup Group" on page 241.
P0607114 Issue 01 Compact Plus System Administration Guide
Page 36

36
Call Queuing
When more than one call is ringing at your telephone, you can
ensure you answer the calls in the order they arrive.
For example, Mr. Cassidy notices that he has calls on Line 3 and
on line 4. He does not know which call arrived first, so he uses
Call Queuing to answer.
Press ≤°‚⁄.
See "Answering the next queued call" on page 235.
Do Not Disturb
If you do not want to be interrupted by any telephone calls, turn
on the Do Not Disturb feature so that calls are immediately
transferred to the Prime extension.
For example, Mr. Moore is having a performance review meeting
with the president of the company. Mr. Moore turns on Do Not
Disturb before the meeting so that all calls are routed to the
attendant.
Press ≤°fi.
A hunt group extension can temporarily leave the hunt group by
activating this feature.
See "Do Not Disturb" on page 230.
Line redirection
You can use the Line redirection feature to redirect the calls
coming in on your external lines to a telephone outside the office.
You can redirect exchange lines to AC15A private circuits, and
you can redirect AC15A private circuits to either exchange lines
or private circuits, and you can redirect one exchange line to
another.
You may choose to redirect all your external lines or only some
of them. For example, you generally receive personal calls on
Line 1 and customer calls on Line 2. You can redirect Line 2 to a
colleague when you are busy, but still accept personal calls on
line 1.
Press ≤°›, then follow the prompts on your display.
See "Line redirection" on page 276.
Compact Plus System Administration Guide P0607114 Issue 01
Page 37

Ring Again
Transfer
37
You can have the Norstar system notify you when an extension is
either not busy or has just been used. This feature enables you to
reach the person on that extension.
For example, Miss Vale has an urgent request for Mr. Moore.
When she dials his extension, it is busy. She uses the Ring Again
feature to monitor the line. As soon as Mr. Moore hangs up, Miss
Vale’s telephone rings to let her know that she can try her call
again.
Dial the extension number, press ≤¤, then hang up.
See "Using Ring Again" on page 284.
If you are an attendant, or if a call should be routed to someone
else, you can do it easily with Compact Plus. For example, a
client calls Mr. Forbes. Mr. Forbes realises that it would be better
for the client to speak to Ms. Smith, so he transfers the call to Ms.
Smith’s extension. When Ms. Smith answers, Mr. Forbes
explains the situation briefly and then hangs up. The client
remains on the line with Ms. Smith.
SWCA keys
Press ≤‡‚, dial the number, then hang up.
See "Transferring a call" on page 253.
System-wide call appearance keys allow anyone in the system to
pick up a parked call by entering the feature code that was used
to park the call, which can be any one of these 16 codes:
≤•fi¤‚ to ≤•fi‹fi.
You can also assign a number of these codes to memory buttons
with indicators to any group of telephones. In which case, calls
can be parked on the memory buttons and are visible and can be
retrieved at other extensions by pressing the corresponding
button.
See "Setting SWCA controls" on page 143.
P0607114 Issue 01 Compact Plus System Administration Guide
Page 38

38
Making suggestions
Please submit your comments and suggestions to
British Telecommunications
Norstar Product Manager
Weston House
246 High Holborn
London
WC1V 7DQ
U.K.
Advice Line
If you have difficulty programming or using a system feature,
refer to the description of the feature, and follow the appropriate
procedures. If you still have difficulty, call the Advice Line at
0800 378822.
Compact Plus System Administration Guide P0607114 Issue 01
Page 39

Programming Terminals and
Extensions
• Terminals and extensions.........40
• Assigning a line to an extension (line access).........40
• Assigning line pool access.........42
• Assigning a Prime line to an extension.........42
• Assigning intercom keys to an extension.........43
• Assigning an Answer key to an extension.........44
• Setting the Originating Line Identification for an extension.........45
P0607114 Issue 01 Compact Plus System Administration Guide
Page 40

40 Programming Terminals and Extensions
Terminals and extensions
Terminals&Extns allows you to assign settings to each telephone.
1. Place the programming overlay over the appropriate keys on
your programming telephone.
2. Press ≤••¤flfl‹›› (CONFIG). The
display shows Password :.
3. Press ‡¤‡fi°‡ (SAPLUS). The display shows
Terminals&Extns.
4. Press ≠. The display shows Show extn#:.
5. Enter the extension number of the telephone you want to
programme. The display shows nnn:nnn (nnn represents the
three-digit extension number).
Assigning a line to an extension (line access)
Line access allows you to assign lines to individual extensions.
When you are finished programming line access settings for one
extension, you can copy those settings to other extensions by
using COPY at the Line Access display. For more information
about copying extension programming, see "Copying
programming for telephones" on page 147.
Line Assignment
This setting allows you to assign physical lines and Direct Inward
Access (DIA) lines to each extension. DIA lines are assigned and
removed in the same manner as other lines.
1. Place the programming overlay over the appropriate keys on
your programming telephone.
2. Press ≤••¤flfl‹›› (CONFIG). The
display shows Password :.
3. Press ‡¤‡fi°‡ (SAPLUS). The display shows
Terminals&Extns.
4. Press ≠. The display shows Show extn#:.
5. Enter the extension number of the telephone you want to
programme. The display shows nnn:nnn.
6. Press ≠ three times. The display shows Show line:.
7. Enter the line number. The display shows Lnnn:Unassigned.
8. Press SCAN to see the setting and then press SCAN again to
view the lines assigned to this extension.
9. Press CHANGE to change the setting for each line: Appr&Ring,
Appr only, Unassigned, or Ring only.
Compact Plus System Administration Guide P0607114 Issue 01
Page 41

Programming Terminals and Extensions 41
10. Press ® to exit or ‘ to continue programming.
In general, exchange lines are not assigned to telephones. If
assigned, they are used for monitoring incoming call usage or for
making outgoing calls.
You cannot assign a line that is private to another telephone.
Each line assigned to appear at a telephone must appear at a key
with an indicator on that extension.
If you set a line to Ring only, incoming calls appear on an
intercom key.
A Central Answering Position (CAPN/CAP) telephone with a
CAPN module (M7324) or KIM (T7316E) can provide extra line
keys.
The M7100N/T7100 and M7000/T7000 telephones are
exceptions. They have no line keys and can be assigned any
number of lines.
Ensure that the lines assigned to M7100N/T7100 and
M7000/T7000 telephones are assigned to ring so that you can
detect incoming calls on the lines.
Number of appearances
This setting allows you to assign the number of appearances of a
DIA line (lines 101 to 140) allowed on an extension. In order to
programme the number of appearances, the line assignment value
must not be Unassigned. The default setting is 1.
1. Place the programming overlay over the appropriate keys on
your programming telephone.
2. Press ≤••¤flfl‹›› (CONFIG). The
display shows Password :.
3. Press ‡¤‡fi°‡ (SAPLUS). The display shows
Terminals&Extns.
4. Press ≠. The display shows Show extn#:.
5. Enter the extension number of the telephone you want to
programme. The display shows nnn:nnn.
6. Press ≠ three times. The display shows Show line:.
7. Press ‘. The display shows Lnnn: and the line
assignment.
8. Press ≠. The display shows Appearances:1. This
prompt does not appear if the line is unassigned.
9. Press CHANGE and enter a numeric value from 1 to 255.
10. Press OK.
11. Press ® to exit or ‘ to continue programming.
P0607114 Issue 01 Compact Plus System Administration Guide
Page 42

42 Programming Terminals and Extensions
Assigning line pool access
Line pools allow the system to share lines among a number of
telephones, reducing line costs and the number of button
appearances on the telephones in the system.
This setting allows an extension to access one or more of the three
line pools available (A, B, or C). When you change the setting to
Yes for a line pool, the extension being programmed can access
any line in that line pool.
1. Place the programming overlay over the appropriate keys on
your programming telephone.
2. Press ≤••¤flfl‹›› (CONFIG). The
display shows Password :.
3. Press ‡¤‡fi°‡ (SAPLUS). The display shows
Terminals&Extns.
4. Press ≠. The display shows Show extn#:.
5. Enter the extension number of the telephone you want to
programme. The display shows nnn:nnn.
6. Press ≠ twice. The display shows Line
assignment.
7. Press ‘. The display shows LinePool access.
8. Press ≠.
9. Press CHANGE to select the setting: N (No) or Y (Yes).
10. Press ® to exit or ‘ to continue programming.
Assigning a Prime line to an extension
This setting assigns a Prime line to the telephone. When the
telephone is being used to make an outgoing call, the Prime line
is the first line the system selects.
1. Place the programming overlay over the appropriate keys on
your programming telephone.
2. Press ≤••¤flfl‹›› (CONFIG). The
display shows Password :.
3. Press ‡¤‡fi°‡ (SAPLUS). The display shows
Terminals&Extns.
4. Press ≠. The display shows Show extn#:.
5. Enter the extension number of the telephone you want to
programme. The display shows nnn:nnn.
6. Press ≠ twice. The display shows Line
assignment.
Compact Plus System Administration Guide P0607114 Issue 01
Page 43

Programming Terminals and Extensions 43
7. Press ‘ until the display shows Prime line:.
8. Press CHANGE to select the setting: None, Pool A, or Intcm
(intercom). Only assigned lines and line pools appear.
9. Press ® to exit or ‘ to continue programming.
An assigned Prime line is not associated with the assignment of a
Prime extension.
An exchange line must be assigned to the extension in Line
assignment before it can be assigned as the Prime line to the
extension.
A line pool must be assigned to the extension in line pool access
before a line pool can be assigned as the Prime line to the
extension.
By assigning a line pool as a Prime line, an extension can be made
to search automatically for an idle line in a pool.
Note: If you set Prime line to Intcm (intercom), you can still
access any line pools you have assigned to the extension.
When you enter the line pool access code, the system
searches for an idle line in that pool. When all the lines in
the pool are busy, the display shows No free lines. The
system does not search from one pool to another.
Assigning intercom keys to an extension
Intercom keys can provide an extension with access to internal
lines and line pools.
1. Place the programming overlay over the appropriate keys on
your programming telephone.
2. Press ≤••¤flfl‹›› (CONFIG). The
display shows Password :.
3. Press ‡¤‡fi°‡ (SAPLUS). The display shows
Terminals&Extns.
4. Press ≠. The display shows Show extn#:.
5. Enter the extension number of the telephone you want to
programme. The display shows nnn:nnn.
6. Press ≠ twice. The display shows Line
assignment.
7. Press ‘ until the display shows Intercom keys:.
8. Press CHANGE to select the setting: 0, 1, 2, 3, 4, 5, 6, 7, or 8.
9. Press ® to exit or ‘ to continue programming.
Each intercom key assigned during programming automatically
appears on the extension. The keys start with the lower right-hand
P0607114 Issue 01 Compact Plus System Administration Guide
Page 44

44 Programming Terminals and Extensions
key, or one key above, if the Handsfree/Mute feature is assigned
to the bottom right key on the extension.
An extension needs two intercom keys to establish a conference
call with two other Norstar/BST extensions.
Only one intercom key may be required if the key is only to be
used to access line pools and to make and receive internal calls.
If an extension has several lines assigned only to ring and not
appear, the arrangement works better if there are two intercom
keys.
M7100N/T7100 telephones have two default intercom keys
which cannot be changed. These keys do not appear on the
telephone.
Assigning an Answer key to an extension
Calls for other Norstar/BST telephones can appear and be
answered at the extension being programmed. The extension
numbers of the other telephones are referred to as Answer
extension numbers. You can assign up to eight Answer extension
numbers to the telephone being programmed.
1. Place the programming overlay over the appropriate keys on
your programming telephone.
2. Press ≤••¤flfl‹›› (CONFIG). The
display shows Password :.
3. Press ‡¤‡fi°‡ (SAPLUS). The display shows
Terminals&Extns.
4. Press ≠. The display shows Show extn#:.
5. Enter the extension number of the telephone you want to
programme. The display shows nnn:nnn.
6. Press ≠ twice. The display shows Line
assignment.
7. Press ‘ until the display shows Answer extns.
8. Press ≠. The display shows Show extn#:.
9. Enter the extension number.
10. Press CHANGE to change the setting for the Answer extension
number: Appr&Ring, Appr only, or Unassigned.
11. To assign additional Answer extension numbers, press
–, ≠, then enter the next Answer
extension number.
12. Press SCAN to view the Answer extension numbers assigned
to this extension.
13. Press ® to exit or ‘ to continue programming.
Compact Plus System Administration Guide P0607114 Issue 01
Page 45

Programming Terminals and Extensions 45
Every Answer extension number assigned to the telephone
automatically assigns an Answer key with an indicator to the
telephone. These keys should be labelled accordingly, identifying
the telephone with its name or extension number.
More than one telephone can have an Answer key for the same
extension number. In this way, more than one telephone can
provide Call Alerting and Call Answering for any calls directed
to that extension number.
A private line does not generate alerting at an Answer key.
Note: You cannot assign Answer extension numbers to an
M7000/T7000, M7100N/T7100 telephones or to a singleline telephone connected to an Analogue Terminal
Adapter (ATA).
See "Answer keys" on page 242 for information on using Answer
keys.
Setting the Originating Line Identification for an extension
Outgoing calls on a Direct Inward Access (DIA) line use an
Originating Line Identification (OLI) number, which appears on
the telephone display of the called party as part of the calling line
identification (CLID). Compact Plus allows you to programme
the OLI number for each extension. The OLI number could be the
Public Received number for the DIA line assigned to the
extensions, or it could be a different Public Received number if
you wish calls to be returned to someone else’s extension. Ensure
that the OLI numbers are in the same range as the received digits
that come from the exchange.
For example, a sales manager who uses a DIA line to call clients
may wish to have returned calls directed to an assistant. The OLI
programmed for the manager’s extension is the Public Received
number for the assistant’s extension. Thus, a client viewing the
CLID number on their telephone display sees the assistant’s
telephone number.
If the OLI number is set to None, then the CLID displayed at the
called party’s telephone is a listed extension number for your
Compact Plus system. If the programmed OLI number is outside
the allowed range, Compact Plus may insert a default number.
1. Place the programming overlay over the appropriate keys on
your programming telephone.
2. Press ≤••¤flfl‹›› (CONFIG). The
display shows Pa s sw or d :.
P0607114 Issue 01 Compact Plus System Administration Guide
Page 46

46 Programming Terminals and Extensions
3. Press ‡¤‡fi°‡ (SAPLUS). The display shows
Terminals&Extns.
4. Press ≠. The display shows Show extn#:.
5. Enter the extension number of the telephone you want to
programme. The display shows nnn:nnn.
6. Press ≠ twice. The display shows Line
assignment.
7. Press ‘ until the display shows OLI #:.
8. Press CHANGE and enter the number.
9. Press ® to exit or ‘ to continue programming.
Compact Plus System Administration Guide P0607114 Issue 01
Page 47

Programming Hospitality Services
• Hospitality extensions.........48
• Alarm time (AL) feature.........49
• Hospitality Services admin alarm feature.........51
• Room occupancy (RO).........52
• Room condition (RC).........53
• Service time.........55
P0607114 Issue 01 Compact Plus System Administration Guide
Page 48

48 Programming Hospitality Services
Hospitality Services (HS) is a group of features that increases the
value of the Compact Plus system in small to medium-sized
hotels, motels or hospitals.
In a hotel setting, guests gain improved services through
immediate access to basic functions like:
• wake-up service or reminders
• accurate tracking of the room service requirements,
for example check-in/check-out).
Hospitality Services features must be activated by qualified
personnel using Software keycodes. See "Software Keys" on
page 58.
Hospitality extensions
Norstar/BST extensions are classified as one of following types
of telephones:
• Common extension: A common extension can be a telephone
found in a lobby, office, or common area. It is not associated
with a room. A common extension does not have access to all
HS features.
Common extensions are Norstar/BST extensions or analogue
telephones connected to an analogue terminal adapter (ATA)
or to an analogue extension module (AEM).
• Room extension: A Room extension is a telephone assigned
to a room in System programming. Up to five telephones can
be assigned to the same room (they all share the same room
number).
Room extension can be any Norstar/BST extension or
analogue telephone connected to an ATA or an AEM.
• Hospitality Services admin telephone: An HS admin
telephone is any two-line display telephone, such as the
T7316, T7316E, M7310N, or M7324N. An HS admin
telephone can be programmed to prompt for a Desk admin
password before access to HS admin features is granted. To
change the Desk admin password see "Hospitality passwords"
on page 174.
Compact Plus System Administration Guide P0607114 Issue 01
Page 49

Alarm time (AL) feature
The Alarm time feature provides an alarm clock capability on
Norstar/BST telephones and analogue telephones connected to an
ATA. Both room extensions and common extensions can be
programmed to sound an audible alert at a requested time.
One Alarm time within a 24-hour period is programmable on a
room or common extension and must be reset daily. When the
alarm sounds, all telephones in a given room alert. Cancelling the
alarm on any telephone cancels the alarm on all the telephones in
the room. A new Alarm time entered on a room or common
extension overwrites any alarm set previously.
If the Compact Plus system experiences a mains failure, the
failure can result in missed Alarm times. When the Compact Plus
system is running and the system time resets, the missed Alarm
times alert on respective room or common extensions. At all
times, the Compact Plus system allows up to a maximum of 24
extensions that can alert at the same time.
Programming Hospitality Services 49
Programming the Alarm time feature
To programme the Alarm time feature on a Norstar/BST
telephone:
1. Press ≤°‡fi. The display shows Alrm: 07:00am
OFF.
2. If the alarm time is correct press ON/OFF.
The display shows Alrm:07:00am ON. Press DONE to exit.
or
To enter a new alarm time press CHG.
The display shows Enter time:.
3. Enter a new four-digit alarm time.
— If the 24-hour clock format is used (hour: 00 to 23 and
minutes: 00 to 59), no confirmation is required. The
display shows Alarm ON hh:mm.
— If the 12-hour format is used, the display shows hh:mm AM
or PM?. Press the AM or PM display key. The display shows
Alarm ON hh:mm.
P0607114 Issue 01 Compact Plus System Administration Guide
Page 50

50 Programming Hospitality Services
To programme the Alarm time feature on M7000/T7000
telephones or analogue telephone:
1. Press ≤°‡fi on M7000/T7000 telephones or
2. Enter a four-digit alarm time.
At the selected times, telephones in the room ring to wake-up or
remind the occupant of the next event or meeting. If Music on
hold is programmed for the system the occupant will hear music
when they answer a wake-up call.
Changing or cancelling an earlier selected Alarm time
press ¿•°‡fi on an analogue telephone.
A tone sounds.
— If the 24-hour clock format is used (hour: 00 to 23 and
minutes: 00 to 59), a tone sounds.
— If the 12-hour format is used, press • to select am or £
to select pm. A tone sounds.
To set a new time for an Alarm time, re-enter a new Alarm time.
The new time overwrites any earlier set time. Cancelling the
Alarm time for any telephone cancels the Alarm time for all the
telephones in the same room.
Cancelling the alarm
• To cancel the Alarm time on a Business Series Terminals or
Norstar/BST telephones, press ≤£°‡fi. The display
reads Alarm off.
• To cancel the Alarm time on an analogue telephone, press
¿£°‡fi.
Turning off the Alarm
When a telephone rings at the selected time, the occupant can
release the Alarm ring as follows:
• Press any key except the ≥ key.
• On an analogue telephone lift and replace the handset back
into position.
Note: If the user presses the ≥ key when the telephone rings,
the alarm is temporarily deactivated (snooze). After a
number of minutes, the telephone will alert again. If the
user is on a call when the alarm sounds, they can press any
key except ® to cancel the alarm and maintain their
active call.
Compact Plus System Administration Guide P0607114 Issue 01
Page 51

Programming Hospitality Services 51
Hospitality Services admin alarm feature
Only an Hospitality Services (HS) admin telephone can use the
Hospitality Services admin alarm feature. The HS admin alarm
feature is room oriented only, it does not control the alarms on
common extensions.
The Hospitality Services admin feature can:
• query the current or last alarm time set for a room
• overwrite previous Alarm time programming for a room on
the system
— assign an Alarm time for any room on the system
— change an Alarm time for any room on the system
— cancel an Alarm pending for any room on the system
To programme the Alarm time for a room with the Hospitality
Services admin alarm feature:
1. Press ≤°‡‡ on a two-line display telephone.
2. If configured, the display reads Pas sw o rd :. Enter the Desk
admin password.
3. The display reads Al of rm#:. Enter the room number.
4. Press VIEW. The display shows Alrm: 07:00am OFF:. If the
alarm time is correct press the ON/OFF display key to activate
the alarm.
5. Enter a four-digit alarm time.
— If the 24-hour format is used (hour: 00 to 23 and minutes:
00 to 59), no confirmation is required. The display shows
Alarm hh:mm ON.
— If the 12-hour format is used, the display shows the four
digit time plus AM or PM?. Press the AM or PM display key.
The display shows Alarm hh:mm am or pm ON.
6. Press the ® key to exit programming.
P0607114 Issue 01 Compact Plus System Administration Guide
Page 52

52 Programming Hospitality Services
Room occupancy (RO)
The Room occupancy (RO) feature allows front desk operators to
assign dialling restrictions to room extensions. This feature also
works with the Room condition (RC) feature.
Dialling restrictions for room extensions, defined in
Restrictions under Terminals&Extns and Call restrns
under Hospitality in System prgrming, replace dialling filters
set under Services. The RO feature does not apply to common
extensions.
The RO feature uses the following room states: Vacant, Basic,
Mid, and Full. A variety of dialling filters can be configured for
each room states. The default setting is Vac ant .
• Va can t Room is empty.
• Basic Room is occupied, and occupants can access basic
callout features.
• Mid Room is occupied, and occupants can access basic
callout features, plus other specified features, for
instance, toll-free calling.
• Full Room is occupied and occupants can access all call
features allowed on the system.
Programming the state of a room extension
To access the Room Occupancy feature and assign the state of a
room extension:
1. Press ≤°‡· on a two-line display telephone.
2. If configured, the display reads Pas sw o rd :. Enter the Desk
admin password.
3. The display reads Oc of rm#:. Enter the room number and
press OK or LIST.
4. The display reads rrrrr:Vacant. Press the CHANGE display
key and select the required status for the room extension:
Vacant, Basic, Mid or Full. The default setting is Vac an t.
5. To programme other rooms, press the FIND or NEXT display
key and return to step 3. If no more rooms require
programming, press the ® key to exit programming.
Note: Programming a room to Vacant state cancels any
outstanding alarms.
Compact Plus System Administration Guide P0607114 Issue 01
Page 53

Room condition (RC)
The Room condition (RC) feature allows users to exchange
information about the serviced state of a room. Users are front
desk attendants, cleaning or maintenance personnel of an
establishment. The RC feature is not available from a common
extension.
The Compact Plus system maintains a database of the state of
each room. This database is accessed from either the room
extension or a Hospitality Services admin telephone.You can set
a Room Condition password to limit access to this features. See
"Room condition password" on page 175.
Room extensions can:
• set the associated room state to Service done (Srvc done)
• set the associated room state to Needs service (Needs srvc)
• query the state of the associated room on a telephone with a
display.
Programming Hospitality Services 53
Hospitality Services admin telephones can:
• set any room state to Service done (Srvc done)
• set any room state to Needs service (Needs srvc)
• query the state of any room.
The system changes the state of occupied rooms to Needs service
on a daily basis at a set time as configured in the system.
Maintenance personnel programme the condition of the room to
Service done when service in the room is complete.
The front desk attendant can query or programme the condition
of a room with a Hospitality Services admin telephone. The
Compact Plus system automatically sets the status of a room to
Needs srvc, when a Room occupancy status changes from
occupied to Vacant.
P0607114 Issue 01 Compact Plus System Administration Guide
Page 54

54 Programming Hospitality Services
Room condition with a room extension
To update the Room condition using a room extension:
1. Press ≤°‡fl on a digital telephone.
2. At the prompt, enter the status of the room.
3. Press ⁄ on the dialpad to indicate Set to srv done.
4. On display telephones, the display reads Set to srv done or
Room condition with a Hospitality service admin
telephone
Press ¿•°‡fl on an analogue telephone.
If required, enter the Room condition password.
or,
Press ¤ on the dialpad to indicate Set to needs srv.
If required, enter the Room condition password.
Set to needs srv. On M7000/T7000 telephones or an
analogue telephone, replace the handset to exit.
To update or query the Room condition using a Hospitality
services admin telephone:
1. Press ≤°‡° on a two-line display telephone.
2. If configured, the display reads Pas sw o rd :. Enter the Desk
admin password.
3. The display reads Cd of rm#:. Enter the room number and
press OK.
4. The display reads rrrrr:Vacant. Press the CHANGE display
key and select the required status for the room extension: if
the room is occupied, select Srvc done or Needs srvc; if the
room is vacant, select Vacant or Needs srvc. The default
setting is Vac ant .
5. To update or query other room extensions, press the FIND or
NEXT display key and return to step 3. If there are no more
room extensions updates or queries, press the ® key to exit
programming.
Compact Plus System Administration Guide P0607114 Issue 01
Page 55

Service time
Programming Hospitality Services 55
The Service time heading of programming under
Hospitality in System prgrming allows the installer or
system administrator to programme the time when occupied
rooms change state from Service done to Service required. The
Service time heading is an integral part of the Room condition
(RC) feature.
1. Place the programming overlay over the appropriate keys on
your programming telephone.
2. Press ≤••Ç؈ÏÈÌ. The display reads
Pa s sw or d :.
3. Press ‡¤‡fi°‡ (SAPLUS). The display shows
Terminals&Extns.
4. Press ‘ until the display reads System prgrming.
5. Press ≠. The display shows Hunt groups.
6. Press ‘ until the display shows Hospitality.
7. Press ≠. The display shows Room/desk info.
8. Press ‘ until the display shows Service time.
9. Press ≠. The display shows Hour:00.
10. Press the CHANGE display key. Enter the hour (00 to 23). If the
number is less than 13, the display shows AM. Press CHANGE
to select PM.
11. Press ‘. The display shows Minutes:00.
12. Press the CHANGE display key. Enter the minutes (00 to 59).
13. Press the ® key to exit programming.
P0607114 Issue 01 Compact Plus System Administration Guide
Page 56

56 Programming Hospitality Services
Compact Plus System Administration Guide P0607114 Issue 01
Page 57

Software Keys
• Viewing the System ID.........58
• Software Keys.........58
P0607114 Issue 01 Compact Plus System Administration Guide
Page 58

58 Software Keys
Viewing the System ID
You can view the System ID during a programming session in
Software Keys.
1. Place the programming overlay over the appropriate keys on
your programming telephone.
2. Press ≤••¤flfl‹›› (CONFIG). The
display shows Pa s sw or d :.
3. Press ‡¤‡fi°‡ (SAPLUS). The display shows
Terminals&Extns.
4. Press ‘ until the display shows Software Keys.
5. Press ≠. The display shows SysID: followed by the
unique System ID number.
6. Press ® to exit or ‘ to continue programming.
Software Keys
Software Keys are password numbers provided by the installer.
They are required by the system if you want to enable the Auto
Attendant.
You are given three keys (passwords), consisting of eight digits
each. These numbers are entered in the Compact Plus system
through programming using the Prime extension and the
Software Keys heading. Once the Software Keys are entered, the
system makes the corresponding capability available.
Record the passwords in the Programming Record. You need the
numbers to restore an upgraded system after a cold start.
Entering the Software Keys
1. Place the programming overlay over the appropriate keys on
your programming telephone.
2. Press ≤••¤flfl‹›› (CONFIG). The
display shows Pa s sw or d :.
3. Press ‡¤‡fi°‡ (SAPLUS). The display shows
Terminals&Extns.
4. Press ‘ until the display shows Software Keys.
5. Press ≠. The display shows Sys ID:.
6. Press ‘. The display shows Password keys.
7. Press ≠. The display shows Key 1:.
8. Enter the eight-digit password number for Key 1. Use BKSP
to make corrections. As soon as the eighth digit is entered, the
display shows Key 2:.
Compact Plus System Administration Guide P0607114 Issue 01
Page 59

Software Keys 59
9. Enter the eight-digit password number for Key 2. The display
shows Key 3:.
10. Enter the eight-digit password number for Key 3.
11. Press OK. The display shows Entry successful.
12. Press ® to exit or ‘ to continue programming.
P0607114 Issue 01 Compact Plus System Administration Guide
Page 60

60 Software Keys
Compact Plus System Administration Guide P0607114 Issue 01
Page 61

Setting System speed dial
• Setting System speed dial.........62
• Assigning a number to a System speed dial code.........62
• Selecting a line.........63
• Setting the system to display a name instead of a number.........63
• Setting the speed dial number to bypass restrictions.........65
P0607114 Issue 01 Compact Plus System Administration Guide
Page 62

62 Setting System speed dial
Setting System speed dial
Speed dial saves time by allowing you to dial frequently called
numbers using a three-digit code. For example, you can
programme telephone numbers for major suppliers or clients for
easy dialling by everyone in the office.
Speed dial codes numbered from 001 to 255 are intended for
system-wide use. Speed dial codes from 256 to 279 are for
personal use and can be programmed differently at each
extension. See "Changing a personal (user) speed dial code" on
page 113 for more information on the Speed dial feature.
The steps to programming System speed dial are:
• assign a number to a System speed dial code
• select an outgoing facility to be used for the number
• set whether the system displays the number or a name
(optional)
• set whether the speed dial number bypasses any restrictions on
the line or extension where it is used (optional).
See "Chart 1: System Speed Dial" on page 316 in Appendix A for
a programming overview.
See also "Using Speed Dial" on page 231.
Assigning a number to a System speed dial code
First, choose a three-digit speed dial code (from 001 to 255) and
then assign a telephone number to it.
1. Place the programming overlay over the appropriate keys on
your programming telephone.
2. Press ≤••¤flfl‹›› (CONFIG). The
display shows Pa s sw or d :.
3. Press ‡¤‡fi°‡ (SAPLUS). The display shows
Terminals&Extns.
4. Press ‘ until the display shows Sys speed dial.
5. Press ≠. The display shows Speed dial #:.
6. Enter the System speed dial code (001 to 255).
7. Press ≠. The display shows the number currently
assigned to the code or No number.
8. Press CHANGE.
9. Enter the telephone number (up to 24 digits) and press OK.
Compact Plus System Administration Guide P0607114 Issue 01
Page 63

Selecting a line
Setting System speed dial 63
After assigning a telephone number to the speed dial code, you
must select an outgoing facility for the number to use. Choose a
Prime line, an exchange line, a line pool, or the routing table.
When you programme a line pool as part of a speed dial number,
use the programme key labelled Intercom and the line pool access
code, or a programmed line pool key.
If you assign a specific line to a System speed dial number, only
extensions with an appearance of that line can use the speed dial
number.
1. Begin with the display showing the speed dial code you just
changed in the previous procedure.
2. Press ‘. The display shows Use prime line.
3. Press CHANGE to choose Use prime line, Use routing tabl, Use
line, or Pool code. Stop pressing CHANGE when you see the
line you want to use for the speed dial.
4. Press ® to exit or ‘ to continue programming.
Setting the system to display a name instead of a number
You can choose to have the display show either the extension
number or a name for a speed dial code. For example, you could
programme a speed dial for a frequently used courier and have the
display show Courier instead of the courier’s telephone number.
System speed dial names can be 16 characters long. The default
displays the number.
Alpha tagging: If you specify a name for a system speed dial,
and your system is set up for CLI display, an incoming call on a
number-only CLI line that matches the system speed dial number
will display whatever name you entered into the system speed
dial name field. This is referred to as alpha tagging. You can
determine how many digits of the incoming call and the number
entered into the system speed dial must match before the system
determines that the numbers are the same. Refer to "CLID
Match" on page 144.
1. Place the programming overlay over the appropriate keys on
your programming telephone.
2. Press ≤••¤flfl‹›› (CONFIG). The
display shows Pa s sw or d :.
3. Press ‡¤‡fi°‡ (SAPLUS). The display shows
Terminals&Extns.
4. Press ‘ until the display shows Sys speed dial.
P0607114 Issue 01 Compact Plus System Administration Guide
Page 64

64 Setting System speed dial
5. Press ≠. The display shows Speed dial#:.
6. Enter the System speed dial code (001 to 255) you want to
use.
7. Press ‘ until the display shows Display digits:.
8. Press CHANGE to choose N (No).
No means the display shows a name for the code.
9. Press ‘. The display shows Name: Sys spd di….
Press ≠ to see the rest of the display.
10. Press CHANGE. The display shows Name:.
11. Enter the name you want to give to the speed dial code.
Enter the name by pressing the appropriate key on the keypad
until the first letter of the name is displayed. Press -->, then
enter the next letter of the name and so on until the name is
complete. Up to 16 characters are allowed. Press # to add
spaces.
12. Press ® to exit or ‘ to continue programming.
CLID name display
When you specify a name for a system speed dial, the system
displays the name programmed on that speed dial when you
receive a call from that number over a number-only analogue line
or target line. If you do not specify a name, then only the number
or line will appear for the call, depending on how the line was
programmed.
Note: For name display to occur, the calling number must also
match the system speed dial entry, as defined under CLID match.
Refer to "CLID Match" on page 144.
To program which display appears first on your telephone, follow
these steps:
1. Place the programming overlay over the appropriate keys on
your programming telephone.
2. Press ≤••¤flfl‹›› (CONFIG). The
display shows Pa s sw or d :.
3. Press ‡¤‡fi°‡ (SAPLUS). The display shows
Terminals&Extns.
4. Press ≠. The display shows Show extn#:.
5. Enter the extension number of the telephone you want to
programme. The display shows nnn:nnn.
6. Press ≠. The display shows Line access.
7. Press ‘ until the display shows Call Services.
Compact Plus System Administration Guide P0607114 Issue 01
Page 65

Setting System speed dial 65
8. Press ≠. The display shows Auto Call Services.
9. Press ‘. The display shows 1stDisplay.
10. Press CHANGE until you get to Name.
11. Press OK.
Setting the speed dial number to bypass restrictions
System speed dial numbers are generally subject to any
restrictions that are programmed in the Compact Plus system, but
they can be programmed to bypass these restrictions. The default
setting is N (No), which means the number is subject to normal
call restrictions.
1. Place the programming overlay over the appropriate keys on
your programming telephone.
2. Press ≤••¤flfl‹›› (CONFIG). The
display shows Password :.
3. Press ‡¤‡fi°‡ (SAPLUS). The display shows
Terminals&Extns.
4. Press ‘ until the display shows Sys speed dial.
5. Press ≠. The display shows Speed dial #:.
6. Enter the System speed dial code (001 to 255).
7. Press ≠. The display shows the number currently
assigned to the code, or No number.
8. Press ‘ until the display shows Bypass restr’n:
9. Press CHANGE to choose Y (Yes) or N (No).
10. Press ® to exit or ‘ to continue programming.
.
P0607114 Issue 01 Compact Plus System Administration Guide
Page 66

66 Setting System speed dial
Compact Plus System Administration Guide P0607114 Issue 01
Page 67

Naming extensions and lines
• Naming extensions.........68
• Naming lines.........69
P0607114 Issue 01 Compact Plus System Administration Guide
Page 68

68 Naming extensions and lines
Naming extensions
You can personalise your office communications by assigning
names to lines and extensions in the Norstar system. The
extension default name is the extension number (for example,
Extn 221). The line default name is the line number (for example,
Line 001).
Names can be seven characters long. Line and extension names
can contain both letters and numbers, but not # and *. To avoid
confusion, do not assign the same name to two extensions, two
lines, or to both an extension and a line in your system. Use
creative combinations of initials, abbreviations, or even
nicknames, to give each extension a unique name.
As the administrator, you can programme the system so that,
when you enter an internal extension number, the person’s name
appears on your telephone display. At the same time, the person
you are calling sees your name on their display.
See ‘Chart 2: Naming extensions’ on page 316 in Appendix A for
a programming overview.
1. Place the programming overlay over the appropriate keys on
your programming telephone.
2. Press ≤••¤flfl‹›› (CONFIG). The
display shows Password:.
3. Press ‡¤‡fi°‡ (SAPLUS). The display shows
Terminals&Extns.
4. Press ≠. The display shows Show extn#:.
5. Enter the extension number of the telephone you want to
programme. The display shows nnn:nnn.
6. Press ≠. The display shows Line access.
7. Press ‘ until the display shows Name:.
8. Press CHANGE.
9. Enter the characters of the name using the key pad by
pressing --> after each letter or press ‘ to restore
the default name.
10. Press ‘ to store the name.
11. Press ® to exit or ‘ to continue programming.
Compact Plus System Administration Guide P0607114 Issue 01
Page 69

Naming lines
Naming extensions and lines 69
Assigning names to lines can help you identify incoming calls.
For example, if both the Sales line and the Service line ring at
your extension, your display shows which line the call is on,
Sales or Service, when the line key is pressed or the handset is
lifted.
If the Sales department is in a meeting and they forward their
lines to your extension, the telephone display shows Sales for
any incoming calls on their lines.
See ‘Chart 3: Naming lines’ on page 317 in Appendix A, for a
programming overview.
1. Place the programming overlay over the appropriate keys on
your programming telephone.
2. Press ≤••¤flfl‹›› (CONFIG). The
display shows Password :.
3. Press ‡¤‡fi°‡ (SAPLUS). The display shows
Terminals&Extns.
4. Press ‘. The display shows Lines.
5. Press ≠. The display shows Show line:.
6. Enter the line number. Press ≠. The display shows
the current name.
7. Press CHANGE.
8. Enter the characters of the name using the keypad or press
‘ to restore the default name.
9. Press ‘ to store the name.
10. Press ® to exit or ‘ to continue programming.
P0607114 Issue 01 Compact Plus System Administration Guide
Page 70

70 Naming extensions and lines
Compact Plus System Administration Guide P0607114 Issue 01
Page 71

Changing the time and date
• Changing the time and date.........72
• Changing the time.........72
• Changing the date.........73
• Changing the time and date using the Basic password.........73
• Changing the time by an hour.........74
• Automatic Time & Date.........74
P0607114 Issue 01 Compact Plus System Administration Guide
Page 72

72 Changing the time and date
Changing the time and date
The current time and date appear on the display of idle
Norstar/Business Series Terminal (BST) telephones. Telephones
connected to an Analogue Terminal Adapter cannot display the
time and date. Whenever the mains is interrupted, the time is lost
on the clock and needs
reprogramming.
Note: You need only change the time and date at one
Norstar/BST telephone. The clock is reset for the entire
system.
The clock also controls the schedules used for services such as
ringing and routing.
After a power failure, the clock is behind by the length of time
power was lost. For example, if the power is out for two minutes,
the clock is two minutes behind.
See ‘Chart 4: Time and Date’ on page 317 in Appendix A for a
programming overview.
Changing the time
1. Place the programming overlay over the appropriate keys on
2. Press ≤••¤flfl‹›› (CONFIG). The
3. Press ¤‹fl›fl (ADMIN). The display shows
4. Press ‘until the display shows Time&Date.
5. Press ≠. The display shows Hour:.
6. Press CHANGE (or NEXT if you do not need to change the hour).
7. Enter the hour (00 to 23). If the number is less than 13, the
8. Press ‘. The display shows Minutes:.
your programming telephone.
display shows Password :.
Terminals&Extns.
display shows AM. Press CHANGE to select PM.
9. Press CHANGE.
10. Enter the minutes (00 to 59).
11. Press ® to exit or ‘ to continue programming.
Compact Plus System Administration Guide P0607114 Issue 01
Page 73

Changing the date
1. Place the programming overlay over the appropriate keys on
2. Press ≤••¤flfl‹›› (CONFIG). The
3. Press ¤‹fl›fl (ADMIN). The display shows
4. Press ‘ until the display shows Time&Date.
5. Press ≠. The display shows Hour:.
6. Press ‘ twice. The display shows Year:.
7. Press CHANGE.
8. Enter the last two digits of the current year.
9. Press ‘. The display shows Month:.
10. Enter the month (01 to 12).
Changing the time and date 73
your programming telephone.
display shows Password :.
Terminals&Extns.
11. Press ‘. The display shows Day:.
12. Press CHANGE.
13. Enter the day of the month (01 to 31).
14. Press ® to exit or ‘ to continue programming.
Changing the time and date using the Basic password
You can change the time and date using ≤••°›fl‹
(TIME) and the Basic password.
1. Press ≤••°›fl‹ (TIME). The display shows
Password :.
2. Press ≤••¤¤‡›¤ (BASIC). The display
shows Hour:.
3. Press CHANGE (or NEXT if you do not need to change the hour).
4. Enter the hour (00 to 23). If the number is less than 13, the
display shows AM. Press CHANGE to select PM.
5. Press NEXT. The display shows Minutes:.
6. Press CHANGE (or NEXT if you do not need to change the
minutes).
7. Enter the minutes (00 to 59).
8. Press NEXT. The display shows Year:.
9. Press CHANGE (or NEXT if you do not need to change the year).
10. Enter the last two digits of the current year.
11. Press NEXT. The display shows Month:.
P0607114 Issue 01 Compact Plus System Administration Guide
Page 74

74 Changing the time and date
12. Press CHANGE (or NEXT if there is no change).
13. Enter the month (01 to 12).
14. Press NEXT. The display shows Day:.
15. Press CHANGE.
16. Enter the day of the month (01 to 31).
17. Press ® to exit.
Changing the time by an hour
Norstar offers two features that allow you to adjust the time
quickly for changes in British Standard Time.
Moving one hour forward with ** FWD
1. Press ≤••‹·‹ (FWD). The display shows
Forward by 1Hr?.
2. Press YES. The display briefly shows Time Changed.
Moving one hour backward with ** BACK
1. Press ≤••¤¤¤fi (BACK). The display shows
Backward by 1Hr?.
2. Press YES. The display briefly shows Time Changed.
Automatic Time & Date
When a Basic Rate Interface (BRI) outgoing call is answered, the
network may provide time and date information to the Norstar
system. The Auto Time&Date feature enables the Norstar system
to use this information to automatically update the time and date
on the Norstar system.
1. Place the programming overlay over the appropriate keys on
your programming telephone.
2. Press ≤••¤flfl‹›› (CONFIG). The
display shows Password:.
3. Press ¤‹fl›fl (ADMIN). The display shows
Terminals&Extns.
4. Press ‘ until the display shows System prgrming.
5. Press ‘. The display shows Featr settings.
6. Press ≠. The display shows Backgrnd music:.
7. Press ‘ until the display shows AutoTime&Date.
8. Press CHANGE to choose Y or N.
9. Press ® to exit or ‘ to continue programming.
Compact Plus System Administration Guide P0607114 Issue 01
Page 75

Assigning a Direct-Dial extension
• Programming Direct-Dial.........76
• Programming an internal Direct-Dial extension.........76
• Programming an external Direct-Dial extension.........77
P0607114 Issue 01 Compact Plus System Administration Guide
Page 76

76 Assigning a Direct-Dial extension
Programming Direct-Dial
Direct-Dial allows you to dial a designated telephone in your
Compact Plus system or private network with a single digit. The
Direct-Dial digit is the digit you dial to reach an attendant in your
office. You can have one Direct-Dial extension in your Norstar
system. A person whose telephone is a Direct-Dial extension is
usually a receptionist for your entire office or for a particular
department.
The Direct-Dial telephone can send up to 30 messages and can
invoke services to activate the extra-dial telephone.
You can forward calls to a Direct-Dial telephone that is outside
your Modular Plus system if the Direct-Dial configuration is set
to use a routing table or a prime line, where the prime line is set
to Intercom. An example of this, is one of your direct-dial
telephones is configured on another system that is part of a
private network. Even though the telephone is on the private
network, the system considers it an external telephone.
Note that ISDN terminals cannot use the Direct-Dial digit to
reach a Direct-Dial extension.
For information on which telephones can access the Direct-Dial
extension, see ‘Assigning telephones to the Direct-Dial
extension’ on page 106.
See ‘Chart 5: Direct-Dial’ on page 318 in Appendix A for a
programming overview.
See ‘Accessing a Direct-Dial extension’ on page 266 for
information on using the Direct-Dial feature.
Programming an internal Direct-Dial extension
1. Place the programming overlay over the appropriate keys on
your programming telephone.
2. Press ≤••¤flfl‹›› (CONFIG). The
display shows Password :.
3. Press ‡¤‡fi°‡ (SAPLUS). The display shows
Terminals&Extns.
4. Press ‘ until the display shows System prgrming.
5. Press ≠. The display shows Hunt groups.
6. Press ‘. until the display shows Direct-dial.
7. Press ≠. The display shows D-Dial1:Intrnl.
8. Press ≠. The display shows Intrnl #:.
9. Press CHANGE.
Compact Plus System Administration Guide P0607114 Issue 01
Page 77

Assigning a Direct-Dial extension 77
10. Enter the extension number.
11. Press ® to exit or ‘ to continue programming.
Programming an external Direct-Dial extension
When you assign an external number as the Direct-Dial
extension, you must also specify whether to use a Prime line,
exchange line, line pool, or routing table to place the call.
1. Place the programming overlay over the appropriate keys on
your programming telephone.
2. Press ≤••¤flfl‹›› (CONFIG). The
display shows Password :.
3. Press ‡¤‡fi°‡ (SAPLUS). The display shows
Terminals&Extns.
4. Press ‘ until the display shows System prgrming.
5. Press ≠. The display shows Hunt groups.
6. Press ‘. until the display shows Direct-dial.
7. Press ≠. The display shows D-Dial1:Intrnl.
8. Press CHANGE to switch to Extrnl.
9. Press ≠. The display shows Extrnl#:.
Note: If the direct-dial telephone is on another system in a
private network, it is still considered an external number by
the system. Use the private network dialing string for that
extension in this field.
10. Press CHANGE, then enter up to 24 digits for the external
number.
11. Press OK. The display shows the number you have entered.
12. Press ‘. The display shows the facility.
13. Press CHANGE until the display shows the facility you want.
Options are: Use prime line, Use line, Pool code, or
Use routing tabl.
ATTENTION!
If you want to be able to forward calls to an external directdial telephone, the facility needs to be set to use the routing
table or a prime line, where the prime line is set to Intercom.
14. If you choose Use line or Pool code, you must enter a line
number or pool code. If you choose Use routing tabl, you
must enter a destination code.
15. Press ® to exit or ‘ to continue programming.
P0607114 Issue 01 Compact Plus System Administration Guide
Page 78

78 Assigning a Direct-Dial extension
Compact Plus System Administration Guide P0607114 Issue 01
Page 79

Barring calls and privileges
(Restrictions)
• Using restriction filters to bar calls.........80
• Assigning filters to a telephone (Extn restrns).........83
• Assigning filters to a line (Line restrns).........84
• Assigning filters to a line/extension (Line/extn restrns).........85
• Class of Service passwords.........86
• Assigning a remote access filter.........89
• Locking an extension.........93
• Preventing Last Number Redial.........94
• Preventing Saved Number Redial.........94
• Preventing Recall.........95
• Preventing Redirect.........96
P0607114 Issue 01 Compact Plus System Administration Guide
Page 80

80 Barring calls and privileges (Restrictions)
Using restriction filters to bar calls
Restrictions are digits that the system does not accept during
dialling. Overrides are digits that the system accepts in spite of
the restrictions. Groups of restrictions and overrides are
programmed into restriction filters.
Rather than define individual restrictions and apply them
repeatedly to each telephone and line, a restriction filter allows
you to apply restrictions as a single package of dialling sequences
that are not permitted.
Different filters can be applied to
• lines, to prevent telephones that share a line from dialling
restricted numbers
• extensions, to prevent a specific telephone from dialling
restricted numbers
• a combination of line and extension, to allow specific
telephones to be exempt from the line filter
• AC15A private circuits, to prevent people from using your
The number of restriction filters that you have for your system
depends on a number of factors. You may want to have different
restrictions for different times of the day (such as barring
long-distance calls after work hours). You may want different
restrictions for a telephone that clients may use.
Default filters
You may not have to create or change a filter. Some of the more
popular filters that restrict long-distance calls exist by default.
The following table shows the default restriction filters that the
Compact Plus system provides.
Filter 01 prevents you from dialling any number that begins with
0 or 1, except when the number begins with 0-800.
For example, a manager and four employees share a line but
the employees have a line/extension filter that restricts the
calls they can make on that line.
network to make restricted calls
Filter 05 prevents you from dialling any number that begins with
010, 1, and 00.
Filter 06 prevents you from dialling numbers that begin with any
digit.
Compact Plus System Administration Guide P0607114 Issue 01
Page 81

Barring calls and privileges (Restrictions) 81
You may change the default filters before you apply them. For
instance, you might add override 002 to Restriction 02,
permitting calls to 1-800.
Restriction filter defaults
Filter Restrictions (denied) Overrides
00 No restrictions (cannot be changed)
01 01: 0
02: 1
02 No restrictions
03 No restrictions
04 No restrictions
05 01: 010
02: 1
03: 00
06 01: •
(the dot represents any digit)
07 - 99 No restrictions or overrides programmed
001: 0800
Customising a call barring filter
You can customise default filters for your needs before you apply
them. You can
• create a new restriction filter
• add or remove restrictions
• add or remove overrides
Rules for adding and creating filters
• You can have up to 100 restriction filters.
• There is a maximum of 400 restrictions and overrides
allocated to the 100 programmable filters.
• Each programmable filter can have up to 48 restrictions. There
is no limit on the number of overrides that can be allocated to
a restriction.
• You can use any restriction or override in more than one filter.
Each time it is used, it counts as one entry. For example, if
restriction 411 exists in filters 01, 02, and 03, it uses up three
of the 400 entries available.
• The maximum length of a restriction is 15 digits. The
maximum length of an override is 16 digits.
• You can use • and £ in a sequence of numbers in either a
restriction or an override. These characters are often used as
part of feature codes for other systems or for features provided
by the public switched telephone network (PSTN).
• The solid dot (•) can represent any digit. It is inserted by
pressing ANY.
P0607114 Issue 01 Compact Plus System Administration Guide
Page 82
82 Barring calls and privileges (Restrictions)
• When you are finished programming restrictions for one
extension, you can copy those settings to other extensions by
using COPY at the Restrictions ˆ display. For more
information about copying extension programming, see
‘Restriction service’ on page 160.
• You cannot delete a filter but you can delete a restriction
within a filter. Removing the restrictions programmed on a
filter makes it an unrestricted filter, but the filter itself is not
removed.
Applying restriction filters
Removing a restriction changes the
identifying number of the restriction.
Removing a restriction removes the
overrides associated with it, and changes
the identifying number of the restriction.
For example, removal of restriction 01 renumbers restrictions 01 to 08 as 01 to 07.
Once you create the filters, you can assign the restrictions to a
telephone (under Terminals&Extns), to a line (under Lines), to a
particular line on a telephone (under Terminals&Extns), and to
remote callers (under Remote access).
To assign restriction filters for different times of the day, see
‘Restriction service’ on page 160.
See ‘Chart 6: Restriction filters’ on page 319 in Appendix A for
a programming overview.
1. Place the programming overlay over the appropriate keys on
your programming telephone.
2. Press ≤••¤flfl‹›› (CONFIG). The
display shows Password:.
3. Press ‡¤‡fi°‡ (SAPLUS). The display shows
Terminals&Extns.
4. Press ≠. The display shows Show extn#:.
5. Enter the extension number of the telephone you want to
programme. The display shows nnn:nnn.
6. Press ≠. The display shows Line access.
7. Press ‘ until the display shows Restrictions.
8. Press ≠. The display shows Restrn filters.
9. Press ≠. The display shows Show filter:.
10. Enter the two-digit code or press ‘.
11. Press ≠.
Compact Plus System Administration Guide P0607114 Issue 01
Page 83

Barring calls and privileges (Restrictions) 83
12. Use REMOVE, ADD, the keypad, and OK to change the
restrictions for the filter.
13. Press ≠, then ‘ to see the overrides for the
restriction.
14. Use REMOVE, ADD, the keypad, and OK to change the overrides
for the restriction.
15. Press ® to quit or ‘ to continue programming.
Assigning filters to a telephone (Extn restrns)
Extension restrictions allows you to assign a restriction filter to a
telephone to prevent certain numbers from being dialled from
that telephone. You can assign a different restriction filter for
normal service and for each of six schedules.
See ‘Using alternate or scheduled services’ on page 158 for more
information about the schedules.
1. Place the programming overlay over the appropriate keys on
your programming telephone.
2. Press ≤••¤flfl‹›› (CONFIG). The
display shows Password:.
3. Press ‡¤‡fi°‡ (SAPLUS). The display shows
Terminals&Extns.
4. Press ≠. The display shows Show extn#:.
5. Enter the extension number of the telephone you want to
programme. The display shows nnn:nnn.
6. Press ≠. The display shows Line access.
7. Press ‘ until the display shows Restrictions.
8. Press ≠. The display shows Restrn filters.
9. Press ‘. The display shows Extn restrns.
10. Press ≠. The display shows Filters.
11. Press ≠. The display shows Normal:.
12. Press CHANGE and use the keypad to enter the number of the
restriction filter to be assigned to the extension for each
schedule.
13. Press ® to quit or ‘ to continue programming.
P0607114 Issue 01 Compact Plus System Administration Guide
Page 84

84 Barring calls and privileges (Restrictions)
The following table shows the default restrictions.
Default filters for extensions
Schedule Restriction filter
Normal 02
Sched 1 (Night) 11
Sched 2 (Evening) 12
Sched 3 (Lunch) 13
Sched 4 00
Sched 5 00
Sched 6 00
This means, for example, that if you enter a set of restrictions for
filter 11, they are automatically applied when the Night schedule
is in use.
Assigning filters to a line (Line restrns)
Line restrictions allows you to assign a restriction filter to a line
to prevent certain numbers from being dialled from any telephone
with that line appearance. You can assign a different restriction
filter for normal service and for each of six schedules. See ‘Using
alternate or scheduled services’ on page 158 for more
information about the schedules.
1. Place the programming overlay over the appropriate keys on
your programming telephone.
2. Press ≤••¤flfl‹›› (CONFIG). The
display shows Password:.
3. Press ‡¤‡fi°‡ (SAPLUS). The display shows
Terminals&Extns.
4. Press ‘. The displays shows Lines.
5. Press ≠. The display shows Show line:.
6. Enter the line number.
7. Press ≠. The display shows Name:.
8. Press ‘ until the display shows Restrictions.
9. Press ≠. The display shows Restrn filters.
10. Press ‘. The display shows Line restrns.
11. Press ≠. The display shows Normal:.
12. Press CHANGE and use the keypad to enter the number of the
restriction filter to be assigned to the line for each schedule.
13. Press ® to quit or ‘ to continue programming.
Compact Plus System Administration Guide P0607114 Issue 01
Page 85

Barring calls and privileges (Restrictions) 85
The following table shows the default restrictions.
Default filters for extensions
Schedule Restriction filter
Normal 03
Sched 1 (Night) 21
Sched 2 (Evening) 22
Sched 3 (Lunch) 23
Sched 4 00
Sched 5 00
Sched 6 00
This means, for example, that if you enter a set of restrictions for
filter 21, they are automatically applied when the Night schedule
is in use.
Assigning filters to a line/extension
(Line/extn restrns)
Line/extension restrictions allows you to assign a restriction filter
to a specific line that can be used for outgoing calls at a specific
telephone. This type of filter replaces any line or extension
restriction filters that might otherwise apply. It restricts the
numbers you can dial on a line, but only from that telephone. The
same line on another telephone can have different restrictions.
As with extension restrictions, you can apply a different line or
extension restriction for normal service and for each of six
schedules. A maximum of 255 line/extension restrictions may be
applied to lines at telephones.
If a line/extension restriction is assigned to a line at a particular
telephone, it overrides any line restrictions or extension
restrictions that might otherwise apply.
If no line/extension restrictions have been defined, the numbers
are checked against the extension restrictions and the line
restrictions, if either of these have been defined. The numbers
may be rejected by either restriction.
1. Place the programming overlay over the appropriate keys on
your programming telephone.
2. Press ≤••¤flfl‹›› (CONFIG). The
display shows Password:.
3. Press ‡¤‡fi°‡ (SAPLUS). The display shows
Terminals&Extns.
4. Press ≠. The display shows Show extn#:.
5. Enter the extension number of the telephone you want to
programme. The display shows nnn:nnn.
P0607114 Issue 01 Compact Plus System Administration Guide
Page 86

86 Barring calls and privileges (Restrictions)
6. Press ≠. The display shows Line access.
7. Press ‘ until the display shows Restrictions.
8. Press ≠. The display shows Restrn filters.
9. Press ‘ until the display shows Line/extn rstrn.
10. Press ≠. The display shows Show line:.
11. Enter the line number.
12. Press ≠. The display shows Normal:.
13. Press CHANGE and use the keypad to enter the number of the
filter to be assigned as the line/extension restriction for each
schedule. There are no default line/extension restrictions.
14. Press ® to quit or ‘ to continue programming.
Class of Service passwords
Call barring shows you how to customise and apply dialling
filters to restrict calls. You can temporarily override these filters
with a Class of Service (COS) password. The COS passwords
replace one set of filters with another to allow someone to make
calls that would otherwise be restricted, without giving them
complete freedom to make every kind of call. The COS
passwords let you define individual passwords and determine the
restriction filter and remote package associated with each.
A system can have a maximum of 100 six-digit COS passwords,
ranging from 00 to 99. Each password consists of a user filter,
which replaces the current extension or line/extension filter, and
a line filter, which replaces the current line filter.
Your COS password is in effect only for the duration of your call
and does not affect the restrictions placed on other users of the
system.
The COS passwords for a system should be determined randomly
and should be changed regularly. Employee COS passwords
should be deleted when they leave the company.
Typically, each user has a separate COS password. However,
several users can share a password or one user can have several
passwords. Users should memorise their COS passwords instead
of writing them down.
You can use COPY and the keypad to copy the restriction filters
and remote package from one COS password to another. The
COS passwords must be unique.
Compact Plus System Administration Guide P0607114 Issue 01
Page 87

Before you begin programming a COS password, make sure you
have defined the appropriate restriction filters in Restrictions
under Lines. Then check that you have created a suitable remote
package in Remote access under System prgrming.See ‘Using
Class of Service passwords’ on page 263 for information about
using this feature.
Selecting a COS password
1. Place the programming overlay over the appropriate keys on
your programming telephone.
2. Press≤••¤flfl‹›› (CONFIG). The display
shows Password:.
3. Press ‡¤‡fi°‡ (SAPLUS). The display shows
Terminals&Extns.
4. Press ‘ until the display shows Passwords.
5. Press ≠. The display shows COS pswds.
Barring calls and privileges (Restrictions) 87
6. Press ≠. The displays shows Show paswd #:.
7. Enter a two-digit password (00 to 99).
8. Press ≠. The display shows the setting for that COS
password.
9. Press CHANGE.
10. Enter a password (maximum six digits).
11. Press ® to exit or ‘ to continue programming.
Assigning user restrictions to the COS password
A COS password can be used by internal and external users;
therefore, you must assign restrictions for the user instead of for
the extension.
1. Place the programming overlay over the appropriate keys on
your programming telephone.
2. Press≤••¤flfl‹›› (CONFIG). The display
shows Password:.
3. Press ‡¤‡fi°‡ (SAPLUS). The display shows
Terminals&Extns.
4. Press ‘ until the display shows Pas s wo r ds .
5. Press ≠. The display shows COS pswds.
6. Press ≠. The displays shows Show paswd #:.
7. Enter a two-digit password (00 to 99).
8. Press ≠. The display shows the setting for that COS
password.
P0607114 Issue 01 Compact Plus System Administration Guide
Page 88

88 Barring calls and privileges (Restrictions)
9. Press ‘. The display shows User flt:.
10. Press CHANGE.
11. Enter the number for the restriction filter to be applied with
this COS password.
12. Press ® to exit or ‘ to continue programming.
Assigning line restrictions to the COS password
1. Place the programming overlay over the appropriate keys on
your programming telephone.
2. Press≤••¤flfl‹›› (CONFIG). The display
shows Pa s sw or d :.
3. Press ‡¤‡fi°‡ (SAPLUS). The display shows
Terminals&Extns.
4. Press ‘ until the display shows Pas s wo r ds .
5. Press ≠. The display shows COS pswds.
6. Press ≠. The displays shows Show paswd #:.
7. Enter a two-digit password (00 to 99).
8. Press ≠. The display shows the setting for that COS
password.
9. Press ‘ until the display shows Line flt:.
10. Press CHANGE.
11. Enter the number for the restriction that applies to the line
when this COS password is used.
12. Press ® to exit or ‘ to continue programming.
Assigning a remote package to the COS password
1. Place the programming overlay over the appropriate keys on
your programming telephone.
2. Press ≤••¤flfl‹›› (CONFIG). The
display shows Password:.
3. Press ‡¤‡fi°‡ (SAPLUS). The display shows
Terminals&Extns.
4. Press ‘ until the display shows Passwords.
5. Press ≠. The display shows COS pswds.
6. Press ≠. The displays shows Show paswd #:.
7. Enter a two-digit password (00 to 99).
8. Press ≠. The display shows the setting for that COS
password.
9. Press ‘ until the display shows Remote pkg:.
Compact Plus System Administration Guide P0607114 Issue 01
Page 89

10. Press CHANGE.
11. Enter the number of the remote package that applies with this
COS password.
12. Press ® to exit or ‘ to continue programming.
Assigning a remote access filter
People on other systems in your private network can dial into
your system over AC15A private circuits or exchange lines and
make outgoing calls from your system. Therefore, you may want
to limit the numbers that can be dialled over AC15A private
circuits and exchange lines. You do this by assigning a remote
access filter to the AC15A private circuits or exchange lines.
See ‘Chart 7: Remote Access Packages’ on page 320 in Appendix
A for a programming overview.
1. Place the programming overlay over the appropriate keys on
your programming telephone.
Barring calls and privileges (Restrictions) 89
2. Press ≤••¤flfl‹›› (CONFIG). The
display shows Pa s sw or d :.
3. Press ‡¤‡fi°‡ (SAPLUS). The display shows
Terminals&Extns.
4. Press ‘ until the display shows System prgrming.
5. Press ≠. The display shows Hunt groups.
6. Press ‘ until the display shows Remote access.
7. Press ≠ twice. The display shows Show pkg:.
8. Enter a package number.
9. Press ≠. The display shows LinePool access.
10. Press ≠. The display shows Pool A:.
11. Press CHANGE to choose Y (Yes) or N (No).
12. Press –.
13. Press ‘. The display shows Remote page:.
14. Press CHANGE to choose Y (Yes) or N (No).
15. Press ‘. The display shows Remote admin:.
16. Press CHANGE to choose Y (Yes) or N (No).
17. Press ‘. The display shows Remote monitor:.
18. Press –.
19. Press ≠. The display shows Rem access pkgs.
20. Press ‘. The display shows Rem line access.
21. Press ≠. The display shows Show line:.
P0607114 Issue 01 Compact Plus System Administration Guide
Page 90

90 Barring calls and privileges (Restrictions)
22. Enter the number of the AC15A private circuit (061 or 062).
The displays shows the line number followed by Rem pkg:.
23. Press CHANGE.
24. Enter the number of the remote package that you just created.
25. Press ® to exit or ‘ to continue in programming.
Setting up a new COS password
As the Administrator you set up the COS passwords. You choose
a password number, the password, and finally the user and line
filters for your new Class of Service.
If you leave the user or line filter settings at Deflt, the current
filter is retained for this Class of Service. You may assign a new
filter to either the user or line filter, or to both, depending on your
needs. You must change at least one of them, or your Class of
Service is no different from ordinary service.
1. Place the programming overlay over the appropriate keys on
your programming telephone.
2. Press ≤••¤flfl‹›› (CONFIG). The
display shows Password :.
3. Press ‡¤‡fi°‡ (SAPLUS). The display shows
Terminals&Extns.
4. Press ‘ until the display shows Passwords.
5. Press ≠. The display shows COS pswds.
6. Press ≠. The display shows Show pswd #:.
7. Enter an unused password number (00 to 99). The display
shows COS pswd # followed by the number you chose.
8. Press ≠. The display shows Pswdnn: and the current
setting.
9. Press CHANGE.
10. Enter six digits for the new password.
11. Press ‘. The display shows User flt: and the
current setting.
12. If you are changing the user filter, press CHANGE. The display
shows User fltr:.
13. Enter the two-digit number of an existing dialling filter.
14. Press ‘. The display shows Line fltr: and the
current setting.
15. If you are changing the line filter, press CHANGE. The display
shows Line fltr:.
16. Enter the two-digit number of an existing dialling filter.
17. Press ® to exit or ‘ to continue programming.
Compact Plus System Administration Guide P0607114 Issue 01
Page 91

Barring calls and privileges (Restrictions) 91
Changing an existing COS password
To maintain the security of a Class of Service password, it is a
good idea to change it frequently.
1. Place the programming overlay over the appropriate keys on
your programming telephone.
2. Press ≤••¤flfl‹›› (CONFIG). The
display shows Password :.
3. Press ‡¤‡fi°‡ (SAPLUS). The display shows
Terminals&Extns.
4. Press ‘ until the display shows Passwords.
5. Press ≠. The display shows COS pswds.
6. Press ≠. The display shows Show pswd #:.
7. Enter the password number of the COS password you want to
change (00 to 99).
8. Press ≠. The display shows Pswd, followed by the
number you chose and the current password.
9. Press CHANGE.
10. Enter six digits for the new password.
11. Press ® to exit or ‘ to continue programming.
Changing the filters assigned to an existing COS
password
1. Place the programming overlay over the appropriate keys on
your programming telephone.
2. Press ≤••¤flfl‹›› (CONFIG). The
display shows Password :.
3. Press ‡¤‡fi°‡ (SAPLUS). The display shows
Terminals&Extns.
4. Press ‘ until the display shows Passwords.
5. Press ≠. The display shows COS pswds.
6. Press ≠. The display shows Show pswd #:.
7. Enter the password number of the COS password whose filter
you want to change (00 to 99).
8. Press ≠. The display shows Pswd, followed by the
number you chose and the current password.
9. Press ‘. The display shows User flt: and the
current setting.
10. If you are changing the user filter, press CHANGE. The display
shows User fltr:.
P0607114 Issue 01 Compact Plus System Administration Guide
Page 92

92 Barring calls and privileges (Restrictions)
11. Enter the two-digit number of an existing dialling filter or
leave blank to return to the default filter.
12. Press ‘. The display shows Line fltr: and the
current filter assigned.
13. If you are changing the line filter, press CHANGE. The display
shows Line fltr:.
14. Enter the two-digit number of an existing dialling filter or
leave blank to return to the default filter.
15. Press ® to exit or ‘ to continue programming.
Erasing an existing COS password
When a Class of Service password is no longer needed, you can
erase it.
1. Place the programming overlay over the appropriate keys on
your programming telephone.
2. Press ≤••¤flfl‹›› (CONFIG). The
display shows Password :.
3. Press ‡¤‡fi°‡ (SAPLUS). The display shows
Terminals&Extns.
4. Press ‘ until the display shows Passwords.
5. Press ≠. The display shows COS pswds.
6. Press ≠. The display shows Show pswd #:.
7. Enter the password number of the COS password you want to
erase (00 to 99).
8. Press ≠. The display shows Pswd, followed by the
number you chose and current password.
9. Press CLR.
10. Press ‘.
11. Press ® to exit or ‘ to continue programming.
Compact Plus System Administration Guide P0607114 Issue 01
Page 93

Locking an extension
You can limit the number of features that can be used or
programmed at a particular extension by determining a lock
condition for the extension.
The options are:
• None (default)— not locked. You can programme any system
or extension setting.
• Full—fully locked. You can programme only these settings:
display contrast, ring type, ring volume, and volume control.
• Partial—partly locked. You can programme most extension
settings. You cannot programme system settings, personal
speed dial codes, dialling mode, or memory keys; and you
cannot move line keys or enable Voice Call Deny.
Note: Do not apply extension lock to the extension you use to
Barring calls and privileges (Restrictions) 93
programme the system. There must be at least one two-line
display telephone in the system that has extension lock set
to None, or you will not be able to programme the system.
1. Place the programming overlay over the appropriate keys on
your programming telephone.
2. Press ≤••¤flfl‹›› (CONFIG). The
display shows Password:.
3. Press ‡¤‡fi°‡ (SAPLUS). The display shows
Terminals&Extns.
4. Press ≠. The display shows Show extn#:.
5. Enter the extension number of the telephone you want to
programme. The displays shows nnn:nnn.
6. Press ≠. The display shows Line access.
7. Press ‘ until the display shows Restrictions.
8. Press ≠. The display shows Restrn filters.
9. Press ‘. The display shows Extn restrns.
10. Press ≠. The display shows Filters.
11. Press ‘. The display shows ExtnLock:.
12. Press CHANGE to select None, Full, or Partial.
13. Press ® to exit or ‘ to continue programming.
P0607114 Issue 01 Compact Plus System Administration Guide
Page 94

94 Barring calls and privileges (Restrictions)
Preventing Last Number Redial
Under some conditions, a telephone may be used by customers or
clients. You can prevent non-employees from accessing sensitive
numbers by blocking certain features at the telephone. The
default setting allows an extension to use the Last Number Redial
feature.
See ‘Chart 8: Extension restrictions’ on page 321 in Appendix A
for a programming overview.
1. Place the programming overlay over the appropriate keys on
your programming telephone.
2. Press ≤••¤flfl‹›› (CONFIG). The
display shows Password :.
3. Press ‡¤‡fi°‡ (SAPLUS). The display shows
Terminals&Extns.
4. Press ≠. The display shows Show extn#:.
5. Enter the extension number of the telephone you want to
programme. The display shows nnn:nnn.
6. Press ≠. The display shows Line access.
7. Press ‘ until the display shows Restrictions.
8. Press ≠. The display shows Restrn filters.
9. Press ‘. The display shows Extn restrns.
10. Press ≠. The display shows Filters.
11. Press ‘ until the display shows Allow last no:
12. Press CHANGE to choose Y (Yes) or N (No).
13. Press ® to exit or ‘ to continue programming.
Preventing Saved Number Redial
The default setting allows an extension to use the Saved Number
Redial feature.
1. Place the programming overlay over the appropriate keys on
your programming telephone.
2. Press ≤••¤flfl‹›› (CONFIG). The
display shows Password:.
3. Press ‡¤‡fi°‡ (SAPLUS). The display shows
Terminals&Extns.
4. Press ≠. The display shows Show extn#:.
5. Enter the extension number of the telephone you want to
programme. The display shows nnn:nnn.
6. Press ≠. The display shows Line access.
Compact Plus System Administration Guide P0607114 Issue 01
Page 95

Preventing Recall
Barring calls and privileges (Restrictions) 95
7. Press ‘ until the display shows Restrictions.
8. Press ≠. The display shows Restrn filters.
9. Press ‘. The display shows Extn restrns.
10. Press ≠. The display shows Filters.
11. Press ‘ until the display shows Allow saved no:.
12. Press CHANGE to choose Y (Yes) or N (No).
13. Press ® to exit or ‘ to continue programming.
The default setting allows an extension to use the Recall feature.
1. Place the programming overlay over the appropriate keys on
your programming telephone.
2. Press ≤••¤flfl‹›› (CONFIG). The
display shows Password :.
3. Press ‡¤‡fi°‡ (SAPLUS). The display shows
Terminals&Extns.
4. Press ≠. The display shows Show extn#:.
5. Enter the extension number of the telephone you want to
programme. The display shows nnn:nnn.
6. Press ≠. The display shows Line access.
7. Press ‘ until the display shows Restrictions.
8. Press ≠. The display shows Restrn filters.
9. Press ‘ until the display shows Extn restrns.
10. Press ≠.The display shows Filters.
11. Press ‘ until the display shows Allow recall:.
12. Press CHANGE to choose Y (Yes) or N (No).
13. Press ® to exit or ‘ to continue programming.
P0607114 Issue 01 Compact Plus System Administration Guide
Page 96

96 Barring calls and privileges (Restrictions)
Preventing Redirect
The default setting allows an extension to use the Redirect
feature.
1. Place the programming overlay over the appropriate keys on
your programming telephone.
2. Press ≤••¤flfl‹›› (CONFIG). The display
shows Password :.
3. Press ‡¤‡fi°‡ (SAPLUS). The display shows
Terminals&Extns.
4. Press ≠. The display shows Show extn#:.
5. Enter the extension number of the telephone you want to
programme. The display shows nnn:nnn.
6. Press ≠. The display shows Line access.
7. Press ‘ until the display shows Restrictions.
8. Press ≠. The display shows Restrn filters.
9. Press ‘ until the display shows Extn restrns.
10. Press ≠. The display shows Filters.
11. Press ‘ until the display shows Allow redirect:.
12. Press CHANGE to choose Y (Yes) or N (No).
13. Press ® to exit or ‘ to continue programming.
Compact Plus System Administration Guide P0607114 Issue 01
Page 97

Programming capabilities
• Programming an extension.........98
• Setting Call Forward no answer.........98
• Setting Call Forward on Busy.........100
• Programming Do Not Disturb on Busy.........101
• Programming Handsfree.........102
• Programming Handsfree answerback.........103
• Assigning a Pickup group.........104
• Assigning a page zone.........104
• Programming paging.........105
• Assigning telephones to the Direct-Dial extension.........106
• Allowing Priority call.........107
• Assigning a Hotline.........108
• Auxiliary ringer.........109
• Activating Redirect ring.........109
• Receive tones.........110
P0607114 Issue 01 Compact Plus System Administration Guide
Page 98

98 Programming capabilities
Programming an extension
Many features that can be used at individual extensions (see
‘Appendix A: Programming overviews’ on page 313) must first
be programmed for use. As the Administrator, you can
• programme Full and Automatic Handsfree
• assign Pickup Groups to allow colleagues to easily answer
calls ringing at a telephone other than their own
• assign page zones so that colleagues can page within their
groups without disturbing the whole office
• programme an auxiliary ringer (loud bell) that alerts you when
there are incoming calls to an extension
• assign a Direct-Dial extension so your colleagues can reach an
attendant by dialling just one digit
• set Call Forward so that all calls are answered when people’s
telephones are busy or unanswered
• programme Do Not Disturb on Busy
• activate Redirect Ring
• assign a Hotline extension to call one number automatically
• allow Priority call
See ‘Chart 9: Extension capabilities 1’ on page 322 in Appendix
A for a programming overview.
Setting Call Forward no answer
When you set the system up to forward calls that are not answered
at a particular telephone, you must define the extension that the
calls are sent to and the number of times that an incoming call
rings before the call is forwarded. You can choose 2, 3, 4, 6, and
10 rings. The default is 4 rings.
Note: If the extension that you are forwarding calls to does not
have a free intercom key, or has Do Not Disturb or Do Not
Disturb on busy activated, the incoming call continues to
visually alert at your telephone, and the caller continues to
hear ringback.
If this is not desirable, you can programme a Call Forward
on Busy or Call Forward no answer destination for the
second extension.
For example, extension 224 is programmed to forward all
incoming calls to extension 235, which in turn is
programmed to forward all incoming calls to extension
240.
Unanswered calls coming in on an outside line are
automatically transferred to the Prime extension for that
line.
Compact Plus System Administration Guide P0607114 Issue 01
Page 99

Programming capabilities 99
If the extension is a member of a hunt group, the Call Forward no
answer feature is overridden and the hunt group call will continue
to ring until the hunt time has expired.
A hunt group extension can be a Call Forward on busy extension.
1. Place the programming overlay over the appropriate keys on
your programming telephone.
2. Press ≤••¤flfl‹›› (CONFIG). The
display shows Password :.
3. Press ¤‹fl›fl (ADMIN). The display shows
Terminals&Extns.
4. Press ≠. The display shows Show extn#:.
5. Enter the extension number of the telephone you wish to
programme. The display shows nnn:nnn.
6. Press ≠ three times. The display shows Fwd
to:None.
7. Press CHANGE and enter the extension number where you
want the calls to be sent. You can press CLR to change the
destination back to None.
8. Press ® to exit or ‘ to continue programming.
Changing the number of rings before a call is forwarded
1. Place the programming overlay over the appropriate keys on
your programming telephone.
2. Press ≤••¤flfl‹›› (CONFIG). The
display shows Password :.
3. Press ¤‹fl›fl (ADMIN). The display shows
Terminals&Extns.
4. Press ≠. The display shows Show extn#:.
5. Enter the extension number of the telephone you wish to
programme. The display shows nnn:nnn.
6. Press ≠. The display shows Capabilities.
7. Press ≠. The display shows Fwd no answer:.
8. Press ≠. The display shows Fwd to:nnn.
9. Press‘. The display shows Forward delay:.
10. Press CHANGE to choose the number of times the telephone
rings before it is forwarded: 2, 3, 4, 6, or 10 rings.
11. Press ® to exit or ‘ to continue programming.
P0607114 Issue 01 Compact Plus System Administration Guide
Page 100

100 Programming capabilities
Setting Call Forward on Busy
When a call comes in and you are already engaged on the
telephone or when you have Do Not Disturb activated at your
telephone, Call Forward on Busy automatically passes the call to
another extension.
If the extension is a member of a hunt group, the Call Forward on
Busy feature is overridden and the hunt group call will continue
to ring until the hunt time has expired.
A hunt group extension can be a Call Forward on Busy extension.
1. Place the programming overlay over the appropriate keys on
your programming telephone.
2. Press ≤••¤flfl‹›› (CONFIG). The
display shows Password :.
3. Press ¤‹fl›fl (ADMIN). The display shows
Terminals&Extns.
4. Press ≠. The display shows Show extn#:.
5. Enter the extension number of the telephone you wish to
programme. The display shows nnn:nnn.
6. Press ≠. The display shows Capabilities.
7. Press ≠. The display shows Fwd no answer:.
8. Press ‘. The display shows Fwd on busy.
9. Press ≠. The display shows Fwd to:
.
10. Press CHANGE and enter the extension number you want to
receive the calls. Press CLR to change the destination back to
None.
11. Press ® to exit or ‘ to continue programming.
Compact Plus System Administration Guide P0607114 Issue 01
 Loading...