

Page 1

Messaging Guide
This guide explains how to use the Voice
Messaging features. Familiarize yourself with
the frequently used procedures such as
retrieving your messages and recording your
personalized greeting. Then explore the other
features available within the system.
Each section contains a brief explanation on a
specific feature followed with step-by-step
guidelines to ease your learning process.
Mailbox
Your electronic Mailbox receives your calls and
stores your messages, and also stores your
Password and Personalized greeting. When you
call into Voicemail from your own phone, you
will have access to your personal mailbox and
able to use the features described in this guide.
Password
Your Password provides security for your
mailbox and its contents. All your interactions
with Voicemail are private and confidential.
When you check in to your room you are
advised to change your Password. (Your default
password will be announced in the Change
Password Menu. Alternatively, you can check
with the Hotel Operator). You will only be
required to enter your Password if you call from
any other phone other than the one in your
room.
Prompts
Voicemail guides you with audible prompts at
each step. The prompts tell you what to do next,
or what options are available, so that you don’t
have to remember every step. You can interrupt
a prompt or a message by pressing the * key or
the key for the next step, if the option is
available.
Dial-in Numbers
To access your Mailbox, you will need to dial
the preset Voicemail number. On some
telephone sets, you can press the ‘Message’
speed-dial button. This number can also be
obtained from the Hotel operators.
Calling into Your Mailbox
1. Dial the Voicemail extension number or press
the message speed-dial button on your room
phone.
If you are calling from outside the Hotel, you will
have to follow steps 2 and 3.
2. Enter your room number
3. Enter password followed by the pound (#)
key
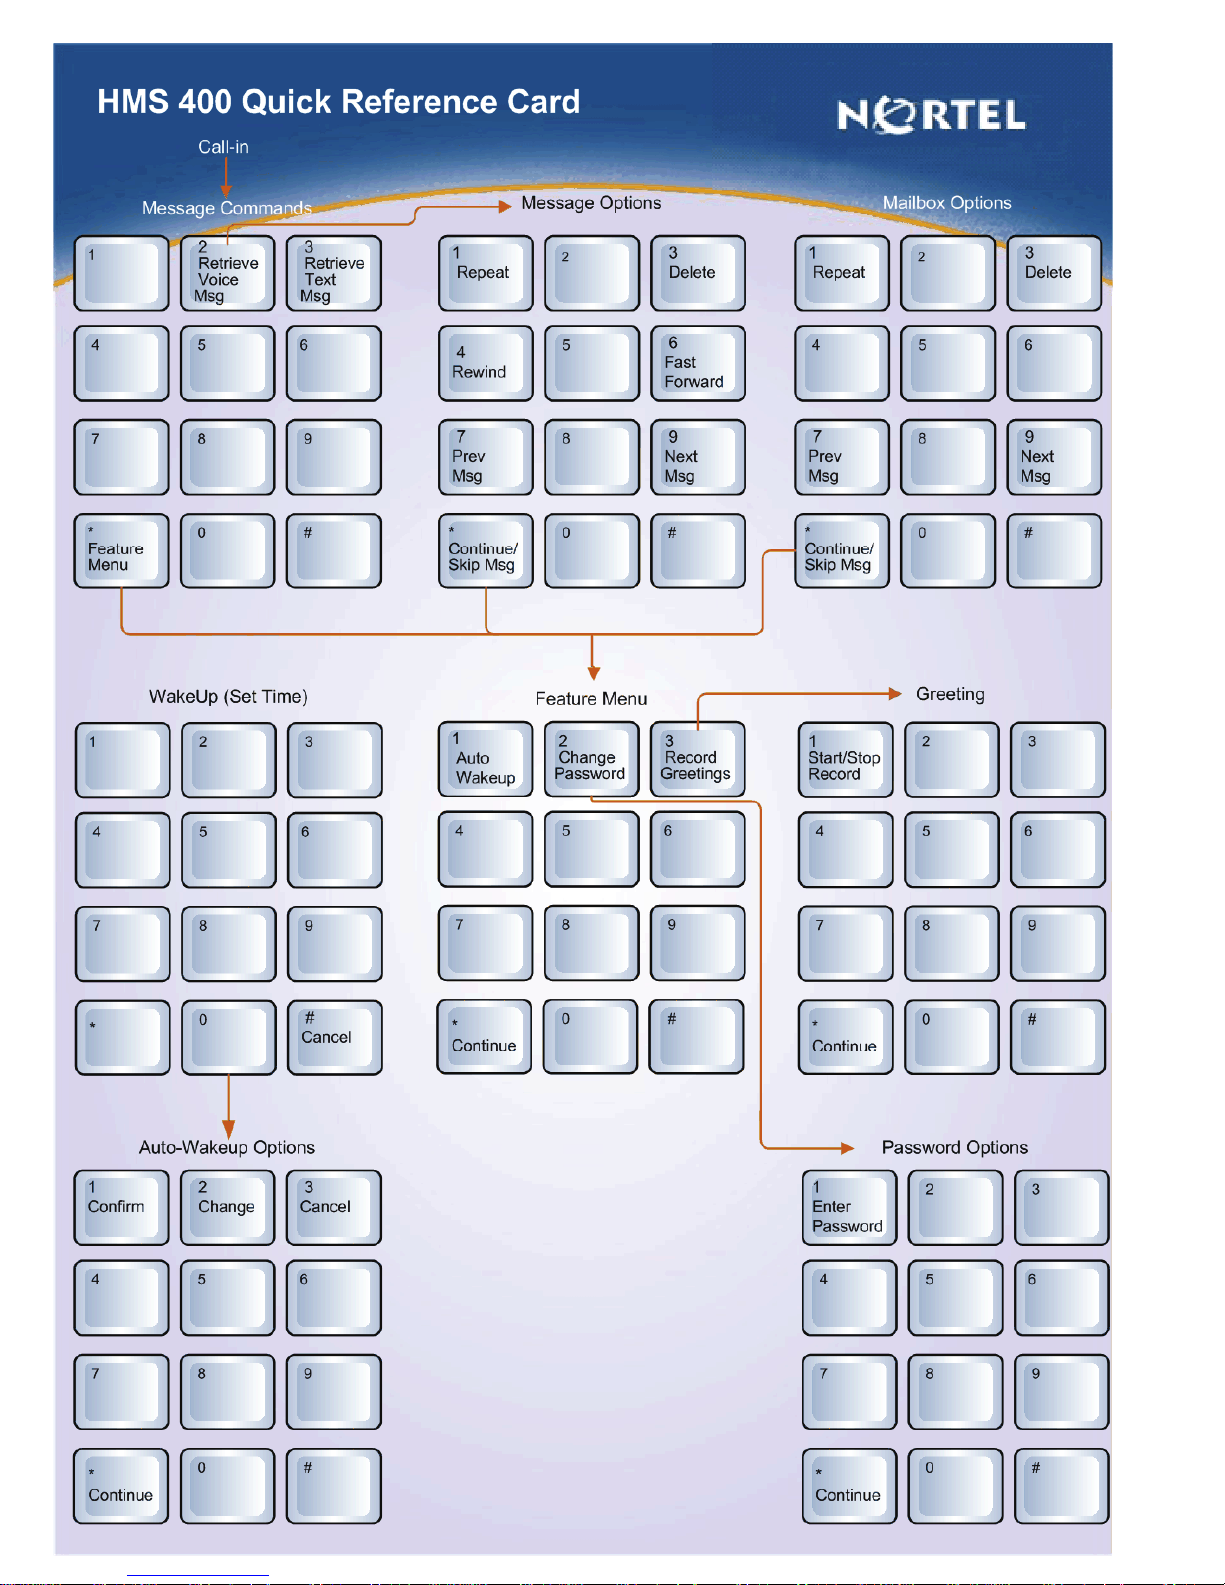
Retrieving Your Messages
When you login to your Mailbox, the system will
announce the number of messages in your
mailbox. Prompts will differ depending on the
types of messages available. For instance, “You
have 2 voice messages and written messages”.
In this instance, you have the choice of
selecting which kind of message you would like
to retrieve first. In the case of having only voice
messages, the system will then present the user
with 2 options:
• Press 2 for Message Retrieval OR
• Press ¸ for Feature Menu
If 2 is pressed, the following will take place:
1. Message envelope played
2. First new voice message played
3. While message is being played, the following
options are available:
• To repeat the message, press 1
• To delete the message, press 3
• To skip back (5 seconds), press 4
• To skip forward (5 seconds), press 6
• To go to previous message, press 7
• To go to next message, Press 9
• To end message, Press ¸
LNOTE
Once a message skips back to the beginning (as a
result of pressing 4 repeatedly), the system will
replay the message from the start. On the other
hand, if 6 is pressed repeatedly until it reaches to
the end of the message, the message menu
options will be played
LNOTE
When 7 is pressed, system will say “Previous
Message” followed by the envelope of the
previous message
LNOTE
When 9 is pressed, system will say “Next
Message” followed by the envelope of the next
message
LNOTE
When ¸ is pressed, system will straightaway jump
to the message options menu
4. The following Message Options Menu is given
at the end of each message:
• To repeat the message, press 1
• To delete the message, press 3
• To go to previous message, press 7
• To go to next message, press 9
• To continue (save and proceed to the next
message), press ¸
5. After all messages have been played or skipped
to the end, the system will go into the Feature
Menu and the options available are:
• To set a wakeup call, press 1
• To change password, press 2
• To record a personalized greeting, press 3
6. If text message is available, press 3 to be
transferred to the Message Desk
7. If there are no messages, system will go to the
Feature menu
Restoring Messages
Deleted messages can be restored as long as you
are still on the same session. A deleted message
can be restored in 2 ways; either immediately after
deletion by pressing 3 again or returning to the
deleted message using the navigation keys (7 or
9) and then pressing 3.
LNOTE
Messages that have been marked as deleted will
still be played back
Setting an Auto-Wakeup Call
You can set an automatic wake up call from your
phone by selecting this option from the feature
menu.
LNOTE
This option can be disabled by the System
Administrator. If selected when disabled, your
call will be transferred to the Operator instead
1. Press ¸ for further options in the message
menu
2. Press 1 to set Wakeup Call
3. System will announce current time in AM/PM
format
4. Enter desired Wakeup time in the 24-hour clock
format
5. At the confirmation prompt, if you wish:
• To confirm, Press 1
• To change, Press 2
• To cancel, Press 3
6. Pressing 2 will take you back to step 3
7. Pressing 3 will take you back to Feature Menu
8. Once confirmed, call will end
Auto Wake Up Snooze Feature
Pressing any digits on the keypad upon
receiving your wake-up call will activate the
snooze function. System will call back in 10
minutes time
Changing Your Password
You are advised to change your Voicemail
Password upon checking in to your room. You can
change your password by selecting this option
from the feature menu.
¸ for further options in the message
1. Press
menu
2. Press 2 to change password
3. Your current password will be played, Press 1
to change this password
4. Enter your new password
LTIPS
Change your password as often as possible. Do
not assign Passwords that can be easily
obtained from your documents; for example:
Birth Date, Passport Number or Identification
Card Number
Recording Personalized Greeting
The personal greeting feature allows you to record
your personalized greeting, which will be played
after the system prompt when calls reach your
Mailbox. You can record your personalized
greeting by selecting this option from the feature
menu.
1. Press ¸ for further options in the message
menu
2. Press 3 to record new greeting message
3. Press 1 to start recording your greeting
4. After the ‘beep’ tone, record your greeting using
the handset (do not use hands free)
5. Press any key to stop recording
6. If you are not satisfied with your greeting and
wish to re-record, press 1 again
HMS 400 Guest Quick Reference Card
Copyright © 2007 Nortel Networks. All rights reserved.
Date: March 2007
Document Release: Standard 3.0
Document number: NN42350-103
* Nortel, the Nortel (Logo), and the Globemark are
trademarks of Nortel Networks.
Page 2
 Loading...