


UCx Feature Guide for Nortel IP phones with Feature Key mode enabled
Date: 22 November 2016
System: UCx
Release: 5.0
Phone models: Nortel IP Phones i20xx Series, 11xx Series and 12xx Series

TABLE OF CONTENTS
1. INTRODUCTION.................................................................................................................................. 5
1.1 Controls and Buttons ................................................................................................................ 6
2. USAGE ............................................................................................................................................... 7
2.1 Making a Call ............................................................................................................................ 7
Using Off-hook dialing ....................................................................................................................... 7
Using On-hook dialing ....................................................................................................................... 7
Using Handsfree dialing ..................................................................................................................... 7
Using System Directory ..................................................................................................................... 7
Using Call History (Call Log) ............................................................................................................... 7
Using Calls key ................................................................................................................................... 8
Using Last Number Redial.................................................................................................................. 8
Page 2 of 26
Using Hotline ..................................................................................................................................... 8
Using Intercom (Voice Call) ............................................................................................................... 8
Using Paging ...................................................................................................................................... 8
Using Page General ........................................................................................................................... 8
Using Page Zones............................................................................................................................... 9
Using Ring Again (Call Back) .............................................................................................................. 9
Using User Speed Dial........................................................................................................................ 9
Using System Speed Dial ................................................................................................................. 10
2.2 While on a Call ....................................................................................................................... 10
On Hold ........................................................................................................................................... 10
Transfer (Attended) ......................................................................................................................... 10
Transfer (Blind) ................................................................................................................................ 10
Transfer to Voicemail Box ............................................................................................................... 10
Call Park ........................................................................................................................................... 11
Call Park Retrieval ............................................................................................................................ 11
Display Name/Number for active call .............................................................................................. 11
Display Name/Number for incoming call while on an active call ..................................................... 11
Disconnect ....................................................................................................................................... 11
2.3 Incoming Calls ........................................................................................................................ 12
Internal Auto Answer ...................................................................................................................... 12
Call Pickup ....................................................................................................................................... 12
Group Pickup ................................................................................................................................... 12
Copyright E-MetroTel ©2016 2828 W. Parker Rd. Unit B201, Plano, TX. USA. 75075 www.emetrotel.com

Call Waiting ..................................................................................................................................... 12
Call Forward All/Unconditional 1 ..................................................................................................... 12
Remote Call Forward All/Unconditional 1 ........................................................................................ 13
Call Forward Busy 1 .......................................................................................................................... 13
Remote Call Forward Busy 1 ............................................................................................................. 13
Call Forward Unavailable 1 ............................................................................................................... 13
Remote Call Forward Unavailable 1 ................................................................................................. 13
Call Forward to Voicemail 1 ............................................................................................................. 13
Do Not Disturb................................................................................................................................. 14
2.4 Calls with Multiple Parties ...................................................................................................... 14
Call Join ........................................................................................................................................... 14
Conference ...................................................................................................................................... 14
2.5 Additional System Features .................................................................................................... 15
Page 3 of 26
Blacklist ........................................................................................................................................... 15
Blacklist Cancel ................................................................................................................................ 15
Blacklist Last Caller .......................................................................................................................... 15
Call Recording toggle ....................................................................................................................... 15
Call Timer ........................................................................................................................................ 15
Call Trace ......................................................................................................................................... 15
Caller ID Blocking ............................................................................................................................. 16
Follow Me toggle ............................................................................................................................. 16
Intercom Allow ................................................................................................................................ 16
Intercom Disallow............................................................................................................................ 16
Speak your Extension ...................................................................................................................... 16
Speak Time ...................................................................................................................................... 16
Static Time and Date ....................................................................................................................... 16
Stamp Log ........................................................................................................................................ 16
Wake Up Call ................................................................................................................................... 16
2.6 Phone Configuration Features ................................................................................................. 17
External Autodial ............................................................................................................................. 17
Internal Autodial ............................................................................................................................. 17
Configure Feature ............................................................................................................................ 17
Language ......................................................................................................................................... 18
Ring Type ......................................................................................................................................... 18
Copyright E-MetroTel ©2016 2828 W. Parker Rd. Unit B201, Plano, TX. USA. 75075 www.emetrotel.com

Page 4 of 26
Ring Volume .................................................................................................................................... 18
Contrast ........................................................................................................................................... 18
Time Zone Offset ............................................................................................................................. 19
Button Inquiry ................................................................................................................................. 19
Test Set ............................................................................................................................................ 19
2.7 Hotdesking ............................................................................................................................. 19
Hotdesk from a phone with the Services Key .................................................................................. 19
Hotdesk from an unregistered phone ............................................................................................. 20
Hotdesk from a phone with a programmed key .............................................................................. 21
2.8 Call Center Agent Features ...................................................................................................... 21
3. SERVICES KEY ................................................................................................................................... 23
Features available from Services Key listed in order of appearance ............................................... 23
4. VOICEMAIL ...................................................................................................................................... 25
4.1 Accessing Voicemail ................................................................................................................ 25
4.2 Direct Dial to Voicemail .......................................................................................................... 25
5. USER EXTENSION PORTAL ................................................................................................................ 26
Copyright E-MetroTel ©2016 2828 W. Parker Rd. Unit B201, Plano, TX. USA. 75075 www.emetrotel.com
Page 5 of 26
1. INTRODUCTION
This Feature Guide describes the usage of your Nortel IP Phone when Feature Key mode is enabled.
With Feature Key mode enabled, the operation of your Nortel IP phone when connected to the UCx
Server operates like a Nortel BCM phone by displaying a Feature key that is used to invoke features
using feature codes.
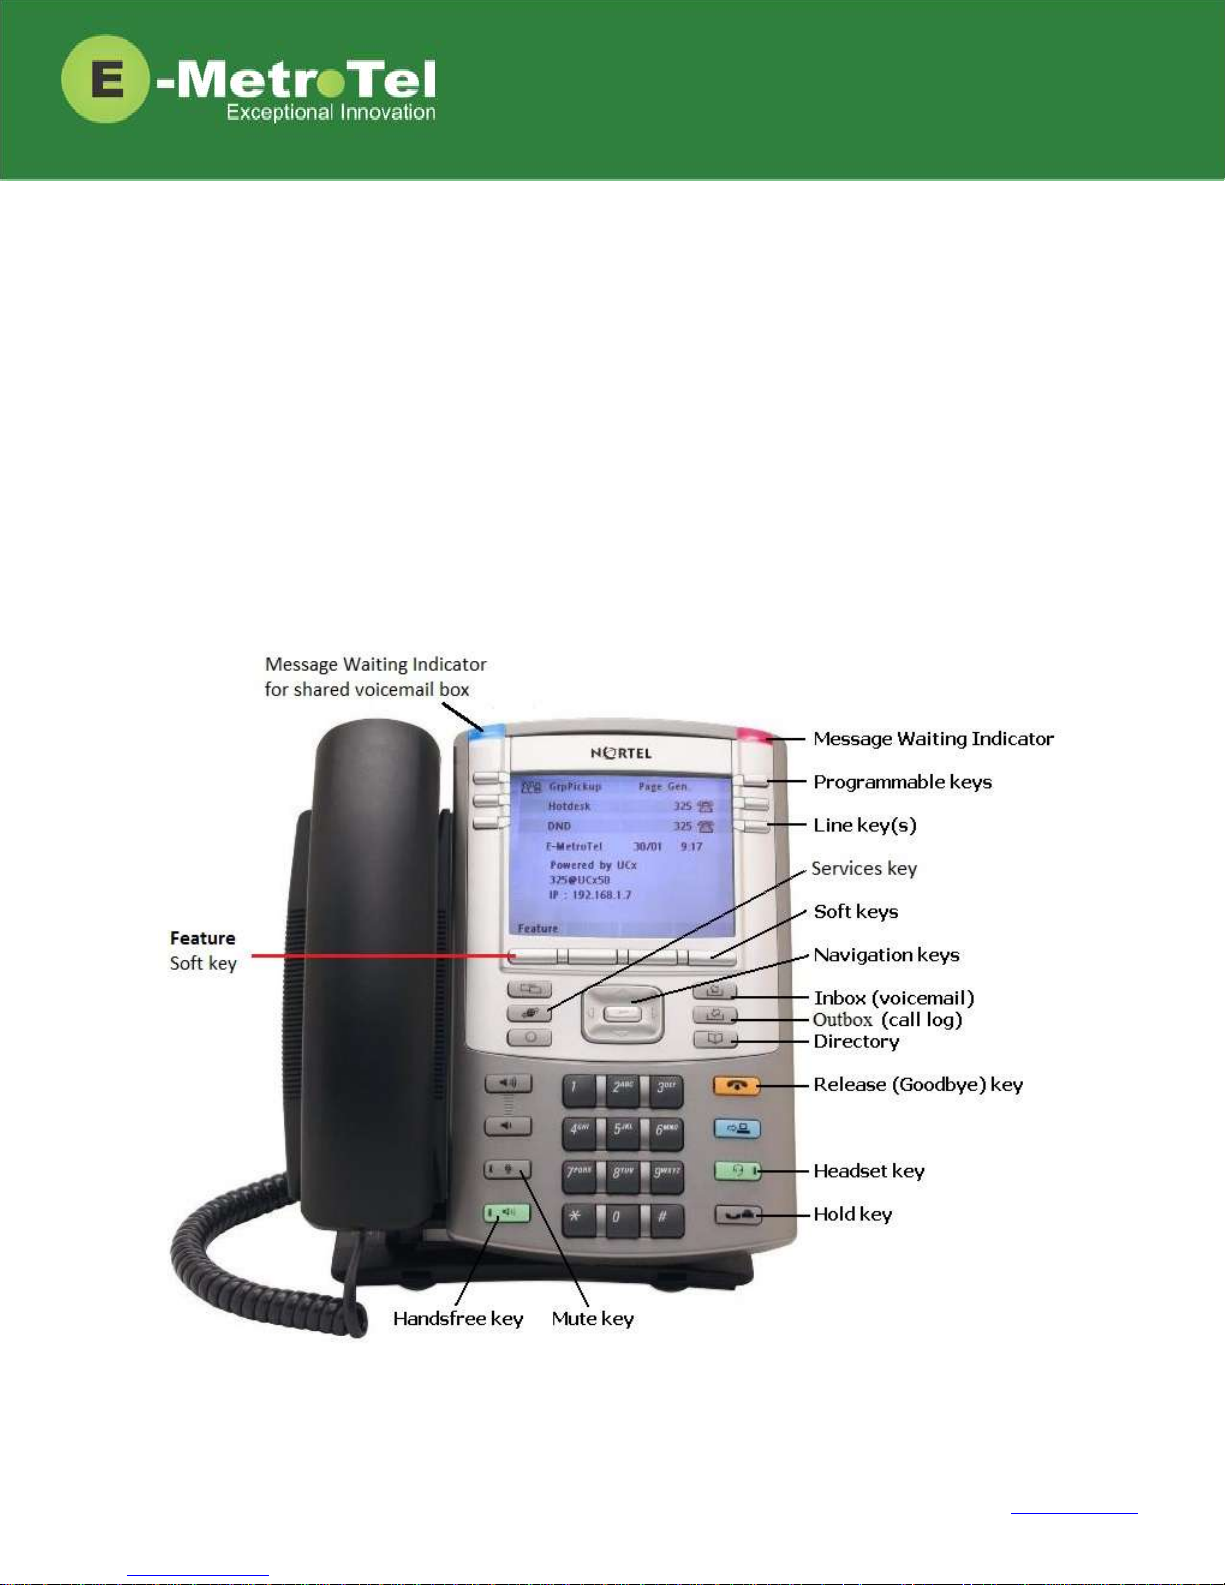
Depending on the model of phone you have, different keys may be offered for different features.
Nevertheless, there are some basic set of controls and buttons that will be available across all models.
The figure below shows the button layout of the 1140E IP phone as a reference. Refer to the respective
Nortel IP phone user guide for the button layout of your phone.
Copyright E-MetroTel ©2016 2828 W. Parker Rd. Unit B201, Plano, TX. USA. 75075 www.emetrotel.com
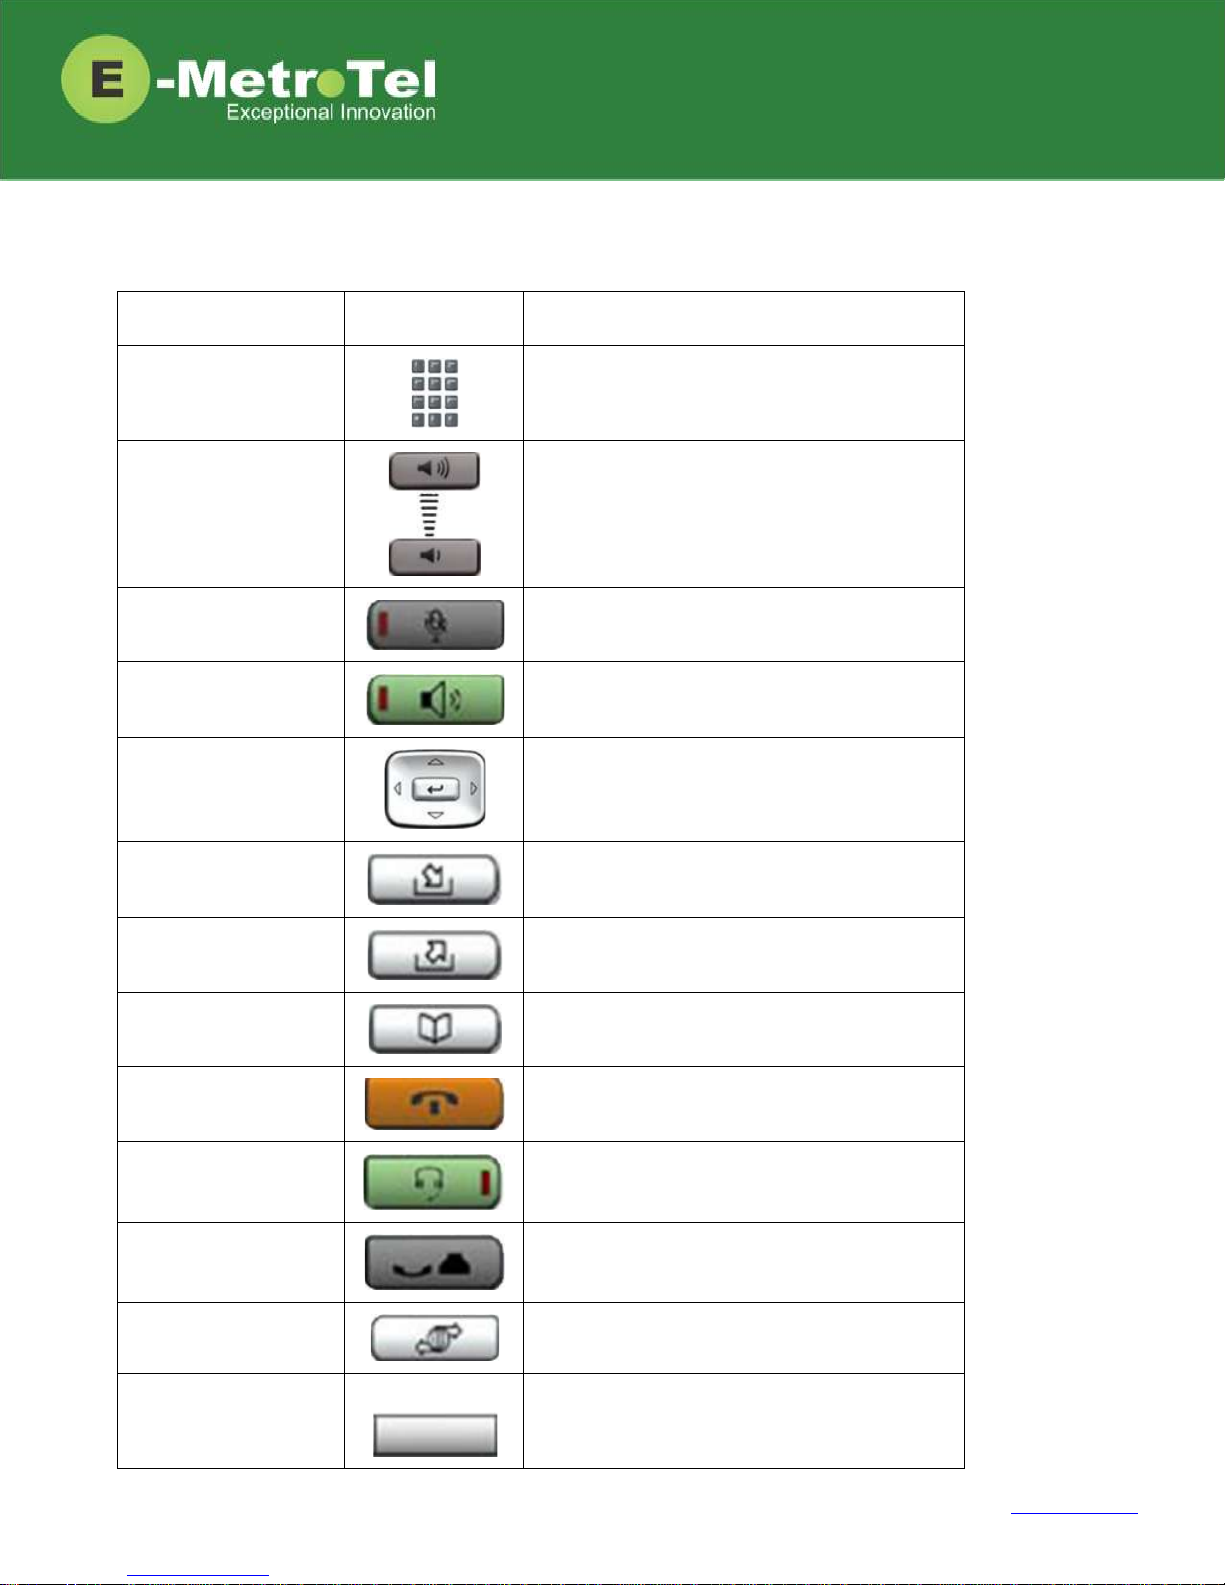
Name
Control/Button
Description
Dial pad
Standard telephone dial pad
Volume Up/Down
Ringer volume/sound volume
Mute
Mute/unmute toggle
Handsfree
Enable handsfree mode
Up/Down/Left/Right
Navigation keys
Menu navigation
Inbox
Voicemail
Outbox
Call history (Call log)
Directory
Company directory
Release (Goodbye)
Release a call; Exit; End of a feature
Headset
Enable headset mode (if a headset is present)
Hold
Put call on-hold
Services
Provides a list of features that can be invoked
Feature
Feature
Invokes features via feature codes
1.1 Controls and Buttons
Standard telephone controls and buttons are listed in the table below.
Page 6 of 26
Copyright E-MetroTel ©2016 2828 W. Parker Rd. Unit B201, Plano, TX. USA. 75075 www.emetrotel.com

Feature
Steps
Using Off-hook dialing
1. Lift handset.
2. Dial the number.
Using On-hook dialing
1. Press the Line key.
2. Dial the number.
Using Handsfree dialing
1. Press the Handsfree key or Headset key if headset is connected.
2. Dial the number.
Using System Directory
1. Press the Directory key
OR
Press the Feature softkey followed by feature code 960.
2. Use the dial pad to enter the first 3 letters of either the first or last name of
the person you want to call.
Using Call History
(Call Log)
1. Press the Outbox key
OR
Press the Feature softkey followed by feature code 812.
2. Press the Recvd, Placed or Missed soft key to view the list of received,
dialed or missed calls.
3. Use the Up/Down Navigation keys to view call log entries.
4. On Nortel phones with a single display line, use the More soft key to view
additional information about call log entries.
5. Press the Call soft key to call the phone number from the selected call log
entry.
Note: The Call Log feature is NOT supported on phones that have single
line display screens and do not have soft keys.
2. USAGE
2.1 Making a Call
Page 7 of 26
Copyright E-MetroTel ©2016 2828 W. Parker Rd. Unit B201, Plano, TX. USA. 75075 www.emetrotel.com
Page 8 of 26
Using Calls key
1. Press the Calls soft key to view details of missed calls.
2. Press the Call soft key to call the phone number from the selected call log
entry.
Using Last Number Redial
1. Press the Line key followed by the the Redial soft key
OR
Press the Feature soft key followed by feature code 5.
Using Hotline
1. Lift handset or press the Line/Handsfree/Headset key and the configured
number is dialed automatically.
Using Intercom
(Voice Call)
1. Press the Feature soft key followed by feature code 66.
2. Enter the EXTENSION number.
3. Speak into the handset and your voice will be heard on the dialed
EXTENSION’s speaker
Using Paging
1. Dial the PAGE GROUP extension number.
2. Speak into the handset and your voice will be heard on the speakers of the
extensions that belong to the page group.
Using Page General
1. Press the Feature soft key followed by feature code 60.
2. Speak into the handset and your voice will be heard on the speakers of the
extensions that belong to the Default page group.
The Hotline feature and number is configured by the UCx Administrator
on a per extension basis.
Page Groups are configured by the UCx Administrator under Paging and
Intercom.
The Calls soft key will appear when there are missed calls since the last
use of the phone.
Copyright E-MetroTel ©2016 2828 W. Parker Rd. Unit B201, Plano, TX. USA. 75075 www.emetrotel.com

Page 9 of 26
Using Page Zones
1. Press the Feature soft key followed by feature code 61X, where X is the
zone number from 1 to 6.
2. Speak into the handset and your voice will be heard on the speakers of the
extensions that belong to Page Zone X.
Using Ring Again
(Call Back)
1. Dial an extension and if you receive a Busy tone or if there is No Answer.
2. Press the RngAgn soft key.
3. If Ring Again is activated when the dialed extension is Busy, you will be
notified when the extension becomes idle.
4. If Ring Again is activated when the dialed extension has No Answer, you will
be notified when there is activity on the phone and the phone becomes idle.
5. When the extension you want to reach is available, you will be notified and
prompted to call back the extension.
6. If you respond Yes, the feature will dial the extension immediately.
7. If you respond No, Ring Again for that extension will be cancelled.
Using User Speed Dial
1. Dial *75 to enter the user speed dial menu.
2. Enter the speed dial location and press the # sign.
3. Follow the audio prompts.
The same steps are used to add or change a speed dial entry. For an
existing entry, the following audio prompts are presented:
1 - To Listen to the number
2 - To Change the entry location
3 - To Change the number
* - To Cancel and delete the entry
The first page group with Group Description ending with the digit “X”
will be treated as Page Zone X.
Copyright E-MetroTel ©2016 2828 W. Parker Rd. Unit B201, Plano, TX. USA. 75075 www.emetrotel.com

Using System Speed Dial
1. Press the Feature soft key followed by the feature code 0.
2. Enter the Speed Dial Code.
Feature
Steps
On Hold
1. To place an active call on hold, just press the Hold key.
2. To retrieve the call previously put on-hold, press the Line key with the held
call.
3. If a call is placed on hold for an extended period of time, a notification tone
will be played.
Transfer (Attended)
1. Press the Transfer soft key and the original caller is placed on hold.
2. Enter the other number you want to call and press the Call soft key or the #
sign.
3. When the other party answers, you can consult with the other party first.
4. To connect the other party with the original caller press the Transfer soft
key.
5. To abort the transfer, press the Cancel soft key or the Release key to return
to the original caller.
Transfer (Blind)
1. Dial ## and the system prompt will say "Transfer" and present dial tone.
2. Enter the other number you want to transfer the call to.
3. The call is immediately transferred.
Transfer to Voicemail Box
1. Press the Feature soft key followed by the feature code 986.
2. Enter the mailbox number you want to transfer to.
Speed Dial Codes are configured by the UCx Administrator under
Phonebook.
The time interval for the notification tone is configurable and can also
be disabled by your UCx Administrator under Nortel Settings.
2.2 While on a Call
Page 10 of 26
Copyright E-MetroTel ©2016 2828 W. Parker Rd. Unit B201, Plano, TX. USA. 75075 www.emetrotel.com

Page 11 of 26
Feature
Steps
Call Park
1. Press the Feature soft key followed by the feature code 74.
2. The system will say and display the PARKING LOT number.
4. To retrieve the parked call, dial the PARKING LOT number from any phone.
Call Park Retrieval
1. An alternative method to retrieve a parked call is to dial *86.
2. The oldest parked call is retrieved regardless of who parked the call.
Display Name/Number for
active call
1. The Name and Number of the calling party is automatically displayed for an
active call.
2. For telephones with only a single line display, you can press the Info soft key
to toggle between the Name and Number.
Display Name/Number for
incoming call while on an
active call
1. The Name and Number of another incoming call is automatically displayed
while you are active on an existing call.
2. By default, the Name and Number will be displayed for 5 seconds.
Disconnect
1. If using the handset, replace the handset into the cradle or press the
Release key.
2. If using Handsfree or Headset, press the Release key.
If nobody retrieves a parked call within the timeout period, the call is
automatically sent back to the extension that parked the call. The
duration of the timeout is configurable by the UCx Administrator under
Parking Lot.
The Call Display Timer is configurable by your UCx Administrator under
Nortel Settings.
Copyright E-MetroTel ©2016 2828 W. Parker Rd. Unit B201, Plano, TX. USA. 75075 www.emetrotel.com

Feature
Steps
Internal Auto Answer
1. When Internal Auto Answer is set to Intercom, all calls from internal
extensions will behave as intercom calls (i.e. auto-answered). All external
calls or calls under certain circumstances (e.g. Blind Transfer and Follow Me)
will behave as a normal call.
Call Pickup
1. Press the Feature soft key followed by the feature code 76.
2. Enter the EXTENSION number that is ringing.
3. Press the Enter soft key to invoke the pickup.
Group Pickup
1. Press the Feature soft key followed by the feature code 75.
2. Call ringing at another extension in your pickup group is picked up.
Call Waiting
1. To activate Call Waiting, dial *70.
2. To deactivate Call Waiting, dial *71.
Call Forward
All/Unconditional 1
1. Press the Feature soft key followed by the feature code 4.
2. Enter or change the destination number.
3. Press the Forwd soft key to invoke call forward all calls.
4. To cancel, press the Feature soft key followed by the feature code #4.
Internal Auto Answer is configured by the UCx Administrator on a per
extension basis. The feature is disabled by default.
Call group and Pickup group(s) are configured by the UCx Administrator
on a per extension basis.
To use call waiting, your phone must be configured to have 2 or more
lines (DN) keys.
When you have 2 or more line keys and call waiting is enabled, you will
receive additional incoming calls until there is no free line key. When
call waiting is disabled, you will not receive incoming calls if you have a
call on at least one of the line keys - additional line keys can be used
only to make outgoing calls
2.3 Incoming Calls
Page 12 of 26
Copyright E-MetroTel ©2016 2828 W. Parker Rd. Unit B201, Plano, TX. USA. 75075 www.emetrotel.com

Page 13 of 26
Feature
Steps
Remote Call Forward
All/Unconditional 1
1. To activate Call Forward All/Unconditional from another local phone, dial
*720.
2. If calling from an external phone, dial your DISA number followed by the PIN
code. When dial tone is presented, dial *720.
3. Enter your EXTENSION number when prompted.
4. Enter the destination number.
5. To deactivate Call Forward All/Unconditional, dial *73 + EXTENSION.
Call Forward Busy 1
1. To activate Call Forward on Busy, dial *90 + EXTENSION.
(For example, to call forward to extension 200, dial *90200.)
2. To deactivate Call Forward on Busy, dial *91.
Remote Call Forward Busy
1
1. To activate Call Forward Busy from another local phone, dial *910.
2. If calling from an external phone, dial your DISA number followed by the PIN
code. When dial tone is presented, dial *910.
3. Enter your EXTENSION number when prompted.
4. Enter the destination number.
5. To deactivate Call Forward on Busy, dial *91 + EXTENSION.
Call Forward Unavailable 1
1. To activate Call Forward on Unavailable, dial *52 + EXTENSION.
(For example, to call forward to extension 200, dial *52200.)
2. To deactivate Call Forward on Unavailable, dial *53.
Remote Call Forward
Unavailable 1
1. To activate Call Forward All/Unconditional from another local phone, dial
*520.
2. If calling from an external phone, dial your DISA number followed by the PIN
code. When dial tone is presented, dial *520.
3. Enter your EXTENSION number when prompted.
4. Enter the destination number.
5. To deactivate Call Forward on Unavailable dial *53 + EXTENSION.
Call Forward to Voicemail 1
1. Press the Feature soft key followed by the feature code 984.
2. To cancel, press the Feature soft key followed by the feature code #4.
Copyright E-MetroTel ©2016 2828 W. Parker Rd. Unit B201, Plano, TX. USA. 75075 www.emetrotel.com

Page 14 of 26
Feature
Steps
Do Not Disturb
1. Press the DND key
OR
Press the Feature soft key followed by the feature code 85.
2. When DND is active on your phone, the phone display shows “Do not
disturb”.
3. To deactivate Do Not Disturb, press the DND key again
OR
press the Feature soft key followed by the feature code #85
Feature
Steps
Call Join
1. While in a call or conference on the first Line (DN) key, press the Hold key.
The caller(s) on the first line is placed on hold.
2. Make or receive a call on the second Line key
3. Press the Conf soft key, followed by the Join soft key.
4. Press the first Line key to join all parties into a conference.
5. You can continue to add as many parties to the existing conference with the
above steps.
Conference
1. While on a call, press the Conf soft key. The original caller is placed on hold.
2. Dial the extension or external phone number of the party you want to add
to the call.
3. To add the new party to the conference, press the Conf soft key again.
4. To return to the conference without adding the new party, press the Cancel
soft key.
Note: The Call Join capability is applicable only under the following
conditions:
The phone has a minimum of 2 Line (DN) keys
The calls on both lines can be conferenced
1: Dial *74 from any local phone to deactivate all types of call forwarding for the specified extension.
2.4 Calls with Multiple Parties
Copyright E-MetroTel ©2016 2828 W. Parker Rd. Unit B201, Plano, TX. USA. 75075 www.emetrotel.com

Feature
Steps
Blacklist
1. To add a number to the blacklist, dial *30.
2. Enter the number to be added to the blacklist.
3. Press 1 to confirm.
4. Blacklisted numbers are screened and blocked from all incoming routes.
Blacklist Cancel
1. To remove a number from the blacklist, dial *31.
2. Enter the number to be removed from the blacklist.
3. Press 1 to confirm.
Blacklist Last Caller
1. To add the number from the last caller to the blacklist, dial *32.
2. Press 1 to confirm.
Call Recording toggle
1. While on a call, dial *1 to start recording. The system will play a beep tone
to indicate recording has started.
2. To stop recording, press *1 again. The system will play a beep tone to
indicate recording has stopped.
Call Timer
1. While the phone is idle, press the Feature key followed by the feature code
77 to show the duration of the last call.
OR
While in a call, press the Feature key followed by the feature code 77 to
show the current static duration of the call.
Call Trace
1. Dial *69 and the system will announce information about your last call.
2. Enter 1 to dial the number of the last call.
Note: Internal numbers cannot be blacklisted.
On Demand Recording is configured by the UCx Administrator on a per
extension basis.
2.5 Additional System Features
Page 15 of 26
Copyright E-MetroTel ©2016 2828 W. Parker Rd. Unit B201, Plano, TX. USA. 75075 www.emetrotel.com

Page 16 of 26
Feature
Steps
Caller ID Blocking
1. To block the Caller Name and ID for the next outbound call, press the
Feature key and enter the feature code 819.
2. To cancel the feature, press the Feature key and enter the feature code
#819.
Follow Me toggle
1. To toggle the Follow Me feature ON and OFF, dial *21.
Intercom Allow
1. To allow all intercom calls to your phone, dial *54.
2. To allow intercom calls from a specific EXTENSION, dial *54 + EXTENSION.
(For example, to allow intercom calls from extension 200, dial *54200.)
Intercom Disallow
1. To disallow all intercom calls to your phone, dial *55.
2. To disallow intercom calls from a specific EXTENSION, dial *55 + EXTENSION.
(For example, to disallow intercom calls from extension 200, dial *55200.)
Speak your Extension
1. To have the system play a message saying your current extension number,
dial *65.
Speak Time
1. To have the system play a message saying the current system time, press
the Feature soft key followed by the feature code 803.
Static Time and Date
1. To always show the time and date on the phone’s display screen, press the
Feature soft key followed by the feature code 806.
Stamp Log
1. To create a time stamp log entry for troubleshooting purposes, press the
Feature soft key followed by the feature code 9*9.
Wake Up Call
1. To schedule a reminder or wake-up call, dial *68.
The Follow Me feature is added by the UCx Administrator on a per
extension basis.
This feature is useful for phones with no dedicated date and time area.
The Time and Date is displayed on the phone even when there are
missed calls or new messages.
Once any outbound call is made, the feature is automatically
deactivated. This feature has no effect on internal calls.
Copyright E-MetroTel ©2016 2828 W. Parker Rd. Unit B201, Plano, TX. USA. 75075 www.emetrotel.com

Feature
Steps
External Autodial
This feature allows the user to configure a programmable button on their phone
to dial a combination of digits, * and/or #. Typically, this feature is used to
configure the programmable button as a speed dial for an external telephone
number. When the button is pressed, the configured digits are automatically
dialed. To program a button:
1. Press the Feature key followed by the feature code *1.
2. Press the programmable button you want to program.
3. Enter the string of digits you want to configure.
4. Press the Enter soft key.
Internal Autodial
This feature allows the user to configure a programmable button on their phone
to dial an internal extension. When the button is pressed, the configured
extension is automatically dialed. If the configured extension belongs to a Nortel
phone, the button further provides the following functionality:
The icon associated with the programmable button indicates the current
state of the configured extension
When the programmable button is pressed while the configured
extension is alerting, the button invokes the directed pickup feature (i.e.
allows the user to answer calls alerting at the configured extension)
To program a button:
1. Press the Feature key followed by the feature code *2.
2. Press the programmable button you want to program.
3. Enter the string of digits you want to configure.
4. Press the Enter soft key.
Configure Feature
This feature allows the user to configure a programmable button on their phone
to invoke any supported feature.
1. Press the Feature key followed by the feature code *3.
2. Press the programmable button you want to program.
3. Enter the feature access code you want to configure.
4. Press the Enter soft key.
2.6 Phone Configuration Features
Page 17 of 26
Copyright E-MetroTel ©2016 2828 W. Parker Rd. Unit B201, Plano, TX. USA. 75075 www.emetrotel.com

Page 18 of 26
Feature
Steps
Language
This feature allows the user to configure the language of voice prompts used for
services such as voice mail, conferencing, etc. To configure the language:
1. Press the Feature key followed by the desired language code:
*501 – English
*502 – French
*503 – Spanish
*504 – Default (The default language configured by your UCx
Administrator.)
Ring Type
configure the Ring Type:
1. Press the Feature key followed by the feature code *6.
2. Use the Up and/or Down soft keys or digits 0 to 7 to select the desired ring
type.
3. Press the Enter soft key to save the selected ring type.
Ring Volume
To configure the Ring Volume:
1. Press the Feature key followed by the feature code *80.
2. Use the Up and/or Down soft keys or digits 0 to 7 to select the desired ring
volume.
3. Press the Enter soft key to save the selected ring volume.
Contrast
phone. To configure the Contrast:
1. Press the Feature key followed by the feature code *7.
2. Use the Up and/or Down soft keys or digits 0 to 9 to select the desired
contrast. (Depending on the phone type, contrast levels of 4, 8 or 16 are
supported.)
3. Press the Enter soft key to save the selected contrast.
Copyright E-MetroTel ©2016 2828 W. Parker Rd. Unit B201, Plano, TX. USA. 75075 www.emetrotel.com

Page 19 of 26
Feature
Steps
Time Zone Offset
in a different time zone from the UCx system, time must be adjusted to display
the correct time for that time zone. To adjust the time:
1. Press the Feature key followed by the feature code *510.
2. Use the Up and/or Down soft keys or digits 0 to 9 to select the desired time
zone offset.
3. Press the Enter soft key to save the selected time zone offset.
Button Inquiry
To check what is programmed on a button on the phone:
1. Press the Feature key followed by the feature code *0.
2. Press the button you want to check.
Test Set
To test the functionality of a button on a phone:
1. Press the Feature key followed by the feature code 805.
2. Press the button you want to test.
Note: When using Hotdesking with different types of phones, the capabilities are determined by the
phone in use. For example, if a physical phone with 2 programmable keys is hotdesked to an
extension normally assigned to a phone with 4 programmable keys, only 2 programmable keys would
be available during the Hotdesking session.
2.7 Hotdesking
The Hotdesking feature allows you to temporarily assign an extension to a phone that normally uses
another extension or has no extension assigned. For example, you mainly work from home but
occasionally come to the office and you may want to assign your own extension to a phone located at
the office. Another use of the Hotdesking feature is to have multiple users share phone(s) in the office.
Physical phones have no extensions assigned – each user activates the Hotdesking feature to assign their
extension to a phone when they want to use it.
The physical phone that you want to activate Hotdesking must have the Hotdesking feature enabled. On
your extension, the Hotdesking password must be configured.
Hotdesk from a phone with the Services Key
To invoke Hotdesking:
1. Press the Feature soft key followed by the feature code *999.
2. Enter the Hotdesk extension.
3. Enter the Hotdesk password.
Copyright E-MetroTel ©2016 2828 W. Parker Rd. Unit B201, Plano, TX. USA. 75075 www.emetrotel.com

To cancel Hotdesking:
1. Press the Feature soft key followed by the feature code #*999.
Hotdesk from an unregistered phone
To invoke Hotdesking:
1. Press the Hotdesk (HDesk) soft key
2. Enter the Hotdesk extension
3. Enter the Hotdesk password
Page 20 of 26
To cancel Hotdesking:
1. Press the Unreg soft key
Copyright E-MetroTel ©2016 2828 W. Parker Rd. Unit B201, Plano, TX. USA. 75075 www.emetrotel.com

Hotdesk from a phone with a programmed key
To invoke Hotdesking:
1. Press the Hotdesk programmed key
2. Enter the Hotdesk extension
3. Enter the Hotdesk password
Page 21 of 26
To cancel Hotdesking:
1. Press the Hotdesk programmed key again
2.8 Call Center Agent Features
If your extension is a dynamic member of a queue, then you have to login to the queue to start receiving
calls from that queue. (Note: Static members do not need to login and logout of a queue.)
To login to a queue:
1. Press the Feature soft key followed by the feature code 901.
Your extension is added to all queues in which the extension is configured as a dynamic member.
OR
1. Dial *45 + QUEUE. (For example, to login to queue 600, dial *45600.)
Your extension is added to the specified QUEUE.
2. The system will announce that your extension has been added.
To logout of a queue:
1. Press the Feature soft key followed by the feature code 901.
Your extension is removed from all queues in which the extension is configured as a dynamic
member.
OR
Copyright E-MetroTel ©2016 2828 W. Parker Rd. Unit B201, Plano, TX. USA. 75075 www.emetrotel.com

Page 22 of 26
1. Dial *45 + QUEUE. (For example, to logout of queue 600, dial *45600.)
Your extension is removed from the specified QUEUE.
2. The system will announce that your extension has been removed.
Queue agents can temporarily change their status to “Not Ready” and pause receiving calls from the
queue.
To activate pause:
1. Press the Feature soft key followed by the feature code 902.
Your extension is paused for all queues.
OR
1. Dial *46 + QUEUE. (For example, to activate pause for queue 600, dial *46600.)
Your extension is paused for the specified QUEUE.
2. The system will announce that pause has been activated.
To deactivate pause:
1. Press the Feature soft key followed by the feature code 902.
Your extension is un-paused for all queues.
OR
1. Dial *46 + QUEUE. (For example, to deactivate pause for queue 600, dial *46600.)
Your extension is un-paused for the specified QUEUE.
2. The system will announce that pause has been deactivated.
Copyright E-MetroTel ©2016 2828 W. Parker Rd. Unit B201, Plano, TX. USA. 75075 www.emetrotel.com

Feature
Feature key access code
System Wide Star Codes or Keys
Stamp log
F9*9
9*9
Speed dial
F0
*0
Voice call (Intercom)
F66
*80 + EXTENSION
Group pickup
F75
*8
Directed pickup
F76
** + EXTENSION
Call timer
F77 Do not disturb
F85
*78 or *76 (toggle)
Do not disturb cancel
F#85
*79 or *76 (toggle)
Call forward
F4
*72 + EXTENSION
Call forward cancel
F#4
*73
Forward to voicemail
F984
CID blocking
CID blocking cancel
F#819
Hotdesking
F*999
Hotdesking cancel
F#*999
Static Time/Date
F806
Static Time/Date cancel
F#806
Agent Login / Logout
F901
*45 + QUEUE number
Agent Not Ready / Ready
F902
*46 + QUEUE number
External autodial
F*1 Internal autodial
F*2 Configure feature
F*3
3. SERVICES KEY
To invoke a feature using the Services key, perform the following steps:
1. While the phone is idle, press the Services key
2. Use the down arrow key to locate the desired feature
3. Press the Invoke soft key
Features available from Services Key listed in order of appearance
Page 23 of 26
Copyright E-MetroTel ©2016 2828 W. Parker Rd. Unit B201, Plano, TX. USA. 75075 www.emetrotel.com

Page 24 of 26
Feature
Feature key access code
System Wide Star Codes or Keys
Language - English
F*501
Language - French
F*502
Language - Spanish
F*503
Language - default
F*504
Time zone offset
F*510
Ring type
F*6
Contrast
F*7
Ring volume
F*80
Page general
F60 Page zone 1
F611
Page zone 2
F612
Page zone 3
F613
Page zone 4
F614
Page zone 5
F615
Page zone 6
F616
Redial
F5
Redial soft key
Voicemail
F981
*97
Voicemail number
F985
Leave Message
F980
#*
Call log
F812
Outbox key
Directory
F960
Directory key
Time announcement
F803
*60
Button inquiry
F*0
Test sets
F805
Copyright E-MetroTel ©2016 2828 W. Parker Rd. Unit B201, Plano, TX. USA. 75075 www.emetrotel.com

Page 25 of 26
4. VOICEMAIL
4.1 Accessing Voicemail
If your UCX administrator has configured a mailbox for your Extension, your phone will indicate with a
red lamp that you have message(s) waiting. For more details, refer to the UCx Voicemail User Guide.
To access your voicemail box:
1. Press the Inbox key
Or you can:
1. Press the Feature key followed by the feature code 981.
To access your mailbox from a different phone:
1. Dial *98 + EXTENSION
For example, to access the mailbox of extension 200, dial *98200.
To display the voicemail number for your extension:
1. Press the Feature key followed by the feature code 985.
2. The voicemail extension number will be displayed.
4.2 Direct Dial to Voicemail
You can dial directly to an Extension’s voicemail box without ringing the phone set:
1. Press the Feature key followed by the feature code 980.
2. Enter the EXTENSION number that you want to leave a message for.
Copyright E-MetroTel ©2016 2828 W. Parker Rd. Unit B201, Plano, TX. USA. 75075 www.emetrotel.com

Page 26 of 26
5. USER EXTENSION PORTAL
Each Extension created with a voicemail box has access to a user extension portal where the end user
can access their own voicemail box, call recordings and other features enabled for the Extension. For
more details, refer to the User Manual for UCx User Extension Portal.
Accessing the User Extension Portal
Access the user portal by entering the following URL in a web browser:
http://your_ucx_server_ip_hostname/recordings
For example, if your UCX Server IP address is 192.168.1.200, access the user portal as follows:
http://192.168.1.200/recordings
Log-in using your EXTENSION number and your voicemail password.
Copyright E-MetroTel ©2016 2828 W. Parker Rd. Unit B201, Plano, TX. USA. 75075 www.emetrotel.com
 Loading...