

Nordyne 913549A, 918359, 918837 Installation Instructions Manual
Air Conditioner and Heat Pump
Installation Instructions
Low Ambient Control Kit
R22: 913549A 10 SEER Models
918359 12 and 13 SEER Models
R-410: 918837 12 through 15 SEER Models
INTRODUCTION
These instructions are primarily intended to assist qualifi ed individuals experienced in the proper installation of
heating and/or air conditioning appliances. Before beginning the installation, read these instructions thoroughly and
follow all warnings and cautions in the instructions and on the unit. Improper installation, service, adjustment, or
maintenance can cause explosion, fi re, electrical shock, or other conditions which may result in personal injury or
property damage.
The Low Ambient Control Kit is designed for use in air-conditioner and heat pump products. The kit consists of
a pressure switch, a service adapter tee, a 24V relay for heat pump applications, and miscellaneous parts for
mounting. The kit is intended to maintain system pressures at normal levels should cooling be required at low outdoor
temperatures. The pressures are controlled by a pressure switch that cycles the outdoor fan motor. When the liquid
pressure drops below the designated pressure setting, the fan motor is switched off. If the liquid pressure then rises
above the recommended pressure setting, the fan motor is switched on again.
INSTALLATION SEQUENCE
WARNING:
To avoid risk of electric shock, personal injury,
or death, disconnect electrical power to the unit
before performing any maintenance or service.
The unit may have more than one electric power
supply.
The installation sequence is as follows:
1. Read these installation instructions completely before
proceeding.
BLUE
BLUE
Low Ambient
Control
2. Disconnect all power to the unit.
3. At the front of the unit remove the service panel to the
control box. This will have all of the electrical control
components within and in the case of the R4 units
the gas control components as well.
4. Remove the front panel with the service ports and
drain tube opening from the unit.
5. There are two service valves in the interior of the
unit. Locate the one in the 1/2” diameter compressor
discharge line. In the case of a split system, locate
the 3/8” service valve (high side).
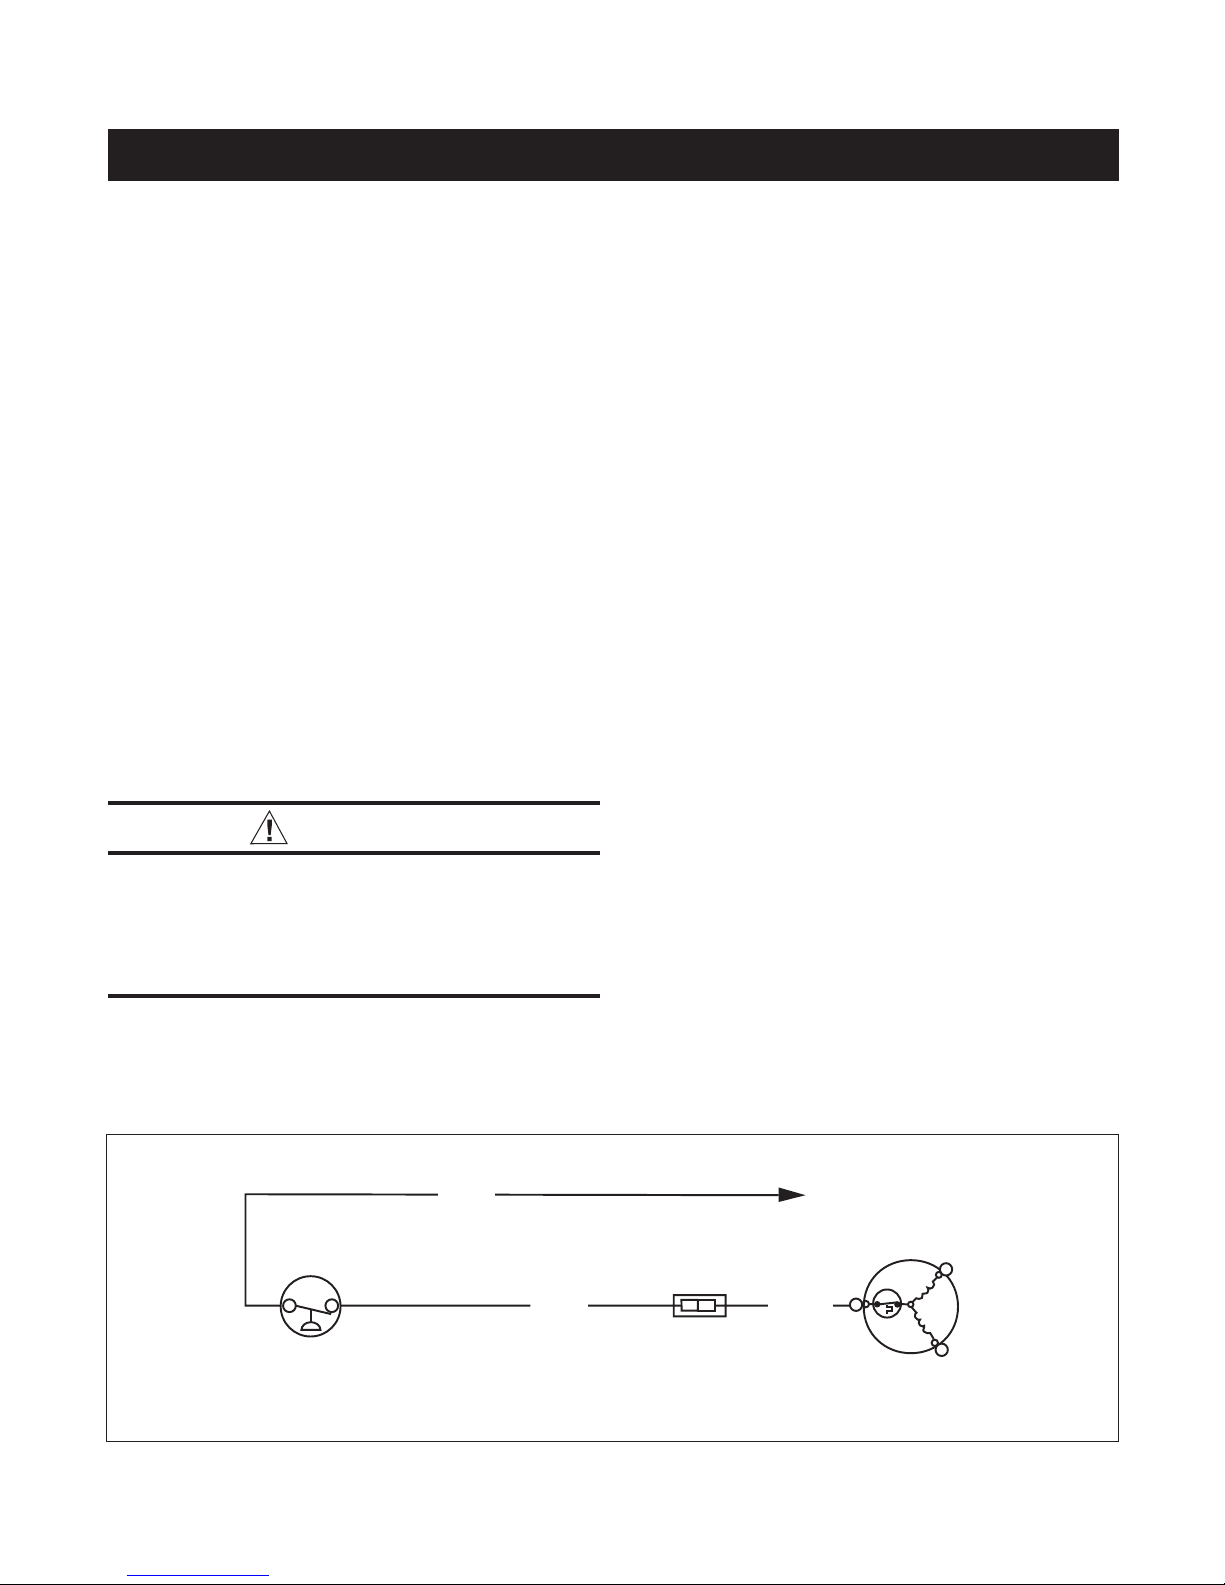
To "T2" on Compressor Contactor
R
C
BLACK
Line Splice
Connector
Outdoor Fan
S
Motor
Figure 1. Air Conditioner Low Ambient Control Kit Wiring Diagram

6. Remove the cap from the service valve. Mount the
service adapter tee, provided with kit, onto the service
valve and tighten. Mount the pressure switch onto
the port of service adapter that does not have valve
core and tighten. Replace the cap, removed from the
service valve, onto service port of adapter tee that
includes a valve core.
7. Route the two wire leads from the switch through the
wire grommet at the top of the panel separating the
compressor from the control box.
A. For Air Conditioners
a) Remove the fan motor common lead from “T2” on
the contactor (black wire).
b) Connect the two black wires to terminals #1 and
#3 on the relay and route the wires through the low
voltage divider. Connect one black wire to “O” on
the defrost board. Connect the other black wire
to 24V common ( “C” on the defrost board).
c) Connect the “Y” adapter terminal, provided with
the kit, to terminal #4 of relay.
d) Remove the black outdoor fan motor wire from
“DF2” on the defrost board and connect it to the
adapter on terminal #4 of relay.
e) Connect the piggyback end of the white wire to
terminal #5 of relay and connect the other end to
“DF2” on the defrost board.
b) Using wire splice provided connect one lead from
the pressure switch to the fan motor lead.
c) Connect the other pressure switch lead to “T2” on
the contactor. (See Figure 1)
B. For Heat Pumps
a) Mount the relay provided in the control box, near
the low voltage compartment.
BLUE
Low Ambient
Control
BLUE
2
To "DF2" on
4
Defrost Board
6
WHITE
5
3
1
f) Connect one wire lead from the pressure switch
to terminal #5 of relay and the other to terminal
#4 of relay.
8. Tie all wires back as needed.
9. Replace the service panels removed in Steps #2
through #5.
10. Restore power to the unit.
(Y Adapter Terminal)
R
C
BLACK
Outdoor Fan
Motor
S
BLACK
To "C" on Defrost Board
Figure 2. Heat Pump Low Ambient Control Kit Wiring Diagram
O’Fallon, MO
BLACK
¢7081759¤
708175C
To "O" on Defrost Board
708175C (Replaces 708175B)
Specifi cations and illustrations subject to change
without notice and without incurring obligations.
Printed in U.S.A. (07/06)
 Loading...