

Nordmende CSG91IX Brief Presentation Of Product
CSG91IX
BRIEF PRESENTATION OF PRODUCT
1
2
3
4
5 6
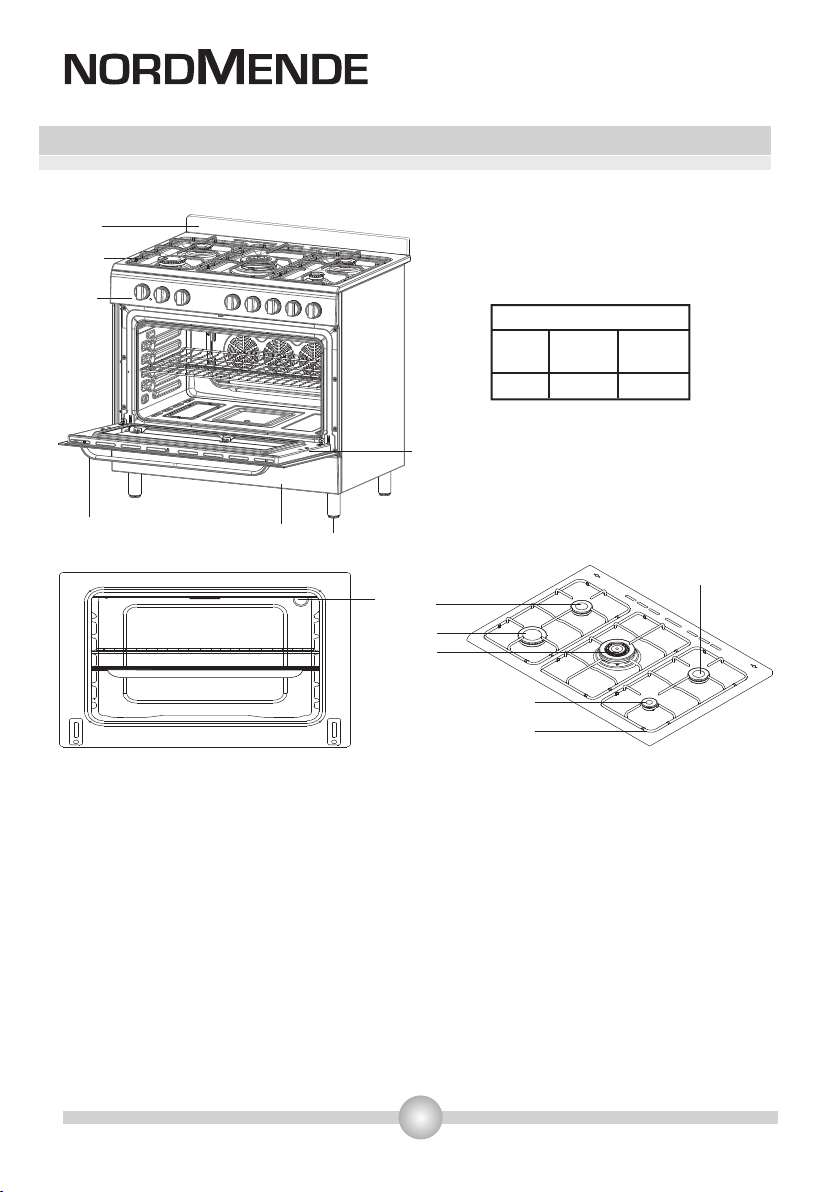
PRODUCT DIMENSIONS
DEPTH WIDTH HEIGHT
(cm) (cm) (cm)
60 90 85/90
8
9
10
13
11
12
EN
9
List of Components:
1-
Splash back
2- Cooktop
3- Control Panel
4- Oven Door Handle
5- Drawer Cover
6- Adjustable Feet
7- Oven Door
8- Oven Lamp
9- Semi-Rapid Burner
10- Rapid Burner
11- Burner
Auxiliary
12- Pan Support
13- Wok Burner
1
USE OF YOUR PRODUCT
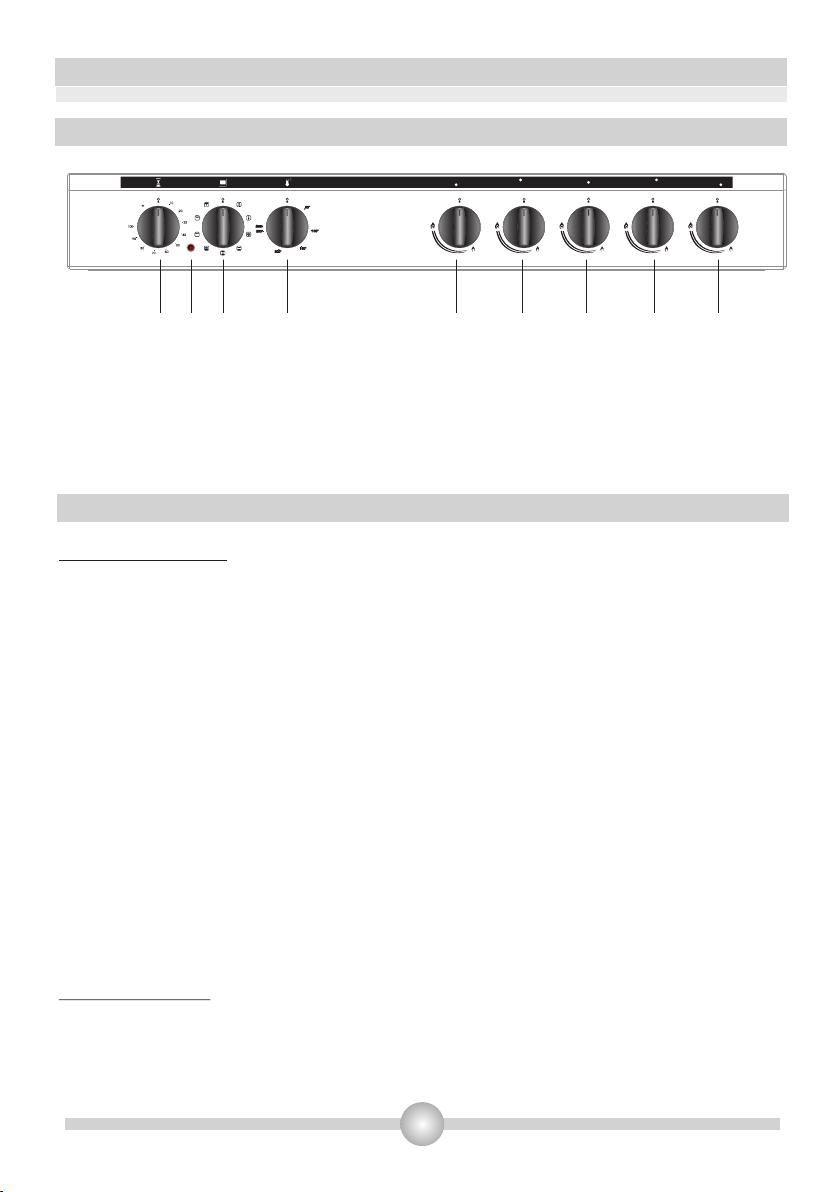
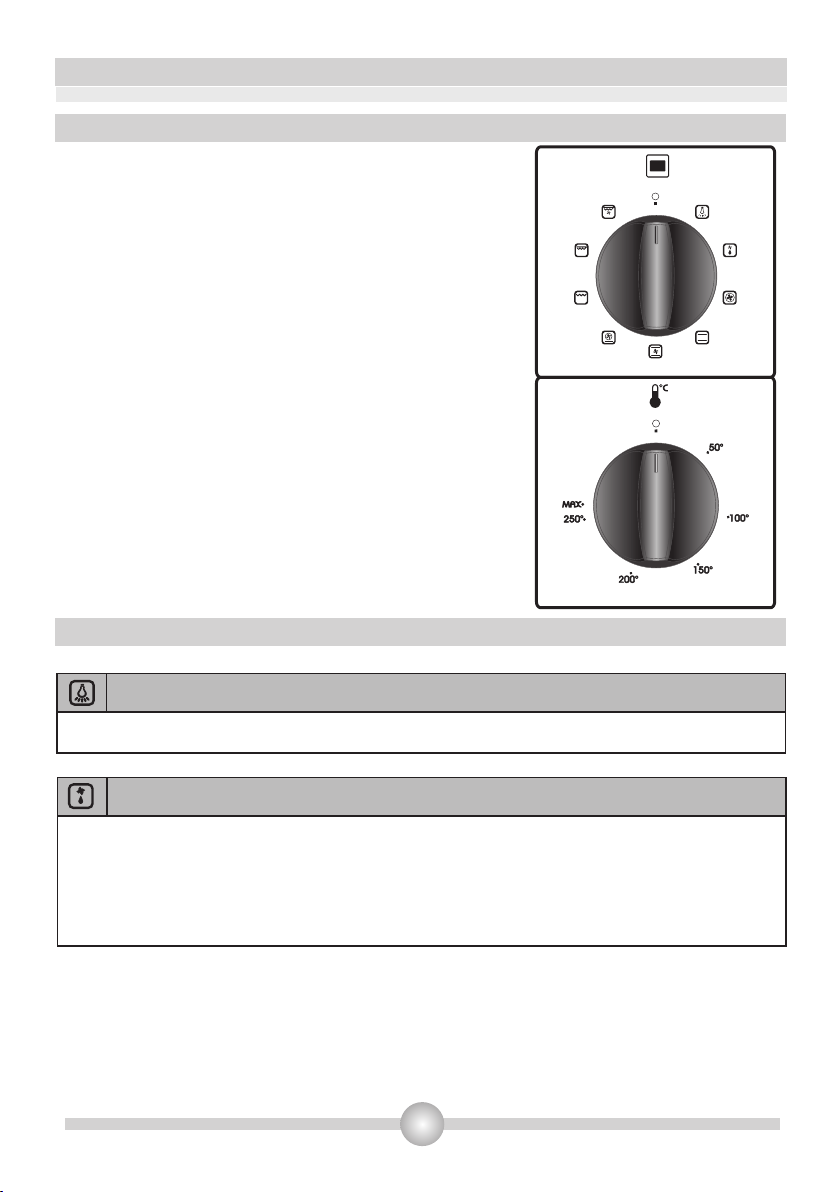
Control Panel
4
1
2
3
5 6
7
8 9
1- Timer
2- Oven Function Control Knob
3- Oven Thermostat Control Knob
4- Oven Operation Indicator
5- Gas Hob Control knob Front Left
6- Gas Hob Control Knob Rear Left
7- Gas Hob Control Knob Middle
8- Gas Hob Control Knob Rear Right
9- Gas Hob Control Knob Front Right
Use of gas burners
Ignition of the burners
To determine which knob controls which burner, check the position symbol above the knob.
•
Manual Ignition of the Gas Burners
If your appliance is not equipped with any ignition aid or in case there is a failure in the electric
network, follow the procedures listed below
For Hob Burners: To ignite one of the burners, press and turn its knob counter-clockwise so that the
knob is in maximum position, approach a match, taper or another manual aid to its upper
circumference. Move the ignition source away as soon as you see a stable flame.
•
Electrical Ignition
Electrical Ignition by Hob Control Knob
Press the valve of the burner you want to operate and turn the valve in the counterclockwise
direction (clockwise for the grill burner) so that the knob is in maximum position while keeping the
knob pressed. The spark plugs will generate sparks as long as you keep the control knob pressed.
The micro switch placed under the knob will automatically create sparks through the spark plug of
the burner. Continue pressing the knob until you see a stable flame on the burner.
Flame safety device:
Hob Burners
Hobs equipped with flame failure device provide security in case of accidentally extinguished flame.
If such a case occurs, the device will block the burners gas lines and will avoid any accumulation
:
2
USE OF YOUR PRODUCT
of unburned gas. Wait 90 seconds before re-igniting an extinguished gas burner
.
* This is an obligation for countries that follow EU Directives. If your country don't follow EU
Directives,your product may not be equipped with flame safety device.
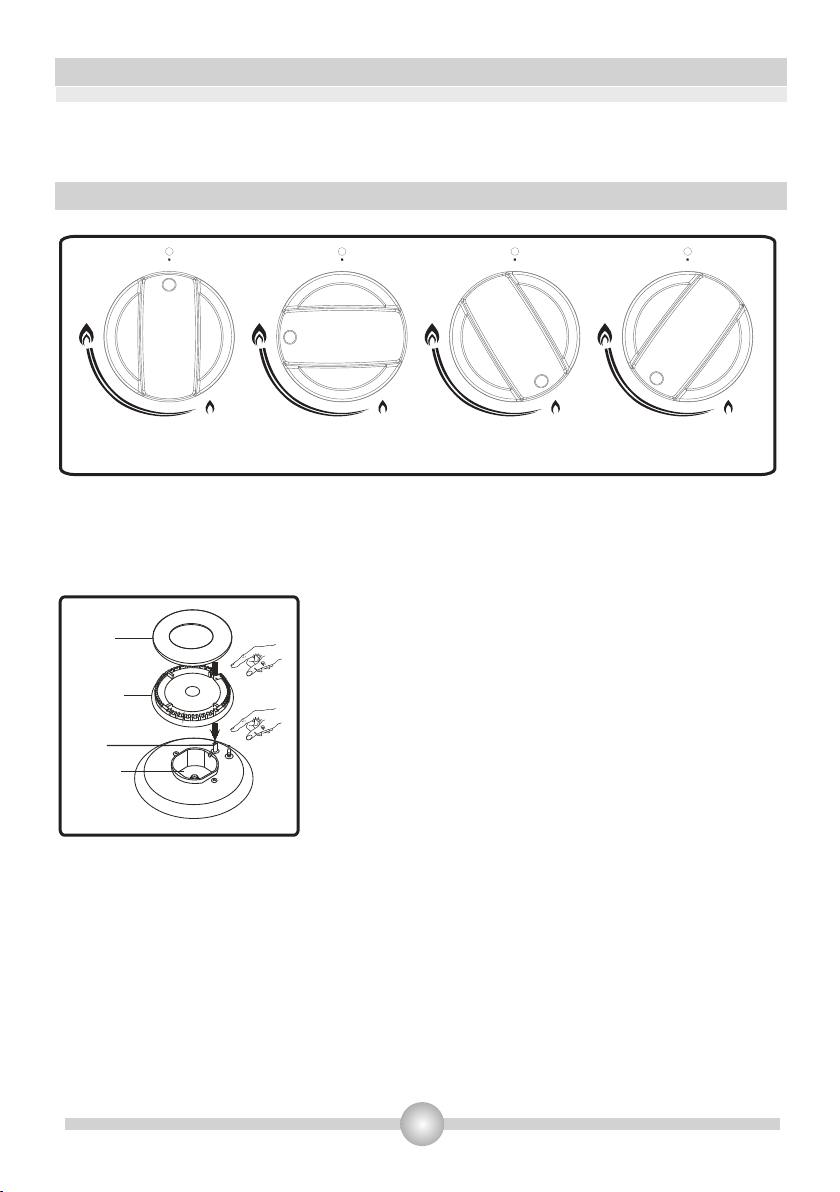
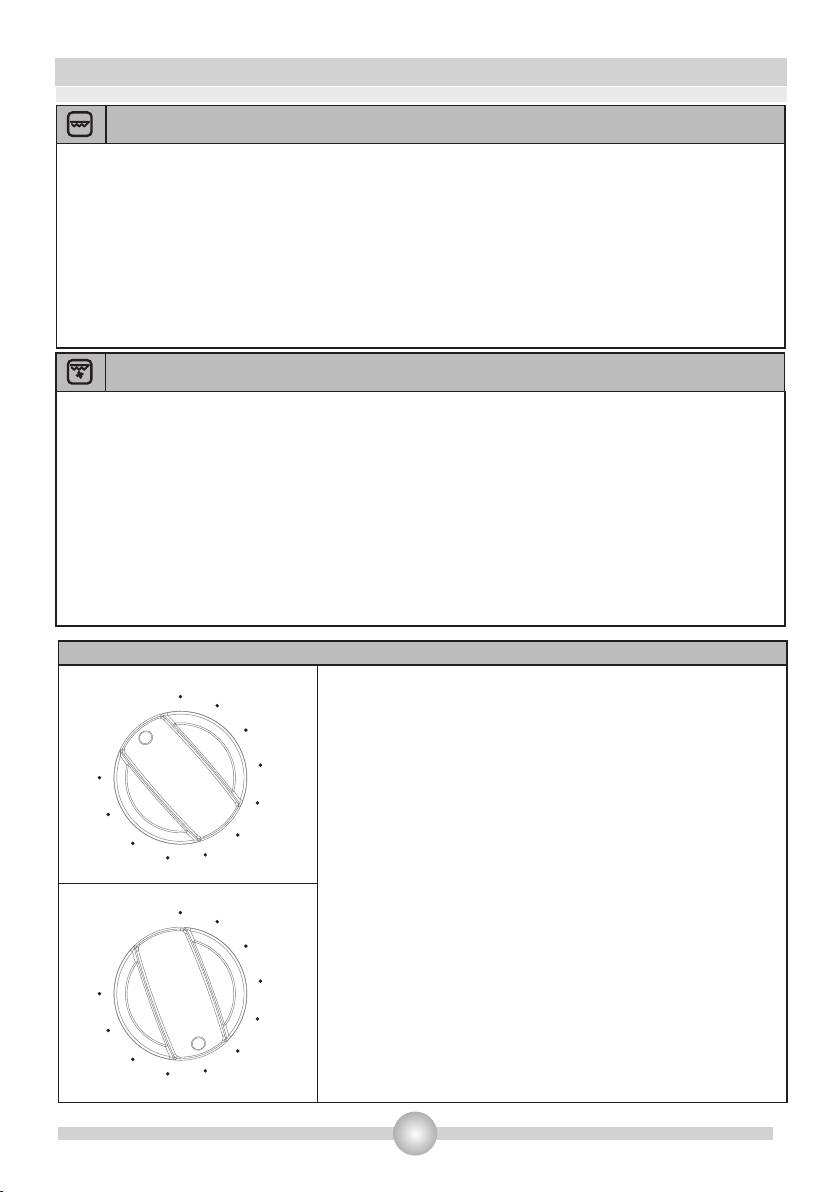
Control of the hob burners
OFF position
The knob has 3 positions: Off (0), maximum (big flame symbol) and minimum (small flame symbol).
After you ignite the burner in maximum position; you can adjust the flame length between
maximum and min. positions. Do not operate the burners when the knob position is between
maximum and off positions.
Cap
Crown
Spark
Plug
Burner
Cup
Figure 2
MAX. position
MIN. position
MODULATE
After the ignition, check the flames visually. If you see yellow
tip, lifted or unstable flames; turn the gas flow off, and check
the assembly of burner caps and crowns (Figure 2). Also,
make sure that no liquid has flown into the burner cups. If
the burner flame goes out accidentally, turn the burner off,
ventilate the kitchen with fresh air, and do not attempt
re-ignition for 90 sec.
When turning the hob off, turn the knob in the clockwise
direction so that the knob shows "0" position or the marker
on the knob points upwards.
Figure 1
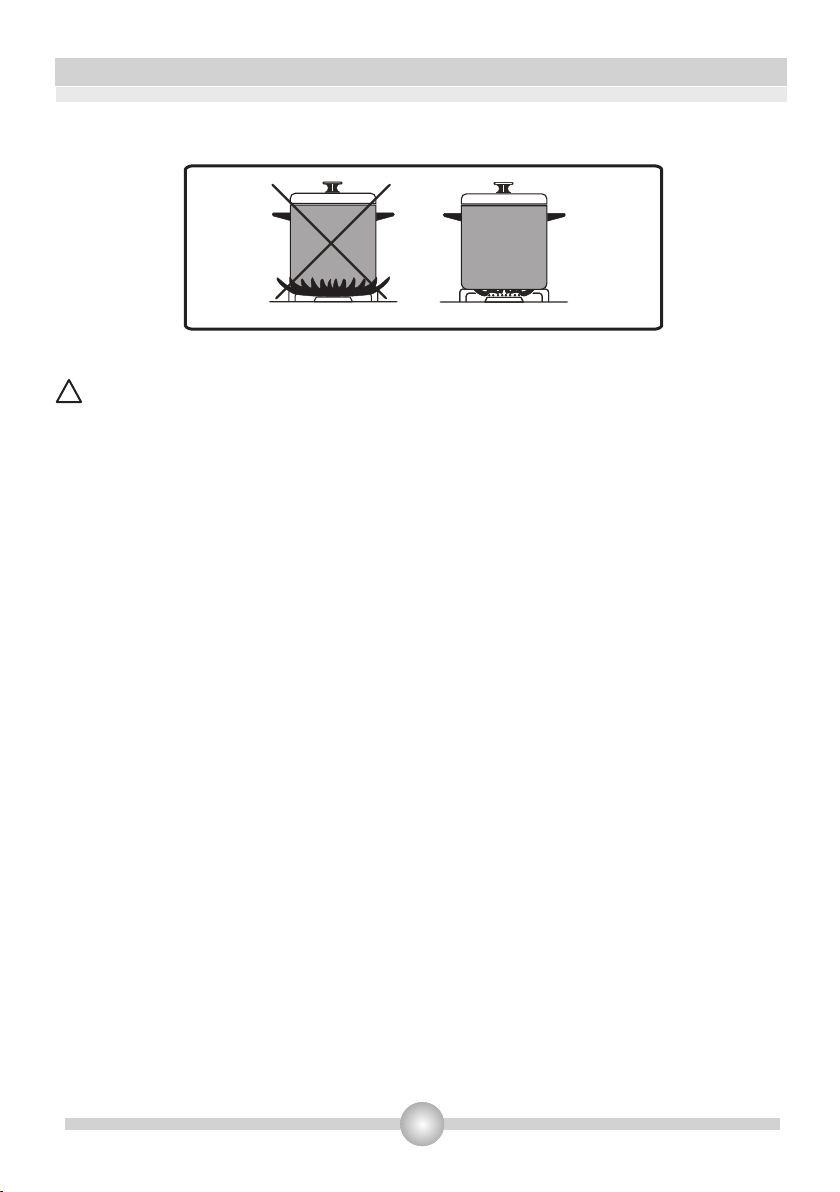
Your hob has burners of different diameters. The most economic way of using gas is to choose the
correct size gas burners for your cooking pan size and to bring the flame to minimum position once
the boiling point is reached. It is recommended to always cover your cooking pan.
In order to obtain maximum performance from the main burners, use pots with the following flat
bottom diameters. Using smaller pots than the minimum dimensions stated below will cause
energy loss.
Rapid / Wok Burner: 22-26cm
Semi-rapid Burner: 14-22cm
Auxiliary Burner: 12-18cm
3
USE OF YOUR PRODUCT
INJECTOR TABLE(60x60-50x60_SABAF BURNERS)
Make sure that the tips of the flames do not spread out of the outer circumference of the pan, as
this may also harm the plastic accessories around the pan (handles etc.).
Figure 3
When the burners are not in use for prolonged periods, always turn the main gas control valve off
.WARNING:
!
• Use only flat pans and with a sufficiently thick base.
• Ensure that the base of the pan is dry before placing it on the burners.
• The temperature of accessible parts may be high when the appliance is operating. So it is
imperative to keep children and animals out of the reach of the burners during and after
cooking.
• After use, the hob remains very hot for a prolonged period of time, do not touch it and do not
place any object on top of the hob.
• Never place knives, forks, spoons and lids on the hob as they will get hot and could cause
serious burns.
• Do not use cooking containers that protrude from the cookers table.
3
4
USE OF YOUR PRODUCT
Use of oven
Oven Function Control Knob:
To select the desired cooking function, turn
the knob to the related symbol. The
details of the oven functions are explained in
the next section.
Oven Thermostat Control Knob:
After the cooking function has been set, the desired
temperature can be adjusted by oven thermostat knob
and the oven will start to operate (timer must
be adjusted, if available).
The thermostat signal light will be on or off according to
the thermostat operation.
Figure 4
Figure 5
Oven Functions
Oven Lamp
Only the oven light will be turned on and it remains on in all the cooking functions.
Defrost Function
The oven lights will be turned on, the fan starts operating.
To use the defrost function, take your frozen food and place it in the oven on a shelf placed in the
third slot from the bottom. It is recommended that you can place an oven tray under the
defrosting food, to catch the water accumulated due to melting ice. This function will not cook or
bake your food, it will only help to defrost it.
's warning
5
USE OF YOUR PRODUCT
Turbo Function
The oven lights will be turned on, the ring heating element and fan will
's thermostat and warning
start operating.
The turbo function evenly disperse the heat in the oven. All foods on all racks will be cooked
evenly. It is recommended to pre-heat the oven about 10 minutes.
Static Cooking Function
The oven's thermostat and warning lights will be turned on, the lower and upper heating
elements will start operating.
The static cooking function emits heat, ensuring even cooking of the lower and upper food. This is
ideal for making pastries, cakes, baked pasta, lasagne and pizza. Preheating the oven for 10 minutes
is recommended and it is best to cook on only one shelf at a time in this function.
Fan Function
The oven lights will be turned on, the upper and lower heating
's thermostat and warning
elements and fan will start operating.
This function is very good for obtaining results in baking pastry. Cooking is carried out by the lower
and upper heating element within the oven and by the fan providing air circulation, which will
give a slight grill effect to the food. It is recommended to pre-heat the oven about 10 minutes.
Pizza Function
The oven lights will be turned on, the ring and lower heating elements
's thermostat and warning
and fan will start operating.
Fan and lower heating function is ideal for baking food, such as pizza, equally in a short time.
While the fan evenly disperses the heat of the oven, the lower heating element ensures the
baking of food dough.
Grilling Function
The oven lights will be turned on, the grill heating element will start
's thermostat and warning
operating.
The function is used for grilling and toasting foods, use the upper shelves of oven. Lightly brush
the wire grid with oil to stop foods sticking and place foods in the centre of the grid. Always place
a tray beneath to catch any drips of oil or fat. It is recommended to pre-heat the oven about 10
minutes.
Warning: When grilling, the oven door must be closed and the oven temperature should be
adjusted to 190 C.
0
6
USE OF YOUR PRODUCT
Faster Grilling Function
The oven lights will be turned on, the grill and upper heating
's thermostat and warning
elements will start operating.
The function is used for faster grilling and for covering a larger surface area, such as grilling meats,
use the upper shelves of oven. Lightly brush the wire grid with oil to stop foods sticking and place
foods in the centre of the grid. Always place a tray beneath to catch any drips of oil or fat. It is
recommended to pre-heat the oven about 10 minutes.
Warning: When grilling, the oven door must be closed and the oven temperature should be
adjusted to 190 C.
0
Double Grill and Fan Function
The oven lights will be turned on, the grill and upper heating
's thermostat and warning
elements and fan will start operating.
The function is used for faster grilling of thicker foods and for covering a larger surface area. Both
the upper heating elements and grill will be energised along with the fan to ensure even cooking.
Use the upper shelves of oven. Lightly brush the wire grid with oil to stop foods sticking and place
foods in the centre of the grid. Always place a tray beneath to catch any drips of oil or fat. It is
recommended to pre-heat the oven about 10 minutes.
Warning: When grilling, the oven door must be closed and the oven temperature should be
adjusted to 190 C.
0
Use of mechanical timer
0
10
20
30
Manual Operation:
When you set the timer button to the position indicating M as
shown on the picture, you can continuously run your oven.
40
50
60
0
10
20
30
40
50
60
When the timer button is in 0 position the oven will not
operate.
Operating by adjusting the time:
Set the desired cooking time by turning timer button to a
certain time range between 0 - 100 minutes. At the end of this
time period, the oven will stop working and the timer will give
an audible warning once.
100
100
M
90
80
70
M
90
80
70
7

USE OF YOUR PRODUCT
Accessories
• The product already supplied with accessories. You can also use accessories you purchase from
the market, but they must be heat and flame resistant. You can also use glass dishes, cake
molds, special oven trays that are appropriate for use in oven. Pay attention to the using
instructions by the manufacturer of those accessories.
• In case small size dishes are used, place the dish onto the wire grid, as it will completely be on
the middle part of the grid.
• If the food to be cooked does not cover the oven tray completely, if the food is taken from the
deep freezer or the tray is being used for collection of food's juices that flow during grilling, the
form changes can be observed in the tray because of the high heat that occur during cooking or
roasting. The tray will return to its old form only when the tray cool down after cooking. This is a
normal physical event that occurs during heat transfer.
• Do not leave glass tray or dish in cold environment right away after cooking in glass tray or dish.
Do not put onto cold and wet surfaces. Place on a dry kitchen cloth or dish cross, ensure it to
cool slowly. Otherwise the glass tray or dish may be broken.
• If you will grill in your oven; we recommend you to use the grid that was given in tray together
with product (If your product includes this material). If you will use the big wire grid; put a tray
onto one of the lower shelves for fat to be collected. Also put some water into it for ease of
cleaning.
• As explained in the corresponding clauses, never attempt to use the gas operated grill burner
without the grill protection lid. If your oven has a gas operated grill burner, but the grill heat
shield is missing, or if it is damaged and cannot be used, request a spare part from the nearest
service.
11
 Loading...