

Page 1
Page 2

barnesandnoble.com llc, 76 Ninth Avenue, New York, NY 10011 USA.
© 2012 barnesandnoble.com llc., Barnes & Noble S.à r.l. or their aliates. All rights reserved. NOOK® and the
NOOK logos are trademarks of barnesandnoble.com llc., Barnes & Noble S.à r.l. or their aliates. Patent Pending.
Screenshots and product images are simulated and for instructional purposes only. They may dier from the actual
product and are subject to change without notice. Content shown may vary from actual available content, which may
change without notice. Your use of NOOK is subject to the NOOK Terms of Service located in the Settings section
of this device and here: NOOK.co.uk/legal/eula. Contains Reader® Mobile technology by Adobe Systems Incorporated. Adobe®, Reader®, and Reader® Mobile are either registered trademarks or trademarks of Adobe Systems
Incorporated in the United States and/or other countries. All trademarks or registered trademarks that are not the
property of barnesandnoble.com llc or its aliates are the property of their respective owners.
Model BNTV600
Version: 2.0.6.A-UK
Page 3

Table of Contents
Introduction .................................................................................................................................................... 9
Contact Us ........................................................................................................................................................................................ 9
Getting to Know Your NOOK ...................................................................................................................................................... 10
Power and Charging ........................................................................................................................................................................ 14
Safety and Care ............................................................................................................................................................................... 16
Caring for Your NOOK .................................................................................................................................................................. 17
Gestures ........................................................................................................................................................ 19
Tap ................................................................................................................................................................................................... 19
Double Tap ...................................................................................................................................................................................... 19
Press and Hold ............................................................................................................................................................................... 19
Swipe ............................................................................................................................................................................................... 20
Scroll ................................................................................................................................................................................................ 20
Drag ................................................................................................................................................................................................. 21
Pinch and Zoom .............................................................................................................................................................................. 21
Turning on Your NOOK for the First Time ............................................................................................... 22
Charge Your NOOK ...................................................................................................................................................................... 22
Register Your NOOK ..................................................................................................................................................................... 22
Unlocking Your NOOK ................................................................................................................................ 24
The Status Bar ............................................................................................................................................. 25
The Left-hand Side of the Status Bar ............................................................................................................................................. 25
The Centre of the Status Bar ......................................................................................................................................................... 25
The Right-hand Side of the Status Bar ........................................................................................................................................... 25
The System Bar ............................................................................................................................................ 26
The System Bar on the Home Screen ............................................................................................................................................ 26
The System Bar in the Library ........................................................................................................................................................ 26
The System Bar in the Shop ........................................................................................................................................................... 26
The Recent Drawer...................................................................................................................................... 27
Replacing the Recent Drawer with My Recent Read .................................................................................................................... 27
Your Home Screen ....................................................................................................................................... 28
Active Shelf ..................................................................................................................................................................................... 28
Panels ............................................................................................................................................................................................... 28
The Nav Buttons ............................................................................................................................................................................. 28
Editing the Home Screen ................................................................................................................................................................ 29
Adding Library Items, Bookmarked Web Pages, or Widgets to the Home Screen .................................................................... 29
Page 4

Removing an Item from the Home Screen .................................................................................................................................... 30
Changing the Wallpaper of the Home Screen .............................................................................................................................. 30
Configuring the Home Screen ........................................................................................................................................................ 30
NOOK Profiles .............................................................................................................................................. 31
Types of Profiles .............................................................................................................................................................................. 31
Parental Controls ............................................................................................................................................................................ 31
Creating, Editing, and Deleting NOOK Profiles ............................................................................................................................ 31
Assigning Library Items to Profiles ................................................................................................................................................. 35
Searching Your NOOK ................................................................................................................................ 36
Using the Search Tool ..................................................................................................................................................................... 36
Configuring the Search Tool ........................................................................................................................................................... 36
Your NOOK® Today ....................................................................................................................................38
Changing the Location Described in Weather Reports ................................................................................................................ 38
Your Library .................................................................................................................................................. 39
About Your Library ......................................................................................................................................................................... 39
Opening Items in the Library .......................................................................................................................................................... 40
Organising Library Content on Shelves ......................................................................................................................................... 40
Moving Content to and from NOOK® Cloud ............................................................................................................................. 41
NOOK Scrapbook ........................................................................................................................................ 42
Saving a Page in a Scrapbook .......................................................................................................................................................... 42
Viewing a Scrapbook ...................................................................................................................................................................... 42
Adding a Note to a Scrapbook Page .............................................................................................................................................. 43
Viewing Notes about Scrapbook Pages ......................................................................................................................................... 43
Removing a Page from a Scrapbook ............................................................................................................................................... 43
Reading on Your NOOK .............................................................................................................................. 44
Reading a Book ............................................................................................................................................................................... 44
Reading a PDF ................................................................................................................................................................................. 47
Reading a NOOK Children’s Book ................................................................................................................................................ 48
Reading a NOOK Comics Book .................................................................................................................................................... 55
Reading a Magazine ......................................................................................................................................................................... 56
Reading a Newspaper ..................................................................................................................................................................... 59
Watching TV Shows and Films on Your NOOK........................................................................................ 60
NOOK Video .................................................................................................................................................................................. 60
Renting Films ................................................................................................................................................................................... 60
HDMI Output ................................................................................................................................................................................. 61
Closed Captioning .......................................................................................................................................................................... 61
Page 5

Shopping on Your NOOK ............................................................................................................................ 62
Introduction ..................................................................................................................................................................................... 62
Browsing Lists and Categories ........................................................................................................................................................ 62
Searching for Titles, Authors, or Topics ......................................................................................................................................... 62
Buying a Book .................................................................................................................................................................................. 63
Buying a Single Issue of a Magazine or Newspaper ...................................................................................................................... 63
Buying a Subscription to a Magazine or Newspaper ..................................................................................................................... 64
Buying an App ................................................................................................................................................................................. 64
Buying a Film or TV Show ............................................................................................................................................................... 64
Managing Your NOOK Account .................................................................................................................................................... 66
Using Your Wishlist ......................................................................................................................................................................... 67
NOOK® Channels ......................................................................................................................................................................... 67
Apps ............................................................................................................................................................... 68
Overview ......................................................................................................................................................................................... 68
Using the Browser ........................................................................................................................................ 69
The Top of the Browser ................................................................................................................................................................. 69
Toolbars for Browser View and Article View ................................................................................................................................ 70
Viewing Bookmarked Pages, Browser History, and Saved Pages ................................................................................................. 71
Changing the Home Page ............................................................................................................................................................... 71
Adding a Bookmarked Page to Your NOOK Home Screen ........................................................................................................ 71
Using NOOK® Email ................................................................................................................................... 72
Launching the Email Application ..................................................................................................................................................... 72
Managing Email Accounts ............................................................................................................................................................... 72
Using NOOK® Friends ................................................................................................................................ 75
Launching the NOOK Friends App ................................................................................................................................................ 75
The NOOK Friends Nav Bar ......................................................................................................................................................... 75
Friends’ Activities ............................................................................................................................................................................ 76
NOOK Friends ................................................................................................................................................................................ 77
Using the LendMe® Program in NOOK® Friends ....................................................................................................................... 79
About Me ........................................................................................................................................................................................ 83
Using Bluetooth® ......................................................................................................................................... 85
Turning Bluetooth On and O ....................................................................................................................................................... 85
Using Bluetooth Devices ................................................................................................................................................................ 85
Using UltraViolet™ ..................................................................................................................................... 86
Signing Up for an UltraViolet Account ........................................................................................................................................... 86
Linking Your UltraViolet Account .................................................................................................................................................. 86
Page 6

Viewing UltraViolet Content .......................................................................................................................................................... 87
Using the Quick Settings Window ............................................................................................................. 88
Configuring the Home Screen .................................................................................................................... 89
Opening the Home Screen Settings Window ............................................................................................................................... 89
Configuring the Quick Corner ....................................................................................................................................................... 90
Configuring the Home Screen Shelf ............................................................................................................................................... 90
Using the Accessibility Reader ................................................................................................................... 92
Introduction ..................................................................................................................................................................................... 92
Getting Started with the Accessibility Reader ............................................................................................................................... 92
Customising the General Settings on Your NOOK .................................................................................. 94
Opening the General Settings Screen ............................................................................................................................................ 94
Turning PowerSave Mode On or O ............................................................................................................................................ 94
Configuring the Screen ................................................................................................................................................................... 94
Configuring Language Settings ........................................................................................................................................................ 95
Configuring Security Settings .......................................................................................................................................................... 97
Configuring the Volume Settings for NOOK Features ................................................................................................................. 98
Configuring Date and Time Settings .............................................................................................................................................. 98
Updating the Software on Your NOOK ................................................................................................... 100
Installing a Software Update over a Wireless Network .............................................................................................................. 100
Discovering the Version Number of Your NOOK Software ..................................................................................................... 100
Using a microSD Memory Card ............................................................................................................... 101
Types of Memory Cards Supported ............................................................................................................................................ 101
Viewing Memory Card Content ................................................................................................................................................... 101
Installing a Memory Card .............................................................................................................................................................. 102
Removing a Memory Card ........................................................................................................................................................... 104
Appendix A: NOOK UK Limited Warranty ........................................................................................... 105
ONE YEAR LIMITED WARRANTY ............................................................................................................................................ 105
Appendix B: Trademarks and Copyrights ............................................................................................... 109
AccuWeather ................................................................................................................................................................................ 109
Adobe ........................................................................................................................................................................................... 109
AT&T ............................................................................................................................................................................................. 109
Bluetooth ....................................................................................................................................................................................... 109
Dictionary ...................................................................................................................................................................................... 109
Facebook ....................................................................................................................................................................................... 109
Fonts .............................................................................................................................................................................................. 109
microSD and microSDHC ............................................................................................................................................................ 109
Page 7

Spotify ............................................................................................................................................................................................ 110
Wi-Fi .............................................................................................................................................................................................. 110
Additional Information .................................................................................................................................................................. 110
Appendix C: FCC Notices ......................................................................................................................... 111
FCC IDs ........................................................................................................................................................................................ 111
FEDERAL COMMUNICATIONS COMMISSION (FCC) STATEMENT
INFORMATION TO THE USER ................................................................................................................................................. 111
FCC/IC/CE Radiation Exposure Statement ............................................................................................................................... 111
Other Information Related to the Radio ..................................................................................................................................... 112
Appendix D: Industry Canada Notice ..................................................................................................... 113
Appendix E: European Union ................................................................................................................... 114
EU Regulatory Conformance ....................................................................................................................................................... 114
Appendix F: NOOK® Terms of Service .................................................................................................... 115
Glossary ....................................................................................................................................................... 116
Active Shelf ................................................................................................................................................................................... 116
Article View (Magazine) ................................................................................................................................................................ 116
Article View (Web Browser) ....................................................................................................................................................... 116
Home Screen ................................................................................................................................................................................ 116
Hotspot (Magazines) ..................................................................................................................................................................... 116
Hotspot (Wi-Fi) ............................................................................................................................................................................ 116
NOOK® Channels ....................................................................................................................................................................... 116
NOOK® Video ............................................................................................................................................................................. 116
Profile ............................................................................................................................................................................................. 116
Recent Drawer .............................................................................................................................................................................. 117
Scrapbook ..................................................................................................................................................................................... 117
System Bar ..................................................................................................................................................................................... 117
Your NOOK® Today ................................................................................................................................................................... 117
Widget ........................................................................................................................................................................................... 117
Page 8

Page 9

Introduction
This User Guide is designed to help you get the most enjoyment out of your NOOK HD+.
Contact Us
If you have questions about your NOOK that this guide doesn’t answer, be sure to visit the NOOK online support
centre at:
http://NOOK.co.uk/support
The online support centre oers additional information about your NOOK, including:
• A PDF version of this NOOK User Guide that you can download to your computer
• Tutorial videos
• Frequently Asked Questions
You can also contact NOOK Customer Support by sending email to [email protected].
Stay in Touch
Follow us on Facebook and Twitter to receive daily reviews, exclusive oers, and free NOOK Books.
http://www.facebook.com/NOOK
http://www.twitter.com/NOOK_uk
Now, let’s get started with a quick tour of your NOOK and its main features.
NOOK HD+ User Guide 9
Page 10

Getting to Know Your NOOK
Your NOOK is an eReader with a full-colour touchscreen. On your NOOK, you can:
• Read books, magazines, newspapers, comics, and graphic novels.
• Shop from an amazing selection of best-selling books, magazines and newspapers. Buy books, single issues of
magazines and newspapers, as well as subscriptions to magazines and newspapers.
• Discover new books through NOOK Channels, the easiest and best way to find what you love. One hundred
years of bookseller knowledge go into our handpicked collections of books, magazines, and apps that speak to
your interests. There are dozens of channels, so find your favourites and follow them for inspiration.
• Buy or rent and then download or stream popular films and TV shows from Disney, Sony, HBO and more.
Watch everything from Hollywood blockbusters to indie favorites on your NOOK. Link your UltraViolet™ account to your NOOK account to enjoy your UltraViolet digital collection on your NOOK.
• Store thousands of books, along with magazines, newspapers, comics, graphic novels, music, photos, apps, videos, and more.
• Lend, borrow, share, and recommend books to friends via Facebook, Twitter®, or Google® using NOOK
LendMe® technology.
• Store and play songs and videos.
• Send and receive email.
• Store and read files, including PDFs and Microsoft Oce documents.
Your NOOK is small and comfortable enough to hold easily with one hand and to slip into a bag or a purse.
10 NOOK HD+ User Guide
Page 11
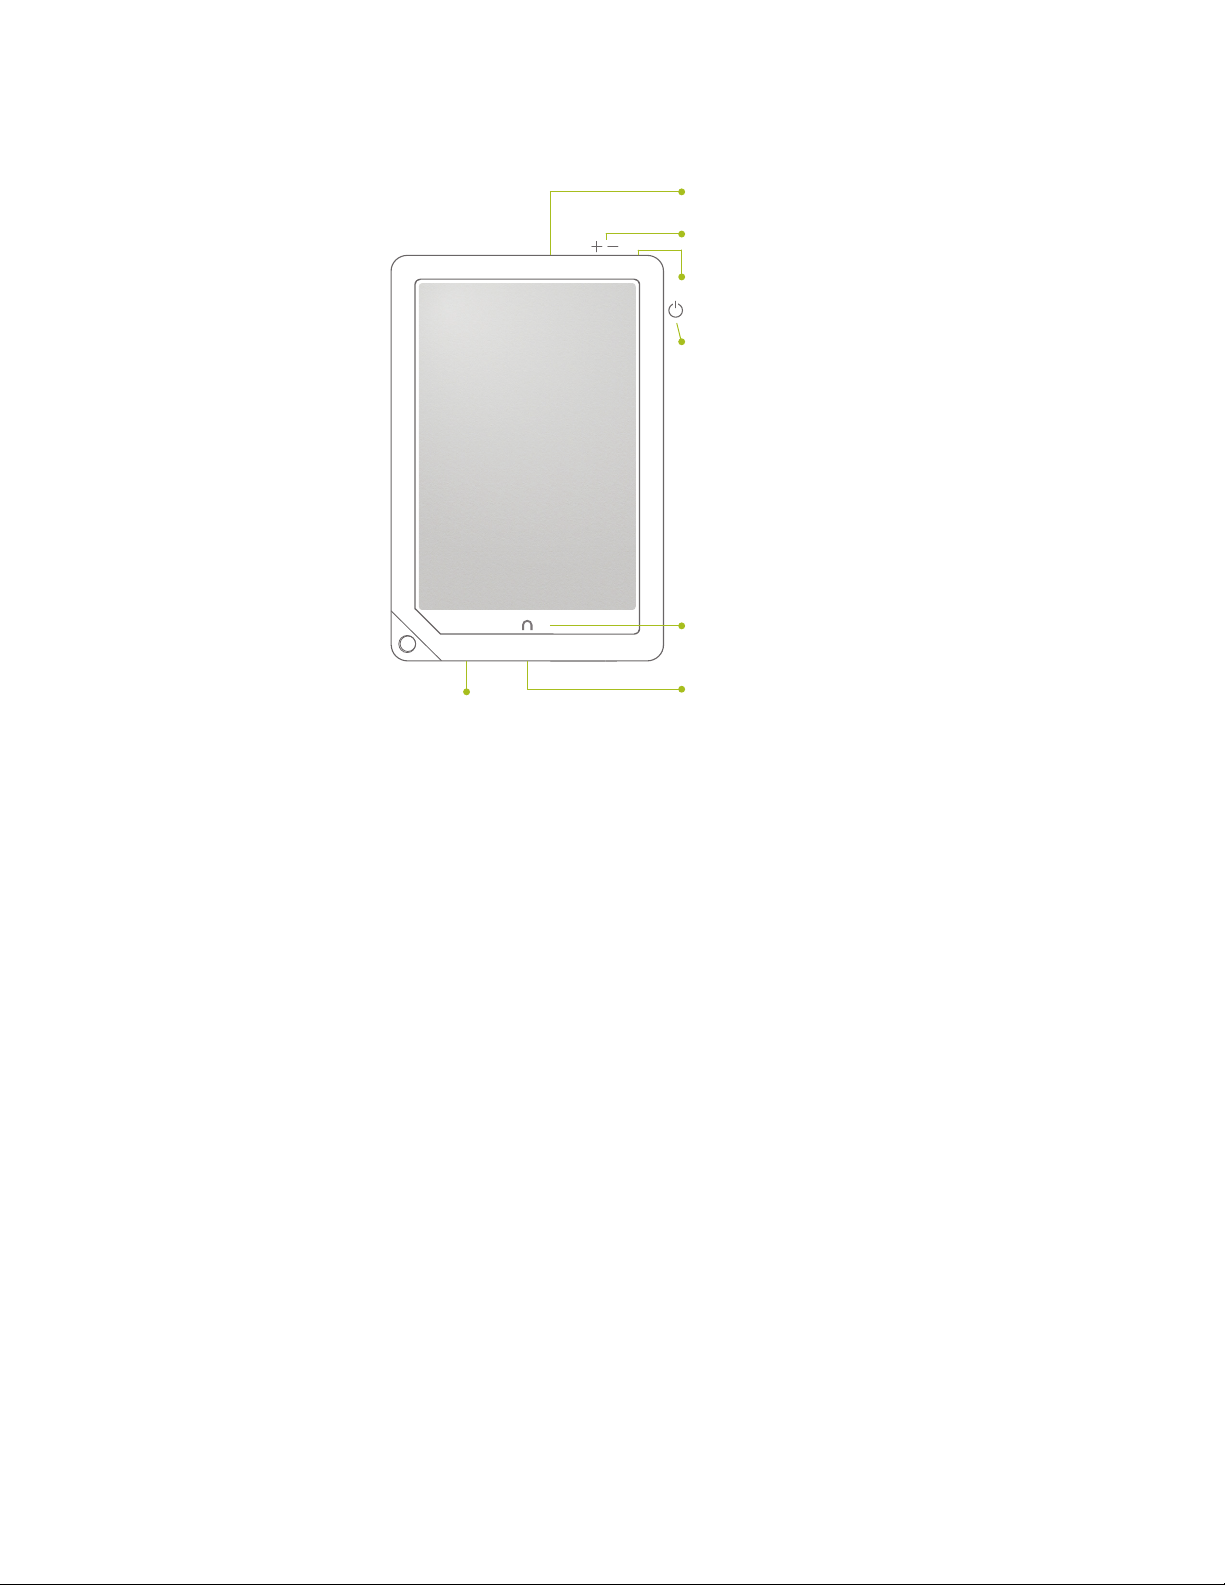
Your NOOK looks like this.
microSD™ Memory
Card Slot
Microphone
Volume Buttons
Headphone Jack
(
)
3.5mm
Power Button
NOOK Button
30-pin Port
Power Button
On the right-hand side of your NOOK is the power button. Press and hold the button for 2 seconds to turn on your
NOOK. To learn more about power management for your NOOK, see “Power and Charging”.
Headphone Jack
Along the top edge of your NOOK, you’ll find a 3.5 mm audio jack—a standard size jack for headphone and ear
buds.
Microphone
You’ll also find a built-in microphone set into the top edge of your NOOK.
Volume Buttons
Raise or lower the volume of audio by pressing the upper or lower end of the audio toggle button on the top edge
of your NOOK.
HD Colour Touchscreen
Your NOOK features a high-resolution colour touchscreen for easy navigation and page turns. The touchscreen
displays video up to 1080p.
NOOK HD+ User Guide 11
Page 12

NOOK Button
This NOOK symbol on the lower front of your NOOK is called the NOOK button. Once your NOOK is turned
on and the screensaver has been unlocked, pressing the NOOK button displays the Home Screen. On the bottom of
the Home Screen you’ll find Nav Buttons for navigating to important features such as Library and Shop.
30-pin Port
Your NOOK features a 30-pin port for charging and for connecting to a personal computer.
microSD Memory Card Slot
Your NOOK features enough built-in memory to hold thousands of books, along with many magazines, newspapers,
photos, apps, videos, and personal files such as PDFs.
You can add more storage to your NOOK by installing a standard microSD memory card. The card fits into a covered slot in the back of your NOOK, next to the curved bar in the corner. A microSD memory card can hold up to
64 GB of content. Once you have installed a microSD card in your NOOK, you can access the files stored on the
card through the My Files section of your Library.
To learn about installing a microSD memory card in your NOOK, see “Using an SD Memory Card”.
Bluetooth®
Your NOOK supports the A2DP, AVCRP, and HID profiles of the Bluetooth 2.0 standard for connectivity, enabling
your NOOK to connect to Bluetooth devices such as headphones, speakers, and keyboards. These wireless devices
are sold separately. See your NOOK retailer for a list a supported Bluetooth devices.
NOTE: Your NOOK can connect to certain Bluetooth headsets, but it does not interpret commands, such as
play or pause, from these headsets.
12 NOOK HD+ User Guide
Page 13
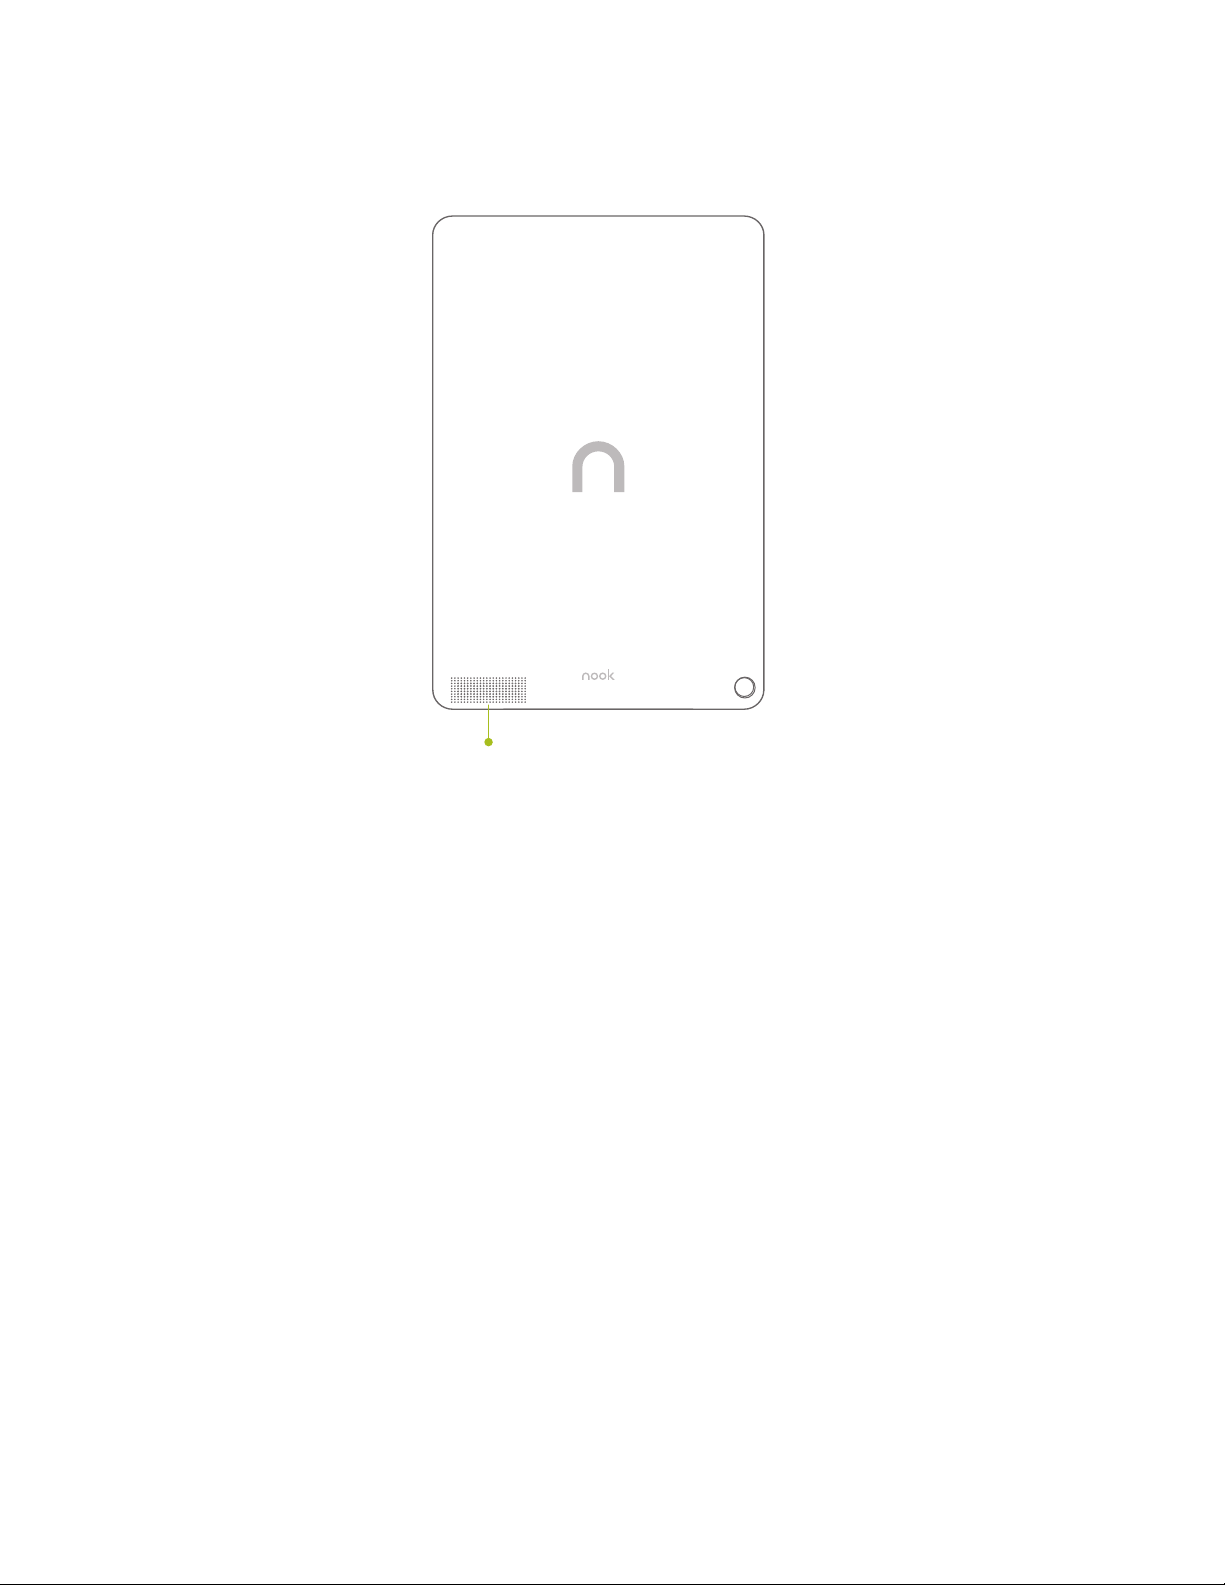
Speakers
Audio speakers are built into the back of your NOOK, as shown below:
Speaker
NOOK HD+ User Guide 13
Page 14

Power and Charging
Turning Your NOOK On and O
NOTE: If you have already registered your NOOK and created a profile, you will need to drag your profile’s
icon to the lock symbol on the screen to unlock your NOOK after you turn it on. If you have set up a
passcode to protect your NOOK, you will have to enter the passcode after you unlock your profile. See
“Using a Device Passcode to Protect Your NOOK”.
Turning On Your NOOK
To turn on your NOOK, press the power button located on the left-hand edge of your NOOK. Hold the button
down for 2 seconds and release it.
Your NOOK starts. When it has completed its start-up process, it makes a chiming sound.
Turning O Your NOOK
You do not need to turn your NOOK o when you stop using it. With a fully charged battery and with Wi-Fi turned
on, your NOOK has enough power to last in a suspended “sleeping” state for many days. With a fully charged battery and with Wi-Fi turned o, your NOOK has enough power to last in a suspended state for several weeks.
On the other hand, if you are carrying your NOOK without a cover in a bag or purse, you might want to turn o
your NOOK to avoid it being accidentally turned on from its “sleeping” state. You also might want to turn o your
NOOK simply to conserve power.
To turn o your NOOK, do this:
1. Press the power button and hold it down for 5 seconds.
A window appears, asking if you really want to turn your NOOK completely o.
2. Tap the Power o button in the dialogue box.
Your NOOK turns o.
NOTE: If you ignore the window asking you to confirm that you want to power o your NOOK, after several
seconds the window disappears and your NOOK resumes whatever it was doing before you pressed
the power button.
14 NOOK HD+ User Guide
Page 15
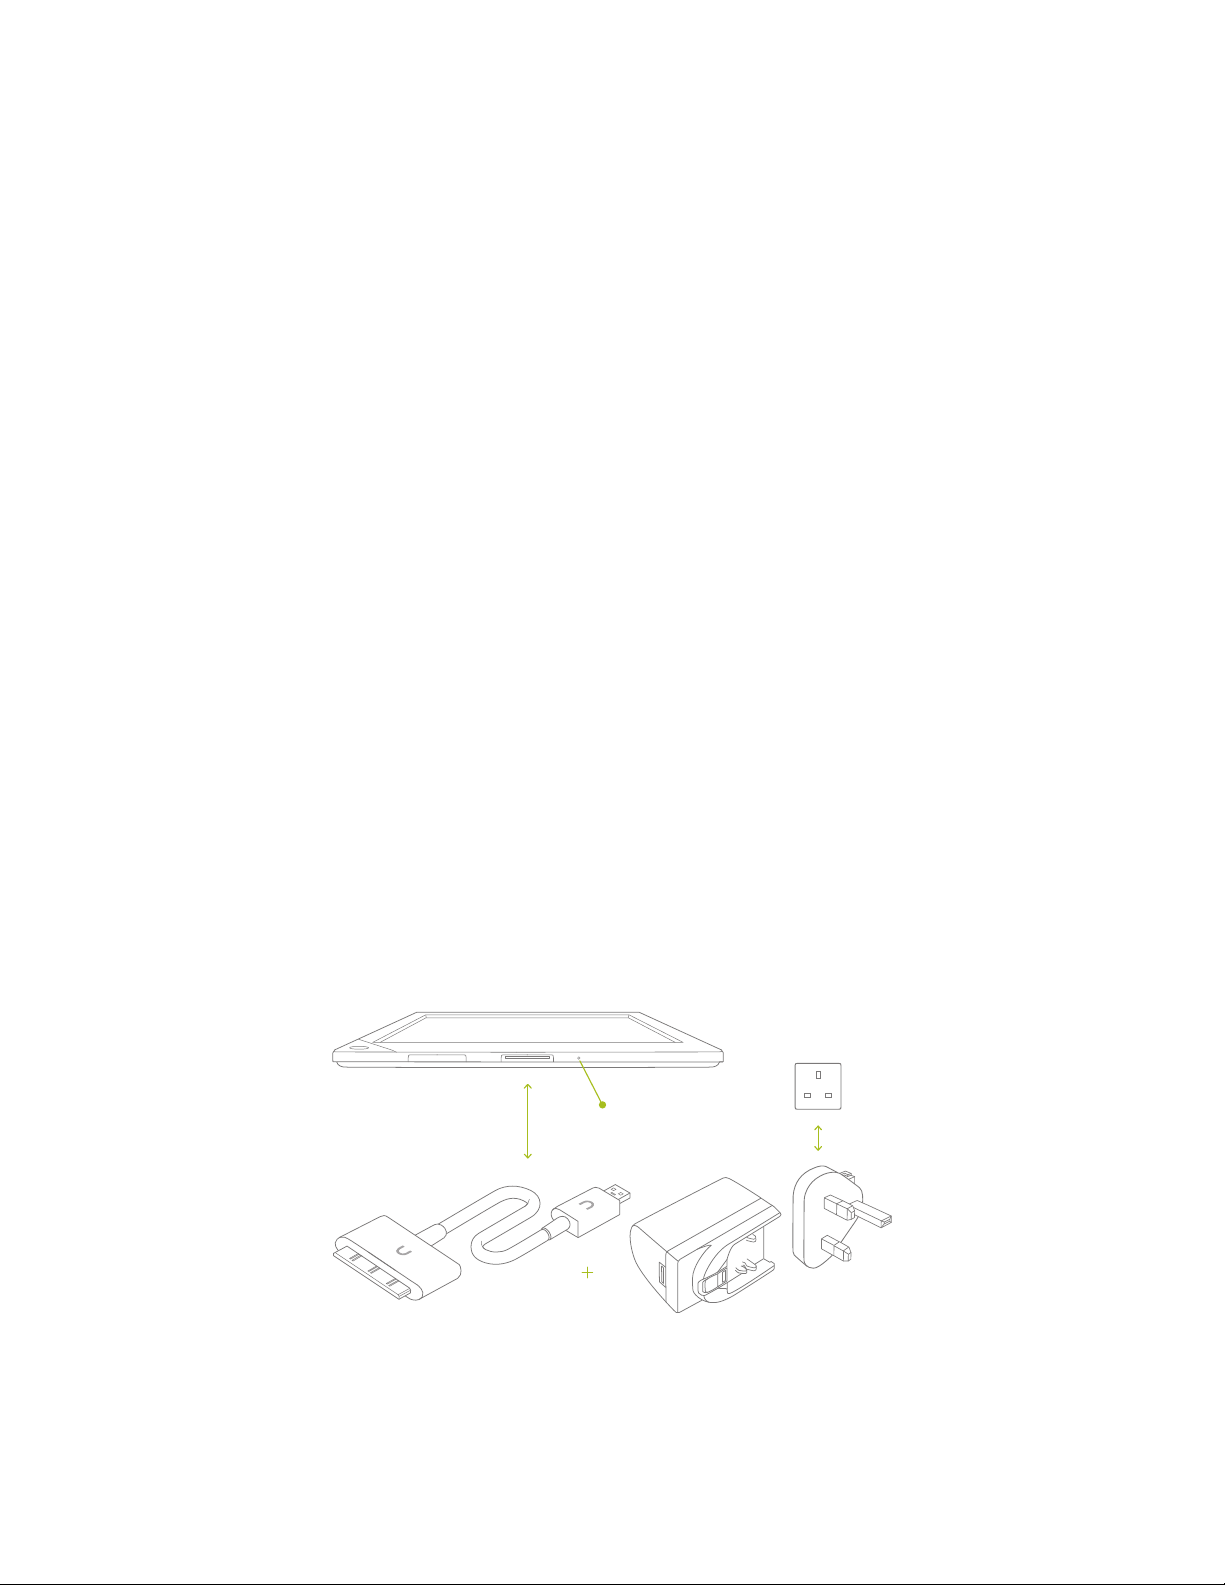
Wall Charging
To charge your NOOK, use the charging components included with your NOOK.
CAUTION: Only use the Barnes & Noble power adapter and custom 30-pin USB cable supplied with your
NOOK. Other power adapters might damage your NOOK and its battery. Do not use a power
adapter and cable intended for other models of NOOK eReader.
NOTE: Using your NOOK’s 30-pin USB cable, you can connect your NOOK to your personal computer
to transfer files. However, connecting your NOOK to your personal computer may not fully charge
your NOOK. To charge your NOOK, you must plug it into a wall outlet.
To charge your NOOK from a wall outlet, do this:
1. Assemble the power adapter and 30-pin USB cable. Insert the USB end of the cable into the matching receptacle
on the power adapter.
2. Plug the 30-pin end of the USB cable into your NOOK.
3. Plug the power adapter into a compatible electrical outlet. If your NOOK was turned o, it will now turn itself
on.
NOTE: Depending on how much power remains in the battery, it might take 3-4 hours to fully recharge your
NOOK. Do not turn o your NOOK while it is charging.
NOTE: If the Charging Indicator Light is blinking, your NOOK is too hot to charge. Move your NOOK to a
cooler environment.
NOTE: Once your NOOK has enough power to turn on, you can see how much power remains in the battery
by checking the battery charge indicator in the right-hand corner of the Status Bar. You may need to
drag your account icon to the lock symbol on the screen to unlock your NOOK and display the Status
Bar, which runs along the top of the screen.
4. Once your NOOK has fully charged, unplug the power adapter from the electrical outlet. Unplug the USB cable
from your NOOK.
Wall Socket
Charging
Indicator Light
30-pin
Cable
Power
Adapter
NOOK HD+ User Guide 15
Page 16

Resetting Your NOOK
Performing a Soft Reset
If for some reason your NOOK becomes unresponsive, you can perform a soft reset to restart the device.
1. Press and hold the power button for 20 seconds, then release the power button.
2. Press the power button again for 2 seconds to turn on your NOOK.
Low Power
If you turn on your NOOK when its battery charge is almost depleted, a warning appears on the screen, suggesting
that you begin charging your NOOK before trying to use it.
If the battery is depleted, your NOOK will shut down until it has been suciently recharged.
Charging Recommendations
Your NOOK contains a lithium ion battery. To maximise battery life:
• Avoid fully discharging the battery. Charge your NOOK after several hours of use or when you see the low
charge alert, rather than continuing to use it until it turns itself o.
• Avoid high temperatures for charging, use, and storage. For more information, see “Temperature Ranges.”
• If you are not going to use your NOOK for more than 30 days, charge the battery to 40%-50% and then turn o
your NOOK.
Safety and Care
This section explains important information about safety and about caring for your NOOK.
Water
CAUTION: Your NOOK, cables, and adapters are not waterproof. To avoid risk of overheating, melting, and burns,
keep the device and all accessories away from water and other liquids.
Do not use the cable if either end of the cable gets wet or is exposed to liquid spray. Allow the
end(s) of the cable to dry thoroughly before trying to use the cable. Do not expose your NOOK
to wet or damp conditions. Avoid exposing the device to liquid or food. If liquid is spilled on the
device, make sure to unplug the charging cable and allow the device to dry thoroughly before
reusing. Do NOT attempt to dry out your NOOK with an external heat source such as a dryer or
microwave oven. Clean the screen of your NOOK with a soft cloth and avoid using liquid cleaners
on the screen.
Electricity
Your NOOK is an electrical device. Follow the same basic safety procedures you would follow with any electrical
device.
When charging your NOOK, use only the custom USB cable and power adapter included with your NOOK.
16 NOOK HD+ User Guide
Page 17

Aeroplanes
When using your NOOK on an aeroplane, be sure to follow the instructions of the flight crew.
To turn your NOOK’s wireless networking on or o, do this:
1. Tap the gear icon in the Status Bar to open the Quick Settings window.
2. Slide the Wi-Fi switch on or o. Or slide the Aeroplane Mode switch to on.
Aeroplane Mode turns o wireless networking but allows other features on your NOOK to work as usual.
3. Tap anywhere outside the Quick Settings window to close it.
Electronic Equipment
If you are around sensitive electronic equipment–for example, if you are in a hospital–ask if you may use your
NOOK. You probably can if you turn o Wi-Fi networking. Settings such as intensive care units might forbid the use
of any electronic device, with or without networking.
Battery
Your NOOK includes a non-replaceable lithium ion battery. Do not attempt to replace the battery. If you suspect
your battery is having problems, please contact Customer Service.
Caution About High Audio Volume
WARNING: Exposure to loud noise from any source for extended periods of time may aect your hearing. The
louder the volume, the faster your hearing may be aected. To protect your hearing:
• Limit the amount of time you use headsets or headphones at high volume.
• Avoid turning up the volume to block out noisy surroundings.
• Turn the volume down if you can’t hear people speaking near you. If you experience hearing
discomfort, including the sensation of pressure or fullness in your ears, ringing in your ears, or
mued speech, you should stop listening to the device through your headset or headphones
and have your hearing checked.
Caring for Your NOOK
To take the best possible care of your NOOK, please follow the recommendations below.
Temperature Ranges
Your NOOK should function as designed in these temperature ranges:
Use Fahrenheit Celsius
Charging 41-95 F 5-35 C
Operation 32-95 F 0-35 C
Storage 5-113 F -13-45 C
Outside of these ranges, your NOOK might develop power, display, and/or software issues. If temperatures are
extremely cold or hot, permanent physical damage can result. Such damage is not covered by the warranty. Storage
applies to temporary locations like the trunk of your car (or other motor vehicle) as well as long-term storage.
NOOK HD+ User Guide 17
Page 18

Even on a day that is not very hot, the passenger compartment or trunk of a car can be extremely hot. Do not leave
your NOOK in a car.
High storage temperatures reduce battery life. For more information, see “Charging Recommendations”.
Caring for the Touchscreen
You should clean the touchscreen on your NOOK from time to time. Clean the screen with a damp soft cloth, such
as a micro-fibre cloth. Micro-fibre cloths are available from Barnes & Noble stores and from partner retailers. Do not
use any chemicals to clean the screen.
18 NOOK HD+ User Guide
Page 19
Gestures
Your NOOK recognises these dierent gestures:
• Tap
• Double tap
• Press and hold
• Swipe
• Scroll
• Drag
• Pinch and Zoom
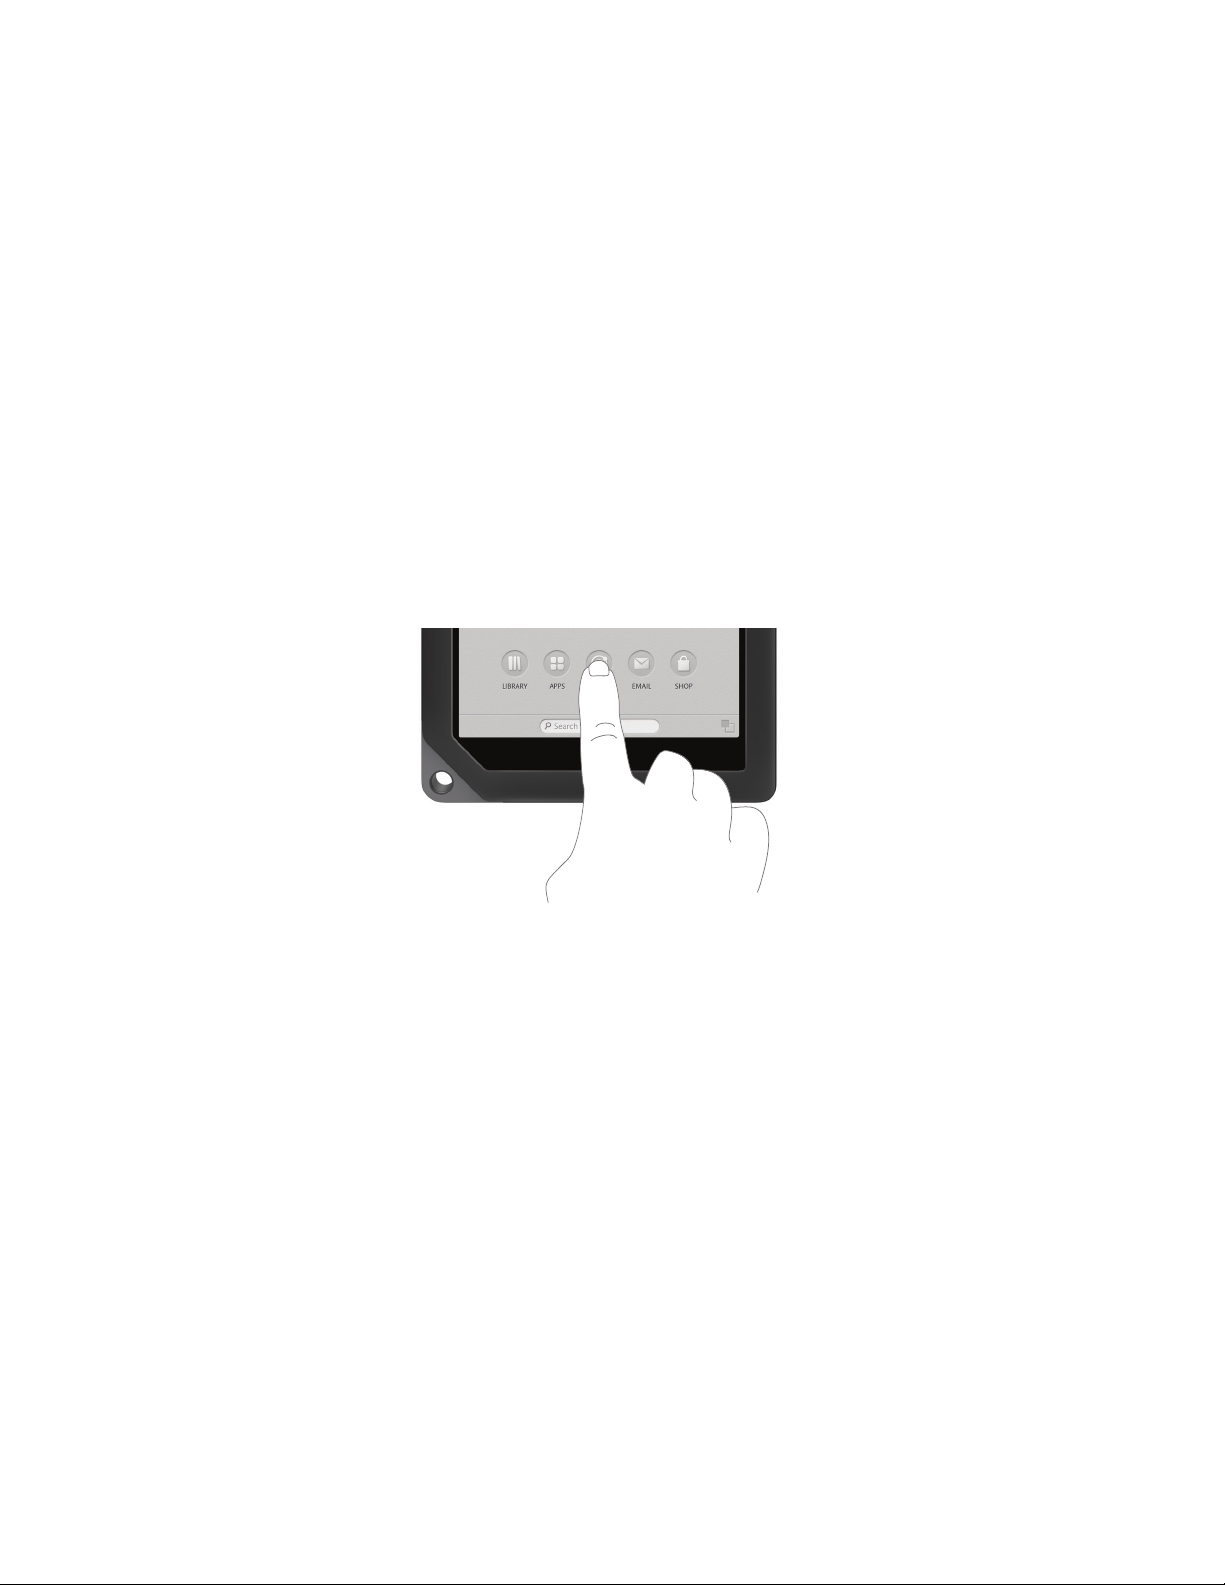
Tap
A tap on the screen is a quick touch of your fingertip. It’s the same gesture you use when you tap a key on a computer keyboard.
Tapping on a button.
Double Tap
Some features require a double tap: two taps in quick succession. For example, by double-tapping on an item in the
NOOK Shop, you can open a window displaying information about the item.
Press and Hold
Pressing and holding means touching your finger to the screen and holding it there for 2 seconds.
In many situations, pressing and holding causes your NOOK to open a pop-up menu. The pop-up menu—sometimes
called a contextual menu—oers you choices about the image your finger is resting on.
For example, if you press and hold on a book cover, your NOOK opens a menu oering you choices of things you
can do with that book: open the book, recommend it, lend it, and so on.
NOOK HD+ User Guide 19
Page 20
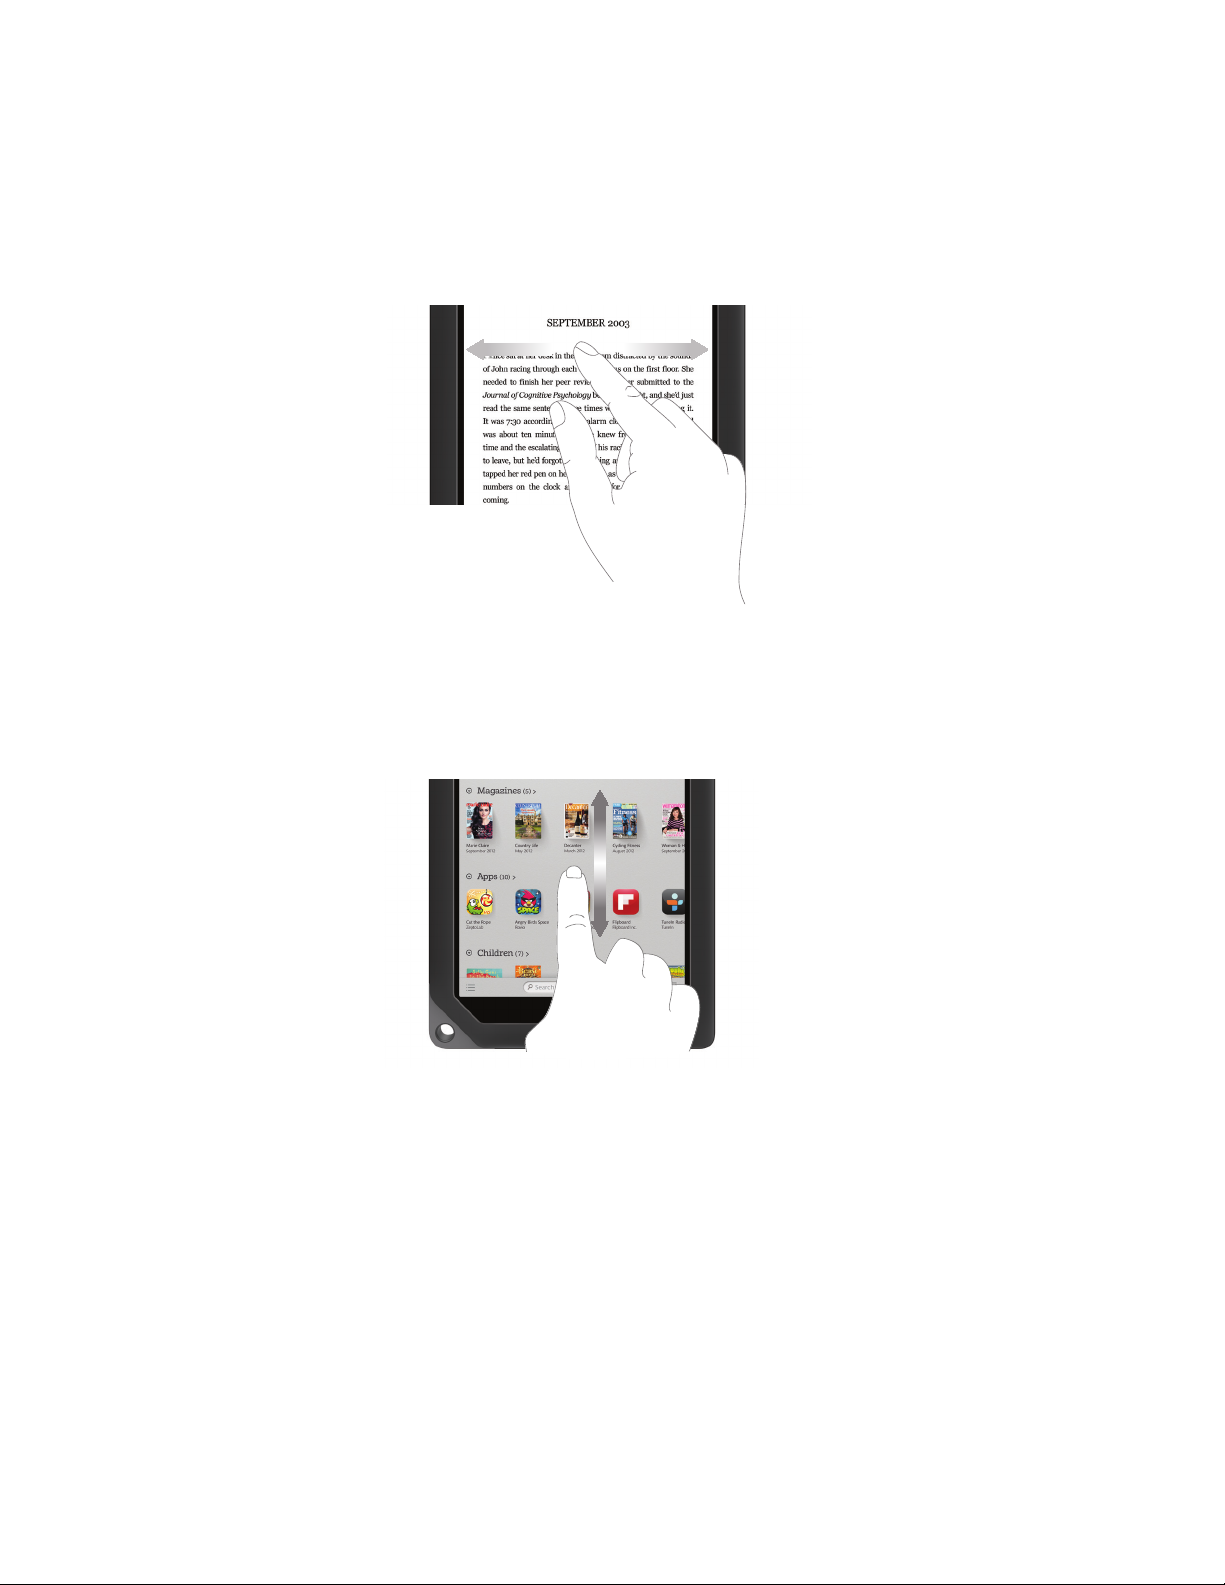
Swipe
To swipe is to slide your finger across the screen as though you were brushing away a crumb. You can swipe left, flicking your finger to the left. Or you can swipe right, flicking your finger to the right.
You’ll typically swipe to scroll through a long list or collection things, such as the row of books and other items on the
Active Shelf.
Swiping left or right.
Scroll
Slide your finger up or down the screen to scroll through any list displaying a scrollbar. A scroll gesture is like a vertical
swipe.
Scrolling up or down.
20 NOOK HD+ User Guide
Page 21
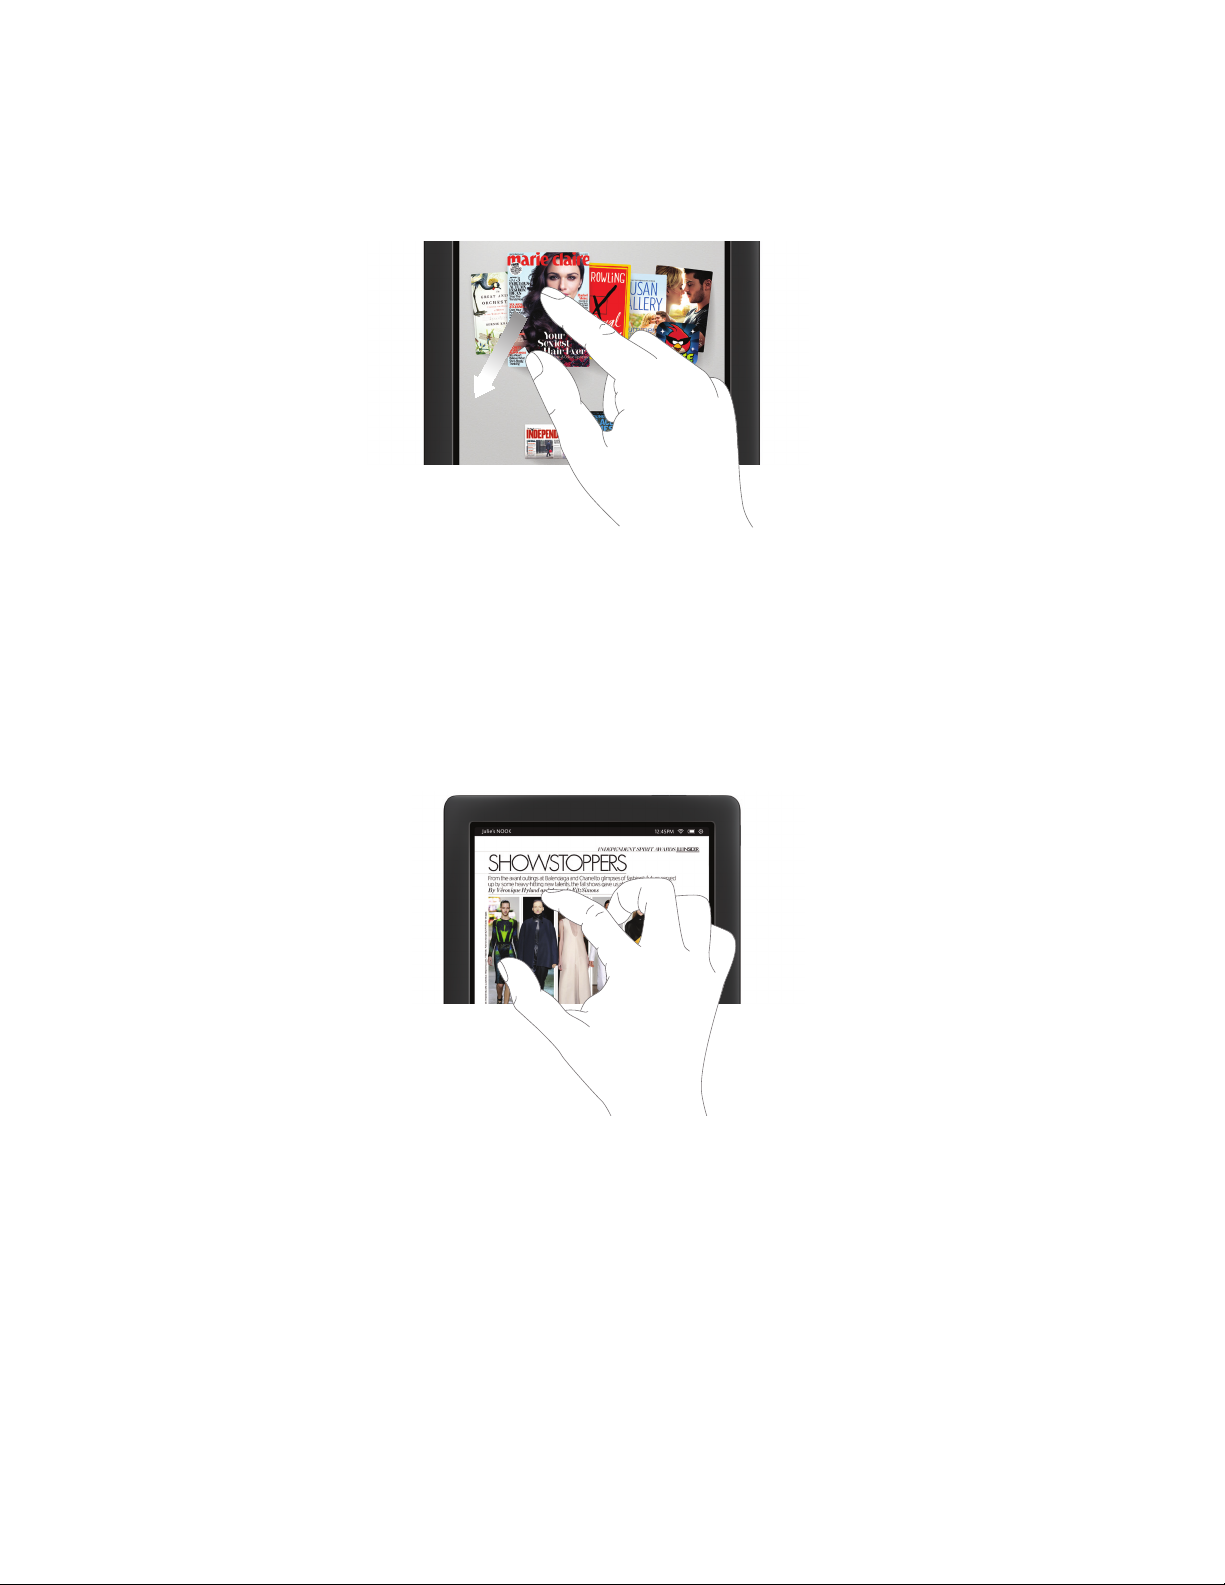
Drag
To drag is to touch an object and pull it to another location, while keeping your fingertip touching the screen. Once
you have moved the object to where you want it to be, lift your finger, leaving the object in its new location.
Dragging an item on the screen.
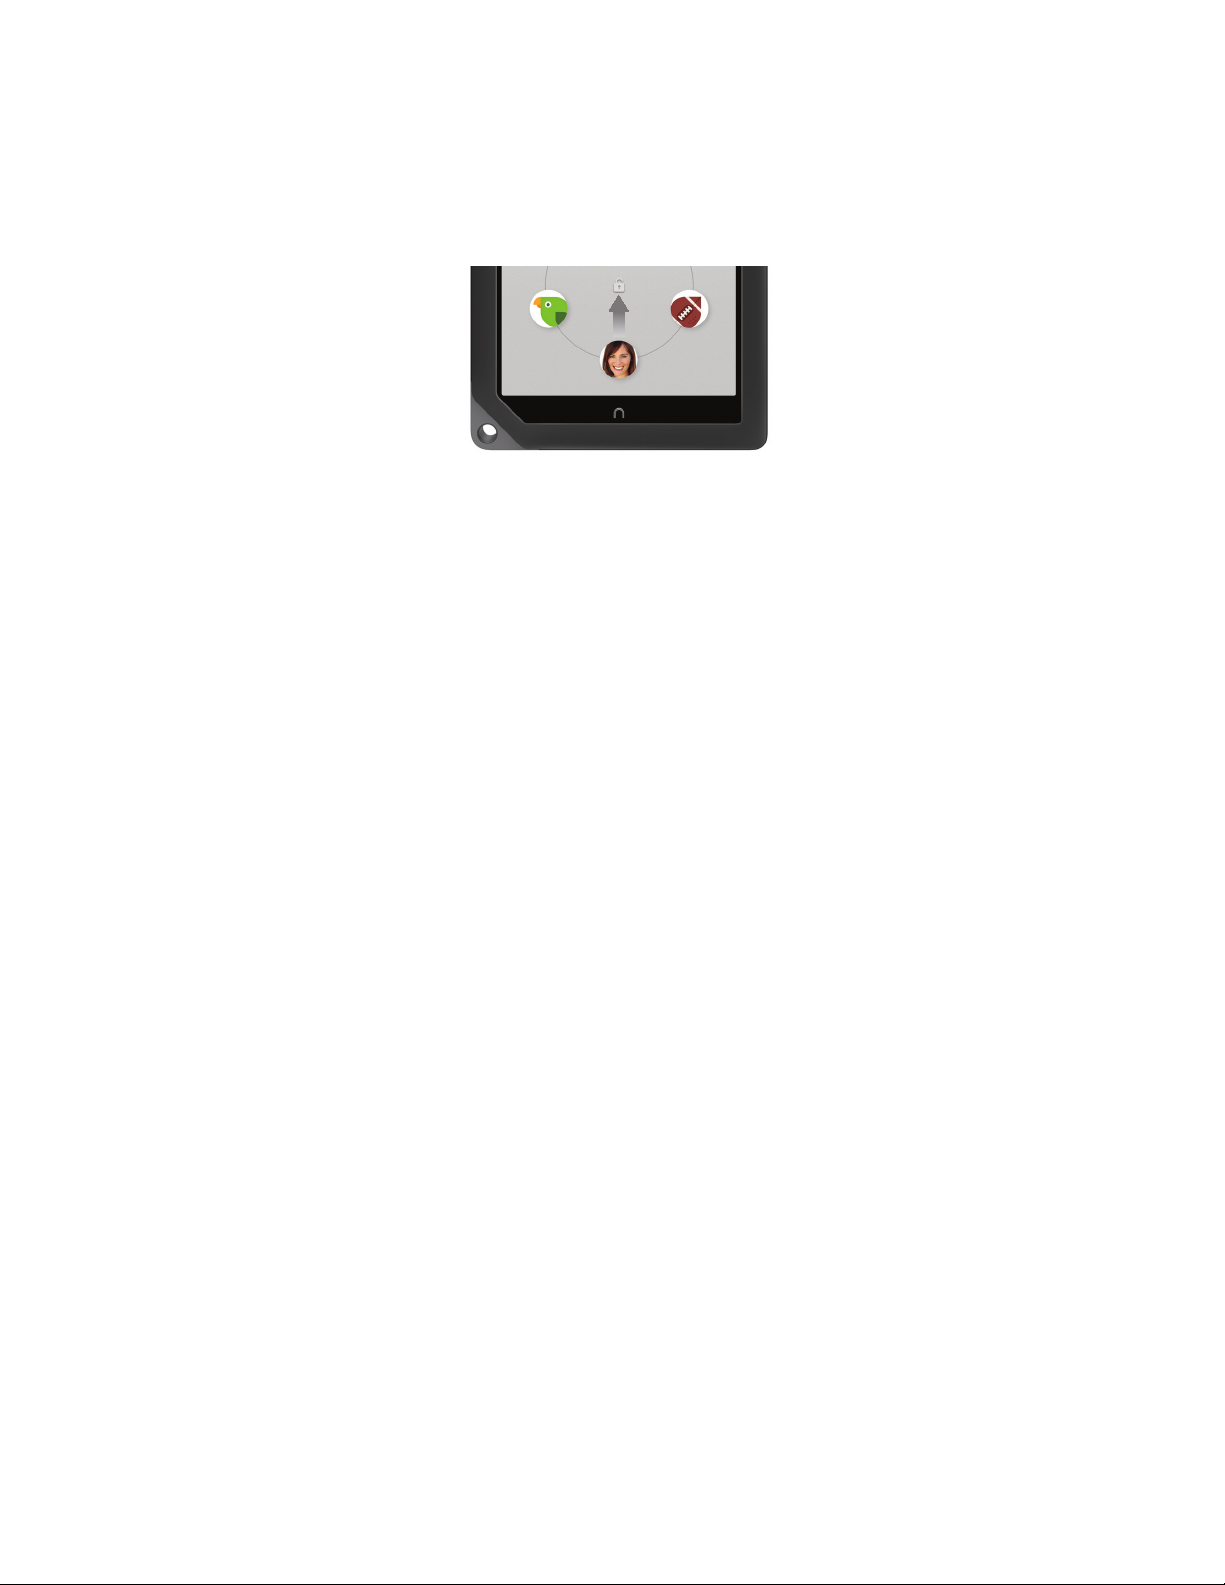
Pinch and Zoom
You can use two fingers to shrink or enlarge an image.
• Pinch your fingers together to shrink an image and zoom out.
• Pull your fingers apart to enlarge an image and zoom in. (Pulling your fingers apart this way is sometimes called
“pinching out.”)
Pinching and zooming.
NOOK HD+ User Guide 21
Page 22

Turning on Your NOOK for the First Time
Charge Your NOOK
You must charge your NOOK before you use it for the first time.
Plug your NOOK into a wall outlet using the Power Adapter and 30-pin Cable included with your device.
You can use your NOOK while it charges.
The charging indicator light on the bottom of your device will show orange when your NOOK is charging. When the
light turns green, your NOOK is fully charged.
It takes 3-4 hours to charge your NOOK.
Register Your NOOK
NOTE: To register your NOOK, you must have access to a Wi-Fi network.
To register your NOOK, do this:
1. Turn on your NOOK if it is not already turned on.
To turn on your NOOK, press the power button along the upper left-hand edge of the bezel and hold the button down for 2 seconds. When it turns on for the first time, your NOOK displays a welcome message. It also
displays buttons for selecting a language.
2. Tap the button labelled British English.
Your NOOK displays a list of available Wi-Fi networks.
3. Tap on the name of the Wi-Fi network you want to use. If the network asks you for security information such as
a password, enter it.
If you don’t know the network name or password, ask the network’s administrator for help.
4. Once you have connected to a network, tap Continue with Setup.
5. Tap the underlined words and phrases and use the pop-up menus to select your country and (if your country
spans multiple time zones) your time zone. Tap Next.
Your NOOK registers itself and checks for critical software updates. If there are no updates, it proceeds next
to the Terms of Service screen. You must accept the Terms of Service and Privacy Policy to continue using your
NOOK. To read the Terms and Service and the Privacy Policy, tap on the link provided.
6. If you agree to the terms, tap the Yes tick box. Optionally, you may tick the box to receive email from partners
about products and services that may be of interest. Then tap the Agree button.
7. Sign in with your NOOK account. This gives you access to any items in your NOOK Library and allows you to
shop for new books, magazines, newspapers, videos, and apps on your NOOK.
• If you already have an account, tap Yes, I have an account.
On the next screen, enter the email address and password associated with your account. Then tap
Submit.
• If you do not already have an account, Tap, No I need to create an account.
Tap on the underlined words and phrases and type in the fields to set up your account.
Once you have signed in, you can set up your NOOK Profile. Your NOOK displays a scrollable list of topics such
as Cooking & Food, Travel, and Mystery & Suspense.
22 NOOK HD+ User Guide
Page 23

8. Tap the icons representing your interests. Then tap Next.
Your NOOK displays some sample titles based on your interests.
9. Tap on the samples you would like to add to your Library. Then tap Next. (If you would like to skip this step, tap
the word Skip in the lower left-hand corner of the screen.)
Your NOOK adds the titles you selected to your Library.
That’s it. You’ve registered your NOOK. You’re ready to shop at the NOOK Shop, read your favourite books, magazines, and newspapers, watch films in HD, and more.
NOOK HD+ User Guide 23
Page 24
Unlocking Your NOOK
Your NOOK features a screensaver that locks the screen. To unlock the screen, drag the icon for the profile you
want to use to the lock icon in the centre of the screen. (To learn more about profiles, see “NOOK Profiles”).
Drag a profile’s icon to the lock symbol to unlock your NOOK and display that profile.
24 NOOK HD+ User Guide
Page 25
The Status Bar
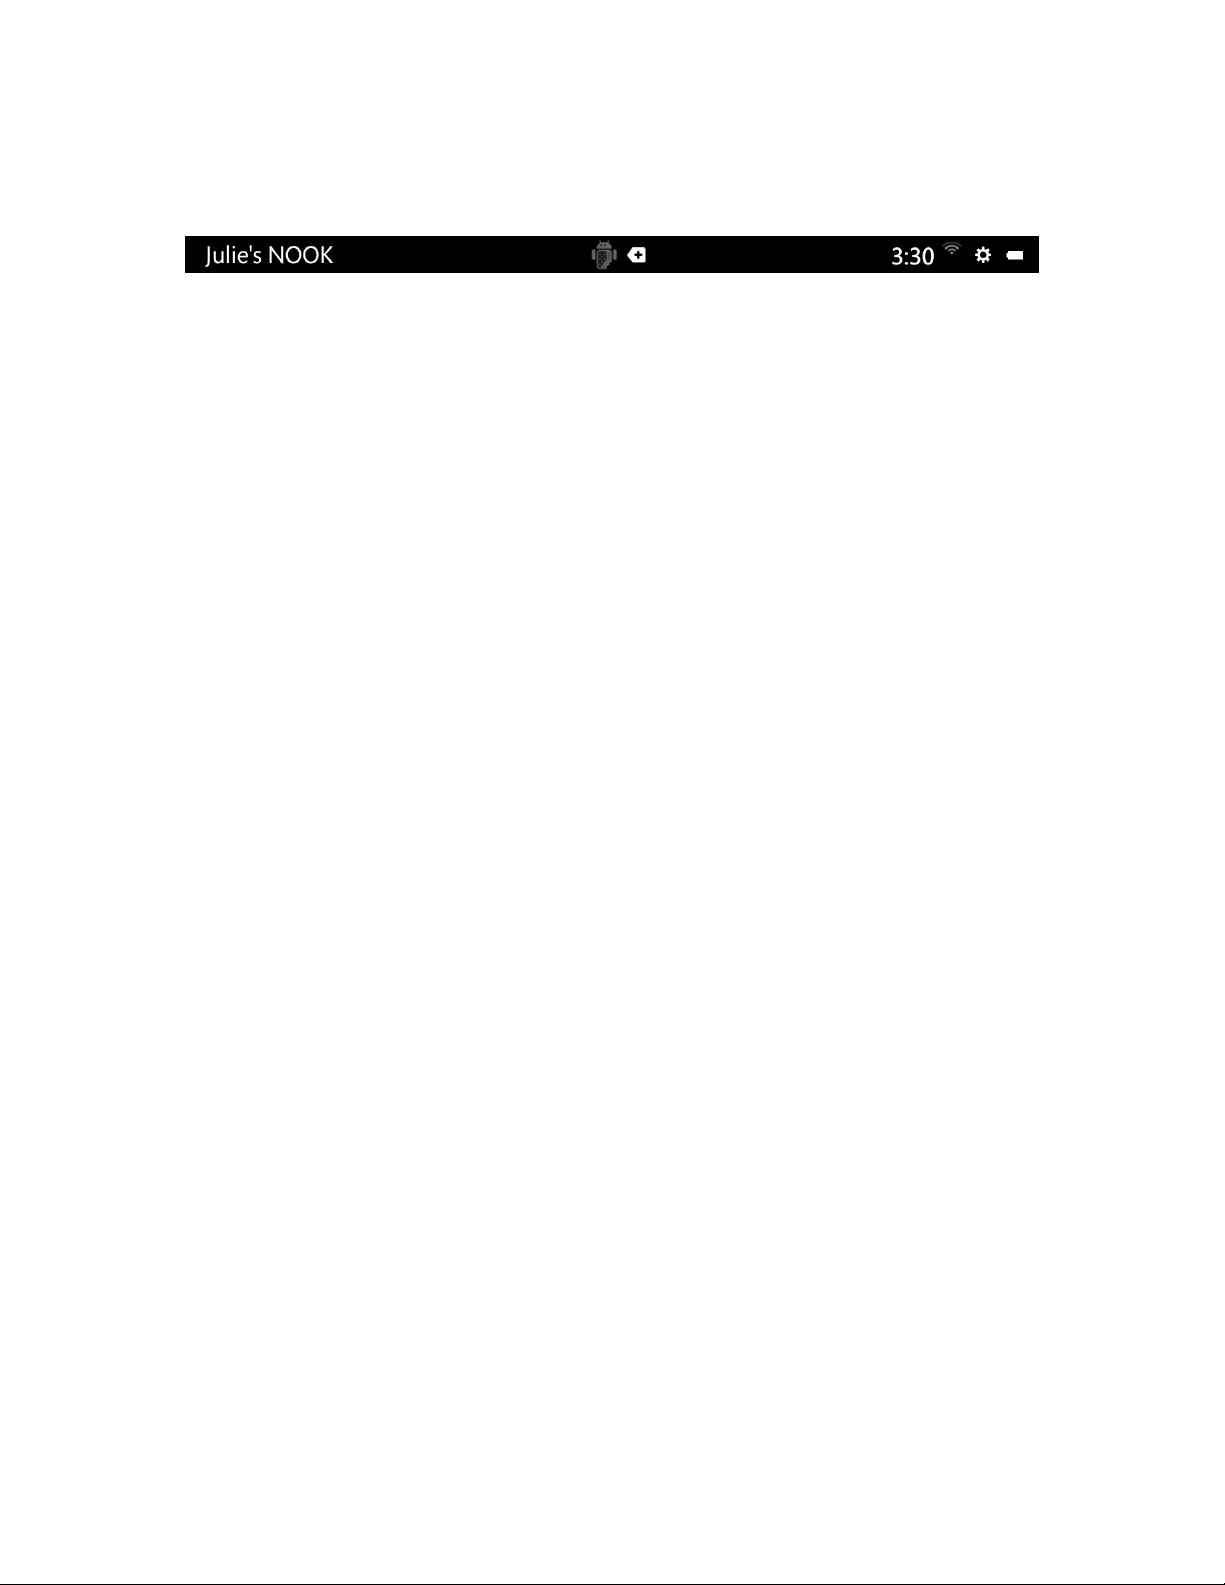
The Status Bar is a black ribbon that runs along the top of your screen.
The Left-hand Side of the Status Bar
The left-hand side of the Status Bar identifies the owner of the NOOK; for example, “Julie’s NOOK.”
The Centre of the Status Bar
The centre of the Status Bar displays notification icons if any notifications are present. Notifications include news
about NOOK® Friends requests, microSD card formatting status, software updates, and more.
The Right-hand Side of the Status Bar
The right-hand side of the Status Bar shows:
• The current time
• A Wi-Fi indicator showing whether or not your NOOK is connected to Wi-Fi and, if it is connected, how strong
the Wi-Fi network signal is
• A gear icon that you can tap to open the Quick Settings window (in the Quick Settings window, you can tap
Home to access configuration settings for the Home Screen, and you can tap All Settings to access all the configuration screens for your NOOK)
• A battery indicator showing the charging status of your battery
NOOK HD+ User Guide 25
Page 26
The System Bar
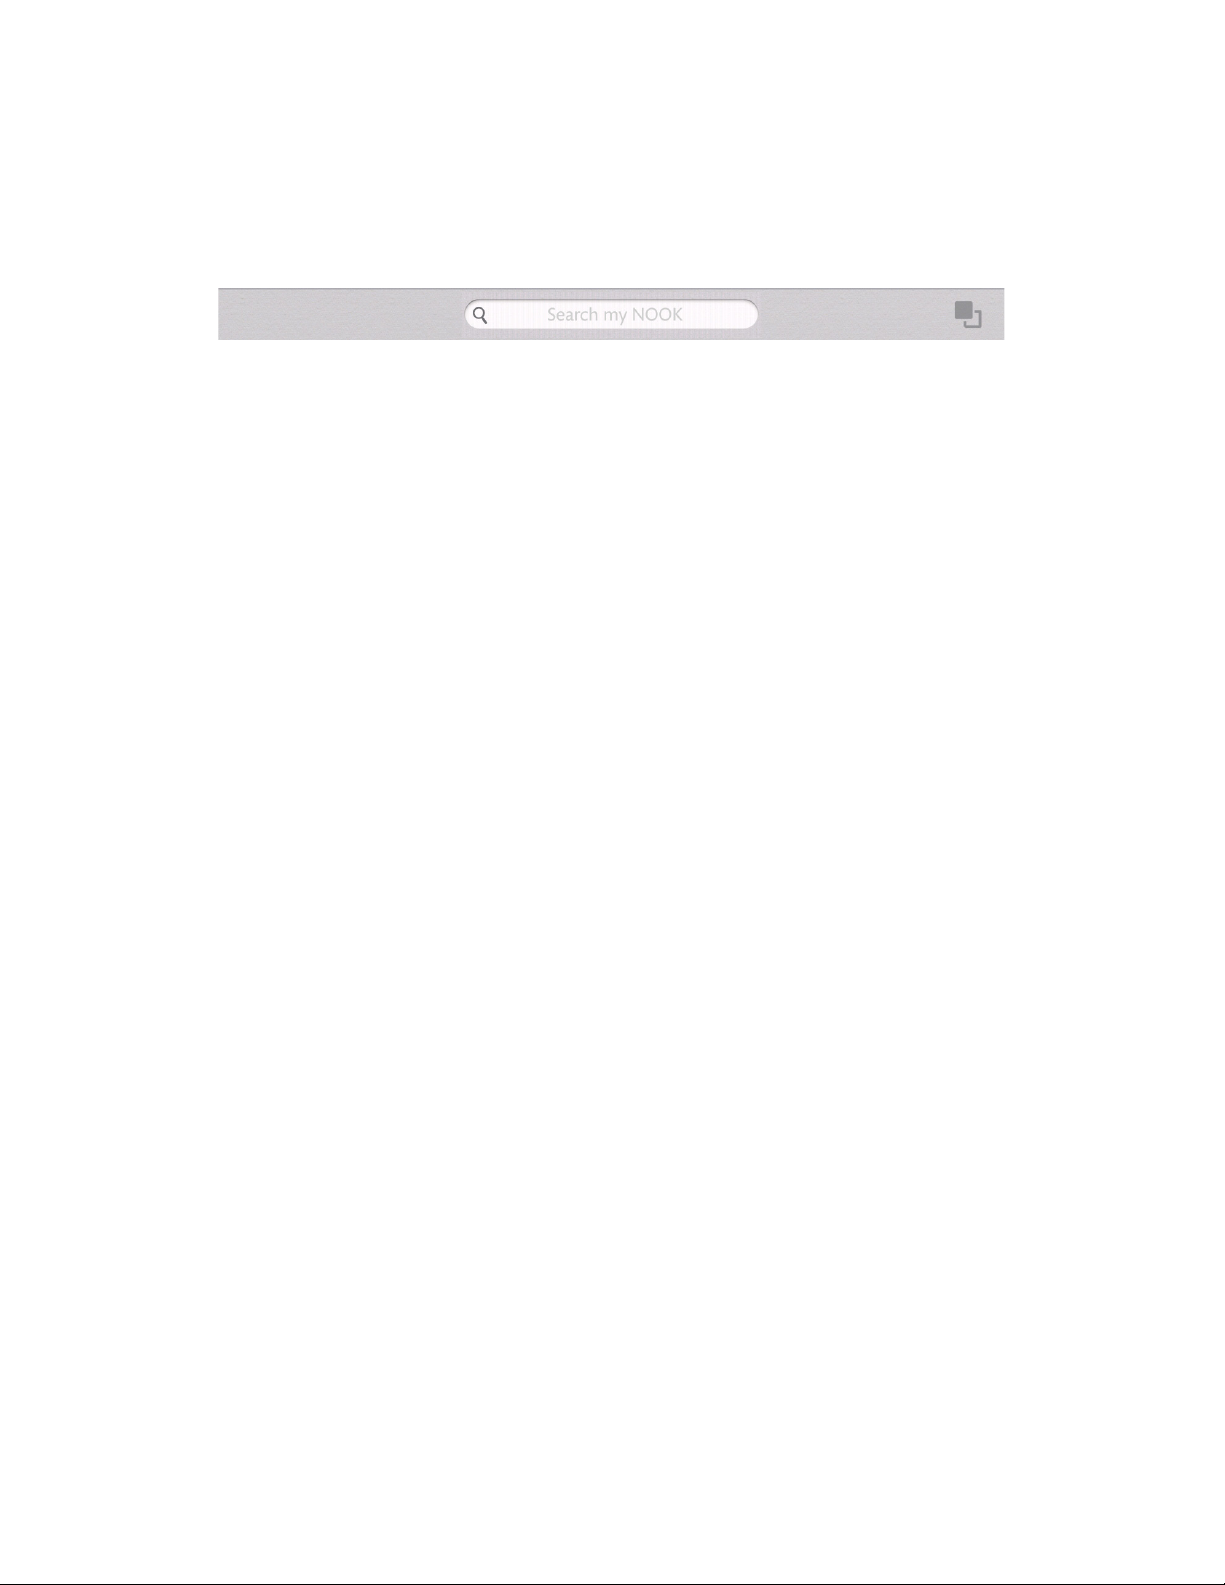
The System Bar is a short grey panel that runs along the lower edge of many screens, including the Home Screen, the
Library, the Shop, and Settings screens. The System Bar contains useful tools for accessing contents and features.
Here’s an example of the System Bar:
The System Bar.
The System Bar on the Home Screen
On the Home Screen, the System Bar contains:
• A Search tool
• Either:
• An icon (two overlapping squares) for opening the Recent Drawer
• An icon (an open book) for returning to your most recent reading material
The System Bar in the Library
In the Library, the System Bar contains:
• An icon (three stacked lines) for opening the Library menu
• A Search tool
• Either:
• An icon (two overlapping squares) for opening the Recent Drawer
• An icon (an open book) for returning to your most recent reading material
The System Bar in the Shop
On many pages in the Shop, the System Bar contains:
• An icon (a heart) for displaying your Wishlist
• An icon (a shopping bag and a clock) for displaying recently viewed items
• A Search tool
• Either:
• An icon (two overlapping squares) for opening the Recent Drawer
• An icon (an open book) for returning to your most recent reading material
26 NOOK HD+ User Guide
Page 27

The Recent Drawer
By default, an icon of two overlapping squares appears in the lower right-hand corner of the System Bar. Tap this
icon to open the Recent Drawer: a scrollable horizontal panel showing the last fifty items you have accessed on your
NOOK. These items can be Library items such as books or films, or they can be apps such as Email or the Web
browser.
To return to one of these items, tap it. Your NOOK closes the Recent Drawer and opens the item you selected.
Replacing the Recent Drawer with My Recent Read
If you like, you can replace the Recent Drawer with the icon of a book that simply returns you to the book, magazine, or newspaper you were reading most recently.
To switch to an icon for your most recent read, do this:
1. On the Home Screen, tap the gear icon in the Status Bar to open the Quick Settings window.
2. At the top of the Quick Settings window, tap Home to open the configuration settings for the Home Screen.
3. Scroll through the settings, and find the tick box labelled Show my Recent Drawer, and tap the box to make the
configuration change you want:
• To display the Recent Drawer icon, leave the box ticked.
• To display the Recent Read icon, leave the box unticked.
NOOK HD+ User Guide 27
Page 28
Your Home Screen
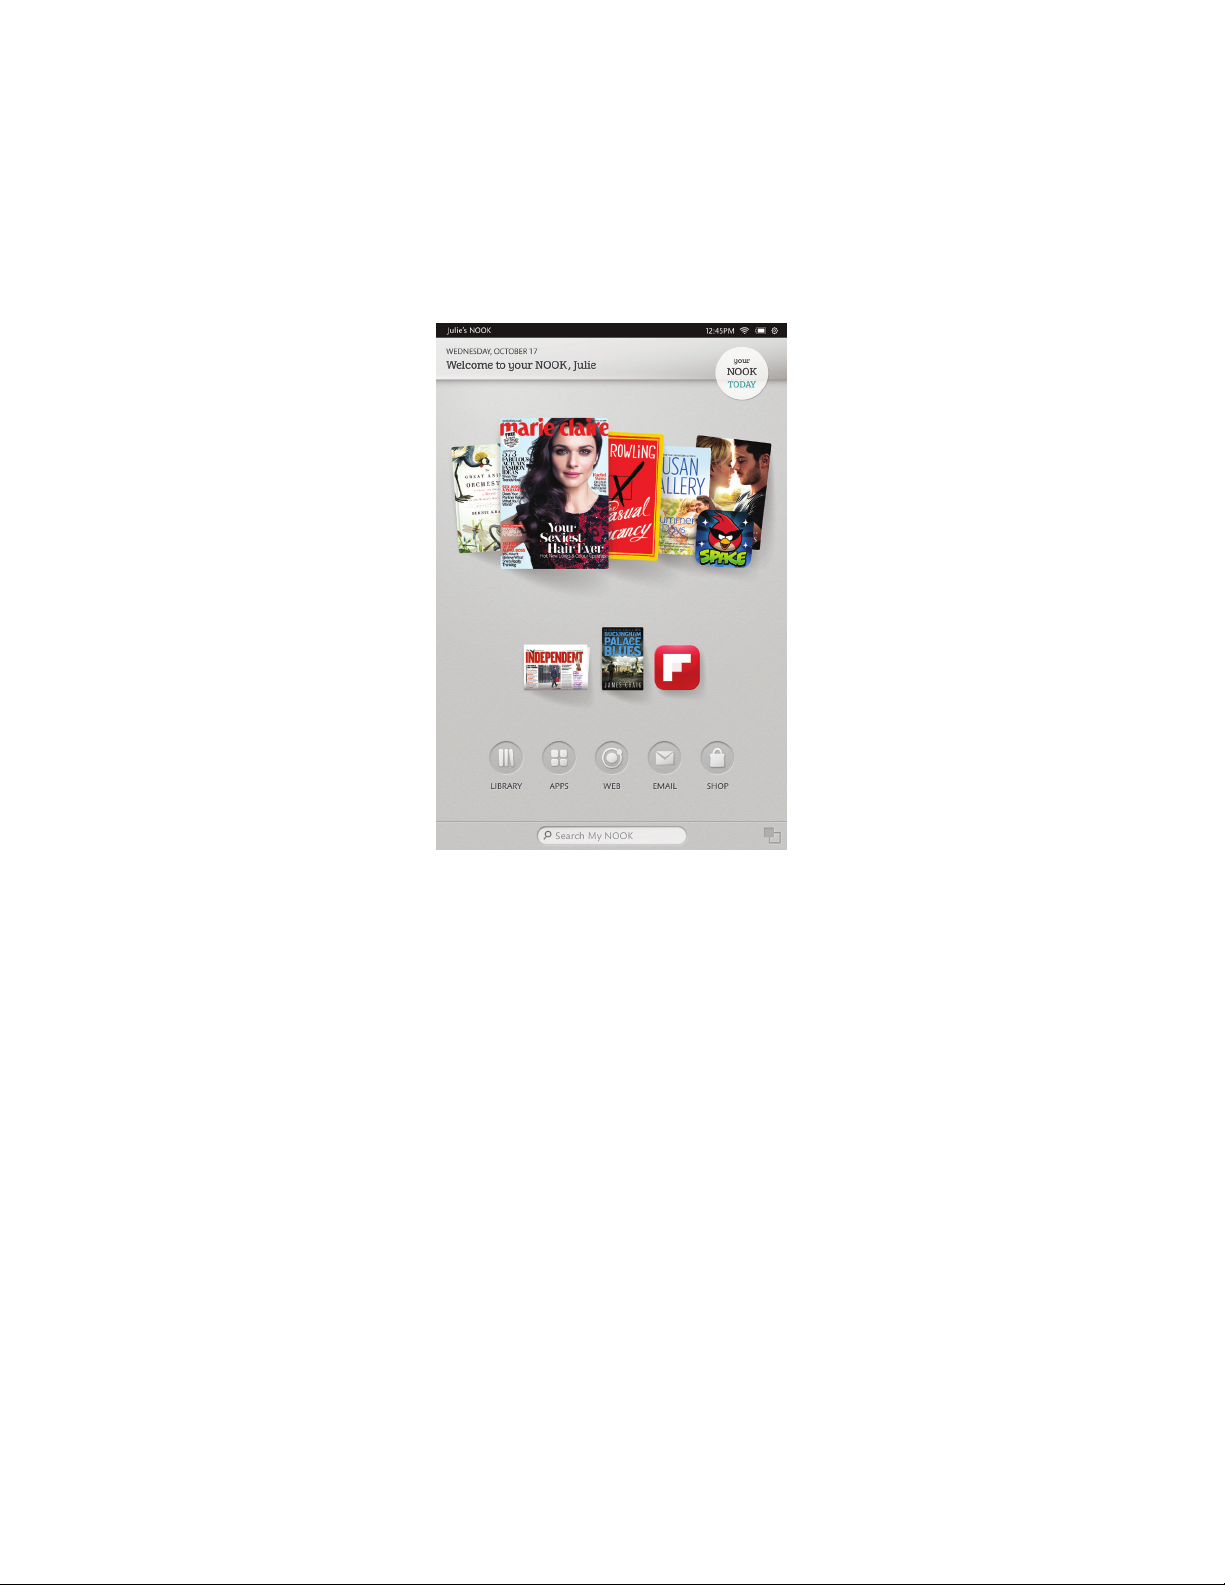
Your Home Screen presents a scrollable list of the content you have accessed most recently. It also presents navigation buttons and a link to Your NOOK Today.
You can return to the Home Screen at any time by pressing the NOOK button (the raised silver NOOK logo at the
bottom of the screen.
Active Shelf
The Active Shelf is a scrollable shelf presenting the content you have recently purchased, accessed, or shared through
the LendMe program. In its default configuration, the Active Shelf presents your most recent purchases on the right
and the items you have most recently accessed on the left.
Swipe the shelf to the left or the right. As you swipe, new items come to the foreground. To open an item, tap on it.
Panels
Your Home Screen features five panels for holding content. The Active Shelf appears on the centre panel (the third
panel from the left), which is the panel that your Home Screen displays by default.
To move to another panel, swipe left or right on the background of the Home Screen.
The Nav Buttons
The Nav Buttons–a row of five buttons for navigating to the major features of your NOOK–appear toward the bottom of your Home Screen.
28 NOOK HD+ User Guide
Page 29

The Nav Buttons consist of these five buttons:
• Library - displays the Library where your NOOK content is stored. Your Library includes books, magazines,
films & TV shows, apps, newspapers, scrapbooks, and any files you have transferred from your personal computer
• Apps - displays your apps, including built-in apps such as Email and NOOK Friends, as well as any additional apps
you have purchased through the NOOK Shop
• We b - opens the Web browser
• Email - opens the email app
• Shop - opens the NOOK Shop so you can shop for content such as books, magazines, films & TV shows, apps,
and newspapers.
Editing the Home Screen
Press and hold on the background of your Home Screen to edit the contents of the Home Screen. A menu opens
with these five tabs:
• Library - displays the contents of your Library; you can drag any item from the Library to the Home Screen.
• Apps - displays your apps; you can drag any app to the Home Screen.
• Wallpapers - presents shortcuts to your media gallery, a folder of wallpapers (static images), and “living wall-
papers” (animated images); navigate through these choices to select an image for the background of the Home
Screen.
• Bookmarks - displays thumbnail representations of any Web pages you have bookmarked; you can drag any of
these items to the Home Screen.
• Widgets - displays a collection of widgets (special applications) you can add to your Home Screen; widgets in-
clude an analog clock, a list of upcoming calendar events, and a music playlist, as well as widgets from third-party
applications that you might have purchased through the NOOK Shop; you can drag any of these widgets to the
Home Screen.
Adding Library Items, Bookmarked Web Pages, or Widgets to the Home Screen
Your NOOK automatically adds the items you have recently purchased or accessed to the Active Shelf on your
Home Screen. This makes them easy to find.
You can also place other items on the Home Screen for convenient access. These items can include Library content
such as books, films, and apps. They can also include bookmarked Web pages and widgets.
To add an item to the Home Screen, do this:
1. Press and hold on the background of the Home Screen.
The shortcuts menu appears, presenting five tabs of content: Library, Apps, Wallpapers, Bookmarks, and Widgets.
2. Tap the menu choice for the type of item you want to add.
Your NOOK displays further choices below. If you see a stack of items like books, tap on the stack to display all
the items individually in a row.
3. To place an item on the Home Screen, drag it from the shortcuts menu on to the Home Screen.
4. When you have finished adding items, tap the Done button at the bottom of the screen.
NOOK HD+ User Guide 29
Page 30

Removing an Item from the Home Screen
To remove an item you have added to the Home Screen, do this:
1. Press and hold on the item.
A pop-up menu appears.
2. Tap the menu choice Do not show on home.
Your NOOK removes the item from the Home Screen.
Changing the Wallpaper of the Home Screen
To change the wallpaper (the background image) on the Home Screen, do this:
1. Press and hold on the background of the Home Screen
The shortcuts menu appears, presenting five tabs of content: Library, Apps, Wallpapers, and Bookmarks.
2. Tap the Wallpapers tab.
The Shortcuts Menu displays three choices: Gallery, Wallpapers (static images), and Live Wallpapers (animated
images).
3. Tap the menu choice for the image source you want.
4. Sort through available images. To select an image, tap on it.
Some Live Wallpapers have additional settings you can access through a Settings button.
5. Once the image is displayed full screen and you have adjusted any settings it has, tap the Set Wallpaper button to
save that image as the Home Screen wallpaper.
6. Tap Done.
Configuring the Home Screen
To customise the behaviour of the Active Shelf or any other part of the Home Screen, do this:
1. Tap the gear icon in the Status Bar to open the Quick Settings window.
2. In the Quick Settings window, tap All Settings.
Along the left-hand side of the screen, your NOOK displays a menu of Settings screens.
3. Tap the Applications menu choice.
Your NOOK displays a list of applications and features.
4. Tap Home.
Your NOOK displays the Home settings screen.
5. Use the tick boxes and menu choices to customise the behaviour of the Home Screen.
6. When you have finished making your changes, tap the back arrow icon in the upper left-hand corner of the
screen.
Your NOOK displays the Home Screen, where your changes should have taken eect.
30 NOOK HD+ User Guide
Page 31

NOOK Profiles
A NOOK® Profile tailors content and shopping experiences on your NOOK for an individual user. Your NOOK
supports up to six NOOK Profiles, enabling dierent people, including parents and children, to use your NOOK in
dierent ways.
All the purchases made on your NOOK are processed through the NOOK account you signed in with or created
when you registered your NOOK.
Types of Profiles
Your NOOK supports three types of NOOK Profiles:
• The Primary Profile
This is the profile created by default when you register your NOOK. This profile can view all the content on the
device. It can also create and edit profiles for other users. All purchases made on the NOOK are processed using
the payment method associated with this profile.
• An Adult Profile
An adult profile can purchase any type of content. An adult profile can control which content is visible to itself
and which content is visible to any child profile. It can also set parental controls for child profiles. It cannot control which content is visible to the primary profile.
• A Child Profile
By default, a child profile can only view and purchase content authorised by an adult profile or the primary profile. A child profile does not have the ability to create or edit other profiles. It cannot override parental controls.
Parental Controls
Simple-to-use parental controls help create a “child safe” experience and let parents keep tabs on activity and
purchases. Using parental controls, you can control the types of content that child profiles can view and purchase.
You set up parental controls when you create a child profile. You can adjust them later if you like by editing the child
profile.
Creating, Editing, and Deleting NOOK Profiles
NOTE: You must be connected to a Wi-Fi network in order to create or edit NOOK Profiles.
Creating an Adult Profile
To create a new adult profile for your device, do this:
1. In the upper left-hand corner of the Home Screen, tap the icon for the profile currently being displayed.
A window opens displaying the profile or profiles already created on your device. In addition, the panel features
two buttons: Add Adult Profile and Add Child Profile.
2. Tap Add Adult Profile.
Your NOOK displays a form for creating a profile.
3. Tap on the underlined words to customise the profile. You can optionally specify a gender for the profile. Enter
the name of the person who will be using the profile. If you want to add all the content in the NOOK account
associated with this device to this new profile’s Library, tap the tick box for adding content. Then tap Next.
Your NOOK displays a list of possible interests for the profile.
NOOK HD+ User Guide 31
Page 32

4. Tap on the icons representing the profile owner’s interests. Then tap Next.
Your NOOK oers some free sample content based on the profile owner’s interests.
5. Tap on the items you would like to add to the profile’s Library. Tap Next.
Your NOOK finishes creating the Profile. Your NOOK displays the Home screen for the Profile.
Creating a Child Profile
NOTE: Before you create a child profile on your NOOK, the Primary Account on the device must have been
configured with a payment method such as a credit card. When the child profile is created, your NOOK
will charge one penny to your payment method as a record of the account creation. Your NOOK will
also oer you free books, which you can add to the child profile’s Library.
To create a new child profile for your device, do this:
1. In the upper left-hand corner of the Home Screen, tap the icon for the profile currently being displayed.
A window opens displaying the profile or profiles already created on your device. In addition, the panel features
two buttons: Add Adult Profile and Add Child Profile.
2. Tap Add Child Profile.
Your NOOK displays a form for creating a profile.
3. Tap the underlined words to customise the profile. Enter the name and gender of the child. Tap the up and down
arrow buttons to select the month and year the child was born, so that your NOOK can present recommendations appropriate for the child’s age. Tap the tick box to indicate you are familiar with the terms and conditions
of creating a child profile. You can read the terms and conditions by tapping the hyperlinked text beside the tick
box.
NOTE: Local regulations may require that the child’s age be specified.
4. Tap Continue.
If you have not entered a payment method for the primary profile, your NOOK guides you through a form for
entering payment method information. When you have entered information for a payment method issued by a
U.K. bank to a bank account holder with a U.K. address, tap Continue to continue creating the child profile.
NOTE: If you have never made a purchase with this account, you will be asked to confirm a £0.01 charge to
validate this payment method before you finish creating this child profile. A free Children’s book will be
added to your account once you complete this step. Once you have validated this charge, you will not
need to repeat this step.
Your NOOK displays the Parental Controls page for this account.
5. Tap on tick boxes to select which of the following permissions and limitations you want to grant this account:
• Browse Shop
• Password-protect purchases in Shop (require an account password to be entered before completing any
purchase in Shop)
• Display only Children’s content in Shop
• Access My Files in Library
• Browse the Web
• Reads for Children
• Apps for Children
32 NOOK HD+ User Guide
Page 33

• Videos for Children
• Games for Children
6. If you like, fine-tune the permissions for video content by selecting and unselecting the icons for film and TV ratings. Ratings include U, Uc, PG, 12, 12A, and 15. Your NOOK automatically selects ratings based on the child’s
age, but you can edit these selections as you like.
7. Tap Continue.
Your NOOK displays a list of possible interests for the profile.
8. Select the interests relevant for your child. Tap Next.
Your NOOK displays sample content based on the interests you selected.
9. Tap on the items you would like to add to the profile’s Library. Tap Next.
Your NOOK finishes creating the profile. Your NOOK displays the Home screen for the profile.
Editing a NOOK Profile
The primary profile can edit other adult profiles and child profiles. An adult profile can only edit its own profile. A
child profile cannot edit other profiles.
To edit a profile, do this:
1. In the upper left-hand corner of the Home Screen, tap the icon for the profile currently being displayed.
A window opens displaying the profiles that have been created on your NOOK. If you do not see the profile you
are looking for, scroll the panel from right to left to display additional profiles.
2. Tap the Edit Profile button.
The icons of editable profiles change to show that they are editable.
3. Tap the profile you want to edit.
Tapping an adult profile opens a pop-up menu listing four choices:
• Change interests
• Change image
• Manage content
• Remove this profile
Tapping a child profile opens a pop-up menu listing five choices:
• Change interests
• Change image
• Change parental controls
• Manage content
• Remove this profile
4. Tap the menu choice for the change you want to make.
• Tap Change interests to change the interests and channels associated with the profile you are editing.
• Tap Change image to change the icon or thumbnail image that represents the profile on the Home
Screen and the screensaver.
NOOK HD+ User Guide 33
Page 34

• If you are editing a child profile, tap Change parental controls to change the profile’s access to various
types of content.
• Tap Manage content to select which items (for example, which books, magazines, apps, and videos) will
be available to this profile
• Tap Remove this profile to delete the profile from your device.
Deleting a Profile
You can delete any profile except the primary profile on your NOOK.
34 NOOK HD+ User Guide
Page 35

Assigning Library Items to Profiles
To assign an individual item in your Library to a particular profile, do this:
1. In the Library or on the Home Screen, press and hold on the item’s cover.
A pop-up menu appears.
2. Tap the menu choice Assign to profile.
3. Tap on each of the profiles to which you want to assign this item.
4. Tap Save.
To assign multiple Library items at once to a profile, do this:
1. In the Library, tap the Contents icon (a stack of horizontal lines) in the System Bar.
A pop-up menu opens.
2. Tap the Manage Content for Profiles menu choice.
A window opens and displays icons for profiles along the top and Library contents below.
3. Tap the icon of the profile whose content you want to manage.
4. Tap the category of content you want to assign. For example to add or remove particular books for a profile, tap
Books.
5. Tap tick boxes to select and unselect the items in this category you want to assign to the selected profile. Any
item whose box is ticked is currently assigned to the profile.
6. Once you have made your change, tap the Save button at the bottom of the window.
If you haven’t made any changes, tap Cancel to close the window.
Your NOOK returns you to the Library.
NOOK HD+ User Guide 35
Page 36

Searching Your NOOK
Using the Search Tool
To search for content on your NOOK or on the Web, do this:
1. Press the NOOK button to visit the Home Screen.
2. Tap the Search tool at the bottom of the screen.
3. Type the word or phrase you want to search for, and tap the Return arrow key.
Your NOOK searches for the content and displays a list of search results.
4. Tap on the result you want to explore.
Configuring the Search Tool
To configure the Search tool, do this:
1. In the Status Bar, tap the gear icon to open the Quick Settings window.
2. In the Quick Settings window, tap All Settings.
3. In the left-hand menu in Settings, tap Applications.
4. In the list of applications, tap Search.
Your NOOK displays the Search settings screen.
On the Search settings screen, you can make the changes described below.
Selecting Which Types of Content Are Searched
By default, the Search tool on your NOOK searches the following types of content:
• Web content (content on public Web sites searchable by search engines)
• Apps installed on your NOOK
• Contacts
• Library, including information about the books, magazines, and newspapers, films, and TV shows in your Library
• Music, including information about artists, albums, and tracks
• Shop, including books, magazines, and newspapers available for purchase
Optionally, your NOOK can also search:
• OceSuite, including document file names
• Spotify
To select the types of content you want to search, tap the tick boxes next to the items listed on the Search settings
screen. Your NOOK will search the type of items you select.
Any changes you make take eect right away.
36 NOOK HD+ User Guide
Page 37

Clearing Shortcuts from Previous Searches
To clear shortcuts (links to results) from previous searches, do this:
1. Tap the Clear shortcuts button in the settings navigation menu on the left-hand side of the screen.
Your NOOK displays a button on the right-hand side of the screen for clearing shortcuts.
2. Tap the Clear shortcuts button on the right-hand side of the screen.
A dialogue box opens, asking if you really want to clear shortcuts to recently searched items.
3. Tap the Clear shortcuts button in the dialogue box to clear the shortcuts.
NOOK HD+ User Guide 37
Page 38

Your NOOK® Today
Your NOOK Today, available through a button on the Home screen, presents shopping suggestions based on your
interests and recent purchases. It also displays today’s weather for your location.
NOTE: To access Your NOOK Today, your NOOK must be connected to a Wi-Fi network.
To access Your NOOK Today, press the NOOK button to display the Home Page. On the Home screen, tap the
Your NOOK Today button.
You can view previous suggestions by swiping left or right.
Changing the Location Described in Weather Reports
To change the location described in the Your NOOK Today weather service, do this:
1. Tap the CHANGE LOCATION link in the lower right of the weather area of the Your NOOK Today window.
A dialogue box opens.
2. Either:
• Type your location and tap OK.
• Tap the Guess my location link.
38 NOOK HD+ User Guide
Page 39
Your Library
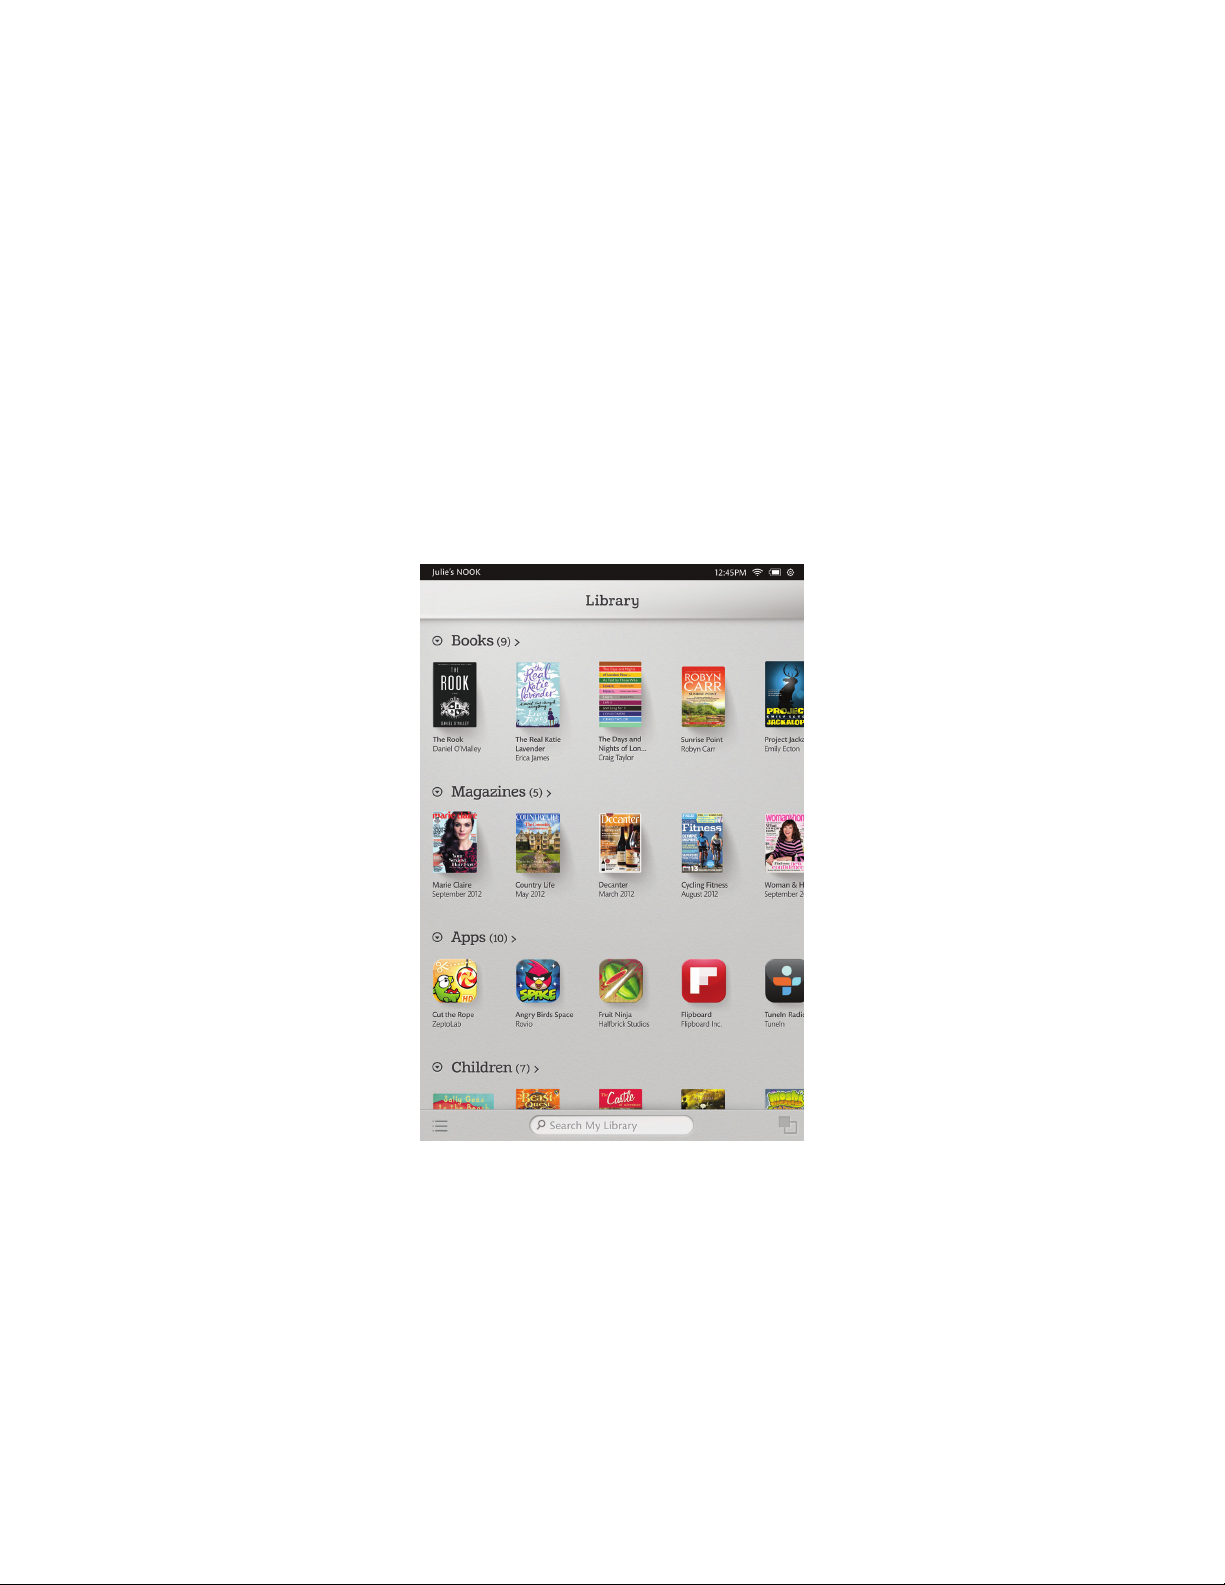
About Your Library
Your Library holds:
• Books
• Magazines
• Newspapers
• Films & TV shows
• Apps
• Scrapbooks
• Any files you have sideloaded (transferred from your computer) onto your device
The Library.
Storing Items in NOOK® Cloud
To save storage space on your NOOK, you can move items from your device to NOOK Cloud, the cloud-based
storage service included in your NOOK account.
NOTE: You cannot move item that you have sideloaded (transferred from your personal computer) to NOOK
Cloud.
NOOK HD+ User Guide 39
Page 40

Opening Items in the Library
To open any item in the Library, tap on its cover.
Organising Library Content on Shelves
You can group Library items on shelves to make them easier to find.
Creating a Shelf
To create a Shelf in the Library, do this:
1. Tap the Content icon (a stack of horizontal lines) in the System Bar at the bottom of the Library.
A pop-up window opens.
2. Tap the Create New Shelf menu choice.
A dialogue box opens along with a keyboard.
3. Type the name of the new shelf and tap Save.
Your NOOK closes the dialogue box and creates the shelf.
Managing the Contents of a Shelf
Once you have created a shelf, you can add books, magazines, and other items to it.
To add items to a shelf, do this:
1. In the Library, scroll through your content until you find My Shelves. Tap on the category title My Shelves.
Your NOOK lists the shelves you have created.
2. Tap the Edit button next to the shelf you want to edit.
Your NOOK opens a window listing the contents of your Library.
3. Tap the tick box next to each item you want to add to the shelf.
4. When you have finished selecting items for the shelf, tap the Save button.
Your NOOK closes the window and adds the items to the shelf.
Renaming a Shelf
To rename a shelf, do this:
1. In the Library, scroll through your content until you find My Shelves. Tap on the category title My Shelves.
Your NOOK lists the shelves you have created.
2. Tap the Edit button next to the shelf you want to rename.
Your NOOK opens a window listing the contents of your Library.
3. Tap the Rename button.
A dialogue box opens, allowing you to type a new name for the shelf.
4. Type the new name for the shelf. Tap the Save button in the dialogue box.
Your NOOK renames the shelf and returns to the window showing the shelf ’s contents.
5. If you have finished making changes to the shelf, tap the Save button.
Your NOOK closes the window.
40 NOOK HD+ User Guide
Page 41

Removing a Shelf
You can remove a shelf from your Library. Removing a shelf does not delete the shelf ’s content. It simply removes
the grouping of content in that particular shelf.
To remove a shelf, do this:
1. In the Library, scroll through your content until you find My Shelves. Tap on the category title My Shelves.
Your NOOK lists the shelves you have created.
2. Tap the Edit button next to the shelf you want to remove
Your NOOK opens a window listing the contents of your Library. Ticks appear next to the items on this shelf.
3. Tap the Remove button.
A dialogue box opens, asking if you really want to remove this shelf.
4. Tap OK.
Your NOOK removes the shelf.
Moving Content to and from NOOK® Cloud
To save space on your device, you can move Library item to NOOK Cloud, the cloud-based storage service included
with your NOOK account. Once you move items to NOOK Cloud, they take up almost no space on your NOOK.
Only the cover and a brief description of each item remains. You can re-download these items at any time by tapping
on their covers. A green down-arrow on an item’s cover indicates that it is available for downloading.
The following types of content may be moved to NOOK Cloud:
• Books
• Magazines
• Newspapers
• Films and TV shows
Moving an Item to NOOK Cloud
To move an item to NOOK Cloud, do this:
1. Press and hold on the item’s cover.
A pop-up menu opens.
2. Tap the Move to NOOK Cloud menu choice.
Your NOOK removes the item from your NOOK and saves a copy in NOOK Cloud for downloading.
Moving an Item from NOOK Cloud to Your NOOK
To move an item from NOOK Cloud back to your NOOK, find the item’s cover in your Library and tap on it.
Viewing the Contents of Your NOOK Cloud Storage Area
To view your NOOK Cloud storage area, do this:
1. In the System Bar of the Library, tap the Contents icon.
A pop-up menu appears.
2. Tap the View Archive menu choice.
NOOK HD+ User Guide 41
Page 42

NOOK Scrapbook
NOOK® Scrapbook lets you save magazine pages you love in one spot so you can go back and enjoy them later.
Saving a Page in a Scrapbook
To save a page in a scrapbook, do this:
1. Either:
• Using two fingers, swipe down the centre of the screen, or
• Tap in the centre of the page to open the Reading Tools. If you see a scissors icon, the publication sup-
ports scrapbooking. Tap the scissors icon.
A scrollable panel opens at the bottom of the screen. The panel displays a button for creating a new scrapbook.
It also displays any scrapbooks you have already created. If you do not see a scrapbook you are looking for,
swipe the panel to scroll through its selections.
2. Select the scrapbook in which you want to save the page.
• To create a new scrapbook, tap New Scrapbook. A dialogue box opens, along with an online keyboard.
Type a name for the new scrapbook, and tap OK.
A message appears, confirming that the page has been saved in the new scrapbook.
• To save the page in a scrapbook you have already started, tap on the scrapbook’s cover.
A message appears, confirming that the page has been saved in the scrapbook you selected.
Viewing a Scrapbook
To view a scrapbook, do this:
1. On the Home Screen, tap the Library button.
2. In the Library, scroll to find the section called My Scrapbooks.
3. Open the scrapbook you want.
When you’re reading a scrapbook, you can do the following:
• To turn pages, swipe left or swipe right just as you do in a book or magazine.
• To zoom in on a page, double-tap. To zoom out, double-tap again.
• To bookmark a page, tap the plus sign (+) in the upper right-hand corner of the page.
• To display Reading Tools, including a scrollbar for moving quickly through the scrapbook, tap in the centre of the
page.
• To see a window with tabbed views of the Table of Contents, Notes, and Bookmarks, tap the Contents
icon (a stack of horizontal lines).
• To see thumbnail images of all the pages, tap the grid icon.
42 NOOK HD+ User Guide
Page 43

Adding a Note to a Scrapbook Page
To add a note to scrapbook page, do this:
1. Press and hold on the centre of the page.
A pop-up menu opens.
2. Tap the word Note.
A dialogue box opens for entering a note.
3. Type the note.
4. Tap the Save button.
Your NOOK adds the note to the page.
Viewing Notes about Scrapbook Pages
To view the notes you have written about scrapbook pages, do this:
1. On any page in the scrapbook, tap in the centre of the page.
The Reading Tools open.
2. Tap the Contents icon (a stack of horizontal lines).
A window opens with tabbed views of the scrapbook’s Table of Contents, Notes, and Bookmarks.
3. Tap the Notes tab if it is not already selected.
The window displays the notes you have written in this scrapbook.
Removing a Page from a Scrapbook
To remove a page from a scrapbook, do this:
1. Find the page you want to remove in the scrapbook.
2. Press and hold in the centre of the page.
A pop-up menu appears.
3. Tap the Remove button.
Your NOOK removes the scrapbook page.
NOOK HD+ User Guide 43
Page 44

Reading on Your NOOK
Reading a Book
To read a book on your NOOK, tap on its cover.
Turning Pages
To turn to the next page, tap along the right-hand side of the screen. You can also turn to the next page by swiping to
the left.
To turn to the previous page, tap along the left-hand side of the screen. You can also turn to the previous page by
swiping to the right.
Moving from One Part of a Book to Another
To move quickly through the book, do this:
1. Tap the centre of the page to open the Reading Tools.
Two panels of tools appear at the bottom of the page.
2. Use the Reading Tools to move through the book.
• Drag your finger along the scrollbar to scroll through the book.
A bubble appears above the scrollbar, telling you which chapter and page you have reached.
• To go to a specific page, tap Go to Page. A dialogue box appears. Type the page number you want, and
press the Go button (an arrow).
3. When you have reached the page you want, tap the middle of the page to close the Reading Tools and continue
reading.
Using the Table of Contents
To see the Table of Contents of the book, or to jump to a chapter or section listed in the Table of Contents, do this:
1. Tap the centre of the page to open the Reading Tools.
2. Tap the Contents icon (a stack of horizontal lines).
A panel opens with three tabs: Table of Contents, Highlights and Notes, and Bookmarks.
3. Tap the Table of Contents tab if it is not already highlighted.
Your NOOK displays the Table of Contents for the book.
4. Tap on the chapter or section you want to read next.
Your NOOK closes the Reading Tools and displays the page you selected.
44 NOOK HD+ User Guide
Page 45

Using Highlights and Notes
You can highlight passages in a book and write notes about the passages.
Highlighting a Passage
To highlight a passage, do this:
1. Press and hold on the word you want to highlight.
If you want to highlight an entire passage, press and hold on the first or last word in the passage. When the popup menu appears, drag a solid bar on either side of the highlighted word to select the remaining words in the
passage.
2. In the pop-up menu, tap Highlight.
Your NOOK highlights the word or passage you selected.
Writing a Note
To write a note, do this:
1. Press and hold on the first word of the passage you want to write a note about.
A pop-up menu appears.
2. Tap Add Note.
A dialogue box appears.
3. Type the note.
4. Tap Save.
Looking Up a Word in the Dictionary, in Google, or in Wikipedia.
Your NOOK includes a built-in dictionary. You can also look up terms in Google and Wikipedia directly from the
book you are reading.
To look up a word, do this:
1. Press and hold on the word you want to look up.
A pop-up menu opens.
2. Tap Look Up.
Your NOOK opens a window with a dictionary definition of the word.
3. Do one of the following.
• To search for the word on Google, tap the Google (g) icon.
Your NOOK opens a Web browser and searches for the word in Google. When you have finished
reading in the browser, you can return to your previous reading by opening the Recent Drawer in the
System Bar and tapping on the cover you want.
• To search for the word on Wikipedia, tap the Wikipedia (W) icon.
Your NOOK opens a Web browser and searches for the word on Wikipedia. When you have finished
reading in the browser, you can return to your previous reading by opening the Recent Drawer in the
System Bar and tapping on the cover you want.
• To close the dictionary window, tap CLOSE.
NOOK HD+ User Guide 45
Page 46

Using Bookmarks
Placing a Bookmark
To bookmark a page, tap in the upper right-hand corner of the page. A blue bookmark ribbon appears, indicating that
you have bookmarked the page.
Seeing a List of Bookmarks and Moving to a Bookmarked Page
To see a list of all the bookmarks you have placed in a book, do this:
1. Tap in the middle of the page to open the Reading Tools.
Two panels of tools appear at the bottom of the screen.
2. Tap the Contents icon (a stack of horizontal lines).
A panel opens with three tabs: Table of Contents, Highlights and Notes, and Bookmarks.
3. Tap the Bookmarks tab.
The panel lists all the pages you have bookmarked.
4. To move to a specific bookmarked page, tap the page in the list of bookmarks.
Clearing the Bookmarks from a Book
To remove all the bookmarks from a book, open the Bookmarks panel in the Reading Tools and tap Clear All.
Adjusting the Appearance of the Page
In most books, you can adjust the features described below.
• Size - oers a range of font sizes from small to large
• Font
• Ascender Sans
• Baskerville
• Dante
• Georgia
• Gill Sans
• Mundo Sans
• Theme
• Day (black text on a white page)
• Night (white text on a black page; useful for reading at night or in dark environments)
• Grey (black text on a grey page)
• Butter (dark brown text on a pale yellow page)
• Mocha (white text on a greyish brown page)
• Sepia (white text on a sepia brown page)
• Line Spacing
• Single spacing
46 NOOK HD+ User Guide
Page 47

• 1.5-line spacing
• Double spacing
• Margin Size
• Narrow margins
• Medium Margins
• Wide margins
• Publisher Defaults
• On (uses the default formatting recommended by the publisher and turns o all other controls)
• O (lets you change the appearance of the page to your liking)
If you turn on Publisher Defaults, the page displays using the settings recommended by the publisher. All other page
controls in the dialogue box appear greyed out.
To change the appearance of the book, do this:
1. Tap the centre of the page to make the Reading Tools appear.
2. Tap the text icon.
Your NOOK opens a window displaying font and colour controls.
3. Tap the controls to select the font, font size, and background colour you want.
Adjusting the Brightness of the Screen
It’s easy to adjust the brightness of the screen while you’re reading a book. Just do this:
1. Tap the gear icon in the Status Bar.
The Quick Settings window opens.
2. Find the slider labelled Brightness and drag it left or right to adjust the screen brightness to your liking.
3. Tap anywhere outside the Quick Settings window to close the window and return to reading.
Reading a PDF
On your NOOK you can read PDF files, including PagePerfect NOOK Books that are carefully rendered to recreate
the design of their print versions. The NOOK features for reading a PDF are similar to those for reading non-PDF
NOOK Books, but with these dierences:
• You can zoom in on a page by double-tapping it. Double-tap on the page again to zoom out.
• The Reading Tools for PDFs include a thumbnail viewer with miniature representations of pages. You can move
quickly through the PDF by scrolling through the thumbnails and tapping on the thumbnail of the page you want
to read next.
• Because PDF files do not have reflowable text, you cannot changes their fonts or page formats. The Reading
Tools for PDFs do not include the Text button that appears in the Reading Tools for other types of books.
• When reading a PDF, you can rotate the screen to landscape position and view content in a 2-page format. (You
can turn this feature on or o through a tick box on the Reader Settings screen.)
NOOK HD+ User Guide 47
Page 48

Reading a NOOK Children’s Book
Your NOOK supports NOOK Children’s picture books, specially designed for young children and formatted for richcolour, touch-screen displays. These books open in landscape orientation in order to best present the illustrations in
picture books’ two-page spreads.
Moving from Page to Page
To turn to the next page in a NOOK Children’s book:
• Swipe to the left (drag your finger from right to left across the screen), or
• Tap anywhere along the right-hand edge of the screen
To turn back to the previous page:
• Swipe to the right, or
• Tap along the left-hand edge of the screen
To skip from one part of the book to another, do this:
1. Tap the white arrow at the bottom of the screen.
A scrollable panel with thumbnail images of pages appears at the bottom of the screen.
2. Slide your finger right or left across the thumbnail images to find the page you want to read.
3. Tap the thumbnail image of the page.
The book displays the page you selected. The scrollable panel disappears.
Choosing a Way of Reading
There are various ways you can enjoy a NOOK Children’s book. Some books include narration (a built-in audio track
that reads the text aloud as you move from page to page). Some books also include animation and interactive activities. NOOK Children’s books include a Read and Record feature that lets you record your own narration of the book.
When you open a NOOK Children’s book, you will see square buttons on the left-hand side of the first screen,
colour-coded for non-readers. The buttons are labelled:
• Read by Myself
• Read to Me or Read and Play
• Read and Record
NOTE: The Read to Me and Read and Play buttons appear only on NOOK Children’s books with narration or
activities.
48 NOOK HD+ User Guide
Page 49
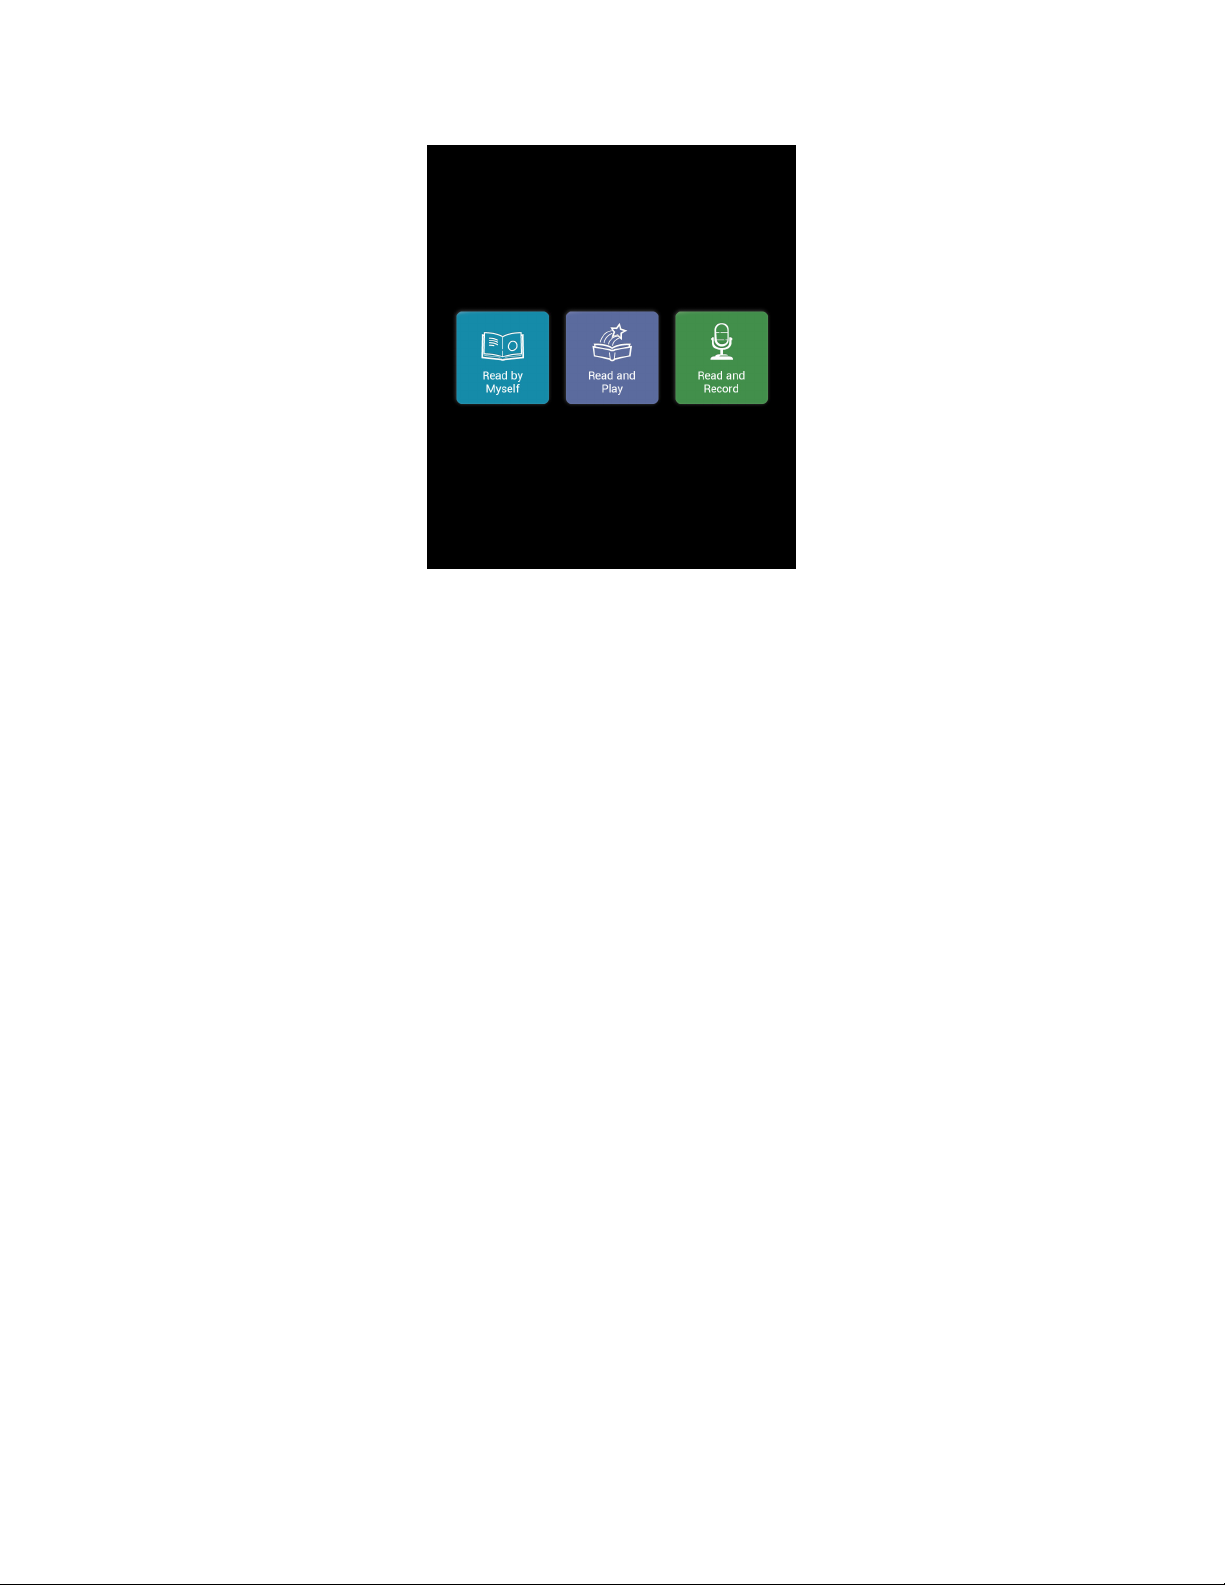
Options for reading are displayed next to the front cover of a NOOK Children’s book.
Reading a Book by Yourself
To read a book by yourself, simply tap on the blue Read by Myself button to open. Then turn the pages as you would
with any other NOOK Book. In Read by Myself mode, the picture book will not play an audio track or play any animations. You can trigger activities, if available, by tapping the white star when it appears at the top of the screen.
NOOK HD+ User Guide 49
Page 50
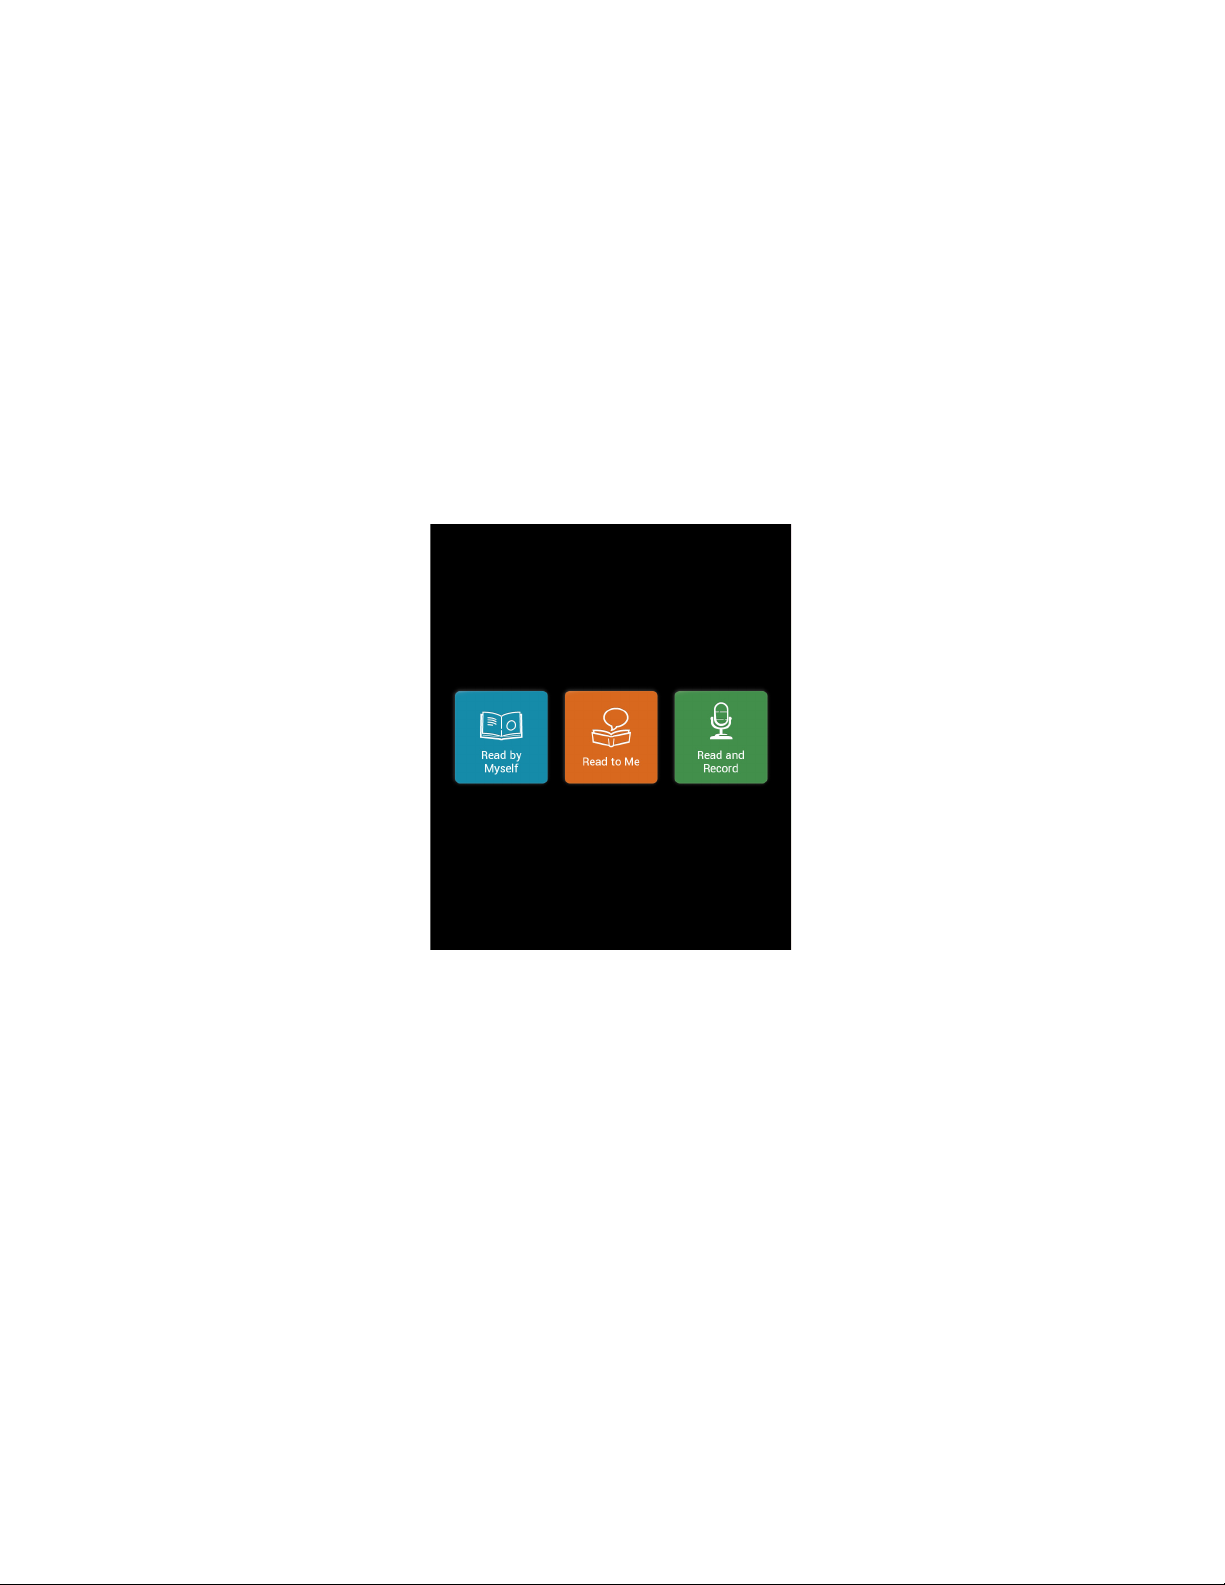
Enlarging Text & Images
If text on the page of a NOOK Children’s book is too small to read, double-tap on the text area to enlarge it.
In books with audio tracks, enlarged text will also display a Play button (an orange triangle) at the top left-hand corner. To play the audio associated with the enlarged text, tap once on the Play button.
To close the text box, double-tap it again, or tap anywhere else on the page.
To zoom in on text and images, simply pinch out to stretch the image on screen. Tap and slide to move your focus
around the screen. Double-tap to return to viewing the page at its normal size and position.
Hearing a Book Read Aloud
Read to Me and Read and Play books feature an audio track. Tap the orange Read to Me or the purple Read and Play
buttons to hear the story read aloud as you turn the pages. The NOOK Children’s book will play the audio track by
default if you open the front cover of one of these books.
Choosing Read to Me in this NOOK Children’s book will play the audio track automatically as you turn pages.
50 NOOK HD+ User Guide
Page 51
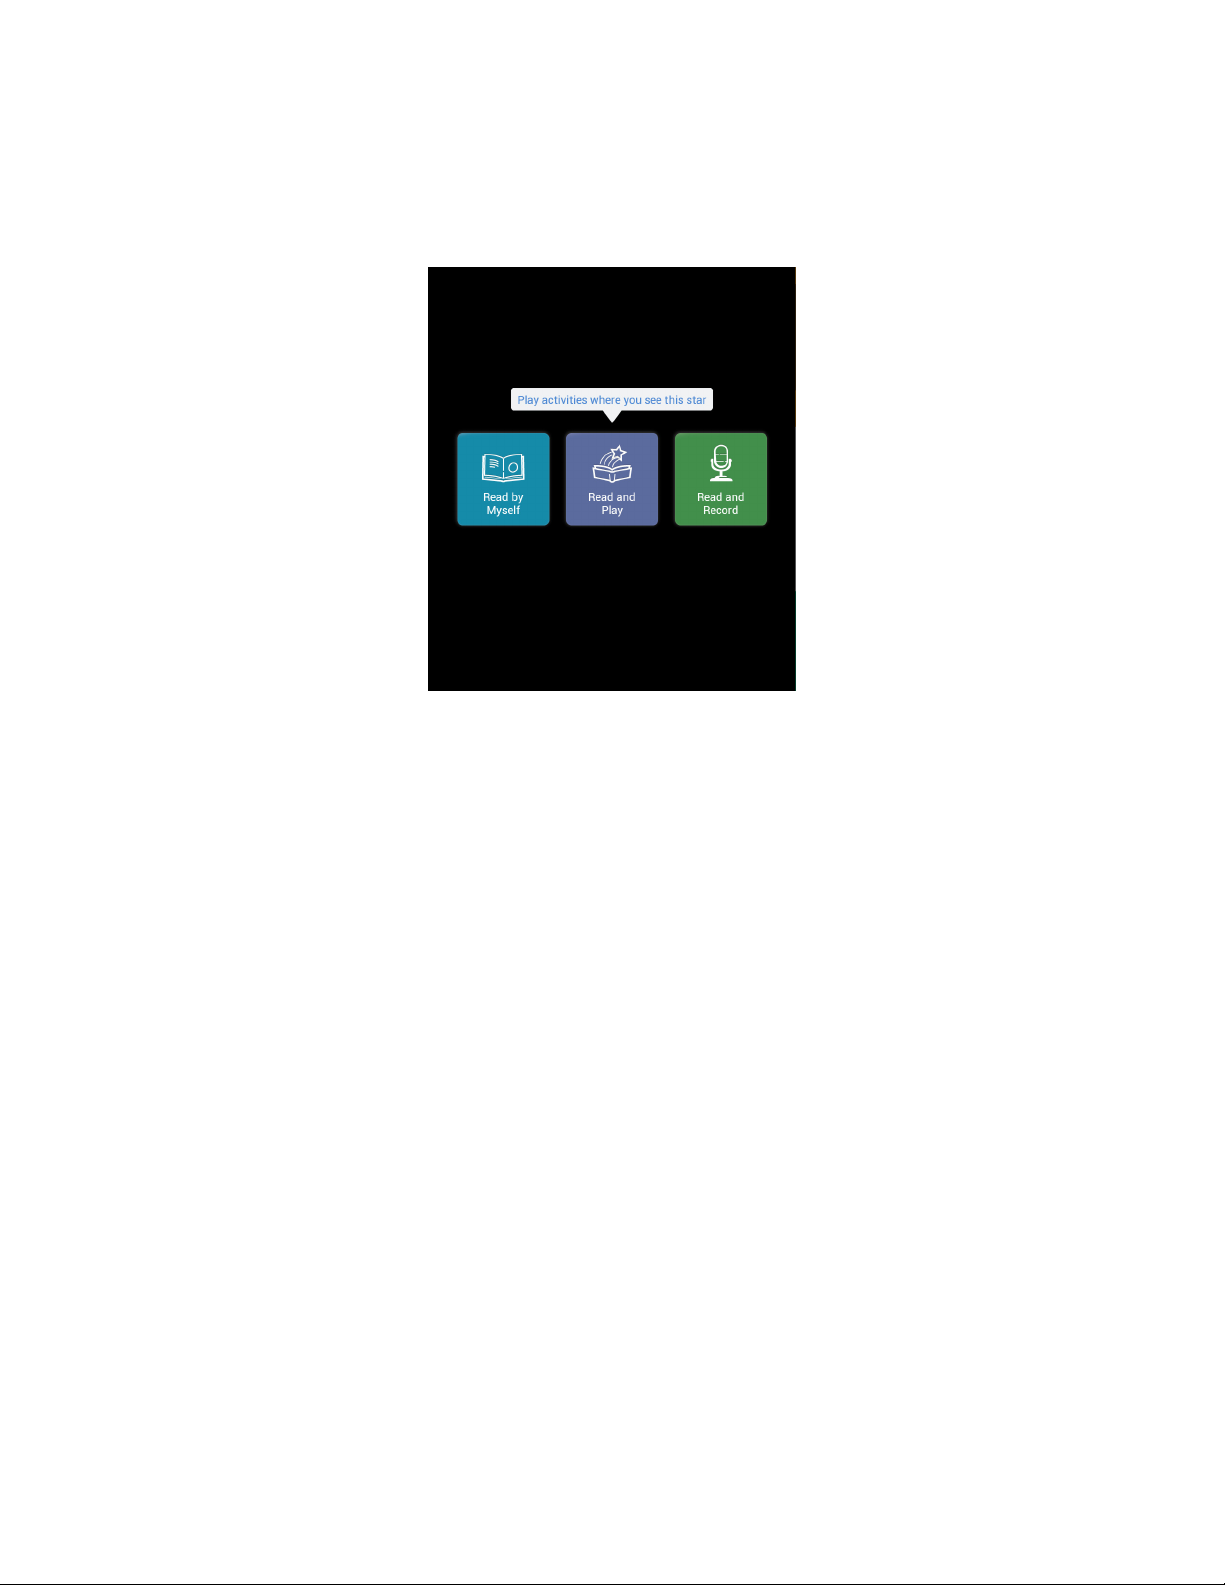
Read and Play Books
If a NOOK Children’s book displays the purple Read and Play button with a star symbol on its first screen, that book
includes special activities that enable readers to interact with the book’s content. Pages with activities display an Activity button with a white star at the top of the page. Tap the Activity button to start or stop the activity.
The front cover of a Read and Play book.
NOOK HD+ User Guide 51
Page 52

NOTE: When you’re engaged in a Read and Play activity, use the right arrow and left arrow onscreen to turn
pages. When an activity is live, gestures like tapping and swiping interact with the activity; they don’t
turn pages.
Some activities end automatically. Other activities continue until you stop them. To stop an activity, do one of the
following:
• Tap the stop button in the centre top of the page, or
• Tap the left- or right-page-turn arrow to stop the activity and turn the page.
Recording Yourself Reading a Book
You can record yourself reading a NOOK Children’s book, save the recording, and play it back.
To record yourself reading a NOOK Children’s book, do this:
1. Tap the cover of the NOOK Children’s book you want to record.
2. On the opening screen of the book, tap the green Read and Record button.
Your NOOK opens the book to the first page.
3. Press the green Record button and read the two-page spread.
When you start to record, the Record button changes to a Stop button. You’ll know you’re recording because a
red indicator will circle the stop button.
Here are some tips for making the best possible recording:
• Do not cover up the microphone with your hand when recording.
• Hold the device between 12˝ to 18˝ from your face.
• The microphone works best when there is no background noise.
• If the Record button is blocking the text you want to read, press the move button and drag the buttons
to another part of the screen.
4. When you have finished reading the spread, tap Stop or turn the page.
• If you would like to hear the spread you have recorded, press the Play button. Press the Pause button
when you have finished listening.
• If you would like to re-record the spread, press the Re-record button. A dialogue box appears, asking if
you want to re-record this spread now. Tap Yes. When you have finished recording, press Stop.
• To exit the recording at any time, tap the Done button (the button with a blue tick) in the lower left-
hand corner of the screen.
5. To continue recording, swipe or tap to turn to the next page and tap Record.
6. Continue recording and turning pages until you have finished the book.
52 NOOK HD+ User Guide
Page 53
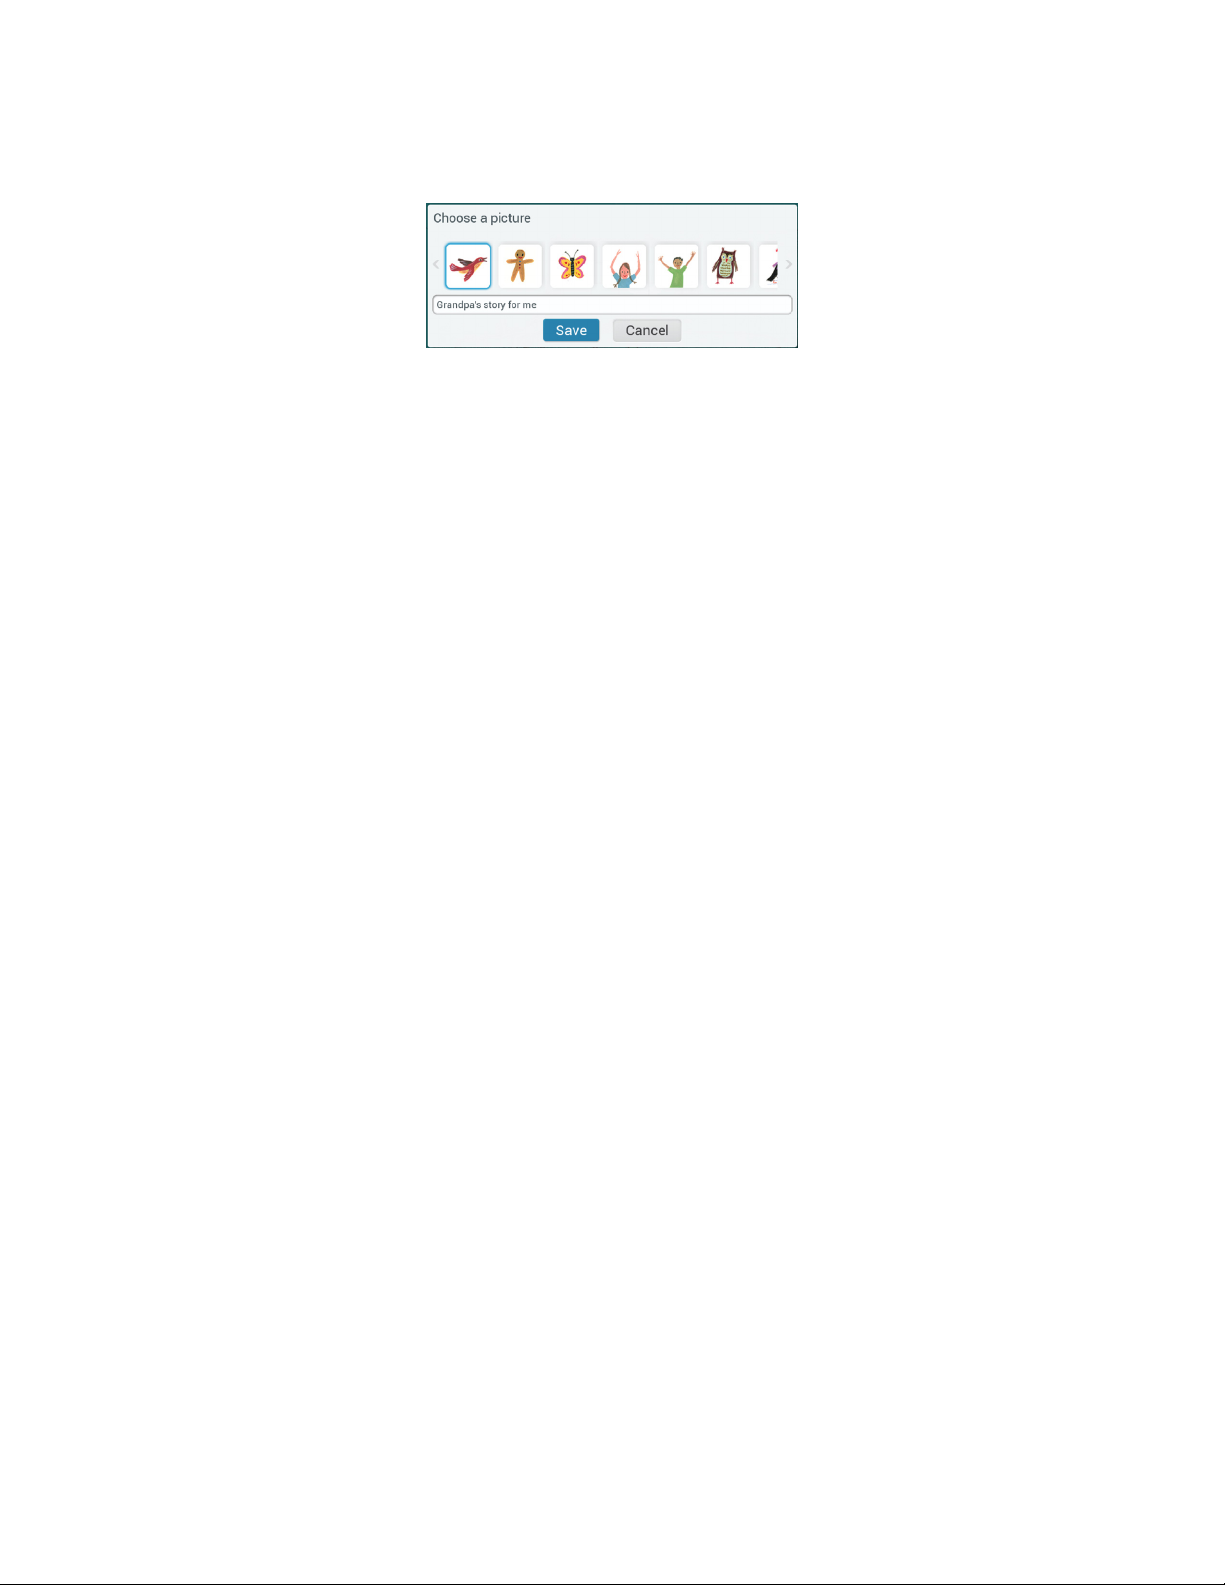
7. At the end of the book, next to the back cover, press the blue Done button at the top of the screen.
Your NOOK opens a dialogue box for giving your recording a title and labelling it with a picture.
Choose a picture and type a title for your recording.
8. Tap the picture you want to use as a label.
9. Tap the text field for the recording’s name. Type the name for the recording.
10. Tap Save.
Your NOOK returns you to the front cover of the NOOK Children’s book. You recordings appear in the lower
left-hand corner of the screen.
NOTE: Your NOOK Shops your recordings as audio files in the My Files area. The recordings are not part of
the NOOK Children’s books themselves. If you are planning to erase and deregister your NOOK, you
can back up these audio files to your personal computer to preserve them.
NOTE: Your NOOK saves audio files for Read and Record books on its internal file system. You cannot record
audio files directly onto an SD memory card.
Playing a Recording
To play a recording you made of a NOOK Children’s book, do this:
1. Tap the cover of the NOOK Children’s book you want to hear.
2. On the opening screen of the book, tap the picture of the recording you want to play.
Your NOOK opens to the first page of the book and plays your recording of that page.
3. Swipe or tap to turn the page.
4. Continue turning pages and listening your recording until you have finished the book.
NOOK HD+ User Guide 53
Page 54
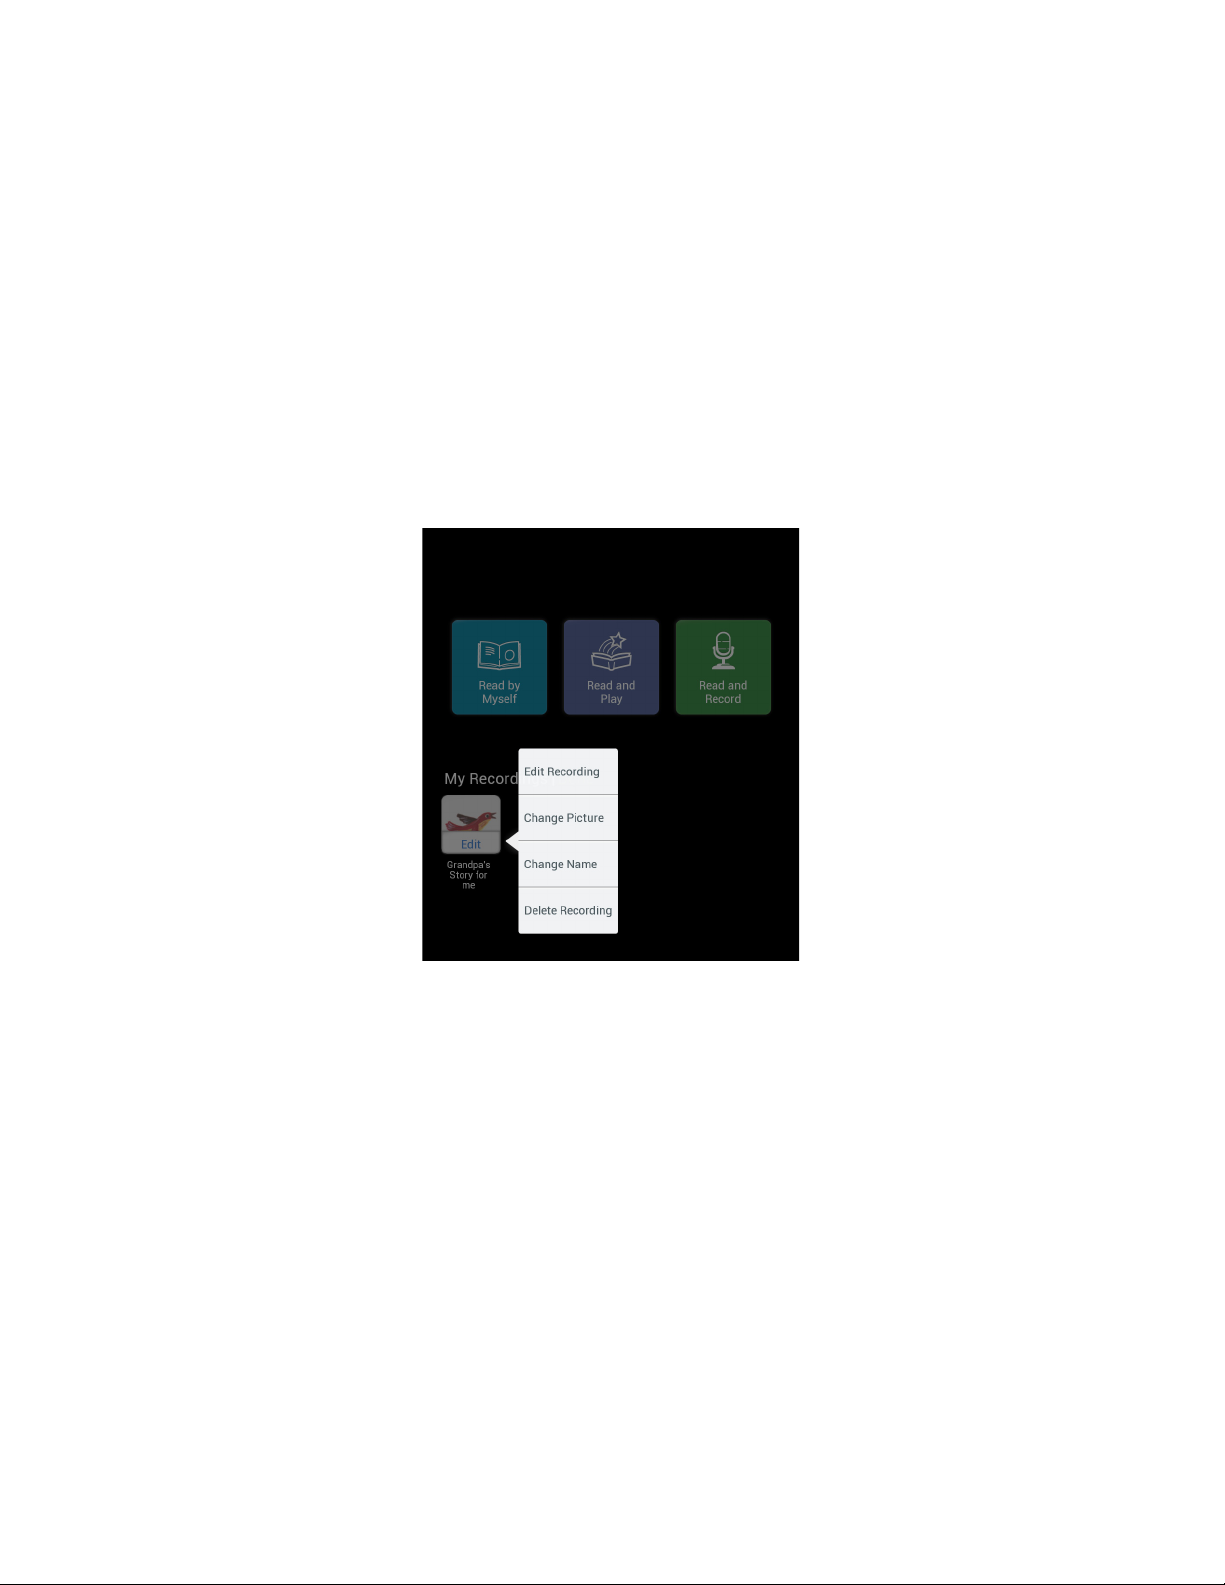
Editing or Deleting a Recording
To edit a recording you have made, do this:
1. Tap the cover of the NOOK Children’s book that includes the recording you want to edit or delete.
2. Tap the word Edit next to the title My recordings.
An Edit button appears on each picture of a recording for the book.
3. Tap the Edit button on the picture of the recording you want to edit.
A pop-up menu opens, oering you these choices:
• Edit Recording
• Change Picture
• Change Name
• Delete Recording
The Edit menu oers choices for editing or deleting a recording.
4. Tap the menu choice for the change you want to make.
• If you tapped Edit Recording, the NOOK Children’s book opens to the first page and displays the Re-
record and Play buttons. Record the pages you want to change. The Re-record and Play buttons work
just like they did when you first made the recording.
• If you tapped Change Picture, a dialogue box with a scrollable list of pictures opens so you can select a
dierent picture for the recording. Tap the picture you want to use. Then tap Save.
• If you tapped Change Name, a dialogue box with a text field opens so you can type a new name for the
recording. Tap in the text field, type the name you want to use, and tap Save.
• If you tapped Delete Recording, a dialogue box opens, asking you to confirm you want to delete the
recording. Tap Yes to delete the recording.
5. Next to the title My recordings, tap the word Done when you have finished editing or deleting recordings.
54 NOOK HD+ User Guide
Page 55

Reading a NOOK Comics Book
Your NOOK supports NOOK Comics books, which are specially formatted for rich-colour, touch-screen displays.
You can read NOOK Comics in portrait mode or landscape mode (a two-page spread).
To open a NOOK Comics book, tap on its cover.
Moving from Page to Page
To turn to the next page in a NOOK Comics book:
• Swipe to the left (drag your finger from right to left across the screen), or
• Tap anywhere along the right-hand edge of the screen
To turn back to the previous page:
• Swipe to the right, or
• Tap along the left-hand edge of the screen
To skip from one part of the book to another, do this:
1. Tap in the centre of the screen to call up Reader Tools, which display thumbnail images of pages in the lower half
of the screen.
A progress bar beneath the pictures of pages shows your current position in the book. A slider beneath the
thumbnail images lets you move quickly forward or backward through the book.
2. Drag the slider to the part of the book you want to read next.
The Reader Tools also include controls at the bottom of the screen that let you:
• Display a table of contents for the book.
• Display a slider tool for adjusting the brightness of the screen.
To view a page without the Reader Tools and thumbnail images, tap in the centre of the current page or tap on the
thumbnail of the page you want to read next
Enlarging Text and Images
To zoom in on text and images, simply double-tap or pinch out to stretch the image on screen. Tap and slide to move
your focus around the screen. Double-tap to return to viewing the page at its normal size and position.
Many NOOK Comics support Zoom View, a feature that lets you zoom in on a single panel and read a book by
moving from panel to panel by swiping or tapping. If you see the Zoom View button at the top of the screen, tap it to
zoom in on a panel. You can also zoom in by double-tapping on a panel. To move to the next panel, tap on the righthand edge of the screen or swipe from right to left. To return to viewing the entire page, tap the Zoom View button
again or double-tap anywhere on the page.
Using Bookmarks
You can bookmark a page by tapping the + icon in the upper right-hand corner of the screen.
To view a list of bookmarks, open the Reader Tools, tap the Contents icon (a stack of horizontal lines), and tap the
Bookmarks tab.
To jump to a page that has been bookmarked, tap on the page where it is listed in Bookmarks list. To clear the list of
bookmarks, tap the Clear all bookmarks button at the bottom of the bookmarks list.
NOOK HD+ User Guide 55
Page 56

Reading a Magazine
Magazine Formats
Your NOOK displays magazines published in a variety of digital formats. The format determines a magazine’s interactive features, including its navigation. Some formats are more interactive than others.
This section describes the interface and features available in the most popular format for magazines. You may occasionally encounter magazines with dierent interfaces and features. Digital magazine formats tend to be intuitive and
easy to use, so even if the magazine’s features dier from those described here, you should be able to find your way
through the publication without any trouble.
NOTE: To ensure that there’s always room in your Library for new periodicals, your NOOK may occasionally
move old periodicals to your account’s storage area on NOOK Cloud, leaving just the periodical covers
in the Library on your NOOK. To retrieve a periodical from NOOK Cloud, just tap the Download ribbon on a periodical’s cover. Your NOOK re-downloads that issue, giving you full access to its contents.
Magazine View and Article View
Most magazines you will read on NOOK use a format that oers two views for reading.
• Magazine View: In Magazine View, you see digital representations of the printed pages of the magazine. The
pages on your NOOK will look just like the pages in the printed edition. If the page is filled with photos in the
printed edition, the page appears filled with photos on your NOOK. Magazine View works in both portrait mode
and landscape mode.
• Article View: In Article view, you see just the text of the article without any illustrations or photos. You can
scroll through the text as you would in a book. You can also navigate directly from article to article. Article View
works in both portrait mode and landscape mode.
Magazine View
In Magazine View, you navigate through the magazine by swiping your finger to turn pages.
You can also tap in the centre of the screen to call up Reader Tools, which display thumbnail images of pages in the
lower half of the screen. A progress bar beneath the pictures of pages shows your current position in the magazine.
A slider beneath the thumbnail images lets you move quickly forward or backward through the magazine. The Reader
Tools also include controls at the bottom of the screen that let you:
• Info: Display the Details page for the magazine, listing publisher, publication date, and other information.
• Contents: Open a window with tabbed views of the Table of Contents and Bookmarks
• Thumbnail View: Display a grid of thumbnail views of all the pages in the publication; you can then tap on a
thumbnail to jump to that two-page spread in the magazine.
• Scrapbook: Copy the page to a scrapbook, if the magazine’s publisher allows scrapbooking.
• Toggle between Magazine View and ArticleView
To view a page without the Reader Tools and thumbnail images, tap in the centre of the current page or tap on the
thumbnail of the page you want to read next.
56 NOOK HD+ User Guide
Page 57
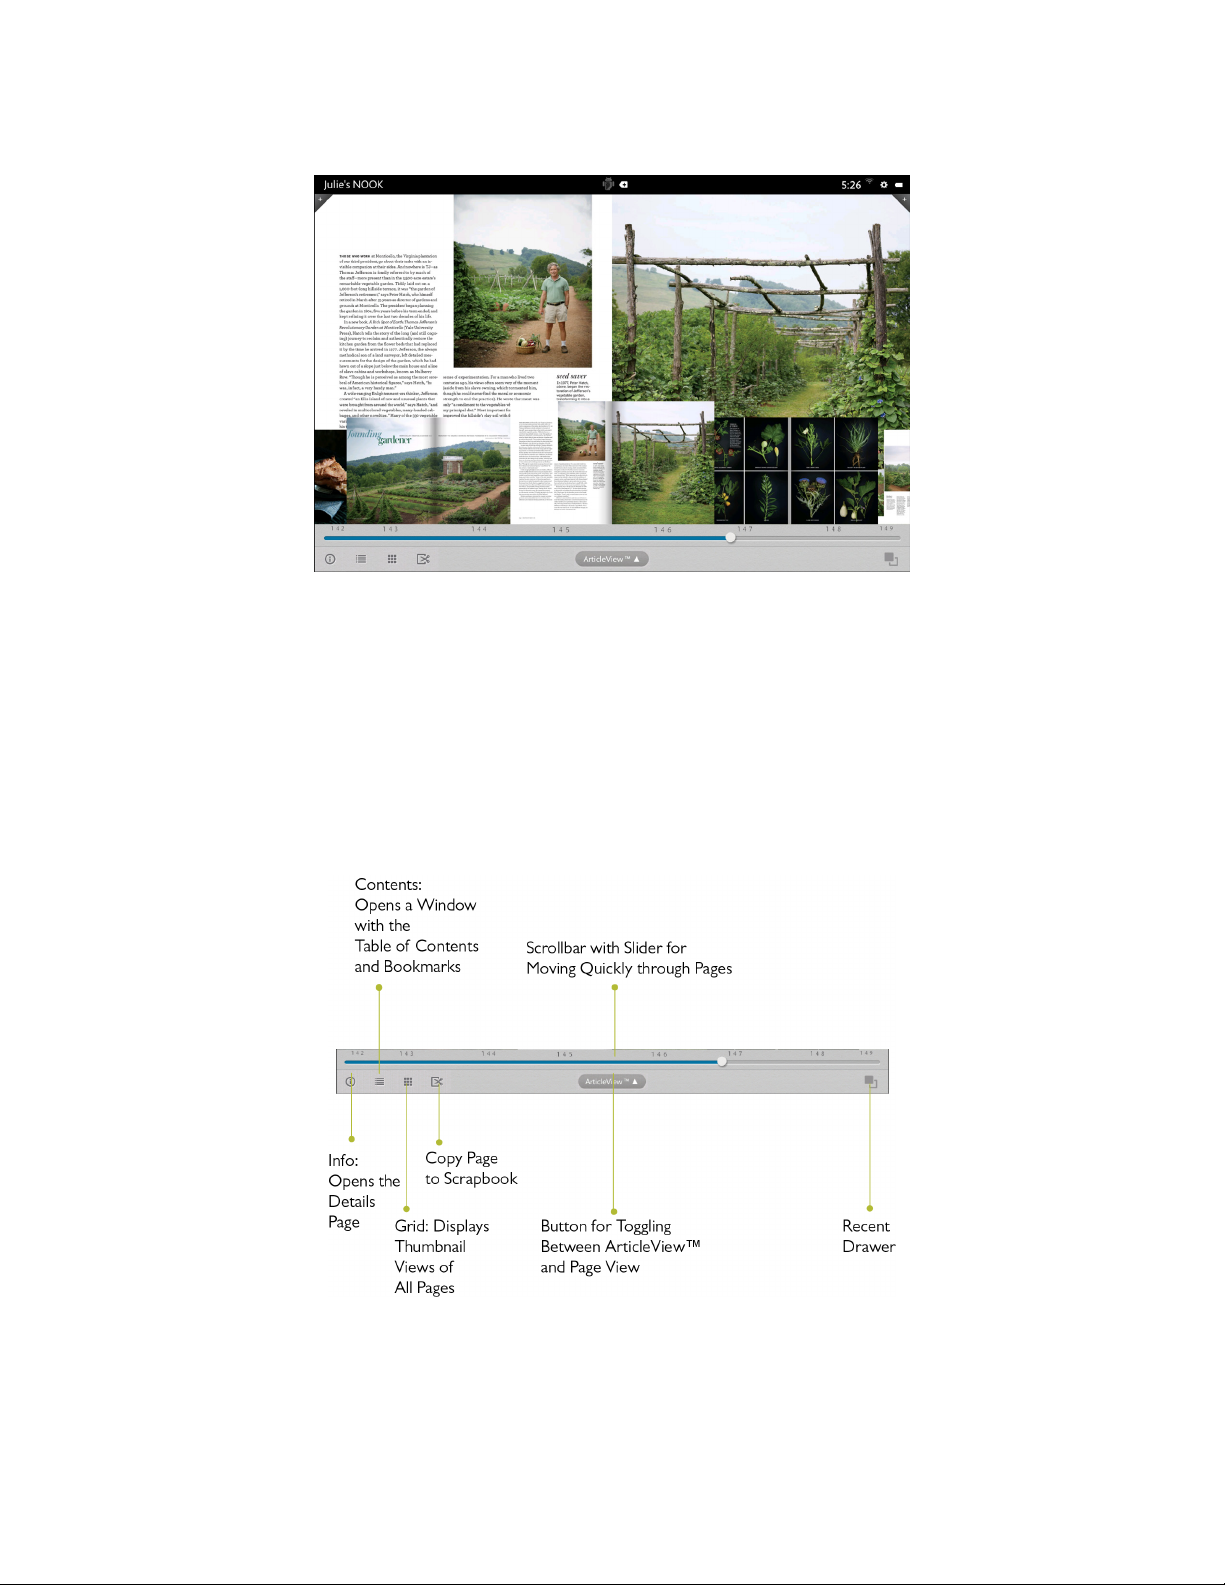
An example of Magazine View with the Reader Tools open, displaying thumbnails and a slider for navigating from page to page.
Once you’re viewing a page without the thumbnail images, you can turn the page and view the next page by tapping on the right-hand side of the screen. You can flip back to a previous page by tapping on the left-hand side of the
screen.
In Magazine View, you can bookmark a page by tapping the + icon in the upper right-hand corner of the screen.
To view a list of bookmarks, open the Reader Tools, tap the Contents icon, and tap the Bookmarks tab. To jump to a
page that has been bookmarked, tap on the page where it is listed in Bookmarks list. To clear the list of bookmarks,
tap the Clear all bookmarks button at the bottom of the bookmarks list.
The picture below describes the tools available in Magazine View.
NOOK HD+ User Guide 57
Page 58
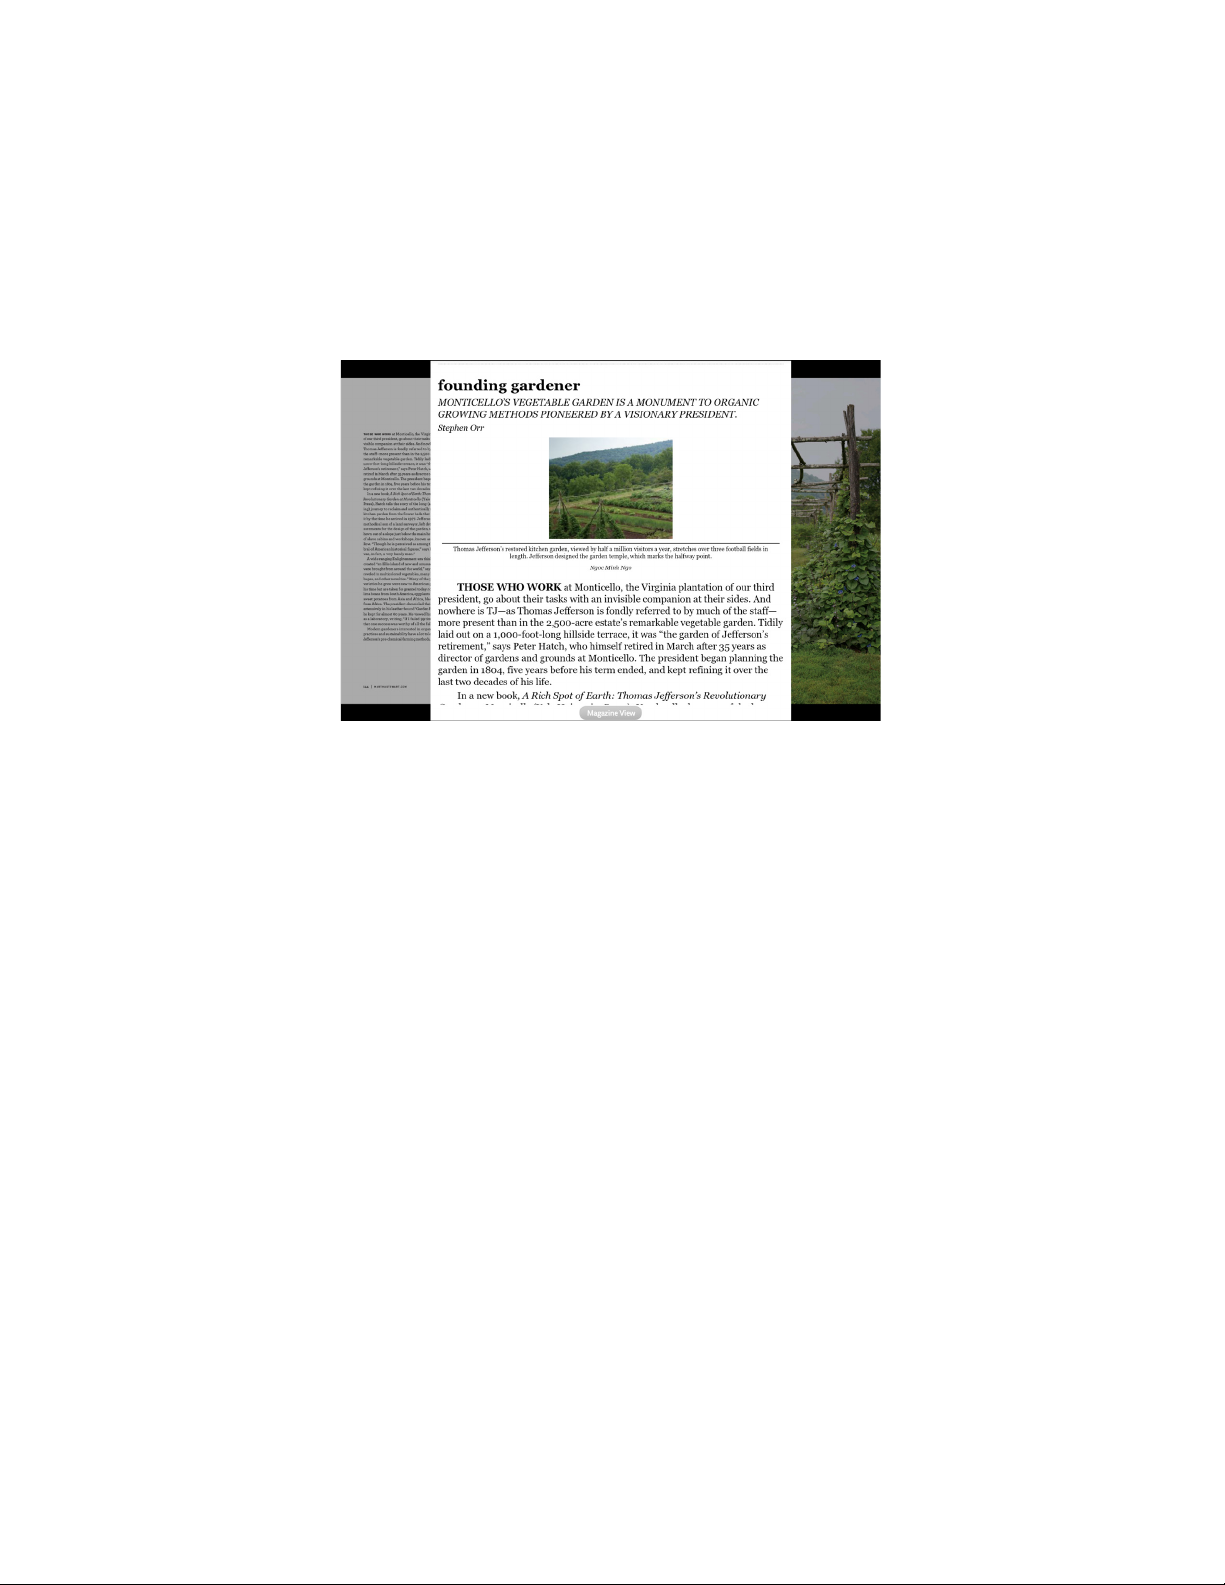
Article View
Alternatively, you can view just the text of an article without any photos, drawings, or custom formatting. If you’re
reading a long article or an article that has type running over photographs, you might find this view a little easier on
your eyes. This view is called Article View.
NOTE: Article View is not available for all magazines. Some magazine publishers choose to make their content
only available in Magazine View.
The picture below shows an example of Article View.
Tap on the centre of the page in Article View to open Reader Tools that include these controls:
• Info: Display the Details page for the magazine, listing publisher, publication date, and other information.
• Contents: Open a window with tabbed views of the Table of Contents and Bookmarks
• Thumbnail View: Display a grid of thumbnail views of all the pages in the publication; you can then tap on a
thumbnail to jump to that two-page spread in the magazine.
• Text: Opens a window with controls for changing the appearance of the page. These controls, which let you
select fonts, line-spacing, and so on, are just like those available in NOOK Books.
To navigate to another article in Article View, tap in the centre of the page to open the Reader Tools, then tap on the
Content icon. A window opens listing:
• The magazine’s cover
• Articles and optionally their page numbers
Tap on the title of the next article you want to read.
You can also move from article to article by swiping right or left.
To return to reading in Magazine View, tap the Magazine View button at the bottom of the screen.
58 NOOK HD+ User Guide
Page 59

Reading a Newspaper
Reading a newspaper is just as easy as reading a book. You even have access to the same Reading Tools that you use
when reading books.
Recent issues of newspapers appear on your Daily Shelf, as well as in the Newspapers section of your Library.
NOTE: To ensure that there’s always room in your Library for new periodicals, your NOOK may occasionally
move old periodicals to your account’s storage area in NOOK Cloud, leaving just the periodical covers
in the Library on your NOOK. To retrieve a periodical from NOOK Cloud, just tap the Download ribbon on a periodical’s cover. Your NOOK re-downloads that issue, giving you full access to its contents.
Opening a Newspaper
To open a newspaper, tap on its cover.
Reading a Newspaper
When you first open a newspaper, a scrollable table of contents appears along the left-hand side the screen, along
with a list of major stories on the right. To read a news story, tap on it.
When you are reading an article, you can navigate as though you were reading a book.
Turning to the Next Page
To turn to the next page, do any of the following:
• Tap along the right-hand edge of the screen.
• Swipe your finger from right to left across the screen.
• Swipe your finger from low to high on the screen.
Turning to the Previous Page
To turn to the previous page, do any of the following:
• Tap along the left-hand edge of the screen.
• Swipe your finger from left to right across the screen.
• Swipe your finger from high to low on the screen.
Accessing Reading Tools
Tap in the centre of the page to call up the Reading Tools, which include Reading Tools like those available for books
and magazines:
• Info: Details about this issue of the publication, including its date.
• Contents: A window with tabbed views of the Table of Contents, Highlights and Notes, and Bookmarks.
• Te x t : Tools for customising the appearance of the page by changing the font, line-spacing, margins, screen co-
lour, and so on.
• Search: A search tool for finding words or phrases in the issue you’re reading.
Bookmarking Pages
You can bookmark a page in a newspaper article by tapping in the upper right-hand corner of the page.
NOOK HD+ User Guide 59
Page 60

Watching TV Shows and Films on Your NOOK
NOOK Video
NOOK Video™ is a streaming and download service that allows you to rent films and purchase films and TV shows
for viewing on your NOOK. NOOK Video oers a wide variety of popular films and TV shows.
NOOK Video supports both streaming and downloading content. When you purchase or rent a film, you need to
select how you will access it: streaming or downloading. Unlike books and periodicals, videos do not download automatically when purchased.
Streaming means that the content is delivered over an active Wi-Fi connection. You must be connected to a Wi-Fi
Internet connection to watch streamed content. Streaming videos does not require any storage on your NOOK.
NOTE: When streaming content, it’s best to have to a strong Wi-Fi connection.
Downloading means that you transfer the NOOK Video content over a Wi-Fi connection to your NOOK just as you
download other content like books and magazines. Once you have downloaded a NOOK Video, you can watch it
any time regardless of whether or not your NOOK is connected to Wi-Fi (though rented content must be watched
within the rental period, as described below). Unlike streamed videos, downloaded videos do consume storage on
your NOOK.
If you plan to download many videos, you should consider purchasing a microSD card to give your NOOK extra storage.
NOTE: Downloading videos may take some time. The speed of the download will depend on the length of the
video and the bandwidth of your Wi-Fi network. If you are planning to download a film to watch it offline (for example, in a location without a Wi-Fi network, such as in an automobile or on an aeroplane),
we recommend that you connect your NOOK to a power source and begin downloading the film as
soon as you have purchased or rented it.
Renting Films
You can rent films on your NOOK.
Once you rent an item, you have 30 days to begin watching it.
Once you start watching it, you have 24 hours to finish watching it before the rental expires. You can watch the item
as many times as you like within that 24-hour period.
You can stream an item to begin watching it right away, or you can download an item to begin watching it within the
30-day rental period.
NOTE: You may download a rented film to only one device during the rental period, so be sure to download
only on the device on which you intend to watch the film. In contrast, you may stream films on all
authorised NOOK devices during the rental period. You may authorise up to five devices through your
NOOK account.
60 NOOK HD+ User Guide
Page 61

HDMI Output
You can connect your NOOK to an HDMI-compliant TV using the optional NOOK HDTV Adapter Kit, which is
available from NOOK retailers. Using the HDTV Adapter Kit, you can transmit NOOK Video content from your
NOOK to an HDMI TV while also charging your NOOK. The transmitted content can be a film or TV show you have
previously downloaded to your NOOK or content you are streaming to your NOOK from the NOOK Video library.
Closed Captioning
Your NOOK supports closed captioning on select NOOK Video titles.
NOTE: Not all titles include Closed Captioning data.
NOOK HD+ User Guide 61
Page 62

Shopping on Your NOOK
Introduction
NOTE: To access the NOOK Shop on your NOOK, you must be connected to a Wi-Fi network. If you are not
connected to a network but you are in an area with Wi-Fi access, your NOOK will guide you through
the process of connecting to a network.
You can buy books, magazines, newspapers, apps, films & TV shows on your NOOK.
To begin shopping, tap the Shop icon on the Home Screen. The Shop page displays icons for dierent categories of
items, such as books, magazines, and so on. It also displays a scrollable collection of lists with recommendations for
you.
To learn more about anything you see in the NOOK Shop, tap on its cover. To purchase an item, tap on the button
displaying the item’s price.
Whenever you tap on a price to buy an item, your NOOK replaces the price button with a button labelled Confirm.
Tap this button to confirm that you want to buy the item.
When you buy an item in the NOOK Shop, NOOK.co.uk charges the payment method associated with your NOOK
account (that is, the account of the primary profile on your NOOK).
NOTE: When shopping, you can always return to the Shop store front by tapping on the House icon in the up-
per left-hand corner of the screen.
Browsing Lists and Categories
The Home screen of the Shop displays icons for these categories:
• Books
• Magazines
• Films & TV Shows
• Children’s
• Apps
• Newspapers
The Children’s category includes books, magazines, and apps that are likely to appeal to children (though they may
appeal to adults, as well).
Searching for Titles, Authors, or Topics
To search for a book or periodical, tap the search field at the bottom of the screen. When a keyboard appears, type
the title, author’s name, or topic you’re looking for, then tap the Return button to start the search.
When the NOOK Shop search engine displays its results, tap on the item you’re interested in to see more details.
If the search engine finds more entries than will fit on the screen, scroll through the search engine results by dragging
your finger up or down.
62 NOOK HD+ User Guide
Page 63

Buying a Book
Once you’re in the NOOK Shop, you can buy any book you see that has a button displaying the book’s price. (If you
don’t see a button with a price next to a particular book, it’s because you’ve already purchased the book. A grey label
reading Purchased appears where the price button used to be.)
To buy a book, do this:
1. To buy a book, tap on the button displaying a price next to the book’s cover or title.
The NOOK Shop replaces the price button with a button labelled Confirm.
2. Tap the Confirm button.
What happens next depends on how you’ve customised your NOOK Shop. If you’re using the default set-up,
your NOOK begins downloading the book once you tap Confirm. If you’ve set up your NOOK Shop to require
that your NOOK account password be entered every time anyone makes a purchase on your NOOK, a dialogue
box opens. Tap in the Password field and enter the password for your NOOK account. Tap OK.
NOTE: You can configure your NOOK to prompt you for a password before you make a purchase. To set up
your NOOK to require a password, visit Settings and open the Shop settings page.
To go ahead and purchase the item, click Buy.
To cancel the transaction without buying, tap the X in the upper right hand corner of the window. This closes the
window without completing the purchase.
What Happens When You Buy an Item in the NOOK Shop?
When you buy a book, magazine, newspaper, comic, graphic novel, or app, it begins downloading to your NOOK.
Here’s a closer look at what happens:
• The item appears at the far left end of the Active Shelf.
• The item also appears in your Library.
• A badge saying “New” appears on item’s cover. This badge will disappear once you open the item.
• If an item is still in the process of downloading, a progress bar appears on its cover, indicating the amount of
content that remains to be downloaded.
Buying a Single Issue of a Magazine or Newspaper
To buy a single issue of a newspaper or magazine, do this:
1. Open the details page for the magazine or newspaper you want.
2. Tap the Buy Current Issue button.
The button changes to a green Confirm button.
3. Tap the Confirm button to confirm your purchase.
Once you have confirmed your purchase, your NOOK downloads the issue. The Confirm button changes to a
button labelled Read.
4. Tap the Read button to begin reading the issue.
NOOK HD+ User Guide 63
Page 64

Buying a Subscription to a Magazine or Newspaper
Your NOOK oers free 14-day trials of magazines and newspapers. You are eligible for one free trial for each newspaper and magazine.
To start your free 14-day trial, do this:
1. Open the details page for the magazine or newspaper you want.
2. Tap the Free Trial button.
A dialogue button opens, asking you to confirm your order.
3. Tap the Start My Free Trial.
NOTE: All first-time subscribers receive a FREE 14-day trial. If you cancel your subscription before the end of
the 14 days, you will not be charged. If you do not cancel the subscription, deliveries will continue and
your default payment method will be charged automatically at the monthly subscription rate then in
eect. Your subscription will automatically renew each month unless you choose to cancel. You are only
eligible for one free trial for each eNewspaper and eMagazine.
Buying an App
To buy an app in the NOOK Shop, do this:
1. Open the details page for the app you want to buy.
2. Tap the button showing the price of the app.
The button changes to a green Confirm button.
3. Tap the Confirm button to confirm your purchase.
Once you have confirmed your purchase, your NOOK downloads the app. The Confirm button changes to a button labelled Open. Tap the Open button to open the app.
Once you have downloaded the app, it appears on the Apps screen, which you can display by tapping the Apps button on the bottom of the Home Screen.
Buying a Film or TV Show
To buy a film or TV show in the NOOK Shop, do this:
1. Open the details page for the film or TV episode you want to buy.
2. Tap the button showing the price of the film or TV show.
The button changes to a green Confirm button.
3. Tap the Confirm button to confirm your purchase.
Once you have confirmed your purchase, your NOOK downloads the item you purchased. The Confirm button
changes to a button labelledProcessing. Once the purchase has been completed, two new buttons appear.
4. Tap the button for the way you want to access the film or TV show. Do one of the following:
• Tap Stream to begin playing the film or TV show so you can watch it immediately. Streaming plays the
content without storing a copy on your NOOK.
• Tap Download to download the film or TV show so you can watch it later, even in locations without a
Wi-Fi network. Downloading content stores a copy of the content on your NOOK.
64 NOOK HD+ User Guide
Page 65

NOTE: For some TV shows, it is possible to purchase the TV Season, which includes all episodes for a season in
a single purchase.
NOTE: To learn how to select the storage location for downloaded films and TV shows, see “Selecting the
Default Storage for Films and TV Shows” below.
Renting a Film
Many films are available for rent. If you rent a film, you have 30 days from the time of purchase to begin watching it.
Once you start watching, you have 24 hours to finish.
Rented films can be downloaded or streamed. Select the stream option to begin watching the film right away, or
download the film and watch it later.
When the rental period has expired, the film is no longer eligible for viewing. A badge reading “Expired” appears on
the film’s cover. The film will be automatically removed from your Library the next time your NOOK syncs with the
NOOK Shop over a Wi-Fi network.
NOTE: You may download a rented film only to one NOOK during the rental period, so be sure to tap the
Download button only on the NOOK on which you intend to watch the film. On the other hand, if you
decide to stream the film, you may stream it to any NOOK registered to your NOOK account. (You
can have up to five NOOKs registered to your account for viewing NOOK Video content.)
Selecting the Default Storage for Films and TV Shows
Because some films take up several gigabytes (GB) of storage, you might find it convenient to expand the storage capacity of your NOOK with a microSD card. Depending on the microSD card you install, you can expand the storage
capacity of your NOOK with an extra 2 GB to 64 GB. Once you have installed the extra storage, you can configure
your NOOK to automatically store new downloaded NOOK Video content on the microSD card rather than on
your NOOK’s internal storage.
For more information about microSD cards and your NOOK, see “Using a microSD Memory Card”.
To configure your NOOK to store new NOOK Video content on the microSD card, do this:
1. Tap the gear icon in the Status Bar to open the Quick Settings window.
2. In the Quick Settings window, tap All Settings.
3. In the left-hand column of the Settings window, tap Storage Management.
Your NOOK opens the Storage Management settings window.
4. Scroll to the bottom of the Storage Management window and find the area labelledDEFAULT VIDEO STORAGE.
5. Tap the button for the location where new video downloads should be stored. Choose from:
• My NOOK (your NOOK’s internal storage)
• SD Card (the microSD card you installed in your NOOK)
Your selection takes eect right away.
NOTE: Changing this setting does not move any content on your NOOK. This setting aects only new content
that you download.
NOOK HD+ User Guide 65
Page 66

Managing Your NOOK Account
You can manage your NOOK account from your NOOK.
To configure your account, do this:
1. Tap the gear icon in the Status Bar to open the Quick Settings window.
2. In the Quick Settings window, tap All Settings.
3. In the Settings window, tap Applications in the left-hand column.
4. Tap Shop in the right-hand column.
Your NOOK displays a settings screen that oers the following controls:
• Password Protect purchases for Adult Profiles
• Manage Payment Method
• Clear Recent Shop Purchases
• Clear Recently View List
5. Make the changes you want.
Your changes take eect right away.
66 NOOK HD+ User Guide
Page 67

Using Your Wishlist
Your Wishlist is like a shopping cart on your NOOK. You can add books, magazines, newspapers, apps, films, and TV
shows to your Wishlist so you can buy them later.
Adding to Your Wishlist
To add a book, magazine, or newspaper to your Wishlist, do this:
1. For books and periodicals, tap on the item’s cover to display the Details page. For apps, tap on the picture of the
app to display the Details page.
2. On the Details page, tap the icon showing a heart with a plus sign (+).
Your NOOK adds the item to your Wishlist.
Viewing Your Wishlist
To view your Wishlist, do this:
1. On the home screen of the NOOK Shop or on any of the NOOK Shop category pages, tap the Wishlist icon (a
heart symbol) in the System Bar.
The NOOK displays your current Wishlist.
Your Wishlist shows all the books, periodicals, and apps you have added to your Wishlist. For each item, you’ll see:
• The cover
• The title
• The price
• The date you added the item to the Wishlist.
Buying from Your Wishlist
To buy an item on your Wishlist, display the list and tap the price button next to the item’s name. Tap the Confirm
button to complete your purchase.
NOOK® Channels
NOOK Channels collect books and other contents based on a common style or interest. To view a list of NOOK
Channels and their book recommendations, tap the NOOK Channels link in the NOOK Shop.
NOOK HD+ User Guide 67
Page 68

Apps
Overview
Your NOOK includes the following built-in apps:
• Browser - a Web browser
• Calendar– a calendar program that works with Microsoft Exchange accounts
• Contacts – a contact management application where you can view your email contacts and add new email
contacts for sharing book recommendations, quotes, and so on
• Email - an app for sending and receiving email (see “Using NOOK® Email” for details)
• Gallery – an app for viewing and organising photos and videos that you load on your NOOK
• Music Player – an app for playing MP3 and AAC music files that you load on your NOOK
• NOOK® Friends – software for connecting with NOOK Friends, sharing recommendations, and borrowing
and lending books through NOOK LendMe® technology (see “Using NOOK® Friends” for details)
• Spotify® - a music streaming service that gives you the right music for every moment, with millions of songs and
free radio – just hit play
You can buy additional apps in the NOOK Shop.
To run an app, tap on its icon.
NOTE: The Calendar app requires a connection to a Microsoft Exchange account.
68 NOOK HD+ User Guide
Page 69
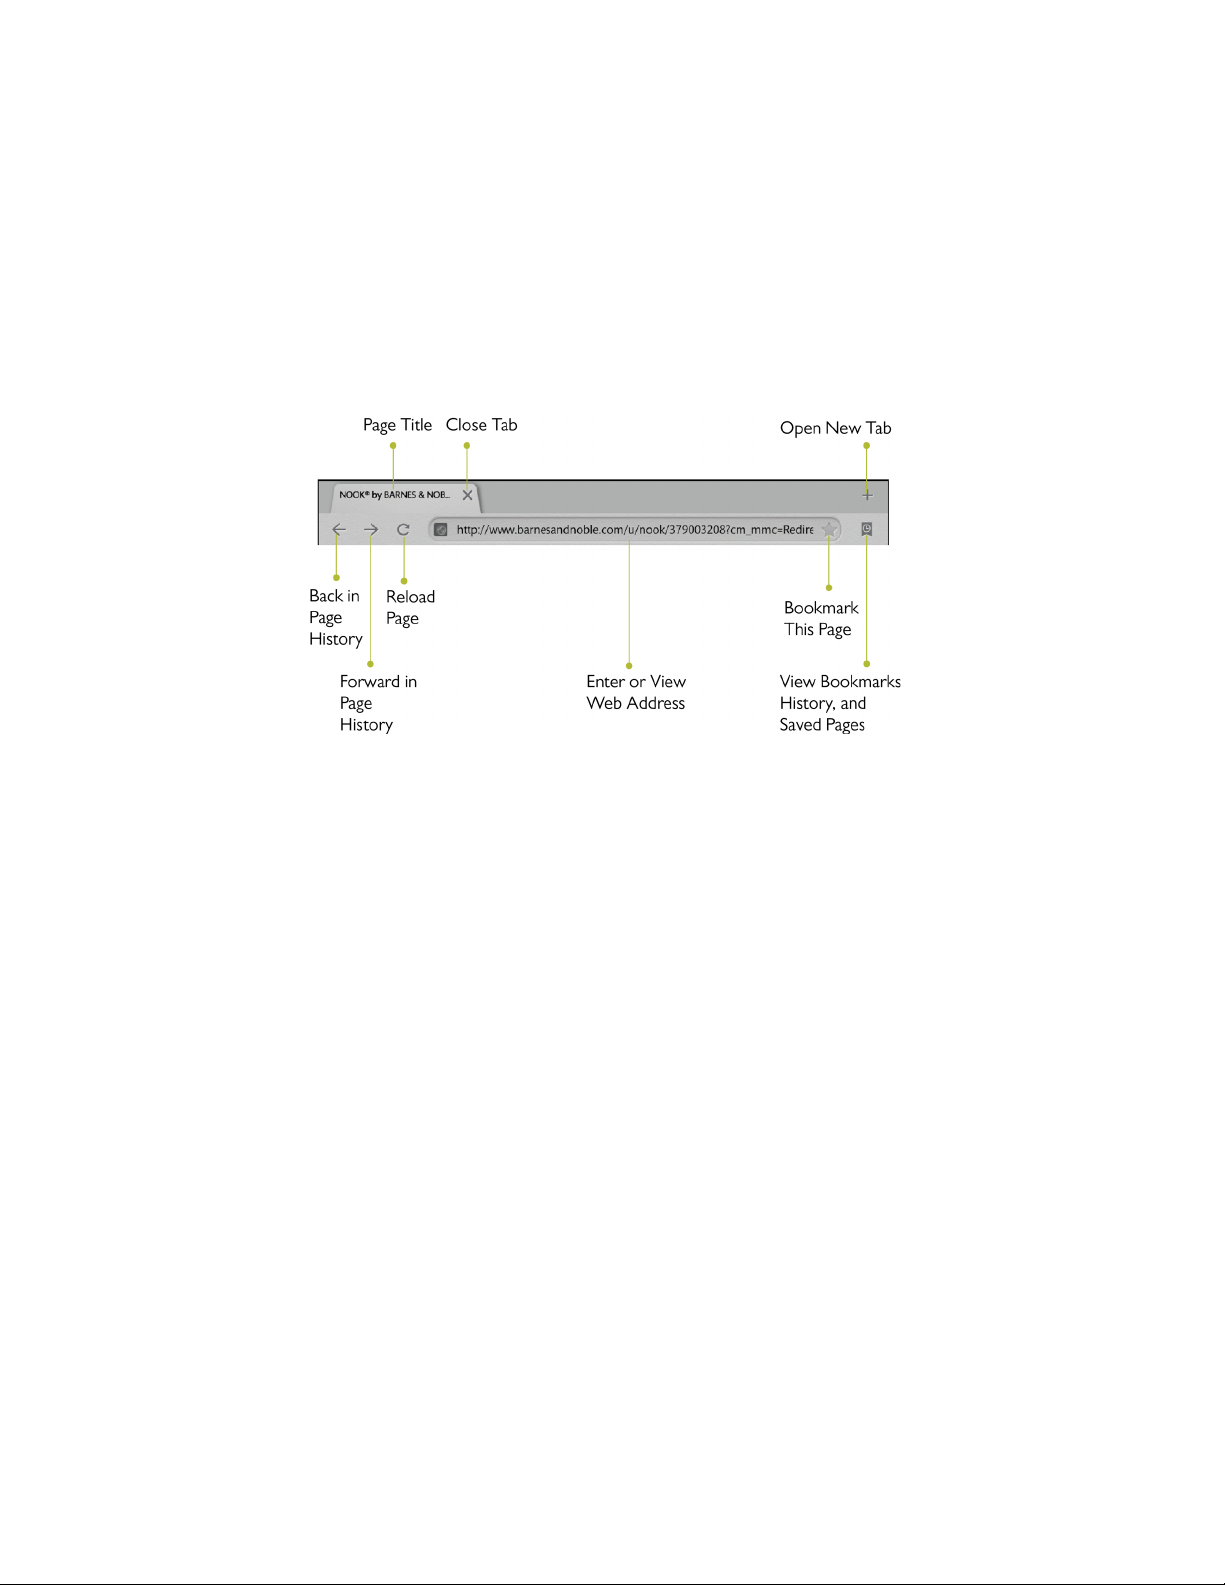
Using the Browser
Your NOOK features a Web Browser for searching the Web and enjoying Web content.
To launch the Browser, tap the Browser icon on the Apps screen.
NOTE: To use the Browser, your NOOK must be connected to a Wi-Fi network.
The Top of the Browser
At the top of the Browser you’ll find the following tools:
NOOK HD+ User Guide 69
Page 70
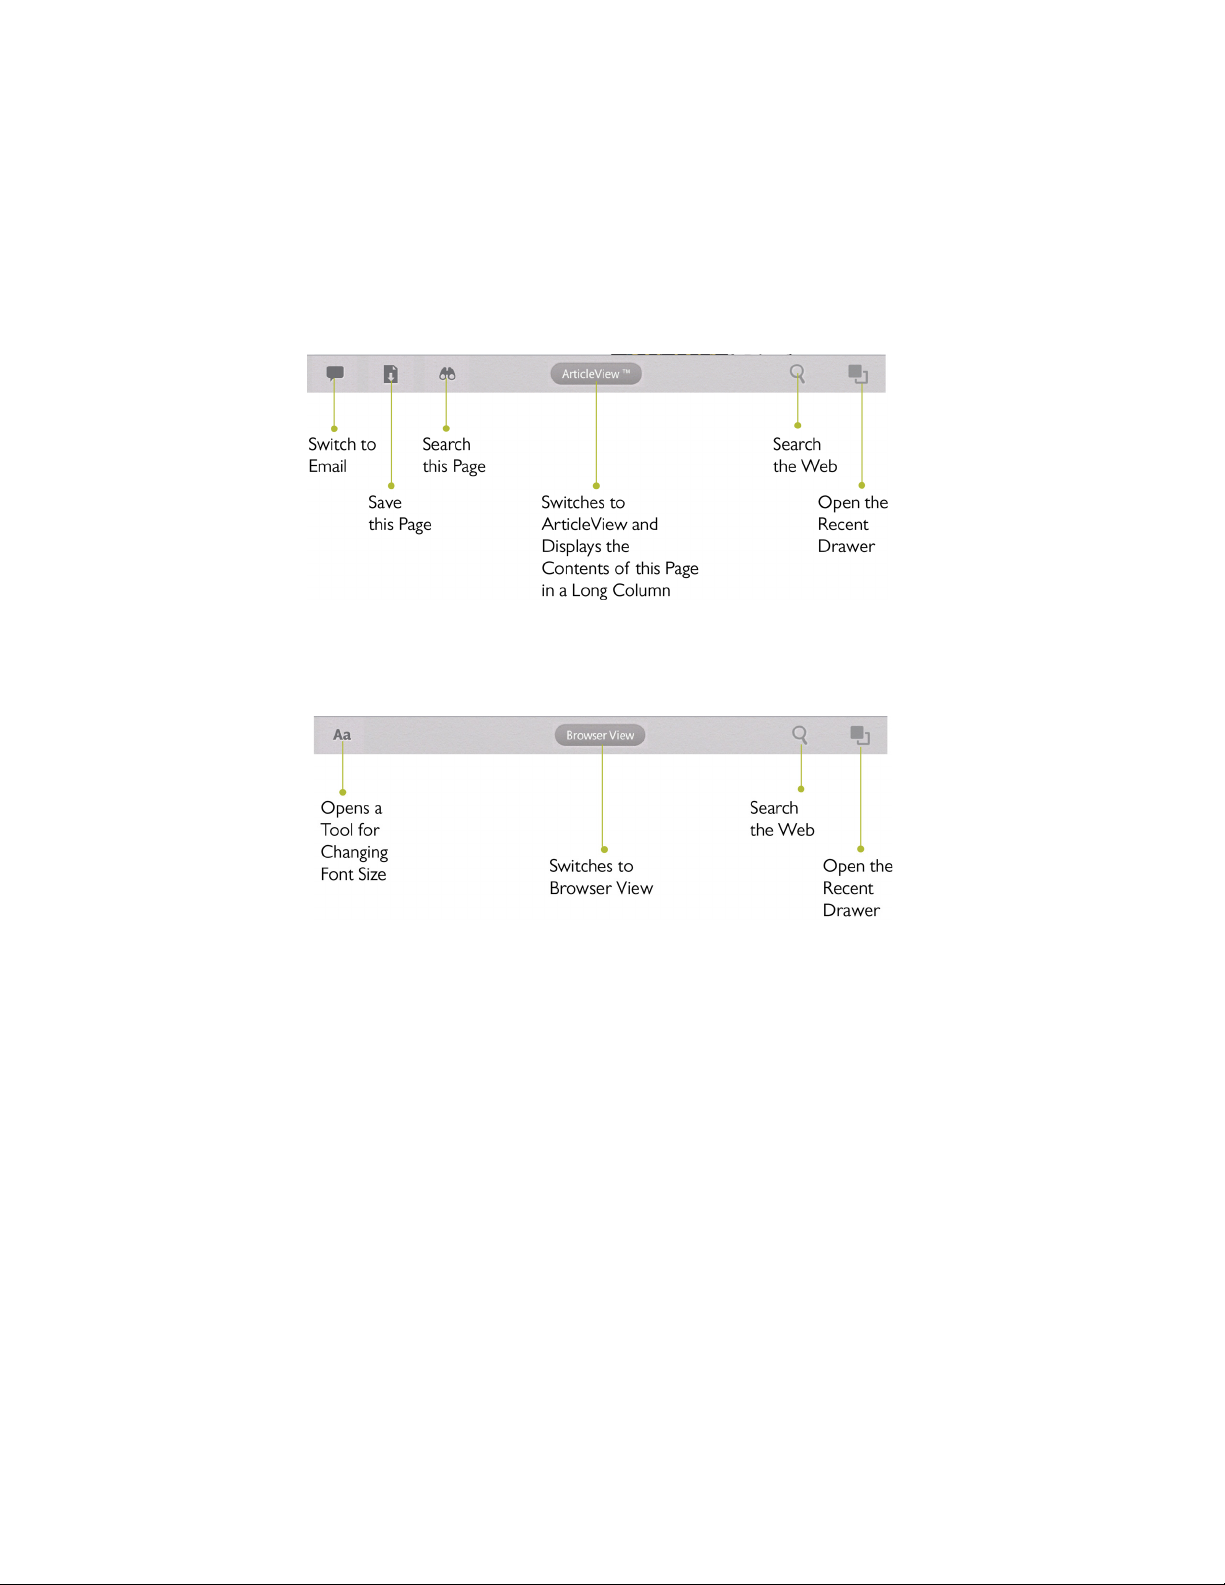
Toolbars for Browser View and Article View
The Browser oers two ways of displaying Web content:
• Browser View - the traditional way of displaying Web pages; their text and graphics appears as they would in
any other browser
• Article View - a way of viewing the main text and images of the Web page in a long column
In Browser View, the following toolbar appears at the bottom of the screen:
The Toolbar in Browser View.
In Article View, the toolbar changes to look like this:
70 NOOK HD+ User Guide
Page 71

Viewing Bookmarked Pages, Browser History, and Saved Pages
To view pages you have bookmarked, pages you have visited, and any pages you have saved, tap the clock icon to the
right of the URL address field at the top of the browser. Your NOOK opens a page with tabbed views of Bookmarks,
History, and Saved pages.
Changing the Home Page
To make a bookmarked page your Browser home page, do this:
1. On Bookmarks page, press and hold on the page you want to configure as your home.
A pop-up menu opens.
2. Tap the Set as homepage menu choice.
Adding a Bookmarked Page to Your NOOK Home Screen
To add a shortcut, do this:
1. On Bookmarks page, press and hold on the page you want to configure as your home.
A pop-up menu opens.
2. Tap the Set as homepage menu choice.
NOOK HD+ User Guide 71
Page 72

Using NOOK® Email
Your NOOK lets you send and receive email from one or more of your email accounts, such as your Gmail account,
your Yahoo! account, or your email account for work.
NOTE: Your NOOK must be connected to a Wi-Fi network in order to send and receive email.
NOTE: Your NOOK lets you use email accounts that you already have, such as a Gmail account. NOOK.co.uk
does not provide email accounts.
When it first connects to an email account, it retrieves the 50 most recent email messages. Thereafter it retrieves the
25 most recent messages.
Launching the Email Application
You can launch your NOOK Email app from the Home Screen or the Apps screen.
To launch Email from the Home Screen, do this:
1. Tap the NOOK button to display the Home Screen.
2. Tap the Email button at the bottom of the screen.
The Email app launches.
If you have not set up an email account, the Email application displays a screen for setting up an email account.
If you have already set up an email account, the Email application displays your Inbox.
Managing Email Accounts
Types of Accounts
Your NOOK supports three types of email accounts:
• POP (an Internet standard for email)
• IMAP (another Internet standard for email)
• Microsoft® Exchange
Most Internet service providers (ISPs) and free email services (such as Google and Yahoo!) support both POP and
IMAP. POP email programs usually send or receive messages in batches at timed intervals. IMAP establishes a continuous connection between your email program and the email server. Many people find that IMAP provides more stable
service than POP, but both email protocols are popular and both work.
Setting Up an Account
You can set up multiple email accounts on your NOOK. For example, if you have a Gmail account and a Yahoo! account, you can send and receive email for both accounts on your NOOK. One of your accounts will be your default
email account, so that when you send messages from your NOOK, you’ll use that account automatically.
Your NOOK oers you two ways of setting up an email account. You can enter simply your email address and a password and let your NOOK automatically configure your account with those credentials, or you can manually configure
the account yourself.
72 NOOK HD+ User Guide
Page 73

Letting Your NOOK Set up Your Account
To let your NOOK automatically configure your email account, do this:
1. On the email account set-up screen, enter the email address of the account you want to configure. This should
be an account you already have set up with your ISP or with an email service provider such as Google.
2. Enter the password for the account.
3. Tap Next.
Your NOOK connects to the email account and set up a connection. It then presents a screen with several
options. You can control how often your NOOK should check for email, whether or not you would like to be
notified when email arrives, and so on.
4. Select the options you want, and tap Next.
5. If you would like to give this account a name (such as Gmail) so you can distinguish it from other email accounts
on your NOOK, enter the name in the field labelled Give this account a name. If you do not want to give this account a name, leave this field blank.
6. In the field labelled Your name, enter your name as you would like it to appear in email messages you send. This
name is the name that shows up in the From field in email listings.
7. Click Done.
You’ve finished setting up your email account.
Manually Setting up Your Account
NOTE: To set up your account manually, you will need to know the name of your account’s email server. Most
ISPs and email service providers provide this information in their help pages. If you are setting up an
email account for a business or other private organisation, you might need to ask a system administrator
for the server name and other relevant configuration information.
1. On the email account set-up screen, enter the email address of the account you want to configure. This should
be an account you already have set up with your ISP or with an email service provider such as Google.
2. Enter the password for the account.
3. To make this account the default account you will use for sending mail from your NOOK, tick the box labelled
Send email from this account by default.
4. Tap Manual Setup.
Your NOOK displays a Server settings screen.
5. In the Domain Username field, enter your username for this server.
NOTE: Some servers require that your name begin with a backward slash \. Your system administrator will
know whether or not your email account requires this.
6. In the Server name field, enter the name of the server.
7. To always use SSL when connecting to the email server, tick the Use secure connection (SSL) box.
NOTE: SSL, which stands for Secure Socket Layer, is a widely-used technology for encrypting Internet so it can-
not be intercepted or tampered with.
8. To accept all SSL certificates from email servers, tick the box labelled Accept all SSL certificates.
NOOK HD+ User Guide 73
Page 74

9. Tap Next.
Your NOOK connects to the email account and set up a connection. If your NOOK connected successfully, it
displays a new screen with a congratulatory message at the top. The screen features these two fields:
• Account name
• Your name
10. If you would like to give this account a name (such as Gmail) so you can distinguish it from other email accounts
on your NOOK, enter the name in the field labelled Give this account a name. If you do not want to give this account a name, simply leave these field blank.
11. In the field labelled Your name, enter your name as you would like it to appear in email messages you send. This
name is the name that shows up in the From field in email listings.
12. Click Done.
You’ve finished setting up your new email account.
Adding an Account
Once you have set up one email account, you can add others, so that you can send and receive email from multiple
accounts on your NOOK. On the main Email screen, click the Add Account button, and follow the instructions above
for setting up an account.
Switching from One Account to Another
If you have set up more than one email account on your NOOK, you can switch from one account to another by
pulling down the Account menu at the top of Email screen and selecting the name of the account you want to switch
to.
You can also select Combined Inbox to see all your messages from your accounts in a single Inbox folder.
Deleting an Account
NOTE: Deleting an account removes the account configuration settings and any email folders associated with
the account. If you have downloaded messages to your NOOK and you have not left copies on the
server or on another devices, those messages will be lost when the account is deleted.
To delete an email account, do this:
1. On the main Email screen, tap the tick box next to the name of the account you want to delete.
2. Once the tick box is ticked, tap the Delete icon (a trash can) in the upper right-hand corner of the screen.
3. A dialogue box appears, asking you to confirm that you want to delete the account.
4. Tap OK.
74 NOOK HD+ User Guide
Page 75

Using NOOK® Friends
NOOK Friends is an app that lets you connect to friends, lend and borrow books, share comments and recommendations, and more.
The app creates a social network for NOOK Friends. A NOOK Friend is a friend of yours who has a NOOK account and an email address in your contacts list, and who has accepted your invitation to connect as a NOOK Friend.
Friendship is reciprocal. When someone becomes your NOOK Friend, you also become his or her NOOK Friend.
NOTE: If you have linked your NOOK to your Facebook account, the NOOK Friends app automatically adds
Facebook friends who have NOOK accounts into your NOOK Friends.
NOTE: You can also add a new NOOK Friend by inviting an existing Contact or entering an email address.
Contacts who already have NOOK accounts automatically appear as Suggested Friends in the NOOK
Friends app.
Launching the NOOK Friends App
To launch the NOOK Friends app, do this:
1. On the Home Screen, tap Apps to display the apps on your NOOK.
2. Tap the NOOK Friends app to launch it.
The NOOK Friends Nav Bar
At the top of the NOOK Friends app you’ll see a horizontal nav bar with three buttons. These buttons call up the
app’s main features. The buttons are:
• Friends’ Activities - a continuously updated news stream about the recent activities, such as shared quotes
and book recommendations, of your NOOK Friends
• LendMe® - NOOK LendMe technology for borrowing and lending NOOK Books
• About Me - your NOOK Friends profile, which shows your name, your photo, the number of books you own,
and other information relevant to the NOOK Friends app
In addition to the NOOK Friends nav bar, the NOOK Friends app features buttons for issuing NOOK Friends invitations and for listing all your NOOK Friends.
We’ll describe all these buttons and features in turn.
NOOK HD+ User Guide 75
Page 76

Friends’ Activities
The Friends’ Activities screen shows a scrollable list of recent activities of your NOOK Friends. Activities include:
• A NOOK Friend making a recommendation to the public (via Twitter or Facebook)
• A NOOK Friend recommending a book, magazine, newspaper, comic, graphic novel, or app to you
• A NOOK Friend rating a book, magazine, newspaper, comic, graphic novel, or app
• A NOOK Friend sharing a quote with the public (via Twitter or Facebook)
• A NOOK Friend sharing a quote with you
• A NOOK Friend posting his or her reading status to the public (via Twitter or Facebook)
• A NOOK Friend who is also a Facebook friend Liking a book, magazine, newspaper, comic, graphic novel, or app
Visit the Friends’ Activities screen to catch up on what your friends are reading, playing, and recommending.
To learn more about a book, periodical, or app mentioned in these activities, tap its cover or icon.
To purchase an item, tap the button listing the item’s price and then tap Confirm to complete your purchase.
76 NOOK HD+ User Guide
Page 77

NOOK Friends
Tap the All Friends button in the NOOK Friends nav bar to access your list of NOOK Friends.
The NOOK Friends screen features two pages, which you can toggle between by tapping the buttons near the top of
the screen. The two pages are:
• Friends - a list of your NOOK Friends
• Pending - a list of requests from friends who have sent you invitations to become NOOK Friends, as well as a
list of any invitations you have sent to friends
When you first display the screen, the Friends button is highlighted, and the screen displays your list of NOOK
Friends.
Inviting Individual Friends to Become NOOK Friends
To send an NOOK Friends invitation to a user in your Contacts list, do this:
1. In the NOOK Friends app, tap the Add Friend button (the icon with a person and a plus sign) in the System Bar at
the bottom of the screen.
The Add NOOK Friends window opens, listing various ways of finding friends.
2. Tap Find friends from my contacts.
3. This window lists all the people in your Contacts app. Tap the Invite button next to a user’s name to send that
user an invitation to become your NOOK Friend.
To invite friends from Facebook, do this:
1. In the NOOK Friends app, tap the Add Friend button (the icon with a person and a plus sign) in the System Bar at
the bottom of the screen.
The Add NOOK Friends window opens, listing various ways of finding friends.
2. Tap Find friends from Facebook.
A window opens, listing your Facebook friends. (If you have not linked your Facebook account to your NOOK,
first visit the Social screen in Settings.)
3. Tap the Invite button next to the name of each Facebook friend you would like to invite to be a NOOK Friend.
To send an invitation to a friend who is not in your Contacts list, do this:
1. In the NOOK Friends app, tap the Add Friend button (the icon with a person and a plus sign) in the System Bar at
the bottom of the screen.
The Add NOOK Friends window opens, listing various ways of finding friends.
2. Tap Invite a friend via email.
A dialogue box opens with a form for entering a name and email address.
3. Enter the Forename, Surname, and Email address of the person you would like to invite to become your NOOK
Friend.
4. Tap Save.
The NOOK Friends app sends an invitation to the person whose email address you entered in the invitation
form.
NOOK HD+ User Guide 77
Page 78

Viewing Lists of Friends and Pending Invitations
In the System Bar at the bottom of the screen you’ll see an icon showing three people. This is the Friends button.
Tap the All Friends button to open a window with two lists:
• Friends - a list of all your NOOK Friends
• Pending - a list of pending NOOK Friends requests
Tap the tab at the top of the window to display the list you want.
The Friends List
Tap the photo or photo place-holder of a friend to see that friend’s recent activities, such as shared quotes and recommendations.
Tap the LendMe button next to a friend’s name to learn about that friend’s lendable books.
To remove a NOOK Friend from this list, do this:
1. Tap the X button that appears beside the Activities and LendMe buttons for that friend.
A dialogue box opens, asking you to confirm that you want to remove this friend.
2. Tap the button labelled Yes, Remove This Friend.
The Pending Listing
Tap the Pending button to see lists of pending NOOK Friends requests. The Pending page is divided into two sections:
• Awaiting Confirmation
• Sent Invitations
Awaiting Confirmation
The Awaiting Confirmation section shows a list of the invitations you have received to become a NOOK Friend of
other people.
When you receive a NOOK Friend invitation, you have two choices:
• Accept - tap the Accept button to add this person as a NOOK Friend
• Reject - tap the Reject button to turn down the invitation for friendship
Sent Invitations
The Sent Invitations section lists the people to whom you have sent your own NOOK Friend invitations. When a
friend accepts your invitation, NOOK Friends lists them in the Friends view, rather than in the Sent Invitations section
of the Pending page.
To cancel an invitation that you have sent but that the recipient has not accepted, tap the Cancel button next to the
name of the person you invited.
78 NOOK HD+ User Guide
Page 79

Using the LendMe® Program in NOOK® Friends
Lending and Borrowing Books
With NOOK LendMe® technology, you can share lendable NOOK Books with any NOOK Friend or any friend who
has a NOOK account with a valid payment method. Your NOOK Friend or friend can read the book on any NOOK
or NOOK eReader or on any NOOK application such as NOOK for iPhone®.
You may lend each of your lendable books once. You cannot read a book while it is on loan or while a lending oer is
pending, but you always get the book back once it has been returned or when 14 days have passed.
You can access LendMe features through the NOOK Friends app or through your Library.
Guidelines for Lending and Borrowing Books
Here are details about lending and borrowing books.
• You can lend only books that are in your NOOK account. Your account holds all the NOOK Books that you
have purchased. Not all books can be lent, though many can.
• You can lend only from a registered NOOK eReader.
• You can send a lending oer to any email address, but to accept the oer, the other person must have an email
address associated with a NOOK online account, a valid credit card number associated with the online account, and a NOOK or NOOK eReader application that supports lending. An account holder’s credit card is not
charged when he or she borrows a book from you.
• You can lend a book from anywhere with supported wireless connectivity.
• You can only lend a book one time. It only counts as the one-time lending if your friend accepts the lending oer.
If the lending oer expires or your friend rejects the oer, you can still lend the book.
• When you oer to lend a book, the oer lasts for up to 7 days. The oer ends when your friend accepts the offer or when 7 days have passed.
• Once you have oered to lend the book, you cannot retract your oer.
• A loan is for 14 calendar days, counting the day on which the lending oer is accepted. A lent book is automati-
cally returned at the beginning of the 15th calendar day (if the borrower has not returned it more quickly).
• When you lend a book, you temporarily lend the digital rights to the book. During the period when the lending
oer is pending and while the book is lent, you cannot read it. When the book is returned, you get the digital
rights back, and can read the book again.
• You cannot lend a book that has been lent to you.
• You cannot save a copy of a lent book to the microSD card.
• You cannot archive a book that has been lent to you.
Determining whether a Book Can Be Lent
Not all books can be lent. Here’s how you can determine whether or not a book is lendable.
• Any book eligible for lending has a LendMe badge on its cover.
• If your Library includes any books eligible to be lent out, they will appear on the shelf of lendable books in the
LendMe section of your Library.
NOOK HD+ User Guide 79
Page 80

• LendMe badges are present when you are browsing and searching for books in the NOOK Shop on the NOOK.
co.uk website. When you navigate to the details page of a book, you’ll see a LendMe badge on the book’s cover
if that book can be lent.
• LendMe badges are present in your library on the NOOK.co.uk Web site. If you can lend a book, a LendMe
badge is present below the date added. Click the badge to lend the book.
If you have lent a book, it appears in the list of books you have lent. On the cover of each book, you’ll see the number of days left on the loan.
Viewing Books that are Borrowed, Lent, or Available for Lending
Viewing Books in the NOOK Friends App
You can also view a list of lendable books by tapping the Lend tab on the LendMe screen of the NOOK Friends app.
The Lend tab displays a list of your lendable books, along with a LendMe button for each book. The screen below
shows the Lend page in the LendMe view of NOOK Friends. This page lists the books you own that are available for
lending.
To lend a book, tap the LendMe button. (For more details about lending, see the section “Lending a Book” below.)
Viewing Books in Your Library
You can also view a list of lendable books in your Library. In its list of contents, your Library shows:
• A shelf of books, if any, that you have borrowed.
If a book is still on loan, a number appears on its cover, indicating the number of days remaining before the book
returns to its owner.
• A shelf of books, if any, that you own and that are eligible for lending.
• A shelf of books, if any, that you have lent.
Keeping Your List of Lendable Books Private
By default, all your NOOK Friends can see all your lendable books.
Your NOOK oers two ways to control the privacy of your lendable books.
• You can control whether or not your list of lendable books is visible to your NOOK Friends.
• If you choose to leave your list of lendable books visible to NOOK Friends, you can choose to show or hide
individual titles in the list.
To adjust your privacy settings for lendable books, do this:
1. In the NOOK Friends app, tap the Privacy button in the upper right of the screen.
The NOOK Friends app opens a window listing all your books that are legible for lending. Beside each book, a
toggle button appears, presenting you with the choice of showing or hiding that book.
2. Use the authorisation tick box to control whether or not your NOOK Friends can see any of your books.
• To make any of your books visible to friends, tap the tick box labelled I authorise my NOOK Friends to see
my lendable books and leave the box ticked.
• To make your entire list of books invisible to friends, leave this box unticked.
3. If you have made your books visible, you can still hide individual books. Tap the Show/Hide toggle beside any
book title you wish to hide.
80 NOOK HD+ User Guide
Page 81

• If the toggle switch says Show, your friends can see the book in a list of lendable books.
• If the toggle switch says Hide, this book does not appear in the list of your lendable books.
Lending a Book
To lend a book to a NOOK Friend, do this:
1. Open the NOOK Friends application for the book you want to lend. To open the application, do any of the following:
• On the Home Screen, tap Apps to display the apps on your NOOK. Tap the NOOK Friends app to
launch it. In the NOOK Friends app, tap the LendMe tab at the top of the screen if it is not already
highlighted. Scroll through the list of books eligible for lending. Tap the LendMe button next to the book
you want to lend.
• If the book is on the Home Screen or the Active Shelf or in the Library, press and hold on the book’s
cover until a pop-up menu appears. In the pop-up menu, tap the LendMe menu choice.
• On the Home Screen, the Active Shelf, or the Library, double-tap on the book’s cover to open the
book’s details page. On the details page, tap the LendMe button.
• In the book itself, tap the centre of the page to bring up the Reading Tools. Tap the discover icon. Your
NOOK opens a window showing the book, along with a row of stars for rating the book, and buttons
for writing a review, lending the book, and recommending the book. Tap the share button.
2. In the dialogue box that appears, tap a social media icon to select the way you want to notify your contact of the
LendMe oer.
• You can notify your friend through email through your Contacts.
• If you have linked your NOOK to your Facebook account, you can notify your friend by posting the of-
fer posting a message on your friend’s wall.
• If you have linked your NOOK to your Google Gmail account, you can notify your friend through an
automatically generated email notification that will be sent to the email address for your friend that you
imported from your Google Gmail account.
• If you have not entered any contacts or linked your account in any way, select Contacts, then use the
Add Contact button to add your friend’s email address.
3. Write your email message or wall message and send it to your NOOK Friend.
To lend a book to a friend who is not a NOOK Friend, do this:
1. Make sure you can communicate with your friend either through email or Facebook.
• If you plan to make the LendMe oer through email, make sure you have entered your friend’s email
address in your Contacts app. You can access the Contacts app from the Apps screen. To visit the Apps
screen, tap the Apps button on the Home Screen.
• If you plan to make the LendMe oer through Facebook, make sure that you have linked your NOOK
to your Facebook account, and also make sure that the friend to whom you want to lend the book is
in your Friends list on Facebook. You can connect your NOOK to your Facebook account through the
Social Accounts and NOOK Friends setting screen, which is available from the Applications menu choice
in All Settings.
2. In your Library, press and hold on the cover of the book you want to lend. Books are eligible for lending if they
have a LendMe badge on their cover.
A pop-up menu opens.
NOOK HD+ User Guide 81
Page 82

3. In the pop-up menu, tap on the menu choice LendMe.
A dialogue box opens, explaining the terms of the LendMe oer, and asking if you want to reach your friend
through your Contacts list or through Facebook.
4. Tap on the menu choice you for the communication channel you want to use: Contacts or Facebook.
• If you selected Contacts, a dialogue box opens that lets you select a friend from your Contacts list and send that
friend a message.
• Tap the Select a Contact button. A window opens, listing your contacts. Tap on the name of the friend to
whom you want to lend the book.
• Tap in the Message field. When a keyboard appears, type a message to your friend. You might want to
mention why you like the book or why you think your friend would like the book.
• Tap the Send button to email your LendMe oer and message to your friend.
• If you selected Facebook, a dialogue box opens that lets you post a LendMe oer on the Facebook wall of a
friend.
• Tap the Select a Friend button, and tap on the name of the friend to whom you want to oer to lend the
book.
• Tap in the Message field. When a keyboard appears, type a message to your friend. You might want to
mention why you like the book or why you think your friend would like the book.
• Tap the Post button to post the LendMe oer and message on your friend’s wall on Facebook.
Borrowing a Book
You can ask a NOOK Friend to lend you a book from his or her library.
To find out which of your NOOK Friends have lendable books, do this:
1. Launch the NOOK Friends application, if you haven’t already launched it. To launch NOOK Friends, do either of
the following:
• Tap the Apps button on the Home Screen to display the apps installed on your NOOK. Tap the icon for
the NOOK Friends app to launch it.
2. Once the NOOK Friends app is running, tap the LendMe button at the top of the screen.
3. Find a book to borrow. Do one of the following:
• Swipe to scroll horizontally through the books on the shelf labelled Friends’ books to borrow. When you
see a book you would like to borrow, tap its cover. A dialogue box opens, listing the friends who own
this book.
• Enter a book title or author’s name in the search field at the bottom of the LendMe page. Tap the
search icon (a magnifying glass). The LendMe page lists any books that match the title or name you
searched for. Tap the Borrow button next to the book you would like to borrow.
4. Tap the Request button next to the name of friend from whom you would like to borrow the book. A dialogue
box opens. Write a brief message to your friend, and click Send.
NOTE: If you’re enjoying a book sample or a book you’ve borrowed, you can purchase the book at any time.
Simply tap in the centre of a page to open the Reading Tools, tap on the flag at the right end of the page
slider to open a page of extras, and then tap on the Buy button to purchase the book using your NOOK
account.
82 NOOK HD+ User Guide
Page 83

To view a list of lendable books belonging to a specific NOOK Friend, do this:
1. In the NOOK Friends app, tap the Friends button (an icon with three people) in the lower right-hand corner of
the screen to display a list of your NOOK Friends.
2. Tap the LendMe button next to the name of the friend whose lendable books you want to see.
A window opens listing any lendable books that belong to that friend.
3. To request to borrow a specific book, tap the Borrow button next to the book’s name.
Viewing a List of Pending Oers from your NOOK Friends
To view a list of books that your NOOK Friends have oered to lend you, do this:
1. Tap the LendMe button in the NOOK Friends app.
2. Scroll down the LendMe screen of bookshelves to the Oers shelf.
• If the shelf is empty, none of your friends has oered to lend you books.
• If a book appears on the shelf, a friend has oered to lend you the book. Tap on the book cover to read
the details of the oer and to accept it.
Viewing a List of Pending Requests from NOOK Friends
To view a list of books that friends would like to borrow from you, do this:
1. Tap the LendMe button in the NOOK Friends app.
2. Scroll down the LendMe screen of bookshelves to the Requests shelf.
• If the shelf is empty, none of your friends has requested to borrow a book from you.
• If a book appears on the shelf, a friend has requested to borrow that book from you. Tap on the book
cover to read the details of the request and to accept or deny the request.
The NOOK Friends app opens a dialogue box presenting details about the LendMe request, along with buttons for
lending the book or declining the request.
To lend your friend the book, tap Yes, Lend this Book.
To decline, tap Decline. If you decline this request, you can still lend this book to another friend who requests it.
If you lend a book, it appears on the Lent to others shelf in the LendMe section of the Library until the loan is over.
Identifying Books You Have Borrowed
If you have borrowed a book, its appears on the shelf of borrowed books in the LendMe section of your Library. A
coloured bar on the book’s cover tells you how many days remain for you to read the book.
If you have finished borrowing a book, the book’s cover appears faded. If you would like to purchase the book you
borrowed, simply tap on the book’s cover and purchase it just as you would any other book.
About Me
Tap the About Me tab at the top of the NOOK Friends app to display the About Me page. This page is a summary of
information about you as a NOOK Friend. The profile includes this information:
• Your name
NOOK HD+ User Guide 83
Page 84

• Your photo (if you have linked to your Facebook account and have posted a profile picture there)
• The email account associated with your NOOK Friends account
• The number of NOOK Friends you have
• The number of NOOK books you own
• The number of books you have recommended
• A scrollable list of your NOOK Friends activities (recommendations, shared quotes, etc.) shared publicly through
Facebook or Twitter
84 NOOK HD+ User Guide
Page 85

Using Bluetooth®
NOTE: Your NOOK supports the A2DP, AVCRP, and HID profiles of the Bluetooth 2.0 standard for connectiv-
ity, enabling your NOOK to connect to Bluetooth devices such as headphones, speakers, and keyboards. These wireless devices are sold separately. See your NOOK retailer for supported Bluetooth
devices.
Turning Bluetooth On and O
To turn Bluetooth on or o, do this:
1. Tap the gear icon in the Status Bar to open the Quick Settings window.
2. In the Quick Settings window, tap the All Settings menu choice.
3. On the Settings screen, tap the Wireless and Bluetooth menu choice on the left if it is not already selected.
4. Under the Devices heading, tap the Bluetooth toggle button to turn Bluetooth on or o.
Using Bluetooth Devices
You can pair your NOOK with Bluetooth devices such as Bluetooth headsets and loudspeakers.
Ask your NOOK retailer about the latest list of supported Bluetooth devices.
If you have turned Bluetooth on and your NOOK detects one or more supported Bluetooth devices nearby, it lists
the devices on the Wireless & Bluetooth settings screen. Tap on the device you want to pair your NOOK with.
NOOK HD+ User Guide 85
Page 86

Using UltraViolet™
UltraViolet is an all-new way to collect, access, and enjoy your films and TV shows in the cloud.
Purchase a Blu-ray, DVD, or digital video with the UltraViolet logo, and you can stream or download your film or TV
show to your UltraViolet-compatible devices, including your NOOK.
Signing Up for an UltraViolet Account
To sign up for an UltraViolet account and get started with UltraViolet, do this:
1. Visit www.uvvu.com to set-up an UltraViolet account, and link your UltraViolet account to your NOOK account
from your NOOK HD or HD+. (See “Linking Your UltraViolet Account” for instructions on linking your account.)
2. Buy films with the UltraViolet logo.
Shop for DVDs, Blu-rays, or digital videos with the UltraViolet logo online at NOOK.com or on your NOOK®
HD or HD+.
3. Add UltraViolet films to your digital collection in the cloud.
To add a DVD or Blu-ray to your digital collection, simply follow the instructions inside the packaging. If your
UltraViolet account is linked on your NOOK® HD or HD+, digital purchases will be automatically added to your
UltraViolet collection, free with purchase.
4. Watch however you choose, at home or on the go.
Instantly stream or download UltraViolet films and TV shows from your NOOK Library on your NOOK® HD
or HD+.
Redeeming Your UltraViolet Code
To redeem an UltraViolet code for a DVD or Blu-ray film you purchase, follow the instructions located inside the
DVD or Blu-ray box. You may be instructed to visit the Web site of a film studio to register for an account and enter
your UltraViolet credentials.
Here are some helpful sites for redeeming UltraViolet codes:
• 20th Century Fox
https://foxuv.com/support
• Sony Pictures
http://www.sonypictures.com/uvredeem
• Universal Studios
http://universalhidef.com/ultraviolet/whatisultraviolet/
• Warner Bros.
http://www.flixster.com/ultraviolet/
Linking Your UltraViolet Account
To link your NOOK account to your UltraViolet account, do this:
1. Tap the gear icon in the Status Bar to open the Quick Settings window.
2. In the Quick Settings window, tap All Settings.
3. In the list of settings categories on the Settings screen, tap Account Settings.
86 NOOK HD+ User Guide
Page 87

4. In the list of configuration options on the right-hand side of the screen, tap UltraViolet.
A dialogue box opens, presenting buttons for signing up for UltraViolet or for signing in with your UltraViolet
account.
• To sign up for an UltraViolet account, tap the Sign Up button. Your NOOK opens a Web browser win-
dow with a sign-up form on the UltraViolet Web site. Fill out the form and accept the UltraViolet terms
of service. Once you have submitted the sign-up form, return to the UltraViolet settings screen to sign
in to your new account from your NOOK.
• If you have already signed up for an UltraViolet account, tap the Sign In button. Your NOOK opens
a dialogue box asking for your UltraViolet sign-in name and password. Enter this information and tap
the Sign In button in the dialogue box. Your NOOK links to your UltraViolet account, enabling you to
stream or download UltraViolet content.
Viewing UltraViolet Content
Once you have linked your UltraViolet account to your NOOK, any titles you have added to your UltraViolet collection appear in the Library on your NOOK. Open an item to view it.
NOTE: If an UltraViolet title appears in your Library but does not respond when you try to open it, it may not
be available through the NOOK Shop yet. If the title is not yet available, its cover might include a badge
that says “Unsupported.”
You can still view most unsupported titles on your NOOK, though, using the Flixster app, a free solution for viewing video content. You can find the Flixster app in the Apps section of the NOOK Shop.
Alternatively, you can visit the UltraViolet Web site (www.uvvu.com) to view a list of playback options
available for the title.
Viewing UltraViolet Content on Flixster
To view UltraViolet content on your NOOK using the Flixster app, do this:
1. If you have not already done so, create an UltraViolet account on the UltraViolet Web site (www.uvvu.com)
and redeem your UltraViolet DVD and Blu-ray titles by following the instructions found inside the box of each
UltraViolet-compatible DVD or Blue-ray disc.
2. Using the Web browser on your personal computer, visit the Flixster Web site (www.flixster.com) and create a
Flixster account. Through the Flixster Web site, link your Flixster account to your UltraViolet account.
NOTE: You must perform this linking step on your personal computer. The Flixster app does not include a
feature for linking your Flixster account to your UltraViolet account.
3. On your NOOK, visit the NOOK Shop and download the free Flixster app.
4. Open the Flixster app, and log in to your Flixster account.
5. Find the UltraViolet content you want to watch in the My Films area of the app. Tap the cover of the title you
want to watch.
The Flixster app displays a details page for that content.
6. Tap Watch Now.
NOOK HD+ User Guide 87
Page 88

Using the Quick Settings Window
Tap the gear icon in the Status Bar to open the Quick Settings window. This Quick Settings oers the following controls:
• Brightness: a slider for adjusting the brightness of the screen
• Wi-Fi: a toggle switch for turning Wi-Fi on and o and control for selecting the Wi-Fi network to connect to
• Airplane Mode: a toggle switch for quickly turning Wi-Fi o
• Lock Rotation: a toggle switch for locking the rotation of the screen in its current position, either portrait or
landscape
• All Settings: a link for opening configuration screens for features such as battery settings and the NOOK Shop
NOTE: When you open the Quick Settings window from the Home Screen, the window includes a shortcut
link to the Home settings screen. When opened from the Shop, it includes a shortcut link to the Shop
settings screen.
•
88 NOOK HD+ User Guide
Page 89
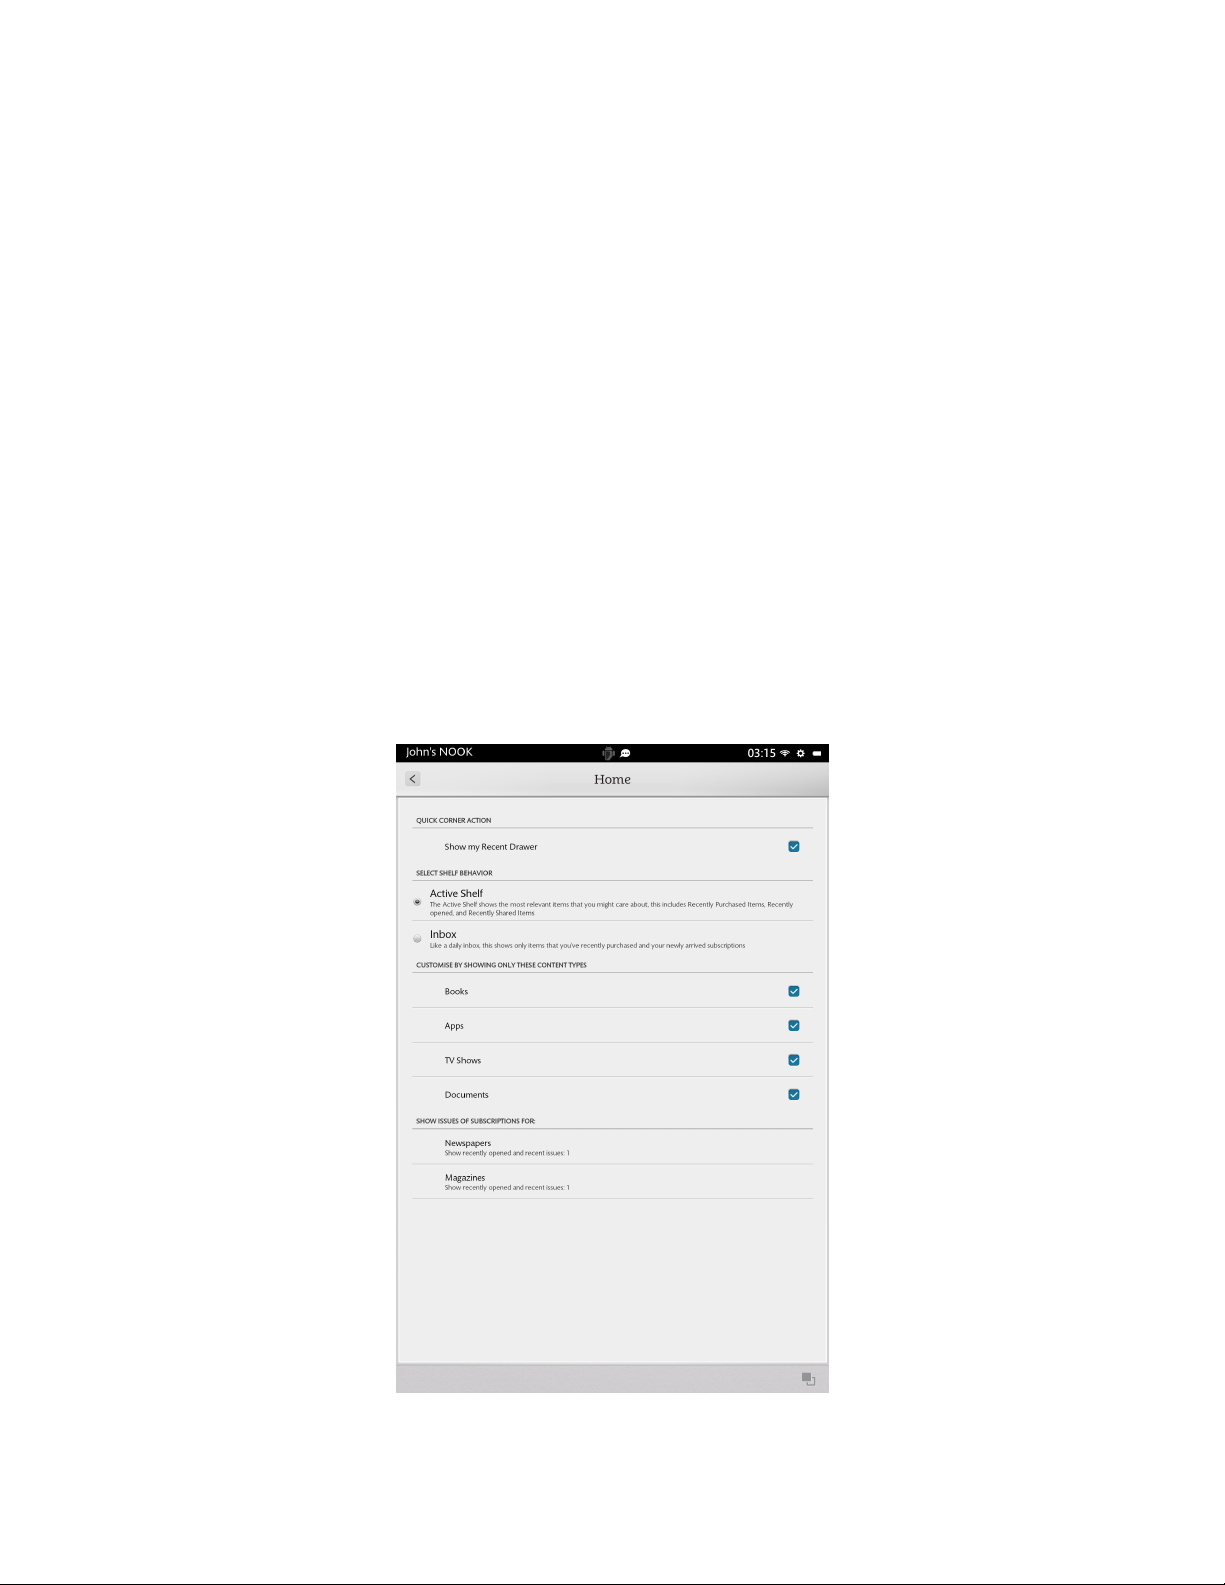
Configuring the Home Screen
Your NOOK includes controls for customising the behaviour of the Home Screen.
Opening the Home Screen Settings Window
To open the Home Screen settings window from the Home Screen, do this:
1. Tap the gear icon in the Status Bar to open the Quick Settings window.
2. Tap the Home Settings menu choice. (This menu choice appears only when you open the Quick Settings window
from the Home Screen.
Your NOOK displays the Home Screen settings window.
To open the Home Screen settings window from any other screen, do this:
1. Tap the gear icon in the Status Bar to open the Quick Settings window.
2. In the Quick Settings window, tap the All Settings menu choice.
3. On the Settings screen, tap Applications in the left-hand menu.
On the right-hand side of the screen, your NOOK displays a list of NOOK features.
4. Tap Home in the list of NOOK features.
Your NOOK displays the Home Screen settings window.
The Home settings screen looks like this:
The Home settings screen.
NOOK HD+ User Guide 89
Page 90

Configuring the Quick Corner
By default, the Home Screen displays an icon that looks like an open drawer (two overlapping squares) in the righthand corner of the System Bar, the grey panel at the bottom of the screen. Tapping this icon opens the Recent
Drawer, a scrollable window of the most recent content and applications you have accessed.
If you like, you can replace the Recent Drawer feature with a Recent Read feature. This feature is represented by an
icon that combines an open book and a clock. Tapping on the Recent Read icon directly opens the content (a book,
magazine, or newspaper) that you were most recently reading.
A tick box at the top of the Home settings screen controls whether the Recent Drawer icon or the Recent Read is
displayed in the corner of the Home Screen.
To display the Recent Drawer icon in the corner, tap the tick box labelled Show my Recent Drawer and leave a tick in
the box.
To display the Recent Read icon instead, tap the Show my Recent Drawer tick box so that the box is empty.
Configuring the Home Screen Shelf
Selecting the Active Shelf or an Inbox
By default, your NOOK displays the Active Shelf at the top of the centre panel of the Home Screen. This scrollable
shelf displays items you have recently purchased, recently opened, or recently shared.
If you prefer, you can change this shelf to function as an Inbox, displaying only items you have recently purchased, as
well as recent issues of subscriptions (such as magazine subscriptions) that have recently arrived.
To select the behaviour of the shelf on the Home Screen, do this:
1. Open the Home settings screen.
2. In the area of the Home settings screen labelled SELECT SHELF BEHAVIOUR, tap the button for the shelf you
want to see displayed: Active Shelf or Inbox.
Limiting the Content Types Displayed on the Shelf
By default, the Active Shelf and the Inbox display the following types of content:
• Books
• Apps
• TV Shows
• Documents
• Subscription Content, including Newspapers and Magazines
To control whether or not the Shelf displays Books, Apps, TV Shows, or Documents such as PDFs, tap the tick box
next to each content type. Leave the tick box ticked to make that content type. Leave the tick box empty to omit that
content type from the shelf.
For subscription content, such as newspapers, you can select how many issues of a particular publication appear in
the shelf. Your choices are: no issues, one issue, two issues, three issues, and all issues that have been published since
your subscription began.
By default, your NOOK displays one issue of each publication.
90 NOOK HD+ User Guide
Page 91
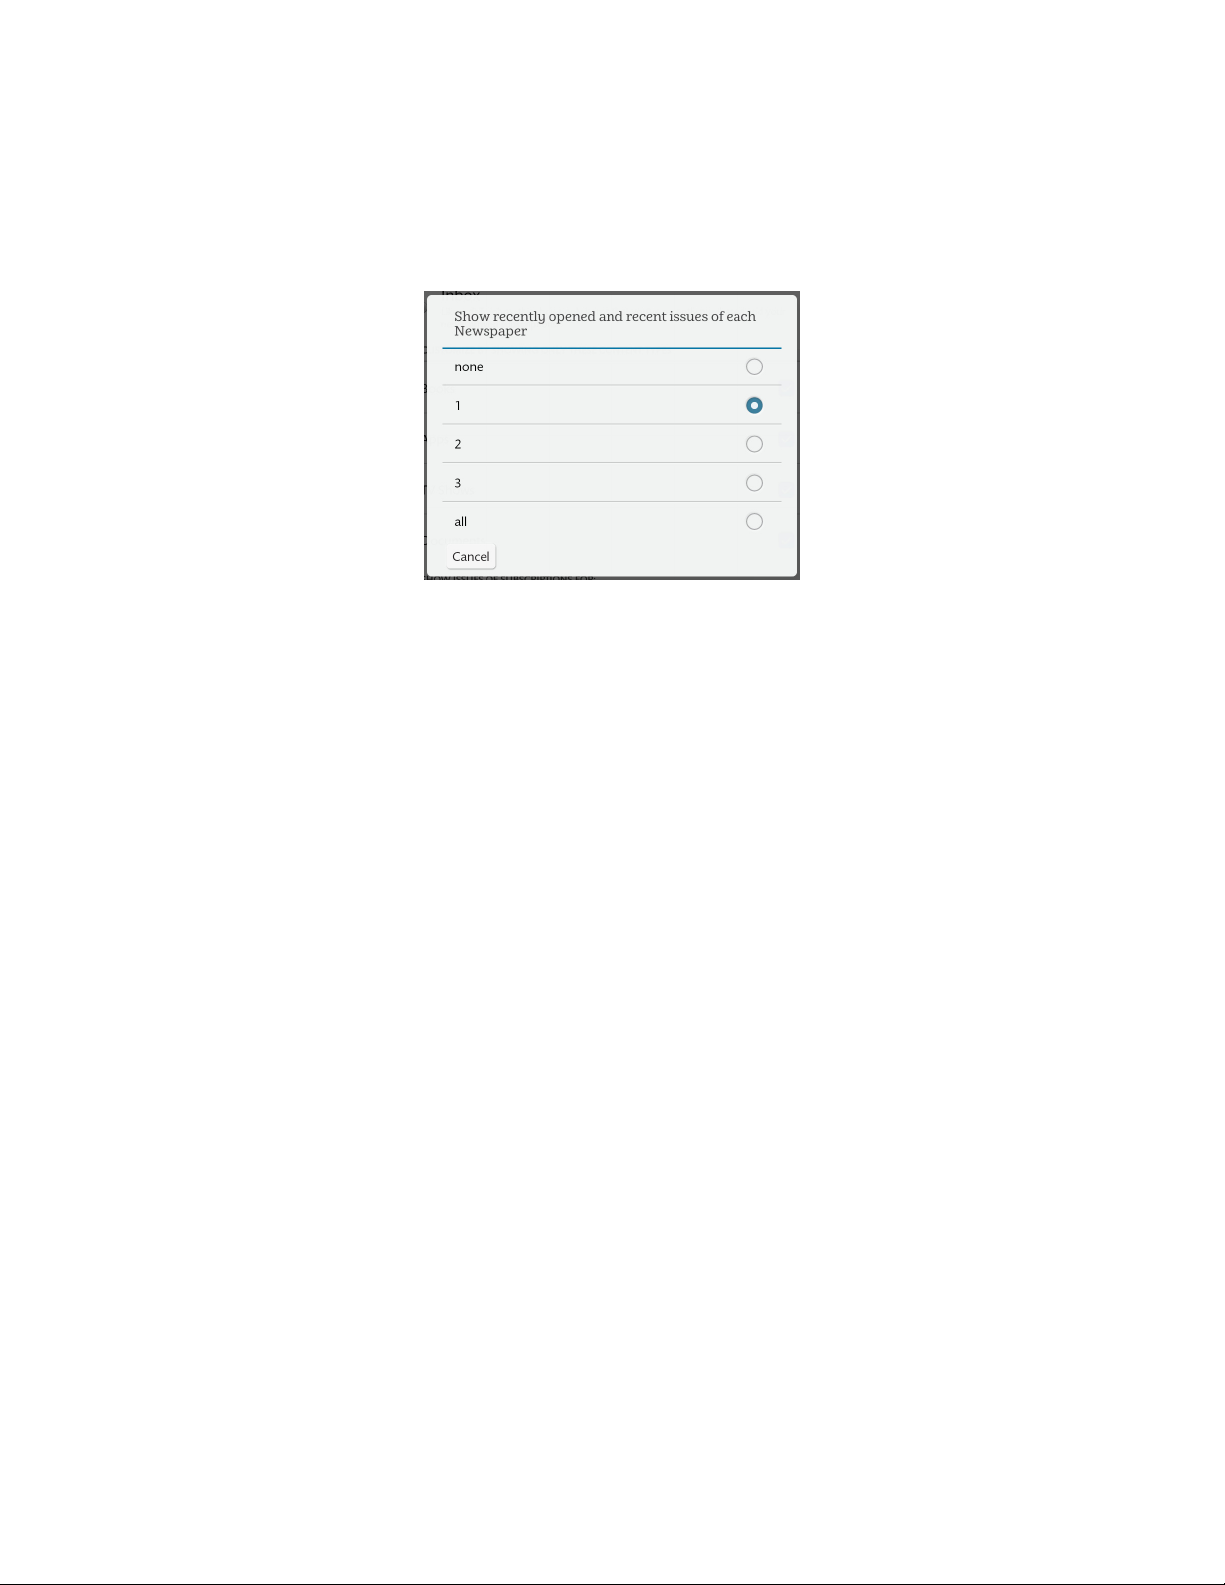
To change the number of issues of a publication that will be displayed on the Active Shelf or Inbox,
do this:
1. Tap the category of publication you want to configure: Newspapers or Magazines.
A window opens, oering you a choice of how many issues should be displayed on your Home Screen. The
window looks like this:
The subscription issue configuration for newspapers.
2. Tap the choice you want from the following: none, 1, 2, 3, or all.
The window closes. Your choice takes eect right away.
NOOK HD+ User Guide 91
Page 92

Using the Accessibility Reader
Introduction
Your NOOK includes a beta version of the NOOK Accessibility Reader, a built-in accessibility feature that reads
books, periodicals, and user interface features aloud. You can choose how the Accessibility Reader reads to you. You
can move through content word by word or sentence by sentence. You can also choose to have your NOOK read to
you continuously until you tell it to stop.
Modes of Operation
The Accessibility Reader features three modes of operation: Manual, Auto, or Menu. Once it is running, the Accessibility Reader is always in one of these modes.
The Accessibility Reader begins in Manual mode. In Manual mode, you can use gestures to control the progress of the
Reader. You can move forward and backward by page, by sentence, or by word. (The gestures used in Manual mode
are described below.)
A tap on the screen toggles the reader between Manual mode and Auto mode.
In Auto mode, the Reader reads book or periodical content continuously, highlighting each sentence on the screen
as it goes. When it reaches the end of a page, the Reader will turn the page automatically and continue reading.The
reading continues until you tap once anywhere on the screen. This single tap returns the Reader to Manual mode.
In Menu mode, you select choices to configure the Accessibility Reader or to take an action such as defining a word.
Getting Started with the Accessibility Reader
Configuring Your NOOK for Accessibility
To turn on the Accessibility Reader and its text-to-speech functions, do this:
1. Tap the gear icon in the Status Bar to open the Quick Settings window.
2. In the Quick Settings window, tap All Settings.
3. On the Settings screen, tap the Applications menu choice in the left-hand column.
4. In the list of applications, tap Reader.
5. On the Reader settings screen, tap the tick box labelled Enable accessibility and leave the tick box ticked.
Starting the Accessibility Reader
Once you have enabled accessibility through the Reader settings screen, starting the Accessibility Reader is as simple
as opening a book. When the book or periodical is opened, the Accessibility Reader runs in Manual mode. It begins
by stating the current page number and how many pages are in the book or periodical in total.
A single click will put the Accessibility Reader in Auto mode. The book or periodical will be read to you until you click
again to return to Manual mode.
92 NOOK HD+ User Guide
Page 93

Navigating in Manual Mode
In Manual mode, you can move by page, by sentence, and by word.
To move forward one page, swipe to the left with one finger. To move forward one sentence, swipe left with two
fingers. To move forward one word, swipe left with three fingers.
To move backward a page, swipe to the right with one finger. To move back one sentence, swipe right with two
fingers. To move backward one word, swipe right with three fingers.
If you are moving word by word, you can move to a word to select it and then use the Menu mode to select an option for defining the word or spelling the word. Menu mode is described below.
Using the Menu System
You can switch to Menu mode from Manual mode by pressing and holding on the screen. Once you enter Menu
mode, the Accessibility Reader announces the currently highlighted menu selection. Single flicks up or down will move
you through the various menu items.
Once you have found the menu choice you want to select, double-tap the screen to select it.
For menu selections that require no further interaction (for example, defining the current word), the Accessibility
Reader automatically returns to Manual mode once the menu item’s action is complete.
For selections that require further user interaction and some means to indicate completion (for example, selecting a
dierent speech rate), a two-finger double tap completes the action and returns the Accessibility Reader to Manual
mode.
Changing Modes
To toggle between Auto mode and Manual mode, tap once with one finger on the screen.
When you enter Auto mode, the Reader starts at the top of the current page. If you toggle back into Auto mode
from Manual mode, the Accessibility Reader will pick up the text at the point where you finished.
From Manual mode, you can enter Menu mode by pressing and holding anywhere on the screen. (On some smartphones, this gesture is called a long press.) Upon entering Menu mode, the Reader displays a menu over the current
text and announces the current menu item.
To return to Manual mode from Menu mode without performing any of the available actions, simply double-tap with
two fingers.
NOOK HD+ User Guide 93
Page 94

Customising the General Settings on Your NOOK
Opening the General Settings Screen
The General settings screen on your NOOK oers controls for turning PowerSave Mode on and o, customising the
dictionary in your NOOK, adjusting the volume of features like music and alarms, and making other configuration
changes to your NOOK.
To open the General settings screen, do this:
1. Tap the gear icon in the Status Bar to open the Quick Settings window.
2. In the Quick Settings window, tap the All Settings menu choice.
3. On the main Settings screen, tap General in the lefthand navigation bar.
Your NOOK opens the General settings screen.
Turning PowerSave Mode On or O
Your NOOK features a PowerSave Mode that fine-tunes your NOOK’s performance to save power and extend its
battery charge.
To turn on PowerSave Mode, do this:
1. Open the General settings screen by tapping the General menu choice on the All Settings screen.
2. Find the BATTERY LIFE section of the scrollable panel on the right. Tap the PowerSave Mode toggle switch so it
reads ON.
Your NOOK adjusts the brightness of the screen and other settings in order to prolong the life of the battery.
Configuring the Screen
Locking the Rotation of the Screen
To lock the screen in its current orientation, do this:
1. Open the General settings screen by tapping the General menu choice on the All Settings screen.
2. Hold your NOOK in the orientation you want: portrait or landscape.
3. Find the SCREEN section of the scrollable panel on the right. Tap the Lock Rotation toggle switch so it reads ON.
To unlock the screen rotation, return to this toggle switch and tap it so that it reads OFF.
NOTE: Some content such as NOOK Children’s Books always appears in landscape mode regardless of
whether or not the screen is locked in portrait mode.
Adjusting the Brightness of the Screen
Like the Quick Settings window, the General settings screen includes a slider for adjusting the brightness of the
screen. To make the screen brighter, drag the slider to the right. To make it dimmer, drag the slider to the left. Your
adjustment takes eect right away.
94 NOOK HD+ User Guide
Page 95

Changing the Screen Timeout
By default, your NOOK dims its screen after two minutes of inactivity to save power. You change this two-minute
interval to five minutes, 15 minutes, or 1 hour. Keep in mind that longer timeout periods consume more power, since
the screen will be illuminated even when no activity is taking place.
To change the screen timeout interval, do this:
1. Open the General settings screen by tapping the General menu choice on the All Settings screen.
2. Find the SCREEN area of the scrollable panel on the right. Tap Screen Timeout.
A window opens listing four choices for the screen timeout interval:
• 2 minutes
• 5 minutes
• 15 minutes
• 1 hour
3. Tap the round button for the screen timeout interval you want.
Your choice takes eect right away.
To return to the General Settings screen, tap the back arrow at the top of the right-hand panel.
Configuring Language Settings
Selecting the Language of your NOOK’s User Interface
Your NOOK oers you a choice of which language is used in its user interface: American English or British English.
NOTE: Changing the language used in the user interface does not change the language used in any content such
as books or periodicals. Publications always use whatever language was used by their publisher.
To change the language used in the user interface, do this:
1. Open the General settings screen by tapping the General menu choice on the All Settings screen.
2. Find the LANGUAGE section in the scrollable panel on the right and note the Language menu choice, which
displays its current setting beneath it.
3. To change the setting, tap Language.
A new window opens, listing your choices.
• English (United Kingdom)
• English (United States)
Once you have made your selection, your NOOK returns you to the General settings screen.
NOOK HD+ User Guide 95
Page 96

Turning Spelling Correction On and O
Your NOOK includes a spell checker for checking the spelling of content, such as email messages, that you type
yourself in the built-in apps on your NOOK. You can configure the spell checker to use the language used by the user
interface or American English, French, German, Italian, or Spanish.
To use the spell checker, do this:
1. Open the General settings screen by tapping the General menu choice on the All Settings screen.
2. Find the LANGUAGE section in the scrollable panel on the right.
3. Tap the Spelling correction tick box so that the box is ticked.
4. To select a language for the spell checker, tap the gear icon next to the words Spelling correction.
A dialogue box opens, displaying these choices:
• Use system language
• English
• French
• German
• Italian
• Spanish
If you select Use system language, the spell checker uses whatever language you selected for the user interface.
5. Tap the language you want to the spell checker to use.
Your NOOK applies your selection and returns you to the General settings screen.
Adding Words to the Spelling Dictionary
You can customise the dictionary in your NOOK to recognise additional words.
To add a word to the dictionary, do this:
1. Open the General settings screen by tapping the General menu choice on the All Settings screen.
2. Find the LANGUAGE section in the scrollable panel on the right.
3. Tap the Personal dictionary menu choice.
Your NOOK displays a new screen featuring an Add button.
4. Tap the Add button.
Your NOOK displays a text field and an online keyboard for entering a new word.
5. Type the word you want to add. Tap OK.
Your NOOK adds the word to the dictionary. It also displays the word in a list under the Add button.
To remove a word you have added to the dictionary, return to the Add screen and tap the X next to the word you
want to remove.
96 NOOK HD+ User Guide
Page 97

Configuring Security Settings
Using a Device Passcode to Protect Your NOOK
To set up a device passcode for your profile so that no one can pick up your NOOK and start using it
without first entering the passcode, do this:
1. Open the General settings screen by tapping the General menu choice on the All Settings screen.
2. Scroll down the General settings screen until you see the heading SECURITY.
3. Tap the Screen lock menu choice.
A Screen Lock window opens.
4. Tap the Passcode toggle switch.
A dialogue box opens, explaining that your passcode will be required for all profiles on the device and that child
profiles will not be able to access content in other profiles once the passcode is set.
5. Tap the Set Passcode button.
A window with a keypad opens.
6. Enter the sequence you want to use as your passcode. Tap the Continue button.
7. Re-enter the passcode to confirm it. Tap Continue again.
You have set up your passcode.
NOOK HD+ User Guide 97
Page 98

Configuring the Volume Settings for NOOK Features
Your NOOK lets you individually adjust the audio volume for:
• Music and videos
• Notifications (such as the arrival of new email or a NOOK Friends request)
• Alarms
To change audio volumes, do this:
1. Open the General settings screen by tapping the General menu choice on the All Settings screen.
2. Find the SOUNDS section in the scrollable panel on the right.
3. Slide the knob on the volume control you want to adjust.
Your change takes eect right away.
By default, your NOOK plays a quiet clicking sound when you unlock the screen saver. To turn this sound o, tap the
Screen lock sound toggle switch and leave it in the OFF position.
Configuring Date and Time Settings
Changing the Time Zone Used by Your NOOK
To change the time zone used by your NOOK, do this:
1. Open the General settings screen by tapping the General menu choice on the All Settings screen.
2. Find the DATE & TIME section in the scrollable panel on the right. Tap the Select time zone menu choice.
Your NOOK displays a scrollable list of international time zones.
3. Tap the time zone you want to use.
Your NOOK changes its clock to use the time zone you selected and returns you to the General settings screen.
98 NOOK HD+ User Guide
Page 99

Choosing a 12-hour or 24-hour Clock Format
By default, your NOOK uses a 24-hour clock format. It numbers hours 1 to 24.
Optionally, you can switch to a 12-hour format in which hours are numbered 1 to 12. In a 12-hour format, 13:00
becomes 1:00 PM.
To switch to a 12-hour format, do this:
1. Open the General settings screen by tapping the General menu choice on the All Settings screen.
2. Find the DATE & TIME section in the scrollable panel on the right. Tap the Use 24-hour format toggle switch so it
reads OFF.
Your NOOK switches to a 12-hour format.
To return to a 24-hour format, tap the Use 24-hour format toggle switch so it reads ON.
Changing the Date Format
By default your NOOK displays the date in a format commonly used in the country you specified when you registered your NOOK.
To change the date format, do this:
1. Open the General settings screen by tapping the General menu choice on the All Settings screen.
2. Find the DATE & TIME section in the scrollable panel on the right. Under the Select date format menu choice you
will see a sample date in the date format currently selected for your NOOK.
3. Tap Select date format to change the date format.
A window opens showing a choice of date formats.
4. Tap the format you want to use.
The window closes. Your selection takes eect right away.
NOOK HD+ User Guide 99
Page 100

Updating the Software on Your NOOK
From time to time NOOK.co.uk will release software updates for your NOOK. Your NOOK will automatically install
these updates.
NOTE: Updating software does not delete any of your books, magazines, films, TV shows, newspapers, or apps,
nor does it delete any of the files you have transferred onto your NOOK from your personal computer.
The software update simply installs new NOOK software to give you the latest available features. Your
NOOK remains registered to your NOOK account, and all your reading material remains accessible.
Installing a Software Update over a Wireless Network
When a new software release is available, your NOOK will download it and install it when you next connect to a
wireless network.
Software installations take only a few minutes. Once the software installation is complete, you can continue reading or
shopping or doing whatever else you were doing before the new software was installed.
Discovering the Version Number of Your NOOK Software
To discover which software release your NOOK is running, do this:
1. Tap the gear icon in the Status Bar at the top of the screen.
Your NOOK opens the Quick Settings window.
2. Tap the All Settings menu choice.
Your NOOK opens the Settings screens for configuring your NOOK.
3. Tap Device Information.
Your NOOK displays information about your NOOK, including the software version number. If you would like
to check for software updates, tap the software version number.
100 NOOK HD+ User Guide
 Loading...