

Page 1

L500
User Guide
Page 2

Thank you for choosing
NOMVDIC™, founded by a group of people with the spirit of
exploration. As a user-focused and technology-based enterprise,
we believe that our products have the potential to inspire you to
seek out the infinite possibilities of entertainment, extending the
dimensions of your home, and redefining it to fit the lifestyle you like.
We created NOMVDIC for you who seek more.
Once again, thank you for choosing NOMVDIC™.
Page 3

Safety Precautions
Please read the following Safety Precautions before you start using the projector.
• Read all warnings and follow all instructions.
• Allow at least 20“ (50 cm) clearance around the projector to ensure proper ventilation.
• Place the projector in a well-ventilated area. Do not place anything on the projector that
prevents heat dissipation.
• Do not place the projector on an uneven or unstable surface. The projector may fall over,
causing personal injury or projector malfunction.
• Do not look straight at the projector lens during operation. The intense light beam may damage
your eyes.
• Do not block the projection lens with any objects when the projector is under operation as this
could cause objects to become heated and deformed or even cause a fire.
• Do not attempt to disassemble the projector. There are dangerous high voltages inside which
may cause death if you should come into contact with live parts.
• When moving the projector, be careful not to drop or bump the projector on anything.
• Do not place any heavy objects on the projector or connection cables.
• Do not stand the projector on end vertically. Doing so may cause the projector to fall over,
causing personal injury or projector malfunction.
• Avoid exposing the projector to direct sunlight or other sources of sustained heat. Do not install
near any heat sources such as radiators, heat registers, stoves, or other devices (including
amplifiers) that may increase the temperature of the projector to dangerous levels.
• Do not place liquids near or on the projector. Liquids spilled into the projector may cause it to
fail. If the projector does become wet, disconnect it from the power supply and contact us to
have the projector serviced.
• When the projector is under operation, you may sense some heated air and odor from its
ventilation grill. It is a normal operation and not a defect.
Page 4

• Do not attempt to circumvent the safety provisions of the polarized or grounding-type plug. A
polarized plug has two blades with one wider than the other. A grounding-type plug has two
blades and a third grounding prong. The wide and third blade are provided for your safety. If the
plug does not fit into your outlet, obtain an adapter and do not attempt to force the plug into
the outlet.
• When connecting to a power outlet, DO NOT remove the grounding prong. Please ensure
grounding prongs are NEVER REMOVED.
• Protect the power cord from being treaded upon or pinched, particularly at the plug, and at the
point where it emerges from the projector.
• In some countries, the voltage is NOT stable. This projector is designed to operate safely within
a voltage between 100 to 240 volts AC, but could fail if power cuts or surges of ±10 volts occur.
In areas where voltage may fluctuate or cut out, it is recommended that you connect your
projector through a power stabilizer, surge protector, or uninterruptable power supply (UPS).
• If smoke, an abnormal noise, or a strange odor is present, immediately switch the projector o
and contact your dealer or NOMVDIC™. It is dangerous to continue using the projector.
• Use only attachments/accessories specified by the manufacturer.
• Disconnect the power cord from the AC outlet if the projector is not being used for a long period
of time.
• Refer all servicing to qualified service personnel.
Page 5

Consignes de sécurité
Veuillez lire les Précautions de sécurité suivantes avant de commencer à utiliser le projecteur.
• Conservez ce guide d’utilisation dans un endroit sûr pour pouvoir vous y reporter ultérieurement.
• Lisez tous les avertissements et suivez toutes les instructions.
• Laissez un espace d’au moins 20“ (50 cm) autour du projecteur pour garantir une ventilation
appropriée.
• Placez le projecteur dans une zone bien ventilée. Ne placez rien sur le projecteur qui empêche la
dissipation thermique.
• Ne placez pas le projecteur sur une surface instable ou irrégulière. Le projecteur peut tomber,
causant des blessures physiques ou un dysfonctionnement du projecteur.
• Ne regardez pas directement l’objectif du projecteur pendant le fonctionnement. L’intensité du
faisceau lumineux pourrait entraîner des lésions oculaires.
• Ouvrez toujours l’obturateur de l’objectif ou retirez toujours le protège-objectif lorsque la lampe
du projecteur est allumée.
• Ne bloquez pas l’objectif de projection avec des objets lorsque le projecteur est en cours de
fonctionnement car cela pourrait causer l’échauffement et la déformation des objets, voire
causer un incendie.
• La lampe devient extrêmement chaude pendant le fonctionnement. Laissez le projecteur
refroidir pendant environ 45 minutes avant de retirer la lampe pour la remplacer.
• N’utilisez pas les lampes au-delà de la durée de vie nominale des lampes. Une utilisation
excessive des lampes au-delà de leur durée de vie nominale peut entraîner leur éclatement
dans de rares occasions.
• Ne remplacez jamais la lampe ou un composant électronique tant que le projecteur n’est pas
débranché.
• N’essayez pas de démonter le projecteur. Les hautes tensions dangereuses présentes à
l’intérieur peuvent causer la mort si vous entrez en contact avec les pièces sous tension.
• Lors du déplacement du projecteur veillez à ne pas faire tomber ni cogner le projecteur. • Ne
placez aucun objet lourd sur le projecteur ou les câbles de raccordement.
• Ne placez aucun objet lourd sur le projecteur ou les câbles de raccordement.
Page 6

• Ne faites pas tenir le projecteur sur une extrémité à la verticale. Procéder de la sorte peut causer
la chute du projecteur et des blessures physiques ou un dysfonctionnement du projecteur.
• Évitez d’exposer le projecteur à la lumière directe du soleil ou à d’autres sources de chaleur
soutenues. N’installez pas l’appareil près d’une source de chaleur telle qu’un radiateur, un registre
de chaleur, un poêle ou tout autre appareil (y compris un amplificateur) pouvant augmenter la
température du projecteur à des niveaux dangereux.
• Ne placez pas de liquides sur le projecteur, ni à proximité. Les liquides reversés dans le projecteur
peuvent entraîner une panne. Si le projecteur est mouillé, débranchez-le de l’alimentation
électrique et contactez votre centre de service local pour faire réparer le projecteur.
• De l’air chaud et une odeur particulière peuvent s’échapper de la grille de ventilation lorsque le
projecteur est sous tension. Il s’agit du fonctionnement normal et non d’un défaut.
• N’essayez jamais de contourner le dispositif de sécurité de la fiche polarisée ou de mise à la terre.
Une fiche polarisée comporte deux broches dont une plus large que l’autre. Une fiche du type
terre contient 2 broches normales et une troisième pour la terre. La broche large et la troisième
broche sont destinées à votre sécurité. Si la fiche n’entre pas dans votre prise, procurez-vous un
adaptateur et ne tentez pas de forcer la fiche dans la prise.
• Lors du branchement sur une prise de courant, NE retirez PAS la broche de mise à la terre. Veuillez
vous assurer que les broches de mise à la terre ne sont JAMAIS RETIRÉES.
• Protégez le cordon d’alimentation pour qu’il ne soit pas piétiné ou pincé, en particulier au niveau
de la ficher et à l’endroit où il sort du projecteur.
• Dans certains pays, la tension n’est PAS stable. Ce projecteur est conçu pour fonctionner en toute
sécurité à une tension comprise entre 100 et 240 V CA, mais une panne peut survenir en cas de
coupure de courant ou de surtension de ±10 V. Dans les zones où la tension peut fluctuer ou être
coupée, il est conseillé de raccorder votre projecteur à un stabilisateur de puissance, un dispositif
de protection contre les surtensions ou un onduleur (UPS).
• Si de la fumée, un bruit anormal ou une odeur inhabituelle sont présents, éteignez immédiatement
le projecteur et contactez votre revendeur ou ViewSonic®. Il est dangereux de continuer à utiliser
le projecteur.
• Utilisez uniquement des fixations/accessoires spécifiés par le fabricant.
• Débranchez le cordon d’alimentation de la prise CA si le projecteur n’est pas utilisé pendant une
longue période.
• Pour tout entretien, veuillez vous adresser à du personnel qualifié.
Page 7

Content
Safety Precautions ....................................................................................... 3
Consignes de sécurité ................................................................................. 5
Introduction ..................................................................................................12
Package Contents ..........................................................................................................................12
Product Overview ............................................................................................................................13
Projector ................................................................................................................................................................13
Connection Ports ................................................................................................................................................15
Remote Control ...................................................................................................................................................16
Initial Setup ...................................................................................................18
Choosing a Location - Projection Orientation ......................................................................18
Projection Dimensions ....................................................................................................................19
Page 8

Making Connections ..................................................................................20
Connecting to Power .................................................................................................................... 20
DC Power (Power Outlet) ............................................................................................................................... 20
Connecting to External Devices ................................................................................................22
HDMI Connection ...............................................................................................................................................22
USB Connection .................................................................................................................................................23
Wireless Screen Mirroring .............................................................................................................25
Connecting to Audio ......................................................................................................................26
Bluetooth Speaker ............................................................................................................................................26
Bluetooth Out .....................................................................................................................................................27
Connecting to Networks ..............................................................................................................28
Wi-Fi Connection ...............................................................................................................................................28
Custom SSID ........................................................................................................................................................29
NOMVDIC Remote Control App ................................................................................................ 30
Page 9

Using the Projector ......................................................................................31
Starting Up the Projector ..............................................................................................................31
First Time Activation ....................................................................................................................... 32
Bluetooth Pairing ...............................................................................................................................................32
Preferred Language..........................................................................................................................................33
Network Settings................................................................................................................................................34
Selecting an Input Source ............................................................................................................ 35
Adjusting the Projected Image .................................................................................................. 37
Fine-Tuning the Image Quality ..................................................................................................................... 37
Correcting Keystone .........................................................................................................................................38
4 Corner Adjustment.........................................................................................................................................39
Shutting Down the Projector ...................................................................................................... 40
Page 10

Operating the Projector .............................................................................41
Home Screen .................................................................................................................................... 41
Home Screen - On-Screen Display (OSD) Menu Tree ........................................................43
Menu Operations ............................................................................................................................49
File Management ...............................................................................................................................................49
Apps Center .........................................................................................................................................................57
Settings .................................................................................................................................................................59
Screen Mirroring ..................................................................................................................................................74
Bluetooth .............................................................................................................................................................. 75
Add App ................................................................................................................................................................ 76
Input Source Selected — On-Screen Display (OSD) Menu Tree ..................................... 77
Image Setting Menu ........................................................................................................................................ 80
Advanced Setting Menu ................................................................................................................................. 84
Page 11

Appendix ...................................................................................................... 87
Specifications ................................................................................................................................... 87
Timing Chart .....................................................................................................................................89
HDMI Video Timing ............................................................................................................................................89
HDMI PC Timing ................................................................................................................................................. 90
USB C Video Timing ............................................................................................................................................91
USB C PC Timing ................................................................................................................................................92
Troubleshooting ..............................................................................................................................93
LED Indicators ..................................................................................................................................94
Maintenance .....................................................................................................................................95
General Precautions .........................................................................................................................................95
Cleaning the Lens ..............................................................................................................................................95
Storing the Projector ........................................................................................................................................95
Regulatory and Service Information ....................................................... 96
Compliance Information ............................................................................................................... 96
FCC Compliance Statement .........................................................................................................................96
CE Conformity for European Countries ......................................................................................................98
Declaration of RoHS2 Compliance ..............................................................................................................99
Indian Restriction of Hazardous Substances ........................................................................................ 100
Copyright Information ..................................................................................................................101
Customer Service ............................................................................................................................................. 102
Limited Warranty .............................................................................................................................................103
Page 12
Introduction
L500
Register now for a one-year warranty
on your NOMVDIC™!
ࠕ【々ౌ【あ〟居宑宒宐宙宇完宆寭〥孴೧ؔ
〥ฯৄ、〇ぃ〵【屆
L500
Register now for a one-year warranty
on your NOMVDIC™!
ࠕ【々ౌ【あ〟居宑宒宐宙宇完宆寭〥孴೧ؔ
〥ฯৄ、〇ぃ〵【屆
L500
Register now for a one-year warranty
on your NOMVDIC™!
ࠕ【々ౌ【あ〟居宑宒宐宙宇完宆寭〥孴೧ؔ
〥ฯৄ、〇ぃ〵【屆
L500
Register now for a one-year warranty
on your NOMVDIC™!
ࠕ【々ౌ【あ〟居宑宒宐宙宇完宆寭〥孴೧ؔ
〥ฯৄ、〇ぃ〵【屆
L500
Register now for a one-year warranty
on your NOMVDIC™!
ࠕ【々ౌ【あ〟居宑宒宐宙宇完宆寭〥孴೧ؔ
〥ฯৄ、〇ぃ〵【屆
L500
Register now for a one-year warranty
on your NOMVDIC™!
ࠕ【々ౌ【あ〟居宑宒宐宙宇完宆寭〥孴೧ؔ
〥ฯৄ、〇ぃ〵【屆
Register now for a one-year warranty
on your NOMVDIC™!
ࠕ【々ౌ【あ〟居宑宒宐宙宇完宆寭〥孴೧ؔ
〥ฯৄ、〇ぃ〵【屆
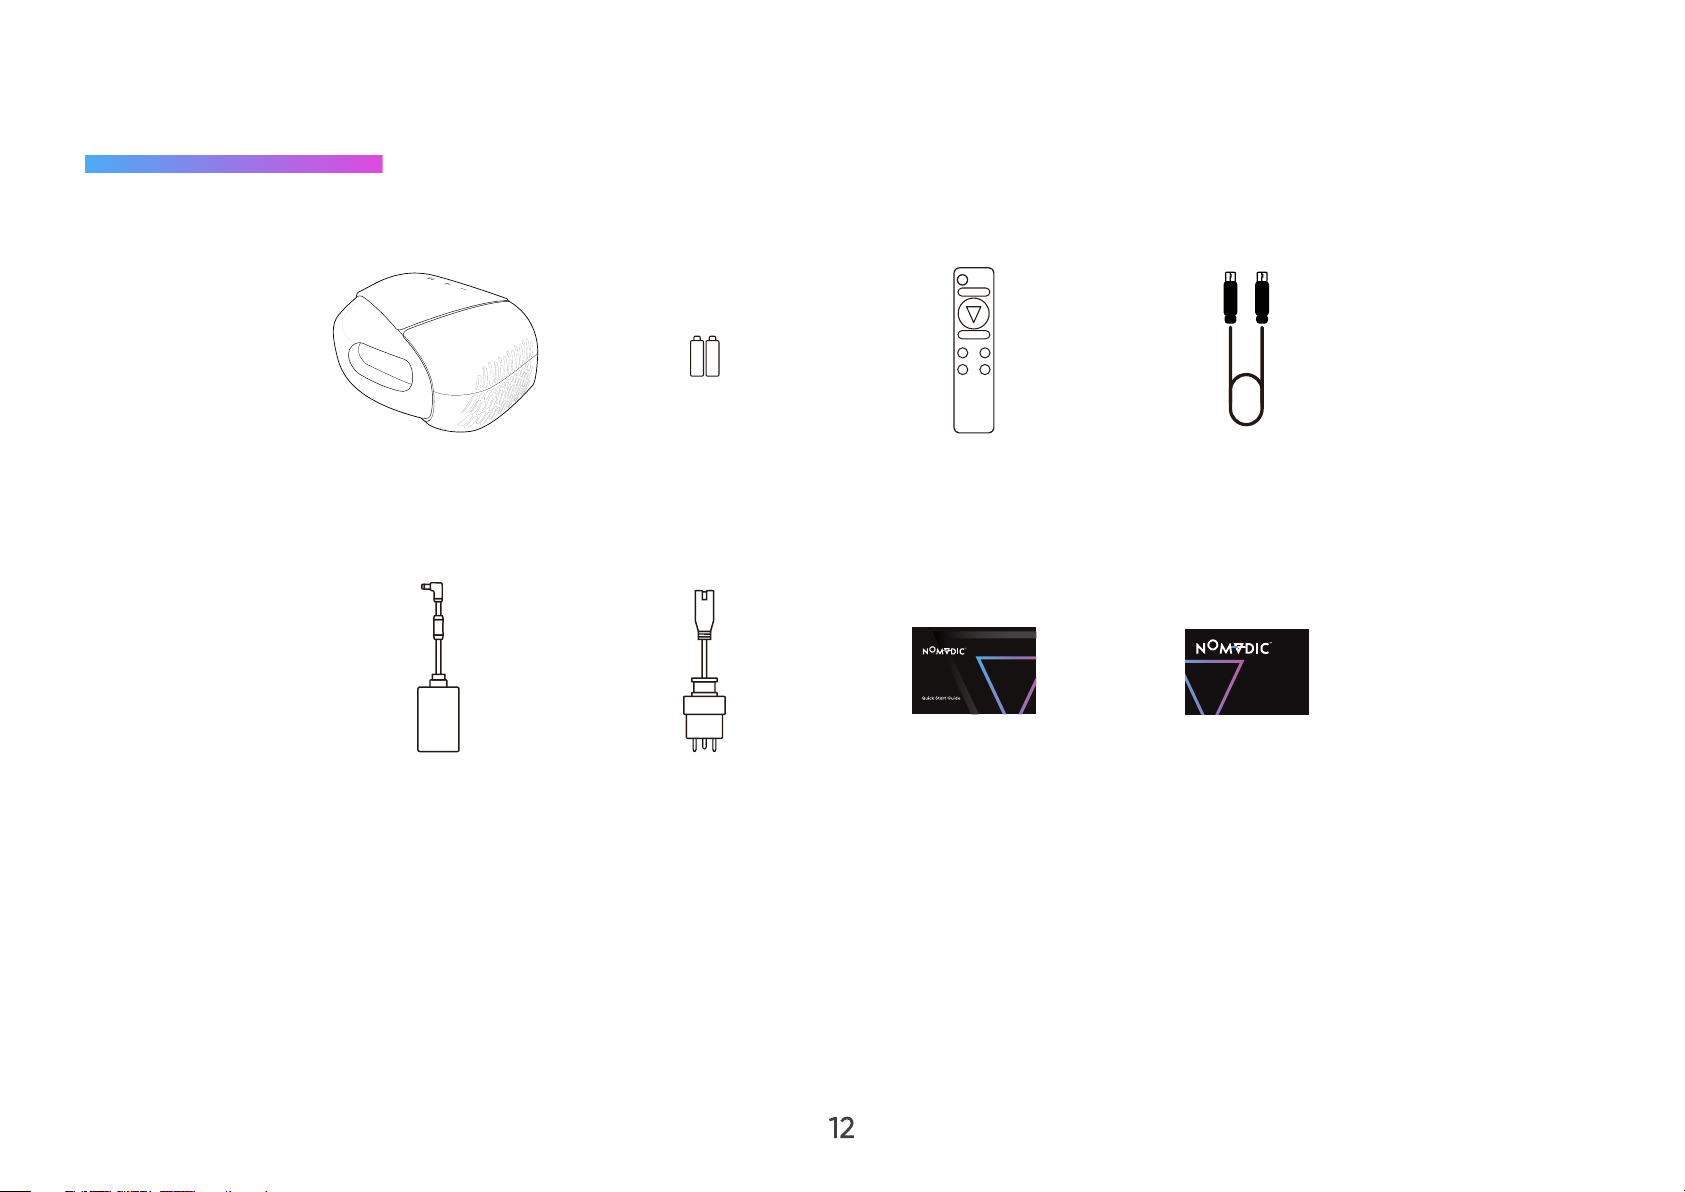
Package Contents
L500
Remote Control
Batteries
Remote Control USB C Cable
Register now for a one-year warranty
L500
on your NOMVDIC™!
ࠕ【々ౌ【あ〟居宑宒宐宙宇完宆寭〥孴೧ؔ
〥ฯৄ、〇ぃ〵【屆
Power Adapter Power Cord Quick Start Guide Warranty Card
NOTE: The power cord and video cables included in your package may vary depending on your country. Please contact
customer service for more information.
12
Page 13
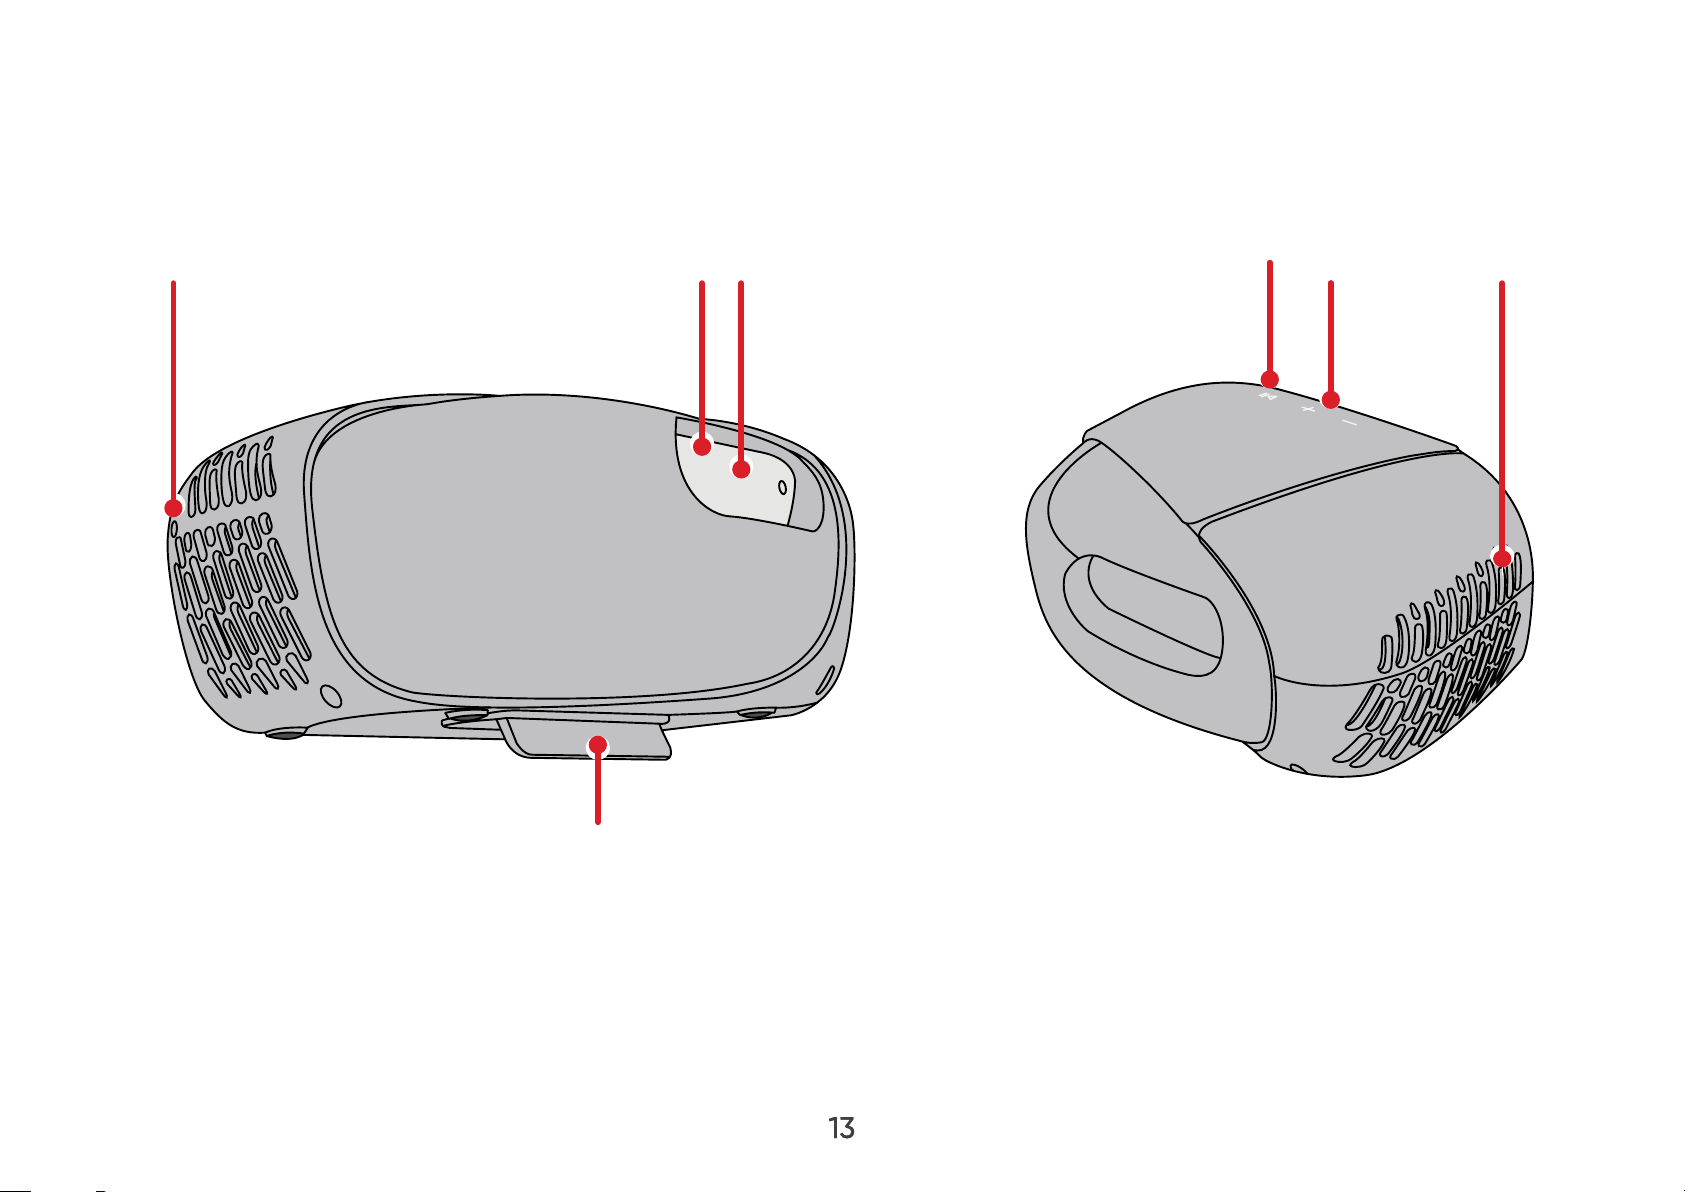
Product Overview
4
5
Projector
1
2
3
6
7
1313
Page 14
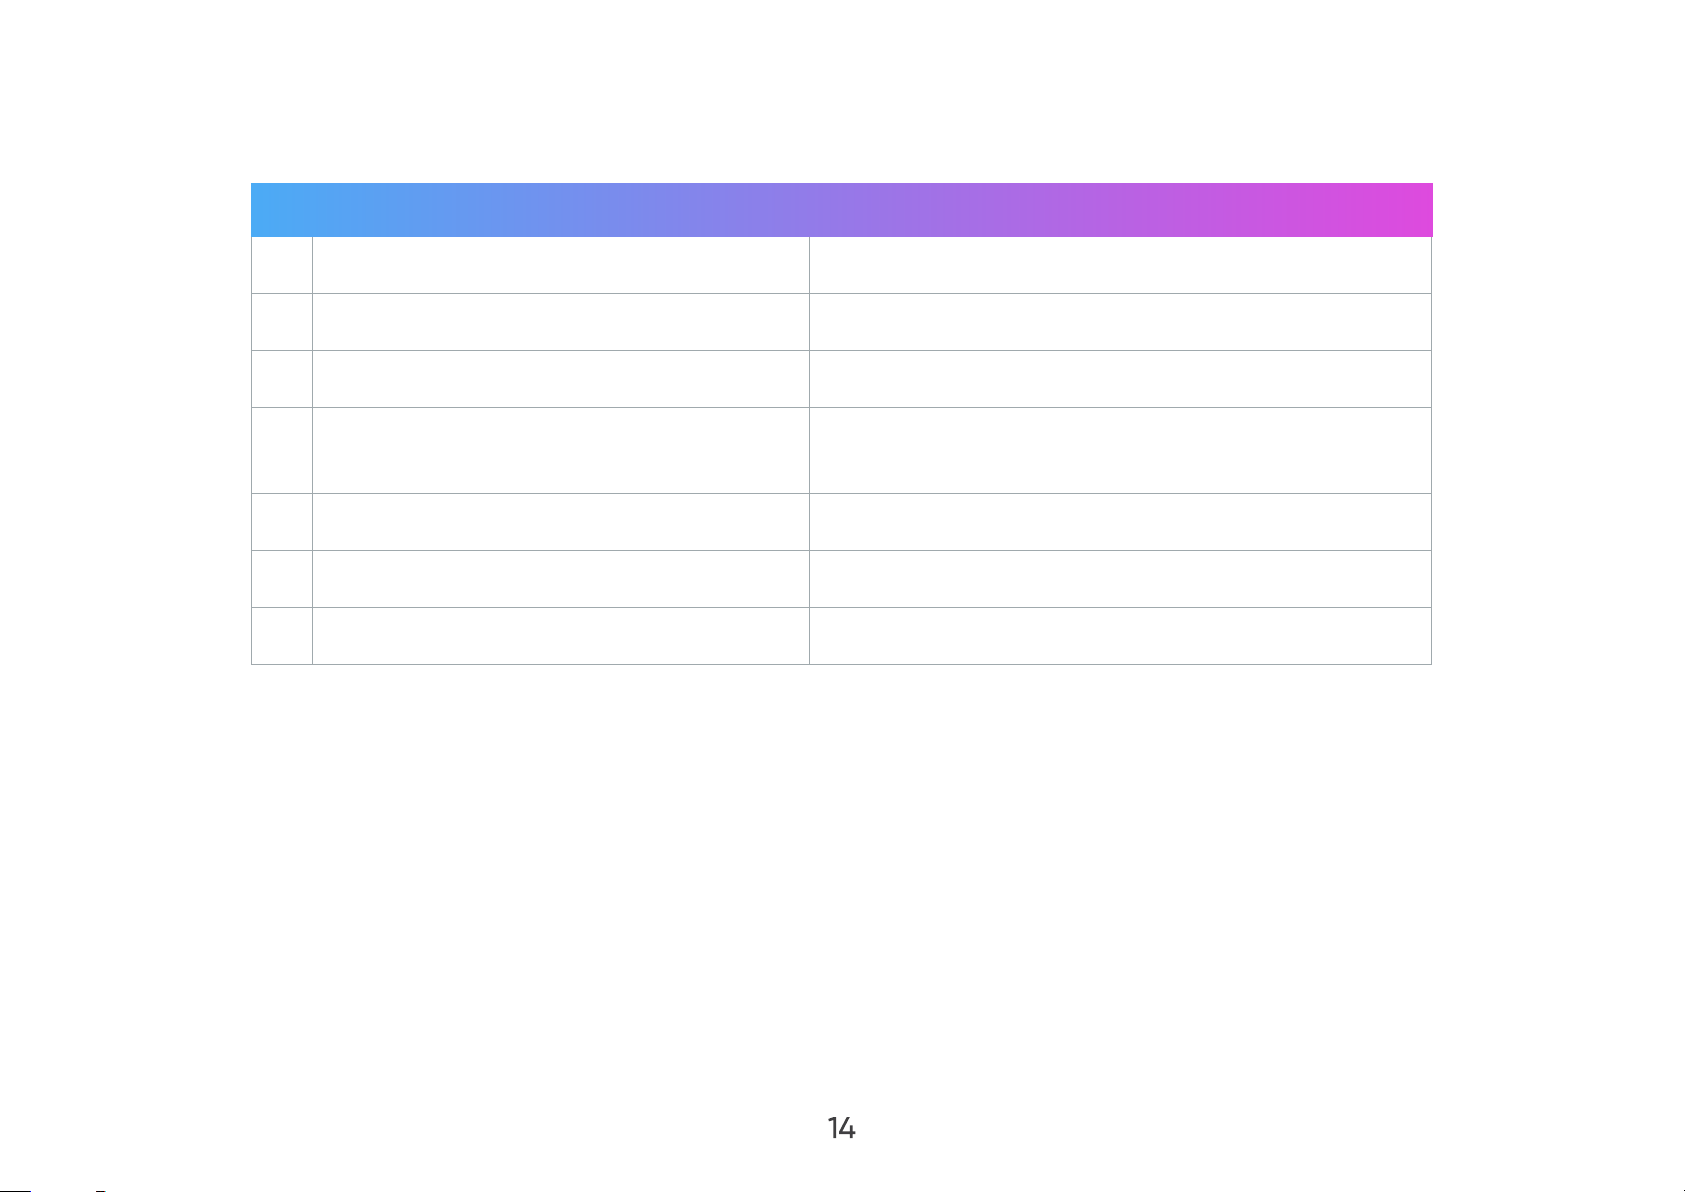
Item Description
1 Power Button Powers On/O the projector
2 IR Sensor IR sensor for the remote control
3 Lens Projection lens
4 Adjustment Foot & Tripod Mount
5 Play/Pause Button Play and pause the content in the media player
6 Volume Button Increase or decrease the volume level
7 Harman Kardon Speakers Harman Kardon Speakers
• Adjust the projection angle
• Mounting location for tripods
14
Page 15
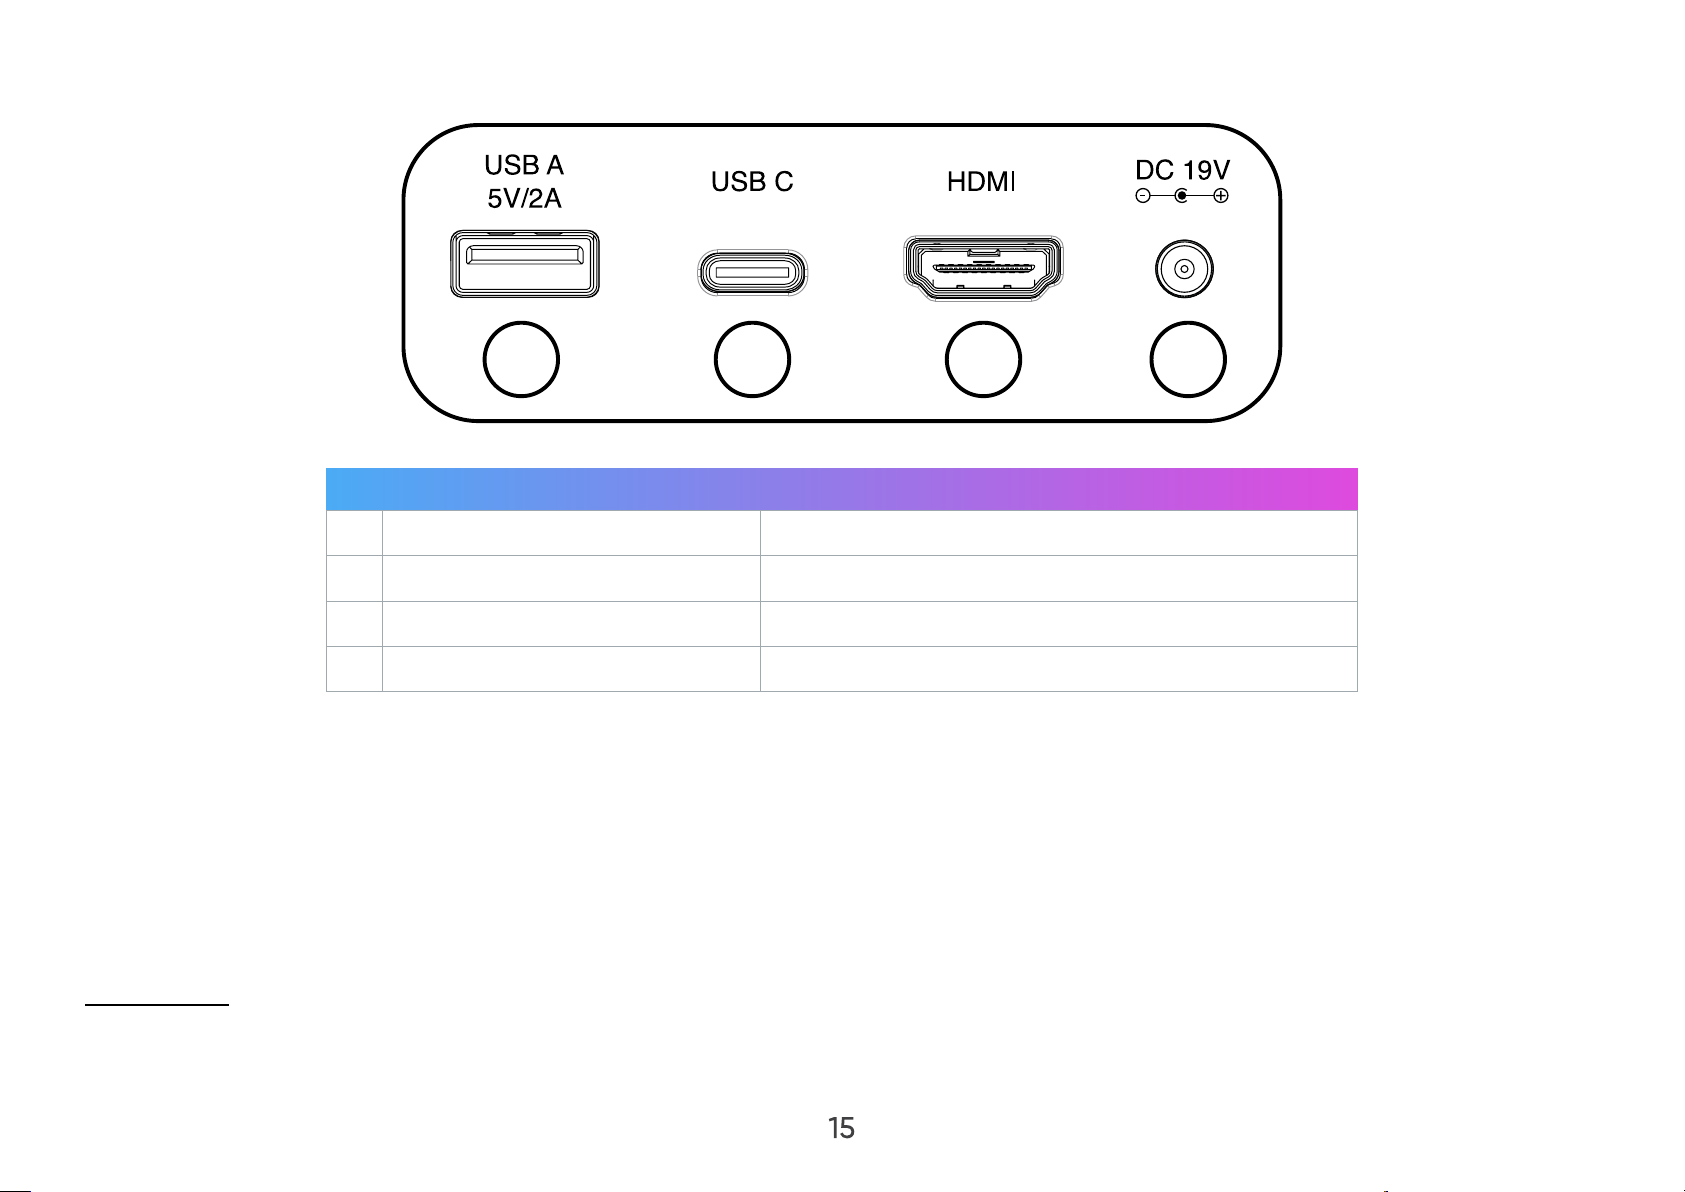
Connection Ports
1 2 3
4
Port Description
1 USB A (5V/2A) USB 2.0 Type A port (USB Reader - FAT32/NTFS)
2 USB-C USB-C port
3 HDMI HDMI port
4 DC IN Power input socket
¹ Please use the supplied USB-C cable, and ensure your USB-C device can support video transmission as well as charging.
² Supports HDMI , HDCP
³ iPhone/iPad users will need to buy an additional adapter. To avoid compatibility issues, please use Apple authorized accessories.
2.0
2.2
15
Page 16
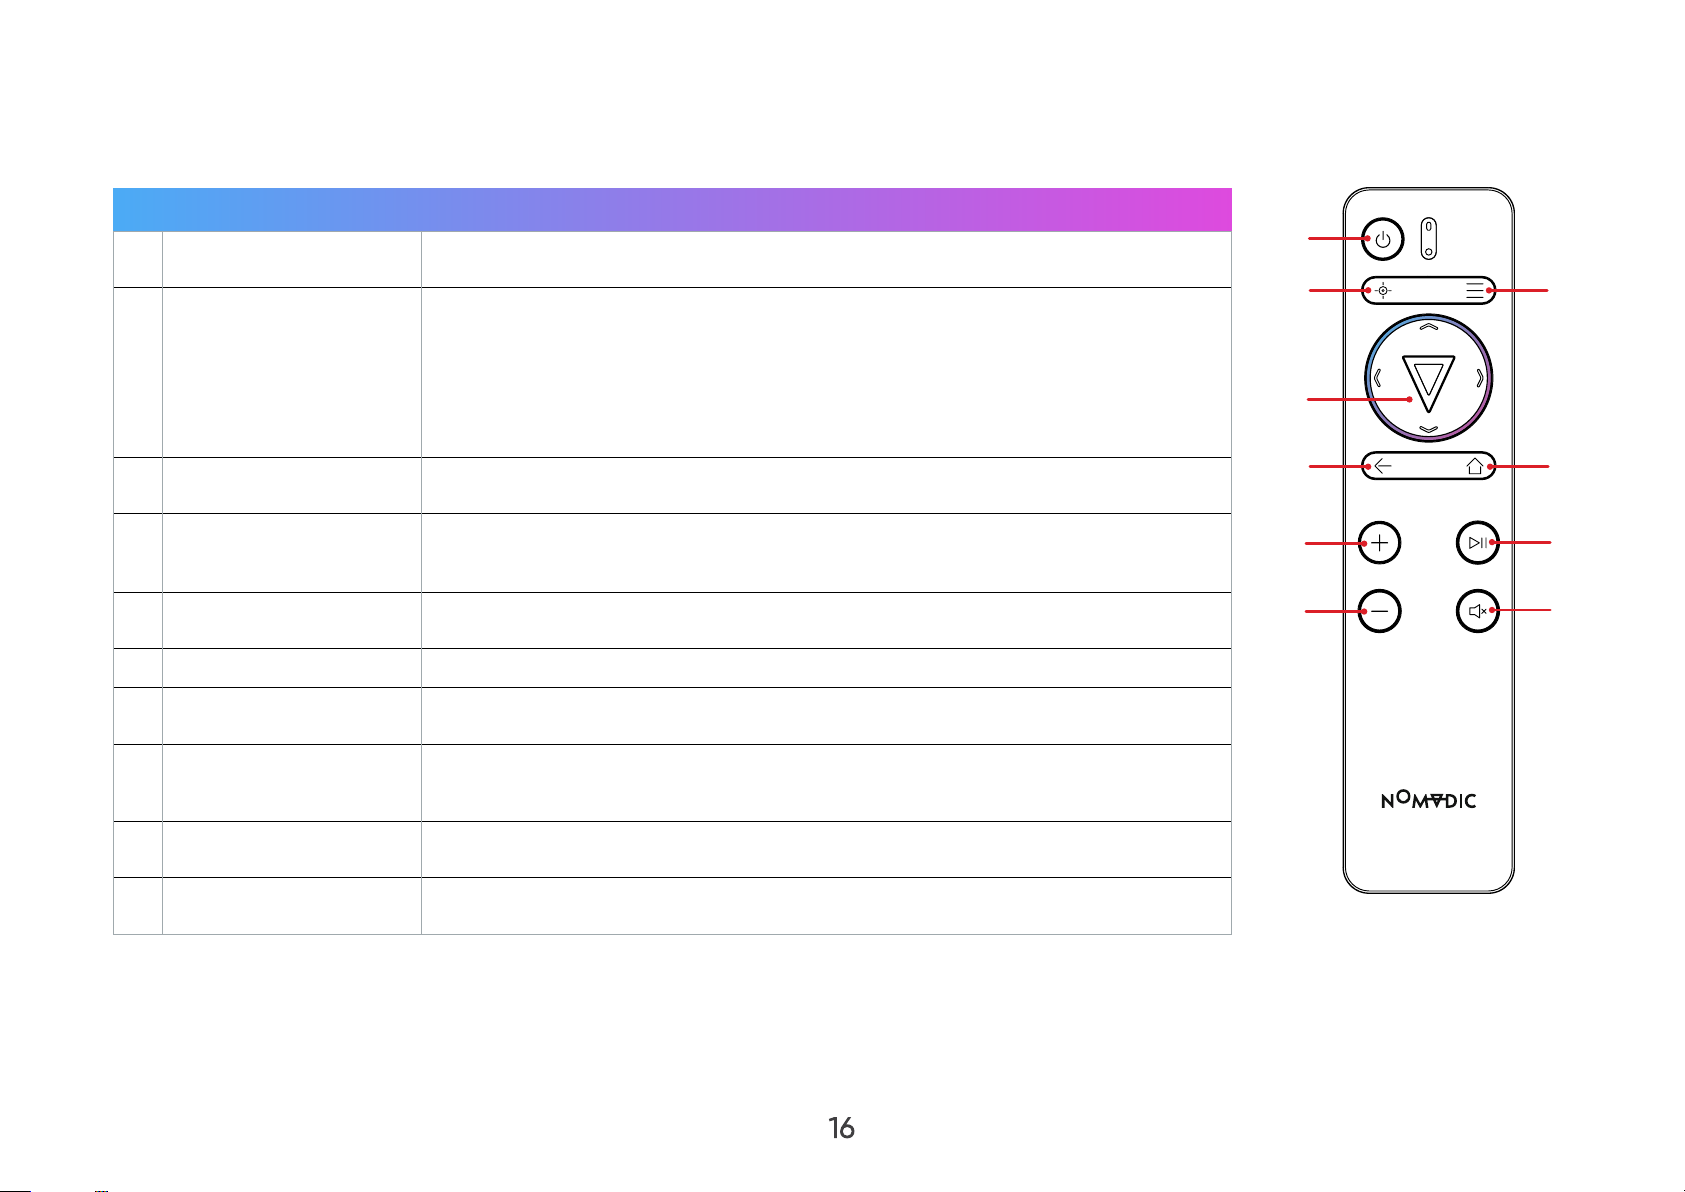
Remote Control
Button Description
1 Power Turn on the Projector.
To manually adjust, press the Focus button on the remote control and
use the Left and Right arrows.
1
2
3
2 Focus
3 Settings Display the Settings menu.
OK/Up/Down/Left/
4
Right
5 Return Return to the previous screen.
6 Home Access the Home screen.
7 Increase Increase the volume.
8 Play/Pause
9 Decrease Decrease the volume.
10 Mute Mute/Unmute.
NOTE: This model does not support the Focus button. To adjust
the focus of the on-screen image, please use the Focus
Adjustment Ring.
Confirm the selection.
Navigate and select the desired menu items and make adjustments.
Play/Pause content.
NOTE: Only supports built-in media player.
4
5
7
9
6
8
10
NOTE: You can also control the L500 with the NOMVDIC Remote Control App. To learn more, see page 30.
16
Page 17

Remote Control - Eective Range
To ensure proper function of the remote control follow the steps below:
1. The remote control must be held at an angle within 30° perpendicular to the projector’s IR remote control sensor(s).
2. The distance between the remote control and the sensor(s) should not exceed 6 m (20 ft.)
Remote Control - Replacing the Batteries
1. Remove the battery cover from the bottom of the remote control by pressing the finger grip and sliding it across.
2. Remove any existing batteries (if necessary) and install two AAA batteries.
3. Observe the battery’s polarities as indicated.
4. Replace the battery cover by aligning it with the base and pushing it back into position.
NOTE:
• Avoid leaving the remote control and batteries in excessive heat or a humid environment.
• Replace only with the same or equivalent type recommended by the battery manufacturer.
• If the batteries are drained or if you will not be using the remote control for an extended period of time, remove the batteries to
avoid damage to the remote control.
• A battery subjected to extremely low air pressure may result in an explosion or the leakage of flammable liquid or gas.
• Avoid high or low extreme temperatures that a battery can be subjected to during use, storage or transportation; and low air
pressure at high altitude.
• Dispose of the used batteries according to the manufacturer’s instructions and local environment regulations for your region.
17
Page 18
Initial Setup
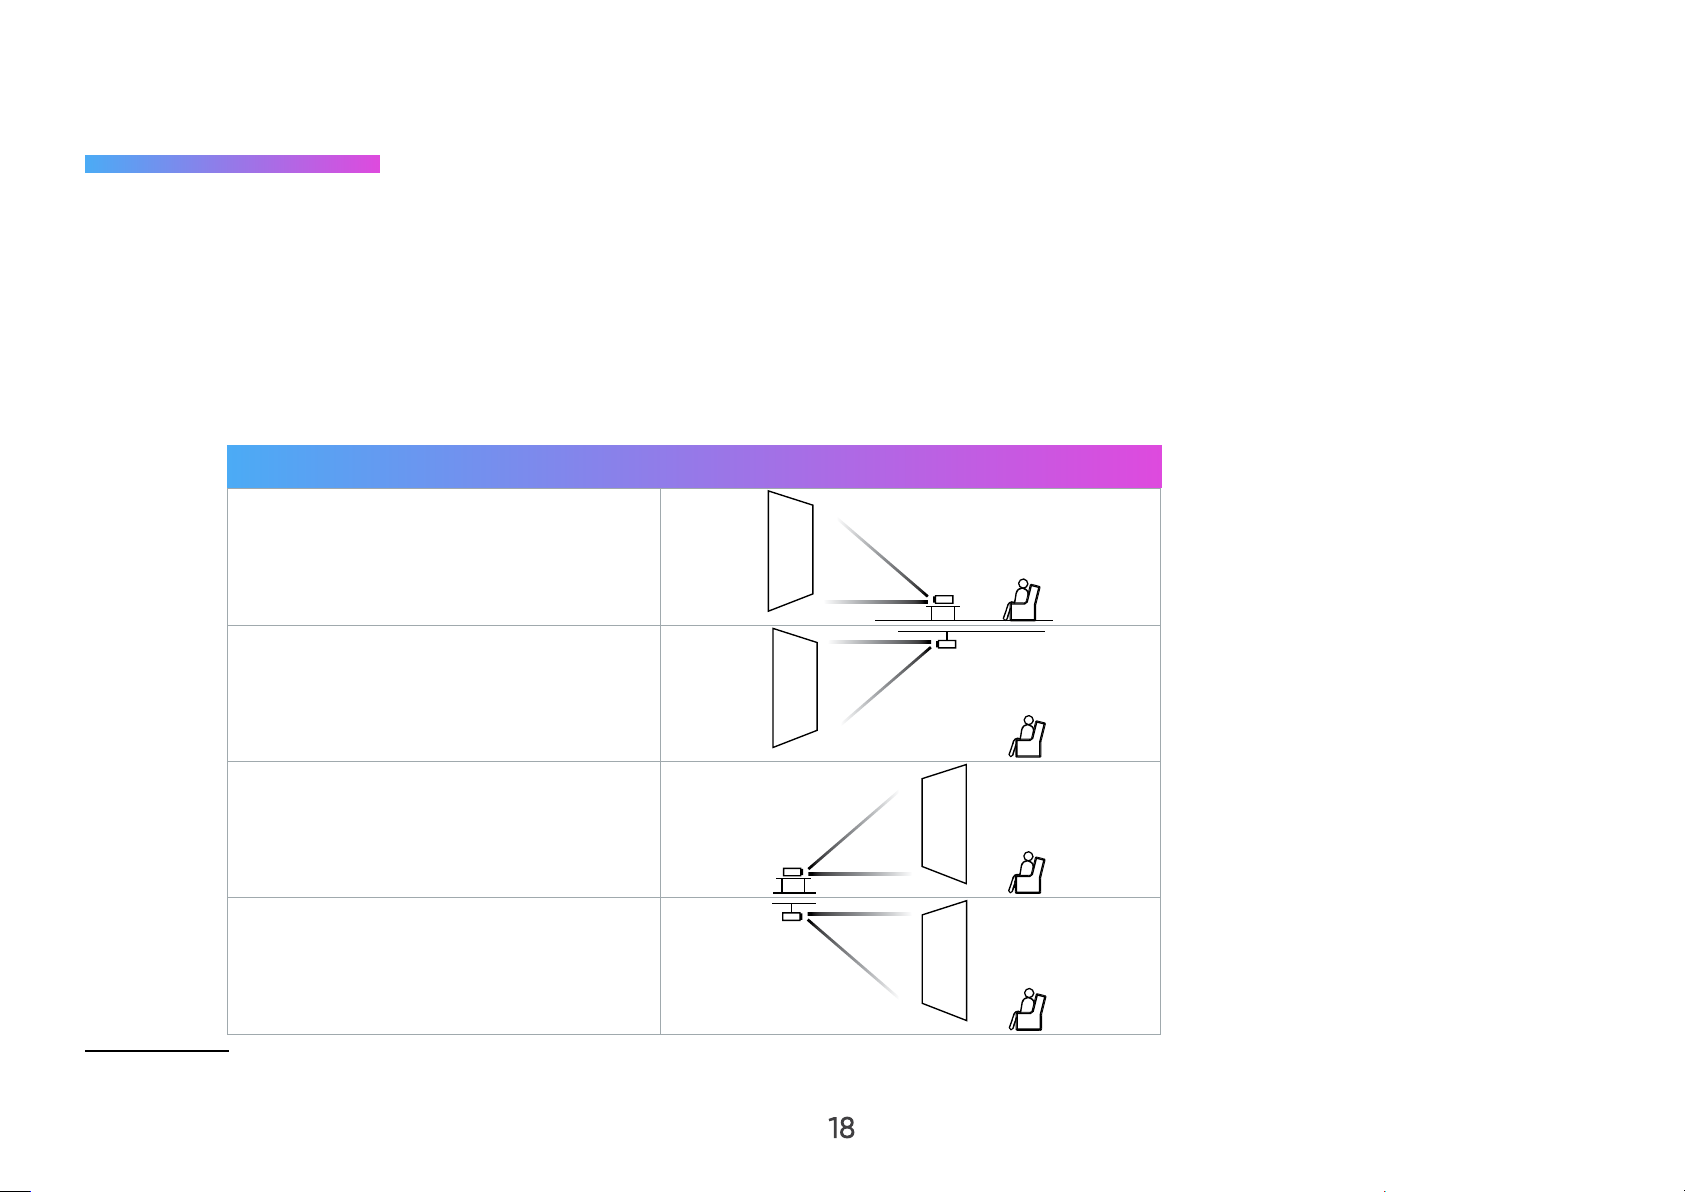
Choosing a Location - Projection Orientation
Personal preference and room layout will decide the installation location. Consider the following:
• Size and position of your screen.
• Location of a suitable power outlet.
• Location and distance between the projector and other equipment.
The projector is designed to be installed in one of the following locations:
Location
Front Table
The projector is placed near the
floor in front of the screen.
Front Ceiling
The projector is suspended upsidedown from the ceiling in front of the
screen.
Rear Table
The projector is placed near the
floor behind the screen.
Rear Ceiling
The projector is suspended upsidedown from the ceiling behind the
screen.
¹ A rear projection screen is required.
18
Page 19
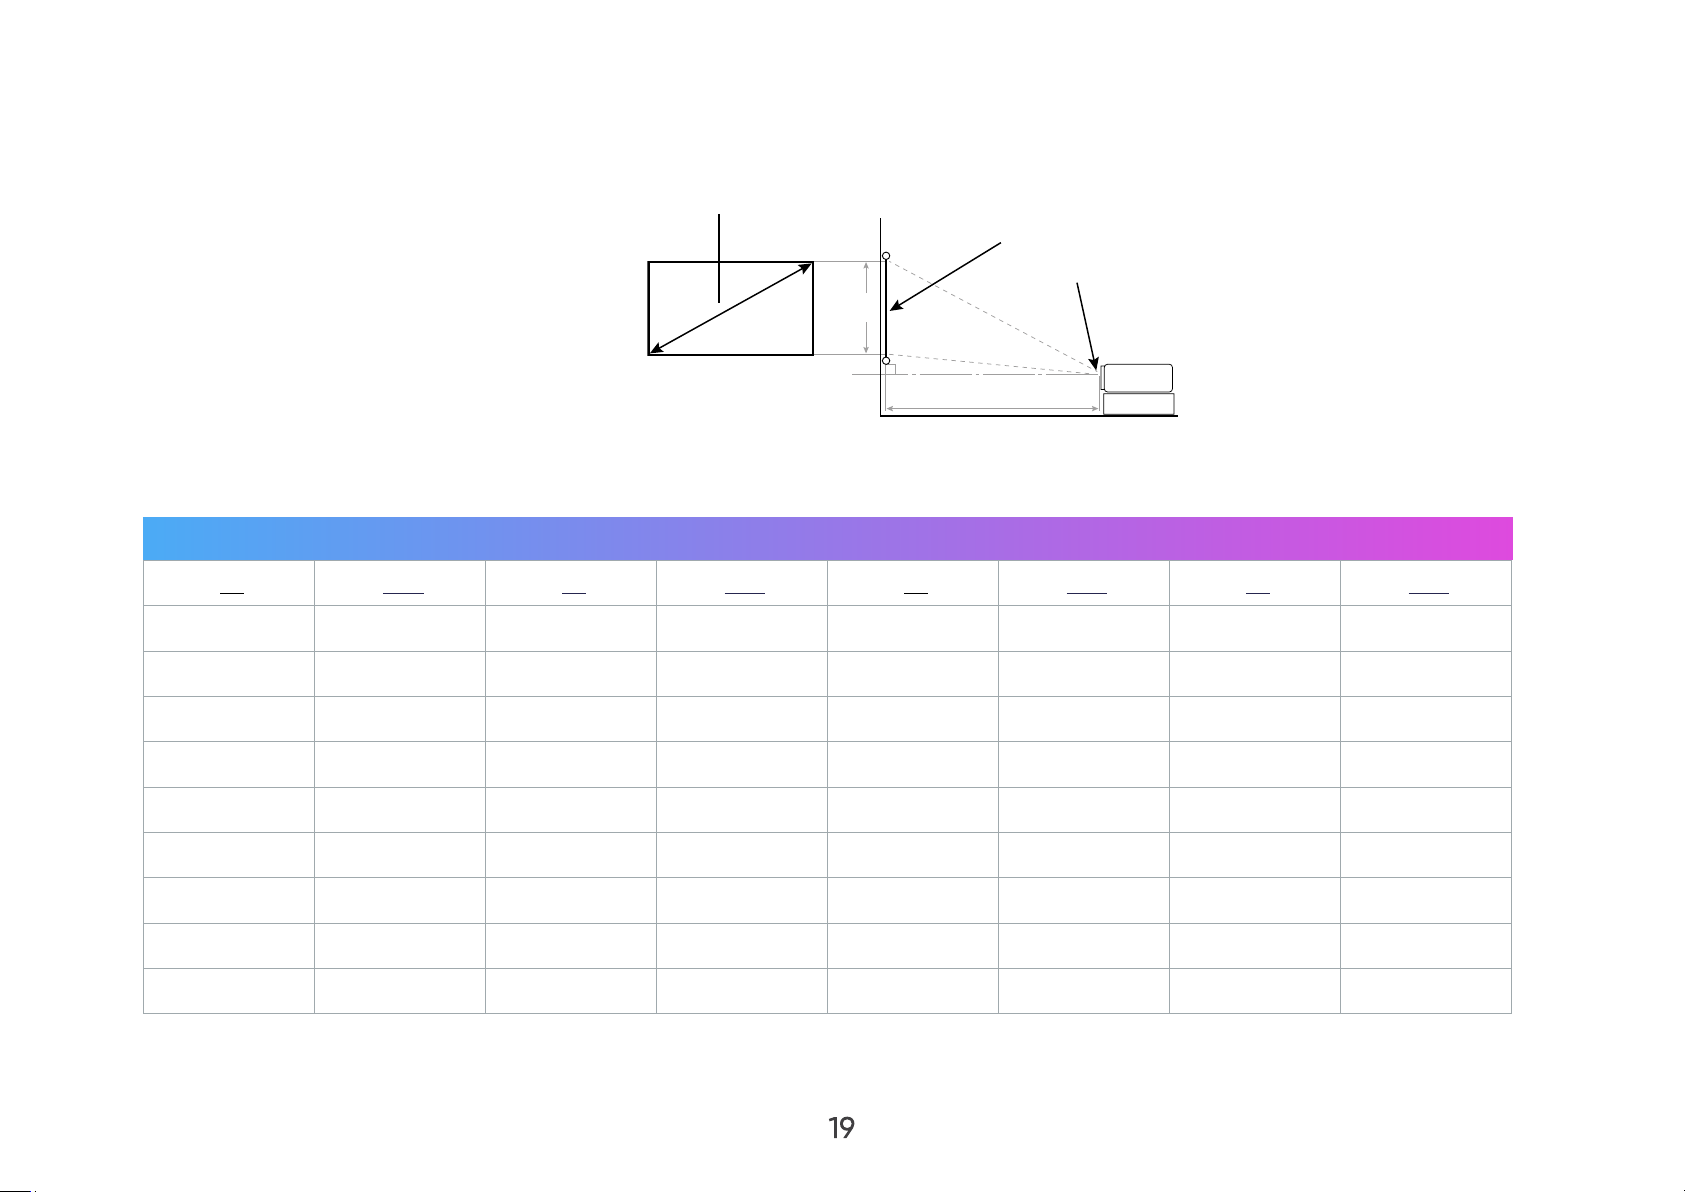
Projection Dimensions
(a)
• 16:9 Image on a 16:9 Screen
NOTE: (e) = Screen / (f) = Center of Lens
16:9 Image on a 16:9 Screen
(a) Screen Size (b) Projection Distance (c) Image Height Image Width
in. mm in. mm in. mm in. mm
40 1016 41.85 1063 19.4 494 34.86 886
60 1524 62.75 1594 29.2 742 52.29 1328
(e)
(f)
(c)
(b)
80 2032 83.66 2125 38.9 987 69.73 1771
90 2286 94.13 2391 44.13 1121 78.44 1992
100 2540 104.60 2657 49.01 1245 87.16 2214
110 2794 115.03 2922 53.93 1370 95.87 2435
120 3048 125.51 3188 58.81 1494 104.59 2657
150 3810 156.88 3985 73.54 1868 130.74 3321
180 4572 188.26 4782 88.18 2240 156.92 3986
NOTE: It is recommended that if you intend to permanently install the projector to physically test the projection size and
distance using the actual projector before you permanently install it.
19
Page 20
Making Connections
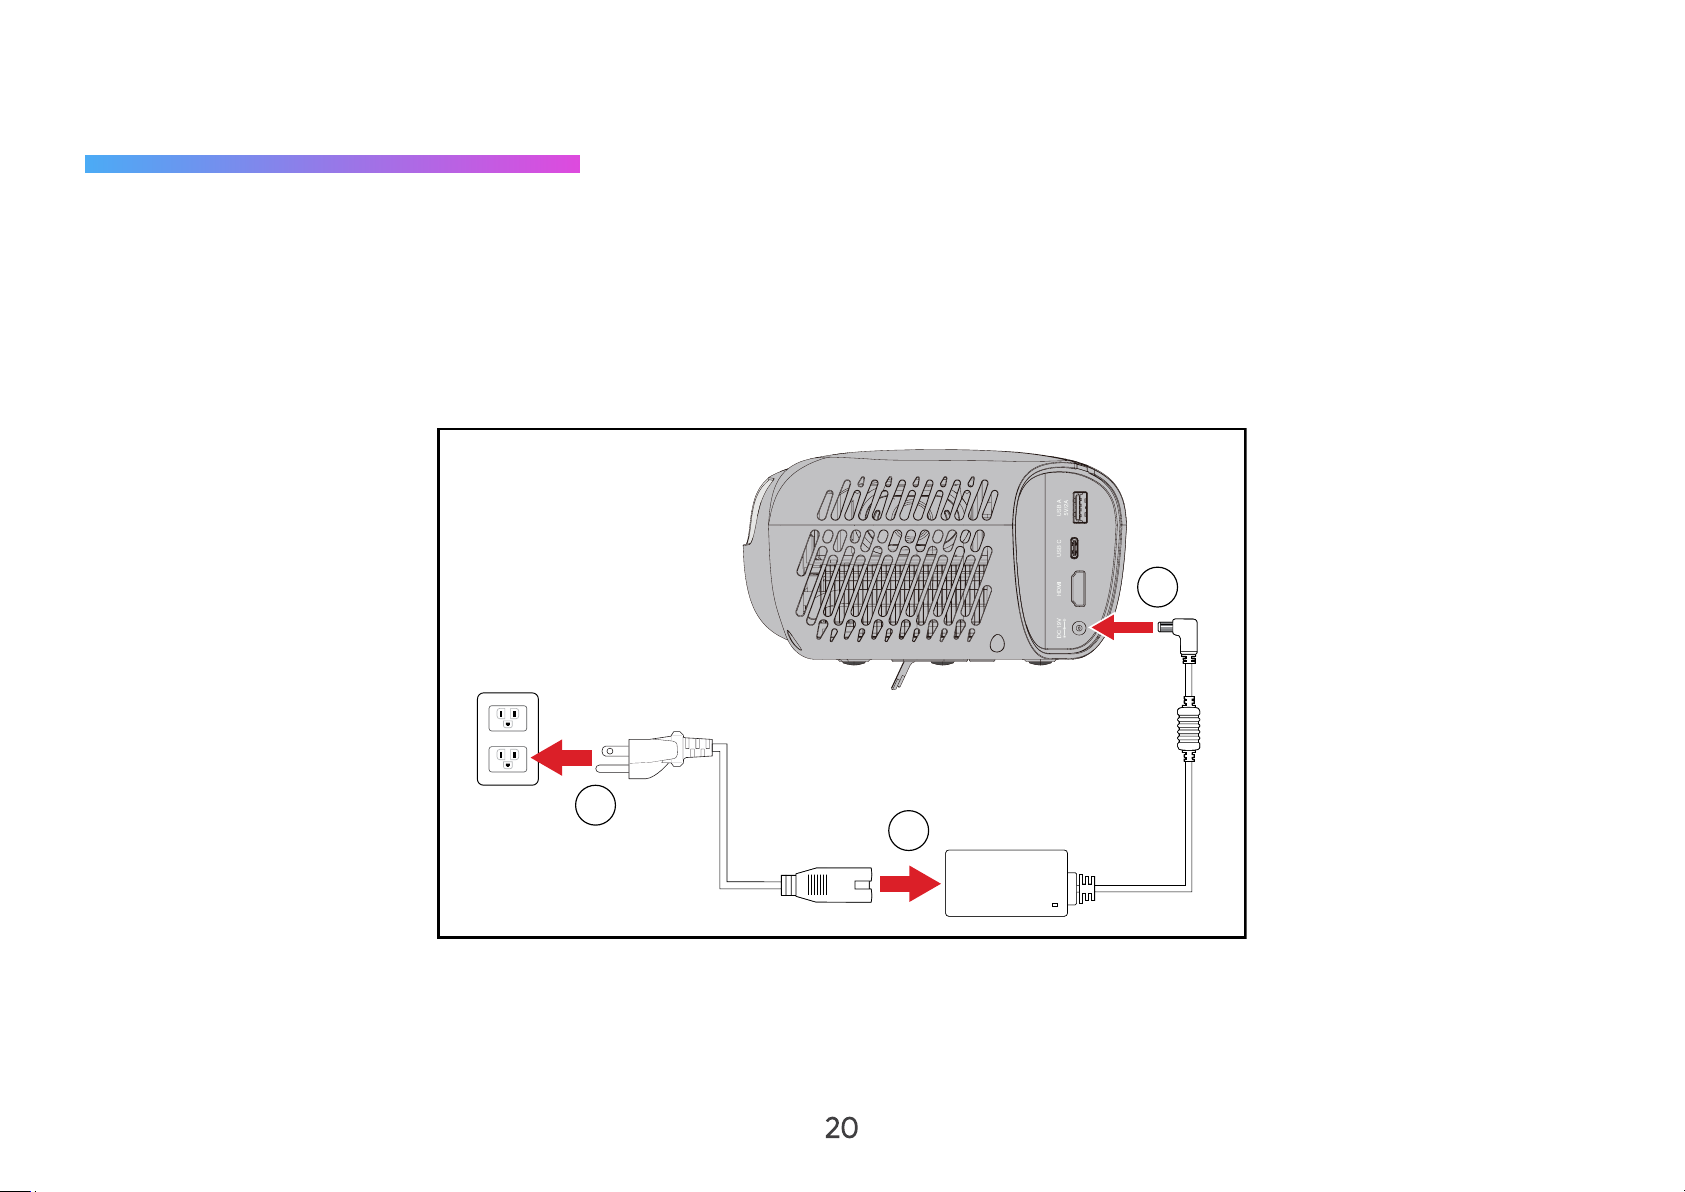
Connecting to Power
DC Power (Power Outlet)
1. Connect the power cord to the power adapter.
2. Connect the power adapter to the DC IN jack at the rear of the projector.
3. Plug the power cord plug into a power outlet.
2
3
1
NOTE: When installing the projector, incorporate a readily accessible disconnect device in the fixed wiring, or connect the
power plug to an easily accessible outlet near the unit. If a fault should occur during operation of the projector, use
the disconnect device to switch o the power supply, or disconnect the power plug.
20
Page 21

CAUTION:
• Ensure that your projector is connected to the power adapter before turning it on for the first time. We strongly recommend that you
use a grounded wall socket while using your projector with the power adapter.
• The socket outlet must be easily accessible and near your projector.
• To disconnect your projector from its main power supply, unplug your projector from the power socket.
21
Page 22
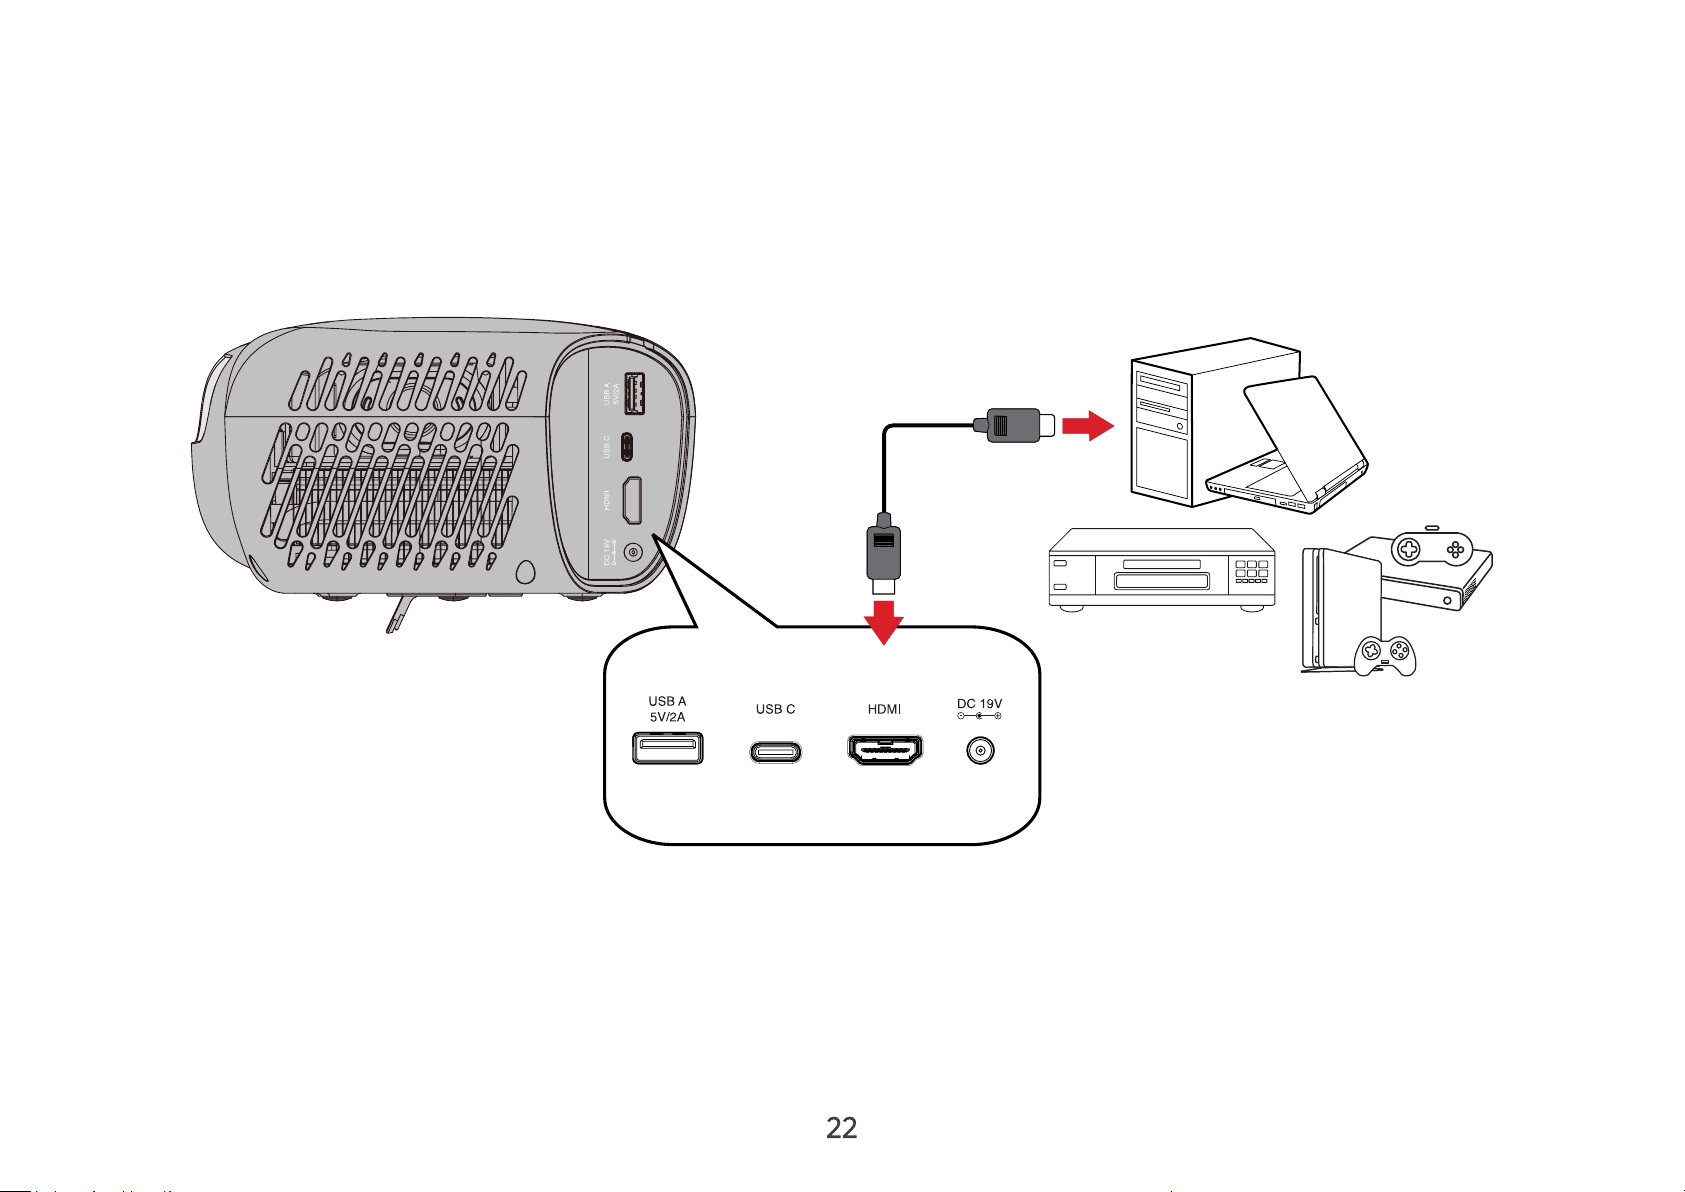
Connecting to External Devices
HDMI Connection
Connect one end of an HDMI cable to the HDMI port of your video device. Then connect the other end of the cable to the
HDMI port (it supports HDMI 1.4, HDCP 1.4) of your projector.
NOTE: iPhone/iPad users will need to use an additional adapter.
22
Page 23
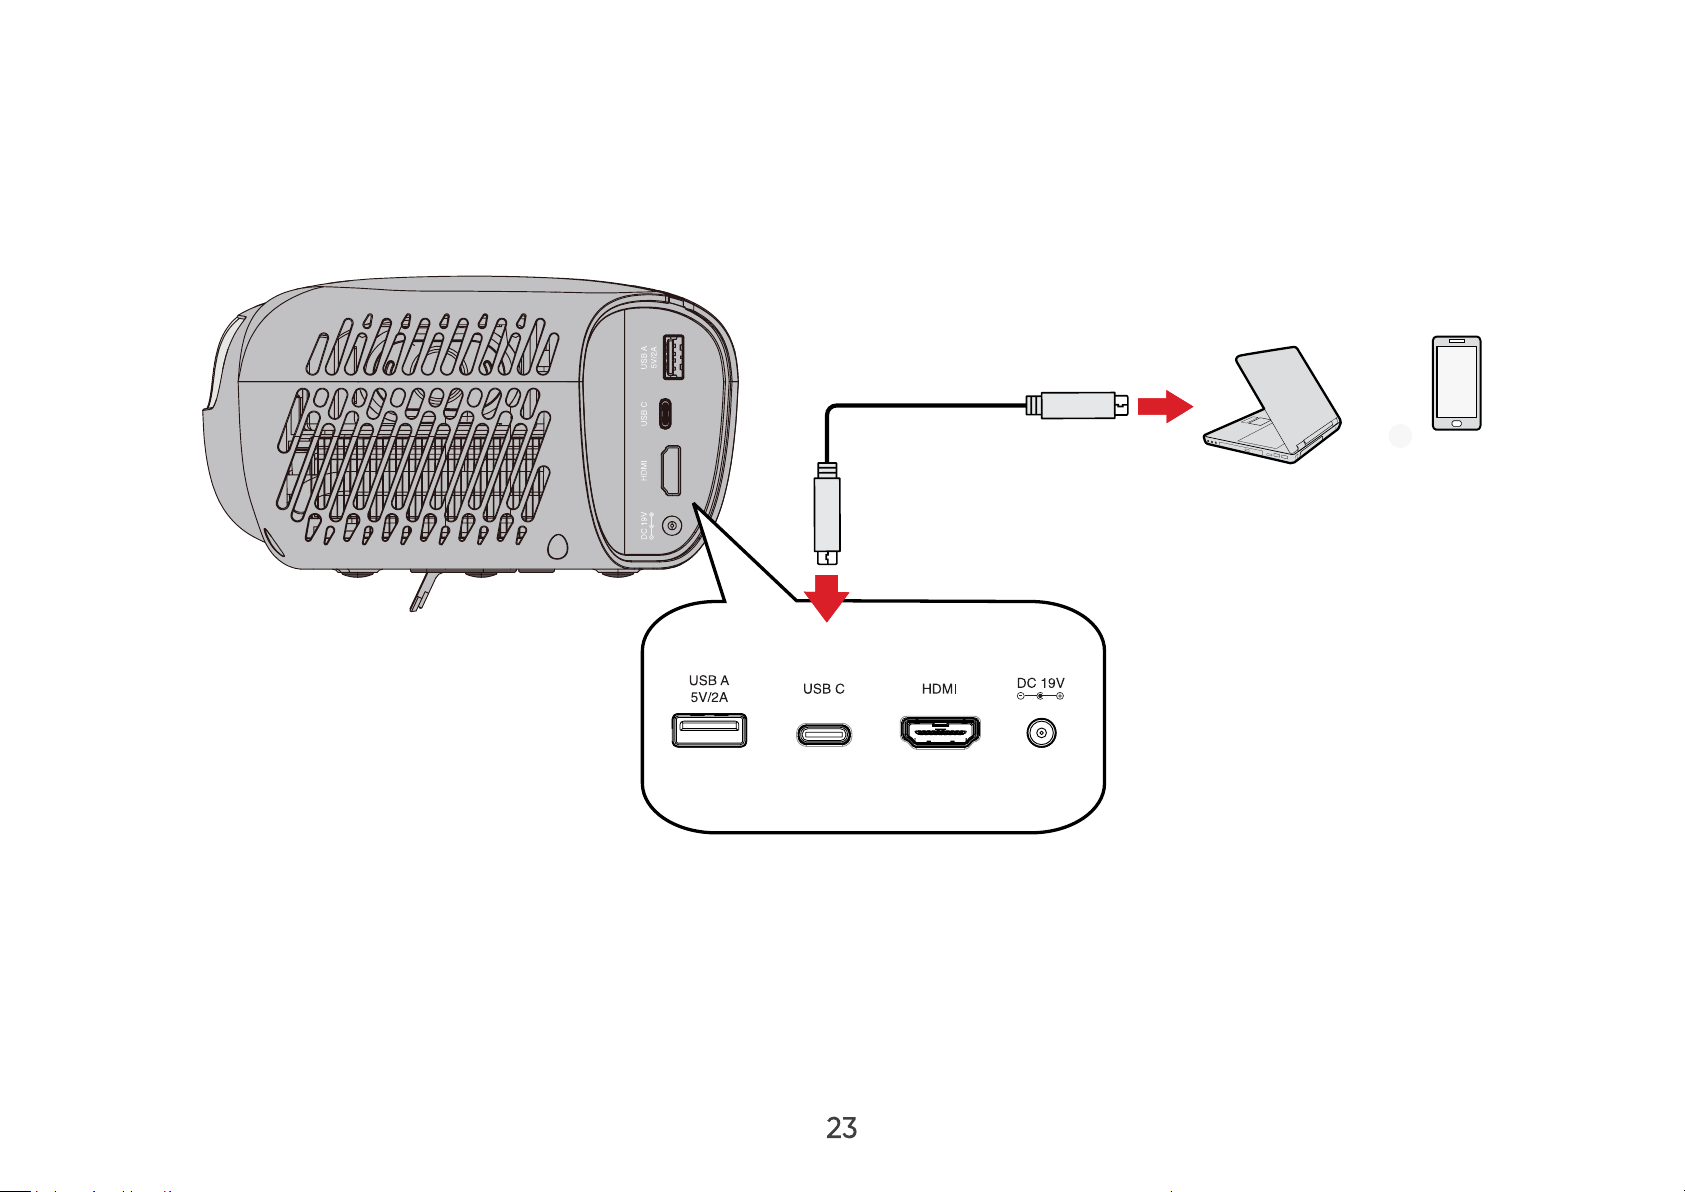
USB Connection
USB-C Connection
Connect one end of a USB Type-C cable to the USB-C port of your device. Then connect the other end of the cable to the
USB-C port of your projector.
NOTE: Ensure your USB Type-C device can support video transmission.
23
Page 24
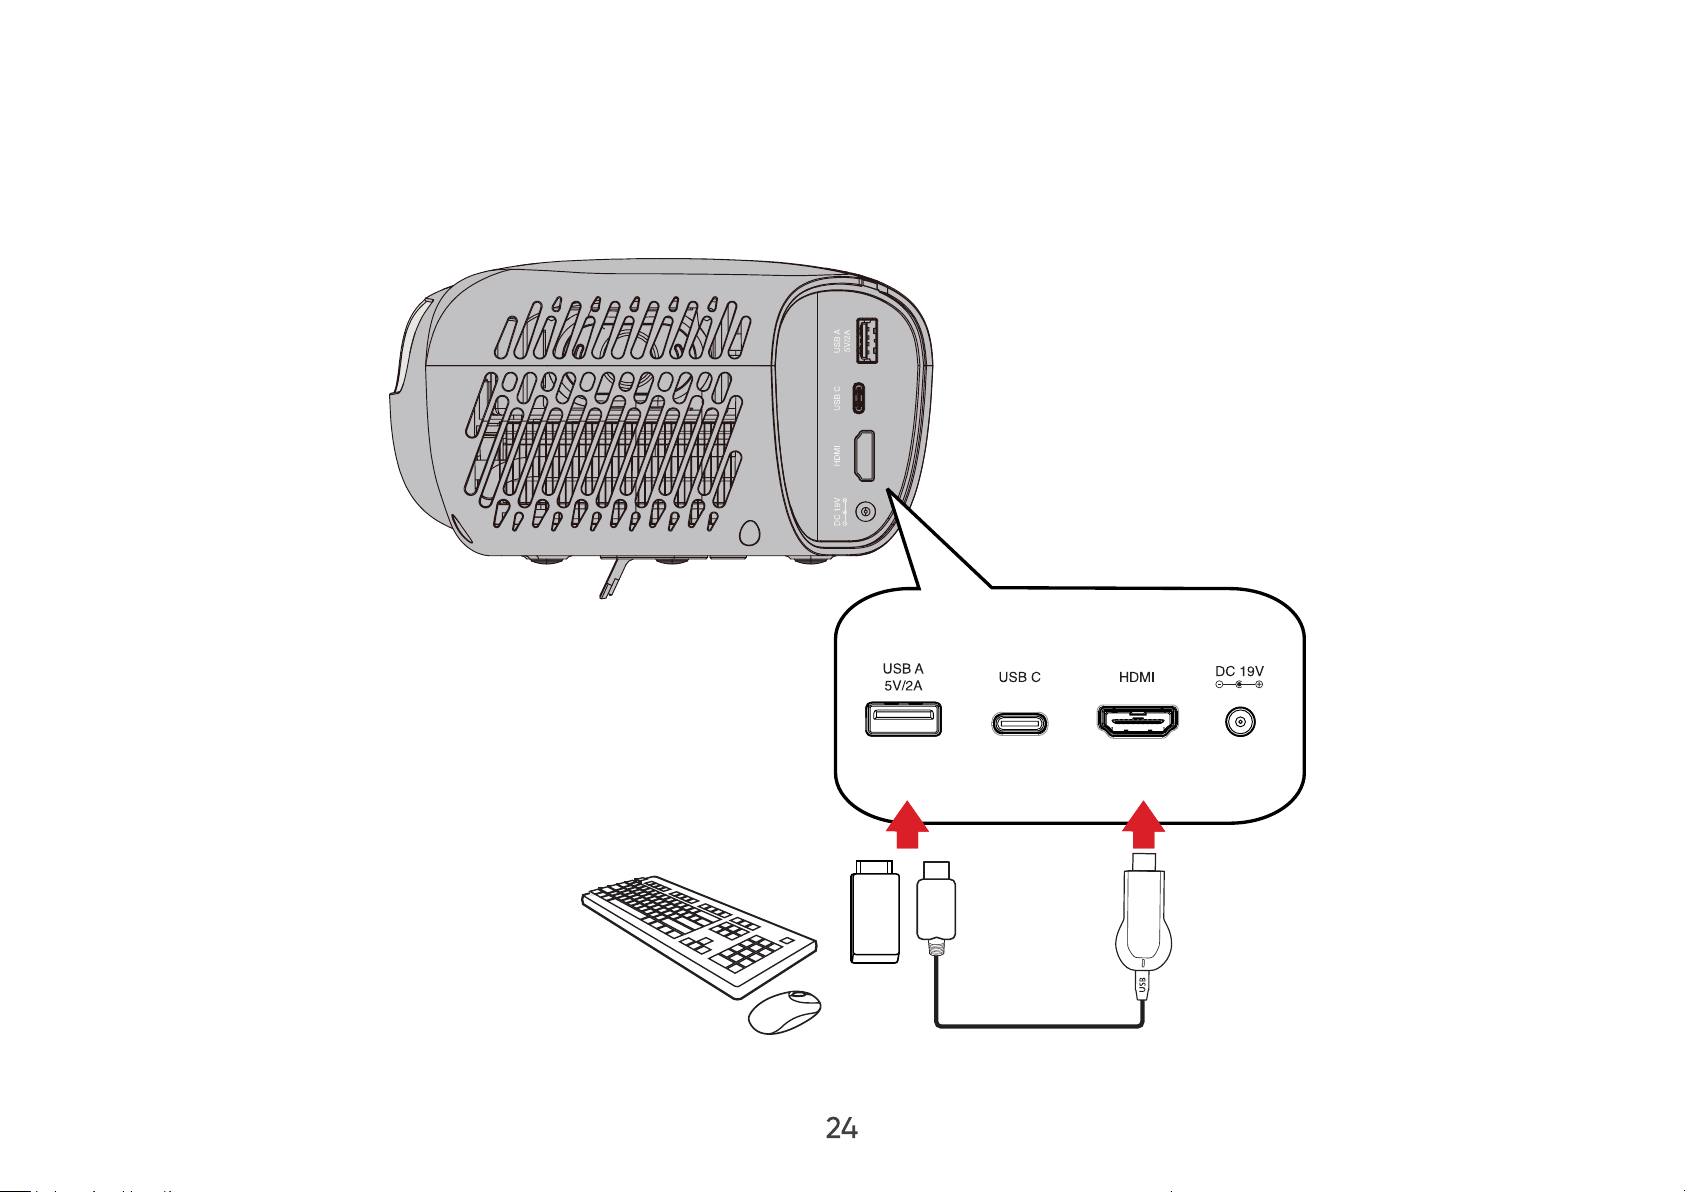
USB Type A Connection
Connect one end of a USB Type A cable to the USB Type A port of your device (if applicable). Then connect the other end of
the cable to the USB A port of your projector.
Additionally, you can connect a keyboard, a mouse, dongles, storage devices, etc. to the projector’s USB A port.
24
Page 25

Wireless Screen Mirroring
Screen Mirroring provides a 5GHz Wi-Fi connection for users to mirror the screen on their personal device.
NOTE:
• Ensure your device is connected to the same network as the projector.
• It is recommended to use a 5GHz Wi-Fi network for best results.
For iOS:
1. Access the drop down control menu.
2. Select the “Screen Mirroring” icon.
3. Choose “NOMVDIC XXXX”.
For Android:
1. Download and install the “Google Home” application and open it.
2. Pull-to-refresh the app and wait for 30 seconds.
3. “NOMVDIC XXXX” will now be visible, select it.
NOTE: Some Android devices support direct “Casting”. If your device does, go to the Casting feature and choose
“NOMVDIC” from the list of available devices. If you do not have the “Google Home” application you can also scan
the QR code and follow the steps to directly cast your Android device.
25
Page 26

Connecting to Audio
Bluetooth Speaker
The projector is equipped with Bluetooth that allows the user to connect their device wirelessly for audio playback.
To connect and pair your device:
1. Go to: Home > Bluetooth.
2. Use the Up (
press OK ( ) on the remote control.
3. A sound eect will be audible upon entering pairing mode.
4. Upon successful connection, another sound eect will be audible.
)/Down ( ) directional buttons on the remote control to select Bluetooth Speaker or Bluetooth Pairing. Then
NOTE:
• Once paired, if both the projector and your device are powered on they will automatically connect via Bluetooth.
• The projector’s name will be labeled as “NOMVDIC L500”.
• To connect the L500 with a paired smart device, select “L500” from the smart device’s Bluetooth settings to connect again each
time.
26
Page 27

Bluetooth Out
Connect the projector to external headphones or speakers that support Bluetooth.
To connect and pair your device:
1. Go to: Home > Bluetooth.
2. Use the Up (
) on the remote control.
3. The projector will search for nearby Bluetooth devices. Select your device from the list and press OK (
control.
NOTE: Bluetooth Out cannot work with Bluetooth Speaker or Bluetooth Pairing at the same time.
)/Down ( ) directional buttons on the remote control to select the Bluetooth Out option. Then press OK (
27
) on the remote
Page 28
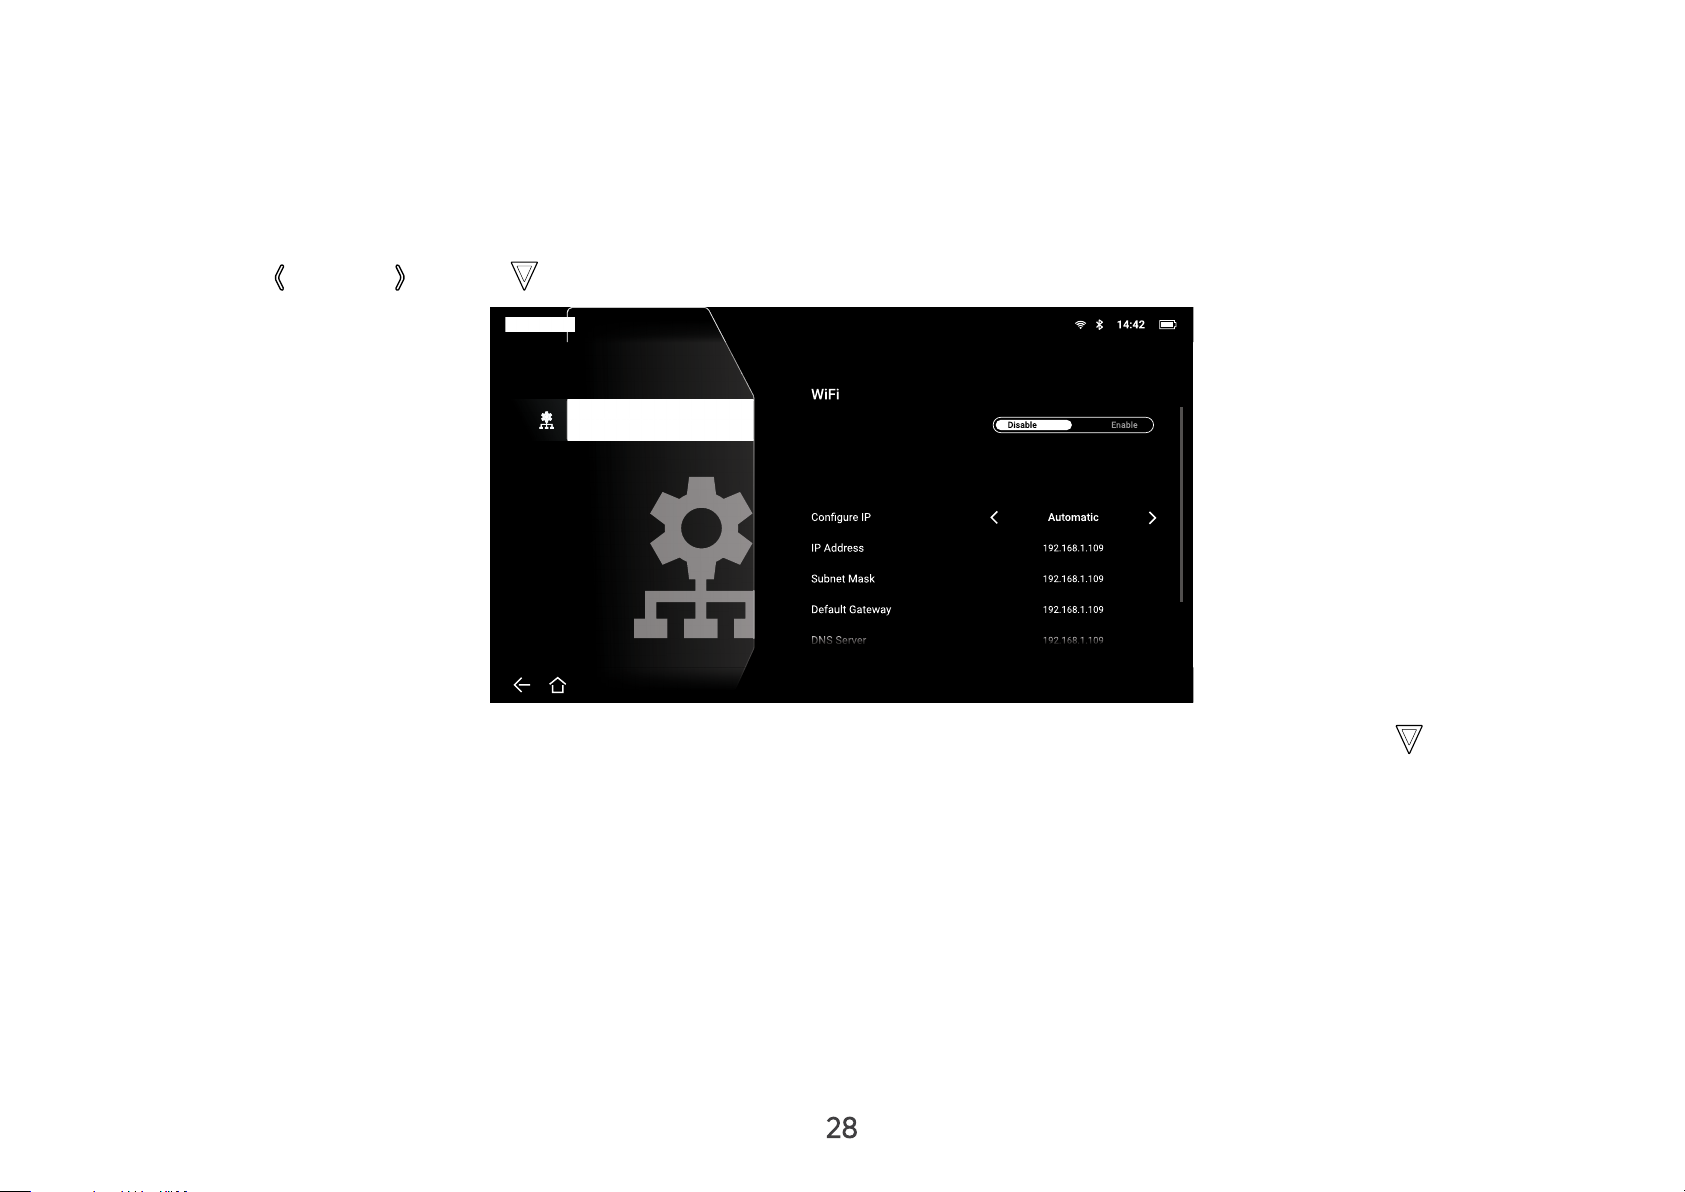
Connecting to Networks
Wi-Fi Connection
To connect to a Wi-Fi network:
1. Go to: Home > Settings > Network Settings > Wi-Fi.
2. Press Left (
)/Right ( ) or OK ( ) on the remote control to select Enable.
Settings/
SSID
Name
3. Available Wi-Fi networks will then be displayed. Select one of the available Wi-Fi networks and press OK ( ) on the
remote control.
4. If you connect to a secure Wi-Fi network, you must enter the password when prompted.
28
Page 29

Custom SSID
To connect to a Wi-Fi network:
1. Go to: Home > Settings > Network Settings > Wi-Fi.
2. Press Left (
3. From the available Wi-Fi networks list select Others and press OK (
4. Enter the SSID and select the security level.
5. Enter the password when prompted.
NOTE: It is recommended to let the system configure the network settings automatically by choosing Automatic for
Configure IP.
)/Right ( ) or OK ( ) on the remote control to select Enable.
) on the remote control.
29
Page 30

NOMVDIC Remote Control App
In addition to the remote control supplied with the L500, the NOMVDIC Remote Control App can be downloaded to a
smartphone and be used to control the projector.
For iOS:
1. Go to the App Store.
2. Search for, select, and download the “NOMVDIC Remote Control” App.
3. Install the App.
4. Connect your smartphone and the L500 to the same Wi-Fi network.
For Android:
1. Go to the Google Play Store.
2. Search for, select, and download the “NOMVDIC Remote Control” App.
3. Install the App.
4. Connect your smartphone and the L500 to the same Wi-Fi network.
30
Page 31
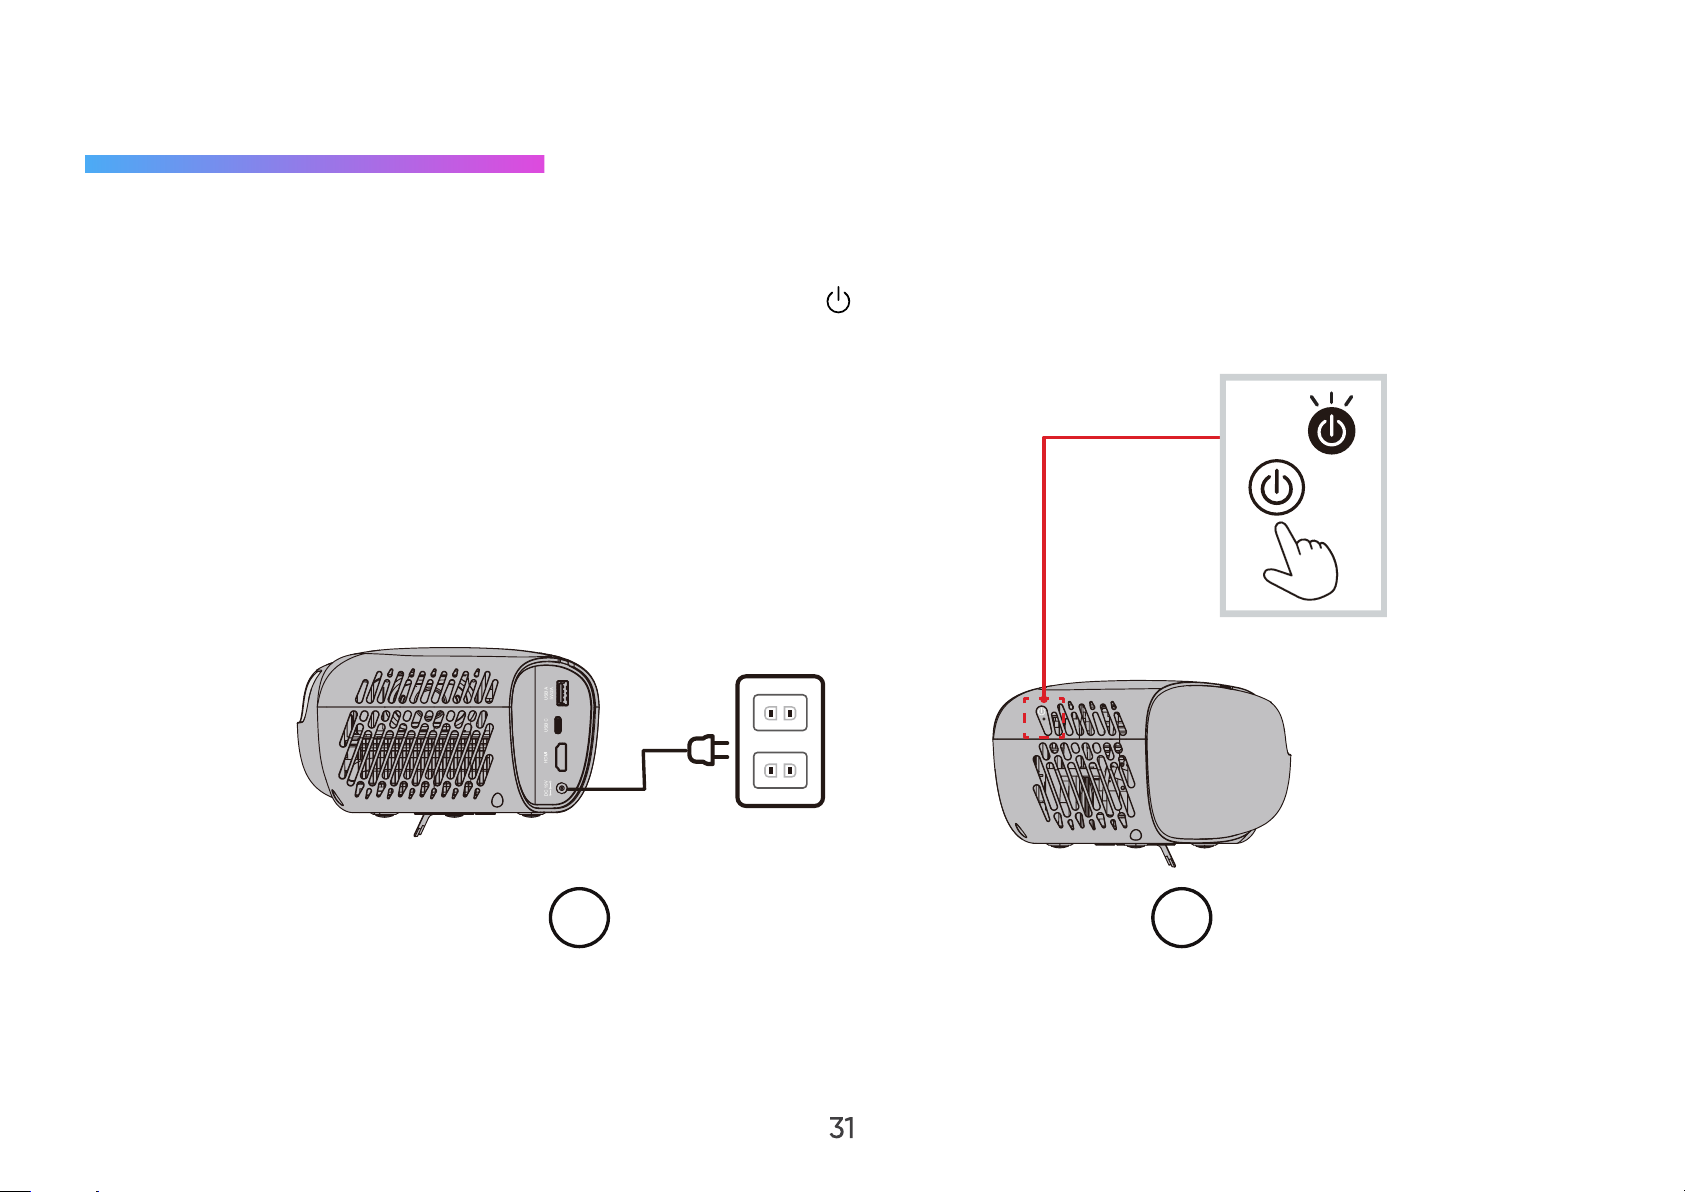
Using the Projector
Starting Up the Projector
1. Ensure the projector’s power cord is properly connected to a power outlet.
2. After plugging in the DC Power Adapter, press the Power (
NOTE: The Status LED will be flashing green during the startup process, and solid green after completion.
) button to turn on the projector.
1 2
31
Page 32

First Time Activation
If the projector is activated for the first time, you will need to set up your Bluetooth Pairing, Preferred Language, and Network
Settings. Follow the on-screen instructions using the remote control. When the “Finish screen” appears, this indicates the
projector is ready to use.
Bluetooth Pairing
Pair the Bluetooth remote. For more information, see page 26.
32
Page 33

Preferred Language
Select the desired language and press OK ( ) on the remote control to confirm the selection.
33
Page 34

Network Settings
Select one of the available Wi-Fi network options. For more information, see page 28.
NOTE: You can also control the L500 with the NOMVDIC Remote Control App. To learn more see page 30.
34
Page 35
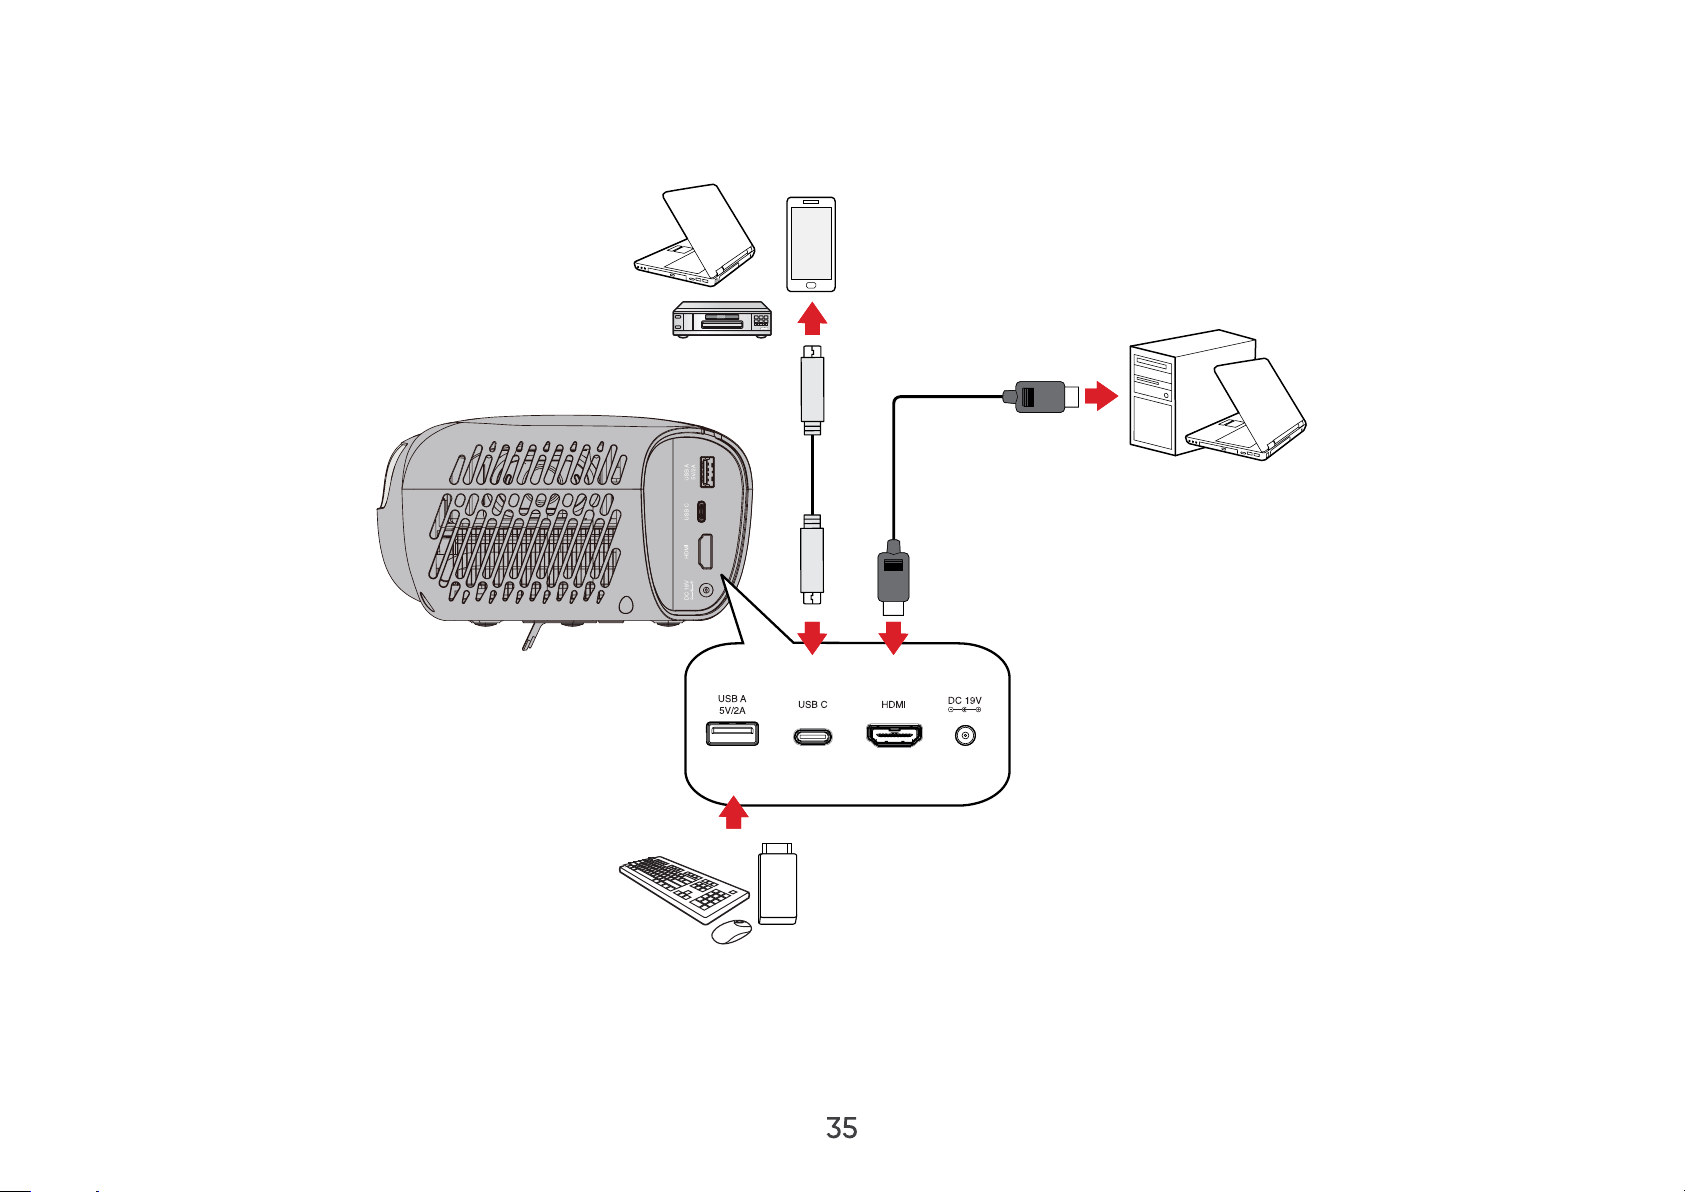
Selecting an Input Source
The projector can be connected to multiple devices at the same time. However, it can only display one source at a time.
35
Page 36

The projector will automatically search for input sources. If multiple sources are connected, press the Left ( ) button on the
remote control until the source input tab is selected and then choose the input source.
NOTE: Ensure the connected sources are also turned on.
36
Page 37

Adjusting the Projected Image
Fine-Tuning the Image Quality
To adjust the image to the size you need:
1. Go to: Home > Settings > Basic Settings > Zoom.
2. Press Left (
To improve the image clarity, just press Focus (
press and hold Focus (
to adjust the clarity.
)/Right ( ) to reduce or magnify the image.
) on the remote control for three (3) seconds to display the test pattern, then press Left ( )/Right ( )
) on the remote control. If you need to manually fine-tune the image clarity,
37
Page 38

Correcting Keystone
Keystoning refers to the situation where the projected image becomes a trapezoid due to angled projection.
To correct the problem:
• Adjust the projection angle or height of the projector.
• If the installation location of the projector does not allow for angle or height adjustment, you can use the Auto Keystone
function from the OSD menu.
Go to: Home > Settings > Basic Settings > Keystone > Auto Keystone > select Enable.
• If you need to manually correct the image after the Auto Keystone adjustment:
1. Go to: Home > Settings > Basic Settings > Keystone > Auto Keystone > select Disable.
2. Press Up (
Highlight V Keystone and press Left (
Highlight H Keystone and press Left (
)/Down ( ) to highlight H Keystone, or V Keystone.
)/Right ( ) to correct the vertical keystone.
)/Right ( ) to correct horizontal keystone.
38
Page 39

4 Corner Adjustment
You can manually adjust the shape and size of an image that is unevenly rectangular on all sides.
1. Go to: Home > Settings > Basic Settings > Keystone > 4 Corner > select Enable > press OK (
now be displayed.
2. Use Up (
3. Use Left (
NOTE: As indicated on the screen, Up (
4. Press Up (
back to a previous step. Pressing Settings (
NOTE:
• Adjusting keystone will reset the Corner Adj. settings.
• After the Corner Adj. settings have been modified, some aspect ratios or timings may not be available. When that
happens, reset the settings on all four (4) corners.
• If the projector is not placed on a flat surface or the screen and the projector are not perpendicular to each other, the
projected image can become trapezoidal. However, the Auto Keystone function will correct the issue automatically.
)/Down ( )/Left ( )/Right ( ) to select the corner you wish to adjust and press OK ( ).
)/Right ( ) to select an adjustment method that suits your need and press OK ( ).
)/Down ( ) for a 40-degree angle adjustment and Up ( )/Down ( )/Left ( )/
Right (
) for a 40-degree angle adjustment.
)/Down ( )/Left ( )/Right ( ) to adjust the shape and size. You can press Return ( ) or Settings ( ) to go
) will reset the settings on the corner that you have chosen.
). The Corner Adj. menu will
39
Page 40

Shutting Down the Projector
1. Press the Power ( ) button on the remote control.
2. Using the Up (
NOTE: If you do not respond within a few seconds after the first press of the Power (
)/Down ( ) buttons on the remote control, highlight Turn O and press OK ( ) on the remote control.
) button, the message will disappear.
40
Page 41

Operating the Projector
Home Screen
The Home Screen is displayed every time you start the projector. To navigate the Home Screen, simply use the directional
buttons (
) button on the remote control, regardless of what page you are on.
)/( )/( )/( ) on the remote control. You can return to the main Home Screen at any time by pressing the Home (
41
Page 42
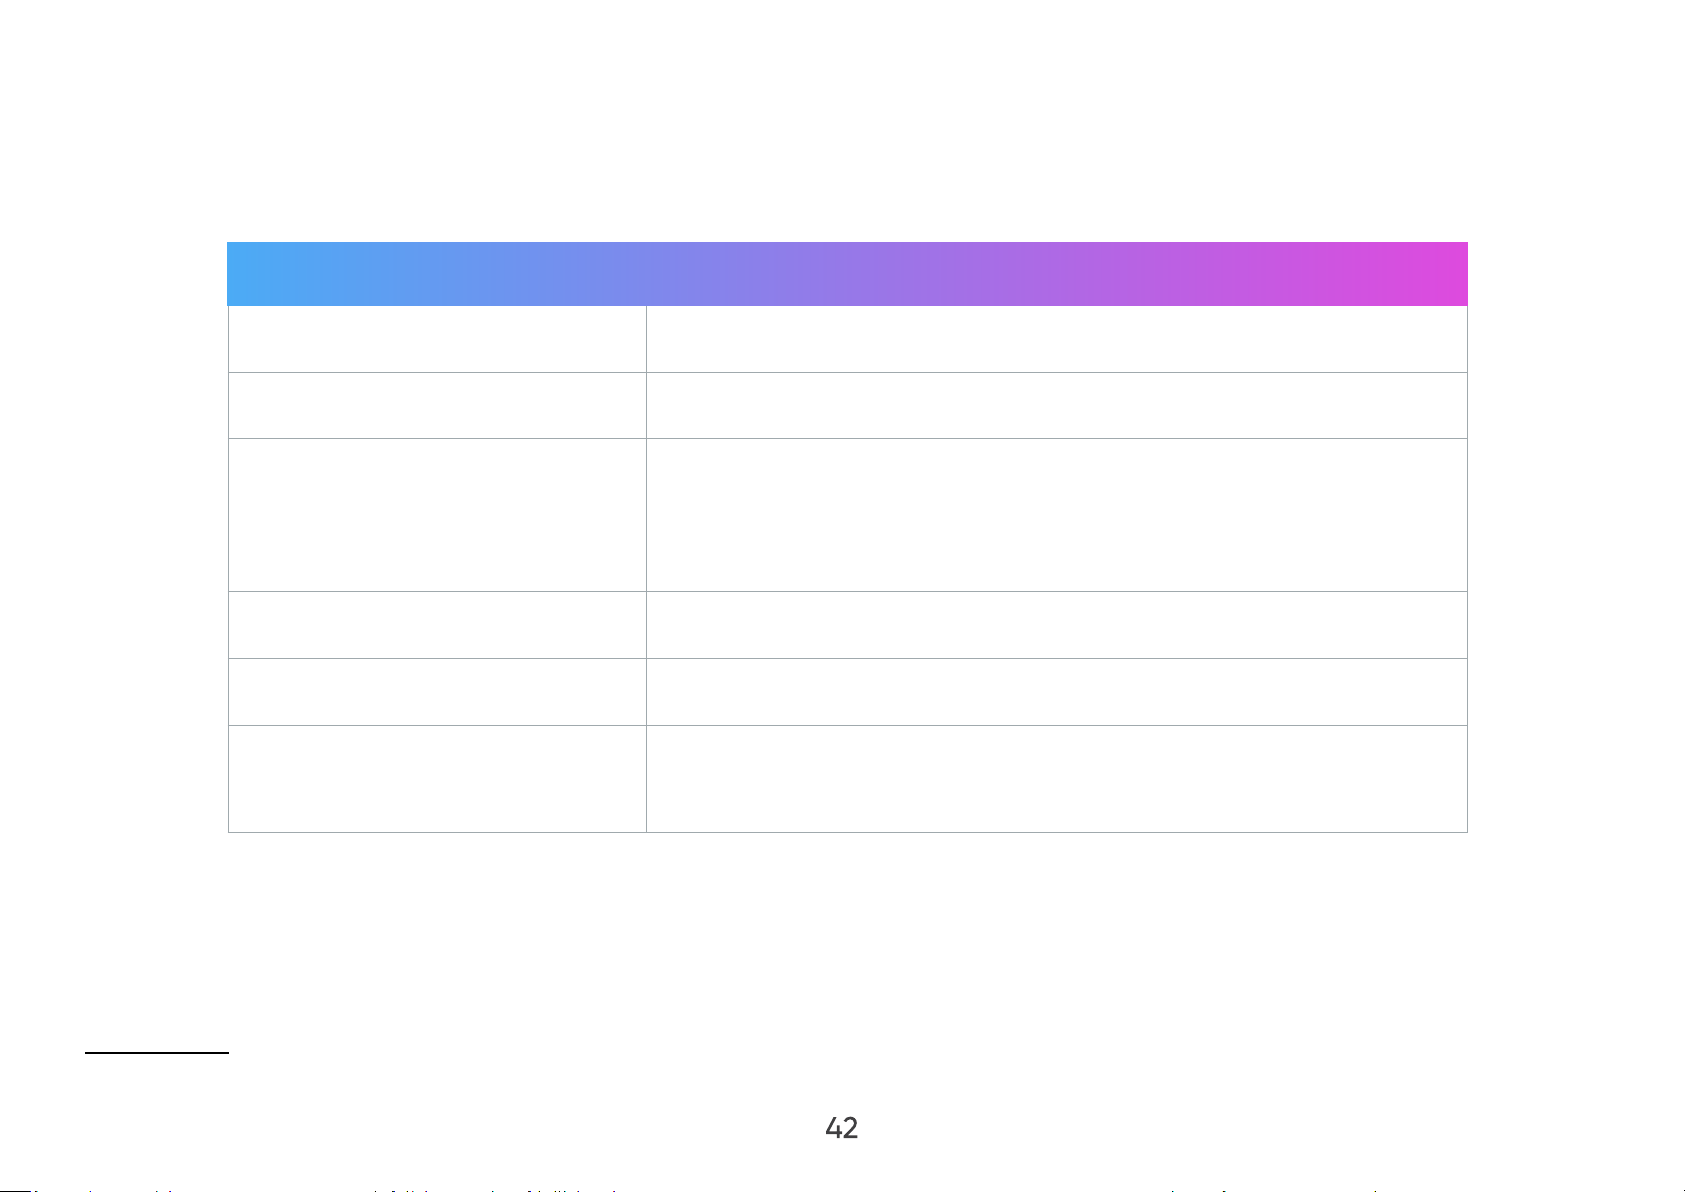
Menu Description
File Management
Apps Center
Settings
Screen Mirroring
Bluetooth
Add App
Provides a user interface to manage files and folders.
Access and view all the applications you have installed.
Manage various categories such as: Network settings, Date & Time,
Basic and Advanced settings, Firmware update, and System Information.
Mirror your personal device’s screen through the projector.
Select the appropriate Bluetooth mode.
Select your favorite Apps and add them to the Home Screen1.
Up to four (4) Apps can be added to the Home Screen.
42
Page 43
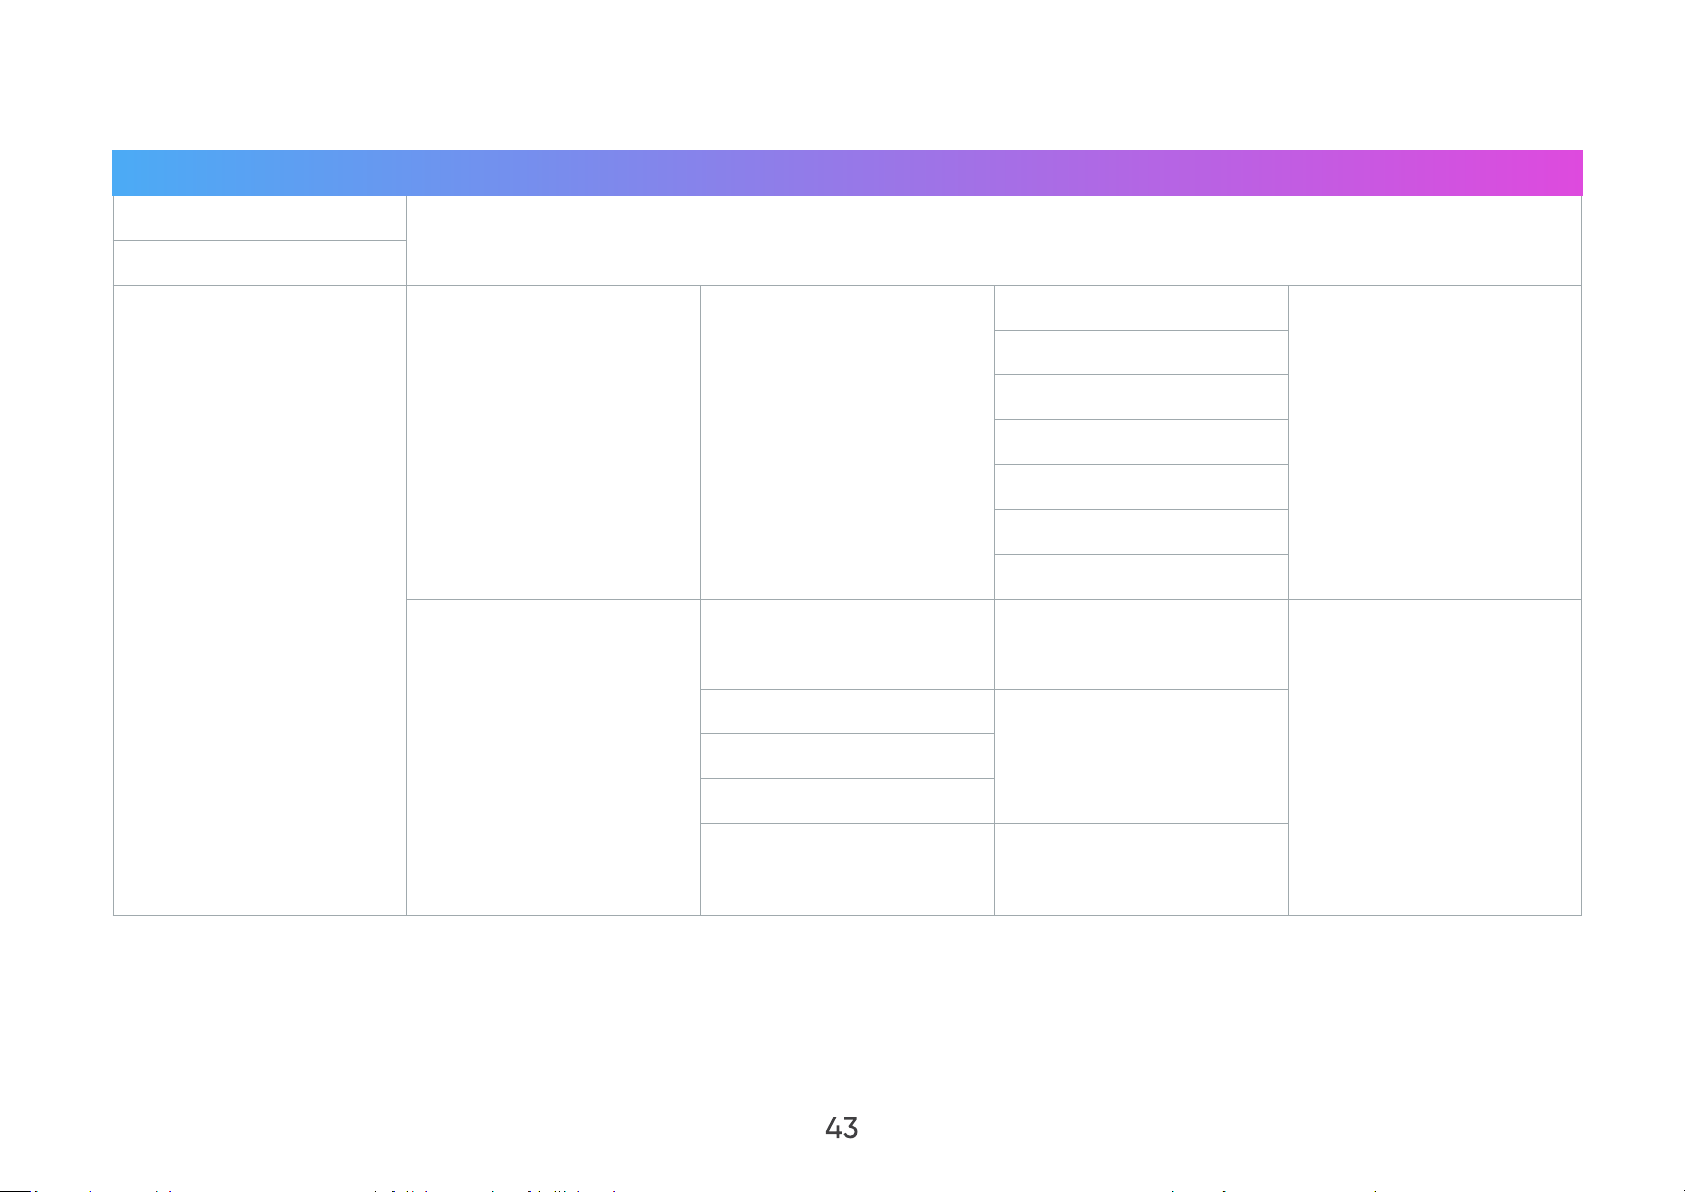
Home Screen - On-Screen Display (OSD) Menu Tree
Main Menu Sub-menu Menu Option
File Management
Apps Center
Disable/Enable
SSID
Configure IP
Settings
Network Settings Wi-Fi
Automatic Date & Time Disable/Enable
Date
Date & Time
Time
Time Zone
Time Format 12 hours/24 hours
IP Address
Subnet Mask
Default Gateway
DNS Server
43
Page 44
Main Menu Sub-menu Menu Option
English Turkish
French Czech
German Portuguese
Italian Thai
Spanish Polish
Russian Finnish
Settings
Basic Settings Language
繁體中文
Arabic
簡體中文
日本語
韓語
Swedish
Dutch
Indonesian
Hindi
44
Page 45
Main Menu Sub-menu Menu Option
Vietnamese
Settings
Basic Settings
Language
Projector Projection
Keystone
Zoom 0.8x~1.0x
Greek
Hungarian
Front Table/Front
Ceiling/Rear Table/Rear
Ceiling
Auto Keystone
V Keystone (-/+, -40~40)
H Keystone (-/+, -40~40)
4 Corner Disable/Enable
4 Corner Adjustment
Manual Focus
Focus
Auto Focus Calibration
Test Pattern OK
Auto Focus
45
Page 46
Main Menu Sub-menu Menu Option
Disable
Settings
Advanced Settings
Power On Source
Auto Power On
Power On Ring Tone Disable/Enable
Smart Energy
HDMI
USB C
Direct Power On
CEC
Auto Power O
Sleep Timer
Disable/10 minutes/
20 minutes/30 minutes
Disable/30 minutes/
1 hour/2 hours/3 hours/
4 hours/8 hours/12 hours
46
Power Saving Disable/Enable
Page 47
Main Menu Sub-menu Menu Option
Movie
Settings
Advanced Settings
Audio Mode
Audio Settings
Audio Volume (-/+, 0~50)
Mute
Light Source Level Full/Eco
High Altitude Mode Disable/Enable
Reset Settings
Reset to Factory Default
Music
User
Disable
Enable
47
Page 48
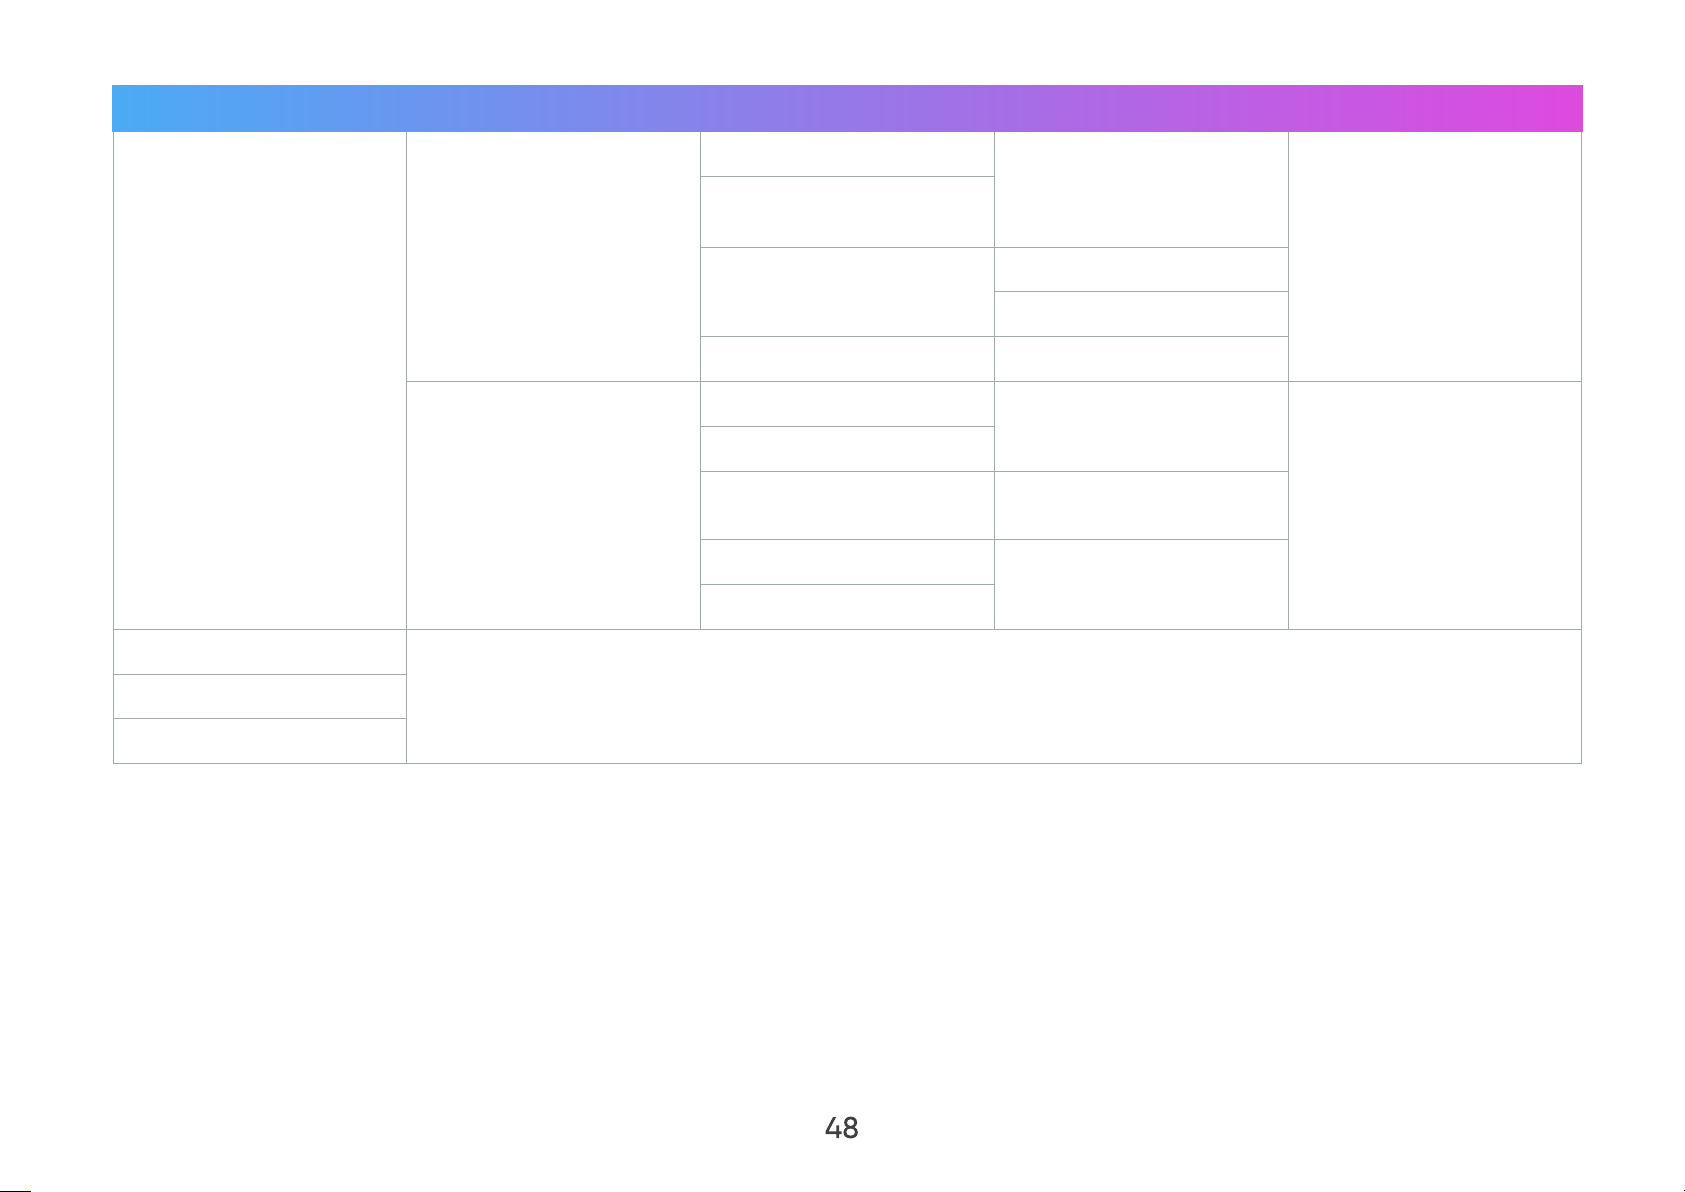
Main Menu Sub-menu Menu Option
Software Update Online
Software Update by
USB
Firmware Upgrade
OTA Reminder
Software Version
Settings
Light Source Hours
System Version
Disable
Enable
Screen Mirroring
Bluetooth
Add App
Information
Memory Information
Wi-Fi Mac Address
Serial Number
xx GB (Free)/xx GB
(Total)
48
Page 49

Menu Operations
File Management
Easily manage files and folders.
1. Go to: Home > File Management.
49
Page 50

2. Select a device on the source list: USB, Local Storage, etc. Use the directional buttons ( )/( )/( )/( ) on the remote
control to select the desired file. Then press the Right ( ) button on the remote control to open the selected file.
3. Press the Return ( ) button on the remote control to go to a previous a level.
NOTE: Press the Home (
) button on the remote control to return to the Home Screen at anytime.
50
Page 51

How to Edit a File
1. While in File Management, press and hold the OK ( ) button on the remote control for three (3) seconds.
2. A check box will appear at the front of each file. Use the directional buttons (
one or more files.
)/( )/( )/( ) and press OK ( ) to select
51
Page 52
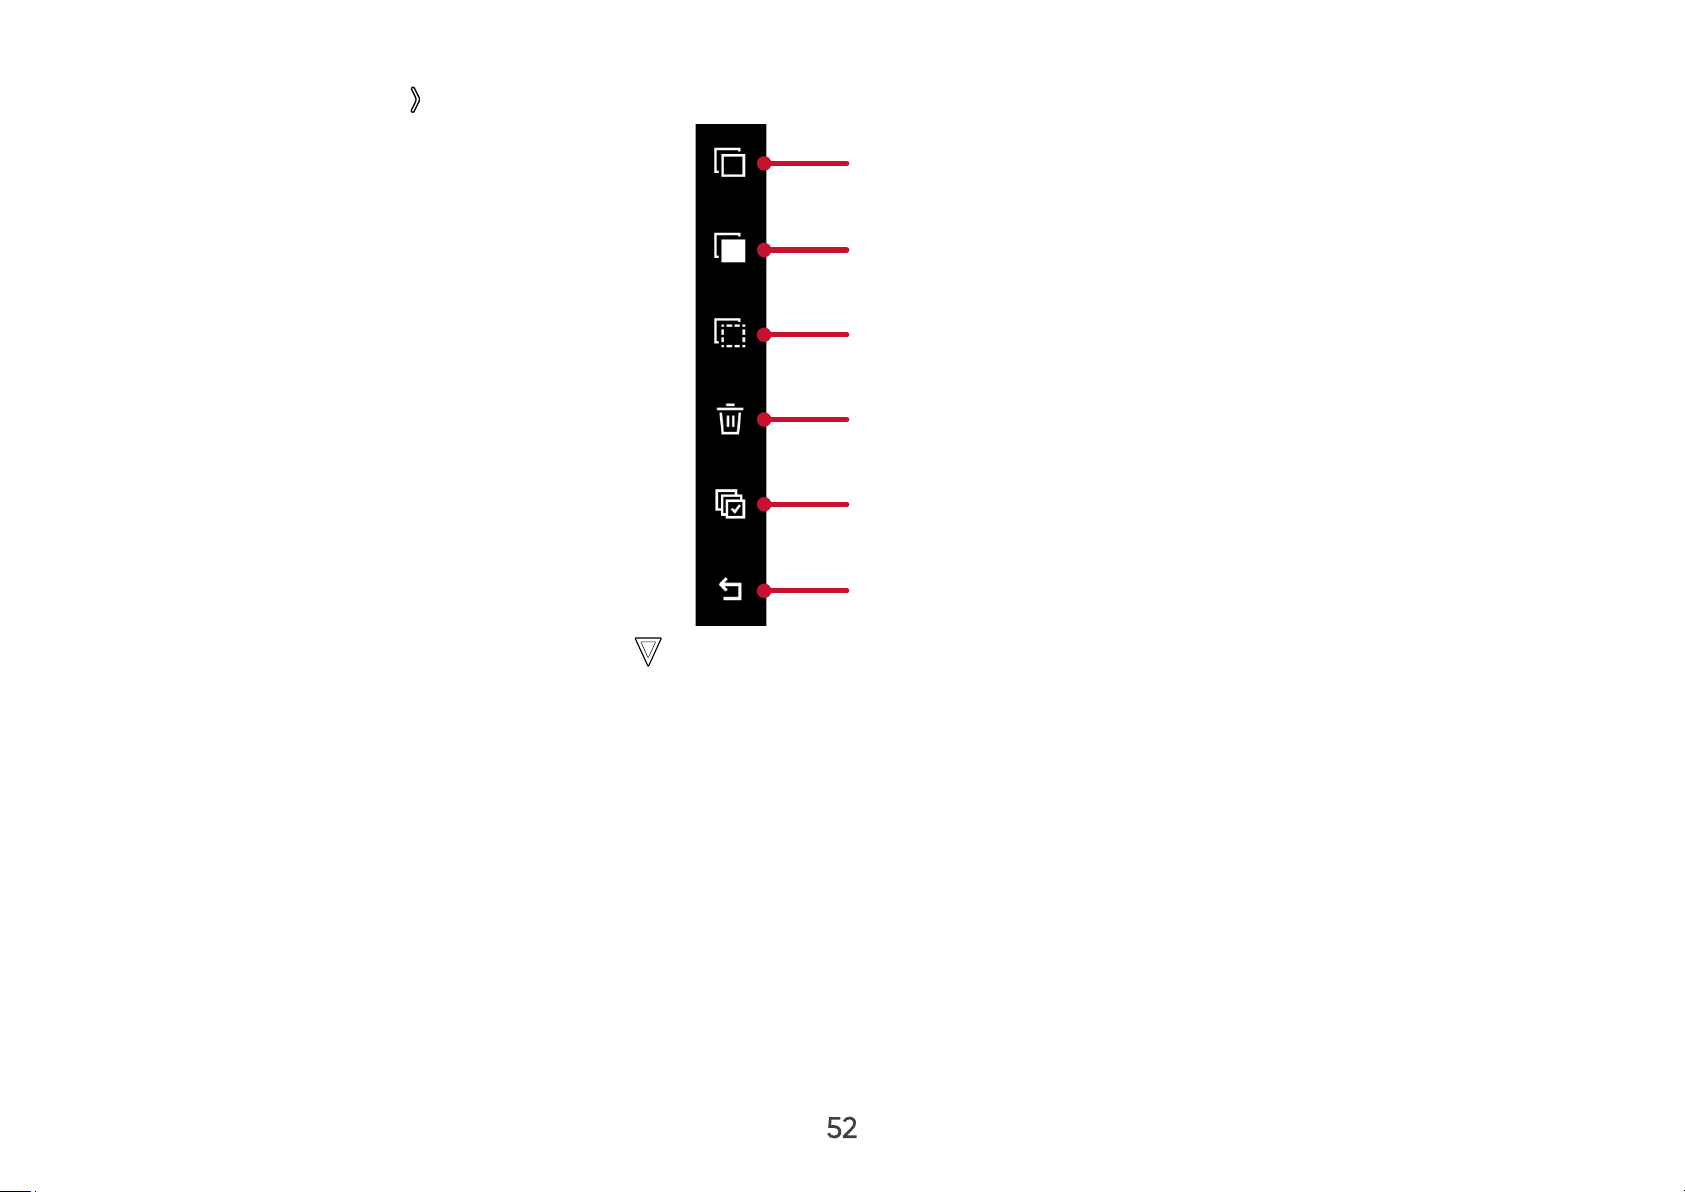
3. By pressing the Right ( ) button, Copy, Paste, Cut, Delete, Select All, and Return boxes will be available for use.
Copy
Paste
Cut
Delete
Select All
Return
4. Select your desired action and press OK ( ) to execute.
5. If you are Copying or Cutting, select your destination folder to complete the process.
52
Page 53
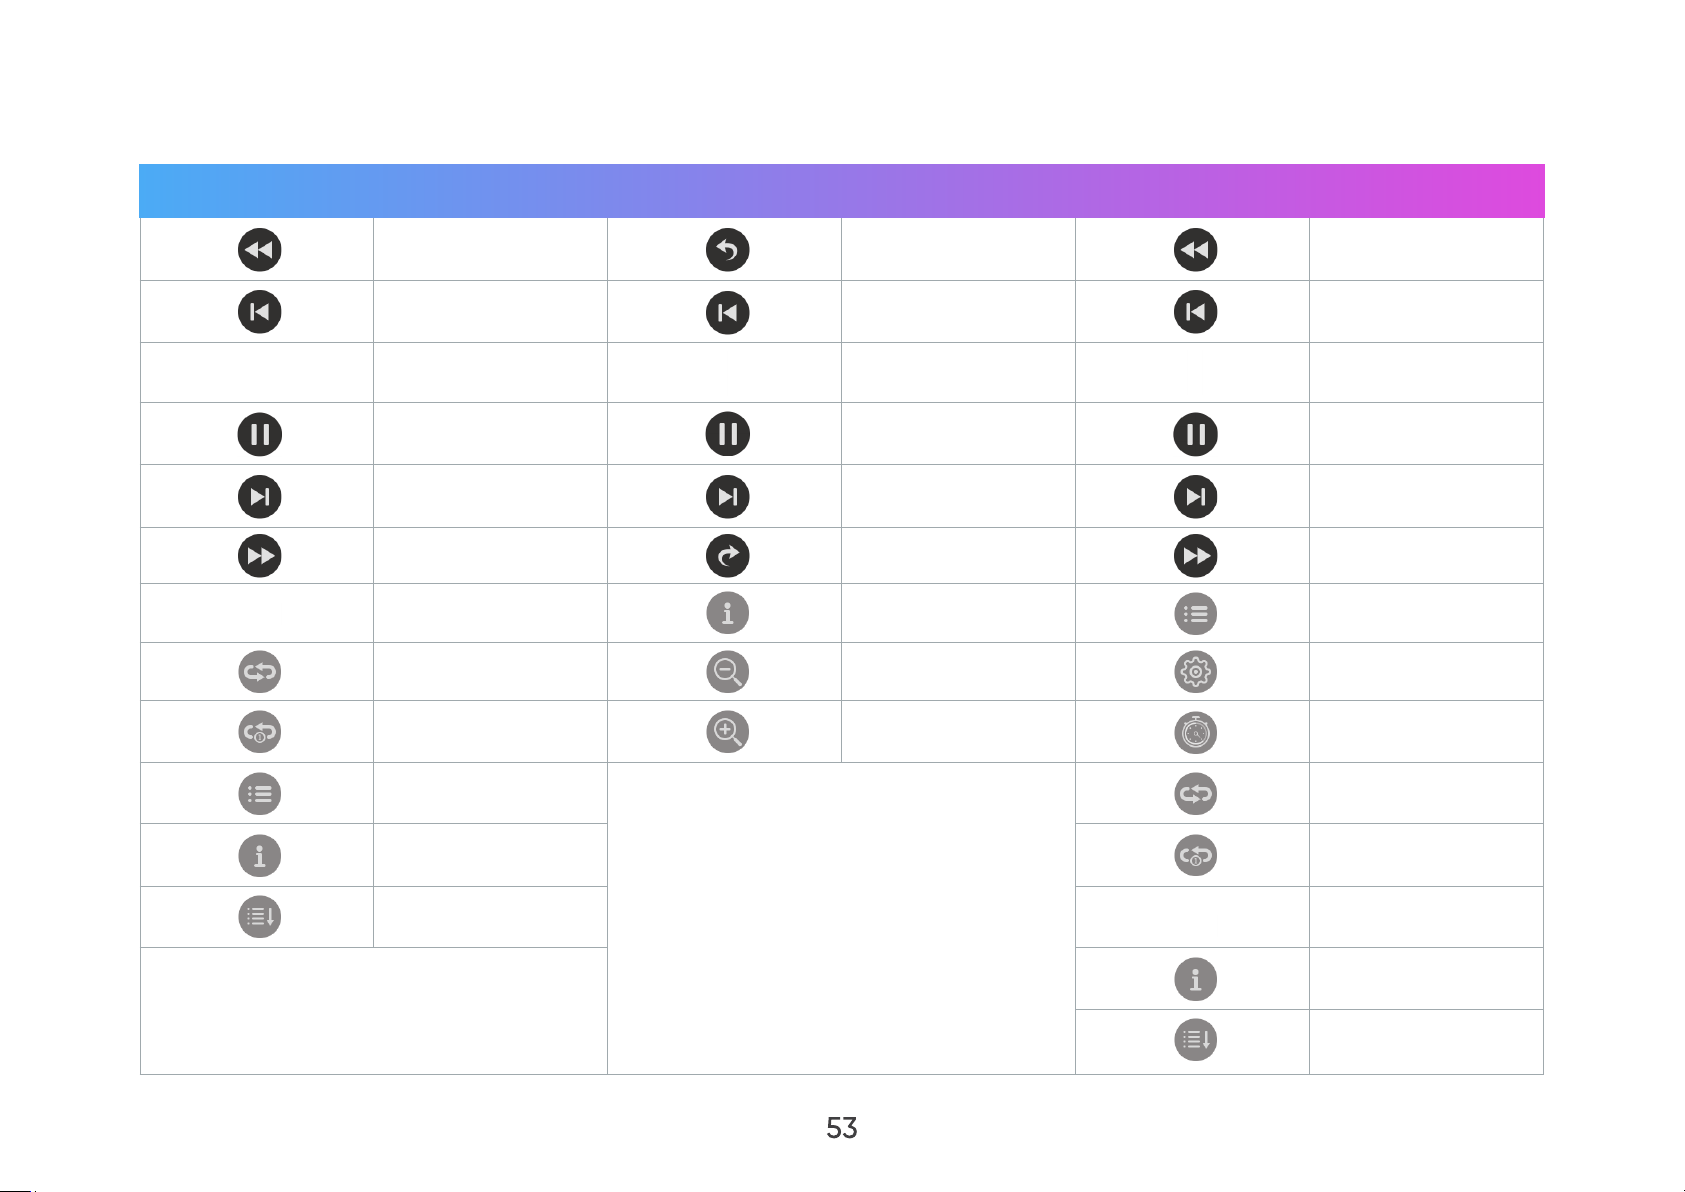
How to Use Control Bar Buttons
The control bar buttons will appear on screen if a video, music, or photo file is opened.
Audio Picture Video
Rewind
Previous
Play Play Play
Pause Pause Pause
Next Next Next
Fast Forward Rotate (Right) Fast Forward
Shue Media Information Playlist
Repeat All Zoom out Play Settings
Repeat Once Zoom in Broadcast Time
Playlist Repeat All
Rotate (Left)
Previous Previous
Rewind
Media Information Repeat Once
Linear Play Shue
Media Information
Linear Play
53
Page 54
Tips for Using USB
When using USB for reading and/or storage please keep in mind the following:
1. Some USB storage devices may not be compatible.
2. If you use an USB extension cable, the USB device may not recognize the USB.
3. Only use USB storage devices formatted with Windows FAT32 or NTFS file system.
4. Larger files will need extra time to load.
5. Data on USB storage devices may be damaged or lost. Back up important files.
Supported File Formats
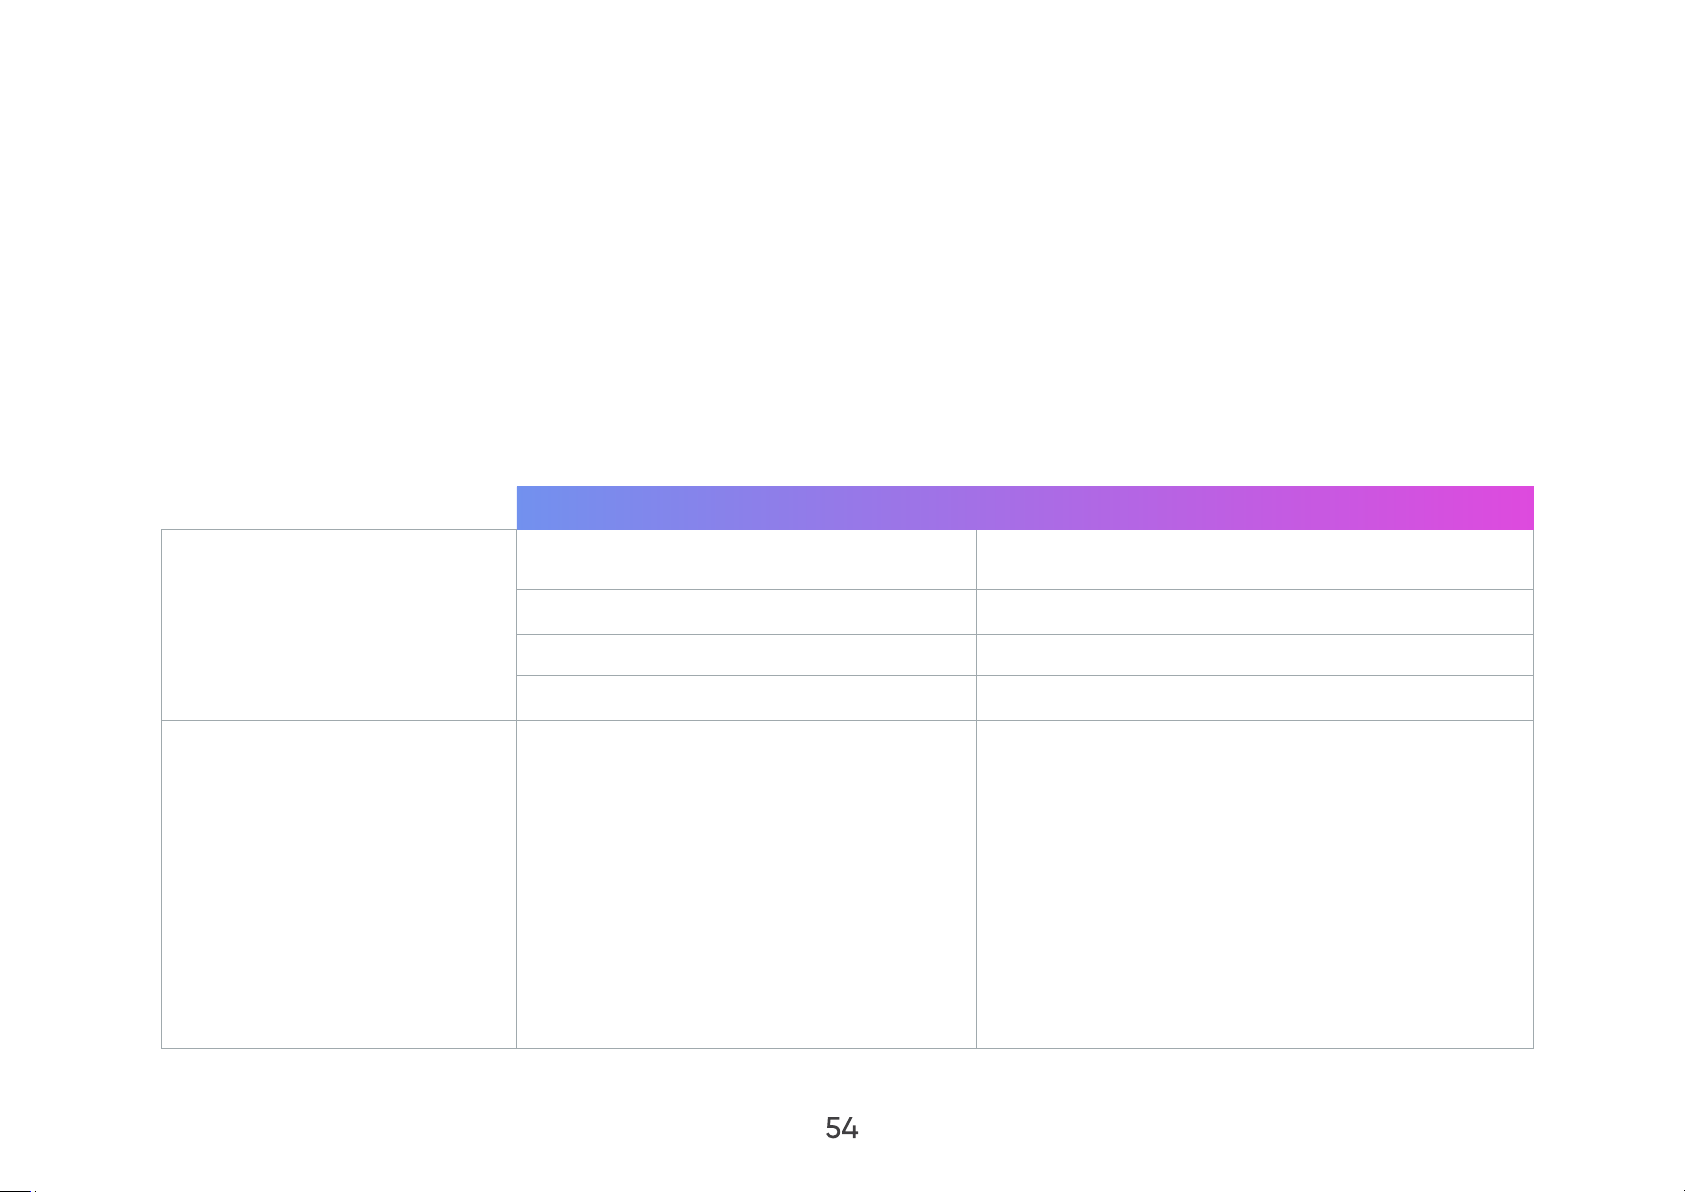
Supported Oce formats:
Item Description
doc/docx Able to open and read documents in doc/docx.
Document Viewing Function
Supporting Interface
Language
xls/xlsx Able to open and read documents in xls/xlsx.
ppt/pptx Able to open and read documents in ppt/pptx.
PDF Able to open and read documents in PDF.
Supporting 44 Interface Languages
54
English, Simplified Chinese, Chinese (TW),
Chinese (HK), Spanish (LA), French (EU), PT (EU),
PT (BR), German, Russian, Italian, Swedish,
Spanish (EU), Korean, Arabic, Farsi, Serbian,
Bosnian, Macedonian, Bulgarian, Ukrainian,
Greek, Norwegian, Danish, Czech, Hungarian,
Slovak, Polish, Romanian, Finnish, Estonian,
Latvian, Lithuanian, British English, Slovenian,
Croatian, Turkish, Vietnamese, Bahasa
Indonesia, Dutch, Malay, Thai, Hindi, Hebrew,
Burmese, Catalan.
Page 55
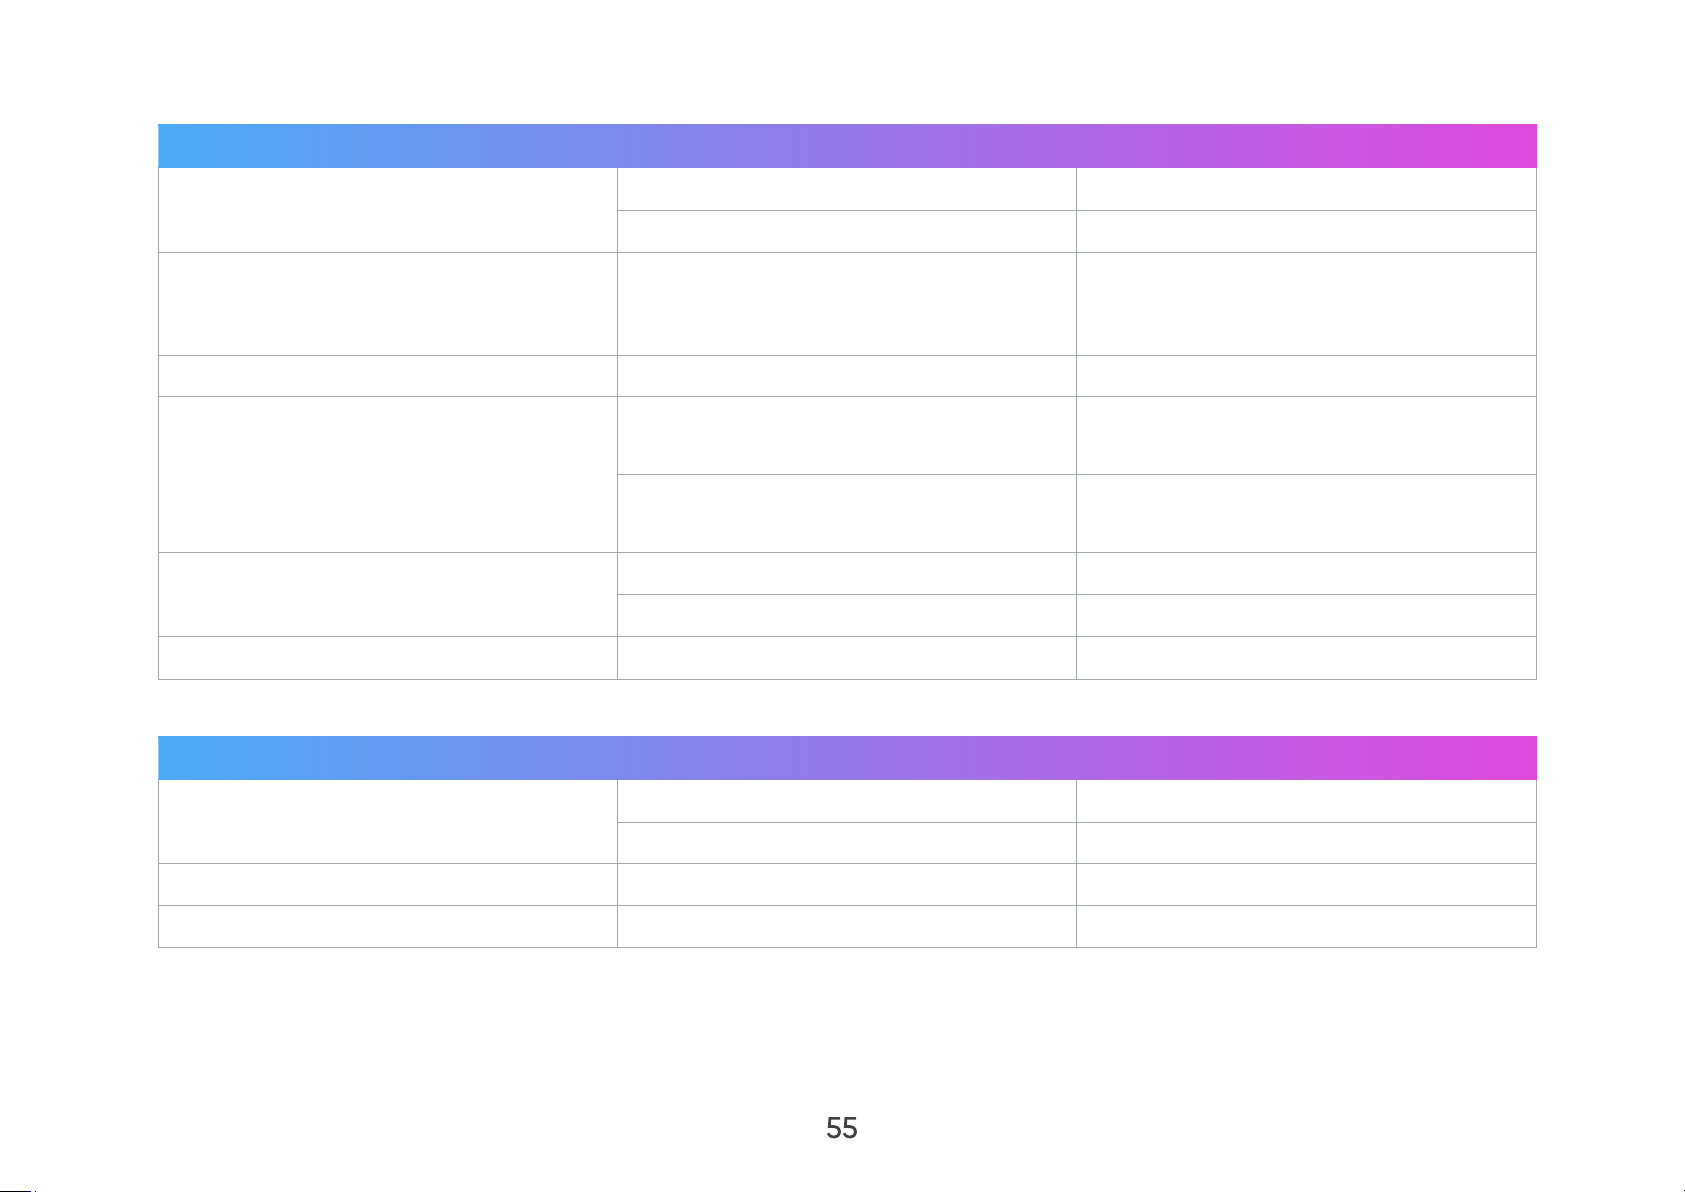
Supported Multimedia Formats:
Extension Type Codec
.avi
Video Xvid, H.264
Audio MP3
.mp4
.mov
.mkv Video H.264
.ts
.vob
.mpg Video MPEG-1
Supported Photo Formats:
Extension Type Maximum Resolution
.jpg/.jpeg
Video H.264/MPEG-4
Video H.264, MPEG-2
Audio MP3
Video MPEG-1, MPEG-2
Audio DVD-LPCM
Progressive JPEG 7680 x 4320
Baseline JPEG 7680 x 4320
.bmp 9600 x 6400
.png 7680 x 4320
55
Page 56
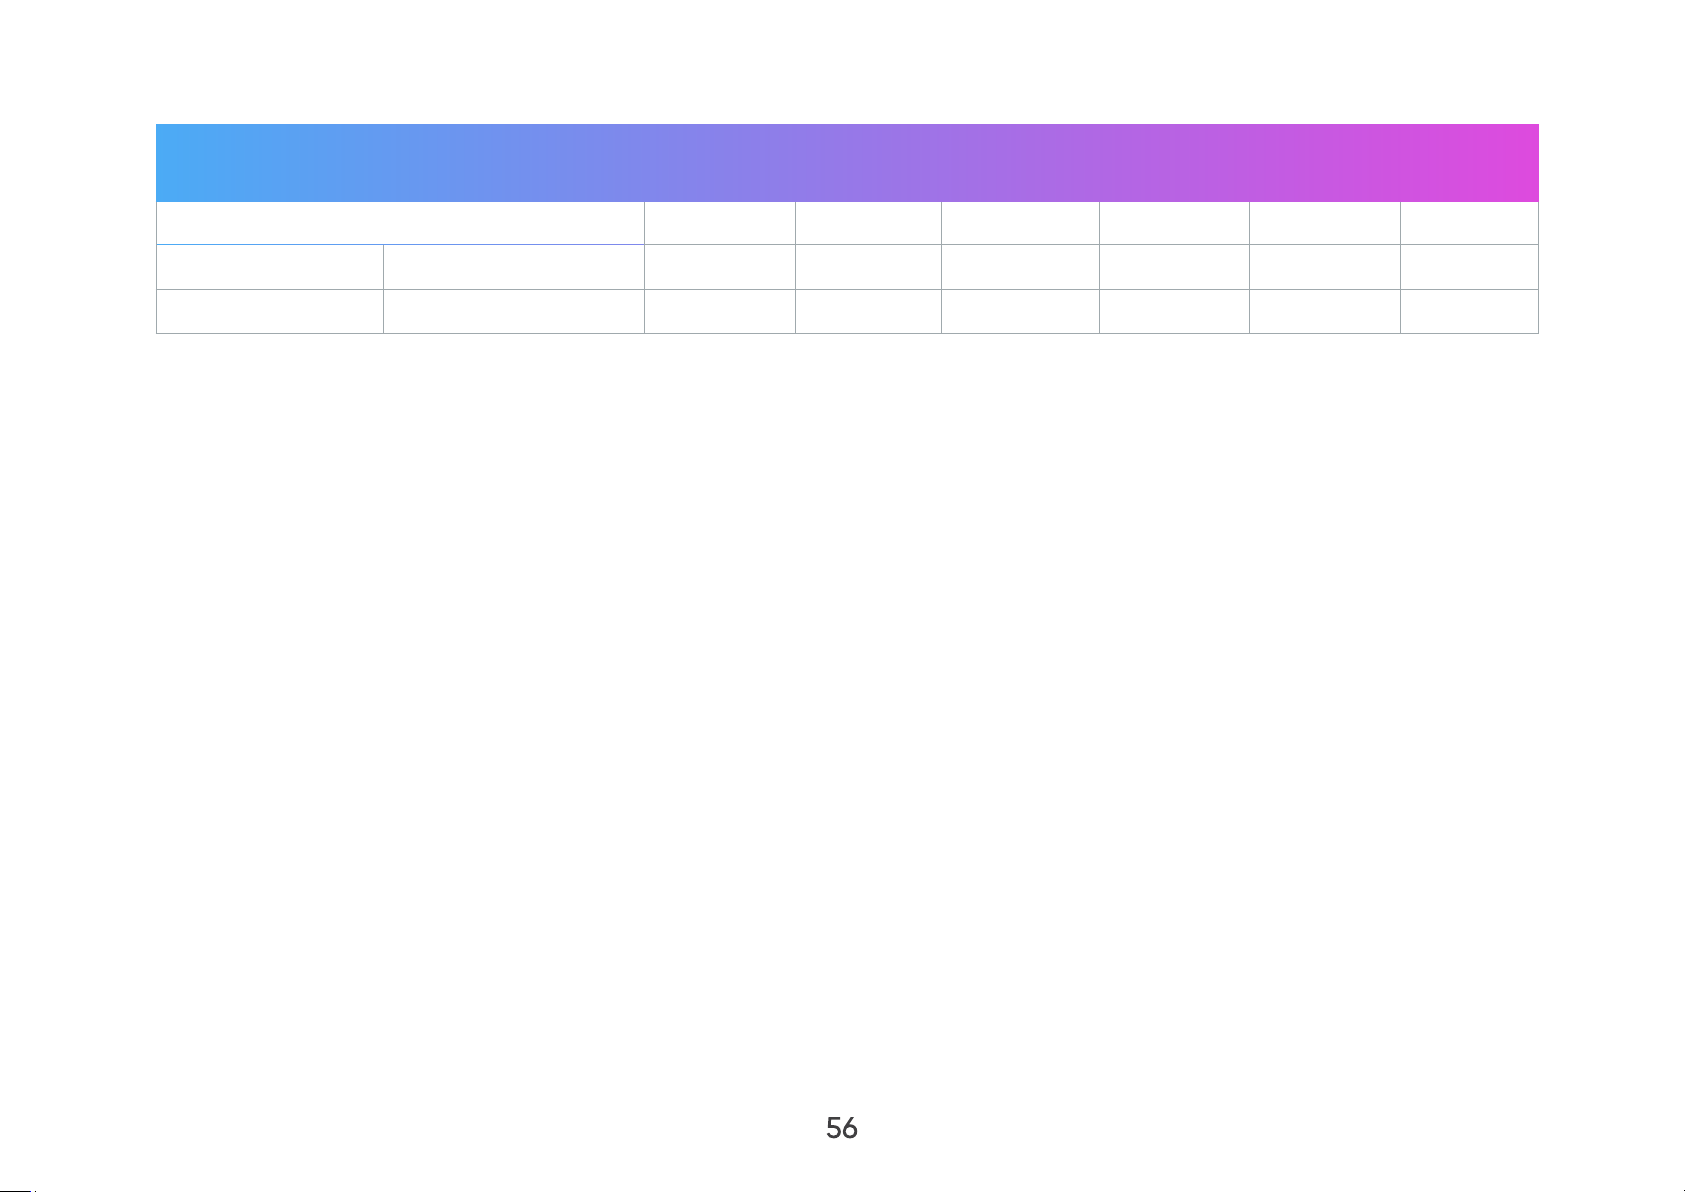
Supported External Connected Device Formats:
Device
NTFS Support FAT32 Format exFAT
(Max. Size)
Read Write Read Write Read Write
USB Memory Stick 256 GB V N/A V V N/A N/A
USB HDD 2 TB V N/A V V N/A N/A
NOTE:
• Windows 10 built-in format tool only supports FAT32 format up to 32 GB.
• Firmware upgrade only supports FAT32 format.
Supported Size
56
Page 57

Apps Center
View, launch, and uninstall Apps.
1. Go to: Home > Apps Center.
57
Page 58

2. Use the directional buttons ( )/( )/( )/( ) to select the desired App. Then press OK ( ) on the remote control to launch
the App.
NOTE: Press the Home ( ) button on the remote control to return to the Home Screen at anytime.
To Uninstall Apps
1. Open the Apps Center by selecting: Home > Apps Center.
2. Use the directional buttons (
3. Press and hold OK (
4. Select OK (
NOTE: Press the Home (
) to uninstall the App.
) on the remote control for three (3) seconds.
)/( )/( )/( ) to select the desired App.
) button on the remote control to return to the Home Screen at anytime.
58
Page 59

Settings
Under Settings you can adjust Network, Date & Time, Basic, and Advanced Settings, Firmware Update, and view Information.
59
Page 60
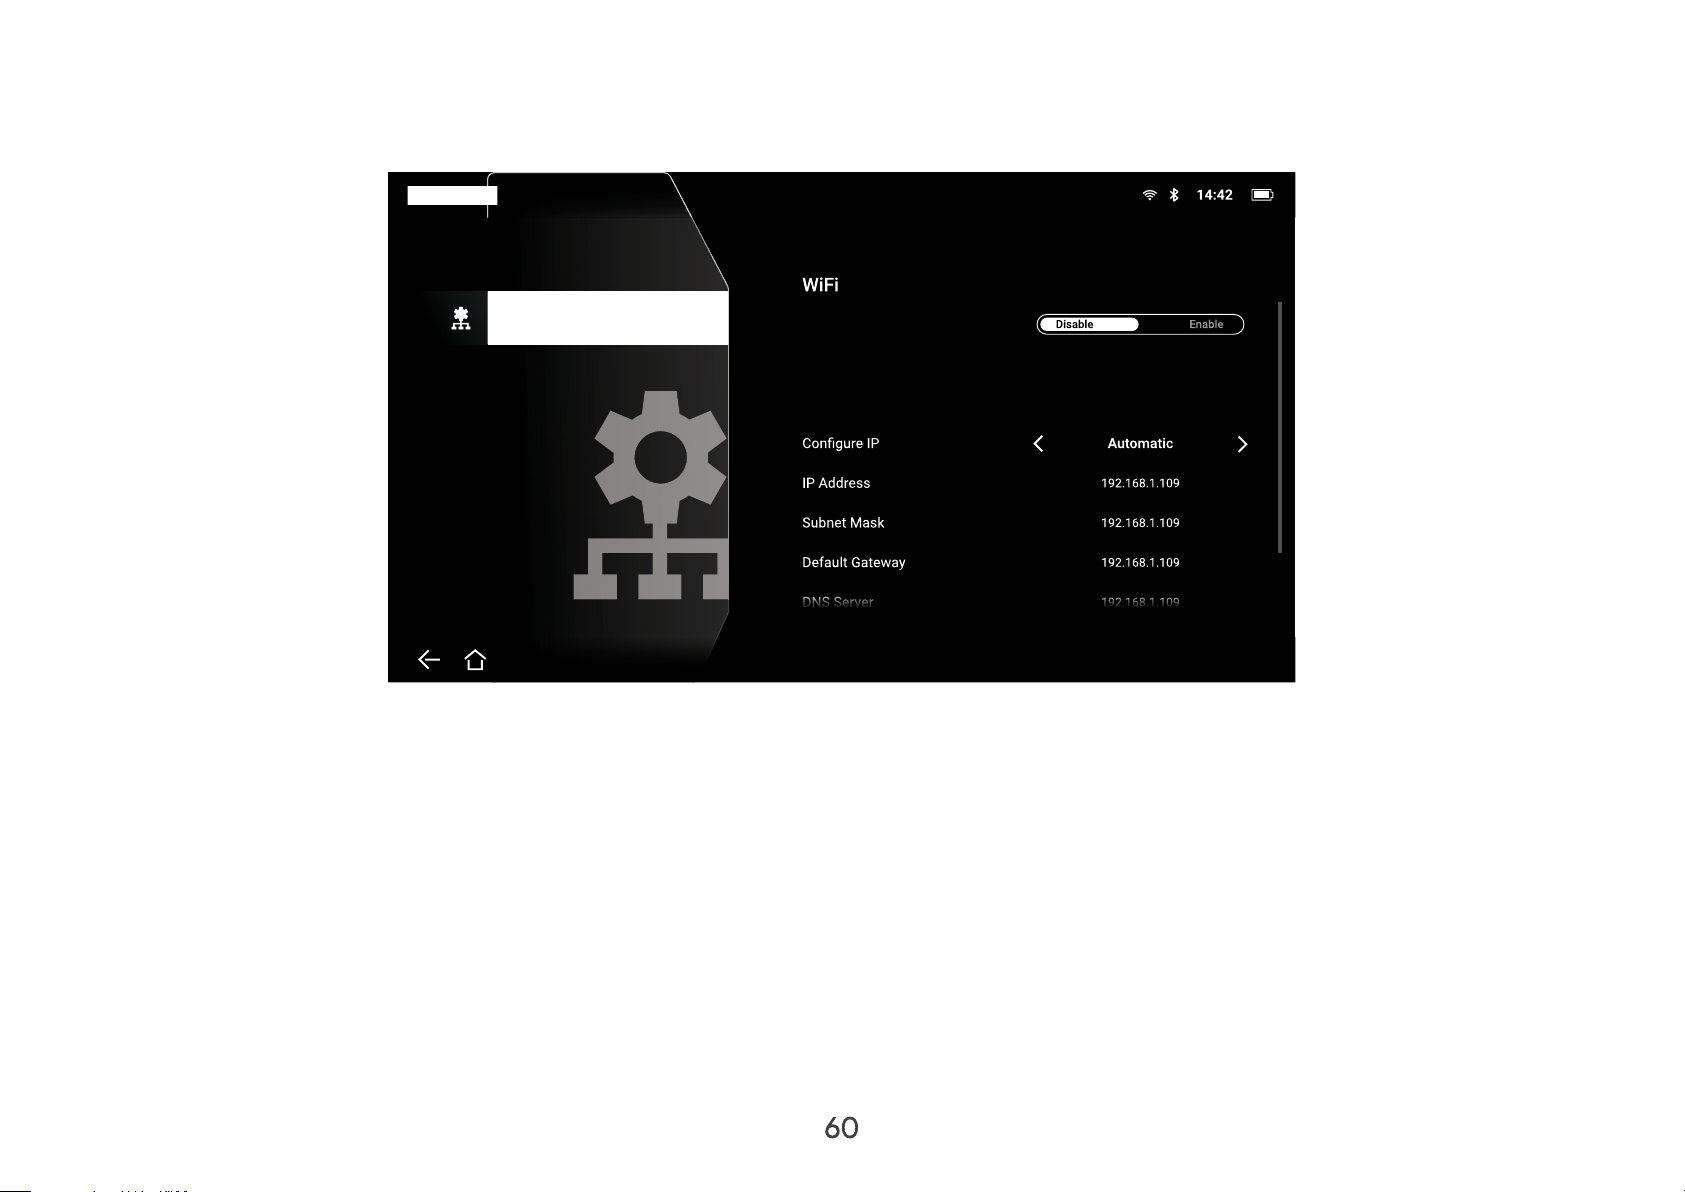
Network Settings
1. Go to: Home > Settings > Network Settings.
Settings/
2. View and adjust your Wi-Fi and network settings.
3. To setup a Wireless connection, see page 28.
SSID
Name
60
Page 61
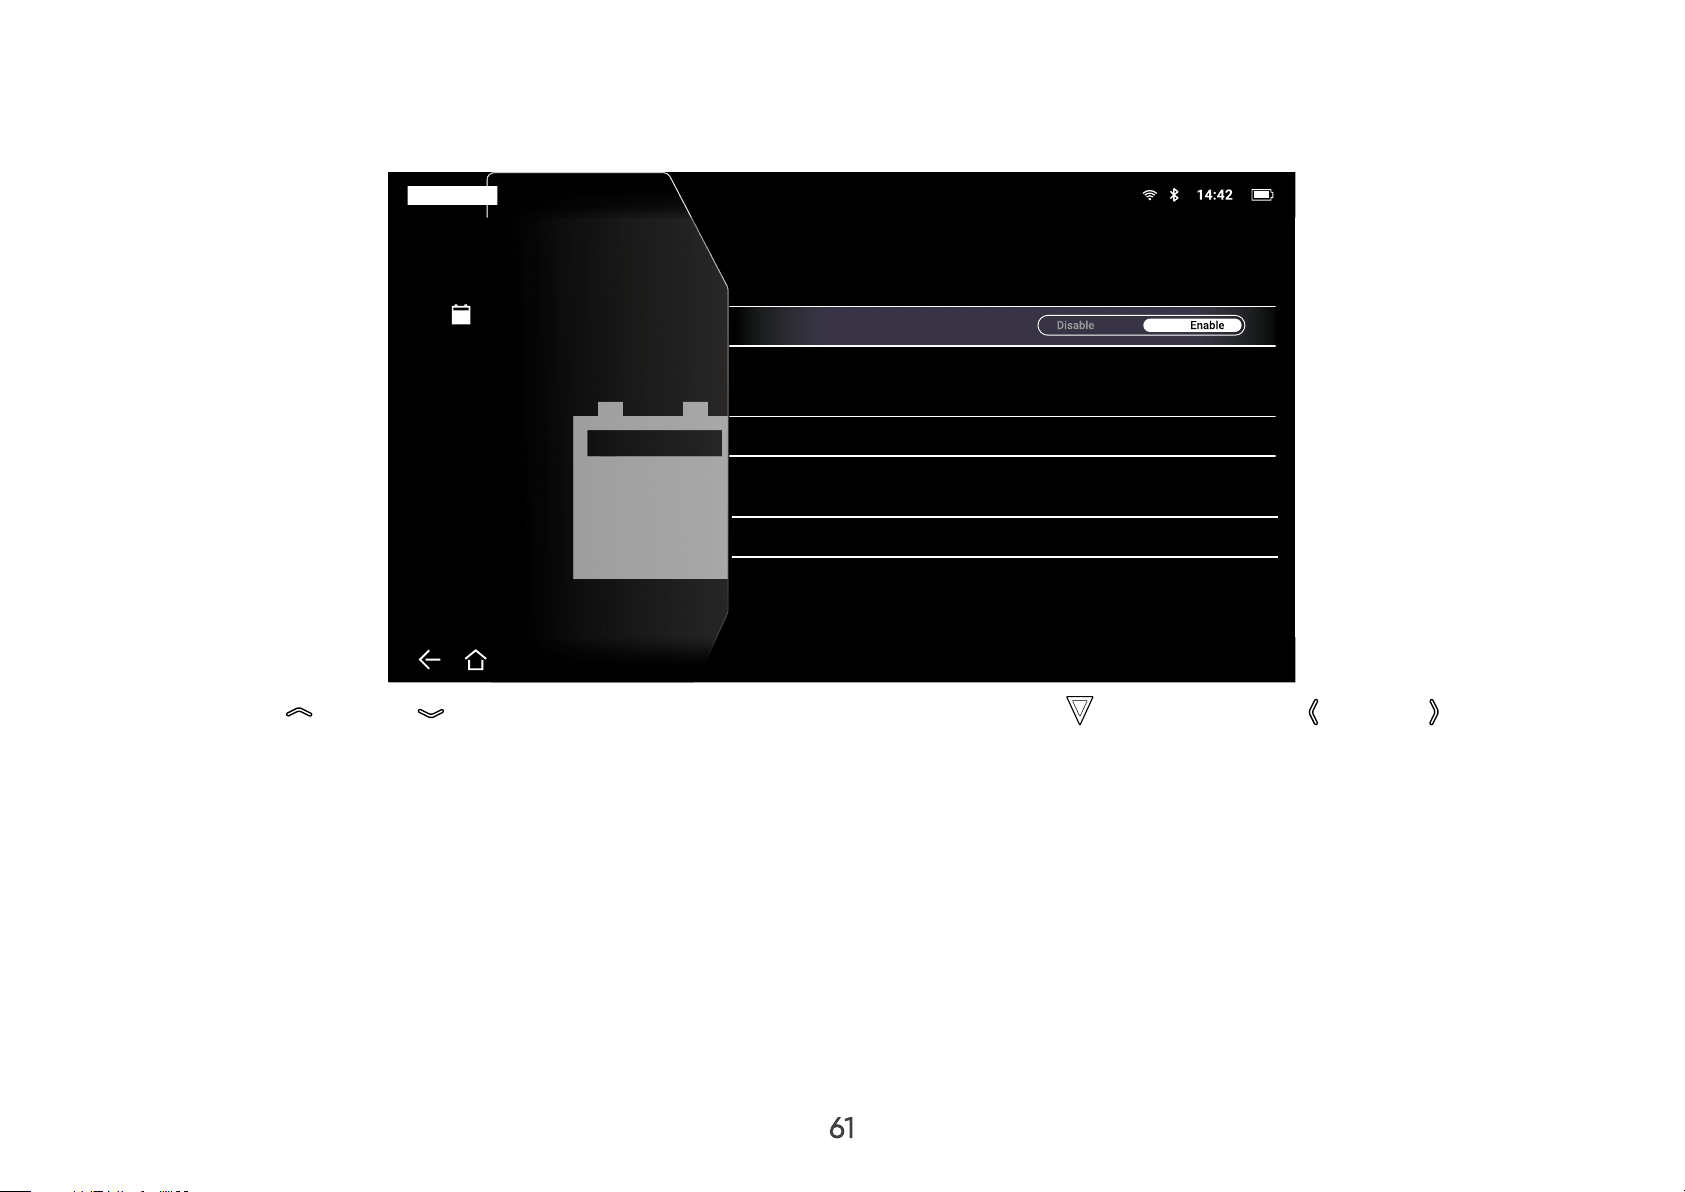
Date & Time
1. Go to: Home > Settings > Date & Time.
Settings/Date & Time
Date & Time
Automatic Date & Time
Date
2022-3-15
Time
14:42
2. Use the Up ( )/Down ( ) buttons to select the desired option and press OK ( ), or use the Left ( )/Right ( ) buttons to
make adjustments or selections.
61
Page 62
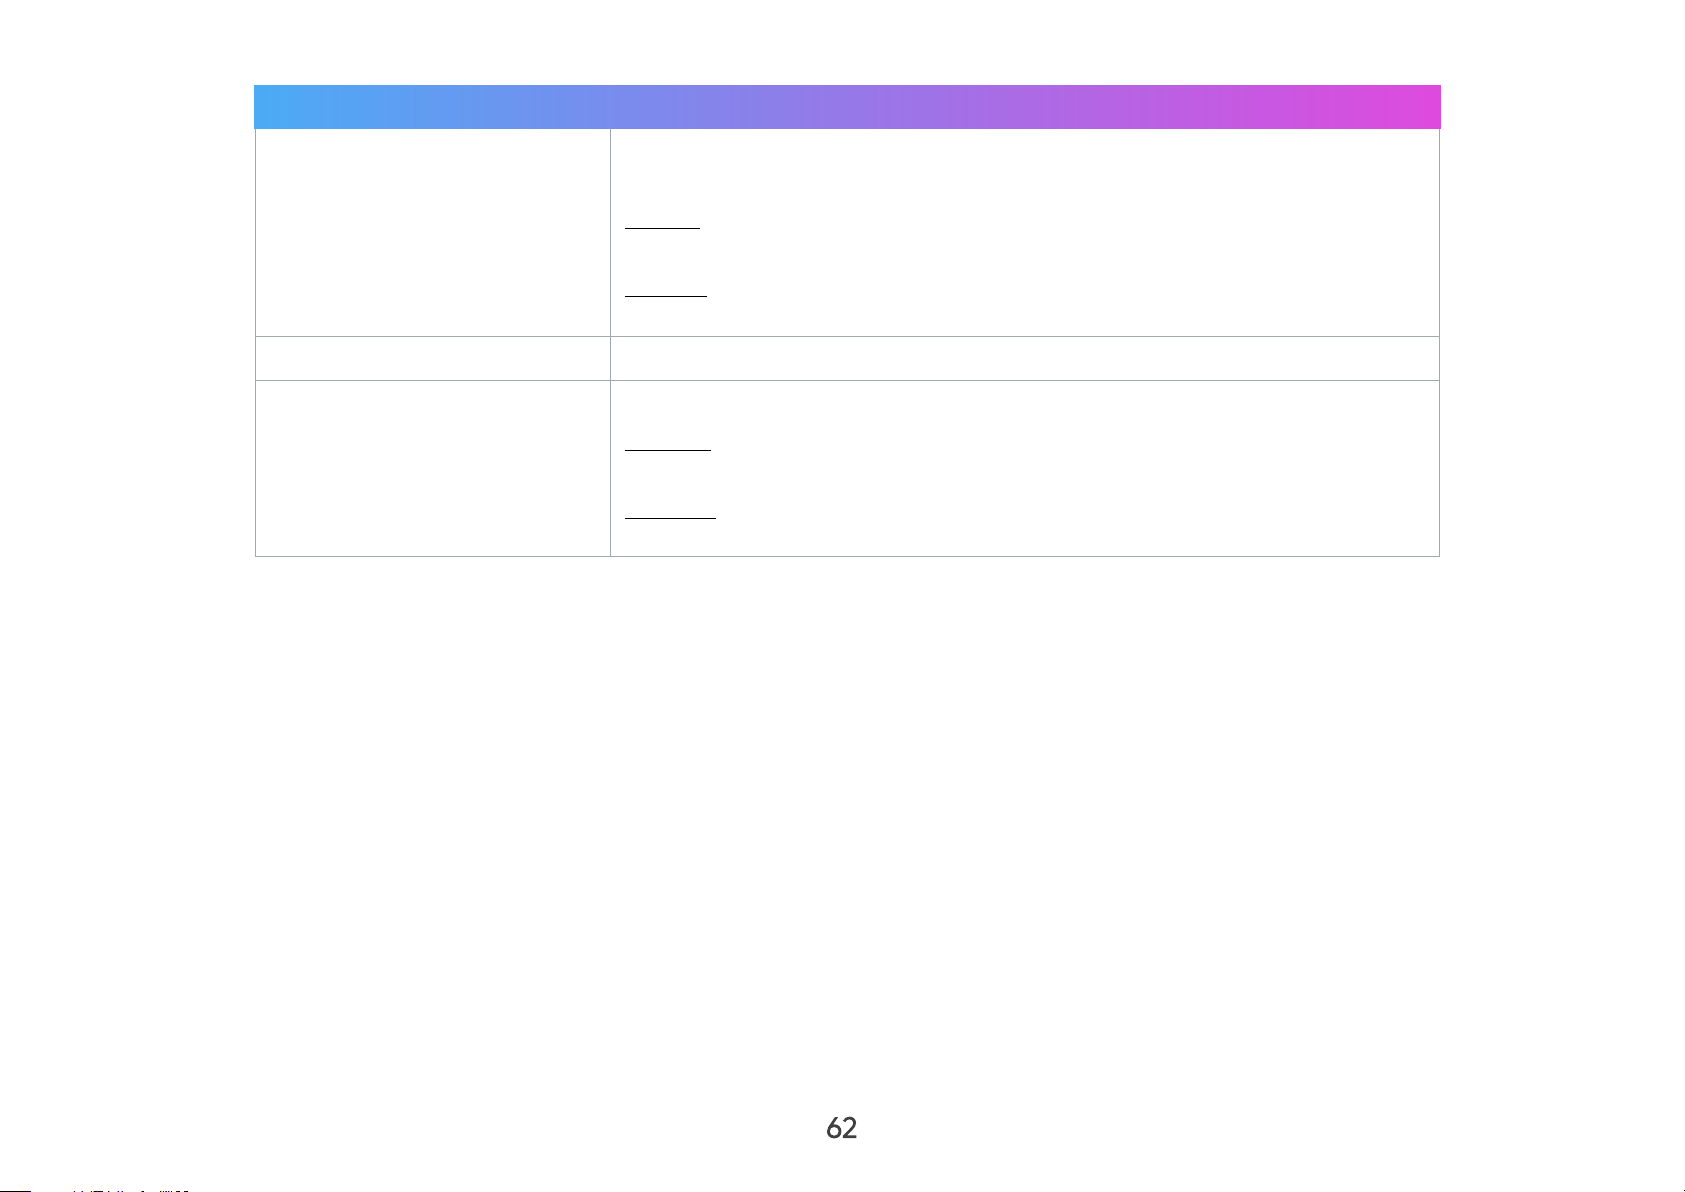
Menu Description
Users can synchronize the date and time automatically after connecting
to the Internet.
Automatic Date & Time
Time Zone
Time Format
Enable
Turn on synchronization.
Disable
Turn o synchronization.
Select your location.
Select the displayed time format.
12 hours
12-hour clock.
24 hours
24-hour clock.
62
Page 63
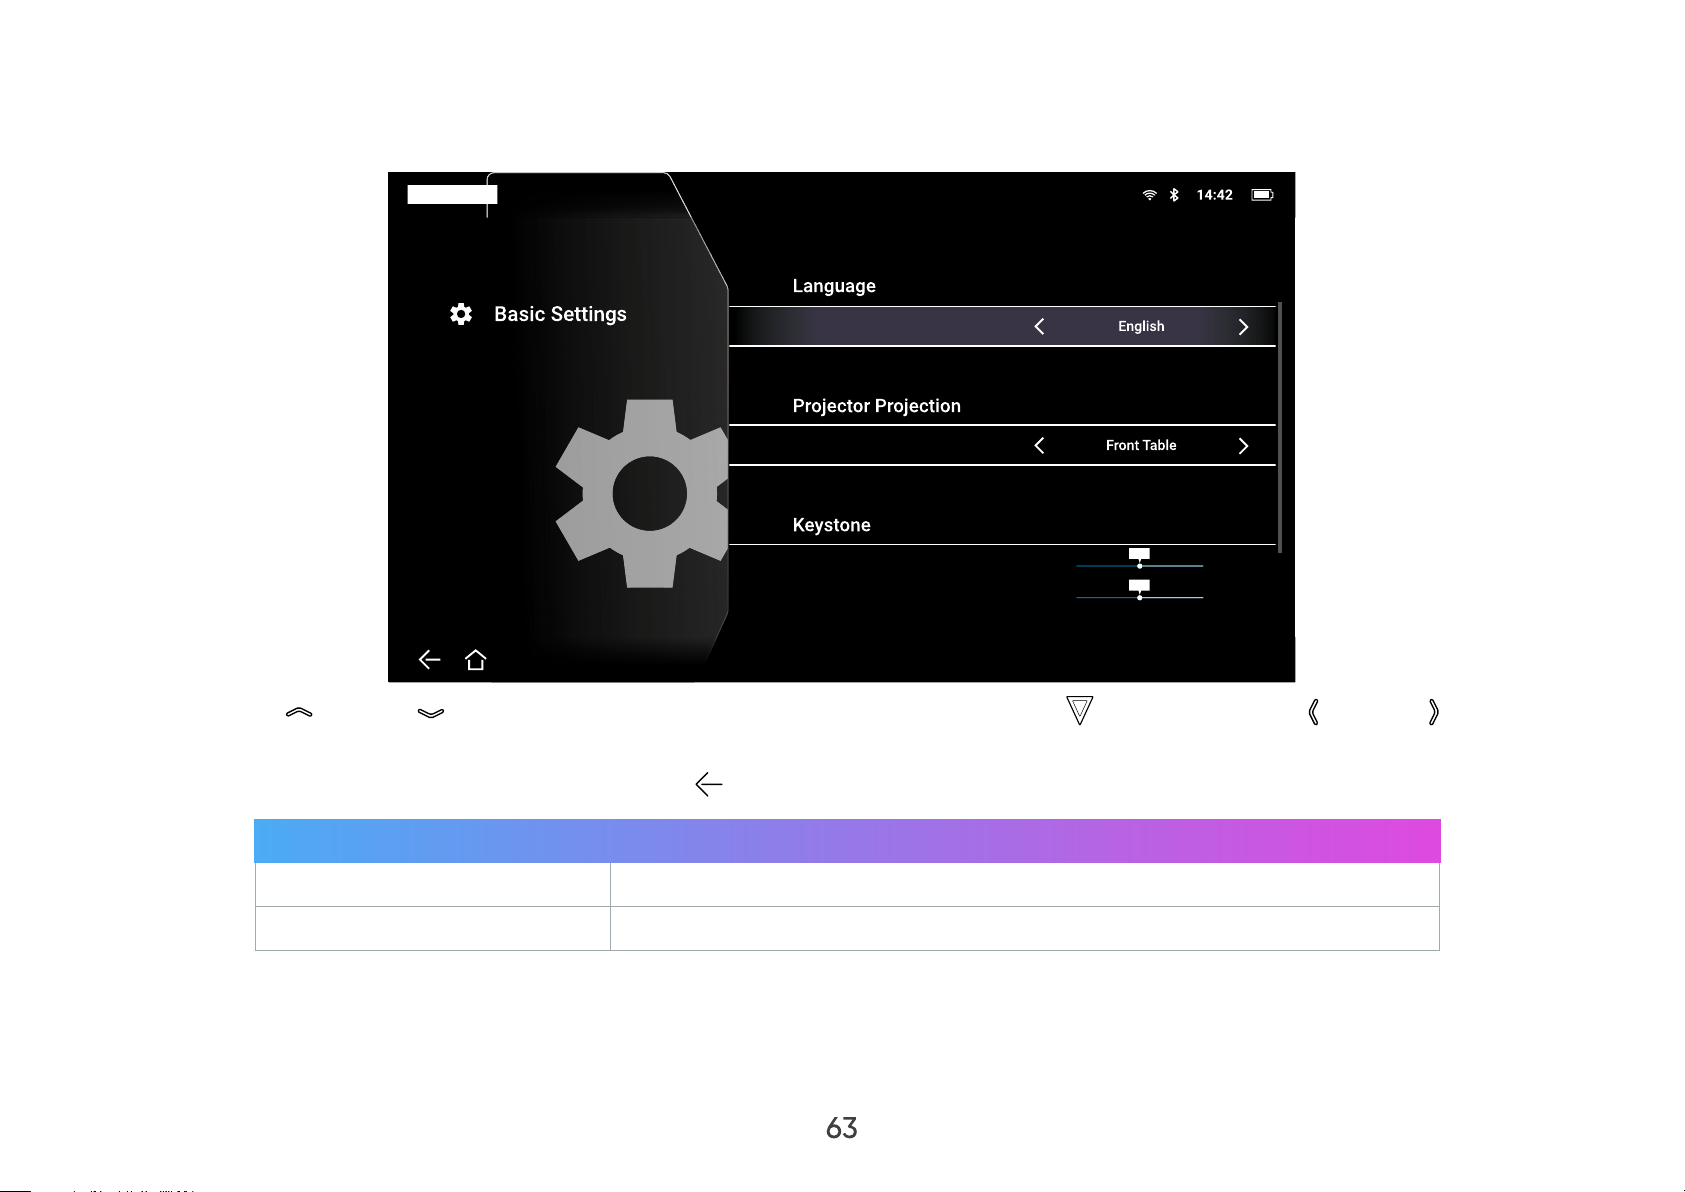
Basic Settings
1. Go to: Home > Settings > Basic Settings.
Settings/Basic Settings
V Keystone
H Keystone
-40
-40
0
0
40
40
2. Use the Up ( )/Down ( ) buttons to select the desired option and press OK ( ), or use the Left ( )/Right ( ) buttons to
make adjustments or selections.
3. To return to a previous menu press the Return (
) button.
Menu Description
Language
Projector Position
Select your desired language.
Select the preferred projection position.
63
Page 64
Menu Description
Adjust trapezoidal screen image distortion.
Auto Keystone
Automatically adjust vertical keystone.
Horizontal Keystone
Keystone can be adjusted horizontally manually.
Vertical Keystone
Keystone can be adjusted vertically manually.
4 Corner Adjustment
Keystone
Adjust each corner individually for maximum projection flexibility.
Zoom
NOTE: If 4 Corner Adjustment is on, H/V Keystone will be disabled.
Adjust the level of zoom.
64
Page 65
Menu Description
Adjust the focus of the screen image.
Manual
Focus
Test Pattern
Use the Left (
Auto Focus
Select Enable to automatically correct the image focus.
NOTE: It is suggested to use a screen size of 40”~ 100” inches. If this
Auto Focus Calibration
Calibrate the Auto Focus feature.
Test the color presentation of the projector.
)/Right ( ) buttons to manually correct the image focus.
is not suitable for you, correct the image focus manually.
65
Page 66

Advanced Settings
1. Go to: Home > Settings > Advanced Settings.
2. Use the Up ( )/Down ( ) buttons to select the desired option and press OK ( ), or use the Left ( )/Right ( ) buttons to
make adjustments or selections.
3. To return to a previous menu press the Return (
) button.
66
Page 67
Menu Description
Power On Source
Auto Power On
Allows the user to enter the desired source directly after turning on the
projector.
Direct Power On
Allows the projector to turn on automatically once power is fed through
the power cord.
CEC
This projector supports CEC (Consumer Electronics Control) function for
synchronized power on/o operation via HDMI connection. That is, if a
device that also supports CEC function is connected to the HDMI input of
the projector, when the projector’s power is turned o, the power of the
connected device will also be turned o automatically. When the power
of the connected device is turned on, the projector’s power will be turned
on automatically.
NOTE:
• In order to work properly, make sure that the device is correctly
connected to the HDMI input of the projector via an HDMI cable,
and its CEC function is turned on.
• Depending on the device, the CEC function may not work.
Power On Ring Tone
Enable or disable the power on ring tone.
67
Page 68
Menu Description
Auto Power O
The projector can turn o automatically after a set period of time once
no input source is detected.
Sleep Timer
Smart Energy
Audio Settings
Turn o automatically after a set period of time.
Power Saving
Lower power consumption if no input source is detected after five (5)
minutes.
NOTE: The power consumption of the LED will be changed to 30%
after no signal is detected for five (5) minutes.
Audio Mode
• Movie: Default audio mode.
• Music: Ideal for music playback.
Audio Volume
Adjust the volume from 0 to 50.
Mute
Mute or unmute the volume.
Select the suitable power consumption of the LED.
Light Source Level
Full
100%
Eco
70%
68
Page 69
Menu Description
High Altitude Mode
Reset Settings
It is recommended that you use High Altitude Mode when your
environment is between 1,500~3,000 m above sea level, and a
temperature between 5°C~25°C.
NOTE: If you use this projector under other extreme conditions
excluding the above, it may display auto shut-down
symptoms, which is designed to protect your projector from
over-heating. In cases like this, you should switch to High
Altitude Mode to solve these symptoms. However, this is not
to state that this projector can operate under any and all
harsh or extreme conditions.
Reset the settings to default.
NOTE: Language, High Altitude Mode, Projector Position, Network
Settings, All installed Apps in the Apps Center, Add App,
Bluetooth, Zoom, H/V Keystone, 4 Corner Adjustment, and
Light Source Hours will remain unchanged.
Reset to Factory Default
Factory reset.
NOTE: Light Source Hours will remain unchanged.
69
Page 70
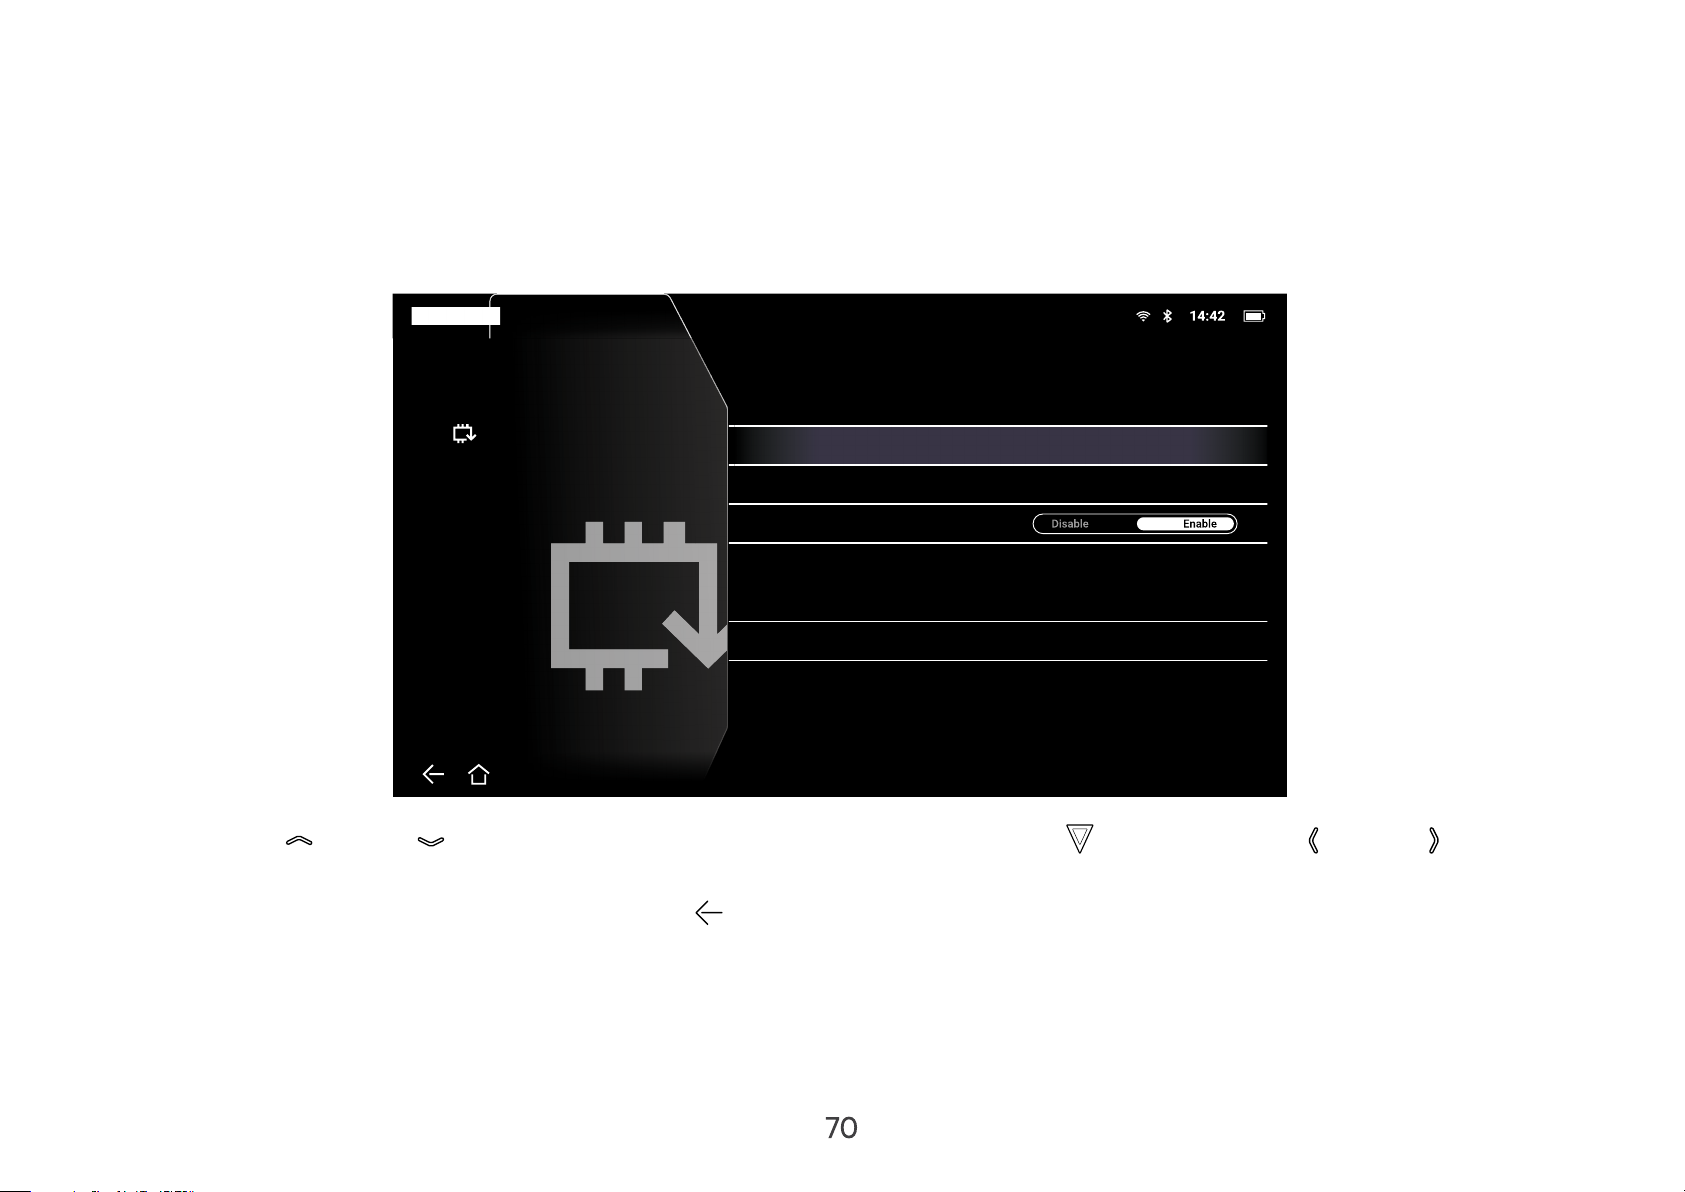
Firmware Upgrade
Users can update the firmware Online, or by USB, and check the version number.
NOTE: Do not unplug the power cord, USB, or disconnect from the Internet during the upgrading process.
1. Before entering the Firmware Upgrade menu, ensure the projector is connected to the Internet.
2. To enter the menu, go to: Home > Settings > Firmware Upgrade.
Settings/Firmware Upgrade
Software Upgrade
Firmware Upgrade
Software Update Online
Software Update By USB
OTA Reminder
Version
V0.2Software Version
3. Use the Up ( )/Down ( ) buttons to select the desired option and press OK ( ), or use the Left ( )/Right ( ) buttons to
make adjustments or selections.
4. To return to a previous menu press the Return (
) button.
70
Page 71
Menu Description
To update online:
1. Go to: Home > Settings > Firmware Upgrade > Software Update
Online.
Software Update Online
2. Select Enter by pressing OK (
3. The system will check the NOMVDIC website (OTA) and display a
dialog message if there is new Firmware.
4. By selecting Yes , a progress bar will appear as the update process
begins.
5. Upon reaching 100%, the projector will restart. The whole process will
take about 10 minutes.
6. After updating the Firmware, it will take a few minutes to restart the
projector.
NOTE: The projector screen will be black for about 10 minutes during
the updating process.
) on the remote control.
71
Page 72
Menu Description
To update by USB:
1. Download the latest Firmware version from the NOMVDIC website
and copy the file to a USB device.
2. Plug the USB device into the USB A port on the projector, then go to:
Home > Settings > Firmware Upgrade > Software Update by USB.
Software Update by USB
OTA Reminder
Firmware Version
3. Select Enter by pressing OK (
4. The system will detect the Firmware version and display a dialog
message.
5. By selecting Yes, a progress bar will appear as the update process
begins.
6. Upon reaching 100%, the projector will restart. The whole process will
take about 10 minutes.
7. After updating the Firmware, it will take a few minutes to restart the
projector.
NOTE: The USB device should be FAT32 format.
Selecting Enable ensures the Internet-connected projector will display a
reminder when there is a newer software version available online.
Displays the currently installed software version.
) on the remote control.
72
Page 73

Information
1. Go to: Home > Settings > Information.
2. View system status and information.
NOTE: Press the Home (
) button on the remote control to return to the Home Screen at anytime.
73
Page 74

Screen Mirroring
Mirror your personal device’s screen. To setup wireless Screen Mirroring, see page 25.
NOTE: Ensure your device is connected to the same network as the projector.
74
Page 75

Bluetooth
The projector is equipped with Bluetooth that allows the user to connect their device wirelessly for audio playback. For more
information, see page 26.
75
Page 76

Add App
Add your favorite Apps to the Home Screen.
1. From the Home Screen, select Add App and then press OK ( ) on the remote control.
2. Use the directional buttons to select the desired App and press
3. Now your favorite App will appear on the Home Screen.
NOTE: Only four (4) Apps can be added to the Home Screen.
OK ( ).
Delete Apps from the Home Screen
1. From the Home Screen, select the App you want to delete and press and hold OK ( ) for three (3) seconds.
2. The message, “Do you want to Delete this application from My Favorites?” will appear.
3. Select Yes , and press
OK ( ) to delete the App.
76
Page 77
Input Source Selected — On-Screen Display (OSD) Menu Tree
After your input source is selected, you can adjust the Image Setting and Advanced Setting menus.
Main Menu Sub-menu Menu Option
Brightest
Image Setting
Color Mode
Brightness (-/+, 0~100)
Contrast (-/+, -50~50)
Color Temp
TV
Movie
6500K
7500K
9300K
User
Red Gain (-/+, 0~100)
Green Gain (-/+, 0~100)
Blue Gain (-/+, 0~100)
Red Oset (-/+, -50~50)
Green Oset (-/+, -50~50)
Blue Oset (-/+, -50~50)
Tint (-/+, -50~50)
77
Page 78
Main Menu Sub-menu Menu Option
Saturation (-/+, 0~100)
Sharpness (-/+, 0~50)
1.8
2.0
2.2
Image Setting
Gamma
Light Source Level
Test Pattern OK
Reset Current Color
Settings
2.35
2.5
sRGB
Cubic
Full
Eco
OK
78
Page 79
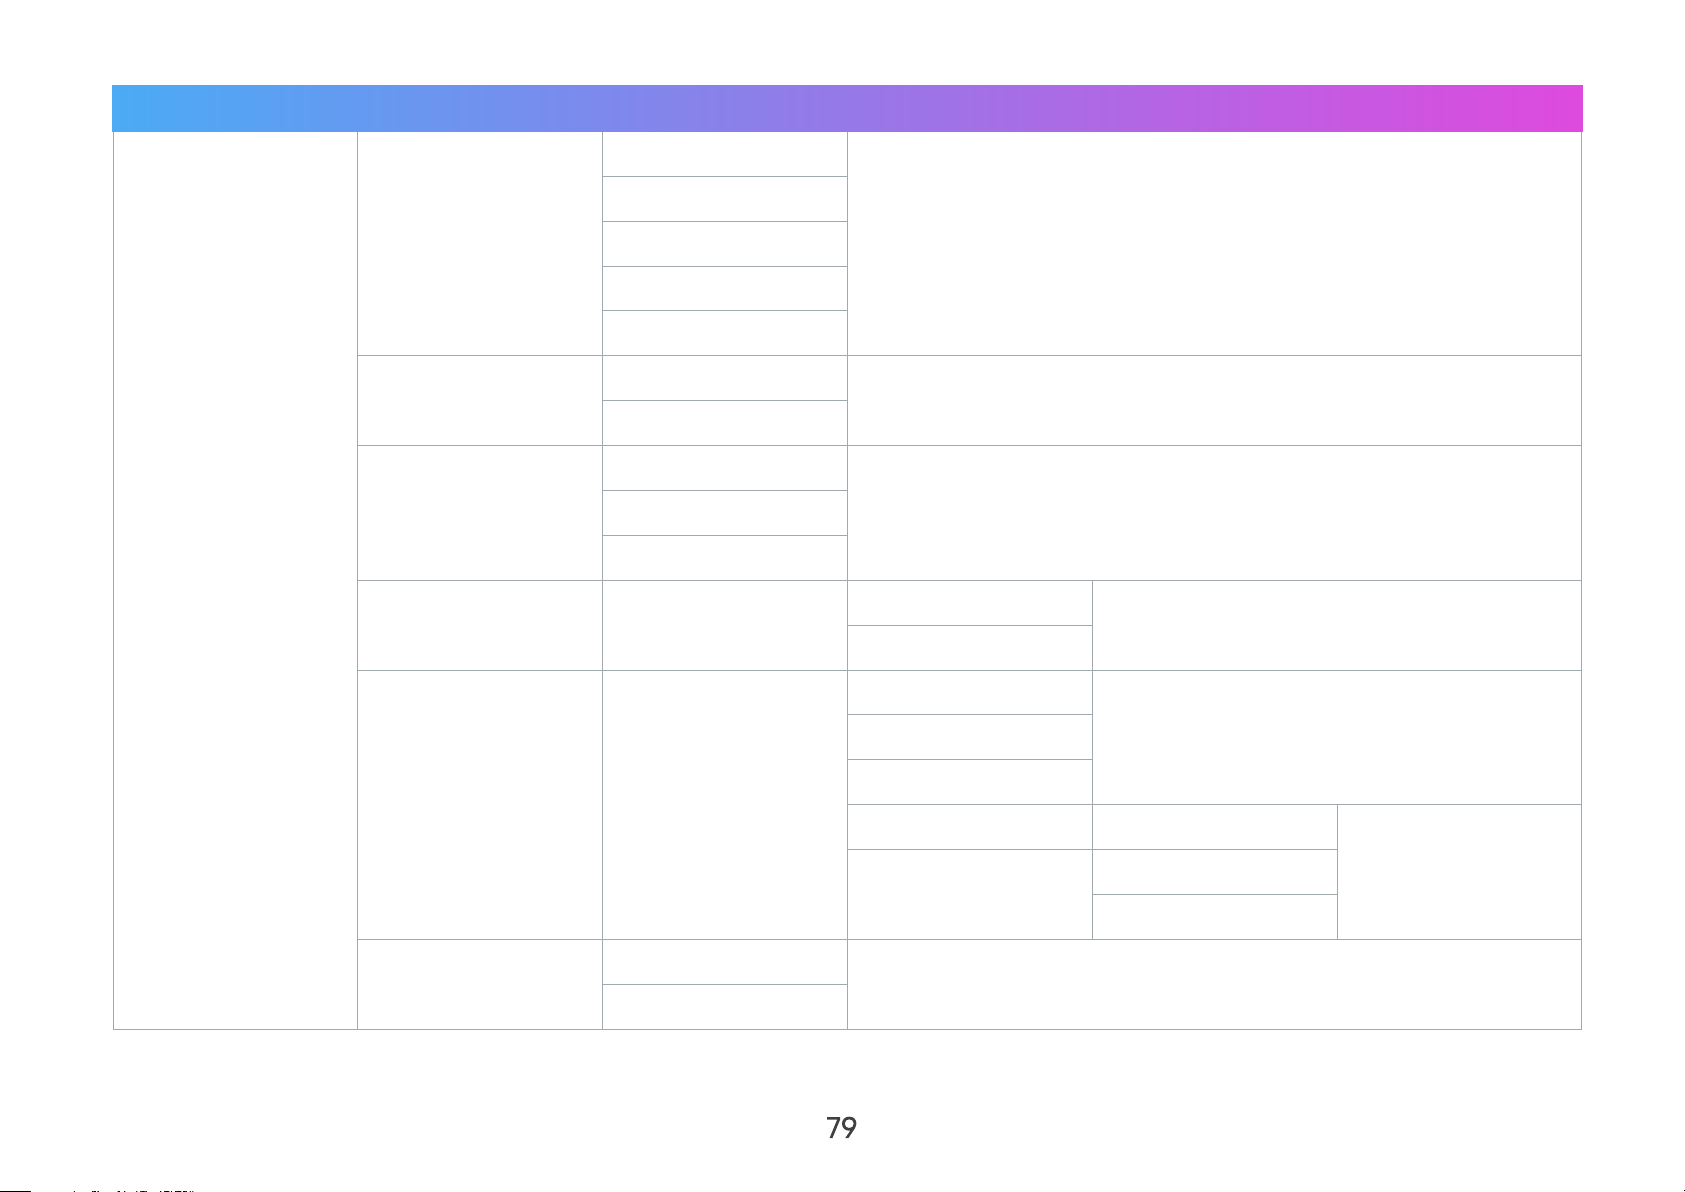
Main Menu Sub-menu Menu Option
Auto
4:3
Advanced Setting
Aspect Ratio
HDR
EOTF
HDMI Setting Range
Audio Settings Audio Mode
16:9
16:10
Auto
SDR
Low
Mid
High
Full Range
Limited
Movie
Music
Audio Volume (-/+, 0~50)
Information
Disable
Mute
Enable
Source
Resolution
79
Page 80

Image Setting Menu
After your input source is selected, you can adjust the Image Setting menu.
To access the Image Setting menu:
1. Press the Settings (
2. Use the Left (
)/Right ( ) buttons on the remote control to select Image Setting (if applicable).
) button on the remote control.
3. Then use the Up ( )/Down ( ) buttons on the remote control to select the sub-menu(s).
4. Use the Left (
5. Press the Return (
)/Right ( ) buttons on the remote control to enter the sub-menu(s) and/or adjust the settings.
) button on the remote control to go to the previous menu or exit.
80
Page 81
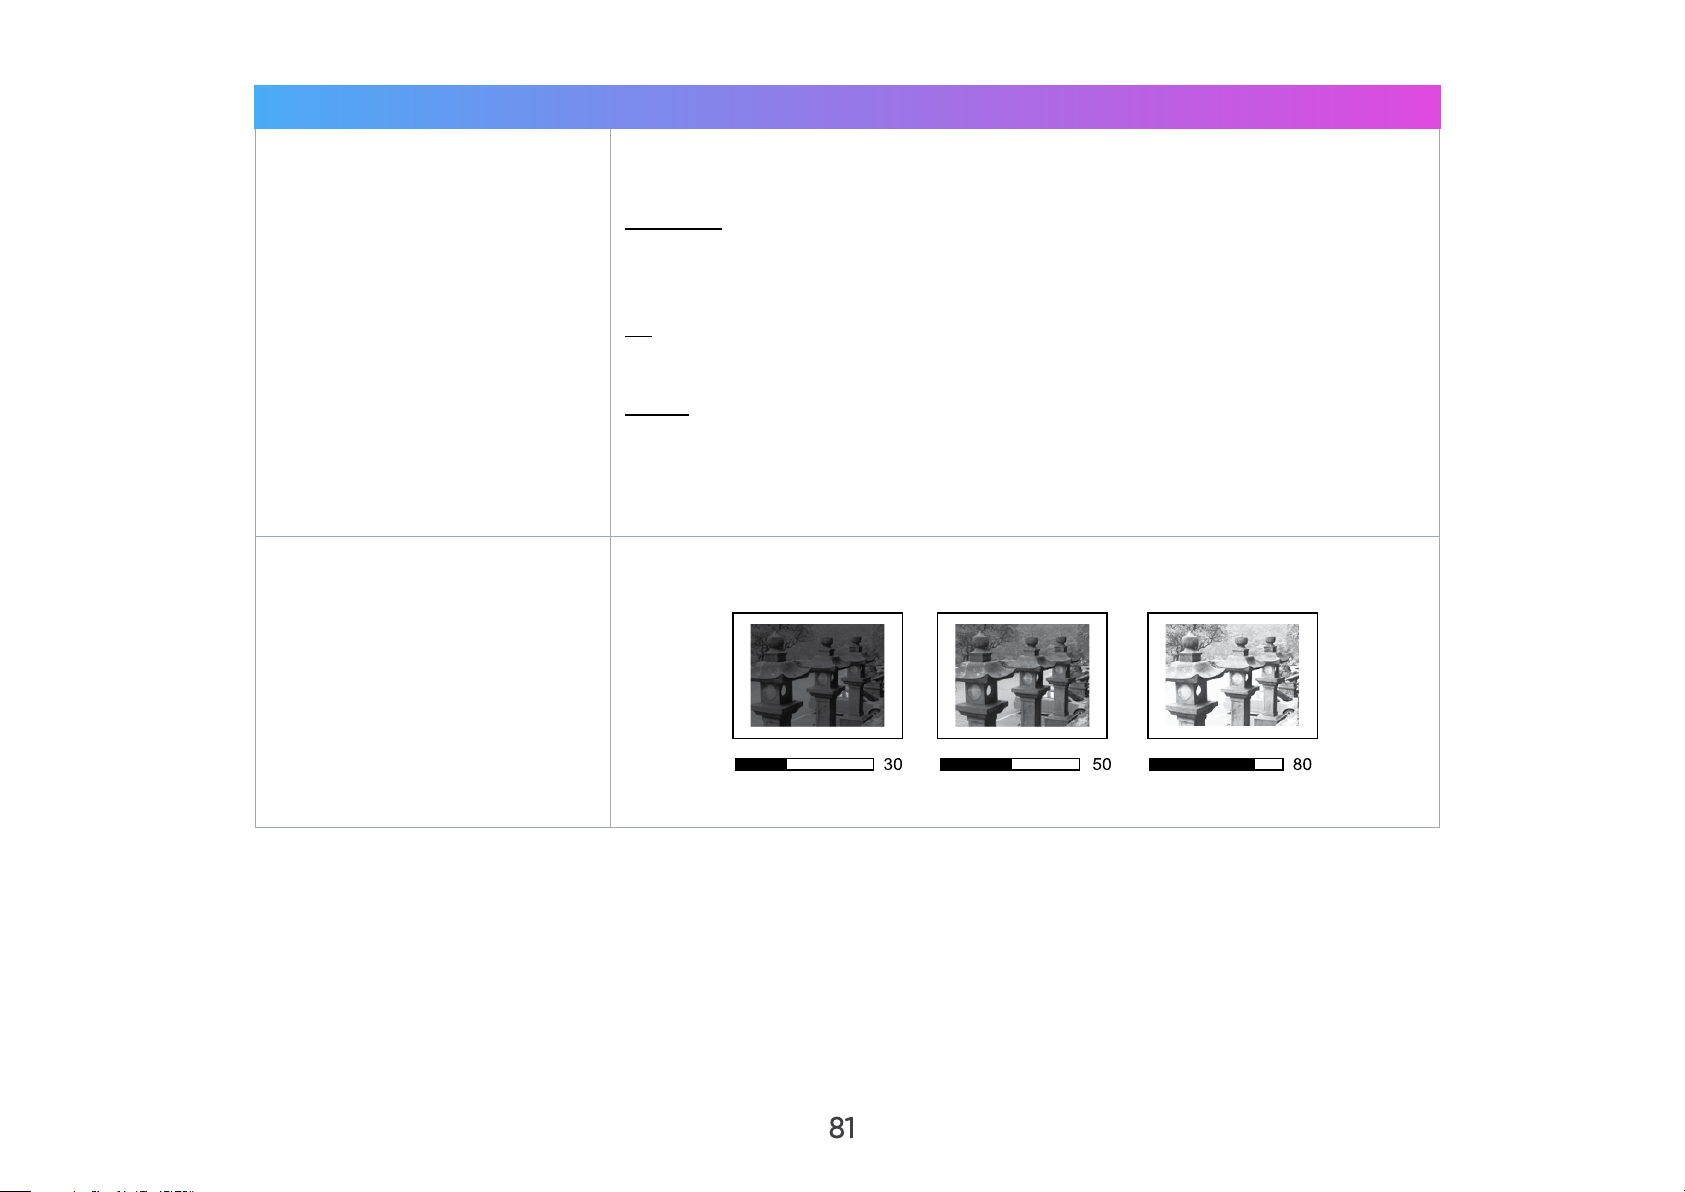
Menu Description
The projector is preset with several predefined picture modes so that you
can choose one to suit your operating environment and input signal.
Brightest
Maximizes the brightness of the projected image. This mode is suitable for
environments where extra-high brightness is required, i.e. well-lit rooms.
Color Mode
Brightness
TV
Optimized for viewing sports in well-lit environments.
Movie
Appropriate for colorful movies, video clips from digital cameras, or DVs
through the PC input. Best for low-light environments.
NOTE: Only supports HDMI/USB-C signal input.
The higher the value, the brighter the image. Lower values will result in a
darker image.
NOTE: This function may not work with some Apps.
81
Page 82
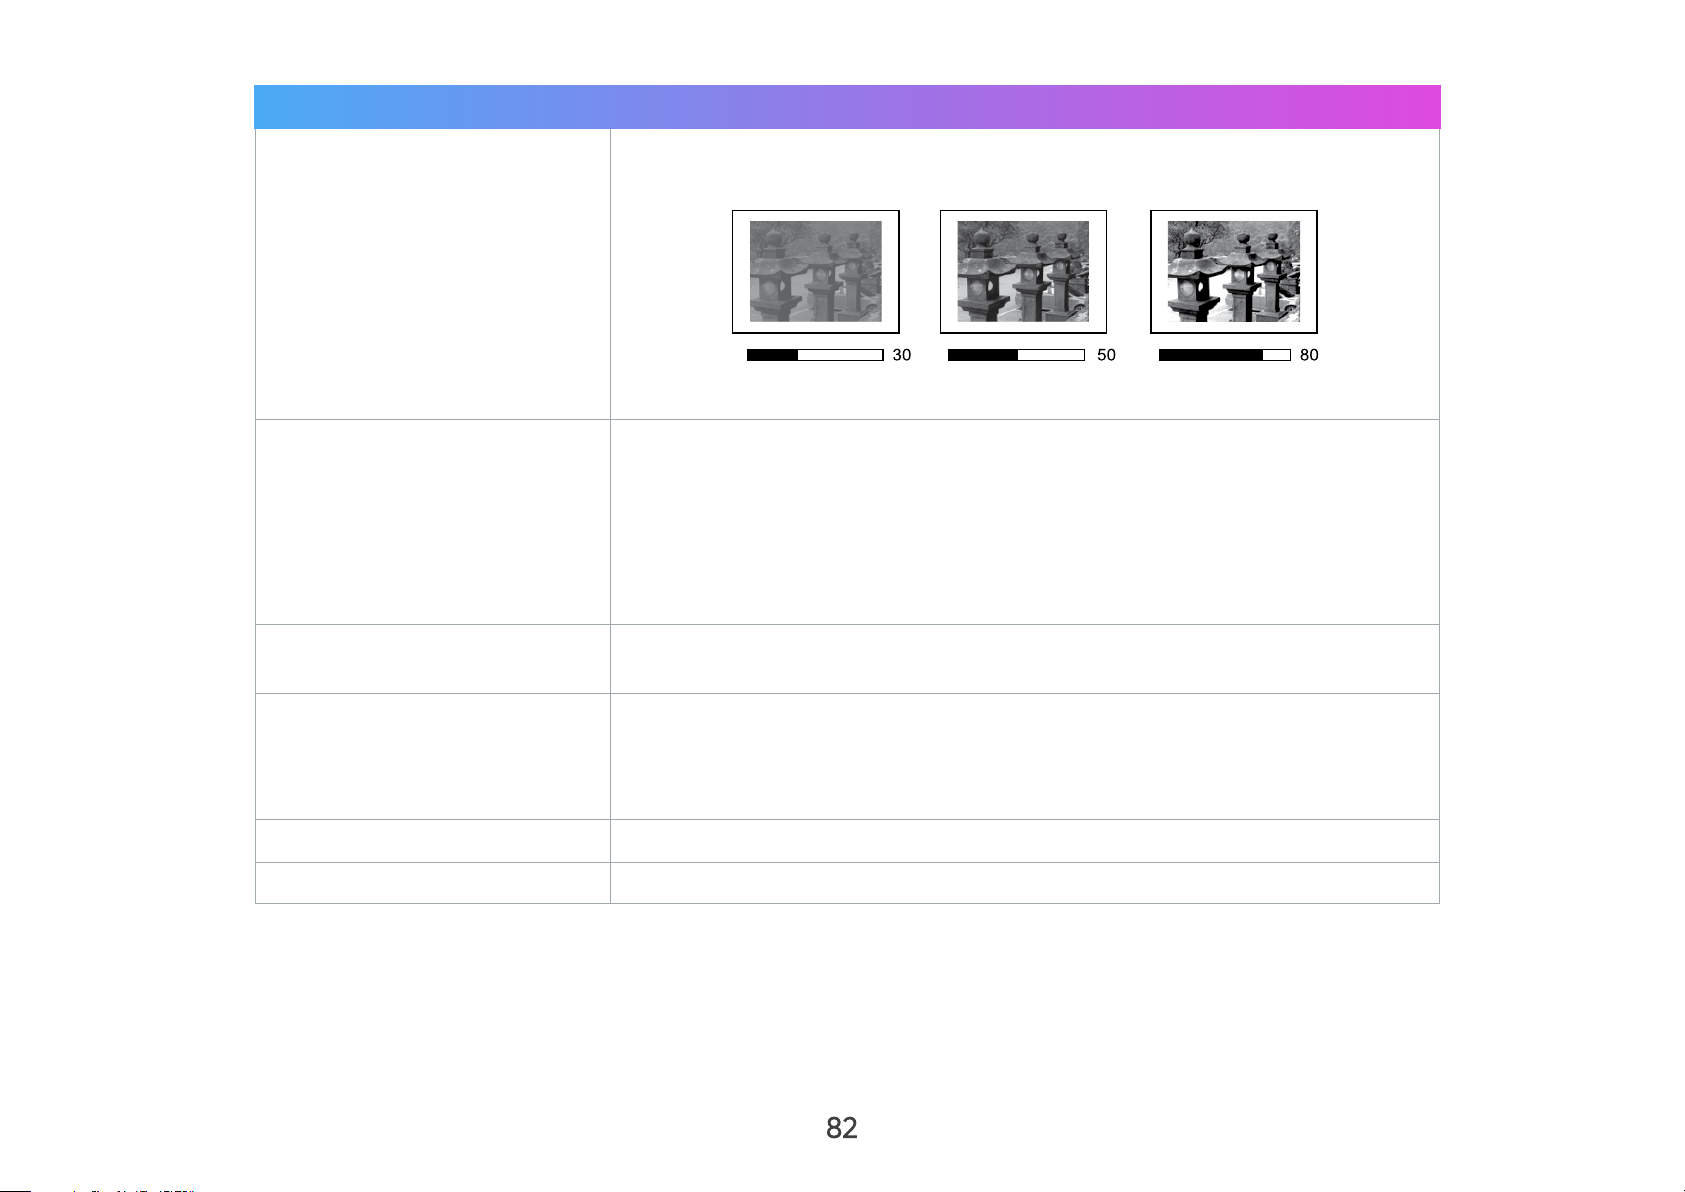
Menu Description
Use this to set the peak white level after you have previously adjusted the
Brightness setting to suit your selected input and viewing environment.
Contrast
NOTE: This function may not work with some Apps.
Select the color temperature setting.
• 6500K: Maintains normal white coloring.
Color Temp
Tint
Saturation
Sharpness
Gamma
• 7500K: A higher, cooler color temperature than 6500K.
• 9300K: The highest color temperature; makes the image appear the
most bluish-white.
• User Color: Adjust red, green, and blue values as desired.
The higher the value, the more greenish the picture becomes. The lower
the value, the more reddish the picture becomes.
Refers to the amount of that color in a video picture. Lower settings
produce less saturated colors; in fact, a setting of “0” removes that color
from the image entirely. If the saturation is too high, that color will be
overpowering and unrealistic.
A high value results in a sharper picture; a low value softens the picture.
Reflects the relationship between input source and picture brightness.
82
Page 83
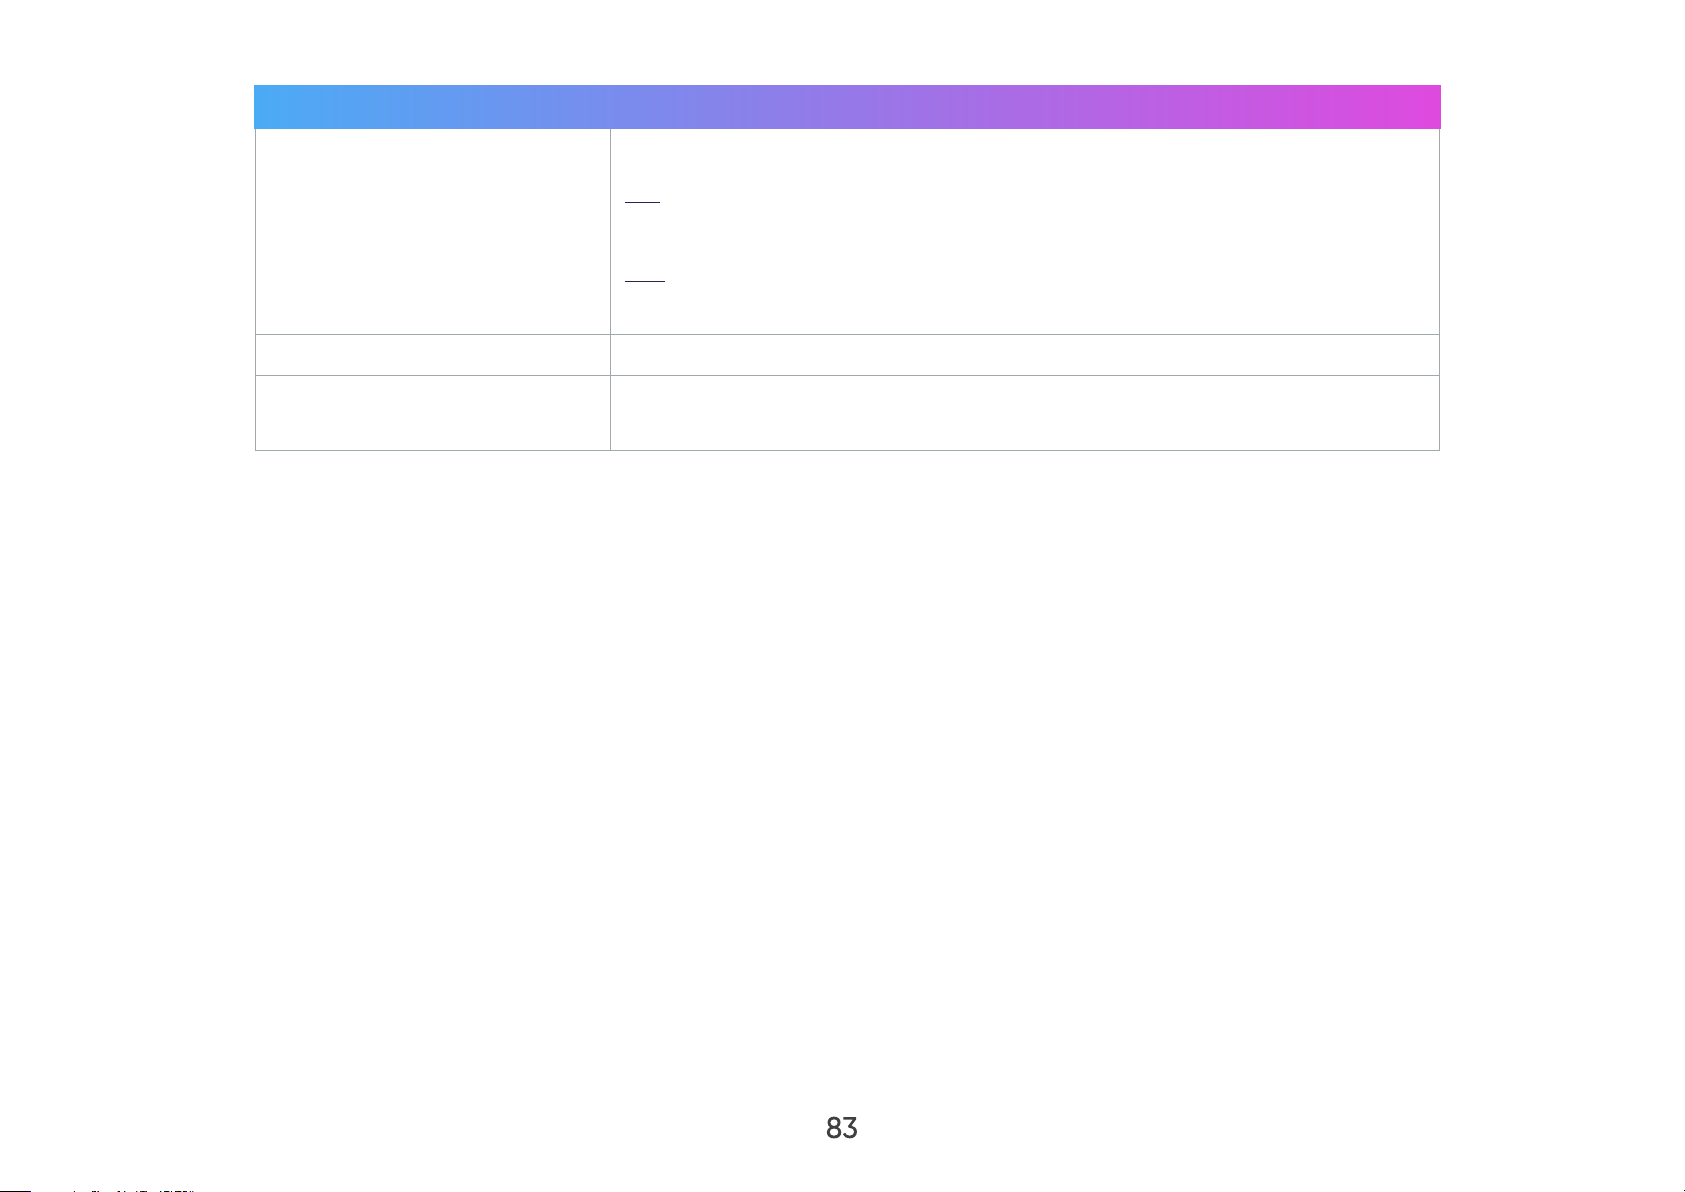
Menu Description
Select the suitable power consumption of the LED.
Full
Light Source Level
Test Pattern
Reset Current Color
Settings
100%
Eco
70%
Test the color presentation of the projector.
Return current color settings to their default values.
83
Page 84

Advanced Setting Menu
After your input source is selected, you can adjust the Advanced Setting menu.
To access the Advanced Setting menu:
1. Press the Settings (
2. Use the Right (
) button on the remote control to select Advanced Setting.
) button on the remote control.
3. Then use the Up ( )/Down ( ) buttons on the remote control to select the sub-menu(s).
4. Use the Left (
5. Press the Return (
)/Right ( ) buttons on the remote control to enter the sub-menu(s) and/or adjust the settings.
) button on the remote control to go to the previous menu or exit.
84
Page 85
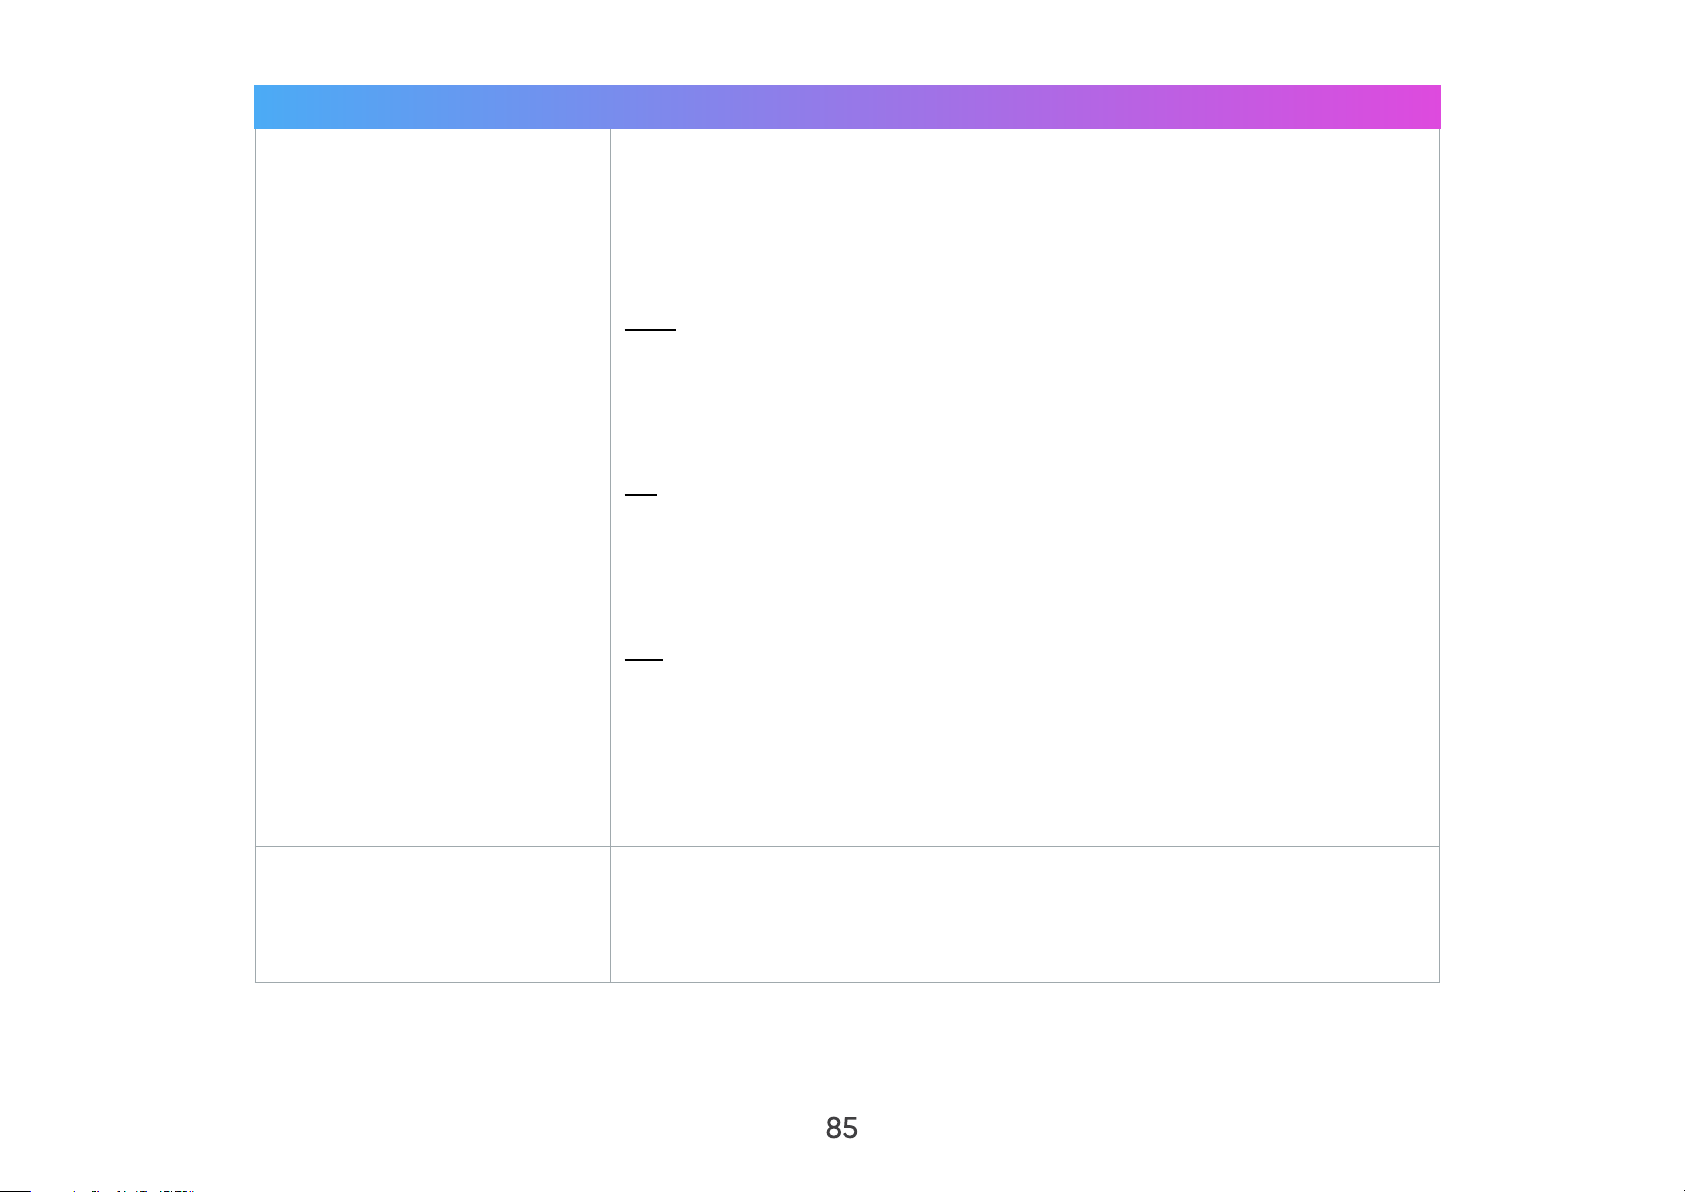
Menu Description
The Aspect Ratio is the ratio of the image width to the image height.
With the advent of digital signal processing, digital display devices, like
this projector, can dynamically stretch and scale the image output to a
dierent aspect than that of the image input signal.
NOTE: Only supports HDMI/USB-C signal input.
Auto
Scales an image proportionally to fit the projector’s native resolution in its
horizontal width. This is suitable for the incoming image which is neither
4:3 nor 16:9 and you want to make the most use of the screen without
altering the image’s aspect ratio.
Aspect Ratio
HDR
4:3
Scales an image so that it is displayed in the center of the screen with
a 4:3 aspect ratio. This is most suitable for 4:3 images like computer
monitors, standard definition TV, and 4:3 aspect DVD movies, as it
displays them without aspect alteration.
16:9
Scales an image so that it is displayed in the center of the screen with a
16:9 aspect ratio. This is most suitable for images which are already in a
16:9 aspect, like high definition TV.
The projector supports HDR imaging sources. It can automatically detect
the dynamic range of the source, and optimize image gamma and color
settings to reproduce contents under a wide range of light conditions.
You can also select SDR for the imaging sources.
85
Page 86
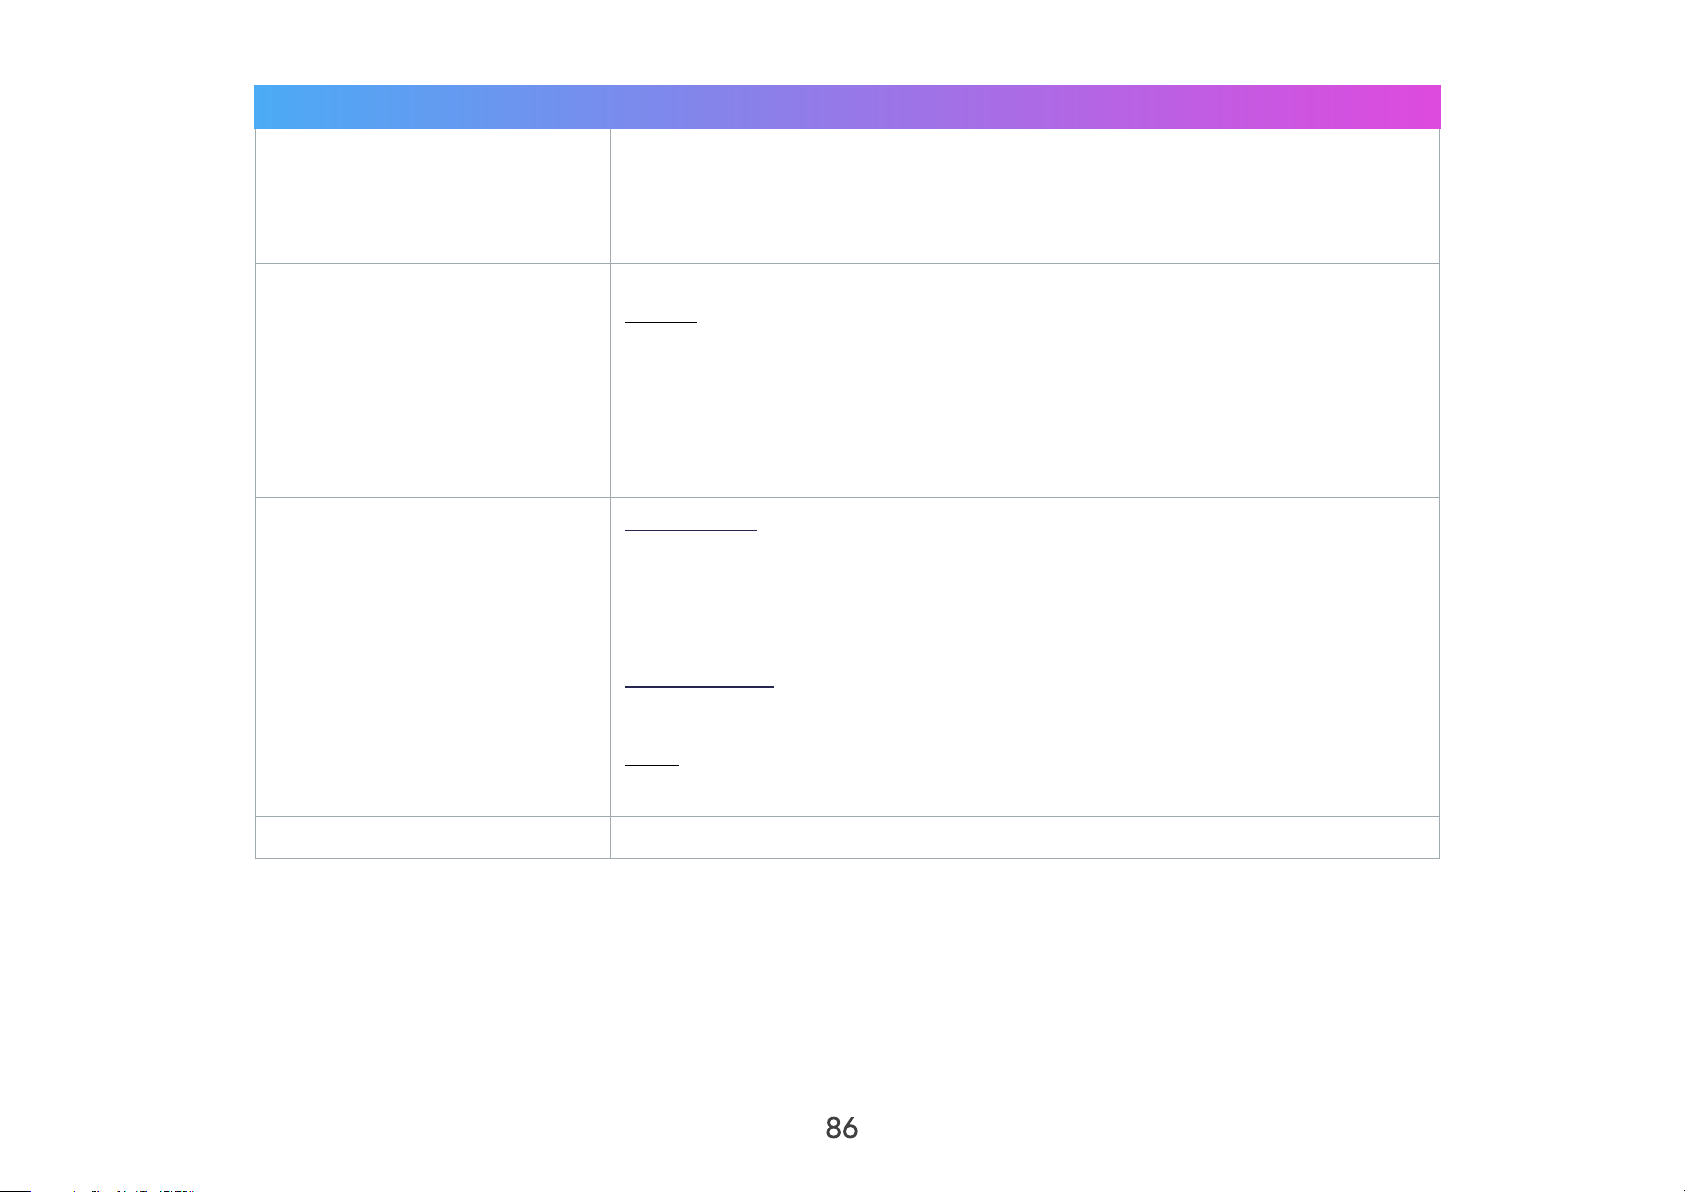
Menu Description
The projector can automatically adjust the brightness levels of your
EOTF
HDMI Setting
Audio Settings
image according to the input source. Normally, the default setting Mid is
recommended. If the brightness of the projected image is dark, please
use Low. When giving priority to gradation property, please use High.
Range
Select a suitable color range according to the color range setting of the
connected output device.
• Full: Sets the color range from 0~255.
• Limited: Sets the color range from 15~235.
Audio Mode
• Movie: Default audio mode.
• Music: Ideal for music playback.
Audio Volume
Information
Adjust the volume from 0 to 50.
Mute
Mute or unmute the volume.
Shows the input source and resolution.
86
Page 87
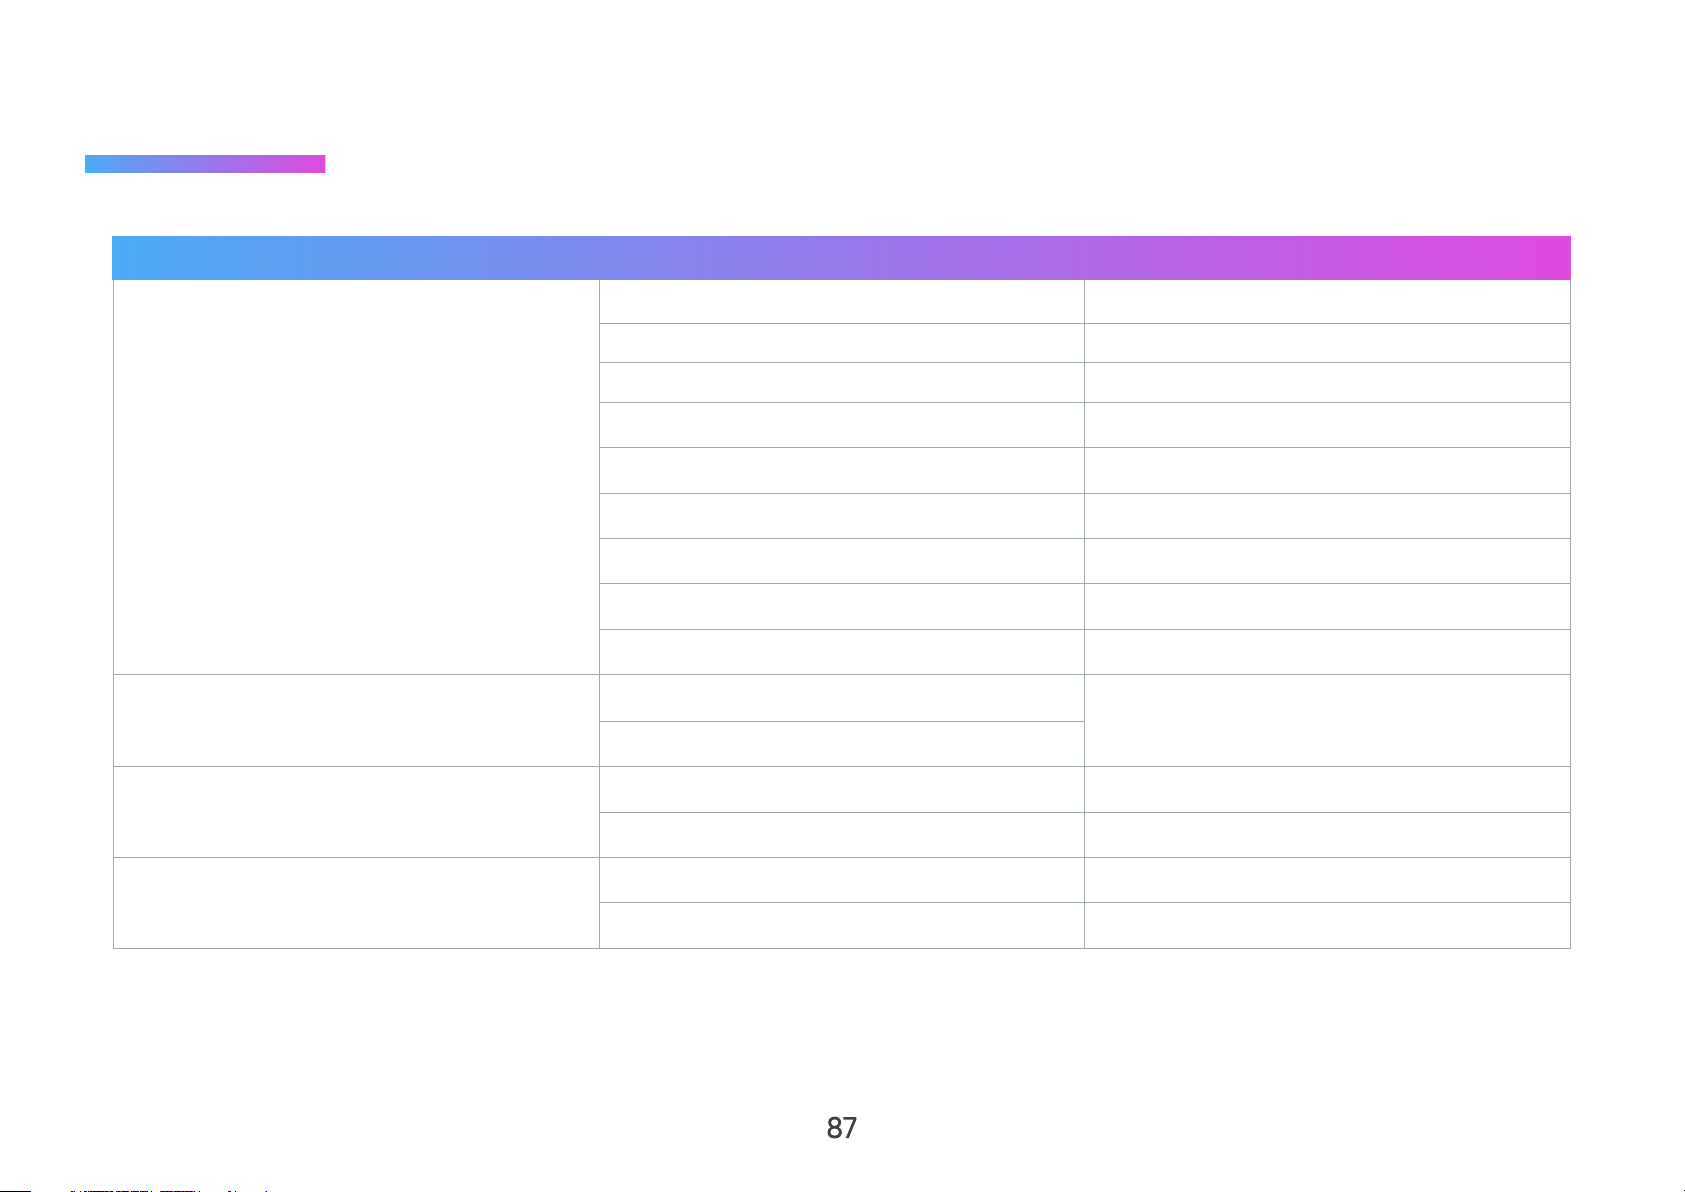
Appendix
Specifications
Item Category Specifications
Type 0.23” 1080p, Laser
Display Size 40”~180”
Throw Distance 1.06~4.78 m (100” @ 2.66 m)
Lens F=2.0, f=6.2451 mm
Projector
Input Signal
Resolution
Local Storage
Optical Zoom Fixed
Light Source Type RGB Laser
Light Source 30,000 hours
Display Color 1.07 Billion Colors
Keystone Horizontal: -/+ 40°; Vertical: -/+ 40°
HDMI
: 15K~102 kHz, fv: 23~120 Hz,
f
USB C
Native 1920 x 1080
Support VGA (640 x 480) to UHD (3840 x 2160)
Total 16 GB
Available 12 GB
h
87
Page 88
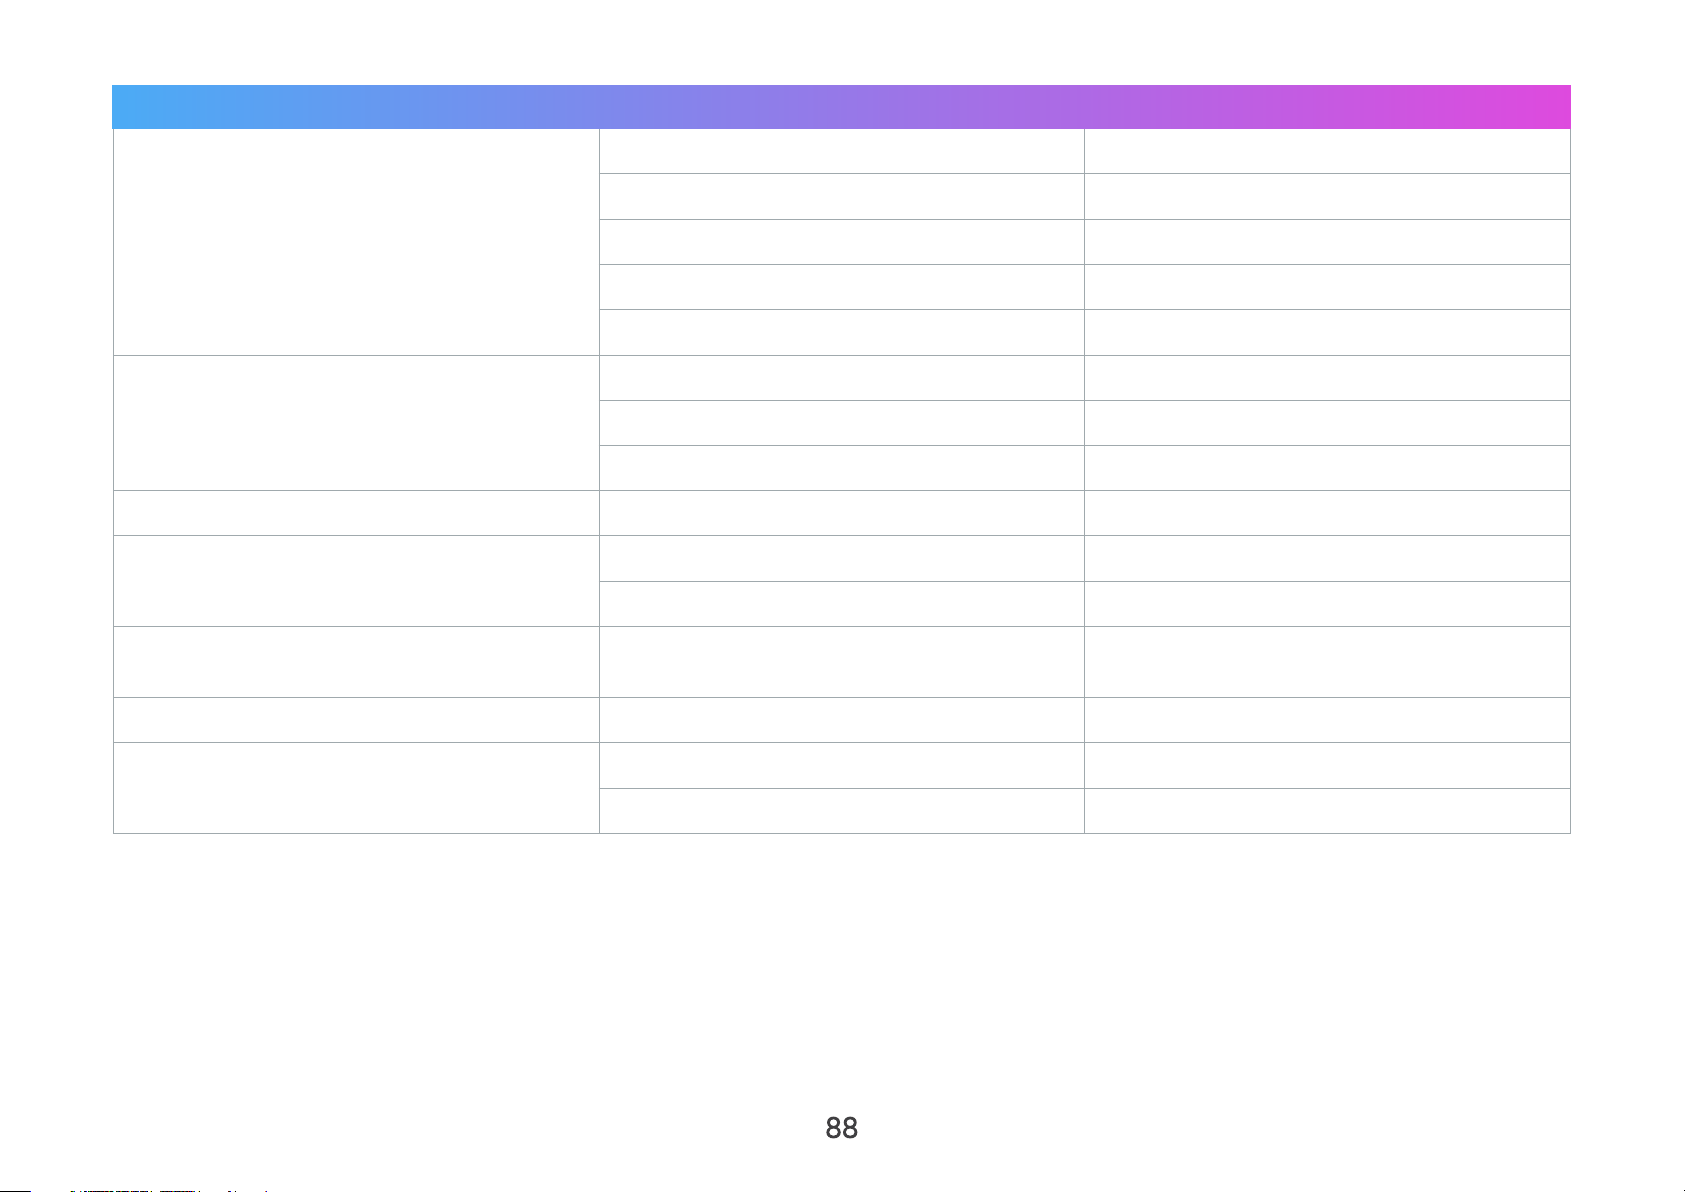
Item Category Specifications
HDMI 1 (HDMI 2.0, HDCP 2.2)
USB Type C 1 (5V/2A)
Input
Output
Power Adapter
Operating Conditions
Dimensions
Weight
Power Consumption
USB Type A 1 USB 2.0 Reader
Wi-Fi input 1 (5G, 802.11 ac)
Audio In (Bluetooth) 1 (BT 4.2)
Audio Out (Bluetooth) 1 (BT 4.2)
Speaker 7W Cube
USB Type A (Power) 1 (USB 2.0, 5V/2A, share with reader)
Input Voltage DC IN 100-240V, 50/60 Hz (auto switch)
Temperature 0°C to 35°C (32°F to 95°F)
Humidity 0% to 90% (non-condensing)
Physical (W x H x D)
Physical 1.2 kg (2.64 lbs)
On 51.3W (Typical)
O < 0.5W (Standby)
208 x 165 x 92 mm
(8.19” x 6.50” x 3.62”)
88
Page 89
Timing Chart
HDMI Video Timing
Signal Resolution Aspect Ratio Refresh Rate (Hz)
480i
480p
576i
576p
720p
1080i
1080p
720 x 480 4:3 / 16:9 60
720 x 480 4:3 / 16:9 60
720 x 576 4:3 / 16:9 50
720 x 576 4:3 / 16:9 50
1280 x 720 16:9 50 / 60
1920 x 1080 16:9 50 / 60
1920 x 1080 16:9 24 / 25 / 30 / 50 / 60
89
Page 90
HDMI PC Timing
Signal Resolution Refresh Rate (Hz)
VGA
720 x 400
SVGA
832 x 624
XGA
1024 x 576
XGA+
1152 x 870
WXGA
WXGA
SVGA
1280 x 960
HD
640 x 480 59 / 67 / 72 / 75 / 85
720 x 400 70
800 x 600 56 / 60 / 72 / 75 / 85
832 x 624 75
1024 x 768 60 / 70 / 75 / 85
1024 x 576 60
1152 x 864 75
1152 x 870 75
1280 x 768 60 / 75 / 85
1280 x 800 60 / 75 / 85
1280 x 1024 60 / 75 / 85
1280 x 960 60 / 85
1360 x 768 60
WXGA+
1400 x 1050
1600 x 1200
WSXGA+
1920 x 1080
1440 x 900 60 / 75 / 85
1400 x 1050 60
1600 x 1200 60
1680 x 1050 60
1920 x 1080 60
90
Page 91
USB C Video Timing
Signal Resolution Aspect Ratio Refresh Rate (Hz)
480i
480p
576i
576p
720p
1080i
1080p
720 x 480 4:3 / 16:9 60
720 x 480 4:3 / 16:9 60
720 x 576 4:3 / 16:9 50
720 x 576 4:3 / 16:9 50
1280 x 720 16:9 50 / 60
1920 x 1080 16:9 50 / 60
1920 x 1080 16:9 24 / 25 / 30 / 50 / 60
91
Page 92
USB C PC Timing
Signal Resolution Refresh Rate (Hz)
VGA
720 x 400
SVGA
832 x 624
XGA
1024 x 576
XGA+
1152 x 870
WXGA
WXGA
SVGA
1280 x 960
HD
640 x 480 59 / 67 / 72 / 75 / 85
720 x 400 70
800 x 600 56 / 60 / 72 / 75 / 85
832 x 624 75
1024 x 768 60 / 70 / 75 / 85
1024 x 576 60
1152 x 864 75
1152 x 870 75
1280 x 768 60 / 75 / 85
1280 x 800 60 / 75 / 85
1280 x 1024 60 / 75 / 85
1280 x 960 60 / 85
1360 x 768 60
WXGA+
1400 x 1050
1600 x 1200
WSXGA+
1920 x 1080
1440 x 900 60 / 75 / 85
1400 x 1050 60
1600 x 1200 60
1680 x 1050 60
1920 x 1080 60
92
Page 93
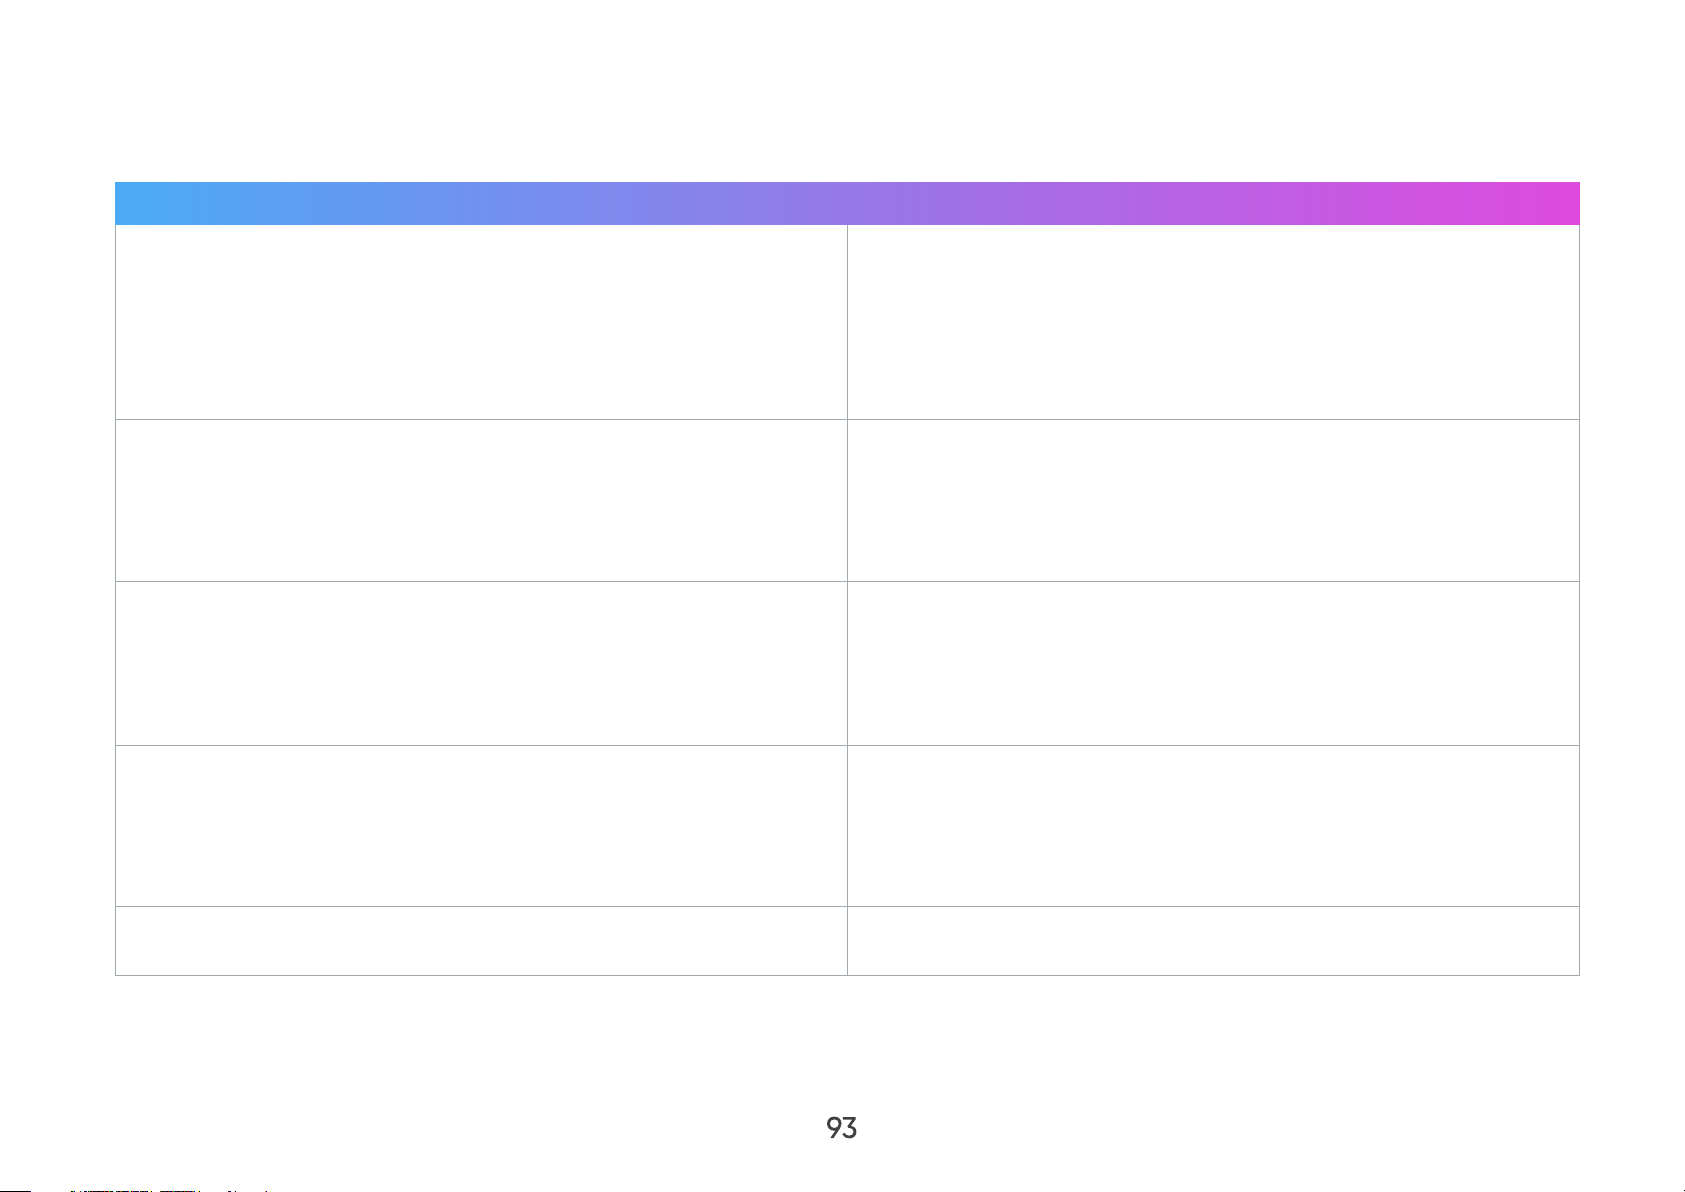
Troubleshooting
This section describes some common problems that you may experience when using the projector.
Problem or Issue Possible Solutions
• Ensure the power cord is properly attached to the projector
and to the power outlet.
The projector does not turn on
There is no picture
The image is blurred
The remote control does not work
• If the cooling process has not completed, please wait until it
has finished then try to turn on the projector again.
• If the above does not work, try another power outlet or
another electrical device with the same power outlet.
• Ensure the video source cable is connected properly, and that
the video source is turned on.
• If the input source is not selected automatically, select the
correct source with the Source key on either the projector or
the remote control.
• Improve the clarity of the image by using adjusting the focus
to clarify the image.
• Ensure the projector and screen are aligned properly. If
necessary, adjust the height of the projector as well as the
projection angle and direction.
• Ensure there are no obstacles between the remote control
and projector; and that they are within 8 m (26 ft) of each
other.
• The batteries may be out of power, please check and replace
if necessary.
The projector/system is frozen and will not respond
• Please toggle the Power button o/on to reset the projector.
93
Page 94
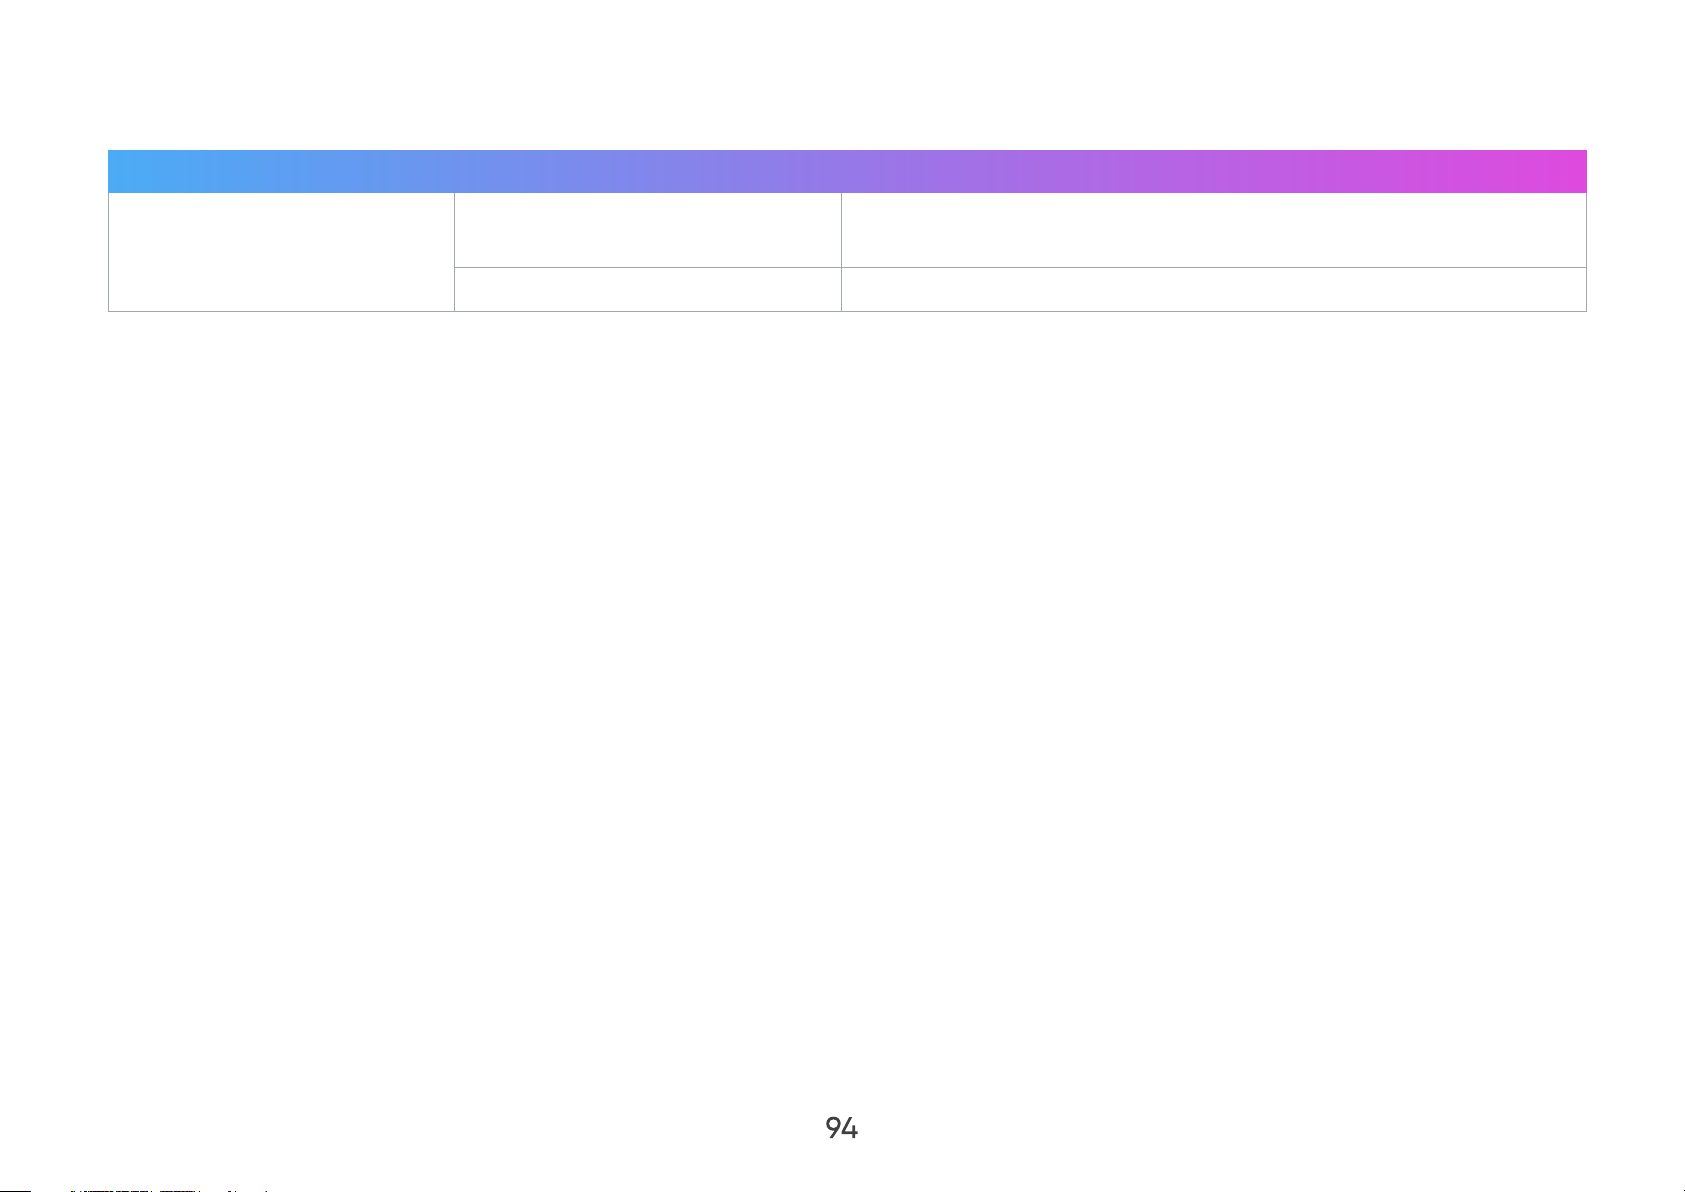
LED Indicators
Location Light Status and Description
LED Indicator
Green Power on
Red Stand-by mode
94
Page 95

Maintenance
General Precautions
• Make sure the projector is turned o and the power cable is unplugged from the power outlet.
• Never remove any parts from the projector. Contact Customer Support when any part of the projector needs replacing.
• Never spray or pour any liquid directly onto the case.
• Handle the projector with care, as a darker-colored projector, if scued, may show marks more clearly than a lighter-colored projector.
Cleaning the Lens
• Use a canister of compressed air to remove dust.
• If the lens is still not clean, use lens-cleaning paper or moisten a soft cloth with lens cleaner and gently wipe the surface.
CAUTION: Never rub the lens with abrasive materials.
Storing the Projector
If you intend to store the projector for an extended period of time:
• Ensure the temperature and humidity of the storage area are within the recommend range.
• Retract the adjuster foot completely.
• Remove the batteries from the remote control.
• Pack the projector in its original packaging or equivalent.
Disclaimer
• It is not recommend the use of any ammonia or alcohol-based cleaners on the lens or case. Some chemical cleaners have been
reported to damage the lens and/or case of the projector.
• NOMVDIC™ will not be liable for damage resulting from use of any ammonia or alcohol-based cleaners.
95
Page 96

Regulatory and Service Information
Compliance Information
This section addresses all connected requirements and statements regarding regulations. Confirmed corresponding
applications shall refer to nameplate labels and relevant markings on the unit.
FCC Compliance Statement
This device complies with part 15 of FCC Rules. Operation is subject to the following two conditions: (1) this device may
not cause harmful interference, and (2) this device must accept any interference received, including interference that may
cause undesired operation. This equipment has been tested and found to comply with the limits for a Class B digital device,
pursuant to part 15 of the FCC Rules.
These limits are designed to provide reasonable protection against harmful interference in a residential installation. This
equipment generates, uses, and can radiate radio frequency energy, and if not installed and used in accordance with the
instructions, may cause harmful interference to radio communications. However, there is no guarantee that interference will
not occur in a particular installation. If this equipment does cause harmful interference to radio or television reception, which
can be determined by turning the equipment o and on, the user is encouraged to try to correct the interference by one or
more of the following measures:
• Reorient or relocate the receiving antenna.
• Increase the separation between the equipment and receiver.
• Connect the equipment into an outlet on a circuit dierent from that to which the receiver is connected.
• Consult the dealer or an experienced radio/TV technician for help.
Warning: You are cautioned that changes or modifications not expressly approved by the party responsible for compliance
could void your authority to operate the equipment.
96
Page 97

FCC Radiation Exposure Statement
This equipment complies with FCC radiation exposure limits set forth for an uncontrolled environment. End users must follow
the specific operating instructions to satisfy RF exposure compliance.
This transmitter must not be co-located or operating in conjunction with any other antenna or transmitter. This equipment
should be installed and operated with a minimum distance of 20 centimeters between the radiator and your body.
The users manual or instruction manual for an intentional or unintentional radiator shall caution the user that changes or
modifications not expressly approved by the party responsible for compliance could void the user’s authority to operate the
equipment.
Industry Canada Statement
CAN ICES-003(B) / NMB-003(B)
IC Warning Statement
This device complies with Industry Canada license- exempt RSS standard(s). Operation is subject to the following two
conditions: (1) this device may not cause interference, and (2) this device must accept any interference, including interference
that may cause undesired operation of the device.
Le présent appareil est conforme aux CNR d’Industrie Canada applicables aux appareils radio exempts de licence.
L’exploitation est autorisée aux deux conditions suivantes : (1) l’appareil ne doit pas produire de brouillage, et (2) l’utilisateur
de l’appareil doit accepter tout brouillage radioélectrique subi, méme si le brouillage est susceptible d’en compromettre le
fonctionnement.
Country Code Statement
For product available in the USA/Canada market, only channel 1~11 can be operated. Selection of other channels is not
possible.
Pour les produits disponibles aux États-Unis/Canada du marché, seul le canal 1 à 11 peuvent être exploités. Sélection d’autres
canaux n’est pas possible.
97
Page 98

IC Radiation Exposure Statement
This equipment complied with IC RSS-102 radiation exposure limits set forth for an uncontrolled environment. This equipment
should be installed and operated with minimum distance 20cm between the radiator & your body. The device for the band
5150-5825 MHz is only for indoor usage to reduce potential for harmful interference to co-channel mobile satellite systems.
Cet équipement est conforme aux limites d’exposition aux rayonnements IC établies pour un environnement non contrôlê.
Cet équipement doit être installé et utilize avec un minimum de 20cm de distance entre la source de rayonnement et votre
corps. les dispositifs fonctionnant dans la bande 5150-5825 MHz sont réservés uniquement pour une utilisation à l’intérieur
afin de réduire les risques de brouillage.
Operation in the band 5150-5250 MHz is only for indoor use to reduce the potential for harmful interference to co-channel
mobile satellite systems.
La bande 5150-5250 MHz est réservés uniquement pour une utilisation à l’intérieur afin de réduire les risques de brouillage
préjudiciable aux systèmes de satellites mobiles utilisant les mêmes canaux.
CE Conformity for European Countries
The device complies with the EMC Directive 2014/30/EU, Low Voltage Directive 2014/35/EU, Ecodesign Directive
2009/125/EC and Radio Equipment Directive 2014/53/EU. Frequency Range : 2400-2483.5MHz, 5150-5250MHz
Max Output Power : under 20dBm
The following information is only for EU-member states:
The mark shown to the right is in compliance with the Waste Electrical and Electronic Equipment Directive
2012/19/EU (WEEE). The mark indicates the requirement NOT to dispose of the equipment as unsorted municipal
waste, but use the return and collection systems according to local law.
If the batteries, accumulators and button cells included with this equipment display the chemical symbol Hg, Cd,
or Pb, then it means that the battery has a heavy metal content of more than 0.0005% Mercury, or more than
0.002% Cadmium, or more than 0.004% Lead.
98
Page 99
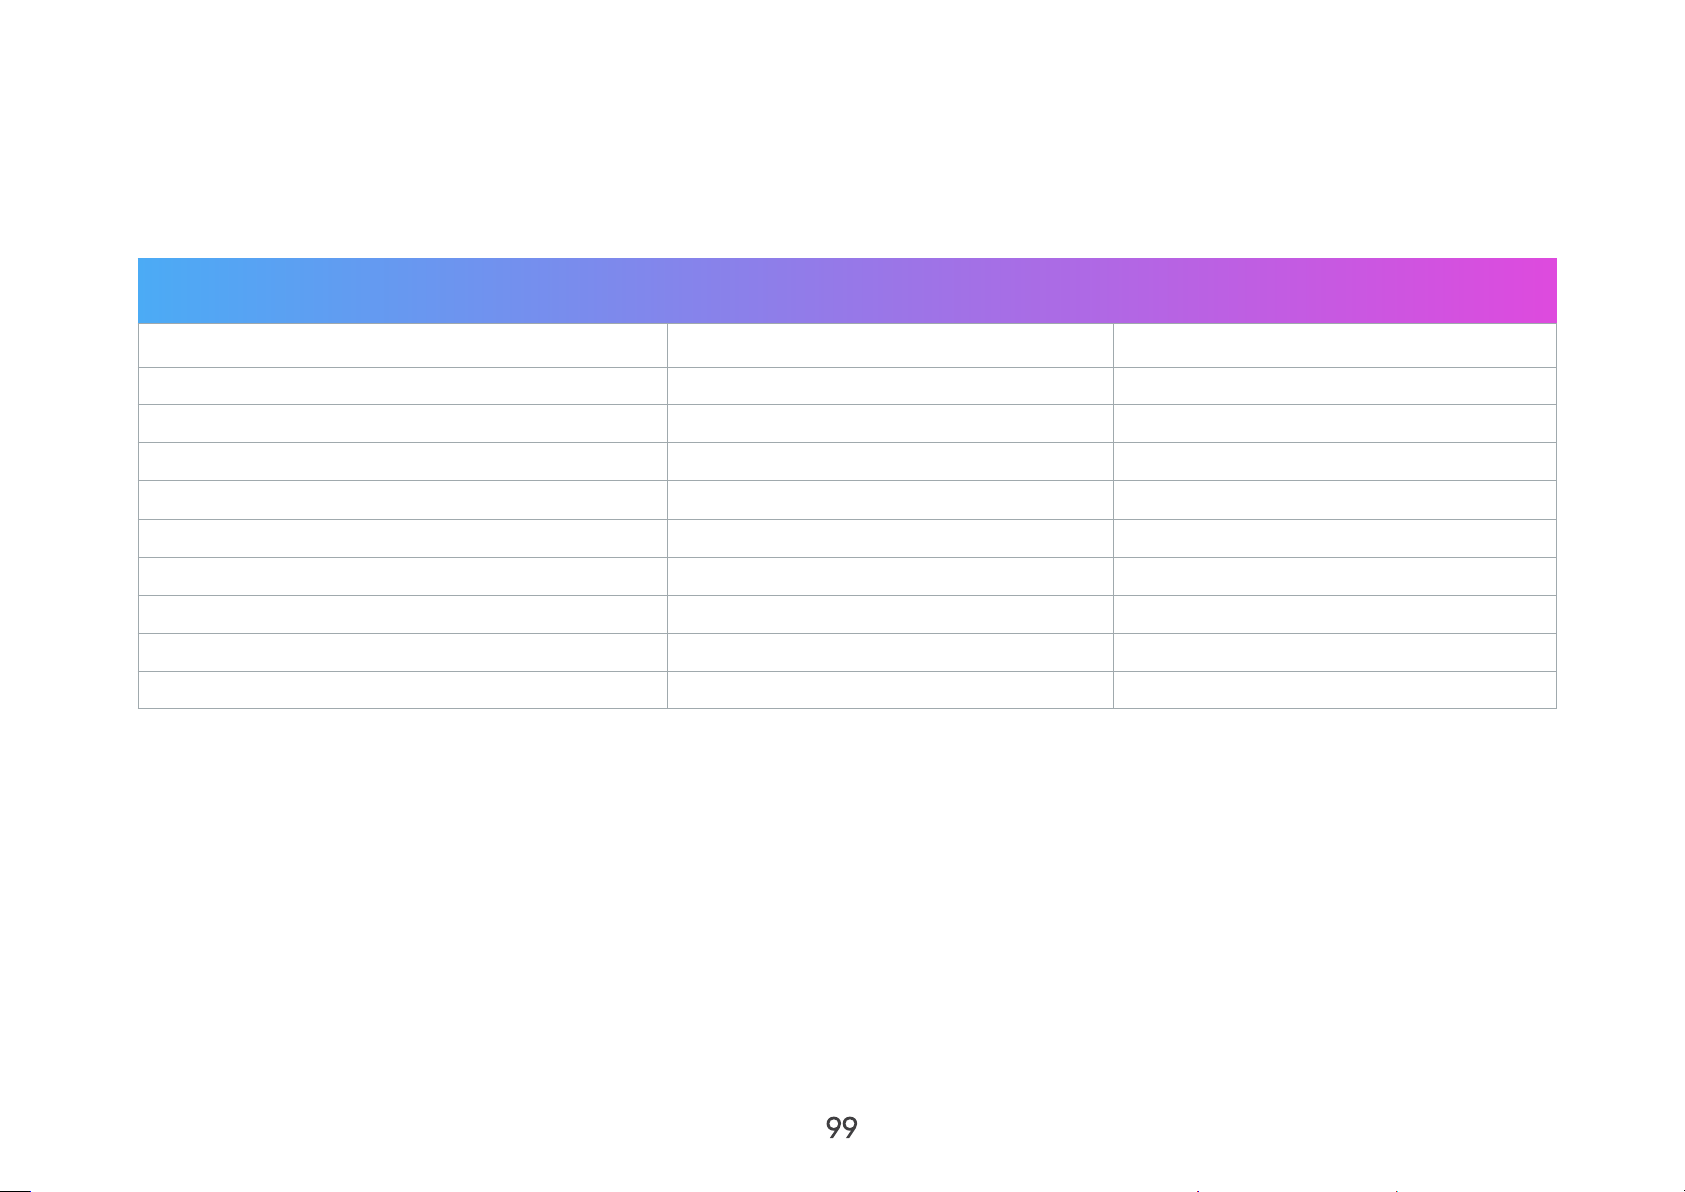
Declaration of RoHS2 Compliance
This product has been designed and manufactured in compliance with Directive 2011/65/EU of the European Parliament and
the Council on restriction of the use of certain hazardous substances in electrical and electronic equipment (RoHS2 Directive)
and is deemed to comply with the maximum concentration values issued by the European Technical Adaptation Committee
(TAC) as shown below:
Substance
Lead (Pb) 0.1% < 0.1%
Mercury (Hg) 0.1% < 0.1%
Cadmium (Cd) 0.01% < 0.01%
Hexavalent Chromium (Cr6⁺) 0.1% < 0.1%
Polybrominated biphenyls (PBB) 0.1% < 0.1%
Polybrominated diphenyl ethers (PBDE) 0.1% < 0.1%
Bis(2-Ethylhexyl) phthalate (DEHP) 0.1% < 0.1%
Benzyl butyl phthalate (BBP) 0.1% < 0.1%
Dibutyl phthalate (DBP) 0.1% < 0.1%
Diisobutyl phthalate (DIBP) 0.1% < 0.1%
Certain components of products as stated above are exempted under the Annex III of the RoHS2 Directives as noted below.
Examples of exempted components are:
• Copper alloy containing up to 4% lead by weight.
• Lead in high melting temperature type solders (i.e. lead-based alloys containing 85% by weight or more lead).
Proposed Maximum
Concentration
Actual Concentration
• Electrical and electronic components containing lead in a glass or ceramic other than dielectric ceramic in capacitors, e.g.
piezoelectronic devices, or in a glass or ceramic matrix compound.
• Lead in dielectric ceramic in capacitors for a rated voltage of 125V AC or 250V DC or higher.
99
Page 100

Indian Restriction of Hazardous Substances
Restriction on Hazardous Substances statement (India). This product complies with the “India E-waste Rule 2011” and prohibits
use of lead, mercury, hexavalent chromium, polybrominated biphenyls or polybrominated diphenyl ethers in concentrations
exceeding 0.1 weight % and 0.01 weight % for cadmium, except for the exemptions set in Schedule 2 of the Rule.
100
 Loading...