

Page 1

Electronic user's guide released subject to "Nokia User's Guides Terms and
Conditions, 7th June, 1998"
User’s Guide
Issue 4
9353068
Page 2

DECLARATION OF CONFORMITY
We, NOKIA CORPORATION declare under our sole responsibility that the product
TME-1 is in conformity with the provisions of the following Council Directive:
1999/5/EC. A copy of the Declaration of Conformity can be found from
http://www.nokia.com/phones/declaration_of_conformity/.
Copyright © 2001-2002 Nokia. All rights reserved.
Reproduction, transfer, distribution or storage of part or all of the contents in this
document in any form without the prior written permission of Nokia is
prohibited.
Nokia and Nokia Connecting People are registered trademarks of Nokia
Corporation. Other product and company names mentioned herein may be
trademarks or tradenames of their respective owners.
Nokia operates a policy of continuous development. Nokia reserves the right to
make changes and improvements to any of the products described in this
document without prior notice.
Under no circumstances shall Nokia be responsible for any loss of data or income
or any special, incidental, consequential or indirect damages howsoever caused.
The contents of this document are provided “as is”. Except as required by
applicable law, no warranties of any kind, either expressed or implied, including,
but not limited to, the implied warranties of merchantability and fitness for a
particular purpose, are made in relation to the accuracy, reliability or contents of
this document. Nokia reserves the right to revise this document or withdraw it at
any time without prior notice.
The availability of particular products may vary by region. Please check with the
Nokia dealer nearest to you.
Page 3
1. For your safety
Read these simple guidelines. Breaking the rules may be dangerous or
illegal. Further detailed information is given in this manual.
INTERFERENCE
All wireless equipment may get interference which could affect performance.
QUALIFIED SERVICE
Only qualified service personnel must repair equipment.
INSTALLATION
Follow the installation instructions. Use only approved accessories.
CONNECTING TO OTHER DEVICES
When connecting to any other device, read its user’s guide for detailed
safety instructions. Do not connect incompatible products.
MAKE BACKUP COPIES
Remember to make backup copies of all important data.
EMERGENCY CALLS
This terminal, like all wireless equipment, operates using radio signals,
wireless and landline networks as well as user-programmed functions
which cannot guarantee conncetion in all conditions. Therefore, you
should never rely solely upon any wireless equipment for essential
communications (e.g. medical emergencies.)
For your safety
Copyright © 2002 Nokia. All rights reserved.
3
Page 4

Table of contents
For your safety
1.For your safety .................. 3
2.Introduction....................... 5
Package contents .............................. 6
Network services................................ 6
3.Setting up the terminal.... 8
4.PBX installation............... 11
Connecting the terminal to
a PBX trunk line ...............................11
Connecting the terminal to
a PBX extension line....................... 12
5.Light indicators ...............16
6.Tone indicators................ 18
7.Nokia 22 accessories.......19
8.Troubleshooting ............... 20
First things to check ....................... 20
Dial tone is not heard.....................20
Noise is heard during a call.......... 20
Reception is poor.............................20
Entering PIN code does not
succeed............................................... 21
Nokia 22 cannot be reached in
extension mode................................21
9.Technical specifications..22
10.Important safety
information .........................24
11.Care and maintenance..26
Copyright © 2002 Nokia. All rights reserved.
4
Page 5
Introduction
2. Introduction
Congratulations on your purchase of the Nokia 22 PBX connectivity
terminal. The Nokia 22 features two Private Branch Exchange (PBX)
interfaces. In addition to PBX connectivity solutions, the Nokia 22 can
also be used in conjunction with other fixed GSM solutions and various
data solutions.
You may find more information of Nokia 22 and downloadable files on
the Nokia web site www.nokia.com.
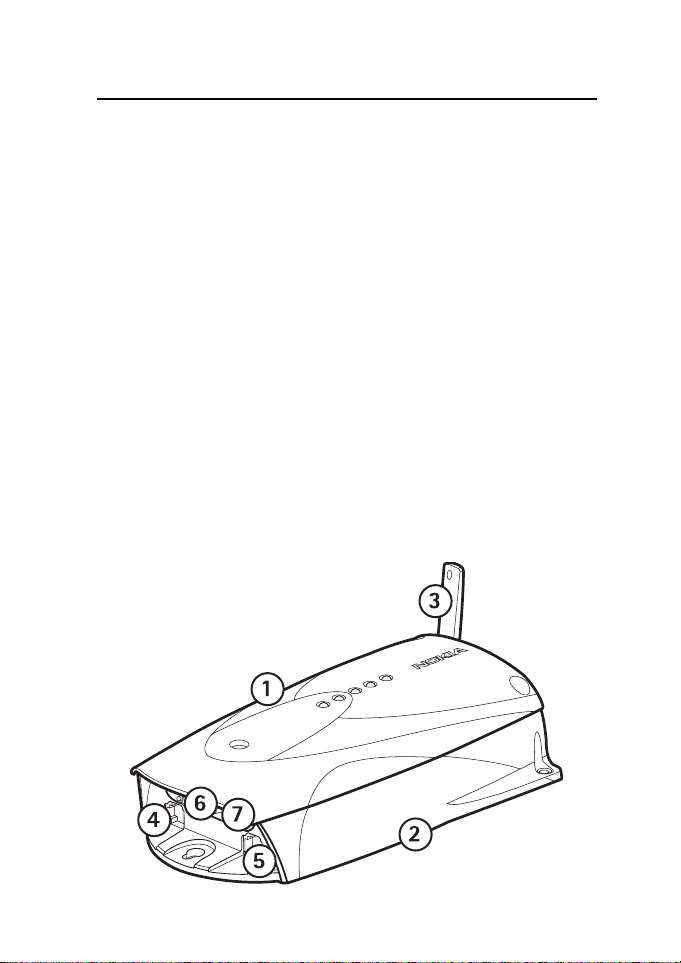
The Nokia 22 incorporates:
• GSM terminal (1)
• application module (2)
• antenna (3)
• PBX extension connector (4)
• PBX trunk connector (5)
• RS-232 data connector (6)
• power supply connector (7)
Copyright © 2002 Nokia. All rights reserved.
5
Page 6
Introduction
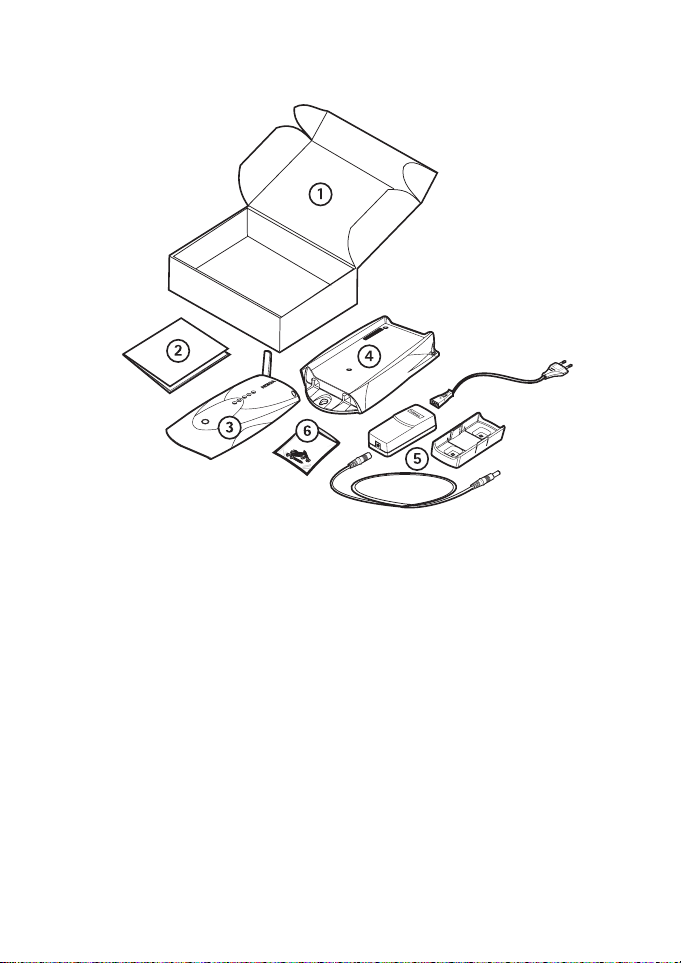
■Package contents
1 Nokia 22 sales package
2 Nokia 22 User’s Guide
3 Nokia 22 GSM terminal
4 Application module
5 Power source with a wall rack, AC and DC cables
6 Screws
■Network services
The cellular device described in this user guide is designed to be used as
an end-user terminal on the GSM 900 and GSM 1800 networks and on
the GSM 900/1800 dual band network. For information on different
Copyright © 2002 Nokia. All rights reserved.
6
Page 7

Introduction
network services operational in GSM networks, please consult your
network service provider.
Note that dual band functionality is a network-dependent feature.
Check with your local service provider if you can subscribe to and use
the dual band functionality.
Copyright © 2002 Nokia. All rights reserved.
7
Page 8
Setting up the terminal
3. Setting up the terminal
If you use the Nokia 22 Configurator Software, refer to the Operator’s
Guide supplied with the software for instructions on how to use the
terminal.
To use the Nokia 22 for the first time, proceed as follows:
1 Install the SIM card.
2 Mount the GSM terminal on the application module.
3 Connect the terminal to a DTMF telephone or to a PBX.
4 Connect the power supply to the terminal and to an AC wall outlet.
5 Enter the PIN code if your SIM card requires it.
6 Check the signal strength.
7 Make a test call.
Caution: In order to comply with RF exposure requirements, install the
terminal so that a minimum distance of 20 cm can be maintained
between the antenna and all persons. If you use an external antenna,
install the antenna so that a minimum distance of 20 cm can be
maintained between the antenna and all persons, with antenna gain not
exceeding 3 dBi.
Warning! To avoid damage to the SIM card, do not connect the
power supply to an AC wall outlet before you have installed the
SIM card and mounted the GSM terminal on the application
module.
Installing the SIM card
Keep all miniature SIM cards out of the reach of small children. The SIM
card and its contacts can easily be damaged by scratches or bending, so
be careful when handling, inserting or removing the card.
Copyright © 2002 Nokia. All rights reserved.
8
Page 9
Setting up the terminal
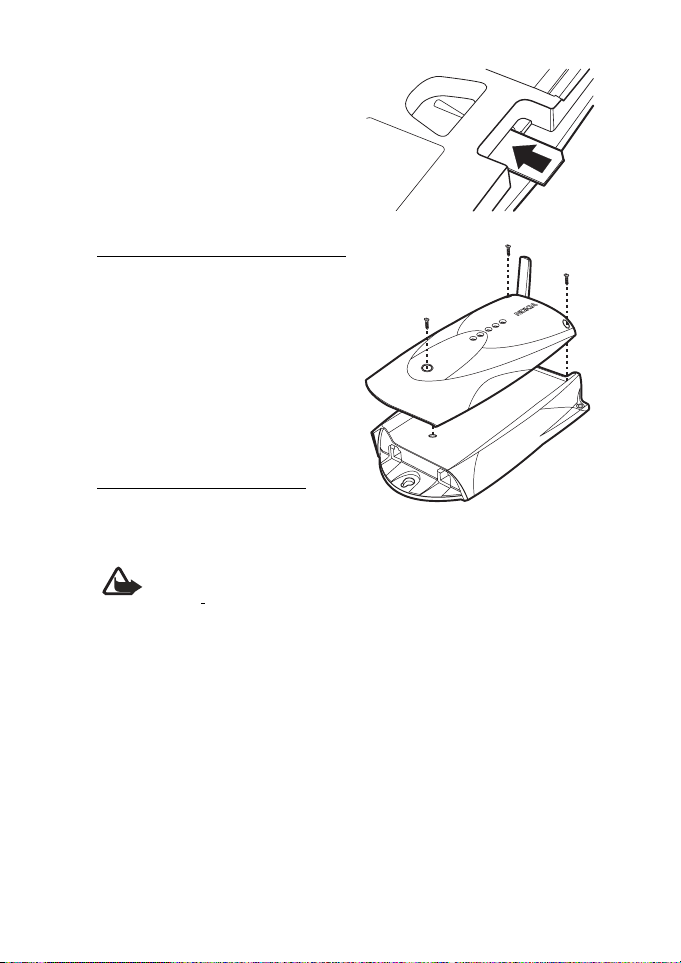
Insert the SIM card ensuring that the
golden contact area is facing
downwards.
Mounting the GSM terminal
Mount the GSM terminal on the
application module using the three
screws supplied with the terminal.
Connecting a telephone
Connect a DTMF telephone to the
trunk connector.
Warning! To avoid damage to the devices, the telephone must
be connected to the trunk connector with a standard 6/6-pin
RJ-11
connector that has only its two middle pins connected.
The distance between the telephone or a PBX and Nokia 22 should not
be less than 1 meter. Distance from one Nokia 22 terminal to another
Nokia 22 should be greater than 30 cm. In case of interferences, try to
increase the distance inbetween.
About connecting Nokia 22 to the PBX (Private Branch Exchange), see
the next chapter ”PBX installation”.
Copyright © 2002 Nokia. All rights reserved.
9
Page 10

Setting up the terminal
Connecting the power supply
1 Connect the power cord from the
power supply to the terminal.
2 Connect the power supply to an
AC wall outlet.
Entering the PIN code
The PIN (Personal Identification Number) code protects your SIM card
against unauthorised use. It is usually supplied with the SIM card. Use
the telephone connected to the terminal to enter the PIN code.
When light indicator 4 blinks, lift the receiver. When the enter PIN code
tone is heard, enter the PIN code followed by #. The OK tone is heard and
light indicator 3 lights up. If the opeartion fails, see Entering PIN code
does not succeed on page 21.
If the AutoPIN feature is active, the terminal automatically enters your
PIN code the next time the power is switched on.
Checking the signal strength
To check the signal strength, lift the receiver of the telephone connected
to the terminal and key in 777**#. Make sure the signal strength is
adequate to make and receive calls. The signal strength is indicated by
the light indicators for aproximately one minute (see Light indicators on
page 16).
Making a test call
Make the test call using the telephone connected to the terminal. To
adjust the volume, key in 0**x during the call. The ’x’ represents a value
ranging from 1 (the lowest volume level) to 10 (the highest volume
level).
Copyright © 2002 Nokia. All rights reserved.
10
Page 11

PBX installation
4. PBX installation
For detailed information on how to connect the Nokia 22 to a PBX,
contact your service provider.
This section informs of the mandatory settings needed when connecting
the Nokia 22 to a PBX. For more information about PBX configuration,
contact your PBX service provider.
■Connecting the terminal to a PBX trunk line
1 Disconnect the terminal’s power supply from the AC wall outlet.
2 Connect the terminal to the PBX trunk line using an RJ-11 cable.
3 Connect the power supply to the terminal.
If the AutoPIN feature is active, the terminal attempts to connect to the
network within 20-30 seconds. If the AutoPIN feature is not active, light
indicator 4 starts to blink and you have to enter your PIN code before
the network connection can be established.
The network connection is established when light indicator 3 lights up
The PBX trunk line connection is established when light indicator 1
lights up.
Copyright © 2002 Nokia. All rights reserved.
11
Page 12

PBX installation
Warning! Inappropriate installation of the Nokia 22 terminal
to a PBX may damage the PBX or the Nokia 22 terminal. If an
extension line of the PBX is connected to the terminal’s trunk
connector, the devices attempt to feed current to each other
and they can be damaged.
To avoid damage to the devices, an analogue trunk line of the
PBX must be connected to the terminal’s trunk connector with
a standard
pins connected. An analogue extension line of the PBX must be
connected to the terminal’s extension connector with a
standard
pins connected. Note that the terminal’s trunk and extension
connectors cannot be used at the same time to connect a
device.
Do not connect the Nokia 22 to a digital (ISDN) interface of a
PBX.
6/6-pin RJ-11 cable that has only its two middle
6/6-pin RJ-11 cable that has only its two middle
Making an incoming test call
Make a call to the terminal’s GSM number. For details on the number,
contact your service provider. The terminal redirects the call to the
switching centre and sends a ringing tone to the PBX trunk line. The
switching centre then answers and redirects the call.
Making an outgoing test call
The PBX must be configured to route certain outgoing numbers (for
example numbers with a mobile prefix) to the trunk line the Nokia 22 is
connected to before an outgoing call can be made. When the PBX sends
a number to the terminal, the terminal connects the call.
■Connecting the terminal to a PBX extension line
1 Disconnect the terminal’s power supply from the AC wall outlet.
2 Connect the terminal to the PBX extension line using an RJ-11 cable.
3 Connect the power supply to the terminal.
Copyright © 2002 Nokia. All rights reserved.
12
Page 13

PBX installation
If the AutoPIN feature is active, the terminal attempts to connect to the
network within 20-30 seconds. If the AutoPIN feature is not active, light
indicator 4 starts to blink and you have to enter your PIN code before
the network connection can be established.
The network connection is established when light indicator 3 lights up.
The PBX trunk line connection is established when light indicator 1
lights up.
Note: When the Nokia 22 terminal is connected to an
extension line of a PBX, some precautions must be taken into
account. If no calling restrictions have been set up, any caller
calling the Nokia 22 terminal’s GSM number gains access to
the outgoing PBX tunk line and can make phone calls that are
charged to the PBX owner.
To prevent this situation, the PBX must be configured to deny
any outgoing calls coming from the extension line the Nokia
22 is connected to. If the PBX cannot be configured in such a
way, it is possible to configure the Nokia 22 to automatically
call a predefined extension number when it receives a GSM
call.
For further information about PBX configuration, see your PBX
user’s guide.
Call monitoring
A PBX tells to the Nokia 22 that the call is disconnected by providing
either a busy tone or a silence to Nokia 22. To clear the call to GSM
network, the Nokia 22 shall be selected to monitor either one of those.
The default is monitoring silence.
Setting up the busy tone monitoring
When the Nokia 22 is used in the extension mode with a PBX, there is a
need for the detection of the busy tone in the PBX. Tone detection is
needed because the PBX emits the tone when the hook on transition
occurs in the extension line.
The Tone Teaching feature in Nokia 22 is used to teach the Nokia 22 the
busy tone of each PBX.
Copyright © 2002 Nokia. All rights reserved.
13
Page 14

PBX installation
After the Nokia 22 has physically been installed to the final position, the
learning mode can be activated:
1 Call from another extension to the extension where Nokia 22 is in-
stalled.
2 After you get the dial tone from Nokia 22, dial
**####**1234#88*own_ext_number#
(own_ext_number is the extension number where you are commanding the Nokia 22 from)
3 After the last digit (#), put the receiver down, and wait until the
Nokia 22 calls you back.
4 When the phone in the extension rings, pick up the receiver, and
listen to the tone:
• If you hear a busy tone, the learning did not succeed, and you
should repeat the steps
• If you hear the command query beep (three beeps), Nokia 22 has
learned the busy tone
Set the hook on, and wait for 60 seconds. The Nokia 22 will reboot itself
before it is ready for use.
Making an incoming test call
Make a call to the terminal’s GSM number. For details on the number,
contact your service provider. The terminal answers the call and places
the PBX extension line off-hook. The PBX then emits a dial tone and you
can dial an extesion number or outgoing number. After that, the PBX
connects the call.
Making an outgoing test call
Make a call to the PBX extension number the terminal is connected to.
The terminal answers the call. After that, a dial tone is heard, provided
that the terminal has been set to emit a dial tone, and you can dial the
desired number. The terminal connects the call.
The PBX can also be configured to automatically route certain numbers.
Copyright © 2002 Nokia. All rights reserved.
14
Page 15

PBX installation
Functionality in extension mode
Outgoing call on the extension line, mode A
1 User keys in the number of the extension to which the Nokia 22 is
connected.
2 Terminal answers the call and emits a dial tone.
3 User keys in the B subscriber’s number.
4 Terminal establishes the call.
Outgoing call on the extension line, mode B
1 User keys in the number of the extension where the Nokia 22 is con-
nected.
2 Terminal answers the call and provides silence.
3 User keys in the B subscriber’s number.
4 Terminal establishes the call.
Incoming call on the extension line, mode A
1 Terminal answers the call and opens the extension line.
2 PBX emits a dial tone.
3 User enters an extension number or outgoing number.
4 PBX routes the call as if the call would come from an extension tel-
ephone.
Incoming call on the extension line, mode B
1 Terminal answers the incoming call and opens the extension line.
2 Terminal sends a predefined number to the PBX extension.
3 B subscriber answers the call.
Copyright © 2002 Nokia. All rights reserved.
15
Page 16
Light indicators
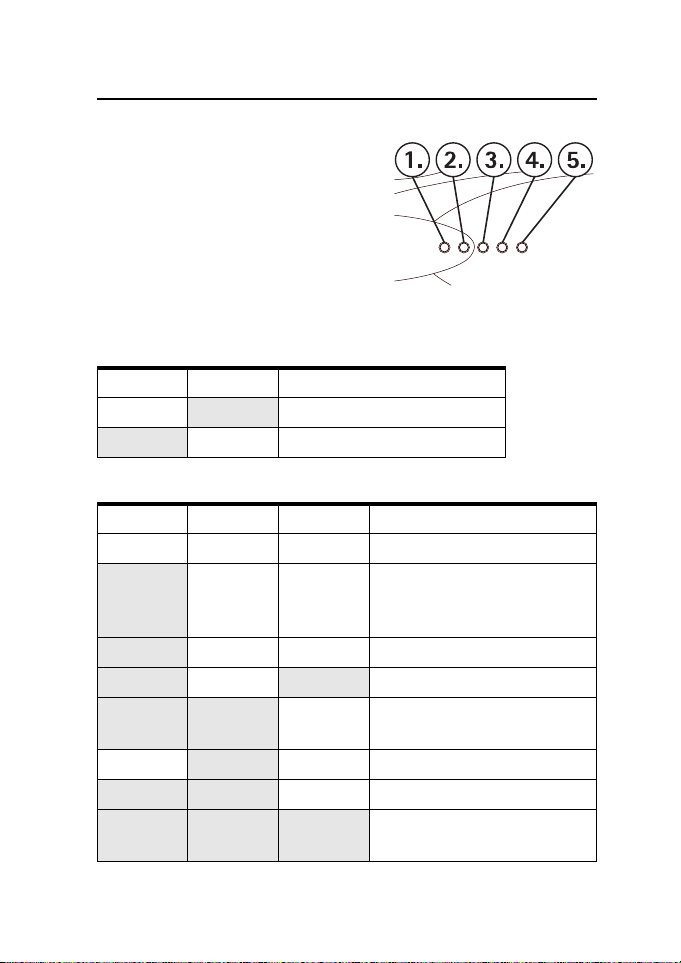
5. Light indicators
• Light indicators 1 and 2 indicate the
state of the application module.
• Light indicators 3, 4 and 5 indicate
the state of the GSM terminal.
• The light indicators display the signal
strength for approximately one
minute if you key in 777**# using the
telephone connected to the terminal.
Table 1. Application module light indicators.
12Description
-
On - The trunk mode is active.
Table 2. GSM terminal light indicators
345Description
- - - Power is off.
Blinking - - Power is on. The terminal is
On--In service.
On - On Call in progress.
On Blinking - The terminal has received a
-
Blinking Blinking - Enter the PUK code.
On On On The terminal has received an
On The extension mode is active.
attempting to connect to the
telephone network.
call.
Blinking - Enter the PIN code.
SMS message or voice mail.
Copyright © 2002 Nokia. All rights reserved.
16
Page 17
Light indicators
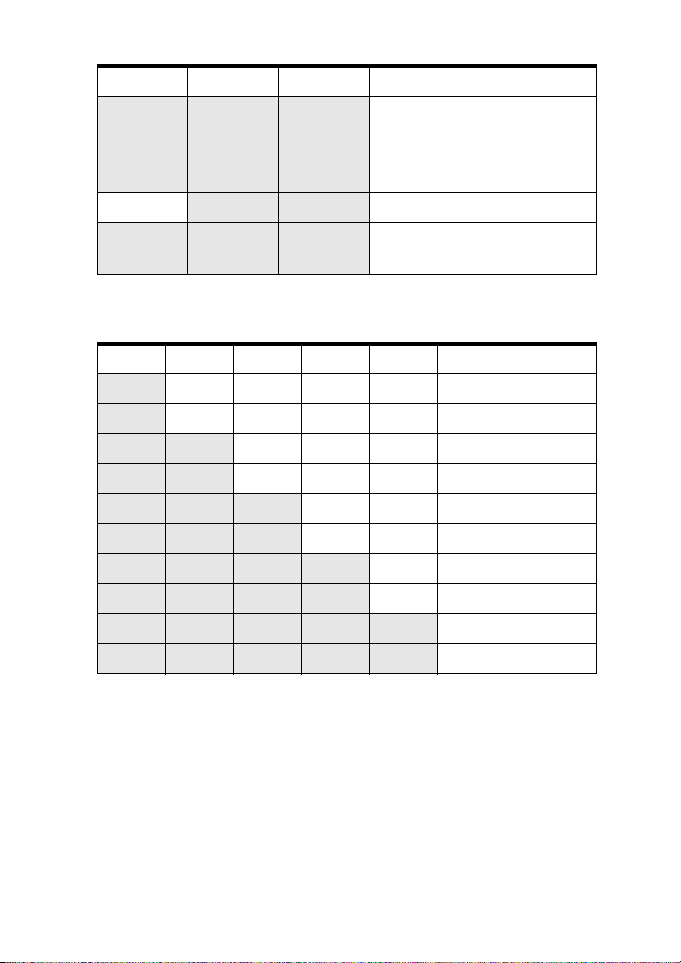
345Description
On On Blinking The terminal has no space for
new SMS messages. The oldest
message is automatically
deleted.
-
Blinking Blinking Install the SIM card.
Blinking Blinking Blinking An error has occurred. Contact
service personnel.
Table 3. Signal strength.
12345Signal strength
Blinking----No signal.
On----Approx. -105dBm
On Blinking---Approx. -100dBm
On On---Approx. -95dBm
On On Blinking - - Approx. -90dBm
On On On - - Approx. -85dBm
On On On Blinking - Approx. -80dBm
On On On On - Approx. -75dBm
On On On On Blinking Approx. -70dBm
On On On On On Approx. -65dBm
Copyright © 2002 Nokia. All rights reserved.
17
Page 18

Tone indicators
6. Tone indicators
The following tones indicate the state of the terminal when a telephone
is used to change the terminal’s settings or to check whether the
terminal has received new SMS messages.
Tones Description
- - - - - - - - - - - - - - - - - Enter SIM card
- _ _ - _ _ - _ _ Enter PIN code
- - Enter PUK code
- - - - Error
OK
SMS received
Copyright © 2002 Nokia. All rights reserved.
18
Page 19

Nokia 22 accessories
7. Nokia 22 accessories
For details and availability of Nokia 22 Accessories, contact your local
dealer.
• Power supply (ACW-5) Supplied with the terminal.
• Backup battery set Features a backup battery (BBW-4) and power
supply (ACW-4).
• Data package Features an RS232 data cable and an AT-command
guide.
• Antenna adapter (XRP-3) Allows an external antenna to be con-
nected to the terminal.
• Configurator software For a more advanced configuration of the
terminal. Features the software, a cable and an Operator’s Guide.
Copyright © 2002 Nokia. All rights reserved.
19
Page 20

Troubleshooting
8. Troubleshooting
For more information on troubleshooting, please see FAQ (Frequently
Asked Questions) at www.nokia.com.
■First things to check
1 If a telephone is connected to the terminal, check that it is connect-
ed to the trunk connector and that the connection is firm.
2 Check that the power supply is firmly connected to the terminal and
to an AC outlet.
3 Check that the antenna is firmly connected to the terminal.
■Dial tone is not heard
If the dial tone is not heard when you lift the receiver of the telephone
connected to the terminal:
1 Check that the power supply is firmly connected to the terminal and
to the AC wall outlet.
2 Check the light indicators for further information.
3 If the dial tone is still not heard, disconnect the power supply from
the AC wall outlet and then reconnect it.
■Noise is heard during a call
The terminal may be too close to a telephone or another electronic
device. Position the terminal and the devices possibly interfering with
the terminal further apart from each other.
■Reception is poor
If there are problems with reception, for example interruptions in
speech, the signal may be too weak. Check the signal strength. If the
signal is weaker than -95 dBm, move the terminal to another location. If
the terminal does not receive a stronger signal, contact your service
provider.
Copyright © 2002 Nokia. All rights reserved.
20
Page 21

Troubleshooting
■Entering PIN code does not succeed
If entering the PIN code fails three times, the code is blocked. You can
unblock it by entering your PUK (Personal Unblocking Key) code. The
PUK code may be supplied with the SIM card. If not, contact your local
service provider for the code. If you lose the code, contact your service
provider. When the PIN code is blocked, light indicators 3 and 4 blink. To
unblock the code, proceed as follows:
1 Lift the receiver of the telephone connected to the terminal. When
the enter PUK code tone is heard, enter your PUK code followed by #.
2 Enter a new PIN code (4 -- 8 digits) followed by # when light indi-
cator 4 blinks and the enter PIN code tone is heard.
3 Confirm the new PIN code by re-entering the code followed by #.
■Nokia 22 cannot be reached in extension mode
Check that the LED 2 is lit. Check also that the extension line is
connected to the ’ext’ connector. Reboot the terminal and make sure
that before powering up the terminal, Nokia 22 is properly connected to
the extension line.
Copyright © 2002 Nokia. All rights reserved.
21
Page 22

Technical specifications
9. Technical specifications
Dimensions 182 x 101 x 46 mm withouth dual-band
antenna
Weight 420 g
Power supply ACW-5
Charger type Switched mode power supply
AC mains plug type Europe, UK, US
Voltage 13.5 V
DC connector 750 mA
Operating range 90-264 Vac
Frequency range 47-63 Hz
Weight 70 g + cables
Volume < 110 cm^3
Cable length AC 1500 mm, DC 1500 mm
Environmental specifications
Operating conditions 0C...+55C
Storage conditions -40C...+70C
Relative humidity range under normal operating conditions
20...75%. The terminal is not protected against ingress of water or
liquids of any type.
External antenna specifications
Operating frequency
range
Nominal antenna
cable impedance
Antenna cable
connector
Copyright © 2002 Nokia. All rights reserved.
890 - 960 MHz and 1710 - 1880 MHz
50 Ohm
Standard FME male connector
22
Page 23

Technical specifications
Electro-magnetic compatibility (Europe)
The GSM terminal is tested for electro-magnetic compatibility
(EMC) according to the ETS 300 342-1/13/standards.
The application module fullfils the ITU-T standard and the ETS
300-001 specifications for PBX extension and trunk connections.
The module supports also ETS 300-659 Calling Line Identification
(FSK and DTMF).
Copyright © 2002 Nokia. All rights reserved.
23
Page 24

Important safety information
10. Important safety information
The Nokia 22 power supply ACW-5 converts line voltage of 110V/220V/230V AC
to low voltage DC.
Note: The power supply socket should be easily accessible and it must not be covered. The power supply is insulation class 2 covered.
WARNING! Dangerous voltage. Do not attempt to open the casing.
Note! This power supply is for indoor use only ! Do not expose the unit to water,
rain or dust.
The power supply should be disconnected from the socket when the terminal is
not in use for a prolonged period of time or when the power supply is not connected to the terminal.
When you disconnect the power cord of the power supply, grasp and pull the
plug, not the cord.
IMPORTANT! Use only the power supply approved by Nokia. The use of any other
types will invalidate any approval or warranty applying to the terminal, and may
be dangerous.
Operating environment
Operation of any radio transmitting equipment, including the Nokia 22 terminal,
may interfere with the functionality of inadequately protected medical devices.
Consult a physician or the manufacturer of the medical device if you have any
questions. Other electronic equipment may also be subject to interference.
As with other radio transmitting equipment, users are advised that for the satisfactory operation of the equipment and for safety reasons, it is recommended
that the equipment should only be used in the normal operating position.
Only qualified service personnel should service the terminal. Faulty service may
be dangerous and may invalidate any warranty applicable to the terminal.
Do not cover the terminal.
Do not use the terminal in an environment where strong radiation or magnetic
fields may exist. Note that the terminal is for indoor use only.
Failure to observe these instructions may lead to suspension or denial of telephone services for the offender, legal action or both.
Copyright © 2002 Nokia. All rights reserved.
24
Page 25

Important safety information
Emergency calls
Remember, to make or receive any calls the terminal must have sufficient power
and be properly installed in a service area with adequate signal strength.
Emergency calls may not be possible on all wireless networks or when certain
network services and/or product features are in use. Check with the network
service provider.
When making an emergency call, remember to give all the necessary information
as accurately as possible.
Remember that your terminal may be the only means of communication at the
scene of an accident - do not cut off the call until given permission to do so.
Note! Emergency numbers vary in different areas and countries. Check the local
emergency number. In some networks, calls to the emergency number may be
possible even without a SIM card.
Copyright © 2002 Nokia. All rights reserved.
25
Page 26

Care and maintenance
11. Care and maintenance
Your Nokia 22 terminal is a product of superior design and craftsmanship and
should be treated with care. The suggestions below will help you to fulfil any
warranty obligations and to enjoy this product for many years. When using the
terminal or any accessory:
• Keep it and all its parts and accessories out of the small children’s reach.
• Keep it dry. Precipitation, humidity and liquids contain minerals that will cor-
rode electronic circuits.
• Do not use or store it in dusty, dirty areas.
• Do not store it in hot areas. High temperatures can shorten the life of elec-
tronic devices and warp or melt certain plastics.
• Do not store it in cold areas. When the terminal warms up (to its normal temperature), moisture can form inside the terminal, which may damage electronic circuit boards
• Do not attempt to open it. Non-expert handling of the device may damage it.
• Do not drop, knock or shake it. Rough handling can break internal circuit
boards.
• Do not use harsh chemicals, cleaning solvents, or strong detergents to clean
it. Wipe it with a soft cloth slightly dampened in a mild soap-and-water solution.
• Do not paint it. Paint can clog the device and prevent proper operation.
• Use only the supplied or an approved replacement or external antenna. Un-
authorised antennas, modifications or attachments could damage the terminal and may violate regulations governing radio devices.
• When dismounting the GSM terminal from the application module, first disconnect the power supply from the terminal.
• If the terminal or any of its accessories are not working properly, take them
to your nearest qualified service facility. The personnel there will assist you,
and if necessary, arrange for service.
Copyright © 2002 Nokia. All rights reserved.
26
 Loading...