

Page 1
User Guide
9239142
Issue 1 EN
Page 2
DECLARATION OF CONFORMITY
We, NOKIA CORPORATION declare under our sole responsibility
that the product Nokia THR880i is in conformity with the
provisions of the following Council Directive:1999/5/EC. A copy of the Declaration of
Conformity can be found at http://www.nokia.com/phones/declaration_of_conformity/.
Copyright © 2004-2005 Nokia. All rights reserved.
Reproduction, transfer, distribution or storage of part or all of the contents in this document in any form
without the prior written permission of Nokia is prohibited.
Nokia and Nokia Connecting People are registered trademarks of Nokia Corporation. Other product and
company names mentioned herein may be trademarks or tradenames of their respective owners.
Nokia tune is a sound mark of Nokia Corporation.
US Patent No 5818437 and other pending patents. T9 text input software Copyright (C) 1997-2005. Tegic
Communications, Inc. All rights reserved.
Includes RSA BSAFE cryptographic or security protocol software from RSA Security.
Nokia operates a policy of continuous development. Nokia reserves the right to make changes and
improvements to any of the products described in this document without prior notice.
Under no circumstances shall Nokia be responsible for any loss of data or income or any special,
incidental, consequential or indirect damages howsoever caused.
The contents of this document are provided "as is". Except as required by applicable law, no warranties of
any kind, either express or implied, including, but not limited to, the implied warranties of
merchantability and fitness for a particular purpose, are made in relation to the accuracy, reliability or
Page 3

contents of this document. Nokia reserves the right to rev ise t his docu ment or wi thdr aw it a t any time
without prior notice.
The availability of particular products may vary by region. Please check with the Nokia dealer nearest to
you.
El uso y el funcionamiento de este dispositivo requieren licencia. Si desea obtener información detallada,
póngase en contacto con las autoridades competentes en materia de frecuencia de su país.
Denne enhed må kun betjenes, hvis der er givet tilladelse hertil. Kontakt den lokale frekvensmyndighed for
at få yderligere oplysninger.
Für die Verwendung dieses Geräts ist eine Funklizenz erforderlich. Weitere Informationen erhalten Sie in
Deutschland bei der für ihren Wohnort zuständigen Außenstelle der Regulierungsbehörde für
Telekommunikation und Post.
The use and operation of this device is subject to permission: for details contact your local frequency
authority.
L'utilisation et l'exploitation de cet appareil sont soumises à autorisation : pour plus d'informations,
prenez contact avec l'autorité locale compétente en matière de fréquences.
L'utilizzo di questo dispositivo deve essere autorizzato: per informazioni contattare la locale autorità per
l'assegnazione delle frequenze.
Het gebruik van dit apparaat is alleen toegestaan als u daarvoor toestemming hebt gekregen. Neem
contact op met de plaatselijke instantie voor meer informatie.
3Copyright © 2005 Nokia. All rights reserved.
Page 4

A utilização e funcionamento deste aparelho estão sujeitos a autorização: para mais informações,
contacte as entidades locais responsáveis pela atribuição de frequências.
Tämän tuotteen käyttö on luvanvaraista. Ota yhteys paikalliseen taajuusviranomaiseen.
Användning av denna utrustning kan kräva tillstånd. Kontakta den lokala post- och telemyndigheten.
Гйб фз чсЮуз кбй фз лейфпхсгЯб бхфЮт фзт ухукехЮт брбйфеЯфбй чпсЮгзуз бдеЯбт: гйб лерфпмЭсейет
ерйкпйнщнЮпфе ме фзн бсмьдйб фпрйкЮ бсчЮ гйб фйт ухчньфзфет.
Pou¾ití a provoz tohoto zaøízení není mo¾ný bez povolení: dal¹í informace získáte u místního
telekomunikaèního úøadu.
Käesoleva seadme kasutamine ja töötamine on seotud vastavate lubadega: teabe saamiseks pöörduge
kohalikku ametkonda, mis tegeleb raadiosageduste haldusega.
A készülék használata és üzemeltetése engedélyhez kötött. A részletekrõl érdeklõdjön a helyi
frekvenciahasználat-szabályozó hatóságnál.
Naudotis ¹iuo prietaisu galima tik gavus leidim±. I¹samesnìs informacijos teiraukitìs vietinìje ry¹iù
reguliavimo tarnyboje.
©ïs ierïces lieto¹anai un ekspluatàcijai nepiecie¹ama at¶auja: lai iegþtu sïkàku informàciju, sazinieties ar
vietºjo frekvenèu regulº¹anas pàrvaldi.
L-uzu u t-thaddim ta' dan l-apparat jenhtiegu permess. Ghal aktar taghrif irrikorri ghand l-Awtorità
Maltija ghall-Komunikazzjonijiet.
U¿ytkowanie i obs³uga tego urz±dzenia wymaga zezwolenia. Szczegó³owe informacje na ten temat
mo¿na uzyskaæ od lokalnych organów zajmuj±cych siê kontrol± czêstotliwo¶ci radiowych.
Na pou¾ívanie a prevádzku tohto zariadenia sa vy¾aduje povolenie. Podrobné informácie získate od
miestneho rádiotelekomunikaèného úradu.
Za uporabo te naprave morate imeti ustrezno dovoljenje; dodatne informacije so na voljo na Agenciji za
telekomunikacije in radiodifuzijo Republike Slovenije.
4Copyright © 2005 Nokia. All rights reserved.
Page 5

✁
Quick guide
This quick guide gives you tips for using your Nokia THR880i radio. For more
detailed information, read through the user guide.
Before using your radio
1. Install and charge the battery.
2. Switch on the radio by pressing and holding .
For details, see Getting started on page 23.
Call functions
• Select a folder—Talk groups are divided into folders. To select a folder, press
in the standby mode, and select the desired folder.
• Select a talk group—Turn the group selector until you reach the desired
group.
• Make a group call to your selected group—When you have set your selected
group and its name is displayed in the standby mode, press and hold the PTT
key.
• Respond to a group call—Press and hold the PTT key. You can start speaking
when a short tone is played.
• Make an express call—Key in a TETRA number, and press and hold the PTT key.
You can start speaking when a short tone is played.
Copyright © 2005 Nokia. All rights reserved.
Page 6

• Respond to an express call—Press and hold the PTT key. You can start
speaking when a short tone is played.
• Make a phone call—Enter the area code and phone number, and press .
The area code is not required for TETRA numbers. Scroll to Private, Abbr.
number, Phone, or Office ext., and press . See also Make a phone call on
page 61.
• Answer a phone call—Press when a ringing tone is played.
Direct mode
• Activate direct mode—Select Menu→Settings→Phone settings→Active
mode→Direct.
• Select a channel and a group—Turn the group selector until you reach the
desired channel. Use the back key to select groups. For
details, see Select channels and groups on page 66.
Keys
• Activate and deactivate the loudspeaker—Press . When the
loudspeaker is active, is displayed.
• Adjust the volume—Press the volume key on the right side of the radio to
adjust the volume of the activated speaker, either the loudspeaker or the
earpiece.
• Use the fast menu key—Press to access the fast menu. In the fast menu ,
scroll with the scroll keys or by pressing , and select items by pressing and
holding or pressing Select. See Fast menu on page 42.
✁
Copyright © 2005 Nokia. All rights reserved.
Page 7
• Use the duty key—You can set the duty key to make a call to the home
group, to start a call to the dispatcher of selected group, or to send a callback
request to the address of the selected group. See Duty key setting on page 102.
Basic menu functions
• Access a menu—Press Menu, scroll to the desired menu function, and press
Select.
• Exit a menu—Press to exit a menu function without changing its
settings and to return to the standby mode. See also Mute the call temporarily
on page 53 and page 68.
Other functions
• Lock and unlock keys—To lock the keypad and the power key, press Menu and
. To lock the keypad, group selector, power key, , and , press Menu,
and press and hold . To unlock the keys, press Unlock and .
• Write a text message—Press in the standby mode.
• Send a status message—Press in the standby mode to start sending a
message.
• Search for names in the contacts directory—Press Names, enter the first
characters of the name and scroll to the name.
• Use your personal shortcuts—Press Go to, and select the desired function.
✁
Copyright © 2005 Nokia. All rights reserved.
Page 8

Contents
Quick guide........................................................................................................... 5
Contents................................................................................................................ 8
FOR YOUR SAFETY ............................................................................................ 15
General information.......................................................................................... 19
Active holder.............................................................................................................................................. 19
Access codes .............................................................................................................................................. 19
Modes of operation.................................................................................................................................. 19
Transmission barring................................................................................................................................ 20
Network selection .................................................................................................................................... 21
Using your device in wet and damp conditions............................................................................... 22
1. Getting started .............................................................................................. 23
Install the battery..................................................................................................................................... 23
Install the electromagnetic interference filters (for RC-2 and RC-4)....................................... 24
Charge the battery ................................................................................................................................... 25
Switch the radio on and off .................................................................................................................. 25
Lock the keys (Keyguard)........................................................................................................................ 26
2. Your radio ...................................................................................................... 27
Standby mode............................................................................................................................................ 28
Call types .................................................................................................................................................... 29
Red key calls........................................................................................................................................... 30
Group selector and back key ................................................................................................................. 30
PTT (Push-to-talk) key............................................................................................................................. 31
8Copyright © 2005 Nokia. All rights reserved.
Page 9

Duty key and fast menu key.................................................................................................................. 32
Loudspeaker ............................................................................................................................................... 33
Light indicator ........................................................................................................................................... 33
Volume key................................................................................................................................................. 34
Display indicators ..................................................................................................................................... 34
Notifications .............................................................................................................................................. 37
3. Using your radio............................................................................................ 38
Access a menu function ......................................................................................................................... 38
Menu list..................................................................................................................................................... 39
Fast menu ................................................................................................................................................... 42
Voice feedback .......................................................................................................................................... 43
4. Group calls..................................................................................................... 45
Basics ........................................................................................................................................................... 45
Folders...................................................................................................................................................... 45
Home group ............................................................................................................................................ 46
Dynamic talk groups ............................................................................................................................ 47
Start group communication .................................................................................................................. 48
Switch group calls on and off ........................................................................................................... 48
Select a folder........................................................................................................................................ 48
Select a talk group................................................................................................................................ 49
Scanning settings.................................................................................................................................. 50
PTT key settings ..................................................................................................................................... 50
Access the group list in the standby mode....................................................................................... 51
Receive a group call................................................................................................................................. 51
Respond to a group call ...................................................................................................................... 52
Voice override......................................................................................................................................... 52
Mute the call temporarily................................................................................................................... 53
Make a group call..................................................................................................................................... 53
9Copyright © 2005 Nokia. All rights reserved.
Page 10

Call the selected talk group ............................................................................................................... 53
Call a scanned talk group ................................................................................................................... 53
Call a dispatcher (network service).................................................................................................. 53
Talk groups (Menu 5)............................................................................................................................... 54
Edit group folders.................................................................................................................................. 54
View background folder ...................................................................................................................... 56
Restore group settings......................................................................................................................... 56
Group journal ......................................................................................................................................... 57
5. Express calls................................................................................................... 58
Make an express call ............................................................................................................................... 58
Reuse a number..................................................................................................................................... 59
Call an abbreviated TETRA number.................................................................................................. 59
Speed dialling......................................................................................................................................... 59
Receive an express call ........................................................................................................................... 59
Respond to an express call................................................................................................................. 60
Reject an express call .......................................................................................................................... 60
6. Phone calls..................................................................................................... 61
Make a phone call .................................................................................................................................... 61
Call an abbreviated TETRA number.................................................................................................. 62
Speed dialling......................................................................................................................................... 63
International phone calls (network service).................................................................................. 63
In-call options........................................................................................................................................ 63
Answer a phone call ................................................................................................................................ 64
Mute the ringing tone ......................................................................................................................... 64
Reject a phone call ............................................................................................................................... 64
7. Direct mode ................................................................................................... 65
Basics ........................................................................................................................................................... 65
10Copyright © 2005 Nokia. All rights reserved.
Page 11

Start direct mode communication....................................................................................................... 66
Activate direct mode............................................................................................................................ 66
Select channels and groups ............................................................................................................... 66
Scan the groups on a channel........................................................................................................... 67
Receive a direct mode call ..................................................................................................................... 67
Respond to a direct mode call........................................................................................................... 68
Voice override......................................................................................................................................... 68
Mute the call temporarily................................................................................................................... 68
Make a direct mode call ......................................................................................................................... 69
Gateway and repeater............................................................................................................................. 69
Red key calls and emergency calls in direct mode ......................................................................... 70
8. Positioning..................................................................................................... 72
GPS receiver ............................................................................................................................................... 72
Positioning application ........................................................................................................................... 73
Position info ........................................................................................................................................... 73
Waypoints ............................................................................................................................................... 75
Position settings.................................................................................................................................... 76
9. Write text....................................................................................................... 79
Predictive text input ................................................................................................................................ 79
Traditional text input .............................................................................................................................. 80
Tips................................................................................................................................................................ 81
10.Contacts ...................................................................................................... 82
Save names and numbers....................................................................................................................... 82
Search for names...................................................................................................................................... 83
Organise the contacts directory ........................................................................................................... 84
Add numbers and text items ............................................................................................................. 84
Change the number type .................................................................................................................... 84
11Copyright © 2005 Nokia. All rights reserved.
Page 12

Change the default number............................................................................................................... 84
Delete contact entries ......................................................................................................................... 85
Settings for Contacts............................................................................................................................... 85
Speed dials.................................................................................................................................................. 85
Caller groups.............................................................................................................................................. 86
11.Menu functions............................................................................................ 87
Status msgs. (Menu 1) ............................................................................................................................ 87
Unit alert messages.............................................................................................................................. 88
Send status messages .......................................................................................................................... 88
Read status messages.......................................................................................................................... 90
Received and Sent folders .................................................................................................................. 91
User-specified folders .......................................................................................................................... 91
Delete status messages ....................................................................................................................... 91
Status settings ....................................................................................................................................... 92
Messages (Menu 2) .................................................................................................................................. 92
Write text messages............................................................................................................................. 93
Send text messages to multiple recipients.................................................................................... 94
Read text messages.............................................................................................................................. 95
Inbox and Sent items folders............................................................................................................. 96
Templates ................................................................................................................................................ 96
Saved text msgs. and user-specified folders................................................................................. 96
Delete messages .................................................................................................................................... 97
Message settings................................................................................................................................... 97
Call register (Menu 3) ............................................................................................................................. 98
Recent calls lists.................................................................................................................................... 98
Counters and timers............................................................................................................................. 99
Contacts (Menu 4) ................................................................................................................................ 100
Talk groups (Menu 5)............................................................................................................................ 100
Settings (Menu 6).................................................................................................................................. 100
12Copyright © 2005 Nokia. All rights reserved.
Page 13

Profiles .................................................................................................................................................. 100
Call settings......................................................................................................................................... 101
Phone settings .................................................................................................................................... 103
Direct mode settings......................................................................................................................... 104
Keyguard settings .............................................................................................................................. 104
Communication settings.................................................................................................................. 105
Enhancement settings ...................................................................................................................... 105
Modem settings.................................................................................................................................. 106
Security settings................................................................................................................................. 106
Display settings................................................................................................................................... 107
Time and date settings ..................................................................................................................... 108
Restore factory settings ................................................................................................................... 109
Gallery (Menu 7).................................................................................................................................... 109
Organiser (Menu 8) ............................................................................................................................... 110
Alarm clock .......................................................................................................................................... 110
Calendar................................................................................................................................................ 110
To-do list .............................................................................................................................................. 112
Notes...................................................................................................................................................... 112
Applications (Menu 9).......................................................................................................................... 112
Calculator............................................................................................................................................. 112
Countdown timer ............................................................................................................................... 113
Stopwatch............................................................................................................................................ 114
Positioning (Menu 10).......................................................................................................................... 115
Web (Menu 11) ...................................................................................................................................... 115
Call functions during a browser connection .............................................................................. 115
Basic steps for accessing and using services ............................................................................. 116
Service settings................................................................................................................................... 116
Enter the settings manually............................................................................................................ 116
Connect to a browser service ......................................................................................................... 118
13Copyright © 2005 Nokia. All rights reserved.
Page 14

Browse the pages of a service........................................................................................................ 119
Disconnect from a service ............................................................................................................... 119
Bookmarks............................................................................................................................................ 120
Service inbox ....................................................................................................................................... 120
The cache memory............................................................................................................................. 121
Browser security................................................................................................................................. 121
12.Data communication ................................................................................. 123
Call functions during a data connection ........................................................................................ 123
Install communication applications and modem drivers ........................................................... 123
Connect your radio to a PC................................................................................................................. 124
13.Battery information................................................................................... 126
Charging and discharging ................................................................................................................... 126
CARE AND MAINTENANCE............................................................................. 128
IMPORTANT SAFETY INFORMATION.............................................................. 129
14Copyright © 2005 Nokia. All rights reserved.
Page 15
FOR YOUR SAFETY
Read these simple guidelines. Not following them may be dangerous or illegal. Read the
complete user guide for further information.
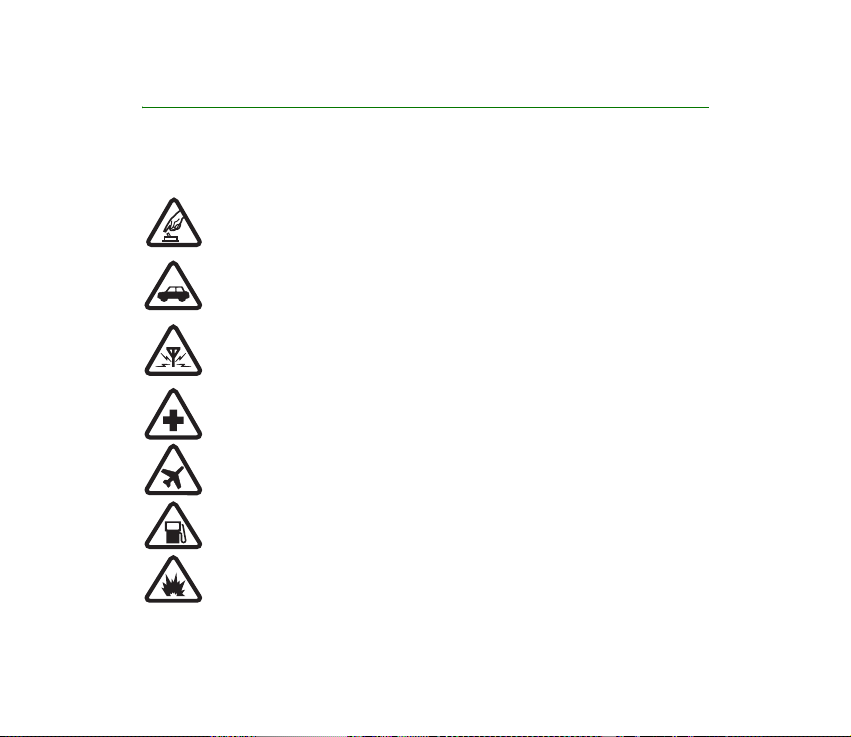
SWITCH ON SAFELY
Do not switch the device on when wireless phone use is prohibited or when it
may cause interference or danger.
ROAD SAFETY COMES FIRST
Obey all local laws. Always keep your hands free to operate the vehicle while
driving. Your first consideration while driving should be road safety.
INTERFERENCE
All wireless devices may be susceptible to interference, which could affect
performance.
SWITCH OFF IN HOSPITALS
Follow any restrictions. Switch the device off near medical equipment.
SWITCH OFF IN AIRCRAFT
Follow any restrictions. Wireless devices can cause interference in aircraft.
SWITCH OFF WHEN REFUELLING
Don't use the device at a refuelling point. Don't use near fuel or chemicals.
SWITCH OFF NEAR BLASTING
Follow any restrictions. Don't use the device where blasting is in progress.
15Copyright © 2005 Nokia. All rights reserved.
Page 16
USE SENSIBLY
Use only in the normal position as explained in the product documentation.
Don't touch the antenna unnecessarily.
QUALIFIED SERVICE
Only qualified personnel may install or repair this product.
ENHANCEMENTS AND BATTERIES
Use only approved enhancements and batteries. Do not connect incompatible
products.
BACK-UP COPIES
Remember to make back-up copies or keep a written record of all important
information.
CONNECTING TO OTHER DEVICES
When connecting to any other device, read its user guide for detailed safety
instructions. Do not connect incompatible products.
EMERGENCY CALLS
Ensure the radio is switched on and in service. Press as many times as
needed to clear the display and return to the start screen. Key in the emergency
number, then press . Give your location. Do not end the call until given
permission to do so.
■ ABOUT YOUR DEVICE
The wireless device described in this guide is approved for use on the TETRA network.
Contact your service provider for more information about networks.
When using the features in this device, obey all laws and respect privacy and legitimate
rights of others.
16Copyright © 2005 Nokia. All rights reserved.
Page 17

Warning: To use any features in this device, other than the alarm clock, the device
must be switched on. Do not switch the device on when wireless device use may
cause interference or danger.
Your device and its enhancements may contain small parts. Keep them out of reach of small
children.
■ Network Services
To use the phone you must have service from a wireless service provider. Many of the
features in this device depend on features in the wireless network to function. These
Network Services may not be available on all networks or you may have to make specific
arrangements with your service provider before you can utilize Network Services. Your
service provider may need to give you additional instructions for their use and explain what
charges will apply. Some networks may have limitations that affect how you can use
Network Services. For instance, some networks may not support all language-dependent
characters and services.
Your service provider may have requested that certain features be disabled or not activated
in your device. Contact your service provider for more information.
■ Shared memory
The following features in this device may share memory: contacts, calendar, to-do notes,
images in gallery, and note application. Use of one or more of these features may reduce the
memory available for the remaining features sharing memory. For example, saving many
notes may use all of the available memory. Your device may display a message that the
memory is full when you try to use a shared memory feature. In this case, delete some of the
information or entries stored in the shared memory features before continuing. Some of the
17Copyright © 2005 Nokia. All rights reserved.
Page 18

features, such as contacts, may have a certain amount of memory specially allotted to them
in addition to the memory shared with other features.
■ Enhancements, batteries, and chargers
Always switch the device off and disconnect the charger before removing the battery.
Check the model number of any charger before use with this device. This device is intended
for use when supplied with power from ACP-8, ACP-9, ACP-12, LCH-9, and LCH-12.
Warning: Use only batteries, chargers, and enhancements approved by Nokia for
use with this particular model. The use of any other types may invalidate any
approval or warranty, and may be dangerous.
For availability of approved enhancements, please check with your dealer. When you
disconnect the power cord of any enhancement, grasp and pull the plug, not the cord.
Important: Enhancements to be used with this device do not meet the same
durability or water resistance specifications as the device itself. For example, all
the chargers are only to be used in dry conditions. They should never be used when
damp or wet.
■ Interference filters (for RC-2 and RC-4)
To check the type number of your radio, remove the battery. The type number (RC-2, RC-3, or
RC-4) is printed on the white label inside your radio. When charging an RC-2 or RC-4 radio
with the charger ACP-8, ACP-9 or ACP-12, you need to use two electromagnetic
interference filters. Two filters are supplied in the sales package, and they are also available
as separate accessories. See
and RC-4)
on page 24 for how to install the filters to the charger’s power cord.
Install the electromagnetic interference filters (for RC-2
18Copyright © 2005 Nokia. All rights reserved.
Page 19
General information
■ Active holder
The wearable active holder CRR-1 offers multiple carrying
possibilities, and makes the Nokia THR880i radio an
integral part of the work outfit.
■ Access codes
The factory setting for the four-digit PIN code is 1234.
When the PIN code request is enabled, the code is
requested each time the radio is switched on. See Security
settings on page 106.
The factory setting for the five-digit security code is
12345.
To prevent unauthorised use of your radio, change the
codes. Keep the new codes secret and in a safe place
separate from your radio. See Security settings on page 106.
■ Modes of operation
Your radio has two modes of operation: network mode and direct mode. In the
network mode, the radio operates using the TETRA network. In the direct mode,
the radio operates without the network, so that the radios communicate directly
19Copyright © 2005 Nokia. All rights reserved.
Page 20

with each other. In the direct mode, only some functions of the radio are available.
For more information on the direct mode, see Direct mode on page 65.
■ Transmission barring
When transmission barring is active, the radio does not send any signals to the
network, and only limited network services are available. In the network mode, the
radio can only receive group calls and status and text messages addressed to talk
groups, providing that the radio is registered to the network. In the direct mode,
the radio can receive direct mode calls. When transmission barring is active, the
radio cannot re-register to the network, for example, if it is switched off and then
on again.
The limited network services in the network mode are only available in the
coverage area of the network cell where the radio was last registered. The radio
cannot register to other network cells while transmission barring is active, and
therefore the area of operation may be limited.
When transmission barring is active in the network mode, the radio cannot send
the necessary information to the network about changes in talk groups. When
transmission barring is active, you cannot change the selected group. If you make
any other changes that affect talk groups, such as change the selected folder,
home group, or the scanning priority of a group, you will not be able to receive
further communication from the affected groups. After transmission barring has
been deactivated, the radio can attempt to negotiate the changes with the
network.
20Copyright © 2005 Nokia. All rights reserved.
Page 21
If you start to make a red key call or an emergency call to an emergency number
programmed into your radio when transmission barring is active, the radio
automatically deactivates transmission barring and attempts to make the call. See
Red key calls and emergency calls in direct mode on page 70.
Note: If you start to make a red key call or an emergency call when transmission
barring is active, transmission barring will be deactivated, and you should consider
exiting the area where you wanted transmission to be barred.
To activate or deactivate transmission barring, select
Menu→Settings→Phone settings→Transmission barring→On or Off.
Transmission barring should be active before you enter the area where you want
transmission to be barred. or is displayed in the standby mode when
transmission barring is active. Depending on predefined radio settings, the radio
may send a notification message to the network about the activation. is
displayed if the message does not need to be sent or message sending failed, and
is displayed if the message has been sent.
■ Network selection
In addition to your predefined home network, you may be able to select other
networks in which your radio can operate (network service), for example, if you
are not in the coverage area of your home network. The network can be changed
automatically or manually; see Network selection on page 103.
Some services are network dependent, so the availability of services may change
when the network is changed. In addition, the selected folder, selected group,
21Copyright © 2005 Nokia. All rights reserved.
Page 22

home group, or the availability of groups may change when the network is
changed.
■ Using your device in wet and damp conditions
• You can use this device in the rain, but do not submerge it in water.
• If the device or the system connector has been exposed to salt water, wash it
immediately with freshwater to avoid corrosion. The device must be carefully wiped dry.
• Before opening the back cover, dry the device to prevent water from reaching the
interior of the device. The battery is not water resistant.
• Never charge the device when the bottom connector is wet or damp.
• Never use a damp device with enhancements that have an electrical function (such as a
desk stand or car kit).
Note: Make sure the interior of your device and the back cover seals are dry, clean,
and free of any foreign objects. Foreign objects may damage the seals against
water.
22Copyright © 2005 Nokia. All rights reserved.
Page 23
1. Getting started
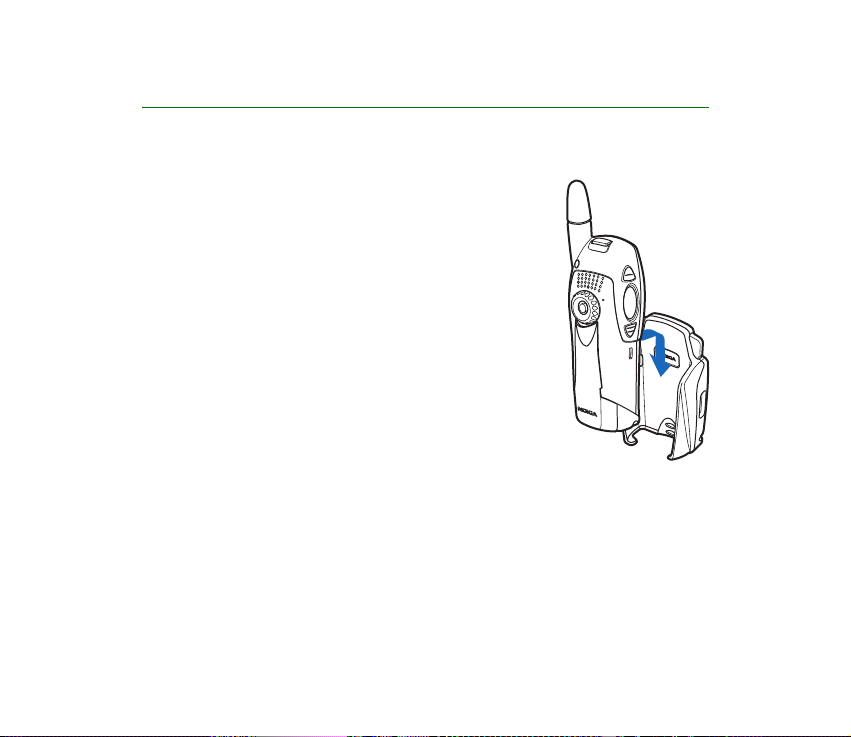
■ Install the battery
1. To open the battery cover, press the release button
upwards, away from the bottom connectors. Pressing
the release button down makes the opening harder.
2. Slide the battery under the back cover of the radio so
that the end with the contacts enters first.
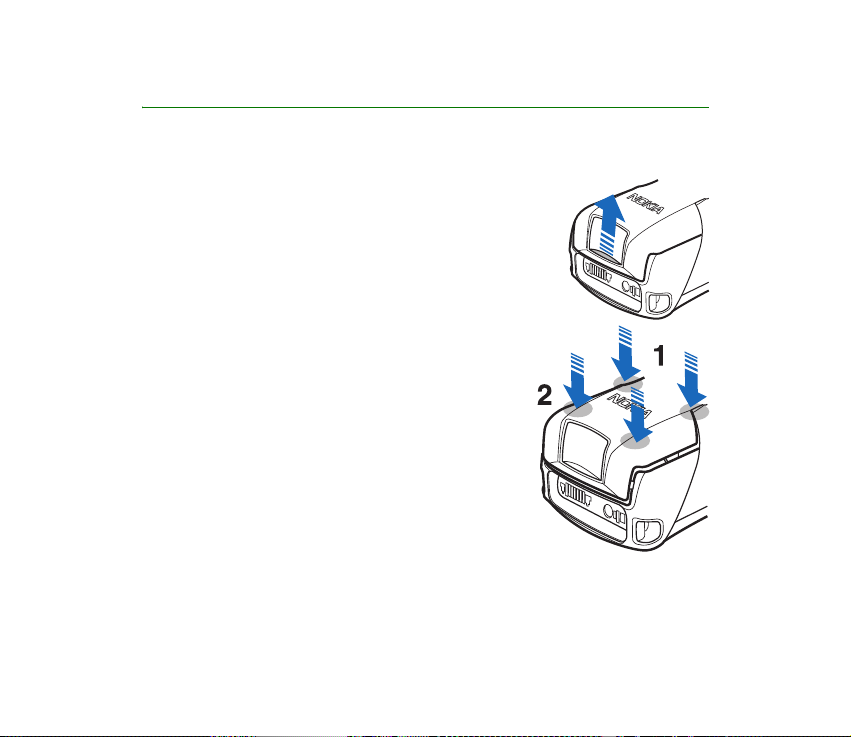
3. To close the battery cover, first pull it back and
downwards so that the locking catches near the
hinge are directed towards their slots, and press
them to make sure that they are locked in place (1).
Then press the bottom end of the cover down to
lock the cover in place (2). Be careful when closing
the battery cover. If the cover is not properly closed
or, for example, the locking catches or the seals are
damaged, the durability of the radio against shocks
and water is impaired.
Always switch the device off and disconnect the
charger before removing the battery.
23Copyright © 2005 Nokia. All rights reserved.
Page 24
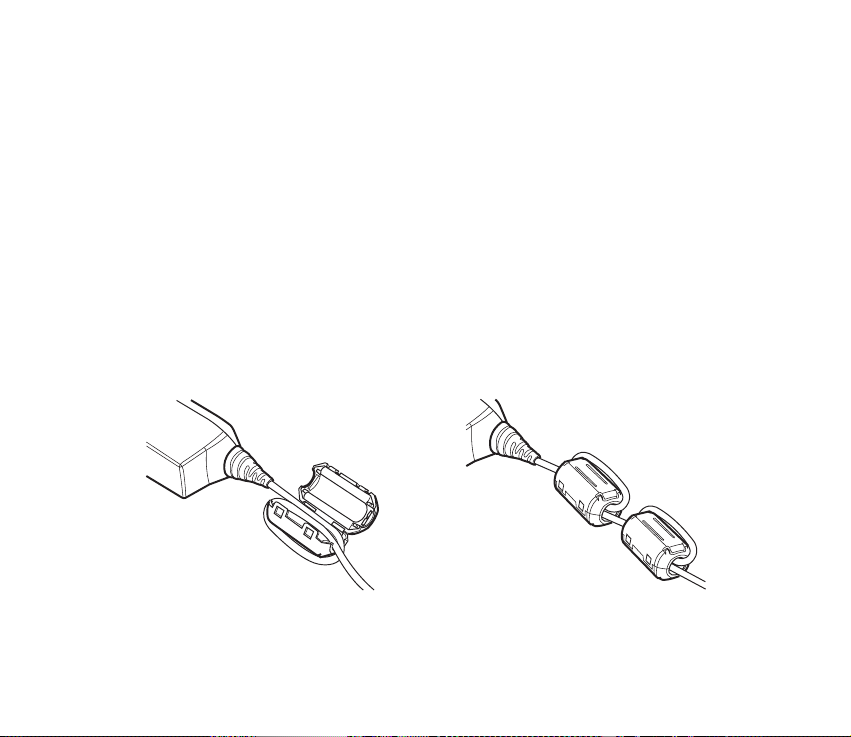
■ Install the electromagnetic interference filters (for RC-2
and RC-4)
To check the type number of your radio, remove the battery. The type number (RC2, RC-3, or RC-4) is printed on the white label inside your radio. When charging an
RC-2 or RC-4 radio with the charger ACP-8, ACP-9, or ACP-12, you need to use
two electromagnetic interference filters. Two filters are supplied in the sales
package, and they are also available as separate accessories.
Install the filters to the charger’s power cord before you connect the charger to
the radio or an AC wall outlet.
1. The filters should be placed on the power cord one after the other, within 15
cm (6 inches) of the charger. Place the power cord inside the opened filter, and
then wrap it in one loop around the filter.
2. Close the filters around the power cord.
24Copyright © 2005 Nokia. All rights reserved.
Page 25
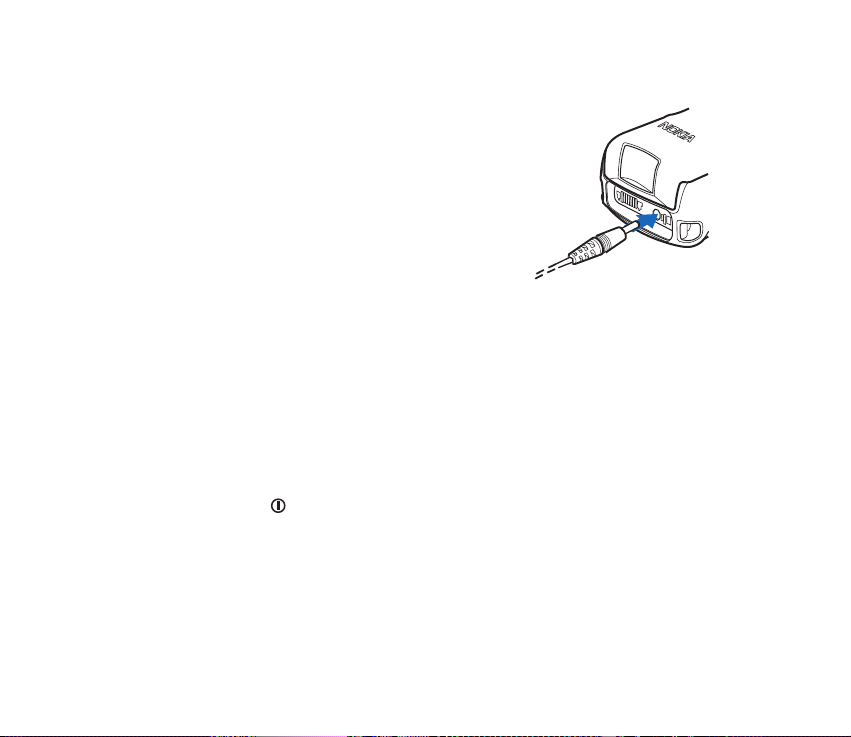
■ Charge the battery
1. Connect the lead from the charger to the bottom
of your radio.
2. Connect the charger to an AC wall outlet. The
battery indicator bar starts to scroll. Charging is
briefly displayed if the radio is switched on. You
can use the radio while charging.
If the battery is completely empty, it may take a
few minutes before the charging indication
appears on the display, or any calls can be made.
3. The battery is fully charged when the battery indicator bar stops scrolling, and
Battery full is briefly displayed if the radio is switched on.
If Not charging is displayed, charging has been suspended. Wait for a while,
disconnect the charger, plug it in again, and retry. If charging still
fails, contact your dealer.
■ Switch the radio on and off
1. Press and hold to switch the radio on and off.
2. If the radio asks for a PIN code, enter the four-digit PIN code (displayed as ****),
and press OK.
3. If the radio asks for a security code, enter the five-digit security code
(displayed as *****), and press OK.
25Copyright © 2005 Nokia. All rights reserved.
Page 26
For more information, see Access codes on page 19.
Your device has an external antenna.
Note: As with any other radio transmitting device, do not touch the antenna
unnecessarily when the device is switched on. Contact with the antenna affects
call quality and may cause the device to operate at a higher power level than
otherwise needed. Avoiding contact with the antenna while operating the device
optimises the antenna performance and the battery life.
■ Lock the keys (Keyguard)
When the keyguard is on, calls still may be possible to the official emergency number
programmed into your device. Key in the emergency number and press .
Your radio has two levels of keyguard:
• Keypad locks the keypad and the power key. To activate this keyguard, press
Menu and within 1.5 seconds. Keypad locked is briefly displayed.
• All keys locks the keypad, group selector, power key, , and . is not
locked if Duty key setting is set to Home group call. To activate this keyguard,
press Menu, and press and hold within 1.5 seconds. All keys are locked is
briefly displayed.
To unlock either keyguard, press Unlock and within 1.5 seconds.
You can answer a phone call and respond to a group call or an express call when
either keyguard is on. When the call ends, the keys are automatically locked. See
also Keyguard settings on page 104.
26Copyright © 2005 Nokia. All rights reserved.
Page 27
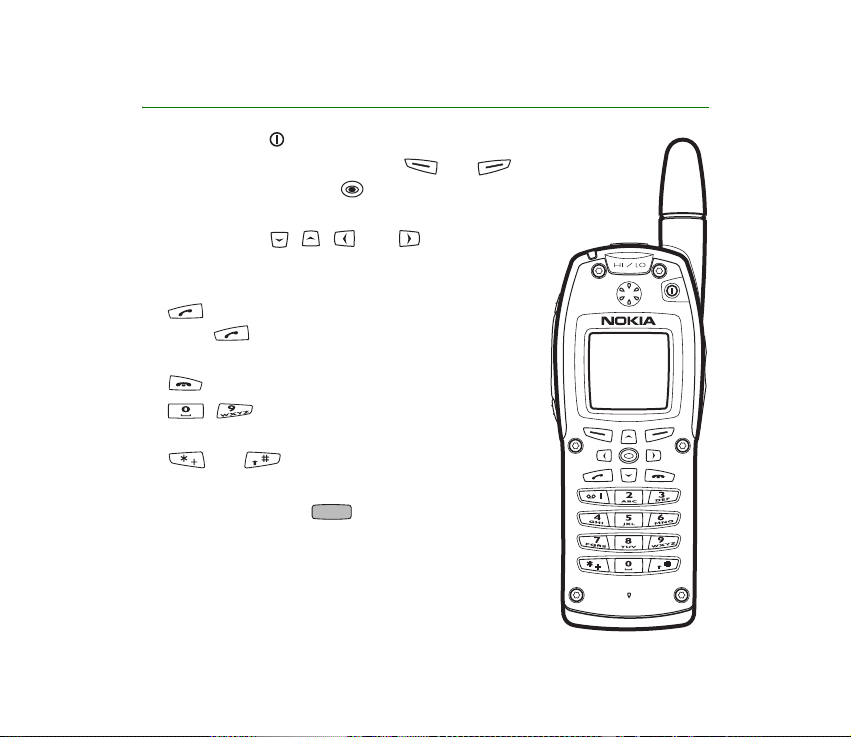
2. Your radio
• The power key switches the power on and off.
• The function of the selection keys and
and middle selection key depends on the guiding
text shown on the display above the keys.
• The scroll keys , , , and are used to
scroll through names, phone numbers, and menus.
See also Scroll key shortcuts on page 29.
• dials and answers a phone call. In the standby
mode, shows the list of the most recently
dialled numbers.
• ends or rejects a phone call or an express call.
• - are used to enter numbers and
characters.
• and are used for various purposes in
different functions.
• The red function key (on top of the radio). See
Red key calls on page 30.
27Copyright © 2005 Nokia. All rights reserved.
Page 28

■ Standby mode
When the radio is switched on and ready for use and no characters have been
entered by the user, the radio is in the standby mode. The following indicators
appear:
xxxxxx In the network mode, if group calls are switched off, indicates in which
network the radio is currently used. Group calls off is also displayed.
In the network mode, when group calls are switched on and there is a
selected group, the folder name, the group name, and the group status are
displayed. In the direct mode, the channel name and the group name are
displayed.
In the network mode, shows the signal strength of the cellular network at
your current location. The higher the bar, the stronger the signal.
If the radio is out of service, there is no bar, and No service is displayed.
Shows the battery charge level. The higher the bar, the more power in the
battery.
The middle selection key in the standby mode is Menu, and the right selection key
is Names. The left selection key is Go to; press it to access your personal shortcut
list, and select the desired function. To edit the shortcut list, select Options and
one of the following:
• Select options—to view the list of available functions. Press Mark to add a
function to the shortcut list, and press Unmark to remove a function.
28Copyright © 2005 Nokia. All rights reserved.
Page 29

• Organise—to rearrange the functions in the list. Press Move to change the
position of a function.
Scroll key shortcuts
• In the network mode, press to access the list of talk groups in the selected
folder. In the direct mode, press to access the list of direct mode channels.
• In the network mode, press to access the list of talk group folders. In the
direct mode, press to access the list of direct mode channels.
• In the network mode, press to start writing a text message.
• In the network mode, press to start sending a status message.
■ Call types
The following call types are available in the network mode:
• Group calls are immediate communication between talk group members. For
details, see Group calls on page 45.
• Express calls are immediate communication between two people. For details,
see Express calls on page 58.
• Phone calls are like conventional telephone calls. For details, see Phone calls
on page 61.
Your radio also offers direct mode operation. See Direct mode on page 65.
29Copyright © 2005 Nokia. All rights reserved.
Page 30

Red key calls
In the network mode, the red key call is a network service. Before you can take
advantage of this network service, you must subscribe to it through your service
provider, and obtain instructions for its use from your service provider. The red key
call is made to a destination that has been predefined by your organisation. In the
network mode, when you press and hold the red function key, the radio will
attempt to make a red key call. When you press the red function key and then the
back key, the radio will attempt to make a silent red key call. For information on
red key calls in the direct mode, see Red key calls and emergency calls in direct
mode on page 70.
If the radio receives a red key call, or a call made to a destination that is
predefined as an emergency number, the radio plays a tone, and Priority call is
displayed with the call information.
■ Group selector and back key
In the network mode, turning the group selector is
used for selecting groups. The names of the current
folder and group are shown on the display.
The back key in the middle of the group selector is
used for switching between groups. Pressing the back
key switches between groups that have the same
index number as the last two selected groups
30Copyright © 2005 Nokia. All rights reserved.
Page 31

(excluding the home group), and pressing and holding the back key selects the
home group. See Home group on page 46.
In the direct mode, the group selector is used for selecting channels. The name of
the channel is shown on the display. Each channel may have up to three groups.
Pressing and holding the back key selects the first group (A) on the channel, and
pressing the back key switches between the second and the third group (B and C)
on the channel.
If voice feedback is activated, the radio plays the index number of the group or
channel when you turn the group selector. When you use the back key, the radio
plays the index number or index name (A, B, or C) of the group, or "Home" if the
home group is selected. See Voice feedback on page 43.
■ PTT (Push-to-talk) key
Your radio can make and receive one-way and two-way calls.
During a one-way call, only one person can speak at a time, and
the speaker must press and hold the PTT key. During a two-way
call, the PTT key is not used, and you can speak as in a
conventional phone call.
To speak during a one-way call, press and hold the PTT key. You can start speaking
after a short tone is played and (transmitting) appears on the display. Release
the PTT key to let the other party speak. (receiving) is displayed when you
receive a one-way call.
31Copyright © 2005 Nokia. All rights reserved.
Page 32

Express calls and group calls are one-way calls. Phone calls are normally two-way
calls, but your radio is also capable of making and receiving one-way phone calls.
The network changes the call type if needed.
For group calls in the network mode, you can set the PTT key to make a call either
always to your selected talk group, or to the talk group whose name is on the
display (either the active scanned group or the selected group). See PTT key
settings on page 50.
■ Duty key and fast menu key
The duty key is located above the PTT key and the fast menu key below the
PTT key; see the picture in the PTT (Push-to-talk) key section. In the network mode,
you can set the duty key to work in one of three ways; see Duty key setting on
page 102. In the direct mode, pressing and holding makes a call to the first
group on the selected channel.
The fast menu key is used for accessing the fast menu. For details, see Fast
menu on page 42.
32Copyright © 2005 Nokia. All rights reserved.
Page 33

■ Loudspeaker
Your radio has a high volume loudspeaker (1) for
hands-free use. When the loudspeaker is in use,
is displayed, and you can listen and speak to
the radio from a short distance.
Warning: Do not hold the device near your ear
when the loudspeaker is in use, because the volume may be extremely loud.
When you use the earpiece, hold the radio as you would any other telephone, with
the antenna pointed up and over your shoulder. When you use the loudspeaker,
hold the radio approximately 10 cm (4 inches) away from your mouth, with the
antenna pointed up and away from your face and eyes.
To activate or deactivate the loudspeaker, press (2).
To activate or deactivate both the loudspeaker and the earpiece, press and hold
(2). If you make or receive a phone call while the earpiece is not in use, the
earpiece is activated when the call is connected.
■ Light indicator
There is a light indicator on top of the radio. A yellow light
indicates that you must wait before you can speak, a green light
indicates that the radio is transmitting, and a red light indicates
that the call or operation has failed.
33Copyright © 2005 Nokia. All rights reserved.
Page 34

The light indicator is not always lit when the radio is transmitting, for example,
when the radio is sending information to the network.
■ Volume key
The volume key adjusts the volume of the currently active speaker,
either the earpiece or the loudspeaker. Press the upper end of the
key to increase the volume, and press the lower end of the key to
decrease the volume.
■ Display indicators
Display indicators inform you about the operation of your radio:
The loudspeaker is in use. See Loudspeaker on page 33.
The loudspeaker and the earpiece are not in use. See Loudspeaker on page
33.
The top microphone is selected in the audio settings of the profile. See
Profiles on page 100.
An external speaker and top microphone are selected in the audio settings
of the profile. See Profiles on page 100.
The speakers and tones are muted.
The keypad is locked. See Lock the keys (Keyguard) on page 26.
34Copyright © 2005 Nokia. All rights reserved.
Page 35

You have received one or more text messages. See Read text messages on
page 95.
You have received one or more status messages. See Read status
messages on page 90.
A dial-up connection is established. is replaced with when there is
an incoming or outgoing call during the connection and data transfer is
suspended.
Scanning is activated. See Scanning settings on page 50.
Air interface encryption (network service) is not in use.
Transmission barring is active. See Transmission barring on page 20.
Transmission barring is active, and the radio has sent a notification
message about the activation to the network. See Transmission barring on
page 20.
The radio is in the coverage area of a network cell that has lost the
connection to the network, and only limited services are available.
The GPS receiver is on; note that using the GPS receiver may drain the
battery faster. When the indicator blinks, the GPS receiver is calculating
its location. See GPS receiver on page 72 and Positioning application on
page 73.
You have set the alarm clock. See Alarm clock on page 110.
35Copyright © 2005 Nokia. All rights reserved.
Page 36

The countdown timer is running. See Countdown timer on page 113.
The stopwatch is running in the background. See Stopwatch on page 114.
Call indicators
Displayed during one-way calls.
Displayed during two-way calls.
Indicates that your radio is transmitting a call, and that it is your turn to
speak during a one-way call.
Indicates that your radio is receiving a one-way call.
Displayed during a one-way phone call when neither party is
transmitting.
Displayed during an express call when neither party is transmitting.
Displayed during a call made to your selected group when nobody is
transmitting.
Displayed during a call made to a scanned group when nobody is
transmitting.
Displayed during normal direct mode calls when no direct mode device is
available. See Direct mode on page 65.
Displayed during direct mode calls when a compatible direct mode
gateway is available. See Gateway and repeater on page 69.
36Copyright © 2005 Nokia. All rights reserved.
Page 37

Displayed during direct mode calls when a compatible direct mode
repeater is available. See Gateway and repeater on page 69.
■ Notifications
The following are explanations for some of the notifications that may appear on
the display:
• Not allowed for current access level—You do not have access rights to perform
the action. See Security settings on page 106.
• No network coverage—The radio cannot perform the operation, because the
radio is not in the network coverage area.
• Sel. group's properties changed—The status of the selected talk group has
changed. To view the details, press View.
• Unauthorised position request from—The radio received a position request
from an unauthorised number (position information was not sent). To view the
details, press Read. See Position settings on page 76.
• Network not allowed:—The radio cannot register to the selected network. If the
network was selected manually, you can attempt to select another network or
activate automatic network selection. See Network selection on pages 21 and
103.
• Network changed:—Automatic network selection is on, and the radio has
selected a new network. To exit the message, press OK. See Network selection
on pages 21 and 103.
37Copyright © 2005 Nokia. All rights reserved.
Page 38

3. Using your radio
■ Access a menu function
Tip: You can select whether the menu is shown
as a list or as a grid, like in the picture. See
Display settings on page 107.
1. Press Menu, and use the scroll keys to scroll
through the menu. Select the desired menu, for
example, Settings, by pressing Select.
2. If the menu contains submenus, select the one that
you want.
3. To return to the previous menu level, press Back. To exit the menu, press Exit.
If a menu item is dimmed, you cannot select it. You may not have access rights to
change the setting. See Security settings on page 106.
38Copyright © 2005 Nokia. All rights reserved.
Page 39

■ Menu list
1. Status msgs.
1. Send status message
2. Received
3. Sent
4. My folders
5. Delete messages
6. Status settings
2. Messages
1. Create message
2. Inbox
3. Sent items
4. Saved text msgs.
5. Templates
6. My folders
7. Delete messages
8. Message settings
3. Call register
1. Missed calls
2. Received calls
3. Dialled numbers
4. Clear recent call lists
5. Call duration
6. Data counter
7. Data connection timer
4. Contacts
1. Search
2. Add new contact
3. Edit name
4. Delete
5. Add number
6. Settings
7. Speed dials
8. Caller groups
5. Talk groups
1. Edit group folders
2. View background folder
3. Group settings
4. Restore group settings
5. Group journal
6. Settings
1. Profiles
1. General
2. Silent
3. Meeting
39Copyright © 2005 Nokia. All rights reserved.
Page 40

4. Outdoor
5. Pager
6. Active holder
7. Headset
2. Call settings
1. Anykey answer
2. Summary after call
3. Push-to-talk setting
4. Duty key setting
3. Phone settings
1. Language settings
2. Welcome note
3. Network selection
4. Active mode
5. Unit alert duration
6. Transmission barring
4. Direct mode settings
1. Direct mode scanning
2. View active direct mode device
5. Keyguard settings
1. Automatic keyguard
2. Keyguard code
6. Communication settings
1. Listen to voice messages
2. Voice mailbox number
7. Enhancement settings
1. Active holder
2. Headset
3. Handsfree
8. Modem settings
1. Active access point
2. Edit active access point
9. Security settings
1. PIN code request
2. Configure access levels
3. Access level
4. Change of access codes
10.Display settings
1. Wallpaper
2. Colour schemes
3. Menu view
4. Screen saver time-out
5. Brightness
11.Time and date settings
1. Clock
2. Date
12.Restore factory settings
7. Gallery
8. Organiser
1. Alarm clock
2. Calendar
3. To-do list
40Copyright © 2005 Nokia. All rights reserved.
Page 41

4. Notes
9. Applications
1. Calculator
2. Countdown timer
3. Stopwatch
10.Positioning
1. Position info
2. Waypoints
3. Position settings
11.Web
1. Home
2. Bookmarks
3. Service inbox
4. Settings
5. Go to address
6. Clear the cache
41Copyright © 2005 Nokia. All rights reserved.
Page 42

■ Fast menu
The fast menu contains frequently-used menu functions. To access the fast menu,
press .
Your organisation can define which of the following items are shown in the fast
menu:
• Network mode or Direct mode, depending on the current setting.
• Scanning on or Scanning off, depending on the current setting. This option
affects the scanning setting in the currently active mode (network mode or
direct mode).
• Group calls on or Group calls off, depending on the current setting.
• Barring on or Barring off, depending on the current setting.
• A maximum of seven profiles. See Profiles on page 100.
• A maximum of 10 situation indicators.
If it has been predefined that the fast menu is empty, No items in fast menu is
displayed when you access the fast menu. By default, the fast menu includes the
following items:
• Scanning on or Scanning off, depending on the current setting. This option
affects the scanning setting in the currently active mode (network mode or
direct mode). If you do not have access rights to change the scanning setting,
this item is not shown.
• Network mode or Direct mode, depending on the current setting.
• The General and Silent profiles.
42Copyright © 2005 Nokia. All rights reserved.
Page 43

• The first five situation indicators, if these are predefined in the memory of the
radio.
Activate a fast menu item
1. In the standby mode, press , and scroll to the desired item with the scroll
keys or by pressing quickly.
If voice feedback is activated, the radio plays the names of the items when you
scroll with .
2. To activate the highlighted item, press and hold , or press Select.
Some fast menu functions can be activated only when the radio is in the network
mode and in the network coverage area.
■ Voice feedback
You can get information about some of the operations in your radio as voice
feedback without looking at the display. You can select whether voice feedback is
on or off for each profile. See Profiles on page 100.
When voice feedback is activated, it is used in the following situations:
• When you turn the group selector, the radio plays the index number of the
group (network mode) or channel (direct mode).
• When you use the back key, the radio plays the talk group index number or
"Home" in the network mode, and the talk group index name (A, B, or C) in the
direct mode.
43Copyright © 2005 Nokia. All rights reserved.
Page 44

• When you scroll in the fast menu with , the radio plays the prerecorded
names of the items.
Voice feedback is primarily intended to be used when the loudspeaker is active.
Warning: Do not hold the device near your ear when the loudspeaker is in use,
because the volume may be extremely loud.
The volume of voice feedback depends on the volume settings of the radio. For
details, see Loudspeaker on page 33, and Volume key on page 34.
44Copyright © 2005 Nokia. All rights reserved.
Page 45

4. Group calls
■ Basics
Group calls (network service) are immediate one-way calls within a talk group.
They are connected without the recipients answering.
You can select one talk group you primarily want to communicate with, and other
talk groups whose calls you want to scan. You may receive calls made to your
selected group even when you are engaged in a call with a scanned group that has
a low or medium scanning priority.
Scanning (network service) allows you to follow the calls going on in several talk
groups. The scanned groups may have different scanning priorities, and a group
with a high scanning priority can interrupt a call you are having with another
scanned group.
To access the talk groups in the selected folder, use the group selector or press
in the standby mode.
To communicate with a talk group, you must have access rights to communicate
with it, and you must be in the geographical area where communication with the
group is possible.
Folders
The talk groups in your radio are arranged in folders. One folder can have up to 24
predefined talk groups and up to 24 dynamic (over-the-air) talk groups. Only one
45Copyright © 2005 Nokia. All rights reserved.
Page 46

folder can be selected at a time, and you can only scan or call those talk groups
that are in the selected folder, with the exception of the home group. See Home
group on page 46. In the standby mode, the name of the currently selected folder
is shown on the display.
To access the list of folders, press in the standby mode, or select Menu→Talk
groups→Edit group folders.
A maximum of five folders can be predefined as the user’s own folders, to which
you can copy desired talk groups (see Edit group folders on page 54). The user’s
own folders may also contain predefined groups. It Your organisation may also
predefine some folders as protected, so that only users with certain access rights
may view and select them; see Security settings on page 106. The list of folders
has the following indicators: for protected predefined folders, for
unprotected predefined folders, for the user's own protected folders, and
for the user's own unprotected folders.
Home group
You can set one talk group as the home group. The home group is automatically
included in scanning, and you can receive calls from the home group even when
the selected folder is not the folder of the home group. You cannot receive calls
from the home group if the home group scanning priority is set to Off or scanning
is switched off.
To communicate with the home group, you must be in the area of the home group
and have access rights to communicate with it.
46Copyright © 2005 Nokia. All rights reserved.
Page 47

Select Menu→Talk groups→Group settings. To change the priority of the home
group, select Home group priority; if you do not want to scan the home group,
select Off. To view the folder and group name of the home group, select Home
group. To change the home group, press Change, and select the new home group.
You can easily select the home group by pressing and holding the back key. If
voice feedback is activated, the radio plays "Home". When the home group name
is displayed in the standby mode, press and hold the PTT key. You can start
speaking after a short tone is played and (transmitting) appears on the display.
You can also set the radio to make a call to the home group when you press and
hold the duty key . See Duty key setting on page 102. When you talk, press and
hold the duty key .
Dynamic talk groups
Dynamic talk groups can be added to and removed from the memory of the radio
over the air by your service provider or network operator. When groups are added
or removed, a notification is displayed, such as Group added. To view the changes,
press View. The changes are saved in the Group journal; see Group journal on page
57.
In each folder, the dynamic groups are shown at the end of the group list if the
folder has been set to show dynamic groups. For details, contact your network
operator or service provider.
47Copyright © 2005 Nokia. All rights reserved.
Page 48

■ Start group communication
To start group communication, group calls must be on. Select a folder and a talk
group you primarily want to communicate with, activate scanning if you want,
and select the groups you want to scan. You may also define how you want the
PTT key to function.
Switch group calls on and off
1. Select Menu→Talk groups→Group settings→Group calls.
2. To switch group calls on, scroll to On, and press OK. To switch group calls off,
scroll to Off, and press OK.
You can call or receive calls from a talk group if it is a selected or a scanned group
and if it is available. These groups have their own indicators in the group list; see
Edit group folders on page 54.
If you do not want to receive calls from talk groups, switch group calls off. If you
do not want to listen to group calls, deactivate the loudspeaker and earpiece by
pressing and holding .
Select a folder
To select a folder whose talk groups you want to be available, press in the
standby mode to access the list of folders. Enter the first characters of the folder
name or scroll to the desired folder, and press Select.
To view the list of talk groups that are included in the selected folder, press in
the standby mode.
48Copyright © 2005 Nokia. All rights reserved.
Page 49

When you change the folder, the new selected group will be the group that has
the same index number as the latest selected group in the previous folder. If the
new folder has less groups than the previous folder and the group index does not
exist, the last group in the new folder is selected. However, if the home group had
been set as the selected group with the back key or the latest selected group was
set by the network, the selected group does not change when you change the
folder.
Select a talk group
Turn the group selector until you reach the desired group. Wait until Group
selected is displayed and the radio plays a short tone.
When you turn the group selector, the group name appears on the display, and if
voice feedback is activated, the radio plays the index number of the current group.
To switch between the groups that have the same index number as the last two
selected groups (excluding the home group), press the back key. To select the
home group, press and hold the back key.
Or, you can select a group by pressing in the standby mode and selecting the
desired group from the list of talk groups. Wait until Group selected is displayed
and the radio plays a short tone.
Note that if you change your selected group, you cannot receive calls from the
group that used to be your selected group unless the group is included in
scanning.
49Copyright © 2005 Nokia. All rights reserved.
Page 50

Scanning settings
1. Select Menu→Talk groups→Group settings→Scanning.
2. To switch scanning on, scroll to On, and press OK. To switch scanning off, scroll
to Off, and press OK.
You can also quickly activate and deactivate scanning in the fast menu. See Fast
menu on page 42. is displayed when scanning is on.
To set the groups you want to scan, press in the standby mode to access the
list of talk groups in the selected folder. Scroll to the desired group, and select
Options→ Include to include the group in scanning, or Exclude to exclude the
group from scanning. You can also set scanned groups in the menu. See Edit group
folders on page 54.
PTT key settings
You may set the PTT key to function in either of the following ways:
• Pressing and holding the PTT key always makes a call to the selected group,
even if the radio has just received a call from a scanned group and the name of
the scanned group is still on the display.
• Pressing and holding the PTT key makes a call to the talk group whose name is
on the display. If the radio has just received a call from a scanned group and
the name of the scanned group is still on the display, the call is made to that
scanned group. If there have been no calls from scanned groups and the name
of the selected group is on the display, the call is made to the selected group.
To set the function of the PTT key, see Push-to-talk setting on page 102.
50Copyright © 2005 Nokia. All rights reserved.
Page 51

■ Access the group list in the standby mode
In the standby mode, press to access the list of talk groups in the selected
folder. The folder name, the group name, and the group status (Active,
Unavailable, Not allowed, Unknown, or Inactive) are displayed. To select a group,
scroll to it, and press Select.
Scroll to the desired group, and select Options and one of the following: either
Include to include the group in scanning or Exclude to exclude the group from
scanning, Set as Home to set the group as the home group, Copy group to copy the
group to a user’s own folder, Delete group to delete a dynamic group from the
radio or a copied group from a user’s own folder, Send message to send a text
message to the group, Send status to send a status message to the group, and
Change priority to change the scanning priority of a group.
■ Receive a group call
You can receive group calls from your selected talk group, the home group, and
the scanned groups in the selected folder.
When you receive a group call, the folder and group names, the caller’s name or
number, and (receiving) are displayed in the standby mode.
When nobody is speaking during a group call, is displayed if the call comes
from your selected group, and is displayed if the call comes from a scanned
group.
Tip: You can use the menu when you are listening to a group call.
51Copyright © 2005 Nokia. All rights reserved.
Page 52

Respond to a group call
Press and hold the PTT key while the group name is displayed.
If you have set the PTT key to always make a call to the selected group, the call is
made to the selected group even if another group name is displayed; see PTT key
settings on page 50. To make a call to another group, first set it as the selected
group; see Select a talk group on page 49.
If the call indicator has changed to or , the call has been disconnected, and
pressing and holding the PTT key will start a new call to the group.
To queue for your turn to talk during a group call, press and hold the PTT key
(network service). A queuing tone is played, and Queued is displayed. You can start
speaking after a short tone is played and appears on the display. To stop
queuing, release the PTT key.
Tip: You can also respond to a group call when you are using the menu.
Voice override
With voice override (network service), you can override the communication in the
talk group and avoid the need to queue for your turn to speak. If you have a right
to use voice override, the selection key Overrid. is available when the radio
receives group calls.
To request for voice override, press Overrid., and press and hold the PTT key. You
can start speaking after a short tone is played and appears on the display.
52Copyright © 2005 Nokia. All rights reserved.
Page 53

Mute the call temporarily
When the radio is receiving a group call, you can mute the call for a predefined
time (0-60 seconds) by pressing .
■ Make a group call
Call the selected talk group
Press and hold the PTT key when the name of the selected group is displayed in the
standby mode. You can start speaking after a short tone is played and appears
on the display.
Call a scanned talk group
To make a call to a scanned group after the conversation has ended, press and
hold the PTT key while the group name and are still on the display.
If you have set the PTT key to always make a call to the selected group, you cannot
call a scanned group in this way; see PTT key settings on page 50. To call the
scanned group, first set it as the selected group; see Select a talk group on page
49.
Call a dispatcher (network service)
1. To access the list of talk groups in the selected folder, press in the standby
mode.
2. Scroll to the desired group, press , and press OK.
53Copyright © 2005 Nokia. All rights reserved.
Page 54

If the group whose dispatcher you are calling is not your selected group or if you
are not scanning the group, you may have to wait a few seconds before your call is
connected. Note that all talk groups may not have dispatchers.
If the call is changed to a one-way call, Use PTT to speak is displayed, and you must
press and hold the PTT key when you speak.
You can also set the radio to start a phone call to the dispatcher of the selected
group when you press the duty key ; see Duty key setting on page 102. If the
call is changed into a one-way phone call, press and hold the PTT key when you
speak.
■ Talk groups (Menu 5)
This menu contains the folders and talk groups that have been stored
in the memory of your radio. You can also view and change settings related to
groups, and view the group journal.
See also Home group on page 46, and Start group communication on page 48.
Edit group folders
In this submenu, you can select and view folders, and view and change
information related to talk groups.
Select Menu→Talk groups. Below the submenu Edit group folders, you can see how many groups in the selected folder have the scanning state Included. Select
Edit group folders, and select the desired folder.
54Copyright © 2005 Nokia. All rights reserved.
Page 55

To view and edit the talk groups of a folder, scroll to the desired folder, and press
Edit. In the list of talk groups, the indicators in front of group names give you
more information about the group:
• The scanning priority is indicated with dots: one dot for low priority ( ), two
dots for medium priority ( ), and three dots for high priority ( ).
• If the group is the selected group, the indicator is inside a box ( ).
• If a group that is included in scanning is not available, there is a backslash ( \ )
across the indicator ( ).
In the list of talk groups, scroll to the desired group, and select Options and one of
the following:
• Include or Exclude—to include a group in scanning, or exclude a group from
scanning.
• Set as Home group—to set the group as the home group. See Home group on
page 46.
• Copy group—to copy the group to a user’s own folder. Talk groups in protected
folders can only be copied to the user’s own protected folders.
• Delete group—to delete dynamic talk groups from the radio, or copied groups
from the user’s own folders.
• Change priority—allows you to change the scanning priority of the group to
Low, Medium, or High.
55Copyright © 2005 Nokia. All rights reserved.
Page 56

View background folder
You can receive calls from background groups even when scanning or group calls
are switched off. These calls may also interrupt group calls in progress. You may be
able to respond to calls from background groups, but you cannot start them.
To view the list of background groups, select Menu→Talk groups→View
background folder. To view information about the group, scroll to the name, and
press View. If there is a backslash ( \ ) across the indicator in front of the group
name, the group is unavailable.
Restore group settings
In this submenu, you can restore talk groups to their original settings.
Select Menu→Talk groups→Restore group settings and from the following:
• Restore folder—to set the scanning priorities and scanning states of the talk
groups in the desired folder to the original values. If the folder is a user’s own
folder, the groups copied by the user are deleted from the folder.
• Dynamic groups—to set the scanning priorities and scanning states of
predefined dynamic groups to the original values, and to delete dynamic
groups that have been added over-the-air.
• My folders—to set the scanning priorities and scanning states of predefined
talk groups in the user’s own folders to the original values, and to delete the
groups copied by the user.
• Restore all—to set the scanning priorities and scanning states of all talk groups
to the original values. Dynamic groups added over-the-air and groups copied
56Copyright © 2005 Nokia. All rights reserved.
Page 57

by the user to the user’s own folders are deleted. The original home group is set
as the selected group, and the folder of the home group is set as the selected
folder.
Group journal
To view the group journal, select Menu→Talk groups→Group journal. The group
journal tracks certain actions made by the network or by the radio user, such as
adding or deleting dynamic groups over the air ( and ), groups becoming
available or unavailable ( and ), and groups selected by the network
().
If you have read the journal event, the top right corner of the indicator is turned
(for example, ).
The group journal can track 100 events, and the oldest events are automatically
deleted when the journal becomes full. To read more information about the event,
press Read. To delete all events from the group journal, select an event by pressing
Read, and select Options→Delete all.
Tip: To select a dynamic group in the group journal, scroll to the event that
indicates that the group was added, press Read, and then press Select. You
can select a group if it has not been deleted, and if it is included in the
selected folder.
57Copyright © 2005 Nokia. All rights reserved.
Page 58

5. Express calls
Express calls (network service) are immediate one-way calls between two people.
They are connected without the recipient answering. You can make express calls
to TETRA network numbers.
If you receive an express call when you are not using the loudspeaker, your radio
alerts you, and the call is connected only after you have answered it by pressing
.
■ Make an express call
1. Enter a TETRA number.
2. Press and hold the PTT key, and start speaking after a short tone is played and
appears on the display.
3. Release the PTT key to let the other party speak. is displayed when you
receive a call.
If is displayed, the loudspeaker is in use. To activate or deactivate the
loudspeaker, press . For details, see Loudspeaker on page 33.
If Call type changed appears, the call has changed into a one-way phone call. You
must wait until the other party answers it before you can start speaking. To end
the call, press .
You can also search for the phone number in Contacts; see Search for names on
page 83.
58Copyright © 2005 Nokia. All rights reserved.
Page 59

Tip: In the standby mode, press once to access the list of last-dialled
numbers.
Reuse a number
After an express call has ended, the other party’s name and number remain on the
display for a short while, and the call indicator changes to . To make a new call
to the number, press and hold the PTT key while is displayed. You can also
make a phone call to the number by pressing .
Call an abbreviated TETRA number
To make a call to an abbreviated TETRA number, press , enter the number,
and press and hold the PTT key. For details on abbreviated TETRA numbers, contact
your service provider.
Speed dialling
If you have assigned a phone number to one of the speed dialling keys -
, you can make an express call to that number by pressing the desired speed
dialling key, and then pressing and holding the PTT key. Note that express calls can
only be made to TETRA network numbers. See Speed dials on page 85.
■ Receive an express call
When you receive an express call, and the caller’s name and number or Call
are displayed.
59Copyright © 2005 Nokia. All rights reserved.
Page 60

If the loudspeaker is not in use, you must press to answer the call. To end
the call, press .
Tip: You can use the menu when you are listening to an express call.
Respond to an express call
Press and hold the PTT key, and start speaking after a short tone is played and
appears on the display.
Reject an express call
To reject an express call, press .
If the loudspeaker is not in use and the radio alerts for an express call, rejecting
the call sends the line busy tone to the caller. If the call has already been
connected when you reject it, the call indicator changes to .
60Copyright © 2005 Nokia. All rights reserved.
Page 61

6. Phone calls
Phone calls (network service) are like conventional telephone calls. They can be
made to TETRA network and public telephone network numbers.
Phone calls are normally two-way calls, but your radio is also capable of making
and receiving one-way phone calls in case the other party’s terminal cannot make
or receive two-way calls.
If you receive an express call when you are not using the loudspeaker, you will
receive the call like a phone call, with the radio alerting you. This is to make sure
that you do not miss the call. Use the PTT key when you speak during a one-way
call.
One-way and two-way calls have different ringing tones. You can change the
tones in the Profiles submenu. See Profiles on page 100.
■ Make a phone call
1. Enter the area code and phone number. The area code is not required for TETRA
numbers.
2. Press .
3. Scroll to one of the following number types:
• Private for a TETRA network number
• Abbr. number for an abbreviated TETRA number
61Copyright © 2005 Nokia. All rights reserved.
Page 62

• Phone for a public telephone network number
• Office ext. for an office extension number
For details on the number types, contact your service provider.
4. To call the number, press .
5. To end the call, press .
You can also search for the phone number in Contacts; see Search for names on
page 83.
If is displayed, the loudspeaker is in use. To activate or deactivate the
loudspeaker, press . For details, see Loudspeaker on page 33.
If the call is changed to a one-way phone call, Use PTT to speak appears on the
display, and you must press and hold the PTT key when you speak. To end the call,
press .
Tip: You can make a phone call even during an express call or a group call.
After you have pressed to make a call, the other call is disconnected.
Tip: In the standby mode, press once to access the list of last-dialled
numbers.
Call an abbreviated TETRA number
To make a phone call to an abbreviated TETRA number, press , enter the
number, and press . For details on abbreviated TETRA numbers, contact your
service provider.
62Copyright © 2005 Nokia. All rights reserved.
Page 63

Speed dialling
If you have assigned a phone number to one of the speed dialling keys -
, you can make a phone call to that number by pressing the desired speed
dialling key and then pressing . See Speed dials on page 85.
International phone calls (network service)
1. Press twice for the international prefix. The + character replaces the
international access code.
2. Enter the country code, area code, and the phone number.
3. Press .
In-call options
To access the menu during a two-way call, press Menu.
When you press Options during a two-way call, the following options are
available:
• Mute or Unmute—Mutes or unmutes the microphone.
• Send DTMF—Allows you to enter and send DTMF tones, such as passwords or
bank account numbers.
• Contacts—Allows you to access the contacts directory.
• End call—Ends the call.
63Copyright © 2005 Nokia. All rights reserved.
Page 64

■ Answer a phone call
When a ringing tone is played, press or .
If is displayed, the loudspeaker is in use. To deactivate or activate the
loudspeaker, press .
If the call is a one-way call, you can also answer it by pressing and holding the PTT
key. is displayed during a one-way call.
To end the call, press or .
Mute the ringing tone
To mute the ringing tone, press Silence.
Reject a phone call
To reject an incoming call and to send the caller the line busy tone, press or
Reject.
64Copyright © 2005 Nokia. All rights reserved.
Page 65

7. Direct mode
■ Basics
In the direct mode, the radio operates without the network, so that the radios
communicate directly with each other. The direct mode enables one-way calls
both in the network coverage area and outside the network coverage area. For
details and availability, contact your service provider.
When the direct mode is active, only those radio functions that do not require the
use of the network can be used. In the direct mode, you cannot send or receive
status or text messages, make or receive network mode calls, use the Web browser
or the data connection, or activate fast menu items that require the use of the
network. To use radio functions that require the use of the network, activate the
network mode, and return to the network coverage area.
Your radio has direct mode channels, and each channel can have up to three
groups. To receive a direct mode call that is made to the selected or a scanned
group on the selected channel, the user must be in the coverage area of the
transmitting radio. The radio coverage areas of different users can vary; even if
you can hear a conversation, not all those speaking can necessarily hear you. For
communication to be efficient, all the users should be within each other's radio
coverage areas.
65Copyright © 2005 Nokia. All rights reserved.
Page 66

■ Start direct mode communication
Activate direct mode
To activate direct mode, select Menu→Settings→Phone settings→Active
mode→Direct. To return to the network mode, select Network.
When you activate the direct mode, the selected channel and group are those that
were last selected in the direct mode. When you return to the network mode, the
selected folder and group are those that were last selected in the network mode.
When the radio operates in normal direct mode, Direct mode is displayed in the
standby mode, and is displayed during direct mode calls. The names of the
selected channel and group are shown on the display. The bar above indicates
the signal strength of the radio you are receiving communication from. The higher
the bar, the stronger the signal, and the better the connection.
If a compatible direct mode gateway device is available, Gateway is displayed in
the standby mode, and the bar above indicates the signal strength of the
gateway. is displayed during direct mode calls. If a compatible direct mode
repeater device is available, Repeater is displayed in the standby mode, and the
bar above indicates the signal strength of the repeater. is displayed
during direct mode calls. See Gateway and repeater on page 69.
Select channels and groups
Up to 60 direct mode channels can be stored in the memory of the radio. Up to
three groups can be stored for each channel. To select a channel, turn the group
selector until the desired channel is displayed. Wait until Group selected is
66Copyright © 2005 Nokia. All rights reserved.
Page 67

displayed and the radio plays a short tone. If voice feedback is activated, the radio
plays the index number of the channel when you turn the group selector.
When you select a channel, the first group (A) is automatically selected. To switch
between the second and the third group (B and C) on the same channel, press the
back key. To select the first group (A) on the channel, press and hold the back key.
If voice feedback is activated, the radio plays the index name (A, B, or C) of the
group when you use the back key.
You can also select the channel and group with the scroll keys; press or in
the standby mode to access the list of channels. To select a channel and its first
group (A), scroll to the desired channel, and press Select. To select another group
from the channel, press Groups, and select the desired group.
If you do not want to listen to communication from direct mode channels,
deactivate the loudspeaker and earpiece by pressing and holding .
Scan the groups on a channel
Direct mode scanning allows you to receive calls made to the other groups on the
same channel. Select Menu→Settings→Direct mode settings→Direct mode
scanning→On or Off.
■ Receive a direct mode call
You can receive calls from the selected group and the scanned groups on the
selected channel. Even if scanning is not on, you can receive calls from groups
that are on the same frequency and that have been predefined as open groups.
67Copyright © 2005 Nokia. All rights reserved.
Page 68

When you receive a direct mode call, , the speaker’s number or name, and the
names of the channel and group are displayed. If the speaker’s number or name is
not available, Call is displayed.
If the connection to the transmitting radio is lost, Connection lost is displayed.
Respond to a direct mode call
Press and hold the PTT key while the channel and group names are displayed.
To queue for your turn to talk during a call, press and hold the PTT key. A queuing
tone is played while you are in the queue. You can start speaking after a short tone
is played and appears on the display. To stop queuing, release the PTT key.
Voice override
With voice override (network service), you can override the communication in the
group and avoid the need to queue for your turn to speak. If you have a right to
use voice override, the selection key Overrid. is available when the radio receives a
direct mode call.
To request for voice override, press Overrid., and press and hold the PTT key. You
can start speaking after a short tone is played and appears on the display.
Mute the call temporarily
When the radio is receiving a direct mode call, you can mute the call for a
predefined time (0-60 seconds) by pressing .
68Copyright © 2005 Nokia. All rights reserved.
Page 69

■ Make a direct mode call
1. Make sure that the names of the desired channel and group are displayed.
2. Press and hold the PTT key, and start speaking after a short tone is played and
appears on the display.
In the direct mode, pressing and holding makes a call to the first group on the
selected channel. Press and hold the duty key when you speak.
■ Gateway and repeater
Your organisation may have separate direct mode gateway devices or direct mode
repeater devices. The devices operate on certain frequencies, and offer an
additional service to your radio when the radio is in a coverage area of a
compatible device, and operates in the direct mode on the same frequency as the
device.
When the radio is on a direct mode channel and group where a compatible direct
mode gateway device is available, Gateway is displayed in the standby mode, and
during direct mode calls, is displayed. On such a channel and group, direct
mode calls are routed through the gateway device. In addition to transmitting
calls to the direct mode group, the gateway device may also transmit outgoing
calls to a network mode talk group predefined by your service provider, and you
may also be able to receive group calls from that group. Your radio does not
support any other services that may be offered by gateway devices.
If the connection to the gateway device is lost, Gateway connection lost is
displayed, and the radio continues to operate in normal direct mode.
69Copyright © 2005 Nokia. All rights reserved.
Page 70

When calls are routed through the direct mode gateway device, they are not
connected as fast as normal direct mode calls.
When the radio is on a direct mode channel and group where a compatible direct
mode repeater device is available, Repeater is displayed in the standby mode, and
during direct mode calls, is displayed. On such a channel and group, the
coverage area in making and receiving direct mode calls may be extended. The
calls are routed through the repeater device to such radios in its coverage area
that are in the direct mode on the same channel and group, and that support that
type of repeater devices.
If the connection to the repeater device is lost, Repeater connection lost is
displayed, and the radio will continue to operate in normal direct mode.
See also Direct mode settings on page 104.
■ Red key calls and emergency calls in direct mode
If you are not within the network coverage area, you cannot make emergency calls
or red key calls to network mode destinations.
If you attempt to make an emergency call to an emergency number in the direct
mode, the radio switches to the network mode, attempts to connect to the
network, and attempts to make the call.
For each direct mode channel, your organisation can define whether the radio
attempts to make red key calls in the direct mode to a predefined direct mode
group, or switches to the network mode and attempts to make the call to the
destination that is predefined for red key calls in network mode.
70Copyright © 2005 Nokia. All rights reserved.
Page 71

Press and hold the red function key, and the radio attempts to make a red key call.
Press the red function key and then the back key, and the radio attempts to make
a silent red key call. However, if the silent call is made to the predefined direct
mode group, it changes into an ordinary red key call to the group. See also Red
key calls on page 30.
If a compatible direct mode gateway device is available, and a red key call is made
to a predefined direct mode group, the call may also be transmitted to the
network mode group that is predefined for the gateway device.
If the radio receives a red key call, or a call made to a destination that is
predefined as an emergency number, the radio plays a tone, and Priority call is
displayed with the call information.
71Copyright © 2005 Nokia. All rights reserved.
Page 72

8. Positioning
■ GPS receiver
The Global Positioning System (GPS) is a worldwide radio navigation system that
includes 24 satellites and their ground stations that monitor the operation of the
satellites. Your radio is equipped with an internal GPS receiver.
A GPS terminal, such as the GPS receiver in the Nokia THR880i, receives lowpower radio signals from the satellites, and measures the travel time of the
signals. From the travel time, the GPS receiver can calculate its location to the
accuracy of metres.
You can use the GPS applications in the Positioning menu. When the GPS receiver
is on, is displayed. If the indicator blinks, the GPS receiver is calculating its
location. When using the GPS receiver, do not touch the antenna of the radio; the
antenna of the GPS receiver is located there. Hold the radio upright in your hand
at an angle of about 45 degrees, with a clear view of the sky.
The GPS receiver in the Nokia THR880i takes its power from the radio battery.
Note that using the GPS receiver may drain the battery faster.
72Copyright © 2005 Nokia. All rights reserved.
Page 73

Note: The Global Positioning System
The Global Positioning System (GPS) is operated by the United States government,
which is solely responsible for accuracy and maintenance of the system.
The accuracy of location data can be affected by adjustments to GPS satellites
made by the United States government and is subject to change with the United
States Department of Defense civil GPS policy and the Federal Radionavigation
Plan. Accuracy can also be affected by poor satellite geometry.
Availability and quality of GPS signals may be affected by buildings and natural
obstacles as well as weather conditions. The GPS receiver should only be used
outdoors to allow reception of GPS signals.
Therefore, GPS should not be used for precise location measurement and you
should never rely solely on location data from the GPS receiver.
■ Positioning application
Select Menu→Positionin g.
Note that establishing a GPS connection may take from a couple of seconds to
several minutes. The availability and quality of GPS signals may be affected by
buildings, natural obstacles, and weather conditions. When the GPS receiver is on,
is displayed. If the indicator blinks, the GPS receiver is calculating its location.
Position info
To activate the GPS receiver and to view available position information, select
Menu→Positioning→Position info. Use and to scroll between the
displays.
73Copyright © 2005 Nokia. All rights reserved.
Page 74

The first display contains the current geographical coordinates in WGS-84 format
(a geographical coordinate system) and an estimate of the accuracy of the
location. The correct coordinates are shown only if the GPS receiver receives the
needed positioning information from the GPS satellites.
The second display contains the approximate altitude from the mean sea level. If
the device is moving, the approximate speed and the approximate direction of the
movement in degrees from true north are also shown.
The third display contains the approximate time of the measurement in Universal
Time (UTC) format and the number of satellites the radio is connected to
(maximum 12).
The text on top of the display informs you of the status of the GPS reveiver. If No
GPS fix is displayed, the GPS receiver is calculating its location or not receiving
information from the satellites, and the correct coordinates cannot be displayed.
The coordinates of the previous calculated position remain on the display until
new position information is received from the satellites.
If 2-D positioning is displayed, the coordinates are displayed, but the receiver
cannot calculate the altitude, because it is only receiving information from three
satellites. If 3-D positioning is displayed, the receiver is receiving information
from a mimimun of four satellites, and the coordinates and the altitude can be
calculated.
If you want to save the displayed position information as a waypoint (landmark),
select Save. Enter a name, and if desired, a short comment for the waypoint.
74Copyright © 2005 Nokia. All rights reserved.
Page 75

Waypoints
In the Position info submenu, you can save part of the position information as a
waypoint (landmark) for later use. You can save up to 100 waypoints.
To view the list of saved waypoints, select Menu→Positioning→Waypoints. Scroll
to the desired waypoint, and press Options for the following options:
• Delete—to delete the waypoint.
• Delete all—to delete all saved waypoints.
• Send as message—to send the waypoint name, the coordinates, and the
comment as a text message.
• Edit name—to edit the name of the waypoint.
• Edit note—to edit the comment of the waypoint.
• Memory status—to see how many waypoints can still be saved in the memory,
and how many waypoints are currently saved.
To view the waypoint information, select the desired waypoint. The first display
contains the geographical coordinates and an estimate of the accuracy of the
coordinates. The second display contains the date and time of the measurement,
and the third display contains the comment, if saved with the waypoint. Use
and to scroll between the displays. Press Options to send the waypoint as a
text message or edit the name or comment of the waypoint.
75Copyright © 2005 Nokia. All rights reserved.
Page 76

Position settings
To change settings related to positioning, select Menu→Posi tioni ng→Position
settings.
GPS receiver
Select GPS receiver→GPS automatic to activate the GPS receiver only when you
open Positioning from the menu, send information using NMEA interface, or
receive a position request that is answered. Select GPS always on to have the GPS
receiver active all the time. Using the GPS receiver may drain the battery faster.
Allow position info sending
The GPS receiver may receive requests for position information, or for network
information that the service provider can use to calculate the approximate
position of the radio (network service). Position information sending is only
possible in the network mode and when transmission barring is not activated.
Note that this feature and its accuracy are dependent on the network, satellite
systems (when GPS is used), and the organisation receiving the information. This
feature may not function in all areas or at all times.
To set how the radio responds to position requests, select Allow position info
sending, and one of the following:
• Yes—The radio attempts to send position information whenever position
requests are received from numbers authorised by your organisation.
• No—The radio does not send position information when position requests are
received.
76Copyright © 2005 Nokia. All rights reserved.
Page 77

• Priority calls only—The radio attempts to send position information only when
position requests from authorised numbers are received during a call to an
emergency number programmed into your radio, or during a red key call or a
silent red key call to a network mode destination. If the GPS receiver does not
get the needed information from the satellites to determine the current
coordinates before the call ends, the coordinates that were last calculated by
the receiver are sent instead.
Note that position information from the GPS receiver may be sent to the
network during these calls if it has been predefined by your organisation,
regardless of which setting is selected.
NMEA interface
If the radio is connected to a compatible PC with the DLR-3P cable, you can send
position information to compatible map applications on the PC. The protocol
NMEA-0183 version 3.0 is used for data transfer. To activate or deactivate the
GPS receiver and the sending of position information to the compatible PC, select
NMEA interface→On or Off.
Approved NMEA sentences include GPRMC, GPVTG, GPGGA, GPGLL, GPGSA, and
GPGSV. The default data transfer rate of the NMEA interface is 4800 b/s. AT
commands cannot be used when NMEA data transfer is active.
Coordinate format
To select how the WGS-84 coordinates are displayed, select Coordinate
format→ddd°mm’ss’’, ddd°mm.mmm’, or ddd.ddddd°.
77Copyright © 2005 Nokia. All rights reserved.
Page 78

Set units of measurement
To select which units are used to display position information, select Set units of
measurement. You can select the unit separately for Accuracy, Speed, and
Altitude.
78Copyright © 2005 Nokia. All rights reserved.
Page 79

9. Write text
You can enter text, for example, when writing messages, in two different ways.
You can use traditional text input or predictive text input.
When you are writing text, on the top left of the display indicates predictive
text input, and indicates traditional text input. The character case is
indicated by , , or next to the text input indicator, and you can
change the character case by pressing . The number mode is indicated by
. To change to the number mode, press and hold and select Number
mode. To change back to the letter mode, press and hold .
When writing text, select Options →Dictionary on to set predictive text input on
if it is available for the language. To change back to traditional text input, select
Dictionary off. To temporarily change the writing language, select Writing
language.
Tip: To quickly set predictive text input on or off when writing text, press
twice, or press and hold Options.
To set a different language for writing text and for display texts, see Language
settings on page 103.
■ Predictive text input
You can enter any letter with a single key press. Predictive text input is based on a
built-in dictionary to which you can also add new words.
79Copyright © 2005 Nokia. All rights reserved.
Page 80

1. Start writing a word by using the keys - . Press each key only once
for one letter. The word changes after each key press.
To insert a number while in the letter mode, press and hold the desired number
key. For more instructions, see Tips on page 81.
2. When you have finished writing the word and it is correct, confirm it by
pressing or adding a space with .
If the word is not correct, press repeatedly until the word you want
appears, and confirm it. Or, select Options→ Matches.
3. Start writing the next word.
When writing compound words, write the first part of the word, and confirm it by
pressing . Write the last part of the word, and confirm it by pressing or
.
■ Traditional text input
Press a number key - repeatedly until the character you want appears.
Not all characters available under a number key are printed on the key. The
characters available depend on the language selected in Language settings; see
Language settings on page 103. If the next letter you want is on the same key as
the present one, wait until the cursor appears or press any of the scroll keys, and
enter the letter.
To insert a number while in the letter mode, press and hold the desired number
key. The most common punctuation marks and special characters are available
under .
80Copyright © 2005 Nokia. All rights reserved.
Page 81

■ Tips
• To insert a space, press .
• To delete a character to the left of the cursor, press Clear. To delete characters
quickly, press and hold Clear.
• To insert a special character when using traditional text input, press .
When using predictive text input, press and hold , or select
Options→Insert symbol.
• To insert a name or a phone number by searching for it in Contacts, select
Options→Insert contact or Insert number.
• To insert a word when using predictive text input, select Options→Insert word.
Write the word using traditional text input, and press Save. The word is also
added to the dictionary.
81Copyright © 2005 Nokia. All rights reserved.
Page 82

10. Contacts
You can save multiple phone numbers and text, such as an e-mail address, a street
address, or a note under a name in the contacts directory.
To quickly access the list of names in the contacts directory, press Names in the
standby mode. To open the Contacts menu, select Menu→Contacts.
■ Save names and numbers
You can save at least 255 names and phone numbers in Contacts, and up to five
numbers and up to two text notes under a name. You may be able to save more
than 255 names and numbers if your radio has enough memory.
Each number must be assigned a number type when it is saved in Contacts. You
can call a saved number only if it has been assigned the correct number type.
The first number saved under a name is automatically set as the default number.
When you select a name from Contacts, for example, to make a call, the default
number is used unless you select another number. The default number is indicated
by a box around the number type indicator (for example, ).
1. Select Menu→Contacts→Add new contact.
2. Enter the name, and press OK.
3. Enter the area code and the phone number, and press OK.
4. Select one of the following number types:
82Copyright © 2005 Nokia. All rights reserved.
Page 83

• Private ( ) for a TETRA number other than an abbreviated TETRA number
• Abbr. number ( ) for an abbreviated TETRA number
• Phone ( ) for a public telephone network number
• Office ext. ( ) for an office extension number
5. When the name and number are saved, press Done.
Tip: To save a phone number in the standby mode, enter the phone number,
and press Save.
■ Search for names
1. Press Names, and enter the first characters of the name you are searching for.
Or, select Menu→Contacts→Search. Enter the first characters of the name
you are searching for, and press Search.
2. Scroll to the name you want.
3. When the desired name is highlighted, you can call the default number. To
make a phone call, press . To make an express call, press and hold the PTT
key. Note that express calls can only be made to TETRA network numbers.
If multiple numbers have been saved for the name and you want to call one of
the other numbers, first press Details, and scroll to the number you want to
call.
Tip: To search for a name during a call, select Options→Contacts→Search.
83Copyright © 2005 Nokia. All rights reserved.
Page 84

■ Organise the contacts directory
Add numbers and text items
To add phone numbers or text items to a name in Contacts, first access the list of
names, scroll to the name to which you want to add a new number or text item,
and press Details. Select Options→Add number or Add detail, and select one of
the number or text types. Enter the number or enter the text, and press OK to save
it. There are also options for editing and deleting numbers and text items.
Tip: You can also edit names or add numbers by selecting
Menu→Contacts→Edit name or Add number.
Change the number type
In the list of names, scroll to the desired name, and press Details. Scroll to the
number whose type you want to change, and select Options→Change type.
Change the default number
In the list of names, scroll to the desired name, and press Details. Scroll to the
number you want to set as the default number, and select Options→Set as
default.
84Copyright © 2005 Nokia. All rights reserved.
Page 85

Delete contact entries
To delete a single contact entry, search for the name and number you want to
delete. Press Details, and select Options→Delete. Or, select
Menu→Contacts→Delete→One by one.
To delete all names and numbers from the contacts directory, select
Menu→Contacts→Delete→Delete all. When Are you sure? is displayed, press OK,
and confirm with the security code.
■ Settings for Contacts
Select Menu→Contacts→Settings, and select one of the following:
• Contacts view—You can select how your radio shows the stored names and
numbers: Normal name list shows five names at a time, and Name and number
shows one name and phone number at a time.
• Memory status—You can check what percentage of the internal memory of the
radio is in use, and how much memory is still free.
■ Speed dials
You can set any of the number keys - to work as a speed dialling key.
1. Select Menu→Contacts→Speed dials. Scroll to the desired speed dialling key
(2 to 9), and press Assign.
2. Press Search, and select the desired name and number.
85Copyright © 2005 Nokia. All rights reserved.
Page 86

After a number has been assigned for a speed dialling key, press Options, and you
can view, change, or delete the assigned phone number.
To make call with speed dialling, see Speed dialling on pages 59 and 63.
■ Caller groups
You can set the radio to play a specific ringing tone and show a graphic on the
display when you receive a phone call from a particular name and phone number.
Select Menu→Contacts→Caller groups, and select the caller group you want.
You can change options for Group name, Group ringing tone, and Group logo, and
edit the member list of the caller group in Group members.
You can use the Alert for setting in profiles to set the radio to ring only when
receiving phone calls from names and numbers that belong to a specific caller
group. See Profiles on page 100.
86Copyright © 2005 Nokia. All rights reserved.
Page 87

11. Menu functions
■ Status msgs. (Menu 1)
Select Menu→Status msgs.. You can read and send status messages (network service), and save them for later use.
There are three types of status messages:
• Status messages are predefined messages with varying contents. You can send
them to your selected recipient.
• Situation indicators are predefined messages with varying contents. You can
send them to a predefined recipient.
• Callback requests contain the message "callback". You can send callback
requests to your selected recipient.
Status and situation indicator messages consist of numbers. If the number has a
corresponding text in the radio memory, the text is shown when you receive
messages or send them with the Send status message submenu.
Network settings may affect, for example, the recipient of those callback requests
and situation indicators that are sent to talk group addresses. The recipient is
either the talk group dispatcher or all talk group members.
87Copyright © 2005 Nokia. All rights reserved.
Page 88

Unit alert messages
The unit alert network service is a type of status message. It is used to alert people
to the following radio traffic. If you receive a unit alert message, pay special
attention to the following calls and messages.
The text of the unit alert message is predefined by your organisation. When you
receive a unit alert message, the message is displayed, the radio plays an alarm
tone, the lights flash, and the General profile is activated. To stop the alarm, press
Stop.
A unit alert message is sent like a status message.
Send status messages
Tip: To send a status message, press in the standby mode.
Tip: To send a status message in the standby mode, enter the status
number, and select Options→ Send as a status→Status or Situation.
Tip: You can set the radio to send status messages when you press the duty
key . To send a callback request to the address of the selected group,
press and hold the duty key in the standby mode. To send a situation
indicator, enter the situation number in the standby mode, and press and
hold the duty key. See Duty key setting on page 102.
Send status messages or callback requests
1. Select Menu→Status msgs.→Send status message.
88Copyright © 2005 Nokia. All rights reserved.
Page 89

2. To send a status message, select Status. Scroll to the desired status message,
and press OK. You can also search for a message by entering its first letters.
To send a callback request, select Callback.
3. Select the recipient of the status message or callback request in one of the
following ways:
• If a default recipient number is displayed, press OK to send the message to
the default recipient. See Status settings on page 92.
• Search for an individual recipient from Contacts. Select Search→Contacts,
and select the desired name and number. To send the message, press OK
when the number is displayed.
• Search for a talk group in the selected folder. Select Search→Talk groups,
and select the desired group to send the message.
• Enter the phone number, and press OK. Scroll to one of the following
number types: Private for a TETRA network number, Abbr. number for an
abbreviated TETRA number, Phone for a public telephone network number,
or Office ext. for an office extension number. To send the message, press
Send.
Send situation indicators
1. Select Menu→Status msgs.→Send status message→Situation.
2. Scroll to the desired situation indicator, and press Send. You can search for a
message by entering its first letters.
You can view the recipient of the situation indicator in the Status settings
submenu. See Status settings on page 92.
89Copyright © 2005 Nokia. All rights reserved.
Page 90

Read status messages
When you receive a status message, the message and are displayed in the
standby mode. The type of the message is identified with either Status: (status
addressed to an individual), Group status: (status addressed to a talk group),
Situation:, or Callback request:.
To confirm that you have read the message, press OK. If you have received another
status message, 1 status message received is displayed. To read the message, press
Read. To read the message later, press Exit.
After you have pressed OK or Exit, the message is moved to the Received folder.
Read status messages in the Received folder
1. Select Menu→Status msgs..
2. Select Received to view received messages. For callback messages, the sender’s
name or number is shown instead of the message. The messages are identified
with the following indicators:
• for unread and for read status messages
• for unread and for read situation indicators
• for unread and for read callback requests
3. Scroll to the desired message, and press Read.
When you are reading a message, you can delete the message by pressing
Delete. Press Options for the following options: Reply, Save, or Use number.
Easy callback
1. When you are reading a status message, press .
90Copyright © 2005 Nokia. All rights reserved.
Page 91

2. To make a phone call, press .
Received and Sent folders
After you have received a status message, the radio moves it to the Received folder. After you have sent a message, the radio moves it to the Sent folder. To read a message in a folder, press Read.
When a folder becomes full, the oldest read message is deleted when a new
message is moved to the folder. You can create folders under the My folders
submenu, and store messages there for later use.
You can define the maximum number of messages that are kept in the Received
and Sent folders. See Status settings on page 92.
User-specified folders
Select Menu→Status msgs.→My folders. You can create folders and save
received and sent messages there. To add the first folder under My folders, press
Add. To add more folders, select Options→Add folder.
To delete a folder, scroll to the folder, and select Options→Delete folder. When
you delete a folder, all the messages in that folder are also deleted.
Delete status messages
1. Select Menu→Status msgs.→Delete messages.
2. Scroll to the folder whose contents you want to delete, and press OK. Or, scroll
to All to delete the contents of all the status message folders, and press OK.
91Copyright © 2005 Nokia. All rights reserved.
Page 92

Status settings
Select Menu→Status msgs.→Status settings, and select one of the following:
• Max. number of received—defines the maximum number of received status
messages that are kept in the Received folder.
• Max. number of sent—defines the maximum number of sent status messages
that are kept in the Sent folder.
• Delivery reports—defines if the delivery reports that the network sends on your
status messages are shown (network service).
• Recipient of situations—displays the name or number of the recipient of
situation indicators.
• Default recipient of status msgs.—defines the default recipient of status
messages and callback requests.
■ Messages (Menu 2)
You can read and write text messages, and send them to
individuals and talk groups (network service). You can also save
messages in folders for later use. You can send text messages of up to 160
characters to phone and office extension numbers, and text messages of up to
140 characters to private numbers. For the number types, see Make a phone call
on page 61.
92Copyright © 2005 Nokia. All rights reserved.
Page 93

Important: Some networks may not support the text message character counts
indicated in this user guide. In such a network, text messages that are over the
allowed number of characters cannot be delivered, but they may be deleted as a
whole. Pay attention to the character count when you write messages to be sent in
such a network. Contact your service provider or network operator for the details
of your network.
Write text messages
Tip: To start writing a text message, press in the standby mode.
1.Select Menu→Messages→Create message.
2. Write the message. For details, see Write text on page 79. You can also insert a
template into the message; select Options→Use template, and select the
desired template.
The number of characters that is left for the message is shown on the top right
corner of the display. If you enter more than 140 characters, which is the
maximum length of messages that can be sent to private numbers, the counter
starts to count characters from -1 to -20. You can send messages containing
the additional 20 characters marked with a minus sign to phone and office
extension numbers.
3. When you finish writing the message, press Send.
To send the message as a flash message (network service), select
Options→Sending options→Send as flash. The receiving terminal must
support the reception of flash messages. When you receive a flash message,
93Copyright © 2005 Nokia. All rights reserved.
Page 94

the beginning of the message appears on the display. Flash messages are not
automatically saved in the Inbox folder.
4. Select the recipient of the message in one of the following ways:
• If a default recipient number is displayed, press OK to send the message to
the default recipient. See Message settings on page 97.
• Search for an individual recipient from Contacts. Select Search→Contacts,
and select the desired name and number. To send the message, press OK
when the number is displayed.
• Search for a talk group in the selected folder. Select Search→Talk groups,
and select the desired group to send the message.
• Enter the number, and press OK. Scroll to one of the following number
types: Private for a TETRA network number, Abbr. number for an
abbreviated TETRA number, Phone for a public telephone network number,
or Office ext. for an office extension number. To send the message, press
Send.
Note: When sending messages, your device may display the words Message sent.
This is an indication that the message has been sent by your device. This is not an
indication that the message has been received at the intended destination. For
more details about messaging services, check with your service provider.
Send text messages to multiple recipients
1. After you have written the message, select Options→Sending options→Send
to many.
94Copyright © 2005 Nokia. All rights reserved.
Page 95

2. To send the message, scroll to the desired name, and press OK. If you have
saved multiple phone numbers for the name, you also need to select the
desired number.
3. Select the next recipient, and press OK to send the message. When you do not
want to send the message to any more recipients, press Done.
Read text messages
When you have received a text message, and 1 message received are
displayed in the standby mode.
The blinking indicator indicates that the message memory is full. Before you
can receive new messages, delete some of your old messages.
1. Press Show to read the message, or press Exit to read it later.
To read the text message later, select Menu→Messages→Inbox, and select
the desired message. indicates an unread text message.
2. While reading the message, press Options for the following options: Delete,
Use number, Forward, Forwarding opt's, Edit, Move, Rename, and Copy to
calendar.
Reply to messages
1. When reading a message, press Reply.
2. Select one of the following reply types: Empty screen, Original text, Template,
or one of the standard answers, such as Thank you. If you selected Template,
select the desired template from the list.
95Copyright © 2005 Nokia. All rights reserved.
Page 96

3. Write your reply message, and press Send. Press OK to send the message to the
displayed number.
Easy callback
When you are reading a text message, press to make a phone call to the
sender of the message.
Inbox and Sent items folders
Received messages are saved in the Inbox folder. When you send a message, it is saved in the Sent items folder. When the Sent items folder is full, the oldest message is automatically deleted when a new message is moved to the folder.
Templates
The Templates submenu includes the templates that you can use when writing or
replying to messages. You can edit the templates, but the original templates are
restored when you select Restore factory settings.
To create your own template, write the template message in the Create message
submenu. Select Options→Save message, and save the message to the Templates
folder.
Saved text msgs. and user-specified folders
You can move text messages to the Saved text msgs. folder, or you can add new folders under the My folders submenu and save messages there.
96Copyright © 2005 Nokia. All rights reserved.
Page 97

While reading a message, select Options→Move. Scroll to the folder where you
want to move the message, and press OK.
To add or delete a folder, select Menu→Messages→My folders. To add the first
folder, press Add. To add more folders, select Options→Add folder. To delete a
folder, scroll to the folder, and select Options→Delete folder. When you delete a
folder, all the messages in that folder are also deleted.
Delete messages
Select Menu→Messages→Delete messages. To delete all read messages in a
certain folder, select the folder, and press OK when Delete all read messages from
folder? is displayed. To delete all read messages from all folders, select All read,
and press OK when Delete read messages from all folders? is displayed. To delete
all read and unread messages from all folders except Templates, select All
messages , and press OK when Delete all messages from all folders? is displayed.
To delete the message you are reading, select Options→Delete.
Message settings
Select Menu→Messages→Message settings, and select one of the following:
• Delivery reports—to ask the network to send delivery reports on your text
messages (network service). Delivery reports are not available for messages
addressed to talk groups.
• Default recipient of text msgs.—to view or change the default recipient of text
messages.
97Copyright © 2005 Nokia. All rights reserved.
Page 98

• Font size—to change the size of the text that is used when reading and writing
text messages.
• Message centre number
(network service). Enter the number, and press OK. The message centre number
is needed for sending text messages. You receive the number from your service
provider.
1
—to save the phone number of the message centre
■ Call register (Menu 3)
You can view the phone numbers of missed, received, and dialled
calls, and view the approximate length of your two-way phone
calls (network service). You can also check the amount of sent and received data
and the duration of a data connection.
The radio registers missed and received calls only if the network supports these
functions, and the radio is switched on and within the network service area.
Recent calls lists
Select Menu→Call register, and select one of the following:
• Missed calls—to view the list of the last ten phone numbers from which
somebody has tried to make a phone call to you (network service).
• Received calls—to view the list of the last ten phone numbers from which you
have most recently accepted a phone call or from which you have received an
express call (network service).
1. This menu is shown only if the network supports it.
98Copyright © 2005 Nokia. All rights reserved.
Page 99

• Dialled numbers—to view the list of the ten phone numbers to which you made
or tried to make a phone call, or an express call by dialling the number.
Tip: To quickly access the list of last dialled numbers, press once
when the radio is in the standby mode.
• Clear recent call lists—to delete the contents of recent calls lists. Select
whether you want to delete all the phone numbers in the recent call lists, or
only those numbers in the missed calls, received calls, or dialled numbers lists.
You cannot undo the operation.
When you press Options in the Missed calls, Received calls, or Dialled numbers
submenus, you can view the date and time of the call, call the number, save the
number in Contacts, and edit or delete the number.
Counters and timers
Note: The actual invoice for calls and services from your service provider may vary,
depending on network features, rounding off for billing, taxes and so forth.
Select Menu→Call register, and select one of the following:
• Call duration—to view the approximate duration of your incoming and
outgoing two-way phone calls. Select Phone calls to view information on calls
to public telephone network numbers, or Private calls to view information on
calls to TETRA network numbers.
• Data counter—to check the approximate amount of data you have sent or
received during the last data connection or in total. The counter unit is a byte.
99Copyright © 2005 Nokia. All rights reserved.
Page 100

• Data connection timer—to check the approximate duration of the last data
connection or of all data connections.
You can also clear the timers or the data counter. You must enter the security
code; see Access codes on page 19.
■ Contacts (Menu 4)
See Contacts on page 82.
■ Talk groups (Menu 5)
See Talk groups (Menu 5) on page 54.
■ Settings (Menu 6)
Profiles
Your radio has various profiles for different events and environments, and you can
customise the settings related to the profiles. The available profiles are General,
Silent, Meeting, Outdoor, Pager, Active holder, and Headset.
To activate a profile, press quickly in the standby mode, and select the desired
profile.
Customise profiles
1. Select Menu→Settings→Profiles.
2. Scroll to the desired profile, and select Options→Personalise.
100Copyright © 2005 Nokia. All rights reserved.
 Loading...