

Page 1

PAMS Technical Documentation
THF–13 Series Transceivers
Tuning and Flashing
Instructions
Issue 1 08/99 Nokia Mobile Phones Ltd.
Page 2
THF–13
Tuning and Flashing Instructions
AMENDMENT RECORD SHEET
PAMS Technical Documentation
Amendment
Number
Date Inserted By Comments
08/99 OJuntune Issue 1
Page 2
Nokia Mobile Phones Ltd.
Issue 1 08/99
Page 3

PAMS Technical Documentation
Tuning and Flashing Instructions
CONTENTS
Tuning Instructions 4. . . . . . . . . . . . . . . . . . . . . . . . . . . . . . . . . . . . . .
General 4. . . . . . . . . . . . . . . . . . . . . . . . . . . . . . . . . . . . . . . . . . .
Minimum Required Servicing Equipment 4. . . . . . . . . . . . . .
Equipment Setup 4. . . . . . . . . . . . . . . . . . . . . . . . . . . . . . . . . . .
Equipment Setup For Tuning A Phone
Without Removing Covers 6. . . . . . . . . . . . . . . . . . . . . . . . . . . . . .
Equipment Setup For Tuning A Phone
With Covers Removed 7. . . . . . . . . . . . . . . . . . . . . . . . . . . . . . . .
Manual Tuning Steps 8. . . . . . . . . . . . . . . . . . . . . . . . . . . . . . .
General 8. . . . . . . . . . . . . . . . . . . . . . . . . . . . . . . . . . . . . . . . . . .
1 - AFC Middle Frequency Tuning 9. . . . . . . . . . . . . . . . . . . .
2 - AFC Frequency Limits Tuning 9. . . . . . . . . . . . . . . . . . . . .
3 - RSSI and AGC Tuning 9. . . . . . . . . . . . . . . . . . . . . . . . . . .
4 - Deviation Tuning 10. . . . . . . . . . . . . . . . . . . . . . . . . . . . . . . .
FFSK Deviation Tuning 10. . . . . . . . . . . . . . . . . . . . . . . . . . .
Nominal Deviation Tuning 10. . . . . . . . . . . . . . . . . . . . . . . . .
Maximum Deviation Tuning 11. . . . . . . . . . . . . . . . . . . . . . .
Rx Tri Tuning 11. . . . . . . . . . . . . . . . . . . . . . . . . . . . . . . . . . . .
Phi Signal Deviation Tuning 11. . . . . . . . . . . . . . . . . . . . . . .
5 - TX Output Power Tuning 11. . . . . . . . . . . . . . . . . . . . . . . . .
6 - Battery Calibrations 12. . . . . . . . . . . . . . . . . . . . . . . . . . . . . .
7 - Charger Calibrations 12. . . . . . . . . . . . . . . . . . . . . . . . . . . . .
8 - Show Tuning Values 12. . . . . . . . . . . . . . . . . . . . . . . . . . . . .
THF–13
Page No
Introduction to Flashing 13. . . . . . . . . . . . . . . . . . . . . . . . . . . . . . . . . .
Equipment Setup For THF-13 Flashing 14. . . . . . . . . . . . . . . . . .
Software for THF-13 flashing 15. . . . . . . . . . . . . . . . . . . . . . . .
Installation 15. . . . . . . . . . . . . . . . . . . . . . . . . . . . . . . . . . . . . . . .
Prommer use interface 16. . . . . . . . . . . . . . . . . . . . . . . . . . . . . .
After sales version screen menu map 16. . . . . . . . . . . . . .
Menu action descriptions 17. . . . . . . . . . . . . . . . . . . . . . . . . . . .
How to start Prommer software 17. . . . . . . . . . . . . . . . . . . . . .
Appendix 1, Vocabulary 18. . . . . . . . . . . . . . . . . . . . . . . . . . . . .
Issue 1 08/99
Nokia Mobile Phones Ltd.
Page 3
Page 4

THF–13
Tuning and Flashing Instructions
Tuning Instructions
General
The tuning operations of the THF-13 are carried out using the Service
Software. The Service Software program turns the phone into Locals
Mode, in which the phone can be outwardly controlled via the M2BUS in-
terface.
Tuning is based on the Service Software communicating with the D/A and
A/D converters of the phone.
The calibration data of the phone resides on the EEPROM. The contents
of the EEPROM can be read by the Service Software. The program also
enables writing of the factory preset calibration data to the EEPROM, af-
ter which the whole tuning process should be carried out again.
If a repair has been carried out on the RF section of a system module
then the appropriate tunings should be performed as described in the fol-
lowing section and using th on-screen help menus as a guide. Spare sys-
tem modules will be delivered pre-tuned from the factory and will not re-
quire retuning.
PAMS Technical Documentation
During tuning, proceed as follows:
– Take care not to damage sensitive measuring instruments with exces-
sive RF power.
– Carry out all tuning steps in the shortest possible time to avoid exces-
sive heating of RF units.
– Perform all tuning steps in the order presented.
– Never try to mask a fault by tuning it out!
Minimum Required Servicing Equipment
–PC/AT Computer with Service Software installed: See Service Software
instructions.
–M2BUS cable DAU–9P and other service software accessories; see
equipment set–up pictures.
–Audio analyzer.
–RF power meter, power measurement sensitivity –10 dBm.
–RF generator.
–Device to provide specified test modulation to modulate RF generator.
–Multimeter or DVM.
–Attenuator and branching unit.
–Power supply, nom. voltage 3.6 V (with service battery BBD–3 voltage
is 8.2 V).
Equipment Setup
Turn off the computer before connecting the cable to avoid possible damage to the serial port.
Page 4
Nokia Mobile Phones Ltd.
Issue 1 08/99
Page 5

PAMS Technical Documentation
Caution:Do not connect the PKD–1 to the serial port. This could damage
the PKD–1 !
Connect the MBUS cable SCH–5 to the phone. Connect 9–pin male
D–connector in your PC serial port.
For transmit, audio measuring and adjustment connect ADS–1 EAR/MIC
breakout cables as follows:
– EAR line to test equipment AF INPUT
– MIC line to test equipment AF GEN OUTPUT
Connect BBD–3 service battery connectors to the power supply. Supplyvoltage should be set to 8.2 V.
THF–13
Tuning and Flashing Instructions
Issue 1 08/99
Nokia Mobile Phones Ltd.
Page 5
Page 6
THF–13
Tuning and Flashing Instructions
PAMS Technical Documentation
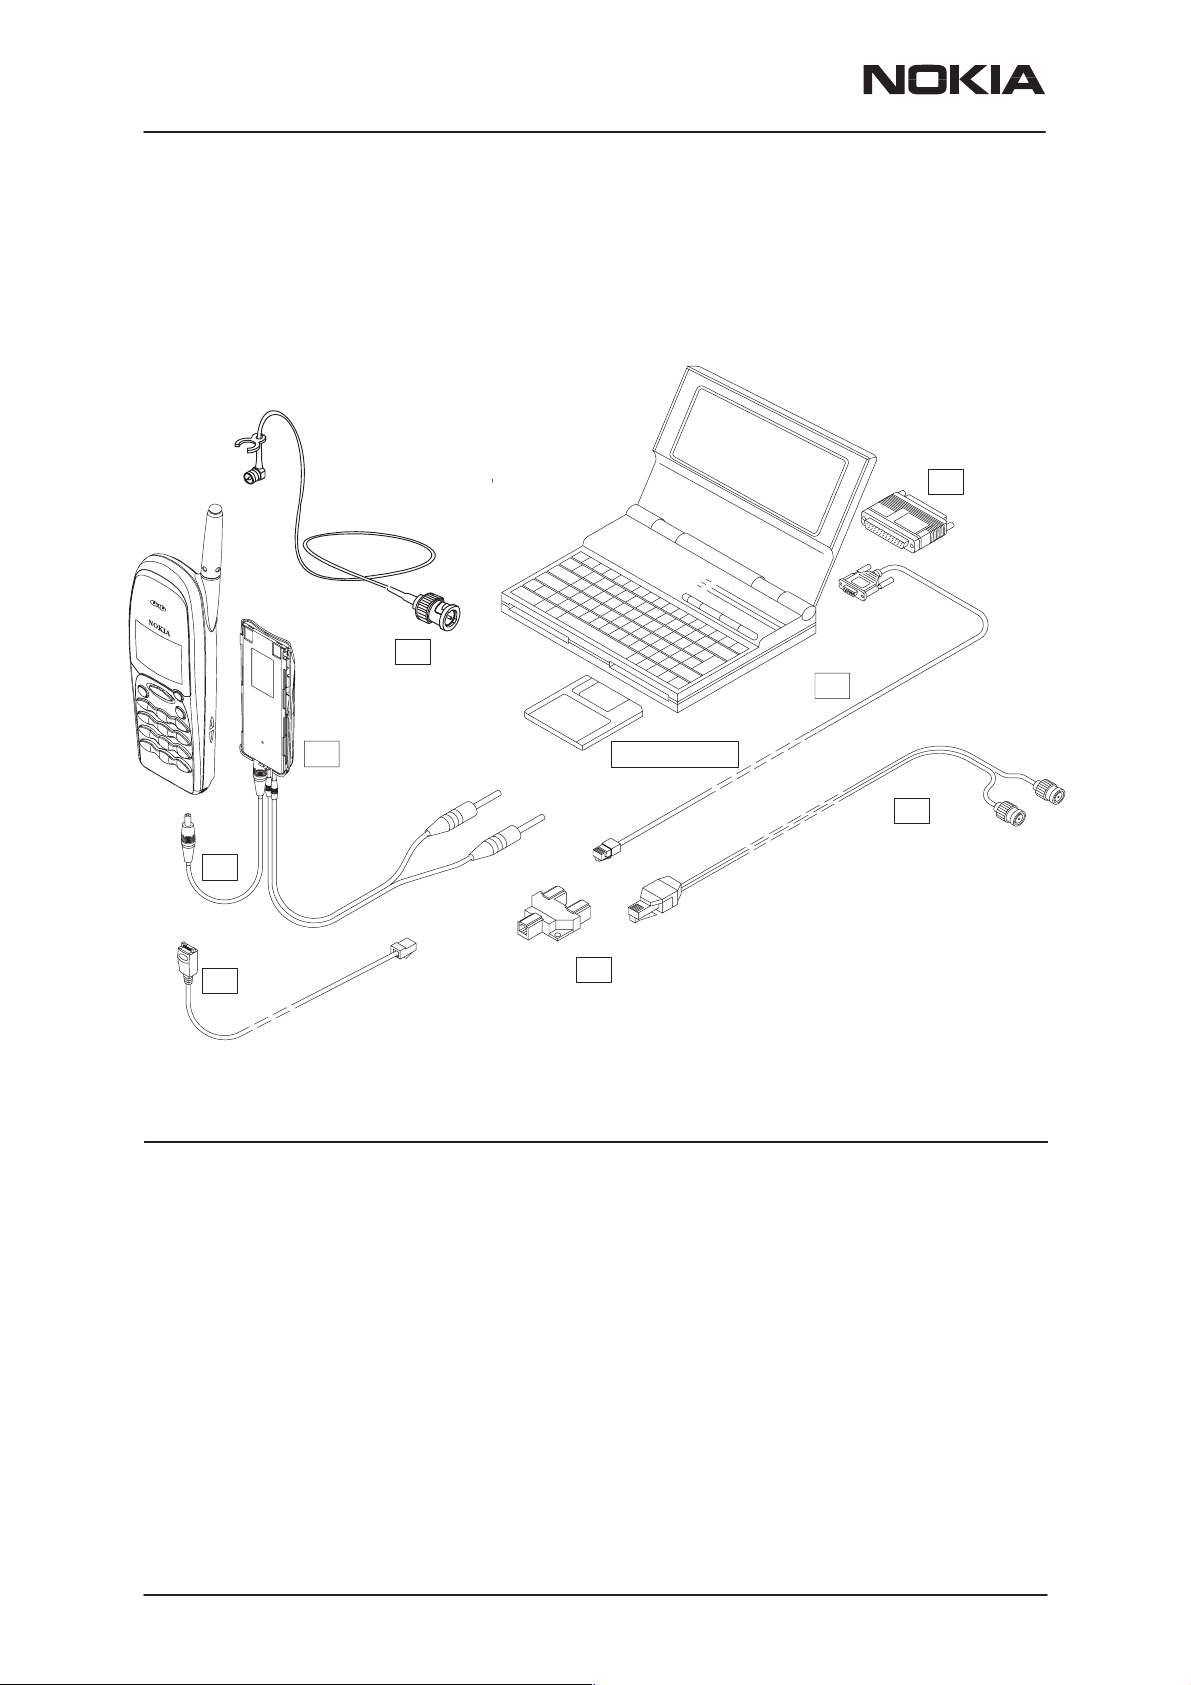
Equipment Setup For Tuning A Phone Without Removing Covers
4.
8.
7.
1.
+8.2 V
2.
3.
Item Service Accessory Type Code
1 Service Battery BBD-3 0775071
2 DC cable SCB-3 0740114
3 Service Cable SCH-5A 0730166
4 Software protection key PKD-1 0750018
5 Service Software diskette 3.5” 0774112
6 Audio Cable ADS-1 0730011
7 Service MBUS Cable DAU-9S 0730108
8 Antenna Cable XRC-1B 0730128
9 Modular T-Connector 4626134
10 WinTesla Diskette 3,5” 0774071
11 Dongle Drivers for Win 3.1x, 95 and NT
(combined 16bit, 32bit) 0770137
5., 10., 11.
6.
9.
Page 6
Note: item 3, earlier version SCH-5 can be used instead
Nokia Mobile Phones Ltd.
Issue 1 08/99
Page 7
PAMS Technical Documentation
Tuning and Flashing Instructions
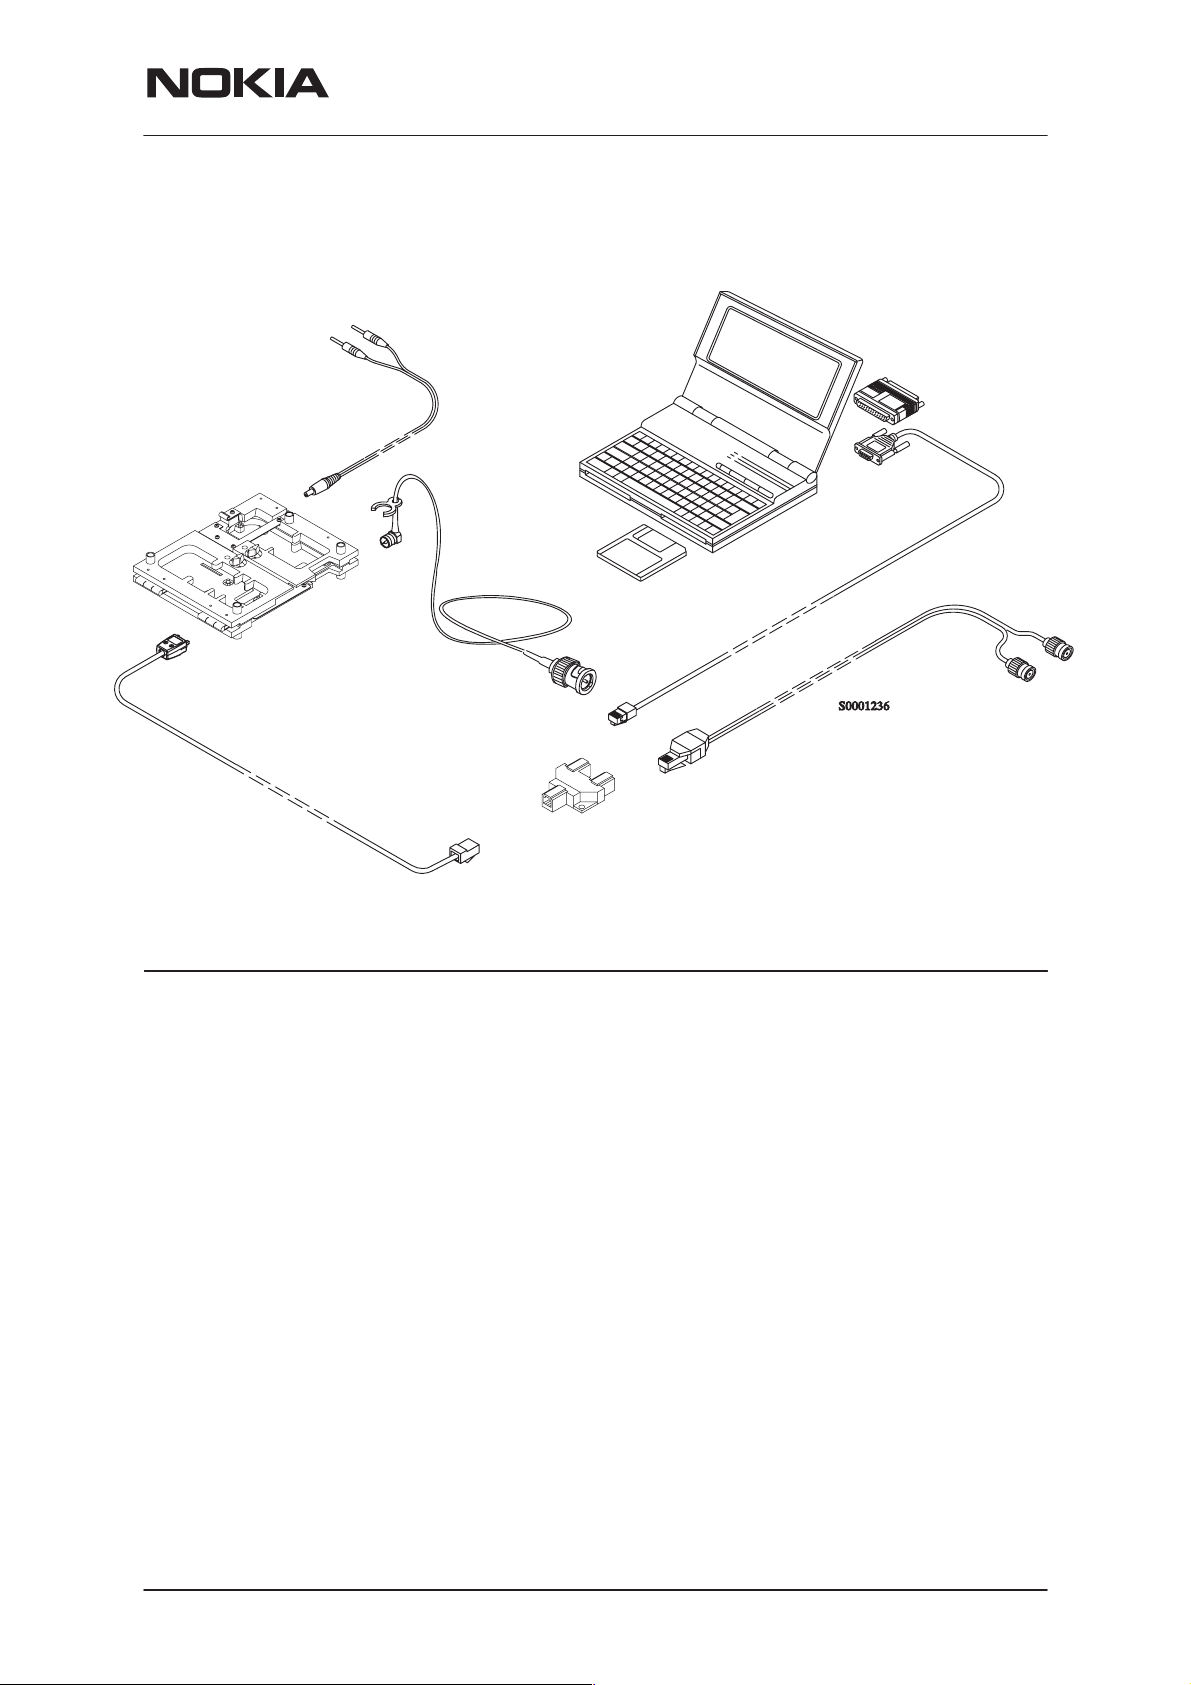
Equipment Setup For Tuning A Phone With Covers Removed
+4.1 V
8.
3.
9., 10., 11.
1.
3.6V
4.
6.
THF–13
7.
5.
2.
Item: Service accessory: Type Code:
1 Test frame * JBS-24 0770167
2 Modular T-Connector 4626134
3 Power Supply Cable PCS-1 0730012
4 Antenna Cable XRC-1B 0730128
5 Service Cable SCH-5A 0730166
6 Service MBUS Cable DAU-9S 0730108
7 Audio Cable ADS-1 0730011
8 Software protection key PKD-1 0750018
9 WinTesla Diskette 3,5” 0774071
10. Dongle Drivers for Win 3.1x, 95 and NT
(combined 16bit, 32bit) 0770137
11 Service Software diskette 3.5” 0774112
*) The nominal operating voltage for the JBS is 3.6 V.
Note: item 5, earlier version SCH-5 can be used instead
Issue 1 08/99
Nokia Mobile Phones Ltd.
Page 7
Page 8

THF–13
Tuning and Flashing Instructions
Manual Tuning Steps
General
If any repairs or replacements have not been made, manual tuning is not
necessary on the phone. Spare modules have been tuned at the factory.
If some repair or replacements have been made, manual tuning is nessessary.
If you do not want to use phone country version dependent tuning channels, proceed as follows:
1. Choose RF controls from the Configure menu.
2. Change channel values.
3. Choose Write File -button in order to save channel values in ” TESLA.ini ” -file.
PAMS Technical Documentation
The program saves the channel settings and uses them every time when
Tunings or Testing menu is chosen. The program uses ordinary channels
depending on the phone country version, if you don’t change channels.
Default channels in RF-controls dia-
log
Using
Channel low for 1 band phones Afc and afc-limits tuning, basic settings
Channel mid for 1 band phones Afc and afc-limits tuning, basic settings
Channel high for 1 band phones Afc and afc-limits tuning, basic settings
Channel low for 2 band phones Afc and afc-limits tuning, basic settings
Channel mid for 2 band phones Afc and afc-limits tuning, basic settings
Channel high for 2 band phones Afc and afc-limits tuning, basic settings
Rssi channel low band 1 Rssi ch compensation
Rssi channel mid band 1 Rssi ch compensation
Rssi levels and agc (1 band phones)
Rssi channel high band 1 Rssi ch compensation
Rssi channel low band 2 Rssi ch compensation
Page 8
Rssi channel mid band 2 Rssi ch compensation
Rssi channel high band 2 Rssi ch compensation
Rssi mid ch for 2 band phones Rssi levels and agc (2 band phones)
Nokia Mobile Phones Ltd.
Issue 1 08/99
Page 9

PAMS Technical Documentation
1 - AFC Middle Frequency Tuning
This dialog is used for adjusting the TX frequency for the phone’s middle
channel.
The phone is turned to the default middle channel (RX and TX) and transmitter is activated.
Note: Temperature during tuning should be approx. +25 °C.
AFC middle frequency tuning procedure:
- Select Tunings/AFC middle frequency tuning
- Connect devices and set values to measuring equipment according to
information texts.
- Measurement device shows the AFC frequency D/A converter reading.
THF–13
Tuning and Flashing Instructions
- Tune until the value is the middle TX frequency.
- Use the arrow keys or mouse to change the value and ALT-S to write
the value to EEPROM.
2 - AFC Frequency Limits Tuning
This dialog is used for adjusting the TX frequency limits for the phone’s
middle channel.
The phone is turned to the default middle channel (RX and TX) and transmitter is activated.
AFC frequency limits tuning procedure:
- Select Tunings/AFC frequency limits tuning
- Set the RF-generator frequency and signal level according to the information given in dialog box..
- Measurement device shows the AFC frequency D/A converter reading.
- Tune until the value is the TX frequency ± 2.5 kHz.
- Use the arrow keys or mouse to change the value and ALT-S to write
the value to EEPROM.
3 - RSSI and AGC Tuning
This dialog is used for adjusting the RSSI and AGC levels.
RSSI tuning procedure:
- Select Tunings/RSSI and AGC Tuning
- Set RF-generator frequencies and signal levels according to the information given by the Service Software.
Issue 1 08/99
Nokia Mobile Phones Ltd.
Page 9
Page 10

THF–13
Tuning and Flashing Instructions
- The Service Software reads values given by A/D converter for received
signal.
- The Service Software tunes three tuning points for channel compensation (Low, high and middle channel).
- The program also executes six tuning points for RSSI levels.
Tuning RF signal Level no
point level
1 -58 dBm 6
2 -68 dBm 5
3 -83 dBm 4
4 -93 dBm 3
5 -103 dBm 2
6 -115 dBm 1
AGC tuning procedure:
PAMS Technical Documentation
- Set the RF signal levels according to the information given by the Service Software.
- The program shows the AGC ON and the AGC OFF levels.
4 - Deviation Tuning
Deviation tuning procedure:
- Select Tunings/Deviation tuning
- Connect devices and set measurement equipment values according to
information texts.
- Use the arrow keys or mouse to change tuning values and ALT-S to
write them to the phone. Use TAB key to change field.
- Compare measurement device values to the program information text
values.
- Tune until the measured value is within range given by dialogs information texts.
FFSK Deviation Tuning
This adjustment is used to set outgoing FFSK data deviation.
The command turns the phone to default middle channel (RX and TX),
activates the transmitter, opens the data path, and sets up the modem to
send a continuous 1800 Hz, ”0” signal.
To adjust, enter values (0-15) for the D/A converter, and compare results
to the reading given by the deviation meter.
Nominal Deviation Tuning
The purpose of this tuning operation is to adjust the nominal deviation of
voice and DTMF signaling.
Page 10
Nokia Mobile Phones Ltd.
Issue 1 08/99
Page 11

PAMS Technical Documentation
The command turns the phone to the default middle channel, and activates the transmitter.
To adjust, enter values from the range 0-7 into the D/A converter and
compare results with deviation meter readings.
Maximum Deviation Tuning
This adjustment has an effect on voice and DTMF signal maximum deviation.
The command turns the phone on the default middle channel, and activates the transmitter.
Enter various values from the range 0-7 into the D/A converter, and
compare results with the reading in the deviation meter.
Note: Deviation will increase when D/A reading is decreased.
Rx Tri Tuning
THF–13
Tuning and Flashing Instructions
The purpose of this adjustment is to adjust Rx Trimmer.
The transmitter is turned off.
To adjust, enter values from the range 0-15 into the D/A converter.
Use ALT+1 and ALT+2 keys to enable/disable expander. Tune until the
level in EXTEAR-pin is the same with and without expander.
Phi Signal Deviation Tuning
The purpose of this adjustment is to adjust phi signal (SAT) deviation.
The command turns the phone on the default middle channel (RX and
TX), activates transmitter, and enables the φ loop.
To adjust, enter values (0-15) to the D/A converter and compare changes
to deviation meter readings.
5 - TX Output Power Tuning
This adjustment writes the power levels of the phone transmitter into the
EEPROM. When doing this, a power meter must be used. THF-13 has
three power levels to tune. Power levels low and middle are adjusted
only at band 3. Power level high is tuned at all four bands.
Tuning can be interrupted when necessary by pressing Esc key.
Power levels tuning procedure:
- Connect power meter to the antenna connector of the phone.
- Adjust the phone supply voltage to +3.6 V !
- If service battery is used, the supply voltage is 8.2V.
- Select Tunings/TX output power
Issue 1 08/99
Nokia Mobile Phones Ltd.
Page 11
Page 12

THF–13
Tuning and Flashing Instructions
- Use the arrow keys, or mouse to change the tuning value.
- Change tuning value until the power meter value is at the target power
value given in dialog’s information texts..
- Use TAB key to change field and ALT-S to write values to EEPROM.
6 - Battery Calibrations
Battery calibration procedure:
- Connect service battery to phone and set supply voltage to 8.2 V.
- Select Tunings/Battery Calibrations
- The program reads the Battery Voltage, Battery Size and Battery Temperature values from phone and shows them to the user.
- Press Run-button. After that calibration is done by the service software
and the new values are written to the EEPROM. New values are also
shown to the user..
PAMS Technical Documentation
7 - Charger Calibrations
Charger calibration procedure:
- Connect service battery to phone and set supply voltage to 10.5 V.
- Connect also dc cable between the phone and the service battery.
- Select Tunings/Battery Calibrations
- The program reads the Charger Voltage, Charger current offset and reference values from phone and shows them to the user.
- Press Run-button. After that calibration is done by the service software
and the new values are written to the EEPROM. New values are also
shown to the user.
8 - Show Tuning Values
This dialog box enables reading of the phone tuning parameters, and
writing of the default values.
Note: Spare modules received from the factory are factory-tuned.
Page 12
Nokia Mobile Phones Ltd.
Issue 1 08/99
Page 13

PAMS Technical Documentation
Introduction to Flashing
The Flash Programming procedure can be divided into six main steps.
1. Prommer synchronous clock pin is set to low.
2. Phone power is switched on. The ASIC boot software is now ready to
receive the secondary boot code.
3. The secondary boot is loaded into the internal phone MCU RAM at a
low communication speed.
4. As response to a successful secondary boot down loading and execution the phone returns its current HW configuration and MCU SW version.
5. The prommer selects one of the target specific download codes and
sends it to the phone. The code selection is executed automatically based
on the phone configuration data. The transmission speed used is as
fast as the target HW allows. Down load code is loaded and executed in
the RAM.
THF–13
Tuning and Flashing Instructions
6. MCU SW is programmed into the phone FLASH using the flashing algorithm provided in down load code. The data is transmitted in data
frames, frame size varies from one to several kilobytes. The download
code includes flash erase and flashblank check routines for the MCU SW
update purposes.
Issue 1 08/99
Nokia Mobile Phones Ltd.
Page 13
Page 14

THF–13
Tuning and Flashing Instructions
Equipment Setup For THF-13 Flashing
PAMS Technical Documentation
8.
4.
10.
3.
Item: Service accessory: Type Product code:
11.
1.
7.
9.,12.
5.
6.
2.
1 Flash Loading Adapter FLA-5 0080178
2 Prommer FPS-4S 0085095
3 Service Battery BBD-3 0775071
4 Service Cable SCH-5A 0730166
5 D15 - D15 Cable AXS-5 0730091
(Included in FLA-5 sales pack)
6 Printer Cable (Included in FPS-4 sales pack) 0730029
7 D9 - D9 Cable AXS-4 0730090
(Included in FPS-4 sales pack)
8 Software protection key PKD-1 0750018
8 alt. Dealer Software protection key PKD-1D 0750053
9 SW Prommer FPS-4 diskette 3.5” 0774043
(Included in FPS-4 and FLA-5 sales packs)
10 Travel Charger ACH-6E (Euro) 0270381
Travel Charger ACH-6U (USA/JP) 0270382
Travel Charger ACH-6X (UK) 0270380
11 AC Charger ACL-3E 0680015
(Included in FPS-4 sales pack)
12 SW flash ProgramTHF-13 diskette 3,5” 0775213
Note: item 4, earlier version SCH-5 can be used instead
Page 14
Nokia Mobile Phones Ltd.
Issue 1 08/99
Page 15

PAMS Technical Documentation
Tuning and Flashing Instructions
Software for THF-13 flashing
SW THF-13 Flash Program diskette 3.5” THF-13 0775213
SW THF-13K Flash Program diskette 3.5” THF-13K 0775214
SW THF-13T Flash Program diskette 3.5” THF-13T 0775215
HW requirements: IBM compatible PC, CPU 80486 or later.
One Serial and one Parallel port.
Parallel port can be LPT1 to LPT3.
Serial port can be any of COM1 to COM4.
If selected port is non default (LPT1 or COM1) port you must run prom-
mer setup.
SW requirements: MSDOS 3.x (5.x) or later.
THF–13
The installation program ’SETUP.BAT’ needs later DOSversion. It uses
DOS command ’choice.com’ which ismissing old (< 5.x) DOS versions.
Prommer software does not run under WINDOWS properly.
PC MCU speed have no affects to phone programming times!
MCUSW downloading speed depends directly on PC speed !
Installation
1. Connect parallel cable from PC LPT port to FPS-4 Parallel Input.
2. Connect serial cable from PC COM port to FPS-4 Serial Input.
3. Connect the Flash Loading Adapter to the FPS-4 Phone Connector.
4. Connect Power Plug to FPS-4 PWR connector.
5. Run setup utility program ’SETUP’ on your diskette drive.
Give the target directory in parameter ( e.g. A:> SETUP C:\FPS4 ).
Check that parallel and serial port numbers and your Flash loading
adapter type are selected correctly.
NOTE! You can change FPS-4 prommer i/o-port numbers later from
prommer setup menu when you run prommer with ’-S’ option ( e.g.
C:\FPS4> FPS4 -S ). The Flash adapter type can be changed any time in
setup menu.
All prommer settings are saved to ’SETUP.FPS’ file in prommer default
directory.
Issue 1 08/99
Nokia Mobile Phones Ltd.
Page 15
Page 16

THF–13
Tuning and Flashing Instructions
Prommer use interface
After sales version screen menu map
Main Menu
Help on Help
Program Phone by Type
Program Phone by File Name
Advanced Options Menu...
Read Phone SW & HW ID
Download MCUSW to Prommer Box
Program Phone with Code in Box
PAMS Technical Documentation
Move MCUSW Prommer SRAM->Flash
Delete MCUSW from Prommer
Setup (PC_HW & FPS4 SW)...
Prommer SW Version Info
Prommer SW Update...
Download FPGA
Download Application 1
Download Application 2 (Dummy)
PC Settings...
Serial Port: COM1
Parallel Port: LPT1
Parallel XMIT Speed: Fast
Sound at ’Error’
Screen Saver after 10 min
Hard Disk Suspender: Off
Prommer Maintance...
Check Code CSUM...
Secondary codes
Algorithm codes
Application 1 code
Application 2 code
FPGA codes
Page 16
Nokia Mobile Phones Ltd.
Issue 1 08/99
Page 17

PAMS Technical Documentation
MCUSW codes
Flashing Vpp Check
Prommer SRAM Clean Up
Prommer EEPROM...
Flashing Adapter: FLA-1 or 3
Exit to DOS
Menu action descriptions
Program Phone by Type
Action updates MCUSW code to target HW almost automatically; only
thing that user must do is to select correct target HW type from menu.
This action uses data file ’RELEASES.FPS’, which links each target HW
to MCUSW code file. This file must be update manually in DOS ASCII text
editor.
THF–13
Tuning and Flashing Instructions
Program Phone by File Name
Action loads selected MCUSW file to prommer SRAM and flashes it immediately to target.
Read Phone SW & HW ID
Action displays detailed list of target HW & SW configuration.
Download MCUSW to Prommer Box
Action loads selected MCUSW file to prommer SRAM.
Program Phone with Code in Box
Action flashes selected MCUSW code in prommer memory to target.
Old MCUSW code is deleted automatically from target Flash before pro-
gramming.
Move MCUSW Prommer SRAM->Flash
Action moves MCUSW code to prommer SRAM to Flash.
Delete MCUSW from Prommer
Action deletes MCUSW from prommer memory.
Prommer SW Version Info
Action displays all code versions (execpt MCUSW codes) in prommer
box.
How to start Prommer software
Preparations:
Install prommer software with ‘SETUP.BAT’ batch program.
1.Run flash prommer software called ‘FPS4’ in directory where FPS4 was
installed.
Issue 1 08/99
Nokia Mobile Phones Ltd.
Page 17
Page 18

THF–13
Tuning and Flashing Instructions
NOTE! Prommer software do not run properly under WINDOWS.
Appendix 1, Vocabulary
Abbreviation Description
DAU-9P M2BUS - RS-232 adapter
EEPROM Memory for adjustment parameters (Electrically Erasable and
Programmable Read Only Memory)
M2BUS Serial communication bus which can be connected to
accessory devices and test PC
ME Mobile Equipment
MS Mobile Station
PC IBM PS/AT or compatible personal computer
PAMS Technical Documentation
PKD Parallel Port Software Protection Device
RF Radio Frequency parts
SW Software
[]
1
Page 18
Nokia Mobile Phones Ltd.
Issue 1 08/99
 Loading...