

Page 1

Nokia 6790 slide User Guide
Issue 1
Page 2
DECLARATION OF CONFORMITY
Hereby, NOKIA CORPORATION declares that this RM-599 product is in compliance with
of Di
rective 1999/5/EC. A copy of the Declaration of Conformity can be found at http://www.nokia.com/phones/
the essential requirements and other relevant provisions
declaration_of_conformity/.
Nokia, Nokia Connecting People, Mail for Exchange, Navi, Ovi, and Nokia Original Enhancements logo are trademarks or registered trademarks of Nokia Corporation.
Nokia tune is a sound mark of Nokia Corporation. Other product and company names mentioned herein may be trademarks or tradenames of their respective owners.
Reproduction, transfer, distribution, or storage of part or all of the contents in this document in any form without the prior written permission of Nokia is prohibited.
Nokia operates a policy of continuous development. Nokia reserves the right to make changes and improvements to any of the products described in this document
without prior notice.
This software is based in part of the work of the FreeType Team. This product is covered by one or more of the following patents: United States Patent 5,155,805,
United States Patent 5,325,479, United States Patent 5,159,668, United States Patent 2232861 and France Patent 9005712.
This product includes software licensed from Symbian Software Ltd ©1998-2009. Symbian and Symbian OS are trademarks of Symbian Ltd.
Java and all Java-based marks are trademarks or registered trademarks of Sun Microsystems, Inc.
Portions of the Nokia Maps software are © 1996-2009 The FreeType Project. All rights reserved.
This product is licensed under the MPEG-4 Visual Patent Portfolio License (i) for personal and noncommercial use in connection with information which has been
encoded in compliance with the MPEG-4 Visual Standard by a consumer engaged in a personal and noncommercial activity and (ii) for use in connection with MPEG-4
video provided by a licensed video provider. No license is granted or shall be implied for any other use. Additional information, including that related to promotional,
internal, and commercial uses, may be obtained from MPEG LA, LLC. See http://www.mpegla.com.
TO THE MAXIMUM EXTENT PERMITTED BY APPLICABLE LAW, UNDER NO CIRCUMSTANCES SHALL NOKIA OR ANY OF ITS LICENSORS BE RESPONSIBLE FOR ANY LOSS OF DATA OR
INCOME OR ANY SPECIAL, INCIDENTAL, CONSEQUENTIAL OR INDIRECT DAMAGES HOWSOEVER CAUSED.
THE CONTENTS OF THIS DOCUMENT ARE PROVIDED "AS IS". EXCEPT AS REQU IRED B Y APPLI CABLE L AW, NO WARRA NTIES O F ANY K IND, EI THER E XPRESS OR IMPLIED, INCLUDING,
BUT NOT LIMITED TO, THE IMPLIED WARRANTIES OF MERCHANTABILITY AND FITNESS FOR A PARTICULAR PURPOSE, ARE MADE IN RELATION TO THE ACCURACY, RELIABILITY OR
CONTENTS OF THIS DOCUMENT. NOKIA RESERVES THE RIGHT TO REVISE THIS DOCUMENT OR WITHDRAW IT AT ANY TIME WITHOUT PRIOR NOTICE.
Reverse engineering of software in the device is prohibited to the extent permitted by applicable law. Insofar as this user guide contains any limitations on Nokia's
representations, warranties, damages and liabilities, such limitations shall likewise limit any representations, warranties, damages and liabilities of Nokia's licensors.
Page 3

The availability of particular products and applications and services for these products may vary by region. Please check with your Nokia dealer for details and availability
of language options. This device may contain commodities, technology or software subject to export laws and regulations from the US and other countries. Diversion
contrary to law is prohibited.
FCC/INDUSTRY CANADA NOTICE
Your device may cause TV or radio interference (for example, when using a telephone in close proximity to receiving equipment). The FCC or Industry Canada can require
you to stop using your telephone if such interference cannot be eliminated. If you require assistance, contact your local service facility. This device complies with part
15 of the FCC rules. Operation is subject to the following two conditions: (1) This device may not cause harmful interference, and (2) this device must accept any
interference received, including interference that may cause undesired operation. Any changes or modifications not expressly approved by Nokia could void the user's
authority to operate this equipment.
Issue 1 EN-US
Page 4

Contents
Safety...................................................................7
About your device......................................................................7
Office applications.....................................................................8
Network services.......................................................................8
Shared memory..........................................................................8
Support.................................................................8
1. Frequently asked questions...........................10
What is the lock code?............................................................10
Where can I get settings for my device?...............................10
How can I transfer content from my old device?.................10
2. Get started......................................................10
Keys and parts..........................................................................11
Insert the SIM card and battery..............................................12
Charge the battery...................................................................14
Switch the device on or off.....................................................14
Lock the keys............................................................................15
Connect the headset................................................................15
Memory cards...........................................................................15
Shortcuts..................................................................................17
3. Your Nokia 6790 slide ....................................17
Phone setup.............................................................................17
Settings wizard........................................................................18
Transfer content......................................................................18
Make calls.................................................................................19
Voice mail.................................................................................19
Volume control........................................................................19
Write text with the keyboard.................................................20
Write and send messages.......................................................20
Active standby..........................................................................21
Menu.........................................................................................21
Indicators.................................................................................22
Clock..........................................................................................23
Antenna locations....................................................................23
4. Customize your device...................................24
Profiles......................................................................................24
Select ringing tones.................................................................25
Change the display theme......................................................25
5. E-mail and instant messaging........................25
Messaging key..........................................................................25
Ovi Mail.....................................................................................25
Nokia Messaging......................................................................26
Mail for Exchange.....................................................................26
Chat...........................................................................................26
6. Ovi Maps.........................................................27
Positioning (GPS).....................................................................27
About Maps...............................................................................31
Move on a map.........................................................................31
Plan a route..............................................................................31
Navigate to the destination...................................................32
7. Internet and connectivity..............................32
Internet key..............................................................................32
Browser....................................................................................32
Page 5

Fast downloading....................................................................34
Connect the USB data cable....................................................35
Bluetooth..................................................................................36
Connection manager...............................................................38
8. Calendar and contacts....................................38
Create a calendar entry...........................................................39
Calendar views.........................................................................39
Save and edit names and numbers.......................................39
Create contact groups.............................................................39
Add ringing tones for contacts...............................................40
9. Images and music..........................................40
Camera......................................................................................40
Gallery.......................................................................................41
Share online.............................................................................41
About Ovi Share.......................................................................42
Music player..............................................................................42
FM radio....................................................................................43
RealPlayer.................................................................................44
10. Office applications........................................44
Calculator..................................................................................44
Convert measurements...........................................................45
Find and organize files............................................................45
Quickoffice................................................................................45
Zip manager.............................................................................46
PDF reader................................................................................46
11. Downloads...................................................46
Application manager...............................................................46
Download!................................................................................48
12. Protect your device and data.......................49
Lock the device........................................................................49
Memory card security..............................................................50
Back up data.............................................................................50
Be careful when you connect.................................................50
13. Settings........................................................51
General settings.......................................................................51
Phone settings.........................................................................52
Connection settings.................................................................52
Application settings................................................................52
14. Green tips.....................................................52
Save energy..............................................................................52
Recycle......................................................................................53
Save paper................................................................................53
Learn more...............................................................................53
Accessories.........................................................54
Battery................................................................54
Battery and charger information...........................................54
Nokia battery authentication guidelines..............................55
Taking care of your device.................................55
Recycle......................................................................................56
Additional safety information...........................57
Small children..........................................................................56
Operating environment..........................................................57
Medical devices........................................................................57
Vehicles.....................................................................................58
Page 6

Potentially explosive environments......................................58
Emergency calls.......................................................................58
Certification information (SAR)..............................................59
Index..................................................................60
Page 7
Safety
Read these simple guidelines. Not following them may be
dangerous or illegal. Read the complete user guide for further
information.
SWITCH ON SAFELY
Do not switch the device on when wireless phone
use is prohibited or when it may cause interference
or danger.
ROAD SAFETY COMES FIRST
Obey all local laws. Always keep your hands free to
operate the vehicle while driving. Your first
consideration while driving should be road safety.
INTERFERENCE
All wireless devices may be susceptible to
interference, which could affect performance.
SWITCH OFF IN RESTRICTED AREAS
Follow any restrictions. Switch the device off in
aircraft, near medical equipment, fuel, chemicals,
or blasting areas.
QUALIFIED SERVICE
Only qualified personnel may install or repair this
product.
ACCESSORIES AND BATTERIES
Use only approved accessories and batteries. Do
not connect incompatible products.
WATER-RESISTANCE
Your device is not water-resistant. Keep it dry.
About your device
The wireless device described in this guide is approved for
use on the (E)GSM 850/900/1800/1900 and UMTS 900/2100
HSDPA networks. Contact your service provider for more
information about networks.
Your device supports several connectivity methods and like
computers may be exposed to viruses and other harmful
content. Exercise caution with messages, connectivity
requests, browsing, and downloads. Only install and use
services and software from trustworthy sources that offer
adequate security and protection, such as applications that
are Symbian Signed or have passed the Java Verified™ testing.
Consider installing antivirus and other security software on
your device and any connected computer.
Your device may have preinstalled bookmarks and links for
third-party internet sites and may allow you to access thirdparty sites. These are not affiliated with Nokia, and Nokia
does not endorse or assume liability for them. If you access
such sites, take precautions for security or content.
Warning: To use any features in this device, other
than the alarm clock, the device must be switched on. Do not
switch the device on when wireless device use may cause
interference or danger.
© 2004 Nokia. All rights reserved. 7
Page 8

When using this device, obey all laws and respect local
customs, privacy and legitimate rights of others, including
copyrights. Copyright protection may prevent some images,
music, and other content from being copied, modified, or
transferred.
Make back-up copies or keep a written record of all important
information stored in your device.
When connecting to any other device, read its user guide for
detailed safety instructions. Do not connect incompatible
products.
The images in this guide may differ from your device display.
Refer to the user guide for other important information about
your device.
arrangements with your service provider to use them.
Network services involve transmission of data. Check with
your service provider for details about fees in your home
network and when roaming on other networks. Your service
provider can explain what charges will apply. Some networks
may have limitations that affect how you can use some
features of this device requiring network support such as
support for specific technologies like WAP 2.0 protocols (HTTP
and SSL) that run on TCP/IP protocols and languagedependent characters.
Your service provider may have requested that certain
features be disabled or not activated in your device. If so,
these features will not appear on your device menu. Your
device may also have customized items such as menu names,
menu order, and icons.
Office applications
The office applications support common features of Microsoft
Word, PowerPoint, and Excel (Microsoft Office 2000, XP, and
2003). Not all file formats are supported.
Network services
To use the device you must have service from a wireless
service provider. Some features are not available on all
networks; other features may require that you make specific
Shared memory
The following features in this device may share memory:
tones, graphics, contacts, text messages, multimedia
messages, instant messages, e-mail, calendar, games, notes,
and applications. Use of one or more of these features may
reduce the memory available for the remaining features. If
your device displays a message that the memory is full, delete
some of the information stored in the shared memory.
Support
If you want to learn more about how to use your product or you are unsure how your device should function, see the support
pages at www.nokia.com/support or your local Nokia website, www.nokia.mobi/support (with a mobile device), the Help
application in the device, or the user guide.
© 2004 Nokia. All rights reserved.8
Page 9

If this does not resolve your issue, do the following:
● Restart the device: switch off the device, and remove the battery. After about a minute, replace the battery, and switch on
the device.
● With the Nokia Software Updater application, update your device software regularly for optimum performance and possible
new features.
See www.nokia.com/softwareupdate. Remember to back up
you
device data before updating the device
r
software.
store the original factory sett
● Re
explained in the user guide. Your documents and files are not deleted in the reset.
ings as
If the issue remains unsolved, contact Nokia for repair options. See www.nokia.com/repair. Before sending your device for
repair, always back up the da
ta in your device.
© 2004 Nokia. All rights reserved. 9
Page 10

1. Frequently asked questions
When you take a new device into use, you may have
questions. In addition to those answered in this guide, visit
the product support pages of the Nokia website.
What is the lock code?
Your device is equipped with one or more codes to protect
the device itself or the SIM card against unauthorised use.
Lock code
The lock code (also known as security code) protects your
device against unauthorized use. The preset code is 12345.
You can change the code, and set the device to request the
See "Lock the device," p. 49.
code.
You must remember the new code, and keep it secret and in
a safe place separate from your device. If you forget the lock
code and your device is locked, you must take the device to
a Nokia authorized service facility and additional charges
may apply. To unlock the device, the software must be
reloaded, and the data you have saved in the device may be
lost.
PIN and PUK codes
If you forget any of the following access codes, contact your
service provider.
● Personal identification number (PIN) code — This code
protects your SIM card against unauthorized use. The PIN
code (4-8 digits) is usually supplied with the SIM card. After
three consecutive incorrect PIN code entries, the code is
blocked, and you need the PUK code to unblock it.
● PIN2 code — This code (4-8 digits) is supplied with some
SIM cards, and is required to access some functions in your
device.
● Personal Unblocking Key (PUK) code and PUK2
code — These codes (8 digits) are required to change a
blocked PIN code or PIN2 code, respectively. If the codes
are not supplied with the SIM card, contact the operator
whose SIM card is in your device.
Where can I get settings for my device?
Your device normally has MMS, GPRS, streaming, and mobile
internet settings automatically configured, based on your
network service provider information. You may have settings
from your service providers already installed in your device,
or you may receive or request the settings from the network
service providers as a special message.
You can also use the Settings wizard application to define the
settings.
See "Settings wizard," p. 18.
How can I transfer content from my old device?
You can use the Nokia Switch application to copy content such
as phone numbers, addresses, calendar items, and images
from your previous Nokia device to your Nokia 6790 slide.
See "Transfer content," p. 18.
© 2004 Nokia. All rights reserved.10
Page 11
2. Get started
Model number: 6790s-1.
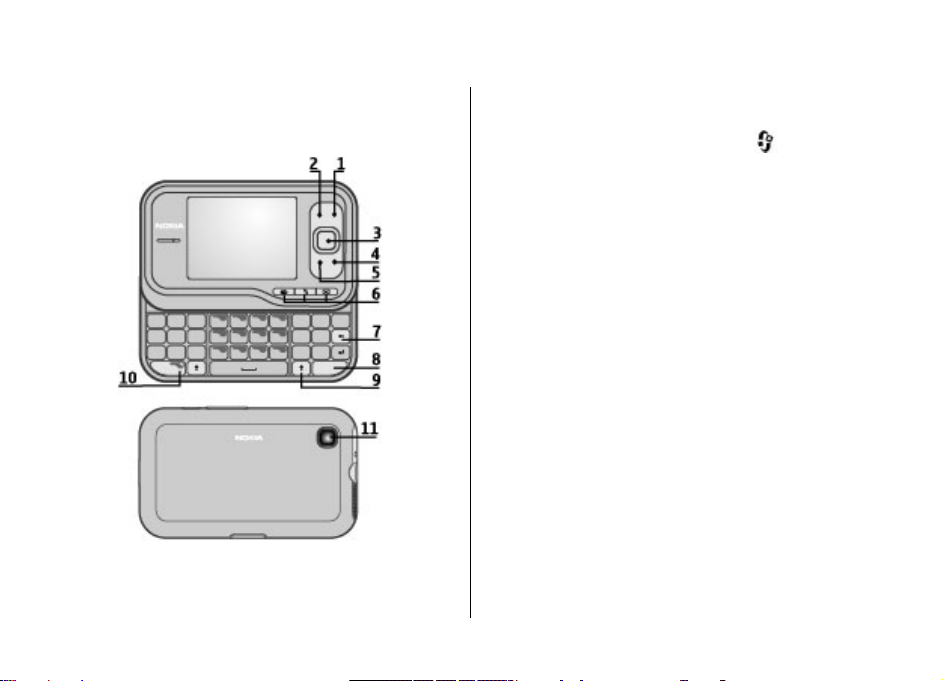
Keys and parts
1 — Power/End key
2 — Right selection key
3 — Navi™ key; hereafter referred as scroll key
© 2004 Nokia. All rights reserved. 11
4 — Call key
5 — Left selection key
6 — Quick access keys: internet, menu
keys
7 — Backspace key
8 — Sym (symbol) key
9 — Shift key
10 — Function key
11 — Camera
, and messaging
Page 12

12 — Volume keys
13 — Capture key
14 — Micro USB connector
15 — Charger connector
16 — Headset connector
17 — Microphone
Insert the SIM card and battery
Safe removal. Always switch the device off and disconnect the
charger before removing the battery.
1. Remove the back cover.
2. Remove the battery, if inserted.
3. Insert the SIM card in the card holder. Ensure that the
contact area on the card faces down. Close the SIM card
holder, and slide the cover of the holder to lock it.
© 2004 Nokia. All rights reserved.12
Page 13
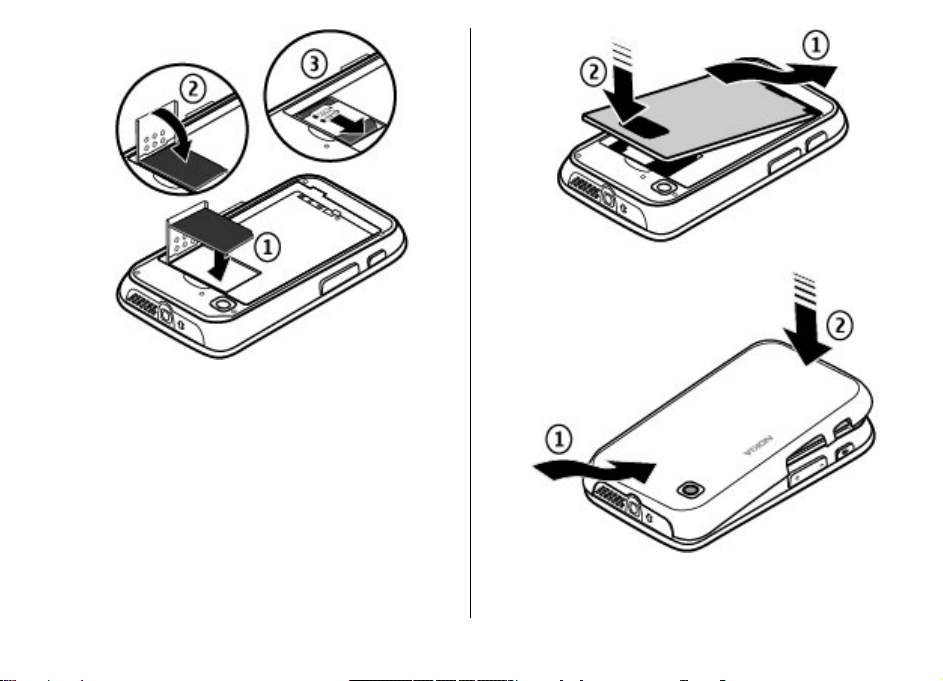
5. Replace the back cover.
4. Align the battery contacts with the battery compartment
connectors, and insert the battery.
© 2004 Nokia. All rights reserved. 13
Page 14
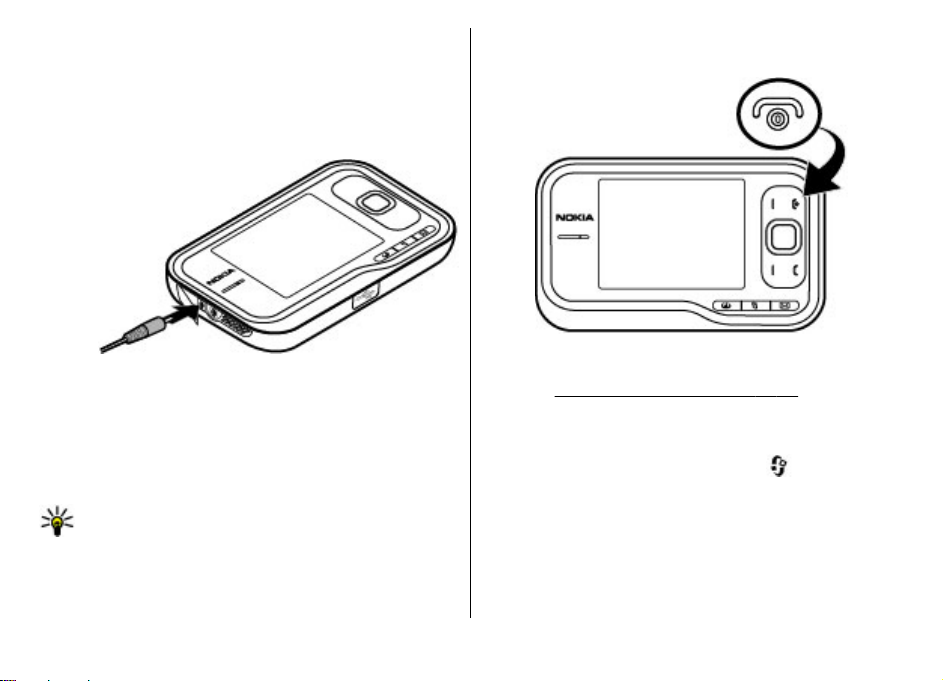
Charge the battery
Your battery has been partially charged at the factory. If the
device indicates a low charge, do the following:
1. Connect the charger to a wall outlet.
2. Connect the charger to the device. The charging port is
behind the black cover.
3. When the device indicates a full charge, disconnect the
charger from the device, then from the wall outlet.
You do not need to charge the battery for a specific length of
time, and you can use the device while it is charging. If the
battery is completely discharged, it may take several minutes
before the charging indicator appears on the display or
before any calls can be made.
Tip: Disconnect the charger from the wall outlet when
the charger is not in use. A charger that is connected
to the outlet consumes power even when it is not
connected to the device.
Switch the device on or off
Press and hold the power key until you feel the device vibrate.
If prompted, enter the PIN code or lock code, and select OK.
If the device asks for the lock code, enter the lock code, and
select OK.
The Phone setup application opens when you switch on your
device for the first time. With the Phone setup application,
you can customize how the device looks and works. To open
the Phone setup application later, select
Applications > Help > Phone setup.
To set the correct time zone, time, and date, select the
country you are located and the current date and time. To
find your country, enter the first letters of the country name.
It is important to select the correct country, because
scheduled calendar entries may change if you change the
See "What is the lock code?," p. 10.
>
© 2004 Nokia. All rights reserved.14
Page 15
country later and the new country is located in a different
time zone.
Lock the keys
You can set the keypad to lock automatically after a time-out
period, or when the slide is closed.
To change the length of the time-out period, after which the
keypad is locked, select
General > Security > Phone and SIM card > Keypad
autolock period > User defined and the desired length of
time.
To manually lock the keypad in phone mode, press the end
key, and select Lock keypad.
Tip: When the keypad is locked, press and hold the
scroll key to quickly view the date and time.
> Tools > Settings and
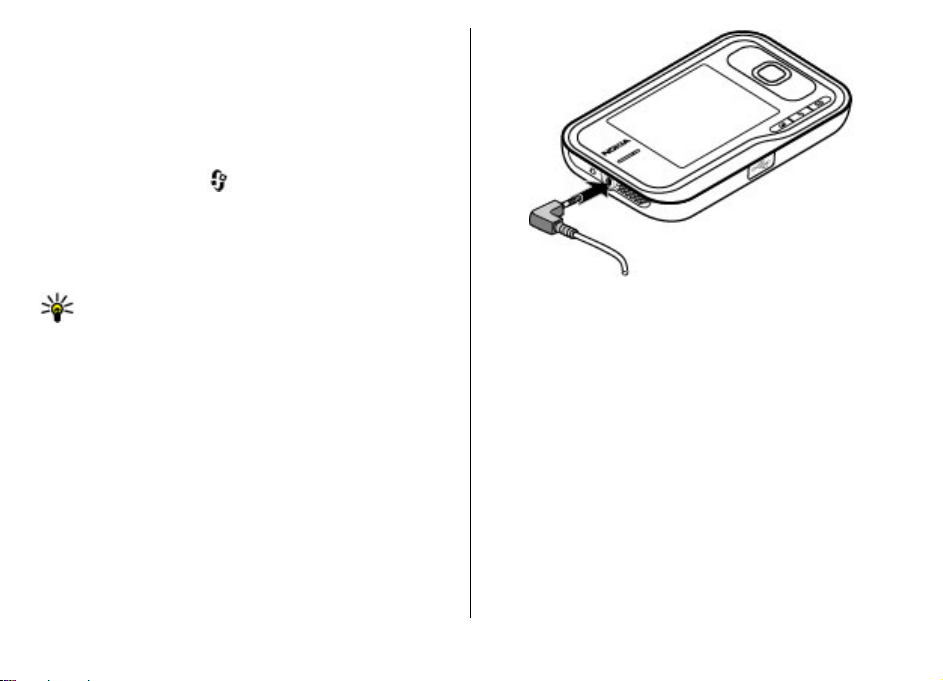
Connect the headset
Connect the compatible headset to the headset connector of
your device.
Do not connect products that create an output signal as this
may cause damage to the device. Do not connect any voltage
source to the Nokia AV Connector.
When connecting any external device or any headset, other
than those approved by Nokia for use with this device, to the
Nokia AV Connector, pay special attention to volume levels.
Memory cards
Supported memory cards
Use only compatible microSD cards approved by Nokia for use
with this device. Nokia uses approved industry standards for
memory cards, but some brands may not be fully compatible
with this device. Incompatible cards may damage the card
and the device and corrupt data stored on the card.
Keep all memory cards out of the reach of small children.
© 2004 Nokia. All rights reserved. 15
Page 16
You can extend the available memory with a microSDHC or
microSD card with a capacity of up to 8 GB. Optimal
performance is with a 4 GB microSD card. You can insert or
remove a microSDHC or microSD card without switching the
device off.
To maximize the performance of your device, it is
recommended that no more than 100 files are stored in any
folder.
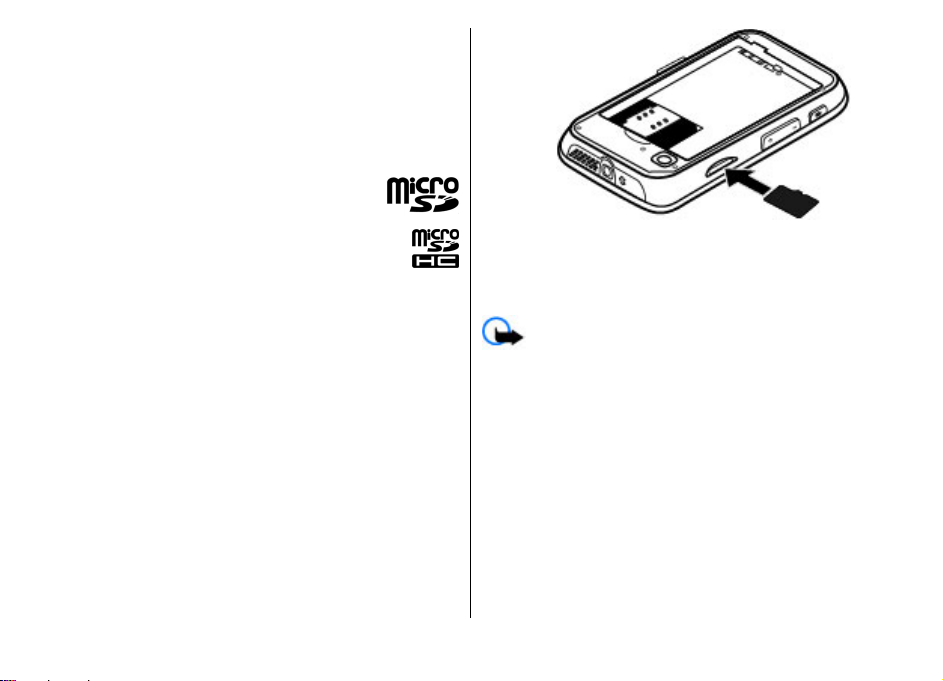
Insert the memory card
Use a memory card to increase the amount of memory
available for your device. You can also back up information
from your device to the memory card.
Check the compatibility of a memory card with its
manufacturer or provider.
A compatible memory card may be included in the sales
package. The memory card may be already inserted in the
device. If not, do the following:
1. Remove the back cover.
2. Insert the memory card in the slot with the contact area
first. Ensure the contact area is facing the connectors on
the device.
3. Push the card in until it locks into place.
4. Close the back cover.
Remove the memory card
Important: Do not remove the memory card during
an operation when the card is being accessed. Doing so may
damage the memory card and the device, and corrupt data
stored on the card.
1. Press the power key briefly, and select Remove memory
card.
2. Remove the back cover.
3. Press the end of the memory card to release it from the
memory card slot, and remove the card.
4. Replace the cover.
© 2004 Nokia. All rights reserved.16
Page 17
Shortcuts
Here are some of the keyboard shortcuts in your device.
Shortcuts can make the use of the applications more efficient.
Shortcuts
General shortcuts
Power key
# Press and hold # to activate the Silent
Scroll key Press and hold the scroll key to view the
Standby mode
Call key
Press and hold to switch your device on
and off.
Press once to switch between profiles.
profile.
screen saver clock when the keypad is
locked.
Open the call register. Up to 20 numbers
that you last called or attempted to call
3. Your Nokia 6790 slide
After you have switched on your device, start to explore.
are displayed. Scroll to the desired
number or name and press the call key.
0 Press and hold to open your homepage
Number key (2–9) Call a phone number using 1-touch
Web shortcuts
Function key + *
Function key + # Zoom out of the page.
y Go to the homepage.
r Open the bookmarks folder.
t Open the search dialog.
p Return to the previous page.
w View the active pages.
b View the page overview.
n Enter a new web address.
in the browser.
dialing. To activate 1-touch dialing,
select
Phone > Call > 1-touch dialing.
Zoom into the page.
> Tools > Settings and
Phone setup
When you switch on your device for the first time, the Phone
Setup application opens.
© 2004 Nokia. All rights reserved. 17
Page 18

To access the Phone Setup application later, select >
Applications > Help > Phone setup.
To set up the device connections, select Settings wizard.
To transfer data to your device from a compatible Nokia
device, select Phone switch.
The available options may vary.
Settings wizard
Select > Tools > Settings wizard.
Us e Set ting s w iza rd t o def ine e-mail and connection settings.
The availability of the items in Settings wizard depends on
the features of the device, SIM card, service provider, and the
data in the Settings wizard database.
To start Settings wizard, select Start.
To get the best results when using the settings wizard, keep
your SIM card inserted in the device. If the SIM card is not
inserted, follow the instructions on the display.
Select from the following:
● Operator — Define the operator-specific settings, such as
MMS, Internet, WAP, and streaming settings.
● E-mail setup — Configure a POP, IMAP, or Mail for
Exchange account.
The settings available for editing may vary.
Transfer content
The type of content that can be transferred depends on the
model of the device from which you want to transfer content.
If that device supports synchronization, you can also
synchronize data between the devices. Your Nokia 6790
slide notifies you if the other device is not compatible.
If the other device cannot be switched on without a SIM card,
you can insert your SIM card in it. When your Nokia 6790
slide is switched on without a SIM card, the offline profile is
automatically activated, and transfer can be done.
Transfer content for the first time
1. To retrieve data from the other device for the first time,
on your Nokia 6790 slide , select Switch in the Phone
Setup application, or select
2. Select the connection type you want to use to transfer the
data. Both devices must support the selected connection
type.
3. If you select Bluetooth, connect the two devices. To have
your device search for devices with Bluetooth
connectivity, select Continue. Select the device from
which you want to transfer content. You are asked to
enter a code on your Nokia 6790 slide. Enter a code (1-16
digits), and select OK. En
device, and select OK. The devices are now paired.
Some earlier Nokia devices may not have the Switch
application. In this case, the Switch application is sent to
the other device as a message. To install Switch on the
other device, open the message, and follow the
instructions.
4. From your Nokia 6790 slide, select the content you want
to transfer from the other device.
When the transfer has started, you can cancel it and
continue later.
> Tools > Switch.
same code on the other
ter the
© 2004 Nokia. All rights reserved.18
Page 19

Content is transferred from the memory of the other device
to the corresponding location in your Nokia 6790 slide. The
length of the transfer time depends on the amount of data
to be transferred.
Make calls
Note: The actual invoice for calls and services from
your service provider may vary, depending on network
features, rounding off for billing, taxes, and so forth.
To make and receive calls, the device must be switched on, it
must have a valid SIM card installed, and you must be located
in the service area of a cellular network.
Important: In the Offline profile you cannot make or
receive any calls, or use other features that require cellular
network coverage. Calls may still be possible to the official
emergency number programed into your device. To make
calls, you must first activate the phone function by changing
profiles. If the device has been locked, enter the lock code.
Make calls
To make a call, enter the phone number, including the area
code, and press the call key. To end the call or cancel the call
attempt, press the end key.
Tip: For international calls, add the + character that
replaces the international access code, and enter the
country code, area code (omit the leading 0, if
necessary) and phone number.
Answer a call
To answer a call, press the call key. To decline a call, press the
end key.
To mute the ringing tone instead of answering a call, select
Silence.
To adjust the volume of an active call, use the volume keys.
Voice mail
Select > Tools > Call mailbox.
When you open the Voice mail application for the first time,
you are asked to enter the number of your voice mailbox.
To call your voice mailbox, scroll to Voice mailbox, and select
Options > Call voice mailbox.
To call your mailbox in the standby mode, press and hold 1;
or press 1 and then the call key. Select the mailbox you want
to call.
To change the mailbox number, select the mailbox and
Options > Change number.
Volume control
To adjust the earpiece or loudspeaker volume during a call or
when listening to an audio file, use the volume keys.
To activate or deactivate the loudspeaker during a call, select
Loudsp. or Handset.
Warning: Continuous exposure to high volume may
damage your hearing. Listen to music at a moderate level,
© 2004 Nokia. All rights reserved. 19
Page 20
and do not hold the device near your ear when the
loudspeaker is in use.
Write text with the keyboard
Your device has a full keyboard.
To insert punctuation marks, press the corresponding key or
a combination of keys.
To switch between the different character cases, press the
Shift key.
To insert characters printed at the top of keys, press and hold
the function key and press the corresponding key.
To erase a character, press the backspace key. To erase
several characters, press and hold the backspace key.
To insert characters and symbols that are not shown on the
keyboard, press the sym key.
To change the writing language, or to activate predictive text
input, select Options > Input options and the appropriate
option.
Write and send messages
Select > Messaging.
Important: Exercise caution when opening messages.
Messages may contain malicious software or otherwise be
harmful to your device or PC.
Before you can create a multimedia message or write an email, you must have the correct connection settings in place.
The wireless network may limit the size of MMS messages. If
the inserted picture exceeds this limit, the device may make
it smaller so that it can be sent by MMS.
Check the size limit of e-mail messages with your service
provider. If you attempt to send an e-mail message that
exceeds the size limit of the e-mail server, the message is left
in the Outbox folder, and the device attempts to resend it
periodically. Sending an e-mail requires a data connection,
and continuous attempts to resend the e-mail may increase
your phone bill. In the Outbox folder, you can delete such a
message, or move it to the Drafts folder.
1. Select New message > Message to send a text or
multimedia message (MMS), Audio message to send a
multimedia message that includes one sound clip, or E-
mail to send an e-mail message.
© 2004 Nokia. All rights reserved.20
Page 21

2. In the To field, press the scroll key to select recipients or
groups from the contacts list, or enter the recipient’s
phone number or e-mail address. To add a semicolon (;)
that separates the recipients, press *. You can also copy
and paste the number or address from the clipboard.
3. In the subject field, enter the subject of the e-mail. To
change the fields that are visible, select Options >
Message header fields.
4. In the message field, write the message. To insert a
template or note, select Options > Insert content >
Insert text > Template or Note.
5. To add a media file to a multimedia message, select
Options > Insert content, the file type or source, and
the desired file. To insert a business card, slide, note, or
some other file to the message, select Options > Insert
content > Insert other.
6. To capture an image or record a video or sound clip for a
multimedia message, select Options > Insert
content > Insert image > New, Insert video clip >
New, or Insert sound clip > New.
7. To add an attachment to an e-mail, select Options and
the attachment type. E-mail attachments are indicated by
.
8. To send the message, select Options > Send, or press
the call key.
Note: The message sent icon or text on your device
screen does not indicate that the message is received at the
intended destination.
Your device supports text messages beyond the limit for a
single message. Longer messages are sent as two or more
messages. Your service provider may charge accordingly.
Characters with accents, other marks, or some language
options take more space, and limit the number of characters
that can be sent in a single message.
You may not be able to send video clips that are saved in the
MP4 file format or that exceed the size limit of the wireless
network in a multimedia message.
Active standby
When you have switched on the device, and it is registered
to a network, the device is in the standby mode and ready for
use.
To open the list of last dialled numbers, press the call key.
Scroll left to access a list of received and missed calls.
To use voice commands or voice dialling, press and hold the
right selection key.
To change the profile, press the power key, and select a
profile.
To connect to the web, press the internet key.
Menu
The main menu is a starting point from which you can open
all applications in the device or on a memory card. To access
the main menu, press
To open an application or a folder, select the item.
.
© 2004 Nokia. All rights reserved. 21
Page 22
To change the menu view, select > Options > Change
Menu view and a view type.
To close an application or a folder, select Back and Exit as
many times as needed to return to the standby mode.
Tip: To display and switch between open applications,
press and hold the menu key, and select an application.
To close an application, press the backspace key.
Leaving applications running in the background increases the
demand on battery power and reduces the battery life.
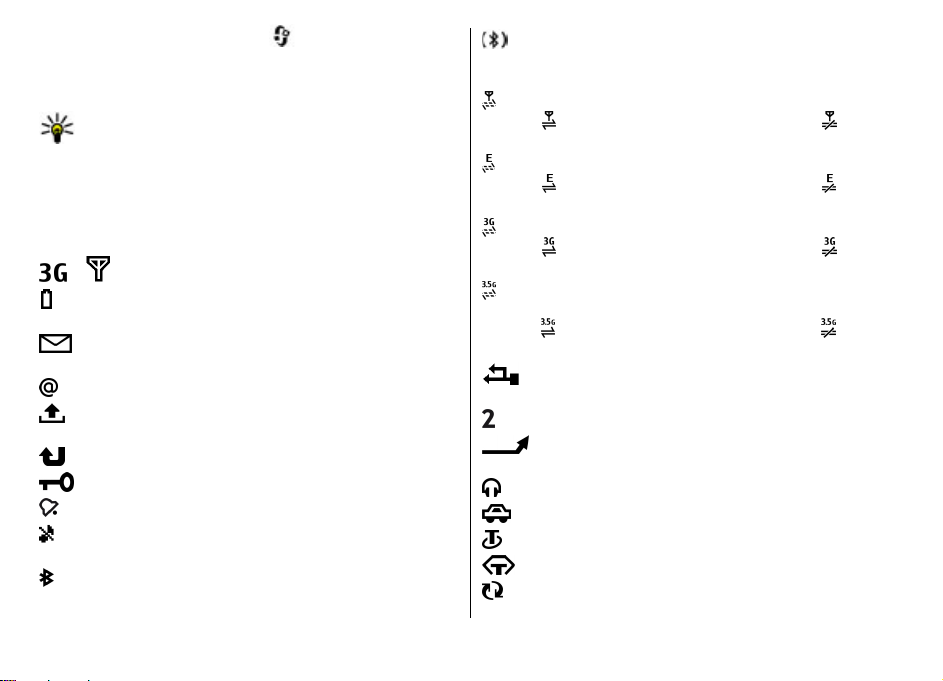
Indicators
or The device is connected to a UMTS or GSM network.
The battery charge level. The higher the bar, the stronger
the charge in the battery.
You have one or more unread messages in the Inbox
folder in Messaging.
You have received new e-mail in the remote mailbox.
There are messages waiting to be sent in the Outbox
folder in Messaging.
You have one or more missed phone calls.
The keys of the device are locked.
An alarm is active.
You have activated the Silent profile, and the device does
not ring for an incoming call or message.
Bluetooth connectivity is activated.
A Bluetooth connection is established. When the
indicator is blinking, your device is trying to connect with
another device.
A GPRS packet data connection is available (network
service).
that the connection is on hold.
service).
that the connection is on hold.
service).
that the connection is on hold.
and available (network service). The icon may vary between
regions.
that the connection is on hold.
cable.
two phone lines, a number indicates the active line.
indicates that the connection is active. indicates
An EGPRS packet data connection is available (network
indicates that the connection is active. indicates
A UMTS packet data connection is available (network
indicates that the connection is active. indicates
High-speed downlink packet access (HSDPA) is supported
indicates that the connection is active. indicates
Y ou r d ev ic e i s c on ne ct ed to a c om pu te r w it h a US B d ata
The second phone line is being used (network service).
All calls are forwarded to another number. If you have
A headset is connected to the device.
A handsfree car kit is connected to the device.
A loopset is connected to the device.
A text phone is connected to the device.
Your device is synchronizing.
© 2004 Nokia. All rights reserved.22
Page 23

Clock
With Clock, you can view your local time or time in other
cities, and use your device as an alarm clock.
Alarm clock
Select > Applications > Clock.
To view your active and inactive alarms, open the alarms tab.
To set a new alarm, select Options > New alarm. Define the
repetition, if needed. When an alarm is active,
To turn off the sounding alarm, select Stop. To stop the alarm
for a certain time period, select Snooze. If your device is
switched off when an alarm is due, your device switches itself
on and starts sounding the alarm tone.
Tip: To define the time period after which the alarm
sounds again when you set it to snooze, select
Options > Settings > Alarm snooze time.
To cancel an alarm, select Options > Remove alarm.
To change the time, date, and clock type settings, select
Options > Settings.
To automatically update the time, date, and time zone
information to your device (network service), select
Options > Settings > Automatic time update > On.
World clock
Select > Applications > Clock.
To view the time in different locations, open the world clock
tab. To add locations to the list, select Options > Add
location. You can add a maximum of 15 locations to the list.
is displayed.
To set your current location, scroll to a location, and select
Options > Set as current location. The location is displayed
in the clock main view, and the time in your device is changed
according to the selected location. Ensure that the time is
correct and matches your time zone.
Clock settings
Select Options > Settings.
To change the time or date, select Time or Date.
To change the clock shown in the standby modes, select Clock
type > Analog or Digital.
To allow the mobile phone network to update the time, date,
and time zone information to your device (network service),
select Automatic time update > On.
To change the alarm tone, select Clock alarm tone.
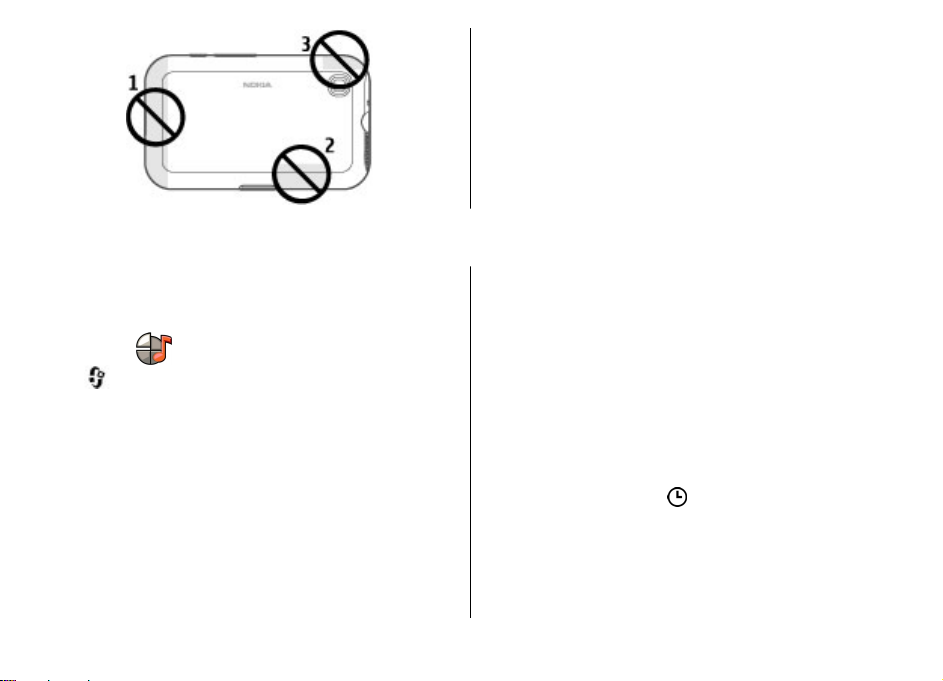
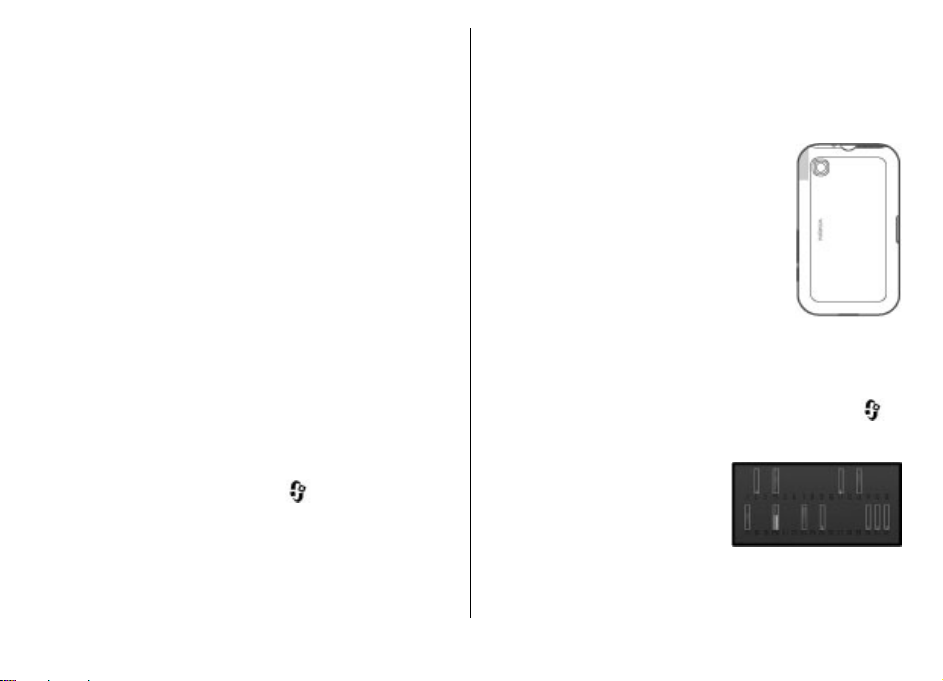
Antenna locations
Your device has three integrated antennas: cellular antenna,
Bluetooth antenna, and GPS antenna.
Your device may have internal and external antennas. Avoid
touching the antenna area unnecessarily while the antenna
is transmitting or receiving. Contact with antennas affects the
communication quality and may cause a higher power level
during operation and may reduce the battery life.
© 2004 Nokia. All rights reserved. 23
Page 24
4. Customize your device
You can customize your device by, for example, adjusting the
various tones, and changing the background image and
screen saver.
Profiles
Select > Tools > Profiles.
You can adjust and customize the ringing tones, alert tones,
and other device tones for different events, environments, or
caller groups. The active profile is shown at the top of the
display in the standby mode. However, if the active profile is
General, only today's date is shown.
To create a new profile, select Options > Create new, and
define the settings.
To customize a profile, select a profile and Options >
Customize.
To change a profile, select a profile and Options >
Activate. The Offline profile prevents your device from
1 — Cellular antenna
2 — Bluetooth antenna
3 — GPS antenna
accidentally switching on, sending or receiving messages, or
using Bluetooth connectivity, GPS, or FM radio; it also closes
any internet connection that may be in operation when the
profile is selected. The Offline profile does not prevent you
from establishing a Bluetooth connection at a later time, or
from restarting the GPS or FM radio, so comply with any
applicable safety requirements when establishing and using
these features.
To set the profile to be active until a certain time within the
next 24 hours, scroll to the profile, select Options >
Timed, and set the time. When the time expires, the profile
changes back to the previously active non-timed profile.
When the profile is timed,
mode. The Offline profile cannot be timed.
To delete a profile that you created, select Options > Delete
profile. You cannot delete the predefined profiles.
is displayed in the standby
© 2004 Nokia. All rights reserved.24
Page 25
Select ringing tones
To set a ringing tone for a profile, select Options >
Customize > Ringing tone. Select a ringing tone from the
list, or select Download sounds to open a bookmark folder
containing a list of bookmarks for downloading tones using
the browser. Any downloaded tones are saved to Gallery.
To play the ringing tone for a selected contact group only,
select Options > Customize > Alert for, and select the
desired group. Phone calls coming from outside that group
have a silent alert.
To change the message tone, select Options > Customize >
Message alert tone.
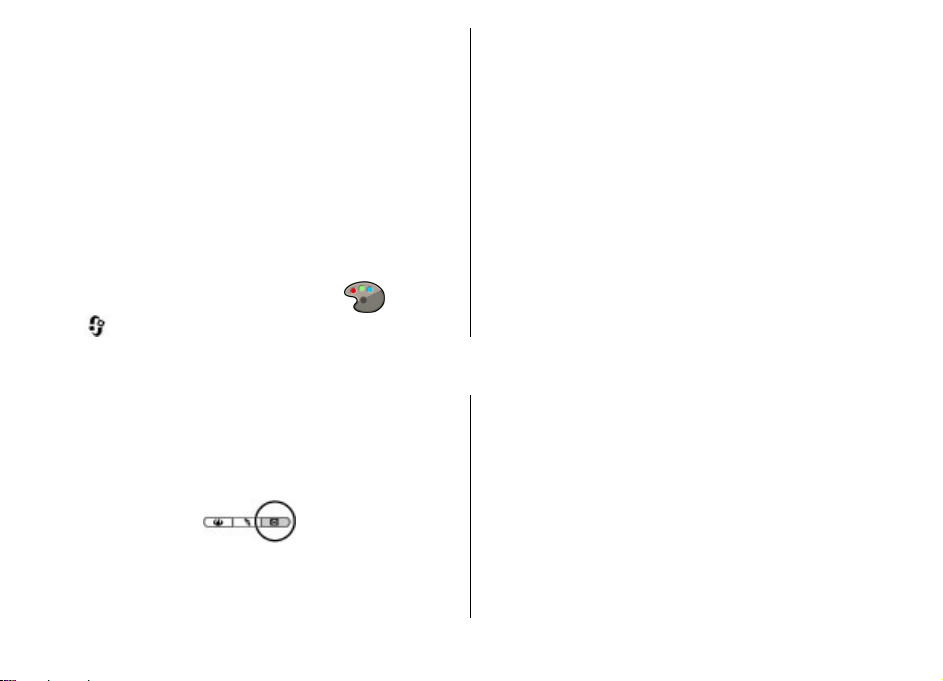
Change the display theme
Select > Tools > Themes.
5. E-mail and instant messaging
With your device, you can read and reply to both personal and
work e-mail, and chat with your instant messaging contacts.
Messaging key
Your device has a key for quick access to your messages.
To change the theme used in all applications, select
General.
To change the theme used in the main menu, select Menu
view.
To change the theme for a particular application, select the
application-specific folder.
To change the background image of the home screen, select
Wallpaper.
To select an animation for the screen saver, select Power
saver.
To turn theme effects on or off, select General > Options >
Theme effects.
Ovi Mail
If you do not yet have an e-mail account, or want to create
another one, Ovi Mail offers you that possibility. Ovi Mail is a
free e-mail service that you can use from the web or directly
from your device.
For more information, see mail.ovi.com.
This service may not be available in all regions or languages.
© 2004 Nokia. All rights reserved. 25
Page 26

Nokia Messaging
With Nokia Messaging, you can receive e-mail sent to your
personal e-mail address on your device.
You can access up to 10 personal e-mail accounts, such as
Windows Live Hotmail or Google e-mail services. Each e-mail
arrives in its own mailbox, and you can access all e-mails in
one place.
Nokia Messaging can be used on your device together with
most other e-mail solutions. However, if you are using Nokia
Intellisync Mobile Suite, you must uninstall it before using
Nokia Messaging.
Nokia Messaging is currently provided on a trial basis.
Using Nokia Messaging may involve the transmission of large
amounts of data (network service).
For more information, see www.email.nokia.com.
Mail for Exchange
With Mail for Exchange, you can receive your work e-mail to
your device. You can read and reply to your e-mails, view and
edit compatible attachments, view calendar information,
receive and reply to meeting requests, schedule meetings,
and view, add, and edit contact information. Mail for
Exchange can be set up only if your company has Microsoft
Exchange Server. In addition, your company's IT
administrator must have activated Mail for Exchange for your
account.
Before starting to set up Mail for Exchange, ensure that you
have the following:
● A corporate e-mail ID
● Your office network user name
● Your office network password
● Your network domain name (contact your company's IT
department)
● Your Mail for Exchange server name (contact your
company's IT department)
Depending on your company's Mail for Exchange server
configuration, you may need to enter other information in
addition to those listed. If you do not know the correct
information, contact your company's IT department.
With Mail for Exchange, the use of the lock code may be
ma ndat ory. The d ef aul t lo ck co de of yo ur d evi ce is 12 345 , bu t
your company's IT administrator may have set a different one
for you to use.
You can access and modify the Mail for Exchange profile and
settings in the Messaging settings.
Chat
With the instant messaging (IM) network service, you can
send short, simple text messages to online users. You have
to subscribe to a service and register with the IM service you
want to use.
Select
To connect to the service, select Go online and the
connection method. A GPRS connection connection may
generate additional data transmission charges. For pricing
details, contact your service provider.
> Contacts, and open the Ovi tab.
© 2004 Nokia. All rights reserved.26
Page 27

To start a chat with a friend, select Options > Chat. To send
a chat message, enter the text in the message field, and select
Send.
In the chat view, select Options and from the following:
● Send — Send the message.
● Add smiley — Insert a smiley.
● Send my location — Send your location details to your
chat partner (if supported by both devices).
● Profile — View the details of a friend.
● My profile — Select your presence status or profile image,
personalise your message, or modify your details.
● Edit text — Cut, copy, or paste text.
● End chat — End the active chat.
6. Ovi Maps
Need directions? Looking for a restaurant? Your device has
the tools to get you where you want to be.
Positioning (GPS)
You can use applications such as GPS data to determine your
location, or measure distances and coordinates. These
applications require a GPS connection.
About GPS
The coordinates in the GPS are expressed in the degrees and
decimal degrees format using the international WGS-84
coordinate system. The availability of the coordinates may
vary by region.
● Exit — End all active chats, and close the application.
The available options may vary.
To receive location information from your friend, you must
have the Maps application. To send and receive location
information, you must have both the Maps and Positioning
applications.
To view the location of your friend, select Show on map.
To return to the Ovi Contacts main view without ending the
chat, select Back. If you select a phone number in a chat, to
add it to your contacts list, call, or copy the number, select
Options and the appropriate option.
The Global Positioning System (GPS) is operated by the
government of the United States, which is solely responsible
for its accuracy and maintenance. The accuracy of location
data can be affected by adjustments to GPS satellites made
by the United States government and is subject to change
with the United States Department of Defense civil GPS policy
and the Federal Radionavigation Plan. Accuracy can also be
affected by poor satellite geometry. Availability and quality
of GPS signals may be affected by your location, buildings,
natural obstacles and weather conditions. GPS signals may
not be available inside buildings or underground and may be
impaired by materials such as concrete and metal.
GPS should not be used for precise location measurement,
and you should never rely solely on location data from the
© 2004 Nokia. All rights reserved. 27
Page 28
GPS receiver and cellular radio networks for positioning or
navigation.
The trip meter has limited accuracy, and rounding errors may
occur. Accuracy can also be affected by availability and quality
of GPS signals.
Different positioning methods can be enabled or disabled in
positioning settings.
Assisted GPS (A-GPS)
Your device also supports assisted GPS (A-GPS).
A-GPS requires network support.
Assisted GPS (A-GPS) is used to retrieve assistance data over
a packet data connection, which assists in calculating the
coordinates of your current location when your device is
receiving signals from satellites.
When you activate A-GPS, your device receives useful satellite
information from an assistance data server over the cellular
network. With the help of assisted data, your device can
obtain the GPS position faster.
Your device is preconfigured to use the Nokia A-GPS service,
if no service provider-specific A-GPS settings are available.
The assistance data is retrieved from the Nokia A-GPS service
server only when needed.
To disable the A-GPS service, select
GPS data and Options > Positioning settings >
Positioning methods > Assisted GPS > Disable.
You must have an internet access point defined in the device
to retrieve assistance data from the Nokia A-GPS service over
a packet data connection. The access point for A-GPS can be
defined in positioning settings. Only a packet data internet
> Applications >
access point can be used. Your device asks you to select the
internet access point when GPS is used for the first time.
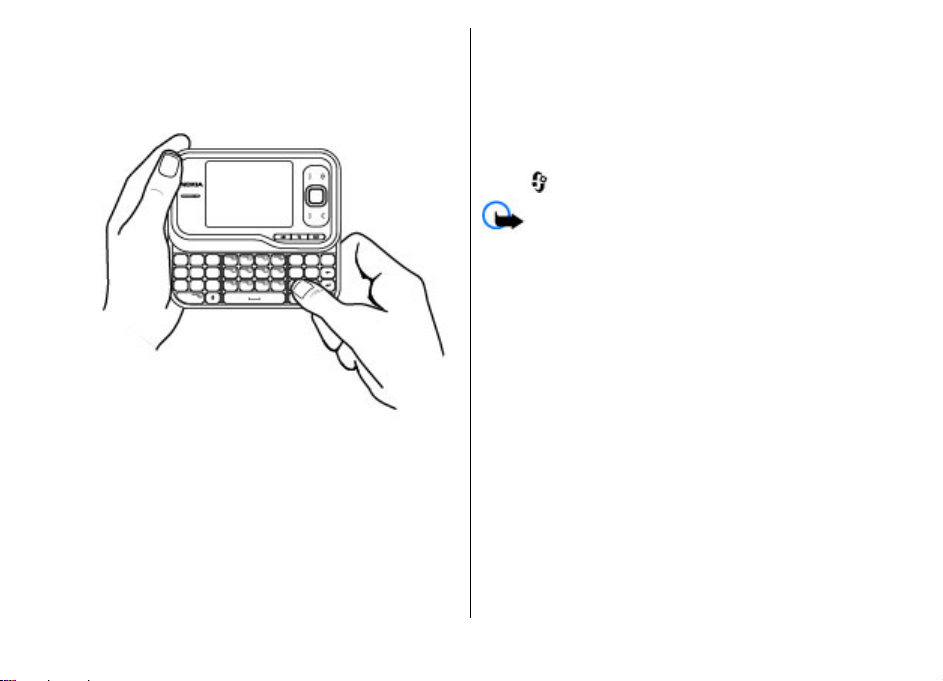
Hold your device correctly
When using the GPS receiver, ensure you do not cover the
antenna with your hand.
Establishing a GPS connection may take from
a couple of seconds to several minutes.
Establishing a GPS connection in a vehicle
may take longer.
The GPS receiver draws its power from the
device battery. Using the GPS receiver may
drain the battery faster.
Tips on creating a GPS connection
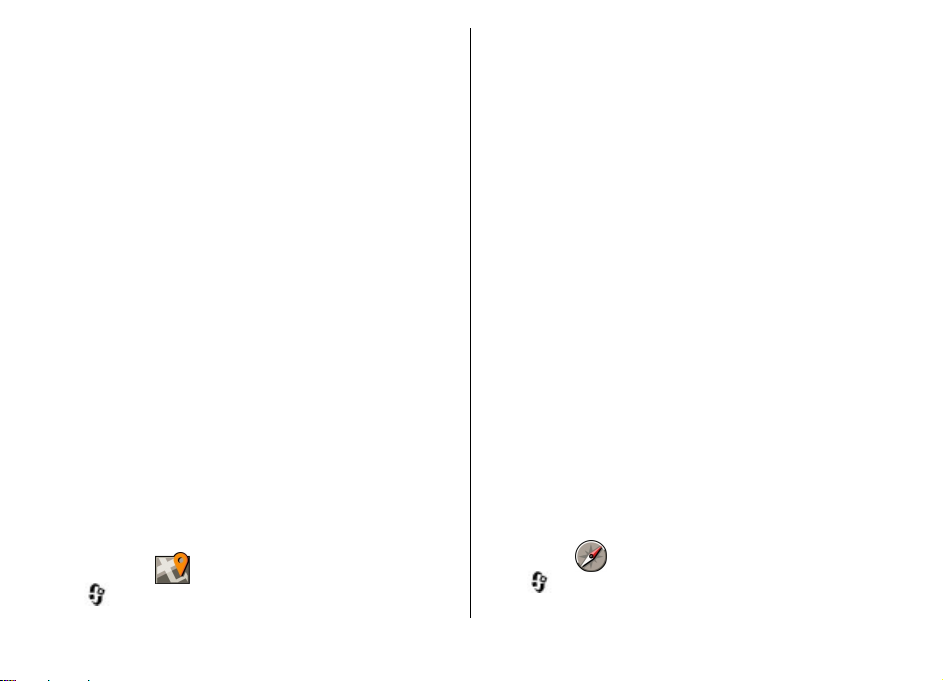
Check satellite signal status
To check how many satellites your device has found, and
whether your device is receiving satellite signals, select
Applications and GPS data > Position > Options >
Satellite status.
If your device has found satellites,
a bar for each satellite is shown in
the satellite info view. The longer
the bar, the stronger the satellite
signal. When your device has
received enough data from the
satellite signal to calculate the coordinates of your location,
the bar turns blue.
>
© 2004 Nokia. All rights reserved.28
Page 29
To view the positions of found satellites, select Chg. view.
Initially your device must receive signals from at least four
satellites to be able to calculate the coordinates of your
location. When the initial calculation has been made, it may
be possible to continue calculating the coordinates of your
location with three satellites. However, the accuracy is
generally better when more satellites are found.
If your device cannot find the satellite signal, consider the
following:
● If you are indoors, go outdoors to receive a better signal.
● If you are outdoors, move to a more open space.
● Ensure that your hand does not cover the GPS antenna of
your device.
● If the weather conditions are bad, the signal strength may
be affected.
● Some vehicles have tinted (athermic) windows, which
may block the satellite signals.
Position requests
You may receive a request from a network service to receive
your position information. Service providers may offer
information about local topics, such as weather or traffic
conditions, based on the location of your device.
When you receive a position request, the service that is
making the request is displayed. Select Accept to allow your
position information to be sent or Reject to deny the request.
Landmarks
Select > Applications > Landmarks.
With Landmarks, you can save the position information of
specific locations in your device. You can sort the saved
locations into different categories, such as business, and add
other information to them, such as addresses. You can use
your saved landmarks in compatible applications, such as GPS
data.
GPS coordinates are expressed in the degrees and decimal
degrees format using the international WGS-84 coordinate
system.
Select Options and from the following:
● New landmark — Create a new landmark. To make a
positioning request for your current location, select
Current position. To select the location from map, select
Select from map. To enter the position information
manually, select Enter manually.
● Edit — Edit or add information to a saved landmark (for
example, a street address).
● Add to category — Add a landmark to a category in
Landmarks. Select each category to which you want to add
the landmark.
● Send — Send one or several landmarks to a compatible
device. Your received landmarks are placed in the Inbox
folder in Messaging.
You can sort your landmarks into preset categories, and
create new categories. To edit and create new landmark
categories, open the categories tab, and select Options >
Edit categories.
GPS data
Select > Applications > GPS data.
© 2004 Nokia. All rights reserved. 29
Page 30

GPS data is designed to provide route guidance information
to a selected destination, position information about your
current location, and traveling information, such as the
approximate distance to the destination and the
approximate duration of travel.
The coordinates in the GPS are expressed in degrees and
decimal degrees format using the international WGS-84
coordinate system.
To use GPS data, the GPS receiver of your device must initially
receive position information from at least four satellites to
calculate the coordinates of your location. When the initial
calculation has been made, it may be possible to continue
calculating the coordinates of your location with three
satellites. However, the accuracy is generally better when
more satellites are found.
Route guidance
Select
> Applications > GPS data and Navigation.
Start the route guidance outdoors. If started indoors, the GPS
receiver may not receive the necessary information from the
satellites.
Route guidance uses a rotating compass on the device
display. A red ball shows the direction to the destination, and
the approximate distance to it is shown inside the compass
ring.
Route guidance is designed to show the straightest route and
the shortest distance to the destination, measured in a
straight line. Any obstacles on the route, such as buildings
and natural obstacles, are ignored. Differences in altitude are
not taken into account when calculating the distance. Route
guidance is active only when you move.
To set your trip destination, select Options > Set
destination and a landmark as the destination, or enter the
latitude and longitude coordinates.
To clear the destination set for your trip, select Stop
navigation.
Retrieve position information
Select
> Applications > GPS data and Position.
In the position view, you can view the position information
of your current location. An estimate of the accuracy of the
location is displayed.
To save your current location as a landmark, select Options >
Save position. Landmarks are saved locations with more
information, and they can be used in other compatible
applications and transferred between compatible devices.
Trip meter
Select
> Applications > GPS data and Trip distance.
The trip meter has limited accuracy, and rounding errors may
occur. Accuracy can also be affected by availability and quality
of GPS signals.
To turn trip distance calculation on or off, select Options >
Start or Stop. The calculated values remain on the display.
Use this feature outdoors to receive a better GPS signal.
To set the trip distance and time and average and maximum
speeds to zero, and to start a new calculation, select
Options > Reset. To set the trip meter and total time to zero,
select Restart.
© 2004 Nokia. All rights reserved.30
Page 31

About Maps
With Maps, you can see your current location on the map,
browse maps of different cities and countries, search for
places, plan routes from one location to another, save
locations, and send them to compatible devices. You can also
purchase licenses for traffic information and navigation
services, if available for your country or region.
When you use Maps for the first time, you may need to select
an Internet access point for downloading maps.
If you browse to an area which is not covered by maps already
downloaded in your device, a map for the area is
automatically downloaded through the Internet. Some maps
may be available in your device or on a memory card. You can
also use the Nokia Map Loader PC software to download
maps. To install Nokia Map Loader to a compatible PC, see
www.nokia.com/maps.
Tip: To avoid data transfer costs, you can also use Maps
without an Internet connection, and browse the maps
that are saved in your device or memory card.
Note: Downloading content such as maps, satellite
images, voice files, guides or traffic information may involve
transmission of large amounts of data (network service).
Almost all digital cartography is inaccurate and incomplete
to some extent. Never rely solely on the cartography that you
download for use in this device.
Move on a map
When the GPS connection is active, shows your current
location on the map.
To view your current or last known location, select Options >
My position.
To move on the map, scroll up, down, left, or right with the
scroll key. The map is oriented towards north by default.
When you have an active data connection and browse the
map on the display, a new map is automatically downloaded
if you scroll to an area not covered by the maps that have
already been downloaded. The maps are automatically saved
in the device memory or on a compatible memory card, if
inserted.
To zoom in and out on the map, press the left and right shift
keys, or the shift key and the backspace key, depending on
the keyboard of your device.
To change the map type, select Options > Map mode.
Plan a route
To plan a route, scroll to your start point on the map, press
the scroll key, and select Add to route. To add the destination
and more locations to the route, select Add new route
point. If you want to use your current position as the starting
point, add the destination to the route.
To change the order of the locations in the route, scroll to a
location, press the scroll key, and select Move. Scroll to the
place where you want to move the location, and select
Select.
To edit the route, press the scroll key, and select Edit route.
To show the route on the map, select Show route.
© 2004 Nokia. All rights reserved. 31
Page 32

To navigate to the destination by car or on foot, if you have
purchased a license for these services, select Show route >
Options > Start driving or Start walking.
To save the route, select Show route > Options > Save
route.
Navigate to the destination
To navigate to your destination, you must purchase a licence
for the navigation service.
To purchase a licence for pedestrian and car navigation,
select Options > Shop & licenses > Drive & Walk. To
purchase a licence for pedestrian navigation only, select
Walk. The licence is region-specific and can be used only in
the selected area. You can pay for the licence through a credit
7. Internet and connectivity
You can browse the internet, or connect your device to a
compatible computer, using the various connectivity
methods of your device.
Internet key
Your device has a key for accessing the web quickly.
card or in your phone bill, if supported by your service
provider. You can transfer the licence from your device to
another compatible device, but the licence can only be used
in one device at a time.
When you use car navigation for the first time, you are asked
to select the language of the voice guidance and download
the related voice guidance files. To change the language
later, in the main view, select Options > Tools >
Settings > Navigation > Voice guidance. Voice guidance
is not available for pedestrian navigation.
To start navigating, scroll to a location, press the scroll key,
and select Drive to or Walk to.
To stop navigating, select Stop.
Browser
With the Browser application, you can view web pages on the
internet. You can also browse web pages that are designed
specifically for mobile devices.
To browse the web, you need to have an internet access point
configured in your device.
Browse the web
Select > Web.
Shortcut: To open the browser, press the internet key.
© 2004 Nokia. All rights reserved.32
Page 33

Important: Use only services that you trust and that
offer adequate security and protection against harmful
software.
Important: Only install and use applications and other
software from trusted sources, such as applications that are
Symbian Signed or have passed the Java Verified™ testing.
The homepage opens. To change the homepage, select
Options > Tools.
To browse a web page, in the bookmarks view, select a
bookmark, or enter the address in the field (
the scroll key.
Some web pages may contain material, such as graphics and
sounds, that require a large amount of memory to view. If
your device runs out of memory while loading such a web
page, the graphics on the page are not displayed.
To browse web pages without graphics, to save memory,
select Options > Tools > Page > Load content > Text
only.
To enter a new web address, select Options > Go to web
address.
Tip: While browsing, to open a bookmark, press 1, and
select a bookmark.
To refresh the content of the web page, select Options >
Navigation options > Reload.
To save the current web page as a bookmark, select
Options > Save as bookmark.
), and press
To view snapshots of the web pages you have visited during
the current browsing session, select Back (available if
History list is activated in the browser settings and the
current web page is not the first web page you visit). Select
the web page to return to.
To save a web page while browsing, select Options >
Settings > Save page.
You can save web pages and browse them later when offline.
You can also group web pages into folders. To access the web
pages you have saved, in the bookmarks view, select Saved
pages.
To open a sublist of commands or actions for the current web
page, select Options > Service options (if supported by the
web page).
To prevent or allow the automatic opening of multiple
windows, select Options > Window > Block pop-ups or
Allow pop-ups.
Shortcuts while browsing
● Press 1 to open the bookmarks view.
● Press 2 to search for keywords on the current page.
● Press 3 to return to the previous page.
● Press 5 to list all open windows.
● Press 8 to show the page overview of the current page.
Press 8 again to zoom in and view the desired section of
the page.
● Press 9 to enter a new web address.
● Press 0 to go to the homepage (if defined in settings).
● Press * and # to zoom in or out on the page.
© 2004 Nokia. All rights reserved. 33
Page 34

Tip: To return to the home screen with the web
browser open in the background, press
the end key. To return to the web browser, press and
hold
, and select the web browser.
twice or
Web feeds and blogs
Web feeds are XML files on web pages that are used to share,
for example, the latest news headlines or blogs. Blogs or
weblogs are web diaries. It is common to find web feeds on
web, blog, and wiki pages.
The Web application automatically detects if a web page
contains web feeds.
To subscribe to a web feed, select a feed and Options >
Subscribe to web feeds.
To update a web feed, select a feed and Options >
Refresh.
To define how the web feeds are updated, select Options >
Tools > Web feeds.
Empty the cache
The information or services you have accessed are stored in
the cache memory of the device.
A cache is a memory location that is used to store data
temporarily. If you have tried to access or have accessed
confidential information requiring passwords, empty the
cache after each use. The information or services you have
accessed are stored in the cache.
To empty the cache, select Options > Clear privacy data >
Cache.
End the connection
To end the connection and view the browser page offline,
select Options > Settings > Disconnect; or to end the
connection and close the browser, select Options > Exit.
To take the browser to the background, press the end key
once. To end the connection, press and hold the end key.
To delete the information the network server collects about
your visits to various web pages, select Options > Clear
privacy data > Cookies.
Connection security
If the security indicator ( ) is displayed during a connection,
the data transmission between the device and the internet
gateway or server is encrypted.
The security icon does not indicate that the data transmission
between the gateway and the content server (where the data
is stored) is secure. The service provider secures the data
transmission between the gateway and the content server.
Security certificates may be required for some services, such
as banking services. You are notified if the identity of the
server is not authentic or if you do not have the correct
security certificate in your device. For more information,
contact your service provider.
Fast downloading
High-speed downlink packet access (HSDPA, also called 3.5G,
indicated by
provides high-speed data downloads. When HSDPA support
in the device is activated and the device is connected to a
) is a network service in UMTS networks and
© 2004 Nokia. All rights reserved.34
Page 35

UMTS network that supports HSDPA, downloading data such
as messages, e-mail, and browser pages through the cellular
network may be faster. An active HSDPA connection is
indicated by
To turn HSDPA on or off, select
Connection > Packet data > High speed packet access.
Some cellular networks do not allow incoming voice calls
when HSDPA is active, in which case you need to deactivate
HSDPA to receive calls. For more information, contact your
service provider.
For availability and subscription to data connection services,
contact your service provider.
HSDPA only affects the download speed; sending data to the
network, such as messages and e-mail, is not affected.
. The icon may vary between regions.
> Tools > Settings and
Connect the USB data cable
The USB connector is behind a cover.
The USB data cable is for data transfer only and does not
support charging.
To avoid corrupting data, do not disconnect the USB data
cable during data transfer.
Transfer data between your device and a PC
1. Insert a memory card in your device, and connect the
device to a compatible PC with the data cable.
2. When the device asks which mode to use, select Mass
storage. In this mode, you can see your device as a
removable hard drive in your computer.
3. End the connection from the computer (from the Unplug
or Eject Hardware wizard in Microsoft Windows, for
example) to avoid damaging the memory card.
To use Nokia PC Suite with your device, install Nokia PC Suite
on your PC, connect the data cable and select PC Suite.
To change the USB mode you normally use with the data
cable, select
USB and USB connection mode, and the desired option.
> Tools > Settings > Connectivity >
© 2004 Nokia. All rights reserved. 35
Page 36

To set the device to ask for the mode each time you connect
the USB data cable to the device, select
Settings > Connectivity > USB and Ask on connection >
Yes.
> Tools >
Bluetooth
Select > Tools > Connectivity > Bluetooth.
About Bluetooth
Bluetooth technology in your device enables wireless
connections between electronic devices within a range of 10
metres (33 feet). A Bluetooth connection can be used to send
images, videos, text, business cards, calendar notes, or to
connect wirelessly to devices that use Bluetooth technology.
Since devices using Bluetooth technology communicate
using radio waves, your device and the other devices do not
need to be in direct line-of-sight. The two devices only need
to be within a maximum of 10 metres (33 feet) of each other,
although the connection can be subject to interference from
obstructions such as walls or other electronic devices.
Several Bluetooth connections can be active at a time. For
example, if your device is connected to a headset, you can
also transfer files to another compatible device at the same
time.
This device is compliant with Bluetooth Specification 2.0 +
EDR supporting the following profiles: advanced audio
distribution, audio/video remote control, basic imaging,
device identification, dial-up networking, file transfer,
generic audio/video distribution, generic object exchange,
hands-free, headset, human interface device, object push,
phone book access, and SIM access. To ensure interoperability
between other devices supporting Bluetooth technology, use
Nokia approved accessories for this model. Check with the
manufacturers of other devices to determine their
compatibility with this device.
Features using Bluetooth technology increase the demand on
battery power and reduce the battery life.
Send and receive data with Bluetooth
Select > Tools > Connectivity > Bluetooth.
1. When you activate Bluetooth connectivity for the first
time, you are asked to name your device. Give your device
a unique name to make it easy to recognize if there are
several Bluetooth devices nearby.
2. Select Bluetooth > On.
3. Select My phone's visibility > Shown to all or Define
period. If you select Define period, you need to define
the time during which your device is visible to others. Your
device and the name you entered can now be seen by
other users with devices using Bluetooth technology.
4. Open the application where the item you want to send is
stored.
5. Select the item and Options > Send > Via Bluetooth.
The device searches for other devices using Bluetooth
technology within range and lists them.
Tip: If you have sent data using Bluetooth
connectivity before, a list of the previous search
results is displayed. To search for more Bluetooth
devices, select More devices.
© 2004 Nokia. All rights reserved.36
Page 37

6. Select the device with which you want to connect. If the
other device requires pairing before data can be
transmitted, you are asked to enter a passcode.
When the connection has been established, Sending data is
displayed.
The Sent folder in the Messaging application does not store
messages sent using Bluetooth connectivity.
To receive data using Bluetooth connectivity, select
Bluetooth > On and My phone's visibility > Shown to
all to receive data from a non-paired device or Hidden to
receive data from a paired device only. When you receive data
through Bluetooth connectivity, depending on the settings
of an active profile, a tone sounds, and you are asked if you
want to accept the message in which the data is included. If
you accept, the message is placed in the Inbox folder in the
Messaging application.
Tip: You can access the files in the device or on the
memory card using a compatible accessory that
supports the File Transfer Profile Client service (for
example, a laptop computer).
A Bluetooth connection is disconnected automatically after
sending or receiving data. Only Nokia PC Suite and some
accessories such as headsets may maintain a connection even
if not actively used.
Pair devices
Select > Tools > Connectivity > Bluetooth.
Open the paired devices tab.
Before pairing, decide on your own passcode (1-16 digits),
and agree with the user of the other device to use the same
code. Devices that do not have a user interface have a fixed
passcode. You need the passcode only when you connect the
devices for the first time. After pairing, it is possible to
authorize the connection. Pairing and authorizing the
connection makes connecting quicker and easier, as you do
not have to accept the connection between paired devices
every time you establish a connection.
The passcode for remote SIM access must have 16 digits.
When the wireless device is in the remote SIM mode, you can
only use a compatible connected accessory, such as a car kit,
to make or receive calls.
Your wireless device will not make any calls, except to the
emergency numbers programed into your device, while in
this mode.
To make calls, you must first leave the remote SIM mode. If
the device has been locked, enter the lock code to unlock it
first.
1. Select Options > New paired device. The device starts
to search for Bluetooth devices within range. If you have
sent data using Bluetooth connectivity before, a list of the
previous search results is displayed. To search for more
Bluetooth devices, select More devices.
2. Select the device with which you want to pair, and enter
the passcode. The same passcode must be entered to the
other device as well.
3. Select Yes to make the connection between your device
and the other device automatic, or No to confirm the
connection manually every time a connection attempt is
made. After pairing, the device is saved to the paired
devices page.
© 2004 Nokia. All rights reserved. 37
Page 38

To give a nickname to the paired device, select Options >
Assign short name. The nickname is displayed in your
device.
To delete a pairing, select the device whose pairing you want
to delete and Options > Delete. To delete all pairings, select
Options > Delete all. If you are currently connected to a
device and cancel the pairing with that device, pairing is
removed immediately, and the connection is ended.
To allow a paired device to connect automatically to your
device, select Set as authorized. Connections between your
device and the other device can be made without your
knowledge. No separate acceptance or authorization is
needed. Use this status only for your own devices, such as
your compatible headset or computer, or devices that belong
to someone you trust. If you want to accept connection
requests from the other device separately every time, select
Set as unauthorized.
To use a Bluetooth audio accessory such as a Bluetooth
handsfree or headset, you need to pair your device with the
accessory. For the passcode and further instructions, see the
8. Calendar and contacts
With Calendar, you can, for example, keep track of your
schedule, your friends' birthdays, or tasks that you need to
do. Select
With Contacts, you can save and update contact information,
such as phone numbers, home addresses, and e-mail
addresses of your contacts. You can add a personal ringing
tone or a thumbnail image to a contact. You can also create
contact groups, which allow you to send text or e-mail
> Office > Calendar.
accessory user guide. To connect to the audio accessory,
switch on the accessory. Some audio accessories connect
automatically to your device. Otherwise, open the paired
devices tab, select the accessory and Options > Connect to
audio device.
Connection manager
Select > Tools > Connectivity > Conn. mgr..
View and end active connections
Select > Tools > Connectivity > Conn. mgr..
To view detailed information about network connections,
select a connection from the list and Options > Details. The
type of information shown depends on the connection type.
To end the selected network connection, select Options >
Disconnect.
To end all active network connections simultaneously, select
Options > Disconnect all.
messages to many recipients at the same time. Select >
Contacts.
You can use the Switch application to copy contacts from your
previous Nokia device to your Nokia 6790 slide .
content," p. 18.
See "Transfer
© 2004 Nokia. All rights reserved.38
Page 39

Create a calendar entry
1. To add a new calendar entry, scroll to the desired date,
select Options > New entry and from the following:
● Meeting — Add a reminder of your meeting.
● Meeting request — Create and send a new meeting
request. You must have a mailbox set up for sending
requests.
● Memo — Write a general note for the day.
● Anniversary — Add a reminder of birthdays or special
dates (entries are repeated annually).
● To-do — Add a reminder of a task that must be done
by a specific date.
2.
To add a description to an entry, select Options > Add
description.
3. To save the entry, select Done.
Tip: In the day, week, or month calendar view, press a
key (0-9). An appointment entry opens, and the
characters you enter are added to the subject field. In
the to-do view, a to-do note entry opens.
When the calendar alarm sounds, select Silence to mute the
alarm.
To stop the calendar alarm, select Stop.
To set the alarm to snooze, select Snooze.
To define the period after which the calendar alarm sounds
again when set to snooze, select Options > Settings >
Alarm snooze time.
Calendar views
To switch between month, week, and to-do note view, select
Options > Month view, Week view, or To-do view.
To change the starting day of the week, the view that is
shown when you open the calendar, or the calendar alarm
settings, select Options > Settings.
To go to a certain date, select Options > Go to date. To go
to today, press #.
Save and edit names and numbers
1. Press , and select Contacts > Options > New
contact.
2. Fill in the fields that you want, and select Done.
To edit a contact card, select it, and Options > Edit. You can
also search for the desired contact by entering the first letters
of the name to the search field.
To attach an image to a contact card, open the contact card,
and select Options > Add image. The image is shown when
the contact calls.
Create contact groups
1. To create a new group, in the group list, select Options >
New group. Use the default name or enter a new name.
Select OK.
2. To add members to the group, select the group and
Options > Add members.
3. Mark each contact you want to add, and select OK.
© 2004 Nokia. All rights reserved. 39
Page 40

Add ringing tones for contacts
Press , and select Contacts.
To define a ringing tone for a contact or a contact group:
1. Press the scroll key to open a contact card or go to the
groups list, and select a contact group.
2. Select Options > Ringing tone.
9. Images and music
With your Nokia 6790 slide, you can capture images, and
listen to music and radio. You can also share your images in
different online services.
Camera
When you use the camera, the display is automatically
rotated to landscape.
Capture an image
Select > Camera.
To capture an image, use the display as a viewfinder, and
press the capture key. The device saves the image in Gallery.
To zoom in or out before capturing an image, use the scroll
key.
The toolbar provides you with shortcuts to different items
and settings before and after capturing an image or
recording a video clip. To view the toolbar, select Options >
Show toolbar. Select from the following:
Switch to image mode.
3. Select the ringing tone you want to use.
When a contact or group member calls you, the device plays
the selected ringing tone (if the caller’s phone number is sent
with the call and your device recognizes it).
To remove the ringing tone, select Default tone from the list
of ringing tones.
Switch to video mode.
Activate sequence mode (images only).
Switch to night mode (video only).
Video length.
Close the toolbar.
The available options vary depending on the capture mode
and view you are in. The settings return to the default values
when you close the camera.
Record videos
Select > Camera.
1. If the camera is in image mode, select video mode from
the toolbar.
2. To start recording, press the capture key.
3. To pause recording, select Pause. Select Continue to
resume recording.
© 2004 Nokia. All rights reserved.40
Page 41

4. To stop recording, select Stop. The video clip is
automatically saved in Gallery. The maximum length of
the video clip depends on the available memory.
Gallery
Select > Gallery.
Select from the following:
● Images
● Video clips
● Songs
● Sound clips
● Streaming links
● Presentations
You can browse and open folders, and copy and move items
to folders. You can also create albums and copy and add items
to albums.
Files stored on your compatible memory card (if inserted) are
indicated with
To open a file, press the scroll key. Video clips, RAM files, and
streaming links open and play in Video centre, and music and
sound clips in Music Player.
To copy or move files to the memory card (if inserted) or to
device memory, select a file and Options > Move and
copy > Copy.
— View images and videos in Photos.
— View videos in Video centre.
— Open Music player .
— Listen to sound clips.
— View and open streaming links.
— View presentations
.
Share online
About Share online
Select > Applications > Share online.
With Share online, you can post your images, video clips, and
sound clips from your device to compatible online sharing
services, such as albums and blogs. You can also view and
send comments to the posts in these services, and download
content to your compatible Nokia device.
The supported content types and the availability of the Share
online service may vary.
Subscribe to services
Select > Applications > Share online.
To subscribe to an online sharing service, go to the service
provider's website, and check that your Nokia device is
compatible with the service. Create an account as instructed
on the website. You receive a user name and password
needed to set up your device with the account.
1. To activate a service, open the Share online application in
your device, select a service and Options > Activate.
2. Allow the device to create a network connection. If you
are prompted for an internet access point, select one from
the list.
3. Sign in to your account as instructed on the service
provider’s website.
Nokia's services in the online sharing service are free of
charge. Any data transferred over the network may incur
charges from your service provider. For the availability and
cost of the third party services and data transfer costs, contact
your service provider or the relevant third party.
Create a post
Select > Applications > Share online.
© 2004 Nokia. All rights reserved. 41
Page 42

To post media files to a service, select a service and
Options > New upload. If the online sharing service
provides channels for posting files, select the desired
channel.
To add an image, video clip, or sound clip to the post, select
Options > Insert.
Enter a title or description for the post, if available.
To add tags to the post, select Tags:.
To enable the posting of location information contained in
the file, select Location:.
To set the level of privacy for a file, select Privacy:. To allow
everyone to view your file, select Public. To restrict others
from seeing your files, select Private. You can define the
Default setting on the service provider's website.
To send the post to the service, select Options > Upload.
About Ovi Share
Ovi Share is an online service that helps you to share your
images, video clips, audio, and other media on your computer
or device with your family and friends. In Ovi Share, you can
tag and comment on images, create lists of your favourites,
and more. You must register to be able to share, but no
registration is required to view the media that you share with
others.
With your device, you can use the Share online application.
For more information, see share.ovi.com.
Music player
Select > Music > Music player.
Music player supports file formats such as AAC, AAC+, eAAC+,
MP3, and WMA. Music player does not necessarily support all
features of a file format or all the variations of file formats.
You can also use Music player to listen to podcast episodes.
Podcasting is a method for delivering audio or video content
over the internet using either RSS or Atom technologies for
playback on mobile devices and PCs.
Play a song or a podcast episode
To add all available songs and podcasts to the music library,
select Options > Refresh library.
To play a song or a podcast episode, select the desired
category, and the song or podcast episode.
To pause playback, press the scroll key; to resume, press the
scroll key again. To stop playback, scroll down.
To fast-forward or rewind, press and hold the scroll key to the
right or left.
To skip to the next item, scroll right. To return to the
beginning of the item, scroll left. To skip to the previous item,
scroll left again within 2 seconds after a song or podcast has
started.
To modify the tone of the music playback, select Options >
Equalizer.
To modify the balance and stereo image, or to enhance bass,
select Options > Audio settings.
© 2004 Nokia. All rights reserved.42
Page 43

To view a visualization during playback, select Options >
Show visualization.
To return to the active standby mode and leave the player
playing in the background, press the end key.
Nokia Music Store
Select > Music > Music store.
In the Nokia Music Store (network service) you can search,
browse, and purchase music to download to your device. To
purchase music, you first need to register for the service.
To access the Nokia Music Store, you must have a valid
internet access point in the device.
Nokia Music Store is not available for all countries or regions.
Nokia Music Store settings
The availability and appearance of the Nokia Music Store
settings may vary. The settings may also be predefined and
not editable. You may be asked to select the access point to
use when connecting to the Nokia Music Store. Select Default
access point.
In the Nokia Music Store, you may be able to edit the settings
by selecting Options > Settings.
Transfer music from PC
1. Ensure that a compatible memory card is inserted in the
device.
2. Connect your device to the PC using Bluetooth
connectivity or a compatible USB data cable.
3. If you are using a USB data cable, select Media transfer
as the connection mode.
If you select Media transfer as the connection mode, you can
use Windows Media Player to synchronize music between
your device and PC.
FM radio
The FM radio depends on an antenna other than the wireless
device antenna. A compatible headset or accessory needs to
be attached to the device for the FM radio to function
properly.
Listen to the radio
Select > Music > Radio.
The quality of the radio broadcast depends on the coverage
of the radio station in that particular area.
You can make a call or answer an incoming call while listening
to the radio. The radio is muted when there is an active call.
To start a station search, select
If you have saved radio stations in your device, to go to the
next or previous saved station, select
Select Options and from the following:
● Activate loudspeaker — Listen to the radio using the
loudspeaker.
● Manual tuning — Change the frequency manually.
● Station directory — View available stations based on
location (network service).
● Save station — Save the station to which you are
currently tuned to your station list.
or .
or .
© 2004 Nokia. All rights reserved. 43
Page 44

● Stations — Open the list of your saved stations.
● Play in background — Re tu rn to th e s ta nd by mo de wh il e
listening to the FM radio in the background.
RealPlayer
Select > Applications > RealPlayer.
RealPlayer plays video and sound clips that are stored on your
device, transferred from an e-mail message, or a compatible
computer, or streamed to your device over the web.
Supported file formats include MPEG-4, MP4 (not streaming),
3GP, RV, RA, AMR, and Midi. RealPlayer does not necessarily
support all variations of a media file format.
Play video clips and stream links
To play a video clip, select Video clips, and a clip.
To list recently played files, in the application main view,
select Recently played.
To stream content over the air (network service), select
Streaming links and a link. RealPlayer recognizes two kinds
of links: an rtsp:// URL and an http:// URL that points to a RAM
file. Before the content begins streaming, your device must
10. Office applications
You can also use your device as a converter or calculator, or
use the different applications to access attachments that you
may have received in an e-mail.
connect to a website and buffer the content. If a network
connection problem causes a playback error, RealPlayer
attempts automatically to reconnect to the internet access
point.
To download video clips from the web, select Download
videos.
To fast-forward during playback, scroll right and hold. To
rewind during play, scroll left and hold.
To stop the playback or streaming, select Stop. Buffering or
the connection to the streaming site stops, the playback of
the clip stops, and the clip rewinds to the beginning.
To view the video clip in normal screen mode, select
Options > Continue in normal scr..
RealPlayer settings
Select > Applications > RealPlayer.
You may receive RealPlayer settings in a message from your
service provider.
To define the settings manually, select Options >
Settings > Video or Streaming.
Calculator
Select > Office > Calculator.
This calculator has limited accuracy and is designed for
simple calculations.
© 2004 Nokia. All rights reserved.44
Page 45

To make a calculation, enter the first number of the
calculation. Select a function such as add or subtract from the
function map. Enter the second number of the calculation and
select = . The calculator performs operations in the order they
are entered. The result of the calculation remains in the editor
field and can be used as the first number of a new calculation.
The device saves the result of the last calculation in its
memory. Exiting the Calculator application or switching off
the device does not clear the memory. To recall the last saved
result the next time you open the Calculator application,
select Options > Last result.
To save the numbers or results of a calculation, select
Options > Memory > Save.
To retrieve the results of a calculation from the memory and
use them in a calculation, select Options > Memory >
Recall.
Convert measurements
Select > Office > Converter.
1. Scroll to the type field, and select Options > Conversion
type to open a list of measures. Select the measurement
type to use (other than currency) and OK.
2. Scroll to the first unit field, and select Options > Select
unit. Select the unit from which to convert and OK. Scroll
to the next unit field, and select the unit to which to
convert.
3. Scroll to the first amount field, and enter the value to
convert. The other amount field changes automatically to
show the converted value.
Find and organize files
Select > Office > File mgr..
To find a file, select Options > Find. Enter a search term that
matches the file name.
To move and copy files and folders, or to create new folders,
select Options > Organize.
Shortcut: To apply actions to multiple items at once,
mark the items. To mark or unmark items, press #.
Quickoffice
About Quickoffice
Select > Office > Quickoffice.
Quickoffice consists of Quickword for viewing Microsoft Word
documents, Quicksheet for viewing Microsoft Excel
worksheets, Quickpoint for Microsoft PowerPoint
presentations, and Quickmanager for purchasing software.
You can view Microsoft Office 2000, XP, and 2003 documents
(DOC, XLS, and PPT file formats) with Quickoffice. If you have
the editor version of Quickoffice, you can also edit files.
Not all file formats or features are supported.
Work with files
To open a file, scroll to it and press the scroll key.
To sort files according to the type, select Options > Sort
by.
To view the details of a file, select Options > Details. The
details include the name, size and location of the file, and the
time and date when the file was last modified.
© 2004 Nokia. All rights reserved. 45
Page 46

To send files to a compatible device, select Options >
Send and the sending method.
You can save the archive files in the device memory or on a
memory card.
Zip manager
Select > Office > Zip.
With Zip manager, you can create new archive files to store
compressed ZIP formatted files; add single or multiple
compressed files or directories to an archive; set, clear, or
change the archive password for protected archives; and
change settings, such as compression level and file name
encoding.
11. Downloads
You can download and install applications to your device.
Application manager
With Application manager, you can see the software
packages installed in your device. You can view details of
installed applications, remove applications, and define
installation settings.
You can install two types of applications and software to your
device:
● JME applications based on Java™ technology with the .jad
or .jar file extensions
● Other applications and software suitable for the Symbian
operating system with the .sis or .sisx file extensions
Only install software that is compatible with your device.
PDF reader
Select > Office > Adobe PDF.
With PDF reader, you can read PDF documents on the display
of your device; search for text in the documents; modify
settings, such as zoom level and page views; and send PDF
files using e-mail.
Install applications and software
You can transfer installation files to your device from a
compatible computer, download them during browsing, or
receive them in a multimedia message, as an e-mail
attachment, or using other connectivity methods, such as
Bluetooth connectivity. You can use Nokia Application
Installer in Nokia PC Suite to install an application to your
device.
Icons in Application manager indicate the following:
.sis or .sisx application
Java application
application not fully installed
application installed in the memory card
© 2004 Nokia. All rights reserved.46
Page 47

Important: Only install and use applications and other
software from trusted sources, such as applications that are
Symbian Signed or have passed the Java Verified testing.
Before installation, note the following:
● To view the application type, version number and the
supplier or manufacturer of the application, select
Options > View details.
To display the security certificate details of the application,
select Details: > Certificates: > View details.
● If you install a file that contains an update or repair to an
existing application, you can only restore the original
application if you have the original installation file or a full
backup copy of the removed software package. To restore
the original application, remove the application, and
install the application again from the original installation
file or the backup copy.
The .jar file is required for installing Java applications. If it
is missing, the device may ask you to download it. If there
is no access point defined for the application, you are
asked to select one. When you are downloading the .jar
file, you may need to enter a user name and password to
access the server. You obtain these from the supplier or
manufacturer of the application.
To install an application or software:
1. To locate an installation file, select
App. mgr.. Alternatively, search installation files using
File Manager, or select Messaging > Inbox, and open a
message that contains an installation file.
> Installations >
2. In Application Manager, select Options > Install. In
other applications, to start the installation, select the
installation file.
During installation, the device shows information about
the progress of the installation. If you install an
application without a digital signature or certification,
the device displays a warning. Continue installation only
if you are sure of the origin and contents of the
application.
To start an installed application, select the application. If the
application does not have a default folder defined, it is
installed in the Installations folder in the main menu.
To see which software packages are installed or removed and
when, select Options > View log.
Important: Your device can only support one antivirus
application. Having more than one application with antivirus
functionality could affect performance and operation or
cause the device to stop functioning.
After you install applications to a compatible memory card,
installation files (.sis, .sisx) remain in the device memory. The
files may use large amounts of memory and prevent you from
storing other files. To maintain sufficient memory, use Nokia
PC Suite to back up installation files to a compatible PC, then
use the file manager to remove the installation files from the
device memory.If the .sis file is a message attachment, delete
the message from the Messaging inbox.
Remove applications and software
Select > Applications > Installations > App. mgr..
© 2004 Nokia. All rights reserved. 47
Page 48

Scroll to a software package and select Options >
Uninstall. Select Yes to confirm.
If you remove software, you can only reinstall it if you have
the original software package or a full backup of the removed
software package. If you remove a software package, you
may no longer be able to open files created with that
software.
If another software package depends on the software
package that you removed, the other software package may
stop working. For more information, see the documentation
of the installed software package.
With Download! (network service), you can browse,
download, and install items, such as latest applications and
related documents, to your device from the Web.
The items are categorized under catalogs and folders
provided by Nokia or independent service providers. Some
items may be chargeable, but you can usually preview them
free of charge.
Download! uses available network connections to access the
most up-to-date content. For information on additional items
available through Download!, contact your service provider,
or the supplier or manufacturer of the item.
Application manager settings
Select > Applications > Installations > App. mgr..
Select Options > Settings and from the following:
● Software installation — Select whether Symbian
software that has no verified digital signature can be
installed.
● Online certificate check — Check the online certificates
before installing an application.
● Default web address — Set the default address used
when checking online certificates.
Some Java applications may require that a message be sent
or a network connection be made to a specific access point
to download extra data or components.
Download!
Select > Download!.
Manage items
Select > Download!.
To open an item or view the content of a folder or catalog,
select the item, folder, or catalog.
To buy the selected item, select Options > Buy.
To download an item that is free of charge, select Options >
Get.
To search for an item, select Options > Search.
To adjust the settings, select Options > Applications >
Settings.
To view a list of downloaded items, select Options > My
items.
Subscriptions
Select > Download! and Options > My items > My
subscriptions.
© 2004 Nokia. All rights reserved.48
Page 49

To view file details of the selected item, select Options >
Open.
To renew or cancel a subscription, select Options and the
corresponding option.
Download! search
Select > Download! and Options > Search.
Scroll to the catalogs from which you want to search for
items, select Mark, and enter the search keywords.
To start the search, select Options > Search.
Purchase history
Select > Download! and My items > My downloads.
To open the selected item with the corresponding
application, select Options > Open.
To view file details of the selected item, select Options >
View details.
To start, pause, resume or cancel the download of the
selected item, select Options and the corresponding option.
12. Protect your device and data
Download! settings
Select > Download!.
To change the Download! settings, select Options >
Settings and from the following:
● Network connection — Select the network destination
used for the network connection.
● Connection type — Select whether you want a
confirmation query to be shown before the connection is
created.
● Automatic open — Select whether you want the
downloaded item or application to open automatically
after the download is completed.
● Preview confirmation — Select whether you want a
confirmation query to be shown before previewing an
item.
● Buy confirmation — Select whether you want a
confirmation query to be shown before buying an item.
● Subscript. confirmation — Define whether you want the
subscription confirmation query to be shown before
subscribing to an item.
Important: Your device can only support one antivirus
application. Having more than one application with antivirus
functionality could affect performance and operation or
cause the device to stop functioning.
© 2004 Nokia. All rights reserved. 49
Lock the device
The lock code protects your device against unauthorized use.
The preset code is 12345.
To lock the device, in the active standby, press the power key,
and select Lock phone.
Page 50

To unlock your device, select Unlock, enter the lock code, and
select OK.
To change the lock code, select
General > Security > Phone and SIM card. Enter the old
code and then the new code twice. The new code can be
4-255 characters long. Both letters and digits can be used,
and both uppercase and lowercase letters are possible.
Write down the new code, and keep it secret and in a safe
place separate from your device. If you forget the lock code
and your device is locked, you must take the device to a Nokia
authorized service facility and additional charges may apply.
To unlock the device, the software must be reloaded, and the
data you have saved in the device may be lost.
You can also lock the device remotely by sending a text
message to the device. To enable remote locking, and to
define the text for the message, select
Settings and General > Security > Phone and SIM
card > Remote phone locking > Enabled. Enter the
remote lock message, and confirm the message. The message
must be at least 5 characters long. Write down the text, as
you may need it later.
> Tools > Settings and
> Tools >
Memory card security
Select > Office > File mgr..
You can protect a memory card with a password to prevent
unauthorized access. To set a password, select Options >
Memory card password > Set. The password can be up to
8 characters long and is case-sensitive. The password is
stored in your device. You do not need to enter it again while
you use the memory card on the same device. If you use the
memory card on another device, you are asked for the
password. Not all memory cards support password
protection.
To remove the memory card password, select Options >
Memory card password > Remove. When you remove the
password, the data on the memory card is not protected
against unauthorized use.
To open a locked memory card, select Options > Unlock
memory card. Enter the password.
If you cannot recall the password to unlock a locked memory
card, you may reformat the card, in which case the card is
unlocked and password removed. Formatting a memory card
destroys all data stored on the card.
Back up data
Select > Office > File mgr..
It is recommended that you back up the device memory
regularly to a memory card or a compatible computer.
To back up information from the device memory to a memory
card, select Options > Back up phone memory.
To restore information from the memory card to the device
memory, select Options > Restore from mem. card.
You can also connect your device to a compatible computer
and use Nokia PC Suite to back up data.
Be careful when you connect
Your device supports several connectivity methods and, like
computers, may be exposed to viruses and other harmful
© 2004 Nokia. All rights reserved.50
Page 51

content. Exercise caution with messages, connectivity
requests, browsing, and downloads.
Messages
● If you receive suspicious messages, do not open the
attachments.
Important: Exercise caution when opening
messages. Messages may contain malicious software or
otherwise be harmful to your device or PC.
Bluetooth
● When you are not using Bluetooth connectivity, select
Bluetooth > Off or My phone's visibility > Hidden.
13. Settings
Select > Tools > Settings. You can define and modify various settings of your device.
Modifying these settings affects the operation of your device
across several applications.
Some settings may be preset for the device or sent to you in
a special message by your service provider. You may not be
able to change such settings.
Select the setting you want to edit, and modify the values in
the following ways:
● Switch between two values, such as on or off.
● Select a value from a list.
● Open a text editor to enter a value.
● Scroll left or right to adjust a value.
● Do not pair with unknown devices or devices that you do
not trust.
Browsing and downloads
● If you have tried to access or have accessed confidential
information requiring passwords, empty the cache after
each use. The information or services you have accessed
are stored in the cache.
Important: Use only services that you trust and
that offer adequate security and protection against
harmful software.
General settings
Select > Tools > Settings and General.
Select from the following:
● Personalization — Change the display settings, and
personalize the device.
● Date and time — Change the date and time.
● Enhancement — Define the settings for your accessories.
● Slide handling — Change the slide settings.
● My own key — Change the function that is activated
when you press the internet or messaging key.
● Sensor settings — Change the sensor settings.
● Security — Define the security settings.
● Factory settings — Restore the original settings of the
device.
© 2004 Nokia. All rights reserved. 51
Page 52

● Positioning — Define the positioning method and server
for GPS-based applications.
Phone settings
Select > Tools > Settings and Phone.
Select from the following:
● Call — Define general call settings.
● Call forwarding — Define call divert settings.
● Call restriction — Define call barring settings.
● Network — Define the network settings.
Connection settings
Select > Tools > Settings and Connection.
Select from the following:
● Bluetooth — Edit the Bluetooth settings.
● USB — Edit the data cable settings.
● Destinations — Define new or edit existing access points.
Some or all access points may be preset for your device by
your service provider, and you may not be able to create,
edit or remove them.
14. Green tips
Here are tips on how you can contribute to
protecting the environment.
● Packet data — Define when packet data network is
attached, and enter the default packet switched access
point name if you use your device as a modem for a
computer.
● Data call — Set the time-out period after which data call
connections automatically end.
● Presence — Edit the settings for presence (network
service). To register for the service, contact your service
provider.
● SIP settings — View or create session initiation protocol
(SIP) profiles.
● XDM settings — Create an XDM profile. The XDM profile is
required for many communications applications, for
example, presence.
● Remote drives — Connect the device to a remote drive.
● Configurations — View and delete trusted servers from
which your device may receive configuration settings.
● APN control — Restrict packet data connections.
Application settings
Select > Tools > Settings and Applications.
Select an application from the list to adjust its settings.
Save energy
When you have fully charged the battery and disconnected
the charger from the device, unplug the charger from the wall
outlet.
© 2004 Nokia. All rights reserved.52
Page 53

You do not need to charge your battery so often if you do the
following:
● Close and disable applications, services, and connections
when not in use.
● Decrease the brightness of the screen.
● Set the device to enter the power saver mode after the
minimum period of inactivity, if available in your device.
● Disable unnecessary sounds, such as keypad and ringing
tones.
Recycle
Most of the materials in a Nokia phone are recyclable. Check
how to recycle your Nokia products at www.nokia.com/
werecycle, or with a mobile device, www.nokia.mobi/
werecycle.
Recycle packaging and user guides at your local recycling
scheme.
Save paper
This user guide helps you get started with your device. For
more detailed instructions, open the in-device help (in most
applications, select Options > Help). For further support,
see www.nokia.com/support.
Learn more
For more information on the environmental attributes of
your device, see www.nokia.com/ecodeclaration.
© 2004 Nokia. All rights reserved. 53
Page 54

Accessories
Warning: Use only batteries, chargers, and
accessories approved by Nokia for use with this particular
model. The use of any other types may invalidate any
approval or guarantee, and may be dangerous. In particular,
use of unapproved chargers or batteries may present a risk
of fire, explosion, leakage, or other hazard.
Battery
Battery and charger information
Your device is powered by a rechargeable battery. The battery
intended for use with this device is BP-4L. Nokia may make
additional battery models available for this device. This
device is intended for use when supplied with power from
the following chargers: AC-8
may vary depending on the type of plug. The plug variant is
identified by one of the following: E, EB, X, AR, U, A, C, K, or
UB.
The battery can be charged and discharged hundreds of
times, but it will eventually wear out. When the talk and
standby times are noticeably shorter than normal, replace
the battery. Use only Nokia approved batteries, and recharge
your battery only with Nokia approved chargers designated
for this device.
If a battery is being used for the first time or if the battery
has not been used for a prolonged period, it may be necessary
to connect the charger, then disconnect and reconnect it to
begin charging the battery. If the battery is completely
. The exact charger model number
For availability of approved accessories, please check with
your dealer. When you disconnect the power cord of any
accessory, grasp and pull the plug, not the cord.
discharged, it may take several minutes before the charging
indicator appears on the display or before any calls can be
made.
Safe removal. Always switch the device off and disconnect the
charger before removing the battery.
Proper charging. Unplug the charger from the electrical plug
and the device when not in use. Do not leave a fully charged
battery connected to a charger, since overcharging may
shorten its lifetime. If left unused, a fully charged battery will
lose its charge over time.
Avoid extreme temperatures. Always try to keep the battery
between 59°F and 77°F (15°C and 25°C). Extreme
temperatures reduce the capacity and lifetime of the battery.
A device with a hot or cold battery may not work temporarily.
Battery performance is particularly limited in temperatures
well below freezing.
Do not short-circuit. Accidental short-circuiting can occur
when a metallic object such as a coin, clip, or pen causes
direct connection of the positive (+) and negative (-)
© 2004 Nokia. All rights reserved.54
Page 55

terminals of the battery. (These look like metal strips on the
battery.) This might happen, for example, when you carry a
spare battery in your pocket or purse. Short-circuiting the
terminals may damage the battery or the connecting object.
Disposal. Do not dispose of batteries in a fire as they may
explode. Dispose of batteries according to local regulations.
Please recycle when possible. Do not dispose as household
waste.
Leak. Do not dismantle, cut, open, crush, bend, puncture, or
shred cells or batteries. In the event of a battery leak, prevent
battery liquid contact with skin or eyes. If this happens, flush
the affected areas immediately with water, or seek medical
help.
Damage. Do not modify, remanufacture, attempt to insert
foreign objects into the battery or immerse or expose it to
water or other liquids. Batteries may explode if damaged.
Correct use. Use the battery only for its intended purpose.
Improper battery use may result in a fire, explosion, or other
hazard. If the device or battery is dropped, especially on a
hard surface, and you believe the battery has been damaged,
take it to a service center for inspection before continuing to
use it. Never use any charger or battery that is damaged. Keep
your battery out of the reach of small children.
Safe removal. Always switch the device off and disconnect the
charger before removing the battery.
Nokia battery authentication guidelines
Always use original Nokia batteries for your safety. To check
that you are getting an original Nokia battery, purchase it
from a Nokia authorized service center or dealer, and inspect
the hologram label using the following steps:
Authenticate hologram
1. When you look at the hologram on
the label, you should see the Nokia
connecting hands symbol from one
angle and the Nokia Original
Enhancements logo when looking
from another angle.
2. When you angle the hologram left,
right, down and up, you should see 1,
2, 3 and 4 dots on each side
respectively.
Successful completion of the steps is not
a total assurance of the authenticity of
the battery. If you cannot confirm
authenticity or if you have any reason to
believe that your Nokia battery with the
hologram on the label is not an authentic
Nokia battery, you should refrain from
using it, and take it to the nearest Nokia authorized service
center or dealer for assistance.
For additional information, refer to the warranty and
reference leaflet included with your Nokia device.
© 2004 Nokia. All rights reserved. 55
Page 56

Taking care of your device
Your device is a product of superior design and craftsmanship
and should be treated with care. The following suggestions
will help you protect your warranty coverage.
● Keep the device dry. Precipitation, humidity, and all types
of liquids or moisture can contain minerals that will
corrode electronic circuits. If your device does get wet,
remove the battery, and allow the device to dry completely
before replacing it.
● Do not use or store the device in dusty, dirty areas. Its
moving parts and electronic components can be damaged.
● Do not store the device in high or cold temperatyre. High
temperatures can shorten the life of electronic devices,
damage batteries, and warp or melt certain plastics. When
the device warms to its normal temperature from a cold
temperature, moisture can form inside the device and
damage electronic circuit boards.
● Do not attempt to open the device other than as instructed
in this guide.
● Do not drop, knock, or shake the device. Rough handling
can break internal circuit boards and fine mechanics.
● Do not use harsh chemicals, cleaning solvents, or strong
detergents to clean the device. Only use a soft, clean, dry
cloth to clean the surface of the device.
● Do not paint the device. Paint can clog the moving parts
and prevent proper operation.
● Use only the supplied or an approved replacement
antenna. Unauthorized antennas, modifications, or
attachments could damage the device and may violate
regulations governing radio devices.
● Use chargers indoors.
● Backup all data you want to keep, such as contacts and
calendar notes.
● To reset the device from time to time for optimum
performance, power off the device and remove the
battery.
These suggestions apply equally to your device, battery,
charger, or any accessory.
Recycle
Always return your used electronic products, batteries, and
packaging materials to dedicated collection points. This way
you help prevent uncontrolled waste disposal and promote
the recycling of materials. Check product environmental
information and how to recycle your Nokia products at
www.nokia.com/werecycle, or www.nokia.mobi/werecycle.
© 2004 Nokia. All rights reserved.56
Page 57

Additional safety information
Small children
Your device and its accessories are not toys. They may contain
small parts. Keep them out of the reach of small children.
Operating environment
This device meets RF exposure guidelines in the normal use
position at the ear or at least 2.2 centimeters (7/8 inch) away
from the body. Any carry case, belt clip, or holder for bodyworn operation should not contain metal and should position
the device the above-stated distance from your body.
To send data files or messages requires a quality connection
to the network. Data files or messages may be delayed until
such a connection is available. Follow the separation distance
instructions until the transmission is completed.
Medical devices
Operation of any radio transmitting equipment, including
wireless phones, may interfere with the functionality of
inadequately protected medical devices. Consult a physician
or the manufacturer of the medical device to determine if
they are adequately shielded from external RF energy or if
you have any questions. Switch off your device in health care
facilities when any regulations posted in these areas instruct
you to do so. Hospitals or health care facilities may be using
equipment that could be sensitive to external RF energy.
Implanted medical devices
Manufacturers of medical devices recommend that a
minimum separation of 15.3 centimeters (6 inches) should
be maintained between a wireless device and an implanted
medical device, such as a pacemaker or implanted
cardioverter defibrillator, to avoid potential interference
with the medical device. Persons who have such devices
should:
● Always keep the wireless device more than 15.3
centimeters (6 inches) from the medical device when the
wireless device is turned on.
● Not carry the wireless device in a breast pocket.
● Hold the wireless device to the ear opposite the medical
device to minimize the potential for interference.
● Turn the wireless device off immediately if there is any
reason to suspect that interference is taking place.
● Read and follow the directions from the manufacturer of
their implanted medical device.
If you have any questions about using your wireless device
with an implanted medical device, consult your health care
provider.
Hearing aids
Some digital wireless devices may interfere with some
hearing aids. If interference occurs, consult your service
provider.
© 2004 Nokia. All rights reserved. 57
Page 58

Vehicles
RF signals may affect improperly installed or inadequately
shielded electronic systems in motor vehicles such as
electronic fuel injection, electronic antilock braking,
electronic speed control, and air bag systems. For more
information, check with the manufacturer of your vehicle or
its equipment.
Only qualified personnel should service the device or install
the device in a vehicle. Faulty installation or service may be
dangerous and may invalidate your warranty. Check regularly
that all wireless device equipment in your vehicle is mounted
and operating properly. Do not store or carry flammable
liquids, gases, or explosive materials in the same
compartment as the device, its parts, or accessories.
Remember that air bags inflate with great force. Do not place
your device or accessories in the air bag deployment area.
Switch off your device before boarding an aircraft. The use of
wireless teledevices in an aircraft may be dangerous to the
operation of the aircraft and may be illegal.
Potentially explosive environments
Sw it ch off yo ur dev ic e i n an y a rea with a potentially explosive
atmosphere. Obey all posted instructions. Sparks in such
areas could cause an explosion or fire resulting in bodily
injury or death. Switch off the device at refueling points such
as near gas pumps at service stations. Observe restrictions in
fuel depots, storage, and distribution areas; chemical plants;
or where blasting operations are in progress. Areas with a
potentially explosive atmosphere are often, but not always,
clearly marked. They include areas where you would be
advised to turn off your vehicle engine, below deck on boats,
chemical transfer or storage facilities and where the air
contains chemicals or particles such as grain, dust, or metal
powders. You should check with the manufacturers of
vehicles using liquefied petroleum gas (such as propane or
butane) to determine if this device can be safely used in their
vicinity.
Emergency calls
Important: This device operates using radio signals,
wireless networks, landline networks and user-programmed
functions. If your device supports voice calls over the internet
(internet calls), activate both the internet calls and the
cellular phone. The device may attempt to make emergency
calls over both the cellular networks and through your
internet call provider if both are activated. Connections in all
conditions cannot be guaranteed. You should never rely
solely on any wireless device for essential communications
like medical emergencies.
To make an emergency call:
1. If the device is not on, switch it on. Check for adequate
signal strength. Depending on your device, you may also
need to complete the following:
● Insert a SIM card if your device uses one.
● Remove certain call restrictions you have activated in
your device.
● Change your profile from Offline or Flight profile to an
active profile.
2. Press the end key as many times as needed to clear the
display and ready the device for calls.
© 2004 Nokia. All rights reserved.58
Page 59

3. Enter the official emergency number for your present
location. Emergency numbers vary by location.
4. Press the call key.
When making an emergency call, give all the necessary
information as accurately as possible. Your wireless device
may be the only means of communication at the scene of an
accident. Do not end the call until given permission to do so.
Certification information (SAR)
This mobile device meets guidelines for exposure to
radio waves.
Your mobile device is a radio transmitter and receiver. It is
designed not to exceed the limits for exposure to radio waves
recommended by international guidelines. These guidelines
were developed by the independent scientific organization
ICNIRP and include safety margins designed to assure the
protection of all persons, regardless of age and health.
The exposure guidelines for mobile devices employ a unit of
measurement known as the Specific Absorption Rate or SAR.
The SAR limit stated in the ICNIRP guidelines is 2.0 watts/
kilogram (W/kg) averaged over 10 grams of tissue. Tests for
SAR are conducted using standard operating positions with
the device transmitting at its highest certified power level in
all tested frequency bands. The actual SAR level of an
operating device can be below the maximum value because
the device is designed to use only the power required to reach
the network. That amount changes depending on a number
of factors such as how close you are to a network base station.
The highest SAR value under the ICNIRP guidelines for use of
the device at the ear is 0.85 W/kg
.
Use of device accessories may result in different SAR values.
SAR values may vary depending on national reporting and
testing requirements and the network band. Additional SAR
information may be provided under product information at
www.nokia.com.
Your mobile device is also designed to meet the requirements
for exposure to radio waves established by the Federal
Communications Commission (USA) and Industry Canada.
These requirements set a SAR limit of 1.6 W/kg averaged over
one gram of tissue. The highest SAR value reported under this
standard during product certification for use at the ear is 0.93
W/kg and when properly worn on the body is 0.37 W/kg
.
© 2004 Nokia. All rights reserved. 59
Page 60

Index
A
access codes 10
alarm
calendar note 39
alarm clock 23
animated screen saver 25
anniversary notes 39
antennas 23
application manager 46
application settings 52
applications 21, 46
assisted GPS (A-GPS) 27
audio messages 20
auto-update for time/date 23
B
background image 25
backing up data 50
battery
charging 14
inserting 12
birthday notes 39
blogs 34
Bluetooth
authorizing devices 37
pairing 37
passcode 37
receiving data 36
sending data 36
browser 32
cache memory 34
security 34
C
cache memory 34
calculator 44
calls
answering 19
making 19
voice mail 19
camera
capturing images 40
toolbar 40
video clips 40
chat services (IM) 26
Clock
settings 23
connection methods
Bluetooth 36
contacts
creating groups 39
editing 39
images in 39
ringing tones 40
saving 39
converting
measurements 45
D
data connections 38
date and time 23
display
changing the look 25
Download!
managing items 48
purchase history 49
search settings 49
settings 49
subscriptions 48
E
e-mail 26
F
feeds, news 34
FM radio 43
G
Gallery 41
GPS
position requests 29
GPS (global positioning
system) 27
H
headset 15
HSDPA 34
© 2004 Nokia. All rights reserved.60
Page 61

I
IM (instant messaging) 26
indicators 22
installing applications 46
internet connection 32
See also
browser
J
Java applications 46
JME Java application support 46
K
keyboard 20
keypad lock 15
keys 11, 25, 32
L
landmarks 29
location information 27
lock code 10, 49
locking
device 49
M
mail for exchange 26
Maps 31
maps
browsing 31
navigating 32
routes 31
measurements
converting 45
media
radio 43
meeting notes 39
meetings
setting up 39
memo notes
See
memory
memory card 15, 16
menus 21
MMS (multimedia message
service) 20
multimedia messages 20
music player
music store 43
to-do notes
web cache 34
backing up data 50
locking 50
passwords 50
playing 42
transferring music 43
N
navigation tools 27
news feeds 34
Nokia Music Store 43
Nokia support information 8
O
Ovi Mail 25
Ovi Share 42
P
pairing
devices 37
passcode 37
PDF reader 46
personalization 25
phone setup 17
PIN code 10
PIN2 code 10
playing
video and audio 44
positioning information 27
profiles
creating 24
customizing 24
selecting ringing tones 25
PUK codes 10
Q
Quickoffice 45
R
radio 43
listening 43
RealPlayer
playing media clips 44
settings 44
remote lock 49
ringing tones
in profiles 25
© 2004 Nokia. All rights reserved. 61
Page 62

S
screen saver 25
security
memory card 50
web browser 34
security code 10, 49
sending
using Bluetooth 36
settings 10
applications 52
clock 23
Download! application 49
RealPlayer 44
settings wizard 18
Share online 41
activating services 41
creating posts 41
subscribing 41
sharing media files online 41
shortcuts 17
SIM card
inserting 12
SMS (short message service) 20
software applications 46
support resources 8
Switch 18
Switch application 10
switching device on and off 14
Symbian applications 46
T
text entry 20
text messages
sending 20
themes
changing 25
time and date 23
time zone settings 23
to-do notes 39
U
uploading media files 41
USB data cable 35
V
video clips
playing 44
voice mail
calling 19
changing number 19
volume control 19
W
web connection 32
web logs 34
week settings
calendar alarm 39
world clock 23
Z
Zip manager 46
© 2004 Nokia. All rights reserved.62
Page 63

Guide d'utilisation du Nokia 6790 slide
Version 1
Page 64

DÉCLARATION DE CONFORMITÉ
NOKIA CORPORATION déclare par la présente que le produit RM-599 est conforme aux exigences essentielles et aux dispositions applica
de l
a Directive 1999/5/EC. Vous trouverez une copie de la déclaration de conformité à l’adresse http://www.nokia.com/phones/
bles
declaration_of_conformity.
Nokia, Nokia Connecting People, Mail for Exchange, Navi, Ovi et le logo des accessoires d’origine de Nokia sont des marques de commerce ou des marques déposées
de Nokia Corporation. La mélodie Nokia est une marque sonore de Nokia Corporation. Les autres noms de produits et de sociétés mentionnés dans le présent document
sont des marques de commerce ou des appellations commerciales de leurs propriétaires respectifs.
Il est interdit de reproduire, de transférer, de distribuer ou de stocker une partie ou la totalité du contenu du présent document, sous quelque forme que ce soit, sans
l’autorisation écrite préalable de Nokia. Nokia pratique une politique de développement continu. Nokia se réserve le droit d'apporter des modifications et des
améliorations à tout produit mentionné dans le présent document sans avis préalable.
Ce logiciel repose en partie sur l'œuvre de la FreeType Team. Ce produit est protégé par l'un ou plusieurs des brevets suivants : brevets américains n° 5155805, 5325479,
5159668, 2232861 et brevet français 9005712.
Symbian Ltd.
Ce produit inclut la licence d'un système d'exploitation de Symbian Ltd © 1998-2009. Symbian et Symbian OS sont des marques de commerce de
Java et tous les noms des marques Java sont des marques de commerce ou des marques déposées de Sun Microsystems, Inc.
Certaines parties de l'application Cartes de Nokia sont protégées par droits d'auteur ©1996-2009. The FreeType Project. Tous droits réservés.
Ce produit fait l'objet d'une licence MPEG-4 Visual (i) pour un usage personnel et non commercial en relation avec l'information encodée conformément au standard
MPEG-4 Visual par un consommateur, pour une utilisation personnelle et non commerciale, et (ii) pour un usage avec Des produits MPEG-4 vidéo fournis par un prestataire
détenteur d'une licence. Aucune licence n'est accordée pour toute autre utilisation ni ne devrait être interprétée à de telles fins. Des renseignements supplémentaires,
notamment des renseignements portant sur les utilisations promotionnelles, internes et commerciales, sont disponibles auprès de MPEG LA, LLC. Sur le Web : http://
www.mpegla.com.
DANS LA MESURE OÙ LES LOIS EN VIGUEUR LE PERMETTENT, NOKIA NE PEUT EN AUCUN CAS ÊTRE TENUE RESPONSABLE DE TOUTE PERTE DE DONNÉES OU DE REVENU AINSI QUE
DE TOUT DOMMAGE PARTICULIER, INCIDENT, CONSÉCUTIF OU INDIRECT.
LE CONTENU DU PRÉSENT DOCUMENT EST FOURNI « TEL QUEL ». SOUS RÉSERVE DES LOIS APPLICABLES, AUCUNE GARANTIE SOUS QUELQUE FORME QUE CE SOIT, EXPLICITE OU
IMPLICITE, Y COMPRIS, MAIS SANS S'Y LIMITER, LES GARANTIES IMPLICITES DE QUALITÉ MARCHANDE ET D'ADÉQUATION À UN USAGE PARTICULIER, N'EST ACCORDÉE QUANT À
L'EXACTITUDE, À LA FIABILITÉ OU AU CONTENU DU PRÉSENT DOCUMENT. NOKIA SE RÉSERVE LE DROIT DE MODIFIER LE PRÉSENT DOCUMENT OU DE LE RETIRER SANS AVIS
PRÉALABLE.
Page 65

Toute ingénierie inverse de logiciels compris dans cet appareil est strictement interdite, dans la mesure des lois en vigueur. Si le présent guide d'utilisation contient
des restrictions quant à la représentation, la garantie et la responsabilité de Nokia, celles-ci restreignent également la représentation, la garantie et la responsabilité
des concédants de Nokia.
La disponibilité des produits, des services et des applications connexes peut varier selon les régions. Pour toute question à ce sujet ou concernant la langue des produits,
veuillez communiquer avec votre détaillant Nokia. Cet appareil peut contenir des marchandises, des technologies ou des logiciels assujettis aux lois et règlements sur
l’exportation en vigueur aux États-Unis et dans d’autres pays. Il est interdit d'exporter ce produit en contravention de la loi.
AVIS DE LA FCC ET D'INDUSTRIE CANADA
Votre appareil peut nuire à la réception des téléviseurs et des radios (s’il est utilisé à proximité des récepteurs, par exemple). La FCC et Industrie Canada peuvent exiger
que vous cessiez d'utiliser votre téléphone si vous ne parvenez pas à éliminer l'interférence. Si vous avez besoin d’assistance, communiquez avec un centre de service
de votre région. Cet appareil est conforme aux dispositions de la section 15 du règlement de la FCC. Son utilisation est assujettie aux deux conditions suivantes : 1) Ce
dispositif ne doit pas causer d'interférence nuisible; et 2) ce dispositif doit accepter toute interférence reçue, y compris l'interférence qui pourrait causer un
fonctionnement non désiré. Toute modification ou altération non autorisée par Nokia risque d'annuler les droits de l'utilisateur de se servir de cet appareil.
Version 1 FR-CA
Page 66

Table des matières
Sécurité................................................................7
À propos de votre appareil.......................................................7
Applications de bureautique....................................................8
Services réseau...........................................................................8
Mémoire partagée.....................................................................9
Assistance.............................................................9
1. Foire aux questions........................................10
Qu'est-ce le code de verrouillage?.........................................10
Où puis-je obtenir les paramètres de mon appareil?..........10
Comment puis-je transférer le contenu de mon ancien
appareil?...................................................................................11
2. Démarrage......................................................11
Touches et pièces....................................................................12
Insérer la carte SIM et la pile..................................................13
Charger la pile..........................................................................15
Allumer ou éteindre l'appareil...............................................15
Verrouiller le clavier................................................................16
Connecter les écouteurs..........................................................16
Cartes mémoire........................................................................16
Raccourcis.................................................................................18
3. Votre Nokia 6790 à clavier coulissant ...........19
Configuration du téléphone...................................................19
Assistant paramètres..............................................................19
Transférer des fichiers et des données.................................19
Faire des appels.......................................................................20
Boîte vocale..............................................................................21
Réglage du volume..................................................................21
Écrire du texte avec le clavier.................................................21
Rédiger et envoyer des messages..........................................22
Veille active..............................................................................23
Menu.........................................................................................23
Indicateurs...............................................................................24
Horloge.....................................................................................25
Emplacement des antennes...................................................26
4. Personnaliser votre appareil..........................26
Profils........................................................................................26
Choisir les sonneries................................................................27
Changer le thème de l'affichage............................................27
5. Courriel et messagerie instantanée...............28
Touche de messagerie............................................................28
Ovi Mail.....................................................................................28
Messagerie Nokia.....................................................................28
Mail for Exchange.....................................................................28
Clavardage................................................................................29
6. Cartes Ovi........................................................30
Positionnement (GPS).............................................................30
À propos de l'application Cartes.............................................34
Se déplacer sur une carte........................................................34
Planifier un itinéraire..............................................................35
Naviguer vers une destination...............................................35
7. Internet et connectivité.................................36
Touche Internet.......................................................................36
Page 67

Naviguer...................................................................................36
Téléchargement rapide...........................................................38
Connecter le câble de données USB.......................................39
Bluetooth..................................................................................40
Gestionnaire de connexion.....................................................42
8. Agenda et contacts.........................................43
Créer une entrée d'agenda.....................................................43
Affichages de l'agenda............................................................44
Enregistrer et modifier des noms et des numéros..............44
Créer des groupes de contacts...............................................44
Associer des sonneries à des contacts...................................44
9. Images et musique.........................................45
Lentille de l'appareil photo....................................................45
Bibliothèque.............................................................................46
Partage en ligne......................................................................46
À propos d'Ovi Share...............................................................47
Lecteur de musique.................................................................47
Radio FM...................................................................................49
RealPlayer.................................................................................49
Téléchargez!.............................................................................54
12. Protéger l'appareil et ses données..............56
Verrouiller l'appareil...............................................................56
Fonctions de sécurité de la carte mémoire...........................57
Sauvegarder vos données.......................................................57
Soyez prudent lors des connexions.......................................57
13. Paramètres...................................................58
Paramètres généraux..............................................................58
Paramètres du téléphone.......................................................59
Paramètres de connexion.......................................................59
Paramètres d'applications......................................................59
14. Conseils écologiques....................................60
Économie d'énergie.................................................................60
Recyclage..................................................................................60
Économie de papier.................................................................60
Renseignements supplémentaires........................................60
Accessoires.........................................................61
10. Applications de bureautique........................50
Calculatrice...............................................................................50
Conversion de mesures...........................................................51
Rechercher et organiser des fichiers.....................................51
Quickoffice................................................................................51
Zip Manager..............................................................................52
Lecteur PDF...............................................................................52
11. Téléchargements..........................................52
Gestionnaire d'applications....................................................52
Pile.....................................................................61
Renseignements concernant la pile et les chargeurs..........61
Identification des piles d'origine de Nokia...........................62
Soins à apporter à votre appareil......................63
Recyclage..................................................................................64
Autres renseignements importants concernant
la sécurité...........................................................64
Jeunes enfants.........................................................................64
Page 68

Environnement d'utilisation...................................................64
Appareils médicaux.................................................................64
Véhicules...................................................................................65
Environnements à risques d’explosion.................................65
Appels d'urgence.....................................................................66
Renseignements sur la certification (SAR)............................66
Index..................................................................68
Page 69

Sécurité
Veuillez lire ces consignes de sécurité. Il peut s’avérer
dangereux, voire illégal, de ne pas s’y conformer. Pour de
l'information plus détaillée, lisez le guide d'utilisation au
complet.
ALLUMEZ VOTRE APPAREIL AVEC DISCERNEMENT
N'allumez pas l'appareil lorsque l'utilisation des
téléphones sans fil est interdite ou si elle risque de
provoquer des interférences ou de présenter un
danger.
LA SÉCURITÉ ROUTIÈRE AVANT TOUT
Respectez toutes les lois locales en vigueur. Gardez
toujours les mains libres pour conduire votre
véhicule. La sécurité routière est la première
responsabilité du conducteur.
INTERFÉRENCES
Tous les appareils sans fil sont sensibles aux
interférences qui risquent de perturber leur
fonctionnement.
ÉTEIGNEZ VOTRE APPAREIL DANS LES ZONES
RÉGLEMENTÉES
Conformez-vous à toutes les restrictions en
vigueur. Éteignez votre appareil dans les avions et
à proximité d'équipements médicaux, de
réservoirs d'essence, de produits chimiques et de
zones de dynamitage.
TECHNICIENS QUALIFIÉS
Ne confiez l'installation ou la réparation de ce
produit qu'à des techniciens qualifiés.
ACCESSOIRES ET PILES
Utilisez uniquement des accessoires et des piles
approuvés. Ne connectez jamais d’appareils
incompatibles.
RÉSISTANCE À L'EAU
Votre appareil n'est pas imperméable. Gardez-le au
sec.
À propos de votre appareil
L'appareil sans fil décrit dans ce guide est approuvé pour une
utilisation sur les réseaux (E)GSM 850, 900, 1800 et 1900 et
UMTS 900/2100 HSDPA . Pour en savoir davantage sur les
réseaux, communiquez avec votre fournisseur de services.
Votre appareil prend en charge plusieurs types de connexion
et, tel un ordinateur, peut être exposé à des virus et d'autres
types de fichiers destructeurs. Faites attention lorsque vous
ouvrez des messages, acceptez des demandes de connexion,
naviguez sur des sites Web et téléchargez des fichiers.
N'installez et n'utilisez que des services et des logiciels
provenant de sources dignes de confiance offrant une
sécurité et une protection adéquates, par exemple, des
applications dotées de l'homologation « Symbian Signed »
ou « Java Verified
antivirus et d'autres applications de sécurité sur votre
appareil et sur tout ordinateur auquel vous le connectez.
MC
». Nous vous suggérons d'installer un
© 2004 Nokia. Tous droits réservés. 7
Page 70

Il est possible que votre appareil contienne déjà des signets
ou des liens qui vous permettent d'accéder à des sites
Internet tiers. Ces sites ne sont pas affiliés à Nokia et Nokia
décline toute responsabilité les concernant. Si vous décidez
d'accéder à ces sites, prenez les précautions nécessaires en
matière de sécurité ou de contenu.
Applications de bureautique
Les applications de votre appareil prennent en charge les
fonctions courantes de Word, PowerPoint et Excel de
Microsoft (Office 2000, XP et 2003). Tous les formats de
fichiers ne sont pas nécessairement pris en charge.
Avertissement : Pour utiliser les fonctions du
téléphone, à l'exception du réveil, l'appareil doit être allumé.
N'allumez jamais votre appareil lorsque l'utilisation
d'appareils sans fil risque de provoquer des interférences ou
de présenter un danger.
Lorsque vous utilisez cet appareil, veillez à respecter toutes
les lois en vigueur, les coutumes locales ainsi que la vie privée
et les droits d'autrui, ce qui comprend les droits d'auteur.
Prenez note que la protection des droits d'auteur peut
empêcher la copie, la modification, le téléchargement ou le
transfert d'images, de musique ou d'autres types de fichiers.
Prenez soin de faire des copies de sauvegarde ou de noter par
écrit toutes les données importantes enregistrées dans votre
appareil.
Lorsque vous connectez votre téléphone à un autre appareil,
lisez le guide d'utilisation qui accompagne ce dernier pour
connaître les consignes de sécurité à respecter. Ne connectez
jamais d’appareils incompatibles.
Les images comprises dans le présent guide peuvent différer
de celles de l'appareil.
Reportez-vous au guide d'utilisation pour d'autres
renseignements importants concernant votre appareil.
Services réseau
Pour utiliser l'appareil, vous devez détenir un compte auprès
d'un fournisseur de services sans fil. Il se peut que certaines
fonctions ne soient pas offertes sur tous les réseaux ou que
vous deviez prendre des dispositions spéciales avec votre
fournisseur de services pour les utiliser. Les services réseau
font appel au transfert de données. Pour toute question
concernant les frais liés aux transferts de données au sein de
votre réseau d'origine et en itinérance sur d'autres réseaux,
communiquez avec votre fournisseur de services. Celui-ci est
en mesure de vous informer des tarifs en vigueur. Il se peut
que des restrictions limitent votre utilisation de certaines
fonctions de l'appareil qui dépendent de la prise en charge
du réseau, par exemple des technologies précises telles que
les protocoles WAP 2.0 (HTTP et SSL) exécutés sur des
protocoles TCP/IP et les jeux de caractères propres à certaines
langues.
Votre fournisseur de services peut avoir demandé que
certaines fonctions de votre appareil soient désactivées. Le
cas échéant, elles ne s'afficheront pas dans le menu de votre
appareil. Votre appareil peut par ailleurs être doté d'éléments
personnalisés, notamment les noms de menus, les séquences
de menus et les icônes utilisées.
© 2004 Nokia. Tous droits réservés.8
Page 71

Mémoire partagée
Les fonctions suivantes de l'appareil peuvent se partager la
mémoire : tonalités, graphiques, contacts, messages texte,
messages multimédias, messages instantanés, courriel,
agenda, jeux, notes et applications. L'utilisation d'une ou de
plusieurs de ces fonctions peut réduire la mémoire disponible
pour les autres fonctions qui la partagent. Si votre appareil
affiche un message indiquant que la mémoire est pleine,
supprimez certaines des données stockées dans la mémoire
partagée.
Assistance
Pour en apprendre davantage au sujet du fonctionnement de votre produit ou si vous n'êtes pas certain de la manière dont
il doit fonctionner, vous pouvez visiter les pages d'assistance à l'adresse www.nokia.com/support ou le site Web Nokia de
votre région à l'adresse www.nokia.mobi/support (avec un appareil cellulaire), ou encore consulter l'application Aide sur
votre appareil ou le guide d'utilisation.
Si cela ne résout pas votre problème, essayez ce qui suit :
● Redémarrer l'appareil : éteignez l'appareil, puis retirez la pile. Attendez environ une minute, replacez la pile, puis allumez
l'appareil.
● Mettez votre appareil à jour régulièrement au moyen de l'application Software Updater de Nokia afin d'obtenir un
rendement optimal et de profiter des éventuelles nouvelles fonctions. Visitez le site www.nokia.com/softwareupdate ou,
au Canada, www.nokia.ca/A41459033. N'oubliez pas de sauvegarder les données de votre appareil avant la mise à jour du
micrologiciel.
● Restaurez les paramètres d'origine en vous reportant au guide d'utilisation. La restauration ne supprime pas vos documents
et vos fichiers.
Si le problème persiste, communiquez avec Nokia pour connaître les options de réparation. Visitez le site www.nokia.com/
repair ou, au Canada, www.nokia.ca/assistance-et-logiciels/reparation. Avant d'envoyer votre appareil en réparation,
effectuez toujours une sauvegarde des données qu'il contient.
© 2004 Nokia. Tous droits réservés. 9
Page 72

1. Foire aux questions
L'utilisation d'un nouvel appareil peut soulever des
questions. En plus des réponses que vous trouverez dans le
présent guide, vous pouvez consulter les pages d'assistance
technique du site Web de Nokia.
Qu'est-ce le code de verrouillage?
Votre appareil comporte un ou plusieurs codes servant à le
protéger et à protéger votre carte SIM contre les utilisations
non autorisées.
Code de verrouillage
Le code de verrouillage (aussi appelé code de sécurité)
protège votre appareil contre les utilisations non autorisées.
Le code prédéfini est 12345.
Vous pouvez modifier le code et régler l'appareil de sorte qu'il
vous le demande.
reportez-vous à la rubrique «Verrouiller
l'appareil» à la page 56.
Vous devez vous rappeler du nouveau code, le tenir secret et
le conserver dans un endroit sûr à l'écart de votre appareil. Si
vous oubliez le code de verrouillage et que l'appareil est
verrouillé, vous devez apporter l'appareil dans un centre de
réparation autorisé Nokia. Des frais supplémentaires
pourraient être facturés. Comme il faut réinstaller le
micrologiciel pour déverrouiller l'appareil, vous pourriez
perdre des données que vous y avez enregistrées.
Pour plus d'information à ce sujet,
NIP et codes de déblocage personnels (PUK)
Si vous avez oublié un des codes d'accès suivant,
communiquez avec votre fournisseur de services.
● Numéro d'identification personnel (NIP) — Ce code sert à
protéger votre carte SIM contre une utilisation non
autorisée. Le NIP (de 4 à 8 chiffres) est habituellement
fourni avec la carte SIM. Si vous entrez un NIP erroné trois
fois de suite, celui-ci est alors bloqué et vous devez utiliser
le code PUK pour le débloquer.
● NIP2 — Ce code (de 4 à 8 chiffres) est fourni avec certaines
cartes SIM et il est nécessaire pour accéder à certaines
fonctions de votre appareil.
● Code de déblocage personnel (PUK) et code PUK2 — Ces
codes (de 8 chiffres) sont nécessaires, respectivement,
pour modifier un NIP ou un NIP2 bloqués. Si ces codes ne
sont pas fournis avec la carte SIM, communiquez avec le
fournisseur de votre carte SIM.
Où puis-je obtenir les paramètres de mon appareil?
Habituellement, les paramètres de messages multimédias
(MMS), de service GPRS, de transmission en continu et
d'Internet mobile sont configurés automatiquement, en
fonction des renseignements fournis par votre fournisseur de
services réseau. Il est possible que des paramètres de vos
fournisseurs de services soient déjà installés dans votre
appareil. Sinon, vous pouvez demander les paramètres aux
fournisseurs de services réseau et les recevoir comme
message spécial.
© 2004 Nokia. Tous droits réservés.10
Page 73

Vous pouvez également utiliser l'application Assistant
paramètres pour définir les paramètres.
d'information à ce sujet, reportez-vous à la rubrique
«Assistant paramètres» à la page 19.
Pour plus
Comment puis-je transférer le contenu de mon ancien appareil?
Vous pouvez utiliser l'application Échange de Nokia pour
copier des éléments qui se trouvaient dans votre ancien
2. Démarrage
Numéro de modèle: 6790s-1.
appareil Nokia, tels que des numéros de téléphone, des
adresses, des notes d'agenda et des images, dans votre Nokia
67
90 à clavier coulissant.
reportez-vous à la rubrique «Transférer des fichiers et des
données» à la page 19.
Pour plus d'information à ce sujet,
© 2004 Nokia. Tous droits réservés. 11
Page 74

Touches et pièces
1 — Interrupteur/touche de fin
2 — Touche de sélection droite
3 — Touche NaviMC
navigation ».
4 — Touche de conversation
5 — Touche de sélection gauche
MC
, ci-après appelée « touche de
6 — Touches d'accès rapide: touches Internet, touche de
menu
et touche de messagerie
7 — Touche d'effacement arrière.
8 — Touche Sym (symbole)
9 — Touche de majuscule
10 — Touche de fonction
11 — Lentille de l'appareil photo
12 — Touches de volume
13 — Touche de capture
14 — Connecteur micro USB
© 2004 Nokia. Tous droits réservés.12
Page 75

15 — Prise pour chargeur
16 — Prise pour écouteurs
17 — Microphone
Insérer la carte SIM et la pile
Il faut toujours éteindre l’appareil et débrancher
le chargeur avant d'enlever la pile.
1. Retirez la façade arrière.
2. Retirez la pile, si celle-ci est insérée.
3. Insérez la carte SIM dans son compartiment. Assurez-vous
que les contacts dorés font face vers le bas. Fermez le
compartiment pour carte SIM, puis faites glisser son
couvercle pour bien le fermer.
© 2004 Nokia. Tous droits réservés. 13
Page 76

4. Alignez les contacts de la pile avec les connecteurs
correspondants de son compartiment, puis faites-la
glisser en place.
5. Replacez la façade arrière.
© 2004 Nokia. Tous droits réservés.14
Page 77

Charger la pile
Votre pile a été chargée partiellement en usine. Si l'appareil
indique que la pile est faible, procédez comme suit :
1. Branchez le chargeur dans une prise murale.
2. Branchez le chargeur à l'appareil. Le port de recharge est
situé sous le couvercle noir.
Allumer ou éteindre l'appareil
Maintenez l'interrupteur enfoncé jusqu'à ce que vous sentiez
l'appareil vibrer.
3. Lorsque l'appareil indique que la pile est complètement
chargée, déconnectez le chargeur de l'appareil, puis
débranchez-le de la prise murale.
Il n'est pas nécessaire de charger la pile durant un temps
précis et vous pouvez utiliser l'appareil pendant la recharge.
Si la pile est complètement déchargée, il peut s'écouler
plusieurs minutes avant que l'indicateur de charge s'affiche
ou avant de pouvoir effectuer des appels.
Astuce : Lorsque le chargeur n'est plus utilisé,
débranchez-le de la prise murale. Un chargeur branché
dans une prise consomme de l'électricité même s'il
n'est pas connecté à l'appareil.
© 2004 Nokia. Tous droits réservés. 15
Si l'appareil vous le demande, entrez le NIP ou le code de
verrouillage, puis sélectionnez OK. Si l'appareil vous
demande le code de déverrouillage, entrez-le, puis
sélectionnez OK.
vous à la rubrique «Qu'est-ce le code de
verrouillage?» à la page 10.
L'application de configuration du téléphone s'ouvre lorsque
vous allumez votre appareil en marche pour la première fois.
L'application de configuration du téléphone vous permet de
personnaliser l'apparence et le fonctionnement de l'appareil.
Pour ouvrir l'application de configuration du téléphone plus
tard, sélectionnez
tél..
Pour plus d'information à ce sujet, reportez-
> Applications > Aide > Config.
Page 78

Pour régler le fuseau horaire, l'heure et la date, sélectionnez
le pays dans lequel vous vous trouvez ainsi que la date et
l'heure actuelles. Pour trouver votre pays, entrez les
premières lettres de son nom. Il est important de sélectionner
le bon pays, car les entrées d'agenda programmées peuvent
changer si vous modifiez le pays ultérieurement et que le
nouveau pays se trouve dans un fuseau horaire différent.
Verrouiller le clavier
Vous pouvez régler le clavier de sorte qu'il se verrouille
automatiquement après un délai d'attente ou lorsque le
clavier coulissant est fermé.
Pour modifier la durée du délai d'attente avant le verrouillage
du clavier, sélectionnez
ParamètresGénéral > Sécurité > Téléphone et carte
SIM > Période verr. auto clavier > Définie par
utilisateur, puis choisissez la durée souhaitée.
Pour verrouiller manuellement le clavier en mode téléphone,
appuyez sur la touche de fin, puis sélectionnez Verrouiller le
clavier.
Astuce : Lorsque le clavier est verrouillé, maintenez
enfoncée la touche de navigation pour afficher
rapidement la date et l'heure.
> Outils >
Connecter les écouteurs
Branchez vos écouteurs compatibles dans la prise pour
écouteurs de l'appareil.
Ne connectez pas à votre appareil des produits qui émettent
des signaux, car cela risque d'endommager ce dernier. Ne
branchez aucune source d'électricité au connecteur AV Nokia.
Lorsque vous branchez des appareils externes ou des
écouteurs dans le connecteur AV (autres que ceux approuvés
par Nokia pour cet appareil), portez une attention
particulière au volume.
Cartes mémoire
Cartes mémoire compatibles
N’utilisez que des cartes mémoire de format microSD
compatibles et approuvées par Nokia pour cet appareil. Nokia
utilise des cartes mémoire conformes aux normes de
l'industrie, mais certaines marques peuvent ne pas être
entièrement compatibles avec cet appareil. Une carte non
compatible peut endommager l'appareil, être elle-même
abîmée et compromettre les données qui y sont stockées.
© 2004 Nokia. Tous droits réservés.16
Page 79

Gardez toujours les cartes mémoire hors de la portée des
jeunes enfants.
Vous pouvez augmenter la mémoire disponible avec une
carte microSDHC ou microSD d'une capacité maximale de
8 Go. Vous obtiendrez la meilleure performance possible avec
une carte microSD de 4 Go. Vous pouvez insérer ou retirer une
carte microSDHC ou microSD sans éteindre l'appareil.
Pour profiter au maximum des performances maximales de
votre appareil, il est recommandé de ne pas enregistrer plus
de 100 fichiers dans un même dossier.
Insérer la carte mémoire
Les cartes mémoire permettent d'augmenter la quantité de
mémoire disponible de votre appareil. Vous pouvez
également sauvegarder les données de votre appareil sur la
carte mémoire.
Pour toute question concernant la compatibilité d'une carte
mémoire, communiquez avec son fabricant ou son
revendeur.
Il est possible qu'une carte mémoire compatible soit incluse
dans l'emballage. Dans un tel cas, elle pourrait déjà être
insérée dans l'appareil. Dans le cas contraire, procédez
comme suit :
1. Retirez la façade arrière.
2. Insérez la carte mémoire dans la fente en introduisant
d'abord la partie dotée de contacts. Assurez-vous que les
contacts font bien face aux connecteurs de l'appareil.
3. Appuyez sur la carte jusqu'à ce que celle-ci se verrouille
en position.
4. Remettez en place la façade arrière.
Retirer la carte mémoire
Important : Ne retirez pas la carte mémoire pendant
qu’une application est en train d’y accéder. Cela risquerait
d'endommager la carte mémoire et l'appareil, ainsi que de
corrompre les données qui y sont enregistrées.
1. Appuyez brièvement sur l'interrupteur, puis sélectionnez
Retirer carte mémoire.
2. Retirez la façade arrière.
3. Appuyez sur l'extrémité de la carte mémoire pour la
dégager et la retirer de son logement.
4. Replacez la façade arrière.
© 2004 Nokia. Tous droits réservés. 17
Page 80

Raccourcis
Vous trouverez ici certains des raccourcis clavier offerts sur
votre appareil. Les raccourcis permettent une utilisation plus
efficace des applications.
Raccourcis
Raccourcis généraux
Interrupteur
# Maintenez la touche # enfoncée pour
Touche de
navigation
Mode veille
Touche de
conversation
Maintenez la touche enfoncée pour
allumer ou éteindre votre téléphone.
Appuyez une seule fois sur cette touche
pour passer d'un profil à un autre.
activer le profil silencieux.
Maintenez enfoncée la touche de
navigation pour afficher l'horloge de
l'écran de veille lorsque le clavier est
verrouillé.
Ouvrir le registre d'appels. Le registre
affiche les 20 derniers numéros que
vous avez composés. Mettez en
surbrillance le numéro ou le nom de
votre choix, puis appuyez sur la touche
de conversation.
0 Maintenez la touche 0 enfoncée pour
Touches
numériques (2 à
9)
Raccourcis Web
Touche de
fonction + *
Touche de
fonction + #
y Aller à la page d'accueil.
r Ouvrir le dossier des signets.
t Ouvrir la boîte de dialogue de
p Revenir à la page précédente.
w Afficher les pages actives.
b Afficher l'aperçu de la page.
n Entrer une nouvelle adresse Web.
ouvrir la page d'accueil du navigateur.
Appeler un numéro de téléphone à
l'aide de la composition 1 touche. Pour
activer la composition 1 touche,
sélectionnez
Paramètres, puis Téléphone >
Appeler > Appels abrégés.
Zoom avant sur la page.
Zoom arrière sur la page.
recherche.
> Outils >
© 2004 Nokia. Tous droits réservés.18
Page 81

3. Votre Nokia 6790 à clavier coulissant
Une fois que vous avez allumé votre appareil, vous pouvez
commencer à l'explorer.
Configuration du téléphone
Lorsque vous allumez votre appareil la première fois,
l'application de configuration du téléphone s'ouvre.
Pour accéder à l'application de configuration du téléphone
ultérieurement, sélectionnez
Config. tél..
Pour configurer les connexions de l'appareil, sélectionnez
Assist. Param..
Pour transférer les données sur votre appareil à partir d'un
appareil Nokia compatible, sélectionnez Échange téléph..
Les options disponibles peuvent varier.
> Applications > Aide >
Assistant paramètres
Sélectionnez > Outils > Assistant Paramètres.
Utilisez l'Assistant paramètres pour définir les paramètres de
connexion et ceux des courriels. La disponibilité des éléments
de l'Assistant paramètres dépendent des caractéristiques de
l'appareil, de la carte SIM, du fournisseur de services et des
données qui figurent dans la base de données de l'Assistant
paramètres.
Pour démarrer l'Assistant paramètres, sélectionnez
Démarrer.
Pour obtenir les meilleurs résultats possible avec l'Assistant
paramètres, laissez la carte SIM dans l'appareil. Si la carte SIM
est absente, suivez les directives qui s'affichent à l'écran.
Vous avez accès aux options suivantes :
● Opérateur — Pour définir les paramètres propres à votre
fournisseur (ex. : MMS, Internet, WAP et transmission en
continu).
● Config. courriel — Pour configurer un compte de courriel
POP, IMAP ou Mail for Exchange.
Les options modifiables peuvent varier.
Transférer des fichiers et des données
Le type de données qui peuvent être transférées dépend du
modèle de l'appareil à partir duquel vous voulez les
transférer. Si cet appareil prend en charge la synchronisation,
vous pouvez également synchroniser les données entre les
appareils. Votre appareil Nokia 67
informe si l’autre appareil n'est pas compatible.
S'il n'est pas possible d'allumer l'autre appareil sans une carte
SIM, vous devez insérer votre carte SIM dans celui-ci. Lorsque
vous allumez votre Nokia 6790 à clavier coulissant sans
SIM, le profil h
pouvez effectuer le transfert.
Transférer des fichiers et des données pour la
première fois
1. Pour récupérer des données de l'autre appareil pour une
première fois, sélectionnez Échange dans l'application de
90 à clavier coulissant vous
carte
ors ligne est automatiquement activé et vous
© 2004 Nokia. Tous droits réservés. 19
Page 82

configuration du téléphone Nokia 6790 à clavier
coulissant, ou sélectionnez
2. Sélectionnez le type de connexion que vous voulez utiliser
lors du transfert des données. Les deux appareils doivent
prendre en charge le type de connexion sélectionné.
3. Si vous sélectionnez Bluetooth, connectez les deux
appareils. Pour que votre appareil recherche les appareils
à connectivité Bluetooth à proximité, sélectionnez
Continuer. Sélectionnez l'appareil à partir duquel vous
voulez transférer des fichiers et des éléments. Votre
appareil Nokia 6790 à clavier coulissant vous demandera
d'entrer un code. Entrez le code (1 à 16 chiffres), puis
sélectionnez OK. Entrez le même code sur l'autre appareil,
puis sélectionnez OK. Les appareils sont maintenant
associés.
Il se peut que certains appareils Nokia plus anciens ne
contiennent pas l'application Échange. Dans ce cas,
l'application est envoyée à l'autre appareil sous forme de
message. Pour installer l'application Échange sur l'autre
appareil, ouvrez le message et suivez les instructions.
4. Sur votre appareil Nokia 67
sélectionnez le contenu de l'autre appareil que vous
désirez transférer.
Une fois que le transfert est commencé, vous pouvez
l'annuler et continuer ultérieurement.
Le contenu est transféré de la mémoire de l'autre appareil à
l'emplacement correspondant de votre Nokia 67
coulissant. La durée du transfert dépend de la quantité de
données transférées.
> Outils > Échange.
90 à clavier coulissant,
90 à clavier
Faire des appels
Remarque : Le temps exact facturé par votre
fournisseur de services pour les appels et les services peut
varier en fonction des caractéristiques du réseau, des règles
d'arrondissement du temps, des taxes ainsi que d'autres
facteurs.
Pour faire et recevoir des appels, l'appareil doit être allumé,
une carte SIM valide doit être insérée et vous devez vous
trouver dans la zone de couverture d’un réseau cellulaire.
Important : En mode hors ligne, vous ne pouvez pas
faire ou recevoir d’appels, ni utiliser d’autres fonctions qui
nécessitent un accès au réseau cellulaire. Il se peut toutefois
que vous puissiez appeler le numéro d’urgence officiel
programmé dans votre appareil. Pour faire des appels, vous
devez d'abord activer l'appareil en changeant de profil. Si
l’appareil est verrouillé, entrez le code de verrouillage.
Faire des appels
Pour effectuer un appel, entrez le numéro de téléphone avec
son indicatif régional et appuyez sur la touche de
conversation. Pour mettre fin à l'appel ou annuler une
tentative d'appel, appuyez sur la touche de fin.
Astuce : Pour les appels internationaux, ajoutez le
caractère + qui remplace le code d'accès international,
puis entrez l'indicatif du pays, l'indicatif régional
(ignorez le premier zéro si nécessaire) et le numéro de
téléphone.
© 2004 Nokia. Tous droits réservés.20
Page 83

Répondre à un appel
Pour répondre à un appel, appuyez sur la touche de
conversation. Pour refuser un appel, appuyez sur la touche
de fin.
Pour mettre la sonnerie en sourdine plutôt que de répondre
à un appel, sélectionnez Silence.
Pour régler le volume d'un appel actif, servez-vous des
touches de volume.
Boîte vocale
Sélectionnez > Outils > Bte v. app..
Lorsque vous ouvrez l'application Boîte vocale pour la
première fois, on vous demande d'entrer le numéro de votre
boîte vocale.
Pour appeler votre boîte vocale, mettez l'option Boîte vocale
en surbrillance, puis sélectionnez Options > Appeler bte
vocale.
Pour appeler votre boîte aux lettres à partir de l'écran de
démarrage, maintenez la touche 1 enfoncée ou appuyez sur
1, puis sur la touche de conversation. Sélectionnez la boîte
aux lettres que vous souhaitez appeler.
Pour changer le numéro de la boîte aux lettres, sélectionnez
la boîte aux lettres, puis Options > Changer numéro.
Pour activer ou désactiver le haut-parleur pendant un appel,
sélectionnez Haut-parl. ou Combiné.
Avertissement : L’exposition continue à un volume
élevé peut entraîner des troubles de l’ouïe. Écoutez de la
musique à un volume modéré et ne tenez pas l’appareil
contre votre oreille lorsque le haut-parleur est activé.
Écrire du texte avec le clavier
Votre appareil possède un clavier complet.
Réglage du volume
Pour régler le volume de l'écouteur ou du haut-parleur
pendant un appel ou pendant l'écoute d'un fichier audio,
utilisez les touches de volume.
© 2004 Nokia. Tous droits réservés. 21
Pour insérer des signes de ponctuation, appuyez sur la touche
ou la combinaison de touches correspondante.
Page 84

Pour basculer entre les majuscules et les minuscules, appuyez
sur la touche Majuscule.
Pour insérer les caractères imprimés au-dessus des touches,
maintenez la touche de fonction enfoncée et appuyez sur la
touche correspondante.
Pour effacer un caractère, appuyez sur la touche d'effacement
arrière. Pour effacer plusieurs caractères, maintenez la
touche d'effacement arrière enfoncée.
Pour insérer des caractères et des symboles ne figurant pas
sur le clavier, appuyez sur la touche Sym.
Pour changer la langue d'écriture ou pour activer le texte
prédictif, sélectionnez Options > Options de saisie et
l'option appropriée.
Rédiger et envoyer des messages
Sélectionnez > Messagerie.
Important : Faites attention lorsque vous ouvrez les
messages. Certains messages peuvent contenir des
programmes destructeurs ou s’avérer nuisibles pour votre
appareil ou votre ordinateur.
Avant de pouvoir créer un message multimédia ou rédiger un
courriel, vous devez régler correctement les paramètres de
connexion.
Prenez note que le réseau sans fil peut limiter la taille des
messages multimédias transférés. Si l'image jointe au
message dépasse la limite, il est possible que votre appareil
diminue sa taille afin que le message puisse être envoyé.
Vérifiez la taille maximale des courriels auprès de votre
fournisseur de services. Si vous tentez d'envoyer un courriel
dont la taille dépasse la limite imposée par le serveur de
courriel, le message reste dans le dossier Corbeille de départ
et l'appareil réessaie de l'envoyer périodiquement. L'envoi
d'un courriel requiert une connexion de données et des essais
d'envoi répétés peuvent faire grimper votre facture de
services téléphoniques. Vous pouvez supprimer le message
du dossier Corbeille de départ ou le déplacer vers le dossier
Brouillons.
1. Sélectionnez Nouveau mess. > Message pour envoyer
un message texte ou multimédia (MMS), Message audio
pour envoyer un message multimédia comportant un clip
audio ou Courriel pour envoyer un courriel.
2. Dans le champ À, appuyez sur la touche de navigation
pour ajouter des destinataires ou des groupes à partir de
votre liste de contacts, ou encore, entrez directement le
numéro ou l'adresse de courriel du destinataire. Pour
séparer les destinataires, ajoutez un point-virgule (;) en
appuyant sur *. Vous pouvez aussi copier et coller un
numéro ou une adresse à partir du presse-papiers.
3. Dans le champ Objet, entrez le sujet du courriel. Pour
modifier les champs visibles, sélectionnez Options >
Champs d'en-tête mess..
4. Dans le champ du texte du message, rédigez votre
message. Pour insérer un modèle ou une note,
sélectionnez Options > Insérer contenu > Insérer du
texte > Modèle ou Note.
5. Pour ajouter un fichier multimédia à un message
multimédia, sélectionnez Options > Insérer contenu,
le type de fichier ou sa source, puis le fichier voulu. Pour
© 2004 Nokia. Tous droits réservés.22
Page 85

insérer une carte professionnelle, une diapositive, une
note ou un autre type de fichier au message, sélectionnez
Options > Insérer contenu > Insérer autre.
6. Pour prendre une photo ou enregistrer un clip audio ou
vidéo pour l'insérer dans un message multimédia,
sélectionnez Options > Insérer contenu > Insérer
une image > Nouveau, Insérer un clip vidéo >
Nouveau, or Insérer un clip audio > Nouveau.
7. Pour ajouter une pièce jointe à un courriel, sélectionnez
Options, puis le type de pièce jointe. Les pièces jointes à
un courriel sont signalées par le symbole
8. Pour envoyer le message, sélectionnez Options >
Envoyer ou appuyez sur la touche de conversation.
Remarque : L'icône ou l'avis de message envoyé à
l'écran ne signifie pas que le destinataire l'a reçu.
Votre téléphone peut envoyer des messages texte qui
dépassent la limite normale de caractères par message. Le
cas échéant, les messages qui dépassent la limite sont
envoyés en plusieurs parties. Il se peut que votre fournisseur
de services vous facture le nombre de messages utilisés. Les
caractères comportant des accents ou d’autres marques et
les options requises pour certaines langues prennent plus
d'espace, ce qui limite le nombre de caractères pouvant être
insérés dans un seul message.
Il n'est pas toujours possible d'envoyer dans un message
multimédia un clip vidéo enregistré au format de fichier MP4
ou dont la taille dépasse la limite de taille du réseau sans fil.
.
Veille active
Lorsque l'appareil est allumé et qu'il est inscrit sur un réseau
cellulaire, il affiche alors son écran de démarrage et est prêt
à être utilisé.
Pour ouvrir la liste des derniers numéros composés, appuyez
sur la touche de conversation. Appuyez sur la gauche de la
touche de navigation pour accéder à la liste des appels reçus
et manqués.
Pour utiliser les commandes vocales ou la composition
vocale, maintenez la touche de sélection droite enfoncée.
Pour changer le profil, appuyez sur l'interrupteur et
sélectionnez un profil.
Pour vous connecter au Web, appuyez sur la touche Internet.
Menu
Le menu principal est le point à partir duquel vous pouvez
ouvrir toutes les applications se trouvant dans l'appareil ou
sur une carte mémoire. Pour accéder au menu principal,
appuyez sur
Pour ouvrir une application ou un dossier, mettez-le en
surbrillance et appuyez sur le centre de la touche de
navigation.
Pour changer l'affichage du menu, sélectionnez
Options > Changer affich. menu, puis choisissez un type
d'affichage.
Pour fermer une application ou un dossier, sélectionnez
Retour et Quitter autant de fois que nécessaire pour
retourner à l'écran de démarrage.
la touche
.
>
© 2004 Nokia. Tous droits réservés. 23
Page 86

Astuce : Pour afficher des applications ouvertes et
basculer entre elles, maintenez la touche de menu
enfoncée et sélectionnez une application. Pour fermer
une application, appuyez sur la touche d'effacement
arrière.
Le fait de laisser les applications s'exécuter en arrière-plan
augmente la consommation électrique et diminue
l'autonomie de la pile.
Indicateurs
ou L'appareil est connecté à un réseau UMTS ou GSM.
Niveau de charge de la pile. Plus la barre est élevée, plus
la charge de la pile est élevée.
Le dossier Boîte de réception dans le menu Messages
contient au moins un message non lu.
Vous avez reçu un nouveau courriel dans votre boîte aux
lettres à distance.
Il y a des messages en attente d'envoi dans le dossier
Corbeille de départ de la messagerie.
Vous avez manqué un ou plusieurs appels.
Les touches du téléphone sont verrouillées.
Le réveil est activé.
Vous avez activé le profil silencieux. Le téléphone ne
sonnera pas lors d'un appel entrant ou de la réception d'un
message.
La connectivité Bluetooth est activée.
Une connexion Bluetooth est établie. Lorsque l'icône
clignote, cela signifie que votre appareil est en train d'essayer
de se connecter à un autre appareil.
Une connexion GPRS (données par paquets) est accessible
(service réseau).
indique que la connexion est en attente.
Une connexion EGPRS (données par paquets) est accessible
(service réseau).
indique que la connexion est en attente.
Une connexion UMTS (données par paquets) est accessible
(service réseau).
indique que la connexion est en attente.
L'accès par paquets en liaison descendante haut débit
(HSDPA) est pris en charge et accessible (service réseau).
L'icône peut changer selon les régions.
connexion est active.
attente.
Votre appareil est connecté à un ordinateur au moyen
d'un câble de données USB.
La seconde ligne téléphonique est en cours d'utilisation
(service réseau).
Tous les appels sont transférés vers un autre numéro.
Si vous disposez de deux lignes téléphoniques, un numéro
indique la ligne active.
Des écouteurs compatibles sont connectés à l'appareil.
Un dispositif mains libres pour voiture est connecté à
l'appareil.
indique que la connexion est active.
indique que la connexion est active.
indique que la connexion est active.
indique que la
indique que la connexion est en
© 2004 Nokia. Tous droits réservés.24
Page 87

Une boucle inductive est connectée à l'appareil.
Un téléphone textuel est connecté à l'appareil.
Votre appareil est en cours de synchronisation.
Horloge
L'horloge vous permet de consulter l'heure locale ou l'heure
dans d'autres villes et d'utiliser votre appareil comme réveil.
Réveil
Sélectionnez > Applications > Horloge.
Pour afficher vos alarmes actives et inactives, ouvrez l'onglet
des alarmes. Pour programmer une nouvelle alarme,
sélectionnez Options > Nouvelle alarme. Au besoin,
définissez la répétition.
active.
Pour couper la sonnerie de l'alarme, sélectionnez Arrêter.
Pour désactiver l'alarme pour une période donnée,
sélectionnez Répéter. Si votre appareil est éteint à l'heure de
l'alarme programmée, il s’allume automatiquement et
sonne.
Astuce : Pour définir le délai au bout duquel la
sonnerie retentit de nouveau lorsque vous
interrompez temporairement l'alarme, sélectionnez
Options > Paramètres > Délai de répét.
d'alarme.
Pour annuler une alarme, sélectionnez Options >
Désactiver alarme.
s'affiche quand une alarme est
Pour modifier les paramètres d'heure, de date et de type
d’horloge, sélectionnez Options > Paramètres.
Pour actualiser automatiquement l'heure, la date et le f useau
horaire de votre appareil (service réseau), sélectionnez
Options > Paramètres > Mise à jour auto heure >
Activée.
Horloge mondiale
Sélectionnez > Applications > Horloge.
Pour voir l'heure dans différents endroits, ouvrez l'onglet de
l'horloge mondiale. Pour ajouter des emplacements à la liste,
sélectionnez Options > Ajouter un emplacement. Vous
pouvez ajouter un maximum de 15 emplacements à la liste.
Pour entrer votre emplacement actuel, mettez-le en
surbrillance, puis sélectionnez Options > Comme emplac.
actuel. L'emplacement s'affiche sur l’écran principal de
l’horloge et l'heure de votre appareil est modifiée en fonction
de l'emplacement sélectionné. Assurez-vous que l'heure est
exacte et qu'elle correspond à votre fuseau horaire.
Paramètres de l'horloge
Sélectionnez Options > Paramètres.
Pour changer l'heure ou la date, sélectionnez Heure ou
Date.
Pour modifier l'horloge affichée sur les écrans de démarrage,
sélectionnez Type d'horloge > Analogique ou
Numérique.
© 2004 Nokia. Tous droits réservés. 25
Page 88

Pour permettre au réseau mobile de mettre à jour l'heure, la
date et le fuseau horaire de votre appareil (service réseau),
sélectionnez Mise à jour auto heure > Activée.
Pour changer la tonalité de l'alarme, sélectionnez Tonalité
alarme horloge.
Emplacement des antennes
Votre appareil est doté de trois antennes intégrées: une
antenne cellulaire, une antenne Bluetooth et une antenne
GPS.
Il se peut que votre appareil soit doté d'une antenne interne
et d'une antenne externe. Évitez de toucher inutilement
l’antenne lorsque l’appareil est allumé. Le contact avec
l'antenne altère la qualité de la communication et peut
entraîner une consommation excessive d'énergie, ce qui a
pour effet de diminuer la durée de la pile.
4. Personnaliser votre appareil
Vous pouvez personnaliser votre appareil, par exemple, en
réglant les diverses sonneries et en changeant le fond d'écran
et l'écran de veille.
Profils
Sélectionnez > Outils > Profils.
Vous avez la possibilité de régler et de personnaliser les
sonneries, les alertes et les autres tonalités associées à
différents événements, environnements ou groupes
d'appelants. Le profil actif est indiqué dans le haut de l'écran
1 — Antenne cellulaire
2 — Antenne Bluetooth
3 — Antenne GPS
de démarrage. Toutefois, si le profil actif est le profil Général,
seule la date courante est affichée.
Pour créer un nouveau profil, sélectionnez Options > Créer
nouveau, puis définissez-en les paramètres.
Pour personnaliser un profil, sélectionnez ce profil, puis
Options > Personnaliser.
Pour changer un profil, sélectionnez ce profil, puis Options >
Activer. Le profil Hors ligne empêche l'allumage accidentel
de l'appareil, l'envoi et la réception de messages de manière
fortuite et l'utilisation intempestive d'une connexion
Bluetooth, du GPS ou de la radio FM. La sélection de ce profil
© 2004 Nokia. Tous droits réservés.26
Page 89

entraîne également la fermeture de toute connexion Internet
active. Le profil Hors ligne n'empêche ni l'établissement
ultérieur d'une connexion Bluetooth, ni le redémarrage du
GPS ou de la radio FM. Il convient donc de respecter toutes les
règles de sécurité applicables lors de l'établissement de telles
connexions et de l'utilisation de ces fonctions.
Pour activer le profil jusqu'à une certaine heure dans les
24 prochaines heures, mettez-le en surbrillance puis,
sélectionnez Options > Limité et entrez l'heure voulue.
Lorsque le délai est expiré, l'appareil réactive le dernier profil
actif non temporaire. Lorsque le profil est temporaire,
s'affiche à l'écran de démarrage. Il est impossible de
temporiser le profil hors ligne.
Pour supprimer un profil que vous avez créé, sélectionnez
Options > Supprimer profil. I l es t im pos sib le de s upp rim er
les profils prédéfinis.
Choisir les sonneries
Pour associer une sonnerie à un profil, sélectionnez
Options > Personnaliser > Sonnerie. Sélectionnez une
sonnerie dans la liste ou sélectionnez Télécharger des
sons pour ouvrir un dossier contenant une liste de signets
permettant de télécharger des sonneries. Toutes les
sonneries téléchargées sont enregistrées dans la
Bibliothèque.
Pour n'entendre la sonnerie que lors d'appels provenant d'un
groupe de contacts choisis, sélectionnez Options >
Personnaliser > Alerte pour, puis sélectionnez le groupe
désiré. Les appels provenant de numéros n'appartenant pas
à ce groupe sont alors signalés en mode silencieux.
Pour changer la tonalité signalant la réception d'un message,
sélectionnez Options > Personnaliser > Tonalité alerte
message.
Changer le thème de l'affichage
Sélectionnez > Outils > Thèmes.
Pour changer le thème utilisé dans toutes les applications,
sélectionnez Généraux.
Pour changer le thème utilisé dans le menu principal,
sélectionnez Affich. menu.
Pour changer le thème d'une application particulière,
sélectionnez le dossier propre à cette application.
Pour changer l'image d'arrière-plan de l'écran d'accueil,
sélectionnez Papier peint.
Pour choisir une animation pour l'écran de veille,
sélectionnez Écono. énergie.
Pour activer ou désactiver les effets du thème, sélectionnez
Généraux > Options > Effets du thème.
© 2004 Nokia. Tous droits réservés. 27
Page 90

5. Courriel et messagerie instantanée
Votre appareil vous permet de lire des courriels personnels
et professionnels, d'y répondre et de clavarder avec vos
contacts de messagerie instantanée.
Touche de messagerie
Votre appareil est doté d'une touche d'accès rapide aux
messages.
Ovi Mail
Si vous n'avez pas encore de compte de courriel ou si vous
voulez en créer un autre, vous pouvez le faire avec Ovi Mail,
un service de courriel gratuit que vous pouvez utiliser depuis
le Web ou directement à partir de votre appareil.
Pour obtenir de plus amples renseignements, consultez le
site mail.ovi.com.
Il est possible que ce service ne soit pas offert dans toutes les
régions ou toutes les langues.
Messagerie Nokia
Avec Messagerie Nokia, vous pouvez recevoir sur votre
appareil les courriels envoyés à votre adresse personnelle.
Vous pouvez accéder à un total de 10 comptes de messagerie
personnels, tels que ceux des services Windows Live Hotmail
ou Google. Chaque courriel arrive dans sa propre boîte aux
lettres et vous avez accès à tous vos courriels au même
endroit.
Vous pouvez utiliser Messagerie Nokia sur votre appareil
conjointement à la plupart des autres solutions de
messagerie. Toutefois, si vous utilisez la suite Nokia
Intellisync Mobile, vous devez la désinstaller avant d'utiliser
Messagerie Nokia.
Le service Messagerie Nokia est présentement offert en
version d'essai.
L'utilisation de Messagerie Nokia peut entraîner la
transmission d'importants volumes de données (service
réseau).
Pour obtenir des renseignements supplémentaires, reportezvous au site www.email.nokia.com.
Mail for Exchange
Mail for Exchange vous permet de recevoir vos courriels
professionnels sur votre appareil. Vous pouvez lire vos
courriels et y répondre, consulter et modifier les pièces
jointes, afficher les données de l'agenda, recevoir des
demandes de réunion et y répondre, planifier des réunions
ainsi qu'afficher, ajouter et modifier les coordonnées de
contacts. Vous pouvez configurer Mail for Exchange
seulement si votre société utilise Microsoft Exchange Server.
De plus, le responsable des services informatiques de votre
société doit avoir activé votre compte Mail for Exchange.
Avant de configurer Mail for exchange, assurez-vous d'avoir
les éléments suivants :
© 2004 Nokia. Tous droits réservés.28
Page 91

● une adresse courriel professionnelle;
● le nom d'utilisateur du réseau de votre bureau;
● le mot de passe du réseau de votre bureau;
● le nom de domaine de votre réseau (communiquez avec
le service des ressources informatiques de votre société);
● le nom de votre serveur Mail for Exchange (communiquez
avec le service des ressources informatiques de votre
société).
La configuration du serveur Mail for Exchange de votre
société pourrait nécessiter l'entrée de données
supplémentaires. Si vous ne possédez pas les
renseignements demandés, communiquez avec le service des
ressources informatiques de votre société.
L'utilisation de Mail for Exchange pourrait rendre le code de
déverrouillage obligatoire. Le code de déverrouillage par
défaut de votre appareil est 12345, mais il est possible que
le responsable du service informatique de votre société ait
défini un code différent pour vous.
Vous pouvez accéder au profil Mail for Exchange et en
modifier les paramètres à partir des paramètres de la
messagerie.
Clavardage
Le service réseau de messagerie instantanée (MI) vous
permet d'envoyer des messages texte courts et simples à des
utilisateurs en ligne. Vous devez vous abonner à un service
et vous inscrire au service de MI que vous désirez utiliser.
Sélectionnez
> Contacts, puis ouvrez l'onglet Ovi.
Pour vous connecter au service, sélectionnez Aller en ligne,
puis la méthode de connexion. Une connexion de données
par paquets peut entraîner des frais supplémentaires de
transmission de données. Pour connaître les détails de la
tarification, communiquez avec votre fournisseur de services
réseau.
Pour commencer à clavarder avec un ami, sélectionnez
Options > Clavardage. Pour envoyer un message de
clavardage, entrez le texte dans le champ du message, puis
sélectionnez Envoyer.
Dans l'écran de clavardage, sélectionnez Options, puis l'une
des options suivantes :
● Envoyer — Envoyer le message.
● Ajouter une binette — Pour insérer une binette.
● Envoyer mon emplac. — Pour envoyer les détails de
votre emplacement à votre interlocuteur (si les deux
appareils prennent cette fonction en charge).
● Profil — Pour afficher les détails d'un ami.
● Mon profil — Sélectionner votre état de présence ou votre
image de profil, personnaliser votre message ou modifier
vos données personnelles.
● Modifier le texte — Copier ou coller du texte.
● Terminer le clavardage — Pour mettre fin à la session
de clavardage en cours.
● Quitter — Pour mettre fin à toutes les sessions de
clavardage en cours et fermer l'application.
Les options disponibles peuvent varier.
Pour recevoir les données d'emplacement de votre ami, il
vous faut l'application Cartes. Pour envoyer et recevoir des
données d'emplacement, il vous faut les applications Cartes
et Positionnement.
© 2004 Nokia. Tous droits réservés. 29
Page 92

Pour afficher l'emplacement de votre ami, sélectionnez
Afficher sur carte.
Pour revenir à l'écran principal du service Contacts Ovi sans
mettre fin à la session de clavardage, sélectionnez Retour.
6. Cartes Ovi
Vous n'arrivez pas à trouver votre destination? Vous cherchez
un restaurant? Votre appareil dispose d'outils qui vous
permettront de vous rendre là où vous le souhaitez.
Positionnement (GPS)
Votre appareil vous permet d'utiliser des applications telles
que le GPS pour déterminer votre emplacement ou pour
calculer des distances et trouver des coordonnées. Ces
applications exigent une connexion GPS.
À propos de la technologie GPS
Les coordonnées GPS sont exprimées en degrés et en
décimales, selon le système de coordonnées international
WGS-84. La disponibilité des coordonnées peut varier selon
les régions.
Le système GPS est exploité par le gouvernement des ÉtatsUnis, qui est le seul responsable de sa précision et de sa
maintenance. La précision des données de positionnement
peut être compromise par des ajustements que le
gouvernement des États-Unis apporte aux satellites GPS et
peut varier en fonction de la politique du département de la
Défense des États-Unis et du Federal Radionavigation Plan en
matière de GPS civil. Une erreur de calcul de la part du satellite
peut aussi nuire à la précision. Les édifices et les obstacles
Lorsque vous sélectionnez un numéro de téléphone pendant
une session de clavardage, sélectionnez Options, puis
l'option appropriée pour l'ajouter à vos contacts, le composer
ou le copier.
naturels, tout comme les conditions météorologiques et
votre position actuelle, peuvent nuire à la réception et à la
qualité des signaux GPS. Il se peut que les signaux GPS ne
soient pas captés à l'intérieur des immeubles et sous terre et
que leur transmission soit entravée par des éléments tels que
le béton et le métal.
La technologie GPS ne doit pas être utilisée pour effectuer des
mesures de positionnement précises; on ne doit jamais se fier
uniquement aux données de positionnement obtenues par
un récepteur GPS ou un réseau cellulaire.
La précision de l'odomètre étant limitée, des erreurs
d'arrondissement peuvent se produire. La réception et la
qualité des signaux GPS peuvent aussi nuire à la précision des
calculs.
Les paramètres de positionnement comportent divers modes
de positionnement que vous pouvez activer ou désactiver.
GPS assisté (A-GPS)
Votre appareil est compatible avec le GPS assisté (A-GPS).
Le service A-GPS dépend de la disponibilité de réseau.
Le système A-GPS (Assisted Global Positioning System,
système GPS assisté) permet de calculer des positions à l'aide
© 2004 Nokia. Tous droits réservés.30
Page 93

du réseau cellulaire, par connexion de données, lorsque votre
appareil reçoit des signaux du système de satellites.
Lorsque vous activez la fonction A-GPS, votre téléphone reçoit
les données utiles d'un satellite par l'intermédiaire d'un
serveur de données d'assistance sur le réseau cellulaire. Les
données d'assistance permettent à votre appareil d'obtenir
votre position GPS plus rapidement.
Votre appareil est préconfiguré pour utiliser le service A-GPS
de Nokia au cas où aucun fournisseur de service ne dispose
des paramètres spécifiques à la technologie A-GPS. Les
données d'assistance sont récupérées sur le serveur de
service A-GPS de Nokia, uniquement lorsque cela est
nécessaire.
Pour désactiver le service A-GPS, sélectionnez
Applications > Données GPS et Options > Param.
positionnement > Modes positionnement > GPS
assisté > Désactiver.
Pour que votre appareil puisse rechercher les données
d'assistance du service A-GPS de Nokia par connexion de
données par paquets, vous devez définir un point d'accès à
Internet. Le point d'accès du GPS assisté peut être défini dans
les paramètres de positionnement. Seul un point d'accès
Internet permettant la transmission de données par paquets
peut être utilisé. Lorsque vous utilisez le GPS pour la première
fois, votre appareil vous demande de sélectionner le point
d'accès Internet à utiliser.
>
Tenir correctement le téléphone
Lorsque vous utilisez le récepteur GPS, assurez-vous que
votre main ne couvre pas l’antenne.
La durée nécessaire à l'établissement d'une
connexion GPS est de quelques secondes à
plusieurs minutes. Établir une connexion
GPS à l'intérieur d'un véhicule peut prendre
un peu plus de temps.
Le récepteur GPS est alimenté par la pile du
téléphone. L'utilisation du récepteur GPS
peut provoquer un déchargement plus
rapide de la pile.
Conseils pour créer une connexion GPS
Vérifier l'état du signal satellite.
Pour obtenir le nombre de satellites détectés par votre
appareil et pour savoir si ce dernier reçoit des signaux
satellite, sélectionnez
GPS > Position > Options > État satellite.
Si votre appareil a détecté des
satellites, une barre s’affiche pour
chacun d’eux dans l’écran des
données satellites. Plus la barre est
longue, plus le signal satellite est
puissant. Lorsque votre appareil a
reçu suffisamment de données de signaux satellites pour
permettre le calcul des coordonnées de votre emplacement,
la barre devient bleue.
Pour afficher la position des satellites détectés, sélectionnez
Chang. aff..
Au démarrage, le récepteur GPS doit recevoir les données de
positionnement d'au moins quatre satellites pour calculer les
coordonnées de votre position. Après avoir calculé une
> Applications > Données
© 2004 Nokia. Tous droits réservés. 31
Page 94

première position, votre appareil peut continuer à calculer
les coordonnées de votre position avec les signaux de
seulement trois satellites. Néanmoins, l'exactitude est
généralement meilleure lorsque votre appareil détecte les
signaux de davantage de satellites.
Si votre appareil ne détecte pas de signal satellite, il est
important de tenir compte des points suivants :
● Si vous êtes à l'intérieur, sortez; la réception d'un signal
est meilleure à l'extérieur.
● Quand vous êtes à l'extérieur, dirigez-vous vers des
espaces dégagés.
● Veillez à ce que vos mains ne couvrent pas l'antenne GPS
de votre appareil.
● De mauvaises conditions météorologiques peuvent nuire
à la force du signal.
● Les vitres teintées (athermiques) de certains véhicules
peuvent bloquer les signaux satellites.
Demandes de position
Vos données de positionnement peuvent être demandées par
un service réseau. Les fournisseurs de services peuvent
fournir des renseignements sur des sujets locaux, tels que les
conditions météorologiques et routières, en fonction du
positionnement de votre appareil.
Lorsque vous recevez une demande de position, le service
demandeur s'affiche. Sélectionnez Accepter pour permettre
l'envoi de vos données de positionnement ou Rejeter pour
refuser la demande.
Points de repère
Sélectionnez > Applications > Repères.
Grâce aux repères, vous pouvez enregistrer des
emplacements spécifiques sur votre appareil. Vous pouvez
classer les emplacements enregistrés dans différentes
catégories, telles que Travail, et ajouter d'autres données,
comme l'adresse. Vous pouvez ensuite utiliser les points de
repère enregistrés dans des applications compatibles, par
exemple le GPS.
Les coordonnées du GPS sont exprimées en degrés et en
degrés décimaux, selon le système de coordonnées
international WGS-84.
Sélectionnez Options, puis l'une des options suivantes :
● Nouveau repère — Créer un nouveau repère. Pour
effectuer une demande de votre position actuelle,
sélectionnez Position actuelle. Pour sélectionner
l'emplacement sur une carte, sélectionnez Sélectionner
sur carte. Pour entrer manuellement les coordonnées de
la position, sélectionnez Entrer manuellement.
● Modifier — Modifier ou ajouter des renseignements à un
repère enregistré (par exemple, une adresse civique).
● Ajouter à catégorie — Ajouter un repère à une catégorie
de repères. Sélectionnez chacune des catégories
auxquelles vous voulez ajouter le repère.
● Envoyer — Envoyer un ou plusieurs repères à un appareil
compatible. Les points de repère que vous avez reçus sont
placés dans le dossier Boîte réception de la messagerie.
Vous pouvez classer les repères dans des catégories
prédéfinies ou en créer de nouvelles. Pour modifier des
catégories de repères ou en créer de nouvelles, ouvrez
© 2004 Nokia. Tous droits réservés.32
Page 95

l'onglet des catégories et sélectionnez Options > Modifier
catégories.
Données GPS
Sélectionnez > Applications > Données GPS.
Les données GPS servent à fournir des renseignements de
guidage d'itinéraire vers une destination choisie, de
l'information de positionnement sur votre emplacement
actuel et des renseignements sur votre déplacement, tels que
la distance jusqu'à la destination et la durée approximative
du trajet.
Les coordonnées du GPS sont exprimées en degrés et en
degrés décimaux, selon le système de coordonnées
international WGS-84.
Pour utiliser les données de GPS, le récepteur GPS de votre
appareil doit initialement recevoir de l'information de
position d'au moins quatre satellites pour pouvoir calculer
les coordonnées de votre emplacement. Une fois le calcul
initial effectué, il est possible de continuer à calculer les
coordonnées de votre emplacement au moyen de trois
satellites. Le degré de précision est toutefois habituellement
meilleur si l'appareil repère un plus grand nombre de
satellites.
Guidage d'itinéraire
Sélectionnez
Navigation.
Démarrez le guidage d'itinéraire à l’extérieur. Si vous le
démarrez à l'intérieur, il est possible que le récepteur GPS ne
reçoive pas toute les données nécessaires des satellites.
> Applications > Données GPS et
Le guidage d'itinéraire utilise une boussole rotative sur
l’écran de l’appareil. Une bille rouge indique la direction de
votre destination tandis que la distance approximative
apparaît à l'intérieur de l'anneau de la boussole.
Le guidage d'itinéraire est conçu pour indiquer le chemin le
plus direct et la distance la plus courte jusqu'à destination,
laquelle est mesurée en ligne droite. Ce calcul ne tient pas
compte des obstacles, tels que les édifices et les obstacles
naturels, qui pourraient se trouver sur le chemin. Les
différences d'altitude ne sont pas prises en compte dans le
calcul des distances. Le guidage d'itinéraire ne s'active que
lorsque vous vous déplacez.
Pour définir la destination de votre trajet, sélectionnez
Options > Définir destination et un point de repère
comme destination, ou entrez les coordonnées de latitude et
de longitude.
Pour effacer la destination définie pour votre trajet,
sélectionnez Terminer navigation.
Récupérer l'information de position
Sélectionnez
Position.
À l'écran de position, vous pouvez consulter l'information de
position relative à votre emplacement actuel. Une estimation
de la précision de l'emplacement est affichée.
Pour enregistrer votre emplacement actuel comme point de
repère, sélectionnez Options > Enregistrer position. Les
repères sont des emplacements enregistrés avec plus de
renseignements qui peuvent être utilisés par d'autres
applications et être transférés entre des appareils
compatibles.
> Applications > Données GPS et
© 2004 Nokia. Tous droits réservés. 33
Page 96

Compteur de distance
Sélectionnez
du voyage.
La précision de l'odomètre étant limitée, des erreurs
d'arrondissement peuvent se produire. La réception et la
qualité des signaux GPS peuvent aussi nuire à la précision des
calculs.
Pour activer ou désactiver le calcul de la distance du trajet,
sélectionnez Options > Démarrer ou Arrêter. Les valeurs
calculées restent indiquées sur l'écran. Utilisez cette fonction
à l'extérieur afin de recevoir un meilleur signal GPS.
Pour remettre à zéro la distance du trajet, le temps et la
vitesse moyenne et maximale, puis redémarrer un nouveau
calcul, sélectionnez Options > Réinitialiser. Pour remettre
le compteur kilométrique et la durée totale à zéro,
sélectionnez Redémarrer.
> Applications > Données GPS et Dist.
À propos de l'application Cartes
Avec l'application Cartes, vous pouvez visualiser votre
position actuelle sur une carte, parcourir des cartes de villes
et de pays divers, rechercher des lieux, préparer des
itinéraires pour vous rendre d'un point à un autre, enregistrer
des positions et envoyer ces positions à des appareils
compatibles. Vous pouvez aussi acheter des licences pour des
services d'information sur la circulation et de navigation
routière, s'ils sont offerts pour le pays ou la région.
Lorsque vous utilisez l'application Cartes pour la première
fois, vous devrez peut-être définir un point d'accès Internet
pour le téléchargement des cartes.
Lorsque vous naviguez dans une région dont la carte n'est
pas déjà présente dans votre appareil, celle-ci est
automatiquement téléchargée à partir d'Internet. Certaines
cartes peuvent être préchargées sur une carte mémoire ou
sur votre appareil. L'application pour ordinateur Nokia Map
Loader vous permet aussi de télécharger des cartes dans
votre appareil. Pour installer l'application Nokia Map Loader
sur un ordinateur, rendez-vous à www.nokia.com/maps.
Astuce : Pour éviter les coûts liés aux transferts de
données, vous pouvez également utiliser l'application
Cartes sans connexion Internet et parcourir les cartes
enregistrées dans votre appareil ou sur la carte
mémoire.
Remarque : Le téléchargement de contenu tel que
des cartes, des images satellite, des fichiers vocaux, des
guides ou d'information routière peut engendrer un
important transfert de données (service réseau).
Jusqu’à un certain point, aucune cartographie numérique
n’est totalement précise ou complète. Ne vous fiez jamais
uniquement aux cartes que vous téléchargez dans cet
appareil.
Se déplacer sur une carte
Lorsque la connexion GPS est active, indique votre position
actuelle sur la carte.
Pour afficher votre position actuelle ou votre dernière
position enregistrée sur la carte, sélectionnez Options > Ma
position.
© 2004 Nokia. Tous droits réservés.34
Page 97

Pour vous déplacer sur la carte, appuyez sur le haut, le bas,
la droite ou la gauche de la touche de navigation. La carte est
orientée par défaut vers le nord.
Lorsqu'une connexion de données est active et que vous
parcourez la carte à l'écran, si vous vous déplacez vers une
zone non couverte par vos cartes téléchargées à l'aide de la
touche de navigation, une nouvelle carte se télécharge
automatiquement. Les cartes sont automatiquement
enregistrées dans la mémoire de l'appareil ou sur une carte
mémoire compatible si elle est insérée.
Pour effectuer un zoom avant ou arrière sur une carte,
appuyez sur les touches de majuscule de gauche et de droite,
ou sur la touche de majuscule et la touche d'effacement,
selon le clavier de votre appareil.
Pour changer le type de carte, sélectionnez Options > Mode
carte.
Planifier un itinéraire
Pour planifier un itinéraire, déplacez-vous jusqu'à votre point
de départ sur la carte avec la touche de navigation, appuyez
au centre de la touche de navigation, puis sélectionnez
Ajouter à l'itinéraire. Pour ajouter la destination et d'autres
emplacements à l'itinéraire, sélectionnez Ajouter une
étape. Pour utiliser votre position actuelle comme point de
départ, ajoutez la destination à l'itinéraire.
Pour changer l'ordre des étapes de l'itinéraire, mettez un
emplacement en surbrillance, appuyez au centre de la touche
de navigation, puis sélectionnez Déplacer. Déplacez-vous
jusqu'à l'endroit où vous souhaitez déplacer l'emplacement,
puis sélectionnez Sélectionner.
Pour modifier l'itinéraire, appuyez au centre de la touche de
navigation, puis sélectionnez Modifier l'itinéraire.
Pour afficher l'itinéraire sur la carte, sélectionnez Afficher
l'itinéraire.
Pour vous rendre à la destination en voiture ou à pied en
utilisant la navigation, si vous avez acheté une licence pour
ces services, sélectionnez Afficher l'itinéraire > Options >
Commencer à conduire ou Commencer à marcher.
Pour enregistrer l'itinéraire, sélectionnez Afficher
l'itinéraire > Options > Enregistrer l'itinéraire.
Naviguer vers une destination
Pour naviguer vers une destination, vous devez acheter une
licence pour le service de navigation.
Pour acheter une licence pour la navigation piétonnière et la
navigation automobile, sélectionnez Options > Boutiques
et licences > Cond. et marcher. Pour acheter une licence
pour la navigation piétonnière seulement, sélectionnez
Marcher. La licence est spécifique à une région et ne peut
être utilisée que dans la région sélectionnée. Vous pouvez
porter les frais d'achat de la licence sur votre compte de carte
de crédit ou sur votre compte téléphonique, si cela fait partie
des services offerts par votre fournisseur. La licence peut être
transférée vers un autre appareil, mais la même licence ne
peut être active que sur un seul appareil à la fois.
Lors de la première utilisation de la navigation automobile,
l'appareil vous demande de choisir la langue du guidage
vocal et de télécharger les fichiers correspondants. Pour
changer la langue ultérieurement, à partir de l'écran
principal, sélectionnez Options > Outils > Paramètres >
© 2004 Nokia. Tous droits réservés. 35
Page 98

Navigation > Guide vocal. Le guidage vocal n'est pas offert
pour la navigation piétonnière.
Pour lancer la navigation, mettez un lieu en surbrillance,
appuyez au centre de la touche de navigation, puis
sélectionnez Y aller en voiture ou Y aller à pied.
7. Internet et connectivité
Grâce aux diverses méthodes de connexion qu'offre votre
appareil, vous pouvez naviguer sur Internet ou connecter
votre appareil à un ordinateur compatible.
Pour mettre fin à la navigation, sélectionnez Arrêter.
Important : N'utilisez que des services fiables qui
offrent une protection adéquate contre les logiciels nuisibles.
Touche Internet
Votre appareil est doté d'une touche dédiée qui vous permet
d'accéder rapidement à Internet.
Naviguer
Le navigateur vous permet de consulter des pages Web sur
Internet. Vous pouvez aussi naviguer sur des pages
spécialement conçues pour les téléphones mobiles.
Pour naviguer sur le Web, un point d'accès Internet doit être
configuré dans votre appareil.
Naviguer sur le Web
Sélectionnez > Web.
Raccourci : Pour ouvrir le navigateur, appuyez sur la
touche Internet.
Important : N'installez et n'utilisez que des
applications et des logiciels provenant de sources fiables,
telles que les applications certifiées Symbian Signed ou ayant
réussi le test Java VerifiedMC
La page d'accueil s'ouvre. Pour changer la page d'accueil,
sélectionnez Options > Outils.
Pour ouvrir une page Web, sélectionnez un signet à l'écran
des signets ou entrez l'adresse dans le champ (
appuyez sur la touche de navigation.
Il est possible que l'ouverture de certaines pages Web
nécessite beaucoup de mémoire si celles-ci contiennent, par
exemple, des images et des sons. Si votre appareil manque
de mémoire lors du chargement d'une telle page Web, les
images de la page ne seront pas affichées.
Pour parcourir des pages Web sans graphiques afin
d'économiser la mémoire, sélectionnez Options > Outils >
Page > Charger le contenu > Texte seulement.
MC
.
), puis
© 2004 Nokia. Tous droits réservés.36
Page 99

Pour entrer une nouvelle adresse Web, sélectionnez
Options > Aller à adresse Web.
Astuce : Pour ouvrir un signet pendant la navigation,
appuyez sur 1, puis sélectionnez un signet.
Pour actualiser le contenu de la page Web, sélectionnez
Options > Options navigation > Recharger.
Pour enregistrer la page Web en cours comme signet,
sélectionnez Options > Enreg. comme signet.
Pour afficher les instantanés des pages Web que vous avez
visitées pendant la session de navigation, sélectionnez
Retour (cela est possible si l'option Historique est activée
dans les paramètres de navigation et que la page courante
n'est pas la première page Web que vous avez visitée).
Sélectionnez la page Web que vous voulez rouvrir.
Pour enregistrer une page Web pendant la navigation,
sélectionnez Options > Paramètres > Enregistrer page.
Vous pouvez enregistrer des pages Web et les parcourir
ultérieurement alors que vous êtes hors ligne. Vous pouvez
aussi grouper des pages Web dans des dossiers. Pour avoir
accès aux pages Web enregistrées, dans l'écran des signets,
sélectionnez Pages enregistrées.
Pour ouvrir une sous-liste de commandes ou d'actions pour
la page Web en cours, sélectionnez Options > Options de
service (si cette fonction est prise en charge par la page
Web).
Pour éviter ou permettre l'ouverture automatique de
plusieurs fenêtres, sélectionnez Options > Fenêtre > Bloq.
fenêtres pub. ou Autoriser fenêtres pub..
Raccourcis pour la navigation
● Appuyez sur 1 pour ouvrir l'écran des signets.
● Appuyez sur 2 pour rechercher des mots-clés dans la page
Web active.
● Appuyez sur 3 pour revenir à la page précédente.
● Appuyez sur 5 pour afficher toutes les fenêtres ouvertes.
● Appuyez sur 8 pour afficher l'aperçu de la page Web active.
Appuyez sur 8 une deuxième fois pour faire un zoom avant
et voir la section désirée de la page.
● Sélectionnez 9 pour entrer une nouvelle adresse Web.
● Appuyez sur 0 pour aller à la page d'accueil (si elle a été
définie dans les paramètres).
● Appuyez sur * pour effectuer un zoom avant et sur # pour
effectuer un zoom arrière.
Astuce : Pour revenir à l'écran d'accueil alors que le
navigateur est ouvert en arrière-plan, appuyez deux
fois sur
au navigateur, maintenez la touche
sélectionnez le navigateur.
ou une fois sur la touche de fin. Pour revenir
enfoncée et
Flux de nouvelles et blogues
Les flux de nouvelles sont des fichiers XML émis par pages
Web qui servent à recevoir, par exemple, des manchettes
d'actualité ou des mises à jour de blogues. Les blogues sont
des journaux personnels publiés sur le Web. Les pages Web,
les blogues et les sites wiki offrent souvent des flux de
nouvelles.
L’application Web détecte automatiquement la présence de
flux de nouvelles sur une page Web.
© 2004 Nokia. Tous droits réservés. 37
Page 100

Pour vous abonner à un flux de nouvelles, sélectionnez ce
dernier, puis Options > S'abonner sources Web.
Pour mettre à jour un flux de nouvelles, sélectionnez ce
dernier, puis Options > Actualiser.
Pour définir la méthode de mise à jour des flux de nouvelles,
sélectionnez Options > Outils > Sources Web.
Vider la mémoire cache
L'information ou les services auxquels vous avez accédé
pendant la navigation sont enregistrés dans la mémoire
cache de l'appareil.
On appelle « mémoire cache » la partie de la mémoire où sont
stockées temporairement des données. Si vous avez tenté
d'accéder ou avez accédé à des renseignements confidentiels
au moyen de mots de passe, videz la mémoire cache après
chaque utilisation. Les renseignements ou les services
auxquels vous avez accédé lors de votre navigation sont
enregistrés dans la mémoire cache.
Pour vider la mémoire cache, sélectionnez Options >
Effacer données confid. > Cache.
Pour supprimer les renseignements recueillis par le serveur
de réseau au cours de vos séances de navigation Web,
sélectionnez Options > Effacer données confid. >
Témoins.
Sécurité de connexion
Si l'indicateur de sécurité ( ) s'affiche pendant une
connexion, cela indique que les données transmises entre le
téléphone et la passerelle de navigation ou le serveur sont
cryptées.
L'icône de sécurité n'indique pas que la transmission de
données entre la passerelle et le serveur de contenu (là où les
données sont stockée) est sécurisée. C'est le fournisseur de
services qui sécurise la transmission de données entre la
passerelle et le serveur.
Il se peut que des certificats de sécurité soient exigés pour
certains services en ligne comme les services bancaires. Un
message apparaît à l'écran si l'identité du serveur n'est pas
authentique ou si votre téléphone ne comporte pas le
certificat de sécurité approprié. Pour plus d'information à ce
sujet, communiquez avec votre fournisseur de services.
Rompre la connexion
Pour rompre la connexion et afficher hors ligne la page
actuelle, sélectionnez Options > Paramètres >
Déconnecter; pour rompre la connexion et fermer le
navigateur, sélectionnez Options > Quitter.
Pour faire passer le navigateur en arrière-plan, appuyez sur
la touche de fin. Pour rompre la connexion, maintenez la
touche de fin enfoncée.
Téléchargement rapide
L'accès par paquets en liaison descendante haut débit
(HSDPA, également appelé 3,5G, indiqué par
service réseau offert sur les réseaux UMTS et permettant de
télécharger des données à un débit élevé. Lorsque la prise en
charge par l'appareil du HSDPA est activée et que l'appareil
est connecté à un réseau UMTS prenant lui-même en charge
le HSPDA, le téléchargement de données comme des
messages, des courriels ou des pages Web, peut devenir plus
© 2004 Nokia. Tous droits réservés.38
) est un
 Loading...