

Nokia Smart Home User Manual
Nokia Smart Home
user guide

2 Nokia Smart Home user guide
Contents
Quick install guide for
the Nokia Smart Home
..............3
Introduction ......................5
Chapter 1: Connect your
Nokia Smart Home
.................6
Getting started ....................7
Login............................8
Dashboard .......................9
How to set up your wireless network ..10
Where to nd basic information
for your device and network
.........14
How to set up a guest network .......16
Connecting other devices ...........16
How to set up parental controls ......18
How to limit access to your network ...24
How to change the login
password of the ONT
..............28
How to assign IP addresses
to devices in your network
..........30
How to set up a DNS...............33
How to set up a DDNS..............36
How to use a network clock to
set the time on your ONU (NTP)
......38
Wi-Fi Analyser ....................40
Speed Test ......................42
Statistics........................44
Chapter 2: Prepare your
Nokia Smart Home
................46
Login...........................46
Dashboard ......................47
Smart Home screen ...............47
Managing devices .................48
Managing rooms ..................52
Chapter 3: Create automation rules
and modify your settings with the
Nokia Smart Home web interface
....54
Scenarios .......................56
Rules ...........................57
Schedules .......................58
Setting up a security video camera....60
Chapter 4: View and control
your Nokia Smart Home
with the mobile app
...............63
Appendix .......................69
Supported Z-Wave and
ZigBee devices
...................69

3 Nokia Smart Home user guide
Quick install guide for
the Nokia Smart Home
1. Install the Nokia Digital ONU app
Download from the Google Play store,
or the Apple App store. Then use this app
for steps 2 and 3.
2. Connect your Nokia Smart Home [Figure 1]
■
Log in
■
On the Dashboard screen, swipe right
■
Click on ONT Management
■
Click on Wi-Fi to set up your wireless network
■
Click on Advanced ONT Settings to change
the setting for DHCP, DNS, Firewall, MAC
Filter, IP Filter, URL Filter, etc
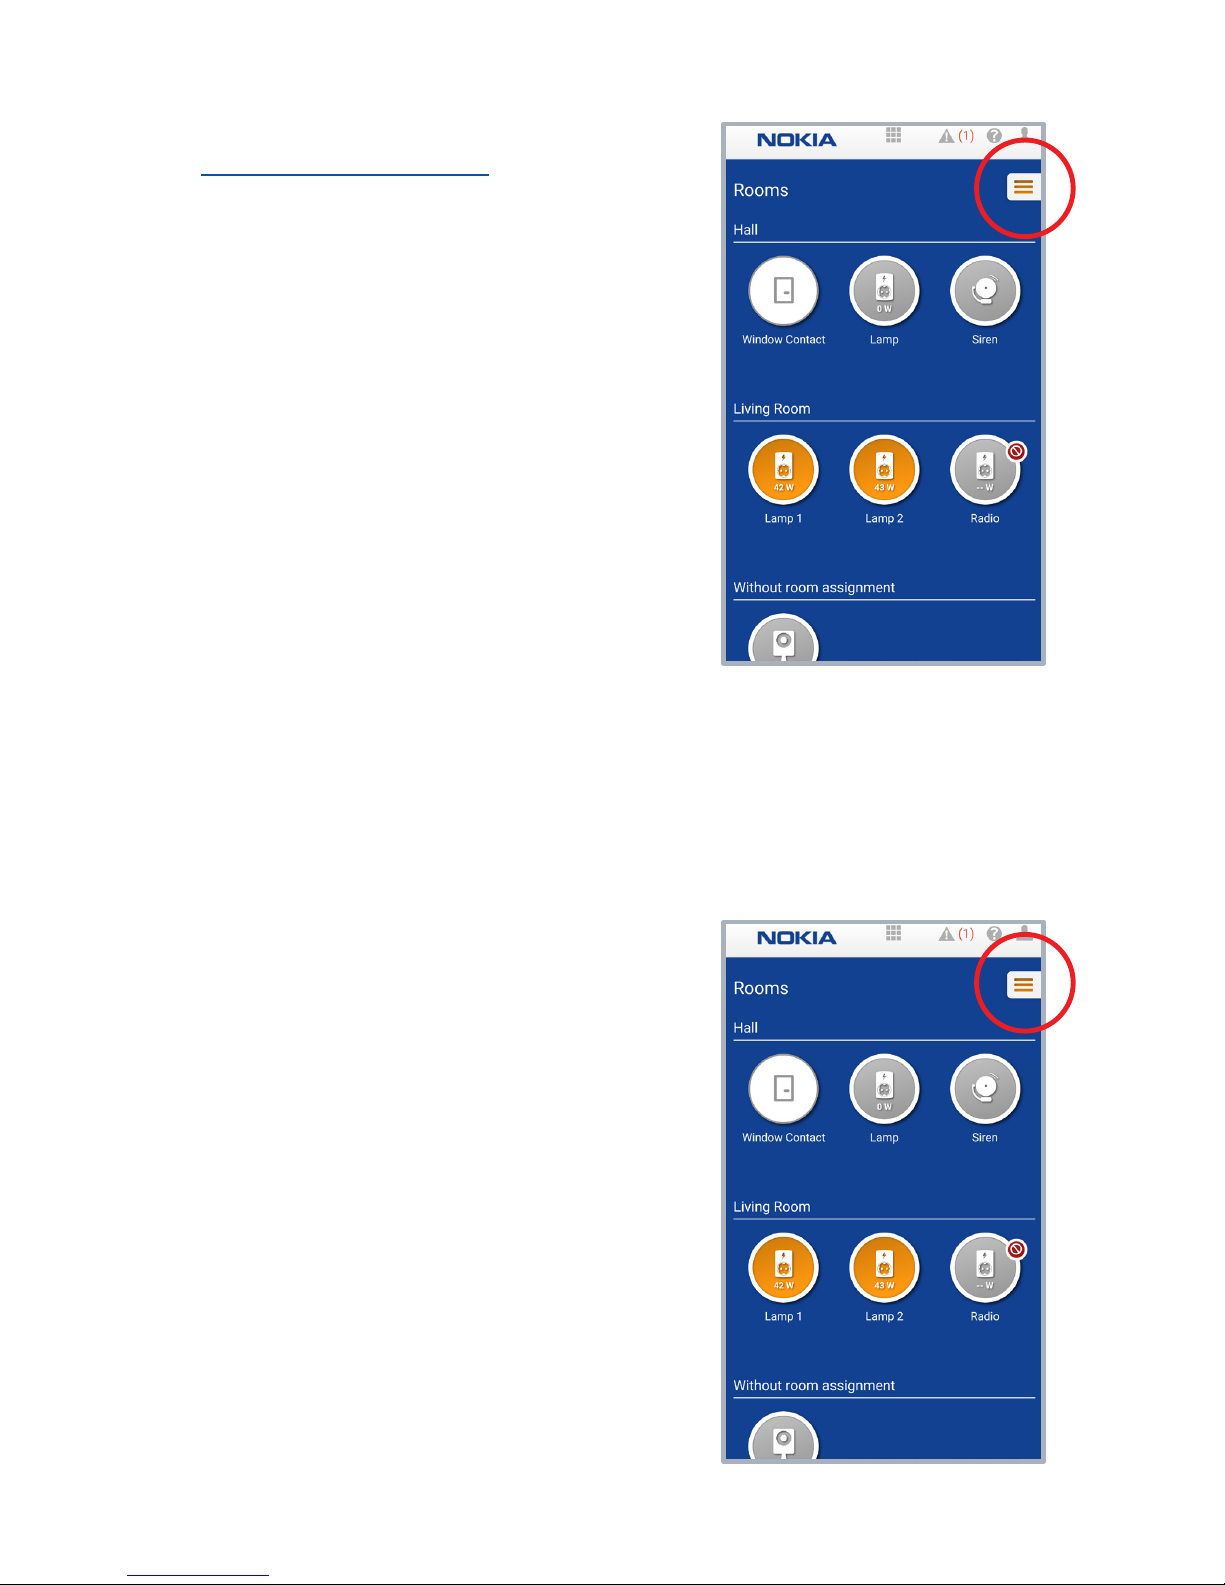
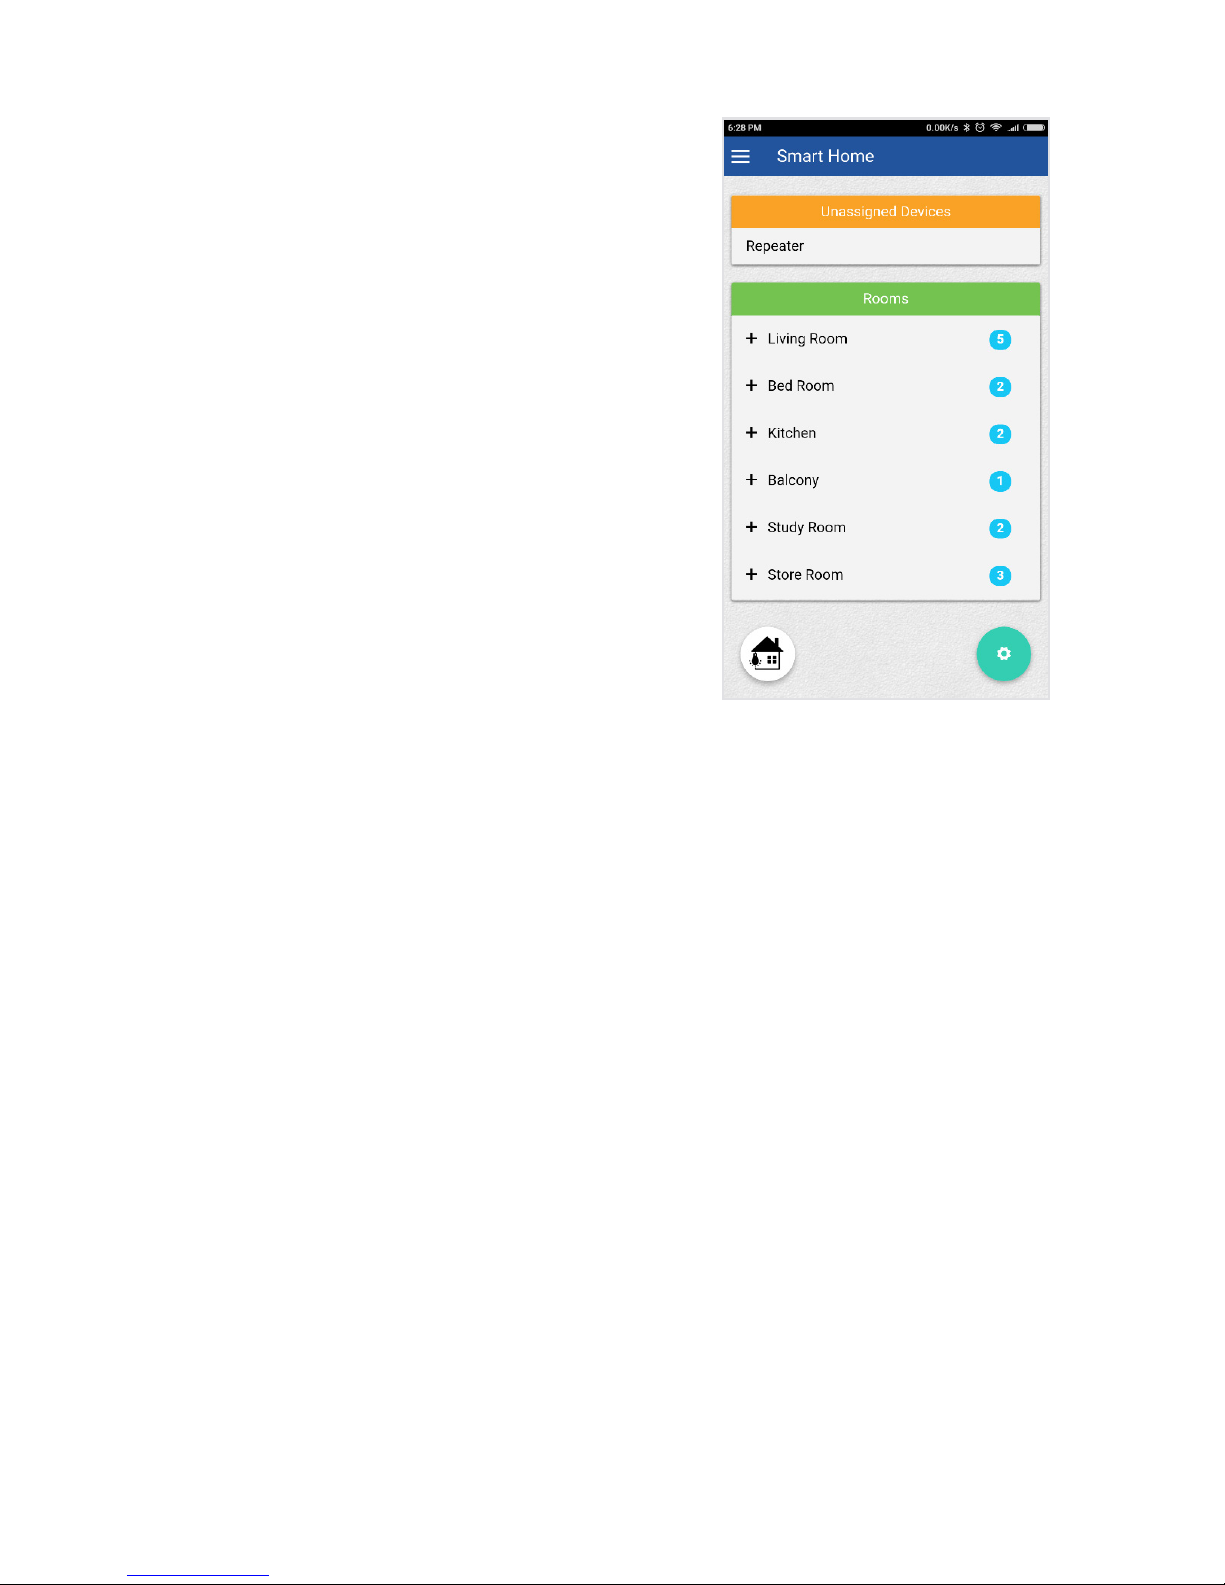
3. Prepare your Nokia Smart Home:
Dene rooms, connect devices
■
Log in
■
On the Dashboard screen click on the
Smart Home icon
■
Click on Rooms and add all your rooms
■
Click on the green icon [Figure 2]
■
Select Pair Devices and connect all your
devices
■
Click on devices to allocate them to rooms
Figure 1
Figure 2
4 Nokia Smart Home user guide
4. Create automation rules: connect to URL
www.nokia.greenpocket.de
Click on the navigation bar [Figure 3],
then on Automation:
■
Use + to create a new scenario (a group of
devices that are switched on/o together)
■
Test the scenario by clicking on it
■
Create new rules
• Click + to create a new trigger
• Click + to create an action (device or
scenario that is activated by the trigger,
or that operates as long as the trigger
persists)
5. Install the Nokia Smart Home mobile app.
Download from the Google Play store or
the Apple App store. Then use this app
for step 6.
6. View and control your Nokia Smart Home
Click on the navigation bar to view
[Figure 4]:
■
Rooms: see all the devices per room; view
their status (on/o) and watch as rules are
executed
■
Consumption: see the power consumption
per device; choose the device; choose the
time interval (by day, week, month)
Figure 3
Figure 4

5 Nokia Smart Home user guide
Introduction
This manual shows you how to setup and manage
your Nokia Smart Home.
You’ll be guided step by step with easy to follow instructions that allow you to:
■
Set up your home network
■
Install and pair your smart devices
■
Set up Nokia Smart Home automation
■
Control and manage your Nokia Smart Home
You’ll need two mobile apps on your smartphone to help you set up the Nokia
Smart Home solution:
■
Nokia Digital ONU mobile app
■
Nokia Smart Home mobile app
Instructions for downloading and installing these apps are at the start of
Chapters 1 and 4.
For a list of supported smart devices (Z–Wave, ZigBee and Wi-Fi devices),
see the Appendix.

6 Nokia Smart Home user guide
Chapter 1: Connect your
Nokia Smart Home
How to use the Nokia digital optical network unit (ONU)
mobile application
Downloading the Nokia Digital ONU mobile app
The Android app can be downloaded from the Google Play store;
the iOS app can be downloaded from the Apple App store.
Supported versions:
■
Android – 4.1.x and above
■
iOS – 7.0 and above

7 Nokia Smart Home user guide
Getting started
The Nokia digital optical network unit (ONU) mobile application
lets you connect your Nokia Smart Home and congure most
of the features of your residential gateway (RGW). It also lets
you check on the status of your Optical Network Terminal
(ONT). Here’s how you can use it:
Features that
can be congured
■
Wi-Fi
■
LAN
■
DHCP
■
DNS
■
Firewall
■
MAC Filter
■
IP Filter
■
URL Filter
■
NTP
■
DMZ
■
ALG
■
Port Forwarding
■
DDNS
■
Password
Device status
and information
■
Fiber ONU gateway –
ONT information
• Overview
• Device information
• LAN status
• Optical module status
■
Home network – connected
device information
■
Wi-Fi Analyser
8 Nokia Smart Home user guide
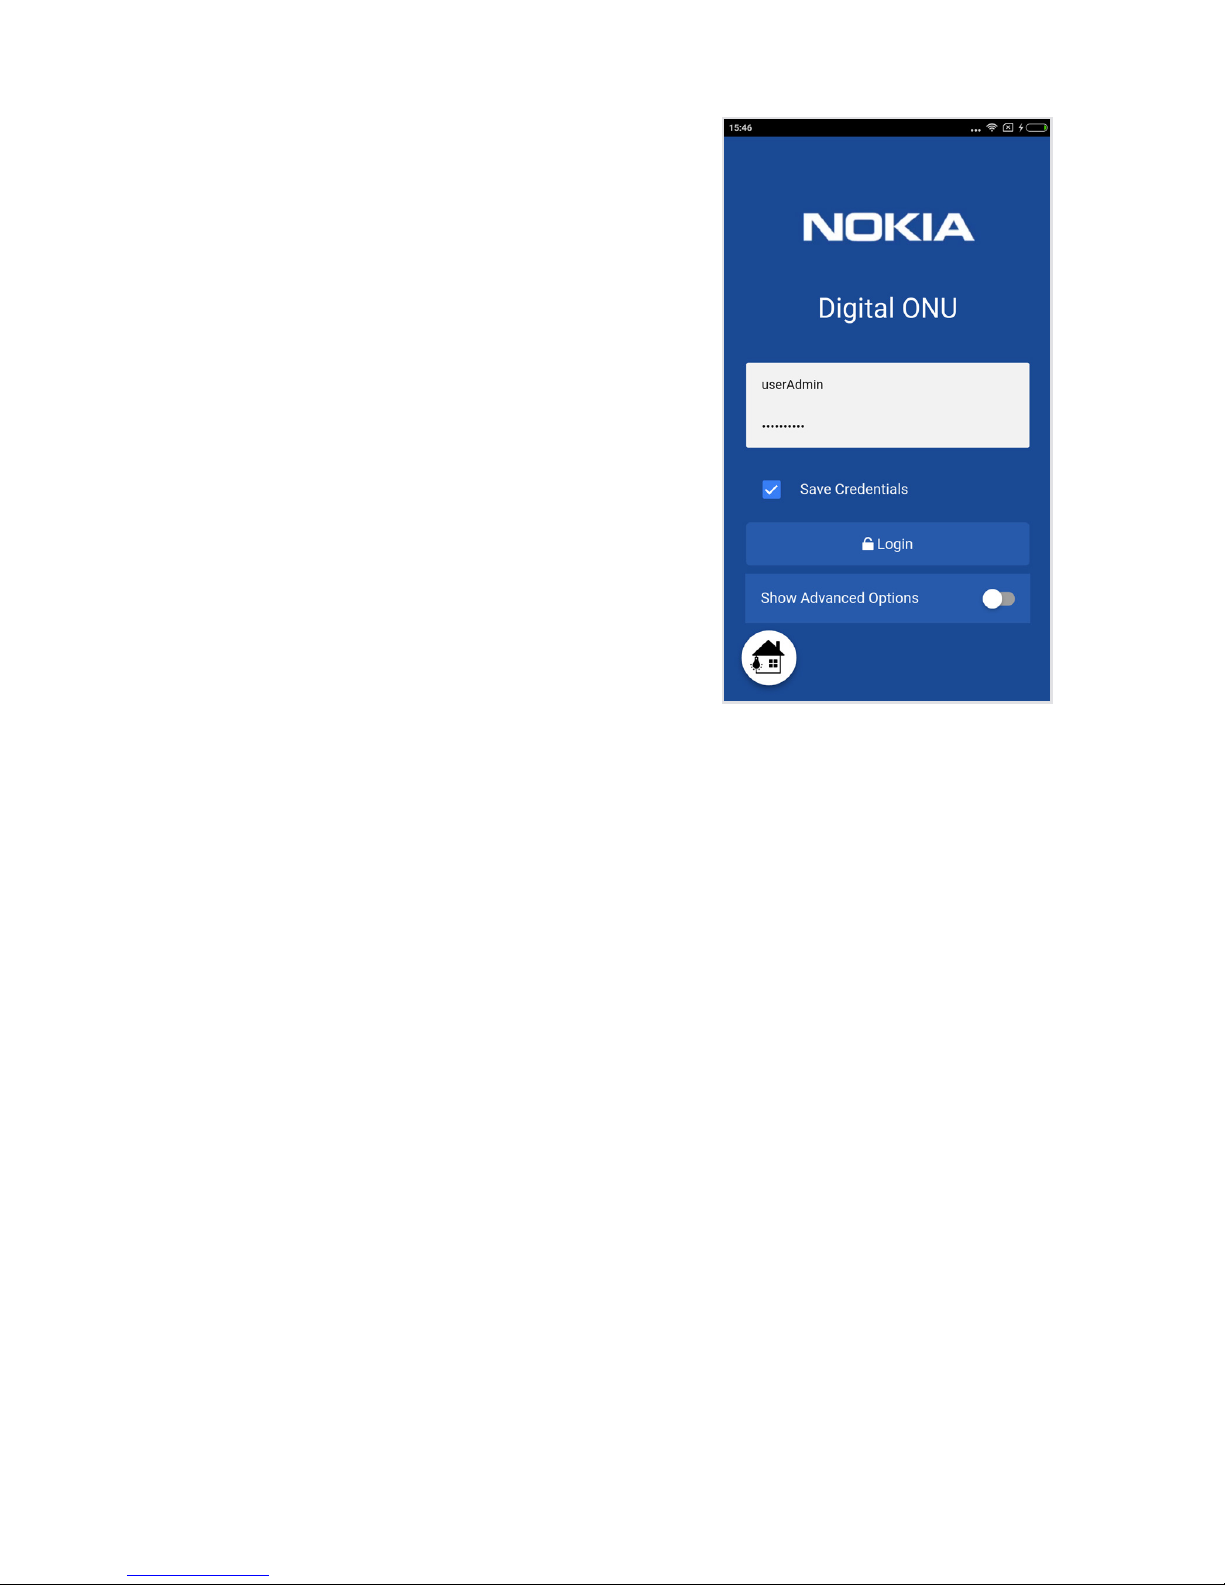
Login
To access and congure certain features
of the ONT, log in to the ONT.
1. Connect the smartphone to the
Wi-Fi interface of the ONT.
2. Open the digital ONU application.
3. Enter the username and password in
the login window, as shown in Figure 1.
If logging in to the app for the rst time,
use the username and password provided
on the back of the ONT.
4. For login options, click the Show
Advanced Options toggle button. A eld
to input the ONT’s IP address will pop up.
The default value is 192.168.1.254.
You can edit this eld if necessary.
5. Click Login.
Figure 1
9 Nokia Smart Home user guide
Dashboard
1. After logging in to the app, the dashboard
screen appears [Figure 1].
2. The dashboard shows the ONT status,
URL blocker status and the rewall status.
Clicking on any of these options takes you
to the respective windows.
3. The dashboard screen shows the online
and oine count of devices.
4. Click on Show Advanced Options to go
to the various windows of the ONT.
5. You can also access the menu by swiping
the mobile app page to the right. The side
menu includes the following options:
a. Dashboard
b. ONT Management
c. Wi-Fi Analyser
d. App settings
e. About
f. Logout
Figure 1
10 Nokia Smart Home user guide
How to set up your
wireless network
To connect the Wi-Fi enabled devices in your
home network to the ONT and the internet,
you must enable and congure a wireless
network on the ONT. Depending on the type
of the ONT, the Wi-Fi options for wireless
5 GHz may be available.
Wireless 2.4 GHz
This frequency range is used by the
802.11b/g/n standard and can provide widely
available bandwidths of up to 450 Mb/s.
This conguration can be done as follows:
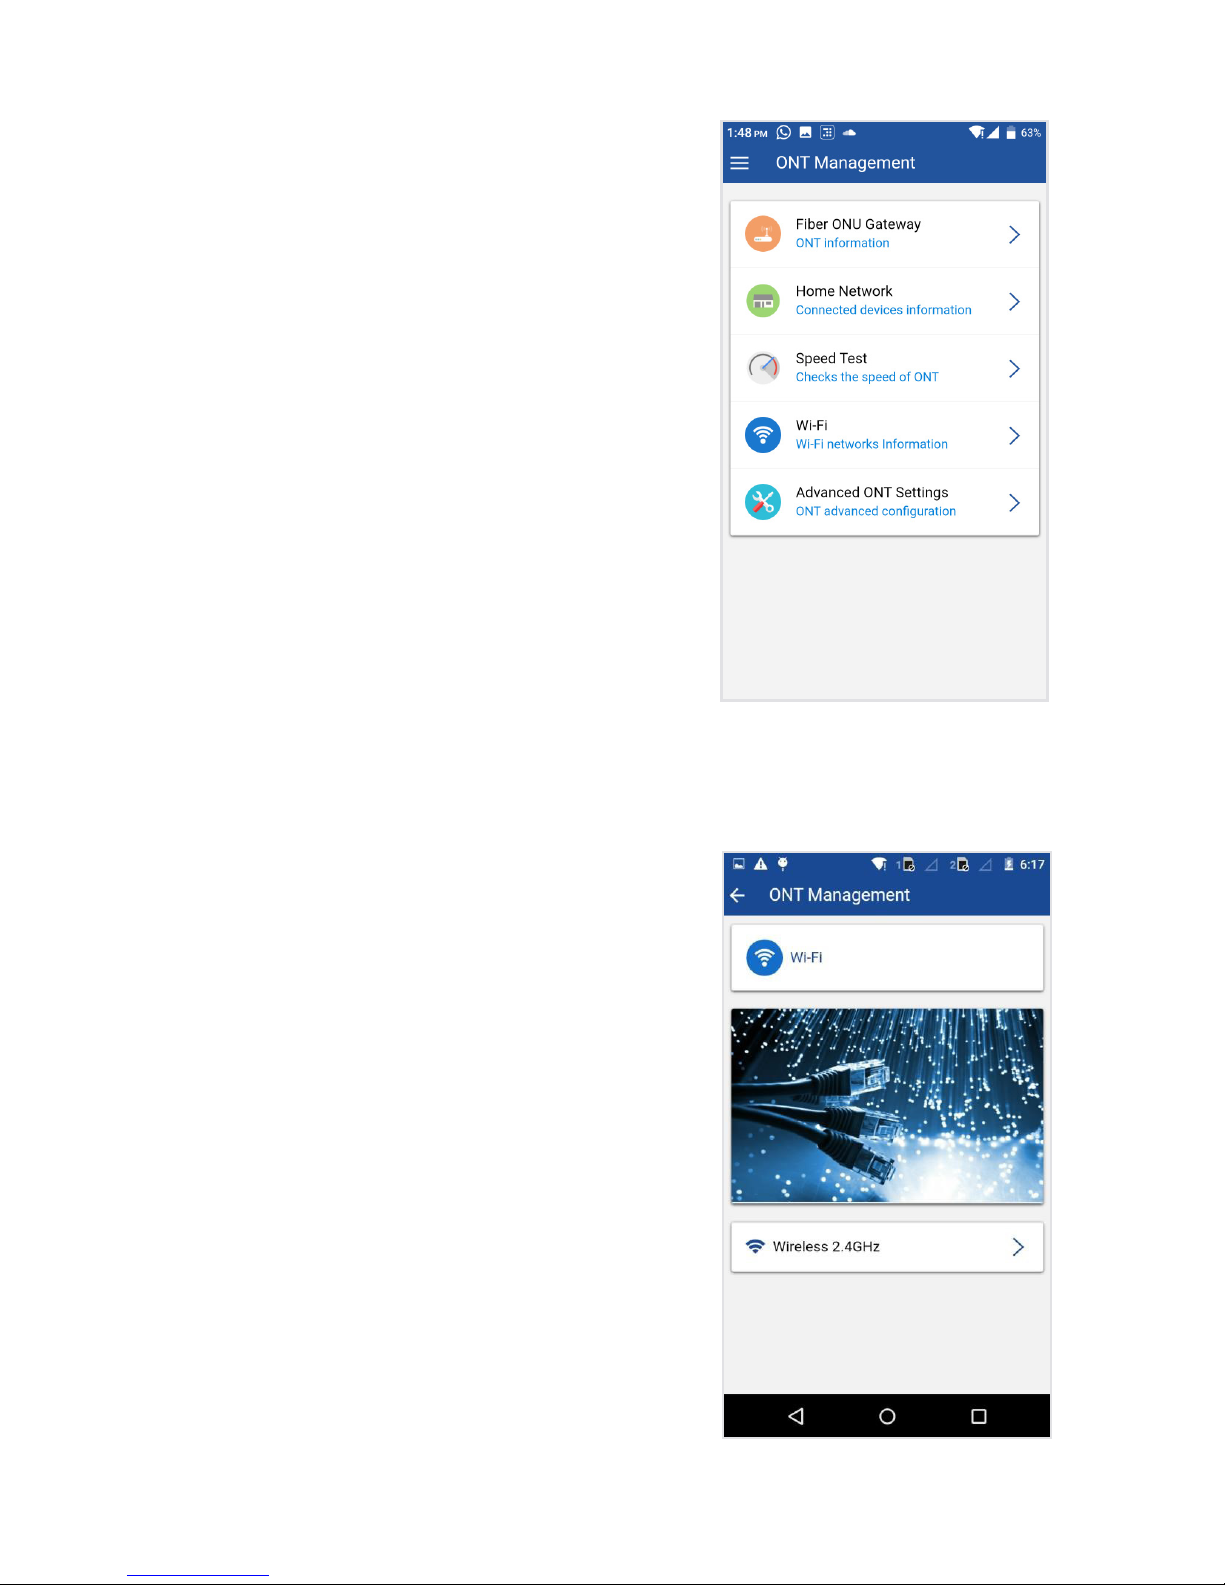
1. On the home screen as shown in
Figure 1, select Wi-Fi.
2. This brings you to a window [Figure 2]
with one or two submenus, depending
on the type of ONT being used.
3. Select Wireless 2.4GHz.
Basic setup
Figure 2
Figure 1
11 Nokia Smart Home user guide
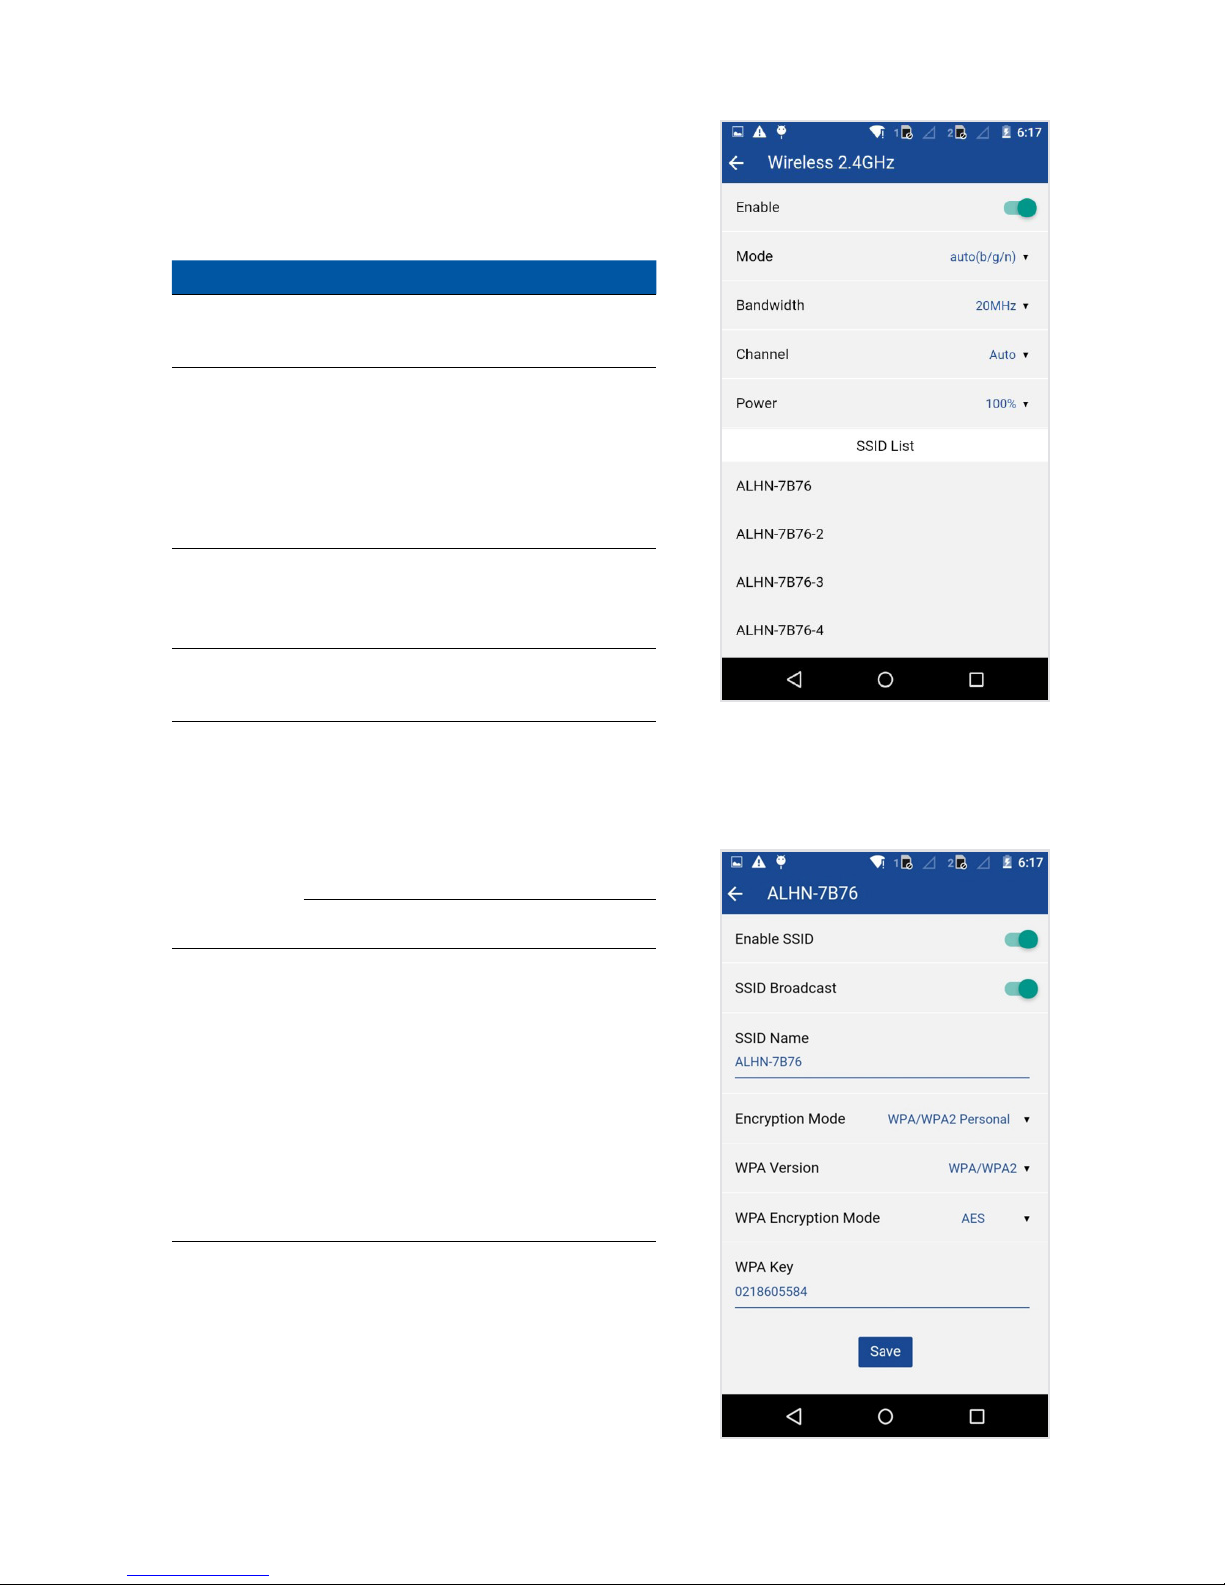
Basic setup
4. The following window [Figure 3] opens.
5. Set the parameters as shown in Table 1.
Table 1. Wi-Fi 2.4 GHz parameters
Parameter Description
Enable Toggle to enable or disable
the 2.4 GHz network
Mode Choose:
• auto(b/g/n)
• b
• g
• n
• b/g
Bandwidth Choose the mode of operation:
• 20 MHz
• 40 MHz
Channel Indicates the wireless channel
being used
Power Choose between Wi-Fi transmit
power percentages:
• 100%*
• 75%
• 50%
• 25%
Transmit power for ETSI is 100 mW.
SSID list The active 2.4 GHz SSIDs. In this
example, there are two: Home
network and guest network. When you
select one of the SSIDs listed, it allows
you to modify the SSID details such
as: Enable/Disable the SSID and SSID
broadcast, name or rename the SSID,
and set the encryption mode (OPEN,
WEP, WPA/WPA2 Personal, WPA/WPA2
Enterprise). In this example [Figure 4],
the guest network SSID is opened.
* 100% Wi-Fi transmit power for all regions outside of Europe is 500 mW;
for 100% - Wi-Fi.
Figure 4
Figure 3
12 Nokia Smart Home user guide
Basic setup
Wireless 5 GHz
This frequency range is used by the 802.11ac
standard and can provide high capacity
bandwidths of up to 1.3 Gb/s.
Conguration can be done as follows:
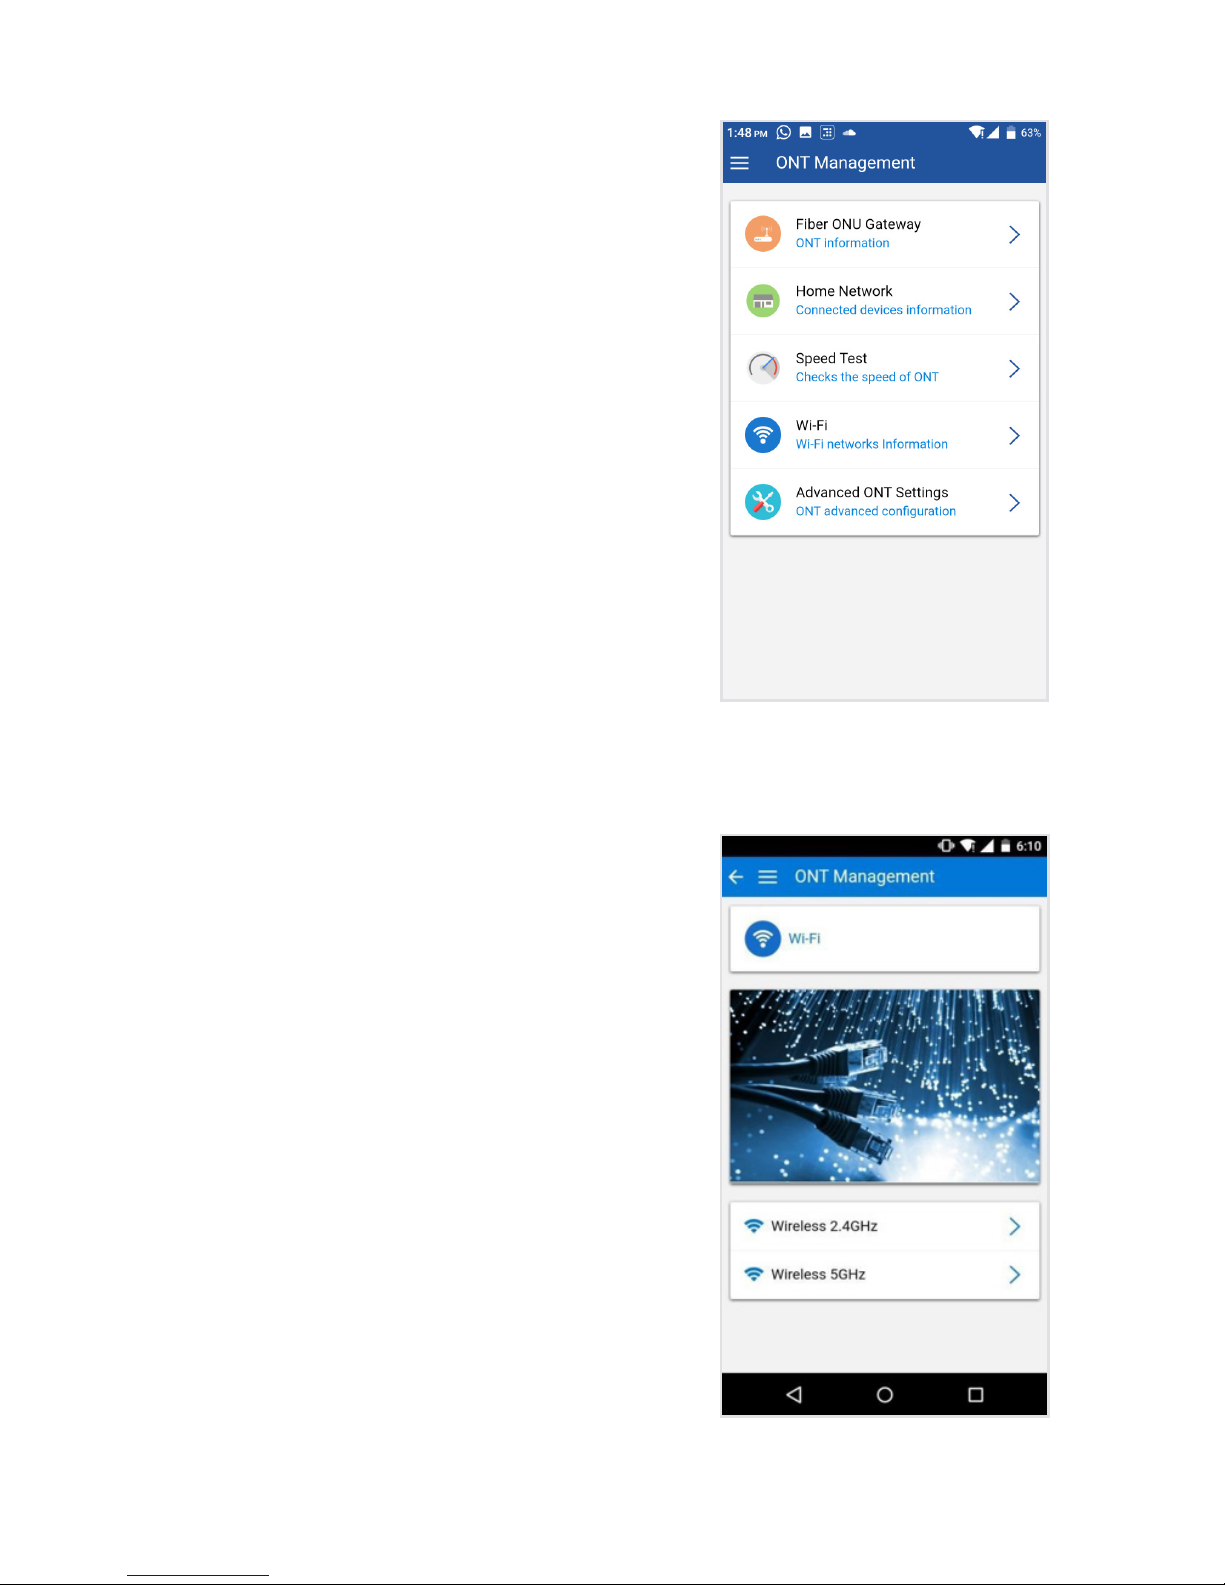
1. On the home screen as shown in Figure 1,
select Wi-Fi.
2. This brings you to a window [Figure 2]
with two submenus.
3. Select Wireless 5GHz.
Here you can set the parameters for the
5 GHz bandwidth described in Table 2.
Figure 1
Figure 2
13 Nokia Smart Home user guide
Basic setup
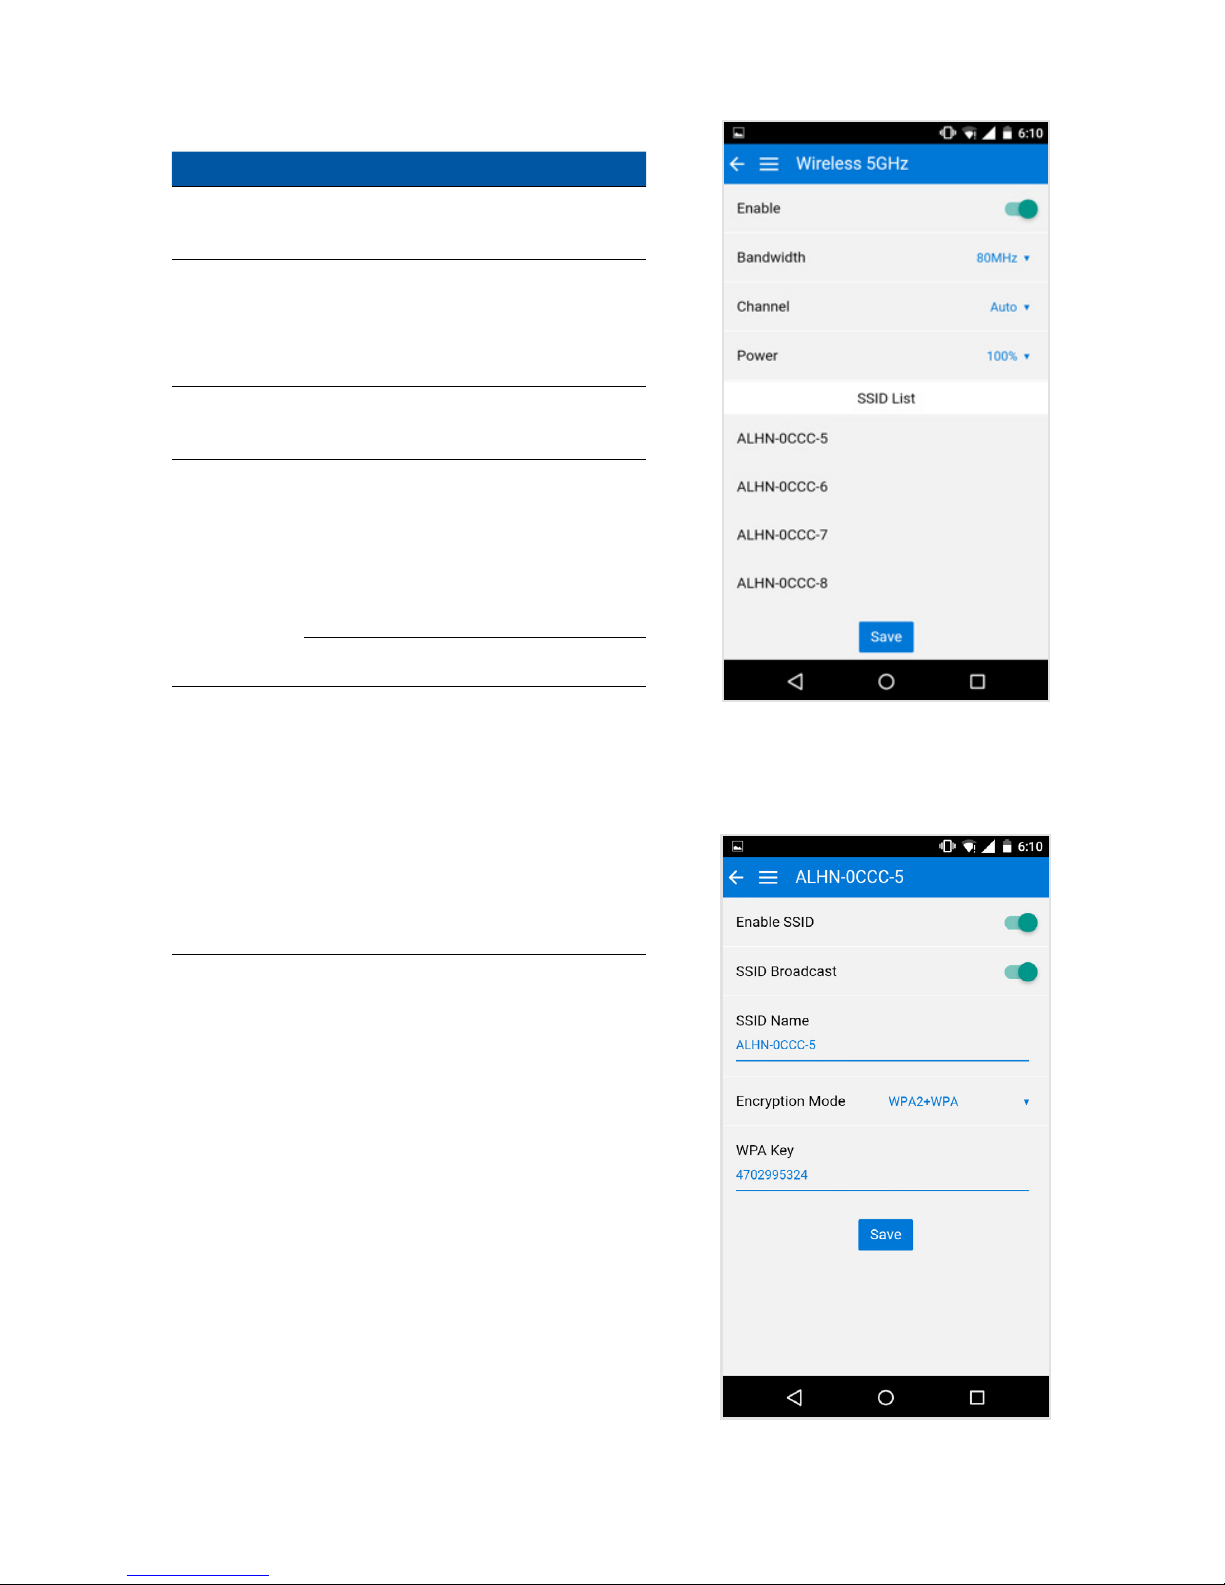
Table 2. Wi-Fi 5 GHz parameters
Parameter Description
Enable Toggle to enable or disable
the 5 GHz network
Bandwidth Choose the mode of operation:
• 20 MHz
• 40 MHz
• 80 MHz
Channel Indicates the wireless channel
being used [Figure 3]
Power Choose between Wi-Fi transmit
power percentages:
• 100%*
• 75%
• 50%
• 25%
Transmit power for ETSI is 100 mW.
SSID list The active 5 GHz SSIDs. When you
select one of the SSIDs listed, it
allows you to modify the SSID details
such as: Enable/Disable the SSID and
SSID broadcast, name or rename
the SSID, and set the encryption
mode (NONE-OPEN, WPA2-AES,
WPA2+WPA, WPA/WPA2 Enterprise).
In this example [Figure 4], the guest
network SSID is opened.
* 100% Wi-Fi transmit power for all regions outside of Europe is 500 mW;
for 100% - Wi-Fi.
Figure 3
Figure 4
14 Nokia Smart Home user guide
Basic setup
Where to nd basic
information for your
device and network
Device status and information
In just a few clicks, you can quickly check the
status of the LAN or WLAN connection and
see basic ONT information.
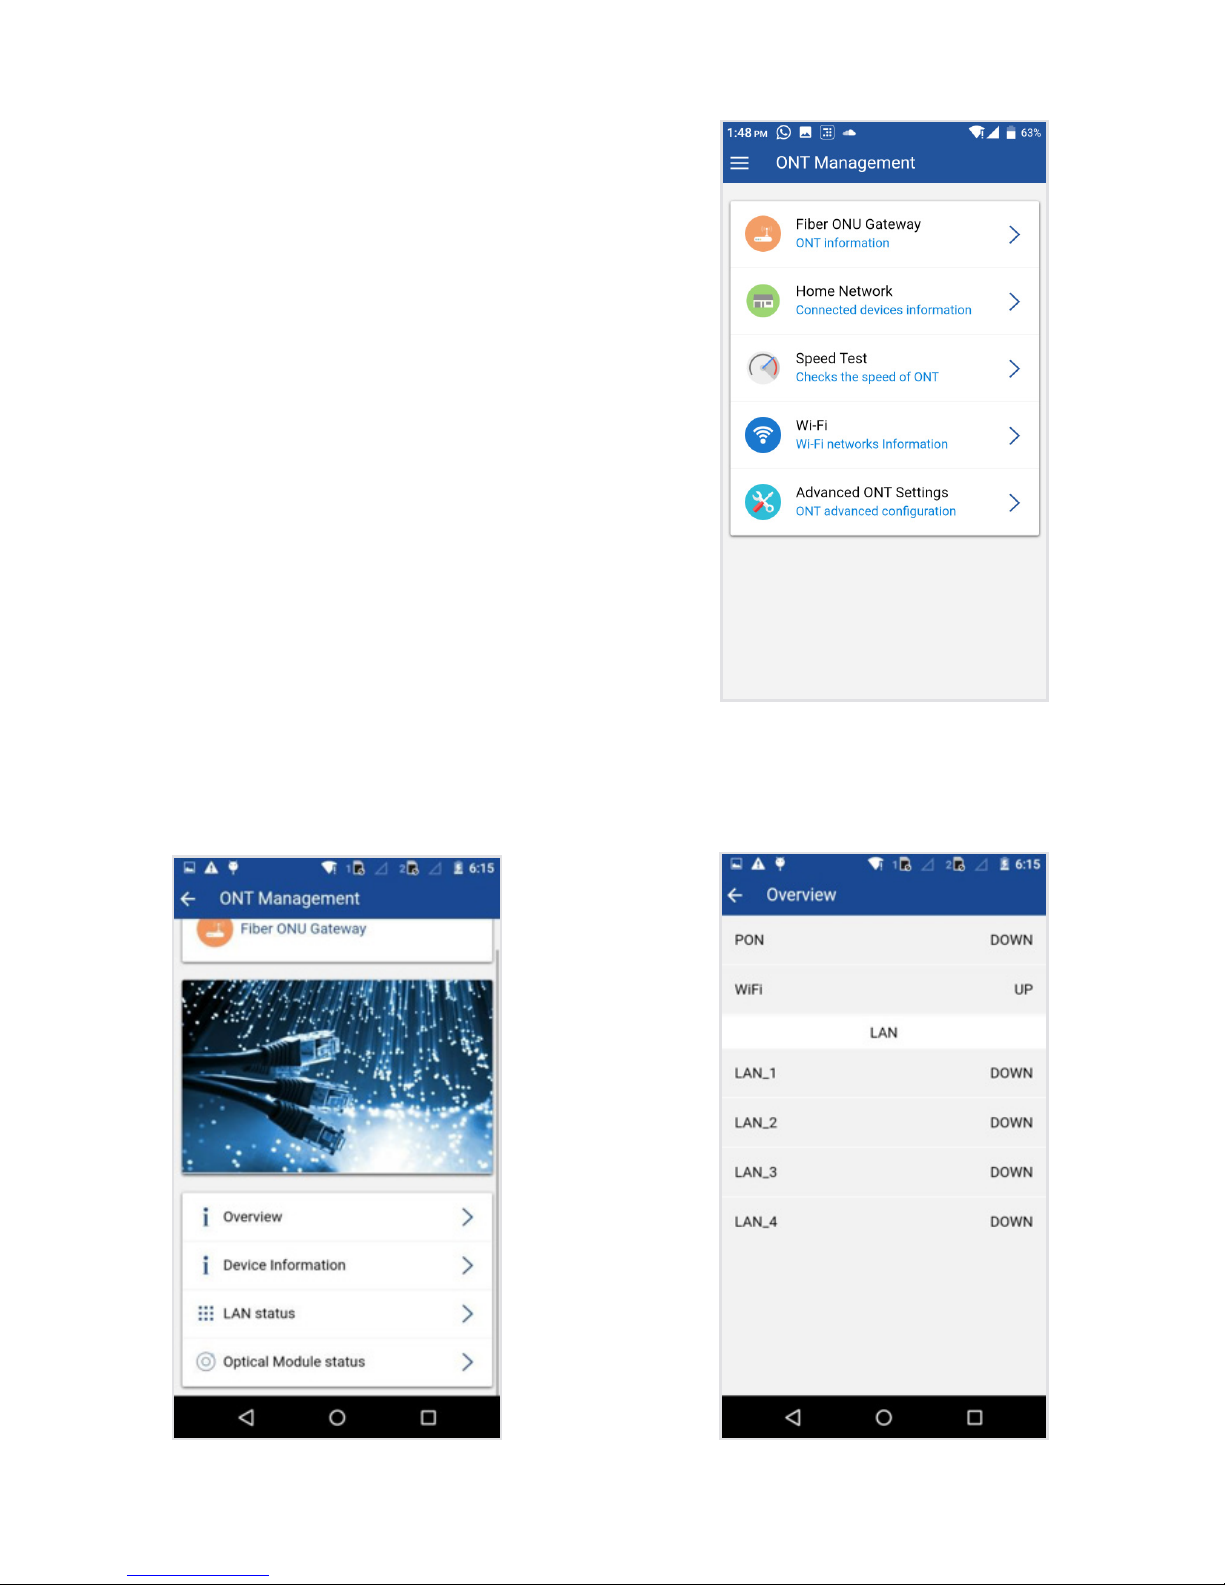
1. On the home screen as shown in Figure 1,
select Fiber ONU Gateway.
2. This brings you to a window [Figure 2]
with four submenus.
Figure 1
Figure 3Figure 2
15 Nokia Smart Home user guide
Figure 4
Figure 5 Figure 6
Overview: Shows the status of each of
the interfaces on the ONU (Wi-Fi, LAN
ports) and the instantaneous throughput
[Figure 3].
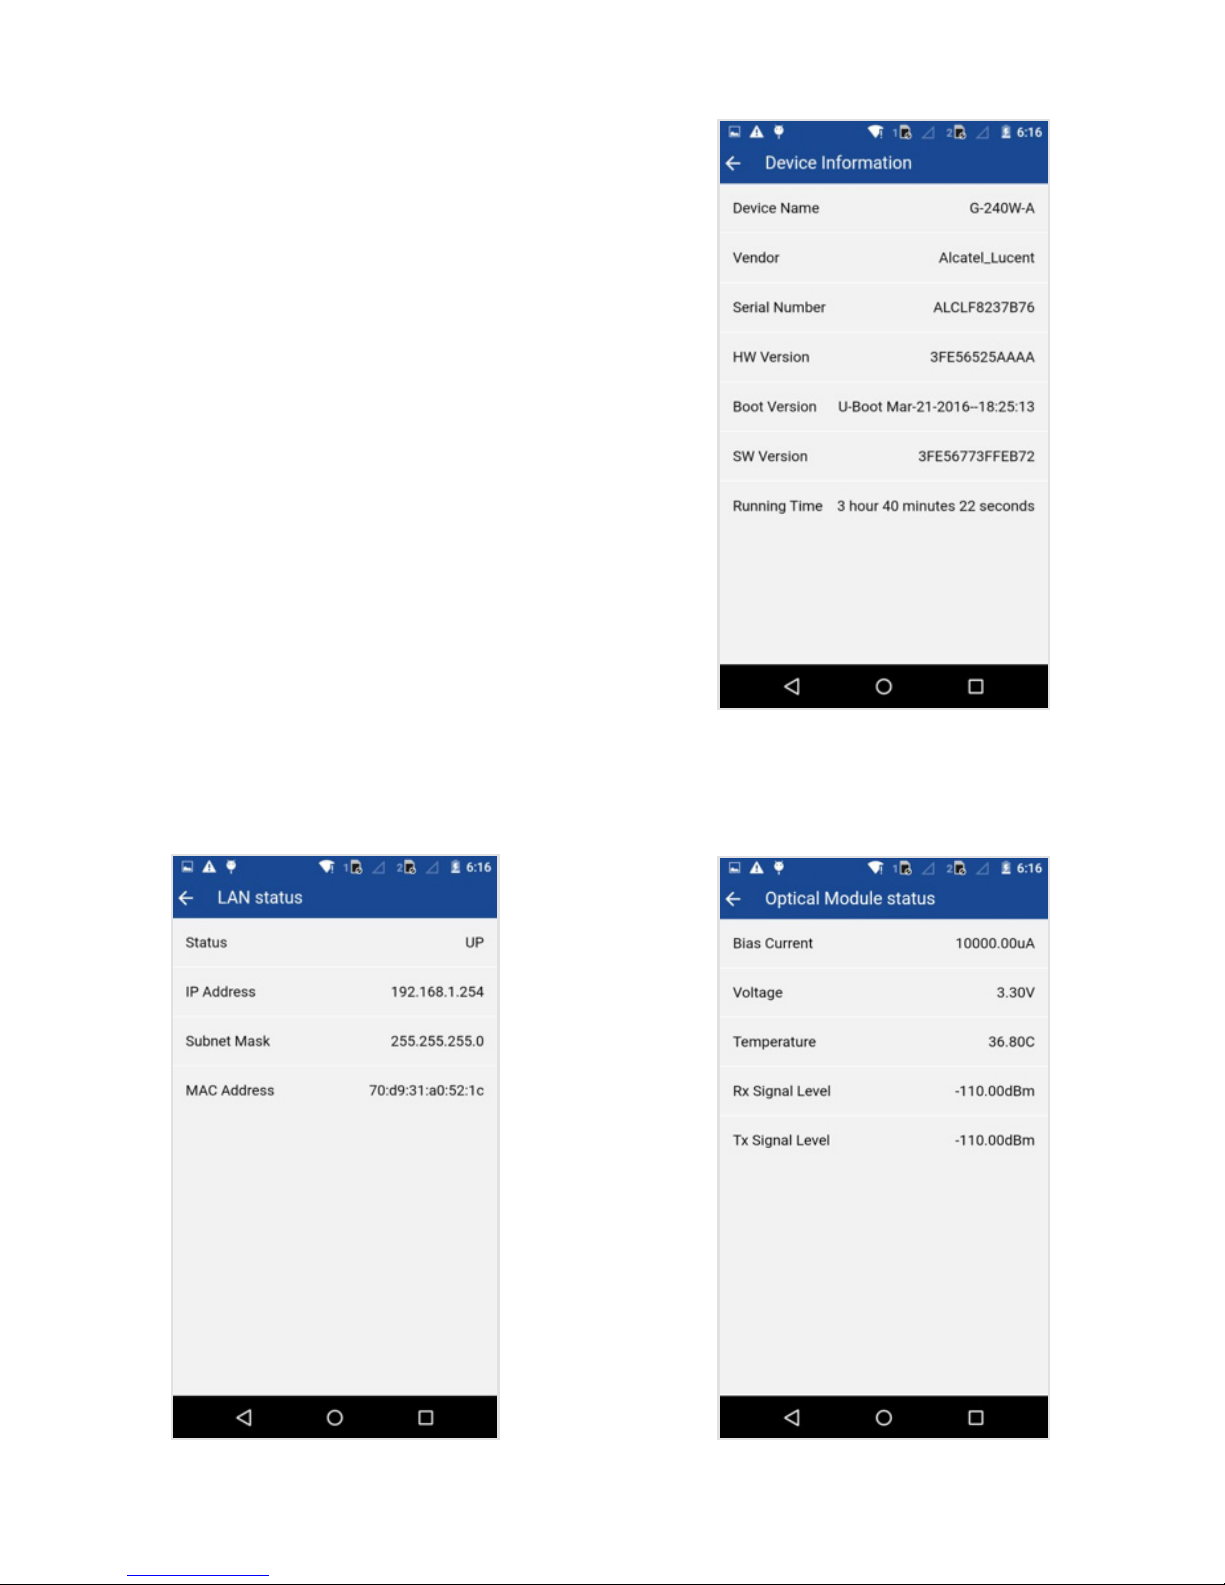
Device information: Displays the
technical details of the ONU (software
and hardware versions, serial number
and overall ONU running time)
[Figure 4].
LAN status: Displays overall status
and the details on the LAN interface
(TX/RX totals, IP Address, MAC Address)
[Figure 5].
Optical Module status: Displays technical
details on the ONU optical module
[Figure 6].

16 Nokia Smart Home user guide
How to set up
a guest network
Setting up a guest network is much the same
as setting up your initial wireless network.
You’ll just need to select a dierent SSID from
your initial network setup, enter a unique
SSID (network name) and, if required, create
a password for the guest network.
Connecting
other devices
Sometimes equipment or applications
in your home network may require trac
from the internet to be sent to them over
a specic port. This is often the case with
gaming consoles, for example, which requires
you to congure port forwarding on the ONT.
1. On the home screen as shown in
Figure 1, select Advanced ONT Settings.
2. This brings you to a window [Figure 2]
with 12 submenus.
The Advanced ONT Settings menu allows
you to congure the following residential
gateway functions: DHCP, DNS, Firewall,
MAC Filter, IP Filter, URL Filter, NTP, DMZ,
ALG, Port Forwarding, DDNS and Password.
Figure 1
Figure 2

17 Nokia Smart Home user guide
3. The Port Forwarding menu allows you
to add or delete new entries for port
forwarding [Figure 3].
To add a new port forwarding entry
you can select a predened app setting
or add a manual entry.
Select the App Name option to allow you
to pick a pre-existing application for port
forwarding. Alternatively, you can select
Customer Settings to get your own port
forwarding settings.
4. If you select App Name, the following
screen appears that allows you to add port
forwarding rules for the application named
[Figure 4].
Figure 3
Figure 4
18 Nokia Smart Home user guide
How to set up
parental controls
You can restrict access to or from the internet
from within your home subnetwork in several
ways:
■
IP lter
■
MAC lter
■
Controlling access to websites
IP lter
IP ltering enables you to name the IP address
of a device within your subnet (for example,
192.1.x.x), and restrict the ow of certain
types of IP data to or from that device, based
on the IP address. Restricted content is
discarded as it passes through the ONU.
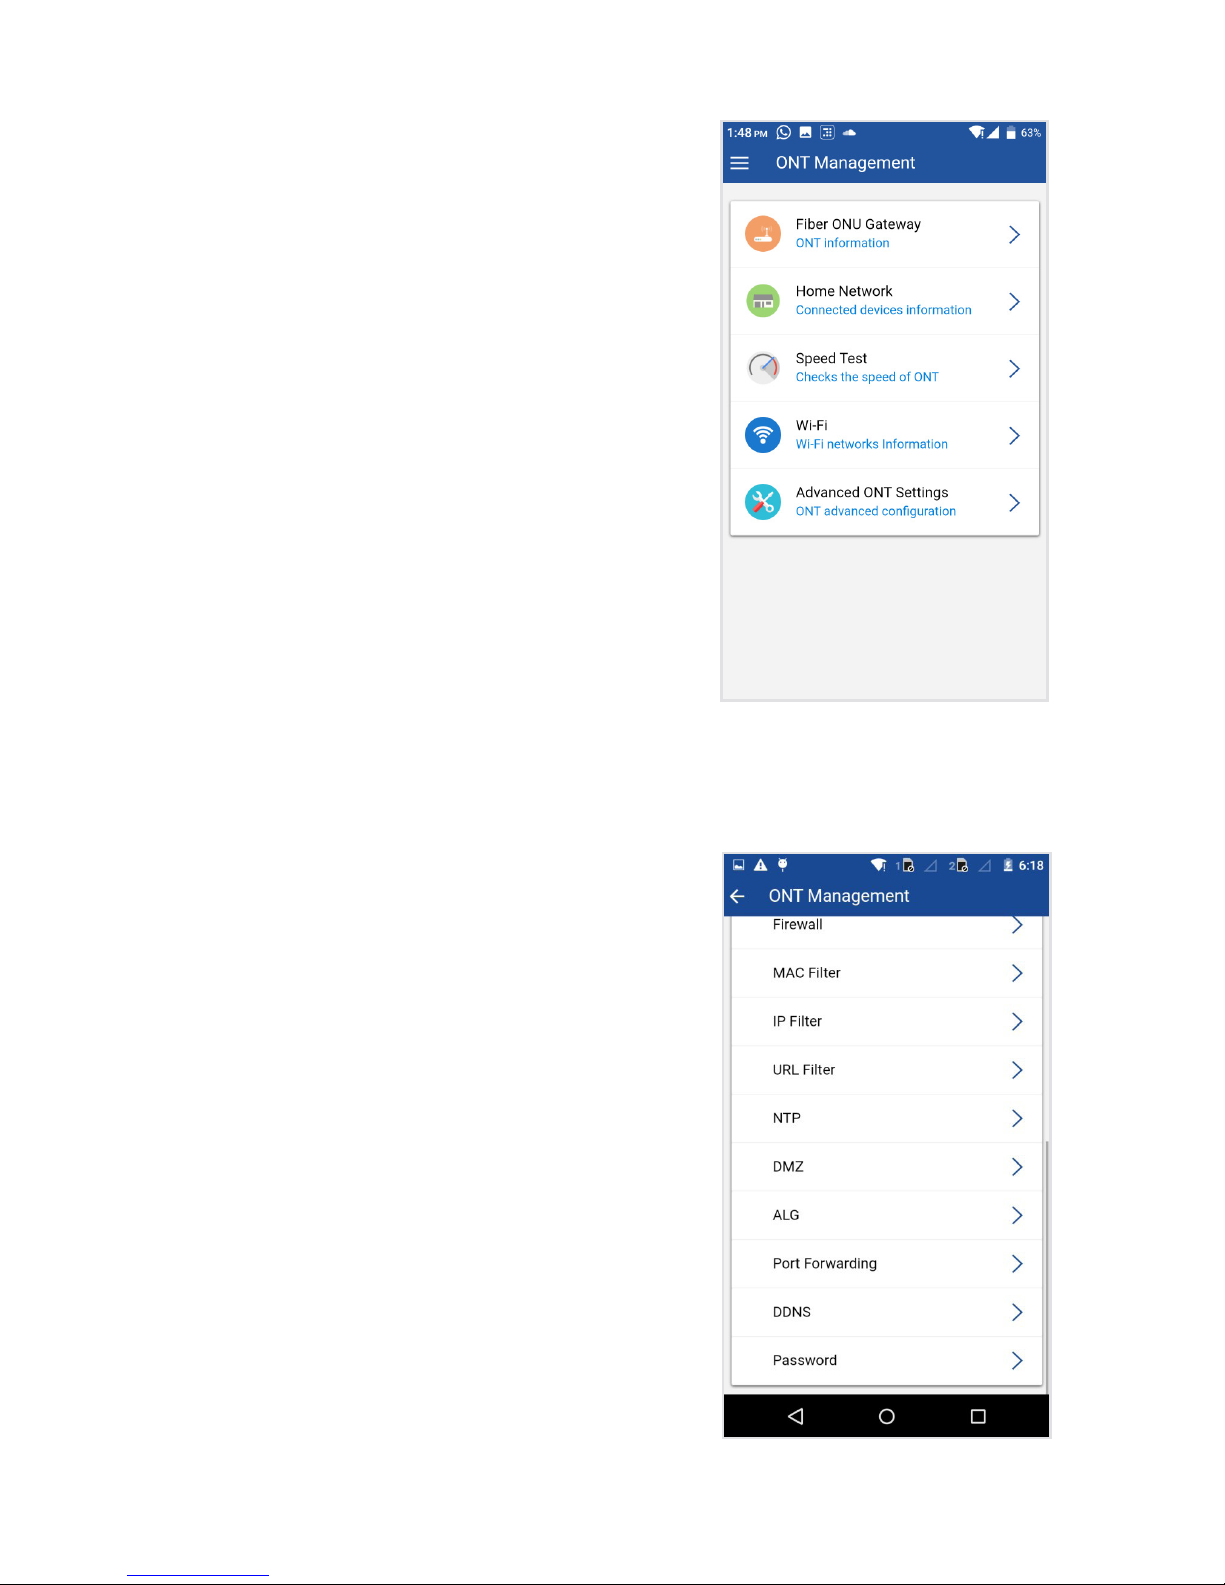
1. On the home screen as shown in
[Figure 1], select Advanced ONT Settings.
2. This brings you to a window [Figure 2]
with 12 submenus.
The Advanced ONT Settings menu allows
you to congure the following residential
gateway functions: DHCP, DNS, Firewall,
MAC Filter, IP Filter, URL Filter, NTP, DMZ,
ALG, Port Forwarding, DDNS and Password.
Figure 1
Figure 2
19 Nokia Smart Home user guide
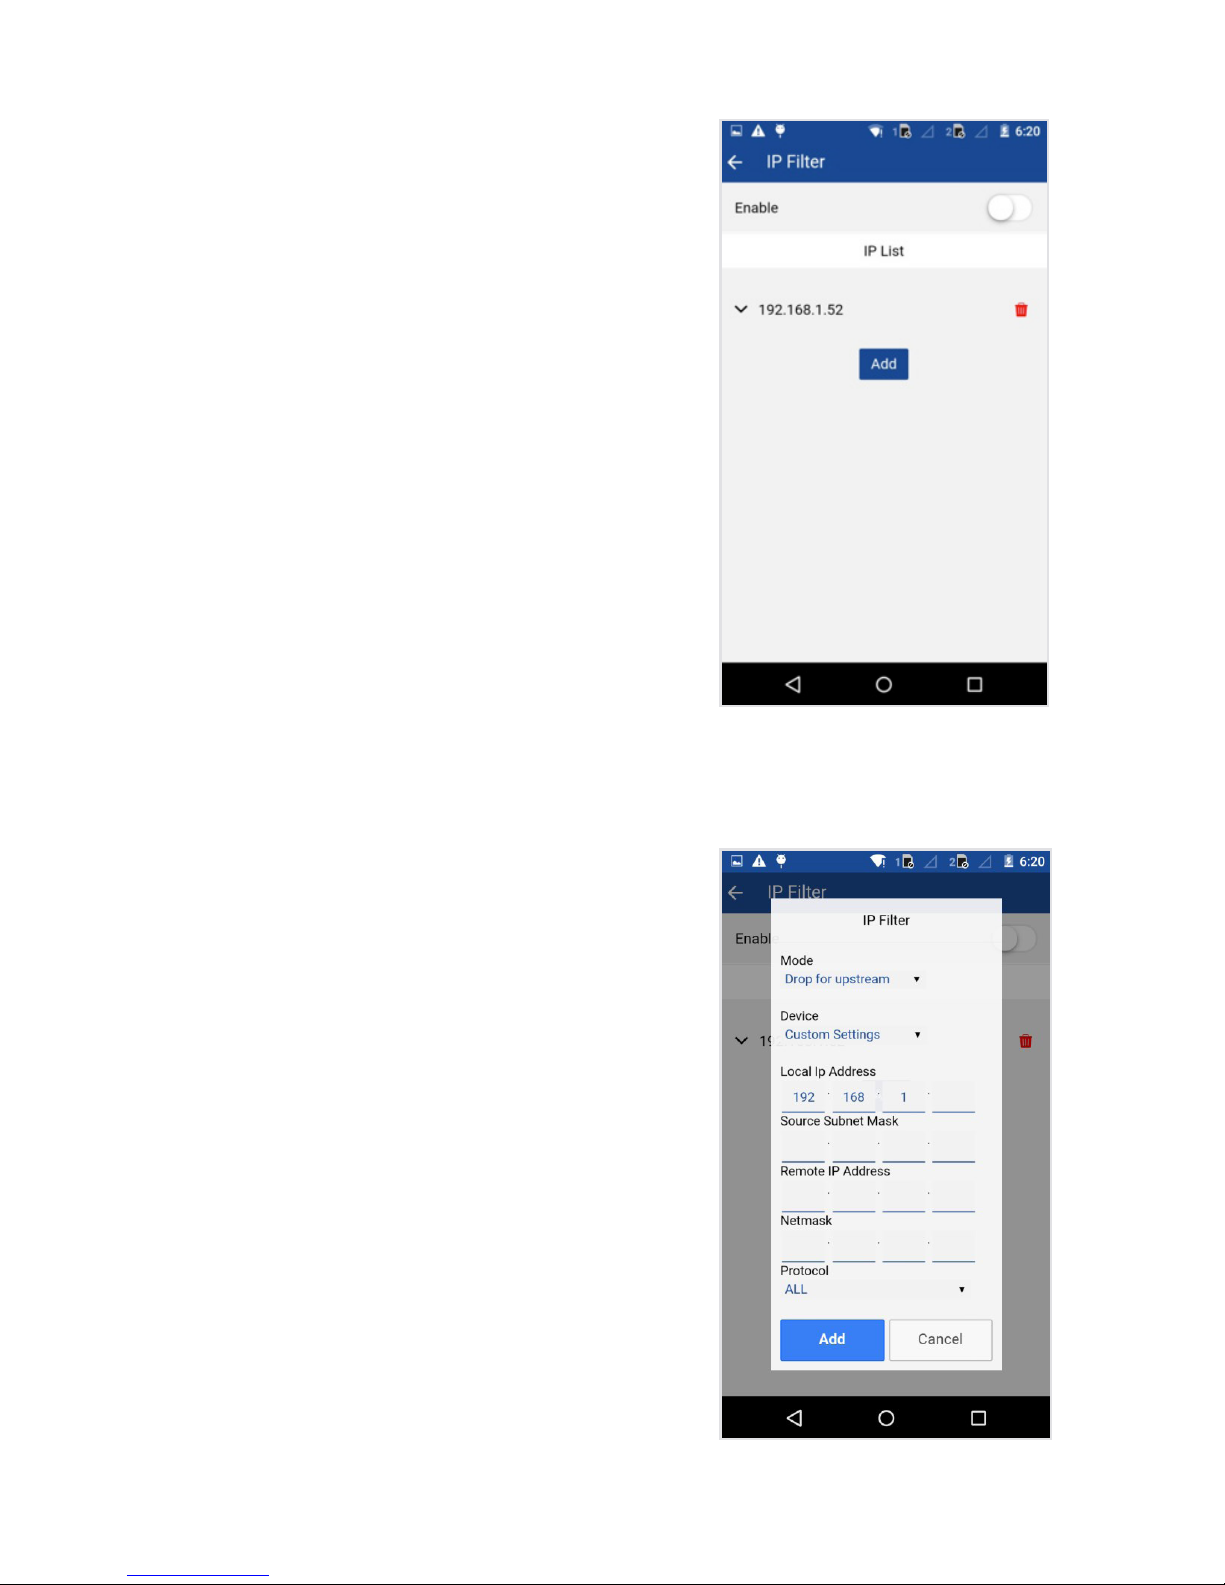
3. Select IP Filter. The following screen will
appear [Figure 3].
In this menu you can add a new IP address
lter entry or modify an existing entry.
4. Select the Mode option that will allow
you to pick the ltering type [Figure 4]:
Drop for upstream: Residential gateway
will drop all trac originating from the
specied device.
Drop for downstream: Residential gateway
will drop all trac with a destination to
the specied device.
5. Select the Device option to allow you
to either select a known device from
the ONU memory or manually register
a new device.
6. Select the Protocol option to allow you to
select specic types of trac for ltering
or to lter all trac.
Figure 3
Figure 4

20 Nokia Smart Home user guide
MAC lter
Equipment in your network is identied by the
unique MAC address assigned to that device.
You can restrict which devices have access to
the internet according to their MAC address
by allowing or blocking access for the devices
listed (your choice).
1. On the home screen as shown in Figure 1,
select Advanced ONT Settings.
2. This brings you to a window [Figure 2]
with 12 submenus.
The Advanced ONT Settings menu allows
you to congure the following residential
gateway functions: DHCP, DNS, Firewall,
MAC Filter, IP Filter, URL Filter, NTP, DMZ,
ALG, Port Forwarding, DDNS and Password.
Figure 1
Figure 2
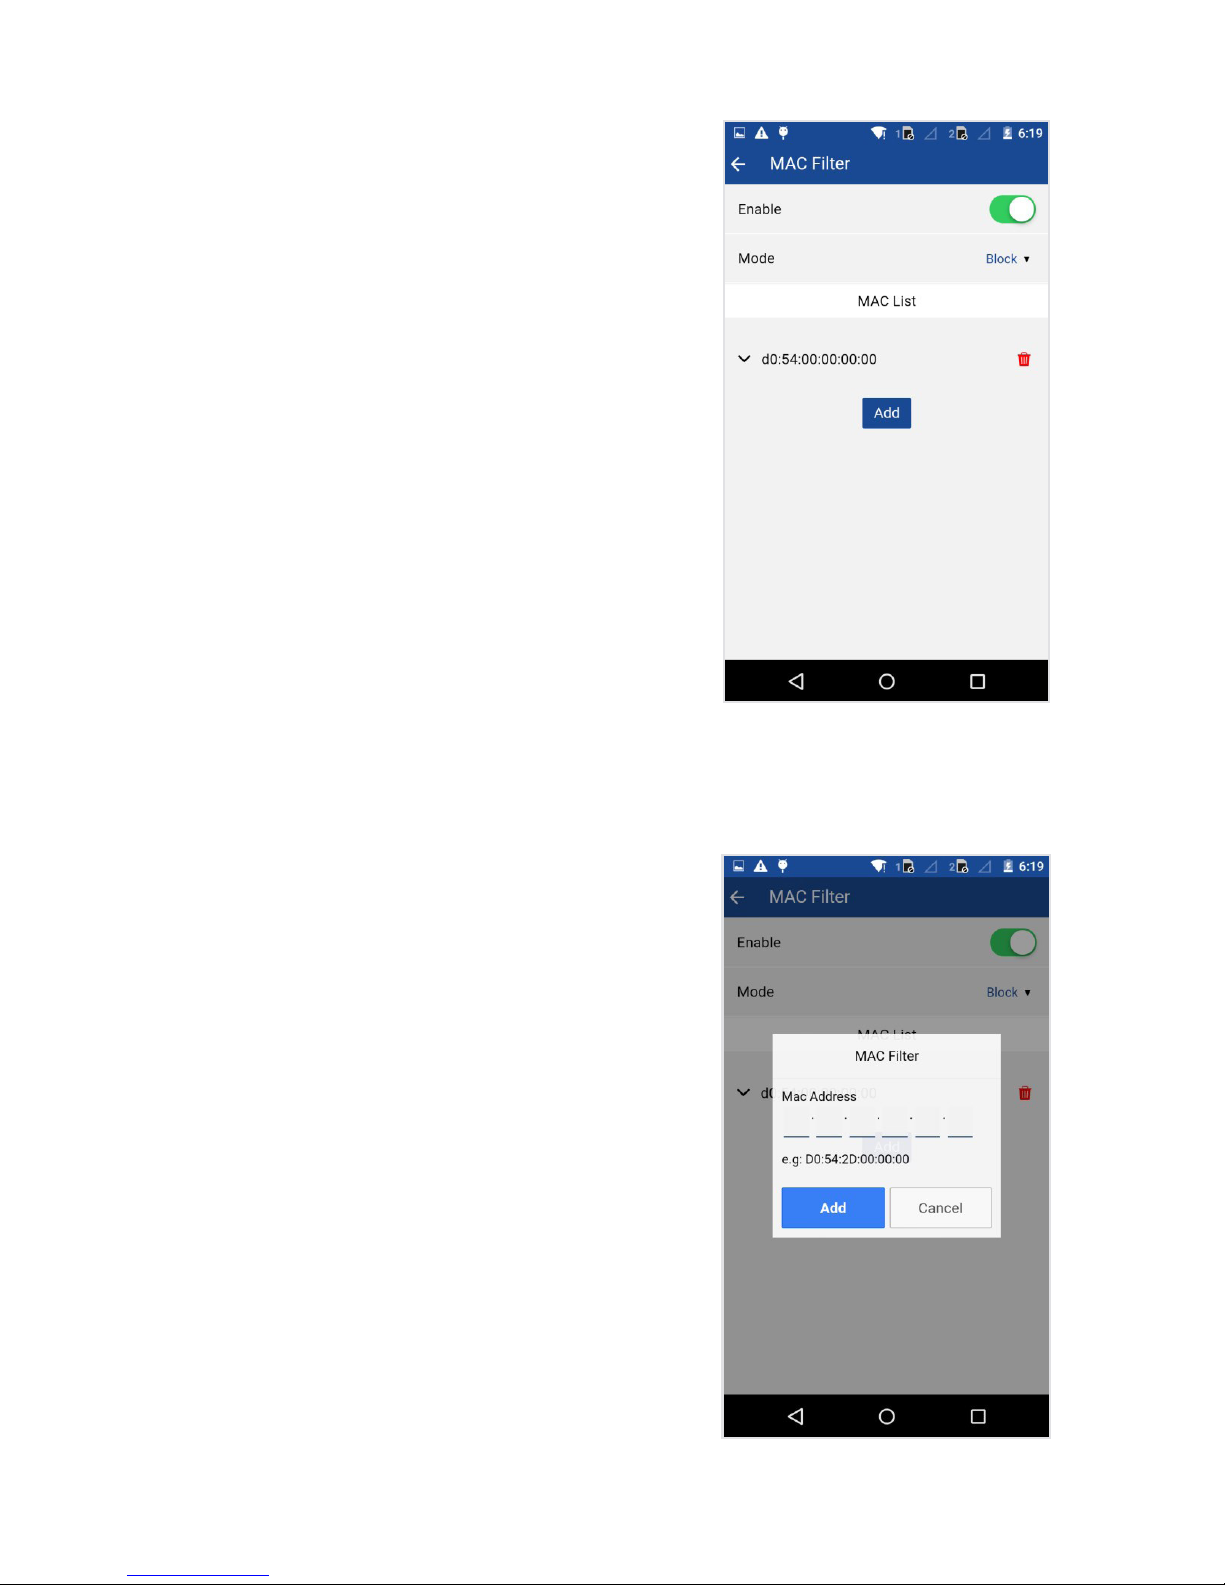
21 Nokia Smart Home user guide
3. Select MAC Filter. The following screen
will appear [Figure 3].
In this menu you can enable or disable the
MAC lter option in the ONU. You can block
or allow lists of MAC addresses.
4. Type in the MAC address you would like to
lter on either the block or allow lists here
[Figure 4]. The block option will block all
listed MAC addresses from reaching the
home network. The allow option will only
allow the listed MAC addresses into the
home network.
Figure 3
Figure 4
 Loading...