

Page 1

一致性聲明
0434
諾基亞、Nokia
及的其他產品及公司名稱可能分別為其
未事先取得諾基亞的書面同意,嚴禁以任何形式複製
美國專利號碼
、Nokia Connecting People
5818437
諾基亞公司聲明本
declaration_of_conformity/
© 2007 Nokia.
,其他專利正在申請中。T9
RM-249
版權所有,翻印必究。
、Nokia Care
各自擁有者之商標或商號名稱。
指引的基本要求和其他相關規定。一致性聲明的
1999/5/EC
產品符合
內找到。
、Visual Radio
、傳輸、分發或儲存本文件的部份或全部內
文字輸入軟件
及 Navi 是諾基亞公司的商標或註冊商標。
Copyright © 1997-2007
。
Nokia tune 是諾基亞公司的聲音標誌。本
容。
Tegic Communications, Inc.
副本可於
版權所有。
www.nokia.com/phones/
文件中所提
RSA BSAFE 密碼編譯或來自
包括
Java 及所有基於 Java
This product is licensed under the MPEG-4 Vis
encoded in compliance with the MPEG-4 V
video provided by a licensed video provid
internal, and commercial uses, may be obta
本產品擁有 MPEG-4 視覺專利組合許可證,(i)
影像連接一起使用,影像由持牌的影像供應商提
MPEG-4
獲得。請瀏覽 http://www.mpegla.com
諾基亞奉行持續研發的政策。諾基亞保留
在適用法律許可的最大範圍內,任何情況下對
本文件的內容以「現有形式」提供。除所適用
針對特定目的的適用性的暗示保證。諾基亞
如需最新產品的資料,請參閱 www.noki
特定產品及產品應用程式的供應情況可
RSA Security
Sun Microsystems, Inc
的商標是
isual Standard by a cons
er. No license is granted or shall be implied
。
對本文所描述之任何產品進行更改及改進的權
a.com.hk
能根據地區的不同而有所分別。請向您的諾基
的安全協定軟件。
的商標或註冊商標。
ual Patent Portfolio License (i) for personal and
ined from MPEG LA, LLC. See http://www.mpegl
在消費者參與個人和非商業活動下符合
資料遺失、收益損失或因此所引致的任何特別
的法律外,諾基亞不對本文件的正確性、可
保留隨時修訂或收回本文件的權利,恕不預先通知。
。
umer engaged in a personal and no
供。未授與、亦未包含其他方面的使用許可
noncommercial use in connection
for any other use. Additional information, incl
a.com.
視覺準則提供的資料,這些資料只作個人和
MPEG-4
利,恕不預先通知。
的、意外的、連帶的或間接的損失,諾基亞恕不負
靠性或其內容提供任何保證,不論是明示或暗示
亞經銷商查詢以獲取詳細資料及提供的語言選
ncommercial activity and (ii) f
。包括推廣性、內部及商業用途在內的附加資
with information which has been
or use in connection with MPEG-4
uding that related to promotional,
非商業性使用,以及
的,包括但不限於適銷性及
項。
料可從 MPEG LA, LLC
。
責
(ii) 與
Page 2

本裝置中提供的第三方應用程式由不從屬於
或關聯於諾基亞的個人或團體建立和擁有。
並沒有責任向終端用戶提供支援或保證這些應用程式的功能
如您使用這些應用程式,表示您清楚知道應
發表任何陳述或保證,不論明示或暗示,包括
其他權利。
出口控制
本裝置可能含有受美國及其他國家出口法
用程式以「現有形式」提供,不論明示或暗
但不限於標題的保證、能切合特定目的或
律及法規約束的物品、技術或軟件。禁止與法
,亦不會對這些應用程式或物件上的資料
對於這些第三方的應用程式,諾基亞並不擁有版權
示及在法律覆蓋範圍下均沒有保證。您亦清楚
達致特定目的的經營能力,或應用程式不
律相抵觸的改動。
負責。諾基亞對這些第三方應用程式不負任何擔保責任
或知識產權。因此,諾基亞
無論諾基亞及其附屬機構均沒有
會侵犯第三者的專利、版權、商標或
。
Page 3

目錄
安全規定 ...............................................................8
關於本裝置............................................................9
網絡服務................................................................9
共享記憶體............................................................9
鍵盤鎖 (按鍵保護).............................................................17
沒有 SIM 卡時仍可使用的功能...........................................18
4. 通話功能..........................................................18
撥打電話.........................................................................18
接聽或拒絕來電........................................................19
通話時可用的選項..................................................19
1. 一般資料..........................................................10
密碼功能...................................................................................10
配置設定服務...........................................................................10
下載內容...................................................................................10
諾基亞支援...............................................................................11
2. 使用須知..........................................................11
安裝 SIM 卡及電池...................................................................11
插入 microSD 卡..................................................................12
為電池充電....................................................................12
天線......................................................................................13
耳機......................................................................................13
更換彩色框....................................................................14
掛繩...........................................................................................14
3. 您的裝置..........................................................15
按鍵及部件...............................................................................14
開啟及關閉裝置.......................................................................15
待機模式...................................................................................16
航空模式..........................................................................17
5. 中文輸入..........................................................19
選擇書寫語言...........................................................................19
在輸入法之間互相切換...........................................................20
拼音輸入法...............................................................................20
筆畫輸入法...............................................................................20
詞組輸入...................................................................................21
開啟或關閉智慧英文輸入法 ..................................................22
傳統文字輸入法.......................................................................22
智慧輸入法...............................................................................22
編寫文字的秘訣.......................................................................22
6. 瀏覽功能表......................................................23
7. 訊息.................................................................23
文字訊息...................................................................................23
多媒體訊息...............................................................................24
建立文字或多媒體訊息...........................................................24
閱讀訊息及回覆.......................................................................24
訊息發送過程...........................................................................24
電郵...........................................................................................25
Page 4

快顯訊息...................................................................................26
Nokia Xpress 聲音短訊............................................................26
記憶體已滿...............................................................................26
資料夾.......................................................................................27
即時訊息...................................................................................27
留言訊息...................................................................................29
廣播訊息...................................................................................29
服務指令...................................................................................29
刪除訊息...................................................................................30
SIM 卡上的訊息........................................................................30
訊息設定...................................................................................30
8. 通訊錄.............................................................31
儲存姓名及電話號碼...............................................................31
儲存詳情...................................................................................32
設定...........................................................................................32
群組...........................................................................................32
尋找聯絡人...............................................................................32
複製或移動聯絡人...................................................................32
編輯聯絡人詳情.......................................................................33
刪除聯絡人...............................................................................33
同步處理所有資料...................................................................33
名片...........................................................................................33
撥號快捷操作...........................................................................33
客戶服務號碼、服務號碼及本手機號...................................33
9. 通話記錄..........................................................34
10. 設定...............................................................34
操作模式...................................................................................34
佈景...........................................................................................34
目錄
鈴聲...........................................................................................35
顯示...........................................................................................35
時間和日期...............................................................................35
我的快捷操作...........................................................................35
藍牙...........................................................................................36
分組數據...................................................................................37
數據傳送...................................................................................37
USB 數據線...............................................................................38
通話...........................................................................................38
手機...........................................................................................39
配套...........................................................................................39
配置...........................................................................................39
保密項目...................................................................................40
恢復原廠設定..............................................................40
11. 網絡系統功能表..............................................41
12. 多媒體資料....................................................41
資料夾和檔案.............................................................41
列印圖像...................................................................................41
記憶卡.......................................................................................41
13. 影音工具........................................................42
相機及錄相機...........................................................................42
音樂播放機...............................................................................43
收音機.......................................................................................44
語音備忘...................................................................................45
均衡器.......................................................................................45
立體聲強化...............................................................................45
14. 對講機...........................................................46
Page 5

目錄
對講機頻道...............................................................................46
開啟或關閉對講機...................................................................46
撥打及接收對講機通話
回撥要求...................................................................................47
新增一對一聯絡人...................................................................47
對講機設定...............................................................................48
配置設定...............................................................................
15. 應用程式
啟動遊戲...............................................................................
啟動應用程式
應用程式選項
下載應用程式
...........................................................................49
...........................................................................49
...........................................................................49
16. 電子秘書
鬧鐘.....................................................................................
日曆.....................................................................................
待辦事項列表
備註...........................................................................................51
計算機.....................................................................................
計時器...................................................................................
計時錶...................................................................................
詞典...........................................................................................52
17. 網絡
設定瀏覽...............................................................................
連接至服務...............................................................................52
瀏覽網頁...............................................................................
書籤...........................................................................................53
外觀設定...................................................................................53
保密設定...............................................................................
...........................................................................51
...............................................................52
...........................................................46
....48
........................................................48
....48
........................................................49
......49
......50
..51
....51
....51
....52
....53
....54
下載設定..................................................................................
服務信箱..................................................................................
快取記憶體
瀏覽器安全性...........................................................................55
18. SIM
19. 個人電腦連接
Nokia
分組數據、
藍牙........................................................................................
數據通訊應用程式
20.
1
2
增強配套.................................................................................
電池.....................................................................................
保養及維修
...............................................................................55
服務........................................................56
.................................................56
電腦端套件 (PC Suite)...................................................56
電池資料
.
真正的增強配套
及 CSD.........................................................56
HSCSD
...................................................................57
.........
..............................................57
..............................................5
..........................................................5
......
.54
.54
...56
..5
59
附加安全資料.......................................................5
兒童.....................................................................................
操作環境.............................................................................
醫療設備.................................................................................
汽車.....................................................................................
可能發生爆炸的環境.............................................................
緊急電話.................................................................................
可證明 (SAR).........................................................................6
許
......
......
......
..
..6
..6
59
59
60
60
有限保證..............................................................6
8
8
9
9
1
1
1
2
Page 6

索引.....................................................................6
目錄
4
Page 7
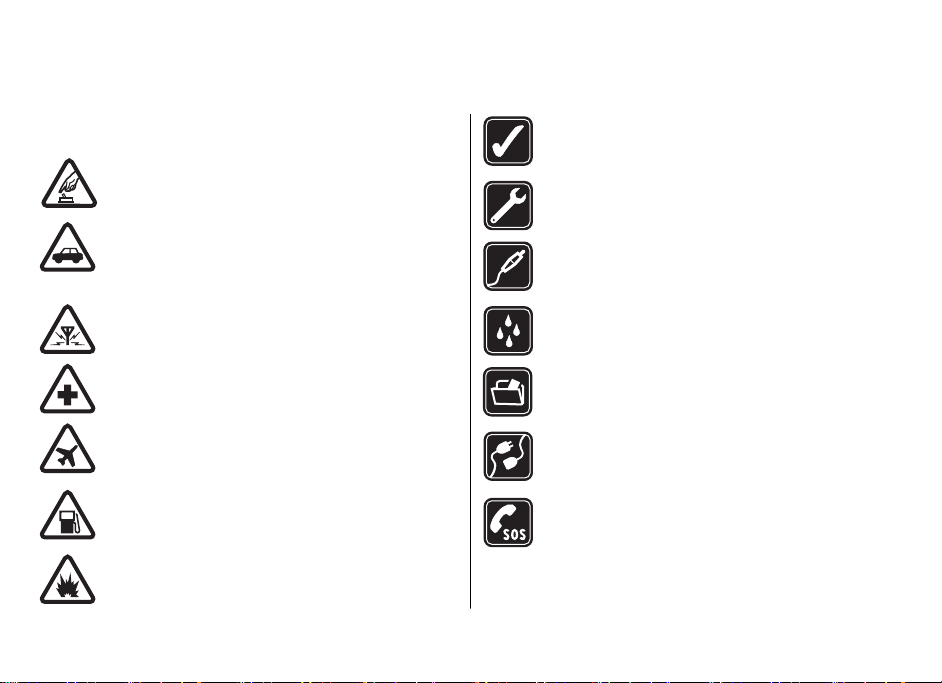
安全規定
請閱讀下列簡易的使用準則。違反這些準則可能會引致危險
或觸犯法律。請閱讀完整的用戶指南以獲取進一步資料。
安全規定
當禁止使用無線電話,或可能因此造成干擾或危險
時,請勿開機。
行車安全第一
請遵守當地所有法律。駕車時請保持雙手活動自
如,以便控制車輛。行車安全是駕駛車輛時優先考
慮的因素。
干擾
所有無線裝置都可能受到干擾,影響效能。
正確使用
請以產品說明書中所述的姿勢使用手機。如非必
要,請勿觸摸天線區域。
合格服務
僅容許合格的服務人員安裝或維修本產品。
增強配套與電池
請僅使用經認可的增強配套及電池。請勿連接不兼
容的產品。
防水性
本裝置並不防水。請保持乾燥。
在醫院內請關機
請遵守所有限制。位處醫療儀器附近時請關機。
在飛機內請關機
請遵守所有限制。無線裝置會對飛機飛行造成干
擾。
加油時請關機
請勿在加油站使用手機。請勿在燃料或化學品附近
使用手機。
位處爆破作業附近時請關機
請遵守所有限制。進行爆破作業時請勿使用手機。
8
備份
請記住為儲存於您裝置內的重要資料備份或保留書
面記錄。
連接其他裝置
在連接任何其他裝置時,請先閱讀其用戶指南,獲
取詳細的安全指引。請勿連接不兼容的產品。
緊急電話
請確保裝置已經開啟且處於服務區域內。視情況按
結束鍵所需次數以清除螢幕並返回至待機模式。輸
入緊急電話號碼,然後按通話鍵。告知您所在的位
置。當接到掛掉電話的指示後才可結束通話。
Page 8

關於本裝置
關於本裝置
本手冊所敘述的無線裝置適用於 EGSM 900
資料。
當使用本裝置的功能時,請遵守所有法律並尊重當地習俗
版權保護可以防止一些圖像、音樂
要使用本裝置內的任何一項功能 (
警告:
下,請勿開機。
、GSM 1800
(包括鈴聲)
與 GSM 1900
和其他內容被複製、修改、發送或轉發。
鬧鐘功能除外)
、他人的私隱和合法權利
網絡。請向您的服務供應商查詢以獲取更多有關網絡的
(包括版權
,裝置必須開啟。在使用無線裝置可能導致干擾或危險的情況
)。
網絡服務
要使用手機,必須享有無線服務供應商提供的服務。部份功能要求特殊網絡功能。並非所有網絡均支援這些功能;
可能要求您在使用網絡服務前先向服務供應商作特殊申請。您的服務供應商會為您提供指引,並
絡可能有限制,影響您使用網絡服務。例如,有些網絡可能無法
服務供應商可能會要求您關閉或不要啟動裝置的某些功能。這樣,這些功能便不會顯示於您裝置的功能表
經過特殊配置,例如:功能表名稱、功能表次序及圖標
本裝置支援在
用程式、即時訊息、遠端同步處理和使用瀏覽器或 MM
TCP/IP 協議上運行的 WAP 2.0
協議 (HTTP
的更改。請向您的服務供應商查詢以獲取更多資料。
S 下載的內容,均要求網絡支援這些技術。
支援所有受語言影響的字符和服務。
。本裝置的一些功能,例如:多媒體訊息 (MMS)
和 SSL)
說明要收取的費用。一些網
中。本裝置可能已
、電子郵件應
共享記憶體
本裝置內的以下功能使用共享記憶體:多媒體資料、通
項、Java
當您嘗試使用需要共享記憶體的功能時,本裝置可能會顯示記憶體已滿的訊息。在這種情
某些資料或某些項目,然後再繼續。
TM
遊戲和應用程式,與及備註應用程式。使用其中任何一項或
訊錄、文字訊息、多媒體訊息、即時訊息、電子郵件、日曆
多項功能都會減少其他功能使用共享記憶體的容量。
況下,先刪除共享記憶體功能中的
某些網絡
、待辦事
9
Page 9

1. 一般資料
密碼功能
保密碼
保密碼 (5 至 10 個數字) 可防止他人未經授權便使用您的手
機。預設密碼為 12345。您可以更改密碼並將手機設定為要
求輸入密碼。 請參閱 「保密項目」,第 40 頁。
PIN 碼
個人識別 (PIN) 碼及通用個人識別 (UPIN) 碼 (4 至 8 個數字)
可防止他人未經授權便使用您的 SIM 卡。 請參閱 「保密項
目」,第 40 頁。
PIN2 碼 (4 至 8 個數字) 可能隨 SIM 卡提供,對於某些功能需
要此碼。
存取安全模組內的資料時要求模組 PIN 碼。 請參閱 「安全模
組」,第 55 頁。
進行數碼簽名時需要簽名 PIN 碼。 請參閱 「數碼簽
名」,第 55 頁。
PUK 碼
要更改鎖定的 PIN 碼及 UPIN 碼分別 需要個人解鎖 (PUK) 碼及
通用個人解鎖 (UPUK) 碼 (8 個數字)。更改鎖定的 PIN2 碼 (8
個數字) 時需要 PUK2 碼。如果這些密碼沒有隨 SIM 卡提供,
請向您當地的服務供應商查詢以獲取密碼。
10
限制密碼
當使用通話限制時需要限制密碼 (4 個數字)。 請參閱 「保密
項目」,第 40 頁。
配置設定服務
要使用某些網絡服務 (例如:流動互聯網服務、多媒體訊息服
務、Nokia Xpress 聲音短訊或遠端互聯網伺服器同步處理),
您的裝置需要正確的配置設定。如要獲取更多有關供應情況
的資料,請向您的服務供應商或最近的授權諾基亞經銷商查
詢或瀏覽諾基亞網站上的支援頁面。請參閱 「諾基亞支
援」,第 11 頁。
當您已經以配置訊息的形式接收設定,且這些設定未自動儲
存及啟動時,收到配置設定會顯示。
要儲存設定,選擇顯示 > 儲存。如果系統要求,輸入服務供
應商提供的 PIN 碼。
要放棄收到的設定,選擇退出或顯示 > 放棄。
下載內容
您可以下載新的內容 (例如:佈景) 至您的手機 (網絡服務)。
重要訊息: 請僅使用您信賴及對有害軟件提供充分安
全防禦措施的服務。
Page 10
如要獲取各種服務的供應、價格與收費的資料,請向您
務供應商查詢。
諾基亞支援
的服
Nokia 電腦端套件
您可在諾基亞網站
上的電腦端套件
(PC Suite)
www.nokia.com.hk/support
(PC Suite)
兼容列表。
使用須知
支援資料
請瀏覽 www.
以獲取本指南、與您諾基亞產品相關的附加資料、下載
及服務的最新版本。
nokia
.com.hk/support
或您本地的諾基亞網站
配置設定服務
您亦可於 www.nokia.com.hk/settings
置型號的配置設定 (
其他服務的配置設定
例如:多媒體訊息、
)。
免費下載適用於您裝
GPRS、電子郵件及
2. 使用須知
安裝 SIM
移除電池前務必關閉裝置並 與充電器的連接。
如要獲取有關
銷商查詢。SIM
此裝置適用於
卡及其觸點很容易因刮痕或彎曲而損壞,因此使用、插
SIM
入或取出 SIM
卡及電池
中
斷
卡服務的供應及資料,請向您的 SIM
SIM
卡經銷商亦可以是服務供應商或其他經銷商。
BL-4B 電池。必須使用諾基亞原廠電池。
卡時要加倍小心。
客戶服務
如果您需要聯絡客戶服務,請瀏覽
www.nokia.com.hk/contactus
內容
基亞客戶服務聯絡中心的列表。
查看本地的諾
維修
如要獲取維修服務,請瀏覽 www.nokia.com.hk/repair
最近的諾基亞服務中心。
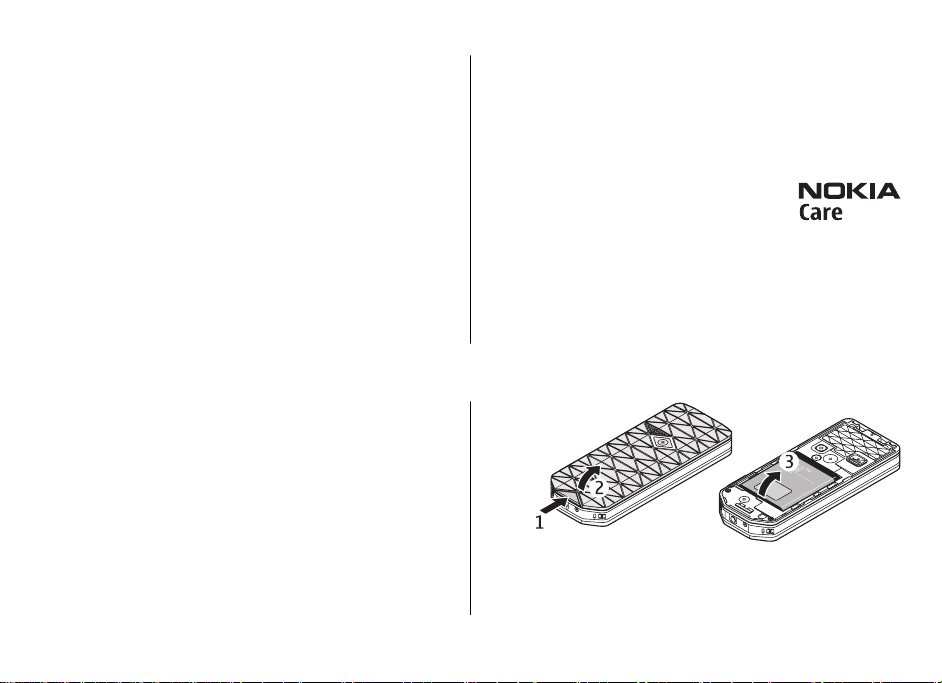
1.
卡經
滑動鬆開按鈕 (1)
(3) 所示移除電池。
如圖
以解開後殼的鎖定,然後取下後殼
查看
(2)。
11
Page 11

使用須知
2.
2. 滑動記憶卡卡夾以將其解鎖
(1)。
開啟 SIM 卡卡夾 (4)。將 SIM 卡的接觸面朝下,如圖 (5) 所
示,將卡放進手機。關上 SIM 卡卡夾 (6)。
3.
注意電池接觸區 (7),然後插入電池 (8)。將後殼的上半部
份置於裝置上 (9),然後關上後殼 (10)。
插入 microSD 卡
僅使用經諾基亞認可、供本裝置使用的兼容 microSD 卡。諾
基亞使用許可的記憶卡工業標準,但是某些商標的記憶卡可
能不完全兼容於本裝置。使用不兼容的卡可能會損壞卡及裝
置,並可能會毀壞儲存於卡中的數據。
1. 關閉裝置,然後移除裝置的後殼及電池。
12
3. 打開卡夾 (2),然後插入記憶
卡,令卡的接觸面朝內 (3)。
4. 關上卡夾 (4),然後滑動卡夾
以鎖定 (5)。
5. 插入電池,然後蓋上裝置的後殼。
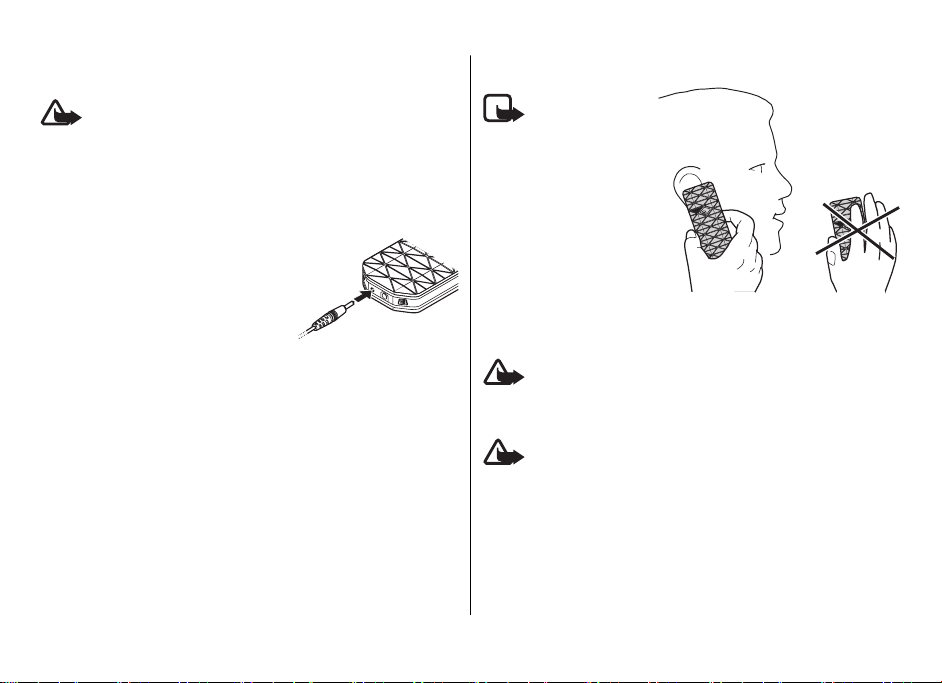
為電池充電
將充電器用於本裝置之前,請先檢查充電器的型號。本裝置
適用於 AC-3 或 AC-4 充電器。
Page 12
準確的充電器型號可能視乎插頭的類型而有所不同。例
AC-3 充電器的型號可以是
僅使用經諾基亞認可、適用於本特定型號的電
警告:
池、充電器及增強配套。使用其他未經許可的增強配套,可
能會令手機的保養失效,甚至造成危險。
有關認可的增強配套的供應情況,請向經銷商查詢。切斷任
何增強配套的電源時,請握住插頭拔出,不要拉電線。
1. 將充電器連接至牆上的電源插座。
2. 將充電器的電線連接至手機底部
的插孔。
如果電池電量已完全用盡,可能要等
待幾分鐘後螢幕上才會出現充電圖示
或可作任何通話。
充電時間視乎使用的充電器而定。當
裝置處於待機模式下時,使用
充電器為 BL-4B
電池充電大約需要
AC-3C、AC-3U
AC-3
2 小時
、AC-3X
15 分鐘。
如:
等。
使用須知
天線
本裝置備
注意:
有內置及外部天線。如
同任何其他無線電發送
裝置一樣,使用時盡量
避免接觸天線。接觸此
類天線會影響通訊質
量,並使裝置的耗電量
增加,亦可能會縮短電
池壽命。
耳機
請以中等音量聆聽音樂。持續聽高音量可能會
警告:
損壞聽力。
如果您將耳機連接至裝置,請特別注意音量級別。
使用耳機可能會影響您收聽外面的聲音。在危
警告:
及您安全的地方,請勿使用耳機。
請不要將裝置連接至產生輸出信號的產品,連接至該類產品
可能會毀壞裝置。請不要將任何
配套
插孔。
當將任何外部裝置或任何耳機
裝置或耳機除外
級別。
連接至 Nokia AV
)
電壓的電源連接至
有
(經諾基亞許可適用於本裝置的
插孔時,請特別注意音量
Nokia AV
13
Page 13

使用須知
更換彩色框
更換彩色框來更改您裝置的外觀。
1. 移除裝置的後殼。
2. 首先取下裝置上部的彩色框
(1),然後將其移除。
3. 要固定彩色框,將其粘貼在裝
置的下部 (3) ,然後由底部至
頂部附上該框 (4, 5)。由頂部
按該框將其固定到位。
4. 蓋上裝置外殼,確保已正確關上。
掛繩
如圖所示穿上掛繩,然後繫緊。
14
Page 14
3. 您的裝置
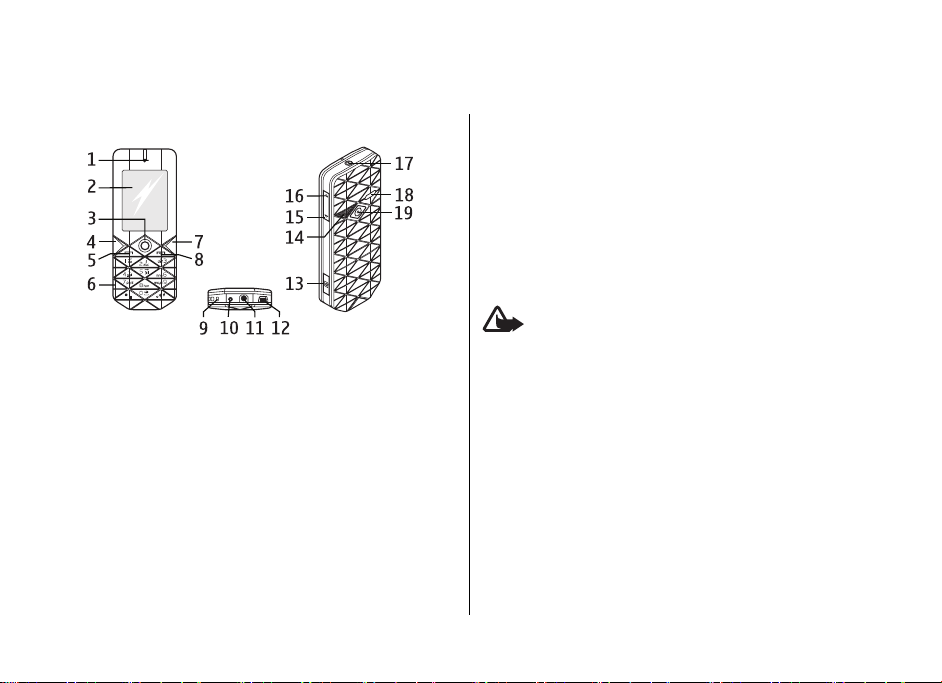
按鍵及部件
12 — Mini USB
相機鍵
13 —
— 相機閃光燈
14
— 音量下鍵
15
— 音量上鍵
16
17 — 電源鍵
18 — 喇叭
相機鏡頭
19 —
您的裝置
數據線插孔
1 — 聽筒
— 顯示
2
3
4 — 左選擇鍵
5 — 通話鍵
6 — 鍵盤
7 — 右選擇鍵
8 — 結束鍵
9 — 麥克風
10 — 充電器插孔
11 — Nokia AV
TM
— Navi 鍵:
4 方向導航鍵和中間選擇鍵
配套插孔 (2.5 毫米
)
本裝置中的電源鍵
警告:
鎳。不可長時間與皮膚接觸。將皮膚持續暴露在鎳中可能導
致鎳過敏。
及金屬配件可能包含
(17)
開啟及關閉裝置
要開啟或關閉裝置,按住電源鍵。
如果裝置提示輸入
),然後選擇確認
示
裝置可能會提示您設定時間及日期。
格林威治標準時間
輸入日期。
當您第一次開啟裝置且裝置處於待機模式下時,裝置可能
提示您從服務供應商處接收配置設定
請參閱
或 UPIN 碼,輸入密碼
PIN
。
(GMT) 的時差選擇您所在地的時區,然後
「時間和日期」,第
(以 **** 顯
輸入當地時間,根據與
頁。
35
(網絡服務)
。如要獲取
會
15
Page 15
您的裝置
更多資料,請參閱
頁。 請參閱
第 39
連接至支援。
「配置設定服務」,第
請參閱 「配
置」,
10 頁。
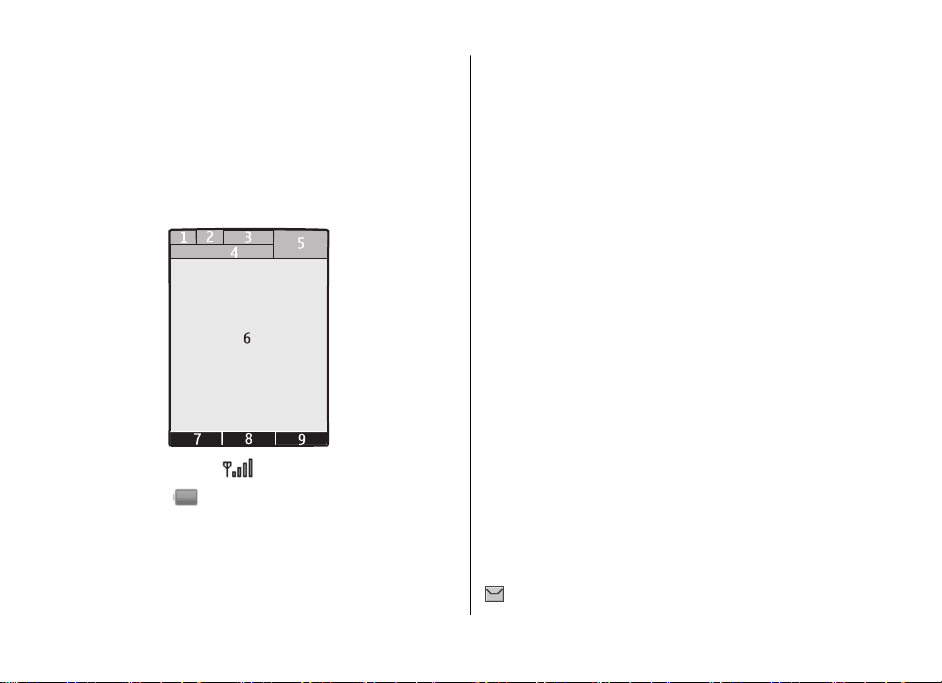
待機模式
當裝置已準備就緒,又尚未輸入任何字元時,裝置便處於
機模式下。
顯示
1 — 流動網絡的訊號強度
2 — 電池充電狀態
3 — 指示符號
網絡名稱或網絡標誌
4 —
— 時鐘
5
6 — 主螢幕
7 — 左選擇鍵的功能。
中間選擇鍵的功能
8 —
— 右選擇鍵的功能。請參閱
9
同的網絡商可能有網絡商特定名稱以進入網絡商特定網站
待
捷徑顯示
捷徑顯示模式顯示您可以直接存取所選裝置功能及資料的列
表。
要開啟或關閉捷徑顯示,選擇
徑顯示 >
在待機模式下,向上或向下捲動瀏覽列表,然後選擇
顯示。箭頭指示可提供進一步資料。要停止瀏覽,選擇
要組織及更改捷徑顯示模式,選擇
項。
捷徑顯示
> 開或
「左選擇鍵」,第
請參閱
「右選擇鍵」,第
功能表 >
關。
設定 >
操作,然後選擇可用的選
待機模式下的快捷操作
要進入通話記錄的列表,按通話鍵一次。捲動至號碼或姓
名,然後按通話鍵撥打號碼。
要開啟網絡瀏覽器,按住
要致電您的留言信箱,按住
將按鍵用作快捷操作。
第 35 頁。
0。
1。
請參閱
「我的快捷操
作」,
指示符號
未讀訊息
35 頁。
36 頁。不
螢幕 > 捷
選擇
退出。
。
或
16
Page 16

未發送、已取消發送或發送失敗的訊息
未接來電
/ 您的手機已連接至即時訊息服務,可用狀態為在線或
離線。
已接收的即時訊息
鍵盤已鎖定。
在接到來電或文字訊息時手機不響鈴。
鬧鐘已啟動。
倒數計時器正在運行。
計時錶在背景中運行。
/ 手機已在 GPRS 或 EGPRS 網絡註冊。
/ 已建立一個 GPRS 或 EGPRS 連接。
/ GPRS 或 EGPRS 連接已暫停 (保留)。
已啟動藍牙。
/ 對講機連接已啟動或暫停。
如果您有兩個線路號碼,會選擇第二個線路號碼。
所有來電會被轉接 至另一個號碼。
啟動喇叭,或將音樂座連接至裝置。
通話限於封閉用戶組。
已選取定時操作模式。
您的裝置
/ / 耳機、免持聽筒或感應迴路裝置已連接至裝置。
航空模式
您可以關閉所有無線電的功能,並且仍可存取離線遊戲、日
曆及電話號碼。
在飛機上或醫院等對無線電敏感的環境中請使用航空模式。
航空模式啟動時,會顯示
選擇功能表 > 設定 > 操作模式 > 航空 > 啟動或個人化選
擇啟動或設置航空模式。
要關閉航空模式,選擇任何其他操作模式。
要在航空模式中撥打緊急電話 輸入緊急電話號碼,按通話
鍵,當確認顯示時,選擇退出航空操作模式?。手機嘗試撥
打緊急電話。
警告: 在飛行操作模式下,您不能撥打或接聽任何電
話 (包括緊急電話) 或使用其他要求網絡覆蓋的功能。要撥打
任何電話,必須先更改操作模式以啟動通話功能。如果裝置
被鎖定,請輸入鎖定碼。如果當裝置已鎖定或處於飛行操作
模式下時,您需要撥打緊急電話,您可能亦可在鎖定碼欄位
中輸入已編入本裝置內的官方緊急號碼,然後選擇「通
話」。裝置將確認您是否要退出飛行操作模式以撥打緊急電
話。
。
鍵盤鎖 (按鍵保護)
要防止意外按鍵,選擇功能表,然後在 3.5 秒內按 * 鎖定鍵
盤。
17
Page 17

通話功能
要解鎖鍵盤,選擇開鎖,然後在 1.5 秒內按 *。如果安全鍵盤
鎖已設定為開啟,輸入安全碼 (如果要求)。
要在鍵盤鎖啟動時接聽電話,按通話鍵。當您結束通話或拒
絕來電時,鍵盤會自動鎖定。
進階功能為自動鍵盤鎖及安全鍵盤鎖。 請參閱 「手
機」,第 39 頁。
當鍵盤鎖定時,可能仍可撥打已編入本裝置內的官方緊急號
碼。
4. 通話功能
撥打電話
撥打號碼
1. 輸入電話號碼連區號。
要撥打國際長途電話,按 * 兩次輸入國際長途碼 (+ 字元
可代替國際接入號碼),如有需要,輸入國家和地區代碼
(如果需要,可以不包括開頭的 0),與及電話號碼。
2. 要撥打電話號碼,按通話鍵。要在通話中調校音量,按音
量上鍵 (+) 或音量下鍵 (-)。
3. 要結束通話或取消試撥,按結束鍵。
您可以尋找已儲存於通訊錄中的姓名或電話號碼。 請參閱
「尋找聯絡人」,第 32 頁。 按通話鍵撥打號碼。
要進入已撥號碼的列表,在待機模式下按通話鍵一次。要撥
打號碼,選擇號碼或名稱,然後按通話鍵。
沒有 SIM 卡時仍可使用的功能
裝置中的一些功能可能無需插入 SIM 卡亦可使用 (例如:與兼
容個人電腦或其他兼容裝置的數據傳送)。某些功能在功能表
中顯示為灰暗,表示不能使用。
撥號快捷操作
設定電話號碼至 2 至 9 中的其中一個數字鍵。請參閱 「撥號
快捷操作」,第 33 頁。
使用以下其中一種方式撥打該號碼:
按數字鍵,然後按通話鍵。
或
如果單鍵撥號已設定為開,按住數字鍵直至開始通話。
更多詳細資料可從單鍵撥號獲取。 請參閱 「通
話」,第 38 頁。
增強語音撥號
您可以說出已儲存於您裝置通訊錄中的姓名來撥打電話。
語音指令視乎語言而定。使用語音撥號前先設定識別語言。
請參閱 「手機」,第 39 頁。
18
Page 18

中文輸入
注意: 在嘈雜的環境或在緊急情況下使用語音標籤可
能會比較困難,因此,請勿在任何環境下均完全依靠語音撥
號。
1. 在待機模式下,按住右選擇鍵或音量下鍵。會聽到短的提
示聲,且螢幕上會顯示請講話。
2. 清楚地說出您想撥打的聯絡人姓名。如果語音識別成功,
會顯示一個匹配項目的列表。裝置會播放列表中第一個匹
配的語音指令。如果該指令不正確,捲動至另一個項目。
使用語音指令執行所選裝置功能與語音撥號相似。 請參閱
「語音指令」,第 36 頁。
接聽或拒絕來電
要接聽來電,按通話鍵。要結束通話,按結束鍵。
要拒絕來電,按結束鍵。要使鈴聲靜音,選擇無聲。
要在當前通話期間接聽等待的電話 (網絡服務),按通話鍵。
第一個電話會被保留。要結束當前通話,按結束鍵。您亦可
以啟動來電等待功能。 請參閱 「通話」,第 38 頁。
5. 中文輸入
裝置中可用的輸入法視乎銷售市場而預設。
當書寫語言設定為繁體中文時,您可以使用筆劃輸入法輸入
繁體中文字元。當書寫語言設定為簡體中文時,您可以使用
拼音或筆劃輸入法輸入簡體中文字元。
通話時可用的選項
在通話期間所能使用的選項,大部份都屬於網絡服務。如要
獲取有關供應情況的資料,請向您的服務供應商查詢。
通話過程中,選擇操作並從以下選項中選擇:
通話選項包括:靜音或取消靜音、通訊錄、功能表、鎖鍵
盤、錄製、語音增強、喇叭或手機。
網絡選項包括:接聽或拒絕、保留或恢復通話、接通另一
方、加入會議通話、掛斷、結束全部通話,與及下列選項:
● 發送多頻音 — 發送聲音字串
● 切換通話 — 在當前通話與保留的通話之間切換
● 轉移通話 — 將保留的通話連接至當前通話,並中斷自己
的通話連接
● 會議通話 — 建立會議通話
● 單方通話 — 在會議通話中進行私人會話
警告: 當喇叭正在使用時,請勿把裝置靠近您的耳
朵,因為音量可能非常響亮。
選擇書寫語言
您可以將書寫語言更換成裝置支援的任何語言。選擇操作,
或按住 #,然後選擇書寫語言及想要使用的語言。
19
Page 19
中文輸入
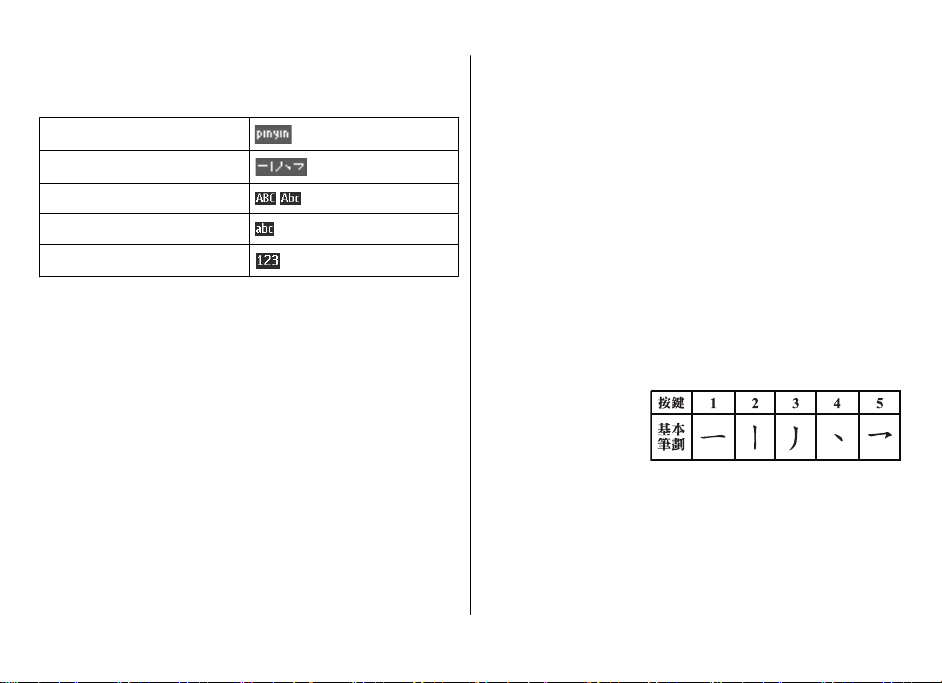
在輸入法之間互相切換
輸入法指示符號會在螢幕的上方顯示:
拼音
筆劃
大寫
小寫
數字輸入
並非所有的輸入法都可以在任何情況下使用。請經常查看
示符號,獲知使用的是哪一種輸入法。
要在可用的輸入法之間切換,執行以下其中一項操作:
#,直至顯示想要使用輸入法的指示符號。
重複按
例如:在編寫訊息時選擇
,然後選擇想要使用的輸入法。
操作
拼音輸入法
拼音輸入法
您僅需按鍵一次,而不用考慮符號在數字鍵上的位置。
會進行拼音符號的邏輯組合。
要使用拼音輸入法輸入字元:
1. 按數字鍵一次輸入您想要輸入的每個拼音符號
輸入「
ü」)。
裝置
(使用「
2. 重複按
3. 如有需要,捲動至拼音輸入區域,捲動至想要的拼音
4. 捲動至想要的中文字符,然後選擇
1 鍵直至出現您想要的聲標。
合,然後向下捲動。
確認
。
近似拼音
使用此功能,您的裝置可容許某些近似的拼音組合:
z/zh、s/sh
如:如果依次按
合「
「
顯示輸入法符號或預測列表時,選擇操作
指
、n/l、r/l、
hao」、「gan
gang」及「
f/h、an/ang、
、2、6,您的裝置不僅會顯示有效的組
4
」、「gao
hang」。要選擇想使用的近似組合,當沒有
in/ing 及 en/eng。例
」及「han」,亦會顯示
> 近似拼音
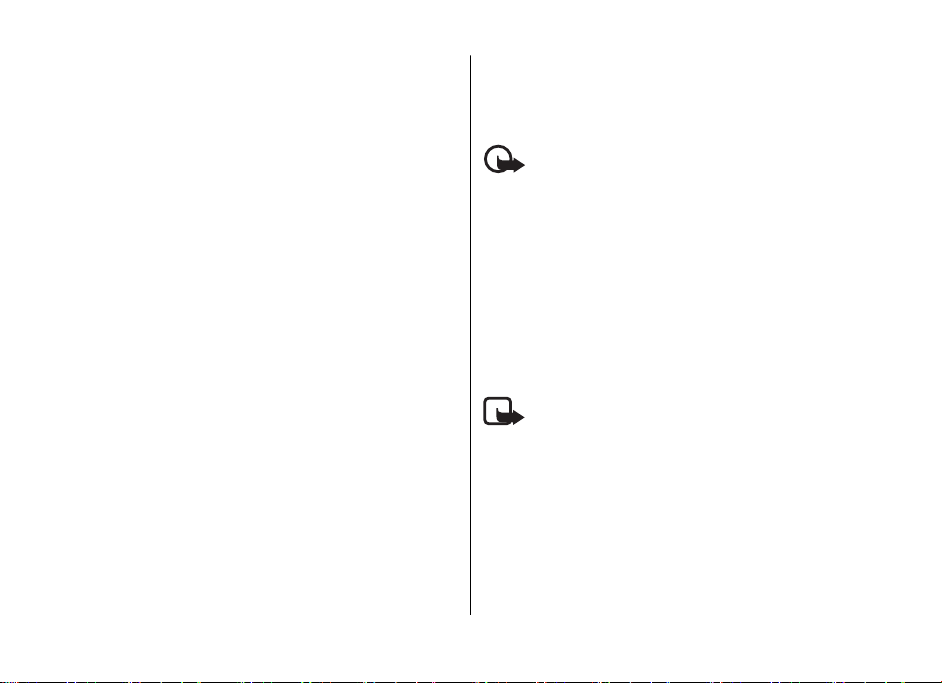
筆畫輸入法
組成中文字符的筆畫分為五類:橫、豎、撇、點及勾。每種
筆劃分別對應一個從
筆劃分類如下表所示:
v」
至 5 的數字鍵。
1
組
c/ch、
。
20
Page 20

1. 根據標準的筆劃次序,按數字鍵輸入筆劃。
如果您不知道要用什麼筆劃,或不知道該筆劃所屬類型,
按 6 代替該筆劃,然後繼續輸入其他筆劃。在輸入區域出
現的問號表示該筆劃。
2. 捲動至想要的中文字符,然後選擇確認。
詞組輸入
可以一次輸入一個不超過七個中文字元的詞組。
您的裝置中並沒有儲存所有詞組。您可以建立詞組,然後儲
存於您的裝置中。
中文輸入
輸入詞組
1. 按對應的數字鍵輸入音節、拼音首字母或該詞組第一個字
元的頭幾筆。
2. 按 0 輸入分隔符號。如果在拼音模式下,重複按 1 輸入您
想要字元的聲標。
3. 輸入音節、拼音首字母或下一個中文字元的頭幾筆。
4. 如有需要,重複第 2 步及第 3 步,輸入音節、拼音首字母
或該詞組中所有中文字元的頭幾筆。
5. 在拼音模式下,如有需要,重複按 * 鍵可突出顯示您想要
的拼音組合。
6. 捲動至想要的詞組,然後選擇確認。
分隔符號
分隔不同字元音節的拼音字串或不同字元的筆劃。
某些時候,不一定需要在拼音模式下使用分隔符號,因為裝
置可能可以識別兩個音節並自動在這兩個音節之間插入分隔
符號。例如:要輸入詞組「彩色」,按 2、2、4、7 及 3。裝
置會自動在兩個音節 「cai」 及 「se」之間插入分隔符號,
並顯示「cai.se」作為對應按鍵拼音組合的候選詞組。
在某些情況下,您需要分隔符號以定義所輸入下一個音節的
開始。例如:如果您想要輸入詞組 「西安」,就需要在兩個
音節 「xi」 和 「an」之間插入分隔符號。否則,裝置會顯
示「xian」 作為一個候選的拼音組合。
當您輸入分隔符號時,裝置會預測可以與您輸入的拼音或筆
劃字串和分隔符號的可能候選組合 (如有) 組成詞組的字元或
字元串。您可以繼續輸入分隔符號,預測的候選字列表會隨
即更新。例如:要使用拼音輸入 「祝你生日快樂」,按 9,
21
Page 21

中文輸入
0 五次,接著按
然後按
zhu ni sheng ri kuai le
「
* 突出顯示「
」作為候選詞組。
z.....」,手機會顯示
用戶已定義詞組
您可以建立不超過七個字元的詞組。當數據庫接近滿時
詞組會取代最長時間沒有被存取過的詞組。
當沒有顯示輸入法符號或預測列表時,選擇
組 > 新增,輸入想要的詞組,然後選擇
要編輯數據庫中的詞組,當沒有輸入法符號或預測列表顯
時,選擇
作 > 編輯
操作 >
。
用戶詞組
,捲動至想要的詞組,然後選擇
操作
確認。
,新
> 用戶詞
開啟或關閉智慧英文輸入法
當書寫語言
入法輸入文字。
當輸入英
英文
慧輸入選項
為英文時,您可以使用傳統文字輸入法或智慧輸
慧輸入選項
文文
字時
>
智慧輸入法
,選擇
輸入法為開。要關閉智慧英文輸入法,選擇操作
操作
>
關
>
智
。
設定智慧英文
>
傳統文字輸入法
9,直至出現想要的字元。可用的字元視
重複按數字鍵
乎書寫語言而定。
如果要輸入的下一個字母在同一個鍵上,先等待游標出現,
然後再輸入該字母。
要存取最常用的標點符號及特殊字元,重複按數字鍵
* 選擇特殊字元。
2 至
1 或按
智慧輸入法
預測輸入基於內置的詞典,而且可在詞典中添加新詞。
使用按鍵 2 至
1.
母。
2. 在完成輸入字並確定無誤後,按
如果該字不正確,重複按
示
操
若在單字後面出現「
字。要新增單詞至詞典,選擇
輸入文字,然後選擇
第一部分,然後向右按導航鍵進行確認。寫入後半部份並
確認該字。
3. 開始寫下一個字。
9 開始輸入文字。按一次按鍵可輸入一個字
0 加入空格確認。
*,然後從列表中選擇字。
?」號(問號),表示字典中沒有該
拼寫。使用傳統文字輸入法
儲存。要輸入複合字,先輸入該字的
編寫文字的秘訣
編寫文字時也可能使用以下功能:
智
● 要在沒有顯示輸入法符號時插入數字,按住想要的數字
鍵。
● 要在沒有顯示候選或智慧輸入法列表時插入空格,按
要在使用智慧英文輸入法時插入單詞,選擇
●
輸入選項 >
然後選擇儲存
● 要在已完成輸入一個單詞或字元後輸入特殊字符,按
● 要重複輸入編輯視窗中游標左邊的中文字元,按住
要結束智慧中文輸入法,選擇
●
新的文字。
插入單字
。使用傳統英文輸入法編寫文字,
。該單詞同時被新增至字典。
返回,或按相關鍵開始輸入
操作
0。
> 智慧
*。
*。
22
Page 22

6. 瀏覽功能表
裝置提供各類功能,這些功能按功能表分組。
1. 要進入功能表,選擇功能表。
2. 在功能表中捲動,然後選擇一個選項 (例如:設定)。
3. 如果選擇的功能表包含下一級子功能表,選擇一個子功能
表 (例如:通話)。
4. 如果選擇的功能表包含下一級子功能表,重複第 3 步。
5. 選擇想要的設定。
7. 訊息
您可以閱讀、編寫、發送及儲存文字和多媒體訊息、電郵、
聲音短訊及快顯訊息。訊息服務僅在您的網絡商或服務供應
商支援時才能使用。
注意: 裝置可能會指示訊息已傳送至已編入本裝置內
的訊息中心號碼。裝置可能不會指示預定的收訊人已收到該
訊。如要獲取有關訊息服務的詳細資料,請向您的服務供應
商查詢。
重要訊息: 開啟訊息時應加倍小心。訊息中可能包含
惡意軟件或其他對本裝置或個人電腦造成損害的內容。
瀏覽功能表
6. 要返回至上一級功能表,選擇返回。
要退出功能表,選擇退出。
要更改功能表檢視,選擇操作 > 主功能表顯示格式 > 清
單、圖示、圖示標籤或清單列表。
要重新排列功能表,捲動至要移動的功能表,然後選擇操
作 > 組織 > 移動。捲動至想將功能表移往的位置,選擇確
認。要儲存更改,選擇完成 > 確認。
文字訊息
本裝置支援傳送字元數目超過單個訊息字元限制的文字訊
息。較長的訊息會以兩個或兩個以上的連續訊息傳送。服務
供應商可能會收取相應的費用。使用重音符號或其他標記符
號的字符及部份語言選項中的字符會佔用更多空間,因而限
制單個訊息內可以傳送的字符數。
螢幕上方的指示符號顯示剩餘的字符總數及發送所需的訊息
數。例如,673/2 表示您還可以輸入 673 個字符,該訊息會
作為兩個連續訊息發送。
在您可以發送任何文字或 SMS 電郵訊息前,您必須儲存訊息
中心號碼。 請參閱 「文字訊息」,第 30 頁。
閃爍則表示訊息記憶體已滿。這時要刪除一些舊訊息
若
後才能接收新訊息。
23
Page 23
訊息
多媒體訊息
僅具備兼容功能的裝置才可接收及顯示多媒體訊息。訊息的
顯示外觀視乎接收裝置而有所不同。
無線網絡可能會對多媒體訊息的大小有所限制。 如果插入的
圖片大小超過此限制,裝置可能會縮小圖片以便以多媒體訊
息方式傳送。
多媒體訊息可以包含文字、圖片、音效檔及短片。
建立文字或多媒體訊息
選擇功能表 > 訊息服務 > 建立訊息 > 訊息。要加入收訊
人,捲動至收訊人:欄位,然後輸入收訊人的號碼或電郵地
址,或選擇新增從可用的選項中選擇收訊人。要加入副本收
訊人或密件收訊人收訊人,選擇操作 > 新增收訊人。要輸入
訊息文字,捲動至文字:欄位,然後輸入文字。要為訊息加
入標題,選擇操作 > 新增主題。要將內容附加至訊息,捲動
至螢幕底部的附件列,然後選擇想要的附件類型。
訊息類型會顯示於螢幕的頂部,且會根據訊息的內容自動更
改。
要傳送訊息,按發送。
可能使訊息類型由文字訊息變成多媒體訊息的操作包括 (但不
僅限於以下):
● 為訊息附上檔案。
● 要求傳送報告。
● 將訊息的優先級別設定為高或低。
● 為訊息加上抄送 (Cc) 或密送 (Bcc) 收訊人或主題或在收訊
人欄位加入電郵地址。
服務供應商的收費可能視乎訊息類型而有所不同。請向您的
服務供應商查詢以獲取詳細資料。
閱讀訊息及回覆
重要訊息: 開啟訊息時應加倍小心。電郵訊息或多媒
體訊息中的物件可能含有惡意軟件或其他可能對本裝置或個
人電腦造成損害的內容。
當收到訊息時,您的裝置會發出通知。按顯示顯示訊息。如
果收到多於一個訊息,從收件匣中選擇訊息,然後按打開。
使用導航鍵查看整個訊息。
選擇操作 > 回覆類型及訊息類型以回覆訊息。
訊息發送過程
要發送訊息,選擇發送。手機將訊息儲存於寄件匣資料夾
中,然後開始發送。
注意: 裝置可能會指示訊息已傳送至已編入本裝置內
的訊息中心號碼。裝置可能不會指示預定的收訊人已收到該
訊。如要獲取有關訊息服務的詳細資料,請向您的服務供應
商查詢。
如果訊息發送時被中斷,手機將嘗試重發幾次。如果重發失
敗,訊息會被保留在寄件匣資料夾中。要取消發送寄件匣資
料夾中的訊息,捲動至想要的訊息,然後選擇操作 > 取消發
送。
24
Page 24

電郵
電郵應用程式使用分組數據連接
帳號。電郵應用程式有別於
電郵功能,您需要兼容的電郵系統。
您可以使用裝置編寫、發送及閱讀電郵,並可獲得您帳號中
新電郵的通知。您的裝置支援
器。
在您可以發送及提取任何電郵訊息前,您需要一個新的
帳號或使用您當前的帳號。要查詢電郵帳號的供應情況
定,請向您的電郵服務供應商查詢。
您可以配置訊息的形式接收電郵配置設定。
置設定服務」,第
要設定您的電郵喜好設定,選擇
設定 > 電子郵件訊息
頁。
第 31
10 頁。
。
(網絡服務)
電郵功能。要在裝置上使用
SMS
POP3 及
功能表 > 訊息服務
請參閱 「電子郵件訊
電郵設定精靈
如果手機中沒有定義電郵設定,電郵設定精靈便會自動
始,或選擇
新增
可能需要
要手動輸入設定,選擇
操作
電子郵件應用程式可能要求沒有代理主機的互聯網接入
WAP 接入點一般包括代理主機,並且不與電郵應用程式一起
操作。
功能表 >
電子郵件設定精靈
信箱 >
連接到互聯網,可能需要網絡支援與及收費。
> 新增信箱 >
訊息服務 > 電子郵件
手動建立
。使用電子郵件設定精靈
功能表 >
訊息服務
。
可讓您存取電郵
IMAP4 電子郵件伺服
電郵
及設
> 訊息
> 操作
「配
開
點。
請參閱
息」,
信箱
> 電子郵件
編寫及發送電郵
您可以在連接至電郵服務前編寫電郵訊息,或者先連接至服
務,然後編寫及發送電郵。
功能表 >
1. 選擇
2. 如果已定義多於一個電郵帳號,選擇您想要用來發送電
的帳號。
3. 輸入收訊人的電郵地址,編寫主題,然後輸入電郵訊息
要加入檔案,選擇
要儲存電郵,選擇
編寫電郵,選擇
4. 要發送電郵訊息,選擇
要從草稿資料夾發送電郵,選擇
稿,然後選擇想要的訊息。
訊息 > 建立訊息
按鈕,然後選擇以下選項。
插入
操作 >
儲存為草稿訊息
發送按鈕。
> 電子郵件訊息
儲存訊息。要編輯或稍後繼續
。
功能表 >
閱讀及回覆電郵
重要訊息:
體訊息中的物件可能含有惡意軟件或其他可能對本裝置或個
>
人電腦造成損害的內容。
要下載已發送至您電郵帳號的電郵訊息,選擇
服務及您的電郵帳號。確認連接至您的郵箱。電郵應用程
>
首先僅會下載電郵標題。
電郵訊息。向下捲動檢視電郵。選擇
回覆回覆電郵。確認或編輯電郵地址和主題,然後編寫
作 >
回覆訊息。
接,選擇操作
箱,郵箱連接亦會自動中斷。
開啟訊息時應加倍小心。電郵訊息或多媒
選擇電郵,然後按打開
要發送回覆訊息,選擇
> 中斷連接。如果在一段時間內沒有操作郵
提取下載附件。
發送按鈕。
訊息服務 >
> 訊息
功能表
下載完整的
選擇操
要中斷郵箱連
訊息
。
郵
。
草
式
25
Page 25

訊息
新電郵通知
您的裝置會在一定的時間間隔內自動查看您的電郵帳號
會通知您(如果您已收到新電郵
1. 選擇功能表 >
輯信箱。
2. 選擇您的電郵帳號、
●
信箱更新間隔
間間隔
●
自動提取
3. 要啟動新電郵通知功能,選擇
定 > 電子郵件訊息
訊息
— 設定裝置查看電郵帳號新電郵的時
— 自動從您的電郵帳號擷取新電郵。
)。
> 訊息設定 >
下載設定,然後選擇以下選項:
> 新電子郵件通知
電子郵件訊息
功能表 >
訊息 > 訊息設
開。
>
快顯訊息
快顯訊息是可以立即顯示給收訊人的文字訊息。快顯訊
會自動儲存。
>
要從當前訊息中提取電話號碼及地址,選擇
情。
,並
要儲存訊息,選擇
編
Nokia Xpress
您可以使用多媒體訊息服務以簡便的方式建立及發送聲音短
訊。必須先啟動多媒體訊息服務才能使用聲音短訊。
儲存及您想要儲存該訊息的資料夾。
聲音短訊
建立訊息
1. 選擇功能表
2. 說出您的訊息。
3. 在
息不
4. 要發送訊息,選擇
訊息服務 >
機會開啟。請參閱
收訊人:欄位中輸入一個或多個電話號碼,或選擇
擷取電話號碼。
>
「語音備忘」,第
發送。
建立訊息 >
操作 > 提取詳
聲音短訊。錄音
45 頁。
新增
編寫快顯訊息
> 建立訊息 >
選擇功能表
的電話號碼,然後編寫訊息。快顯訊息的最大長度為
符。
爍字元設定標記。在標記後面的文字會閃爍。要結束閃
字,插入第二個標記。
> 訊息
要向訊息中插入閃爍文字,
快顯訊息。
選擇操作 >
輸入收訊人
70 個字
插入符號
閱讀及回覆快顯訊息
收到的快顯訊息以
要閱讀訊息,選擇
26
訊息:及訊息開始的幾個詞表示。
。
閱讀
> 閃
爍文
收聽訊息
要開啟已接收的聲音短訊,選擇
如果收到多於一個訊息,選擇
要稍後收聽訊息,選擇
退出。
播放。
顯示
> 播放。
記憶體已滿
當您收到訊息且用於儲存訊息的記憶體已滿時,會顯示
體已滿。無法接收訊息。
。
記憶
Page 26

要刪除舊訊息,選擇確認 > 確認及資料夾。捲動至想要刪除
的訊息,然後選擇刪除。
要刪除更多訊息,選擇標記。標記您想要刪除的所有訊息,
然後選擇操作 > 刪除標記。
資料夾
裝置將接收到的訊息儲存於收件匣資料夾中。尚未發送的訊
息儲存於寄件匣資料夾中。
要設定裝置將已發送訊息儲存於寄件備份資料夾,選擇功能
表 > 訊息服務 > 訊息設定 > 標準設定 > 儲存發出的訊
息。
要編輯及發送已寫好並儲存於草稿資料夾中的訊息,選擇功
能表 > 訊息服務 > 草稿。
可以將訊息移至已存資料資料夾中。要整理已存資料子資料
夾,選擇功能表 > 訊息服務 > 已存資料。
要新增資料夾,選擇操作 > 新增資料夾。
要刪除或重新命名資料夾,捲動至想要的資料夾,然後選擇
操作 > 刪除資料夾或重新命名資料夾。
要建立新範本,將訊息儲存為範本,或進入範本列表,然後
選擇功能表 > 訊息服務 > 已存資料 > 範本。
即時訊息
注意: 您可能無法使用本指南中描述的所有功能,視
乎您的即時訊息服務而定。
訊息
使用即時訊息 (IM) (網絡服務),您可以向在線用戶發送簡短
的文字訊息。您需要申請該服務,並註冊您想要使用的即時
訊息服務。如要獲取更多有關註冊即時訊息服務的資料,請
向您的服務供應商查詢。
要設定即時訊息服務所需設定,使用選項連接設定。 請參
閱 「存取」,第 27 頁。
螢幕上顯示的圖標和文字可能會有所不同,視乎即時訊息服
務而定。
存取
選擇功能表 > 訊息服務 > 即時訊息。即時訊息可能會被其
他項目取代,視乎服務供應商而定。如果即時訊息服務有多
於一組的連接設定可用,選擇想要的一組。
按操作,可選擇以下選項:
● 登入 — 連接至即時訊息服務。要設定手機在開機時自動
連接至即時訊息服務,在登入過程中,選擇自動登入: >
開。
● 已存會談 — 查看、刪除或重新命名在即時訊息通話過程
中儲存的會談
● 連接設定 — 編輯訊息及動態顯示連接所需的設定
連接
要連接至該服務,進入即時訊息功能表,選擇即時訊息服務
(如有需要),然後選擇登入。
要中斷與即時訊息服務的連接,選擇操作 > 登出。
27
Page 27

訊息
會話
當連接至該服務時,您向其他人顯示的狀態會顯示於狀
中:我的狀態:線上
要更改您自己的狀態,選擇
在狀態列下有三個資料夾,包括您的聯絡人並顯示其狀
交
談、線上
夾,然後選擇
要摺疊資料夾,選擇
● 談
交
的列表或加入即時訊息的邀請:
螢幕上顯示的圖標和文字視乎即時訊息服務而定。
● 線上
● 離線
要開始會談,擴展在線或離線資料夾,捲動至您想與其聊
天的聯絡人,然後選擇
展開
選擇
● 群組 > 公共群組
果網絡不支援群組則不會顯示
時訊息會話,捲動至該群組,然後選擇
會談中用作暱稱的螢幕名稱。當您已成功加入群組會談
()及離線
— 顯示目前即時訊息會話中新的及已讀的即時訊息
表示新的群組訊息
表示已讀群組訊息
表示新的即時訊息
表示已讀的即時訊息
表示邀請
() — 顯示在線聯絡人的數目
() — 顯示離線聯絡人的數目
會談資料夾,捲動至您想要與其聊天的聯絡人,然後
打開。
、我的狀態:忙碌
更改。
()。 要展開某個資料夾,捲動至該資料
擴展 (或向右捲動
(或向左捲動
隱藏
聊天。要回答邀請或要回覆訊息,
由服務供應商提供的公共群組列表
—
或狀態:
)。
)。
)。要開始與某個群組進行即
加入。輸入您想在
隱藏
態列
態:
時,您可以開始群組會談。可以建立私人群組。
「群組」,第
● 尋找 > 用戶
件地址或姓名尋找網絡上其他的即時訊息用戶或公共群
組。如果選擇
主題或識別碼尋找群組。
● 操作 > 聊天
始會談
29 頁。
— 透過電話號碼、螢幕名稱、電子郵
或群組
群組,則可透過群組中的成員、群組名稱、
或加入群組
— 在找到想要的用戶或群組時開
接受或拒絕邀請
如果您已收到新的邀請,要閱讀邀請,選擇
多於一個邀請,選擇一個邀請,然後選擇
群組會談,選擇
要拒絕或刪除邀請,選擇
接受,然後輸入您想用作暱稱的螢幕名稱。
操作
> 拒絕或
閱讀即時訊息
如果您收到不屬於當前會談的新訊息,
示。 要閱讀訊息,選擇
一個訊息,然後選擇
在當前會談過程收到的新訊息會保留在
如果所收到訊息的發送者不在
發送者的識別碼。
> 儲存連絡人
擇操作
閱讀。如果收到多於一個訊息,選擇
打開。
即時訊息聯絡人
要儲存手機記憶體中沒有的新聯絡人,選
。
1 個即時訊息
即時訊息 >
參加會談
(如
要加入或開始即時訊息會話,輸入您的訊息,然後選擇
如果您在會談中接收到沒有加入當前會談的聯絡人發來的新
訊息,
會顯示,並且手機會發出提示聲。
請參閱
閱讀。如果收到
打開。要加入私人
刪除。
會顯
會談中。
中,會顯示該
發送。
編寫訊息,然
28
Page 28

後選擇發送
訊息之下。
。您的訊息會顯示,並且回覆訊息會顯示於您的
新增即時訊息聯絡人
連接至即時訊息服務後,在即時訊息主功能表中,選擇
作 >
服器尋找或
談,捲動至某個聯絡人,然後選擇
朋友
加入
從伺服器複製
> 使用手機號碼
(視乎服務供應商而定
手動輸入識別碼
、
聊天。
操
、從伺
)。 要開始會
封鎖或解鎖訊息
當您在會談中並想要封鎖訊息時,選擇
要封鎖您聯絡人列表中特定聯絡人發送的訊息,捲動至
中的聯絡人,然後選擇
要解鎖聯絡人,在即時訊息主功能表中選擇
表。捲動至您想要解鎖的聯絡人,然後選擇
> 封鎖聯絡人
操作
操作 >
> 確認
操作 >
解鎖 > 確認
封鎖聯絡人。
會談
。
封鎖列
群組
您可以使用服務供應商提供的公共群組,或建立您自己
時訊息會談私人群組。
您可以儲存您的服務供應商可能會維護的公共群組用作書
連接至即時訊息服務,然後選擇群組 > 公共群組。
籤。
擇一個群組,然後選擇
螢幕名稱作為您在群組的暱稱。
要從您的列表中刪除群組,選擇操作 > 刪除群組
要尋找群組,選擇
加入。如果您不在群組內,輸入您的
群組 >
公共群組 >
尋找群組。
的即
。
要建立私人群組,連接至即時訊息服務,然後從主功能表中
選擇操作 >
名稱。標記聯絡人列表中的私人群組成員,然後編寫邀
建立群組。輸入群組名稱及您想用作暱稱的螢幕
留言訊息
留言信箱是一項網絡服務,您必須事先申請。如要獲取更
資料,請向您的服務供應商查詢。
要致電您的留言信箱,選擇
> 接聽留言訊息
息
要輸入、尋找或編輯您的留言信箱號碼,選擇
如果網絡支援,
箱號碼,選擇
廣播訊息
。
您可以從服務供應商處接收各種主題的訊息
要獲取更多有關資料,請向您的服務供應商查詢。
選擇功能表 >
服務指令
選
服務指令讓您可以編寫及發送服務要求
務供應商 (
要編寫及發送服務要求,選擇
令編輯器。如要獲取詳細資料,請向您的服務供應商
接聽。
訊息服務
例如:網絡服務的啟動指令
功能表 >
。
表示新的留言訊息。
> 廣播訊息,然後選擇可用選項。
功能表 >
訊息服務 >
要致電您的留言信
(USSD
)。
訊息服務 >
訊息
請。
留言訊
留言信箱號碼。
(網絡服務)
指令) 至您的服
。如
系統指
查詢。
多
29
Page 29

訊息
刪除訊息
刪除單個訊息、所有訊息或資料夾。
要刪除訊息,選擇
訊息刪除單個訊息;選擇
息,或選擇全部訊息
功能表 >
。
訊息服務 >
按照資料夾
刪除訊息 >
刪除資料夾中的所有訊
SIM 卡上的訊息
SIM 卡上的訊息是儲存至您
您可以將這些訊息由
可以反方向進行。
要閱讀 SIM
SIM
卡上的訊息,選擇功能表
卡上的訊息
SIM 卡複製或移動至手機記憶體,但不
。
卡的文字訊息。
SIM
> 訊息服務 >
訊息設定
標準設定
標準設定是用於文字及多媒體訊息的常用設定。
選擇功能表
擇以下選項:
● 儲存發出的訊息
資料夾中。
● 替換寄件備份
已發送的舊訊息。該設定僅當您選擇
時才會顯示。
字體大小
●
> 訊息服務 >
— 選擇是將已發送訊息儲存至
— 選擇
— 選擇訊息所使用的字體大小。
訊息設定 >
是,在記憶體已滿時用新訊息覆寫
標準設定,然後選
儲存發出的訊息
按照
操作
寄件備份
> 是
● 我的最愛收訊人
電子郵件地址或收件人群組
● 圖像表情符號
以字元為基礎的表情符號。
— 加入您最喜愛的電話號碼、聯絡人、
是設定裝置使用圖像表情符號代替
— 選擇
文字訊息
文字訊息設定影響文字訊息及
收和檢視。
選擇功能表 >
擇以下選項:
● 訊息報告
絡服務)
>
訊息中心 —
●
話號碼及訊息中心的名稱。您可從服務供應商處接收該號
碼。
● 當前訊息中心
訊息有效期
●
發送格式 —
●
絡服務)
使用分組數據
●
支援字元 —
●
中的所有字元。如果選擇
記的字元會被轉換為其他字元。
●
本中心回覆 — 選擇
向您發送回覆訊息
訊息服務
— 選擇是
。
選擇新增中心
— 選擇網絡嘗試發送訊息所用的時間
選擇發送訊息的格式:
選擇完整編碼
> 訊息設定 >
要求網絡對您的訊息發送傳送報告
— 選擇正在使用的訊息中心。
— 選擇是
提
供
網絡服務)。
(
電子郵件訊息的發送、接
SMS
設定發送文字訊息時所需的電
文字、傳呼
設定 GPRS 為首選 SMS
可選擇按檢視的樣子發送訊息
簡式編碼,使用加重音及其他標
允許訊息收訊人透過您的訊息中心
多媒體訊息
訊息設定影響多媒體訊息的發送、接收和檢視。
文字訊息,然後選
(網
或傳真(網
傳輸方式。
30
Page 30

您可以配置訊息的形式接收多媒體訊息的配置設定。請
「配置設定服務」,第
「配置」,第
閱
選擇功能表
從以下選項中選擇:
訊息報告 —
●
絡服務)。
● 多媒體訊息建立模式
媒體訊息。這樣令接收裝置更有可能有能力顯示這些
容。
●
圖像大小
較高的解像度
預設投影片計時
●
設時間
● 允許多媒體接收
如果選擇
訊息。多媒體服務的預設設定通常為
表的可用性視乎您的手機而定。
39 頁。
> 訊息服務 >
選擇是要求網絡對您的訊息發送傳送報告
— 設定多媒體訊息中的圖像大小。如
(可能在某些網絡中不支援
在註冊網絡,便無法在註冊網絡以外接收多媒體
頁。您亦可手動輸入設定。
10
訊息設定 >
— 選擇
定義多媒體訊息中投影片之間的預
—
— 選擇是
或否接收或封鎖多媒體訊息。
多媒體訊息,然後
已限制建立含限制內容的多
) 不可使用。
在註冊網絡。該功能
請參
果受限制,
8. 通訊錄
您可以將姓名和電話號碼
卡記憶體中。
裝置記憶體可以儲存備有附加詳情的聯絡人,例如不同的
話號碼及文字項目。您也可以為一定數目的聯絡人儲存圖片
SIM 卡記憶體可以儲存附有一個電話號碼的姓名。儲存於
卡記憶體內的聯絡人以
(聯絡人)
儲存至裝置記憶體及
表示。
參閱
(網
內
收到的多媒體訊息
●
提示後手動接收多媒體訊息或拒絕接收多媒體訊息。若將
允許多媒體接收
允許接收廣告
●
收已設定為否
顯示此設定。
配置設定 —
●
媒體訊息選擇服務供應商、
然後選擇當前配置設定中包含的多媒體訊息服務帳號。
— 允許自動接收多媒體訊息、收到
設定為否
—
收到的多媒體訊息
或
選擇配置顯示支援多媒體訊息的配置。為多
,便不會顯示此設定。
接收或拒絕廣告。如果
或個人配置
預設
已設定為
電子郵件訊息
此設定可影響電子郵件的發送、接收和檢視。您可以配置
息的形式接收設定。請參閱
您亦可手動輸入設定。
選擇功能表 >
選項。
手機的顯示姓名功能會使用最相近的電話號碼。如果相符
SIM
數字少於 7 個,顯示的姓名可能不正確。
電
儲存姓名及電話號碼
。
SIM
姓名及電話號碼儲存於使用的記憶體中。
訊息服務
「配置設定服務」,第
請參閱 「配置」,第
> 訊息設定 >
允許多媒體接
拒絕,則不會
。選擇帳號
10 頁。
頁。
39
電子郵件訊息
通訊錄
,
訊
顯示
的
31
Page 31

通訊錄
要儲存姓名及電話號碼,選擇功能表 > 通訊錄 > 姓名 >
操作 > 新增姓名。
● 字體大小 — 設定聯絡人列表的字體大小
● 記憶體狀態 — 查看可用及已用的記憶體容量
儲存詳情
在裝置記憶體中,您可以為聯絡人儲存不同類型的電話號
碼、鈴聲或短片及簡短文字項目。
您儲存的第一個號碼被自動設定為預設號碼,以一個圍繞該
號碼類型的方框指示符號表示 (例如:
名時 (例如要撥打電話),除非選擇了另一個號碼,否則會使
用預設號碼。
確定使用的記憶體是手機或手機和 SIM 卡。 請參閱 「設
定」,第 32 頁。
尋找要加入詳情的聯絡人,然後選擇詳情 > 操作 > 新增詳
情。
從可用的選項中選擇。
)。從通訊錄選擇姓
設定
這些設定定義聯絡人資料儲存的位置、顯示的方式及剩餘的
記憶體容量。
選擇功能表 > 通訊錄 > 設定,然後選擇以下選項:
● 記憶體選擇 — 選擇將通訊錄儲存於 SIM 卡或手機記憶
體。選擇手機和 SIM 卡從兩個記憶體中提取姓名及電話號
碼。在這種情況下,當您儲存姓名及電話號碼時,會儲存
至手機記憶體中。
● 顯示方式 — 選擇通訊錄中的姓名及電話號碼顯示的方式
● 姓名顯示 — 選擇是將聯絡人的名或姓顯示在前面
32
群組
選擇功能表 > 通訊錄 > 群組將儲存於記憶體中的姓名及電
話號碼整理至設有不同鈴聲和群組圖像的號碼分組中。
尋找聯絡人
要使用尋找指令尋找,選擇功能表 > 通訊錄 > 姓名 > 操
作 > 尋找。輸入姓名的頭幾個字元或字母,然後選擇尋找。
要使用彈出式視窗尋找,在待機模式下向下捲動以突出顯示
第一個姓名 (或電話號碼)。輸入您正尋找姓名的第一個輸入
符號。符號會在彈出式視窗中顯示。您可以在彈出式視窗中
輸入更多符號。會顯示相應的姓名。列出姓名的次序可能與
姓名中不同。
當使用尋找指令或彈出式視窗時,要更換輸入法,按 #。
複製或移動聯絡人
要在 SIM 卡記憶體及手機記憶體之間複製或移動聯絡人,選
擇功能表 > 通訊錄 > 姓名。選擇要複製或移動的聯絡人,
然後選擇操作 > 複製聯絡人或移動聯絡人。
要複製或移動多名聯絡人,選擇要複製或移動的第一名聯絡
人,然後選擇操作 > 標記。標記其他聯絡人,然後選擇操
作 > 複製已標記或移動已標記。
要在 SIM 卡記憶體及手機記憶體之間複製或移動所有聯絡
人,選擇功能表 > 通訊錄 > 複製通訊錄或移動通訊錄。
Page 32

SIM 卡記憶體可以儲存附有一個電話號碼的姓名。
編輯聯絡人詳情
尋找聯絡人,然後按
要編輯姓名、電話號碼、文字項目或要更改圖像,選擇
作 > 編輯。
要更改電話號碼類型,捲動至想要的電話號碼,然後選
更改類型。
作 >
詳情。
操
擇操
刪除聯絡人
要刪除聯絡人,尋找想要刪除的聯絡人,然後選擇
除聯絡人。
要刪除手機或
功能表 > 通訊錄
擇
SIM 卡
要刪除聯絡人所附的電話號碼、文字項目或圖像,尋找想要
的聯絡人,然後選擇
作 >
SIM 卡記憶體中的所有聯絡人及所附詳情,選
。
刪除,然後選擇可用的選項。
> 刪除全部姓名
。捲動至想要刪除的詳情,選擇
詳情
從手機記憶體
>
操作
> 刪
或從
同步處理所有資料
將您的日曆、聯絡人資料及備註與遠端互聯網伺服器進行同
步處理 (網絡服務)
理」,第 38
。 請參閱
頁。
「從伺服器進行同步處
名片
您可以名片形式從支援
人的聯絡資料。
要傳送名片,尋找聯絡人,然後選擇
。
片
接收名片時,選擇
要放棄名片,選擇
vCard 標準的兼容裝置發送及接收個
詳情 > 操作
顯示 > 儲存
退出 > 確認
將名片儲存至手機記憶體中。
。
撥號快捷操作
您的裝置可以透過按一個鍵撥打電話號碼。可以將電話號碼
設定至數字鍵
能表 > 通訊錄 >
號的快捷操作的電話號碼。
選擇設定
作 > 更改
選擇尋找,然後選擇聯絡人以設定快捷操作。如果
功能已關閉,手機會詢問您是否要啟動此功能。
操
要使用快捷操作撥打電話,按住對應的按鍵。
快捷操作」,第
2 至 9。
;或者,如果已為該鍵設定了電話號碼,則選擇
。
要將數字鍵設定至電話號碼,選擇
單鍵撥號
18 頁。
,然後捲動至想要設定為
客戶服務號碼、服務號碼及本手機號
,然後從以下子功能表中選擇:
選擇功能表 >
●
客戶服務號碼
卡中已包含該號碼
通訊錄
— 致電服務供應商的資料號碼
) (網絡服務)
> 發送名
單鍵撥號
請參閱
(如果 SIM
通訊錄
功
單鍵撥
操
「撥號
33
Page 33

通話記錄
●
服
務號碼 — 致電服務供應商的服務號碼
已包含該號碼
● 本手機號
卡中已包含該號碼
網絡服務)
) (
— 查看已指定給您
)。
SIM 卡的電話號碼 (
(如果
SIM 卡中
如果
9. 通話記錄
如果網絡支援且裝置已開啟並處於網絡服務區域內,裝
記錄未接來電、已接來電及已撥電話。
要查看有關通話的資料,選擇
、已接來電或
電
要同時查看您最近的未接來電、已接來電及已撥電話的
號碼,選擇通話記錄
人,選擇
要查看有關您最近通話的資料,選擇
通話計時、
已撥電話。
訊息收訊人
分組數據計數器
。要查看您最近向其發送過訊息的聯絡
。
功能表 >
或分組數據計時器
通話記錄
功能表
> 未接來
> 通話記錄 >
。
10. 設定
操作模式
手機有各種設定分組,稱為操作模式,您可以為不同情
環境設定適合的鈴聲。
選擇功能表
擇以下選項:
● 啟動 —
啟動已選擇的操作模式
> 設定 >
操作模式及想要的操作模式,然後選
卡支援。
這些功能要求
SIM
要查看您已發送及接收的文字訊息及多媒體訊息的數目,
置會
擇功能表
注意:
票可能會不同,這視乎網絡功能、開單時數目的四捨五入、
電話
稅項等等因素而定。
注意:
器) 可能會被重設。
● 個人化選擇
然後更改。
定時 — 設定操作模式在一定時間
●
況和
啟動狀態,並設定結束時間。對該操作模式設定的時間過
後,未設定時間前的操作模式便會啟動。
SIM
> 通話記錄 >
您的服務供應商對通話和服務所列出的實際發
在服務或軟件升級時,一些計時器
— 個人化操作模式。選擇您要更改的設定,
訊息記錄。
長達 24 小時
(
佈景
佈景包含個人化您裝置的元素。
包括總計時
(
) 內處於
選
34
Page 34

> 佈景,然後選擇以下選項:
選擇功能表
● 選擇佈景
夾列表。開啟
● 佈景下載
> 設定
— 設定佈景。會開啟
— 開啟連結列表以下載更多佈景
資料夾,然後選擇一個佈景。
佈景
多媒體資料
中的一個資料
鈴聲
您可以更改所選當前操作模式的鈴聲設定。
選擇功能表
到相同的設定。
要設定手機僅在接到來自所選號碼分組中電話號碼的電話時
才響鈴,選擇
選擇操作
如果選擇最高鈴聲級別,鈴聲會在幾秒鐘後達到最
> 設定
請參閱
優先號碼組
> 儲存
「操作模式」,第
。
儲存設定,或選擇
取消
。您可以在操作模式
> 鈴聲
功能表內找
34 頁。
保留設定不變。
高級別。
顯示
> 螢幕,然後選擇可用的選項:
選擇功能表
●
背景圖片 —
● 捷徑顯示
捷徑顯示模式
● 待機模式的字體顏色
●
導航鍵圖標
前導航鍵快捷操作的圖標
●
螢幕保護圖案
更多螢幕保護圖案,選擇
動螢幕保護圖案,選擇
●
字
> 設定
加入待機模式的背景圖像
— 開啟或關閉捷徑顯示模式以及整理並個人化
— 在捷徑顯示關閉時,顯示待機模式下當
體大
小 — 設定訊息、通訊錄及網絡的字體大小
— 選擇待機模式下文字的顏色
— 設定裝置顯示螢幕保護圖案。要下載
圖案下載。要設定多長時間後啟
啟動時間。
設定
● 網絡標誌
● 小區訊息顯示
— 設定裝置顯示或隱藏網絡標誌
顯示小區識別訊息
—
(如果網絡提供
)
時間和日期
要更改時鐘類型、時間、時區及日期設定,選擇
定 > 日期和時間
動更新時間
當旅行到不同時區時,選擇
日期和時間設定
(GMT) 或協調世界時 (UTC)
所在地時區。時間及日期會根據時區來設定,可讓您的裝置
顯示已接收文字或多媒體訊息的正確發送時間。
(網絡服務)。
日期和時間設定
>
功能表 >
時區:,然後根據與格林威治標準時間
>
的時差向左或向右捲動選擇對應的
、日期與時間格式
設定 > 日期和時間 >
功能表
> 設
或
我的快捷操作
使用個人快捷操作,您可以快速進入裝置中經常使用的功能
左選擇鍵
要從列表中選擇功能,選擇
作 > 左選擇鍵
如果左選擇鍵是啟動某項功能的捷徑,在待機模式下,選擇
捷徑 > 操作
● 選擇操作
能
組織 — 重新排列個人快捷操作列表中的功能
●
。
,然後選擇以下選項:
— 將功能新增至快捷操作列表,或刪除某個功
功能表 >
設定 >
我的快捷操
自
。
35
Page 35

設定
右選擇鍵
要從列表中選擇功能,選擇
作 > 右選擇鍵
。
功能表 >
> 我的快捷操
設定
快捷操作列
選擇功能表
快捷操作或
應用程式及其次序。
> 設定
組織快捷操作
> 我的快捷操作 >
選擇位於捷徑顯示快捷操作列中的
快捷操作列 >
導航鍵
要從預先定義的列表將其他裝置功能指定至導航鍵,選
能表 > 設定
> 我的快捷操作
> 導航鍵。
捷徑顯示鍵
> 我的快捷操作
選擇功能表
航鍵的動作以啟動捷徑顯示模式。
> 設定
> 捷徑顯示鍵選擇導
語音指令
透過語音指令致電聯絡人及執行裝置功能。
語音指令視乎語言而定,您必須設定
請參閱 「手機」,第
指令。
要選擇透過語音指令啟動的裝置功能,選擇
我的快捷操作 > 語音指令及一個資料夾。
表示語音標籤已啟動。
播放已啟動的語音指令,選擇
號」,第 18
頁。
要啟動語音標籤,選擇
識別語言
頁。
39
播放。 請參閱
才能使用語音
功能表 >
捲動至某項功能。
新增。要
「增強語音撥
擇功
設定
要管理語音指令,捲動至裝置功能,然後選擇
以下選項:
更改或關閉所選功能的語音指令
或全部刪除
— 啟動或關閉語音指令列表中所有
選擇
或刪除 —
● 修改
● 全部新增
功能的語音指令
藍牙
藍牙無線技術
藍牙技術讓您可以將裝置連接至
藍牙裝置。由於可用藍牙技術的裝置使用無線電通訊,您的
裝置和其他裝置不需要置於視線範圍內,盡管此連接可能受
到來自阻礙物如牆壁或其他電子裝置的干擾。
本裝置與支援以下操作模式的
EDR 兼容:標準接入、標準物件互換、進階音效分配、影
遠端控制、免提、耳機、物件推動、檔案傳輸、撥號網絡
接入及串列埠。要確保與其他支援藍牙技術裝置之間的
SIM
相互可操作性,請使用諾基亞許可用於本型號的配套。請向
這些裝置的製造商查詢,以確定其是否與本裝置兼容。
在某些場合可能對使用藍 技術有所限制。請向當地的權威
機構或服務供應商查詢。
使用藍 的功能,或當使用其他功能時允許這些功能
背景中運行,會增加電池的耗電量及縮短電池壽命。
>
技術
牙
10 米 (32
Bluetooth Specification 2.0 +
牙
設定藍牙連接
牙
>
選擇
項:
功能
表
>
設定
>
數據連
藍
線
,然後選擇以下選
操作,再選擇
英呎) 以內的兼容
音
、
在
36
Page 36

牙
— 選擇開
● 藍
● 手機可測性
● 尋找音效配套
連接至手機的裝置。
● 當前裝置
● 已配對裝置
列出範圍內的所有藍牙裝置。選擇一個裝置,然後選擇
對。輸入藍牙裝置的密碼
的裝置配對。第一次連接裝置時需要提供此密碼。當您的
裝置連接至其他裝置,您便可以開始數據傳送。
● 我的手機名稱
如果您擔心安全問題,可關閉藍牙功能或將
隱藏。請僅接受從您信任的裝置進行的藍牙通訊。
為
啟動藍牙功能。 表示藍牙已啟動。
定義裝置向其他藍牙裝置顯示的方式
—
— 尋找兼容的藍牙音效裝置。選擇您想要
— 查看當前已啟動的藍牙連接
尋找範圍內的所有藍牙裝置。選擇
—
16 個字元),將裝置與您
(最多
— 設定裝置的名稱以進行藍牙連接
手機可測性
新裝置
分組數據
通用分組無線服務
的互聯網協議
要定義如何使用服務,選擇
分組數據 >
● 當需要時
當應用程式結束時,此連接便會關閉。
●
保持連線 —
絡。
您可以使用藍牙無線技術或
人電腦,並將裝置用作數據機從個人電腦啟用
要從您的個人電腦定義設定,選擇
線 > 分組數據
您想要使用的接入點。
(GPRS) 是一種能讓流動裝置透過基於網絡
(IP) 發送和接收數據的網絡服務。
> 數據連線
功能表 >
分組數據連接
— 設定在應用程式需要時建立分組數據連接。
設定裝置在開機時自動連接至分組數據網
> 分組數據設定
,然後選擇以下選項:
USB 數據線將裝置連接至兼容個
選擇修改接入點
設定
功能表 > 設定
當前接入點
>
> 接入點別名
GPRS 連接。
> 數據連
,然後啟動
設定
>
,輸
入名稱以更改接入點設定,然後選擇
入點,輸入接入點名稱
確認。
擇
將手機用作數據機建立互聯網連接。請參閱
套件 (PC Suite)
均有設定,個人電腦上的設定便會被使用。
配
」,第 56
以建立與網絡的連接,然後選
(APN)
如果您的個人電腦與裝置上
頁。
確認。
選擇分組數據接
「Nokia
數據傳送
將您的日曆、聯絡人資料及備註與其他兼容裝置
裝置)、兼容個人電腦或遠端互聯網伺服器
步處理。
當裝置中未插入
其他兼容裝置進行數據傳送。
傳送
要從裝置複製或同步處理數據,裝置的名稱及設定必須在
送裝置的列表內。如果從其他裝置
接收數據,系統會使用其他裝置的數據,自動將對應的裝置
加至列表中。
目。
要在列表中新增傳送裝置
設定 > 數據連線
手機同步處理
要編輯副本及同步處理設定,從傳送裝置列表中選擇一個
置,然後選擇
要刪除某個傳送裝置,從傳送裝置列表中選擇該裝置,然後
選擇操作
SIM 卡時,您的裝置仍可與兼容個人電腦或
列表
伺服器同步
手機複製,然後根據傳送類型輸入設定。
或
操作 >
> 刪除
及電腦同步處理
(例如:流動裝置
> 數據傳送
編輯。
。
> 操作 >
(網絡服務
(例如:兼容的流動裝置
是列表中的原始項
),選擇
增加傳送姓名
設定
電腦端
(例如:流動
) 進行同
傳
)
功能表 >
>
裝
37
Page 37

設定
與兼容裝置進行數據傳送
使用藍牙無線技術或數據線連接進行同步處理。其他裝置必
須啟動才能接收數據。
要開始數據傳送,選擇功能表 > 設定 > 數據連線 > 數據
傳送並從列表中選擇傳送裝置 (伺服器同步或電腦同步處理除
外)。
根據設定,會複製選擇的數據或對數據進行同步處理。
從個人電腦進行同步處理
要同步處理日曆、備註及通訊錄的數據,在兼容個人電腦上
安裝您裝置的 Nokia 電腦端套件 (PC Suite)。使用藍牙無線技
術或 USB 數據線將裝置連接至個人電腦,然後從個人電腦開
始同步處理。
USB 數據線
您可使用 USB 數據線在裝置與兼容個人電腦或支援 PictBridge
的印表機之間傳送數據。還可以將 USB 數據線與 Nokia 電腦
端套件 (PC Suite) 配合使用。
要啟動裝置以進行數據傳送或圖像列印,連接數據線。確認
「USB 數據線已連接。 選擇模式。」,然後選擇以下選項:
● 諾基亞模式 — 將該數據線用於電腦端套件 (PC Suite)
● 列印與影音工具 — 將裝置與 PictBridge 兼容印表機或與您
的兼容電腦一起使用
● 數據傳送 — 連接至沒有安裝諾基亞軟件的個人電腦,然
後將裝置用作數據儲存器
要更改 USB 模式,選擇功能表 > 設定 > 數據連線 > USB
數據線,然後選擇想要的 USB 模式。
從伺服器進行同步處理
要使用遠端互聯網伺服器,必須申請同步處理服務。如要獲
取更多有關此服務的資料及所需設定,請向您的服務供應商
查詢。您可以配置訊息的形式接收設定。 請參閱 「配置設定
服務」,第 10 頁。
要從您的裝置開始同步處理,選擇功能表 > 設定 > 數據連
線 > 數據傳送 > 伺服器同步。
第一次同步處理或在中斷同步處理操作後進行的同步處理可
能需要 30 分鐘才能完成。
38
通話
選擇功能表 > 設定 > 通話,然後選擇以下選項:
● 來電轉接 — 轉接來電 (網絡服務)。如果已啟動某些通話限
制功能,您可能無法轉接來電。請參閱 「保密項
目」,第 40 頁。
● 語音增強 — 選擇啟動增強說話的清晰度,特別是在嘈雜
的環境下。
● 任何鍵接聽 — 選擇開透過短暫按任何鍵 (電源鍵、左選擇
鍵及右選擇鍵或結束鍵除外) 接聽來電。
● 自動重撥 — 選擇開,在試撥失敗後,裝置會繼續試撥,
最多試撥 10 次。
● 單鍵撥號 — 選擇開,透過按住對應的數字鍵撥打已設定
至數字鍵 2 至 9 的姓名及電話號碼。
Page 38

啟動,要求網絡在您通話時通知有另一
● 來電等待
來電
● 通話總結
次通話的大約時間。
發送本手機號
●
號碼 (網絡服務
擇網絡預設。
● 用戶撥出號碼
碼 1 或 2 撥打電話 (
— 選擇
(網絡服務)
— 選擇
。請參閱 「接聽或拒絕來電」,第
開,設定裝置在每次通話後簡單顯示該
是,向您通話的對方顯示您的電話
— 選擇
)。要使用與您服務供應商協定的設定,選
— 如果您的
SIM 卡支援,選擇使用電話號
網絡功能)
19
手機
> 手機,然後選擇以下選項:
選擇功能表
● 語言設定
動,根據
言,選擇
言。
● 安全鍵盤鎖
碼。選擇
● 自動鍵盤鎖
功能時,裝置鍵盤在預設時間過後自動鎖定。選擇
後設定時間。
● 問候語
● 航空模式詢問
空操作模式。在航空操作模式下,所有無線電連接均會關
閉。航空操作模式用於對無線電發射較敏感的地區。
● 網絡商選擇
用流動網絡中選擇一個。使用
供應商有漫遊協定的網絡。
> 設定
— 要設定裝置的顯示語言,選擇
SIM 卡上的資料選擇語言。要選擇
SIM 卡語言。要設定語音播放語言,選擇
請參閱 「增強語音撥號」,第
— 將裝置設定為在解鎖鍵盤時要求輸入保密
開,然後輸入保密碼。
— 設定當裝置處於待機模式下且未使用任何
— 編寫在裝置開啟時顯示的備註
— 裝置會在每次開啟時詢問是否要使用航
— 選擇自動
設定裝置自動從您所在區域的可
18 頁。
手動,您可選擇與您的服務
手機語言。
USIM 卡語
頁。
自
識別語
開,然
設定
更新提示 —
● SIM
用情況視乎服務供應商而定
● 說明訊息顯示
● 開機鈴聲
請參閱 「SIM
選擇裝置是否顯示說明文字
—
— 在開啟裝置時播放鈴聲。
服務」,第 56
)
頁。
(可
配套
僅當裝置正在或已經連接至兼容流動配套時,才顯示此功
表或以下選項。
配套。選擇某個配套,然後根據配套
選擇功能表 >
選擇以下選項:
● 預設模式
模式
● 自動接聽
提示:設定為嗶一聲或
● 燈光
光亮起
● 文字電話
或迴路裝置設定。
設定 >
— 選擇在連接至選定的配套後自行啟動的操作
— 設定裝置在 5 秒後自動接聽來電。如果
— 要設定燈光永久
15 秒。
— 選擇
關,則自動接聽功能關閉。
。選擇自動,設定在按鍵後燈
開
使用文字電話 >
是使用該設定替代耳機
能
來電
配置
您可以配置某些特定服務所需的裝置設定。您的服務供應商
亦可能已向您發送這些設定。
務」,第 10
選擇功能表 >
● 預設配置設定
服務供應商的配置設定設定為預設設定,選擇
為預設。
頁。
配置,然後選擇以下選項:
設定 >
查看儲存於裝置中的服務供應商。要將
—
請參閱
「配置設定服
操作 >
設
39
Page 39

設定
● 應用程式中啟動預設
設定
● 首選接入點
選擇操作 >
及分組數據接入點或
● 連接至支援
況視乎服務供應商而定
個人配置設定
●
務,與及啟動或刪除這些帳號。要新增個人帳號
未新增任何帳號
選擇服務類型,然後選擇並輸入每個要求的參數。參數視
乎所選服務的類型而有所不同。要刪除或啟動個人帳
捲動至該帳號,然後選擇
— 查看儲存的接入點。捲動至接入點,然後
— 從您的服務供應商處下載配置設定
— 啟動所支援應用程式的預設配置
詳情查看服務供應商的名稱、數據傳輸方式
GSM 撥號號碼。
—
)
手動新增個人帳號可用於不同的服
新增;否則,選擇
),選擇
刪除或啟動
操作 >
(可用情
(如果尚
操作 >
。
保密項目
當正在使用限制通話的安全功能時
戶組和固定撥號
號碼。
選擇功能表
● 開機 PIN
求輸入
功能。
● PIN2 碼要求
是否要求輸入
功能。
●
通話限制 —
電話 (網絡服務
),可能可以撥打已編入本裝置內的官方緊急
> 設定 >
碼或開機
PIN 或 UPIN
保密,然後選擇以下選項:
UPIN 碼 —
碼。有些 SIM
— 選擇當使用受
碼。有些
PIN2
限制撥打至您的裝置或從您的裝置撥出的
)。需要限制密碼。
(例如,通話限制、封閉用
將裝置設定為每次開機時要
卡不允許關閉要求密碼
PIN2 碼保護的特定功能時
SIM 卡不允許關閉要求密碼
新增。
號,
● 固定撥號
您的 SIM
便不可用 (
況下,收訊人的電話號碼及訊息中心號碼必須包括於固定
撥號列表內。
封閉用戶組
●
保密項目
●
均要求輸入保密碼。如果選擇
選擇 SIM
輸入保密碼。
●
密碼功能
限制密碼
● 當前使用密碼
● 授權證書
或用戶證書列表。
● 安全模组設定
請求或更改模組
能」,第 10
— 限制您僅可向所選的電話號碼撥打電話
卡支援此功能
透過
— 指定可與您互通電話的一組人
— 選擇手機
卡記憶體且想要更改正在使用的記憶體時,要求
— 更改保密碼、
或用戶證書
— 要查看安全模組詳情
頁。
)。當固定撥號開啟時,
GPRS 連接發送文字訊息除外
設定裝置在每次插入新的
手機通訊錄,裝置會在您已
碼、UPIN 碼、PIN2
PIN
— 選擇啟動
PIN 及簽名 PIN
PIN 碼或 UPIN
— 查看下載至您裝置中的授權證書
「證書」,第
請參閱
55 頁。
,啟動模組
請參閱 「密碼功
碼。
GPRS
)。在這種情
網絡服務)
(
SIM 卡時
碼
恢復原廠設定
要將手機恢復為原廠設定,選擇
設定。
從以下選項中選擇:
重設所有喜好設定而不刪除任何個人資料
● 僅恢復設定
● 全部恢復
例如:通訊錄、訊息及媒體檔案。
—
— 重設所有喜好設定,並刪除所有個人資料,
功能表 >
設定 > 恢復原廠
(如果
連接
碼或
PIN 碼
40
Page 40

11. 網絡系統功能表
此功能表讓您可以使用網絡商提供的服務。名稱和圖標
網絡商而定。如要獲取更多資料,請向您的網絡商查詢。網
視乎
12. 多媒體資料
版權保護可能防止一些圖像、音樂
製、修改、傳送或轉發。
管理圖像、短片、音樂檔案、佈景、圖片、鈴聲、錄音及接
收的檔案。這些檔案儲存於裝置記憶體或附加的記
並且可能已在資料夾內整理妥當。
您的裝置支援啟動密鑰系統保護獲得的內容。獲取
須檢查有關內容及啟動密鑰的傳送條款,因為可能需要
付費。
資料夾和檔案
要查看資料夾的列表,選擇
要查看資料夾中的檔案列表,選擇資料夾然後選擇
要查看資料夾或檔案的可用選項,選擇資料夾或檔案,然後
選擇操作
要在移動檔案時查看記憶卡的資料夾,捲動至記憶
按右導航鍵。
。
(鈴聲) 以及其他內容被複
功能表 >
多媒體資料
憶卡中,
之前請必
另行
。
。
打開
卡,然後
網絡系統功能表
絡商可透過服務訊息更新此功能表。
箱」,第 54
頁。
請參閱
「服務信
列印圖像
您的裝置支援列印
要將裝置連接至兼容打印機,可使用數據傳輸線或透過藍
將圖像傳送至支援藍牙技術的打印機。
接」,第 56
選擇想要列印的圖像,然後選擇
.jpeg 格式的圖像。
頁。
請參閱 「個人電腦連
操作 > 列印
。
記憶卡
請將所有記憶卡置於兒童無法觸及之處。
警告:
使用記憶卡儲存您的多媒體檔案,例如:短片、樂曲
檔案及圖像。
多媒體資料
夾可能會被儲存於記憶卡中。
請參閱 「插入 microSD
中某些含手機使用的內容 (
卡」,第 12
例如:
佈景
頁。
的資料
)
、聲音
牙
41
Page 41

影音工具
格式化記憶卡
某些記憶卡提供時已預先格式化,其他則需要格式化。
經銷商諮詢在使用前是否需要格式化記憶卡。當格式化記
卡時,卡內的所有數據均會永久丟失。
要格式化記憶卡,選擇
憶卡資料夾
格式化完成後,輸入記憶卡的名稱。
及操作
> 多媒體資料
功能表
> 格式化記憶卡
或應用程式
> 確認。
請向
、記
鎖定記憶卡
設定密碼鎖定記憶卡,避免未授權的使用。
選擇記憶卡資料夾
多為 8 個字元。該密碼會儲存於您的裝置中,當您在
及操作
> 設定密碼
。密碼的長度最
同一部
13. 影音工具
相機及錄相機
可用內置相機拍攝圖像或錄製短片。
拍攝圖片
要使用靜態圖片功能,按相機鍵,或當短片功能開啟時
左或向右捲動。
要以橫向格式拍攝圖片,將裝置置於水平位置。要在相機模
式中放大或縮小,按音量鍵。
,向
裝置中使用記憶卡時不需要再次輸入密碼。如果您想在其他
裝置中使用該記憶卡,會要求您輸入密碼。
要刪除密碼,選擇
憶
操作 >
刪除密碼。
查看記憶體消耗
查看記憶卡上不同數據群組消耗的記憶體及可用於安裝新應
用程式或軟件的記憶體。
> 詳情。
及操作
選擇記憶卡
要拍攝圖片,按相機鍵。裝置將圖片儲存至記憶卡中
有),或儲存至手機記憶體中。
選擇操作 >
或選擇自動在較暗的光線條件下自動啟動閃光燈。
燈時請保持安全距離。離人或動物太近時請勿使用閃光
拍照時請勿遮住閃光燈。
選擇操作 >
圖片。在預覽時間內,選擇
將圖片作為多媒體訊息發送。
您裝置支援的圖片拍攝解像度高達
閃光
> 開啟閃光燈
設定 > 圖像預覽時間
返回拍攝新的圖片,或選擇
使用閃光燈拍攝所有圖片;
及預覽時間以顯示拍攝的
1600 x 1200
(
使用閃光
像素。
如
燈。
發送
42
Page 42

錄製短片
要啟動短片功能,按住相機鍵;或當相機功能開啟時,
或向右捲動。
要開始錄製短片,選擇
或按相機鍵;要繼續錄製,選擇繼續或按相機鍵;要停
暫停
止錄製,選擇
裝置將短片儲存至記憶卡中
停止。
或按相機鍵;要暫停錄製,選擇
錄製
如有),或儲存至裝置記憶體中。
(
向左
相機及錄像機選項
褐
要使用過濾器,選擇
色、負片或
要調校相機以適應光線條件,選擇
日光
要更改其他的相機及錄像機設定,與及要選擇儲存圖像及
片存儲的位置,選擇
曝光。
、鎢絲燈或
操作 > 效果
螢光。
操作 > 設定
> 隨機顏色、
> 白平衡 >
操作
。
灰階、
自動、
短
音樂播放機
您的裝置包括音樂播放機,可用於收聽您已從網絡下載
用 Nokia 電腦端套件
聲音檔案。請參閱
頁。您亦可以檢視您已錄製或下載的短片。
第 56
在開啟裝置的過程中,儲存於裝置記憶體或記憶卡音樂
夾中的音樂及短片檔案可以被自動偵測及加至音樂資料庫中。
要開啟音樂播放機,選擇
(PC Suite)
「Nokia
傳輸的樂曲或其他
電腦端套件
> 影音工具
功能表
(PC
Suite)」,
> 音樂播放機
或使
MP3 或 AAC
資料
音樂功能表
存取儲存於裝置記憶體或記憶卡上的音樂及短片檔案、從網
絡下載音效檔及短片或檢視網絡伺服器上的兼容短片串流
絡服務)。
要收聽音效檔或短片,選擇
型,然後選擇
要從網絡下載檔案,選擇
要在加入檔案後更新音樂資料庫,選擇
建立播放列表
要使用您選擇的音樂建立播放列表,執行以下操作:
1. 選擇播放列表 >
稱。
從顯示的列表中加入音效檔或短片。
2.
3. 選擇完成儲存播放列表。
適用於串流服務的配置
您可從服務供應商處以配置訊息的形式接收串流所需的配置
設定。請參閱
請參閱
設定。
要啟動設定,請執行以下操作:
1. 選擇操作 >
2. 選擇串流的服務供應商,
帳號及當前配置設定中包含的串流服務帳號。
3. 選擇
。
。
播放
「配置設定服務」,第
「配置」,第
下載
播放列表、
> 下載及下載站點。
操作
建立播放列表
39 頁。
> 串流設定 >
預設
演出者、專輯或
更新資料庫
操作 >
,然後輸入播放列表的名
亦可手動輸入
10 頁。
配置。
或個人配置。
影音工具
(網
類
。
43
Page 43

影音工具
播放樂曲
請以中等音量聆聽音樂。持續處於高音量環境
警告:
會影響聽力。當喇叭在使用時,請勿把裝置靠近您的耳朵,
因為音量可能非常響亮。
使用螢幕上的虛擬按鍵操作音樂播放機。
當您開啟音樂播放機
情。 要開始播放,選擇
要調校音量級別,使用裝置的音量鍵。
要暫停播放,選擇
要跳至下一首樂曲,選擇
選擇
要快轉當前樂曲,按住
您想要的位置鬆開鍵。
要切換至音樂功能表,選擇
要切換至當前的播放列表,選擇
要停止音樂播放機,按住結束鍵。
兩次。
時,會顯示預設曲目中第一首樂曲的詳
。
。
。要跳至前一首樂曲的開端,
。要倒轉當前樂曲,按住
。
。
。在
更換音樂播放機外觀
您的裝置提供了幾個佈景主題可更換音樂播放機的外觀
影音工具 >
選擇功能表
機 >
一個列出的佈景主題。虛擬鍵可能視乎佈景主題而有所變化。
>
操作 > 設定
> 音樂播放機佈景主題
音樂播放機
> 前往音樂播放
,然後選擇其中
。
收音機
FM 收音機依賴無線裝置天線以外的天線。要令
常運作,需要連接兼容耳機或增強配套至裝置。
請以中等音量聆聽音樂。持續處於高音量環境
警告:
會影響聽力。當喇叭在使用時,請勿把裝置靠近您的耳朵
因為音量可能非常響亮。
或
> 收音機。
、
、
或
。
或
選擇功能表 >
要使用螢幕上的圖像鍵
動至想要的鍵,然後選擇。按
更改收音機頻率。
要搜尋電台,按住
影音工具
收聽收音機
選擇功能表 >
選擇
要調校音量,按音量鍵。
操作,選擇以下選項:
按
● 關閉收音機
存電台 —
儲
●
● 電台 —
台,捲動至想要的電台,然後選擇
新命名。
● 尋找所有電台
設
定頻率
●
● 設定 —
持耳機與裝置的連接。耳機線可用作收音機的天線。選擇
影音工具
或
。要選擇收音機電台,快速按相應的數字鍵。
— 關閉收音機
將當前調校的頻率儲存於電台中
選擇已儲存電台的列表。要刪除或重新命名電
— 輸入您想要收聽的收音機頻道的頻率
選擇喇叭或
> 收音機。要捲動至想要的頻率,
操作 >
自動搜尋您所在位置可收聽的電台
—
耳機使用喇叭或耳機收聽收音機。保
FM 收音機正
,向左或向右捲
來以每格
0.05 MHz
刪除電台或
,
重
44
Page 44

單聲道輸出或
機。
● 電台目錄
● 視覺收音機
● 啟動視覺服務
動開啟視覺收音機
圖像資料,您可以使用視訊收音機應用程式查看這些資
料。要查看供應情況及費用,請向您的服務供應商查詢。
如果某個使用分組數據或
接收數據,可能會干擾收音機。
立體聲輸出以單聲道聲音或立體聲收聽收音
— 進入備有收音機電台列表的網站
— 手動開啟視覺收音機
— 選擇
自動設定當您開啟收音機時是否自
(網絡服務)。一些電台可以發送文字或
HSCSD
(如果可用和支援
連接的應用程式正在發送或
語音備忘
錄製講話、聲音或當前通話,並將其儲存於
功能在錄下姓名及電話號碼以便稍後寫下時非常有用。
錄製聲音
影音工具 >
1. 選擇功能表
鍵
擇。
要開始錄音,選擇
2.
作 > 錄製
微弱的「嗶」。當在通話中錄音時,將裝置置於靠近您耳
朵的正常位置。要暫停錄製,選擇
要結束錄音,選擇 。錄音儲存於
3.
忘中。
>
、
或
,向左或向右捲動至想要的鍵,然後選
。當錄制通話時,通話中的各方都會聽到一聲
錄音機。要使用螢幕上的圖像
。要在通話時開始錄音,選擇
多媒體資料
。
多媒體資料
> 語音備
)
。此
操
影音工具
擇記
:
— 收聽最近的錄音
發送上一個錄音
—
選擇語音備忘
選擇用手機記憶體或記憶卡儲存錄音,
憶體 —
可查看多媒體資料中的錄音列
選擇以下操作
● 播放最後錄音
●
發送最後錄音
● 錄音列表 —
表
●
選
或更改資料夾。
均衡器
使用音樂播放機時透過增大或減小頻率波段來控制聲音。
選擇功能表 >
要啟動設定,捲動至其中一組均衡器設定,然後選擇
要檢視、修改或重新命名選擇的設定,選擇
重新命名。
改或
不是所有的設定均可以被修改或重新命名。
影音工具
> 均衡器。
操作 >
啟動。
顯示、修
立體聲強化
立體聲強化可在您使用立體聲耳機時透過允許更寬的立體聲
效果來增強裝置的音效輸出。
要更改設定,選擇
功能表 >
影音工具
> 立體聲強化
。
45
Page 45

對講機
14. 對講機
對講機 (PTT) 是一種利用 GPRS 流動網絡提供的雙向無線
電服務 (網絡服務)。
您可以使用對講機與具備兼容裝置的一個或一組人 (頻道) 進
行會談。當您已連接至對講機服務時,可以使用裝置的其他
功能。
要查詢供應情況、收費、附加功能的資料及要申請該服務,
請向您的服務供應商查詢。漫遊服務可能會比
普通通話受到更多限制。該功能可能無法使用,視乎您的手
機而定。
在您可以使用對講機服務前,您必須定義所需的對講機服務
設定。 請參閱 「對講機設定」,第 48 頁。 請參閱 「配置
設定」,第 48 頁。
對講機頻道
對講機頻道類型
一個對講機頻道包括一組在接到邀請後加入頻道的人 (例如:
朋友或工作團隊)。當您致電頻道時,頻道內的所有成員都會
同時聽到電話。
在公共頻道中,每個頻道成員都可邀請其他人;在私人頻
道,只有頻道建立者才可以邀請其他人。
您可以設定每個頻道的狀態為啟動或關閉。
啟動的頻道及每個頻道的成員數目是有限制的。請向您的服
務供應商查詢以獲取詳情。
建立頻道
要新增頻道,選擇功能表 > 對講機 > 新增頻道,然後在表
格欄位中輸入設定。
要向頻道發送邀請,選擇確認。要發送進一步的邀請,選擇
功能表 > 對講機 > 頻道列表及頻道,然後選擇操作 > 發
送邀請。
開啟或關閉對講機
要連接至對講機服務,選擇功能表 > 對講機 > 啟動對講機。
表示對講機連接。 表示服務暫時不可用。如果您已增
加頻道至手機,您會自動加入至啟動的頻道。
要中斷與對講機服務的連接,選擇關閉對講機。
您可能會將一個預設的功能設定至對講機 (音量上) 鍵以開啟
頻道列表、聯絡人列表或單個頻道或聯絡人。 請參閱 「對講
機設定」,第 48 頁。
撥打及接收對講機通話
警告: 當喇叭正在使用時,請勿把裝置靠近您的耳
朵,因為音量可能非常響亮。
要撥打頻道通話、一對一通話或撥打多名接收者的通話,您
必須在通話時一直按著對講機 (音量上) 鍵。要收聽回覆,鬆
開對講機 (音量上) 鍵。
46
Page 46

查看功能表 > 對講機 > 聯絡人列表中聯絡人的登入狀態:
- 可用的聯絡人; - 未知的聯絡人; - 不想被人打
擾,但可以接收回撥要求的聯絡人;
絡人。
此項服務視乎您的網絡商而定,並且僅適用於已申請的聯絡
人。要申請聯絡人,選擇操作 > 申請聯絡人;或者如果已標
記一個或多個聯絡人,選擇申請已標記。
- 已關閉對講機的聯
撥打頻道通話
要撥打頻道通話,在對講機功能表中選擇頻道列表,捲動至
想要的頻道,然後按住對講機 (音量上) 鍵。
撥打一對一通話
要開始一對一通話,選擇功能表 > 通訊錄 > 姓名或功能
表 > 對講機 > 回電收件匣、頻道列表或聯絡人列表。選擇
某個聯絡人、某個成員或某個暱稱,然後按住對講機 (音量
上) 鍵。
撥打對講機通話至多名接收者
您可以從聯絡人列表中選擇多名對講機聯絡人。
1. 選擇功能表 > 對講機 > 聯絡人列表,然後標記想要的聯
絡人。
2. 按住對講機 (音量上) 鍵開始通話。參與的聯絡人加入通話
後會立即顯示於螢幕上。
3. 按住對講機 (音量上) 鍵與他們通話。鬆開對講機 (音量
上) 鍵收聽回覆。
對講機
4. 按結束鍵結束通話。
接收對講機通話
當有對講機來電時裝置會發出短的提示聲通知您,您可以接
受或拒絕。
當致電者正在通話時,按住對講機 (音量上) 鍵會聽到一聲等
待音,並顯示列隊中。等待其他人說話完畢,您便可隨即說
話。
回撥要求
發送回撥要求
如果撥打一對一通話且沒有得到回覆,您可從以下列表發送
回撥要求:
● 功能表 > 通訊錄 > 姓名
● 功能表 > 對講機 > 回電收件匣、頻道列表或聯絡人列表
選擇聯絡人、會員或暱稱及操作 > 發送 PTT 回撥要求。
回應回撥要求
當您收到某人發送的回撥要求時,收到回撥要求會在待機模
式下顯示。 要開啟回電收件匣,選擇顯示。會顯示向您發送
過回撥要求的聯絡人的暱稱列表。 要撥打一對一通話,選擇
想要的要求,按住對講機 (音量上) 鍵。
新增一對一聯絡人
您可以下列方式儲存您經常撥打一對一通話的聯絡人姓名:
47
Page 47

應用程式
● 要新增對講機位址至通訊錄中的姓名,尋找想要的聯絡
人,然後選擇詳情 > 操作 > 新增詳情 > 對講機位址。
僅當您輸入對講機位址時,聯絡人才會在對講機聯絡人列
表中顯示。
● 要新增聯絡人至對講機聯絡人列表,選擇功能表 > 對講
機 > 聯絡人列表 > 操作 > 新增聯絡人。
● 要從頻道列表中新增聯絡人,連接至對講機服務,選擇頻
道列表,然後捲動至想要的頻道。選擇成員,捲動至您想
要儲存其聯絡資料的成員,然後選擇操作。
● 要新增聯絡人,選擇另存。要新增對講機位址至通訊錄中
的姓名,選擇新增至姓名。
對講機設定
選擇功能表 > 對講機 > 對講機設定,然後選擇以下選項:
● 1 對 1 通話 — 選擇開允許裝置接收一對一通話。要將裝置
設為用鈴聲先通知您有一對一的來電,選擇通知。
● 對講機按鍵預設功能 — 將對講機 (音量上) 鍵設定為以下
其中一項功能:開啟通訊錄、開啟頻道列表或撥號至聯絡
15. 應用程式
您可以管理應用程式及遊戲。這些檔案儲存於裝置記憶體或
附加的記憶卡中,並且可能已在資料夾內整理妥當。
您可以格式化、鎖定及解鎖記憶卡。請參閱 「記憶
卡」,第 41 頁。
人或群組。選擇某個聯絡人、群組或撥號至對講機頻道,
然後選擇頻道。當您按住對講機 (音量上) 鍵時,便會執行
所選的功能。
● 顯示我的登入狀態 — 允許或不允許發送登入狀態
● 對講機啟動狀態 — 選擇是或先詢問,設定當您開啟裝置
時自動連接至對講機服務。
● 國外漫遊時啟動 PTT — 在註冊網絡以外使用裝置時,開啟
或關閉對講機服務
● 發送我的對講機位址 — 選擇否在頻道及一對一通話中隱
藏您的對講機位址。
配置設定
您可以從服務供應商處接收連接至服務的設定。請參閱 「配
置設定服務」,第 10 頁。您亦可手動輸入設定。 請參閱
「配置」,第 39 頁。
要選擇連接至服務的設定,選擇功能表 > 對講機 > 配置設
定。
啟動遊戲
您裝置的軟件可能包括一些遊戲。
選擇功能表 > 應用程式 > 遊戲。捲動至想要的遊戲,然後
選擇打開。
48
Page 48

要設定遊戲的聲音、燈光及振動效果,選擇
式 > 操作 >
閱
「應用程式選項」,第
應用程式設定
。您可以選擇更多選項。
頁。
49
功能表 > 應用程
請參
啟動應用程式
您裝置的軟件可能包括一些
選擇功能表
後選擇打開。
> 應用程式 >
應用程式。
Java
集合。捲動至某一應用程式,然
應用程式選項
● 更新版本
(網絡服務)
● 網頁 — 從互聯網頁獲取應用程式的進一步資料或其他數
據 (網絡服務
● 應用程式存取
— 查看網絡上是否有新版的應用程式可供下載
) (如果可用)
— 限制透過存取網絡獲得的應用程式
下載應用程式
您的裝置支援
是否與您的裝置兼容。
J2ME Java
應用程式。下載應用程式前需確認其
16. 電子秘書
鬧鐘
要設定裝置在指定時間發出響鬧,選擇
鬧鐘。
功能表
> 電子秘書
重要訊息:
其他軟件,例如
您可使用多種不同的方式下載新的
功能表 >
● 選擇
或遊戲下載;可用書籤的列表便會顯示。
籤」,第
● 使用 Nokia 電腦端套件
置。
如要獲取不同服務的供應、價格與收費的資料,請向您的服
務供應商查詢。
本裝置可能已預裝某些書籤或連結,用於允許進入由
於諾基亞的第三方提供的網站。諾基亞不支持這些網站
不承擔任何責任。若選擇存取這些網站,您應象對待任何其
他互聯網網站一樣,對安全或內容採取預防措施。
僅安裝及使用來自可靠來源的應用程式及
已通過
應用程式 > 操作 >
53 頁。
TM
驗證。
Java
Java 應用程式及遊戲。
下載 >
請參閱 「書
(PC Suite) 下載應用程式至您的裝
設定響鬧
要設定響鬧,選擇
要在已設定響鬧時間後更改響鬧時間,選擇
>
要設定裝置在一星期中的選定日子提醒您,選擇
響鬧時間,然後輸入響鬧時間。
開。
電子秘書
應用程式下載
不從屬
,亦
重複響鬧
。
49
Page 49

電子秘書
要選擇響鬧鈴聲,選擇響鬧鈴聲:。 如果您選擇將收音機作
為響鬧鈴聲,將耳機連接至裝置。
要設定重響逾時,選擇重響逾時及時間。
捲動至日期,然後選擇操作 > 寫備註內容,再選擇以下其中
一種備註類型:
備忘錄。 填寫欄位。
會議、 通話、 生日、 備忘或
停止響鬧
當到達響鬧時間時,裝置會發出提示聲,預定報時及當前時
間會在螢幕上閃爍 (即使已關閉裝置) 。
要停止響鬧,選擇停止。如果您讓裝置持續響鬧一分鐘或選
擇重響,響鬧會在您於重響逾時中設定的時間暫停,然後恢
復響鬧。
如果在裝置關閉的狀態下到了響鬧時間,裝置便會自動啟動
並開始響鬧。如果您選擇停止,裝置詢問您是否要開機準備
通話。選擇取消關閉裝置,或確認撥打及接聽電話。當無線
裝置可能造成干擾或引致危險時,請勿選擇確認。
日曆
選擇功能表 > 電子秘書 > 日曆。
當前日期以圍繞該數字的方框表示。若該日有任何備註,該
日期便以粗體顯示。要查看該日備註,選擇顯示。要查看星
期,選擇操作 > 星期顯示格式。要刪除日曆中的所有備註,
選擇月或星期顯示格式,然後選擇操作 > 刪除全部備註。
在設定中,您可以設定日期、時間、時區。在自動刪除備註
中,您可以設定裝置在指定時間後自動刪除舊的備註。
建立日曆備註
選擇功能表 > 電子秘書 > 日曆。
50
備註響鬧
裝置顯示備註,並發出響鬧 (如果已設定)。 如果已顯示
通話備註,按通話鍵撥打電話。
要停止響鬧並查看備註,選擇顯示。要暫時停止響鬧,選擇
重響。要停止響鬧但不查看備註,選擇退出。
農曆日曆
要使用農曆日曆,裝置語言必須為中文。
在按月檢視中,被突出顯示日子的農曆資料會在日曆中間下
方顯示。
要檢視被突出顯示日子的農曆詳情,在按月顯示格式中,選
擇操作 > 農曆。
要尋找農曆節日,在農曆按天檢視中,選擇節日,輸入春節
所屬的公曆 (格勒哥里曆法) 年份,然後選擇想要的農曆節日。
在農曆按天檢視中,選擇操作,然後選擇以下選項:
● 節氣 — 搜尋節氣。輸入公曆 (格勒哥里曆法) 年份,然後
選擇想要的節氣。
● 公曆轉農曆 — 將公曆 (格勒哥里曆法) 日期轉換成農曆日
期。輸入想要的公曆 (格勒哥里曆法) 日期。
● 農曆轉公曆 — 將農曆日期轉換成公曆 (格勒哥里曆法) 日
期。輸入春節所屬的公曆 (格勒哥里曆法) 年份,然後輸入
想要的農曆日期。如果顯示兩個結果,選擇您想要的一
個。
Page 50

電子秘書
待辦事項列表
您可以為您必須做的任務儲存備註。
選擇功能表 > 電子秘書 > 待辦事項。如果尚未新增備註,
要建立備註,選擇新增;否則,選擇操作 > 新增。在欄位中
填寫備註,然後選擇儲存。
要查看備註,捲動至該備註,然後選擇顯示。查看備註時,
還可以選擇一個選項以編輯屬性。您亦可以選擇選項刪除選
定的備註及刪除全部。
備註
要編寫及發送備註,選擇功能表 > 電子秘書 > 備註。
如果尚未新增備註,要建立備註,選擇寫備註;否則,選擇
操作 > 寫備註內容。編寫備註,然後選擇儲存。
計算機
您裝置內的計算機可作標準、科學及貨款計算。
選擇功能表 > 電子秘書 > 計算機、計算類型,然後選擇亦
包括操作指引的可用選項。
注意: 此計算機的準確度有限,僅適用於作簡單計算。
計時器
倒數計時器
1. 要啟動倒數計時器,選擇功能表 > 電子秘書 > 倒數計時
器 > 普通計時器,輸入響鬧時間,然後編寫當時間到達
時顯示的備註。要更改倒數計時時間,選擇更改時間。
2. 要開始計時,選擇開始。
3. 要停止計時,選擇停止計時。
分段計時器
1. 要設定最多可達 10 段時間的分段計時器,先輸入各段時
間。
2. 選擇功能表 > 電子秘書 > 倒數計時器 > 分段計時器。
3. 要開始計時,選擇開始計時 > 開始。
計時錶
您可以使用計時錶計時、測量分別計時或以圈計時。計時期
間仍可使用裝置的其他功能。
使用計時錶或當使用其他功能時允許其在背景中運行,將增
加電池的耗電量及縮短電池壽命。
選擇功能表 > 電子秘書 > 計時錶,然後選擇以下選項:
● 分別計時 — 測量分別記時。要開啟時間測量,選擇開
始。每次當您要測量分別計時時,選擇分別計。要停止時
間測量,選擇停止。要儲存測量的時間,選擇儲存。要再
次開啟時間測量,選擇操作 > 開始。從先前測量的時間
繼續計時。要重設定時間而不儲存它,選擇重新設定。
● 以圈計時 — 以圈計時
51
Page 51

網絡
● 繼續 — 查看您已設定為在背景中進行的計時結果
● 顯示最後時間 — 查看最近測量的時間 (如果計時錶沒有重
設)
● 查看時間或刪除時間 — 查看或刪除儲存的時間
要在背景進行計時,按結束鍵。
詞典
在字典中,您可以尋找中文字的英文翻譯,亦可尋找英文字
的中文翻譯。
1. 選擇功能表 > 電子秘書 > 字典。
17. 網絡
2. 如有需要,切換至想要的輸入法模式。
3. 輸入中文或英文字。
4. 在顯示的字列表中捲動至想要的字,然後選擇該字查看翻
譯。
要尋找英文單詞的同義詞或反義詞,選擇操作 > 同義詞
或操作 > 反義詞。
要查看顯示的字列表中上一個或下一個字的翻譯,向左或
向右捲動。
重要訊息: 請僅使用您信賴及對有害軟件提供充分安
全防禦措施的服務。
您可以透過裝置的瀏覽器,在網頁上存取各種使用無線標記
語言 (WML) 或可擴展超文本標記語言 (XHTML) 的流動互聯網
服務。外觀可能因螢幕大小而有所不同。您可能無法查看互
聯網網頁的所有詳情。
您裝置中的 XHTML 瀏覽器支援 Unicode 編碼格式。
請向您的服務供應商查詢有關這些服務的供應、價格、收費
及指引的資料。
52
設定瀏覽
您可以從為您提供所需服務的服務供應商處接收瀏覽功能所
需的配置設定,設定以配置訊息形式發送。 請參閱 「配置設
定服務」,第 10 頁。
您亦可手動輸入所有配置設定。 請參閱 「配置」,第 39 頁。
連接至服務
請確保已啟動正確的服務配置設定。
1. 要選擇連接至服務的設定,選擇功能表 > 網絡 > 設
定 > 配置設定。
2. 選擇配置。僅顯示支援瀏覽服務的配置。選擇用於瀏覽的
服務供應商、預設或個人配置。請參閱 「設定瀏
覽」,第 52 頁。
Page 52

3. 選擇帳號
4. 選擇顯示終端機視窗
認證。
使用以下其中一種方式建立與服務的連接:
網絡 > 主頁
要選擇服務的書籤,選擇
要選擇最後瀏覽的
址。
要輸入服務的位址,選擇
服務的位址,然後選擇
及當前配置設定中包含的瀏覽服務帳號。
確認為內聯網連接執行手動用戶
>
;或在待機模式下,按住
> 網絡
功能表
功能表 >
。
確認
功能表 >
URL,選擇
選擇功能表 >
0。
> 書籤。
網絡 > 上回瀏覽網
網絡 > 選擇位址
。輸入
瀏覽網頁
在建立與服務的連接之後,您便可以開始瀏覽網頁。裝
盤的功能可能因服務的不同而有所分別。請遵照裝置螢幕上
的文字指引。如要獲取更多資料,請向您的服務供應商查詢
使用手機按鍵瀏覽
朝任何方向捲動瀏覽網頁。
要選擇項目,按通話鍵或選擇
要輸入字母及數字,按
要輸入特殊字元,按
0 至 9。
*。
選擇
。
直接撥號
您可以在瀏覽時撥打電話及儲存網頁上的姓名和電話號
置鍵
碼。
書籤
您也可以將網頁位址儲存為裝置記憶體內的書籤。
書籤;或在待機模式下,選擇
在瀏覽時,選擇
1.
> 網絡 >
能表
2. 選擇書籤,或按通話鍵連接至頁面。
選擇操作建立及管理書籤。
3.
本裝置可能已預裝某些書籤或連結,用於允許進入由不從屬
於諾基亞的第三方提供的網站。諾基亞不支持這些網站
不承擔任何責任。若選擇存取這些網站,您應象對待任何其
他互聯網網站一樣,對安全或內容採取預防措施。
當您收到書籤時,
。
顯示
操作 >
書籤。
1 個書籤會顯示。
收到
要查看書籤,選擇
外觀設定
。
當瀏覽時,選擇
式下,選擇
以下選項:
● 文字換行
●
● 顯示圖像
● 提示
● 提示
● 字元編碼 —
功能表 >
— 選擇文字的顯示方式
字體大小 —
從安全連接轉換至非安全連接時發出提示。
包含非安全項目時發出提示。這些提示並不保證安全連
接。 請參閱
設定字體大小
—
不安全連接提示 >
— 選擇
— 選擇不安全資料提示 >
「瀏覽器安全性」,第
其他選項
操作 >
網絡 > 設定
選擇不顯示隱藏網頁中的圖像。
選擇內容編碼
> 外觀設定
> 外觀設定
設定裝置在瀏覽中當
是
設定裝置在安全頁面
是
設定瀏覽網頁內容的編碼。
;或在待機模
,然後選擇
55 頁。
網絡
功
,亦
53
Page 53

網絡
● 字元編碼 — 選擇 Unicode (UTF-8)網址 > 開設定裝置以
UTF-8 編碼發送 URL。
● 螢幕大小 — 設定螢幕版面配置為完整畫面或小畫面
● JavaScript — 啟用 Java 程式
● 頁面標題顯示 — 在瀏覽時顯示網頁的當前標題
保密設定
Cookies
Cookie 是網站儲存在您裝置快取記憶體中的資料。當您清除
快取記憶體,Cookies 會被刪除。 請參閱 「快取記憶
體」,第 55 頁。
當瀏覽時,選擇操作 > 其他選項 > 保密選項 > Cookie 設
定;或在待機模式下,選擇功能表 > 網絡 > 設定 > 保密
設定 > Cookies。
要允許或禁止裝置接收 cookies,選擇允許接收或不允許接
收。
安全連接的程式
您可以選擇是否運行安全頁面的程式。 裝置支援 WML 程式。
在瀏覽時,要允許程式,選擇操作 > 其他選項 > 保密選
項 > WMLScript 設定;或在待機模式下,選擇功能表 > 網
絡 > 設定 > 保密設定 > 使用 WMLScript > 允許接收。
下載設定
要將所有下載的檔案自動儲存於多媒體資料中,選擇功能
表 > 網絡 > 設定 > 下載設定 > 自動儲存 > 開。
服務信箱
裝置能夠接收您的服務供應商發送的服務訊息 (網絡服務)。
服務訊息是通知訊息 (例如:新聞標題),可能包含文字訊息
或服務位址。
服務信箱存取
當您接收服務訊息時,選擇顯示進入服務信箱。
如果您選擇退出,訊息會移至服務信箱。
要稍後進入服務信箱,選擇功能表 > 網絡 > 服務信箱。 捲
動至您想要的訊息,然後選擇提取啟動瀏覽器及下載完整的
訊息。
要顯示有關服務通知的詳細資料或要刪除訊息,選擇操作 >
詳情或刪除。
服務信箱設定
選擇功能表 > 網絡 > 設定 > 服務信箱設定,然後選擇以
下選項:
● 服務訊息 — 設定是否想要接收服務訊息
● 訊息篩選 — 選擇開設定裝置僅接收經服務供應商認可的
內容供應商發送的服務訊息。
54
Page 54

● 自動連接 — 選擇開設定裝置在接收到服務訊息時,自動
從待機模式啟動瀏覽器。如果您選擇關,當裝置接收到服
務訊息時,僅在您選擇提取後才啟動瀏覽器。
快取記憶體
快取記憶是一種記憶位址,作暫存數據之用。如果嘗試存取
或存取過需要密碼的機密資料,請在每次使用後清空快取記
憶體。您已存取的資料或服務會儲存於快取記憶體內。
要在瀏覽時清除快取記憶體,選擇操作 > 其他選項 > 清除
快取記憶體。
在待機模式下,選擇功能表 > 網絡 > 清除快取記憶體。
瀏覽器安全性
某些服務可能要求安全功能,例如在線銀行或購物服務。對
於此類連接,您需要進行安全認證,還可能需要安全模組,
SIM 卡上可能會提供此模組。如要獲取更多資料,請向您的
服務供應商查詢。
網絡
證書
重要訊息: 即使利用證書可降低遠端連接及軟件安裝
的風險,亦需要正確使用證書才可從增強的安全性中獲益。
證書本身的存在不提供任何自我保護;證書管理者必須具備
正確、可信或值得依賴的證書以提高可用的安全度。證書有
其使用期限。假如證書應該有效但顯示「證書已過期」或
「證書無效」,請檢查您裝置內的當前日期和時間是否正確。
有以下三種證書:伺服器證書、授權證書及用戶證書。您可
從服務供應商處接收這些證書。授權證書和用戶證書亦可能
已由您的服務供應商儲存於安全模組中。
要查看您下載至裝置中的授權證書及用戶證書,選擇功能
表 > 設定 > 保密 > 授權證書或用戶證書。
如果手機與內容伺服器之間的數據傳輸已經過加密,便會在
連接中顯示安全指示符號
安全圖示並不表示通訊閘和目錄伺服器 (或儲存被請求的資
源) 之間的數據傳輸是安全的。服務供應商應確保通訊閘與內
容伺服器之間數據傳輸的安全性。
。
安全模組
安全模組能改進需要瀏覽器連接的應用程式的安全服務,且
允許您使用數碼簽名。安全模組可能包含證書以及私密金鑰
和公共密鑰。證書已由服務供應商儲存至安全模組中。
要查看或更改安全模組設定,選擇功能表 > 設定 > 保密 >
安全模组設定。
數碼簽名
如果您的 SIM 卡備有安全模組,您可用裝置建立數碼簽名。
數碼簽名如同在紙質票據、書面合約或其他文件簽署您的姓
名一樣。
要建立數碼簽名,在頁面上選擇一個連結 (例如:希望購買的
一本書的書名及其價格)。簽署的文字便會顯示,並可能包括
金額及日期。
55
Page 55

SIM 服務
檢查標題文字是否為讀取以及數碼簽名圖示 是否顯示。
如果數碼簽名圖示未顯示,則表示違反安全性,此時不要輸
入任何個人數據 (如簽名 PIN 碼)。
要簽署文字,首先閱讀所有文字,然後選擇簽名。一個螢幕
內可能不夠顯示全部文字。因此,在簽名之前要確保徹底捲
動,並閱讀全部文字。
18. SIM 服務
您的 SIM 卡可能提供其他服務。僅當您的 SIM 卡支援此功能
表時您才可以進入。功能表的名稱和內容視乎可用的服務而
定。
如要獲取有關 SIM 卡服務的供應及資料,請向您的 SIM 卡經
銷商查詢。SIM 卡經銷商亦可以是服務供應商或其他經銷商。
19. 個人電腦連接
在裝置透過藍牙或數據傳輸線連接至兼容的個人電腦時發送
及接收電子郵件,與及存取互聯網。可透過與個人電腦的各
種連接及數據通訊應用程式來使用裝置。
Nokia 電腦端套件 (PC Suite)
您可以使用 Nokia 電腦端套件 (PC Suite) 同步處理您裝置與兼
容個人電腦或遠端互聯網伺服器 (網絡服務) 之間的通訊錄、
日曆、備註及待辦事項。您可於諾基亞網站找到更多資料及
下載電腦端套件。 請參閱 「諾基亞支援」,第 11 頁。
選擇您想使用的用戶證書,然後輸入簽名 PIN 碼。數碼簽名
圖示消失,服務可能顯示認購訊息。
要設定手機在您使用 SIM 服務時顯示手機與網絡之間發出的
確認訊息,選擇功能表 > 設定 > 手機 > SIM 更新提示 >
顯示。
進入這些服務可能需要發送訊息或撥打電話,而這些是需要
繳付費用的。
分組數據、HSCSD 及 CSD
您可以透過手機使用分組數據、高速電路交換數據 (HSCSD)
及電路交換數據 (CSD,GSM 數據) 的數據服務。如要獲取供
應情況及要申請數據服務,請向您的服務供應商查詢。
使用 HSCSD 服務會比普通語音或數據通話更快地消耗電池電
量。
藍牙
使用藍牙技術將您的兼容手提電腦連接至互聯網。您的手機
必須已啟動支援互聯網接入的服務供應商,而且您的個人電
56
Page 56

個人區域網絡
腦必須支援藍牙
絡接入點 (NAP)
分組數據連接至互聯網。使用手機的網絡接入點
時無需安裝電腦端套件
術」,第 36
PAN (
服務及與您的個人電腦配對後,會自動開啟
(PC Suite)
頁。
)。手機連接至手機的網
(NAP)
。 請參閱
「藍牙無線技
服務
數據通訊應用程式
有關使用數據通訊應用程式的訊息,請參閱該程式隨附
件。
電池資料
20.
的文
充電與放電
本裝置由充電電池供電。電池可以充電、放電數百次,但
最終亦會失效。當通話與待機時間明顯短於正常時間
候,請更換電池。請僅使用諾基亞認可的電池,並僅
諾基亞認可、指定用於本裝置的充電器為電池充電。
新電池在二至三次完全充電與放電之後才能達到最佳性能。
如果替換的電池是第一次使用或如果電池長時間沒有
用,在開始為電池充電時,您可能需要將電池連接至充電
器然後斷開,之後再連接。
不使用充電器時將其從電源插座及裝置中拔出。不要
全充電的電池連接至充電器,因為過分充電可能會縮短其
壽命。如果已完全充電的電池擱置不用,其本身便會不斷
放電。
如果電池已完全沒電,可能要過幾分鐘充電指示符號才會
出現在螢幕上或才能撥打電話。
請勿將電池用作其他用途。請勿使用損壞的充電器或電池。
的時
使用
使
將完
電池資料
建議不要在連接電腦時撥打或接聽電話,因這可能破壞操
為使在數據通訊期間能獲得更佳的表現效果,請將裝置按
朝下,放在穩固的平面上。數據通話期間請不要移動裝置
例如:數據通話期間請不要握住裝置。
請勿使電池短路。當金屬物品
觸電池的正極
看上去像電池上的小金屬條。
或背包中時,就有可能發生這種情況。電極的短路將會造成
電池或觸及物品的毀損。
將電池置於極熱或極冷的地方將減短電池的容量及壽命,例
如,夏季和冬季時將電池放在封閉的車內。請盡量把電池保持
在
至
15 °C
電池,即使電池電量充足,裝置亦可能暫時無法操作。電池的
效能在冰點以下時將大打折扣。
切勿將電池丟入火中,因其可能發生爆炸。電池受損壞時亦
可能發生爆炸。請依當地的法例規定處理電池。請盡量回收
以循環再用。請勿將電池當作家庭廢物般丟棄。
請勿拆開或拆毀電池。在電池滲漏的情況下,盡量避免讓滲
出的液體接觸皮膚或眼睛。如果上述滲漏情況發生,請立即
用清水沖洗皮膚或眼睛,或尋求醫療協助。
及負極
(+) (
25 °C (59 °F
如硬幣、萬字夾或筆
(
–
時,可能會發生意外短路。
)
例如當您將備用電池放在口袋
)
及
之間。如果裝上過熱或過冷之
77 °F)
作。
直接接
)
(
鍵
。
它們
57
Page 57

真正的增強配套
諾基亞電池認證指引
為了您的安全,請堅持使用諾基亞原廠電池。要證實您
的是一枚諾基亞的原廠電池,應向一間獲授權的諾基亞經銷
商購買,及使用以下的步驟檢查全息影像標籤:
成功完成以下步驟並不能完全保證電池的可靠性。如果
任何理由相信您的電池不是可靠的諾基亞原廠電池,便應該
停止使用,然後將其帶往最近的諾基亞授權服務點或經
尋求協助。您的諾基亞授權服務點或經銷商將檢查電池的可
靠性。如果不能確認可靠性,請將電池送回至您購買的地方。
授權全息影像
當您查看標籤上的全息影像,您應該
1
從一個角度看到諾基亞的牽手符號,
及從另一個角度看到諾基亞的原廠增
強配套標誌。
1
2
真正的增強配套
.
僅使用經諾基亞認可、適用於本特定型號的電
警告:
池、充電器及增強配套。使用其他未經許可的增強配套,可
能會令手機的保養失效,甚至造成危險。
您的裝置有更多齊備的增強配套可供
選擇。選擇符合您個人通訊需要的增
強配套。
購買
您有
銷商
當您從左、右、下和上角度注視全息
2
影像時,應該可以在每邊分別看到
、、
、
2 3
1
如果您的電池不是可靠的電池怎麼辦?
如果您不能透過您諾基亞電池標籤上的全息影像確認是
靠的諾基亞電池,請不要使用此電池。將其帶往最近的諾基亞
授權服務點或經銷商尋求協助。使用未經製造商許可的電池
能造成危險,並可能導致操作失效和對您的裝置及其增強配套
造成損壞。這樣亦會令裝置的所有許可和保養失效。
要尋找更多有關原廠諾基亞電池的資料,請瀏覽
www.nokia.com/battery
4
點。
否為可
可
。
增強配套
使用配件及增強配套時的注意事項
●
請將所有附件及增強配套置於兒童無法觸及之處。
切斷任何配件或增強配套的電源時,請握住插頭拔出,不
●
要拉電線。
請定期檢查汽車中的增強配套是否安裝妥當並且操作正●
●
僅容許合格的人員安裝複雜的車用增強配套。
常。
58
Page 58

電池
類型
BL-4B
重要訊息:
能達到這些電池的通話及待機時間。 電池實際的通話及待機
時間可能視乎
通話時間
2.8 小時
僅在某些最優化的網絡條件或環境中使用才
卡、使用的功能、電池的使用時間及條
SIM
待機時間
長達 250
小時
保養及維修
本裝置是採用優良技術設計的產品,務請小心使用。以
議有助維護您裝置的保養。
●
請保持裝置乾燥。雨水、濕氣與各種液體或水份可能含有
腐蝕電路的礦物質。如果裝置被弄濕,請移除電池,等到
裝置完全乾燥後再放回電池。
請勿將裝置存放在佈滿灰塵、髒亂的地方或在此類地方使
●
用裝置。活動式的零件及電子元件可能較容易損壞
請勿將裝置存放在高溫之處。高溫會縮短電子裝置的壽
●
命、損壞電池並使部分塑膠材質變形或熔化。
●
請勿將裝置存放在低溫之處。當裝置升溫至正常的溫度
時,其內部可能會產生濕氣,損壞電路板。
●
請勿嘗試違反本指南的說明自行拆卸裝置。
請勿扔擲、敲擊或搖晃裝置。粗暴的使用方式可能會破壞
●
內部的電路板及精密構造。
。
附加安全資料
兒童
手機及其增強配套可能包含較小配件。請將配件置於兒
法觸及的地方。
件、電池所處的溫度、不同的網絡條件及更多其他因素而定,
因此通話及待機時間可能明顯少於此處規定的時間。此外,使
用鈴聲、免提、在數字模式下使用及使用其他消耗電量的功能
及裝置用於通話的總時間均會影響待機時間。同樣地,裝置開
啟的總時間及處於待機模式下的總時間亦會影響通話時間。
●
下建
請勿使用刺激性的化學製品、清潔溶劑或腐蝕性的清潔劑
來清潔裝置。
● 請勿為裝置塗上顏料。塗料可能會妨礙裝置的活動式
件,影響正常使用。
● 使用柔軟、清潔和乾燥的布清潔鏡頭
感應器和光暗感應器鏡頭
僅使用隨裝置提供或經許可的天線。未經授權的天線、改●
裝或其他附件可能會破壞裝置,
請在室內使用充電器。
●
●
經常為您希望保留的數據
份。
要經常重設裝置以獲取最佳性能,關閉裝置並除下電池。
●
這些建議同樣適用於本裝置、電池、充電器或其他任何配
套。如果任何裝置不能正常操作,請送交就近的授權服務商
店獲取服務。
)。
(例如通訊錄及日曆備註
(例如:相機、距離
並可能違反無線裝置管制
操作環境
當您以對著耳朵的正常姿勢使用裝置或當其置於距離您身體
童無
至少 2.2 厘米
(7/8 英吋)
處時,此裝置便符合
保養與維修
零
) 建立備
暴露指引。
RF
59
法。
Page 59

附加安全資料
請勿隨身攜帶含金屬材料的便攜套、皮帶扣或機架,並
裝置放在距離身體如上所述的位置。
要傳輸數據檔案或訊息,本裝置須與網絡建立良好連接
一些情況下,數據檔案或訊息可能會被延遲直至這些連接可
以使用。請確保遵守上述間距說明,直到傳輸順利完成
裝置某些部件具有磁性。裝置可能會吸引金屬物件
信用卡或其他磁性儲存媒體放在裝置附近,因為該媒體
存的資料可能因此被清除。
應將
。在
。
。請勿將
所儲
醫療設備
任何無線傳輸裝置的操作,包括無線電話,都可能會干
護不足的醫療設備之功能。請詢問醫生或醫療設備的製造
商,確認這些設備是否可充分阻擋外部
問題。請在醫療診所等區域張貼的相關法規指示下關閉
置。醫院或醫療診所可能正在使用容易受外部
設備。
RF 能量,或您的其他
RF 能量影響的
植入式醫療設備
醫療設備的製造商建議在無線裝置及植入式醫療設備
調校器或植入式心律去顫器
吋) 的距離,以避免對醫療設備產生的干擾。配戴此類設備的
人應該遵守以下規定:
● 當無線裝置開啟時,裝置與醫療設備之間的距離經常保持
● 不要將無線裝置放在胸前的口袋
●
厘米 (6 英吋
在 15.3
以沒有使用醫療設備那一邊的耳朵接聽電話,以減低干擾
的可能性。
) 之間保持最少
) 以上。
15.3
擾防
裝
(如心律
厘米 (6 英
● 如果有任何理由懷疑產生干擾,請立即關閉裝置。
● 閱讀及遵循植入式醫療設備製造商的指引。
如果您對將無線裝置及植入式醫療設備一起使用有任
問,請向您的醫師查詢。
何疑
助聽器
某些數碼無線裝置可能會干擾助聽器。如果產生干擾,請向
您的服務供應商查詢。
汽車
無線射頻 (RF)
絕的電子系統
系統、電子速控系統及安全氣袋系統
請向您汽車的製造商或代表或已添加至您汽車的裝置
或其代表查詢。
應僅由合格的專業人員維修裝置,或是在汽車中裝設裝置
錯誤的安裝或維修可能會產生危險,而且可能使任何適用於
該裝置的保養失效。請定期檢查汽車內所有的無線裝
是否安裝妥當並且操作正常。請勿將易燃液體、氣體
物與裝置及其組件或增強配套置於同一汽車置物箱中。對於
配備安全氣袋的汽車,請謹記會有一股巨大的力量充滿安
氣袋。請勿將物件
全氣袋之上或安全氣袋可伸展到的地方。若車內的無
安裝不當,安全氣囊充氣脹大時可能會引致嚴重傷亡。
飛行中禁止使用手機。登機前請將關閉裝置。在飛機上使
無線電子裝置可能會危及飛機的操作安全、干擾無線通訊網
絡,而且可能是違法的。
訊號可能會影響汽車上未適當安裝或未妥善隔
(如電子燃油噴注系統、電子防滑
)。如要獲取更多資料,
(包括固定及可攜式的無線設備
(防鎖) 剎車
製造商
置設備
或易爆
放置在安
)
線設備
。
全
用
60
Page 60

可能發生爆炸的環境
請在任何可能發生爆炸的環境關閉裝置,並遵守所有的
及指示。可能發生爆炸的場所包括那些您通常會被告知要關
閉交通工具引擎的地方。在這類地方產生的火花可
爆炸或失火,導致身體受傷甚至死亡。在油站請關機,
如,在靠近油泵的服務站。遵守在加油站
域)、化工廠或進行爆破工程的地方使用無線電裝備的限制。
這類可能發生爆炸的地方通常
這些地方包括船的甲板、化學品輸送或貯存的設施、使
化石油燃料 (
物或微粒 (
例如丙烷或丁烷
例如顆粒、塵埃或金屬粉末
(但不一定)
) 的交通工具、空氣中含有化學
(燃料存放及銷售區
會有清楚的標示。
的地方。
)
告示
能會造成
例
用液
緊急電話
重要訊息:
無線網絡、有線網絡及用戶可編制程式的功能進行操作。因
此,無法保證這些功能在任何情況下都能使用。因此,您不
應僅依賴任何無線電話機進行基本通訊
要撥打緊急電話:
1. 若手機尚未開啟,請先開機。檢查訊號強度是否足夠。
有些網絡可能需將有效的
2. 視情況按結束鍵所需次數以清除螢幕,使裝置作好通
備。
3. 輸入您目前所在地的官方緊急號碼。緊急號碼依所在
同而有所分別。
無線電話,包括本手機,利用電波訊號、
(例如,緊急就醫
卡正確地插入裝置中。
SIM
)。
話準
地不
附加安全資料
4. 按通話鍵。
若某些功能正在使用中,撥打緊急電話之前,可能需要先
閉這些功能。詳情請查閱本指南或向服務供應商諮詢。
撥打緊急電話時,盡可能準確地提供所有必要的訊息。您的
無線電話可能是發生意外情況時唯一的通訊途徑。當接到
掉電話的指示後才可結束通話。
許可證明
本流動裝置符合有關暴露於無線電波的國際準則。
本流動電話是一部無線電收發器。其設計不會超出由國際
引建議的無線電波暴露限制。這些指引是經由獨立的科學
織 (ICNIRP)
全,不論其年齡和健康。
流動裝置的暴露指引運用了一組名為特別吸收率的測量數
據,即
體組織 2.0
的操作位置使電話以最高認可功率水平在所有測試波段中傳
輸訊號而進行的。裝置的實際
為裝置的設計僅為使用達到接通網絡所需的功率。該
多項因素決定,例如:您與網絡基站之間的距離。在耳朵
使用本裝置進行測試時,
0.50 W/kg
使用裝置配件及增強配套可能會導致不同的
可能視乎國際報告、測試需求和網絡帶寬而有所不同
的 SAR 資料可能在
(SAR)
制定的,包括一個安全空間,以確保所有人的安
SAR。ICNIRP
瓦特/千克 (W/kg)
。
指引中所述的
www.nokia.com
SAR 限制為平均每
SAR 的測試是通過在標準
。對
SAR 會遠遠低於其最大值,因
ICNIRP 準則規定的最高
SAR
上的產品資料中提供。
SAR 值為
值。SAR 值
關
掛
指
組
10 克人
數值由
旁
。附加
61
Page 61

有限保證
有限保證
按照以下條款和條件,諾基亞流動電話公司
亞」) 保證該「諾基亞」流動電話產品與
附、配件(
1. 流動電話、數據產品及所有「諾基亞」所產附、配件
2.
3.
4.
5. 在有限保證期間,「諾基亞」或其授權的服務網將根
6. 經修理「產品」的有限保證期為原有限保證期所剩下
7. 應「諾基亞」或其授權服務中心的要求,「消費者」必
以下稱「產品」
池除外) 的有限保證期為自購買之日起十二
「諾基亞」產電池的有限保證期為自購買之日起六
月。
有限保證僅適用於「產品」的初始消費購買者
「消費者」
有限保證僅適用在本文件結尾處所列出的國家和地區之
一購買「產品」的「消費者」﹔有限保證僅在「
圖銷售「產品」的國家和地區有效。
「諾基亞」的選擇,用新的或工廠重新製作的替換件,或
者 修理或者更換任何有缺陷的「產品」或其一部分,並
將可正常運作的「產品」交給「消費者」。修理或更
「產 品」時所用的零件和人工都不向「消費者」收費。
有被更換下來的零件、電路板或設備都將成為「諾基
亞」的 財產,外殼和裝飾性的零件應在裝運時沒有缺
陷,因此不包括在本有限保證條款的範圍內。
時間,或從修理之日起九十
時 間為準。
須提供購買收據或其他可證明購買日期和地點的資訊。
),不可轉讓給後繼購買者
) 在材料和工藝方面無缺陷﹕
(90)
(以下稱「諾基
/或「諾基亞」所產
(12) 個月。
/最終使用者。
諾基亞」
天,以這兩者中較長的
(電
(6) 個
(以下稱
意
據
換
的
8. 在將「產品」運往「諾基亞」及其授權服務中心,以及
從這些地方送出的過程中的運輸、遞送和處理費用均由
「消費者」承擔。
9. 在以下任何一種情況下,「消費者」將不能受到本有限
保證條款中規定的保障﹕
a) 「產品」曾受到﹕非正常使用、非正常情況、不當儲
存、暴露在潮濕環境中、暴露在過高或過低溫度或類
境情況下,未經授權的修改,未經授權的連
似環
線,未經授權的修理
未經授權的備
外、改動、不正確的安裝、不可抗力、食物或液體濺
洒,不正確地調整
亞」的合理控制範圍的行為,包括消耗性零件
險絲) 的缺陷和天線的斷裂或損壞,除非這些是直接
由材料或工藝上的缺陷所引起的,以及「產品」的
常磨損。
正
所
b) 在適用的有限保證期內,「消費者」未將關於「產
品」的缺陷或故障告知「諾基亞」。
c) 「產品」系列號碼或附、配件日期代碼遭去除、損毀
或塗改。
d) 缺陷或損壞是由流動電話系統在功能方面的缺陷,或
是外接天線接收信號不足引起的。
e) 與「產品」一起使用或連接起來的附、配件不是「諾
基亞」提供的,或不適合與「諾基亞」流動電話一起
使 用,或者「產品」被用於非其意圖使用的用途。
(包括但不僅限於在修理中使用
、誤用、疏忽、濫用、事故意
用零件)
控制開關、或其他超出「諾基
(如保
62
Page 62

f) 電池短路、電池或電池單元的密封包裝被破壞,或者
有人為損壞的痕蹟,或是電池被使用在非其被指定使
用的 設備上。
如果在有限保證期內發生問題,「消費者」應採取下列
10.
的步驟﹕
「消費者」應該將「產品」送回到購買的地方進行修
a)
理或更換。
b)
如果按(a)
項執行不方便,「消費者」應與當地的
「諾基亞」辦事處聯繫,索取最近的授權服務中心的
地址。
c) 「消費者」應安排將「產品」送到授權服務中心。從
裝置上拆除「產品」的相關費用並不屬於本有限保證
的 範圍。
d) 如果需要不屬於本有限保證的範圍的零件與人工,
「消費者」將需支付相應的費用「消費者」應負擔與
裝「產品」有關的費用。
重新安
如果「產品」中有某些運營商設定的功能
e)
),「諾基亞」保留在提供服務前讓「消費者」詢
卡
(如鎖定
問 相關流動電話運營商的權利。
f) 如果「產品」送回「諾基亞」時已過了有限保證期,
「諾基亞」將採用其通常情況下的服務政策,並向
「消 費者」收取相應的費用。
11. 任何適銷性的默示保證、或是對於特定用途的適用性
默示保證,僅限於前列的有限保證期內。否則,前述有
限保 證條款就是購買者僅有的補償,而且取代其他所有
明示的或默示的保證。「諾基亞」對於附帶的或間接的
損失或預
期利益或利潤的損失,談話隱私的損失或損
害,以及由於使用或無法使用「產品」而導致的停工或
資料的損失或
損壞等情況,不承擔責任。
12. 本有限保證所提供的權益是對各國家和地區適用的強
性立法所規定的其他權利與救濟的補充。
13.「諾基亞」不承擔,也不授權其授權服務中心或個人或
體為其承擔,任何超出本有限保證中所明訂範圍以外的
責 任和義務。
所有保證資訊、產品功能和規格有可能隨時修改,恕不
14.
另行通知。
如上列第四條所述,本有限保證在下列國家和地區境內
15.
有效:中國香港特別行政區、中國澳門特別行政區。
SIM
的
有限保證
制
實
63
Page 63

索引
C
cookies 54
CSD 56
F
卡
請參閱
10
44
對講機
FM 收音機
H
HSCSD 56
M
microSD
插入 12
P
PictBridge 38
PIN 碼 10
PTT
PUK 碼
S
SIM
服務 56
訊息 30
64
SIM 卡
18
安裝
U
USB 插孔
USB 數據線
W
WML 程式
X
XHTML 52
三劃
10, 54
下載
四劃
中文輸入
互聯網 52
分段計時器
分組數據
天線 13
手機鎖
請參閱
50
日曆
備註 50
11
15
38
54
19
51
56
鍵盤鎖
五劃
功能表
本手機號
立體聲強化
23
六劃
任何鍵接聽
列印圖像
同步處理
多媒體資料
資料夾
檔案 41
字母
字體大小
安全
證書 55
安全性
瀏覽器
安裝 11
收音機 44
13
耳機
自動重撥
七劃
34
佈景
免提
請參閱
33
45
38
41
37
41
41
35
55
38
喇叭
Page 64

即時訊息
均衡器
快取記憶體
快捷操作
右選擇鍵
左選擇鍵
語音指令
導航鍵
快顯訊息
八劃
來電等待
來電轉接
拍攝圖片
52
服務
收件匣
訊息 54
服務指令
服務號碼
狀態指示符號
九劃
保密
保密碼
宣傳訊息
客戶服務
客戶服務號碼
待機模式
待辦事項列表
10
密碼
模組 55
10
27
45
55
16, 35
36
35
36
36
26
19, 39
38
42
54
29
33
54
11
16
16
33
51
15
按鍵
按鍵保護
通話鍵 15
結束鍵
電源
導航鍵 15
選擇鍵 15
鍵盤
鍵盤鎖
按鍵保護
拼音輸入法
指示符號
為電池充電
相機
相機閃光燈
相機鍵 15, 42
背景圖片
背景圖像
致電者識別碼
計時器
計時錶
計算機
重撥 38
限制密碼
音量鍵
音樂播放機
15
15
15
17
17
16
42, 43
35
35
51
51
51
10
15
十劃
倒數計時器
個人電腦連接
書寫語言
19
20
12
15
43
51
17
39
56
53
書籤
留言訊息
真正的增強配套
航空模式
航空模式詢問
記憶卡
記憶體已滿
記錄
訊息
訊息發送
訊號強度
配套
配置
配置設定服務
閃光燈
29
17
請參閱
41
插入 12
34
SIM 卡上的訊息
刪除30
快顯訊息
服務指令
留言訊息
設定
資料夾
廣播訊息
聲音短訊
30
27
24
16
39
39
42
十一劃
10
密碼
密碼功能
彩色框
10
14
索引
57
39
航空模式
26
30
26
29
29
29
26
10
65
Page 65

索引
23
捲動
捷徑顯示
14
掛繩
34
設定
USB 數據線
下載 54
手機 39
日期
字體大小
串流 43
佈景
快捷操作
服務信箱
保密 40
背景圖片
原廠
時間 35
訊息 30
配套
配置 39
捷徑顯示
通話
鈴聲 35
對講機
數據傳送
操作模式
螢幕保護圖案
瀏覽器外觀
藍牙
顯示 35
16, 35
35
34
40
39
38
48
36
35
54
35
35
37
34
38
53
35
35
通訊錄
本手機號
同步處理
名片
刪除
服務號碼
客戶服務號碼
移動
設定
尋找 32
群組
撥號快捷操作
編輯詳情
複製 32
儲存姓名
儲存詳情
儲存電話號碼
通話
已接來電
已撥電話
未接來電
拒絕
國際長途
接聽
語音撥號
撥打
選項 19
通話功能
通話記錄
通話錄 31
通話鍵
15
33
33
32
32
32
19
19
18
18
34
33
33
33
33
31
32
34
34
34
18
18
33
33
31
56
連接
部件 15
麥克風
15
十二劃
50, 51
備註
喇叭 15, 19
單鍵撥號
智慧輸入法
無線標記語言
短片 43
筆劃輸入法
結束通話
結束鍵
視覺收音機
詞典
詞組輸入
開機鈴聲 39
38
22
52
20
18
15
45
52
21
十三劃
傳統文字輸入法
解鎖鍵盤
農曆日曆
48
遊戲
35
鈴聲
電子秘書
電池
充電
電池充電狀態
電郵通知
電郵應用程式
22
17
50
49
12
16
26
25
6
6
Page 66

電源鍵
電腦端套件
電話簿
15
請參閱
十四劃
42
圖片
對講機 46
設定 48
52
網絡
網絡商功能表
語言 39
語音播放
語音指令
語音備忘 45
語音增強
語音撥號
說明文字
36
38
18
39
十五劃
通訊 57
37
傳送
38, 56
49
29
18
55
19
廣播訊息
撥打號碼
撥號 18
撥號快捷操作
數碼簽名
數據
數據線
編輯文字
鬧鐘
56
通訊錄
41
39
18, 33
十六劃
導航鍵
操作模式
螢幕 35
螢幕保護圖案
諾基亞聯絡資料
輸入法
選擇鍵 15
錄音機
頻道類型
15
請參閱
34
19, 20
45
46
十七劃
應用程式
聲音短訊
聯絡資料
鍵盤
鍵盤鎖
48, 49
26
11
15
17, 39
十八劃
23
瀏覽
瀏覽器 52
cookies 54
程式 54
WML
安全性
快取記憶體
書籤 53
數碼簽名
瀏覽網頁
證書 55
55
導航鍵
35
11
55
55
53
36, 56
藍牙
離線模式
十九劃
55
證書
二十二劃
歡迎語
聽筒15
39
二十三劃
16, 35
顯示
索引
18
7
6
Page 67

DECLARATION OF CONFORMITY
0434
© 2007 Nokia. All rights reserved.
Nokia, Nokia Connecting People, Nokia Care,
of Nokia Corporation. Other product and company names mentioned herein may be trad
Reproduction, transfer, distribution,
prohibited.
US Patent No 5818437 and other pending
Hereby, NOKIA CORPORATION declares tha
provisions of Directive 1999/5/EC. A copy of the De
declaration_of_conformity/.
Visual Radio, and Navi
or storage of part or all of the contents in this document in any form without the prior
patents. T9 text input software Copyright © 19
t this RM-249 product is in compliance with
claration of Conformity can be found at www.nokia.com/phones/
are trademarks or registered trademarks of Nokia Corporation
the essential requirements and other relevant
. Nokia tune is a sound mark
emarks or tradenames of their respective ow
written permission of Nokia is
97-2007. Tegic Communications, Inc. All rig
ners.
hts reserved.
Includes RSA BSAFE cryptographic or secur
Java and all Java-based marks are trademark
This product is licensed under the MPEG-4 Visual Patent Portfo
been encoded in compliance with the MPEG-4 Visual Standard by
with MPEG-4 video provided by a licensed
related to promotional, internal, and co
Nokia operates a policy of ongoing development. No
without prior notice.
TO THE MAXIMUM EXTENT PERMITTED BY
DATA OR INCOME OR ANY SPECIAL, INCIDENTAL
THE CONTENTS OF THIS DOCUMENT ARE PROVIDED "AS IS". EXCEPT AS REQUIRED BY APPLI
INCLUDING, BUT NOT LIMITED TO, THE I MPLIED WARRA
ACCURACY, RELIABILITY OR CONTENTS OF THIS D
NOTICE.
For the most current product informatio
The availability of particular products and appl
of language options.
ity protocol software from RSA Security.
s or registered trademarks of Sun Microsystems, Inc.
lio License (i) for personal and noncommerci
video provider. No license is granted or shall be implied for any other use. Additiona
mmercial uses, may be
kia reserves th
APPLICABLE LAW, UNDER NO CI
, CONSEQUENTIAL OR INDIRECT DAMAGES HOWSOE
NTIES OF MERCHANT
OCUMENT. NOKIA RESERVES
n, please refer to www.nokia.com.hk.
ications for thes
a consumer engaged in a personal
obtained from MPEG LA, LLC. See http://www.mpegla.com.
e right to make changes and improvemen
RCUMSTANCES SHALL NOKIA OR ANY OF
ABILITY AND FITNESS FOR A PARTICUL
THE RIGHT TO REVISE THIS DOCUMENT OR W
e products may vary by region.
al use in connection
and noncommercial activity and (
ts to any of the product
VER CAUSED.
CABLE LAW, NO WARRANT IES OF ANY KIND, EITHER E XP
Please check with your Nokia de
ITS LICENSORS BE RESPONSIBLE FO
AR PURPOSE, ARE MADE IN RELA
ITHDRAW IT AT ANY TIME
with information which has
ii) for use in connection
l information, including that
s described in this document
aler for details, and availability
R ANY LOSS OF
RESS OR IMPLIED,
TION TO THE
WITHOUT PRIOR
Page 68

The third-party applications provided with
Nokia does not own the copyrights or
support, functionality of the applications, or the information in the applications or these ma
your device may have been created and may be owned by persons or entities not affili
intellectual property rights to the third-party
applications. As such, Nokia does not take
applications.
BY USING THE APPLICATIONS YOU ACKNOWLEDGE THAT THE APPLICATIONS ARE PROVIDED AS
MAXIMUM EXTENT PERMITTED BY APPLICABLE LAW. YOU FURTHER ACKNOWLE
WARRANTIES, EXPRESS OR IMPLIED, INC
THE APPLICATIONS WILL NOT INFRINGE ANY
LUDING BUT NOT LIMITED TO WARRANTIES OF
THIRD-PARTY PATENTS, COPYRIGHTS, TRADEMARKS, OR OTHER RIGHTS.
DGE THAT NEITHER NOKIA NOR ITS AFFILI
IS WITHOUT WARRANTY OF ANY KIND, EXPRESS OR
TITLE, MERCHANTABILITY OR FITNESS FOR A PARTICULAR P
Export controls
This device may contain commodities, tech
law is prohibited.
nology or software subject to export laws and regulations from the US and other countr
terials. Nokia does not provide a
ATES MAKE ANY REPRESENTATI
ated with or related to Nokia.
any responsibility for end-user
ny warranty for the third-party
IMPLIED, TO THE
ONS OR
URPOSE, OR THAT
ies. Diversion contrary to
Page 69

Contents
For your safety ................................................7
About your device............................................8
Network services.............................................8
Shared memory...............................................9
1. General information..................................10
Access codes.......................................................................
Configuration setting service............................................
Download content............................................................
Nokia support.....................................................................
10
10
.11
11
2. Get started.................................................12
Install SIM card and battery..............................................1
Insert a microSD card.........................................................
Charge the battery............................................................
Antenna...............................................................................1
Headset...............................................................................1
Change the accent color frame.........................................14
Strap....................................................................................15
13
.13
3. Your device................................................15
Keys and parts....................................................................
Switch the device on and off............................................
Standby mode....................................................................16
Flight mode........................................................................1
Keypad lock (keyguard).....................................................1
Functions without a SIM card...........................................19
16
16
4. Call functions..............................................19
Make a call..........................................................................19
Answer or reject a call.......................................................20
Options during a call.........................................................
5. Write text...................................................21
Text modes.........................................................................21
Traditional text input........................................................
Predictive text input..........................................................21
6. Navigate the menus...................................22
7. Messaging..................................................22
Text messages....................................................................22
Multimedia messages........................................................
Create a text or multimedia message..............................23
Read a message and reply................................................2
2
Message sending process..................................................24
E-mail..................................................................................24
Flash messages...................................................................25
4
Nokia Xpress audio messaging.........................................26
4
Memory full.........................................................................26
Folders.................................................................................26
Instant messages...............................................................27
Voice messages..................................................................29
Info messages....................................................................29
Service commands.............................................................29
Delete messages................................................................30
SIM messages.....................................................................30
8
Message settings................................................................30
8
8. Contacts......................................................32
.20
21
23
3
Page 70

Save names and phone numbers.....................................
Save details.........................................................................
Settings...............................................................................
Groups.................................................................................3
Search for a contact...........................................................3
Copy or move contacts......................................................33
Edit contact details............................................................33
Delete contacts...................................................................33
Synchronize all...................................................................33
Business cards....................................................................34
Dialing shortcuts................................................................34
Info, service, and my numbers.........................................34
32
32
32
9. Call log........................................................34
10. Settings....................................................35
Profiles................................................................................
Themes................................................................................35
Tones...................................................................................
Display.................................................................................3
Time and date....................................................................3
My shortcuts.......................................................................36
Bluetooth............................................................................37
Packet data.........................................................................38
Data transfer.......................................................................39
USB data cable....................................................................40
Call.......................................................................................40
Phone..................................................................................40
Enhancements....................................................................41
Configuration......................................................................41
Security...............................................................................42
Restore factory settings....................................................4
35
35
11. Operator menu.........................................43
12. Gallery......................................................44
Folders and files.................................................................44
Print images.......................................................................44
3
Memory card.......................................................................44
3
13. Media.......................................................45
Camera and video..............................................................45
Music player........................................................................46
Radio...................................................................................47
Voice recorder....................................................................48
Equalizer.............................................................................49
Stereo widening.................................................................49
14. Push to talk..............................................49
PTT channels.......................................................................50
Switch PTT on and off........................................................50
Make and receive a PTT call..............................................50
Callback requests...............................................................51
Add a one-to-one contact.................................................51
6
PTT settings........................................................................52
6
Configuration settings.......................................................52
15. Applications.............................................52
Launch a game...................................................................53
Launch an application.......................................................53
Application options............................................................53
Download an application..................................................53
16. Organizer.................................................53
Alarm clock.........................................................................54
Calendar..............................................................................54
3
To-do list.............................................................................55
Notes...................................................................................55
Calculator............................................................................55
Timers.................................................................................55
Page 71

Stopwatch...........................................................................5
Dictionary............................................................................
56
17. Web..........................................................56
Set up browsing.................................................................
Connect to a service...........................................................
Browse pages.....................................................................57
Bookmarks..........................................................................5
Appearance settings..........................................................5
Security settings.................................................................58
Download settings.............................................................59
Service inbox......................................................................59
Cache memory....................................................................59
Browser security................................................................60
57
57
18. SIM services..............................................61
19. PC connectivity.........................................61
Nokia PC Suite.....................................................................
Packet data, HSCSD, and CSD.............................................62
Bluetooth............................................................................
Data communication applications...................................62
Battery information
20.
1
2
. Genuine enhancements...........................6
Enhancements....................................................................6
Battery.................................................................................6
....
...........................6
61
62
Care and maintenance...................................6
5
Vehicles...............................................................................6
Potentially explosive environments.................................68
Emergency calls..................................................................6
CERTIFICATION INFORMATION (SAR)..................................6
Limited Warranty...........................................6
8
Index..............................................................7
8
3
5
5
5
6
8
8
9
9
2
Additional safety information.......................6
Small children.....................................................................6
Operating environment.....................................................6
Medical devices..................................................................6
6
6
6
6
Page 72

For your safety
Read these simple guidelines. Not following them may be
dangerous or illegal. Read the complete user guide for
further information.
SWITCH ON SAFELY
Do not switch the device on when wireless
phone use is prohibited or when it may cause
interference or danger.
ROAD SAFETY COMES FIRST
Obey all local laws. Always keep your hands free
to operate the vehicle while driving. Your first
consideration while driving should be road
safety.
INTERFERENCE
All wireless devices may be susceptible to
interference, which could affect performance.
SWITCH OFF IN HOSPITALS
Follow any restrictions. Switch the device off
near medical equipment.
SWITCH OFF IN AIRCRAFT
Follow any restrictions. Wireless devices can
cause interference in aircraft.
SWITCH OFF WHEN REFUELING
Do not use the device at a refueling point. Do
not use near fuel or chemicals.
SWITCH OFF NEAR BLASTING
Follow any restrictions. Do not use the device
where blasting is in progress.
USE SENSIBLY
Use only in the positions as explained in the
product documentation. Do not touch the
antenna areas unnecessarily.
QUALIFIED SERVICE
Only qualified personnel may install or repair
this product.
ENHANCEMENTS AND BATTERIES
Use only approved enhancements and
batteries. Do not connect incompatible
products.
WATER-RESISTANCE
Your device is not water-resistant. Keep it dry.
BACK-UP COPIES
Remember to make back-up copies or keep a
written record of all important information
stored in your device.
CONNECTING TO OTHER DEVICES
When connecting to any other device, read its
user guide for detailed safety instructions. Do
not connect incompatible products.
EMERGENCY CALLS
Ensure the phone function of the device is
switched on and in service. Press the end key as
many times as needed to clear the display and
return to the standby mode. Enter the
emergency number, then press the call key.
7
Page 73

Give your location. Do not end the call until
given permission to do so.
About your device
The wireless device described in this guide is approved for use on the EGSM 900 and GSM 1800 and 1900 networks.
Contact your service provider for more information about networks.
When using the features in this device, obey all laws and respect local customs, privacy and legitimate rights of others,
including copyrights.
Copyright protections may prevent some images, music (including ringing tones), and other content from being copied,
modified, transferred, or forwarded.
Warning: To use any features in this device, other than the alarm clock, the device must be switched on. Do not
switch the device on when wireless device use may cause interference or danger.
Network services
To use the phone you must have service from a wireless service provider. Many of the features require special network
features. These features are not available on all networks; other networks may require that you make specific
arrangements with your service provider before you can use the network services. Your service provider can give you
instructions and explain what charges will apply. Some networks may have limitations that affect how you can use
network services. For instance, some networks may not support all language-dependent characters and services.
Your service provider may have requested that certain features be disabled or not activated in your device. If so, these
features will not appear on your device menu. Your device may also have a special configuration such as changes in
menu names, menu order, and icons. Contact your service provider for more information.
This device supports WAP 2.0 protocols (HTTP and SSL) that run on TCP/IP protocols. Some features of this device, such
as multimedia messaging (MMS), e-mail application, instant messaging, remote synchronization, and content
downloading using the browser or MMS, require network support for these technologies.
8
Page 74

Shared memory
The following features in this device may share memory: gallery, contacts, text messages, multimedia messages, and
instant messages, e-mail, calendar, to-do notes, Java™ games and applications, and note application. Use of one or
more of these features may reduce the memory available for the remaining features sharing memory. Your device may
display a message that the memory is full when you try to use a shared memory feature. In this case, delete some of
the information or entries stored in the shared memory features before continuing.
9
Page 75

1. General information
Access codes
Security code
The security code (5 to 10 digits) helps to protect your
phone against unauthorized
12345. You can change the code, and set the phone to
request the code. S
ee "Security," p. 42.
use. The preset code is
PIN codes
The personal identification number (PIN) code and the
universal personal identific
to 8 digits) help to protect your SIM card against
unauthorized use. See "Security," p. 42.
The PIN2 code (4 to 8 digits) may be supplied with the
card and is required for some functions.
The module PIN is required
the security module. See "S
The signing PIN is required fo
"Digital signature," p. 60.
ation number (UPIN) code (4
to access the information in
ecurity module," p. 60.
r the digital signature. See
PUK codes
The personal unblocking key
personal unblocking key (U
required to change a blocked PIN code and UPIN code,
respectively. The PUK2 code (8 digits) is required to
10
(PUK) code and the universal
PUK) code (8 digits) are
change a blocked PIN2 code. If the codes are not supplie
with the SIM card, contact your local service provider for
the codes.
Barring password
The barring password (4 digi
the Call barring service
ts) is required when using
. See "Security," p. 42.
Configuration setting service
To use some of the networ
internet services, MMS, Noki
remote internet server synchronization, your device
needs the correct configur
information on availability, contact your service provid
or the nearest authorized Nokia dealer, or visit the
SIM
support area on the Nokia website. See "Nokia
support," p. 11.
When you have received the settings as a configuration
message and the settings are not automatically saved an
activated,
To save the settings, select
enter the PIN code supplied by the service provider.
To discard the received settings, select
Discard
Configuration settings received
.
k services, such as mobile
a Xpress audio messaging, or
ation settings. For more
Show >
Save. If required,
Exit
d
er
d
is displayed.
or Show >
Page 76

Download content
You may be able to download new content (for example,
themes) to your phone (network service).
Important:
that offer adequate security and protection against
harmful software.
For the availability of diffe
tariffs, contact your service provider.
Use only services that you trust and
rent services, pricing, and
Nokia support
Support information
Check www.nokia.com.hk/support or your local Nokia
website for the latest version
information, downloads, and services related to your
Nokia product.
of this guide, additional
Configuration settings service
You may also download free configuration settings such
as MMS, GPRS, e-mail, and other services for your device
model at www.nokia.com.hk/settings.
Nokia PC Suite
You may find PC Suite and
Nokia website at www.nokia.com
related information on the
.hk/
.
support
Customer service
If you need to contact customer service,
check the list of loca
centers at www.nokia.com.hk/
contactus.
l Nokia Care contact
11
Page 77

Maintenance
For maintenance services, check your nearest Nokia
service center at www.nokia.com.hk/repair.
2. Get started
Install SIM card and battery
Always switch the device o
before removing the battery.
For availability and info
services, contact your SIM ca
service provider or other vendor.
This device is intended fo
Always use original Nokia batteries.
The SIM card and its contacts
scratches or bending, so
inserting, or removing the card.
1.
12
ff and disconnect the charger
rmation on using SIM card
rd vendor. This may be the
r use with a BL-4B battery.
can be easily damaged by
be careful when handling,
Slide the release button (1) to unlock and remove the
back cover (2). Remove the battery as shown (3).
2.
Open the SIM card holder (4
with the contact surface faci
Close the SIM card holder (6).
3.
). Insert the SIM card (5)
ng down into the holder.
Page 78

Observe the battery contacts (7), and insert the battery
(8). Place the upper part of
(9), and close it (10).
the back cover on the device
Insert a microSD card
4. Close the card holder (4),
and slide it to lock (5).
Use only compatible microSD
use with this device. Nokia uses approved industry
standards for memory cards, but some brands may not be
fully compatible with this device. Incompatible cards may
damage the card and the devi
on the card.
1. Switch the device off, an
the battery of the device.
2. Slide the memory card
holder to unlock (1).
3. Open the card holder (2),
and insert the memory
card into the card holder
with the contact surface
facing inward (3).
cards approved by Nokia for
ce and corrupt data stored
d remove the back cover and
5. Insert the battery, and attach the back cover to the
device.
Charge the battery
Check the model number of any charger before use with
this device. This device is intended for use when supplied
with power from the AC-3 or AC-4 charger.
The exact charger model number may vary depending on
the type of plug. For example, the model numbers for
AC-3 charger can be AC-3
Warning:
enhancements approved by
particular model. The use of any other types may
invalidate any approval or warranty, and may be
dangerous.
For availability of approved
with your dealer. When you disconnect the power cord of
any enhancement, grasp and pull the plug, not the cord.
1. Connect the charger to a wall socket.
C, AC-3U, AC-3X, etc.
Use only batteries, chargers, and
Nokia for use with this
enhancements, please check
the
13
Page 79

2. Connect the lead from the
charger to the socket on the
bottom of your device.
If the battery is completely
discharged, it may take a few
minutes before the charging
indicator appears on the display
or before any calls can be made.
The charging time depends on the charger used. Charging
a BL-4B battery with the AC-3 charger takes approximately
2 hours and 15 minutes while the device is in the standby
mode.
Antenna
Your device has
internal antennas.
Note: As with
any radio
transmitting device,
avoid touching an
antenna
unnecessarily when
the antenna is in use.
For example, avoid
touching the cellular
antenna during a
phone call. Contact with a transmitting or receiving
antenna affects the quality of the radio communication,
may cause the device to operate at a higher power level
than otherwise needed, and may reduce the battery life.
Headset
Warning: Listen to music at a moderate level.
Continuous exposure to high volume may damage your
hearing.
Pay special attention to volume level if you connect any
other headsets to the device.
Warning: When you use the headset, your ability
to hear outside sounds may be affected. Do not use the
headset where it can endanger your safety.
Do not connect products that create an output signal as
this may cause damage to the device. Do not connect any
voltage source to the Nokia AV Connector.
When connecting any external device or any headset,
other than those approved by Nokia for use with this
device, to the Nokia AV Connector, pay special attention
to volume levels.
Change the accent color frame
Replace the accent color frame to change the look of your
device.
1. Remove the back cover of your device.
14
Page 80

2. Detach the accent color
frame first at the upper
part of your device (1),
and remove it (2).
from bottom to top (4, 5).
Press it from the top to
snap it in.
4. Attach the back cover of your device, and ensure that
it is closed properly.
Strap
3. To mount an accent color
frame, affix it at the lower
part of your device (3),
and attach it successively
3. Your device
Thread the strap as shown in the
picture and tighten it.
15
Page 81

Keys and parts
18 — Loudspeaker
19 — Camera lens
1 — Earpiece
2 — Display
3 — Navi™ key: 4-way navigation key and middle
selection
4 — Left selection key
5 — Call key
— Keypad
6
— Right selection key
7
8 — End key
9 — Microphone
10 — Charger connector
11 — Nokia AV Connector (2.5 mm)
12 — Mini USB cable connector
13 — Camera key
14 — Camera flash
15 — Volume down key
16 — Volume up key
— Power key
17
key
16
Warning:
this device may contain nickel. It is not designed for
prolonged contact with the skin. Continuous exposure to
nickel on the skin may lead to a nickel allergy.
The power key (17) and metallic trim in
Switch the device on and off
To switch the device on or off, press and hold the power
key.
If the device prompts for a PIN or a UPIN code, enter the
code (displayed as ****), and select OK
The device may prompt you to set the time and date. Ente
the local time, select the time
terms of the time difference with respect to Greenwich
mean time (GMT), and enter the date. See "Time and
date," p. 36.
When you switch on your device for the first time an
device is in the standby mo
get the configuration settings from your service provide
(network service). For more information refer to
to support. See "Configuration," p. 41. See
"Configuration setting service," p. 10.
zone of your location in
de, you may be prompted to
.
Connect
Standby mode
When the device is ready for use, and you have not
entered any characters, the device is in the standby mode.
r
d the
r
Page 82

Display
1 — Signal strength of the cellular network
2 — Battery charge status
3 — Indicators
4 — Name of the network or the operator logo
5 — Clock
6 — Main screen
7 — Function of the left selection key. See "Left selection
key," p. 36.
8 — Function of the middle selection key
9 — Function of the right selection key. See "Right
selection key," p. 37. Operator variants may have an
operator-specific name to access an operator-specific
website.
Active standby
The active standby mode displays a list of selected device
features and information that you can directly access.
To switch active standby on or off, select Menu >
Settings > Display > Active standby > Active
standby mode > On or Off.
In the standby mode, scroll up or down to navigate in the
list, and choose Select or View. The arrows indicate that
further information is available. To stop navigation, select
Exit.
To organize and change the active standby mode, select
Options and from the available options.
Shortcuts in the standby mode
To access the list of dialed numbers, press the call key
once. Scroll to the number or name, and press the call key
to call the number.
To open the web browser, press and hold 0.
To call your voice mailbox, press and hold 1.
Use keys as a shortcut. See "My shortcuts," p. 36.
Indicators
unread messages
unsent, canceled, or failed messages
missed call
17
Page 83

/ Your phone is connected to the IM service, and the
availability status is online or offline.
instant messages received
The keypad is locked.
The phone does not ring for an incoming call or text
message.
The alarm clock is activated.
The countdown timer is running.
The stopwatch is running in the background.
/ The phone is registered to the GPRS or EGPRS
network.
/ A GPRS or EGPRS connection is established.
/ The GPRS or EGPRS connection is suspended (on
hold).
A Bluetooth connection is active.
/ A push-to-talk connection is active or suspended.
If you have two phone lines, the second phone line is
selected.
All incoming calls are diverted to another number.
The loudspeaker is activated, or the music stand is
connected to the device.
Calls are limited to a closed user group.
The timed profile is selected.
/ / A headset, handsfree, or loopset is connected
to the device.
18
Flight mode
You can deactivate all radio frequency functions and still
have access to offline games, calendar, and phone
numbers.
Use the flight mode in radio sensitive environments—on
board aircraft or in hospitals. When the flight mode is
active,
Select Menu > Settings > Profiles > Flight >
Activate or Personalise to activate or set up the flight
mode.
To deactivate the flight mode, select any other profile.
Emergency call in flight mode Enter the emergency
number, press the call key, and select Yes when Exit flight
profile? is displayed. The phone attempts to make an
emergency call.
or receive any calls, including emergency calls, or use
other features that require network coverage. To make
calls, you must first activate the phone function by
changing profiles. If the device has been locked, enter the
lock code. If you need to make an emergency call while
the device is locked and in the flight profile, you may be
also able to enter an official emergency number
programmed in your device in the lock code field and
select 'Call'. The device will confirm that you are about to
exit flight profile to start an emergency call.
is shown.
Warning: With the flight profile you cannot make
Keypad lock (keyguard)
To prevent accidental keypresses, select Menu, and press
* within 3.5 seconds to lock the keypad.
Page 84

To unlock the keypad, select Unlock, and press * within
1.5 seconds. If Security keyguard is set to on, enter the
security code if requested.
To answer a call when keyguard is on, press the call key.
When you end or reject the call, the keypad automatically
locks.
Further features are Automatic keyguard and Security
keyguard. See "Phone," p. 40.
When the keypad lock is on, calls may be possible to the
official emergency number programmed into your device.
4. Call functions
Make a call
Number dialing
Functions without a SIM card
Several functions of your device may be used without
installing a SIM card (for example, the data transfer with
a compatible PC or another compatible device). Some
functions appear dimmed in the menus and cannot be
used.
You can search for a name or phone number that you have
saved in Contacts. See "Search for a contact," p. 33. Press
the call key to call the number.
To access the list of dialed numbers, press the call key once
in the standby mode. To call the number, select a number
or name, and press the call key.
1. Enter the phone number, including the area code.
For international calls, press * twice for the
international prefix (the + character replaces the
international access code), enter the country code, the
area code without the leading 0, if necessary, and the
phone number.
2. To call the number, press the call key. To adjust the
volume in a call, press the volume key up or down.
3. To end the call or to cancel the call attempt, press the
end key.
Dialing shortcuts
Assign a phone number to one of the number keys, 2 to 9.
See "Dialing shortcuts," p. 34.
Call the number in one of the following ways:
Press a number key, then the call key.
OR
If Speed dialling is set to On, press and hold a number
key until the call begins.
19
Page 85

Further details are described in Speed dialling. See
"Call," p. 40.
Enhanced voice dialing
To answer a waiting call during an active call (network
service), press the call key. The first call is put on hold. To
end the active call, press the end key. You may also
activate the Call waiting function. See "Call," p. 40.
You can make a phone call by saying the name that is
saved in the contact list of the device.
Voice commands are language-dependent. Set the
Recognition lang. before using voice dialing. See
"Phone," p. 40.
Note: Using voice tags may be difficult in a noisy
environment or during an emergency, so you should not
rely solely upon voice dialing in all circumstances.
1. In the standby mode, press and hold the right selection
key or the volume down key. A short tone sounds, and
Speak now is displayed.
2. Speak the name of the contact you want to dial clearly.
If the voice recognition is successful, a list with
matches is shown. The device plays the voice
command of the first match on the list. If it is not the
correct command, scroll to another entry.
Using voice commands to carry out a selected device
function is similar to voice dialing. See "Voice
commands," p. 37.
Answer or reject a call
To answer an incoming call, press the call key. To end the
call, press the end key.
To reject an incoming call, press the end key. To mute the
ringing tone, select Silence.
20
Options during a call
Many of the options that you can use during a call are
network services. For availability, contact your service
provider.
During a call, select Options and from the following
options:
Call options are Mute or Unmute, Contacts, Menu, Lock
keypad, Record, Voice clarity, Loudspeaker or
Handset.
Network options are Answer or Reject, Hold or Unhold,
New call, Add to conference, End call, End all calls, and
the following:
● Send DTMF — to send tone strings
● Swap — to switch between the active call and the call
on hold
● Transfer — to connect a call on hold to an active call
and disconnect yourself
● Conference — to make a conference call
● Private call — to have a private discussion in a
conference call
Warning: Do not hold the device near your ear
when the loudspeaker is in use, because the volume may
be extremely loud.
Page 86

5. Write text
Text modes
To enter text (for example,
can use traditional or predictive text input.
When you write text, press and hold
between traditional text input, indicated by
predictive text input, indicated by
are supported by predictive text input.
The character cases are indicated by
change the character case, press #
letter to number mode, indicated by
#, and select
to the letter mode, press and hold
To set the writing language, select
language.
Number mode
Traditional text input
Press a number key, 2
character appears. The availabl
selected writing language.
If the next letter you want is located on the same key
the present one, wait until
the letter.
when writing messages) you
Options to toggle
. Not all languages
,
. To change from the
, press and hold
. To change from the number
#.
> Writing
Options
9
to
, repeatedly until the desired
e characters depend on the
the cursor appears and enter
, and
, and
To access the most common punctuation marks and
special characters, repeatedly press the number key
press * to select a special character.
Predictive text input
Predictive text input is base
which you can also add new words.
1. Start writing a word, using the keys
. To
as
key only once for one letter.
2. When you finish writing the word and it is correct, to
confirm it by adding a space, press 0
If the word is not correct, press
the word from the list.
If the ? character is displayed after the word, the word
you intended to write is not in the dictionary. To add
the word to the dictionary, select
using traditional text input, and select
compound words, enter the first part of the word, and
press the navigation key right to confirm it. Write the
last part of the word, and confirm the word.
3.
Start writing the next word.
d on a built-in dictionary to
2 to
.
repeatedly, and select
*
Spell. Enter the word
9. Press each
. To write
Save
1 or
21
Page 87

6. Navigate the menus
The device offers you an extensive range of functions that
are grouped into menus.
1. To access the menu, select Menu.
2. Scroll through the menu, and select an option (for
example, Settings).
3. If the selected menu contains further submenus, select
one (for example, Call).
4. If the selected menu contains further submenus,
repeat step 3.
7. Messaging
You can read, write, send and save text and multimedia
messages, e-mail, audio and flash messages. The
messaging services can only be used if they are supported
by your network or service provider.
Note: Your device may indicate that your message
was sent to the message center number programmed into
your device. Your device may not indicate whether the
message is received at the intended destination. For more
details about messaging services, contact your service
provider.
22
5. Select the setting of your choice.
6. To return to the previous menu level, select Back.
To exit the menu, select Exit.
To change the menu view, select Options > Main menu
view > List, Grid, Grid with labels, or Tab.
To rearrange the menu, scroll to the menu to be moved,
and select Options > Organise > Move. Scroll to where
you want to move the menu, and select OK. To save the
change, select Done > Yes.
Important: Exercise caution when opening
messages. Messages may contain malicious software or
otherwise be harmful to your device or PC.
Text messages
Your device supports the sending of text messages
beyond the character limit for a single message. Longer
messages are sent as a series of two or more messages.
Your service provider may charge accordingly. Characters
that use accents or other marks, and characters from some
language options, take up more space, limiting the
number of characters that can be sent in a single message.
Page 88

An indicator at the top of the display shows the total
number of characters left and the number of messages
needed for sending. For exam
are 673 characters left and that the message will be sent
as a series of 2 messages.
Before you can send any text
must save your message center number. See "Text
messages," p. 30.
The blinking
full. Before you can receive
your old messages.
indicates that the message memory is
ple, 673/2 means that there
or SMS e-mail messages, you
new messages, delete some of
Multimedia messages
Only devices that have comp
and display multimedia messages. The appearance of a
message may vary depending
The wireless network may limit the size of MMS messages.
If the inserted picture exceed
make it smaller so that
A multimedia message can contain text, pictures, so
clips, and video clips.
atible features can receive
on the receiving device.
s this limit, the device may
it can be sent by MMS.
und
Add subject
>
Options
message, scroll to the attachment bar at the bottom of
the display and select the desired type of attachment.
The message type is indicated at the top of the display and
changes automatically depending on the content of the
message.
To send the message, press
Operations that may cause the message type to ch
from text message to multim
are not limited to the following:
● Attach a file to the message.
● Request a delivery report.
Set priority for the message to high or low.
●
● Add a Cc or Bcc recipient or subject to the message or
an e-mail address in the recipient field.
Service providers may charge differently depending on
the message type. Check with your service provider for
details.
. To attach content to the
Send.
ange
edia message include, but
Read a message and reply
Create a text or multimedia
message
Create message
Menu >
Select
Message. To add recipients, scroll to the
enter the recipient’s number or e-mail address, or select
to select recipients from the available options. To add
Add
Cc or Bcc recipients, select
enter the message text, scroll to the
the text. To add a subject for the message, select
Messaging
>
Options
> Add recipient
Text: field, and enter
>
To: field, and
. To
Important:
messages. E-mail messages or multimedia message
objects may contain malicious software or otherwise be
harmful to your device or PC.
Your device issues a noti
received. Press
one message was received select a message from the
inbox and press
parts of the message.
Exercise caution when opening
Show to display the message. If more than
fication when a message is
. Use the navigation key to view all
Open
23
Page 89

Reply as and the message type to
>
Options
Select
answer to a message.
Message sending process
To send the message, select
message in the
Your device may indicate that your message
Note:
was sent to the message center number programmed into
your device. Your device may not indicate whether the
message is received at the
details about messaging services, contact your service
provider.
If an interruption occurs whil
the phone tries to resend the message a few times. If
these attempts fail, the
folder. To cancel the sendin
Outbox folder, scroll to the desired message, and select
Options >
Cancel sending
folder, and the sending starts.
Outbox
message remains in the
. The phone saves the
Send
intended destination. For more
e the message is being sent,
g of the messages in the
.
E-mail
The e-mail application uses a packet data connection
(network service) to allow you to access your e-mail
account. This e-mail application
e-mail function. To use the e-ma
you need a compatible e-mail system.
You can write, send, and read e-mail with your device and
you can get a notification about new e-mail on your
account. Your device supports POP3 and IMAP4 e-mail
servers.
24
is different from the SMS
il function on your device,
Outbox
Before you can send and retr
you must obtain a new e-mail
account. To check the availability and the settings of your
e-mail account, contact your
You may receive the e-mail co
configuration message. See
service," p. 10.
To setup your e-mail preferences, select
Messaging
See "E-mail messages," p. 31.
> Message settings
ieve any e-mail messages,
account or use your current
e-mail service provider.
nfiguration settings as a
"Configuration setting
>
Menu
E-mail messages
>
.
E-mail setup wizard
The e-mail setup wizard starts automatically if no e-m
settings are defined in the phone, or to start the setting
wizard , select
Options
Using e-mail setup wizard may require inernet connetction
and may require network support and you may nee
pay for the service.
To enter the settings manually, select Menu >
Messaging
mailbox
The e-mail application may requires
point without a proxy. WAP access points normally in
a proxy and do not work with the e-mail application.
Menu > Messaging
Add mailbox
>
> E-mail
>
Create manually
E-mail setup wizard
>
>
mailbox
.
E-mail
>
Options >
an internet access
>
mailbox
.
d to
Add
clude
ail
Write and send an e-mail
You can write your e-mail
the e-mail service; or connect to the service first, then
write and send your e-mail.
1. Select Menu
mail message
2. If more than one e-mail account is defined, select the
account from which you want to send the e-mail.
> Messaging >
message before connecting to
Create message
.
> E-
Page 90

3. Enter the recipient’s e-mail address, write the subject,
and enter the e-mail message. To attach a file, select
the Insert button and from the options.
To save the e-mail, select Options > Save message.
To edit or continue writing your e-mail later, select As
draft message.
4. To send the e-mail message, select the Send button.
To send an e-mail from the draft folder, select Menu >
Messaging > Drafts and the desired message.
Read an e-mail and reply
Important: Exercise caution when opening
messages. E-mail messages or multimedia message
objects may contain malicious software or otherwise be
harmful to your device or PC.
To download e-mail messages that have been sent to your
e-mail account, select Menu > Messaging and your email account. Confirm to connect to your e-mailbox. The
e-mail application only downloads e-mail headers at first.
Select an e-mail and press Open to download the
complete e-mail message. Scroll down to view the e-mail.
Select Retrieve to download attachments. Select
Options > Reply to reply to an e-mail. Confirm or edit
the e-mail address and subject and create your reply
message. To send the reply message, select the Send
button. To terminate the connection to your e-mailbox
select Options > Disconnect. The connection to the emailbox is also automatically terminated after some time
without activity.
New e-mail notifications
Your device can automatically check your e-mail account
in time intervals and issue a notification, if your e-mail
account has received new e-mail .
1. Select Menu > Messaging > Message settings >
E-mail messages > Edit mailboxes.
2. Select your e-mail account, Downloading sett. and
the following options:
● Mailbox upd. interval — to set how often your
device checks your e-mail account for new e-mail
● Automatic retrieval — to retrieve new e-mail
automatically from your e-mail account.
3. To enable the new e-mail notification, select Menu >
Messaging > Message settings > E-mail
messages > New e-mail notif. > On.
Flash messages
Flash messages are text messages that are instantly
displayed upon reception. Flash messages are not
automatically saved.
Write a flash message
Select Menu > Messaging > Create message > Flash
message. Enter the recipient’s phone number and write
your message. The maximum length of a flash message is
70 characters. To insert a blinking text into the message,
select Options > Insert symbol > Blink character to
set a marker. The text after the marker blinks. To end the
blinking text range, insert a second marker.
25
Page 91

Read and reply to a flash
message
A received flash message is indicated with Message: and
a few words from the beginning of the message.
To read the message, select Read.
To extract numbers and addresses from the current
message, select Options > Use detail.
To save the message, select Save and the folder in which
you want to save it.
Nokia Xpress audio messaging
You can use the MMS to create and send an audio message
in a convenient way. MMS must be activated before you
can use audio messages.
If more than one message is received, select Show >
Play.
To listen to the message later, select Exit.
Memory full
When you receive a message, and the memory for the
messages is full, Memory full. Unable to receive
messages. is displayed.
To delete old messages, select OK > Yes and the folder.
Scroll to the desired message, and select Delete.
To delete more messages, select Mark. Mark all the
messages you want to delete, and select Options >
Delete marked.
Folders
Create a message
1. Select Menu > Messaging > Create message >
Audio message. The voice recorder opens. See "Voice
recorder," p. 48.
2. Speak your message.
3. Enter one or more phone numbers in the To: field, or
select Add to retrieve a number.
4. To send the message, select Send.
Listen to a message
To open a received audio message, select Play.
26
The device saves received messages in the Inbox folder.
Messages that have not yet been sent are saved in the
Outbox folder.
To set the device to save the sent messages in the Sent
items folder, select Menu > Messaging > Message
settings > General settings > Save sent messages.
To edit and send messages that you have written and
saved in the drafts folder, select Menu > Messaging >
Drafts.
You can move messages to the Saved items folder. To
organize your Saved items subfolders, select Menu >
Messaging > Saved items.
To add a folder, select Options > Add folder.
Page 92

To delete or rename a folder, scroll to the desired folder,
and select Options
To create a new template, save a message as a template,
or access the template list, and select Menu
Messaging
> Delete folder
> Saved items
or Rename folder
Templates.
>
>
Instant messages
have access to all of the feat
With instant messaging (IM) (network service) you can
send short, simple text messages to online users. You
to subscribe to a service and register with the IM service
you want to use. For more information about signing up
for IM services, contact your service provider.
To set the required settings
option Connection settings
The icons and texts on the display may vary, depending
on the IM service.
ures described in this guide.
have
for the IM service, use the
. See "Access," p. 27.
Depending on your IM service, you may not
Note:
Access
. IMs may be replaced
IMs
Menu >
Select
by another term depending on the service provider. If
more than one set of connect
available, select the one you want.
Options
Select
Login — to connect to the IM service. To set the phone
●
to automatically connect to the IM service when you
switch on the phone, in
Automatic login:
Messaging
, and
>
ion settings for IM service is
from the following options:
the login session, select
> On.
● Saved conversations
.
conversations that you saved during an IM session
● Connection settings
messaging and presence connection
— to view, erase, or rename the
— to edit the settings needed for
Connect
To connect to the service, access the instant messages
menu, select the IM service, if needed, and
To disconnect from the IM service, select Options
.
Logout
Login
Sessions
When connected to the service, your status, as seen by
others, is shown in a status line: My status: Online
status: Busy, or Status: Invisible
status, select
Below the status line there are three folders containing
your contacts that show their status:
Online ()
and select
To collapse the folder, select
● Conversations
, and Offline (). To expand the folder, scroll to it,
Expand
instant messages or invitations to IM during the active
IM session:
indicates a new group message
indicates a read group message
indicates a new instant message
indicates a read instant message
.
Change
(or scroll right).
— shows the list of new and read
. To ch ange your own
Conversations
Collapse
(or scroll left).
.
>
, My
,
27
Page 93

indicates an invitation
The icons and texts on the display depends on the IM
service.
● Online ()
online
● Offline ()
offline
To start a conversation, expa
folder, scroll to the contact with whom you want to
chat, and select
to a message, expand the
to the contact to whom you want to chat, and select
Open.
Groups > Public groups
●
groups provided by the service provider (not visible if
groups are not supported by the network). To start an
IM session with a group, scroll to a group, and select
Join. Enter the screen name
your nickname in the conversation. When you hav
successfully joined the grou
start a group conversation. You can create a private
group. See "Groups," p. 29.
● Search
users or public groups on the network by phone
number, screen name, e-mail address, or name. If you
select Groups
in the group, group name, topic, or ID.
● Options > Chat
conversation when you have
group that you want
— shows the number of contacts that are
— shows the number of contacts that are
nd the online or the offline
Chat. To answer an invitation or reply
or Groups
> Users
, you can search for a group by a member
or Join group
Conversations folder, scroll
— List of bookmarks to public
that you want to use as
p conversation, you can
— to search for other IM
— to start the
found the user or the
Accept or reject an invitation
If you receive a new invitation, to read it, select
more than one invitation is received, select an invitation
28
e
Read. If
and Open
Accept, and enter the screen name you want to use as
your nickname. To reject or
Options
. To join the private group conversation, select
delete the invitation, select
> Reject
or Delete
.
Read an instant message
If you receive a new message that is not a message
associated with an active conversation, New instant
message
one message is received, select a message and
New messages received during an active conversation are
held in IMs
from someone who is not in IM contacts
displayed. To save a new contact that is not in the phone
memory, select
is displayed. To read it, select
> Conversations
> Save contact
Options
Read
. If more than
. If you receive a message
, the sender ID is
.
Open
.
Participate in a conversation
To join or start an IM session, write your message, and
select Send
If you receive a new message during a conversation from
a person who is not taki
conversation,
alert tone. Write your message, and select
message is displayed, and th
below your message.
.
is displayed, and
ng part in the current
the phone sounds an
Send. Your
e reply message is displayed
Add IM contacts
When connected to the IM serv
Options >
select
Enter ID manually
Add a Contact
, Search from server
ice, in the IM main menu,
> By mobile number
, or Copy from
,
Page 94

server (depending on the service provider). To start a
conversation, scroll to a contact, and select Chat.
you want to use as your nickname. Mark the private group
members in the contacts list, and write an invitation.
Block or unblock messages
When you are in a conversation and want to block
messages, select Options > Block contact.
To block messages from a specific contact in your contacts
list, scroll to the contact in Conversations, and select
Options > Block contact > OK.
To unblock a contact, in the IM main menu, select
Options > Blocked list. Scroll to the contact you want to
unblock, and select Unblock > OK.
Groups
You can use the public groups provided by the service
provider or create your own private groups for an IM
conversation.
You can bookmark public groups that your service
provider may maintain. Connect to the IM service, and
select Groups > Public groups. Select a group and
Join. If you are not in the group, enter your screen name
as your nickname for the group.
To delete a group from your list, select Options > Delete
group.
To search for a group, select Groups > Public groups >
Search groups.
To create a private group, connect to the IM service, and,
from the main menu, select Options > Create group.
Enter the name for the group and the screen name that
Voice messages
The voice mailbox is a network service to which you may
need to subscribe. For more information, contact your
service provider.
To call your voice mailbox, select Menu > Messaging >
Voice messages > Listen to voice msgs..
To enter, search for, or edit your voice mailbox number,
select Voice mailbox no..
If supported by the network,
messages. To call your voice mailbox number, select
Listen.
indicates new voice
Info messages
You can receive messages on various topics from your
service provider (network service). For more information,
contact your service provider.
Select Menu > Messaging > Info messages and from
the available options.
Service commands
Service commands allow you to write and send service
requests (USSD commands) to your service provider, such
as activation commands for network services.
29
Page 95

To write and send the service request, select Menu >
Messaging > Serv. commands. For details, contact your
service provider.
Delete messages
Delete a single message, all messages, or a folder.
To delete messages, select Menu > Messaging > Delete
messages > By message to delete a single message, By
folder to delete all messages from a folder, or All
messages.
● Save sent messages — Select Yes to save the sent
messages in the Sent items folder.
● Overwriting in Sent — SelectAllowed to overwrite
old sent messages with the new ones when the
message memory is full. This setting is shown only if
you select Save sent messages > Yes.
● Font size — Select the font size used in messages.
● Favourite recipient — add your favourite phone
numbers, contacts or e-mail addresses or recipient
groups
● Graphical smileys — Select Yes to set the device to
replace character-based smileys with graphical ones.
SIM messages
SIM messages are specific text messages that are saved to
your SIM card.
You can copy or move those messages from the SIM to the
phone memory, but not vice versa.
To read SIM messages, select Menu > Messaging >
Options > SIM messages.
Message settings
General settings
General settings are common for text and multimedia
messages.
Select Menu > Messaging > Message settings >
General settings and from the following options:
30
Text messages
The text message settings affect the sending, receiving,
and viewing of text and SMS e-mail messages.
Select Menu > Messaging > Message settings > Text
messages and from the following options:
● Delivery reports — Select Yes to ask the network to
send delivery reports about your messages (network
service).
● Message centres — Select Add centre to set the
phone number and name of the message center that is
required for sending text messages. You receive this
number from your service provider.
● Msg. centre in use — to select the message center in
use.
● Message validity — to select the length of time for
which the network attempts to deliver your message
● Messages sent via — to select the format of the
messages to be sent: Text, Paging, or Fax (network
service)
● Use packet data — Select Yes to set GPRS as the
preferred SMS bearer.
Page 96

● Character support
characters in the messages to be sent as viewed. If you
Reduced, characters with accents and other
select
marks may be converted
Rep. via same centre
●
recipient of your message
your message center (network service).
— Select
Full to select all
to other characters.
— Select Yes
to send you a reply using
to allow the
Multimedia messages
The message settings affect the sending, receiving, an
viewing of mult
You may receive the configuration settings for
multimedia messaging as a
"Configuration setting service," p. 10. You can also enter
the settings manually. See "Configuration," p. 41.
Menu >
Select
Multimedia messages
● Delivery reports — Select
send delivery reports about your messages (network
service).
● MMS creation mode
multimedia messages with restricted content. This
makes it more likely, that
to display the content.
●
Image size
multimedia messages. If restricted, higher resolutions,
which are likely not to be supported in some networks,
are not available.
●
Default slide timing
between slides in
imedia messages.
configuration message. See
Messaging >
— to set the image size in
multimedia messages
Message settings >
and from the following options:
Yes to ask the network to
— Select
— to define the default time
Restricted
the receiving device is able
to create
d
● Allow MMS receptn. — Select
block the multimedia message. If you select
network, you cannot receive
when outside your home ne
of the multimedia message service is generally
home network
on your phone.
● Incoming MMS msgs.
multimedia messages automatically, manually after
being prompted, or to reject
is not shown if
● Allow adverts
This setting is not shown if Allow MMS receptn. is set
No, or Incoming MMS msgs.
to
● Configuration sett.
display the configurations
messaging. Select a service provider,
Personal config.
Account and an MMS account contained in the active
configuration settings.
. The availability of this menu depends
— to allow the reception of
Allow MMS receptn.
— to receive or reject advertisements.
— Select
for multimedia
Yes or No
multimedia messages
twork. The default setting
the reception. This setting
is set to
Configuration
that support multimedia
to receive or
In home
In
Reject.
Default
No.
to
, or
is set to
messaging. Select
E-mail messages
The settings affect sending,
You may receive the settings as a configuration message.
See "Configuration setting service," p. 10. You can also
manually enter the settings. See
"Configuration," p. 41.
Menu >
Select
mail messages
Messaging >
to display the options.
receiving, and viewing e-mail.
Message settings
>
E-
31
Page 97

8. Contacts
You can save names and phone numbers (contacts) in the
device memory and in the SIM card memory.
The device memory can save contacts with additional
details, such as various phone numbers and text items.
You can also save an image for a limited number of
contacts.
The SIM card memory can save names with one phone
number attached to them. The contacts saved in the SIM
card memory are indicated by
The phone functions that display names use the phone
number that most closely matches. If less than 7 digits
match, the name displayed may not be correct.
.
Save names and phone numbers
Names and numbers are saved in the used memory.
To save a name and phone number, select Menu >
Contacts > Names > Options > Add new contact.
Save details
In the device memory you can save different types of
phone numbers, a tone or a video clip, and short text items
for a contact.
The first number you save is automatically set as the
default number and is indicated with a frame around the
32
number type indicator (for example, ). When you select
a name from contacts (for example, to make a call), the
default number is used unless you select another number.
Ma ke su re th at th e mem ory i n use is Phone or Phone and
SIM. See "Settings," p. 32.
Search for the contact to add a detail, and select Details >
Options > Add detail.
Select from the available options.
Settings
These settings define where the contact information is
stored, how it is displayed, and how much memory
remains.
Select Menu > Contacts > Settings and from the
following options:
● Memory in use — to select the SIM card or phone
memory for your contacts. Select Phone and SIM to
recall names and numbers from both memories. In that
case, when you save names and numbers, they are
saved in the phone memory.
● Contacts view — to select how the names and
numbers in Contacts are displayed
● Name display — to select whether the contact’s first
or last name is displayed first
● Font size — to set the font size for the list of contacts
Page 98

● Memory status
capacity
— to view the free and used memory
Groups
Menu > Contacts
Select
and phone numbers saved in
groups with different ring
> Groups
ing tones and group images.
to arrange the names
the memory into caller
Search for a contact
Menu >
Select
the list of contacts, or enter the first characters of the
name to search.
Contacts
> Names
and scroll through
Copy or move contacts
To copy or move a contact between the SIM card memory
and the phone memory, select Menu >
. Select the contact to copy or m ove and
Names
Copy contact
To copy or move several cont
to copy or move and
contacts, and select
marked
To copy or move all cont
memory and the phone memory, select
Contacts
The SIM card memory can save names with one phone
number attached to them.
or Move contact
Options
Options
.
> Copy contacts
.
acts, select the first contact
> Mark. Mark the other
> Copy marked
acts between the SIM card
or Move contacts
Contacts
Menu >
>
Options
or Move
.
>
Edit contact details
Search for the contact, and select Details
To edit a name, number, or text item or to change the
image, select
To change the number type, sc
and select
Options >
Options
Edit.
roll to the desired number,
> Change type
.
.
Delete contacts
To delete a contact, search for the desired contact, and
select Options
To delete all the contacts and the details attached to them
from the phone or SIM card memory, select
Contacts
or From SIM card
To delete a number, text item, or an image attached to
the contact, search for the contact, and select
Scroll to the desired detail, and select
Delete and from the av
> Delete contact.
> Del. all contacts
.
ailable options.
> From phone memory
Menu >
Options
Details
>
.
Synchronize all
Synchronize your calendar, contacts data, and notes w
a remote internet server (network service). See
"Synchronize from a server," p. 39.
ith
33
Page 99

Business cards
You can send and receive a
from a compatible device that supports the vCard
standard as a business card.
To send a business card, search for the contact, and
> Options
Details
When you receive a business card, select
to save the business card in
the business card, select
person’s contact information
> Send business card
the phone memory. To discard
Exit >
Show
Yes.
.
> Save
Dialing shortcuts
Your device can dial a phon
The number keys, 2 to 9, can have a phone number
assigned to them. To assign a phone number to a nu
key, select
to the number to assign as the shortcut for
dialling
Assign
Select
to the key, select
>
Menu
.
, or if a number has already been assigned
Options >
e number with one keypress.
Contacts >
Speed dials
Change.
, and scroll
Speed
9. Call log
select
mber
Search and the contact to assign the shortcut. If
Select
Speed dialling
to activate it.
To make a call using the shortcuts, press and hold the
corresponding key. See "D
is off, the phone asks whether you want
ialing shortcuts," p. 19.
Info, service, and my numbers
Menu >
Select
submenus:
●
Info numbers
your service provider if the numbers are included on
your SIM card (network service)
● Service numbers
your service provider, if the numbers are included on
your SIM card (network service)
●
My numbers
to your SIM card, if the numbers are included on your
SIM card.
These functions require supporting by the SIM card.
Contacts and from one of these
— to call the information numbers of
— to call the service numbers of
— to view the phone numbers assigned
The device registers your missed, received, and dialed
calls if the network supports it and the device is switched
on and within the network service area.
To view the information on your calls, select
Missed calls
34
Log >
numbers
.
, Received calls
Menu >
, or Dialled
To view your recent missed
dialed numbers chronologically, select
the contacts to whom you mo
Msg. recipients
select
and received calls and the
st recently sent messages,
.
Call log. To view
Page 100

To view the approximate information on your recent
communications, select Menu > Log > Call duration,
Data counter, or Pack. data timer.
To view how many text and multimedia messages you
have sent and received, select Menu > Log > Message
log.
Note: The actual invoice for calls and services from
your service provider may vary, depending on network
features, rounding off for billing, taxes, and so forth.
10. Settings
Profiles
Your phone has various setting groups called profiles, for
which you can customize the phone tones for different
events and environments.
Select Menu > Settings > Profiles, the desired profile,
and from the following options:
● Activate — to activate the selected profile
● Personalise — to personalize the profile. Select the
setting you want to change, and make the changes.
● Timed — to set the profile to be active until a certain
time (up to 24 hours) and set the end time. When the
time set for the profile expires, the previous profile that
was not timed becomes active.
Note: Some timers, including the life timer, may
be reset during service or software upgrades.
Themes
A theme contains elements for personalizing your device.
Select Menu > Settings > Themes and from the
following options:
● Select theme — to set a theme. A list of folders in
Gallery opens. Open the Themes folder, and select a
theme.
● Theme downloads — to open a list of links to
download more themes
Tones
You can change the tone settings of the selected active
profile.
Select Menu > Settings > Tones. You can find the same
settings in the Profiles menu. See "Profiles," p. 35.
35
 Loading...