

Nokia pt128 x
PRINTED IN CANADA
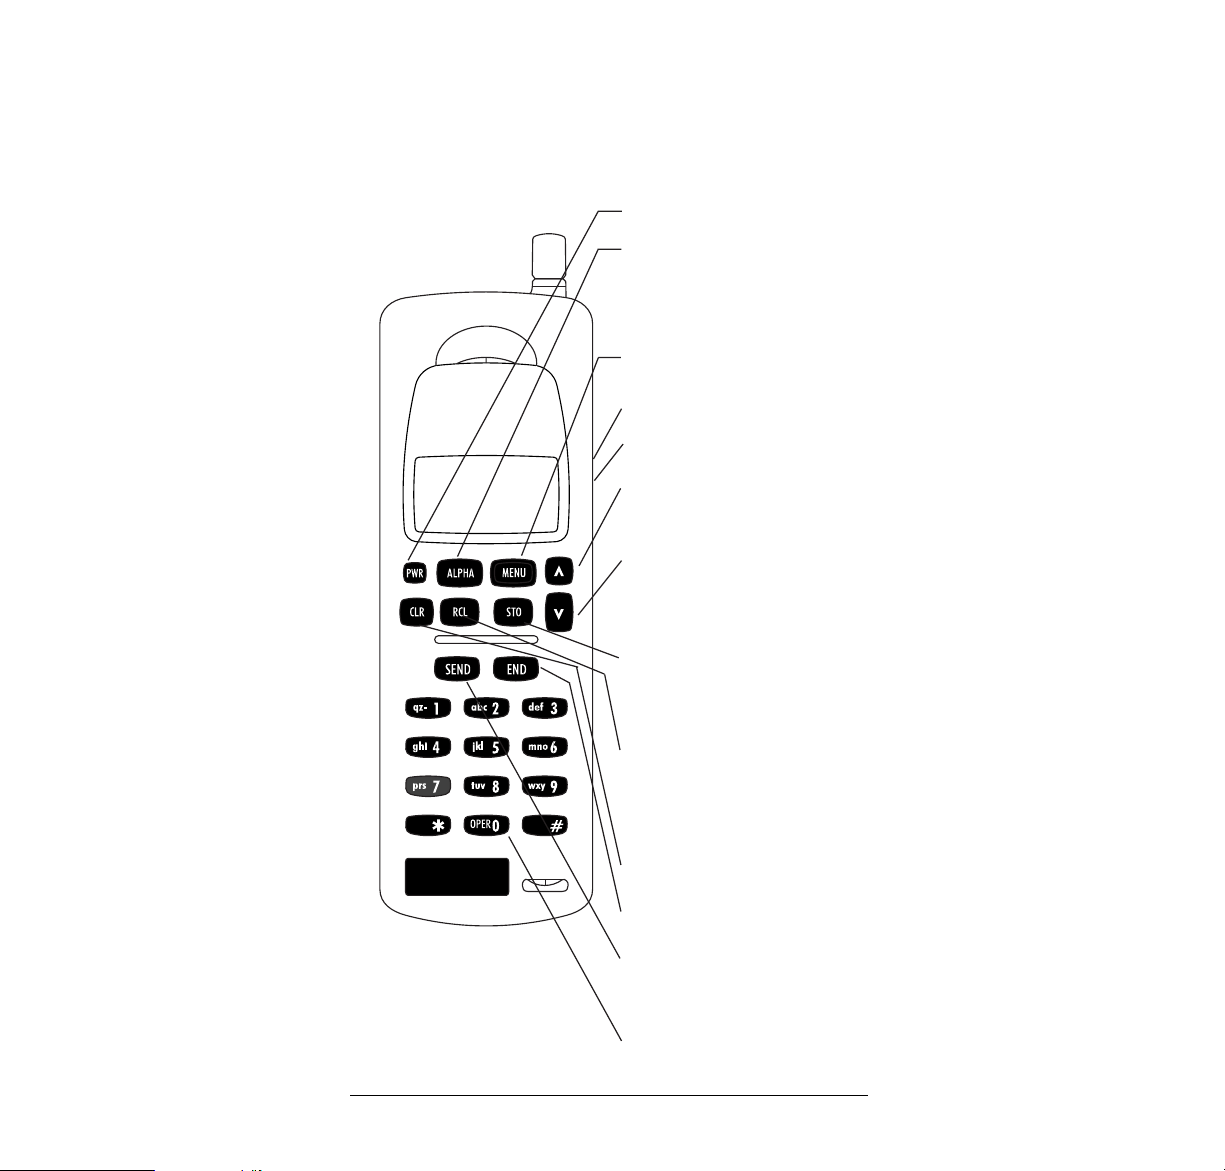
DESCRIPTION OF KEYS
More detailed information on each key is given throughout
the manual.
Press and hold to switch on or
off.
Number and alpha keys.
Used to “dial” a number. Also
to send DTMF numbers
(MENU + SEND).
After pressing RCL, press to
scroll through the memory
locations.
Recalls information from a
memory location. Also used to
show hidden digits, if the
display is full.
Used to store information in a
memory location. Also used to
confirm a setting for a feature
in the menu.
Used to enter menu functions.
Press to increase the volume;
Press to decrease the volume.
After pressing MENU, press to
scroll through the menu and to
select options.
Press to switch to alpha mode
and to key in or display letters;
press again to switch back to
numeric mode.
Deletes characters and cancels
keystrokes.
Used to end a phone call.
NOKIA

1
Traffic Safety
Do not use a hand-held telephone while driving a vehicle.
If using a hand-held phone park the vehicle before
conversing.
Always secure the phone in its holder; do not place the
phone on the passenger seat or where it can break loose
in a collision or sudden stop.
The use of the alert device to operate a vehicle’s lights or
horn on public roads is not permitted.
Remember, road safety always comes first!
Operating Environment
Remember to follow any special regulations in force in any
area and always switch off your phone whenever it is forbidden to use it, or when it may cause interference or danger.
Operation of any radio transmitting equipment, including
cellular phones, may interfere with the functionality of inadequately protected medical devices. Consult a physician
or the manufacturer of the medical device if you have any
questions. Other electronic equipment may also be
subject to interference.
As with other mobile radio transmitting equipment, users
are advised that for the satisfactory operation of the equipment and for the safety of personnel, it is recommended
that the equipment should only be used in the normal
operating position.
Users are advised to switch off the phone when at a refuelling point . Users are reminded of the need to observe
restrictions on the use of radio equipment in fuel depots,
chemical plants or where blasting operations are in progress.
Do not store or carry flammable liquids, gases or
explosive materials in the same compartment as the
phone, its parts or accessories.
Only authorised personnel should install or service the
phone in a vehicle. Faulty installation or service may be
dangerous and may invalidate the warranty.
Electronic fuel injection systems, electronic anti-skid
braking systems, electronic cruise control systems and
other electronic systems can malfunction due to the lack
of protection from radio signals. Check regularly that all
cellular phone equipment in your vehicle is mounted and
operating properly.
IMPORTANT SAFETY INFORMATION

2
Switch off your cellular phone when in an aircraft. The use
of cellular telephones in an aircraft may be dangerous to
the operation of the aircraft, disrupt the cellular network
and is illegal.
Failure to observe these instructions may lead to
suspension or denial of cellular telephone services to the
offender, or legal action or both.
Emergency Calls
IMPORTANT!
This phone, like any cellular phone, operates using
radio signals, cellular and landline networks, and userprogrammed functions which cannot guarantee
connection in all conditions. Therefore you should never
rely solely upon any cellular phone for essential
communications (e.g. medical emergencies).
Locking the phone or restricting calls do not prevent
making emergency calls with the phone. If the ALPHA
indicator is shown on the display, you must clear it by
pressing the ALPHA key. If there are any characters on
the display, clear them with the CLR key. Otherwise
simply key in 911 (or other official, programmed
emergency number) and press the SEND key.
Emergency calls may not be possible on all cellular phone
networks or when certain network services are in use.
Check with local cellular service providers.
Note that in uneven terrain or close to large buildings the
operating range of the base stations can be limited
affecting the connection. When making an emergency
call, remember to give the location of the emergency, as
accurately as possible. Remember that your cellular
phone may be the only means of communication at the
scene of an accident – do not cut off the call until given
permission to do so.
The cigarette lighter charger (LCH-2) contains a protective
fuse. The fuse is located in the charger tip. If the charger
does not work, the fuse may be blown. If blown, replace it
with a 3.0 amp. 125 volt fuse. Never use a fuse with a
higher current rating.
FUSE REPLACEMENT

3
Regulations
Your phone may cause TV or radio interference (e.g. when
using telephone in close proximity of receiving equipment).
The FCC/Industry Canada can require you to stop using
your telephone if such interference cannot be eliminated.
If you require assistance, contact your local dealer.
This device complies with part 15 of the FCC rules.
Operation is subject to the condition that this device does
not cause harmful interference.
Important Safety Information
....................................................1
Getting Started...................................................................................5
Installing and Removing the Battery.........................................5
Battery Charge Indicator.................................................................6
Charging and Recharging the Battery.....................................6
Display Indicators...............................................................................7
Basic Functions................................................................................8
Switching On and Off........................................................................8
Placing a Call........................................................................................8
Receiving a Call..................................................................................9
Signal Strength..................................................................................10
Volume Keys.......................................................................................10
Last Number Redial........................................................................10
Speed Dialing....................................................................................11
The Memory
......................................................................................11
Storing Information..........................................................................11
Keying in Names..............................................................................12
Editing Names or Numbers.........................................................13
Displaying “Hidden’’ Numbers..................................................13
Deleting Information from a Memory Location..................13
Recalling Information by Memory Location Number......13
Recalling Information by Name
.................................................14
Scanning for a Number.................................................................14
Scanning for a Name.....................................................................14
Scratchpad Memory.......................................................................15
Displaying Your Own Number...................................................15
CONTENTS
FCC/INDUSTRY CANADA NOTICE

4
Menu Facility
....................................................................................16
Menu Shortcuts
.................................................................................16
Menu Functions
.................................................................................18
Setting the Ringing Volume
.........................................................18
Setting the Ringing Type
..............................................................18
Length of Your Calls
.......................................................................18
Resetting the Call Timers
.............................................................19
Roaming
................................................................................................19
Locking/Unlocking the Phone
....................................................20
Setting the Lights
.............................................................................21
Setting the Key Tones...................................................21
NAM Select – Using the Phone on Two Networks
...........22
Setting Auto Answer
.......................................................................22
Accessory Menu
...............................................................................22
Clearing Last Called Numbers
..................................................23
Changing the Lock Code
.............................................................23
Data Mode
...........................................................................................23
DTMF Dialing
......................................................................................24
Keyguard
..............................................................................................25
Calling Your System Operator
...................................................25
Call Forwarding
.................................................................................26
Flash Function
....................................................................................26
Accessories
......................................................................................26
Car Installation Kit
............................................................................26
Car Installation Kit Options
..........................................................27
Cellular Data Connection
.............................................................27
Holder with Spiral Cable
...............................................................27
Chargers
...............................................................................................28
Travel Charger
...................................................................................28
Fast Travel Charger
........................................................................28
Desktop Charging Stand
..............................................................29
Cigarette Lighter Charger
............................................................29
Battery Charging Adapter
............................................................30
Charging Indicators
........................................................................30
Batteries
................................................................................................30
Carry Options
.....................................................................................31
Appendix
.............................................................................................32
Display Messages
...........................................................................32
Tones
......................................................................................................34
Care and Maintenance
..................................................................35
Troubleshooting
................................................................................35
Technical Information
.....................................................................36
CONTENTS
5
Your phone is powered by a rechargeable battery.
TO ACHIEVE FULL BATTERY CAPACITY,
NEW BATTERIES MUST BE CHARGED
WITH THE PHONE OFF
FOR AT LEAST
24 HOURS BEFORE INITIAL USE.
If left unused, a fully charged battery will discharge itself in
a few weeks. Store batteries uncharged in a cool, dark
and a dry place.
The battery pack is a sealed unit with no serviceable parts
inside. Do not attempt to open the case.
WARNING: Use only Nokia-approved batteries, antennae
and chargers. The use of any other types will invalidate
any approval or warranty applying to the telephone, and
may be dangerous.
To Install the Battery:
A Insert the bottom of the battery into the base of the
phone.
B Fasten it to the phone by pressing slightly downwards
on the battery and in at the top, until the locking catch
snaps into place.
C Make sure the battery is properly installed.
INSTALLING AND REMOVING THE BATTERY
GETTING STARTED
STOP
6
To Remove the Battery:
A Switch the power off before removing the battery.
B Depress the locking catch at the top of the battery and
gently pull it away from the phone.
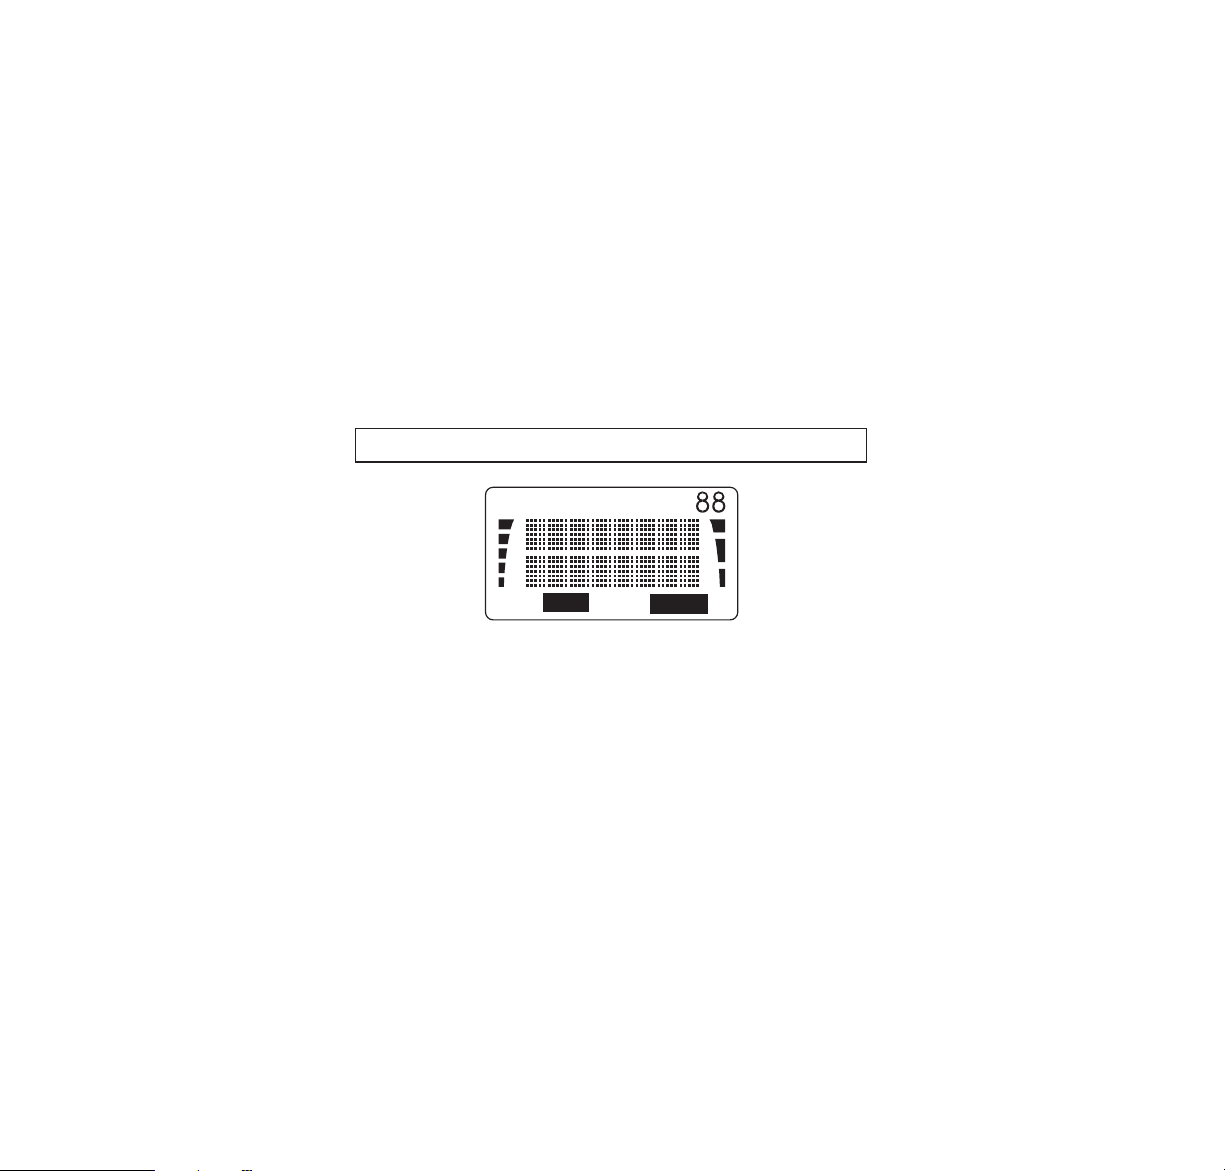
The bars on the right side of the display screen indicate
the battery charge level. The more bars, the higher the
battery charge. When the charge falls to less than 10%,
the phone displays a warning message BATTERY LOW
and an audible “beep’’ will be heard.
It will be repeated every 5 minutes if the phone is in
standby mode and every minute if the phone is in use.
When the battery is fully discharged, the message
RECHARGE BATTERY is displayed and you will hear three
short “beeps’’. The message will remain on the display for
10 seconds before the phone switches itself off.
A Plug the AC charger into a standard 120V AC outlet.
B Connect the lead from the charger to the bottom of the
phone. (A short “
beep’’
will sound to indicate charging is
in progress.)
C When the phone is switched on, the battery charge
indicator will scroll the bars on the right side of the display
screen. When the battery is fully charged, the scrolling will
stop and all bars will be displayed.
CHARGING AND RECHAGING THE BATTERY
BATTERY CHARGE INDICATOR
7
Detailed information on a variety of available battery
chargers is included in the “Accessories’’ section,
starting with page 26.
A new battery must be fully charged before being used
for the first time.
You can use the phone during recharging, but the charging
process will be interrupted for the duration of the call.
Batteries last longer and perform better if allowed to
discharge fully at least once a week. You can do this by
leaving the phone switched on overnight, or until the
message RECHARGE BATTERY is displayed and the
phone shuts itself off.
NOTE: If the battery is too hot or cold, charging will be
interrupted until the battery reaches a normal temperature.
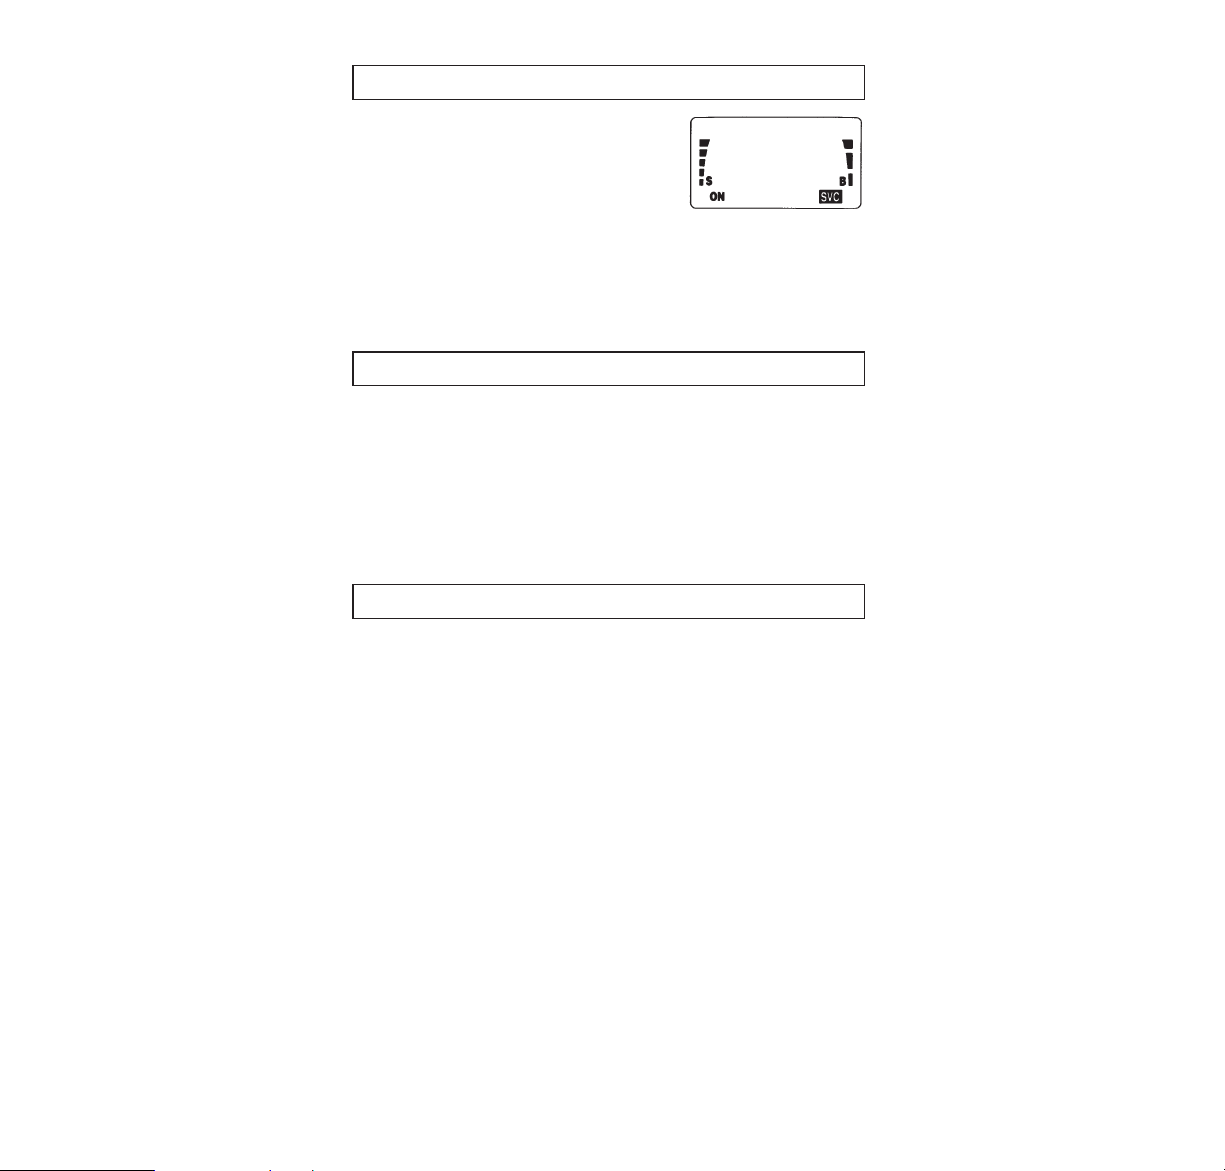
AB – Shows which network is in use
A – A system only AB – both systems
B – B system only blank – home area only
ALPHA – Shows that the phone is in ALPHA mode and
letters can be keyed in or displayed.
MENU – Shows that the MENU key has been pressed.
88 – Indicates which menu function is on display; or which
memory location is currently being used.
ON – Shows that the phone is switched on.
ROAM – Appears when the phone is outside its home
service area.
IN USE – Shows that a call is in progress.
NO SVC – Shows that the phone is outside cellular
service area.
ROAM
NO SVC
AB
ALPHA MENU
IN USE
ON
S
B
DISPLAY INDICATORS
8
S – Shows the cellular signal strength.
B – Shows the battery charge.
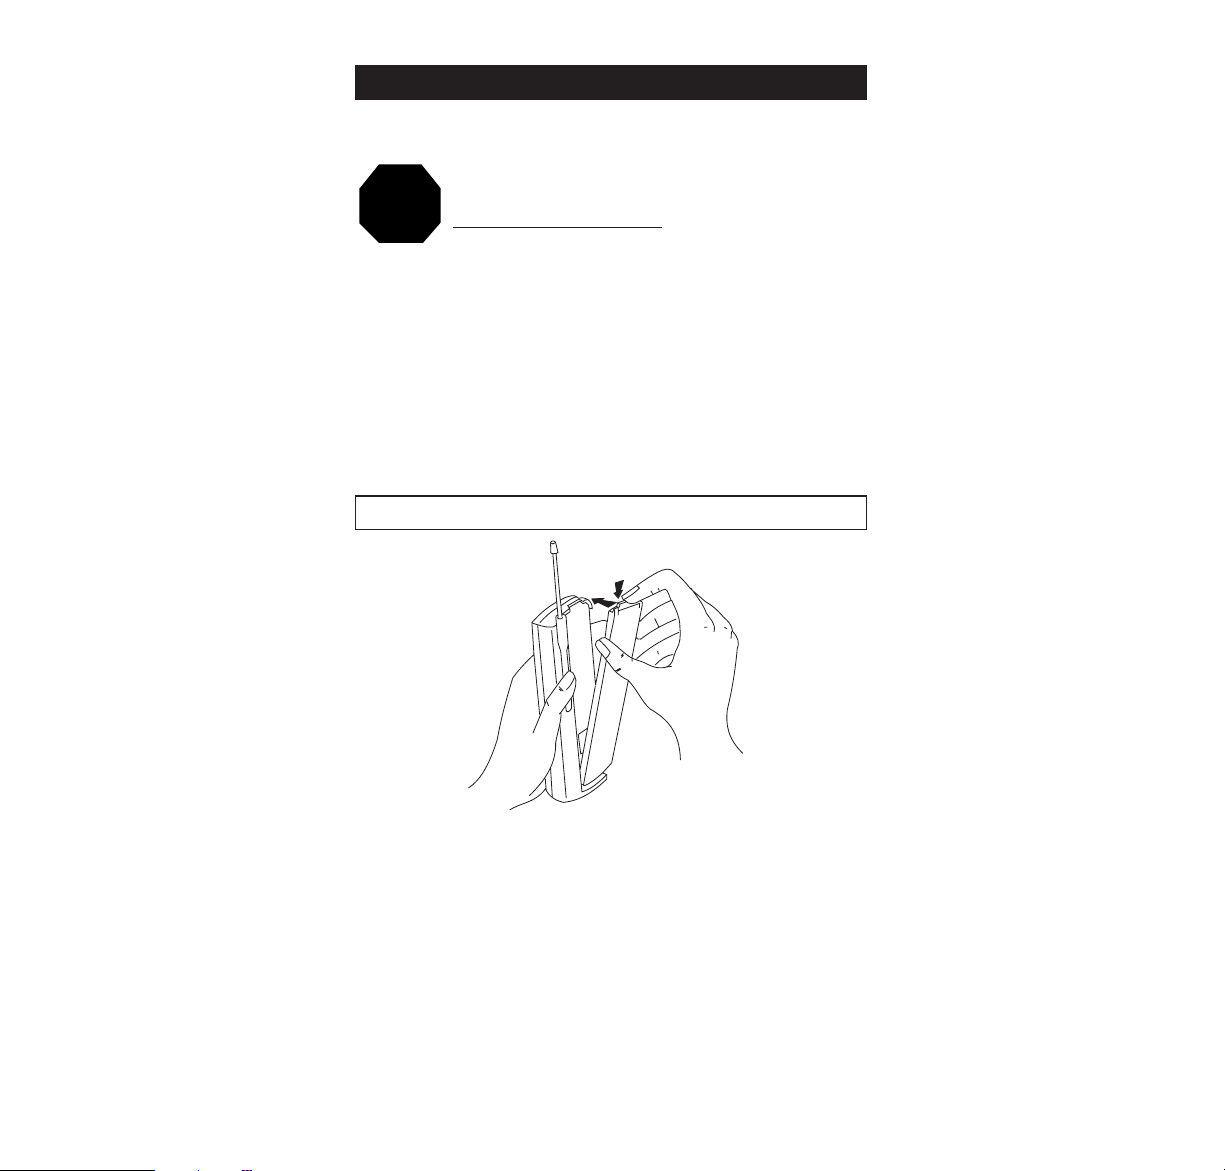
Extend the antenna fully.
As with any other radio transmitting device, avoid
prolonged contact with the antenna when the phone is
switched on.
A Press the PWR key and hold it for at least 2 seconds.
The phone will carry out a short self-test sequence, then
briefly display its programmed name or number.
B When the ON indicator appears on the display, the
phone is ready for use.
If NO SVC appears it likely means that you are outside the
cellular service area and the network cannot serve you.
A cellular phone can only send and receive calls when
it is switched on.
C Press the PWR key and hold it for at least two seconds
to switch the phone off.
Fully extend the antenna before
sending or receiving a call.
NOTE: Push in the antenna when you
are not using the phone.
You can use the phone without
extending the antenna in a good
coverage area (see “Signal Strength’’,
page 10).
A Key in the number (include the area code, if you’re
making a long distance call).
The number will appear on the display.
If you make a mistake, press
CLR to delete the last keystroke;
or to clear the whole display, press and hold the CLR key.
PLACING A CALL
SWITCHING ON AND OFF
BASIC FUNCTIONS

9
B Press SEND. The IN USE indicator will appear, and the
number will disappear from the display.
C Lift the phone to your ear, and wait until your call is
answered. You can alter the volume of the phone or the
HF loudspeaker, (whichever you are currently using) by
pressing the volume key on the right side of the phone.
D When you have finished the call, press END.
If the message LOCKED appears on the display when you
try to make a call, your phone has been electronically
LOCKED – see “Locking the Phone’’, page 20.You can
still make emergency calls and calls to the number in
memory location 98, when the phone is locked.
If the message NO SERVICE appears in the display, you
are outside the cellular service area.
A When there is an incoming call, the ringing tone
sounds and the CALL message flashes on the display.
If the ringing tone has been switched off – the SILENT
SERVICE feature has been selected for privacy or other
reasons – the keypad and display lights will flash instead
and only one short
“beep’’
will be given (see “Setting the
Ringing Volume’’, page 18).
B Press SEND and lift the phone to your ear. (For your com-
fort do not lift the phone to your ear before pressing SEND.)
Note: For your added safety, you can press any key to
answer.
C When you have finished speaking, press END.
If you don’t answer the call, the CALL message will remain
on the display (showing that someone has tried to phone
you). Press any key to clear the display.
RECEIVING A CALL
10
The quality of your call depends on
the strength of the cellular signal in
your area. The phone displays current signal strength as a series of
bars on the left side of the display
screen. The more bars, the better the signal. If the signal
is poor, try moving the phone slightly to improve reception.
If you are using the phone in a building, it may be
necessary to move near a window, or outdoors for better
reception.
The earpiece volume can be controlled by the two buttons
on the side of the phone.
Use the upper button to increase and the lower to decrease
the volume level. The volume level is shown on the display.
VOLUME 1 indicates the lowest and VOLUME 5 the highest
volume level. If you try to increase or decrease the volume
level over these values, a
“beep’’
is given.
The five last called numbers can be recalled from memory
and the latest number can even be redialed automatically.
The numbers can still be retrieved even if the phone has
been switched off and back on.
To recall from memory and redial the number that you
called most recently:
A With the display clear, press SEND.
The number will appear on the display and is automatically
redialed.
To recall from memory one of the five last called numbers:
A Press 0 RCL.
B Use v or V to scroll the list until you find the desired
number.
C Press SEND to make a call to the number on the
display.
LAST NUMBER REDIAL
VOLUME KEYS
SIGNAL STRENGTH
 Loading...