

Page 1

Nokia Customer Care
NEM-4 Series Cellular Phones
5 - Disassembly Instructions
Issue 2 09/2004 Copyright © 2004 Nokia Corporation. Page 5-1
Company Confidential
Page 2
NEM-4 Company Confidential
5 - Disassembly Instructions Nokia Customer Care
Table of Contents
Page No
Disassembly instructions................................................................................................ 3
Assembly instructions.................................................................................................... 6
NEM-4 Dome Sheet Exchange...................................................................................... 7
Page 5-2 Copyright © 2004 Nokia Corporation. Issue 2 09/2004
Company Confidential
Page 3
Company Confidential NEM-4
Nokia Customer Care 5 - Disassembly Instructions
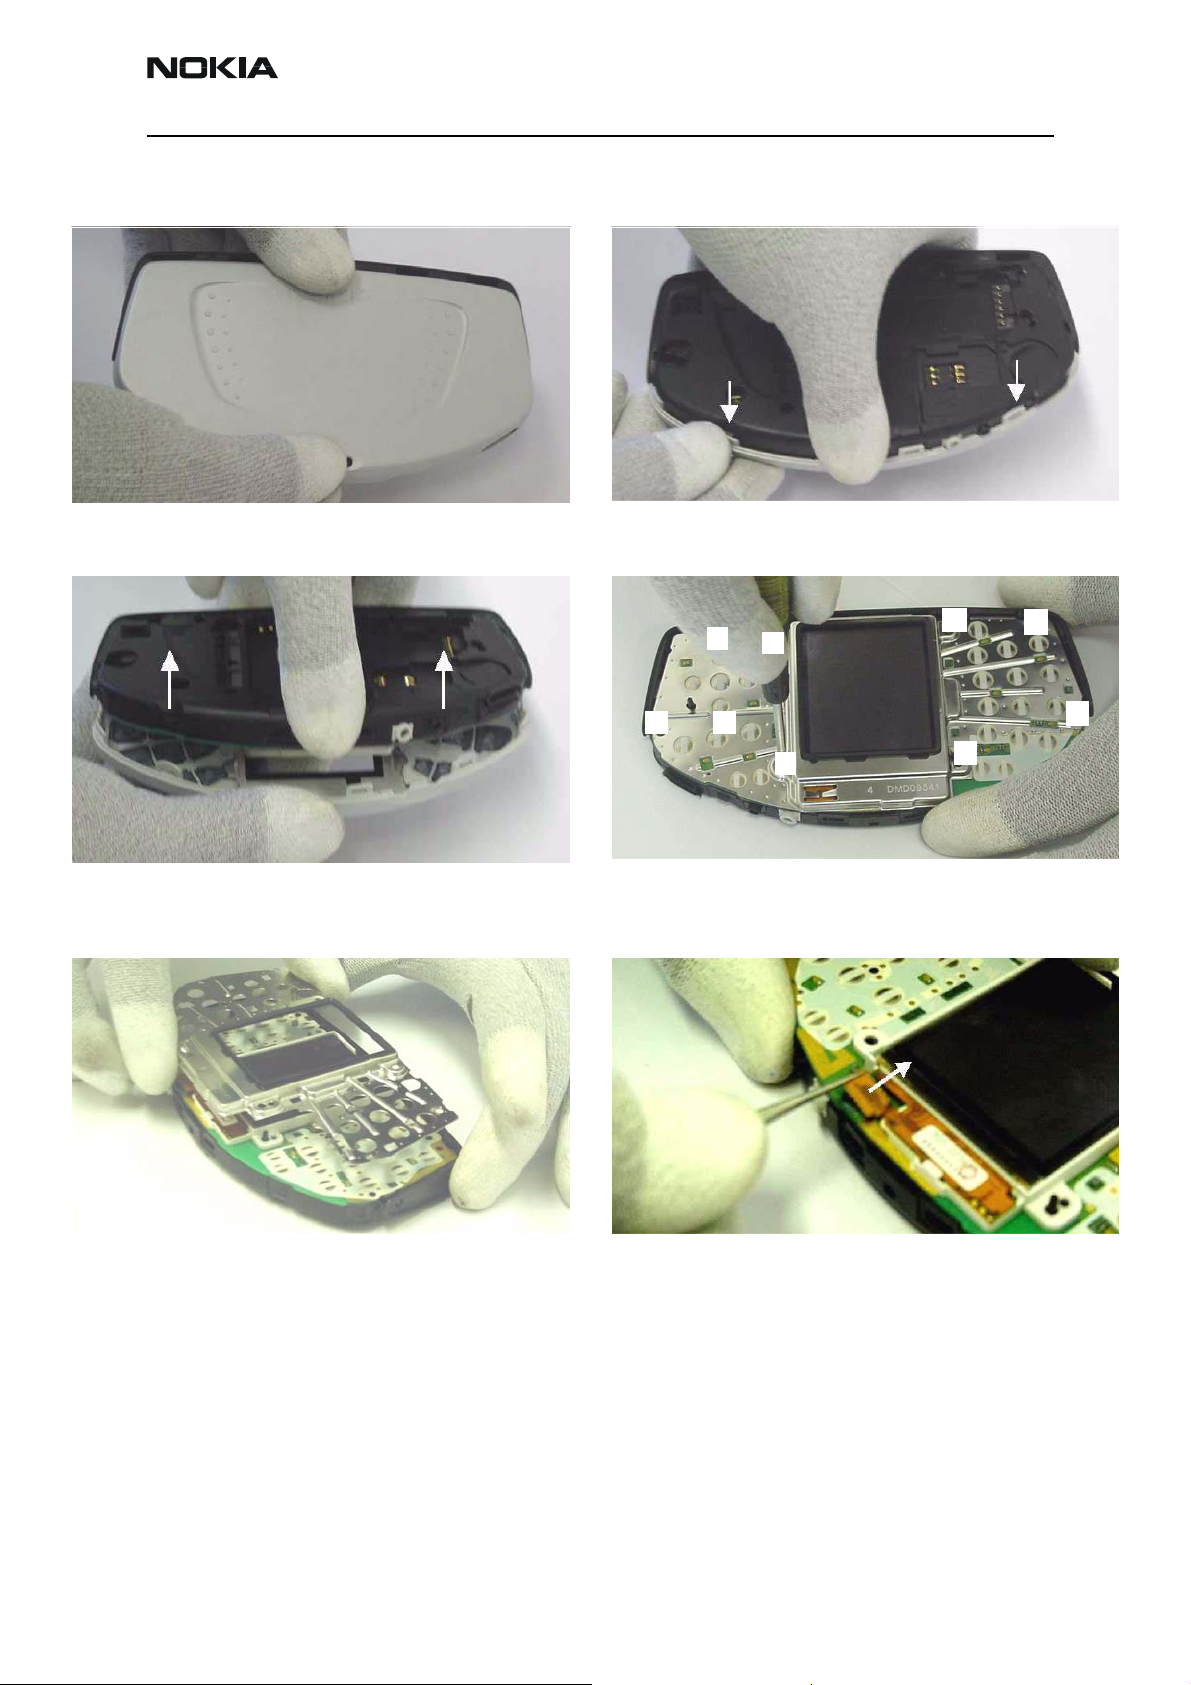
Disassembly instructions
Press the Release Button before removing B-Cover.
Remove A-cover and keymats.
The A-Cover is attached with snaps. Open both snaps before
removing A-cover.
1
2
9
Unscrew the Torx PLUS size 6 screws, using the order shown. For
assembly, take reverse order and torque of 26Ncm. Press down
the PWB with fingers.
8
7
3
6
4
5
Remove UI-Shield. Open LCD Module’s connector carefully with tweezers and
remove LCD Module.
Issue 2 09/2004 Copyright © 2004 Nokia Corporation. Page 5-3
Company Confidential
Page 4

NEM-4 Company Confidential
5 - Disassembly Instructions Nokia Customer Care
Always protect LCD with protection foil to avoid
dust and scratches.
Remove Mono Jack from Chassis.
Take Engine from Chassis.
Remove Stereo Jack from Chassis.
Remove DC Connector from Chassis with Torx.
Put Torx under the DC Connector (1) and bend (2).
Page 5-4 Copyright © 2004 Nokia Corporation. Issue 2 09/2004
Remove Microphone from Chassis with Torx. Put Torx hole
behind Microphone and push carefully.
Company Confidential
Page 5

Company Confidential NEM-4
Nokia Customer Care 5 - Disassembly Instructions
Remove the Vibra Motor from its guidance with tweezers. Remove Antenna from Chassis with tweezers.
Remove HF Speaker from Chassis with screwdriver. Put screwdriver between Chassis and HF Speaker then bend screwdriver.
Take care not to damage the snaps by bending them too much.
Remove Release Button with screwdriver from Chassis. Release
Button is locked by small notch. Bend the chassis near the notch
in order to release it.
Remove Earpiece with screwdriver from Chassis by bending the
snaps carefully.
Remove Power Key with tweezers.
Issue 2 09/2004 Copyright © 2004 Nokia Corporation. Page 5-5
Company Confidential
Page 6

NEM-4 Company Confidential
5 - Disassembly Instructions Nokia Customer Care
Remove Domesheet with Tweezers from PWB Engine.
Assembly instructions
Note! The silicon gasket may stick in the PWB. Damaged and loose
silicon gasket must be replaced with a spare part gasket.
Remove Domesheet with Tweezers from PWB Engine.
Replace damaged or loose silicon gasket with a spare part gasket.
Fix the gasket carefully with tweezers in chassis.
Page 5-6 Copyright © 2004 Nokia Corporation. Issue 2 09/2004
Company Confidential
Page 7

Company Confidential NEM-4
Nokia Customer Care 5 - Disassembly Instructions
NEM-4 Dome Sheet Exchange
Put the PWB Module into the Soldering Jig. Use the SRT-6 to remove the faulty Dome Sheet. Place it under
the Dome Sheet as shown in the picture and lift it up carefully
from PWB Module.
Take care about components on the PWB Module during removal
of the Dome Sheet.
Clean the pads on the PWB Module with a clean cloth if necessary. Be carefully not damage the components on the PWB.
Use the same procedure also for the Dome Sheet Left.
Put the new Dome Sheet onto the Dome Sheet Assembly Jig.
Mind the guiding pins.
Issue 2 09/2004 Copyright © 2004 Nokia Corporation. Page 5-7
Company Confidential
Page 8

NEM-4 Company Confidential
5 - Disassembly Instructions Nokia Customer Care
Remove the protection film. Tweezers can be used for retaining
the Dome Sheet.
Arrows point to the right assembly position. Put the PWB Module onto the Assembly Jig carefully.
Use the same procedure also for the Dome Sheet Left.
Press on PWB Module after checking that all guiding pins are
positioned correctly. Do not touch the spring contacts.
Page 5-8 Copyright © 2004 Nokia Corporation. Issue 2 09/2004
Company Confidential
Finally check that the holes of Dome Sheet are centered to the
PWB module holes. Ensure also, that there are no bubbles in
Dome Sheet film.
 Loading...