

Page 1

Get started Nokia N75
Page 2

Nokia N75
Get Started
Page 3

Copyright © 2007 Nokia. All rights reserved.
Nokia, Nokia Connecting People, Visual Radio, and Pop-Port are trademarks or registered trademarks of Nokia Corporation.
Other product and company names mentioned herein may be trademarks or tradenames of their respective owners.
Reproduction, transfer, distribution or storage of part or all of the contents in this document in any form without the prior written
permission of Nokia is prohibited.
9252452, Issue 1 EN
Page 4
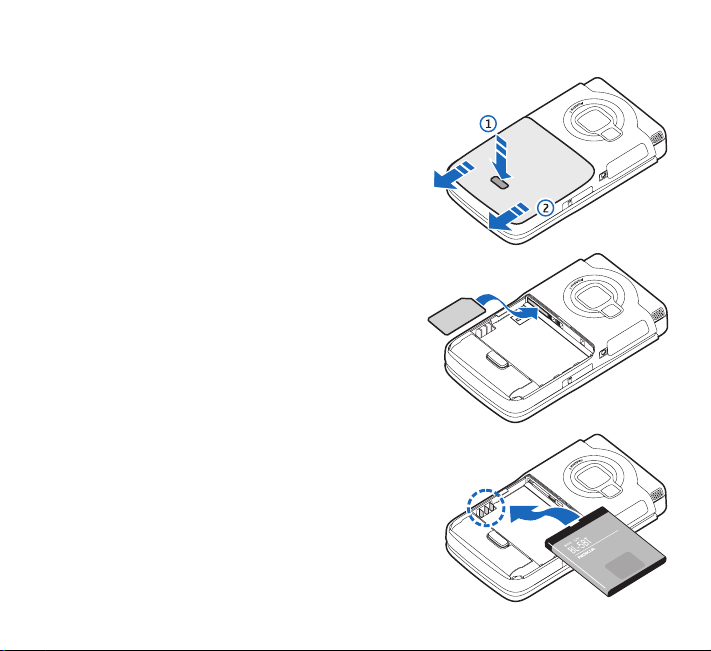
Insert the SIM card and battery
Keep all SIM cards out of the reach of small children.
Always switch the device off, and disconnect the charger
before removing the battery.
1 With the back of the device facing you, press the
release button (1), and slide off the cover (2).
2 Slide the SIM card into the holder until it clicks. Make
sure that the bevelled corner on the card is facing the
left side of the device and that the contact area on
the card is facing down.
3 Insert the battery.
4 Replace the back cover.
Page 5
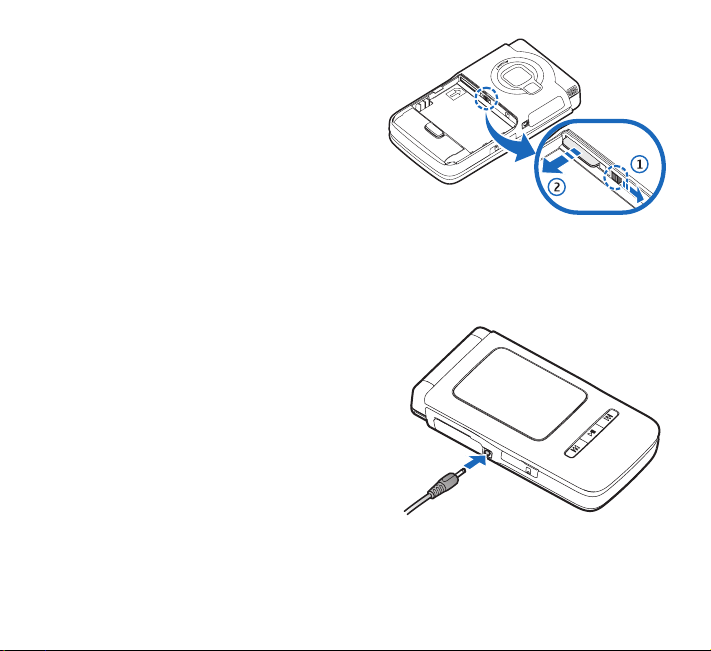
To remove the SIM card, slide the lock (1) to the
right and pull out the SIM card (2).
Charge the battery
1 Connect a compatible charger to a wall outlet
2 Connect the power cord to the device. The battery
indicator bar starts scrolling. The device can be
used while charging. If the battery is completely
discharged, it may take a few minutes before the
charging indicator is shown.
3 When the battery is fully charged, the bar stops scrolling. Disconnect the charger, first from
the device, then from the wall outlet.
Page 6
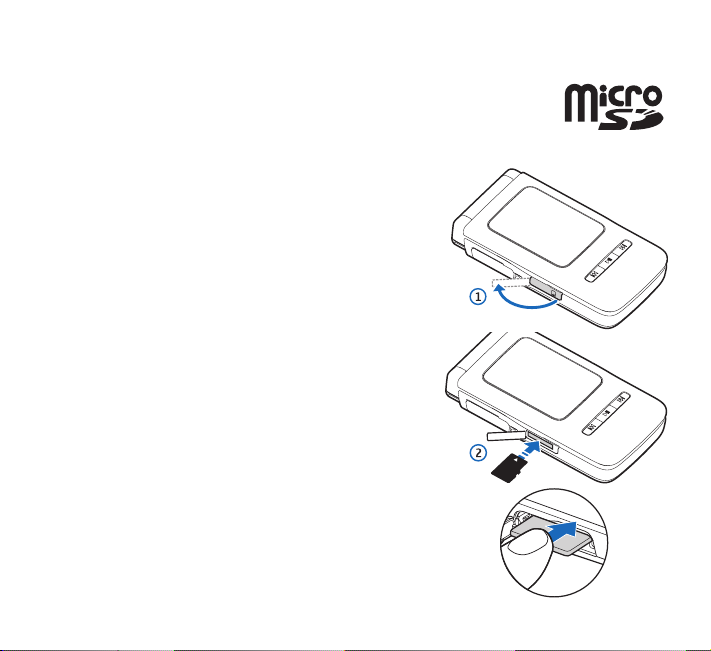
Memory card
You can use a compatible microSD card as extra storage space to save the
memory on your device. You can also back up information from your device
to the memory card.
Insert the memory card
1 To insert the memory card, place your finger in the recess
of the door of the memory card slot, and open the door.
2 Insert the memory card in the slot. Make sure that the
contact area on the card is facing down and towards the
slot with the bevelled corner facing the base of the
device. Push the card in. You can hear a click when the
card locks into place.
Page 7
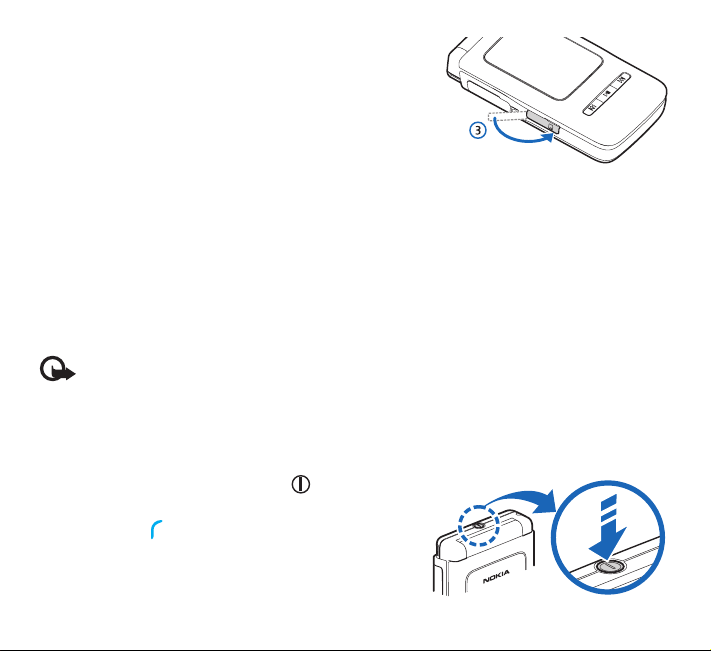
3 Close the door. You cannot use the memory card if the
door is open.
Eject the memory card
1 Before you eject the card, press the power key, and select Remove mem. card. All applications
are closed.
2 When Remove memory card and press 'OK' is displayed, open the door of the memory
card slot.
3 Press the memory card to release it from the slot.
4 Remove the memory card.
5 If the device is switched on, select OK.
Important: Do not remove the memory card in the middle of an operation when the card
is being accessed. Removing the card in the middle of an operation may damage the
memory card as well as the device, and data stored on the card may be corrupted.
Switch the device on
1 Press and hold the power button ( ).
2 If the device asks for a (U)PIN code or lock code, enter
it, and press . The factory setting for the lock code
is 12345.
Your device has one internal antenna.
Page 8

Note: As with any other radio transmitting device,
do not touch the antenna unnecessarily when the
device is switched on. Contact with the antenna
affects call quality and may cause the device to
operate at a higher power level than otherwise
needed. Not touching the antenna area during a
phone call optimizes the antenna performance
and the battery life.
• When you switch on the device for the first time, it may ask you to set the following
information: Select current city:, Time:, and Date:. Use the 4-way scroll key, the center
selection key, and the number keys. To find the city, enter the first letters of the city name.
The city you select also defines the time zone for the clock in your device.
• Depending on your service provider, the device might display the message Installing while
installing preloated applications. This will only occur during the first start up.
• Your Nokia N75 normally has MMS, GPRS, streaming, and mobile Internet settings
automatically configured in the device.
• Press to open the main menu.
Your service provider may have requested that certain features be disabled or not activated in
your device. If so, they will not appear on your device menu. Your device may also have been
specially configured. This configuration may include changes in menu names, menu order, and
icons. Contact your service provider for more information.
Page 9

Connect the audio adapter and headset
Connect the audio adapter AD-41 to the
TM
Pop-Port
connect the headset HS-28 to the adapter.
1 Open the connector cover on the device.
2 Ensure the connector is ‘upside down’
3 Connect the headset to the audio adaptor.
connector of your device, and
before connecting to your device. Connect
the audio adapter connector. Do not use
excessive force.
Warning: When you use the headset,
your ability to hear outside sounds may
be affected. Do not use the headset
where it can endanger your safety.
Page 10

Keys and parts (fold open)
Light sensor (1)
Display screen (2)
4-way scroll key (3)
Right selection key ( ) (4)
Multimedia key ( ) (5)
End key ( ) (6)
Clear key ( ) (7)
Keypad (8)
( ) and internet shortcut key (9)
Edit key ( ) (10)
Call key ( ) (11)
Menu key ( ) (12)
Left selection key ( ) (13)
Center selection key ( ) (14)
Earpiece (15)
Page 11

Keys and parts (fold closed)
Quick cover keys (1):
backward play/pause forward
Memory card slot (microSD card) (2)
Charger connector (3)
TM
Pop-Port
Power button (5)
Quick cover display (6)
Stereo speakers (7)
Camera (8)
Camera flash (9)
Zoom/Volume key (10)
Infrared (IR) window (11)
Mode key ( ) (12)
Capture key ( ) (13)
The quick cover keys and quick cover display are
hereafter referred to as the cover keys and the
cover display.
connector (4)
Page 12

Connectivity
Your device supports Bluetooth connectivity. To open Bluetooth connection settings, press , and
select Tools > Bluetooth. For more information on Bluetooth connectivity, see the user guide.
With your Nokia N75, you can also transfer data with compatible devices using the USB data
cable. With Windows XP, your device is automatically recognised as an external hard drive.
With Nokia PC suite and the USB cable or Bluetooth connectivity you can synchronise the
calendar and contacts information between a compatible PC and your Nokia N75, make
backups, and much more.
For information about transferring music, see ‘Music’.
Data cable CA-53
To connect Data cable CA-53 to the Pop-Port
1 Open the connector cover on the devices.
2 Ensure the data cable connector is ‘upside down’
before connecting to your device. Connect the
data cable connector. Do not use excessive force.
TM
connector of your device:
Page 13

Music
Music lets you listen to music on your device using the loudspeaker or headset, and lets you
create playlists of songs.
Warning: Do not hold the device near your ear when the loudspeaker is in use, because
the volume may be extremely loud.
You can listen to music with the fold open or closed. If you are listening to music when a call
comes in, the music pauses when you answer the call, and resumes shortly after the end of the
call. The music also pauses if you use the video camera.
Music supports files with extensions AAC, AAC+, eAAC+, MP3, WMA, WAV, 3G2, 3GP, 3GPP,
3GPP2, MPEG, MP4, M4A, DCF, ODF, ASF, and M3U. Music does not necessarily support all
features of a file format or all the variations of file formats.
Copyright protections may prevent some images, music (including ringing tones), and other
content from being copied, modified, transferred or forwarded.
Play music
To play music with the fold open, do the following:
1 Press and select Music. Alternatively, press and hold .
2 In Music menu view, select a category such as All songs or Albums.
3 Select the music you want to play.
In Now playing view, use the scroll keys to control playback:
• Press to play or pause a song
• Press or to skip backwards or forwards
• Press to stop playback
Page 14

To return from Now playing view to Music menu view, where you can select more music, select
Options > Go to Music menu.
To play music with the fold closed, do the following:
1 In the standby mode, press .
2 In Music menu view, use the volume keys on the side of the device
to select a category such as All songs or Albums. Press .
3 Use the volume keys to select the music you want to play, and
press .
In Now playing view, use the cover keys to control playback:
• Press to play or pause a song
• Press or to skip backwards or forwards
To return to Music menu view from Now playing view, where you
can select more music, press . To return to Now playing view,
press again.
Transfer music
You can use three different methods to transfer music to your device:
• To synchronize music files from a compatible PC to your device with Windows Media Player,
attach the USB cable and select Media player as the connection method. Use this method
to copy WMDRM protected music (both purchased and subscription) to your device. This option
copies both the music and the license to use it.
• To use Nokia Audio Manager in Nokia PC Suite, attach the USB cable and select PC Suite as
the connection method. Use this method to rip and convert music to newer formats like eAAC+.
Page 15

• To view your device on your PC as an external hard drive, connect to your PC with Cable or
Bluetooth connectivity. If you are using the USB cable, select Data transfer. Use this method
to be able to drag and drop files to your device’s memory card. You may not be able to
transfer data that has been protected against copying.
Get connected with Windows Media Player
Note: Windows Media Player version 10 or later is required to synchronize music files.
If you have an older version of Windows Media Player, please visit the Microsoft website
to download a later version.
To synchronize music files from a compatible PC to your device with Windows Media Player:
1 Install Windows Media Player drivers on to your PC from the CD-ROM provided.
2 Start Windows Media Player version 10 or later (or other PC client that can handle
purchased content).
3 Connect your device to the PC using the USB cable and select Media player mode. Windows
recognizes a new device is connected and attempts to install the required driver.
4 At the first screen of the install wizard, select ‘No, not this time’. At the second screen, select
‘Install the software automatically (Recommended)’.
When the driver installation is complete, your Nokia device appears under ‘Portable devices’
in the Windows Media Player window. You are now ready to start synchronizing music to
your device.
Note: Upgrading to a later version of Windows Media Player may require you to install
a different version of driver.
Page 16

Radio
You can normally make a call or answer an incoming call while listening to the radio. The radio
is muted when there is an active call.
The FM radio depends on an antenna other than the wireless device antenna. A compatible headset
or enhancement needs to be attached to the device for the FM radio to function properly.
Press , and select Applications > Radio. To start a station search, select or .
To change the frequency manually, select Options > Manual tuning.
If you have previously saved radio stations, select or to go to the previous or next
saved station, or press the corresponding number key to select the memory location of a station.
To adjust the volume, press . To listen to the radio using the loudspeakers, select
Options > Activate loudspeaker.
Warning: Listen to music at a moderate level. Continuous exposure to high volume may
damage your hearing. Do not hold the device near your ear when the loudspeaker is in
use, because the volume may be extremely loud.
To save the current tuned station to your station list, select Options > Save station. To open
the list of your saved stations, select Options > Stations.
To return to the standby mode and leave the FM radio playing in the background, select
Options > Play in background.
Camera
Your Nokia device has a high resolution camera on the back of the device that you can use to
take still pictures and record videos.
Page 17

To activate the camera, press and hold .
The images and video clips are automatically saved in the Images & video folder in Gallery.
You can send images and video clips in a multimedia message, as an e-mail attachment, or by
using Bluetooth connectivity.
Take pictures
When taking a picture, note the following:
• Use both hands to keep the camera still.
• The quality of a digitally zoomed picture is lower than that of a nonzoomed picture.
• The camera switches to battery saving mode if there are no keypresses for a short while.
To continue taking pictures, press .
To take a picture using the cover display as the viewfinder (fold closed), do the following:
1 If the camera is in Video mode, press to switch to Image mode.
2 Press . Do not move the device before the image is saved.
To take a picture using the main display as the viewfinder, do the following:
1 Open the fold. If the camera is in Video mode, press to select the Image mode from the
active toolbar.
2 Press . Do not move the device before the image is saved.
To zoom in or out using either display, press .
To make lighting and color adjustments before taking a picture, in the main display, press
or to scroll to items on the active toolbar. In the cover display, press to activate the
toolbar, and to scroll to items.
Page 18

Record videos
To record videos using the cover display as the viewfinder (fold closed):
1 If the camera is in the Image mode, press to switch to Video mode.
2 To start recording, press . The red record icon is shown and a tone sounds, indicating
that recording has started.
3 To stop recording, press or select Stop. The video clip is automatically saved to
the Images & video folder of Gallery. The maximum length of the video is 60 minutes
(if enough memory is available).
To record videos using the main display as the viewfinder:
1 Open the fold. If the camera is in the Image mode, press or select Options >
Video mode to switch to Video mode.
2 To start recording, press . The red record icon is shown and a tone sounds, indicating
that recording has started.
3 To stop recording, press or select Stop. The video clip is automatically saved to the
Images & video folder of Gallery. The maximum length of the video is 60 minutes (if enough
memory is available).
To pause recording at any time, select Pause. The pause icon ( ) blinks on the display.
Video recording automatically stops if recording is set to pause and there are no keypresses
within a minute. To resume recording, select Continue.
To zoom in or out using either display, press .
Page 19

Transfer content from another device
You can transfer content, such as an address book (or contacts), between compatible Nokia
devices using Bluetooth connectivity or infrared. The type of content that can be transferred
depends on the Nokia device you are trying to transfer content to. If the other device supports
synchronization, you can also synchronize data between the other device and your Nokia device.
Copyright protections may prevent some images, music (including ringing tones), and other
content from being copied, modified, transferred or forwarded.
You can insert your SIM card in the other device. When your Nokia device is switched on without
a SIM card, the offline profile is automatically activated.
Transfer content (to your device)
1 To use the application for the first time, press on your Nokia device, and select Tools >
Transfer. If you have used the application before and want to start a new transfer, select
Transfer data.
In the information view, select Continue.
2 Select whether you want to use Bluetooth connectivity or infrared to transfer the data.
Both devices must support the selected connection type.
3 If you select Bluetooth connectivity:
To have your Nokia device search for devices with Bluetooth connectivity, select Continue.
Select your other device from the list. You are asked to enter a code on your Nokia device.
Enter a code (1-16 digits), and select OK. Enter the same code on the other device, and select
OK. The devices are now paired.
For some phone models, the Transfer application is sent to the other device as a message.
To install Transfer on the other device, open the message, and follow the instructions on
the display.
Page 20

4 From your Nokia device, select the content you want to copy from the other device.
Content is copied from the memory of the other device to the corresponding location in your
Nokia device. Copying time depends on the amount of data to be transferred. You can cancel
copying and continue later.
If the other device supports synchronization, you can keep the data up-to-date in both devices.
Tip! Synchronizing data means that data is made the same in each device, including
deleted data. Use Transfer data to copy data from one device to another.
To start a synchronization with a compatible Nokia device, select Phones, scroll to the device,
and select Options > Synchronize. Follow the instructions on the display.
Basic use and common actions
Phone calls
• To make a phone call, open the cover, enter the phone number and press .
• To call somebody in your Phonebook, press in the Standby view, and select Contacts.
Select a contact and press .
• To answer a call, open the cover or press .
Turn off the sounds of your device
1 Press the power key .
2 Select Silent from the list.
Send an item
• In an application, select Options > Send, if available, and select the sending method.
Page 21

Useful shortcuts
Use shortcuts to quickly get the most from your device. The corresponding sections of the user
guide contain further details of the functions.
Shortcuts when taking pictures or recording video
• To zoom in and out, press .
• To send a picture or video you have just taken, press , or select Send.
Edit text and lists
• To mark an item in a list, scroll to it, and press and at the same time.
• To mark multiple items in a list, press and hold while you press or . To end the
selection, release , then release .
• To copy and paste text: To select letters and words, press and hold . At the same time,
press or to highlight text. To copy the text to clipboard, while still holding , select
Copy. To insert the text into a document, press and hold , and select Paste
Standby mode
• To switch between applications that are open, press and hold , and select an application.
If memory is low, the device may close some applications. The device saves any unsaved data
before closing an application
• To switch between Normal and Silent profiles, press and hold . If you have two phone
lines (network service), this action switches between the two lines.
• To open Music, press and hold , or to open a list of predefined applications assigned to
the multimedia key, press .
• To call your voice mailbox (network service), press and hold .
• To change the profile, press , and select a profile.
Page 22

• To open the last dialed numbers list, press .
• To start a connection to Services (network service), press and hold .
Messaging
• To send a message when it is ready, press .
Phone
• To end a call when you are not using the headset, press during the call, or close the cover.
Closing the cover when you are using the headset does not end a call.
Settings
You may have MMS, GPRS, streaming, and Mobile Internet settings from your service providers
already installed in your device, or you may receive the settings from the service providers as a
special text message.
Page 23

Support
Help
The help function provides instructions when you are using the device. To access it from an
application, select Options > Help.
User guide
Further detailed information is given in the separate user guide. Do not use this get started guide
in place of the complete user guide, which provides important safety and maintenance information.
Online
For Add-on applications guide and other information, see http://www.nokia.com/support.
Copyright © 2007 Nokia. All rights reserved.
Nokia, Nokia Connecting People, Visual Radio, and Pop-Port are trademarks or registered
trademarks of Nokia Corporation. Other product and company names mentioned herein may
be trademarks or tradenames of their respective owners.
Reproduction, transfer, distribution or storage of part or all of the contents in this document in
any form without the prior written permission of Nokia is prohibited.
Page 24

Notes
Page 25

Notes
 Loading...