

Page 1

DNT2Mi sp/mp
User Manual
C33975.85--B0
DN01145897 © Nokia Corporation 1 (128)
Issue 2-0 en Nokia Proprietary and Confidential
Data Network Terminal
Single-port and Multiport
Operating Instructions
Page 2
Data Network Terminal Single-port and Multiport Operating Instructions
2 (128) © Nokia Corporation DN01145897
Nokia Proprietary and Confidential Issue2-0en
The information in this documentation is subject to change without notice and describes only
the product defined in the introduction of this documentation. This documentation is intended
for the use of Nokia's customers only for the purposes of the agreement under which the
documentation is submitted, and no part of it may be reproduced or transmitted in any form or
means without the prior written permission of Nokia. The documentation has been prepared to
be used by professional and properly trained personnel, and the customer assumes full
responsibility when using it. Nokia welcomes customer comments as part of the process of
continuous development and improvement of the documentation.
The information or statements given in this documentation concerning the suitability, capacity,
or performance of the mentioned hardware or software products cannot be considered binding
but shall be defined in the agreement made between Nokia and the customer. However, Nokia
has made all reasonable efforts to ensure that the instructions contained in the documentation
are adequate and free of material errors and omissions. Nokia will, if necessary, explain issues
which may not be covered by the documentation.
Nokia's liability for any errors in the documentation is limited to the documentary correction of
errors. NOKIA WILL NOT BE RESPONSIBLE IN ANY EVENT FOR ERRORS IN THIS
DOCUMENTATION OR FOR ANY DAMAGES, INCIDENTAL OR CONSEQUENTIAL
(INCLUDING MONETARY LOSSES), that might arise from the use of this documentation or
the information in it.
This documentation and the product it describes are considered protected by copyright
according to the applicable laws.
NOKIA logo is a registered trademark of Nokia Corporation.
Other product names mentioned in this documentation may be trademarks of their respective
companies, and they are mentioned for identification purposes only.
Copyright © Nokia Corporation 2003. All rights reserved.
The following products comply with the protection requirements of the European Union Council
Directive 89/336/EEC relating to electromagnetic compatibility (EMC), provided that installed
using EMC-compatible installation practices (installation in mechanical housings stated to be
EMC-compatible and using cabling material [at least as well shielded] and practices as stated
in relevant Nokia user manuals):
Product code Product versions
T65670/80 DNT2Mi sp/mp, AC-powered
DNT2Mi sp/mp, DC-powered
DNT2Mi sp/mp, remote-powered
Page 3

DN01145897 © Nokia Corporation 3 (128)
Issue 2-0 en Nokia Proprietary and Confidential
Contents
Contents 3
Summary of changes 7
1 About this document 9
2 Introduction to DNT2Mi 11
3 Applications 13
4 Construction and interfaces 15
4.1 Front panel 15
4.1.1 Indicators and keys 16
4.1.2 Local management interface 16
4.2 Rear panel 19
4.2.1 Terminal interfaces 20
5 Installing DNT2Mi 23
5.1 Electromagnetic compatibility 23
5.2 Grounding of DNT2Mi 23
5.3 Clearances around DNT2Mi 24
5.4 Work order 25
5.5 Inserting DTE interface units 25
5.6 Free-standing installation 27
5.7 Installing DNT2Mi on a wall or into a rack 27
5.7.1 Installing DNT2Mi on a wall 27
5.7.2 Uninstalling a wall-mounted DNT2Mi 30
5.7.3 Installing a modem shelf into a 19-inch rack 30
5.7.4 Installing DNT2Mi in a modem shelf 31
5.7.5 Uninstalling DNT2Mi from a modem shelf 33
5.8 Connecting power supply 34
5.8.1 Troubleshooting 37
5.8.2 Strain relief 37
5.9 Completing the installation 38
5.9.1 Verifying the installation 38
5.9.2 Adjusting the LCD display 38
5.9.3 Recommended actions after the installation 38
6 Commissioning DNT2Mi 39
6.1 Automatic power-up test 39
6.2 Management 40
6.3 Timing source 41
6.4 Line settings 41
6.5 Port settings 41
6.6 Time slot settings (Q1: 6,5) 42
6.7 Protection settings 42
6.8 Measurements 43
6.9 Default values 44
Page 4

Data Network Terminal Single-port and Multiport Operating Instructions
4 (128) © Nokia Corporation DN01145897
Nokia Proprietary and Confidential Issue2-0en
6.10 Factory values 47
7 Maintaining DNT2Mi 49
7.1 Getting general information 49
7.2 Monitoring alarms 50
7.3 Testing 51
7.4 Checking measurements and statistics 55
8 Using front panel menus 57
8.1 Main menu levels 60
8.2 Configuring DNT2Mi 60
8.2.1 Configuring a port 62
8.2.2 Configuring a line 68
8.2.3 Configuring common settings 69
8.2.4 Default settings 70
8.3 Testing DNT2Mi 71
8.3.1 Testing a port 71
8.3.2 Testing a line 71
8.3.3 Testing the equipment 72
8.4 Monitoring DNT2Mi 73
8.4.1 Monitoring a port 73
8.4.2 Monitoring a line 74
8.4.3 Monitoring alarms 75
8.4.4 Monitoring equipment information 76
8.4.5 Self testing 76
9 Using Q1 menus 77
9.1 General 77
9.2 DNT controls (5) 96
9.3 DNT settings (6) 96
9.3.1 Display (6,0) 96
9.3.2 Service options (6,1) 97
9.3.3 Timing source (6,2) 98
9.3.4 Line settings (6,3) 100
9.3.5 Port settings (6,4, port #) 105
9.3.6 Time slot use (6,5) 112
9.3.7 Default settings (6,6) 112
9.3.8 Factory settings (6,7) 112
9.4 Statistics (8) 113
9.5 User privileges (10) 114
10 Technical specifications 115
10.1 Dimensions 115
10.2 Power supply 116
10.3 Line interfaces 117
10.4 Unit identification 117
10.5 Ambient conditions 118
10.5.1 Environmental and mechanical requirements 118
10.5.2 Electromagnetic compatibility 119
10.5.3 Safety and protection 120
Page 5

DN01145897 © Nokia Corporation 5 (128)
Issue 2-0 en Nokia Proprietary and Confidential
Appendix A. 121
A.1 Commissioning chart 121
Glossary 125
Page 6

Data Network Terminal Single-port and Multiport Operating Instructions
6 (128) © Nokia Corporation DN01145897
Nokia Proprietary and Confidential Issue2-0en
Page 7

DN01145897 © Nokia Corporation 7 (128)
Issue 2-0 en Nokia Proprietary and Confidential
Summary of changes
Document Date Comment
DN01145897 Issue 1–0 en 19 April 2002
DN01145897 Issue 2–0 en 27 March 2003 Information on two new D2048 interface units
(E62628.10 and E62628.11) added.
Page 8

Data Network Terminal Single-port and Multiport Operating Instructions
8 (128) © Nokia Corporation DN01145897
Nokia Proprietary and Confidential Issue2-0en
Page 9

About this document
DN01145897 © Nokia Corporation 9 (128)
Issue 2-0 en Nokia Proprietary and Confidential
1 About this document
These operating instructions introduce the DNT2Mi Data Network Terminal and
provide information needed for its installation and use.
The terminal interface units that are used in DNT products are presented
separately in document DTE Interface Units for Nokia Data Network Terminals
Operating Instructions.
Page 10

Data Network Terminal Single-port and Multiport Operating Instructions
10 (128) © Nokia Corporation DN01145897
Nokia Proprietary and Confidential Issue2-0en
Page 11

Introduction to DNT2Mi
DN01145897 © Nokia Corporation 11 (128)
Issue 2-0 en Nokia Proprietary and Confidential
2 Introduction to DNT2Mi
Figure 1. Single-port (above) and multiport (below) DNT2Mi terminals
Nokia DNT2Mi is a single- or multiport (sp/mp) data access network terminal
intended for customer premises. It provides a two-wire or four-wire SHDSL line
interface (ITU-T G.991.2) and up to three interchangeable DTE interface units.
The following interface units are available (for more information, refer to Table
2):
• V.11
• V.28
• V.35
• X.21
• G.703/64k
• G.703/2M
Page 12

Data Network Terminal Single-port and Multiport Operating Instructions
12 (128) © Nokia Corporation DN01145897
Nokia Proprietary and Confidential Issue2-0en
• G.704/2M
• EIA-530-A
• Ethernet
•VF
• D2048
Single-port and multiport versions
The single-port version offers one of the DTE interface types mentioned above,
whereas the multiport version can house up to three independent DTE interface
types. Additionally, the multiport version includes Time Division Multiplexing
(TDM), which allowsdividing thetransmission capacity over each DTE interface
according to application needs.
Power supply
DNT2Mi can be fed eitherwith AC 90 to 264 V, DC -20 to -75 V, or remotely via
ACL2i through the line.
Management
DNT2Mi can be managed locally with the front panel keys, Nokia’s hand-held
Service Terminal, or with a Microsoft Windows-based Macro Service Terminal
Emulator (MSTE) program running on a PC. For more information about
supported Windows operating systems, refer to the Macro Service Terminal
Emulator User's Manual.
DNT2Mi can also be managed remotely with Nokia's Network Management
System (NMS).
Page 13

Applications
DN01145897 © Nokia Corporation 13 (128)
Issue 2-0 en Nokia Proprietary and Confidential
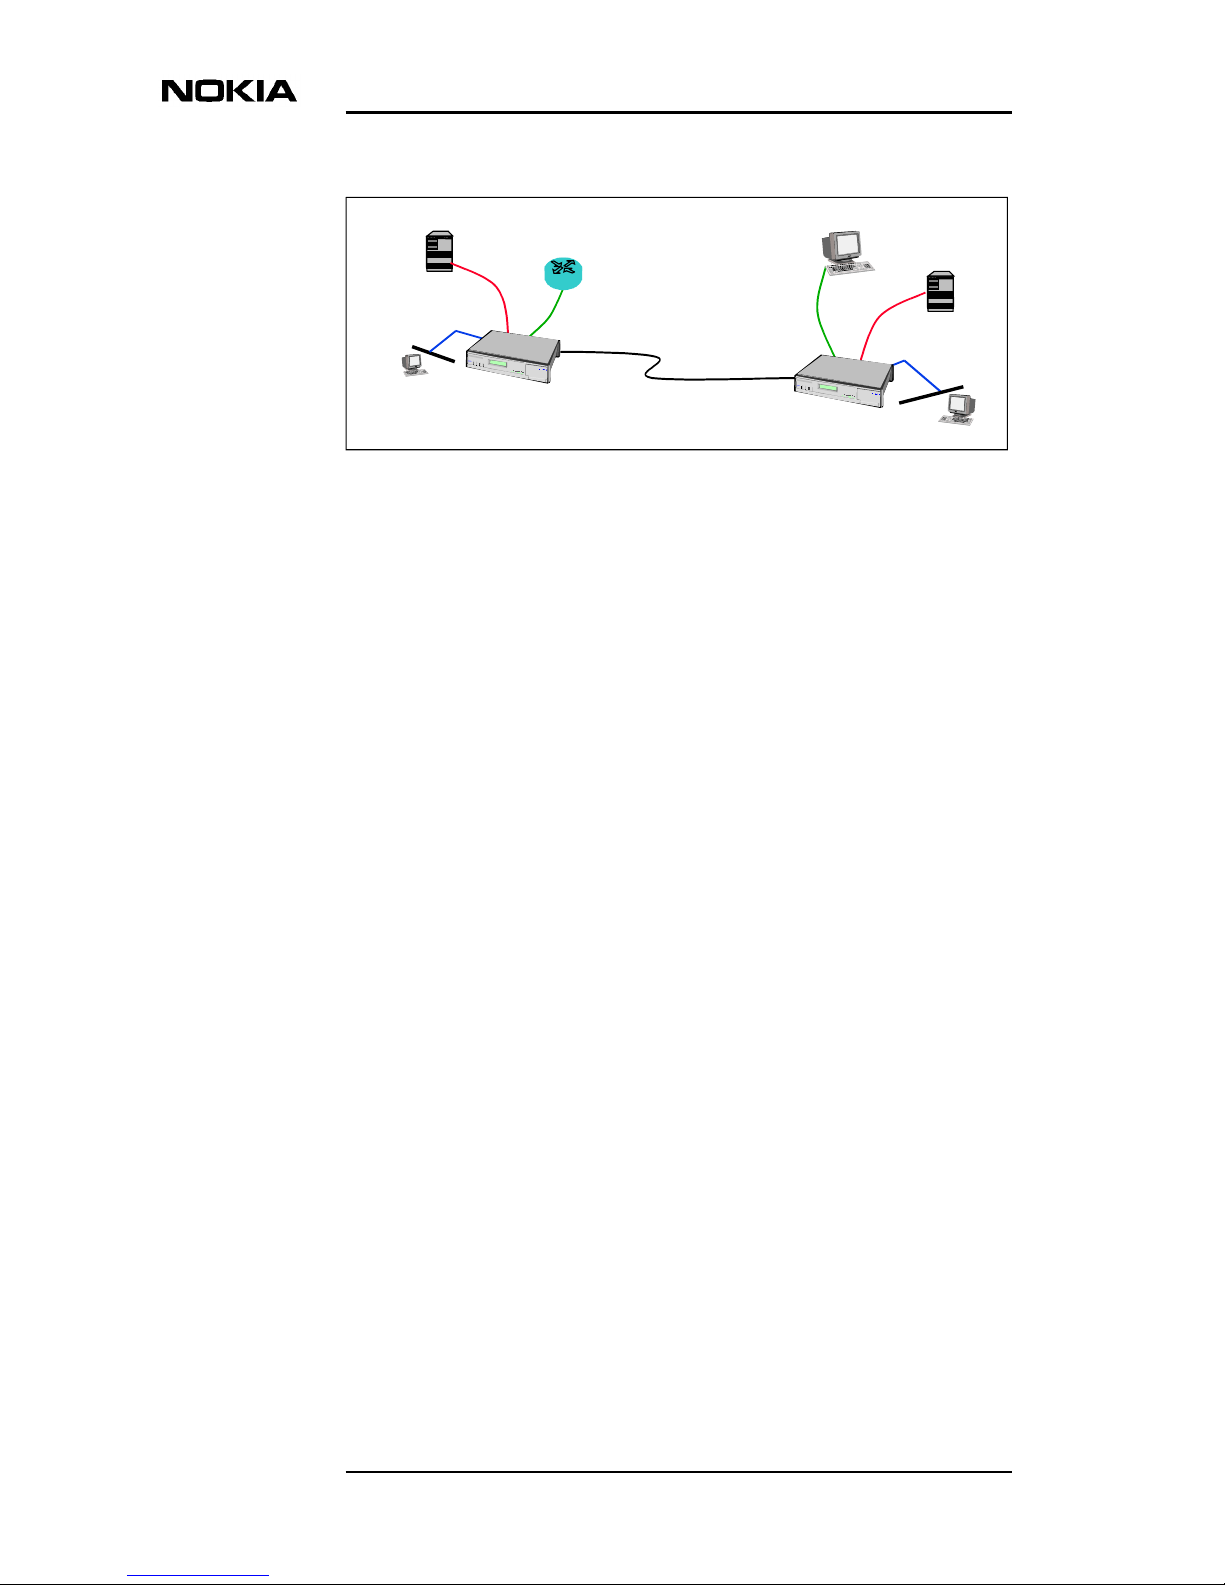
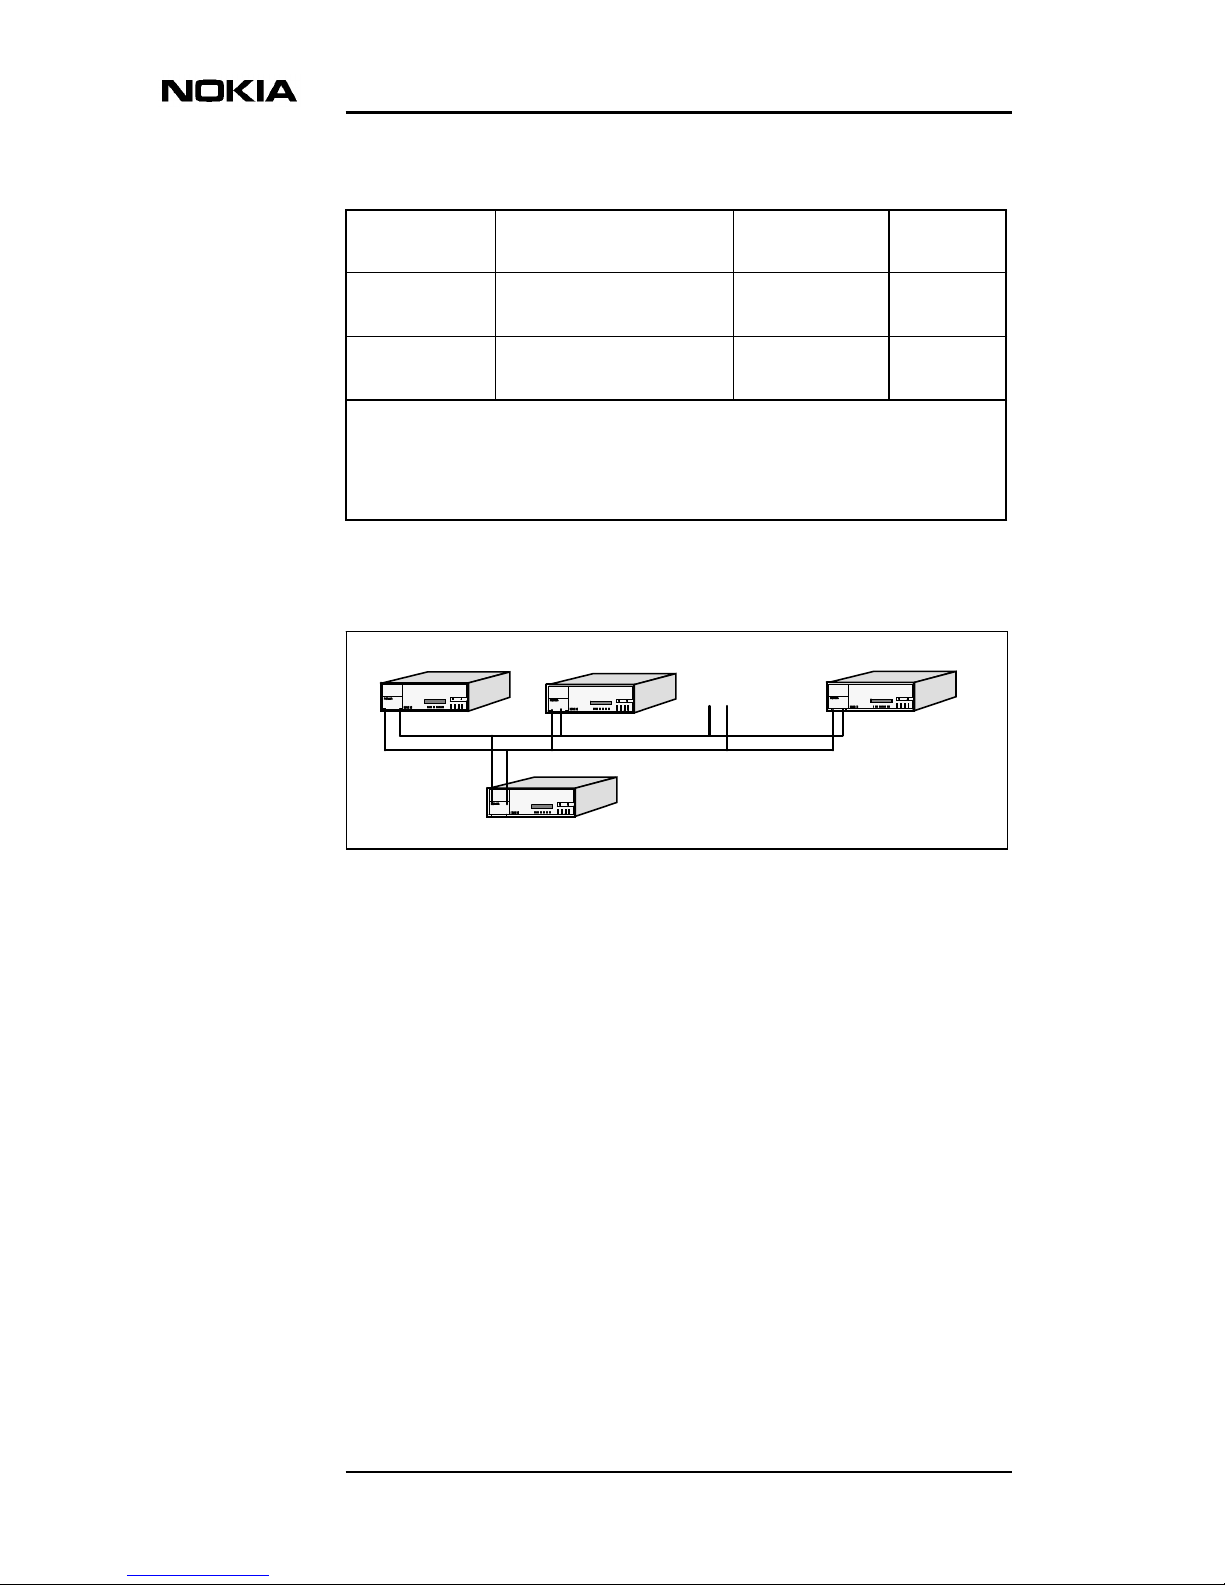
3 Applications
The DNT2Mi Data Network Terminal can be used for Local Area Network
(LAN) and Private Automatic Branch Exchange (PABX)connections (seeFigure
2). The device can be controlled, configured, and tested either by using the front
panel keys and the LCD display or via Nokia’s common network management
system.
Figure 2. An example of DNT2Mi use
DNT2Mi canalso be used in point-to-point connections with a DNT2Mi terminal
at both ends of the line (see Figure 3).
PABX
Data
Local
Exchange
SHDSL
DNT2Mi
Multiport
PDH
network
DNT2Mi
Single-port
Page 14
Data Network Terminal Single-port and Multiport Operating Instructions
14 (128) © Nokia Corporation DN01145897
Nokia Proprietary and Confidential Issue2-0en
Figure 3. DNT2Mi used in a point-to-point application
DNT2Mi provides an n x 64 kbit/s (n = 1 to 32) data access and enables TDM
multiplexing of line rates to three n x 64k ports. It also incorporates V.110 rate
adaptation enabling port rates lower than 64 kbit/s.
The line rate is n x 64 kbit/s (n = 3 to 32 in two-wire connection; n = 6 to 32 in
four-wire connection but only even numbers can be used), and the Trellis Coded
Pulse Amplitude Modulation (TC-PAM) coding is used for transmission.
DNT2Mi multiport
DNT2Mi multiport
Data
Data
PABX
PABX
LAN-IC
LAN-IC
SHDSL
Page 15

Construction and interfaces
DN01145897 © Nokia Corporation 15 (128)
Issue 2-0 en Nokia Proprietary and Confidential
4 Construction and interfaces
This chapter introduces the mechanical construction and interfaces of DNT2Mi.
4.1 Front panel
The front panel of DNT2Mi includes a display,LED indicators,push-button keys,
and a local management connector.
Page 16
Data Network Terminal Single-port and Multiport Operating Instructions
16 (128) © Nokia Corporation DN01145897
Nokia Proprietary and Confidential Issue2-0en
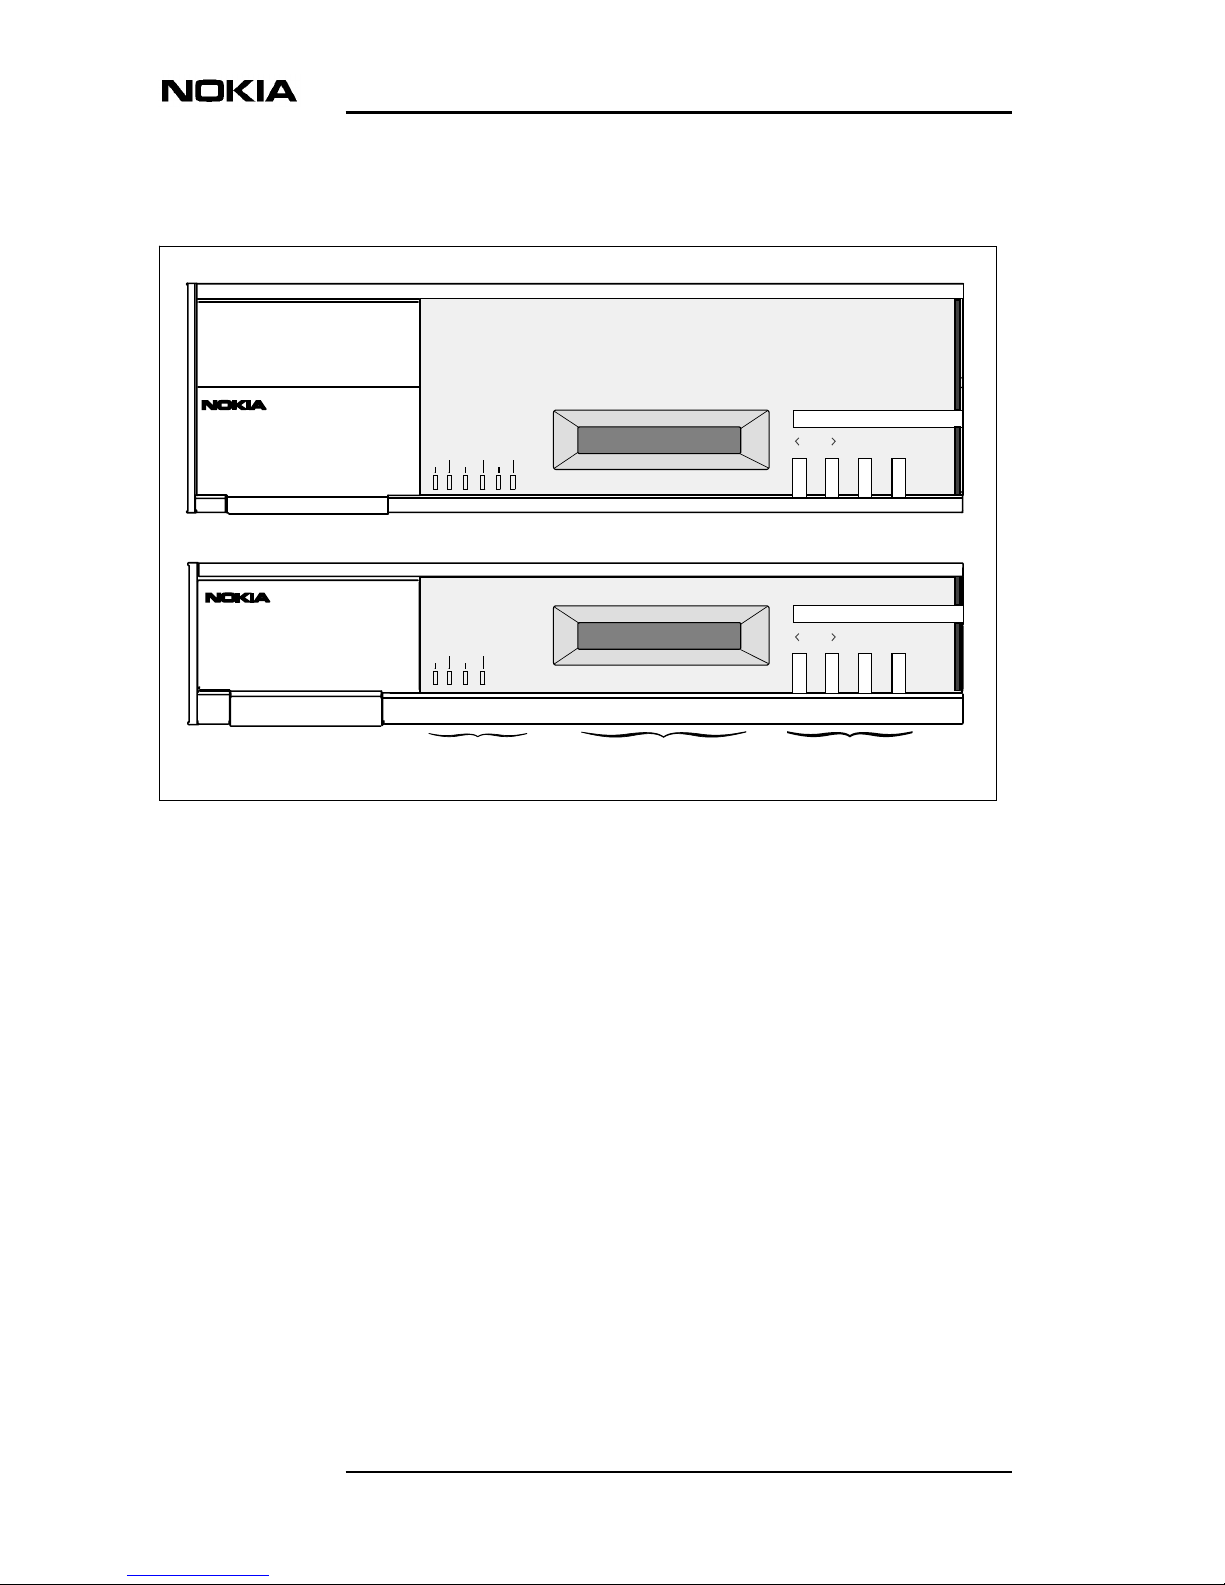
4.1.1 Indicators and keys
Figure 4. Indicators and keys of the two DNT2Mi units
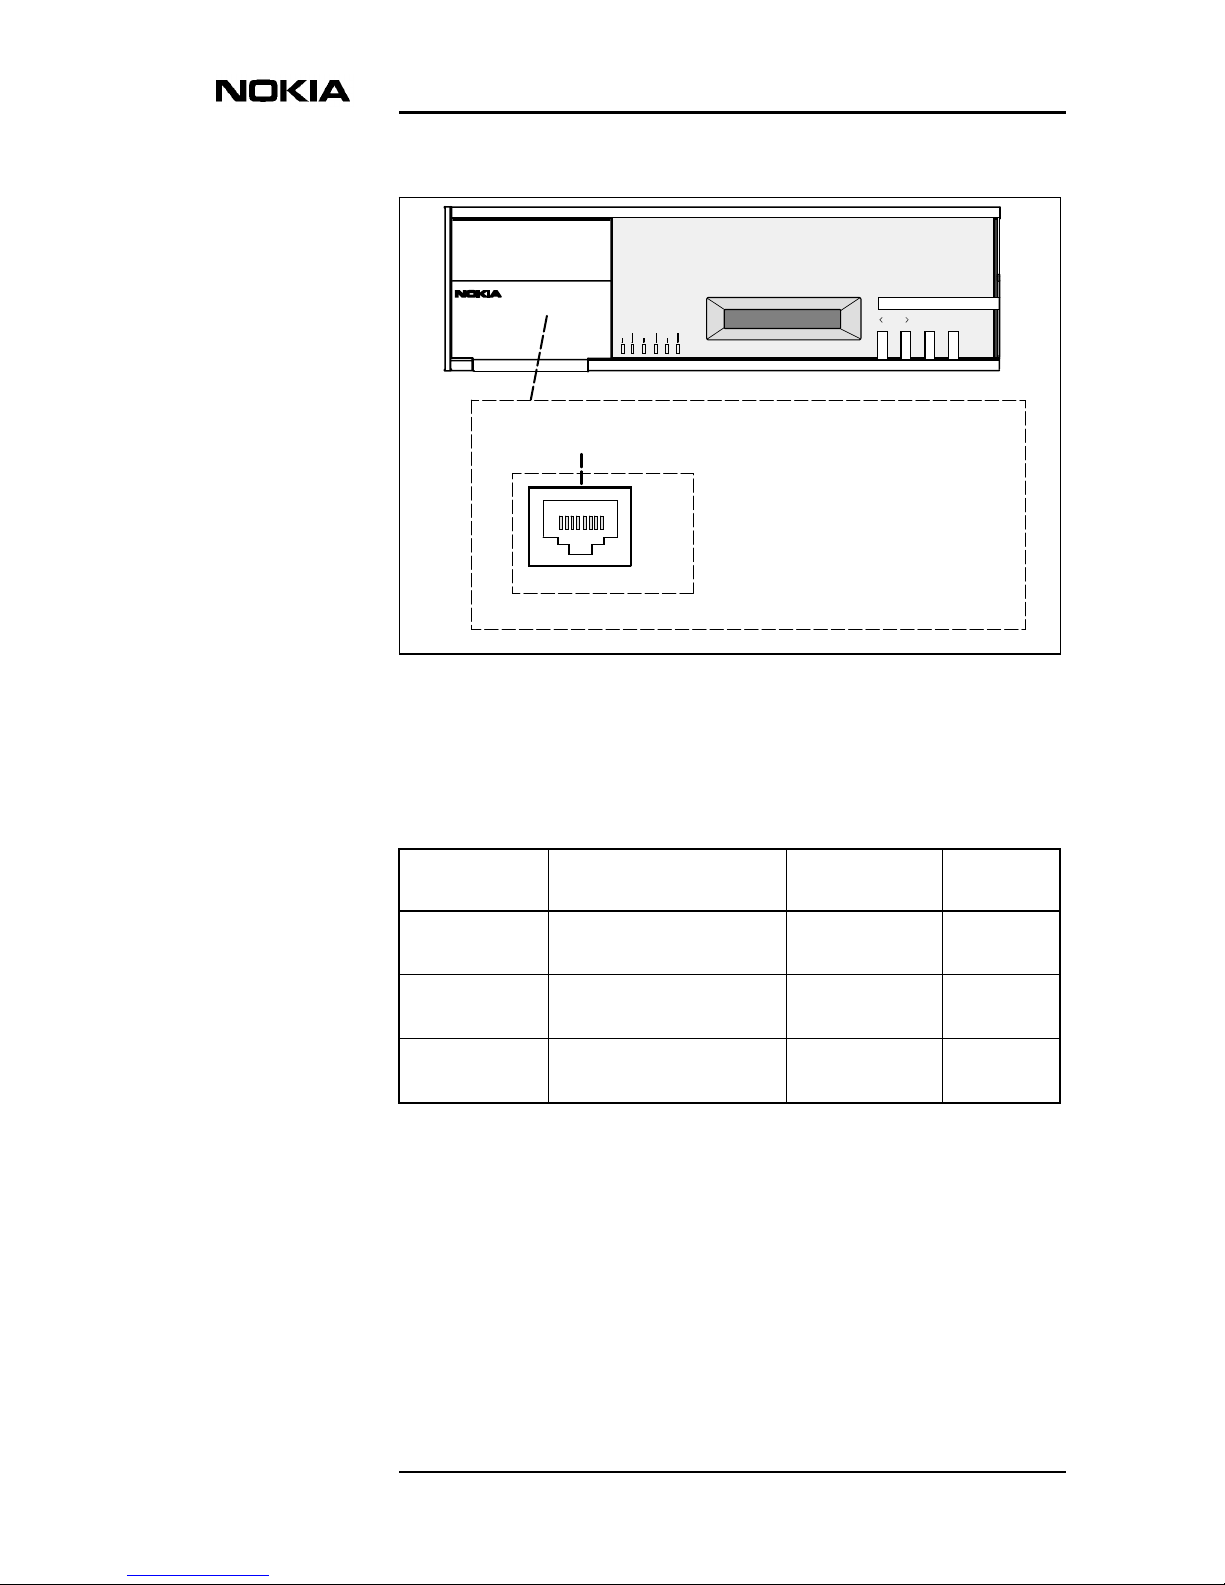
4.1.2 Local management interface
The localmanagement interface is located behind the front paneldoor (see Figure
5). The interface is used to manage DNT2Mi with Macro Service Terminal
Emulator (MSTE) running on a PC or with other Nokia management software.
If signal 108 (DTR) is on, connecting the Service Terminal Emulator will
disconnect DNT2Mi from the remote network management. If signal 108 is off,
the entire network can be managed through this equipment.
Management interface cables of DNT2Mi are listed in Table 1.
Electrically, management interface signals comply with ITU-T V.28 or V.11. The
selection is made using either front panel menus or Q1 menus.
OK EXIT
DTR DSR DCD RTS CTS
STATUS
PWR TESTP1P2
P3
1. LED
indicators
2. LCD
display
3. Front
panel keys
Multiport DNT2Mi
Single-port DNT2Mi
OK EXIT
DTR DSR DCD RTS CTS
STATUS
PWR TEST
PORT
DNT2Mi
DNT2Mi
Page 17
Construction and interfaces
DN01145897 © Nokia Corporation 17 (128)
Issue 2-0 en Nokia Proprietary and Confidential
Figure 5. Local management connector
OK EXIT
DTR DSRDCD RTS CTS
STATUS
PWR TESTP1P2
P3
18
Local management connector
(RJ-45)
1. 107 (OUT) Tx b (OUT)
2. 108 (IN)
3. 109 (OUT) Tx a (OUT)
4. SG SG
5. 103 (IN) Rx b (IN)
6. 104 (OUT)
7. 105 (IN) Rx a (IN)
8. 106 (OUT)
V.28
V.11
Table 1. Management interface cables
Code Name Connector
type
Length
TX21750 Management cable
(ST -> ACL2i)
Euro c/4
3x7F/D15F
1.5 m
TX25741.06 Management cable
(PC -> ACL2i)
D9M/D9F 3 m
E64320.01 Management cable
(PC -> DNT2Mi)
RJ45/D9F 3 m
Page 18
Data Network Terminal Single-port and Multiport Operating Instructions
18 (128) © Nokia Corporation DN01145897
Nokia Proprietary and Confidential Issue2-0en
Several DNT2Mi units can be connected to the same Q1 bus of V.11-type via a
local management interface.
Figure 6. Q1 management bus
E62711.01 Management cable
(ST -> DNT2Mi)
RJ45/D15F 1.5 m
DZ60639.1 Management cable
(PC -> DNT2Mi)
RJ45/D25F 3 m
ST = Service Terminal
DNT2Mi = Single-port or multiport n x 64 kbit/s stand-alone Network Terminal
PC = PC + Service Terminal Emulator
ACL2i = 2 Mbit/s SHDSL Rack-mounted Line Terminal
Table 1. Management interface cables (Continued)
Code Name Connector
type
Length
DNT2Mi,
NMS/10
- - -
Tx Rx Tx Rx Tx Rx
Tx
Rx
DNT2Mi
Page 19
Construction and interfaces
DN01145897 © Nokia Corporation 19 (128)
Issue 2-0 en Nokia Proprietary and Confidential
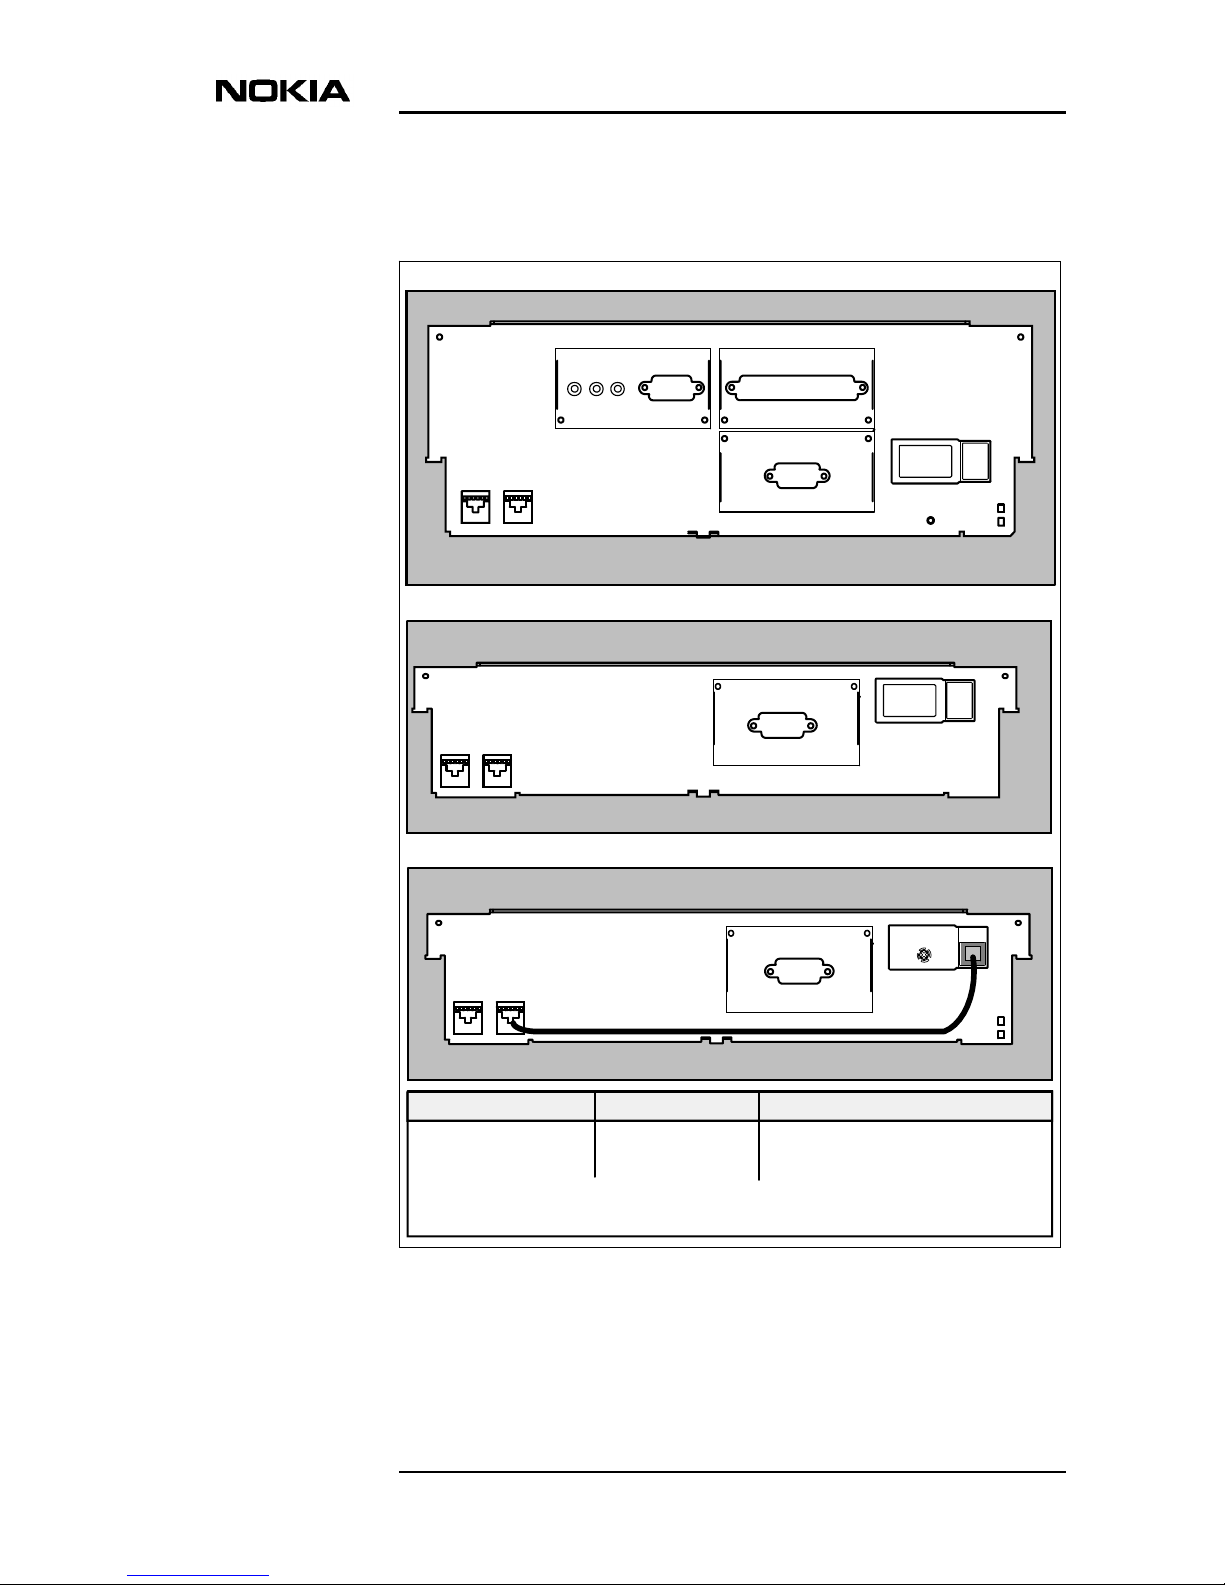
4.2 Rear panel
Figure 7. Rear panels of the DNT2Mi units
1. a
3.
1.
b
Line
2.
2.
2.
G.704 V.11
X.21
4.
RPWR
2.
1. a
3.
Line
4.
RPWR
1.
b
Multiport DNT2Mi
Single-port DNT2Mi
The two upper
adapters are
upside down
2.
1.a
3.
Line
4.
RPWR
1. b
Remote-powered DNT2Mi
1. c
OUT
OUT
OUT
AC VERSION DC VERSION REMOTE-POWERED VERSION
1 a) Remote power input
c) Remote power input cable
1 a) Mains connection
b) Mains switch
1 a) DC connection
b) DC switch
2. DTE interfaces
3. Line interface, 2-wire or 4-wire
4. Remote power feeding output
X.21
X.21
b) Ground connection
Page 20

Data Network Terminal Single-port and Multiport Operating Instructions
20 (128) © Nokia Corporation DN01145897
Nokia Proprietary and Confidential Issue2-0en
Figure 8. Line interface connector
4.2.1 Terminal interfaces
This section briefly introduces the DTE interface unit options. For more detailed
information, refer to document DTE Interface Units for Nokia Data Network
Terminals Operating Instructions.
123456
6-pin modular jack, RJ-11
Line
1.
2.
3. Not connected
4. Not connected
5.
6.
Pin
Line 1a
Line interface
Line 1b
Line 2a (not in use in 2-w mode)
Line 2b (not in use in 2-w mode)
Page 21

Construction and interfaces
DN01145897 © Nokia Corporation 21 (128)
Issue 2-0 en Nokia Proprietary and Confidential
Figure 9. DTE interface options
G.704/2M
V
.11
X.21
G.703/64kV.28
V.35
EIA-530-A
G.703/2M
1
69
RT
432
78
C
5
51
69
432
78
1
1
1
9
8
1
G.704/2M
ASYM75SYM120
IN/OUT IN OUT
19
37 20
1
9
8
15
13
25 14
15
13
25 14
SYMM:120
G.703/2M
ASYMM. 75
(IN) (OUT)
D2048 G.703/2M (BNC)
18
18
G.704/2M
G.704/2M
IN OUT
75
75
IN OUTG.704/2M
18
75
IN OUTG.704/2M
18
75
75
D2048 (RJ45 + SMB)
D2048 (RJ45 + BNC)
75
Page 22

Data Network Terminal Single-port and Multiport Operating Instructions
22 (128) © Nokia Corporation DN01145897
Nokia Proprietary and Confidential Issue2-0en
Figure 10. DTE interface options (continued)
The interface type is selected by installing an appropriate interface unit. You can
do this without opening the terminal's case. The interface unit types are given in
Table 2.
Ethernet
18
VF
LMI 10Base-T
EC PWR
EA
EL WL
CAS
Table 2. DTE interface adapter units
Adapter type Electrically Connector type Product code
V.11 V.11, V.10 D37F DS 62603.11
V.24
V.28
1)
D25F DS 62602.11
V.35 V.35, V.28 34F DS 62604.11
X.21 V.11 D15F DS 62605.11
G.703/64k G.703 D15F DS 62609.11
G.703/2M G.703 SMBM, BNC or
D9F
DS 62607.11
G.704/2M G.703 SMBM or D9F DS 62608.11
EIA-530-A V.11, V.10 D25F DS 62610.11
ET 10Base-T RJ45 E66210.02
(Router/Bridge)
E66210.22 (Bridge)
D2048 G.703 RJ45 E62628.01
D2048 G.703 RJ45 or BNC E62628.10
D2048 G.703 RJ45 or SMB E62628.11
VF Analogue 2/4-
wire
RJ45 E62612.02
1) In accordance with the ITU-T Recommendation V.28, this type of electrical
interface can be used up to 19.2 kbit/s. With proper cabling, however, operation up to
64 kbit/s is possible.
Page 23

Installing DNT2Mi
DN01145897 © Nokia Corporation 23 (128)
Issue 2-0 en Nokia Proprietary and Confidential
5 Installing DNT2Mi
This chapter provides instructions on how to mechanically install and connect
DNT2Mi. The menu settings required for bringing the unit into use can be found
in Chapter 6.
5.1 Electromagnetic compatibility
DNT2Mi complies with EMC specifications (refer to Chapter 10) when the
following conditions are fulfilled:
• The securing screws of the multiport DNT2Mi cover are properly fastened.
• All multiport DNT2Mi ports are provided with adapters, or unused ports
provided with dummy plates.
• The DTE cables and connectors are provided with reliable shielding.
• The connector’s connecting screws are properly fastened, so that shielding
integrity from the metal housing of the equipment to the cable shield over
the interconnecting interface is secured.
• A grounded 3-conductor mains cord and a grounded mains outlet for
mains-powered DNT2Mi terminals, or a similar grounding for DCpowered versions, is used.
5.2 Grounding of DNT2Mi
The AC-powered version of DNT2Mi is grounded properly when the mains cord
is connected to a grounded mains outlet.
The DC-powered version of DNT2Mi has a separate pin reserved for the ground
connection, refer to Section 5.8.
Page 24
Data Network Terminal Single-port and Multiport Operating Instructions
24 (128) © Nokia Corporation DN01145897
Nokia Proprietary and Confidential Issue2-0en
Caution
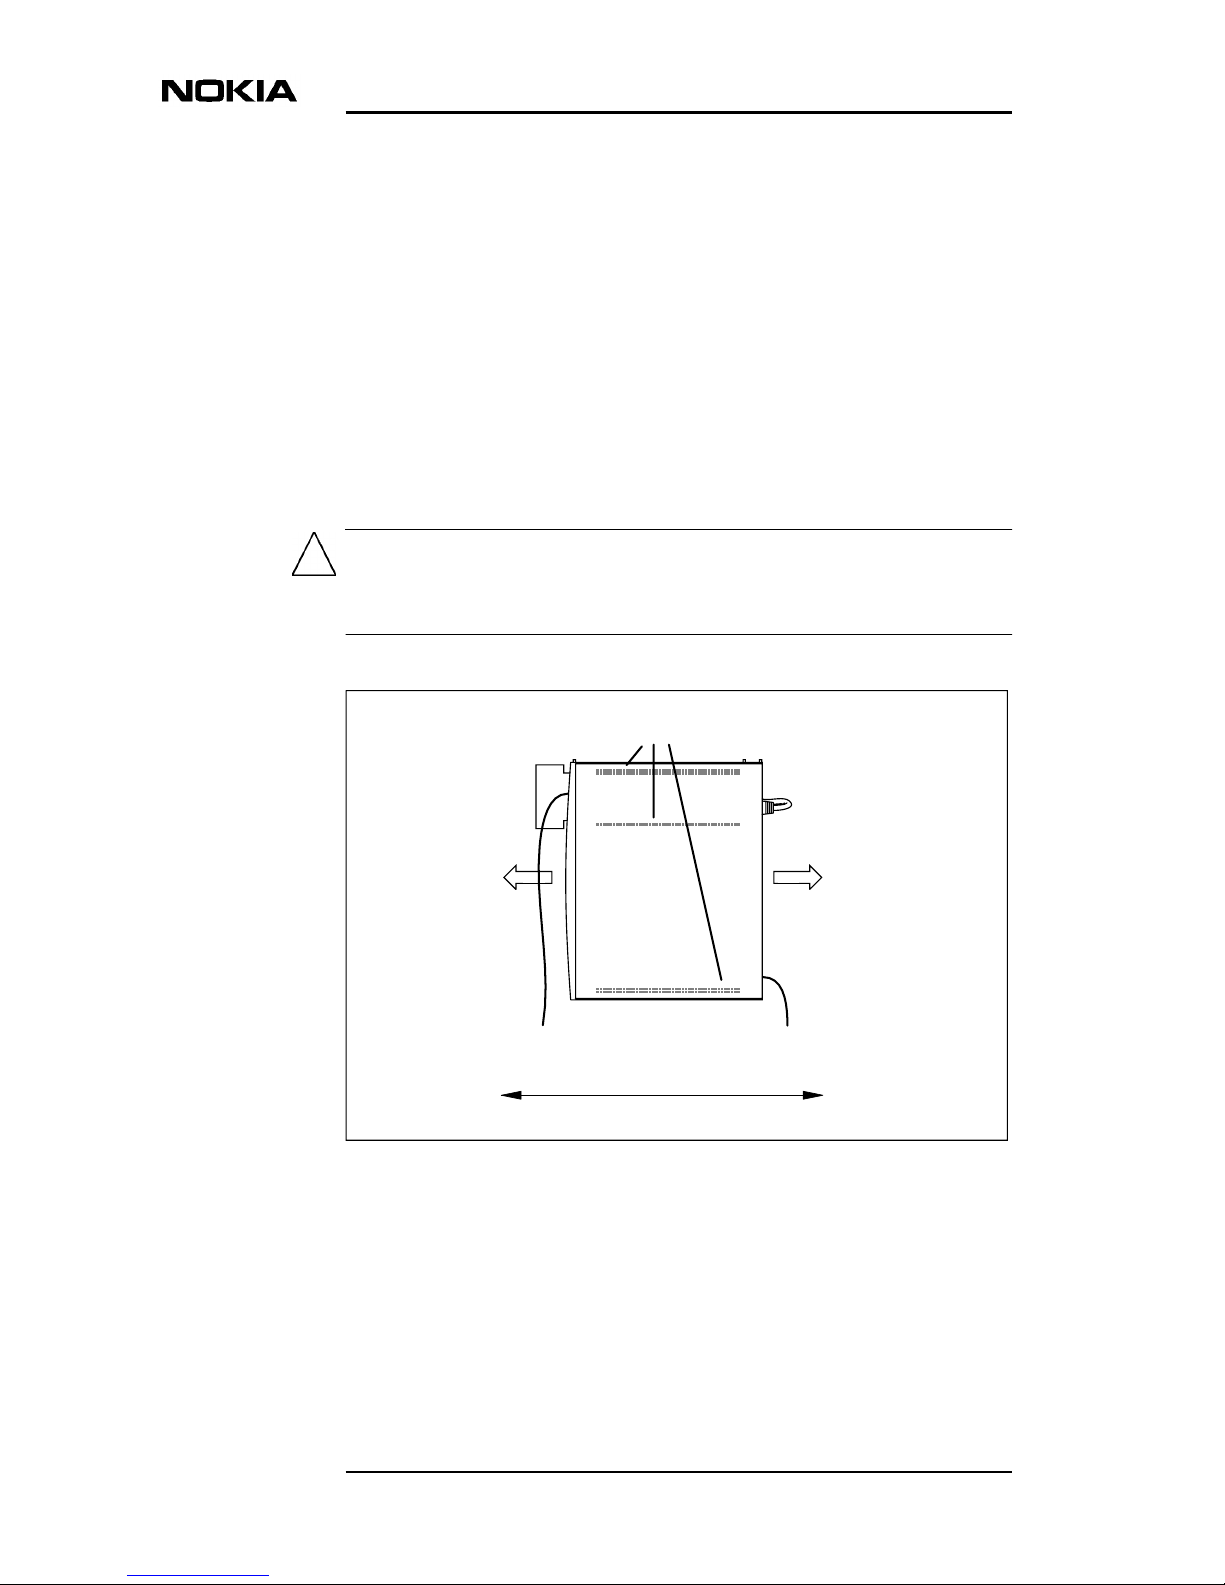
5.3 Clearances around DNT2Mi
When installing DNT2Mi on a wall or freely on a horizontal level, you must
ensure that there is an adequate space for connecting cables. Recommended
clearances are shown in Figure 11.
In a modem-shelf installation, slot sizing of the shelf ensures adequate horizontal
clearances between the units.
Heat released from the unit is insignificant, and does not therefore set
requirements on the clearances around the equipment. DNT2Mi is cooled through
natural convection through air inlets and outlets located in the bottom and top of
it.
Do not cover DNT2Mi. The air inlets and outlets must be unobstructed to
maintain proper circulation of air.
Figure 11. Clearances around DNT2Mi
Approx.
100 mm
Approx.
100 mm
Approx. 440 mm
Do not cover!
Page 25
Installing DNT2Mi
DN01145897 © Nokia Corporation 25 (128)
Issue 2-0 en Nokia Proprietary and Confidential
Caution
5.4 Work order
First examine the unit and make sure that it has not been damaged during
transportation. Also, check that you have the cables needed for connections
(mains cable, DTE cable, line cable).
Then proceed according to the steps below:
1. Insert DTE interface units into the DNT2Mi terminal, if needed, refer to
Section 5.5.
2. Insert DNT2Mi in a special shelf-like modem subrack or on a wall, if
needed, refer to Section 5.7. Otherwise, proceed with the free-standing
installation described in Section 5.6.
3. Plug the mains cord into a grounded mains outlet (AC version) or connect
the DC power lines (refer to Section 5.8).
4. Connect DNT2Mi to your DTE and to the line.
5. Switch on the power (AC or DC). The modem performs a self test.
6. Adjust the LCD contrast, if needed, refer to Section 5.9.2.
Then proceed to check that the main settings are correct (the settings are
described in Chapter 6). The settings can be checked and altered using
either the front panel keys and display (Chapter 8) or by using the Q1
connection (Chapter 9).
5.5 Inserting DTE interface units
The equipment is sensitive to static electricity. When handling the units you
should follow the general instructions concerning handling of ESD-sensitive
equipment. You should always take antistatic precautions (such as a wrist
grounding) when handling a plug-in unit once it has been removed from its
antistatic packaging.
If the DTE interface units are not pre-inserted or a unit needs to be changed,
follow the instructions below.
Page 26
Data Network Terminal Single-port and Multiport Operating Instructions
26 (128) © Nokia Corporation DN01145897
Nokia Proprietary and Confidential Issue2-0en
Caution
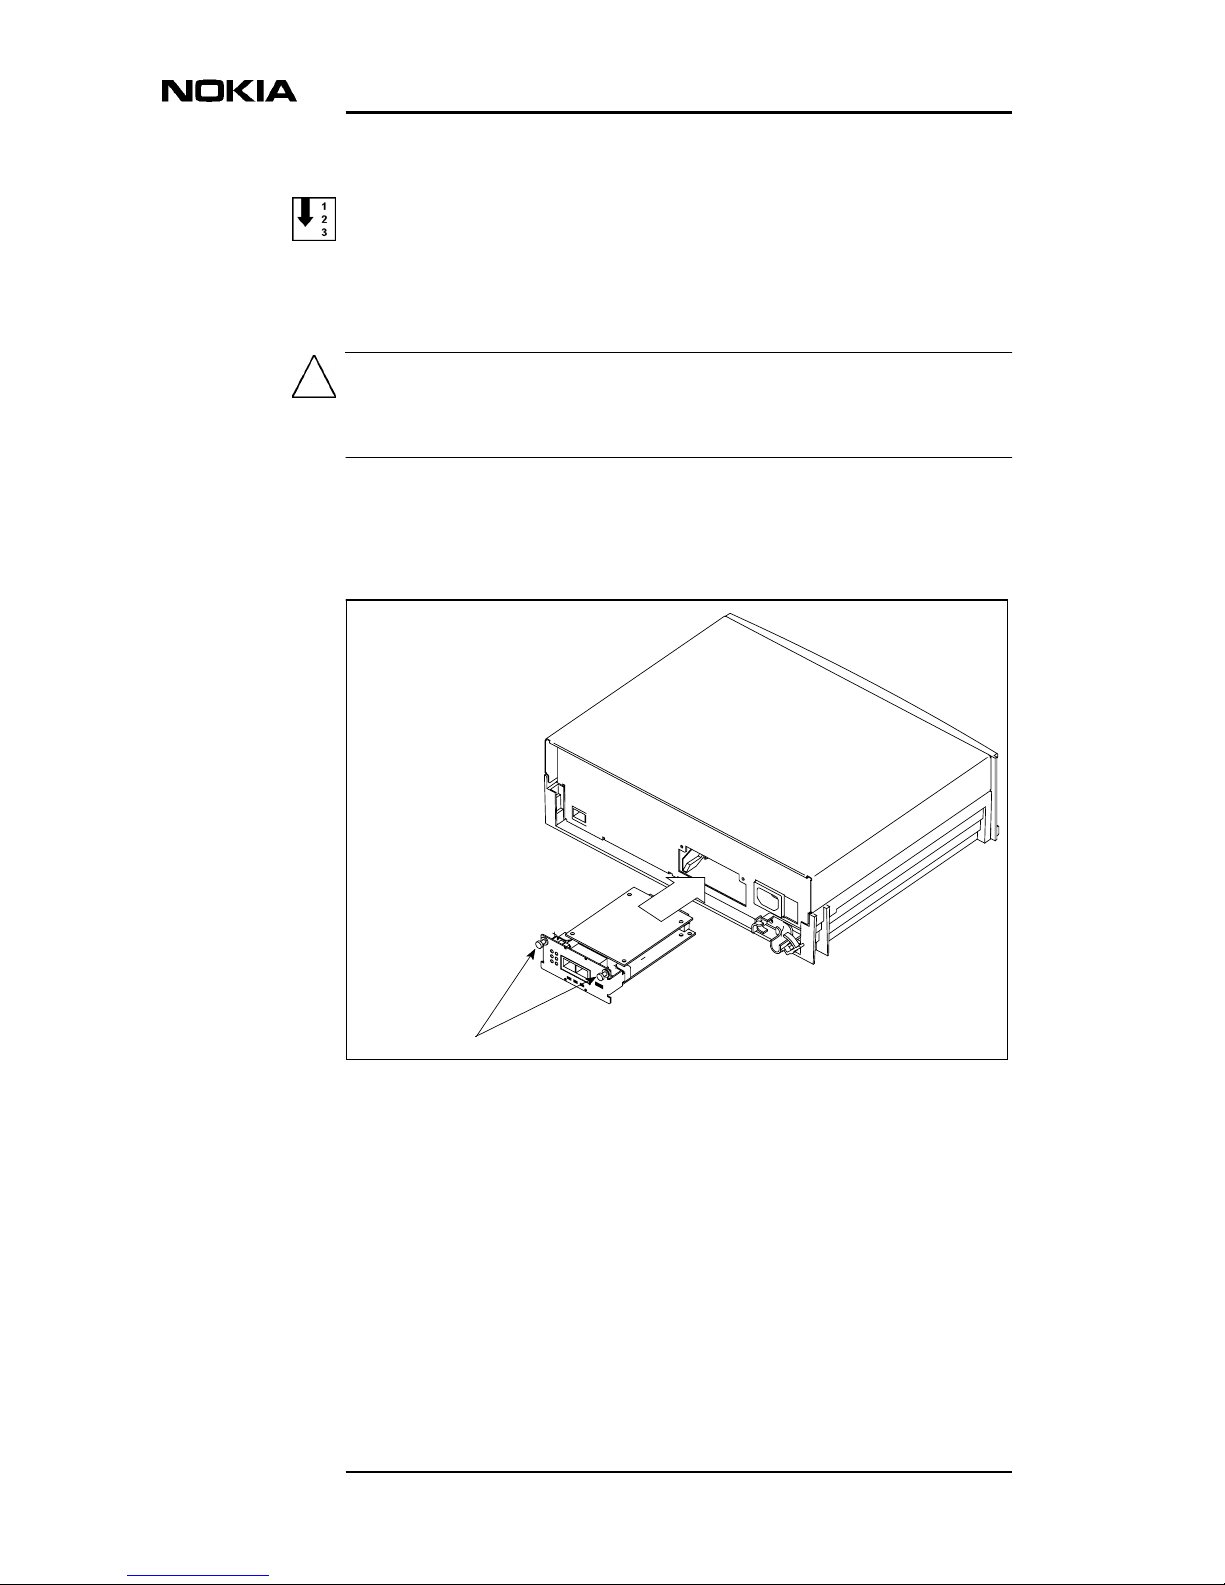
To insert DTE interface units:
1. Make sure that the power is switched off.
The multiportversion of DNT2Mi has three slots and the DTE interface units that
go to the upper slots (2 and 3) need to be inserted upside down.
2. Insert a DTE interface unit carefully into the slot.
3. Tighten the two screws.
Figure 12. Inserting DTE interface units into DNT2Mi (single-port)
Screws
Page 27
Installing DNT2Mi
DN01145897 © Nokia Corporation 27 (128)
Issue 2-0 en Nokia Proprietary and Confidential
Note
Caution
Note
5.6 Free-standing installation
A free-standing installation of DNT2Mi is allowed only if permitted by the local
electric safety regulations!
To install DNT2Mi free-standing:
1. Place DNT2Mi on a dry and clean horizontal level.
Make sure that the unit may not be dropped incidentally!
2. Guide the strain relief as advised in Figure 24.
3. Take care of the grounding as advised in Section 5.2.
5.7 Installing DNT2Mi on a wall or into a rack
This section gives instructions for the mechanical installation of DNT2Mi into a
19-inch rack or on a wall.
The mounting accessories used are:
• DS 62000.1 Modem shelf for low housing (single-port, 7 units)
• DF 62001.1 Wall-mounting bracket
• DF 62010.1 DC-power rail.
5.7.1 Installing DNT2Mi on a wall
When selecting an installation location, make sure that all cables can be easily
connected. See Figure 11 for adequate clearances.
Page 28

Data Network Terminal Single-port and Multiport Operating Instructions
28 (128) © Nokia Corporation DN01145897
Nokia Proprietary and Confidential Issue2-0en
Figure 13. Installation of DNT2Mi on a wall
To install DNT2Mi on a wall:
1. Position the mounting bar onto DNT2Mi.
• Place DNT2Mi bottom-side up and slide the angled end of the
mounting bar towards the rear panel.
• Ensure that the pin in the other end of the mounting bar locks into
the opening in the bottom of DNT2Mi.
Wall-mounting bracket
Mounting bar
6
1
2
3
4
5
Slide angled end of
the mounting bar
towards the rear panel
Fasten to DNT2Mi with
the screw included
Mark fixing points on the wall using
the bracket as schema
Drill holes ( 45 mm,
Lift DNT2Mi on
the bracket
Fasten the bracket into
wall with screws
ø 6 mm drill bit) into
the wall
Page 29
Installing DNT2Mi
DN01145897 © Nokia Corporation 29 (128)
Issue 2-0 en Nokia Proprietary and Confidential
2. Fasten the mounting bar into the opening in the bottom of DNT2Mi with
the screw included. Use a Phillips screwdriver.
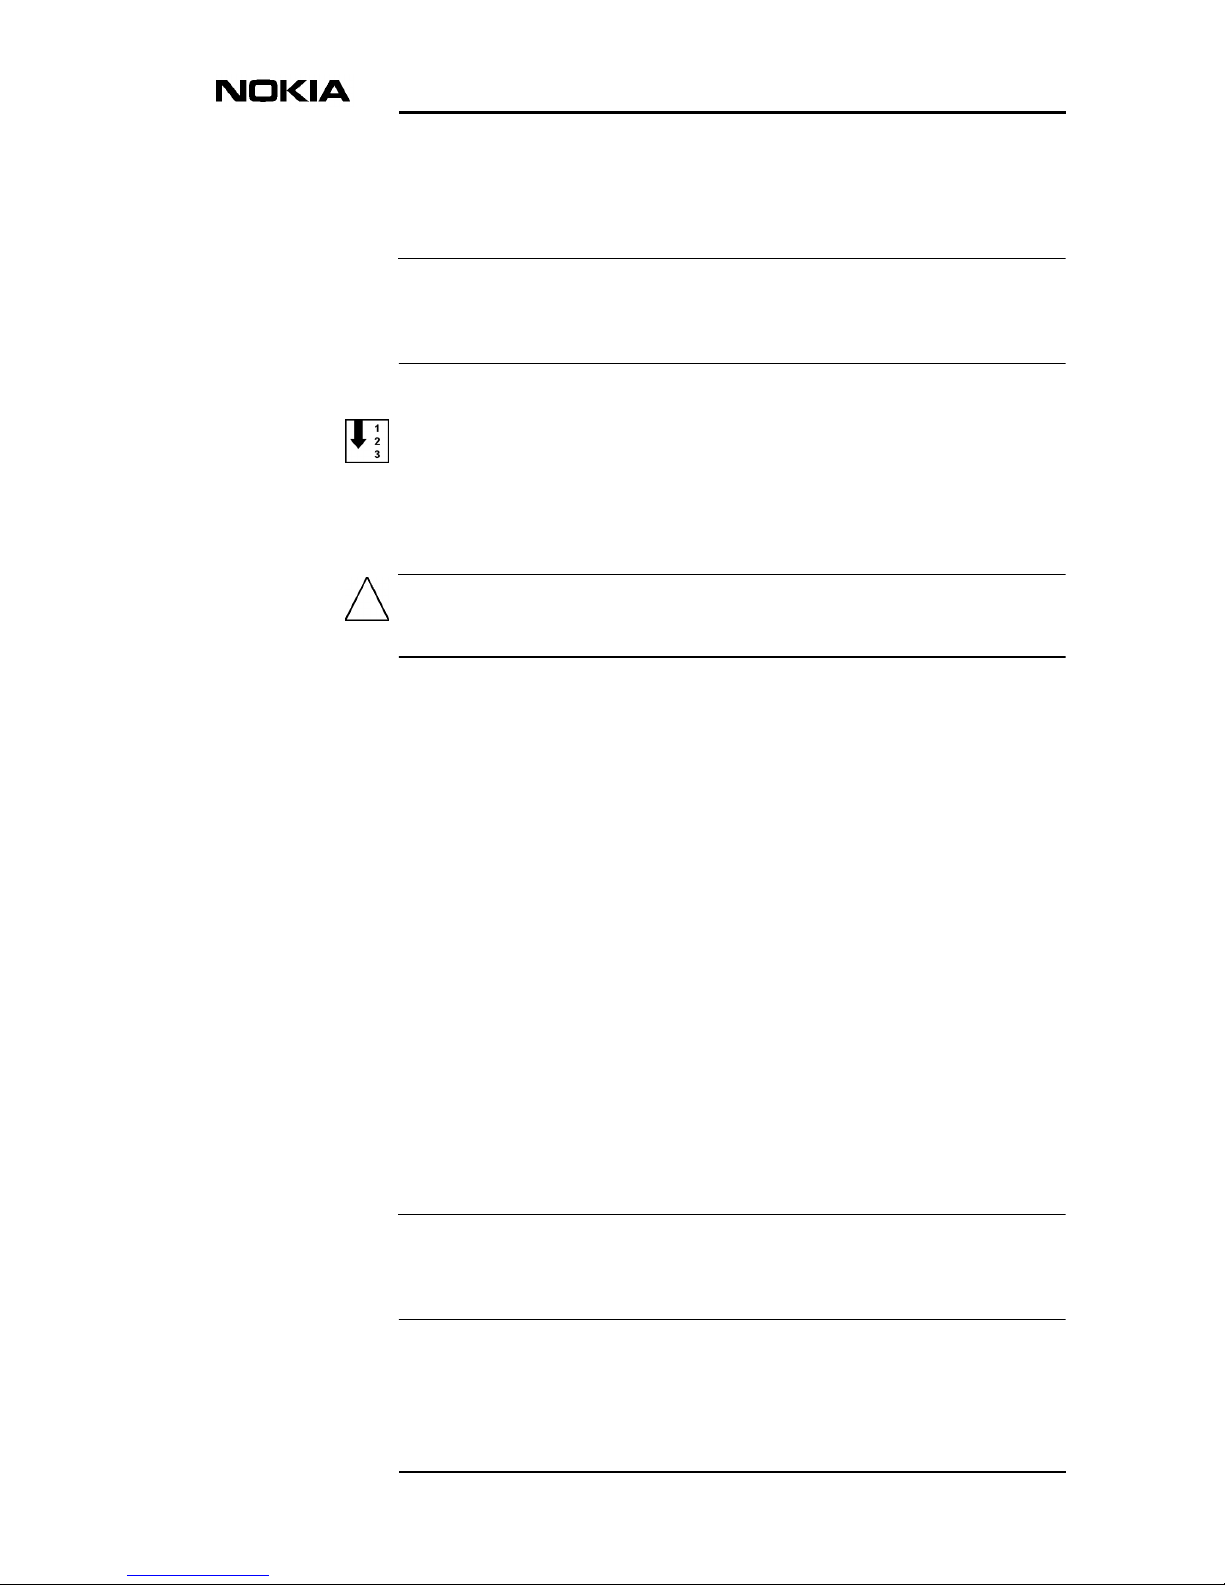
3. Mark fixing points on the wall for two screws using the wall-mounting
bracket as schema (Figure 14).
- Position the bracket on the wall in horizontal position, its hooks
facing upwards. Use a spirit level to check that the bracket is in a
straight position.
Figure 14. Marking of fixing points for wall screws
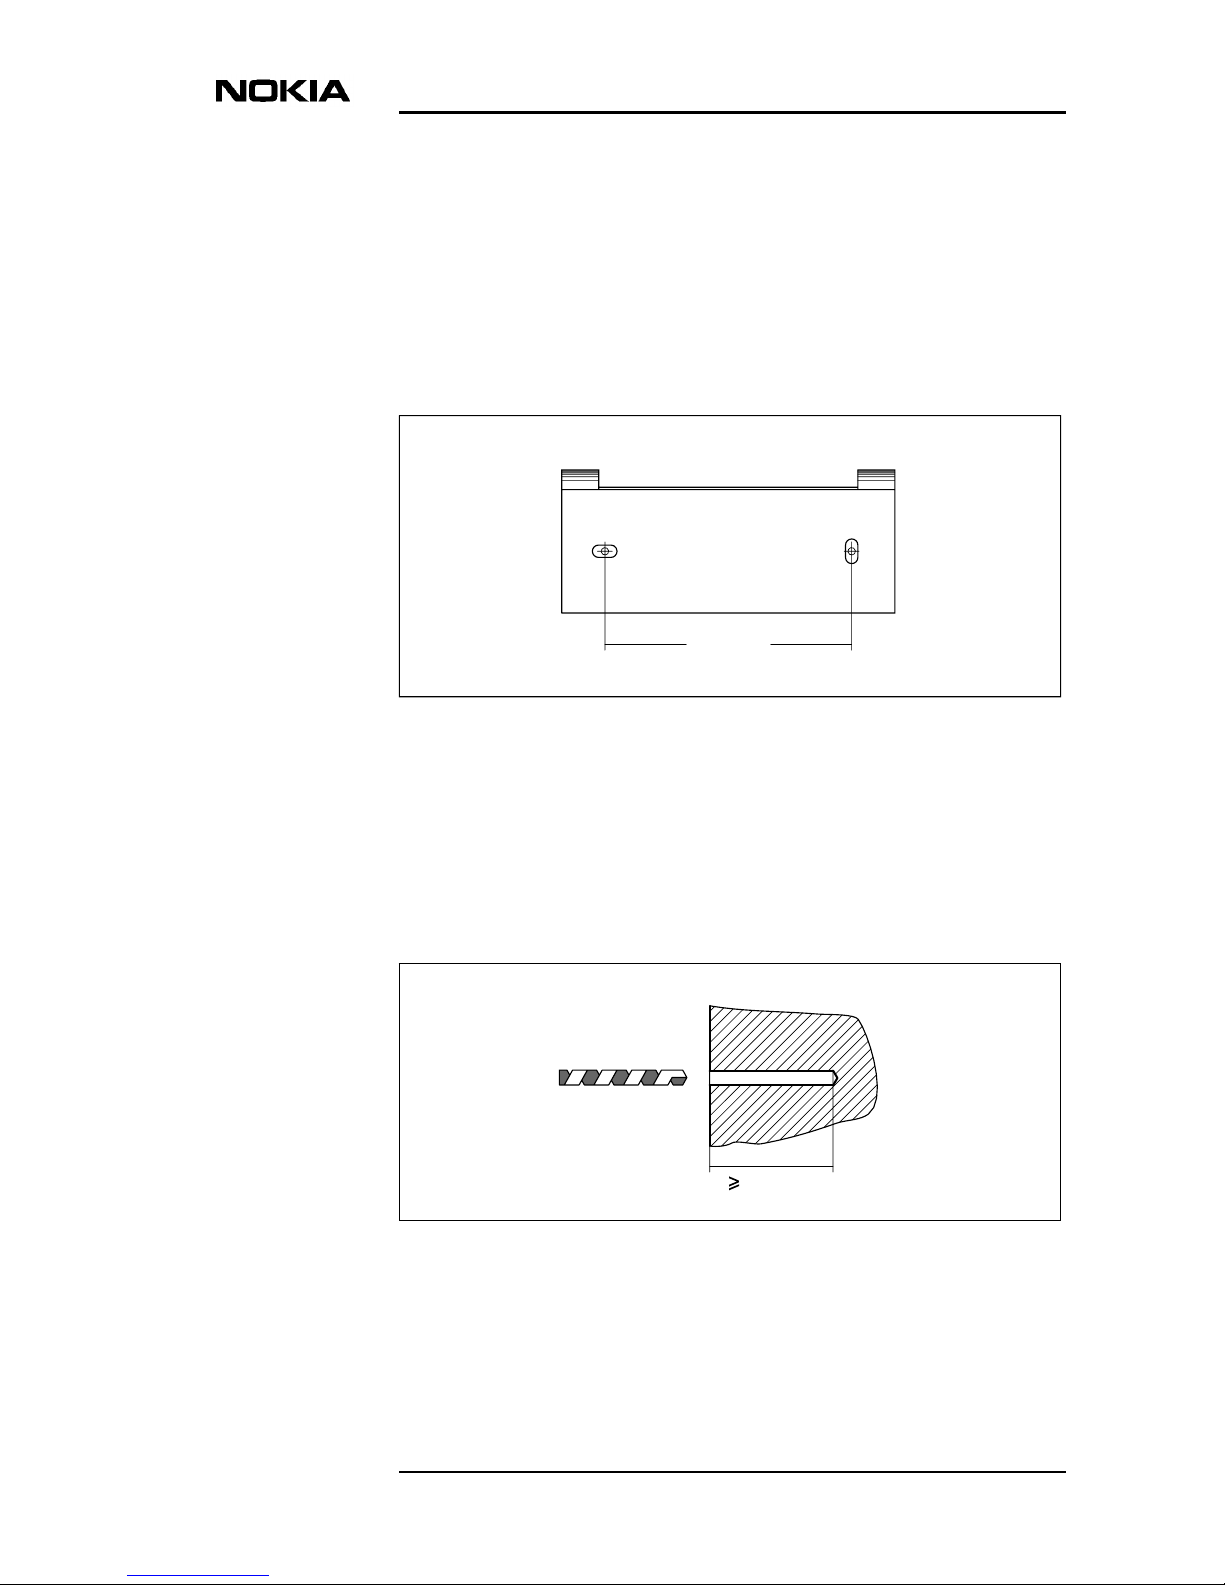
4. Drill holes(≥ 45 mm)into thewall (Figure15). Use a drilling machine with
a ø 6 mm drill bit.
• Clean the holes and insert the included anchor plugs into the drilling
holes, if the wall material requires them.
Figure 15. Drilling screw holes into a wall
100 mm
45 mm
ø 6 mm bit
Page 30

Data Network Terminal Single-port and Multiport Operating Instructions
30 (128) © Nokia Corporation DN01145897
Nokia Proprietary and Confidential Issue2-0en
5. Fasten the wall-mounting bracket on the wall.
• Position the bracket on the wall and fasten it by screwing the
included wall screws into the drilling holes.
6. Lift DNT2Mi on the wall.
• Slide the fixing holes of the mounting bar into the hooks of the wallmounting bracket and lay the lower end of DNT2Mi down against
the wall.
5.7.2 Uninstalling a wall-mounted DNT2Mi
To uninstall a wall-mounted DNT2Mi:
1. Switch off the power.
2. Disconnect the cabling.
3. Lift DNT2Mi from the hooks of the wall-mounting bracket.
Figure 16. Uninstalling DNT2Mi from the wall
5.7.3 Installing a modem shelf into a 19-inch rack
Before installing DNT2Mi into a modem shelf, install the modem shelf into a 19inch rack or cabinet.
Page 31

Installing DNT2Mi
DN01145897 © Nokia Corporation 31 (128)
Issue 2-0 en Nokia Proprietary and Confidential
To install a modem shelf into a 19-inch rack:
1. Insert the modem shelf into the 19-inch rack.
• Align the fixing holes of the modem shelf with the fixing holes in the
rack.
2. Put the rack mounting nuts (8 pcs) to the rack and fix the modem shelf to
the rack with eight screws.
3. Tighten the screws with a 5 mm Allen key.
Figure 17. Installing a modem shelf into a 19-inch rack
5.7.4 Installing DNT2Mi in a modem shelf
After you have installed the modem shelf into a 19-inch rack or cabinet, continue
by installing DNT2Mi in the modem shelf.
Rack nuts
Rack screws
(M6x16,
Allen-head)
19-inch rack
Page 32

Data Network Terminal Single-port and Multiport Operating Instructions
32 (128) © Nokia Corporation DN01145897
Nokia Proprietary and Confidential Issue2-0en
To install DNT2Mi in a modem shelf:
1. Insert DNT2Mi into a free slot in the shelf.
• Push until the unit locks into the stopper at the end of the slot rail.
2. Fasten the locking bar with the thumb screws included to lock DNT2Mi
into the shelf.
• Position the locking bar its openings facing upwards and flat side
against the upper edge of the shelf.
• Position the thumb screws through the locking bar’s openings into
the fasteningholes of the shelf andtighten the screws. Alternatively,
you can first tighten the screws loosely, then slide the locking bar
into its place and tighten the screws firmly.
Figure 18. Installation of DNT2Mi in a modem shelf
Locking bar
Thumb screws
Stoppers (at the end
of each rail)
Openings upwards
Insert into a free slot
Fasten with
thumb screws
1
2
Page 33

Installing DNT2Mi
DN01145897 © Nokia Corporation 33 (128)
Issue 2-0 en Nokia Proprietary and Confidential
5.7.5 Uninstalling DNT2Mi from a modem shelf
To uninstall DNT2Mi from a modem shelf:
1. Switch off the power.
2. Disconnect the cabling.
3. Loosen the thumb screws of the locking bar. Do not remove the screws
completely.
4. Remove thelocking bar by pushing it to left and stringingit out through the
slots.
5. Draw DNT2Mi out of the modem shelf.
Figure 19. Uninstalling DNT2Mi from a modem shelf
3 Loosen thumb screws
2 Disconnect cabling
4 Remove locking bar
5 Draw DNT2Mi out
1
Switch power off
Page 34

Data Network Terminal Single-port and Multiport Operating Instructions
34 (128) © Nokia Corporation DN01145897
Nokia Proprietary and Confidential Issue2-0en
WARNING
Note
5.8 Connecting power supply
This section specifies the requirements for the mains power supply of the site.
MAINS VOLTAGE!
Follow the national legislation when working with the power supply.
DNT2Mi must be permanently wired to a disconnect device (for example
circuit breaker) in accordance with the current local and national wiring
standards.
The following warning applies to the AC power supply:
The protective ground wire can only be used for protective conductor
installations. Using the protective ground conductor for other purpose is
dangerous to life. Ensure that the ground connection is established before the
power outlet is connected to the power interface.
The power supply of DNT2Mi can operate at the following voltages:
• 90 to 264 V
AC
(AC-powered unit)
• -20 to -75 V
DC
(DC-powered unit)
• 50 to 150 V (remote-powered via ACL2i).
Power interfaces are located on the rear panel of DNT2Mi.
AC mains is recommended to be protected with a lightning and transient
overvoltage protector(mains wire-in protector). This protection is notincluded in
DNT2Mi.
In general, mains fuses and supply cables have to be rated according to the
national electric safety regulations.
DNT2Mi can be connected either to a positive-grounded or to a negativegrounded DC power system. Principlesof the DC powersystems are presented in
Figures 20 and 21.
Page 35

Installing DNT2Mi
DN01145897 © Nokia Corporation 35 (128)
Issue 2-0 en Nokia Proprietary and Confidential
Figure 20. Principle of a negative-grounded DC power system
Figure 21. Principle of a positive-grounded DC power system
-48V system
Earthing bar
+ bar
+
-
Fuse 2 A max. 10 A
1.0 mm
2
1.0 mm
2
+
-
E
+48V system
Earthing bar
- bar
+
-
Fuse 2 A max. 10 A
1.0 mm
2
1.0 mm
2
+
-
E
Page 36

Data Network Terminal Single-port and Multiport Operating Instructions
36 (128) © Nokia Corporation DN01145897
Nokia Proprietary and Confidential Issue2-0en
Note
Figure 22. Grounding principle of the remote-powered system
If the remote power feed is connected in a wrong way, that is, if the pairs are
cross-connected at the DNT end, the receiving remote unit still functions
properly. However, in this situation data transfer is not possible. See Figure 23.
Figure 23. Remote power feed connection
Earthing bar
Line
1.0 mm
2
Power cable
To remote
DC power
Line 1
Line 2
DNT2Mi-rp/mp
To remote
DC power
Line 1
Line 2
DNT2Mi-rp/mp
Line
block
Line
block
Lines correct
Lines cross-connected
Power available and
data transfer possible
Power available but data
transfer not possible
a
a
b
b
a
b
a
b
Page 37

Installing DNT2Mi
DN01145897 © Nokia Corporation 37 (128)
Issue 2-0 en Nokia Proprietary and Confidential
Note
5.8.1 Troubleshooting
Remote-powered DNT2Mi
If there is a backlight but no menuon the display of DNT2Mi, the line is too long,
or there is a line break on one of the pairs.
If the initial displays are shown, but the unit resets after a while, the situation may
be due to the fact that the line is too long.
If there is no backlight to be seen, the line is too long, or the power supply is
broken.
The status LED is red
Check the Status field of the top level menu display and check the Status and
Alarm submenus under the Monitoring menu.
Location of error source
Test the connection according to information in Section 7.3.
The network terminal must be connected to a ground mains outlet.
5.8.2 Strain relief
In an AC-powered unit, guide the power cable through the strain relief located
under the power interface to secure a firm connection (see Figure 24).
In a DC-powered unit, the DC-power cable is connected and guided through the
strain relief at the factory.
Figure 24. Strain relief
Page 38

Data Network Terminal Single-port and Multiport Operating Instructions
38 (128) © Nokia Corporation DN01145897
Nokia Proprietary and Confidential Issue2-0en
Caution
5.9 Completing the installation
5.9.1 Verifying the installation
To verify that you have installed DNT2Mi correctly:
1. Switch the power to DNT2Mi with the power switch on the rear panel.
2. Check that the green LED (PWR) lights up on the front panel.
Do not cover DNT2Mi. The air inlets and outlets must be unobstructed to
maintain proper circulation of air.
5.9.2 Adjusting the LCD display
The LCD adjustment (see Figure 25) may be necessary if the viewing angle
differs from the normal table-topviewing angle, which isthe case, for example in
a wall mounting. Adjust the contrast with a small crosshead screwdriver.
Figure 25. Adjusting LCD contrast
5.9.3 Recommended actions after the installation
After the installation, we recommend you to:
• Label DNT2Mi unit(s) and cables according to your installation plan to
help future maintenance operations.
• Clean the site after installation. Recycle any applicable material.
OK
DNT2M
DTRDSR
DCDRTSCTS
STATUS
PWR TESTP1P2
P3
18
LCD-Contrast Adjuster
Page 39

Commissioning DNT2Mi
DN01145897 © Nokia Corporation 39 (128)
Issue 2-0 en Nokia Proprietary and Confidential
Note
6 Commissioning DNT2Mi
This chapter describes the most common items that need to be checked before
DNT2Mi is taken into use.
DNT2Mi is ready to operate after the power supply (AC, DC, or remote power)
and port and line cables are connected. However, identifications and settings
should be checked and, if required, statistics and error counter should be reset.
DNT2Mi can be configured, tested, and controlled via:
• Front panel LCD and keys
• Service Terminal (using Q1)
• Macro Service Terminal Emulator running on a PC (using Q1).
Other Nokia management products, such as Nokia NMS, can be used for the same
purpose.
Menu structure for the front panel menus is shown in Chapter 8. Menu structure
for Q1 management is shown in Chapter 9.
The tables in Appendix A can be used to mark down information gathered during
the commissioning procedure.
It can take up to 60 seconds to save the altered settings. If the power is switched
off during this time, the new settings will be lost. During the saving process, you
can use the equipment normally.
6.1 Automatic power-up test
When the power is switched on, the unit performs an automatic self test, which is
used to check the most vital operational functions of the equipment.
During the power-up test, the Status LED and the Test LED are lit.
Page 40

Data Network Terminal Single-port and Multiport Operating Instructions
40 (128) © Nokia Corporation DN01145897
Nokia Proprietary and Confidential Issue2-0en
Note
After the automatic power-up test, the display indicates possible errors found
during the test. More detailed information on the fault can then be found in the
Self test menu.
The test ends automatically if no fatal errors were found.
6.2 Management
DNT2Mi canbe managed through the line connection, local management, orport
connection.
The following items need to be checked:
Q1 transmission speed (Q1: 6,1,1)
The Q1 transmission speed needs to be set to match the system management
speed.
Q1 address information (Q1: 6,1,2)
The equipment needs a Q1 address to be visible in the NMS systems. You must
give a unique address to each equipment.
You can also enter a name for the equipment by using the command 4,7,2,1.
Q1 management path (Q1: 6,1,3)
The routing of the management must be defined to correspond with the system.
The address setting has the following restrictions:
• The address 4095 must not be given if the equipment is connected to an
NMS bus. This address is a common (broadcast) address.
• The address 4094 is reservedfor PC-TMC/STEuse (generaladdress for the
PC interface unit).
• The address 0is reserved for PC-TMC/STE use(default address for the PC
interface unit).
Page 41

Commissioning DNT2Mi
DN01145897 © Nokia Corporation 41 (128)
Issue 2-0 en Nokia Proprietary and Confidential
6.3 Timing source
Before connecting DNT2Mi to a network, you need to know how the network is
timed.
DNT2Mi can receive timing information through the line and port interfaces.
DNT2Mi can also be used as a network timing source using the unit’s internal
timing circuits.
More information can be found in Sections 9.3.3 and 9.3.5.
6.4 Line settings
You have to check the following items:
Line interface (Q1: 6,3,3)
The line interface settings determine line SHDSL mode, connection speed, and
use of wires.
Typically, DNT2Mi is configured as STU-R, Rate Adaptive. The Rate Adaptive
mode automatically adapts the requested fixed line rate to STU-C.
Power backoff (Q1: 6,3,6)
Select this option to enable or disable transmit power reduction on short loops.
Line alarms (Q1: 6,3,8 and 6,3,9)
The BER alarm limit and alarm severity have to be checked.
6.5 Port settings
Adapter unit types are automatically recognised by DNT2Mi and can be seen
from the Identifications menu, for instance.
Page 42

Data Network Terminal Single-port and Multiport Operating Instructions
42 (128) © Nokia Corporation DN01145897
Nokia Proprietary and Confidential Issue2-0en
Note
Note
Port settings (Q1: 6,4, port#,3)
Different adapters include different configurable parameters. Check that port
settings are compatible with the equipment they are connected to.
There are some adapter settings that are done by changing the jumper settings on
the actual adapter. For more information, refer to document DTE Interface Units
for Nokia Data Network Terminals Operating Instructions.
Port alarms (Q1: 6,4, port#,5)
Check that the Q1 alarm visibility is set correctly, that is, enabled or disabled. If
Q1 alarms are disabled, port alarms are not visible in the NMS system.
Also, the BER alarm limit and the alarm severity need to be checked.
6.6 Time slot settings (Q1: 6,5)
DNT2Mi canmap a certain amount of time slotsfrom the line connection directly
to a port. Check and configure the time slot allocations, if necessary.
Pay close attention to the mapping of time slot 0. For example, time slot 0 cannot
be mapped with G.704 adapters.
6.7 Protection settings
Password (Q1: 10,1 and 10,4)
DNT2Mi settings can be protected with a password.
Front panel key rights (Q1: 10,5)
The front panel keys can be used to configure the equipment and to launch tests
(Test activation). Both functions can be either enabled or disabled.
Page 43

Commissioning DNT2Mi
DN01145897 © Nokia Corporation 43 (128)
Issue 2-0 en Nokia Proprietary and Confidential
Note
6.8 Measurements
After all the settings have been checked, we recommend that you carry out a line
quality and a BER test.
Before starting the BER test, reset all statistics and error counters. Read statistics
and error counters after the BER test.
Noise margins, Rx and Tx line levels, and attenuations (Q1: 7,1...3)
Establish a link between two units. After the line is up, check the noise margin,
Rx level, and line attenuation from the Measurements menu.
You can use Table 28 in Appendix A to mark down the results for line
attenuation.
Bit error rate test
We recommend you to perform a five-minute bit error rate (BER) test. For the
test, you need an external test equipment.
You can use Table 27 in Appendix A to mark down the results.
After the tests
Check that all alarms have disappeared and the statistics are still correct.
Table 3. Monitoring a line
Tx level
Line 1 or 2: xx dBm xx = +7.5 to +14.5 dBm
Rx level
Line 1 or 2: xx dBm xx = +14.5 to -26 dBm
Noise margin
Line 1 or 2: xx dB xx = 0 to +15 dB
Attenuation
Line 1 or 2: xx dB xx = 0 to 41 dB
Page 44

Data Network Terminal Single-port and Multiport Operating Instructions
44 (128) © Nokia Corporation DN01145897
Nokia Proprietary and Confidential Issue2-0en
6.9 Default values
The following default values can be recalled, forexample from the Q1 menu path
6,6:
Line voltage: xx V Alternatives: 55 to 155 V + no remote power
Signal quality
Last 15 min
Signal quality monitored during 1 period of 15 minutes to
max. 4 (with front panel menus) or 100 (with Q1 menus)
successive periods of 15 minutes.
Front panel menus give you absolute values and Q1
menus both absolute and relative values.
Signal quality
Last 24 hours
Signal quality monitored during 1 period of 24 hours to
max. 4 (with front panel menus) or 30 (with Q1 menus)
successive periods of 24 hours.
Front panel menus give you absolute values and Q1
menus both absolute and relative values.
Table 4. Explanation of noise margin
Noise margin Bit error ratio
+15 dB
+1 dB
Expected BER < 10
-7
0 dB
Expected BER 10
-7
Table 3. Monitoring a line (Continued)
Table 5. Global parameters
Timing source Line
Front panel operation rights Testing and configuration allowed
Q1 address *) 2
Q1 management path Q1 via line: on
LM interface: on
Control and test loop limit 10 minutes
Q1 password for settings No protection, password: DNT2Mi
Equipment ID DNT2Mi
Use of front panel Full menu
Page 45

Commissioning DNT2Mi
DN01145897 © Nokia Corporation 45 (128)
Issue 2-0 en Nokia Proprietary and Confidential
Use of front panel keys In use
Q1 rate *) 4800 bit/s
*) = Recalling the default values does not change the values set for the Q1
management parameters. The original values for these parameters can be recalled by
recalling the factory settings, refer to Section 6.10.
Table 6. Line parameters
Line interface STU-R rate adaptive, 2-wire
Power backoff ON
Bit error alarm limit
10
-6
Table 7. Multiplexer parameters
Use of time slots No time slots connected
Table 8. Port parameters, V-series (V.11, V.28, V.35 or EIA-530-A)
Port rate n x 64k (n=1)
Use of V.110 rate adaptation in
port 2 or 3
Not in use
In port 2 or 3 9600 kbit/s, Synchronous
Remote loop detection Allowed
Externally caused alarms Disabled (not to be seen through Q1).
However, even if these alarms are disabled, they
cause front panel alarms.
Rx timing (CT103) DCE source (CT114)
CTS use Not in use
CTS On
DCD Follows line synchronisation
DSR On
Circuit 140 Disabled
Circuit 141 Disabled
Table 5. Global parameters (Continued)
Page 46

Data Network Terminal Single-port and Multiport Operating Instructions
46 (128) © Nokia Corporation DN01145897
Nokia Proprietary and Confidential Issue2-0en
Table 9. Port parameters, X.21
Port rate n x 64k (n=1)
Use of V.110 rate adaptation in
port 2 or 3
Not in use
In port 2 or 3 9600 kbit/s, Synchronous
Remote loop detection Allowed
Externally caused alarms Disabled (not to be seen through Q1).
However, even if these alarms are disabled, they
cause front panel alarms.
Circuit C Ignored
Circuit I Follows line synchronisation
Use of RL request from DTE Disabled
Use of LL request from DTE Disabled
Table 10. Port parameters, G.703/64k
Port rate n x 64k (n=1)
Remote loop detection Allowed
Externally caused alarms Disabled (not to be seen through Q1).
However, even if these alarms are disabled, they
cause front panel alarms.
Port rate 64k (always)
Interface mode Codirectional
AIS mode No octet timing
Table 11. Port parameters, G.704/2M
Port rate n x 64k (n=1)
Remote loop detection Allowed
Externally caused alarms Disabled (not to be seen through Q1).
However, even if these alarms are disabled, they
cause front panel alarms.
Framing format Basic frame
Page 47

Commissioning DNT2Mi
DN01145897 © Nokia Corporation 47 (128)
Issue 2-0 en Nokia Proprietary and Confidential
Note
6.10 Factory values
Recalling the default values does not affect the following settings that are
considered as factory settings. When the factory settings are recalled, the values
in this section and in Section 6.9 become effective.
Recalling of factory settings can take up to 60 seconds.
G.704 TS map Equal to line
Unused time slots Filled with FF
National bits Sa4 to Sa8 1
BER alarm limit 1E-3
BER alarm severity B-level
Table 11. Port parameters, G.704/2M (Continued)
Table 12. Factory values
Q1 address 2
Q1 rate 4800 bit/s
Page 48

Data Network Terminal Single-port and Multiport Operating Instructions
48 (128) © Nokia Corporation DN01145897
Nokia Proprietary and Confidential Issue2-0en
Page 49

Maintaining DNT2Mi
DN01145897 © Nokia Corporation 49 (128)
Issue 2-0 en Nokia Proprietary and Confidential
7 Maintaining DNT2Mi
This chapter describes what general information and statistics you can get on the
equipment to be monitored. It also deals with possible alarms and faults.
You canaccess all this information using front panel or Q1menus. The menus are
described in detail in Chapters 8 and 9.
7.1 Getting general information
The front panel menu Monitor Info or the Identifications menu, branch 4 on the
Q1 mainmenu, gives the name and type ofthe unit to be monitored, the codesand
versions of HW units and programs to be used.
Figure 26. Example of general information
In this menu, only the name of the supervised unit is changeable. To change the
name, select Modify (Q1 menu option 4,7,2,1). Note that the maximum length of
the name is 15 characters.
Identifications
Equipment name:
DNT2Mi
Equipment type:
DNT2Mi mp (T65680)
HW:
Main E65671.01 A
Mux E65633.01 A
SW:
S65672.01 A0
Port 1:
V.35 (DS 62604)
Port 2:
X.21 (DS 62605)
Port 3:
V.11 (DS 62603)
Page 50

Data Network Terminal Single-port and Multiport Operating Instructions
50 (128) © Nokia Corporation DN01145897
Nokia Proprietary and Confidential Issue2-0en
7.2 Monitoring alarms
The Fault display (see Figure 27) gives error information concerning the unit
chosen. The information includes the name, which the user has given to the
supervised device, supervision block, that is, the type of the device to be
monitored, the type of a fault, and the fault status shown by the alarm class (A =
urgent, B = non-urgent, AS = urgent, service alarm).
Figure 27. Example of Fault display
In the example above, the first line consists of the name given to the supervised
device and alarm class (AS),the second line shows the supervision block, and the
third the type of the fault.
Table 13 shows alarm information from port and line interfaces and alarms from
the equipment itself.
*DNT2Mi (AS)
Line:
-no incoming signal
Page 51

Maintaining DNT2Mi
DN01145897 © Nokia Corporation 51 (128)
Issue 2-0 en Nokia Proprietary and Confidential
7.3 Testing
DNT2Mi tests can be controlled via the front panel or using Q1 menus.
Table 13. Alarms
Alarm
source
Q1 message Front panel
message
Description
Port n BER > 1E-6 (1E-3) Bit error rate worse than the set limit in port 1, 2, or 3
Loss of incoming
signal
No incoming
signal
DTE off or not connected to the DTE interface adapter
of port 1, 2, or 3
Blocked from use Timeslot allocation mismatch. The number of timeslots
allocated to the port does not match with the speed
used in the line.
Test mode CT140 ON DTE is driving circuit 140 (RL) active in port 1, 2, or 3
CT141 ON DTE is driving circuit 141 (LL) active in port 1, 2, or 3
Remote test Remotely controlled digital loop in port 1, 2, or 3
– No adapter The DTE interface adapter not in place in port 1, 2, or 3
AIS 2M AIS G.704 AIS message in port 1, 2, or 3
Loss of frame
alignment
Framing lost G.704 framing lost in port 1, 2, or 3
CRC multiframe
alignment lost
CRC MFA lost G.704 multiframe alignment lost in port 1, 2, or 3
End to end frame
loss
V.110 frame lost V.110 framing lost in port 2 or 3
Far-end alarm Bit 3 (A-bit) of the frame not containing the frame
alignment signal
Line Loss of frame
alignment
Framing lost Line frame synchronisation lost (G.704)
BER > 1E-6 (1E-3) Bit error rate worse than the set limit
No incoming line
signal
No line signal Line failure or remote equipment is faulty or switched
off
Test mode – Line in test mode
Equipment Synch. clock fault Failure in synchronisation source, for example line
signal missing when the line timing mode has been
selected.
Page 52

Data Network Terminal Single-port and Multiport Operating Instructions
52 (128) © Nokia Corporation DN01145897
Nokia Proprietary and Confidential Issue2-0en
The following tests are available for testing a DNT2Mi terminal:
Table 14. Tests available for DNT2Mi
Front
panel
Q1
management
Automatic
control
Note
Equipment tests
Power up test After power is
switched on
Self test Equipment
self test
Self test (5,4)
Line interface test
Network test loop
ITU-T X.150 loop 2
Data coming from the line is
looped back to the line.
Line DL
test
Loop to line (DL) See Figure “Network
test loop (all ports)”
after this table.
Dedicated port tests
Local test loop
ITU-T X.150 loop 3
Data coming from the DTE is
looped back to the DTE.
Port LL test Loop to DTE (LL)
(5,2,#,3)
V.xx Circuit 141
or X.21 loop 3
command
Automatic control can
be disabled by setting
circuit 141 in the ‘Not in
use’ state.
See Figure “Local test
loop in a port” after this
table.
Network test loop
ITU-T X.150 loop 2
Data coming from the line is
looped back to the line.
Port DL
test
Loop to line (DL)
(5,2,#,2)
See Figure “Network
test loop (single-port)”
after this table.
Page 53

Maintaining DNT2Mi
DN01145897 © Nokia Corporation 53 (128)
Issue 2-0 en Nokia Proprietary and Confidential
Figure 28. Network test loop (all ports)
PRBS tests
ITU-T V.52 2
9
-1 test pattern
Transmitter and receiver
towards the line.
Port TR
test
Tx-Rx test (TR)
(5,2,#,4)
See Figure “PRBS (2
9
-
1) test (transmitter /
receiver)” after this
table.
Remotely controlled
network test loop
ITU-T X.150 loop 2 at remote
end
Data coming from the line is
looped back to the line.
Activated at the local port
and a loop is established at
the remote end.
Port RL
test
V.xx Circuit 140
or X.21 loop 2
command
Automatic control can
be disabled by setting
circuit 140 in the ‘Not in
use’ state at the local
port.
Establishment of the
requested loop can be
disabled by setting
“Remote loop not
allowed” at the remote
end.
See Figure “Remotely
controlled network test
loop” after this table.
Remotely controlled
network test loop with
PRBS test pattern
ITU-T X.150 loop 2 at remote
end and ITU-T V.52 2
9
-1 test
pattern
Transmitter and receiver at
the local port.
Port RLTR
test
Establishment of the
requested loop can be
disabled by setting
“Remote loop not
allowed” at the remote
end.
See Figure “Remotely
controlled network test
loop with PRBS test
pattern” after this table.
Table 14. Tests available for DNT2Mi (Continued)
Front
panel
Q1
management
Automatic
control
Note
DTE
PORT 2
DTE
DTE
REMOTE DNT
PORT 1
PORT 2
DTE
PORT 3
DTE
LOCAL DNT
LINE
BLOCK
PORT 1
PORT 3
DTE
Page 54

Data Network Terminal Single-port and Multiport Operating Instructions
54 (128) © Nokia Corporation DN01145897
Nokia Proprietary and Confidential Issue2-0en
Figure 29. Local test loop in a port
Figure 30. Network test loop (single-port)
Figure 31. PRBS (29-1) test (transmitter/receiver)
PORT 1
DTE
PORT 2
DTE
PORT 3
DTE
REMOTE DNT
PORT 2
DTE
PORT 3
DTE
LOCAL DNT
DTE
PORT 2
DTE
PORT 3
DTE
LOCAL DNT
DTE
PORT 1
DTE
PORT 2
DTE
PORT 3
DTE
REMOTE DNT
PORT 1
DTE
PORT 2
DTE
PORT 3
DTE
REMOTE DNT
PORT 2
DTE
PORT 3
DTE
LOCAL DNT
DTE
Tx Rx
Page 55

Maintaining DNT2Mi
DN01145897 © Nokia Corporation 55 (128)
Issue 2-0 en Nokia Proprietary and Confidential
Figure 32. Remotely controlled network test loop
Figure 33. Remotely controlled network test loop with PRBS test pattern
7.4 Checking measurements and statistics
Measurements and statistics to be checkedthrough the front panelcontrol and Q1
measurements cover various quality parameters, line and error counters.
The parameters that can be viewed through the front panel menus or the Q1
menus Measurement (main menu branch 7 and Statistics (main menu branch 8)
are listed below.
Measurements via the front panel or Q1
• Noise margin
• Rx level
• Tx level
DTE
PORT 2
DTE
PORT 3
DTE
REMOTE DNT
PORT 1
PORT 2
DTE
PORT 3
DTE
LOCAL DNT
DTE
PORT 2
DTE
PORT 3
DTE
LOCAL DNT
DTE
Tx Rx
DTE
PORT 2
DTE
PORT 3
DTE
REMOTE DNT
Page 56

Data Network Terminal Single-port and Multiport Operating Instructions
56 (128) © Nokia Corporation DN01145897
Nokia Proprietary and Confidential Issue2-0en
• Line attenuation
• Line voltage (remote-powered)
Attenuation can be 0 to 41 dB.
DNT statistics via the front panel or Q1
Signal qualities of the selected 15-minute periods (4 periods with front panel
menus and 100 with Q1) and 24-hour periods (4 periods with front panel menus
and 30 with Q1) and since the last reset, according to Rec. G.826, are indicated
by the quality parameters in Table 15.
System counters via Q1
• Number of CPU resets and the time passed since the last reset.
Table 15. Statistics values via Q1
Information Abbreviation and/or
ratio
Description
Total time TT Time passed since the last reset.
Unavailability time UAT
(Rx, Tx)
Time during which severely errored seconds have
occurred.
Errored seconds ES
(Rx, Tx)
Number of errored seconds.
Severely errored seconds SES
(Rx, Tx)
Number of seconds during which ≥ 30% blocks
are errored.
Background block errors BBE
(Rx)
Number of errored blocks except blocks during
severely errored seconds and unavailable time.
The block size depends on the used line rate.
Unavailability time ratio UATR
(Rx, Tx)
Ratio of unavailability time to the total time during
the last 15 minutes or 24 hours.
Errored seconds ratio ESR
(Rx, Tx)
Ratio of errored seconds to the total of seconds in
the available time during the last 15 minutes or 24
hours.
Severely errored seconds
ratio
SESR
(Rx, Tx)
Ratio of severely errored seconds to the total of
seconds in the available time during the last 15
minutes or 24 hours.
Background block error
ratio
BBER
(Rx)
Ratio of background block errors to the total of
blocks during the last 15 minutes or 24 hours,
except blocks during severely errored blocks and
unavailable time.
Page 57

Using front panel menus
DN01145897 © Nokia Corporation 57 (128)
Issue 2-0 en Nokia Proprietary and Confidential
8 Using front panel menus
This chapter describes the front panel menus and how to navigate between them
using the front panel keys.
Page 58

Data Network Terminal Single-port and Multiport Operating Instructions
58 (128) © Nokia Corporation DN01145897
Nokia Proprietary and Confidential Issue2-0en
Figure 34. Front panel functions
The following information is useful to know when working with the menus:
Request to Send
PWR
STATUS
Power on
Function
DTR
DSR
DCD
RTS
CTS
Data Terminal Ready
Data Set Ready
Line Signal Detector
Clear to Send
108
107
109
105
106
LED
The states of these signals are shown
Test on
Active data
in port 1, 2 or 3
Colour
Green
Red
Red
Green
TEST
P1, P2, P3
=
OFF
=
ON
State of signal:
=
DTE signal active during
INTERFACE SIGNALS
Display
(blinking)
=
DTE signal inactive during
in the Port display of the Monitoring
menu.
the last 15 minutes
the last 15 minutes
LED INDICATORS
OK EXIT
DTR DSR DCD RTS CTS
STATUS
PWR TESTP1P2
P3
Multiport DNT2Mi
Single-port DNT2Mi
OK EXIT
DTR DSR DCD RTS CTS
STATUS
PWR TEST
PORT
DNT2Mi
DNT2Mi
Alar
m
Page 59

Using front panel menus
DN01145897 © Nokia Corporation 59 (128)
Issue 2-0 en Nokia Proprietary and Confidential
Figure 35. Front panel actions
The menu structure is presented in full detail on the following sections.
If L2: 1024 is shown on the left side of the display, it indicates that the lines are
cross-connected. This can occur in the STU-R, 4-wire mode only and does not
affect data flow.
DTR DSR DCD RTS CTS
STATUS
P1
P2
TheOK key takes you one
The
EXIT
key takes you one
The arrow keys < > are used
for scrolling the alternatives
on a menu level.
EXITOK
TEST
P3
PWR
L1: 1024 L2: 1024
STU-R: OK
Display
Shows the status information, test
results, configuration options, and
monitoring information.
level down in the menu. It also
selects or activates a desired
test, monitoring, or
configuration alternative.
step up in the menu without
activating or storing anything.
Page 60

Data Network Terminal Single-port and Multiport Operating Instructions
60 (128) © Nokia Corporation DN01145897
Nokia Proprietary and Confidential Issue2-0en
8.1 Main menu levels
Figure 36. Front panel main menus
8.2 Configuring DNT2Mi
When configuring DNT2Mi, take the following into account: at entering a menu
level where you can change unit's configuration parameters, a configuration
option on the bottom row starts to blink indicating that you are allowed to change
it.
Note that the menu has an individual configuration parameter set for each port
type.
OK
EX
OK
EX
OK
EX
OK
EX
Main Menu Level
Monitor
DNT2Mi
Status: OK
Main Menu Level
Configure
Main Menu Level
Test
Monitor
Port 1
Configure
Port 1
Test
Port 1
Monitor
Port 2
Configure
Port 2
Test
Port 2
Monitor
Port 3
Configure
Port 3
Test
Port 3
Monitor
Line
Configure
Line
Test
Line
Monitor
Alarms
Configure
Common
Test
Equipment
Monitor
Info
Configure
Default
Monitor
Self test results
Page 61

Using front panel menus
DN01145897 © Nokia Corporation 61 (128)
Issue 2-0 en Nokia Proprietary and Confidential
Note
Note
Note
The modem automatically detects the port adapter type in use and shows the
corresponding configuration parameters under the Configure: Port menu option.
The text Save? (OK/Exit) appears in the display only when changes have been
made to the edit buffer. If the OK key is pressed, the changes are stored and
activated. Pressing the EXIT key ends the configuration procedure and nothingis
changed.
The asterisk(*) indicates whether a parametervalue is currently stored in thenonvolatile memory (that is, the parameter value is used also the next time when the
modem is switched on).
If the port adapter is not in place, the menu shows the port parameters that were
used previously or, alternatively, the V-type port parameters.
Page 62

Data Network Terminal Single-port and Multiport Operating Instructions
62 (128) © Nokia Corporation DN01145897
Nokia Proprietary and Confidential Issue2-0en
8.2.1 Configuring a port
Figure 37. Configuring port 1 / V.xx type interfaces
CT103 timing
CT113
CT103 timing
CT114 inv
CT114 *
OK
EX
EX
OK
Save? OK/Exit
Configure
Port 1
Not allowed
Remote loop
Allowed *
Remote loop
DTE alarms
Disabled *
DTE alarms
Use of CT141Use of CT141
In use
Use of CT140Use of CT140
Ignored *
Use of CT107Use of CT107
CT103 timing
CT114 *
CT105, CT106 use
Ignored *
CT103 timing
CT105, CT106 use
Ignored *
CT105, CT106 use
Delay 8 bits
CT105, CT106 use
Delay 255 bits
CT105, CT106 use
Simul. carrier
EX
OK
OK
OK
OK
EX
Use of CT109
Normal *
Use of 109
Normal *
Use of CT109
Simul. carrier
OK
EX
Use of CT107
Ignored * CT108 - CT107
OK
EX
Use of CT140
Not in use * Not in use *
OK
EX
Use of CT141
Not in use * Not in use * In use
OK
EX
DTE alarms
Disabled * Enabled
Remote loop
Allowed *
OK
Dismiss
Accept
>
Accept
Accept
OK
EX
EX
OK
Dismiss
Page 63

Using front panel menus
DN01145897 © Nokia Corporation 63 (128)
Issue 2-0 en Nokia Proprietary and Confidential
Figure 38. Configuring port 2 and port 3 / V.xx type interfaces
Not allowed
Remote loop
Allowed *
Remote loop
DTE alarms
Disabled *
DTE alarms
Use of CT141Use of CT141
In use
Use of CT140Use of CT140
Ignored *
Use of CT107Use of CT107
Synchronous *Synchronous *
OK
EX
EX
OK
OK
EX
CT103 timing
CT114 *
CT105, CT106 use
Ignored *
Save? OK/Exit
Configure
Port 2
V.110
Not in use *
Configure
Port 3
V.110
Not in use *
V.110
1200 bits/s
V.110
56 kbits/s
Only if V.28 adapter and V.110 in use
CT103 timing
CT114 *
CT103 timing
CT113
CT105, CT106 use
Ignored *
CT105, CT106 use
Delay 8 bits
V.110
2400 bits/s
OK
EX
Port mode Port mode Port mode
Async. 8 bits
Port mode
Async. 11 bits
CT105, CT106 use
Delay 256 bits
CT105, CT106 use
Simul. carrier
EX
OK
OK
EX
OK
OK
OK
EX
Use of CT109
Normal *
Use of CT109
Normal *
Use of CT109
Simul. carrier
OK
EX
Use of CT107
Ignored * CT108 - CT107
OK
EX
Use of CT140
Not in use * Not in use *
OK
EX
Use of CT141
Not in use * Not in use * In use
OK
EX
DTE alarms
Disabled * Enabled
Remote loop
Allowed *
EX
OK
OK
Dismiss
Accept
>
OK
Page 64

Data Network Terminal Single-port and Multiport Operating Instructions
64 (128) © Nokia Corporation DN01145897
Nokia Proprietary and Confidential Issue2-0en
Figure 39. Configuring ports / X.21 interfaces
EX
EX
EX
OK
EX
EX
OK
EX
EX
EX
OK
EX
LL from DTE
Not allowed *
Accept
Dismiss
LL from DTE
Not allowed *
LL from DTE
Allowed
OK
OK
OK
OK
OK
OK
OK
OK
Circuit C
Ignored *
Circuit I
Normal *
DTE alarms
Disabled *
Save? OK/Exit
Configure
Port 1
Remote loop
Allowed *
RL from DTE
Not allowed *
V.110
Not in use *
Configure
Port 2
V.110
Not in use *
V.110
1200 bits/s
V.110
56 kbits/s
Configure
Port 3
Only for port 2 and port 3
Accept
Dismiss
Circuit C
Ignored *
Circuit C
Simul. Carrier
Circuit I
Normal *
Circuit I
Simul. Carrier
DTE alarms
Disabled *
DTE alarms
Enabled
Remote loop
Allowed *
Remote loop
Not allowed
RL from DTE
Not allowed *
RL from DTE
Allowed
V.110
2400 bits/s
Page 65

Using front panel menus
DN01145897 © Nokia Corporation 65 (128)
Issue 2-0 en Nokia Proprietary and Confidential
Figure 40. Configuring ports / G.703/64k interfaces
Figure 41. Configuring ports / G.703 interfaces
Codir. *
Interface mode
Codir. *
DTE alarms
Interface mode
DTE alarms
AIS mode
Octet tim disab *
OK
EX
DTE alarms
Disabled *
OK
EX
Remote loop
Allowed *
OK
EX
OK
EX
EX
OK
OK
EX
OK
Accept
Dismiss
Interface mode
Contradir.
AIS mode
Octet tim disab *
AIS mode
Octet tim enab
Disabled * Enabled
Remote loop
Allowed *
Remote loop
Not allowed
Save? OK/Exit
Configure
Port 1
Configure
Port 2
Configure
Port 3
OK
EX
Dismiss
Save? OK/Exit
Configure
Port 1
OK
EX
EX
OK
OK
Configure
Port 2
Configure
Port 3
Accept
DTE alarms
Disabled *
DTE alarms
Disabled *
DTE alarms
Enabled
Remote loop
Allowed *
Remote loop
Allowed *
Remote loop
Not allowed
OK
EX
Page 66

Data Network Terminal Single-port and Multiport Operating Instructions
66 (128) © Nokia Corporation DN01145897
Nokia Proprietary and Confidential Issue2-0en
Figure 42. Configuring ports / G.704 interfaces
BER alarm sever.
No alarm
BER alarm sever.
A-level
OK
EX
OK
EX
OK
EX
OK
EX
EX
OK
DTE if alarms
Disabled *
OK
EX
OK
EX
OK
...
...
OK
TS0 bit Sa8
Fixed to 1 *
...
Remote loop
Allowed *
OK
EX
BER alarm limit
1E-3 *
OK
EX
BER alarm sever.
B-level *
OK
EX
TS0 bit Sa8
Fixed to 1
TS0 bit Sa8
Fixed to 0
DTE if alarms
Disabled *
DTE if alarms
Enabled
Remote loop
Allowed *
Remote loop
Not allowed
BER alarm limit
1E-3 *
BER alarm limit
1E-6
BER alarm sever.
B-level *
BER alarm sever.
AS-level
OK
EX
OK
EX
OK
EX
Not with D2048 adapter
TS map
Equal to line *
Idle Channels
Code FF *
Sa4...Sa8 bits
11111 *
Save? OK/Exit
Configure
Port 1
Framing format
Basic frame *
Configure
Port 2
Configure
Port 3
Accept
Dismiss
TS0 bit Sa5
Fixed to 1 *
Only with D2048
adapter
Framing format
Basic frame *
Framing format
CRC multiframe
Framing format
CRC monitoring
TS map
Equal to line *
TS map
First TS=1
TS map
First TS=31
Idle Channels
Code FF *
Idle Channels
Code FF
Idle Channels
Code 00
TS0 bit Sa4
Fixed to 1 *
TS0 bit Sa4
Fixed to 1
TS0 bit Sa4
Fixed to 0
TS0 bit Sa5
Fixed to 1
TS0 bit Sa5
Fixed to 0
Framing format
BF monitoring
Framing format
No frame
EX
...
TS map
Special TS= *
TS map
Special TS= *
TS map
Special TS=01
TS map
Special TS=31
OK
----
Page 67

Using front panel menus
DN01145897 © Nokia Corporation 67 (128)
Issue 2-0 en Nokia Proprietary and Confidential
Figure 43. Configuring ports / VF interfaces
Configure
Port 1
Configure
Port 2
Configure
Port 3
Ports 2 and 3 in
multiport version only
Input level
-22.0 dBm (2-w) *
OK
EX
DTE if alarms
Disabled *
OK
EX
Input level
-22.0 dBm (2-w) *
Input level
-7.0 dBm (2-w)
DTE if alarms
Disabled *
DTE if alarms
Enabled
...
1)
1) Scale (0.5 dBm resolution):
-22.0 dBm to -7.0 dBm (2-wire)
-22.0 dBm to -7.0 dBm (4-wire)
Remote loop
Allowed *
OK
EX
Remote loop
Allowed *
Remote loop
Not alowed
OK
EX
OK
Save? OK/Exit
EX
Page 68

Data Network Terminal Single-port and Multiport Operating Instructions
68 (128) © Nokia Corporation DN01145897
Nokia Proprietary and Confidential Issue2-0en
8.2.2 Configuring a line
Figure 44. Front panel menus for line settings
A-level
BER alarm sever.
NO alarm
BER alarm sever
OK
EX
EX
OK
OK
EX
OK
Save? OK/Exit
Configure
Line
Line interface
C 2w psdS 2048
Accept
B-level *
1E-3 *
ON *
B-level *
1E-3 *
ON *
OFF
OK
EX
Power backoff Power backoff Power backoff
1E-6
OK
EX
BER alarm limit BER alarm limit BER alarm limit
OK
EX
BER alarm sever BER alarm sever.
AS-level
BER alarm sever.
psdS = PSD mask, Symmetric
32 = Line rate, the value of n x 64k
For more information, refer to Section 9.3.4 "Line settings"
SHDSL mode
STU-R Adaptive
2/4-wire
2-wire
2/4-wire
4-wire
OK
EX
n=3 (192)
2-wire
SHDSL mode
STU-C Fixed
2/4-wire Line rate 2W
OK
EX
OK
EX
Line rate 4W
n=6 (384)
Line rate 4W
n=32 (2048)
2/4-wire
4-wire
OK
EX
Line rate 2W
n=32 (2048)
Page 69

Using front panel menus
DN01145897 © Nokia Corporation 69 (128)
Issue 2-0 en Nokia Proprietary and Confidential
8.2.3 Configuring common settings
Figure 45. Front panel menus for common settings
Timing source
Internal
Mng speed
4800 bits/s *
...
...
...
Time slots 0-15
. . . . . . . . . . . . . . . .
Time slots 16-31
Save? OK/Exit
Configure
Common
Timing source
Line *
Give 1st TS:
n=0
Give 1st TS:
n=2
Add time slot to
Port 3
Remove time slot
Give 1st TS:
n=31
Timing source
Line *
Timing source
Port 1
Give last TS:
n=0
Add time slot to
Port 1
Give 1st TS:
n=1
Give last TS:
n=1
Give last TS:
n=2
Give last TS:
n=31
Timing source
Transparent
EX
EX
OK
EX
Mng path Line
OFF *
Mng path Line
OFF *
Mng path Line
ON
Mng speed
4800 bits/s *
Mng speed
9600 bits/s
Mng addr
0002 *
Mng addr
0002 *
Mng addr
4094
1...4094
600, 1200, 2400, 4800, 9600
EX
Mng path LMI
ON *
Mng path LMI
ON *
Mng path LMI
OFF
Front panel keys
In use *
EX
Front panel keys
In use *
Front panel keys
Locked
Test time limit
00010 min *
EX
Test time limit
00010 min *
EX
LM if type
V.28 *
LM if type
V.28 *
LM if type
V.11 *
OK
EX
OK
OK
EX
EX
OK
OK
OK
OK
OK
OK
OK
OK
OK
OK
OK
OK
OK
Test time limit
64999 min
Test time limit
Unlimited
. . . . . . . . . . . . . . . .
Page 70

Data Network Terminal Single-port and Multiport Operating Instructions
70 (128) © Nokia Corporation DN01145897
Nokia Proprietary and Confidential Issue2-0en
8.2.4 Default settings
Figure 46. Front panel menus for default settings
OK
EX
EX
OK
Common defaults
Port 1
Common defaults
Line
Common defaults
Port 2
Save? OK/Exit
Configure
Default settings
Common defaults
Port 3
Common defaults
Factory
Common defaults
All
Page 71

Using front panel menus
DN01145897 © Nokia Corporation 71 (128)
Issue 2-0 en Nokia Proprietary and Confidential
8.3 Testing DNT2Mi
8.3.1 Testing a port
Figure 47. Front panel menus for testing a port
8.3.2 Testing a line
Figure 48. Front panel menus for testing a line
OK
EX
OK
EX
OK
EX
...
...
OK
EX
OK
EX
OK
EX
Port #
TR test 1)
Port #
LL test
Port #
DL test
Port #
RL test 1)
Port #: TR test
Error count:0000
Port #
RLTR test 1)
Test
Port 1
Test
Port 2
Test
Port 3
Port #
LL test ON
Port #
Test not allowed
Port #
DL test ON
Port #
RL test
Port #
RL test ON
Port #
RLTR test
Port #: RLTR test
Error count:xxxx
Port #:RLTR test
Error count:0000
or
1)
The test is not possible
with the D2048 adapter
Line
DL test
EX
Line
DL test ON
OK
EX
Test
Line
OK
Page 72

Data Network Terminal Single-port and Multiport Operating Instructions
72 (128) © Nokia Corporation DN01145897
Nokia Proprietary and Confidential Issue2-0en
8.3.3 Testing the equipment
Figure 49. Front panel menus for testing the equipment
OK
EX
OK
EX
Equipment
Self test
Test
Equipment
Equipment
Self test
Equipment
Self test OK
Equipment
Self test FAIL
...
or
Page 73

Using front panel menus
DN01145897 © Nokia Corporation 73 (128)
Issue 2-0 en Nokia Proprietary and Confidential
8.4 Monitoring DNT2Mi
8.4.1 Monitoring a port
Figure 50. Front panel menus for monitoring a port
OK
EX
OK
EX
OK
EX
...
...
Port 1
00 00 00 00 00 00
Monitor
Port 1
P1 signal qual.
15 min periods
Rx ES: 0000
Tx ES: 0000
Rx BBE: 0000 Start time 1
d:xx h:xx m:xx
P1 signal qual.
24 h periods
Start time 0
d:xx h:xx m:xx
Monitor
Port 2
Monitor
Port 3
Only with V.xx or X.21 or EIA or ET adapters
Start time 0
d:xx h:xx m:xx
Rx UAT: 0000
Tx UAT: 0000
Rx SES: 0000
Tx SES: 0000
Rx ES: 0000
Tx ES: 0000
Rx UAT: 0000
Tx UAT: 0000
Rx SES: 0000
Tx SES: 0000
Rx BBE: 0000 Start time 1
d:xx h:xx m:xx
G.704/2M adapter and CRC multiframe
Or D2048 adapter and CRC multiframe
Or D2048 adapter and CRC monitoring
Port 1 slips
Tx 0000 Rx 0000
Page 74

Data Network Terminal Single-port and Multiport Operating Instructions
74 (128) © Nokia Corporation DN01145897
Nokia Proprietary and Confidential Issue2-0en
8.4.2 Monitoring a line
Figure 51. Front panel menus for monitoring a line
RX ES: xxxx
Noise margin [dB]
L1: xx L2: xx
Attenuation [dB]
L1: xx L2: xx
Rx level [dBm]
L1: xx L2: xx
OK
EX
Monitor line
Measurements
Monitor
Line
Tx level [dBm]
L1: xx L2: xx
OK
EX
Monitor line
Statistics
Signal qual. L1
15 min periods
Start time 0
d:xx h:xx m:xx
RX UAT: xxxx
OK
EX
Line voltage V
xxx
OK
EX
Start time 1
d:xx h:xx m:xx
RX SES: xxxx
RX BBE: xxxx
Signal qual. L1
24 h periods
Signal qual. L2
24h periods
Signal qual. L2
15 min periods
Start time 3
d:xx h:xx m:xx
Page 75

Using front panel menus
DN01145897 © Nokia Corporation 75 (128)
Issue 2-0 en Nokia Proprietary and Confidential
8.4.3 Monitoring alarms
Figure 52. Front panel menus for monitoring alarms
Port #
No incoming sig.
Monitor
Alarms
Line
No line signal
Equipment
Hardware error
Port #
CRC MFA lost
Alarms
No alarms
Line
No frame sync
Line
BER > 1E-6
Line
BER > 1E-3
Line
STU-R pwr OFF
Port #
Framing lost
Port #
AIS
Port #
V.110 frame lost
Port #
No adapter
Port #
Remote test
Port #
CT141
Port #
CT140
Port #
BER > 1E-3
Port #
BER > 1E-6
Equipment
Sync clock fault
Port #
Blocked from use
Port #
Far-end alarm
OK
EX
Page 76

Data Network Terminal Single-port and Multiport Operating Instructions
76 (128) © Nokia Corporation DN01145897
Nokia Proprietary and Confidential Issue2-0en
8.4.4 Monitoring equipment information
Figure 53. Front panel menus for monitoring equipment information
8.4.5 Self testing
Figure 54. Front panel menus for self testing
Info DNT2Mi
T65680
SW:
S65672.01 A0
Basic HW:
E65671.01 A0
Port 1: V.11
DS62604
Mux HW:
E65633.01 A0
Port 2: D2048
E62628.01 A0
Port 3: Empty
v.28
v.11
v.35
x.21
G.703/2M
G.704/2M
G.703/64K
EIA-530-A
D2048
ET
VF
DS62602
DS62603
DS62604
DS62605
DS62607
DS62608
DS62609
DS62610
E62628
E66210 (displayed as V.35 adapter)
E62612
OK
EX
Monitor
Info
Monitor
Self test result
Self test result
OK
Self test result
Basic unit error
Self test result
Mux unit error
Self test results
OK
EX
Page 77

Using Q1 menus
DN01145897 © Nokia Corporation 77 (128)
Issue 2-0 en Nokia Proprietary and Confidential
9 Using Q1 menus
9.1 General
The Q1 main menu level contains the following 11 menus, of which those
available in DNT2Mi are typed in boldface in the list below:
1. Fault display
2. Local alarm cancel
3. Reset local cancel
4. Identifications
5. Controls (temporary)
6. Settings (permanent)
7. Measurements
8. Statistics
9. Testing
10. User privileges
11. Miscellaneous
The options of the DNT2Mi menus are described in more detail in the following
subsections.
Page 78

Data Network Terminal Single-port and Multiport Operating Instructions
78 (128) © Nokia Corporation DN01145897
Nokia Proprietary and Confidential Issue2-0en
Figure 55. Main Q1 menu structure
1 Fault display
2 Local alarm cancel *)
3 Reset local cancel *)
4 Identifications
5 Controls
6 Settings
7 Measurements
8 Statistics
9 Testing *)
10 User privileges
11 Miscellaneous *)
DNT2Mi (B)
Line:
Test mode
Port1:
Far and alarm
1
DNT Identifications:
0 Display
2 Eq name
DNT controls:
0 Display
1 All test loops off
2 Port test loops
3 Line test loops
4
5
DNT settings:
0 Display
1 Service options
2 Timing source
3 Line settings
4 Port settings
5 Timeslot use
6 Default settings
7 Load factory settings
6
DNT measurements:
0 Display all
7
DNT statistics:
8
DNT privileges:
1 Password
4 Setting parameters
5 Front panel rights
10
*) not implemented
1 Eq type
5 HW units
6 SW version
7 Modify
4 Self test
1 Noise margins
4 Attenuations
5 Line voltage
2 Rx levels
3 Tx levels
4 System counters
99 Reset all statistics
1 Port statistics
2 Line1 statistics
3 Line2 statistics
Page 79

Using Q1 menus
DN01145897 © Nokia Corporation 79 (128)
Issue 2-0 en Nokia Proprietary and Confidential
Figure 56. Identifications menu
DNT Identifications:
0 Display
1 Eq type
2 Eq name
5 HW units
6 SW versions
7 Modify
4
4,0
Identifications
Equipment name:
DNT2Mi
Equipment type:
DNT2Mi mp (T65680)
HW:
Main E65671.01 A
Mux E65633.01 A
SW:
S65672.01 A0
Port 1:
V.11 (DS62603)
Port 2:
No adapter
Port 3:
G.704/2M (DS62608)
Installation Date:
First:2003-03-16
Last:2003-03-27
Installed by:K.Reijonen
Serial number:
4H0122334455H
4,1
DNT2Mi mp
4,2
DNT2Mi
4,5
HW units:
Main E65671.01 A
Mux E65633.01 A
4,6
SW version:
S65672.01 A0
4,7
Modify:
2 Eq name
4 Installation info
4,7,2
Eq name:
0 Display
1 Modify
4,7,2,0
DNT2Mi
4,7,2,1
Give new Eq name:
1... 15 characters
4,7,4
Page 80

Data Network Terminal Single-port and Multiport Operating Instructions
80 (128) © Nokia Corporation DN01145897
Nokia Proprietary and Confidential Issue2-0en
Figure 57. Identifications menu (continued)
4,7,4
Intallation info:
0 Display
1 Modify
4,7,4,1,1
Give new Installation date:
yyyy-mm-dd
4,7,4,1,2
Give new Installer:
Max20 characters
4,7,4,0
Installation info:
Date:
First:2003-03-22
Last:2003-03-29
Installed by:K.Reijonen
4,7,4,1
1 Date
2 Installed by
Page 81

Using Q1 menus
DN01145897 © Nokia Corporation 81 (128)
Issue 2-0 en Nokia Proprietary and Confidential
Figure 58. Controls menu
Port test loops:
Give port number
1,2 or 3
5
5,2
5,2, port #
5,4
DNT controls:
0 Display
1 All test loops off
2 Port test loops
3 Line test loops
4 Self test
Port port# test loops:
0 Display
1 Port test loops off
2 Loop to line (DL)
3 Loop to DTE (LL)
4 Tx-Rx test (TR)
5,3
Self test:
0 Result of last ST
1 Start Self Test
Line test loops:
0 Display
1 Line test loops off
2 Loop to Line (DL)
Page 82

Data Network Terminal Single-port and Multiport Operating Instructions
82 (128) © Nokia Corporation DN01145897
Nokia Proprietary and Confidential Issue2-0en
Figure 59. Settings menu structure
6,1,3
6,1,4
6,2
6,3
6,4
6,5
6,6
6,7
DNT settings:
0 Display
1 Service options
2 Timing source
3 Line settings
4 Port settings
5 Timeslot use
6 Default settings
7 Load factory settings
Service options:
1 Q1 Speed
2 Q1 Address
3 Q1 Management path
4 Test time out limit
6
6,1
Q1 speed:
0 Display
Set speed
600 ...9600
6,1,1
Q1 address:
0 Display
1 Modify
6,1,2
Give new address:
0 to 4094
6,1,2,1
Page 83

Using Q1 menus
DN01145897 © Nokia Corporation 83 (128)
Issue 2-0 en Nokia Proprietary and Confidential
Figure 60. Settings menu structure (continued)
6,3
6,4
6,5
6,6
6,7
Test time out limit:
0 Display
1 to 64999 min
65000 no limit
6,1,4
Q1 Management path:
0 Display
1 Q1 via Line
2 LM interface
6,1,3
6,1,3,2,3
Interface type:
0 Display
1 V.11
2 V.28
Q1 via Line:
0 Display
1 On
2 Off
6,1,3,1
LM Interface:
0 Display
1 On
2 Off
3 Interface type
6,1,3,2
Timing source:
0 Display
1 Internal
2 Line
3 Port1
4 Transparent
6,2
Page 84

Data Network Terminal Single-port and Multiport Operating Instructions
84 (128) © Nokia Corporation DN01145897
Nokia Proprietary and Confidential Issue2-0en
Figure 61. Settings menu structure (continued)
Line settings:
0 Display
3 Line interface
6 Power backoff
8 BER alarm limit
9 BER alarm severity
6,3
Line interface
SHDSL mode:
1 STU-C (fixed)
2 STU-R (rate adaptive)
6,3,3
6,4
6,5
6,6
6,7
6,3,3,1
Line if: STU-C
2/4-wire mode:
2 Two-wire
4 Four-wire
6,3,3,1,2
Line if: STU-C, 2w, PSDS
Give line rate
n = 3 .. 32
6,3,3,1,4
Line if: STU-C, 4w, PSDS
Give line rate
n = 6 .. 32 (even number)
6,3,6
6,3,8
6,3,9
psdS = Power special density mask, Symmetric
32 = Line rate, the value of n x 64k
For more information, refer to Section 9.3.4 "Line settings"
6,3,3,2
Line if: STU-R
2/4 wire mode:
2 Two-wire
4 Four-wire
Page 85

Using Q1 menus
DN01145897 © Nokia Corporation 85 (128)
Issue 2-0 en Nokia Proprietary and Confidential
Figure 62. Settings menu structure (continued)
6,4
6,5
6,6
6,7
6,3,9
BER alarm severity:
0 Display
1 No alarm
2 A-level alarm
3 B-level alarm
4 AS-level alarm
6,3,8
BER alarm limit:
0 Display
1 E-3
2 E-6
6,3,6
Power backoff:
0 Display
1 ON
2 OFF
Page 86

Data Network Terminal Single-port and Multiport Operating Instructions
86 (128) © Nokia Corporation DN01145897
Nokia Proprietary and Confidential Issue2-0en
Figure 63. Settings menu structure (continued)
6,6
Default settings:
1 Port1
2 Port2
3 Port3
4 Line
9 All
6,5,1
Give TS(s):
(e.g 0-8.16-20)
6,5
Timeslot use:
0 Display
1 Modify
6,4
Port settings:
Give port number:
1,2 or 3.
6,4,port#
6,5,1,TS#
Modify TS:
1 Add to port1
2 Add to paort2
3 Add to port3
4 Remove
6,6,1...9
Default settings:
Are you sure?
1 Cancel
99 Yes
6,7
Load factory settings:
Are you sure?
1 Cancel
99 Yes
Page 87

Using Q1 menus
DN01145897 © Nokia Corporation 87 (128)
Issue 2-0 en Nokia Proprietary and Confidential
Figure 64. Settings menu structure (continued)
Port settings:
0 Display
2 RL control
3 DTE if parameters
4 V.110 rates
5 DTE if alarms
6 Connection name
RL control:
0 Display
1 Allowed
2 Not allowed
V.110 rates:
0
1
2 1200 bit/s
3
4
5
6
7
8
6,4, port #
port 2 and/or port 3 only
DTE if alarm:
0 Display
1 Q1 alarms enabled
2 Q1 alarms disabled
Connection name:
0 Display
1 Modify
Give new connection name:
1 to 15 characters
6,4, port#,4
6,4, port#,2
6,4, port#,5
6,4, port#,6
6,4, port#,6,1
6,4, port#,3
Display
Not in use
2400 bit/s
4800 bit/s
9600 bit/s
19200 bit/s
48 kbit/s
56 kbit/s
Page 88

Data Network Terminal Single-port and Multiport Operating Instructions
88 (128) © Nokia Corporation DN01145897
Nokia Proprietary and Confidential Issue2-0en
Figure 65. Settings menu structure (continued), G.704/2M & D2048 adapters
6,4,Port#,3
Idle channels:
0 Display
1 Modify code
6,4,port #,3,1
6,4,port #,3,5
G.704/2M & D2048 Interface settings:
G.704/2M DTE:
0 Display
1 Framing format
4 TS map
5 Idle channels
6 Sa bits usage
7 BER alarm limit
8 BER alarm severity
6,4, port #, 3
Framing format:
0 Display
1 No frame
2 Basic frame
3 CRC multiframe
4 BF monitoring *)
5 CRC monitoring *)
*) Only with D2048 adapter
6,4,port #,3,4
TS map:
0 Display
1 Set equal to line
2 Select 1st TS
3 Select 1st TS & special TS
Sa bits usage:
0 Display
1 Fill Sa4
2 Fill Sa5
3 Fill Sa6
4 Fill Sa7
5 Fill Sa8
6,4,port #,3,6
BER alarm limit:
0 Display
1 E-3
2 E-6
6,4,port #,3,7
BER alarm severity:
0 Display
1 No alarm
2 A-level alarm
3 B-level alarm
4 AS-level alarm
6,4,port #,3,8
6,4,port #,3,7,0..2
6,4,port #,3,8,0..4
TS map:
Give 1st TS (1...31)
6,4,port #,3,4,2
6,4,port #,3,6,1..5
Give filling value:
0 or 1
6,4,port #,3,5,1
Give idle code:
0 to FF
TS map:
Give 1st TS and
special TS (eg. 2.31)
6,4,port #,3,4,3
Page 89

Using Q1 menus
DN01145897 © Nokia Corporation 89 (128)
Issue 2-0 en Nokia Proprietary and Confidential
Figure 66. Settings menu structure (continued), V-type adapters
6,4,port#,3
CT141 use:
0 Display
1 In use
2 Not in use
Sync/Async:
0 Display
1 Synchronous
2 Async 8 bits
3 Async 9 bits
4 Async 10 bits
5 Async 11 bits
CT103 timing:
0 Display
1 CT113 (DTE source)
2 CT114 (DCE source)
DTE circuits:
0 Display
1 RTS & CTS use
2 DCD use
3 DSR & DTR use
4 CT140 use
5 CT141 use
RTS & CTS use:
0 Display
1 CTS ON
2 RTS-CTS delay 8 bits
3 RTS-CTS delay 255 bits
4 Simulated carrier
DSR & DTR use:
0 Display
1 DTR controls DSR
2 DSR ON
CT140 use:
0 Display
1 In use
2 Not in use
6,4,port #,3,1
6,4,port #,3,2
6,4,port #,3,3
6,4,port #,3,3,1
6,4,port #,3,3,2
6,4,port #,3,3,3
6,4,port #,3,3,4
6,4,port #,3,3,5
V-type inteface settings:
V-type DTE:
1 Sync/async 1)
2 CT103 timing
3 DTE circuits
6,4,port#,3
1)
3 CT114 INV (DCE source) 2)
DCD use:
0 Display
1 Follows line sync
2 Simulated carrier
Only in ports 2 and 3 and if V.28
adapter and V.110 in use
2) Only in port 1
Page 90

Data Network Terminal Single-port and Multiport Operating Instructions
90 (128) © Nokia Corporation DN01145897
Nokia Proprietary and Confidential Issue2-0en
Figure 67. Settings menu structure (continued), X- and VF-type adapters
6,4,port#,3
Circuit C:
0 Display
1 Not in use
2 Simulated carrier
Circuit I:
0 Display
1 Follows line sync
2 Simulated carrier
RL request:
0 Display
1 In use
2 Not in use
LL request:
0 Display
1 In use
2 Not in use
6,4,port #,3,1
6,4,port #,3,2
6,4,port #,3,3
6,4,port #,3,4
X.21 interface settings:
X.21 type DTE:
0 Display
1 Circuit C
2 Circuit I
3 RL request
4 LL request
6,4,port#,3
VF type DTE:
0 Display
1 Input level
6,4,port#,3
Give input level:
0 Display
-22.0...-7.0 dBm
(0.5 dBm resolution)
6,4,port#,3,1
VF Interface settings:
Page 91

Using Q1 menus
DN01145897 © Nokia Corporation 91 (128)
Issue 2-0 en Nokia Proprietary and Confidential
Figure 68. Settings menu structure (continued), G.703/64k & G.703/2M
AIS mode:
0 Display
1 Octet timing enabled
2 Octet timing disabled
Interface mode:
0 Display
1 Codirectional
2 Contradirectional
6,4,port #,3,1
6,4,port #,3,2
G.703/64k Interface settings:
G.703/2M Interface settings:
G.703/64k DTE:
0 Display
1 AIS mode
2 Interface mode
G703/2M DTE:
No parameters
6,4, port #, 3
6,4, port #, 3
Page 92

Data Network Terminal Single-port and Multiport Operating Instructions
92 (128) © Nokia Corporation DN01145897
Nokia Proprietary and Confidential Issue2-0en
Figure 69. Measurements menu structure
DNT measurements:
0 Display all
1 Noise margins
2 Rx levels
3 Tx levels
4 Attenuations
5 Line voltage
Pair
#
1
2
Line voltage xxV
7
7,0
Noise margins
Pair 1 xxdB
Pair 2 xxdB
7,1
Rx levels
Pair 1 xxdBm
Pair 2 xxdBm
7,2
Tx levels
Pair 1 xxdBm
Pair 2 xxdBm
7,3
Attenuation
Pair 1 xxdB
Pair 2 xxdB
7,4
Line voltage
xxV
7,5
NM
dB
xx
xx
At
dB
xx
xx
Tx
dBm
xx
xx
Rx
dBm
xx
xx
NM = Noise margin
At = Attenuation
Page 93

Using Q1 menus
DN01145897 © Nokia Corporation 93 (128)
Issue 2-0 en Nokia Proprietary and Confidential
Figure 70. Statistics menu structure
xx
xx
xx
xx
xx
xx
xx
Port stat absolute:
1 15min periods
2 24h periods
3 Since last reset
Port stat relative:
1 15 min periods
2 24h periods
8
DNT statistics:
1 Port statistics
2 Line statistics
3 System counters
99 Reset all statistics
Port statistics:
1 Interface status
2 Timing slip
3 Relative values
4 Absolute values
5 Reset statistics
8,1,port#
Timing slip:
0 Display
1 Reset counters
8,1,port#,2
8,1,port#,3
8,1,port#,4
8,2
8,3
15 min/24h relative statistics:
PO xxd xxh xxmin xxs
UATR
ESR
SESR
BBER
UATR
ESR
SESR
8,1,port#,3,1
8,1,port#,3,2
8,1,port#,4,1
8,1,port#,4,2
(Rx):
(Rx):
(Rx):
(Rx):
(Tx):
(Tx):
(Tx):
xxxxx
xxxxx
xxxxx
xxxxx
xxxxx
xxxxx
xxxxx
15 min/24h absolute statistics:
PO xxd xxh xxmin xxs
UAT
ES
SES
BBE
UAT
ES
SES
(Rx):
(Rx):
(Rx):
(Rx):
(Tx):
(Tx):
(Tx):
xx
xx
xx
xx
xx
xx
xx
Statistics since last reset:
TT 2d 3h 45min 12s
UAT
ES
SES
BBE
UAT
ES
SES
8,1,port#,4,3
(Rx):
(Rx):
(Rx):
(Rx):
(Tx):
(Tx):
(Tx):
Give period 0 to 100
(0=current, 1=last, 2=prev. etc)
1)
Give period 0 to 100
(0=current, 1=last, 2=prev. etc)
1)
1) You can choose up to 100 15 min
periods or up to 30 24h periods
Port statistics:
Give port number:
1, 2 or 3
8,1
*
* This menu is not displayed in
the single-port version
Page 94

Data Network Terminal Single-port and Multiport Operating Instructions
94 (128) © Nokia Corporation DN01145897
Nokia Proprietary and Confidential Issue2-0en
Figure 71. Statistics menu structure (continued)
15 min absolute Rx statistics:
PO 0d 0h 5min 59s
UAT
ES
SES
BBE
Line statistics:
1 Line status
3 Relative values
4 Absolute values
5 Reset statistics
8,2
Line stat relative:
1 15 min periods
2 24h periods
8,2,3
8,2,3,1/8,2,3,2
15 min relative Rx statistics:
PO 0d 0h 4min 38s
UATR
ESR
SESR
BBER
Line1
Line stat absolute:
1 15 min periods
2 24h periods
3 Since last reset
8,2,4
8,2,4,1/8,2,4,2
8,2,4,3
System counters:
1 CPU reset counter
2 Time since reset
CPU reset counter:
0 Display
1 Reset counters
Time since last reset:
123d 12h 34min
8,3
8,3,1
8,3,2
Line1
Rx statistics since last reset:
TT 0d 1h 12min 52s
UAT
ES
SES
BBE
Line1
Line2
- -
- -
- -
- -
Line2
- -
- -
- -
- -
Give period 0 to 100
(0=current, 1=last, 2=prev. etc)
1)
Give period 0 to 100
(0=current, 1=last, 2=prev. etc)
1)
1) You can choose up to 100 15 min
periods or up to 30 24h periods
xx
xx
xx
xx
xx
xx
xx
xx
Line2
- -
- -
- -
- -
xx
xx
xx
xx
Page 95

Using Q1 menus
DN01145897 © Nokia Corporation 95 (128)
Issue 2-0 en Nokia Proprietary and Confidential
Figure 72. Privileges menu structure
DNT privileges:
1 Password
4 Setting parameters
5 Front panel rights
Give password
1...7 characters
Setting parameters:
1 Password timeout
2 Protections
3 Password
Password timeout:
0 Display
1 to 1000 min
Protections:
0 Display
1 No protection
2 Password required
Give new password:
1...7 characters
Front panel rights:
0 Display
1 Configuring
2 Test activation
Configuring:
0 Display
1 Allowed
2 Not allowed
Test activation:
0 Display
1 Allowed
2 Not allowed
10
10,1
10,4
10,4,1
10,4,2
10,4,3
10,5
10,5,1
10,5,2
Page 96

Data Network Terminal Single-port and Multiport Operating Instructions
96 (128) © Nokia Corporation DN01145897
Nokia Proprietary and Confidential Issue2-0en
Caution
9.2 DNT controls (5)
The DNT controls menu(see Figure 58) contains all possible tests to beactivated
in DNT2Mi via the Q1 management.
It also shows if DNT2Mi in question is being tested. See the example below.
The DNT Controls menu also has a Self Test submenu, which shows the result
of the last self test and enables the activation of a self test. The activation of this
test cuts off the connection between the network manager and the unit. The result
of the self test can be read after the unit has performed the whole test. The test
takes about 20 seconds.
The activation of a self test also cuts the data connection.
9.3 DNT settings (6)
9.3.1 Display (6,0)
The first display of the DNT Settings menu (see Figure 59) shows part of the
current settings. The display can look, for example like this:
Display controls:
type control
Port1: -- -Port2: -- -Port3: -- -Line: G.704 --
Page 97

Using Q1 menus
DN01145897 © Nokia Corporation 97 (128)
Issue 2-0 en Nokia Proprietary and Confidential
9.3.2 Service options (6,1)
The Service options menu provides also the network manager with three Q1specific configurable service options, that is, speed used on the management
connection, Q1 address, and management path. All these options can be checked
and changed.
Q1 speed (6,1,1)
The speed must be selected according to the speed used in the management
network.
DNT settings:
Q1 speed: 4800
Q1 address: 2
Q1 via line: Off
LM interface: On
Test timeout limit: 10
Timing source: Line
Line interface:
BER alarm limit: 1E-3
BER alarm severity: B-level
Port 1 (V.35) rate: Line rate n=32 (2048k)
Port 2 (--) rate: 1*64 kbit/s
Port 3 (--) rate: 1*64 kbit/s
Timeslot usage:
TS: Port: TS: Port:
00 P1 01 P1
02 P1 03 P1
04 P1 05 P1
06 P1 07 P1
08 P1 09 P1
10 P1 11 P1
12 P1 13 P1
14 P1 15 P1
16 P1 17 P1
18 P1 19 P1
20 P1 21 P1
22 P1 23 P1
24 P1 25 P1
26 P1 27 P1
28 P1 29 P1
30 P1 31 P1
Power backoff: On
STU-R rate adaptive
2-wire
PSD symmetric
Line rate n=32 (2048k)
Page 98

Data Network Terminal Single-port and Multiport Operating Instructions
98 (128) © Nokia Corporation DN01145897
Nokia Proprietary and Confidential Issue2-0en
Q1 address (6,1,2)
The Q1 address must be selected before DNT2Mi can be accessed using
management.
The address can range from 0000 to 4095. The last address (4095) is a universal
address that cannot be selected by the Q1 manager.
Q1 management path (6,1,3)
A Q1 management source is selected from this menu. The source can either be:
• Q1 via line, EOC
• Local management interface
• Q1 via Port1 (only with G.704 adapter).
9.3.3 Timing source (6,2)
This menu allows you to select a source for timing. The timing alternatives are:
• Internal
• Line
• Port1
• Transparent.
Figure 73 illustrates the principle of each alternative.
The timing of circuit 103 can be set either by the clock from DTE (113) or by the
clock of the equipment (114). See Figures 78 and 79 in Section 9.3.5.
Page 99

Using Q1 menus
DN01145897 © Nokia Corporation 99 (128)
Issue 2-0 en Nokia Proprietary and Confidential
Figure 73. Timing source alternatives
Line SHDSL
114
115
113
Timing
DTE DNT2Mi
114
115
113
Timing
DTE DNT2Mi
114
115
113
DTEDNT2Mi
Timing
Line SHDSL
114
115
113
Timing
DTE DNT2Mi
Timing
Line SHDSL
Timing
114
115
113
DTE DNT2Mi
Port timing
Line timing
Internal timing
Transparent timing
DTE
adapter
DTE
adapter
DTE
adapter
DTE
adapter
DTE
adapter
Page 100

Data Network Terminal Single-port and Multiport Operating Instructions
100 (128) © Nokia Corporation DN01145897
Nokia Proprietary and Confidential Issue2-0en
9.3.4 Line settings (6,3)
This menu branch allows you to perform settings to a line.
Line interface (6,3,3)
In this menu, you can select the following line settings:
• SHDSL mode
• 2-wire or 4-wire mode
• Line rate.
Figure 74. Principle of the Line interface menu
SHDSL mode (6,3,3)
This menu allows you to select the SHDSL mode.
Line interface
STU-C Fixed
4-wire
STU-R Rate Adaptive
SHDSL mode
Line Rate
n=6...32
4-wire
2-wire2-wire
Line Rate
n=3...32
 Loading...