

Page 1
www.odeon.cn
sales@odeon.cn
DCT- 4 Flashing Manual
DCT-4 Flashing Manual Page 1/15
Page 2

Index
How to install a Phoenix Flashfile:...................................................................... 3
How to Flash a DCT-4 Phone:.............................................................................. 4
How to make a “Factory Reset”: ......................................................................... 7
How to read/write a PM:........................................................................................ 8
How to edit the Security Code:.......................................................................... 11
How to make a “Format User Area” .................................................................. 12
The Product Manager:........................................................................................ 13
ACD Reading....................................................................................................... 14
How to repair Bluetooth problems:................................................................... 15
DCT-4 Flashing Manual Page 2/15
Page 3

How to install a Phoenix Flashfile:
1. Double click on the icon of the Flashfile
2. Then the installation of the Flashfiles starts. Click always “Next” and “Yes”
during the installation, than you can’t make anything wrong.
3. The Destination Folder should be always: C:\Program Files\Nokia\Phoenix\.
Note:
On a German Windows the
destination folder should be:
C:\Programme\Nokia\Phoenix\
4. After this the program starts to copy the files (It will take some minutes). At the
end of the installation, you will get a message, that the Flashfiles are
successfully installed.
DCT-4 Flashing Manual Page 3/15
Page 4
How to Flash a DCT-4 Phone:
1. Connect your Phone to the box, and start the J.A.F software:
(Double Click on this Symbol on the Desktop)
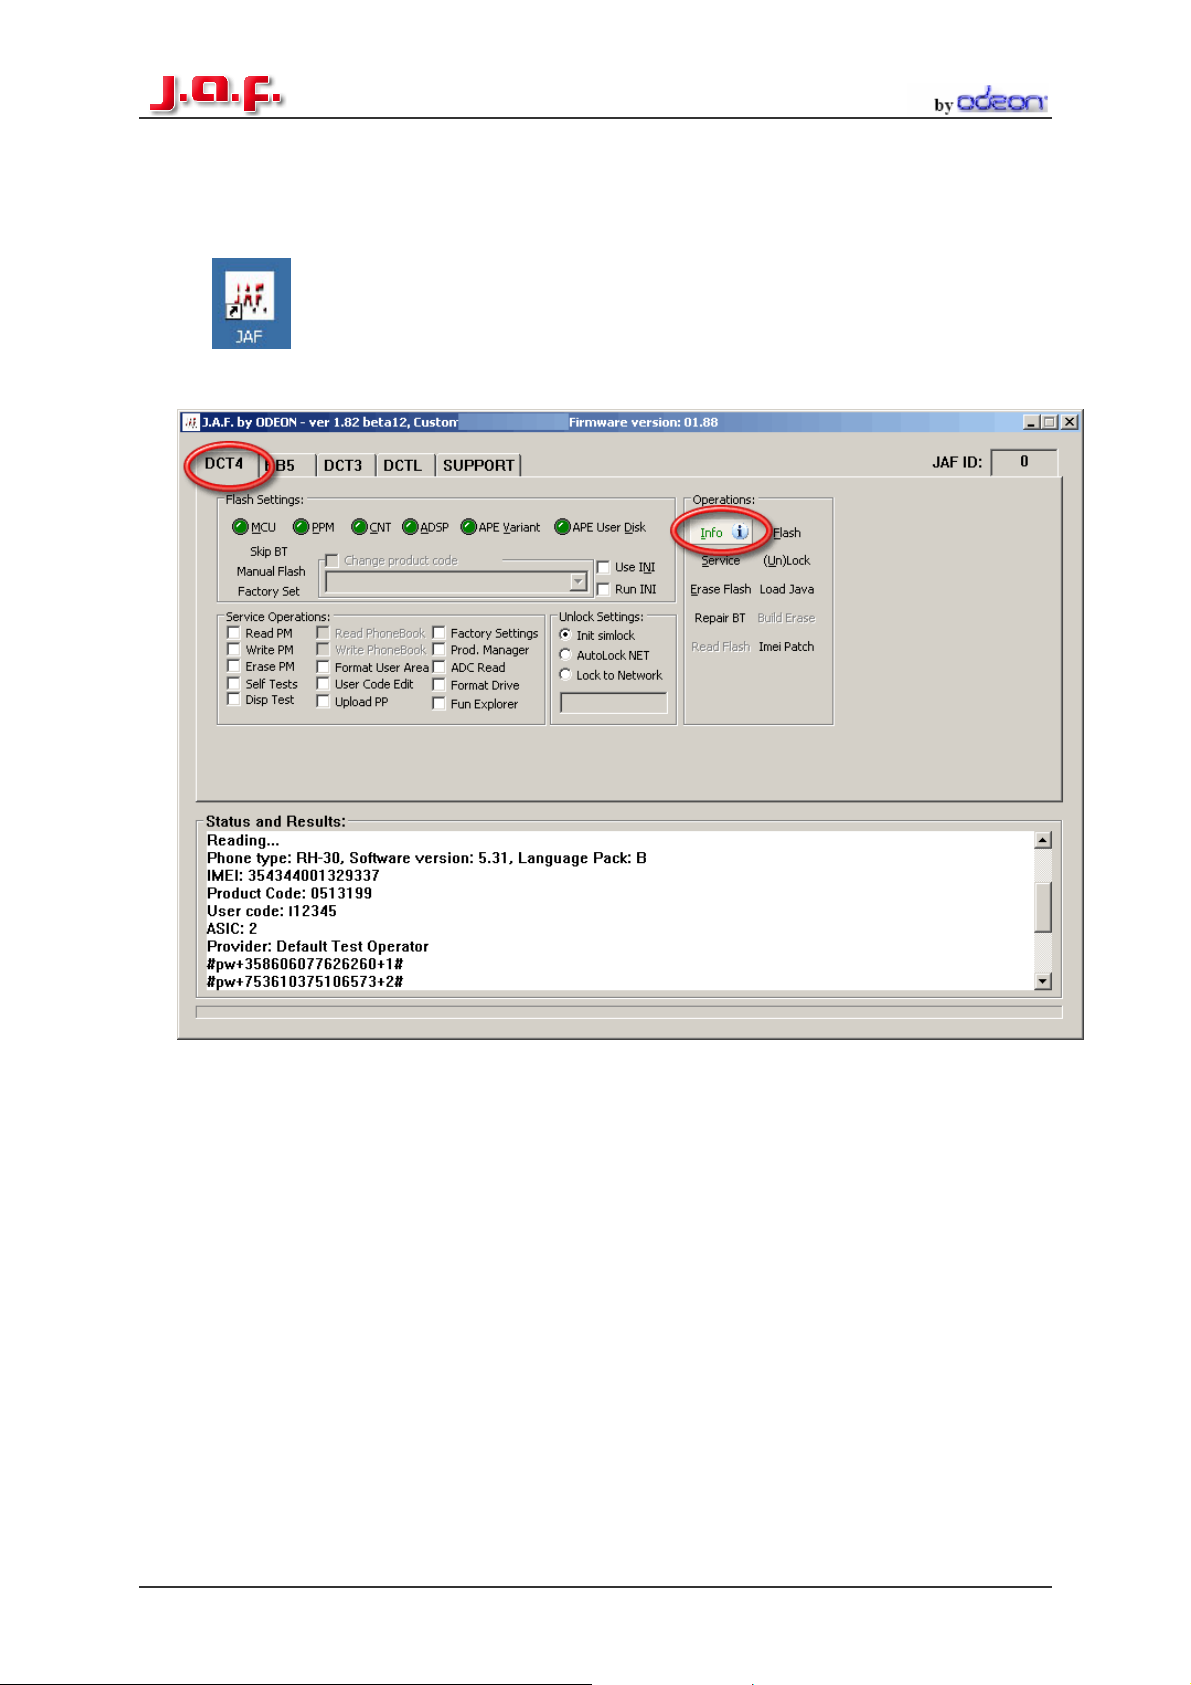
2. Select the DCT-4 Tab in the J.A.F Software and Press the “Info” Button
After this in the status Box should be a new message like in the picture above
In this Box you can see the:
• Phone Type
• Software Version
• Language Pack of the Firmware
• IMEI
• Product Code
• Ansic Type
• The Provider
• And the unlock codes
DCT-4 Flashing Manual Page 4/15
Page 5
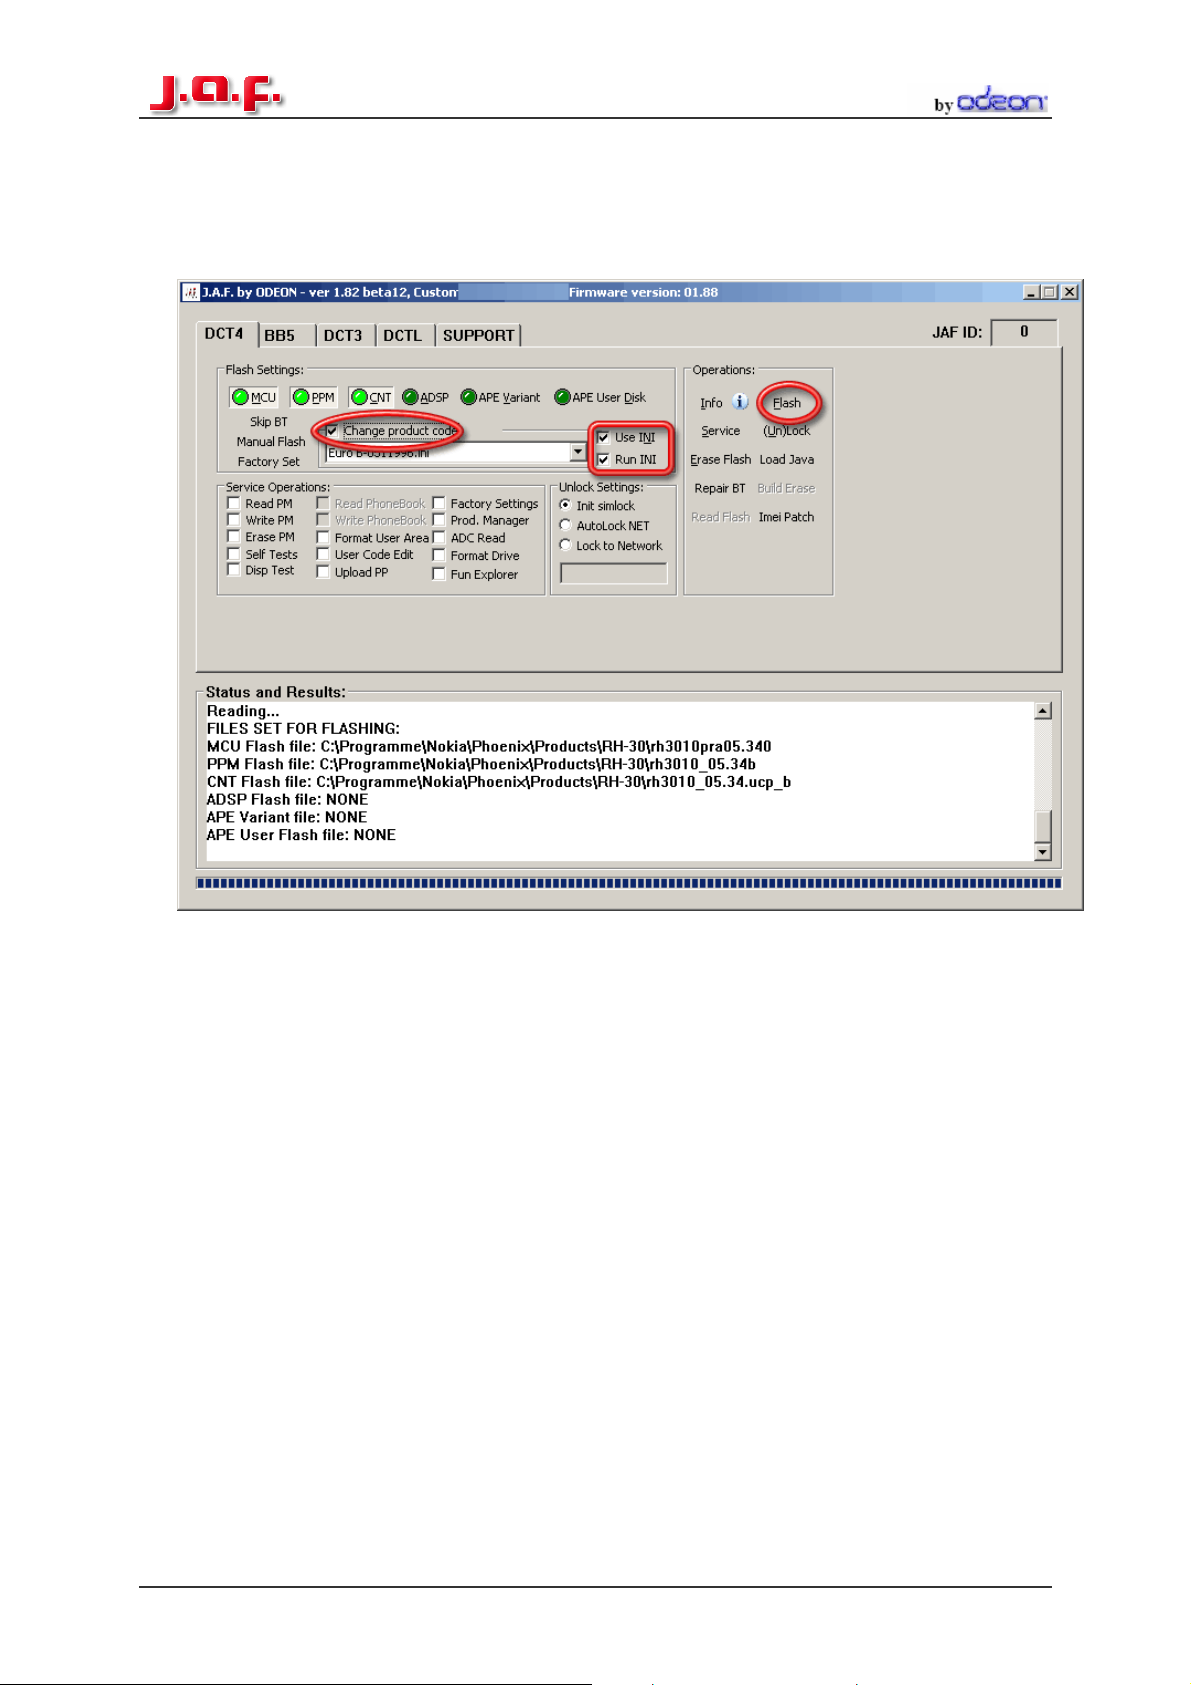
3. Now you must select the right Flashfiles. The most Phones need only MCU
and PPM, but some need also the CNT package and the new Nokia
Communicators need also the APE and ADSP Files. The easiest way to select
the right files is to press the “Use INI button, then all files are selected
automatically.
4. If the files are selected Press the “Flash” button now the box is working and
after some minutes the Phone will be up to date.
If you want to change the Product code just tick the “Change product code”
box also…
NOTE: If you have a dead phone and the “Use INI” Function is also not working
click on the “Manual Flash” button to activate the manual mode. Now the flasher
is able to flash the dead phone.
In some cases the Bluetooth chip of the Phone is damaged, so the flasher can’t
flash this section and will stop flashing. Phone dead.
If you have such problems click on the “Skip BT” Button to solve the Problem.
Now the flasher leaves out the Bluetooth part of the phone.
DCT-4 Flashing Manual Page 5/15
Page 6

How to Unlock a DCT-4 Phone:
1. Connect the Phone to the Box
2. Select “Init Simlock” then Press the “Unlock” Button.
If you want to lock the Phone to only one Network tick the “Lock to Network”
Button and enter the Operator Code and then press Unlock.
DCT-4 Flashing Manual Page 6/15
Page 7

How to make a “Factory Reset”:
Tick the “Factory Settings” button and then Press the “Service” button. Then a new
windows appears there you can select the “reset type” you want. (Factory Set Full is
recommend) Wait until the message ”Done!” appear in the “Status and Results” Box.
DCT-4 Flashing Manual Page 7/15
Page 8
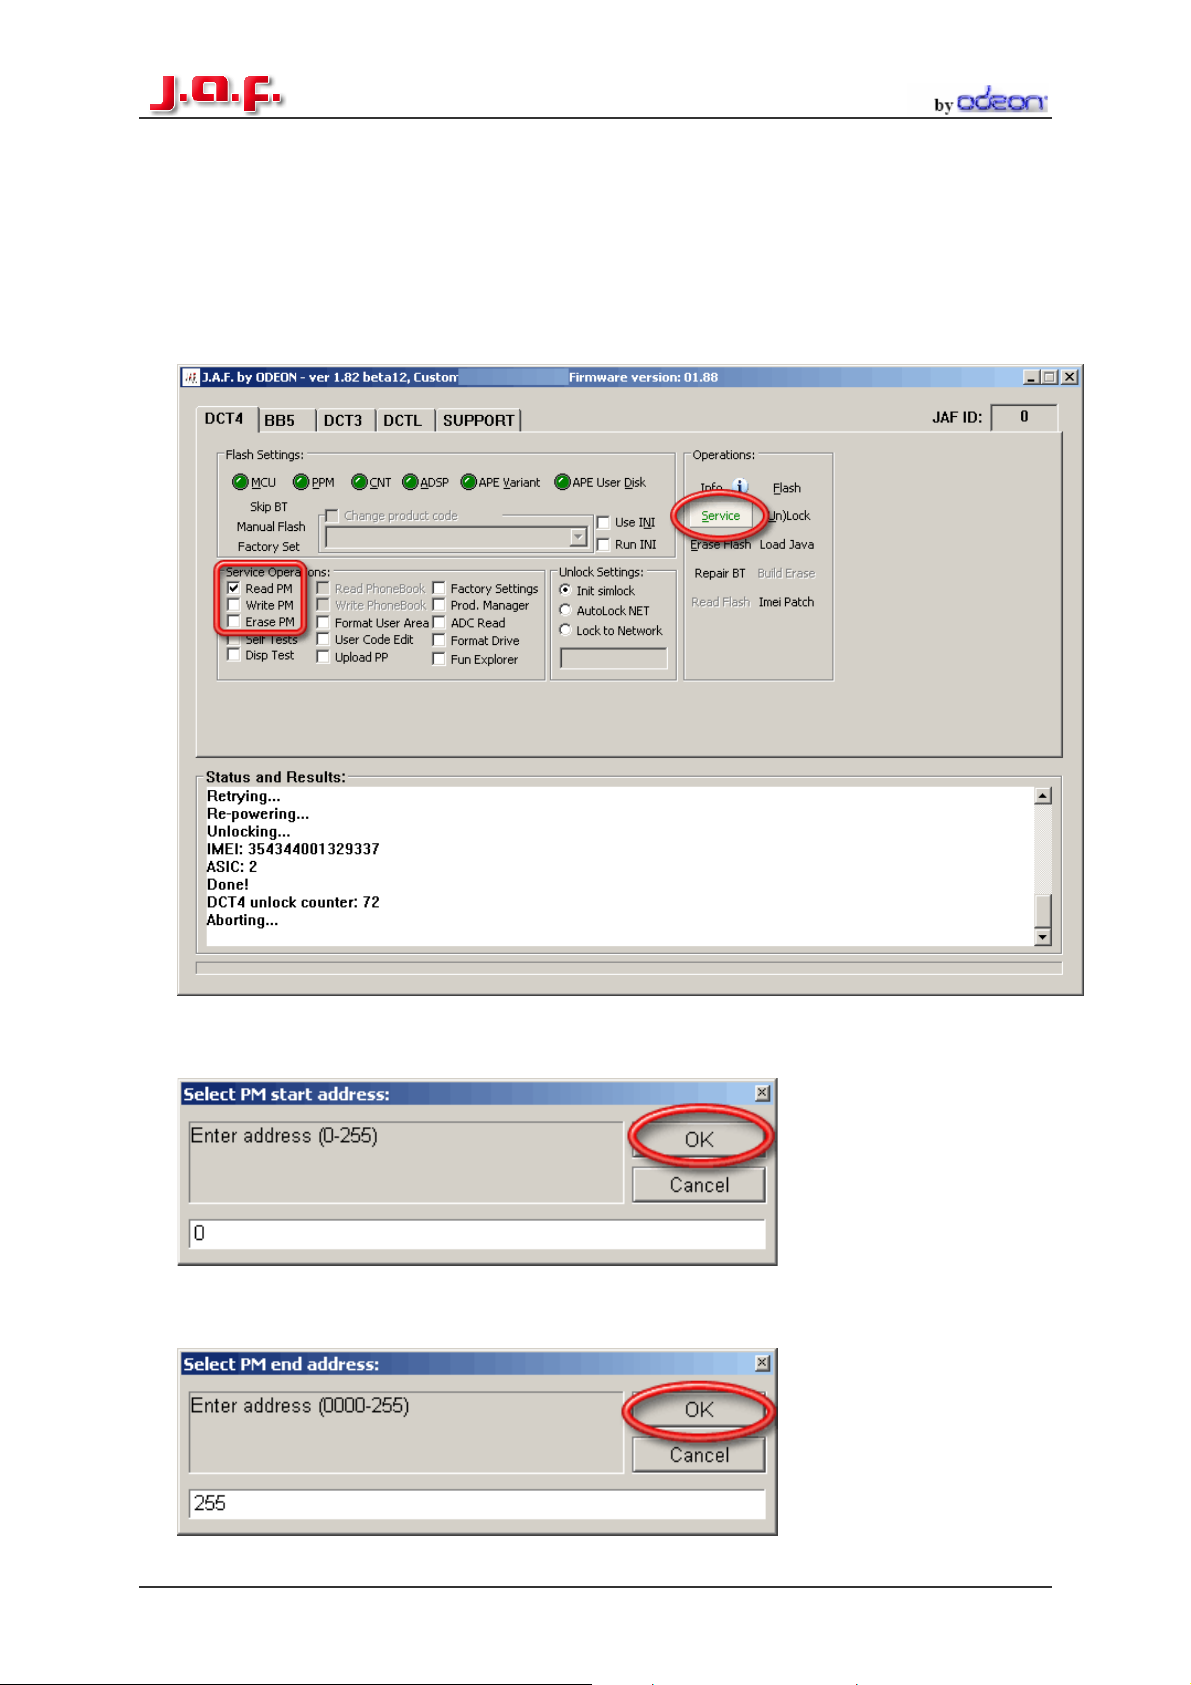
How to read/write a PM:
1. Connect you phone to the box. And go to the DCT-4 Tab. In the Service
Operations you have three possibilities for the PM. One to read, one for
writing and erasing. So just check the option you want and press then the
“Service” button.
2. If you select “read” the Program will ask you where to start reading the PM.
The whole PM is saved from 0 to 255. So enter in the start address field 0.
3. And for the end address tip 255 then press also “OK” button. Now it will take
some minutes to read the PM
DCT-4 Flashing Manual Page 8/15
Page 9

4. The PM is now saved in C:\Program Files\Nokia\Phoenix\
5. If you want to write a PM just tick “write PM” instead read. But then the
Program will ask you if you are know what you are doing ☺ cause in the PM
are all important settings for the Phone saved. But just click the “Yes” Button.
DCT-4 Flashing Manual Page 9/15
Page 10

6. Now you must be carefully, flash only the write PM into the Phone cause
otherwise the Phone won’t work any more. Then Press “Open”
7. Now the Box starts to write the PM to the Phone. Wait until there is the
message “Done!” in the status and results box.
NOTE: In the PM are all important settings of the Phone saved. So be carefully with
this file. Flash it only if you have a dead Phone to reanimate it.
DCT-4 Flashing Manual Page 10/15
Page 11

How to edit the Security Code:
Connect the Phone to the box and select “User Code Edit” and press then the
“Service” Button. Then a new window will appear.
If you want to read the current user code Press “Read Code”.
The editing is also very simple. Write the new Security Code into the Box (5 Digit
only) and press then press the “Write Code” button
DCT-4 Flashing Manual Page 11/15
Page 12

How to make a “Format User Area”
This feature is especially for WD2 Phones, like the 7610 or the 6600. After flashing
such a WD2 Phone it’s recommend to make such a “Format User Area”. To delete all
old User files, which are maybe not compatible with the new Firmware.
Just tick the “Format User Area” Button and then press the “Service” button. Then
wait until there is the message “Done!”
DCT-4 Flashing Manual Page 12/15
Page 13

The Product Manager:
This Feature is for reading/writing special Phone information like the Manufacture
month or the Hardware Version.
DCT-4 Flashing Manual Page 13/15
Page 14

ACD Reading
This is a nice feature for reading some Voltages and some other interesting things.
DCT-4 Flashing Manual Page 14/15
Page 15

How to repair Bluetooth problems:
If the Bluetooth function isn’t working after flashing, connect the phone to the box and
click the “Repair BT” button. Then wait till the message “Done!” is in the status and
results box. Now the BT of the phone should work again.
Date of manual 20. July 2005
Made by Flyingfox
DCT-4 Flashing Manual Page 15/15
 Loading...