

Page 1
CPEo 400
Series
Page 2

Accuracy
While reasonable efforts have been made to assure the accuracy of this document, Motorola, Inc. assumes no
liability resulting from any inaccuracies or omissions in this document, or from use of the information obtained
herein. Motorola, Inc. reserves the right to make changes to any products described herein to improve reliability,
function, or design, and reserves the right to revise this document and to make changes from time to time in content
hereof with no obligation to notify any person of revisions or changes. Motorola, Inc. does not assume any liability
arising out of the application or use of any product, software, or circuit described herein; neither does it convey
license under its patent rights or the rights of others. It is possible that this publication may contain references to, or
information about Motorola products (machines and programs), programming, or services that are not announced
in your country. Such references or information must not be construed to mean that Motorola intends to announce
such Motorola products, programming, or services in your country.
Copyrights
This document, M otorola products, and 3rd Party Software products described in this document may include
or describe copyrighted Motorola and other 3rd Party supplied computer programsstoredinsemiconductor
memories or other media. Laws in the United States and other countries preserve for Motorola, its licensors, and
other 3rd Party supplied software certain exclusive rights for copyrighted material, including the exclusive right
to copy, reproduce in any form, distribute and make derivative works of the copyrighted material. Accordingly,
any copyrighted material of Motorola, its licensors, or the 3rd Party software supplied material contained in the
Motorola products described in this document may not be copied, reproduced, reverse engineered, distributed,
merged or modified in any manner without the express written permission of Motorola. Furthermore, the purchase
of Motorola products shall not be deemed to grant either directly or by implication, estoppel, or otherwise, any
license under the copyrights, patents or patent applications of Motorola or other 3rd Party supplied s oftware,
except for the normal non-exclusive, royalty free license to use that arises by operation of law in the sale of a
product.
A list of 3rd Party supplied software copyrights are contained in the Supplemental information section of this
document.
Restrictions
Software and documentation are copyrighted materials. Making unauthorized copies is p rohibited by law. No part
of the software or documentation may be reproduced, transmitted, transcribed, stored in a retrieval system, or
translated into any language or computer language, in anyformorbyanymeans,withoutpriorwrittenpermission
of Motorola, Inc.
License Agreements
The software described in this document is the property o f Motorola, Inc and its licensors. It is furnished by express
license agreement only and may be used only in accordance with the terms of such an agreement.
High Risk Materials
Components, units, or 3rd Party products used in the product described herein are NOT fault-tolerant and are NOT
designed, manufactured, or intended for use as on-line control equipment in the following hazardous environments
requiring fail-safe controls: the operation of Nuclear Facilities, Aircraft Navigation or Aircraft Communication
Systems, Air Traffic Control, Life Support, or Weapons Systems (High Risk Activities). Motorola and its supplier(s)
specifically disclaim any expressed or implied warranty of fitness for such High Risk Activities.
Tra dema rks
Motorola and the Stylized M Logo are registered in the US Patent & Trademark Office. All other product or service
names are the property of their respective owners.
The CE mark confirms Motorola, Inc. statement of compliance with EU directives applicable to this product. Copies
of the Declaration of Compliance and installation information in accordance with the requirements of EN50385 can
be obtained from the local Motorola representative or by contacting the Customer Network Resolution Center
(CNRC). The 24 hour telephone numbers are listed at h
Network Resolution Center contact information. Alternatively if you do not have access to CNRC or the
internet, contact the Local Motorola Office.
ttps://mynetworksupport.motorola.com. Select Customer
MAR 2008
Page 3

Table
of
Contents
Contents
■■■■■■■■■■■■■■■■■■■■■■■■■ ■■■■■■■■■■■■■■■■■■■■■■■■■■ ■■■■■■■■■■■
WiMAX CPEo400 Series User Guide
RevisionHistory......................................... 2
VersionInformation..................................... 2
Chapter 1: WiMAX CPEo400 Series User Guide
ProductOverview........................................ 1-2
WiMAXCPEo400SeriesOverview.............................. 1-2
PowerfulFeaturesinaSingleUnit.............................. 1-3
OperatingInformation.................................... 1-3
■
■
■
■
Chapter 2: Installation
HardwareInstallationOverview................................. 2-2
SoftwareInstallationOverview ................................. 2-3
WhatYouNeedtoBegin................................... 2-3
AdvancedSetup....................................... 2-3
ProceduretoLogintotheCPE.................................. 2-4
Before you Begin Configuration............................... 2-4
LoggingintotheCPE .................................... 2-4
SetupWizardandAuthentication ................................ 2-6
WizardStepOne—EnableLoginPasswordProtection ................... 2-6
WizardStepTwo—DeviceTime............................... 2-6
WizardStepThree—WiMAXSecurity............................ 2-6
CPEUserScreens...................................... 2-8
Chapter 3: Basic Configuration
Basic Con fi gurationOverview.................................. 3-2
PersonalizeMenu ...................................... 3-2
InternetMenu........................................ 3-4
StatusMenu......................................... 3-7
Chapter 4 : Advanced Configuration
Advanced ConfigurationOverview................................ 4-2
PortForwardingMenu.................................... 4-2
LocalAddressMenu..................................... 4-3
ControlPanelMenu..................................... 4-6
Chapter 5: Glossary and Troubleshooting
GlossaryofTerms........................................ 5-2
68P09285A67-D i
MAR 2008
Page 4

Contents
Glossary........................................... 5-2
BasicTroubleshootingOverview................................. 5-3
AComputerCannotLogOntotheCPE........................... 5-3
CannotConnecttotheInternet............................... 5-3
AdditionalTroubleshootingSupport............................. 5-3
Chapter 6: Configuring TCP/IP and DNS Settings
ConfiguringTCP/IP ....................................... 6-2
ConfiguringTCP/IPinWindows2000............................ 6-2
ConfiguringTCP/IPinWindowsXP ............................. 6-6
Chapter 7: Important Safety and Legal Information
ImportantSafetyInformation.................................. 7-2
This Product complies with the following RF energy exposure standards and guidelines: . . 7-2
CaringfortheEnvironment................................... 7-7
DisposalofMotorolaEquipmentinEUCountries...................... 7-7
DisposalofMotorolaNetworksEquipmentinNonEUCountries .............. 7-7
CMMDisclosure....................................... 7-7
CopyrightsandTrademarks................................... 7-9
Notice............................................ 7-9
Copyrights.......................................... 7-9
UsageDisclosureRestrictions................................ 7-9
ii 68P09285A67-D
MAR 2008
Page 5

List
of
Figures
List of Figures
■■■■■■■■■■■■■■■■■■■■■■■■■ ■■■■■■■■■■■■■■■■■■■■■■■■■■ ■■■■■■■■■■■
Figure1-1:CPEo400Unit.................................... 1-2
Figure2-1:CPELoginScreen.................................. 2-4
Figure2-2:CPEStatusScreen.................................. 2-7
Figure2-3:UserButtons..................................... 2-8
Figure3-1:PersonalizeMenu.................................. 3-2
Figure3-2:CPEInternetMenu ................................. 3-5
Figure3-3:CPEStatusMenu.................................. 3-7
Figure4-1:CPEPortForwardingMenuNew .......................... 4-2
Figure4-2:CPELocalAddressMenu.............................. 4-4
Figure4-3:CPEControlPanelMenu............................... 4-6
Figure6-1:WindowsControlPanel ............................... 6-2
Figure6-2:NetworkandDial-upConnections.......................... 6-3
Figure6-3:LocalAreaConnection................................ 6-3
Figure6-4:Properties...................................... 6-4
Figure6-5:SelectNetworkConnectionType .......................... 6-4
Figure6-6:SelectNetworkProtocol............................... 6-5
Figure6-7:InternetProtocol(TCP/IP)Properties........................ 6-5
Figure6-8:WindowsXPStartWindow.............................. 6-6
Figure6-9:ControlPanel .................................... 6-6
Figure6-10:NetworkandInternetConnections......................... 6-7
Figure6-11:ControlPanelClassicView............................. 6-7
Figure6-12:NetworkConnections ............................... 6-8
Figure6-13:LocalAreaConnectionProperties......................... 6-8
Figure6-14:InternetProtocol(TCP/IP)Properties ....................... 6-9
Figure7-1:EURoHS ...................................... 7-7
Figure7-2:ChinaManagementMethods(CMM)DisclosureTable................ 7-8
■
■
■
■
68P09285A67-D iii
MAR 2008
Page 6

List of Figures
iv 68P09285A67-D
MAR 2008
Page 7

List
of
Tables
List of Tables
■■■■■■■■■■■■■■■■■■■■■■■■■ ■■■■■■■■■■■■■■■■■■■■■■■■■■ ■■■■■■■■■■■
Table1:Manualversionhistory................................. 2
Table2-1:UserScreens..................................... 2-8
Table3-1:PasswordFields.................................... 3-3
Table3-2:DeviceTimeFields.................................. 3-3
Table3-3:DeviceNameFields.................................. 3-3
Table3-4:RestoreFactorySettingsFields............................ 3-4
Table3-5:WiMAXSecurityFields................................ 3-5
Table3-6:FirewallFields.................................... 3-6
Table3-7:DynamicDNSFields ................................. 3-6
Table4-1:PortForwardingBasicFields............................. 4-3
Table4-2:PortForwardingForwardingScreenFields...................... 4-3
Table4-3:DHCPServerFields.................................. 4-4
Table4-4:LeaseStatusFields.................................. 4-5
Table4-5:LeaseReservationFields............................... 4-5
Table4-6:SoftwareTabFields.................................. 4-7
Table4-7:SystemTabFields................................... 4-7
Table5-1:GlossaryTerms.................................... 5-2
Table7-1:ComplianceStatement................................ 7-3
■
■
■
■
68P09285A67-D v
MAR 2008
Page 8

List of Tables
vi 68P09285A67-D
MAR 2008
Page 9

About
This
Manual
WiMAX CPEo400 Series User Guide
■■■■■■■■■■■■■■■■■■■■■■■■■ ■■■■■■■■■■■■■■■■■■■■■■■■■■ ■■■■■■■■■■■
■
■
■
■
68P09285A67-D 1
MAR 2008
Page 10

Revision History
Revision History
■■■■■■■■■■■■■■■■■■■■■■■■■■ ■■■■■■■■■■■■■■■■■■■■■■■■■ ■■■■■■■■■■■
The following shows the issue status of this manual since it was first released.
Version Information
Table 1 Manual version history
■
■
Manual
issue
A
B
Date of issue
AUG 2007
SEP 2007
C OCT 2007
D
MAR 2008
Remarks
CPEo400 User Guide Release
Upissue to Initial Release
Includes review comments
Update to remove Desktop
2 68P09285A67-D
MAR 2008
Page 11

Chapter
1
WiMAX CPEo400 Series User Guide
■■■■■■■■■■■■■■■■■■■■■■■■■ ■■■■■■■■■■■■■■■■■■■■■■■■■■ ■■■■■■■■■■■
■
■
■
■
68P09285A67-D 1-1
MAR 2008
Page 12

Product Overview Chapter 1: WiMAX CPEo400 Series User Guide
Product Overview
■■■■■■■■■■■■■■■■■■■■■■■■■■ ■■■■■■■■■■■■■■■■■■■■■■■■■ ■■■■■■■■■■■
■
■
WiMAX CPEo400 Series Overview
Figure 1-1 CPEo400 Unit
Thank you for purchasing the Motorola Customer Premises Equipment Outdoor (CPEo) 400
device. The Outdoor CPE allows you to connect to the wireless world easily and seamlessly.
The CPE outdoor (CPEo) device provides the user:
• Convenience — with easy plug and play functionality. Flexible connectivity. Compact
design.
• Performance — high gain antenna providing B est in Class range in outdoor environment.
• Control — remote management capability allows easy det ection and authentication once
the unit is setup.
The features and the physical appearance of your Outdoor CPE device m ay differ slightly from
the illustration. This product is subject to change. For the most recent documentation, visit the
Product Documentation page on www.motorola.com.
1-2 68P09285A67-D
MAR 2008
Page 13

WiMAX CPEo400 Series User Guide Powerful Features in a Single Unit
Powerful Features in a Single Unit
The CPE device provides the following features:
• WiMAX (Worldwide Interoperability for Microwave Access) Access
• WAN DHCP Client
• LAN DHCP Server
• Home Gateway Functions
Operating Information
Operating temperature for this unit is -40C to 55C (-40F to 131F).
68P09285A67-D 1-3
MAR 2008
Page 14

Operating Information Chapter 1: WiMAX CPEo400 Series User Guide
1-4 68P09285A67-D
MAR 2008
Page 15

Chapter
2
Installation
■■■■■■■■■■■■■■■■■■■■■■■■■ ■■■■■■■■■■■■■■■■■■■■■■■■■■ ■■■■■■■■■■■
■
■
■
■
68P09285A67-D 2-1
MAR 2008
Page 16

Hardware Installation Overview Chapter 2: Installation
Hardware Installation Overview
■■■■■■■■■■■■■■■■■■■■■■■■■■ ■■■■■■■■■■■■■■■■■■■■■■■■■ ■■■■■■■■■■■
■
■
The CPEo400 is an outdoor unit and the hardware installation is beyond the scope of this
document. Please arrange with your service provider for professional installation.
2-2 68P09285A67-D
MAR 2008
Page 17

WiMAX CPEo400 Series User Guide Software Installation Overview
Software Installation Overview
■■■■■■■■■■■■■■■■■■■■■■■■■ ■■■■■■■■■■■■■■■■■■■■■■■■■■ ■■■■■■■■■■■
■
■
What You Need to Begin
Once the C PEo400 has been professionally installed by your service provider, you will need:
• Acomputer
Ensure your computer is plugged in, and the ethernet cable is connected from your computer to
the CPE.
Advanced Setup
The CPE can also be used to connect to a multi-port switch (hub) - purchased separately from
the CPE. Connecting the CPE device to a hub will allow you to connect more than one computer
to your CPE device.
68P09285A67-D 2-3
MAR 2008
Page 18
Procedure to Log into the CPE Chapter 2: Installation
Procedure to Log into the CPE
■■■■■■■■■■■■■■■■■■■■■■■■■■ ■■■■■■■■■■■■■■■■■■■■■■■■■ ■■■■■■■■■■■
■
■
Before you Begin Configuration
Some settings on your computer must be verified or changed to e nsu r e that your computer
configuration can support the Outdoor CPE.
Verify that the Network Settings of your LAN Connection on your computer are set to
Automatically Obtain IP Addresses and Automatically Obtain DNS Server Addresses. Refer to
Chapter 6 Configuring TCP/IP and DNS Settings for instructions.
Logging into the CPE
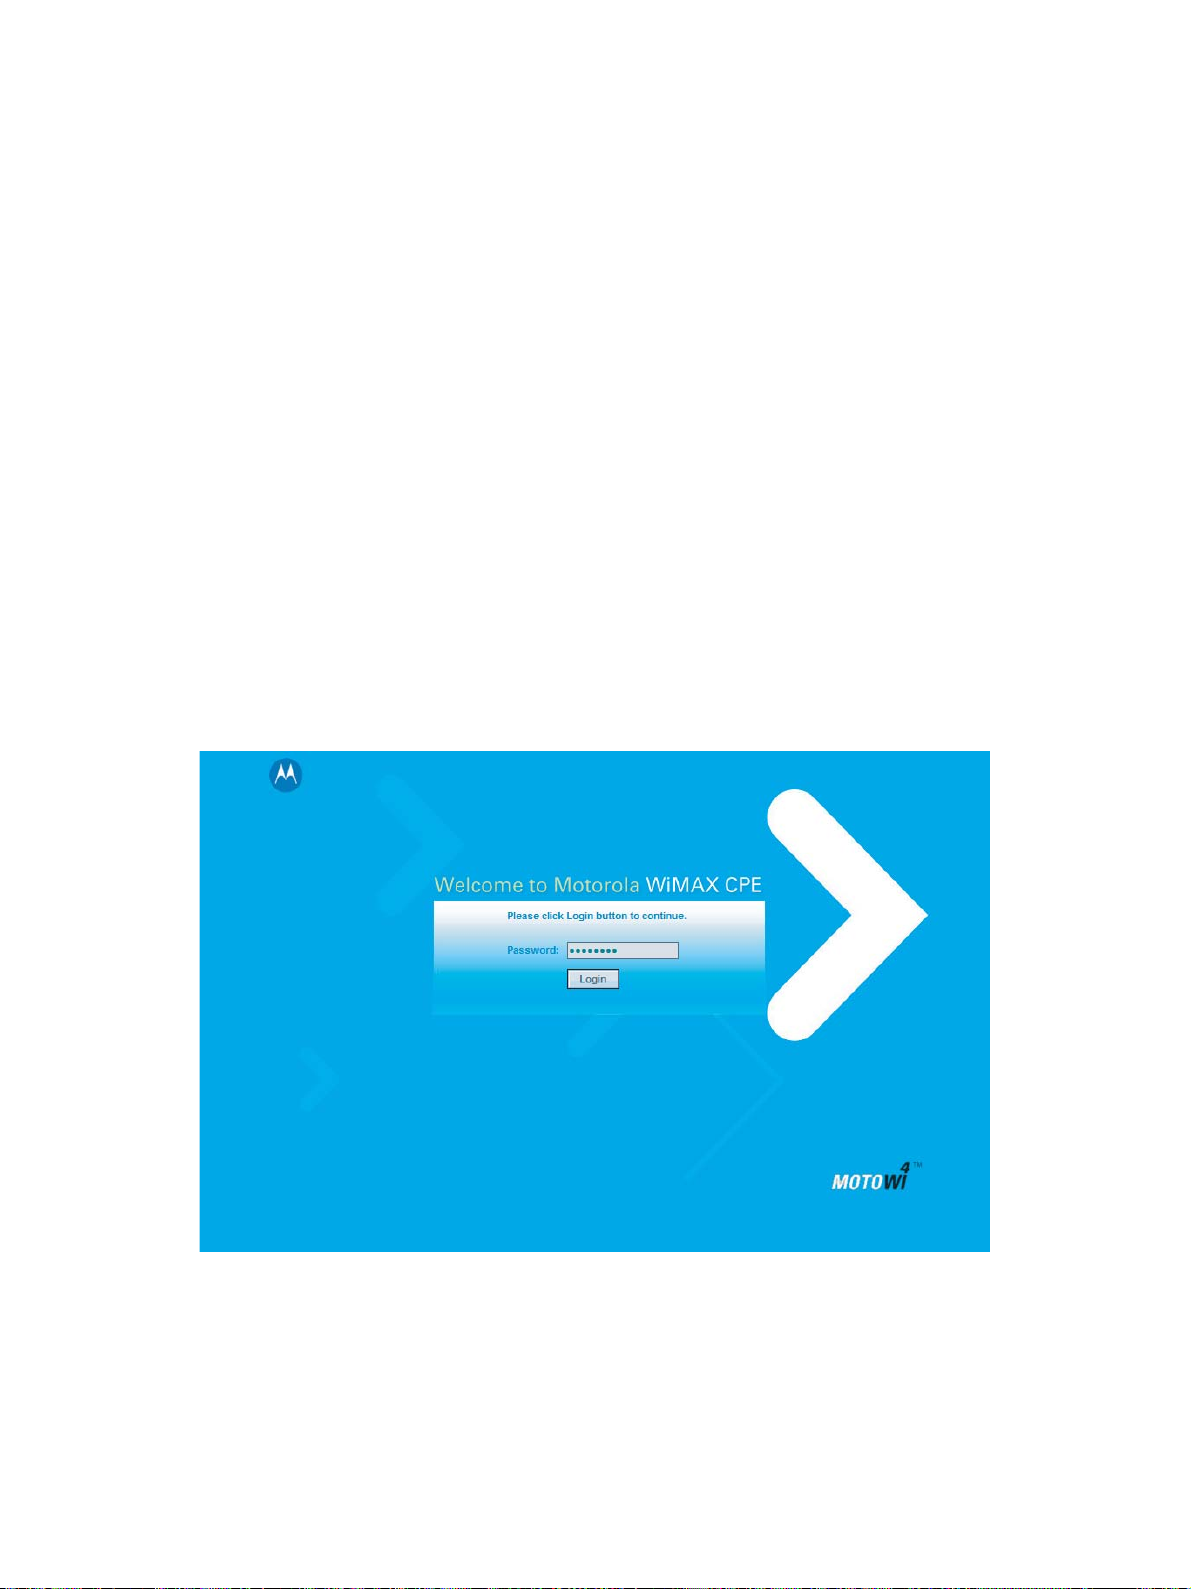
Use the following procedure to log into the CPE
Figure 2-1 CPE Login Screen
Continued
2-4 68P09285A67-D
MAR 2008
Page 19
WiMAX CPEo400 Series User Guide Logging into the CPE
Procedure 2-1 Logging into the CPE
1
2
3
Verify that the Network Settings of your LAN Connection on your computer
are set to Automatically Obtain IP Addresses and Automatically Obtain DNS
Server Addresses. Refer to Chapter 6 Configuring TCP/IP and DNS Settings
On a computer that is connected to the CPE, open a web browser.
In the Address or Location field, type http://mywimax. and press ENTER
to display the login screen.
NOTE
You must include the period (.) after http://mywimax. in order to
access the login screen.
4
5
6
7
8
The Welcome to Motorola WiMAX CPE screen will be displayed and will
prompt you for a password.
In the Password field, enter motorola for the password.
Click Login
First time users will see a pop-up box that states:
Result: The Wizard application will guide y ou through for the first time
configuration. Click OK button to continue.
Click the OK button to launch the wizard application.
68P09285A67-D 2-5
MAR 2008
Page 20

Setup Wizard and Authentication Chapter 2 : Installation
Setup Wizard and Authentication
■■■■■■■■■■■■■■■■■■■■■■■■■■ ■■■■■■■■■■■■■■■■■■■■■■■■■ ■■■■■■■■■■■
■
■
You can use the setup Wizard to quickly set up your CPE for use.
Wizard Step One — Enable Login Password Protection
The setup Wizard automatically enables Password Protection. It is recommended that you keep
the password protection enabled to protect your device and network.
Procedure 2-2 Enable Password Protection
The Setup Wizard automatically enables Password Protection. When Password Protection is
enabled, users are prompted for and must supply the correct password prior to gaining access
the CPE.
1
2
Ensure the E nable Login Password Protection box is checked. The
password will always be motorola.
Click Next
Wizard Step Two — Device Time
This screen allows you t o set the time zone for your location and to enable automatic adjustment
for Daylight Savings Time (when applicable)..
Procedure 2-3 Device Time
1
2
3
Select the appropriate time zone for your location from the drop down box.
Check the box called Auto Adjust for Daylight Savings Time if you live in a
region that observes D aylight Savings T ime (this box is checked by default).
Click the Next button.
Wizard Step Three — WiMAX Security
The WiMAX Security tab will contain your authentication method. Check with your service
provider to determine if they require a user name and password for authentication purposes.
Procedure 2-4 WiMAX Security
1
2-6 68P09285A67-D
Select one of the following:
IF: THEN...
Continued
MAR 2008
Page 21

WiMAX CPEo400 Series User Guide Wizard Step Three — W iMAX Security
Procedure 2-4 WiMAX Security (Continued)
The Authentication
Method is EAP-TLS .
The Authentication
Method is
EAP-TTLS/MS-CHAPv2
Congratulations! You have now completed the setup of your WiMAX
connection.
1. Enter the Realm information as provided by
your service provider
2. Click the Apply button
1. Enter the User Nameand Password as
supplied by your service provider.
2. Enter the Realminformation as provided by
your service provider.
3. Click the Finish button when finished
NOTE
You can confirm a successful WiMAX connection by seeing a green
check mark on the globe symbol at the top of your User Screen.
2
Click OK on the Congratulations! dialog bo x.
A WiMAX Status Screen will appear. This screen will provide any status associated with your
WiMAX Wireless Broadband connection. See the example Status Screen below.
Figure 2-2 CPE Status Screen
68P09285A67-D 2-7
MAR 2008
Page 22

CPE User Screens Chapter 2: Installation
CPE User Screens
There are buttons th at appear on each CPE User Screen. These buttons and their functions
are described here.
Table 2-1 User Screens
Button Function
Restart
Wizard Prompts you to start the
Refresh Refreshes the status data
Auto Refresh Allows the web browser to
Shuts down and restarts the
CPE device.
set-up wizard over again.
automatically refresh at the
interval determined in the
Control Panel menu.
Figure 2-3 User Buttons
restart button
2-8 68P09285A67-D
MAR 2008
Page 23

Chapter
3
Basic Configuration
■■■■■■■■■■■■■■■■■■■■■■■■■ ■■■■■■■■■■■■■■■■■■■■■■■■■■ ■■■■■■■■■■■
■
■
■
■
68P09285A67-D 3-1
MAR 2008
Page 24

Basic Configuration Overview Chapter 3: Basic Configuration
Basic Configuration Overview
■■■■■■■■■■■■■■■■■■■■■■■■■■ ■■■■■■■■■■■■■■■■■■■■■■■■■ ■■■■■■■■■■■
■
■
Once the CPE set up has been completed, you can login to your CPE from any computer on
your home network by typing the device name in the address bar. The default device name is
mywimax. The Basic Configuration Menus that are available are:
• Personalize
• Internet
• Status
Personalize Menu
The Personalize menu provides the following tabs:
• Password
• Device Time
• Device Name
• Restore Factory Settings
Figure 3-1 Personalize Menu
3-2 68P09285A67-D
MAR 2008
Page 25

WiMAX CPEo400 Series User Guide Personalize Menu
Password Tab
The password tab allows you to enable/disable passw ord protection.
The Setup Wizard automatically enables Password Protection. When Password Prot ection is
enabled, users a re prompted for and must supply the correct password prior to gaining access
the CPE.
Table 3-1 Password Fields
Field or Button Description
Enable Login Password Protection Checking this box will require login
password protection. Password will always
be motorola.
Device Time Tab
The Device Time tab allows you to establish the time zone for your location. It also allows you
to automatically adjust for Daylight Savings Time if applicable. Be sure to click the Apply
button when finished
Table 3-2 Device Time Fields
Current Local Time Shows the current local date and time
Time Zone
Auto Adjust for Daylight Savings Time Check this box if your location observes
Device Name Tab
The Device Name tab allows you to re-name your CPE device. This is the D evice Name you
enter on an internet browser address bar to access your CPE device. For example, during the
setup process you typed http://mywimax.. “mywimax.” is the device name. If you change
the Device Name, subsequent logins would require you to type in the new Device Name. Be
sure to click the Apply button when finished.
Table 3-3 Device Name Fields
New Device Name
Field or Button Description
Select your local time zone from the drop
down box
Daylight Savings Time (default is checked).
Field or Button Description
Enter the new name for the CPE device.
Maximum 20 characters.
68P09285A67-D 3-3
MAR 2008
Page 26

Internet Menu Chapter 3: Basic Configuration
Restore Factory Settings Tab
TheRestoreFactorySettingsTabwillresetyourCPE to the manufacturer’s default settings. Be
sure to click the Apply button when finished .
CAUTION
Only perform a Restore Factory S ettings tab under the guidance of your service
provider.
Table 3-4 Restore Factory Settings Fields
Field or Button Description
Restore Factory Settings
Checking this box will restore the CPE to
factory default settings. The device will
restart when you click Apply.
Internet Menu
The Internet menu provides the following tabs:
• WiMAX Security
• Internet Protocol
• Firewall
• Dynamic DNS
3-4 68P09285A67-D
MAR 2008
Page 27

WiMAX CPEo400 Series User Guide Internet Menu
Figure 3-2 CPE Internet Menu
WiMAX Security Tab
The WiMAX Security tab will contain your authentication method. Check with your service
provider to determine if they r equire a user name and password for authentication purposes. Be
sure to click the Apply button when finished.
Table 3-5 WiMAX Security Fields
Authentication Method Drop down box allows you to select either
User Name (EAP-TTLS/MS-CHAPv2 only) Enter the User Name supplied by your
Password (EAP-TTLS/MS-CHAPv2 only) EnterthePasswordsuppliedbyyourservice
Password Confirmation
(EAP-TTLS/MS-CHAPv2 only)
Realm Enter the Realm as supplied by your service
Field or Button Description
EAP-TLS (default) or EAP-TTLS/MS-CHAPv2
service provider.
provider.
Re-enter the Password supplied by your
service provider.
provider.
68P09285A67-D 3-5
MAR 2008
Page 28

Internet Menu Chapter 3: Basic Configuration
Internet Protocol Tab
CAUTION
Please check with your service provider for these settings. If you are unsure of the
settings, leave the default values set and click the Apply button. If your service
provider has instructed you to change any of these settings, be sure to click the Apply
button when you are finished.
Firewall Tab
A firewall helps to protect your home network from unauthorized access. It will also help to
manage authorized access from the Internet to your CPE. Be sure to click the Apply button
when finished.
Table 3-6 Firewall Fields
Field or Button Description
Enable Firewall Check this box to enable the firewall for
your home network.
Enable Web Login from Internet Check thisboxtoenablesyoutoaccessyour
CPE device from a network other than your
own.
Web Login Port from Internet This is a non-editable field.
Enable ping from Internet Enables the CPE to respond to a ping from
the Internet. This option would be enabled
to allow testing only. Do not leave this
enabled.
Dynamic DNS Tab
Dynamic Domain Name Service (DDNS) allows a user with a non-static IP address to keep their
domain name associated with an ever changing IP address. As an example, DDNS is used when
you are hosting your own website. Be sure to click the Apply button when finished.
Table 3-7 Dynamic DNS Fields
Field or Button Description
Enable DDNS Check this box to Enable DDNS (default is
unchecked)
DDNS Service Provider Select DDNS Service Provider that you
belong to from the drop down box.
DDNS User Name
3-6 68P09285A67-D
Only valid if Enable DDNS is checked. Enter
your DDNS account user name.
Continued
MAR 2008
Page 29

WiMAX CPEo400 Series User Guide Status Menu
Table 3-7 Dynamic DNS Fields (Continued)
Field or Button Description
DDNS Password Only valid if Enable DDNS is checked. Enter
your DDNS account password.
DDNS Host Name
Status Menu
Use the status window to check the status of your WiMAX wireless broadband internet
connection.
Figure 3-3 CPE Status Menu
Only valid if Enable DDNS is checked. Enter
the DDNS Host Name. This is assigned by
the DDNS service.
This completes the Basic Configuration information for your CPEo400 unit. The rest of the
manual contains Advanced User information for use in conjunction with your Service Provider’s
support.
68P09285A67-D 3-7
MAR 2008
Page 30

Status Menu Chapter 3: Basic Configuration
3-8 68P09285A67-D
MAR 2008
Page 31

Chapter
4
Advanced Configuration
■■■■■■■■■■■■■■■■■■■■■■■■■ ■■■■■■■■■■■■■■■■■■■■■■■■■■ ■■■■■■■■■■■
■
■
■
■
68P09285A67-D 4-1
MAR 2008
Page 32

Advanced Configuration Overview Chapter 4: Advanced Configuration
Advanced Configuration Overview
■■■■■■■■■■■■■■■■■■■■■■■■■■ ■■■■■■■■■■■■■■■■■■■■■■■■■ ■■■■■■■■■■■
■
■
The Advanced Configuration section describes the following advanced menus:
• Port Forwarding
• Local Address
• Control Panel
NOTE
Contact your service provider for support with this functions.
Port Forwarding Menu
Port forwarding enables you to direct incoming traffictospecificLANhosts(computersonyour
network) based on the protocol and port number. The port forwarding menu provides the
following tabs:
• Basic
• Forwarding
Figure 4-1 CPE Port Forwarding Menu New
4-2 68P09285A67-D
MAR 2008
Page 33

WiMAX CPEo400 Series User Guide Local Address Menu
Basic Tab
Be sure to click the Apply butto n when finished.
Table 4-1 Port Forwarding Basic Fields
Field or Button Description
Enable UPnP IGD Enables Universal Plug and Play (UPnP)
Internet Gateway Device (IGD ) profile to
allow certain Windows applications to setup
the port forwarding rule dynamically when
NAT is enabled on this device.
DMZ (De-Militarized Zone) IP Address Enter the DMZ IP Address
Forwarding Screen
Click on the ADD button to create additional Port Forwarding rules. Be sure to click the Apply
button when finished.
Table 4-2 Port Forwarding Forwarding Screen Fields
Field or Button Description
Select Select a box when you want to delete the
Protocol Select TCP (Transmission Control Protocol)
WAN Port Start
WAN Port End Enter the ending port range for external
LAN IP Address Enter the IP address to host the service.
LAN Port Start
LAN Port End Enter the ending port range for internal
Enabled Check to enable specificportforwarding.
Local Address Menu
The Local Address menu allows you to configure your Local Area Ne twork (LAN) connections.
The Local Address menu provides the following tabs:
specificrow.
or UDP (User Datagram Protocol).
Enter t he beginning port range for external
network access.
network access.
Enter the beginning port range for internal
network access.
network access.
• DHCP Server
• Lease Status
• Lease Reservation
68P09285A67-D 4-3
MAR 2008
Page 34

Local Address Menu Chapter 4: Advanced Configuration
Figure 4-2 CPE Local Address Menu
DHCP Server Tab
The DH CP Serve r Tab enables Dynamic Host Configuration Protocol (DH C P) server functionality
on t he LAN, allowing the CPE to dynamically assign lease IP addresses to clients that connect to
it fro m the local network. Be sure to click the Apply button when finished making any changes
Table 4-3 DHCP Server Fields
Enable DHCP Server If selected, the DHCP server on the gateway
DHCP Server IP Address Enter the port forwarding LAN Client IP
DHCP Starting IP Address Sets the first IP address assigned by the
Field or Button Description
assignsIPaddressestothecomputersand
other hosts on your network if they have
DHCP enabled. By default, the gateway
server is enabled. If there is another DHCP
server running on your network (on another
router), you must disable one of the DHCP
servers.
Address.
DHCP server, in dotted-decimal format. It
must be greater than the IP address value of
the gateway. For example, if the IP address
of the gateway is 192.168 .15.1 (default), the
starting IP address must be 192.168.15.2
(or higher)
Continued
4-4 68P09285A67-D
MAR 2008
Page 35

WiMAX CPEo400 Series User Guide Local Address Menu
Table 4-3 DHCP Server Fields (Continued)
Field or Button Description
DHCP Ending IP Address Sets the final IP address assigned by the
DHCP server. If the DHCP server runs out
of DHCP addresses, users cannot access
network resources. If this happens, increase
the Ending IP or reduce the Lease Time.
DHCP Lease Time
Sets the time, in seconds, that a network
computer remains connected to the gateway
using its current assigned IP address. At the
end of this time, the DHCP server renews
the lease or assigns the computer a new
IP address. The default is 3600 seconds (1
hour). The maximum is 999999 seconds
(approx. 278 hours).
Lease Status Tab
The Lease Status tab in the Local Address menu displays the active DHCP leases since the last
reboot.BesuretoclicktheApply button when finished making any changes.
Table 4-4 Lease Status Fields
Field or Button Description
Client Host Name Displays the client host name. The Name
MAC Address Media A ccess Control (MAC) address.
IP Address Shows the IP Address for each active lease.
Remaining Lease Duration
Lease Reservation Tab
Theleasereservationtabmanagestheleasereservationstoensurethesameclientgetsthesame
IP address every time. Be sure to click the Apply button when finished making any changes
Table 4-5 Lease Reservation Fields
Field or Button Description
Select Select this box if you want to delete an
field is limited to 20 characters (only 5
appear in display)
Shows the amount of time, in seconds,
remaining in the lease. When the Remaining
Lease Duration reaches 0, a new IP address
will automatically be assigned.
established lease reservation. Be sure to
click t he Delete button once you have
selected your exception to be deleted.
Continued
68P09285A67-D 4-5
MAR 2008
Page 36

Control Panel Menu Chapter 4: Advanced Configuration
Table 4-5 Lease Reservation Fields (Continued)
Field or Button Description
Client Host Name Enter the client host name. The Name field
is limited to 20 characters (only 5 appear
in display)
MAC Address Media Access Control (MAC) address. Enter
the MAC address of the device.
IP Address Enter the IP address that you want assigned
to the MAC Address.
Enabled Checking this box enables the lease
reservation.
Control Panel Menu
The Control Panel sections allows you to view/update your software information. The Control
Panel men u provides access to the following tabs:
• Software
• Certificate
• System
• About
Figure 4-3 CPE Control Panel Menu
4-6 68P09285A67-D
MAR 2008
Page 37

WiMAX CPEo400 Series User Guide Control Panel Menu
Software Tab
TheSoftwareTabmanagesthesoftwareonyourCPE device. It is also where you can upgrade
device software.
CAUTION
Do not upg rade or remove software without first contacting your service provider.
Table 4-6 Software Tab Fields
Field or Button Description
Browse
Upgrade Click this button once you have located the
View
Install Click this button once you have selected an
Uninstall Select the software package you would like
Usethisbuttontobrowseyourcomputerfor
additional software packages.
software package/update you would like to
add to your device.
Use this button to view any available
software packages.
available software package that you would
like installed.
removed and select this button.
Certificate Tab
The certificate tab is where you manage the certificates that are stored on the device.
Use the BROWSE button to locate the certificate file on your computer, and then click the
IMPORT button. Use the REMOVE button to remove any selected certificate(s).
System Tab
This tab allows you to manage additional features of your CPE device. Be sure to click the Apply
button when finished making any changes
Table 4-7 System Tab Fields
Language Used in User Interface Select the desired language for the user
Enable WiMAX Radio Interface Check this box to enable the WiMAX Radio
Field or Button Description
interface. The default language is English.
Interface. If this box is disabled, the WiMAX
radio will not transmit any signal.
Continued
68P09285A67-D 4-7
MAR 2008
Page 38

Control Panel Menu Chapter 4: Advanced Configuration
Table 4-7 System Tab Fields (Continued)
Field or Button Description
Auto Refresh Interval Enter, in seconds, the interval for status
Auto Refresh. Valid range is 1 second - 9999
seconds.
Re-bootstrap EMS (Element Management
System)
Check this box to reconnect the device with
the EMS.
NOTE
Only perform this function under
the supervision of a Customer
Support Representative.
Enable Buzzer Check this box to enable/disable the buzzer
for the initial set-up and installation of
your CPE device. The default is enabled
(checked).
About Tab
The About Tab will display basic properties of your CPE device such as: Product Name, Model
ID, Hardware Version, Serial Number and the WiMAX MAC Address.
4-8 68P09285A67-D
MAR 2008
Page 39

Chapter
5
Glossary and Troubleshooting
■■■■■■■■■■■■■■■■■■■■■■■■■ ■■■■■■■■■■■■■■■■■■■■■■■■■■ ■■■■■■■■■■■
■
■
■
■
68P09285A67-D 5-1
MAR 2008
Page 40

Glossary of Terms Chapter 5: Glossary and Troubleshooting
Glossary of Terms
■■■■■■■■■■■■■■■■■■■■■■■■■■ ■■■■■■■■■■■■■■■■■■■■■■■■■ ■■■■■■■■■■■
■
■
Below is a list of acronyms and their definitions.
Glossary
Table 5-1 Glossary Terms
Acronym Definition
CPE Customer Premise Equipment
EMS
IEEE
IP
LOS
MAC
NLOS
VoIP
Wi-Fi
WiMAX
WLAN
Element Management System
Institute of Electrical and Electronic
Engineers
Internet Protocol
Line Of Site
Media Access Control
Non-Line Of Site
Voice Over Internet Protocol
Wireless Fidelity
Worldwide Interoperability for Microwave
Access
Wireless Local Area Network
5-2 68P09285A67-D
MAR 2008
Page 41

WiMAX CPEo400 Series User Guide Basic Troubleshooting Overview
Basic Troubleshooting Overview
■■■■■■■■■■■■■■■■■■■■■■■■■ ■■■■■■■■■■■■■■■■■■■■■■■■■■ ■■■■■■■■■■■
■
■
This section provides basic troubleshooting for your CPEo400 device.
A Computer Cannot Log On to the CPE
Check that the Ethernet cable is properly connected to the CPE unit and the computer.
Cannot Connect to the Internet
Check the Outdoor CPE connection status from the Web Interface, refer to the Connection
Status section to verify the connection status.
If the Outdoor CPE connection is down, and the gateway has not received an IP for 5 to 10
minutes, rerun the setup wizard.
Additional Troubleshooting Support
Please contact your service provider for additional Troubleshooting Support.
68P09285A67-D 5-3
MAR 2008
Page 42

Additional Troubleshooting Support Chapter 5: Glossary and Troubleshooting
5-4 68P09285A67-D
MAR 2008
Page 43

Chapter
6
Configuring TCP/IP and DNS Settings
■■■■■■■■■■■■■■■■■■■■■■■■■ ■■■■■■■■■■■■■■■■■■■■■■■■■■ ■■■■■■■■■■■
■
■
■
■
68P09285A67-D 6-1
MAR 2008
Page 44

Configuring TCP/IP Chapter 6: Configuring TCP/IP and DNS Settings
Configuring TCP/IP
■■■■■■■■■■■■■■■■■■■■■■■■■■ ■■■■■■■■■■■■■■■■■■■■■■■■■ ■■■■■■■■■■■
■
■
Thischapterisneededforsetupprocedures. Refer to for more information regarding this
chapter.
All client computers on your network must be configured for TCP/IP (the protocol that controls
communication among computers). Perform one of:
• Configuring TCP/IP in Windows 2000
• Configuring TCP/IP in Windows XP
NOTE
Follow the instructions in your Macintosh or UNIX user manual.
Configuring TCP/IP in Windows 2000
1. On the Windows Desktop, click Start.
2. Select Settings and then Control Panel from the pop-up menus to display the Control
Panel window:
Figure 6-1 Windows Control Panel
6-2 68P09285A67-D
MAR 2008
Page 45

WiMAX CPEo400 Series User Guide Configuring TCP/IP in Windows 2000
3. Double-click the Network and Dial-up Connections icon to display the Network and
Dial-up Connections window:
Figure 6-2 Network and Dial-up Connections
In the steps that follow, a c onn e ction
displayed on computers with multiple network interfaces. Computers with only one
network interface may only see the label: Local Area Connection.
4. Click Local Area Connection number. The value of number varies from system to system.
The Local Area Connection number Status window is displayed:
number
like 1, 2, 3, etc., is a reference that is
Figure 6-3 Local A rea Connection
5. Click Properties. Information similar to the follow ing window is displayed:
68P09285A67-D 6-3
MAR 2008
Page 46

Configuring TCP/IP in Windows 2000 Chapter 6: Configuring TCP/IP and DNS Settings
Figure 6-4 Properties
6. If Internet Protocol (TCP/IP) is in the list of components, TCP/IP is installed. You can
skip to Step 10
If Internet Protocol (TCP/IP) is not in the list, click Install. The Select Network Component
Type window is displayed:
Figure 6-5 Select Network Connection Type
7. Click Protocol on the Select N etwork Component Type window and click Add.TheSelect
Network Protocol window is displayed:
6-4 68P09285A67-D
MAR 2008
Page 47

WiMAX CPEo400 Series User Guide Configuring TCP/IP in Windows 2000
Figure 6-6 Select Network Protocol
8. Click Internet Protocol (TCP/IP)..
9. Click OK. The Local Area Connection number Properties window is re-displayed.
10. B e sure the box next to Internet Protocol (TCP/I P) is checked.
11. Click Properties. The Internet Protocol (TCP/IP) Properties window is displayed:
Figure 6-7 Internet Protocol (TCP/IP) Properties
12. B e sure Obtain IP address automatically and Obtain DNS server address automatically are
selected.
13. Click OK to accept the T CP /IP settings.
68P09285A67-D 6-5
MAR 2008
Page 48

Configuring TCP/IP in Windows XP Chapter 6: Configuring TCP/IP and DNS Settings
14. Click Close to close the Local Area Connection number Properties window.
15. Click OK when prompted to restart the compu ter and click OK again.
Configuring TCP/IP in Windows XP
1. On the Windows desktop, click Start to display the Start window:
Figure 6-8 Windows XP Start Window
2. Click Control Panel to display the Control Panel window. The display varies, depending on
your Windows XP view options. If the display is a Category view as shown below, continue
with Step 3.Otherwise,skiptoStep 5
Figure 6-9 Control Panel
6-6 68P09285A67-D
MAR 2008
Page 49

WiMAX CPEo400 Series User Guide Configuring TCP/IP in Windows XP
3. Click Network and Internet Connections to display the Network and Internet
Connections window:
Figure 6-10 Network and Internet Connections
4. Click Network Connections.SkiptoStep 6.
5. If a classic view similar to below is displayed, double-click Network Connections to
display the LAN or High-speed Internet connections.
Figure 6-11 Contro l Panel Classic View
6. Right-click the Local Area Connection. If more than one connection is displayed, be sure
toselecttheoneforyournetworkinterface.
68P09285A67-D 6-7
MAR 2008
Page 50

Configuring TCP/IP in Windows XP Chapter 6: Configuring TCP/IP and DNS Settings
Figure 6-12 Network Connections
7. Select Properties from the pop-up menu to display the Local Area Connection Properties
window:
Figure 6-13 Local Area Connection Properties
8. On the Local Area Connection Properties window, select Internet Protocol (TC P/IP)
if it is not selected.
9. Click Properties to display the Internet Protocol (TCP/IP) Properties window:
6-8 68P09285A67-D
MAR 2008
Page 51

WiMAX CPEo400 Series User Guide Configuring TCP/IP in Windows XP
Figure 6-14 Internet Protocol (TCP/IP) Properties
10. B e sure Obtain IP address automatically and Obtain DNS server address automatically are
selected.
11. Click OK to close the TCP/IP Properties window.
12. Click OK to close the TCP/IP Properties window.
Click OK to close the TCP/IP Properties window.
68P09285A67-D 6-9
MAR 2008
Page 52

Configuring TCP/IP in Windows XP Chapter 6: Configuring TCP/IP and DNS Settings
6-10 68P09285A67-D
MAR 2008
Page 53

Chapter
7
Important Safety and Legal Information
■■■■■■■■■■■■■■■■■■■■■■■■■ ■■■■■■■■■■■■■■■■■■■■■■■■■■ ■■■■■■■■■■■
■
■
■
■
68P09285A67-D 7-1
MAR 2008
Page 54

Important Safety Information Chapter 7: Important S afety and Legal Information
Important Safety I nformation
■■■■■■■■■■■■■■■■■■■■■■■■■■ ■■■■■■■■■■■■■■■■■■■■■■■■■ ■■■■■■■■■■■
■
■
Your Motorola WiMAX Wireless Broadband Gateway is designe d and tested to comply with a
number of national and international standards and guidelines (listed below) regarding human
exposure to RF electromagnetic energy.
This Product complies with the following RF energy exposure
standards and guidelines:
• United States Federal Communications Commission, Code of Federal Regulations; 47CFR
part 2 sub-part J
• American National Standards Institute (ANSI)/ Institute of Electrical and Electronic
Engineers (IEEE) C95 1-2005
• Institute of Electrical and Electronic Engineers (IEEE) C95.1-1999 Edition
• International Commission on Non-Ionizing Radiation Protection (ICNIRP) 1998
• Ministry of Health (Canada) Safety Code 6. Limits of Human Exposure to Radio frequency
Electromagnetic Fields in the Frequency Range from 3 kHz to 300 GHz, 1999
• Australian Communications Authority Radioco mmu nica tion s (E lectroma gnetic Radiation -
Human Exposure) Standard, 2003
• ANATEL ANNEX to Resolution No. 303 of July 2, 2002 “Regulation o f Limitation of
Exposure to Electrical, Magnetic, and Electromagnetic Fields in the Radio Frequency
Range Between 9 kHz and 300 GHz” and “Attachment to Resolution #303 from July
2, 2002”
RF Exposure Compliance and Guidelines Operating Instructions
To comply with FCC RF energy exposure requirements, this Gateway transmitter
should be operated at a minimum separation distance of 55 cm from all persons.
For additional information on exposure require ment s or other training information, visit
http://www.motorola.com/rfhealth
FCC Regulatory Information
This device complies with Part 15 of the FCC Rules. Operation is subject to the following two
conditions: (1) this device may not cause harmful interference, and (2) this device must accept
any interference received; including interference that may cause undesired operation.
This equipment has been tested a nd found to comply wit h the limits for a Class B digital device
pursuant to Part 15 of the FCC rules. These limits are designed to provide reasonable protection
against harmful interference in a residential installation. This equipment gene rate s, uses,
and can radiate radio frequ e ncy energy and, if not installed and used in accordance with the
instructions, may cause harmful interference to radio communications.
7-2 68P09285A67-D
MAR 2008
Page 55

WiMAX CPEo400 Series User Guide This Product complies with the following RF energy exposure standards and guidelines:
EU Declaration of Conformity
This device complies with the essential requirements of the R&TTE Directive 1999/5/EC. The
following test methods have been applied in order to prove presumption of co nformity with the
essential requirements of th e R&TTE Directive 1999/5/EC
IEC 60950-1: 2001 ( 1st Edition )
Safety of Information Technology Equipment
EN50385 : (2002-08)
Product standard to demonstrate the compliance of radio base stations and fixed terminal
stations for wireless telecommunication systems with the basic restrictions or the reference
levels related to human exposure to radio frequency electromagnetic fields (110MHz - 40 GHz) General public
EN 301 489-1 V1.6.1: (2005-09)
Electromagnetic co mpat ibility and Radio Spectrum Matters (ERM); ElectroMagnetic
Compatibility (EMC) standard for radio equipment and services; Part 1: Common technical
requirements
EN 301 489-4 V1.3.1: (2002-08)
Electromagnetic compatibility and radio spectrum matters (ERM); Electromagnetic compatibility
(EMC) standard for radio equipment and services; Part 4: Specific conditions for fixed radio
links and ancillary equipment and services
EN 302 326-2 V1.1.1(2006-03)
Fixed Radio Systems; Multipoint Equipment and Antennas; Part 2: Harmonized EN covering
the essential requirements of article 3.2 of the R&TTE Directive for Digital Multipoint Radio
Equipment
EN 302 326-3 V1.1.1(2006-03)
Fixed Radio Systems; Multipoint Equipment and Antennas; Part 3: Harmonized EN covering the
essential requirements of article 3.2 of the R&TTE Directive for Multipoint Radio Antennas
Table 7-1 Compliance Stateme nt
Language
Statement
Česky [Czech]
68P09285A67-D 7-3
[Jméno výrobce] tímto prohlašuje, že
tento [typ zaˇrízení] je ve shodˇese
základními požadavky a dalšími pˇríslušnými
ustanoveními smˇernice 1999/5/ES.
Continued
MAR 2008
Page 56

This Product complies with the following RF energy exposure standards and guidelines: Chapter
7: Important Safety and Legal Information
Table 7-1 Compliance Statement (Continued)
Language
Statement
Dansk [Danish] Undertegnede [fabrikantens navn] erklærer
herved, at følgende udstyr [udstyrets
typebetegnelse] overholder de væsentlige
krav og øvrige relevante krav i direktiv
1999/5/EF.
Deutsch [German]
Hiermit erklärt [Name des Herstellers],
dass sich das Gerät [Gerätetyp] in
Übereinstimmung mit den grundlegenden
Anforderungen und den übrigen
einschlägigen Bestimmungen der Richtlinie
1999/5/EG befindet.
Eesti [Estonian]
Käesolevaga kinnitab [tootja nimi =
name of manufacturer] seadme [seadme
tüüp = type of equipment] vastavust
direktiivi 1999/5/EÜ põhinõuetele ja
nimetatud direktiivist tulenevatele teistele
asjakohastele sätetele.
English Hereby, [name of manufacturer], declares
that this [type of equipment] is in compliance
with the essential requirements and other
relevant provisions of Directive 1999/5/EC.
Español [Spanish]
Por medio de la presente [nombre del
fabricante] declara que el [clase de equipo]
cumple co n los requisitos esenciales y
cualesquiera otras disposiciones aplicables
o exigibles de la Directiva 1999/5/CE.
λληνικ [Greek] [name of manufacturer]
Ω [type of equipment]
Ω Ω
1999/5/ .
Français [French]
Par la présente [nom du fabricant] déclare
que l’appareil [type d’appareil] est conforme
aux exigences essentielles et aux autres
dispositions pertinentes de la directive
1999/5/CE.
Italiano [Italian] Con la presente [nome del costruttore]
dichiara che questo [tipo di apparecchio]
è conforme ai requisiti essenziali ed alle
altre disposizioni pertinenti stabilite dalla
direttiva 1999/5/CE.
Latviski [Latvian]
Ar šo [name of manufa cturer / izgatavotaja
nosaukums] deklare, ka [type of equipment
/ iekartas tips] atbilst Direktivas 1999/5 /EK
butiskajam prasibam un citiem ar to
saistitajiem noteikumiem.
Continued
7-4 68P09285A67-D
MAR 2008
Page 57

WiMAX CPEo400 Series User Guide This Product complies with the following RF energy exposure standards and guidelines:
Table 7-1 Compliance Statement (Continued)
Language
Lietuvi˛u [Lithuanian]
Šiuo [manufacturer name] deklaruoja, kad
Statement
šis [equipment type] atitinka esminius
reikalavimus ir kitas 1999/5/EB Direktyvos
nuostatas.
Nederlands [Dutch] Hierbij verklaart [naam van de fabrikant]
dat het toestel [type van toestel] in
overeenstemming is met de essentiële eisen
en de andere relevante bepalingen van
richtlijn 1999/5/EG.
Malti [Maltese] Hawnhekk, [isem tal-manifattur], j iddikjara
li dan [il-mudel tal-prodott] jikkonforma
mal--hti˙gijiet essenzjali u ma provvedimenti
o-hrajn relevanti li hemm fid-Dirrettiva
1999/5/EC.
Magyar [Hungarian]
Alulírott, [gyártó neve] nyilatkozom, hogy
a [... típus] megfelel a vonatkozó alapvetõ
követelményeknek és az 1999/5/EC irányelv
egyéb elõírásainak.
Polski [Polish]
Niniejszym [nazwa producenta] o´swiadcza,
˙ze [nazwa wyrobu] jest zgodny z
zasadniczymi wymogami oraz pozostałymi
stosownymi postanowieniami Dyrektywy
1999/5/EC.
Português [Portuguese]
[Nome do fabricante] declara que este [tipo
de equipamento] está conforme com os
requisitos essenciais e outras disposições da
Directiva 1999/5/CE.
Slovensko [Slovenian] [Ime proizvajalca] izjavlja, da je ta [tip
opreme] v skladu z bistvenimi zahtevami
in ostalimi relevantnimi določili direktive
1999/5/ES.
Slovensky [Slovak]
[Meno výrobcu] týmto vyhlasuje, že [typ
zariadenia] sp´lˇna základné požiadavky a
všetky príslušné ustanovenia Smernice
1999/5/ES.
Suomi [Finnish] [Valmistaja = manufacturer] vakuuttaa
täten että [type of equipment = laitteen
tyyppimerkintä] tyyppinen laite on
direktiivin 1999/5/EY oleellisten vaatimusten
ja sitä koskevien direktiivin muiden ehtojen
mukainen.
Svenska [Swedish]
Härmed intygar [företag] att denna
[utrustningstyp] står I överensstämmelse
med de väsentliga egenskapskrav och övriga
relevanta b estämmelser som framgår av
direktiv 1999/5/EG.
68P09285A67-D 7-5
MAR 2008
Page 58

This Product complies with the following RF energy exposure standards and guidelines: Chapter
7: Important Safety and Legal Information
In compliance with national requirements, a power supply cord with a cross-sectional area of
0.75mm2 minim um for each individual conductor, w ill be provided when the product is sumitted
for national approval.
7-6 68P09285A67-D
MAR 2008
Page 59

WiMAX CPEo400 Series User Guide Caring for the Environment
Caring for the Environment
■■■■■■■■■■■■■■■■■■■■■■■■■ ■■■■■■■■■■■■■■■■■■■■■■■■■■ ■■■■■■■■■■■
■
■
The following information is provided to enable regulatory compliance with the European Union
(EU) Directive 2002/96/EC Waste Electrical and Electronic Equipment (WEEE) when using
Motorola Networks equipment in EU countries.
Disposal of Motorola Equipment in EU Countries
his product is compliant with the requirements of the European Union Restriction of Hazardous
Substances (EU RoHS) directive.
Figure 7-1 EU RoHS
Please do not dispose of Motorola Networks equipm ent in landfill sites.
In the EU, Motorola Networks in conjunction wit h a recycling partner will ensure that equipment
is collected and recycled according to the requirements of EU environmental law.
Disposal of Motorola Networks Equipment in Non EU Countries
In non-EU countries, dispose of Motorola Networks equipment in accordance with national
and regional regulations.
CMM Disclosure
The China Management Methods (CMM) Disclosure Table is intended only to communicate
compliance with China requirements; it is not intended to communicat e compliance with EU
RoHS or any other environmental requirements.
68P09285A67-D 7-7
MAR 2008
Page 60

CMM Disclosure Chapter 7: Important S afety and Legal Information
Figure 7-2 China Management Methods (CMM) D isclosur e Table
7-8 68P09285A67-D
MAR 2008
Page 61

WiMAX CPEo400 Series User Guide Copyrights and Trademarks
Copyrights and Trademarks
■■■■■■■■■■■■■■■■■■■■■■■■■ ■■■■■■■■■■■■■■■■■■■■■■■■■■ ■■■■■■■■■■■
■
■
Notice
While reasonable efforts have been made to assure the accuracy of this document, Motorola, Inc.
assumes no liability resulting from any inaccuracies or omissions in this document, or from use
of the information obtained herein. The information in this document has been carefully checked
and is believed to be entirely reliable. However, no responsibility is assumed for inaccuracies or
omissions. Motorola, Inc. reserves the right to make changes to any products described herein
and reserves the right to revise this document and to make changes from time to time in content
hereof with no obligation to notify any person of revisions or changes. Motorola, Inc. does not
assume any liability arising out of the application or use of any product, software, or circuit
described herein; neither does it convey license under its patent rights or the rights of others.
It is possible that this publication may contain r eferences to, or information about Motorola
products (machines and programs), programming, or services that are not announced in your
country. Such references or information must not be construed to mean that Motorola intends
to announce such Motorola products, programming, or services in your country.
Copyrights
This instruction manual, and the Motorola products described in this instruction manual may
be, include or describe copyrighted Motorola material, such as computer programs stored in
semiconductor memories or other media. Laws in the United States and other countries preserve
for Motorola and its licensors certain exclusive rights for copyrighted material, including the
exclusive right to copy, reproduce in any form, distribute and make derivative w orks of the
copyrighted material. Accordingly, any copyrighted material of Motorola and its licensors
contained herein or in the Motorola products described in this instruction manual may not be
copied, reproduced, distributed, merged or modified in any manner without the express written
permission of Motorola. Furthermore, the purchase of Motorola products shall not be deemed to
grant either d irect ly or by implication, estoppel, or otherwise, any license under the copyrights,
patents or patent applications of Motorola, as arises by operation of law in the sale of a product.
Usage Disclosure Restrictions
License Agreements
The software described in this document is the property of Motorola, Inc and its licensors. It
is furnished by express license agreement o nly and may be used only in accordance with the
termsofsuchanagreement.
68P09285A67-D 7-9
MAR 2008
Page 62

UsageDisclosureRestrictions Chapter7:Important Safety and Legal Information
Copyrighted Materials
Software and documentation are copyrighted materials. Making unauthorized copies is
prohibited by law. No part of the software or documentation may be reproduced, transmitted,
transcribed, stored in a retrieval system, or translated into any language or computer language,
in any form or by any means, without prior written permission of Motorola, Inc.
High Risk Materials
Components, units, or third-party products used in the product described herein are NOT
fault-tolerant and are NOT designed, manufactured, or intended for use as on-line control
equipment in t he following hazardous environments requiring fail-safe controls: the operation
of Nuclear Facilities, A ircra ft Navigation or Aircraft Communication Systems, Air Traffic
Control, Life Support, or Weapons Systems (High Risk Activities). Motorola and its supplier(s)
specifically disclaim any expressed or implied warra nt y of fitness for such High Risk Activities.
Trademarks
MOTOROLA and the Stylized M Logo are registered in the US Patent & Trademark Office. All
other product or service names are the property of their respective owners.
© Motorola, Inc., 2007
7-10 68P09285A67-D
MAR 2008
Page 63

motorola.com
68P09285A67-D
68P09285A67-D
MOTOROLA and the Stylized M Logo are registered in the US Patent & Trademark
Office. All other product or service names are the property of their respective owners.
© Motorola, Inc., 2008.
 Loading...