

Page 1

Nokia Display Car Kit CK-600
User and Installation Guide
9211132
Issue 2.1 EN
-US
Page 2

DECLARATION OF CONFORMITY
Hereby, NOKIA CORPORATION declares that this HF-23 product is in compliance with the
essential requirements and other relevant provisions of Directive 1999/5/EC. The product is
in conformity with the limits defined in Directive 2004/104/EC (amending Directive 72/245/
EEC), Annex I, paragraph 6.5, 6.6, 6.8 and 6.9. A copy of the Declaration of Conformity can be
found at http://www.nokia.com/phones/declaration_of_conformity/.
© 2008 Nokia. All rights reserved.
Nokia, Nokia Connecting People, Navi and the Nokia Original Accessories logo are
trademarks or registered trademarks of Nokia Corporation. Other product and company
names mentioned herein may be trademarks or tradenames of their respective owners.
Bluetooth is a registered trademark of Bluetooth SIG, Inc.
Reproduction, transfer, distribution, or storage of part or all of the contents of this document
in any form without the prior written permission of Nokia is prohibited.
Nokia operates a policy of ongoing development. Nokia reserves the right to make changes
and improvements to any of the products described in this document without prior notice.
To the maximum extent permitted by applicable law, under no circumstances shall Nokia be
responsible for any loss of data or income or any special, incidental, consequential or indirect
damages howsoever caused.
The contents of this document are provided “as is”. Except as required by applicable law, no
warranties of any kind, either express or implied, including, but not limited to, the implied
warranties of merchantability and fitness for a particular purpose, are made in relation to the
accuracy, reliability or contents of this document. Nokia reserves the right to revise this
document or withdraw it at any time without prior notice.
The availability of particular products may vary by region. Please check with your Nokia
dealer for details.
Export controls
This device may contain commodities, technology or software subject to export laws and
regulations from the US and other countries. Diversion contrary to law is prohibited.
Issue 2.1 EN-US
2
Page 3

Contents
Contents ................................... 3
For your safety......................... 5
Quick start................................ 6
First time setup...................................... 6
Input device ............................................ 6
1. Introduction ......................... 9
About this document............................ 9
Bluetooth wireless technology........ 10
2. Get started.......................... 11
Parts ........................................................ 11
Input device CU-10............................. 12
Display and standby mode................ 12
Rotate the display............................ 12
Store the display in the pouch ..... 13
Information shown in the
standby mode.................................... 13
Navigate the menus............................ 13
Switch the car kit on or off.............. 14
Switch on ........................................... 14
Switch off........................................... 14
First time use........................................ 15
Pair and connect the car kit............. 15
Pair and connect with phone
or music player................................. 16
Connect the car kit manually ....... 17
Connect the car kit
automatically.................................... 17
Disconnect the car kit..................... 17
Manage or clear the list of
paired devices ................................... 17
3. Calls .................................... 18
Make a call............................................ 18
Answer a call ........................................ 18
Adjust call volume............................... 19
Mute or unmute the microphone ... 19
Call register........................................... 19
Speed dialling....................................... 19
Switch a call between car kit
and connected device........................ 20
Send DTMF tones................................. 20
4. Music player ....................... 21
Listen to music..................................... 21
Adjust music volume.......................... 22
Music player settings......................... 22
5. Contacts.............................. 23
Search for a contact........................... 23
Speed dials ............................................ 23
Copy contacts to car kit.................... 24
6. Settings............................... 25
Bluetooth settings............................... 25
User and installation settings.......... 25
Audio settings................................... 25
Display settings................................ 26
General settings............................... 26
Installation settings........................ 27
7. Troubleshooting.................. 28
Reset the car kit................................... 28
Connection issues................................ 28
Audio issues .......................................... 29
Other issues........................................... 30
8. Installation.......................... 31
Safety information.............................. 31
Integration with a car radio
system..................................................... 32
Use the ISO cable CA-152............. 33
Use the power cable CA-153P ..... 36
Install the car kit in a vehicle.......... 38
Hands-free unit HF-23................... 39
Input device CU-10......................... 40
Display SU-34................................... 40
3
Page 4

Microphone MP-2........................... 43
ISO cable CA-152............................ 43
Motion sensor................................... 44
Optional accessories........................... 44
Mobile holder ................................... 44
External antenna............................. 44
Check the operation of the
car kit ..................................................... 45
Software updates................................ 45
Care and maintenance........... 46
Additional safety
information ............................ 47
FCC/Industry Canada notice.. 48
4
Page 5
For your safety
For your safety
Read these simple guidelines. Not following them may be dangerous or illegal.
Read the complete user and installation guide for further information.
SWITCH ON SAFELY
Do not switch the device on when wireless phone use is prohibited or
when it may cause interference or danger.
ROAD SAFETY COMES FIRST
Obey all local laws. Always keep your hands free to operate the
vehicle while driving. Your first consideration while driving should be
road safety.
INTERFERENCE
All wireless devices may be susceptible to interference, which could
affect performance.
SWITCH OFF IN RESTRICTED AREAS
Follow any restrictions. Switch the device off near fuel, chemicals, or
blasting areas.
QUALIFIED SERVICE
Only qualified personnel may install or repair this product.
ACCESSORIES
Use only approved accessories. Do not connect incompatible
products.
When connecting to any other device, read its user guide for detailed safety
instructions. Do not connect incompatible products.
5
Page 6
Quick start
Quick start
This section briefly describes the basic features of the car kit. For details,
see the respective sections in this guide.
■ First time setup
1. Switch on the car kit (see p. 14) and your mobile phone or music
player.
2. When you are prompted to select a language for the texts on the car
kit display, turn the Navi
and press the wheel.
3. Activate the Bluetooth feature on your phone or music player, and
set up a Bluetooth connection between the car kit and your device.
4. When you are prompted to copy the contacts from your device to the
car kit, turn the Navi wheel to scroll to Yes, and press the wheel to
start the copying. If you select No, you cannot use your saved
contacts to make calls with the car kit.
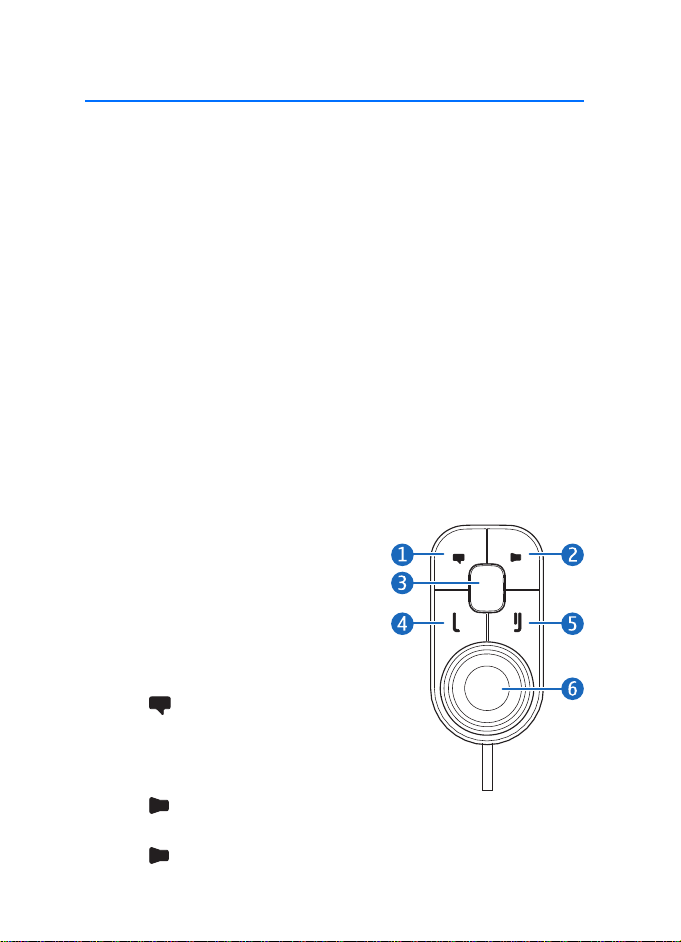
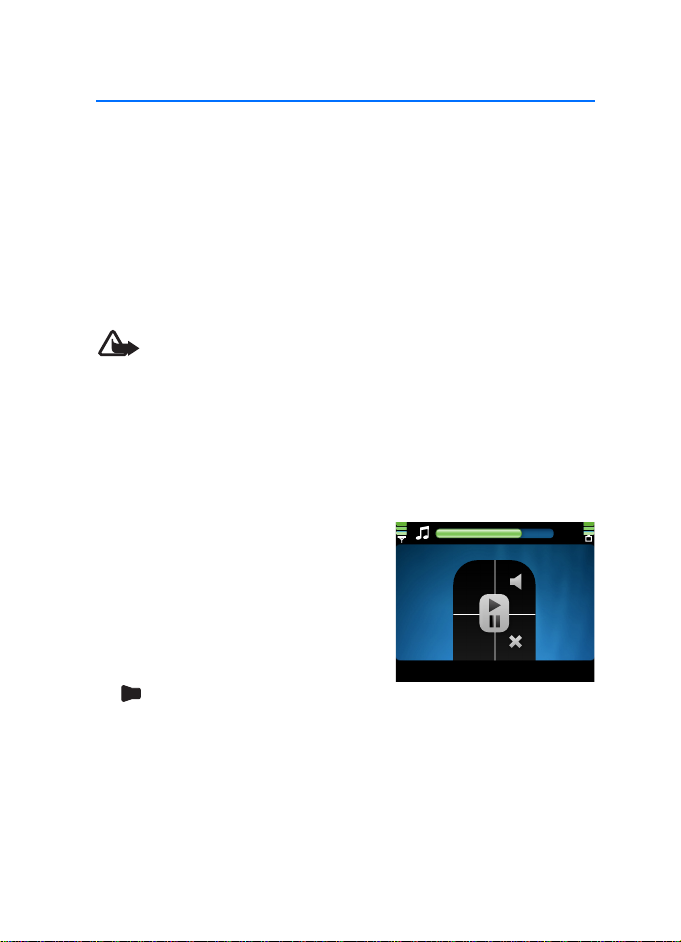
■ Input device
When you use the input device to
operate the music player connected to
the car kit, the available music player
functions are shown on the car kit
display.
1. Voice dialling key
Press to activate voice dialling on
a compatible mobile phone when no
call is in progress.
2. Mute key
Press to mute or unmute the
external loudspeaker in the standby mode.
Press to mute or unmute the microphone during a call.
TM
wheel to scroll to the desired language,
6
Page 7

Quick start
Press and hold for about 2 seconds to switch a call from the car
kit to the compatible device connected to it.
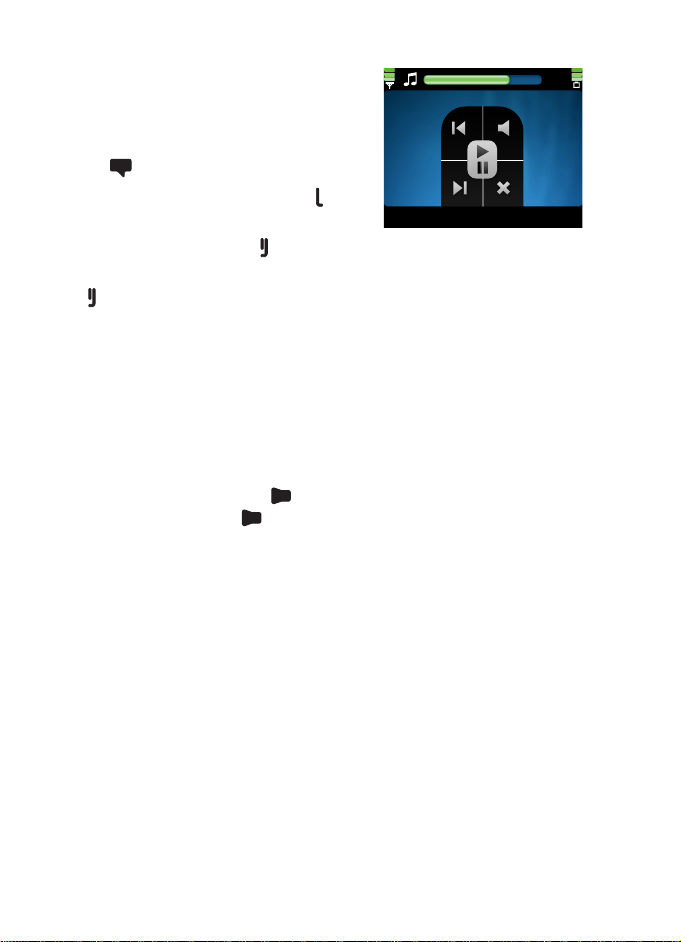
3. Mode key
Press the mode key to switch between the standby mode and the
music player menu.
In the music player menu, press the mode key to start, pause, or
resume music playback on the compatible music player connected to
the car kit.
4. Call key
• Press to make or answer a call or to switch between an active
call and a call on hold.
• Press to view the list of last dialled numbers in the standby
mode.
• Press twice to redial the last dialled number in the standby
mode.
5. End key
• Press to end or reject a call.
• Press to delete a single character when you write text or
numbers.
• Press to return to the previous menu level or display view.
• Press and hold to return to the standby mode from the menu
functions.
• Press and hold to switch the car kit on or off (if the car kit is not
connected to the ignition system).
6. Navi wheel (hereafter referred to as wheel)
• Turn the wheel left or right to adjust the volume during a call or
while listening to music, or to scroll through menu items.
• Turn the wheel left in the standby mode to enter a phone number
or to use speed dialling.
• Turn the wheel right in the standby mode to search for a contact
in Contacts.
7
Page 8

Quick start
• Press the wheel to perform the function shown at the bottom of
the display.
8
Page 9

Introduction
1. Introduction
With the Nokia Display Car Kit CK-600, you can conveniently make and
answer calls hands-free and listen to music from your compatible
device.
You can also copy contacts from two compatible devices to the car kit,
which allows two users to use their contacts immediately after their
device is connected to the car kit. The contacts and the menu functions
of the car kit can be accessed with the supplied input device and display.
The car kit can be paired with up to eight Bluetooth devices at a time
and connected to a compatible mobile phone and music player at the
same time.
Read this guide carefully before having the car kit professionally
installed and using it. Also, read the user guide for the device that you
connect to the car kit. It provides important safety and maintenance
information.
Check www.nokia.com/support or your local Nokia website for the latest
guides, additional information, and downloads related to your Nokia
product.
This product may contain small parts. Keep them out of the reach of
small children.
■ About this document
Setup and operation are described in “Get started”, p. 11, “Calls”, p. 18,
“Music player”, p. 21, “Contacts”, p. 23, and “Settings”, p. 25.
Troubleshooting tips can be found in “Troubleshooting”, p. 28.
Installation in a car is described in “Installation”, p. 31. The car kit
should only be installed by a qualified service technician using the
original Nokia parts supplied in the sales package.
9
Page 10

Introduction
■ Bluetooth wireless technology
Bluetooth wireless technology allows you to connect compatible
devices without cables. The car kit and the other device do not need to
be in line of sight, but they should be within 10 metres (33 feet) of each
other. Connections may be subject to interference from obstructions,
such as walls, or other electronic devices.
The car kit is compliant with the Bluetooth Specification 2.0 supporting
the following profiles: the Hands-Free Profile (HFP) 1.5 (to use the car
kit hands free with your mobile device for calling), Phone Book Access
Profile (PBAP) 1.0 (to copy contacts from your mobile device to the car
kit), Advanced Audio Distribution Profile (A2DP) 1.0 (to stream music
from your music player to the car kit), and Audio Video Remote Control
Profile (AVRCP) 1.0 (to operate the connected music player with the
input device). Check with the manufacturers of other devices to
determine their compatibility with this device.
10
Page 11

2. Get started
2
1
3
5
6
7
10
9
8
4
■ Parts
The car kit contains the following parts:
Get started
1. Hands-free unit HF-23
2. ISO cable CA-152 (if supplied in the sales package)
3. Power cable CA-153P (if supplied in the sales package)
4. Microphone MP-2
5. Display SU-34
6. Charging cable CA-134 with a Nokia 2.0 mm plug
7. Input device CU-10 with Navi wheel
8. Loudspeaker SP-3 (if supplied in the sales package)
9. Pouch CP-335 for storing the display when it is not used
11
Page 12
Get started
10.CD that contains this user and installation guide
■ Input device CU-10
You can operate the car kit using the
input device. The device is provided with
the Navi wheel that you can turn or
press.
1. Voice dialling key
2. Mute key
3. Mode key
4. Call key
5. End key
6. Navi wheel (hereafter referred to as
wheel)
The keys are illuminated for easy operation in the dark. For functions
that can be performed with the input device, see “Input device”, p. 6.
■ Display and standby mode
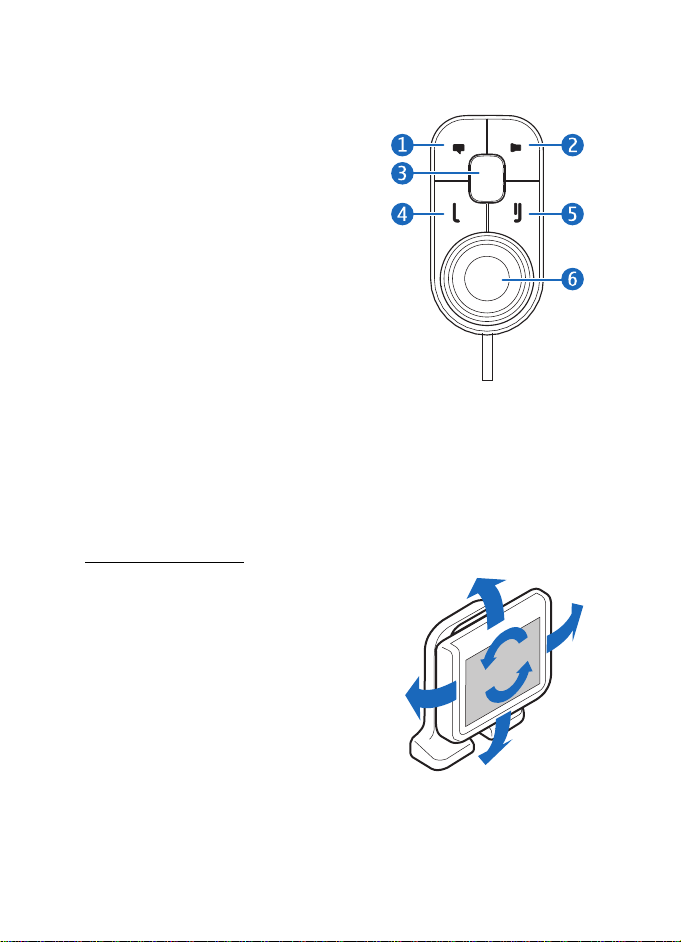
Rotate the display
When the display is attached to the
dashboard using the supplied stand, you
can rotate the display up to about 24
degrees left or right and up to about 20
degrees up or down.
When the display is attached to the
dashboard using the supplied mounting
plate, you can rotate the display up to
about 15 degrees left or right and up to
about 10 degrees up or down.
Do not try to force the display to rotate more.
12
Page 13
Get started
1
2
3
4
5
Store the display in the pouch
When you do not use the display, detach it from the stand or mounting
plate, and put it into the supplied pouch to protect it against scratches.
Information shown in the standby mode
When the car kit is in the standby mode and connected to a compatible
device using Bluetooth wireless technology, the following information is
displayed:
1. Current status of the car kit, for
example, type of the connected
device (compatible mobile phone or
music player)
2. Signal strength of the cellular
network at the current location if
this information is provided by the
connected phone; the higher the
bar, the stronger the signal
3. Name or logo of the service provider if this information is provided by
the connected phone
4. Battery status of the connected phone if this information is provided
by the phone; the higher the bar, the more power left
5. Function that can be performed by pressing the wheel; in the
standby mode, pressing the wheel opens the list of menu functions
To enter a phone number manually or use speed dialling, turn the wheel
left. For details, see “Speed dials”, p. 23.
To search for a contact from Contacts in the car kit, turn the wheel right.
For details, see “Search for a contact”, p. 23.
To view the last dialled numbers, press . For details, see “Call register”,
p. 19.
■ Navigate the menus
Many of the car kit functions are grouped into menus.
13
Page 14

Get started
To open the list of menu functions in the standby mode, press the wheel
when Menu is displayed at the bottom of the display.
To scroll to an item (such as a menu function) or through a list, turn the
wheel left or right. To select an item, scroll to the item, and press the
wheel.
To return to the previous menu level, press . To return to the standby
mode, press and hold until the standby mode screen is displayed.
■ Switch the car kit on or off
If you are not certain whether the ignition sense wire is connected or
not, consult with the technician who installed the car kit.
Switch on
If the ignition sense wire is connected, turn on the car ignition. When
the car kit is switched on, the display and the indicator light of the input
device turn on.
If the ignition sense wire is not connected, press and hold for about 5
seconds. Alternatively, turn on the ignition, start driving, and wait until
the built-in motion sensor switches the car kit on automatically (if the
motion sensor is turned on). When the motion sensor is on, the car kit
switches off after 2 minutes if no phone is connected to the car kit
during this time; to switch the car kit back on, press and hold for
about 5 seconds. To turn the motion sensor on or off, press the wheel in
the standby mode, and select Settings > Installation > Ignition sensor.
After the car kit is switched on, it tries to make a Bluetooth connection
to the phone that was last used with it.
Switch off
If the ignition sense wire is connected, turn off the car ignition. If you
have a call in progress on your phone connected to the car kit, the car kit
switches off after you end the call. When the car kit switches off, the
display and the indicator light of the input device turn off.
14
Page 15

Get started
If the ignition sense wire is not connected, press and hold for about 5
seconds to switch off the car kit. If the ignition sense wire is not
connected and you disconnect your device from the car kit (for example,
to take it with you), the car kit automatically switches off after 2
minutes.
After you turn off the car ignition, do not leave the phone or music
player connected to the car kit to prevent accidental draining of the car
battery. If the phone or music player is left connected to the car kit, the
car kit automatically switches off after 12 hours.
■ First time use
When you switch on the car kit for the first time, you are asked to select
the desired language for the texts on the car kit display. Turn the wheel
to scroll to the desired language, and press the wheel.
After the language selection, you are asked to pair and connect the car
kit with a compatible device using Bluetooth wireless technology. See
also steps 3 to 5 in “Pair and connect the car kit”, p. 15.
When your device is connected to the car kit, you are prompted to copy
the contacts from the device to the car kit. To start the copying, select
Yes. If you select No, you cannot use your saved contacts to make calls
with the car kit. To copy the contacts later, see “Copy contacts to car
kit”, p. 24.
■ Pair and connect the car kit
Before using the car kit, you must associate (pair) and connect it with a
compatible mobile phone or music player that supports Bluetooth
wireless technology. See also “Bluetooth wireless technology”, p. 10.
When you use your device with the car kit, secure the device in the car
using a compatible mobile holder. However, you can maintain the
Bluetooth connection in the car even if you keep your device, for
example, in a handbag.
To charge the battery in your compatible Nokia device while using the
car kit, connect the device to the car kit using the supplied charging
cable.
15
Page 16

Get started
You can pair the car kit with up to eight devices but connect it to only
one device supporting the HFP Bluetooth profile and another device
supporting the A2DP (and possibly AVRCP) profile at a time.
Pair and connect with phone or music player
If your phone supports the HFP and A2DP (and possibly AVRCP)
Bluetooth profiles and has a music player feature, you can use the car
kit to handle calls and play music.
If your phone does not support the A2DP Bluetooth profile, you can
separately pair the car kit with the phone and a music player that
supports this profile.
To pair and connect the car kit with a compatible phone or music player
after the first time use:
1. Switch on the car kit and your phone or music player.
If you want to pair and connect a music player that supports the
A2DP Bluetooth profile, disconnect the car kit from your phone if the
phone supports this profile.
2. Press the wheel in the standby mode, and select Bluetooth > Paired
devices > Pair new device.
3. Activate the Bluetooth feature on your device, and set it to search for
Bluetooth devices. For instructions, see the user guide of your device.
4. Select the car kit (Nokia CK-600) from the list of found devices on
your device, or follow the related instructions in the user guide for
the device.
The Bluetooth passcode 0000 is shown on the car kit display.
5. Enter the Bluetooth passcode 0000 to pair and connect the car kit
with your device. In some devices you may need to make the
connection separately after pairing. See “Connect the car kit
manually”, p. 17, or the user guide of your device.
If your device does not have a keypad, it may use the passcode 0000
by default. If this is not the case, see the user guide of the device to
change the default Bluetooth passcode to 0000.
16
Page 17

Get started
If the pairing is successful and your device is connected to the car kit, a
related message is shown on the car kit display. The car kit also appears
in the menu of your phone or music player where you can view the
currently paired Bluetooth devices.
Connect the car kit manually
To manually connect the car kit to a paired phone or music player when
the car kit is switched on, press the wheel in the standby mode, select
Bluetooth > Connect phone or Connect music player, and select the
device from the list.
Connect the car kit automatically
You may be able to set your phone so that the car kit connects to it
automatically. To activate this feature in a Nokia device, change the
paired device settings in the Bluetooth menu.
When you switch on the car kit, the car kit tries to make a Bluetooth
connection to the last used phone. If this fails, the car kit tries to
connect to the second last used phone.
Disconnect the car kit
To disconnect the car kit from your phone or music player, close the
connection in the Bluetooth menu of your device. Alternatively, press
the wheel in the standby mode, and select Bluetooth > Active devices
and the device you want to disconnect.
Manage or clear the list of paired devices
The car kit saves the pairing information about the last eight Bluetooth
devices that have been paired with it.
To remove a device from the list of paired devices, press the wheel in the
standby mode, and select Bluetooth > Paired devices, the desired device,
and Delete pairing.
To clear the list of paired devices and reset the car kit to the factory
settings, press the wheel in the standby mode, and select Settings >
Restore factory settings.
17
Page 18

Calls
3. Calls
■ Make a call
To enter a phone number, turn the wheel left in the standby mode. Scroll
to the first digit of the phone number, and press the wheel. Select the
other digits of the phone number in the same way. (To delete the most
recent digit, press .) Once the phone number is displayed, press to
call it. To end the call (or cancel the call attempt), press .
To search for a contact from Contacts, see “Search for a contact”, p. 23.
To call the most recently dialled number, press twice. To call one of
the other recently dialled numbers, press , scroll to the desired name
or phone number, and press .
To activate the voice dialling feature on the connected phone, press
when you are not in a call, if your phone supports the use of this feature
with the car kit. Proceed as instructed in the phone user guide. For voice
dialling, you must save voice tags for the desired contacts in your phone.
■ Answer a call
To answer a call, press or the wheel. The caller’s name is displayed if
the cellular network supports this function and you have copied the
caller’s contact information from the connected device to the car kit
(see “Copy contacts to car kit”, p. 24). If you do not answer the call, you
can view the caller’s name (or phone number) by pressing wheel after
the call (see also “Call register”, p. 19).
To reject an incoming call, press .
If you have set the Automatic answer function to On, the car kit
automatically answers the call. See “User and installation settings”,
p. 25.
To put a call on hold, press the wheel when Call options is displayed, and
select Hold; to make the call on hold active, select Unhold.
To answer a new call during a call if you have activated the call waiting
feature in your phone, press . The first call is put on hold. To reject the
18
Page 19

Calls
new call, press . To switch between the active call and the call on hold,
press . To end the active call and make the call on hold active, press .
■ Adjust call volume
To adjust the volume during a call or when a call is alerting, turn the
wheel left to decrease the volume or right to increase it. When you
change the volume, the horizontal bar at the top of the display moves
accordingly. The volume is set only for the current call. To set the default
volume for calls, see “Audio settings”, p. 25.
To mute the volume, press in the standby mode or when you receive
a call. To restore the original volume, press .
■ Mute or unmute the microphone
To mute or unmute the microphone during a call, press ; or press the
wheel when Call options is displayed, and select the desired option.
When the microphone is muted, is displayed.
■ Call register
The car kit registers the phone numbers of recent missed, received, and
dialled calls. The car kit registers missed and received calls only if the
cellular network supports these functions, and the device that you have
connected to the car kit is switched on and within the network service
area.
To view the recent calls, press the wheel in the standby mode, and select
Call register and a call type. To view the phone number of the selected
call, press the wheel. To call the phone number, press .
■ Speed dialling
You can assign a contact to one of the speed dialling numbers, 1 - 9. See
“Speed dials”, p. 23.
To use speed dialling, turn the wheel left in the standby mode, and scroll
to the desired speed dialling number. The contact assigned to the speed
dialling number is displayed. To call the contact, press .
19
Page 20

Calls
■ Switch a call between car kit and connected device
To switch a call from the car kit to your compatible phone, press and
hold for about 2 seconds. Some phones may close the Bluetooth
connection until the call ends.
To switch the call back to the car kit, press the wheel when Reconnect is
displayed, or use the relevant function on your device.
■ Send DTMF tones
You can send DTMF tone strings (for example, a password) during a call.
Press the wheel when Call options is displayed, and select Send DTMF.
Scroll to the first digit of the string, and press the wheel. Select the
other digits of the string in the same way. (To delete the most recent
digit, press .) Once the whole string is displayed, press to send it as
DTMF tones.
20
Page 21
Music player
4. Music player
You can use the car kit to listen to music from a compatible music player
(or its memory card) that supports the A2DP (and possibly AVRCP)
Bluetooth profile.
To open the music player menu, press the wheel in the standby mode,
and select Music. Alternatively, press the mode key to switch between
the standby mode and the music player menu. The car kit detects the
Bluetooth profiles supported by the connected music player and shows
the available functions.
Warning: Listen to music at a moderate level. Continuous
exposure to high volume may damage your hearing.
■ Listen to music
To listen to music from your music player through the car kit, ensure
that the player is connected to the car kit and is ready for use, and open
the music player menu. The car kit shows the music player functions
that can be controlled with the input device.
If your music player supports the A2DP
Bluetooth profile, you can do the
following:
• To play or pause the song that you
have selected on the music player,
press the mode key.
• To mute or unmute playback, press
.
21
Page 22
Music player
If your music player supports the AVRCP
Bluetooth profile, you can also do the
following:
• To select the previous song, press
.
• To select the next song, press .
To return to the previous screen without
stopping playback, press .
To exit to the standby mode without stopping playback, press and hold
for about 2 seconds.
If you receive or make a call while listening to music, the music is
paused until you end the call.
■ Adjust music volume
To adjust the volume during music playback, turn the wheel left to
decrease the volume or right to increase it, or set the volume on your car
radio. To set the default volume for music, see “Audio settings”, p. 25.
To mute the volume, press during music playback. To restore the
original volume, press .
■ Music player settings
To adjust the music player settings, open the music player menu, and
press the wheel when Music settings is displayed.
To view or change the music player connected to the car kit, select
Active music player. To change the music player, select the desired
player from the list. See also “Bluetooth settings”, p. 25.
To modify the tone of the music playback, select Equaliser and the
desired option. This setting cannot be changed if you use the car radio
amplifier for music.
To exit from the music settings, select Back.
22
Page 23

Contacts
5. Contacts
You can copy names and phone numbers (contacts) from two
compatible mobile phones to the car kit, and use the contacts for
calling. This is convenient when you use the car kit with two phones
because you can access the contacts immediately while the contacts
saved in the phone are synchronised with the car kit in the background.
The copied contacts are saved in the Contacts menu. For details, see
“Copy contacts to car kit”, p. 24.
■ Search for a contact
The car kit uses predictive search for faster access to the saved contacts.
The search only shows the available characters, and non-available
characters are greyed out.
To search for a contact in the standby mode, turn the wheel right, or
press the wheel, and select Contacts > Search.
To view all the contacts saved in Contacts, press , or select .
To only view contact names that start with certain letters, scroll to the
first letter of the name, and press the wheel. (For more available
characters, select the right arrow.) You can repeat this four times. To
delete the most recent letter, press . To view the list of names that
start with the entered letters, press , or select . To switch back to the
character list, press .
To call the default phone number of the selected contact, scroll to the
desired contact, and press . To call some other phone number of the
contact, press the wheel, scroll to the desired number, and press .
■ Speed dials
Speed dialling is a quick way to call frequently used phone numbers. You
can assign a phone number to the speed dialling numbers, 1 - 9.
Speed dials must be turned on before using speed dialling (see “User and
installation settings”, p. 25).
23
Page 24

Contacts
To set up speed dialling, press the wheel in the standby mode, and select
Contacts > Speed dials.
• To allow or prevent speed dialling, select Activate or Deactivate. If
you deactivate speed dialling, you are prompted to activate it when
you try to use speed dialling.
• To view the contacts assigned to speed dialling numbers, select View,
and scroll through the list. To call the selected contact, press the
wheel.
• To assign a name or phone number to a speed dialling number, select
Assign. To select the name from the contacts list, select the first
letter of the name. The names starting with this letter are shown.
Select the desired name, phone number, and speed dialling number.
• To delete an assigned speed dial, select Delete and the contact that
you want to remove from the speed dial list. The contact is removed
only from the speed dial list, not from Contacts.
■ Copy contacts to car kit
You can copy the contacts saved in the internal memory of two
compatible mobile phones that you connect to the car kit.
To copy the contacts from the connected device, press the wheel in the
standby mode, and select Contacts > Download Contacts > Yes. is
displayed during the copying.
If you make or receive a call while the contacts are copied, the copying
may be stopped. In this case, start the copying again. While the contacts
are being copied, you cannot use the contacts saved in Contacts.
If you connect another device to the car kit, the contacts copied from
the previous device cannot be used. To use the contacts saved in the
new device with the car kit, copy the contacts to the car kit.
Each time you connect your device to the car kit, the contacts saved in
Contacts are updated if the contacts saved in the device have changed.
24
Page 25

Settings
6. Settings
■ Bluetooth settings
To manage Bluetooth connections, press the wheel in the standby mode,
and select Bluetooth.
To view the devices that are currently connected to the car kit, select
Active devices. To disconnect a device from the car kit, select the desired
device. To connect to a paired device when the device list is empty, press
the wheel and select the desired device.
To view the devices that are currently paired with the car kit, select
Paired devices. To pair the car kit with a compatible phone or music
player, select the device and Pair new device. To remove the pairing,
select the device and Delete pairing.
To connect the car kit with a paired phone or music player, select
Connect phone or Connect music player, and select the device from the
list. See also “Pair and connect the car kit”, p. 15.
■ User and installation settings
You can save different user and installation settings for up to eight
paired devices.
Audio settings
To adjust the audio settings, press the wheel in the standby mode, and
select Settings > Audio.
To set the default volume for phone calls, select Handsfree volume, turn
the wheel left to decrease or right to increase the volume, and press the
wheel. See also “Adjust call volume”, p. 19.
To set the default volume for the music player, select Music volume, turn
the wheel left to decrease or right to increase the volume, and press the
wheel.
To define when the car radio is muted, select Phone sounds and the
desired option. If you select Calls only, the car radio is muted only when
25
Page 26

Settings
you receive a call. If you select Always on, the car radio is muted when
the connected device produces any sound, for example, a text message
tone.
To turn the warning tones of the car kit on or off, select Warning tones
and the desired option.
Display settings
To adjust the display settings, press the wheel in the standby mode, and
select Settings > Display.
To turn the night mode on or off, select Night mode and the desired
option. If you select On, the display backlight is dimmer.
To set the direction of the menu rotation when you turn the wheel,
select Menu rotation and the desired option. If you select Clockwise, the
menu is rotated to the same direction to which you turn the wheel.
To change the colour of the display, such as the background and the
signal strength bar, select Colour themes and the desired colour theme.
To adjust the brightness of the display, select Brightness and the desired
brightness level.
To set the time after which the display backlight turns off in the standby
mode, select Auto dimming and the desired time. If you select Off, the
backlight remains always on when the car kit is switched on.
General settings
To adjust the general settings, press the wheel in the standby mode, and
select Settings > General.
To select whether the contacts saved in Contacts are sorted by first or
last name, select Sort order and the desired option.
To turn speed dialling on or off, select Speed dials and the desired
option. If you select On, the phone numbers assigned to the speed
dialling numbers, 1 - 9, can be dialled as described in “Speed dialling”,
p. 19.
To turn automatic answer on or off, select Automatic answer and the
desired option. If you select On, the car kit automatically answers an
26
Page 27

Settings
incoming call. To set the time period after which the call is answered,
see the phone user guide.
To change the car kit language, select Language setting and the desired
language.
To view the software and hardware versions of the product, select
Product info. To scroll through the information, press the wheel
repeatedly.
To reset the car kit to the factory settings, select Restore factory
settings. Alternatively, switch on the car kit, and press and hold the
wheel for about 5 seconds.
Installation settings
The installation settings should only be changed by a qualified service
technician during the installation of the car kit. To adjust the settings,
press the wheel in the standby mode, and select Settings > Installation.
To turn the built-in motion sensor on or off, select Ignition sensor and
the desired option.
To select the appropriate music output, select Music output and the
correct mode according to the car radio setup. For details, see
“Integration with a car radio system”, p. 32.
27
Page 28

Troubleshooting
7. Troubleshooting
■ Reset the car kit
The car kit doesn’t react to my actions. How can I reset it?
Press and hold for about 10 seconds when the car kit is switched on.
The car kit restarts. The reset does not clear the car kit settings.
■ Connection issues
I can’t connect the car kit to my device through a Bluetooth
connection.
• Ensure that the car kit is switched on and paired with your device.
• Check that the Bluetooth feature is activated on your device.
The car kit doesn’t establish a Bluetooth connection to my paired
device when I turn on the ignition or switch on the car kit.
• Check that the Bluetooth feature is activated on your device.
• Ask the technician who installed the car kit to ensure that the
ignition sense wire is properly connected.
• Ensure that your device is set to connect to the car kit automatically
when the car kit is switched on.
My car radio doesn’t have a stereo or auxiliary input.
Ask the technician who installs the car kit to use an adapter that allows
to connect the stereo outputs of the car kit to some other input on the
car radio (such as the CD changer connector) for stereo sound.
I can’t pair my compatible music device with the car kit.
Check that the Bluetooth passcode of the music device is 0000. If this is
not the case, change the passcode to 0000 as instructed in the user
guide of the music device.
28
Page 29

Troubleshooting
■ Audio issues
My voice echoes at the other end of the line.
• Lower the volume of your car speaker. If the car kit is connected to
your car stereo system, decrease the input level, if possible.
• Ensure that the distance between the microphone and speakers is
optimal.
• Ensure that the microphone does not point toward the speaker.
The caller can’t hear my voice during a call.
Ensure that the device is properly connected to the car kit through a
Bluetooth connection.
The audio quality isn’t good or I can’t hear sound.
• If the car kit is connected to the car radio, check that the car radio
volume is set properly.
• If the car kit is connected to the supplied loudspeaker, check that the
car kit volume is set properly.
The car kit doesn’t play sound in stereo.
• Check that the car radio is set to receive audio through the stereo
input.
• Check that you have selected the correct audio source in the car
radio.
• Check that the car radio volume is set properly.
The sound quality of music is similar to a phone call.
If you use the music player feature of your mobile phone, check that the
phone supports the A2DP Bluetooth profile and that no other A2DP
device is connected to the car kit. If your phone supports this profile and
another A2DP device is connected to the car kit, disconnect the other
device from the car kit and connect your phone.
If you use a music device that supports the A2DP Bluetooth profile,
check that no other A2DP device is connected to the car kit.
29
Page 30

Troubleshooting
I can’t hear music played when the mobile phone or music device is
connected to the car kit.
• Check that your phone or music device supports the A2DP Bluetooth
profile and that no other A2DP device (for example, a Bluetooth
adapter using A2DP) is connected to the car kit.
• Check that the phone or music device is properly connected to the
car kit.
• Check that the car kit is properly connected to the stereo input on
your car radio. See “Integration with a car radio system”, p. 32, or
consult with the technician who installed the car kit.
The car radio isn’t muted when I answer a call.
Ask the technician who installed the car kit to ensure that the car radio
mute wire is properly connected.
■ Other issues
The car kit doesn’t switch on when I turn on the car ignition.
Ask the technician who installed the car kit to ensure that the ignition
sense wire is properly connected.
The battery of the mobile phone doesn’t charge when the device is
connected to the car kit.
Check that the mobile phone is connected to the car kit with the
supplied charging cable.
30
Page 31

Installation
8. Installation
■ Safety information
Observe the following safety guidelines when installing the car kit.
• Only a qualified service technician should install or service the car kit
using the approved original Nokia parts supplied in the sales
package. Faulty installation or service may be dangerous and may
invalidate any warranty which may apply to the car kit.
End users should remember that the car kit comprises of complex
technical equipment that requires professional installation using
special tools and expert know-how.
• Instructions given in this guide are general guidelines that apply to
the installation of the car kit in an automobile. However, due to the
wide variety of car types and models available on the market, this
guide cannot consider the individual technical requirements relevant
for any particular vehicle. Contact the vehicle manufacturer for
detailed information about the vehicle in question.
• The car kit is suitable for use only in a vehicle with a 12-V, negative
grounding. Use on other supply voltages or alternative polarity will
damage the equipment.
• Remember that modern automotive systems include onboard
computers where key vehicle parameters are stored. Improper
disconnection of the car battery may cause loss of data,
necessitating extensive effort for reinitialisation of the system. If you
have any concerns, contact your car dealer before any installation
work is done.
• Do not wire the car kit equipment to the high-voltage lines of the
ignition system.
• When installing the parts of the car kit, ensure that none of them
interfere with or hinder the steering or braking systems or other
controls or systems used in the operation of the vehicle (for example,
airbags). Ensure that the car kit and any of its components are not
31
Page 32

Installation
installed where you might come in contact with it in the event of an
accident or collision.
If the display of a mobile device is to be used, ensure that the device
is mounted in a holder and that the device display is clearly visible to
the user.
• Your service technician or dealer may be able to provide you with
information on alternatives for mounting the equipment suitably in
your vehicle without requiring bore holes.
• Do not smoke when working on the car. Ensure that there is no
source of fire or flame nearby.
• Take care not to cause damage to electrical cables, fuel or brake
lines, or safety equipment during installation work.
• RF signals may affect improperly installed or inadequately shielded
electronic systems in motor vehicles such as electronic fuel injection
systems, electronic antiskid (antilock) braking systems, electronic
speed control systems, and airbag systems. If you notice a fault or
change in the operation of such a system, contact your car dealer.
• Ensure that cables are placed so that they will not be subject to
mechanical wear and tear (for example, not laid under car seats or
over sharp edges).
■ Integration with a car radio system
The car kit can be connected to a car radio system in three different
ways. Select the appropriate option according to the parts supplied in
the sales package.
For information about the connectors on the hands-free unit HF-23, see
“Hands-free unit HF-23”, p. 39.
You can connect the car kit to a loudspeaker with an impedance of at
least 2 ohms. The optimal impedance for the car kit is 4 ohms. If the
impedance is over 8 ohms, the output power is significantly lower than
normal.
32
Page 33

Installation
Use the ISO cable CA-152
When you connect the car kit to the car radio system with the ISO cable
CA-152, you can select if the car kit amplifier is used for calls and the
car radio amplifier is used for music, or if the car kit amplifier is used for
both.
Use the car kit amplifier for calls and music
In this setup, the car radio is muted when you make or receive a call or
listen to music from a connected device that supports the A2DP
Bluetooth profile.
The built-in amplifier of the car kit is used for calls and music played on
the A2DP device.
1. To connect the ISO cable to the car radio:
• Unplug the appropriate cables from the car radio, and insert the
ISO cable plug instead. Connect the open ends of the cables to
the car radio speakers.
33
Page 34

Installation
• Connect one of the wires labelled Mute 1, Mute 2, or Mute 3 on
the car radio to the ISO cable. Leave the other mute wires
connected as they are.
• Insert the power cable plug of the ISO cable to the respective
connector on the hands-free unit.
• Check the +12-V power pin and the ignition pin on the car radio
and the respective pins of the ISO cable. If necessary, swap the
pins on the fuses of the ISO cable. Plug the ISO cable to the two
open ISO connectors.
2. Plug the ISO cable to the respective connector on the hands-free
unit.
3. Connect the external input device CU-10 and the microphone
MP-2 to the respective connectors on the hands-free unit.
4. To charge a compatible Nokia mobile phone through the car kit,
connect one end of the supplied charging cable CA-134 to the
hands-free unit and the other end to the 2.0 mm (0.08 inch) charging
connector of the phone.
5. Switch on the car kit, press the wheel in the standby mode, and
select Settings > Audio > Music output > System connector.
Use the car kit amplifier for calls and the car radio amplifier
for music
In this setup, the car radio is muted when you make or receive a call.
34
Page 35

Installation
The amplifier and equaliser of your car radio are used for music played
on a connected device that supports the A2DP profile. The built-in
amplifier of the car kit is used for calls.
1. To connect the ISO cable to the car radio:
• Unplug the appropriate cables from the car radio, and insert the
ISO cable plug instead. Connect the open ends of the cables to
the car radio speakers.
• Connect one of the wires labelled Mute 1, Mute 2, or Mute 3 on
the car radio to the ISO cable. Leave the other mute wires
connected as they are.
• Insert the power cable plug of the ISO cable to the respective
connector on the hands-free unit.
• Check the +12-V power pin and the ignition pin on the car radio
and the respective pins of the ISO cable. If necessary, swap the
35
Page 36

Installation
pins on the fuses of the ISO cable. Plug the ISO cable to the two
open ISO connectors.
2. Plug the ISO cable to the respective connector on the hands-free
unit.
3. Cut the loop indicated with scissors in the figure.
4. Connect the stereo outputs of the hands-free unit to the AUX input
of the car radio. Use an appropriate cable specific to your car radio
(this cable is not supplied with the car kit).
5. Connect the external input device CU-10 and the microphone
MP-2 to the respective connectors on the hands-free unit.
6. To charge a compatible Nokia mobile phone through the car kit,
connect one end of the supplied charging cable CA-134 to the
hands-free unit and the other end to the 2.0 mm (0.08 inch) charging
connector of the phone.
7. Switch on the car kit, press the wheel in the standby mode, and
select Settings > Audio > Music output > Automatic detection.
Use the power cable CA-153P
In this setup, the car radio is muted when you make or receive a call.
36
Page 37

Installation
The loudspeaker SP-3 is used for calls, and the amplifier and equaliser of
your car radio are used for music played on a connected device that
supports the A2DP Bluetooth profile.
1. Connect the respective wires of the power cable CA-153P to the car
battery and ignition sense (if available). Connect the car radio mute
wire (if available) to the car radio.
2. Plug the power cable to the respective connector on the hands-free
unit.
3. Connect the loudspeaker SP-3 to the respective connector on the
hands-free unit.
4. Connect the stereo outputs of the hands-free unit to the AUX input
of the car radio. Use an appropriate cable specific to your car radio
(this cable is not supplied with the car kit).
5. Connect the external input device CU-10 and the microphone
MP-2 to the respective connectors on the hands-free unit.
6. To charge a compatible Nokia mobile phone through the car kit,
connect one end of the supplied charging cable CA-134 to the
hands-free unit and the other end to the 2.0 mm (0.08 inch) charging
connector of the phone.
7. Switch on the car kit, press the wheel in the standby mode, and
select Settings > Audio > Music output > Automatic detection.
Alternatively, if the music is to be played back through an external
37
Page 38

Installation
loudspeaker (such as the SP-3), select Mono speaker instead of
Automatic detection.
Do not use the internal amplifier of the hands-free unit to drive external
loudspeakers to play back music. If you need to replace a fuse on the
CA-153P cable, only use a fuse with a rating of 2 A or less.
■ Install the car kit in a vehicle
This section describes how to install the car kit parts in a vehicle. The
parts are explained in “Parts”, p. 11.
When installing the parts of the car kit, ensure that none of them
interfere with or hinder the steering or braking systems or other controls
or systems used in the operation of the vehicle (for example, airbags). Do
not use screws to install the display if you mount it within the head
impact area. Use the supplied adhesive instead.
Installation of the car kit may cause warning or other alert tones in the
vehicle (such as reversing warning tones or lights left on alerts) to be
muted. For further information, contact the manufacturer of the vehicle
or its representative.
Example of appropriate installation, with the display mounted using the
supplied stand
38
Page 39

Hands-free unit HF-23
1
2
3
4
6
5 7 8 9
The hands-free unit has the following connectors:
1. Connector for input device CU-10
2. Connector for charging cable CA-134 (to charge a compatible Nokia
phone)
3. Connector for the display unit SU-34
4. Mini-USB connector for firmware update
5. Connector for microphone MP-2
6. Stereo outputs (standard RCA connectors) for connection to a car
radio with appropriate line-in ports. The outputs are active only
when you listen to music from a device that supports the A2DP
Bluetooth profile and that is connected to the car kit.
7. Connector for power cable CA-153P
8. Connector for ISO cable CA-152
9. Connector for loudspeaker SP-3
When you install the hands-free unit, ensure that the cables for the
microphone and loudspeaker reach the places where you intend to
mount these parts.
Installation
39
Page 40

Installation
Do not mount the hands-free unit inside a metal housing or on a metal
surface, because this will impair the Bluetooth connection between the
hands-free unit and the Bluetooth device that is connected to the car
kit. For an optimal connection, ensure that the distance between the
hands-free unit and a metal surface is over 4 mm (0.16 inch).
Install the hands-free unit in the car using suitable mounting material
(not supplied in the sales package). Ensure that the hands-free unit
stays securely in place.
Input device CU-10
The input device should be located so that it is within easy reach of the
user. Do not mount the input device within the head impact area.
Ensure that the input device cable reaches to the hands-free unit for
connection. The best location to mount the input device is horizontally
on the console between the driver’s and front passenger's seat so that
the input device keys are toward the front of the vehicle.
To mount the input device:
1. Attach the supplied tape pad to the desired location in the car: peel
off the protective sheet from a side of the pad, and press the pad into
place.
When you peel off the protective sheet, do not touch the adhesive
side with a finger. Ensure that the surface where you attach the pad
is dry and free from dirt and dust.
2. Peel off the protective sheet from the pad on the underside of the
input device and from the other side of the pad attached to the car.
3. Press the pads firmly against each other, and check that the input
device stays securely in place.
Display SU-34
The display should be located so that it is clearly visible for the user and
it can be easily rotated left, right, up, or down.
40
Page 41

Installation
When installing the display, ensure that it does not interfere with or
hinder the steering or braking systems or other controls or systems used
in the operation of the vehicle (for example, airbags).
Ensure that the display cable reaches to the hands-free unit for
connection. Mount the display on the dashboard in the upright position.
When you peel off the protective sheet from the supplied adhesive, do
not touch the adhesive with a finger.
Mount the stand to the dashboard
To use the display with the supplied stand:
1. Peel off the protective sheet from a side of the supplied adhesive,
and attach it to the feet of the stand.
2. Place the display cable between the two feet of the stand, and lock it
in place between the teeth of the feet.
3. Peel off the protective sheet from the other side of the adhesive, and
press the stand firmly to the dashboard.
Ensure that the surface where you attach the stand is dry and free from
dirt and dust.
Mount the plate to the dashboard
To use the display with the supplied mounting plate:
1. Peel off the protective sheet from a side of the adhesive, and attach
it to the plate.
2. Peel off the protective sheet from the other side of the adhesive, and
press the plate firmly to a mounting device (such as a mounting
bracket) that is attached to the dashboard.
When you use screws instead of adhesives to install the plate, do not use
screws if you mount it within the head impact area. To drill the bore
holes, check the markings on the inner side of the plate that show where
the screws can be placed.
Attach the display to the stand or plate
To attach the display to the stand:
1. Press the ball hinge on the stand into the socket on the connector
part of the display cable (1).
41
Page 42

Installation
3
2
1
3
2
1
2. Slide the display onto the connector part (2).
3. Set the display to the appropriate position (3).
To attach the display to the plate:
1. Press the ball hinge on the stand or plate into the socket on the
connector part of the display cable (1).
2. Slide the display onto the connector part (2).
3. Set the display to the appropriate position (3).
If you need to change the mounting, pull the connector part of the
display cable from the ball hinge. To detach the display, pull it from the
connector part.
42
Page 43

Installation
Microphone MP-2
Select the mounting location of the microphone carefully to increase
the quality of voice transmission.
The best place to mount the microphone is close to the rear view mirror.
Mount the microphone so that it points toward the driver’s mouth and
at least 1 metre (3 feet) from the car kit loudspeaker to avoid audio
feedback.
Ensure that the microphone cable reaches to the hands-free unit for
connection.
Mount the microphone so that it is not exposed to air streams from the
vents. Do not place the microphone cable in the heating, ventilation, or
air-conditioning system. Use the supplied double-sided adhesive tape to
fix the microphone to reduce the amount of background noise of the car
that can interfere with your calls.
Insert the microphone plug into the microphone connector on the
hands-free unit, and turn the plug clockwise to lock it firmly. Use of any
other microphone than the supplied microphone may impact the audio
quality.
ISO cable CA-152
If the ISO cable CA-152 is supplied with the car kit, you can use it to
easily connect the car kit to a car radio that has ISO connectors. See
“Integration with a car radio system”, p. 32.
43
Page 44

Installation
Motion sensor
The hands-free unit HF-23 contains a motion sensor that allows the car
kit to automatically switch on when you turn on the ignition and start
driving. The motion sensor works if it is activated and the ignition sense
wire is not connected.
To activate the motion sensor, switch on the car kit, press the wheel in
the standby mode, select Settings > Installation > Ignition sensor > On.
■ Optional accessories
You can extend the features of the car kit with optional accessories.
Consult your dealer or service technician for suitable accessories for the
car kit. Use only approved and compatible accessories.
Mobile holder
To use your mobile device in a car, you can mount a mobile holder
designed for the device. For compatible holders for your device, contact
your dealer.
If the display of a mobile device is to be used, ensure that the device is
mounted in a holder and that the device display is clearly visible to the
user. Ensure that the holder does not interfere with or hinder the
steering or braking systems or other controls or systems used in the
operation of the vehicle (for example, airbags).
For mounting instructions, see the documentation that came with the
mobile holder.
External antenna
The external antenna improves the reception of the mobile phone in a
car. For availability, contact your dealer.
Note: In order to comply with RF exposure guidelines, install the
external antenna so that a minimum distance of 20 centimetres (8
inches) can be maintained between the external antenna and all
persons, with external antenna gain not exceeding 3 dBi.
44
Page 45

Installation
■ Check the operation of the car kit
After the car kit has been installed, check that it is mounted and
working properly. See also “Troubleshooting”, p. 28.
■ Software updates
The firmware of the car kit can be updated from a compatible PC using a
standard USB cable (not supplied with the car kit) that has a USB plug at
one end and a mini-USB plug at the other end. Keep the USB cable
connected while the firmware is being updated. To update the firmware,
you need to download and install an installation program to your PC.
Check www.nokia.com/support or your local Nokia website for the
installation program, the latest firmware version, and additional
information.
45
Page 46

Care and maintenance
Care and maintenance
Your car kit is a product of superior design and craftmanship and should be
treated with care. The following suggestions will help you protect your warranty
coverage.
• Keep the car kit dry. Precipitation, humidity and all types of liquids or
moisture can contain minerals that will corrode electronic circuits.
• Do not use or store the car kit in dusty, dirty areas. Its moving parts and
electronic components can be damaged.
• Do not attempt to open the car kit.
• Do not use harsh chemicals, cleaning solvents, or strong detergents to clean
the car kit parts.
• Do not paint the car kit parts. Paint can clog the moving parts and prevent
proper operation.
If the car kit is not working properly, take the defective part to your nearest
authorised service facility for service.
46
Page 47

Additional safety information
Additional safety information
■ Vehicles
RF signals may affect improperly installed or inadequately shielded electronic
systems in motor vehicles such as electronic fuel injection systems, electronic
antiskid (antilock) braking systems, electronic speed control systems, and air bag
systems. For more information, check with the manufacturer or its representative
of your vehicle or any equipment that has been added.
Faulty installation or service may be dangerous and may invalidate any warranty
that may apply to the device. Check regularly that all wireless device equipment
in your vehicle is mounted and operating properly. Do not store or carry
flammable liquids, gases, or explosive materials in the same compartment as the
device, its parts, or accessories. For vehicles equipped with an air bag, remember
that air bags inflate with great force. Do not place objects, including installed or
portable wireless equipment in the area over the air bag or in the air bag
deployment area. If in-vehicle wireless equipment is improperly installed and the
air bag inflates, serious injury could result.
47
Page 48

FCC/Industry Canada notice
FCC/Industry Canada notice
NOTE: FCC Radiation Exposure Statement: This equipment complies with FCC radiation exposure limits set
forth for an uncontrolled environment. This transmitter must not be co-located or operating in conjunction
with any other antenna or transmitter. NOTE: Changes or modifications not expressly approved by Nokia
could void the user's authority to operate t he equipment.
48
Page 49

Equipo para Auto con pantalla
Nokia CK-600
Manual del usuario y guía de
instalación
9212633
Edición 2.1 ES
-LAM
Page 50

DECLARACIÓN DE CONFORMIDAD
Mediante la presente, NOKIA CORPORATION declara que el producto HF-23 cumple con los
requisitos esenciales y otras disposiciones pertinentes de la Directiva 1999/5/EC. Este producto
cumple con los límites definidos en la Direct iva 2004/104/EC (que modifi ca la Directiva 72/245/
EEC), Anexo I, párrafo 6.5, 6.6, 6.8 y 6.9. Se puede consultar una copia de la Declaración de
Conformidad, en http://www.nokia.com/phones/declaration_of_conformity/ en inglés.
© 2008 Nokia. Todos los derechos reservados.
Nokia, Nokia Connecting People, Navi y el logo de Nokia Original Accessories son marcas
comerciales o marcas registradas de Nokia Corporation. Otros nombres de productos y
compañías aquí mencionados pueden ser marcas comerciales o nombres comerciales de
sus respectivos propietarios.
Bluetooth es una marca registrada de Bluetooth SIG, Inc.
Se prohíbe la duplicación, la transferencia, la distribución o el almacenamiento parcial o
total del contenido de este documento, de cualquier manera, sin el consentimiento previo
por escrito de Nokia.
Nokia cuenta con una política de desarrollo continuo. Nokia se reserva el derecho de
introducir cambios y mejoras en cualquiera de los productos descritos en este documento
sin previo aviso.
Según el máximo alcance permitido por la legislación vigente, en ninguna circunstancia,
Nokia será responsable de las pérdidas de datos o de ganancias ni de los daños especiales,
incidentales, resultantes o indirectos, independientemente de cómo hayan sido causados.
El contenido de este documento se provee “tal como está”. A menos que lo requiera la
legislación vigente, no se otorgará ninguna garantía, sea expresa o implícita, en relación con
la precisión, la confiabilidad o el contenido de este documento, incluidas, con mero carácter
enunciativo, las garantías implícitas de comercialización y de idoneidad para un fin
determinado. Nokia se reserva el derecho de modificar este documento o discontinuar su uso
en cualquier momento sin previo aviso.
La disponibilidad de productos específicos y de aplicaciones y servicios para dichos productos
puede variar de una región a otra. Comuníquese con su distribuidor de Nokia para obtener
información adicional.
Controles de exportación
Este dispositivo puede contener materias primas, tecnología o software sujetos a leyes y
regulaciones de exportación de los Estados Unidos y otros países. Se prohíbe su desvío
contraviniendo las leyes.
Edición 2.1 ES-LAM
2
Page 51

Contenido
Contenido ................................. 3
Seguridad.................................. 5
Inicio rápido ............................. 6
Primera configuración.......................... 6
Dispositivo de entrada......................... 6
1. Introducción......................... 9
Acerca de este documento ................. 9
Tecnología inalámbrica Bluetooth.. 10
2. Inicio................................... 11
Piezas...................................................... 11
Dispositivo de entrada CU-10.......... 12
Pantalla y modo en espera................ 12
Girar la pantalla ............................... 12
Guardar la pantalla en el
estuche................................................ 13
Información que se muestra
en el modo en espera...................... 13
Navegación por los menús................ 14
Encender o apagar el equipo
para auto................................................ 14
Encender............................................. 14
Apagar................................................. 15
Uso por primera vez............................ 15
Vincular y conectar el equipo
para auto................................................ 16
Vincular y conectar con el
teléfono o el reproductor
de música........................................... 16
Conectar manualmente el
equipo para auto.............................. 17
Conectar automáticamente
el equipo para auto......................... 17
Desconectar el equipo para auto. 18
Administrar o borrar la lista
de dispositivos vinculados............. 18
3. Llamadas ............................. 19
Realizar una llamada.......................... 19
Contestar una llamada....................... 19
Ajustar el volumen de la llamada ... 20
Silenciar o activar el micrófono ...... 20
Registro de llamadas.......................... 20
Marcación rápida ................................ 21
Alternar una llamada entre el
equipo para auto y el dispositivo
conectado.............................................. 21
Enviar tonos DTMF.............................. 21
4. Reproductor de música ...... 22
Escuchar música.................................. 22
Ajustar el volumen de la música..... 23
Configuraciones del reproductor
de música............................................... 23
5. Contactos............................ 24
Buscar un contacto............................. 24
Marcación rápida ................................ 25
Copiar contactos al equipo
para auto ............................................... 25
6. Configuraciones.................. 27
Configuraciones Bluetooth............... 27
Configuraciones del usuario y
de instalación....................................... 27
Configuraciones de audio.............. 27
Configuraciones de pantalla......... 28
Configuraciones generales............ 29
Configuraciones de instalación.... 29
7. Solución de problemas....... 30
Reiniciar el equipo para auto........... 30
Problemas de conexión...................... 30
Problemas de audio............................. 31
Otros problemas................................... 32
3
Page 52

8. Instalación.......................... 33
Información de seguridad................. 33
Integración con el sistema de
radio del automóvil............................ 34
Usar el cable ISO CA-152.............. 35
Usar el cable de alimentación
CA-153P............................................. 38
Instalar el equipo para auto en
un vehículo........................................... 39
Unidad manos libres HF-23.......... 41
Dispositivo de entrada CU-10...... 42
Pantalla SU-34................................. 43
Micrófono MP-2.............................. 45
Cable ISO CA-152............................ 46
Sensor de movimiento ................... 46
Accesorios opcionales........................ 46
Soporte móvil ................................... 47
Antena externa ................................ 47
Revisar el funcionamiento del
equipo para auto................................. 47
Actualizaciones de software............ 47
Cuidado y mantenimiento..... 48
Información adicional
de seguridad........................... 49
Aviso de la FCC/Industry
Canada.................................... 50
4
Page 53

Seguridad
Seguridad
Lea estas sencillas indicaciones. Su incumplimiento puede ser peligroso o ilegal.
Lea todo el manual del usuario y la guía de instalación para obtener más
información.
ENCIENDA EL TELÉFONO EN FORMA SEGURA
No encienda el dispositivo donde el uso de teléfonos móviles esté
prohibido o pueda causar interferencia o peligro.
LA SEGURIDAD VIAL ANTE TODO
Obedezca las leyes locales. Mantenga siempre las manos libres para
maniobrar el vehículo mientras conduce. La seguridad vial debe ser
su prioridad cuando conduce.
INTERFERENCIA
Todos los dispositivos móviles pueden ser sensibles a interferencias
que pueden afectar su rendimiento.
APAGUE EL DISPOSITIVO EN ÁREAS RESTRINGIDAS
Respete todas las restricciones existentes. Apague el dispositivo
cuando se encuentre cerca de combustibles, productos químicos o
áreas donde se realizan explosiones.
SERVICIO TÉCNICO CALIFICADO
Sólo personal calificado puede instalar o reparar este producto.
ACCESORIOS
Utilice sólo accesorios aprobados. No conecte productos
incompatibles.
Antes de conectar el teléfono a otro dispositivo, lea el manual del usuario para
ver las instrucciones de seguridad detalladas. No conecte productos
incompatibles.
5
Page 54

Inicio rápido
Inicio rápido
Este sección describe brevemente las funciones básicas del equipo para
auto. Para obtener detalles, consulte las secciones correspondientes de
esta guía.
■ Primera configuración
1. Encienda el equipo para auto (consulte la pág. 14) y el teléfono móvil
o el reproductor de música.
2. Cuando se le solicite seleccionar un idioma para los textos que
aparecen en la pantalla del equipo para auto, gire la rueda NaviTM
para desplazarse al idioma que desea y luego pulse la rueda.
3. Active la función Bluetooth en el teléfono o en el reproductor de
música y configure una conexión Bluetooth entre el equipo para auto
y el dispositivo.
4. Cuando se le solicite copiar los contactos del dispositivo al equipo
para auto, gire la rueda Navi para desplazarse a Sí y pulse la rueda
para iniciar la copia. Si selecciona No, no podrá utilizar los contactos
guardados para realizar llamadas con el equipo para auto.
■ Dispositivo de entrada
Cuando utiliza el dispositivo de entrada
para hacer funcionar el reproductor de
música que está conectado al equipo
para auto, las funciones disponibles del
reproductor de música se muestran en la
pantalla del equipo para auto.
1. Tecla de marcación por voz
Pulse para activar la marcación
por voz en un teléfono móvil
compatible cuando no hay ninguna
llamada en curso.
6
Page 55

Inicio rápido
2. Tecla Silencio
Pulse para silenciar o activar el sonido en el altavoz externo en el
modo en espera.
Pulse para silenciar o activar el micrófono durante una llamada.
Mantenga pulsada cerca de dos segundos para cambiar una
llamada desde el equipo para auto al dispositivo compatible que está
conectado a éste.
3. Tecla de modo
Pulse la tecla de modo para alternar entre el modo en espera y el
menú del reproductor de música.
En el menú del reproductor de música, pulse la tecla de modo para
iniciar, poner en pausa o reanudar la reproducción de música en el
reproductor de música compatible que está conectado al equipo
para auto.
4. Tecla Llamar
• Pulse para realizar o contestar una llamada o para alternar
entre una llamada activa y una llamada en espera.
• En el modo en espera, pulse para ver la lista de los últimos
números marcados.
• En el modo en espera, pulse dos veces para volver a marcar el
último número que marcó.
5. Tecla Finalizar
• Pulse para finalizar o rechazar una llamada.
• Pulse para eliminar un solo carácter cuando escriba texto o
ingrese números.
• Pulse para volver al nivel de menú anterior o a la vista anterior
de la pantalla.
• Mantenga pulsada para volver al modo en espera desde las
funciones del menú.
• Mantenga pulsada para encender o apagar el equipo para auto
(si el equipo para auto no está conectado al sistema de encendido
del auto).
7
Page 56

Inicio rápido
6. Rueda Navi (de aquí en adelante denominada rueda)
• Gire la rueda hacia la izquierda o la derecha para ajustar el
volumen durante una llamada o mientras escucha música, o para
desplazarse a través de los elementos del menú.
• En el modo en espera, gire la rueda hacia la izquierda para
ingresar un número de teléfono o para usar la marcación rápida.
• En el modo en espera, gire la rueda hacia la derecha para buscar
un contacto en Guía.
• Pulse la rueda para realizar la función que se muestra en la parte
inferior de la pantalla.
8
Page 57

Introducción
1. Introducción
Con el Equipo para auto con pantalla CK-600 de Nokia, puede realizar y
responder cómodamente llamadas en la unidad manos libres y escuchar
música en el dispositivo móvil compatible.
También puede copiar contactos desde dos dispositivos compatibles al
equipo para auto, lo que permite que dos usuarios utilicen sus contactos
inmediatamente después de que su dispositivo esté conectado al equipo
para auto. Se puede acceder a los contactos y a las funciones del menú
del equipo para auto con el dispositivo de entrada y la pantalla que se
proporcionan.
El equipo para auto se puede vincular hasta con ocho dispositivos
Bluetooth al mismo tiempo y se puede conectar a un teléfono móvil y
a un reproductor de música compatibles al mismo tiempo.
Lea atentamente esta guía antes de instalar, con la ayuda de un
profesional, y utilizar el equipo para auto. Además, lea el manual del
usuario del dispositivo que va a conectar al equipo para auto. Ofrece
información importante de seguridad y mantenimiento.
Consulte en www.nokia.com/support para Estados Unidos y www.nokialatinoamerica.com/soporte para Latinoamérica, para obtener los
manuales más recientes, información adicional y descargas relacionadas
con su producto Nokia.
Este producto puede contener partes pequeñas. Manténgalas fuera del
alcance de los niños.
■ Acerca de este documento
La configuración y el funcionamiento se describen en “Inicio”, pág. 11,
“Llamadas”, pág. 19, “Reproductor de música”, pág. 22, “Contactos”,
pág. 24 y “Configuraciones”, pág. 27.
Puede encontrar consejos para la solución de problemas en “Solución de
problemas”, pág. 30.
9
Page 58

Introducción
La instalación en un auto se describe en “Instalación”, pág. 33. El equipo
para auto sólo debe ser instalado por un técnico de servicio calificado
que utilice las piezas originales de Nokia que se incluyen en el paquete
de venta.
■ Tecnología inalámbrica Bluetooth
La tecnología inalámbrica Bluetooth le permite conectar dispositivos
compatibles sin utilizar cables. No es necesario que el equipo para auto
y el otro dispositivo estén en línea directa, pero entre ambos dispositivos
debe haber una distancia máxima de 10 metros (33 pies). Las conexiones
pueden sufrir interferencias a causa de obstrucciones, como por
ejemplo, paredes u otros dispositivos electrónicos.
El equipo para auto cumple con la Especificación 2.0 de Bluetooth que
admite los siguientes perfiles: Perfil de manos libres (HFP) 1.5 (para
utilizar el manos libres del equipo para auto con el dispositivo móvil
para las llamadas), Perfil de acceso a directorio (PBAP) 1.0 (para copiar
los contactos desde el dispositivo móvil al equipo para auto), Perfil de
distribución de audio avanzado (A2DP) 1.0 (para transmitir música
desde el reproductor de música al equipo para auto) y Perfil de control
remoto de audio/video (AVRCP) 1.0 (para hacer funcionar el reproductor
de música que está conectado con el dispositivo de entrada). Consulte a
los fabricantes de otros dispositivos para determinar la compatibilidad
entre esos dispositivos y el suyo.
10
Page 59

2. Inicio
2
1
3
5
6
7
10
9
8
4
■ Piezas
El equipo para auto contiene las siguientes piezas:
Inicio
1. Unidad manos libres HF-23
2. Cable ISO CA-152 (si se incluye en el paquete de venta)
3. Cable de alimentación CA-153P (si se incluye en el paquete de venta)
4. Micrófono MP-2
5. Pantalla SU-34
6. Cable de carga CA-134 con enchufe de 2.0 mm de Nokia
7. Dispositivo de entrada CU-10 con rueda Navi
8. Altavoz SP-3 (si se incluye en el paquete de venta)
9. Estuche CP-355 para guardar la pantalla cuando no se utiliza
10. CD que incluye este manual del usuario y la guía de instalación
11
Page 60

Inicio
■ Dispositivo de entrada CU-10
Puede operar el equipo para auto con el
dispositivo de entrada. El dispositivo
incluye la rueda Navi que puede girar o
pulsar.
1. Tecla de marcación por voz
2. Tecla Silencio
3. Tecla de modo
4. Tecla Llamar
5. Tecla Finalizar
6. Rueda Navi (de aquí en adelante denominada rueda)
Las teclas se iluminan para facilitar la operación en la oscuridad. Para
ver las funciones que se pueden realizar con el dispositivo de entrada,
consulte “Dispositivo de entrada”, pág. 6.
■ Pantalla y modo en espera
Girar la pantalla
Cuando la pantalla está puesta en el tablero
de instrumentos con el soporte que se
proporciona, puede girarla hasta cerca de
24 grados hacia la derecha o la izquierda y
hasta cerca de 20 grados hacia arriba o
hacia abajo.
Cuando la pantalla está puesta en el tablero
de instrumentos con la placa de montaje
que se proporciona, puede girarla hasta
cerca de 15 grados hacia la derecha o la
izquierda y hasta cerca de diez grados hacia arriba o hacia abajo.
No trate de forzar la pantalla para que gire más.
12
Page 61

Inicio
1
2
3
4
5
Guardar la pantalla en el estuche
Cuando no utilice la pantalla, sáquela del soporte o de la placa de
montaje y póngala en el estuche que se proporciona para protegerla de
los rayones.
Información que se muestra en el modo en espera
Cuando el equipo para auto está en el modo en espera y está conectado
a un dispositivo compatible con la tecnología inalámbrica Bluetooth,
se muestra la siguiente información:
1. Estado actual del equipo para auto,
por ejemplo, tipo de dispositivo
conectado (teléfono móvil
compatible o reproductor de música)
2. Intensidad de la señal de la red
celular disponible en la ubicación
actual, si el teléfono conectado
proporciona esta información;
mientras más alta sea la barra, más intensa es la señal
3. Nombre o logotipo del proveedor de servicios, si el teléfono
conectado proporciona esta información
4. Estado de la batería del teléfono que está conectado, si el teléfono
proporciona esta información; mientras más alta sea la barra, más
energía queda
5. Función que se puede realizar al pulsar la rueda; en el modo en
espera, cuando pulsa la rueda abre la lista de funciones del menú
Para ingresar manualmente un número de teléfono o para utilizar la
marcación rápida, gire la rueda hacia izquierda. Para obtener más
detalles, consulte “Marcación rápida”, pág. 25.
Para buscar un contacto en la Guía en el equipo para auto, gire la rueda
hacia la derecha. Para obtener más detalles, consulte “Buscar un
contacto”, pág. 24.
Para ver los últimos números marcados, pulse . Para obtener más
detalles, consulte “Registro de llamadas”, pág. 20.
13
Page 62

Inicio
■ Navegación por los menús
Muchas funciones del equipo para auto están agrupadas en menús.
Para abrir una lista de funciones del menú en el modo en espera, pulse la
rueda cuando aparezca Menú en la parte inferior de la pantalla.
Para desplazarse a un elemento (como una función de menú) o por una
lista, gire la rueda hacia la izquierda o la derecha. Para seleccionar un
elemento, desplácese hasta el elemento y pulse la rueda.
Para volver al nivel anterior del menú, pulse . Para volver al modo en
espera, mantenga pulsada hasta que aparezca la pantalla del modo
en espera.
■ Encender o apagar el equipo para auto
Si no está seguro si el cable sensor de encendido está conectado,
consulte con el técnico que instaló el equipo para auto.
Encender
Si el cable sensor de encendido está conectado, encienda el sistema de
arranque del auto. Cuando el equipo para auto está encendido, se
enciende la pantalla y la luz indicadora del dispositivo de entrada.
Si el cable sensor de encendido no está conectado, mantenga pulsada
durante cinco segundos. También puede encender el motor, comenzar a
conducir y esperar a que el sensor de movimiento incorporado encienda
automáticamente el equipo para auto (si el sensor de movimiento está
activado). Cuando el sensor de movimiento está activado, el equipo para
auto se apaga después de dos minutos si no se conecta ningún teléfono
durante este lapso; para volver a encender el equipo para auto,
mantenga pulsada durante cinco segundos. Para activar o desactivar
el sensor de movimiento, pulse la rueda en el modo en espera y
seleccione Ajustes > Instalación > Sensor de encendido.
Después de que se encendió el equipo para auto, éste intenta establecer
una conexión Bluetooth con el último teléfono que utilizó.
14
Page 63

Inicio
Apagar
Si el cable sensor de encendido está conectado, apague el sistema de
arranque del auto. Si tiene una llamada en curso en el teléfono
conectado al equipo para auto, el equipo para auto se apaga después de
que finaliza la llamada. Cuando el equipo para auto se apaga, la pantalla
y la luz indicadora del dispositivo de entrada se apagan.
Si el cable sensor de encendido no está conectado, mantenga pulsada
durante cinco segundos para apagar el equipo para auto. Si el cable
sensor de encendido no está conectado y desconecta el dispositivo del
equipo para auto (por ejemplo, para llevárselo), el equipo para auto se
apaga automáticamente después de dos minutos.
Después de apagar el sistema de arranque del auto, no deje el teléfono
móvil ni el reproductor de música conectado al equipo para auto para
evitar que la batería del auto se descargue accidentalmente. Si el
teléfono móvil o el reproductor de música quedan conectados al equipo
para auto, el equipo para auto se apaga después de 12 horas.
■ Uso por primera vez
Cuando enciende el equipo para auto por primera vez, se le solicita
seleccionar el idioma que desea para los textos que aparecen en la
pantalla del equipo para auto. Gire la rueda para desplazarse hasta el
idioma que desee y púlsela.
Después de seleccionar el idioma, se le solicita vincular y conectar el
equipo para auto con un dispositivo compatible mediante tecnología
inalámbrica Bluetooth. Consulte también los pasos tres a cinco en
“Vincular y conectar el equipo para auto”, pág. 16.
Cuando el dispositivo está conectado al equipo para auto, se le solicita
copiar los contactos desde el dispositivo al equipo para auto. Para iniciar
la copia, seleccione Sí. Si selecciona No, no podrá utilizar los contactos
guardados para realizar llamadas con el equipo para auto. Para copiar
los contactos en otro momento, consulte “Copiar contactos al equipo
para auto”, pág. 25.
15
Page 64

Inicio
■ Vincular y conectar el equipo para auto
Antes de usar el equipo para auto, debe asociarlo (vincular) y conectarlo
a un teléfono móvil o reproductor de música compatible que admita la
tecnología inalámbrica Bluetooth. Consulte también “Tecnología
inalámbrica Bluetooth”, pág. 10.
Cuando utilice el dispositivo con el equipo para auto, asegure el
dispositivo en el auto con un soporte móvil compatible. Sin embargo,
puede mantener la conexión Bluetooth en el auto incluso si deja el
dispositivo, por ejemplo, en un bolso.
Para cargar la batería del dispositivo Nokia compatible mientras usa el
equipo para auto, conecte el dispositivo al equipo para auto con el cable
de carga incluido.
Puede vincular el equipo para auto hasta con ocho dispositivos,
pero sólo puede conectarlo a un dispositivo compatible con el perfil
Bluetooth HFP y a otro dispositivo compatible con el perfil Bluetooth
A2DP (y posiblemente AVRCP) a la vez.
Vincular y conectar con el teléfono o el reproductor de música
Si el teléfono admite los perfiles HFP y A2DP (y posiblemente AVRCP) de
Bluetooth y tiene una función de reproductor de música, puede utilizar
el equipo para auto para administrar llamadas y reproducir música.
Si el teléfono no admite el perfil A2DP de Bluetooth, puede vincular de
manera independiente el equipo para auto con el teléfono y con un
reproductor de música que admita este perfil.
Para vincular y conectar el equipo para auto con un teléfono o un
reproductor de música compatibles después del primer uso:
1. Encienda el equipo para auto y el teléfono o el reproductor de música.
Si desea vincular y conectar un reproductor de música compatible
con el perfil A2DP de Bluetooth, desconecte el equipo para auto del
teléfono si el teléfono admite este perfil.
2. Pulse la rueda en el modo en espera y seleccione Bluetooth >
Dispositivos vinculados > Vincular dispos. nuevo.
16
Page 65

Inicio
3. Active la función Bluetooth en el dispositivo y configúrela para que
busque dispositivos Bluetooth. Para obtener instrucciones, consulte
el manual del usuario del dispositivo.
4. En el dispositivo, seleccione el equipo para auto (Nokia CK-600) en la
lista de dispositivos encontrados o siga las instrucciones
relacionadas del manual del usuario del dispositivo.
El código de acceso de Bluetooth 0000 aparece en la pantalla del
equipo para auto.
5. Para vincular y conectar el equipo para auto al dispositivo, ingrese el
código de acceso Bluetooth 0000. En algunos dispositivos, luego de
realizar la vinculación, puede que deba efectuar la conexión por
separado. Consulte “Conectar manualmente el equipo para auto”,
pág. 17 o el manual del usuario del dispositivo.
Si el dispositivo no tiene teclado, puede que utilice el código de
acceso 0000 de manera predeterminada. Si éste no es el caso,
consulte el manual del usuario del dispositivo para cambiar el código
de acceso Bluetooth predeterminado a 0000.
Si la vinculación es correcta y el dispositivo está conectado al equipo
para auto, en la pantalla del equipo para auto aparece un mensaje
relacionado. El equipo para auto también aparece en el menú del
teléfono o del reproductor de música, donde puede ver los dispositivos
Bluetooth actualmente vinculados.
Conectar manualmente el equipo para auto
Para conectar manualmente el equipo para auto a un teléfono o a un
reproductor de música vinculados cuando el equipo para auto está
encendido, pulse la rueda en el modo en espera y seleccione Bluetooth >
Conectar teléfono o Conectar reprod. música y seleccione el dispositivo
en la lista.
Conectar automáticamente el equipo para auto
Es posible que pueda configurar el teléfono para que el equipo para auto
se conecte automáticamente. Para activar esta función en un
17
Page 66

Inicio
dispositivo Nokia, cambie las configuraciones del dispositivo vinculado
en el menú Bluetooth.
Cuando enciende el equipo para auto, el equipo para auto intenta
realizar una conexión Bluetooth con el último teléfono que utilizó.
Si esto falla, el equipo para auto intenta conectarse al penúltimo
teléfono que utilizó.
Desconectar el equipo para auto
Para desconectar el equipo para auto del teléfono o del reproductor
de música, cierre la conexión en el menú Bluetooth del dispositivo.
Como alternativa, pulse la rueda en el modo en espera y seleccione
Bluetooth > Activar dispositivos y el dispositivo que desea desconectar.
Administrar o borrar la lista de dispositivos vinculados
El equipo para auto guarda la información de vinculación de los últimos
ocho dispositivos Bluetooth que se vincularon.
Para eliminar un dispositivo de la lista de dispositivos vinculados, pulse
la rueda en el modo en espera y seleccione Bluetooth > Dispositivos
vinculados, el dispositivo que desea y Borrar vínculo.
Para borrar la lista de dispositivos vinculados y restablecer el equipo
para auto a las configuraciones de fábrica, pulse la rueda en el modo en
espera y seleccione Ajustes > Rest. ajustes originales.
18
Page 67

Llamadas
3. Llamadas
■ Realizar una llamada
Para ingresar un número de teléfono, gire la rueda hacia la izquierda en
el modo en espera. Desplácese al primer dígito del número de teléfono y
pulse la rueda. Seleccione los otros dígitos del número de teléfono de la
misma forma. (Para eliminar el dígito más reciente, pulse .) Cuando
vea en pantalla el número de teléfono, pulse para llamar a dicho
número. Para finalizar la llamada (o cancelar el intento de llamada),
pulse .
Para buscar un contacto en la Guía, consulte “Buscar un contacto”,
pág. 24.
Para llamar al número que marcó más recientemente, pulse dos veces .
Para llamar a otro de los números que marcó recientemente, pulse ,
desplácese hasta el nombre o número de teléfono que desea y pulse .
Para activar la función de marcación por voz en el teléfono que está
conectado, pulse cuando no tenga llamadas en curso, si el teléfono
admite el uso de esta función con el equipo para auto. Proceda de
acuerdo a las instrucciones del manual del usuario del teléfono. Para la
marcación por voz, debe guardar etiquetas de voz de los contactos que
desea en el teléfono.
■ Contestar una llamada
Para contestar una llamada, pulse o la rueda. El nombre de la persona
que llama se muestra si la red celular admite esta función y si copió la
información de contacto de la persona que llama desde el dispositivo
conectado al equipo para auto (consulte “Copiar contactos al equipo
para auto”, pág. 25). Si no contesta la llamada, puede ver el nombre de
la persona que llama (o el número de teléfono) al pulsar la rueda
después de la llamada (consulte también “Registro de llamadas”,
pág. 20).
Para rechazar una llamada entrante, pulse .
19
Page 68

Llamadas
Si configuró la función Respuesta automática en Activar, el equipo para
auto responde automáticamente la llamada. Consulte “Configuraciones
del usuario y de instalación”, pág. 27.
Para retener una llamada, pulse la rueda cuando aparezca Opciones de
llamada y seleccione Retener; para activar la llamada retenida,
seleccione Activar.
Para responder una llamada mientras tiene otra en curso, si activó
la función de llamada en espera en el teléfono, pulse . La primera
llamada queda retenida. Para rechazar la llamada nueva, pulse . Para
alternar entre la llamada activa y la llamada retenida, pulse . Para
finalizar la llamada activa y dejar activa la llamada retenida, pulse .
■ Ajustar el volumen de la llamada
Para ajustar el volumen durante una llamada o cuando reciba una
notificación de llamada, gire la rueda hacia la izquierda para bajar el
volumen o a la derecha para subirlo. Cuando cambia el volumen, la barra
horizontal que está en la parte superior de la pantalla se mueve en el
sentido correspondiente. El volumen sólo se ajusta para la llamada
actual. Para configurar el volumen predeterminado para las llamadas,
consulte “Configuraciones de audio”, pág. 27.
Para silenciar el volumen, pulse en el modo en espera o cuando
reciba una llamada. Para restaurar el volumen original, pulse .
■ Silenciar o activar el micrófono
Para silenciar o activar el micrófono durante una llamada, pulse
o pulse la rueda cuando aparezca Opciones de llamada y seleccione la
opción que desea. Cuando el micrófono está silenciado, aparece .
■ Registro de llamadas
El equipo para auto registra los números de teléfono de las llamadas
recientes, recibidas y marcadas. El equipo para auto registra las
llamadas perdidas y recibidas sólo si la red celular admite estas
funciones y el dispositivo que conectó al equipo para auto está
encendido y dentro del área de servicio de la red.
20
Page 69

Llamadas
Para ver las llamadas recientes, pulse la rueda en el modo en espera y
seleccione Registro de llamadas y un tipo de llamada. Para ver el número
de teléfono de la llamada que seleccionó, pulse la rueda. Para llamar al
número de teléfono, pulse .
■ Marcación rápida
Puede asignar un contacto a uno de los números de marcación rápida,
del 1 al 9. Consulte “Marcación rápida”, pág. 25.
Para utilizar la marcación rápida, gire la rueda hacia la izquierda en el
modo en espera y desplácese hasta el número de marcación rápida que
desea. Se muestra el contacto asignado al número de marcación rápida.
Para llamar al contacto, pulse .
■ Alternar una llamada entre el equipo para auto
y el dispositivo conectado
Para alternar una llamada entre el equipo para auto y el teléfono
compatible, mantenga pulsada cerca de dos segundos. Algunos
teléfonos pueden interrumpir la conexión Bluetooth hasta que la
llamada finalice.
Para cambiar la llamada de vuelta al equipo para auto, pulse la rueda
cuando aparezca Volver a conectar o utilice la función que corresponda
en el dispositivo.
■ Enviar tonos DTMF
Puede enviar cadenas de tonos DTMF (por ejemplo, una contraseña)
durante una llamada. Pulse la rueda cuando aparezca Opciones de
llamada y seleccione Enviar DTMF.
Desplácese al primer dígito de la cadena y pulse la rueda. Seleccione los
otros dígitos de la cadena de la misma forma. (Para eliminar el dígito
más reciente, pulse .) Cuando aparezca la cadena completa, pulse
para enviarla como tonos DTMF.
21
Page 70

Reproductor de música
4. Reproductor de música
Puede utilizar el equipo para auto desde un reproductor de música
compatible (o de su tarjeta de memoria) que sea compatible con el perfil
A2DP (y posiblemente AVRCP) de Bluetooth.
Para abrir el menú del reproductor de música, pulse la rueda en el modo
de espera y seleccione Música. Como alternativa, pulse la tecla de modo
para alternar entre el modo en espera y el menú del reproductor de
música. El equipo para auto detecta los perfiles de Bluetooth que admite
el reproductor de música que está conectado y muestra las funciones
disponibles.
Advertencia: Escuche música a un volumen moderado.
La exposición prolongada a un nivel de volumen alto puede
perjudicar su capacidad auditiva.
■ Escuchar música
Para escuchar música desde el reproductor de música a través del
equipo para auto, asegúrese de que el reproductor esté conectado al
equipo para auto y de que esté listo para usarlo y abra el menú del
reproductor de música. El equipo para auto muestra las funciones del
reproductor de música que se pueden controlar con el dispositivo
de entrada.
Si el reproductor de música admite el
perfil A2DP de Bluetooth, puede hacer
lo siguiente:
• Para reproducir o poner en pausa la
canción que seleccionó en el
reproductor de música, pulse la tecla
de modo.
• Para silenciar o activar la
reproducción, pulse .
22
Page 71

Reproductor de música
Si el reproductor de música admite el
perfil AVRCP de Bluetooth, además
puede hacer lo siguiente:
• Para seleccionar la canción anterior,
pulse .
• Para seleccionar la próxima canción,
pulse .
Para volver a la pantalla anterior sin
detener la reproducción, pulse .
Para salir al modo en espera sin detener la reproducción, mantenga
pulsada cerca de dos segundos.
Si recibe o realiza una llamada cuando escucha música, ésta queda en
pausa hasta que finalice la llamada.
■ Ajustar el volumen de la música
Para ajustar el volumen durante la reproducción de música, gire la rueda
hacia la izquierda para bajar el volumen o a la derecha para subirlo, o ajuste
el volumen en la radio del auto. Para configurar el volumen predeterminado
para la música, consulte “Configuraciones de audio”, pág. 27.
Para silenciar el volumen, pulse durante la reproducción de música.
Para restaurar el volumen original, pulse .
■ Configuraciones del reproductor de música
Para ajustar las configuraciones del reproductor de música, abra el menú del
reproductor de música y pulse la rueda cuando aparezca Ajustes de música.
Para ver o cambiar el reproductor de música que está conectado al
equipo para auto, seleccione Activar reprod. música. Para cambiar el
reproductor de música, seleccione el reproductor que desea en la lista.
Consulte también “Configuraciones Bluetooth”, pág. 27.
Para modificar el tono de la reproducción de música, seleccione
Ecualizador y la opción que desea. Esta configuración no se puede
cambiar si utiliza el amplificador de la radio del auto para la música.
Para salir de las configuraciones de música, seleccione Atrás.
23
Page 72

Contactos
5. Contactos
Puede copiar nombres y números telefónicos (contactos) desde dos
teléfonos móviles compatibles al equipo para auto y puede utilizar los
contactos para llamar. Esto es cómodo cuando utiliza el equipo para
auto con dos teléfonos, porque puede acceder a los contactos
inmediatamente mientras los contactos del teléfono se sincronizan con
el equipo para auto en el fondo.
Los contactos copiados se guardan en el menú Guía. Para obtener más
detalles, consulte “Copiar contactos al equipo para auto”, pág. 25.
■ Buscar un contacto
El equipo para auto utiliza la búsqueda predictiva para un acceso más
rápido a los contactos guardados. La búsqueda sólo muestra los
caracteres disponibles y los caracteres no disponibles quedan
oscurecidos.
Para buscar un contacto en el modo en espera, gire la rueda hacia la
derecha o púlsela y seleccione Guía > Buscar.
Para ver todos los contactos guardados en Guía, pulse o seleccione
.
Para ver sólo los nombres de contactos que comienzan con una letra,
desplácese hasta la primera letra del nombre y pulse la rueda. (Para ver
más caracteres disponibles, seleccione la flecha a la derecha.) Puede
repetirlo cuatro veces. Para eliminar la letra más reciente, pulse . Para
ver la lista de los nombres que comienzan con las letras que ingresó,
pulse o seleccione . Para volver a la lista de caracteres, pulse .
Para llamar al número de teléfono predeterminado del contacto que
seleccionó, desplácese hasta el contacto que desea y pulse . Para
llamar a algún otro número de teléfono del contacto, pulse la rueda,
desplácese hasta el número que desea y pulse .
24
Page 73

Contactos
■ Marcación rápida
La marcación rápida es una manera rápida de llamar a los números de
teléfono utilizados con más frecuencia. Puede asignar un número de
teléfono a los números de marcación rápida, del 1 al 9.
La marcación rápida debe estar activada para utilizarla (consulte
“Configuraciones del usuario y de instalación”, pág. 27).
Para configurar la marcación rápida, gire la rueda en el modo en espera
y seleccione Guía > Marcaciones rápidas.
• Para permitir o impedir la marcación rápida, seleccione Activar o
Desactivar. Si desactiva la marcación rápida, se le solicita activarla
cuando intenta utilizarla.
• Para ver los contactos que están asignados a los números de
marcación rápida, seleccione Ver y desplácese por la lista. Para
llamar al contacto que seleccionó, pulse la rueda.
• Para asignar un nombre o un número de teléfono a un número de
marcación rápida, seleccione Asignar. Para seleccionar el nombre
desde la lista de contactos, seleccione la primera letra del nombre.
Aparecen los nombres que comienzan con dicha letra. Seleccione el
nombre, número de teléfono o número de marcación rápida que
desea.
• Para eliminar una marcación rápida asignada, seleccione Borrar y
el contacto que desea eliminar de la lista de marcación rápida.
El contacto sólo se elimina de la lista de marcación rápida, no de
la Guía.
■ Copiar contactos al equipo para auto
Puede copiar los contactos guardados en la memoria interna de dos
teléfonos móviles compatibles que conecte al equipo para auto.
Para copiar los contactos desde el dispositivo conectado, pulse la rueda
en el modo en espera y seleccione Guía > Descargar contactos > Sí.
Durante la copia aparece .
Si realiza o recibe o una llamada mientras se copian los contactos, la
copia se puede detener. En este caso, comience nuevamente la copia.
25
Page 74

Contactos
Mientras se copian los contactos, no puede utilizar los contactos que
están guardados en la Guía.
Si conecta otro dispositivo al equipo para auto, no se pueden utilizar los
contactos copiados desde el dispositivo anterior. Para utilizar los
contactos guardados en el nuevo dispositivo con el equipo para auto,
copie los contactos al equipo para auto.
Cada vez que conecta el dispositivo al equipo para auto, los contactos
que están guardados en la Guía se actualizan si los contactos guardados
en el dispositivo cambiaron.
26
Page 75

Configuraciones
6. Configuraciones
■ Configuraciones Bluetooth
Para administrar las conexiones Bluetooth, pulse la rueda en el modo en
espera y seleccione Bluetooth.
Para ver los dispositivos que actualmente están conectados al equipo
para auto, seleccione Activar dispositivos. Para desconectar un
dispositivo del equipo para auto, seleccione el dispositivo que desea.
Para conectarse a un dispositivo vinculado cuando la lista de
dispositivos está vacía, pulse la rueda y seleccione el dispositivo que
desea.
Para ver los dispositivos que actualmente están vinculados con el equipo
para auto, seleccione Dispositivos vinculados. Para vincular el equipo
para auto con un teléfono o un reproductor de música compatibles,
seleccione el dispositivo y Vincular dispos. nuevo. Para eliminar la
vinculación, seleccione el dispositivo y Borrar vínculo.
Para conectar el equipo para auto con un teléfono o reproductor de
música vinculado, seleccione Conectar teléfono o Conectar reprod.
música y seleccione el dispositivo en la lista. Consulte también “Vincular
y conectar el equipo para auto”, pág. 16.
■ Configuraciones del usuario y de instalación
Puede guardar distintas configuraciones de usuario y de instalación
para hasta ocho dispositivos vinculados.
Configuraciones de audio
Para ajustar las configuraciones de audio, pulse la rueda en el modo en
espera y seleccione Ajustes > Audio.
Para configurar el volumen predeterminado para las llamadas de
teléfono, seleccione Volumen manos libres, gire la rueda hacia la
izquierda para bajar el volumen o a la derecha para subirlo y pulse la
rueda. Consulte también “Ajustar el volumen de la llamada”, pág. 20.
27
Page 76

Configuraciones
Para configurar el volumen predeterminado para el reproductor de
música, seleccione Volumen de la música, gire la rueda hacia la izquierda
para bajar el volumen o a la derecha para subirlo y pulse la rueda.
Para definir cuando se silencia la radio del auto, seleccione Sonidos del
teléfono y la opción que desee. Si selecciona Sólo llamadas, la radio del
auto sólo se silencia cuando recibe una llamada. Si selecciona Siempre
activado, la radio del auto se silencia cuando el dispositivo que está
conectado emite cualquier sonido, por ejemplo, el tono de un mensaje
de texto.
Para activar o desactivar los sonidos de advertencia del equipo para
auto, seleccione Tonos de aviso y la opción que desee.
Configuraciones de pantalla
Para ajustar las configuraciones de la pantalla, pulse la rueda en el
modo en espera y seleccione Ajustes > Pantalla.
Para activar o desactivar el modo nocturno, seleccione Modo noche y la
opción que desee. Si selecciona Activar, la luz de fondo de la pantalla es
más tenue.
Para configurar la dirección de rotación del menú cuando gira la rueda,
seleccione Rotación del menú y la opción que desee. Si selecciona
Sentido agujas del reloj, el menú rota en la misma dirección en que gira
la rueda.
Para cambiar el color de la pantalla, como el fondo y la barra de
intensidad de la señal, seleccione Temas de colores y el tema de colores
que desee.
Para ajustar el brillo de la pantalla, seleccione Brillo y el nivel de brillo
que desee.
Para configurar el tiempo después del cual se apaga la luz de fondo de la
pantalla en el modo en espera, seleccione Atenuación auto y el tiempo
que desee. Si selecciona Desactivar, la luz de fondo siempre permanece
encendida cuando el equipo para auto está encendido.
28
Page 77

Configuraciones
Configuraciones generales
Para ajustar las configuraciones generales, pulse la rueda en el modo en
espera y seleccione Ajustes > General.
Para seleccionar si los contactos guardados en la Guía se ordenan por
nombre o apellido, seleccione Orden de clasific ación y la opción que desee.
Para activar o desactivar la marcación rápida, seleccione Marcaciones
rápidas y la opción que desee. Si selecciona Activar, se puede marcar los
números de teléfono asignados a los números de marcación rápida, del
1 al 9, de acuerdo a lo que se describe en “Marcación rápida”, pág. 21.
Para activar o desactivar la respuesta automática, seleccione Respuesta
automática y la opción que desea. Si selecciona Activar, el equipo para
auto responde la llamada entrante automáticamente. Para definir el
período de tiempo después del cual se responde la llamada, consulte el
manual del usuario del teléfono.
Para cambiar el idioma del equipo para auto, seleccione Ajuste de
idioma y el idioma que desea.
Para ver la versión de software y hardware del producto, seleccione Info.
del producto. Para desplazarse por la información, pulse repetidamente
la rueda.
Para restaurar el equipo para auto a las configuraciones de fábrica,
seleccione Rest. ajustes originales. Como alternativa, encienda el equipo
para auto y mantenga pulsada la rueda cerca de cinco segundos.
Configuraciones de instalación
Las configuraciones de instalación sólo debe cambiarlas un técnico de
servicio calificado durante la instalación del equipo para auto. Para
ajustar las configuraciones, pulse la rueda en el modo en espera y
seleccione Ajustes > Instalación.
Para activar o desactivar el sensor de movimiento incorporado,
seleccione Sensor de encendido y la opción que desea.
Para seleccionar la salida de música que corresponda, seleccione Salida
de música y el modo correcto de acuerdo a la configuración de la radio
del auto. Para obtener más detalles, consulte “Integración con el sistema
de radio del automóvil”, pág. 34.
29
Page 78

Solución de problemas
7. Solución de problemas
■ Reiniciar el equipo para auto
El equipo para auto no reacciona ante mis acciones. ¿Cómo puedo
reiniciarlo?
Cuando el equipo para auto está encendido, mantenga pulsada cerca
de diez segundos. El equipo para auto se reinicia. El reinicio no borra las
configuraciones del equipo para auto.
■ Problemas de conexión
No puedo conectar el equipo para auto a mi dispositivo a través de
una conexión Bluetooth.
• Asegúrese de que el equipo para auto esté encendido y vinculado con
el dispositivo.
• Revise que la función Bluetooth esté activada en el dispositivo.
El equipo para auto no establece una conexión Bluetooth con mi
dispositivo vinculado cuando enciendo el motor del auto o enciendo
el equipo para auto.
• Revise que la función Bluetooth esté activada en el dispositivo.
• Pida al técnico que instaló el equipo para auto que verifique que el
cable del sensor de encendido esté correctamente conectado.
• Asegúrese de que el dispositivo esté configurado para conectarse
automáticamente al equipo para auto cuando este último esté
encendido.
La radio del auto no tiene una entrada estéreo o auxiliar.
Pida al técnico que instaló el equipo para auto que utilice un adaptador
que permita conectar las salidas estéreo del equipo para auto a alguna
otra entrada de la radio del auto (como el conector del reproductor de
CD) para sonido estéreo.
30
Page 79

Solución de problemas
No puedo vincular mi dispositivo de música compatible con el equipo
para auto.
Verifique que el código de acceso Bluetooth del dispositivo de música
sea 0000. Si no es así, cámbielo a 0000 como se indica en el manual del
usuario del dispositivo de música.
■ Problemas de audio
Mi voz produce eco en el otro extremo de la línea.
• Disminuya el volumen del altavoz del auto. Si el equipo para auto
está conectado al sistema estéreo del auto, disminuya el nivel de
entrada, si es posible.
• Asegúrese de que el micrófono y los altavoces estén a una distancia
óptima.
• Asegúrese de que el micrófono no apunte hacia el altavoz.
La persona que llama no escucha mi voz durante la llamada.
Asegúrese de que el dispositivo esté correctamente conectado al equipo
para auto con una conexión Bluetooth.
La calidad de audio no es buena o no puedo escuchar sonidos.
• Si el equipo para auto está conectado a la radio del auto, revise que
el volumen de la radio del auto esté correctamente configurado.
• Si el equipo para auto está conectado al altavoz incluido, revise que
el volumen del equipo para auto esté correctamente configurado.
El equipo para auto no reproduce sonido en estéreo.
• Revise que la radio del auto esté configurada para recibir audio por la
entrada estéreo.
• Compruebe que haya seleccionado la fuente de audio correcta en la
radio del auto.
• Revise que el volumen de la radio del auto esté correctamente
configurado.
La calidad de sonido de la música es similar a una llamada de teléfono.
Si usa la función del reproductor de música del teléfono móvil, verifique
que el teléfono sea compatible con el perfil Bluetooth A2DP y que no
31
Page 80

Solución de problemas
haya otro dispositivo A2DP conectado al equipo para auto. Si el teléfono
admite este perfil y hay otro dispositivo A2DP conectado al equipo para
auto, desconecte el otro dispositivo del equipo para auto y conecte el
teléfono.
Si usa un dispositivo de música que admita el perfil Bluetooth A2DP,
verifique que no haya otro dispositivo A2DP conectado al equipo
para auto.
No puedo escuchar la música que se reproduce cuando el teléfono
móvil o dispositivo de música está conectado al equipo para auto.
• Verifique que el teléfono o el dispositivo de música sea compatible
con el perfil Bluetooth A2DP y que no haya otro dispositivo A2DP
(por ejemplo, un adaptador Bluetooth que use A2DP) conectado al
equipo para auto.
• Verifique que el teléfono o el dispositivo de música esté
correctamente conectado al equipo para auto.
• Compruebe que el equipo para auto esté correctamente conectado a
la entrada estéreo de la radio del auto. Consulte “Integración con el
sistema de radio del automóvil”, pág. 34, o comuníquese con el
técnico que instaló el equipo para auto.
La radio del auto no se silencia cuando respondo una llamada.
Pida al técnico que instaló el equipo para auto que verifique que el cable
de silencio de la radio del auto esté correctamente conectado.
■ Otros problemas
El equipo para auto no se enciende cuando enciendo el sistema de
arranque del auto.
Pida al técnico que instaló el equipo para auto que verifique que el cable
del sensor de encendido esté correctamente conectado.
La batería del teléfono móvil no se carga cuando el dispositivo está
conectado al equipo para auto.
Verifique que el teléfono móvil esté conectado al equipo para auto con
el cable de carga incluido.
32
Page 81

Instalación
8. Instalación
■ Información de seguridad
Siga estas normas de seguridad cuando instale el equipo para auto.
• Sólo un técnico de servicio calificado debe instalar o reparar el
equipo para auto con las piezas originales aprobadas de Nokia que
se incluyen en el paquete de venta. Una instalación o reparación
defectuosa puede resultar peligrosa y anular cualquier garantía que
se aplique al equipo para auto.
Los usuarios finales deben recordar que el equipo para auto consiste
de equipo técnico complejo que requiere instalación profesional con
herramientas especiales y conocimiento práctico especializado.
• Las instrucciones de este manual corresponden a indicaciones
generales que se aplican a la instalación del equipo para auto en un
automóvil. Sin embargo, debido a la amplia variedad de tipos y modelos
de autos disponibles en el mercado, esta guía no puede considerar los
requerimientos técnicos individuales correspondientes para un vehículo
en particular. Comuníquese con el fabricante del vehículo para obtener
información detallada acerca del vehículo de su interés.
• El equipo para auto es adecuado para su uso sólo en un vehículo con
conexión negativa a tierra de 12-V. Si utiliza otros voltajes o
polaridad alternativa, dañará el equipo.
• Recuerde que los sistemas automotores modernos incluyen
computadoras que almacenan importantes parámetros del vehículo.
La incorrecta desconexión de la batería del auto puede provocar la
pérdida de datos, lo cual requeriría un trabajo exhaustivo para
reinicializar el sistema. En caso de tener alguna duda, comuníquese
con su distribuidor de automóviles antes de realizar la instalación.
• No conecte los cables del equipo para auto a las líneas de alto voltaje
del sistema de encendido del motor.
• Cuando instale las piezas del equipo para auto, asegúrese de que
ninguna interfiera ni entorpezca los sistemas de dirección o frenos u
otros controles o sistemas que se usen en la operación del vehículo
33
Page 82

Instalación
(por ejemplo, bolsas de aire). Asegúrese de que tanto el equipo para
auto como cualquiera de sus componentes no estén instalados
donde pudiera entrar en contacto con ellos en caso de sufrir un
accidente o una colisión.
Si se debe utilizar la pantalla de un dispositivo móvil, asegúrese de
que el dispositivo esté montado en un soporte y de que la pantalla
del dispositivo esté claramente visible para el usuario.
• Es posible que el técnico o distribuidor le entregue información sobre
alternativas para instalar el equipo de manera adecuada en el
vehículo sin realizar perforaciones.
• No fume mientras trabaja en el automóvil. Asegúrese de que no haya
una fuente de fuego o llamas en las cercanías.
• Tenga cuidado de no dañar los cables eléctricos, las líneas de
combustible o frenos o el equipo de seguridad durante la instalación.
• Las señales de RF pueden afectar los sistemas electrónicos instalados
o protegidos en forma inadecuada en los automóviles, por ejemplo,
sistemas electrónicos de inyección directa, sistemas electrónicos de
frenos antideslizantes (antibloqueo), sistemas electrónicos de
control de velocidad y sistemas de bolsas de aire. Si nota una falla o
un cambio en el funcionamiento de alguno de estos sistemas,
comuníquese con el distribuidor de automóviles.
• Asegúrese de colocar los cables de manera que no queden expuestos
al desgaste mecánico (por ejemplo, que no queden bajo los asientos
del auto o sobre bordes filosos).
■ Integración con el sistema de radio del automóvil
El equipo para auto puede conectarse a un sistema de radio de
automóvil de tres formas distintas. Seleccione la opción
correspondiente según las piezas que se incluyen en el paquete
de ventas.
Para obtener información acerca de los conectores de la unidad de
manos libres HF-23, consulte “Unidad manos libres HF-23”, pág. 41.
Puede conectar el equipo para auto a un altavoz con una impedancia de
al menos 2 ohms. La impedancia óptima del equipo para auto es de
34
Page 83

Instalación
4 ohms. Si la impedancia supera 8 ohms, la energía de salida es
significativamente menor que la normal.
Usar el cable ISO CA-152
Cuando conecte el equipo para auto en el sistema de radio del automóvil
con el cable ISO CA-152, puede seleccionar si utilizará el amplificador
del equipo para auto para las llamadas y el amplificador de la radio del
auto para la música, o si utilizará el amplificador del equipo para auto
en ambos casos.
Usar el amplificador del equipo para auto para llamadas y música
En esta configuración, la radio del auto está en silencio cuando realiza o
recibe una llamada o escucha música desde un dispositivo conectado
compatible con el perfil Bluetooth A2DP.
El amplificador incorporado del equipo para auto se utiliza para las
llamadas y la música que se reproduce en el dispositivo A2DP.
35
Page 84

Instalación
1. Para conectar el cable ISO a la radio del auto:
• Desconecte los cables correspondientes de la radio del auto y
conecte en ese lugar el cable ISO. Conecte los extremos abiertos
de los cables a los altavoces de la radio del auto.
• Conecte uno de los conectores clasificados como Mute 1, Mute 2
o Mute 3 de la radio del auto al cable ISO. Deje los otros
conectores clasificados como Mute conectados donde están.
• Enchufe el cable de alimentación del cable ISO al conector
respectivo de la unidad manos libres.
• Revise el terminal de alimentación +12-V y el terminal de
encendido de la radio del auto y los terminales correspondientes
del cable ISO. Si fuese necesario, intercambie los terminales de los
fusibles del cable ISO. Conecte el cable ISO a los dos conectores
ISO abiertos.
2. Enchufe el cable ISO al conector respectivo de la unidad manos
libres.
3. Conecte el dispositivo de entrada externo CU-10 y el micrófono
MP-2 a los correspondientes conectores de la unidad manos libres.
4. Para cargar un teléfono móvil Nokia compatible mediante el equipo
para auto, conecte un extremo del cable de carga CA-134 incluido a
la unidad manos libres y el otro extremo al conector de carga de
2,0 mm (0,08 pulgadas) del teléfono.
5. Encienda el equipo para auto, pulse la rueda en el modo en espera y
seleccione Ajustes > Audio > Salida de música > Conector del
sistema.
Usar el amplificador del equipo para auto para las llamadas y
el amplificador de la radio del auto para la música
En esta configuración, la radio del auto se silencia cuando realiza o
recibe una llamada.
36
Page 85

Instalación
El amplificador y el ecualizador de la radio del auto se utilizan para la música
que se reproduce en un dispositivo conectado que admite el perfil A2DP. El
amplificador incorporado del equipo para auto se utiliza para las llamadas.
1. Para conectar el cable ISO a la radio del auto:
• Desconecte los cables correspondientes de la radio del auto y
conecte en ese lugar el cable ISO. Conecte los extremos abiertos
de los cables a los altavoces de la radio del auto.
• Conecte uno de los conectores clasificados como Mute 1, Mute 2
o Mute 3 de la radio del auto al cable ISO. Deje los otros
conectores clasificados como Mute conectados donde están.
• Enchufe el cable de alimentación del cable ISO al conector
respectivo de la unidad manos libres.
• Revise el terminal de alimentación +12-V y el terminal de encendido
de la radio del auto y los terminales correspondientes del cable ISO.
Si fuese necesario, intercambie los terminales de los fusibles del
cable ISO. Conecte el cable ISO a los dos conectores ISO abiertos.
37
Page 86

Instalación
2. Conecte el cable ISO al conector respectivo de la unidad manos libres.
3. Corte el bucle indicado con tijeras en la figura.
4. Conecte las salidas estéreo de la unidad manos libres en la entrada
AUX de la radio del auto. Use un cable adecuado específico para la
radio del auto (este cable no se incluye con el equipo para auto).
5. Conecte el dispositivo de entrada externo CU-10 y el micrófono
MP-2 a los correspondientes conectores de la unidad manos libres.
6. Para cargar un teléfono móvil Nokia compatible mediante el equipo
para auto, conecte un extremo del cable de carga CA-134 incluido a
la unidad manos libres y el otro extremo al conector de carga de
2,0 mm (0,08 pulgadas) del teléfono.
7. Encienda el equipo para auto, pulse la rueda en el modo en espera y
seleccione Ajustes > Audio > Salida de música > Detección automática.
Usar el cable de alimentación CA-153P
En esta configuración, la radio del auto se silencia cuando realiza o
recibe una llamada.
El altavoz SP-3 se utiliza para llamadas y el amplificador y el ecualizador
de la radio del auto se utilizan para la música que se reproduce en un
dispositivo conectado que admite el perfil Bluetooth A2DP.
38
Page 87

Instalación
1. Conecte los respectivos conectores del cable de alimentación
CA-153P a la batería del auto y al sensor de encendido (si está
disponible). Conecte el conector de silencio de la radio del auto
(si está disponible) a la radio del auto.
2. Conecte el cable de alimentación al conector respectivo de la unidad
manos libres.
3. Conecte el altavoz SP-3 al conector respectivo de la unidad manos
libres.
4. Conecte las salidas estéreo de la unidad manos libres en la entrada
AUX de la radio del auto. Use un cable adecuado específico para la
radio del auto (este cable no se incluye con el equipo para auto).
5. Conecte el dispositivo de entrada externo CU-10 y el micrófono
MP-2 a los correspondientes conectores de la unidad manos libres.
6. Para cargar un teléfono móvil Nokia compatible mediante el equipo
para auto, conecte un extremo del cable de carga CA-134 incluido a
la unidad manos libres y el otro extremo al conector de carga de
2,0 mm (0,08 pulgadas) del teléfono.
7. Encienda el equipo para auto, pulse la rueda en el modo en espera y
seleccione Ajustes > Audio > Salida de música > Detección
automática. Como alternativa, si la música se va a reproducir a
través de un altavoz externo (como el SP-3), seleccione Altavoz
mono en lugar de Detección automática.
No utilice el amplificador interno de la unidad manos libres para dirigir
la reproducción de música a los altavoces externos. Si necesita
reemplazar un fusible en el cable CA-153P, utilice sólo un fusible con
una capacidad de 2 A o menos.
■ Instalar el equipo para auto en un vehículo
Esta sección describe cómo instalar las piezas del equipo para auto en
un vehículo. Las piezas se detallan en “Piezas”, pág. 11.
Cuando instale las piezas del equipo para auto, asegúrese de que
ninguna interfiera ni entorpezca los sistemas de dirección o frenos u
otros controles o sistemas que se usen en la operación del vehículo (por
ejemplo, bolsas de aire). No utilice tornillos para instalar la pantalla si la
39
Page 88

Instalación
monta dentro del área de impacto de la cabeza. En su lugar, utilice el
adhesivo que se proporciona.
La instalación del equipo para auto puede causar que se silencien tonos
de advertencia u otros tonos de alarma del vehículo (como los tonos de
advertencia de retroceso o las alertas de luces encendidas). Para obtener
más información, comuníquese con el fabricante del vehículo o con su
representante.
Ejemplo de instalación correcta, con la pantalla montada en el soporte
que se proporciona
40
Page 89

Unidad manos libres HF-23
1
2
3
4
6
5 7 8 9
La unidad manos libres tiene los siguientes conectores:
1. Conector para el dispositivo de entrada CU-10
2. Conector para cable de carga CA-134 (para cargar un teléfono Nokia
compatible)
3. Conector para la unidad de pantalla SU-34
4. Conector mini USB para la actualización de firmware
5. Conector para micrófono MP-2
6. Salidas estéreo (conectores RCA estándar) para conectar a una radio
de auto con puertos de entrada correspondientes. Las salidas sólo
están activas cuando escucha música desde un dispositivo
compatible con el perfil Bluetooth A2DP y que está conectado
al equipo para auto.
7. Conector para cable de alimentación CA-153P
8. Conector para cable ISO CA-152
9. Conector para altavoz SP-3
Instalación
41
Page 90

Instalación
Cuando instale la unidad manos libres, asegúrese de que los cables del
micrófono y el altavoz lleguen a los lugares donde intenta instalar
estas piezas.
No instale la unidad manos libres dentro de un alojamiento metálico o
sobre una superficie metálica, ya que impedirá la conexión Bluetooth
entre la unidad manos libres y el dispositivo Bluetooth que se conecta al
equipo para auto. Para una óptima conexión, asegúrese de que la
distancia entre la unidad manos libres y una superficie metálica sea
superior a 4 mm (0,6 pulgadas).
Instale la unidad manos libres en el auto mediante material de montaje
adecuado (no se incluye en el paquete de ventas). Asegúrese de que la
unidad manos libres se mantenga fija en su lugar.
Dispositivo de entrada CU-10
El dispositivo de entrada se debe colocar de forma que quede al alcance
del usuario. No monte el dispositivo de entrada dentro del área de
impacto de la cabeza.
Asegúrese de que el cable del dispositivo de entrada se pueda conectar a
la unidad manos libres. La mejor ubicación para instalar el dispositivo de
entrada es de manera horizontal en la consola entre el asiento del
conductor y el copiloto, de manera que las teclas del dispositivo de
entrada queden en dirección a la parte delantera del vehículo.
Para instalar el dispositivo de entrada:
1. Coloque la almohadilla adhesiva incluida en la ubicación del auto
que desea: retire la lámina protectora de uno de los lados de la
almohadilla y presione la almohadilla en su lugar.
Cuando retire la lámina protectora, no toque con los dedos el lado
adhesivo. Asegúrese de que la superficie donde colocará la
almohadilla esté seca y no esté sucia ni tenga polvo.
2. Retire la lámina protectora de la almohadilla en la parte inferior
del dispositivo de entrada y del otro lado de la almohadilla pegada
al auto.
3. Presione firmemente las almohadillas una contra otra y revise que el
dispositivo de entrada esté fijo.
42
Page 91

Instalación
Pantalla SU-34
La pantalla se debe ubicar de modo que el usuario la vea con claridad y
que se pueda girar hacia la izquierda, derecha, arriba o abajo con
facilidad.
Cuando instale la pantalla, asegúrese de que no interfiera ni entorpezca
los sistemas de dirección o frenos u otros controles o sistemas que se
usen en la operación del vehículo (por ejemplo, bolsas de aire).
Asegúrese de que el cable de la pantalla se pueda conectar a la unidad
manos libres. Monte la pantalla en el tablero de instrumentos en
posición vertical.
Cuando retire la lámina protectora del adhesivo que se proporciona,
no toque con los dedos el lado adhesivo.
Montar el soporte en el tablero de instrumentos
Para utilizar la pantalla con el soporte que se proporciona:
1. Retire la lámina protectora de un lado del adhesivo que se
proporciona y colóquelo en las patas del soporte.
2. Ponga el cable de la pantalla entre las dos patas del soporte y
asegúrelo en su lugar entre los dientes de las patas.
3. Retire la lámina protectora del otro lado del adhesivo y presione con
firmeza el soporte en el tablero de instrumentos.
Asegúrese de que la superficie donde colocará el soporte esté seca y no
esté sucia ni tenga polvo.
Montar la placa en el tablero de instrumentos
Para utilizar la pantalla con la placa de montaje que se proporciona:
1. Retire la lámina protectora de un lado del adhesivo que se
proporciona y colóquelo en la placa.
2. Retire la lámina protectora del otro lado del adhesivo y presione la
placa con firmeza en un dispositivo de montaje (como un soporte de
montaje) que esté instalado en el tablero de instrumentos.
Cuando utilice tornillos en lugar de los adhesivos para instalar la placa,
no utilice los tornillos si la monta dentro del área de impacto de la
43
Page 92

Instalación
3
2
1
3
2
1
cabeza. Para perforar agujeros, revise las marcas del lado interno de la
placa que muestran donde se pueden colocar los tornillos.
Poner la pantalla en el soporte o la placa
Para poner la pantalla en el soporte:
1. Presione el enganche de bola en la toma que hay en la pieza del
conector del cable de la pantalla (1).
2. Deslice la pantalla en la pieza del conector (2).
3. Fije la pantalla en la posición adecuada (3).
Para poner la pantalla en la placa:
1. Presione el enganche de bola del soporte o de la placa en la toma que
hay en la pieza del conector del cable de la pantalla (1).
2. Deslice la pantalla en la pieza del conector (2).
3. Fije la pantalla en la posición adecuada (3).
44
Page 93

Instalación
Si necesita cambiar el montaje, tire la pieza del conector del cable de la
pantalla para sacarlo del enganche de bola. Para sacar la pantalla, tírela
de la pieza del conector.
Micrófono MP-2
Seleccione cuidadosamente dónde instalará el micrófono para
aumentar la calidad de la transmisión de voz.
El mejor lugar para instalar el micrófono es cerca del espejo retrovisor.
Instale el micrófono de manera que quede en dirección a la boca del
conductor y al menos a un metro (tres pies) del altavoz del equipo para
auto para evitar acoplamientos.
Asegúrese de que el cable del micrófono se pueda conectar a la unidad
manos libres.
Instale el micrófono de manera que no quede expuesto a corrientes de
aire de las rejillas de ventilación. No coloque el cable del micrófono en el
sistema de calefacción, ventilación o aire acondicionado. Use la cinta
adhesiva de doble cara para sujetar el micrófono y reducir la cantidad de
ruido de fondo del auto que puede interferir con las llamadas.
Inserte el enchufe del micrófono en el conector de micrófono de la
unidad manos libres y gire el enchufe a la derecha para fijarlo. El uso de
cualquier otro micrófono distinto del micrófono incluido podría afectar
la calidad de audio.
45
Page 94

Instalación
Cable ISO CA-152
Si el cable ISO CA-152 se incluye en el quipo para auto, puede usarlo
para conectar fácilmente el equipo para auto a una radio de auto que
tenga conectores ISO. Consulte “Integración con el sistema de radio del
automóvil”, pág. 34.
Sensor de movimiento
La unidad manos libres HF-23 tiene un sensor de movimiento que
permite que el equipo para auto se encienda automáticamente al
encender el motor y comenzar a conducir. El sensor de movimiento
funciona si está activado y si el cable sensor de encendido no está
conectado.
Para activar el sensor de movimiento, encienda el equipo para auto,
pulse la rueda en el modo en espera, seleccione Ajustes > Instalación >
Sensor de encendido > Activar.
■ Accesorios opcionales
A través de accesorios opcionales puede ampliar las funciones del
equipo para auto. Comuníquese con su distribuidor o técnico de servicio
para conocer los accesorios adecuados para el equipo para auto. Utilice
sólo accesorios aprobados y compatibles.
46
Page 95

Instalación
Soporte móvil
Para utilizar el dispositivo móvil en un auto, puede montar un soporte
móvil diseñado para el dispositivo. Para conocer los soportes
compatibles para el dispositivo, comuníquese con el distribuidor.
Si se debe utilizar la pantalla de un dispositivo móvil, asegúrese de que
el dispositivo esté montado en un soporte y de que la pantalla del
dispositivo esté claramente visible para el usuario. Asegúrese de que el
soporte no interfiera ni entorpezca los sistemas de dirección o frenos u
otros controles o sistemas que se usen en la operación del vehículo
(por ejemplo, bolsas de aire).
Para acceder a las instrucciones de instalación, consulte la
documentación que se incluye con el soporte móvil.
Antena externa
Una antena externa mejora la recepción del teléfono móvil en el auto.
Comuníquese con su distribuidor para conocer la disponibilidad.
Nota: A fin de cumplir las normas de exposición RF, cuando instale la
antena exterior, mantenga una distancia mínima de 20 centímetros
(8 pulgadas) entre la antena exterior y las personas; la ganancia de
antena exterior no debe exceder los 3 dBi.
■ Revisar el funcionamiento del equipo para auto
Después de instalar el equipo para auto, revise que esté funcionando
correctamente. Consulte también “Solución de problemas”, pág. 30.
■ Actualizaciones de software
El firmaware del equipo para auto se puede actualizar desde una PC
compatible con un cable USB estándar (no se incluye con el equipo para
auto) que tenga un conector USB en un extremo y un conector mini USB
en el otro extremo. Mantenga el cable USB conectado mientras se
actualiza el firmware. Para actualizar el firmware, debe descargar e
instalar un programa de instalación en la PC.
Visite www.nokia.com/support para Estados Unidos o www.nokialatinoamerica.com/soporte para Latinoamérica, para obtener el programa
de instalación, la última versión del firmware e información adicional.
47
Page 96

Cuidado y mantenimiento
Cuidado y mantenimiento
Su equipo para auto es un producto de diseño y fabricación superiores, y se lo
debe tratar con cuidado. Las siguientes sugerencias lo ayudarán a mantener la
cobertura de su garantía.
• Mantenga el equipo para auto seco. Las precipitaciones, la humedad y todos
los tipos de líquidos o humedad contienen minerales que corroen los circuitos
electrónicos.
• No utilice ni guarde el equipo para auto en lugares sucios o polvorientos.
Las piezas movibles y los componentes electrónicos podrían dañarse.
• No trate de abrir el equipo para auto.
• No utilice productos químicos abrasivos, solventes de limpieza ni detergentes
fuertes para limpiar las piezas del equipo para auto.
• No pinte las piezas del equipo para auto. La pintura puede obstruir las piezas
movibles e impedir la operación apropiada.
Si el equipo para auto no funciona correctamente, lleve la pieza defectuosa al
centro de servicio autorizado más cercano para revisarla.
48
Page 97

Información adicional de seguridad
Información adicional de seguridad
■ Vehículos
Las señales de RF pueden afectar los sistemas electrónicos instalados o
protegidos en forma inadecuada en los automóviles, por ejemplo, sistemas
electrónicos de inyección directa, sistemas electrónicos de frenos antideslizantes
(antibloqueo), sistemas electrónicos de control de velocidad y sistemas de bolsas
de aire. Para obtener detalles, verifique estos aspectos con el fabricante o el
concesionario de su vehículo o de los equipos que haya incorporado
posteriormente.
Una instalación o reparación defectuosa puede resultar peligrosa y anular
cualquier garantía que se aplique al dispositivo. Compruebe con regularidad que
el equipo completo del dispositivo móvil de su vehículo esté correctamente
montado y funcionando debidamente. No almacene ni transporte líquidos
inflamables, gases o materiales explosivos en el mismo compartimiento
destinado al dispositivo, sus piezas o accesorios. Para los automóviles equipados
con bolsas de aire, recuerde que se inflan con mucha fuerza. No coloque objetos,
incluidos los equipos instalados o los celulares, encima del área de la bolsa de aire
o en la zona donde ésta pueda desplegarse. Si el equipo de telefonía móvil para
vehículos no está bien instalado y las bolsas de aire se despliegan, se pueden
producir lesiones graves.
49
Page 98

Aviso de la FCC/Industry Canada
Aviso de la FCC/Industry Canada
NOTA: Declaración de exposición a la radiación de la FCC: este equipo cumple con los límites de exposición a
la radiación de la FCC determinados para un entorno sin supervisión. Este transmisor no debe ubicarse ni
operarse junto a otra antena o transmisor. NOTA: cualquier cambio o modificación que no hay a sido
expresamente aprobado por Nokia puede anular la legitimación del usuario de utilizar este equipo.
50
Page 99

Kit Veicular com Tela Nokia CK-600
Manual do Usuário e de Instalação
9212633
Edição 2.1 PT-BR
Page 100

DECLARAÇÃO DE CONFORMIDADE
A NOKIA CORPORATION declara, neste instrumento, que o produto HF-23 está em
conformidade com as exigências básicas e outros dispositivos relevantes da Diretiva 1999/5/
EC. Este produto está em conformidade com os limites definidos na Diretiva 2004/104/EC
(emenda da Diretiva 72/245/EEC), Anexo I, parágrafos 6.5, 6.6, 6.8 e 6.9. Para obter uma
cópia da Declaração de Conformidade, acesse o site, em inglês, http://www.nokia.com/
phones/declaration_of_conformity/.
© 2008 Nokia. Todos os direitos reservados.
Nokia, Nokia Connecting People, Navi e o logotipo de Acessórios originais da Nokia são
marcas comerciais ou marcas registradas da Nokia Corporation. Outros nomes de produto e
empresa, mencionados neste manual, podem ser marcas comerciais ou nomes comerciais de
seus respectivos proprietários.
Bluetooth é uma marca registrada da Bluetooth SIG, Inc.
É proibida a reprodução, transferência, distribuição ou armazenamento, no todo ou em parte,
do conteúdo deste documento, de qualquer forma, sem a prévia autorização por escrito
da Nokia.
A Nokia adota uma política de desenvolvimento contínuo. A Nokia reserva-se o direito de
fazer alterações e melhorias em qualquer dos produtos descritos neste documento sem
aviso prévio.
NO LIMITE PERMITIDO PELA LEI APLICÁVEL, NEM A NOKIA NEM QUALQUER DE SEUS
LICENCIANTES PODERÃO SER, EM HIPÓTESE ALGUMA, RESPONSABILIZADOS POR
QUAISQUER PERDAS DE DADOS, LUCROS OU LUCROS CESSANTES, NEM POR DANOS
EXTRAORDINÁRIOS, INCIDENTAIS, CONSEQÜEN TES OU IN DIRE TOS, SEJA QUAL FOR A
CAUSA.
O CONTEÚDO DESTE DOCUMENTO É FORNECIDO “NO ESTADO EM QUE SE ENCONTRA” E
DEVE SER INTERPRETADO DE MANEIRA LITERAL. SALVO NOS C ASOS EM QUE A LEI EM VIGOR
O EXIJA, NENHUMA GARANTIA DE QUALQUER ESPÉCIE, SEJA EXPRESSA OU IMPLÍCITA,
INCLUINDO, ENTRE OUTRAS, AS GARANTIAS IMPLÍCITAS DE COMERCIALIZAÇÃO E
ADEQUAÇÃO PARA UMA FINALIDADE ESPECÍFICA, SERÁ OFERECIDA EM RELAÇÃO À
PRECISÃO, À CONFIABILIDADE OU AO CONTEÚDO DESTE DOCUMENTO. A Nokia reserva-se o
direito de revisar este documento ou de excluí-lo a qualquer momento, sem aviso prévio.
A disponibilidade de determinados produtos, seus aplicativos e serviços pode variar conforme
a região. Verifique, com o revendedor Nokia, os detalhes e a disponibilidade de opções
de idioma.
Controles de exportação
Este dispositivo contém produtos, tecnologia ou software sujeitos às leis e regulamentos de
exportação dos Estados Unidos da América e outros países. Proíbe-se qualquer uso contrário
às referidas leis.
Edição 2.1 PT-BR
2
 Loading...