


Nokia 7190
User Guide

The wireless phone described in this guide is approved for use in GSM 1900
and AMPS 800 networks. (For AMPS 800 network the analogue module
Nokia NRM-1 required).
Copyright information
Part No. 9352071, Edition 1 Printed in Canada 01/01
©
Copyright
Nokia Connecting People and the original accessories logos are trademarks
of Nokia Corporation and/or its affiliates.
US Patent No 5818437 and other pending patents. T9 text input software
Copyright
Navi™ is a trademark of Nokia Mobile Phones.
The information contained in this User Guide was written for Nokia phone
NSB-5. Therefore, the right to make changes and improvements to any of
the products described in this guide without prior notice is reserved.
These commodities are authorized by the U.S. Government for export only
to Canada, Mexico, or the United States. They may not be resold, diverted,
transferred, or otherwise disposed of in any other country, either in their
original form or after being incorporated through an intermediate process
into other end-items, without the written approval of the U.S.
Department of State.
2001. Nokia Mobile Phones. All rights reserved.
©
1997-2000. Tegic Communications, Inc. All rights reserved.
Includes RSA BSAFE cryptographic or security protocol
software from RSA Security.
FCC/Industry Canada Notice
Your phone may cause TV or radio interference (for example, when using
a telephone in close proximity to receiving equipment). The FCC or Industry
Canada can require you to stop using your telephone if such interference
cannot be eliminated. If you require assistance, contact your local service
facility.
This device complies with part 15 of the FCC rules. Operation is subject to
the condition that this device does not cause harmful interference.

Contents
1. For your safety . . . . . . . . . . . . . . . . . . . . . . . . . . 1
2. Welcome to Nokia. . . . . . . . . . . . . . . . . . . . . . . . 3
To find this guide on the internet . . . . . . . . . . . . . . . . 3
Using this guide. . . . . . . . . . . . . . . . . . . . . . . . . . . . . . .3
Network dependent features . . . . . . . . . . . . . . . . . . . .5
List of own numbers* . . . . . . . . . . . . . . . . . . . . . . . . . .5
Contacting Nokia . . . . . . . . . . . . . . . . . . . . . . . . . . . . .6
3. Before you begin . . . . . . . . . . . . . . . . . . . . . . . . . 7
Install the SIM card. . . . . . . . . . . . . . . . . . . . . . . . . . . . 7
Switch the phone on. . . . . . . . . . . . . . . . . . . . . . . . . . . 9
Navi™ roller . . . . . . . . . . . . . . . . . . . . . . . . . . . . . . . . . . 9
Your phone’s clock . . . . . . . . . . . . . . . . . . . . . . . . . . . 10
4. About your phone . . . . . . . . . . . . . . . . . . . . . . . 12
Your phone’s display . . . . . . . . . . . . . . . . . . . . . . . . . .13
Your phone’s keys . . . . . . . . . . . . . . . . . . . . . . . . . . . .14
The sliding cover . . . . . . . . . . . . . . . . . . . . . . . . . . . . .15
[ i ]

5. Make and answer calls . . . . . . . . . . . . . . . . . . . 16
Make a call with the keypad . . . . . . . . . . . . . . . . . . . 16
Answer a call . . . . . . . . . . . . . . . . . . . . . . . . . . . . . . . 16
End a call. . . . . . . . . . . . . . . . . . . . . . . . . . . . . . . . . . . 16
Reject a call . . . . . . . . . . . . . . . . . . . . . . . . . . . . . . . . 16
Re-dial the last number . . . . . . . . . . . . . . . . . . . . . . . 17
Earpiece volume . . . . . . . . . . . . . . . . . . . . . . . . . . . . . 17
6. Menu navigation . . . . . . . . . . . . . . . . . . . . . . . 18
Important info about shortcuts. . . . . . . . . . . . . . . . . 18
Menu list . . . . . . . . . . . . . . . . . . . . . . . . . . . . . . . . . . . 20
9. Call log* . . . . . . . . . . . . . . . . . . . . . . . . . . . . . . 38
Check missed calls* . . . . . . . . . . . . . . . . . . . . . . . . . . .38
Check dialed calls . . . . . . . . . . . . . . . . . . . . . . . . . . . .39
Check received calls . . . . . . . . . . . . . . . . . . . . . . . . . .40
Clear call lists . . . . . . . . . . . . . . . . . . . . . . . . . . . . . . .40
Call timers . . . . . . . . . . . . . . . . . . . . . . . . . . . . . . . . . . 41
10. Voice mail* . . . . . . . . . . . . . . . . . . . . . . . . . . . . 42
Save the voice mailbox number* . . . . . . . . . . . . . . . .42
Call and setup your voice mailbox* . . . . . . . . . . . . . .42
Listen to your voice messages* . . . . . . . . . . . . . . . . .43
7. Your phone’s keypad . . . . . . . . . . . . . . . . . . . . 28
Enter characters and numbers. . . . . . . . . . . . . . . . . . 28
Enter special characters. . . . . . . . . . . . . . . . . . . . . . . 29
8. Phone book . . . . . . . . . . . . . . . . . . . . . . . . . . . 30
Open the Phone book . . . . . . . . . . . . . . . . . . . . . . . . . 30
Phone book options . . . . . . . . . . . . . . . . . . . . . . . . . . 31
Customize your Phone book . . . . . . . . . . . . . . . . . . . 34
Your phone’s memory. . . . . . . . . . . . . . . . . . . . . . . . . 35
List of own numbers* . . . . . . . . . . . . . . . . . . . . . . . . . 37
[ ii ]
11. Profiles . . . . . . . . . . . . . . . . . . . . . . . . . . . . . . . 44
Select a profile . . . . . . . . . . . . . . . . . . . . . . . . . . . . . .44
Customize a profile . . . . . . . . . . . . . . . . . . . . . . . . . . .45
12. Advanced features . . . . . . . . . . . . . . . . . . . . . . 46
Advanced dialing. . . . . . . . . . . . . . . . . . . . . . . . . . . . .46
In-call options* . . . . . . . . . . . . . . . . . . . . . . . . . . . . . .47
Call forwarding* . . . . . . . . . . . . . . . . . . . . . . . . . . . . .51
Automatic redial* . . . . . . . . . . . . . . . . . . . . . . . . . . . .52
Calling cards . . . . . . . . . . . . . . . . . . . . . . . . . . . . . . . .53
Voice dialing . . . . . . . . . . . . . . . . . . . . . . . . . . . . . . . .54
1-touch dialing . . . . . . . . . . . . . . . . . . . . . . . . . . . . . .57
[ iii ]

13. Customize your phone . . . . . . . . . . . . . . . . . . . 59
Customize the roller . . . . . . . . . . . . . . . . . . . . . . . . . . 59
Display cell information . . . . . . . . . . . . . . . . . . . . . . . 60
Set the display language . . . . . . . . . . . . . . . . . . . . . . 60
SIM services . . . . . . . . . . . . . . . . . . . . . . . . . . . . . . . . 61
14. Security . . . . . . . . . . . . . . . . . . . . . . . . . . . . . . 62
Lock the keypad . . . . . . . . . . . . . . . . . . . . . . . . . . . . . 62
Unlock the keypad . . . . . . . . . . . . . . . . . . . . . . . . . . . 62
Slide setting . . . . . . . . . . . . . . . . . . . . . . . . . . . . . . . . 62
Access (PUK) codes. . . . . . . . . . . . . . . . . . . . . . . . . . . 63
Security code . . . . . . . . . . . . . . . . . . . . . . . . . . . . . . . 63
Fixed dialing* . . . . . . . . . . . . . . . . . . . . . . . . . . . . . . . 65
Change access codes . . . . . . . . . . . . . . . . . . . . . . . . . 67
SIM card security . . . . . . . . . . . . . . . . . . . . . . . . . . . . 69
Module security . . . . . . . . . . . . . . . . . . . . . . . . . . . . . 69
15. Text messages* . . . . . . . . . . . . . . . . . . . . . . . . . .71
Text messaging setup . . . . . . . . . . . . . . . . . . . . . . . . . 71
Write and send text messages* . . . . . . . . . . . . . . . . . 72
Reply to a text message* . . . . . . . . . . . . . . . . . . . . . . 75
Special sending options . . . . . . . . . . . . . . . . . . . . . . . 76
Message storage. . . . . . . . . . . . . . . . . . . . . . . . . . . . . 76
Organize messages with folders . . . . . . . . . . . . . . . . 77
Message settings . . . . . . . . . . . . . . . . . . . . . . . . . . . . .79
Predictive text input . . . . . . . . . . . . . . . . . . . . . . . . . .80
16. Your Personal Digital Assistant . . . . . . . . . . . . . 84
Calendar . . . . . . . . . . . . . . . . . . . . . . . . . . . . . . . . . . . .84
Alarm clock . . . . . . . . . . . . . . . . . . . . . . . . . . . . . . . . .87
Use the Calculator. . . . . . . . . . . . . . . . . . . . . . . . . . . .88
To-do list . . . . . . . . . . . . . . . . . . . . . . . . . . . . . . . . . . .90
17. Communicate with other devices. . . . . . . . . . . . 91
Infrared . . . . . . . . . . . . . . . . . . . . . . . . . . . . . . . . . . . . 91
18. DLR-3P connections . . . . . . . . . . . . . . . . . . . . . 94
19. Welcome to the wireless Internet*. . . . . . . . . . . 95
The Services menu. . . . . . . . . . . . . . . . . . . . . . . . . . . .95
WAP settings . . . . . . . . . . . . . . . . . . . . . . . . . . . . . . . .96
Your service provider and WAP . . . . . . . . . . . . . . . . .96
Launch the browser* . . . . . . . . . . . . . . . . . . . . . . . . . .96
Download a ringing tone . . . . . . . . . . . . . . . . . . . . .100
20. Fun and games . . . . . . . . . . . . . . . . . . . . . . . . 101
[ iv ]
[ v ]

21. Reference information . . . . . . . . . . . . . . . . . . .102
Batteries and chargers . . . . . . . . . . . . . . . . . . . . . . . 102
Important safety information . . . . . . . . . . . . . . . . . 103
Care and maintenance . . . . . . . . . . . . . . . . . . . . . . . 109
Accessories . . . . . . . . . . . . . . . . . . . . . . . . . . . . . . . . 110
Batteries . . . . . . . . . . . . . . . . . . . . . . . . . . . . . . . . . . 111
Troubleshooting . . . . . . . . . . . . . . . . . . . . . . . . . . . . 115
22. Frequently Asked Questions (FAQ) . . . . . . . . . . 118
23. Glossary . . . . . . . . . . . . . . . . . . . . . . . . . . . . . 120
24. Technical information . . . . . . . . . . . . . . . . . . 124
25. Nokia One-Year Limited Warranty . . . . . . . . . 125
26. Index . . . . . . . . . . . . . . . . . . . . . . . . . . . . . . . 128
[ vi ]
1. For your safety
This section provides various safety guidelines. Read this information
before using your mobile phone (hereafter referred to as “phone”).
Failure to comply with these guidelines could prove to be dangerous
or illegal. For more detailed safety information, refer to “Important
safety information” on page 103.
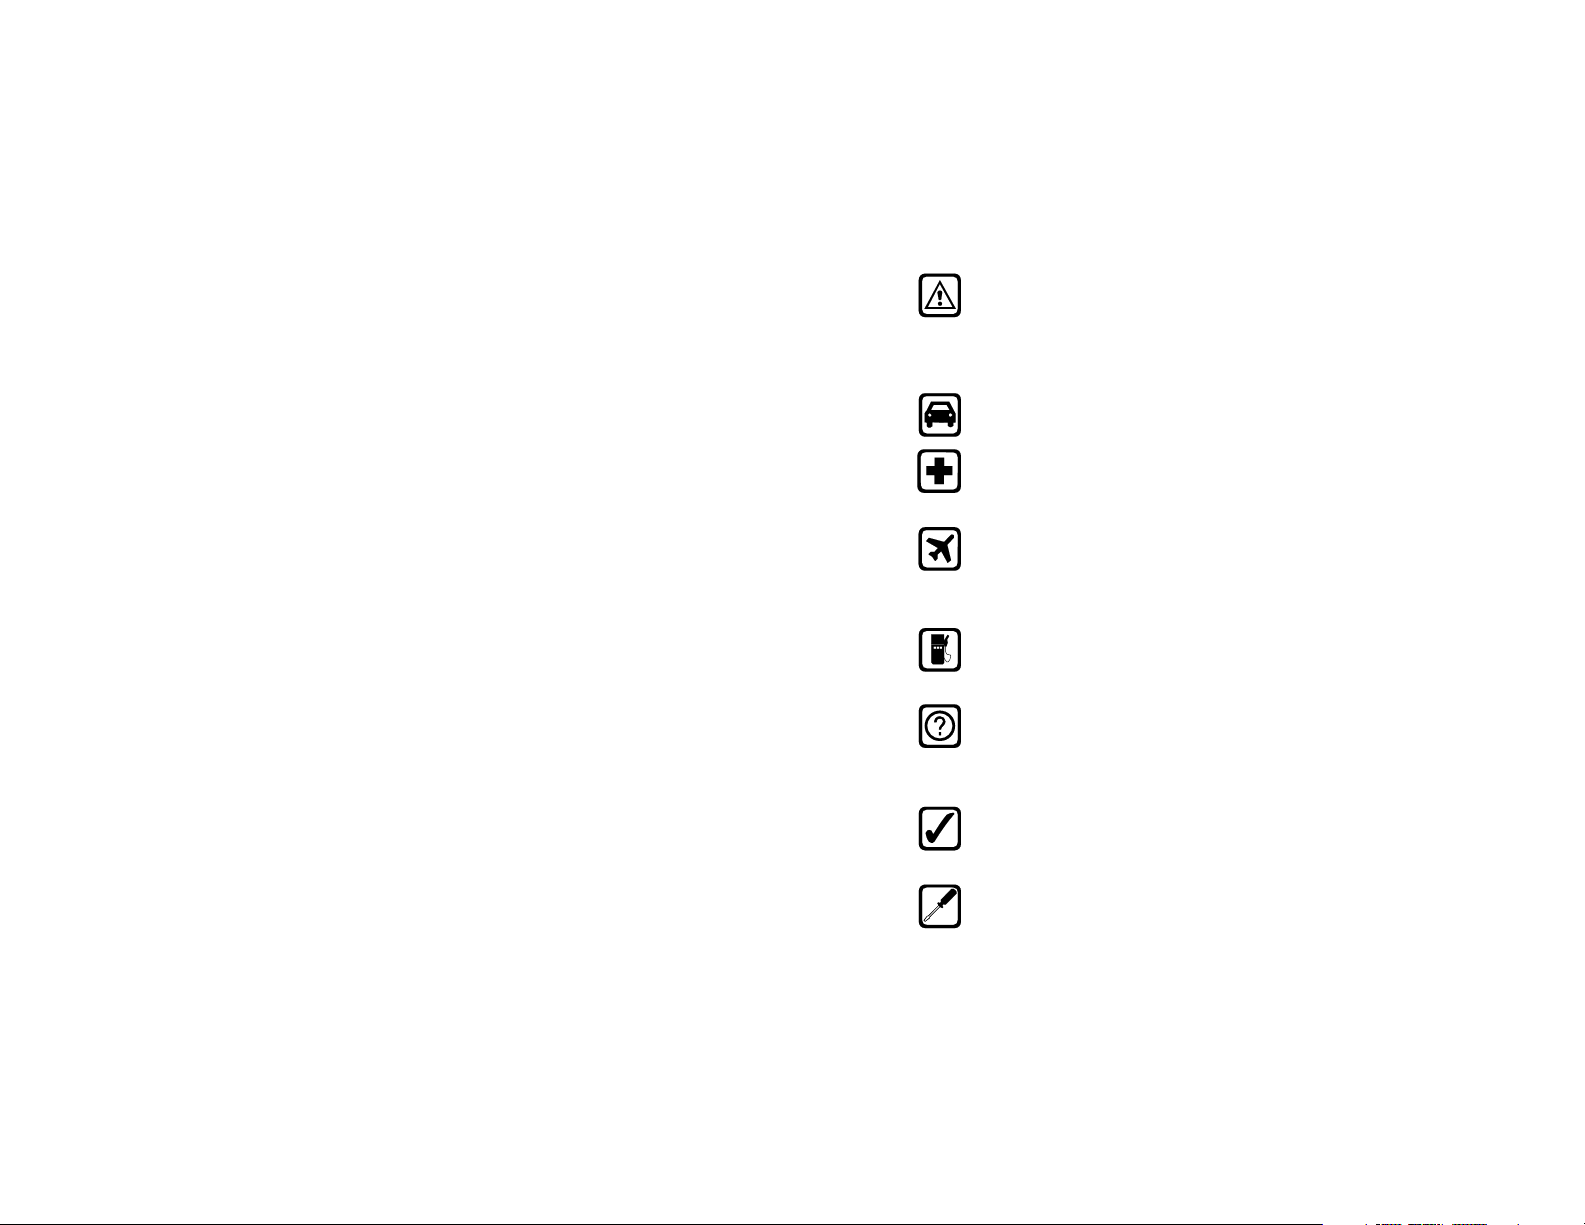
Road safety comes first
Don’t use your phone while driving. Park your vehicle first.
Switch off in hospitals
Switch off your phone when you’re in a hospital or near medical
equipment. Follow any regulations or rules that are in force.
Switch off in aircraft
Don’t use phones on airplanes, this can cause interference with
aircraft navigational equipment. Also, the use of phones on
airplanes is illegal.
Switch off when refueling
Don’t use the phone at a refueling point or near fuel or chemicals
of any kind.
Interference
All phones are susceptible to interference, which could affect
performance. This interference could prevent you from making
an emergency call.
Use sensibly
Use only in the normal position (to ear). Avoid unnecessary
contact with the antenna when the phone is on.
Qualified service
Only qualified service personnel can install or repair cellular
phone equipment.
For your safety
[ 1 ]

Accessories and batteries
Use only approved accessories and batteries. Don’t connect
incompatible products.
Connecting to other devices
When connecting to any other device, read the other device’s user
guide for detailed safety instructions. Don’t connect incompatible
products. Remember to make backup copies of all important data.
Making calls
Ensure the phone is switched on and in service. Enter the phone
number, including the area code, and then press . To end a
call, press . To answer a call, press .
Emergency calls
Ensure the phone is switched on and in service. If the word Clear
appears on screen above the right selection key, press to
clear the display. Enter the emergency number, and then press
. Give your location and don’t end the call until told to
do so.
Infrared precautions
Don’t point the infrared (IR) beam at anyone’s eyes or allow it to
interfere with other IR devices.
Welcome to Nokia
2. Welcome to Nokia
Your new Nokia 7190 is more than an exceptional mobile phone. Some
people call the 7190 a breakthrough in wireless technology. We call it
Command@Hand. Managing personal information is easy with the built-in
phone book, calendar, and to-do list. Plus, writing messages is faster than
ever with a new feature called predictive text input. You can even access
selected internet sites right from your phone with the built in WAP browser.
Also, your phone can be connected to a PC or laptop using its built in
infrared port. For more information, see the accompanying PC Connectivity
guide that came with your package.
• To find this guide on the internet
The latest version of this user guide may be available at www.nokia.ca.
• Using this guide
Throughout this guide, you’ll notice repeated use of the following words
and phrases. Please take a moment to read and understand their use.
• Press . . . . . . . . . . . . . . briefly press and release a button or the roller.
• Press xxx . . . . . . . . . . press the selection key below xxx on the screen.
• Press and hold . . . . . press and hold a button for 1 to 3 seconds
(depending on the feature being used).
• Scroll to . . . . . . . . . . use the roller to scroll to an item in a displayed
list.
• Scroll until
xxx appears . . . . . . . . scroll with the roller until a full page display
menu or submenu appears on screen.
[ 2 ]
[ 3 ]
Welcome to Nokia
Also, certain "styles" of text are used to attract attention or place emphasis.
• Italicized text is used to emphasize a point. For example, “You cannot
use your phone without this card.”
• Bold text indicates a web address, menu display, or web link. Examples
include, “Press Menu to enter the menu list” and "You may find this
guide on-line at www.nokia.ca."
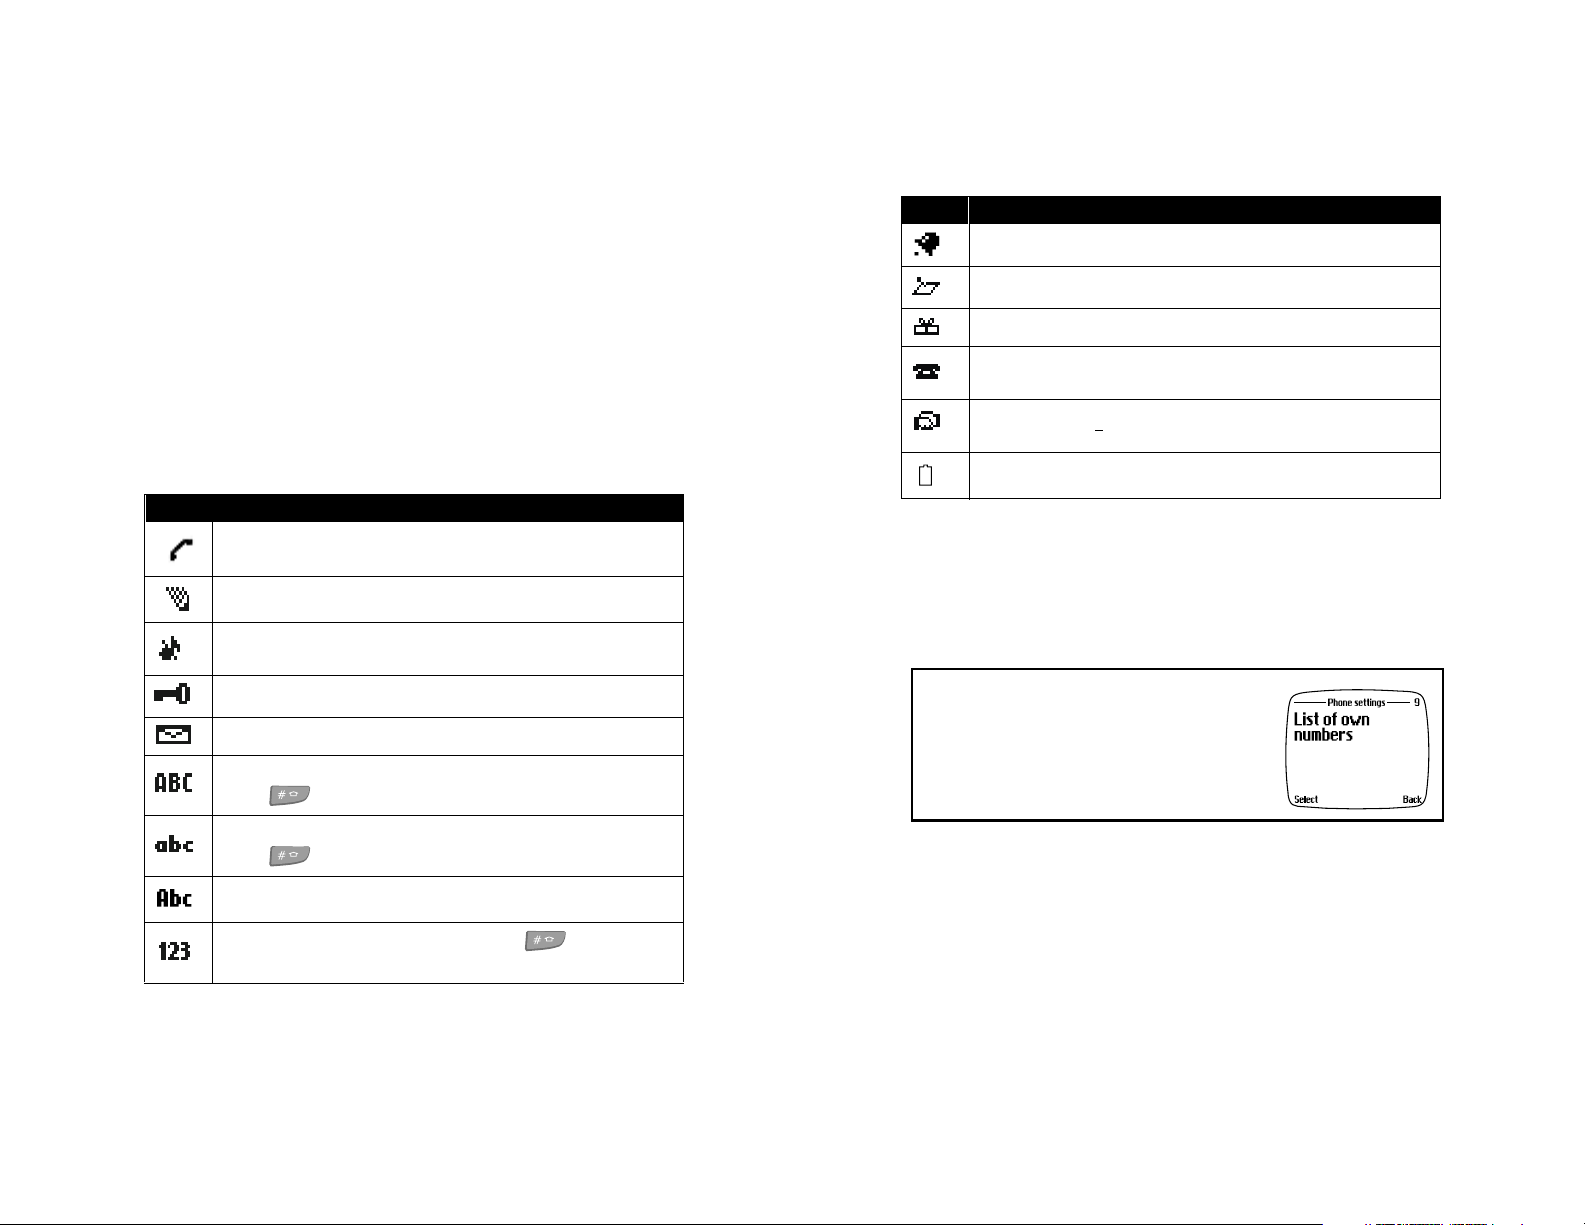
Icons
Your phone displays icons (pictures) to indicate your call status, remind
you of a meeting, to let you know a message is waiting, and much more.
These icons and their descriptions are included in the table below:
Icon Description
Indicates a call is active.
The phone is waiting for you to enter numbers or text.
Musical note. You’ve turned off your keypad tones, warning tones,
message alert tones, and set your ringing tone to
Key. Keyguard has been activated to prevent accidental dialing.
Unopened letter. You have one or more unread text messages waiting.
Uppercase characters. Any characters you enter will be uppercase.
Press to switch back to lowercase.
Silent.
Icon Description
Bell. The alarm clock is set.
Notepad. You have General note entered in your Calendar.
Gift. You have a note in your Calendar that it is someone’s birthday.
Telephone. You have a note in your Calendar to call someone.
Handshake. You h
Battery. See “Start screen” on page 13 for a picture and description
of the battery and battery bar.
ave a note in your Calendar of a meeting.
• Network dependent features
Some features described in this guide may not be available in your home
network. The paragraph heading for features such as these will display an
asterisk (*). See the example below:
• List of own numbers*
Your service provider may have saved your
phone, data, and fax numbers to the SIM
card. To view these numbers:
Lowercase characters. Any characters you enter will be lowercase.
Press to switch back to uppercase.
Indicates sentence case. The first letter of each sentence will be
uppercase.
Numbers. Appears when you press and hold while editing
text. Only numbers can be entered in this mode.
[ 4 ]
[ 5 ]

Before you begin
•Contacting Nokia
To help Nokia promptly answer your questions, please have your phone’s
model number and IMEI number ready when you call Customer Service.
The IMEI and model number are on back of your phone under the battery.
If you’re calling about an accessory, please have it available for reference.
Customer Care, Canada
Nokia Products Ltd.
575 Westney Rd. South
Ajax, Ontario L1S 4N7
Tel: 1-888-22NOKIA
(1-888-226-6542)
Fax: 1-905-427-1070
3. Before you begin
• Install the SIM card
The slot for the SIM card is located on back
of your phone, beneath the battery. To
install the SIM card, be sure that the
phone is turned off, and perform the
following steps:
• If the battery is already attached, see
“Remove the battery” on page 9.
• If the battery isn’t attached, go to
step 1.
Insert the SIM card as shown, with the gold
1
contacts facing down.
Important!
The beveled corner on the SIM
card must match up with the
beveled corner on the SIM slot.
SIM
Slot
SIM
card
SIM
slot
[ 6 ]
Lock the SIM card into place by sliding
2
the card holder to the left.
[ 7 ]
Before you begin
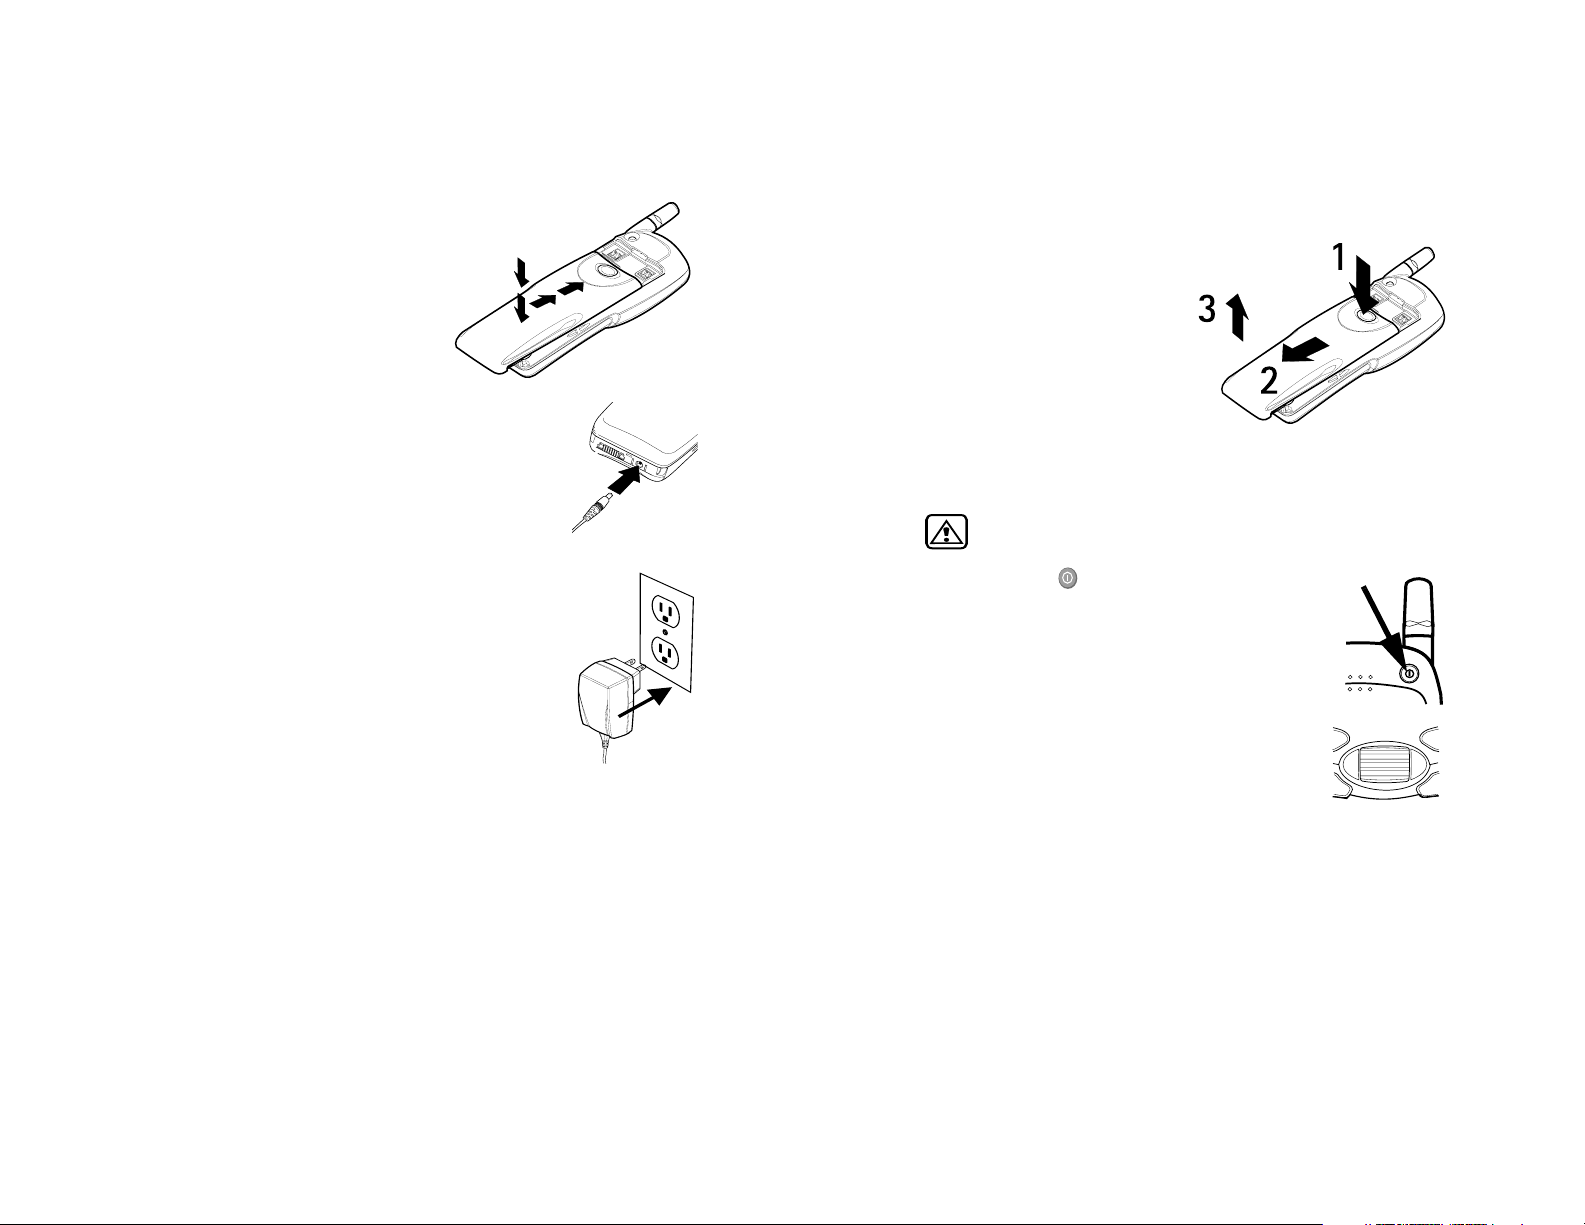
Install the battery
Align the battery with the slots on
1
back of the phone.
Gently slide the battery toward the
2
antenna until you hear a click.
Charge the battery
Plug the lead from the charger into the circular jack
1
on the end of your phone.
Plug the AC adapter into a standard wall outlet.
2
The phone beeps and the battery bar on screen
starts to scroll from bottom to top.
If the battery is empty, it will take a moment
Note:
for the bar on screen to begin scrolling.
You can use the phone while it’s charging.
Tip:
When the battery bar stops scrolling, the battery
3
is fully charged.
Charging time depends on the charger and battery. For example,
Note:
charging time for the BLS-2N battery with the ACP-7U charger is
about 2 hours.
Disconnect the charger from the phone and unplug it from the wall
4
outlet once the battery is fully charged.
Remove the battery
Switch the phone off before
Note:
removing the battery.
Press the release button on back
1
of the battery.
Push the battery toward the
2
bottom of the phone until it
stops.
Lift the battery to remove.
3
• Switch the phone on
Do not switch the phone on where wireless phone use is
prohibited or when it may cause interference or danger!
Press and hold until you see the display light up
1
(about 3 seconds).
Enter the PIN code (if necessary) and press OK.
2
•Navi™ roller
You’ll probably use the Navi roller as much or more
than any other key on your phone. Use the roller in
tandem with the selection keys to navigate menus,
select items in lists, connect to the internet, and much
more.
• Roll the roller up or down to scroll through a list or to page through
menus and submenus.
• Press the roller to do the following (depending on what is displayed):
• Show details of a highlighted name or number.
• Display a submenu.
• Select a highlighted function or setting.
[ 8 ]
[ 9 ]

A press of the roller at the Start screen displays the Names List from
Tip:
the Phone book. You can change this function so that a roller press
displays other features. See “Customize the roller” on page 59 for
more information.
• Your phone’s clock
You can set the time, the time format (12/24 hr), and whether you want
to display the clock on screen or hide it from view.
Show or hide the clock
At the Start screen, press Menu.
1
Scroll until Settings appears and press the roller.
2
Time settings appears on screen.
Press the roller, scroll until Clock appears,
3
and press the roller again.
Show clock is highlighted.
Press the roller.
4
Clock shown appears on screen.
To hide the clock, follow the steps above, but scroll to Hide clock
Note:
(in step 4) instead of Show clock.
Before you begin
Set the time
At the Start screen, press Menu.
1
Scroll until Settings appears and press the roller.
2
Time settings appears on screen.
Press the roller and Scroll until Clock appears.
3
Press the roller, scroll to Set the time, and press the roller again.
4
Scroll with the roller to change the hour (or use the keypad).
5
When the correct hour is displayed, press the roller.
6
The minutes are highlighted.
Scroll with the roller to change the minutes, or you can enter the
7
minutes using the keypad.
Press OK.
8
Scroll to am or pm and press the roller.
9
Time is set appears on screen.
Select the display format
Your phone supports both 12 and 24-hour display formats.
At the Start screen, press Menu.
1
Scroll until Settings appears and press the roller.
2
Time settings appears on screen.
Press the roller and scroll until Clock appears.
3
Press the roller and scroll to Time format.
4
Press the roller, scroll to 24-hour or am/pm, and press the roller again.
5
am/pm selected or 24-hour clock selected appears on screen.
[ 10 ]
[ 11 ]
About your phone
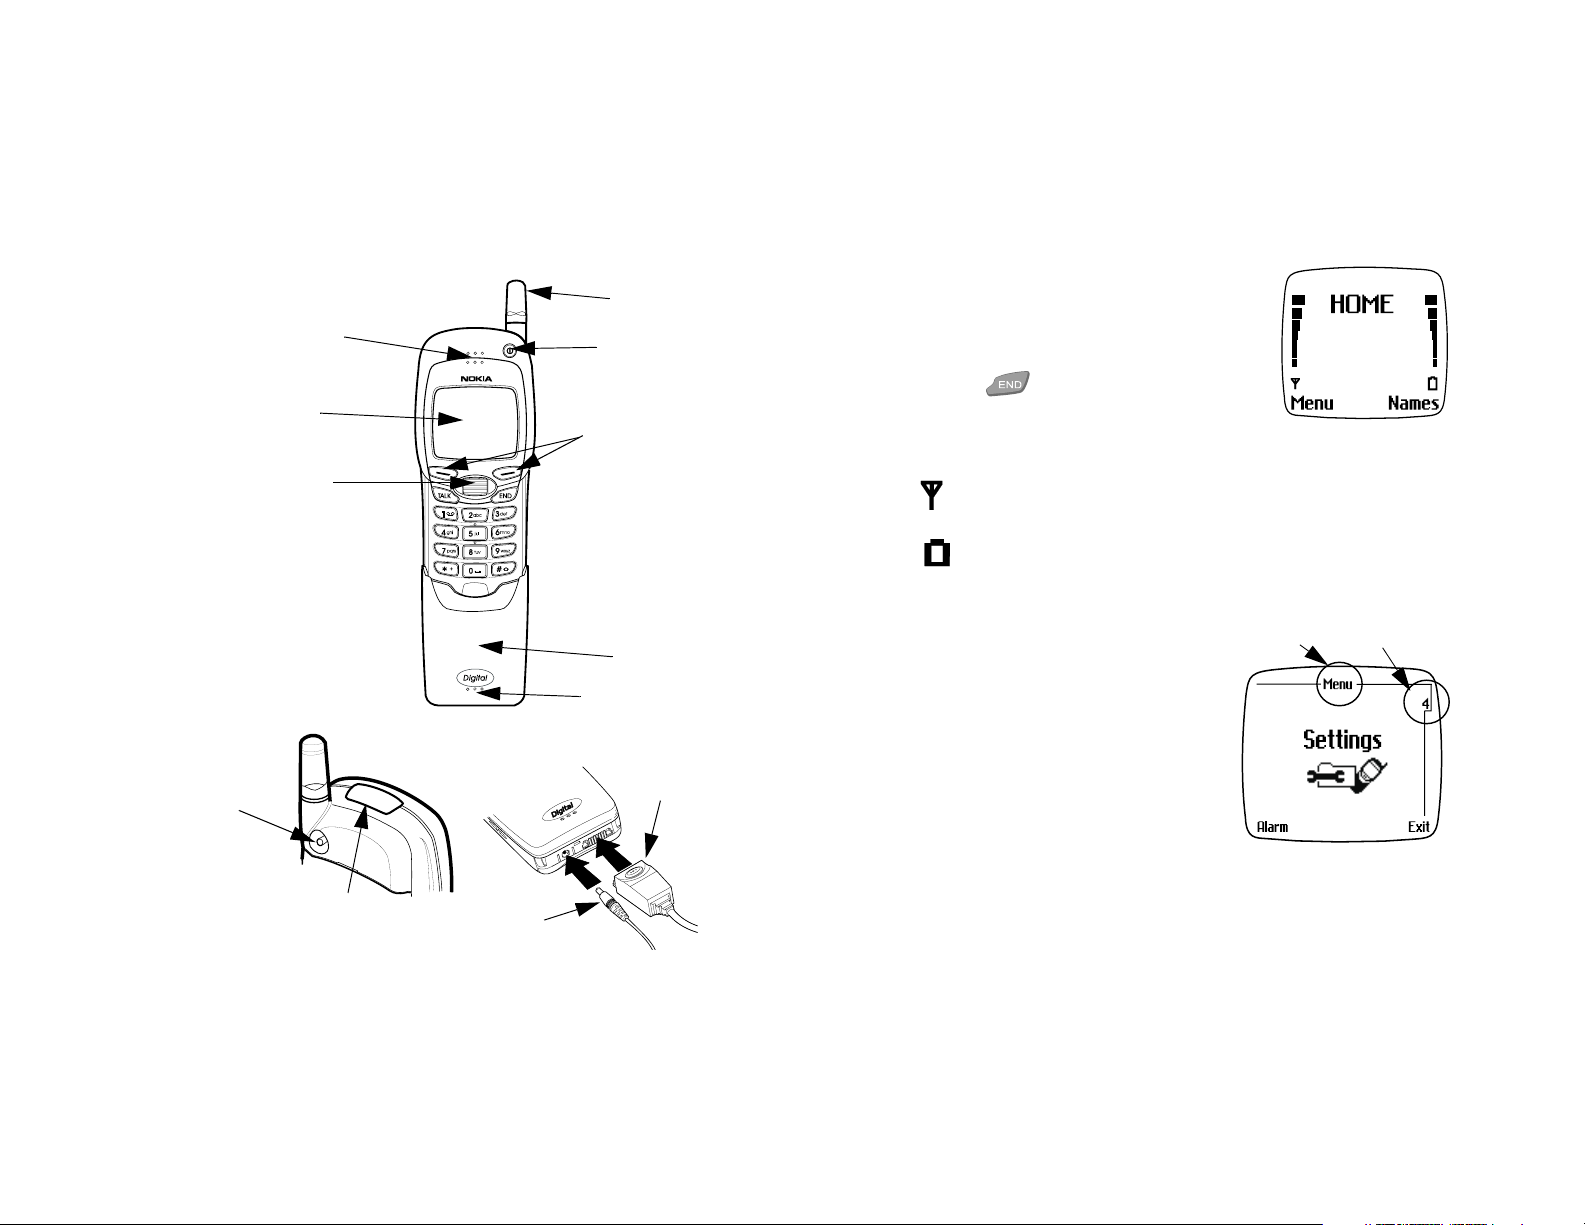
4. About your phone
Front
Earphone
Display
screen
Roller
(Navi Roller)
Back
External
antenna jack
Bottom
Fixed
antenna
Power key
Selection keys
Sliding
cover
Microphone
Data cable
or headset
• Your phone’s display
Start screen
The Start screen refers to the phone’s initial
display, no menus or submenus are shown.
Return to the Start screen from anywhere by
pressing .
HOME
Header and scroll bar
When you’re navigating menus, a header
appears at the top of your screen. The
header shows the menu or submenu in
which you’re working.
The scroll bar shows the menu number as
well as the menu’s relative position within
the menu structure.
Your service provider’s name often appears here.
The segmented bar above this icon indicates signal strength.
The higher the bar - the stronger the signal.
The segmented bar above this icon indicates the battery level.
The higher the bar - the more power left in the battery.
Header
Scroll bar
Infrared port
[ 12 ]
Charger
plug
Adjust the display contrast
At the Start screen, press Menu.
1
[ 13 ]
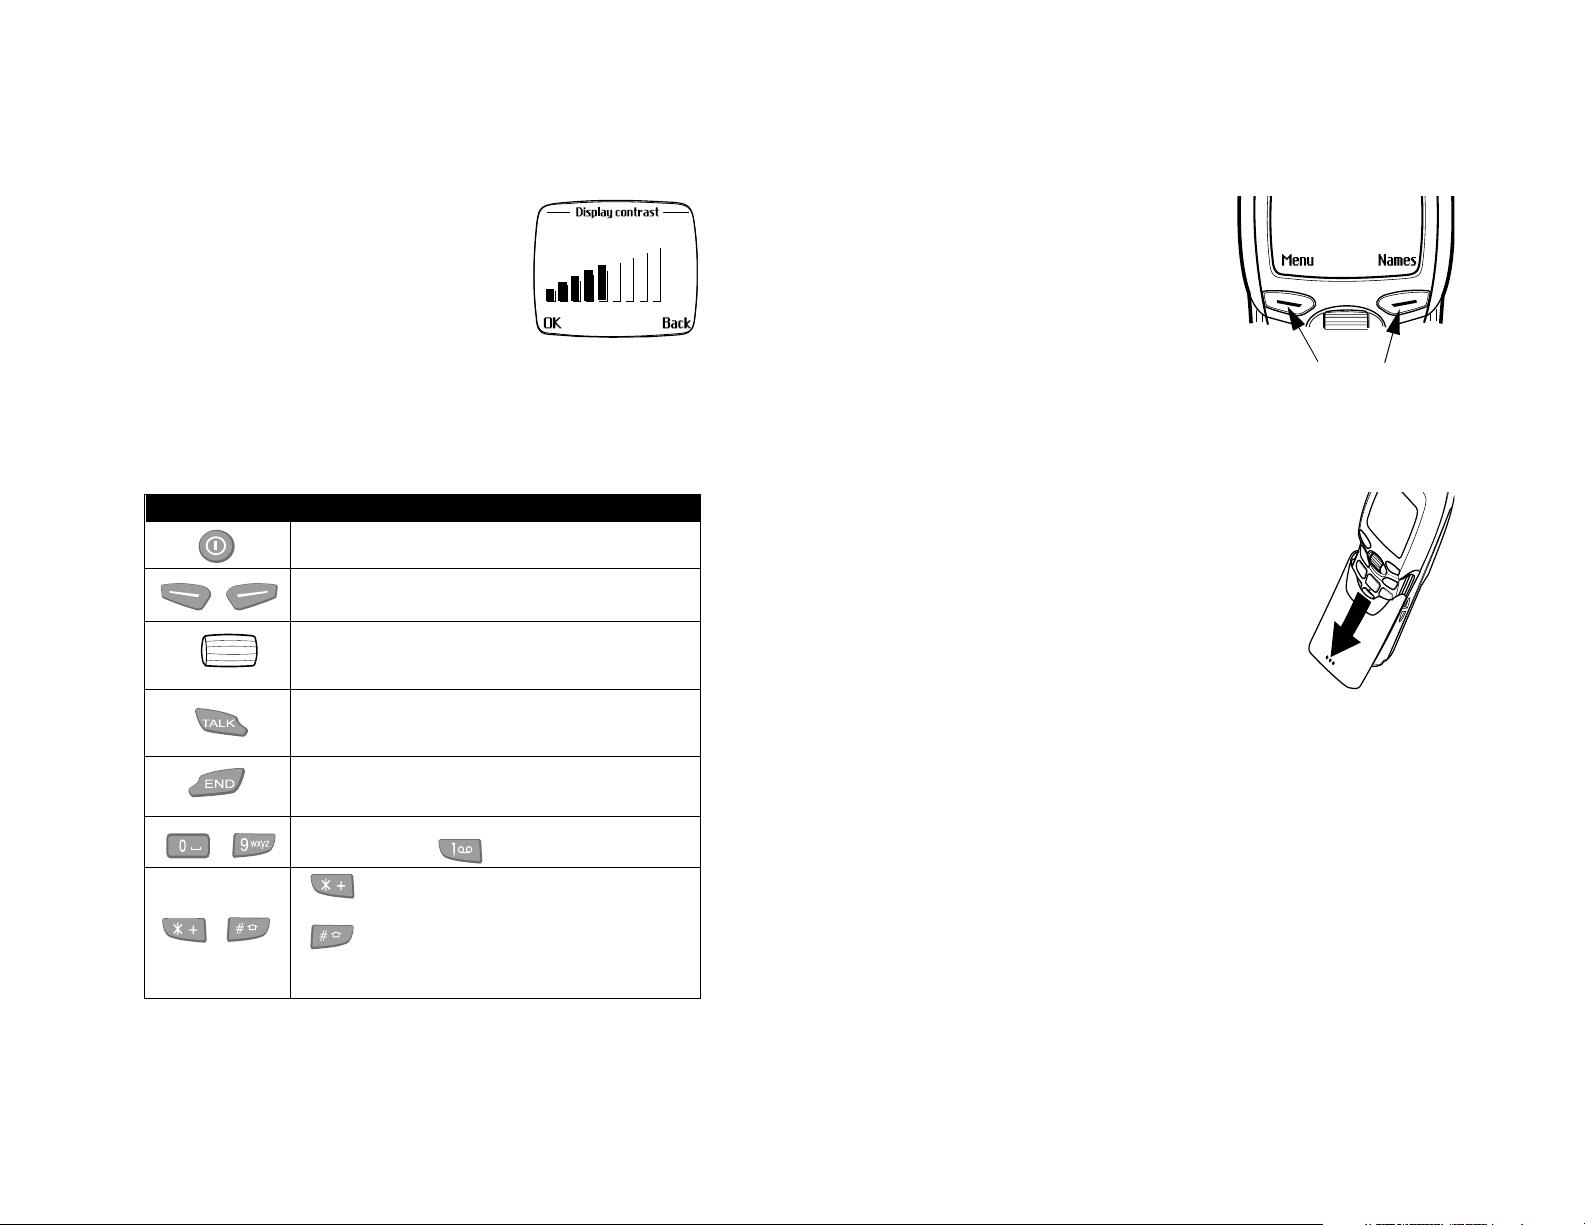
Scroll until Settings appears and press the
2
roller.
Scroll to Phone settings and press the roller.
3
Scroll to Display contrast and press the
4
roller.
A bar graph appears on screen.
Roll the roller up or down to adjust the contrast.
5
Press the roller to accept your changes.
6
Selection keys
Two selection keys are located below
the display screen. In this guide, each
selection key is referred to by the text
above it, inside the screen (such as
Menu or Names).
For example, pressing Menu displays the
first of many menus. Similarly, pressing
Names displays the Phone book menu.
About your phone
Selection keys
• Your phone’s keys
Key Description
Power key:
or press briefly to display the profiles list.
Selection keys:
indicated on screen above the key.
Roller:
select a highlighted item. Use during a call to adjust the
earpiece volume.
Talk key:
or to answer a call. Press once at the Start screen to enter
the list of last-dialed numbers.
End key:
Note:
-
Number keys:
Tip
bringing up the special characters list.
changing the letter case in
ABC to 123 mode.
Press and hold to switch the phone on or off,
Press one of these to perform the function
Roll to scroll through menus and lists. Press to
Press to call the name/number shown on screen
Pr ess to end a call or t o re turn to t he m ain menu.
On analogue, pressing the end key will mute the ring.
Press to enter a number or letter.
: Press and hold to call your voice mailbox.
is used for scrolling through dialing codes and
is used to perform special functions (such as
[ 14 ]
mode) and switching from
ABC
• The sliding cover
The sliding cover protects the keypad and can be
used to answer, end, or reject a call.
• To open the cover, slide it down.
• To close the cover, slide it up until you hear a
click.
Closing the cover exits the menu or Phone
Tip:
book and returns you to the Start screen.
Just in case...
If the plastic part of your sliding cover accidentally comes off, reattach
the cover as described in “Reattach the sliding cover” on page 117.
[ 15 ]

Make and answer calls
5. Make and answer calls
Besides using your keypad, you can also make calls using your phone book,
voice dial, or 1-touch dialing, once you’ve programmed these features.
Use the index in back of this guide to locate these features quickly.
Tip:
• Make a call with the keypad
Open the sliding cover while the phone is on.
1
Enter the area code and phone number using the keypad.
2
Press . Your phone dials the number.
3
To end the call, press .
4
Make an international call
Enter the international dialing prefix.
1
Enter the correct international country code (for example 1 for the US
2
and Canada, 58 for Venezuela, and so on).
Enter the area code and phone number.
3
Press . Your phone dials the number.
4
•Answer a call
• Open the sliding cover, or press .
• End a call
• Press or close the sliding cover.
• Re-dial the last number
The last 30 numbers dialed from your phone are stored in memory.
To display and redial these numbers:
At the Start screen, press .
1
Scroll to any of the numbers using the roller.
2
Press to call the number, or press Options to display the
3
following list:
Call . . . . . . . . . . . . . . . . Calls the highlighted number.
Call time . . . . . . . . . . . Allows you to view the call time and date of
the highlighted number.
Edit number . . . . . . . . Allows you to edit the number and save it to
your phone.
Save . . . . . . . . . . . . . . . Saves the number to memory. You can edit the
name and number before you save.
Add to phone book . . Adds the number to your phone book.
Erase . . . . . . . . . . . . . . Erases the number from your dial list.
Scroll to highlight an option. Press the roller to select.
4
• Earpiece volume
While in a call, roll the roller. A bar graph
appears on screen. Roll the roller again to
adjust the volume. The larger bars indicate
higher earpiece volume.
Volume
• Reject a call
• Press Decline, or close the sliding cover while your phone is
ringing. A busy signal is sent to the network.
[ 16 ]
[ 17 ]
6. Menu navigation
Press Menu 2-5-3
OKSelect
2
Redial
Call timers
NamesMenu
Call Log
Menu
Exit
Call log
Back
5
Clear digital call
timers
Call timers
Back
3
Your phone has 12 main menus. Each main menu contains a number of
submenus and lists. You can navigate the menus using the roller and
selection keys, or you can use a shortcut.
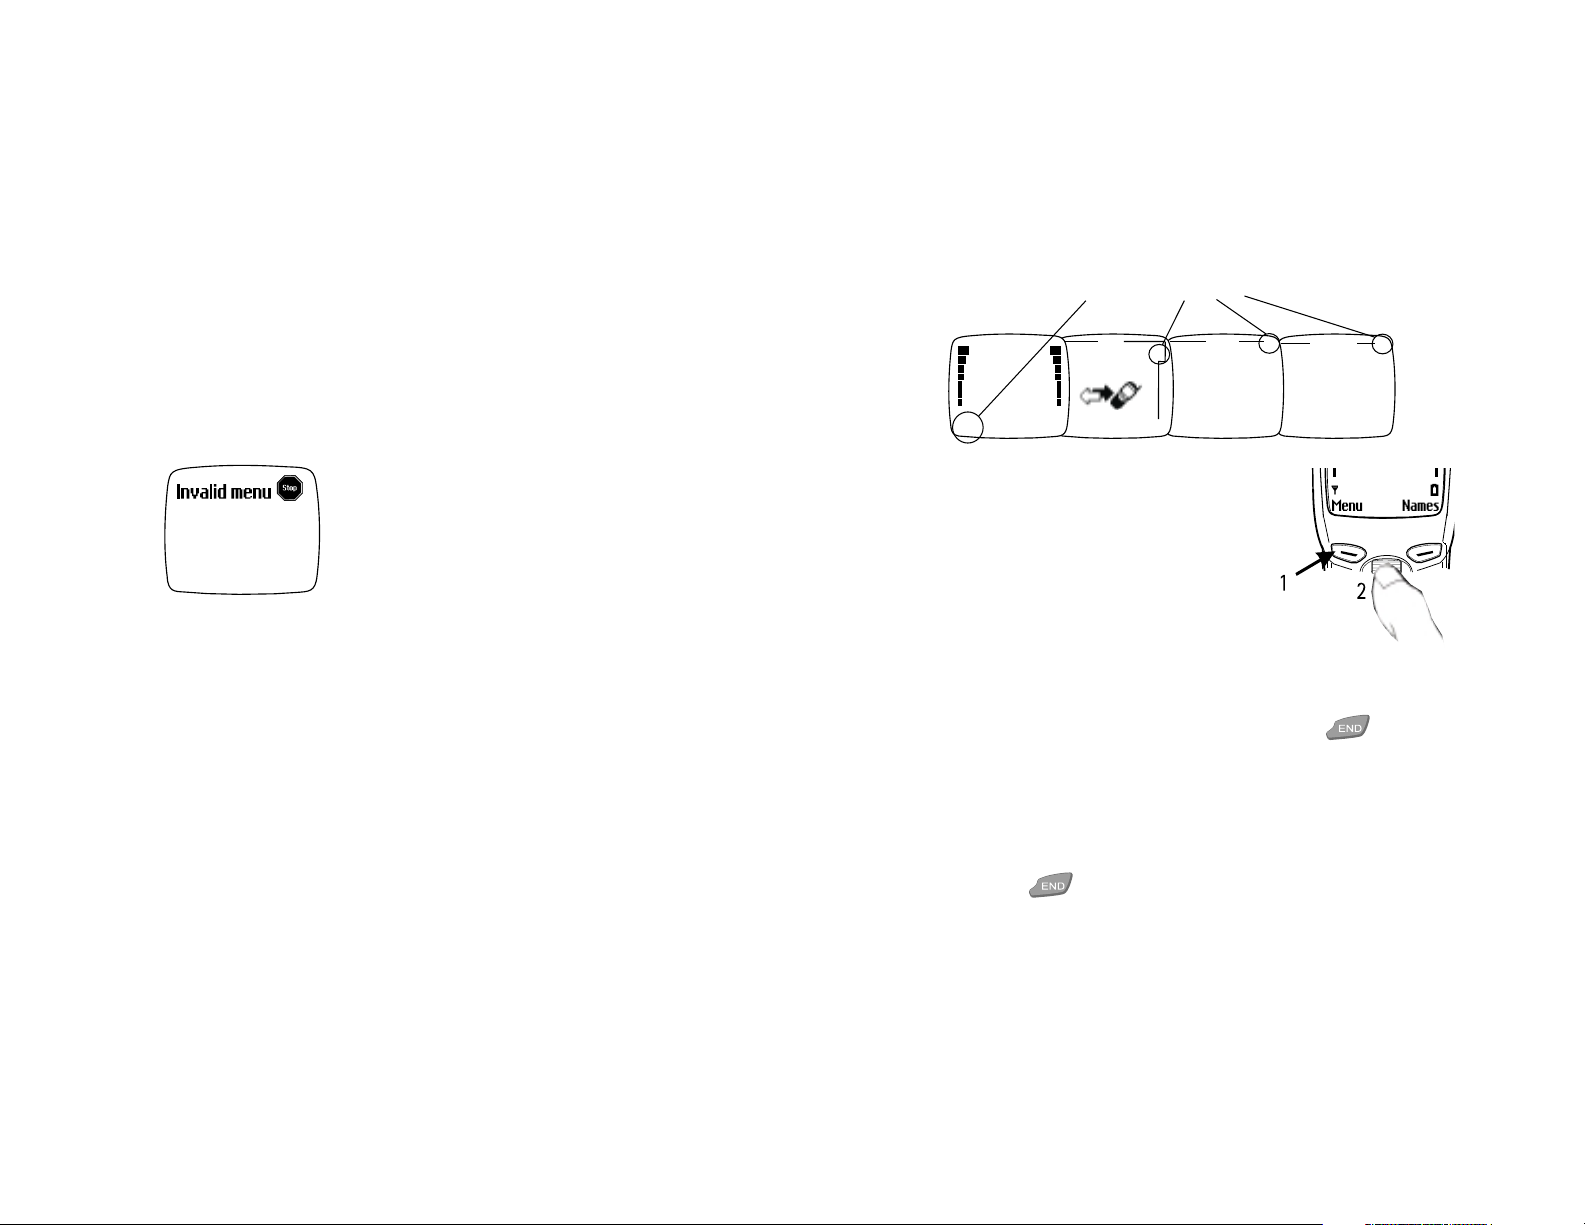
• Important info about shortcuts
Shortcuts are a quick and easy way to access features. However, they
don’t always work (for the reasons described below).
Some features are dependent upon your service
provider. The absence of a feature not only
affects the menu number for that feature but
other features within the menu as well. If you try
to "shortcut" to a feature affected in this manner,
an error message such as the one on the left
appears. If this happens, try to locate the feature
using the roller and selection keys. If you can’t locate the feature, contact
your service provider for more information about the feature in question.
Menu navigation
Press Menu (at the Start screen), followed by the main menu #, its
submenu #, and so on. For example, to clear digital call timers, press
Menu 2-5-3 (Call log > Call timers > Clear digital call timers).
Use the roller
At the Start screen, press Menu.
1
Scroll through the menus with the roller.
2
Press the roller to enter the displayed
3
menu.
Navigate the submenus and lists using the
4
roller and left or right selection keys.
The Help Feature
A brief help description is available for most menus and submenus.
Just go to any menu and wait for 10 seconds.
Use a shortcut
The Messages (1), Calculator (7), and Calendar (8) submenus can’t
Note:
be accessed using shortcuts. Access the menus and submenus of
these functions using the roller method only.
[ 18 ]
Return to a previous menu
• To return to the Start screen from any menu, press .
• While in a submenu, press Back to return to the previous menu.
For example, if you’re at Settings > Time settings, pressing Back will
return you to Settings.
Exit a menu without changing settings
•Press Exit, , or close the sliding cover.
[ 19 ]

Menu navigation
• Menu list
Some items may not
Note:
appear due to phone/SIM card
configuration and service
availability. Check with your
service provider for details.
1. Messages
Text messages
1
Write (options)
Send message
Sending options
Multiple copies
Save message
Clear screen
Insert name (Options)
Insert name
View details
Insert number
Find
Insert template
Please call
Call me at home,...
Call me at work,...
I’m in a meeting,...
Meeting is cance...
I am late, I will b....
See you in.
See you at
Sorry, I can’t hel...
I will be arriving...
Exit
Move cursor
Dictionary
Dictionary off/on
English
Français
Español
1) Inbox (options)
1) Add folder
2) Write message
3) Empty the folder
4) Open folder
5) Message settings
1) Message center number
2) Messages sent as
1) Text
2) E-mail
3) Page
4) Fax
3) Message validity
1) 1 hour
2) 6 hours
3) 24 hours
4) 3 days
5) 1 week
6) Maximum time
4) Default recipient
number (options)
1) Find
2) Accept
5) Delivery reports
1) On
2) Off
6) Reply via same center
1) Yes
2) No
2) Outbox (options)
1) Add folder
2) Write message
3) Empty the folder
4) Open folder
5) Message settings
1) Message center number
2) Messages sent as
1) Text
2) E-mail
3) Page
4) Fax
3) Message validity
1) 1 hour
2) 6 hours
3) 24 hours
4) 3 days
5) 1 week
6) Maximum time
4) Default recipient
number (options)
1) Find
2) Accept
5) Delivery reports
1) On
2) Off
6) Reply via same center
1) Yes
2) No
3) Archive (options)
1) Add folder
2) Write message
3) Open folder
4) Message settings
1) Message center number
2) Messages sent as
1) Text
2) E-mail
3) Page
4) Fax
3) Message validity
1) 1 hour
2) 6 hours
3) 24 hours
4) 3 days
5) 1 week
6) Maximum time
4) Default recipient
number (options)
1) Find
2) Accept
5) Delivery reports
1) On
2) Off
6) Reply via same center
1) Yes
2) No
4) Templates (options)
1) Add folder
2) Write message
3) Empty the folder
4) Open folder
5) Message settings
1) Message center number
2) Messages sent as
1) Text
2) E-mail
3) Page
4) Fax
3) Message validity
1) 1 hour
2) 6 hours
3) 24 hours
4) 3 days
5) 1 week
6) Maximum time
4) Default recipient
number (options)
1) Find
2) Accept
5) Delivery reports
1) On
2) Off
6) Reply via same center
1) Yes
2) No
[ 20 ]
[ 21 ]

Menu navigation
Templates
1) Please call
2) Call me at home,...
3) Call me at work,...
4) I’m in a meeting,...
5) Meeting is cance...
6) I’m late. I will b...
7) See you in
8) See you at
9) Sorry, I can’t hel...
10)I will be arriving...
Voice messages*
2
1) Listen to voice messages
2) Voice mailbox number
2. Call log
Missed calls
1
Received calls
2
Dialed calls
3
Clear call lists
4
1) All calls
2) Missed calls
3) Dialed calls
4) Received calls
Call timers
5
1) Last call
1) Current call timer
1) Off
2) On
2) All digital calls
3) All analog calls (if analogue
module is attached)
4) Clear digital call timers
(security code needed)
5) Clear analog call timers
(security code needed)
(if analogue module is
attached)
3. Profiles
1
2
3
4
5
[ 22 ]
Normal (options)
1) Select
2) Customize (same for all
profiles except Headset)
1) Ringing options
2) Ringing tone
3) Ringing volume
4) Vibrating alert
5) Message alert tone
6) Keypad tones
7) Warning tones
8) Accepted caller groups
Silent
1) Select
2) Customize (see
profile for custom options)
3) Rename
Normal
Meeting
1) Select
2) Customize (see
profile for custom options)
3) Rename
Normal
Outdoor
1) Select
2) Customize (see
profile for custom options)
3) Rename
Normal
Pager
1) Select
2) Customize (see
profile for custom options)
3) Rename
Normal
Handsfree
6
kit/handsfree kit attached)
Headset
7
Headset attached)
1) Customize
(appears when car
(appears only after
1) Ringing options
2) Ringing tone
3) Ringing volume
4) Vibrating alert
5) Message alert tone
6) Keypad tones
7) Warning tones
8) Automatic answer
9) Accepted caller groups
4. Settings
Time settings
1
1) Alarm clock
1) Select
2) Clock
1) Show clock/Hide clock
2) Set the time
3) Time format
1) 24-hour
2) am/pm
Call settings
2
1) Anykey answer
1) On
2) Off
2) Automatic redial
1) On
2) Off
3) 1-touch dialing
1) On
2) Off
4) Call waiting
1) Activate
2) Cancel
3) Check status
5) Line for outgoing calls
1) Line 1
2) Line 2
6) Summary after call
1) On
2) Off
7) Fax or data call
1) Fax & data
2) Fax, data, & voice
3) Fax mailbox
4) Data mailbox
8) Send own caller ID when
calling
1) Default
2) Yes
3) No
9) Calling card
1) None
2) Card A
1) Select
2) Edit
3) Erase
3) Card B
1) Select
2) Edit
3) Erase
4) Card C
1) Select
2) Edit
3) Erase
5) Card D
1) Select
2) Edit
3) Erase
Phone settings
3
1) Language
1) Automatic
2) English
3) Français
4) Español
[ 23 ]

Menu navigation
2) Cell info display*
1) On
2) Off
3) System
1) Automatic
2) Manual
4) Roller function
1) Phone book
2) Quick menu
3) 1-touch dialing
4) Dialed calls
5) Profiles
5) Notifications on SIM update*
1) Shown
2) Not shown
6) Display contrast
7) Slide setting
1) On
2) Off
8) Touch tone length
1) Short
2) Long
9) List of own numbers*
(must be supported by SIM card)
Communication settings
4
1) News and info service*
1) On
2) Off
3) Topic index
4) Topics
1) Add
5) Language
1) All
2) English
3) Français
4) Español
2) Service command editor*
Security settings
5
1) SIM card security
Enter PIN code: 1234 is default
1) On
2) Off
2) Call restrictions*
1) Outgoing calls
1) Activate
2) Cancel
3) Check status
2) International calls
1) Activate
2) Cancel
3) Check status
3) International calls except
to home country
1) Activate
2) Cancel
3) Check status
4) Incoming calls
1) Activate
2) Cancel
3) Check status
5) Incoming calls if roaming
1) Activate
2) Cancel
3) Check status
6) Cancel all call restriction
Restriction password:
3) Fixed dialing
4) Closed user group
1) System default
2) On
Group number:
3) Off
5) Security level
Enter security code:
1) Off
2) Memory
3) Phone
6) Module Security (if analogue
module is attached)
7) Change access codes
1) Change PIN code
2) Change PIN2 code
3) Change security code
4) Change restriction
password
5) Change module code
(if analogue module is
attached)
5. Forwarding
Forward all voice calls*
1
1) Activate
1) To voice mailbox
2) To other number
2) Cancel
3) Check status
Forward when not able to
2
take calls*
1) Activate
1) To voice mailbox
2) To other number
2) Cancel
3) Set delay time
1) 5 seconds
2) 10 seconds
3) 15 seconds
4) 20 seconds
5) 25 seconds
6) 30 seconds
Forward all fax calls*
3
1) Activate
1) To fax mailbox
2) To other number
2) Cancel
3) Check status
Forward all data calls*
4
1) Activate
1) To data mailbox
2) To other number
2) Cancel
3) Check status
Cancel all call forwarding
5
6. Games
Play
Snake II
1
1) 1 player
2) 2 players
3) Level
4) Top score
5) Instructions
Rotation
2
1) New game
2) Level
3) Instructions
Racket
3
1) New game
2) Level
3) Instructions
Opposite
4
1) New game
2) Level
3) Instructions
Settings
5
1) Sounds
1) Off
2) On
2) Lights
1) Off
2) On
[ 24 ]
[ 25 ]

Menu navigation
7. Calculator
Options
Exchange rate
1
8. Calendar
>
View
Options
Make a note
1
1) Meeting
2) Call
3) Birthday
4) General note
View by weeks
2
Go to date
3
View selected day
4
Settings
5
1) Set the date
2) Set the time
3) Date format
1) dd mm yyyy
1) date separator (.)
2) date separator (/)
3) date separator (-)
2) mm dd yyyy
1) date separator (.)
2) date separator (/)
3) date separator (-)
3) yyyy mm dd
1) date separator (.)
2) date separator (/)
3) date separator (-)
4) Time format
1) 24-hour
2) am/pm
5) Week starts on
1) Monday
2) Sunday
3) Saturday
6) Autoerase
1) Never
2) Older than 1 mo.
3) Older than 3 mos.
4) Older than 6 mos.
9. To-do list
Options (with no previous entries)
Add
1
Go to calendar
2
(scroll to day, week, or
month)
Dictionary
3
1) Dictionary off
2) English
3) Français
4) Español
Options (with previous entry)
Add
1
Erase
2
Edit
3
Change priority
4
1) High (1)
2) Medium (2)
3) Low (3)
View
5
View by priority
6
1) High (1)
2) Medium (2)
3) Low (3)
Go to calendar
7
Save to calendar
8
Send as text
9
1) Send message
2) Sending options
1) Multiple copies
3) Save message
4) Clear screen
5) Insert name
6) Insert number
7) Insert template
8) Exit
9) Insert word
10) Insert symbol
11 ) E d it wo rd
12) Next match
13) Dictionary
Dictionary
10
1) Dictionary off
2) English
3) Français
4) Español
10. Infrared
Activate
11. Services*
Home
1
Bookmarks
2
Options
1) Add bookmark
Settings
3
1) Connection settings
1) Set 1
1) Activate
2) Edit
1) Homepage
2) Connection type
3) Connection security
4) Bearer
5) Dial-up number
6) IP address
7) Authentication type
8) Data call type
9) Data call speed
10) Username
11 ) P a s s w o r d
3) Rename
2) Set 2
1) Activate
2) Edit (same as set 1)
3) Rename
3) Set 3
1) Activate
2) Edit (same as set 1)
3) Rename
4) Set 4
1) Activate
2) Edit (same as set 1)
3) Rename
5) Set 5
1) Activate
2) Edit (same as set 1)
3) Rename
2) Appearance settings
1) Text wrapping
1) On
2) Off
2) Show images
1) On
2) Off
3) Security certificate
Go to address
4
Clear the cache
5
12. Keyguard
Press the roller and follow the
instructions to activate and
deactivate.
[ 26 ]
[ 27 ]
Your phone’s keypad
7. Your phone’s keypad
• Enter characters and numbers
You can enter any combination of numbers and letters into text messages,
phone book entries, or web addresses using the and modes.
The phone’s current mode is indicated in the upper left corner of the
screen. To enter a letter or number, press the key labeled with that letter
or number while in or mode.
The default case in mode is sentence case. Only the first
Note:
letter of each sentence is capitalized.
• To enter a word, press any key once to insert the first letter on the key,
twice for the second letter, and so on.
• Press to enter a space between words.
• Press briefly while in mode to enter a period (.). Press
repeatedly to bring up other characters.
• Press and hold to display special characters such as punctuation
marks, slashes, and more. More about this on the next page.
• If you enter an incorrect character, press Clear to erase.
• To erase more than one character, press Clear as many times as
necessary, or press and hold Clear to delete all characters.
Predictive text input is a faster way to write messages. See “Write
Tip:
words with predictive text” on page 80 for more information.
Switch between ABC and 123 mode
The default is mode, but you can switch modes easily.
At a text message or phone book entry, press and hold until the
icon in the upper left corner of the display switches to
(or vice versa).
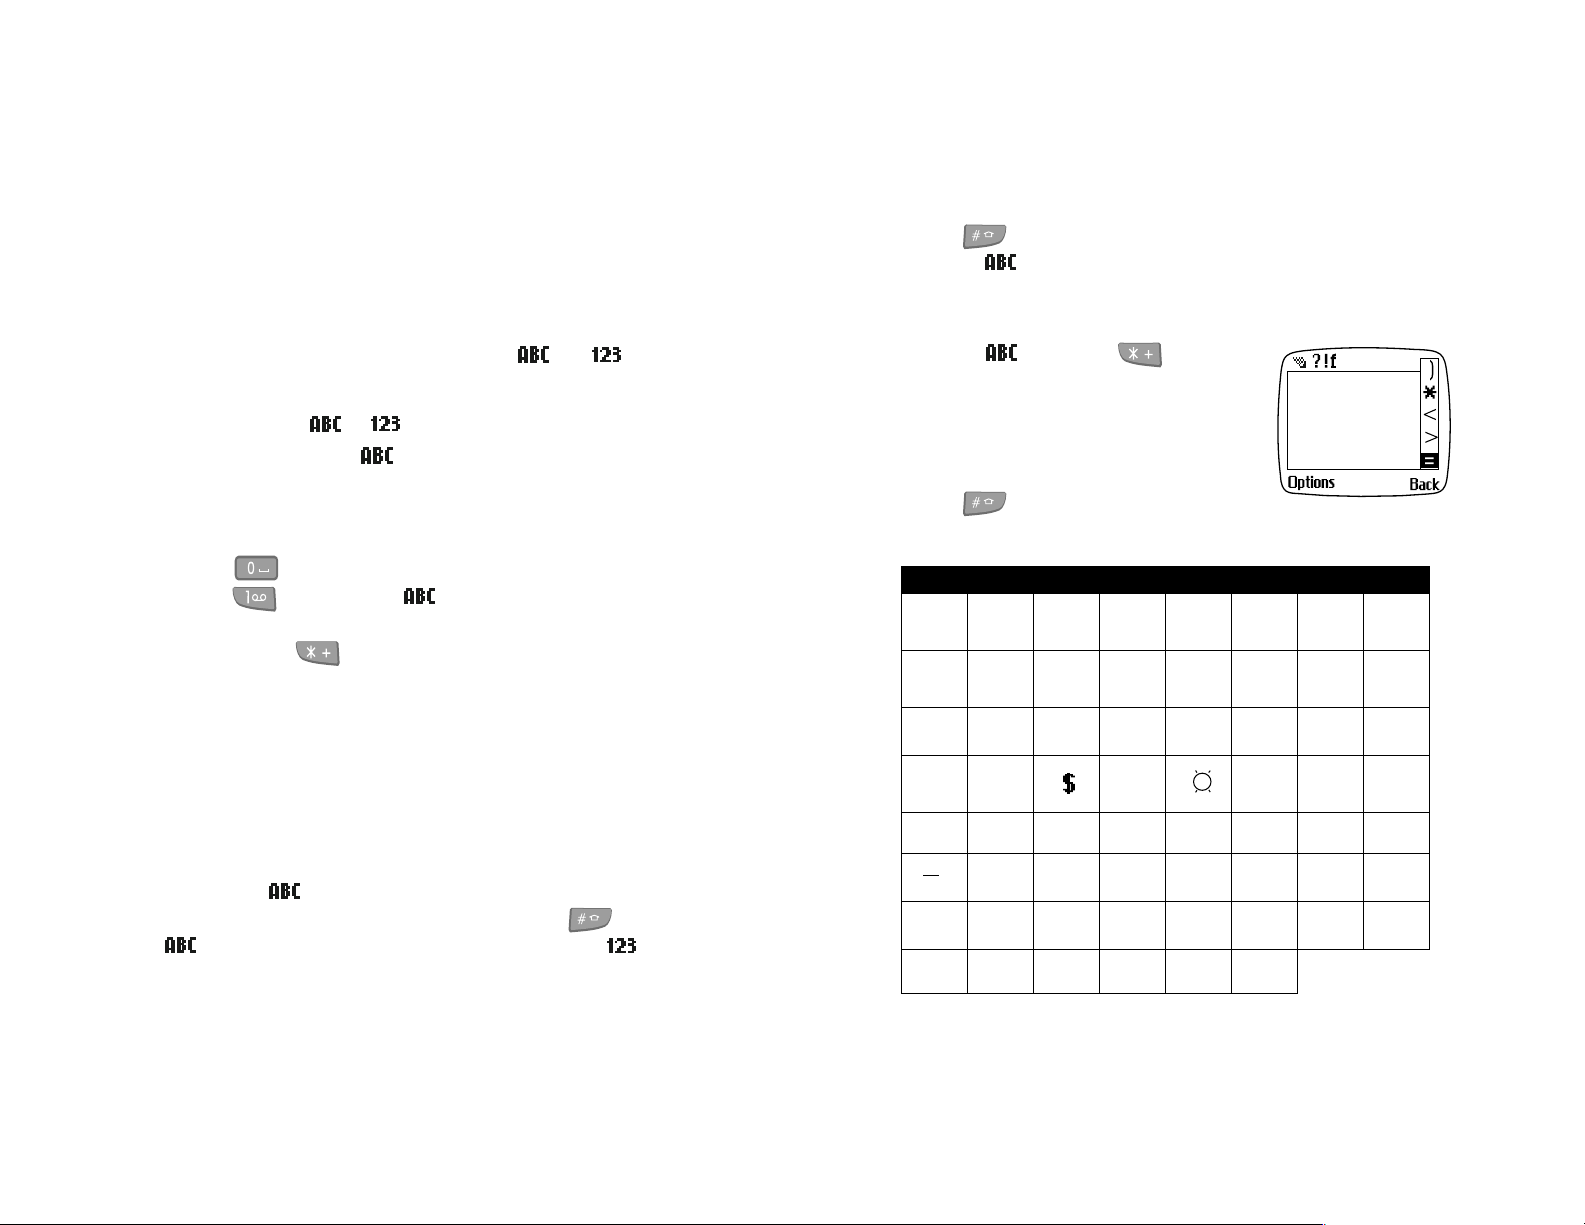
Switch between uppercase and lowercase
Press to switch to and from uppercase to lowercase characters
while in mode or while entering special characters.
• Enter special characters
While in mode, press to display a
list of special characters on the right of your
screen.
• Scroll to highlight a character. Press the
roller to enter the character into your
message.
Press to switch between uppercase
and lowercase characters, if they’re available.
Available special Characters
.
)
?!
,
%* #+<=
€
Àà Áá Ââ Ãã Ää Åå Ææ Çç
D
Ï
β
£
ð
Èè
Ññ Òò Óó Ôô Õõ Öö Øø
Ùù Úú Ûû Üü Þþ
Éé Êê Ëë
@ ’ -_(
:;
¥
&
/~
§
ìíÎ
>
i
\
"
¿
[ 28 ]
[ 29 ]

8. Phone book
You can store up to 1000 names, numbers, addresses, and e-mail addresses
in your Phone book. Numbers can be (up to) 32 digits long, while names
can be up to 50 characters long.
Phone book
Scroll to the text type (E-mail, Address, or Note) of your choice and
3
press the roller.
Saved to phone appears on screen.
Enter the text with the keypad and press OK.
4
Press to return to the Start screen.
5
• Open the Phone book
At the Start screen, press Names.
1
To highlight an item, scroll to it with the roller.
Press the roller to select the item.
Add names and numbers to the phone book
At the Start screen, press Names.
1
Scroll to Add entry and press the roller.
2
Enter a name using the keypad or roller and press OK.
3
Enter a number using the keypad and press OK.
4
Saved to phone or Saved to SIM card appears on screen, depending
on which memory you’ve set as your default.
Press to return to the Start screen.
5
Add a text entry to a name
Once you’ve added a contact to your phone book, you’ll probably want to
add more information about the contact, such as an email address,
mailing address, or a note.
This feature only works when you select phone memory as your
Note:
default. A text entry cannot be created as a "stand alone" contact in
your phone book. Text entries can only be added to existing contacts.
Find the entry in your phone book to which you want to add text.
1
Press Options, scroll to Add text, and press the roller.
2
Save a number quickly
At the Start screen, enter a number to save.
1
Press and hold Options.
2
Saved to phone or Saved to SIM card appears on screen, depending
on which memory you’ve set as your default.
• Phone book options
At the Start screen, press Names.
1
The following options appear on screen. Scroll through the list with
the roller. Press the roller to select.
Menu Option Use this option to..
List names
Find
Add entry
Voice tags
Edit
Erase
Copy
Scroll through a list of saved names.
Search for a specific name.
Enter a new name and number, then add it to the Phone
book.
List all of the names and numbers that have voice tags
assigned to them.
Update or change any saved name or number.
Erase names and numbers. You can erase individual names
and numbers, or all information at one time.
Copy names and numbers from your phone to a SIM card.
[ 30 ]
[ 31 ]
 Loading...