

Page 1

PAMS Technical Documentation
NSE–5 Series Transceivers
Troubleshooting
Issue 1 07/99
Page 2

NSE–5
PAMS
Troubleshooting
Contents
Baseband 3. . . . . . . . . . . . . . . . . . . . . . . . . . . . . . . . . . . . . . . . . . . . . . . . . . .
1. Phone is totally dead 4. . . . . . . . . . . . . . . . . . . . . . . . . . . . . . . . . . . . .
2. Flash programming doesn’t work 5. . . . . . . . . . . . . . . . . . . . . . . . . . .
3. Power doesn’t stay on or phone is jammed 9. . . . . . . . . . . . . . . . . .
4. Display Information: Contact Service 11. . . . . . . . . . . . . . . . . . . . . . .
5. The phone doesn’t register to the network 11. . . . . . . . . . . . . . . . . . .
6. SIM card is out of order 15. . . . . . . . . . . . . . . . . . . . . . . . . . . . . . . . . . . . . .
7. Audio Faults 17. . . . . . . . . . . . . . . . . . . . . . . . . . . . . . . . . . . . . . . . . . . . . . . .
7.1 Uplink/Downlink Problem 17. . . . . . . . . . . . . . . . . . . . . . . . . . . . . . . .
7.1 Uplink Problem 18. . . . . . . . . . . . . . . . . . . . . . . . . . . . . . . . . . . . . . . . .
7.1 Downlink Problem 19. . . . . . . . . . . . . . . . . . . . . . . . . . . . . . . . . . . . . .
8. Charging Faults 19. . . . . . . . . . . . . . . . . . . . . . . . . . . . . . . . . . . . . . . . . . . . .
Technical Documentation
Page No
8.1 Seems Dead 19. . . . . . . . . . . . . . . . . . . . . . . . . . . . . . . . . . . . . . . . . . .
8.2 Display Problem 20. . . . . . . . . . . . . . . . . . . . . . . . . . . . . . . . . . . . . . . .
Rf Troubleshooting 21. . . . . . . . . . . . . . . . . . . . . . . . . . . . . . . . . . . . . . . . . .
Abbreviations in fault finding charts 22. . . . . . . . . . . . . . . . . . . . . . . . . . .
GSM Receiver 23. . . . . . . . . . . . . . . . . . . . . . . . . . . . . . . . . . . . . . . . . . . . .
PCN Receiver 26. . . . . . . . . . . . . . . . . . . . . . . . . . . . . . . . . . . . . . . . . . . . .
GSM Transmitter 30. . . . . . . . . . . . . . . . . . . . . . . . . . . . . . . . . . . . . . . . . . .
PCN Transmitter 33. . . . . . . . . . . . . . . . . . . . . . . . . . . . . . . . . . . . . . . . . . .
Synthesizers 36. . . . . . . . . . . . . . . . . . . . . . . . . . . . . . . . . . . . . . . . . . . . . . .
UHF VCO 37. . . . . . . . . . . . . . . . . . . . . . . . . . . . . . . . . . . . . . . . . . . . . . . . .
Page 2
Issue 1 07/99
Page 3

PAMS
NSE–5
Technical Documentation
Troubleshooting
TroubleShooting
Baseband
The following hints should facilitate finding the cause of the problem when
the circuitry seems to be faulty. This troubleshooting instruction is divided
following section.
1. Phone is totally dead
2. Flash programming doesn‘t work
3. Power doesn‘t stay on or the phone is jammed
4. Display information: Contact Service
5. Phone doesn‘t register to the network or phone doesn‘t make a call.
6. Plug in SIM card is out of order ( insert SIM card or card rejected).
7. Audio fault.
8. Charging fault
The first thing to do is carry out a through visual check of the module.
Ensure in particular that:
a) there are not any mechanical damages
b) soldered joints are OK
Note:X201 is a connection that is ONLY present in the production. Therefore it is not applicable for the
PAMS repair.
Issue 1 07/99
Page 3
Page 4
NSE–5
PAMS
Troubleshooting
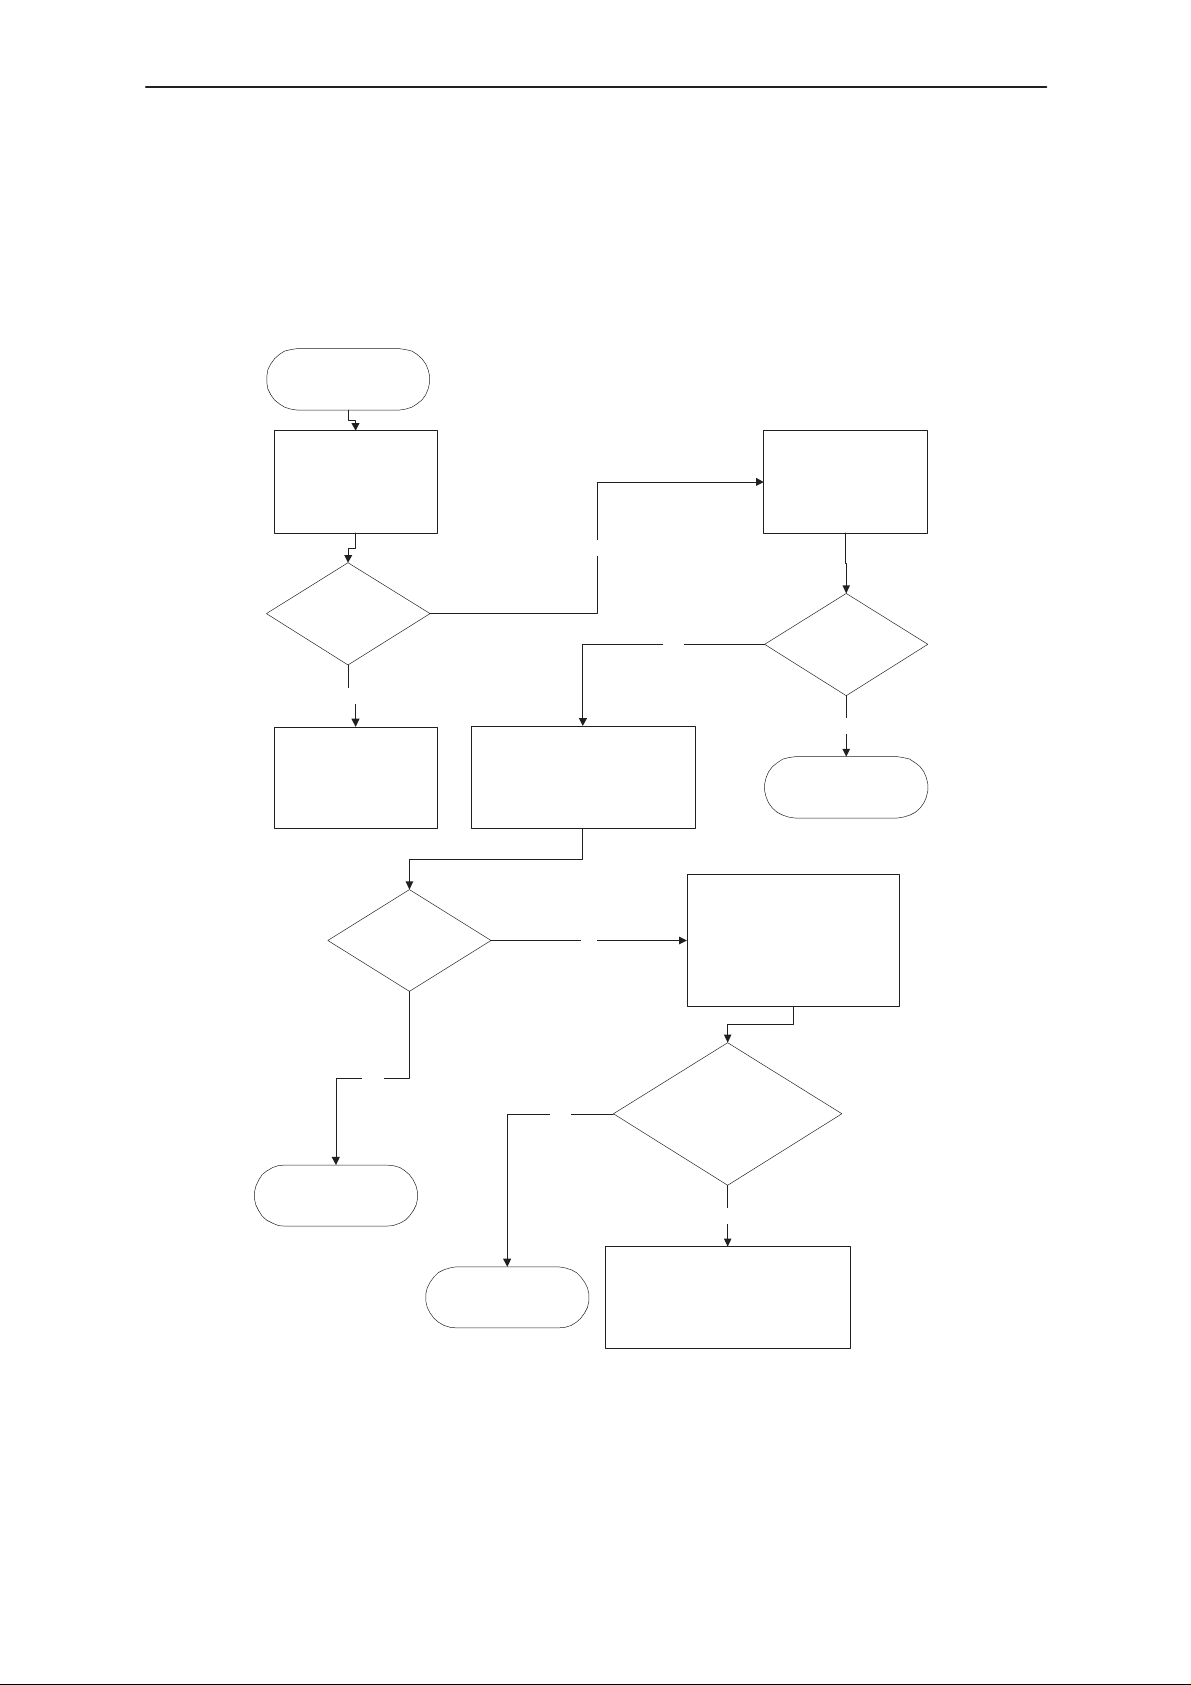
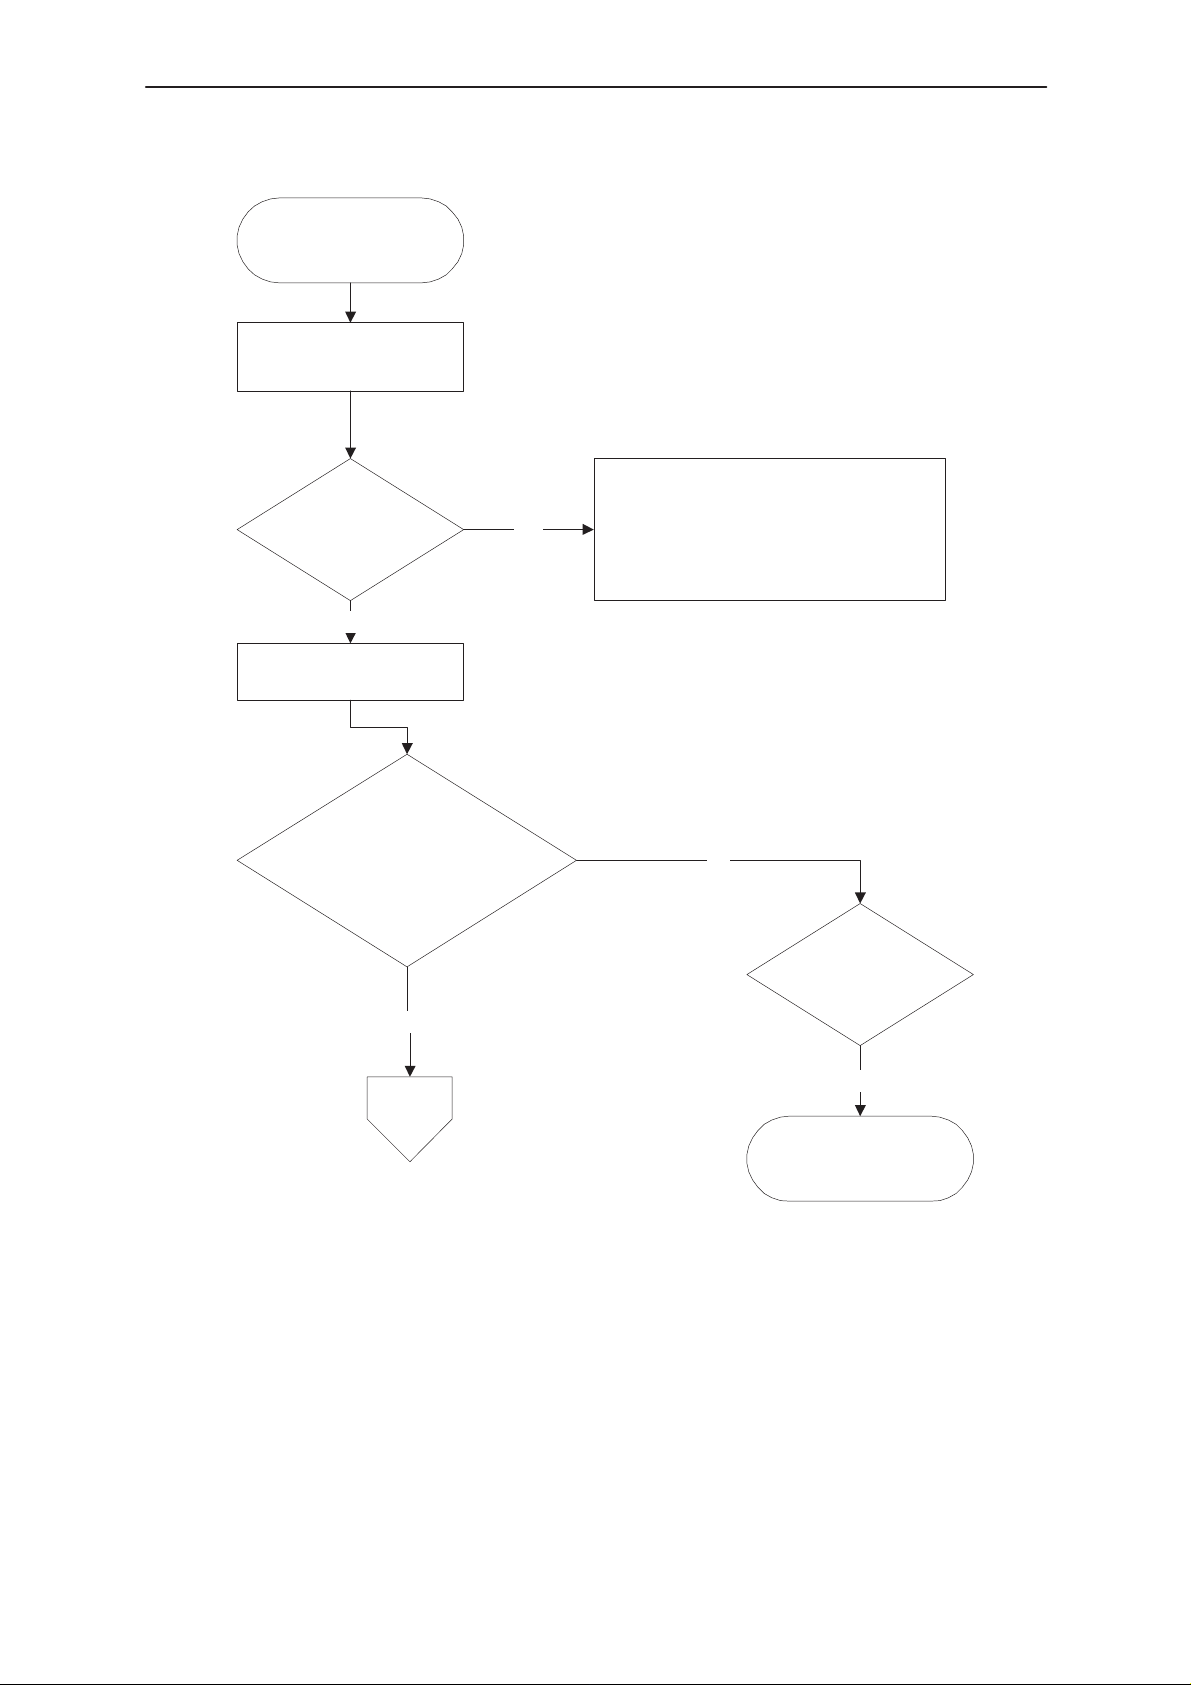
1. Phone is totally dead
This means that phone doesn’t take current at all when the power switch
is pressed (X400 pin 7) or when the watchdog disable pin (X201 pin 11) is
grounded. Used battery voltage must be higher than 3.1 V. Otherwise the
hardware of CCONT (N100) prevents totally to switch power on.
Phone is totally dead.
Measure voltage at
C155 (VBAT)
3.6V
Technical Documentation
Measure voltage at
C153
Yes
Yes
3.6V
No
Failure in VBAT.
Check X101, X102,
L103, L102, R102
Voltages OK?
Yes
Power doesn’t stay on.
Measure voltage at V113 pin 4
C112 (end towards bottom) (VXO)
When PWR switch is pressed or
WDOGDISABLE is grounded.
(Vbb) 2.8V
2.8V
No
Yes
(Will be low only during
power switch is pressed.)
No
Faulty PCB
Measure voltage at R413 (end
towards edge) when pwr–switch
(X400 pin 7) is pressed or
WDOGDISABLE (X201 pin 11)
is grounded.
0V
power–up of CCONT if
No
Figure 1.
Page 4
Faulty PCB
Check R413, V410
Check LCD–module
Check WDOGDISABLE line
Issue 1 07/99
Page 5

PAMS
NSE–5
Technical Documentation
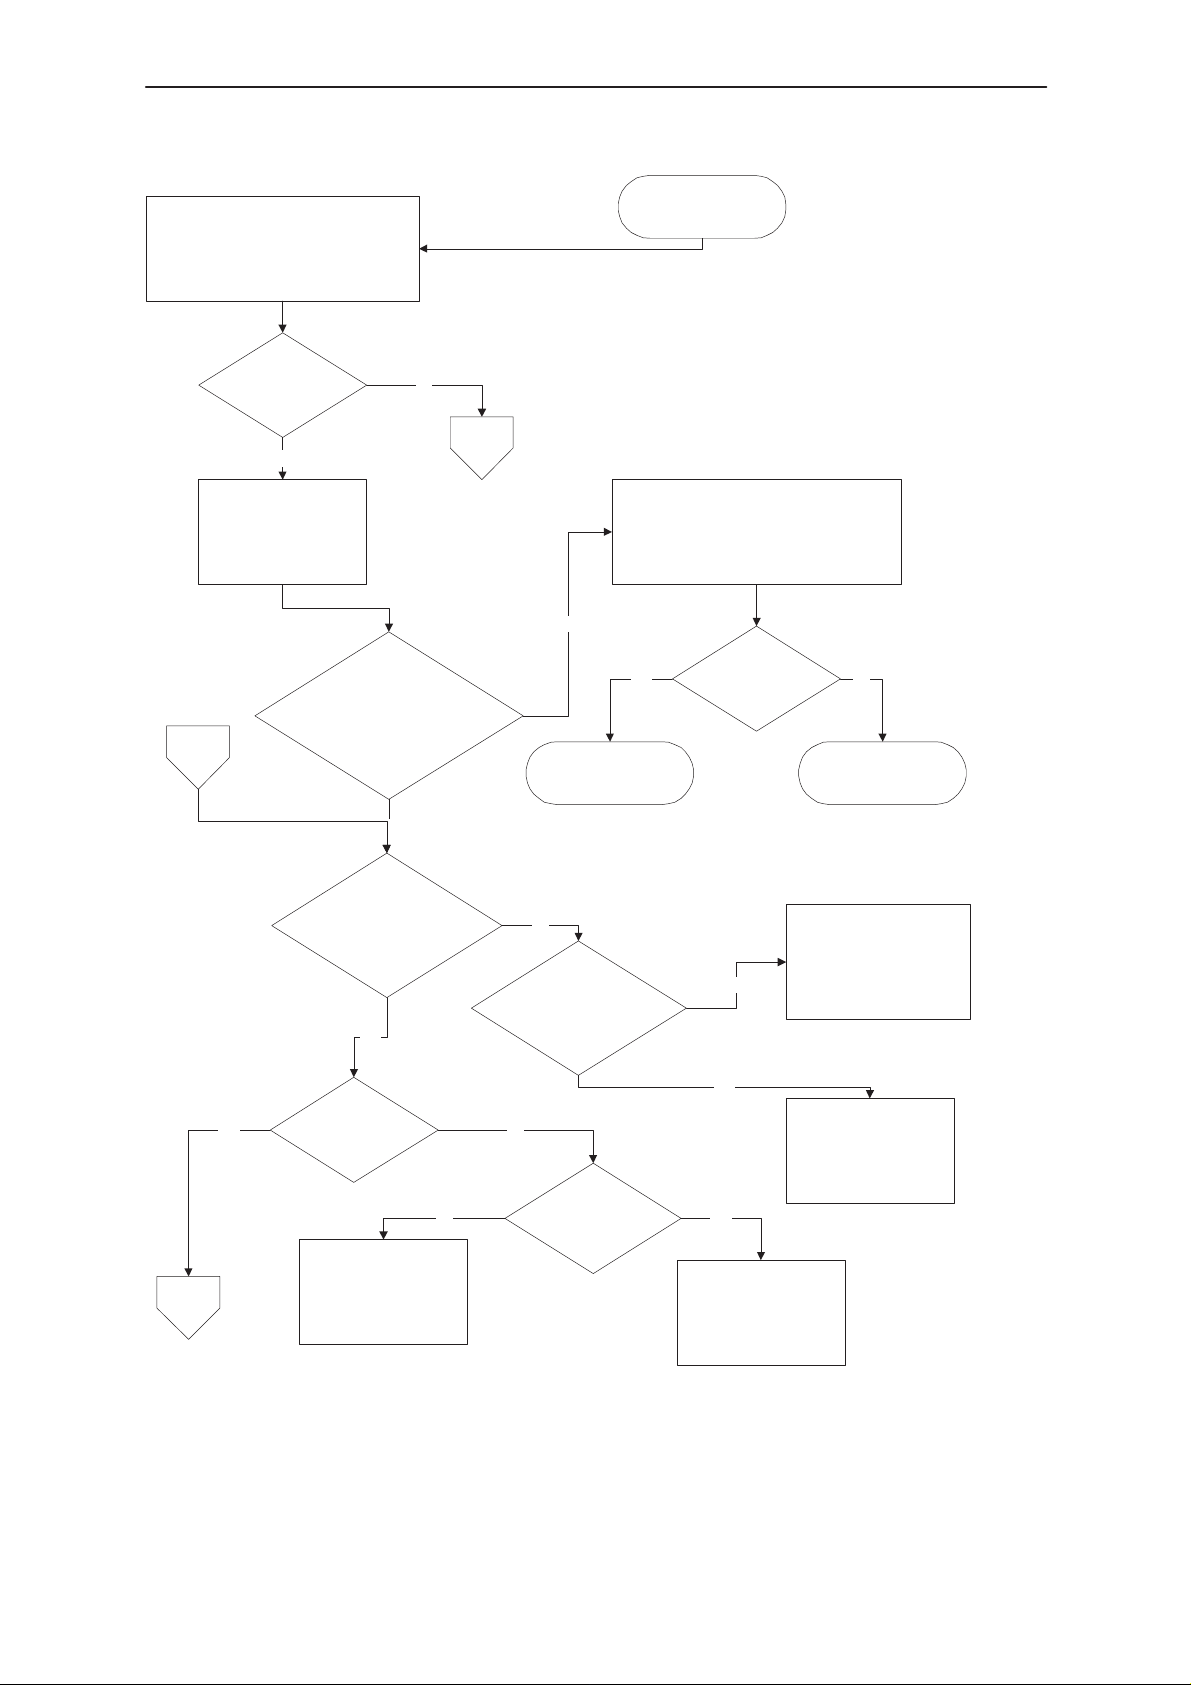
2. Flash programming doesn’t work
The flash programming can be done via panel connector X201 or via
system connector X200.
In production, the first programming is done via panel connector X201.
After this, the panel connector is cut away, thus other flash programming
must be done via system connector X200.
The main differences between these are:
a) FLASH programming voltage is produced different way.
b) Signal routings are different.
The fault finding diagrams for flash programming are shown in the next
three figures
In flash programming error cases the flash prommer can give some
information about a fault.
The fault information messages could be:
– MCU doesn’t boot
– Serial clock line failure
– Serial data line failure
– External RAM fault
– Algorithm file or alias ID don’t find
– MCU flash Vpp error
Troubleshooting
Issue 1 07/99
Page 5
Page 6
NSE–5
PAMS
Troubleshooting
Check if fault information from
Prommer is one of the following:
a) MCU doesn’t boot
b) serial dataline failure
c) serial clock line failure
failure is one of the
above mentioned?
Yes
Connect watchdog
disable (WDDIS R413
end towards edge) to
GND.
C308 end towards RTC–battery
C112 end towards bottom (VXO)
C
(Vbb) is 2.8V
is 2.8V
Technical Documentation
FLASH Programming
doesn’t work.
No
A
X201 pin 11 –> R413 end towards edge
No
See section ”Phone is
totally dead”.
Check WDDIS line:
and
R413 other end –> X400 pin 7
Line OK?
NoYes
Faulty PCB
Yes
Master RESET (PURX
R147 towards board)) is ”1”
(2.8V) after ca. 60ms
Yes
Yes
B
13MHz clock
D700 pin 4
500mVpp min.
No Yes
Check R727, V702,
R728, R714, G701
No
Check sleep clock
(C150 end towards MAD)
32kHz square wave
No
RFC 13MHz
800mV min.
V702 collector
No
Yes
Check D700
Check sleep clock circuit.
R117, R118, R121, R135,
C103, C104, C149, B100
and C150
Faulty N100 or
overloaded PURX line
Figure 2.
Page 6
Issue 1 07/99
Page 7
PAMS
NSE–5
Technical Documentation
B
Check that the following lines are OK:
FCLK (M–BUS) line: X200 pin 11, X201 pin 3 –> V102 pin 4
FTX (fbus_tx) line: X200 pin 13, X201 pin 1 –> V101 pin 4
FRX (fbus_rx) line: X200 pin 12, X201 pin 2 –> V101 pin 5
(value on all should be 100 ohm)
Check also pull–up and –down resistors: R106, R304, R306
GND: X200 pin 14, X201 pin 7 –> GND
OK? Repair or defect PCB
Yes
Troubleshooting
No
Figure 3.
Check:
D304, D305, D306
OK?
Yes
MAD or FLASH faulty.
No
Repair
Issue 1 07/99
Page 7
Page 8
NSE–5
PAMS
Troubleshooting
A
External RAM fault?
Yes
Check pins of SRAM (D302)
Check control lines of SRAM: RAMselX ...
No
Technical Documentation
No
ID problem?
NO
MCU FLASH Vpp
Error
Yes
Check type of FLASH
Check soldering of FLASH
(Both FLASHES)
Yes
Unknown fault.
Try phone totally dead.
Check R145 and R146
in both ends.
Voltage higher than
1.7V during
Yes
Defect FLASH or
flashing–SW has wrong
version.
flashing?
Flashing from
No
Defect MAD
MCUGENIO03 or
flashing–SW has wrong
version.
X201?
YesNo
Check R146 for
connection to X201 pin
10 in one end and X201
pin 7 in the other end.
Check D100
Figure 4.
Page 8
Issue 1 07/99
Page 9

PAMS
NSE–5
Technical Documentation
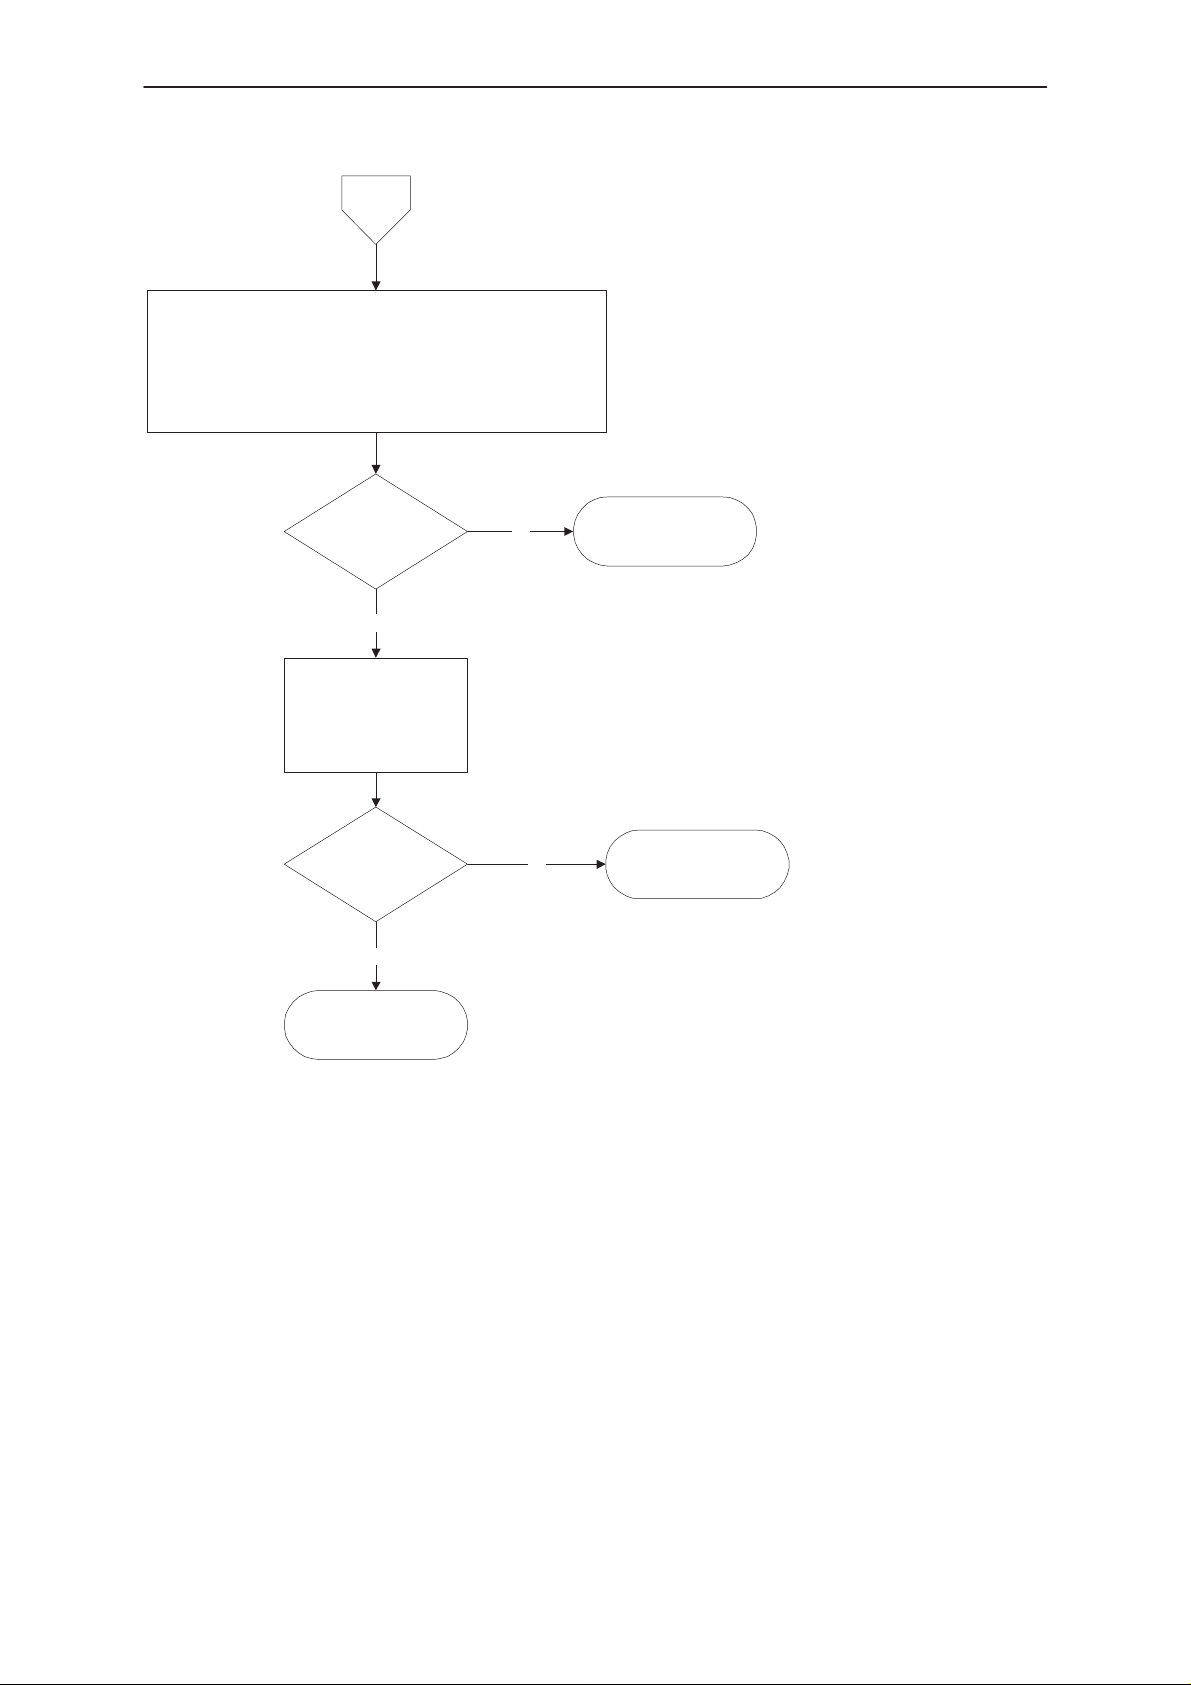
3. Power doesn’t stay on or phone is jammed
If this kind of fault has come after flash programming, there are most
probably open pins in ICs.
The soldered joints of ICs: D300 (MAD2Pr1), D301 & D303 (FLASH),
N100 (CCONT), D302 (SRAM) are useful to check at first.
Normally the power will be switched off by CCONT (N100) after 30
seconds, if the watchdog of the CCONT can not be served by software.
Check watchdog is updated. X400 pin 2 is high and at the same time
X400 pin 13 toggles. In the normal case there is a short burst of pulses
every 8 seconds.
The power off function of CCONT can be prevented by connecting a short
circuit wire from CCONT R413 (end towards edge) to ground.
Troubleshooting
Issue 1 07/99
Page 9
Page 10
NSE–5
PAMS
Troubleshooting
Power doesn’t stay on or
phone is jammed
Check X400 pin 13
while X400 pin 2 is high
pin 13 pulsing?
Connect R413 end
towards edge to GND
No
Yes
Technical Documentation
Software is able to run in phone,
check UI–module.
If power is switched off after a few
seconds, check BSI and BTEMP lines.
Figure 5.
VBB (C308 end towards RTC
batt.) = 2.8V
and
VXO (C112 end towards
bottom) = 2.8V
Yes
C
Go To Figure
No
Vbatt is correct
3.6V
Yes
2.
N100 is faulty.
Page 10
Issue 1 07/99
Page 11
PAMS
NSE–5
Technical Documentation
Troubleshooting
4. Display Information: Contact Service
This fault means that software is able to run and thus the watchdog of
CCONT (N100) can be served.
Selftest functions are run when power is switched on and software is
started to excute from flash.
If any of selftests is failed, contact service information will be shown on
display.
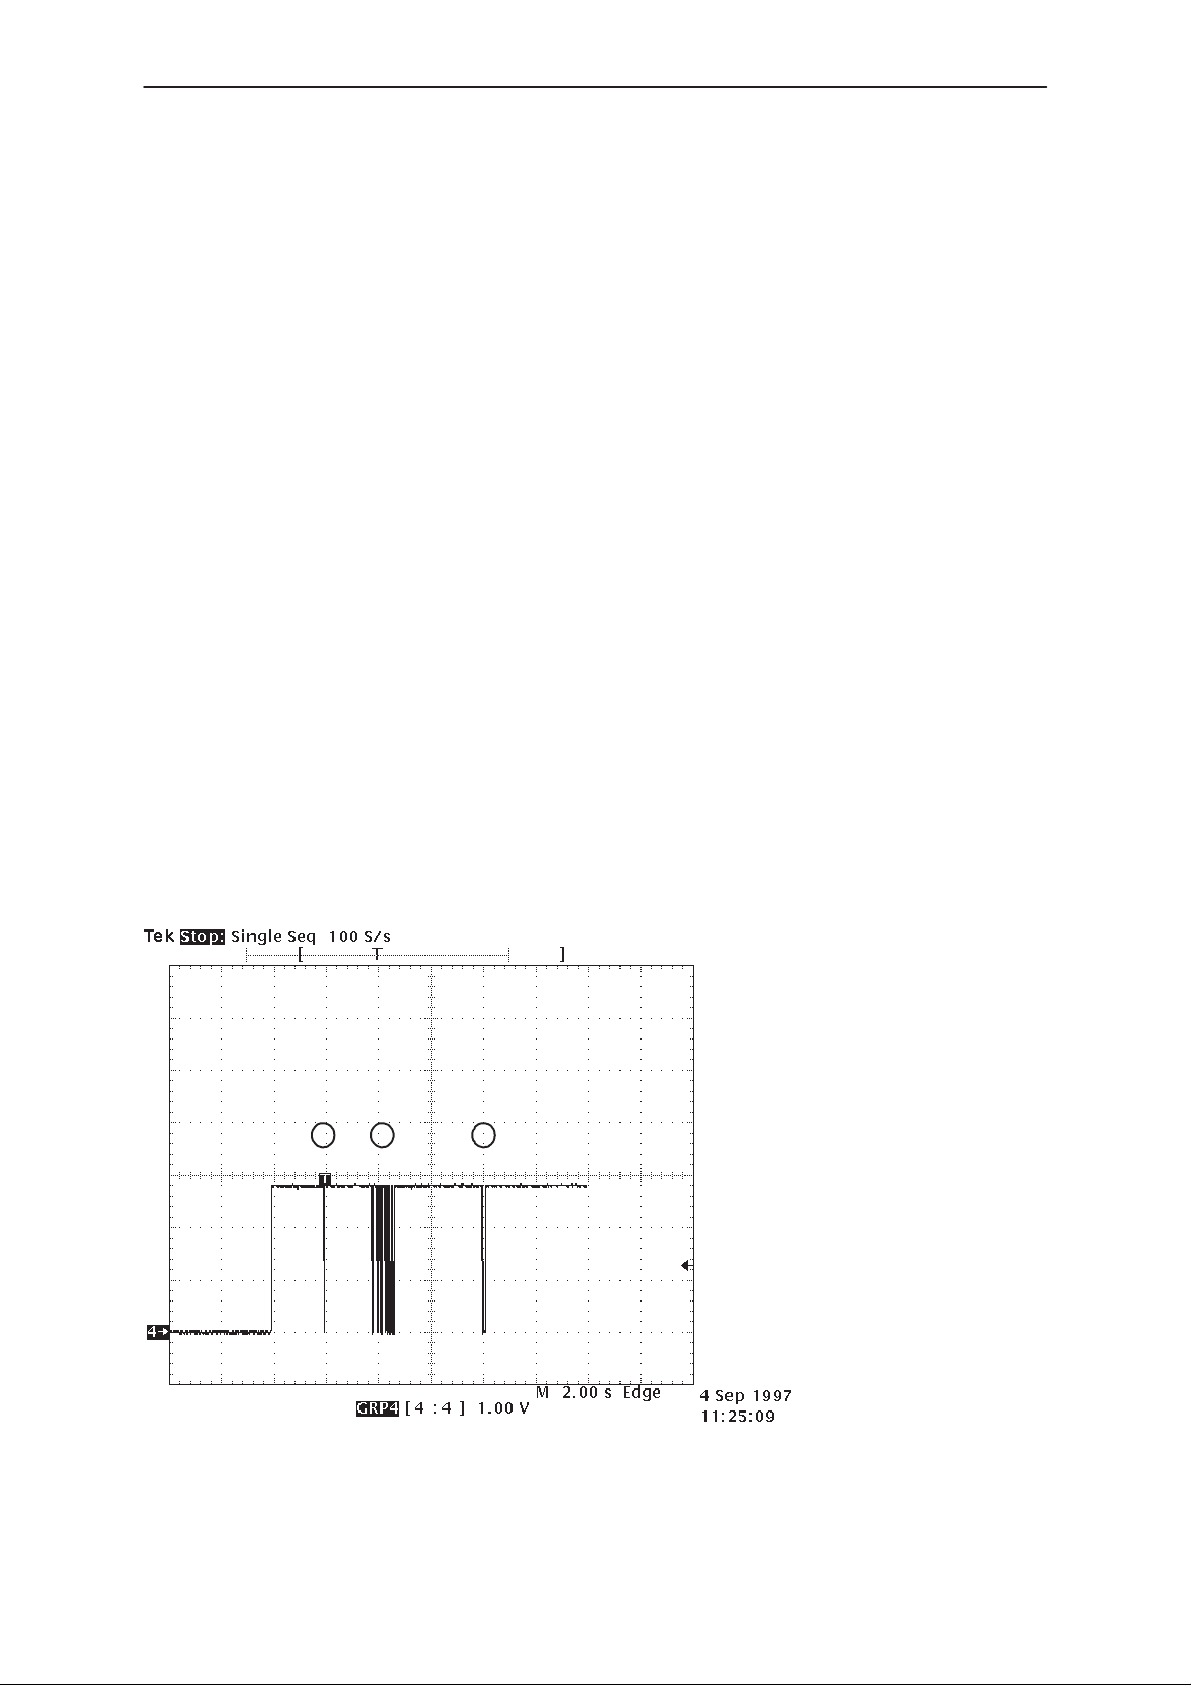
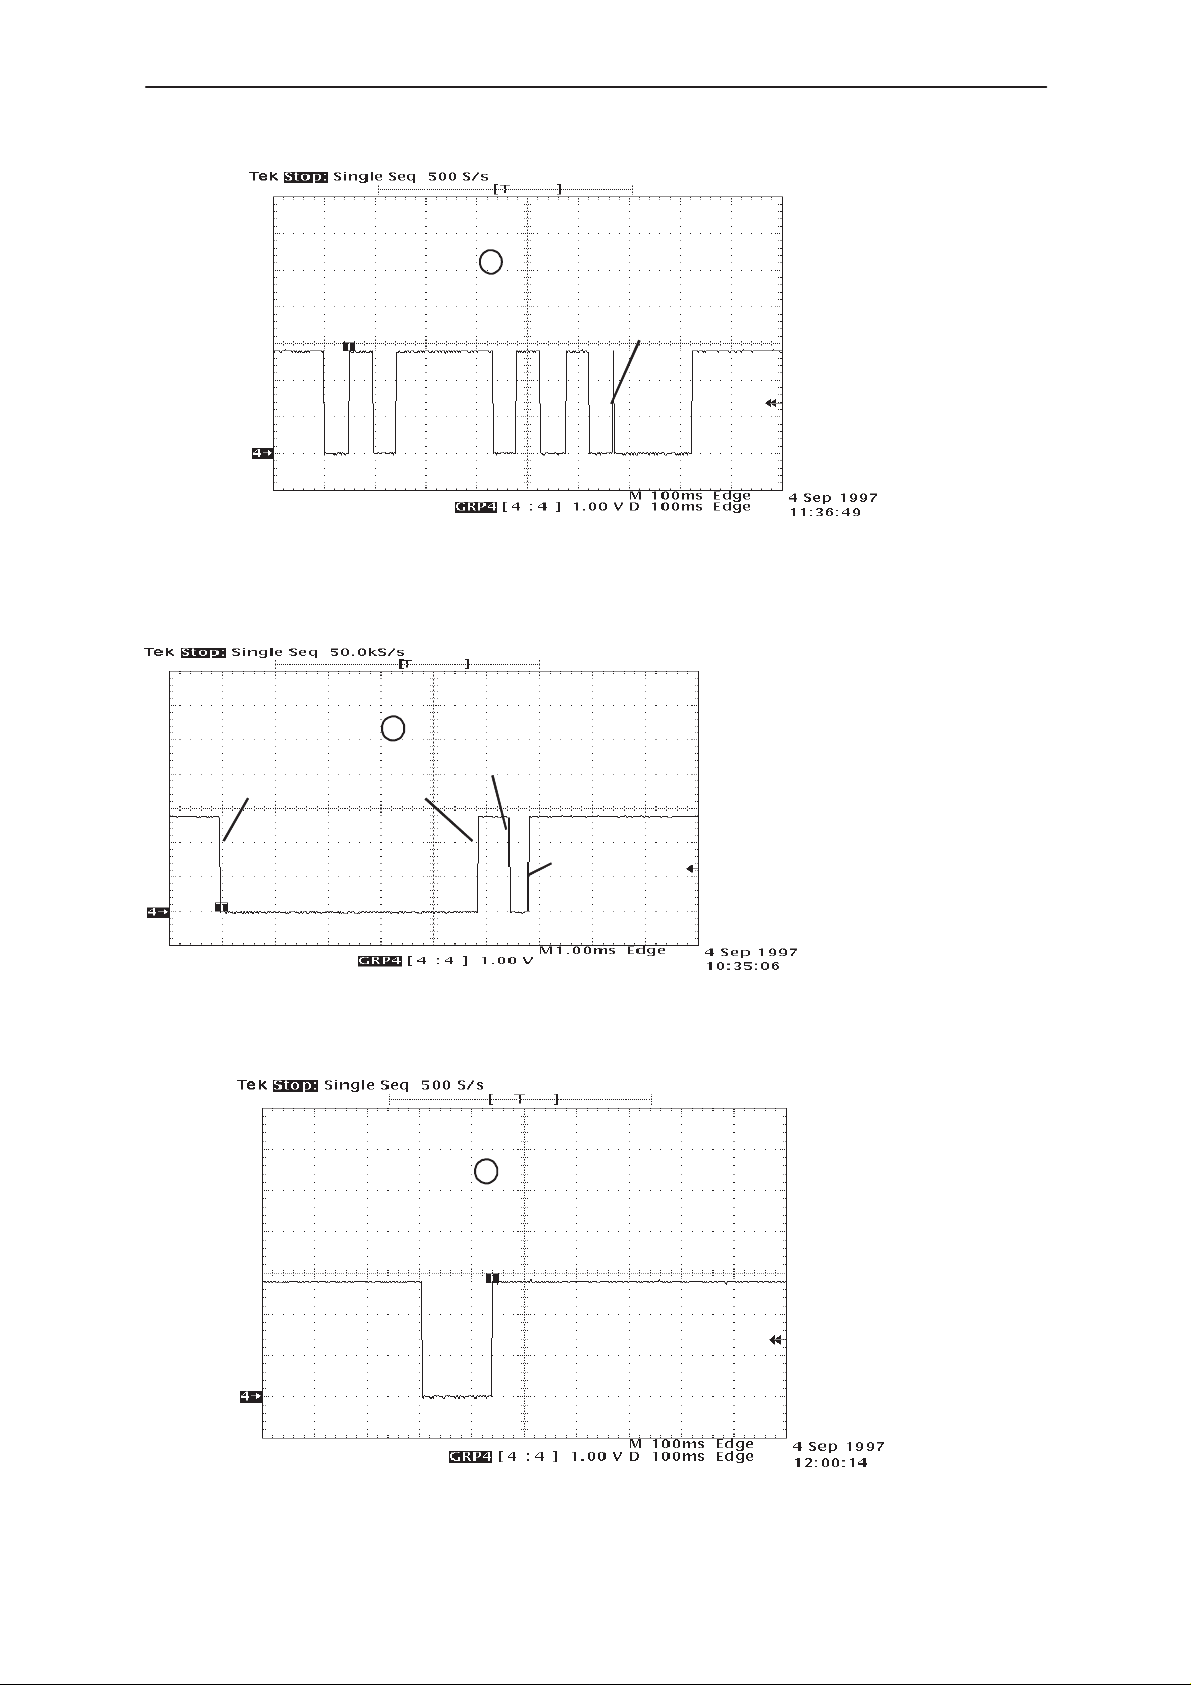
5. The phone doesn’t register to the network or phone doesn’t make a call
If the phone doesn’t register to the network or the phone doesn’t make a
call, the reason could be either the baseband or the RF part.
The phone can be set to wanted mode by Wintesla service software and
determinate if the fault is in RF or in baseband part (RF interface
measurements).
The control lines for RF part are supplied both the System Asic
(MAD2;D300) and the RFI (Cobba_GJP; N200). MAD2Pr1 handles digital
control lines ( like synthena, TxP etc.) and Cobba handles analog control
lines (like AFC, TxC etc.).
The DSP software is constructed so that operation states of DSP
(MAD2Pr1) can be seen in external flag (DSPXF) output pin J308.
After power up, DSP signals all completed functions by changing the state
of the XF pin (see Figure 1–6, Figure 1–7, Figure 1–8 and Figure 1–9).
1. DSP initialization
done
2.Synchronization to
network done
3. Registrarition to
network done.
1 2 3
MAD2Pr1 pin D8
(DSPXF)
J308
The states of DSP (MAD2) after power on
Issue 1 07/99
Figure 6.
Page 11
Page 12
NSE–5
PAMS
Troubleshooting
PSW
search last PSW
channel
scan starts
The states of DSP after power on
Technical Documentation
2
OK
MAD2Pr1 pin D8
(DSPXF)
synchronizatio
OK
n
J308
Figure 7.
1
init
initialize
patch code
download
The states of DSP after power on
send RACH
RACH OK
dsp
constants
download
3
initializatio
ndone
go SDCCH
imediate
OK
assigment
MAD2Pr1 pin D8
(DSPXF)
J308
Figure 8.
MAD2Pr1 pin D8
(DSPXF)
The states of DSP after power on
Page 12
J308
Figure 9.
Issue 1 07/99
Page 13

PAMS
NSE–5
Technical Documentation
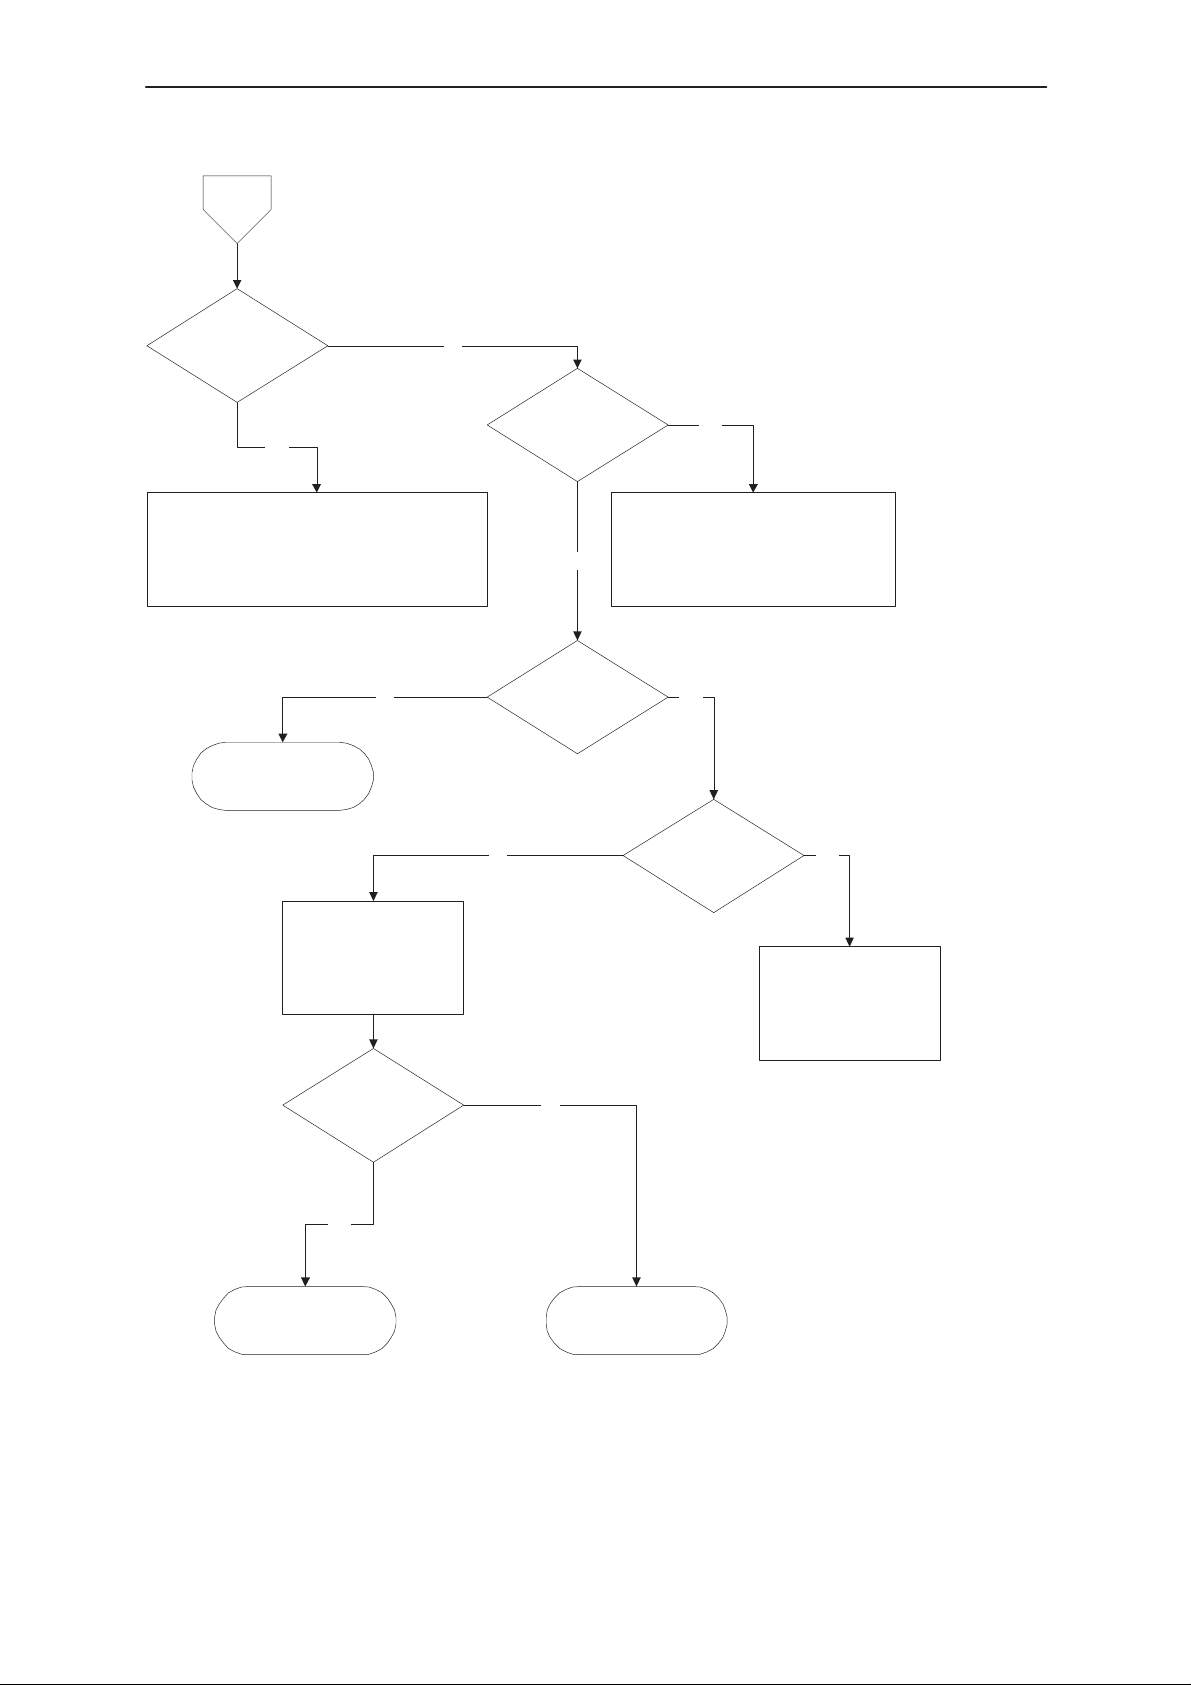
Phone doesn’t register to the
network
or
phone doesn’t make a call
Analog supply
voltage to COBBA
is > 2.7V?
(C201)
Yes
Analog reference to
COBBA is 1.5V?
(C200)
Yes
Check:
Supply voltage Vcp (C126) > 4.8V
Supply voltage VRX (C108) > 2.7V
Supply voltage VRX2 (C137) > 2.7V
Supply voltage VSYN_2 (C136) >
2.7V during the receiving slot
Supply voltage VTX (C141) > 2.7V
during the transmitting slot
Troubleshooting
No
Check N100
No
Check R200, C140,
C174
All OK?
Yes
Synthesizer lines:
SEna1 R724
SClk R722
SData R723
Pulses 0–>1 during receiving slot
All OK ?
Yes
D
No
Check N100, D300
No
Check D300
Figure 10.
Issue 1 07/99
Page 13
Page 14

NSE–5
PAMS
Troubleshooting
D
RF control lines:
RxC (R725) 0–>2.3Vmax during receiving slot
AFC (C747) 0– 1.2V typ. during receiving slot
OK?
Yes
Analog data signals:
RxIP & RxIN 0–>1.5V DC during receiving slot
Recieved signal is biased to DC, amplitude
50mVpp nominal and frequency 13MHz
OK?
Technical Documentation
No
Check N200
No
Yes
RF control lines:
TxC (C700) 0–>2.3Vmax during transmit slot
TxP (R706) 0–>2.8V (logical signal) during
transmit slot
OK?
No
Check N200 if TxC fail
else
Check D300
Check N200 if DC fail
Yes
Analog data signals:
TxIN & TxIP (C709) 0–>0.8V DC during transmit slot
TxQN & TxQP (C708) 0–>0.8V DC during transmit slot
Transmit signal is biased to DC, amplitude 300mVpp
and frequency 64kHz
or
RF part
OK?
NoYes
Page 14
Check RF part Check N200
Figure 11.
Issue 1 07/99
Page 15

PAMS
NSE–5
Technical Documentation
6. SIM card is out of order
The hardware of the SIM interface from MAD2Pr1 (D300) to the SIM
connector (X100) can be tested without SIM card.
When the power is switched on and if the BSI line (X102;1) is grounded by
resistor, all the used lines (VSIM, RST, CLK, DATA) rises up to 5 V four
times. Thus ”Insert SIM card” faults can be found without SIM card.
The fault information ”Card rejected” means that ATR message (the first
message is always sent from card to phone) is sent from card to phone
but the message is somehow corrupted, data signal levels are wrong etc.
or factory set values (stored to the EEPROM) are not correct.
Insert SIM card fault
Troubleshooting
Voltage < 1.5V on top of
R123 when BSI resistor is
connected
Yes
VSIM (C143), DATAO (C131),
SIMRSTO (C130) and SIMCLKO
(C129) lines rise up to 5V after
power on
Yes
SIMPWR (J321), SIMCardDet
(J325), SIMCardRst (J324),
SIMCLK (J323), SIMIOC (J322)
rise to 2.8V after power on
Yes
No
Check X102, R115,
R123, C119
No
Check X100, R120,C143,
C116,C129,C130,C131
No
Faulty PCB, N100
If a 5V SIM card (or no SIM card) is used, the voltage will rise to 3Volts
and then 5Volts (the phone will try this 4 times).
Issue 1 07/99
Faulty D300
Figure 12.
Page 15
Page 16

NSE–5
PAMS
Troubleshooting
Card rejected fault
VSIM according to spec.
2.8Vmin (3V card)
4.5Vmin (5V card)
Yes
ATR data can be
seen at C131
Yes
Technical Documentation
No
Faulty PCB, N100
No
Check X100, R120
ATR data can be
seen at J325
Yes
SIM_IOControl line (J322)
is ”1” during ATR
message
Yes
Check N100
No
Check N100
No
Check D300
Figure 13.
Page 16
Issue 1 07/99
Page 17

PAMS
NSE–5
Technical Documentation
7. Audio Faults
7.1 Uplink/Downlink Problem
Uplink and downlink are
broken
Voltage over C113
(HOOKDET) is 2.8V without
external audio devices
Yes
Voltage over C110
(HEADDET) is 2.8V without
external audio devices
Troubleshooting
No
Check R113, R112,
C113
No
Yes
Frequency at E200
(PCMSclk) is 8kHz square
wave logical level during call
Yes
Check for uplink and for
downlink broken
Check R110, R109,
R108, C110
No
Check N200
Figure 14.
Issue 1 07/99
Page 17
Page 18

NSE–5
PAMS
Troubleshooting
7.1 Uplink Problem
Uplink is broken
Voltage at E101 is 1.8V
Voltage at E100 is 0.3V
during call
Yes
Voltage on COBBA side of
C117 & C121 is 1.4V during call
Yes
Technical Documentation
No
Check:
microphone connections (through slide)
micbias components (V111, R148, R116,
R119, V100)
Micbias control line (one side of R149)
during call
No
Check N200 COBBA
Audio voltage (few
millivolts) on COBBA side of
C117 & C121 during call
Yes
Check N200
No
Check C117, C121,
Slide and PCB
Figure 15.
Page 18
Issue 1 07/99
Page 19

PAMS
NSE–5
Technical Documentation
7.1 Downlink Problem
Downlink broken
Voltage on C203 & C204
is 1.4VDC
during call
Yes
Audio signal on C203 & C204
during call when speaker
should emit sound
Troubleshooting
No
Check C203, C204,
C403, C404, C405,
X400 and N200
No
Check N200 & D300
Yes
Is connector on
Display assy OK?
Yes
Check display module
and speaker
8. Charging Faults
8.1 Seems Dead
Nothing happens when
charger is connected
No
Repair or new module
Figure 16.
Voltage level at R104 is
higher than 0.4V when
charger is connected
Check N100
Issue 1 07/99
No
Check X200, N101,
F100, R101, L100,
C144, C101, R103,
Yes
R104
Figure 17.
Page 19
Page 20

NSE–5
PAMS
Troubleshooting
8.2 Display Problem
Display information:
Not charging
Voltage at C119 is
about 0.8V, power on,
BSI value 39k
Voltage at C120 is about
0.5V, power on, BTEMP
value 47k
Technical Documentation
No
Check X102, R115,
R123, C119
Yes
No
Check X101, R105,
V105, R124, C105,
R115, R123, C120
Yes
32Hz (fast charger) or 1Hz
(slow charger) at N101
(CHAPS) pin 7
Yes
N101 pin 5 & 12
same voltage as
Vbatt
Yes
voltage at N101 pin 5 &
12 rises slow when
charger is connected
Yes
Check PCB
No
Check R100,C100,
V102, N100
No
Check R102, N101
No
Check N101
Figure 18.
Page 20
Issue 1 07/99
Page 21

PAMS
NSE–5
Technical Documentation
Rf T roubleshooting
Measurements should be done using a spectrum analyzer with a
high–frequency 500 ohm passive probe (LO–/reference frequencies and
RF–powerlevels) and oscilloscope with a 10:1 probe (DC–voltages and
low frequency signals).
RF–section is mainly built from two ASICS CRFU3 (N600) and SUMMA
(N700), external filters, MMIC PA–modules (N500, N501) and two
synthesizers. For easier troubleshooting, this is divided into five sections:
GSM Receiver, GSM Transmitter, PCN Receiver, PCN Transmitter and
Synthesizer parts. The tolerance is specified for critical signals/voltages.
Before changing either of the ASICS, please check the following things:
The soldering and connections of pins of the ASICS are OK, supply
voltages are OK and the signals of the synthesizers are coming to ASICS.
This will prevent the unnecessary changing of the ASICS.
Please note that the grounding of the PA–module is directly below the
PA–module so it is difficult to check. The PA–module is static discharge
sensitive! So ESD protection must be used when dealing with
PA–module (ground straps and ESD soldering irons). The PA is also class
3 moisture sensitive so parts must be dry bake.
Troubleshooting
Check that discrete components i.e resistors,inductors and capacitors are
not missing and are soldered properly.
Figure 1. PCB Top View
Issue 1 07/99
Page 21
Page 22

NSE–5
PAMS
Troubleshooting
Technical Documentation
Figure 2. PCB Bottom view
Abbreviations in fault finding charts
BB Baseband
DC Direct Current
ESD Electro Static Dicharge
f: Frequency of signal (measured with spectrum analyzer)
LO Local Oscillator
P: Power of signal in desibels (dB) (measured with spectrum analyzer)
PA Power Amplifier
PCB Printed Circuit Board
PLL Phase Locked Loop
RF Radio Frequency
RX Receiver
T Time between pulses
TX Transmitter
UHF Ultra High Frequency
V: Voltage of signal (measured with oscilloscope)
VCO Voltage controlled oscillator
VHF Very High Frequency
Page 22
Issue 1 07/99
Page 23

PAMS
NSE–5
Technical Documentation
GSM Receiver
Start WinTesla–Service–Software and
Select: Product
Select: Testing
RF Controls
Apply a 947.0 MHz (MID channel) –50 dBm signal to RF–connector. This
signal is tracked through RX–path and will make the troubleshooting of the
RX easier.
Troubleshooting
Band
GSM
RX Continuous
Cont. Mode Ch: 60
Front End On
Path of the received GSM signal
This path defines the general route of the received signal:
Antenna, Mechanical Switch (X501), Diplexer (Z503), Duplexer (Z500),
CRFU3 (LNA N600), GSM Filter (Z600), CRFU3 (Mixer N600), SAW
71MHz Filter (Z700), SUMMA (N700), 13Mhz Filter (Z701), SUMMA,
COBBA_GJP (N200).
The related component numbe
r(s) are defined inside (.).
Issue 1 07/99
Page 23
Page 24

NSE–5
ÁÁÁ
ÁÁÁ
ÁÁÁ
ÁÁÁ
Á
Á
Á
ÁÁÁ
Á
ÁÁÁ
ÁÁÁ
ÁÁÁ
ÁÁÁÁÁ
Á
Á
ÁÁÁ
Á
Á
Á
Á
Á
Á
Á
Á
Á
Á
ÁÁÁ
Á
Á
Á
Á
Á
Á
Á
Á
ÁÁÁ
Á
ÁÁÁ
ÁÁÁ
ÁÁÁ
ÁÁÁ
ÁÁÁ
Á
Á
ÁÁÁ
Á
Á
Á
ÁÁÁ
ÁÁÁ
ÁÁÁ
ÁÁÁ
Á
Á
ÁÁÁ
Á
Á
Á
ÁÁÁ
ÁÁÁ
Á
Á
ÁÁÁ
Á
ÁÁÁ
Á
Á
ÁÁÁ
Á
Á
Á
ÁÁÁ
ÁÁÁ
ÁÁÁ
ÁÁÁ
ÁÁÁ
PAMS
Troubleshooting
Fault finding chart for GSM receiver
Oscilloscope
SUMMA N700 pin 41
SUMMA N700 pin 35
CRFU3 N600 pin 8, 47
ÁÁББББББ
CRFU3 N600 pin 13, 33
Spectrum analyser
Verify 500 ohm passive
ББББББ
probe
Measure between Me-
Á
Á
ББББББ
chanical Switch (X501)
and Diplexer (Z503),
ББББББ
Pin = –50 dBm, 947
MHz
ÁÁББББББ
VREF
VRX_2
VSYN_2
ÁÁÁ
VRX_1
Yes
ÁÁÁÁББББББ
ÁÁÁ
ÁÁÁ
ÁÁÁÁББББББ
Vdc = 1.5 Volt
Vdc = 2.8 Volt
Vdc = 2.8 Volt
ББББББ
Vdc = 2.8 Volt
ББББББ
ББББББ
Technical Documentation
Check
No
ÁÁÁБББББÁÁ
ÁÁÁБББББ
No
ÁÁ
ÁÁ
ÁÁÁБББББÁÁ
BaseBand
Check
Spectrum analys-
БББББ
er, probe and signal generator
БББББ
Á
Á
Á
Spectrum analyser
CRFU3 N600 pin 27
Pin = –55 dBm, 947
ÁÁББББББ
MHz
Spectrum analyser
CRFU3 N600 pin 23
Pout = –33 dBm, 947
ÁÁББББББ
MHz
Spectrum analyser
ÁÁББББББ
CRFU3 N600 pin 18,19
Pin = –48 dBm, 947
ÁÁББББББ
MHz
Yes
ÁÁÁÁББББББ
Yes
ÁÁÁÁББББББ
Yes
ÁÁÁÁББББББ
ÁÁÁÁББББББ
Check
Diplexer (Z503)
No
ÁÁ
Duplexer (Z500)
БББББ
Á
Check
CRFU3 (N600)
No
ÁÁ
pin 24, BandSelect
БББББ
Á
pin 28, FraCtrl
ÁÁÁБББББÁÁ
Check
No
ÁÁ
GSM Filter (Z600)
БББББ
Á
Page 24
Issue 1 07/99
Page 25

PAMS
ÁÁÁ
ÁÁÁ
ÁÁÁ
Á
Á
ÁÁÁ
Á
Á
Á
ÁÁÁ
Á
Á
Á
Á
Á
ÁÁÁ
Á
Á
Á
ÁÁÁ
Á
ÁÁÁ
Á
ÁÁÁ
ÁÁÁ
Á
Á
ÁÁÁ
Á
Á
Á
ÁÁÁ
Á
Á
Á
Á
ÁÁÁ
Á
Á
Á
ÁÁÁ
ÁÁÁ
ÁÁÁ
ÁÁÁ
Á
Á
ÁÁÁ
Á
Á
Á
ÁÁÁ
ÁÁÁ
Á
Á
ÁÁÁ
Á
ÁÁÁ
Á
Á
ÁÁÁ
Á
Á
Á
ÁÁÁ
ÁÁÁ
ÁÁÁ
Á
Á
ÁÁÁ
Á
Á
Á
Á
ÁÁÁ
Á
Á
Á
ÁÁÁ
ÁÁÁ
ÁÁÁ
Á
Á
ÁÁÁ
Á
ÁÁÁ
ÁÁÁ
NSE–5
Technical Documentation
Yes
Spectrum analyser
ÁÁББББББ
CRFU3 N600 pin 15,16
ÁÁББББББ
Pout = – 23 dBm, 71
ÁÁББББББ
MHz
ÁÁББББББÁÁÁÁÁББББББ
ÁÁÁÁББББББ
ÁÁÁÁББББББ
No
ÁÁÁ
Yes
Spectrum analyser
ÁÁББББББ
ÁÁÁÁББББББ
SUMMA N700 pin
37,38
ÁÁББББББ
ÁÁÁÁББББББ
Pin = –36 dBm, 71
MHz
ÁÁББББББ
ÁÁÁÁББББББ
Spectrum analyser
CRFU3 N600 pin 3
Pin = +1 dBm, 2036
ББББББ
MHz
Yes
Check
CRFU3 (N600)
Troubleshooting
ÁÁÁБББББÁÁ
ÁÁÁБББББ
No
ÁÁ
ÁÁÁБББББÁÁ
ÁÁÁБББББÁÁ
ÁÁÁБББББ
No
ÁÁ
Check
UHF Syntheziser
БББББ
Check
71 MHz SAW Filter
БББББ
Á
Á
Á
Á
Spectrum analyser
SUMMA N700 pin 30
Pout = 0 dBm, 13 MHz
ÁÁББББББ
Spectrum analyser
ÁÁББББББ
SUMMA N700 pin 25
Pin = –21 dBm, 13
ÁÁББББББ
MHz
Spectrum analyser
SUMMA N700 pin 23,
ÁÁББББББ
24
Pout = –7 dBm, 13
ÁÁББББББ
MHz
Yes
ÁÁÁÁББББББ
Yes
ÁÁÁÁББББББ
ÁÁÁÁББББББ
Yes
ÁÁÁÁББББББ
ÁÁÁÁББББББ
Check
SUMMA
No
ÁÁ
ÁÁÁБББББÁÁ
pin 36, RXC
БББББ
Á
Check
No
ÁÁ
ÁÁÁБББББ
No
ÁÁ
13 MHz Filter
БББББ
Check
SUMMA
БББББ
Á
Á
Á
Check
BaseBand
ÁÁББББББ
Issue 1 07/99
Yes
ÁÁÁÁББББББ
ÁÁÁБББББÁÁ
Page 25
Page 26

NSE–5
PAMS
Troubleshooting
PCN Receiver
Start WinTesla–Service–Software and
Select: Product
Select: Testing
Apply a 1842.8 MHz (MID channel) –50 dBm signal to RF–connector. This
signal is tracked through RX–path and will make the troubleshooting of the
RX easier.
Technical Documentation
Band
PCN
RF Controls
RX Continuous
Cont. Mode Ch: 700
Front End On
Path of the received PCN signal
This path defines the general route of the received signal:
Antenna, Mechanical Switch (X501), Diplexer (Z503), TX/RX Switch
(Z504), PCN Filter (Z501), CRFU3 (LNA N600), PCN Filter (Z602),
CRFU3 (Mixer N600), LC 187 MHz Filter (L604), CRFU3 (Mixer N600),
SAW 71MHz Filter (Z700), SUMMA (N700), 13Mhz Filter (Z701), SUMMA,
COBBA_GJP (N200).
The related component number(s) are defined inside (.).
Page 26
Issue 1 07/99
Page 27

PAMS
ÁÁÁ
ÁÁÁ
Á
Á
Á
ÁÁÁ
Á
Á
ÁÁÁ
ÁÁÁ
ÁÁÁ
ÁÁÁ
ÁÁÁ
ÁÁÁÁÁ
Á
Á
ÁÁÁ
Á
Á
Á
Á
Á
Á
Á
Á
Á
Á
ÁÁÁ
Á
Á
Á
Á
Á
Á
Á
Á
ÁÁÁ
Á
ÁÁÁ
ÁÁÁ
ÁÁÁ
ÁÁÁ
ÁÁÁ
Á
Á
ÁÁÁ
Á
Á
Á
ÁÁÁ
ÁÁÁ
ÁÁÁ
Á
Á
ÁÁÁ
Á
Á
Á
Á
ÁÁÁ
Á
Á
Á
ÁÁÁ
ÁÁÁ
Á
Á
ÁÁÁ
Á
ÁÁÁ
Á
Á
ÁÁÁ
Á
Á
Á
ÁÁÁ
ÁÁÁ
ÁÁÁ
ÁÁÁ
ÁÁÁ
ÁÁÁ
NSE–5
Technical Documentation
Fault finding chart for PCN receiver
Oscilloscope
SUMMA N700 pin 41
ÁÁББББББ
SUMMA N700 pin 35
CRFU3 N600 pin 8, 47
CRFU3 N600 pin 13, 33
Spectrum analyser
Verify 500 ohm passive
ББББББ
probe
Measure between Me-
Á
Á
ББББББ
chanical Switch (X501)
ББББББ
and Diplexer (Z503),
VREF
ÁÁÁ
VRX_2
VSYN_2
VRX_1
Yes
ÁÁÁÁББББББ
ÁÁÁ
ÁÁÁ
Vdc = 1.5 Volt
ББББББ
Vdc = 2.8 Volt
Vdc = 2.8 Volt
Vdc = 2.8 Volt
ББББББ
ББББББ
Troubleshooting
ÁÁÁБББББ
No
ÁÁÁБББББ
No
ÁÁ
ÁÁ
Check
BaseBand
Check
Spectrum analys-
БББББ
er, probe and sig-
БББББ
nal generator
Á
Á
Á
Á
Pin = –55 dBm,
ÁÁББББББ
1842.8 MHz
Spectrum analyser
CRFU3 N600 pin 34
Pin = –57 dBm,
ÁÁББББББ
1842.8 MHz
Spectrum analyser
CRFU3 N600 pin 38
ÁÁББББББ
Pout = –39 dBm,
1842.8 MHz
ÁÁББББББ
Spectrum analyser
ÁÁББББББ
CRFU3 N600 pin 42,43
ÁÁÁÁББББББ
Yes
ÁÁÁÁББББББ
Yes
ÁÁÁÁББББББ
ÁÁÁÁББББББ
Yes
ÁÁÁÁББББББ
ÁÁÁБББББÁÁ
Check
Diplexer (Z503)
No
ÁÁ
TX/RX Switch
БББББ
Á
(Z504)
PCN Filter (Z501)
Check
ÁÁÁБББББ
No
ÁÁ
CRFU3 (N600)
pin 24, BandSelect
БББББ
Á
Á
pin 28, FraCtrl
ÁÁÁБББББÁÁ
Check
Pin = –48 dBm,
ÁÁББББББ
1842.8 MHz
Issue 1 07/99
ÁÁÁÁББББББ
Yes
No
ÁÁ
PCN Filter (Z602)
БББББ
Page 27
Á
Page 28

NSE–5
ÁÁÁ
ÁÁÁ
ÁÁÁ
ÁÁÁ
ÁÁÁ
Á
Á
Á
ÁÁÁ
Á
Á
Á
ÁÁÁ
ÁÁÁ
ÁÁÁ
ÁÁÁ
Á
ÁÁÁ
Á
ÁÁÁ
ÁÁÁ
Á
Á
ÁÁÁ
Á
ÁÁÁ
Á
Á
ÁÁÁ
Á
Á
Á
ÁÁÁ
ÁÁÁ
ÁÁÁ
ÁÁÁ
Á
Á
Á
ÁÁÁ
Á
Á
Á
ÁÁÁ
ÁÁÁ
ÁÁÁ
ÁÁÁ
Á
ÁÁÁ
Á
ÁÁÁ
ÁÁÁ
ÁÁÁÁÁ
Á
Á
ÁÁÁ
Á
ÁÁÁ
Á
Á
ÁÁÁ
Á
Á
Á
ÁÁÁ
ÁÁÁ
ÁÁÁ
Á
Á
ÁÁÁ
Á
Á
ÁÁÁ
PAMS
Troubleshooting
Spectrum analyser
CRFU3 N600 pin 45,46
Pout = –26 dBm, 187
ÁÁББББББ
MHz
ÁÁББББББÁÁÁÁÁББББББ
No
ÁÁÁ
Yes
Spectrum analyser
ÁÁББББББ
ÁÁÁÁББББББ
CRFU3 N600 pin 11,12
Spectrum analyser
CRFU3 N600 pin 3
Pin = –36 dBm,
ББББББ
2029.8 MHz
|
Yes
Check
CRFU3 (N600)
L609, L610
Technical Documentation
Check
No
ÁÁ
ÁÁÁБББББÁÁ
ÁÁÁБББББÁÁ
UHF Syntheziser
БББББ
Check
Á
Pin = –29 dBm, 187
ÁÁББББББ
MHz
ÁÁÁÁББББББ
Yes
Spectrum analyser
CRFU3 N600 pin 15,16
Pout = –20 dBm, 71
ÁÁББББББ
MHz
No
ÁÁÁ
Spectrum analyser
CRFU3 N600 pin 9
Pin = –10 dBm, 116
ББББББ
MHz
|
Yes
Check
CRFU3 (N600)
ÁÁББББББÁÁÁÁÁББББББ
L600, L601
Yes
Spectrum analyser
SUMMA N700 pin
ББББББ
ÁÁÁÁББББББ
37,38
No
ÁÁ
187 MHz Filter
БББББ
Á
Check
No
ÁÁ
ÁÁÁБББББÁÁ
ÁÁÁБББББ
VHF Syntheziser
БББББ
Check
Á
Á
Pin = –34 dBm, 71
ББББББ
MHz
Spectrum analyser
SUMMA N700 pin 30
ÁÁББББББ
Pout = 2 dBm, 13 MHz
Page 28
ÁÁÁÁББББББ
Yes
ÁÁÁÁББББББ
No
ÁÁ
71 MHz SAW Filter
БББББ
Check
ÁÁÁБББББ
No
SUMMA
pin 36, RXC
Issue 1 07/99
Á
Á
Page 29

PAMS
ÁÁÁ
ÁÁÁ
ÁÁÁ
ÁÁÁ
ÁÁÁ
ÁÁÁ
ÁÁÁ
Á
Á
ÁÁÁ
Á
Á
Á
Á
ÁÁÁ
Á
Á
Á
ÁÁÁ
Á
Á
ÁÁÁ
Á
Á
Á
ÁÁÁ
Á
Á
Á
Á
ÁÁÁ
Á
Á
Á
ÁÁÁ
Á
Á
ÁÁÁ
Á
ÁÁÁ
ÁÁÁ
NSE–5
Technical Documentation
Spectrum analyser
SUMMA N700 pin 25
ÁÁББББББ
Pin = –18 dBm, 13
MHz
ÁÁББББББ
Spectrum analyser
ÁÁББББББ
SUMMA N700 pin 23,
24
ÁÁББББББ
Pout = –7 dBm, 13
MHz
ÁÁББББББ
Yes
ÁÁÁÁББББББ
ÁÁÁÁББББББ
Yes
ÁÁÁÁББББББ
ÁÁÁÁББББББ
ÁÁÁÁББББББ
Troubleshooting
ÁÁÁБББББ
No
ÁÁ
ÁÁÁБББББÁÁ
ÁÁÁБББББ
No
ÁÁ
Check
13 MHz Filter
БББББ
Check
SUMMA
БББББ
Á
Á
Á
Á
Check
ÁÁББББББ
BaseBand
Yes
ÁÁÁÁББББББ
ÁÁÁБББББÁÁ
Issue 1 07/99
Page 29
Page 30

NSE–5
PAMS
Troubleshooting
GSM Transmitter
Apply a RF–cable to external RF–connector (X501) to allow the
transmitted signal act as normal. RF–cable should be connected to
measurement equipment or to at least a 10 dB attenuator, otherwise the
PA may burn.
Start WinTesla–Service–Software and
Select: Product
Select: Testing
Technical Documentation
Band
GSM
RF Controls
TX Continous
TX_Data Type: Random
Path of the transmitted GSM signal
This path defines the general route of the transmitted signal:
COBBA_GJP (N200), SUMMA(N700), 116 Mhz Filter(L703, L704, L708),
CRFU3 (Upconverter N600), GSM Filter (Z601), MMIC PA (N500),
Directional Coupler (L500), Duplexer (Z500), Diplexer (Z503), Mechanical
Swith (X501), Antenna.
The related component number(s) are defined inside (.).
There is also power detection (V500) and power control circuits inside
SUMMA for transmitter power control.
TX Power Level : BASE
Channel: 60
Page 30
Issue 1 07/99
Page 31

PAMS
ÁÁÁ
ÁÁÁ
ÁÁÁ
Á
Á
Á
ÁÁÁ
Á
Á
Á
ÁÁÁ
Á
Á
Á
ÁÁÁ
Á
ÁÁÁ
ÁÁÁ
ÁÁÁÁÁ
Á
Á
Á
ÁÁÁ
Á
Á
Á
Á
Á
ÁÁÁ
Á
Á
Á
Á
Á
Á
ÁÁÁ
Á
Á
Á
Á
ÁÁÁ
Á
ÁÁÁ
ÁÁÁ
ÁÁÁ
Á
Á
ÁÁÁ
Á
Á
Á
Á
ÁÁÁ
Á
Á
Á
ÁÁÁ
ÁÁÁ
Á
Á
ÁÁÁ
Á
ÁÁÁ
Á
Á
ÁÁÁ
Á
Á
Á
ÁÁÁ
ÁÁÁ
ÁÁÁ
ÁÁÁ
Á
Á
ÁÁÁ
Á
Á
Á
Á
ÁÁÁ
Á
ÁÁÁ
NSE–5
Technical Documentation
Fault finding chart for GSM transmitter
Oscilloscope
SUMMA N700 pin 41
SUMMA N700 pin 27,
ÁÁББББББ
47
SUMMA N700 pin 32
CRFU3 N600 pin 8, 47
ÁÁББББББ
CRFU3 N600 pin 39
Oscilloscope
SUMMA N700 pin 1
ББББББ
SUMMA N700 pin 2
ÁÁББББББ
VREF
VTX
ÁÁÁ
TXP
VSYN_2
ÁÁÁ
VTX
Yes
TXQN
ÁÁÁ
TXQP
ÁÁÁ
Vdc = 1.5 Volt
Vdc = 2.8 Volt
ББББББ
Vdc > 2.5 Volt
Vdc = 2.8 Volt
ББББББ
Vdc = 2.8 Volt
Vac = 0.4 Vpp, Vdc =
ББББББ
0.8 V
Vac = 0.4 Vpp, Vdc =
ББББББ
0.8 V
Troubleshooting
Check
No
ÁÁ
ÁÁÁБББББÁÁ
ÁÁÁБББББ
No
ÁÁ
BaseBand
БББББ
Check
BaseBand
БББББ
Á
Á
Á
SUMMA N700 pin 3
ÁÁББББББ
CRFU3 N600 pin 4
ÁÁББББББ
Spectrum analyser
SUMMA N700 pin 44,
ÁÁББББББ
45
Pout = –8 dBm, 116
ÁÁББББББ
MHz
Spectrum analyser
ÁÁББББББ
CRFU3 N600 pin 25, 26
Pin = –4 dBm, 116
ÁÁББББББ
MHz
TXIP
ÁÁÁ
TXIN
ÁÁÁ
Vac = 0.4 Vpp, Vdc =
ББББББ
0.8 V
Vac = 0.4 Vpp, Vdc =
ББББББ
0.8 V
Yes
ÁÁÁÁББББББ
ÁÁÁÁББББББ
Yes
ÁÁÁÁББББББ
ÁÁÁÁББББББ
Yes
ÁÁÁБББББÁÁ
ÁÁÁБББББÁÁ
Check
ÁÁÁБББББ
No
ÁÁ
ÁÁÁБББББÁÁ
SUMMA
VHF Synthesizer
БББББ
Á
Á
Check
No
ÁÁ
116 Mhz LC Filter
БББББ
Á
Spectrum analyser
CRFU3 N600 pin 22
Pin = +10 dBm,902
ÁÁББББББ
ÁÁÁÁББББББ
MHz
ÁÁББББББÁÁÁÁÁББББББ
Spectrum analyser
CRFU3 N600 pin 3
Pin = –5 dBm,2036
MHz
Yes
Check
Issue 1 07/99
Check
No
ÁÁ
ÁÁÁБББББÁÁ
UHF Synthesizer
БББББ
Á
Page 31
Page 32

NSE–5
ÁÁÁ
Á
ÁÁÁ
Á
ÁÁÁ
Á
Á
ÁÁÁ
Á
Á
Á
ÁÁÁ
Á
ÁÁÁ
Á
Á
ÁÁÁ
Á
Á
Á
ÁÁÁ
ÁÁÁÁÁ
Á
Á
ÁÁÁ
Á
Á
Á
ÁÁÁ
Á
ÁÁÁ
ÁÁÁ
ÁÁÁ
ÁÁÁ
Á
Á
ÁÁÁ
Á
Á
Á
Á
ÁÁÁ
Á
Á
Á
ÁÁÁ
Á
ÁÁÁ
Á
Á
Á
ÁÁÁ
Á
Á
ÁÁÁ
ÁÁÁ
Á
Á
ÁÁÁ
Á
Á
Á
Á
ÁÁÁ
Á
Á
Á
ÁÁÁ
Á
ÁÁÁ
Á
Á
ÁÁÁ
ÁÁÁ
ÁÁÁ
Á
ÁÁÁ
Á
PAMS
Troubleshooting
CRFU3
ÁÁББББББÁÁÁÁÁББББББ
Yes
Spectrum analyser
ÁÁББББББ
GSM PA N500 pin 1
ÁÁББББББ
Pin = +2 dBm,902
MHz
ББББББ
Use WinTesla to se-
ББББББ
lect
TX_Data Type: Ran-
ÁÁББББББ
dom
TX Power Level: 10
ÁÁÁÁББББББ
ÁÁÁÁББББББ
ÁÁÁÁББББББ
Yes
ÁÁÁÁББББББ
ÁÁÁÁББББББ
Technical Documentation
ÁÁÁБББББÁÁ
ÁÁÁБББББÁÁ
ÁÁÁБББББ
No
ÁÁ
ÁÁÁБББББÁÁ
ÁÁÁБББББÁÁ
Check
GSM Filter (Z601)
БББББ
Á
Á
Yes
Spectrum analyser
GSM PA N500 pin 4
ÁÁББББББ
ÁÁÁÁББББББ
Pout = +21 dBm,902
MHz
ÁÁББББББ
ÁÁББББББÁÁÁÁÁББББББ
ÁÁББББББÁÁÁÁÁББББББ
ÁÁÁÁББББББ
Yes
Spectrum analyser
RX Connector X501
ÁÁББББББ
Pout = +21 dBm,902
ÁÁББББББ
MHz
ÁÁББББББÁÁÁÁÁББББББ
ÁÁÁÁББББББ
ÁÁÁÁББББББ
Yes
Check
ÁÁÁБББББ
No
ÁÁ
GSM PA (N500)
Check Power Loop
БББББ
Detector (V500)
SUMMA N700 pin
ÁÁÁБББББ
ÁÁÁБББББ
31
SUMMA N700 pin
34 – TXC
Check
ÁÁÁБББББ
No
ÁÁ
Directional Coupler
(L500)
Duplexer (Z500)
БББББ
Diplexer (Z503)
Mechanical Swith
ÁÁÁБББББ
(X501)
Á
Á
Á
Á
Á
Á
Á
GSM TX
OK
ÁÁББББББÁÁÁÁÁББББББ
Page 32
ÁÁÁБББББÁÁ
Issue 1 07/99
Page 33

PAMS
NSE–5
Technical Documentation
PCN Transmitter
Apply a RF–cable to external RF–connector (X501) to allow the
transmitted signal act as normal. RF–cable should be connected to
measurement equipment or to at least a 10 dB attenuator, otherwise the
PA may burn.
Start WinTesla–Service–Software and
Select: Product
Select: Testing
Troubleshooting
Band
PCN
RF Controls
TX Continous
TX_Data Type: Random
Path of the transmitted PCN signal
This path defines the general route of the transmitted signal:
COBBA_GJP (N200), SUMMA(N700), 232 Mhz SAW Filter(Z702), CRFU3
(Upconverter N600), PCN Filter (Z603), PCN Buffer (N502), PCN Filter
(Z502), MMIC PA (N501), Directional Coupler (L500), TX/RX Switch
(Z504), Diplexer (Z503), Mechanical Swith (X501), Antenna.
The related component number(s) are defined inside (.).
There is also power detection (V500) and power control circuits inside
SUMMA for transmitter power control.
TX Power Level : BASE
Channel: 700
Issue 1 07/99
Page 33
Page 34

NSE–5
ÁÁÁ
ÁÁÁ
ÁÁÁ
Á
Á
Á
ÁÁÁ
Á
Á
Á
Á
Á
Á
ÁÁÁ
Á
ÁÁÁ
ÁÁÁ
ÁÁÁ
ÁÁÁ
ÁÁÁ
ÁÁÁÁÁ
Á
Á
ÁÁÁ
Á
Á
Á
Á
Á
ÁÁÁ
Á
Á
Á
Á
Á
Á
ÁÁÁ
Á
Á
Á
Á
ÁÁÁ
Á
ÁÁÁ
ÁÁÁ
ÁÁÁ
Á
Á
ÁÁÁ
Á
Á
Á
Á
ÁÁÁ
Á
Á
Á
ÁÁÁ
ÁÁÁ
ÁÁÁ
ÁÁÁ
Á
Á
ÁÁÁ
Á
Á
Á
ÁÁÁ
ÁÁÁ
Á
Á
ÁÁÁ
Á
ÁÁÁ
Á
Á
Á
ÁÁÁ
Á
Á
Á
ÁÁÁ
ÁÁÁ
PAMS
Troubleshooting
Fault finding chart for PCN transmitter
Oscilloscope
SUMMA N700 pin 41
SUMMA N700 pin 27,
ÁÁББББББ
47
SUMMA N700 pin 32
ÁÁББББББ
CRFU3 N600 pin 8, 47
CRFU3 N600 pin 39
PCN Buffer N502 pin 6
Oscilloscope
SUMMA N700 pin 1
ББББББ
VREF
VTX
ÁÁÁ
TXP
ÁÁÁ
VSYN_2
VTX
VTX
Yes
ÁÁÁÁББББББ
Vdc = 1.5 Volt
Vdc = 2.8 Volt
ББББББ
Vdc > 2.5 Volt
ББББББ
Vdc = 2.8 Volt
Vdc = 2.8 Volt
Vdc = 2.8 Volt
Vac = 0.4 Vpp, Vdc =
0.8 V
Technical Documentation
Check
No
ÁÁ
ÁÁÁБББББÁÁ
ÁÁÁБББББ
BaseBand
БББББ
Check
Á
Á
SUMMA N700 pin 2
ÁÁББББББ
SUMMA N700 pin 3
ÁÁББББББ
CRFU3 N600 pin 4
ÁÁББББББ
Spectrum analyser
SUMMA N700 pin 46
ÁÁББББББ
Pout = –9 dBm, 232
MHz
ÁÁББББББ
Spectrum analyser
CRFU3 N600 pin 35, 37
Pin = –9 dBm, 232
ÁÁББББББ
MHz
TXQP
ÁÁÁ
Vac = 0.4 Vpp, Vdc =
ББББББ
0.8 V
TXIP
ÁÁÁ
Vac = 0.4 Vpp, Vdc =
ББББББ
0.8 V
TXIN
ÁÁÁ
Vac = 0.4 Vpp, Vdc =
ББББББ
0.8 V
Yes
ÁÁÁÁББББББ
ÁÁÁÁББББББ
Yes
ÁÁÁÁББББББ
No
ÁÁ
ÁÁÁБББББÁÁ
ÁÁÁБББББÁÁ
BaseBand
БББББ
Á
Check
ÁÁÁБББББ
No
ÁÁ
SUMMA
VHF Synthesizer
БББББ
Á
Á
Check
No
ÁÁ
232 Mhz SAW Fil-
БББББ
ter
Á
Spectrum analyser
ÁÁББББББ
CRFU3 N600 pin 40
Pin = +3 dBm,1747.8
MHz
ÁÁББББББ
Page 34
Yes
ÁÁÁÁББББББ
Spectrum analyser
CRFU3 N600 pin 3
No
ÁÁÁ
Pin = –5 dBm,1979.8
MHz
ББББББ
Yes
Check
ÁÁÁБББББÁÁ
Check
No
ÁÁ
UHF Synthesizer
БББББ
Á
Issue 1 07/99
Page 35

PAMS
ÁÁÁ
Á
ÁÁÁ
Á
ÁÁÁ
ÁÁÁ
ÁÁÁ
Á
Á
ÁÁÁ
Á
Á
Á
Á
ÁÁÁ
Á
ÁÁÁ
ÁÁÁ
ÁÁÁ
Á
Á
ÁÁÁ
Á
Á
Á
ÁÁÁ
ÁÁÁ
Á
Á
ÁÁÁ
Á
ÁÁÁ
Á
Á
ÁÁÁ
Á
Á
Á
ÁÁÁ
ÁÁÁ
Á
Á
ÁÁÁ
ÁÁÁ
Á
Á
ÁÁÁ
Á
ÁÁÁ
Á
ÁÁÁ
Á
ÁÁÁ
Á
Á
ÁÁÁ
Á
Á
ÁÁÁ
Á
Á
ÁÁÁ
Á
Á
Á
ÁÁÁ
Á
ÁÁÁ
Á
Á
Á
ÁÁÁ
Á
Á
ÁÁÁ
ÁÁÁ
ÁÁÁ
NSE–5
Technical Documentation
CRFU3
ÁÁББББББÁÁÁÁÁББББББ
Yes
Spectrum analyser
PCN Buffer N502 pin 1
Pin = –6 dBm,1747.8
ÁÁББББББ
MHz
ÁÁББББББÁÁÁÁÁББББББ
Spectrum analyser
PCN Buffer N502 pin 4
Pin = +2 dBm,1747.8
ÁÁББББББ
MHz
ÁÁÁÁББББББ
Yes
ÁÁÁÁББББББ
Troubleshooting
ÁÁÁБББББÁÁ
Check
No
ÁÁ
ÁÁÁБББББÁÁ
No
ÁÁ
PCN Filter (Z603)
БББББ
Check
PCN Buffer (N502)
БББББ
Á
Á
Yes
Spectrum analyser
ÁÁББББББ
ÁÁÁÁББББББ
PCN PA N501 pin 1
Pin = +2 dBm,1747.8
MHz
ÁÁББББББ
ÁÁÁÁББББББ
Yes
Use WinTesla to se-
ÁÁББББББ
lect
ÁÁÁÁББББББ
TX_Data Type: Ran-
ББББББ
dom
ÁÁÁÁББББББ
TX Power Level: 10
ÁÁББББББÁÁÁÁÁББББББ
Yes
Spectrum analyser
ÁÁББББББ
ÁÁÁÁББББББ
PCN PA N501 pin 4
Pout = +10
ÁÁББББББ
dBm,1747.8 MHz
ÁÁÁÁББББББ
ÁÁÁБББББÁÁ
Check
No
ÁÁ
ÁÁÁБББББÁÁ
ÁÁÁБББББÁÁ
ÁÁÁБББББÁÁ
ÁÁÁБББББ
PCN Filter (N502)
БББББ
Check
Á
Á
PCN PA (N501)
No
ÁÁ
Check Power Loop
БББББ
Á
ÁÁББББББÁÁÁÁÁББББББ
ÁÁББББББÁÁÁÁÁББББББ
Yes
Issue 1 07/99
Detector (V500)
ÁÁÁБББББ
ÁÁÁБББББ
SUMMA N700 pin
28
SUMMA N700 pin
34 – TXC
Page 35
Á
Á
Page 36

NSE–5
ÁÁÁ
ÁÁÁ
ÁÁÁ
ÁÁÁ
ÁÁÁ
ÁÁÁ
ÁÁÁ
ÁÁÁ
Á
Á
ÁÁÁ
Á
Á
Á
Á
ÁÁÁ
Á
Á
Á
Á
ÁÁÁ
Á
Á
ÁÁÁ
ÁÁÁ
Á
Á
ÁÁÁ
Á
ÁÁÁ
PAMS
Troubleshooting
Yes
Spectrum analyser
RX Connector X501
ÁÁББББББ
Pout = +7 dBm,1747.8
ÁÁББББББ
MHz
ÁÁББББББÁÁÁÁÁББББББ
PCN TX
OK
ÁÁББББББ
ÁÁÁÁББББББ
ÁÁÁÁББББББ
Yes
ÁÁÁÁББББББ
Technical Documentation
Check
ÁÁÁБББББ
No
ÁÁ
ÁÁÁБББББ
ÁÁÁБББББÁÁ
Directional Coupler
(L500)
TX/RX Switch
БББББ
(Z504)
Diplexer (Z503)
Mechanical Switch
(X501)
Á
Á
Á
Synthesizers
There are three oscillators generating the needed frequencies for
RF–section. 13 MHz reference oscillator, 464 MHz VHF VCO and UHF
VCO.
The frequency range for UHF VCO is GSM TX: 2012.4 ... 2061.6 Mhz,
PCN TX: 1942.2 ... 2016.8 Mhz,
GSM RX: 2012.4 ... 2061.6 Mhz,
PCN RX: 1992.2 ... 2066.8 MHz.
Start WinTesla–Service–Software and
Select: Product
Band
GSM
Select: Testing
RF Controls
13 MHz reference oscillator
The 13 MHz oscillator (G701) is controlled by COBBA_GJP (N200). This
13 MHz signal is pulse–shaped and connected to SUMMA (N700) and it is
also buffered, filtered and connected to MAD2 (D300).
Page 36
RX Continuous
Cont. Mode Ch: 60
Issue 1 07/99
Page 37

PAMS
Á
Á
Á
Á
Á
Á
Á
Á
Á
Á
Á
Á
Á
Á
Á
Á
Á
Á
Á
Á
Á
Á
Á
Á
Á
Á
Á
Á
Á
Á
Á
Á
Á
Á
Á
Á
Á
Á
Á
Á
Á
Á
Á
Á
Á
Á
Á
Á
Á
Á
Á
Á
Á
Á
Á
Á
Á
Á
Á
Á
Á
Á
NSE–5
Technical Documentation
VHF VCO
The 464 MHz VHF VCO (G702) signal is used to generate the 116 MHz–
and 232 MHz signals inside SUMMA. The 116 MHz signal is used in GSM
transmitter and in PCN receiver. The 232 MHz signal is used in PCN
transmitter.
Fault finding chart for VHF VCO
The fault finding is as described for UHF VCO with following exceptions:
UHF VCO
ББББББББ
1
SUMMA N700 pin 21
2
UHF VCO G700
3
SUMMA UHF PLL
4
UHF VCO G700 OUT–pin
ББББББББ
The exceptions will be inside (.) in the fault finding chart for the UHF VCO.
UHF VCO
ÁÁÁÁÁББББББББ
changed to
changed to
changed to
changed to
ÁÁÁÁ
VHF VCO
SUMMA N700 pin 12
VHF VCO G702
SUMMA VHF PLL
VHF VCO G702 OUT–pin
ББББББББ
Troubleshooting
БББББББ
Vdc = 1.8 ... 3.0 Volt
Pout > –3 dBm
БББББББ
UHF VCO (G700) is used to generate the first injection for RX (GSM
2012.4 ... 2061.6 MHz, PCN 1992.2 ... 2066.8 MHz) and the final injection
for TX (GSM 2012.4 ... 2061.6 MHz, PCN 1942.2 ... 2016.8 MHz). The
output frequency of the module depends on the DC–control voltage
coming from SUMMA.
Fault finding chart for UHF VCO and 13 MHz reference oscillator
Oscilloscope
Á
Á
ББББББ
ББББББ
SUMMA N700 pin 21
(12)
ÁÁББББББ
Vdc = 1.8 ... 3.0 Volt
Á
Á
Á
Á
ББББББ
ББББББ
ББББББ
ББББББ
No
Oscilloscope
ÁÁББББББ
ББББББ
ББББББ
ÁÁÁ
ÁÁÁ
Yes
ББББББÁÁÁÁ
ББББББ
ББББББ
ББББББ
ББББББ
ББББББÁÁÁÁÁБББББÁÁÁÁ
ÁÁÁ
ÁÁÁ
ÁÁÁ
ÁÁÁ
UHF VCO G700 is
БББББ
OK
(VHF VCO G702)
БББББ
VCTCXO G701 is
OK
БББББ
SUMMA UHF PLL
БББББ
is OK
БББББ
(SUMMA VHF
БББББ
PLL) Supply’s are
OK
БББББ
Á
Á
ÁÁÁ
Á
Á
Á
Á
Á
Á
Á
Á
Á
Á
SUMMA N700 pin 15
Vac = > 2 Vpp, 13
ÁÁББББББ
MHz
Oscilloscope
VCTCXO G701 OUT–
ÁÁББББББ
pin
Issue 1 07/99
No
VCTCXO
ББББББÁÁÁÁ
G701 is OK
БББББ
Check
ББББББÁÁÁÁÁБББББ
ÁÁÁ
ÁÁÁ
Page 37
Page 38

NSE–5
Á
Á
Á
ÁÁÁ
Á
Á
Á
Á
Á
Á
Á
Á
Á
Á
Á
Á
Á
Á
Á
Á
Á
Á
Á
Á
Á
Á
Á
Á
Á
Á
ÁÁÁ
Á
Á
Á
Á
Á
Á
Á
Á
Á
Á
Á
Á
Á
Á
Á
Á
PAMS
Troubleshooting
Vdc = 1.4 Volt
ÁÁББББББ
Vac = app. 1 Vpp, 13
ББББББ
MHz
No
No
Oscilloscope
ÁÁББББББ
VCTCXO G701 VCC–
pin
ÁÁББББББ
Vdc = 2.8 Volt
No
Á
Á
ББББББ
Check BaseBand
ББББББ
Technical Documentation
ББББББÁÁÁÁ
ББББББÁÁÁÁÁБББББÁÁÁÁ
ББББББÁÁÁÁÁБББББÁÁÁÁ
ББББББÁÁÁÁÁБББББ
Yes
Yes
ББББББ
ББББББ
ÁÁÁ
ÁÁÁ
Pulse–shaper
БББББ
D700
Check
VCTCXO G701
БББББ
БББББ
ÁÁÁ
ÁÁÁ
Á
Á
Á
Á
ÁÁББББББÁББББББ
Oscilloscope
SUMMA N700 pin 41
SUMMA N700 pin 13,
ÁÁББББББÁББББББ
22
SUMMA N700 pin 9,
ББББББÁББББББ
16, 19
UHF VCO G700
ÁÁББББББÁББББББ
ÁÁББББББ
VCC–pin
Use WinTesla to se-
ББББББ
lect RX Burst Mode
ÁÁББББББÁББББББ
Oscilloscope
SUMMA N700 pin 5
SUMMA N700 pin 6
ÁÁÁÁБББББÁÁÁÁ
VREF
VCP
ÁÁÁ
VSYN_2
ÁÁÁ
VSYN_2
ÁÁÁ
Yes
ÁÁÁÁБББББ
Vdc = 1.5 Volt
Vdc > 4.0 Volt
БББББ
Vdc = 2.8 Volt
БББББ
Vdc = 2.7 Volt
БББББ
No
Check
ÁÁÁ
ÁÁÁ
ÁÁÁ
ÁÁÁ
BaseBand
ÁÁÁÁБББББÁÁÁÁ
=
=
Synthesizer clock
Synthesizer data
SUMMA N700 pin 7
=
Yes
Synthesizer enable
No
Check
ÁÁББББББÁББББББÁÁÁÁÁБББББ
BaseBand
Page 38
ÁÁÁ
Issue 1 07/99
Page 39

PAMS
Á
Á
Á
Á
Á
Á
Á
Á
Á
Á
Á
Á
Á
Á
Á
Á
Á
Á
Á
Á
Á
Á
Á
Á
Á
Á
Á
Á
Á
Á
Á
Á
Á
Á
Á
Á
NSE–5
Technical Documentation
Á
Á
ББББББ
ББББББ
Spectrum analyser
UHF VCO G700
ББББББ
OUT–pin(VHF VCO
ББББББ
G702 OUT–pin)
No
ÁÁÁ
ÁÁÁ
Check
UHF VCO G700
БББББ
БББББ
Troubleshooting
Á
Á
Pout > –10 dBm,
ÁÁББББББÁББББББ
2036 MHz(464 MHz)
ÁÁÁÁБББББÁÁÁÁ
Yes
ÁÁББББББÁББББББÁÁÁÁÁБББББÁÁÁÁ
ÁÁББББББÁББББББÁÁÁÁÁБББББÁÁÁÁ
Á
Á
ББББББ
ББББББ
Spectrum analyser
SUMMA N700 pin 18
ББББББ
Pin > –10 dBm,
1018 MHz
ББББББ
Yes
ÁÁÁ
ÁÁÁ
UHF
Synthesizer
БББББ
Seems to be OK.
Check discrete
БББББ
Á
Á
components
ÁÁББББББÁББББББ
No
ÁÁÁÁБББББÁÁÁÁ
Á
Á
Á
Á
Check CRFU3
ÁÁББББББÁББББББÁÁÁÁÁБББББÁÁÁÁ
ÁÁББББББÁББББББÁÁÁÁÁБББББÁÁÁÁ
Issue 1 07/99
Page 39
Page 40

NSE–5
PAMS
Troubleshooting
Technical Documentation
[This page intentionally left blank]
Page 40
Issue 1 07/99
 Loading...