

Page 1

Nokia Customer Care
5 — Disassembly / Reassembly
Instructions
Issue 1 Company Confidential Page 5–1
Copyright © 2004 Nokia. All Rights Reserved.
Page 2

RM-1
Nokia Customer Care Disassembly / Reassembly Instructions
(This page left intentionally blank.)
Page 5–2 Company Confidential Issue 1
Copyright © 2004 Nokia. All Rights Reserved.
Page 3

RM-1
Disassembly / Reassembly Instructions Nokia Customer Care
Table of Contents
General information on RM-1 disassembly / reassembly..................................................................................................5–5
Disassembly / reassembly instructions...................................................................................................................................5–5
List of Figures
Figure 41 Required tools for RM-1 disassembly / reassembly..........................................................................................5–5
Issue 1 Company Confidential Page 5–3
Copyright © 2004 Nokia. All Rights Reserved.
Page 4

RM-1
Nokia Customer Care Disassembly / Reassembly Instructions
(This page left intentionally blank.)
Page 5–4 Company Confidential Issue 1
Copyright © 2004 Nokia. All Rights Reserved.
Page 5
RM-1
Disassembly / Reassembly Instructions Nokia Customer Care
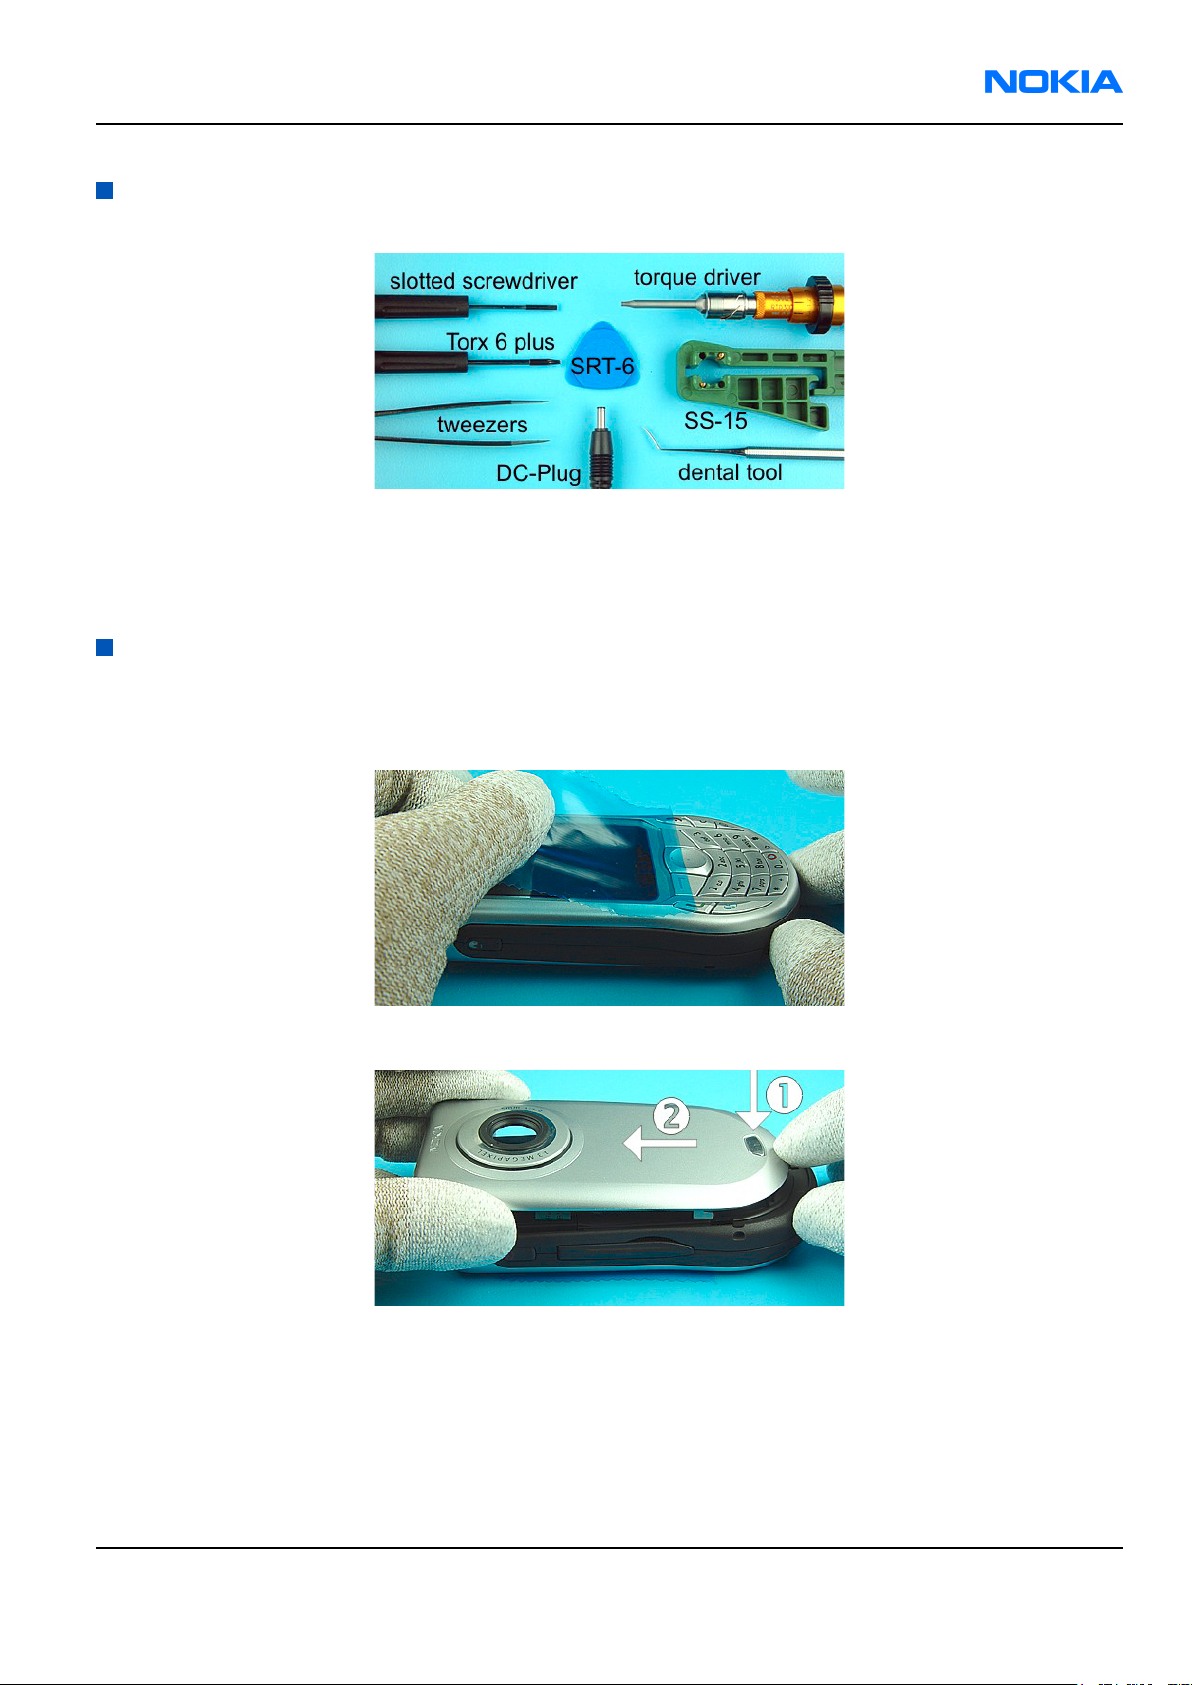
General information on RM-1 disassembly / reassembly
Figure 41 Required tools for RM-1 disassembly / reassembly
Reassembly takes place in the reverse order.
Note: Reassembly specific instructions in steps: 6., 13., 14.,16., 24..
Disassembly / reassembly instructions
Steps
1. Protect the Window with a protective film.
2. To remove the Back Cover press the release button and slide it clear.
Issue 1 Company Confidential Page 5–5
Copyright © 2004 Nokia. All Rights Reserved.
Page 6

RM-1
Nokia Customer Care Disassembly / Reassembly Instructions
3. Remove the A-Cover.
4. Protect the inner side of the Window with a protective film.
5. Remove the Keymat.
6. Unscrew the seven Torx Plus® size 6 screws. For reassembly, the reverse order and a Torque driver with
a torque of 25Ncm has to be used.
Page 5–6 Company Confidential Issue 1
Copyright © 2004 Nokia. All Rights Reserved.
Page 7

RM-1
Disassembly / Reassembly Instructions Nokia Customer Care
7. To prevent mechanical stress from the LCD connector, lift up both parts the UI Frame Assy and the Engine
Module simultaneously from the Chassis Audio Assy.
8. Before removing the LCD Module, open the LCD connector with SRT-6.
Note: Be careful not to damage surrounding components.
9. Remove the UI Frame Assy from the Engine Module.
10. To remove the LCD Cover Shield from the UI Frame Assy, open the two snaps by using a slotted screwdriver.
Issue 1 Company Confidential Page 5–7
Copyright © 2004 Nokia. All Rights Reserved.
Page 8

RM-1
Nokia Customer Care Disassembly / Reassembly Instructions
11. Remove the LCD Module from the UI Frame Assy.
12. Protect the LCD Module Window with a protective film.
13. For reassembly, first place the UI Frame Assy back to the Chassis Audio Assy and then connect the LCD
connector before placing the LCD Module into the UI Frame Assy.
13.B Hold the LCD Cover Shield above the UI Frame Assy and lower the cover shield to attach the parts.
Make sure that the side snaps connect correctly.
14. Remove the Earpiece with a Torx driver.
Note: Be careful not to damage the guide pin during reassembly.
Page 5–8 Company Confidential Issue 1
Copyright © 2004 Nokia. All Rights Reserved.
Page 9

RM-1
Disassembly / Reassembly Instructions Nokia Customer Care
15. Remove the Camera Gasket.
16. To remove the Camera Module, place the Camera removal tool SS-15 on the Camera Module and press down
until the metal springs of the connector open. Then press the SS-15 together and lift it up.
16.B For reassemby, use the back of the Camera removal tool SS-15 and be careful not to damage the three
guide pins.
Issue 1 Company Confidential Page 5–9
Copyright © 2004 Nokia. All Rights Reserved.
Page 10

RM-1
Nokia Customer Care Disassembly / Reassembly Instructions
17. Remove the Voice Key.
18. Remove the Power Key.
19. Remove the Vibra Motor with tweezers.
Page 5–10 Company Confidential Issue 1
Copyright © 2004 Nokia. All Rights Reserved.
Page 11

RM-1
Disassembly / Reassembly Instructions Nokia Customer Care
20. Use a DC Plug to remove the DC Jack.
21. Remove the Microphone with tweezers.
22. Remove the Bluetooth Antenna with tweezers.
23. To remove the MMC Cover, wobble until it comes clear.
Issue 1 Company Confidential Page 5–11
Copyright © 2004 Nokia. All Rights Reserved.
Page 12

RM-1
Nokia Customer Care Disassembly / Reassembly Instructions
24. To remove the Card Plate including the Ground Gasket, use SRT-6 at the shown places.
24.B. For reassembly, place the Card Plate including the Ground Gasket on the backside of the Chassis Audio
Assy and press it down at the shown positions.
25. Remove the Card Plate including the Ground Gasket.
26. Remove the IHF Speaker with a dental tool.
Page 5–12 Company Confidential Issue 1
Copyright © 2004 Nokia. All Rights Reserved.
Page 13

RM-1
Disassembly / Reassembly Instructions Nokia Customer Care
27. To remove the Antenna Assy, unlock the 8 snaps with a slotted screwdriver.
28. Remove the Antenna Assy.
Issue 1 Company Confidential Page 5–13
Copyright © 2004 Nokia. All Rights Reserved.
Page 14

RM-1
Nokia Customer Care Disassembly / Reassembly Instructions
(This page left intentionally blank.)
Page 5–14 Company Confidential Issue 1
Copyright © 2004 Nokia. All Rights Reserved.
 Loading...