

Page 1

Nokia Customer Care
NHL-12 Series Transceivers
5 - Disassembly & Assembly
Instructions
Issue 2 10/2004 COMPANY CONFIDENTIAL
Copyright © 2004 Nokia. All Rights Reserved.
Page 2

NHL-12
Nokia Customer Care 5 - Disassembly & Assembly Instructions
[This page left intentionally blank]
2 COMPANY CONFIDENTIAL Issue 2 10/2004
Copyright © 2004 Nokia. All Rights Reserved.
Page 3

NHL-12
5 - Disassembly & Assembly Instructions Nokia Customer Care
NHL-12 Disassembly........................................................................................... 4
NHL-12 Reassembly.......................................................................................... 15
Issue 2 10/2004 COMPANY CONFIDENTIAL 3
Copyright © 2004 Nokia. All Rights Reserved.
Page 4

NHL-12
Nokia Customer Care 5 - Disassembly & Assembly Instructions
[This page left intentionally blank]
4 COMPANY CONFIDENTIAL Issue 2 10/2004
Copyright © 2004 Nokia. All Rights Reserved.
Page 5
NHL-12
5 - Disassembly & Assembly Instructions Nokia Customer Care
1. NHL-12 Disassembly
Before you start:
• Ensure that you are connected to the ESD wristband.
• Use only specified tools.
• Be careful when handling sensitive components.
• Protect the LCD with a foil whenever possible.
To disassemble:
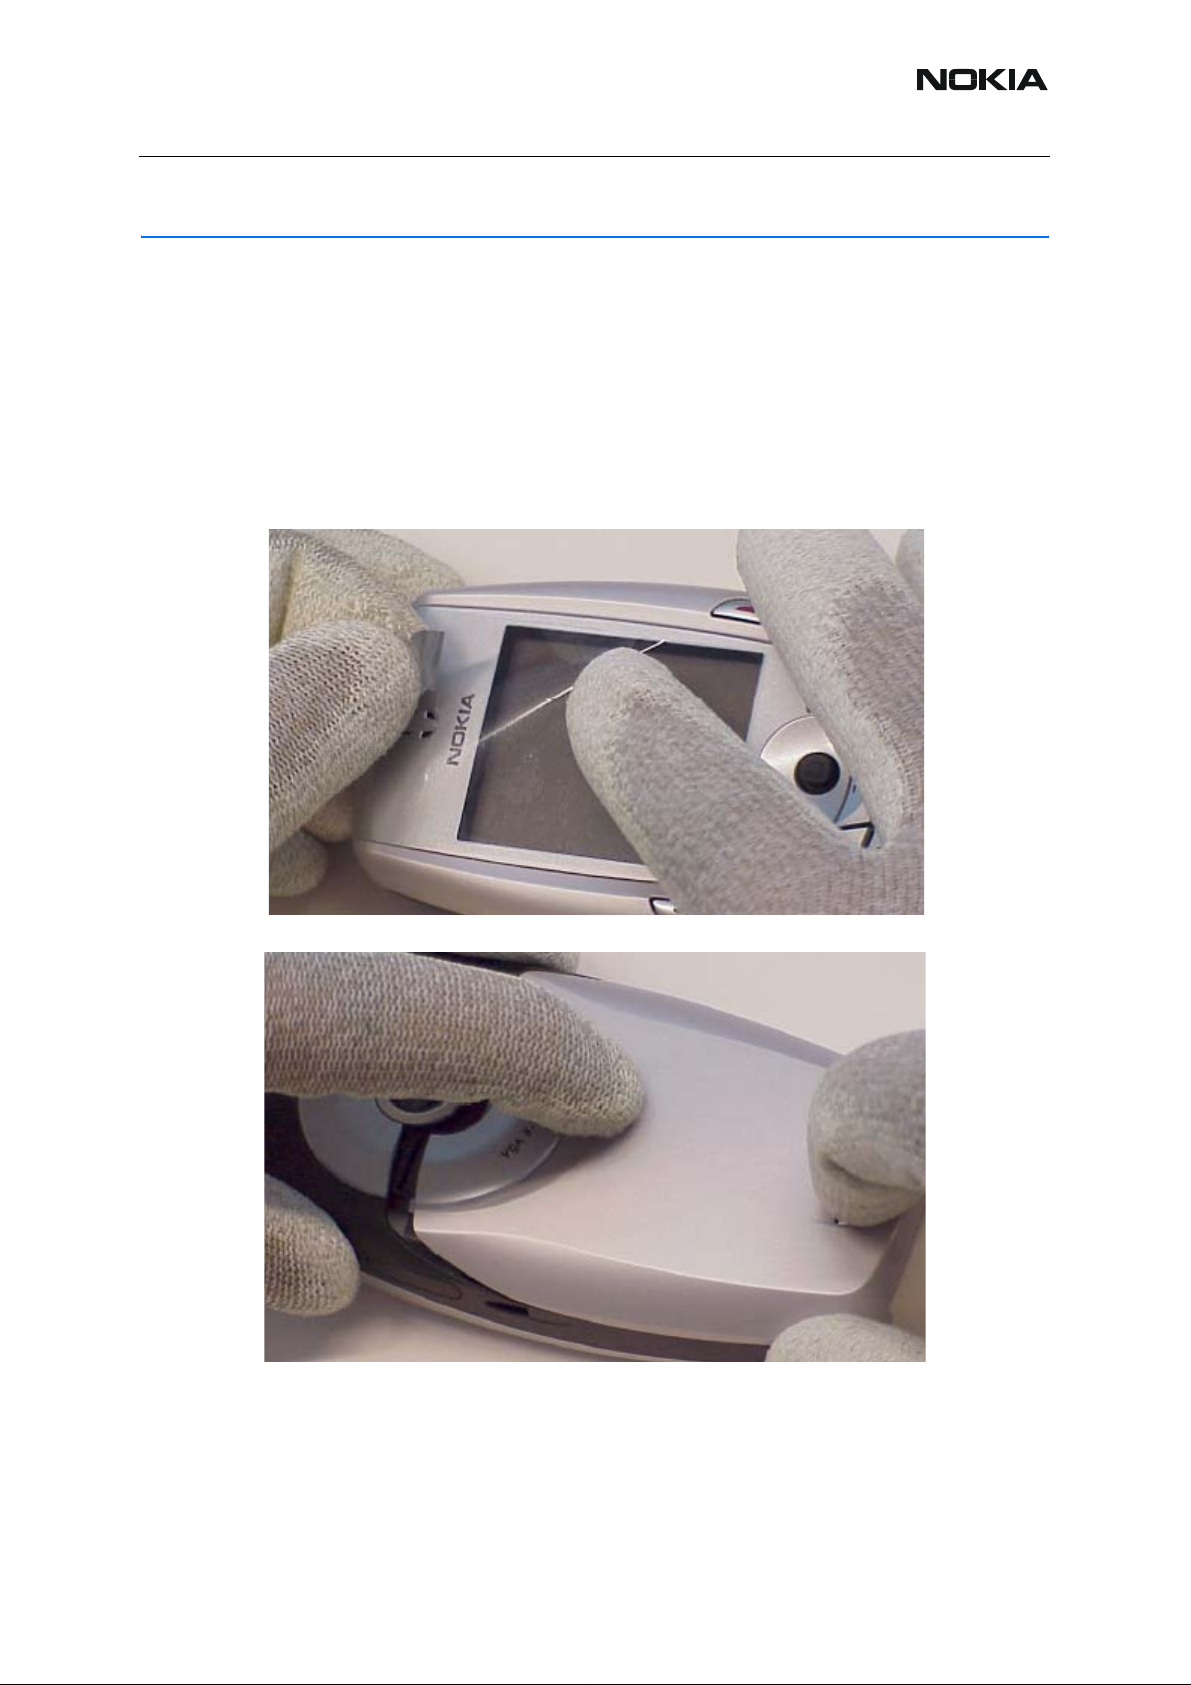
1. Protect the window with a foil to avoid dust and scratches.
2. Before removing the C-cover, press the release button.
Issue 2 10/2004 COMPANY CONFIDENTIAL 5
Copyright © 2004 Nokia. All Rights Reserved.
Page 6
NHL-12
Nokia Customer Care 5 - Disassembly & Assembly Instructions
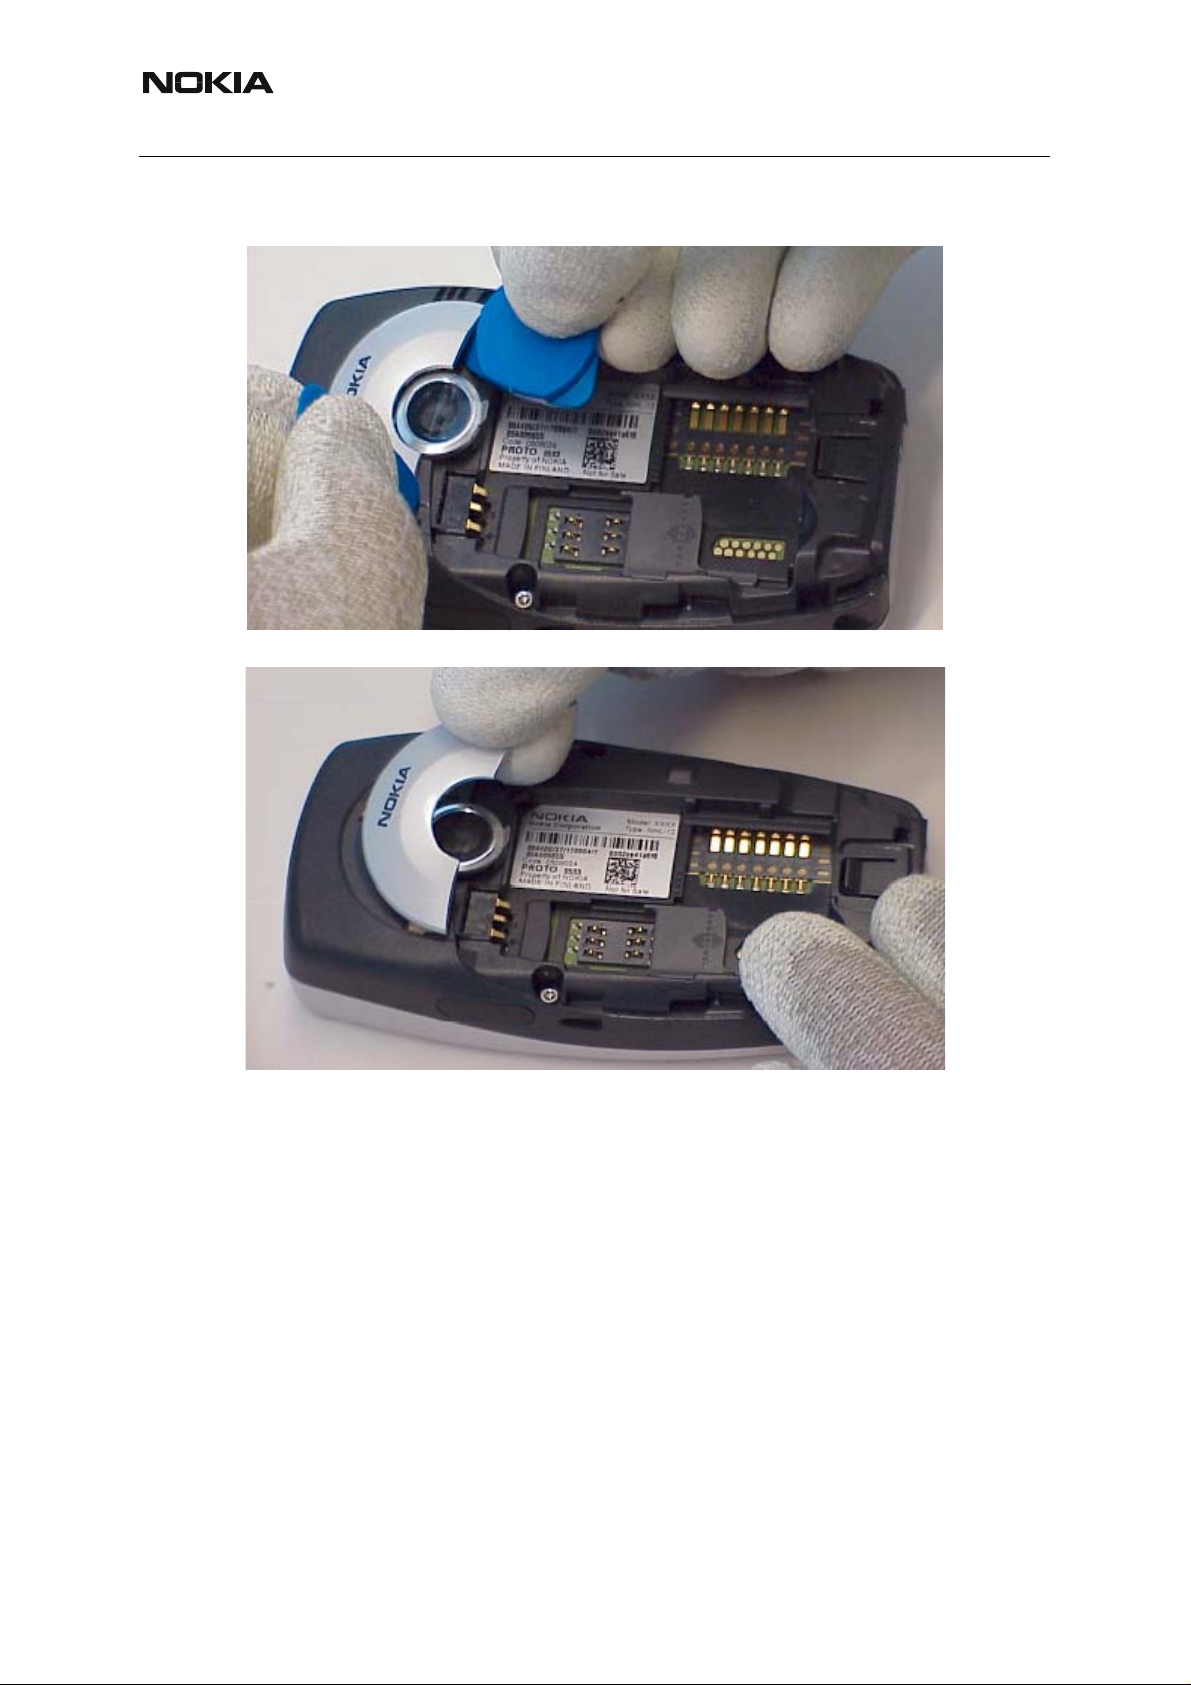
3. To remove the camera ornament, lift it from the right side with SRT-6 and rotate clockwise from the left side.
4. Remove the camera ornament.
6 COMPANY CONFIDENTIAL Issue 2 10/2004
Copyright © 2004 Nokia. All Rights Reserved.
Page 7
NHL-12
5 - Disassembly & Assembly Instructions Nokia Customer Care
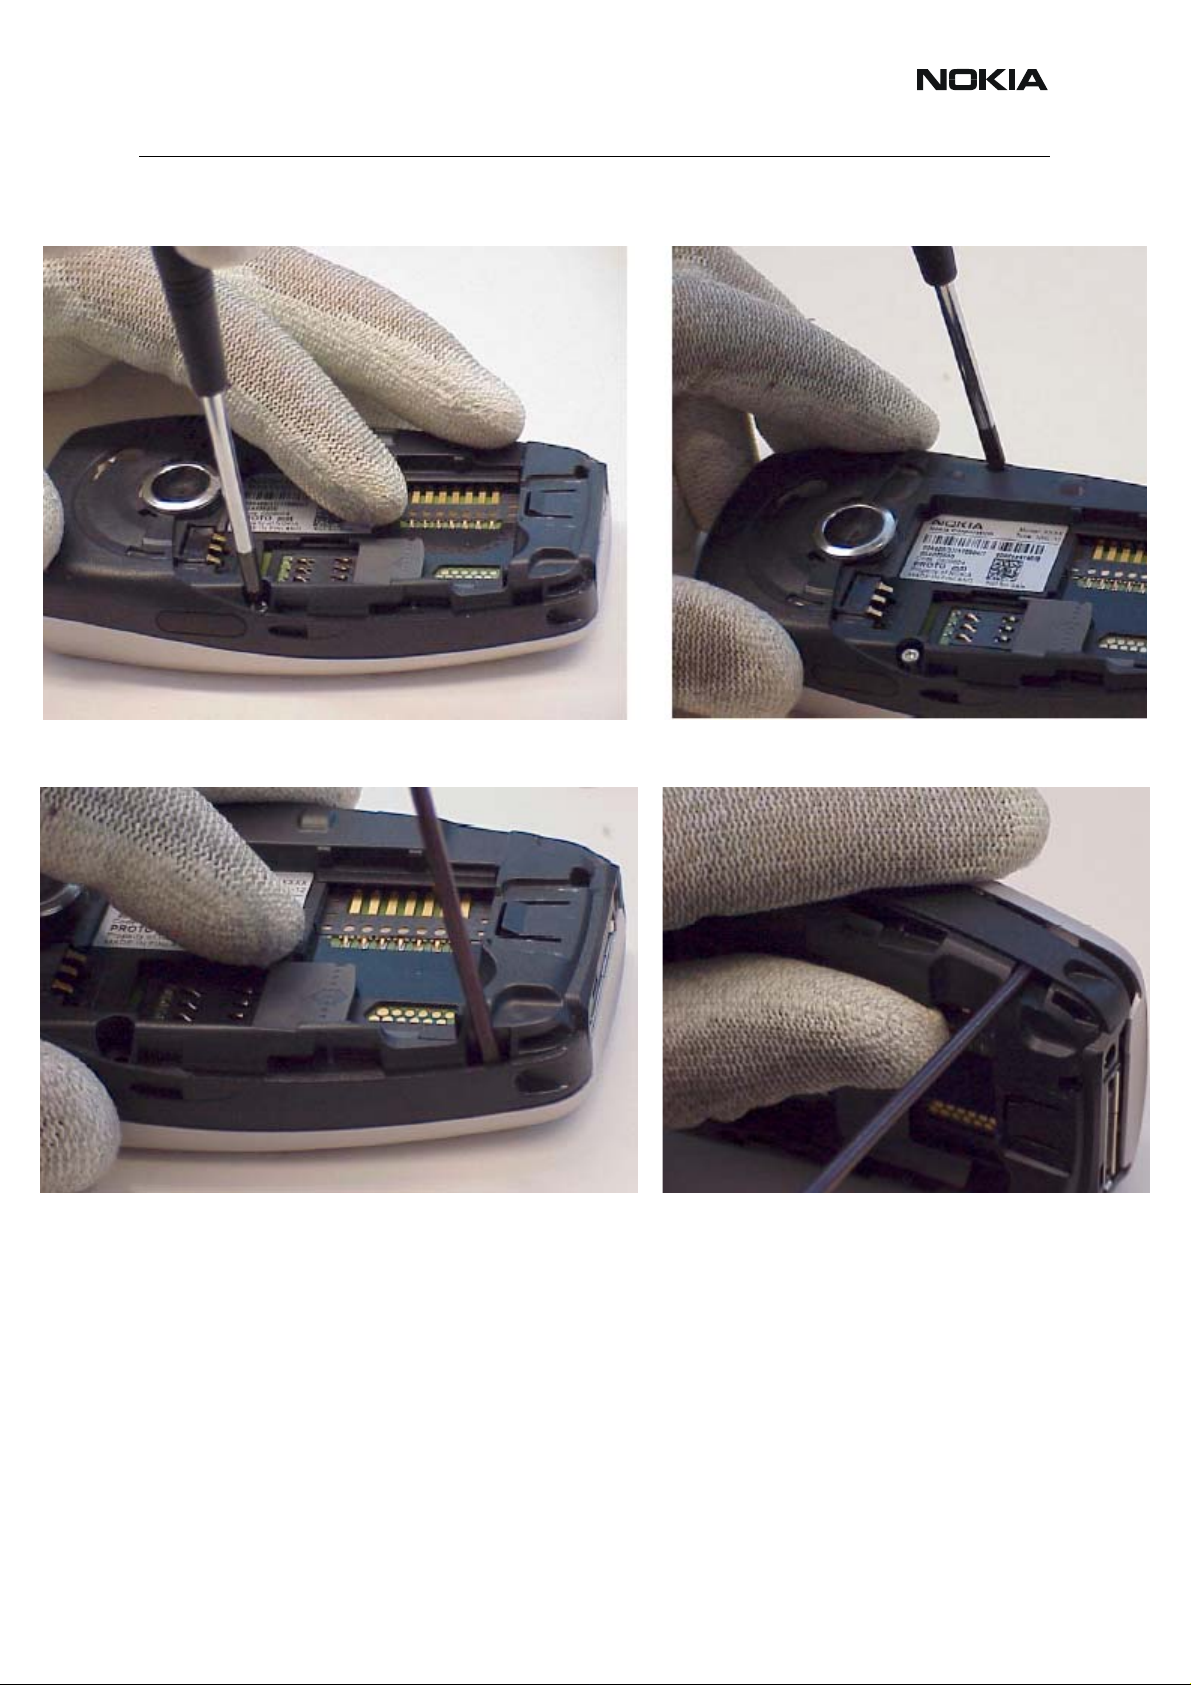
5. Unscrew the two screws located at the rear in the middle. Use size 6 Torx Plus
driver.
6. Release A-cover snaps. Use appropriate tools, e.g. a small slotted screwdriver. Be careful not to damage mechanical parts
Issue 2 10/2004 COMPANY CONFIDENTIAL 7
Copyright © 2004 Nokia. All Rights Reserved.
Page 8
NHL-12
Nokia Customer Care 5 - Disassembly & Assembly Instructions
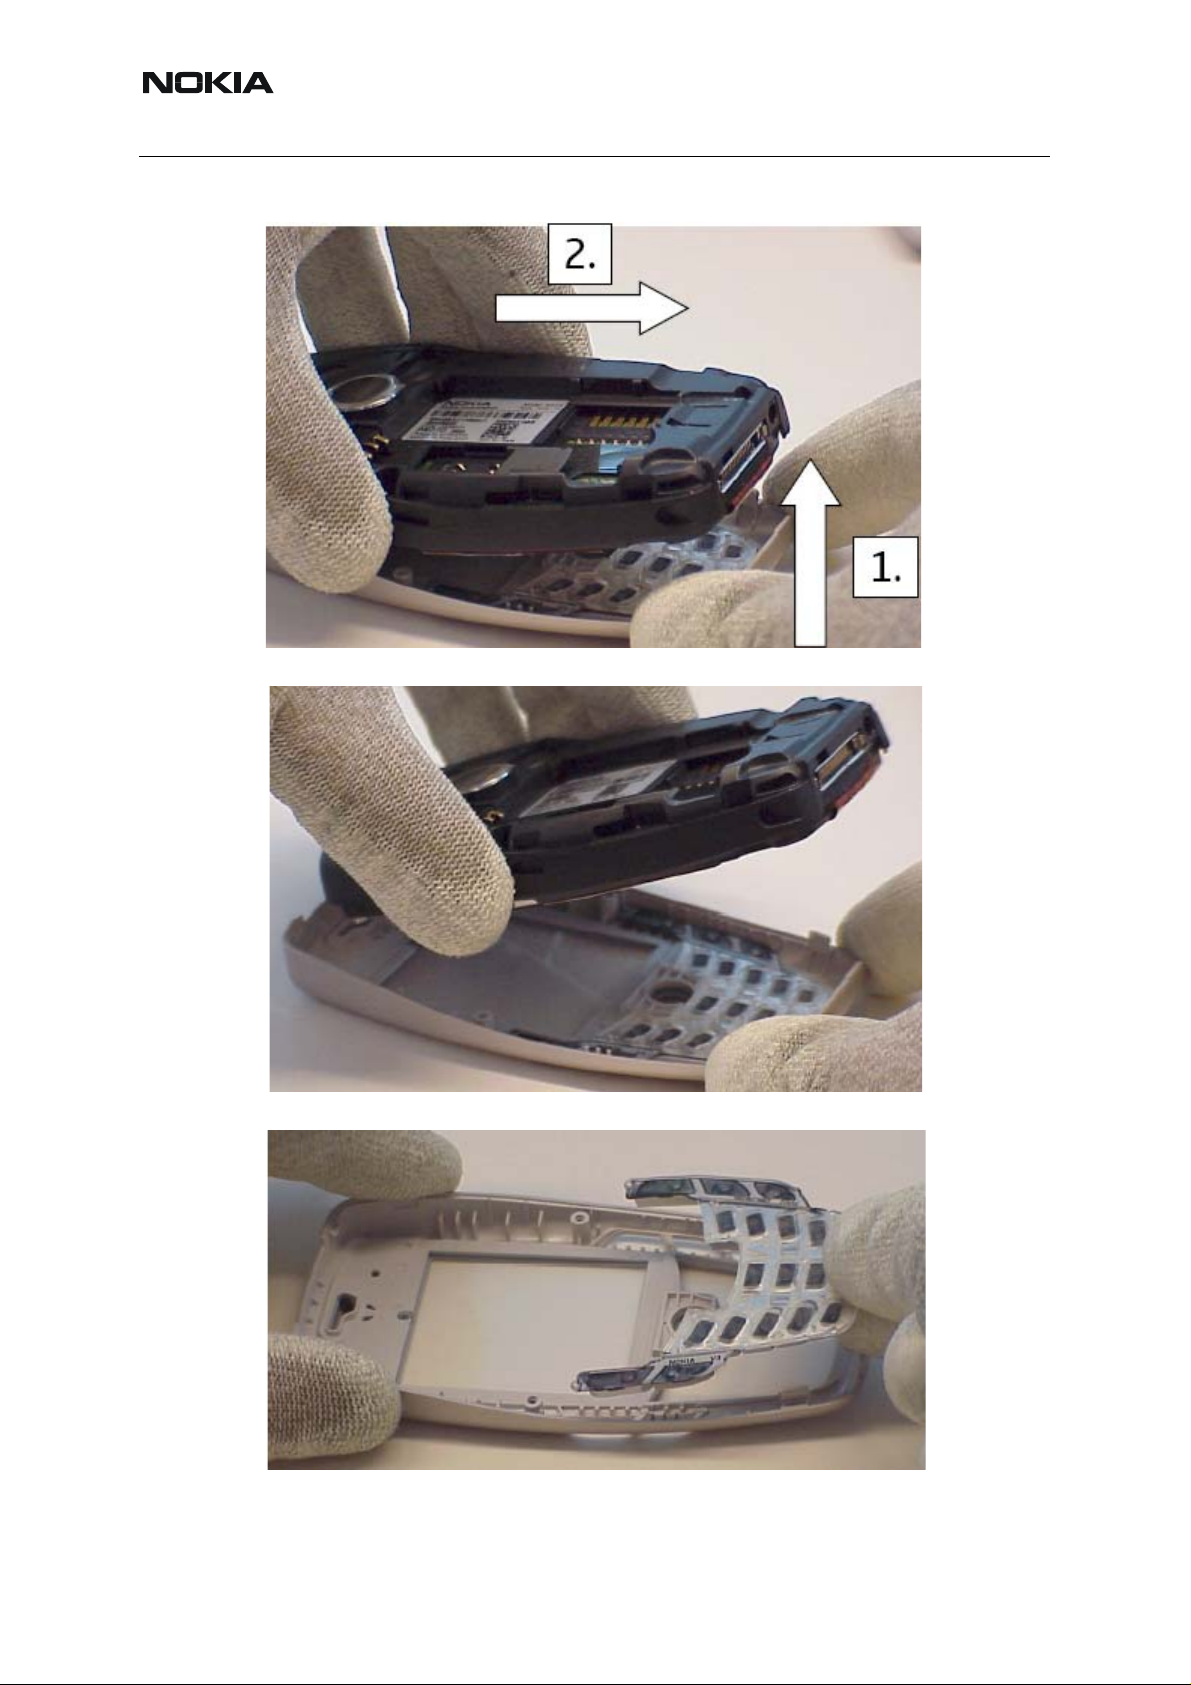
7. Lift the bottom end up a little and slide backwards.
8. Remove the A-cover and keymat.
9. Remove the keymat from the A-cover.
8 COMPANY CONFIDENTIAL Issue 2 10/2004
Copyright © 2004 Nokia. All Rights Reserved.
Page 9

NHL-12
5 - Disassembly & Assembly Instructions Nokia Customer Care
10.Remove the joystick hat.
11.Unscrew the two bottom screws. Use size 6 Torx Plus driver.
12.Unscrew the two top screws. Use size 6 Torx Plus driver.
Issue 2 10/2004 COMPANY CONFIDENTIAL 9
Copyright © 2004 Nokia. All Rights Reserved.
Page 10

NHL-12
Nokia Customer Care 5 - Disassembly & Assembly Instructions
13.Release side snaps from both sides with a SRT-6 tool.
14.Lift the bottom end up.
15.Release the LCD connector with the SRT-6 tool.
10 COMPANY CONFIDENTIAL Issue 2 10/2004
Copyright © 2004 Nokia. All Rights Reserved.
Page 11

NHL-12
5 - Disassembly & Assembly Instructions Nokia Customer Care
16.Remove the BB shield with the SRT-6 tool.
17.Remove PWB.
Issue 2 10/2004 COMPANY CONFIDENTIAL 11
Copyright © 2004 Nokia. All Rights Reserved.
Page 12

NHL-12
Nokia Customer Care 5 - Disassembly & Assembly Instructions
18.Remove the camera module with the SRT-11 tool.
19.Release the snaps on both sides with the SRT-6 tool.
20.Remove the antenna module.
12 COMPANY CONFIDENTIAL Issue 2 10/2004
Copyright © 2004 Nokia. All Rights Reserved.
Page 13

NHL-12
5 - Disassembly & Assembly Instructions Nokia Customer Care
21.Use tweezers to remove the vibra.
22.Remove the DC-jack with SRT-6.
23.Remove mic with SRT-6.
Issue 2 10/2004 COMPANY CONFIDENTIAL 13
Copyright © 2004 Nokia. All Rights Reserved.
Page 14

NHL-12
Nokia Customer Care 5 - Disassembly & Assembly Instructions
24. To remove the power button, bend it backwards to release the snap and lift it
up.
25.To remove the locking lever, place it in the lowest position and then lift it up
from the right side You may have to use some additional force to remove the tip
from the hole.
14 COMPANY CONFIDENTIAL Issue 2 10/2004
Copyright © 2004 Nokia. All Rights Reserved.
Page 15

NHL-12
5 - Disassembly & Assembly Instructions Nokia Customer Care
26.Release both side snaps with an appropriate tool, e.g. a small slotted screwdriver.
27.Remove the LCD top shield.
28.After protecting the LCD with a protective tape, remove it.
Issue 2 10/2004 COMPANY CONFIDENTIAL 15
Copyright © 2004 Nokia. All Rights Reserved.
Page 16

NHL-12
Nokia Customer Care 5 - Disassembly & Assembly Instructions
2. NHL-12 Reassembly
1. Assemble camera with the SRT-11 tool.
2. Place the top left corner of the locking lever to the recess and top right corner
tip to the hole in the B-cover. Then slide the locking lever up to its place.
16 COMPANY CONFIDENTIAL Issue 2 10/2004
Copyright © 2004 Nokia. All Rights Reserved.
Page 17

NHL-12
5 - Disassembly & Assembly Instructions Nokia Customer Care
3. Insert the power button back to its place. Make sure that the snap in the middle
is locked.
4. Insert the antenna module back to its place. Make sure that both side snaps
are locked.
5. Insert mic back to its place.
Issue 2 10/2004 COMPANY CONFIDENTIAL 17
Copyright © 2004 Nokia. All Rights Reserved.
Page 18

NHL-12
Nokia Customer Care 5 - Disassembly & Assembly Instructions
6. Insert the DC-jack back to its place.
7. Insert vibra back to its place.
18 COMPANY CONFIDENTIAL Issue 2 10/2004
Copyright © 2004 Nokia. All Rights Reserved.
Page 19

NHL-12
5 - Disassembly & Assembly Instructions Nokia Customer Care
8. Insert PWB back to its place. Use the two guiding pins.
Issue 2 10/2004 COMPANY CONFIDENTIAL 19
Copyright © 2004 Nokia. All Rights Reserved.
Page 20

NHL-12
Nokia Customer Care 5 - Disassembly & Assembly Instructions
9. Insert BB shield back to its place. Use the two guiding pins.
10.Connect the LCD connector.
20 COMPANY CONFIDENTIAL Issue 2 10/2004
Copyright © 2004 Nokia. All Rights Reserved.
Page 21

NHL-12
5 - Disassembly & Assembly Instructions Nokia Customer Care
11.Insert the UI assy back to its place. Make sure not to damage the LCD flex foil.
12.Ensure both side snaps are locked.
13.Rotate the LCD back to its place and push to fit it to the ca sing. Make sure not
to damage the LCD flex foil.
Issue 2 10/2004 COMPANY CONFIDENTIAL 21
Copyright © 2004 Nokia. All Rights Reserved.
Page 22

NHL-12
Nokia Customer Care 5 - Disassembly & Assembly Instructions
14.Insert the LCD top shield to its place. First insert the bottom end wall the hole
between LCD and UI assy. Use the two guiding pins for correct positioning. Ensure that both side snaps are locked.
15.Ensure the bottom wall of the LCD top shield is in the hole.
22 COMPANY CONFIDENTIAL Issue 2 10/2004
Copyright © 2004 Nokia. All Rights Reserved.
Page 23

NHL-12
5 - Disassembly & Assembly Instructions Nokia Customer Care
16.Insert the joystick hat to its place.
17.Tighten the screws located at the top and bottom. Use size 6 Torx Plus driver
with 26 Ncm torque.
18.Assemble keymat cover.
Issue 2 10/2004 COMPANY CONFIDENTIAL 23
Copyright © 2004 Nokia. All Rights Reserved.
Page 24

NHL-12
Nokia Customer Care 5 - Disassembly & Assembly Instructions
19.To assemble the A-cover, first place the upper part of the ENO module near
the cover.
20.To lock the upper snaps, slide the ENO module upwards. To lock the lower
snaps, push the bottom end down. Ensure that both A-cover and B-cover joints
are even at top of the phone.
21.Tighten the two middle screws. Use size 6 Torx Plus driver with 26 Ncm
torque.
24 COMPANY CONFIDENTIAL Issue 2 10/2004
Copyright © 2004 Nokia. All Rights Reserved.
Page 25

NHL-12
5 - Disassembly & Assembly Instructions Nokia Customer Care
22.To assemble the camera ornament, first place it on the B-cover. Then rotate
the ornament counterclockwise to lock the snaps.
23.Insert the C-cover back to its place.
Issue 2 10/2004 COMPANY CONFIDENTIAL 25
Copyright © 2004 Nokia. All Rights Reserved.
Page 26

NHL-12
Nokia Customer Care 5 - Disassembly & Assembly Instructions
[This page intentionally blank]
26 COMPANY CONFIDENTIAL Issue 2 10/2004
Copyright © 2004 Nokia. All Rights Reserved.
 Loading...