

Page 1

Customer Care Solutions
Technical Documentation
3 - Service Software Instructions
ISSUE 2 01/2004 COMPANY CONFIDENTIAL 1
Copyright © 2003 Nokia. All Rights Reserved.
Page 2

NHL-10
CCS Technical Documentation Service Software Instructions
This page has been deliberately left blank
2 COMPANY CONFIDENTIAL ISSUE 2 01/2004
Copyright © 2003 Nokia. All Rights Reserved.
Page 3

NHL-10
Service Software Instructions CCS Technical Documentation
Table of Contents
Page No
Service Software ............................................................................................................ 5
Phoenix ..........................................................................................................................5
Supported Operating Systems .....................................................................................5
Hardware requirements for using Phoenix .................................................................. 5
Introduction .................................................................................................................5
Installing Phoenix .....................................................................................................5
Uninstalling Phoenix ................................................................................................ 6
Data Packages ........................................................................................................... 6
Starting a session ......................................................................................................... 6
Concepts ................................................................................................................... 6
Selecting a product ................................................................................................... 7
Selecting a connection .............................................................................................. 7
Using components .................................................................................................... 7
Using profiles ........................................................................................................... 7
SW update flashing setup ..............................................................................................8
FPS-8 Flash setup ........................................................................................................ 8
POS Flash concept .................................................................................................... 10
Module Jig Flash concept ......................................................................................... 11
RF Tuning/Testing setup ........................................................................................... 13
RF tuning/testing setup with JBV-1, DA-2, SA-20 and XRS-11 ........................... 13
NHL-10 Phoenix installation instructions ................................................................. 14
FPS-8 to PC connection Setup instructions ..............................................................14
FPS-8 activation ........................................................................................................ 15
Checking Application SW version inside FPS-8 ...................................................... 15
JBV-1 Docking Station SW ...................................................................................... 17
Before Installation .................................................................................................. 17
Installing SW Needed for the JBV-1 SW Update .................................................. 17
Updating the JBV-1 Docking Station Software ..................................................... 21
Data Package for Phoenix (Product Specific)............................................................. 23
Before installation .....................................................................................................23
Installation of Phoenix Data Package (Product Specific) ......................................... 24
How to Uninstall Data Package ................................................................................ 28
Reprogramming NHL-10 ............................................................................................29
Connecting cables ..................................................................................................... 29
Settings backup/restore ............................................................................................. 29
Updating software .....................................................................................................30
Formatting user area ..................................................................................................31
Restore settings ......................................................................................................... 31
ISSUE 2 01/2004 COMPANY CONFIDENTIAL 3
Copyright © 2003 Nokia. All Rights Reserved.
Page 4

NHL-10
CCS Technical Documentation Service Software Instructions
This page has been deliberately left blank
4 COMPANY CONFIDENTIAL ISSUE 2 01/2004
Copyright © 2003 Nokia. All Rights Reserved.
Page 5

NHL-10
Service Software Instructions CCS Technical Documentation
Service Software
Phoenix
Phoenix is the new generation Service Software. It has been designed to meet the challenges
in servicing modern cellular phone technology.
The Phoenix program has been built using component architecture. This means that the actual
program is small and most of the program’s functionality is divided into dynamically loaded
modules (DLLs).
Supported Operating Systems
Windows 98, 2000, ME and NT 4.0 (SP4) and XP.
Hardware requirements for using Phoenix
Minimum:
Processor 233 MHz, RAM memory 64 MB, Disk space 100 MB.
Recommended for Windows 2000:
Processor 700 MHz, RAM memory 512 MB, Disk space 50-150 MB.
Introduction
This section briefly describes how to install the Phoenix software and includes some basic information on how to use the program. For more detailed information, please refer to Phoenix’s
Help files. Each feat ure in Phoenix has its own Help function, which can be activated while running the program.
Press the F1 key or the feature’s Help button to activate a Help file.
Installing Phoenix
1 Download the latest Phoenix release. Please contact your regional After Market
Services point for information on where to download the latest release.
Download and read the release notes which have useful information on the soft-
ware version you are using.
2 Download the latest Data Packages for the products you will be using.
3 Before you start installing the program, check that the dongle is attached to par-
allel port. Contact your supervisor in order to obtain a suitable dongle.
Administrator rights (Windows 2000, NT or XP only) are required in order to be
able to install Phoenix.
4 Install Phoenix by executing the Phoenix installation package and follow the
instructions on the screen.
Initially the setup files are extracted into the file system.
Note: If the setup files are already e xtr acted (left in the file system fr om previous installation)
“Overwrite Protection” dialog appears. Always click “Yes to All” to overwrite the existing
setup files.
ISSUE 2 01/2004 COMPANY CONFIDENTIAL 5
Copyright © 2003 Nokia. All Rights Reserved.
Page 6

NHL-10
CCS Technical Documentation Service Software Instructions
5 The installation checks that the latest supported dongle driver version is installed.
The dongle driver is installed if there is no previous installation of the dongle
driver or if the installed dongle driver is older than the latest supported version.
Note: If the dongle driver is installed during installation, you need to reboot your PC and restart the
installation after reboot.
Program files are stored under C:\Program Files\Nokia\Phoenix (default).
6 Install the data package by executing the installation package and follow the
instructions on the screen.
The data packages will create product specific directories under the installation
directory.
Data files are stored under C:\Program Files\Nokia\Phoenix (default).
Uninstalling Phoenix
If you need to remove Phoenix Service Software from your computer:
1 Make sure that the dongle is attached (unregistration).
2 Go to the Control Panel and select Add/Remove Programs.
3 Select NHL-10 Change/Remove.
4 Click OK to remove the application
You may have to reboot your PC after uninstallation.
Note: If you have dif f er ent product pac kages installed, the components ar e uninstalled only if
they are not included in other product packages.
Data Packages
Data Packages (DP) is a name for a helpful feature in the Phoenix software. This type of feature
provides a flexible way of distributing and installing Phoenix and its data files.
All product-specific data is separated from the program code and installed separately. This
means that the installation is performed in at least two steps.
Each product will have its own Data Package (DP). The FPS-8 flashing equipment also has its
own package.
Starting a session
Concepts
In the Phoenix context, Product means the cellular phone attached to a PC. More specifically,
it is a particular type of phone.
Connection means the type of cable used to attach the phone to the port to which the other end
of the cable is attached.
6 COMPANY CONFIDENTIAL ISSUE 2 01/2004
Copyright © 2003 Nokia. All Rights Reserved.
Page 7

NHL-10
Service Software Instructions CCS Technical Documentation
Selecting a product
Many of Phoenix’s features are product-specific. It is, therefore, mandatory to choose the product you will be working on at the beginning of the session.
Select the menu item File - Open Product. You will be presented with a list of available products.
After the product selection, you will see an additional menu item on the main menu. If you take
a look at the available menu items, you will see that their number has increased.
Selecting a connection
The connection defines the cable and the communications port that will be used when connecting to the phone.
In case the connection is wrong, you need to select a correct one.
1Choose File -> Manage Connections.
2 Select the correct connection. Press the Arrow up key so that the correct connec-
tion becomes the first on the list.
3 Press Apply and close the window.
Using components
When working with Phoenix, each task generally has its own component that will perform the
task. The first thing, therefore, is to open the desired component.
Opening a component means that you open a tool window within Phoenix. When this window
is opened, Phoenix also opens a toolbar for it and adds compone nt-specific menu it ems in the
View menu.
Using profiles
A Profile is a useful feature in Phoenix. Product, connection and currently open components
can be stored into a permanent storage (a disk file called profile, *.nmp) for later retrieval.
Opening and saving profiles is done via menu commands found in the File menu. Select Open
Profile and Save Profile.
Since profiles are stored into a disk file with the user-defined name, there can be multiple profiles for different repeated tasks.
ISSUE 2 01/2004 COMPANY CONFIDENTIAL 7
Copyright © 2003 Nokia. All Rights Reserved.
Page 8
NHL-10
CCS Technical Documentation Service Software Instructions
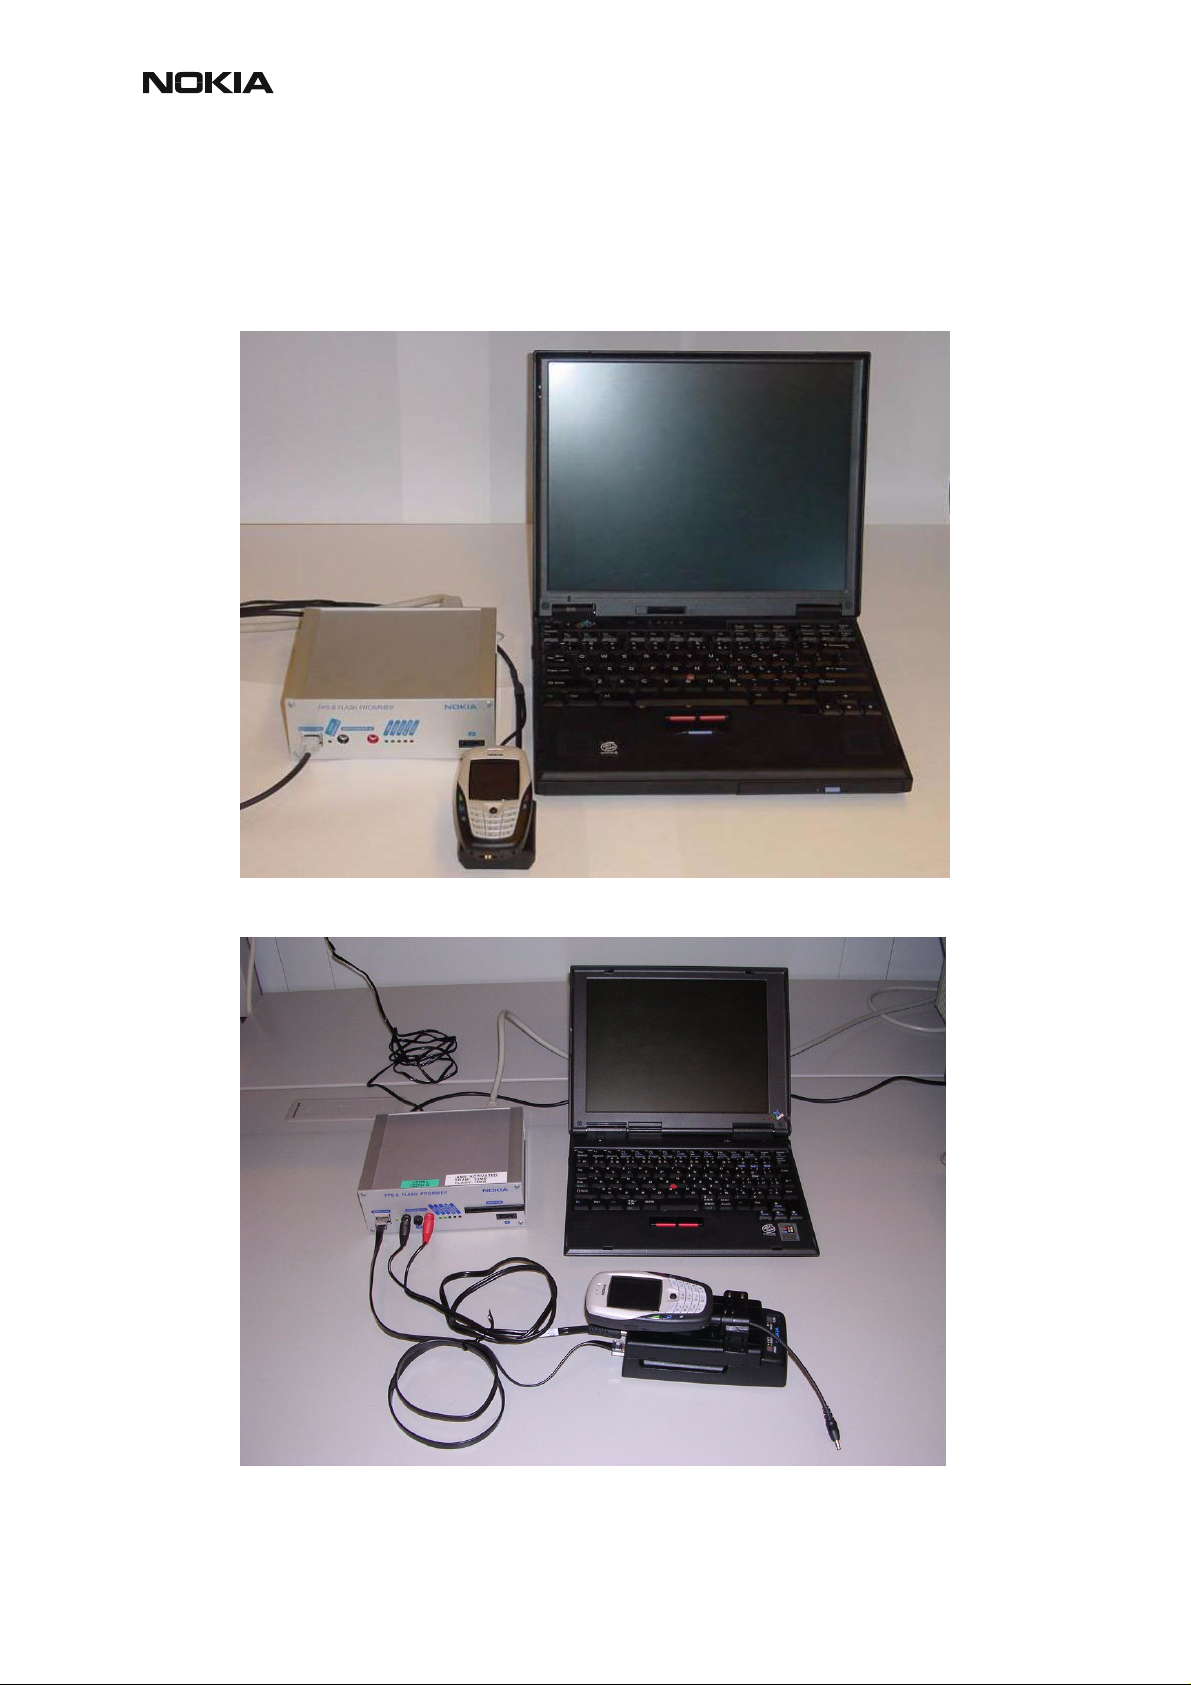
SW update flashing setup
FPS-8 Flash setup
8 COMPANY CONFIDENTIAL ISSUE 2 01/2004
Copyright © 2003 Nokia. All Rights Reserved.
Page 9
NHL-10
Service Software Instructions CCS Technical Documentation
The following equipment is required for NHL-10 AMS SW update, when connecting NHL-10 to
PC with FPS-8:
Item Description Type Code
1 Docking station adapter DA-2 (use with JBV-1) 0770500
1a Point of Sales flash load-
SF-2 0770506
ing adapter
2 Power cable PCS-1 0730012
3 Power cable FLC-2 0730185
4 Modular cable XCS-4 0730178
5 Flash prommer box sales
FPS-8 0080321
pack
6 Printer cable AXP-8, incl in FPS-8
sales pack
7 D9 – D9 cable AXS-4, incl in FPS-8
0730090
sales pack
8 Software protection key PKD-1 0750018
9 AC C harge r, ACF- 8 inc l in FP S-8
0680032
sales pack
10 SRAM Module (3 pcs
needed inside FPS-8)
SF12 0080346 (Code
includes one SRAM
module)
ISSUE 2 01/2004 COMPANY CONFIDENTIAL 9
Copyright © 2003 Nokia. All Rights Reserved.
Page 10
NHL-10
CCS Technical Documentation Service Software Instructions
POS Flash concept
The following equipment is required for NHL-10 AMS SW update, at point of sale when connecting NHL-10 to PC with FLS-4:
Item Description Type Code
1 Point of Sales flash loading
SF-2 0770506
adapter
2 Service cable XCS-1 0730218
3 FLS-4S sates pack for E & A FLS-4S 0080541
4 FLS-4S sates pack for APAC FLS-4S 0080542
5 FLS-4S sates pack for US FLS-4S 0080543
10 COMPANY CONFIDENTIAL ISSUE 2 01/2004
Copyright © 2003 Nokia. All Rights Reserved.
Page 11

NHL-10
Service Software Instructions CCS Technical Documentation
Module Jig Flash concept
Flashing with MJ-2 is recommended in Local Mode. The S2 switch should be set in the Passed
position.
ISSUE 2 01/2004 COMPANY CONFIDENTIAL 11
Copyright © 2003 Nokia. All Rights Reserved.
Page 12

NHL-10
CCS Technical Documentation Service Software Instructions
The following equipment is required for NHL-10 AMS SW update when system module is
placed in the Module Jig MJ-2 and connected through a FPS-8 set-up:
Item Description Type Code
1 Module Jig MJ-2 0770501
2 Power cable PCS-1 0730012
3 Modular cable XCS-4 0730178
4 Flash prommer box sales
FPS-8 0080321
pack
5 Printer cable AXP-8, incl in FPS-8
sales pack
6 D9 – D9 cable AXS-4, incl in FPS-8
0730090
sales pack
7 Software protection key PKD-1 0750018
8 AC C harge r, AFC- 8 inc l in FP S-8
0680032
sales pack
9 SRAM Module (3 pcs
needed inside FPS-8)
SF12 0080346 (Code
includes one SRAM
module)
Note: Zocus calibration can be performed with JBV-1/DA-2 and MJ-2 concept using the XRF12 RF
cable. EM calibration can only be performed with JBV-1/DA-2.
12 COMPANY CONFIDENTIAL ISSUE 2 01/2004
Copyright © 2003 Nokia. All Rights Reserved.
Page 13

NHL-10
Service Software Instructions CCS Technical Documentation
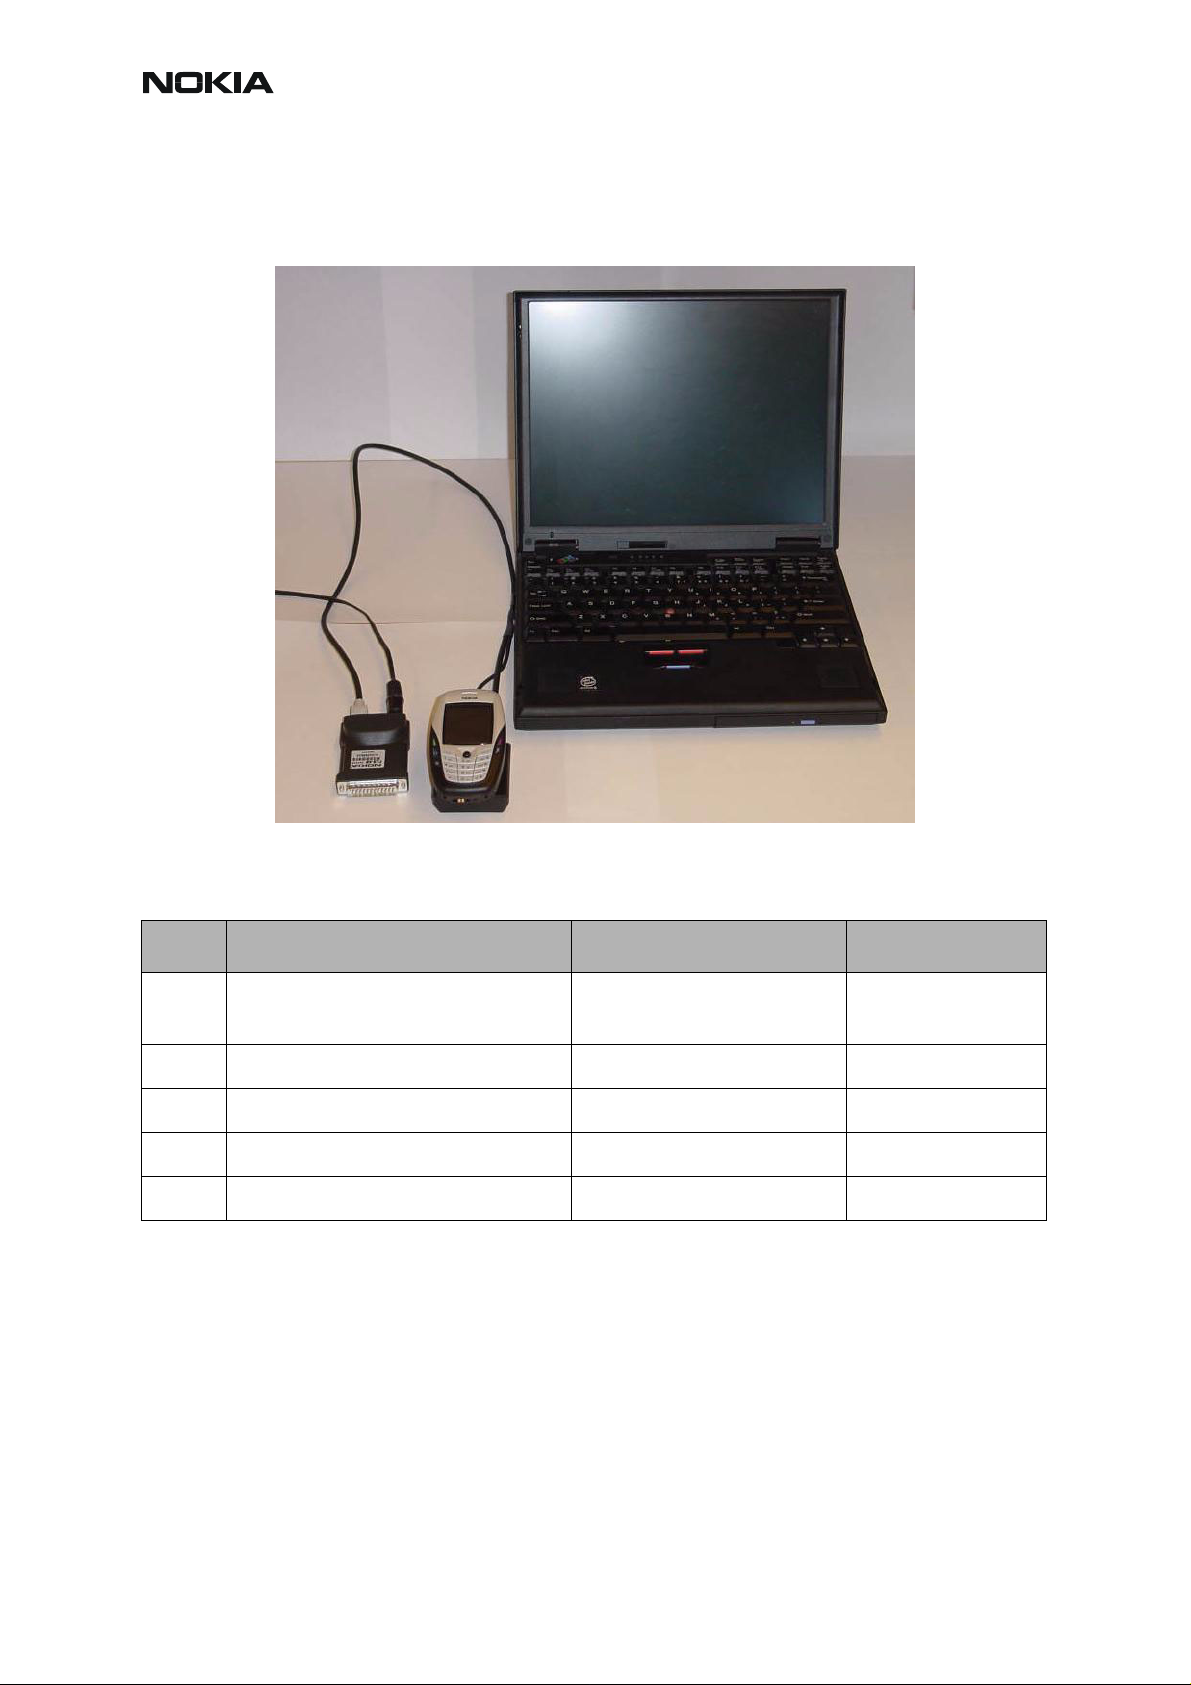
RF Tuning/Testing setup
RF tuning/testing setup with JBV-1, DA-2, SA-20 and XRS-11
Locking
Arm
ISSUE 2 01/2004 COMPANY CONFIDENTIAL 13
Copyright © 2003 Nokia. All Rights Reserved.
Page 14

NHL-10
CCS Technical Documentation Service Software Instructions
Connection Instructions:
1 Remove Camera Ornament from the phone.
2 Connect DA-2 to the phone.
3 Put XRS-11 on to DA-2.
4 Latch the XRS-11 with the locking arm of DA-2.
Disconnection Instructions:
1 Rotate the locking arm of DA-2.
2 Take XRS-11 from DA-2.
3 Disconnect DA-2 from the phone.
4 Put Camera Ornament on to the phone.
NHL-10 Phoenix installation instructions
Now that cables have been connected, you must install the NHL-10 version of Pho enix to your
PC.
• 2003.15.2.25 is the first external released AMS Phoenix that supports
6600.
• Save the package to your hard disk and install it by doubleclicking it.
Note: It is recommended to uninstall the previous NHL-10 Phoenix package bef or e installing
the new one. Do it as follows:
• Click Start -> Settings -> Control Panel.
• Select Add/Remove Programs.
• Phoenix NHL-10 release.
• Select Add/Remove.
Reboot your computer after uninstallation.
FPS-8 to PC connection Setup instructions
Establish connection between your PC and FPS-8. The procedure is as follows:
• Start Phoenix.
•Choose File -> Manage connections.
• Choose Add.
14 COMPANY CONFIDENTIAL ISSUE 2 01/2004
Copyright © 2003 Nokia. All Rights Reserved.
Page 15

NHL-10
Service Software Instructions CCS Technical Documentation
• Select Manual in select mode.
• As Media, select FPS-8.
• Port number, select the COM port where you have connected the serial
cable of FPS-8, for example COM1.
• BIT_RATE, select a rate (115200 is the default one).
• COMBOX_DEF_MEDIA, select FBUS.
• Click Finish.
•Press the Arrow up key so that FPS8 COM1 FBUS becomes the first on
the list.
• Press Apply and close the window.
The connection between PC and FPS-8 has now been configured.
FPS-8 activation
Follow the instructions inside FPS-8 sales pack to get FPS-8 activated.
Checking Application SW version inside FPS-8
When you have a connection established to FPS-8, and FPS-8 has been activated, the first
thing to do is to check that you have the correct application SW version inside FPS-8. Phoe nix
SW can check that automatically. The procedure goes as follows:
Go to the partner web site and take newest AMS FPS-8 SW.
Instructions:
• Click Fps-8 downloads.
• Click Flash Update.
• Click AMS/Production version.
• Click 3.00.000 or newer one.
• Take file flash_update_03_00_000.exe.
• Save it to your hard drive to a place that you can remember.
• Go to that directory and click on flash_update_03_00_000.exe.
You will see the following note on your screen. Install files to the directory which the installation
program suggests to you.
ISSUE 2 01/2004 COMPANY CONFIDENTIAL 15
Copyright © 2003 Nokia. All Rights Reserved.
Page 16

NHL-10
CCS Technical Documentation Service Software Instructions
Figure 1: InstallShield Wizard screen
When the installation is finished, FPS-8 files are located in
c:\Program Files\Nokia\Phoenix\Flash\.
You can now start Phoenix SW.
When Phoenix SW has stared, do the following:
• Click on Flashing
• Click on FPS-8/FPS-8C Maintenance
If SW inside FPS-8 prommer is too old, you get the following notification:
Figure 2: Prommer SW update screen
Click Yes and you see on the small screen as the Prommer goes to service mode (mode2 is
lit) SW goes into box, application SW, Secondary boot codes and algorithm codes are up dated.
There is no longer need to do anything special with NHL-10 specific Seco ndary boot codes and
algorithm codes.
Your PC and FPS-8 are now ready for the NHL-10 SW update.
16 COMPANY CONFIDENTIAL ISSUE 2 01/2004
Copyright © 2003 Nokia. All Rights Reserved.
Page 17

NHL-10
Service Software Instructions CCS Technical Documentation
JBV-1 Docking Station SW
The JBV-1 Docking Station is a common tool for all DCT-4 generation products.
In order to make the JBV-1 usable with different phone models, a phone spe cific Docking St a-
tion Adapter is used for different service functions.
The JBV-1 Docking Station contains Software (Firmware) which can be updated.
You need the following equipment to be able to update JBV-1 software:
• PC with USB connection
• Operating System supporting USB (Not Win 95 or NT)
• USB Cable (Can be purchased from shops or suppliers providing PC hardware and accessories)
• JBV-1 Docking Station
• External Power Supply 11-16V
Before Installation
• Download Jbv1_update.zip – file to your computer (e.g. C:\TEMP) from
your download web site.
• Close all other programs.
• Follow instructions on the screen.
Installing SW Needed for the JBV-1 SW Update
DO NOT CONNECT THE USB CABLE / JBV-1 TO YOUR COMPUTER YET!
Run Jbv1_update.zip file and start SW Installation by double clicking Setup.exe.
Files needed for the JBV-1 Package setup Program will be extracted.
Installation begins, please read the information shown and Choose Next to continue.
ISSUE 2 01/2004 COMPANY CONFIDENTIAL 17
Copyright © 2003 Nokia. All Rights Reserved.
Page 18

NHL-10
CCS Technical Documentation Service Software Instructions
Use suggested destination folder where JBV-1 SW Package will be installed and
Choose Next to continue.
Select Full Installation and choose Next to continue.
18 COMPANY CONFIDENTIAL ISSUE 2 01/2004
Copyright © 2003 Nokia. All Rights Reserved.
Page 19

NHL-10
Service Software Instructions CCS Technical Documentation
Program Folder will be created. Choose Next to continue, Software files will be installed.
After successful installation, choose Finish to complete.
ISSUE 2 01/2004 COMPANY CONFIDENTIAL 19
Copyright © 2003 Nokia. All Rights Reserved.
Page 20

NHL-10
CCS Technical Documentation Service Software Instructions
NOW YOU CAN CONNECT THE USB CABLE / JBV-1 TO YOUR COMPUTER!
Connect power to JBV-1 (11-16V DC) from an external power supply, then connect the USB
Cable between JBV-1 USB connector and PC.
Windows will detect the connected USB cable and detect drivers for new HW. Please follow
the instructions and allow Windows to search and install the best
Drivers available. After this procedure the actual JBV-1 SW update can begin.
20 COMPANY CONFIDENTIAL ISSUE 2 01/2004
Copyright © 2003 Nokia. All Rights Reserved.
Page 21

NHL-10
Service Software Instructions CCS Technical Documentation
Updating the JBV-1 Docking Station Software
Go to folder C:\Program Files\Nokia\ JBV-1 SW Package\ FIRMWARE UPDATE and start the
JBV-1 Update SW by double clicking fwup.exe.
The JBV-1 Firmware update starts and shows the current status of the JBV-1 connected.
If firmware version read from your JBV-1 is not the latest one available, it needs to be updated
by choosing Update Firmware.
Choose file JBV1v11.CDE (example used here is for v 11) and Open to update your JBV-1.
After a successful update, the current JBV-1 status will be shown. You have now updat ed the
software of your JBV-1 docking station and it is ready for use.
ISSUE 2 01/2004 COMPANY CONFIDENTIAL 21
Copyright © 2003 Nokia. All Rights Reserved.
Page 22

NHL-10
CCS Technical Documentation Service Software Instructions
22 COMPANY CONFIDENTIAL ISSUE 2 01/2004
Copyright © 2003 Nokia. All Rights Reserved.
Page 23

NHL-10
Service Software Instructions CCS Technical Documentation
Data Package for Phoenix (Product Specific)
Before installation
The Product Data Package contains all product specific data to make the Phoenix Service Software and tools usable with a certain phone model.
It also includes the latest version of flash update package for FLS-4* and FPS-8*
• Check that the Dongle is attached to the parallel port of your computer.
• Install Phoenix Service SW.
• Download the installation package (e.g. NHL-10_dp_v_1.00.exe) to your
computer (e.g. C:\TEMP) .
• Close all other programs.
• Run the application file (e.g. NHL-10_dp_v_1.00.exe) and follow the
instructions on the screen.
If you already have the Phoenix Service SW installed on your computer, sooner or later there
will be need to update it when new versions are released.
Please note that very often the Phoenix Service SW and the Phone Specific Data Package for
Phoenix come in pairs, meaning that certain version of Phoenix can only b e used with certain
version of Data Package. Always use the latest available versions of both. Instructions can be
found in phone model specific Technical Bulletins.
ISSUE 2 01/2004 COMPANY CONFIDENTIAL 23
Copyright © 2003 Nokia. All Rights Reserved.
Page 24

NHL-10
CCS Technical Documentation Service Software Instructions
Installation of Phoenix Data Package (Product Specific)
Run the NHL-10_dp_v_1.00.exe to start installation.
When you choose Next the files needed for installation will be extracted. Please wait.
Choose Next to continue.
24 COMPANY CONFIDENTIAL ISSUE 2 01/2004
Copyright © 2003 Nokia. All Rights Reserved.
Page 25

NHL-10
Service Software Instructions CCS Technical Documentation
In this view, you can see the contents of the Data Package.
Read the text carefully.
There should be information about the Phoenix version needed with this data package.
Choose Next.
Confirm location and choose Next to continue.
The Install Shield checks where the Phoenix application is installed and the directory is shown.
ISSUE 2 01/2004 COMPANY CONFIDENTIAL 25
Copyright © 2003 Nokia. All Rights Reserved.
Page 26

NHL-10
CCS Technical Documentation Service Software Instructions
Choose Next to continue.
26 COMPANY CONFIDENTIAL ISSUE 2 01/2004
Copyright © 2003 Nokia. All Rights Reserved.
Page 27

NHL-10
Service Software Instructions CCS Technical Documentation
Phone model specific files will be installed... please wait.
Choose Finish to complete the installation.
You now have all phone model specific files installed in your Phoenix Service SW.
ISSUE 2 01/2004 COMPANY CONFIDENTIAL 27
Copyright © 2003 Nokia. All Rights Reserved.
Page 28

NHL-10
CCS Technical Documentation Service Software Instructions
How to Uninstall Data Package
Uninstallation can also be done manually from Windows Control Panel / Add / Remove Programs/ “NHL-10 Phone Data Package”.
If you try to install the same version of Phoenix Data Package that you already have, you are
asked if you want to uninstall the version you have on your PC. Answer OK to uninstall, Cancel
if you don’t want to uninstall. Older versions of data packages do not need to be uninstalled.
Once the previously installed Data package is uninstalled, choose Finish.
Run the NHL-10_dp_v_1.00.exe again to continue installation from the beginning.
28 COMPANY CONFIDENTIAL ISSUE 2 01/2004
Copyright © 2003 Nokia. All Rights Reserved.
Page 29

NHL-10
Service Software Instructions CCS Technical Documentation
Reprogramming NHL-10
Connecting cables
Once you have the NHL-10 opened and the battery and SIM removed, attach it to the SF-2
adapter. Once connected to the SF-2 the phone goes to local mode and the screen will not
show anything during SW update.
Proceed as follows:
• Connect XCS-4 cable from SF-2 to FPS-8
• Connect FLC-2 cable from FPS-8 to SF-2
• There is no need to press the phone power key. Phone has set itself automatically to local mode and it is now ready for SW update.
Settings backup/restore
It is quicker to use MMC user data backup, which can be found at: Menu -> Extras -> Memory
-> Options -> Backup phone memory.
Start Phoenix SW by double-clicking the Phoenix icon on your desktop.
•Choose File->Manage Connections.
• Click FPS-8 COM1 FBUS.
• Click Apply, and then close the dialog.
•Choose File->Scan Product. If the phone is ok, you should see the SW
version in lower right-hand corner, for example V1.31.0.
• If the scanning finds nothing, the phone is most likely in a strange mode.
Settings Backup:
• Click Product.
•Click User settings.
•Click All Settings.
•Click Browse.
• Choose from Directory C:\Program files\Nokia\Phoenix\Products\NHL-
10\NHL_10.ini.
You will now see the following PC screen:
ISSUE 2 01/2004 COMPANY CONFIDENTIAL 29
Copyright © 2003 Nokia. All Rights Reserved.
Page 30

NHL-10
CCS Technical Documentation Service Software Instructions
Figure 3: All settings screen
Updating software
New SW package can be updated.
• Choose Flashing -> FPS-8 Flash -> Choose Restore User Phone or Phone as
Manufactured -> Uncheck Manual File Selection. Then Click on Flash.
• Now in Flash file selection window, choose the product code.
Select the correct file:
Now click OK, and SW update starts.
You will see as the 18 MB package goes into FPS-8 (If transfer is very slow, it is recommended
that Parallel port is in ECP mode. Transfer in ECP mode is much faster).
If you do not know how to change the PC Parallel port mode from BIOS, contact your local sup-
port.
Then Phoenix erases flash memories.
Finally, you will see how the SW package goes into phone (When SW update takes place, Yel-
low Mode 1 led is blinking fast).
When SW update has ended, the yellow led stops blinking and you get a note in windows SW.
You will get instructions to turn the phone on. Do so and wait for 15 seconds.
30 COMPANY CONFIDENTIAL ISSUE 2 01/2004
Copyright © 2003 Nokia. All Rights Reserved.
Page 31

NHL-10
Service Software Instructions CCS Technical Documentation
Formatting user area
The user area also needs to be formatted in order to make sure that there is no user data left
in the phone.
Choose File -> Scan product. In the bottom of the Phoenix window you should see V3.1, Date,
NHL-10(c) NMP.
Format User area the following way:
Click Product -> User area format. You will get a note warning you about loss of user data.
Click yes to proceed.
Phoenix shows the Formatting user data area, please wait screen for a while and gives you
a success message.
Restore settings
Settings can be restored from MMC or Phoenix.
ISSUE 2 01/2004 COMPANY CONFIDENTIAL 31
Copyright © 2003 Nokia. All Rights Reserved.
Page 32

NHL-10
CCS Technical Documentation Service Software Instructions
This page has been deliberately left blank
32 COMPANY CONFIDENTIAL ISSUE 2 01/2004
Copyright © 2003 Nokia. All Rights Reserved.
 Loading...