

Page 1
®
Home
Find...
Go To..
Model Part No.:
613017 - TrailBlazert (includes EZ Glidet Kit)
613018 - TrailBlazert Lite (includes EZ Glidet Kit)
613019 - TrailBlazert XP (includes EZ Glidet Kit)
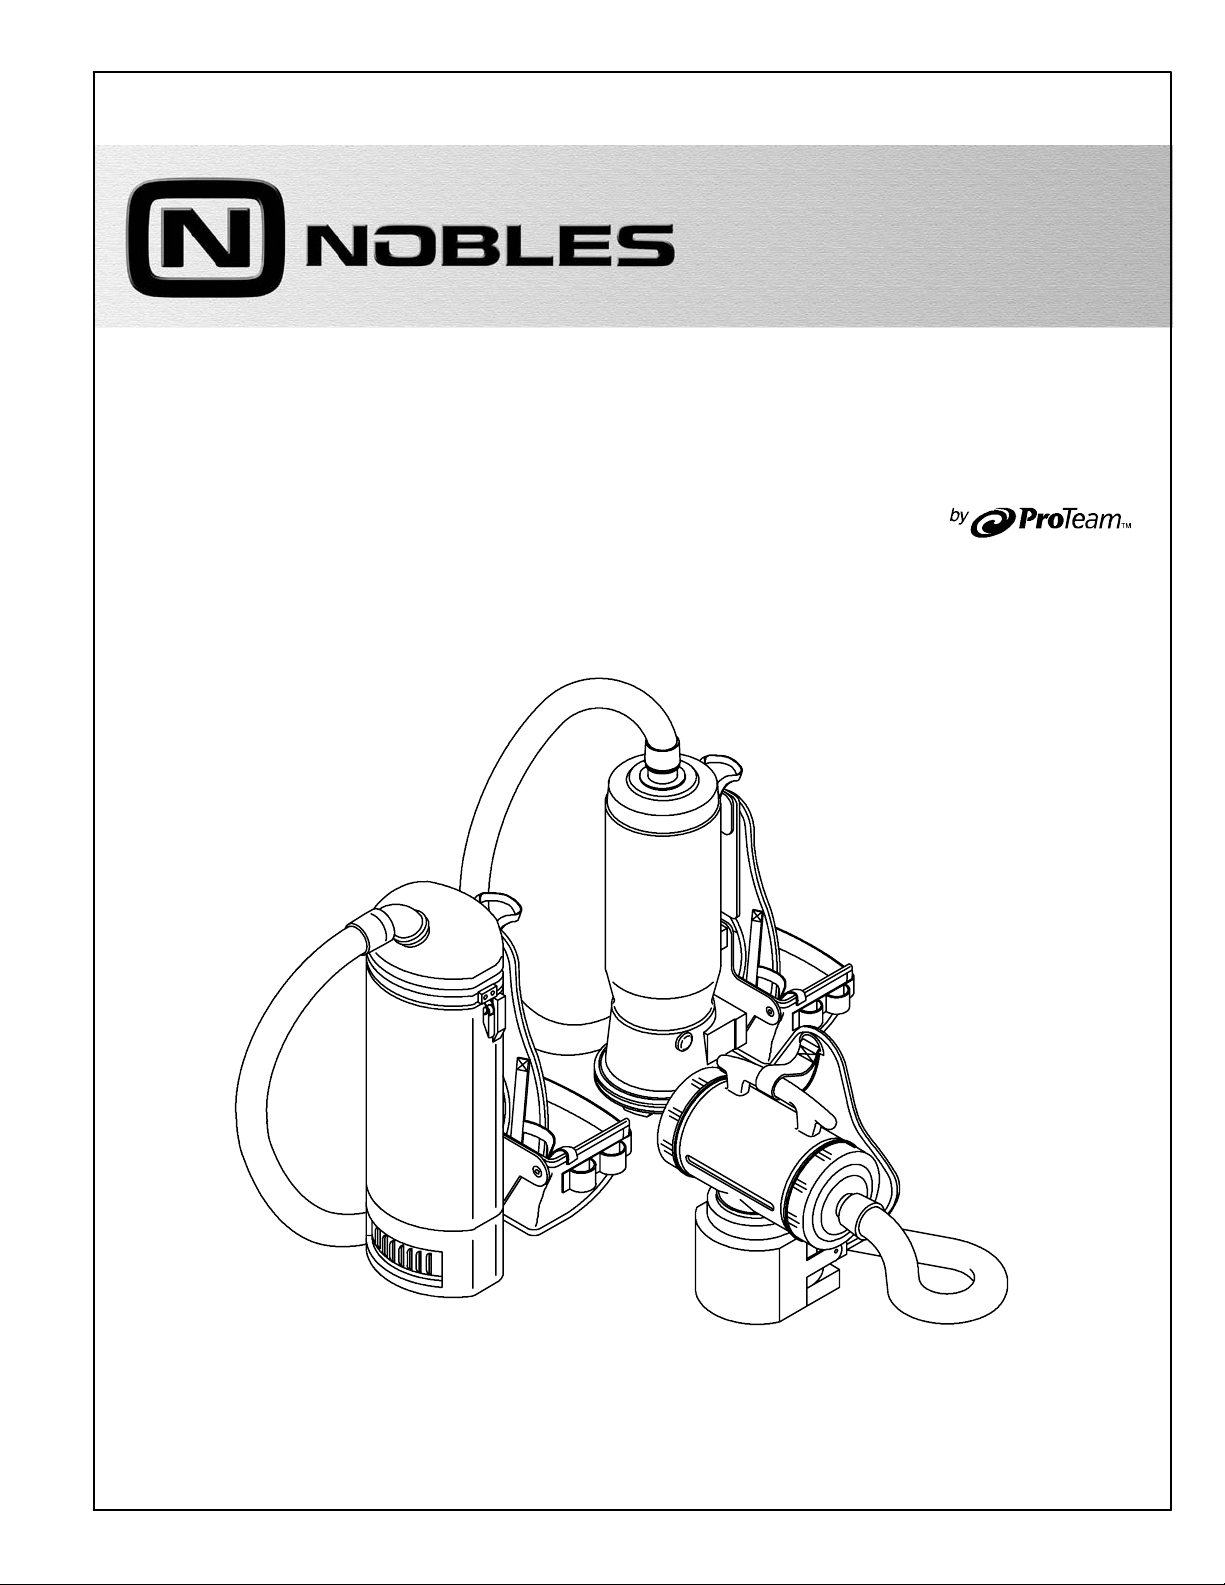
TRAILBLAZER
OPERATOR AND PARTS MANUAL
TrailBlazert
t
SERIES
BACKPACK VACUUMS
www.nobles.com
TrailBlazert XP
TrailBlazert Lite
612909
Rev. 02 (07-2009)
*612909*
Page 2
OPERATION
Home
Find...
Go To..
Carefully unpack and inspect your new vacuum for
shipping damage. Each unit is tested and thoroughly
inspected before shipping. For instructions regarding
any shipping damage, contact Nobles immediately. All
returns must have a Return Authorization Number
(RAN).
This manual is furnished with each new unit. It
provides necessary operation and maintenance
instructions and an illustrated parts list.
Read this manual completely and understand the
machine before operating or servicing it.
Use the Parts Lists to order parts. Before ordering
parts or supplies, be sure to have your machine model
number and serial number handy. Parts and supplies
may be ordered by phone or mail from any authorized
parts and service center, distributor or from any of the
manufacturer’s subsidiaries.
This machine will provide excellent service. However,
the best results will be obtained at minimum costs if:
S The machine is operated with reasonable care.
S The machine is maintained regularly - per the
machine care instructions provided.
S The machine is maintained with manufacturer
supplied or equivalent parts.
This machine is intended for commercial use only. It is
suited to pick up dirt, dry debris and dust in an indoor
environment and is not constructed for any other use.
The pick up of any type of fluid or dangerous dust is
prohibited. Use only recommended accessories.
MACHINE DATA
Please fill out at time of installation
for future reference.
Model No. --
Serial No. --
Machine Options --
Sales Rep. --
Sales Rep. phone no. --
Customer Number --
Installation Date --
UNCRA TING MACHINE: Carefully check carton for
signs of damage. Report damages at once to carrier.
PROTECT THE ENVIRONMENT
Please dispose of packaging materials
and old machine components in an environmentally safe way according to local waste disposal regulations.
Always remember to recycle.
Tennant Company
PO Box 1452
Minneapolis, MN 55440 USA
Phone: (800) 553--8033 or (763) 513--2850
www.nobles.com
Specifications and parts are subject to change without
notice.
Copyright E 2001--2008 TENNANT Company.
All rights reserved.
Nobles is a registered United States trademark of Tennant Company.
TrailBlazer is a United States trademark of Tennant Company.
2
TrailBlazert Series (07--09)
Page 3

TABLE OF CONTENTS
Home
Find...
Go To..
OPERATION
SAFETY INSTRUCTIONS 4....................
GROUNDING INSTRUCTIONS 5...........
PREPARING THE VACUUM FOR OPERATION 5
TRAILBLAZERt 5........................
TRAILBLAZERt LITE 6...................
TRAILBLAZERt XP 8.....................
ELECTRICAL CORD CARE 9..................
PROPER STORAGE 10........................
PROPER VACUUMING MOTION FOR LARGE
AREAS WITH DIRECT SUCTION TOOLS 10.....
ERGONOMICS 10.............................
CARING FOR YOUR VACUUM 10...............
PREVENTATIVE MAINTENANCE 10.............
TROUBLESHOOTING 11.......................
FILTER MAINTENANCE 11.....................
TRAILBLAZERt AND TRAILBLAZERt LITE 1 1
TRAILBLAZERt XP 12.....................
RECOMMENDED STOCK ITEMS 13.............
SPECIFICATIONS 13..........................
PARTS LIST 14...............................
TRAILBLAZERt 14........................
TRAILBLAZERt LITE 16...................
TRAILBLAZERt XP 18.....................
OPTIONS 20..................................
RESTAURANT VAC TOOL KIT 20............
COMMERCIAL VAC TOOL KIT 20............
E-Z GLIDEt COMMERCIAL VAC TOOL KIT 20
TURBO FLOOR TOOL 21...................
JETSWEEPt FLOOR TOOL 21.............
TrailBlazert Series (03--02)
3
Page 4

OPERATION
Home
Find...
Go To..
SAFETY INSTRUCTIONS
WARNING: To reduce the risk of fire, electric shock or injury, read the following:
1. Do not vacuum with a frayed, worn, or damaged cord.
2. Do not vacuum liquids or expose the backpack vacuum to rain or water.
3. Do not vacuum hazardous or toxic materials.
4. Do not use to pick up flammable or hazardous materials.
5. Do not leave the unit plugged in when it is not in use. Unplug it from the outlet when the unit is
not in use and before servicing.
6. Do not use outdoors or on wet surfaces.
7. Do not try to r ecover any liquid with this vacuum. T his vacuum is for DRY RECOVERY only.
8. Use only as described in this manual. Use only manufacturer’s recommended attachments
and replacement parts.
9. To prevent electrical damage, use the recommended 50 foot/16 gauge extension cord
provided. If you need to use a 100 foot cord, it must be 14 gauge or better. DO NOT use cords
longer than 100 feet.
10. Do not use a damaged cord or plug. If the unit is not working as it should, or if it has been
dropped, damaged, left outdoors, or exposed to water, return it to an authorized servicing
dealer for inspection.
11. Do not pull or carry the vacuum by the cord or use the cord as a handle. Do not close a door
on the cord or pull the cord around sharp edges or corners. Do not run over the cord. Keep
the cord away from heated surfaces.
12. Do not pull on the cord to unplug. Grasp the plug at the outlet and pull.
13. Do not handle the plug or vacuum with wet hands.
14. Do not put any objects into openings. Keep hair, loose clothing, fingers, and all parts of the
body away from openings and moving parts. Long hair should not hang over or near the unit.
15. Do not vacuum flammable or combustible materials or anything that is burning or smoking,
such as cigarettes, matches, or hot ashes.
16. Empty the filter bag after every use and before storage. Some types of dust and debris may
combust.
17. Turn off the unit before unplugging.
18. Connect commercial -- r ated units to properly grounded outlets only.
19. Use with care when cleaning stairs.
20. Do not allow to be used as a toy. Close attention is necessary when used by or near children.
SAVE THESE INSTRUCTIONS - Violation of any of these instructions may void any and all
warranties.
4
TrailBlazert Series (11-- 01)
Page 5
OPERATION
Home
Find...
Go To..
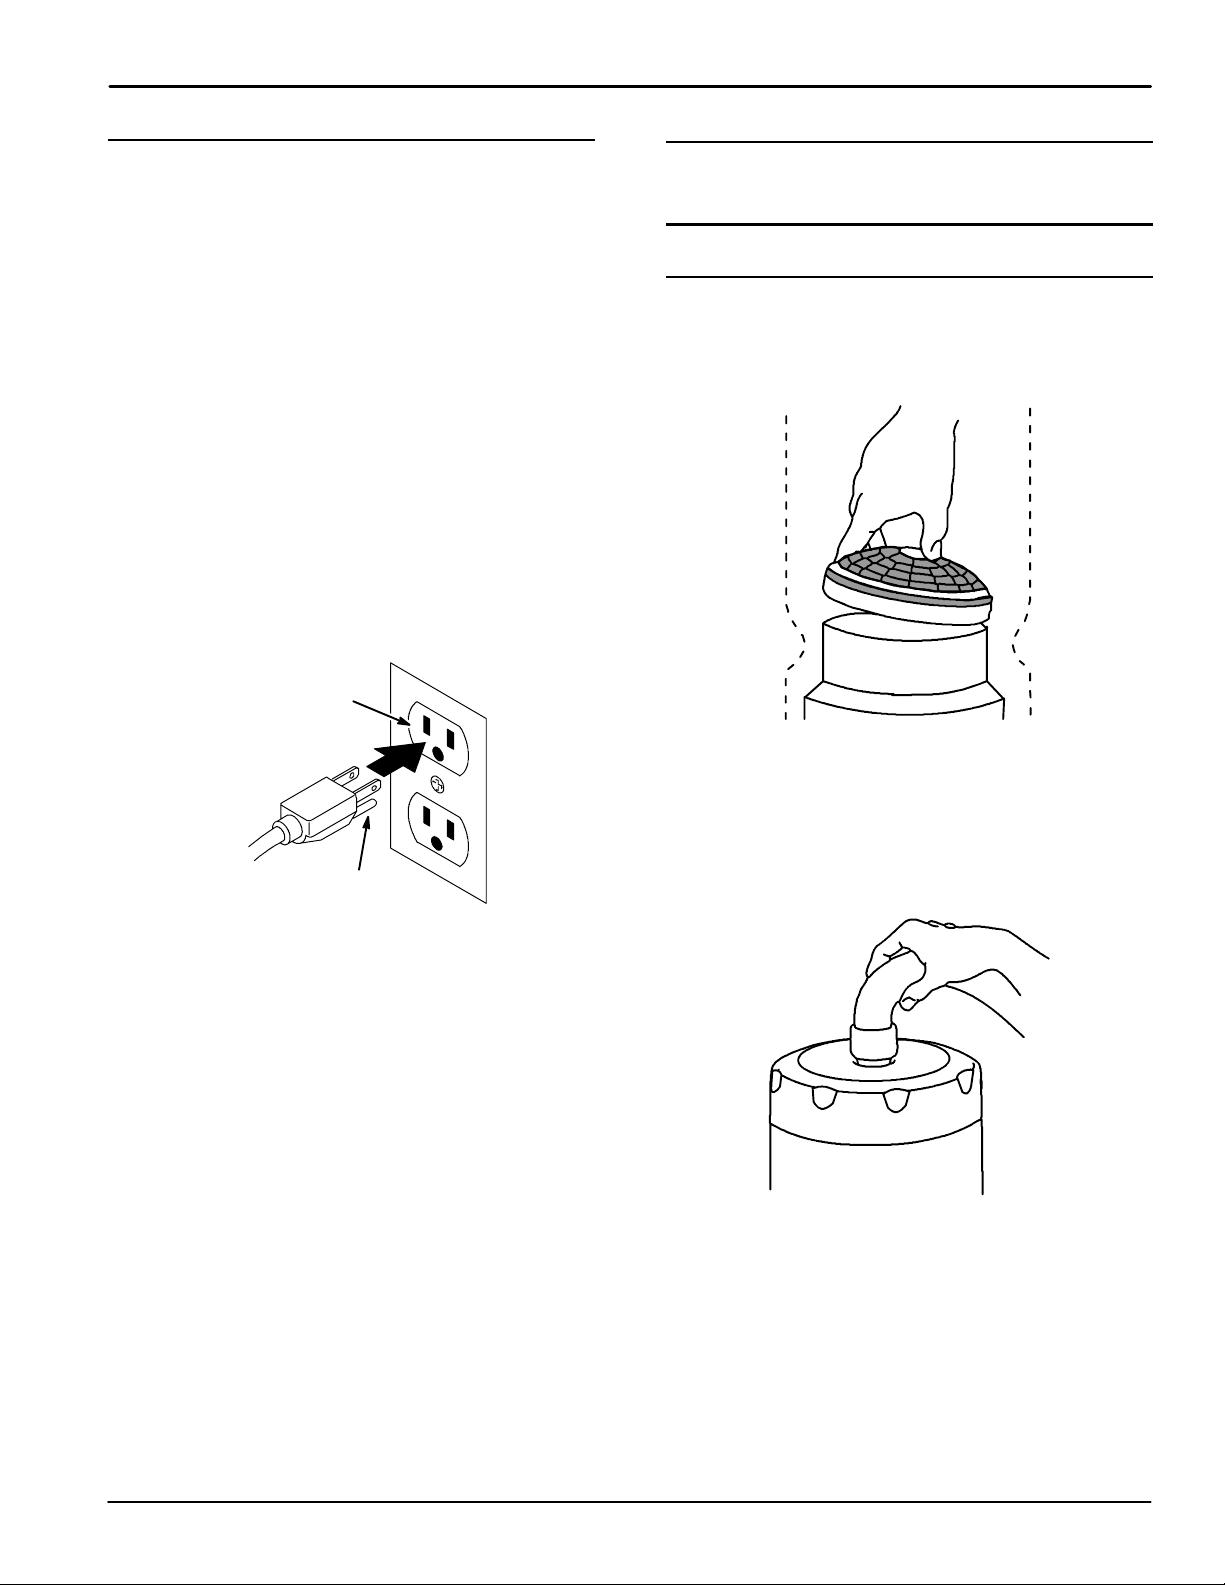
GROUNDING INSTRUCTIONS
The vacuum Must be grounded. If the vacuum should
malfunction or stop working, grounding provides a
path of least resistance for electrical current, thereby
reducing the risk of electrical shock. This unit is
equipped with a cord that has an
equipment--grounding conductor and grounding plug.
The plug must be inserted in an appropriate outlet that
is properly installed and grounded in accordance with
all local codes and ordinances. Cutting off the ground
wire or using a cord that is not equipped with a ground
plug will void the warranty on the unit, and Nobles will
accept NO liability associated with the unit.
Improper connection of the equipment--grounding
connector conductor can result in a risk of electrical
shock. Check with a qualified electrician or service
person if you doubt that the outlet is properly
grounded. Do not modify the plug provided with the
vacuum. If it will not fit the outlet, have a proper outlet
installed by a qualified electrician.
Grounded
3HoleOutlet
Ground Pin
PREPARING THE VACUUM FOR OPERATION
TRAILBLAZERt MODEL
1. Remove the top cap and pull out the cloth filter.
Check to see that the dome filter has not shifted
during shipping (Figure 1).
FIG. 1
2. Install a Micro filter inside of the cloth filter. At the
beginning of each shift, the filters should be
checked. Empty or replace as necessary.
NOTE: Never use a Micro filter without the cloth filter.
3. Replace the cap. Push the hose into the cap
opening (Figure 2).
(120V)
FIG. 2
TrailBlazert Series (11-- 01)
5
Page 6
OPERATION
Home
Find...
Go To..
4. Twist the aluminum wand into the hose. Check
hose cuffs at both ends to make sure that they are
tight.
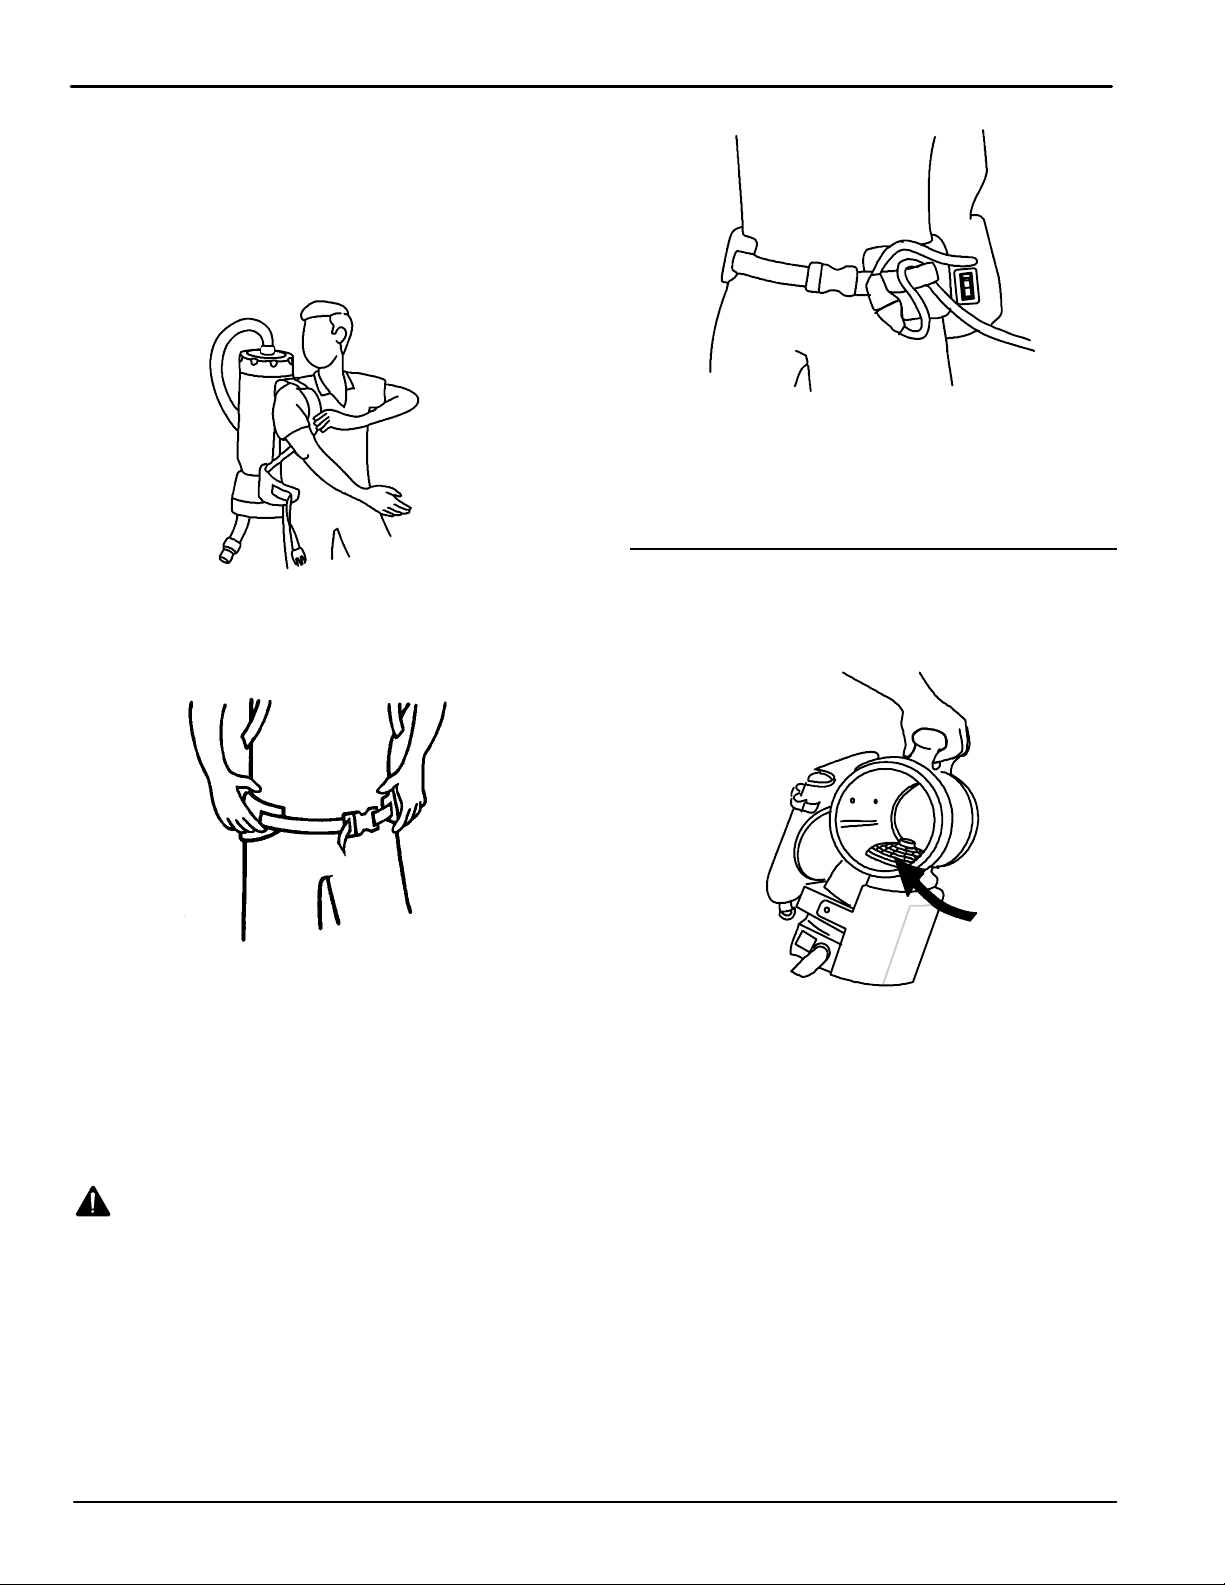
5. Loosen the shoulder straps and waist belt. In an
open area, lift the vacuum by one shoulder strap
and slide your free arm into the other strap
(Figure 3).
FIG. 5
8. To attach tools to an aluminum wand, LOOSEN
the plastic nut at the end of the wand, insert the
tool, and retighten the nut. To ensure the copper
ring stays in place, NEVER remove the nut.
FIG. 3
6. Fasten the waist belt snugly and make sure the
weight is resting comfortably on your hips
(Figure 4).
FIG. 4
NOTE: The backplate is adjustable up or down by
removing the four screws that attach to the vacuum’s
body.
7. Check the wear on the cord by the vacuum body
and at the plug. Place the extension cord between
the waist belt’s strap and padded area to signal
you if you have run out of cord while vacuuming
(Figure 5).
TRAILBLAZERt LITE MODEL
1. Remove the cap and pull out the cloth filter. Check
to see that the dome filter has not shifted during
shipping (Figure 6).
FIG. 6
2. Install a Micro filter inside of the cloth filter. At the
beginning of each shift, the filters should be
checked. Empty or replace them if necessary .
NOTE: Never use a Micro filter without the cloth filter.
The cloth filter’s rubber gasket provides the seal.
shock or injury, do not pull or carry the vacuum
by the cord or use the cord as a handle. Do not
close door on cord or pull the cord around sharp
edges or corners. Do not run over the cord. Keep
the cord away from heated surfaces. Do not pull
on the cord to unplug. Grasp the plug at the outlet
and pull. Work within cord length to avoid stress
and damage.
WARNING: To reduce the risk of fire, electric
6
TrailBlazert Series (11-- 01)
Page 7
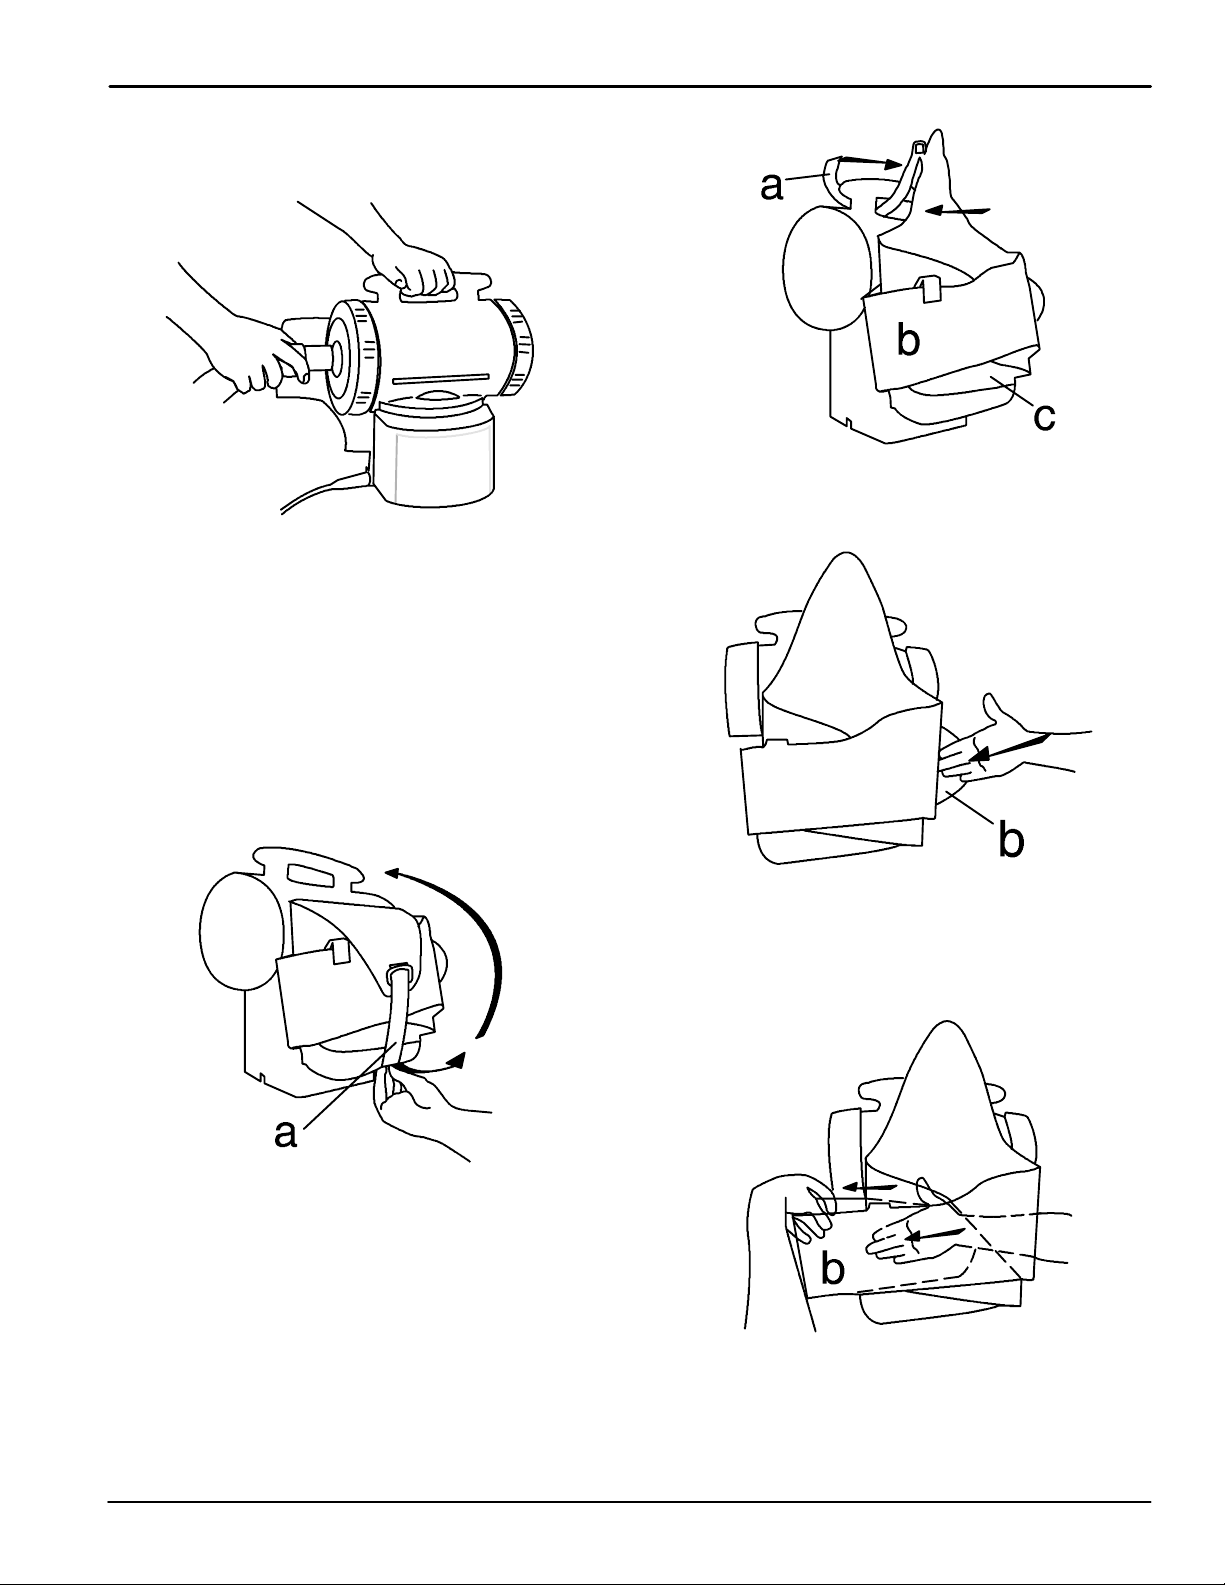
3. Replace the cap. Push the hose into the end cap
Home
Find...
Go To..
opening (Figure 7). End caps are interchangeable
for right-- or left--handed operators.
FIG. 7
4. The new waistbelt with monostrap system allows
the Trailblazer Lite to be utilized in three different
ways to accommodate the user with a choice of
comfortable adjustments.
With the waist belt wrapped up in an
envelope--style packet, the vacuum can be carried
by the molded top handle or, with the monostrap
connected, can be slung over the shoulder. The
vacuum can also be worn around the waist with or
without the monostrap for support.
5. Detach the Velcro
®
strap (a) from the base of the
waistbelt and lift the strap (Figure 8).
OPERATION
FIG. 9
7. With the waistbelt facing you, use your right hand
to separate the exposed Velcro
of the flap and the back of the belt (Figure 10).
®
between the end
FIG. 8
6. Slide the Velcro®strap (a) under the molded plastic
handle of the vacuum and back around over the
top of the handle. Attach the end of the strap to
the Velcro
®
tab(Figure9).
FIG. 10
8. Continue to slide your right hand all the way to the
left to separate the remaining Velcro
®
(Figure 11).
With your left hand, pull the flap (b) out from
behind the waistbelt and toward you to expose
flap c.
FIG. 11
TrailBlazert Series (11-- 01)
7
Page 8
OPERATION
Home
Find...
Go To..
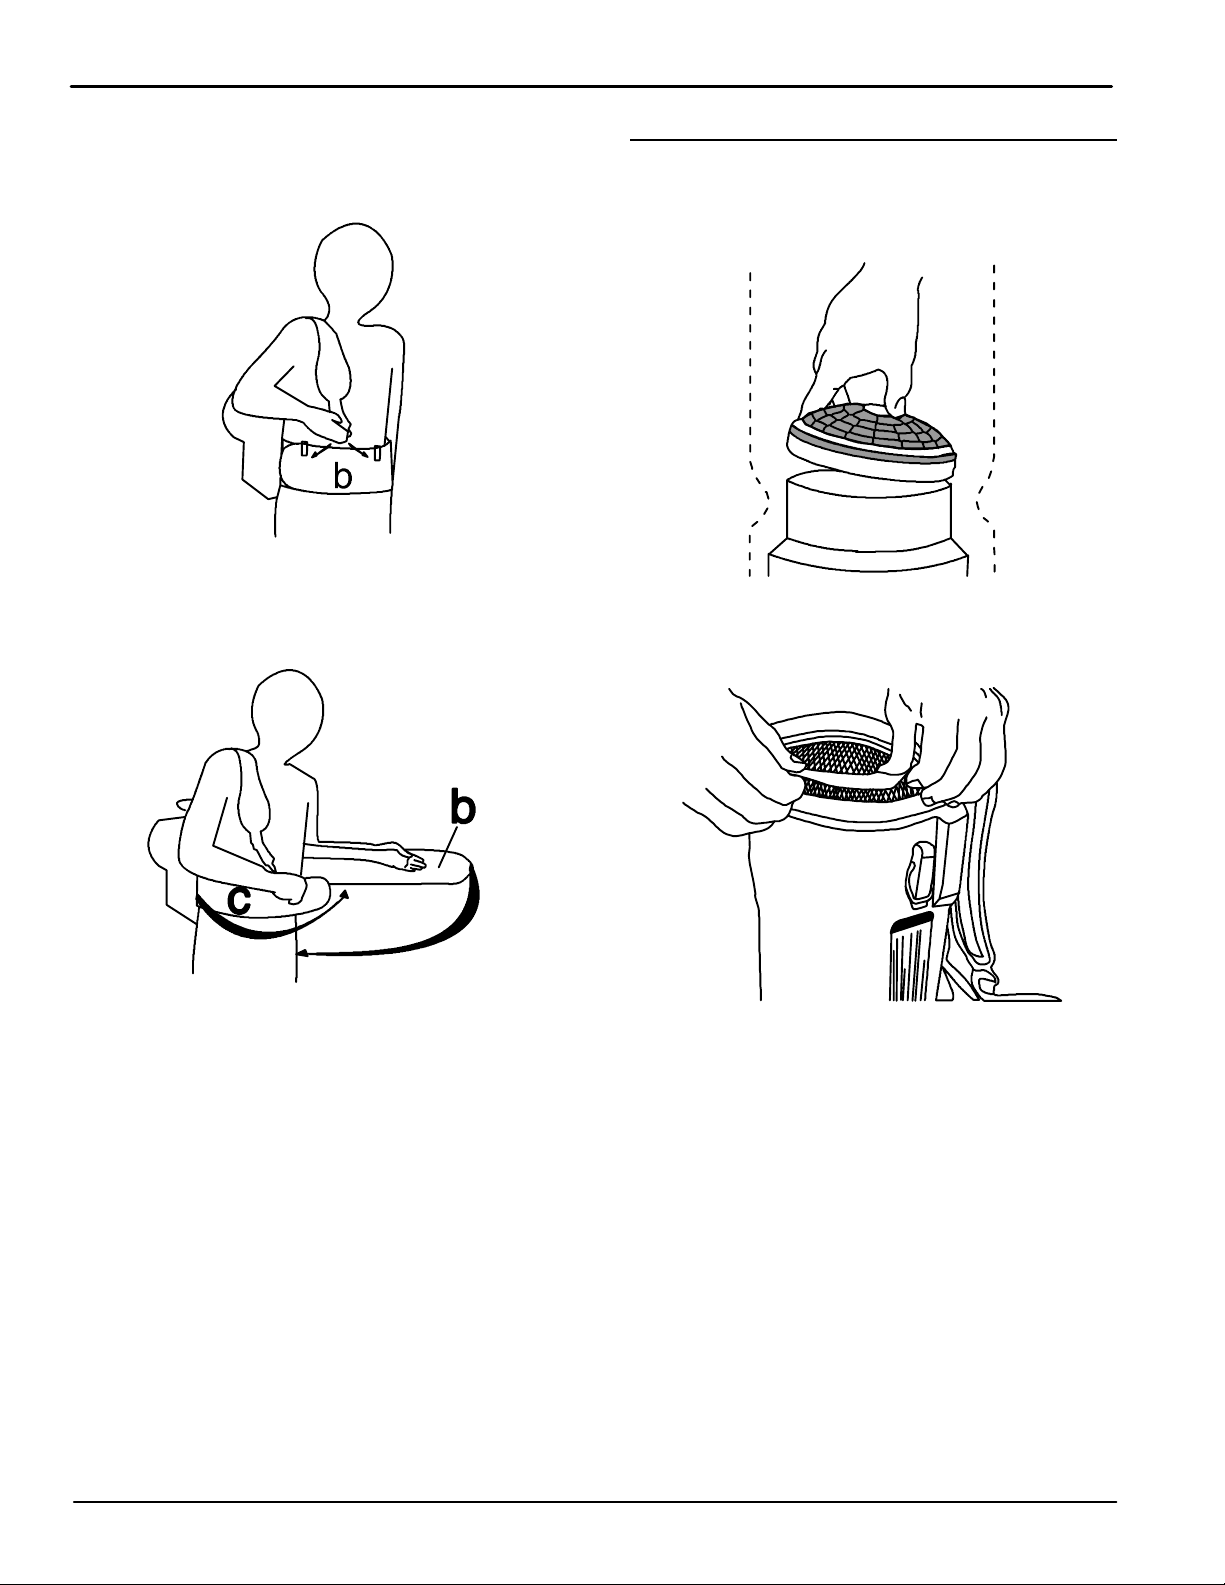
9. To put the vacuum on, slide the monostrap up
over your preferred shoulder. Fasten the belt by
bringing the right flap (C) across the front. then
bring the left flap (B) over on top of it. (Figure 12).
FIG. 12
10. Adjust the comfort of the shoulder strap by
adjusting the length of the strap and/or attaching
the front snap hook to any of the other rings on
the front of the waistbelt (Figure 13).
TRAILBLAZERt XP MODEL
1. Unlatch and remove the top cap and pull out the
cloth filter. Check to see that the dome filter has
not shifted during shipping (Figure 14).
FIG. 14
2. Reinstall the cloth filter, making sure that the lip of
the filter completely covers the rim of the vacuum
(Figure 15).
NOTE: For maximum comfort, alternate the shoulder
strap to the right or left shoulder every two hours.
NOTE: If monostrap is not attached, insert this step
between steps 8 and 9. Attach the hook on the short
end of the monostrap to the ring up on the end of the
Velcro
the monostrap to any of the four rings on the waistbelt.
Attach to rings on flap c if right--handed, and flap b if
left-- handed.
1 1. Twist the aluminum wand into the hose. Check
FIG. 13
®
strap (a). Attach the hook on the other end of
hose cuffs at both ends to make sure that they are
tight.
8
FIG. 15
3. Install a Micro filter (if there is not one already
installed) by sliding the gasket of the Mic ro fil ter
over the inlet on the inside of the top cap
(Figure 16). Replace the cap, making sure that the
latches catch correctly.
TrailBlazert Series (03--02)
Page 9
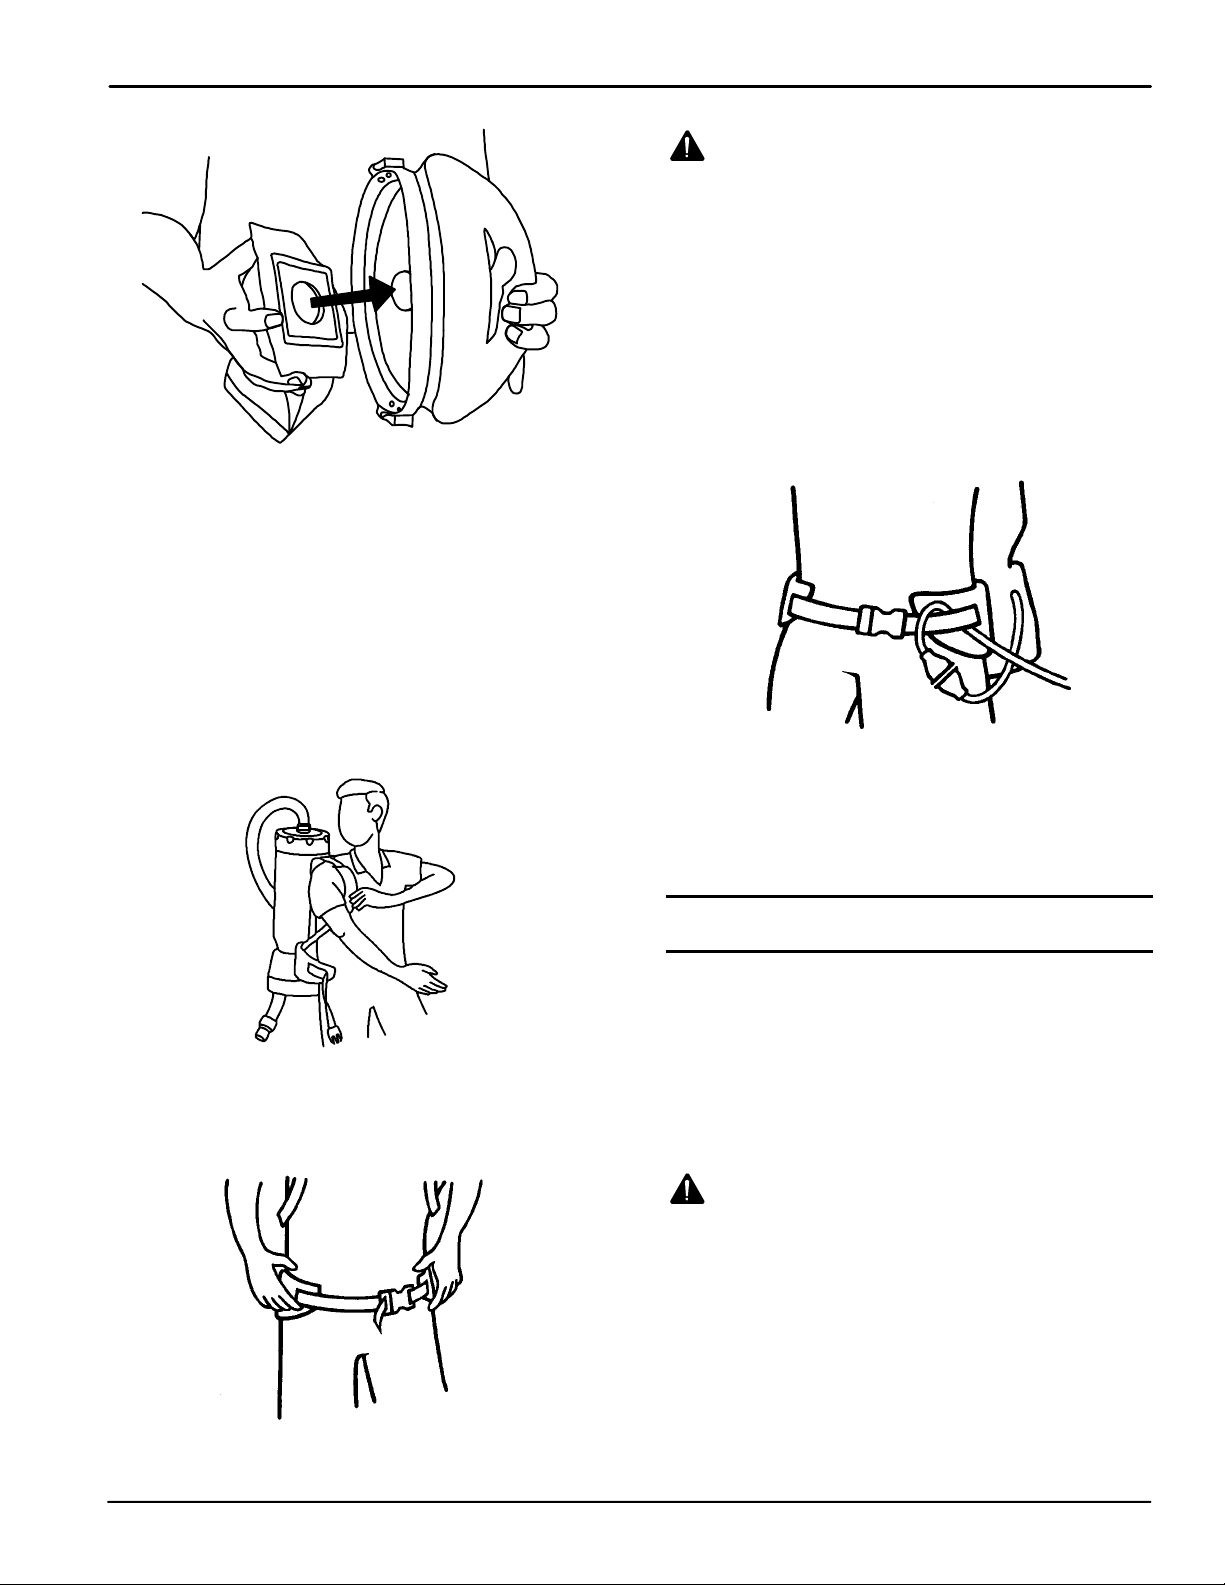
FIG. 16
Home
Find...
Go To..
At the beginning of each shift, the filters should be
checked. Empty or replace as necessary.
NOTE: Never use a Micro filter without the cloth filter.
4. Push the hose into the cap opening .
5. Twist the aluminum wand into the hose. Check
hose cuffs at both ends to make sure that they are
tight.
6. Loosen the shoulder straps and waist belt. In an
open area, lift the vacuum by one shoulder strap
and slide your free arm into the other strap
(Figure 17).
OPERATION
WARNING: To reduce the risk of fire, electric
shock or injury, do not pull or carry the vacuum
by the cord or use the cord as a handle. Do not
close door on cord or pull the cord around sharp
edges or corners. Do not run over the cord. Keep
the cord away from heated surfaces. Do not pull
on the cord to unplug. Grasp the plug at the outlet
and pull. Work within cord length to avoid stress
and damage.
8. Check the wear on the cord by the vacuum body
and at the plug. Place the extension cord between
the waist belt’s strap and padded area to signal
you if you have run out of cord while vacuuming
(Figure 19).
FIG. 19
9. To attach tools to a 1½” aluminum wand, LOOSEN
the plastic nut at the end of the wand, insert the
tool, and retighten the nut. To ensure the copper
ring stays in place, NEVER remove the nut.
FIG. 17
7. Fasten the waist belt snugly and make sure the
weight is resting comfortably on your hips
(Figure 18).
FIG. 18
ELECTRICAL CORD CARE
NEVER stretch the cord tightly between the vacuum
and the outlet. A cord that is stretched or pulled will
not function properly and creates a danger.
After vacuuming, unplug the cord (at both ends of an
extension cord) and wind it up loosely. DO NOT wind
the cord up by wrapping it around your hand and
elbow.
WARNING: To reduce the risk of fire, electric
shock or injury, do not pull on the cord to unplug.
Grasp the plug at the outlet and pull. Work within
cord length to avoid stress and damage. Do not
handle the plug or vacuum with wet hands.
TrailBlazert Series (11-- 01)
9
Page 10
OPERATION
Home
Find...
Go To..
PROPER STORAGE
S The on/off switch is conveniently placed for easy
access on the waist belt of the TrailBlazer and on
the left side of the Trailblazer Lite body.
When the vacuum is not in use, it should be stored in
a dry place.
WARNING: To reduce the risk of fire, electric
shock or injury, empty the filter bag after every
use and before storage. Some types of dust and
debris may combust.
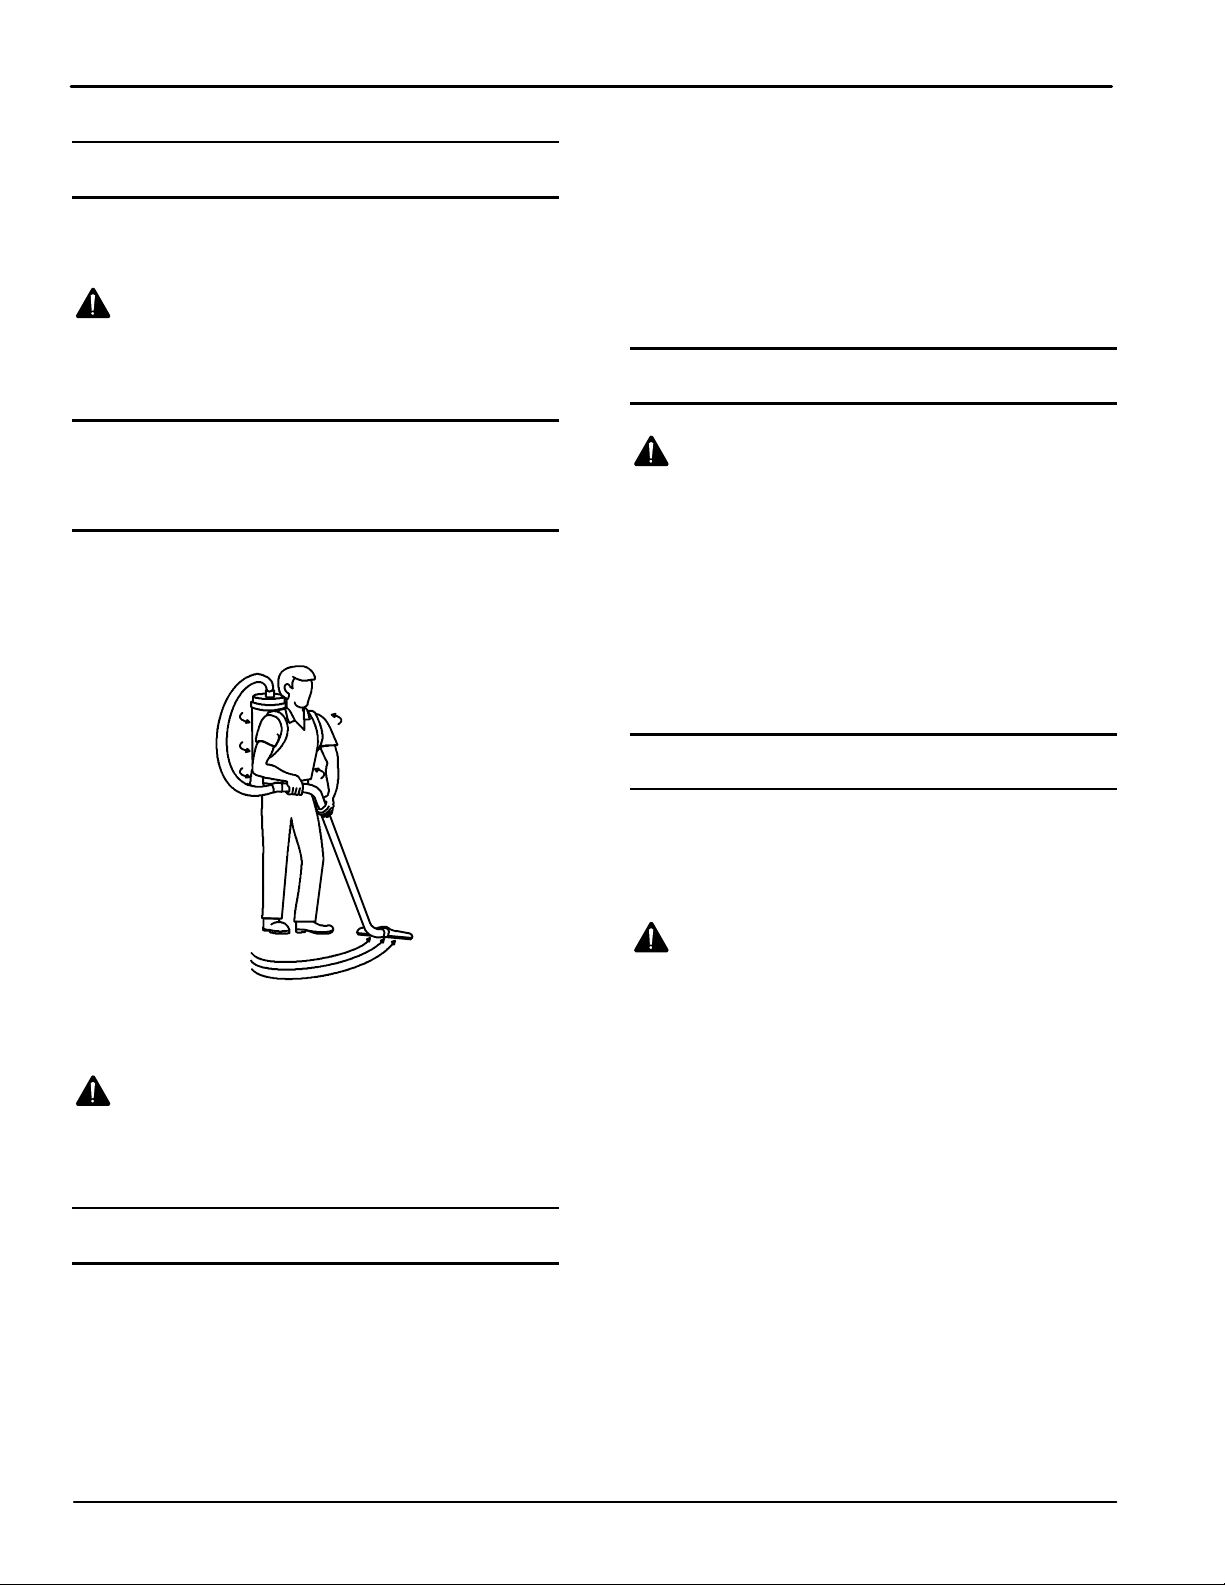
PROPER VACUUMING MOTION FOR LARGE AREAS WITH DIRECT SUCTION TOOLS
1. Begin with the wand parallel to your body.
2. Draw the top of the wand in toward your waist and
twist at the waist walking backward or forward
(a side--to--side motion) (Figure 20).
Use the proper attachments for the job. Pro--T eam has
attachments to perform most jobs without requiring
that the operator bend over or get into difficult
positions.
CARING FOR YOUR VACUUM
WARNING: To reduce the risk of fire, electric
shock or injury unplug unit from wall outlet when
not in use and before servicing.
1. Every time you finish vacuuming, shake out the
cloth and Micro filters.
2. Each week, rinse, dry and return the foam/filter
diffuser to the bottom of the TrailBlazer below the
motor.
3. After each shift, wipe the inside and outside of the
vacuum with a household cleaning agent.
PREVENTATIVE MAINTENANCE
FIG. 20
3. The motion is similar to mopping and keeps the
upper body and arms from tiring.
WARNING: DO NOT use machine to pick up
flammable or combustible materials or anything
that is burning or smoking, such as cigarettes,
matches, or hot ashes.
ERGONOMICS
S The weight of the vacuum should be carried on the
operator’s hips and be evenly distributed.
S The padded waist belt or waist and shoulder straps
are adjustable for a custom fit.
ATTENTION: The following information is for use
by qualified service personnel only and is to
provide guidance for troubleshooting and
maintenance.
WARNING: To reduce the risk of fire, electric
shock or injury unplug unit from wall outlet when
not in use and before servicing.
S UNPLUG the vacuum when working on the motor or
any electrical part.
S CHECK the condition of all electrical cords before
each use.
S Have a qualified service person at an authorized
Nobles Service Dealer CHECK the carbon brushes
on the motor every six months and replace any
brush worn down to ½” in length.
S DO NOT lubricate the motor; it is equipped with
sealed bearings.
S The backpack vacuums have a ventilated backplate
to keep the operator cool.
10
TrailBlazert Series (11-- 01)
Page 11
TROUBLESHOOTING
Home
Find...
Go To..
1. If the vacuum will not operate, check:
a. The power supply cord at the wall outlet.
b. The power supply cord at the vacuum.
c. That the switch is in the “on” position and
functioning properly.
2. If the pigtail (18” power cord) is getting warm,
check to see that the extension cord does not
exceed a length of 50 feet at 16 gauge or 100 feet
at 14 gauge. Longer cords will overheat and
damage the vacuum.
3. If the exhaust that comes out of the bottom of the
vacuum is warmer than usual, check and/or clean
all four filters.
4. If the power switch fails, check the circuit breaker.
If that is not the problem, see an authorized
servicing dealer.
5. If loss of suction occurs:
a. Check that debris is not plugging the hose,
wand, and/or floor tool.
b. Check and/or clean both micro and cloth
filters.
c. Check that the hose cuffs are fitting tightly on
the hose and are not cracked.
d. Check that the cap is properly attached to the
body.
OPERATION
FIG. 21
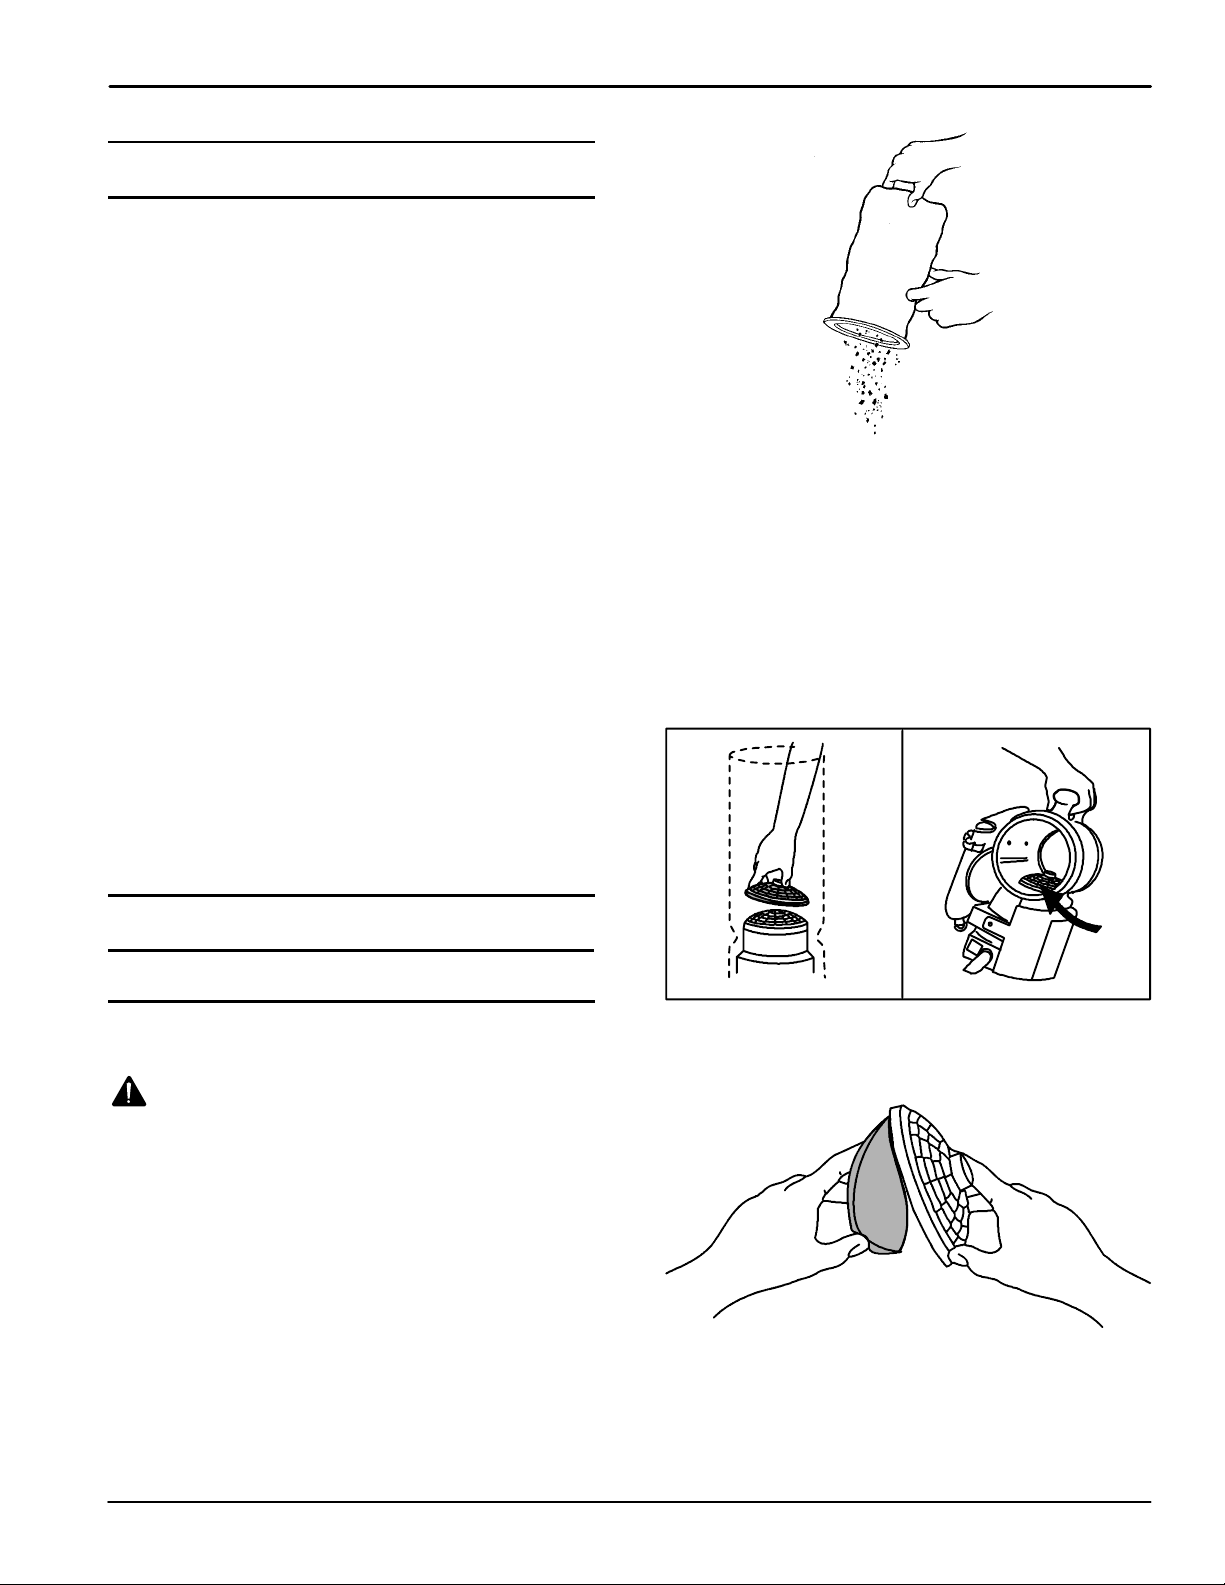
NOTE: Lift both Micro filter and cloth filter out at the
same time to avoid ripping the Micro filter, especially if
it is full.
3. Once a month (or more often if necessary) hand
or machine wash the cloth filter and let it LINE
DRY. (Do not put it in the dryer).
4. Once a month (or more often if necessary) clean
the dome filter, located inside the vacuum
underneath the Micro and cloth filters
(Figure 22).
FILTER MAINTENANCE
TRAILBLAZERt AND TRAILBLAZERt LITE
MODELS
WARNING: To reduce the risk of fire, electric
shock or injury unplug unit from wall outlet when
not in use and before servicing.
1. Check the Micro filter EACH and EVERY time you
start and finish vacuuming. A clogged and dirty
filter restricts airflow and results in reduced suction
and overheating.
2. While vacuuming throughout a building, stop every
two hours or as needed to shake out the Micro
filter (Figure 21). Replace with new Micro filter
when necessary.
FIG. 22
a. Pull the top piece of the dome filter off and
remove the foam media (Figure 23). Shake it
out, rinse it and let it air dry thoroughly.
FIG. 23
TrailBlazert Series (11-- 01)
11
Page 12
OPERATION
Home
Find...
Go To..
b. Before the next use, return the foam media to
its place. Replace with new foam media if
necessary.
c. Firmly snap the top piece of the dome filter
into place.
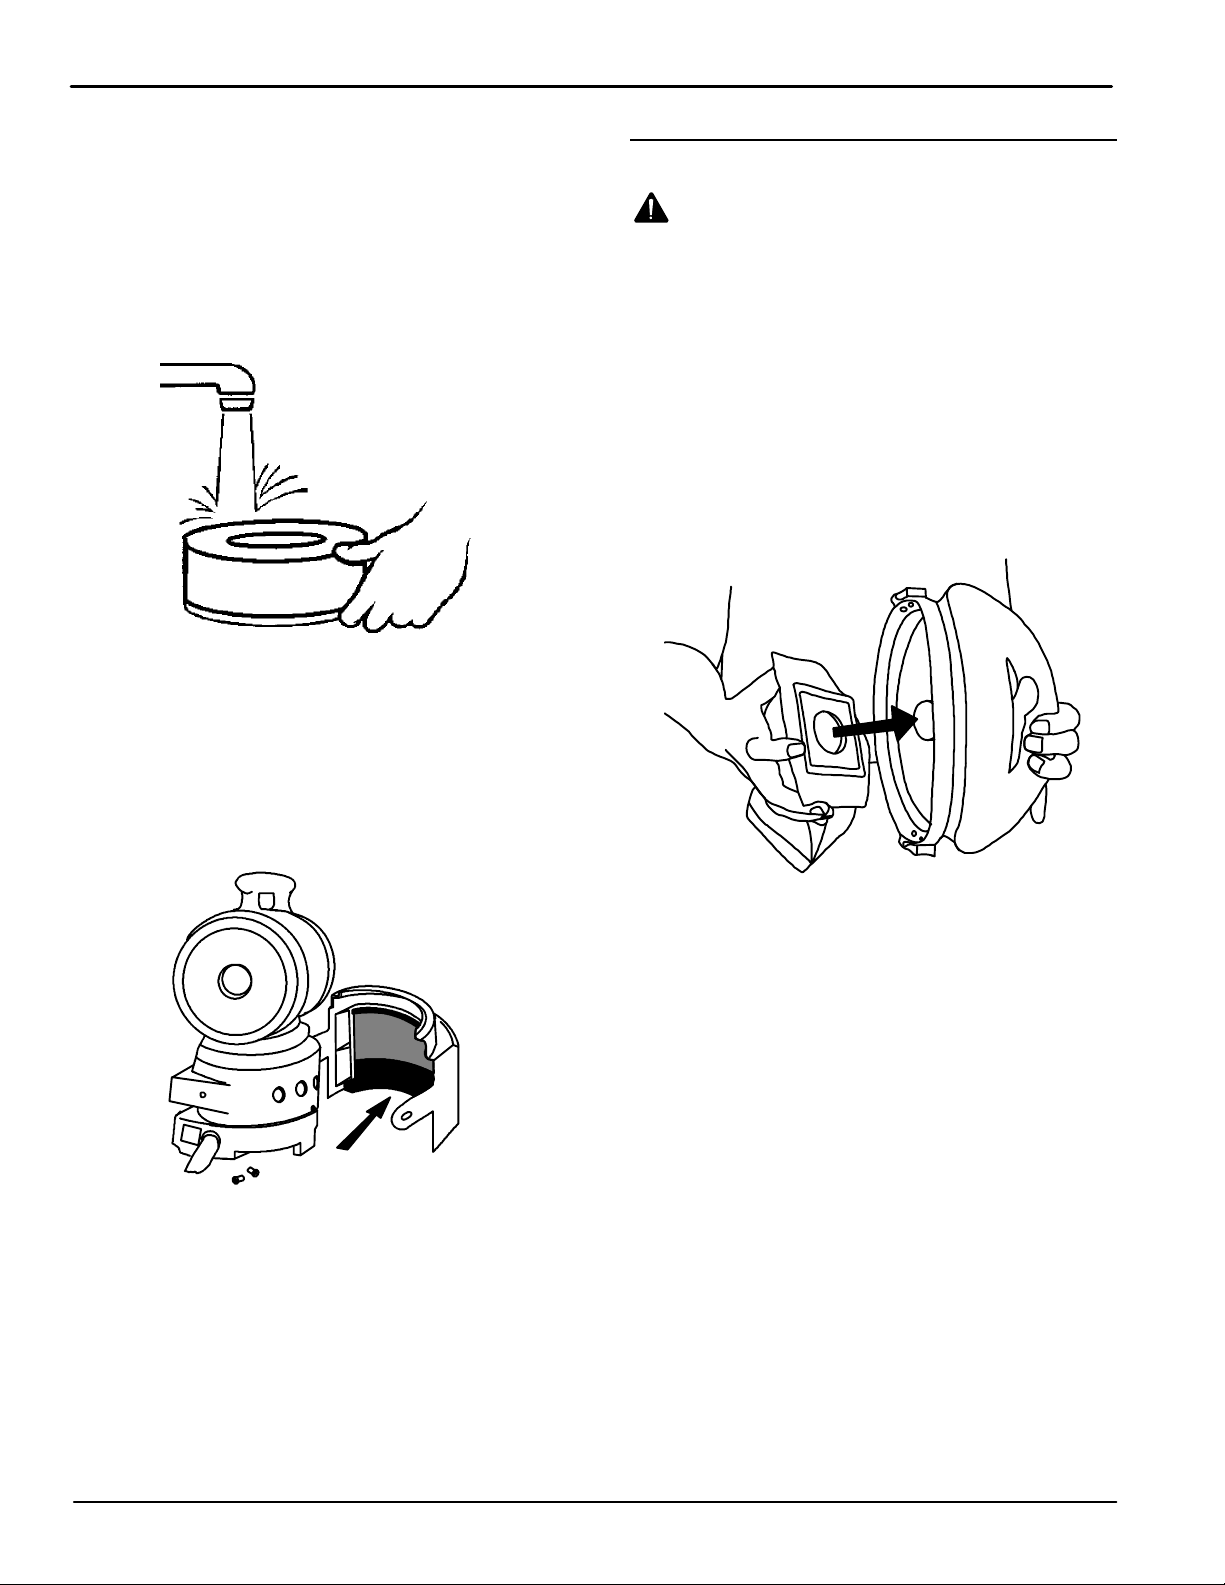
5. For the TrailBlazer and the TrailBlazer XP, each
week rinse, air dry, and return the foam
filter/diffuser at the bottom of the unit below the
motor (Figure 24).
TRAILBLAZERt XP MODEL
WARNING: To reduce the risk of fire, electric
shock or injury unplug unit from wall outlet when
not in use and before servicing.
1. Check the Micro filter EACH and EVERY time you
start and finish vacuuming. A clogged and dirty
filter restricts airflow and results in reduced suction
and overheating.
2. While vacuuming stop every two hours or as
needed to check the Micro filter. Replace with new
Micro filter when necessary.
To install a Micro filter, slide the gasket of the Micro
filter over the inlet on the inside of the top cap
(Figure 26), then replace the cap, making sure that the
latches catch correctly.
FIG. 24
6. For the TrailBlazer Lite, once a month (or as
necessary) take off the shroud assembly by
removing the two screws (Figure 25).
Rinse the foam attached to the inside of the
shroud with warm, soapy water and let it drip dry .
Reattach the shroud assembly before the next
use.
FIG. 25
FIG. 26
NOTE: Lift both Micro filter and cloth filter out at the
same time to avoid ripping the Micro filter, especially if
it is full.
3. Once a month (or more often if necessary) hand
or machine wash the cloth filter and let it LINE
DRY. (Do not put it in the dryer).
When reinstalling the cloth filter, be sure the lip of the
filter completely covers the rim of the vacuum
(Figure 27).
12
TrailBlazert Series (03--02)
Page 13
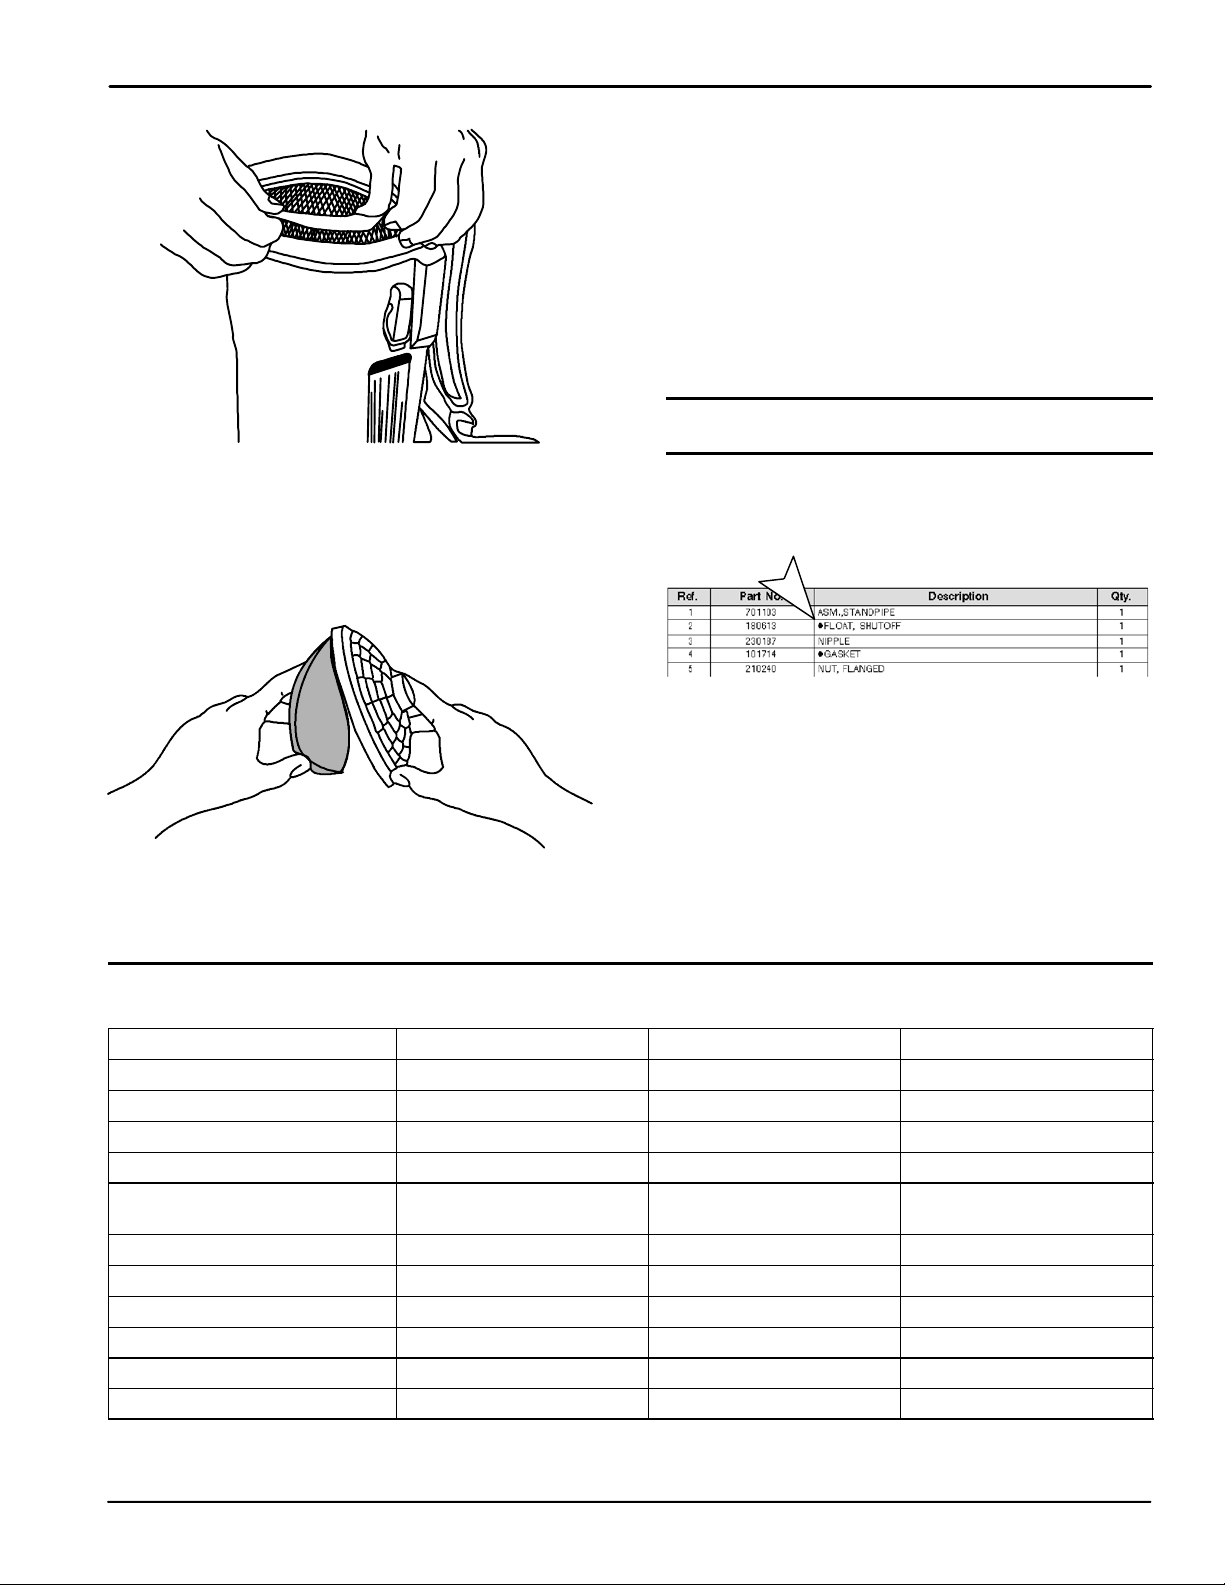
FIG. 27
Home
Find...
Go To..
4. Once a month (or more often if necessary) clean
the dome filter, located inside the vacuum
underneath the Micro and cloth filters
a. Pull the top piece of the dome filter off and
remove the foam media (Figure 28). Shake it
out, rinse it and let it air dry thoroughly.
OPERATION
b. Before the next use, return the foam media to
its place. Replace with new foam media if
necessary.
c. Firmly snap the top piece of the dome filter
into place.
NOTE: If using a high filtration disc in place of the
foam media, check it every 2--3 weeks. When the disc
becomes discolored, replace it with a new disc. The
life of the high filtration disc will depend greatly on the
use and care of the Micro filter and cloth filter.
RECOMMENDED STOCK ITEMS
Refer to Parts List section for recommended stock
items. Stock Items are clearly identified with a bullet
preceding the parts description. See example below:
FIG. 28
SPECIFICATIONS
MODEL TrailBlazert TrailBlazert Lite TrailBlazert XP
WEIGHT 4.1Kg(9lbs) 3.4Kg(7.5lbs) 5.2Kg(11.5lbs)
VACUUM MOTOR 120V, 1.25 HP, 2 stage 120V, 1.1 HP, 1 stage 120V, 1.8 HP, 1 stage
WATER LIFT 234 cm. (92 in) 160 cm. (63 in) 254cm. (100 in)
AIRFLOW 95 cfm 112 cfm 150 cfm
FILTRATION 99.79%@.3 mic. with optional
high filtration media disc
PRODUCTIVITY 688m2(7,400 sq.ft)/hr. 688m2(7,400 sq.ft)/hr. 688m2(7,400 sq.ft)/hr.
VACUUM BAG CAPACITY 6.6 L (6 qts) 6.6 L (6 qts) 10.7 L (9.8 qts)
POWERCORDLENGTH 15m (50 ft.) 15m (50 ft.) 15m (50 ft.)
VACUUM HOSE LENGTH 1.5m (5 ft.) 1.5m (5 ft.) 1.5m (5 ft.)
CONSTRUCTION Polyethylene Polyethylene Polyethylene
SOUND LEVEL 68dB(A) 68dB(A) 70dB(A)
99.79%@.3 mic. with optional
high filtration media disc
99.79%@.3 mic. with optional
high filtration media disc
TrailBlazert Series (03--02)
13
Page 14
PARTS LIST
Home
Find...
Go To..
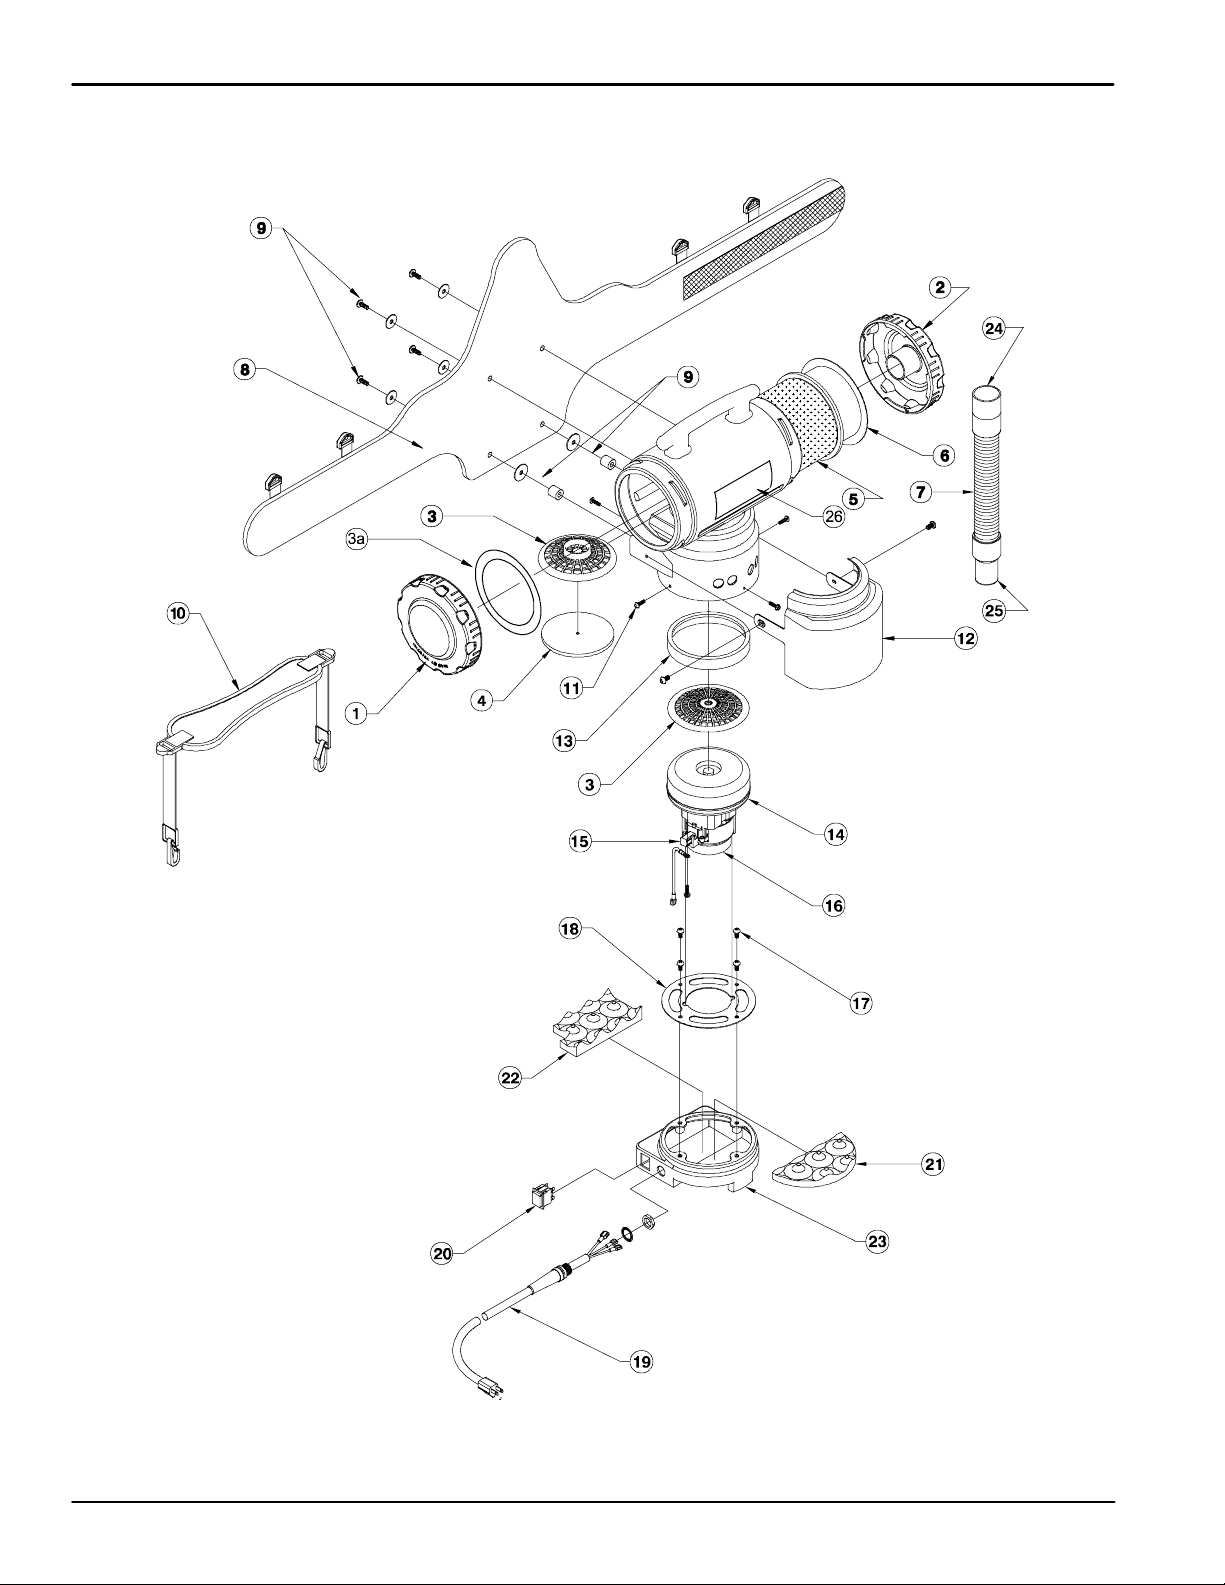
TRAILBLAZERt
14
TrailBlazert Series (07--09)
Page 15

TRAILBLAZERt
Home
Find...
Go To..
PARTS LIST
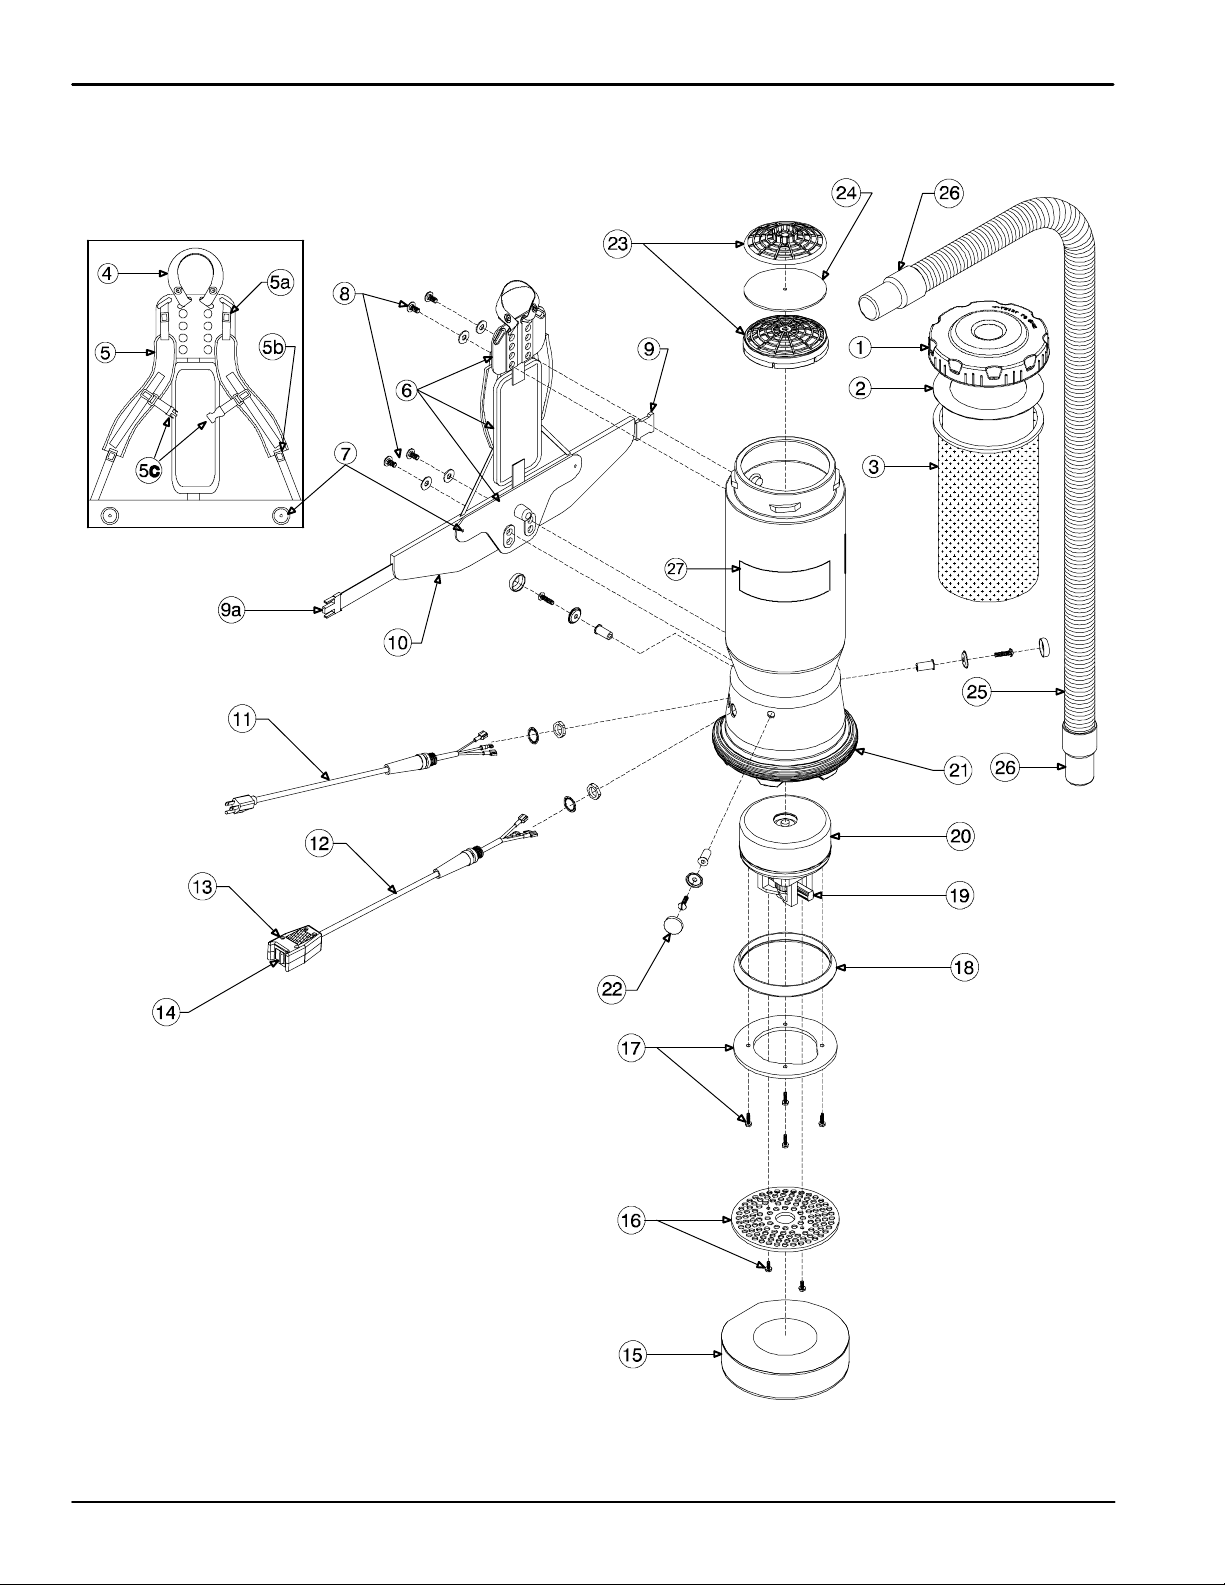
REF PART # DESCRIPTION QTY.
1 612083 TWIST CAP (GREEN) 1
2 612084 DFILTER BAGS (10 PACK)
TRAILBLAZER, TRAILBLAZER LITE
3 612299 DFILTER, 6QT. MICRO CLOTH 1
4 613054 HANDLE CARRY W/ RIVET AND
WASHER SET
5 613055 STRAP, SHOULDER ASSEMBLY W/
STERNUM STRAP
STRAP AND 2 BUCKLES
5a 612327 STRAP, SHOULDER PLASTIC
ADJUSTMENT BUCKLE TOP
5b 612328 STRAP, SHOULDER PLASTIC AD-
JUSTMENT BUCKLE BOTTOM
5c 9005106 BUCKLE, TOP, MAL & FEM 1
6 613024 ASM., BACKPLATE TWO--PIECE W/
CENTER PAD
7 612330 KIT, NUT BARREL SET 1
8 612331 KIT, BACKPLATE BLACK SET 1
9 612332 KEEPER, WAIST BELT 1
9a 612333 LATCH, WAIST BELT 1
10 612334 BELT, WAIST 1
613022 BACKPLATE, TWO--PIECE SYSTEM
COMPLETE
11 612337 DASM., POWER CORD (18” 16/3) 1
12 612340 DKIT, CORD SWITCH ASSEMBLY
W/ BOX
612338 CORD SWITCH W/ CRIMPS 1
13 612342 SWITCH BOX W/VELCRO®AND
SCREWS
14 612316 SWITCH, DP ON/OFF 1
15 612343 SOUND MUFFLER 1
D RECOMMENDED STOCK ITEMS
REF PART # DESCRIPTION QTY.
16 612344 AIR DIFFUSER, PLASTIC
1
1
1
1
1
1
1
1
1
17 612345 RING, MOTOR COMPRESSION
612346 KIT, COMPRESSION RING 1
18 612347 TETRASEAL 1
19 612348 DCARBON BRUSH SET FOR 928W
20 612368 DMOTOR, VAC W/ CRIMPS
612350 MOTOR VAC W/ CRIMPS 928W
612351 MOTOR VAC W/ RECTIFIER AND
612352 RECTIFIER MOTOR (AVIATION-
612353 KIT MOTOR GROUND CONNEC-
612354 KIT, MOTOR CRIMP 1
21 612355 BOTTOM BUMPER 1
22 612356 MOTOR MOUNTING SYSTEM SET: 1
23 612357 DOME FILTER W/ FOAM MEDIA 1
24 612358 FILTER, FOAM MEDIA FOR DOME
612359 DISC, HIGH FILTRATION
25 612087 HOSE VAC 1--1/2” STATIC--
26 612323 CUFF HOSE SWIVEL REPLMT
27 1035559 LABEL, NOBELS TRAILBLAZER 1
N/S 612718 ACCESSORY, 50’ EXTENSION
W/ SCREWS
W/ SCREWS
MOTOR
928W(120V)
(220V)
CRIMPS 400HZ (AV)
VAC )
TION AND WIRE CLAMP
FILTER
(OPTIONAL)
DISSIPATING BLACK W/ CUFFS
BLACK 1--1/2”
CORD YELLOW W/ CORD WRAP
1
1
1
1
1
1
1
1
1
1
1
1
1
TrailBlazert Series (07--09)
15
Page 16
PARTS LIST
Home
Find...
Go To..
TRAILBLAZERt LITE
16
TrailBlazert Series (07--09)
Page 17

TRAILBLAZERt LITE
Home
Find...
Go To..
PARTS LIST
REF PART # DESCRIPTION QTY.
1 612061 BLIND TWIST CAP ASSEMBLY
2 612068 TWIST CAP FOR 1½” CUFF
3 612296 DOME, FILTER W/FOAM MEDIA 1
3a 9004604 GASKET, DOME 1
4 612297 FILTER FOAM MEDIA FOR DOME
612298 DISC HIGH FILTRATION
5 612299 DFILTER 6QT. MICRO CLOTH 1
6 612084 DFILTER BAG (10 PACK)
7 612302 HOSE VAC 1--1/2” STRETCH W/
8 613057 WAIST BELT W/VELCRO
612306 RETROFIT SET: WAIST BELT AND
9 612304 WAIST BELT CONNECTION SET 1
10 612305 ASM., MONOSTRAP 1
11 612307 KIT, STEP CAP SCREW 1
12 612069 DEFLECTOR SHROUD ASSEMB 1
13 612309 SEAL, MOTOR 1
D RECOMMENDED STOCK ITEMS
(GREEN)
(GREEN)
FILTER
(OPTIONAL)
TRAILBLAZER, TRAILBLAZER LITE
CUFFS 3:1
®
MONOSTRAP
REF PART # DESCRIPTION QTY.
1
1
1
1
1
1
1
1
14 612310 DMOTOR/FAN 802 WATT (120 V) 1
612351 MOTOR VAC W/ RECTIFIER AND
CRIMPS 400HZ (AV)
612352 RECTIFIER, MOTOR (AVIATION-
VAC )
15 613023 DCARBON BRUSH SET FOR 802W
MOTOR
16 613056 KIT, FAN AND BRUSH COVER 1
17 612313 KIT, MOTOR MOUNT SCREW 1
18 612314 PLATE, DIRECTOR 1
19 612315 DCORD, 16/3 X 18” ASM W/
STRAIN--RELIEF
20 612316 DSWITCH, DP ON/OFF 1
21 612317 SOUND FOAM, FRONT BAFFLE 1
22 612318 SOUND FOAM, REAR BAFFLE 1
23 613058 STEP CAP (TEAL) 1
24 612321 CUFF, HOSE FIXED REPLMT
BLACK 1--1/2”
25 612323 CUFF, HOSE SWIVEL REPLMT
BLACK 1--1/2”
26 1035560 LABEL, TRAILBLAZER LITE 1
N/S 612718 ACCESSORY, 50’ EXTENSION
CORD YELLOW W/ CORD WRAP
1
1
1
1
1
1
1
TrailBlazert Series (07--09)
17
Page 18
PARTS LIST
Home
Find...
Go To..
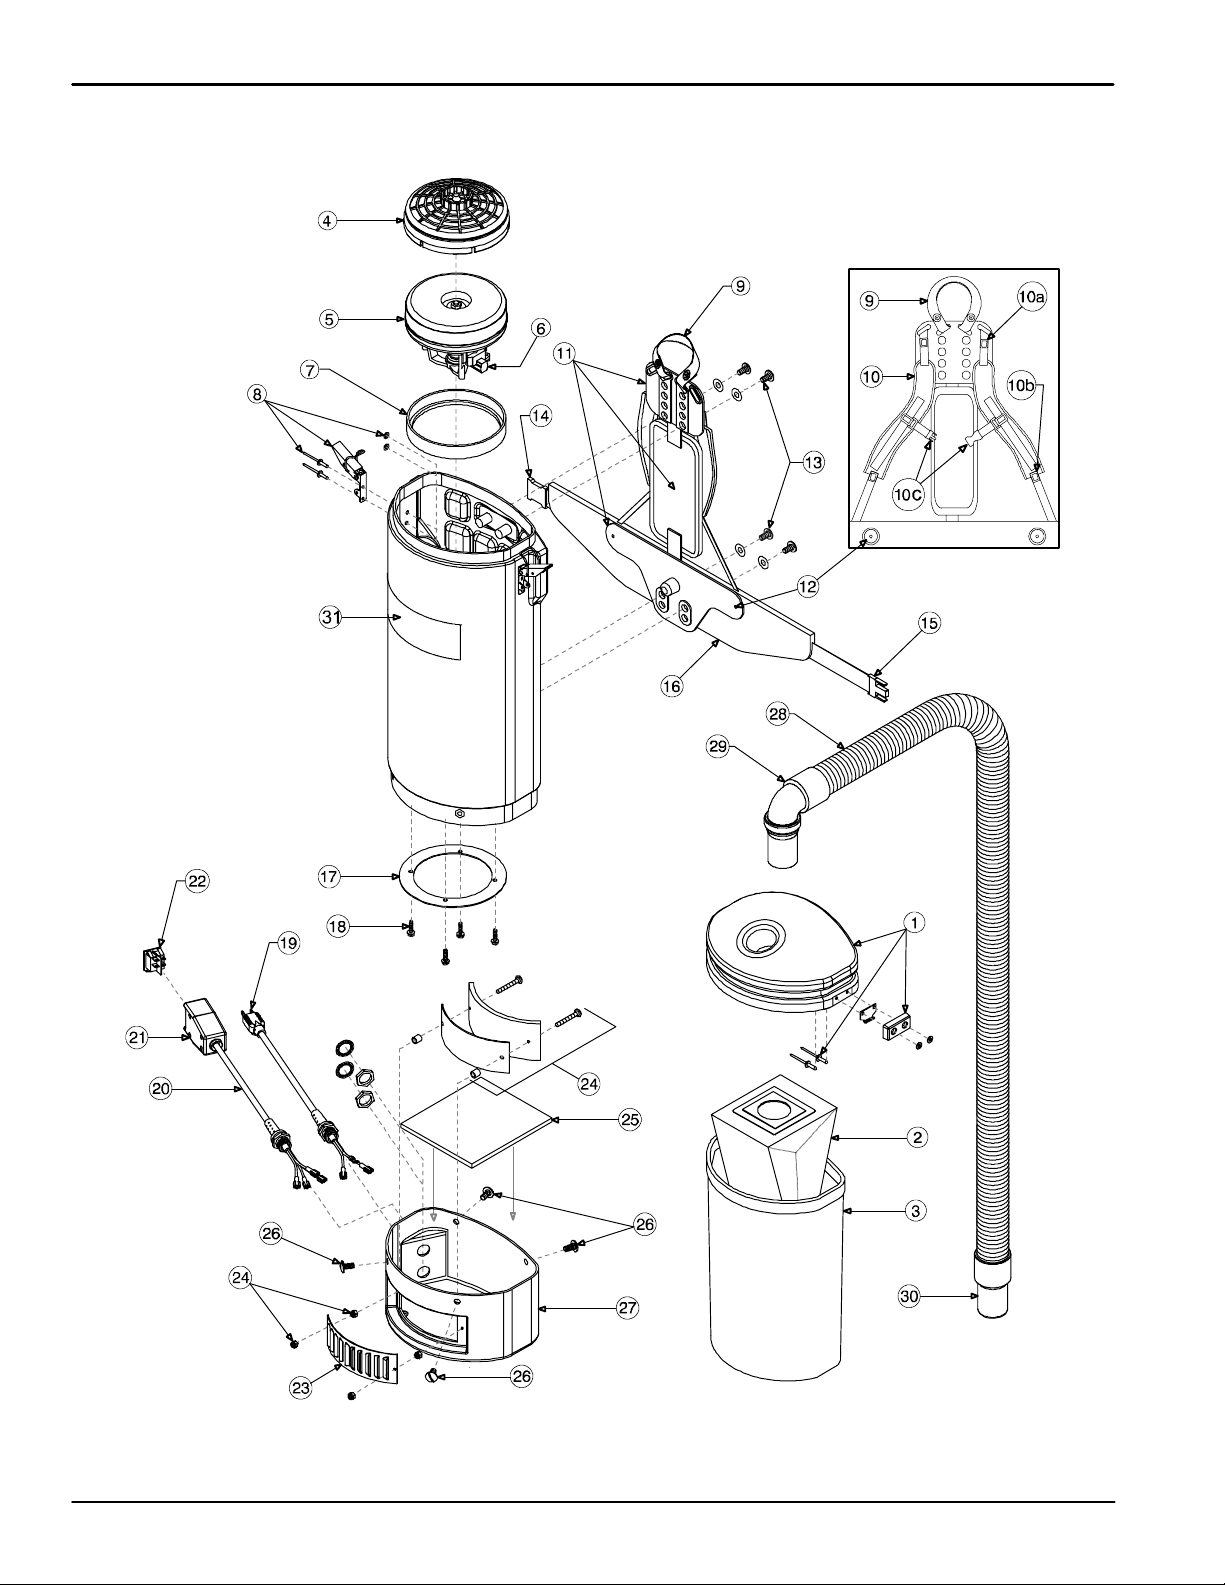
TRAILBLAZERt XP
18
TrailBlazert Series (07--09)
Page 19

TRAILBLAZERt XP
Home
Find...
Go To..
PARTS LIST
REF PART # DESCRIPTION QTY.
1 613060 ASM., LID 1
2 613020 DFILTER BAGS (10--PACK) INTER-
3 613021 DFILTER, MICRO CLOTH
4 612357 DOME,FILTERW/FOAMMEDIA 1
612358 FOAM MEDIA FOR DOME FILTER 1
612359 DISC, HIGH FILTRATION 2--PACK
5 612370 DMOTOR/FAN W/CRIMPS, 1340
6 612367 DCARBON BRUSH SET FOR
7 612309 SEAL, MOTOR 1
8 613061 ASM., DRAW LATCH 1
9 613054 HANDLE, CARRY W/ RIVET AND
10 613055 STRAP SHOULDER ASSEMBLY W/
10a 612327 STRAP SHOULDER PLASTIC
10b 612328 STRAP SHOULDER PLASTIC AD-
10c 9005106 BUCKLE, TOP, MAL & FEM 1
11 613024 ASM., BACKPLATE TWO-- PIECE W/
12 612330 KIT, NUT BARREL SET 1
13 612331 BACKPLATE (BLACK)
14 612332 KEEPER, WAIST BELT 1
D RECOMMENDED STOCK ITEMS
CEPT MICRO, TRAILBLAZER XL
TRAILBLAZER XL
(OPTIONAL)
WATT 120V
1340W MOTOR
WASHER SET
STERNUM STRAP
ADJUSTMENT BUCKLE TOP
JUSTMENT BUCKLE BOTTOM
CENTER PAD
CONNECTION SET
REF PART # DESCRIPTION QTY.
15 612333 LATCH, WAIST BELT 1
1
1
1
1
1
1
1
1
1
1
1
16 612334 WAIST, BELT 1
613022 BACKPLATE, TWO--PIECE SYSTEM
17 613062 MOTOR PLATE 1
18 612346 KIT, COMPRESSION RING 1
19 613025 DASM., POWER CORD (18” 16/3) 1
20 612340 DKIT, CORD SWITCH ASSEMBLY
612338 CORD SWITCH W/ CRIMPS 1
21 612342 SWITCH BOX W/VELCRO®AND
22 612316 SWITCH, DP ON/OFF 1
23 613063 EXHAUST LOUVER 1
24 613064 ASM., SOUND/EXHAUST 1
25 613065 ACCOUSTIC INSULATOR, FELT
26 613066 KIT, BOTTOM CAP SCREW 1
27 613067 BOTTOM CAP (BLACK) 1
28 613068 HOSE, STATIC DISSIPATING W/
29 613069 REPLMT CUFF W/ SWIVEL ELBOW
30 612323 CUFF HOSE, SWIVEL REPLMT
31 1035561 LABEL, TRAILBLAZER XL 1
N/S 612718 ACCESSORY, 50’ EXTENSION
COMPLETE
W/ BOX
SCREWS
LARGE
CUFFS
BLACK
BLACK 1--1/2”
CORD YELLOW W/ CORD WRAP
1
1
1
1
1
1
1
1
TrailBlazert Series (03--02)
19
Page 20
OPTIONS
Home
Find...
Go To..
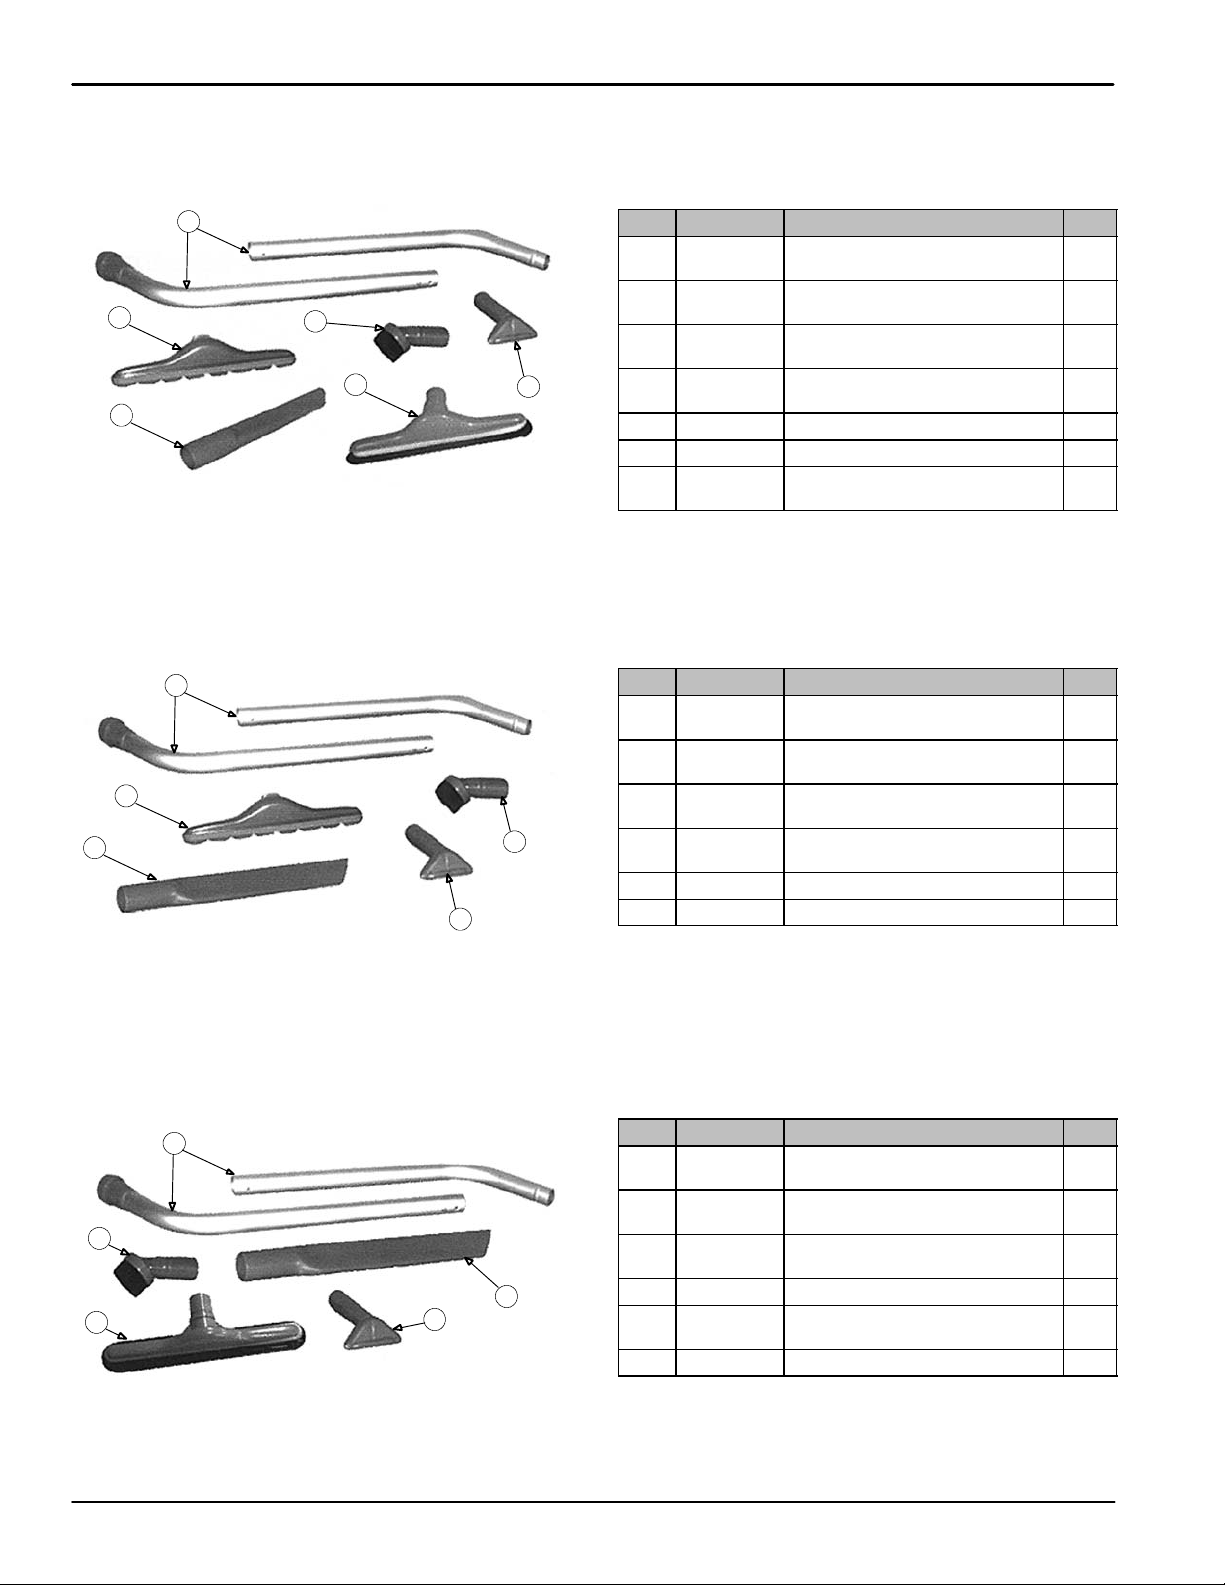
RESTAURANT VAC TOOL KIT
1
2
3
6
4
5
REF PART # DESCRIPTION QTY.
∇ 612575 KIT, VAC TOOL RESTAURANT
Y 1 612596 TOOL, WAND 1--1/2” 56” 2-- PC
Y 2 612600 TOOL, FLOOR 1--1/2” 14” W/
Y 3 612582 TOOL, DUST BRUSH 1--1/2” 3” W/
Y 4 612586 TOOL, UPHOLSTERY 1-- 1/2” 5” 1
Y 5 612578 TOOL, CREVICE 1-- 1/2” 11” 1
Y 6 612604 TOOL, FLOOR 1-- 1/2” 14” HARD-
1--1/2”
2--BENDALUMW/BUTTONLOCK
SCALLOPS
REDUCER
FLOOR W/ NYLON BRUSH
1
1
1
1
1
COMMERCIAL VAC TOOL KIT
1
2
4
3
5
REF PART # DESCRIPTION QTY.
∇ 612576 KIT, VAC TOOL COMMERCIAL
Y 1 612596 TOOL, WAND 1--1/2” 56” 2-- PC
Y 2 612600 TOOL, FLOOR 1--1/2” 14” W/ SCAL-
Y 3 612582 TOOL, DUST BRUSH 1--1/2” 3” W/
Y 4 612579 TOOL, CREVICE 1-- 1/2” 17” 1
Y 5 612586 TOOL, UPHOLSTERY 1-- 1/2” 5” 1
1--1/2”
2--BENDALUMW/BUTTONLOCK
LOPS
REDUCER
1
1
1
1
20
E-Z GLIDEt COMMERCIAL VAC TOOL KIT
1
2
3
4
5
REF PART # DESCRIPTION QTY.
∇ 612283 KIT, VAC TOOL E--Z GLIDE
Y 1 612596 TOOL, WAND 1--1/2” 56” 2-- PC
Y 2 612582 TOOL, DUST BRUSH 1--1/2” 3” W/
Y 3 612579 TOOL, CREVICE 1-- 1/2” 17” 1
Y 4 612603 TOOL, FLOOR 1--1/2” 14” E--Z
Y 5 612586 TOOL, UPHOLSTERY 1-- 1/2” 5” 1
∇ ASSEMBLY
Y INCLUDED IN ASSEMBLY
COMMERCIAL 1--1/2”
2--BENDALUMW/BUTTONLOCK
REDUCER
GLIDE W/ NYLON BRUSH
TrailBlazert Series (11-- 01)
1
1
1
1
Page 21
OPTIONS
Home
Find...
Go To..
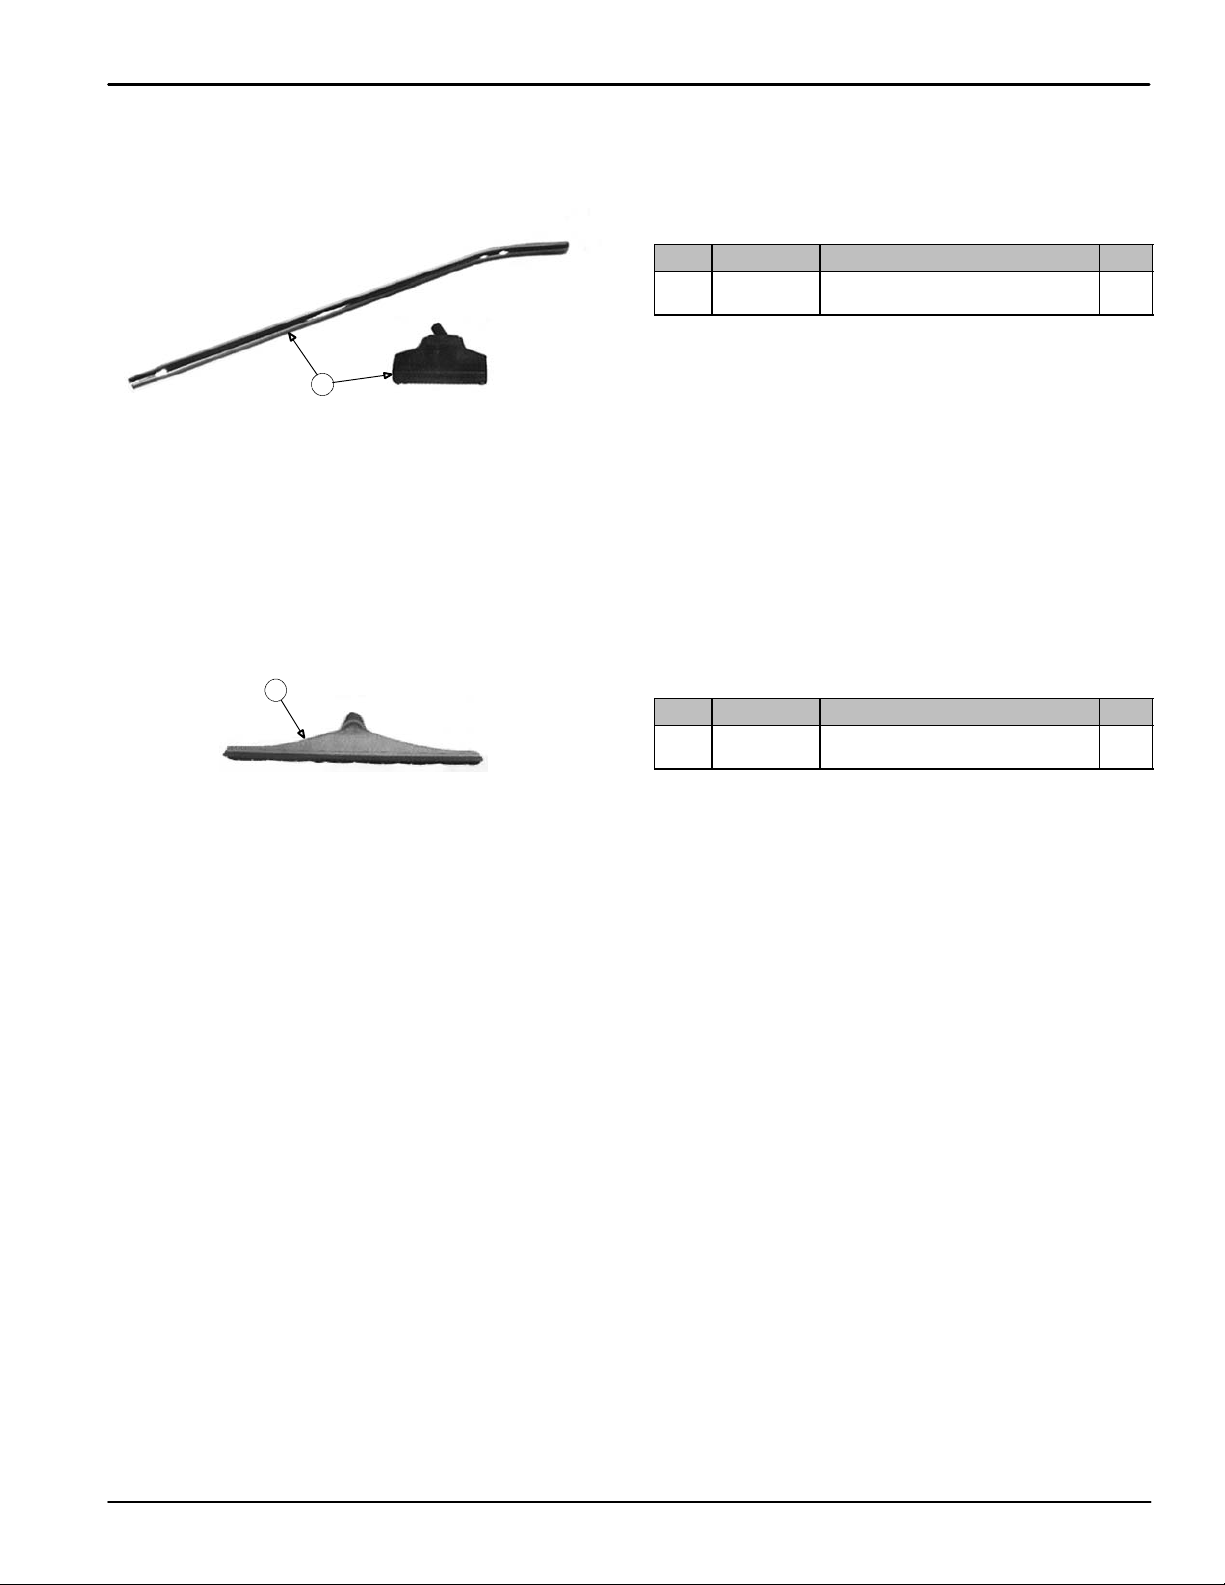
TURBO FLOOR TOOL
REF PART # DESCRIPTION QTY.
1 612607 KIT, TOOL FLOOR 1-- 1/4” 11”
1
TURBO BRUSH W/ WAND
JETSWEEPt FLOOR TOOL
1
1
REF PART # DESCRIPTION QTY.
1 612648 TOOL, FLOOR 1--1/2” 20” JET
SWEEP W/ NYLON BRUSH
1
TrailBlazert Series (11-- 01)
21
Page 22

North American Limited Warranty
Home
Find...
Go To..
MODEL Rotationally--
Molded
Components
All non-- rider machines
except those listed below
Speed Scrub Rider, Strive Rider 10 years 3 years 3 years 90 days 1500
EZ--Rider
EZ--Rider
Ansert, Vipert 10 years 1 year 1 year None N/A
TV1200, Pathmakert,
Tidy-- Vact, Cyclone,
Ultraglide
Scoutt24, 27 and 28
1
Three (3) year limited warranty on electric motors and belts not subject to wear
2
For machines shipped from Tennant Company on or after 2/1/2008
3
For machines shipped from Tennant Company prior to 2/1/2008
NEW MACHINE WARRANTY
Tennant Company warrants to the original purchaser, for the above--stated periods (whichever occurs first), that machines will be free
from defects in workmanship and material, provided that machines are installed, operated, and maintained in accordance with Nobles
written manuals or other instructions.
This warranty does not apply to damage or failure caused by accident, freight damage, misuse, negligence, abuse, improper repair,
or maintenance of the machines. Please refer to Operator Manual for proper machine operation and maintenance instructions.
The warranty period begins on the installation date at the end--user site. A Machine Installation/Warranty Report form included with Operator’s Manual must be completed and returned immediately at the time of purchase. If proof of purchase is unavailable, the warranty
begins ninety (90) days after original sale to an Authorized Nobles dealer.
Demonstrator machines purchased from Tennant Company carry the same warranty as a new machine.
LABOR AND TRAVEL WARRANTY
Tennant Company will, at its option, provide labor and travel or pay for outside repair for the above-- stated periods.
PARTS WARRANTY
Parts replaced or repaired under this warranty are guaranteed for the remainder of the warranty period. The parts warranty on batteries
is pro-- rated for one (1) year from the Tennant Company shipping date. Consumable parts, expected to wear from normal use, are not
covered under the parts warranty. These consumable parts include, butare notlimitedto:belts, drive chains, brushes,pad drivers,filters,
squeegees, tires [pro--rated for one (1) year on rider machines], skirts, hand grips, battery cables, power cords, cord restraints,external
hoses, vacuum bags, fuses and carbon brushes. Battery chargers and accessories are warranted for one (1) year.
REPAIR PARTS WARRANTY
After the warranty period expires, repair parts supplied by Tennant Company are warranted against defects for the period of ninety (90)
days. The repair parts warranty only covers parts, not labor or travel.
SERVICE LABOR WARRANTY
Labor performed by a Tennant Company service representativeis warrantedfor thirty(30) days from the date the repairs are completed.
This policy does not cover work performed by any service company other than Tennant Company,and is restricted to the specific repair
operation or component for which a claim is made.
DISCLAIMER
TENNANT COMPANY EXPRESSLYDISCLAIMS ANY AND ALL OTHER WARRANTIES EXPRESS OR IMPLIED, INCLUDING, BUT
NOT LIMITED TO, ANY IMPLIED WARRANTY OF MERCHANTABILITYAND FITNESS FOR A PARTICULAR PURPOSE. NOBLES
SHALL NOT BE LIABLE FOR INCIDENTAL OR CONSEQUENTIAL DAMAGES, WHETHER DIRECT OR INDIRECT, INCLUDING,
BUT NOT LIMITED TO, BUYER’S LOSS OF MATERIAL OR PROFITS, INCREASED EXPENSE OF OPERATION, BODILY INJURY,
LOSS OF USE OF PROPERTY OR DOWNTIME.
2
3
1
, Trailblazert,
10 years 3 years 3 years
10 years 3 years 2 months 6 months 2000
10 years 2 years 6 months 6 months 1000
1 year 1 year 1 year
Parts Labor Travel Hourmeter
90 days (No travel on cord--elec-
tric or battery Typhoon)
None
(Except Scout 24 and 28 for 90
days)
2500
N/A
Nobles reserves the right to change its warranty policy without notice.
Tennant Company S P.O. Box 1452 S Minneapolis, MN 55440--1452 USA S (800) 553-- 8033 S (763) 513--2850
611764 Rev. 07 (02-- 08) Effective for machines installed after 2/1/2008
 Loading...