

Page 1

CafeRomatica
Automatic coffee and espresso machine
User manual and recommendations for use
NICR6..
a passion for coffee.
Page 2

1
G
F
A
B
D
E
O
S
H
N
M
J K
/
C
L
P
T
Q
U
R
Page 3

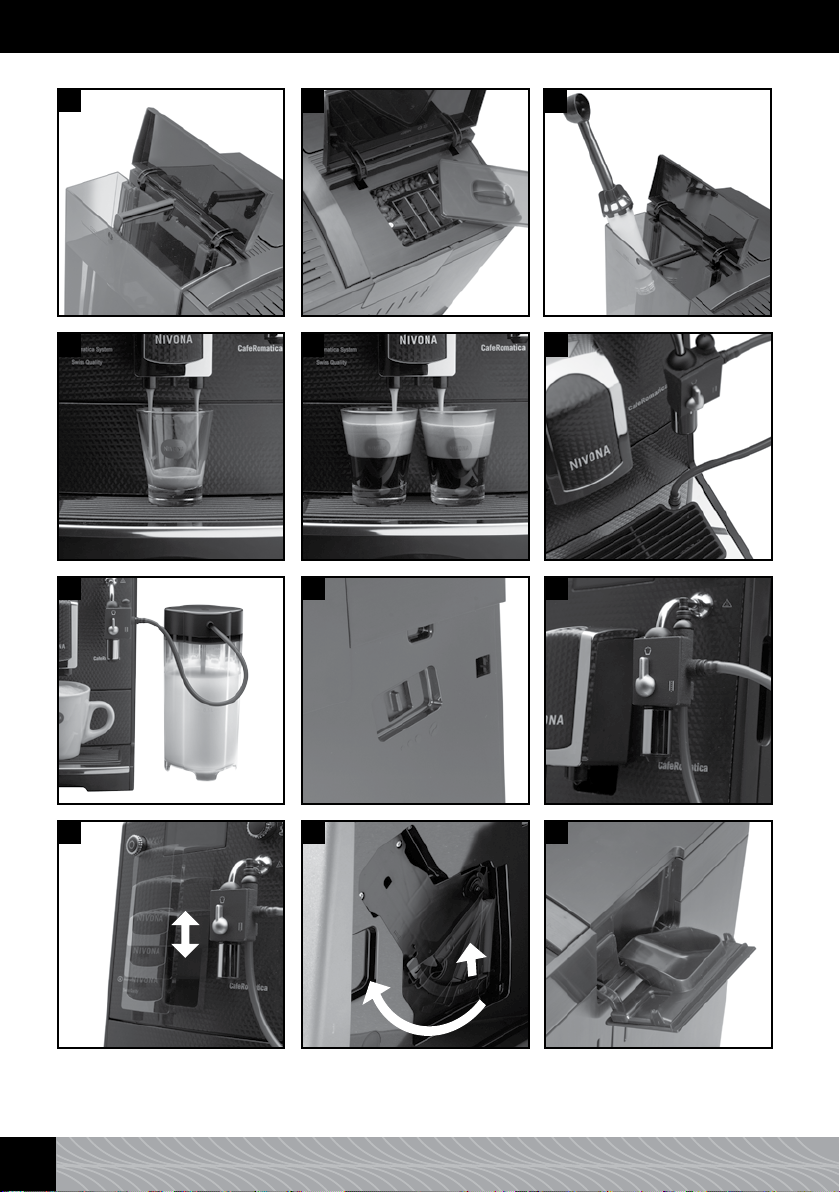
A
Display
(Main menu)
B
Rotary
C
Steam-hot water-rotary knob
D
Setting in the display
E
Height-adjustable spout
F
Cover water tank
G
Cover Bean container
H
On/Off switch
J
Cup stand
K
Cup warmer
(Use of the waste heat of the heater)
L
Service door
M
Flap of the ground coffee chamber
N
Drip pan
O
Used coffee tray
(interior)
P
Steam-hot water-jet/
Milk frother/spumatore
Q
Rear rollers
(back, only designs 670 and 680)
R
Parts of the milk frother
S
Type label
(remove drip pan)
T
Cable compartment
(back)
U
Milk container
(only designs 670 and 680)
1
Page 4
2
3
4
11
5
8
6
9
12
7
10
13
2
Page 5
Dear customer,
Congratulations and many thanks for deciding on a quality product from the house of NIVONA.
To enjoy your NIVONA appliance fully, please read the instruction carefully prior to the use and take
note of the safety instructions prior to the first set-up.
Please keep this instruction in a safe place, thus, you can use it as reference and pass it on to possible
further users of the appliance.
These symbols in this instruction are used with the following perennial meaning:
Warning: This symbols indicates possible risks.
Information: This symbol calls attention to features.
Tip: With this symbol, additional tips are indicated.
CAUTION: Hot surface
You can obtain an Application (App) in an Apple-App-Store or in the Google Play-Store for your
NIVONA fully automatic machine, with which you are able to control and operate the main functions
of your fully automatic machine. Via the menu option “BLUETOOTH’’ you are able to allow or
deactivate a connection of your device with your smartphone (see note 3.11.).
Your retailer and your Team NIVONA wish you great coffee pleasure and much joy with your
high-quality NIVONA product.
bought at
Place, date
•
3
Page 6

Content
1. SAFETY INSTRUCTIONS ................................................................................................ 5
2. SET-UP ........................................................................................................................ 6
2.1. Preparation ............................................................................................................ 6
2.2. The most important control elements ........................................................................ 7
2.3. Filling of water and beans ....................................................................................... 7
2.4. Turn on the appliance and fill the system .................................................................. 8
2.5. Turn on appliance during operation ........................................................................ 10
2.6. ECO-Mode ........................................................................................................... 10
3. TAKE/CHANGE BASIC SETTINGS ................................................................................. 10
3.1. Set the operation with or without filter .................................................................... 11
3.2. Set water hardness ............................................................................................... 11
3.3. Choose the flavour ................................................................................................ 11
3.4. Set temperature ................................................................................................... 11
3.5. Set a language ..................................................................................................... 12
3.6. Set an automatic switch-off time ............................................................................ 12
3.7. Switch-off rinsing ................................................................................................. 12
3.8. Factory settings .................................................................................................... 13
3.9. Request statistics ................................................................................................. 13
3.10. Bluetooth ........................................................................................................... 13
4. PREPARE COFFEE SPECIALITIES ................................................................................ 14
4.1. Espresso and coffee should be prepared individually with each preparation. ............... 15
4.2. Change the standard setting for Espresso and coffee ................................................ 15
4.3. Prepare Cappuccino and milk foam, change settings for Cappuccino and milk foam .... 17
4.4. Prepare Cafe Americano and change standard setting for Cafe Americano .................. 20
4.5. Set “My coffee’’ for me and others according to your gusto ....................................... 23
4.6. Set grinding degree ............................................................................................... 24
4.7. Prepare instant coffee (i.e. decaffeinated coffee) ..................................................... 25
5. CLEANING AND CARE ................................................................................................. 25
5.1. Rinse the frother .................................................................................................. 25
5.2. Rinse the system .................................................................................................. 26
5.3. Clean milk frother ................................................................................................. 26
5.4. Clean the system .................................................................................................. 27
5.5. Descale system..................................................................................................... 28
5.6. Regularly clean by hand ........................................................................................ 29
5.7. Cleaning of the brewing unit .................................................................................. 30
5.8. Change filter ........................................................................................................ 30
5.9. Maintenance status............................................................................................... 31
6. SYSTEM NOTIFICATION .............................................................................................. 32
7. SOLVE PROBLEMS BY YOURSELF ................................................................................ 33
8. SPARE PARTS/ACCESSORIES ...................................................................................... 34
9. CUSTOMER SERVICE, GUARANTEE, ENVIRONMENT PROTECTION ................................ 34
10. TECHNISCHE DATEN ................................................................................................ 35
4
•
Page 7

1. Safety instructions
1. Safety instructions
• Theappliancemustonlybeusedfortheintendedpurpose(domesticuseonly)
andisnotintendedforthecommercialuse(seeguaranteeconditions).Otherwise
theguaranteeclaimsexpire.
• Operationvoltageandvoltagemuststrictlymatch.Pleasetakenoteofthetype
label/thelabelontheappliance(seepicture1/S).
• Donotusetheapplianceifthepowercableorcaseisdamaged.Donotbringthe
powercableintocontactwithhotparts.
• Donotunplugthemainsplugbypullingthepowercable.
• Strictlyfollowthecleaninganddescalinginformation.Nonobservancewillvoid
youguaranteeclaims.
• Ensurethattheapplianceisturnedoffandthatthemainsplugisunplugged
priortomaintenanceandcleaning.
• Neverletthemainspluggetwetandprotectitagainstmoisture.
• Puttheapplianceonaneven,stablesurfaceanduseinsideonly.Neverputthe
applianceonhotsurfacesornearames.
• Thisdevicemaybeusedbychildrenfrom8yearsandolderaswellasofindividualswithreducedphysical,sensoryormentalabilitiesorlimitedexperienceand
knowledge,iftheyaresupervisedandinstructedregardingthesafeuseifthe
deviceandiftheyunderstandtheresultingrisks.Childrenmustnotplaywiththe
device.Cleaningandmaintenancebytheusermustnotbecarriedoutbychildren,
unlesstheyare8yearsoldorolderandaresupervised.Thedeviceanditsconnectioncablearetobekeptawayfromchildrenthatareyoungerthan8years.
• Pleaseunplugthemainsplugduringextendedabsenceoverseveraldays.
• Donotleavetheapplianceswitchedonunnecessarily.Donotsubmergethe
applianceintowater.
• Nevercleantheapplianceorpartsoftheapplianceinthedishwasher.Nonobservancewillvoidyouguaranteeclaims.
• Immediatelyunplugthemainsplugincaseofamalfunction(neverpullonthe
powercableorapplianceitself).
• Liabilityforpossibledamageswillnotbeacceptediftheapplianceisoperated
improperly,incorrectlyusedorrepairedunprofessionally.Theguaranteeswillbe
cancelledinsuchcases.
•
5
Page 8

1. Safety information / 2. Set up
• Pleaseusetheinternalcoffeegrinderforthegrindingofroastedanduntreated
coffeebeansonly,notforanyotherfood!Alwaysensurethattherearenoforeign
objectsamongthecoffeebeans–
otherwisetheguaranteeiscancelled.
• Pleasecontactthephoneserviceortheretailerofwhichyouhaveboughtthe
appliancerstincaseofanyrepairsoftheappliancethatmayberequired-and
sendtheapplianceuponconsultationandtakingintoconsiderationpoint9of
thisusermanualtoNIVONA Zentralkundendienst, Südwestpark 90, D-90449
Nürnberg.
• Incasethepowercableisdamaged,itmustbereplacedbythemanufactureror
itscustomerserviceorasimilarlyqualiedprofessionaltopreventrisks.
Warning: Electric repairs must only be carried out by professionals! Due to
inappropriate repairs serious risks may occur to the user. Is the appliance
misused or operated or maintained incorrectly, no liability for possible
damage can be accepted!
Warning: Operating the On/Off switch (picture 1/H) during the brewing operation can damage the appliance! Only switch it off when the appliance is in
standby mode.
Warning: Risk of burns! While supplying steam or hot water, it may initially
occur that hot water is spraying out of the steam-hot water - jet / the spumatore. Touch the metal outlet of the spumatore in a cooled-off state only.
2. Set-up
2.1. Preparation
➔ Carefully remove the appliance and all supplied parts from the packaging.
The following parts are included in the scope of supply.
• User manual
• Guarantee card
• Measuring spoon with installation aid for the filter cartridge
• two cleaning tablets
• one Claris filter
• one control strip for the water hardness
• one milk container with connection tube (only designs 670 and 680)
6
•
Page 9

2. Set up
Information: The appliance should be posted in its complete original packaging in case of a customer
support service. Please keep the packaging including the polystyrene parts in full.
➔ Put the appliance onto an even, dry and appropriate work surface.
➔ Connect it to a professionally installed socket.
➔ Your appliance has a cable compartment - you can push the cable length which is not required
into the compartment on the back, should the lead be too long (picture 1/T).
2.2. The most important control elements
Your NIVONA appliance offers you diverse possibilities to prepare speciality coffees to your individual
wishes. The most important control elements and their basic function are mostly identical for the
different coffee specialities:
• On/Off switch (picture 1/H): By pressing you turn the appliance on, by pressing once more you
turn it off again.
• Rotary - Turn -Press - Selector (short Rotary) (picture 1/B): Select your favourite beverage in the main
menu by turning the rotary. By pressing the rotary in the main menu, the beverage preparation
starts. During the preparation of the beverage, you can alter the strength and amount of your
coffee with the rotary. The changeable value flashes respectively.
• Steam-Hot water-Rotary knob (picture 1/C): When the display shows “OPEN VENT’’, place a container
underneath the steam-hot water jet / the spumatore prior to use. You open the vent for the hot
water or steam supply, by turning it clockwise up to the stop. You stop the supply, by turning it
anticlockwise up to the stop.
• Steam-Hot water Jet/Spumatore (picture 1/P): Is the tap of the spumatore upright with open steam-hot
water rotary knob (picture 1/C), foamed milk or hot water are made depending on the choice of
beverage. The milk tube is rinsed, when the tap of the spumatore is horizontal with open steam-hot
water rotary knob (picture 1/C).
• Height-adjustable spout (picture 1/E): By moving up or down, you adjust the spout to the height
of your cups or glasses. Grab the spout between thumb and index finger and move it up or down
(picture 11).
• Milk container (only designs 670 and 680): Fill the milk container with fresh, cold, low fat milk.
Close the lid of the milk container and connect the suction tube with one end to the milk container
and with the other end to the milk frother/spumatore.
2.3. Filling of water and beans
➔ Open the cover on the left side of the device (picture 1/F) and remove the water tank (picture 2).
Rinse it with cold, clear tab water.
➔ Fill the water tank above the minimal mark (0,5 l) and put it back into the appliance. Ensure that
the water tank fits properly when inserting it.
➔ Close the cover on the left side of the device again.
Warning: Always ll the water tank with clear, cold water only! Never use carbonated water or different
uids! Nonobservance will void you guarantee claims.
➔ Open the lid of the bean container (picture 1/G and 3).
➔ Fill it with untreated, roasted coffee beans only.
➔ Close the lid again. Ensure the proper fit.
•
7
Page 10

2. Set up
Warning: Do not use beans which were treated with additives like sugar or similar products during or
after the roasting process. This may cause damages to the grinder. The resulting repair costs are not
covered by the guarantee.
2.4. Turn on the appliance and ll the system
➔ Turn the appliance on with the On/Off switch (picture 1/H).
Please set the following basic setting prior to preparing your first coffee:
Set a language
➔ Turn the rotary to set your language.
➔ Press the rotary to confirm your setting.
The display shows “INSERT FILTER?’’.
2.4.1. Operate appliance with lter
The scope of supply includes a Claris filter. When using the filter, descaling your appliance becomes
less often as the filter softens the water.
➔ Turn the rotary to ‘YES’ and press the rotary so that the appliance recognises that a new filter has
been inserted.
➔ The display shows “INSERT FILTER’’.
➔ Empty the water tank (picture 1/F and 2) and carefully screw the filter with the installation aid at
the back of the measuring spoon (picture 4) into the corresponding mounting in the water tank.
Warning: Do not overwind or bend.
➔ Fill the tank with fresh water above the minimum mark (0,5 l) and insert it back into the appliance.
➔ Close the cover on the left side of the device again.
➔ Place a big enough container (at least 0,5 l) underneath the water outlet (picture 1/P) and open
the steam- hot water- rotary knob clockwise.
The system is now being rinsed. The display shows “FILTER RINSING’’.
➔ Wait until no water is coming out of the outlet after some time. Then, close the steam- hot water-
rotary knob anticlockwise.
The display shows “PLEASE RINSE’’.
➔ Press the rotary.
The display shows “SYSTEM RINSING’’.
When the appliance is heated, the display shows the main menu with the beverage symbols as a sign
of the appliance being ready for its use.
At the rst preparation: If you are preparing coffee for the first time, the grinding chamber is still empty.
It is possible that the appliance is not preparing any coffee and that the display is showing “FILL
BEANS’’ after the first grinding process.
➔ Follow the notes on the display and, in this case, press the rotary once again.
The process is being repeated.
Information: If you use the appliance with lter and have programmed the system to “INSERT FILTER’’
“YES’’, the possibility to adjust the water hardness is cancelled. Internally, the water hardness is set
on level 1 automatically! Then, you have to descale your appliance less often - but always on request
and always with REMOVED FILTER.
After the supply of approximately 50 l of water, the effect of the filter is exhausted (Change filter see
point 3.1).
8
•
Page 11

2. Set up
Warning: Even if the display does not show “PLEASE CHANGE FILTER’’, the lter must be changed after
two month at latest, even with only a rare use of the appliance.
2.4.2. Operate appliance without lter
If you would like to operate the appliance without filter, the filter setting must be set on “INSERT
FILTER? NO’’. This is important because descaling has to take place more often without a filter,
depending on water hardness (the appliance is delivered with the factory setting “INSERT FILTER?
NO’’!).
➔ Turn the rotary to “NO’’ and press the rotary.
The display shows the setting water hardness.
Information: For production reasons, it may occur at the initial set up that the pipes in the appliance
are still empty. The appliance shows that as follows: The display “PLEASE FILL’’/OPEN VENT’’ appears
after the appliance has been turned on with the On/Off switch (picture 1/H).
➔ Place a big enough container (at least 0,5 l) underneath the steam-hot water jet / the spumatore.
➔ Open the steam- hot water - rotary knob clockwise.
The system is now being filled. Water may emerge from the steam- hot water jet / spumatore
(picture1/P).
➔ Close the steam- hot water - rotary knob anticlockwise.
After the system is heated, the display shows “PLEASE RINSE’’.
➔ Press the rotary.
The display shows “SYSTEM RINSING’’.
When the appliance is ready for use, the display shows the main menu.
2.4.3. Set water hardness
The appliance has to be descaled sooner or later depending on the water hardness in your area.
Sothat the system can display in time when the descaling is required, you must set the appropriate
water hardness prior to the first use.
The basic factory setting for the water hardness is LEVEL 3.
Initially, test the quality of your water with the provided test strip:
➔ Immerse the test strip into the water for a short period and shake it slightly.
➔ After approximately one minute you can read the result, by counting the red dots on the test
strip.
➔ The different levels are split and adjustable as follows:
Test strip / level of hardness = Display
1 red dot / 1–7° = LEVEL 1
2 red dots / 8–14° = LEVEL 2
3 red dots / 15–21° = LEVEL 3
4 red dots / >21° = LEVEL 4
Information: If no dot turns red, set it to level 1.
That is how you set the water hardness for your appliance:
➔ Turn the rotary to your water hardness and press the rotary afterwards to set the level of your
water hardness.
The display shows “PLEASE FILL’’/OPEN VENT’’.
➔ Place a big enough container (at least 0,5 l) underneath the steam-hot water jet / the spumatore.
•
9
Page 12

2. Set up / 3. Take/change basic settings
➔ Open the steam- hot water - rotary knob clockwise. The display shows
“SYSTEM FILLING”.
The system is now being filled with water and heated subsequently. Water may emerge from the
steam- hot water jet / spumatore (picture 1/P).
➔ Close the steam- hot water - rotary knob anticlockwise.
The display shows “PLEASE RINSE’’.
➔ Press the right rotary. The display shows “SYSTEM RINSING’’.
When the appliance is ready for use, the display shows the main menu.
At the rst preparation: If you are preparing coffee for the first time, the grinding chamber is still empty.
It is possible that the appliance is not preparing any coffee and that the display is showing “FILL
BEANS’’ after the first grinding process.
➔ Follow the notes on the display and, in this case, press the rotary once again.
The process is being repeated.
2.5. Turn on appliance during operation
If you have carried out the first start during the initial set up (point 2.4), proceed as follows for the
following power ups:
➔ Turn the appliance on with the On/Off switch (picture 1/H).
The display shows the notification “NIVONA, SYSTEM HEATING’’.
When the appliance is heated, the display shows “PLEASE RINSE’’.
➔ Press the rotary.
The system is now being rinsed. The display shows “SYSTEM RINSING’’. Afterwards the appliance is
ready to operate. The display shows the main menu (picture 1/A).
Information: When you do not use the device for a longer period (i.e due to a holiday), turn off the
device with the On/Off switch (picture 1/H) and pull the plug.
Information: For each coffee speciality a factory setting is set. Thus, you can get the coffee immediately (see
point 4.). However, we recommend that you alter the basic settings according to your wishes in advance
(see point 3).
2.6. ECO-Mode
When you do not use the rotary for a longer period, the appliance switches to ECO-mode. The display
shows “ENERGY SAVING’’.
➔ By pressing the rotary, you exit the ECO-mode.
The display shows the main menu.
3. Take/change basic settings
Information: For each coffee speciality a factory setting is set. Hence, you can get coffee immediately
(see point 4.). However, we recommend to change the basic settings according to your individual
wishes in advance.
➔ To change the basic settings, choose the menu option “SETTINGS’’ in the main menu by turning
the rotary.
➔ You get to the menu “SETTINGS’’ by pressing the rotary.
➔ Choose the menu option in “SETTINGS’’, which you would like to change, by turning the rotary.
➔ You get to the chosen menu option by pressing the rotary.
➔ You change the respective setting in the respective menu option by turning the rotary.
10
•
Page 13

3. Take/change basic settings
➔ You confirm the chosen setting by pressing the rotary.
➔ By choosing “EXIT’’ and then pressing the rotary, you get to the next menu level above: From the
chosen setting via the menu “SETTINGS’’ to the main menu.
3.1. Set the operation with or without lter
➔ To change the operation to with or without filter, chose the menu option “SETTINGS’’ in the main
menu by turning the rotary and then press the rotary.
➔ Chose the option “FILTER’’ in “SETTTINGS’’ by turning the rotary.
Operate the appliance with filter: Please follow the procedure under point 2.4.1.
Operate the appliance without filter: Please follow the procedure under point 2.4.2
➔ You can carry on directly with the programming of further setting from this position or you can
leave the setting with choosing “EXIT’’ and then pressing the rotary.
3.2. Set water hardness
➔ To change the water hardness, choose the menu option “SETTINGS’’ in the main menu by turning
the rotary and then press the rotary.
➔ Choose the option “WATER HARDNESS’’ in “SETTINGS’’ by turning the rotary.
Please follow the procedure in point 2.4.3 afterwards.
➔ You can carry on directly with the programming of further setting from this position or you can
leave the setting with choosing “EXIT’’ and then pressing the rotary.
3.3. Choose the avour
Depending on your wish, you can choose the flavour. Thus, you can change the flavour of your coffee
as desired. For this, there are three profiles for the flow velocity of the water through the coffee
grounds on file under option “FLAVOUR’’. Profile 1 “DYNAMIC’’ ensures a dynamic flow, Profile 2
“CONSTANT’’ a constant flow and Profile 3 “INTENSE’’ ensures a intensive flow. The factory setting is
“INDIVIDUAL’’, viz. you can change your flavour setting individually for each coffee recipe. However,
should you choose a Flavour Profile 1, 2 or 3 at this point, it will apply for all coffee specialities.
Tip: Test your favourite avour prole on one of the beverages.
➔ To change the flavour setting, choose the menu option “SETTTINGS’’ in the main menu by turning
the rotary and then press the rotary.
➔ Turn the rotary to “FLAVOUR’’. Press the rotary.
➔ Turn the rotary to the flavour profile of your choice.
➔ Press the rotary to confirm your setting.
➔ You can carry on directly with the programming of further setting from this position or you can
leave the setting with choosing “EXIT’’ and then pressing the rotary.
3.4. Set temperature
You can set the temperature for coffee, mild and hot water to
“NORMAL”, “HIGH”, “MAXIMUM” or “INDIVIDUAL” as desired. The factory setting is “HIGH’’.
When you have set the temperature as described below, it will apply for all coffee specialities.
However, you can set the temperature to “INDIVIDUAL’’ for each coffee speciality (see point 4
below). Then, choose the setting “INDIVIDUAL’’ in this menu as follows:
•
11
Page 14

3. Take/change basic settings
➔ To change the temperature, choose the menu option “SETTINGS’’ in the main menu by turning
the rotary and then press the rotary.
➔ Turn the rotary to “TEMPERATURE’’. Press the rotary.
➔ Turn the rotary to “INDIVIDUAL’’.
➔ Press the rotary to confirm your setting.
➔ You can carry on directly with the programming of further setting from this position or you can
leave the setting with choosing “EXIT’’ and then pressing the rotary.
Information: When you have selected ‘INDIVIDUAL’ in your settings, you can choose your temperature
setting individually for each coffee recipe.
3.5. Set a language
➔ To change the language, select the menu option “SETTINGS’’ in the main menu by turning the
rotary and then press the rotary.
➔ Select the option “LANGUAGE’’ in “SETTINGS’’ by turning the rotary. Press the rotary.
➔ By turning the rotary, you can change the language.
➔ By pressing the rotary, you confirm your selected language.
➔ You can carry on directly with the programming of further setting from this position or you can
leave the setting with choosing “EXIT’’ and then pressing the rotary.
3.6. Set an automatic switch-off time
With this function you are able to set if and after how long from the last use the appliance should
switch itself off automatically. The factory setting is after “10 MINUTES’’.
➔ To change the switch-off time, choose the menu option “SETTINGS’’ in the main menu by
turning the rotary and then press the rotary.
➔ Turn the rotary to “DEVICE AUTO-OFF’’. Press the rotary.
The display shows the possible switch-off times.
➔ Turn the rotary to set the desired switch-off time.
➔ Press the rotary to confirm your setting.
Your appliance is now switching itself off after the set switch-off time after the last use.
➔ You can carry on directly with the programming of further setting from this position or you can
leave the setting with choosing “EXIT’’ and then pressing the rotary.
3.7. Switch-off rinsing
The switch-on rinsing is permanently installed in the factory. After each switch-on from a cold stand
by mode, the appliance heats up anew and requests a rinsing to always operate with fresh water.
The display shows this rinsing request and it can be started manually by pressing the rotary.
The factory setting for the switch-off rinsing is set to “ON’’.
Optionally, you can deactivate the switch-off rinsing after the switch-off of the device.
➔ To change the setting, choose the menu option “SETTINGS’’ in ne main menu by turning the
rotary and then press the rotary.
➔ Turn the rotary to “SWITCH-OFF RINSING’’. Press the rotary.
➔ Turn the rotary to your desired setting “ON’’ or “OFF’’. Press the rotary.
12
•
Page 15

3. Take/change basic settings
The display shows further settings.
➔ You can carry on directly with the programming of further setting from this position or you can
leave the setting with choosing “EXIT’’ and then pressing the rotary.
Information: The switch-off rinsing is only carried out if at least one coffee or milk beverage has been
prepared prior, even if the switch-off rinsing is on “ON’’.
3.8. Factory settings
You can reset recipes, settings or Bluetooth to factory settings in the menu option “FACTORY
SETTINGS’’.
➔ Choose the menu option “SETTINGS’’ in the main menu by turning the rotary and then pressing
the rotary.
➔ Turn the rotary to “FACTORY SETTINGS’’. Press the rotary.
➔ Turn the rotary to “RESET RECIPES’’ or “RESET SETTINGS’’ or “RESET BLUETOOTH’’.
➔ Press the rotary to confirm your setting.
➔ You can carry on directly with the programming of further setting from this position or you can
leave the setting with choosing “EXIT’’ and then pressing the rotary.
3.9. Request statistics
In the menu option “STATISTICS’’ you can read how often you have prepared beverages and carried
out features since the set up of the appliance. Additionally, a progress bar indicates if a cleaning or
care programme or a filter change is pending.
➔ Choose the menu option “SETTINGS’’ in the main menu by turning the rotary and then pressing
the rotary.
➔ Turn the rotary to “STATISTICS’’. Press the rotary.
➔ Turn the rotary to see the different statistics.
➔ To exit, press the rotary.
The display shows further settings.
➔ You can carry on directly with the programming of further setting from this position or you can
leave the setting with choosing “EXIT’’ and then pressing the rotary.
3.10. Bluetooth
You can obtain an Application (App) in an Apple-App-Store or in the Google Play-Store for your
NIVONA fully automatic machine, with which you are able to control and operate the main functions
of your fully automatic machine. You can approve or deactivate a connection of your device to a
smartphone in the menu option “BLUETOOTH’’.
➔ Choose the menu option “SETTINGS’’ in the main menu by turning the rotary and then pressing
the rotary.
➔ Turn the rotary to “BLUETOOTH”. Press the rotary.
➔ To approve a connection to a smartphone, turn the rotary to “CONNECT’’ and then press the
rotary.
➔ Now, open the app on your smartphone. Ensure that the Bluetooth is turned on in the process.
➔ In most cases the app will automatically connect to your device. You recognise this because the
small symbol for the fully automatic machine in the top right corner on the start page of the app
is white and has a check mark.
•
13
Page 16

3. Set/change basic settings / 4. Prepare coffee specialities
➔ If the app has not connected itself, click on the small symbol for the fully automatic machine of
the app, in the top right. A list with available fully automatic machines or their serial numbers
appears. Select the serial number of your device ( see serial number on type label picture 1/S).
➔ Turn the rotary to “DEACTIVATE’’ to cancel the connection to your smartphone or to disallow it.
➔ Press the rotary to confirm your setting.
➔ You can carry on directly with the programming of further setting from this position or you can
leave the setting with choosing “EXIT’’ and then pressing the rotary.
4. Prepare coffee specialities
Your NIVONA appliance offers you diverse possibilities to prepare speciality coffees to your individual
wishes. The most important control elements and their basic function are mostly identical for the
different coffee specialities:
• On/Off switch (picture 1/H): By pressing you turn the appliance on, by pressing once more you
turn it off again.
• Rotary - Turn -Press - Selector (short Rotary) (picture 1/B): Select your favourite beverage in the main
menu by turning the rotary. By pressing the rotary in the main menu, the beverage preparation
starts. During the preparation of the beverage, you can alter the strength and amount of your
coffee with the rotary. The changeable value flashes respectively.
• Steam-Hot water-Rotary knob (picture 1/C): When the display shows “ Open vent’’, place a container
underneath the steam-hot water jet / the spumatore prior to use. You open the vent for the hot
water or steam supply, by turning it clockwise up to the stop. You stop the supply, by turning it
anticlockwise up to the stop.
• Steam-Hot water Jet/Spumatore (picture 1/P): Is the tap of the spumatore upright with open steam-hot
water rotary knob (picture 1/C), foamed milk or hot water are made depending on the choice of
beverage. The milk tube is rinsed, when the tap of the spumatore ishorizontal with open steam-hot
water rotary knob (picture 1/C).
• Height-adjustable spout (picture 1/E): By moving up or down, you adjust the spout to the height
of your cups or glasses. Grab the spout between thumb and index finger and move it up or down
(picture 11).
• Milk container (only designs 670 and 680): Fill the milk container with fresh, cold, low fat milk.
Close the lid of the milk container and connect the suction tube with one end to the milk container
and with the other end to the milk frother/spumatore.
Information: The display shows the current setting of the selected coffee specialities in the lower row.
The strength is displayed on the left, the avour prole in the middle and the amount on the right.
Each coffee speciality can be prepared in two different ways:
a) You either change the setting at each preparation individually as described in 4.1. The standard
setting will remain in the process.
b) Or you adopt the standard settings from the menu “BEVERAGE RECIPES’’ in the menu “SETTINGS’’.
There, factory default settings are stored, which you can change individually according to your
preferences, as described in 4.2. to 4.5.
At the rst preparation: If you are preparing coffee for the first time, the grinding chamber is still
empty. It is possible that the appliance is not preparing any coffee and that the display is showing
“FILL BEANS’’ after the first grinding process.
➔ Follow the notes on the display and, in this case, press the rotary once again.
14
•
Page 17

4. Prepare coffee specialities
The process is being repeated.
Particulars of the preparation of two cups:
Information: 2 cups can be prepared simultaneously with beverages without milk and without hot water
only. With Cappuccino and Cafe Americano, several beverages can only be prepared one after another
and not at the same time.
➔ Turn the rotary in the main menu to the beverage of your choice.
➔ You start the preparation by pressing the rotary.
➔ To prepare two cups directly one after another, press the rotary once again immediately.
Are two cups prepared at the same time, two grinding processes are carried out automatically one
after another. Should there be no water or beans anymore or should the bowl need emptying during
both grinding processes, it will be displayed and the second cup of coffee will not be prepared
anymore.
➔ Follow the instructions on the display and then press the rotary only for the second cup of coffee.
4.1. Espresso and coffee should be prepared individually with each preparation.
Information: For beverages with milk (CAPPUCCINO) see point 4.3. For beverages with hot water
(CAFFÈ AMERICANO) see point 4.4.
Irrespective of the standard setting in the menu option “SETTINGS’’ “BEVERAGE RECIPES’’, you can
set your beverage individually with every preparation.
➔ Turn the rotary in the main menu to the beverage of your choice (i.e. “ESPRESSO’’).
Information: The display shows the current setting of the selected coffee specialities in the lower row.
The strength is displayed on the left, the avour prole in the middle and the amount on the right.
Information: Take into consideration whether you prepare one or two cups and place the cups under
the outlet respectively (picture 5 and 6).
➔ Press the rotary to get the selected beverage.
Information: The changeable parameter is shown in the lower row of the display by ashing.
➔ While the bean symbol is flashing for the strength, turn the rotary to adjust the strength. Clockwise
stronger and anticlockwise weaker.
➔ While the ml-display is flashing for the amount, turn the rotary to adjust the amount. Clockwise
stronger and anticlockwise weaker.
Information: The size of your cups/glassess should be taken into consideration.
Information: In that way, you can change the displayed settings in the lower row of the display, while
you get a beverage, apart from the avour prole.
Information: The settings only apply for the current supply but will not be saved.
➔ If you would like to cancel the preparation, press the rotary once again.
The display shows “CANCELLED’’. The appliance cancels the supply and returns to the main menu.
4.2. Change the standard setting for Espresso and coffee
The factory standard setting
for Espresso is: Strength normal, Flavour profile 3, Amount 40ml. The display shows “ooo III 40ml’’,
for coffee it is: Strength normal, Flavour setting 1, Amount 120ml. The display shows “ooo I 120ml’’
➔ Place a cup or glass underneath the outlet (picture 5).
•
15
Page 18

4. Prepare coffee specialities
➔ Turn the rotary to the beverage of your choice (i.e. Espresso).
Information The display shows the current setting of the selected coffee specialities in the lower row.
The strength is shown on the left, the flavour profile in the middle and the amount on the right.
Information Take into consideration whether you prepare one or two cups and place the cups under
the outlet respectively (picture 5 and 6).
➔ Press the rotary for the beverage preparation.
The cup lighting is switched on (only designs 670 and 680). The appliance is preparing a cup of the
selected beverage in the standard setting.
Preparation of two cups
Information: 2 cups can be prepared simultaneously with beverages without milk and without hot water
only. With Cappuccino and Cafe Americano, several beverages can only be prepared one after another
and not at the same time.
➔ To prepare two cups directly one after another, press the rotary once again immediately after the
start.
➔ If you would like to cancel the preparation, press the rotary once again.
The display shows “CANCELLED’’. The appliance cancels the supply and returns to the main menu.
You can change the standard setting in two ways as follows:
4.2.1. Live programming for Espresso and coffee (designs 670 and 680 only)
You can change and save the standard setting during the preparation as follows.
➔ Choose the menu option “SETTINGS’’ in the main menu by turning the rotary and then pressing
the rotary.
➔ Turn the rotary to “BEVERAGES RECIPES’’. Press the rotary.
➔ Turn the rotary to the beverage of your choice. “ESPRESSO’’). Press the rotary.
➔ Turn the rotary to “LIVE PROGRAMMING’’.
➔ Place a cup or a glass underneath the outlet (picture 5).
Information: Should you wish to cancel the Live programming after the start, hold the rotary down for
longer than three seconds.
➔ To change the standard setting press the rotary now.
The display shows “SELECT STRENGTH’’.The display shows “SELECT STRENGTH’’.
➔ Turn the rotary to select the strength of your choice (weaker to the left and stronger to the right).
➔ Press the rotary to confirm the choice of your strength.
The display shows “SELECT FLAVOUR’’.
➔ Turn the rotary to set the flavour profile of your choice (for the explanation of the flavour profiles
see point 3.3).
➔ Press the rotary to confirm your choice of flavour.
The display shows “PLEASE WAIT’’. The device is grinding, heating and will then start with the
preparation.
The display shows “STOP COFFEE?’’
➔ Press the rotary when the desired amount of coffee is prepared.
The standard setting for the beverage of your choice (i.e. Espresso) is now changed and saved. The
display shows “RECIPE CREATED’’ for a short amount of time and returns to the main menu with the
new standard settings.
16
•
Page 19

4. Prepare coffee specialities
4.2.2. Manual programming for Espresso and coffee
You can also change the standard setting manually as follows.
➔ Choose the menu option “SETTINGS’’ in the main menu by turning the rotary and then pressing
the rotary.
➔ Turn the rotary to “BEVERAGES RECIPES’’. Press the rotary.
➔ Turn the rotary to the beverage of your choice (i.e. Espresso). Press the rotary.
Select strength
➔ Turn the rotary to “STRENGTH’’. Press the rotary.
➔ Turn the rotary up to the strength of your choice (weaker to the left and stronger to the right).
Press the rotary to confirm your setting.
Select avour (in case “FLAVOUR’’ (point 3.3) is set to “INDIVIDUAL’’ in the menu “SETTINGS’’)
➔ Turn the rotary to “FLAVOUR’’. Press the rotary.
➔ Turn the rotary to the flavour of your choice (for the explanation of the flavour profiles see point
3.3). Press the rotary to confirm your setting.
Select amount
➔ Turn the rotary to “COFFEE AMOUNT’’. Press the rotary.
➔ Turn the rotary to the amount of your choice (from 20 ml to 240 ml). Press the rotary to confirm
your setting.
Information: Take into consideration the size of you cups.
Select temperature (in case “TEMPERATURE’’ “COFFEE’’ (point 3.4) is set to “INDIVIDUAL’’ in the
menu “SETTINGS’’)
➔ Turn the rotary to “TEMPERATURE’’. Press the rotary.
➔ Turn the rotary to the temperature to your choice (“NORMAL’’, “HIGH’’, “MAXIMUM’’). Press the
rotary to confirm your setting.
➔ To exit a menu level, turn the rotary in each menu level to “EXIT’’. Then, press the rotary.
➔ Repeat until you are in the main menu.
Information: If no changes are being made in the settings for a longer period, the appliance will auto-
matically return to the main menu.
4.3. Prepare Cappuccino and milk foam, change settings for Cappuccino and milk foam
The factory standard setting
for Cappuccino is: Strength normal, Flavour profile 2, Amount 200ml. The display shows
“oooI200ml’’.
Warning: Risk of burns! The exiting water may spray! The steam-/hot water jet / spumatore gets very
hot during the use. Allow the steam-/hot water jet / spumatore to cool down for several minutes before
touching it. Only touch on the rubber parts.
Information: If you wish to prepare milk foam only (without coffee), turn the rotary in the main menu to
milk foam and proceed as described in the following steps.
Warning: Dried milk residues are hard to remove. Therefore, please clean everything properly after
cooling! Always follow the instruction “RINSE MILK FROTHER’’ on the display.
Warning: From time to time (ideally prior to a longer break in preparation, but denitely regularly!) the
milk frother has to be dismantled completely into individual parts ( picture 1/R) and these have to be
cleaned under clear water for optimum hygiene.
•
17
Page 20

4. Prepare coffee specialities
You can prepare milk directly from the pack or from a different container with the special milk frother
and fill directly into the cup or into the glass.
➔ Connect the suction tube to the milk frother (picture 10).
➔ Connect the other end of the suction tube to the milk container (designs 670 and 680 only)
(picture8) or submerge it directly into the milk carton or into a different container.
Warning: Ensure that the tap of the spumatore is upright. This is how the frothed up milk is created.
➔ Turn the rotary to “CAPPUCCINO’’.
Information: The display shows the current settings in the lower row. The strength is shown on the left,
the avour prole in the middle and the amount of milk froth on the right.
➔ Press the rotary.
The display shows “PLEASE PLACE CUP UNDERNEATH THE MILK FROTHER’’. Simultaneously the
device is grinding the coffee already.
➔ Place the cup underneath the milk forther (picture 1/P)
Information: By ashing of the strength in the lower row of the display it is shown that you can now
change this parameter by turning the rotary.
➔ While the bean symbol is flashing for the strength, turn the rotary to adjust the strength. Clock-
wise stronger and anticlockwise weaker.
The appliance is heating. Then, the display shows “OPEN VENT’’.
➔ Turn the steam-hot water- rotary knob (picture 1/C) clockwise up to the stop.
Information: The display shows the current settings in the lower row. The strength is shown on the left,
the avour prole in the middle and the amount of milk froth on the right.
Information: By ashing of the amount of milk froth in the lower row of the display it is shown that you
can now change this parameter.
➔ While the ml-display for the milk froth is flashing, turn the rotary to change the amount of milk
froth. Clockwise stronger and anticlockwise weaker.
As soon as the desired amount of milk froth is prepared, the display shows “CLOSE VENT’’.
➔ Turn the steam-hot water - rotary knob (picture 1/C) anticlockwise to the 0-setting.
“Please turn the Steam/Hot Water Tap (Illustration 1/C) clockwise to the Zero Position at the latest,
when enough milk has been drawn.”
The display shows “PLEASE PLACE CUP UNDERNEATH COFFEE OUTLET’’.
➔ Now, place a cup or a glass underneath the coffee outlet (picture 5).
Information: By ashing of the amount of coffee in the lower row of the display it is shown that you can
now change this parameter.
➔ While the ml-display is flashing for the amount, turn the rotary to adjust the amount. Clockwise
stronger and anticlockwise weaker.
You can change the standard setting in two ways as follows:
4.3.1. Live programming for Cappuccino and milk froth ( designs 670 and 680 only)
You can change and save the standard setting during the preparation as follows.
➔ Choose the menu option “SETTINGS’’ in the main menu by turning the rotary and then pressing
the rotary.
18
•
Page 21

4. Prepare coffee specialities
➔ Turn the rotary to “BEVERAGES RECIPES’’. Press the rotary.
➔ Turn the rotary to “CAPPUCCINO’’. Press the rotary.
➔ Turn the rotary to “LIVE PROGRAMMING’’.
➔ Place a cup or glass underneath the outlet (picture 5).
Information: Should you wish to cancel the Live programming after the start, hold the rotary down for
longer than three seconds.
➔ To change the standard setting press the rotary for longer than three seconds.
The display shows “SELECT STRENGTH’’.The display shows “SELECT STRENGTH’’.
➔ Turn the rotary to select the strength of your choice. Weaker to the left and stronger to the right.
➔ Press the rotary to confirm the choice of your strength.
The display shows “SELECT FLAVOUR’’.
➔ Turn the rotary to select the flavour of your choice (for explanation of the flavour profiles see
point3.3).
➔ Press the rotary to confirm your choice of flavour.
The display shows “PLEASE PLACE CUP UNDERNEATH COFFEE OUTLET’’.
➔ Place a cup or a glass underneath the coffee outlet.
The display shows “PLEASE WAIT’’. The device is grinding, heating and will then start with the
preparation.
First, the coffee is prepared.
The display shows “STOP COFFEE?’’
➔ Press the rotary when the desired amount of coffee is prepared.
Information: If you only want to prepare milk froth (without coffee) , so turn the rotary to
“SETTINGS”, “BEVERAGE RECIPES”, “MILK FROTH” and proceed as described in the following steps.
After the coffee part of the Cappuccino is prepared, the display shows “PLEASE PLACE CUP UNDERNEATH MILK FROTHER’’.
➔ Place the cup underneath the milk frother (picture 1/P)
Warning: Ensure that the tap of the spumatore is upright. This is how the frothed up milk is created.
The display shows “OPEN VENT’’.
➔ Turn the steam-hot water- rotary knob (picture 1/C) clockwise up to the stop.
Warning: First, water comes out off the spumatore, then the milk froth.
The display shows “STOP MILK FROTH?’’
➔ Press the rotary when the desired amount of milk froth is prepared.
The display shows “CLOSE VENT’’
➔ Close the steam- hot water - rotary knob anticlockwise.
Information: Wait for the last milk drops before you remove the cup.
The standard setting for CAPPUCCINO is now changed and saved. The display shows “RECIPE
CREATED’’ for a short amount of time and returns to the main menu with the new standard settings.
4.3.2. Manual programming for Cappuccino and milk froth
You can also change the standard setting manually as follows.
➔ Choose the menu option “SETTINGS’’ in the main menu by turning the rotary and then pressing
the rotary.
•
19
Page 22

4. Prepare coffee specialities
➔ Turn the rotary to “BEVERAGES RECIPES’’. Press the rotary.
➔ Turn the rotary to “CAPPUCCINO’’. Press the rotary.
Select strength
➔ Turn the rotary to “STRENGTH’’. Press the rotary.
➔ Turn the rotary to the strength of your choice. Weaker to the left and stronger to the right. Press
the rotary to confirm your setting.
Select avour (in case “FLAVOUR’’ (point 3.3) is set to “INDIVIDUAL’’ in the menu “SETTINGS’’)
➔ Turn the rotary to “FLAVOUR’’. Press the rotary.
➔ Turn the rotary to the flavour of your choice (for the explanation of the flavour profiles see point
3.3). Press the rotary to confirm your setting.
Select amount of coffee
➔ Turn the rotary to “COFFEE AMOUNT’’. Press the rotary.
➔ Turn the rotary to the amount of your choice. Press the rotary to confirm your setting.
Information: Take into consideration the size of your cups or glasses.
Information: If you want to prepare milk froth only (without coffee), turn the rotary to “SETTINGS’’,
“BEVERAGE RECIPES’’, “MILK FROTH’’ and proceed as described in the following steps “SELECT
AMOUNT OF FROTH’’.
Select amount of froth
➔ Turn the rotary to “AMOUNT OF FROTH’’. Press the rotary.
➔ Turn the rotary to the amount of your choice. Press the rotary to confirm your setting.
Information: Take into consideration the size of your cups or glasses.
SELECT TOTAL AMOUNT
Information: At this setting your previously set settings will change accordingly. This is to ensure
that the relation of the beverage components (coffee and milk froth) is maintained if the total amount
changes.
➔ Turn the rotary to “TOTAL AMOUNT’’. Press the rotary.
➔ Turn the rotary to the amount of your choice. Press the rotary to confirm your setting.
Information: Take into consideration the size of your cups or glasses.
Select temperature (in case “SETTINGS’’ “TEMPERATURE’’, point 3.4. is set on “INDIVIDUAL’’)
➔ Turn the rotary to “TEMPERATURE’’. Press the rotary.
➔ Turn the rotary to the temperature to your choice (“NORMAL’’, “HIGH’’, “MAXIMUM’’). Press the
rotary to confirm your setting.
➔ To exit a menu level, turn the rotary in each menu level to “EXIT’’. Then, press the rotary.
➔ Repeat until you are in the main menu.
Information: If no changes are being made in the settings for a longer period, the appliance will
automatically return to the main menu.
4.4. Prepare Cafe Americano and change standard setting for Cafe Americano
The factory standard setting
for Cafe Americano is: Strength normal, Flavour Profile 2, Amount 120ml. The display shows
“oooII120ml’’.
20
•
Page 23

4. Prepare coffee specialities
➔ Place a cup or glass underneath the outlet (picture 5).
The display shows “PLEASE PLACE CUP UNDERNEATH COFFEE OUTLET’’.
➔ Place a cup underneath the coffeeoutlet.
Information: The display shows the current setting of the selected coffee specialities in the lower row.
The strength is shown on the left, the avour prole in the middle and the amount on the right.
➔ Press the rotary for the beverage preparation.
The cup lighting is switched on (only designs 670 and 680). The appliance grinds and prepares the
coffee part (approx. 40ml) of the Cafe Americano in the standard setting.
➔ If you would like to cancel the preparation, press the rotary once again.
The display shows “CANCELLED’’. The appliance cancels the supply and returns to the main menu.
Information: If you wish to prepare hot water only (without coffee) i.e. for tea, turn the rotary to “HOT
WATER’’ in the main menu and proceed as described in the following steps.
After the coffee part of the Cafe Americano is prepared, the display shows “PLEASE PLACE CUP
UNDERNEATH THE WATER OUTLET’’.
➔ Place the cup underneath the milk forther (picture 1/P)
Warning: Ensure that the tap of the spumatore is upright. This is how the hot water is created.
The display shows “OPEN VENT’’.
➔ Turn the steam-hot water- rotary knob (picture 1/C) clockwise up to the stop.
Information: The display shows the current settings in the lower row. The strength is shown on the left,
the avour prole in the middle and the hot water on the right.
Information: By ashing of the amount of hot water in the lower row of the display, it is shown that you
can now change this parameter.
➔ While the ml-display is flashing for the hot water, turn the rotary to change the amount of hot
water. Clockwise stronger and anticlockwise weaker.
As soon as the desired amount of hot water is prepared, the display shows
’’CLOSE VENT”.
➔ Turn the steam-hot water - rotary knob (picture 1/C) anticlockwise to the 0-setting.
Information: You can use hot water for around 2 minutes. Then, the appliance is switching off the
preparation automatically. By turning the steam-hot water- rotary knob backwards and forwards the
preparation starts anew.
Tip: You can also prepare hot water with the spumatore (picture 1/P) i.e. for tea, without having
prepared coffee beforehand.
You can change the standard setting in two ways as follows:
4.4.1. Live programming for Cafe Americano (designs 670 and 680 only)
You can change and save the standard setting during the preparation as follows.
➔ Select the menu option “SETTINGS’’ in the main menu by turning the rotary and then pressing
the rotary.
➔ Turn the rotary to “BEVERAGES RECIPES’’. Press the rotary.
➔ Turn the rotary to “AMERICANO’’. Press the rotary.
➔ Turn the rotary to “LIVE PROGRAMMING’’.
➔ Place a cup or a glass underneath the coffee outlet (picture 5).
➔ To change the standard setting press the rotary for longer than three seconds.
•
21
Page 24

4. Prepare coffee specialities
Information: Should you wish to cancel the Live programming after the start, hold the rotary down for
longer than three seconds.
The display shows “SELECT STRENGTH’’.The display shows “SELECT STRENGTH’’.
➔ Turn the rotary to select the strength of your choice (weaker to the left and stronger to the right).
➔ Press the rotary to confirm the choice of your strength.
The display shows “SELECT FLAVOUR’’.
➔ Turn the rotary to select the flavour of your choice (for explanation of the flavour profiles see
point3.3).
➔ Press the rotary to confirm your choice of flavour.
The display shows “PLEASE PLACE CUP UNDERNEATH COFFEE OUTLET’’.
➔ Place a cup underneath the coffeeoutlet and press the rotary to confirm,
The display shows “PLEASE WAIT’’. The device is grinding, heating and will then start with the
preparation.
First, the coffee is prepared.
The display shows “STOP COFFEE?’’
➔ Press the rotary when the desired amount of coffee is prepared.
Information: If you wish to prepare hot water only (without coffee) i.e. for tea, turn the rotary to
“SETTINGS’’, “BEVERAGE RECIPED’’, “HOT WATER’’ and proceed as described in the following steps.
After the coffee part of the Cafe Americano is prepared, the display shows “PLEASE PLACE CUP
UNDERNEATH THE WATER OUTLET’’.
➔ Place a cup underneath the wateroutlet (picture 1/P) and press the rotary to confirm.
The display shows “OPEN VENT’’.
Warning: Ensure that the tap of the spumatore is upright. This is how the hot water is created.
➔ Turn the steam-hot water- rotary knob (picture 1/C) clockwise up to the stop.
The display shows “STOP HOT WATER?’’
➔ Press the rotary when the desired amount of hot water is prepared.
The display shows “CLOSE VENT’’.
➔ Close the steam-hot water-rotary knob anticlockwise when the desired amount of hot water is
prepared.
The standard setting for CAFE AMERICANO is now changed and saved. The display shows “RECIPE
CREATED’’ for a short amount of time and returns to the main menu with the new standard settings.
4.4.2. Manual programming for Cafe Americano
You can also change the standard setting manually as follows.
➔ Select the menu option “SETTINGS’’ in the main menu by turning the rotary and then press the
rotary.
➔ Turn the rotary to “BEVERAGES RECIPES’’. Press the rotary.
➔ Turn the rotary to “AMERICANO’’. Press the rotary.
Select strength
➔ Turn the rotary to “STRENGTH’’. Press the rotary.
22
•
Page 25

4. Prepare coffee specialities
➔ Turn the rotary to the strength of your choice. Weaker to the left and stronger to the right. Press
the rotary to confirm your setting.
Select avour (in case “FLAVOUR’’ (point 3.3) is set to “INDIVIDUAL’’ in the menu “SETTINGS’’)
➔ Turn the rotary to “FLAVOUR’’. Press the rotary.
➔ Turn the rotary to the flavour of your choice (for the explanation of the flavour profiles see
point3.3). Press the rotary to confirm your setting.
Select amount of coffee
➔ Turn the rotary to “COFFEE AMOUNT’’. Press the rotary.
➔ Turn the rotary to the amount of your choice. Press the rotary to confirm your setting.
Information: Take into consideration the size of your cups or glasses.
Information: If you wish to prepare hot water only (without coffee) i.e. for tea, turn the rotary to
“SETTINGS’’, “BEVERAGE RECIPES, “HOT WATER’’ and proceed as described in the following steps
“Select amount of hot water’’.
Select amount of hot water
➔ Turn the rotary to “AMOUNT OF HOT WATER’’. Press the rotary.
➔ Turn the rotary to the amount of your choice. Press the rotary to confirm your setting.
Information: Take into consideration the size of your cups or glasses.
Select total amount
Information: At this setting your previously set settings will change accordingly. This is to ensure
that the relation of the beverage components (coffee and milk froth) is maintained if the total amount
changes.
➔ Turn the rotary to “TOTAL AMOUNT’’. Press the rotary.
➔ Turn the rotary to the amount of your choice. Press the rotary to confirm your setting.
Information: Take into consideration the size of your cups or glasses.
Select temperature (in case “SETTINGS’’ “TEMPERATURE’’, point 3.4. is set on “INDIVIDUAL’’)
➔ Turn the rotary to “TEMPERATURE’’. Press the rotary.
➔ Turn the rotary to the temperature to your choice (“NORMAL’’, “HIGH’’, “MAXIMUM’’). Press the
rotary to confirm your setting.
➔ To exit a menu level, turn the rotary in each menu level to “EXIT’’. Then, press the rotary.
➔ Repeat until you are in the main menu.
Information: If no changes are being made in the settings for a longer period, the appliance will
automatically return to the main menu.
4.5. Set “My coffee’’ for me and others according to your gusto
You can set a coffee completely according to gusto with your appliance (with designs 670 and 680
for up to 5 different people or beverages).
In the factory, a coffee beverage without milk is set with the standard setting for “MY COFFEE’’:
Strength normal, Flavour Profile 2, Amount 120ml. The display shows: “ooo II 120ml’’.
You can also change the standard setting manually as follows.
➔ Select the menu option “SETTINGS’’ in the main menu by turning the rotary and then press
therotary.
•
23
Page 26

4. Prepare coffee specialities
➔ Turn the rotary to “BEVERAGES RECIPES’’. Press the rotary.
➔ Turn the rotary to “MY COFFEE’’. Press the rotary.
Now, you can change an existing recipe or create a new one.
4.5.1. Edit recipe
➔ Turn the rotary to “EDIT’’. Press the rotary.
➔ Turn the rotary to the recipe you wish to edit (Design 660: only one recipe). Only one recipe
“MYCOFFEE’’ is stored in the factory. Press the rotary.
Under the option “CHANGE RECIPE’’ you can alter the settings as described in 4.2. to 4.4.
Additionally,under option “SELECT BEVERAGE’’ you can change the selected beverage and its recipe.
For this, proceed as described under points 4.2. to 4.4.
Under option “CHANGE NAME’’ you can name each recipe (i.e. to the name of one of your family
members).
➔ Turn the rotary to the letter or symbol of your choice. Press the rotary to enter the selected letter
or symbol.
➔ Repeat this step until you have entered the name of the recipe in full.
➔ Turn the rotary to “SELECT ICON’’ (last but two item in the lower row), to assign your recipe an
icon in the display. Press the rotary.
➔ Turn the rotary to a symbol of your choice. Press the rotary.
➔ If you would like to finish and confirm your entry, turn the rotary to “CONFIRM NAME’’ (second-last
symbol in the lower row). Press the rotary.
With “REMOVE’’ the selected recipe is deleted.
You exit the menu level with “EXIT’’ (last symbol in the lower row).
4.5.2. Add a new recipe (designs 670 and 680 only)
➔ Turn the rotary to “ADD’’. Press the rotary.
➔ Turn the rotary to the beverage of your choice. Press the rotary.
The appliance adopts the settings from the main menu for the beverage of your choice.
Now, you can change the recipe as described in 4.2. to 4.5. and name your recipe (i.e. name of one
of your family members) as described in 4.5.1.
4.6. Set grinding degree
Warning: The grinding degree should only be changed while the grinder is running.
You can align the grinder accordingly, depending on the roasting of your coffee beans. We recommend
to always leave the grinder on a medium setting.
To change the grinding degree, please proceed as follows:
➔ Open the service door on the case on the right (picture 1/L) by slightly pulling the unlocking
device in the handle to you and slowly removing the service door of the appliance's case.
The regulator for the grinding degree is at the top right (picture 9).
➔ Place a cup underneath the height-adjustable outlet.
➔ Turn the rotary to “ESPRESSO’’ in the main menu.
➔ Press the rotary to start the Espresso preparation.
➔ While the mill is grinding, change the grinding degree by switching the regulator (picture 9).
By switching the regulator to the left, the grinding degree gets finer, to the right coarser. It applies
here:
• a blond roasting needs a finer (regulator further to the left),
• a dark roasting needs a coarser (regulator further to the right) setting.
24
•
Page 27

4. Prepare coffee specialities / 5. Cleaning and care
Tip: Test the setting that suits you best according to your individual sense of taste.
➔ Close the service door again, in doing so, guide the pins at the rear end of the service door into
the gaps. Then, shut the service door until it clicks.
4.7. Prepare instant coffee (i.e. decaffeinated coffee)
➔ Open the lid of the ground coffee chamber (picture 13).
The display shows “FILL IN COFFEE POWDER’’ in alternation with “CLOSE GROUND COFFEE
CHAMBER’’.
➔ Pour in a levelled measuring spoon of coffee powder and close the lid again. The display shows
“COFFEE POWDER IS READY’’.
➔ Place a cup or glass underneath the coffee outlet (picture 5).
➔ Turn the rotary in the main menu to the beverage of your choice.
➔ You start the preparation by pressing the rotary.
Information: If you have started the preparation by accident or to early, you can also changed the
amount in ml during the preparation.
➔ Turn the rotary to your desired setting while the “ml-display’’ is flashing.
➔ If you would like to cancel the preparation, press the rotary once again.
Information: If you have opened the ground coffee chamber by accident - or you have not pressed
the rotary after the powder was poured in - the appliance will be automatically rinsed via the outlet
(picture 1/E) approximately one minute after the lid was closed again and is then ready again.
Warning: The ground coffee chamber is not a storage container. Therefore, never ll in more than
one portion into the chamber and use fresh or vacuum=packed powder from fresh beans only. Water
soluble- instant coffee must not be used!
5. Cleaning and care
Your NIVONA appliance requests some of the below mentioned cleaning and care activities on
thedisplay (i.e. “PLEASE RINSE THE MILK FROTHER’’.
➔ When such a cleaning or care request is displayed, turn the rotary to the “hand symbol with
theraised index finger’’ in the main menu.
➔ Then, press the rotary.
You appliance starts the appropriate cleaning or care process and requests further activities on
thedisplay.
➔ Follow the instructions on the display. In case of doubt, you will find further explanations in
thenow following points 5.1. to 5.9.
5.1. Rinse the frother
Warning: The running programme must not be interrupted!
You should rinse the milk frother after each beverage with milk, yet, at the latest when the display
requests it. For this purpose, proceed as follows:
➔ Turn the rotary to “CARE’’. Press the rotary.
➔ Turn the rotary to “RINSE MILK FROTHER’’. Press the rotary.
The display shows “TUBE ON MILK FROTHER AND IN DRIP PAN’’.
➔ Connect the provided tube to the milk frother with one end of the tube (picture 10).
➔ Put the other end of the tube in the drip pan at the right rear (picture 7).
➔ Place a big enough container (at least 0,5 l) underneath the milk frother.
•
25
Page 28

5. Cleaning and care
➔ Press the rotary.
The display shows “OPEN VENT’’.
➔ Turn the steam-hot water- rotary knob (picture 1/C) clockwise up to the stop.
Occasionally, the display shows “TURN MILK FROTHER TO RINSE SETTING’’.
➔ Turn the tab of the spumatore to the horizontal position.
➔ Press the rotary.
Information: If you want to cancel the rinsing programme, press the rotary.
The display shows “MILK FROTHER IS RINSING, DO NOT REMOVE THE TUBE.’’ The appliance
starts the rinsing process. As soon as the rinsing cycle is finished, the display shows “CLOSE VENT’’.
➔ Turn the steam-hot water- rotary knob (picture 1/C) clockwise up to the stop.
The display shows “TURN MILK FROTHER TO MILK SETTING’’.
➔ Turn the tab of the spumatore to the upright position.
The appliance heats up and is then ready to operate again. The display shows the main menu.
5.2. Rinse the system
From time to time, you should rinse the system For this purpose, proceed as follows:
➔ Turn the rotary to “CARE’’. Press the rotary.
➔ Turn the rotary to “RINSE SYSTEM’’. Press the rotary.
The display shows “SYSTEM RINSING’’.
As soon as the rinsing cycle is finished, the appliance heats up and is then ready to operate again.
The display shows the main menu.
5.3. Clean milk frother
Warning: The running programme must not be interrupted!
Information: If the appliance has to be cleaned, the display shows “PLEASE CLEAN MILK FROTHER’’.
For this purpose, proceed as follows:
➔ Turn the rotary to “CARE’’. Press the rotary.
➔ Turn the rotary to “CLEAN MILK FROTHER’’. Press the rotary.
The display shows “EMPTY BOWLS’’ in alteration with “FILL UP WATER TANK’’.
➔ Remove the drip pan and the used coffee tray (picture 1/N and 1/O) and empty both of them.
➔ Fill - if required - the water tank with fresh water and first insert the water tank and then the drip
pan and the used coffee tray.
The display shows “TUBE ON MILK FROTHER AND IN CLEANING AGENT’’.
➔ Connect the tube to the milk frother with one end of the tube (picture 10).
➔ Put some cleaning agent (available as optional accessory, see point 8.) and water in a container,
at least 0,3 l in total. Please pay attention to the information provided by the manufacturer of the
cleaning agent concerning the mixing ratio.
➔ Put the other end of the tube into the cleaning agent solution.
➔ Place a big enough container (at least 0,5 l) underneath the milk frother.
Information: Ensure that the tap of the spumatore is upright on the milk setting.
➔ Press the rotary.
The display shows “START CLEANING’’/’’OPEN VENT’’ in alteration.
➔ Open the steam- hot water - rotary knob clockwise.
26
•
Page 29

5. Cleaning and care
The appliance starts the cleaning process. The display show “MILK FROTHER IS CLEANING, DO
NOT REMOVE TUBE’’.
➔ Close the steam-hot water- rotary knob clockwise when the request appears on the display.
After a short amount of time, the display shows “TUBE ON MILK FROTHER AND IN DRIP PAN’’.
➔ Connect the tube to the milk frother with one end of the tube (picture 10). Put the other end
ofthe tube in the drip pan at the right rear (picture 7).
➔ Press the rotary.
The display shows “OPEN VENT’’.
➔ Turn the steam-hot water- rotary knob (picture 1/C) clockwise up to the stop.
The display show “MILK FROTHER IS RINSING, DO NOT REMOVE TUBE’’.
Occasionally, the display shows “TURN MILK FROTHER TO RINSE SETTING’’.
➔ Turn the tab of the spumatore to the horizontal position.
➔ Press the rotary.
As soon as the cleaning cycle is finished, the display shows “CLOSE VENT’’.
➔ Turn the steam-hot water- rotary knob (picture 1/C) clockwise up to the stop.
The display shows “TURN MILK FROTHER TO MILK SETTING’’.
➔ Turn the tap of the spumatore to the upright position to the milk setting.
➔ Press the rotary.
The display shows “EMPTY BOWLS’’.
➔ Remove the drip pan and the used coffee tray (picture 1/N and 1/O), empty both of them and
insert them again.
The appliance heats up and is then ready to operate again. The display shows the main menu.
5.4. Clean the system
Information: If the appliance has to be cleaned, the display shows “PLEASE CLEAN SYSTEM’’. You can
still prepare beverages. However, we recommend that you carry out the cleaning programme as soon
as possible for you not to jeopardise your guarantee claims.
Warning: The running cleaning programme must not be interrupted. Only add the cleaning tablet when
the appliance requests it.
➔ Turn the rotary to “CARE’’. Press the rotary.
➔ Turn the rotary to “CLEAN SYSTEM’’. Press the rotary.
The display shows “EMPTY BOWLS’’ in alteration with “FILL UP WATER TANK’’.
➔ Fill - if required - the water tank with fresh water and first insert the water tank.
➔ Then, remove the drip pan and the used coffee tray (picture 1/N and 1/O), empty both and
insertboth again.
The appliance rinses twice. The display shows “SYSTEM RINSING PLEASE WAIT’’.
The, the display shows “CLEANING TABLET INTO GROUND COFFEE CHAMBER’’.
➔ Place a big enough container (at least 0,5 l) underneath the outlet (picture 1/E).
➔ Open the lid of the ground coffee chamber (picture 13).
➔ Insert the cleaning tablet into the ground coffee chamber and close the lid.
The display shows “START CLEANING’’
➔ Press the rotary.
•
27
Page 30

5. Cleaning and care
The appliance starts the cleaning process. The display shows “SYSTEM CLEANING’’. The cleaning
process tuns automatically and takes approximately 10 minutes.
Information: Please follow an instruction should it appear on the display during the cleaning cycle.
Theappliance resumes the cleaning cycle automatically afterwards.
As soon as the cleaning cycle is finished, the display shows “EMPTY BOWLS’’.
➔ Empty the drip pan and the used coffee tray (picture 1/N and 1/O) and insert both again after
cleaning them.
➔ Fill - if required - the water tank with fresh water.
Information: If the cleaning process has been interrupted, the display shows
’’PLEASE RINSE”.
➔ Then, press the rotary.
The display shows “SYSTEM RINSING PLEASE WAIT’’.
As soon as the cleaning cycle is finished, the display shows “EMPTY BOWLS’’.
➔ Empty the drip pan and the used coffee tray (picture 1/N and 1/O) and insert both again after
cleaning them.
➔ Fill - if required - the water tank with fresh water.
The appliance heats up and is then ready to operate again. The display shows the main menu.
5.5. Descale system
When the appliance needs descaling, the display shows “PLEASE DESCALE SYSTEM’’.
However, you can start the descaling programme manually at any time.
Warning: Please respect the exact order while descaling as described in the following! You can - even
when the appliances prompts you to descale - still prepare beverages. Yet, we recommend to carry out
the descaling programme as soon as possible. Otherwise guarantee claims may be cancelled.
Warning: The running descaling programme must not be interrupted. Never use vinegar or agents
on vinegar basis for descaling, but use standard, solvent products which are recommended for fully
automated coffee machines.
Warning: Before the start of the descaling programme, the lter has to be removed from the water tank.
➔ Turn the rotary to “CARE’’. Press the rotary.
➔ Turn the rotary to “DESCALE SYSTEM’’. Press the rotary.
The display shows “EMPTY BOWLS’’.
➔ Remove the drip pan and the used coffee tray (picture 1/N and 1/O) and empty both of them.
➔ Insert drip pan and used coffee tray again.
The display shows “REMOVE WATER TANK’’ and “REMOVE FILTER’’ in alteration.
➔ Empty the water tank (picture 1/F and 2) and carefully screw the filter with the installation aid
at the back of the measuring spoon (picture 4) from the mounting in the water tank. Remove
thefilter.
The display shows “FILL WATER TANK UP TO THE 0,5 L MARK” in alteration with
“ADD DESCALER AND INSERT TANK”.
➔ Remove the filter. Fill the water tank with fresh water up to the 0,5l mark and insert it again.
Warning: First, ll in the corresponding amount of water up to the 0,5 ml mark and then add the
descaler. Never vice versa! Observe the instructions of the manufacturer of the descaler.
28
•
Page 31

5. Cleaning and care
➔ Only now, add the descaler.
The display shows “START DESCALING’’ and “OPEN VENT’’ in alteration.
➔ Place a big enough container (at least 0,5 l) centrally underneath the milk frother (picture 1/P).
Information: Ensure that the tap of the spumatore is horizontal in the rinse setting.
➔ Turn the steam-hot water- rotary knob (picture 1/C) clockwise up to the stop.
The appliance starts the descaling process. The display shows “SYSTEM IS DESCALING’’. The
descaling is running automatically. The descaler solution is now running through the milk frother
inintervals.
If the descaling of the milk frother is finished, the display shows “CLOSE VENT’’.
➔ Place a big enough container (at least 0,5 l) centrally underneath the milk frother (picture 1/P).
➔ Turn the steam-hot water- rotary knob (picture 1/C) clockwise up to the stop.
The appliance starts the descaling process. The display shows “SYSTEM IS DESCALING’’. The
descaling is running automatically. The descaler solution is now running through internal system
inintervals.
The descaling is finished,if the display shows “EMPTY BOWLS”,
’’FILL WATER TANK” and ‘INSERT FILTER” in alteration.
➔ Remove the drip pan and the used coffee tray (picture 1/N and 1/O) and empty both of them.
➔ Insert drip pan and used coffee tray again.
➔ Remove the water tank. Rinse the water tank with clear water.
➔ If necessary, insert the filter into the water tank again.
➔ Fill the water tank with fresh water and insert it again.
➔ Place a big enough container (at least 0,5 l) centrally underneath the milk frother (picture 1/P).
The display shows “PLEASE RINSE’’ and “OPEN VENT’’ in alteration.
➔ Turn the steam-hot water- rotary knob (picture 1/C) clockwise up to the stop to start the rinsing
process.
The display shows “SYSTEM RINSING’’. The rinsing cycle starts and runs automatically. As soon as
the rinsing cycle for the milk frother is finished, the display shows “CLOSE VENT’’.
➔ Place a big enough container (at least 0,5 l) centrally underneath the milk frother (picture 1/P).
➔ Turn the steam-hot water- rotary knob (picture 1/C) clockwise up to the stop.
The display shows “SYSTEM RINSING’’. The rinsing cycle inside runs automatically.
Information: If the descaling process was interrupted, the display shows
’’EMPTY BOWLS” and “CHANGE WATER” in alteration.
➔ Empty the drip pan and the used coffee tray (picture 1/N and 1/O) and insert both again after
cleaning them.
➔ Fill the water tank with fresh water and insert it again.
➔ If necessary, insert the filter into the water tank again.
The appliance heats up and is then ready to operate again. The display shows the main menu.
Warning: Finally, please absolutely ensure to remove residue of the descaling uid on the case with
adamp cloth.
5.6. Regularly clean by hand
Information: Please follow these cleaning information. Because especially while handling food abso-
lute cleanliness is necessary.
Warning: Never submerge the appliance into water! Do not use any scouring agent for the cleaning.
•
29
Page 32

5. Cleaning and care
➔ Clean the interior and exterior of the case with a soft, damp cloth without cleaning agents only.
➔ Empty the drip pan (picture 1/N) and the used coffee tray (picture 1/O) when the display shows
itat the latest (only when the device is switched on, because the device only then recognises that
the bowls have been emptied).
Information: Occasionally, use some soap water for cleaning the drip pan (picture 1/N).
➔ The water tank should be rinsed with clear water daily and refilled with fresh, cool water.
Information: Dried milk residues are hard to remove.
➔ Therefore, clean the milk frother, tube and outlet regularly.
Information: From time to time (ideally prior to a longer break in preparation, but denitely regularly!)
the milk frother has to be dismantled completely into individual parts and cleaned under clear water.
➔ Pull the milk frother downwards (picture 10/11) and dismantle it into its individual parts (picture
1/R).
➔ Clean the individual parts (picture 1/R) thoroughly and assemble the milk frother again.
➔ Insert the assembled milk frother upwards onto the steam tube up to the stop (picture 10/11).
Information: Your appliance is tted with rear rolls (picture 1/Q) (only designs 670 and 680). These
enable the movement on even working surfaces. That, you can also clean underneath the appliance.
5.7. Cleaning of the brewing unit
Warning: Only remove the brewing unit when the appliance is turned off.
Warning: Clean the brewing unit after a carried out cleaning programme for example, but at least once
a month. Otherwise the guarantee claims may expire.
If required, the brewing unit should be taken out and cleaned under running water. Do not use
cleaning agents under any circumstances but only clear, clod water! For hygiene reasons we recommend
to take out the brewing unit i.e. after a carried out cleaning programme (see point 5.4.) and to clean
it thoroughly.
➔ Open the service door on the case on the right (picture 1/L) by slightly pulling the unlocking
device in the handle to you and slowly removing the service door of the appliance's case.
➔ Unlock the brewing unit by pressing the red switch upwards and to turn the handle to the left up
to the stop and click (picture 12).
➔ Then, carefully remove the brewing unit with the handle.
➔ Clean the brewing unit under cold water and leave to dry.
➔ Carefully insert the brewing unit again and lock it by holding the red switch down and by turning
the handle to the right up to the stop and click.
➔ Close the service door again, in doing so, guide the pins at the rear end of the service door into
the gaps. Then, shut the service door (picture 1/L) until it clicks.
5.8. Change lter
After the flow of approximately 50 l of water, the effect of the filter is exhausted. The display shows
“CHANGE FILTER’’.
You can still prepare beverages. However, we recommend to always change the filter immediately.
➔ Turn the rotary to “SETTINGS’’. Press the rotary.
➔ Turn the rotary to “FILTER’’. Press the rotary.
30
•
Page 33

5. Cleaning and care
➔ Turn the rotary to “INSERT FILTER? YES’’ so that the appliance recognises that the filter is
inserted.
➔ Empty the water tank (picture 1/F and 2) and carefully unscrew the old filter with the installation
aid at the back of the measuring spoon from the mounting in the water tank (picture 4).
➔ Dispose of the old filter in your household waste.
➔ Press the rotary.
The display shows “INSERT FILTER’’ or “FILTER INSERTED?’’ in case a filter has been inserted
already.
➔ Carefully screw the new filter with the installation aid at the back of the measuring spoon into
theappropriate mounting in the water tank (picture 4).
Warning: Do not overwind or bend lter.
➔ Fill the tank with fresh water and insert it back into the appliance.
The display shows “CHANGE FILTER’’/’’OPEN VENT’’ in alteration.
➔ Place a big enough container (at least 0,5 l) underneath the milk frother (picture 1/P) and turn
the steam- hot water- rotary knob (picture 1/C) clockwise up to the stop.
The filter is now being rinsed. The display shows “FILTER RINSING’’.
➔ Wait until no water is coming out of the milk frother after some time.
The display shows “CLOSE VENT’’.
➔ Turn the steam-hot water- rotary knob (picture 1/C) clockwise up to the stop.
The system is heating up. The appliance is now ready to operate. The display shows the main menu.
Warning: At low water usage, you must change the lter after two months at the latest. The, no notication appears on the display. With the rotary disk at the head of the lter, you can set the change
date (month display).
5.9. Maintenance status
You appliance shows you whether a cleaning or descaling process is imminent.
➔ Turn the rotary to “CARE’’. Press the rotary.
➔ Turn the rotary to “STATISTICS’’. Press the rotary.
At the bottom the display shows:
“CLEANING SYSTEM’’
“CLEANING MILK FROTHER’’
“DESCALE’’
“FILTER CHANGE’’
The respective progress bar shows you whether a cleaning or descaling process is imminent. The
further right the progress bar is, the closer is the necessary cleaning or descaling.
➔ Press the rotary to exit the “MAINTENANCE STATUS’’.
Warning: Please carry out the cleaning and descaling regularly but at latest when the display is
prompting you to do so. Otherwise the guarantee claims may expire.
•
31
Page 34

6. System notication
6. System notication
Notication Meaning Remedy
Fill system Fill water pipe system ➔ Press right rotary
Filter potentially faulty ➔ Remove filter or change
Fill with water Water tank is empty ➔ Fill water tank
Water tank is missing or
inserted incorrectly
➔ Insert water tank correctly
(see point 2.3.)
Refill beans Beans are missing ➔ Fill with beans
Beans in container are stuck
together
Information: The display “REFILL BEANS’’ only switches off after coffee is prepared again!
Empty bowls Drip pan and/or
used coffee tray are full
Bowls are missing Drip pan with used coffee
tray is missing or inserted
incorrectly
Cleaning is necessary Cleaning of the system is
necessary
Descaling is necessary Descaling of system is
necessary
Change filter Filter exhausted ➔ Change filter
Remove brewing unit Brewing unit inserted
incorrectly
(see point 2.3.)
➔ Stir beans in container with
a spoon
➔ Clean bean container with
a cloth
➔ Empty drip pan and/or
used coffee tray
➔ Insert drip pan with used
coffee tray
➔ Clean system
(see point 5.4.)
➔ Descale system
(see point 5.5.)
(see point 5.8.)
➔ Insert and lock brewing unit
correctly
(see point 5.7.)
32
•
Page 35

7. Solve problems by yourself
7. Solve problems by yourself
Fault Meaning Remedy
Hot water or
steam supply not possible
To little milk froth or liquid
froth
System might be calcified ➔ Please carry out high-dosage
Coffee is dripping only Grinding degree is too fine ➔ Set grinding degree coarser
Coffee has no froth Inappropriate coffee type ➔ Change type of coffee
Loud noise in grinder Grinding degree is not
Milk frother (picture 11) is
blocked
System might be calcified ➔ Please carry out high-dosage
Inappropriate milk ➔ Use cold milk
Milk frother (picture 11) is
blocked
Powder coffee is too fine ➔ Use coarser coffee powder
System might be calcified ➔ Please carry out high-dosage
Beans are not freshly roasted
anymore
matched with
coffee beans
Foreign objects in the grinder
i.e. stones
➔ Please, clean milk frother
thoroughly and dismantle
completely (picture 1/R
and11)
descaling (point 5.5.)
➔ Please, clean milk frother
thoroughly and dismantle
completely (picture 1/R
and11)
descaling (point 5.5.)
(point 4.6.)
descaling (point 5.5.)
➔ Use fresh beans
➔ Optimise grinding degree
➔ Ring service hotline, powder
coffee can still be prepared
Display shows Fault 8
Service-Tel
If you cannot solve a fault or a failure or a error message by yourself, it is crucial that you ring our service
hotline: 0911-25266390.
If the system notices faults, the display shows the error message.
Warning: Note down the error message. Switch off the device and unplug it. Then, ring 0911-25266390
and name your design, serial number (see type label picture 1/S) and the error number. Our customer
service will discuss further steps with you.
Ring service phone ➔ Switch of machine and turn
in on again. In case the error
message occurs again, ring
the service hotline under
0911-25266390.
•
33
Page 36

8. Spare parts/Accessories / 9. Customer service, guarantee, environment protection
8. Spare parts/Accessories
Fresh water lter NIRF 700:
You can buy new fresh water filters at a well organised retailer or at our central customer service.
Cleaning tablets NIRT 701:
You can buy new cleaning tablets at a well organised retailer or at our central customer service.
Descaler NIRK 703:
You can buy descaler at a well organised retailer or at our central customer service.
Special cleaning agent for milk residue NICC 705:
You can buy special cleaning agents for your milk froth equipment at a well organised retailer or at
our central customer service.
Milk Cooler NICT 500:
The high quality stainless steel milk cooler keeps the milk cold for a long period and thus, ensures
the best milk froth results.
Milk container NIMC 1000:
The milk container made from transparent plastic shows the milk level at one glance.
Milk tube NIMA 330:
Three spare tubes for all NIVONA designs with OneTouch spumatore.
NIVONA Cooler NICO 100:
Mini refrigerator with own power supply. Cools one litre of commercially packed milk.
9. Customer service, guarantee, environment protection
Customer service
Only the highest quality standards apply for NIVONA products. If there are still questions to the
useof your appliance, please write to us. Only with your help, are we able to develop and improve
products so that they fully meet your needs.
Evaporate the appliance
If you have to send your device in case of a fault, please let it evaporate first as follows so that no
residual water remains in the system:
➔ Turn the appliance on with the main switch (picture 1/H).
➔ First, follow the instructions on the display.
➔ Turn the rotary in the main menu to “Care’’. Press the rotary.
➔ Turn the rotary to “EVAPORATE SYSTEM’’. Press the rotary.
The display shows “REMOVE WATER TANK’’ and “REMOVE BOWLS’’ in alteration.
➔ Remove the water tank (picture 2).
➔ Empty the drip pan and the used coffee tray (picture 1/N and 1/O) and insert both again after
cleaning them.
The display shows “TUBE ON MILK FROTHER AND IN DRIP PAN’’.
➔ Connect the tube to the milk frother with one end of the tube (picture 10).
➔ Put the other end of the tube in the drip pan at the right rear (picture 7).
➔ Place a big enough container (at least 0,5 l) centrally underneath the milk frother (picture 1/E).
The display shows “OPEN VENT’’.
➔ Turn the steam-hot water- rotary knob (picture 1/C) clockwise up to the stop.
34
•
Page 37

9. Customer service, Guarantee, Environment protection / 10. Technische Daten
The display shows “EVAPORATING DO NOT REMOVE TUBE’’.
The appliance is now evaporating.
The display shows “CLOSE VENT’’.
➔ Turn the steam-hot water - rotary knob (picture 1/C) anticlockwise up to the stop.
Now, your appliance switches off and is ready for shipping.
Information: Please carefully pack the appliance for shipping, mostly suited in its original packaging.
We are not liable for any damages during transportation.
Guarantee and customer service conditions
Please read the detailed guarantee and customer service conditions on the enclosed information
sheet.
Please dispose of lter cartridges in your household waste.
Disposal of device and packaging
Please keep the packaging of your appliance. It serves for the protection during transport in case of
acustomer service case.
Electric and electronic devices often contain valuable and environmentally incompatible materials
and should therefore not be treated at normal household waste. They can damage the human health
and the environment in the residual waste or when treated improperly. Therefore, never put your
possibly faulty appliance in the household waster but take it to your local tip.
You can get further information from your local town hall, waste disposer or your retailer of whom
youhave bought this appliance.
10. Technische Daten
Voltage 220 - 240V AC, 50/60 Hz
Output 1455 W
Standby: Auto-OFF function is deactivated and
BT-Module in transmission/reception mode: 1,7W
Conformity mark: CE
Pump pressure, statistically, max.: 15 bar
Capacity water tank: approx. 2,2 litre
Capacity beans container: approx. 250g
Capacity Coffee grounds container: max. 11 portions
Length of cable: approx. 1,1 metre
Weight: approx. 9 kg
Measurements (WxHxD): 39,5x29,6x53,6 cm
NIVONA Apparate GmbH
Südwestpark 90
D-90449 Nürnberg
www.nivona.com
© 2017 by NIVONA
•
35
 Loading...