

Page 1

USER MANUAL
Page 2

Page 3

CONTENTS
General Notice
Precautions
Safety Notice
Download APP and Register
Rapid Installation
Parts Info
Operation Guide
Battery Use and Maintenance
DOs and DON'Ts while Riding
Maintenance and Repair
Troubleshooting List
Technical Parameters
Maintenance Record
·····································2
········································3
·················· ·····················4
········· · · · ············6
······· ·················· · ····· ····8
······ ························· · ····· ····10
· ·············· · ··· · ··· · ··········15
· · ············ ·······22
· · ···················28
··· · ········· ·············30
············ ······· ······· ···· · 34
·····························41
············· · ················46
Page 4

2
General Notice
Please read this User Manual carefully for proper operation before riding the scooter.
For your safety, please check whether the parts are in good condition according to this User
Manual before riding. Contact your dealer in time in case of any problems.
Please follow the traffic laws. Slow down on slippery roads in bad weather to allow greater
braking distance for your safety.
Please pay attention to deep water. It may cause rusting or failure of the motor, battery or
other parts if water level reaches wheel axle.
Do not dismantle the scooter on your own. Please contact your dealer for replacement or
purchase of original parts.
Do not lend your M1 to those who can’t operate a scooter for others' safety and preventing
unnecessary damage to your scooter.
Please keep this User Manual properly.
Page 5
Precautions
Rider and Passenger
M1 is not designed for a ride of more than 2 persons.
Riding Conditions
M1 is not designed for off-road use.
This User Manual should be deemed as a permanent document of M1. If this scooter is
transferred to others, this User Manual should also be handed over to the new owner.
Reproduction or reprint of any part of this User Manual is strictly prohibited.
Warning: Failure to follow the instructions herein may lead to serious casualties.
3
Attention: Failure to follow the instructions herein may lead to personal injury or scooter
damage.
Page 6

Safety Notice
Using a safety helmet and protective goggles is strongly advised.
You are advised to take proper training or exercise before using on open roads.
Please follow the Operation Guide (P.15) to fully understand how to properly operate the
scooter.
It should be noted that the braking distance in bad weather will be much longer. Please
avoid braking on paint markers, manhole covers and oil stains to prevent slipping. Pay extra
attention when riding through railway crossings, junctions, tunnels, and bridges. Slow down
if road conditions are unclear.
4
Page 7

Do not use high beam indiscriminately. Continuous use of high beam may disturb the vision
of the drivers and pedestrians.
Do not use mobile phones or other electronic devices which may draw your attention while
riding.
Do not change the lane without signaling. Changing the lane at will is one of the major
causes for accidents. When you need to change the lane, remember to switch on the Turn
Signal Indicator first. Always check the vehicles approaching from behind before changing
the lane.
5
Page 8
Download APP and Register
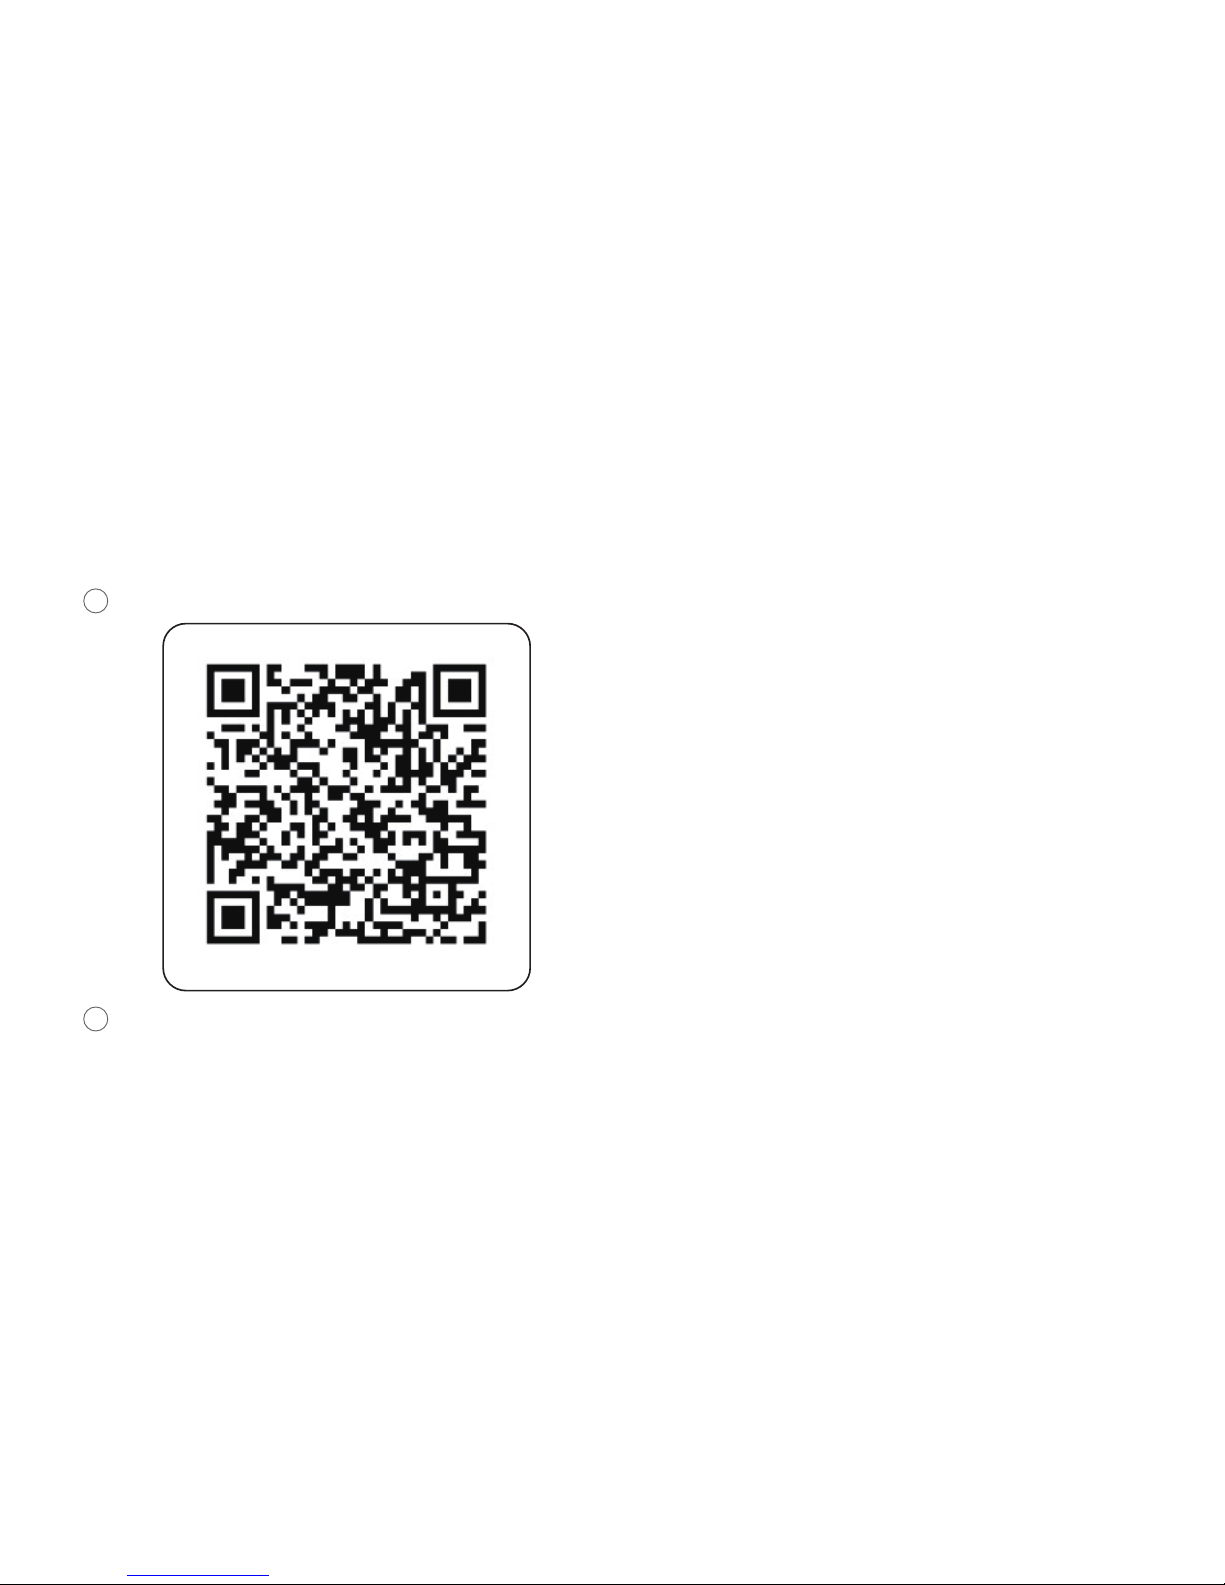
Scan the QR code below to download the APP titled NIU Scooter.
Run Setup after downloading and register.
1
2
6
Page 9

Attach the
SN Code here
Note:
The mobile phone system is required
to be at least Android 4.0 or iOS 8.
Make sure that the mobile phone has
been connected to the Internet when
running NIU app (Wi-Fi/2G/3G/4G).
Scan the QR code below for scooter binding after registration.
3
7
Page 10
Rapid Installation
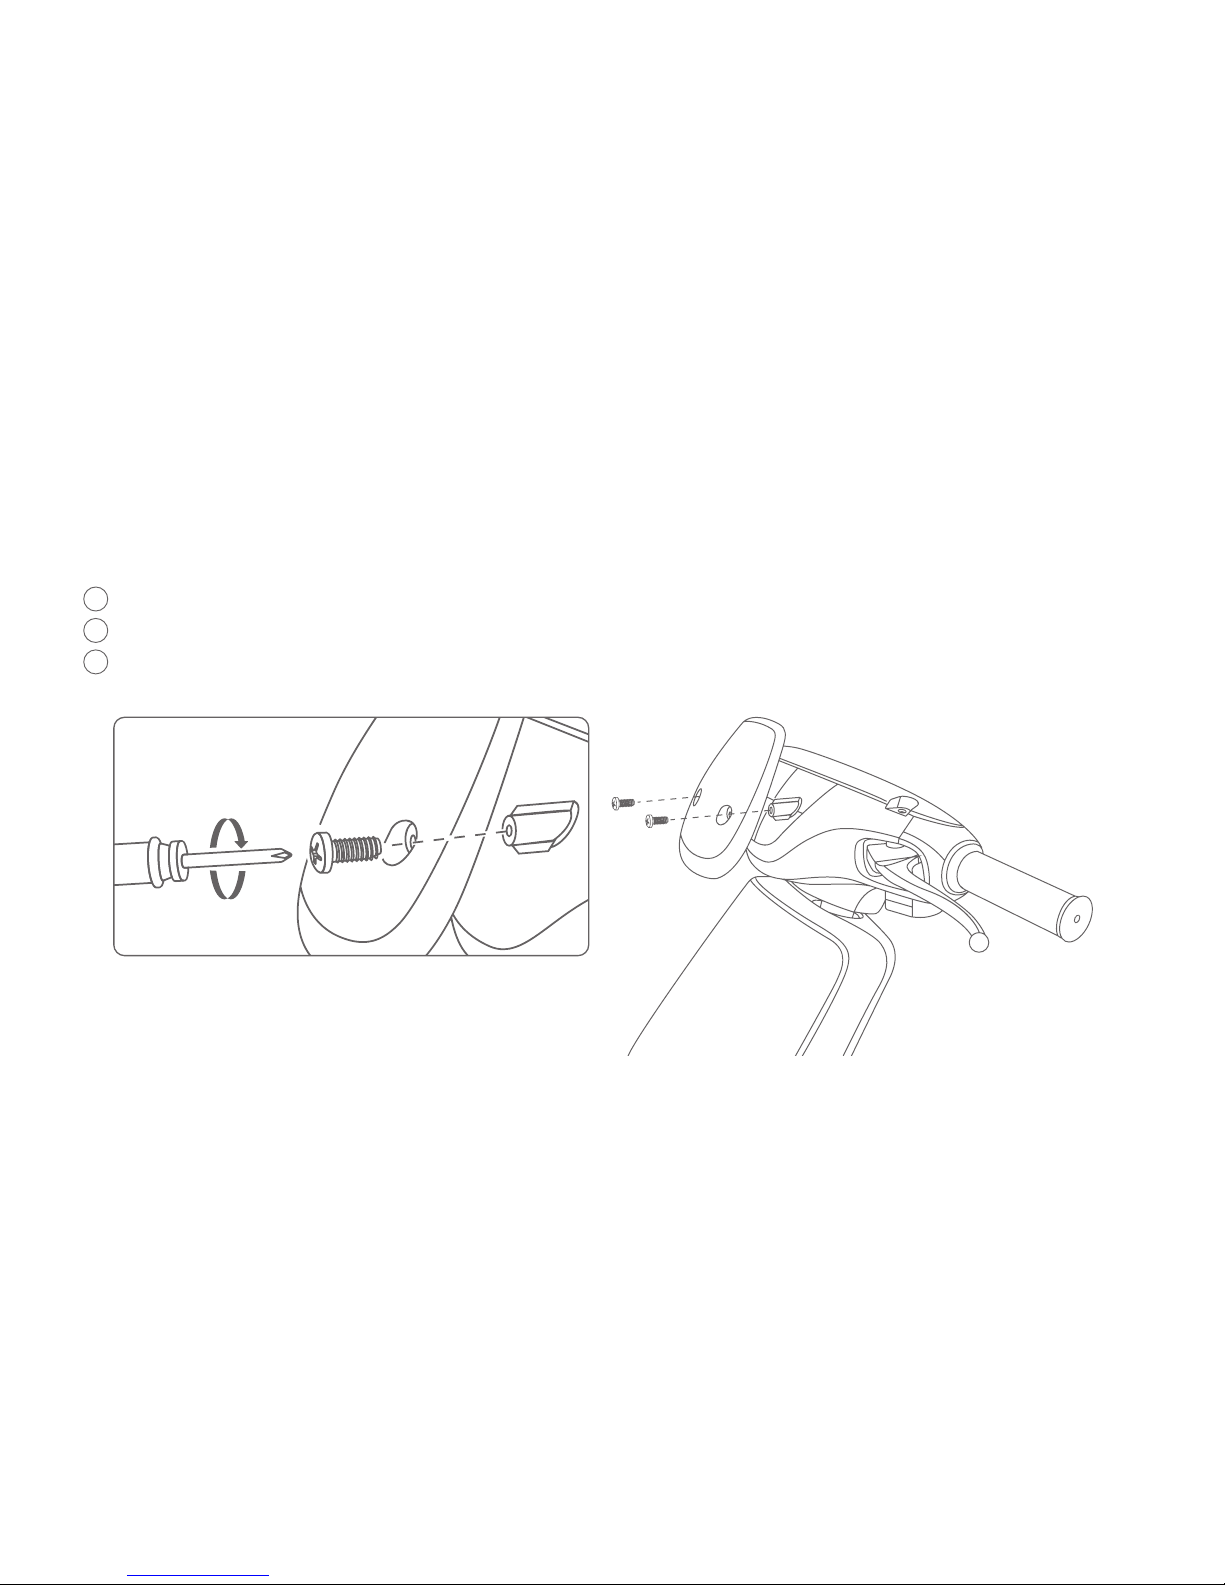
Open the Accessories Box to take the tools
Align the windshield rubber part with the windshield holes and then install it.
Tighten the two screws with a screwdriver to secure the windshield.
1
2
3
8
Page 11
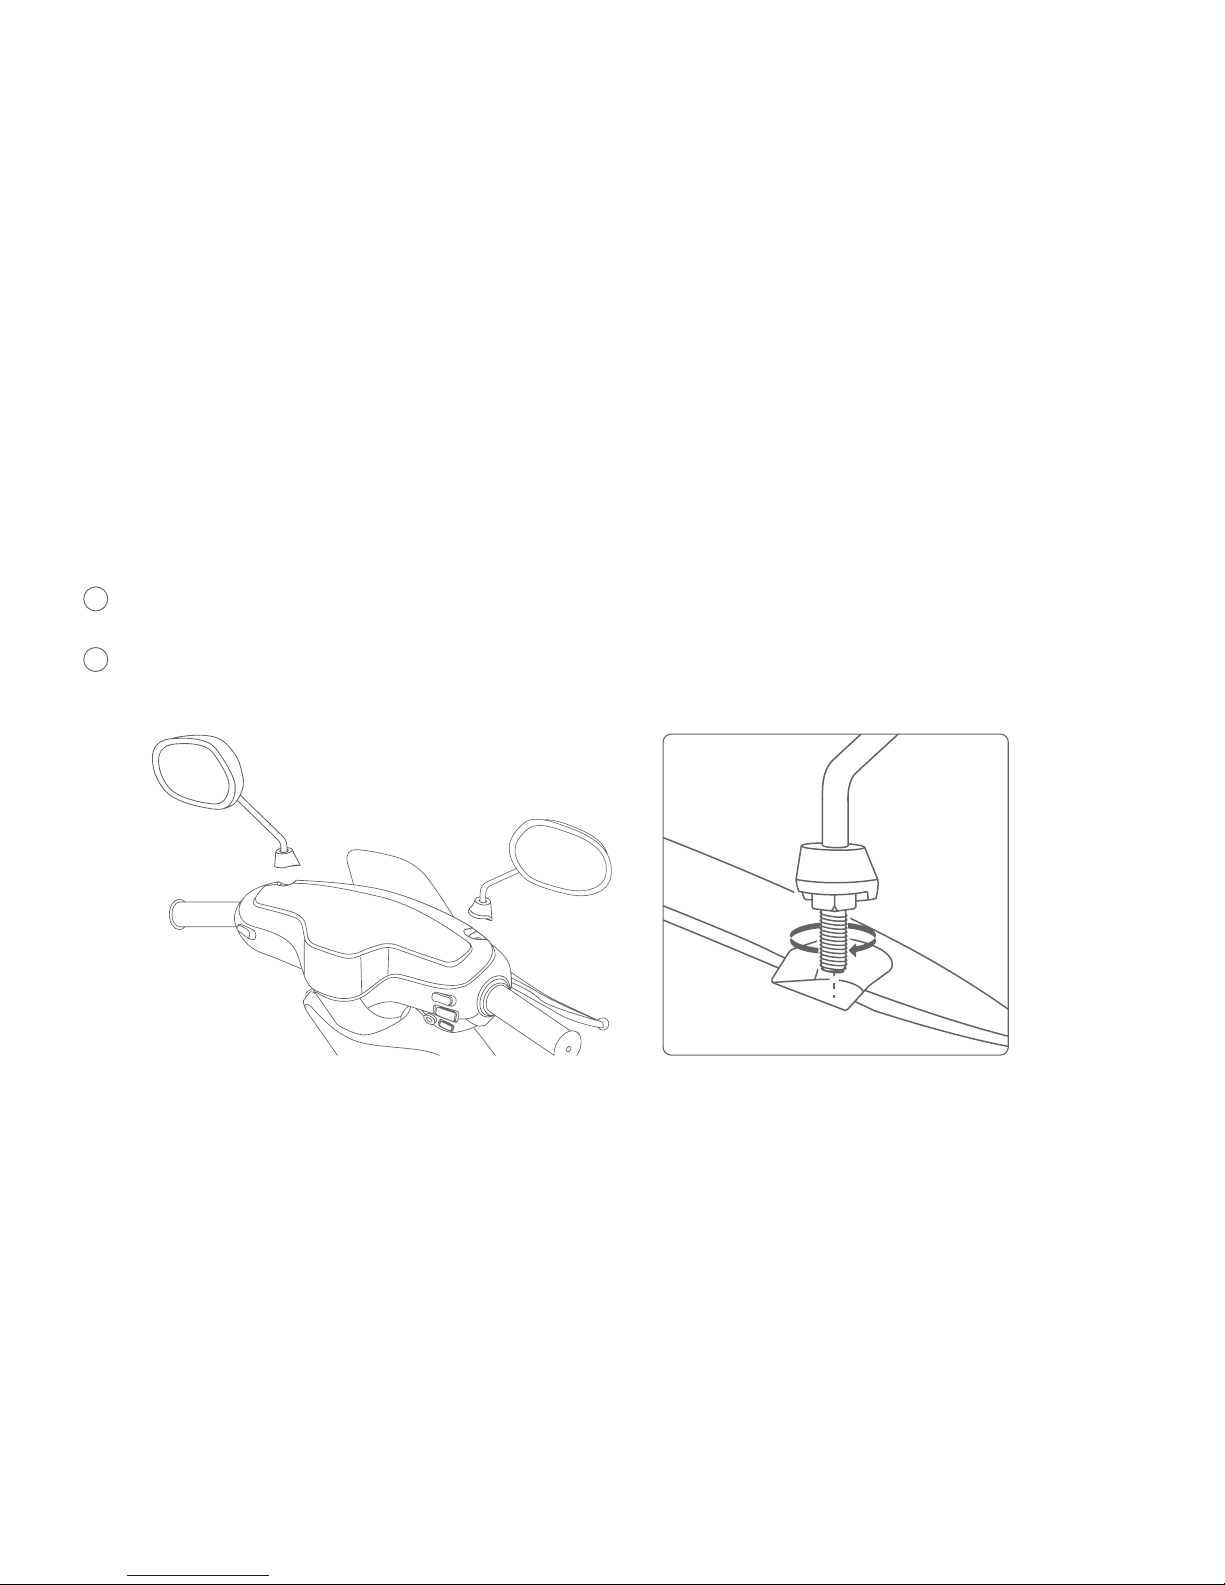
Install the rearview mirrors into the mounting holes on dashboard and turn it
clockwise. The bolt shall be screwed in for more than 15mm.
Adjust the rearview mirror to an appropriate position and then tighten nuts on the
rearview mirror with a spanner. Properly set the dust cover.
4
5
9
Page 12
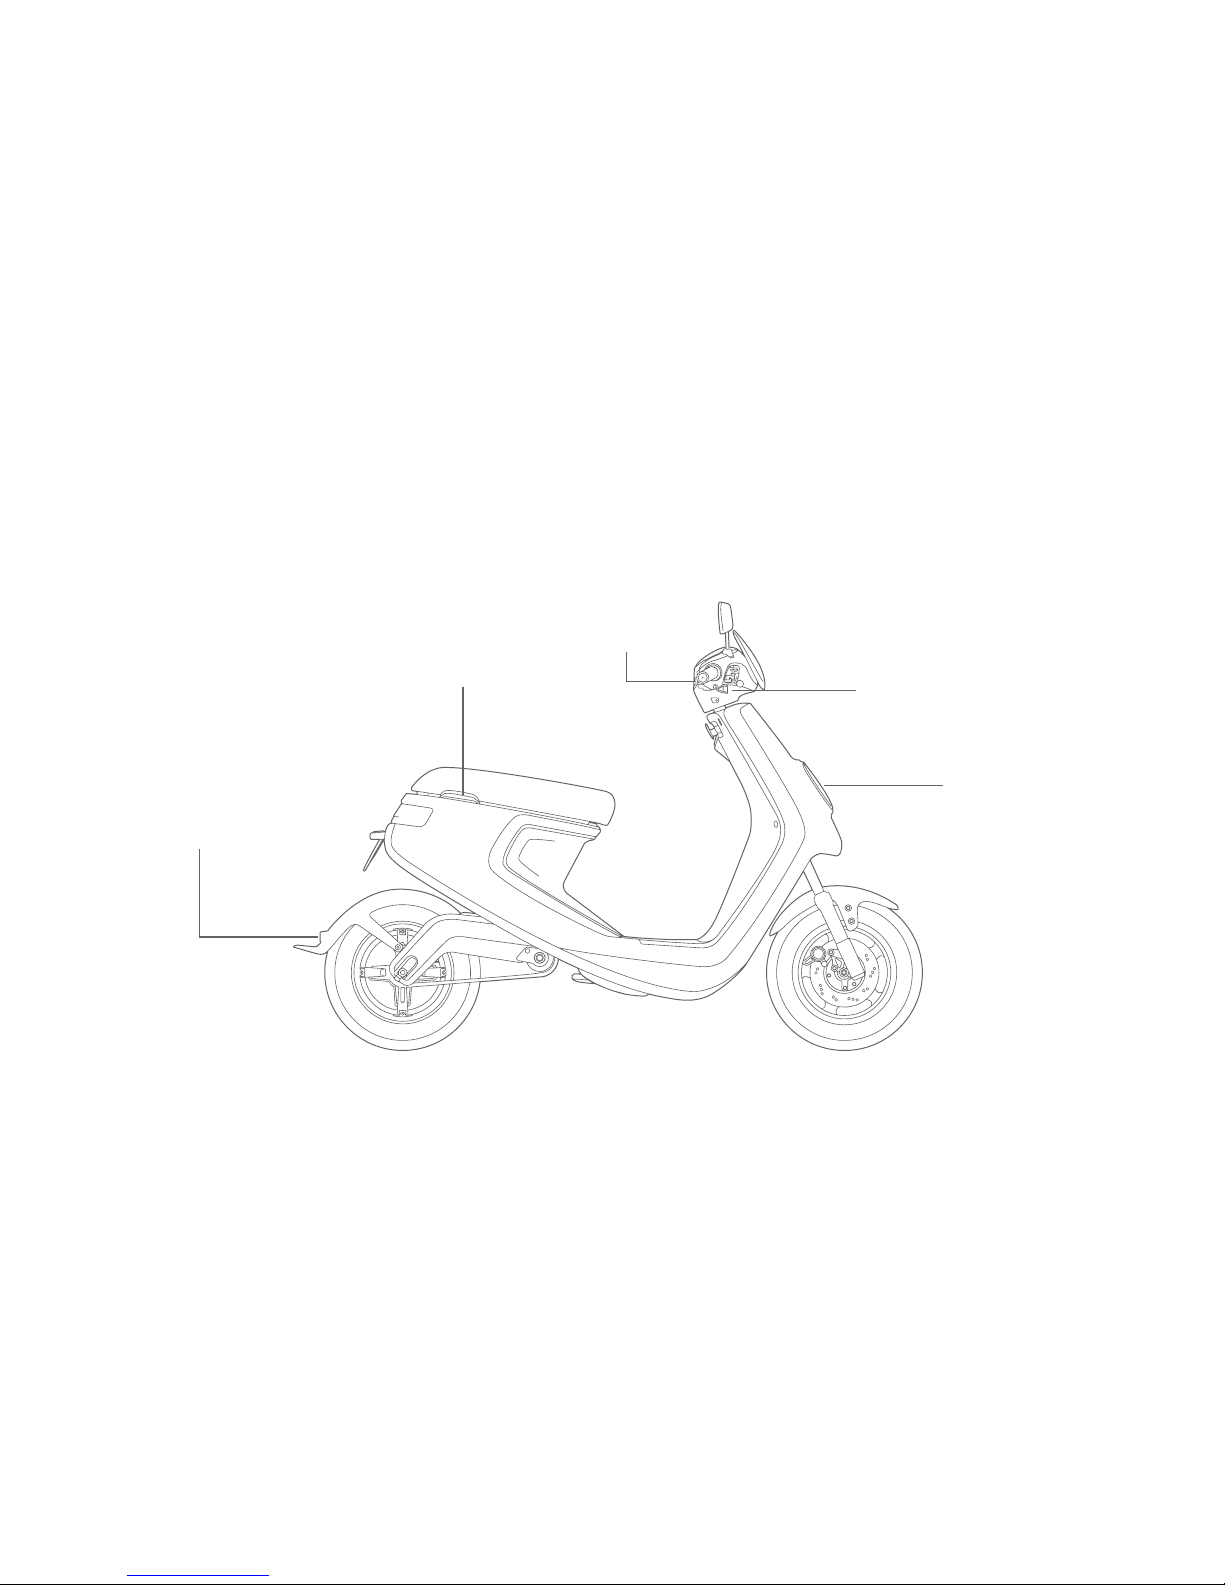
Parts Info
Handrail
Reflector
Headlight
Right
Combination
Switch
Turn Signal
Indicator
10
Page 13
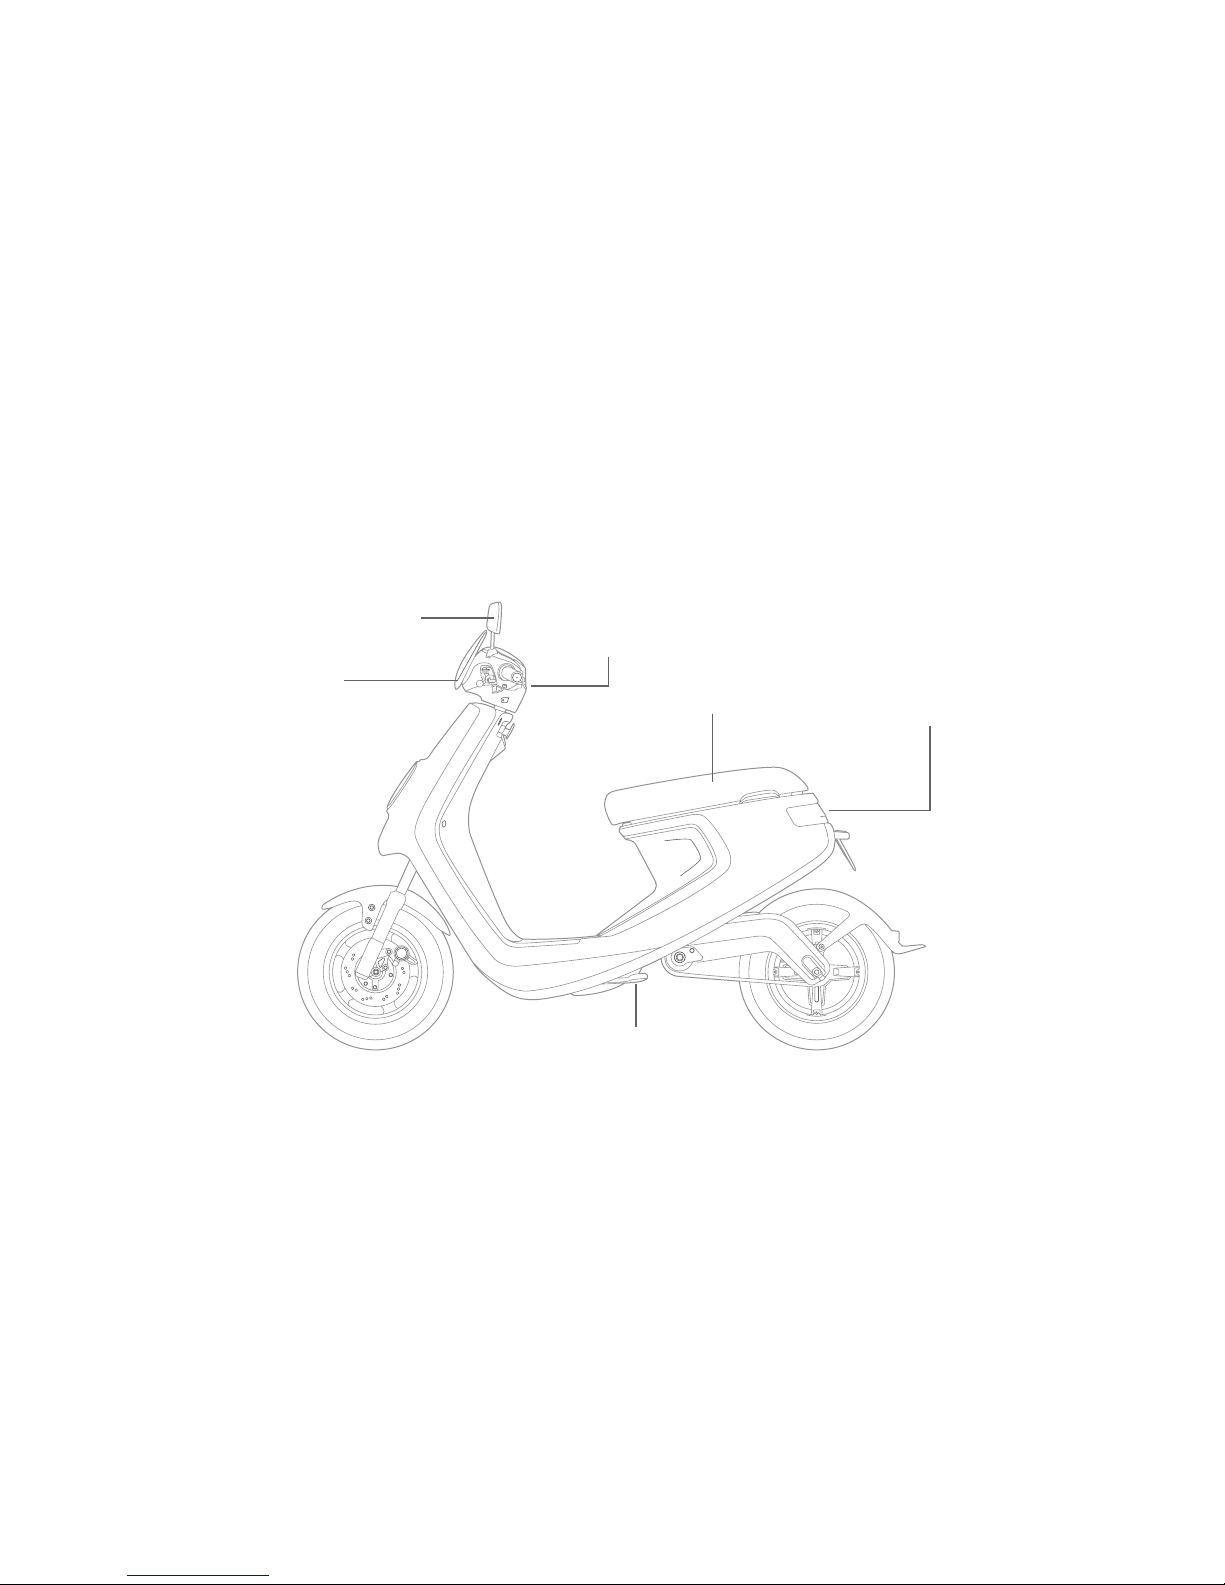
Parts Info
Windshield
Taillight
Rearview
Mirror
Left
Combination
Switch
Side
Stand
Saddle
11
Page 14
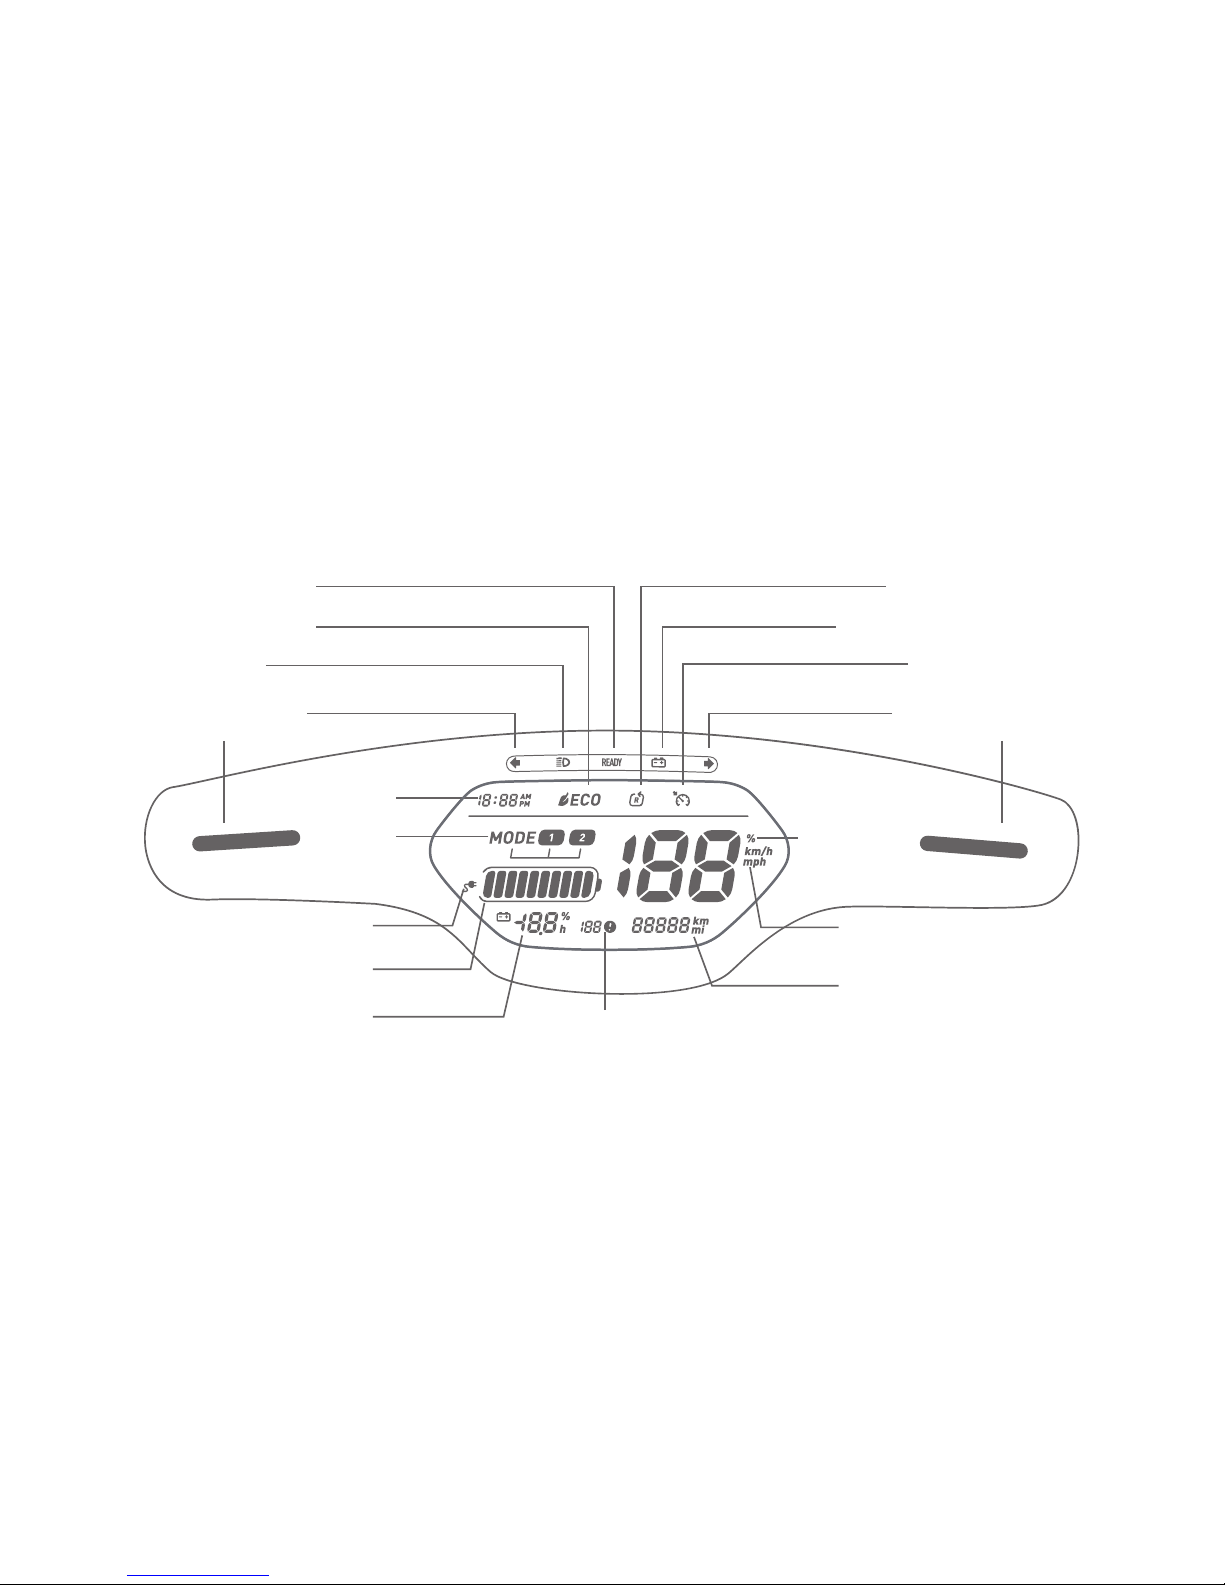
Ready Indicator
Economic Mode
Energy Recycling
Cruising Mode
Battery Bar
Fault Code
Speed
Distance Travelled
Battery Percentage &
Remaining Charging Time
Charging
Percentage
High Beam
Low Battery Indicator
Left Turn
Signal Indicator
Time
Charging
Riding
Mode
Right Turn
Signal Indicator
Dashboard Display Info
12
Page 15
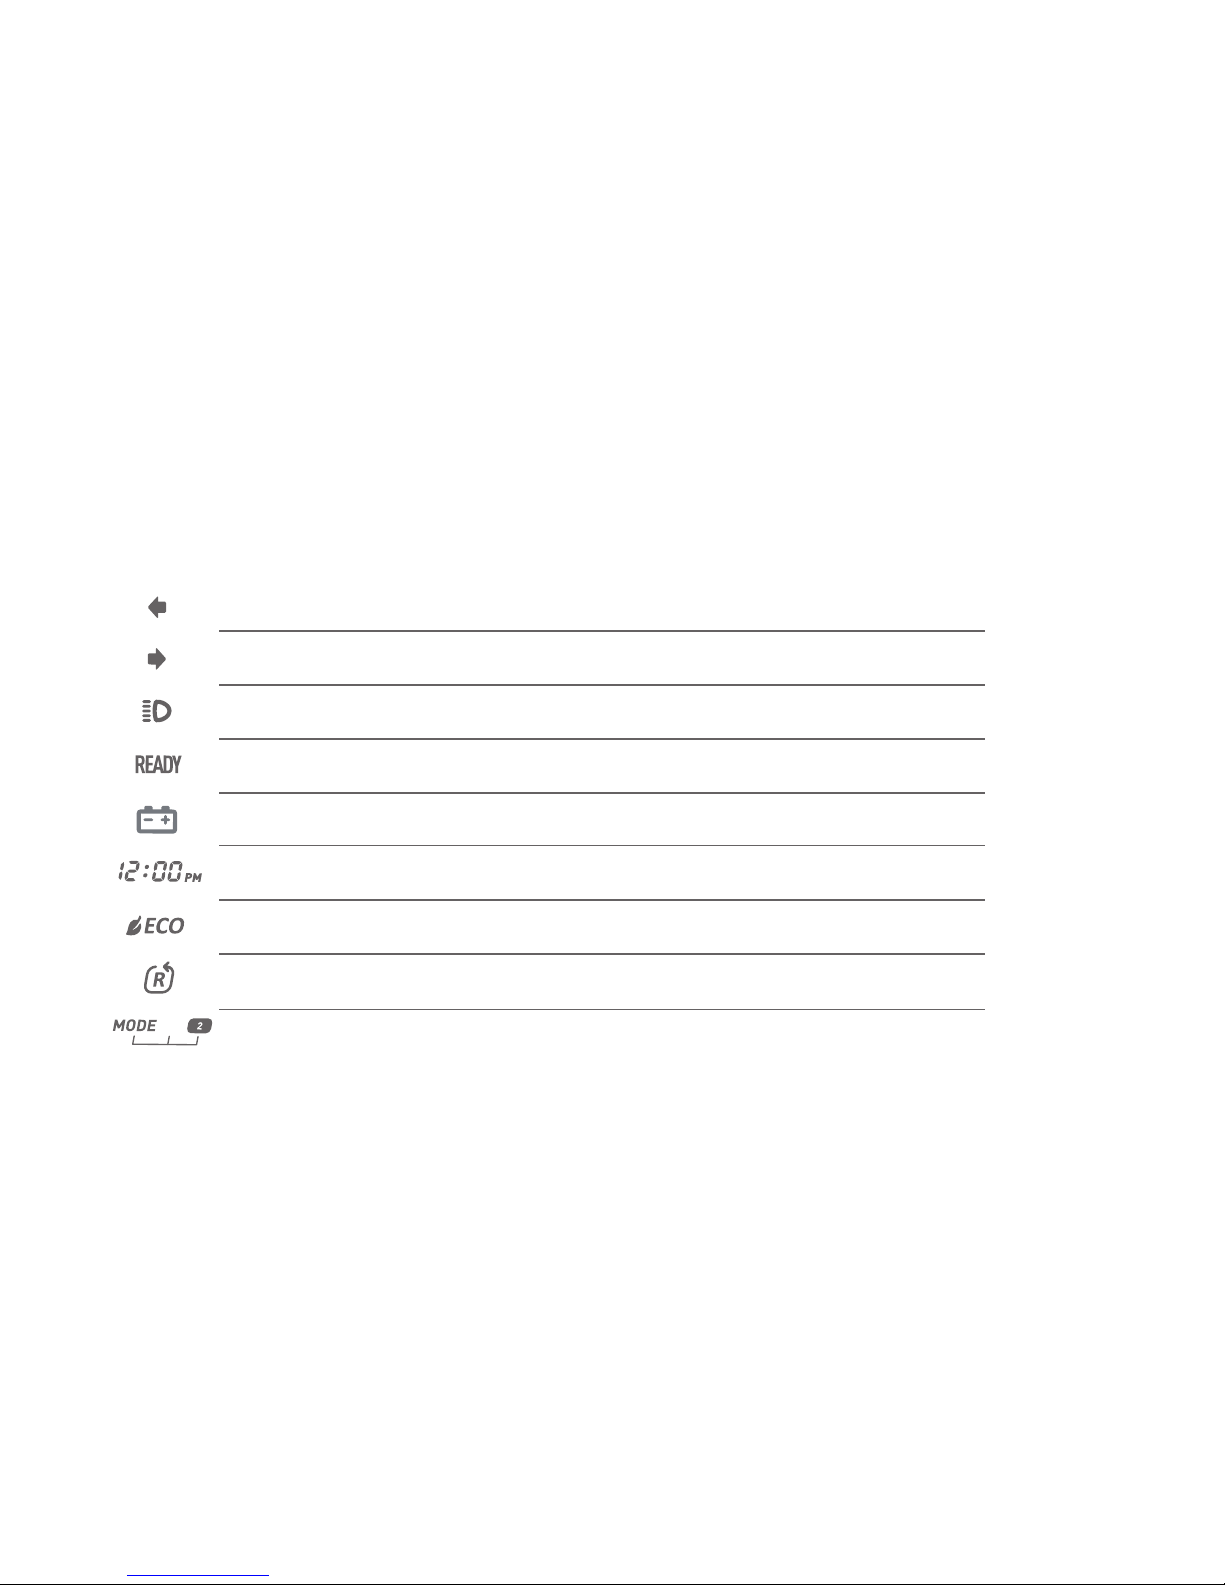
Left Turn Signal Indicator
Right Turn Signal Indicator
High Beam
Ready Indicator
Low Battery Indicator
Time
Economic Mode
Energy Recycling Status
Riding Mode
Dashboard Display Info
The Left Turn Signal Indicator is on.
The Right Turn Signal Indicator is on.
The High Beam is on.
In riding Mode.
Battery level less than 20%.
Now is 12:00 pm.
Ideal energy consumption status.
Energy is being recycled from braking.
Mode 2 is selected.
13
Page 16
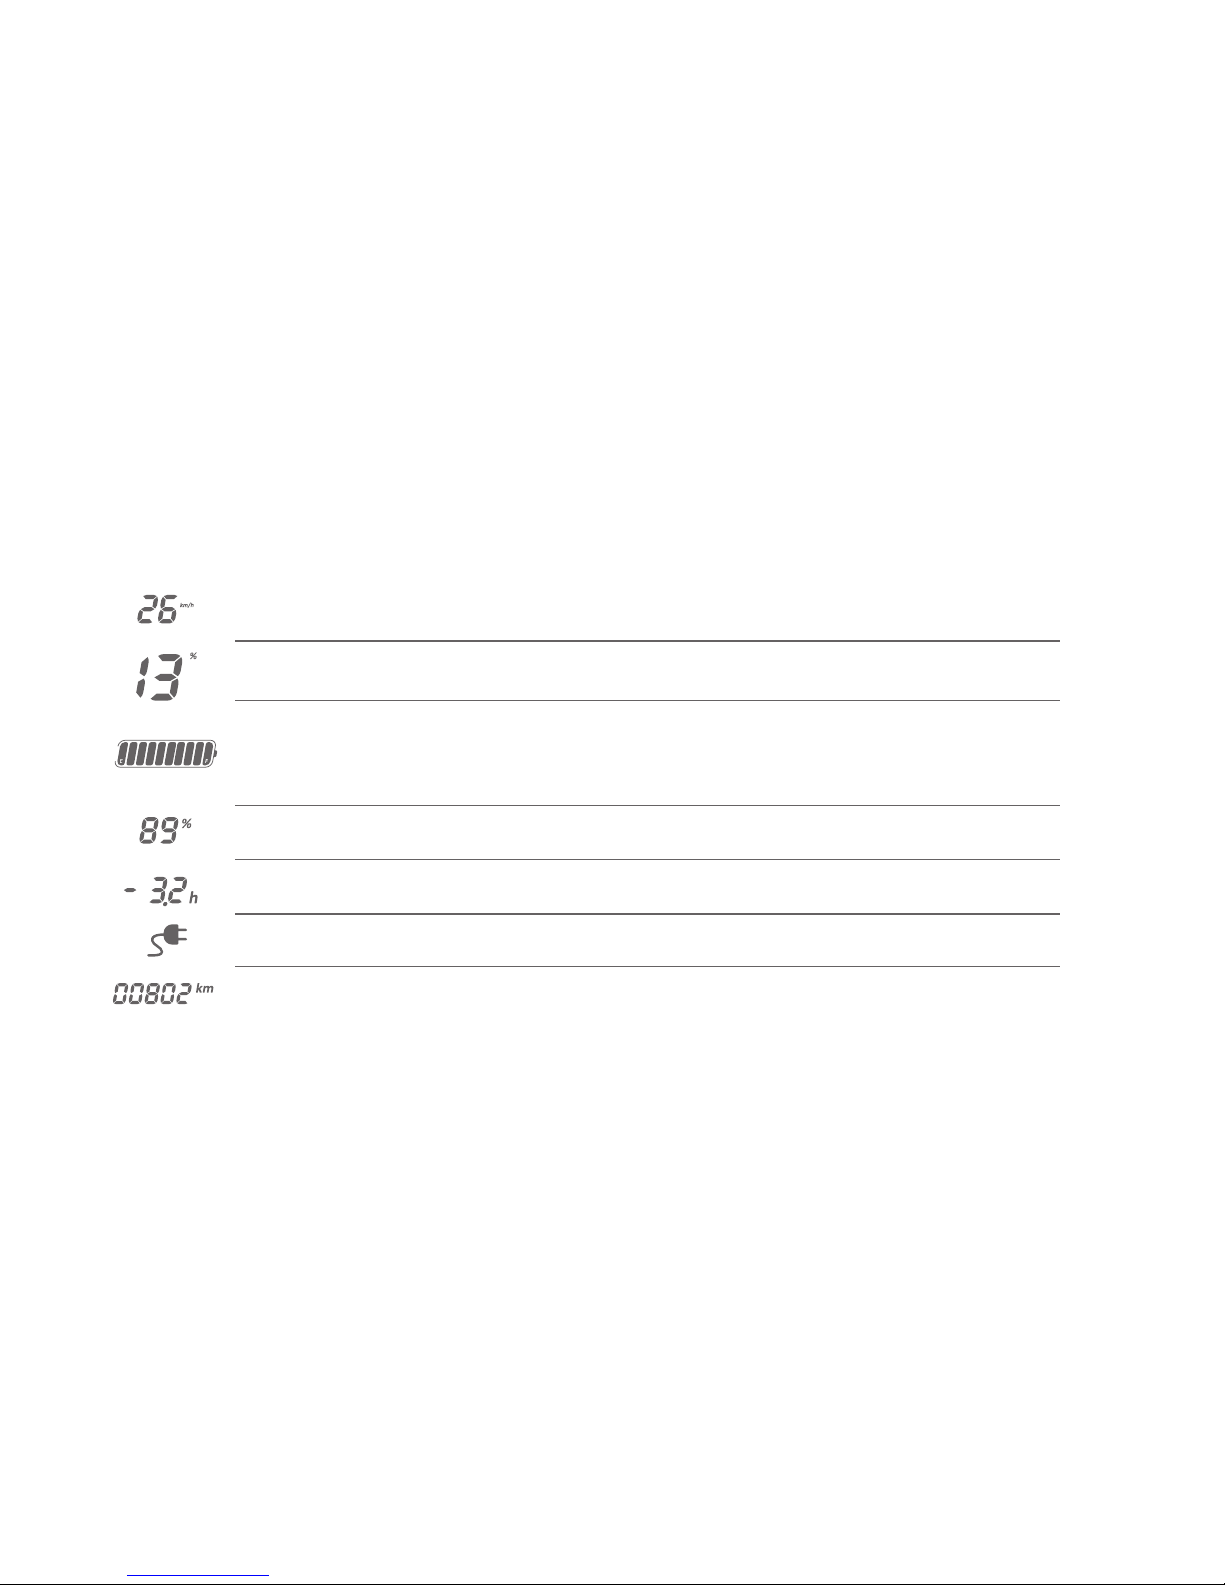
Dashboard Display Info
Speed
Charging Percentage (Large)
Battery Bar
Battery Percentage (Small)
Remaining Charging Time
Charging
Distance Travelled
Current speed is 26km/h.
Current battery charging progress is 13%.
Current battery level.
E: Low battery (less than 10%)
F: Full battery (more than 90%)
Battery level in percentage is 89%.
The remaining charging time is 3.2 hours.
The battery is being charged.
Distance Travelled is 802km.
14
Page 17
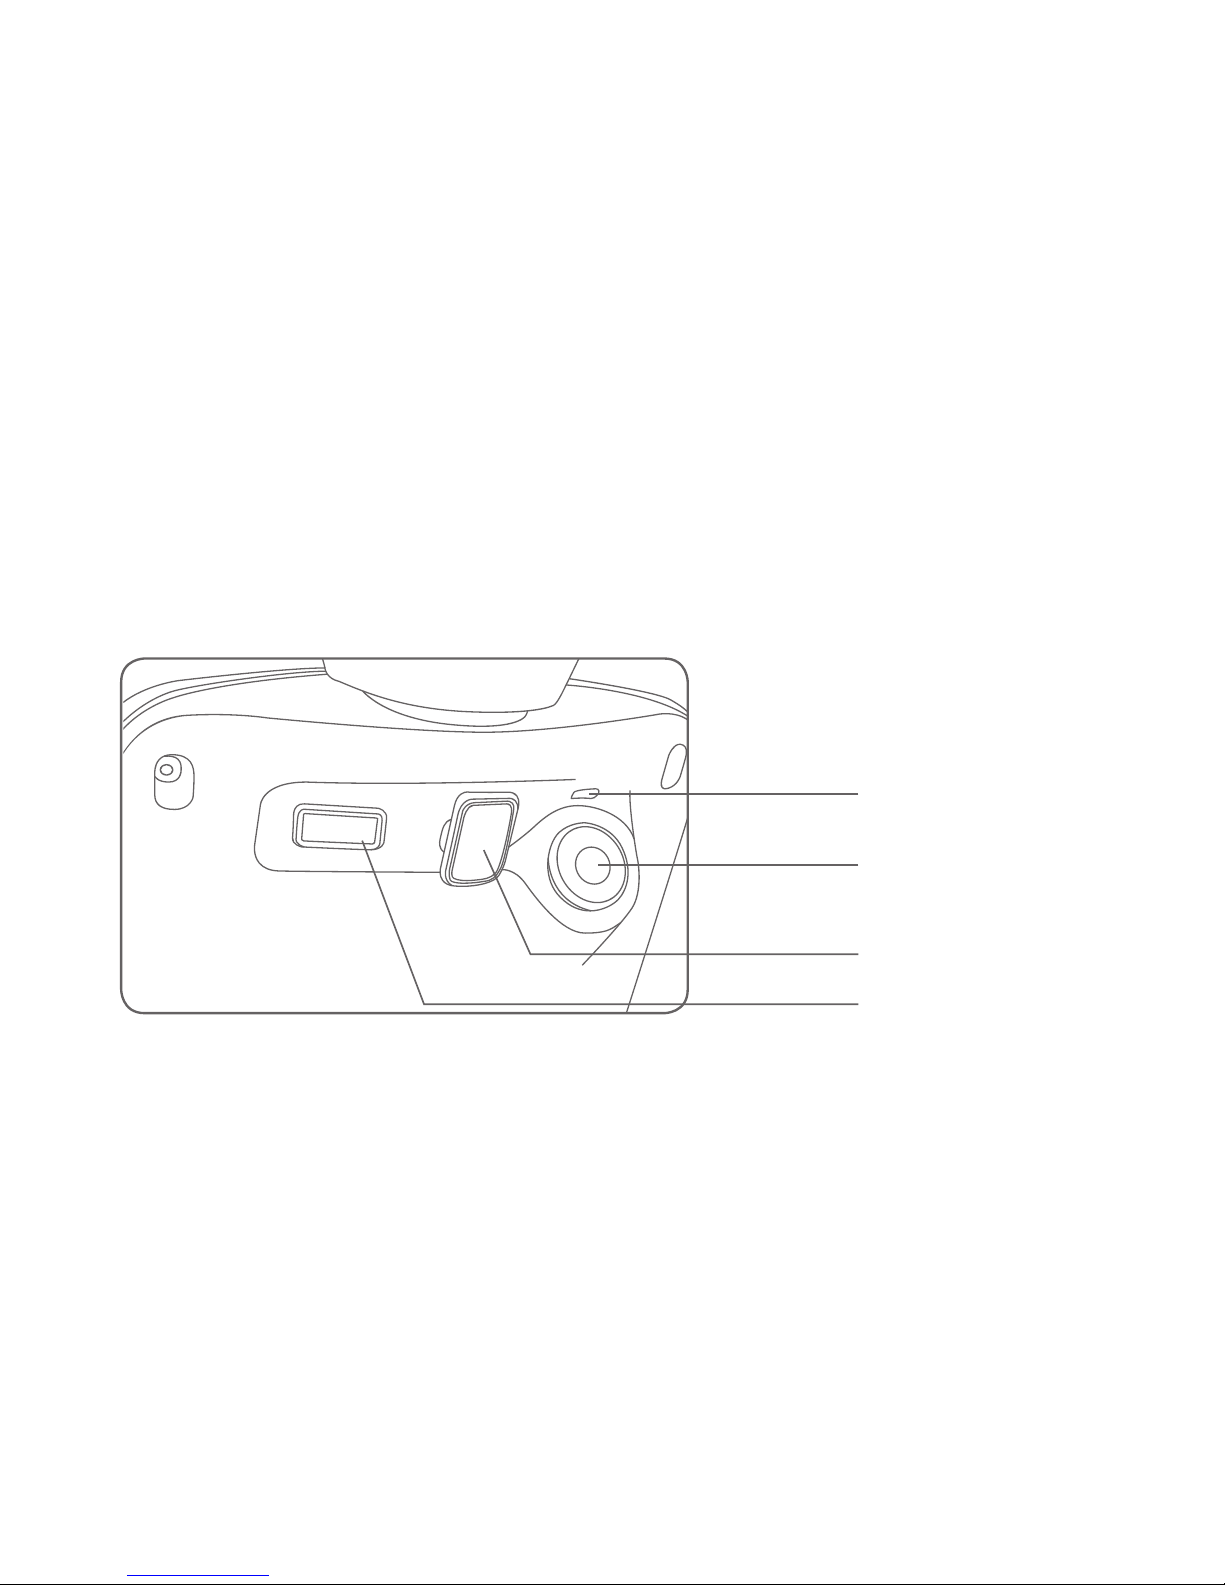
Operation Guide
USB Port
Keyhole Light
Hook
Keyhole
15
Page 18
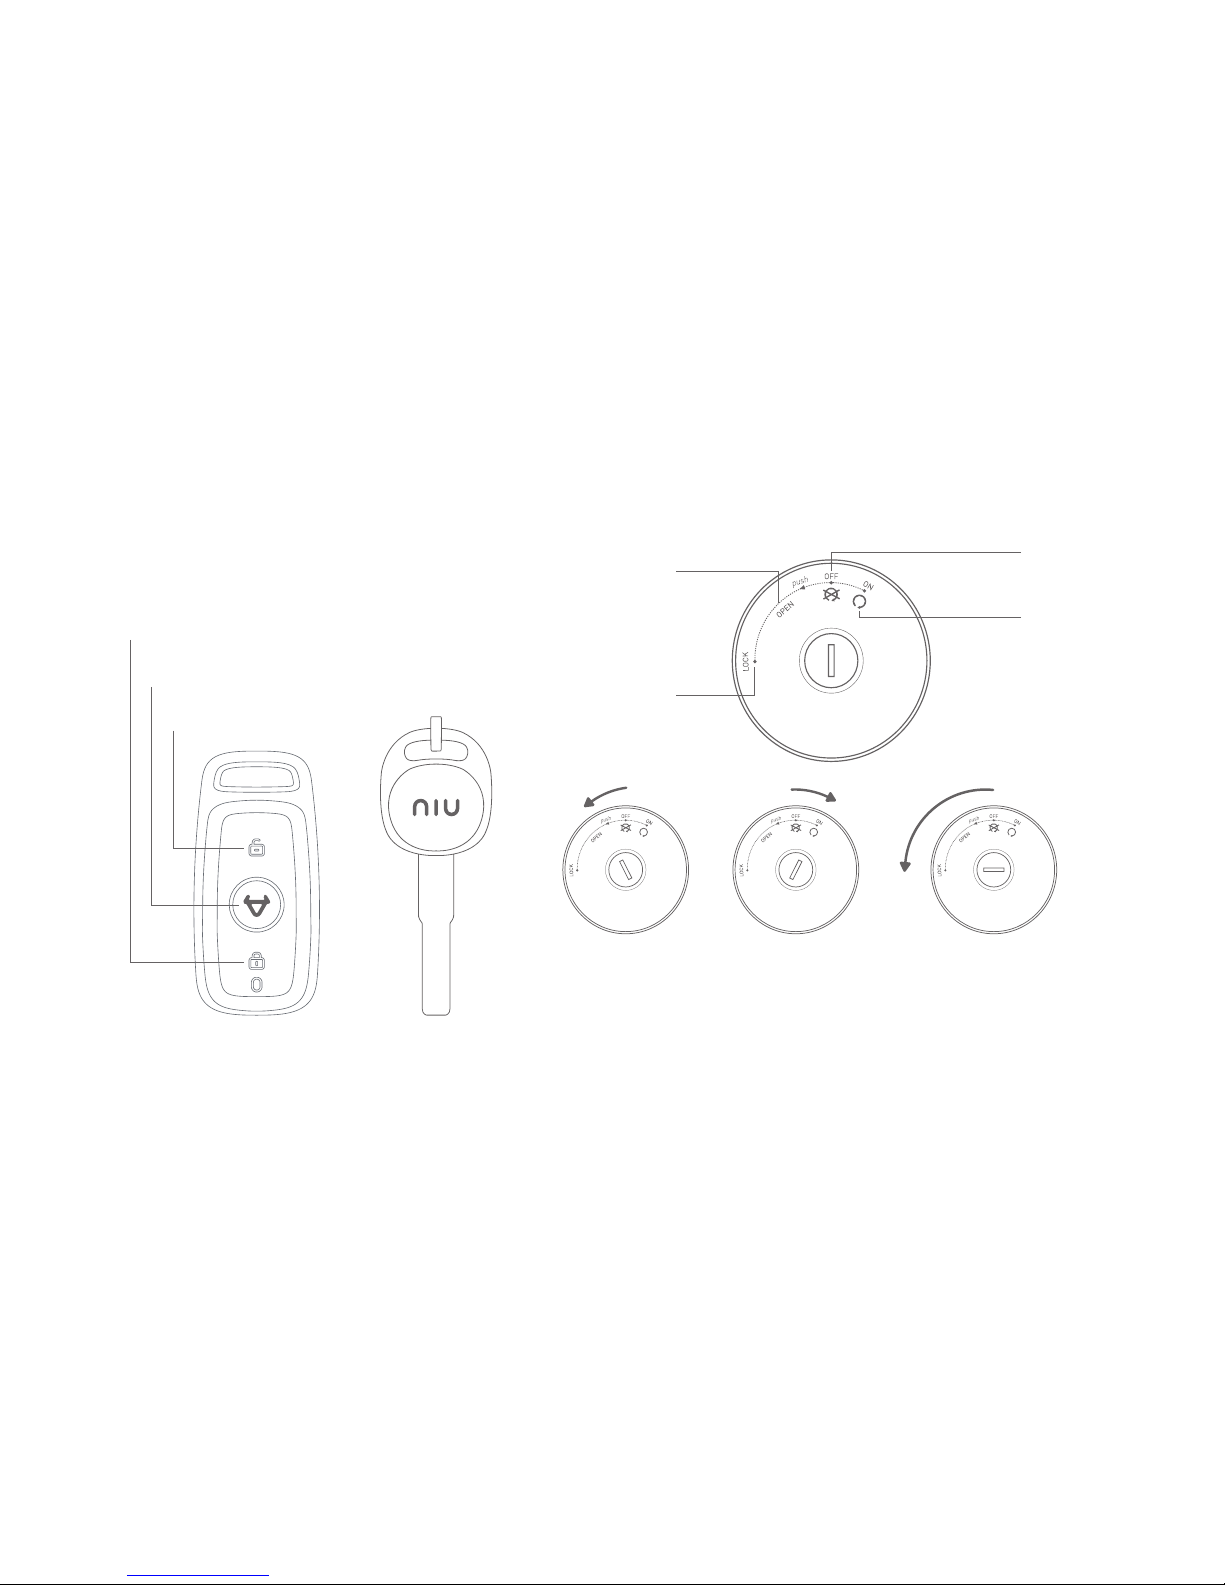
Off
On
Open Saddle Turn on
the Scooter
Push the key in
and turn to LOCK
position to lock the
Steering Handlebar
Open
Saddle
Lock
Steering
Handlebar
Operation Guide
Locating Button
Unlock Button
Lock Button
Remote Controller Key
16
Page 19

Operation Guide
Start the Scooter
Press the Unlock button of the remote controller. After the Turn Signal Indicators flash
twice, the scooter is unlocked. Insert the key into the Keyhole and turn to
. Press and
hold the Start Button for 2 seconds,
on Dashboard will light on. You are ready to go.
Locking the scooter
Turn the key to
to turn off the scooter. Turn the steering handlebar to the left, then
push the key inward and turn to LOCK to lock Steering Handlebar. Press the Lock Button
on the Remote Controller within an effective distance to turn on the Alarm. The Turn Signal
Indicators will stay on for 2 seconds after the scooter is properly locked.
Locating
Press the Locating Button and the Turn Signal Indicators will flash for 10 seconds. If no
further operation during this period, the Alarm will be on for 10 seconds. The Alarm can be
cancelled by pressing the Unlock or Lock Button.
17
Page 20
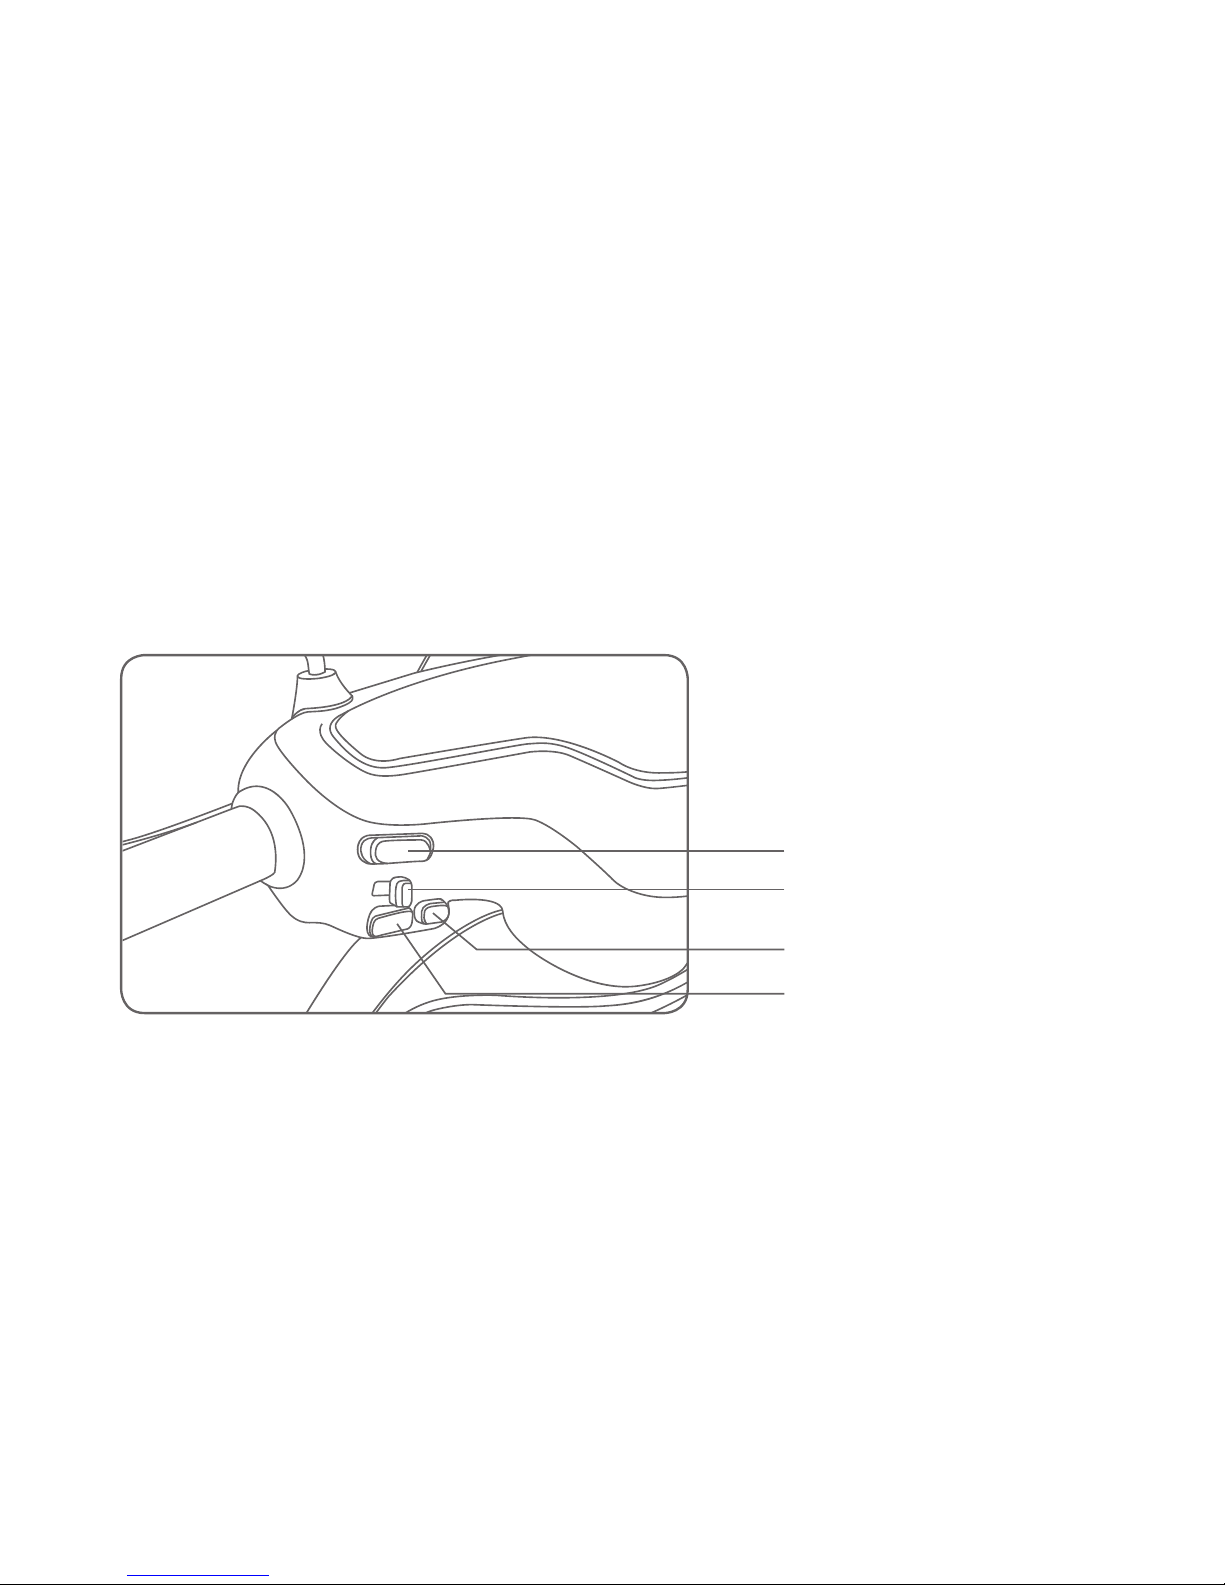
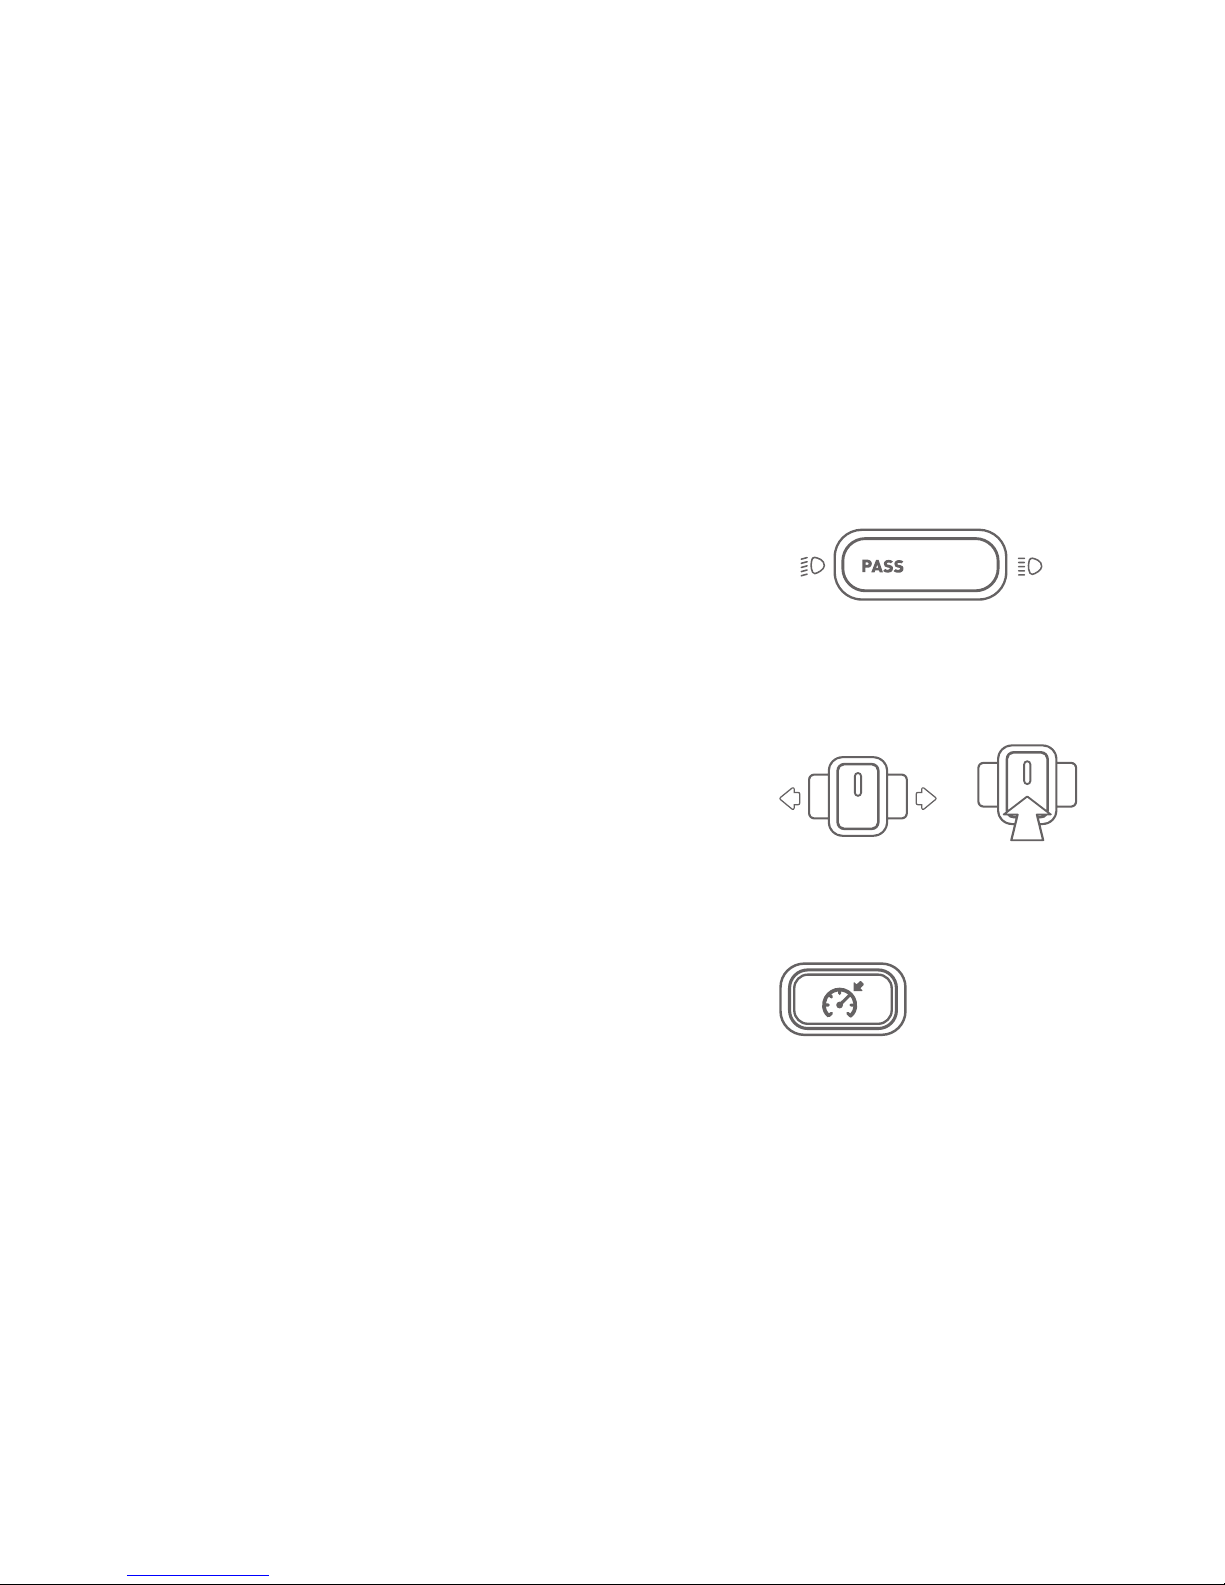
High/Low Beam Light
Turn Signal Indicator
Horn
Cruising Mode
Operation Guide
18
Page 21
High
Beam
Low
Beam
High/Low Beam: Press the right part to turn on the high
beam; press the left part to turn on the low beam. To
signal overtaking with flashing light, the rider may press
and release the Pass button repeatedly.
Turn Signal Indicator: Push the button left to turn on the
Left Turn Signal Indicator; push the button right to turn
on the Right Turn Signal Indicator. Press the button to
reset and the Turn Signal Indicator will be off.
Cruising Mode: Push the button to cruise at current
speed. Press again or brake to turn it off.
On Off
19
Page 22
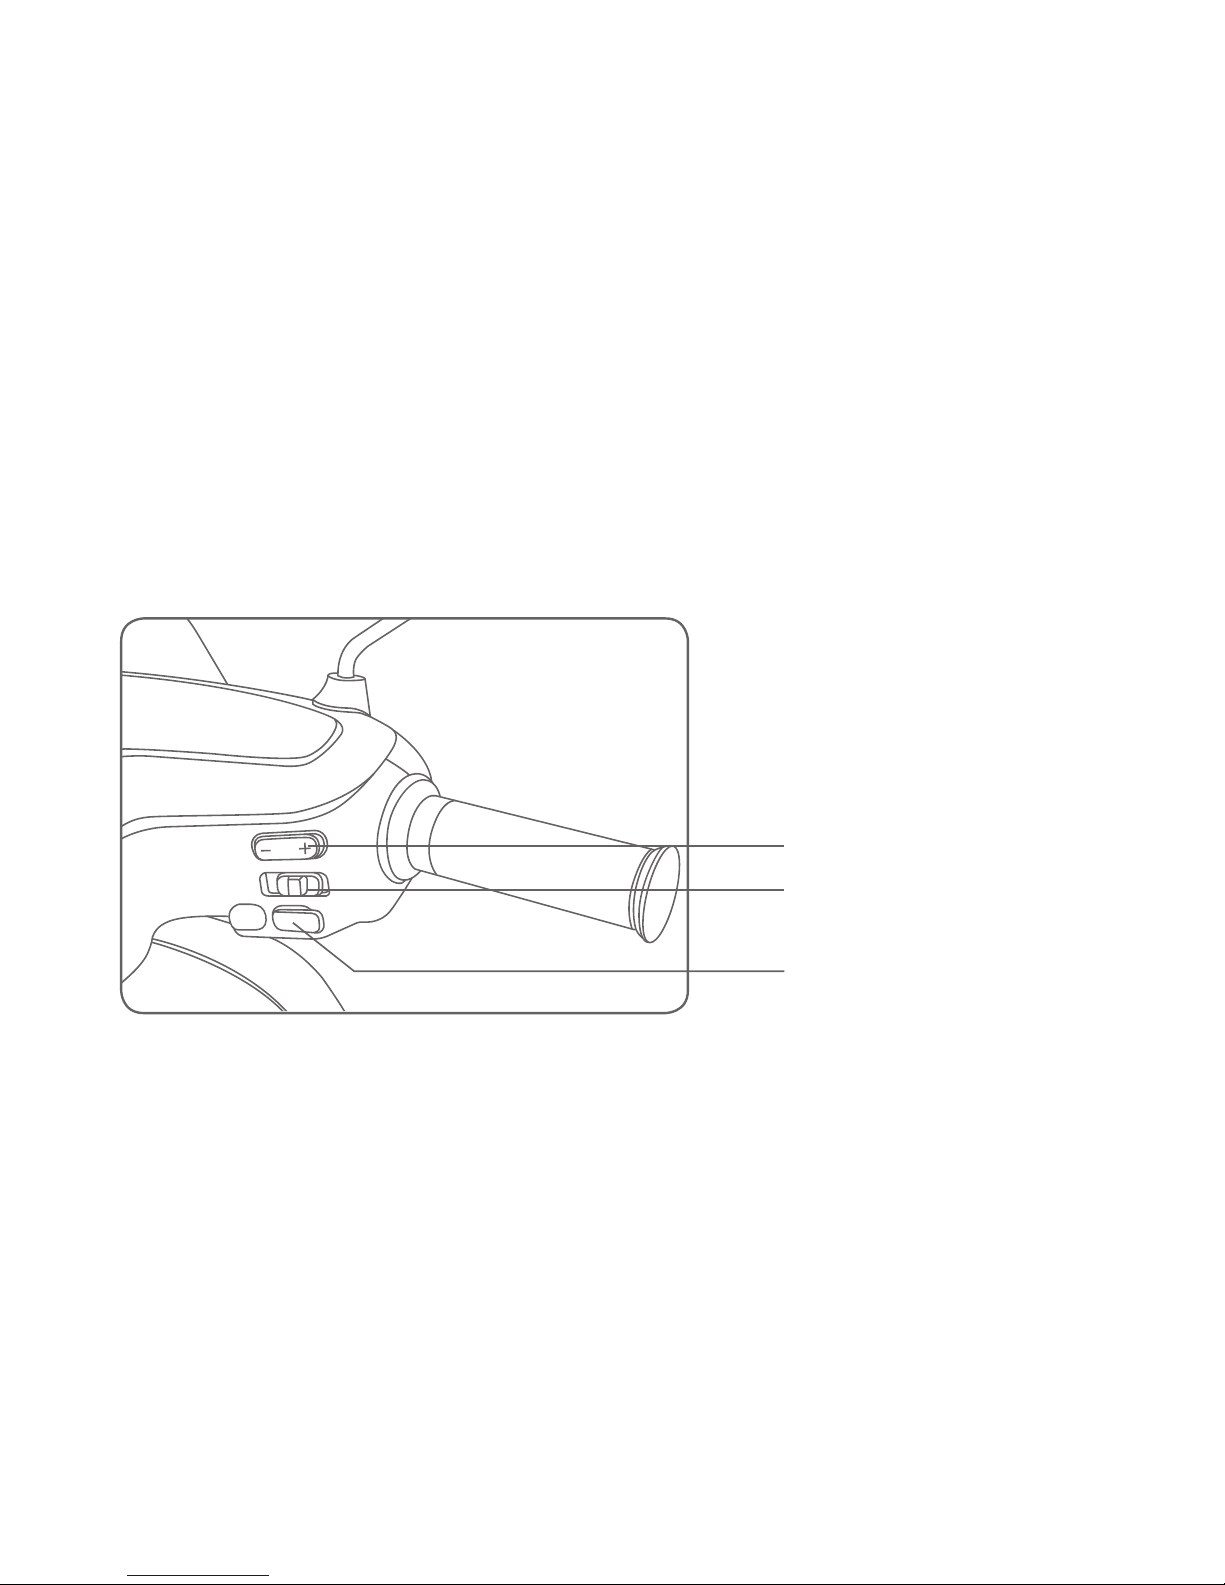
Operation Guide
Mode Switch
Hazard Light Switch
Start Button
20
Page 23
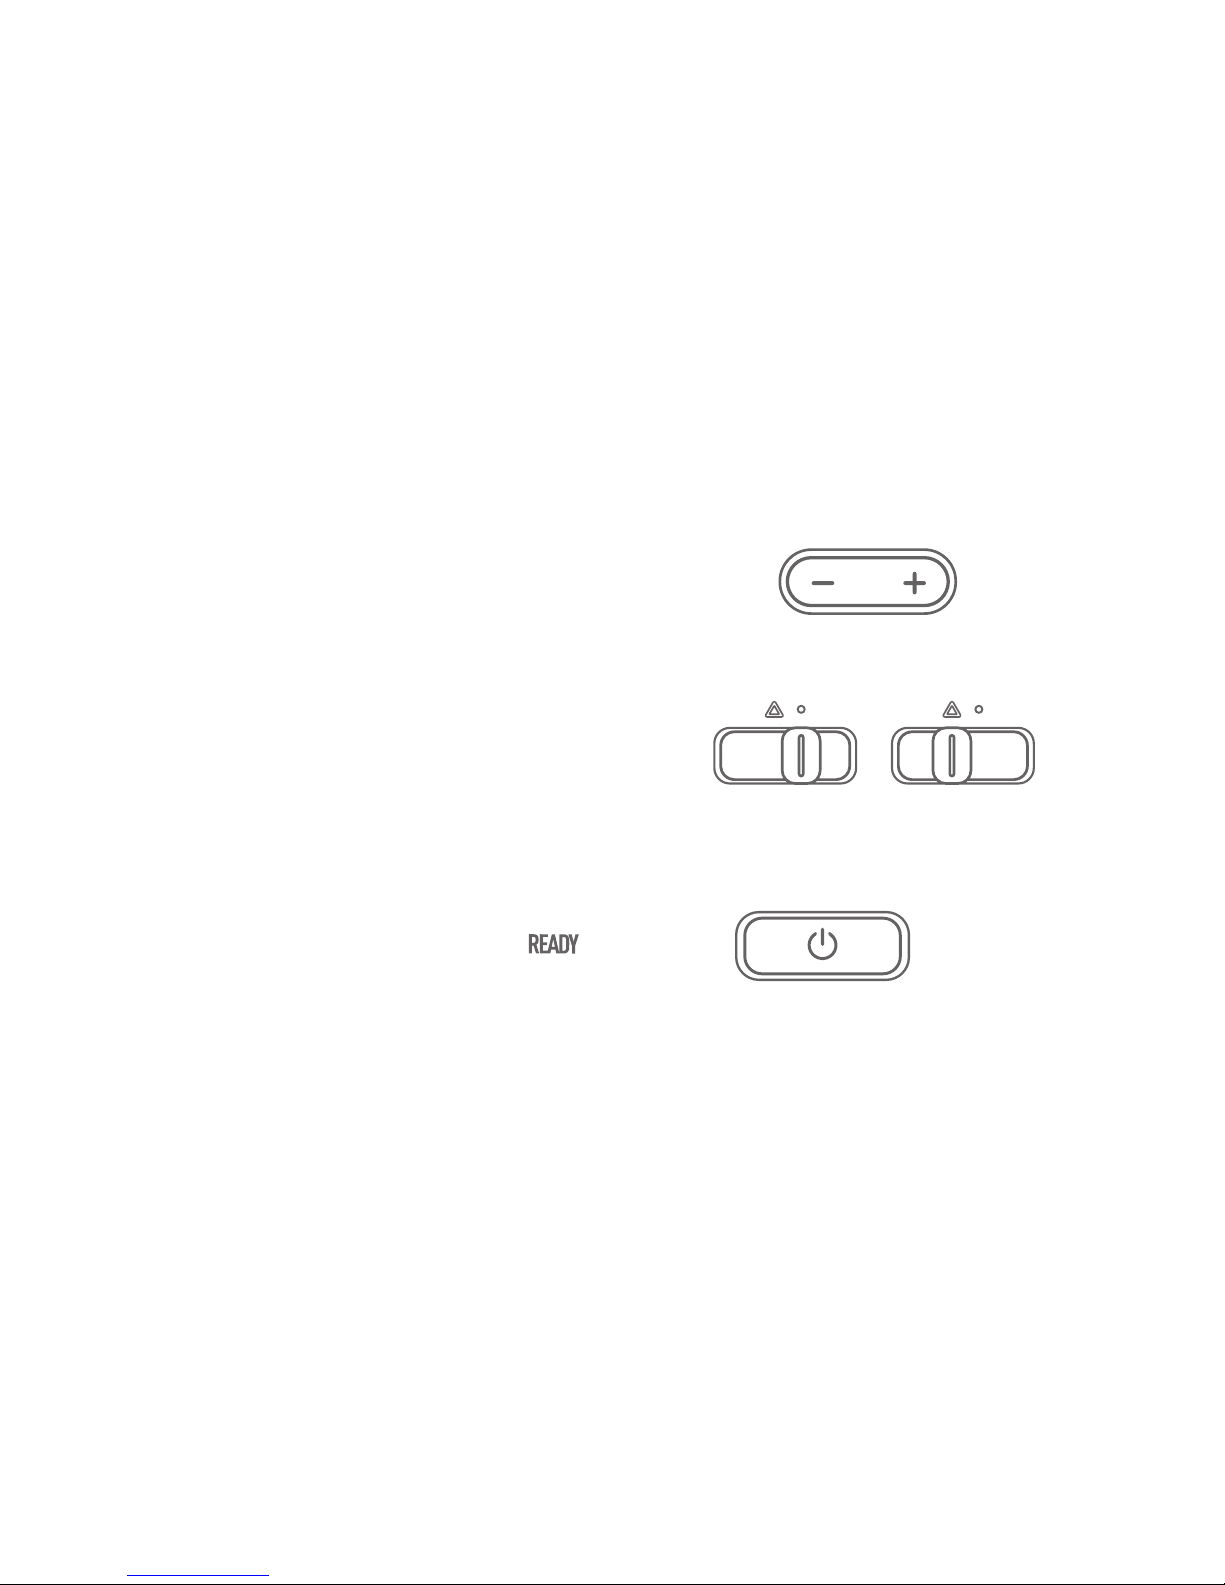
Hazard Light Switch: Push the switch left to
turn on the Hazard Light; push the switch
right to turn it off.
Start Button: Press and hold the Start button
for 2 seconds to start the scooter. The
on
the dashboard will light up. Press the button
again to turn it off.
Mode Switch: Press left part to switch to
Mode 1(Eco Mode). Pess right part to switch
to Mode 2(Sport Mode).
Mode 1
(Eco Mode)
Mode 2
(Sport Mode)
On Off
21
Page 24
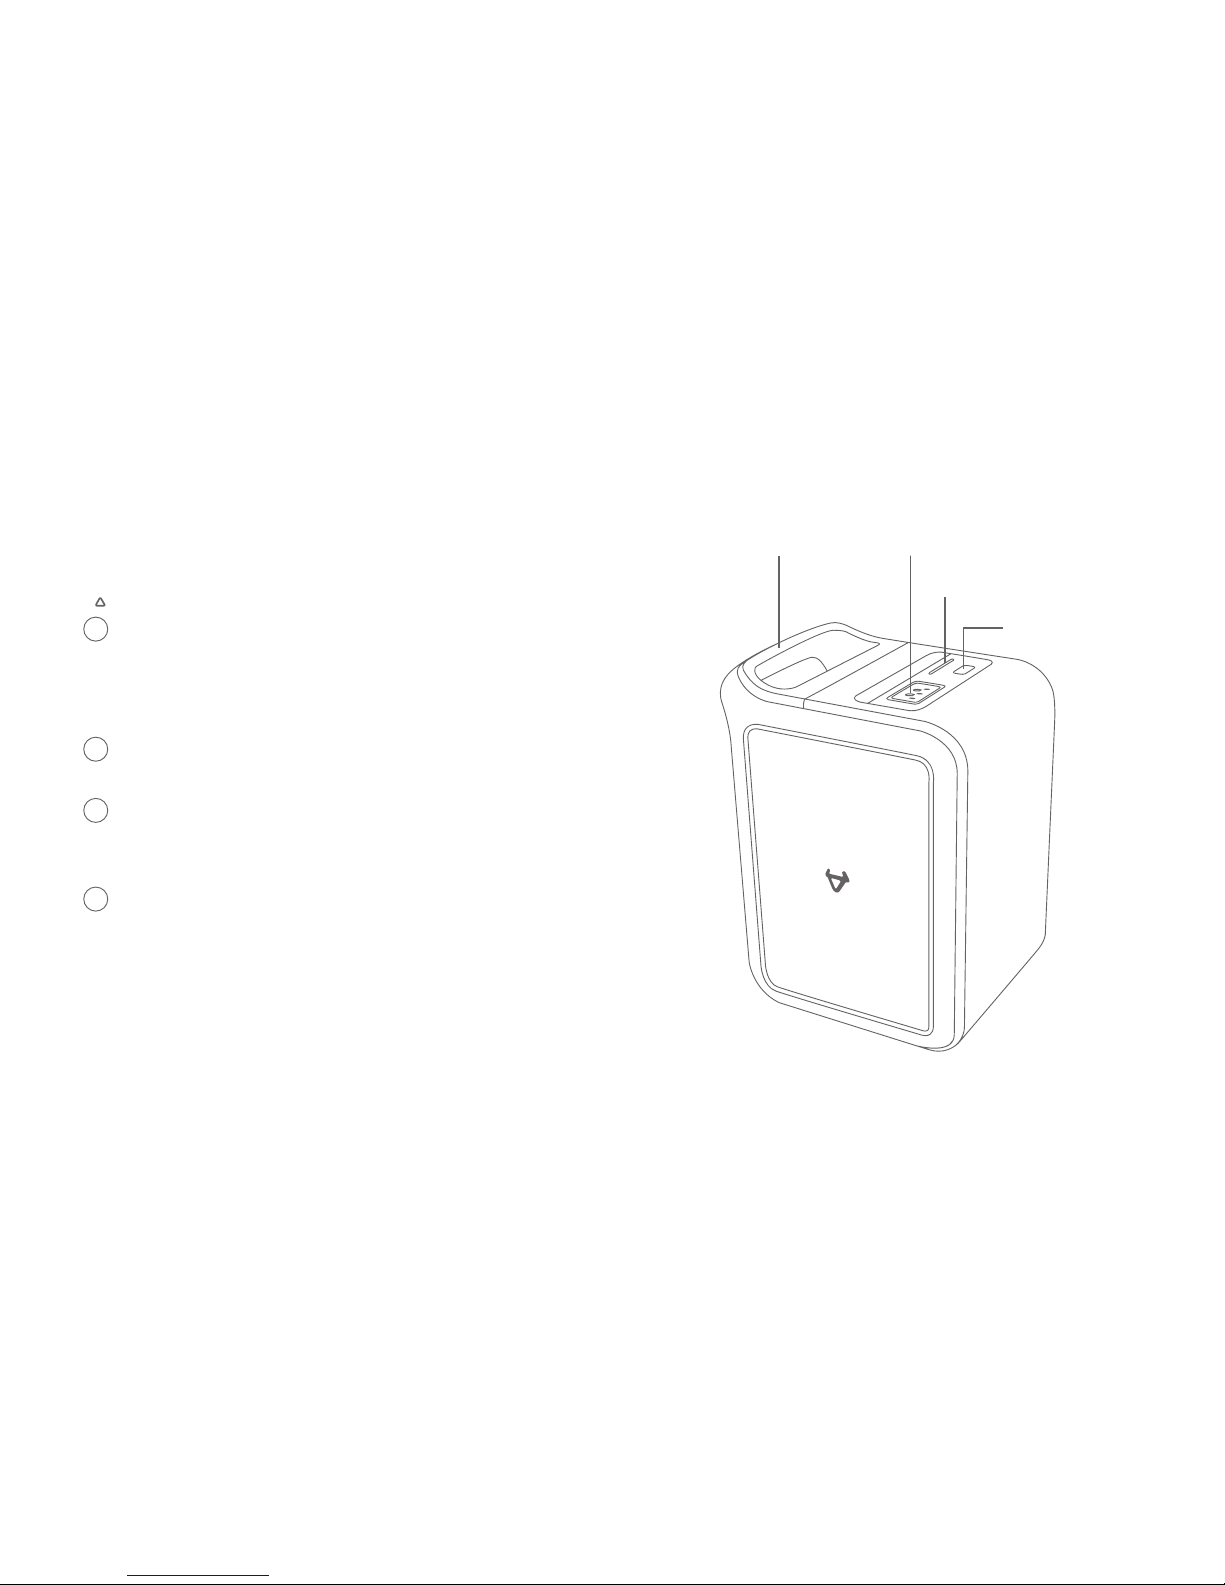
Battery Use and Maintenance
Battery Level Indicator
When the Indicator Button is pressed, the
Indicator will light up to show the percentage of
the battery. The indicator has 5 sections. Each
presents 20% of the battery level.
If the battery level is less than 20%, the Indicator
will flash 3 times.
When charging, the indicator will flash to show
the charging progress. They will stop flashing
when the battery is fully charged.
If all 5 sections flash, it means the battery has
fault. Please contact your dealer for consultation.
Handle Charging Port
Indicator
Indicator
Button
1
2
3
4
22
Page 25
Battery Use and Maintenance
Using Environment
In order to prevent possible leakage, overheat, smoking, fire or explosion, please follow
these instructions:
The battery should be used at the temperature of -10°C to 45°C.
Do not expose to water, beverages or corrosive liquids.
Keep away from heat source, open fire, inflammable and explosive gases and liquids.
Please keep metal parts away from the battery compartment.
In case of undesirable odor, overheat or deformation of the battery, please disuse the
battery immediately, keep away from the battery and contact your dealer.
Warning: The M1 battery is NOT a repairable part by the user. In case of battery fault,
please contact your dealer. Users dismantling the battery may lead to leakage, overheat,
smoking, fire or explosion. Do not attempt to open or repair the battery, as any attempt to
do so will render the warranty invalid.
1
2
3
4
5
23
Page 26
24
Battery Use and Maintenance
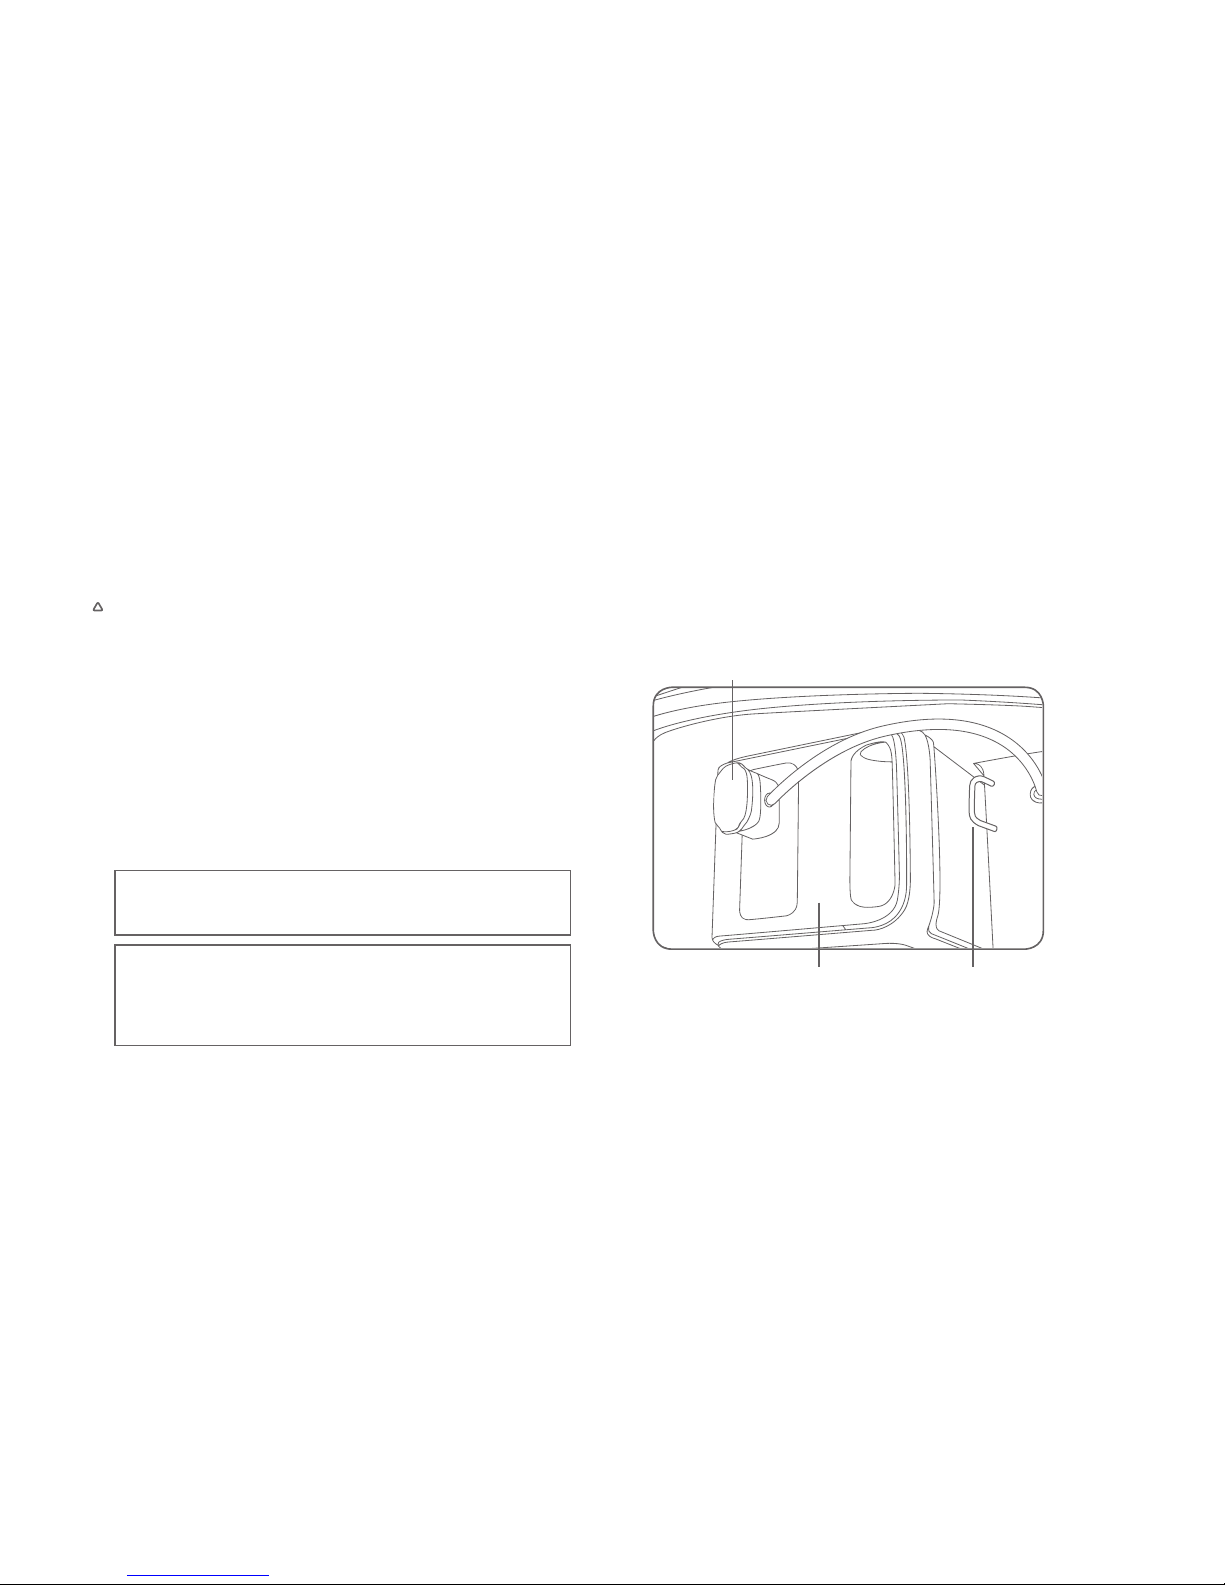
Charging Environment
The battery should be charged at the
temperature of 10°C to 35°C. The
charging time should not exceed 24 hours.
Overcharging will shorten the battery life.
Warning: Using non-original battery
chargers may lead to leakage,
overheat, smoking, fire or explosion.
Attention: Do not charge the battery
below 0°C.
Battery Connector/Charging Port
Battery Battery Lock
Page 27
25
Battery Use and Maintenance
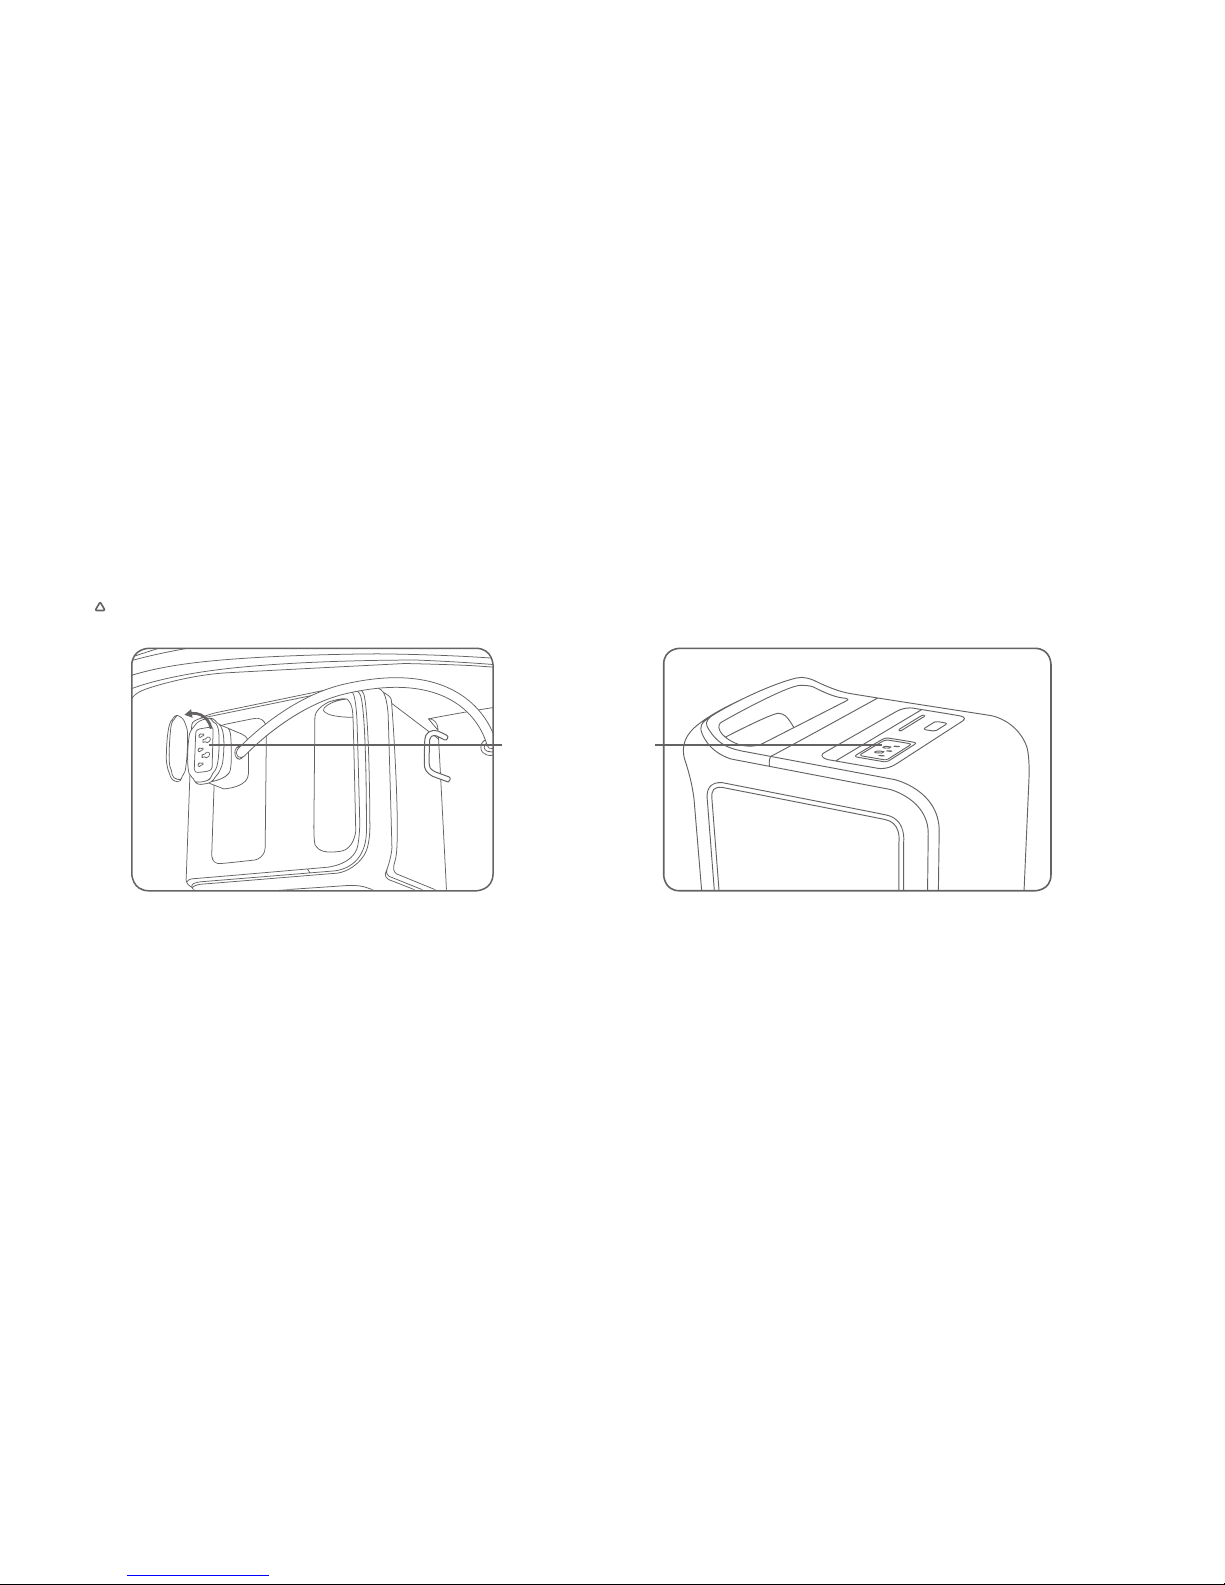
Charging Methods
Charging on the Scooter
Open the saddle, open the cover of the
connector, and plug the charger into the
charging socket.
Charging the Battery
Remove the battery from the scooter.
Connect the charger with battery and
socket.
Charging Port
Page 28

Warning:
All operation should be strictly conform to the user manual. If not, result will be assumed
by user.
Must use original charger
Pay attention to the type of battery and applied voltage. Mixture use is forbidden.
Charging should be in ventilated environment. DO NOT charge in closed space or under
high temperature. DO NOT put charger into trunk or tail box while charging.
While charging, connect battery with charger before connect with electric supply. After full
charged, cut off the electric supply before cut off the battery plug.
When the green light turns on, please cut off the power in time. Avoid long time connection
between charger and AC power supply while not charging.
While charging, if the signal light is abnormal, has different smell or the charger is over
temperature, please stop charging immediately and check or change the charger in time.
When using and storing the charger, please avoid foreign matter, especially water or other
liquid in case of internal short circuit. DO NOT bring charger within scooter, if have to,
please make sure of damping.
DO NOT disassemble or change the parts in charger by yourself.
26
Page 29

Attention:
If the battery can not be fully charged after 12 hours, please stop charging and contact
your dealer.
To maximize the battery life, please keep the battery percentage within 20% to 80%.
For storage, please keep the battery under 40°C to prevent irreversible capacity loss of
the battery.
M1 battery will lose more capacity in lower temperature conditions. To be more
specific, the usable capacity at -10°C is 70%, 85% at 0°C and 100% at 25°C.
The best battery capacity performance for storage is 50%. Storing battery with less
than 10% or more than 90% over a long period of time will cause irreversible capacity
loss to the battery.
The battery needs to take out from the scooter for storage longer than one week. In
this condition, please keep the battery at the temperature of 0°C to 20°C with capacity
of 30%-70%. It's advised to have at least one cycle of charge and discharge every 2
months to minimize battery capacity loss during storage. If the battery failure is due to
misuse or lack of proper maintenance as instructed, its warranty will be invalidated.
Falling may cause uncontrollable internal damage to the battery and may cause
leakage, overheat, smoking, fire or explosion.
27
Page 30
DOs and DON'Ts while Riding
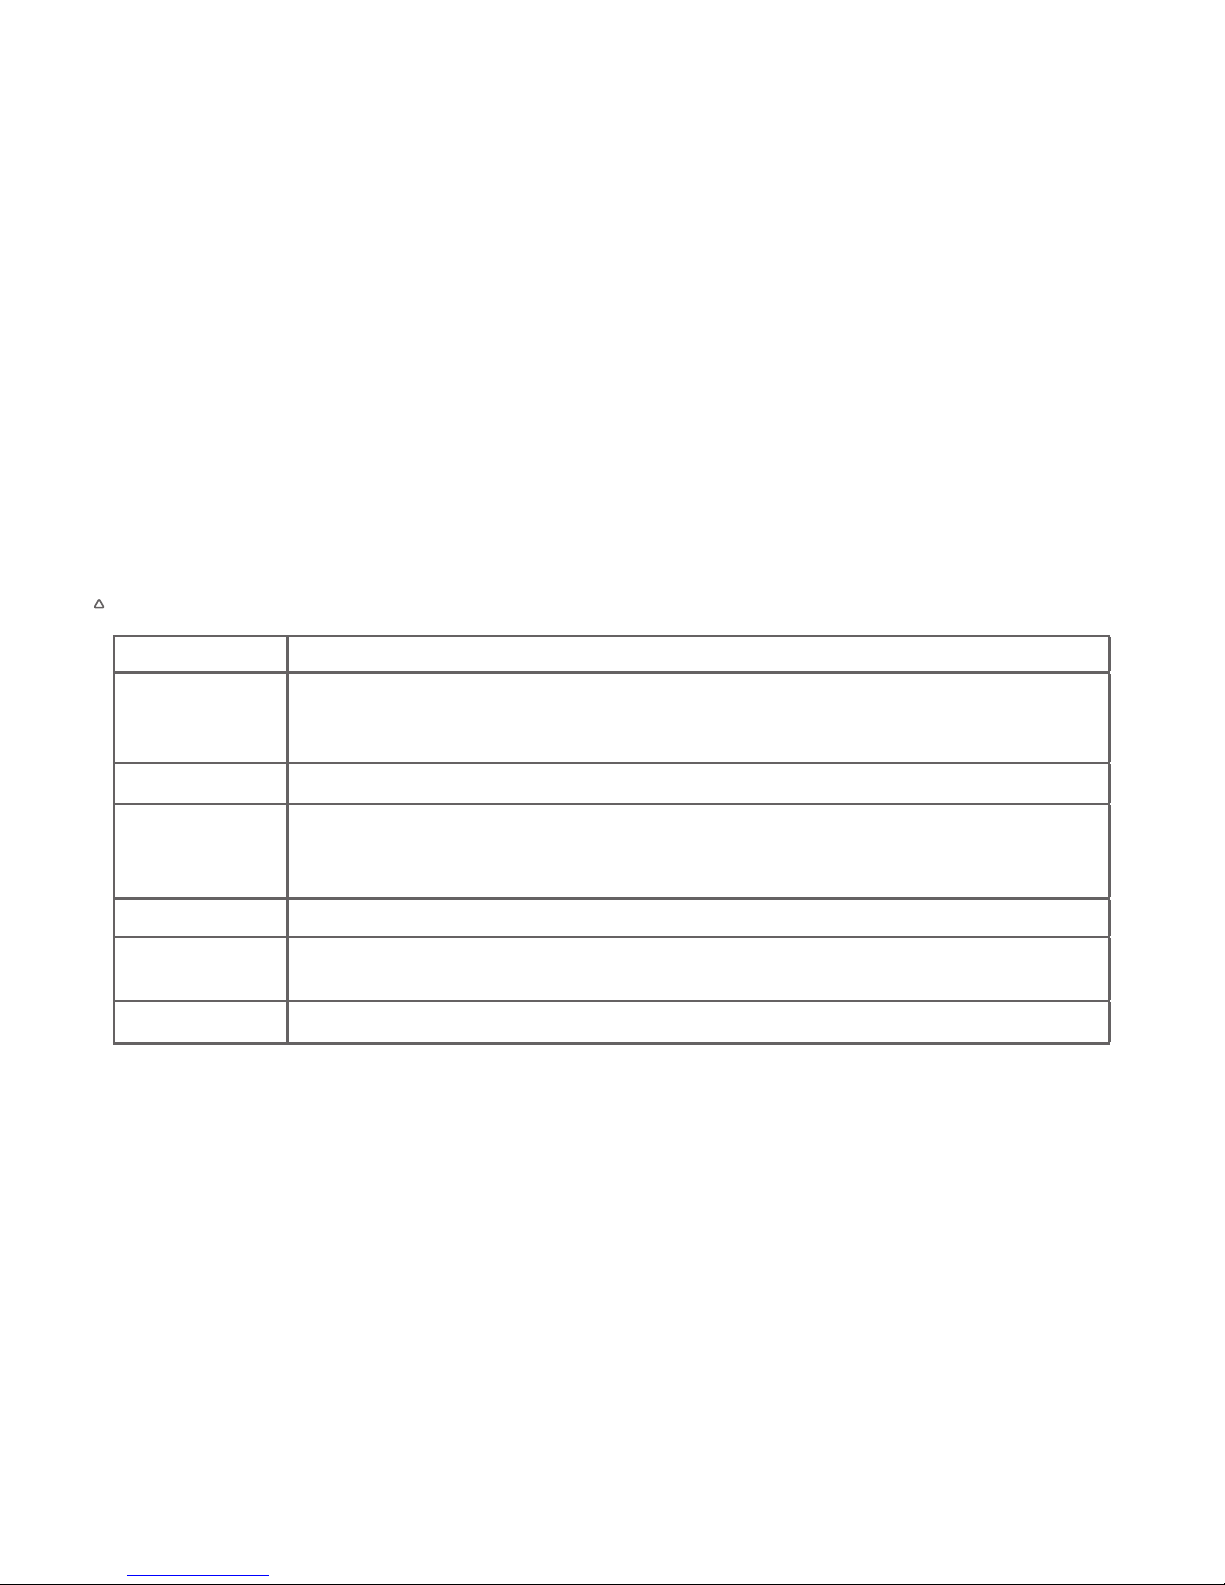
Before Riding: Please check the following details before riding.
Check Point Description
Steering
Handlebar
1. Steadiness
2. Steering flexibility
3. No axial displacement or loosening
Braking 1. Braking lever has 5 to 9mm idle travel.
Tyres
1. The air pressure range of both tires is 25 to 34psi.
2. Proper tyre tread depth
3. No cracks or openings
Battery Adequate for planned distance to travel
Lights
Check all the lights—High Beam, Low Beam, Brake Light, Turn Signal
Indicator, etc.
Horn Check whether the horn can work.
28
Page 31
DOs and DON'Ts while Riding
Braking Precautions
Adjust the scooter upright before applying brakes.
If the tyres are locked and the scooter lose steering ability resulting from excessive braking
force, loosen the grip on the braking lever and the tyres will be working again and the
scooter will be stabilized.
Try to maintain a 1:1 ratio of front and rear braking force on slippery roads.
Warning:
Using the front brake or rear brake only is dangerous because of possible grip or control
loss. Pay extra attention and use the brakes gently when riding on damp, slippery roads
and around corners. Otherwise, riders will be exposed to great danger.
Attention:
Inexperienced riders tend to use the rear brake only, which will accelerate the wear of the
brake and result in a longer braking distance.
29
Page 32

30
Maintenance and Repair
Users are advised to have the scooter checked and maintained on a regular basis, even for
the scooters that are not used for a long time.
Regular Maintenance
Users are advised to have their scooters checked 2 months after purchased or with 500km
travelled distance. Overall check and maintenance is advised to be conducted every 6
months or 3000km thereafter.
Daily Maintenance
If any problem occurs during checks, please look through the Home Repair Instructions or
send the scooter to the dealer’s for checks and maintenance.
Scooter Washing
Please use neutral detergent and water to wash the scooter. Use soft cloth to wipe the
scooter after washing to prevent scratching.
Page 33
31
Attention:
If the scooter is frequently used in overload, high-speed, bumpy or up/downhill riding conditions, the
maintenance cycle should be shortened.
For more guaranteed quality and longer service life, please use original parts, which are under
normal warranty.
Warning:
If incapable of repair or adjustment on his/her own, the scooter owner is advised to send the scooter
to the dealer’s for maintenance and adjustment for the sake of safety.
Always choose a smooth surface road for repair and adjustment. If it’s necessary to repair the scooter
during a ride, please mind the trafc.
Warning:
Do not use pressure washer to wash the scooter, especially around the battery compartment. Do not
ush the rear inner mudguard, where the charger, controller and other parts are installed behind.
If the charging port on the scooter is wetted, please do not charge before the charger dries off.
Contacting your dealer is recommended.
Page 34
32
Storage Method
Short-term Storage:
Keep the scooter in flat, steady, well-ventilated and dry area.
Charge the battery to 50% full before storage to maximize battery life.
Avoid exposure under sunlight and rain to reduce damage or aging.
Long-term Storage:
Remember to have a cycle of charge and a discharge at least every 2 months and charge the
battery to 50% full before storage to maximize battery life.
Charge the battery to 100% full after long-term storage.
Check all the parts carefully to make sure that there is no problem before riding it. If there's
any problem, take the scooter to your dealer for maintenance or repair.
1
1
2
2
3
3
Warning: Please take out the battery from the scooter when long-term storage.
Page 35
33
Regular Maintenance Checklist
Regular Safety and
Performance Check
Brakes
Lights
Horn
Electric Parts
Tyres
Structural Check
Lubrication
Wheel Bearing
Vibration Damper
Side Stand
Steering Bearing
Major Parts
Battery
Main Wiring Harness
Control System
Page 36

Troubleshooting List
Malfunction
Description
Causes Troubleshooting
No output when
switched on
1. Dead battery
2. Batery not connected
3. Alarm failure
1. Charge the battery.
2. Check if it's properly connected
3. Replace Alarm
Motor failure
when turning the
twist grip after
switched on
1. Battery voltage is low
2. The power off switch is
enabled when pulling the
brake lever
3. The Parking Mode has
not been turned off yet
1. Charge the battery.
2. Do not pull the brake lever when
twisting the twist grip.
3. Check “Start the Scooter” section.
Check if the side stand is on.
Battery charge
failure
1. Not properly connected
2. Battery temperature is too
high or too low
1. Check whether the plug is loosened.
2. Wait for it to achieve normal
temperature
34
Page 37

Troubleshooting List
Malfunction
Description
Causes Troubleshooting
Dropping
speed or
range
1. Low battery level
2. Under-inflation of tyres
3. Frequent braking and
overload
4. Battery aging or normal
capacity loss
5. Low battery capacity
resulting from low
temperature
1. Charge the battery and check if the plug
is properly plugged in and whether the
charger is damaged.
2. Check the tyre inflation every time.
3. Develop good riding habits.
4. Replace the battery.
5. Normal situaiton.
Sudden stop
during a ride
Dead battery Charge the battery.
Identify the fault causes in reference to the meter panel fault codes.
35
Page 38
36
Fault Code List
Fault
Code
Meaning Causes Troubleshooting
30
Battery
overcharge
Battery in overcharge
protection
Turn on headlight to discharge. Check
if the charger is broken or wrong type.
31
Battery
overcurrent
Battery in overcurrent
protection
Stop charging and check if the
charger is failed.
32
Charge
overcurrent
Stays in 0°C for over 30
sec or -20°C for over 3 sec
Put the battery indoor until battery
temperature is over -15°C
130
Battery
overdischarge
Battery level is too low and
the BMS is about to enter
protection mode
Stop riding and charge the battery.
131
Battery
overcurrent
Battery is undervoltage or
overvoltage
Check if the charger is failed.
132
Battery overtemperature
Battery temperature is too
high
Stop riding and park the bike in the
shade to let the battery cool down.
Page 39
37
Fault Code List
Fault
Code
Meaning Causes Troubleshooting
133
Battery belowtemperature
Battery temperature is
too low
Charge the battery after it reaches
the operating temperature range.
60
Communication
Module failure
SIM card identification
failure
Contact your dealer.
67
SIM card unpaid or weak
signal
62 GPS failure
63 GPS Antenna short circuit
64 GPS Antenna open circuit
65
SN code are not written
or Smart central
controller serial code are
not written
Page 40
38
Fault Code List
Fault
Code
Meaning Causes Troubleshooting
10
FOC stop
working
Motor stucked Check if the motor is stucked.
11
Undervoltage or
overvoltage
Check if the charger is intact.
12 Overcurrent Contact your dealer if happens often.
13 Controller overheat
Park the bike in shade and wait for it
to cool down.
110 FOC failure
MOSFET failure
Contact your dealer.
MOSFET driver failure
111
FOC varication
failure
Non-original Controller
or communication failure
Restart the bike. Contact your dealer
if it does not work.
190
FOC
Communication
failure
Can not receive
Controller's data
Contact your dealer.
Page 41

39
Fault Code List
Fault
Code
Meaning Causes Troubleshooting
120 Motor failure
Motor Hall Sensor failure
Contact your dealer.
Motor cord disconnected
140
Twist Grip
failure
Twist Grip Hall Sensor
failure
Contact your dealer.
191
Battery
communication
failure
BMS can't return data or
returned data is incorrect
Check the Connector is properly
plugged. Contact your dealer if
happens often.
99
Communication
Harness failure
Smart Central Controller
or Harness Assembly
failure
Contact your dealer.
71 Light Control Gyroscope failure Contact your dealer.
161 Locked bike
The bike is remotely locked
by the server.
Contact your dealer.
Page 42

Troubleshooting List
Malfunction
Description
Causes Troubleshooting
131 displayed Over discharging Stop the scooter and restart later.
132 displayed Battery overtemperature
Stop riding and let the battery cool
down.
133 displayed Battery undertemperature
Charge the battery after it reaches
the operating temperature range.
40
Page 43
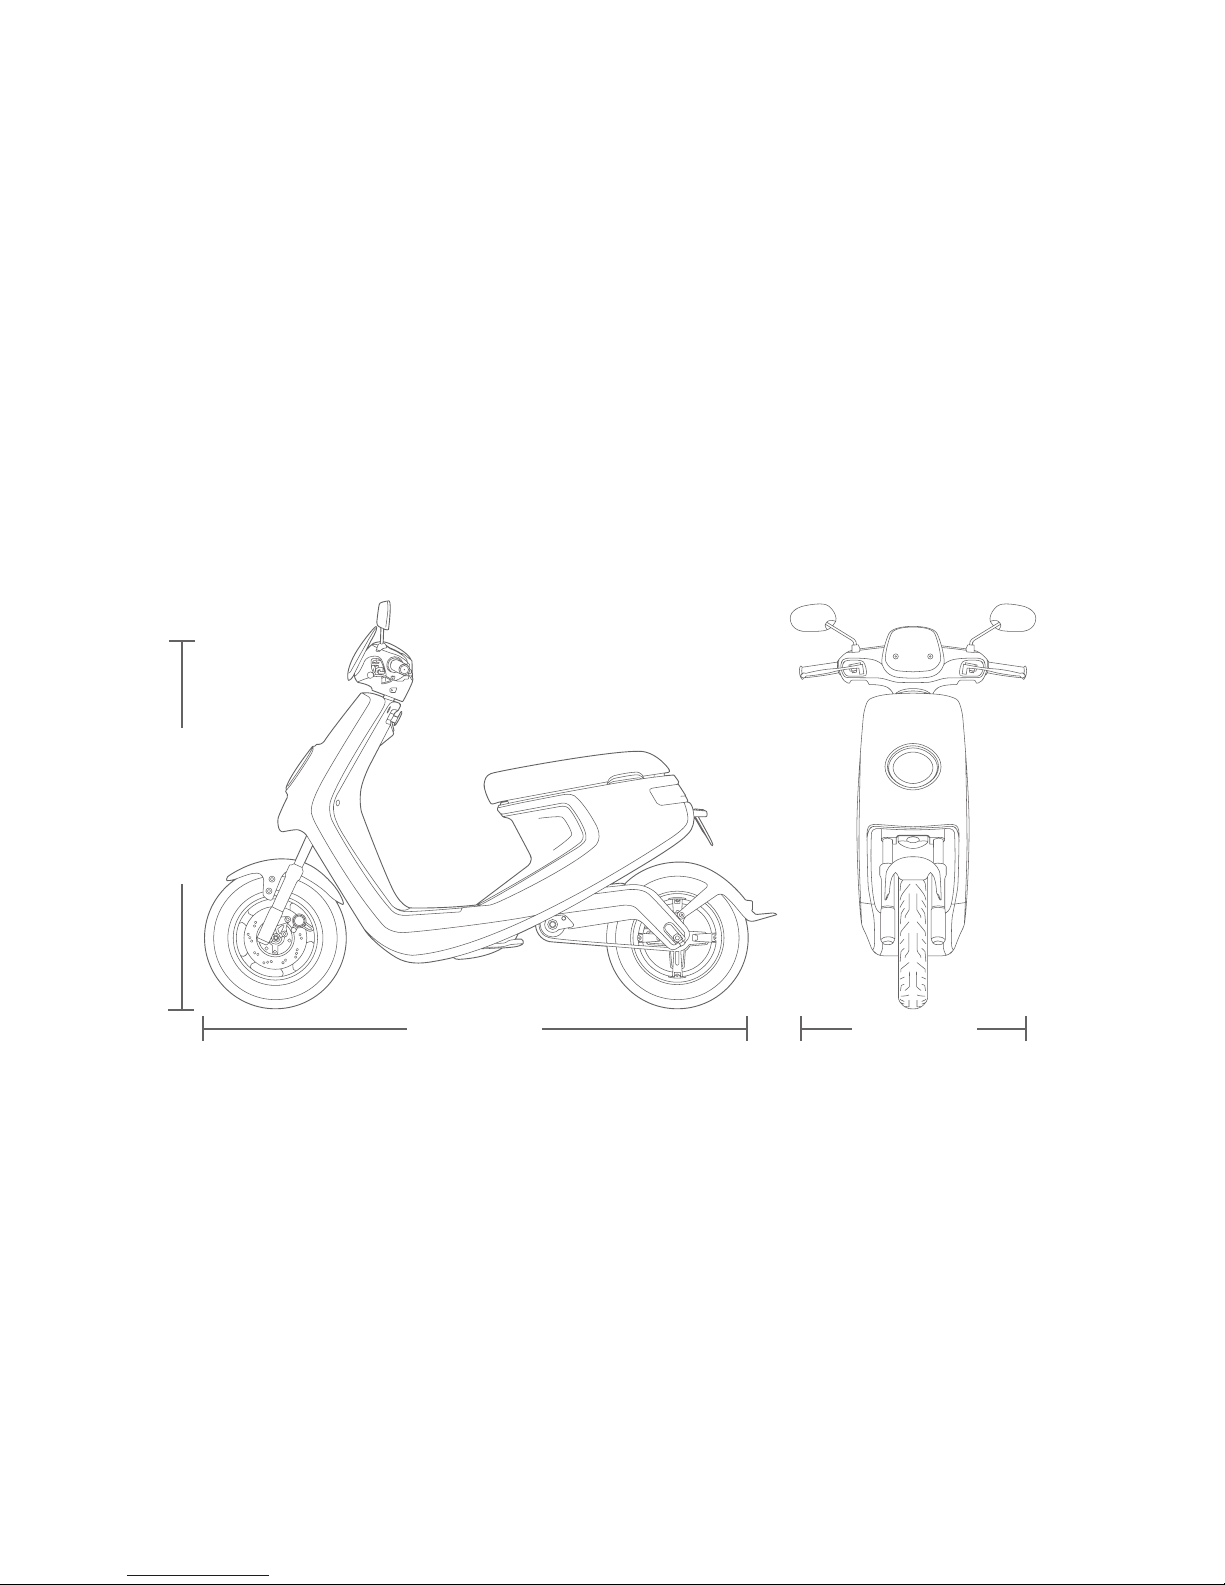
Technical Parameters
1640mm 657mm
1099mm
41
Page 44
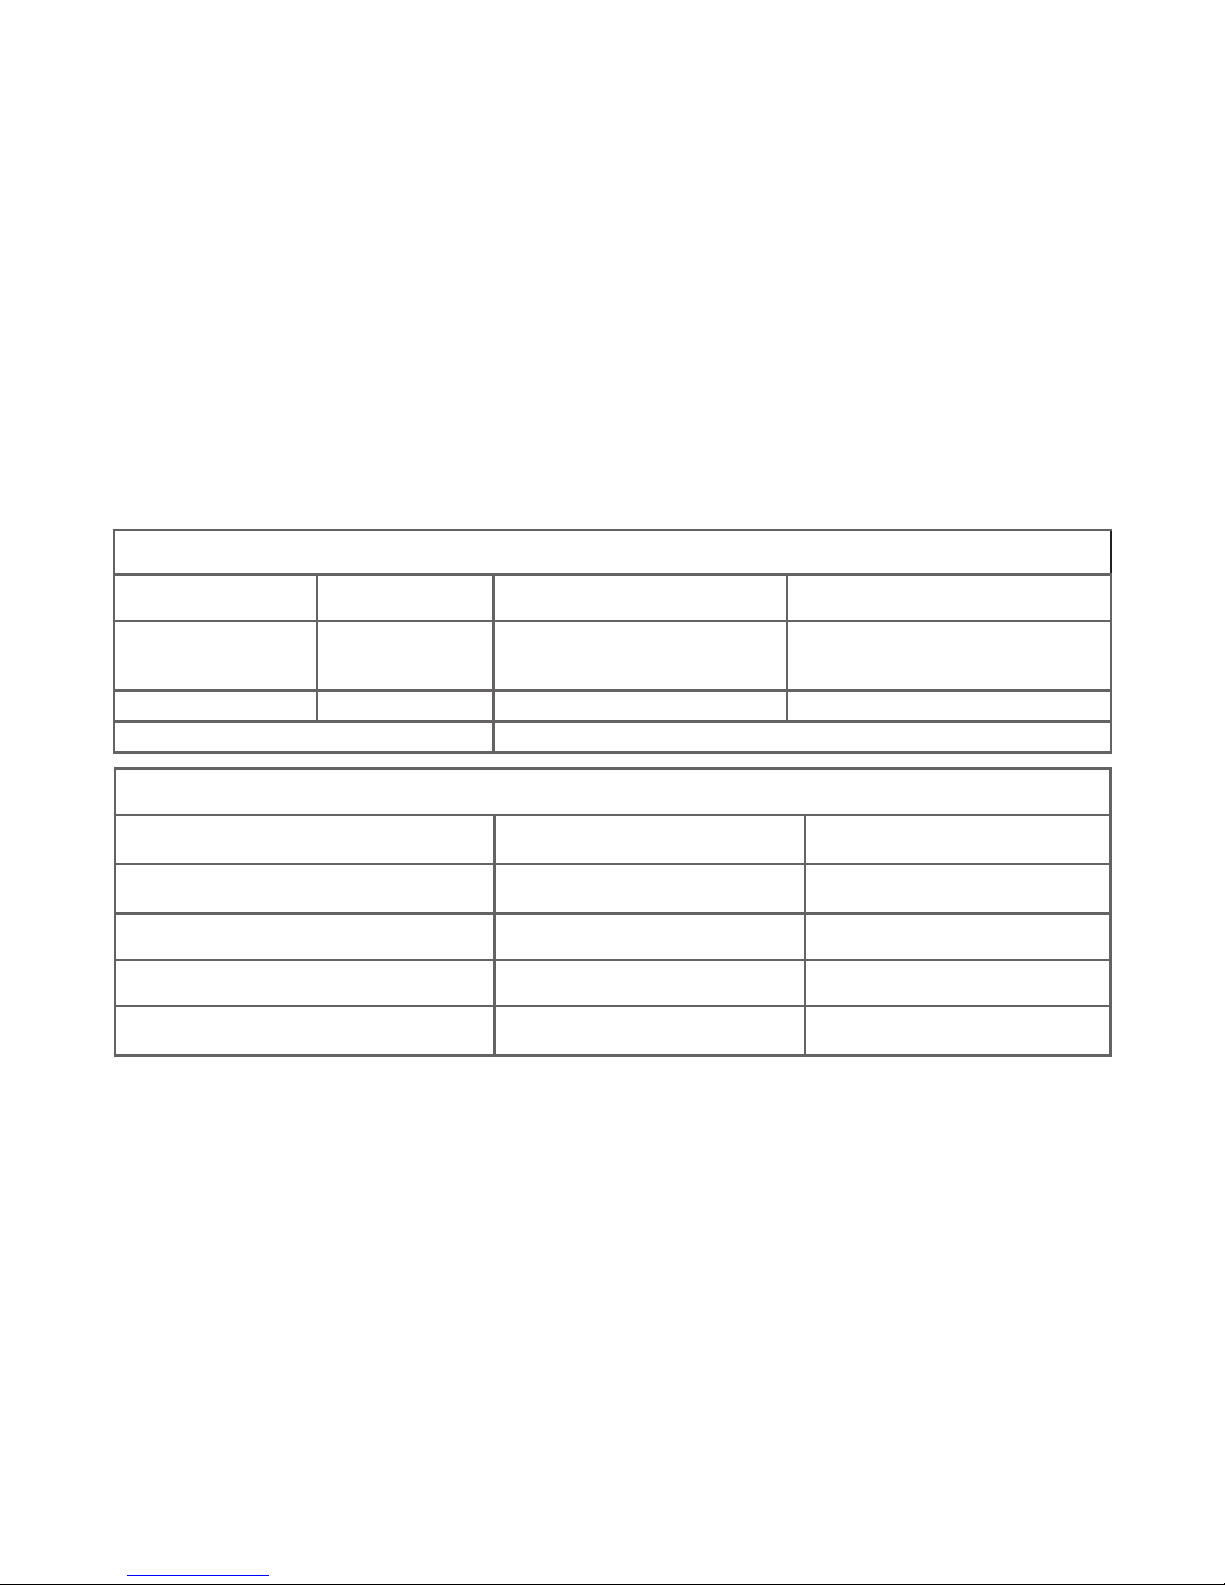
42
Key Features
Product Weight 60Kg Gradeability Dynamic: 15°
Rated Voltage 48V Maximum Designed Speed
45km/h
40km/h
25km/h
Maximum Load 100Kg Braking Distance ≤4.5m (30km/h)
Designed Capacity 1 or 2 Persons
Battery System
M1 Sport M1 Pro
Voltage 48V 48V
Capacity 26Ah 32Ah
Standard Charging Current 4A 4A
Maximum Discharging Current 40A 40A
Page 45
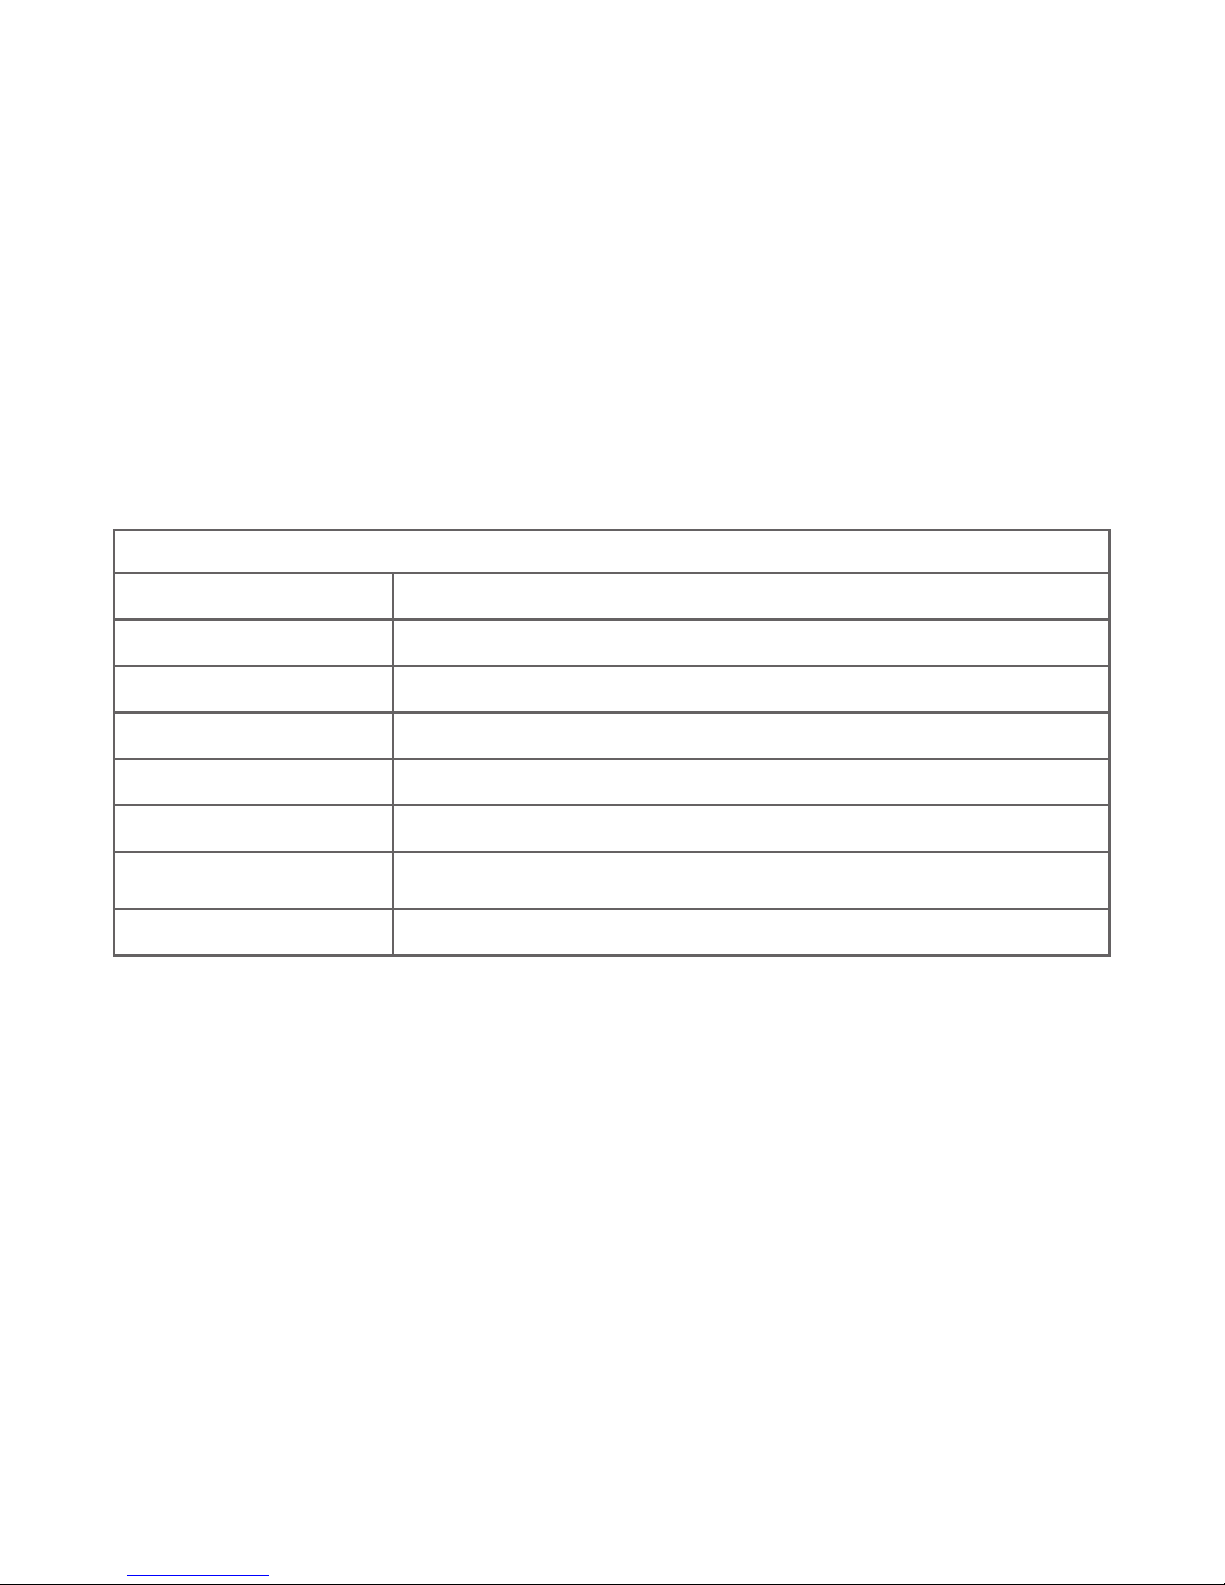
43
Frame
Front Damper Oil Damping Direct Acting Shock Absorber
Rear Damper Rear Mono-Shock
Front Tyre Specifications 90/90-10 Rim: 2.15x10
Rear Tyre Specifications 90/90-10 Rim: 2.15x10
Front Brake Mode 180 mm Dual-Piston Hydraulic Disk Brake
Rear Brake Mode Drum Brake
Minimum Ground
Clearance
126mm
Seat Height 710mm
Page 46
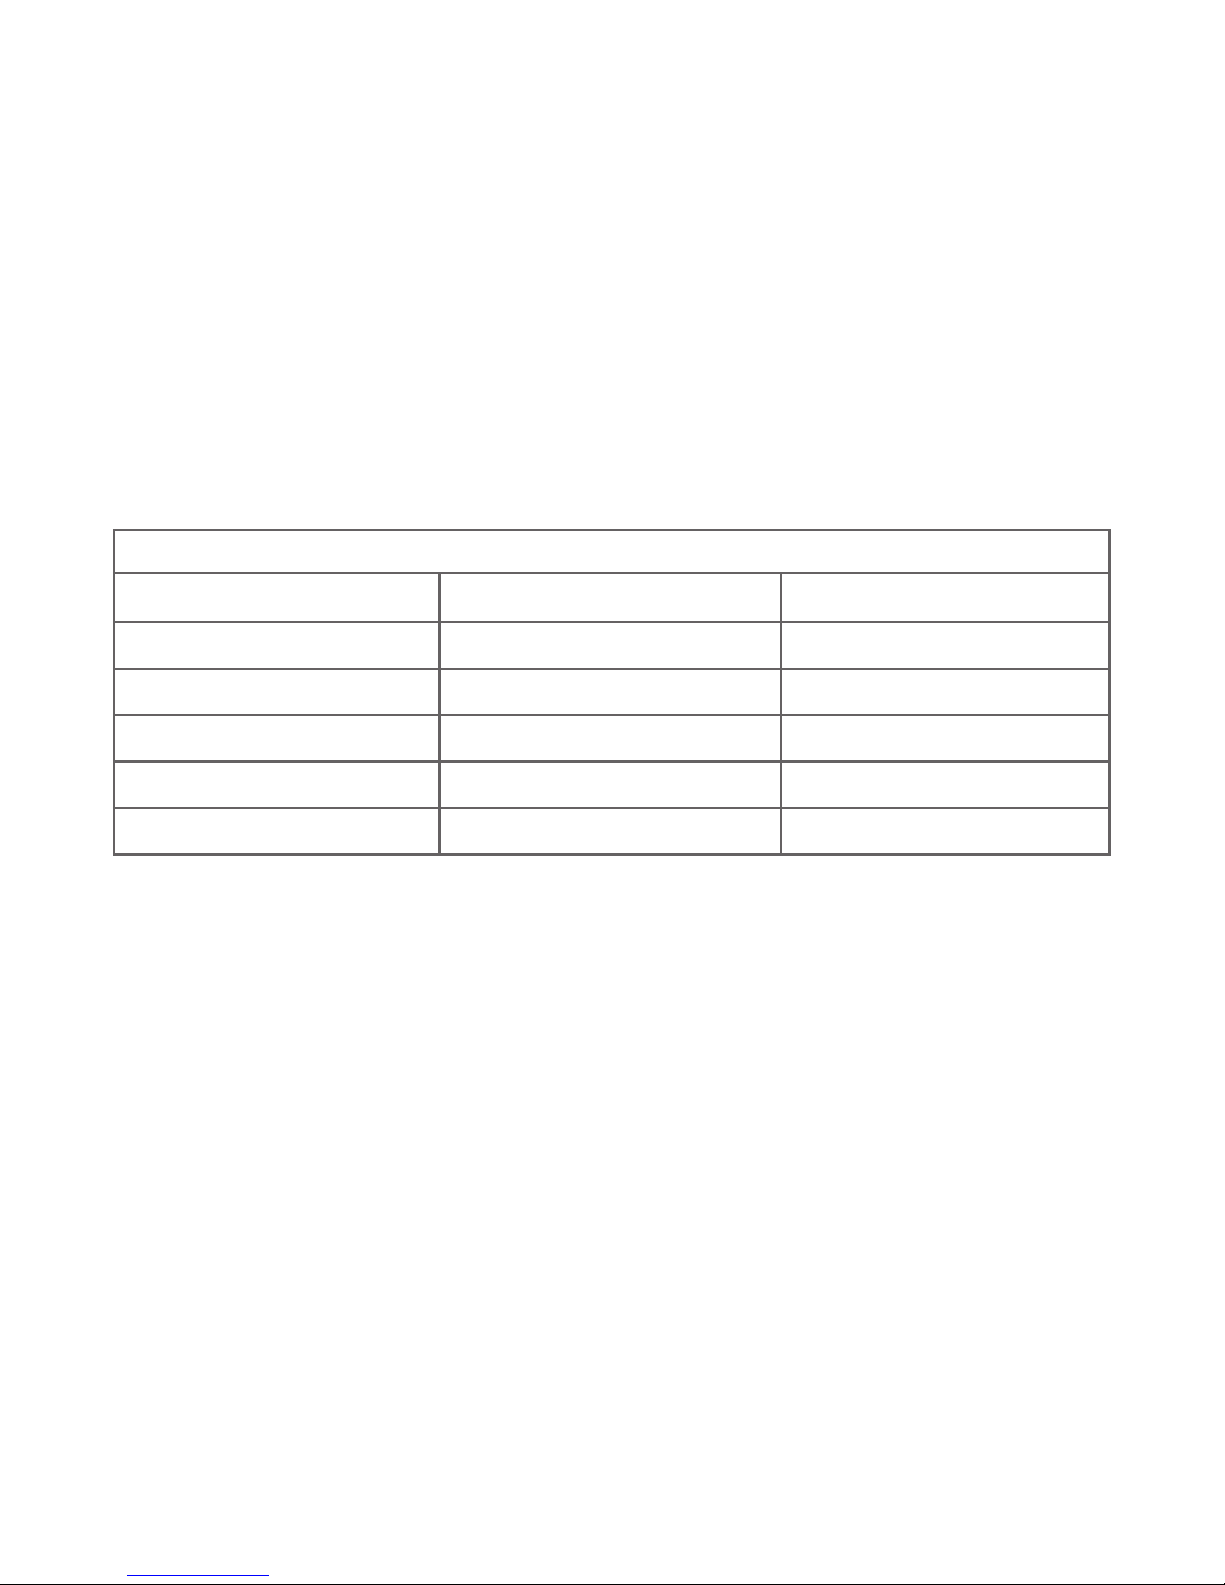
Power System
M1 Sport M1 Pro
Motor Tailored Motor by Bosch GmbH Tailored Motor by Bosch GmbH
Motor Control Mode FOC Vector Control FOC Vector Control
Motor Rated Power 800W 1200W
Motor Maximum Power 900W 1600W
FOC Controller Max. Current 40A 40A
44
Page 47

Electrical System
Headlight 12V LED
Turn Indicator 12V LED
Taillight 12V LED
Brake Light 12V LED
Meter Panel 12V LCD
Central Control Unit 12V
USB Charging 5V/1A
45
Page 48

Maintenance Record
Date
Malfuntion
Description
Causes and
Troubleshooting
Service
Station
Serviced by Remarks
46
Page 49

Maintenance Record
Date
Malfuntion
Description
Causes and
Troubleshooting
Service
Station
Serviced by Remarks
47
Page 50

Maintenance Record
Date
Malfuntion
Description
Causes and
Troubleshooting
Service
Station
Serviced by Remarks
48
Page 51

Maintenance Record
Date
Malfuntion
Description
Causes and
Troubleshooting
Service
Station
Serviced by Remarks
49
Page 52

V1.4
 Loading...